

Page 1
b
Stay Ahead with Agfa Graphics. Training Manual
:ANAPURNA Mw
Creative with
White ink
a
Page 2

2 Introduction
INTRODUCTIONA.
This document is intended to get started with white ink applications on the
:Anapurna Mw. (other then the defaults you can select in Wasatch SoftRip)
Creative with White ink Stay Ahead With Agfa Graphics.
Page 3
General Information 3
t
a
t
GENERAL INFORMATIONB.
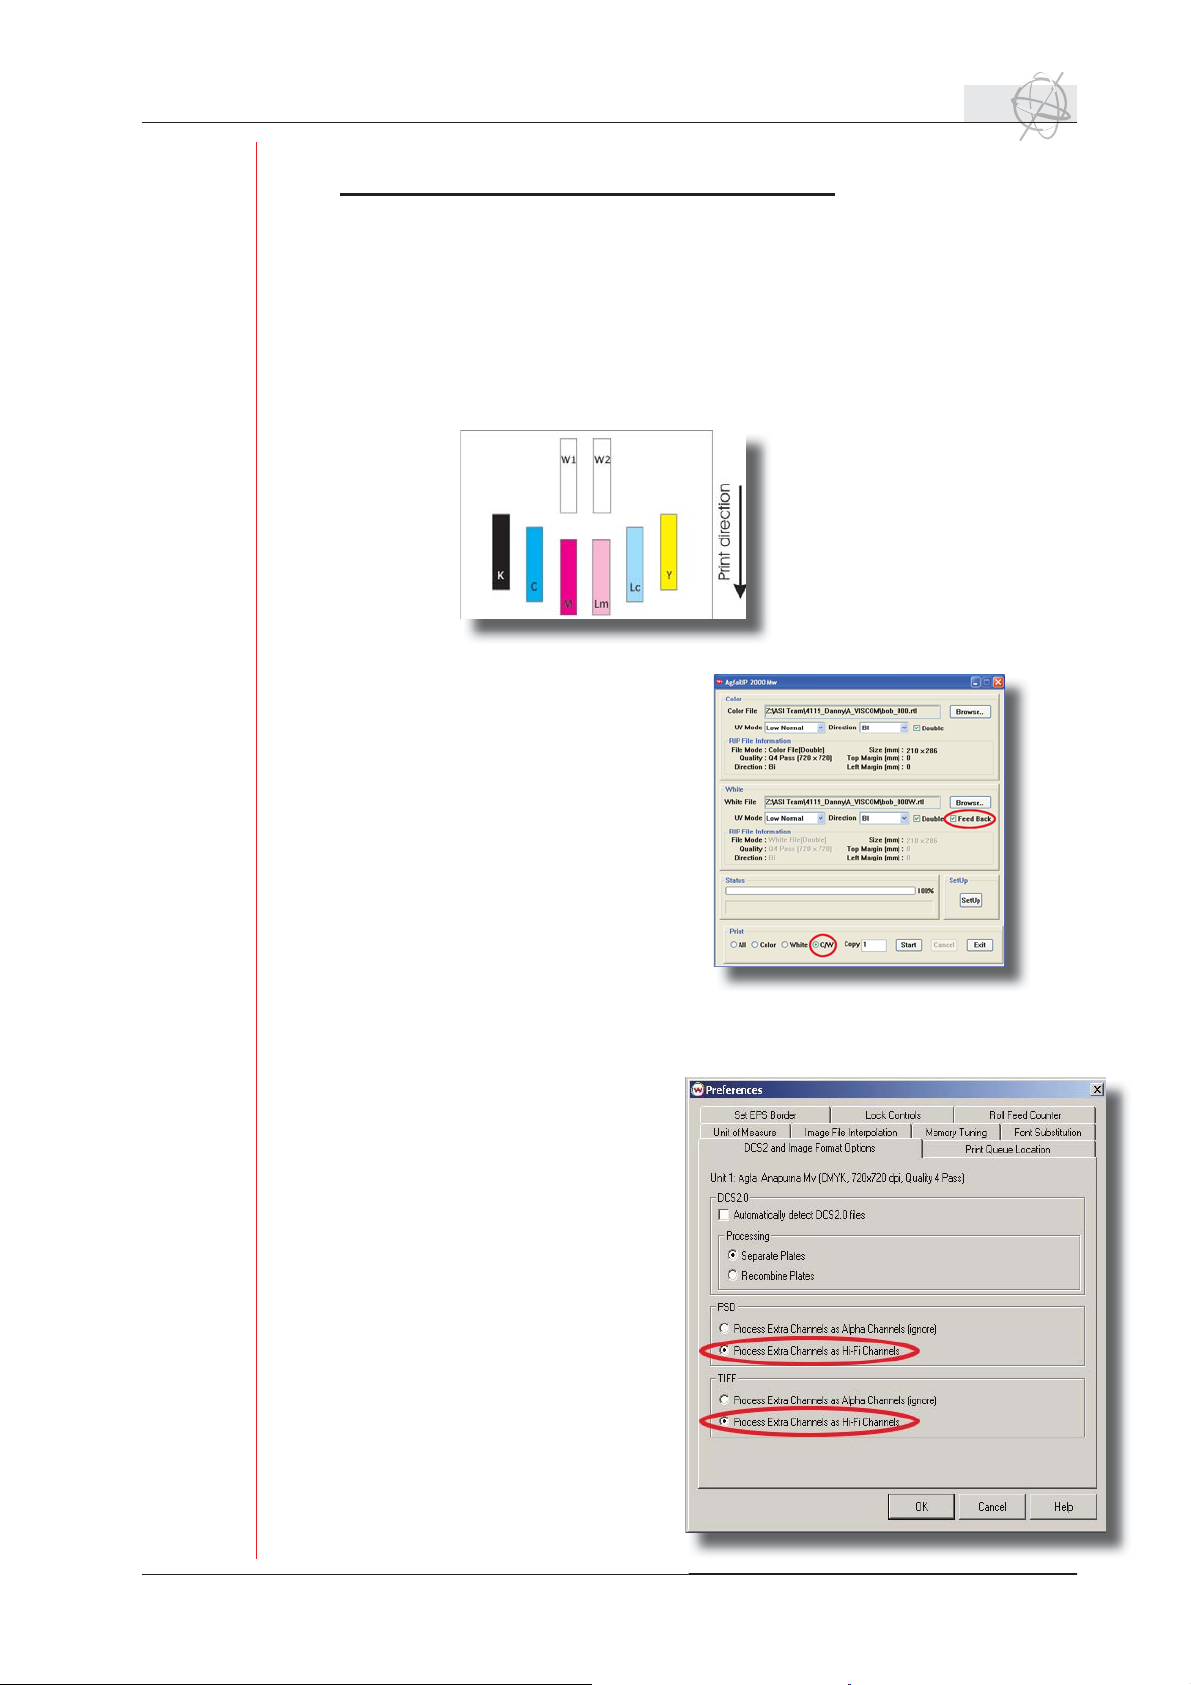
- Printheads: Color order and positioning
This schematic overview shows us that we immediately can print white followed by a
color in one print run. This is called “Pre-white” printing.
the 2 white printing heads are
alternately jetting to achieve
the optimum printing speed...
If we want to print color fi rst, and white
on top, we need to do it in two separate
print runs, using the “C/W” and “feedback”
option in the AgfaRip. This is called “Postwhite” printing.
When working with a spot white, the Wasatch SoftRIP will need to receive some extra information from you to determine the
position where the white has to be
printed. You can defi ne a spot white
either by defi ning a spot color in
Wasatch (spot color replacement) or
by using a spot channel in Photoshop.
If you want to use a spot channel,
make sure that the preferences (fi le
menu) of the Wasatch SoftRIP are set
to support this extra channel and that
your image is in a CMYK color space.
The option ‘process extra channels as
Hi-Fi Channels’ has to be enabled for
psd (photoshop) or tiff fi le formats.
Stay Ahead With Agfa Graphics. Creative with White ink
Page 4

4 White applications
To b
ppl
w
.
ppl
.
d
!
C. White applications:
Pre-White:
re-White:
Print on frontside of a media, normal printing.
Print on frontside of a media, normal printing.
e used on all Frontlit a
To be used on all Frontlit applications, on Transparant as
ell as on Opaque substrates
well as on Opaque substrates.
Post-White:
Print on the backside of a media, mirror/wrong reading printing.
rint on the backside of a media, mirror/wrong reading printing.
To be used on all Backlit a
To be used on all Backlit applications on Transparant substrates.
The White is printed in the 2
The White is printed in the 2
ications, on Transparant as
st-White:
ications on Transparant substrates
nd
n
printrun!
printrun
Profi les:
Available in:
- Q 720 DS (Double Strike) Bidir @ 6 m²/h - 65 ft²/h
- Q 1440 SS (Single Strike) Uni-dir @ 4m²/h - 43 ft²/h
Overview of standard White Image Confi gurations:
- Mw_1440_SS_Uni_FWP
- Mw_720_FWP
- Mw_720_NZP
- Mw_720_Spot White
- Mw_720_White Fill
Creative with White ink Stay Ahead With Agfa Graphics.
Page 5

The Day&Night application 5
r
The Day&Night application:
1st printrun 2nd printrun
+ =
Only color + text pre-white + color
mirror image no text, mirror image
The purpose of this application, is to reach the
same visual effect with and without light emitted through the back of the image.
Most backlight applications look as they should,
when light is emitted through the back, but look
too dark when the light is turned off.
-white + colo
We use a clear plexi, or a glass surface for this application.
The images are printed in mirror, as we will look through the back of the media, which will
also give an extra glossy punch to the image.
First, only the image(color) is printed, and in the second print run we print the white background, and the image again.
Notice that the text is only printed in the fi rst print run and not in the second.
This is due to the fact that there is no feedback option for the color print in the AgfaRip at
this stage, it will be in the future. Therefore, as we need to manually re-align the media after
the fi rst print run, which can cause a slight misalignment, and that might be visual when
small text needs to be printed twice in register.
When printing on multiple small media sizes, it’s best to use a spacer between the
media when you place them on the table, as the heat from the lamps can expand the media,
which will visually show on the far most media. The space between media only needs to be
2mm. (the spacers are only used to position correctly, should not be there when printing!)
Stay Ahead With Agfa Graphics. Creative with White ink
Page 6

6 The Opaque white application & Post white
+
=
The Opaque white application:
This application is printed on the back side of substrate, mirror/wrong reading printing.
Used on Transparent media, such as clear plexi or glass.
color
It’s a combination of a color print (1st printrun)...
followed by a “PreWhite” colored mask (2nd printrun)...
and Pre-White color print (3th printrun)
Which results in an opaque image with a transparant part
pre-white +
color mask
pre-white +
color fi le
Post white:
This application is printed on the back side of substrate, mirror/wrong reading printing.
Used on all BackLit applications on Transparent media
White is only applied in the 2nd printrun
+ =
Creative with White ink Stay Ahead With Agfa Graphics.
Page 7

Preparing an image 7
D. Preparing an image:
We will show you how-to, by going step-by-step through the next photoshop example….
We want to create some colored and white text onto a black KapaColor plate,
the printed end result should look like this:
We start by making the following fi le in Photoshop:
The text color which represents the white ink/text is
not important in this stage, as you can see in the preview
above.
The next step is to defi ne which parts should be printed in white,
and create a spot channel for it.
We also want to have white under the colored text, so we have to select
everything out of the white background. The image must be fl attened fi rst.
To do this, there are several ways in Photoshop. You can use the “Pen
tool”, to make a path around objects, and make a selection out of it….
The “Magic Wand Tool” can also be used…
But in this case, we will work with the “Color Range” tool.
Stay Ahead With Agfa Graphics. Creative with White ink
Page 8

8 Preparing an image
W
A
m
s
t
A
w
Following window will open…
We select the “Highlights”…
All background white is now selected, and also very
important, the inside areas of the letters are also
i
selected, which is more diffi cult if you should use
the Magic Wand Tool on this example…
We now have to invert the selection, so the text parts will be selected…
Go to:
The text outline is now selected…
This is also the area where white is printed underneath a colored surface.
We get the best result, if we shrink the “to-become-white layer” a bit…
Go to:
text parts will be selected…
A contraction of 2 pixels will
work perfect on an image which
has a
150dpi on output format.
Creative with White ink Stay Ahead With Agfa Graphics.
Page 9

Preparing an image 9
T
We now have the complete white layer as a selection…
The next step is to make a spot channel out of it…
Go to: The channels tab, and select “New Spot Channel” on the pull-down menu
The Solidity must be 100%,
the name and color is not important…
The complete selection is now added as a spot channel.
Stay Ahead With Agfa Graphics. Creative with White ink
Page 10

10 Preparing an image
T
t
S
t
We now have to delete the parts which will be printed only with white ink,
so the areas with no other color on top…
Make the spot channel invisible again,
by toggling the channel visibility…
Delete the white in areas…
The white ink areas are now deleted from
the CMYK layer, but are still present in the
Spot channel layer. You can check this by
toggling the CMYK color channel visibility…
Save your image as a .Tiff or a .Psd, but make sure the “Spot Colors” tab is active!
Always make sure you have fl attened the image before saving!!
Creative with White ink Stay Ahead With Agfa Graphics.
Page 11

Preparing an image 11
T
T
If you should need to add additional white areas and you have
already created the Spot Channel,
you can do this as follows:
Make the spot channel invisible again,
by toggling the channel visibility…
And select the CMYK channels…
On the CMYK level, make a selection of the
additional area...
Toggle back to the Spot Channel and
use the Fill command…
The new selection will now be part of
the Spot layer…
t
Stay Ahead With Agfa Graphics. Creative with White ink
Page 12

12 Opening the image in Wasatch SoftRip
T
Y
fi
a
Opening the image in Wasatch SoftRip…
When following Warning pops up upon opening:
That means that your current Image Confi guration, is a
CMYKLCLm mode only, with no white.
You have to select the IC with “Spot White”
fi rst, and re-open the image fi le again to render it for
accurate display.
Check the fi le in Wasatch SoftRip before printing…!!
Move the mouse button over the places where the white ink should be, in this screendump,
the letter “W”, and check the input values on the Info-tab.
All colored texts should show the color value + a 100% white value
Creative with White ink Stay Ahead With Agfa Graphics.
Page 13

Opening the image in Wasatch SoftRip 13
Stay Ahead With Agfa Graphics. Creative with White ink
 Loading...