

Page 1
ePhoto CL20
User’s Guide
ab
Page 2

Trademarks
AGFA and the Agfa rhombus are trademarks of Agfa-Gevaert AG.
AGFAnet, AGFAnet Print Service, PhotoGenie, PhotoWise and ePhoto CL20 are registered
trademarks of Agfa-Gevaert N.V.
Adobe Acrobat is a trademark of Adobe Systems Incorporated that may be registered in certain
jurisdictions.
CompactFlash is a trademark of the SanDisk corporation.
Microsoft, Windows, Internet Explorer and NetMeeting are registered trademarks of Microsoft
Corporation in the United States of America and in other countries.
VideoImpression is a trademark of ArcSoft Inc.
Other products or company names are trademarks or registered trademarks of their respective
holders.
Copyright © July 2000 Agfa-Gevaert N.V.
All rights reserved.
All software and hardware described in this document are subject to change without any notice.
Trademarks 2
Page 3

Regulation Compliance
FCC Information Test
FCC Warning: This equipment meets the limits for a Class B digital device, pursuant to Part 15 of
FCC Rules. Only the power pack and cable supplied with the camera should be used. Operation
with other power packs and cables is likely to result in interference to radio and TV reception and
could void the user’s authorization to operate this equipment.
This device complies with Part 15 of the FCC Rules. Operation is subject to the following two
conditions:
1. This device may not cause harmful interference.
2. This device must accept any interference received, including interference that may cause
undesired operation.
Changes or modifications not expressly approved by the manufacturer may void the user’s authority
to operate this equipment.
The limits for a Class B digital device, pursuant to Part 15 of the FCC Rules, are designed to
provide reasonable protection against harmful interference in a residential installation. This
equipment generates, uses and can radiate radio frequency energy and, if not installed and used in
accordance with the instructions, may cause harmful interference to radio communications.
However, there is no guarantee that interference will not occur in a particular installation. If this
equipment does cause harmful interference to radio or television reception, which can be
determined by switching the equipment off and on, the user is encouraged to try to correct the
interference by one or more of the following measures:
!
Reorient or relocate the receiving antenna.
!
Increase the separation between the equipment and receiver.
!
Connect the equipment into an outlet on a circuit different from that to which the receiver is
connected.
Canadian Radio Interference Regulations
Statement
This Class B digital device meets all the requirements of the Canadian Interference-Causing
Equipment Regulations.
Cet appareil numérique de la Classe B respecte toutes les exigences du Réglement sur le matériel
brouilleur du Canada.
Regulation Compliance 3
Page 4

CE Declaration of conformity according to ISO/IES
Guide 22 and EN 45014
This equipment complies with the requirements of the Low Voltage Directive 73/23/ECC,
93/68/ECC standards: EN 60950: 1995/A3.
This equipment complies with the requirements of the EMC Directive 89/336/ECC
Standards: EN 50081-1-EN55022 class B
EN 50082-1-EN61000-4-2, EN61000-4-3, EN61000-4-4
Regulation Compliance 4
Page 5

Warranty
Agfa warrants this product to be free from defects of material and workmanship for one (1) year
from the date of purchase. During the warranty period, Agfa will repair or replace, at its option, the
product at no charge to the customer. The replacement unit may be a re-manufactured unit or a
unit of equal or greater functionality. After one (1) year, Customer shall pay for all parts, labor and
service.
Agfa warrants that software products will conform to published specifications in effect at the time of
delivery for 90 days after purchase. Customer acknowledges that the Software may have inherent
defects because of its complexity. The warranty applies only to the media on which the software is
recorded. During the 90 days period, Agfa guaranties free support via the telephone. This support is
not valid for third party software.
If a unit is replaced during the warranty period, the original warranty shall remain in effect until the
end of the one (1) year period or shall be 30 days, whichever is longer.
This warranty is transferable with new owner notification to Agfa.
This warranty shall not apply if the customer:
!
Abuses or modifies Product or Software.
!
Operates the system in an environment with excessive dirt, moisture, chemical fumes,
extremes of temperature or other improper conditions. The camera is not impermeable to
water, dust or sand.
!
Supplies other Software or Interfacing.
Warranty service is excluded if the serial number of the product has been tampered with or
removed.
Caution:
fitness for a particular purpose, merchantability and non-infringement, are excluded.
The parties agree that all other warranties, express or implied, including warranties of
Warranty 5
Page 6

Safety Information
!
To reduce the risk of electric shock, do not disassemble the camera.
!
To reduce the risk of fire or electric shock, do not expose the camera to rain or moisture. Refer
all servicing to qualified service personnel.
!
Only use the following batteries: AA Alkaline, AA Lithium or AA NiMh batteries. Do not use
batteries that show signs of leakage, corrosion or swelling, or that are excessively warm.
Safety Information 6
Page 7

Care and Maintenance
!
Avoid leaving the camera in the sun or in a very warm location (beach, car, and so on) for
prolonged periods.
!
Do not wrap the camera in cloth or plastic while it is on (heat and moisture may be trapped and
damage the camera).
!
Avoid using the camera in excessively cold (below 0°C/32°F) or excessively warm (above
40°C/104°F) conditions.
!
When you bring the camera from a cold to a warm location, allow the camera to reach room
temperature before you use it.
!
If condensation develops inside the camera, stop using it immediately. Leave the camera at
room temperature for a few hours to allow the condensation to evaporate.
!
To clean the camera lens or LCD, blow away any surface dust or dirt. Then breathe on the
surface to form a mist and gently wipe it with a soft, lint-free cloth or lens cleaning tissue.
!
To avoid scratching the lens, use a gentle, circular motion when wiping.
!
Never use harsh or abrasive cleaners on the outside surfaces of the camera. Wipe off dust
with a clean, dry cloth.
Care and Maintenance 7
Page 8

Contents
Introduction..................................................................................................................................... 10
Chapter 1: Getting to Know Your Camera.................................................................................... 11
Taking a Closer Look ................................................................................................................11
Power Sources .......................................................................................................................... 13
Batteries..................................................................................................................... 13
USB Power ................................................................................................................14
Memory Options........................................................................................................................ 15
Internal Memory......................................................................................................... 15
CompactFlash Memory Card (Optional External Memory)........................................ 15
Camera Controls ....................................................................................................................... 16
The REC/OFF Auto Return Switch ............................................................................ 16
The Status Display..................................................................................................... 16
The Mode Button .......................................................................................................17
The Resolution Button ...............................................................................................18
The Delete Button...................................................................................................... 19
Chapter 2: Recording a Still Image ...............................................................................................20
Chapter 3: Transferring Images to Your PC................................................................................. 21
Installing the Required Software ............................................................................................... 21
Connecting the Camera to Your PC.......................................................................................... 22
Viewing and Saving Images on Your PC Using the AgfaCam Mounter .................................... 23
Chapter 4: Organizing Images Using PhotoWise ........................................................................ 24
Chapter 5: Ordering Prints Over the Internet Using AGFAnet Print Service ............................ 27
Ordering Prints Using the Print Button ...................................................................................... 27
Ordering Prints Using the AgfaCam Mounter............................................................................ 28
Chapter 6: Using the ePhoto CL20 for Video Applications ........................................................30
Videoconferencing with MS NetMeeting ................................................................................... 30
Videoconferencing over the Internet .......................................................................... 30
Videoconferencing over LAN ..................................................................................... 30
Capturing Video Images with VideoImpression ........................................................................ 31
Contents 8
Page 9

Appendix A: Troubleshooting and Support ................................................................................. 32
Troubleshooting ........................................................................................................................ 32
Support...................................................................................................................................... 32
Appendix B: Camera Specifications ............................................................................................. 34
Contents 9
Page 10

Introduction
The Agfa ePhoto CL20 digital camera can handle still images as well as video images. The
following table gives you an overview of the possibilities of the camera:
Still images Video/Images over USB
Using a CompactFlash™ Card (p.15)
!
to store images on a CompactFlash
memory card
!
to (re)format your CompactFlash card
Recording still images (p.20)
!
in Low resolution (512 x 384) up to 30
images in the internal 1 MB camera
memory
!
at XGA in High resolution (1024 x 768)
up to 10 images in the internal 1 MB
camera memory
!
at PhotoGenie resolution (1280 x 960)
up to 6 images in the internal 1 MB
camera memory
Transferring still images to your PC (p.21)
!
USB powered (no batteries needed)
!
fast image download with the USB
interface at 300KB/s on your PC (this
requires Windows® 98-2000)
!
to view images on your PC using
AgfaCam Mounter
!
to order prints over the internet using
AGFAnet™ Print Service
!
to manage images using PhotoWise™
Videoconferencing (p.30)
!
USB powered (no batteries needed)
!
using the USB interface at 300KB/s on
your PC
(this requires Windows® 98-2000)
!
videoconferencing software using
Microsoft NetMeeting® or other
videoconferencing software that supports
standard video for Windows drivers
!
with built-in flash and self-timer
functionality
Deleting still images (p.19)
!
to delete images
"
to delete the last image recorded
"
to delete all images
!
to clear the camera memory
#
Note: To read more on your ePhoto CL20, visit: http://support.agfa.com/homeOffice.
#
Note: Due to rescaling, some of the screen shots included in this document may appear
unclear when displayed at 100% magnification. You can view these screen shots more clearly
by using the Zoom tool to increase the default magnification.
Capturing video images (p.31)
!
USB powered (no batteries needed)
!
using the USB interface at 300KB/s on
your PC
(this requires Windows® 98-2000)
!
video capture software using
VideoImpression™
Introduction 10
Page 11
Chapter 1: Getting to Know Your Camera
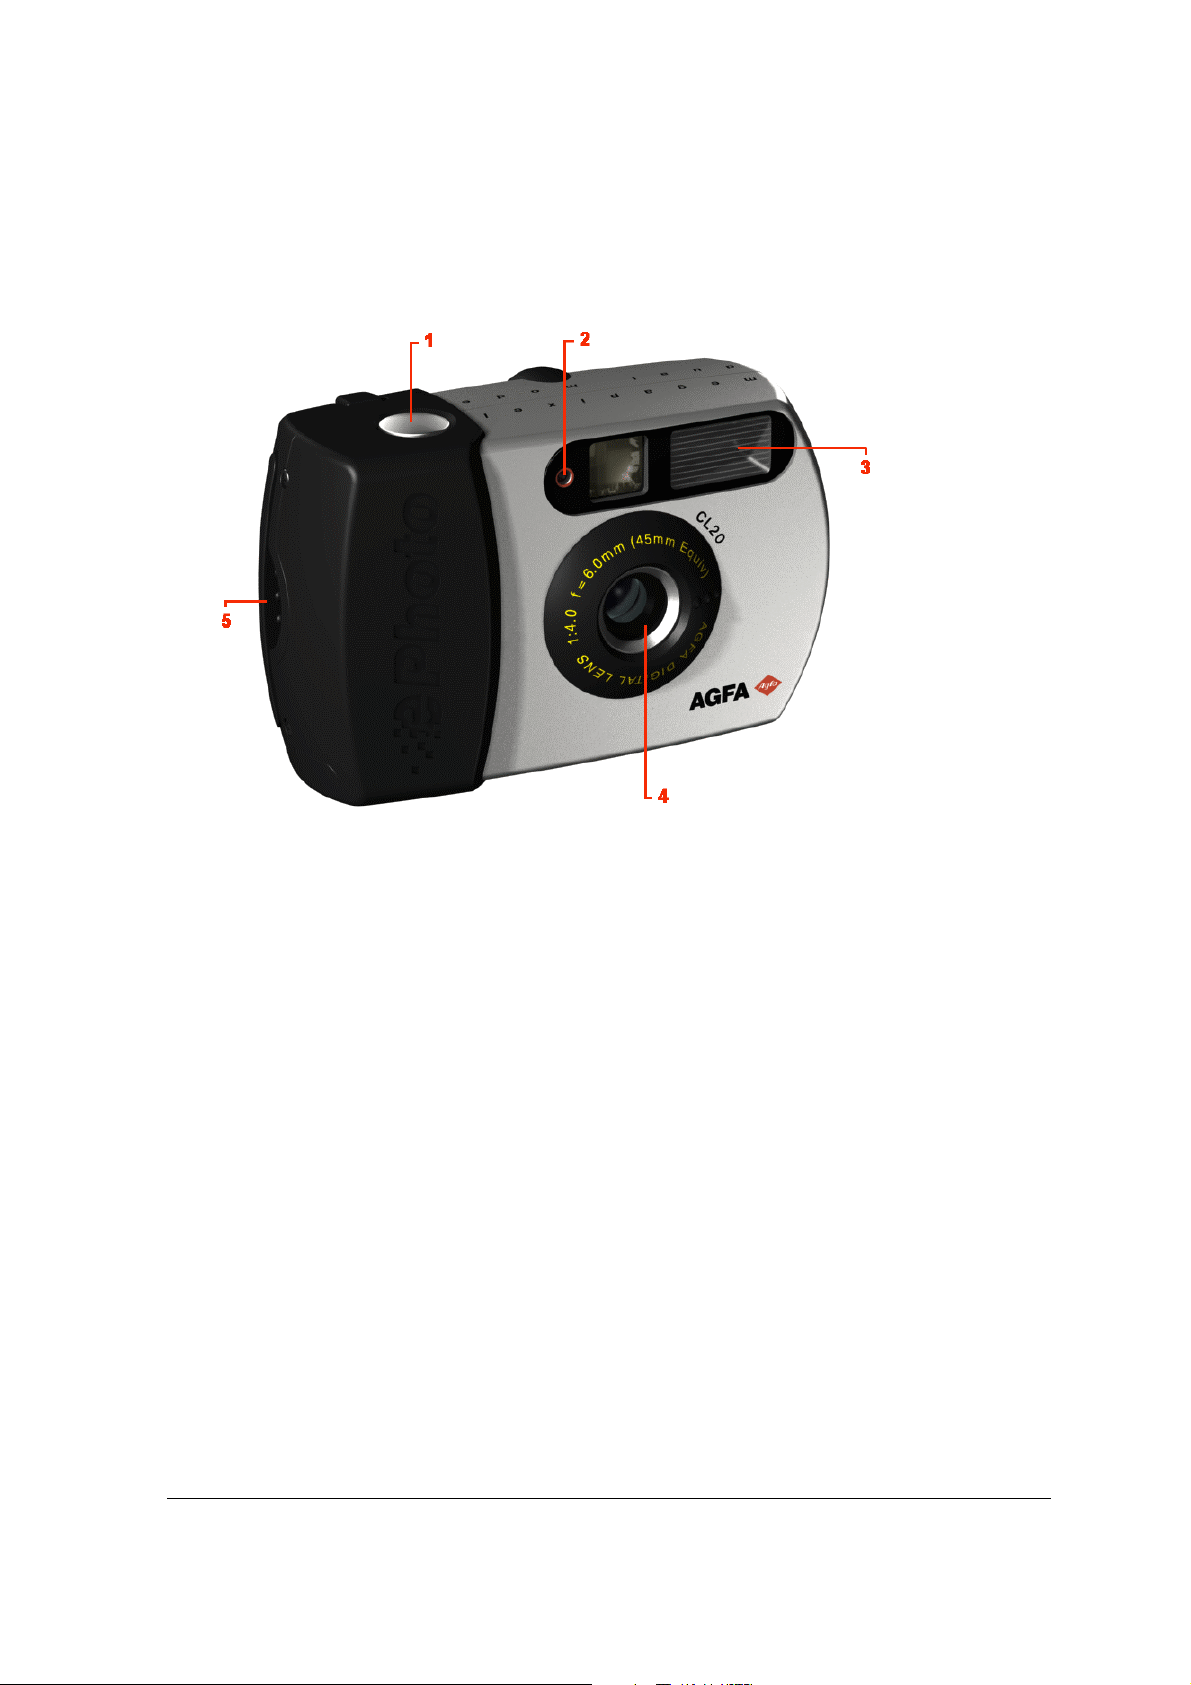
Taking a Closer Look
1
Shutter Button
To record an image or to confirm options of the Delete button.
2
Timer Indicator
A blinking red light indicates that the selftimer is activated.
3
Built-in Flash
To light dark scenes.
4
Lens
Focal range = 65 cm (25.6 inch) to infinity.
5
CompactFlash Slot
To insert an optional CompactFlash memory card.
Chapter 1: Getting to Know Your Camera 11
Page 12

1
USB Port (
)
To connect your camera with a USB cable to your computer.
2
Print Button
To upload your images via the internet to an Internet Printing Service.
3
Green Action Indicator
A steady green light indicates that the camera is ready. The green action indicator blinks when
the camera starts up, processes an image or when the flash is charging.
4
Viewfinder
To frame images.
5
OFF/REC Auto Return Switch
To switch the camera on or off.
6
Display
To see the settings.
7
Battery Compartment
To insert 2 AA Alkaline, AA Lithium or AA NiMh batteries.
8
Tripod Mount
To mount the camera on a tripod or cradle.
9
Delete Button
To delete the last recorded image (press once) or to delete all images (double-press) or to
format the optional CompactFlash™ card (triple-press).
10
Mode Button
To set the selftimer and the flash settings.
11
Resolution Button
To set the resolution of your camera.
Chapter 1: Getting to Know Your Camera 12
Page 13

Power Sources
Your ePhoto CL20 has two possible power sources:
!
batteries
!
USB power
Batteries
Inserting batteries
Your ePhoto CL20 camera comes with 2 AA Alkaline batteries.
#
Note: You can also use AA NiMH or AA Lithium batteries.
1
Unlock the battery compartment door.
2
Slide the door of the battery compartment in the direction of the arrow.
3
Insert 2 AA appropriate batteries. Make sure the pole-marks on the batteries (+ and -)
correspond to those in the battery compartment.
4
Slide the battery compartment door back into place.
Chapter 1: Getting to Know Your Camera 13
Page 14

Battery Status
The Display always indicates the status of the battery. Segments disappear as power is used.
Full Nearly Empty
A Empty icon indicates that the batteries are empty.
Battery Care
!
If you are not going to use your camera for an extended period of time, remove the batteries to
prevent leaks or corrosion.
!
Before replacing the batteries, switch the camera OFF.
!
Use only size AA Alkaline, NiMH (with a minimum capacity of 1200 mAh) or Lithium batteries.
!
Do not use batteries that show signs of leakage, corrosion or swelling.
!
Do not use batteries that are excessively warm.
!
If necessary, clean battery contacts with a dry cloth before installation.
!
Always replace all batteries with two identical, new (or fully charged) ones.
!
Dispose used batteries in a manner that complies with applicable laws.
USB Power
The moment you connect your camera to a PC (with the supplied USB cable), it is powered by the
PC (and does not use battery power).
"
Note: If the camera is USB-powered the flash is disabled.
Chapter 1: Getting to Know Your Camera 14
Page 15

Memory Options
You can store captured images in two ways:
!
In the Internal memory (1 MB capacity)
!
On an optional CompactFlash memory card (external memory of 4, 8, 16, 32, 64, …MB
capacity)
Internal Memory
Your ePhoto CL20 camera comes with an internal memory of 1 MB. You can store 6 images in
PhotoGenie resolution, 10 images in High resolution (XGA) and up to 30 images in Low resolution.
CompactFlash Memory Card (Optional External Memory)
Inserting/Removing an Optional CompactFlash memory card
1
Open the door of the memory card compartment.
2
To insert a card:
Insert the CompactFlash card and push it all the way into the slot.
"
Note: The memory card is shaped so that it can only be inserted into the slot in the correct
way. Do not force the card.
To remove a card:
Pull the CompactFlash card out of the slot.
3
Close the memory card compartment door.
"
Note: With a CompactFlash card inserted, the internal memory can not be used.
Formatting an Optional CompactFlash Memory Card
1
Press the
2
Press the Shutter button to format the CompactFlash memory card.
3
Confirm by pressing the Shutter button once more.
Delete button
three times to activate the formatting option.
Chapter 1: Getting to Know Your Camera 15
Page 16

Camera Controls
The REC/OFF Auto Return Switch
Switching On the Camera
•
Slide the REC/OFF auto return switch towards REC.
Wait until the Green Action Indicator stops blinking before recording an image.
Automatic Power Off Function
The camera is equipped with an automatic power off function. It switches off automatically after one
minute of inactivity.
To re-activate the camera:
•
Slide the REC/OFF auto return switch towards REC.
Switching Off the Camera
•
Slide the REC/OFF auto return switch to shut down the camera.
You hear a beep, the Green Action Indicator and display are dimmed.
The Status Display
The display shows the camera settings you selected by means of icons.
Example of display information:
The display gives you information on:
!
the number of images that still can be recorded
!
the status of the batteries (full, nearly empty)
!
the USB connection to a PC
!
the resolution
!
the flash setting (activated or not)
!
the selftimer setting (activated or not)
!
the deleting of images
Chapter 1: Getting to Know Your Camera 16
Page 17

The Mode Button
Activating Automatic Flash and/or Selftimer
Press the
•
a: Resolution button
b: Mode button
c: Delete button
When you activated the automatic flash, the flashlight will go off if the scene you want to record
is too dark. In this case the flash will charge before you can press the Shutter button.
On the display you see the icons of the option you set:
Icon Option
Mode button
Automatic Flash
to change the combined flash and selftimer option.
#
Note: The flash and selftimer settings are not stored when you switch off the camera.
Automatic Flash + Selftimer
Flash
Flash + Selftimer
No Flash
No Flash + Selftimer
Chapter 1: Getting to Know Your Camera 17
Page 18

The Resolution Button
Setting the Resolution
Depending on the Image resolution you can record 6 images in PhotoGenie resolution (1280 x
960), 10 images in XGA resolution (1024 x 768) and up to 30 still images in
Low resolution (512 x 384).
!
Note: According to the combination of PhotoGenie, High and Low resolution images you store
in the camera’s memory (or on the CompactFlash card), the capacity varies.
To change the Image resolution:
•
Press the
a: Resolution button
b: Mode button
c: Delete button
On the display you see the icons of the option you set:
Icon Option
Resolution button
Low Resolution (512 x 384)
Low image resolution — standard compression
capacity: 30 images in the internal memory
High Resolution (1024 x 768)
High image resolution — standard compression
capacity: 10 images in the internal memory
.
PhotoGenie (1280 x 960)
PhotoGenie image resolution — low compression
capacity: 6 images in the internal memory
Chapter 1: Getting to Know Your Camera 18
Page 19

The Delete Button
a: Resolution button
b: Mode button
c: Delete button
Deleting the Last Image Taken
1
Press the
2
Press the Shutter button to delete the image.
3
Confirm by pressing the shutter button once more.
Delete button
once to select the last image to delete.
Deleting All Images at a Time
Once your camera’s (or CompactFlash card) memory is full, you have to delete images in order to
record new images. If you want to store the images, you have to download them to the PC first.
1
Press the
2
Press the Shutter button to delete the images.
3
Confirm by pressing the shutter button once more.
#
Note: Pressing the Delete button three times you can format the CompactFlash memory card.
Delete button
twice to select all images to delete.
Chapter 1: Getting to Know Your Camera 19
Page 20

Chapter 2: Recording a Still Image
#
Note: Do not forget to insert batteries as described in Inserting Batteries.
1
Slide the REC/OFF auto return switch towards REC.
Wait until the Green Action Indicator stops blinking.
2
Change the camera settings.
3
Frame the image in the viewfinder.
4
Press the Shutter button and hold still your camera until you hear a beep.
The action indicator blinks until the image is stored in the camera’s (or external) memory.
The moment the action indicator stops blinking you can record another image.
#
Note: The camera shuts down after one minute when no button is pressed.
Tips to Record Images
!
The number on the display indicates the number of images that still can be recorded.
!
While recording an image, hold still your camera until you hear a beep.
!
To obtain sharp images, do not record images closer than 65 cm (25.6“).
!
Be aware that the built-in flash only ranges from 1 m to 3 m (3.3 ft to 9.8 ft).
!
Preset your camera to High or PhotoGenie resolution if you intend to print the image.
!
Preset your camera to Low resolution if you intend to use the image in internet or e-mail
applications.
Chapter 2: Recording a Still Image 20
Page 21

Chapter 3: Transferring Images to Your PC
Installing the Required Software
1
Insert the ePhoto CL20 CD in the CD-ROM drive.
#
Note: If the Installation does not start automatically, double-click My computer, double-
click the CD-ROM icon and double-click Setup.exe.
2
Select your language and follow the instructions.
"
AGFAnet client software
To send images over the internet for printing on photopaper.
#
Note: The Print button on your ePhoto CL20 camera will not be available without the
AGFAnet client software.
#
Note: To use the Agfa Internet Print Service, you need the AGFAnet client software.
For more information, refer to the AGFAnet brochure in your package or visit
http://www.AGFAnet.com.
"
Agfa PhotoWise
To organize your images in albums and make slideshows.
"
VideoImpression
To capture video clips (over the USB cable).
"
NetMeeting
To video-conference (over the USB cable).
#
Note: The installer in the NetMeeting folder will also install or update Internet
Explorer if necessary.
Caution
"
Adobe Acrobat
: After installing NetMeeting you have to restart your computer.
To read the User’s Guide.
"
Driver Software
The Driver software will install the Video Driver, the AgfaCam Mounter and the Twain
Driver in order to transfer or save still images.
Caution
#
: After installing the Driver Software you have to restart your computer.
Note: Make sure to install the Driver Software after installing the other applications.
The Driver Software will then automatically detect the previous installed software.
3
Follow the instructions in the successive screens.
Chapter 3: Transferring Images to Your PC 21
Page 22

Connecting the Camera to Your PC
1
Open the USB compartment door.
2
Plug one end of the USB cable into your camera’s USB port.
3
Plug the other end of the USB cable into your computer’s USB port.
The USB port on your PC is labeled with the USB icon
4
Slide the REC/OFF auto return switch towards REC.
The AgfaCam Mounter appears.
as shown in the picture below.
Chapter 3: Transferring Images to Your PC 22
Page 23

Viewing and Saving Images on Your PC Using the AgfaCam Mounter
1
Connect your ePhoto CL20 to your PC as described in Connecting the Camera to Your PC.
The Agfa Camera window appears.
#
Note: After closing the Agfa Camera window you can re-open it by double-clicking My
Computer, Agfa Camera.
2
From the View menu, select Explorer Bar, Folders.
The Explorer bar appears.
3
Select the thumbnails you want to transfer to your PC.
4
Drag them to the desired folder or application in the Explorer Bar.
Chapter 3: Transferring Images to Your PC 23
Page 24

Chapter 4: Organizing Images Using PhotoWise
With PhotoWise you can download images from your CL20 Camera and organize them in rolls of
film.
1
Open PhotoWise by clicking Start > Programs > PhotoWise.
The PhotoWise window appears.
2
Right-click the Camera icon and select “Digital Camera Input Setting…”.
The Select Source window appears.
3
Select the ePhoto CL20 driver (if needed).
4
Enter the path (or use the Browse button) where the images will be stored.
Chapter 4: Organizing Images Using PhotoWise 24
Page 25

5
Select the check box “Create a new roll of film” to place the images in a new roll of film.
-or-
Do not select the check box “Create a new roll of film” to place the images in the (highlighted)
roll of film that was selected before.
6
Click OK.
7
Click the Camera icon.
#
Note: Make sure the camera is connected to your computer via the USB cable.
The ePhoto CL20 window appears.
8
Select all the images or select the desired images you which to transfer to your hard disk.
9
Click the
button.
The images will be saved to the hard disk and will be shown in the PhotoWise thumbnail view
placed under the chosen roll of film.
#
Note: For more information, click
.
Chapter 4: Organizing Images Using PhotoWise 25
Page 26

#
Note: For more information, refer to the PhotoWise online help system. You can access the
online help system by pressing “F1” or by moving your cursor to the top of the window and
choose “Help Topics” from the “Help menu”.
Chapter 4: Organizing Images Using PhotoWise 26
Page 27

Chapter 5: Ordering Prints Over the Internet Using AGFAnet Print Service
After installing the CL20 software from the ePhoto CL20 CD, you can easily upload your images
from your camera to the internet for printing. There are two ways to upload your images to the
internet.
!
Using the Print Button
!
Using the AgfaCam Mounter
Ordering Prints Using the Print Button
1
Install the software as described in Installing the Required Software.
#
Note: In order to use the Print button make sure to install the AGFAnet client software.
2
Connect the ePhoto CL20 with the USB cable to your computer as described in Connecting the
Camera to Your PC.
The AgfaCam Mounter appears.
3
Press the Print button on your camera.
4
The AGFAnet Print application starts.
5
Click Configure Connection... to set up your connection.
6
Click Next to go through each step of the wizard.
#
Note: For more information about the wizard, click the Help button.
After completing the wizard, the uploaded images will be printed and send to your home.
Chapter 5: Ordering Prints Over the Internet Using AGFAnet Print Service 27
Page 28

Ordering Prints Using the AgfaCam Mounter
1
Install the software as described in Installing the Required Software.
2
Connect the ePhoto CL20 with the USB cable to your computer as described in Connecting the
Camera to Your PC.
3
Repeat the procedure described in Viewing and Saving Images on Your PC Using the
AgfaCam Mounter.
4
Select the thumbnails you want to transfer to AGFAnet Prints.
5
Drag the desired images onto the AGFAnet Print application icon.
The AGFAnet Print application starts.
Chapter 5: Ordering Prints Over the Internet Using AGFAnet Print Service 28
Page 29

6
Click Configure Connection... to set up your connection.
7
Click Next to go through each step of the wizard.
#
Note: For more information about the wizard, click the Help button.
After completing the wizard, the uploaded images will be printed and send to your home.
Chapter 5: Ordering Prints Over the Internet Using AGFAnet Print Service 29
Page 30

Chapter 6: Using the ePhoto CL20 for Video Applications
Videoconferencing with MS NetMeeting
Videoconferencing over the Internet
To use NetMeeting® 3.0 (or higher) over the internet you need a modem for internet connection
and Internet Explorer® 4.01 (or higher).
Visit http://www.netmeet.net/bestservers.asp and choose an ILS server for your country and write
down the address (you will need this to specify the ILS Server).
1
Connect the ePhoto CL20 to your computer with the USB cable.
2
Switch on the camera.
3
Connect to the internet.
4
Choose Start/Programs/Accessories/Communications/NetMeeting to launch MS NetMeeting.
5
Select Option from the Tools menu.
6
Specify the ILS Server address in the Directory Settings box.
7
Select the Directory option in the Call menu.
8
Choose someone to videoconference with.
9
Activate the video receive function by clicking the Play button.
10
Choose the Video Send and Receive from the Tools menu.
Videoconferencing over LAN
Using NetMeeting over a Local Area Network (LAN), you only need to make a new call (Call / New
Call) and fill in the TCP/IP address or computer name of the person you want to videoconference
with.
Chapter 6: Using the ePhoto CL20 for Video Applications 30
Page 31

Capturing Video Images with VideoImpression
1
Connect the ePhoto CL20 to your computer with the USB cable.
2
Switch on the camera.
3
Choose Start/Programs/ArcSoft Video/VideoImpression to launch VideoImpression.
4
Click the New button to capture video.
5
Select the Capture Video button (camera icon).
6
Select ePhoto CL20 video capture 2000 in the Driver list (if needed).
7
Click the Format button.
The Format window appears.
8
Set the desired output size (resolution).
9
Click OK.
The VideoImpression window reappears.
10
Click the Record button.
11
Press the ESC-key on your keyboard to stop.
12
Click the Save button (floppy icon) to save your video on your computer.
!
Note: Depending on your hardware configuration, you may have to select a lower resolution in
order to obtain a smoother video clip. To do so, click the Format button.
Chapter 6: Using the ePhoto CL20 for Video Applications 31
Page 32

Appendix A: Troubleshooting and Support
Troubleshooting
The camera does not start up
"
The camera is switched off. Slide the REC/OFF auto return switch towards REC.
"
The camera is automatically switched off because of one minute of inactivity. Slide the
REC/OFF auto return switch towards REC.
"
The batteries are too weak. Replace them.
The Shutter button does not work
"
The camera is still recording an image.
"
The flash is still charging. Check the Green Action Indicator.
The built-in flash does not work
"
The flash is off. Check the flash setting.
Support
For more information and support on your Agfa ePhoto CL20:
Visit our website at:
The most effective way to find an answer to your problem is to execute the successive steps
described below.
1. Create an Agfa e-Service Account
You need to create an Agfa e-Service account to benefit from:
"
personalized online technical support
"
access to customized self-help tools and technical information
"
automatic e-mail notification of all new support documents
"
the latest Agfa product news
To create an Agfa e-Service account and to register your CL20 camera, click
e-Service Account
If you already have an Agfa e-Service account, go to
Add/Register Product
http://support.agfa.com/homeOffice
.
http://support.agfa.com
to add new products to your e-Service.
.
Create your
and click
Appendix A: Troubleshooting and Support 32
Page 33

2. Consult the Solution Finder Database
•
Click the
!
Note: If you do not find the Solution Finder tab, you first have to return to the Home and Office
page.
3. Consult the Support Documents Database
•
Click the
4. Consult the Software Library
•
Select the
camera.
5. Contact the Nearest Service Office
•
Select the
6. Personalized Online Support
If you do not find an answer to your problem/question in the Solution Finder or in the Support
Documents Database, click
Describe your problem as accurate as possible.
Solution Finder
Support Documents
Software Library
Service Offices
tab to consult the standard answers on various problems/questions.
tab to retrieve available software updates for your ePhoto CL20
tab to find the hotline number of your nearest Agfa Service Office.
Agfa Online Support Home
tab to read the latest technical product news.
to open Personalized Online Support.
For more information and support on MS NetMeeting:
Consult the help system or visit http://www.microsoft.com/windows/netmeeting and
http://www.netmeet.net
For more information and support on VideoImpression:
Consult the help system or visit http://www.arcsoft.com
For more information and support on PhotoWise:
Consult the online help system.
Appendix A: Troubleshooting and Support 33
Page 34

Appendix B: Camera Specifications
Parameter Specifications
Image Resolutions 1280 x 960 pixel resolution (PhotoGenie); 1024 x 768 pixel
resolution (XGA); 512 x 384 pixel resolution
LCD Display Black and white status display
Color 24-bit (millions of colors)
Memory 1 MB internal memory
CompactFlash slot Type 1
Lens Focal range = 65 cm (25.6 inch) - infinity
White Balance Auto Automatic
Built-in Flash Automatic, Off, On
Selftimer On, Off
Shutter Speed 1/10 sec to 1/2000 sec (auto)
Weight < 120 g (4.23 oz) without batteries
Dimensions 95(H) x 65 (W) x 35 mm / 3.7”(H) x 2.55”(W) x 1.37”
Appendix B: Camera Specifications 34
 Loading...