

Page 1

SnapScan™ e20
Owner’s Guide
Preface
This chapter gives you information about SnapScan and about How to Use this Online Guide.
Chapter 1: Preparing the Scanner
“Preparing the Scanner” explains how to prepare your SnapScan for installation.
Chapter 2: Installing the Scanner for PC
This chapter shows you how to set up your SnapScan for your PC.
Chapter 3: Installing the Scanner for Macintosh
This chapter shows you how to set up your SnapScan for your Macintosh computer.
Chapter 4: Making your First Scan
Here you find instructions on how to place reflective originals on the glass plate of your
scanner.
Appendix A: Troubleshooting
“Troubleshooting” can be helpful when you come across problems.
Appendix B: Technical Information
This appendix provides specifications for your SnapScan.
Appendix C: Regulation Compliance
This appendix gives you information about safety regulations, electromagnetic compatibility
and the declaration of conformity.
AB
Page 2

Trademarks
AGFA and the Agfa rhombus are trademarks of Agfa-Gevaert AG.
ScanWise and SnapScan are trademarks of Agfa-Gevaert N.V.
Acrobat is a trademark of Adobe Systems Incorporated which may be registered in certain
jurisdictions.
Apple, Macintosh, PowerPC and Mac OS are trademarks of Apple Computer Inc., registered in the
U.S. and other countries.
Corel is a registered trademark of the Corel Corporation.
IBM PC is a trademark of the International Business Machines Corporation.
Microsoft, Windows and Windows NT are registered trademarks of the Microsoft Corporation in the
U.S. and other countries.
Pentium is a registered trademark of the Intel Corporation.
Readiris Pro is a registered trademark of I.R.I.S.
Other product or company names are trademarks or registered trademarks of their respective
holders.
Copyright© July 2000 Agfa-Gevaert N.V.
All rights reserved.
All software and hardware described in this document are subject to change without any notice.
Trademarks 2
Page 3

Contents
Preface ............................................................................................................................................... 5
About SnapScan ......................................................................................................................... 6
Environmental Requirements ......................................................................................................6
Precautions .................................................................................................................................7
Cleaning Your Scanner ............................................................................................................... 7
How to Use This Online Guide....................................................................................................8
How to Print This Guide ..............................................................................................................9
Chapter 1: Preparing the Scanner................................................................................................. 10
Unpacking the Scanner............................................................................................................. 11
Taking a Closer Look ................................................................................................................11
Changing the Handle................................................................................................................. 12
Unlocking the Scanner .............................................................................................................. 13
Chapter 2: Installing the Scanner for PC...................................................................................... 14
Minimum System Requirements ............................................................................................... 15
Installing the Scanner Software.................................................................................................16
Connecting the Scanner to Your PC ......................................................................................... 18
Installing Additional Software .................................................................................................... 19
Chapter 3: Installing the Scanner for Macintosh ......................................................................... 20
Minimum System Requirements ............................................................................................... 21
Installing the Image Editing Software ........................................................................................ 21
Installing the Scanner Software.................................................................................................22
Connecting the Scanner to the Macintosh Computer ............................................................... 24
Installing Additional Software .................................................................................................... 25
Chapter 4: Making Your First Scan ...............................................................................................26
Appendix A: Troubleshooting ....................................................................................................... 28
Appendix B: Technical Information .............................................................................................. 31
Appendix C: Regulation Compliance............................................................................................ 32
Safety Regulations .................................................................................................................... 33
UL Safety Statement .........................................................................................................33
TÜV: Wichtige Sicherheitshinweise................................................................................... 33
Contents 3
Page 4

Electromagnetic Compatibility ...................................................................................................34
Federal Communications Commission Radio Frequency Interference Statement ...........34
Industry Canada Class A and B Label Requirements ....................................................... 34
Declaration of Conformity: SnapScan e20 ................................................................................ 35
Contents 4
Page 5

Preface
About SnapScan
Environmental Requirements
Precautions
Cleaning your Scanner
How to Use this Online Guide
How to Print this Guide
Preface 5
Page 6

About SnapScan
In this Owner’s Guide, the name SnapScan is used for the SnapScan e20 (unless specified
otherwise).
The SnapScan is a one pass flatbed color scanner with a resolution of
600 x 1200 ppi equipped with a cold cathode lamp. It is based on CCD (Charge-Coupled Device)
scanning technology. With the SnapScan, you can scan line-art, gray-scale and color reflective
originals up to A4 format.
The scanned data is transferred through the computer’s USB (Universal Serial Bus) port. The USB
technology makes it easy to install multiple peripherals to your computer. USB eliminates any need
to turn off or restart the computer when attaching a new peripheral.
SnapScan is a scanner that captures and converts reflective originals (for example pictures, text)
into electronic data that can be used in computer applications. It offers high-resolution image
capturing and is an ideal tool in making presentations come to life.
SnapScan supports multiple scanning modes and includes scanner software to get you started right
away. With its powerful and easy-to-use scanner driver software, SnapScan gives you easy access
to high-quality color scans. The scanner driver software gives you a number of additional features to
create special effects or to reproduce even the most difficult originals.
The document cover is adjustable: when you put a thick original (like a book or a magazine) on the
reflective glass plate, the document cover adapts to the thickness of the original.
Environmental Requirements
Place the scanner on a horizontal, flat surface.
To ensure proper ventilation, allow a minimum of 10 cm (4 inches) free space around each
side of the scanner.
Make sure that no vibrations or shocks occur.
Make sure that the area is free of dust.
Avoid any contact with water. Do not use your scanner near water or in a damp environment.
Your SnapScan is designed to perform at best when the environmental humidity is between
20% and 85%. Avoid environments where humidity fluctuations might occur.
Your SnapScan is designed to perform at best when the environmental temperature is
between 10 °C (+ 50 degrees Fahrenheit) and 40 °C (+104 degrees Fahrenheit). Avoid
exposure to direct sunlight and heating devices.
Preface 6
Page 7

Precautions
For your own safety and that of your equipment, respect conscientiously the Environmental
Requirements and always take the following precautions:
Check frequently whether there is no overheating of the AC adapter.
If you do not use your scanner for some time, pull the AC adapter cable out of the power
supply socket.
Handle your SnapScan with care: the glass plate is fragile. There is no warranty on breaking
the glass plate and your dealer is not liable for consequential damages.
Disconnect the AC adapter when you want to clean the scanner housing or the glass plate and
when the scanner needs servicing or repairing.
Do not open the scanner housing as it contains high-voltage areas and sensitive components.
Every repair should be carried out by your dealer.
Do not leave originals on the reflective glass plate for excessive periods of time. The warmth of
the scanner may cause them to deteriorate.
For safety reasons, never use extension cables for the AC adapter.
Caution: For safety reasons, besides the personal maintenance mentioned in this Owner's Guide,
do not try to remove any mechanical parts or any electronic components from your scanner. If your
scanner needs service, our dealer and service offices are available to help you.
Cleaning your Scanner
Cleaning the glass plate regularly, ensures that dirt or smudges do not reduce the quality of
your scanned images.
Before cleaning, disconnect the AC adapter from your scanner.
Use a soft damp cloth and a mild detergent to clean the surface of the glass plate. If you use
alcohol to clean the glass plate, make sure that you do not touch the plastic elements of the
scanner.
Avoid using sprays directly onto the glass plate as this may cause the liquid to penetrate the
seams around the glass and contaminate the mirrors and lenses inside the scanner.
Do not use liquid cleaners or aerosol cleaners.
Preface 7
Page 8
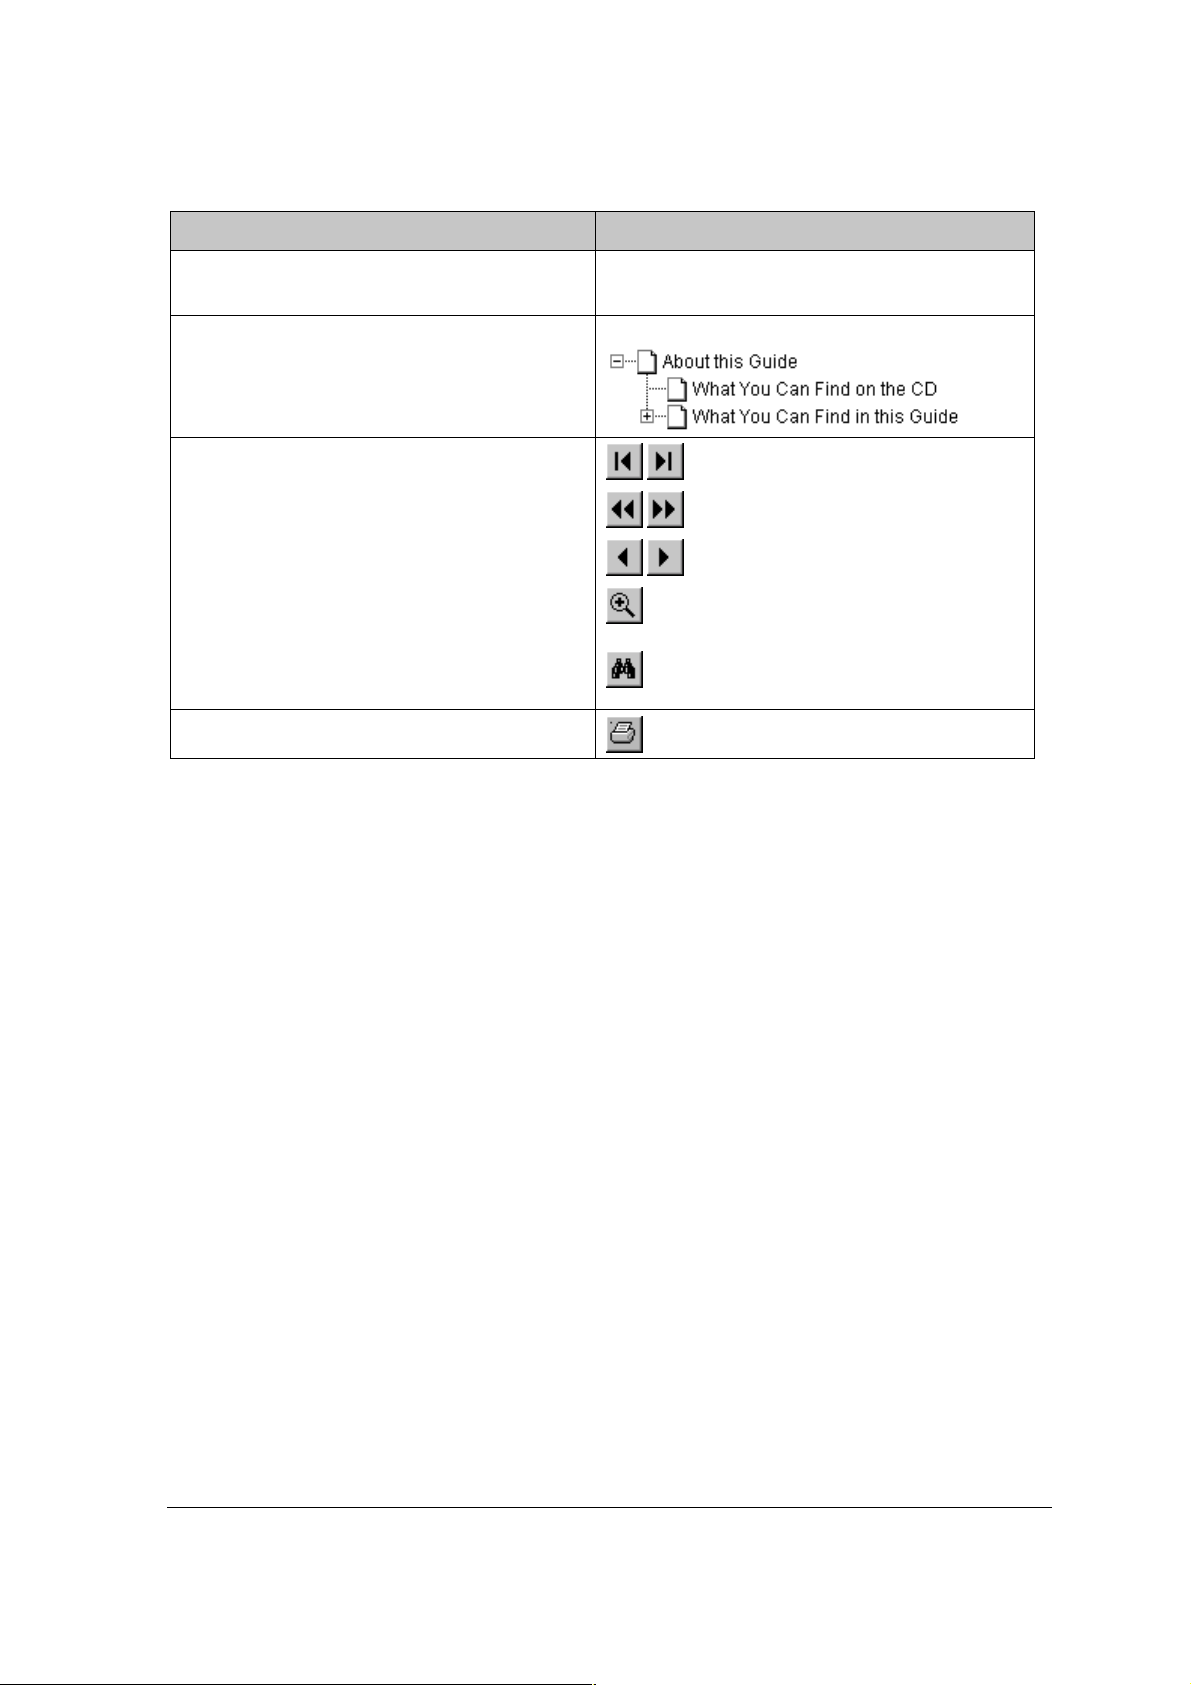
How to Use this Online Guide
To … Click …
jump to another location within or outside the
document
jump to a topic in the document click the corresponding bookmark
jump to the first or the last page
retrace your steps in the document
jump to the previous or to the next page
zoom in and zoom out (control-click) on the
page
search for a part of a word, a complete word
or multiple words
print the document
Note: Due to rescaling, some of the screenshots included in this document may appear
unclear when displayed at 100% magnification. You can view these screenshots more clearly
by using the Zoom tool to increase the default magnification.
blue text
Preface 8
Page 9

How to Print this Guide
1 Choose Page Setup from the File menu.
2 Choose your paper format from the Paper popup menu.
3 Select Orientation: Portrait.
4 Click OK.
5 Choose Print from the File menu.
Preface 9
Page 10

Chapter 1: Preparing the Scanner
This chapter helps you to prepare your SnapScan for installation.
Unpacking the Scanner
Taking a Closer Look
Changing the Handle
Unlocking the Scanner
Chapter 1: Preparing the Scanner 10
Page 11

Unpacking the Scanner
1 Open the packing box and carefully unpack all the items.
2 Check each item to make sure that everything listed on the Packing List (printed on the box) is
present. Check if there is no visible defect.
If something is missing, contact your dealer.
3 Remove the plastic wrapping and the packing materials from the scanner.
Note: Do not throw away the packing materials. They can be useful to protect the scanner
during later transport.
Taking a Closer Look
When you have taken the scanner out of the box, take a closer look at its parts. The following
figures illustrate the different parts of your SnapScan.
1. replaceable handle
2. adjustable document cover
3. glass plate
4. status indicator
Chapter 1: Preparing the Scanner 11
Page 12

The following figure illustrates the location of the different parts at the rear of your scanner.
1. Power connector
2. USB Port (labeled with the USB icon
) to make a connection to your computer
Changing the Handle
It is possible to customize your SnapScan by changing its handle.
1
Rotate the handle counterclockwise to remove it.
2
To place a new handle, slide the handle in the correct position and rotate it clockwise.
Chapter 1: Preparing the Scanner 12
Page 13

Unlocking the Scanner
Before you start using the scanner, you first have to unlock it.
1
Place the scanner on a horizontal, flat surface and pull it carefully towards you until you can
see the locking screw at the bottom.
2
Rotate the locking screw in the direction of
Your scanner is unlocked.
!
Note: If you want to transport your scanner, you have to lock it. To do this, first connect the AC
adapter to the scanner so that its optical assembly moves to its home position. Then, rotate the
locking screw in the direction of
and ready for transportation.
Caution
Macintosh computer.
: Make sure to install the ScanWise software before connecting the scanner to your PC or
and disconnect the scanner. Your scanner is now locked
.
Chapter 1: Preparing the Scanner 13
Page 14

Chapter 2: Installing the Scanner for PC
This chapter shows you how to set up your SnapScan for your PC.
Minimum System Requirements
Installing the Scanner Software
Connecting the Scanner to your PC
Installing Additional Software
Chapter 2: Installing the Scanner for PC 14
Page 15

Minimum System Requirements
A USB port
A Pentium® processor
A
14 inch color monitor
A video card that can display a minimum of 16 bit high color
32 MB of RAM (64 MB of RAM is recommended)
A CD-ROM drive
Windows® 98
ScanWise is compatible with all IBM™ PCs and compatibles running
Windows 98/2000
The amount of disk space available on your PC determines the number and the size of the
images that you can scan. Make sure that you have enough free storage space on your hard
disk. You need about two times the size of the image to scan, edit and save it.
Chapter 2: Installing the Scanner for PC 15
Page 16

Installing the Scanner Software
1
Insert the Agfa ScanWise CD-ROM in your CD-ROM drive.
!
Note: If the ScanWise Installer program does not appear automatically, carry out the
following instructions:
1 Double-click My computer.
2 Double-click the CD-ROM drive.
3 Double-click Setup.exe.
2
Click the up or down arrow to select your language.
This selection determines the language of the ScanWise software and documentation.
3
Click the up or down arrow to select your type of scanner (if needed).
4
Click the dotted right arrow or move the slider to about ScanWise.
A demonstration of ScanW ise will start.
5
Click the dotted right arrow or move the slider to Install.
6
Click Acrobat Reader to start the installation.
You need Acrobat Reader to read the documentation.
7
Follow the instructions on your screen.
When the installation is finished, the Install screen appears again.
8
Click ScanWise to start the Installation.
9
Follow the instructions on your screen.
!
Note: During installation the Register ScanWise window appears. You can choose to
register now or later.
"
Register now: If you choose to register now, the Agfa webpage opens. Here you can
register on line.
"
Register later: If you choose to register later, you can register afterwards via
Start/Programs/Agfa ScanWise/Register ScanWise.
By registering on line, you will create your personal e-Service account and you will enjoy the
following benefits:
1. Customized self-help tools:
Chapter 2: Installing the Scanner for PC 16
Page 17

You have access to the following self-help tools which are customized according to your eservice account profile:
1.
Software downloads
2.
Technical knowledge database (FAQ)
3.
On line manuals and documentation
4.
Access to third-party software support sites
2. Personalized one-to-one technical support:
Agfa assists you on line if you have additional questions about technical issues.
3. Automatic e-mail notification:
Agfa notifies you immediately when new software and upgrades are available for downloading.
!
Note: For support issues, go to http://support.agfa.com.
!
Note: For the latest information consult the ScanWise Read Me File.
When installation is finished you are ready to connect your scanner to your PC.
Chapter 2: Installing the Scanner for PC 17
Page 18

Connecting the Scanner to Your PC
Caution
Misuse of the power adapter can cause serious damage to the product and a safety hazard while
using it.
!
!
1
2
: For your safety, use the adapter that comes with this product. Do not use any substitute.
Note: Check if the AC Adapter complies with your local power supply.
Note: Make sure the scanner is unlocked (see Unlocking the Scanner) before connecting it to
the electric outlet.
Connect the plug of the AC adapter to your scanner.
Connect one end of your USB cable to the USB port on your scanner. Make sure you connect
the correct plug as shown in the figure above.
3
Plug the adapter in the wall outlet.
4
Connect the other end of your USB cable to a USB port on your computer. Make sure you
connect it to the correct port as shown in the figure below. A USB port is labeled with the USB
icon
.
Windows 98/2000 will now detect the scanner and will install the necessary files for the
scanner hardware driver.
Chapter 2: Installing the Scanner for PC 18
Page 19

Installing Additional Software
If you want to use OCR (Optical Character Recognition) you will have to install Readiris Pro™.
Insert the CD-ROM and follow the instructions on your screen.
To install additional software, insert the Corel™ Print Office 2000 CD-ROM and follow the
instructions on your screen.
If the Installer Program does not appear automatically, double-click the Setup.exe file on your
CD-ROM.
For a general overview of the possible workflows, please consult the Navigation Map, which is
supplied with your scanner.
Chapter 2: Installing the Scanner for PC 19
Page 20

Chapter 3: Installing the Scanner for Macintosh
This chapter shows you how to set up your SnapScan for your Macintosh.
Minimum System Requirements
Installing the Image Editing Software
Installing the Scanner Software
Connecting the Scanner to the Macintosh Computer
Installing Additional Software
Chapter 3: Installing the Scanner for Macintosh 20
Page 21

Minimum System Requirements
A USB port
A PowerPC® processor
A 14 inch color monitor with thousands of colors for an accurate display of color images
32 MB of RAM
A CD-ROM drive
Mac® OS 8 or higher
Installing the Image Editing Software
1 Disable the virus protection software.
You can turn it off in the Extensions Manager Control Panel or you can drag the software out of
the System Folder.
Note: After installing, enable the virus protection software again.
2 Restart your computer.
3 Insert the Mac CD-ROM of Corel Print Office 2000.
4 Double-click the Corel Print Office 2000 icon.
5 Follow the instructions on your screen.
Chapter 3: Installing the Scanner for Macintosh 21
Page 22

Installing the Scanner Software
1
Insert the Agfa ScanWise CD-ROM in the CD-ROM drive.
!
Note: If the ScanWise program does not appear automatically, double-click the CD-ROM
icon on your desktop.
The Agfa ScanWise window opens.
2
Double-click the ScanWise Installer icon.
3
Click the up or down arrow to select your language.
This selection determines the language of the ScanWise software and documentation.
4
Click the up or down arrow to select your type of scanner (if needed).
5
Click the dotted right arrow or move the slider to about ScanWise.
A demonstration of ScanW ise will start.
6
Click the dotted right arrow or move the slider to Install.
7
Click Acrobat Reader to start the installation.
You need Acrobat Reader to read the documentation.
8
Follow the instructions on your screen.
When the installation is finished, the Install screen appears again.
9
Click ScanWise to start the Installation.
10
Follow the instructions on your screen.
!
Note: After installation the Register ScanWise window appears.
"
Register now: If you choose to register now, the Agfa webpage opens. Here you can
register on line.
"
Register later: If you choose to register later, you can register afterwards by doubleclicking the ‘Product Registration’ icon in the ScanWise folder.
By registering on line, you will create your personal e-Service account and you will enjoy the
following benefits:
1. Customized self-help tools:
You have access to the following self-help tools which are customized according to your eservice account profile:
Chapter 3: Installing the Scanner for Macintosh 22
Page 23

1.
Software downloads
2.
Technical knowledge database (FAQ)
3.
On line manuals and documentation
4.
Access to third-party software support sites
2. Personalized one-to-one technical support:
Agfa assists you on line if you have additional questions about technical issues.
3. Automatic e-mail notification:
Agfa notifies you immediately when new software and upgrades are available for downloading.
!
Note: For support issues, go to http://support.agfa.com.
When the installation is finished you are ready to connect your scanner to your Macintosh
computer.
Caution:
Before using ScanWise on a system with 32MB physical RAM, it is advised to increase
the virtual memory to 64 MB. Go to Apple Menu – Control Panels – Memory – 64 MB. Restart your
Macintosh. For the latest information consult the ScanWise Read Me File.
Chapter 3: Installing the Scanner for Macintosh 23
Page 24

Connecting the Scanner to the Macintosh Computer
Caution: For your safety, use the adapter that comes with this product. Do not use any substitute.
Misuse of the power adapter can cause serious damage to the product and a safety hazard while
using it.
Note: Check if the AC Adapter complies with your local power supply.
Note: Make sure the scanner is unlocked (see Unlocking the Scanner) before connecting it to
the electric outlet.
1 Connect the plug of the AC adapter to your scanner.
2 Connect one end of your USB cable to the USB port on your scanner. Make sure you connect
the correct plug as shown in the figure above.
3 Plug the adapter in the wall outlet.
4 Connect the other end of your USB cable to a USB port on your computer. Make sure you
connect it to the correct port as shown in the figure below. A USB port is labeled with the USB
icon
.
Chapter 3: Installing the Scanner for Macintosh 24
Page 25

Installing Additional Software
If you want to use OCR (Optical Character Recognition) you will have to install Readiris Pro™.
Insert the CD-ROM and follow the instructions on your screen.
For a general overview of the possible workflows, please consult the Navigation Map, which is
supplied with your scanner.
Chapter 3: Installing the Scanner for Macintosh 25
Page 26

Chapter 4: Making Your First Scan
1
Place a color photograph face down on the glass plate with the top side against the middle of
the front ruler.
The optical performance of a CCD scanner is always best near the middle of the glass plate.
However, the specified scan quality is guaranteed for the entire scan area.
If you put more than one original on the glass plate, position them as close to the center line as
possible to optimize the quality.
2
Close the document cover of the scanner.
!
Note: The adjustable document cover makes it possible to scan from books and
magazines. When you put a thick original on the reflective glass plate, the document
cover adapts to the thickness of the original.
3
4
PC
For
application.
-or-
For
Select your scanner (if needed).
!
: In the Start menu, select Programs, Agfa ScanWise to open the ScanWise
Macintosh
Note: This dialog only appears the first time you use ScanWise.
: Go to the Agfa ScanWise folder on your hard disk and double-click
Chapter 4: Making Your First Scan 26
.
Page 27

5
Click Yes when the system asks to guide you.
6
Follow the steps described in the ScanWise Guide Me mode.
For more information consult the ScanWise Application Guide and the Agfa Contacts on your Agfa
ScanWise CD-ROM. After installation you can access these documents via the Start menu or via
the ScanWise icon on your desktop.
!
Note: If you encounter problems, please consult the ScanWise Read Me file on your computer
or Appendix A: Troubleshooting in this Owner’s Guide.
Chapter 4: Making Your First Scan 27
Page 28

Appendix A: Troubleshooting
This section gives solutions for some common problems you may come across when starting up or
using your SnapScan.
There is no USB port free for your scanner.
Check if you can use a USB port on the keyboard or monitor.
Use a USB hub.
The status indicator fails to light up.
Verify the power connection to the scanner.
If the power connection is working, contact your dealer or local Agfa support center.
The scanner makes an unusual noise and the scanner lamp does not move back and forth when you connect the scanner.
The scanner was not properly unlocked. Immediately disconnect the AC adapter and unlock
the scanner properly, or contact your dealer or local Agfa support center.
The scanner lamp flickers, dims, or fails to light up.
The cold cathode lamp of your scanner needs to be replaced. Contact your dealer or local
Agfa support center.
ScanWise cannot find the scanner
If the scanner driver cannot find the scanner, a message appears telling you that no scanner is
connected.
Check if the scanner is connected with the USB cable to your computer and that the AC
adapter is plugged in. It can always happen that a USB port is damaged, therefore try the other
USB port of your computer.
Open the Apple System Profiler that you find under the
Volumes’ (minimum version 8.5). Here you can check if the USB device is found. If USB is not
present in the list of ‘Devices and Volumes’, please check the hardware (cable, USB ports, ...).
Disconnect the AC adapter and reconnect it again.
Note: If you encounter other problems during or after installation, please consult the ScanWise
Read Me file on your computer.
The driver is not found when you connect the scanner to your computer
If ScanWise is not installed correctly, the following message appears: “The software needed to use
the device SnapScan e20 cannot be found”.
(MACINTOSH ONLY).
menu. Click the tab ‘Devices and
(MACINTOSH ONLY).
Re-install ScanWise.
Check if the Extensions folder contains the file ‘Agfa USB e20’. This driver is necessary for
detecting the scanner.
Appendix A: Troubleshooting 28
Page 29

Windows 98 fails to detect the scanner when you connect it for the first time (PC ONLY).
Check if the scanner is connected with the USB cable to your computer and that the AC
adapter is plugged in. It can always happen that a USB port is damaged, therefore try the other
USB port of your computer.
Check if the Device Manager finds the USB controller. To check if the USB controller is
present in the Device Manager, click with the right mouse button on the icon My Computer and
select Properties from the menu that pops up. Select the Device Manager tab from the System
Properties dialog box.
If the USB controller ( ) is present in the Device Manager, carry out the scanner
installation procedure exactly as described in this manual.
If the USB controller is not present in the Device Manager, carry out the following
instructions:
1 Restart your computer.
2 Enable the USB controller in the BIOS settings.
Caution: Changing your computer’s BIOS settings is at your own risk! It should be
done by system administrators and experienced users only. If you are not familiar
with these tasks, ask your computer dealer to do this for you.
You typically do this by pressing a key combination during the startup of your PC.
Consult your computer manual for more information.
3 Exit and save the changes you made.
Your computer is rebooted automatically.
Check again if the Universal serial bus controller is present in the Device Manager.
If the Universal serial bus controller ( ) is present in the Device Manager, carry out the
scanner installation procedure exactly as described in this manual.
If the Universal serial bus controller is still not present in the Device Manager, carry out
the following instructions:
1 Click the Start button.
2 Select Settings.
3 Select Control Panel.
4 Double-click on the Add New Hardware icon.
5 Attentively follow the instructions that appear on your screen.
The Universal Serial Bus controller should now be present in the Device Manager. Carry out the
scanner installation procedure exactly as described in this manual.
An OEM Windows 98 system was already installed when purchasing your computer (PC ONLY).
When you encounter problems during the installation procedure on a PC with a pre-installed
Windows 98 system, please contact your PC dealer.
Appendix A: Troubleshooting 29
Page 30

The e-mail function is not working (PC ONLY).
ScanWise PC uses the default MAPI (Microsoft Messaging API) client as e-mail destination. This
means you need a MAPI compatible e-mail client and it also has to be configured correctly. If
ScanWise cannot find such a destination, the e-mail destination will NOT be visible in the
destination list.
Examples of MAPI compatible clients: Microsoft Outlook and Outlook Express, Netscape
Messenger, Eudora Pro.
Example of a non MAPI compatible client: Compuserve for Windows.
Some configuration examples:
!
If you are using MS Outlook Express v4.x and it does not show up in the ScanWise destination
list, choose Options in the Tools menu in Outlook Express and make sure that the following
items are checked:
"
Make Outlook Express my default e-mail program.
"
Make Outlook Express my default Simple MAPI client.
This should solve the problem.
!
If you are using MS Outlook Express v5, choose Tools, General in the Tools menu in MS
Outlook Express. If Outlook is not the default e-mail client, click the ‘Make default’ button.
!
You can also choose Internet Options, Programs in the Control Panel and indicate your e-mail
client there.
Your problem is not solved.
For support issues, go to http://support.agfa.com or consult the Support file in the documentation
folder on the ScanWise CD-Rom.
Appendix A: Troubleshooting 30
Page 31

Appendix B: Technical Information
Technical specifications are subject to change without notice.
Scanner type:
- SnapScan e20 Desktop, flatbed, one pass
Maximum resolution:
- optical: 600 ppi horizontal x 1200 ppi vertical
- through interpolation: 9600 ppi horizontal x 9600 ppi vertical
- Internal sample depth: 12 bits for gray, 36 bits for color
Scanning speed:
- line-art: 5 ms / line
- gray: 5 ms / line
- color: 14 ms / line
Maximum scanning area
Lamp for reflective scanning:
AC-adapter:
- Input voltage:
- Input frequency:
Power consumption:
Dimensions:
- length: 423 mm (17.3 “)
- width: 273 mm (11.1 “)
- height: 70 mm (2.9 “)
- weight: 2.5 kg (5.5 lb)
Interface:
Transmission speed:
Environmental specifications:
- operating temperature: +10 °C to +40 °C (+50 to +104 degrees Fahrenheit)
216 x 297 mm (8.5 '' x 11.7 '')
Cold cathode
100 to 240 V
47 to 63 Hz
25 W
USB port
1 mbyte/s
- relative humidity: 20% to 85% RH
- surrounding space: 10 cm (4 “) on every side
Appendix B: Technical Information 31
Page 32

Appendix C: Regulation Compliance
Safety Regulations
UL Safety Statement
TÜV: Wichtige Sicherheitshinweise
Electromagnetic Compatibility
Federal Communications Commission Radio Frequency Interference Statement
Industry Canada Class A and B Label Requirements
Declaration of Conformity: SnapScan e20
Appendix C: Regulation Compliance 32
Page 33

Safety Regulations
SnapScan and its options are designed to comply with:
UL 1950
CSA C22.2 No. 950 - M89 D3
VDE 0805
IEC 950
GS approved
EN 60950
UL Safety Statement
The SnapScan and the AC adapter are suited for indoor use only. Do not use them outdoors.
Use the Agfa supplied AC adapter only, otherwise guarantee will be voided.
For the reason of safety, besides the personal maintenance mentioned in this operation manual, do
not try to remove any mechanical parts or any electronic devices. If your scanner needs service, our
dealer and service offices are available to help you.
TÜV: Wichtige Sicherheitshinweise
Bitte Lesen Sie sich diese Hinweise sorgfältig durch.
Um eine Beschädigung des Gerätes zu vermeiden sollten Sie nur Zuberhörteile verwenden, die
vom Hersteller zugelassen sind.
Das Gerät ist vor Feuchtigkeit zu schützen.
Bei der Aufstellung des Gerätes ist auf sicheren Stand zu achten. Ein Kippen oder Fallen könnte
Verletzungen hervorrufen. Verwenden Sie nur sichere Standorte und beachten Sie die
Aufstellhinweise des Herstellers.
Die Belüftungsöffnungen dienen zur Luftzirkulation die das Gerät vor Überhitzung schütz. Sorgen
Sie dafür, daß diese Öffnungen nicht abgedeckt werden.
Die Netzanschlußsteckdose muß aus Gründen der elektrischen Sicherheit einen
Schutzleiterkontakt haben.
Durch die Lüftungsöffnungen dürfen niemals Gegenstände oder Flüssigkeiten in das Gerät
gelangen. Dies könnte einen Brand bzw. elektrischen Schlag auslösen.
Öffnen Sie niemals das Gerät. Das Gerät darf aus Gründen der elektrischen Sicherheit nur von
authorisiertem Servicepersonal geöffnet werden.
Die Steck dose sollte nahe dem Gerät und leicht zugänglich sein.
Appendix C: Regulation Compliance 33
Page 34

Electromagnetic Compatibility
SnapScan is designed to comply with:
Emission EN55022, class B
Immunity IEC 801-2, IEC 801-3, IEC 801-4
47 CFR, part 15, subpart B, class B
Federal Communications Commission Radio Frequency Interference Statement
This equipment has been tested and found to comply with the limits for a Class B digital device,
pursuant to Part 15 of the FCC Rules. These limits are designed to provide reasonable protection
against harmful interference when the equipment is operated in a residential installation. This
equipment generates, uses, and can radiate radio frequency energy and, if not installed and used in
accordance with the instruction manual, may cause harmful interference to radio communications.
However, there is no guarantee that interference will not occur in a particular installation. If this
equipment does cause harmful interference to radio or television reception, which can be
determined by turning the equipment off and on, the user is encouraged to try to correct the
interference by one or more of the following measures:
Reorient or relocate the receiving antenna.
Increase the separation between the equipment and receiver.
Connect the equipment into an outlet on a circuit different from that to which the receiver is
connected.
Consult the dealer or an experienced radio/television technician for help.
Industry Canada Class A and B Label Requirements
This Class [select A or B] digital apparatus meets all the requirements of the Canadian Interference
Causing Equipment Regulations.
Cet appareil numérique de la classe [A/B] respecte toutes les exigences du Règlement sur le
matériel brouilleur du Canada.
Appendix C: Regulation Compliance 34
Page 35

Declaration of Conformity: SnapScan e20
Manufacter’s authorized:
Johan Berlaen
Agfa-Gevaert N.V.
Septestraat 27
B-2640 Mortsel
Declares that the product
Agfa SnapScan e20
Color image scanner
Complies with the requirements of the Low Voltage Directive 73/23/EEC, 93/68/EEC
The product SnapScan e20 complies with the following standards:
EN 60950: 1992/A1: 1993
Complies with the requirements of the EMC directive 89/336/EEC
The product SnapScan e20 complies with the following standards:
EN 55022 class B
EN 50082 – 1 -,
IEC 801-2, IEC 801-3, IEC 801-4
Johan Berlaen
Site manager EPS Mortsel
Agfa-Gevaert N.V.
Appendix C: Regulation Compliance 35
 Loading...