

Page 1

Add-on for Microsoft
Flight Simulator
And FS2004!
Piper PA-31T
Manual
Page 2

Piper PA-31T Cheyenne X
Development: Digital Aviation
Graphics & models: Tobias Ahlbrecht
Flight Models: Alexander M. Metzger
Sounds: Dr. Achim Bürger
Programming, Gauges: Hans Hartmann
Project Management: Hans Hartmann
Manual, documentation: Martin Georg
Installer: Andreas Mügge
Copyright: © 2007 / Aerosoft GmbH
Airport Paderborn/Lippstadt
D-33142 Büren, Germany
Tel: +49 (0) 29 55 / 76 03-10
Fax: +49 (0) 29 55 / 76 03-33
E-Mail: info@aerosoft.de
Internet: www.aerosoft.de
www.aerosoft.com
All trademarks and brand names are trademarks or
registered trademarks of their respective owners.
All rights reserved.
Aerosoft GmbH 2007
2 3
Page 3

Piper PA-31T
Cheyenne X
Manual
Add-on for
Microsoft Flight Simulator X
Page 4

Piper PA-31T Cheyenne X
Content
Introduction ......................................................................6
Configuration ....................................................................8
Saving your settings ........................................................... 9
Options ................................................................................ 9
Weight and Balance ......................................................... 10
Sounds volume ................................................................. 11
Basics of operation .........................................................12
Panel operation ................................................................ 12
Aircraft model operation ................................................. 14
Frequently asked questions (FAQ) ................................15
General Data ...................................................................17
Abbrevations and Terminology ....................................... 19
Instrument panels ..........................................................24
Views ................................................................................. 24
Panel navigation by clickspots ........................................ 28
Overview ........................................................................... 30
Primary Instruments - Pilot panel .................................... 37
Engine instruments .......................................................... 43
Secondary instruments - Pilot panel ............................... 44
Cockpit Instruments - Copilot panel ................................ 47
Environmental Controls - Copilot .................................... 52
Aerosoft GmbH 2007
4 5
Page 5

Automated flight ............................................................56
Cheyenne I & IA -
Bendix-King KFC250 Autopilot & Flight Director ....... 56
KFC250 Autopilot Operation Modes ........................ 60
Cheyenne II & IIXL -
Bendix-King KFC300 Autopilot & Flight Director ....... 68
Additional KFC300 Autopilot Operation Modes ........ 69
Bendix-King Avionics Paket (Radios) ............................71
KMA 28 Audio Panel Operation ...............................72
KY 196A COM1/COM2 ............................................ 73
KY 53 TSO´d Navigation Receiver Operation ............. 76
KR 87 ADF Receiver Operation .................................77
KT 76C Panel-mounted Transponder Operation ........ 80
Trimble 2000 Approach Plus GPS ...................................83
Introduction ...................................................................... 83
User Interface .................................................................... 84
Pressurization system ....................................................89
Dukes Pressurization Controller (Cheyenne I & IA)Garret
Pressurization Controller (Cheyenne II & IIXL) ................ 89
TCAS (with digital VSI only) ...........................................92
Flight Tutorial ..................................................................95
Introduction ............................................................. 95
Flight controls and control feedback ......................... 95
Engine start-up ........................................................ 96
Taxi to the runway .................................................... 96
Powerback (in emergency situations only) ................ 97
Take off .................................................................... 98
Climb ....................................................................... 99
Cruise ....................................................................100
Descent .................................................................. 100
Landing .................................................................. 101
Page 6

Piper PA-31T Cheyenne X
Introduction
Thank you for purchasing the Piper Cheyenne by Digital Aviation and
Aerosoft. We hope that you will have as much fun with it as we had
while creating it. For many years, the Cheyenne series of business
aircraft was one of the most successful for Piper. It started in the mid
sixties, when Piper decided to redesign its pressurized model „Navajo”
to accommodate propeller turbines as propulsion. On August 29th
1969 the prototype took off for his maiden flight, but it took almost
another five years until the first production aircraft went into service.
The control surfaces and flight controls had to be reworked several
times, because the higher speeds were a strain to the cell. Furthermore, a flooding of Pipers production facility in Lock Haven delayed
deliveries.
On October 22nd 1973, the maiden flight of the first production
aircraft Piper Cheyenne PA31T took place – powered by two
Pratt&Whitney PT6A-28s engines, developing 620hp each. When
Piper expanded the family in 1978 with a decreased variant (PT6A-11,
500hp), they renamed the initial aircraft in „Cheyenne II” and the new
variant became “Cheyenne I”. Improvements like more power, redesigned
cowlings and a new interior lead to the „Cheyenne IA”. In addition
to that, Piper stretched the Cheyenne II and built in a fourth cabin
window. Equipped with PT6A-135s (750hp) engines and an increased
MTOW by 180kg/400lb – this variant became the „Cheyenne IIXL”. In
total, 823 Cheyennes had been built, 526 Cheyenne and Cheyenne II,
215 Cheyenne I and IA, and 82 IIXL, when the production was discontinued in the mid eighties. Even twenty years later, the PA31T models
have an excellent reputation for being spacious, uncomplicated and
reliable aircraft and therefore enjoy great popularity.
Our add-on features all four mentioned variants, each in three liveries
from different countries. All models possess a highly detailed 2D-panel
with various view options, a completely functional 3D cockpit with virtual cabin, two different sound sets and of course a true to the original
model with many ground objects, like Ground Power Unit, towing
equipment, chock blocks and pylons.
Aerosoft GmbH 2007
6 7
Page 7

The instrumentation is an exact rendition of its real counterparts,
based on the „Silver Crown Plus” avionics suite by Bendix-King. Autopilot is either the KFC250 or the KFC300 by Bendix-King, depending
on the model you choose. The pressurization controllers are models by
Dukes and Garret. A configuration program is provided to help with
individual settings.
And now we wish you many pleasant hours with our Piper Cheyenne
Add-On for the Microsoft Flight Simulator.
Page 8

Piper PA-31T Cheyenne X
Configuration
The Piper Cheyenne can be fully configured using the supplied configuration manager. The configuration manager is opened from inside
the aircraft by using the key combination SHIFT-7:
Aerosoft GmbH 2007
8 9
Page 9

Saving your settings
Your configuration settings may be either saved to disk using the
SAVE button (3) or applied to the currently loaded aircraft only, using
the button EXIT (4). When using the SAVE option, the aircraft CFG
file of the selected aircraft will be also updated, to pertain the changes
for the next time you start Microsoft Flight Simulator. Using the button
DEFAULT all configuration options are reverted to their default values,
while RANDOM (2) creates a random aircraft loading.
Options
The OPTIONS section in the upper left part of the configuration manager offers some advanced configuration options:
5: Cold and Dark
Loads the aircraft in a „cold & dark” configuration next time. All
systems are off, and you may work through the complete startup
procedure.
6: Show yoke in VC
Selecting this option displays the yoke in the virtual cockpit also.
You may want to deselect this option to get easier access to some
switches near the yoke.
7: Show analogue VSI (no TCAS)
Selecting this option displays an analogue vertical speed indicator
instead of the default digital one. In this case no TCAS is available.
8: Show HSI 3D objects in VC
Deselecting this option displays the HSI as a 2D object instead of a
3D object in the virtual cockpit. This may increase performance on
low-end systems. Also, it may be necessary when adding a thirdparty HSI instead of the supllied one.
Page 10

Piper PA-31T Cheyenne X
9: Show Radar 3D objects in VC
Deselecting this option displays the radar as a 2D object instead of
a 3D object in the virtual cockpit. This is necessary if you want to
add a third-party weather radar at this place.
10: „Active Noise Reduction” (ANR) Sound Set
When using the ANR sound set, the internal engine sound is
greatly muffled, as the pilot would hear it while wearing Active
Noise Reduction (ANR) headphones. Almost all pilots wear these
or similar headphones today in order to protect their hearing and
ease communication over the radios. It is very rare to see these
aircraft flown without the pilot and passengers wearing headphones.
Note: After changing the sound set the aircraft needs to be
manually reloaded.
Weight and Balance
The Weight and Balance section (11-13) offers the possibility to individually configure the loading and seating of the aircraft. The forward
and aft baggage compartments may be loaded in steps of 10 lbs., and
different crew members and passengers may be placed in any available
seat:
Children: 60 lbs.
Women: 135 lbs.
Men: 170 lbs.
Aerosoft GmbH 2007
10 11
Page 11

Please note that for the pilot and copilot seats, only men or women
may be selected.
A detailed weights listing (18) is displayed just below the load editor.
If the loading is within limits, the TOTAL WEIGHT value is displayed in
green. Overweights are displayed in red.
Sounds volume
Four sliders are available to individually configure different portions of
the sound set:
14: Ambient sounds volume
Adjusts the volume level for click sounds and other background
noises.
15: Avionics sounds volume
Sets the volume level for aural alerts and warnings.
16: Engines sounds volume
Configures the volume level of the engine startup.
17: TCAS (Kollisionswarngerät)
Adjusts the volume level for the TCAS TA and RA sounds.
Page 12

Piper PA-31T Cheyenne X
Basics of operation
Panel operation
Microsoft Flight Simulator traditionally depends heavily upon mouse
actions to operate buttons, switches and knobs. Sometimes, click
spots may not be 100% intuitive, or the result of your action may
depend upon clicking with the left or right mouse button at the correct
location. When familiarizing yourself with the panel, it is suggested
that you turn on „tool tips”. These tips will then appear when you
hold your cursor over the various click spots, and the tips will describe
what each click spot is for. Tool tips can be activated under the FS
menu under Options / Settings / General.
The Piper Cheyenne uses a consistent, standardized approach to
operate the different controls in the aircraft panels. Following is an
overview about these methods to interact with the controls in the 2D
and 3D panels:
Push buttons: Left or right-click to operate these buttons on/off.
Guarded buttons: Guarded buttons require two steps: First, right-click
to open or close the guard covering the control. Second, left-click to
operate the button underneath. The cursor will show a solid hand.
Aerosoft GmbH 2007
12 13
Page 13
Multi-position switches: Multi-position switches have more than one
position, and may be turned left/down or up/right. Left-click to move
the switch to the left or down, and right-click of right/up movement.
Note: You can always use your mouse wheel to operate a multiposition switch.
Knobs with one level: Knobs are rotated left/right, or may be rotated
completely around. Left-click to rotate the knob to the left, and rightclick to rotate the knob to the right anywhere in the click spot. The
cursor will be an unfilled hand.
Some knobs also allow rotating them in larger steps. One example is
the heading bug, which may be rotated in steps of 1 or 10 degrees
left or right. In this case the cursor changes to a hand with „+” or
„-” in it. When the cursor shows a „-”, the knob will rotate to the
left, while a „+” will rotate it to the right. Left-clicks will rotate in low
increments, while right-clicks will rotate in high increments.
Page 14

Piper PA-31T Cheyenne X
Knobs with two levels: Some instruments contain knobs with an inner
and an outer ring. In this case, the click area is further divided into a
left and a right part. Clicks in the left half of the click spot rotate the
outer knob, while the right half adjusts the inner knob. Note that the
operation rules for one-level knobs still apply.
Note: You can always use your mouse wheel to rotate a knob.
Aircraft model operation
Several hotkeys are available to operate animated parts of the external
model and the virtual cabin. Plase note that you need to assign keystrokes to some of these functions in order to execute the animation.
Keystrokes can be assigned via the „Assignments” menu option in the
OPTIONS => ASSIGNMENTS menu in MS Flight Simulator.
Main passenger door: SHIFT-E (Standard key for doors in Flight Simulator)
Front baggage door: Wings fold/unfold
Aft baggage door: UMSCHALT-E-3
Tische in der Kabine: Tail hook extend/retract
Desks in virtual cabin: Click on a desk to fold/unfold it.
External objects: Chocks, external power unit, tow bar etc. will
appear when the following conditions are met:
• parking brake set
• Prop controls: STOP
• Engines OFF
Aerosoft GmbH 2007
14 15
Page 15

Frequently asked questions (FAQ)
VOR/GPS Switch operation:
As soon as the NAV1 radio is tuned to a valid ILS frequency, the VOR/
GPS switch changes to VOR and the autopilot to NAV ARM mode. If
a valid ILS frequency is in range, the autopilot will follow it´s localizer
beam. Valid ILS frequencies are between 108.10 and 111.95 and the
decimal part starts with an odd digit: 108.10, 108.15, 108.30, 108.35,
108.50, ..., 108.95, 109.10, 109.15, ..., 111.95.
Engine Start
You need to follow the engine start procedure as described (see PDF
on your CDROM). CTRL-E will not work.
Panel and cabin lights (virtual cabin)
Due to limitations in Microsoft Flight Simulator, the panel instruments
light and the virtual cabin light are tied together. They can´t be operated
independently.
Autopilot and flight director operation
Activation of the autopilot requires the flight director to be active.
Always check that you have turned on the flight director before activating the autopilot.
Trimble GPS airports, navaids and waypoints selection
Display of available airports, navaids and waypoints in the GPS is restricted to a 2000nm radius around your aircraft position.
Trimble GPS keyboard entry mode
If keyboard commands don´t seem to work at all, make sure SCROLL
LOCK is switched off, because all keyboard inputs will be intercepted
by the GPS as long as SCROLL LOCK IS ON.
Page 16

Piper PA-31T Cheyenne X
Cold & Dark state
After loading in cold & dark state, wait some time for all engine instruments to show zero before you begin any startup procedures. We
strongly suggest loading the Cheyenne from the default „Trike over
Friday Harbour” situation every time!
Aerosoft GmbH 2007
16 17
Page 17

General Data
Power plants
Cheyenne I Cheyenne IA Cheyenne II
Number of
engines
Manufacturer
Model number PT6A-11s PT6A-28s PT6A-135s
Rated
Horsepower
Propeller Speed 2200 rpm 2200 rpm 1900 rpm
Dry weight 317 lbs. 323 lbs.
Pratt & Whitney (UACL)
500 PS
2
Cheyenne IIXL
620 PS
Propeller
Cheyenne I Cheyenne IA Cheyenne II
Number of
propellers
Manufacturer Hartzell
Blade Model T-10173-B-8 T-10173-K-8 T-10173-HB-8
Number of
Blades
Diameter (Inch) 93 inch
Propeller Type
Hydraulically operated, constant speed, full feathering, reversible
2
T-10173-B-8
3
Cheyenne IIXL
T-10178-B-8R
Page 18

Piper PA-31T Cheyenne X
Fuel
Cheyenne I Cheyenne IA Cheyenne II
Capacity without
tip tanks
with tip tanks 374 gal.
Usable fuel
without tip tanks
with Tip Tanks 366 gal.
Fuel grade Jet A
308 gal.
300 gal.
Cheyenne IIXL
Weights
Cheyenne I Cheyenne IA Cheyenne II
Ramp Weight 8750 lbs. 9050 lbs. 9540 lbs.
Standard Empty
Weight
Maximum
Useful Load
Max. Takoff
Weight
Max. Landing
Weight
Max. Zero Fuel
Weight
Max. Weight in
forward baggage
compartment
Max. Weight
in aft baggage
compartment
5110 lbs. 4976 lbs. 5874 lbs.
3640 lbs. 4074 lbs. 4053 lbs.
8700 lbs. 9000 lbs. 9474 lbs.
8700 lbs.
7200 lbs. 7600 lbs.
300 lbs.
200 lbs.
Cheyenne IIXL
9000 lbs.
Aerosoft GmbH 2007
18 19
Page 19

Abbrevations and Terminology
(a) General Airspeed Terminology
CAS Calibrated Airspeed means the indicated speed of an aircraft,
corrected for position and instrument error. Calibrated Airspeed is equal to true airspeed in standard atmosphere at sea
level.
KCAS Calibrated Airspeed expressed in „Knots“.
GS Ground Speed is the speed of an airplane relative to the
ground.
IAS Indicated Airspeed is the speed of an aircraft as shown on
the airspeed indicator when corrected for instrument error.
IAS values published in this manual assume zero instrument
error.
KIAS Indicated Airspeed, expressed in „Knots“.
M Mach Speed (Mach Number) is the ratio of true airspeed to
the speed of sound.
TAS True Airspeed is the airspeed of an airplane relative to undis-
turbed air which is the CAS corrected for altitude, temperature and compressibility.
VA Maneuvering Speed is the maximum speed at which applica-
tion of full available aerodynamic control will not overstress
the airplane.
VFE Maximum Flap Extended Speed is the highest speed permis-
sible with wing flaps in a prescribed, extended position.
VLE Maximum Landing Gear Extended Speedis the maximum
speed at which an aircraft can be safely flown with the landing gear extended.
Page 20

Piper PA-31T Cheyenne X
VLO Maximum Landing Gear Operating Speed is the maximum
speed at which the landing gear can be safely extended or
retracted.
V
Air Minimum Control Speed is the minimum flight speed at
MCA
which the airplane is directionally controllable as determined
in accordance with Federal Aviation Regulations.
V
Maximum Operating Speed is the speed limit that may not
MO/MMO
be deliberately exceeded in normal flight operations. V is
expressed in Knots and M in mach number.
VNO Maximum Structural Cruising Speed is the speed that should
not be exceeded except in smooth air and then only with
caution.
VS Stall Speed or the minimum steady flight speed at which the
airplane is controllable.
VSO Stall Speed or the minimum steady flight speed at which the
airplane is controllable in landing configuration.
VSSE Intentional One Engine Inoperative Speed is the minimum
speed selected by the manufacturer for intentionally rendering one engine inoperative in flight for pilot training.
VX Best Angle of Climb Speed is the airspeed which delivers the
greatest gain of altitude in the shortest possible horizontal
distance..
VY Best Rate of Climb Speed is the airspeed which delivers the
greatest gain in altitude in the shortest possible time.
Aerosoft GmbH 2007
20 21
Page 21

(b) Meteorological Terminology
ISA International Standard Atmosphere in which:
(1) The air is a dry perfect gas;
(2) The temperature at sea level is 15°C (59°F)
(3) The pressure at sea level is 29.92 inches (1013.2 mb).
(4) The temperature gradient from sea level to the altitude
at which the temperature is -56.5°C (-69.7°F) is -0.00198°C
(-0.003564°F) per foot and zero above that altitude.
OAT Outside Air Temperature is the free air static temperature
obtained either from in flight temperature indications or
ground meteorological sources, adjusted for instrument error
and compressibility effects.
IPA Indicated Pressure Altitude is the number actually read from
an altimeter when the barometric subscale has been set to
29.92 inches of mercury (1013.2 millibars).
SP Station Pressure is the actual atmospheric pressure at field
elevation.
Wind The wind velocities recorded as variables on the charts of this
manual are to be understood as the headwind or tailwind
components of the reported winds.
(c) Power Terminology
Takeoff Power Maximum power permissible during takeoff.
Maximum Con- Maximum power permissible continuously during takeoff,
tinuous Power one engine inoperative and emergency operations only.
Maximum Maximum power permissible during climb (Maximum
Climb Power normal operating power).
Maximum Maximum power permissible during cruise (Maximum
Cruise Power normal operating power).
Maximum Nor- Maximum power permissible continuously during all
mal Operating normal operations.
Power
Page 22

Piper PA-31T Cheyenne X
(d) Engine Controls and Instruments
Power Control The lever which modulates engine power from reverse
Lever thrust through takeoff power.
Propeller The lever which requests a propeller governor to maintain
Control Lever propeller rpm at a selected value or feathers a propeller.
Condition The lever which controls fuel flow to an engine.
Lever
Beta Range The region where the propeller blade angle is between
the fine pitch stop and the maximum reverse pitch
setting.
ITT Gauge Inter-Turbine Temperature Gauge - indicates temperature
immediately upstream of the free turbine vanes.
Propeller RPM Indicates propeller speed in rpm.
Engine Indicates shaft output torque in lb-ft.
Torquemeter
(e) Airplane performance and Flight Planning
Terminology
Climb Gradient The demonstrated ratio of the change in height during
a portion of a climb, to the horizontal distance traversed
in the same time interval.
Demonstrated The demonstrated crosswind velocity is the velocity of the
Crosswind crosswind component for which adequate control of the
Velocity airplane during takeoff and landing was actually
demonstrated during certification tests.
Accelerate- The distance required to accelerate an airplane to a
STOP Distance specific speed and, assuming failure of an engine at
the instant of that speed is attained, to bring the
airplane to a stop.
MEA Minimum en route IFR altitude.
Aerosoft GmbH 2007
22 23
Page 23

Route Segment A part of a route. Each end of that part is identified by
(1) a geographical location or
(2) a point at which a definite radio fix can be established.
(f) Weight and Balance Terminology
Usable Fuel Fuel available for flight planning.
Unusable Fuel Fuel remaining after a run out test has been completed
in accordance with governmental regulations.
Standard Empty Weight of a standard airplane including unusable fuel,
Weight full operating fluids and full oil.
Basic Empty Standard empty weight plus operational equipment.
Weight
Payload Weight of occupants, cargo and baggage.
Useful Load Difference between takeoff weight, or ramp weight if
applicable, and basic empty weight.
Page 24

Piper PA-31T Cheyenne X
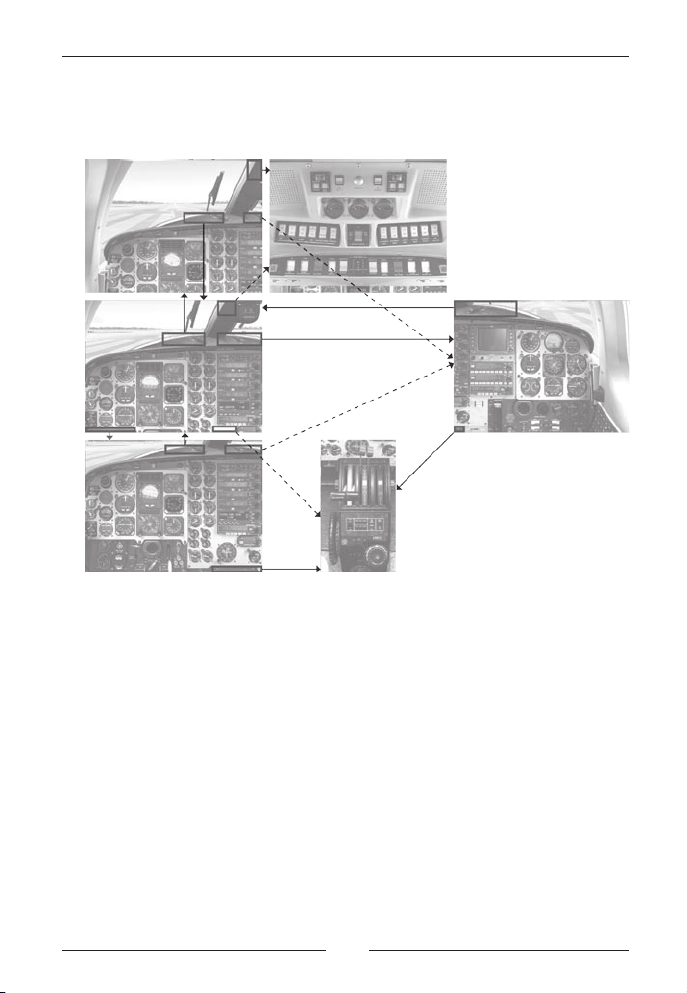
Instrument panels
The Piper Cheyenne offers two ways to access the cockpit: A classic
2D cockpit view, and a 3D virtual cockpit view. By default, Microsoft
Flightsimulator X will load the aircraft in 3D virtual cockpit view.
In classic 2D panel view, 5 different instrument panels are provided:
Normal view, approach view, landing view, IFR view, VFR view and
copilot view. In addition, Microsoft Flightsimulator X provides a Minipanel view and a view mode where no panel is displayed. Cycling
through this view is achieved using the W (forward) and SHIFT-W
(backward) keys. Please note that it is not possible to use a joystick´s
coolie hat to access the panel views in 2D mode.
Views
Normal view:
Aerosoft GmbH 2007
24 25
Page 25

IFR view:
Page 26

Piper PA-31T Cheyenne X
Approach/Landing view:
Aerosoft GmbH 2007
26 27
Page 27

VFR view:
From the 2D cocpit, several sub-panels or view options may be selected by hidden clickspots and hotkeys. In summary, the following views
and sub-panels are available:
• Normal view - Captain • Normal view - Copilot
• IFR view - Captain • ADI/HSI zoomed - Captain
• Landing view - Captain • Yoke visible
• VFR view - Captain • Fuel selectors
• Overhead-Panel • Kneeboard
• Center pedestal • Map view
• Radios • Microsoft ATC window
Page 28
Piper PA-31T Cheyenne X
Panel navigation by clickspots
In addition to these clickspots, panel view may also be selected by
hotkeys:
SHIFT-2: Overhead panel
•
SHIFT-3: Center pedestal
•
SHIFT-4: Fuel crossfeed panel
•
SHIFT-5: ADI/HSI zoom
•
SHIFT-6: Right radio stack
•
SHIFT-7: Configuration screen
•
SHIFT-8: Autopilot zoom
•
SHIFT-9: VOR2 & Alt preselect
•
Sub-panels can be closed by clicking in the upper-right corner of the
background bitmap.
Aerosoft GmbH 2007
28 29
Page 29

The following additional hidden clickspots are available:
ADI: Zooms the ADI and HSI
•
Trimble GPS glass display: opens the map view window
•
Area between radio stack and Glareshield: Displays the
•
right radio stack
Registration plate: Opens the kneeboard
•
Fuel Flow gauges: Fuel selector window
•
Microphone (Copilot view): Microsoft Flight Simulator ATC
•
window
Yoke shaft: Displays or hides the yoke
•
Altitude preselector: Display the NAV2 gauge
•
Page 30

Piper PA-31T Cheyenne X
Overview
Pilot Panel
1: Attitude Direction Indicator 15: Engine Torque
2: Horizontal Situation Indicator 16: ITT Gauge
3: Altimeter 17: Propeller RPM
4: Vertical Speed Indicator & TCAS 18: Gas Generator RPM
5: Radar Altimeter 19: Fuel Flow
6: True Airspeed Indicator 20: Fuel Pressure
7: Turn & Bank Indicator 21: Oil Pressure
8: KNI 582 RMI 22: Oil Temperature
9: OAT Indicator 23: KMA 28 Audio Panel
10: Clock 24: KY 196A COM1/2 Radios
11: Cabin Pressure Test Switch 25: KN 53 NAV1/2 Radios
12: Gyro Pressure 26: Trimble 2000 GPS
13: Pneumatic Pressure 27: KR 87 ADF Radio 1
14: Inverter & Bus Tie Switches 28: KAS 297 Altitude Preselector
Aerosoft GmbH 2007
30 31
Page 31

29: KM551 VOR Indicator 37: KAP 285 Mode Annunciator
30: Flap Control & Position 38: Master Caution Light
31: Pressurization Controller 39: Nav/GPS Switch
32: H.T.G. Switches 40: Annunciator Display
33: Parking Brake 41: Annunciator Test Switch
34: Yoke shaft (click toggles yoke) 42: SAS system (Cheyenne II only)
35: Gear Lever & Indicators 43: Propeller Synchronizer
36: Oxygen Control
Page 32

Piper PA-31T Cheyenne X
Overhead-Panel (Cheyenne I, IA and II)
1: Left gyro controls 17: Pitot Heat Switches
2: Right gyro controls 18: Surface Deice Switch
3: Left Generator Ammeter 19: Tail Floodlights Switch
4: Voltmeter 20: Fire Extinguishers
5: Right Generator Ammeter 21: Deicing System Switches
6: Seat Belts Switch 22: Oil Cooler Door Switches
7: Dome Light 23: Fuel Pump Switches
8: No Smoking Switch 24: Ignition Switches
9: Exit Lights Switch 25: Engine Starters and Generators
10: Wing Lights Switch 26: Panel Light Switches
11: Landing Lights Switch 27: Map Light Switches
12: Taxi Lights Switch
13: Anti-Collision Lights Switch
14: Position Lights Switch auxiliary power unit (APU)
15: Battery Master Switch 29: Starter Disengage Buttons
16: Windshield Heat Switches (Cheyenne IA only)
28: ELT Switch. Connect or disconnect
external power from the external/
Aerosoft GmbH 2007
32 33
Page 33

Overhead-Panel (Cheyenne IIXL)
1: Left gyro controls 16: Windshield Heat Switches
2: Right gyro controls 17: Pitot Heat Switches
3: Left Generator Ammeter 18: Surface Deice Switch
4: Voltmeter 19: Tail Floodlights Switch
5: Right Generator Ammeter 20: Fire Extinguishers
6: Seat Belts Switch 21: Deicing System Switches
7: Dome Light 22: Oil Cooler Door Switches
8: No Smoking Switch 23: Bleed Air Switches
9: Exit Lights Switch 24: Fuel Pump Switches
10: Wing Lights Switch 25: Ignition Switches
11: Landing Lights Switch
12: Taxi Lights Switch 27: Panel Light Switches
13: Anti-Collision Lights Switch 28: Map Light Switches
14: Position Lights Switch 29: ELT Switch. Connect or
15: Battery Master Switch disconnect external power
from the external/auxiliary
power unit (APU)
26: Engine Starters and Generators
Page 34

Piper PA-31T Cheyenne X
Copilot
1: KMA 28 Audio Panel 18: Flaps Position Selector
2: KY 196A COM1 Radio 19: Windshield Wiper Control
3: KY 196A COM2 Radio 20: Cabin Comfort Panel
4: KN 53 NAV1 Radio 21: Oxygen Supply Gauge
5: KN 53 NAV2 Radio 22: Defroster
6: Trimble 2000 GPS 23: Copilot ADI
7: KR 87 ADF1 24: Copilot HSI
8: KAS 297 Altitude Preselector 25: Copilot RMI
9: Flap Control & Position 26: Copilot Clock
10: Avionic control panel 27: Copilot Altimeter
11: KT 76C Transponder 1 & 2 28: Copilot VSI
12: KR 87 ADF2 29: Fuel totalizer
13: Ground Clearance Switch 30: WXR2100 Wetterradar
14: Static Pressure Source 31: Yoke Führung (Klick für Yoke)
15: True Airspeed Indicator
16: Turn and Bank Indicator
17: Fuel Totalizer
Aerosoft GmbH 2007
34 35
Page 35

Center Pedestal
Cheyenne I/IA Cheyenne II/IIXL
1: Power Levers 1: Power Levers
2: Propeller Levers 2: Propeller Levers
3: Condition Levers 3: Condition Levers
4: KC 290/291 Autopilot and (IIXL only: Low Idle and High
Yaw Mode Controller Idle positions)
5: Elevator Trim Wheel 4: KMC 340 Autopilot and Yaw
6: Rudder Trim Wheel Mode Controller
7: Aileron Trim Wheel 5: Elevator Trim Wheel
6: Rudder Trim Wheel
7: Aileron Trim Wheel
Page 36

Piper PA-31T Cheyenne X
Yoke and Fuel crossfeed windows
Control yokes
Two different models of yokes are installed in
the Piper Cheyenne. The Cheyenne IA and IIXL
are equipped with variant (1), while the Cheyenne I and II use variant (2). I und II enthalten
Variante (2).
3: Elevator trim up/down
4: Autopilot disconnect
5: Toggle Microsoft ATC window
6: Flight director pitch synch button Synchro-
nizes the flight director with the current pitch.
This switch is normally used before the autopilot is engaged, to synchronize the autopilot
pitch mode with the aircraft´s actual pitch
attitude.
Fuel crossfeed window
This sub-panel is located between the pilot
seats and contains the fire wall shut-off valves
for both engines, and a fuel crossfeed selector.
The fire wall shut-off valves are mechanical
valves which will cut off fuel flow from the
respective tank to the engine. The fuel crossfeed
valve opens a connection between the left
and the right wing tank, should feeding fuel
from one tank to the other become necessary.
To crossfeed fuel from one tank to the other
engine, close the fire wall shut-off valve for the
inoperative engine, and open the crossfeed
valve.
1: Fuel crossfeed panel, Cheyenne I, IA and II
2: Fuel crossfeed panel, Cheyenne IIXL
3: Fuel crossfeed selector
4: Left fire wall shut-off valve
5: Right fire wall shut-off valve
Aerosoft GmbH 2007
36 37
Page 37

Primary Instruments - Pilot panel
KCI 310 Attitude Direction Indicator (ADI)
1: Attitude Indicator
2: Flight Director
3: Glidepath Indicator
4: Localizer signal indicator
5: Decision Height Indicator
6: RNAV Indicator: Illuminated when
„GPS“ is selected as the NAV source.
Requires a flight plan to be active in the
Trimble GPS.
7: ADI test, and light test button (with the
KFC300 autopilot only)
8: Slip/Skid Indicator
KPI 553A Horizontal Situation Indicator (HSI)
1: Course Deviation Indicator CDI
2: Glidepath Indicator
3: Heading pointer
4: NAV1/ADF1 pointer
5: OBS Selector Knob
6: Heading Selector Knob
7: NAV2/ADF Selector Switch
8: NAV/ADF Flag
9: DME Readout. DME source (DME1 /
hold / DME2) depends on the position of
the DME selector knob on the avionics
panel
10: Groundspeed and Time-to-Distance
readout for DME1 / hold / DME2 (see (9)).
Below 1000ft AGL, the readout changes
to radio altitude
11: To/From Indicator
Page 38

Piper PA-31T Cheyenne X
Altimeter
1: Altitude readout, numeric
2: Pressure in millibars (QNH)
3: Altimeter pressure in Inches
4: Barometric pressure setting knob
Hint: The „B“ key in Microsoft Flight Simu-
lator sets the altimeter to local pressure,
or standard pressure, depending on the
aircraft´s altitude. The transistion altitude
is defined as 18.000ft worldwide.
Vertical Speed Indicator (analogue)
1: Indicates climb or descend rate in ft/min
x 100
Aerosoft GmbH 2007
38 39
Page 39

Vertical Speed Indicator & TCAS Display
1: Indicates climb or descend rate in ft/min
x 100
2: Above/Level/Below selector. switches
display of TCAS targets between the areas
above the aircraft (up to 9.999ft above
and 2500ft below - „ABV“), at aircraft´s
level (2.500ft above and below „LVL“) and
below the aircraft (up to 2500ft above and
9.999ft below - „BLW“). Only modes ABV
and BLW are indicated on the display.
3: TCAS range selector. Switches between
6nm and 12nm TCASRange.
For a detailed reference about TCAS modes and operation, refer
to section TCAS (page 85).
Radar Altimeter
1: Indicates altitude above ground up to
2.000ft, in ft x 100
2: Decision Height Selector
3: Decision Height warning indicator
4: Test button
5: Failure Warning Flag - Warns for unreli-
able indication. This flag is displayed when
avionics power is not available.
Page 40

Piper PA-31T Cheyenne X
Airspeed Indicator (ASI)
1: Indicated Airspeed Indicator
2: Blue line: Best rate of climb speed - single
engine
3: Red Marker: Air minimum control speed
4: Green arc: Normal operating range
5: White arc: Flaps extend range
Pneumatic Turn & Slip Indicator
1: Turn indicator pointer
2: Slip indicator ball
The turn and slip indicator is actually two
instruments in one. The turn portion is a
pointer (1), attached to an air-driven gyro,
which indicates the airplane´s turning rate
in degrees per second. An indicated stan-
dard rate turn should show a turning rate
of 3° per second on the directional gyro.
The slip portion indicates gravitational and centrifugal forces acting on
the airplane. The slip indicator is a simple inclinometer comprised of a
ball contained in a sealed, liquid filled glass tube (2). In a skip or slip,
the rate of turn is too fast or too slow for the angle of bank and will
be indicated by the ball (2) moving from the center to the outside or
inside of the turn.
Aerosoft GmbH 2007
40 41
Page 41

RMI-30 Radio Magnetic Indicator
1: VOR1 / ADF1 indicator needle
2: VOR2 / ADF2 indicator needle
3: VOR1 / ADF1 selector switch
4: VOR2 / ADF2 selector switch
5: HDG Warning Flag: Indicates a failure of
the gyro compass. This usually results
from the inverter not powering the gyro.
Course and heading information are supplied to the RMI by the gyro compasses.
Inverter power is needed to operate the
SAS - Stability Augmentation System
(Cheyenne II only)
1: Stall Margin Indicator
A stability augmentation system (SAS) is
incorporated in the elevator control system
to improve the static longitudinal stability
of the airplane. Major components of
the SAS include an angleof-attack sensor
vane, a computer, servo actuator, and an
elevator down spring and cable assembly.
The angle-of-attack sensor vane, located
on the right side of the nose section,
transmits the airplane´s angle-of-attack to
the SAS computer.
Based on the input from the angle-of-attack sensor vane, the computer
sends a signal to the servo actuator, located in the aft fuselage of the
airplane, which is connected to the elevator control horn through the
elevator down spring and cable assembly. The servo actuator provides
variable elevator down spring tension improving the logitudinal stability
to allow more versatile loading.
Page 42

Piper PA-31T Cheyenne X
Also incorporated in the SAS is a stall margin indicator (1), which
receives its signal from the SAS computer. The indicator provides visual
input to the pilot of the ratio of present speed to stall speed for any
airplane configuration. The indicator dial is marked with five colorcoded zones: red (stall), red and black barber pole (stall warning),
yellow (slow), white (30% above stall) and green (speed greater than
30% above stall).
An additional function of the SAS computer is to provide aural warning to
the pilot, through a stall warning horn, of an impending stall condition.
Aerosoft GmbH 2007
42 43
Page 43

Engine instruments
1: Engine Torque (digital readout on Cheyenne
IIXL only)
Indicates the engine torque, calibrated in
foot-pounds x 100.
2: Engine ITT
Indicates the interstage turbine temperature,
calibrated in degrees centigrade x 100,
measured by probes between the compressor
turbine and power turbine.
3: Propeller RPM
Indicates propeller speed (Np), calibrated in
RPM x 100. The rotational speed of the
power turbine is lowered through the reduc tion gearbox which drives the propeller. With
an indicated propeller speed of 2200 RPM,
power turbine speed (Np) is around 33.000
RPM (all values for Cheyenne II, others may
vary).
4: Compressor Turbine RPM
Indicates compressor turbine speed (Ng),
calibrated in percent. With a 100% indication,
compressor turbine speed is 37.500 RPM. At
the maximum indication of 101.5%, compressor
turbine speed is 38.100 RPM (all values for
Cheyenne II, others may vary)
5: Fuel flow (lbs. per hour)
Indicates the rate of fuel flow to the engine
calibrated in hundreds of pounds per hour
6: Fuel pressure (PSI)
Indicates fuel boost pump pressure to the engine calibrated in PSI.
7: Oil pressure (PSI)
Indicates engine oil pressure, calibrated in PSI, transmitted from the
output of the oil pressure pump prior to the oil entring the engine
lubrication channels.
Page 44

Piper PA-31T Cheyenne X
8: Oil temperature
Indicates engine oil temperature, calibrated in degrees centigrade
transmitted from the output of the oil pressure pump prior to the
oil entring the engine lubrication channels.
Secondary instruments - Pilot panel
OAT Indicator
Shows the outside air temperature. Gauge
is scaled in both Celsius °C and Fahrenheit
°F.
Astrotech LC2 Clock & Timer
The Astrotech LC2 works as both a clock
and a timer. Per default it is configured for
24hrs display.
1: Display (4 digits)
2: SET - RST Button
3: Mode-Button
4: ST/SP - DT/AV Button
The Mode-Button (3) switches between the modes „Clock“ and
„Timer. Timer mode is indicated by a flag above the letters „Timer“. In
Timer mode the display (1) starts with minutes and seconds, switching
to hours and minutes when the first hour is complete. Pushing the
ST/SP button (4) stops and continues the timer function. Pushing RST
(2) after ST/SP (4) resets the Timer to 0.
Aerosoft GmbH 2007
44 45
Page 45

When operating in clock mode, the current date is displayed by
pushing the DT/AV button (4).
Gyro & Pneumatic Pressure
These gauges indicate the pressure in the
pneumatic and gyro systems. Both systems
are pressurized by bleed air from the engines.
Under normal conditions, pneumatic pressure should be 18psi, gyro pressure should
range between 4.2 und 6.2 inHg.
Inverter & Bus Tie Switches
1: Inverter 1/OFF/2 Selector
2: GYRO/INV Bus Tie Switch
Inverters convert 28V DC power from
the generators to 115/26 VAC 400Hz AC
power. The GYRO/INV Bus Tie Switch (2)
selects either the left or right Main Bus
as the power source for DC power. The
Inverter 1/OFF/2 Selector (1) selects either
Inverter 1 or 2 as active.
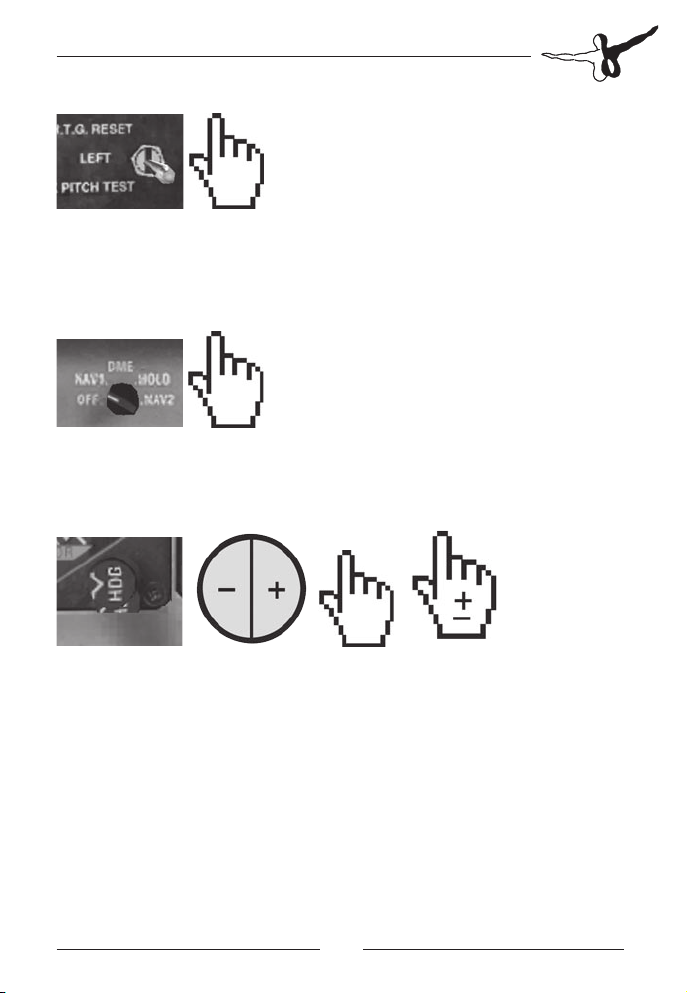
Left/Right HTG Test Switches
These two center-locking switches (1 and
2) are used to test the hydraulic topping
governors prior to flight. When operating
properly, with the propeller lever fully
forward and Np set at 1625 RPM (IIXL:
1450RPM), holding the appropriate switch
in the upper „H.T.G. RESET“ position will result in a 85 RPM reduction
in Np. Returning the switch to the center position will return the Np to
1625 RPM (IXL: 1450 RPM).
Page 46

Piper PA-31T Cheyenne X
Oxygen Control Knob
The oxygen control knob controls the cable-
operated manual shutoff valve. When pulled
out, oxygen is supplied to the cockpit and cabin
outlets. A 22 or 48 cubic foot oxygen supply bottle
is installed aft of the baggage compartment. The
oxygen system is designed to provide emergency
oxygen for the crew and passengers for flight at
altitudes above 10.000 feet.
Garret or Dukes Pressurization Controller
See section PRESSURIZATION (page 82) for
a detailed description of the cabin pressurization system and the operation of the
Garret or Dukes Pressurization Controller.
Aerosoft GmbH 2007
46 47
Page 47

Cockpit Instruments - Copilot panel
Attitude Direction Indicator
1: Caging knob
2: Instrument INOP flag
3: Attitude bars adjustment knob
The caging knob (1) locks the horizon in
a centered position to prevent damage to
the gyroscope in case of severe turbulences.
KI 525A Horizontal Situation Indicator (HSI)
1: OBS control knob
2: heading control knob
3: NAV warning flag
4: HDG warning flag
5: CDI - course deviation indicator needle
6: Heading bug
7: Glideslope Indicator
Page 48

Piper PA-31T Cheyenne X
RMI-30 Radio Magnetic Indicator
1: VOR1 / ADF1 indicator needle
2: VOR2 / ADF2 indicator needle
3: VOR1 / ADF1 selector
4: VOR2 / ADF2 selector
5: HDG Warning Flag: Indicates a failure of
the gyro compass. This usually results from
the inverter not powering the gyro.
Course and heading information are sup-
plied to the RMI by the gyro compasses.
Inverter power is needed to operate the
gyros (for proper operation check inverter
and bus tie switches).
Astrotech LC2 Clock & Timer
The Astrotech LC2 works as both a clock
and a timer. Per default it is configured for
24hrs display.
1: Display (4 digits)
2: SET - RST Button
3: Mode-Button
4: ST/SP - DT/AV Button
The Mode-Button (3) switches between the modes „Clock“ and
„Timer. Timer mode is indicated by a flag above the letters „Timer“. In
Timer mode the display (1) starts with minutes and seconds, switching
to hours and minutes when the first hour is complete. Pushing the ST/
SP button (4) stops and continues the timer function. Pushing RST (2)
after ST/SP (4) resets the Timer to 0. When operating in clock mode,
the current date is displayed by pushing the DT/AV button (4).
Aerosoft GmbH 2007
48 49
Page 49

Altimeter
1: Altitude indicator needle
2: Pressure in millibars (QNH)
3: Altimeter pressure in Inches
4: Barometric pressure setting knob
Hint: The „B“ key in Microsoft Flight Simu-
lator sets the altimeter to local pressure,
or standard pressure, depending on the
aircraft´s altitude. The transistion altitude
is defined as 18.000ft worldwide.
Vertical Speed Indicator (analogue)
1: VS needle, indicates climb/descend rate
in feet/min x 100.
Airspeed Indicator (ASI)
1: Indicated Airspeed Indicator
2: Red line: Air minimum control speed
3: Blue line: Best rate of climb speed
- single engine
4: Green arc: Normal operating range
5: White arc: Flaps extend range
Page 50

Piper PA-31T Cheyenne X
Pneumatic Turn & Slip Indicator
1: Turn indicator pointer
2: Slip indicator ball
The turn and slip indicator is actually two
instruments in one. The turn portion is a
pointer (1), attached to an air-driven gyro,
which indicates the airplane´s turning rate
in degrees per second. An indicated standard rate turn should show a turning rate
of 3° per second on the directional gyro.
The slip portion indicates gravitational and centrifugal forces acting on
the airplane. The slip indicator is a simple inclinometer comprised of a
ball contained in a sealed, liquid filled glass tube (2). In a skip or slip,
the rate of turn is too fast or too slow for the angle of bank and will
be indicated by the ball (2) moving from the center to the outside or
inside of the turn.
Fuel Quantity Gauge
1: Left fuel tank indicator
2: Right fuel tank indicator
Scale in lbs x 100.
Aerosoft GmbH 2007
50 51
Page 51

Flaps Position Indicator & Test Switch
1: Flaps position indicator needle
2: Test switch
3: Flaps position lever.
Flaps can be set to the following positions:
0°, 15°, 40°.
In the real aircraft, flaps are infinitely
variable between 0° and 40°. Unfortunately,
this cannot be simulated in MIcrosoft Flight
Simulator, and as this feature is not used
under normal circumstances, it isn´t simulated
in this package.
Ground Clearance Switch
Provides power to the audio panel, COM1 and
NAV1 receivers when pushed. Allows to receive
ATIS and an IFR clearance without the need to
power up the aircraft completely. Avionics Master
Switch and Battery Switch need to be set to OFF
for the Ground Clearance Switch to function
correctly. Ground clearance mode is deactivated
automatically when battery master or external
power are activated.
Static Pressure Source Switch
Abnormal readings of instruments supplied
with static air could indicate a restriction in the
outside static air ports. An alternate source
is provided to supply static air to the pilot´s
instruments from inside the nose section.
Selecting the ALTERNATE SOURCE position of the static pressure selector
valve, disconnects the pilot´s instruments from their normal source and
connects them to the alternate source.
Page 52

Piper PA-31T Cheyenne X
Environmental Controls - Copilot
Environmental Controls - Cheyenne I, IA and II
1: Windshield Wiper control knob 7: Dehumider Control switch
2: Heater Fuel Flow control switch 8: Oxygen Supply Pressure gauge
3: Environmental Control MODE switch 9: Fuel totalizer
4: Environmental Control MASTER switch
5: Cabin Temperature control knob 11: Yoke clickspot
6: Manual Mode switch
The cabin comfort control panel contains all the controls needed to
operate the heating, cooling and dehumidification system. The MASTER switch (4) controls the heater, air conditioner and cabin recirculating air blower. The MODE switch (3) is normally used in the AUTO
position, and the operator only needs to select the proper temperature
level with the knob marked TEMP (5). The MODE switch (3) MANUAL
position is for standby use in case of a malfunction of the automatic
mode only. When the MODE switch (3) is in MANUAL position, the
heater may be turned on or off as desired. For manual operation, the
MANUAL switch (6) should be placed in heater HTR position, and the
heater turned on or off by use of the HEATER FUEL (2) switch.
The DEHUMIDER switch (7) provides means to decrease humidity when
the MODE switch (3) is in the automatic position. The HEATER FUEL
toggle switch (2) controls the flow of fuel to the heater fuel pump. It
must be turned on for heater operation.
Aerosoft GmbH 2007
10: Defroster
52 53
Page 53

The air conditioning system can be operated either independently or
in conjunction with the heater, depending upon the mode selected
on the cabin comfort control panel. During normal operation, when
the MODE switch (3) is in the AUTO position, a thermostat, adjustable
by the TEMP knob (5), signals an electronic controller which turns on
the air conditioner until the cabin reaches the selected temperature.
When the MODE switch (3) is in MANUAL position, the air conditioner
may be turned on or off, as desired, by use of the MANUAL switch (6).
The air conditioner is on when the MANUAL switch (6) is in the A/C
position, and off when the switch is in the heater HTR position. For
manual operation of the air conditioner, the HEATER FUEL switch (2)
must be off.
Environmental Control System (ECS) - Cheyenne IIXL
1: ECS Bypass switch 7: Windshield Wiper selector
2: ECS Mode switch 8: Cabin Air Control lever
3: ECS Hi/Low Bleed selector 9: Windshield Defog switch
4: Cabin Temperature Rheostat selector knob
5: Manual Temperature control switch 11: Yoke clickspot
6: Cabin Fan switch
The environmental control system (ECS) in the Cheyenne IIXL is an
electronic control system for automatic temperature control with provision for manual electrical control to offset failures. A ram-air ventilation system is provided for unpressurized flight or if failures occur in
the air-conditioning system. Normal air source during pressurized flight
10: Fuel totalizer
Page 54

Piper PA-31T Cheyenne X
is provided by engine bleed air through a bleed-air shutoff valve and
bleed-air ducts from each engine.
Bleed air to the ECS is controlled by a pressure regulator/shutoff valve.
This valve can be selected for high and low airflow via the ECS SELECT
Switch (3). The ECS SELECT Switch (3) must be in the LO position for
engine starting, takoff and landing. The HI position may be used on
the ground to provide maximum heating or cooling. When in HI Position, an annunciator light labeled HI BLEED ON will illuminate.
A pressure regulator shutoff valve bypass is installed. This valve
supplies a minimum of bleed-air flow to a jet pump which induces air
from the raim-air inlet to mix and supplement bleed-air flow and continues to sustain pressurization. The ECS bypass valve has a manual and
automatic control circuit, controlled by the ECS REG BYPASS Switch
(1). The up position (ON) of the switch will open the bypass valve and
close the pressure regulator/shutoff valve. These two functions will
also occur automatically if either propeller control lever is moved to
the feather position. When the ECS bypass is ON, an annunciator light
labeled ECS REG BYPASS will illuminate. The pressure regulator/shutoff
valve will automatically close if
ECS overpressure or
1.
ECS overtemperature exceeds the values set by a pressure
2.
switch or the thermal switch sensing temperature
The primary function of the ECS bypass is to reduce engine bleed-air
requirements to a minimum during engine-out operation. The system
should, however, be manually selected if either an ECS overpressure or
overtemperature occurs.
The temperature control system consists of a temperature controller,
a mode switch (2) labeled AUTO and MAN, a temperature selector
rheostat knob labeled COOL and WARM (4), and a MAN TEMP CONT
Switch (5) labeled HEAT and COOL. The MAN TEMP CONT switch (5)
is spring-loaded to the center position. When the mode switch (2) is at
AUTO, the temperature controller is armed, and input from the temperature sensors in the cabin and the temperature selector rheostat knob
is processed to adjust the mixture of hot air with the super cooled air
to produce the selected temperature. To achieve manual control, the
Aerosoft GmbH 2007
54 55
Page 55

mode switch (2) is moved to MAN. The temperature selector rheostat knob is now deactivated, and the MAN TEMP CONT Switch (5) is
armed. Holding this switch to the HEAT or centered position applies
electrical power directly to the selected side of the hot air bypass valve
motor, and the valve will open or close accordingly.
Two cabin blowers are located in recirculation fan boxes on the left
and right sides of the cabin forward the of the wing door. The blowers
are controlled by a three-position switch labeled CABIN FAN (6). The
switch positions are labeled HI, OFF and LO.
During unpressurized flight, a ram-air ventilation system is available
through a duct extending from the ECS heat exchanger ram-air inlet.
A valve in the distribution box is controlled by a two-postion CABIN
AIR lever labled PRESS and OUTSIDE. This lever must be in the PRESS
position for pressurized flight. During unpressurized flight, the lever is
moved to the OUTSIDE position to open the valve door in the distribution box and permit air from the ram-air inlet to enter the distribution
system.
Page 56

Piper PA-31T Cheyenne X
Automated flight
Cheyenne I & IA - Bendix-King KFC250 Autopilot & Flight Director
KC290 Mode Controller:
1: FD/AP Vertical Trim 7: Approach mode (APPR)
(Pitch Attitude/Altitude) (ILS/VOR)
2: Heading mode (HDG) 8: Autopilot (AP)
3: Flight Director (FD) 9: Autopilot Test Button
4: Altitude hold mode (ALT) 10: Go-Around mode Clickspot
5: NAV mode (NAV) (VOR/GPS)
6: Reverse Locator (Backcourse) mode (BC)
KC291 Yaw Mode Controller:
11: Yaw Damper Engage/Disengage 12: Annunciator Light
The KFC250 Flight Director/Autopilot is a complete 3-axis integrated
system with large, 4-inch electric (or 3-inch vacuum/electric) Flight
Command and Horizontal Situation Indicators. An all solid-state Flight
Computer provides computed Flight Director commands along with
complete 3-axis Autopilot control. The system provides all standard
operating modes plus altitude preselect capability. This chapter describes
the different autopilot modes of operation.
Aerosoft GmbH 2007
56 57
Page 57

Basic Attitude Reference Mode
Activated with „power on” (AP) but with no modes selected. The
Flight Command indicator (Flight director bars in the ADI) and horizontal
situation indicator (HSI) will display existing attitude and heading. The
Command V-bar is retracted out of view until a Flight Director/Autopilot
mode has been selected.
Flight Director (FD)
Command V-bar will call for wings level. The pitch attitude of the
aircraft will remain the same as at the time of mode selection.
Heading (HDG)
Select desired heading on HSI, then select the HDG mode and the
system will command the necessary bank to turn to and maintain the
selected heading.
NAV (VOR/GPS)
Set desired course on HSI and select NAV mode. The system’s all-angle
NAV Course Capture feature gives the pilot complete freedom to select any intercept angle in response to ATC vectors, using HDG mode.
The NAV mode will be „armed,” and at the capture point HDG will
automatically disconnect and the system will „couple” and command
the necessary bank to capture and track a selected VOR or GPS course
without overshooting (Note: Overshoot protection is not possible in
Microsoft Flight Simulator).
Approach (APPR) (ILS or VOR)
Set the inbound front approach course on the HSI and select Approach
mode. The system’s all-angle Approach Course Capture feature allows
the pilot to select any intercept angle in response to ATC vectors, as
in the NAV mode. The Approach mode will be „armed”, and at the
appropriate capture point the system will „couple” and command the
necessary bank to capture and track LOC and Glideslope beams for
precision approaches, or bank command to capture and track VOR
courses for nonprecision approaches.
Page 58

Piper PA-31T Cheyenne X
Back Course (BC)
With back course selected in approach mode, the system when capturing will command the bank necessary to capture and track a reverse
LOC course. Glideslope is locked out. The inbound front approach
course is always set on the HSI to enable you to make course corrections toward the needle rather than away from the needle on the HSI.
Go Around (GA)
Push the „Go Around” button (hidden clickspot on the autopilot
panel: click the screw in the upper left corner) and the system will
command wings level and nose up to a preset missed approach climb
attitude.
Altitude Hold (ALT)
Pitch command to maintain engaged altitude.
Vertical Trim
Provides capability to adjust or slew the Altitude up or down without
disengaging and then reengaging ALT Hold. If Altitude Hold is not
engaged, the Vertical Trim knob will adjust the pitch attitude up or
down.
Altitude Preselect (via KAS 297 Altitude Preselector)
Permits preselection of a desired altitude and automatic capture upon
reaching that altitude.
Autopilot (AP)
Control surfaces respond to all selected Flight Director mode commands in both pitch and roll axis plus automatic pitch trim. A full time
yaw damper is in operation any time the Autopilot is engaged.
Yaw Damp Engage
System senses motion around the yaw axis and automatically moves
the rudder to oppose yaw.
Aerosoft GmbH 2007
58 59
Page 59

PITCH ATTITUDE SELECTOR KNOB OPERATION
Depending on the selected autopilot mode, clicking the UP/DN positions
the PITCH ATTITUDE SELECTOR KNOB produces the following results:
Pitch Modus: +/- 0.5° pitch per click
Kein Modus: Trim adjust +/- 1 per click. Equals pressing the 1 or 7
keys on the numeric keypad.
KAP 285 ANNUNCIATOR PANEL
1: Autopilot Mode Annunciators 4: Middle Marker Annunciator
2: Inner Marker („Airway“) Annunciator
3: Outer Marker Annunciator
The KAP285 Annunciator Panel provides the pilot with continuous
information on system operating status. It shows modes in operation,
as well as modes „armed” prior to capture. It also displays Marker
Beacon lights and a trim system warning flag. Clicking on the annunicator opens a zoomed autopilot window.
5: Trim Fault Warning Annunciator
of
Page 60

Piper PA-31T Cheyenne X
KFC250 Autopilot Operation Modes
There are twelve (12) modes of operation that are provided by the KFC
250 system to offer the pilot Flight Director/Autopilot commands in
response to his selection of desired modes on the Mode Controller.
Most of these modes are activated by pushbutton switches on the
Mode Controller. These pushbuttons operate with alternate action.
The first depression of the pushbutton activates a mode; the second
depression cancels it, if it has not already been automatically inactivated.
Annunciation of the mode selected appears on the annunciator panel.
Any operating mode not compatible with a newly selected mode will
be automatically cancelled in favor of the pilot’s latest selection. This
lets the pilot advance along his flight sequence without the inconvenience
of having to manually cancel modes. For example, if in NAV CPLD
mode, selection of Heading will automatically cancel NAV.
The basic mode of system operation
The system will be in the Basic Attitude Reference or „Gyro” mode
with engines running and aircraft „power on,” but no modes selected
(Annunciator Panel blank). This provides indication of aircraft heading
on the Horizontal Situation Indicator, and roll and pitch attitude on the
Flight Command indicator. The FCI Command V-bar is biased out of
view.
FLIGHT DIRECTOR Mode (FD)
The Flight Director mode is activated by depressing the „FD” button
on the Mode Controller. The FCI Command V-bar will appear and
provide the pilot with steering commands to maintain wings level and
the pitch attitude that existed at the time of Flight Director engagement.
If pitch or roll attitude are changed, recycling the FD button will synchronize the Command V-bar to the new situation. If a change only in
the commanded pitch attitude is desired, the Control Wheel Steering
(CWS) button installed on the pilot’s control wheel allows the pilot
to synchronize the Command V-bar (in the FD mode with Autopilot
disengaged) without removing his hand from the control wheel. The
Flight Director can also be activated by direct selection of any specific
mode, which will activate the Command V-bar. Such selection will will
cause the annunciation of both the FD and the appropriate mode. The
Aerosoft GmbH 2007
60 61
Page 61

Vertical Trim switch on the Mode Controller may also be used to adjust
the selected pitch attitude up or down at approx. 1 degree/second.
Special note: The FD mode must be activated before the Autopilot
can be engaged.
AUTOPILOT Engagement
The AUTOPILOT is engaged by moving the AP toggle switch on the
Mode Controller to the ON position. Note that the AP and the YAW
DAMP (YD) switches are wired so that the YAW DAMP mode is automatically engaged with the AP switch. The Autopilot, together with
the Yaw Damper, provides three-axis stabilization, automatic turn coordination and automatic elevator trim as well as automatic response to
all selected Flight Director commands.
Caution: When the autopilot is engaged, manual application of a
force to the pitch axis of the control wheel for a period of 3 seconds
or more will result in the autotrim system operating in the direction
to create a force opposing the pilot. This opposing mistrim force will
continue to increase as long as the pilot applies a force to the control
wheel and will ultimately overpower the autopilot. If the autopilot is
disengaged under these conditions, the pilot maybe required to exert
control forces in excess of 50 pounds to maintain the desired aircraft
attitude The pilot will have to maintain this control force while he
manually retrims the aircraft.
Caution: Prior to Autopilot engagement, the pilot should make sure
the V-bar commands are satisfied. This will prevent any rapid changes
in the aircraft’s flight path when the Autopilot is engaged.
Page 62

Piper PA-31T Cheyenne X
HEADING SELECT/PRESELECT Mode (HDG SEL)
Select a desired heading by positioning the heading „bug” on the HSI.
This is done with the HDG knob on the HSI. Depress the HDG button
on the Mode Controller to activate the HDG SEL mode. „HDG SEL”
will light on the Annunciator Panel and a computed, visually displayed
bank command is shown on the FCI. Following this bank command,
the aircraft will bank and roll out on the desired preselected heading.
The Command V-bar on the FCI will deflect in the direction of the
shortest turn to satisfy the commanded turn to the preselected heading. The aircraft may be manually banked to realign the V-bar and
satisfy the command or, if the Autopilot is engaged, the aircraft will
automatically bank, turn to, roll out and hold the preselected heading.
As the aircraft approaches the selected heading the V-bar will command a rollout to wings level.
With the HDG SEL mode in operation, subsequent changes made in
the heading „bug” position on the HSI will immediately cause the
V-bar on the FCI to call for a turn to the new heading. The HDG SEL
mode is cancelled when NAV or APPR coupling occurs, or whenever
the FD or HDG mode buttons are depressed.
Caution: An invalid heading source (compass flag in view) will automatically disengage the autopilot. The autopilot may then be re-engaged,
however, only the vertical modes will be useable.
YAW DAMP Mode
The KC291 Yaw Mode Controller is installed beside the KC290 Mode
Controller and the yaw axis is wired so that it automatically engages
when the Autopilot is engaged. Disengagement of the Yaw Damper is
accomplished by using the alternate action switch (pushbutton) on the
KC291. The Yaw Damper may be engaged alone with or without any
Flight Director mode. It usually provides a more stable aircraft whether control surfaces are operated manually or by the Autopilot. The
Yaw Damper engage status is annunciated on the KC291 Yaw Mode
Controller.
Aerosoft GmbH 2007
62 63
Page 63

NAVIGATION (NAV ARM and NAV CPLD) Mode
The NAV mode provides visual bank commands on the Flight Command Indicator and deviation guidance on the HSI to intercept and
track a VOR course or an GPS course.
Operation of the NAV mode requires the pilot to:
Tune the frequency of the selected VOR (or VORTAC) station.
1.
Set the HSI course pointer on the desired course.
2.
Establish angle of intercept by setting the heading „bug” and
3.
activate „HDG” mode.
Depress the NAV button on the Mode Controller.
4.
When the „NAV” button on the Mode Controller is depressed, „NAV
ARM” will be lighted on the Annunciator Panel and the automatic
capture circuit is armed. Heading select, if operating, is retained until
capture occurs.
The VOR „course-capture’’ point is variable to prevent overshoot and
depends on angle of intercept and the rate the course deviation is
changing. Upon capture, a bank command will be displayed on the
FCI; the HDG, if on, will be cancelled and „NAV CPLD” will be lighted
on the Annunciator Panel.
The pilot can manually bank the aircraft to satisfy the command display
which will call for a rollout to level flight when on course centerline to
track the course. Crosswind compensation is provided in the „track“
state.
If the NAV mode is selected with the aircraft level within ±4° of bank
and within three dots of course deviation, NAV ARM will be bypassed
and NAV CPLD will engage directly.
If the Autopilot is engaged, the aircraft will bank to satisfy the command display and rollout on course automatically.
Upon station (or waypoint) passage, an outbound course other than
the inbound reciprocal can be selected by resetting the NAV course
arrow on the HSI. This will cause an immediate V-bar deflection on the
FCI directing a turn to the new course.
Page 64

Piper PA-31T Cheyenne X
The NAV mode is cancelled by depressing the NAV button, or selecting
HDG (when in NAV coupled) or APPR modes, or pushing FD to „OFF“.
Caution: The NAV mode of operation will continue to provide airplane
control without a valid VOR/LOC signal (NAV flag in view).
Special note: When an ILS frequency in range is tuned into the NAV1
radio, a possible selected VOR GPS mode is cancelled, and the autopilot
reverts to NAV mode (i.e. the autopilot follows the localizer signal
only!).
APPROACH (APPR ARM, APPR CPLD and GS CPLD) Mode
The APPR mode provides visual roll and pitch commands on the FCI
V-bar to capture and track precision ILS (LOC and Glideslope) beams,
or non-precision VOR radials. Lateral and vertical deviation can be
monitored on the HSI.
Operation of the APPR mode requires the pilot to
Set the NAV receiver frequency.
1.
Set the HSI course pointer to the inbound runway heading or
2.
the front course in case of ILS precision approach. Do this even
on back course approach.
Set the HDG SEL”bug” on the HSI to the desired intercept
3.
angle and activate HDG” mode.
Depress the „APPR” button on the mode controller.
4.
The automatic APPR capture function will be immediately armed
„APPR ARM” will be lighted on the Mode Annunciator Panel.
In APPR ARM mode, prior to capture, the heading select mode is retained in order to allow the pilot to adjust heading to Approach Control
vectoring instructions. The LOC beam or VOR „capture” point will
vary, depending on angle of intercept and rate of change of deviation
indication. Upon capture, a bank command will be introduced on the
FCI, the existing heading mode will be cancelled and „APPR/CPLD”
will be lighted on the Annunciator Panel.
The pilot may manually bank the aircraft to satisfy the command
display, which will command a rollout to level flight when the aircraft
is on course. Automatic crosswind compensation will provide precise
Aerosoft GmbH 2007
64 65
Page 65

tracking. VOR/LOC deviation is shown on the HSI, and actual crab angle will be shown by offset of the course arrow from the lubber line.
Throughout APPR mode operation, LOC and Glideslope deviation or
VOR deviation are displayed in the HSI. If the Autopilot is engaged
during operation in the APPR mode, automatic steering response will
follow the command display on the FCI.
The Glideslope mode is armed for automatic capture if LOC front
course capture has occurred. Automatic Glideslope capture occurs as
the aircraft passes through the glide path from above or below.
Upon interception of the Glideslope, capture occurs and „GS CPLD” is
lighted on the Annunciator Panel. A smooth capture pitch command is
displayed by the Command V-bar. The pilot (or Autopilot) controls the
aircraft to satisfy the Command V-bar.
Upon GS capture, the ALT HOLD mode (if active) is cancelled. However, ALT HOLD may be manually reselected to maintain altitude upon
reaching MDA if visual contact is not established.
During VOR or RNAV approaches, Glideslope capture will not occur
because the NAV receiver is channeled to a VOR station, not an ILS,
and this locks out the Glideslope function.
APPR CPLD mode is cancelled by selection of HDG, NAV, or Go-Around
modes, or pushing FD or APPR to „Off”.
Caution: The APPR mode of operation will continue to provide airplane
control without a valid VOR/LOC signal (NAV flag in view).
Note: Overshoot protection is not possible in Microsoft Flight Simulator.
BACK COURSE (BACK CRS) Mode
Whenever a LOC or ILS frequency is selected, the BC mode may be
activated by depressing the BC button on the Mode Controller, after
selecting APPR. When in BC mode and Localizer capture occurs. the
system will turn and track outbound on the front course or inbound
on the back course. The BC mode reverses the LOC deviation signal
and course datum to permit the FCI steering command display to
operate on a fly-to rather than a fly-from basis on the reverse course.
„BACK CRS” is lighted on the Annunciator Panel.
Operation on BC is identical to front course operation including setting
the HSI Course Pointer to the front course heading, except that au-
Page 66

Piper PA-31T Cheyenne X
tomatic Glideslope capture is „locked out” by the switching circuitry.
Localizer deviation on HSI will have the proper sensing if the front
inbound Localizer course was set on the HSI.
Special note: Back course mode is only available after selecting APPR
mode.
GO-AROUND Mode
The Go-Around mode is primarily designed to assist the pilot in establishing the proper pitch attitude under missed approach conditions. The
Go-Around switch is located on the autopilot panel in the upper left
corner in form of a hidden click spot.
Activating the Go-Around mode during an approach cancels all Flight
Director modes and disengages the Autopilot, if it is engaged. A
wings-level and pitch-up command is displayed by the FCI and „GO
AROUND” is lighted on the Annunciator Panel. The magnitude of the
pitch-up command is adjustable to match Flight Manual criteria for
each aircraft model.
The Go-Around mode may also be used on takeoff for climb-out
attitude guidance. When used for takeoff, the Go-Around mode may
be followed with HDG for continuous heading control during departure.
NAV and APPR modes may also be armed for automatic capture
and guidance during the departure sequence. Go-Around may be
cancelled by use of Vertical Trim, Altitude Hold mode, Control Wheel
Steering mode or by turning off the Flight Director.
Aerosoft GmbH 2007
66 67
Page 67

ALTITUDE SELECT (ALT ARM) Mode
This mode allows the pilot to select an altitude and, upon approaching
that selected altitude, obtain an automatic visual pitch command on
the FCI to capture and hold the preselected altitude. To operate in this
mode the pilot must:
Set the desired altitude into the „selected altitude” window of
1.
the KAS 297 Altitude Selector.
Establish a climb or descent as appropriate.
2.
Depress the ARM button on the Altitude Selector. This may
3.
be done at any time during the climb or descent before the
selected altitude has been attained. „ALT ARM” will light on
the Annunciator Panel and on the Altitude Selector.
The Altitude „ALERT” annunciator in the KAS 297 will illumi-
4.
nate and a two second aural tone will sound 1,000 ft. prior to
reaching selected altitude and will cancel at 300 ft. prior. An
aural tone will sound upon reaching altitude.
As the aircraft approaches the selected altitude, an „adaptive” pitch
rate command will automatically guide the pilot through it at a low
rate. As the aircraft reaches the selected altitude, ALT HOLD will automatically engage, „ALT HOLD” will light on the Annunciator Panel and
„ALT ARM” will disappear. The command bars on the FCI will call for
level flight at the selected altitude. If autopilot is engaged, the system
will perform the required maneuvers.
ALT ARM is disengaged by depressing the ALT ARM button, by
engaging ALT HOLD, by GS capture, or selecting FLT DIR to OFF.
ALTITUDE HOLD (ALT HOLD) Mode
This mode will cause a computed visual pitch command on the FCI
command bars to hold the aircraft at the pressure altitude existing at
the time it was activated. The mode is activated either automatically by
the ALT ARM function, or manually by depressing the ALT button on
the Mode Controller. If the autopilot is engaged, it will automatically
hold the aircraft at that altitude.
The Vertical Trim switch may be used to adjust the selected altitude
up or down at a constant rate of approximately 600 fpm without
disengaging the mode. This enables the pilot to conveniently adjust
Page 68

Piper PA-31T Cheyenne X
the aircraft altitude to match resetting of the altimeter, or to make
short descent segments during a nonprecision approach. The ALT
HOLD mode is cancelled by automatic Glideslope capture or selection
of ALT ARM, or GO-AROUND modes, or selection of FLT DIR to OFF.
Cheyenne II & IIXL - Bendix-King KFC300 Autopilot & Flight Director
KMC340 Mode Controller
1: FD/AP Vertical Trim (Pitch Attitude/Altitude) und Heading Select Knob
2: Heading select (HDG) 3: Approach (APPR) (ILS/VOR)
4: Navigate (NAV) (VOR/GPS) 5: Altitude hold (ALT)
6: Speed profile (SPD PRF) 7: IAS hold (IAS)
8: Go-around mode click spot 9: Flight Director (FD)
10: Autopilot master switch (AP) 10: Yaw Damper Engage/Disengage
11: Autopilot Fehlfunktion Warnanzeigen
The KFC300 Flight Director/Autopilot is a complete 3-axis integrated
system with large, 4-inch electric (or 3-inch vacuum/electric) Flight
Command and Horizontal Situation Indicators. An all solid-state Flight
Computer provides computed Flight Director commands along with
complete 3-axis Autopilot control. The system provides all standard
operating modes plus altitude preselect capability. In addition to the
KFC250´s modes, the KFC300 also provides two modes to hold a
certain airspeed via pitch correction.
Aerosoft GmbH 2007
68 69
Page 69

This chapter describes only the differences to the KFC250 Autopilot
& Flight Director, mentioned previously. For complete Autopilot
reference, refer to Chapter Automated flight.
KAP315 ANNUNCIATOR PANEL
1: Autopilot Mode Anzeigen
The KAP315 Annunciator Panel provides the pilot with continuous information on system operating status. It shows modes in operation, as
well as modes „armed” prior to capture. Clicking on the annunciator
panel opens a zoomed autopilot window.
Additional KFC300 Autopilot Operation Modes
IAS Hold mode (IAS)
The IAS HOLD mode is selected by depressing the IAS button (7) on
the KMC 340 Mode Controller. „IAS HOLD“ will be lighted on the
KAP 315 Mode Annunciator Panel and the pitch command bars will
be activated on the FCI to call pitch maneuvers necessary to maintain a
constant indicated airspeed. The reference airspeed will be the indicated
airspeed at the time of IAS HOLD engagement, and is independent of
power setting.
If the autopilot is engaged, airspeed will be automatically maintained,
while vertical speed is adjusted, and loss or gain of altitude will
depend on power setting.
The reference airspeed may be adjusted at a rate of two knots per
second by use of the Vertical Trim Knob on the KMC 340 Mode
Controller.The IAS HOLD mode is cancelled by selection of GOAROUND, ALT HOLD, SPD PRF, Glideslope capture or FLT DIR off.
Page 70

Piper PA-31T Cheyenne X
SPEED PROFILE (SPD PRF) mode
The speed profile mode is used primarily in climb or descend. The pilot
engages SPEED PROFILE at the speed appropriate to his altitude at the
time of engagement. Or he adjusts to the appropriate speed for his
altitude with the vertical trim switch after engagement. The reference
airspeed may be adjusted at a rate of two knots per second by use of
the Vertical Trim switch on the Mode Controller.
Engagement will cause „SPD PRF” to be lighted on the Annunciator
Panel and activate the command bars on the FCI to call for pitch
maneuvers necessary to maintain the airspeed appropriate for the
current altitude. If the autopilot is engaged, the airspeed will be automatically adjusted by 1.3 KIAS per 1000 feet in climb or descent.
PITCH ATTITUDE SELECTOR KNOB
Depending on the selected autopilot mode, clicking the UP/DN position
of the PITCH ATTITUDE SELECTOR KNOB (1) produces the following
results:
Pitch Mode: +/- 0.5° pitch per click
IAS Mode: +/- 1 kt per click
SPD PRF Mode: +/- 1 kt per click
Kein Modus: Trim adjust +/- 1. Equals pressing the 1 or 7 keys on
the numeric keypad
Aerosoft GmbH 2007
70 71
Page 71

Bendix-King Avionics Paket (Radios)
The Piper Cheyenne is equipped with a complete avionics suite, the
„Silver Crown Plus“ series by Bendix-King. This suite is composed of
the KMA 28 Audio Panel, two KY 196A VHF communication receivers,
two KY 53 navigations receivers, two KR 87 ADF receivers, and two KT
76C mode C transponders.
1: DME Selector 3: Active Transponder Selector
2: AP-FD-Avionics Master Switch 4: Copilot HSI Nav Source Selector
The Avionics Master Switch (2) controls the avionics bus and supplies
COM1/2, NAV1/2, ADF1/2, Transponder 1/2, the autopilot, the RMI´s
and the marker beacon and glideslope indicators with power.
The DME selector (1) controls the DME readout on the pilot´s HSI. It
can be set to receive the DME signal from either NAV1 or NAV2 sources, and it also contains a DME hold function. For DME hold, first tune
the desired NAV radio to the DME signal you want to receive and hold.
Next, select the respective NAV radio via the DME selector (1), then
switch the DME selector (1) to the HOLD position. You may now tune
a different station on the respective NAV radio, while the original DME
signal is still displayed. Note that there is no indication about which
frequency is used for the DME readout. To cancel DME hold, switch
the DME selector (1) to either NAV1 or NAV2 position.
The active Transponder Selector Switch (3) toggles the status of the
two KT 76C transponders. The selected transponder is made the active
one, while the other one is automatically switched to standby mode.
The Copilot HSI Nav Source Selector Switch (4) selects either NAV1 or
NAV2 as the data source for the Copilot´s HSI.
Page 72

Piper PA-31T Cheyenne X
KMA 28 Audio Panel Operation
Intercom Volume
Works as the power switch for the KMA 28 audio panel. Volume
selection is not modeled.
Receive Audio Selector
Routes the output from the selected receivers to the speakers. In this
release, COM1, COM2, NAV1,NAV2, MKR, ADF and DME are modelled.
When using Squawkbox 3 or any Squawkbox 3-compatible pilot client
for online flying, COM1 or COM2 are flashing when other stations are
transmitting on the selected radio channel.
Speaker Switch
Works in conjunctions with the standard or ANR sounds set. To receive
ident signals with the standard sound set, SPR needs to be active.
When the ANR sound set is used, ident signals are always received.
Transmit Indicator
Flashes when transmitting on COM1 or COM2 via voice. This
function is only active when using Squawkbox 3, or any Squawkbox
3 - compatible pilot client software for online flying. For further
information about Squawkbox 3, visit http://www.squawkbox.ca.
Aerosoft GmbH 2007
72 73
Page 73

KY 196A COM1/COM2 Communications Radio Operation
Power up
When you turn the ON/OFF/Volume knob clockwise to the „ON”
position, your unit will display the frequencies last used in the „USE”
and „STBY” (standby) windows.
Note: As with all avionics, the KY 196A should be turned on only after
engine startup. This simple precaution will help protect the solid-state
circuitry and extend the operating life of your equipment.
Transmitting
During COMM transmissions, a „T” will appear between the „USE”
and „STBY” windows to indicate the keying of the microphone.
KY 196A Frequenzmodus (Normalbetrieb)
Select a new frequency in the „STBY” window, using the
1.
frequency selection knobs. The larger knob controls changes
in increments of 1MHz. The smaller knob controls changes in
increments of 50kHz when pushed in, and 25kHz when pulled
out.
At the outside limits of the band, the display will „wrap
around” to the other end of the band, going from 136MHz to
118MHz.
Page 74

Piper PA-31T Cheyenne X
Press the transfer button to activate the new frequency. The
2.
newly entered frequency in the „STBY” window flipflops with
the frequency in the „USE” window. This new frequency is
now available for use.
Program Mode
The Program Mode is used to program frequencies for use in the
Channel Mode.
Depress the channel (CHAN) button for more than two
1.
seconds, until the channel number (to the right of the standby
frequency) begins flashing. The most recently used active
frequency will remain displayed in the „USE” window.
Turning either frequency selection knob will change the channel.
2.
Once you’ve selected the desired channel number, you may
3.
program a new frequency by pressing the transfer button. This
will cause the frequency in the „STBY” window to flash. The
tuning knobs are now used to enter desired frequency.
To program additional channels, push the transfer button
4.
again to make the channel number flash, and repeat step three
above.
If you wish to program fewer than nine channels while skip-
5.
ping certain channel numbers, rotate the MHZ frequency knob
left or right beyond 136MHz or 118MHz. Dashes (---) will
appear in the „STBY” window, indicating that the channel will
be skipped when the system is operating in the Channel Mode.
To exit the Program Mode, momentarily press the channel
6.
button. The unit will also automatically exit the Program Mode
if no programming occurs within approximately 20 seconds.
Aerosoft GmbH 2007
74 75
Page 75

Channel Mode
The Channel Mode is used to recall preset frequencies stored in memory.
To enter the Channel Mode momentarily, push the channel
1.
button while in the Frequency Mode. The active frequency
remains displayed in the „USE” window, and the last used
channel number and its associated frequency are displayed in
the „CHAN” and „STBY” windows.
If no channels have been programmed, channel 1 automatically
disappears and dashes are displayed in the „STBY” window.
Turn either frequency selection knob to change the channel
2.
number and the channel’s corresponding frequency in the
„STBY” window.
If there is no activity for five seconds, the radio will exit the
3.
Channel Mode and return to the Frequency Mode, with the
channel frequency remaining in the „STBY” window.
You can also return to the Frequency Mode by either:
4.
a. Pressing the channel button before the five-second delay, in
which case the radio recalls the „USE” and „STBY” frequencies
prior to entering the Channel Mode, or
b. Pressing the transfer button, so that the channel frequency
becomes the active frequency and the last „USE” frequency
becomes the new „STBY” frequency.
Note: If the optional remote channel increment switch is
installed, each activation of the switch will put the unit in the
Channel Mode and advance the channel number from the
previous channel used.
Note: If the optional remote channel increment switch is installed,
each activation of the switch will put the unit in the Channel Mode
and advance the channel number from the previous channel used.
Page 76

Piper PA-31T Cheyenne X
Direct Tune Mode
The Direct Tune Mode is entered by pressing and holding the transfer
button for longer than two seconds. The „STBY” frequency will disappear and the frequency in the active window can be changed with the
frequency selection knobs. Momentarily pushing the transfer button
will return the unit to the Frequency Mode (normal operation). The
„STBY” frequency displayed prior to entering the Direct Tune Mode
will return unchanged.
KY 53 TSO´d Navigation Receiver Operation
Power Switch
This knob controls ON/OFF function for the KY53. Volume selection
and IDENT function are not modeled.
Frequency Selection
By rotating the concentric frequency selector knobs either clockwise
or counterclockwise, the desired operating frequency can be dialed
into the standby display window. A clockwise rotation will increase
the displayed frequency number, while a counterclockwise rotation
will decrease it. The larger selector knob is used to change the MHz
portion of the frequency display; the smaller knob changes the kHz
portion in 50 kHz steps. At either band edge of the 108.00 to 117.95
MHz frequency spectrum, an off-scale rotation will wrap the display
around to the other frequency band-edge (i.e., 117.95 advances to
Aerosoft GmbH 2007
76 77
Page 77

108.95 with MHz knob rotation, or 117.00 with kHz knob rotation).
DME and optional internal glideslope channeling are also controlled by
these selector knobs.
NAV Frequency Operation
The desired operating frequency is first entered into the standby
display. To activate, push the transfer button. This will interchange the
frequencies in the ‘use’ and ‘standby’ displays and tune the receiver to
the new operating frequency.
Special note: As soon as the NAV1 radio is tuned to a valid ILS
frequency, the VOR/GPS switch changes to VOR and the autopilot to
NAV ARM mode. If a valid ILS frequency is in range, the autopilot will
follow it´s localizer beam. Valid ILS frequencies are between 108.10
and 111.95 and the decimal part starts with an odd digit: 108.10,
108.15, 108.30, 108.35, 108.50, ..., 108.95, 109.10, 109.15, ..., 111.95.
KR 87 ADF Receiver Operation
Power-on
Rotate the ON/OFF/VOL knob clockwise from the detented „OFF”
position. The unit will be activated and will be ready to operate.
Page 78

Piper PA-31T Cheyenne X
Frequency Selection
The active frequency (to which the ADF is tuned) is displayed in the
left side of the window at all times. A standby frequency is displayed
in the right side when „FRQ” is annunciated. The standby frequency is
placed in „blind” memory when either FLT (Flight Time) or ET (Elapsed
Time) mode is selected.
With „FRQ” annunciated, the standby frequency is selected using
the frequency select knobs which may be rotated either clockwise or
counterclockwise. Pull the small inner knob out to tune 1’s. Push the
smaller inner knob in to tune 10’s. The outer knob tunes the 100’s and
the 1000’s up to 1799.
The standby frequency selected may then be put into the active window
by pressing the „FRQ” button. The standby and active frequencies will
be exchanged (flip-flopped), the new frequency will become active,
and the former active frequency will go into standby.
Operating Modes
Antenna (ANT) mode is selected and annunciated when the „ADF”
button is in the „out” position. ANT provides improved audio reception
from the station tuned and is usually used for identification. The
bearing pointer in the KNI 582 RMI and the HSI will be deactivated
and immediately turn to the 90° relative position and remain there
during ANT reception. ANT mode is not modeled in this release.
The ADF mode is selected and annunciated when the „ADF” button is
in the depressed position. ADF activates the bearing pointer in the KNI
582 RMI and the HSI, causing it to move without hesitation to point in
the direction of the station relative to the aircraft heading.
Outside of the United States some stations are unmodulated and use
an interrupted carrier for identification purposes. The BFO mode, activated and annunciated when the „BFO” button is depressed, permits
the carrier wave and the associated Morse code identifier broadcast
on the carrier wave to be heard. BFO modes are not modeled in this
release.
Aerosoft GmbH 2007
78 79
Page 79

Operating the Timers
The flight timer will always be automatically reset to :00 whenever
power is interrupted either by the avionics master switch or the unit’s
ON/OFF switch. Operation of the flight timer is automatic. The timer is
started in the moment the aircraft takes off. It will stop at the moment the aircraft touches down during landing. The elapsed timer
may be reset back to :00 by pressing the SET/RST button. It will then
start counting up again. (Note: pressing the SET/RST button will reset
the elapsed timer whether it is being displayed or not.). Resetting the
flight timer is possible on the ground only.
The elapsed timer also has a „count-down” mode. To enter the countdown mode, the SET/RST button is depressed for about two seconds,
or until the „ET” annunciation begins to flash. It is now in the ET set
mode, and a time up to 59 minutes, 59 seconds may be preset into
the elapsed timer with the concentric knobs. The preset time will be
displayed and remain unchanged until SET/RST is pressed again, which
will start the elapsed timer counting down from the preset time. When
the timer reaches :00 it will start to count up as the display flashes for
15 seconds and an aural alarm, if installed, is activated for about 1
second.
Note: The standby frequency which is in memory while flight time
or elapsed time modes are being displayed may be called back by
pressing the FRQ button, then transferred to active use by pressing the
FRQ button again.
While FLT or ET is displayed the „in use” frequency on the left side of
the window may be changed, by using the frequency select knobs,
without any effect on the stored standby frequency or the other modes.
This feature is especially useful when searching for stations with
unknown frequencies.
Page 80

Piper PA-31T Cheyenne X
KT 76C Panel-mounted Transponder Operation
About Transponders
Your Honeywell Bendix/King transponder is a radio transmitter and
receiver which operates on radar frequencies. Receiving ground radar
interrogations at 1030 MHz, it returns a coded response of pulses to
groundbased radar on a frequency of 1090 MHz.
As with other Mode A/Mode C transponders, the KT 76C replies with
any one of 4,096 codes, which differ in the position and number of
pulses transmitted. By „replying” to ground transmissions, your KT
76C enables ATC computers to display aircraft identification, altitude
and ground speed on Enroute, Approach or Departure Control radar
screens. When the IDENT button is pressed, your aircraft will be positively identified to the Air Traffic Controller.
Aerosoft GmbH 2007
80 81
Page 81

Operating the KT 76C
Before starting your aircraft’s engine, make sure that the KT 76C
function selector knob, or your avionics master, is turned to OFF. After
engine start, turn the function selector knob to SBY (standby). Give
your transponder about 45 seconds to become operational. Select
the proper reply code by pressing the desired code entry buttons. The
reply code will be displayed in the code window. Before takeoff, rotate
the function selector knob to the ALT (altitude) position for Mode C
altitude reporting to ATC. If you do not have an encoding altimeter,
rotate the function switch to ON for Mode A reporting.
Altitude Display
The KT 76C displays Flight Level Altitude, marked by the letters „FL”
and a number in hundreds of feet, on the left side of the display. For
example, the reading „FL 065” corresponds to the altitude of 6,500
feet, referenced to 29.92 inches of mercury (or 1013 hP) at sea level.
Flight Level Altitude represents „pressure altitude,” and should not
be confused with true altitude. Please note that the displayed altitude
may not agree exactly with the aircraft’s altimeter when flying below
18,000 feet, because encoders are preset to 29.92 inches of mercury.
An encoder’s altitude transmission is automatically corrected for proper
altimeter setting by a ground based computer, to present the correct
altitude to the controller.
Ranging from -1,000 to +99,000 feet, Flight Level Altitude is displayed
only when altitude reporting is enabled. If the altitude window is blank
or shows a series of dashes (as in the case of an invalid altimeter code
being reported), altitude reporting will be disabled.
CLR Button
Code entry mistakes are corrected, one digit at a time, by pressing the
CLR button and reentering the correct code. The last active code will
be displayed if a complete four-digit code has not been entered and
there is no activity on any of the code entry buttons, the VFR button,
or the CLR button for four seconds.
Page 82

Piper PA-31T Cheyenne X
VFR Button
Momentarily pressing the VFR button will enter a pre-programmed
VFR code, typically 1200, in the code window. Pressing and holding
the VFR button for two seconds will cause the last active code to be
displayed. Depending on your home country, it may be desired to
set the default VFR code to a code other than 1200. To change the
default VFR code, edit the PA31.CFG file in the <FSX>\Digital Aviation\
PA31 Cheyenne\ folder using a standard text file editor.
Reply Indicator
The reply indicator blinks to indicate that the KT 76C is functioning
properly and replying to interrogations.
Squawk Ident
When you are asked to “ident” by ATC, press the IDT button. The
reply indicator will illuminate continuously for 18 seconds during the
ident interval.
Important Codes
7700 - Emergency
7600 - Communication Failure
7500 - Hijacking
0000 - Military - DO NOT USE!
See the Aeronautical Information Manual (AIM) for detailed explanation
of these codes and their use.
Interaction with online flying pilot client software
The KT 76C transponders in the Piper Cheyenne are equipped with
special functions for online flying pilot client software adhering to the
Squawkbox 3 standard. When the function selector knob is on the OFF
or STBY position, the pilot client software will transmit squawk mode
STANDBY. In ON and ALT positions, the transponder will transmit
squawk mode C. The IDT button transmits the IDENT signal.
Aerosoft GmbH 2007
82 83
Page 83

Trimble 2000 Approach Plus GPS
Introduction
The Piper Cheyenne is not exactly a new aircraft. Most of them were
built during the 70s and 80s of the last century. The models in this
package represent the Piper Cheyenne as it was built from 1981 on.
By that time, modern navigation systems like GPS (introduced 1995)
didn‘t exist and navigation on general aviation aircraft was done using
common NAV radios and ADFs.
Today, the situation is different. GPS receivers are very common on
general aviation aircraft and so, it‘s necessary to have such a device on
the Cheyenne too. Our choice was the Trimble 2000 Approach Plus
which is one of the earlier GPS receivers for aircraft. It doesn‘t come
with a moving map, like modern devices do, but it has all functions
available that are necessary for navigation today:
Updatable navigation database
•
Terminal procedures (SIDs , STARs and Approaches)
•
Holdings
•
DME arcs (as part of terminal procedures)
•
Procedure turns (as part of terminal procedures)
•
User-defined waypoints
•
Flight plan storage
•
All these major functions are available in the simulated GPS in the
Cheyenne package too. There are some differences though. A list of
those can be found in the chapter „Simulation vs. Reality“.
For a full description of all functions available in theTrimble 2000
Approach Plus GPS, consult the separate original reference manual.
This reference manual is available free of charge here:
ftp://stcpub2:austin@24.227.190.27/Publications/2000plus/82877.PDF
Page 84

Piper PA-31T Cheyenne X
User Interface
The Trimble Approach Plus is controlled by nine buttons and two
concentric knobs.
The Power Switch is located at the upper edge of the display. Use this
switch to switch the GPS on and off.
The Outer Knob is used to control the input cursor and to flip between
display pages.
The Inner Knob is used to select items.
Switches the GPS to Navigation mode. This mode displays information
about the aircrafts position on its current route plus arrival times, fuel
usage etc.
Switches the GPS to Waypoint Selection mode. This mode is used to
select waypoints from the navigation database.
Aerosoft GmbH 2007
84 85
Page 85

Switches to the Flight Plan mode. This mode is used to select stored or
add new flight plans.
The Calculator mode shows a variety of data calculated by the GPS.
This includes atmospheric and fuel data.
The Auxilliary mode is used to import flight plans from FSX.
The Direct key is used to activate a flight plan or fly directly to a waypoint.
The Enter key is used to confirm selections made with the concentric
knobs.
The Nearest key shows a list of the navigational points nearest to the
aircrafts current position.
The Message key displays the current status message from the GPS.
Page 86

Piper PA-31T Cheyenne X
Keyboard Entry Mode
On the real Trimble, you can only select or enter waypoints by using
the two concentric knob. This is already hard to do, but it‘s even
worse if it must be done with mouse clicks. To make data entry more
comfortable, we added a keyboard entry mode which is activated by
the SCROLL LOCK key. This key toggles the keyboard input mode on
or off. As soon as it‘s on, „KBD“ will appear in the upper right corner
of the GPS display.
As an alternative to the SCROLL LOCK key, you can also use a click
spot on the data card between the AUX and NRST keys.
Important: Keyboard entry mode only works in the default view of
the 2D panel and in the virtual cockpit. It‘s not possible to use it in the
IFR (down) view.
When the Trimble is in keyboard entry mode, the following control
keys are available:
Outer Knob: Cursor Left, Cursor Right, Keypad 4 (left) and Keypad 6 (right).
Inner Knob: Cursor Down, Cursor Up, Keypad 2 (left) and Keypad 8 (right).
Aerosoft GmbH 2007
86 87
Page 87

Enter Key: Return, Keypad 5 or Enter.
Importing FS Flight Plans
To avoid the hassle of entering a flight plan into the Trimble, a function
to import a flight plan from FSX is available. This requires three simple
steps:
First, go to the FSX Flight Planner (Menu „Flights | Flight Planner“)
•
and create or load the desired flight plan.
Click on the Trimble. If a flight plan is loaded it displays
•
„PRESS ENT TO IMPORT FS FLIGHT PLAN“.
Click to import and activate the flight plan.
•
The flight plan is now ready for use. To make the aircraft follow the
route, you have to set the VOR/GPS switch to GPS and activate the
NAV mode on the autopilot.
Note: If the VOR/GPS switch doesn‘t change to GPS, it‘s likely that
an ILS frequency is selected on the NAV1 radio. Valid ILS frequencies
are all frequencies between 108.10 and 111.95 where the first digit
after the decimal point is odd. For example: 108.10, 108.15, 109.30,
110.10, 111.35, 111.95. To solve this problem, just tune a non-ILS
frequency like 108.20 on the NAV1 radio.
Page 88

Piper PA-31T Cheyenne X
Simulation vs. Reality: Unimplemented Functions
The real Trimble is quite hard to use due to it‘s limited display capabilities
(2 lines with 20 characters each) and overloaded user interface. To
keep it easy to use, we decided to drop a few functions which are not
really useful in FS:
Waypoint selection by station name („WARBURG“ instead of
•
„WRB“)
Deleting stored flight plans
•
Editing and deleting user-defined waypoints
•
Limitations of the Direct and Join functions
•
Data entry in Calculator mode (data is taken directly from FS
•
instead)
Auxilliary mode has been replaced by a function to import FS
•
flight plans.
Aerosoft GmbH 2007
88 89
Page 89

Pressurization system
Dukes Pressurization Controller (Cheyenne I & IA) Garret Pressurization Controller (Cheyenne II & IIXL)
1: Cabin rate of climb gauge 4: Cabin altitude controller
2: Cabin altitude gauge 5: Cabin pressure test/dump
3: Cabin rate of change control switch (Garret only)
Defaults to 500 ft/min cabin
change rate May be adjusted to a minimum of 100 ft/min or a
maximum of 1000 ft/min (Garret: 2500 ft/min)
Pressurization air for the Piper Cheyenne is obtained by use of high
pressure engine compressor bleed air. The high pressure air is routed
through an intercooler, then into a jet pump which mixes bleed
air with outside air. The decreases the amount of high pressure air
required from the engine and also lowers the temperature of the bleed
air. The air then proceeds to the main pressure line under the cabin
floor and passes through the pressurized air control box assembly,
which controls the flow of air that is to be routed either to the cabin
or overboard.
The cabin air control has three positions marked: PRESSURIZED AIR,
RECIRCULATED AIR, and OUTSIDE AIR. When the control is in the
PRESSURIZED AIR position, the air is directed through the air conditioning evaporator to the heater and heater ducts, and through the
cool air ducts along both sides of the cabin to individually controlled
Page 90

Piper PA-31T Cheyenne X
air outlets. When the control is in the OUTSIDE AIR position, the air
is not needed for pressurization. Air is then routed below the cabin
floor and overboard. During ground operations, to prevent fumes from
other aircraft entering the cabin, the control may be placed in the
RECIRCULATED AIR position. In this position, no outside air enters the
system. Restrict continuous operation in the recirculated air position to
15 minutes.
Before takeoff, set cabin altitude 500 feet above the field pressure
altitude, using the cabin altitude controller (4). Cabin pressurization
will begin as the cabin passes through the altitude selected. Cabin
altitude will remain at the selected altitude until maximum cabin differential (5.5 PSI) is reached, at which time the cabin altitude will begin
to climb, until at 29.000 feet (IIXL only: 31.000 feet) pressure altitude
the cabin pressure altitude will be 10.000 feet (Garret: 11.100 feet).
For flights below an airplane altitude of 13.000 feet (Garret: 12.000
feet), the cabin altitude control (4) should be left at the takeoff setting.
For flights above 13.000 feet (Garret: 12.000 feet) (at which point
maximum differential will be exceeded) set the cabin altitude controller
(4) to the cruise altitude +500 feet and adjust the cabin rate of climb
(1) as desired. It is recommended that this setting be made during
climb out after the controller has captured isobaric control.
To descend for landing be certain that the selected cabin altitude is
higher than the pressure altitude of the landing field. Shortly after
descent is initiated, set the cabin altitude controller (4) to 500 feet
above the pressure altitude of the landing field and adjust the rate
control (3) high enough to allow the cabin to descend to the landing
setting before the aircraft descends to that altitude. For normal
descent, the rate knob (3) should be at the twelve o’clock position. A
higher setting should be selected for rapid descent, so that the aircraft
altitude does not catch up with the cabin altitude.
To the immediate left of the cabin altitude selector and rate of change
controls are instruments to simplify setting the system and to monitor
system operation. The cabin altitude instrument (2) indicates the cabin
altitude in feet, and the cabin rate of change gauge (1) indicates the
rate at which cabin altitude is changing in feet per minute. A differential pressure gauge, which is incorporated in the face of the cabin
Aerosoft GmbH 2007
90 91
Page 91

altitude instrument (2), indicates the differential pressure between the
cabin and the outside atmosphere.
Note:
A residual pressure of approximately .25 PSI will show on the differential
pressure gauge at any time pressurization is selected and the aircraft is
operating lower than the cabin altitude selected.
Do not land when aircraft is pressurized above .3 PSI
A warning light on the annunciator display warns the pilot should the
cabin altitude go above 10.500 feet (Garret: 11.500 feet to 12.000
feet) or should the cabin differential pressure go above 5.7 psi. Cabin
pressure is automatically regulated to a maximum of 5.5 psi. Should
the automatic regulator malfunction, a system of safety devices
releases pressure.
Page 92

Piper PA-31T Cheyenne X
TCAS (with digital VSI only)
TCAS in digital VSI - symbol explanation:
1: Vertical speed needle
2: TCAS display centre (own aircraft symbol)
3: 2nm radius circle
4: RA: Vertical rate to be avoided (red)
5: RA: Required vertical rate (green)
6: Display range
7: Target symbol
8: Vertical trend arrow (up or down)
9: Relative altitude (ft x 100)
Own Aircraft. Airplane Symbol in White or Cyan.
Non Intruding Traffic Altitude Unknown
Open Diamond in White or Cyan.
Proximity Traffic, 200 Feet Below and Descending.
Solid Diamond in White or Cyan.
Traffic Advisory (Intruder).
700 Feet above and level.
Solid Amber Circle.
Resolution Advisory
(Threat). 100 Feet Below and Climbing. Solid Red Square.
Note:
For the TCAS to operate your active transponder needs to be in mode
ON or ALT.
The digital VSI gauge contains a full-fledged implementation of TCAS
II version 7.0 (aka change 7.0 aka MOPS 7.0) logic, as specified by
RTCA document DO-185A plus its amendments approved by SC-
Aerosoft GmbH 2007
92 93
Page 93

147A. Literally all features of the logic are implemented with the
exception of TCAS/TCAS resolution advisory (RA) negotiation and
Mode S ground stations.
Traffic Display Symbology
Both color and shape are used to assist the pilot in interpreting the
displayed information.
The own aircraft is depicted as either a white or cyan arrowhead or
airplane-like symbol. The location of the own aircraft symbol on the
display is dependent on the display implementation. Other aircraft are
depicted using geometric symbols, depending on their threat status, as
follows:
An unfilled diamond, shown in either cyan or white, but not
•
the same color as the own aircraft symbol, is used to depict
non-threat traffic.
A filled diamond, shown in either cyan or white, but not the
•
same color as the own aircraft symbol, is used to depict Proximate Traffic. Proximate Traffic is nonthreat traffic that is within
6 nmi and ±1200 ft from own aircraft.
A filled amber or yellow circle is used to display intruders that
•
have caused a TA to be issued.
A filled red square is used to display intruders that have caused
•
an RA to be issued.
Each symbol is displayed on the screen according to its relative position
to own aircraft. To aid the pilot in determining the range to a displayed aircraft, the traffic display provides range markings at one-half the
selected scale and at the full scale. The selected display range is also
shown on the display. The range markings and range annunciation are
displayed in the same color as the own aircraft symbol.
Vertical speed information and altitude information are also provided
for all displayed traffic that are reporting altitude. Relative altitude
is displayed in hundreds of feet above the symbol if the intruder is
above own aircraft and below the symbol if the intruder is below own
aircraft. When the intruder is above the own aircraft, the relative alti-
Page 94

Piper PA-31T Cheyenne X
tude information is preceded by a + sign. When the intruder is below
the own aircraft, a „-” sign precedes the relative altitude information.
The altitude information is displayed in the same color as the aircraft
symbol.
An arrow is displayed immediately to the right of a traffic symbol
when the target aircraft is climbing or descending at more than 600
fpm. An up arrow is used for a climbing aircraft; a down arrow is used
for a descending aircraft. The arrow is displayed in the same color as
the aircraft symbol. When an aircraft causing a TA or RA is beyond the
currently selected range of the traffic display, half TA or RA symbols
will be displayed at the edge of the display at the proper relative
bearing.
Aerosoft GmbH 2007
94 95
Page 95

Flight Tutorial
Introduction
When compared to smaller piston-engine powered airplanes, flying a
fast turboprop aircraft like the Piper Cheyenne can be quite a challenge.
Besides the faster speed, the aircraft requires precise flying techniques
and some understanding about the aircrafts systems and avionics. This
tutorial is intended to introduce you to the Piper Cheyenne by giving
some hints about how to fly this plane. To work through this tutorial
we recommend that you have read the manual and are generally familiar
with the aircrafts panel, systems and characteristics.
Flight controls and control feedback
Besides the aerodynamic programming by the developer, the feeling of
flying in MS Flight Simulator highly depends on the hardware the pilot
uses. Slow refresh rates (<15 fps) can affect our optical recognition,
and the feeling for the movement of a plane may be deranged. Control
devices are of equal importance, they need to be properly adjusted in
order to provide a realistic feedback. For a simple check switch to slew
mode (<Y> key in MS Flight Simulator). The plane should stay on its
position, while being easily movable using your flight controls. In case
you experience troubles here, you need to calibrate your input devices.
In case you own a registered version of FSUIPC.DLL, you should also
calibrate and check your flight controls there.
Page 96

Piper PA-31T Cheyenne X
Engine start-up
When entering the cold & dark aircraft, first turn ON the battery. Next,
activate the anti-collision light to signal other traffic on the airport that
you will soon start your engines. Check that the prop levers are in FULL
FORWARD position (IIXL only: FEATHERED position), and that your
parking brake is SET. Next, switch ON fuel pump number 1 or 2 on the
engine to be started, set the ignition switch to MANUAL, and set the
yellow starter switch to the START position. When the engine spools
up and Ng passes 10%, move the condition lever to the FULL FORWARD position. Wait until the engine has fully stabilized, then turn the
yellow generator switch to the GENERATOR position. Set the ignition
switch to AUTO. Repeat this procedure for the second engine. On the
Cheyenne IIXL, turn ON the bleed air switches. For detailed engine
startup procedures, consult the section “NORMAL PROCEDURES” in
our manual (Box versions: You can find this part of the manual in a
PDF file on your CD-ROM).
Taxi to the runway
Before taxiing, make sure that all doors are closed and secured. Switch
ON the no-smoking and seatbelt signs (these signs are ON per default
when the aircraft is loaded in cold & dark state), also switch ON the
taxi lights. If not done already, move the prop levers to FULL FORWARD.
As for the most propeller aircraft, the Cheyenne requires only minimal
power to start rolling. Apply some power with the power levers, then
pull them back to idle. You will notice that the plane starts to accelerate
to a quick taxi speed of around 15-20 KIAS. If your Cheyenne accelerates
too fast you may want to move the propeller levers somewhat into
BETA range to reduce the effectiveness of the propeller blades. You
may use mouse clicks, the mouse wheel or <SHIFT>-<F2> for this.
If you haven’t set the trim yet, now it is the time to do it. The Cheyenne
has a white mark on the trim indicator for take off under normal
loads. With only a few passengers on board you need to trim her a bit
more nose up, otherwise when trimmed “on the mark”, the aircraft is
well prepared for the initial climb. Set your flaps as desired (you may
take off without flaps; however the use of 15° flaps is recommended
Aerosoft GmbH 2007
96 97
Page 97

for shorter runways). When arriving at the holding position, check
your flight controls again for free movement. To prepare for automatic
flight, activate the flight director (FD) and select the first altitude using
the altitude preselector. Program your GPS, if desired, and dial in your
assigned transponder code into transponder 1. Activate the environmental
systems, and set the pressurization system. If your cruise altitude is
below ca. 12.000 feet, set the cabin altitude to 500 feet above field
elevation. Otherwise, set the cabin altitude controller to the final cruising
altitude, and move the air control lever to PRESSURIZED AIR.
Powerback (in emergency situations only)
If there is not sufficient space in front of the aircraft to start taxiing,
you may force the Cheyenne to move backwards with the help of the
propeller. To achieve this, move the propeller levers into reverse range.
You need to be careful with the power lever during that maneuver.
You may either use the <F2> key - a few single key presses are sufficient – or the mouse wheel on the throttle panel. If the aircraft starts
rolling too fast, do not use the brakes, as this will lift the nose into the
air and the tail will hit the ground. Subsequent repair costs will be substantial. A better idea is to move the power levers back towards idle
<F3> or use the mouse wheel. As the plane stops, step on the brakes
and set the power levers to full idle. Steering while rolling backward
is possible with differential wheel brakes, using the <F11> and <F12>
keys or a rudder pedal set.
Page 98

Piper PA-31T Cheyenne X
Take off
When all preflight checks are completed and you are ready for takeoff,
report “ready for departure” to tower. When takeoff clearance is
received, switch your transponder from SBY to ALT, turn ON the
landing lights, the strobes and the recognition lights, and enter the
runway to taxi into position. Gently move the power levers forward
to about 50% of its full range, and monitor torque and ITT to rise.
Release the brake and continue to advance the power levers until your
desired power setting has been reached (consult the performance
charts for maximum takeoff power settings, Do not move the power
levers all the way forward!!!). Check the first red line on the torque
gauges for an indication of maximum power.
Depending on the weight of your aircraft, rotate between 90-100
KIAS until 10° nose-up pitch attitude has been established. At a minimum
altitude of 50 feet AGL, retract the landing gear and continue to
accelerate 10KIAS above the minimum safe speed. The minimum safe
airspeed is indicated by the blue line on your airspeed indicator gauge.
At 500 feet AGL, start following your assigned departure route. If you
intend to use the autopilot, first turn on the flight director, and sync it
to your current pitch attitude using the FD SYNC button on the control
yoke. If desired, turn ON the autopilot and the yaw damper. Use the
vertical trim/ pitch attitude button/knob on the autopilot to establish a
steady climb. Retract the flaps at appropriate speed.
Aerosoft GmbH 2007
98 99
Page 99

Climb
To achieve an appropriate climb configuration, reduce propeller RPM
to 1900 or 2000 RPM, as desired (check the performance charts
for appropriate RPM settings). When passing the transition altitude,
set your altimeter to standard pressure (29.92 inches or 1013 hpa).
Altitudes above the transition altitude are referred to as “flight levels”.
As the landing gear is already retracted, turn OFF the landing lights.
No-smoking and seatbelt signs may be set as desired. When reaching
higher flight levels during climb, the maximum available torque will
start to decrease. Consult the performance chart “Maximum climb
power – torque” and the kneeboard reference section for maximum
climb power settings and recommended climb speeds. Closely monitor
ITT, and start to lower the nose to avoid a drop in speed. On the
Cheyenne II and IIXL, you may want to use autopilot modes IAS or SPD
PRF to adjust your pitch attitude automatically.
When reaching the armed altitude, the plane gently acquires a lower
climb rate and will subsequently level off at the desired flight level. The
autopilot switches from ALT ARM to ALT HOLD. If you want to stay at
that level, you need to adjust the engines to the recommended cruise
power settings. If this was just an interim level-off and you intend to
continue the climb, (you may have been cleared by ATC to that interim
level only), dial in the new altitude with the altitude preselector, select
ARM, and establish again a climb pitch attitude. Typical climb rates at
higher flight levels are around 1000 fpm (feet per minute).
Page 100

Piper PA-31T Cheyenne X
Cruise
When cruise level is reached, apply recommended cruise power settings, as indicated on the performance tables. For example, a typical
cruise in the Cheyenne I at FL240 means 833 ft-lb torque at 2000
RPM, which will result in around 230 kts TAS cruising speed. Some
Cheyenne models also differentiate between Maximum Cruise Power
(basically the maximum speed you can achieve) and Economy Cruise
Power, which offers the best trade between flight time and range.
Descent
During descent, a 3° descent angle is desired. To calculate the correct
top of descend, use this simple formula: Difference in flight level
divided by 10 and multiplied by 3 gives you the distance needed to
establish a 3° descend angle. The descent rate is calculated by ground
speed (GS) * 5.
Example: You want to descent from FL260 to FL120, and your ground
speed (GS) is 250 kts. According to our formula we need 42nm for the
descent (260 – 120 = 140. 140 / 10 x 3 = 42nm) with a sink rate of
1250 fpm (250 x 5 = 1250fpm).
In clean air you may want to accelerate your airspeed just below
the red line indicator which depicts the maximum allowed airspeed.
Reduce power settings as needed for the descent. When descend
is established, select the airfield elevation +500 feet on the cabin
altitude controller, and monitor the pressurization gauges for the cabin
altitude to drop. As torque increases during descent, reduce power
further to stay within limits. No-smoking and seatbelt signs may be set
as desired. Also, turn ON the landing lights just before entering the
approach phase.
Aerosoft GmbH 2007
100 101
 Loading...