


AEG-Electrolux ERA4260 User Manual

21
Warnings for your safety. Carefully read these
instructions before installing and using the
machine.
m This freezer is designed to be operated by adults
only. Children should not be allowed to tamper
with the controls or play with the product.
m Make sure that the power plug is not squashed or
damaged by the back of the fridge/freezer. Do not
place heavy articles or the fridge/freezer itself on
the power cord. Do not remove the power cord by
pulling on its lead, particularly when the fridge/freezer is being pulled out of its niche. If the power
plug socket is loose, do not insert the power plug.
If the power cord is damaged, it must be replaced
by a certified service agent or qualified service
personnel. Damage to the cord may cause a
shortcircuit,fire and/or electric shock.
m This appliance is heavy. Care should be taken
when moving it.
m Repairs carried out by inexperienced persons
may cause injuries or serious malfunctioning.
Refer to the nearest Authorized Dealer.
m Make sure the rear part of the appliance stands
against a wall as there are working parts which
heat up and should not be of easy access.
m Make sure that there is a continous and adequate
ventilation as a failure to do so may result in
damage to the appliance or deterioration of the
food.
m The appliance should be left for at least 4 hours
after installation before it is turned on ill order to
allow the refrigerant to settle.
m This product must be serviced only by an AUT-
HORIZED DEALER, and only GENUINE SPARE
PARTS must be employed.
m Before cleaning or reparing the appliance, make
sure it is unplugged.
m It is dangerous to alter the specifications or modify
this product in any way.
m These domestic refrigerators are designed to be
used specifically for the storage and conservation
of food.
m DO NOT USE SHARP INSTRUMENTS to scrap
off frost or ice. Frost may be removed by using a
plastic scraper. (See defrosting instructions).
m Frozen food must not be re-frozen once it has
been thawed out.
Manufacturer’s storage recommendations should
be strictly complied with.
m Lollies can cause frost burns if consumed right
away from the freezer.
m Do not place carbonate or fizzy drinks in the free-
zer as these may explode.
m When an old freezer is to be discarded make sure
to:
m Dismount the doors in order to prevent children
from getting trapped inside.
Have the gas from the cooling system with-
drawn before making it to scrap iron.
m Warnings for your Safety
Index
Warnings for your safety. . . . . . . . . . . . . . . . . . . . . . . . . . . . . . . . . . . . . . . . . . . . . . . . . . . . . . . . . . . 21
Installation Positioning/Cleaning the interior/Electrical connection/Starting up. . . . . . . . . . . . . . . . . . . . . . 22
Changing the opening directions of the doors. . . . . . . . . . . . . . . . . . . . . . . . . . . . . . . . . . . . . . 23
Control and Use Control panel/Interior Light/Dynamic Refrigeration ASP/ Inner Door/ Shelves Position .. 24
Control and Use Freezer Compartment/Refrigerator Compartment . . . . . . . . . . . . . . . . . . . . . . . . . . . . 25
Maintenance Defrosting of the freezer/Defrosting of the fridge . . . . . . . . . . . . . . . . . . . . . . . . . . . . . . . . . 26
Something not working . . . . . . . . . . . . . . . . . . . . . . . . . . . . . . . . . . . . . . . . . . . . . . . . . . . . . . . . . 27-28
Normal noises when functioning. . . . . . . . . . . . . . . . . . . . . . . . . . . . . . . . . . . . . . . . . . . . . . . . . . . 28
Guarantee, Service and spare Parts . . . . . . . . . . . . . . . . . . . . . . . . . . . . . . . . . . . . . . . . . . . . . . . . 29
Tecnical Features . . . . . . . . . . . . . . . . . . . . . . . . . . . . . . . . . . . . . . . . . . . . . . . . . . . . . . . . . . . . . . . . . 29
22
Installation
Positioning
• Place the refrigerator away from direct sunlight
and heat sources.
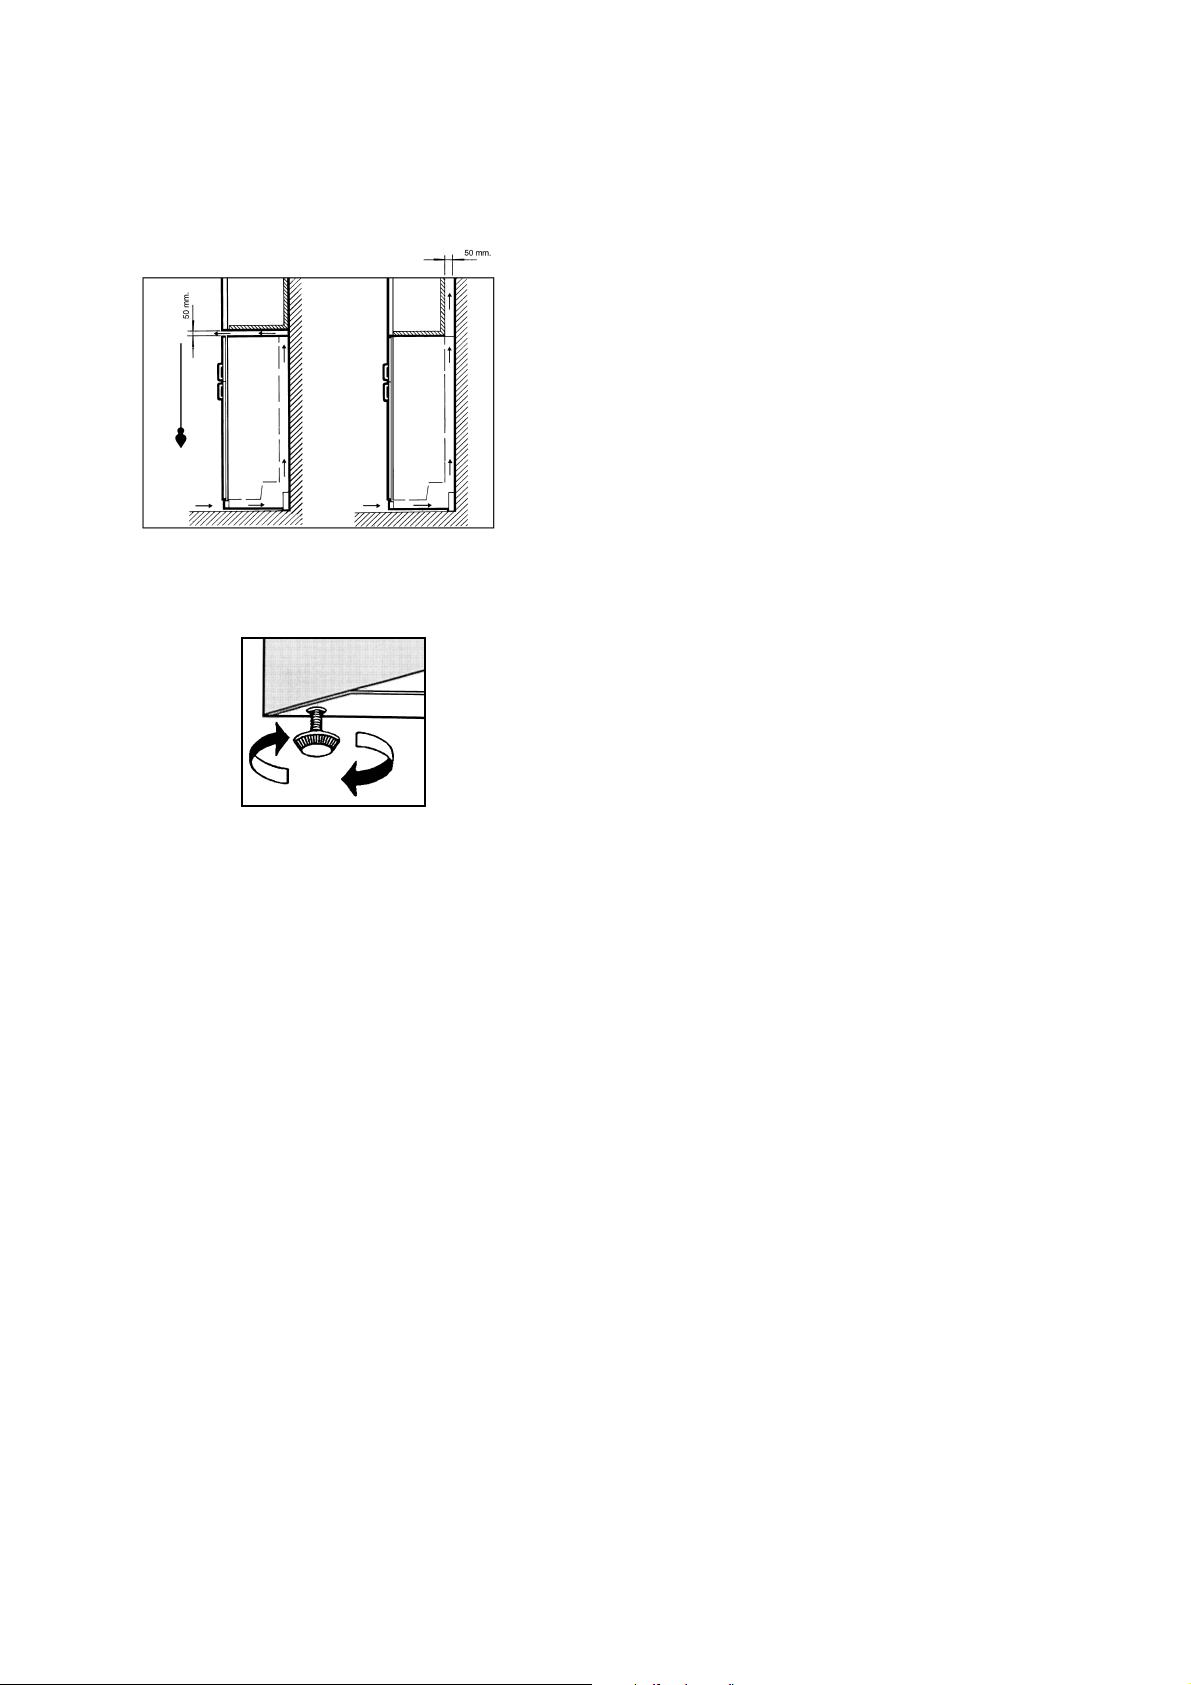
• Maintain recommended ventilation - see Fig. 1.
• Make sure the refrigerator is accurately levelled
turning the adjustable feet in order to avoid vibrations and noises, Fig. 2.
• This is a built in design to be aligned with other
furniture
• The appliance must be located in places of maximum temperature as follows:
SN +10 hasta +32ºC
N +16 hasta +32ºC
ST +18 hasta +38ºC
T +18 hasta +43ºC
If the temperature are higher than these both
above mentioned, the functions of appliance coudl
result reduced.
Cleaning the interior
• Do not use alcohol or any cleanig product containing alcohol because it can damage the cabinet.
• Before using the appliance for the first time wash
the interior whith luke warm water and some neutral soap so as to remove the typical smell of a
brand-new product arid then dry thoroughly.
• Do not use detergents or abrasive powders as
these will damage the finish.
• Remove security used for transportation.
Electrical connection
mBefore plugging the appliance make sure that the
voltage and frequency shown on the «Technical
Features» correspond to your home supply.
It is essential that the appliance be efficiently
earthed.
mFor this purpose the supply cable plug incorpora-
tes a special earth contact. If the sockets of your
domestic wiring system are not grounded, have
the appliance connected to a separate ground wire
in accordance with existing safety regulations.
«THE MANUFACTURER DECLINES TO ACCEPT
ANY LIABILITY IF THIS SAFETY RULE IS NOT
OBSERVED».
Starting – up
• Plug the appliance into the mains.
• Make sure the inner light turns on when opening
the door.
• Turn to intermediate position the knobs of the
«temperature regulator» «A» (See Control And
Use paragraph).
Fig. 1
Fig. 2
23
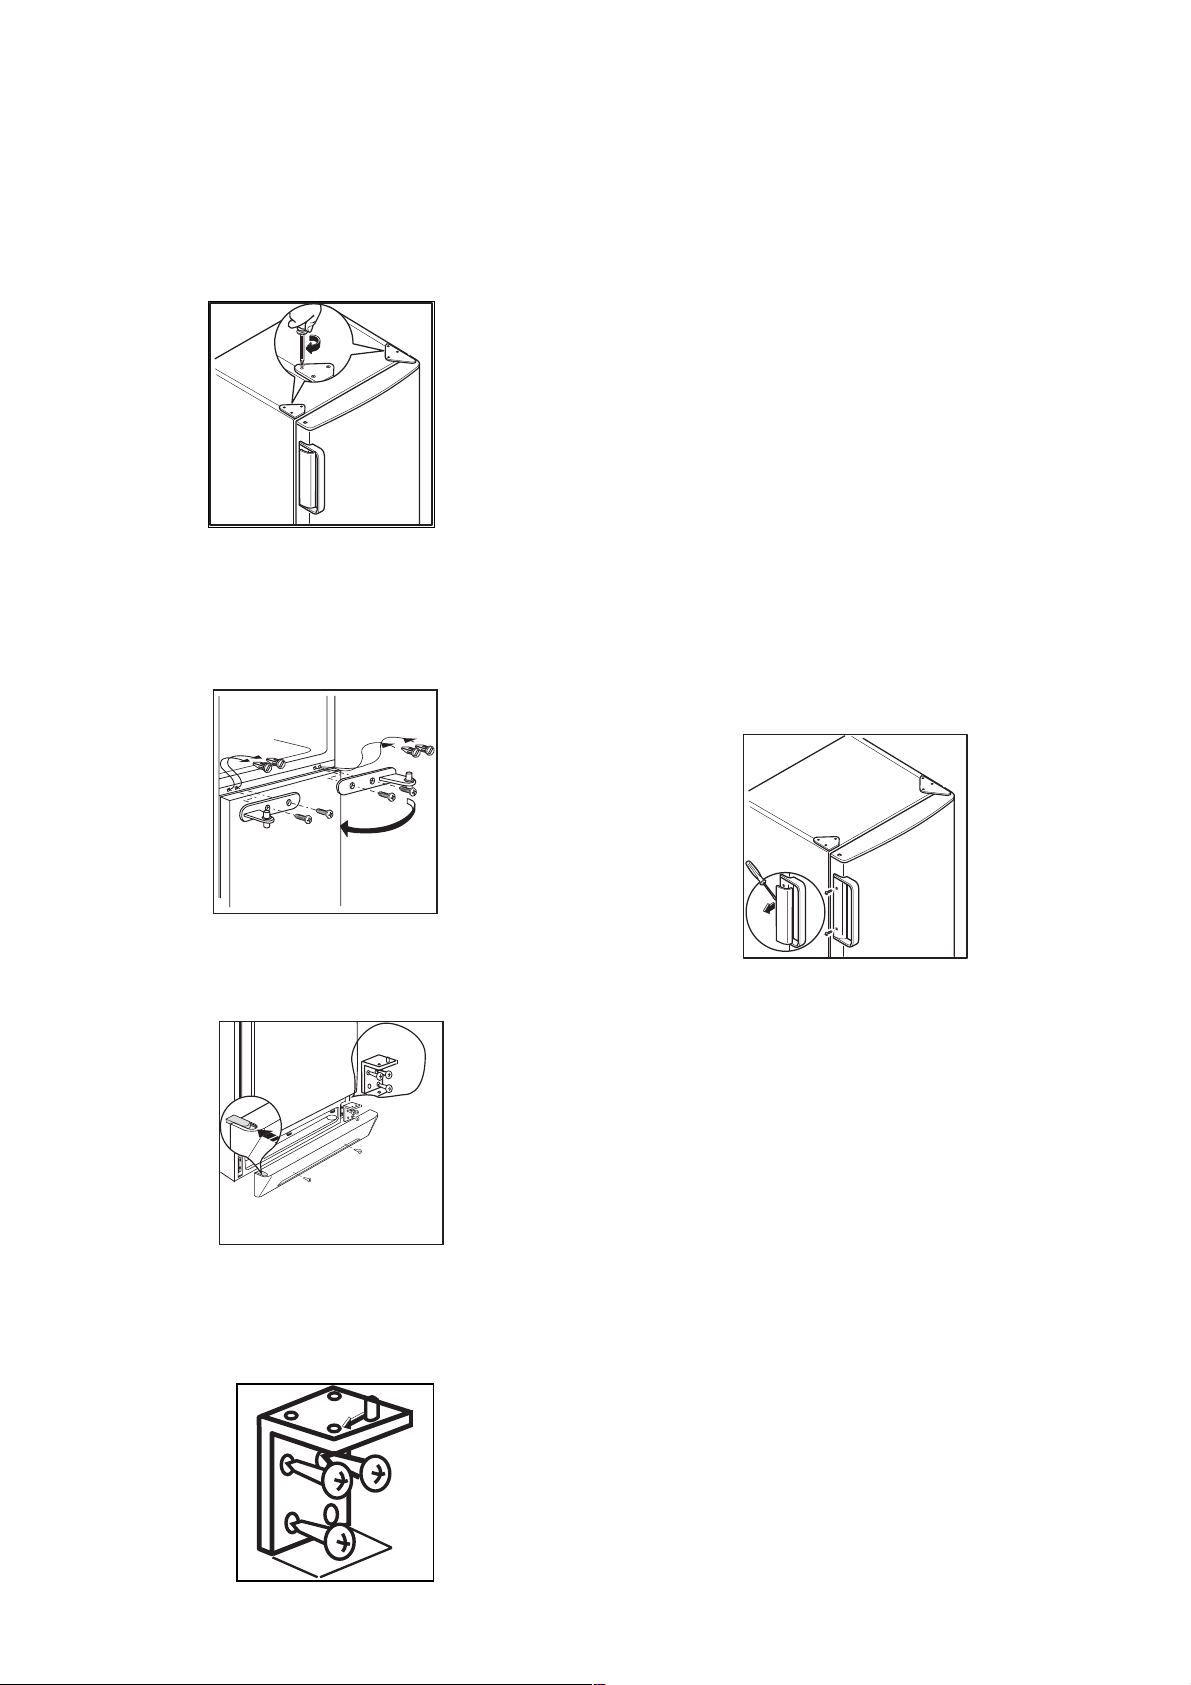
Changing the opening direction of the doors
Before carrying out any operations, remove the plug
from the power socket.
To change the opening direction of the door, proceed as follows:
1. Remove the upper hinge and the upper support
taking care for the upper door not to fall off ;
2. remove the upper door;
3. unscrew the middle hinge. Unscrew the plastic
plugs located on the opposite side of the central
hinge and introduce them in the holes occupied
before by the hinge;
4. remove the lower door;
5. pull off the ventilation grille which is fixed by two
screws;
6. remove the bottom hinge by unscrewing its fixing
screws;
7. using a 10 mm spanner, unscrew the hinge pin
and reassemble it on the opposite side of the
hinge;
8. adjust the level of the appliance by screwing out
the adjustable foot, or feet, at the bottom of the
cabinet using your fingers or a tool;
9. reassemble the lower hinge on the opposite side,
using the screws previously removed. Slide the
hole cover out of the ventilation grille by pushing
it in the direction of the arrow and reassemble it
on the opposite side;
10. refit the ventilation grille, fixing the screws;
11. reassemble the lower door;
12.reassemble the middle hinge on the opposite
side;
13.replace the upper door.
14.In your documentation bag you will find the upper
hinge and the upper support necessary to make
the reversibility. Please mount them in their relevant place.
15.Dismount the handle cover making pressure and
using a screwdriver. Dismantle the handles and
reassemble them on the opposite side. Cover the
holes with the plastic lids that were situated
where the handles are presently. Place the handle cover.
mm
Warning:
After having reversed the opening direction of
the doors check that all the screws are properly
tightened and that the magnetic seal adheres to
the cabinet. If the ambient temperature is cold
(i.e. in Winter), the gasket may not fit perfectly to
the cabinet. In that case, wait for the natural fitting of the gasket or accelerate this process by
heating up the part involved with a normal hairdrier.
PR1