

Page 1
68070 M
Ceramic glass induction hob
Placa vitrocerámica de cocción por inducción
Glasskeramisk induksjonsplatetopp
Installation and Operating Instructions
Instrucciones para el montaje y para el uso
Montasje- og brukerveiledning
Page 2

Dear Customer,
Please read these user instructions carefully and keep them to refer to
later.
Please pass the user instructions on to any future owner of the appliance.
The following symbols are used in the text:
1 Safety instructions
Warning! Information that affects your personal safety.
Important! Information that prevents damage to the appliance.
3 Useful tips and hints
2 Environmental information
2
Page 3

Contents
Operating Instructions. . . . . . . . . . . . . . . . . . . . . . . . . . . . . . . . . . . . . 4
Safety instructions. . . . . . . . . . . . . . . . . . . . . . . . . . . . . . . . . . . . . . . . . . . . . . 4
Description of the Appliance. . . . . . . . . . . . . . . . . . . . . . . . . . . . . . . . . . . . . 6
Cooking surface layout . . . . . . . . . . . . . . . . . . . . . . . . . . . . . . . . . . . . . . . . . . . 6
Digital display. . . . . . . . . . . . . . . . . . . . . . . . . . . . . . . . . . . . . . . . . . . . . . . . . . . 6
Residual heat indicator . . . . . . . . . . . . . . . . . . . . . . . . . . . . . . . . . . . . . . . . . . . 7
Operating the appliance. . . . . . . . . . . . . . . . . . . . . . . . . . . . . . . . . . . . . . . . . 8
Setting the heat setting . . . . . . . . . . . . . . . . . . . . . . . . . . . . . . . . . . . . . . . . . . 8
Switching the power function on and off . . . . . . . . . . . . . . . . . . . . . . . . . . . 9
Using the automatic warm-up function . . . . . . . . . . . . . . . . . . . . . . . . . . . . . 10
Safety cut-out . . . . . . . . . . . . . . . . . . . . . . . . . . . . . . . . . . . . . . . . . . . . . . . . . . 11
Tips on Cooking and Frying . . . . . . . . . . . . . . . . . . . . . . . . . . . . . . . . . . . . . . 11
Cookware for induction cooking zones. . . . . . . . . . . . . . . . . . . . . . . . . . . . . . 11
Tips on energy saving . . . . . . . . . . . . . . . . . . . . . . . . . . . . . . . . . . . . . . . . . . . . 12
Examples of cooking applications . . . . . . . . . . . . . . . . . . . . . . . . . . . . . . . . . . 13
Cleaning and Care . . . . . . . . . . . . . . . . . . . . . . . . . . . . . . . . . . . . . . . . . . . . . . 14
What to do if … . . . . . . . . . . . . . . . . . . . . . . . . . . . . . . . . . . . . . . . . . . . . . . . . 15
Disposal . . . . . . . . . . . . . . . . . . . . . . . . . . . . . . . . . . . . . . . . . . . . . . . . . . . . . . . 17
Installation Instructions . . . . . . . . . . . . . . . . . . . . . . . . . . . . . . . . . . . 17
Service . . . . . . . . . . . . . . . . . . . . . . . . . . . . . . . . . . . . . . . . . . . . . . . . . . . . . . 19
Assembly . . . . . . . . . . . . . . . . . . . . . . . . . . . . . . . . . . . . . . . . . . . . . . . . . . . . 58
3
Page 4

Operating Instructions
1 Safety instructions
Please comply with these instructions. If you do not, any damage re-
3
sulting is not covered by the warranty.
5 This appliance conforms with the following EU Directives:
– 73/23/EEC dated 19.02.1973 Low Voltage Directive
– 89/336/EEC dated 03.05.1989 EMC Directive inclusive of Amending
Directive 92/31/EEC
– 93/68/EEC dated 22.07.1993 CE Marking Directive
Correct use
• This appliance should be used only for normal domestic cooking and
frying of food.
• The appliance must not be used as a work surface or as a storage surface.
• Additions or modifications to the appliance are not permitted.
• Do not place or store flammable liquids, highly inflammable materials
or fusible objects (e.g. plastic film, plastic, aluminium) on or near the
appliance.
Children’s safety
• Small children must be kept away from the appliance.
• Only let bigger children work on the appliance under supervision.
General safety
• The appliance may only be installed and connected by trained, registered service engineers.
• Built-in appliances may only be used after they have built in to suitable built-in units and work surfaces that meet standards.
• In the event of faults with the appliance or damage to the glass ceramic (cracks, scratches or splits), the appliance must be switched off
and disconnected from the electrical supply, to prevent the possibility
of an electric shock.
• Repairs to the appliance must only be carried out by trained registered service engineers.
4
Page 5

Safety during use
• Remove stickers and film from the glass ceramic.
• There is the risk of burns from the appliance if used carelessly.
• Cables from electrical appliances must not touch the hot surface of
the appliance or hot cookware.
• Overheated fats and oils can ignite quickly. When cooking with fat or
oil (e.g. chips) do not leave the appliance unattended.
• Switch the cooking zones off after each use.
• Do not cover the oven’s steam outlet.
• When the oven is working, there is the danger of scalds from the
steam outlet.
• Users with implanted pacemakers should keep their upper body at
least 30 cm from induction cooking zones that are switched on.
• Risk of burns! Do not place objects made of metal, such as knives,
forks, spoons and saucepan lids on the cooking surface, as they can
get hot.
Safety when cleaning
• For cleaning, the appliance must be switched off and cooled down.
• For safety reasons, the cleaning of the appliance with steam jet or
high-pressure cleaning equipment is not permitted.
How to avoid damage to the appliance
• The glass ceramic can be damaged by objects falling onto it.
• The edge of the glass ceramic can be damaged by being knocked by
the cookware.
• Cookware made of cast iron, cast aluminium or with damaged bottoms can scratch the glass ceramic if pushed across the surface.
• Objects that melt and things that boil over can burn onto the glass
ceramic and should be removed straightaway.
• Do not use the cooking zones with empty cookware or without cookware.
• The ventilation gap of 5mm between the worktop and front of the
unit underneath it must not be covered.
5
Page 6
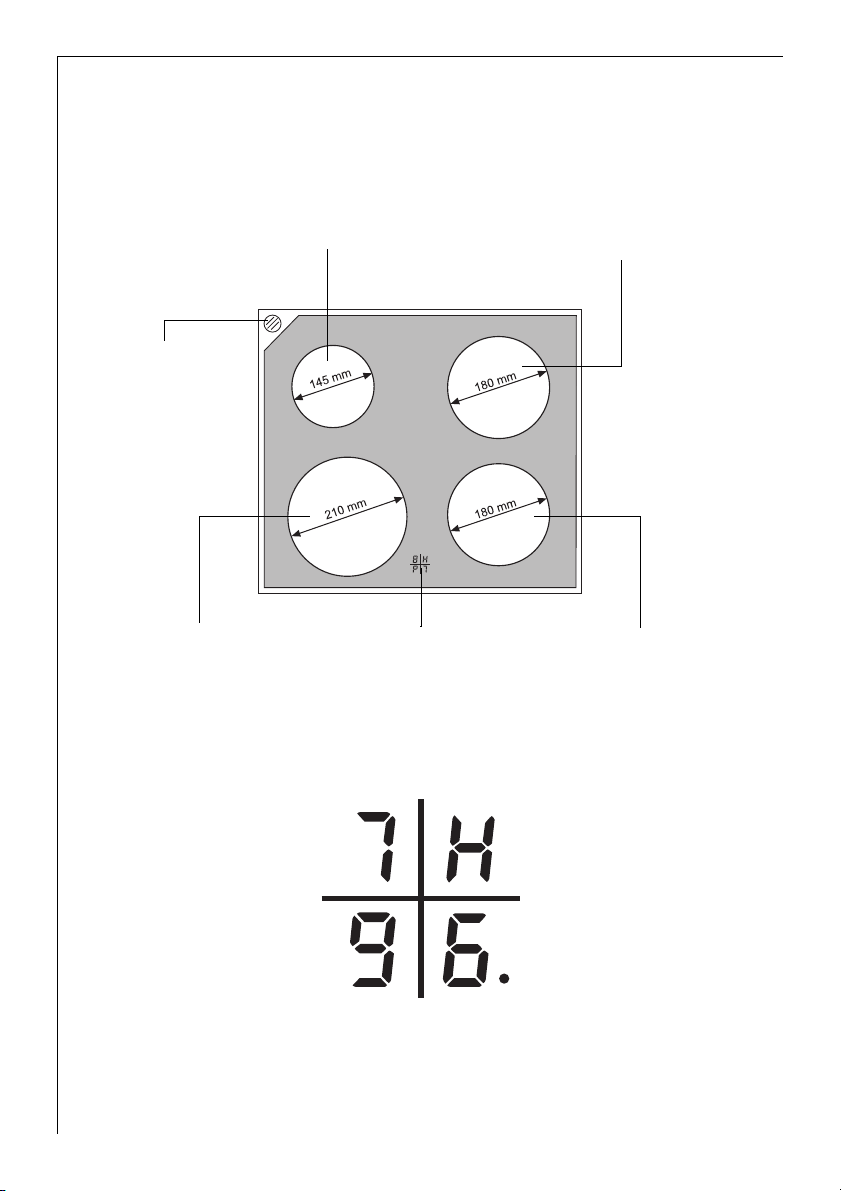
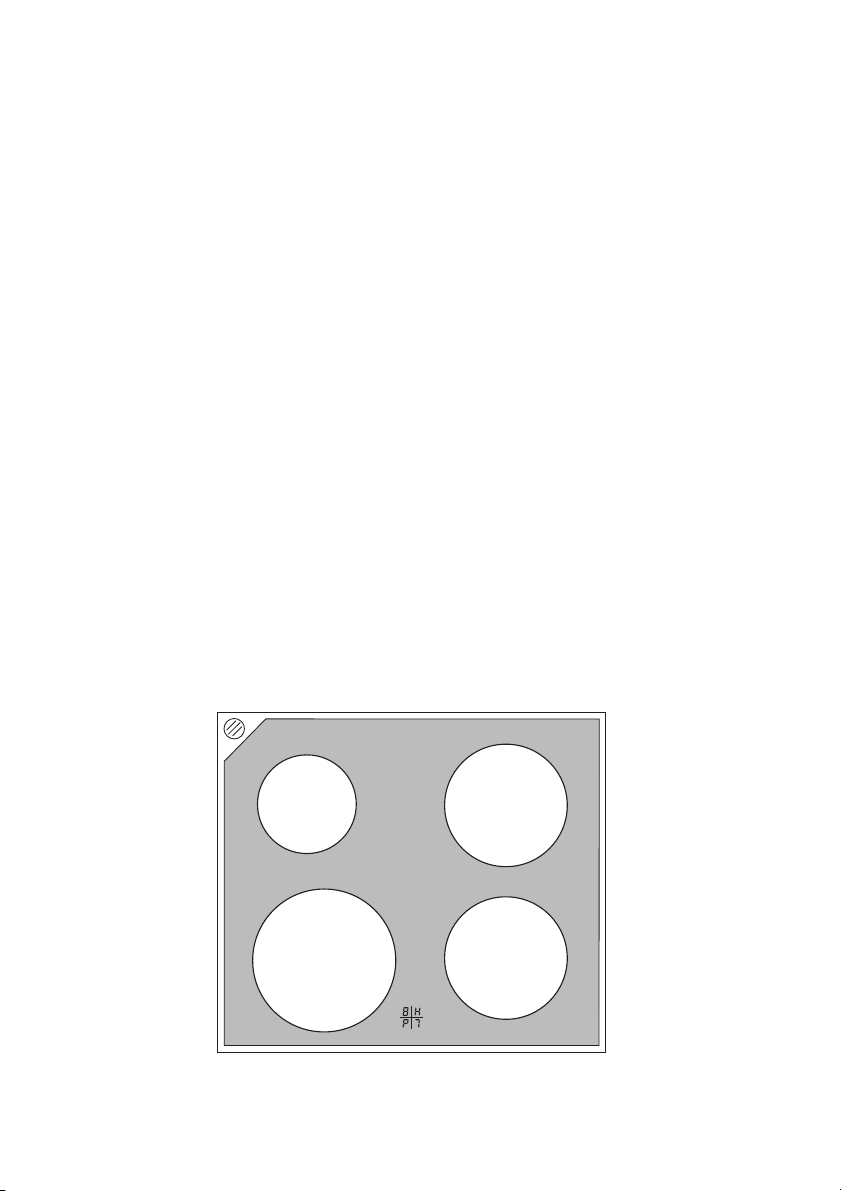
Description of the Appliance
Cooking surface layout
Induction cooking zone 1400W
with power function 1800W
Oven steam outlet
Induction cooking zone 1850 W
with power function 2500 W
Induction cooking zone 2300W
with power function 3200W
Digital display
cooking zone rear left
cooking zone front left
6
Display for
Display for
Digital display
Induction cooking zone 1850 W
with power function 2500 W
Display for
cooking zone rear right
Display for
cooking zone front right
Page 7
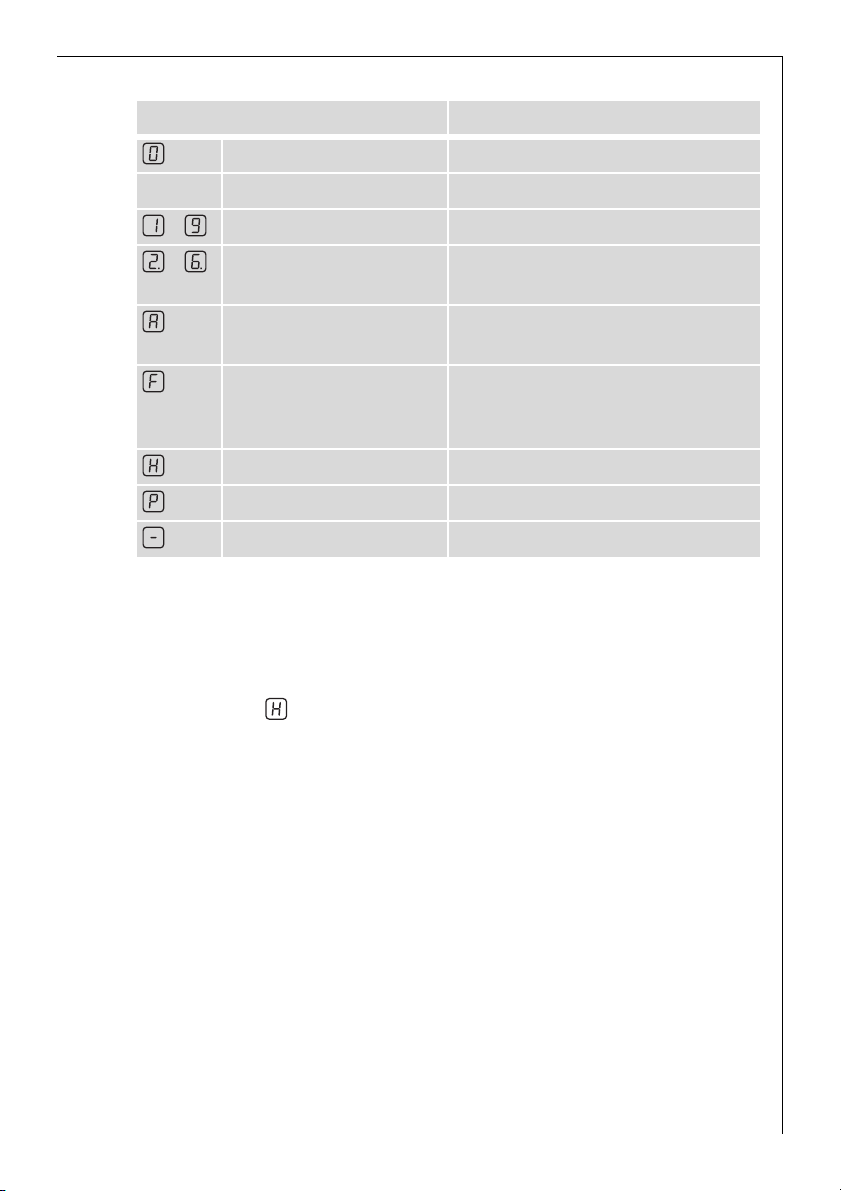
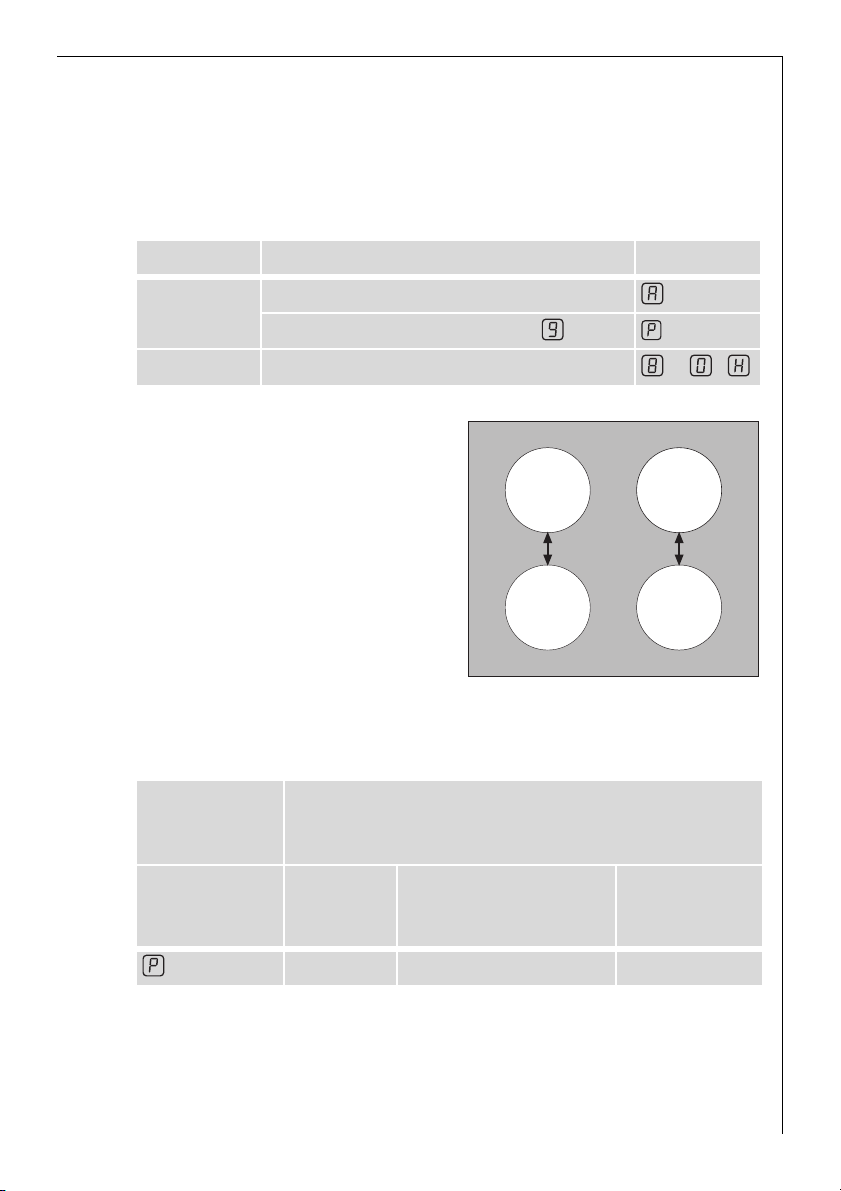
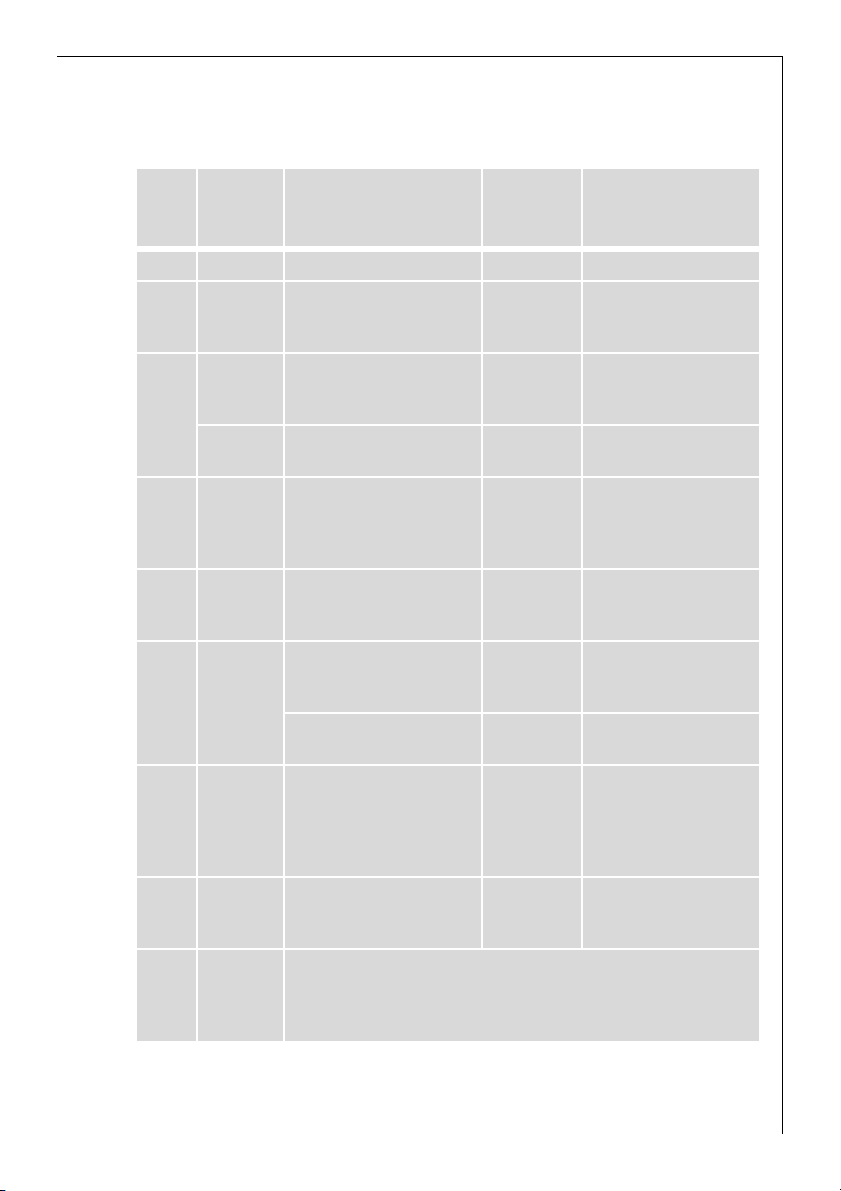
Display Description
Cooking zone is switched off
u Keep warm setting Keep warm setting is set
- Heat settings Heat setting is set
- Heating setting plus
decimal point
Automatic warm up
function
Pan detection Cookware is unsuitable or too
Residual heat Cooking zone is still hot
Power Power function is switched on
Safety cut-out Safety cut-out has been activated
Intermediate heat setting is set
Automatic warm-up function is
activated
small or no cookware has been
placed on the cooking zone
Residual heat indicator
1 Warning! Risk of burns from residual heat. After being switched off,
the cooking zones need some time to cool down. Look at the residual
heat indicator
.
3 Residual heat can be used for melting and keeping food warm.
The induction cooking zones create the heat required for cooking directly in the base of the cookware. The glass ceramic is merely heated
by the residual heat of the cookware.
The cooling fan switches itself on and off depending upon the temperature of the electronics.
7
Page 8
Operating the appliance
Use the induction cooking zones with suitable cookware.
3
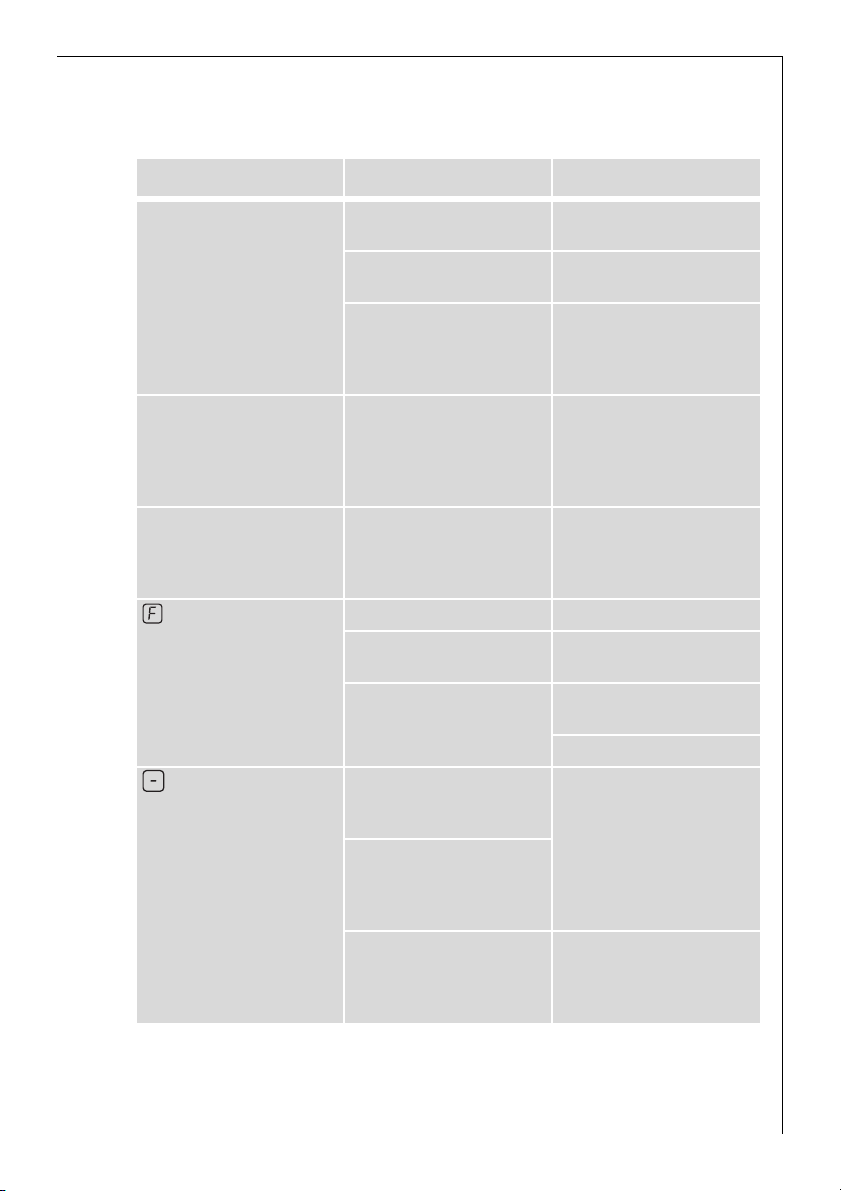
Setting the heat setting
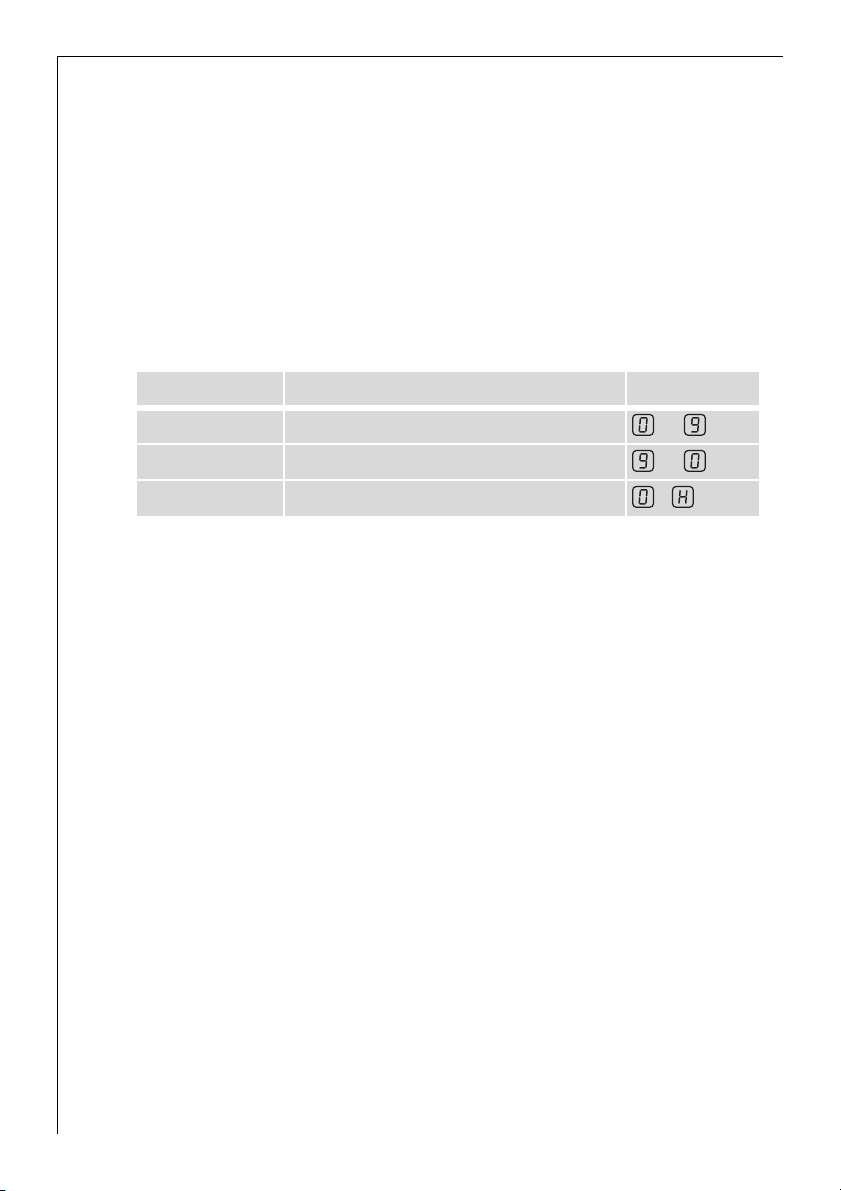
The heat can be set at 15 different levels (including intermediate settings) using the ring switches:
Intermediate settings are available between heat settings 2 to 7. These
are designated in the digital display with a decimal point.
Ring switch Display
To increase turn clockwise to
To decrease turn anti-clockwise to
To switch off set to zero /
3 Please follow the instructions from the manufacturer of the combina-
tion appliance as well.
8
Page 9
Switching the power function on and off
The power function makes more power available to the induction cooking zones, e.g. to bring a large quantity of water to the boil quickly.
The power function is activated for 10 minutes. After that the induction cooking zone automatically switches back to heat setting 9.
Ring switch Display
To switch on 1. briefly turn clockwise as far as possible
2. turn anti-clockwise again to
To switch off turn anti-clockwise to /
Power Management
The cooking zones have a maximum
power available to them.
If this power range is exceeded by
switching on the power function,
Power Management reduces the
heat setting of another cooking
zone.
The display for this cooking zone alternates for two minutes between
the set heat setting and the maximum possible heat setting. Thereafter the actual heat setting is
displayed.
Example:
Last
Other cooking zone
cooking zone
switched on
set
heat setting
set
heat set-
display actual
ting
9 7 alternating with 9 7
heat setting
9
Page 10
Using the automatic warm-up function
All cooking zones are equipped with an automatic warm-up function.
The automatic warm-up function sets the cooking zone to the highest
setting for a certain period of time and then automatically switches
back to the cooking setting that was originally set.
Ring switch Display
To switch on briefly turn clockwise as far as possible
turn anti-clockwise again and set the
required heat setting -
To switch off turn anti-clockwise and select a lower
heat setting
Heat
setting
Length of the
automatic warm up
[min:sec]
Intermediate
heat
Length of the
automatic warm up
[min:sec]
setting
v 0:10
1 0:10
2 0:10 2. 1:20
3 3:10 3. 4:20
4 5:50 4. 8:10
5 10:10 5. 10:30
6 2:00 6. 2:00
7 2:30
8 2:50
9 ---
to
10
Page 11
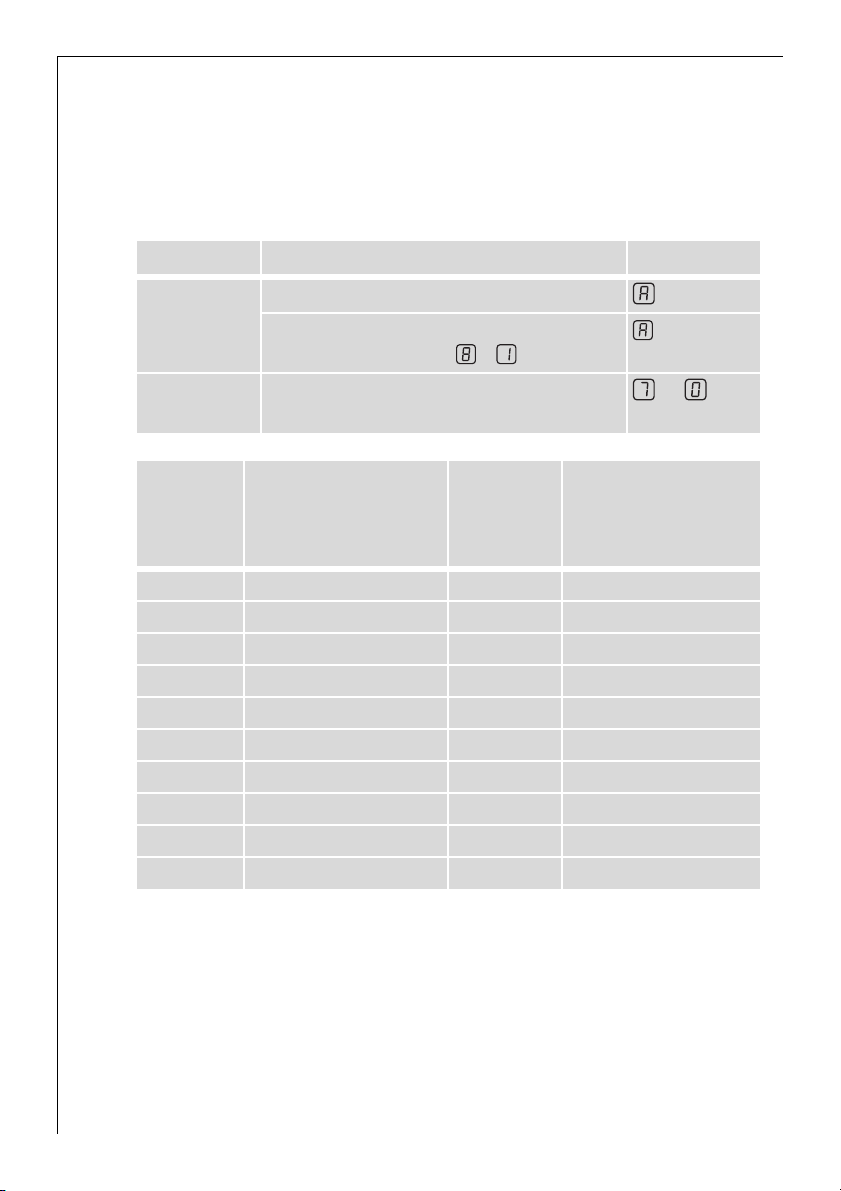
Safety cut-out
Induction cooking zones
• In the event of overheating (e.g. when a pan boils dry) the cooking
zone automatically switches itself off. is displayed. Before being
used again, the cooking zone must be set to
• If cookware that is not suitable is used, flashes for two minutes in
the cooking zone indicator. Then is displayed. Before being used
again, the cooking zone must be set to
• If one of the cooking zones is not switched off after a certain time, or
if the heat setting is not modified, the relevant cooking zone switches
off automatically.
Heat setting Switches off after
0 and cooled down.
0.
V, 1 - 2
3 - 4
5
6 - 9
6 hours
5 hours
4 hours
1.5 hours
Tips on Cooking and Frying
3
Information on acrylamides
According to the latest scientific knowledge, intensive browning of
food, especially in products containing starch, can constitute a health
risk due to acrylamides. Therefore we recommend cooking at the lowest
possible temperatures and not browning foods too much.
11
Page 12
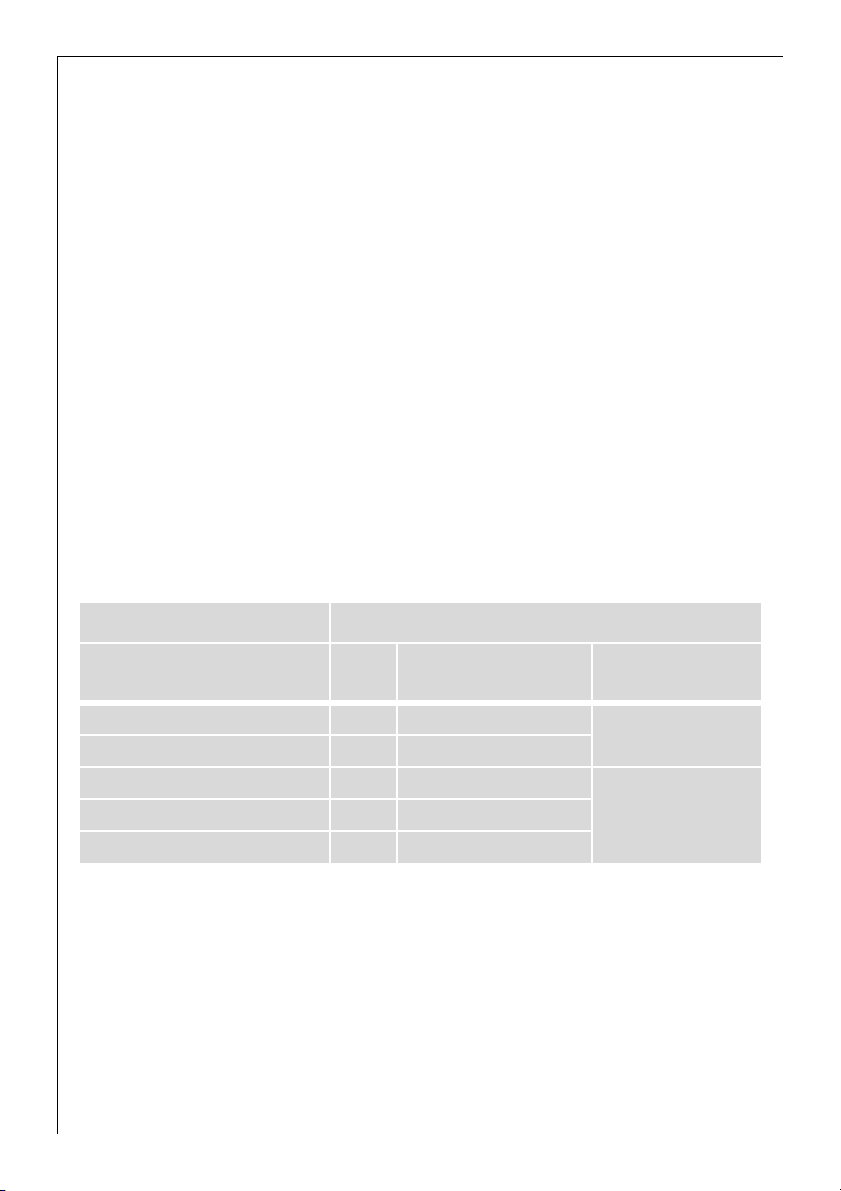
Cookware for induction cooking zones
Cookware made of suitable
Steel, enamelled steel yes
Cast iron yes
Stainless steel if appropriately labelled by the manufacturer
Aluminium, copper, brass ---
Glass, ceramic, porcelain ---
3 Cookware for induction cooking zones is labelled as suitable by the
manufacturer.
Test of suitability
Cookware is suitable for induction, if …
• ... a little water is heated on an induction cooking zone set to heat
setting 9 within a few seconds.
• ... a magnet sticks to the bottom of the cookware.
3 Certain cookware can make noises when being used on induction cook-
ing zones. These noises are not a fault in the appliance and do not affect operation in any way.
Pan size
Induction cooking zones adapt automatically to the size of the cookware bottom up to a certain limit. However the magnetic part of the
cookware bottom must have a minimum diameter depending upon the
size of the cooking zone.
3 The cookware must be placed centrally on the cooking zone.
Tips on energy saving
2 Place cookware on the cooking zone before it is switched on.
2 If possible, always place a lid on the cookware.
12
Page 13
Examples of cooking applications
The information given in the following table is for guidance only.
Heat
Cooking-
setting
The power function is suitable for heating large quantities of liquid.
process
0 Off position
Keeping
V
1-2
2-3
3-4
4-5 Boiling
6-7
7-8
9
food
warm
Melting
Solidi-
fying
Simmer-
ing on
low heat
Steaming
Braising
Gentle
Frying
Heavy
Frying
Boiling
Searing
Deep
frying
suitable for
Keeping cooked foods
warm
Hollandaise sauce,
melting butter, chocolate,
gelatine
Fluffy omelettes, baked
eggs
Simmering rice and milk-
based dishes
Heating up ready-cooked
meals
Steaming vegetables, fish
braising meat
Steaming potatoes 20-60 mins.
Cooking larger quantities
of food, stews and soups
Frying escalopes, veal
cordon bleu, cutlets, ris-
soles, sausages, liver, roux,
eggs, pancakes, dough-
nuts
Hash browns, loin steaks,
steaks, Flädle (pancakes
for garnishing soup)
Boiling large quantities of water, cooking pasta, searing meat
(goulash, pot roast), deep frying chips
Cooking
time
as required Cover
5-25 mins. Stir occasionally
10-40 mins. Cook with lid on
Add at least twice as
25-50 mins.
20-45 mins.
60-150
mins.
Steady
frying
5-15 mins.
per pan
much liquid as rice, stir
milk dishes part way
With vegetables add
only a little liquid (a
Use only a little liquid,
e. g.: max.
Up to 3 l liquid plus in-
Turn halfway through
Turn halfway through
Tips/Hints
through cooking
few tablespoons)
¼ l water
for 750 g potatoes
gredients
cooking
cooking
13
Page 14
Cleaning and Care
Take care! Risk of burns from residual heat.
1
1 Warning! Sharp objects and abrasive cleaning materials will damage
the appliance. Clean with water and washing up liquid.
1 Warning! Residues from cleaning agents will damage the appliance.
Remove residues with water and washing up liquid.
Cleaning the appliance after each use
1.Wipe the appliance with a damp cloth and a little washing up liquid.
2.Rub the appliance dry using a clean cloth.
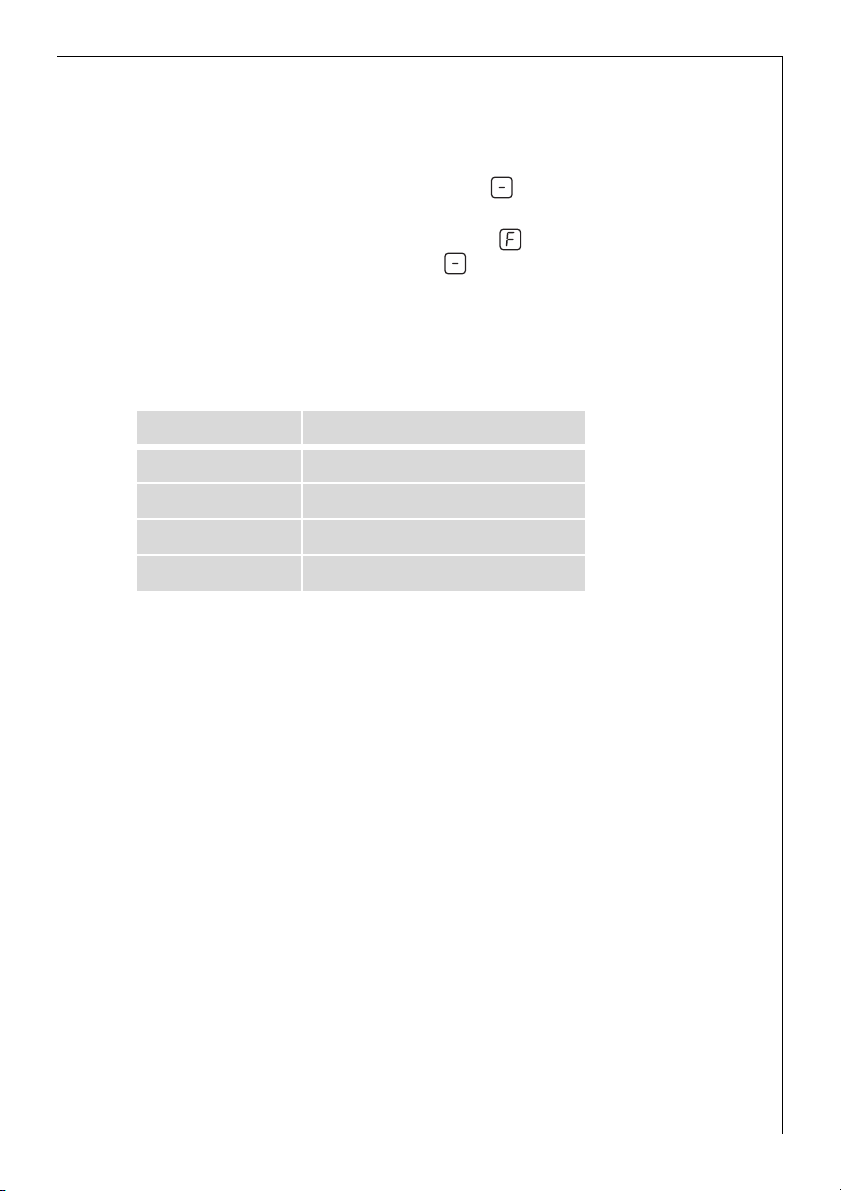
Removing deposits
1.Place a scraper on the glass ceramic surface at an angle.
2.Remove residues by sliding the blade over the surface.
3.Wipe the appliance with a damp cloth and a little washing up liquid.
4.Rub the appliance dry using a clean cloth.
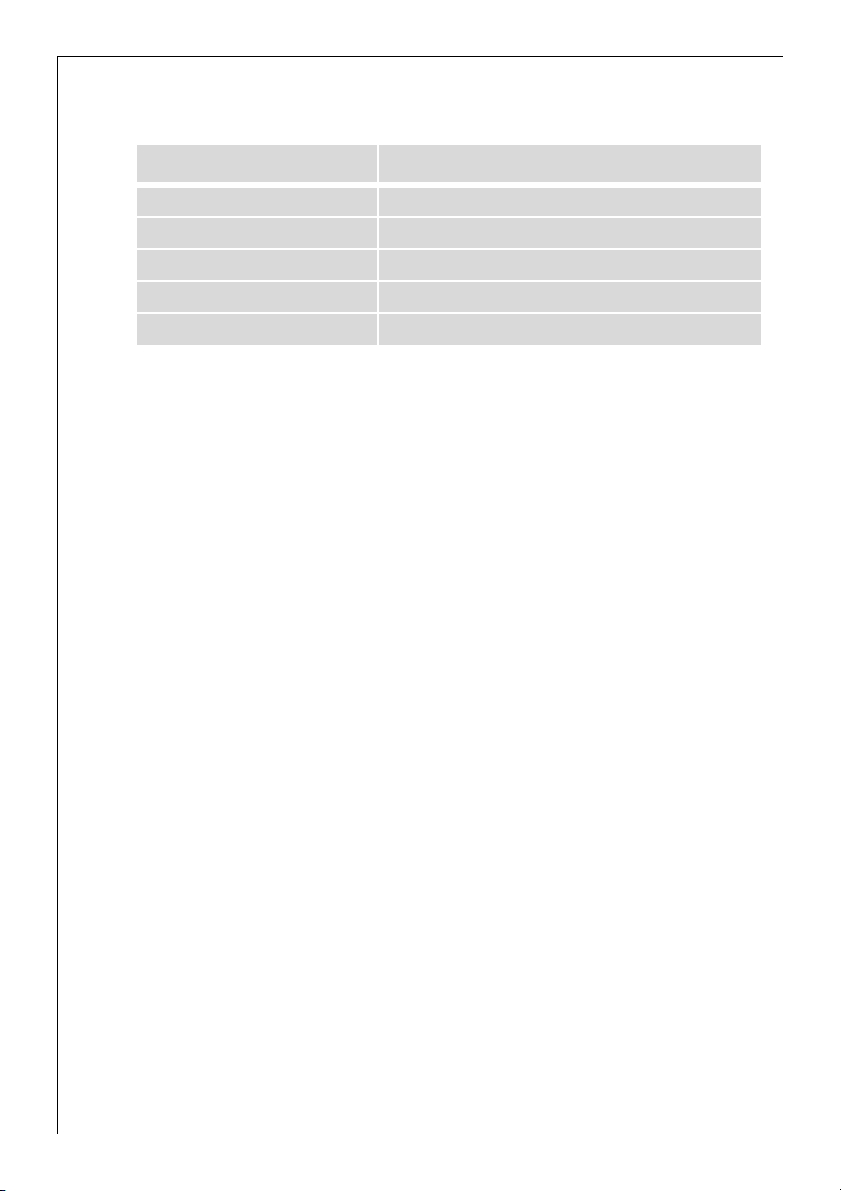
Remove
Type of dirt
sugar, food containing sugar yes ---
plastics, tin foil yes ---
limescale and water rings --- yes
fat splashes --- yes
shiny metallic discolorations --- yes
*Scrapers and cleaners for glass ceramic and stainless steel can be purchased in specialist shops
immediately
when the appliance has
cooled down
using
a scraper*
cleaner for glass ce-
ramic or stainless
steel*
3 Remove stubborn residues with a cleaner for glass ceramic or stainless
steel.
3 Scratches or dark stains on the glass ceramic that cannot be removed
do not however affect the functioning of the appliance.
14
Page 15
What to do if …
Problem Possible cause Remedy
The cooking zones are not
functioning.
The residual heat indicator
is not displaying anything
flashes Unsuitable cookware Use suitable cookware
is lit Overheating protection for
The combination appliance
is not switched on.
The desired heat setting is
not set.
The fuse in the house’s
electrical wiring (fuse box)
has been tripped.
Combination appliance
was connected to the electricity supply when the
cooking surface was installed.
The cooking zone was only
on for a short time and is
therefore not hot
No cookware on the cooking zone
The diameter of the bottom of the cookware is too
small for the cooking zone
the cooking zone has been
triggered
When switching on the
combination appliance, the
ring switch was not in the
Off position
Cooking zone without
cookware for longer than
two minutes
Switch on the appliance.
Set the heat setting.
Check the fuse.
If the fuses trip a number
of times, please call an authorised electrician.
Take fuse out and re-insert
(fuse box), or switch off
and on again
If the cooking zone is supposed to be hot, call the
Customer Service Department.
Place cookware on the
cooking zone
Move onto a smaller cooking zone
Use suitable cookware
Switch off cooking zone
Switch cooking zone on
again
Switch off cooking zone,
place cookware on cooking zone, switch cooking
zone on
If you are unable to remedy the problem by following the above
suggestions, please contact your dealer or the Customer Care Department.
15
Page 16

1 Warning! Repairs to the appliance are only to be carried out by quali-
fied service engineers. Considerable danger to the user may result from
improper repairs.
3 If the appliance has been wrongly operated, the visit from the customer
service technician or dealer may not take place free of charge, even
during the warranty period.
16
Page 17

Disposal
Packaging material
2
The packaging materials are environmentally friendly and can be recycled. The plastic components are identified by markings, e.g. >PE<,
>PS<, etc. Please dispose of the packaging materials in the appropriate
container at the community waste disposal facilities.
2 Old appliance
The symbol
product may not be treated as household waste. Instead it shall be
handed over to the applicable collection point for the recycling of electrical and electronic equipment. By ensuring this product is disposed of
correctly, you will help prevent potential negative consequences for the
environment and human health, which could otherwise be caused by
inappropriate waste handling of this product. For more detailed information about recycling of this product, please contact your local city
office, your household waste disposal service or the shop where you
purchased the product.
W on the product or on its packaging indicates that this
17
Page 18

Installation Instructions
Safety instructions
The laws, ordinances, directives and standards in force in the country of
use are to be followed (safety regulations, proper recycling in accordance with the regulations, etc.)
Installation may only be carried out by a qualified electrician.
The minimum distances to other appliances are to be observed.
Drawers may only be installed with a with protective board directly
under the appliance.
The cut surfaces of the work top are to be protected against moisture
using a suitable sealant.
The sealant seals the appliance to the work top with no gap.
Do not use silicon sealant between the appliance and the work top.
Avoid installing the appliance next to doors and under windows. Otherwise hot cookware may be knocked off the rings when doors and windows are opened.
1 Warning!
Risk of injury from electrical current.
• Before connecting up the hob, disconnect the combination appliance
from the mains.
• Observe electrical safety rules.
• Ensure anti-shock protection through correct installation by a quali-
fied electrician.
• Rated voltage of the combined appliances must match.
1 Important!
Risk of injury from electrical current.
Loose and inappropriate plug and socket connections can lead to
overheating of the plug.
• Fit plug and socket connections together properly.
A device must be provided in the electrical installation which allows the
appliance to be disconnected from the mains at all poles with a contact
opening width of at least 3 mm.
Suitable isolation devices include line protecting cut-outs, fuses (screw
type fuses are to be removed from the holder), earth leakage trips and
contactors.
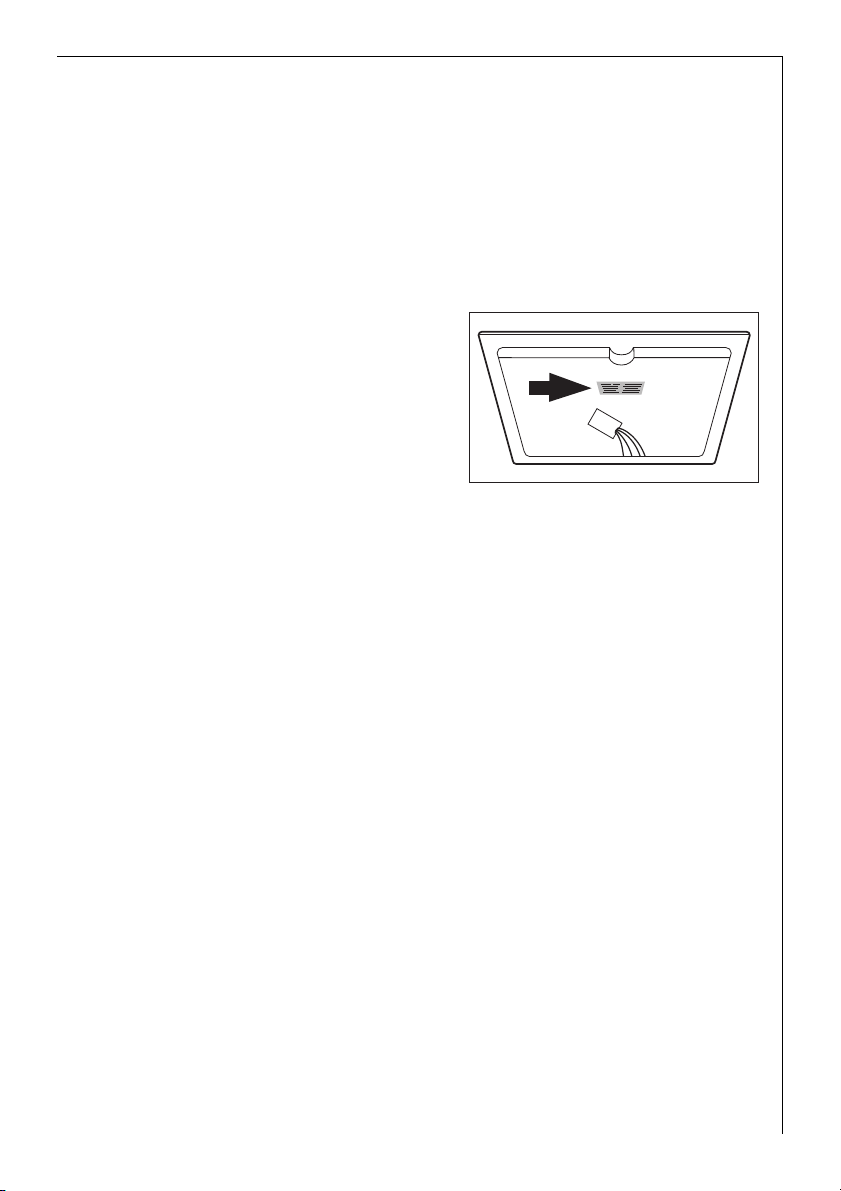
Move the oven steam outlet pipe with a screwdriver to the centre of
the opening in the hob. Then put the outlet connection piece over the
pipe.
1 • Moving the panel ring under pressure can scratch the coated metal
surfaces.
18
Page 19
Service
In the event of technical faults, please first check whether you can
remedy the problem yourself with the help of the operating instructions (section “What to do if…”).
If you were not able to remedy the problem yourself, please contact the
Customer Care Department or one of our service partners.
In order to be able to assist you
quickly, we require the following
information:
– Model description
– Product number (PNC)
– Serial number (S No.)
(for numbers see rating plate)
– Type of fault
– Any error messages displayed by
the appliance
– three digit letter-number combination for glass ceramic
So that you have the necessary reference numbers from your appliance
at hand, we recommend that you write them in here:
Model description: .....................................
PNC: .....................................
S No: .....................................
19
Page 20

Distinguida cliente, distinguido cliente:
lea atentamente estas instrucciones de uso y consérvelas para consultas
posteriores.
Entréguelas a eventuales propietarios posteriores del aparato.
En el texto se utilizan los siguientes símbolos:
1 Indicaciones para la seguridad
¡Advertencia! Indicaciones que sirven para su seguridad personal.
¡Atención! Indicaciones que sirven para prevenir daños en el aparato.
3 Notas y consejos prácticos
2 Información medioambiental
20
Page 21

Índice de materias
Instrucciones para el uso . . . . . . . . . . . . . . . . . . . . . . . . . . . . . . . . . . 22
Indicaciones para la seguridad . . . . . . . . . . . . . . . . . . . . . . . . . . . . . . . . . . . 22
Descripción del aparato . . . . . . . . . . . . . . . . . . . . . . . . . . . . . . . . . . . . . . . . . 24
Equipamiento zona de cocción. . . . . . . . . . . . . . . . . . . . . . . . . . . . . . . . . . . . . 24
Indicador digital. . . . . . . . . . . . . . . . . . . . . . . . . . . . . . . . . . . . . . . . . . . . . . . . . 24
Indicador de calor residual . . . . . . . . . . . . . . . . . . . . . . . . . . . . . . . . . . . . . . . . 25
Manejo del aparato. . . . . . . . . . . . . . . . . . . . . . . . . . . . . . . . . . . . . . . . . . . . . 26
Ajuste del nivel de cocción . . . . . . . . . . . . . . . . . . . . . . . . . . . . . . . . . . . . . . . . 26
Conexión y desconexión de la función Power . . . . . . . . . . . . . . . . . . . . . . . . 27
Uso de la función de cocción termostática. . . . . . . . . . . . . . . . . . . . . . . . . . . 28
Desconexión de seguridad . . . . . . . . . . . . . . . . . . . . . . . . . . . . . . . . . . . . . . . . 29
Consejos para cocinar y asar . . . . . . . . . . . . . . . . . . . . . . . . . . . . . . . . . . . . . 29
Recipientes para zonas de cocción de inducción . . . . . . . . . . . . . . . . . . . . . . 30
Consejos para ahorrar energía . . . . . . . . . . . . . . . . . . . . . . . . . . . . . . . . . . . . . 30
Ejemplos de aplicación para cocinar . . . . . . . . . . . . . . . . . . . . . . . . . . . . . . . . 31
Limpieza y mantenimiento. . . . . . . . . . . . . . . . . . . . . . . . . . . . . . . . . . . . . . . 32
¿Qué hacer cuando … . . . . . . . . . . . . . . . . . . . . . . . . . . . . . . . . . . . . . . . . . . . 33
Eliminación de desechos. . . . . . . . . . . . . . . . . . . . . . . . . . . . . . . . . . . . . . . . . 34
Instrucciones de montaje. . . . . . . . . . . . . . . . . . . . . . . . . . . . . . . . . . 35
Servicio posventa. . . . . . . . . . . . . . . . . . . . . . . . . . . . . . . . . . . . . . . . . . . 37
Montaje . . . . . . . . . . . . . . . . . . . . . . . . . . . . . . . . . . . . . . . . . . . . . . . . . . . . . 58
21
Page 22

Instrucciones para el uso
1 Indicaciones para la seguridad
Observe estas indicaciones, ya que en caso de daños se extingue todo
3
derecho de garantía.
5 Este aparato es conforme a las siguientes directivas CE:
– 73/23/CEE del 19.02.1973 Directiva de Baja Tensión
– 89/336/CEE del 03.05.89 “Directiva de Compatibilidad Electromagné-
tica”, incluyendo Directiva de modificación 92/31/CEE
– 93/68/CEE del 22.07.93 Directiva de Marcación CE
Uso conforme al destino
• Este aparato sólo se debe utilizar para la cocción y el asado de alimentos a nivel doméstico.
• El aparato no se debe utilizar como superficie de trabajo o para depositar objetos.
• No se permite realizar modificaciones en el aparato.
• No se permite colocar o almacenar líquidos inflamables, materiales
fácilmente inflamables u objetos que se podrían fundir (p.ej. láminas,
plásticos, aluminio) encima del aparato o en su proximidad.
22
Seguridad de los niños
• Los niños pequeños se tienen que mantener siempre alejados del aparato.
• Niños de máyor edad solo deben trabajar en el aparato bajo la supervisión de un adulto.
Seguridad general
• El montaje y la conexión del aparato sólo deben ser realizados por
técnicos cualificados y autorizados.
• Los aparatos empotrables sólo se deben utilizar después de su instalación en armarios empotrados y encimeras normalizados y adecuados.
• En caso de fallos en el aparato o daños en la vitrocerámica (roturas,
grietas o fisuras), el aparato se tiene que desconectar y separar de la
red eléctrica para evitar una posible electrocución.
• Las reparaciones en el aparato deben ser ejecutadas únicamente por
técnicos cualificados y autorizados.
Page 23

Seguridad durante el uso
• Elimine las etiquetas adhesivas y láminas de la vitrocerámica.
• En caso de trabajo descuidado existe peligro de quemaduras en el
aparato.
• Los cables de aparatos eléctricos no deben entrar en contacto con la
superficie caliente del aparato o con ollas calientes.
• Grasas y aceites sobrecalentados se encienden con facilidad. Los procesos de cocción con grasa o aceite (p.ej. patatas fritas) no se deben
dejar sin vigilancia.
• Desconecte las zonas de cocción después de cada uso.
• No tapar la salida de vapor del horno.
• Durante el uso del horno existe peligro de quemaduras en la salida de
vapor.
• Los usuarios con marcapasos implantados deberían mantener una
distancia mínima de 30 cm entre la parte superior del cuerpo y las zonas de cocción de inducción.
• ¡Peligro de quemaduras! No coloque objetos metálicos, p.ej. cuchillos,
tenedores, cucharas y tapas en la encimera, dado que se pueden calentar.
Seguridad en la limpieza
• Para la limpieza, el aparato tiene que estar desconectado y enfriado.
• Por razones de seguridad, no se permite limpiar el aparato con un
limpiador de chorro de vapor o de alta presión.
Prevención de daños en el aparato
• La vitrocerámica puede quedar dañada por la caída de objetos.
• Golpes con las ollas pueden dañar el borde de la vitrocerámica.
• Al desplazar ollas de hierro fundido, de fundición de aluminio o con
bases defectuosas se puede rayar la vitrocerámica.
• Los objetos fundibles y los alimentos rebosados se pueden quemar en
la vitrocerámica y se deberían eliminar inmediatamente.
• No utilice las zonas de cocción con recipientes vacíos o sin recipientes.
• No se debe cubrir la rendija de ventilación de 5mm entre la encimera
y el frontal de mueble situado por debajo.
23
Page 24

Descripción del aparato
Equipamiento zona de cocción
Zona de cocción de inducción 1400W
con función Power 1800W
Salida de vapor
del horno
Zona de cocción de inducción 1850 W
con función Power 2500 W
Zona de cocción de
inducción 2300W
con función Power 3200W
Indicador digital
por la zona de cocción
posterior izquierda
por la zona de cocción
anterior izquierda
24
Indicación
Indicación
Indicador digital
Zona de cocción de
inducción 1850 W
con función Power 2500 W
Indicación
por la zona de cocción
posterior derecha
Indicación
por la zona de cocción
anterior derecha
Page 25

Indicador Descripción
La zona de cocción está desconec-
tada
u Nivel de mantenimiento
de temperatura
- Niveles El nivel está ajustado
- Niveles de cocción con
punto decimal
Función de cocción ter-
mostática
Detector de ollas El recipiente es inapropiado o de-
Calor residual La zona de cocción todavía está
Power La función Power está activada
Desconexión de seguri-
dad
El nivel de mantenimiento están
ajustados
Se ha ajustado un nivel intermedio
La función de cocción termostática está activa
masiado pequeño, o no se ha colocado ningún recipiente
caliente
La desconexión de seguridad está
activa
Indicador de calor residual
1 ¡Advertencia! Peligro de quemaduras por el calor residual. Tras la des-
conexión, las zonas de cocción necesitan un cierto tiempo para enfriarse. Observe el indicador de calor residual
.
3 El calor residual se puede aprovechar para fundir y para mantener ca-
lientes los alimentos.
Las zonas de cocción de inducción generan el calor necesario para la
cocción directamente en la base del recipiente. La vitrocerámica se calienta únicamente por el calor devuelto por los recipientes.
El ventilador de refrigeración se conecta y desconecta automáticamente en función de la temperatura del sistema electrónico.
25
Page 26

Manejo del aparato
Utilice las zonas de cocción de inducción con recipientes apropiados.
3
Ajuste del nivel de cocción
Los conmutadores de zonas de cocción permiten ajustar la potencia de
cocción, a elección, en 15 niveles (con posiciones intermedias).
Las posiciones intermedias se pueden seleccionar en los niveles 2 a 7.
Están marcadas en la indicación digital con un punto decimal.
Conmutador de zonas de cocción Indicador
Aumentar girar hacia la derecha hasta
Reducir girar hacia la izquierda hasta
Desconexión poner a cero /
3 Observe también las instrucciones de uso del aparato combinado.
26
Page 27

Conexión y desconexión de la función Power
La función Power pone a disposición de las zonas de cocción por inducción una mayor potencia, p.ej. para hervir rápidamente una gran cantidad de agua.
La función Power se activa durante 10 minutos. A continuación, la zona
de cocción por inducción conmuta automáticamente a la potencia 9.
Interruptor de zonas de cocción indicador
Conexión 1. girar brevemente hacia la derecha,
sobrepasando el tope final
2. girar nuevamente hacia la izquierda a
Desconexión girar hacia la izquierda a /
Power-Management
Las zonas de cocción disponen de
una potencia máxima.
Si este margen de potencia se sobrepasa al conectar la función
Power, el Power-Management reduce el nivel de cocción de otra zona
de cocción.
La indicación de la zona de cocción
en cuestión alterna durante dos minutos entre el nivel de cocción ajustado y el nivel máximo posible. A
continuación, se indica el nivel de
cocción efectivo.
Ejemplo:
Última
Otra zona de cocción
zona de cocción conectada
Nivel de cocción
ajustado
Nivel de
cocción
ajustado
Indicador Nivel de coc-
9 7 alternando con 9 7
ción
efectivo
27
Page 28

Uso de la función de cocción termostática
Todas las zonas de cocción están equipadas con una función de cocción
termostática. La función de cocción termostática ajusta la zona de cocción para un determinado tiempo a la potencia máxima y conmuta entonces automáticamente al nivel ajustado.
Conmutador de zonas de cocción Indicador
Conexión girar el mando hacia la derecha hasta
llegar al tope final
girar de nuevo hacia la izquierda y
ajustar el nivel deseado -
Desconexión girar hacia la izquierda y seleccionar
un nivel más bajo
Nivel de
cocción
v 0:10
1 0:10
2 0:10 2. 1:20
3 3:10 3. 4:20
4 5:50 4. 8:10
5 10:10 5. 10:30
6 2:00 6. 2:00
7 2:30
8 2:50
9 ---
Duración de la
cocción termostática [min:seg]
Nivel
intermedio
Duración de la
cocción termostática [min:seg]
hasta
28
Page 29

Desconexión de seguridad
Zonas de cocción de inducción
• En caso de sobrecalentamiento (p.ej. al calentar una olla con todo el
líquido evaporado), la zona de cocción se desconecta automáticamente. Se muestra . Antes del nuevo uso, la zona de cocción se tiene que ajustar a
• Si se utilizan ollas inapropiadas, parpadea durante dos minutos en
la indicación de la zona de cocción. A continuación se indica . Antes del nuevo uso, la zona de cocción se tiene que ajustar a
• Si, al cabo de un determinado tiempo, no se desconecta una de las
zonas de cocción o no se modifica la temperatura, la zona de cocción
en cuestión se desconecta automáticamente.
Nivel de cocción Desconexión al cabo de
0 y haberse enfriado.
0.
V, 1 - 2
3 - 4
5
6 - 9
6 horas
5 horas
4 horas
1,5 horas
Consejos para cocinar y asar
Indicación con respecto a la acrilamida
3
Según los últimos conocimientos científicos, un tostado intenso de los
alimentos, especialmente en productos que contienen almidón, puede
representar un peligro para la salud debido a la acrilamida. Por esta razón, recomendamos efectuar la cocción a bajas temperaturas y no tostar excesivamente los alimentos.
29
Page 30

Recipientes para zonas de cocción de inducción
Material de los recipientes apto
Acero, acero esmaltado sí
Hierro fundido sí
Acero inoxidable si está marcado en consecuencia por el fabricante
Aluminio, cobre, latón ---
Vidrio, cerámica, porcelana ---
3 Los recipientes aptos para zonas de cocción de inducción están identifi-
cados por el fabricante.
Prueba de aptitud
Los recipientes son aptos para inducción si ...
• ... un poco de agua en una zona de cocción de inducción con el nivel
de cocción 9 se calienta en pocos segundos.
• ... un imán queda adherido en la base del recipiente.
3 Determinados recipientes pueden producir ruidos durante el uso en zo-
nas de cocción de inducción. Estos ruidos no representan ningún fallo
del aparato y no perjudican su función de ninguna manera.
Tamaño de las ollas
Dentro de ciertos límites, las zonas de cocción de inducción se adaptan
automáticamente al tamaño de la base del recipiente. Sin embargo, la
parte magnética de la base del recipiene debe tener un diámetro mínimo según el tamaño de la zona de cocción.
3 Los recipientes se tienen que colocar en posición centrada en las zonas
de cocción.
Consejos para ahorrar energía
2 Coloque la olla en la zona de cocción antes de conectarla.
2 A ser posible, cierre las ollas siempre con una tapa.
30
Page 31

Ejemplos de aplicación para cocinar
Los datos que figuran en la siguiente tabla son valores orientativos.
Proceso
Nivel
0 Posición OFF
V
1-2
2-3 Hinchar
3-4
4-5 Cocción
6-7
7-8
9
La función Power es apta para hervir grandes cantidades de líquido.
de
cocción
Mantener
caliente
Fundir
Cuajar Tortilla francesa, flan 10 -40 min. Cocer con tapa
Rehogar
Estofar
Asado
suave
Asado a
fuego
vivo
Llevar a
ebulli-
ción
Sofreír
Freír
apto para Duración Consejos
Mantener caliente
alimentos cocidos
Salsa holandesa,
fundir mantequilla,
chocolate, gelatina
Hinchar arroz o platos
con leche
Calentar platos prepara-
dos
Estofar verdura, pescado
Estofar carne
Estofar patatas 20-60 min.
Preparación de grandes
cantidades de alimentos,
cocidos y sopas
Escalope, cordon bleu,
chuletas, hamburguesas,
salchichas, hígado, hari-
na tostada, huevos, torti-
llas, carpas fritas
Tortitas de patata, lomo,
bistecs, tortitas
Hervir grandes cantidades de agua, hervir ñoquis, dorar carne
(gulash, asado), freír patatas
según las
necesidades
5 -25 min. Remover entre medio
Añadir al menos la do-
ble cantidad de líqui-
25 -50 min.
Para verdura, añadir un
20-45 min.
60-150
min.
Cocción
continua
5-15 min.
por sartén
poco de líquido (unas
Utilizar poco líquido,
Cubrir
do al arroz, remover
los platos con leche
entre medio
cucharadas)
p.ej.: máx.
agua para 750 g de
Hasta 3 l de líquido
más ingredientes
Girar entre medio
Girar entre medio
¼ l de
patatas
31
Page 32

Limpieza y mantenimiento
¡Precaución! Peligro de quemaduras por el calor residual.
1
1 ¡Atención! Los productos de limpieza agresivos y abrasivos dañan al
aparato. Límpielo con agua y lavavajillas.
1 ¡Atención! Los residuos de productos de limpieza dañan al aparato. Eli-
mine los restos con agua y lavavajillas.
Limpie el aparato después de cada uso.
1.Limpie el aparato con un paño húmedo y un poco de lavavajillas.
2.Seque el aparato con un paño seco.
Eliminar suciedad
1.Aplique un rascador de limpieza en posición inclinada a la superficie de
vitrocerámica.
2.Elimine la suciedad deslizando la hoja.
3.Limpie el aparato con un paño húmedo y un poco de lavavajillas.
4.Seque el aparato con un paño seco.
Eliminar
Clase de suciedad
azúcar, alimentos que contienen
azúcar
Plásticos, láminas de aluminio sí ---
Bordes de cal y agua --- sí
Salpicaduras de grasa --- sí
Decoloraciones con un brillo metálico
* Rascadores de limpieza y productos de limpieza para vitrocerámica o acero inoxidable se en-
cuentran en el comercio especializado.
Inmediata-
mente
sí ---
--- sí
Con el aparato
enfriado
Con
Rascador de limpieza*
Limpiador para vitro-
cerámica o acero
inoxidable*
3 Elimine la suciedad rebelde con un producto de limpieza para vitrocerá-
mica o acero inoxidable.
3 Rayaduras o manchas oscuras en la vitrocerámica ya no se pueden eli-
minar, pero no perjudican el funcionamiento del aparato.
32
Page 33

¿Qué hacer cuando …
Problema Posible causa Corrección
Las zonas de cocción no
funcionan.
El indicador de calor residual no indicada nada.
parpadea Recipientes inadecuados Utilizar recipientes apro-
encendido La protección contra sobre-
El aparato combinado no
está conectado.
El nivel de cocción deseado
no está ajustado.
El fusible en la instalación
doméstica (caja de fusibles)
se ha disparado.
El aparato combinado estaba conectado a la red durante la instalación de la
encimera
La zona de cocción sólo ha
funcionado poco tiempo,
por lo cual no está lo suficientemente caliente.
No se encuentra ningún recipiente en la zona de cocción
El diámetro del fondo del
recipiente es demasiado
pequeño para la zona de
cocción
calentamiento de la zona
de cocción se ha activado
Al conectar el aparato
combinado, el conmutador
de zonas de cocción no se
encontraba en la posición
OFF.
Zona de cocción durante
más de dos minutos sin olla
Conectar el aparato.
Ajustar el nivel de cocción.
Comprobar el fusible.
Si los fusibles se dispararan repetidamente, consulte a un electricista
autorizado homologado.
Retirar y volver a insertar
el fusible (caja de fusibles)
o desconectar y volver conectar
Si la zona de cocción estuviera caliente, llame al Servicio postventa.
piados
Colocar un recipiente
Pasar a una zona de cocción más pequeña
Utilizar recipientes apropiados
Desconectar la zona de
cocción. Volver a conectar
la zona de cocción
Desconectar la zona de
cocción, colocar una olla,
conectar la zona de cocción
33
Page 34

Si no lograra eliminar el problema con las medidas de corrección
indicadas, sírvase consultar a su distribuidor o al Servicio posventa.
1 ¡Advertencia! Las reparaciones en el aparato deben ser ejecutadas úni-
camente por técnicos cualificados. En caso de reparaciones inadecuadas
se pueden producir considerables peligros para el usuario.
3 En caso de errores de manejo, la visita del técnico del Servicio posventa
o del distribuidor deberá ser facturada incluso durante el período de
garantía.
Eliminación de desechos
Material de embalaje
2
Los materiales de embalaje respetan el medio ambiente y son reciclables. Los elementos de materia plástica están identificados; por ejemplo, >PE<, >PS< etc. Elimine los materiales de embalaje, según su
identificación, en los contenedores de recogida disponibles en los puntos de gestión de desechos locales.
2 Aparato viejo
34
El símbolo
to no se puede tratar como desperdicios normales del hogar. Este producto se debe entregar al punto de recolección de equipos eléctricos y
electrónicos para reciclaje. Al asegurarse de que este producto se deseche correctamente, usted ayudará a evitar posibles consecuencias negativas para el ambiente y la salud pública, lo cual podría ocurrir si este
producto no se manipula de forma adecuada. Para obtener información
más detallada sobre el reciclaje de este producto, póngase en contacto
con la administración de su ciudad, con su servicio de desechos del hogar o con la tienda donde compró el producto.
W en el producto o en su embalaje indica que este produc-
Page 35

Instrucciones de montaje
Indicaciones para la seguridad
Se tienen que cumplir las leyes, prescripciones, directivas y normas vigentes en el país de uso.
El montaje debe ser ejecutado únicamente por un técnico cualificado.
Se tienen que observar las distancias mínimas frente a otros aparatos.
Los cajones sólo se deben montar directamente debajo del aparato
instalando un estante de protección.
Las superficies de corte en la encimera se tienen que proteger contra la
humedad mediante un sellador adecuado.
La junta cierra por completo el intersticio entre el aparato y la encimera.
Entre el aparato y la encimera no se debe aplicar sellador de silicona.
Evite montar el aparato directamente al lado de puertas y debajo de
ventanas. Al abrir las puertas y ventanas, se podrían hacer caer ollas calientes de la placa.
1 ¡ADVERTENCIA!
Peligro de lesiones por corriente eléctrica.
• Antes de conectar la encimera, separar el aparato combinado de la
red.
• Observe las reglas de seguridad de la electrotécnica.
• Asegure la protección contra el contacto mediante una instalación
correcta.
• Las tensiones nominales de los aparatos combinados tienen que coincidir.
1 ¡ATENCIÓN!
Peligro de daños por corriente eléctrica.
Las conexiones de enchufe flojas e inadecuadas pueden causar un sobrecalentamiento de los conectores.
• Junte correctamente las conexiones de enchufe.
Es preciso dotar la instalación eléctrica de un dispositivo que permita
desconectar el aparato de la red con un intervalo de abertura mínimo
de 3 mm entre todos los polos.
Los dispositivos más apropiados para dicha separación son los cortacircuitos protectores automáticos, los fusibles (los fusibles de rosca se extraen del portafusibles), los interruptores diferenciales y los
contactores.
35
Page 36

• Con la ayuda de un destornillador, ajuste el racor de salida de vapor
del horno para situarlo debajo de la apertura de la superficie de cocción. A continuación, enchufe el tubo de salida.
1 • El movimiento del anillo embellecedor bajo presión puede rayar la su-
perficie metálica recubierta.
36
Page 37

Servicio posventa
En caso de fallos técnicos, compruebe primero si puede corregir el problema por sí mismo con la ayuda de las instrucciones de uso (capítulo
"Qué hacer cuando…").
Si esto no fuera posible, sírvase consultar al Servicio postventa o a una
de nuestras delegaciones de servicio técnico.
Para poder ayudarle rápidamente,
necesitamos los siguientes datos:
– Denominación del modelo
– Número de producto (PNC)
– Número de serie (Nº S)
(Los números figuran en la placa
de características)
– Tipo de fallo
– Eventual mensaje de error visuali-
zado en el aparato
– combinación de letras y cifras de tres dígitos de la vitrocerámica
Para tener a mano los números de referencia necesarios de su aparato,
le recomendamos anotarlos aquí:
Denominación del modelo: .....................................
PNC: .....................................
Nº S: .....................................
37
Page 38

Kjære kunde!
Les nøye gjennom denne bruksanvisningen og oppbevar den for senere
referanse.
Gi denne bruksanvisningen videre til eventuelle senere eiere av apparatet.
Følgende symboler brukes i teksten:
1 Sikkerhetsanvisninger
Advarsel! Anvisninger som angår din personlige sikkerhet.
OBS! Anvisninger som skal føre til at du unngår skader på apparatet.
3 Anvisninger og praktiske tips
2 Miljøinformasjoner
38
Page 39

Innhold
Bruksanvisning . . . . . . . . . . . . . . . . . . . . . . . . . . . . . . . . . . . . . . . . . . . . . 40
Sikkerhetsanvisninger . . . . . . . . . . . . . . . . . . . . . . . . . . . . . . . . . . . . . . . . . . . 40
Beskrivelse av apparatet. . . . . . . . . . . . . . . . . . . . . . . . . . . . . . . . . . . . . . . . . 42
Kokesonens oppbygging . . . . . . . . . . . . . . . . . . . . . . . . . . . . . . . . . . . . . . . . . . 42
Digitalt display . . . . . . . . . . . . . . . . . . . . . . . . . . . . . . . . . . . . . . . . . . . . . . . . . . 42
Restvarmeindikator . . . . . . . . . . . . . . . . . . . . . . . . . . . . . . . . . . . . . . . . . . . . . . 43
Betjene apparatet . . . . . . . . . . . . . . . . . . . . . . . . . . . . . . . . . . . . . . . . . . . . . . 44
Stille inn kokenivå . . . . . . . . . . . . . . . . . . . . . . . . . . . . . . . . . . . . . . . . . . . . . . . 44
Slå på og av power-funksjonen . . . . . . . . . . . . . . . . . . . . . . . . . . . . . . . . . . . . 45
Bruke oppkokingsautomatikken. . . . . . . . . . . . . . . . . . . . . . . . . . . . . . . . . . . . 46
Nødutkopling . . . . . . . . . . . . . . . . . . . . . . . . . . . . . . . . . . . . . . . . . . . . . . . . . . . 47
Tips til koking og steking. . . . . . . . . . . . . . . . . . . . . . . . . . . . . . . . . . . . . . . . 47
Kokekar for induksjonsvarmesoner . . . . . . . . . . . . . . . . . . . . . . . . . . . . . . . . . 48
Tips til energisparing . . . . . . . . . . . . . . . . . . . . . . . . . . . . . . . . . . . . . . . . . . . . . 48
Eksempler på bruk ved tilberedning. . . . . . . . . . . . . . . . . . . . . . . . . . . . . . . . . 49
Rengjøring og pleie . . . . . . . . . . . . . . . . . . . . . . . . . . . . . . . . . . . . . . . . . . . . . 50
Hva må gjøres hvis … . . . . . . . . . . . . . . . . . . . . . . . . . . . . . . . . . . . . . . . . . . . 51
Avfallsbehandling. . . . . . . . . . . . . . . . . . . . . . . . . . . . . . . . . . . . . . . . . . . . . . . 52
Montasjeveiledning . . . . . . . . . . . . . . . . . . . . . . . . . . . . . . . . . . . . . . . . 53
Garanti . . . . . . . . . . . . . . . . . . . . . . . . . . . . . . . . . . . . . . . . . . . . . . . . . . . . . . 54
Service og reservedeler . . . . . . . . . . . . . . . . . . . . . . . . . . . . . . . . . . . . 55
Service . . . . . . . . . . . . . . . . . . . . . . . . . . . . . . . . . . . . . . . . . . . . . . . . . . . . . . 57
Montasje . . . . . . . . . . . . . . . . . . . . . . . . . . . . . . . . . . . . . . . . . . . . . . . . . . . . 58
39
Page 40

Bruksanvisning
1 Sikkerhetsanvisninger
Ta hensyn til disse anvisningene, ellers faller reklamasjonsrettighetene
3
bort dersom det oppstår feil.
5 Dette apparatet er i samsvar med følgende EU-direktiver:
– 73/23/EEC av 19.02.1973 Lavspenningsdirektiv
– 89/336/EEC av 03.05.1989 EMC-direktiv inklusive endringsdirektiv
92/31/EEC
– 93/68/EEC av 22.07.93 CE-merkedirektiv
Riktig bruk
• Dette apparatet må kun brukes til tilberedning av matvarer i vanlig
husholdning.
• Apparatet må ikke brukes som arbeids- eller avlastningsplate.
• Det er ikke tillatt å foreta endringer eller ombygginger på apparatet.
• Brennbare væsker, lett antennelige materialer eller gjenstander som
kan smelte (f.eks. folier, kunststoff, aluminium) må ikke legges eller
oppbevares oppå eller i nærheten av apparatet.
40
Sikkerhet for barn
• Hold alltid små barn borte fra apparatet.
• La større barn arbeide ved apparatet kun under veiledning og tilsyn.
Generell sikkerhet
• Montering og tilkopling av apparatet må kun utføres av utdannet og
autorisert fagperson.
• Innbyggingsapparater må kun brukes etter innbygging i standardiserte, passende innbyggingsmøbler og benkeplater.
• Ved feil på apparatet eller ved skader i glasskeramikken (sprekker,
brudd eller riss) må apparatet slås av og koples fra strømnettet for å
forhindre fare for elektrisk støt.
• Reparasjoner på apparatet må kun utføres av utdannet og autorisert
fagperson.
Page 41

Sikkerhet under bruk
• Fjern etiketter og folie fra glasskeramikken.
• Det foreligger forbrenningsfare hvis du arbeider uaktsomt ved appa-
ratet.
• Kabler fra elektriske apparater må ikke komme i kontakt med apparatets varme overflate eller varme kokekar.
• Overoppvarmede oljer og fett tar lett fyr. Ikke foreta kokeprosesser
med fett eller olje (f.eks. pommes frites) uten tilsyn.
• Slå av kokesonene etter hver gangs bruk.
• Ikke dekk til stekeovnens damputslippsventil.
• Når stekeovnen er i bruk, kan dampen som siver ut forårsake fare for
forbrenning.
• Brukere med implantert pacemaker for hjertet bør holde overkroppen
minst 30 cm borte fra en induksjonsvarmesone når denne er slått på.
• Forbrenningsfare! Gjenstander av metall, som f.eks. kniver, gafler,
skjeer og grytelokk, må ikke legges på kokefeltet, da de kan bli meget
varme.
Sikkerhet ved rengjøring
• Apparatet må være avslått og avkjølt når du rengjør det.
• Det er av sikkerhetsgrunner ikke tillatt å rengjøre apparatet med
dampstrålerenser eller høyttrykksspyler.
Hvordan unngå skader på apparatet
• Glasskeramikken kan skades av fallende gjenstander.
• Støt med kokekar kan skade kanten på glasskeramikken.
• Kokekar av støpejern, støpt aluminium eller med skadd bunn kan stri-
pe opp glasskeramikken når de trekkes over overflaten.
• Smeltende gjenstander og søl av overkokt mat kan brenne seg fast i
glasskeramikken og bør derfor fjernes straks.
• Ikke bruk kokesonene med tomme kokekar eller uten kokekar.
• Ventilasjonsspalten på 5mm mellom arbeidsbenken og møbelfronten
under må ikke tildekkes.
41
Page 42

Beskrivelse av apparatet
Kokesonens oppbygging
Induksjonsvarmesone 1400W
medpower-funksjon1800W
Stekeovnens damp-
utslippsventil
Induksjonsvarmesone 1850 W
med power-funksjon 2500 W
Induksjonsvarmesone 2300W
med power-funksjon 3200W
Digitalt display
kokesone bak til venstre
kokesone foran til venstre
42
Display for
Display for
Digitaldisplay
Induksjonsvarmesone 1850 W
med power-funksjon 2500 W
Display for
kokesone bak til høyre
Display for
kokesone foran til høyre
Page 43

Indikatorlampe Beskrivelse
Varmesonen er deaktivert
u Holde-varm-trinn Holde-varm-trinn er innstilt
- Kokenivåer Kokenivå er innstilt
- Kokenivå med
desimalpunkt
Oppkokingsautomatikk Oppkokingsautomatikk er aktivert
Registrering av kokekar Kokekaret er ikke egnet, er for lite
Restvarme Varmesonen er varm ennå
Power Power-funksjon er slått på
Nødutkopling Nødutkopling er aktivert
Mellomtrinn er innstilt
eller det er ikke satt på noe kokekar
Restvarmeindikator
1 Advarsel! Forbrenningsfare pga. restvarme. Varmesonene trenger litt
tid til å avkjøles etter at de er slått av. Ta hensyn til restvarmeindikatoren .
3 Restvarmen kan brukes til smelting eller til å holde maten varm.
Induksjonsvarmesonene danner den varmen som er nødvendig for koking direkte i bunnen av kokekaret. Glasskeramikken oppvarmes kun
gjennom varmens tilbakestråling fra kokekaret.
Kjøleviften slår seg på og av automatisk avhengig av temperaturen i
elektronikken.
43
Page 44

Betjene apparatet
Bruk induksjonsvarmesonen med egnet kokekar.
3
Stille inn kokenivå
Med varmesonebryterne kan du stille varmeeffekten inn i 15 trinn etter
eget ønske (med mellomstillinger):
Mellomstillingene kan velges i områdene 2 til 7. Disse er markert i det
digitale displayet med et desimalpunkt.
Varmesonebryter Indikator
Øke drei til høyre til
Redusere drei mot venstre til
Slå av stille på null /
3 Les også i bruksanvisningen for benkeskap ovnen.
44
Page 45

Slå på og av power-funksjonen
Power-funksjonen gir ekstra effekt til induksjonsvarmesonene, f.eks. for
raskt å koke opp en større mengde vann.
Power-funksjonen er aktivert i 10 minutter. Deretter slår induksjonsvarmesonen seg automatisk tilbake til kokenivå 9.
Varmesonebryter Indikator
Slå på 1. drei litt forbi max (imot høyre)
2. drei til venstre, tilbake til
Slå av drei mot venstre til /
Power-styring
Varmesonene disponerer over en
maksimal effekt.
Hvis dette effektområdet overskrides når power-funksjonen slås på,
reduserer power-styringen kokenivået for en annen varmesone.
Indikatorlampen for denne varmesonen skifter i to minutter mellom
det innstilte og det maksimalt mulige kokenivået. Deretter meldes det
faktiske kokenivået.
Eksempel:
Siste
Andre varmesone
aktiverte varmesone
innstilt
kokenivå
innstilt
kokenivå
Melding faktiske
9 7 vekselvis med 9 7
kokenivå
45
Page 46

Bruke oppkokingsautomatikken
Alle varmesonene er utstyrt med en oppkokingsautomatikk. Oppkokingsautomatikken slår varmesonen på med full effekt i en viss tid og
slår deretter automatisk tilbake til det innstilte kokenivået.
Varmesonebryter Indikator
Slå på drei litt forbi max (imot høyre)
drei tilbake til venstre og still inn øn-
sket kokenivå -
Slå av drei mot venstre og velg lavere koke-
nivå
Kokenivå Oppkokingsautoma-
tikken er aktivert i
[min:sek]
v 0:10
1 0:10
2 0:10 2. 1:20
3 3:10 3. 4:20
4 5:50 4. 8:10
5 10:10 5. 10:30
6 2:00 6. 2:00
7 2:30
8 2:50
9 ---
Mellomnivå Oppkokingspro-
sessens varighet
[min:sek]
til
46
Page 47

Nødutkopling
Induksjonsvarmesoner
• Ved overoppvarming (ved f.eks. en tørrkokt kasserolle) slår varmesonen seg av automatisk vises. Før du kan bruke apparatet igjen, må
varmesonen være stilt på
• Hvis du ikke bruker egnet kokeutstyr, blinker i to minutter i var-
mesonens display. Deretter vises . Før du kan bruke apparatet igjen,
må varmesonen være stilt på
• Hvis en av varmesonene ikke blir koplet ut etter en viss tid eller kokenivået ikke blir endret, kopler den aktuelle varmesonen seg ut automatisk.
Kokenivå Slås av etter
0 og avkjølt.
0.
V, 1 -2
3 - 4
5
6 - 9
6 timer
5 timer
4 timer
1,5 timer
Tips til koking og steking
3
Akrylamidopplysninger
Ifølge de nyeste vitenskapelige resultatene kan sterk bruning av matvarer, spesielt ved stivelsesholdige produkter, forårsake helsemessige skader på grunn av akrylamid. Derfor anbefaler vi å tilberede matrettene
ved lave temperaturer og ikke brune maten for sterkt.
47
Page 48

Kokekar for induksjonsvarmesoner
Kokekarets materiale egnet
Stål, stålemalje ja
Støpejern ja
Rustfritt stål hvis merket for dette av produsenten
Aluminium, kobber, messing ---
Glass, keramikk, porselen ---
3 Kokekar for induksjonsvarmesoner merkes for dette av produsenten
Egnethetstest
Kokekaret egner seg for induksjon, hvis ...
• ... litt vann oppvarmes på få sekunder på en induksjonsvarmesone
med kokenivå 9
• ... en magnet blir sittende på kokekarets bunn.
3 Enkelte kokekar kan forårsake lyder under bruk på en induksjonsvarme-
sone. Disse lydene betyr ikke feil på apparatet og har ingen som helst
negativ innvirkning på funksjonen.
Kokekarets størrelse
Induksjonsvarmesonene tilpasser seg automatisk til størrelsen på kokekarets bunn inntil en viss grense. Allikevel må den magnetiske delen av
kokekarets bunn være over en viss størrelse, alt etter størrelsen på varmesonen.
3 Kokekaret må stå midt på varmesonen.
Tips til energisparing
2 Sett kokekaret på varmesonen før du slår varmesonen på.
2 Ha alltid, hvis mulig, lokk på kokekaret.
48
Page 49

Eksempler på bruk ved tilberedning
Angivelsene i følgende tabell er veiledende.
Koke-
Power-funksjonen egner seg til oppkoking av større mengder væske.
Tilberednings
nivå
0 Av-stilling
V Holde varm
1-2
2-3 Mørkoking
3-4
4-5 Koking
6-7
7-8
9
prosess
Smelting
Størkning
Dampkoking
Smørdam-
ping
Lett
steking
Kraftig
steking
Oppkoking
Bruning
Frityrkoking
egnet for Varighet Anvisninger/tips
Holde varm ferdig
tilberedte retter
Hollandaisesaus,
smelting av smør,
sjokolade, gelatin
Eggeomelett,
eggestand
Mørkoke ris og melke-
retter
Oppvarming av ferdi-
gretter
Smørdampe
grønnsaker, fisk
Brune kjøtt
Dampe poteter 20-60 min.
Koking av større
matvaremengder, gry-
teretter og supper
Snitsler, cordon bleu,
koteletter, frikadeller,
stekepølser, lever, sau-
sejevninger, egg, egge-
kake, frityrkoke munker
Potetlapper, hofte-
stykker, steker, flatbiff
Oppkoking av større mengder vann, koke nudler, bruning av
kjøtt (gulasj, grytestek), frytyrkoking av pommes frites
etter behov Tildekkes
5-25 min. Rør om av og til
10-40 min. Tilberedes med lokk
Tilsett minst dobbelt
25-50 min.
20-45 min.
60-150
min.
stekes
fortløpende
5-15 min.
per panne
mengde væske til ri-
sen, melkeretter om-
Grønnsaker tilsettes
litt væske (noen spise-
eks.: maks.
opptil 3 l væske pluss
røres av og til
skjeer)
Bruk lite væske, f.
¼ l vann
til 750 g poteter
ingredienser
Snus av og til
Snus av og til
49
Page 50

Rengjøring og pleie
Forsiktig! Forbrenningsfare på grunn av restvarme.
1
1 OBS! Skarpe og skurende rengjøringsmidler skader apparatet. Rengjør
med vann og oppvaskmiddel.
1 OBS! Rester etter rengjøringsmidler skader apparatet. Fjern rester med
vann og oppvaskmiddel.
Rengjør apparatet etter hver gangs bruk.
1.Tørk av apparatet med en klut fuktet med oppvaskvann.
2.Tørk apparatet tørt med en ren klut.
Fjerne smuss
1.Hold en rengjøringsskrape på skrått mot glasskeramikkens overflate.
2.Fjern smusset ved å la klingen gli over overflaten.
3.Tørk av apparatet med en klut fuktet med oppvaskvann.
4.Tørk apparatet tørt med en ren klut.
fjern
type smuss straks når apparatet er avkjølt med
sukker, sukkerholdige matvarer ja ---
kunststoff, aluminiumsfolie ja ---
kalk- og vannstriper --- ja
fettsprut --- ja
metallisk glinsende misfarging --- ja
*rengjøringsskrape og rengjøringsmiddel for glasskeramikk eller rustfritt stål får du kjøpt hos
fagforhandler
rengjøringsskrape*
rengjøringsmiddel for
glasskeramikk eller
rustfritt stål*
3 Hardnakkede smussflekker fjernes med et rengjøringsmiddel for glass-
keramikk eller rustfritt stål.
3 Striper eller mørke flekker i glasskeramikken kan ikke fjernes, men dette
har ingen innflytelse på apparatets funksjon.
50
Page 51

Hva må gjøres hvis …
Problem Mulig årsak Løsning
Kokesonene virker ikke. Benkeskapovnen er ikke
Restvarmeindikatoren gir
ingen melding
blinker Uegnet kokekar Bruk egnet kokekar
lyser Varmesonens overoppvar-
slått på.
Ønsket koketrinn er ikke
innstilt.
Sikringene for husstanden
(i sikringsskapet) er gått.
Kombinasjonsapparatet var
på nettet ved installasjon
av kokefeltet
Varmesonen har vært innkoplet i så kort tid at den
ikke er blitt varm nok
Ingen kokekar på varmesonen
Kokekarets bunn er for liten for varmesonen
mingsbeskyttelse har løst
seg ut
Når kombinasjonsapparatet
ble slått på, sto varmesonebryteren ikke i Av-stilling
Varmesone lenger enn to
minutter uten kokeservise
Slå på ovnen.
Still inn et koketrinn.
Kontroller sikringene.
Hvis sikringene går flere
ganger, må du kontakte en
autorisert elektriker.
Ta ut og sett inn igjen sikringen (sikringsboksen), eller slå av og på igjen
Hvis varmesonen er varm,
må du ta kontakt med kundetjenesten.
Sett kokekar på varmesonen
Skift til en mindre varmesone
Bruk egnet kokekar
Slå av varmesonen. Slå varmesonen på igjen
Slå av varmesonen, sett på
kokeservise, slå på varmesone
Hvis du ikke får rettet på problemet med løsningstipsene over, ta
kontakt med din forhandler eller med kundeservice.
1 Advarsel!Reparasjoner på apparatet må kun utføres av fagpersoner.
Ukyndig utførte reparasjoner kan føre til alvorlig fare for den som bruker apparatet.
3 Feil som er oppstått på grunn av feil bruk av apparatet kan ikke rettes
kostnadsfritt av kundetekniker eller forhandler, selv om dette skjer
innenfor reklamasjonstiden.
51
Page 52

Avfallsbehandling
Emballasjemateriale
2
Emballasjematerialene er miljøvennlige og kan resirkuleres. Kunststoffene er merket med f.eks . >PE<, >PS< osv. Sørg for å kaste emballasjematerialene ifølge merkingen i den kommunale avfallshåndteringens
oppsamlingsbeholdere.
2 Kassert apparat
Symbolet
ikke må behandles som husholdningsavfall. Det skal derimot bringes til
et mottak for resirkulering av elektrisk og elektronisk utstyr. Ved å sørge
for korrekt avhending av apparatet, vil du bidra til å forebygge de negative konsekvenser for miljø og helse som gal håndtering kan medføre.
For nærmere informasjon om resirkulering av dette produktet, vennligst kontakt kommunen, renovasjonsselskapet eller forretningen der du
anskaffet det.
W på produktet eller på emballasjen viser at dette produktet
52
Page 53

Montasjeveiledning
Sikkerhetsanvisninger
Lover, forskrifter, direktiver og standarder som gjelder i det landet der
apparatet skal brukes, må overholdes (sikkerhetsbestemmelser, forskriftsmessig gjenvinning osv.).
Monteringen skal kun utføres av fagperson.
Minsteavstandene til andre apparater skal overholdes.
Kun hvis apparatet utstyres med en beskyttelsesplate direkte på
undersiden, kan det monteres skuffer under apparatet.
Snittflatene på benkeplaten må beskyttes mot fuktighet med et egnet
tetningsmaterial.
Tetningsmaterialet skal slutte tett mellom apparatet og benkeplaten.
Tetningsmaterialet skal slutte tett mellom apparatet og benkeplaten.
Ikke bruk tetningsmasse av silikon mellom apparatet og benkeplaten.
Unngå å montere apparatet rett ved dører og vinduer. Dører og vinduer
som slår opp, kan forårsake at kjeler og lignende faller ned fra kokeplatene.
1 ADVARSEL!
Fare for personskade på grunn av elektrisk strøm.
• Koble kombinasjonsapparatet fra strømnettet før tilkobling av kokesonen.
• Ta hensyn til sikkerhetsanvisningene for elektroteknikk.
• Sørg for at apparatet er innbygget på forsvarlig måte, slik at berø-
ringsbeskyttelse kan garanteres.
• De kombinerte apparatenes nominelle spenning må stemme overens.
1 OBS!
Fare for elektrisk støt.
Løse stikkforbindelser som ikke er utført forskriftsmessig kan føre til at
kontaktene blir overoppvarmet.
• Sett stikkforbindelsene forskriftsmessig sammen.
Den elektriske installasjonen må gjøres av autorisert installatør. Dersom
apparatet tilkobles fast (uten kabel og plugg) må det i den elektriske installasjonen tilkoples en innretning som gjør det mulig å skille apparatet fra strømnettet med en universalpolet kontaktåpningsvidde på
minst 3 mm. Egnete skilleinnretninger er f.eks. LS-bryter, sikringer
(skruesikringer må tas ut av holderen), FI-bryter og kontaktorer.
• Juster stussen på stekeovnens damputslippsventil under kokefeltets
åpning med hjelp av en skrutrekker. Sett på utslippsrøret til slutt.
1 • Bevegelsen av panelringen under trykk kan lage striper i den emaljer-
te metalloverflaten.
53
Page 54

Garanti
Norge
Levering skjer etter kjøpsloven av 1.1.1989, supplert med "NEL's leveringsbetingelser" (kopi av disse fås hos din elektroforhandler). Oppstår
det problemer med produktet, bør henvendelse skje til forhandler hvor
produktet er kjøpt.
OBS! Ta vare på kvitteringen. Den gjelder som garantibevis.
54
Page 55

Service og reservedeler
Norge
Service
Trenger du service kontakt din lokale serviceforhandler. Forbered deg på
samtalen og noter følgende:
Modell: ..................................................
PNCnummer: ..................................................
Serienummer: ..................................................
Kjøpsdato ..................................................
En klar og kortfattet beskrivelse av feilen:
..........................................................................................
..........................................................................................
Ta vare på kvitteringen, den gjelder som garantibevis.
Under følger oversikt over våre serviceforbindelser i de store byene:
Oslo
E-Service Oslo AS
Risløkkveien 2
0508 Oslo
Telefon: 815 30 222
Faks:
Email:
Service: service@e-serviceoslo.no
Deler : deler@e-serviceoslo.no
Verksted: ole@e-serviceoslo.no
Kristiansand:
Elektroverkstedet A/S
Kirkevn. 4
Postboks 1027 Lund
4631 Kristiansand S
Email: per.rudolfsen@elektroverkstedet.no
Telefon: 38056440
Faks: 38056441
55
Page 56

Stavanger:
E-Service Stavanger AS
Overlege Cappelens Gate 3,
4011 Stavanger
Telefon : 51 91 18 50
Faks: 51 91 18 51
email: service@electroluxservice.no
Trondheim:
Strax Trondheim AS,
Sorgenfriveien 16
7037 Trondheim
Telefon: 73 82 14 80
Faks: 73 82 14 81
Bergen:
E-Service Bergen AS
Øvre Fyllingsvei 81
5162 Laksevåg
Telefon: 55 94 85 50
Faks: 55 94 85 51
Narvik:
Johansens Hvitevareservice
Tore Hundsgt. 48
8514 Narvik
Telefon: 76944480
Mobil: 91849311
56
Kunder som kontakter service under garantiperioden bør forsikre seg
om at alle nødvendige kontroller er utført, siden kunden vil bli belastet
for arbeid som ikke skyldes mekaniske eller elektriske produktfeil.
Electrolux hovedkontor:
ELECTROLUX HOME PRODUCTS NORWAY AS
Postboks 77 Økern
0508 Oslo
Telefon: 815 30 222
Faks: 22 63 55 54
Internett: www.electrolux.no
På våre internettsider vil du finne oppdatert produktinformasjon,
bruksanvisninger og oversikt over våre serviceforbindelser og forhandlere og mye mer.
Page 57

Service
Ved tekniske forstyrrelser, kontroller først om du selv kan løse problemet ved hjelp av bruksanvisningen (kapittelet „Hva må gjøres, hvis...“)
Hvis du ikke kunne løse problemet, kan du ta kontakt med kundetjenesten eller en av våre servicepartnere.
For å kunne hjelp deg raskt, trenger
vi følgende opplysninger:
– Modellbetegnelse
– Produktnummer (PNC)
– Serienummer (S-nr.)
(se typeskiltet for numrene)
– Type forstyrrelse
– Eventuell feilmelding som meldes
fra apparatet
– den keramiske platens treplassers bokstav/tall-kombinasjon
For at du alltid skal ha apparatets identifikasjonstall for hånden når du
trenger dem, anbefaler vi at du skriver dem opp her:
Modellbetegnelse: .....................................
PNC: .....................................
S-nr. .....................................
57
Page 58

Assembly / Montaje / Montasje
58
Page 59

60
59
Page 60

Page 61

Removal / Desmontaje / Demontering
61
Page 62

Rating Plate / Placa de características / Typeskilt
62
Page 63

63
Page 64

From the Electrolux Group. The world´s No.1 choice.
The Electrolux Group is the world´s largest producer of powered appliances for kitchen, cleaning and outdoor
use. More than 55 million Electrolux Group products (such as refrigerators, cookers, washing machines,
vacuum cleaners, chain saws and lawn mowers) are sold each year to a value of approx. USD 14 billion in more
than 150 countries around the world.
AEG Hausgeräte GmbH
Postfach 1036
D-90327 Nürnberg
http://www.aeg.hausgeraete.de
© Copyright by AEG
822 924 872-E-220305-04
Subject to change without notice
Salvo modificaciones
Med forbehold om endringer
 Loading...