

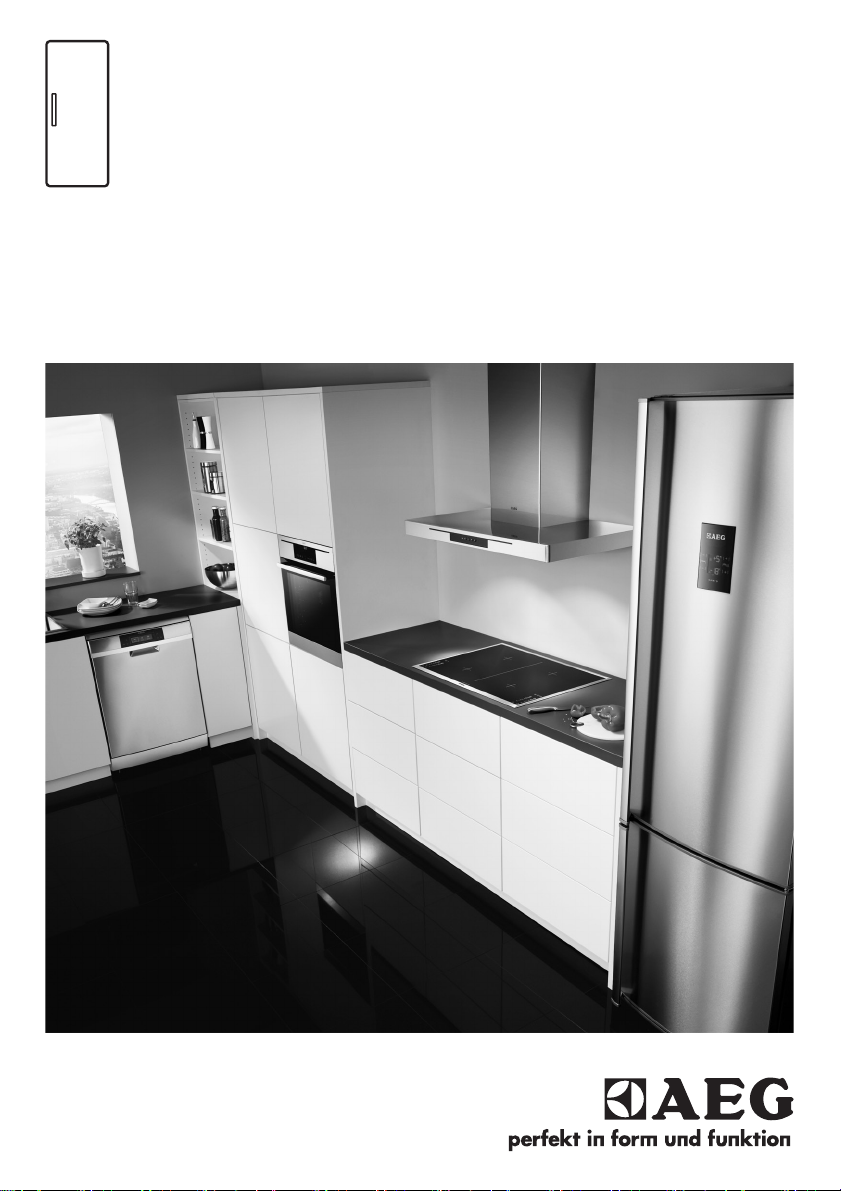
Page 1
S93000KZM0 EN User manual 2
IT Istruzioni per l’uso 20
DE Benutzerinformation 38
RUИнструкция по эксплуатации 57
Page 2

www.aeg.com
2
CONTENTS
1. SAFETY INSTRUCTIONS . . . . . . . . . . . . . . . . . . . . . . . . . . . . . . . . . . . . . . . . . . . . . . . . . . . . . . 3
2. CONTROL PANEL . . . . . . . . . . . . . . . . . . . . . . . . . . . . . . . . . . . . . . . . . . . . . . . . . . . . . . . . . . . 5
3. DAILY USE . . . . . . . . . . . . . . . . . . . . . . . . . . . . . . . . . . . . . . . . . . . . . . . . . . . . . . . . . . . . . . . . . 7
4. HELPFUL HINTS AND TIPS . . . . . . . . . . . . . . . . . . . . . . . . . . . . . . . . . . . . . . . . . . . . . . . . . . . 12
5. CARE AND CLEANING . . . . . . . . . . . . . . . . . . . . . . . . . . . . . . . . . . . . . . . . . . . . . . . . . . . . . . 12
6. WHAT TO DO IF… . . . . . . . . . . . . . . . . . . . . . . . . . . . . . . . . . . . . . . . . . . . . . . . . . . . . . . . . . 13
7. INSTALLATION . . . . . . . . . . . . . . . . . . . . . . . . . . . . . . . . . . . . . . . . . . . . . . . . . . . . . . . . . . . . 15
8. NOISES . . . . . . . . . . . . . . . . . . . . . . . . . . . . . . . . . . . . . . . . . . . . . . . . . . . . . . . . . . . . . . . . . . . 17
9. TECHNICAL DATA . . . . . . . . . . . . . . . . . . . . . . . . . . . . . . . . . . . . . . . . . . . . . . . . . . . . . . . . . . 19
10. ENVIRONMENT CONCERNS . . . . . . . . . . . . . . . . . . . . . . . . . . . . . . . . . . . . . . . . . . . . . . . . . 19
FOR PERFECT RESULTS
Thank you for choosing this AEG product. We have created it to give you impeccable
performance for many years, with innovative technologies that help make life simpler –
features you might not find on ordinary appliances. Please spend a few minutes reading to get
the very best from it.
Visit our website for:
Get usage advice, brochures, trouble shooter, service information:
www.aeg.com
Register your product for better service:
www.aeg.com/productregistration
Buy Accessories, Consumables and Original spare parts for your appliance:
www.aeg.com/shop
CUSTOMER CARE AND SERVICE
We recommend the use of original spare parts.
When contacting Service, ensure that you have the following data available.
The information can be found on the rating plate. Model, PNC, Serial Number.
Warning / Caution-Safety information
General information and tips
Environmental information
Subject to change without notice.
Page 3
ENGLISH 3
1.
SAFETY INSTRUCTIONS
In the interest of your safety and to ensure the correct use, before installing
and first using the appliance, read this
user manual carefully, including its hints
and warnings. To avoid unnecessary mistakes and accidents, it is important to
ensure that all people using the appliance are thoroughly familiar with its operation and safety features. Save these
instructions and make sure that they remain with the appliance if it is moved or
sold, so that everyone using it through
its life will be properly informed on appliance use and safety.
For the safety of life and property keep
the precautions of these user's instructions as the manufacturer is not responsible for damages caused by omission.
1.1 Children and vulnerable
people safety
• This appliance is not intended for use
by persons (including children) with reduced physical, sensory or mental capabilities, or lack of experience and
knowledge, unless they have been given supervision or instruction concerning use of the appliance by a person
responsible for their safety.
Children should be supervised to ensure that they do not play with the appliance.
• Keep all packaging well away from
children. There is risk of suffocation.
• If you are discarding the appliance
pull the plug out of the socket, cut the
connection cable (as close to the appliance as you can) and remove the
door to prevent playing children to
suffer electric shock or to close themselves into it.
• If this appliance featuring magnetic
door seals is to replace an older appliance having a spring lock (latch) on
the door or lid, be sure to make that
spring lock unusable before you discard the old appliance. This will prevent it from becoming a death trap for
a child.
1.2 General safety
WARNING!
Keep ventilation openings, in the appliance enclosure or in the built-in structure, clear of obstruction.
• The appliance is intended for keeping
foodstuff and/or beverages in a normal household as explained in this instruction booklet.
• Do not use a mechanical device or any
artificial means to speed up the thawing process.
• Do not use other electrical appliances
(such as ice cream makers) inside of
refrigerating appliances, unless they
are approved for this purpose by the
manufacturer.
• Do not damage the refrigerant circuit.
• The refrigerant isobutane (R600a) is
contained within the refrigerant circuit
of the appliance, a natural gas with a
high level of environmental compatibility, which is nevertheless flammable.
During transportation and installation
of the appliance, be certain that none
of the components of the refrigerant
circuit become damaged.
If the refrigerant circuit should become damaged:
– avoid open flames and sources of
ignition
– thoroughly ventilate the room in
which the appliance is situated
• It is dangerous to alter the specifications or modify this product in any
way. Any damage to the cord may
cause a short-circuit, fire and/or electric shock.
WARNING!
Any electrical component (power
cord, plug, compressor) must be
replaced by a certified service
agent or qualified service personnel to avoid hazard.
1.
Power cord must not be lengthened.
Page 4

www.aeg.com
4
2.
Make sure that the power plug is
not squashed or damaged by the
back of the appliance. A squashed
or damaged power plug may
overheat and cause a fire.
3.
Make sure that you can come to
the mains plug of the appliance.
4.
Do not pull the mains cable.
5.
If the power plug socket is loose,
do not insert the power plug.
There is a risk of electric shock or
fire.
6.
You must not operate the appliance without the lamp cover (if
foreseen) of interior lighting.
• This appliance is heavy. Care should
be taken when moving it.
• Do not remove nor touch items from
the freezer compartment if your hands
are damp/wet, as this could cause skin
abrasions or frost/freezer burns.
• Avoid prolonged exposure of the appliance to direct sunlight.
• Bulb lamps (if foreseen) used in this
appliance are special purpose lamps
selected for household appliances use
only. They are not suitable for household room illumination.
1.3 Daily Use
• Do not put hot pot on the plastic parts
in the appliance.
• Do not store flammable gas and liquid
in the appliance, because they may
explode.
• Do not place food products directly
against the air outlet on the rear wall.
(If the appliance is Frost Free)
• Frozen food must not be re-frozen
once it has been thawed out.
• Store pre-packed frozen food in accordance with the frozen food manufacturer's instructions.
• Appliance's manufacturers storage
recommendations should be strictly
adhered to. Refer to relevant instructions.
• Do not place carbonated or fizzy
drinks in the freezer compartment as it
creates pressure on the container,
which may cause it to explode, resulting in damage to the appliance.
• Ice lollies can cause frost burns if consumed straight from the appliance.
1.4 Care and cleaning
• Before maintenance, switch off the appliance and disconnect the mains plug
from the mains socket.
• Do not clean the appliance with metal
objects.
• Do not use sharp objects to remove
frost from the appliance. Use a plastic
scraper.
• Regularly examine the drain in the refrigerator for defrosted water. If necessary, clean the drain. If the drain is
blocked, water will collect in the bottom of the appliance.
1.5 Installation
For electrical connection carefully follow the instructions given in
specific paragraphs.
• Unpack the appliance and check if
there are damages on it. Do not connect the appliance if it is damaged.
Report possible damages immediately
to the place you bought it. In that case
retain packing.
• It is advisable to wait at least four
hours before connecting the appliance to allow the oil to flow back in
the compressor.
• Adequate air circulation should be
around the appliance, lacking this
leads to overheating. To achieve sufficient ventilation follow the instructions
relevant to installation.
• Wherever possible the back of the
product should be against a wall to
avoid touching or catching warm parts
(compressor, condenser) to prevent
possible burn.
• The appliance must not be located
close to radiators or cookers.
• Make sure that the mains plug is accessible after the installation of the appliance.
• Connect to potable water supply only
(If a water connection is foreseen).
Page 5
1.6 Service
• Any electrical work required to do the
servicing of the appliance should be
carried out by a qualified electrician or
competent person.
• This product must be serviced by an
authorized Service Centre, and only
genuine spare parts must be used.
1.7 Environment Protection
This appliance does not contain
gasses which could damage the
ozone layer, in either its refriger-
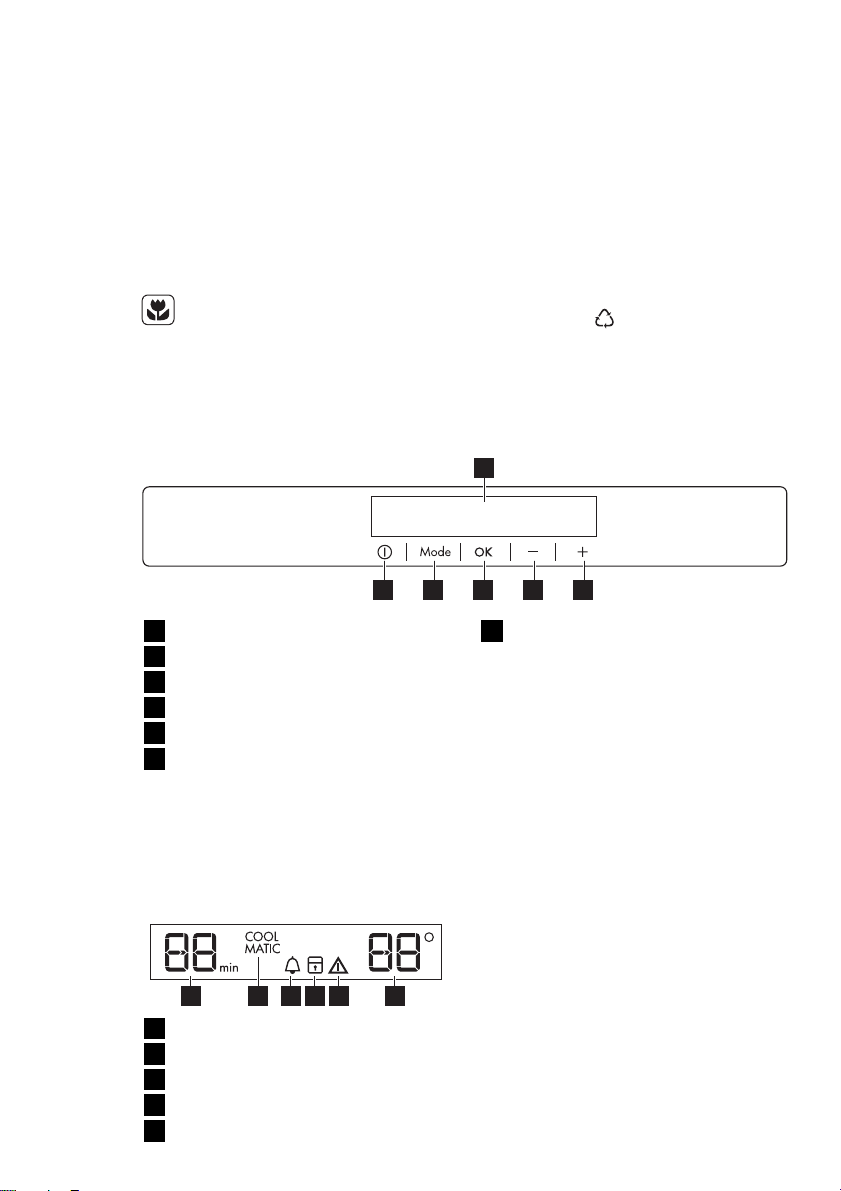
2. CONTROL PANEL
ant circuit or insulation materials.
The appliance shall not be discarded together with the urban
refuse and rubbish. The insulation foam contains flammable
gases: the appliance shall be disposed according to the applicable regulations to obtain from
your local authorities. Avoid
damaging the cooling unit, especially at the rear near the heat exchanger. The materials used on
this appliance marked by the
symbol
1
56 4 3 2
ENGLISH 5
are recyclable.
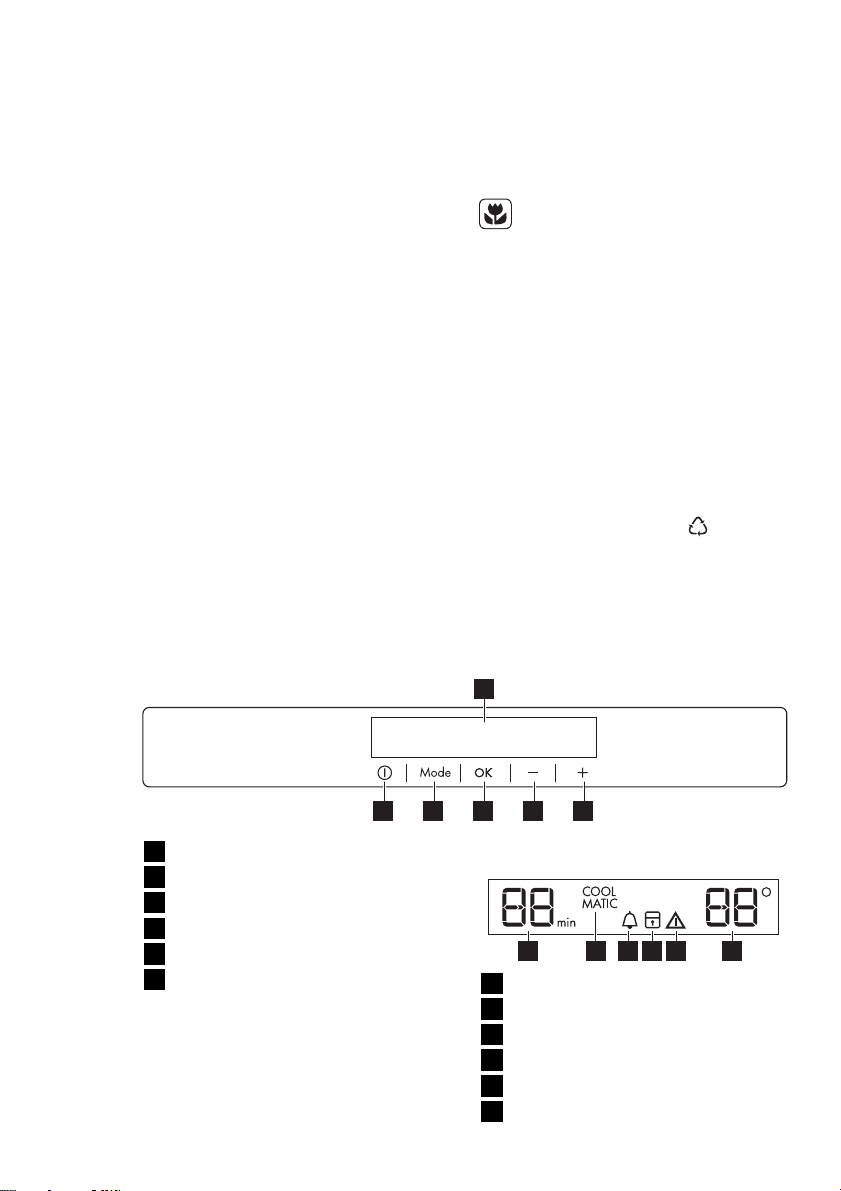
Display
1
Temperature warmer button
2
Temperature colder button
3
OK button
4
Mode button
5
ON/OFF button
6
It is possible to change predefined
sound of buttons to a loudly one by
pressing together Mode button and
Temperature colder button for some
seconds. Change is reversible.
2.1 Display
5 62 431
Timer function
1
COOLMATIC function
2
Minute Minder function
3
Child Lock function
4
Alarm indicator
5
Temperature indicator
6
2.2 Switching on
To switch on the appliance do these
steps:
1.
Connect the mains plug to the power socket.
2.
Press the ON/OFF button if the display is off.
3.
The alarm buzzer could operate after few seconds.
To reset the alarm refer to "High
temperature alarm".
4.
If "dEMo" appears on the display,
the appliance is in demonstration
mode. Refer to "What to do if..."
paragraph.
5.
The temperature indicators show the
set default temperature.
To select a different set temperature refer to "Temperature regulation".
Page 6

www.aeg.com
6
2.3 Switching off
To switch off the appliance do these
steps:
1.
Press the ON/OFF button for 5 seconds.
2.
The display switches off.
3.
To disconnect the appliance from
the power disconnect the mains
plug from the power socket.
2.4 Temperature regulation
The set temperature of the fridge may
be adjusted by pressing the temperature
button.
Set default temperature: +5°C for the
fridge.
The temperature indicator shows the set
temperature.
The set temperature will be reached
within 24 hours.
After a power failure the set temperature remains stored.
2.5 Minute Minder function
The Minute Minder function is to be
used to set an acoustic alarm at the preferred time, useful for example when a
recipe requires to cool down a mixture
for a certain length of time.
To switch on the function:
1.
Press the Mode button until the corresponding icon appears.
The Minute Minder indicator flashes.
The Timer shows the set value (30
minutes) for a few seconds.
2.
Press the Timer regulator button to
change the Timer set value from 1 to
90 minutes.
3.
Press the OK button to confirm.
The Minute Minder indicator is
shown.
The Timer start to flash (min).
At the end of the countdown the Minute
Minder indicator flashes and an audible
alarm sounds:
1.
press OK button to switch off the
sound and terminate the function.
It is possible to deactivate the function
at any time during the countdown:
1.
Press the Mode button until the Mi-
nute Minder indicator flashes.
2.
Press the OK button to confirm.
3.
The Minute Minder indicator goes
off.
It is possible to change the time at any
time during the countdown and at the
end by pressing the Temperature colder
button and the Temperature warmer
button.
2.6 Child Lock function
To lock the buttons from unintentional
operation select the Child Lock function.
To switch on the function:
1.
Press the Mode button until the cor-
responding icon appears.
2.
The Child Lock indicator flashes.
3.
Press the OK button to confirm.
The Child Lock indicator is shown.
To switch off the function:
1.
Press the Mode button until the
Child Lock indicator flashes.
2.
Press the OK button to confirm.
3.
The Child Lock indicator goes off.
2.7 COOLMATIC function
If you need to insert a large amount of
warm food, for example after doing the
grocery shopping, we suggest activating
the COOLMATIC function to chill the
products more rapidly and to avoid
warming the other food which is already
in the refrigerator.
To switch on the function:
1.
Press the Mode button until the cor-
responding icon appears.
The COOLMATIC indicator flashes.
2.
Press the OK button to confirm.
The COOLMATIC indicator is
shown.
The COOLMATIC function shuts off automatically after approximately 6 hours.
To switch off the function before its automatic end:
1.
Press the Mode button until the
COOLMATIC indicator flashes.
2.
Press the OK button to confirm.
3.
The COOLMATIC indicator goes off.
The function switches off by selecting a different fridge set temperature.
Page 7
2.8 Door open alarm
An acoustic alarm will sound if the door
is left open for a few minutes. The door
open alarm conditions are indicated by:
• flashing Alarm indicator
3. DAILY USE
ENGLISH 7
• acoustic buzzer
When normal conditions are restored
(door closed), the alarm will stop.
During the alarm, the buzzer can be
switched off by pressing any button.
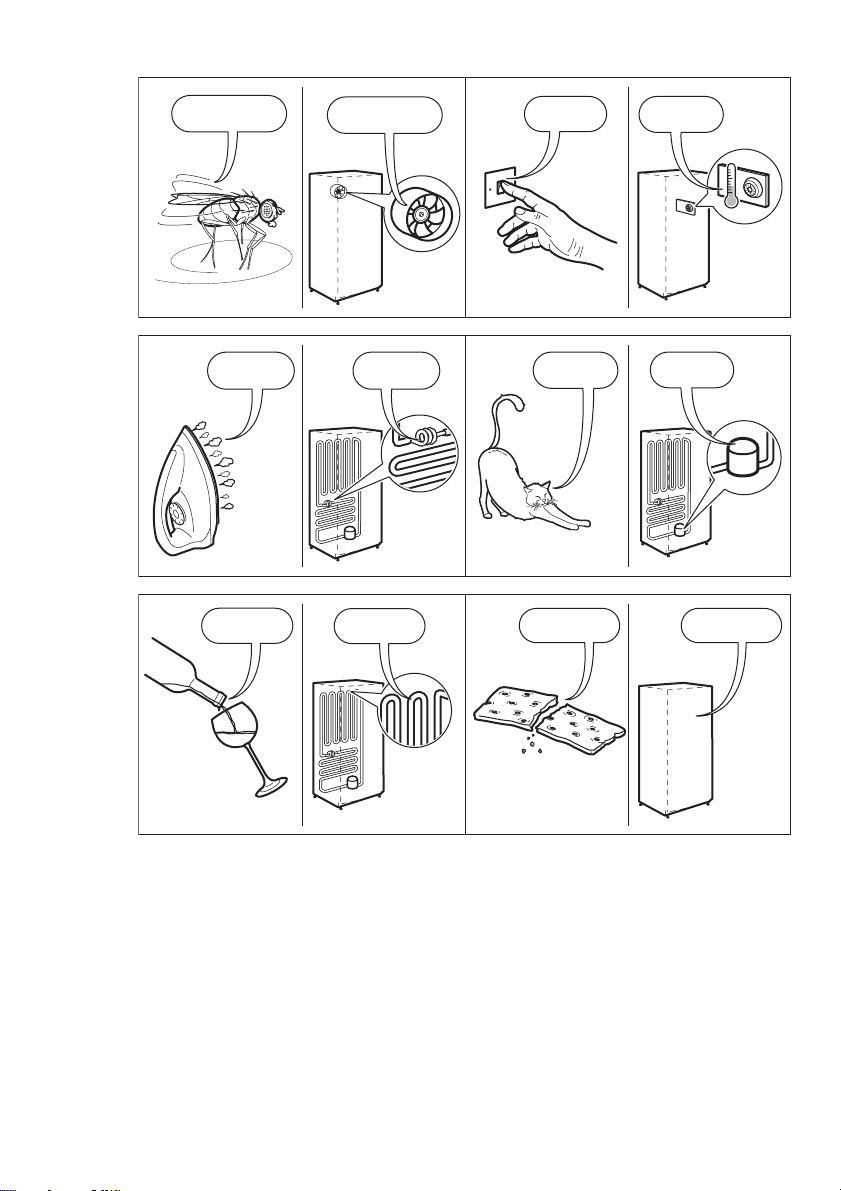
3.1 Cleaning the interior
Before using the appliance for the first
time, wash the interior and all internal
accessories with lukewarm water and
some neutral soap so as to remove the
typical smell of a brand-new product,
then dry thoroughly.
Do not use detergents or abrasive powders, as these will damage the finish.
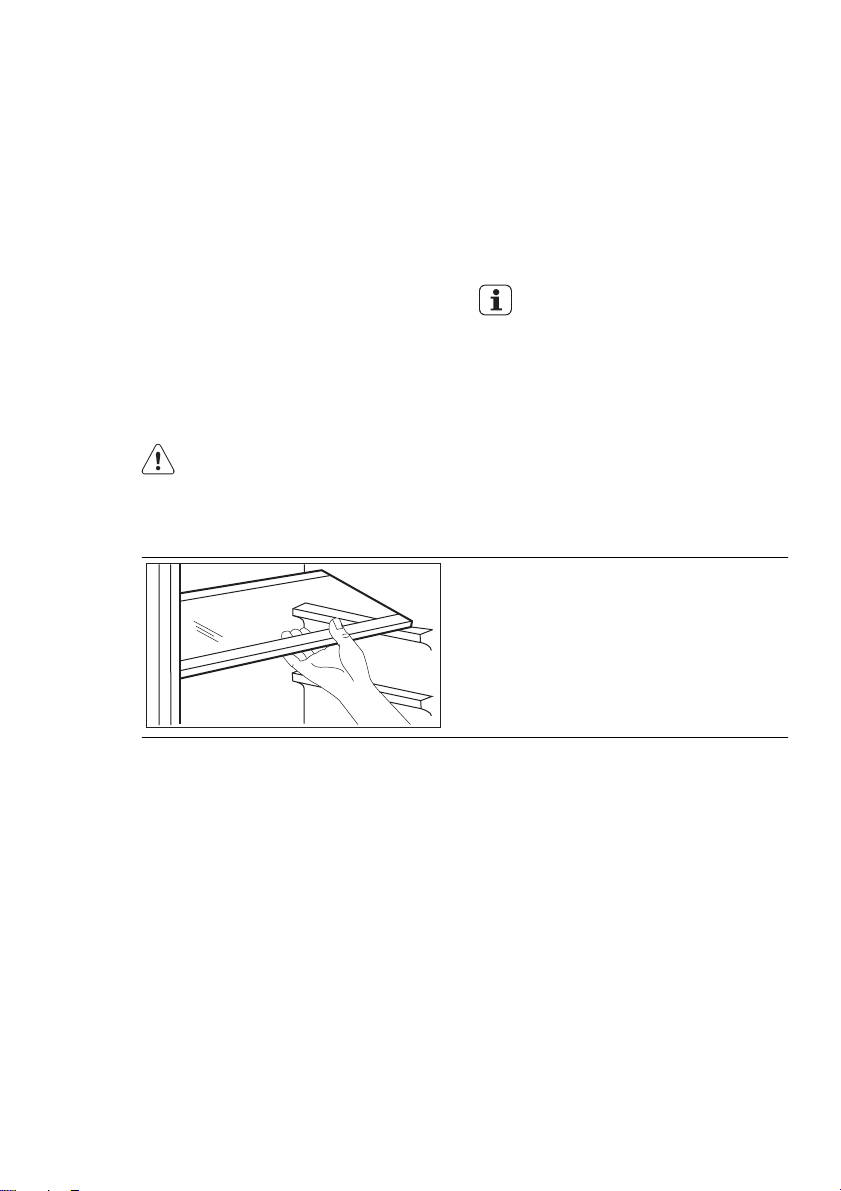
3.2 Movable shelves
3.3 Positioning the door
shelves
To permit storage of food packages of
various sizes, the door shelves can be
placed at different heights.
If “dEMo” appears on the Display, the appliance is in demonstration mode: refer to “WHAT
TO DO IF...” paragraph.
The walls of the refrigerator are equipped with a series of runners so that the
shelves can be positioned as desired.
For better use of space, the front halfshelves can lie over the rear ones.
Page 8
www.aeg.com
8
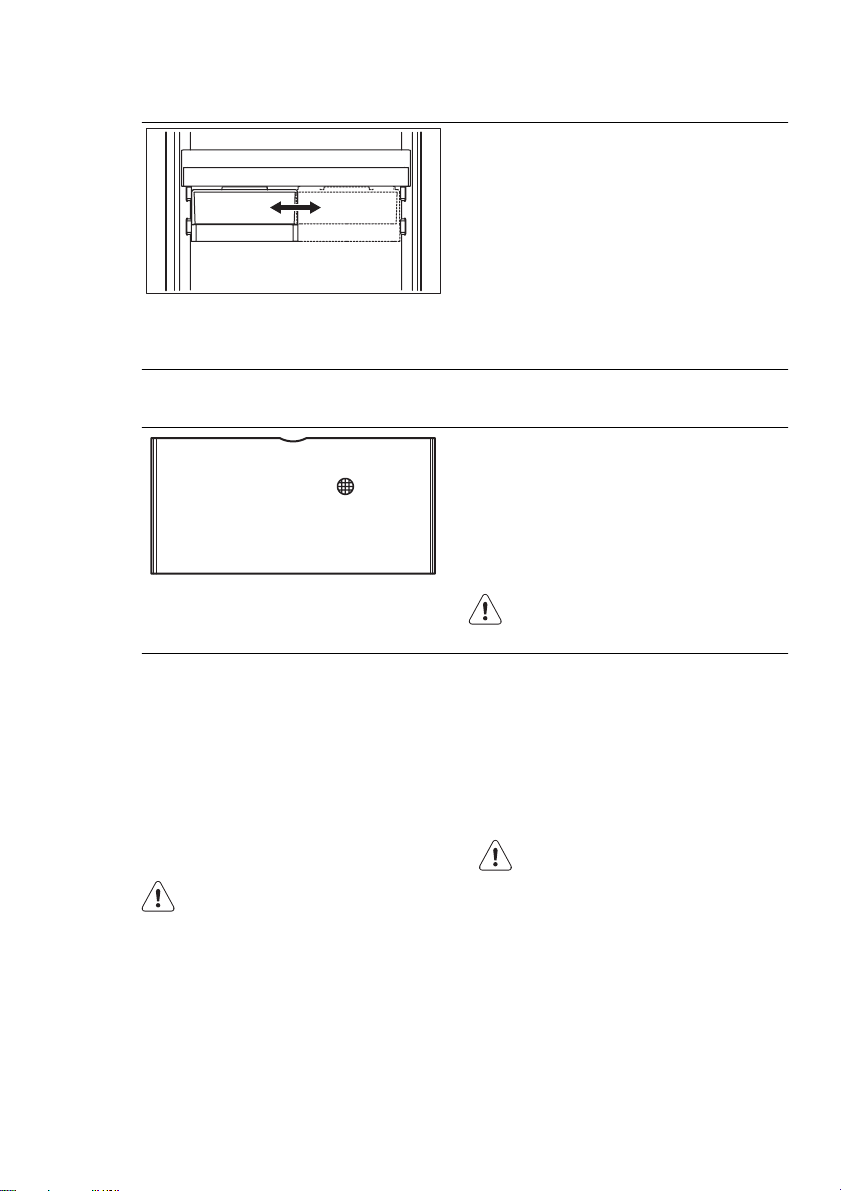
3.4 Positioning the sliding box
3.5 Carbon Air Filter
CLEANAIR CONTROL
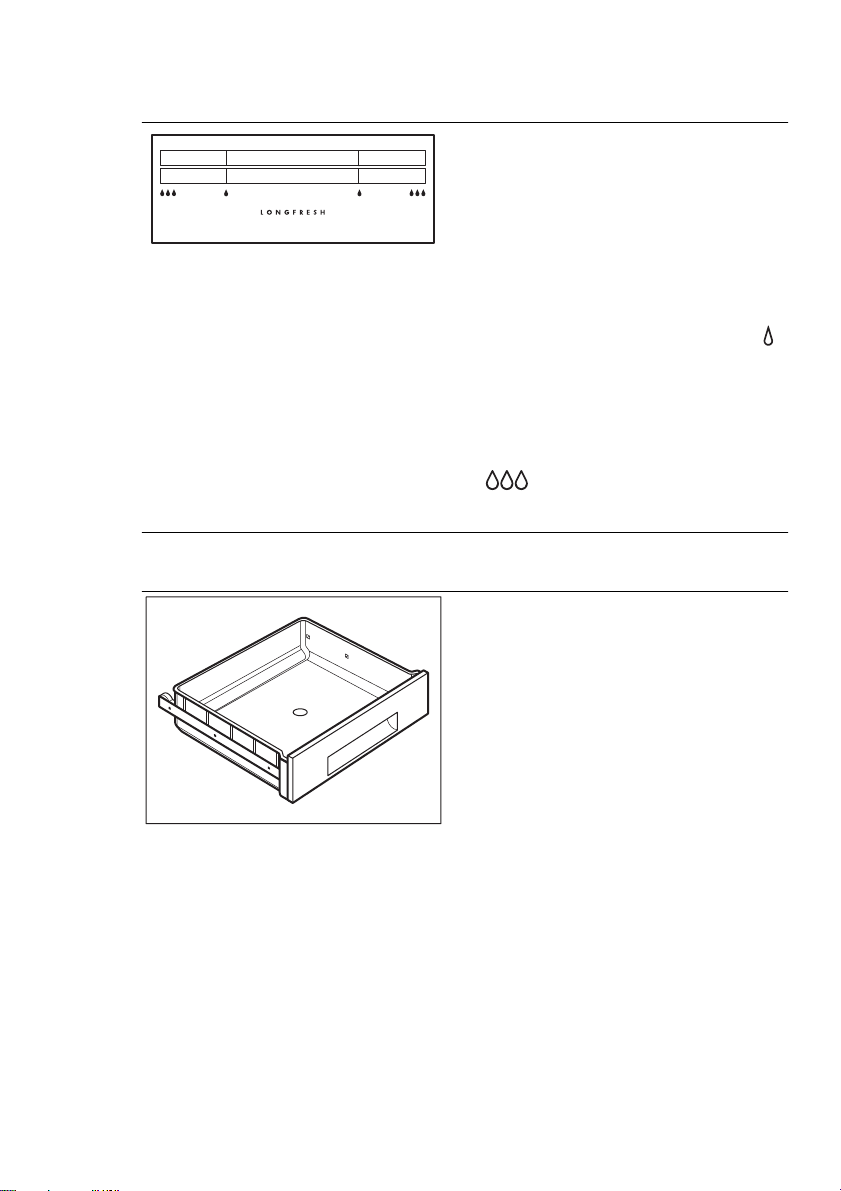
3.6 LONGFRESH
Compartment
In the LONGFRESH 0°C compartment
the temperature is controlled automatically. It stays constantly at about 0°C, no
adjustment is necessary.
The constant storage temperature of
about 0°C and the relative humidity of
between 45 and 90 % provide optimal
conditions for the various kinds of food.
The sliding box can be placed at different heights.
Do make these adjustments proceed as
follow:
1.
lift the shelf with the sliding box upwards and out of the holders in the
door
2.
remove the retaining bracket out of
the guide under the shelf
3.
Reverse the above operation to insert the sliding box at a different
height.
Your appliance is equipped with a carbon filter CLEANAIR CONTROL behind
a flap in the rear wall of the fridge compartment.
The filter purifies the air from unwanted
odours in the fridge and LONGFRESH
compartment meaning that the storage
quality will be further improved.
During the operation, always
keep the air ventilation flap
closed.
ment, where it will last up to 3 times longer with better quality compared to normal refrigerator compartments. This allows you to stock more fresh food. Taste,
degree of freshness, quality and nutritional values (vitamins and minerals) are
well preserved. Loss of weight in vegetables and fruit diminishes. Food yields a
higher degree of nutritional value.
You can therefore store a variety of fresh
food in the LONGFRESH 0°C compart-
The LONGFRESH 0°C compartment is
also suitable for defrosting food.
In this case the thawed food can be stored up to two days .
Page 9
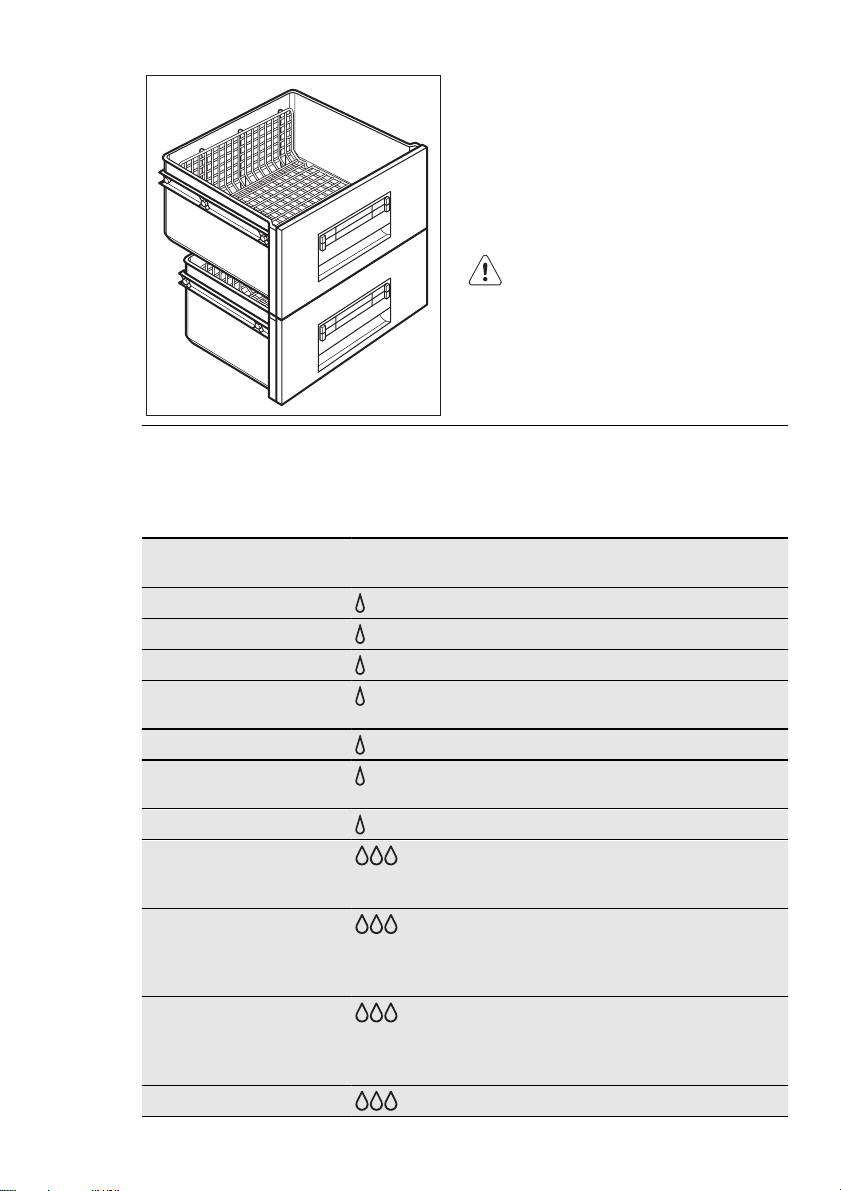
3.7 Humidity control
3.8 Longfresh drawers
ENGLISH 9
Both drawers can be used according to
the desired storage conditions independently of each other with lower or
higher humidity.
Regulation for each drawer is separate
and is controlled using the slide valve at
the front of the drawer.
• „Dry“: low air humidity - up to 50 %
relative humidity
This humidity level is reached when
both sliders are set into this position
and the ventilation openings are wide
open.
• Humid“: high relative humidity - up to
90%
This humidity level is reached when
both sliders are set in this position
and the ventilation openings are
closed. Humidity is kept and can not
escape.
The humidity is not adjustable.
Page 10
www.aeg.com
10
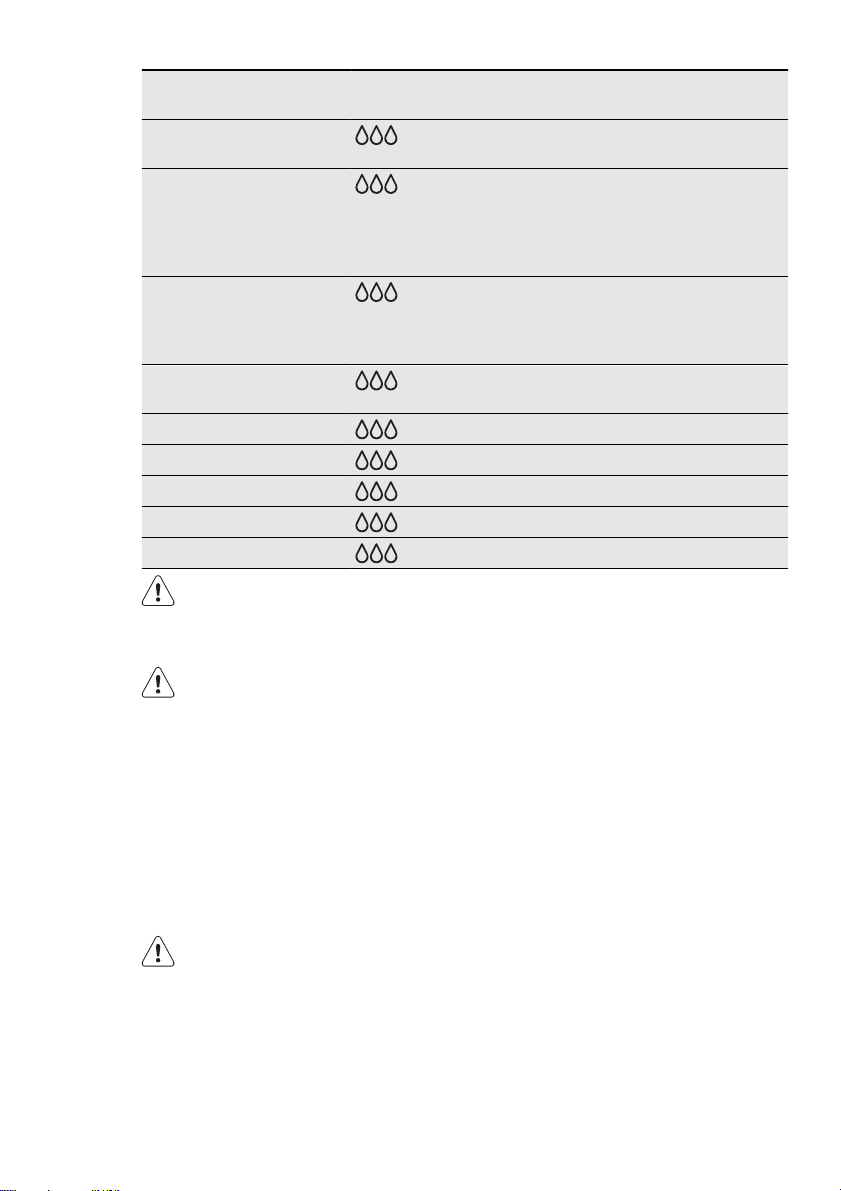
The wire shelves inside the drawers permit that air can circulate freely and consequently a better conservation of foods.
The compartment has stops to prevent
the drawers from falling out when fully
extended.
To remove the drawers (e.g. for cleaning
purposes), pull them out as far as the
stops, lift and remove.
Remove all drawers to store large
quantities of foods.
3.9 Storage time in the
Longfresh 0°C compartment
for fresh food
Type of food Air humidity adjust-
ment
Onion
Butter
Large pork cuts
Beef, venison, small
"dry”
“dry”
“dry”
“dry”
pork cuts, poultry
Tomato sauce
Fish, shellfish, cooked
“dry”
“dry”
meat products
Cooked seafood
Salad, vegetables Car-
“dry”
“humid”
rots, herbs, Brussels
sprouts, celery
Artichokes, cauliflower,
“humid”
chicory, iceberg lettuce,
endive, lamb’s lettuce,
lettuce, leeks, radicchio
Broccoli, Chinese
“humid”
leaves, kale, cabbage,
radishes, Savoy cabbage
Peas, kohlrabi
“humid”
Storage time
up to 5 months
up to 1 month
up to 10 days
up to 7 days
up to 4 days
up to 3 days
up to 2 days
up to 1 month
up to 21 days
up to 14 days
up to 10 days
Page 11
ENGLISH 11
Type of food Air humidity adjust-
ment
Spring onions, radishes,
“humid”
asparagus, spinach
Fruit (The riper the fruit,
“humid”
the shorter the storage
time)
Pears, dates (fresh),
strawberries, peaches
Plums (The riper the
“humid”
fruit, the shorter the
storage time)
rhubarb, gooseberries
Apples (not sensitive to
“humid”
cold), quinces
Apricots, cherries
Damsons, grapes
Blackberries, currants
Figs (fresh)
Blueberries, raspberries
Cakes containing cream and other kinds of pastry products can
be stored in the Longfresh 0°C
compartment for 2 or 3 days.
Not to be placed in the Longfresh 0°C compartment:
• cold sensitive fruit which have
to be stored at cellar or room
temperature like pineapple,
bananas, grapefruit, melons,
mango, papaya, oranges, lemons, kiwi fruit.
• The types of food not mentioned above should be stored
in the refrigerator compartment (e.g. all sorts of cheese,
cold cuts, etc.)
The level of air humidity in the
drawers depends on the content
of humidity in the stored food,
vegetable and fruit and on the
frequency of door opening
The Longfresh 0°C compartment
is also suitable for slow thawing
of food. In this case the thawed
food can be stored in the Longfresh 0°C compartment for up to
two days.
“humid”
“humid”
“humid”
“humid”
“humid”
Tips:
• Pay attention to the freshness of the
food, especially on the expiry date.
Quality and freshness influence the
storage time.
• The whole storage cycle time will depend on the preservation conditions
made prior to the final storage in the
fridge.
• Food, fruit or vegetables should always be packed or wrapped up before
storage.
• Animal food always store packed and
dry.
• Food rich in proteins will go bad
quicker. This means seafood will spoil
before fish which in turn will spoil before meat. While storing food in a 0°C
compartment storage time for that
kind of food can be increased by up to
three times as well without loss on
quality.
• All food stored in a 0°C compartment
should be taken out of the drawers
roughly 15-30 min before consumption, particularly fruit and vegetables
to be consumed without any additional cooking process. Allowing fruit and
vegetables to return to room tempera-
Storage time
up to 7 days
up to 1 month
up to 21 days
up to 20 days
up to 14 days
up to 10 days
up to 8 days
up to 7 days
up to 5 days
Page 12
www.aeg.com
12
ture will improve the texture and flavour.
4. HELPFUL HINTS AND TIPS
4.1 Hints for energy saving
• Do not open the door frequently or
leave it open longer than absolutely
necessary.
• If the ambient temperature is high and
the Temperature Regulator is set to
low temperature and the appliance is
fully loaded, the compressor may run
continuously, causing frost or ice on
the evaporator. If this happens, set the
Temperature Regulator toward warmer settings to allow automatic defrosting and so a saving in electricity consumption.
4.2 Hints for fresh food
refrigeration
To obtain the best performance:
• do not store warm food or evaporating liquids in the refrigerator
• do cover or wrap the food, particularly
if it has a strong flavour
• position food so that air can circulate
freely around it
5. CARE AND CLEANING
4.3 Hints for refrigeration
Useful hints:
Meat (all types) : wrap in polythene bags
and place on the glass shelf above the
vegetable drawer.
For safety, store in this way only one or
two days at the most.
Cooked foods, cold dishes, etc..: these
should be covered and may be placed
on any shelf.
Fruit and vegetables: these should be
thoroughly cleaned and placed in the
special drawer(s) provided.
Butter and cheese: these should be
placed in special airtight containers or
wrapped in aluminium foil or polythene
bags to exclude as much air as possible.
Milk bottles: these should have a cap
and should be stored in the bottle rack
on the door.
Bananas, potatoes, onions and garlic, if
not packed, must not be kept in the refrigerator.
CAUTION!
Unplug the appliance before carrying out any maintenance operation.
This appliance contains hydrocarbons in its cooling unit; maintenance and recharging must
therefore only be carried out by
authorized technicians.
5.1 Periodic cleaning
The equipment has to be cleaned regularly:
• clean the inside and accessories with
lukewarm water and some neutral
soap.
• regularly check the door seals and
wipe clean to ensure they are clean
and free from debris.
• rinse and dry thoroughly.
Do not pull, move or damage
any pipes and/or cables inside
the cabinet.
Never use detergents, abrasive
powders, highly perfumed cleaning products or wax polishes to
clean the interior as this will damage the surface and leave a
strong odour.
Page 13
Clean the condenser (black grill) and the
compressor at the back of the appliance
with a brush. This operation will improve
the performance of the appliance and
save electricity consumption.
The lowest shelf, dividing the cooler
compartment from the LONGFRESH 0°C
compartment can be removed only for
cleaning. To remove pull out the shelf
straight.
The cover plates above the drawers in
the compartment can be taken out for
cleaning.
To make sure fully functionality of the
LONGFRESH 0°C compartment the lowest shelf and cover plates must be put
back in their original position after cleaning.
Take care of not to damage the
cooling system.
Many proprietary kitchen surface cleaners contain chemicals that can attack/
damage the plastics used in this appliance. For this reason it is recommended
that the outer casing of this appliance is
only cleaned with warm water with a little
washing-up liquid added.
After cleaning, reconnect the equipment
to the mains supply.
5.2 Replacing the carbon filter
To get best performance the carbon air
filter should be changed once every
year.
ENGLISH 13
New active air filters can be purchased
from your local dealer.
Refer to “Installation of the carbon air filter” for the instructions.
The air filter is a consumable accessory
and as such is not covered by the guarantee.
5.3 Defrosting of the
refrigerator
Defrosting of the fridge compartment is
automatic.
The water that forms flows into a recipient on the compressor and evaporates.
This recipient cannot be removed.
5.4 Periods of non-operation
When the appliance is not in use for
long periods, take the following precautions:
• disconnect the appliance from elec-
tricity supply
• remove all food
• defrost (if foreseen) and clean the appliance and all accessories
• leave the door/doors ajar to prevent
unpleasant smells.
If the cabinet will be kept on, ask somebody to check it once in a while to prevent the food inside from spoiling in
case of a power failure.
6. WHAT TO DO IF…
WARNING!
Before troubleshooting, disconnect the mains plug from the
mains socket.
Only a qualified electrician or
competent person must do the
troubleshooting that is not in this
manual.
Page 14

www.aeg.com
14
Problem Possible cause Solution
The appliance is
noisy
The appliance is not supported properly
Check if the appliance
stands stable (all the four
feet should be on the
floor)
The appliance does
not operate. The
The appliance is switched
off.
Switch on the appliance.
lamp does not operate.
The mains plug is not
connected to the mains
Connect the mains plug to
the mains socket correctly.
socket correctly.
The appliance has no
power. There is no voltage in the mains socket.
Connect a different electrical appliance to the mains
socket.
Contact a qualified electrician.
The lamp does not
The lamp is in stand-by. Close and open the door.
work.
The lamp is defective. Refer to "Replacing the
lamp".
The compressor operates continually.
The door is not closed
The door has been
The temperature is not
set correctly.
correctly.
opened too frequently.
Set a higher temperature.
Refer to "Closing the
door".
Do not keep the door
open longer than necessary.
The product temperature
is too high.
Let the product temperature decrease to room
temperature before storage.
The room temperature is
too high.
The compressor
does not start imme-
This is normal, no error
has occurred.
Decrease the room temperature.
The compressor starts after a period of time.
diately after pressing the COOLMATIC
switch, or after
changing the temperature.
Water flows on the
rear plate of the refrigerator.
The temperature in
the appliance is too
During the automatic defrosting process, frost defrosts on the rear plate.
The temperature regulator is not set correctly.
This is correct.
Set a higher/lower temperature.
low/high.
Page 15

Problem Possible cause Solution
The door is not closed
correctly.
The product temperature
is too high.
Refer to "Closing the
door".
Let the product temperature decrease to room
temperature before storage.
Many products are stored
at the same time.
The temperature in
the refrigerator is
There is no cold air circulation in the appliance.
too high.
Upper or lower
square is shown in
the temperature Dis-
An error has occurred in
measuring the temperature
play.
Store less products at the
same time.
Make sure that there is
cold air circulation in the
appliance.
Call your service representative (the cooling system
will continue to keep food
products cold, but temperature adjustment will not
be possible).
dEMo appears on
the Display.
The appliance is in demonstration mode (dEMo).
Keep pressed approximately 10 sec. the OK button since a long sound of
buzzer is heard and the
Display shut off for a short
while: appliance start
works regularly
2.
6.1 Replacing the lamp
The appliance is equipped with a longlife LED interior light.
Only service is allowed to replace the
lighting device. Contact your Service
Center.
If necessary, adjust the door. Refer
to "Installation".
3.
If necessary, replace the defective
door gaskets. Contact the Service
Center.
ENGLISH 15
6.2 Closing the door
1.
Clean the door gaskets.
7. INSTALLATION
WARNING!
Read the "Safety Information"
carefully for your safety and correct operation of the appliance
before installing the appliance.
7.1 Positioning
WARNING!
If you are discarding an old appliance that has a lock or catch on
the door, you must ensure that it
is made unusable to prevent
young children being trapped inside.
Page 16
www.aeg.com
16
The appliance shall have the
plug accessible after installation.
Install this appliance at a location where
the ambient temperature corresponds to
the climate class indicated on the rating
plate of the appliance:
Cli-
Ambient temperature
mate
class
SN +10°C to + 32°C
N +16°C to + 32°C
ST +16°C to + 38°C
T +16°C to + 43°C
7.2 Electrical connection
Before plugging in, ensure that the voltage and frequency shown on the rating
7.3 Ventilation requirements
plate correspond to your domestic power supply.
The appliance must be earthed. The
power supply cable plug is provided
with a contact for this purpose. If the domestic power supply socket is not earthed, connect the appliance to a separate
earth in compliance with current regulations, consulting a qualified electrician.
The manufacturer declines all responsibility if the above safety precautions are
not observed.
This appliance complies with the E.E.C.
Directives.
5 cm
min.
200 cm
The airflow behind the appliance must
2
min.
200 cm
be sufficient.
2
Page 17
7.4 Installation of the carbon air filter
ENGLISH 17
8. NOISES
There are some sounds during normal
running (compressor, refrigerant circulation).
1
2
The carbon air filter is an active carbon
filter which absorbs bad odors and permits to maintain the best flavour and aroma for all foodstuffs without risk of
odor cross contamination.
On delivery the carbon filter is in a plastic bag to maintain it’s duration and
characteristics. The filter should be
placed behind the flap before the appliance is turned on.
1.
Open the flap cover (1).
2.
Remove the filter from the plastic
bag.
3.
Insert the filter in the slot found in
the back of the flap cover (2).
4.
Close the flap cover.
During operation, always keep
the air ventilation flap closed.
Handle carefully the filter so
fragments do not loosen from
the surface.
OK
SSSRR
HISSS!
BLUBB!
R!
CLICK!
BRRR!
CRACK!
Page 18
www.aeg.com
18
SSSRRR!
HISSS!
BLUBB!
SSSRRR!
HISSS!
BLUBB!
CLICK!
BRRR!
CLICK!
BRRR!
CRACK!CRACK!
Page 19

9. TECHNICAL DATA
Dimension of the recess
Height 1855 mm
Width 545 mm
Depth 575 mm
Voltage 230-240 V
Frequency 50 Hz
The technical information are situated in
the rating plate on the internal left side
of the appliance and in the energy label.
10. ENVIRONMENT CONCERNS
ENGLISH 19
Recycle the materials with the
symbol
applicable containers to recycle it.
Help protect the environment and
human health and to recycle waste
of electrical and electronic
. Put the packaging in
appliances. Do not dispose
appliances marked with the symbol
with the household waste. Return the
product to your local recycling
facility or contact your municipal
office.
Page 20

www.aeg.com
20
INDICE
1. ISTRUZIONI DI SICUREZZA . . . . . . . . . . . . . . . . . . . . . . . . . . . . . . . . . . . . . . . . . . . . . . . . . . . 21
2. PANNELLO DEI COMANDI . . . . . . . . . . . . . . . . . . . . . . . . . . . . . . . . . . . . . . . . . . . . . . . . . . 23
3. UTILIZZO QUOTIDIANO . . . . . . . . . . . . . . . . . . . . . . . . . . . . . . . . . . . . . . . . . . . . . . . . . . . . . 25
4. CONSIGLI E SUGGERIMENTI UTILI . . . . . . . . . . . . . . . . . . . . . . . . . . . . . . . . . . . . . . . . . . . . 30
5. PULIZIA E CURA . . . . . . . . . . . . . . . . . . . . . . . . . . . . . . . . . . . . . . . . . . . . . . . . . . . . . . . . . . . . 30
6. COSA FARE SE… . . . . . . . . . . . . . . . . . . . . . . . . . . . . . . . . . . . . . . . . . . . . . . . . . . . . . . . . . . . 32
7. INSTALLAZIONE . . . . . . . . . . . . . . . . . . . . . . . . . . . . . . . . . . . . . . . . . . . . . . . . . . . . . . . . . . . 34
8. RUMORI . . . . . . . . . . . . . . . . . . . . . . . . . . . . . . . . . . . . . . . . . . . . . . . . . . . . . . . . . . . . . . . . . . 35
9. DATI TECNICI . . . . . . . . . . . . . . . . . . . . . . . . . . . . . . . . . . . . . . . . . . . . . . . . . . . . . . . . . . . . . 37
10. CONSIDERAZIONI AMBIENTALI . . . . . . . . . . . . . . . . . . . . . . . . . . . . . . . . . . . . . . . . . . . . . . 37
PER RISULTATI PERFETTI
Grazie per aver scelto di acquistare questo prodotto AEG. Lo abbiamo creato per fornirvi
prestazioni impeccabili per molti anni, grazie a tecnologie innovative che vi semplificheranno
la vita - funzioni che non troverete sui normali elettrodomestici. Vi invitiamo di dedicare
qualche minuto alla lettura per sapere come trarre il massimo dal vostro elettrodomestico.
Visitate il nostro sito web per:
ricevere consigli, scaricare i nostri opuscoli, eliminare eventuali anomalie, ottenere
informazioni sull'assistenza.
www.aeg.com
registrare il vostro prodotto e ricevere un servizio migliore:
www.aeg.com/productregistration
acquistare accessori, materiali di consumo e ricambi originali per la vostra
apparecchiatura:
www.aeg.com/shop
SERVIZIO CLIENTI E MANUTENZIONE
Consigliamo sempre l’impiego di ricambi originali.
Quando si contatta l'Assistenza, accertarsi di disporre dei seguenti dati.
Le informazioni si trovano sulla targhetta di identificazione. Modello, numero dell'apparecchio
(PNC), numero di serie.
Avvertenza / Attenzione - Importanti Informazioni di Sicurezza
Informazioni e consigli generali
Informazioni in materia di sicurezza ambientale
Con riserva di modifiche.
Page 21

ITALIANO 21
1.
ISTRUZIONI DI SICUREZZA
Per garantire un impiego corretto e sicuro dell'apparecchio, prima dell'installazione e del primo utilizzo leggere con attenzione il libretto istruzioni, inclusi i
suggerimenti e le avvertenze. Per evitare
errori e incidenti, è importante garantire
che tutte le persone che utilizzano l'apparecchio ne conoscano il funzionamento e le caratteristiche di sicurezza. Conservare queste istruzioni e accertarsi che
rimangano unite all'apparecchio in caso
di vendita o trasloco, in modo che chiunque lo utilizzi sia correttamente informato sull'uso e sulle norme di sicurezza.
Per la sicurezza delle persone e delle cose osservare le precauzioni indicate nelle
presenti istruzioni per l'utente, il produttore non è responsabile dei danni provocati da eventuali omissioni.
1.1 Sicurezza dei bambini e
delle persone fragili
• Questo apparecchio non deve essere
usato da persone, bambini inclusi, con
ridotte capacità fisiche, sensoriali o
psichiche, oppure prive di conoscenza
e esperienza, a meno che non siano
state istruite all'uso dell'apparecchio
da parte dei responsabili della loro sicurezza, oppure sotto vigilanza di questi.
I bambini devono essere sorvegliati
per assicurarsi che non giochino con
l'apparecchio.
• Tenere i materiali di imballaggio al di
fuori della portata dei bambini. Alcuni
materiali possono creare rischi di soffocamento.
• Qualora l'apparecchio venga demolito, estrarre la spina dalla presa, tagliare il cavo di collegamento (il più vicino
possibile all'apparecchio) e smontare
lo sportello per evitare che i bambini
giocando possano subire scosse elettriche o chiudersi dentro l'apparecchio.
• Se questo nuovo apparecchio, che è
dotato di guarnizioni magnetiche nello sportello, va a sostituirne uno più
vecchio avente sportello o coperchio
con chiusure a molla, si deve rendere
inutilizzabili tali chiusure prima di eli-
minare l'apparecchio sostituito, per
evitare che diventi una trappola mortale per i bambini.
1.2 Norme di sicurezza
generali
AVVERTENZA!
Verificare che le aperture di ventilazione,
sia sull'apparecchiatura che nella struttura da incasso, siano libere da ostruzioni.
• L'apparecchiatura è progettata per la
conservazione domestica di alimenti
e/o bevande nelle modalità descritte
nelle presenti istruzioni.
• Non usare dispositivi elettrici o altri
mezzi artificiali non raccomandati dal
produttore allo scopo di accelerare il
processo di sbrinamento.
• Non utilizzare altre apparecchiature
elettriche (per esempio gelatiere) all'interno del frigorifero, salvo quelle
approvate per tale scopo dal produttore.
• Non danneggiare il circuito refrigerante.
• Il circuito refrigerante dell'apparecchiatura contiene isobutano (R600a),
un gas naturale con un elevato livello
di compatibilità ambientale che, tuttavia, è infiammabile.
Durante il trasporto e l'installazione
dell'apparecchiatura, assicurarsi che
nessuno dei componenti del circuito
refrigerante venga danneggiato.
In caso di danneggiamento del circuito refrigerante:
– evitare fiamme libere e scintille
– aerare bene il locale in cui si trova
l'apparecchiatura
• È pericoloso cambiare le specifiche o
modificare il prodotto in qualunque
modo. Un danneggiamento del cavo
potrebbe provocare cortocircuiti, incendi e/o scosse elettriche.
Page 22

www.aeg.com
22
AVVERTENZA!
Tutti i componenti elettrici (cavo
di alimentazione, spina, compressore) devono essere sostituiti
da un tecnico certificato o da
personale d'assistenza qualificato
al fine di evitare di correre rischi.
1.
Non collegare prolunghe al cavo
di alimentazione.
2.
Evitare che il lato posteriore dell'apparecchiatura possa schiacciare o danneggiare la spina, causandone il surriscaldamento con un
conseguente rischio di incendio.
3.
La spina dell'apparecchiatura deve trovarsi in una posizione accessibile.
4.
Evitare di tirare il cavo di alimentazione.
5.
Se la presa elettrica non è perfettamente stabile, non inserire la
spina. Il collegamento potrebbe
provocare scosse elettriche o
creare un rischio di incendio.
6.
L'apparecchiatura non deve essere messa in funzione senza il coprilampada interno (se previsto).
• Questa apparecchiatura è pesante.
Procedere con cautela durante gli
spostamenti.
• Evitare di estrarre o di toccare gli alimenti riposti nel vano congelatore con
le mani bagnate o umide; il contatto
potrebbe provocare abrasioni o ustioni da freddo.
• Evitare un'esposizione prolungata dell'apparecchiatura alla luce solare diretta.
• Le lampadine utilizzate in questa apparecchiatura (se previste) sono lampade speciali selezionate esclusivamente per elettrodomestici. Non sono
adatte per l'illuminazione degli ambienti.
1.3 Uso quotidiano
• Non collocare pentole calde sulle parti
in plastica dell'apparecchio.
• Non collocare gas e liquidi infiammabili nell'apparecchio, perché potrebbero esplodere.
• Evitare di appoggiare gli alimenti contro la presa d'aria situata nella parete
posteriore (per le apparecchiature di
tipo no-frost)
• Gli alimenti congelati non devono essere ricongelati una volta scongelati.
• Riporre gli alimenti surgelati preconfezionati secondo le istruzioni del produttore dell'alimento surgelato.
• Osservare rigorosamente i consigli per
la conservazione degli alimenti del
produttore dell'apparecchio. Vedere
le relative istruzioni.
• Non collocare bevande gassate o frizzanti nello scomparto congelatore
perché creano pressione sul recipiente
che può esplodere danneggiando
l'apparecchio.
• I ghiaccioli possono provocare bruciature da gelo se consumati immediatamente dopo averli tolti dall'apparecchio.
1.4 Pulizia e cura
• Prima della manutenzione, spegnere
l'apparecchio e staccare la spina dalla
presa.
• Non pulire l'apparecchio con oggetti
metallici.
• Non usare oggetti appuntiti per rimuovere la brina dall'apparecchio.
Usare un raschietto di plastica.
• Esaminare regolarmente il foro di scarico dell'acqua di sbrinamento nel frigorifero. Se necessario, pulirlo. Se il
foro è otturato, l'acqua si raccoglie sul
fondo dell'apparecchio.
1.5 Installazione
Per il collegamento elettrico, seguire attentamente le istruzioni
dei paragrafi corrispondenti.
• Disimballare l'apparecchio e assicurarsi che non presenti danni. Non collegare l'apparecchio se è danneggiato.
Segnalare immediatamente gli eventuali danni al negozio in cui è stato acquistato. In questo caso conservare
l'imballaggio.
• Si consiglia di attendere almeno due
ore prima di collegare l'apparecchio
per consentire all'olio di arrivare nel
compressore.
Page 23
• Attorno all'apparecchio vi deve essere
un'adeguata circolazione dell'aria, altrimenti si può surriscaldare. Per ottenere una ventilazione sufficiente seguire le istruzioni di installazione.
• Se possibile il retro dell'apparecchio
dovrebbe essere posizionato contro
una parete per evitare di toccare le
parti calde o di rimanervi impigliati
(compressore, condensatore), evitando così possibili scottature.
• L'apparecchio non deve essere posto
vicino a radiatori o piani di cottura a
gas.
• Installare l'apparecchio in modo che la
presa rimanga accessibile.
• Collegare solo a sorgenti d'acqua potabile (se è previsto un collegamento
alla rete idrica).
1.6 Assistenza tecnica
• Gli interventi elettrici sull'apparecchiatura devono essere eseguiti esclusivamente da elettricisti qualificati o da
personale competente.
ITALIANO 23
• Gli interventi di assistenza devono essere eseguiti esclusivamente da tecnici autorizzati e utilizzando solo ricambi
originali.
1.7 Tutela ambientale
Questo apparecchio non contiene gas che potrebbero danneggiare lo strato di ozono nel circuito refrigerante o nei materiali isolanti. L'apparecchio non deve essere smaltito assieme ai rifiuti urbani e alla spazzatura. La schiuma dell'isolamento contiene gas
infiammabili: lo smaltimento dell'apparecchio va eseguito secondo le prescrizioni vigenti da richiedere alle autorità locali. Evitare di danneggiare il gruppo refrigerante, specialmente nella
parte posteriore vicino allo scambiatore di calore. I materiali usati
su questo apparecchio contras-
segnati dal simbolo
clabili.
sono rici-
2. PANNELLO DEI COMANDI
Display
1
Tasto Temperatura più calda
2
Tasto Temperatura più fresca
3
Tasto OK
4
Tasto Mode
5
Tasto ON/OFF
6
È possibile modificare le impostazioni
audio predefinite dei tasti e impostarle
con un volume più alto premendo contemporaneamente il tasto Mode ed il tasto Temperatura più fredda per alcuni
secondi. La modifica è reversibile.
1
56 4 3 2
2.1 Display
Funzione timer
1
Funzione COOLMATIC
2
Funzione Minute Minder
3
Funzione Sicurezza bambini
4
Spia allarme
5
Indicatore della temperatura
6
5 62 431
Page 24

www.aeg.com
24
2.2 Accensione
Per accendere l'apparecchiatura procedere come segue:
1.
Inserire la spina nella presa di alimentazione.
2.
Premere il tasto ON/OFF se il display è spento.
3.
Il segnale acustico d'allarme potrebbe attivarsi dopo alcuni secondi.
Per resettare l'allarme, consultare la
sezione "Allarme di alta temperatura".
4.
Se "dEMo" appare sul display, l'apparecchiatura si trova in modalità dimostrazione. Fare riferimento al paragrafo "Cosa fare se...".
5.
Gli indicatori di temperatura visualizzano la temperatura impostata pre-
definita.
Per selezionare una temperatura diversa,
consultare la sezione "Regolazione della
temperatura".
2.3 Spegnimento
Per spegnere l'apparecchiatura, procedere come segue:
1.
Premere il tasto ON/OFF per 5 se-
condi.
2.
Il display si spegne.
3.
Per scollegare l’apparecchiatura dal-
la corrente elettrica, staccare la spi-
na dalla presa di alimentazione.
2.4 Regolazione della
temperatura
È possibile regolare la temperatura impostata del frigorifero, premendo il tasto
temperatura.
Impostare la temperatura predefinita:
+5°C per il frigorifero.
Gli indicatori della temperatura visualizzano la temperatura impostata.
La temperatura impostata verrà raggiunta entro 24 ore.
Dopo un'interruzione di corrente
la temperatura impostata rimane
in memoria.
2.5 Funzione Minute Minder
La funzione Minute Minder serve per impostare un segnale acustico in un preciso momento, utile per esempio quando
una pietanza richiede il raffreddamento
di alimenti misti per un certo periodo di
tempo.
Per attivare la funzione:
1.
Premere il tasto Mode finché non
appare l'icona corrispondente.
L'indicatore Minute Minder lampeggia.
Il timer visualizza il valore impostato
(30 minuti) per alcuni secondi.
2.
Premere il tasto Regolatore timer
per modificare il valore impostato da
1 a 90 minuti.
3.
Premere il tasto OK per confermare.
La spia Minute Minder viene visualiz-
zata.
Il Timer inizia a lampeggiare (min).
Al termine del conto alla rovescia la spia
Minute Minder lampeggia e viene emesso un segnale acustico:
1.
premere il tasto OK per spegnere il
segnale acustico e porre fine alla
funzione.
È possibile disattivare la funzione in
qualsiasi momento durante il conto alla
rovescia:
1.
Premere il tasto Mode fino a quando
la spia Minute Minder lampeggia.
2.
Premere il tasto OK per confermare.
3.
La spia Minute Minder si spegne.
È possibile modificare l'ora in qualsiasi
momento durante il conto alla rovescia e
alla fine premendo il tasto Temperatura
più fredda ed il Tasto temperatura più
calda.
2.6 Funzione Sicurezza
Bambini
Per evitare che i tasti vengano premuti
accidentalmente, selezionare la funzione
Sicurezza Bambini.
Per attivare la funzione:
1.
Premere il tasto Mode fino a quando
non appare l'icona corrispondente.
2.
L'indicatore Sicurezza Bambini lam-
peggia.
3.
Premere il tasto OK per confermare.
Page 25

Viene visualizzato l'indicatore Sicurezza Bambini.
Per disattivare la funzione:
1.
Premere il tasto Mode fino a quando
l'indicatore Sicurezza Bambini non
lampeggia.
2.
Premere il tasto OK per confermare.
3.
L'indicatore Sicurezza Bambini si
spegne.
2.7 Funzione COOLMATIC
Se occorre inserire una grande quantità
di alimenti nel frigorifero, per esempio al
ritorno dalla spesa, è consigliabile attivare la funzione COOLMATIC per raffreddare più rapidamente gli alimenti introdotti nel frigorifero e non intiepidire i cibi già presenti al suo interno.
Per attivare la funzione:
1.
Premere il tasto Mode finché non
appare l'icona corrispondente.
La spia COOLMATIC lampeggia.
2.
Premere il tasto OK per confermare.
La spia COOLMATIC viene visualiz-
zata.
ITALIANO 25
La funzione COOLMATIC si disattiva automaticamente dopo circa 6 ore.
Per disattivare la funzione prima dello
spegnimento automatico:
1.
Premere il tasto Mode fino a quando
l'indicatore COOLMATIC lampeg-
gia.
2.
Premere il tasto OK per confermare.
3.
La spia COOLMATIC si spegne.
La funzione si disattiva selezionando un'impostazione di temperatura per il frigorifero diversa.
2.8 Allarme porta aperta
Se la porta è lasciata aperta per alcuni
minuti, viene emesso un segnale acustico. Le condizioni di allarme della porta
aperta sono indicate da:
• indicatore allarme lampeggiante
• segnale acustico
Al ripristino delle condizioni normali
(porta chiusa), l'allarme si interrompe.
Durante l'allarme, il segnale acustico
può essere disattivato premendo qualsiasi tasto.
3. UTILIZZO QUOTIDIANO
3.1 Pulizia dell'interno
Prima di utilizzare l'apparecchiatura per
la prima volta, lavare l'interno e gli accessori con acqua tiepida e sapone neutro per eliminare il tipico odore dei prodotti nuovi, quindi asciugare accuratamente.
Non usare detergenti corrosivi o
polveri abrasive che possano
danneggiare la finitura.
Se “dEMo” appare sul display,
l'apparecchiatura si trova in modalità dimostrazione: fare riferimento al paragrafo “COSA FARE
SE…”.
Page 26

www.aeg.com
26
3.2 Ripiani mobili
Le guide presenti sulle pareti del frigorifero permettono di posizionare i ripiani a
diverse altezze.
Per un migliore sfruttamento dello spazio, i semiripiani anteriori possono essere collocati sopra a quelli posteriori.
3.3 Posizionamento delle
mensole
Per facilitare l'introduzione di alimenti di
diverse dimensioni, i ripiani della porta
possono essere posizionati ad altezze
differenti.
3.4 Posizionamento della scatola scorrevole
La scatola scorrevole può essere inserita
a diverse altezze.
Per regolare l'altezza, procedere come
segue:
1.
sollevare il ripiano con la parte superiore della scatola rivolta verso l'alto
ed estrarla dalle guide
2.
togliere le staffe di fissaggio dalla
guida sotto alla mensola
3.
Procedere in modo inverso per inserire una mensola intermedia ad
un'altezza diversa.
3.5 Filtro dell'aria al carbone
L'apparecchiatura è dotata di un filtro al
carbone CLEANAIR CONTROL posizionato dietro un flap nella parete posterio-
CLEANAIR CONTROL
3.6 Scomparto LONGFRESH
Nello scomparto LONGFRESH 0°C la
temperatura viene controllata automaticamente. Resta costantemente a circa 0
°C e non richiede regolazioni.
La temperatura di conservazione costante di circa 0 °C e l'umidità relativa com-
re del vano frigorifero.
Il filtro purifica l'aria eliminando gli odori
sgradevoli nel vano del frigorifero e
LONGFRESH migliorando ulteriormente
la qualità di conservazione.
Durante il funzionamento, tenere
sempre chiuso il flap di ventilazione aria.
presa tra il 45 e il 90% forniscono condizioni ottimali per i vari tipi di alimenti.
Ѝ possibile, pertanto, conservare diversi
alimenti freschi nello scomparto LONG-
Page 27

FRESH 0°C , dove dureranno almeno il
triplo del tempo con una qualità superiore rispetto a quella dei normali scomparti del frigorifero. Ciò consente di conservare una maggiore quantità di alimenti freschi. Il sapore, il grado di freschezza, la qualità e i valori nutrizionali
(vitamine e sali minerali) vengono ben
mantenuti. Il calo ponderale di frutta e
verdura si riduce e gli alimenti apportano un maggiore valore nutrizionale.
3.7 Controllo dell'umidità
ITALIANO 27
Lo scomparto LONGFRESH 0°C è anche
idoneo allo scongelamento degli alimenti.
In questo caso gli alimenti scongelati
possono essere conservati fino a due
giorni.
Entrambi i cassetti possono essere utilizzati in base alle condizioni di conservazione desiderate, in modo reciprocamente indipendente riguardo al livello di
umidità.
Ciascun cassetto viene regolato separatamente e il controllo viene effettuato
utilizzando il dispositivo di scorrimento
che si trova sulla parte anteriore del cassetto.
• "Secco": umidità relativa bassa - fino
al 50%
Questo livello di umidità viene raggiunto quando entrambi i dispositivi di
scorrimento vengono impostati sulla
posizione
ne sono tutte aperte.
• "Umido": umidità relativa elevata - fino al 90%
Questo livello di umidità viene raggiunto quando entrambi i dispositivi di
scorrimento vengono impostati sulla
posizione
lazione sono chiuse. L'umidità viene
mantenuta e non può fuoriuscire.
e le aperture di ventilazio-
e le aperture di venti-
3.8 CassettiLongfresh
L'umidità non è regolabile.
Page 28

www.aeg.com
28
Le griglie all'interno degli scomparti
consentono la libera circolazione dell'aria e quindi una migliore conservazione
degli alimenti.
Lo scomparto presenta dei fermi che impediscono ai cassetti di fuoriuscire quando vengono estratti completamente.
Per rimuovere i cassetti (ad esempio per
la pulizia), estrarli fino a raggiungere i
fermi, quindi sollevarli e rimuoverli.
È possibile rimuovere tutti i cassetti per conservare maggiori
quantità di alimenti.
3.9 Tempi di conservazione
nello scomparto a 0 °C
LongFresh per alimenti freschi
Tipo di alimento Regolazione dell'umidi-tàTempo di conservazione
Cipolla
Burro
Grandi tagli di carne di
maiale
Manzo, cervo, piccoli ta-
gli di carne di maiale,
pollame
Salsa di pomodoro
Pesce, molluschi, pro-
dotti a base di carne
cotti
Frutti di mare cotti
Insalata, verdure Caro-
te, erbette, cavolini di
Bruxelles, sedano
Carciofi, cavolfiori, cicoria, lattuga iceberg, indivia, valeriana, lattuga,
porri, radicchio
Broccoli, cavolo cinese,
cavolo verde, cavolo
cappuccio, ravanelli,
verza
"secco”
"secco”
"secco”
"secco”
"secco”
"secco”
"secco”
"umido"
"umido"
"umido"
fino a 5 mesi
fino a 1 mese
fino a 10 giorni
fino a 7 giorni
fino a 4 giorni
fino a 3 giorni
fino a 2 giorni
fino a 1 mese
fino a 21 giorni
fino a 14 giorni
Page 29

ITALIANO 29
Tipo di alimento Regolazione dell'umidi-tàTempo di conservazione
Piselli, rapa
Cipollotti, ravanelli,
asparagi, spinaci
Frutta(A un maggiore
grado di maturazione
della frutta corrispondono tempi di conservazione più brevi)
Pere, datteri (freschi),
fragole, pesche
Prugne (A un maggiore
grado di maturazione
della frutta corrispondono tempi di conservazione più brevi)
rabarbaro, uva spina
Mele (che non risentono
del freddo), mele cotogne
Albicocche, ciliegie
Susine damaschine, uva
More, ribes
Fichi (freschi)
Mirtilli, lamponi
Torte contenenti creme e altri tipi di prodotti di pasticceria possono essere conservati nello
scomparto a 0 °C LongFresh per
2 o 3 giorni.
Non collocare nello scomparto a
0 °C LongFresh i seguenti alimenti:
• frutta sensibile al freddo che
deve essere conservata in cantina o a temperatura ambiente,
ad esempio ananas, banane,
pompelmi, meloni, mango, papaya, arance, limoni, kiwi.
• I tipi di alimenti non indicati
sopra devono essere conservati nello scomparto del frigorifero (ad es. tutti i tipi di formaggi, affettati, e così via).
"umido"
"umido"
"umido"
"umido"
"umido"
"umido"
"umido"
"umido"
"umido"
"umido"
fino a 10 giorni
fino a 7 giorni
fino a 1 mese
fino a 21 giorni
fino a 20 giorni
fino a 14 giorni
fino a 10 giorni
fino a 8 giorni
fino a 7 giorni
fino a 5 giorni
Il livello di umidità all'interno dei
cassetti dipende dal contenuto
di umidità presente nella frutta,
nelle verdure e negli alimenti
conservati e dalla frequenza di
apertura della porta
Lo scomparto a 0 °C LongFresh è
anche idoneo allo scongelamento lento degli alimenti. In questo
caso gli alimenti scongelati possono essere conservati nello
scomparto a 0 °C LongFresh fino
a due giorni.
Suggerimenti:
• Controllare la freschezza degli alimenti, soprattutto alla data di scadenza. La
qualità e la freschezza influiscono sul
tempo di conservazione.
• Il tempo dell'intero ciclo di conservazione dipende dalle condizioni degli
alimenti prima della conservazione finale nel frigorifero.
Page 30

www.aeg.com
30
• Occorre sempre confezionare o avvolgere alimenti, frutta o verdure prima
della loro conservazione.
• Gli alimenti di origine animale devono
essere sempre conservati confezionati
e asciutti.
• Gli alimenti ad alto tenore proteico si
deteriorano più rapidamente. I frutti di
mare, ad esempio, si deteriorano prima del pesce, che a sua volta si deteriora prima della carne. Conservando
gli alimenti in uno scomparto a 0 °C, il
tempo di conservazione relativo all'alimento può essere aumentato anche di
tre volte senza perdita di qualità.
• Tutti gli alimenti conservati in uno
scomparto a 0 °C devono essere rimossi dai cassetti circa 15-30 minuti
prima del consumo, in particolare la
frutta e le verdure da consumare senza ulteriore cottura. A temperatura
ambiente frutta e verdure acquisiscono una consistenza e un sapore migliori.
4. CONSIGLI E SUGGERIMENTI UTILI
4.1 Consigli per il risparmio
energetico
• Non aprire frequentemente la porta e
non lasciarla aperta più di quanto assolutamente necessario.
• Se la temperatura ambiente è elevata,
il termostato è impostato su una regolazione alta e l'apparecchio è a pieno
carico, il compressore può funzionare
in continuo causando la formazione di
brina o ghiaccio sull'evaporatore. In
questo caso, ruotare il termostato su
una regolazione più bassa per consentire lo scongelamento automatico risparmiando così energia.
4.2 Consigli per la
refrigerazione di cibi freschi
Per ottenere i migliori risultati:
• non riporre nel frigorifero cibi caldi o
liquidi in fase di evaporazione
• coprire o avvolgere il cibo, in particolare se emana un odore forte
• posizionare il cibo in modo che l'aria
possa circolare liberamente attorno ad
esso
4.3 Consigli per la
refrigerazione
Consigli utili:
Carne (tutti i tipi): avvolgerla in sacchetti
di politene e collocarla sul ripiano di vetro sopra il cassetto delle verdure.
Per motivi di sicurezza, conservarla in
queste condizioni solo per uno o due
giorni al massimo.
Cibi cucinati, piatti freddi ecc..: dovrebbero essere coperti e possono essere
collocati su qualsiasi ripiano.
Frutta e verdura: dovrebbero essere pulite accuratamente e collocate nell'apposito/i cassetto/i speciale/i.
Burro e formaggio: dovrebbero essere
posti in contenitori ermetici speciali o
avvolti in pellicole di alluminio o sacchetti di politene per escludere per quanto
possibile l'aria.
Bottiglie di latte: dovrebbero essere tappate e conservate nell'apposito ripiano
sulla porta.
Non conservare nel frigorifero banane,
patate, cipolle o aglio se non sono confezionati.
5. PULIZIA E CURA
ATTENZIONE
Staccare la spina dell'apparecchio prima di eseguire lavori di
manutenzione.
Questo apparecchio contiene
idrocarburi nell'unità di raffreddamento; la manutenzione e la
ricarica devono pertanto essere
Page 31

effettuate esclusivamente da tecnici autorizzati.
5.1 Pulizia periodica
L'apparecchio deve essere pulito regolarmente:
• Lavare l'interno e gli accessori con acqua tiepida e sapone neutro.
• Ispezionare regolarmente le guarnizioni dello sportello ed eliminare con un
panno umido tracce di sporco e residui.
• Risciacquare e asciugare accuratamente.
Evitare di tirare, spostare o danneggiare tubi e/o cavi all'interno
dell'apparecchio.
Per la pulizia delle parti interne,
non usare mai detergenti, polveri
abrasive, prodotti con forti profumazioni o cere lucidanti, che potrebbero danneggiare la superficie e lasciare un odore intenso.
Pulire il condensatore (griglia nera) e il
compressore sul retro dell'apparecchio
con una spazzola. Questa operazione
migliorerà le prestazioni dell'apparecchiatura riducendone i consumi di energia.
Il ripiano inferiore, che divide lo scomparto di raffreddamento dallo scomparto LONGFRESH 0°C , può essere rimosso solo per la pulizia. Per rimuovere il ripiano, estrarlo tenendolo in posizione
orizzontale.
Le piastre di copertura al di sopra dei
cassetti nello scomparto possono essere
estratti per la pulizia.
Per ottimizzare l'utilizzo dello scomparto
LONGFRESH 0°C , il ripiano inferiore e
le piastre di copertura devono essere ricollocate nella loro posizione originale
dopo la pulizia.
Prestare attenzione a non danneggiare il sistema refrigerante.
Molti detergenti per cucine di marca
contengono sostanze chimiche in grado
ITALIANO 31
di attaccare/danneggiare la plastica impiegata in questo apparecchio. Per questo motivo si raccomanda di pulire l'involucro esterno dell'apparecchio solo
con acqua calda con un po' di liquido
detergente.
Dopo la pulizia, ricollegare l'apparecchio
alla rete di alimentazione.
5.2 Sostituzione del filtro a
carbone
Per garantire il massimo rendimento, sostituire il filtro dell'aria al carbone una
volta all'anno.
I filtri di ricambio possono essere acquistati presso il distributore di zona.
Per le istruzioni, consultare la sezione
"Installazione del filtro dell'aria al carbone".
Il filtro dell'aria è un materiale di consumo e come tale non è coperto da garanzia.
5.3 Sbrinamento del vano
frigorifero
Lo sbrinamento del comparto frigorifero
è automatico.
L'acqua che si forma in tal modo scorre
in un recipiente sul compressore e poi
evapora. Tale recipiente non può essere
rimosso.
5.4 Periodi di inutilizzo
Quando l'apparecchio non è utilizzato
per lunghi periodi, adottare le seguenti
precauzioni:
• scollegare l'apparecchio dalla rete
elettrica
• rimuovere tutto il cibo
• sbrinare (se necessario) e pulire l'apparecchiatura e tutti gli accessori
• lasciare la/e porta/e socchiusa/e per
evitare odori sgradevoli.
Se l'apparecchio rimane acceso, chiedere a qualcuno di controllare ogni tanto
per evitare che il cibo contenuto marcisca in caso di interruzione dell'alimentazione elettrica.
Page 32

www.aeg.com
32
6. COSA FARE SE…
AVVERTENZA!
Prima di eseguire la ricerca guasti, estrarre la spina dalla presa di
alimentazione.
Le operazioni di ricerca guasti,
non descritte nel presente manuale, devono essere eseguite
esclusivamente da elettricisti
qualificati o da personale competente.
Problema Possibile causa Soluzione
L'apparecchiatura è
rumorosa
L'apparecchio non
funziona. La lampadina non si accende.
La spina non è inserita
L'apparecchio non riceve
La lampadina non si
accende.
La lampada è difettosa. Fare riferimento alla sezio-
Il compressore rimane sempre in funzione.
La porta non è chiusa cor-
La porta viene aperta
La temperatura degli ali-
L'apparecchiatura non è
appoggiata in modo corretto
Controllare che l'apparecchiatura sia appoggiata in
modo stabile (tutti e quattro i piedini devono essere
a contatto con il pavimento)
L'apparecchio è spento. Accendere l’apparecchia-
tura.
Inserire correttamente la
correttamente nella presa
di alimentazione.
spina nella presa di ali-
mentazione.
Collegare alla presa di alicorrente. Assenza di tensione nella presa di alimentazione.
mentazione un altro appa-
recchio elettrico.
Rivolgersi ad un elettricista
qualificato.
La lampadina è in modali-
tà stand-by.
Chiudere e riaprire la por-
ta.
ne "Sostituzione della lam-
padina".
La temperatura non è im-
postata correttamente.
Impostare una temperatu-
ra superiore.
Consultare la sezione
rettamente.
"Chiusura della porta".
Limitare il più possibile il
troppo frequentemente.
tempo di apertura della
porta.
Prima di mettere a consermenti è troppo alta.
vare gli alimenti, lasciarli
raffreddare a temperatura
ambiente.
Page 33

Problema Possibile causa Soluzione
La temperatura ambiente
è troppo alta.
Il compressore non si
avvia immediata-
Ciò è normale, non si è
verificato alcun errore.
mente dopo avere
Abbassare la temperatura
ambiente.
Il compressore si avvia do-
po un certo periodo di
tempo.
premuto il tasto
COOLMATIC , oppure dopo aver cambiato la temperatura.
Sul pannello posteriore del frigorifero
scorre acqua.
Durante lo sbrinamento
automatico, la brina che
si forma sul pannello po-
Non si tratta di un'anoma-
lia.
steriore si scioglie.
La temperatura all'interno dell'apparecchio è troppo
Il regolatore della temperatura non è impostato
correttamente.
Impostare una temperatu-
ra superiore/inferiore.
bassa/alta.
La porta non è chiusa cor-
rettamente.
La temperatura degli ali-
menti è troppo alta.
Consultare la sezione
"Chiusura della porta".
Prima di mettere a conser-
vare gli alimenti, lasciarli
raffreddare a temperatura
ambiente.
Sono stati introdotti molti
alimenti contemporanea-
Introdurre gli alimenti po-
co alla volta.
mente.
La temperatura nel
frigorifero è troppo
alta.
L'aria fredda non circola
correttamente all'interno
dell'apparecchio.
Adottare le misure neces-
sarie per garantire una cor-
retta circolazione dell'aria
fredda.
Sul display della
temperatura è visualizzato un quadrato
superiore o inferiore.
Si è verificato un errore
durante la misurazione
della temperatura
Contattare il servizio assi-
stenza (il sistema refrige-
rante continuerà a tenere
gli alimenti freddi, ma non
sarà possibile regolare la
temperatura).
dEMo appare sul display.
L'apparecchiatura è in
modalità dimostrazione
(dEMo).
Tenere il tasto OK premu-
to per circa 10 sec., finché
non si sente un suono pro-
lungato provenire dal cica-
lino ed il display si spegne
per un tempo brevissimo:
l'apparecchiatura inizia a
funzionare regolarmente
ITALIANO 33
Page 34

www.aeg.com
34
6.1 Sostituzione della
lampadina
L'apparecchiatura è dotata di una lampadina interna a LED a lunga durata.
Solo al servizio assistenza è permesso
sostituire l'impianto d'illuminazione.
Contattare il Centro di assistenza locale.
6.2 Chiusura della porta
1.
Pulire le guarnizioni della porta.
7. INSTALLAZIONE
2.
Se necessario, regolare la porta. Vedere "Installazione".
3.
Se necessario, sostituire le guarnizioni della porta difettose. Contattare il
Centro di assistenza locale.
AVVERTENZA!
Prima di procedere all'installazione, leggere attentamente le "Informazioni per la sicurezza", che
riportano le precauzioni da rispettare per la propria incolumità
e il corretto funzionamento dell'apparecchiatura.
7.1 Luogo d'installazione
AVVERTENZA!
Qualora occorra ritirare dall'uso
un apparecchio con serratura, si
raccomanda di rendere quest'ultima inservibile per evitare che i
bambini possano chiudersi all'interno.
La spina dell'apparecchio deve
essere accessibile dopo l'installazione.
Installare l'apparecchio in un luogo la cui
temperatura ambiente corrisponda alla
classe climatica indicata sulla targhetta
del modello:
Classe
climatica
SN da +10°C a +32°C
Temperatura ambiente
Classe
Temperatura ambiente
climatica
N da +16°C a +32°C
ST da +16°C a +38°C
T da +16°C a +43°C
7.2 Collegamento elettrico
Prima di inserire la spina, verificare che la
tensione e la frequenza riportate sulla
targhetta corrispondano ai valori della
rete elettrica domestica.
L'apparecchio deve essere collegato a
massa. La spina del cavo di alimentazione è dotata di un contatto a tale scopo.
Se la presa della rete elettrica domestica
non è collegata a massa, collegare l'apparecchio ad una massa separata in conformità alle norme relative alla corrente,
consultando un elettricista qualificato.
Il fabbricante declina qualsiasi responsabilità se le precauzioni suddette non sono rispettate.
Il presente apparecchio è conforme alle
direttive CEE.
Page 35

7.3 Requisiti di ventilazione
ITALIANO 35
5 cm
min.
200 cm
2
min.
200 cm
Il flusso d'aria dietro l'apparecchiatura
deve essere sufficiente.
2
7.4 Installazione del filtro dell'aria al carbone
1
2
Il filtro dell'aria al carbone è un filtro al
carbone attivo che assorbe i cattivi
odori e permette a tutti gli alimenti
conservati di mantenere le proprie proprietà organolettiche senza il rischio di
contaminazione di odori.
Alla consegna il filtro al carbone è contenuto in una confezione di plastica per
garantirne la durata e le caratteristiche.
Il filtro deve essere posizionato dietro il
flap prima dell'accensione dell'apparecchiatura.
1.
Aprire il coperchio del flap (1).
2.
Rimuovere il filtro dalla confezione
di plastica.
3.
Inserire il filtro nell'alloggiamento
posto sul retro del coperchio del
flap (2).
4.
Chiudere il coperchio del flap.
Durante il funzionamento, tenere sempre chiuso il flap di ventilazione aria.
Maneggiare il filtro con attenzione per evitare che eventuali
frammenti si stacchino dalla superficie.
8. RUMORI
Durante l'uso, alcuni rumori di funzionamento (come quelli del compressore o
del circuito refrigerante) sono da considerarsi normali.
Page 36

www.aeg.com
36
SSSRR
HISSS!
R!
CLICK!
BRRR!
OK
SSSRRR!
HISSS!
SSSRRR!
HISSS!
BLUBB!
CLICK!
BRRR!
CRACK!
CLICK!
BRRR!
BLUBB!
BLUBB!
CRACK!CRACK!
Page 37

9. DATI TECNICI
Nicchia di incasso
Altezza 1855 mm
Larghezza 545 mm
Profondità 575 mm
Tensione 230-240 V
Frequenza 50 Hz
Le informazioni tecniche sono riportate
sulla targhetta sul lato sinistro interno
10. CONSIDERAZIONI AMBIENTALI
ITALIANO 37
dell'apparecchio e sull'etichetta dei valori energetici.
Riciclare i materiali con il simbolo .
Buttare l'imballaggio negli appositi
contenitori per il riciclaggio.
Aiutare a proteggere l’ambiente e la
salute umana e a riciclare rifiuti
derivanti da apparecchiature
elettriche ed elettroniche. Non
smaltire le apparecchiature che
riportano il simbolo
normali rifiuti domestici. Portare il
prodotto al punto di riciclaggio più
vicino o contattare il comune di
residenza.
insieme ai
Page 38

www.aeg.com
38
INHALT
1. SICHERHEITSHINWEISE . . . . . . . . . . . . . . . . . . . . . . . . . . . . . . . . . . . . . . . . . . . . . . . . . . . . . 39
2. BEDIENFELD . . . . . . . . . . . . . . . . . . . . . . . . . . . . . . . . . . . . . . . . . . . . . . . . . . . . . . . . . . . . . . 41
3. TÄGLICHER GEBRAUCH . . . . . . . . . . . . . . . . . . . . . . . . . . . . . . . . . . . . . . . . . . . . . . . . . . . . . 43
4. PRAKTISCHE TIPPS UND HINWEISE . . . . . . . . . . . . . . . . . . . . . . . . . . . . . . . . . . . . . . . . . . . 48
5. REINIGUNG UND PFLEGE . . . . . . . . . . . . . . . . . . . . . . . . . . . . . . . . . . . . . . . . . . . . . . . . . . . 49
6. WAS TUN, WENN … . . . . . . . . . . . . . . . . . . . . . . . . . . . . . . . . . . . . . . . . . . . . . . . . . . . . . . . . 50
7. MONTAGE . . . . . . . . . . . . . . . . . . . . . . . . . . . . . . . . . . . . . . . . . . . . . . . . . . . . . . . . . . . . . . . . 52
8. GERÄUSCHE . . . . . . . . . . . . . . . . . . . . . . . . . . . . . . . . . . . . . . . . . . . . . . . . . . . . . . . . . . . . . . 54
9. TECHNISCHE DATEN . . . . . . . . . . . . . . . . . . . . . . . . . . . . . . . . . . . . . . . . . . . . . . . . . . . . . . . 56
10. UMWELTTIPPS . . . . . . . . . . . . . . . . . . . . . . . . . . . . . . . . . . . . . . . . . . . . . . . . . . . . . . . . . . . . . 56
FÜR PERFEKTE ERGEBNISSE
Danke, dass Sie sich für dieses AEG Produkt entschieden haben. Wir haben es geschaffen,
damit Sie viele Jahre von seiner ausgezeichneten Leistung und den innovativen Technologien,
die Ihnen das Leben erleichtern, profitieren können. Es ist mit Funktionen ausgestattet, die in
gewöhnlichen Geräten nicht vorhanden sind. Nehmen Sie sich ein paar Minuten Zeit zum
Lesen, um seine Vorzüge kennen zu lernen.
Besuchen Sie uns auf unserer Website, um:
Anwendungshinweise, Prospekte, Fehlerbehebungs- und Service-Informationen zu
erhalten:
www.aeg.com
Ihr erworbenes Produkt zu registrieren, um den besten Service dafür zu
gewährleisten:
www.aeg.com/productregistration
Zubehör, Verbrauchsmaterial und Original-Ersatzteile für Ihr Gerät zu erwerben:
www.aeg.com/shop
KUNDENDIENST UND -BETREUUNG
Bitte verwenden Sie ausschließlich Original-Ersatzteile für Ihre Produkte.
Halten Sie folgende Angaben bereit, wenn Sie sich an den Kundendienst wenden
(diese Informationen finden Sie auf dem Typenschild): Modell, Produktnummer (PNC),
Seriennummer.
Warnungs-/ Sicherheitshinweise.
Allgemeine Hinweise und Ratschläge
Hinweise zum Umweltschutz
Änderungen vorbehalten.
Page 39

DEUTSCH 39
1.
SICHERHEITSHINWEISE
Lesen Sie zu Ihrer Sicherheit und für die
optimale Geräteanwendung vor der Installation und dem Gebrauch des Gerätes die vorliegende Benutzerinformation
aufmerksam durch, einschließlich der
Ratschläge und Warnungen. Es ist wichtig, dass zur Vermeidung von Fehlern
und Unfällen alle Personen, die das Gerät benutzen, mit der Bedienung und
den Sicherheitsvorschriften vertraut sind.
Heben Sie die Benutzerinformation gut
auf und übergeben Sie sie bei einem
Weiterverkauf des Gerätes dem neuen
Besitzer, so dass jeder während der gesamten Lebensdauer des Gerätes über
Gebrauch und Sicherheit informiert ist.
Halten Sie sich zu Ihrer Sicherheit und
zum Schutz Ihres Eigentums strikt an die
Vorsichtsmaßnahmen der vorliegenden
Benutzerinformation, da der Hersteller
bei Missachtung derselben von jeder
Haftung freigestellt ist.
1.1 Sicherheit von Kindern und
hilfsbedürftigen Personen
• Das Gerät darf von Personen (einschließlich Kindern), deren physische,
sensorische Fähigkeiten und deren
Mangel an Erfahrung und Kenntnissen
einen sicheren Gebrauch des Gerätes
ausschließen nur unter Aufsicht oder
nach ausreichender Einweisung durch
eine verantwortungsbewusste Person
benutzt werden, die sicherstellt, dass
sie sich der Gefahren des Gebrauchs
bewusst sind.
Kinder müssen beaufsichtigt werden,
damit sie nicht am Gerät herumspielen
können.
• Halten Sie das Verpackungsmaterial
unbedingt von Kindern fern. Erstickungsgefahr!
• Ziehen Sie vor der Entsorgung des
Gerätes den Netzstecker, schneiden
Sie das Netzkabel (so nah wie möglich
am Gerät) ab und entfernen Sie die
Tür, so dass spielende Kinder vor
elektrischem Schlag geschützt sind
und sich nicht in dem Gerät einschließen können.
• Wenn dieses Gerät mit magnetischer
Türdichtung ein älteres Modell mit
Schnappverschluss (Türlasche) an der
Tür oder auf dem Deckel ersetzt, machen Sie den Schnappverschluss vor
dem Entsorgen des Altgerätes unbrauchbar. So verhindern Sie, dass das
Gerät nicht zu einer Todesfalle für Kinder wird.
1.2 Allgemeine
Sicherheitshinweise
WARNUNG!
Achten Sie darauf, dass die Belüftungsöffnungen im Gehäuse oder in der Einbaunische nicht blockiert sind.
• Das Gerät ist für die Aufbewahrung
von Lebensmitteln und/oder Getränken in einem normalen Haushalt bestimmt, wie in der vorliegenden Gebrauchsanweisung beschrieben wird.
• Benutzen Sie keine mechanischen
oder sonstigen Hilfsmittel, um den
Abtauprozess zu beschleunigen.
• Verwenden Sie keine anderen Elektrogeräte (wie Speiseeisbereiter) in Kühlgeräten, wenn solche Geräte nicht
ausdrücklich vom Hersteller für diesen
Zweck zugelassen sind.
• Beschädigen Sie nicht den Kältekreislauf.
• Das Kältemittel Isobutan (R600a) im
Kältekreislauf des Gerätes ist ein natürliches und sehr umweltfreundliches
Gas, das jedoch leicht entflammbar
ist.
Achten Sie beim Transport und bei
der Aufstellung des Gerätes darauf,
nicht die Komponenten des Kältekreislaufs zu beschädigen.
Bei einer eventuellen Beschädigung
des Kältekreislaufs:
– Offene Flammen und Zündfunken
vermeiden
– Den Raum, in dem das Gerät instal-
liert ist, gut lüften
• Technische und anderweitige Änderungen am Gerät sind gefährlich. Ein
defektes Netzkabel kann Kurzschlüsse
und einen Brand verursachen und/
oder zu Stromschlägen führen.
Page 40

www.aeg.com
40
WARNUNG!
Elektrische Bauteile (Netzkabel,
Stecker, Kompressor) dürfen zur
Vermeidung von Gefahren nur
vom Kundendienst oder einer
Fachkraft ausgewechselt werden.
1.
Das Netzkabel darf nicht verlängert werden.
2.
Vergewissern Sie sich, dass der
Netzstecker nicht von der Geräterückseite geklemmt oder beschädigt wird. Ein geklemmter oder
beschädigter Netzstecker überhitzt und kann einen Brand verursachen.
3.
Vergewissern Sie sich, dass der
Netzstecker des Geräts frei zugänglich ist.
4.
Ziehen Sie nicht am Netzkabel.
5.
Stecken Sie den Netzstecker nie in
eine lockere Steckdose. Es besteht Brand- und Stromschlaggefahr.
6.
Betreiben Sie das Gerät nicht ohne Lampenabdeckung (wenn vorgesehen) der internen Beleuchtung.
• Dieses Gerät ist schwer. Vorsicht beim
Transport.
• Entnehmen oder berühren Sie nie mit
nassen/feuchten Händen Tiefkühlgut,
da dies zu Hautverletzungen oder Kälteverbrennungen führen kann.
• Das Gerät nicht direkter Sonneneinstrahlung aussetzen.
• Die Leuchtmittel (wenn vorgesehen) in
diesem Gerät sind Speziallampen, die
nur für Haushaltsgeräte geeignet sind.
Sie eignen sich nicht zur Raumbeleuchtung.
1.3 Täglicher Gebrauch
• Stellen Sie keine heißen Töpfe auf die
Kunststoffteile des Gerätes.
• Lagern Sie keine feuergefährlichen
Gase oder Flüssigkeiten in dem Gerät.
Explosionsgefahr.
• Legen Sie Lebensmittel nicht direkt
vor den Luftauslass in der Rückwand.
(Wenn es ein No-Frost-Gerät ist)
• Ein aufgetautes Produkt darf nicht
wieder eingefroren werden.
• Abgepackte Tiefkühlkost immer entsprechend den Herstellerangaben aufbewahren.
• Die Lagerempfehlungen des Geräteherstellers sollten strikt eingehalten
werden. Halten Sie sich an die betreffenden Anweisungen.
• Keine kohlensäurehaltigen Getränke
oder Sprudel in den Tiefkühlschrank
stellen, da der Druckanstieg in den
Behältern zur Explosion führen und
das Gerät beschädigen kann.
• Eis am Stiel kann Kälteverbrennungen
verursachen, wenn es direkt nach der
Entnahme aus dem Gefrierschrank gegessen wird.
1.4 Reinigung und Pflege
• Schalten Sie vor Wartungsarbeiten immer das Gerät ab und ziehen Sie den
Netzstecker aus der Steckdose.
• Reinigen Sie das Gerät nicht mit Metallgegenständen.
• Keine scharfen Gegenstände zum Entfernen von Reif und Eis im Gerät verwenden. Verwenden Sie einen Kunststoffschaber.
• Kontrollieren Sie den Tauwasserabfluss im Kühlraum in regelmäßigen
Abständen. Reinigen Sie den Ablauf,
falls nötig. Bei verstopftem Wasserabfluss sammelt sich das Wasser auf dem
Boden des Geräts an.
1.5 Montage
Halten Sie sich für den elektrischen Anschluss strikt an die Anweisungen der betreffenden Abschnitte.
• Kontrollieren Sie nach dem Auspacken
das Gerät auf eventuelle Beschädigungen. Nehmen Sie das Gerät nicht in
Betrieb, wenn es beschädigt ist. Melden Sie die Schäden umgehend dem
Händler, bei dem Sie es erworben haben. Bewahren Sie in diesem Fall die
Verpackung auf.
• Lassen Sie das Gerät mindestens vier
Stunden stehen, bevor Sie es elektrisch anschließen, damit das Öl in den
Kompressor zurückfließen kann.
• Ausreichenden Freiraum zur Luftzirkulation um das Gerät lassen; anderen-
Page 41

falls besteht Überhitzungsgefahr. Halten Sie sich für die Belüftung an die Installationsanweisungen.
• Das Gerät sollte zur Vermeidung von
Verbrennungen durch Berührung von
heißen Bauteilen (Kompressor, Kondensator) möglichst mit der Rückseite
gegen eine Wand aufgestellt werden.
• Das Gerät darf nicht in der Nähe von
Heizkörpern oder Kochern installiert
werden.
• Vergewissern Sie sich, dass der Netzstecker des Gerätes nach der Installation frei zugänglich ist.
• Wenn ein Wasseranschluss vorgesehen ist, verbinden Sie das Gerät nur
mit dem Trinkwasseranschluss.
1.6 Kundendienst
• Sollte die Wartung des Gerätes elektrische Arbeiten verlangen, so dürfen
diese nur von einem qualifizierten
Elektriker oder einem Elektro-Fachmann durchgeführt werden.
DEUTSCH 41
• Wenden Sie sich für Reparaturen und
Wartung nur an Fachkräfte der autorisierten Kundendienststellen und verlangen Sie stets Original-Ersatzteile.
1.7 Umweltschutz
Das Gerät enthält im Kältekreis
oder in dem Isoliermaterial keine
ozonschädigenden Gase. Das
Gerät darf nicht wie normaler
Hausmüll entsorgt werden. Die
Isolierung enthält entzündliche
Gase: das Gerät muss gemäß
den geltenden Vorschriften entsorgt werden; sie erhalten diese
bei Ihrer Gemeindeverwaltung.
Nicht das Kälteaggregat beschädigen, insbesondere nicht in der
Nähe des Wärmetauschers. Die
Materialien, die bei der Herstellung dieses Geräts verwendet
wurden und mit dem Symbol
markiert sind, können recycelt
werden.
2. BEDIENFELD
Display
1
Taste zum Erhöhen der Temperatur
2
Taste zum Senken der Temperatur
3
Taste OK
4
Taste Mode
5
Taste ON/OFF
6
Der voreingestellte Tastenton lässt sich
auf einen lauten Ton einstellen. Halten
Sie dazu die Taste Mode und die Taste
zur Verringerung der Temperatur mehrere Sekunden gedrückt. Die Änderung
lässt sich rückgängig machen.
1
56 4 3 2
2.1 Display
Uhrfunktion
1
COOLMATIC-Funktion
2
Minute Minder-Funktion
3
Kindersicherung
4
Alarmanzeige
5
Temperaturanzeige
6
5 62 431
Page 42

www.aeg.com
42
2.2 Einschalten des Geräts
Gehen Sie wie folgt vor, um das Gerät
einzuschalten:
1.
Stecken Sie den Netzstecker in die
Netzsteckdose.
2.
Drücken Sie die Taste ON/OFF,
wenn das Display ausgeschaltet ist.
3.
Nach ein paar Sekunden ertönt
möglicherweise ein akustisches
Alarmsignal.
Wie Sie den Alarm ausschalten, erfahren Sie unter „Temperaturwarnung“.
4.
Wenn auf dem Display „dEMo“ angezeigt wird, befindet sich das Gerät
im Demo-Modus. Schlagen Sie dazu
bitte unter „Was tun, wenn ...“ nach.
5.
Die Temperaturanzeigen zeigen die
jeweils eingestellte Standardtempe-
ratur an.
Informationen zur Auswahl einer anderen Temperatur finden Sie unter „Temperaturregelung“.
2.3 Ausschalten
Zum Ausschalten des Gerätes:
1.
Drücken Sie 5 Sekunden lang die
Taste ON/OFF.
2.
Das Display wird ausgeschaltet.
3.
Ziehen Sie den Gerätestecker aus
der Steckdose, um das Gerät vom
Netz zu trennen.
2.4 Temperaturregelung
Die Temperatur des Kühlschranks lässt
sich durch Drücken des Temperaturreglers einstellen.
Stellen Sie die Standardtemperatur ein:
+5 °C für den Kühlschrank.
Die Temperaturanzeige zeigt die eingestellte Temperatur.
Die eingestellte Temperatur wird innerhalb von 24 Stunden erreicht.
Nach einem Stromausfall bleibt
die eingestellte Temperatur gespeichert.
2.5 Funktion Minute Minder
Mit der Funktion Minute Minder wird ein
akustischer Alarm auf eine gewünschte
Zeit eingestellt. Dies ist zum Beispiel
nützlich, wenn ein Rezept erfordert, dass
eine Speise für eine bestimmte Zeit abkühlen muss.
Zum Einschalten der Funktion:
1.
Drücken Sie die Taste Mode, bis das
entsprechende Symbol angezeigt
wird.
Die Minute Minder Anzeige blinkt.
Der Timer zeigt den eingestellten
Wert (30 Minuten) ein paar Sekunden lang an.
2.
Drücken Sie die Einstelltaste des
Timers, um den eingestellten Wert
des Timers auf 1 bis 90 Minuten zu
ändern.
3.
Drücken Sie zur Bestätigung die Taste OK.
Die Minute Minder Anzeige erscheint.
Der Timer beginnt zu blinken (min).
Nach Ablauf des Countdowns blinkt die
Anzeige Minute Minder und es ertönt
ein Alarmsignal.
1.
Drücken Sie die Taste OK, um das
Alarmsignal auszuschalten und die
Funktion zu beenden.
Diese Funktion kann während des
Countdowns jederzeit ausgeschaltet
werden:
1.
Drücken Sie die Taste Mode bis die
Anzeige Minute Minder blinkt.
2.
Drücken Sie zur Bestätigung die Tas-
te OK.
3.
Die Anzeige Minute Minder erlischt.
Die Zeit kann während des Countdowns
und am Ende geändert werden, indem
Sie die Tasten zur Erhöhung und Verringerung der Temperatur drücken.
2.6 Funktion Kindersicherung
Wählen Sie die Kindersicherung, um die
Tasten gegen eine unbeabsichtigte Betätigung zu verriegeln.
Zum Einschalten der Funktion:
1.
Drücken Sie die Taste Mode, bis das
entsprechende Symbol angezeigt
wird.
2.
Die Anzeige „Kindersicherung“
blinkt.
3.
Drücken Sie zur Bestätigung die Tas-
te OK.
Page 43

Die Anzeige „Kindersicherung“
leuchtet.
Zum Ausschalten der Funktion:
1.
Drücken Sie die Taste Mode, bis die
Anzeige „Kindersicherung“ blinkt.
2.
Drücken Sie zur Bestätigung die Taste OK.
3.
Die Anzeige „Kindersicherung“ erlischt.
2.7 Funktion COOLMATIC
Wenn Sie zum Beispiel nach einem Einkauf größere Mengen warmer Lebensmittel einlegen möchten, empfehlen wir
die Aktivierung der Funktion COOLMATIC, um die Produkte schneller zu kühlen
und zu vermeiden, dass die bereits im
Kühlschrank befindlichen Lebensmittel
erwärmt werden.
Zum Einschalten der Funktion:
1.
Drücken Sie die Taste Mode, bis das
entsprechende Symbol angezeigt
wird.
Die COOLMATIC Anzeige blinkt.
2.
Drücken Sie zur Bestätigung die Taste OK.
Die COOLMATIC Anzeige erscheint.
DEUTSCH 43
Die Funktion COOLMATIC wird nach etwa 6 Stunden automatisch abgeschaltet.
Zum Ausschalten der Funktion vor ihrer
automatischen Abschaltung:
1.
Die Taste Mode drücken, bis die An-
zeige COOLMATIC blinkt.
2.
Drücken Sie zur Bestätigung die Tas-
te OK.
3.
Die Anzeige COOLMATIC erlischt.
Die Funktion wird durch die Auswahl einer anderen Temperatur
für den Kühlraum ausgeschaltet.
2.8 Alarm „Tür offen“
Es ertönt ein Alarmsignal, wenn die Tür
einige Minuten lang offen steht. Der
Alarm „Tür offen“ wird wie folgt angezeigt:
• blinkende Alarmanzeige
• akustisches Signal
Sobald der Normalzustand wiederhergestellt ist (Tür geschlossen), wird der
Alarm deaktiviert.
In der Alarmphase kann das akustische
Alarmsignal durch Drücken einer beliebigen Taste ausgeschaltet werden.
3. TÄGLICHER GEBRAUCH
3.1 Reinigen des Innenraums
Bevor Sie das Gerät in Betrieb nehmen,
beseitigen Sie den typischen „Neugeruch“ am besten durch Reinigen der Innenteile mit lauwarmem Wasser und einer neutralen Seife. Sorgfältig nachtrocknen.
Verwenden Sie keine Reinigungsmittel oder Scheuerpulver, da
hierdurch die Oberfläche beschädigt wird.
Wenn “dEMo” auf dem Display
angezeigt wird, befindet sich das
Gerät im Demo-Modus. Schlagen Sie dazu bitte unter „Was
tun, wenn...“ nach.
Page 44

www.aeg.com
44
3.2 Verstellbare Ablagen
Die Wände des Kühlschranks sind mit einer Reihe von Führungsschienen ausgestattet, die verschiedene Möglichkeiten
für das Einsetzen der Ablagen bieten.
Zur besseren Raumnutzung können die
vorderen Hälften der Ablagen auf die
hinteren Hälften gelegt werden.
3.3 Positionierung der
Türeinsätze
Die Türablagen können in unterschiedlicher Höhe positioniert werden, womit
das Lagern verschieden großer Lebensmittelpackungen ermöglicht wird.
3.4 Anbringen der verschiebbaren Schublade
Die verschiebbare Schublade kann in
verschiedenen Höhen eingesetzt werden.
Bitte nehmen Sie diese Einstellungen
wie folgt vor:
1.
Heben Sie die Ablage mit der verschiebbaren Schublade an und ziehen Sie sie aus den Türhalterungen.
2.
Nehmen Sie den Haltebügel aus der
Führung unter der Ablage heraus.
3.
Das Einsetzen in eine andere Höhe
bitte in umgekehrter Reihenfolge
vornehmen.
3.5 Kohlefilter
Das Gerät ist mit einem Kohlefilter
CLEANAIR CONTROL hinter einer Klappe in der Rückwand des Kühlraums aus-
CLEANAIR CONTROL
3.6 LONGFRESH Fach
Im LONGFRESH 0°C Fach wird die Temperatur automatisch geregelt. Sie bleibt
konstant auf ca. 0 °C, es ist keine Einstellung erforderlich.
gerüstet.
Der Filter reinigt die Luft von unerwünschten Gerüchen im Kühlraum und
im Fach LONGFRESH und verbessert so
die Lagerungsqualität.
Die Lüftungsklappe muss während des Betriebs stets geschlossen sein.
Die konstante Lagertemperatur von ca. 0
°C und die relative Luftfeuchtigkeit zwischen 45 und 90 % bieten optimale Lagerbedingungen für die verschiedensten
Lebensmittel.
Page 45

Sie können daher eine Vielfalt von frischen Lebensmitteln im LONGFRESH
0°C Fach lagern, in dem die Lebensmittel bis zu 3 Mal länger ohne Qualitätseinbußen im Vergleich zu den normalen
Kühlschrankfächern halten. Auf diese
Weise können Sie mehr frische Lebensmittel einlagern. Der Geschmack, Frischegrad und die Nährstoffe (Vitamine und
Mineralien) bleiben gut erhalten. Das
3.7 Feuchtigkeitsregulierung
DEUTSCH 45
Gemüse und Obst verlieren weniger Gewicht. Die Lebensmittel behalten ihren
Nährwert besser.
Das LONGFRESH 0°C Fach eignet sich
auch zum Auftauen von Lebensmitteln.
In diesem Fall können die aufgetauten
Lebensmittel bis zu zwei Tage aufbewahrt werden.
Beide Schubladen können je nach den
gewünschten Lagereigenschaften unabhängig von einander mit niedriger oder
höherer Feuchtigkeit genutzt werden.
Die Feuchtigkeit kann für jede Schublade über die Schieberegler an der Vorderseite der Schublade separat geregelt
werden.
• „Trocken“: niedrige Luftfeuchtigkeit bis zu 50 % relativer Luftfeuchtigkeit
Dieser Feuchtigkeitsgrad wird erreicht,
wenn beide Schieberegler auf diese
Position
schlitze ganz geöffnet sind.
• Feucht“: hohe relative Luftfeuchtigkeit
- bis zu 90 %
Dieser Feuchtigkeitsgrad wird erreicht,
wenn beide Schieberegler auf diese
Position
tungsschlitze geschlossen sind. Die
Feuchtigkeit wird eingeschlossen und
kann nicht entweichen.
gestellt und die Lüftungs-
gestellt und die Lüf-
3.8 Longfresh Schubladen
Die Feuchtigkeit lässt sich nicht einstellen.
Page 46

www.aeg.com
46
Dank der Gitterablagen in den Schubladen kann die Luft ungehindert zirkulieren und somit die Lebensmittel besser
frisch halten.
Die Anschläge im Fach verhindern ein
Herausfallen der Schubladen, wenn diese vollständig herausgezogen werden.
Zum Entfernen der Schubladen (z.B. zur
Reinigung) ziehen Sie diese bis zum Anschlag heraus, heben Sie sie an und nehmen Sie sie dann ganz heraus.
Nehmen Sie alle Schubladen heraus, wenn Sie große Mengen
Lebensmittel einlagern möchten.
3.9 Lagerzeit für frische
Lebensmittel im LongfreshFach (0 °C)
Lebensmittel Einstellung der Luft-
feuchtigkeit
Zwiebeln
Butter
Große Stücke Schwei-
„trocken“
„trocken“
„trocken“
nefleisch
Rind- und Wildfleisch,
„trocken“
kleine Stücke Schweinefleisch, Geflügel
Tomatensauce
Fisch, Krustentiere, ge-
„trocken“
„trocken“
kochte Fleischgerichte
Gekochte Meeresfrüch-
„trocken“
te
Salat, Gemüse Karot-
„feucht“
ten, Kräuter, Rosenkohl,
Sellerie
Artischocken, Blumen-
„feucht“
kohl, Chicorée, Eisberg-
salat, Endivien, Feldsalat, Kopfsalat, Lauch, Radicchio
Brokkoli, Chinakohl,
„feucht“
Grünkohl, Kohl, Rettich,
Wirsing
Lagerzeit
bis zu 5 Monaten
bis zu 1 Monat
bis zu 10 Tagen
bis zu 7 Tagen
bis zu 4 Tagen
bis zu 3 Tagen
bis zu 2 Tagen
bis zu 1 Monat
bis zu 21 Tagen
bis zu 14 Tagen
Page 47

DEUTSCH 47
Lebensmittel Einstellung der Luft-
feuchtigkeit
Erbsen, Kohlrabi
Frühlingszwiebeln, Ra-
„feucht“
„feucht“
dieschen, Spargel, Spi-
nat
Obst (Je reifer die
„feucht“
Frucht, desto kürzer die
Lagerzeit)
Birnen, (frische) Datteln,
Erdbeeren, Pfirsiche
Pflaumen (Je reifer die
„feucht“
Frucht, desto kürzer die
Lagerzeit)
Rhabarber, Stachelbeeren
Äpfel (keine kälteemp-
„feucht“
findlichen Sorten), Quit-
ten
Aprikosen, Kirschen
Zwetschgen, Trauben
Brombeeren, Johannis-
„feucht“
„feucht“
„feucht“
beeren
Feigen (frisch)
Blaubeeren, Himbeeren
Kuchen mit Sahne und andere
Produkte aus Teig können 2 bis 3
Tage lang im Longfresh-Fach bei
0 °C aufbewahrt werden.
Die folgenden Lebensmittel dürfen nicht im Longfresh-Fach (0
°C) gelagert werden:
• Kälteempfindliches Obst, wie
z.B. Ananas, Bananen, Grapefruits, Melonen, Mangos, Papayas, Orangen, Zitronen, Kiwis, das bei Keller- oder Raumtemperatur gelagert werden
muss.
• Lebensmittel, die oben nicht
genannt sind, müssen im Kühlraum aufbewahrt werden (z.B.
alle Arten von Käse, Aufschnitt
usw.).
„feucht“
„feucht“
Tipps:
• Achten Sie auf die Frische der Lebensmittel, insbesondere auf das Haltbarkeitsdatum. Qualität und Frische wirken sich auf die Aufbewahrungsdauer
aus.
• Die Gesamtaufbewahrungsdauer
hängt von den Aufbewahrungsbedingungen vor der endgültigen Lagerung
im Kühlschrank ab.
Lagerzeit
bis zu 10 Tagen
bis zu 7 Tagen
bis zu 1 Monat
bis zu 21 Tagen
bis zu 20 Tagen
bis zu 14 Tagen
bis zu 10 Tagen
bis zu 8 Tagen
bis zu 7 Tagen
bis zu 5 Tagen
Der Grad der Luftfeuchtigkeit in
den Schubladen hängt vom
Feuchtigkeitsgehalt der gelagerten Lebensmittel, des Gemüses
und Obsts und davon ab, wie
häufig die Tür geöffnet wird.
Das Longfresh-Fach (0 °C) eignet
sich auch zum langsamen Auftauen von Lebensmitteln. In diesem
Fall können die aufgetauten Lebensmittel bis zu zwei Tage lang
im Longfresh-Fach (0 °C) aufbewahrt werden.
Page 48

www.aeg.com
48
• Lebensmittel, Obst oder Gemüse
müssen vor der Einlagerung immer in
Behälter oder Folie verpackt werden.
• Tiernahrung ist immer verpackt und
trocken zu lagern.
• Proteinreiche Lebensmittel verderben
schneller. So verderben Meeresfrüchte
schneller als Fisch und dieser schneller
als Fleisch. In einem Fach mit 0 °C
lässt sich diese Art von Lebensmitteln
bis zu dreimal länger und ohne Qualitätsverlust lagern.
• Alle in einem Fach mit 0 °C gelagerten
Lebensmittel sind ca. 15-30 Minuten
vor dem Verzehr aus der Schublade zu
nehmen. Dies gilt insbesondere für
Obst und Gemüse, das ohne weiteres
Kochen verzehrt werden soll. Nehmen
Obst und Gemüse wieder Raumtemperatur an, verbessern sich Textur und
Geschmack.
4. PRAKTISCHE TIPPS UND HINWEISE
4.1 Energiespartipps
• Öffnen Sie die Tür nicht zu häufig, und
lassen Sie diese nicht länger offen als
unbedingt notwendig.
• Wenn die Umgebungstemperatur
hoch ist und der Temperaturregler auf
eine niedrige Temperatur eingestellt
und das Gerät voll beladen ist, kann es
zu andauerndem Betrieb des Kompressors und damit zu Reif- oder Eisbildung am Verdampfer kommen.
Stellen Sie in diesem Fall den Temperaturregler auf eine höhere Einstellung
ein, die ein automatisches Abtauen
und damit auch einen niedrigeren
Energieverbrauch ermöglicht.
4.2 Hinweise für die Kühlung
frischer Lebensmittel
So erzielen Sie die besten Ergebnisse:
• Legen Sie bitte keine warmen Lebensmittel oder dampfenden Flüssigkeiten
in den Kühlschrank.
• Decken Sie die Lebensmittel ab oder
verpacken Sie diese entsprechend,
besonders wenn sie stark riechen.
• Legen Sie die Lebensmittel so hinein,
dass um sie Luft frei zirkulieren kann.
4.3 Hinweise für die Kühlung
Tipps:
Fleisch (alle Sorten): wickeln Sie Fleisch
in lebensmittelechte Tüten und legen
Sie diese auf die Glasablage über der
Gemüseschublade.
Bitte lagern Sie Fleisch aus Sicherheitsgründen nur einen oder maximal zwei
Tage auf diese Weise.
Gekochte Lebensmittel, kalte Gerichte
usw.: diese können abgedeckt auf eine
Ablage gelegt werden.
Obst und Gemüse: bitte waschen Sie
Obst und Gemüse gründlich und legen
Sie es in die speziell dafür vorgesehene(n) Schublade(n).
Butter und Käse: diese sollten stets in
speziellen luftdichten Behältern verpackt
sein oder in Aluminiumfolie bzw. in lebensmittelechte Tüten eingepackt werden, um so wenig Luft wie möglich in
der Verpackung zu haben.
Milchflaschen: bitte bewahren Sie Milchflaschen stets mit Deckel im Flaschenregal in der Tür auf.
Bananen, Kartoffeln, Zwiebeln und
Knoblauch sollten nicht im Kühlschrank
aufbewahrt werden, außer diese sind dafür speziell verpackt.
Page 49

5. REINIGUNG UND PFLEGE
VORSICHT!
Ziehen Sie bitte vor jeder Reinigungsarbeit immer den Netzstecker aus der Steckdose.
Der Kältekreis des Gerätes enthält Kohlenwasserstoffe; Wartungsarbeiten und Nachfüllen
von Kältemittel dürfen daher nur
durch vom Hersteller autorisiertes Fachpersonal ausgeführt werden.
5.1 Regelmäßige Reinigung
Das Gerät und der Zubehör müssen regelmäßig gereinigt werden:
• Reinigen Sie die Innenseiten und die
Zubehörteile mit lauwarmem Wasser
und etwas Neutralseife.
• Prüfen und säubern Sie die Türdichtungen in regelmäßigen Abständen
und kontrollieren Sie, dass diese sauber und frei von Verunreinigungen
sind.
• Spülen und trocknen Sie diese sorgfältig ab.
Ziehen Sie nicht an Leitungen
und/oder Kabeln im Gerät und
achten Sie darauf, diese nicht zu
verschieben oder zu beschädigen.
Benutzen Sie zur Reinigung des
Innenraums keinesfalls Putzmittel, Scheuerpulver, stark parfümierte Reinigungsmittel oder
Wachspolituren, da diese die
Oberfläche des Innenraums beschädigen und einen starken Eigengeruch hinterlassen können.
Reinigen Sie den Kondensator (schwarzes Gitter) und den Kompressor auf der
Geräterückseite mit einer Bürste. Dadurch verbessert sich die Leistung des
Geräts und es verbraucht weniger Strom.
Die unterste Ablage, die das Kühlfach
vom LONGFRESH 0°C -Fach abtrennt,
sollte nur für Reinigungszwecke entfernt
werden. Ziehen Sie die Ablage gerade
aus dem Gerät heraus.
Die Abdeckplatten über den Schubladen
im Fach können zu Reinigungszwecken
herausgenommen werden.
DEUTSCH 49
Damit die volle Funktionalität des
LONGFRESH 0°C -Fachs gewährleistet
ist, müssen die unterste Ablage und die
Abdeckplatten nach der Reinigung wieder in ihre ursprüngliche Position eingesetzt werden.
Bitte achten Sie darauf, das Kühlsystem nicht zu beschädigen.
Viele Haushaltsreiniger für Küchen enthalten Chemikalien, die den im Gerät
verwendeten Kunststoff angreifen können. Aus diesem Grund ist es empfehlenswert, das Gerät außen nur mit warmem Wasser und etwas flüssigem Tellerspülmittel zu reinigen.
Schließen Sie das Gerät nach der Reinigung wieder an die Netzversorgung an.
5.2 Ersetzen des AktivkohleFilters
Das beste Ergebnis wird erzielt, wenn
Sie den Kohlefilter einmal jährlich wechseln.
Neue Aktivkohle-Filter erhalten Sie bei
Ihrem Händler vor Ort.
Die Anleitung unter „Einsetzen des Kohlefilters“ beachten.
Bei dem Luftfilter handelt es sich um
Verbrauchsmaterial, das nicht unter die
Garantie fällt.
5.3 Abtauen des Kühlschranks
Der Kühlraum taut automatisch ab.
Das dabei angesammelte Wasser läuft in
einen Behälter am Kompressor und verdunstet. Dieser Behälter kann nicht entfernt werden.
5.4 Stillstandzeiten
Bei längerem Stillstand des Gerätes
müssen Sie folgendermaßen vorgehen:
• trennen Sie das Gerät von der Netz-
versorgung
• entnehmen Sie alle Lebensmittel
Page 50

www.aeg.com
50
• Tauen Sie das Gerät ab (sofern vorgesehen). Reinigen Sie den Innenraum
und das gesamte Zubehör.
• lassen Sie die Türen offen/angelehnt,
um das Entstehen unangenehmer Gerüche zu vermeiden.
Möchten Sie bei einer längeren Abwesenheit den Gefrierschrank weiter laufen
6. WAS TUN, WENN …
WARNUNG!
Ziehen Sie vor der Fehlersuche
immer den Netzstecker aus der
Steckdose.
Maßnahmen im Rahmen der
Fehlersuche, die in der vorliegenden Gebrauchsanweisung
nicht beschrieben sind, dürfen
nur von einem qualifizierten
Elektriker bzw. einer anderen
kompetenten Person durchgeführt werden.
Problem Mögliche Ursache Abhilfe
Das Gerät ist zu laut Das Gerät steht nicht sta-
Das Gerät funktioniert nicht. Die Lampe der Innenbeleuchtung funktioniert nicht.
Der Netzstecker steckt
Das Gerät bekommt kei-
Die Lampe der Innenbeleuchtung
funktioniert nicht.
Die Lampe ist defekt. Siehe hierzu „Austauschen
bil.
Das Gerät ist abgeschaltet.
nicht richtig in der Steckdose.
nen Strom. Es liegt keine
Spannung an der Netzsteckdose an.
Die Lampe befindet sich
im Standby-Modus.
lassen, bitten Sie jemanden, gelegentlich die Temperatur zu prüfen, damit das
Gefriergut bei einem möglichen Stromausfall nicht im Innern des Gerätes verdirbt.
Kontrollieren Sie, ob eventuelle Unebenheiten der
Standfläche korrekt ausgeglichen wurden, so dass alle vier Füße fest auf dem
Boden stehen.
Schalten Sie das Gerät ein.
Stecken Sie den Netzstecker richtig in die Steckdose.
Testen Sie bitte, ob ein anderes Gerät an dieser
Steckdose funktioniert.
Kontaktieren Sie gegebenenfalls einen qualifizierten Elektriker.
Schließen und öffnen Sie
die Tür.
der Lampe“.
Page 51

Problem Mögliche Ursache Abhilfe
Der Kompressor arbeitet ständig.
Die Tür ist nicht richtig
Die Tür wurde zu häufig
Die Temperatur ist nicht
richtig eingestellt.
geschlossen.
geöffnet.
Stellen Sie eine höhere
Temperatur ein.
Siehe hierzu „Schließen
der Tür“.
Lassen Sie die Tür nicht
länger als erforderlich offen.
Die Temperatur der ein-
zufrierenden Lebensmittel ist zu hoch.
Lassen Sie die Lebensmittel auf Raumtemperatur
abkühlen, bevor Sie sie in
das Gerät legen.
Die Raumtemperatur ist
zu hoch.
Der Kompressor
schaltet sich nicht
Das ist keine Störung,
sondern normal.
Senken Sie die Raumtemperatur.
Der Kompressor schaltet
sich nach einer Weile ein.
sofort ein, nachdem
Sie die Taste COOLMATIC gedrückt
oder die Temperatur
auf einen anderen
Wert eingestellt haben.
Wasser fließt an der
Rückwand des Kühlschranks herunter.
Beim automatischen Abtauen fließt das abgetaute Wasser an der Rück-
Das ist normal.
wand des Geräts herunter.
Die Temperatur im
Gerät ist zu hoch/
Der Temperaturregler ist
nicht richtig eingestellt.
Stellen Sie eine höhere/
niedrigere Temperatur ein.
niedrig.
Die Tür ist nicht richtig
geschlossen.
Die Temperatur der Le-
bensmittel ist zu hoch.
Siehe hierzu „Schließen
der Tür“.
Lassen Sie die Lebensmittel auf Raumtemperatur
abkühlen, bevor Sie sie in
das Gerät legen.
Es wurden zu viele Le-
bensmittel auf einmal ein-
Legen Sie weniger Lebensmittel auf einmal ein.
gelegt.
Die Temperatur im
Kühlschrank ist zu
hoch.
Die Kaltluft kann im Gerät
nicht zirkulieren.
Stellen Sie sicher, dass die
Kaltluft im Gerät zirkulieren
kann.
DEUTSCH 51
Page 52

www.aeg.com
52
Problem Mögliche Ursache Abhilfe
Die Temperaturanzeige zeigt oben
oder unten ein
Quadrat an.
Beim Messen der Temperatur ist ein Fehler aufgetreten.
Bitte wenden Sie sich an
Ihren Kundendienstmitarbeiter (das Kühlsystem hält
zwar die eingelagerten Lebensmittel weiterhin kühl,
doch eine Temperatureinstellung ist nicht mehr
möglich).
Das Display zeigt
dEMoan.
Das Gerät befindet sich
im Demo-Modus (dEMo)..
Halten Sie die OK-Taste
ca. 10 Sekunden gedrückt,
bis ein langer Signalton ertönt und das Display eine
kurze Zeit ausgeschaltet
wird. Das Gerät arbeitet
wieder normal.
2.
6.1 Austauschen der Lampe
Das Gerät ist mit einer langlebigen LEDInnenbeleuchtung ausgestattet.
Die Beleuchtung darf nur von einem
Fachmann ausgetauscht werden. Wenden Sie sich hierzu an den Kundendienst.
Stellen Sie die Tür nach Bedarf ein.
Siehe hierzu „Montage“.
3.
Ersetzen Sie die defekten Türdichtungen, falls erforderlich. Wenden
Sie sich hierzu an den Kundendienst.
6.2 Schließen der Tür
1.
Reinigen Sie die Türdichtungen.
7. MONTAGE
WARNUNG!
Lesen Sie bitte die „Sicherheitshinweise“ vor der Montage des
Geräts sorgfältig durch, um Gefahren für sich selbst zu vermeiden und einen korrekten Betrieb
des Geräts zu gewährleisten.
7.1 Aufstellung
WARNUNG!
Wenn Sie ein altes Gerät entsorgen möchten, das ein Schloss
oder einen Riegel an der Tür besitzt, müssen Sie das Schloss
bzw. den Riegel zunächst unbrauchbar machen, um zu verhindern, dass sich spielende Kinder
darin einschließen können.
Die Steckdose für den Anschluss
des Geräts muss nach der Installation zugänglich sein.
Installieren Sie dieses Gerät an einem
Ort, an dem die Umgebungstemperatur
mit der Klimaklasse übereinstimmt, die
auf dem Typschild des Geräts angegeben ist:
Klima-
Umgebungstemperatur
klasse
SN +10°C bis + 32°C
N +16°C bis + 32°C
ST +16°C bis + 38°C
T +16°C bis + 43°C
Page 53

7.2 Elektrischer Anschluss
Kontrollieren Sie vor der ersten Benutzung des Gerätes, ob die Netzspannung
und -frequenz Ihres Hausanschlusses mit
den auf dem Typenschild angegebenen
Anschlusswerten übereinstimmen.
Das Gerät muss geerdet sein. Zu diesem
Zweck ist die Netzkabelsteckdose mit einem Schutzkontakt ausgestattet. Falls
die Steckdose Ihres Hausanschlusses
nicht geerdet sein sollte, lassen Sie das
Gerät bitte gemäß den geltenden Vorschriften erden und fragen Sie dafür einen qualifizierten Elektriker.
Der Hersteller übernimmt keinerlei Haftung für Schäden oder Verletzungen, die
durch Missachtung der oben genannten
Sicherheitshinweise entstehen.
Das Gerät entspricht den EU- Richtlinien.
7.3 Anforderungen an die Belüftung
DEUTSCH 53
5 cm
min.
200 cm
Hinter dem Gerät muss genug Platz für
2
min.
200 cm
eine ausreichende Luftzirkulation sein.
2
Page 54

www.aeg.com
54
7.4 Einsetzen des Kohlefilters
1
2
Der Kohlefilter ist ein Aktivkohlefilter,
der schlechte Gerüche aufsaugt und so
den Geschmack und das Aroma der Lebensmittel ohne Risiko von Geruchsübertragung optimal aufrecht erhält.
Der Filter wird mit einer Plastikumhüllung geliefert, die seine Haltbarkeit und
die Bewahrung seiner Eigenschaften
gewährleistet. Der Filter muss hinter
der Klappe eingesetzt werden, bevor
das Gerät eingeschaltet wird.
1.
Öffnen Sie die Klappenabdeckung
(1).
2.
Entnehmen Sie den Filter aus der
Kunststoffverpackung.
3.
Setzen Sie den Filter in den Schlitz
an der Rückseite der Klappenabdeckung (2) ein.
4.
Schließen Sie die Klappenabdeckung.
Die Lüftungsklappe muss während des Betriebs stets geschlossen sein.
Behandeln Sie den Filter sorgfältig, damit sich keine Partikel
von der Oberfläche ablösen.
8. GERÄUSCHE
Während das Gerät in Betrieb ist, entstehen bestimmte Geräusche (Kompressor
und Kühlkreislauf).
OK
SSSRR
HISSS!
BLUBB!
R!
CLICK!
BRRR!
CRACK!
Page 55

DEUTSCH 55
SSSRRR!
HISSS!
BLUBB!
SSSRRR!
HISSS!
BLUBB!
CLICK!
BRRR!
CLICK!
BRRR!
CRACK!CRACK!
Page 56

www.aeg.com
56
9. TECHNISCHE DATEN
Abmessungen der Einbaunische
Höhe 1855 mm
Breite 545 mm
Tiefe 575 mm
Spannung 230-240 V
Frequenz 50 Hz
Die technischen Daten befinden sich auf
dem Typenschild im Innern des Gerätes
10. UMWELTTIPPS
auf der linken Seite sowie auf der Energieplakette.
Recyceln Sie Materialien mit dem
Symbol
Verpackung in den entsprechenden
Recyclingbehältern.
Recyceln Sie zum Umwelt- und
Gesundheitsschutz elektrische und
. Entsorgen Sie die
elektronische Geräte. Entsorgen Sie
Geräte mit diesem Symbol
mit dem Hausmüll. Bringen Sie das
Gerät zu Ihrer örtlichen Sammelstelle
oder wenden Sie sich an Ihr
Gemeindeamt.
nicht
Page 57

РУССКИЙ 57
СОДЕРЖАНИЕ
1. УКАЗАНИЯ ПО БЕЗОПАСНОСТИ . . . . . . . . . . . . . . . . . . . . . . . . . . . . . . . . . . . . . . . . 58
2. ПАНЕЛЬ УПРАВЛЕНИЯ . . . . . . . . . . . . . . . . . . . . . . . . . . . . . . . . . . . . . . . . . . . . . . . . 61
3. ЕЖЕДНЕВНОЕ ИСПОЛЬЗОВАНИЕ . . . . . . . . . . . . . . . . . . . . . . . . . . . . . . . . . . . . . . . 63
4. ПОЛЕЗНЫЕ СОВЕТЫ . . . . . . . . . . . . . . . . . . . . . . . . . . . . . . . . . . . . . . . . . . . . . . . . . . 68
5. УХОД И ОЧИСТКА . . . . . . . . . . . . . . . . . . . . . . . . . . . . . . . . . . . . . . . . . . . . . . . . . . . . . 69
6. ЧТО ДЕЛАТЬ, ЕСЛИ ... . . . . . . . . . . . . . . . . . . . . . . . . . . . . . . . . . . . . . . . . . . . . . . . . . 70
7. УСТАНОВКА . . . . . . . . . . . . . . . . . . . . . . . . . . . . . . . . . . . . . . . . . . . . . . . . . . . . . . . . . . 72
8. ШУМЫ ПРИ РАБОТЕ . . . . . . . . . . . . . . . . . . . . . . . . . . . . . . . . . . . . . . . . . . . . . . . . . . . 74
9. ТЕХНИЧЕСКИЕ ДАННЫЕ . . . . . . . . . . . . . . . . . . . . . . . . . . . . . . . . . . . . . . . . . . . . . . . 76
10. ОХРАНА ОКРУЖАЮЩЕЙ СРЕДЫ . . . . . . . . . . . . . . . . . . . . . . . . . . . . . . . . . . . . . . . . 76
ДЛЯ ОПТИМАЛЬНЫХ РЕЗУЛЬТАТОВ
Благодарим Вас за выбор данного продукта AEG. Этот продукт будет безупречно
служить Вам долгие годы – ведь мы создали его с помощью инновационных технологий,
которые облегчат Вашу жизнь и создадут качества, которые Вы не найдете в привычных
приборах. Потратьте немного времени на чтение, чтобы получить максимальную пользу
от своей покупки.
На нашем веб-сайте Вы сможете:
Найти рекомендации по использованию изделий, руководства по эксплуатации,
мастер устранения неисправностей, информацию о техническом обслуживании:
www.aeg.com
Зарегистрировать свое изделия для улучшения обслуживания:
www.aeg.com/productregistration
Приобрести дополнительные принадлежности, расходные материалы и
фирменные запасные части для своего прибора:
www.aeg.com/shop
ПОДДЕРЖКА ПОТРЕБИТЕЛЕЙ И СЕРВИСНОЕ
ОБСЛУЖИВАНИЕ
Мы рекомендуем использовать оригинальные запчасти.
При обращении в сервис-центр следует иметь под рукой следующую информацию.
Данная информация находится на табличке с техническими данными. Модель, код
изделия (PNC), серийный номер.
Внимание / Важные сведения по технике безопасности.
Общая информация и рекомендации
Информация по защите окружающей среды
Право на изменения сохраняется.
Page 58

www.aeg.com
58
1.
УКАЗАНИЯ ПО БЕЗОПАСНОСТИ
Для обеспечения собственной безо‐
пасности и правильной эксплуатации
прибора, перед его установкой и пер‐
вым использованием внимательно
прочитайте данное руководство, не
пропуская рекомендации и предупре‐
ждения. Чтобы избежать нежелатель‐
ных ошибок и несчастных случаев,
важно, чтобы все, кто пользуется дан‐
ным прибором, подробно ознакоми‐
лись с его работой и правилами тех‐
ники безопасности. Сохраните настоя‐
щее руководство и в случае продажи
прибора или его передачи в пользова‐
ние другому лицу передайте вместе с
ним и данное руководство, чтобы но‐
вый пользователь получил соответ‐
ствующую информацию о правильной
эксплуатации и правилах техники
безопасности.
В интересах безопасности людей и
имущества соблюдайте меры пред‐
осторожности, указанные в настоя‐
щем руководстве, так как производи‐
тель не несет ответственности за
убытки, вызванные несоблюдением
указанных мер.
1.1 Безопасность детей и лиц
с ограниченными
возможностями
• Данное изделие не предназначено
для эксплуатации лицами (в том
числе детьми) с ограниченными фи‐
зическими, сенсорными или ум‐
ственными способностями или с не‐
достаточным опытом или знаниями
без присмотра лица, отвечающего
за их безопасность, или получения
от него соответствующих инструк‐
ций, позволяющих им безопасно эк‐
сплуатировать его.
Необходимо следить за тем, чтобы
дети не играли с прибором.
• Держите все упаковочные материа‐
лы в недоступном для детей месте.
Существует опасность удушения.
• Если прибор больше не нужен, вы‐
ньте вилку из розетки, обрежьте
шнур питания (как можно ближе к
прибору) и снимите дверцу, чтобы
дети, играя, не получили удар током
или не заперлись внутри прибора.
• Если данный прибор (имеющий маг‐
нитное уплотнение дверцы) пред‐
назначен для замены старого холо‐
дильника с пружинным замком (за‐
щелкой) дверцы или крышки, перед
утилизацией старого холодильника
обязательно выведите замок из
строя. Это позволит исключить пре‐
вращение его в смертельную лову‐
шку для детей.
1.2 Общие правила по
технике безопасности
Не перекрывайте вентиляционные от‐
верстия в корпусе прибора или в ме‐
бели, в которую он встроен.
• Настоящий прибор предназначен
для хранения продуктов питания и
напитков в бытовых условиях, как
описано в настоящем руководстве.
• Не используйте механические прис‐
пособления и другие средства для
ускорения процесса разморажива‐
ния.
• Не используйте другие электропри‐
боры (например, мороженицы) внут‐
ри холодильных приборов, если
производителем не допускается
возможность такого использования.
• Не допускайте повреждения конту‐
ра холодильника.
• Холодильный контур прибора со‐
держит хладагент изобутан (R600a)
– безвредный для окружающей сре‐
ды, но, тем не менее, огнеопасный
природный газ.
При транспортировке и установке
прибора следите за тем, чтобы не
допустить повреждения компонен‐
тов контура холодильника.
В случае повреждения контура хо‐
лодильника:
– не допускайте использования от‐
крытого пламени и источников
возгорания;
ВНИМАНИЕ!
Page 59

– тщательно проветрите помеще‐
ние, в котором установлен при‐
бор.
• Изменение характеристик прибора и
внесение изменений в его конструк‐
цию сопряжено с опасностью. Лю‐
бое повреждение кабеля может при‐
вести к короткому замыканию, воз‐
никновению пожара и/или пораже‐
нию электрическим током.
ВНИМАНИЕ!
Во избежание несчастных слу‐
чаев замену любых электро‐
технических деталей (шнура
питания, вилки, компрессора)
должен производить сертифи‐
цированный представитель
сервисного центра или квали‐
фицированный обслуживаю‐
щий персонал.
1.
Запрещается удлинять сетевой
шнур.
2.
Убедитесь, что вилка сетевого
шнура не раздавлена и не по‐
вреждена задней частью прибо‐
ра. Раздавленная или повре‐
жденная вилка сетевого шнура
может перегреться и стать при‐
чиной пожара.
3.
Убедитесь в наличии доступа к
вилке сетевого шнура прибора.
4.
Не тяните за сетевой шнур.
5.
Если в розетке плохой контакт,
не вставляйте в нее вилку кабе‐
ля питания. Существует опас‐
ность поражения электрическим
током или возникновения пожа‐
ра.
6.
Запрещается эксплуатировать
прибор без плафона (если он
предусмотрен конструкцией)
лампы внутреннего освещения.
• Прибор имеет большой вес. Будьте
осторожны при его перемещении.
• Не вынимайте и не трогайте пред‐
меты в морозильнике мокрыми или
влажными руками: это может приве‐
сти к появлению на руках ссадин
или ожогов от обморожения.
• Не подвергайте прибор длительно‐
му воздействию прямых солнечных
лучей.
• В приборе используются специаль‐
ные лампы (если предусмотрено
РУССКИЙ 59
конструкцией), предназначенные
только для бытовых приборов. Они
не подходят для освещения поме‐
щений.
1.3 Ежедневная эксплуатация
• Не ставьте на пластмассовые части
прибора горячую посуду.
• Не храните в холодильнике воспла‐
меняющиеся газы и жидкости, так
как они могут взорваться.
• Не помещайте продукты, перекры‐
вая вентиляционное отверстие у
задней стенки (если прибор отно‐
сится к виду приборов «Без образ‐
ования инея»).
• Замороженные продукты после раз‐
мораживания не должны подвер‐
гаться повторной заморозке.
• При хранении расфасованных замо‐
роженных продуктов следуйте реко‐
мендациям производителя.
• Следует тщательно придерживать‐
ся рекомендаций по хранению, дан‐
ных изготовителем прибора. См. со‐
ответствующие указания.
• Не помещайте в холодильник гази‐
рованные напитки, т.к. они создают
внутри емкости давление, которое
может привести к тому, что она лоп‐
нет и повредит холодильник.
• Ледяные сосульки могут вызвать
ожог обморожения, если брать их в
рот прямо из морозильной камеры.
1.4 Чистка и уход
• Перед выполнением операций по
чистке и уходу за прибором, выклю‐
чите его и выньте вилку сетевого
шнура из розетки.
• Не следует чистить прибор метал‐
лическими предметами.
• Не пользуйтесь острыми предмета‐
ми для удаления льда с прибора.
Используйте пластиковый скребок.
• Регулярно проверяйте сливное от‐
верстие холодильника для талой во‐
ды. При необходимости прочистите
сливное отверстие. Если отверстие
закупорится, вода будет собираться
на дне прибора.
Page 60

www.aeg.com
60
1.5 Установка
Для подключения к электросе‐
ти тщательно следуйте ин‐
струкциям, приведенным в со‐
ответствующих параграфах.
• Распакуйте изделие и проверьте,
нет ли повреждений. Не подключай‐
те к электросети поврежденный
прибор. Немедленно сообщите о
повреждениях продавцу прибора. В
таком случае сохраните упаковку.
• Рекомендуется подождать не менее
четыре часа перед тем, как вклю‐
чать холодильник, чтобы масло вер‐
нулось в компрессор.
• Необходимо обеспечить вокруг хо‐
лодильника достаточную циркуля‐
цию воздуха, в противном случае
прибор может перегреваться. Что‐
бы обеспечить достаточную венти‐
ляцию, следуйте инструкциям по ус‐
тановке.
• Если возможно, изделие должно
располагаться обратной стороной к
стене так, чтобы во избежание ожо‐
га нельзя было коснуться горячих
частей (компрессор, испаритель).
• Данный прибор нельзя устанав‐
ливать вблизи радиаторов отопле‐
ния или кухонных плит.
• Убедитесь, что к розетке будет до‐
ступ после установки прибора.
• Подключайте прибор только к пить‐
евому водоснабжению (если такое
подключение предусмотрено кон‐
струкцией прибора).
квалифицированным электриком
или уполномоченным специали‐
стом.
• Техобслуживание данного прибора
должно выполняться только специа‐
листами авторизованного сервисно‐
го центра с использованием исклю‐
чительно оригинальных запчастей.
1.7 Защита окружающей
среды
Ни холодильный контур, ни
изоляционные материалы на‐
стоящего прибора не содержат
газов, которые могли бы повре‐
дить озоновый слой. Данный
прибор нельзя утилизировать
вместе с бытовыми отходами и
мусором. Изоляционный пено‐
пласт содержит горючие газы:
прибор подлежит утилизации в
соответствии с действующими
нормативными положениями, с
которыми следует ознакомить‐
ся в местных органах власти.
Не допускайте повреждения
холодильного контура, особен‐
но, вблизи теплообменника.
Материалы, использованные
для изготовления данного при‐
бора, помеченные символом
, пригодны для вторичной
переработки.
1.6 Обслуживание
• Любые операции по техобслужива‐
нию прибора должны выполняться
Page 61

2. ПАНЕЛЬ УПРАВЛЕНИЯ
РУССКИЙ 61
1
56 4 3 2
Дисплей
1
Кнопка повышения температуры
2
Кнопка понижения температуры
3
Кнопка OK («Вкл/Выкл»)
4
Кнопка Mode («Режим»)
5
Кнопка ON/OFF («Вкл/Выкл»)
6
Предустановленный уровень громко‐
сти можно изменить. Для этого на не‐
сколько секунд нажмите одновремен‐
но кнопку Mode и кнопку понижения
температуры. Это изменение можно
отменить.
2.1 Дисплей
5 62 431
Функция таймера
1
Функция COOLMATIC
2
Функция Minute Minder
3
Функция «Защита от детей»
4
Сигнальный индикатор
5
Индикатор температуры
6
2.2 Включение
Чтобы выключить прибор, выполните
следующие действия:
1.
Вставьте вилку сетевого шнура в
розетку.
2.
Если дисплей отключен, нажмите
на кнопку ON/OFF .
3.
Через несколько секунд может
прозвучать звуковой сигнал.
Сведения о сбросе сигнализации
см. в разделе «Оповещение о вы‐
сокой температуре».
4.
Если на дисплее высветилось со‐
общение "dEMo", значит, прибор
находится в деморежиме. См.
«Что делать, если...»
5.
На индикаторах температуры от‐
ображаются значения температу‐
ры, заданные по умолчанию.
Как выбрать другую температуру, см.
в разделе "Регулирование температу‐
ры".
2.3 Выключение
Для выключения прибора выполните
приведенные ниже действия.
1.
Нажмите кнопку ON/OFF и удер‐
живайте ее нажатой в течение 5
секунд.
2.
Дисплей отключится.
3.
Для отключения прибора от сети
электропитания извлеките вилку
сетевого шнура из розетки.
2.4 Регулирование
температуры
Установленное значение температуры
холодильника можно изменить с по‐
мощью кнопки регулировки темпера‐
туры.
Установленная температура по умол‐
чанию: +5°C для холодильного отде‐
ления.
На дисплее температуры отображает‐
ся заданное значение температуры.
Установленная температура дости‐
гается в течение 24 часов.
При сбое в подаче электроэ‐
нергии заданное значение тем‐
пературы сохраняется.
Page 62

www.aeg.com
62
2.5 Функция Minute Minder
Функция Minute Minder может исполь‐
зоваться для подачи звукового сигна‐
ла в нужное время. Это может ока‐
заться полезным, например, когда по
рецепту требуется охлаждать тесто в
течение определенного времени.
Включение режима
1.
Нажимайте на кнопку Mode, пока
на дисплее не появится соответ‐
ствующий значок.
Замигает индикатор Minute Minder.
На дисплее таймера в течение не‐
скольких секунд отображается за‐
данное значение (30 минут).
2.
Нажатием кнопки регулятора тай‐
мера измените заданное значение
таймера в интервале от 1 до 90
минут.
3.
Нажмите на кнопку OK для под‐
тверждения.
Появится индикатор Minute
Minder.
Индикатор таймера начнет мигать
(min).
По окончании обратного отсчета ин‐
дикатор Minute Minder начнет мигать и
раздастся звуковой сигнал
1.
нажмите на кнопку OK для выклю‐
чения звукового сигнала и отклю‐
чения функции.
Функцию можно отключить в любой
момент обратного отсчета:
1.
Нажмите и не отпускайте кнопку
Mode, пока не замигает индикатор
Minute Minder.
2.
Нажмите на кнопку OK для под‐
тверждения.
3.
Индикатор Minute Minder погаснет.
Время можно изменить как в любой
момент обратного отсчета, так и в
конце него, нажав кнопки повышения
и понижения температуры.
2.6 Функция «Защита от
детей»
Функция «Защита от детей» служит
для блокировки кнопок управления хо‐
лодильником.
Включение функции:
1.
нажимайте кнопку Mode, пока на
дисплее не отобразится соответ‐
ствующий значок.
2.
Замигает индикатор «Защита от
детей».
3.
Чтобы подтвердить выбор, нажми‐
те кнопку OK.
Отобразится индикатор «Защита
от детей».
Выключение функции.
1.
Нажимайте кнопку Mode, пока не
замигает индикатор «Защита от
детей».
2.
Чтобы подтвердить выбор, нажми‐
те кнопку OK.
3.
Индикатор «Защита от детей» по‐
гаснет.
2.7 Функция COOLMATIC
Если необходимо поместить в холо‐
дильник большое количество теплых
продуктов, например, после посеще‐
ния магазина, рекомендуется вклю‐
чить функцию COOLMATIC для уско‐
ренного охлаждения продуктов и
предотвращения повышения темпера‐
туры продуктов, уже находящихся в
холодильнике.
Включение функции
1.
Нажимайте на кнопку Mode ("Ре‐
жим"), пока на дисплее не появит‐
ся соответствующий значок.
Замигает индикатор COOLMATIC.
2.
Нажмите кнопку OK для подтвер‐
ждения.
Появится индикатор COOLMATIC
("Таймер").
Функция COOLMATIC автоматически
отключается примерно через 6 часов.
Выключение функции до ее автомати‐
ческого завершения:
1.
Нажмите и не отпускайте кнопку
Mode, пока не замигает индикатор
COOLMATIC.
2.
Нажмите кнопку OK для подтвер‐
ждения.
3.
Индикатор COOLMATIC погаснет.
Функция выключается при вы‐
боре другой заданной темпера‐
туры холодильника.
Page 63

2.8 Сигнализация открытой
дверцы
Если дверь остается открытой не‐
сколько минут, раздается звуковой
сигнал. На то, что дверца не закрыта,
указывает:
• мигание сигнального индикатора;
• звуковой сигнал.
После восстановления нормальных
условий (дверца закрыта) звуковой
сигнал выключается.
В режиме сигнализации зуммер мож‐
но отключить, нажав любую кнопку.
3. ЕЖЕДНЕВНОЕ ИСПОЛЬЗОВАНИЕ
РУССКИЙ 63
3.1 Очистка внутренних
поверхностей
Перед первым включением прибора
вымойте его внутренние поверхности
и все внутренние принадлежности
теплой водой с нейтральным мылом,
чтобы удалить запах, характерный
для недавно изготовленного изделия,
затем тщательно протрите их.
3.2 Передвижные полки
3.3 Размещение полок
дверцы
Чтобы обеспечить возможность хра‐
нения упаковок продуктов различных
Не используйте моющие или
абразивные средства, т.к. они
могут повредить покрытие по‐
верхностей прибора.
Если на дисплее высветилось
сообщение “dEMo”, значит,
прибор находится в деморежи‐
ме. См. «Что делать, если...»
Расположенные на стенках холодиль‐
ника направляющие позволяют разме‐
щать полки на нужной высоте.
Для оптимального использования про‐
странства передние половинки полок
могут лежать на задних
размеров, полки дверцы можно разме‐
щать на разной высоте.
Page 64

www.aeg.com
64
3.4 Выбор высоты выдвижного ящика
Выдвижной ящик может быть устано‐
влен на различной высоте.
Для выполнения этой операции дей‐
ствуйте следующим образом:
1.
поднимите полку с выдвижным
ящиком вверх и снимите с держа‐
телей дверцы
2.
снимите опорный кронштейн ящи‐
ка с направляющих под полкой
3.
Чтобы установить ящик на другую
высоту, проделайте эту процедуру
в обратном порядке.
3.5 Угольный воздушный фильтр
Ваш прибор оснащен угольным филь‐
тром CLEANAIR CONTROL, устано‐
вленным за заслонкой в задней стенке
CLEANAIR CONTROL
3.6 Отделение LONGFRESH
В отделении LONGFRESH 0°C
температура регулируется автомати‐
чески. Она постоянно поддерживается
на уровне примерно 0°C без необхо‐
димости регулировки.
Постоянная температура хранения
около 0°C и относительная влажность
от 45% до 90% обеспечивают опти‐
мальные условия для хранения раз‐
личных типов продуктов.
Поэтому в отделении LONGFRESH
0°C можно свежие продукты различ‐
ного типа в три раза дольше и с луч‐
холодильного отделения.
Фильтр очищает воздух в холодильни‐
ке и отделенииLONGFRESH для дли‐
тельного сохранения продуктов в све‐
жем виде от нежелательных запахов,
что обеспечивает дальнейшее повы‐
шение качества хранения продуктов.
шим качеством по сравнению с обы‐
чными отделениями холодильника.
Это позволяет запасать больше све‐
жих продуктов. Вкус, свежесть, каче‐
ство и пищевая ценность (витамины и
минералы) продуктов хорошо сохра‐
няются. У овощей и фруктов снижает‐
ся потеря веса. Продукты сохраняют
повышенную пищевую ценность.
Отделение LONGFRESH 0°C также
можно использовать для разморажи‐
вания продуктов.
В этом случае размороженные про‐
дукты могут храниться там до двух
дней.
Во время работы прибора все‐
гда держите воздушную за‐
слонку закрытой.
Page 65

3.7 Контроль влажности
3.8 Ящики Longfresh
РУССКИЙ 65
Оба ящика можно использовать в со‐
ответствии с требуемыми условиями
хранения независимо друг от друга
при разных уровнях влажности.
Регулирование параметров каждого
ящика выполняется независимо, при
помощи подвижного клапана в пере‐
дней части ящика.
• «Сухо»: низкая относительная
влажность - до 50%
Этот уровень влажности достигает‐
ся, когда обе задвижки установлены
в положение
отверстия полностью открыты.
• «Влажно»: высокая относительная
влажность – до 90%
Этот уровень влажности достигает‐
ся, когда обе задвижки установлены
в положение
ные отверстия полностью закрыты.
Влага удерживается внутри и не мо‐
жет выйти наружу.
, а вентиляционные
, а вентиляцион‐
Влажность не регулируется.
Page 66

www.aeg.com
66
Решетки внутри ящиков позволяют
воздуху свободно циркулировать, что
обеспечивает лучшую сохранность
продуктов.
Отделение оснащено ограничителя‐
ми, которые предотвращают выпаде‐
ние ящиков, когда они полностью вы‐
двинуты.
Для извлечения ящиков (например,
для чистки) вытяните их до ограничи‐
теля, поднимите и извлеките.
Для хранения большого коли‐
чества продуктов извлеките
все ящики.
3.9 Время хранения свежих
продуктов в отделении
«Длительная свежесть 0°C»
Вид продуктов Установка влажности
воздуха
Лук
Сливочное масло
Большие куски свини‐
«сухо»
«сухо»
«сухо»
ны
Говядина, дичь, ма‐
«сухо»
ленькие куски свини‐
ны, птица
Томатный соус
Рыба, моллюски и при‐
«сухо»
«сухо»
готовленные мясные
продукты
Приготовленные море‐
«сухо»
продукты
Салат, овощи Мор‐
«влажно»
ковь, зелень, брюс‐
сельская капуста,
сельдерей
Артишоки, цветная ка‐
«влажно»
пуста, цикорий, салат
айсберг, цикорий-эн‐
дивий, маш-салат, са‐
лат-латук, лук-порей и
салат радиччо
Срок хранения
до 5 месяцев
до 1 месяца
до 10 дней
до 7 дней
до 4 дней
до 3 дней
до 2 дней
до 1 месяца
до 21 дней
Page 67

РУССКИЙ 67
Вид продуктов Установка влажности
воздуха
Брокколи, пекинская
«влажно»
капуста, листовая ка‐
пуста, кочанная капу‐
ста, редис, савойская
капуста
Горох, кольраби
Зеленый лук, редис,
«влажно»
«влажно»
спаржа, шпинат
Фрукты(чем более спе‐
«влажно»
лыми являются фрук‐
ты, тем меньше срок
их хранения)
Груши, финики (све‐
жие), клубника, перси‐
ки
Сливы (чем более спе‐
«влажно»
лыми являются фрук‐
ты, тем меньше срок
их хранения)
ревень, крыжовник
Яблоки (холодостой‐
«влажно»
кие), айва
Абрикосы, вишня
Чернослив, виноград
Ежевика, смородина
Инжир (свежий)
Черника, малина
Торты с кремом и другие типы
кондитерских изделий можно
хранить в отделении «Длитель‐
ная свежесть 0°C» от двух до
трех дней.
«влажно»
«влажно»
«влажно»
«влажно»
«влажно»
Срок хранения
до 14 дней
до 10 дней
до 7 дней
до 1 месяца
до 21 дней
до 20 дней
до 14 дней
до 10 дней
до 8 дней
до 7 дней
до 5 дней
В отделение «Длительная све‐
жесть 0°C» не следует поме‐
щать:
• восприимчивые к низкой тем‐
пературе фрукты, которые
следует хранить в подвале
или при комнатной темпера‐
туре, например, ананасы, ба‐
наны, грейпфруты, дыни,
манго, папайя, апельсины,
лимоны и киви;
• не перечисленные выше ти‐
пы продуктов следует хра‐
нить в холодильном отделе‐
нии (например, все сорта сы‐
ра, мясные закуски и т.п.).
Page 68

www.aeg.com
68
Уровень влажности воздуха в
ящиках зависит от содержания
влаги в хранимых продуктах,
овощах и фруктах, а также от
частоты открывания дверцы.
Отделение «Длительная све‐
жесть 0°C» также можно ис‐
пользовать для медленного
размораживания продуктов. В
таком случае размороженные
продукты могут храниться в от‐
делении «Длительная све‐
жесть 0°C» до двух дней.
Рекомендации.
• Проверяйте свежесть продуктов,
особенно срок годности. Качество и
свежесть влияют на срок хранения.
• Длительность срока хранения будет
зависеть от срока хранения, кото‐
рый прошел до начала хранения в
холодильнике.
• Продукты, фрукты и овощи всегда
следует упаковывать или заворачи‐
вать перед хранением.
4. ПОЛЕЗНЫЕ СОВЕТЫ
• Продукты животного происхождения
всегда храните упакованными и в
сухими.
• Продукты с высоким содержанием
протеинов портятся быстрее. Это
означает, что морепродукты портят‐
ся быстрее рыбы, которая, в свою
очередь, портится быстрее мяса.
При хранении продуктов в отделе‐
нии "0°C" время хранения продуктов
такого типа может быть увеличено
до трех раз без потери качества.
• Все продукты, хранящиеся в отде‐
лении "0°C", следует извлекать из
корзин примерно за 15-30 мин пе‐
ред употреблением, в частности,
фрукты и овощи, которые употре‐
бляются в пищу без дополнитель‐
ной термообработки. Фрукты и ово‐
щи при комнатной температуре
имеют лучший внешний вид и аро‐
мат.
4.1 Рекомендации по
экономии электроэнергии
• Не открывайте дверцу слишком ча‐
сто и не держите ее открытой дол‐
ьше, чем необходимо.
• Если температура окружающей сре‐
ды высокая, регулятор температуры
находится в самом высоком поло‐
жении и холодильник полностью за‐
гружен, компрессор может работать
без остановок, что приводит к обра‐
зованию инея или льда на испари‐
теле. Если такое случается, повер‐
ните регулятор температуры до бо‐
лее низких значений, чтобы сделать
возможным автоматическое оттаи‐
вание, и, следовательно, снизить
потребление электроэнергии.
4.2 Рекомендации по
охлаждению продуктов
Для получения оптимальных резуль‐
татов:
• не помещайте в холодильник теп‐
лые продукты или испаряющиеся
жидкости
• накрывайте или заворачивайте про‐
дукты, особенно те, которые имеют
сильный запах
• располагайте продукты так, чтобы
вокруг них мог свободно циркулиро‐
вать воздух
4.3 Рекомендации по
охлаждению
Полезные советы:
Мясо (всех типов): помещайте в поли‐
этиленовые пакеты и кладите на сте‐
клянную полку, расположенную над
ящиком для овощей.
Храните мясо таким образом один,
максимум два дня, иначе оно может
испортиться.
Продукты, подвергшиеся тепловой об‐
работке, холодные блюда и т.д.: дол‐
жны быть накрыты и могут быть раз‐
мещены на любой полке.
Page 69

Фрукты и овощи: должны быть тща‐
тельно очищенными; их следует поме‐
щать в специально предусмотренные
для их хранения ящики.
Сливочное масло и сыр: должны по‐
мещаться в специальные воздухоне‐
проницаемые контейнеры или быть
обернуты алюминиевой фольгой или
полиэтиленовой пленкой, чтобы мак‐
5. УХОД И ОЧИСТКА
РУССКИЙ 69
симально ограничить контакт с возду‐
хом.
Бутылки с молоком: должны быть за‐
крыты крышкой и размещены в полке
для бутылок на дверце.
Бананы, картофель, лук и чеснок не
следует хранить в холодильнике в не‐
упакованном виде.
ПРЕДУПРЕЖДЕНИЕ!
Перед выполнением каких-ли‐
бо операций по чистке или ухо‐
ду за прибором выньте вилку
сетевого шнура из розетки.
В холодильном контуре данно‐
го прибора содержатся углево‐
дороды; поэтому его обслужи‐
вание и заправка должны осу‐
ществляться только уполномо‐
ченными специалистами.
5.1 Периодическая чистка
Холодильник нуждается в регулярной
чистке:
• внутренние поверхности холодиль‐
ника и принадлежности мойте теп‐
лой водой с нейтральным мылом.
• регулярно проверяйте состояние
уплотнения дверцы и мойте его для
поддержания в чистоте и удаления
загрязнений.
• после мытья ополаскивайте вымы‐
тые поверхности и затем тщательно
вытирайте их.
Не тяните, не двигайте и сле‐
дите за тем, чтобы не повре‐
дить трубки и/или кабели, на‐
ходящиеся внутри корпуса.
Никогда не пользуйтесь для
чистки внутренних поверхнос‐
тей моющими средствами,
абразивными порошками, чи‐
стящими средствами с сильны‐
ми ароматизаторами или поли‐
ровальными пастами, так как
они могут повредить поверх‐
ность и оставить стойкий за‐
пах.
Чтобы очистить испаритель (решетка
черного цвета) и компрессор, распо‐
ложенные с задней стороны прибора,
воспользуйтесь щеткой. Эта операция
повышает эффективность работы
прибора и снижает потребление элек‐
троэнергии.
Только для проведения чистки можно
снять самую нижнюю полку, отделяю‐
щую холодильное отделение от отде‐
ления LONGFRESH 0°C . Для этого
потяните полку на себя.
Для проведения чистки можно снять
крышки ящиков, находящихся в отде‐
лении.
Для обеспечения полной функцио‐
нальности отделения LONGFRESH
0°C после выполнения чистки нижнюю
полку и крышки необходимо вернуть
на свои места.
Будьте осторожны, чтобы не
повредить холодильный кон‐
тур.
Некоторые чистящие средства для
кухни содержат химикаты, могущие
повредить пластмассовые детали
прибора. По этой причине рекомен‐
дуется мыть внешний корпус прибора
только теплой водой с небольшим
количеством моющего средства.
После чистки подключите прибор к се‐
ти электропитания.
Page 70

www.aeg.com
70
5.2 Замена угольного
фильтра
Для обеспечения оптимальной рабо‐
ты угольного воздушного фильтра, его
следует ежегодно заменять.
Новые активные воздушные фильтры
можно приобрести у местного постав‐
щика.
Инструкции см. в разделе «Установка
угольного воздушного фильтра».
Воздушный фильтр является расход‐
ным элементом, поэтому гарантия на
него не распространяется.
5.3 Размораживание
холодильной камеры
Размораживание холодильного отде‐
ления выполняется автоматически
Скапливающаяся вода стекает в под‐
дон на компрессоре и испаряется.
Поднос является несъемным.
6. ЧТО ДЕЛАТЬ, ЕСЛИ ...
ВНИМАНИЕ!
Перед устранением неисправ‐
ностей извлеките вилку шнура
питания из розетки.
Устранять неисправности, не
указанные в данном руковод‐
стве, должен только квалифи‐
цированный электрик или упо‐
лномоченный специалист.
Неисправность Возможная причина Способ устранения
Прибор издает силь‐
ный шум.
Прибор не работает.
Лампа не горит.
Вилка шнура питания не
Прибор не установлен
должным образом.
Прибор выключен. Включите прибор.
вставлена как следует в
розетку.
5.4 Перерывы в эксплуатации
Если прибор не будет использоваться
в течение продолжительного времени,
примите следующие меры предосто‐
рожности:
• отключите устройство от сети элек‐
тропитания
• удалите все продукты
• разморозьте (если эта операция
предусмотрена конструкцией прибо‐
ра) и вымойте прибор и все принад‐
лежности;
• оставьте дверцы приоткрытыми,
чтобы предотвратить образование
неприятного запаха.
Если прибор будет продолжать рабо‐
тать, попросите кого-нибудь провер‐
ять его время от времени, чтобы не
допустить порчи находящихся в нем
продуктов в случае отключения элек‐
троэнергии.
Проверьте, прочно ли
стоит прибор (все четыре
ножки должны стоять на
полу).
Как следует вставьте
вилку шнура питания в
розетку.
Page 71

РУССКИЙ 71
Неисправность Возможная причина Способ устранения
Отсутствует электропи‐
тание прибора. Отсут‐
ствует напряжение в ро‐
зетке электросети.
Подключите к этой сете‐
вой розетке другой элек‐
троприбор.
Обратитесь к квалифици‐
рованному электрику.
Лампа не горит. Лампа находится в ре‐
жиме ожидания.
Закройте и снова открой‐
те дверцу.
Лампа перегорела. См. «Замена лампы».
Компрессор рабо‐
тает непрерывно.
Неплотно закрыта двер‐
Дверцу открывали
Неправильно задана
температура.
ца.
слишком часто.
Задайте более высокую
температуру.
См. «Закрывание двер‐
цы».
Не оставляйте дверцу от‐
крытой дольше, чем это
необходимо.
Температура продуктов
слишком высока.
Прежде чем положить
продукты на хранение,
дайте им охладиться до
комнатной температуры.
Температура воздуха в
помещении слишком
высока.
Компрессор не вклю‐
чается сразу после
нажатия выключате‐
Это нормальное явле‐
ние. Оно не является
неисправностью.
Обеспечьте понижение
температуры воздуха в
помещении.
Компрессор включится
через некоторое время.
ля COOLMATIC или
после изменения
температуры.
Вода стекает по зад‐
ней стенке холо‐
дильника.
Во время автоматиче‐
ского размораживания
на задней панели раз‐
Это нормально.
мораживается наледь.
Температура внутри
прибора слишком
низкая/слишком вы‐
Неправильно задана
температура.
Задайте более высокую/
более низкую температу‐
ру.
сокая.
Неплотно закрыта двер‐
ца.
Температура продуктов
слишком высока.
См. «Закрывание двер‐
цы».
Прежде чем положить
продукты на хранение,
дайте им охладиться до
комнатной температуры.
Одновременно хранится
слишком много продук‐
тов.
Одновременно заклады‐
вайте меньшее количе‐
ство продуктов.
Page 72

www.aeg.com
72
Неисправность Возможная причина Способ устранения
Температура в холо‐
дильнике слишком
высокая.
Сверху или снизу на
дисплее температу‐
ры отображается
квадрат.
Внутри прибора отсут‐
ствует циркуляция хо‐
лодного воздуха.
Произошла ошибка в из‐
мерении температуры.
Убедитесь, что внутри
прибора циркулирует хо‐
лодный воздух.
Позвоните в сервисный
центр (система охлажде‐
ния будет и далее под‐
держивать низкую темпе‐
ратуру продуктов, однако
регулировка температу‐
ры будет невозможна).
На дисплее высве‐
чивается dEMo.
Прибор находится в де‐
морежиме. (dEMo).
Нажмите на кнопку OK и
удерживайте ее прибли‐
зительно 10 секунд; про‐
звучит длинный сигнал
зуммера, а дисплей на
короткое время погаснет,
после чего прибор пере‐
йдет в нормальный ре‐
жим работы
2.
6.1 Замена лампы
Прибор оборудован светодиодной
лампой длительного срока службы.
Этот элемент освещения подлежит
замене только в сервисном центре.
Обращайтесь в сервисный центр.
При необходимости отрегулируйте
дверцу. См. раздел «Установка».
3.
При необходимости замените не‐
пригодные уплотнения дверцы.
Обратитесь в сервисный центр.
6.2 Закрытие дверцы
1.
Прочистите уплотнители дверцы.
7. УСТАНОВКА
ВНИМАНИЕ!
Чтобы обеспечить собствен‐
ную безопасность и правиль‐
ную эксплуатацию прибора, пе‐
ред его установкой вниматель‐
но изучите раздел «Сведения
по технике безопасности».
7.1 Размещение
ВНИМАНИЕ!
Если вы выбрасываете старый
холодильник с пружинным зам‐
ком (защелкой) дверцы, необ‐
ходимо вывести замок из
строя, чтобы дети, играя, не
оказались запертыми внутри.
После установки прибора дол‐
жен быть обеспечен свобод‐
ный доступ к сетевой вилке.
Устанавливайте холодильник в месте,
где температура окружающей среды
соответствует климатическому классу,
указанному на табличке с технически‐
ми данными:
Клима‐
тиче‐
Температура окружаю‐
щей среды
ский
класс
SN от +10°C до + 32°C
N от +16°C до + 32°C
Page 73

Клима‐
тиче‐
Температура окружаю‐
щей среды
ский
класс
ST от +16°C до + 38°C
T от +16°C до + 43°C
7.2 Подключение к
электросети
Перед включением прибора в сеть
удостоверьтесь, что напряжение и ча‐
стота, указанные в табличке техниче‐
ских данных, соответствуют парамет‐
рам вашей домашней электрической
сети.
7.3 Требования к вентиляции
РУССКИЙ 73
Прибор должен быть заземлен. С этой
целью вилка сетевого шнура имеет
специальный контакт заземления.
Если розетка электрической сети не
заземлена, выполните отдельное за‐
земление прибора в соответствии с
действующими нормами, поручив эту
операцию квалифицированному элек‐
трику.
Изготовитель снимает с себя всякую
ответственность в случае несоблюде‐
ния вышеуказанных правил техники
безопасности.
Данное изделие соответствует дирек‐
тивам Европейского Союза.
5 cm
min.
200 cm
Необходимо обеспечить достаточную
2
min.
200 cm
циркуляцию воздуха с задней стороны
прибора.
2
Page 74

www.aeg.com
74
7.4 Установка угольного воздушного фильтра
1
2
Угольный воздушный фильтр пред‐
ставляет собой фильтр с активиро‐
ванным углем, поглощающий непри‐
ятные запахи и обеспечивающий со‐
хранение наилучшего вкуса и арома‐
та всех пищевых продуктов без сме‐
шения запахов.
Чтобы обеспечить сохранение харак‐
теристик и срока службы угольного
фильтра, при поставке он находится
в пластиковом пакете. Перед включе‐
нием прибора фильтр следует уста‐
новить за заслонкой.
1.
Откройте крышку заслонки (1).
2.
Достаньте фильтр из пластиково‐
го пакета.
3.
Вставьте фильтр в паз, располо‐
женный с задней стороны крышки
заслонки (2).
4.
Закройте крышку заслонки.
Во время работы всегда дер‐
жите воздушную заслонку за‐
крытой.
Обращайтесь с фильтром с
осторожностью во избежание
отделения от его поверхности
фильтрующих частиц.
8. ШУМЫ ПРИ РАБОТЕ
При нормальных условиях работы
слышны некоторые звуки (работы ком‐
прессора, циркуляции хладагента).
OK
SSSRR
HISSS!
BLUBB!
R!
CLICK!
BRRR!
CRACK!
Page 75

РУССКИЙ 75
SSSRRR!
HISSS!
BLUBB!
SSSRRR!
HISSS!
BLUBB!
CLICK!
BRRR!
CLICK!
BRRR!
CRACK!CRACK!
Page 76

www.aeg.com
76
9. ТЕХНИЧЕСКИЕ ДАННЫЕ
Размеры ниши для
встраивания
Высота 1855 мм
Ширина 545 мм
Глубина 575 мм
Напряжение 230-240 В
Частота 50 Гц
Технические данные указаны на та‐
бличке с техническими данными на
10. ОХРАНА ОКРУЖАЮЩЕЙ СРЕДЫ
левой стенке внутри прибора и на та‐
бличке энергопотребления.
Материалы с символом следует
сдавать на переработку. Положите
упаковку в соответствующие
контейнеры для сбора вторичного
сырья.
Принимая участие в переработке
старого электробытового
оборудования, Вы помогаете
защитить окружающую среду и
здоровье человека. Не
выбрасывайте вместе с бытовыми
отходами бытовую технику,
помеченную символом
Доставьте изделие на местное
предприятие по переработке
вторичного сырья или обратитесь
в свое муниципальное
управление.
.
Page 77

РУССКИЙ 77
Page 78

www.aeg.com
78
Page 79

РУССКИЙ 79
Page 80

www.aeg.com/shop
222353916-A-192012
 Loading...