

Page 1

S75348KG18
S75388KG18
User manual Fridge-Freezer
Инструкция по
эксплуатации
Manual de instrucciones Frigorífico-congelador
Холодильник-
морозильник
Page 2
Contents
2
Thank you for choosing one of our high-quality products.
To ensure optimal and regular performance of your appliance please read this
instruction manual carefully. It will enable you to navigate all processes perfectly
and most efficiently. To refer to this manual any time you need to, we recommend
you to keep it in a safe plac e. An d p le as e pass it to any future owner of the appliance.
We wish you much joy with your new appliance.
Contents
Safety information 2
Children and vulnerable people safety
3
General safety 3
Daily Use 4
Care and cleaning 4
Installation 4
Service 5
Control panel 5
Switching on 6
Switching off 6
Temperature indicators 6
Temperature regulation 6
COOLMATIC function 7
Holiday function 7
FROSTMATIC function 7
High temperature alarm 8
First use 8
Cleaning the interior 8
Daily use 8
Freezing fresh food 8
Storage of frozen food 8
Thawing 9
Movable shelves 9
Bottle rack 9
Vegetable Drawer 10
Positioning the door shelves 10
Air cooling 11
Chiller Zone 11
Removal of freezing baskets from the
freezer 12
Helpful hints and tips 12
Normal Operating Sounds 12
Hints for energy saving 12
Hints for fresh food refrigeration 12
Hints for refrigeration 13
Hints for freezing 13
Hints for storage of frozen food 13
Care and cleaning 13
Periodic cleaning 14
Defrosting of the refrigerator 14
Defrosting of the freezer 15
What to do if… 15
Replacing the lamp 17
Closing the door 17
Technical data 17
Installation 17
Positioning 17
Location 18
Electrical connection 18
Rear spacers 18
Levelling 19
Removing the shelf holders 19
Door reversibility 19
Environmental concerns 21
Subject to change without notice
Safety information
In the interest of your safety and to ensure the correct use, before installing and first using
the appliance, read this user manual carefully, including its hints and warnings. To avoid
unnecessary mistakes and accidents, it is important to ensure that all people using the
Page 3
Safety information
appliance are thoroughly familiar with its operation and safety features. Save these instructions and make sure that they remain with the appliance if it is moved or sold, so that
everyone using it through its life will be properly informed on appliance use and safety.
For the safety of life and property keep the precautions of these user's instructions as the
manufacturer is not responsible for damages caused by omission.
Children and vulnerable people safety
• This appliance is not intended for use by persons (including children) with reduced
physical, sensory or mental capabilities, or lack of experience and knowledge, unless they
have been given supervision or instruction concerning use of the appliance by a person
responsible for their safety.
Children should be supervised to ensure that they do not play with the appliance.
• Keep all packaging well away from children. There is risk of suffocation.
• If you are discarding the appliance pull the plug out of the socket, cut the connection
cable (as close to the appliance as you can) and remove the door to prevent playing
children to suffer electric shock or to close themselves into it.
• If this appliance featuring magnetic door seals is to replace an older appliance having a
spring lock (latch) on the door or lid, be sure to make that spring lock unusable before
you discard the old appliance. This will prevent it from becoming a death trap for a child.
General safety
CAUTION!
Keep ventilation openings clear of obstruction.
3
• The appliance is intended for keeping foodstuff and/or beverages in a normal household
as explained in this instruction booklet.
• Do not use a mechanical device or any artificial means to speed up the thawing process.
• Do not use other electrical appliances (such as ice cream makers) inside of refrigerating
appliances, unless they are approved for this purpose by the manufacturer.
• Do not damage the refrigerant circuit.
• The refrigerant isobutane (R600a) is contained within the refrigerant circuit of the ap-
pliance, a natural gas with a high level of environmental compatibility, which is nevertheless flammable.
During transportation and installation of the appliance, be certain that none of the
components of the refrigerant circuit become damaged.
If the refrigerant circuit should become damaged:
– avoid open flames and sources of ignition
– thoroughly ventilate the room in which the appliance is situated
Page 4
Safety information
4
• It is dangerous to alter the specifications or modify this product in any way. Any damage
to the cord may cause a short-circuit, fire and/or electric shock.
WARNING!
Any electrical component (power cord, plug, compressor) must be replaced by a certified
service agent or qualified service personnel.
1. Power cord must not be lengthened.
2. Make sure that the power plug is not squashed or damaged by the back of the
appliance. A squashed or damaged power plug may overheat and cause a fire.
3. Make sure that you can come to the mains plug of the appliance.
4. Do not pull the mains cable.
5. If the power plug socket is loose, do not insert the power plug. There is a risk of
electric shock or fire.
6.
You must not operate the appliance without the lamp cover
1)
of interior lighting.
• This appliance is heavy. Care should be taken when moving it.
• Do not remove nor touch items from the freezer compartment if your hands are damp/
wet, as this could cause skin abrasions or frost/freezer burns.
• Avoid prolonged exposure of the appliance to direct sunlight.
Daily Use
• Do not put hot pot on the plastic parts in the appliance.
• Do not store flammable gas and liquid in the appliance, because they may explode.
•
Do not place food products directly against the air outlet on the rear wall.
• Frozen food must not be re-frozen once it has been thawed out.
• Store pre-packed frozen food in accordance with the frozen food manufacturer's instructions.
• Appliance's manufacturers storage recommendations should be strictly adhered to. Refer
to relevant instructions.
• Do not place carbonated or fizzy drinks in the freezer compartment as it creates pressure
on the container, which may cause it to explode, resulting in damage to the appliance.
• Ice lollies can cause frost burns if consumed straight from the appliance.
2)
Care and cleaning
• Before maintenance, switch off the appliance and disconnect the mains plug from the
mains socket. If you cannot come to the mains socket, interrupt the power supply.
• Do not clean the appliance with metal objects.
• Do not use sharp objects to remove frost from the appliance. Use a plastic scraper.
• Regularly examine the drain in the refrigerator for defrosted water. If necessary, clean
the drain. If the drain is blocked, water will collect in the bottom of the appliance.
Installation
For electrical connection carefully follow the instructions given in specific paragraphs.
1) If the lamp cover is foreseen
2) If the appliance is Frost Free
Page 5
Control panel
• Unpack the appliance and check if there are damages on it. Do not connect the appliance
if it is damaged. Report possible damages immediately to the place you bought it. In that
case retain packing.
• It is advisable to wait at least four hours before connecting the appliance to allow the
oil to flow back in the compressor.
• Adequate air circulation should be around the appliance, lacking this leads to overheating. To achieve sufficient ventilation follow the instructions relevant to installation.
• Wherever possible the back of the product should be against a wall to avoid touching
or catching warm parts (compressor, condenser) to prevent possible burn.
• The appliance must not be located close to radiators or cookers.
• Make sure that the mains plug is accessible after the installation of the appliance.
•
Connect to potable water supply only.
3)
Service
• Any electrical work required to do the servicing of the appliance should be carried out
by a qualified electrician or competent person.
• This product must be serviced by an authorized Service Centre, and only genuine spare
parts must be used.
Environment Protection
This appliance does not contain gasses which could damage the ozone layer, in either its
refrigerant circuit or insulation materials. The appliance shall not be discarded together
with the urban refuse and rubbish. The insulation foam contains flammable gases: the
appliance shall be disposed according to the applicable regulations to obtain from your
local authorities. Avoid damaging the cooling unit, especially at the rear near the heat
exchanger. The materials used on this appliance marked by the symbol
5
are recyclable.
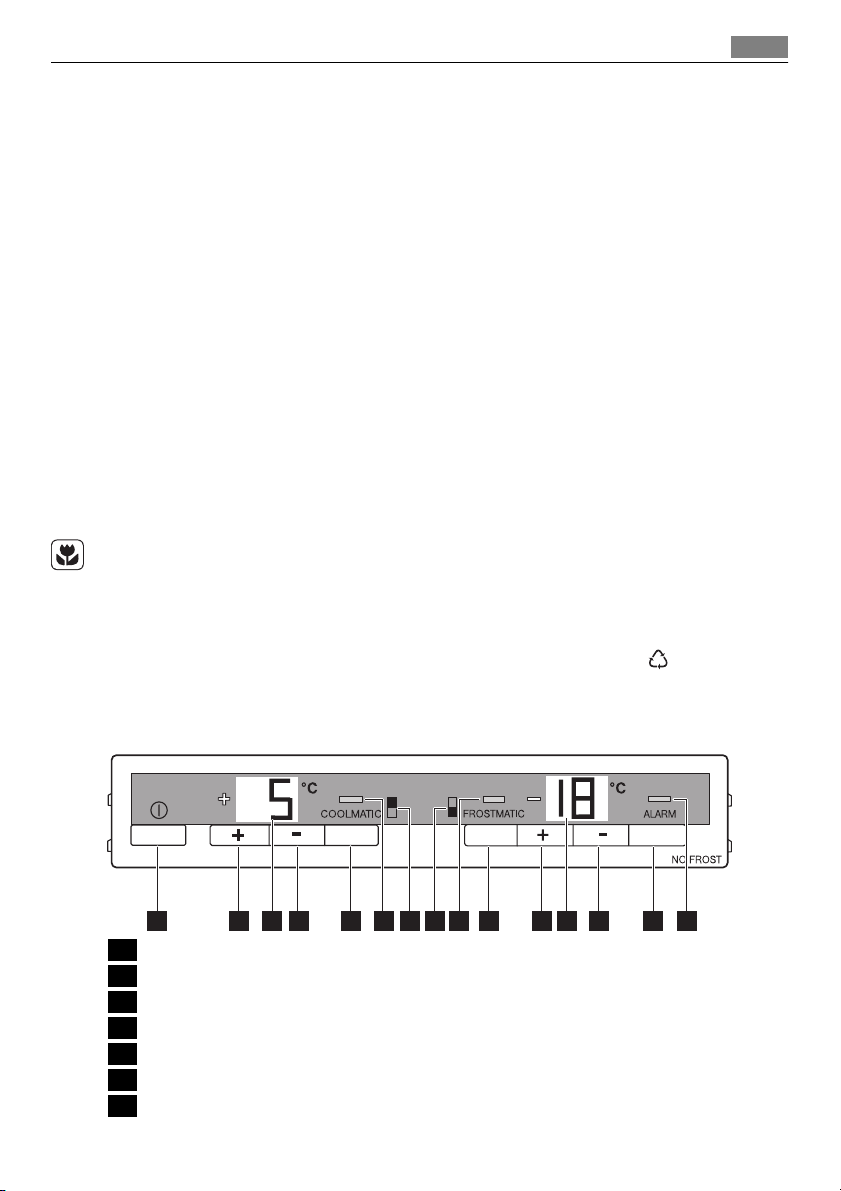
Control panel
1 ON/OFF switch
2 Fridge temperature regulator, + button
3 Fridge temperature indicator
4 Fridge temperature regulator, - button
5 COOLMATIC button
6 COOLMATIC indicator
7 Fridge compartment indicator
3) If a water connection is foreseen
65 7 84321 15141312119 10
Page 6

Control panel
6
8 Freezer compartment indicator
9 FROSTMATIC indicator
10 FROSTMATIC button
11 Freezer temperature regulator, + button
12 Freezer temperature indicator
13 Freezer temperature regulator, - button
14 Alarm reset button
15 Alarm indicator
Switching on
1. Insert the plug into the mains socket.
2. Set ON/OFF switch to ON.
3. The alarm indicator light flashes since the temperature is reached.
The acoustic alarm sounds.
4. Press the alarm reset button to reset the alarm.
Switching off
To switch the entire appliance off:
1. Set ON/OFF switch to OFF.
2. Disconnect the mains plug from the mains socket.
Temperature indicators
The temperature indicators show several information:
• During normal operation, the temperature currently present in the fridge (ACTUAL tem-
perature) is displayed.
• In the freezer the warmest temperature is displayed (ACTUAL temperature). When fully
filled, the warmest zone is normally located at the top in the front area of the freezer.
Depending upon how the section is filled, the temperatures are lower in other areas of
the freezer.
• When the temperature is being adjusted a flashing display indicates the fridge temper-
ature currently set (DESIRED temperature).
When changing the temperature setting wait about 24 hours until the temperature display
has stabilised.
If there is a fault in the appliance the temperature indicator shows:
• a square or a letter in the temperature indicator of the fridge for a fault in the fridge
• a square or a letter in the temperature indicator of the freezer for a fault in the freezer.
Temperature regulation
To operate the appliance, proceed as follows:
1. Set the required temperature by pressing the corresponding temperature regulator. The
temperature indicator will immediately show the changed setting (DESIRED temperature) and the temperature indicator flashes.
2. Each time the temperature regulator is pressed the DESIRED temperature is adjusted
by 1 °C. The DESIRED temperature must be reached within 24 hours.
3. Once the required temperature has been set, after a short period (approx. 5 sec.) the
temperature indicator will show again the current ACTUAL temperature inside the cor-
Page 7
Control panel
responding compartment. The temperature indicator will change from flashing to continuous illumination.
For a correct storage of the food the following temperatures should be set:
• +5 °C in the fridge
• -18 °C in the freezer.
When the setting is changed, the compressor does not start immediately if automatic
defrosting is currently taking place. As the storage temperature within the fridge is reached
quickly you can store food immediately after switching on.
COOLMATIC function
The COOLMATIC function is suited for quick cooling of large quantities of goods in the
refrigerator.
To activate the function, do these steps:
1. Press the COOLMATIC button.
2. The COOLMATIC indicator switches on.
The COOLMATIC function now provides for intensive cooling. A DESIRED temperature of
+2°C is automatically selected.
The COOLMATIC function is ended automatically after a period of 6 hours.
You can deactivate the function at any time:
1. Press the COOLMATIC button.
2. The COOLMATIC indicator switches off.
Holiday function
This function allows you to keep the refrigerator shut and empty during a long holiday
period (e.g. the summer holidays) without the formation of a bad smell.
The fridge compartment must be empty when the holiday function is on.
7
To activate the function:
1. press continuously the temperature regulator (+ button) until the letter "H" (Holiday)
appears on the temperature indicator. The Holiday function sets the temperature approx +15°C. The refrigerator is in the energy-saving mode.
To deactivate the function:
1. set the required temperature by pressing the fridge temperature regulator.
FROSTMATIC function
The FROSTMATIC function accelerates the freezing of fresh food and, at the same time,
protects foodstuffs already stored from undesirable warming.
To activate the function, do these steps:
1. Press the FROSTMATIC button.
2. The FROSTMATIC indicator switches on.
The FROSTMATIC function is ended automatically after a period of 52 hours.
You can deactivate the function at any time:
1. Press the FROSTMATIC button.
2. The FROSTMATIC indicator switches off.
Page 8
First use
8
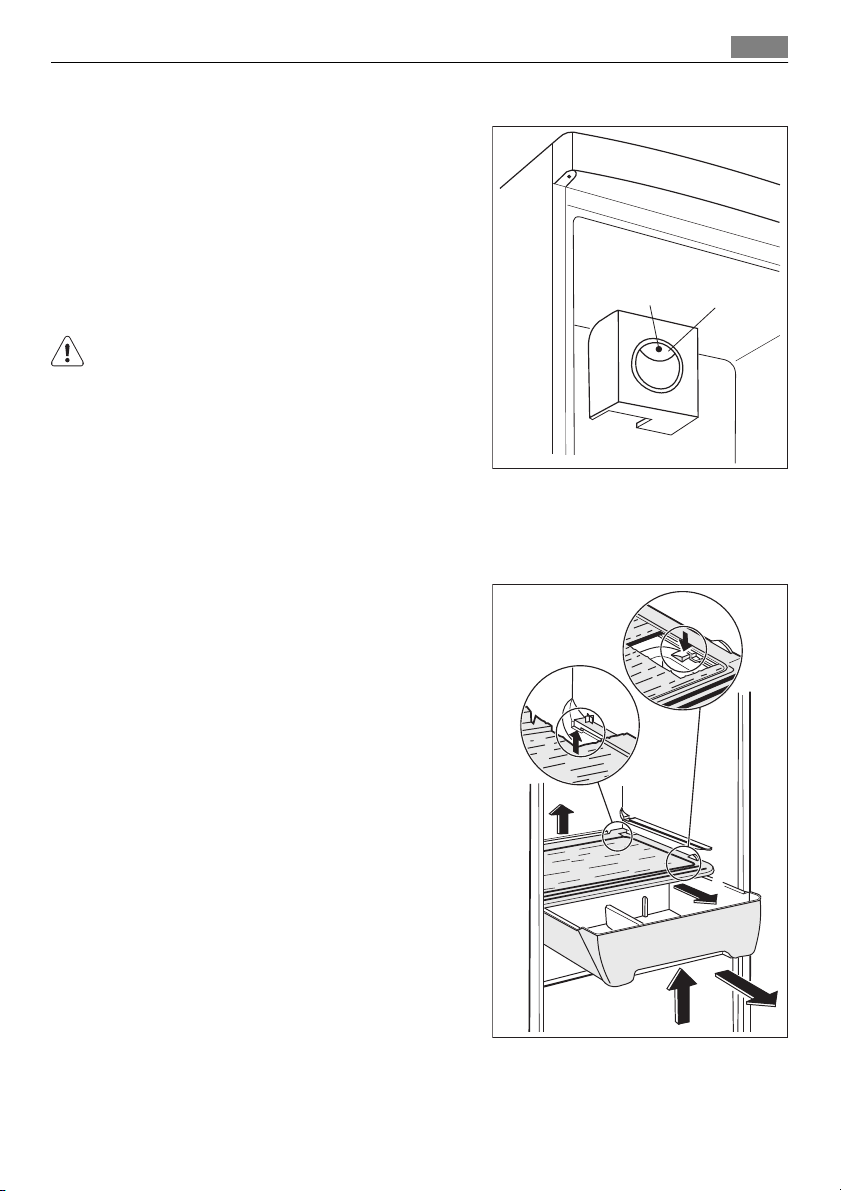
High temperature alarm
In the event of an abnormal temperature rise inside the freezer (e.g. power cut) alarm
indicator light will start to flash and a buzzer will sound.
Push the alarm reset button to stop the buzzer sound, while the alarm indicator light will
continue to flash.
The buzzer will stop automatically when the temperature has returned to normal while the
alarm indicator light will continue to flash.
Press the alarm reset button. The alarm indicator light goes out and at the same time the
freezer temperature indicator show for about 5 seconds the warmest temperature reached
in the freezer compartment.
First use
Cleaning the interior
Before using the appliance for the first time, wash the interior and all internal accessories
with lukewarm water and some neutral soap so as to remove the typical smell of a brandnew product, then dry thoroughly.
Do not use detergents or abrasive powders, as these will damage the finish.
Daily use
Freezing fresh food
The freezer compartment is suitable for freezing fresh food and storing frozen and deepfrozen food for a long time.
To freeze fresh foods it is not necessary to change the medium setting.
However, for a faster freezing operation, turn the temperature regulator toward higher
settings to obtain the maximum coldness.
In this condition, the refrigerator compartment temperature might drop below 0°C. If this
occurs reset the temperature regulator to a warmer setting.
Place the fresh food to be frozen on the top compartment.
Storage of frozen food
When first starting-up or after a period out of use, before putting the products in the
compartment let the appliance run at least 2 hours on the higher settings.
In the event of accidental defrosting, for example due to a power failure, if the power has
been off for longer than the value shown in the technical characteristics chart under "rising
time", the defrosted food must be consumed quickly or cooked immediately and then refrozen (after cooling).
Page 9
Daily use
Thawing
Deep-frozen or frozen food, prior to being used, can be thawed in the refrigerator compartment or at room temperature, depending on the time available for this operation.
Small pieces may even be cooked still frozen, directly from the freezer: in this case, cooking
will take longer.
Movable shelves
The walls of the refrigerator are equipped with a
series of runners so that the shelves can be positioned as desired.
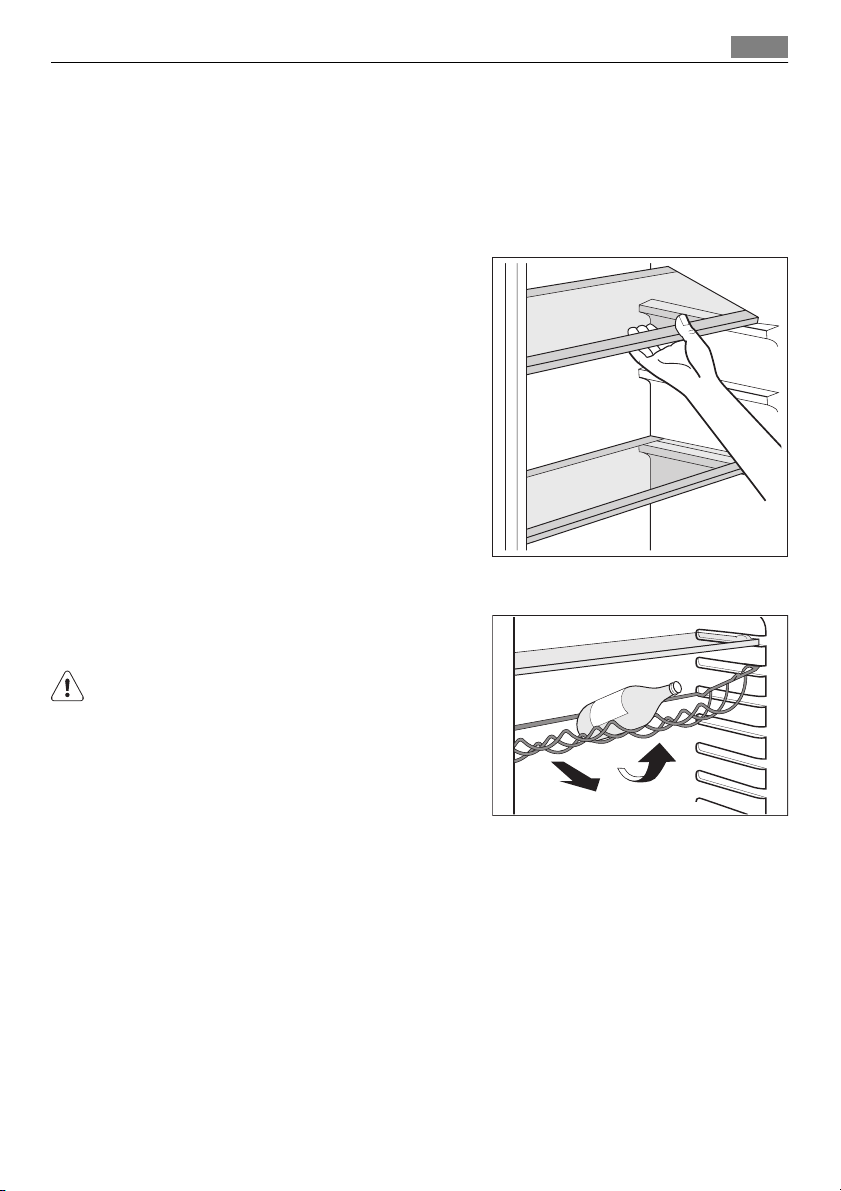
Bottle rack
Place the bottles (with the opening facing front)
in the pre-positioned shelf.
If the shelf is positioned horizontally, place only
closed bottles.
9
This bottle holder shelf can be tilted in order to
store previously opened bottles. To obtain this result, pull the shelf up so it can rotate upwards and
be placed on the next higher level.
Page 10
Daily use
10
Vegetable Drawer
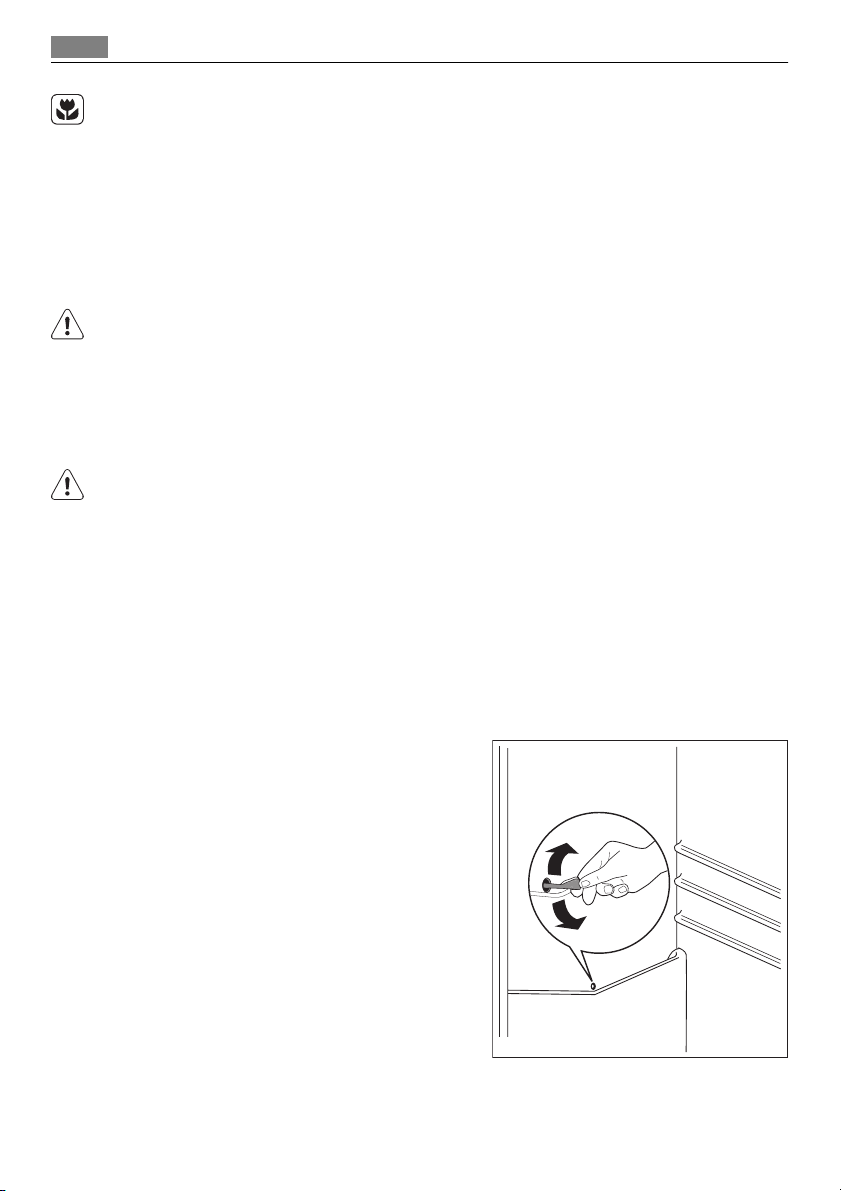
The drawer is suitable for storing fruit and vegetables.
There is a separator inside the drawer that can be
placed in different positions to allow for the subdivision best suited to personal needs.
There is a grille (if foreseen) on the bottom of the
drawer to separate the fruit and vegetables from
any humidity that may form on the bottom surface.
All parts inside the drawer can be removed for
cleaning purposes
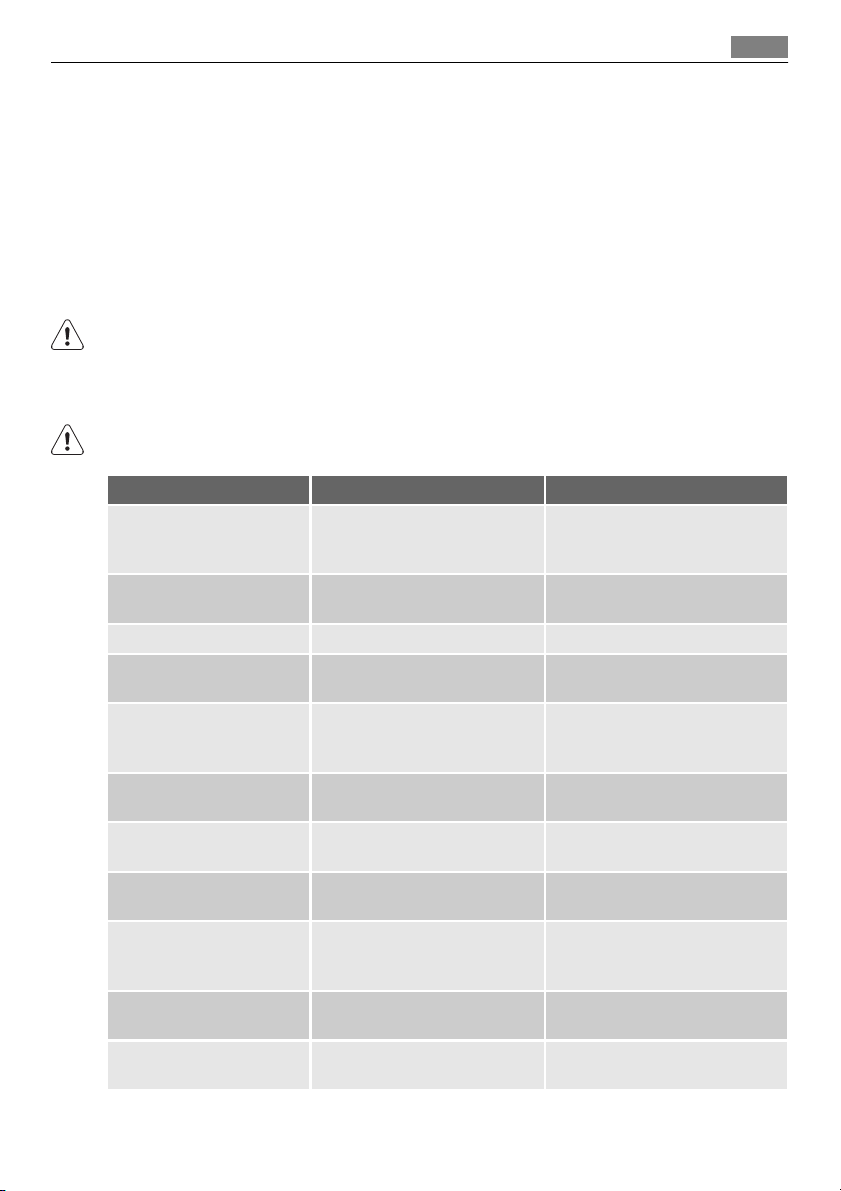
Positioning the door shelves
To permit storage of food packages of various sizes, the door shelves can be placed at
different heights.
To make these adjustments proceed as follows:
gradually pull the shelf in the direction of the
arrows until it comes free, then reposition as
required.
1
2
Page 11
Daily use
Air cooling
The Dynamic Air Cooling (DAC) fan let food cool
quickly and a more uniform temperature in the
compartment.
1. You can switch on the fan by pressing the
switch (1). The green light (2) comes on.
2. Adjust the Temperature regulator to the FAN
position.
This device allows for rapid cooling of foods and
a more uniform temperature in the compartment.
Switch on the fan when the ambient temperature
exceeds 25°C.
2
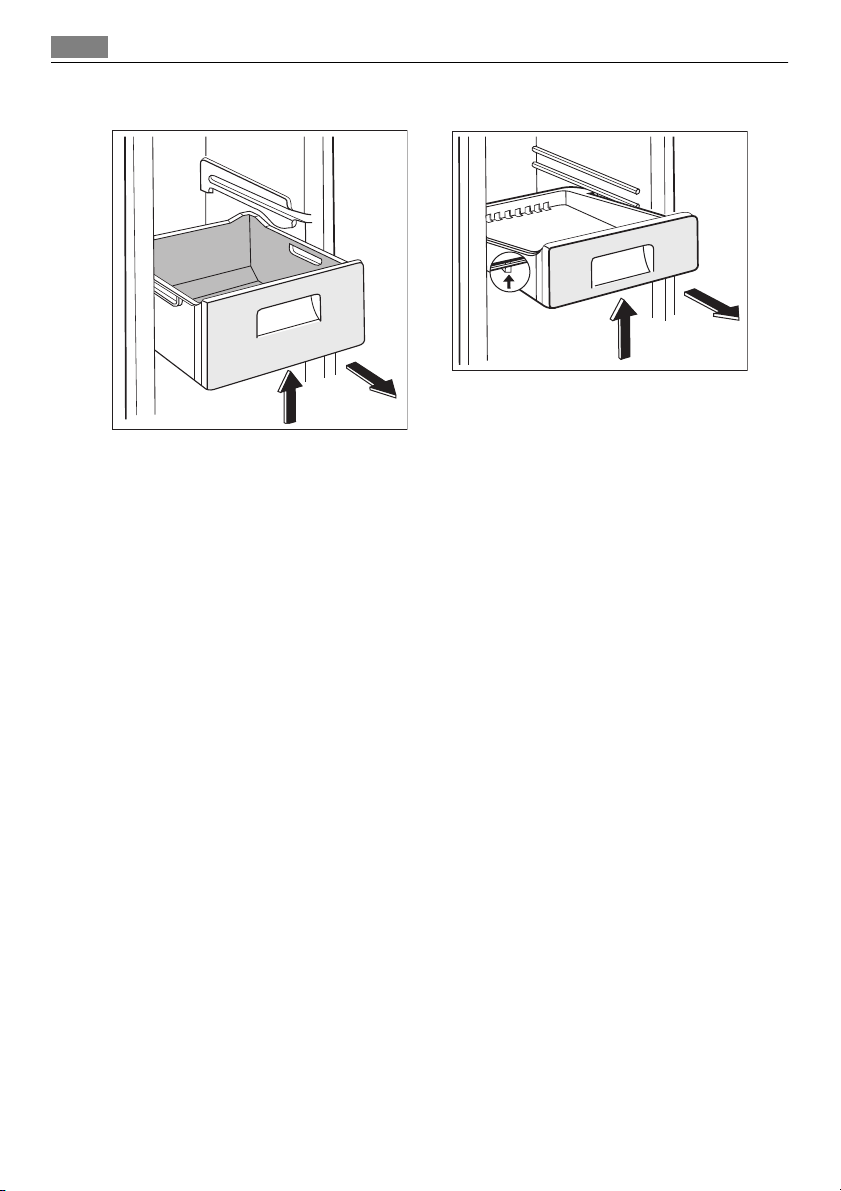
Chiller Zone
The Chiller Zone compartment is suitable for storing fresh food like fish, meat, seafood,
because the temperature is lower here than in the rest of the fridge. It is placed in the lower
part of the refrigerator, directly above of the vegetable drawer.
If you wish to remove the Chiller Zone compartment, do these steps:
1. Open the door of the refrigerator as wide as
possible. If you cannot open the door at an
angle of 180° because of a limit stop or any
other objects , remove the bottle shelf from
the door.
2. Pull the drawer towards yourself to the end
point.
3. Slightly lift the front part of the drawer.
4. Remove the drawer from its support.
5. Lift the back of the support from its nest.
6. Pull the frame towards yourself.
7. Remove the support frame.
To put the Chiller Zone compartment to its initial
position, do above steps in opposite sequence.
5
11
1
6
2
3
Page 12
Helpful hints and tips
12
Removal of freezing baskets from the freezer
2
2
1
1
The freezing baskets have a limit stop to prevent their accidental removal or falling out.
At the time of its removal from the freezer, pull the basket towards yourself and, upon
reaching the end point, remove the basket by tilting its front upwards.
At the time of putting it back, slightly lift the front of the basket to insert it into the
freezer. Once you are over the end points, push the baskets back in their position.
Helpful hints and tips
Normal Operating Sounds
• You may hear a faint gurgling and a bubbling sound when the refrigerant is pumped
through the coils or tubing. This is correct.
• When the compressor is on, the refrigerant is being pumped around and you will hear
a whirring sound and a pulsating noise from the compressor. This is correct.
• The thermic dilatation might cause a sudden cracking noise. It is natural, not dangerous
physical phenomenon. This is correct.
Hints for energy saving
• Do not open the door frequently or leave it open longer than absolutely necessary.
• If the ambient temperature is high and the Temperature Regulator is set to low tem-
perature and the appliance is fully loaded, the compressor may run continuously, causing
frost or ice on the evaporator. If this happens, set the Temperature Regulator toward
warmer settings to allow automatic defrosting and so a saving in electricity consumption.
Hints for fresh food refrigeration
To obtain the best performance:
• do not store warm food or evaporating liquids in the refrigerator
• do cover or wrap the food, particularly if it has a strong flavour
• position food so that air can circulate freely around it
Page 13

Care and cleaning
Hints for refrigeration
Useful hints:
Meat (all types) : wrap in polythene bags and place on the glass shelf above the vegetable
drawer.
For safety, store in this way only one or two days at the most.
Cooked foods, cold dishes, etc..: these should be covered and may be placed on any shelf.
Fruit and vegetables: these should be thoroughly cleaned and placed in the special drawer(s)
provided.
Butter and cheese: these should be placed in special airtight containers or wrapped in
aluminium foil or polythene bags to exclude as much air as possible.
Milk bottles: these should have a cap and should be stored in the bottle rack on the door.
Bananas, potatoes, onions and garlic, if not packed, must not be kept in the refrigerator.
Hints for freezing
To help you make the most of the freezing process, here are some important hints:
• the maximum quantity of food which can be frozen in 24 hrs. is shown on the rating
plate;
• the freezing process takes 24 hours. No further food to be frozen should be added during
this period;
• only freeze top quality, fresh and thoroughly cleaned, foodstuffs;
• prepare food in small portions to enable it to be rapidly and completely frozen and to
make it possible subsequently to thaw only the quantity required;
• wrap up the food in aluminium foil or polythene and make sure that the packages are
airtight;
• do not allow fresh, unfrozen food to touch food which is already frozen, thus avoiding
a rise in temperature of the latter;
• lean foods store better and longer than fatty ones; salt reduces the storage life of food;
• water ices, if consumed immediately after removal from the freezer compartment, can
possibly cause the skin to be freeze burnt;
• it is advisable to show the freezing in date on each individual pack to enable you to keep
tab of the storage time.
13
Hints for storage of frozen food
To obtain the best performance from this appliance, you should:
• make sure that the commercially frozen foodstuffs were adequately stored by the re-
tailer;
• be sure that frozen foodstuffs are transferred from the foodstore to the freezer in the
shortest possible time;
• not open the door frequently or leave it open longer than absolutely necessary.
• Once defrosted, food deteriorates rapidly and cannot be refrozen.
• Do not exceed the storage period indicated by the food manufacturer.
Care and cleaning
CAUTION!
Unplug the appliance before carrying out any maintenance operation.
Page 14
Care and cleaning
14
This appliance contains hydrocarbons in its cooling unit; maintenance and recharging must
therefore only be carried out by authorized technicians.
Periodic cleaning
The equipment has to be cleaned regularly:
• clean the inside and accessories with lukewarm water and some neutral soap.
• regularly check the door seals and wipe clean to ensure they are clean and free from
debris.
• rinse and dry thoroughly.
Do not pull, move or damage any pipes and/or cables inside the cabinet.
Never use detergents, abrasive powders, highly perfumed cleaning products or wax polishes
to clean the interior as this will damage the surface and leave a strong odour.
Clean the condenser (black grill) and the compressor at the back of the appliance with a
brush or a vacuum cleaner. This operation will improve the performance of the appliance
and save electricity consumption.
Take care of not to damage the cooling system.
Many proprietary kitchen surface cleaners contain chemicals that can attack/damage the
plastics used in this appliance. For this reason it is recommended that the outer casing of
this appliance is only cleaned with warm water with a little washing-up liquid added.
After cleaning, reconnect the equipment to the mains supply.
Defrosting of the refrigerator
Frost is automatically eliminated from the evaporator of the refrigerator compartment
every time the motor compressor stops, during normal use. The defrost water drains out
through a trough into a special container at the back of the appliance, over the motor
compressor, where it evaporates.
It is important to periodically clean the defrost
water drain hole in the middle of the refrigerator
compartment channel to prevent the water overflowing and dripping onto the food inside. Use the
special cleaner provided, which you will find already inserted into the drain hole.
Page 15
What to do if…
Defrosting of the freezer
The freezer compartment of this model, on the other hand, is a "no frost" type. This means
that there is no buildup of frost when it is in operation, neither on the internal walls nor
on the foods.
The absence of frost is due to the continuous circulation of cold air inside the compartment,
driven by an automatically controlled fan.
What to do if…
CAUTION!
Before troubleshooting, disconnect the power supply.
Only a qualified electrician or competent person must do the troubleshooting that is not
in this manual.
There are some sounds during normal use (compressor, refrigerant circulation).
Problem Possible cause Solution
The appliance is noisy.
The compressor operates
continually.
The door is not closed correctly. Refer to "Closing the door".
The door has been opened too
The product temperature is too
The room temperature is too
The FROSTMATIC function is
The COOLMATIC function is
Water flows on the rear
plate of the refrigerator.
Water flows into the refrigerator.
Products prevent that water
The appliance is not supported
properly.
The Temperature regulator may
be set incorrectly.
frequently.
high.
high.
switched on.
switched on.
During the automatic defrosting
process, frost defrosts on the
rear plate.
The water outlet is clogged. Clean the water outlet.
flows into the water collector.
Check if the appliance stands stable (all the four feet should be on
the floor).
Set a warmer temperature.
Do not keep the door open longer
than necessary.
Let the product temperature decrease to room temperature before storage.
Decrease the room temperature.
Refer to "FROSTMATIC function".
Refer to "COOLMATIC function".
This is correct.
Make sure that products do not
touch the rear plate.
15
Page 16

What to do if…
16
Problem Possible cause Solution
Water flows on the
ground.
There is too much frost
and ice.
The door is not closed correctly. Refer to "Closing the door".
The Temperature regulator may
The temperature in the
appliance is too high.
The product temperature is too
Many products are stored at the
The temperature in the
refrigeration is too high.
The temperature in the
freezer is too high.
The appliance does not
operate.
The mains plug is not connected
The appliance has no power.
The lamp does not work.
The melting water outlet does
not flow in the evaporative tray
above the compressor.
Products are not wrapped properly.
be set incorrectly.
The door is not closed correctly. Refer to "Closing the door".
high.
same time.
There is no cold air circulation in
the appliance.
Products are too near to each
other.
The appliance is switched off. Switch on the appliance.
to the mains socket correctly.
There is no voltage in the mains
socket.
The lamp is defective. Refer to "Replacing the lamp".
Attach the melting water outlet
to the evaporative tray.
Wrap the products better.
Set a higher temperature.
Let the product temperature decrease to room temperature before storage.
Store less products at the same
time.
Make sure that there is cold air
circulation in the appliance.
Store products so that there is
cold air circulation.
Connect the mains plug to the
mains socket correctly.
Connect a different electrical appliance to the mains socket. Contact a qualified electrician.
As much as the advice does not lead to result, call the nearest brand-mark service.
Page 17
Technical data
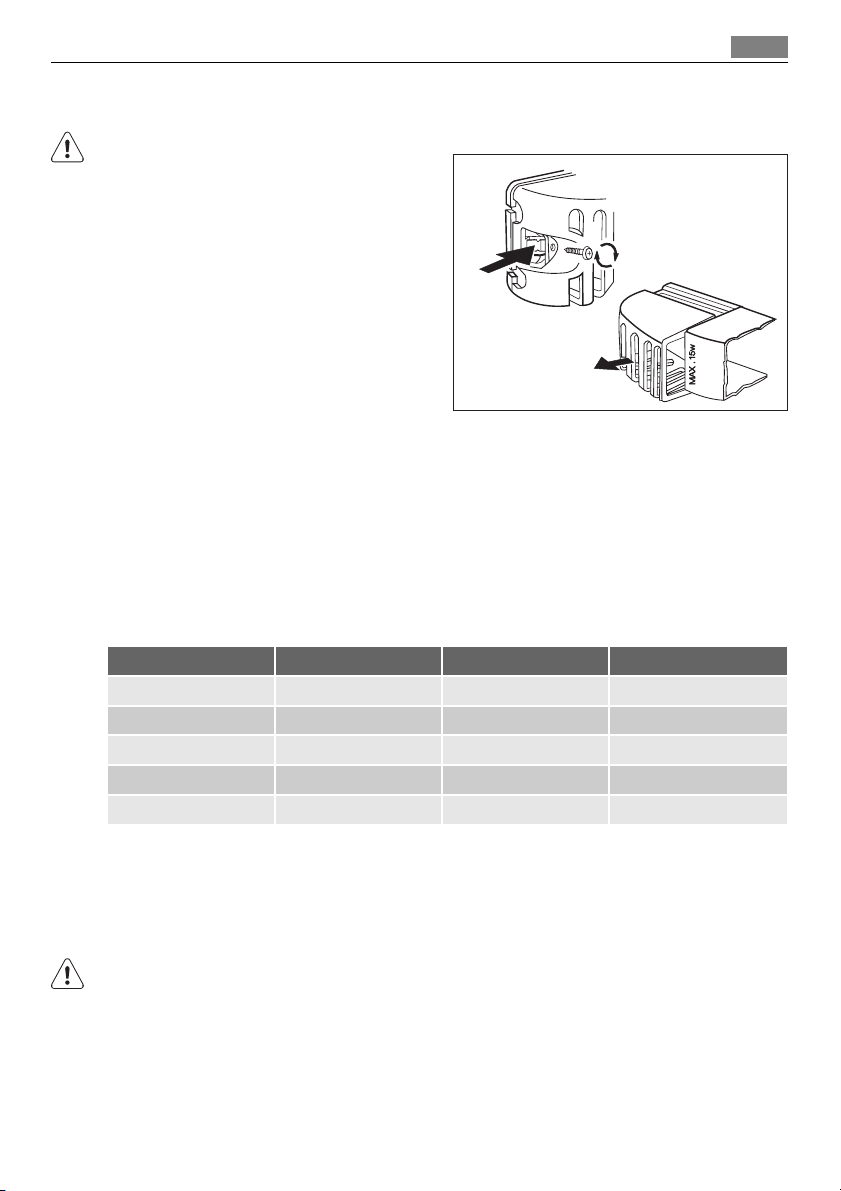
Replacing the lamp
CAUTION!
Disconnect the plug from the mains socket.
1. Remove the screw from the lamp cover.
2. Pull outwards the hook of the lamp cov-
er.
3. Remove the lamp cover.
4. Replace the lamp with one of the same
power (the maximum power is shown on
the light bulb cover).
5. Install the lamp cover.
6. Tighten the screw to the lamp cover.
7. Connect the plug to the mains socket.
8. Open the door. Make sure that the light
comes on.
2
3
Closing the door
1. Clean the door gaskets.
2. If necessary, adjust the door. Refer to "Installation".
3. If necessary, replace the defective door gaskets. Contact the Service Force Center.
Technical data
17
1
S75348KG18 S75388KG18
Dimension
Height 1850 mm 2010 mm
Width 595 mm 595 mm
Depth 632 mm 632 mm
Rising Time 18 h 18 h
The technical information are situated in the rating plate on the internal left side of the
appliance and in the energy label.
Installation
WARNING!
Read the "Safety Information" carefully for your safety and correct operation of the appliance before installing the appliance.
Positioning
Install this appliance at a location where the ambient temperature corresponds to the
climate class indicated on the rating plate of the appliance:
Page 18

Installation
18
Climate class Ambient temperature
SN +10°C to + 32°C
N +16°C to + 32°C
ST +16°C to + 38°C
T +16°C to + 43°C
Location
The appliance should be installed well away from
sources of heat such as radiators, boilers, direct
sunlight etc. Ensure that air can circulate freely
around the back of the cabinet. To ensure best
performance, if the appliance is positioned below
an overhanging wall unit, the minimum distance
between the top of the cabinet and the wall unit
must be at least 100 mm . Ideally, however, the
appliance should not be positioned below overhanging wall units. Accurate levelling is ensured
by one or more adjustable feet at the base of the
cabinet.
WARNING!
It must be possible to disconnect the appliance
from the mains power supply; the plug must therefore be easily accessible after installation.
mm
min
100
A
mm
20
B
Electrical connection
Before plugging in, ensure that the voltage and frequency shown on the rating plate correspond to your domestic power supply.
The appliance must be earthed. The power supply cable plug is provided with a contact for
this purpose. If the domestic power supply socket is not earthed, connect the appliance to
a separate earth in compliance with current regulations, consulting a qualified electrician.
The manufacturer declines all responsibility if the above safety precautions are not observed.
This appliance complies with the E.E.C. Directives.
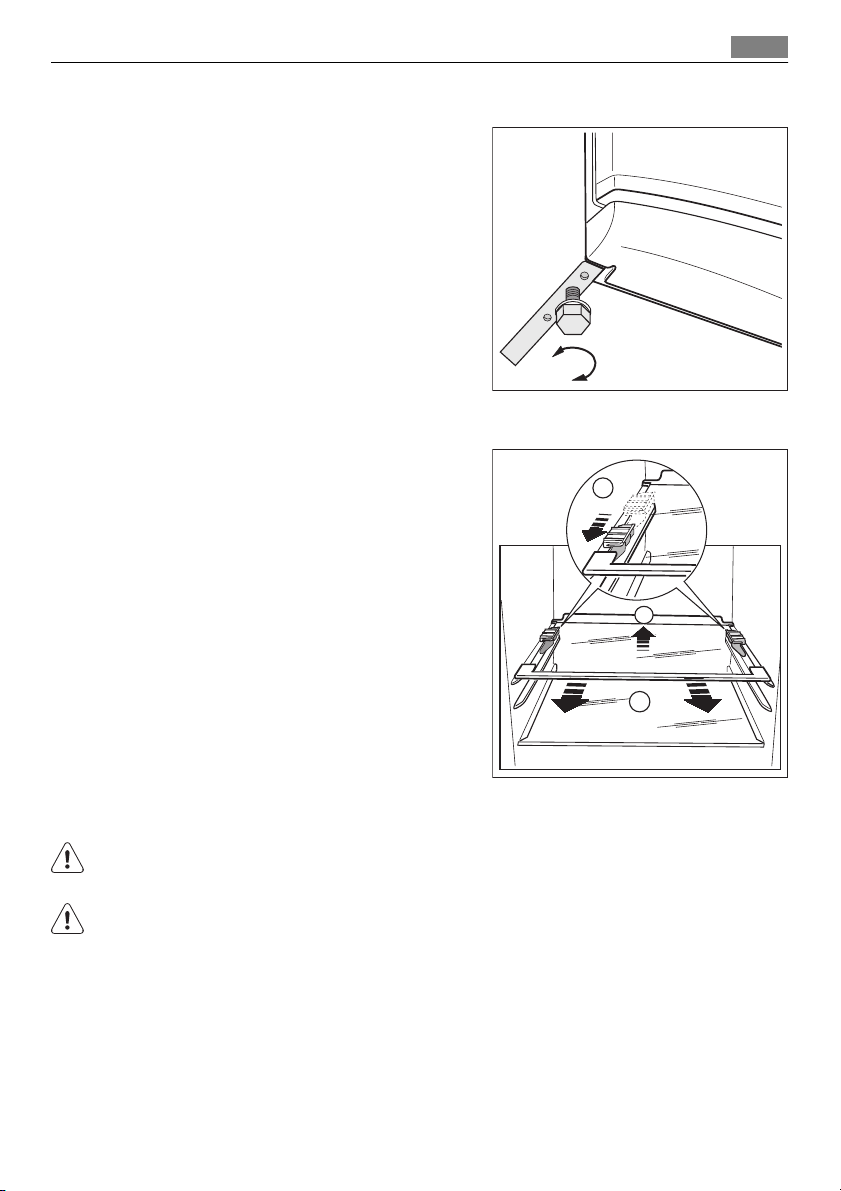
Rear spacers
In the bag with the documentation, there are
two spacers which must be fitted as shown in
the figure.
Slacken the screws and insert the spacer under the
screw head, then tighten again the screws.
3
2
1
Page 19
Levelling
When placing the appliance ensure that it stands
level. This can be achieved by two adjustable feet
at the bottom in front.
Removing the shelf holders
Your appliance is equipped with shelf retainers
that make it possible to secure the shelves during
transportation.
To remove them proceed as follows:
1. Move the shelf holders in the direction of the
arrow (A).
2. Raise the shelf from the rear and push it forward until it is freed (B).
3. Remove the retainers (C).
A
Installation
B
19
C
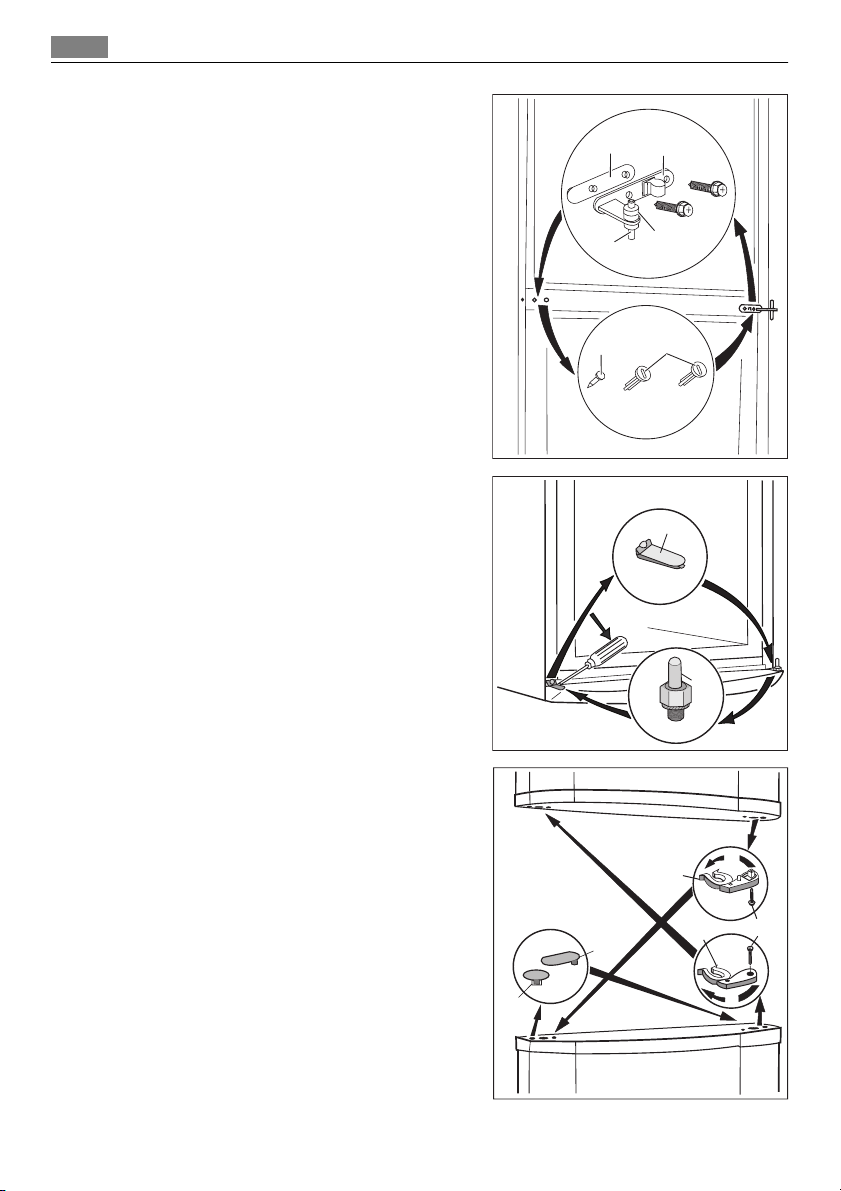
Door reversibility
WARNING!
Before carrying out any operations, remove the plug from the power socket.
To carry out the following operations, we suggest that this be made with another person
that will keep a firm hold on the doors of the appliance during the operations.
Page 20
Installation
20
1. Open the doors. Unscrew the middle
hinge (m2). Remove the plastic spacer
(m1).
2. Remove the spacer (m6) and move to the
other side of the hinge pivot (m5).
3. Remove the doors.
4. Remove the left-hand cover pin of the
middle hinge (m3,m4) and move to the
other side.
5. Fit the pin of the middle hinge (m5) into
the left-hand hole of the lower door.
6. Remove using a tool the cover (b1). Un-
screw the lower hinge pivot (b2) and the
spacer (b3) and place them on the opposite side.
7. Re-insert the cover (b1) on the opposite
side.
m3
m1
m5
m2
m6
m4
b1
8. Reverse the door locking elements
(d2,d3), move to the other side of the
other door and fix by screwing in the
screw (d4).
9. Re-insert the stoppers (d5,d6) on the
other side of the doors.
d5
d6
b3
d2
d3
b2
d4
Page 21

Environmental concerns
21
10. Remove the handle. Unscrew the top
handle bracket from the handle rod (h1).
Unscrew the bottom handle bracket
from the door (h2)
Unscrew the top handle bracket from
the door (h3).
11. Install the handle in the opposite side.
Re-screw the handle bracket on the door
(h4). Turn the handle bracket with the
handle and screw them to the door (h5)
and the fitted handle bracket (h6).
12. Re-insert the lower door on the lower
hinge pivot (b2).
13. Insert the middle hinge (m2) into the left
drill of the lower door.
14. Unscrew the upper hinge pivot (t1) and
place it on the opposite side.
15. Fit the upper door on the upper door
pivot.
16. Re-insert the upper door on the middle
hinge pivot (m5) slightly tilting both
doors.
17. Re-screw the middle hinge (m2). Do not
forget the plastic spacer (m1).
Do a final check to make sure that:
• All screws are tightened.
• The magnetic seal adheres to the cabinet.
• The door opens and closes correctly.
If the ambient temperature is cold (i.e. in Winter), the gasket may not fit perfectly to the
cabinet. In that case, wait for the natural fitting of the gasket.
In case you do not want to carry out the above mentioned operations, contact the nearest
After Sales Service Force. The After Sales Service specialist will carry out the reversibility of
the doors at your cost.
h1 h2 h3
h4 h5 h6
t1
Environmental concerns
The symbol on the product or on its packaging indicates that this product may not be
treated as household waste. Instead it should be taken to the appropriate collection point
for the recycling of electrical and electronic equipment. By ensuring this product is disposed
of correctly, you will help prevent potential negative consequences for the environment
and human health, which could otherwise be caused by inappropriate waste handling of
this product. For more detailed information about recycling of this product, please contact
your local council, your household waste disposal service or the shop where you purchased
the product.
Page 22

22
Содержание
Благодарим вас за то, что выбрали одно из наших
высококачественных изделий.
Чтобы обеспечить оптимальную и бесперебойную работу прибора,
внимательно прочитайте настоящее Руководство. Это позволит
выполнять все операции наиболее правильным и эффективным
образом. Для того чтобы в нужный момент всегда можно было
свериться с настоящим Руководством, рекомендуем хранить его в
надежном месте. Просим также передать его новому владельцу
прибора в случае продажи или уступки.
Надеемся, что новый прибор доставит вам много радости.
Содержание
Сведения по технике безопасности
23
Безопасность детей и лиц с
ограниченными возможностями
23
Общие правила техники
безопасности 24
Ежедневная эксплуатация 25
Чистка и уход 25
Установка 25
Обслуживание 26
Панель управления 26
Включение 27
Выключение 27
Дисплеи температуры 27
Регулирование температуры 28
Функция COOLMATIC 28
Функция "Отпуск" 28
Функция FROSTMATIC 29
Сигнал высокой температуры 29
Первое использование 29
Чистка холодильника изнутри
29
Ежедневное использование 30
Замораживание свежих продуктов
30
Хранение замороженных
продуктов 30
Размораживание продуктов 30
Съемные полки 31
Полка для бутылок 31
Ящик для овощей 31
Размещение полок дверцы 32
Охлаждение воздуха 32
Охлаждающая зона 32
Вынимание корзин из морозильного
отделения 33
Полезные советы 34
Нормальные рабочие звуки 34
Рекомендации по экономии
электроэнергии 34
Рекомендации по охлаждению
продуктов 34
Рекомендации по охлаждению
34
Рекомендации по замораживанию
35
Рекомендации по хранению
замороженных продуктов 35
Уход и чистка 35
Периодическая чистка 36
Размораживание холодильника
36
Размораживание морозильной
камеры 37
Что делать, если ... 37
Замена лампочки 39
Закрытие дверцы 39
Технические данные 40
Установка 40
Размещение 40
Расположение 41
Подключение к электросети 41
Задние прокладки 41
Выравнивание по высоте 42
Снятие держателей полок 42
Page 23

Сведения по технике безопасности
Перевешивание дверцы 42 Забота об окружающей среде 44
Право на изменения сохраняется
Сведения по технике безопасности
Для обеспечения собственной безопасности и правильной эксплуатации
прибора, перед его установкой и первым использованием внимательно
прочитайте данное руководство, не пропуская рекомендации и предупре‐
ждения. Чтобы избежать нежелательных ошибок и несчастных случаев,
важно, чтобы все, кто пользуется данным прибором, подробно ознако‐
мились с его работой и правилами техники безопасности. Сохраните на‐
стоящее руководство и в случае продажи прибора или его передачи в
пользование другому лицу передайте вместе с ним и данное руководство,
чтобы новый пользователь получил соответствующую информацию о
правильной эксплуатации и правилах техники безопасности.
В интересах безопасности людей и имущества соблюдайте меры пред‐
осторожности, указанные в настоящем руководстве, так как производи‐
тель не несет ответственности за убытки, вызванные несоблюдением
указанных мер.
23
Безопасность детей и лиц с ограниченными возможностями
•
Данное изделие не предназначено для эксплуатации лицами (в том
числе детьми) с ограниченными физическими, сенсорными или ум‐
ственными способностями или с недостаточным опытом или знаниями
без присмотра лица, отвечающего за их безопасность, или получения
от него соответствующих инструкций, позволяющих им безопасно эк‐
сплуатировать его.
Необходимо следить за тем, чтобы дети не играли с прибором.
•
Держите все упаковочные материалы в недоступном для детей месте.
Существует опасность удушения.
•
Если прибор больше не нужен, выньте вилку из розетки, обрежьте шнур
питания (как можно ближе к прибору) и снимите дверцу, чтобы дети,
играя, не получили удар током или не заперлись внутри прибора.
•
Если данный прибор (имеющий магнитное уплотнение дверцы) пред‐
назначен для замены старого холодильника с пружинным замком (за‐
щелкой) дверцы или крышки, перед утилизацией старого холодильника
обязательно выведите замок из строя. Это позволит исключить пре‐
вращение его в смертельную ловушку для детей.
210620320-00-032009
Page 24

24
Сведения по технике безопасности
Общие правила техники безопасности
ПРЕДУПРЕЖДЕНИЕ!
Не допускайте перекрытия вентиляционных отверстий.
•
Настоящий прибор предназначен для хранения продуктов питания и
напитков в обычном домашнем хозяйстве, как описано в настоящем
руководстве.
•
Не используйте механические приспособления или любые другие
средства для ускорения процесса размораживания.
•
Не используйте другие электроприборы (например, мороженицы) внут‐
ри холодильников, если производителем не допускается возможность
такого использования.
•
Не допускайте повреждения контура хладагента.
•
Холодильный контур прибора содержит безвредный для окружающей
среды, но, тем не менее, огнеопасный хладагент изобутан (R600a).
При транспортировке и установке прибора следите за тем, чтобы не
допустить повреждений каких-либо компонентов холодильного конту‐
ра.
В случае повреждения холодильного контура:
– не допускайте использования открытого пламени и источников вос‐
пламенения
– тщательно проветрите помещение, в котором установлен прибор
• Изменение характеристик прибора или внесение каких-либо изменений
в его конструкцию сопряжено с опасностью. Поврежденный шнур мо‐
жет вызвать короткое замыкание, пожар или удар электротоком.
ВНИМАНИЕ!
Замену электрических частей изделия (шнура питания, вилки, компрес‐
сора) должен производить сертифицированный представитель сервис‐
ного центра или квалифицированный обслуживающий персонал.
1. Запрещено удлинять шнур питания.
2. Убедитесь, что штепсельная вилка не сплющена и не повреждена с
тыльной стороны прибора. Сплющенная или поврежденная штеп‐
сельная вилка может перегреться и стать причиной пожара.
3. Убедитесь, что Вы сможете достать вилку сетевого шнура прибора.
4. Не тяните сетевой шнур.
5. Если розетка электропитания не закреплена, не вставляйте в нее
вилку. Существует опасность поражения электрическим током или
пожара.
6.
Нельзя пользоваться прибором с лампой без плафона
4)
внутренне‐
го освещения.
• Данный прибор тяжелый. Будьте осторожны при его перемещении.
• Не вынимайте и не трогайте предметы в морозильном отделении мок‐
рыми или влажными руками, это может привести к появлению на руках
ссадин или ожогов от обморожения.
4) Если предусмотрен плафон
Page 25

Сведения по технике безопасности
• Не допускайте долговременного воздействия на прибор прямых сол‐
нечных лучей.
Ежедневная эксплуатация
•
Не ставьте на пластмассовые части прибора горячую посуду.
•
Не храните в холодильнике воспламеняющиеся газы и жидкости, так
как они могут взорваться.
•
Не помещайте продукты питания прямо напротив воздуховыпускного
отверстия в задней стенке.
•
Замороженные продукты после размораживания не должны подвер‐
гаться повторной заморозке.
•
При хранении расфасованных замороженных продуктов следуйте ре‐
комендациям производителя.
•
Следует тщательно придерживаться рекомендаций по хранению, дан‐
ных изготовителем прибора. См. соответствующие указания.
•
Не помещайте в холодильник газированные напитки, т.к. они создают
внутри емкости давление, которое может привести к тому, что она лоп‐
нет и повредит холодильник.
•
Ледяные сосульки могут вызвать ожог обморожения, если брать их в
рот прямо из морозильной камеры.
5)
Чистка и уход
• Перед выполнением операций по чистке и уходу за прибором, выклю‐
чите его и выньте вилку сетевого шнура из розетки. Если невозможно
достать розетку, отключите электропитание.
• Не следует чистить прибор металлическими предметами.
• Не пользуйтесь острыми предметами для удаления льда с прибора.
Используйте пластиковый скребок.
• Регулярно проверяйте сливное отверстие холодильника для талой во‐
ды. При необходимости прочистите сливное отверстие. Если отверстие
закупорится, вода будет собираться на дне прибора.
25
Установка
Для подключения к электросети тщательно следуйте инструкциям, при‐
веденным в соответствующих параграфах.
•
Распакуйте изделие и проверьте, нет ли повреждений. Не подключайте
к электросети поврежденный прибор. Немедленно сообщите о повре‐
ждениях продавцу прибора. В таком случае сохраните упаковку.
•
Рекомендуется подождать не менее четыре часа перед тем, как вклю‐
чать холодильник, чтобы масло вернулось в компрессор.
•
Необходимо обеспечить вокруг холодильника достаточную циркуля‐
цию воздуха, в противном случае прибор может перегреваться. Чтобы
обеспечить достаточную вентиляцию, следуйте инструкциям по уста‐
новке.
5) Если холодильник с защитой от образования льда и инея
Page 26

26
Панель управления
•
Если возможно, изделие должно располагаться обратной стороной к
стене так, чтобы во избежание ожога нельзя было коснуться горячих
частей (компрессор, испаритель).
•
Данный прибор нельзя устанавливать вблизи радиаторов отопления
или кухонных плит.
•
Убедитесь, что к розетке будет доступ после установки прибора.
•
Подключайте прибор только к питьевому водоснабжению.
Обслуживание
• Любые операции по техобслуживанию прибора должны выполняться
квалифицированным электриком или уполномоченным специалистом.
• Техобслуживание данного прибора должно выполняться только спе‐
циалистами авторизованного сервисного центра с использованием ис‐
ключительно оригинальных запчастей.
Защита окружающей среды
Ни холодильный контур, ни изоляционные материалы настоящего при‐
бора не содержат газов, которые могли бы повредить озоновый слой.
Данный прибор нельзя утилизировать вместе с бытовыми отходами и
мусором. Изоляционный пенопласт содержит горючие газы: прибор под‐
лежит утилизации в соответствии с действующими нормативными поло‐
жениями, с которыми следует ознакомиться в местных органах власти.
Не допускайте повреждения холодильного контура, особенно, вблизи
теплообменника. Материалы, использованные для изготовления данного
прибора, помеченные символом
ки.
, пригодны для вторичной переработ‐
6)
Панель управления
1
Выключатель ON/OFF
2
Регулятор температуры холодильного отделения, кнопка +
3
Дисплей температуры холодильного отделения
4
Регулятор температуры холодильного отделения, кнопка -
5
Кнопка COOLMATIC
6
Индикатор COOLMATIC
7
Индикатор холодильного отделения
6) Если предусмотрено подключение к водопроводу
65 7 84321 15141312119 10
Page 27

8
Индикатор морозильного отделения
9
Индикатор FROSTMATIC
10
Кнопка FROSTMATIC
11
Регулятор температуры морозильного отделения, кнопка +
12
Дисплей температуры морозильного отделения
13
Регулятор температуры морозильного отделения, кнопка -
14
Кнопка отключения сигнализации
15
Сигнальный индикатор
Включение
1.
Вставьте вилку сетевого шнура в розетку.
2.
Установите выключатель ON/OFF в положение ВКЛ.
3.
Так как температура в холодильном отделении соответствует задан‐
ной на данный момент, начнет мигать сигнальный индикатор.
Раздастся предупреждающий звуковой сигнал.
4.
Нажмите кнопку отключения сигнализации, чтобы отключить сигнали‐
зацию.
Выключение
Чтобы полностью выключить прибор:
1. Установите выключатель ON/OFF в положение ВЫКЛ.
2. Выньте вилку сетевого шнура из розетки.
Панель управления
27
Дисплеи температуры
Дисплеи температуры отображают несколько видов информации:
•
В нормальном режиме работы на дисплей температуры выводится зна‐
чение температуры внутри холодильного отделения в данный момент
времени (ТЕКУЩАЯ температура).
•
В морозильном отделении отображается самая высокая температура
(ТЕКУЩАЯ температура). При полной загрузке морозильного отделе‐
ния, самая теплая зона, как правило, находится в верхней передней
части морозильного отделения. В зависимости от того, насколько за‐
полнено отделение, температура в других зонах морозильного отде‐
ления более низкая.
•
При выполнении установки температуры мигание показаний дисплея
указывает на выполняемую регулировку температуры холодильного
отделения (ЗАДАННОЙ температуры).
При изменении параметров температуры подождите примерно 24 часа,
пока показания дисплея температуры не стабилизируются.
Когда в приборе возникла неисправность, на дисплее температуры от‐
ображается:
• квадрат или буква на дисплее температуры холодильного отделения,
в случае неисправности холодильного отделения;
• квадрат или буква на дисплее температуры морозильного отделения,
в случае неисправности морозильного отделения.
Page 28

28
Панель управления
Регулирование температуры
Чтобы привести прибор в действие, выполните следующие действия:
1. Установите требуемое значение температуры, нажав соответствую‐
щий регулятор температуры. На дисплее температуры немедленно
отобразится измененное значение (ЗАДАННАЯ температура) и дисп‐
лей начнет мигать.
2. При каждом нажатии кнопки регулятора значение температуры из‐
меняется на 1 °C. ЗАДАННАЯ температура должна быть достигнута в
течение 24 часов.
3. После достижения нужной температуры через короткое время (при‐
мерно через 5 сек.) дисплей температуры снова переключится в ре‐
жим индикации ТЕКУЩЕЙ температуры в соответствующем отделе‐
нии. Показания на дисплее перестанут мигать и загорятся постоянным
светом.
Для правильного хранения продуктов необходимо выставить следующую
температуру:
• +5 °C в холодильном отделении;
• -18 °C в морозильном отделении.
При изменении заданного значения температуры компрессор не вклю‐
чится сразу, если в данный момент выполняется автоматическое размо‐
раживание. Так как температура, необходимая для обеспечения сохран‐
ности продуктов в холодильном отделении, достигается очень быстро,
можно помещать продукты в него сразу после включения.
Функция COOLMATIC
Функция COOLMATIC предназначена для быстрого охлаждения большо‐
го количества продуктов в холодильном отделении.
Чтобы включить эту функцию, выполните следующее:
1. Нажмите кнопку COOLMATIC.
2. Включится индикатор COOLMATIC.
Теперь с помощью функции COOLMATIC будет обеспечено быстрое
охлаждение. При этом автоматически выбирается ЗАДАННАЯ темпера‐
тура +2°C.
Функция COOLMATIC автоматически выключается через 6 часов.
Эту функцию можно выключить в любое время:
1. Нажмите кнопку COOLMATIC.
2. Индикатор COOLMATIC выключится.
Функция "Отпуск"
Эта функция позволяет держать холодильное отделение пустым и за‐
крытым в течение продолжительного периода бездействия (например, во
время летнего отпуска), предотвращая образование в нем неприятных
запахов.
При включенной функции "Отпуск" в холодильном отделении не должно
быть продуктов.
Page 29

Первое использование
Чтобы включить эту функцию:
1. постоянно нажимайте регулятор температуры (кнопку +) до тех пор,
пока на дисплее температуры не появится буква "H" (Holiday - Отпуск).
При выборе функции Holiday устанавливается температура прибли‐
зительно +15°C. Холодильник работает в энергосберегающем режи‐
ме.
Чтобы выключить эту функцию:
1. Установите требуемое значение температуры, нажав регулятор тем‐
пературы холодильного отделения.
Функция FROSTMATIC
Функция FROSTMATIC позволяет быстро заморозить свежие продукты,
предотвращая при этом повышение температуры уже замороженных
продуктов, хранящихся в морозильном отделении.
Чтобы включить эту функцию, выполните следующее:
1. Нажмите кнопку FROSTMATIC.
2. Включится индикатор FROSTMATIC.
Функция FROSTMATIC автоматически выключается через 52 часа.
Эту функцию можно выключить в любое время:
1. Нажмите кнопку FROSTMATIC.
2. Индикатор FROSTMATIC выключится.
Сигнал высокой температуры
В случае аномального повышения температуры внутри морозильного от‐
деления (например, сбой электропитания) начинает мигать сигнальный
индикатор и подается звуковой сигнал.
Нажмите кнопку отключения сигнализации, чтобы прекратить подачу зву‐
кового сигнала, при этом сигнальный индикатор продолжит мигать.
Подача звукового сигнала прекратится автоматически, когда температу‐
ра вернется в норму, при этом сигнальный индикатор продолжит мигать.
Нажмите кнопку отключения сигнализации. Сигнальный индикатор по‐
гаснет и одновременно на дисплее температуры морозильного отделе‐
ния примерно на 5 секунд отобразится самое высокое значение темпе‐
ратуры, достигнутое в морозильном отделении.
29
Первое использование
Чистка холодильника изнутри
Перед первым включением прибора вымойте его внутренние поверхно‐
сти и все внутренние принадлежности теплой водой с нейтральным мы‐
лом, чтобы удалить запах, характерный для только что изготовленного
изделия, затем тщательно протрите их.
Не используйте моющие или абразивные средства, т.к. они могут повре‐
дить покрытие поверхностей холодильника.
Page 30

30
Ежедневное использование
Ежедневное использование
Замораживание свежих продуктов
Морозильное отделение предназначено для замораживания свежих про‐
дуктов и продолжительного хранения замороженных продуктов, а также
продуктов глубокой заморозки.
Для замораживания свежих продуктов не требуется менять среднее зна‐
чение температуры.
Однако, для более быстрого замораживания поверните регулятор тем‐
пературы по направлению к верхним положениям, чтобы установить мак‐
симальный холод.
В таком случае температура в холодильном отделении может опускаться
ниже 0°C. Если такое произойдет, установите регулятор температуры на
более высокую температуру.
Положите подлежащие замораживанию свежие продукты в верхнее от‐
деление.
Хранение замороженных продуктов
При первом запуске или после длительного простоя перед закладкой
продуктов в отделение дайте прибору поработать не менее 2 часов в ре‐
жиме ускоренной заморозки.
При случайном размораживании продуктов, например, при сбое электро‐
питания, если напряжение в сети отсутствовало в течение времени, пре‐
вышающего указанное в таблице технических данных "время повышения
температуры", размороженные продукты следует быстро употребить в
пищу или немедленно подвергнуть тепловой обработке, затем повторно
заморозить (после того, как они остынут).
Размораживание продуктов
Замороженные продукты, включая продукты глубокой заморозки, перед
использованием можно размораживать в холодильном отделении или
при комнатной температуре, в зависимости от времени, которым Вы рас‐
полагаете для выполнения этой операции.
Маленькие куски можно готовить, даже не размораживая, в том виде, в
каком они взяты из морозильной камеры: в этом случае процесс приготов‐
ления пищи займет больше времени.
Page 31

Съемные полки
На стенках холодильника установлен
ряд направляющих, позволяющих раз‐
мещать полки по желанию.
Полка для бутылок
Уложите бутылки (закрывающимися
концами к себе) на предварительно ус‐
тановленную полку.
Если полка установлена в горизонталь‐
ное положение, можно класть только за‐
крытые бутылки.
Ежедневное использование
31
Эту полку для бутылок можно устано‐
вить под наклоном, чтобы хранить ра‐
нее открытые бутылки. Для этого потя‐
ните полку так, чтобы ее можно было повернуть вверх и установить на
следующий верхний уровень.
Ящик для овощей
Ящик предназначен для хранения ово‐
щей и фруктов.
Внутри ящика имеется разделитель, ко‐
торый можно располагать в различных
положениях в соответствии с текущими
потребностями.
На дне ящика имеется решетка (если
она предусмотрена конструкцией дан‐
ной модели), предназначенная для
предохранения овощей и фруктов от
воздействия влаги, оседающей на по‐
верхности дна.
Все внутренние детали ящика можно
вынимать для проведения чистки
1
2
Page 32

32
Ежедневное использование
Размещение полок дверцы
Чтобы обеспечить возможность
хранить упаковки продуктов различ‐
ных размеров, полки дверцы можно
размещать на разной высоте.
Чтобы переставить полку, дей‐
ствуйте следующим образом:
медленно потяните полку в направ‐
лении, указанном стрелками, пока
она не высвободится; затем устано‐
вите ее на нужное место.
Охлаждение воздуха
Вентилятор динамического охлаждения
воздуха (Dynamic Air Cooling - DAC) по‐
зволяет быстрее охлаждать продукты и
поддерживать более равномерную тем‐
пературу внутри холодильного отделе‐
ния.
1.
Вентилятор можно выключить, на‐
жав кнопку (1). Загорится зеленый
индикатор (2).
2.
Установите регулятор температуры
в положение FAN (ВЕНТИЛЯТОР).
Это устройство обеспечивает быстрое
охлаждение продуктов и более равно‐
мерную температуру в отделении.
Включайте вентилятор, если температу‐
ра в помещении превышает 25°C.
2
1
Охлаждающая зона
Ящик охлаждающей зоны предназначен для хранения таких свежих про‐
дуктов, как мясо, рыба, морепродукты, поскольку температура в нем ни‐
же, чем в остальной части холодильника. Он расположен в нижней части
холодильника непосредственно над ящиком для овощей.
Page 33

Ежедневное использование
Если вы хотите снять ящик охлаждаю‐
щей зоны, выполните следующие дей‐
ствия:
1.
Откройте дверцу холодильника как
можно шире. Если открыть дверцу
под углом 180° невозможно из-за
стопора или каких-либо предметов,
снимите с дверцы полку для бутылок.
2.
Вытяните ящик до упора.
3.
Слегка приподнимите переднюю
часть ящика.
4.
Снимите ящик с держателя.
5.
Выньте заднюю часть держателя из
гнезда, подняв ее.
6.
Потяните раму на себя.
7.
Снимите раму держателя.
Для установки ящика охлаждающей зо‐
ны на свое место выполните вышеопи‐
санные действия в обратном порядке.
Вынимание корзин из морозильного отделения
33
5
6
2
3
2
1
2
1
Корзины морозильного отделения оснащены стопором, препятствую‐
щим их случайному выниманию или падению. При извлечении из моро‐
зильного отделения потяните корзину на себя и, когда она достигнет
конечной точки, приподнимите передний край корзины и снимите ее.
При установке корзины в морозильное отделение слегка наклоните ее
переднюю часть. Когда корзина станет на стопор, надавите на нее, что‐
бы установить на место.
Page 34

34
Полезные советы
Полезные советы
Нормальные рабочие звуки
•
Когда хладагент прокачивается через контуры или трубки, может быть
слышно журчание или бульканье. Это нормально.
•
Когда компрессор включен, хладагент прокачивается по кругу, и при
этом слышны жужжание и пульсация, исходящие от компрессора. Это
нормально.
•
Тепловое расширение может вызывать резкое потрескивание. Данное
физическое явление естественно и не представляет опасности. Это
нормально.
Рекомендации по экономии электроэнергии
•
Не открывайте дверцу слишком часто и не держите ее открытой дол‐
ьше, чем необходимо.
•
Если температура окружающей среды высокая, регулятор температу‐
ры находится в самом высоком положении и холодильник полностью
загружен, компрессор может работать без остановок, что приводит к
образованию инея или льда на испарителе. Если такое случается, по‐
верните регулятор температуры до более низких значений, чтобы сде‐
лать возможным автоматическое оттаивание, и, следовательно, сни‐
зить потребление электроэнергии.
Рекомендации по охлаждению продуктов
Для получения оптимальных результатов:
•
не помещайте в холодильник теплые продукты или испаряющиеся жид‐
кости
•
накрывайте или заворачивайте продукты, особенно те, которые имеют
сильный запах
•
располагайте продукты так, чтобы вокруг них мог свободно циркулиро‐
вать воздух
Рекомендации по охлаждению
Полезные советы:
Мясо (всех типов): помещайте в полиэтиленовые пакеты и кладите на
стеклянную полку, расположенную над ящиком для овощей.
Храните мясо таким образом один, максимум два дня, иначе оно может
испортиться.
Продукты, подвергшиеся тепловой обработке, холодные блюда и т.д.:
должны быть накрыты и могут быть размещены на любой полке.
Фрукты и овощи: должны быть тщательно очищенными; их следует по‐
мещать в специально предусмотренные для их хранения ящики.
Сливочное масло и сыр: должны помещаться в специальные воздухоне‐
проницаемые контейнеры или быть обернуты алюминиевой фольгой или
полиэтиленовой пленкой, чтобы максимально ограничить контакт с воз‐
духом.
Page 35

Уход и чистка
Бутылки с молоком: должны быть закрыты крышкой и размещены в полке
для бутылок на дверце.
Бананы, картофель, лук и чеснок не следует хранить в холодильнике в
неупакованном виде.
Рекомендации по замораживанию
Ниже приведен ряд рекомендаций, направленных на то, чтобы помочь
сделать процесс замораживания максимально эффективным:
•
максимальное количество продуктов, которое может быть заморожено
в течение 24 часов. указано на табличке технических данных;
•
процесс замораживания занимает 24 часа. В этот период не следует
класть в морозильную камеру новые продукты, подлежащие замора‐
живанию;
•
замораживайте только высококачественные, свежие и тщательно вы‐
мытые продукты;
•
перед замораживанием разделите продукты на маленькие порции для
того, чтобы быстро и полностью их заморазить, а также чтобы иметь
возможность размораживать только нужное количество продуктов;
•
заверните продукты в алюминиевую фольгу или в полиэтиленовую
пленку и проверьте, чтобы к ним не было доступа воздуха;
•
не допускайте, чтобы свежие незамороженные продукты касались уже
замороженных продуктов во избежание повышения температуры по‐
следних;
•
постные продукты сохраняются лучше и дольше, чем жирные; соль со‐
кращает срок хранения продуктов;
•
пищевой лед может вызвать ожог кожи, если брать его в рот прямо из
морозильной камеры;
•
рекомендуется указывать дату замораживания на каждой упаковке; это
позволит контролировать срок хранения.
35
Рекомендации по хранению замороженных продуктов
Для получения оптимальных результатов следует:
•
убедиться, что продукты индустриальной заморозки хранились у про‐
давца в должных условиях;
•
обеспечить минимальное время доставки замороженных продуктов из
магазина в свою морозильную камеру;
•
не открывать дверцу слишком часто и не держать ее открытой дольше,
чем необходимо.
•
После размораживания продукты быстро портятся и не подлежат по‐
вторному замораживанию.
•
Не превышайте время хранения, указанное изготовителем продуктов.
Уход и чистка
ПРЕДУПРЕЖДЕНИЕ!
Перед выполнением каких-либо операций по чистке или уходу за прибо‐
ром выньте вилку сетевого шнура из розетки.
Page 36

36
Уход и чистка
В холодильном контуре данного прибора содержатся углеводороды; по‐
этому его обслуживание и заправка должны осуществляться только упо‐
лномоченными специалистами.
Периодическая чистка
Прибор нуждается в регулярной чистке:
•
внутренние поверхности прибора и принадлежности мойте теплой во‐
дой с нейтральным мылом.
•
тщательно проверьте уплотнение дверцы и вытрите его дочиста, чтобы
оно было чистым и без мусора.
•
сполосните и тщательно вытрите.
Не тя ните, не двигай те и ста райтесь не повредить т рубки и кабели внутри
корпуса.
Никогда не пользуйтесь для чистки внутренних поверхностей моющими
средствами, абразивными порошками, чистящими средствами с сильным
запахом или полировальными пастами, так как они могут повредить по‐
верхность и оставить стойкий запах.
Прочистите испаритель (черная решетка) и компрессор, расположенные
с задней стороны прибора, щеткой или пылесосом. Эта операция повы‐
шает эффективность работы прибора и снижает потребление электроэ‐
нергии.
Будьте осторожны, чтобы не повредить систему охлаждения.
Некоторые чистящие средства для кухни содержат химикаты, могущие
повредить пластмассовые детали прибора. По этой причине рекомен‐
дуется мыть внешний корпус прибора только теплой водой с небольшим
количеством моющего средства.
После чистки подключите прибор к сети электропитания.
Размораживание холодильника
При нормальных условиях наледь автоматически удаляется с испарите‐
ля холодильного отделения при каждом выключении мотор-компрессора.
Талая вода сливается в специальный поддон, установленный с задней
стороны прибора над мотор-компрессором, и затем оттуда испаряется.
Page 37

Что делать, если ...
Необходимо периодически прочищать
сливное отверстие, имеющееся посре‐
дине канала холодильного отделения,
во избежание попадания капель воды
на находящиеся в ней продукты. Ис‐
пользуйте для этого специальное прис‐
пособление, которое вы найдете уже
вставленным в сливное отверстие.
Размораживание морозильной камеры
Морозильная камера данной модели относится к типу "no frost" (без инея).
Это означает, что в ней не образуются иней и лед ни на продуктах, ни на
стенках самой камеры.
Отсутствие инея обеспечивается благодаря постоянной циркуляции хо‐
лодного воздуха внутри камеры от автоматически включающегося вен‐
тилятора.
37
Что делать, если ...
ПРЕДУПРЕЖДЕНИЕ!
Перед устранением неисправностей выньте вилку сетевого шнура из ро‐
зетки.
Устранять неисправности, не описанные в данном руководстве, должен
только квалифицированный электрик или уполномоченный специалист.
При нормальных условиях слышны некоторые звуки (работы компрессо‐
ра, циркуляции хладагента).
Неполадка Возможная причина Способ устранения
Прибор издает силь‐
ный шум.
Компрессор работает
непрерывно.
Неплотно закрыта двер‐
Прибор не установлен
должным образом.
Возможно, неправильно
установлена температу‐
ра.
ца.
Проверьте, прочно ли
стоит прибор (все четыре
ножки должны стоять на
полу).
Задайте более высокую
температуру.
См. раздел "Закрытие
дверцы".
Page 38

38
Что делать, если ...
Неполадка Возможная причина Способ устранения
Дверца открывалась
Температура продуктов
Температура воздуха в
Включена функция
Включена функция
Вода стекает по зад‐
ней стенке холодиль‐
ника.
Вода стекает внутрь
холодильника.
Продукты мешают воде
Вода стекает на пол. Сброс талой воды на‐
Слишком много льда и
инея.
Неплотно закрыта двер‐
Возможно, неправильно
Температура внутри
прибора слишком вы‐
сокая.
Температура продуктов
Одновременно хранится
слишком часто.
слишком высокая.
помещении слишком вы‐
сокая.
FROSTMATIC.
COOLMATIC.
Во время автоматическо‐
го размораживания на
задней панели размора‐
живается наледь.
Засорилось сливное от‐
верстие.
стекать в водосборник.
правлен не в поддон ис‐
парителя над компрессо‐
ром.
Продукты не упакованы
надлежащим образом.
ца.
установлена температу‐
ра.
Неплотно закрыта двер‐
ца.
слишком высокая.
слишком много продук‐
тов.
Не оставляйте дверцу от‐
крытой дольше, чем это не‐
обходимо.
Прежде чем положить про‐
дукты в холодильник, дай‐
те им охладиться до ком‐
натной температуры.
Обеспечьте снижение тем‐
пературы воздуха в поме‐
щении.
См. раздел "Функция
FROSTMATIC".
См. раздел "Функция
COOLMATIC".
Это нормально.
Прочистите сливное от‐
верстие.
Убедитесь, что продукты
не касаются задней стенки.
Направьте сброс талой во‐
ды в поддон испарителя.
Упакуйте продукты более
тщательно.
См. раздел "Закрытие
дверцы".
Задайте более высокую
температуру.
См. раздел "Закрытие
дверцы".
Прежде чем положить про‐
дукты в холодильник, дай‐
те им охладиться до ком‐
натной температуры.
Одновременно храните
меньше продуктов.
Page 39

Что делать, если ...
Неполадка Возможная причина Способ устранения
Температура в холо‐
дильном отделении
слишком высокая.
Температура в моро‐
зильном отделении
слишком высокая.
Прибор не работает. Прибор выключен. Включите прибор.
Вилка сетевого шнура не‐
На прибор не подается
Лампочка не горит. Лампочка перегорела. См. раздел "Замена лам‐
Внутри прибора нет цир‐
куляции холодного возду‐
ха.
Продукты расположены
слишком близко друг к
другу.
правильно вставлена в
розетку.
электропитание. Отсут‐
ствует напряжение в сете‐
вой розетке.
Убедитесь, что внутри при‐
бора циркулирует холод‐
ный воздух.
Укладывайте продукты та‐
ким образом, чтобы обес‐
печить циркуляцию холод‐
ного воздуха.
Правильно вставьте вилку
сетевого шнура в розетку.
Подключите к этой сетевой
розетке другой электро‐
прибор. Обратитесь к ква‐
лифицированному элек‐
трику.
почки".
Если приведенные рекомендации не позволяют устранить неисправ‐
ность, обратитесь в местный авторизованный сервисный центр.
39
Замена лампочки
ПРЕДУПРЕЖДЕНИЕ!
Выньте вилку сетевого шнура из ро‐
зетки.
1.
Вывинтите винт из плафона.
2.
Потяните на себя кронштейн
плафона.
3.
Снимите плафон.
4.
Установите новую лампу той же
мощности (максимальная мощ‐
ность указывается на плафоне).
5.
Установите плафон.
6.
Затяните винт на плафоне.
7.
Вставьте вилку сетевого шнура в
розетку.
8.
Откройте дверцу. Убедитесь, что лампочка горит.
Закрытие дверцы
1.
Прочистите уплотнители дверцы.
2.
При необходимости отрегулируйте дверцу. См. раздел "Установка".
3.
При необходимости замените непригодные уплотнители дверцы. Об‐
ратитесь в сервисный центр.
2
1
3
Page 40

40
Технические данные
Технические данные
S75348KG18 S75388KG18
Габариты
Высота 1850 мм 2010 мм
Ширина 595 мм 595 мм
Глубина 632 мм 632 мм
Время повыше‐
ния температуры
18 час 18 час
Технические данные указаны на паспортной табличке на левой стенке
внутри прибора и на табличке энергопотребления.
Установка
ВНИМАНИЕ!
Перед установкой прибора внимательно прочитайте "Информацию по
технике безопасности" для обеспечения собственной безопасности и
правильной эксплуатации прибора.
Размещение
Устанавливайте холодильник в месте, где температура окружающей сре‐
ды соответствует климатическому классу, указанному на табличке с тех‐
ническими данными:
Климатический
класс
SN от +10°C до +32°C
N от +16°C до +32°C
ST от +16°C до +38°C
T от +16°C до +43°C
Температура окружающей среды
Page 41

Установка
Расположение
Прибор следует устанавливать вдали от
источников тепла, таких как радиаторы
отопления, котлы, прямые солнечные
лучи и т.д. Обеспечьте свободную цир‐
куляцию воздуха вокруг задней части
прибора. Если прибор расположен под
подвесным шкафчиком, для обеспече‐
ния оптимальной работы минимальное
расстояние между корпусом и шкафчи‐
ком должно быть не менее 100 мм. Од‐
нако в идеальном случае лучше не
устанавливать прибор в таких местах.
Точное выравнивание достигается с по‐
мощью регулировки одной или несколь‐
кими регулировочными ножками в основании корпуса.
ВНИМАНИЕ!
Должна быть обеспечена возможность отключения прибора от сети элек‐
тропитания; поэтому после установки прибора должен быть обеспечен
легкий доступ к вилке сетевого шнура.
mm
min
100
A
mm
20
B
Подключение к электросети
Перед включением прибора в сеть удостоверьтесь, что напряжение и ча‐
стота, указанные в табличке технических данных, соответствуют пара‐
метрам вашей домашней электрической сети.
Прибор должен быть заземлен. С этой целью вилка сетевого шнура
имеет специальный контакт заземления. Если розетка электрической се‐
ти не заземлена, выполните отдельное заземление прибора в соответ‐
ствии с действующими нормами, поручив эту операцию квалифициро‐
ванному электрику.
Изготовитель снимает с себя всякую ответственность в случае несоблю‐
дения вышеуказанных правил техники безопасности.
Данное изделие соответствует директивам Европейского Союза.
41
Задние прокладки
В пакет с документацией вложены две
прокладки, которые должны быть закре‐
плены, как показано на рисунке.
Ослабьте винты и вставьте прокладки
под их головки, после чего снова затя‐
ните винты.
2
1
3
Page 42

42
Установка
Выравнивание по высоте
При установке прибора обеспечьте, что‐
бы он стоял ровно. Это достигается с
помощью двух регулируемых ножек,
расположенных спереди внизу.
Снятие держателей полок
Ваш холодильник оснащен держателя‐
ми полок, позволяющими фиксировать
полки при транспортировке.
Чтобы снять их, действуйте следующим
образом:
1.
Передвиньте держатели полок по на‐
правлению стрелки (A).
2.
Поднимите полку сзади и потяните
ее вперед, пока она не снимется (B).
3.
Снимите держатели (C).
A
B
C
Перевешивание дверцы
ВНИМАНИЕ!
Перед выполнением любых операций выньте вилку из сетевой розетки.
Следующие операции рекомендуется выполнять вдвоем, чтобы надежно
удерживать дверцы прибора.
Page 43

1.
Откройте дверцы. Отвинтите
среднюю петлю (m2). Снимите
пластмассовую шайбу (m1).
2.
Снимите шайбу (m6) и пере‐
ставьте на другую сторону пово‐
ротного штифта петли (m5).
3.
Снимите дверцы.
4.
На левой стороне снимите за‐
глушки средней петли (m3,m4) и
переставьте на другую сторону.
5.
Вставьте штифт средней петли
(m5) в левостороннее отверстие
нижней дверцы.
6.
С помощью инструмента сними‐
те крышку (b1). Отвинтите пово‐
ротный штифт нижней петли
(b2) и шайбу (b3) и установите их
на противоположной стороне.
7.
Установите крышку (b1) на про‐
тивоположной стороне.
Установка
m1
m5
m3
43
m2
m6
m4
b1
8.
Разверните запирающие эле‐
менты дверцы (d2,d3), перене‐
сите на другую сторону другой
дверцы и прикрепите, ввинтив
винт (d4).
9.
Установите ограничители
(d5,d6) на другой стороне две‐
рец.
d5
d6
b3
d2
d3
b2
d4
Page 44

44
Забота об окружающей среде
10.
Снимите ручку. Отвинтите верх‐
нюю скобу ручки от стержня руч‐
ки (h1). Отвинтите нижнюю скобу
ручки от дверцы (h2).
Отвинтите верхнюю скобу ручки
от дверцы (h3).
11.
Установите ручку на противопо‐
ложной стороне.
Привинтите скобу ручки обратно
к дверце (h4). Установите скобу
ручки, соединенную с ручкой, и
привинтите их к дверце (h5) и
установленной скобе ручки (h6).
12.
Насадите обратно нижнюю
дверцу на поворотный штифт нижней петли (b2).
13.
Вставьте среднюю петлю (m2) в левое отверстие нижней дверцы.
14.
Отвинтите поворотный штифт
верхней петли (t1) и переставьте
на противоположную сторону.
15.
Насадите верхнюю дверцу на ее
штифт.
16.
Насадите верхнюю дверцу об‐
ратно на поворотный штифт
средней петли (m5), немного на‐
клонив обе дверцы.
17.
Завинтите среднюю петлю (m2)
обратно. Не забудьте надеть
пластмассовую шайбу (m1).
В завершение проверьте, чтобы:
•
Все винты были затянуты.
•
Магнитная прокладка прилегала к корпусу.
•
Дверца правильно открывалась и закрывалась.
При низкой температуре в помещении (т.е. зимой) прокладка может вна‐
чале неплотно прилегать к корпусу. В таком случае дождитесь естествен‐
ной усадки прокладки.
В случае, если вы не желаете выполнить вышеописанные операции са‐
мостоятельно, обратитесь в ближайший сервисный центр. Специалист
сервисного центра перевесит дверцу за дополнительную плату.
h1 h2 h3
h4 h5 h6
t1
Забота об окружающей среде
Символ на изделии или на его упаковке указывает, что оно не
подлежит утилизации в качестве бытовых отходов. Вместо этого его
следует сдать в соответствующий пункт приемки электронного и
Page 45

Забота об окружающей среде
электрооборудования для последующей утилизации. Соблюдая правила
утилизации изделия, Вы поможете предотвратить причинение
окружающей среде и здоровью людей потенциального ущерба, который
возможен в противном случае, вследствие неподобающего обращения с
подобными отходами. За более подробной информацией об утилизации
этого изделия просьба обращаться к местным властям, в службу по
вывозу и утилизации отходов или в магазин, в котором Вы приобрели
изделие.
45
Page 46

Índice de materias
46
Gracias por elegir uno de nuestros productos de alta calidad.
Si quiere asegurarse de que el electrodoméstico funcione de forma óptima y
continua, lea el manual de instrucciones atentamente. Las instrucciones que
contiene le permitirán realizar todos los procesos con la máxima perfección y
eficacia. Es aconsejable que guarde este manual en un lugar seguro para que pueda
consultarlo siempre que lo necesite. Y no olvide entregárselo al futuro propietario
del electrodoméstico.
Esperamos que disfrute de su nuevo electrodoméstico.
Índice de materias
Información sobre seguridad 47
Seguridad de niños y personas vulnerables
47
Instrucciones generales de seguridad 47
Uso diario 48
Cuidado y limpieza 48
Instalación 49
Servicio técnico 49
Panel de mandos 49
Encendido 50
Apagado 50
Indicadores de temperatura 50
Regulación de la temperatura 51
Función COOLMATIC 51
Función Holiday 51
Función FROSTMATIC 52
Alarma de temperatura alta 52
Primer uso 52
Limpieza de las partes internas 52
Uso diario 52
Congelación de alimentos frescos 52
Almacenamiento de alimentos congelados
53
Descongelación 53
Estantes móviles 53
Estante botellero 53
Cajón de verduras 54
Colocación de los estantes de la puerta
54
Enfriamiento por aire 55
Zona de enfriamiento 55
Extracción de los cestos de congelados del
congelador 56
Consejos útiles 56
Sonidos de funcionamiento normal 56
Consejos para ahorrar energía 56
Consejos para la refrigeración de alimentos
frescos 56
Consejos para la refrigeración 57
Consejos sobre la congelación 57
Consejos para el almacenamiento de
alimentos congelados 57
Mantenimiento y limpieza 58
Limpieza periódica 58
Descongelación del frigorífico 58
Descongelación del congelador 59
Qué hacer si… 59
Cambio de la bombilla 61
Cierre de la puerta 61
Datos técnicos 61
Instalación 62
Colocación 62
Ubicación 62
Conexión eléctrica 62
Piezas de separación traseras 63
Nivelado 63
Extracción de las sujeciones de estante
63
Cambio del sentido de apertura de las
puertas 63
Aspectos medioambientales 66
Salvo modificaciones
Page 47

Información sobre seguridad
Información sobre seguridad
Por su seguridad y para garantizar el funcionamiento correcto del aparato, antes de instalarlo y utilizarlo por primera vez lea atentamente este manual del usuario, incluidos los
consejos y advertencias. Para evitar errores y accidentes, es importante que todas las personas que utilicen el aparato estén perfectamente al tanto de su funcionamiento y de las
características de seguridad. Conserve estas instrucciones y no olvide mantenerlas junto al
aparato en caso de su desplazamiento o venta para que quienes lo utilicen a lo largo de su
vida útil dispongan siempre de la información adecuada sobre el uso y la seguridad.
Por la seguridad de personas y bienes, siga las normas de seguridad indicadas en estas
instrucciones, ya que el fabricante no se hace responsable de daños provocados por omisiones.
Seguridad de niños y personas vulnerables
• Este electrodoméstico no está diseñado para que lo usen personas (incluidos niños) con
discapacidad física, sensorial o mental, o con experiencia y conocimiento insuficientes,
a menos que una persona responsable de su seguridad les supervise o instruya en el uso
del electrodoméstico.
No permita que los niños jueguen con el electrodoméstico.
• Mantenga los materiales de embalaje alejados de los niños. Existe riesgo de asfixia.
• Si va a desechar el aparato, extraiga el enchufe de la toma, corte el cable de conexión
(tan cerca del aparato como pueda) y retire la puerta para impedir que los niños al jugar
puedan sufrir descargas eléctricas o quedar atrapados en su interior.
• Si este aparato, que cuenta con juntas de puerta magnéticas, sustituirá a un aparato más
antiguo con cierre de muelle (pestillo) en la puerta, cerciórese de inutilizar el cierre de
muelle antes de desechar el aparato antiguo. Evitará así que se convierta en una trampa
mortal para niños.
47
Instrucciones generales de seguridad
PRECAUCIÓN
Mantenga las aberturas de ventilación sin obstrucciones.
• El aparato está diseñado para conservar los alimentos y bebidas de una vivienda normal,
como se explica en este folleto de instrucciones.
• No utilice dispositivos mecánicos ni medios artificiales para acelerar el proceso de descongelación.
• No utilice otros aparatos eléctricos (como máquinas de hacer helados) dentro de aparatos
de refrigeración, a menos que el fabricante haya autorizado su utilización.
• No dañe el circuito refrigerante.
• El circuito refrigerante del aparato contiene isobutano (R600a). Es un gas natural con
un gran nivel de compatibilidad medioambiental, aunque es inflamable.
Durante el transporte y la instalación del aparato, cerciórese de no provocar daños al
circuito de refrigerante.
Si el circuito de refrigerante se daña:
–evite fuegos al descubierto y fuentes de encendido
– ventile bien la habitación en la que se encuentra el aparato
Page 48

Información sobre seguridad
48
• Es peligroso alterar las especificaciones o intentar modificar este producto en modo
alguno. Cualquier daño en el cable de alimentación puede provocar cortocircuito, incendio o descarga eléctrica.
ADVERTENCIA
Los componentes eléctricos (cable de alimentación, enchufe, compresor) debe sustituirlos
un técnico autorizado o personal de reparaciones profesional.
1. El cable de alimentación no se debe prolongar.
2. Compruebe que el enchufe no está aplastado ni dañado por la parte trasera del
aparato. Un enchufe aplastado o dañado puede recalentarse y provocar un incendio.
3. Cerciórese de que tiene acceso al enchufe del aparato.
4. No tire del cable de alimentación.
5. Si la toma de red está floja, no introduzca el enchufe. Existe riesgo de descarga
eléctrica o incendio.
6.
No debe utilizar el aparato sin la cubierta de la bombilla
7)
de la iluminación interior.
• Este aparato es pesado. Debe tener precauciones durante su desplazamiento.
• No retire ni toque elementos del compartimento congelador con las manos húmedas o
mojadas, ya que podría sufrir abrasión de la piel o quemaduras por congelación.
• Evite la exposición prolongada del aparato a la luz solar directa.
Uso diario
• No coloque recipientes calientes sobre las piezas plásticas del aparato.
• No almacene gas ni líquido inflamable en el aparato, ya que podrían estallar.
•
No coloque alimentos directamente contra la salida de aire de la pared posterior.
• Los alimentos que se descongelen no deben volver a congelarse.
• Guarde los alimentos congelados, que se adquieren ya envasados, siguiendo las instrucciones del fabricante.
• Se deben seguir estrictamente las recomendaciones del fabricante del aparato sobre el
almacenamiento. Consulte las instrucciones correspondientes.
• No coloque bebidas carbonatadas o con gas en el congelador, ya que se genera presión
en el recipiente, que podría estallar y dañar el aparato.
• Si se consumen polos helados retirados directamente del aparato, se pueden sufrir quemaduras causadas por el hielo.
8)
Cuidado y limpieza
• Antes de realizar tareas de mantenimiento, apague el aparato y desconecte el enchufe
de la toma de red. Si no puede acceder a la toma de red, corte el suministro eléctrico.
• No limpie el aparato con objetos metálicos.
• No utilice objetos afilados para eliminar el hielo del aparato. Utilice un raspador plástico.
• Inspeccione habitualmente el desagüe del agua descongelada del frigorífico. Si es necesario, limpie el desagüe. Si el desagüe se bloquea, el agua se acumulará en la base del
aparato.
7) Si está previsto el uso de cubierta para la bombilla
8) Si el aparato no acumula escarcha (Frost Free)
Page 49

Panel de mandos
Instalación
Para realizar la conexión eléctrica, siga atentamente las instrucciones de los párrafos correspondientes.
• Desembale el aparato y compruebe que no tiene daños. No conecte el aparato si está
dañado. Informe de los posibles daños de inmediato a la tienda donde lo adquirió. En
ese caso, conserve el material de embalaje.
• Es recomendable esperar al menos dos horas antes de conectar el aparato, para permitir
que el aceite regrese al compresor.
• El aparato debe contar con circulación de aire adecuada alrededor, ya que de lo contrario
se produce recalentamiento. Para conseguir una ventilación suficiente, siga las instrucciones correspondientes a la instalación.
• Siempre que sea posible, la parte posterior del producto debe estar contra una pared,
para evitar que se toquen las partes calientes (compresor, condensador) y se produzcan
quemaduras.
• El aparato no debe colocarse cerca de radiadores ni de hornillas de cocina.
• Asegúrese de que es posible acceder al enchufe después de instalar el electrodoméstico.
•
Realice la conexión sólo con el suministro de agua potable.
9)
Servicio técnico
• Un electricista homologado deberá realizar las tareas que se requieran para ejecutar el
servicio o mantenimiento de este electrodoméstico.
• Las reparaciones de este aparato debe realizarlas un centro de servicio técnico autorizado
y sólo se deben utilizar recambios originales.
49
Protección del medio ambiente
Este aparato no contiene gases perjudiciales para la capa de ozono, ni en el circuito de
refrigerante ni en los materiales aislantes. El aparato no se debe desechar junto con los
residuos urbanos. La espuma aislante contiene gases inflamables: el aparato se debe desechar de acuerdo con la normativa vigente, que puede solicitar a las autoridades locales. No
dañe la unidad de refrigeración, en especial la parte trasera, cerca del intercambiador de
calor. Los materiales de este aparato marcados con el símbolo
son reciclables.
Panel de mandos
65 7 84321 15141312119 10
1 Interruptor de encendido/apagado ON/OFF
2 Regulador de temperatura del frigorífico, +
9) Si está prevista una conexión de agua
Page 50

Panel de mandos
50
3 Indicador de temperatura del frigorífico
4 Regulador de temperatura del frigorífico, -
5 Tecla COOLMATIC
6 Indicador COOLMATIC
7 Indicador del compartimento frigorífico
8 Indicador del compartimento congelador
9 Indicador FROSTMATIC
10 Tecla FROSTMATIC
11 Regulador de temperatura del congelador, +
12 Indicador de temperatura del congelador
13 Regulador de temperatura del congelador, -
14 Tecla de alarma
15 Indicador de alarma
Encendido
1. Introduzca el enchufe en la toma de corriente.
2. Pulse el interruptor de encendido ON/OFF (ON).
3. La luz del indicador de alarma comienza a parpadear debido a que la temperatura es
alta.
Se activa la alarma acústica.
4. Pulse la tecla de alarma para apagarla.
Apagado
Para apagar todo el aparato:
1. Pulse el interruptor de encendido ON/OFF (OFF).
2. Desenchufe el aparato de la toma de corriente.
Indicadores de temperatura
Muestran diversa información:
• Durante el funcionamiento normal muestra la temperatura que hay en el interior del
frigorífico (temperatura REAL).
• Muestra la temperatura más alta del congelador (temperatura REAL). Cuando el conge-
lador está completamente lleno, la zona de temperatura más alta suele ser la parte
superior delantera. Dependiendo de cómo se llene la sección, las temperaturas serán más
bajas en otras partes del congelador.
• A medida que se ajusta, el indicador muestra en luz parpadeante la temperatura que se
está seleccionando en el frigorífico (temperatura ELEGIDA).
Cada cambio en el ajuste de la temperatura requiere una espera de 24 horas para que se
estabilice el indicador.
En caso de producirse un fallo en el aparato, el indicador de temperatura muestra:
• un cuadrado o una letra en el indicador de temperatura del frigorífico, si el fallo es del
frigorífico
• un cuadrado o una letra en el indicador de temperatura del congelador, si el fallo es del
congelador.
Page 51

Panel de mandos
Regulación de la temperatura
Para utilizar el aparato, proceda de la manera siguiente:
1. Ajuste la temperatura que prefiera pulsando el regulador apropiado. El indicador de
temperatura mostrará de inmediato el ajuste modificado (temperatura ELEGIDA) al
tiempo que el indicador comienza a parpadear.
2. Cada pulsación del regulador de temperatura ajusta la temperatura ELEGIDA en pasos
de 1 °C. La temperatura ELEGIDA debe alcanzarse en un plazo de 24 horas.
3. Una vez ajustada la temperatura necesaria, y tras un breve periodo de tiempo (unos 5
segundos), el indicador de temperatura volverá a mostrar la temperatura REAL del
interior del compartimento correspondiente. La luz del indicador de temperatura cambiará de parpadeante a fija.
La temperatura adecuada para la correcta conservación de los alimentos debe ser:
• +5 °C en el frigorífico
• -18 °C en el congelador.
Cuando se cambia el ajuste de temperatura, el compresor no arranca de inmediato si se
está realizando la descongelación automática del electrodoméstico. El frigorífico alcanza
la temperatura de conservación con bastante rapidez para que pueda guardar alimentos
inmediatamente después de ponerlo en marcha.
Función COOLMATIC
La función COOLMATIC es adecuada para enfriar rápidamente grandes cantidades de alimentos en el frigorífico.
Siga estos pasos para activar la función:
1. Pulse la tecla COOLMATIC.
2. Se enciende el indicador COOLMATIC.
La función COOLMATIC se pone en marcha y activa el enfriamiento intensivo. Se selecciona
automáticamente un ajuste de temperatura ELEGIDA de +2°C.
La función COOLMATIC se desactiva automáticamente después de 6 horas.
Para desactivar la función en cualquier momento:
1. Pulse la tecla COOLMATIC.
2. Se apaga el indicador COOLMATIC.
51
Función Holiday
Esta función permite mantener el frigorífico vacío durante periodos largos de tiempo (por
ejemplo, las vacaciones de verano) sin que se formen malos olores.
El compartimento frigorífico debe estar vacío mientras la función esté activada.
Para activar la función:
1. pulse varias veces el regulador de temperatura (+) hasta que el indicador muestre la
letra "H" (de Holiday, vacaciones en inglés). La función Holiday ajusta la temperatura a
+15 °C, y se activa el modo de ahorro de energía del frigorífico.
Para desactivar la función:
1. ajuste la temperatura elegida pulsando el regulador de temperatura del frigorífico.
Page 52

Primer uso
52
Función FROSTMATIC
La función FROSTMATIC acelera la congelación de alimentos frescos y, al mismo tiempo,
impide que se calienten los alimentos previamente almacenados
Siga estos pasos para activar la función:
1. Pulse la tecla FROSTMATIC.
2. Se enciende el indicador FROSTMATIC.
La función COOLMATIC se desactiva automáticamente después de 52 horas.
Para desactivar la función en cualquier momento:
1. Pulse la tecla FROSTMATIC.
2. Se apaga el indicador FROSTMATIC.
Alarma de temperatura alta
Cuando se produce un aumento anormal de la temperatura interior del congelador (por
ejemplo, a causa de un corte de corriente), la luz del indicador comienza a parpadear y se
emite una señal acústica.
Pulse la tecla de alarma para apagar la señal acústica; el indicador de alarma seguirá parpadeando.
La señal acústica se apagará automáticamente cuando la temperatura recupere el nivel
normal aunque el indicador de alarma siga parpadeando.
Pulse la tecla de alarma para apagarla. La luz del indicador de alarma se apaga al tiempo
que el indicador de temperatura del congelador muestra, durante 5 segundos, la temperatura más alta alcanzada en el compartimento congelador.
Primer uso
Limpieza de las partes internas
Antes del empleo limpiar todas las partes internas con agua tibia y jabón neutro, a fin de
eliminar el característico olor de nuevo y secarlas luego cuidadosamente.
No emplear detergentes o polvos abrasivos que podrían dañar las superficies.
Uso diario
Congelación de alimentos frescos
El compartimento congelador está ideado para la congelación de alimentos frescos y para
la conservación a largo plazo de alimentos congelados y ultracongelados.
Para congelar alimentos frescos no es necesario cambiar el ajuste intermedio.
Sin embargo, para lograr una congelación más rápida, gire el regulador de temperatura a
un ajuste más alto para obtener el frío máximo.
En esa situación, la temperatura del compartimento frigorífico puede descender por debajo
de 0 °C. En ese caso, sitúe el regulador de temperatura en un ajuste menos frío.
Coloque los alimentos que vaya a congelar en el compartimento superior.
Page 53

Uso diario
Almacenamiento de alimentos congelados
Al poner en marcha el aparato por primera vez o después de un periodo sin uso, déjelo en
marcha al menos durante 2 horas con un ajuste alto antes de colocar los productos en el
compartimento.
En caso de producirse una descongelación accidental, por ejemplo, por un corte del suministro eléctrico, si la interrupción ha sido más prolongada que el valor indicado en la tabla
de características técnicas bajo "tiempo de elevación", los alimentos descongelados deben
consumirse cuanto antes o cocinarlos de inmediato y volverlos a congelar (después de que
se hayan enfriado).
Descongelación
Los alimentos ultracongelados o congelados, antes de utilizarlos, se pueden descongelar en
el compartimento frigorífico o a temperatura ambiente, dependiendo del tiempo de que se
disponga.
Es posible incluso cocinar piezas pequeñas congeladas, tomadas directamente del congelador; en tal caso, el tiempo de cocción será más prolongado.
Estantes móviles
Las paredes del frigorífico cuentan con guías para
colocar los estantes del modo que se prefiera.
53
Estante botellero
Coloque las botellas (con la parte del tapón hacia
fuera) en el estante botellero provisto al efecto.
Si coloca el botellero en posición horizontal, úselo
sólo para botellas cerradas.
El estante botellero puede inclinarse para guardar
botellas previamente abiertas. Para inclinarlo, tire
del estante hacia arriba de forma que pueda girarlo y colocarlo en el nivel más alto siguiente.
Page 54

Uso diario
54
Cajón de verduras
Este cajón es adecuado para guardar frutas y verduras.
Dentro del cajón hay un separador que se puede
colocar en diferentes posiciones para dividir el espacio según las necesidades personales.
El fondo del cajón incorpora una rejilla (si el aparato va equipado con ella) que permite mantener
las frutas y verduras separadas de cualquier humedad que se pueda formar en la superficie inferior.
Todas las piezas del interior del cajón se pueden
retirar para su limpieza.
Colocación de los estantes de la puerta
Para poder guardar alimentos de distintos
tamaños, los estantes de la puerta se pueden
colocar a diferentes alturas.
Para realizar esos ajustes proceda de la manera siguiente:
eleve paulatinamente el estante en la dirección de las flechas hasta retirarlo del soporte
y colóquelo en la posición que desee.
1
2
Page 55

Uso diario
Enfriamiento por aire
El ventilador de Enfriamiento dinámico por aire
(DAC) permite enfriar rápidamente los alimentos
y mantener una temperatura uniforme en el compartimento.
1. Para activar el ventilador, pulse el interruptor
(1). Se enciende la luz verde (2).
2. Ajuste el regulador de temperatura en la po-
sición VENTILADOR.
Este dispositivo permite enfriar los alimentos con
más rapidez y mantener una temperatura más
uniforme dentro del compartimento.
Active el ventilador cuando la temperatura ambiente supere los 25 °C.
2
Zona de enfriamiento
Esta zona alcanza la temperatura más baja del compartimento frigorífico y la convierte en
la idónea para almacenar alimentos frescos como pescado, carne y marisco. Se encuentra
en la parte inferior del frigorífico, justo por encima del cajón de las verduras.
Para retirar el compartimento de la zona de enfriamiento, siga estos pasos:
1. Abra la puerta del frigorífico al máximo. Si no
puede abrir la puerta con un ángulo de 180°
porque lo impide cualquier objeto, retire el
estante botellero de la puerta.
2. Tire del cajón hacia fuera hasta el tope.
3. Levante ligeramente la parte delantera del ca-
jón.
4. Retire el cajón de su soporte.
5. Levante la parte trasera del soporte de su alo-
jamiento.
6. Tire del marco hacia fuera.
7. Retire el marco del soporte.
Para volver a colocar el compartimento de la zona
de enfriamiento en su posición inicial, repita los
pasos anteriores en orden inverso.
5
55
1
6
2
3
Page 56

Consejos útiles
56
Extracción de los cestos de congelados del congelador
2
2
1
1
Los cestos de congelados llevan un tope para impedir que se salgan de las guías o se
caigan. Para extraer un cesto del congelador, tire de él hacia fuera y, cuando llegue al
tope, retírelo tirando suavemente de su parte delantera.
Para volver a colocarlo en su lugar, levante ligeramente la parte delantera del cesto e
insértelo en el congelador. Cuando haya superado los topes, empuje los cestos hasta el
fondo.
Consejos útiles
Sonidos de funcionamiento normal
• Es posible que oiga un gorgoteo o un burbujeo cuando el refrigerante se bombea por el
serpentín o los tubos. Esto es correcto.
• Cuando está en marcha, el compresor bombea el refrigerante a través de todo el circuito
y emite un zumbido o un sonido intermitente. Esto es correcto.
• La dilatación térmica puede causar una serie de crujidos repentinos. Se trata de un fe-
nómeno físico natural y no peligroso. Esto es correcto.
Consejos para ahorrar energía
• No abra la puerta con frecuencia ni la deje abierta más tiempo del estrictamente nece-
sario.
• Si la temperatura ambiente es elevada, la temperatura del aparato se ha ajustado en los
valores más altos y está totalmente lleno, el compresor podría funcionar de manera
continua, provocando la formación de escarcha o hielo en el evaporador. Si esto sucede,
gire el regulador de temperatura a valores inferiores para permitir la descongelación
automática y ahorrar en el consumo eléctrico.
Consejos para la refrigeración de alimentos frescos
Para obtener los mejores resultados:
• no guarde en el frigorífico alimentos calientes ni líquidos en evaporación;
• cubra o envuelva los alimentos, en especial si tienen sabores fuertes;
Page 57

Consejos útiles
• coloque los alimentos de modo que el aire pueda circular libremente entre ellos.
Consejos para la refrigeración
Consejos útiles:
Carne (de todo tipo): guárdela en bolsas de plástico y colóquela en el estante de vidrio,
sobre el cajón de las verduras.
Por razones de seguridad, guárdela de ese modo durante uno o dos días, como máximo.
Alimentos cocinados, platos fríos, etc..: los debe cubrir y puede colocarlos en cualquiera de
los estantes.
Frutas y verduras: se deben limpiar a conciencia y colocar en los cajones especiales suministrados a tal efecto.
Mantequilla y queso: colóquelos en recipientes herméticos especiales o envueltos en papel
de aluminio o en bolsas de plástico, para excluir tanto aire como sea posible.
Botellas de leche: deben tener tapa y se colocarán en el estante para botellas de la puerta.
Los plátanos, las patatas, las cebollas y los ajos, si no están empaquetados, no deben guardarse en el frigorífico.
Consejos sobre la congelación
Estos consejos son importantes para poder aprovechar al máximo el proceso de congelación:
• la cantidad máxima de alimentos que puede congelarse en 24 horas se muestra en la
placa de datos técnicos;
• el proceso de congelación requiere 24 horas. Durante ese periodo no deben añadirse
otros alimentos para congelación;
• congele sólo productos alimenticios de máxima calidad, frescos y perfectamente limpios;
• prepare los alimentos en porciones pequeñas para que se congelen de manera rápida y
total, así como para poder descongelar posteriormente sólo las cantidades necesarias;
• envuelva los alimentos en papel de aluminio o polietileno y compruebe que los envol-
torios quedan herméticamente cerrados;
• no permita que alimentos frescos y sin congelar entren en contacto con alimentos ya
congelados, para evitar el aumento de temperatura de los segundos;
• los alimentos magros se congelan mejor que los grasos; la sal reduce el tiempo de al-
macenamiento de los alimentos;
• el hielo, si se consume inmediatamente después de retirarlo del compartimento conge-
lador, puede provocar quemaduras por congelación en la piel;
• es recomendable etiquetar cada paquete con la fecha de congelación para controlar el
tiempo que permanecen almacenados.
57
Consejos para el almacenamiento de alimentos congelados
Para obtener el máximo rendimiento de este aparato, deberá:
• comprobar que el comerciante ha mantenido los productos congelados correctamente
almacenados;
• procurar que los alimentos congelados pasen de la tienda al congelador en el menor
tiempo posible;
• evitar la apertura frecuente de la puerta o dejarla abierta más del tiempo estrictamente
necesario.
• Una vez descongelados, los alimentos se deterioran con rapidez y no pueden congelarse
otra vez.
• No supere el tiempo de almacenamiento indicado por el fabricante de los alimentos.
Page 58

Mantenimiento y limpieza
58
Mantenimiento y limpieza
PRECAUCIÓN
Antes de realizar tareas de mantenimiento, desenchufe el aparato.
Este equipo contiene hidrocarburos en la unidad de refrigeración; por tanto, el mantenimiento y la recarga deben estar a cargo exclusivamente de técnicos autorizados.
Limpieza periódica
El equipo debe limpiarse de manera habitual:
• limpie el interior y los accesorios con agua templada y un jabón neutro.
• revise periódicamente las juntas de la puerta y límpielas para mantenerlas limpias y sin
restos.
• aclare y seque a fondo.
No mueva, dañe ni tire de los conductos o cables del interior del armario.
No utilice detergentes, polvos abrasivos, productos de limpieza perfumados ni cera para
limpiar el interior, ya que dañarán la superficie y dejarán un fuerte olor.
Limpie el condensador (rejilla negra) y el compresor de la parte posterior del aparato con
un cepillo o un aspirador. Esa operación mejorará el rendimiento del aparato y reducirá el
consumo eléctrico.
Tenga cuidado de no dañar el sistema de refrigeración.
Muchas marcas de limpiadores de superficies de cocina contienen químicos que pueden
atacar o dañar los plásticos del aparato. Por tal razón, se recomienda que el exterior del
aparato se limpie sólo con agua templada a la que se añadirá un poco de líquido lavavajillas.
Después de la limpieza, vuelva a conectar el aparato a la toma de red.
Descongelación del frigorífico
La escarcha se elimina automáticamente del evaporador del frigorífico cada vez que se
detiene el compresor, durante el funcionamiento normal. El agua de la descongelación se
descarga hacia un recipiente especial situado en la parte posterior del aparato, sobre el
motor compresor, donde se evapora.
Page 59

Qué hacer si…
Es importante limpiar periódicamente el orificio
de salida del agua de descongelación situado en
la mitad del canal del compartimento frigorífico
para evitar que el agua desborde y caiga sobre los
alimentos del interior. Utilice el limpiador especial
suministrado, que hallará ya colocado en el orificio
de desagüe.
Descongelación del congelador
Por otra parte, el compartimento congelador de este modelo es de tipo "no frost". Esto
significa que no se genera escarcha durante el funcionamiento, ni en las paredes interiores
ni en los alimentos.
La ausencia de escarcha se debe a la continua circulación de aire frío dentro del compartimento, accionado por un ventilador controlado automáticamente.
Qué hacer si…
59
PRECAUCIÓN
Desenchufe el aparato antes de realizar cualquier reparación.
Las reparaciones que no figuran en este manual sólo pueden ser llevadas a cabo por un
técnico profesional homologado.
Durante el funcionamiento normal del aparato suelen producirse ciertos ruidos (compresor,
circulación del refrigerante).
Problema Posible causa Solución
El aparato hace ruido.
El compresor funciona
continuamente.
La puerta no está bien cerrada. Consulte "Cierre de la puerta".
La puerta se ha abierto con ex-
El aparato no está bien apoyado
en el suelo.
Puede que el ajuste del mando
de temperatura sea incorrecto.
cesiva frecuencia.
Compruebe que los soportes del
aparato descansan sobre una superficie estable (las cuatro patas
deben estar bien apoyadas en el
suelo).
Seleccione una temperatura más
alta.
No mantenga la puerta abierta
más tiempo del necesario.
Page 60

Qué hacer si…
60
Problema Posible causa Solución
La temperatura del producto es
La temperatura ambiente es de-
La función FROSTMATIC se acti-
La función FROSTMATIC se acti-
El agua fluye por la placa
posterior del frigorífico.
El agua fluye por el interior del frigorífico.
Los productos impiden que el
El agua fluye hacia el
suelo.
Hay demasiada escarcha.
La puerta no está bien cerrada. Consulte "Cierre de la puerta".
Puede que el ajuste del mando
La temperatura del aparato es demasiado alta.
La temperatura del producto es
Se han almacenado muchos
La temperatura del frigorífico es demasiado alta.
La temperatura del congelador es demasiado alta.
El aparato no funciona.
El aparato no está bien enchu-
demasiado alta.
masiado alta.
va.
va.
Durante el proceso de descon-
gelación automática, la escarcha
se derrite en la placa posterior.
La salida de agua está obstruida. Limpie la salida de agua.
agua fluya al colector de agua.
El agua de la descongelación no
fluye hacia la bandeja de evaporación situada sobre el compresor.
Los productos no están bien envueltos.
de temperatura sea incorrecto.
La puerta no está bien cerrada. Consulte "Cierre de la puerta".
demasiado alta.
productos a la vez.
No hay circulación de aire frío en
el aparato.
Los productos están demasiado
próximos entre sí.
El aparato se apaga. Encienda el aparato.
fado a la toma de corriente.
Deje que la temperatura del producto descienda a la temperatura
ambiente antes de guardarlo.
Reduzca la temperatura ambiente.
Consulte "Función FROSTMATIC".
Consulte "Función FROSTMATIC".
Esto es correcto.
Compruebe que los productos no
tocan la placa posterior.
Fije la salida de agua de descongelación a la bandeja de evaporación.
Envuelva mejor los productos.
Seleccione una temperatura más
alta.
Deje que la temperatura del producto descienda a la temperatura
ambiente antes de guardarlo.
Guarde menos productos al mismo tiempo.
Compruebe que el aire frío puede
circular libremente en el aparato.
Guarde los productos de modo
que haya circulación de aire frío
entre ellos.
Enchufe el aparato correctamente a la toma de corriente.
Page 61

Problema Posible causa Solución
El aparato no recibe corriente.
La bombilla no funciona.
Si las indicaciones anteriores no ofrecen resultados, llame al Centro de servicio técnico
más cercano.
Cambio de la bombilla
PRECAUCIÓN
Desenchufe el aparato de la toma de corriente.
Datos técnicos
No hay vo ltaje en la toma de corriente.
La bombilla está defectuosa. Consulte "Cambio de la bombilla".
Enchufe otro aparato eléctrico a
la toma de corriente. Llame a un
electricista homologado.
61
1. Retire el tornillo de la cubierta de la
bombilla.
2
1
2. Tire hacia fuera para desenganchar la
cubierta de la bombilla.
3. Retire la cubierta de la bombilla.
4. Cambie la bombilla por otra de la misma
potencia (la potencia máxima se indica
3
en la cubierta de la bombilla).
5. Instale la cubierta de la bombilla.
6. Apriete el tornillo de la cubierta de la
bombilla.
7. Enchufe el aparato a la toma de corriente.
8. Abra la puerta. Compruebe que la bombilla se enciende.
Cierre de la puerta
1. Limpie las juntas de la puerta.
2. Si es necesario, ajuste la puerta. Consulte "Instalación".
3. Si es necesario, cambie las juntas de puerta defectuosas. Contacte al Centro de servicio
técnico.
Datos técnicos
S75348KG18 S75388KG18
Medidas
Altura 1850 mm 2010 mm
Anchura 595 mm 595 mm
Fondo 632 mm 632 mm
Tiempo de elevación 18 h 18 h
La información técnica se encuentra en la placa de datos técnicos en el lado interior izquierdo del aparato y en la etiqueta de energía.
Page 62

Instalación
62
Instalación
ADVERTENCIA
Lea atentamente la "información de seguridad" para garantizar su propia seguridad y el
correcto funcionamiento del electrodoméstico antes de instalar el electrodoméstico.
Colocación
Instale el aparato en un punto en el que la temperatura ambiente se corresponda con la
clase climática indicada en la placa de datos técnicos del aparato:
Clase climática Temperatura ambiente
SN +10°C a + 32°C
N +16°C a + 32°C
ST +16°C a + 38°C
T +16°C a + 43°C
Ubicación
Instale el aparato alejado de fuentes de calor, como radiadores, calderas, luz solar directa, etc. Asegúrese también de que el aire puede circular sin
obstáculos por la parte trasera del armario. Para
garantizar el mejor rendimiento, si el aparato se
coloca debajo de un mueble de cocina colgado en
la pared, deje una distancia mínima de 100 mm
entre la parte superior del aparato y el mueble de
pared. No obstante, lo ideal sería que el aparato
no fuera debajo de ningún mueble colgado en la
pared. La base del aparato va provista de una o
varias patas ajustables para garantizar un nivelado
correcto del mismo.
ADVERTENCIA
Puede que en algún momento sea necesario desenchufar el aparato de la toma de corriente;
por lo tanto, el enchufe debe quedar accesible tras la instalación del aparato.
mm
min
100
A
mm
20
B
Conexión eléctrica
Antes de conectar el aparato, compruebe que el voltaje y la frecuencia que aparecen en la
placa de datos técnicos se corresponden con el suministro de la vivienda.
El aparato debe tener conexión a tierra. El enchufe del cable de alimentación se suministra
con un contacto para tal fin. Si la toma de red de la vivienda carece de conexión a tierra,
conecte el aparato a una toma de tierra conforme con la normativa, después de consultar
a un electricista profesional.
El fabricante rechaza toda responsabilidad si no se toman las precauciones antes indicadas.
Este aparato es conforme con las directivas de la CEE.
Page 63

Piezas de separación traseras
En la bolsa de la documentación hay dos separadores que deben colocarse como se indica
en la figura.
Afloje los tornillos, introduzca el separador por
debajo la cabeza de los tornillos y vuelva a apretarlos.
Nivelado
Al colocar el aparato compruebe que queda nivelado. Esto se puede conseguir utilizando las dos
patas ajustables de la parte inferior delantera.
Instalación
3
63
2
1
Extracción de las sujeciones de estante
El aparato está equipado con sujeciones que permiten mantener los estantes fijos durante el
A
transporte.
Para extraerlas proceda de la manera siguiente:
1. Desplace las sujeciones de estante en la dirección de la flecha (A).
2. Eleve el estante desde atrás y empújelo hacia
delante hasta que quede libre (B).
3. Retire las sujeciones (C).
Cambio del sentido de apertura de las puertas
ADVERTENCIA
Desenchufe siempre el electrodoméstico antes de llevar a cabo cualquier operación.
B
C
Page 64

Instalación
64
Los procedimientos que se indican a continuación requieren la ayuda de otra persona que
sujete bien las puertas del aparato durante todo el proceso.
1. Abra las puertas. Desatornille la bisagra
intermedia (m2). Retire el separador de
m1
plástico (m1).
m2
2. Extraiga el separador (m6) y colóquelo
en el otro lado del pivote de la bisagra
(m5).
3. Retire las puertas.
4. Extraiga el pasador de la tapa izquierda
m5
m6
de la bisagra intermedia (m3,m4) y colóquelo en el otro lado.
5. Introduzca el pasador de la bisagra in-
termedia (m5) en el orificio izquierdo de
m3
m4
la puerta inferior.
6. Utilice una herramienta para retirar la
cubierta (b1). Desatornille el pivote de la
bisagra inferior (b2) y el separador (b3) y
b1
colóquelos en el lado contrario.
7. Vuelva a introducir la cubierta (b1) en el
lado contrario.
b3
b2
Page 65

8. Invierta los elementos de bloqueo de la
puerta (d2,d3), desplácelos al otro lado
de la otra puerta y fíjelos atornillando el
tornillo (d4).
9. Vuelva a introducir los topes (d5, d6) en
el otro lado de las puertas.
Instalación
d2
65
d3
10. Retire la manilla. Desatornille la abraza-
dera de la manilla superior de la varilla
d6
d5
h1 h2 h3
(h1). Desatornille la abrazadera de la manilla inferior de la puerta (h2).
Desatornille la abrazadera de la manilla
superior de la puerta (h3).
11. Instale la manilla en el lado contrario.
h4 h5 h6
vuelva a atornillar la abrazadera de la
manilla en la puerta (h4). Gire la abrazadera de la manilla con la manilla y
atorníllelas a la puerta (h5) y a la abrazadera de la manilla montada (h6).
12. Vuelva a colocar la puerta inferior en el
pivote de la bisagra inferior (b2).
13. Inserte la bisagra intermedia (m2) en el orificio izquierdo de la puerta inferior.
14. Desatornille el pivote de la bisagra su-
perior (t1) y colóquelo en el lado contrario.
15. Encaje la puerta superior en el pivote de
la puerta superior.
16. Vuelva a colocar la puerta superior en el
pivote de la bisagra intermedia (m5) e
incline ligeramente las dos puertas.
17. Vuelva a atornillar la bisagra intermedia
t1
(m2). No olvide colocar el separador de
plástico (m1).
Realice una verificación final para comprobar
que:
• Todos los tornillos están apretados.
• La junta magnética se adhiere al mueble.
d4
Page 66

Aspectos medioambientales
66
• La puerta abre y cierra correctamente.
Es posible que la junta no encaje a la perfección en el mueble si la temperatura ambiente
es baja (es decir, en invierno). En tal caso, espere hasta que la junta se fije al mueble de
forma natural.
Si prefiere no realizar los procedimientos anteriores, póngase en contacto con el Centro de
servicio técnico más próximo. El personal del Centro de servicio técnico cambiará el sentido
de apertura de las puertas con gastos a su cargo.
Aspectos medioambientales
El símbolo que aparece en el aparato o en su embalaje, indica que este producto no se
puede tratar como un residuo normal del hogar. Se deberá entregar, sin coste para el
poseedor, bien al distribuidor, en el acto de la compra de un nuevo producto similar al que
se deshecha, bien a un punto municipal de recolección selectiva de equipos eléctricos y
electrónicos para su reciclaje. Al asegurarse de que este producto se desecha correctamente,
usted ayudará a evitar posibles consecuencias negativas para el medio ambiente y la salud
pública, lo cual podría ocurrir si este producto no se gestionara de forma adecuada. Para
obtener información más detallada sobre el reciclaje de este producto, póngase en contacto
con el Ayuntamiento de su Municipio, ó con la tienda donde lo compró.
Page 67

67
Page 68

www.electrolux.com
www.aeg-electrolux.ru
Para comprar accesorios, consumibles y recambios en nuestra tienda online, por favor visite
nuestro site: www.aeg-electrolux.es
210620320-00-032009
 Loading...