

Page 1
S72300DSW1 NL Gebruiksaanwijzing 2
EN User manual 14
FR Notice d'utilisation 26
DE Benutzerinformation 39
EL Οδηγίες Χρήσης 52
IT Istruzioni per l’uso 65
Page 2

www.aeg.com
2
INHOUD
1. VEILIGHEIDSVOORSCHRIFTEN . . . . . . . . . . . . . . . . . . . . . . . . . . . . . . . . . . . . . . . . . . . . . . . . 3
2. BESCHRIJVING VAN HET PRODUCT . . . . . . . . . . . . . . . . . . . . . . . . . . . . . . . . . . . . . . . . . . . 5
3. VOOR HET EERSTE GEBRUIK . . . . . . . . . . . . . . . . . . . . . . . . . . . . . . . . . . . . . . . . . . . . . . . . . 5
4. DAGELIJKS GEBRUIK . . . . . . . . . . . . . . . . . . . . . . . . . . . . . . . . . . . . . . . . . . . . . . . . . . . . . . . . 6
5. AANWIJZINGEN EN TIPS . . . . . . . . . . . . . . . . . . . . . . . . . . . . . . . . . . . . . . . . . . . . . . . . . . . . . 7
6. ONDERHOUD EN REINIGING . . . . . . . . . . . . . . . . . . . . . . . . . . . . . . . . . . . . . . . . . . . . . . . . . 8
7. PROBLEEMOPLOSSING . . . . . . . . . . . . . . . . . . . . . . . . . . . . . . . . . . . . . . . . . . . . . . . . . . . . . 10
8. TECHNISCHE INFORMATIE . . . . . . . . . . . . . . . . . . . . . . . . . . . . . . . . . . . . . . . . . . . . . . . . . . 11
9. MILIEUBESCHERMING . . . . . . . . . . . . . . . . . . . . . . . . . . . . . . . . . . . . . . . . . . . . . . . . . . . . . . 13
VOOR PERFECTE RESULTATEN
Bedankt dat u voor dit AEG product heeft gekozen. Dit apparaat is ontworpen om vele jaren
uitstekend te presteren, met innovatieve technologieën die het leven gemakkelijker helpen
maken – functies die gewone apparaten wellicht niet hebben. Neem een paar minuten de tijd
om het door te lezen zodat u er optimaal van kunt profiteren.
Ga naar onze website voor:
Advies over gebruik, brochures, het oplossen van problemen en
onderhoudsinformatie:
www.aeg.com
Registreer uw product voor een betere service:
www.aeg.com/productregistration
Koop accessoires, verbruiksartikelen en originele reserveonderdelen voor uw
apparaat:
www.aeg.com/shop
KLANTENSERVICE
Wij raden altijd het gebruik van originele onderdelen aan.
Zorg er als u contact opneemt met de klantenservice voor dat u de volgende gegevens bij de
hand hebt.
De informatie staat op het typeplaatje. model, productnummer, serienummer.
Waarschuwing - Belangrijke veiligheidsinformatie.
Algemene informatie en tips
Milieu-informatie
Wijzigingen voorbehouden.
Page 3
NEDERLANDS 3
1.
VEILIGHEIDSVOORSCHRIFTEN
Lees zorgvuldig de meegeleverde instructies voor installatie en gebruik van
het apparaat. De fabrikant is niet verantwoordelijk voor letsel en schade veroorzaakt door een foutieve installatie. Bewaar de instructies van het apparaat
voor toekomstig gebruik.
1.1 Veiligheid van kinderen en
• Installeer het apparaat niet in de nabij-
• Enkel voor apparaten met een wa-
• De achterzijde van het apparaat moet
kwetsbare mensen
WAARSCHUWING!
Gevaar voor verstikking, letsel of
permanente invaliditeit.
• Installeer het apparaat niet op een
Aansluiting aan het
• Dit apparaat kan worden gebruikt
door kinderen van 8 jaar en ouder en
door mensen met beperkte lichamelijke, zintuiglijke of verstandelijke vermogens of een gebrek aan ervaring
en kennis, indien zij onder toezicht
staan of instructies hebben gekregen
over het veilig gebruiken van het apparaat van iemand die verantwoordelijk is voor hun veiligheid.
• Laat kinderen niet met het apparaat
spelen.
• Houd alle verpakkingsmaterialen uit
de buurt van kinderen.
• Reiniging en onderhoud mag niet
worden uitgevoerd door kinderen
zonder toezicht.
elektriciteitsnet
• Dit apparaat moet worden geaard.
• Alle elektrische aansluitingen moeten
• Controleer of de elektrische informatie
• Gebruik altijd een correct geïnstal-
• Gebruik geen meerwegstekkers en
1.2 Montage
WAARSCHUWING!
Alleen een erkende installatietechnicus mag het apparaat installeren.
• Verwijder alle verpakkingsmaterialen.
• Installeer en gebruik geen beschadigd
apparaat.
• Volg de installatie-instructies op die
zijn meegeleverd met het apparaat.
• Wees voorzichtig met het verplaatsen
van het apparaat, het is zwaar. Draag
altijd veiligheidshandschoenen.
• Zorg ervoor dat rond het apparaat
lucht kan circuleren.
• Wacht ten minste 4 uur alvorens het
apparaat aan de netstroom aan te slui-
• Zorg dat u de elektrische onderdelen
• Steek de stekker pas in het stopcon-
• De stroomkabel moet lager blijven
• Trek niet aan het aansluitnoer om het
ten. Hierdoor kan de olie terug in de
compressor stromen.
heid van radiators, fornuizen, ovens of
kookplaten.
teraansluiting: sluit het apparaat uitsluitend aan op een drinkwaterleiding.
tegen de muur worden geplaatst.
plaats met direct zonlicht.
WAARSCHUWING!
Gevaar voor brand en elektrische
schokken.
door een gediplomeerd elektromonteur worden gemaakt.
op het typeplaatje overeenkomt met
de stroomvoorziening. Zo niet, neem
dan contact op met een elektromonteur.
leerd, schokbestendig stopcontact.
verlengsnoeren.
(hoofdstekker, kabel, compressor) niet
beschadigt. Neem contact met de
Servicedienst of een elektrotechnicus
om de elektrische onderdelen te wijzigen.
tact als de installatie is voltooid. Zorg
ervoor dat het netsnoer na installatie
bereikbaar is.
dan het niveau van de stopcontact.
apparaat los te koppelen. Trek altijd
aan de stekker.
Page 4
www.aeg.com
4
1.3 Gebruik
• Dit apparaat is bedoeld voor huishoudelijk gebruik of gelijksoortige toepassingen zoals:
– Personeelskeukens in winkels, kan-
toren of andere werkomgevingen
– Boerderijen
– Door gasten in hotels, motels en an-
dere woonomgevingen.
– Bed-and-breakfast accomodaties.
WAARSCHUWING!
Gevaar op letsel, brandwonden
of elektrische schokken.
• Gebruik dit apparaat in een huishoudelijke omgeving.
• De specificatie van het apparaat mag
niet worden veranderd.
• Plaats geen elektrische apparaten
(bijv. ijsmachines) in het apparaat tenzij uitdrukkelijk geschikt verklaard door
de fabrikant.
• Zorg ervoor dat u het koelcircuit niet
beschadigt. Het bevat isobutaan
(R600a), aardgas met een hoge ecologische compatibiliteit. Dit gas is ontvlambaar.
• Als er schade aan het koelcircuit optreedt, zorg er dan voor dat er zich
geen vlammen en andere ontstekingsbronnen in de kamer bevinden. Ventileer de kamer goed.
• Zet geen hete items op de kunststofonderdelen van het apparaat.
• Plaats geen koolzuurhoudende dranken in het vriesvak. Dit zal extra druk in
de drankfles veroorzaken.
• Bewaar geen ontvlambare gassen en
vloeistoffen in het apparaat.
• Plaats geen ontvlambare producten of
items die vochtig zijn door ontvlambare producten in, bij of op het apparaat.
• Raak de compressor of condensator
niet aan. Ze zijn heet.
• Zorg ervoor dat u nooit met natte of
vochtige handen items uit het vriesvak
verwijderd of aanraakt.
• Wanneer u een ijslolly uit het apparaat
neemt, eet deze dan niet onmiddellijk
op. Wacht enkele minuten.
• Vries ontdooide voedingswaren nooit
opnieuw in.
• Bewaar de voedingswaren volgens de
instructies op de verpakking.
1.4 Onderhoud en reiniging
WAARSCHUWING!
Gevaar voor letsel en schade aan
het apparaat.
• Schakel het apparaat uit en trek de
stekker uit het stopcontact voordat u
onderhoudshandelingen verricht.
• Gebruik geen waterstralen of stoom
om het apparaat te reinigen.
• Maak het apparaat schoon met een
vochtige, zachte doek. Gebruik alleen
neutrale schoonmaakmiddelen. Gebruik geen schuurmiddelen, schuursponsjes, oplosmiddelen of metalen
voorwerpen.
• Controleer regelmatig de afvoer van
de koelkast en reinig deze indien nodig. Indien de afvoer verstopt is, zal er
water op de bodem van het apparaat
liggen.
• Het koelcircuit van dit apparaat bevat
koolwaterstoffen. Enkel bevoegde
personen mogen de eenheid onderhouden en herladen.
1.5 Binnenverlichting
• De gloeilampen of halogeenlampen in
dit apparaat zijn uitsluitend bedoeld
voor gebruik in huishoudelijke apparaten. Gebruik deze niet voor andere
doeleinden.
1.6 Verwijdering
WAARSCHUWING!
Gevaar voor letsel of verstikking.
• Haal de stekker uit het stopcontact.
• Snij het netsnoer van het apparaat af
en gooi dit weg.
• Verwijder de deurgreep om te voorkomen dat kinderen en huisdieren opgesloten raken in het apparaat.
• Het koelcircuit en de isolatiematerialen van dit apparaat zijn ozonvriendelijk.
Page 5
• Het isolatieschuim bevat ontvlambare
gassen. Neem contact met uw plaatselijke overheid voor informatie m.b.t.
correcte afvalverwerking van het apparaat.
• Veroorzaak geen schade aan het deel
van de koeleenheid dat zich naast de
warmtewisselaar bevindt.
2. BESCHRIJVING VAN HET PRODUCT
1
8
7
6
NEDERLANDS 5
2
3
5
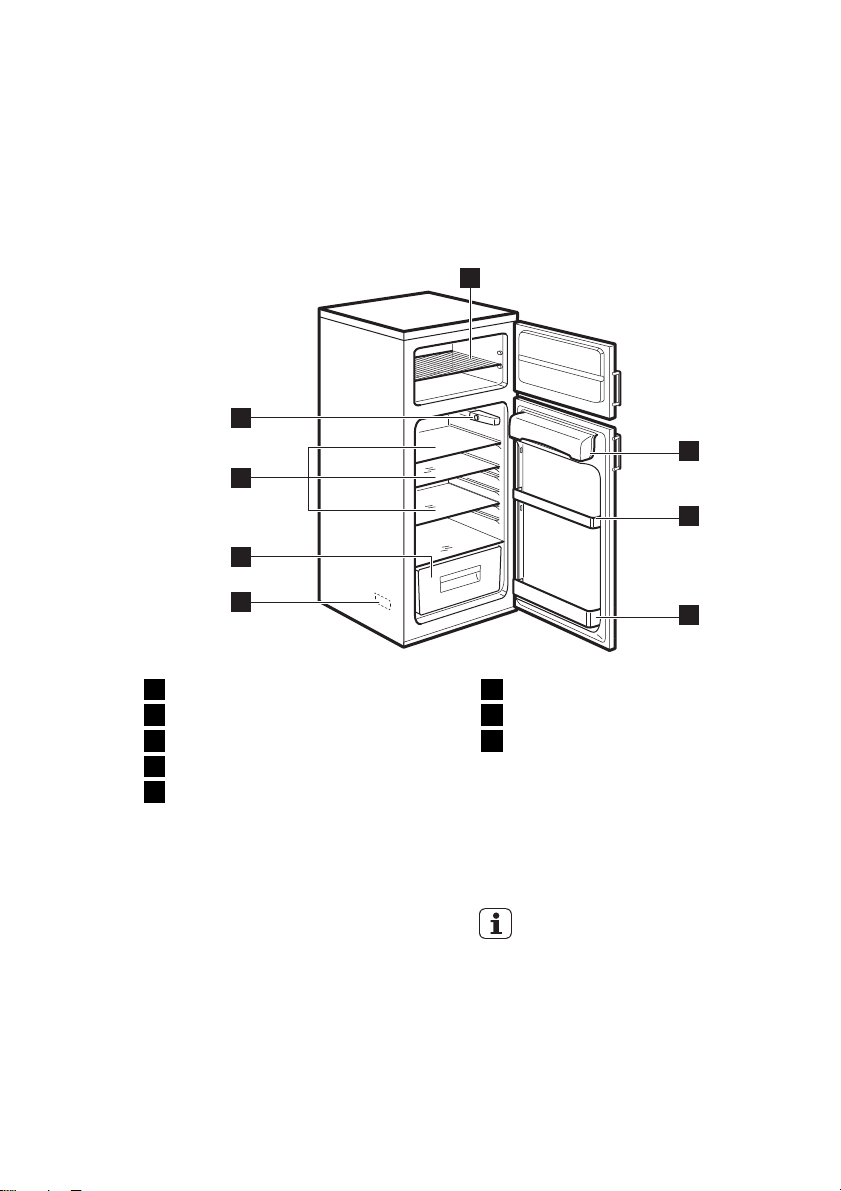
Bakrooster
1
Botercompartiment
2
Deurrooster
3
Flessenrek
4
Typeplaatje
5
3. VOOR HET EERSTE GEBRUIK
3.1
1. Reinig de interne onderdelen van het
apparaat en alle accessoires met
warm water en een neutrale detergent.
2. Zorg ervoor dat het apparaat en de
accessoires geheel droog zijn.
3. Steek de stekker in het stopcontact.
4. Activeer het apparaat en stel de tem-
peratuur in.
4
Groentelade
6
Glazen legroosters
7
Temperatuurknop en binnenverlich-
8
ting
Gebruik geen schuurmiddelen,
schuursponsjes of solventen om
het apparaat en de accessoires
te reinigen.
Page 6
www.aeg.com
6
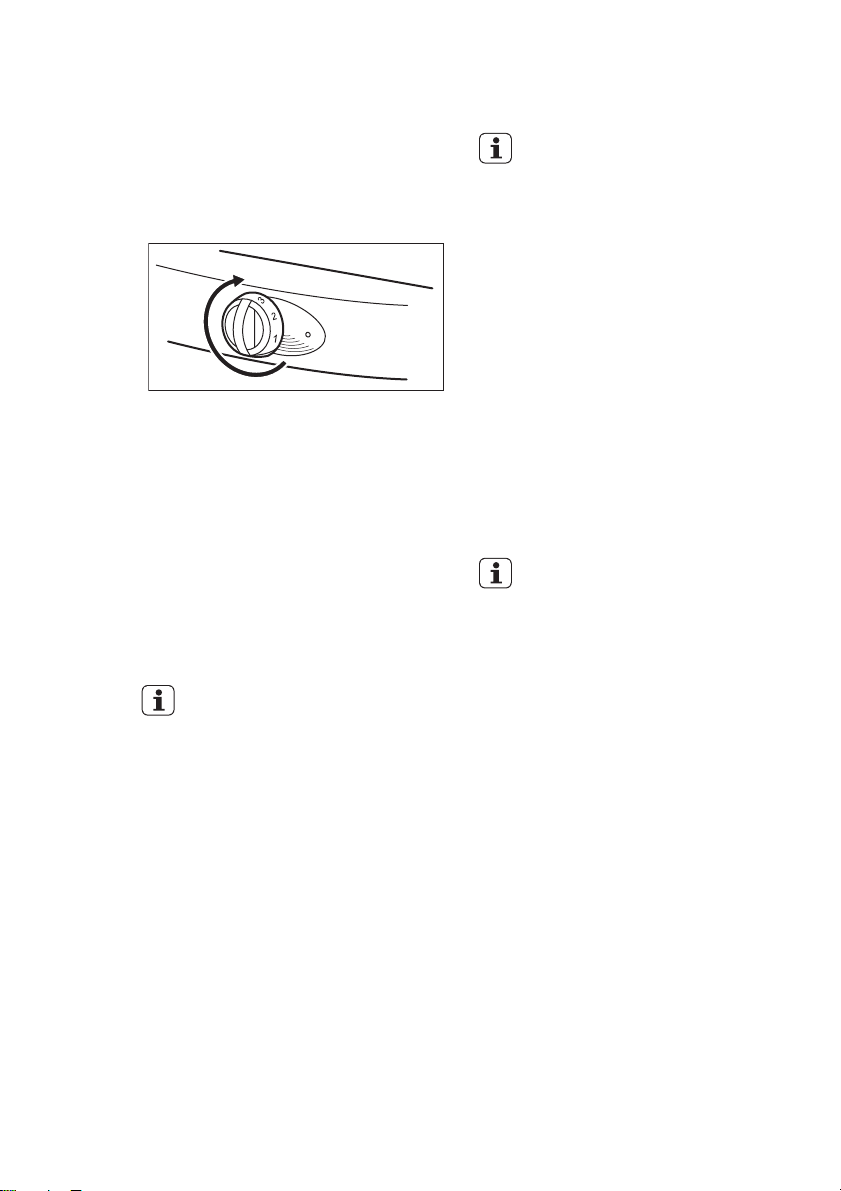
3.2 Activering van het
apparaat en het instellen van
de temperatuur
Draai de temperatuurknop in wijzerzin
om het apparaat te activeren en tegelijk
de temperatuur in te stellen.
De cijfers op de knop verwijzen naar de
verschillende koudestanden.
Draai aan de temperatuurknop om de
instellingen te verlagen voor een minimale lage temperatuur.
4. DAGELIJKS GEBRUIK
Draai aan de temperatuurknop om hogere instellingen voor een maximale lage temperatuur.
We raden u aan om een gemiddelde koudestand te kiezen.
De volgende omstandigheden kunnen
de temperatuurinstelling beïnvloeden.
• De kamertemperatuur en de plaats
waar het apparaat geplaatst is.
• Hoe vaak de deur van het apparaat
geopend wordt.
• De hoeveelheid voedsel in het apparaat.
4.1 Verse voedingswaren
invriezen
De vriezer is geschikt voor het invriezen
van verse voedingswaren en voor de bewaring van (diep)vriesvoeding.
Als de temperatuurknop op een
gemiddelde stand ingesteld
wordt, is het niet nodig om de instelling te wijzigen.
Als u het voedsel sneller wenst in
te vriezen, stel de temperatuur
dan in op een hogere stand. Op
die manier kan de temperatuur
van de koelkast dalen tot 0°C en
meer. Als dit gebeurt, stel de
temperatuurknop in op een lagere stand.
4.2 Het bewaren van
ingevroren voedsel
Als het apparaat nieuw is of langdurig
uitgeschakeld was, plaats dan niet onmiddellijk diepvriesvoeding in de vriezer.
Stel de temperatuur in op de hoogste
stand en laat het apparaat gedurende
minimaal 2 uur werken.
Door een stroomstoring kan de
vriezer ontdooien.
Als de stroom langer uitgeschakeld was dan de "Rijstijdwaarde"
moet u het ontdooide voedsel
onmiddellijk gebruiken of bereiden. Raadpleeg de "TECHNISCHE INFORMATIE" voor deze
waarde.
U kunt de bereide voeding invriezen als ze is afgekoeld.
4.3 Ontdooien
Alvorens (diep)vriesvoeding te bereiden,
moet u ze in de koelkast of bij kamertemperatuur ontdooien.
Het is mogelijk om kleine hoeveelheden
bevrozen voedsel rechtstreeks uit de
vriezer te bereiden, maar hierdoor wordt
de bereidingsduur verlengd.
Page 7
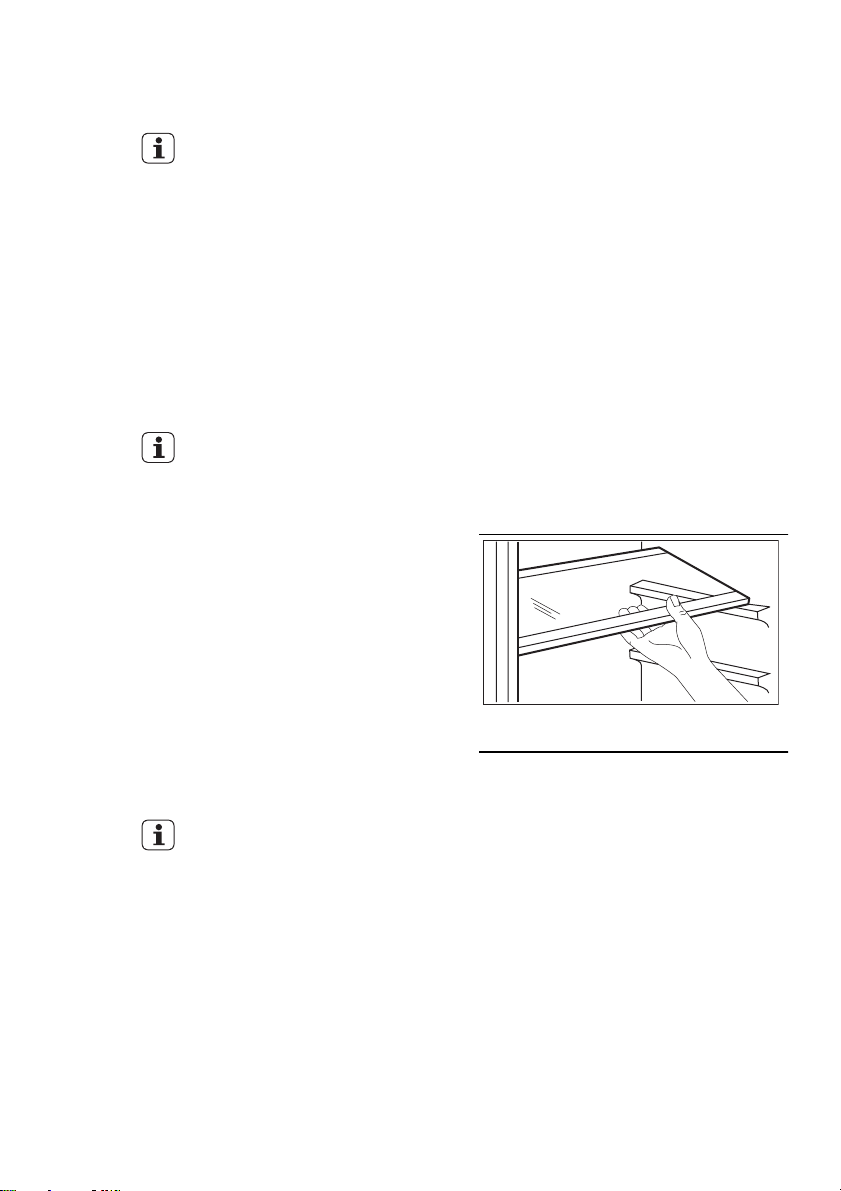
4.4 Glazen legroosters
U kunt de glazen legroosters op verschillende hoogtes plaatsen.
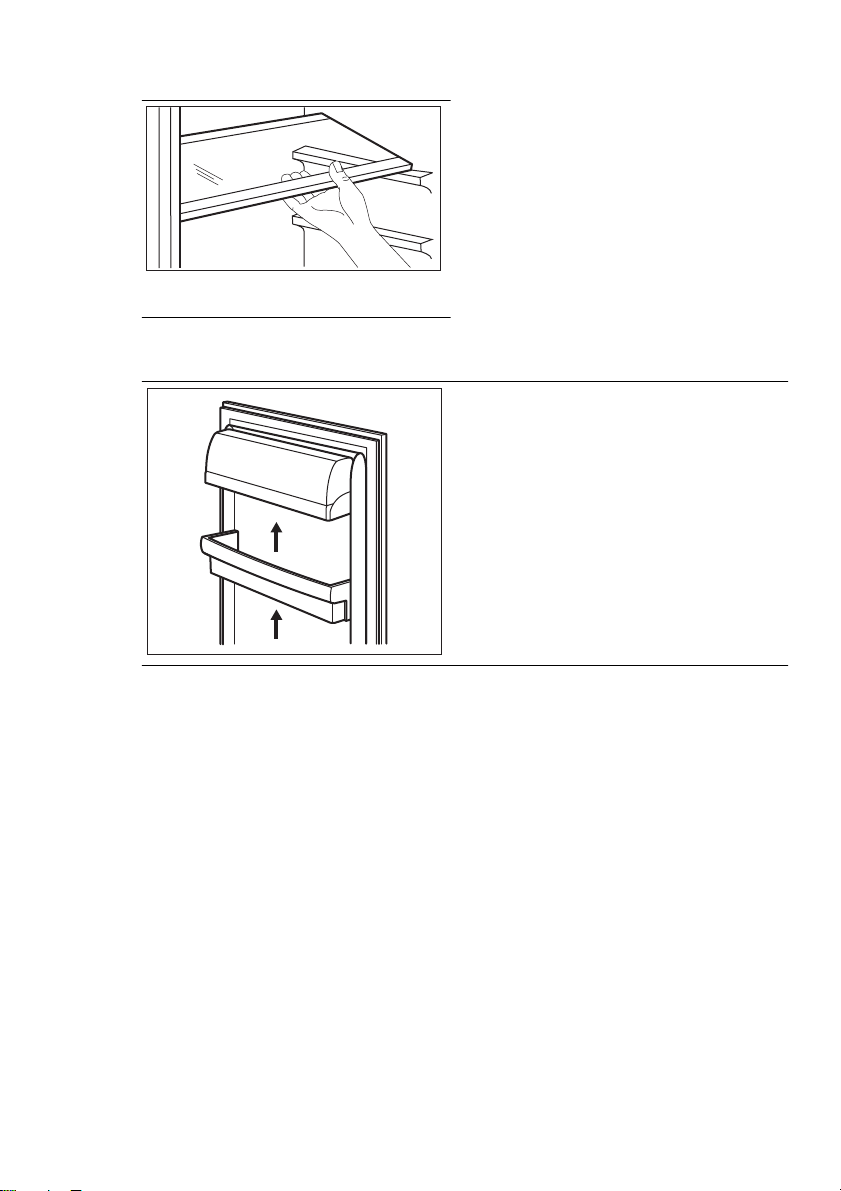
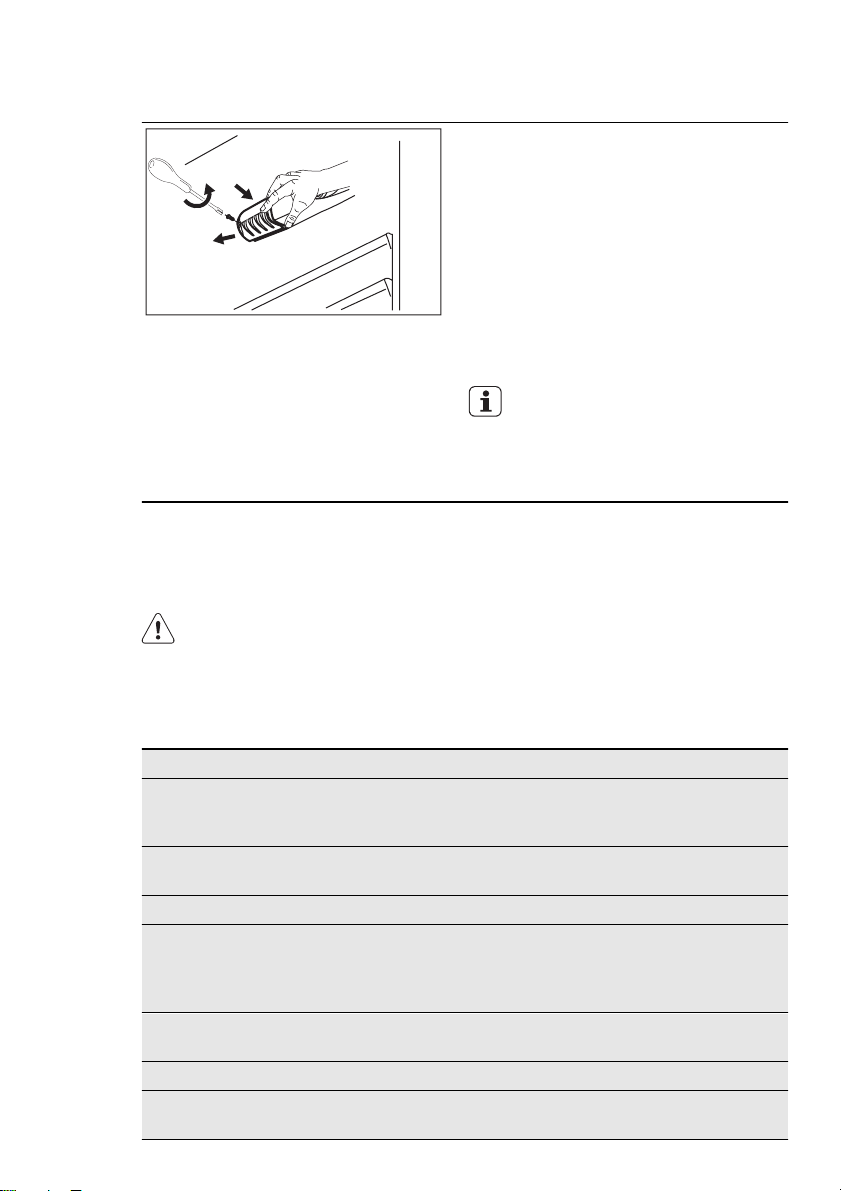
4.5 Het plaatsen van de deurplateaus
U kunt het deurplateau op verschillende
hoogten plaatsen.
1.
Plaats het plateau in de richting van
de pijlen tot het los laat.
2.
Plaats het plateau in de nieuwe
stand.
NEDERLANDS 7
5. AANWIJZINGEN EN TIPS
5.1 Energie besparen
• Open de deur van de koelkast of de
vriezer niet te dikwijls.
• Laat de deur van de koelkast of de
vriezer niet langer dan nodig open
staan.
• Als het apparaat permanent in werking is en er zich rijm aan de interne
achterwand vormt, zijn dit mogelijke
oorzaken:
– De temperatuurknop staat in de
laagste stand.
– De kamertemperatuur is te hoog.
– Het apparaat zit te vol.
Stel de temperatuurknop in op een
hogere stand. De automatische ont-
dooifunctie start en het energieverbruik daalt.
5.2 Koeling
• Zet geen warm voedsel in de koelkast.
Wacht tot het is afgekoeld.
• Plaats geen dampende vloeistoffen in
de koelkast.
• Doe alle voeding met een sterke
smaak of geur in vershouddozen.
• Zorg ervoor dat er lucht rond het
voedsel kan circuleren.
• Doe alle soorten vlees in vershoudzakjes. Plaats ze op het glazen rooster net
boven de groentenlade. Bewaar vlees
niet langer dan 2 dagen in de koelkast.
Page 8
www.aeg.com
8
• Dek bereid voedsel en koude gerechten af en plaats ze op een van de
roosters.
• Was fruit en groenten en bewaar ze in
de groentenlade.
• Bewaar boter en kaas in de speciale
luchtdichte vakken, aluminiumfolie of
vershoudzakjes.
• Zorg ervoor dat melkflessen gesloten
zijn en bewaar ze in het flessenrek in
de deur van het apparaat.
• Bewaar in de koelkast geen bananen,
aardappelen, uien en look zonder verpakking.
5.3 Invriezen
• Het classificatielabel geeft een indicatie van de maximale hoeveelheid voeding die de vriezer in 24 uur kan invriezen.
• De voeding is na 24 uur volledig ingevroren. Plaats tijdens deze periode
geen ander voedsel in de vriezer.
• Plaats het voedsel in kleine hoveelheden in de vriezer. Hierdoor vriest het
voedsel snel in en kan de benodigde
hoeveelheid makkelijk ontdooid worden.
• Verpak het voedsel in aluminiumfolie
of in vershoudzakjes. Zorg ervoor dat
de verpakking luchtdicht is.
• Bewaar geen vers voedsel bij ingevrozen voedsel. Hierdoor stijgt de temperatuur van de ingevroren voeding.
• De bewaringsduur van vette voeding
is korter dan die van vetvrije of verarme voeding. Het zout beperkt de
houdbaarheid van het voedsel.
• We raden aan om op elke verpakking
de invriesdatum van het voedsel te
noteren.
5.4 Het bewaren van
ingevroren voedsel
• Als u ingevroren voedsel koopt, plaats
dit dan zo snel mogelijk in de vriezer.
• Als u ingevroren voedsel ontdooit,
moet u dit zo snel mogelijk bereiden.
Het is niet mogelijk om eerder ingevroren voeding opnieuw in te vriezen.
• Zorg ervoor dat de uiterste houdbaarheidsdatum niet overschreden is. U
vindt deze informatie op de verpakking van het voedsel.
6. ONDERHOUD EN REINIGING
LET OP!
Haal de stekker uit het stopcontact alvorens onderhoudswerkzaamheden te verrichten.
6.1 Reiniging
• Maak het apparaat en alle accessoires
schoon.
• Reinig alle onderdelen van het apparaat en alle accessoires met warm water en een neutrale detergent. Zorg
ervoor dat het apparaat en de accessoires geheel droog zijn.
• Reinig de pakking van de deur regelmatig. Neem contact op met de service-afdeling om een beschadigde pakking te vervangen.
• Maak de condensor (zwart rooster) van
de grill en de compressor aan de ach-
terkant van het apparaat schoon met
een borstel. Hierdoor daalt het energieverbruik en blijft het apparaat in
goede conditie.
• Zorg ervoor dat u de leidingen
of kabels nooit verplaatst of
beschadigd, of eraan trekt.
• Zorg ervoor dat u het koelcircuit niet beschadigt.
• Reinig het apparaat niet met
schuurmiddelen, schuursponsjes, solventen, geparfumeerde
detergenten of boenmiddel.
Na het onderhoud, steek de stekker in
het stopcontact.
Page 9
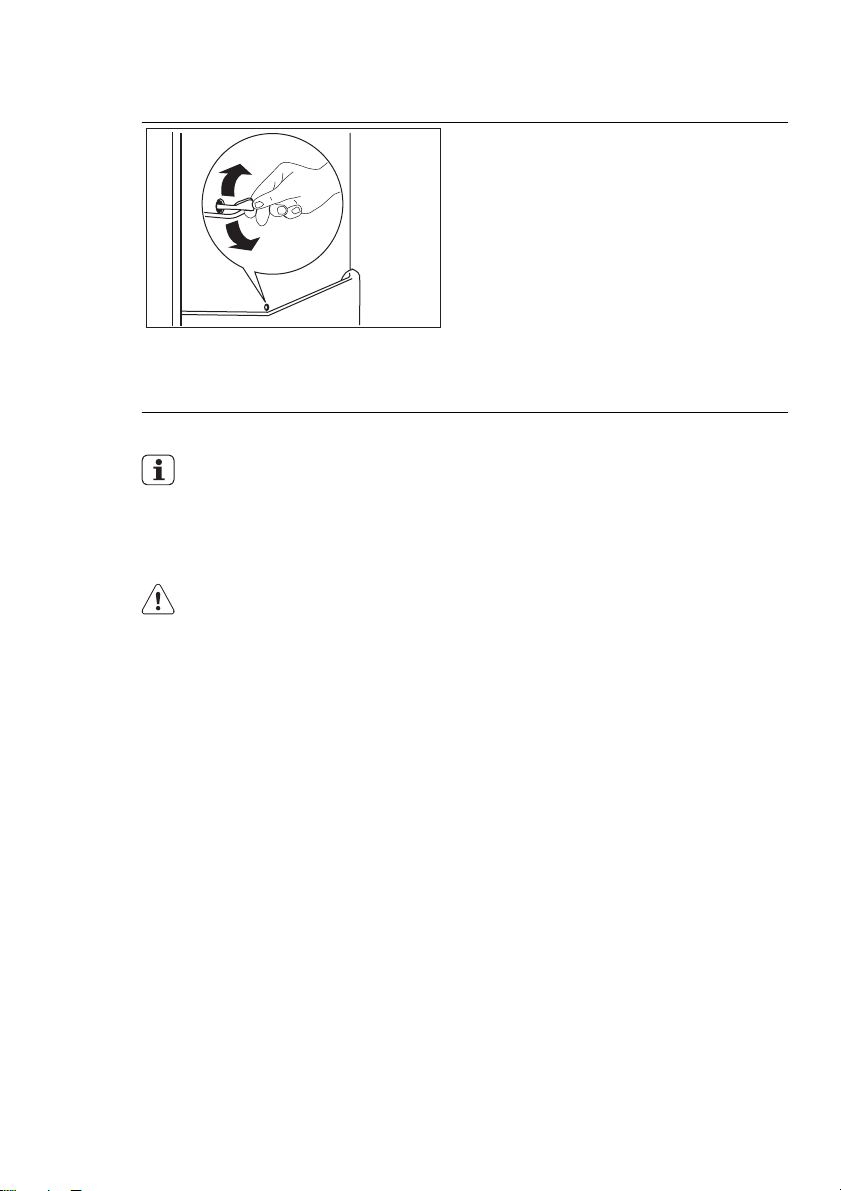
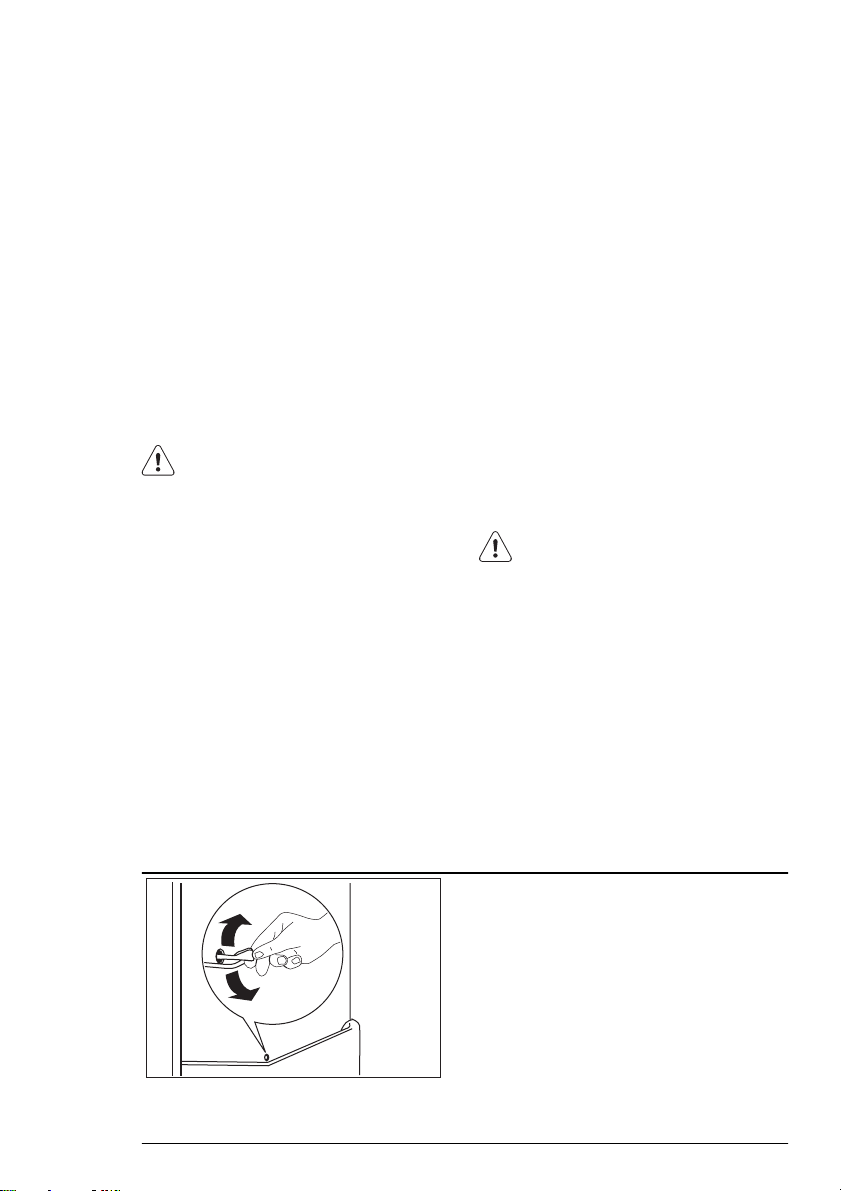
6.2 Automatische ontdooifunctie van de koelkast
Het verwijderen van rijm gebeurt automatisch wanneer de motorcompressor
tijdens de werking stopt.
Het water wordt afgevoerd door het afvoergat en het water wordt verzameld in
de opvangbak waar het verdampt.
De opvangbak bevindt zich achter het
apparaat, boven de motorcompressor.
Het afvoergat bevindt zich achteraan in
de koelkast.
Om ervoor te zorgen dat er geen water
in andere delen van de koelkast terechtkomt, zorg ervoor dat het afvoergat altijd schoon is. Gebruik het reinigingsgereedschap in het afvoergat.
6.3 De vriezer ontdooien
Er kan zich op de vriesroosters
en rond het bovenste deel rijm
bevinden.
Ontdooi de vriezer wanneer de
rijmlaag een dikte van 3 tot 5 mm
bereikt heeft.
4. Reinig en droog de vriezer.
5. Steek de stekker in het stopcontact.
6. Schakel het apparaat in.
7. Stel de temperatuur in op de hoog-
ste stand en laat het apparaat gedurende minimaal 2 tot 3 uur werken.
8. Plaats het voedsel terug in de vriezer.
NEDERLANDS 9
LET OP!
Gebruik geen scherpe metalen
voorwerpen om de rijm te verwijderen.
Gebruik geen mechanische apparaten om de vriezer te ontdooien.
1. Schakel het apparaat uit.
2. Haal al het voedsel uit de vriezer.
Wikkel het voedsel in krantenpapier
en houd het koel.
3. Houd de deur van het apparaat open
tot het volledig ontdooid is.
6.4 Als het apparaat
gedurende lange tijd niet
gebruikt zal worden
1. Schakel het apparaat uit en trek de
stekker uit het stopcontact.
2. Verwijder al het voedsel.
3. Ontdooi het apparaat.
4. Reinig en droog het apparaat en alle
accessoires.
5. Laat de deur open om onaangename
geurtjes te voorkomen.
Page 10
www.aeg.com
10
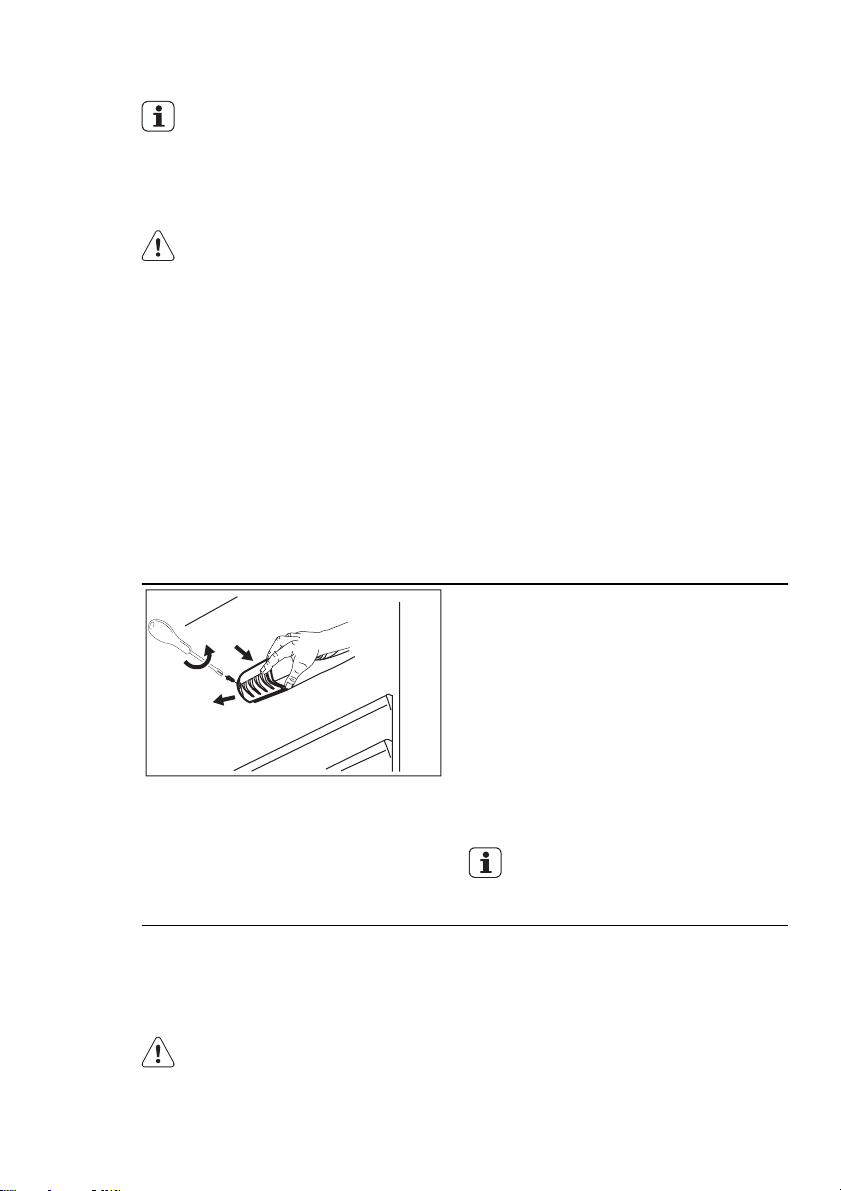
6.5 Het lampje vervangen
7. PROBLEEMOPLOSSING
WAARSCHUWING!
Trek de stekker uit het stopcontact alvorens de controle uit te
voeren.
Voor problemen die niet in de tabel vermeld zijn, neem contact
op met de service-afdeling.
Storing Mogelijke oplossing
Het apparaat maakt lawaai tijdens de werking.
Het apparaat werkt helemaal niet.
Zorg dat de stekker in het stopcontact zit.
Controleer of er spanning is. Sluit een ander elek-
Het lampje brandt niet. Sluit en open de deur om ervoor te zorgen dat de
Het lampje is stuk. Vervang het lampje.
De compressor werkt con-
tinu.
Bepaalde geluiden zijn normaal als het apparaat in
werking is. Raadpleeg de folder die bij het apparaat geleverd wordt.
Zorg ervoor dat het apparaat is ingeschakeld.
trisch apparaat op het stopcontact aan. Om het
stopcontact te repareren, neem contact op met
een erkend elektrotechnicus.
lamp niet in de standby-stand staat.
Stel de temperatuurknop in op een lagere stand.
1.
Trek de stekker uit het stopcontact.
2.
Verwijder de schroef van de afdekking van het lampje.
3.
Haal de afdekking van het lampje
4.
Vervang de oude lamp door een
nieuwe. Gebruik uitsluitend lampen
voor huishoudapparaten. De afdekking van de lamp vermeldt het maximale lampvermogen.
5.
Plaats de afdekking van het lampje
terug.
6.
Steek de stekker in het stopcontact.
De gloeilampen of halogeenlampen in dit apparaat zijn uitsluitend bedoeld voor gebruik in
huishoudelijke apparaten. Gebruik deze niet binnenhuisverlichting.
Page 11

NEDERLANDS 11
Storing Mogelijke oplossing
Zorg dat de deur van het apparaat is gesloten.
Zorg ervoor dat u de deur van het apparaat niet te
Zorg ervoor dat er geen warm voedsel in het ap-
Zorg ervoor dat de kamertemperatuur niet te
Er loopt water over de
achterkant van de koelkast.
Er bevindt zich water in de
koelkast.
Zorg ervoor dat voedsel of verpakkingen niet ver-
Er ligt water op de vloer. De dooiwaterafvoer loopt niet in de verdamperbak
De temperatuur in het apparaat is te laag
De temperatuur in het apparaat is niet laag genoeg.
Zorg dat de deur van het apparaat is gesloten.
Zorg ervoor dat er geen warm voedsel in het ap-
Zorg ervoor dat het apparaat niet te vol zit.
De temperatuur in de
koelkast is niet laag genoeg.
Er is te veel rijmvorming. Zorg ervoor dat het voedsel in speciale bewaardo-
Zorg dat de deur van het apparaat is gesloten.
Stel de temperatuurknop in op een lagere stand.
vaak opent en sluit.
paraat staat. Wacht tot het is afgekoeld.
hoog is.
Dit is normaal als de automatische ontdooifuncties
in werking is.
Controleer of het afvoergat niet verstopt is.
hinderen dat het water in de opvangbak stroomt.
boven de compressor.
Maak de dooiwaterafvoer vast op de verdamperbak.
Stel de temperatuurknop in op een lagere stand.
Stel de temperatuurknop in op een hogere stand.
paraat staat. Wacht tot het voedsel koud is.
Zorg ervoor dat er koude luchtcirculatie is.
zen of in de verpakking zit.
8. TECHNISCHE INFORMATIE
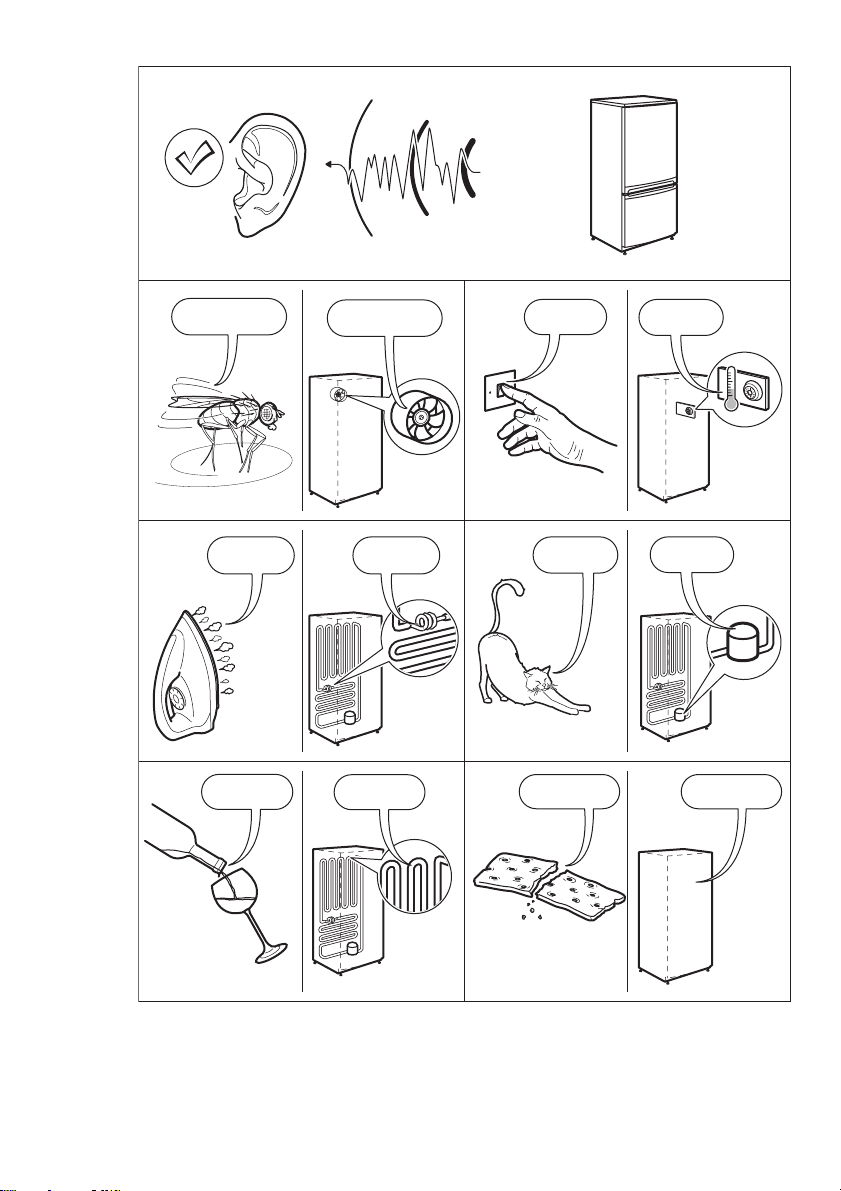
8.1 Normale geluiden
Tijdens normaal gebruik hoort u geluiden (compressor, koelmiddelcirculatie).
Page 12

www.aeg.com
12
SSSRR
HISSS!
R!
CLICK!
BRRR!
OK
SSSRRR!
HISSS!
BLUBB!
SSSRRR!
HISSS!
BLUBB!
BLUBB!
CLICK!
BRRR!
CRACK!
CLICK!
BRRR!
CRACK!CRACK!
8.2 Opstelling
Dit apparaat kan ook in een droge, goed
geventileerde binnenruimte (garage of
kelder) geïnstalleerd worden, maar voor
de beste prestatie kunt u het apparaat
beter installeren op een plaats waar de
omgevingstemperatuur overeenkomt
met de klimaatklasse die staat aangegeven op het typeplaatje van het apparaat.
Page 13
NEDERLANDS 13
Kli-
Omgevingstemperatuur
maatklasse
SN +10°C tot + 32°C
N +16°C tot + 32°C
ST* +16°C tot + 38°C
T +16°C tot + 43°C
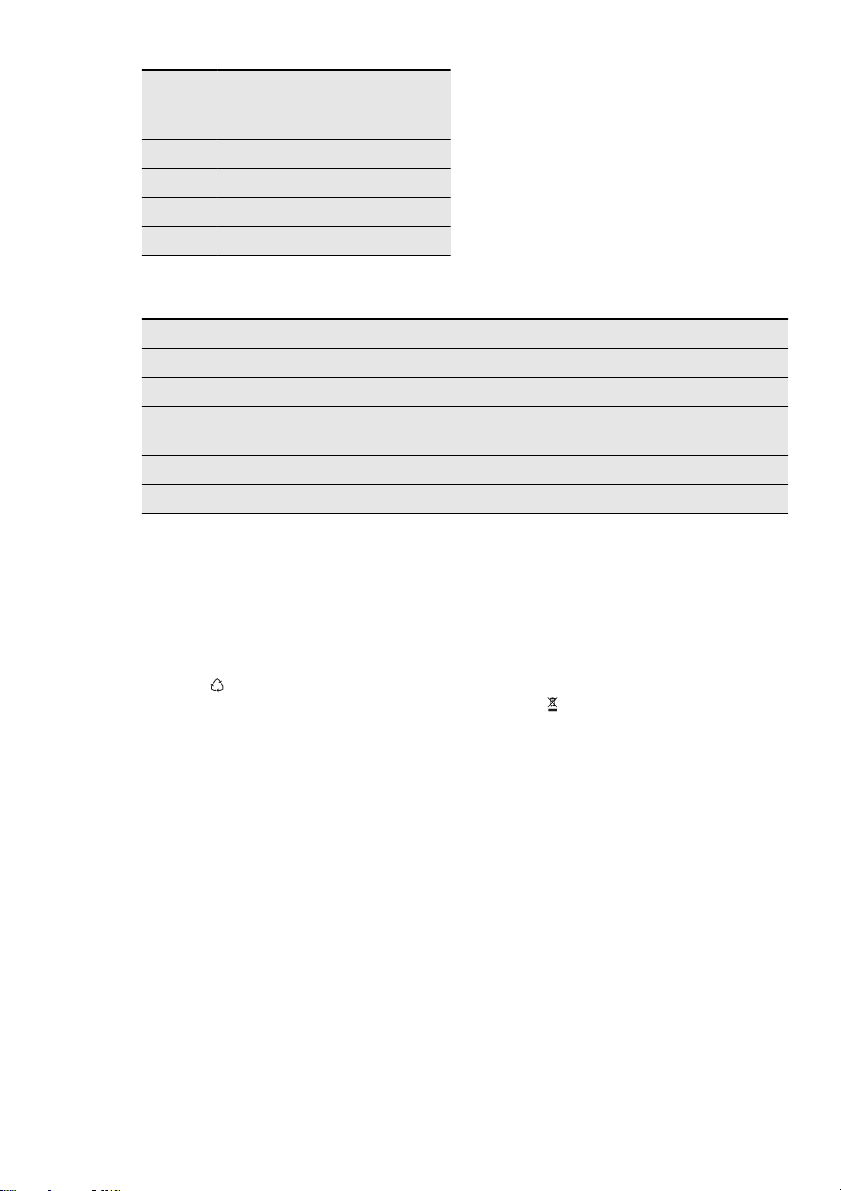
8.3 Technische gegevens
Afmetingen Hoogte 1404 mm
Breedte 545 mm
Diepte 604 mm
Maximale bewaartijd bij
stroomuitval
Voltage 230 V
Frequentie 50 Hz
Voor meer informartie, raadpleeg het
classificatielabel en het energielabel.
9. MILIEUBESCHERMING
19 h
Recycle de materialen met het
symbool
een geschikte verzamelcontainer om
het te recyclen.
Help om het milieu en de
volksgezondheid te beschermen en
recycle het afval van elektrische en
. Gooi de verpakking in
elektronische apparaten. Gooi
apparaten gemarkeerd met het
symbool
huishoudelijk afval. Breng het
product naar het milieustation bij u
in de buurt of neem contact op met
de gemeente.
niet weg met het
Page 14
www.aeg.com
14
CONTENTS
1. SAFETY INSTRUCTIONS . . . . . . . . . . . . . . . . . . . . . . . . . . . . . . . . . . . . . . . . . . . . . . . . . . . . . 15
2. PRODUCT DESCRIPTION . . . . . . . . . . . . . . . . . . . . . . . . . . . . . . . . . . . . . . . . . . . . . . . . . . . . 17
3. BEFORE FIRST USE . . . . . . . . . . . . . . . . . . . . . . . . . . . . . . . . . . . . . . . . . . . . . . . . . . . . . . . . . 17
4. DAILY USE . . . . . . . . . . . . . . . . . . . . . . . . . . . . . . . . . . . . . . . . . . . . . . . . . . . . . . . . . . . . . . . . 18
5. HINTS AND TIPS . . . . . . . . . . . . . . . . . . . . . . . . . . . . . . . . . . . . . . . . . . . . . . . . . . . . . . . . . . . 19
6. CARE AND CLEANING . . . . . . . . . . . . . . . . . . . . . . . . . . . . . . . . . . . . . . . . . . . . . . . . . . . . . . 20
7. TROUBLESHOOTING . . . . . . . . . . . . . . . . . . . . . . . . . . . . . . . . . . . . . . . . . . . . . . . . . . . . . . . 21
8. TECHNICAL INFORMATION . . . . . . . . . . . . . . . . . . . . . . . . . . . . . . . . . . . . . . . . . . . . . . . . . 23
9. ENVIRONMENT CONCERNS . . . . . . . . . . . . . . . . . . . . . . . . . . . . . . . . . . . . . . . . . . . . . . . . . 25
FOR PERFECT RESULTS
Thank you for choosing this AEG product. We have created it to give you impeccable
performance for many years, with innovative technologies that help make life simpler –
features you might not find on ordinary appliances. Please spend a few minutes reading to get
the very best from it.
Visit our website for:
Get usage advice, brochures, trouble shooter, service information:
www.aeg.com
Register your product for better service:
www.aeg.com/productregistration
Buy Accessories, Consumables and Original spare parts for your appliance:
www.aeg.com/shop
CUSTOMER CARE AND SERVICE
We recommend the use of original spare parts.
When contacting Service, ensure that you have the following data available.
The information can be found on the rating plate. Model, PNC, Serial Number.
Warning / Caution-Safety information
General information and tips
Environmental information
Subject to change without notice.
Page 15
ENGLISH 15
1.
SAFETY INSTRUCTIONS
Before the installation and use of the appliance, carefully read the supplied instructions. The manufacturer is not responsible if an incorrect installation and
use causes injuries and damages. Always
keep the instructions with the appliance
for future reference.
1.1 Children and vulnerable
people safety
WARNING!
Risk of suffocation, injury or permanent disability.
• This appliance can be used by children aged from 8 years and above
and persons with reduced physical,
sensory or mental capabilities or lack
of experience and knowledge if they
have been given supervision or instruction for the operation of the appliance by a person who is responsible
for their safety.
• Do not let children play with the appliance.
• Keep all packaging away from children.
• Cleaning and user maintenance shall
not be made by children without supervision.
1.2 Installation
WARNING!
Only a qualified person must install this appliance.
• Remove all the packaging.
• Do not install or use a damaged appliance.
• Obey the installation instruction supplied with the appliance.
• Always be careful when you move the
appliance because it is heavy. Always
wear safety gloves.
• Make sure the air can circulate around
the appliance.
• Wait at least 4 hours before connecting the appliance to the power supply.
This is to allow the oil to flow back in
the compressor.
• Do not install the appliance close to
radiators or cookers, oven or hobs.
• Only for appliances with water con-
nection: connect only to drinking water supply.
• The rear of the appliance must stand
against the wall.
• Do not install the appliance where
there is direct sunlight.
Electrical connection
WARNING!
Risk of fire and electrical shock.
• The appliance must be earthed.
• All electrical connections should be
made by a qualified electrician.
• Make sure that the electrical information on the rating plate agrees with
the power supply. If not, contact an
electrician.
• Always use a correctly installed shockproof socket.
• Do not use multi-plug adapters and
extension cables.
• Make sure not to cause damage to the
electrical components (e.g. mains
plug, mains cable, compressor). Contact the Service or an electrician to
change the electrical components.
• Connect the mains plug to the mains
socket only at the end of the installation. Make sure that there is access to
the mains plug after the installation.
• The mains cable must stay below the
level of the mains plug.
• Do not pull the mains cable to disconnect the appliance. Always pull the
mains plug.
1.3 Use
• This appliance is intended to be used
in household and similar applications
such as:
– Staff kitchen areas in shops, offices
and other working environments
– Farm houses
– By clients in hotels, motels and oth-
er residential type environments
Page 16
www.aeg.com
16
– Bed and breakfast type environ-
ments.
WARNING!
Risk of injury, burns, electrical
shock or fire.
• Use this appliance in a household environment.
• Do not change the specification of this
appliance.
• Do not put electrical appliances (e.g.
ice cream makers) in the appliance unless they are stated applicable by the
manufacturer.
• Be careful not to cause damage to the
refrigerant circuit. It contains isobutane (R600a), a natural gas with a high
level of environmental compatibility.
This gas is flammable.
• If damage occurs to the refrigerant circuit, make sure that there are no
flames and sources of ignition in the
room. Ventilate the room.
• Do not let hot items to touch the plastic parts of the appliance.
• Do not put fizzy drinks in the freezer
compartment. This will create pressure
on the drink container.
• Do not store flammable gas and liquid
in the appliance.
• Do not put flammable products or
items that are wet with flammable
products in, near or on the appliance.
• Do not touch the compressor or the
condenser. They are hot.
• Do not remove or touch items from
the freezer compartment if your hands
are wet or damp.
• When you remove an ice lolly from the
appliance, do not eat it immediately.
Wait a few minutes.
• Do not freeze again food that has
been thawed.
• Obey the storage instructions on the
packaging of frozen food.
1.4 Care and Cleaning
WARNING!
Risk of injury and damage to the
appliance.
• Before maintenance, deactivate the
appliance and disconnect the mains
plug from the mains socket.
• Do not use water spray and steam to
clean the appliance.
• Clean the appliance with a moist soft
cloth. Only use neutral detergents. Do
not use abrasive products, abrasive
cleaning pads, solvents or metal objects.
• Regularly examine the drain of the refrigerator and if necessary, clean it. If
the drain is blocked, defrosted water
collects in the bottom of the appliance.
• This appliance contains hydrocarbons
in the cooling unit. Only a qualified
person must do the maintenance and
the recharging of the unit.
1.5 Internal light
• The type of light bulb or halogen lamp
used for this appliance, is only for
household appliances. Do not use it
for house lighting.
1.6 Disposal
WARNING!
Risk of injury or suffocation.
• Disconnect the appliance from the
mains supply.
• Cut off the mains cable and discard it.
• Remove the door catch to prevent
children and pets to be closed in the
appliance.
• The refrigerant circuit and the insulation materials of this appliance are
ozone-friendly.
• The insulation foam contains flammable gas. Contact your municipal authority for information on how to discard the appliance correctly.
• Do not cause damage to the part of
the cooling unit that is near the heat
exchanger.
Page 17

2. PRODUCT DESCRIPTION
8
7
6
ENGLISH 17
1
2
3
5
Wire shelf
1
Compartment for butter
2
Door shelf
3
Bottle shelf
4
3. BEFORE FIRST USE
3.1
1. Clean the inner parts of the appli-
ance and all the accessories with
warm water and neutral detergent.
2. Make sure that the appliance and the
accessories are fully dry.
3. Connect the mains plug to the mains
socket.
4. Activate the appliance and set the
temperature.
Do not use abrasive products,
abrasive cleaning pads or solvents to clean the appliance and
the accessories.
4
Rating plate
5
Vegetable drawer
6
Glass shelves
7
Temperature knob and internal light
8
3.2 Activating the appliance
and setting the temperature
Turn the temperature knob clockwise to
activate the appliance and, at the same
time, to set the temperature.
The numbers that are on the knob refer
to different temperatures of cold.
Turn the temperature knob to lower settings to obtain minimum cold temperature.
Page 18
www.aeg.com
18
Turn the temperature knob to higher
settings to obtain maximum cold temperature.
We recommend that you set a
medium cold temperature.
The conditions that follow can have an
effect on the temperature setting.
4. DAILY USE
• The room temperature and the location where the appliance is installed.
• How frequently the opening of the appliance door occurs.
• The quantity of food that is in the appliance.
4.1 Freezing the fresh food
The freezer is applicable to freeze fresh
food and for the storage of frozen food
and of deep-frozen food.
If the temperature knob is set at
a medium position, it is not necessary to change the setting.
If you want to freeze the food
more quickly, set the temperature knob at a higher position. In
this condition, the temperature
of the fridge can decrease to 0
°C and more. If this occurs, set
the temperature knob to a lower
position.
4.2 Storage of frozen food
Do not put immediately frozen food in
the freezer if the appliance is new or was
deactivated for a period of time.
Set the temperature knob at the highest
position and let the appliance operate
for minimum 2 hours.
A power failure can cause the defrosting of the freezer.
If the power was off, for a period
of time longer than the “Rising
Time” value, you must use or
cook immediately the defrosted
food. Refer to “TECHNICAL INFORMATION” for the value.
You can freeze the cooked food
when it becomes cool.
4.3 Thawing
Before you cook frozen food or deepfrozen food, thaw the food in the fridge
or at room temperature.
It is possible to cook small quantities of
frozen food directly from the freezer, but
this increases the cooking time.
4.4 Glass shelves
You can put the glass shelves at different heights.
Page 19

4.5 Positioning the door shelves
5. HINTS AND TIPS
ENGLISH 19
You can put the door shelf at different
heights.
1.
Pull the shelf in the direction of the
arrows until it disengages.
2.
Put the shelf in the new position.
5.1 Energy saving
• Do not to open the door of the fridge
or of the freezer frequently .
• Do not keep the door of the fridge or
of the freezer open for more than the
necessary time.
• If the appliance operates continuously
and there is frost on the internal rear
part, the cause can be:
– The temperature knob is set at the
lowest position.
– The room temperature, where the
appliance is installed, is too warm.
– The appliance is full.
Set the temperature knob at a higher
position. The automatic defrosting
starts and the energy consumption decreases.
5.2 Refrigeration
• Do not put hot food in the fridge. Wait
until it becomes cool.
• Do not put in the fridge liquids that
evaporate.
• Put all the food, that has a strong flavour or odour, in containers.
• Make sure that there is air circulation
around the food.
• Put all types of meat in polythene
bags. Put them on the glass shelf
above the vegetable drawer. Do not
keep the meat in the fridge for more
than 2 days.
• Put a cover on cooked food and cold
dishes and put them on one of the
shelves.
• Wash fruit and vegetables and put
them in the vegetable drawer.
• Put butter and cheese in special airtight containers, aluminium foil or polythene bags.
• Make sure that milk bottles have a cap
and put them in the bottle shelf on the
appliance door.
• Do not keep in the fridge bananas,
potatoes, onions and garlic that are
without packaging.
5.3 Freezing
• The rating plate gives the indication of
the maximum quantity of food that the
freezer can freeze in 24 hours.
• The freezing of the food is completed
in 24 hours. Do not put other food in
the freezer during this time.
• Put the food in small quantities in the
freezer. This helps to freeze quickly
the food and to thaw only the necessary quantity.
Page 20
www.aeg.com
20
• Wrap the food in aluminium foil or put
it in polythene bags. Make sure that
the packaging is airtight.
• Do not put fresh food together with
frozen food. This to prevent the temperature of the frozen food to increase.
• The storage time for fat food is shorter
than for non-fat food or for low-fat
food. The salt decreases the storage
time of the food.
• We recommend that you write, on
each packaging, the date of when the
food was frozen.
6. CARE AND CLEANING
5.4 Storage of the frozen food
• When you buy frozen food, make sure
that you put it in the freezer in a very
short time.
• When you thaw frozen food, you must
cook it in a very short time. It is not
possible to freeze again food that was
frozen before.
• Make sure that the use-by date is not
expired. You can find the information
on the packaging of the food.
CAUTION!
Before maintenance, disconnect
the mains plug from the mains
socket.
appliance, with a brush. This helps to
decreases the energy consumption
and keeps the appliance in good conditions.
6.1 Cleaning
• Clean the appliance and the accessories regularly.
• Clean all the parts of the appliance
and all the accessories only with warm
water and neutral detergent. Make
sure that the appliance and the accessories are fully dry.
• Clean the gasket of the door regularly.
To replace a damaged gasket, contact
the Service.
• Clean the grill of the condenser and
the compressor, that are behind the
After maintenance, connect the mains
plug to the mains socket.
6.2 Automatic defrosting of the fridge
The removal of frost occurs automatically
when the motor compressor stops during operation.
The water drains out through the drain
hole and collects in the water container
where it evaporates.
The water container is behind the appliance, above the motor compressor.
The drain hole is in the fridge on the rear
part.
To prevent water to collect in other parts
of the fridge, make sure that the drain
hole is always clean. Use the cleaning
tool that is in the drain hole.
• Be careful not to pull, move or
to cause damage to the pipes
or the cables.
• Be careful not to cause damage to the cooling unit.
• Do not clean the appliance
with abrasive products, abrasive cleaning pads, solvents,
detergents with perfume or
wax polish.
Page 21
6.3 Defrosting of the freezer
There can be frost on the freezer
shelves and around the top compartment.
Defrost the freezer when the layer of frost has a thickness of 3 or
5 mm.
CAUTION!
Do not use sharp metal tools to
remove the frost.
Do not use mechanical devices
to defrost the freezer.
1. Deactivate the appliance.
2. Remove all the food from the freezer.
Wrap the food in newspaper and
keep it at a cold temperature.
3. Keep the appliance door open until
defrosting is completed.
4. Clean and fully dry the freezer.
5. Connect the mains plug to the mains
socket.
6.5 Replacing the lamp
ENGLISH 21
6. Activate the appliance.
7. Set the temperature knob at the
highest position and let the appliance operate for 2 or 3 hours with
this setting.
8. Put back the food in the freezer.
6.4 When the appliance is not
used for long periods
1. Deactivate the appliance and disconnect the mains plug from the mains
socket.
2. Remove all the food.
3. Defrost the appliance.
4. Fully clean and dry the appliance and
all the accessories.
5. Keep the doors open to prevent unpleasant smells.
1.
Disconnect the mains plug from the
mains socket.
2.
Remove the screw from the lamp
cover.
3.
Remove the lamp cover
4.
Replace the old lamp with a new
one. Use only lamps for household
appliances. The lamp cover shows
the maximum power of the lamp.
5.
Install again the lamp cover.
6.
Connect the mains plug to the mains
socket.
The type of light bulb or halogen
lamp used for this appliance, is
only for household appliances.
Do not use it for house lightning.
7. TROUBLESHOOTING
WARNING!
Disconnect the mains plug from
the mains socket before you do
the check.
For problems that are not in the
table, contact the Service.
Page 22
www.aeg.com
22
Problem Possible solution
The appliance makes
noise during operation.
Some sounds are normal when the appliance is
operating. Refer to the leaflet supplied with the
appliance.
The appliance does not
Make sure that the appliance is activated.
operate.
Make sure that the mains plug is connected to the
mains socket.
Do a check and see if there is voltage. Connect a
different appliance to the same mains socket. To
repair a mains socket, contact a qualified electrician.
The lamp does not come
on.
Close and open the door to make sure that the
lamp is not in standby.
The lamp is defective. Replace the lamp.
The compressor operates
Set the temperature knob at a lower position.
continuously.
Make sure that the appliance door is closed.
Make sure not to open and close the appliance
door too frequently.
Make sure not to put hot food in the appliance.
Wait until it becomes cool.
Make sure that the room temperature is not too
warm.
Water collects on the rear
plate of the fridge.
Water collects in the
It is normal that this occurs when the automatic de-
frosting operates.
Make sure that the drain hole is not clogged.
fridge.
Make sure that food or packaging do not prevent
the water to collect in the water container.
There is water on the
floor.
The melting water outlet does not flow in the
evaporative tray above the compressor.
Attach the melting water outlet to the evaporative
tray.
The temperature in the
Set the temperature knob to a lower position.
appliance is too cold
The temperature in the
Set the temperature knob to a higher position.
appliance is not sufficiently cold.
Make sure that the appliance door is closed.
Make sure not to put hot food in the appliance.
Wait for the food to become cool.
Make sure that the appliance is not too full.
Page 23

Problem Possible solution
The temperature in the
fridge is not sufficiently
cold.
There is too much frost. Make sure that the food is closed in special con-
Make sure that the appliance door is closed.
Set the temperature knob to a lower position.
Make sure that there is cold air circulation.
tainers or packaging.
8. TECHNICAL INFORMATION
8.1 Normal sounds
There are some sounds during normal
running (compressor, refrigerant circulation).
ENGLISH 23
Page 24
www.aeg.com
24
SSSRR
HISSS!
R!
CLICK!
BRRR!
OK
SSSRRR!
HISSS!
BLUBB!
SSSRRR!
HISSS!
BLUBB!
BLUBB!
CLICK!
BRRR!
CRACK!
CLICK!
BRRR!
CRACK!CRACK!
8.2 Positioning
This appliance can be installed in a dry,
well ventilated indoor (garage or cellar)
also, but for optimum performance install this appliance at a location where
the ambient temperature corresponds to
the climate class indicated on the rating
plate of the appliance:
Page 25

ENGLISH 25
Cli-
Ambient temperature
mate
class
SN +10°C to + 32°C
N +16°C to + 32°C
ST +16°C to + 38°C
T +16°C to + 43°C
8.3 Technical data
Dimensions Height 1404 mm
Width 545 mm
Depth 604 mm
Rising Time 19 h
Voltage 230 V
Frequency 50 Hz
For more information, refer to the rating
plate and to the energy label.
9. ENVIRONMENT CONCERNS
Recycle the materials with the
symbol
applicable containers to recycle it.
Help protect the environment and
human health and to recycle waste
of electrical and electronic
. Put the packaging in
appliances. Do not dispose
appliances marked with the symbol
with the household waste. Return the
product to your local recycling
facility or contact your municipal
office.
Page 26

www.aeg.com
26
SOMMAIRE
1. INSTRUCTIONS DE SÉCURITÉ . . . . . . . . . . . . . . . . . . . . . . . . . . . . . . . . . . . . . . . . . . . . . . . . 27
2. DESCRIPTION DE L'APPAREIL . . . . . . . . . . . . . . . . . . . . . . . . . . . . . . . . . . . . . . . . . . . . . . . . 29
3. AVANT LA PREMIÈRE UTILISATION . . . . . . . . . . . . . . . . . . . . . . . . . . . . . . . . . . . . . . . . . . . 29
4. UTILISATION QUOTIDIENNE . . . . . . . . . . . . . . . . . . . . . . . . . . . . . . . . . . . . . . . . . . . . . . . . 30
5. CONSEILS . . . . . . . . . . . . . . . . . . . . . . . . . . . . . . . . . . . . . . . . . . . . . . . . . . . . . . . . . . . . . . . . . 31
6. ENTRETIEN ET NETTOYAGE . . . . . . . . . . . . . . . . . . . . . . . . . . . . . . . . . . . . . . . . . . . . . . . . . 32
7. EN CAS D'ANOMALIE DE FONCTIONNEMENT . . . . . . . . . . . . . . . . . . . . . . . . . . . . . . . . . 34
8. CARACTERISTIQUES TECHNIQUES . . . . . . . . . . . . . . . . . . . . . . . . . . . . . . . . . . . . . . . . . . . 36
9. EN MATIÈRE DE PROTECTION DE L'ENVIRONNEMENT . . . . . . . . . . . . . . . . . . . . . . . . . 38
POUR DES RÉSULTATS PARFAITS
Merci d'avoir choisi ce produit AEG. Nous l'avons conçu pour qu'il vous offre des
performances irréprochables pour longtemps, en intégrant des technologies innovantes qui
vous simplifient la vie grâce à des caractéristiques que vous ne trouverez pas forcément sur
des appareils ordinaires. Veuillez prendre quelques instants pour lire cette notice afin d'utiliser
au mieux votre appareil.
Visitez notre site Internet pour :
Obtenir des conseils d'utilisation, des brochures, de l'aide, des informations :
www.aeg.com
Enregistrer votre produit pour obtenir un meilleur service :
www.aeg.com/productregistration
Acheter des accessoires, consommables et pièces de rechange d'origine pour votre
appareil :
www.aeg.com/shop
SERVICE APRÈS-VENTE
N'utilisez que des pièces de rechange d'origine.
Avant de contacter le service, assurez-vous de disposer des informations suivantes :
Vous trouverez ces informations sur la plaque signalétique. Modèle, PNC, numéro de série.
Avertissement/Attention : consignes de sécurité.
Informations générales et conseils
Informations écologiques
Sous réserve de modifications.
Page 27

FRANÇAIS 27
1.
INSTRUCTIONS DE SÉCURITÉ
Avant d'installer et d'utiliser cet appareil,
lisez soigneusement les instructions fournies. Le fabricant ne peut être tenu pour
responsable des dommages et blessures
liés à une mauvaise installation ou utilisation. Conservez toujours cette notice
avec votre appareil pour vous y référer
ultérieurement.
1.1 Sécurité des enfants et
des personnes vulnérables
AVERTISSEMENT
Risque d'asphyxie, de blessure
ou d'invalidité permanente.
• Cet appareil n'est pas destiné à être
utilisé par des enfants ou des personnes dont les capacités physiques, sensorielles ou mentales, ou le manque
d'expérience et de connaissance les
empêchent d'utiliser l'appareil sans
risque lorsqu’ils sont sans surveillance
ou en l’absence d’instruction d’une
personne responsable qui puisse leur
assurer une utilisation de l’appareil
sans danger.
• Ne laissez pas les enfants jouer avec
l'appareil.
• Ne laissez pas les emballages à la portée des enfants.
• Les enfants ne doivent pas nettoyer ni
entreprendre une opération de maintenance sur l'appareil sans surveillance.
1.2 Installation
AVERTISSEMENT
L'appareil doit être installé uniquement par un professionnel
qualifié.
• Retirez l'intégralité de l'emballage.
• N'installez pas et ne branchez pas un
appareil endommagé.
• Suivez scrupuleusement les instructions d'installation fournies avec l'appareil.
• Soyez toujours vigilants lorsque vous
déplacez l'appareil car il est lourd.
Portez toujours des gants de sécurité.
• Assurez-vous que l'air circule autour
de l'appareil.
• Attendez au moins 4 heures avant de
brancher l'appareil sur le secteur. Cela
permet à l'huile de refouler dans le
compresseur.
• N'installez pas l'appareil à proximité
d'un radiateur, d'une cuisinière, d'un
four ou d'une table de cuisson.
• Uniquement pour les appareils avec
branchement d'eau : connectez l'appareil à une arrivée d'eau potable uniquement.
• La surface arrière de l'appareil doit
être positionnée contre un mur.
• N'installez pas l'appareil dans un endroit exposé à la lumière directe du
soleil.
Branchement électrique
AVERTISSEMENT
Risque d'incendie ou d'électrocution.
• L'appareil doit être relié à la terre.
• L'ensemble des branchements électriques doit être effectué par un technicien qualifié.
• Vérifiez que les données électriques figurant sur la plaque signalétique correspondent à celles de votre réseau. Si
ce n'est pas le cas, contactez un électricien.
• Utilisez toujours une prise de courant
de sécurité correctement installée.
• L'appareil ne doit pas être raccordé à
l'aide d'un prolongateur, d'une prise
multiple ou d'un raccordement multiple (risque d'incendie).
• Veillez à ne pas endommager les composants électriques tels que la fiche
secteur, le câble d'alimentation ou le
compresseur. Contactez le service
après-vente ou un électricien pour
changer les composants électriques.
• Ne branchez la fiche d'alimentation à
la prise de courant qu'à la fin de l'installation. Assurez-vous que la prise de
courant est accessible une fois l'appareil installé.
Page 28

www.aeg.com
28
• Le câble d'alimentation doit rester en
dessous du niveau de la fiche secteur.
• Ne tirez pas sur le câble d'alimentation électrique pour débrancher l'appareil. Tirez toujours sur la prise de
courant.
1.3 Utilisation
• Cet appareil est conçu uniquement
pour un usage domestique et des utilisations similaires telles que :
– Cuisines réservées aux employés
dans des magasins, bureaux et au-
tres lieux de travail
– Bâtiments de ferme
– Pour une utilisation privée, par les
clients, dans des hôtels et autres
lieux de séjour
– En chambre d'hôte.
AVERTISSEMENT
Risque de blessures, de brûlures,
d'électrocution ou d'incendie.
• Utilisez cet appareil dans un environnement domestique.
• Ne modifiez pas les caractéristiques
de cet appareil.
• Ne placez aucun appareil électrique
(sorbetière, etc.) dans l'appareil, en
l'absence d'indications du fabricant.
• Veillez à ne pas endommager le circuit
frigorifique. Il contient de l'isobutane
(R600a), un gaz naturel ayant un niveau
élevé de compatibilité environnementale. Ce gaz est inflammable.
• Si le circuit frigorifique est endommagé, assurez-vous de l'absence de flammes et de sources d'ignition dans la
pièce. Aérez la pièce.
• Évitez tout contact d'éléments chauds
avec les parties en plastique de l'appareil.
• Ne placez jamais de boissons gazeuses dans le congélateur. Cela engendrerait une pression sur le récipient de
la boisson.
• Ne stockez jamais de gaz ou de liquide inflammable dans l'appareil.
• Ne placez pas de produits inflammables ou d'éléments imbibés de produits inflammables à l'intérieur ou à
proximité de l'appareil, ni sur celui-ci.
• Ne touchez pas le compresseur ni le
condenseur. Ils sont chauds.
• Ne retirez pas et ne touchez pas les
éléments du compartiment congélateur avec les mains mouillées ou humides (risque d'arrachement de la peau).
• Lorsque vous retirez un bâtonnet glacé de l'appareil, ne le mangez pas immédiatement (risque de brûlure). Attendez quelques minutes.
• Ne recongelez jamais un aliment qui a
été décongelé.
• Respectez les instructions de stockage
figurant sur l'emballage des aliments
surgelés.
1.4 Entretien et nettoyage
AVERTISSEMENT
Risque de blessure corporelle et
de dommages matériels.
• Avant toute opération d'entretien,
mettez à l'arrêt l'appareil et débranchez la fiche de la prise secteur.
• Ne pulvérisez pas d'eau ni de vapeur
pour nettoyer l'appareil.
• Nettoyez l'appareil avec un chiffon
doux humide. Utilisez uniquement des
produits de nettoyage neutres. N'utilisez pas de produits abrasifs, de tampons à récurer, de solvants ni d'objets
métalliques.
• Vérifiez régulièrement l'orifice d'écoulement d'eau de dégivrage du réfrigérateur et si nécessaire, nettoyez-le. Si
l'orifice est bouché, l'eau provenant
du dégivrage s'écoulera en bas de
l’appareil.
• Cet appareil contient des hydrocarbures dans son circuit de réfrigération.
L'entretien et la recharge du circuit de
réfrigération doivent être effectués
par un professionnel qualifié.
1.5 Éclairage interne
• Les ampoules classiques ou halogènes
utilisées dans cet appareil sont destinées uniquement à un usage avec des
appareils ménagers. Ne les utilisez pas
pour éclairer votre logement.
Page 29

1.6 Mise au rebut
AVERTISSEMENT
Risque de blessure ou d'asphyxie.
• Débranchez l'appareil de l'alimentation secteur.
• Coupez le câble d'alimentation et
mettez-le au rebut.
• Retirez le dispositif de verrouillage de
la porte pour empêcher les enfants et
les animaux de s'enfermer dans l'appareil.
2. DESCRIPTION DE L'APPAREIL
8
7
FRANÇAIS 29
• Le circuit frigorifique et les matériaux
d'isolation de cet appareil préservent
la couche d'ozone.
• La mousse isolante contient un gaz inflammable. Pour obtenir plus de détails sur le recyclage de ce produit,
veuillez prendre contact avec les services de votre commune ou le magasin
où vous avez effectué l'achat.
• N'endommagez pas la partie du circuit de réfrigération située à proximité
du condenseur thermique.
1
2
6
5
Grille métallique
1
Compartiment à beurre
2
Balconnet de porte
3
Compartiment à bouteilles
4
Plaque signalétique
5
Bac à légumes
6
Clayettes en verre
7
Thermostat et éclairage interne
8
3. AVANT LA PREMIÈRE UTILISATION
3.1
1. Nettoyez l'intérieur de l'appareil et
tous les accessoires avec de l'eau
chaude et un détergent doux.
2. Assurez-vous que l'appareil et les ac-
cessoires sont entièrement secs.
3. Branchez l'appareil sur le secteur.
3
4
Page 30

www.aeg.com
30
4. Mettez en fonctionnement l'appareil
et réglez la position du dispositif de
réglage de température.
N'utilisez pas de produits abrasifs, de tampons à récurer ni de
solvants pour nettoyer l'appareil
et les accessoires.
3.2 Mise en fonctionnement
de l'appareil et réglage de la
température
Tournez la manette du thermostat dans
le sens des aiguilles d'une montre pour
mettre l'appareil en fonctionnement et,
réglez la position du thermostat.
Les chiffres figurant sur la manette correspondent aux différents niveaux de
froid.
Tournez la manette du thermostat vers
le réglage minimal pour obtenir moins
de froid.
Tournez la manette du thermostat vers
le réglage maximal pour obtenir plus de
froid.
Nous vous recommandons de
sélectionner une température intermédiaire.
Les conditions suivantes peuvent avoir
un effet sur le réglage du thermostat.
• La température ambiante et le lieu où
est installé l'appareil.
• La fréquence d'ouverture de la porte
de l'appareil.
• La quantité d'aliments stockés dans
l'appareil.
4. UTILISATION QUOTIDIENNE
4.1 Congélation d'aliments
frais
Le congélateur est adapté à la congélation d'aliments frais et à la conservation
d'aliments surgelés ou congelés.
Si la manette du thermostat est
réglée sur une position intermédiaire, il n'est pas nécessaire de
modifier le réglage.
Si vous souhaitez congeler les aliments plus rapidement, réglez la
manette du thermostat sur une
position de réglage plus élevée.
Dans ce cas, la température du
réfrigérateur peut descendre en
dessous de 0 °C. Si cela se produit, positionnez le thermostat
sur un niveau inférieur.
4.2 Conservation d'aliments
congelés et surgelés
N'introduisez pas immédiatement des
aliments congelés dans le congélateur si
l'appareil est neuf ou a été à l'arrêt pendant un certain temps.
Réglez le thermostat sur une position de
réglage maximal et laissez l'appareil
fonctionner pendant au moins 2 heures.
Page 31

Une coupure de courant peut
provoquer la décongélation.
Si le courant a été coupé pendant une durée supérieure à la
valeur d'« autonomie de fonctionnement », vous devez consommer ou faire cuire immédiatement les aliments décongelés.
Reportez-vous au chapitre « CARACTÉRISTIQUES TECHNIQUES » pour connaître cette valeur.
Vous pouvez congeler des aliments cuits lorsqu'ils ont refroidi.
Il est possible de faire cuire de petites
quantités d'aliments congelés directement sortis du congélateur, mais cela
augmente le temps de cuisson.
4.4 Clayettes en verre
4.3 Décongélation
Avant de faire cuire des aliments congelés ou surgelés, faites-les décongeler
dans le réfrigérateur ou à température
ambiante.
Les clayettes en verre peuvent être positionnées à différentes hauteurs.
4.5 Mise en place des balconnets de la porte
Les balconnets de la porte peuvent être
positionnés à différentes hauteurs.
1.
Faites glisser le balconnet dans le
sens de la flèche jusqu'à ce qu'il se
libère.
2.
Placez le balconnet dans la nouvelle
position.
FRANÇAIS 31
5. CONSEILS
5.1 Économies d'énergie
• Évitez d'ouvrir trop fréquemment la
porte du réfrigérateur ou du congélateur.
• Limitez l'ouverture de la porte du réfrigérateur ou du congélateur au strict
nécessaire.
• Si l'appareil fonctionne en permanence, avec présence de givre sur la partie arrière interne, cela peut provenir
d'une des causes suivantes :
– Le thermostat est réglé sur la posi-
tion de réglage le plus faible.
– La température ambiante est trop
élevée dans la pièce où l'appareil
est installé.
– L'appareil est plein.
Réglez le thermostat sur une position
de réglage plus élevé. Le dégivrage
automatique démarre et la consommation d'énergie diminue.
Page 32

www.aeg.com
32
5.2 Réfrigération
• N'introduisez pas d'aliments chauds
dans le réfrigérateur. Attendez qu'ils
refroidissent.
• Ne placez pas de liquides qui s'évaporent dans le réfrigérateur.
• Placez les aliments ayant un parfum ou
une odeur prononcés dans des récipients.
• Assurez-vous que l'air circule autour
des aliments.
• Placez tous les types de viande dans
des sachets en plastique. Disposez les
sachets en plastique sur la clayette en
verre au-dessus du bac à légumes. Ne
conservez pas la viande au réfrigérateur pendant plus de 2 jours.
• Couvrez les aliments cuits et les préparations froides et placez-les sur
l'une des clayettes.
• Lavez les fruits et légumes et placezles dans le bac à légumes.
• Placez le beurre et le fromage dans
des récipients hermétiques spéciaux,
des feuilles d'aluminium ou des sachets en plastique.
• Assurez-vous que les bouteilles de lait
ont un bouchon et placez-les dans le
compartiment à bouteilles sur la porte
de l'appareil.
• Ne conservez pas dans le réfrigérateur
des bananes, des pommes de terre,
des oignons ou de l'ail non emballés.
5.3 Freezing
• La plaque signalétique indique la
quantité maximale d'aliments que le
congélateur peut congeler en 24 heures.
• Les aliments sont entièrement congelés en 24 heures. N'introduisez aucun
autre aliment dans le congélateur
pendant ce temps.
• Introduisez les aliments en petites
quantités dans le congélateur. Cela
permet de congeler rapidement les
aliments et de décongeler uniquement la quantité nécessaire.
• Enveloppez les aliments dans des
feuilles d'aluminium ou des sachets en
plastique. Assurez-vous que l'emballage est hermétique.
• Ne placez pas d'aliments frais avec
des aliments congelés. Cela permet
d'éviter une hausse de température
des aliments congelés.
• Les aliments gras se conservent moins
longtemps que les aliments non gras
ou allégés. Le sel diminue la durée de
conservation des aliments.
• Nous recommandons d'inscrire sur
chaque emballage la date de congélation des aliments.
5.4 Conservation des aliments
congelés et surgelés
• Lorsque vous achetez des aliments
surgelés, veillez à les placer dans le
congélateur le plus vite possible.
• Lorsque vous décongelez des aliments, vous devez les faire cuire le
plus rapidement possible. Il n'est pas
possible de congeler à nouveau un aliment qui a déjà été congelé.
• Assurez-vous que la date de péremption n'est pas dépassée. Vous trouverez cette information sur l'emballage
des aliments.
6. ENTRETIEN ET NETTOYAGE
ATTENTION
Avant d'intervenir sur l'appareil,
débranchez-le.
6.1 Nettoyage
• Nettoyez régulièrement l'appareil et
les accessoires.
• Nettoyez toutes les parties de l'appareil et tous les accessoires uniquement
avec de l'eau chaude et un détergent
doux. Assurez-vous que l'appareil et
les accessoires sont entièrement secs.
• Nettoyez régulièrement le joint de la
porte. Pour remplacer un joint endommagé, contactez le service après-vente.
Page 33

• Nettoyez la grille du condenseur et le
compresseur situés à l'arrière de l'appareil avec une brosse. Cela permet
de réduire la consommation d'énergie
et de maintenir l'appareil en bon état
de fonctionnement.
• Veillez à ne pas tirer sur les
tuyaux ou les câbles, les déplacer ni les endommager.
• Veillez à ne pas endommager
le circuit frigorifique.
• N'utilisez pas de produits abrasifs, de tampons à récurer, de
solvants, de détergents parfumés ni d'encaustique.
Une fois l'entretien terminé, branchez
l'appareil sur le secteur.
6.2 Dégivrage automatique du réfrigérateur
Le dégivrage s'effectue automatiquement lorsque le compresseur du moteur
s'arrête en cours de fonctionnement.
L'eau est évacuée par l'orifice d'écoulement et est récupérée dans le bac à eau
où elle s'évapore.
Le bac à eau est situé à l'arrière de l'appareil, au-dessus du compresseur du
moteur.
L'orifice d'écoulement est situé sur la
partie arrière du réfrigérateur.
Pour éviter que l'eau s'accumule dans
d'autres parties du réfrigérateur, assurez-vous que l'orifice d'écoulement est
toujours propre. Utilisez le bâtonnet placé dans l'orifice d'écoulement.
6.3 Dégivrage du congélateur
Du givre peut se former sur les
clayettes du congélateur et autour du compartiment supérieur.
Dégivrez le congélateur lorsque
la couche de givre atteint une
épaisseur de 3 à 5 mm.
ATTENTION
N'utilisez pas d'outils métalliques
tranchants pour retirer le givre.
N'utilisez pas de dispositifs mécaniques pour dégivrer le congélateur.
1. Mettez à l'arrêt l'appareil.
2. Retirez tous les aliments du congéla-
teur. Enveloppez les aliments dans
du papier journal et conservez-les à
basse température.
3. Laissez la porte de l'appareil ouverte
jusqu'à la fin du dégivrage.
4. Nettoyez le congélateur et séchez-le
entièrement.
5. Branchez l'appareil sur le secteur.
6. Mettez en fonctionnement l'appareil.
7. Réglez le thermostat sur la position
de réglage maximal et laissez l'appareil fonctionner pendant 2 ou 3 heures avec ce réglage.
8. Replacez les aliments dans le congélateur.
6.4 Lorsque l'appareil n'est
pas utilisé pendant des
périodes prolongées
1. Mettez à l'arrêt l'appareil et débranchez-le.
FRANÇAIS 33
Page 34

www.aeg.com
34
2. Retirez tous les aliments.
3. Dégivrez l'appareil.
4. Nettoyez soigneusement et séchez
entièrement l'appareil et tous les accessoires.
6.5 Remplacement de l'éclairage
5. Laissez les portes ouvertes pour évi-
ter la formation de mauvaises odeurs.
1.
Débranchez la fiche de l'appareil de
la prise secteur.
2.
Retirez la vis du diffuseur.
3.
Retirez le diffuseur de l'ampoule.
4.
Remplacez l'ancienne ampoule par
une ampoule neuve. Utilisez uniquement des ampoules pour appareils
ménagers. La puissance maximale
de l'ampoule est indiquée sur le diffuseur.
5.
Remettez en place le diffuseur de
l'ampoule.
6.
Branchez l'appareil sur le secteur.
Les ampoules classiques ou halogènes utilisées dans cet appareil
sont destinées uniquement à un
usage avec des appareils ménagers. Ne les utilisez pas pour
éclairer votre logement.
7. EN CAS D'ANOMALIE DE FONCTIONNEMENT
AVERTISSEMENT
Débranchez l'appareil avant de
procéder à toute vérification.
Pour les problèmes ne figurant
pas dans le tableau, contactez le
service après-vente.
Anomalie Solution possible
L'appareil fait du bruit
lorsqu'il fonctionne.
L'appareil ne fonctionne
pas du tout.
Assurez-vous que la fiche du câble d'alimentation
Effectuez un contrôle et vérifiez la tension. Bran-
Certains bruits sont normaux lorsque l'appareil
fonctionne. Reportez-vous à la brochure fournie
avec l'appareil.
Vérifiez que l'appareil est en fonctionnement.
est bien insérée dans la prise de courant.
chez un autre appareil électrique à la prise de courant. Pour réparer une prise de courant, contactez
un électricien qualifié.
Page 35

FRANÇAIS 35
Anomalie Solution possible
L'ampoule ne s'allume
pas.
Fermez la porte et ouvrez-la pour vous assurer que
l'ampoule n'est pas en veille.
L'éclairage est défectueux. Remplacez l'ampoule.
Le compresseur fonction-
ne en permanence.
Réglez le thermostat sur une position de réglage
moins élevé.
Vérifiez que la porte de l'appareil est fermée.
Veillez à ne pas ouvrir et fermer la porte de l'appa-
reil trop souvent.
Veillez à ne pas introduire d'aliments chauds dans
l'appareil. Attendez qu'ils refroidissent.
Assurez-vous que la température ambiante n'est
pas trop élevée.
De l'eau s'écoule sur la
plaque arrière du réfrigé-
C'est normal, cela se produit lors du dégivrage au-
tomatique.
rateur.
De l'eau s'écoule dans le
réfrigérateur.
Assurez-vous que l'orifice d'écoulement n'est pas
obstrué.
Vérifiez qu'aucun aliment ni emballage n'empêche
l'eau de s'écouler dans le bac à eau.
Il y a de l'eau sur le sol. Le tuyau d'évacuation de l'eau de dégivrage ne
s'écoule pas dans le bac d'évaporation situé au-
dessus du compresseur.
Fixez le tuyau d'évacuation de l'eau au bac d'éva-
poration de l'eau de dégivrage.
La température à l'inté-
rieur de l'appareil est trop
Réglez le thermostat sur une position de réglage
moins élevé.
basse (l'appareil fait trop
de froid).
La température à l'intérieur de l'appareil n'est
Réglez le thermostat sur une position de réglage
plus élevé.
pas suffisamment basse
(l'appareil ne fait pas assez de froid).
Vérifiez que la porte de l'appareil est fermée.
Veillez à ne pas introduire d'aliments chauds dans
l'appareil. Attendez qu'ils refroidissent.
Vérifiez que l'appareil n'est pas surchargé.
L'appareil ne fait pas suffi-
Assurez-vous que de l'air froid circule.
samment de froid.
Il y a trop de givre. Assurez-vous que les aliments sont enfermés dans
des bacs ou des emballages spéciaux.
Vérifiez que la porte de l'appareil est fermée.
Page 36

www.aeg.com
36
Anomalie Solution possible
Réglez le thermostat sur une position de réglage
moins élevé.
8. CARACTERISTIQUES TECHNIQUES
8.1 Bruits normaux
L'appareil émet certains bruits pendant
son fonctionnement (compresseur, circuit frigorifique).
Page 37

SSSRR
HISSS!
R!
FRANÇAIS 37
CLICK!
BRRR!
OK
SSSRRR!
HISSS!
BLUBB!
SSSRRR!
HISSS!
BLUBB!
BLUBB!
CLICK!
BRRR!
CRACK!
CLICK!
BRRR!
CRACK!CRACK!
8.2 Installation
Cet appareil peut être également installé dans un local sec et bien ventilé (garage ou cave), mais pour obtenir des performances optimales il est impératif que
les températures ambiantes du local où
il doit être placé correspondent à la classe climatique (indiquée sur la plaque signalétique) pour laquelle il est prévu :
Page 38

www.aeg.com
38
Classe
Température ambiante
climatique
SN +10 °C à + 32 °C
N +16 °C à + 32 °C
ST +16 °C à + 38 °C
T +16 °C à + 43 °C
8.3 Caractéristiques techniques
Dimensions Hauteur 1404 mm
Largeur 545 mm
Profondeur 604 mm
Autonomie de fonction-
19 h
nement
Tension 230 V
Fréquence 50 Hz
Pour plus d'informations, reportez-vous
à la plaque signalétique et à l'étiquette
énergétique.
9. EN MATIÈRE DE PROTECTION DE L'ENVIRONNEMENT
Recyclez les matériaux portant le
symbole
dans les conteneurs prévus à cet
effet.
Contribuez à la protection de
l'environnement et à votre sécurité,
recyclez vos produits électriques et
. Déposez les emballages
électroniques. Ne jetez pas les
appareils portant le symbole
les ordures ménagères. Emmenez un
tel produit dans votre centre local de
recyclage ou contactez vos services
municipaux.
avec
Page 39

DEUTSCH 39
INHALT
1. SICHERHEITSHINWEISE . . . . . . . . . . . . . . . . . . . . . . . . . . . . . . . . . . . . . . . . . . . . . . . . . . . . . 40
2. GERÄTEBESCHREIBUNG . . . . . . . . . . . . . . . . . . . . . . . . . . . . . . . . . . . . . . . . . . . . . . . . . . . . 42
3. VOR DER ERSTEN INBETRIEBNAHME . . . . . . . . . . . . . . . . . . . . . . . . . . . . . . . . . . . . . . . . . 42
4. TÄGLICHER GEBRAUCH . . . . . . . . . . . . . . . . . . . . . . . . . . . . . . . . . . . . . . . . . . . . . . . . . . . . . 43
5. TIPPS UND HINWEISE . . . . . . . . . . . . . . . . . . . . . . . . . . . . . . . . . . . . . . . . . . . . . . . . . . . . . . . 44
6. REINIGUNG UND PFLEGE . . . . . . . . . . . . . . . . . . . . . . . . . . . . . . . . . . . . . . . . . . . . . . . . . . . 45
7. FEHLERSUCHE . . . . . . . . . . . . . . . . . . . . . . . . . . . . . . . . . . . . . . . . . . . . . . . . . . . . . . . . . . . . . 47
8. TECHNISCHE DATEN . . . . . . . . . . . . . . . . . . . . . . . . . . . . . . . . . . . . . . . . . . . . . . . . . . . . . . . 49
9. UMWELTTIPPS . . . . . . . . . . . . . . . . . . . . . . . . . . . . . . . . . . . . . . . . . . . . . . . . . . . . . . . . . . . . . 51
FÜR PERFEKTE ERGEBNISSE
Danke, dass Sie sich für dieses AEG Produkt entschieden haben. Wir haben es geschaffen,
damit Sie viele Jahre von seiner ausgezeichneten Leistung und den innovativen Technologien,
die Ihnen das Leben erleichtern, profitieren können. Es ist mit Funktionen ausgestattet, die in
gewöhnlichen Geräten nicht vorhanden sind. Nehmen Sie sich ein paar Minuten Zeit zum
Lesen, um seine Vorzüge kennen zu lernen.
Besuchen Sie uns auf unserer Website, um:
Anwendungshinweise, Prospekte, Fehlerbehebungs- und Service-Informationen zu
erhalten:
www.aeg.com
Ihr erworbenes Produkt zu registrieren, um den besten Service dafür zu
gewährleisten:
www.aeg.com/productregistration
Zubehör, Verbrauchsmaterial und Original-Ersatzteile für Ihr Gerät zu erwerben:
www.aeg.com/shop
KUNDENDIENST UND -BETREUUNG
Bitte verwenden Sie ausschließlich Original-Ersatzteile für Ihre Produkte.
Halten Sie folgende Angaben bereit, wenn Sie sich an den Kundendienst wenden
(diese Informationen finden Sie auf dem Typenschild): Modell, Produktnummer (PNC),
Seriennummer.
Warnungs-/ Sicherheitshinweise.
Allgemeine Hinweise und Ratschläge
Hinweise zum Umweltschutz
Änderungen vorbehalten.
Page 40

www.aeg.com
40
1.
SICHERHEITSHINWEISE
Lesen Sie vor der Montage und dem Gebrauch des Geräts zuerst die Gebrauchsanleitung. Der Hersteller übernimmt keine Verantwortung für Verletzungen und
Beschädigungen durch unsachgemäße
Montage. Bewahren Sie die Gebrauchsanleitung griffbereit auf.
1.1 Sicherheit von Kindern und
schutzbedürftigen Personen
WARNUNG!
Es besteht Erstickungsgefahr, Risiko von Verletzungen oder permanenten Behinderungen.
• Das Gerät kann durch Kinder ab 8 Jahren und Personen mit eingeschränkten
physischen, sensorischen oder geistigen Fähigkeiten oder mit mangelnder
Erfahrung/mangelndem Wissen benutzt werden, wenn sie durch eine für
ihre Sicherheit zuständige Person beaufsichtigt werden oder von dieser
Person Anweisungen erhielten, wie
das Gerät sicher zu bedienen ist.
• Kinder dürfen nicht mit dem Gerät
spielen.
• Alle Verpackungsmaterialien von Kindern fernhalten.
• Wartung oder Reinigung des Geräts
darf nicht von Kindern ohne Aufsicht
erfolgen.
1.2 Montage
WARNUNG!
Nur eine qualifizierte Fachkraft
darf den Elektroanschluss des
Geräts vornehmen.
• Entfernen Sie das gesamte Verpackungsmaterial.
• Stellen Sie ein beschädigtes Gerät
nicht auf und benutzen Sie es nicht.
• Halten Sie sich an die mitgelieferte
Montageanleitung.
• Seien Sie beim Umsetzen des Geräts
vorsichtig, denn es ist schwer. Tragen
Sie stets Sicherheitshandschuhe.
• Stellen Sie sicher, dass die Luft um das
Gerät zirkulieren kann.
• Warten Sie mindestens 4 Stunden, bevor Sie das Gerät an das Stromnetz
anschließen. Dies ist erforderlich, damit das Öl in den Kompressor zurückfließen kann.
• Stellen Sie das Gerät nicht in der Nähe
von Heizkörpern, Herden, Backöfen
oder Kochfeldern auf.
• Nur für Geräte mit Wasseranschluss:
Verbinden Sie das Gerät ausschließlich mit einem Trinkwasseranschluss.
• Die Geräterückseite muss gegen die
Wand gestellt werden.
• Stellen Sie das Gerät nicht dort auf,
wo es direktem Sonnenlicht ausgesetzt sein könnte.
Elektrischer Anschluss
WARNUNG!
Brand- und Stromschlaggefahr.
• Das Gerät muss geerdet sein.
• Alle elektrischen Anschlüsse sind von
einem geprüften Elektriker vorzunehmen.
• Stellen Sie sicher, dass die elektrischen Daten auf dem Typenschild den
Daten Ihrer Stromversorgung entsprechen. Wenden Sie sich andernfalls an
eine Elektrofachkraft.
• Das Gerät darf ausschließlich an eine
ordnungsgemäß installierte Schutzkontaktsteckdose angeschlossen werden.
• Verwenden Sie keine Mehrfachsteckdosen oder Verlängerungskabel.
• Achten Sie darauf, elektrische Bauteile
(wie Netzstecker, Netzkabel und Kompressor) nicht zu beschädigen. Wenden Sie sich an den technischen Kundendienst, um die elektrischen Bauteile auszutauschen.
• Stecken Sie den Netzstecker erst nach
Abschluss der Montage in die Steckdose. Stellen Sie sicher, dass der Netzstecker nach der Montage noch zugänglich ist.
• Das Netzkabel muss unterhalb des
Netzsteckers verlegt werden.
• Ziehen Sie nicht am Netzkabel, wenn
Sie das Gerät vom Netzstrom trennen
Page 41

möchten. Ziehen Sie dazu immer direkt am Netzstecker.
1.3 Gebrauch
• Dieses Gerät ist für die Verwendung
im Haushalt und ähnliche Zwecke vorgesehen, wie z. B.:
– Personalküchenbereiche in Geschäf-
ten, Büros und anderen Arbeitsum-
feldern
– Bauernhöfe
– Für Gäste in Hotels, Motels und an-
deren wohnungsähnlichen Räum-
lichkeiten
– In Pensionen und vergleichbaren
Unterbringungsmöglichkeiten.
WARNUNG!
Es besteht Verletzungs-, Verbrennungs- Stromschlag- oder Brandgefahr.
• Das Gerät ist für die Verwendung im
Haushalt vorgesehen.
• Nehmen Sie keine technischen Änderungen am Gerät vor.
• Stellen Sie keine elektrischen Geräte
(z. B. Eisbereiter) in das Gerät, wenn
solche Geräte nicht ausdrücklich vom
Hersteller für diesen Zweck zugelassen
sind.
• Achten Sie darauf, den Kältekreislauf
nicht zu beschädigen. Er enthält Isobutan (R600a), ein Erdgas mit einem
hohen Grad an Umweltverträglichkeit.
Dieses Gas ist brennbar.
• Wird der Kältekreislauf beschädigt,
stellen Sie bitte sicher, dass es keine
Flammen und Zündquellen im Raum
gibt. Den Raum belüften.
• Stellen Sie keine heißen Gegenstände
auf die Kunststoffteile des Gerätes.
• Legen Sie kohlensäurehaltige Getränke nicht in das Gefrierfach. Dadurch
entsteht Druck auf den Getränkebehälter.
• Bewahren Sie keine entzündbaren Gase und Flüssigkeiten im Gerät auf.
• Platzieren Sie keine entflammbaren
Produkte oder Gegenstände, die mit
entflammbaren Produkten benetzt
sind, im Gerät, auf dem Gerät oder in
der Nähe des Geräts.
DEUTSCH 41
• Berühren Sie nicht den Kompressor
oder den Kondensator. Sie sind heiß.
• Nehmen keine Gegenstände aus dem
Gefrierfach oder berühren Sie diese
nicht, falls Ihre Hände nass oder feucht
sind.
• Wenn Sie ein Eis am Stiel aus dem Gerät nehmen, essen Sie es nicht sofort.
Warten Sie einige Minuten.
• Frieren Sie aufgetaute Lebensmittel
nicht wieder ein.
• Befolgen Sie die Hinweise auf der Verpackung zur Aufbewahrung tiefgekühlter Lebensmittel.
1.4 Reinigung und Pflege
WARNUNG!
Verletzungsgefahr und Beschädigung des Geräts.
• Schalten Sie vor Reinigungsarbeiten
immer das Gerät aus und ziehen Sie
den Netzstecker aus der Steckdose.
• Reinigen Sie das Gerät nicht mit einem Wasser- oder Dampfstrahl.
• Reinigen Sie das Gerät mit einem weichen, feuchten Tuch. Verwenden Sie
ausschließlich Neutralreiniger. Benutzen Sie keine Scheuermittel, scheuernde Reinigungsschwämmchen, Lösungsmittel oder Metallgegenstände.
• Prüfen Sie regelmäßig den Wasserabfluss des Kühlschranks und reinigen
Sie ihn gegebenenfalls. Bei verstopftem Wasserabfluss sammelt sich das
Abtauwasser am Boden des Geräts an.
• Der Kältekreis des Gerätes enthält
Kohlenwasserstoffe. Das Gerät muss
von einer qualifizierten Fachkraft gewartet und nachgefüllt werden.
1.5 Innenbeleuchtung
• Die Leuchtmittel in diesem Gerät sind
nur für Haushaltsgeräte geeignet. Benutzen Sie sie nicht für die Raumbeleuchtung.
1.6 Entsorgung
WARNUNG!
Verletzungs- und Erstickungsgefahr.
Page 42

www.aeg.com
42
• Trennen Sie das Gerät von der Stromversorgung.
• Schneiden Sie das Netzkabel ab, und
entsorgen Sie es.
• Entfernen Sie das Türschloss, um zu
verhindern, dass sich Kinder oder
Haustiere in dem Gerät einschließen.
• Der Kältekreislauf und die Isolierungsmaterialien dieses Gerätes sind ozonfreundlich.
2. GERÄTEBESCHREIBUNG
8
7
• Die Isolierung enthält entzündliches
Gas. Für Informationen zur korrekten
Entsorgung des Gerätes wenden Sie
sich an Ihre kommunale Behörde.
• Achten Sie darauf, dass die Kühleinheit in der Nähe des Wärmetauschers
nicht beschädigt wird.
1
2
6
5
Gitterablage
1
Butterfach
2
Türablage
3
Flaschenhalter
4
Typenschild
5
Obst-/Gemüseschublade
6
Glasablagen
7
Temperatur-Einstellknopf und Innen-
8
beleuchtung
3. VOR DER ERSTEN INBETRIEBNAHME
3.1
1. Reinigen Sie das Geräteinnere und
die Zubehörteile mit warmem Wasser
und Neutralseife.
2. Stellen Sie sicher, dass das Gerät und
das Zubehör vollständig trocken sind.
3. Stecken Sie den Netzstecker in die
Netzsteckdose.
4. Schalten Sie das Gerät ein und stellen Sie die Temperatur ein.
3
4
Page 43

Benutzen Sie keine Scheuermittel, scheuernde Reinigungsschwämmchen oder Lösungsmittel zum Reinigen des Geräts und
des Zubehörs.
3.2 Einschalten des Geräts
und Einstellen der Temperatur
Den Temperaturregler im Uhrzeigersinn
drehen, um das Gerät einzuschalten,
und gleichzeitig die Temperatur einzustellen.
Die Ziffern auf dem Regler entsprechen
unterschiedlichen Kältetemperaturen.
4. TÄGLICHER GEBRAUCH
DEUTSCH 43
Den Temperaturregler auf eine niedrige
Stufe einstellen, um die Mindest- temperatur (kalt) einzustellen.
Den Temperaturregler auf eine höhere
Stufe einstellen, um die Maximal- temperatur (kalt) einzustellen.
Wir empfehlen die Einstellung einer mittleren Temperatur.
Die folgenden Umstände können sich
auf die Temperatureinstellung auswirken.
• Die Raumtemperatur und der Ort, an
dem das Gerät aufgestellt ist.
• Wie häufig die Tür des Geräts geöff-
net wird.
• Die Menge der Lebensmittel im Gerät.
4.1 Einfrieren frischer
Lebensmittel
Der Gefrierraum eignet sich zum Einfrieren frischer Lebensmittel und zum Lagern gefrorener und tiefgefrorener Lebensmittel.
Ist die Temperatur auf eine mittlere Temperatur eingestellt, ist
eine Änderung der Einstellung
nicht erforderlich.
Stellen Sie eine niedrigere Temperatur ein, wenn Sie Lebensmittel schneller einfrieren möchten.
In diesem Fall kann die Temperatur im Kühlschrank unter 0 °C fallen. Ist dies der Fall, drehen Sie
den Temperaturregler auf eine
wärmere Einstellung.
4.2 Lagerung gefrorener
Lebensmittel
Legen Sie nicht sofort gefrorene Lebensmittel in das Gefrierfach, wenn das Gerät
neu ist oder eine Zeit lang ausgeschaltet
war.
Stellen Sie den Temperaturregler auf die
höchste Position und warten Sie mindestens 2 Stunden.
Ein Stromausfall kann ein Abtauen des Gefrierraums zur Folge
haben.
Nach einem Stromausfall bei Störung, der länger als die Lagerzeit
andauerte, müssen die aufgetauten Lebensmittel sehr rasch verbraucht oder sofort gekocht werden. Diese Lagerzeit ist in
„TECHNISCHE DATEN“ beschrieben.
Sie können die gekochten Lebensmittel nach dem Abkühlen
einfrieren.
4.3 Auftauen
Tiefgefrorene oder gefrorene Lebensmittel können vor der Verwendung im
Kühlschrank oder bei Raumtemperatur
aufgetaut werden.
Page 44

www.aeg.com
44
Kleine Mengen gefrorener Lebensmittel
können direkt aus dem Gefrierraum gekocht werden. Dabei verlängert sich
aber die Garzeit.
4.5 Positionierung der Türablagen
4.4 Glasablagen
Die Glasablagen können in verschiedenen Höhen eingesetzt werden.
Sie können die Türablagen in verschiedenen Höhen einsetzen.
1.
Ziehen Sie die Ablage in Pfeilrichtung, bis sie sich lösen lässt.
2.
Setzen Sie die Ablage in die neue
Position ein.
5. TIPPS UND HINWEISE
5.1 Energiesparen
• Öffnen Sie die Tür des Kühlschranks
oder des Gefrierraums nicht unnötig.
• Lassen Sie die Tür des Kühlschranks
oder des Gefrierraums nur so lange
offen wie benötigt.
• Bildet sich bei Dauerbetrieb Eis im
hinteren Teil des Geräts kann dies folgende Ursache haben:
– Der Temperaturregler steht auf der
niedrigsten Einstellung.
– Die Temperatur in dem Raum, in
dem sich das Gerät befindet, ist zu
hoch.
– Das Gerät ist voll beladen.
Drehen Sie den Temperaturregler auf
eine höhere Position. Die automati-
sche Abtauung startet und der Stromverbrauch sinkt.
5.2 Kühlen
• Stellen Sie keine heißen Lebensmittel
in den Kühlschrank. Warten Sie, bis sie
abgekühlt sind.
• Geben Sie keine Flüssigkeiten in den
Kühlschrank, die verdunsten können.
• Verpacken Sie alle stark riechenden
Lebensmittel in Behälter.
• Stellen Sie sicher, dass die Luft um die
Lebensmittel zirkulieren kann.
• Verpacken Sie Fleisch in Kunststoffbeuteln. Legen Sie diese auf die Glasablage über der Obst-/Gemüseschub-
Page 45

lade. Bewahren Sie Fleisch nicht länger als 2 Tage im Kühlschrank auf.
• Decken Sie gekochte Lebensmittel
und kalte Gerichte ab und stellen Sie
sie auf eine der Ablagen.
• Waschen Sie Obst und Gemüse und
legen Sie es dann in die Obst-/Gemüseschublade.
• Verpacken Sie Butter und Käse in luftdichte Behälter, Aluminiumfolie oder
Kunststoffbeutel.
• Bewahren Sie Milchflaschen stets mit
Deckel im Flaschenregal in der Tür
auf.
• Bananen, Kartoffeln, Zwiebeln und
Knoblauch sollten nur verpackt im
Kühlschrank aufbewahrt werden.
5.3 Einfrieren
• Das Typenschild gibt die maximale
Menge an Gefriergut an, das innerhalb von 24 Stunden eingefroren werden kann.
• Lebensmittel werden innerhalb von 24
Stunden gefroren. Legen Sie während
dieses Zeitraums keine weiteren Lebensmittel in den Gefrierraum.
• Legen Sie die Lebensmittel in kleinen
Mengen in den Gefrierraum. So können die Lebensmittel schnell eingefroren und nur die erforderliche Menge
wieder aufgetaut werden.
DEUTSCH 45
• Verpacken Sie die Lebensmittel in Aluminiumfolie oder Kunststoffbeutel.
Vergewissern Sie sich, dass die Verpackung luftdicht ist.
• Legen Sie keine frischen Lebensmittel
mit gefrorenen Lebensmitteln zusammen. So können die gefrorenen Lebensmittel nicht antauen.
• Fetthaltige Lebensmittel können nicht
so lange gelagert werden wie Lebensmittel ohne oder mit wenig Fett. Salz
verringert die Lagerzeit für die Lebensmittel.
• Wir empfehlen, jede Verpackung mit
dem Einfrierdatum der Lebensmittel
zu versehen.
5.4 Lagerung gefrorener
Lebensmittel
• Legen Sie gekaufte Tiefkühlkost so
schnell wie möglich in den Gefrierraum.
• Aufgetaute Tiefkühlkost muss so
schnell wie möglich zubereitet werden. Aufgetaute gefrorene Lebensmittel können nicht wieder eingefroren
werden.
• Vergewissern Sie sich, dass das Ablaufdatum nicht überschritten ist. Das
Ablaufdatum ist auf der Lebensmittelverpackung angegeben.
6. REINIGUNG UND PFLEGE
VORSICHT!
Ziehen Sie vor der Reinigung immer den Netzstecker aus der
Steckdose.
6.1 Reinigung
• Reinigen Sie das Gerät und alle Zubehörteile regelmäßig.
• Reinigen Sie alle Teile des Geräts und
die Zubehörteile nur mit warmem
Wasser und Neutralseife. Stellen Sie
sicher, dass das Gerät und das Zubehör vollständig trocken sind.
• Reinigen Sie regelmäßig die Türdichtung. Für den Austausch einer beschä-
digten Dichtung wenden Sie sich an
den Kundendienst.
• Reinigen Sie das Gitter des Kondensators und den Kompressor auf der Geräterückseite mit einer Bürste. Dies
senkt den Energieverbrauch und hält
das Gerät in einem guten Zustand.
Page 46

www.aeg.com
46
• Ziehen Sie nicht an Leitungen
und/oder Kabeln und achten
Sie darauf, diese nicht zu verschieben oder zu beschädigen.
• Achten Sie darauf, den Kühlkreislauf nicht zu beschädigen.
• Benutzen Sie keine Scheuermittel, scheuernde Reinigungsschwämmchen, Lösungsmittel
oder Reinigungsmittel mit
Duftstoffen oder Wachspolitur
zum Reinigen des Geräts und
des Zubehörs.
Stecken Sie den Netzstecker nach der
Wartung wieder in die Netzsteckdose.
6.2 Automatisches Abtauen des Kühlschranks
Reif wird automatisch entfernt, wenn der
Motorkompressor während des Betriebs
stoppt.
Das Wasser läuft durch die Abflussöffnung in den Wasserbehälter ab, wo es
verdampft.
Der Wasserbehälter befindet sich an der
Rückseite des Geräts über dem Motorkompressor.
Die Abflussöffnung befindet sich im hinteren Teil des Kühlschranks.
Stellen Sie sicher, dass die Abflussöffnung immer sauber ist, damit sich kein
Wasser in anderen Teilen des Kühlschranks ansammeln kann. Verwenden
Sie dazu das Reinigungsgerät in der Abflussöffnung.
6.3 Abtauen des Gefrierraums
An den Gefrierraumablagen und
im oberen Fach kann sich Reif
bilden.
Tauen Sie den Gefrierraum ab,
wenn die Reifschicht eine Stärke
von etwa 3 bis 5 mm erreicht hat.
VORSICHT!
Verwenden Sie für das Entfernen
des Reifs keine scharfen Metallgegenstände.
Verwenden Sie zum Abtauen des
Gefrierraums keine mechanischen Geräte.
1. Schalten Sie das Gerät aus.
2. Nehmen Sie alle Lebensmittel aus
dem Gefrierraum. Schlagen Sie die
Lebensmittel in Zeitungspapier ein
und bewahren Sie sie kühl auf.
3. Lassen Sie die Gerätetür offen bis der
Abtauvorgang abgeschlossen ist.
4. Reinigen Sie den Gefrierraum und
trocknen Sie ihn völlig ab.
5. Stecken Sie den Netzstecker in die
Netzsteckdose.
6. Schalten Sie das Gerät ein.
7. Stellen Sie den Temperaturregler auf
die höchste Position und lassen Sie
das Gerät 2 bis 3 Stunden bei dieser
Temperatur laufen.
8. Legen Sie die Lebensmittel wieder in
den Gefrierraum.
6.4 Wenn das Gerät längere
Zeit nicht in Betrieb ist
1. Schalten Sie das Gerät ab und ziehen
Sie den Netzstecker aus der Steckdose.
2. Entnehmen Sie alle Lebensmittel.
Page 47

3. Tauen Sie das Gerät ab.
4. Reinigen und trocknen Sie das Gerät
und alle Zubehörteile.
6.5 Ersetzen der Lampe
DEUTSCH 47
5. Lassen Sie die Türen offen, um unan-
genehme Gerüche zu verhindern.
1.
Ziehen Sie den Netzstecker aus der
Netzsteckdose.
2.
Lösen Sie die Schraube an der Lampenabdeckung.
3.
Nehmen Sie die Lampenabdeckung
ab.
4.
Tauschen Sie die Lampe gegen eine
neue aus. Verwenden Sie nur Lampen für Haushaltsgeräte. Die maximale Leistung der Lampe ist auf der
Lampenabdeckung angegeben.
5.
Bringen Sie die Lampenabdeckung
wieder an.
6.
Stecken Sie den Netzstecker in die
Netzsteckdose.
Die Leuchtmittel in diesem Gerät
sind nur für Haushaltsgeräte geeignet. Benutzen Sie sie nicht für
die Raumbeleuchtung.
7. FEHLERSUCHE
WARNUNG!
Ziehen Sie den Netzstecker aus
der Netzsteckdose, bevor Sie das
Gerät überprüfen.
Bei Problemen, die nicht in der
Tabelle aufgeführt sind, wenden
Sie sich bitte an den Kundendienst.
Problem Mögliche Abhilfe
Das Gerät macht Geräusche während des Betriebs.
Das Gerät funktioniert
überhaupt nicht.
Vergewissern Sie sich, dass der Netzstecker in die
Prüfen Sie, ob Spannung vorhanden ist. Testen Sie
Bei eingeschaltetem Gerät sind einige Geräusche
normal. Lesen Sie bitte in der mitgelieferten Broschüre nach.
Stellen Sie sicher, dass das Gerät eingeschaltet ist.
Netzsteckdose eingesteckt ist.
bitte, ob ein anderes Gerät an dieser Steckdose
funktioniert. Wenden Sie sich zur Reparatur einer
Steckdose bitten an einen qualifizierten Elektriker.
Page 48

www.aeg.com
48
Problem Mögliche Abhilfe
Die Lampe schaltet sich
nicht ein.
Schließen und öffnen Sie die Tür, um sicherzustel-
len, dass die Lampe nicht im Standby-Modus ist.
Die Lampe ist defekt. Tauschen Sie die Lampe aus.
Der Kompressor arbeitet
ständig.
Drehen Sie den Temperaturregler auf eine niedrig-
ere Position.
Vergewissern Sie sich, dass die Tür geschlossen ist.
Achten Sie darauf, die Gerätetür nicht zu häufig zu
öffnen und zu schließen.
Legen Sie keine warmen Lebensmittel in das Ge-
rät. Warten Sie, bis sie abgekühlt sind.
Vergewissern Sie sich, dass die Raumtemperatur
nicht zu hoch ist.
Wasser sammelt sich an
der Rückwand des Kühl-
Dies ist während des automatischen Abtauvor-
gangs normal.
schranks.
Wasser sammelt sich im
Kühlschrank an.
Vergewissern Sie sich, dass die Ablauföffnung
nicht verstopft ist.
Achten Sie darauf, dass Lebensmittel oder Verpa-
ckungen nicht verhindern, dass das Wasser in den
Wasserbehälter ablaufen kann.
Es befindet sich Wasser
auf dem Boden.
Das Tauwasser läuft nicht in die Verdampferschale
über dem Kompressor.
Befestigen Sie den Tauwasserablauf an der Ver-
dampferschale.
Die Temperatur im Gerät
ist zu niedrig.
Die Temperatur im Gerät
ist nicht kalt genug.
Drehen Sie den Temperaturregler auf eine niedrig-
ere Position.
Drehen Sie den Temperaturregler auf eine höhere
Position.
Vergewissern Sie sich, dass die Tür geschlossen ist.
Legen Sie keine warmen Lebensmittel in das Ge-
rät. Warten Sie, bis die Lebensmittel abgekühlt
sind.
Achten Sie darauf, dass nicht zu viele Lebensmittel
in das Gerät gelegt werden.
Die Temperatur im Kühl-
schrank ist nicht kalt ge-
Stellen Sie sicher, dass die Kaltluft im Gerät zirku-
liert.
nug.
Es bildet sich zu viel Reif. Stellen Sie sicher, dass die Lebensmittel in speziel-
len Behältern oder Verpackungen verpackt sind.
Vergewissern Sie sich, dass die Tür geschlossen ist.
Drehen Sie den Temperaturregler auf eine niedrig-
ere Position.
Page 49

8. TECHNISCHE DATEN
8.1 Normale Geräusche
Während das Gerät in Betrieb ist, entstehen bestimmte Geräusche (Kompressor
und Kühlkreislauf).
DEUTSCH 49
Page 50

www.aeg.com
50
SSSRR
HISSS!
R!
CLICK!
BRRR!
OK
SSSRRR!
HISSS!
BLUBB!
SSSRRR!
HISSS!
BLUBB!
BLUBB!
CLICK!
BRRR!
CRACK!
CLICK!
BRRR!
CRACK!CRACK!
8.2 Standort
Dieses Gerät kann auch in einer trockenen, gut belüfteten Garage oder in einem Keller installiert werden, doch für
eine optimale Leistung sollte dieses Ge-
rät an einem Ort installiert werden, an
dem die Umgebungstemperatur mit der
Klimaklasse übereinstimmt, die auf dem
Typenschild des Geräts angegeben ist:
Page 51

DEUTSCH 51
Klima-
Umgebungstemperatur
klasse
SN +10 °C bis +32 °C
N +16 °C bis +32 °C
ST +16 °C bis +38 °C
T +16 °C bis +43 °C
8.3 Technische Daten
Abmessungen Höhe 1404 mm
Breite 545 mm
Tiefe 604 mm
Lagerzeit bei Störung 19 Std.
Spannung 230 V
Frequenz 50 Hz
Weitere Angaben finden Sie auf dem Typenschild oder der Energieplakette.
9. UMWELTTIPPS
Recyceln Sie Materialien mit dem
Symbol
Verpackung in den entsprechenden
Recyclingbehältern.
Recyceln Sie zum Umwelt- und
Gesundheitsschutz elektrische und
. Entsorgen Sie die
elektronische Geräte. Entsorgen Sie
Geräte mit diesem Symbol
mit dem Hausmüll. Bringen Sie das
Gerät zu Ihrer örtlichen Sammelstelle
oder wenden Sie sich an Ihr
Gemeindeamt.
nicht
Page 52

www.aeg.com
52
ΠΕΡΙΕΧΌΜΕΝΑ
1. ΟΔΗΓΊΕΣ ΓΙΑ ΤΗΝ ΑΣΦΆΛΕΙΑ . . . . . . . . . . . . . . . . . . . . . . . . . . . . . . . . . . . . . . . . . . . . 53
2. ΠΕΡΙΓΡΑΦΉ ΠΡΟΪΌΝΤΟΣ . . . . . . . . . . . . . . . . . . . . . . . . . . . . . . . . . . . . . . . . . . . . . . . 55
3. ΠΡΙΝ ΑΠΌ ΤΗΝ ΠΡΏΤΗ ΧΡΉΣΗ . . . . . . . . . . . . . . . . . . . . . . . . . . . . . . . . . . . . . . . . . . . 56
4. ΚΑΘΗΜΕΡΙΝΉ ΧΡΉΣΗ . . . . . . . . . . . . . . . . . . . . . . . . . . . . . . . . . . . . . . . . . . . . . . . . . . 56
5. ΥΠΟΔΕΙΞΕΙΣ ΚΑΙ ΣΥΜΒΟΥΛΕΣ . . . . . . . . . . . . . . . . . . . . . . . . . . . . . . . . . . . . . . . . . . . 57
6. ΦΡΟΝΤΊΔΑ ΚΑΙ ΚΑΘΆΡΙΣΜΑ . . . . . . . . . . . . . . . . . . . . . . . . . . . . . . . . . . . . . . . . . . . . . 59
7. ΑΝΤΙΜΕΤΩΠΙΣΗ ΠΡΟΒΛΗΜΑΤΩΝ . . . . . . . . . . . . . . . . . . . . . . . . . . . . . . . . . . . . . . . . . 60
8. ΤΕΧΝΙΚΑ ΣΤΟΙΧΕΙΑ . . . . . . . . . . . . . . . . . . . . . . . . . . . . . . . . . . . . . . . . . . . . . . . . . . . . 62
9. ΠΕΡΙΒΑΛΛΟΝΤΙΚΆ ΘΈΜΑΤΑ . . . . . . . . . . . . . . . . . . . . . . . . . . . . . . . . . . . . . . . . . . . . . 64
ΓΙΑ ΑΡΙΣΤΑ ΑΠΟΤΕΛΕΣΜΑΤΑ
Σας ευχαριστούμε που επιλέξατε αυτό το προϊόν της AEG. Το σχεδιάσαμε για να σας παρέχει
άψογη απόδοση για πολλά χρόνια, με πρωτοποριακές τεχνολογίες που θα κάνουν τη ζωή σας
πιο απλή και με χαρακτηριστικά που ενδεχομένως δεν θα βρείτε σε κοινές συσκευές. Σας
παρακαλούμε να αφιερώσετε λίγα λεπτά και να διαβάσετε τις οδηγίες, ώστε να διασφαλίσετε
την καλύτερη δυνατή χρήση της συσκευής σας.
Επισκεφθείτε την ιστοσελίδα μας για να:
βρείτε υποδείξεις χρήσης, φυλλάδια, συμβουλές για την επίλυση προβλημάτων,
πληροφορίες συντήρησης:
www.aeg.com
καταχωρήσετε το προϊόν σας, ώστε να έχετε καλύτερο σέρβις:
www.aeg.com/productregistration
αγοράσετε εξαρτήματα, αναλώσιμα και γνήσια ανταλλακτικά για τη συσκευή σας:
www.aeg.com/shop
ΥΠΟΣΤΗΡΙΞΗ ΠΕΛΑΤΩΝ ΚΑΙ ΣΕΡΒΙΣ
Συνιστάται η χρήση γνήσιων ανταλλακτικών.
Όταν επικοινωνείτε με το σέρβις, βεβαιωθείτε ότι έχετε διαθέσιμα τα ακόλουθα στοιχεία.
Τα στοιχεία αυτά θα τα βρείτε στην πινακίδα τεχνικών χαρακτηριστικών. Μοντέλο, Κωδ.
προϊόντος (PNC), Αριθμός σειράς.
Προειδοποίηση / Προσοχή - Πληροφορίες ασφαλείας.
Γενικές πληροφορίες και συμβουλές
Περιβαλλοντικές πληροφορίες
Υπόκειται αε αλλαγές χωρίς προειδποίηση.
Page 53

ΕΛΛΗΝΙΚΑ 53
1.
ΟΔΗΓΊΕΣ ΓΙΑ ΤΗΝ ΑΣΦΆΛΕΙΑ
Πριν από την εγκατάσταση και τη χρήση
της συσκευής, διαβάστε προσεκτικά τις
παρεχόμενες οδηγίες. Ο κατασκευαστής
δεν ευθύνεται αν προκληθεί τραυματι‐
σμός ή ζημιά από λανθασμένη εγκατά‐
σταση και χρήση. Να φυλάσσετε πάντα
αυτές τις οδηγίες μαζί με τη συσκευή για
μελλοντική αναφορά.
1.1 Ασφάλεια παιδιών και
ευπαθών ατόμων
ΠΡΟΕΙΔΟΠΟΙΗΣΗ
Κίνδυνος ασφυξίας, τραυματι‐
σμού ή μόνιμης αναπηρίας.
• Η συσκευή αυτή μπορεί να χρησιμο‐
ποιηθεί από παιδιά ηλικίας 8 ετών και
άνω και από άτομα με μειωμένες σω‐
ματικές, αισθητηριακές ή πνευματικές
δυνατότητες ή έλλειψη εμπειρίας και
γνώσης, εάν επιβλέπονται ή έχουν λά‐
βει οδηγίες σχετικά με τη λειτουργία
της συσκευής από άτομο υπεύθυνο
για την ασφάλειά τους.
• Μην αφήνετε τα παιδιά να παίζουν με
τη συσκευή.
• Φυλάσσετε όλα τα υλικά συσκευασίας
μακριά από τα παιδιά.
• Ο καθαρισμός και η συντήρηση από το
χρήστη δεν πρέπει να πραγματο‐
ποιούνται από παιδιά χωρίς επίβλεψη.
1.2 Εγκατάσταση
ΠΡΟΕΙΔΟΠΟΙΗΣΗ
Η εγκατάσταση αυτής της συ‐
σκευής πρέπει να εκτελείται μόνο
από κατάλληλα καταρτισμένο
άτομο.
• Αφαιρέστε όλα τα υλικά της συσκευα‐
σίας.
• Εάν η συσκευή έχει υποστεί ζημιά, μην
προβείτε σε εγκατάσταση ή χρήση της.
• Ακολουθείτε τις οδηγίες εγκατάστασης
που παρέχονται με τη συσκευή.
• Να είστε πάντα προσεκτικοί κατά τη
μετακίνηση της συσκευής, καθότι είναι
βαριά. Φοράτε πάντα γάντια ασφα‐
λείας.
• Διασφαλίστε την κυκλοφορία του αέρα
γύρω από τη συσκευή.
• Περιμένετε τουλάχιστον 4 ώρες πριν
συνδέσετε τη συσκευή στην παροχή
ρεύματος. Αυτό είναι απαραίτητο για
να μπορέσει το λάδι να επιστρέψει στο
συμπιεστή.
• Μην εγκαθιστάτε τη συσκευή κοντά σε
σώματα θέρμανσης, κουζίνες, φούρ‐
νους ή εστίες μαγειρέματος.
• Μόνο για συσκευές με σύνδεση νερού:
η σύνδεση να γίνεται μόνο με παροχή
πόσιμου νερού.
• Η συσκευή πρέπει να βρίσκεται με την
πλάτη στον τοίχο.
• Μην εγκαθιστάτε τη συσκευή σε θέση
όπου εκτίθεται σε άμεσο ηλιακό φως.
Ηλεκτρική σύνδεση
ΠΡΟΕΙΔΟΠΟΙΗΣΗ
Κίνδυνος πυρκαγιάς και ηλεκτρο‐
πληξίας.
• Η συσκευή πρέπει να είναι γειωμένη.
• Όλες οι ηλεκτρικές συνδέσεις πρέπει
να πραγματοποιούνται από επαγγελ‐
ματία ηλεκτρολόγο.
• Βεβαιωθείτε ότι οι πληροφορίες σχετι‐
κά με το ηλεκτρικό ρεύμα στην πινακί‐
δα τεχνικών χαρακτηριστικών συμφω‐
νούν με την παροχή ρεύματος. Εάν
δεν συμφωνούν, επικοινωνήστε με
ηλεκτρολόγο.
• Χρησιμοποιείτε πάντα μια σωστά εγκα‐
τεστημένη πρίζα με προστασία κατά
της ηλεκτροπληξίας.
• Μη χρησιμοποιείτε πολύπριζα και
μπαλαντέζες.
• Προσέχετε να μην προκληθεί ζημιά
στα ηλεκτρικά εξαρτήματα (π.χ. φις
τροφοδοσίας, καλώδιο τροφοδοσίας,
συμπιεστής). Επικοινωνήστε με το
Σέρβις ή με ηλεκτρολόγο για την αλλα‐
γή των ηλεκτρικών εξαρτημάτων.
• Συνδέστε το φις τροφοδοσίας στην
πρίζα μόνον αφού έχει ολοκληρωθεί η
εγκατάσταση. Μετά την εγκατάσταση,
βεβαιωθείτε ότι είναι δυνατή η πρό‐
σβαση στο φις τροφοδοσίας.
Page 54

www.aeg.com
54
• Το καλώδιο τροφοδοσίας πρέπει να
παραμένει χαμηλότερα από το ύψος
του φις τροφοδοσίας.
• Μην τραβάτε το καλώδιο τροφοδοσίας
για να αποσυνδέσετε τη συσκευή.
Τραβάτε πάντα το φις τροφοδοσίας.
1.3 Χρήση
• Αυτή η συσκευή προορίζεται για οικια‐
κή χρήση και παρόμοιες εφαρμογές,
όπως:
– Σε χώρους κουζίνας προσωπικού σε
καταστήματα, γραφεία και άλλα ερ‐
γασιακά περιβάλλοντα
–Αγροικίες
– Από πελάτες σε ξενοδοχεία, μοτέλ
και άλλα περιβάλλοντα στέγασης
– Πανσιόν (για ύπνο και πρωινό).
ΠΡΟΕΙΔΟΠΟΙΗΣΗ
Κίνδυνος τραυματισμού, εγκαυ‐
μάτων, ηλεκτροπληξίας ή πυρκα‐
γιάς.
• Χρησιμοποιείτε αυτή τη συσκευή σε οι‐
κιακό περιβάλλον.
• Μην αλλάζετε τις προδιαγραφές αυτής
της συσκευής.
• Μην τοποθετείτε ηλεκτρικές συσκευές
(π.χ. παγωτομηχανές) μέσα στη συ‐
σκευή, εκτός αν αναφέρονται ως κα‐
τάλληλες για το σκοπό αυτό από τον
κατασκευαστή.
• Προσέχετε να μην προκληθεί ζημιά
στο κύκλωμα ψυκτικού υγρού. Το κύ‐
κλωμα ψυκτικού υγρού περιέχει ισο‐
βουτάνιο (R600a), ένα φυσικό αέριο με
υψηλό επίπεδο περιβαλλοντικής συμ‐
βατότητας. Αυτό το αέριο είναι εύφλε‐
κτο.
• Αν προκληθεί ζημιά στο κύκλωμα ψυ‐
κτικού υγρού, βεβαιωθείτε ότι δεν
υπάρχει παρουσία φλόγας και πηγών
ανάφλεξης στο χώρο. Αερίστε το χώ‐
ρο.
• Μην αφήνετε ζεστά αντικείμενα να έρ‐
θουν σε επαφή με τα πλαστικά μέρη
της συσκευής.
• Μην τοποθετείτε ανθρακούχα ποτά
στο θάλαμο καταψύκτη. Στο θάλαμο
καταψύκτη αναπτύσσεται πίεση στα
δοχεία αυτών των ποτών.
• Μη φυλάσσετε εύφλεκτα αέρια και
υγρά στη συσκευή.
• Μην τοποθετείτε μέσα, κοντά ή επάνω
στη συσκευή εύφλεκτα αντικείμενα ή
αντικείμενα εμποτισμένα με εύφλεκτα
υλικά.
• Μην αγγίζετε το συμπιεστή ή το συ‐
μπυκνωτή. Αυτά τα εξαρτήματα είναι
ζεστά.
• Εάν τα χέρια σας είναι βρεγμένα ή νω‐
πά, μην αφαιρείτε ή μην τα αγγίζετε
προϊόντα από το θάλαμο καταψύκτη.
• Όταν βγάζετε ένα παγωτό τύπου ξυλά‐
κι γρανίτα από τη συσκευή, μην το
τρώτε αμέσως. Περιμένετε μερικά λε‐
πτά.
• Μην καταψύχετε εκ νέου τρόφιμα που
έχετε ξεπαγώσει.
• Ακολουθείτε τις οδηγίες αποθήκευσης
στη συσκευασία των κατεψυγμένων
τροφίμων.
1.4 Φροντίδα και καθάρισμα
ΠΡΟΕΙΔΟΠΟΙΗΣΗ
Υπάρχει κίνδυνος τραυματισμού
και πρόκλησης ζημιάς στη συ‐
σκευή.
• Πριν από την πραγματοποίηση συντή‐
ρησης, απενεργοποιήστε τη συσκευή
και αποσυνδέστε το φις τροφοδοσίας
από την πρίζα.
• Μη χρησιμοποιείτε ψεκασμό με νερό ή
ατμό για το καθάρισμα της συσκευής.
• Καθαρίστε τη συσκευή με ένα υγρό μα‐
λακό πανί. Χρησιμοποιείτε μόνο ουδέ‐
τερα απορρυπαντικά. Μη χρησιμο‐
ποιείτε λειαντικά προϊόντα, σφουγγα‐
ράκια που χαράσσουν, διαλύτες ή με‐
ταλλικά αντικείμενα.
• Επιθεωρείτε τακτικά την αποστράγγιση
του ψυγείου και, αν απαιτείται, καθαρί‐
ζετέ την. Εάν η αποστράγγιση είναι
φραγμένη, το νερό απόψυξης συσσω‐
ρεύεται στο κάτω μέρος της συσκευής.
• Η συσκευή αυτή περιέχει υδρογονάν‐
θρακες στην ψυκτική μονάδα. Η συν‐
τήρηση και η αναπλήρωση του ψυκτι‐
κού υγρού της μονάδας πρέπει να
πραγματοποιούνται μόνο από εξειδι‐
κευμένο άτομο.
1.5 Εσωτερικό φως
• Ο τύπος λαμπτήρα πυράκτωσης ή
αλογόνου που χρησιμοποιείται σε αυ‐
Page 55

τή τη συσκευή προορίζεται μόνο για οι‐
κιακές συσκευές. Μην τον χρησιμο‐
ποιείτε για οικιακό φωτισμό.
1.6 Απόρριψη
ΠΡΟΕΙΔΟΠΟΙΗΣΗ
Κίνδυνος τραυματισμού ή ασφυ‐
ξίας.
• Αποσυνδέστε τη συσκευή από την πα‐
ροχή ρεύματος.
• Κόψτε το καλώδιο τροφοδοσίας και
απορρίψτε το.
2. ΠΕΡΙΓΡΑΦΉ ΠΡΟΪΌΝΤΟΣ
8
7
ΕΛΛΗΝΙΚΑ 55
• Αφαιρέστε το μάνταλο της πόρτας για
να αποτραπεί ο εγκλεισμός παιδιών ή
ζώων μέσα στη συσκευή.
• Το κύκλωμα ψυκτικού υγρού και τα
μονωτικά υλικά αυτής της συσκευής εί‐
ναι φιλικά προς το όζον.
• Ο αφρός μόνωσης περιέχει εύφλεκτο
αέριο. Επικοινωνήστε με τις δημοτικές
αρχές για πληροφορίες σχετικά με τη
σωστή απόρριψη της συσκευής.
• Μην προκαλείτε ζημιά στο τμήμα της
μονάδας ψύξης που βρίσκεται κοντά
στον εναλλάκτη θερμότητας.
1
2
6
5
Μεταλλική σχάρα
1
Θήκη για βούτυρο
2
Ράφι πόρτας
3
Ράφι μπουκαλιών
4
Πινακίδα τεχνικών χαρακτηριστικών
5
3
4
Συρτάρι λαχανικών
6
Γυάλινα ράφια
7
Διακόπτης θερμοκρασίας και εσωτε‐
8
ρικό φως
Page 56

www.aeg.com
56
3. ΠΡΙΝ ΑΠΌ ΤΗΝ ΠΡΏΤΗ ΧΡΉΣΗ
3.1
1. Καθαρίζετε τα εσωτερικά μέρη της
συσκευής και όλα τα εξαρτήματα με
ζεστό νερό και ουδέτερο απορρυπα‐
ντικό.
2. Βεβαιωθείτε ότι η συσκευή και τα
εξαρτήματα είναι εντελώς στεγνά.
3. Συνδέστε το φις τροφοδοσίας στην
πρίζα.
4. Ενεργοποιήστε τη συσκευή και ρυθμί‐
στε τη θερμοκρασία.
Μη χρησιμοποιείτε λειαντικά
προϊόντα, σφουγγαράκια που χα‐
ράσσουν ή διαλύτες για να καθα‐
ρίσετε τη συσκευή και τα εξαρτή‐
ματα.
3.2 Ενεργοποίηση της
συσκευής και ρύθμιση της
θερμοκρασίας
Στρέψτε το διακόπτη θερμοκρασίας προς
τα δεξιά για να ενεργοποιήσετε τη συ‐
σκευή και ταυτόχρονα να ρυθμίσετε τη
θερμοκρασία.
Οι αριθμοί που υπάρχουν επάνω στο
διακόπτη αναφέρονται στις διαφορετικές
θερμοκρασίες ψύξης.
Στρέψτε το διακόπτη θερμοκρασίας στις
χαμηλότερες ρυθμίσεις για να επιτύχετε
ελάχιστη θερμοκρασία ψύξης.
Στρέψτε το διακόπτη θερμοκρασίας στις
υψηλότερες ρυθμίσεις για να επιτύχετε
μέγιστη θερμοκρασία ψύξης.
Οι συνθήκες που ακολουθούν μπορούν
να επιδράσουν στη ρύθμιση της θερμο‐
κρασίας.
• Η θερμοκρασία του χώρου και η θέση
• Πόσο συχνά ανοίγει η πόρτα της συ‐
• Η ποσότητα τροφίμων που υπάρχει
Συνιστούμε μια μέτρια ρύθμιση
της θερμοκρασίας ψύξης.
που είναι εγκατεστημένη η συσκευή.
σκευής.
μέσα στη συσκευή.
4. ΚΑΘΗΜΕΡΙΝΉ ΧΡΉΣΗ
4.1 Κατάψυξη των φρέσκων
τροφίμων
Ο καταψύκτης είναι κατάλληλος για την
κατάψυξη φρέσκων τροφίμων, καθώς και
για την αποθήκευση κατεψυγμένων και
βαθιά κατεψυγμένων τροφίμων.
Εάν ο διακόπτης θερμοκρασίας
έχει ρυθμιστεί σε μια θέση μέ‐
τριας ψύξης, δεν είναι απαραίτη‐
το να αλλάξετε τη ρύθμιση.
Εάν επιθυμείτε να καταψύξετε τα
τρόφιμα πιο σύντομα, τοποθετή‐
στε το διακόπτη θερμοκρασίας σε
ένα υψηλότερο επίπεδο ψύξης.
Σε αυτή την περίπτωση, η θερμο‐
κρασία του ψυγείου μπορεί να
μειωθεί σε 0 °C ή και περισσότε‐
ρο. Εάν συμβεί κάτι τέτοιο, ρυθμί‐
στε το διακόπτη θερμοκρασίας σε
ένα χαμηλότερο επίπεδο.
Page 57

4.2 Αποθήκευση κατεψυγμένων
τροφίμων
Μην τοποθετείτε κατεψυγμένα τρόφιμα
άμεσα στον καταψύκτη, εάν η συσκευή
είναι καινούργια ή ήταν απενεργοποιημέ‐
νη για κάποιο χρονικό διάστημα.
Ρυθμίστε το διακόπτη θερμοκρασίας στο
υψηλότερο επίπεδο και αφήστε τη συ‐
σκευή να λειτουργήσει για τουλάχιστον 2
ώρες.
Η διακοπή ρεύματος μπορεί να
προκαλέσει την απόψυξη του κα‐
ταψύκτη.
Εάν η διακοπή διήρκεσε για διά‐
στημα μεγαλύτερο από την τιμή
του «Χρόνου ανόδου», πρέπει να
καταναλώσετε ή να μαγειρέψετε
άμεσα τα αποψυγμένα τρόφιμα.
Ανατρέξτε στην ενότητα «ΤΕΧΝΙ‐
ΚΑ ΣΤΟΙΧΕΙΑ» για την τιμή.
Μπορείτε να καταψύξετε τα μα‐
γειρεμένα φαγητά αφού έχουν
κρυώσει.
4.3 Ξεπάγωμα
Πριν μαγειρέψετε κατεψυγμένα τρόφιμα
ή τρόφιμα βαθιάς κατάψυξης, ξεπαγώστε
ΕΛΛΗΝΙΚΑ 57
τα στο ψυγείο ή σε θερμοκρασία περι‐
βάλλοντος.
Μπορείτε να μαγειρέψετε μικρές ποσότη‐
τες κατεψυγμένων τροφίμων κατευθείαν
από τον καταψύκτη, αλλά έτσι αυξάνεται
ο χρόνος μαγειρέματος.
4.4 Γυάλινα ράφια
Μπορείτε να τοποθετήσετε τα γυάλινα
ράφια σε διαφορετικά ύψη.
4.5 Τοποθέτηση των ραφιών της πόρτας
Μπορείτε να τοποθετήσετε το ράφι πόρ‐
τας σε διαφορετικά ύψη.
1.
2.
5. ΥΠΟΔΕΙΞΕΙΣ ΚΑΙ ΣΥΜΒΟΥΛΕΣ
5.1 Εξοικονόμηση ενέργειας
• Μην ανοίγετε συχνά την πόρτα του
ψυγείου ή του καταψύκτη.
Τραβήξτε το ράφι προς την κατεύ‐
θυνση των βελών μέχρι να αποδε‐
σμευτεί.
Τοποθετήστε το ράφι στην νέα θέση.
• Μην κρατάτε την πόρτα του ψυγείου ή
του καταψύκτη ανοιχτή για περισσότε‐
ρο διάστημα από ό,τι είναι απαραίτητο.
Page 58

www.aeg.com
58
• Εάν η συσκευή λειτουργεί συνεχώς και
υπάρχει πάγος εσωτερικά στο πίσω
μέρος, η αιτία μπορεί να είναι:
– Ο διακόπτης θερμοκρασίας είναι
ρυθμισμένος στο χαμηλότερο επίπε‐
δο.
– Η θερμοκρασία του χώρου όπου εί‐
ναι εγκατεστημένη η συσκευή, είναι
πολύ υψηλή.
– Η συσκευή είναι γεμάτη.
Ρυθμίστε το διακόπτη θερμοκρασίας
σε ένα υψηλότερο επίπεδο. Η αυτόμα‐
τη απόψυξη αρχίζει και η κατανάλωση
ενέργειας μειώνεται.
5.2 Ψύξη
• Μην τοποθετείτε καυτό φαγητό στο
ψυγείο. Περιμένετε μέχρι να κρυώσει.
• Μην τοποθετείτε στο ψυγείο υγρά τα
οποία εξατμίζονται.
• Τοποθετείτε όλα τα τρόφιμα που έχουν
έντονη γεύση ή οσμή σε δοχεία.
• Βεβαιωθείτε ότι υπάρχει κυκλοφορία
αέρα γύρω από τα τρόφιμα.
• Τοποθετείτε όλα τα είδη κρέατος σε
πλαστικές σακούλες. Διατηρείτε τα στο
γυάλινο ράφι επάνω από το συρτάρι
λαχανικών. Μη διατηρείτε το κρέας στο
ψυγείο για περισσότερο από 2 ημέρες.
• Τοποθετείτε ένα κάλυμμα επάνω στο
μαγειρεμένο φαγητό και τα κρύα πιάτα
και φυλάσσετέ τα σε ένα από τα ράφια.
• Πλένετε τα φρούτα και τα λαχανικά και
φυλάσσετέ τα στο συρτάρι λαχανικών.
• Τοποθετείτε το βούτυρο και το τυρί σε
ειδικά αεροστεγή δοχεία, αλουμινόχαρ‐
το ή πλαστικές σακούλες.
• Τοποθετείτε τα μπουκάλια γάλακτος
στο ράφι μπουκαλιών στην πόρτα της
συσκευής, αφού βεβαιωθείτε ότι είναι
καλυμμένα.
• Μη διατηρείτε στο ψυγείο μπανάνες,
πατάτες, κρεμμύδια και σκόρδα χωρίς
συσκευασία.
φίμων που ο καταψύκτης έχει τη δυνα‐
τότητα να καταψύξει σε 24 ώρες.
• Η κατάψυξη των τροφίμων ολοκληρώ‐
νεται σε 24 ώρες. Κατά το διάστημα
αυτό, μην τοποθετείτε άλλα τρόφιμα
στον καταψύκτη.
• Τοποθετείτε τα τρόφιμα μοιρασμένα σε
μικρές ποσότητες στον καταψύκτη. Αυ‐
τό συμβάλει στη γρήγορη κατάψυξη
των τροφίμων, καθώς και στο ξεπάγω‐
μα μόνο της αναγκαίας ποσότητας.
• Τυλίγετε τα τρόφιμα σε αλουμινόχαρτο
ή τοποθετείτε τα σε πλαστικές σακού‐
λες. Βεβαιωθείτε ότι η συσκευασία εί‐
ναι αεροστεγής.
• Μην αναμειγνύετε φρέσκα τρόφιμα με
κατεψυγμένα. Έτσι αποτρέπεται η αύ‐
ξηση της θερμοκρασίας των κατεψυγ‐
μένων τροφίμων.
• Ο χρόνος αποθήκευσης τροφίμων με
λίπη είναι συντομότερος από αυτόν για
τρόφιμα χωρίς λίπη ή με χαμηλή περιε‐
κτικότητα σε λίπη. Το αλάτι μειώνει το
χρόνο αποθήκευσης των τροφίμων.
• Συνιστούμε να αναγράφετε σε κάθε
συσκευασία την ημερομηνία κατάψυ‐
ξης των τροφίμων.
5.4 Αποθήκευση των
κατεψυγμένων τροφίμων
• Όταν προμηθεύεστε κατεψυγμένα τρό‐
φιμα, βεβαιωθείτε ότι τα τοποθετείτε
στον καταψύκτη σε πολύ σύντομο
χρονικό διάστημα.
• Όταν ξεπαγώνετε κατεψυγμένα τρόφι‐
μα, πρέπει να τα μαγειρεύετε πολύ
σύντομα. Δεν πρέπει να καταψύχετε εκ
νέου τρόφιμα που προηγουμένως ήταν
κατεψυγμένα.
• Βεβαιωθείτε ότι η ημερομηνία λήξης
δεν έχει παρέλθει. Μπορείτε να βρείτε
τις πληροφορίες στη συσκευασία των
τροφίμων.
5.3 Freezing
• Η πινακίδα τεχνικών χαρακτηριστικών
υποδεικνύει τη μέγιστη ποσότητα τρο‐
Page 59

6. ΦΡΟΝΤΊΔΑ ΚΑΙ ΚΑΘΆΡΙΣΜΑ
ΕΛΛΗΝΙΚΑ 59
ΠΡΟΣΟΧΗ
Πριν από τις εργασίες συντήρη‐
σης, αποσυνδέστε το φις τροφο‐
δοσίας από την πρίζα.
6.1 Καθάρισμα
• Καθαρίζετε τακτικά τη συσκευή και τα
εξαρτήματα.
• Καθαρίζετε όλα τα μέρη της συσκευής
και όλα τα εξαρτήματα μόνο με ζεστό
νερό και ουδέτερο απορρυπαντικό. Βε‐
βαιωθείτε ότι η συσκευή και τα εξαρτή‐
ματα είναι εντελώς στεγνά.
• Καθαρίζετε τακτικά το λάστιχο της
πόρτας. Για να αντικαταστήσετε το κα‐
τεστραμμένο λάστιχο, επικοινωνήστε
με το Σέρβις.
• Καθαρίζετε τη γρίλια του συμπυκνωτή
και το συμπιεστή στο πίσω μέρος της
6.2 Αυτόματη απόψυξη του ψυγείου
Η αφαίρεση του πάγου πραγματοποιείται
αυτόματα όταν σταματά ο συμπιεστής
κατά τη διάρκεια της λειτουργίας.
Το νερό αποστραγγίζεται μέσω της οπής
αποστράγγισης και συλλέγεται στο δο‐
χείο νερού όπου και εξατμίζεται.
Το δοχείο νερού βρίσκεται στο πίσω μέ‐
ρος της συσκευής, επάνω από το συ‐
μπιεστή.
Η οπή αποστράγγισης βρίσκεται στο πί‐
σω μέρος εντός του ψυγείου.
Για να αποτρέπεται η συσσώρευση νε‐
ρού σε άλλα μέρη του ψυγείου, βεβαιω‐
θείτε ότι η οπή αποστράγγισης είναι πά‐
ντα καθαρή. Χρησιμοποιείτε το εργαλείο
καθαρισμού που βρίσκεται στην οπή
αποστράγγισης.
6.3 Απόψυξη της κατάψυξης
Ενδέχεται να δημιουργηθεί πάγος
στα ράφια του καταψύκτη και γύ‐
ρω από τον επάνω θάλαμο.
Ο καταψύκτης πρέπει να αποψύ‐
χεται όταν το στρώμα πάγου έχει
πάχος 3 ή 5 mm.
συσκευής με μια βούρτσα. Αυτό συμ‐
βάλει στη μείωση της κατανάλωσης
ενέργειας και διατηρεί τη συσκευή σε
καλή κατάσταση.
• Προσέχετε να μην τραβήξετε,
μετακινήσετε ή προκαλέσετε
ζημιά στους σωλήνες ή τα κα‐
λώδια.
• Προσέχετε να μην προκαλέσε‐
τε ζημιά στην ψυκτική μονάδα.
• Μην καθαρίζετε τη συσκευή με
λειαντικά προϊόντα, σφουγγα‐
ράκια που χαράσσουν, διαλύ‐
τες, αρωματισμένα απορρυπα‐
ντικά ή γυαλιστικό κερί.
Μετά τη συντήρηση, συνδέστε το φις
τροφοδοσίας στην πρίζα.
ΠΡΟΣΟΧΗ
Μη χρησιμοποιείτε αιχμηρά με‐
ταλλικά εργαλεία για να αφαιρέ‐
σετε τον πάγο.
Μη χρησιμοποιείτε μηχανικές συ‐
σκευές για να κάνετε απόψυξη
στον καταψύκτη.
1. Απενεργοποιήστε τη συσκευή.
2. Αφαιρέστε όλα τα τρόφιμα από τον
καταψύκτη. Τυλίξτε τα τρόφιμα σε
εφημερίδες και διατηρήστε τα σε χα‐
μηλή θερμοκρασία.
Page 60

www.aeg.com
60
3. Αφήστε την πόρτα της συσκευής
ανοιχτή μέχρι να ολοκληρωθεί η από‐
ψυξη.
4. Καθαρίστε και στεγνώστε εντελώς τον
καταψύκτη.
5. Συνδέστε το φις τροφοδοσίας στην
πρίζα.
6. Ενεργοποιήστε τη συσκευή.
7. Ρυθμίστε το διακόπτη θερμοκρασίας
στο υψηλότερο επίπεδο και αφήστε
τη συσκευή να λειτουργήσει για 2 ή 3
ώρες με αυτή τη ρύθμιση.
8. Τοποθετήστε τα τρόφιμα πίσω στον
καταψύκτη.
6.5 Αντικατάσταση του λαμπτήρα
6.4 Όταν η συσκευή δεν
χρησιμοποιείται για μεγάλα
χρονικά διαστήματα
1. Απενεργοποιήστε τη συσκευή και
αποσυνδέστε το φις τροφοδοσίας
από την πρίζα.
2. Αφαιρέστε όλα τα τρόφιμα.
3. Πραγματοποιήστε απόψυξη της συ‐
σκευής.
4. Καθαρίστε και στεγνώστε καλά τη συ‐
σκευή και όλα τα εξαρτήματα.
5. Αφήστε τις πόρτες ανοιχτές για να
αποτρέψετε τις δυσάρεστες οσμές.
1.
Αποσυνδέστε το φις τροφοδοσίας
από την πρίζα.
2.
Αφαιρέστε τη βίδα από το κάλυμμα
του λαμπτήρα.
3.
Αφαιρέστε το κάλυμμα του λαμπτή‐
ρα.
4.
Αντικαταστήστε τον παλιό λαμπτήρα
με καινούργιο. Χρησιμοποιείτε μόνο
λαμπτήρες κατάλληλους για οικιακές
συσκευές. Στο κάλυμμα του λαμπτή‐
ρα αναγράφεται η μέγιστη ισχύς του
λαμπτήρα.
5.
Τοποθετήστε το κάλυμμα του λαμ‐
πτήρα ξανά στη θέση του.
6.
Συνδέστε το φις τροφοδοσίας στην
πρίζα.
Ο τύπος λαμπτήρα πυράκτωσης
ή αλογόνου που χρησιμοποιείται
σε αυτή τη συσκευή προορίζεται
μόνο για οικιακές συσκευές. Μην
τον χρησιμοποιείτε για οικιακό
φωτισμό.
7. ΑΝΤΙΜΕΤΩΠΙΣΗ ΠΡΟΒΛΗΜΑΤΩΝ
ΠΡΟΕΙΔΟΠΟΙΗΣΗ
Πριν πραγματοποιήσετε τον έλεγ‐
χο, αποσυνδέστε το φις τροφοδο‐
σίας από την πρίζα.
Για προβλήματα που δεν καλύ‐
πτονται από τον πίνακα, επικοι‐
νωνήστε με το Σέρβις.
Page 61

ΕΛΛΗΝΙΚΑ 61
Πρόβλημα Πιθανή αντιμετώπιση
Η συσκευή κάνει θόρυβο
κατά τη λειτουργία.
Κάποιοι ήχοι είναι φυσιολογικοί όταν λειτουργεί η
συσκευή. Ανατρέξτε στο φυλλάδιο που παρέχεται
με τη συσκευή.
Η συσκευή δεν λειτουργεί. Βεβαιωθείτε ότι η συσκευή είναι ενεργοποιημένη.
Βεβαιωθείτε ότι το φις τροφοδοσίας έχει συνδεθεί
στην πρίζα.
Ελέγξτε αν υπάρχει ηλεκτρική τάση. Συνδέστε μια
άλλη συσκευή στην ίδια πρίζα. Για να επισκευάσετε
την πρίζα, επικοινωνήστε με επαγγελματία ηλεκ‐
τρολόγο.
Ο λαμπτήρας δεν ανάβει. Κλείστε και ανοίξτε την πόρτα για να βεβαιωθείτε
ότι ο λαμπτήρας δεν είναι σε κατάσταση αναμονής.
Ο λαμπτήρας είναι ελαττωματικός. Αντικαταστήστε
το λαμπτήρα.
Ο συμπιεστής λειτουργεί
συνεχώς.
Ρυθμίστε το διακόπτη θερμοκρασίας σε ένα χαμη‐
λότερο επίπεδο.
Βεβαιωθείτε ότι η πόρτα της συσκευής είναι κλει‐
στή.
Βεβαιωθείτε ότι δεν ανοίγετε και κλείνετε την πόρτα
της συσκευής πολύ συχνά.
Βεβαιωθείτε ότι δεν έχετε τοποθετήσει ζεστό φαγη‐
τό μέσα στη συσκευή. Περιμένετε μέχρι να κρυώ‐
σει.
Βεβαιωθείτε ότι η θερμοκρασία περιβάλλοντος δεν
είναι πολύ υψηλή.
Συλλέγεται νερό στην πί‐
σω πλάκα του ψυγείου.
Συλλέγεται νερό στο ψυ‐
γείο.
Είναι φυσιολογικό να συμβαίνει αυτό κατά τη λει‐
τουργία της αυτόματης απόψυξης.
Βεβαιωθείτε ότι η οπή αποστράγγισης δεν είναι
φραγμένη.
Βεβαιωθείτε ότι τα τρόφιμα ή οι συσκευασίες δεν
εμποδίζουν τη συλλογή του νερού στο δοχείο νε‐
ρού.
Υπάρχει διαρροή νερού
στο πάτωμα.
Η έξοδος του νερού απόψυξης δεν ρέει στο δίσκο
εξάτμισης που βρίσκεται επάνω από το συμπιεστή.
Προσαρμόστε την έξοδο του νερού απόψυξης
ώστε να ρέει μέσα στο δίσκο εξάτμισης.
Η θερμοκρασία στη συ‐
σκευή είναι πολύ χαμηλή.
Η θερμοκρασία στη συ‐
σκευή δεν είναι αρκετά χα‐
Ρυθμίστε το διακόπτη θερμοκρασίας σε ένα χαμη‐
λότερο επίπεδο.
Ρυθμίστε το διακόπτη θερμοκρασίας σε ένα υψηλό‐
τερο επίπεδο.
μηλή.
Βεβαιωθείτε ότι η πόρτα της συσκευής είναι κλει‐
στή.
Page 62

www.aeg.com
62
Πρόβλημα Πιθανή αντιμετώπιση
Βεβαιωθείτε ότι δεν έχετε τοποθετήσει ζεστό φαγη‐
Βεβαιωθείτε ότι η συσκευή δεν είναι υπερβολικά γε‐
Η θερμοκρασία στο ψυ‐
γείο δεν είναι αρκετά χα‐
μηλή.
Έχει σχηματιστεί πολύς
πάγος.
Βεβαιωθείτε ότι η πόρτα της συσκευής είναι κλει‐
Ρυθμίστε το διακόπτη θερμοκρασίας σε ένα χαμη‐
8. ΤΕΧΝΙΚΑ ΣΤΟΙΧΕΙΑ
8.1 Φυσιολογικοί ήχοι
Ακούγονται κάποιοι ήχοι κατά τη διάρ‐
κεια της κανονικής λειτουργίας (συμπιε‐
στής, κυκλοφορία ψυκτικού υγρού).
τό μέσα στη συσκευή. Περιμένετε να κρυώσει το
φαγητό.
μάτη.
Βεβαιωθείτε ότι υπάρχει κυκλοφορία κρύου αέρα.
Βεβαιωθείτε ότι τα τρόφιμα είναι κλεισμένα σε ειδι‐
κά δοχεία ή συσκευασίες.
στή.
λότερο επίπεδο.
Page 63

SSSRR
HISSS!
R!
ΕΛΛΗΝΙΚΑ 63
CLICK!
BRRR!
OK
SSSRRR!
HISSS!
BLUBB!
SSSRRR!
HISSS!
BLUBB!
BLUBB!
CLICK!
BRRR!
CRACK!
CLICK!
BRRR!
CRACK!CRACK!
8.2 Τοποθέτηση
Η συσκευή αυτή μπορεί επίσης να εγκα‐
τασταθεί σε στεγνό, καλά αεριζόμενο
εσωτερικό χώρο (γκαράζ ή κελάρι), αλλά
για βέλτιστη απόδοση εγκαταστήστε την
σε χώρο όπου η θερμοκρασία περιβάλ‐
λοντος αντιστοιχεί στην κλιματική κατη‐
γορία που αναγράφεται στην πινακίδα
τεχνικών χαρακτηριστικών της συσκευής:
Page 64

www.aeg.com
64
Κλιμα‐
τική κα‐
Θερμοκρασία περιβάλλο‐
ντος
τηγορία
SN +10 °C έως +32 °C
N +16 °C έως +32 °C
ST +16 °C έως +38 °C
T +16 °C έως +43 °C
8.3 Τεχνικά χαρακτηριστικά
Διαστάσεις Ύψος 1404 mm
Πλάτος 545 mm
Βάθος 604 mm
Χρόνος ανόδου 19 ώρες
Τάση 230 V
Συχνότητα 50 Hz
Για περισσότερες πληροφορίες, ανατρέξ‐
τε στην πινακίδα τεχνικών χαρακτηριστι‐
9. ΠΕΡΙΒΑΛΛΟΝΤΙΚΆ ΘΈΜΑΤΑ
Ανακυκλώστε τα υλικά που φέρουν
το σύμβολο
υλικά συσκευασίας σε κατάλληλα
δοχεία για ανακύκλωση.
Συμβάλλετε στην προστασία του
περιβάλλοντος και της ανθρώπινης
υγείας ανακυκλώνοντας τις άχρηστες
. Τοποθετήστε τα
κών και στην ετικέτα ενεργειακής κατανά‐
λωσης.
ηλεκτρικές και ηλεκτρονικές
συσκευές. Μην απορρίπτετε με τα
οικιακά απορρίμματα συσκευές που
φέρουν το σύμβολο
το προϊόν στην τοπική σας μονάδα
ανακύκλωσης ή επικοινωνήστε με τη
δημοτική αρχή.
. Επιστρέψτε
Page 65

ITALIANO 65
INDICE
1. ISTRUZIONI DI SICUREZZA . . . . . . . . . . . . . . . . . . . . . . . . . . . . . . . . . . . . . . . . . . . . . . . . . . . 66
2. DESCRIZIONE DEL PRODOTTO . . . . . . . . . . . . . . . . . . . . . . . . . . . . . . . . . . . . . . . . . . . . . . 68
3. PREPARAZIONE AL PRIMO UTILIZZO . . . . . . . . . . . . . . . . . . . . . . . . . . . . . . . . . . . . . . . . . . 68
4. UTILIZZO QUOTIDIANO . . . . . . . . . . . . . . . . . . . . . . . . . . . . . . . . . . . . . . . . . . . . . . . . . . . . . 69
5. CONSIGLI E SUGGERIMENTI UTILI . . . . . . . . . . . . . . . . . . . . . . . . . . . . . . . . . . . . . . . . . . . . 70
6. PULIZIA E CURA . . . . . . . . . . . . . . . . . . . . . . . . . . . . . . . . . . . . . . . . . . . . . . . . . . . . . . . . . . . . 71
7. RISOLUZIONE DEI PROBLEMI . . . . . . . . . . . . . . . . . . . . . . . . . . . . . . . . . . . . . . . . . . . . . . . . 73
8. DATI TECNICI . . . . . . . . . . . . . . . . . . . . . . . . . . . . . . . . . . . . . . . . . . . . . . . . . . . . . . . . . . . . . 75
9. CONSIDERAZIONI AMBIENTALI . . . . . . . . . . . . . . . . . . . . . . . . . . . . . . . . . . . . . . . . . . . . . . 77
PER RISULTATI PERFETTI
Grazie per aver scelto di acquistare questo prodotto AEG. Lo abbiamo creato per fornirvi
prestazioni impeccabili per molti anni, grazie a tecnologie innovative che vi semplificheranno
la vita - funzioni che non troverete sui normali elettrodomestici. Vi invitiamo di dedicare
qualche minuto alla lettura per sapere come trarre il massimo dal vostro elettrodomestico.
Visitate il nostro sito web per:
ricevere consigli, scaricare i nostri opuscoli, eliminare eventuali anomalie, ottenere
informazioni sull'assistenza.
www.aeg.com
registrare il vostro prodotto e ricevere un servizio migliore:
www.aeg.com/productregistration
acquistare accessori, materiali di consumo e ricambi originali per la vostra
apparecchiatura:
www.aeg.com/shop
SERVIZIO CLIENTI E MANUTENZIONE
Consigliamo sempre l’impiego di ricambi originali.
Quando si contatta l'Assistenza, accertarsi di disporre dei seguenti dati.
Le informazioni si trovano sulla targhetta di identificazione. Modello, numero dell'apparecchio
(PNC), numero di serie.
Avvertenza / Attenzione - Importanti Informazioni di Sicurezza
Informazioni e consigli generali
Informazioni in materia di sicurezza ambientale
Con riserva di modifiche.
Page 66

www.aeg.com
66
1.
ISTRUZIONI DI SICUREZZA
Leggere attentamente le istruzioni fornite prima di installare e utilizzare l'apparecchiatura. Il produttore non è responsabile se un'installazione ed un uso non
corretto dell'apparecchiatura provocano
lesioni e danni. Tenere sempre le istruzioni a portata di mano in caso di necessità durante l'utilizzo.
1.1 Sicurezza dei bambini e
delle persone vulnerabili
AVVERTENZA!
Rischio di soffocamento, lesioni o
invalidità permanente.
• Questa apparecchiatura può essere
usata da bambini a partire dagli 8 anni
e da adulti con limitate capacità fisiche, sensoriali o mentali o con scarsa
esperienza o conoscenza sull'uso dell'apparecchiatura, se sorvegliati o se
sono stati istruiti relativamente all'uso
dell'apparecchiatura e hanno capito i
rischi coinvolti.
• Non consentire ai bambini di giocare
con l'apparecchiatura.
• Tenere i materiali di imballaggio al di
fuori della portata dei bambini.
• La pulizia e gli interventi di manutenzione non devono essere eseguiti dai
bambini senza supervisione.
1.2 Installazione
AVVERTENZA!
L’installazione dell'apparecchiatura deve essere eseguita da personale qualificato.
• Rimuovere tutti i materiali di imballaggio.
• Non installare o utilizzare l'apparecchiatura se è danneggiata.
• Attenersi alle istruzioni fornite insieme
all'apparecchiatura.
• Fare sempre attenzione quando si
sposta l'apparecchiatura, perché è pesante. Indossare sempre guanti di sicurezza.
• Assicurarsi che l'aria possa circolare liberamente attorno all'apparecchiatura.
• Attendere almeno 4 ore prima di collegare l'apparecchiatura all'alimentazione. Questo serve a consentire all'olio di fluire nuovamente nel compressore.
• Non installare l'apparecchiatura in
prossimità di radiatori, fornelli, forni o
piani cottura.
• Solo per le apparecchiature dotate
di collegamento alla rete idrica: usare solo sorgenti d'acqua potabile.
• La superficie posteriore dell'apparecchiatura deve essere appoggiata alla
parete.
• Non installare l'apparecchiatura dove
sia esposta alla luce solare diretta.
Collegamento elettrico
AVVERTENZA!
Rischio di incendio e scossa elettrica.
• L'apparecchiatura deve disporre di
una messa a terra.
• Tutti i collegamenti elettrici dovrebbero essere realizzati da un elettricista
qualificato.
• Verificare che i dati elettrici riportati
sulla targhetta dei dati corrispondano
a quelli dell'impianto. In caso contrario, contattare un elettricista.
• Utilizzare sempre una presa elettrica
con contatto di protezione correttamente installata.
• Non utilizzare prese multiple e prolunghe.
• Accertarsi di non danneggiare i componenti elettrici (ad es. la spina di alimentazione, il cavo di alimentazione, il
compressore). Contattare il Centro di
Assistenza o un elettricista per sostituire i componenti elettrici.
• Inserire la spina di alimentazione nella
presa solo al termine dell'installazione.
Verificare che la spina di alimentazione rimanga accessibile dopo l'installazione.
Page 67

• Il cavo di alimentazione deve rimanere
sotto il livello della spina di alimentazione.
• Non tirare il cavo di alimentazione per
scollegare l’apparecchiatura. Tirare solo la spina
1.3 Utilizzo
• L'apparecchiatura è destinata all'uso
domestico e applicazioni simili, come:
– Cucine di negozi, uffici e altri am-
bienti di lavoro
– Fattorie
– Hotel, motel e altri ambienti resi-
denziali
– Bed and breakfast.
AVVERTENZA!
Rischio di lesioni, scottature,
scosse elettriche o incendi.
• Utilizzare l’apparecchiatura in un ambiente domestico.
• Non apportare modifiche alle specifiche di questa apparecchiatura.
• Non inserire degli apparecchi elettrici
(ad es. gelatiere) nell'apparecchiatura
se non specificamente consentito dal
produttore.
• Fare attenzione a non danneggiare il
circuito refrigerante. Esso contiene
isobutano (R600a), un gas naturale con
un alto livello di compatibilità ambientale, tuttavia il gas è infiammabile.
• Nel caso di sanno al circuito refrigerante, assicurarsi che non si sviluppino
fiamme libere e scintille nel locale. Aerare bene l'ambiente.
• Non appoggiare oggetti incandescenti sulle parti in plastica dell'apparecchiatura.
• Non introdurre bevande frizzanti nel
vano congelatore. Si verrà a creare
una pressione nel contenitore della
bevanda.
• Non conservare gas e liquidi infiammabili nell'apparecchiatura.
• Non appoggiare o tenere liquidi o
materiali infiammabili, né oggetti facilmente incendiabili sull'apparecchiatura, al suo interno o nelle immediate vicinanze.
ITALIANO 67
• Non toccare il compressore o il condensatore. Sono incandescenti.
• Non togliere o toccare gli oggetti nel
vano congelatore con le mani bagnate
o umide.
• Quando si prende un ghiacciolo dall'apparecchiatura, non mangiarlo immediatamente. Attendere qualche minuto.
• Non ricongelare del cibo precedentemente scongelato.
• Attenersi alle istruzioni per la conservazione riportate sulla confezione del
cibo surgelato.
1.4 Pulizia e manutenzione
AVVERTENZA!
Vi è il rischio di ferirsi o danneggiare l'apparecchiatura.
• Prima di eseguire qualunque intervento di manutenzione, spegnere l'apparecchiatura ed estrarre la spina dalla
presa.
• Non usare acqua spray né vapore per
pulire l'apparecchiatura.
• Pulire l'apparecchiatura con un panno
inumidito e morbido. Utilizzare solo
detergenti neutri. Non usare prodotti
abrasivi, spugnette abrasive, solventi
od oggetti metallici.
• Controllare regolarmente lo scarico
del frigorifero e se necessario pulirlo.
L'ostruzione dello scarico può causare
un deposito di acqua di scongelamento sul fondo dell'apparecchiatura.
• L'unità refrigerante di questa apparecchiatura contiene idrocarburi. L’unità
deve essere ricaricata ed ispezionata
esclusivamente da personale qualificato.
1.5 Luce interna
• Il tipo di lampadine utilizzate in questa
apparecchiatura sono lampade speciali per elettrodomestici. Non usarle
per l'illuminazione di casa.
1.6 Smaltimento
AVVERTENZA!
Rischio di lesioni o soffocamento.
Page 68

www.aeg.com
68
• Staccare la spina dall'alimentazione
elettrica.
• Tagliare il cavo di rete e smaltirlo.
• Rimuovere il blocco porta per evitare
che bambini e animali domestici rimangano chiusi all’interno dell’apparecchiatura.
• Il circuito refrigerante e i materiali di
isolamento di questa apparecchiatura
rispettano l'ozono.
• La schiuma isolante contiene gas in-
• Non danneggiare i componenti dell'u-
2. DESCRIZIONE DEL PRODOTTO
1
8
7
fiammabili. Contattare le autorità locali per ricevere informazioni su come
smaltire correttamente l'apparecchiatura.
nità refrigerante che si trovano vicino
allo scambiatore di calore.
2
6
5
Ripiano a filo
1
Scomparto per il burro
2
Ripiano sulla porta
3
Ripiano bottiglie
4
Targhetta dei dati
5
Cassetto per verdura
6
Ripiani in vetro
7
Manopola della temperatura e luce
8
interna
3. PREPARAZIONE AL PRIMO UTILIZZO
3.1
1. Pulire l'interno dell'apparecchiatura e
tutti gli accessori con dell'acqua calda e un detergente neutro.
2. Assicurarsi che l’apparecchiatura e gli
accessori siano completamente
asciutti.
3. Inserire la spina nella presa.
4. Attivare l’apparecchiatura e imposta-
re la temperatura.
3
4
Page 69

Non usare prodotti abrasivi, spugnette abrasive o solventi per
pulire l'apparecchiatura e gli accessori.
3.2 Attivazione
dell'apparecchiatura e
impostazione della
temperatura
Ruotare la manopola della temperatura
in senso orario per attivare l'apparecchiatura e, contemporaneamente, impostare la temperatura.
I numeri sulla manopola fanno riferimento a diverse temperature di freddo.
ITALIANO 69
Ruotare la manopola della temperatura
sulle impostazioni più basse per ottenere la temperatura fredda minima.
Ruotare la manopola della temperatura
sulle impostazioni più alte per ottenere
la temperatura fredda massima.
Si consiglia di impostare una
temperatura fredda media.
Le seguenti condizioni possono influenzare le impostazioni della temperatura.
• La temperatura ambiente e il locale in
cui si trova l'apparecchiatura.
• La frequenza di apertura della porta
dell'apparecchiatura.
• La quantità di cibo all'interno dell'ap-
parecchiatura.
4. UTILIZZO QUOTIDIANO
4.1 Congelamento di cibi
freschi
Il congelatore può congelare cibi freschi,
conservare cibi congelati e surgelati.
Se la manopola della temperatura è impostata su una posizione
media, non è necessario modificare l'impostazione.
Se si desidera congelare il cibo
più rapidamente, impostare la
manopola della temperatura su
una posizione maggiore. In tali
condizioni, la temperatura del frigo può scendere a 0°C e oltre. In
questo caso, portare la manopola della temperatura sulla posizione più bassa.
4.2 Conservazione dei
surgelati
Non introdurre il cibo surgelato nel congelatore se l'apparecchiatura è nuova o
è rimasta spenta a lungo.
Impostare la manopola della temperatura sulla posizione più alta e lasciare l'apparecchiatura in funzione per almeno 2
ore.
Un'interruzione di corrente può
causare lo sbrinamento del congelatore.
Se la corrente è mancata per più
un periodo di tempo superiore al
“Tempo di Risalita”, sarà necessario consumare o cucinare immediatamente il cibo scongelato.
Per il valore, fare riferimento ai
“DATI TECNICI”.
È possibile congelare cibi cotti
una volta raffreddatisi.
4.3 Scongelamento
Prima di cucinare cibi surgelati o congelati, lasciarli scongelare all’interno del frigo o a temperatura ambiente.
È possibile cucinare piccole quantità di
cibo surgelato prelevato direttamente
Page 70

www.aeg.com
70
dal congelatore, ma ciò aumenterà i
tempi di cottura.
4.4 Ripiani in vetro
I ripiani in vetro possono essere sistemati ad altezze differenti.
4.5 Posizionamento dei ripiani della porta
I ripiani della porta possono essere sistemati ad altezze differenti.
1.
Tirare il ripiano nella direzione indicata dalle frecce fino a sbloccarlo.
2.
Sistemare il ripiano nella nuova posizione.
5. CONSIGLI E SUGGERIMENTI UTILI
5.1 Risparmio energetico
• Non aprire la porta del frigo o del
congelatore troppo spesso.
• Non tenere la porta del frigo o del
congelatore aperta oltre il necessario.
• Se l’apparecchiatura è costantemente
in funzione ed è presente della brina
sulla parte interna posteriore, ciò potrebbe essere dovuto a:
– La manopola della temperatura im-
postata sulla posizione più bassa.
– Una temperatura ambiente troppo
elevata del locale in cui si trova l’apparecchiatura.
– L'apparecchiatura piena.
Impostare la manopola della temperatura su una posizione più alta. Lo sbri-
namento automatico viene avviato e il
consumo energetico si riduce.
5.2 Refrigerazione
• Non introdurre cibi caldi nel frigo. Attendere che si raffreddino.
• non introdurre liquidi che evaporano
nel frigo.
• Il cibo con un odore o un sapore forti,
deve essere riposto nei contenitori.
• Adottare le misure necessarie per garantire una corretta circolazione intorno al cibo.
• Riporre la carne in sacchetti di polietilene. Sistemarli sul ripiano in vetro al
di sopra del cassetto per la verdura.
Page 71

Non conservare la carne nel frigo per
più di 2 giorni.
• Coprire i cibi cotti e le pietanze fredde
e sistemarli su uno dei ripiani.
• Lavare frutta e verdura e sistemarla nel
cassetto per la verdura.
• Conservare il burro e i formaggi negli
speciali contenitori ermetici, in fogli di
alluminio o sacchetti di polietilene.
• Assicurarsi che le bottiglie del latte
siano chiuse e sistemarle sul ripiano
bottiglie sulla porta dell'apparecchiatura.
• Non conservare banane, patate, cipolle e aglio in frigo se non avvolti.
ITALIANO 71
• Avvolgere il cibo in fogli di alluminio o
sistemarlo in buste di polietilene. Accertarsi che la confezione sia stagna.
• Non introdurre cibo fresco insieme a
cibo congelato. Ciò per evitare he la
temperatura del cibo congelato aumenti.
• Il tempo di conservazione dei cibi
grassi è più breve rispetto ai cibi non
grassi o a basso contenuto di grassi. Il
sale riduce il tempo di conservazione
del cibo.
• Si consiglia di scrivere, su ciascuna
confezione, la data in cui è stato congelato il cibo.
5.3 Freezing
• La targhetta dei dati offre indicazioni
sulla quantità massima di cibo che il
congelatore è in grado di congelare in
24 ore.
• Il congelamento del cibo richiede 24
ore. Non introdurre altro cibo nel congelatore durante questo lasso di tempo.
• Introdurre il cibo nel congelatore in
piccole quantità. Ciò aiuta a congelare
rapidamente il cibo e a scongelarne
solo la quantità necessaria.
6. PULIZIA E CURA
ATTENZIONE
Prima di eseguire la manutenzione, estrarre la spina dalla presa
di alimentazione.
6.1 Pulizia
• Pulire regolarmente l'apparecchiatura
e tutti gli accessori.
• Pulire l'interno dell'apparecchiatura e
tutti gli accessori soltanto con dell'acqua calda e un detergente neutro. Assicurarsi che l’apparecchiatura e gli accessori siano completamente asciutti.
• Pulire regolarmente la guarnizione
della porta. Per sostituire una guarnizione danneggiata, contattare il Centro di Assistenza.
5.4 Conservazione dei
surgelati
• Una volta acquistati cibi surgelati, assicurarsi di sistemarli nel congelatore il
prima possibile.
• Una volta scongelati, i cibi surgelati
devono essere subito cotti. Non è
possibile congelare nuovamente cibi
già scongelati.
• Verificare che la data di scadenza. Le
informazioni utili si trovano sulla confezione.
• Pulire la griglia del condensatore e il
compressore sul retro dell'apparecchiatura con una spazzola. Ciò aiuta a
ridurre il consumo energetico e mantiene l’apparecchiatura in buone condizioni.
• Fare attenzione a non tirare, rimuovere o danneggiare i tubi
o i cavi.
• Fare attenzione a non danneggiare l'unità refrigerante.
• Non pulire l’apparecchiatura
con prodotti abrasivi, spugnette abrasive, solventi, detergenti profumati o cere lucidanti.
Dopo aver eseguito le operazioni di manutenzione, inserire la spina nella presa.
Page 72

www.aeg.com
72
6.2 Sbrinamento automatico del frigo
La rimozione della brina avviene automaticamente quando il motocompressore si arresta durante il funzionamento.
L'acqua fluisce attraverso il foro di scarico e viene raccolta nel relativo contenitore da cui evapora.
Il contenitore dell'acqua si trova sul retro
dell'apparecchiatura, sopra al motocompressore.
Il foro di scarico si trova all'interno del
frigo sulla parte posteriore.
Per evitare che l'acqua fluisca in altre
parti del frigo, assicurarsi che il foro di
scarico sia sempre pulito. Utilizzare lo
strumento per la pulizia sistemato nel foro di scarico.
6.3 Sbrinamento del
congelatore
I ripiani del congelatore e lo
scomparto superiore possono
presentare della brina.
Quando lo strato raggiunge uno
spessore dai 3 ai 5 mm, il vano
congelatore deve essere sbrinato.
ATTENZIONE
Non utilizzare strumenti appuntiti
per rimuovere la brina.
Non utilizzare dispositivi meccanici per sbrinare il congelatore.
1. Spegnere l'apparecchiatura.
2. Togliere il cibo dal congelatore. Av-
volgere il cibo in carta di giornale e
conservarlo a bassa temperatura.
3. Mantenere la porta dell'apparecchiatura aperta fino al termine dello sbrinamento.
4. Pulire e asciugare completamente il
congelatore.
5. Inserire la spina nella presa.
6. Accendere l'apparecchiatura.
7. Impostare la manopola della tempe-
8. Reinserire il cibo nel congelatore.
6.4 Se l'apparecchiatura non
viene utilizzata per lunghi
periodi
1. Spegnere l'apparecchiatura ed
2. Estrarre tutti gli alimenti.
3. Sbrinare l'apparecchiatura.
4. Pulire e asciugare completamente
5. Tenere aperte la porte per impedire
ratura sulla posizione più alta e lasciare l'apparecchiatura in funzione
per almeno 2 o 3 ore.
estrarre la spina dalla presa di alimentazione.
l'apparecchiatura e tutti gli accessori.
la formazione di cattivi odori.
Page 73

6.5 Sostituzione della lampadina
7. RISOLUZIONE DEI PROBLEMI
AVVERTENZA!
Scollegare la spina dalla presa di
alimentazione prima di eseguire i
controlli.
Per problemi non presenti in tabella, contattare il Centro di Assistenza.
Problema Possibile soluzione
L'apparecchiatura emette
rumori durante il funzionamento.
L'apparecchiatura non
funziona.
Verificare che la spina sia collegata alla presa elet-
Eseguire un controllo e verificare la presenza di
La lampadina non si accende.
La lampadina è difettosa. Sostituire la lampadina.
Alcuni rumori dell'apparecchiatura sono normali
durante il funzionamento. Fare riferimento al libretto fornito con l'apparecchiatura.
Controllare che l'apparecchiatura sia attivata.
trica.
tensione. Collegare alla presa di alimentazione
un'altra apparecchiatura elettrica. Per riparare una
presa di alimentazione, contattare un elettricista
qualificato.
Chiudere e riaprire la porta per assicurarsi che la
lampadina non sia in standby.
ITALIANO 73
1.
Scollegare la spina dalla presa di
corrente.
2.
Rimuovere la vite dal coprilampada.
3.
Rimuovere il coprilampada
4.
Sostituire la vecchia lampadina con
una nuova. Usare solo lampadine
per elettrodomestici. Sul coprilampada è indicata la potenza massima
della lampadina.
5.
Installare nuovamente il coprilampada.
6.
Inserire la spina nella presa.
Il tipo di lampadine utilizzate in
questa apparecchiatura sono
lampade speciali per elettrodomestici. Non usarle per l'illuminazione di casa.
Page 74

www.aeg.com
74
Problema Possibile soluzione
Il compressore rimane
sempre in funzione.
Impostare la manopola della temperatura su una
posizione più bassa.
Controllare che la porta dell'apparecchiatura sia
chiusa.
Assicurarsi di non aprire e chiudere la porta del-
l'apparecchiatura troppo spesso.
Assicurarsi di non introdurre cibi caldi all'interno
dell'apparecchiatura. Attendere che si raffreddino.
Verificare che la temperatura ambiente non sia
troppo elevata.
Sul pannello posteriore
del frigorifero è presente
È normale con lo sbrinamento automatico in funzione.
dell'acqua.
È presente dell'acqua nel
Controllare che il foro di scarico non sia ostruito.
frigo.
Assicurarsi che il cibo o le confezioni non blocchi-
no il deflusso dell'acqua verso il contenitore.
Presenza di acqua sul pavimento.
L'acqua di sbrinamento non viene scaricata nella
bacinella di evaporazione posta sopra il compressore.
Collegare lo scarico dell'acqua di sbrinamento alla
bacinella di evaporazione.
La temperatura all'interno
dell'apparecchiatura è
Impostare la manopola della temperatura su una
posizione più bassa.
troppo fredda
La temperatura all'interno
dell'apparecchiatura non
Impostare la manopola della temperatura su una
posizione più alta.
è sufficientemente fredda.
Controllare che la porta dell'apparecchiatura sia
chiusa.
Assicurarsi di non introdurre cibi caldi all'interno
dell'apparecchiatura. Attendere che il cibo si raffreddi.
Controllare che l'apparecchiatura non sia troppo
piena.
La temperatura all'interno
Assicurarsi che circoli aria fredda.
del frigo non è sufficientemente fredda.
Si forma troppa brina. Assicurarsi che il cibo sia ermeticamente chiuso in
speciali contenitori o confezioni.
Controllare che la porta dell'apparecchiatura sia
chiusa.
Impostare la manopola della temperatura su una
posizione più bassa.
Page 75

8. DATI TECNICI
ITALIANO 75
8.1 Rumori normali
Durante l'uso, alcuni rumori di funzionamento (come quelli del compressore o
del circuito refrigerante) sono da considerarsi normali.
Page 76

www.aeg.com
76
SSSRR
HISSS!
R!
CLICK!
BRRR!
OK
SSSRRR!
HISSS!
BLUBB!
SSSRRR!
HISSS!
BLUBB!
BLUBB!
CLICK!
BRRR!
CRACK!
CLICK!
BRRR!
CRACK!CRACK!
8.2 Luogo d'installazione
Questa apparecchiatura può essere installata in un luogo asciutto e ben ventilato (garage o una cantina); tuttavia, per
ottenere prestazioni ottimali è consiglia-
bile installarlo in un luogo la cui temperatura ambiente corrisponda alla classe
climatica indicata sulla targhetta del modello:
Page 77

ITALIANO 77
Classe
Temperatura ambiente
climatica
SN da +10°C a 32°C
N da +16°C a 32°C
ST da +16°C a 38°C
L da +16°C a 43°C
8.3 Dati tecnici
Dimensioni Altezza 1404 mm
Larghezza 545 mm
Profondità 604 mm
Tempo di risalita 19 h
Tensione 230 V
Frequenza 50 Hz
Per ulteriori informazioni, fare riferimento alla targhetta dei dati e all'etichetta
energetica.
9. CONSIDERAZIONI AMBIENTALI
Riciclare i materiali con il simbolo .
Buttare l'imballaggio negli appositi
contenitori per il riciclaggio.
Aiutare a proteggere l’ambiente e la
salute umana e a riciclare rifiuti
derivanti da apparecchiature
elettriche ed elettroniche. Non
smaltire le apparecchiature che
riportano il simbolo
normali rifiuti domestici. Portare il
prodotto al punto di riciclaggio più
vicino o contattare il comune di
residenza.
insieme ai
Page 78

www.aeg.com
78
Page 79

ITALIANO 79
Page 80

www.aeg.com/shop
200384568-A-252012
 Loading...