


MCD3880EM
User manual Microwave Oven
Gebruiksaanwijzing Magnetron
Contents
2
Thank you for choosing one of our high-quality products.
To ensure optimal and regular performance of your appliance please read this
instruction manual carefully. It will enable you to navigate all processes perfectly
and most efficiently. To refer to this manual any time you need to, we recommend
you to keep it in a safe plac e. An d p le as e pass it to any future owner of the appliance.
We wish you much joy with your new appliance.
Contents
Safety information 2
General safety 2
Child safety 4
Utensil safety 4
Food safety 6
Safety instructions when cooking with grill
and combination modes 7
Before first use 7
How a microwave oven works 8
Description of functions 9
Altering parameters 10
Product description 11
Operation 12
Setting the clock 12
Child lock 13
Cooking with microwave 13
Quick start 13
Cooking with grill 14
Cooking with microwave + grill 14
Automatic defrost 14
Manual defrost 15
Automatic function F1 (heating food) 15
Automatic function F2 (cooking) 16
Automatic function F3 (defrosting and
toasting) 17
Hints and tips 18
Something not working 21
Replace the light bulb 22
Maintenance and cleaning 22
Oven ceiling 23
Environmental information 24
Installation 24
Before installation 24
After installation 25
Installation diagrams 26
Technical data 26
European Guarantee 27
Subject to change without notice
Safety information
General safety
READ CAREFULLY AND KEEP FOR FUTURE REFERENCE
• The built-in safety interlock switches prevent the microwave oven from operating when
the door is open.
• Do not tamper with them, or attempt to operate the oven with the door open as open
door operation can result in exposure to microwave energy.
• Do not allow food spills or cleaner residue to accumulate on door sealing surfaces. See
the Cleaning and Care section for cleaning instructions.
Safety information
3
• It is particularly important that the oven door closes properly and that there is no damage
to the: (1) door (warped), (2) hinges and latches (broken or insecure), (3) door seals and
sealing surface.
WARNING!
If the door, hinges/latches or door seals are damaged, the microwave must not be operated
until it has been repaired by a authorized service person.
WARNING!
It is hazardous for anyone except factory trained service personnel to service or make
adjustments to this oven. Contact your nearest authorised service agent if service should
be required.
• Do not remove the outer case, door or control panel at any time. Doing so may cause
exposure to extremely high voltage.
• Install or locate this oven only in accordance with 'installation instructions' found in this
manual.
• Use the appliance for its intended use as described in this manual. Do not use corrosive
chemicals in this appliance. This type of oven is specifically designed to heat, cook, or
defrost food. It is not designed for industrial or laboratory use neither for commercial
use as this will invalidate the guarantee.
• Do not operate the oven empty. If food or water is not present to absorb the microwave
energy, the magnetron tube can be damaged.
• Do not store this appliance outdoors. Do not use this product near water.
• Do not attempt to dry clothing or newspapers in the microwave oven. These items can
ignite.
• Do not use the cavity for storage purposes. Do not leave paper products, cooking utensils,
or food in the cavity when not in use.
• The temperature of accessible surfaces may be high when the appliance is operating.
WARNING!
If smoke is observed, switch off or unplug the appliance and keep the door closed in order
to stifle any flames. Never use water.
WARNING!
The appliance is not intended for use by children or persons with reduced physical, sensory
or mental capabilities, or lack of experience and knowledge, unless they have been given
supervision or instruction.
• Do not force the turntable to rotate by hand. This may cause malfunctioning.
• The appliance is not intended to be operated by means of an external timer or separate
remote-control system.
• Care should be taken not to obstruct any air vents located on the top, rear, side and
bottom of the oven.
WARNING!
Do not use this oven for commercial purposes. This oven is made for domestic use only.

Safety information
4
Child safety
• This appliance is designed to be operated by adults. Children should be supervised to
ensure they do not tamper with the controls or play with the product.
• Keep all packaging materials away from children.
Utensil safety
Microwave function
For the microwave function, keep in mind that microwaves are reflected by metal surfaces.
Glass, china, clay, plastic, and paper let microwaves pass.
For this reason, metal pans and dishes or containers with metal parts or decorations
cannot be used in the microwave. Glass ware and clay with metallic decoration or
content (e.g. lead crystal) cannot be used in microwave ovens.
The ideal materials for use in microwave ovens are glass, refractory china or clay, or heat
resistant plastic. Very thin, fragile glass or china should only be used for short period of
times (e.g. heating).
Hot food transmits heat to the dishes which can become very hot. You should, therefore,
always use an oven glove!
How to test ovenware you want to use
Put the item you want to use in the oven for 20 seconds at maximum microwave power.
After that time, if it is cold and just slightly warm, it is suitable to use. However, if it heats
up a lot or causes electric arcing it is not suitable for microwave use.
Grill and Hot air function
In the case of the grill function, the ovenware must be resistant to temperature of at least
300°C.
Plastic dishes are not suitable for use in the grill.
Microwave + grill function
In the microwave + grill function, the ovenware used must be suitable for use in both the
microwave and the grill.
Aluminium containers and foil
Pre-cooked food in aluminium containers or in aluminium foil can be put in the microwave
if the following aspects are respected:
Keep in mind the manufacturer’s recommendations written on the packaging.
• The aluminium containers cannot be more than 3 cm high or come in contact with the
cavity walls (minimum distance 3 cm). Any aluminium lid or top must be removed.
• Put the aluminium container directly on top of the turntable plate. If you use the rectangular rack, put the container on a china plate. Never put the container directly on
the rectangular rack!
• The cooking time is longer because the microwaves only enter the food from the top. If
you have any doubts, it is best to use only dishes suitable for microwave use.
• Aluminium foil can be used to reflect microwaves during the defrosting process. Delicate
food, such as poultry or minced meat, can be protected from excessive heat by covering
the respective extremities/edges.
•
Important: aluminium foil cannot come into contact with the cavity walls since this
may cause electrical arcing.

Safety information
5
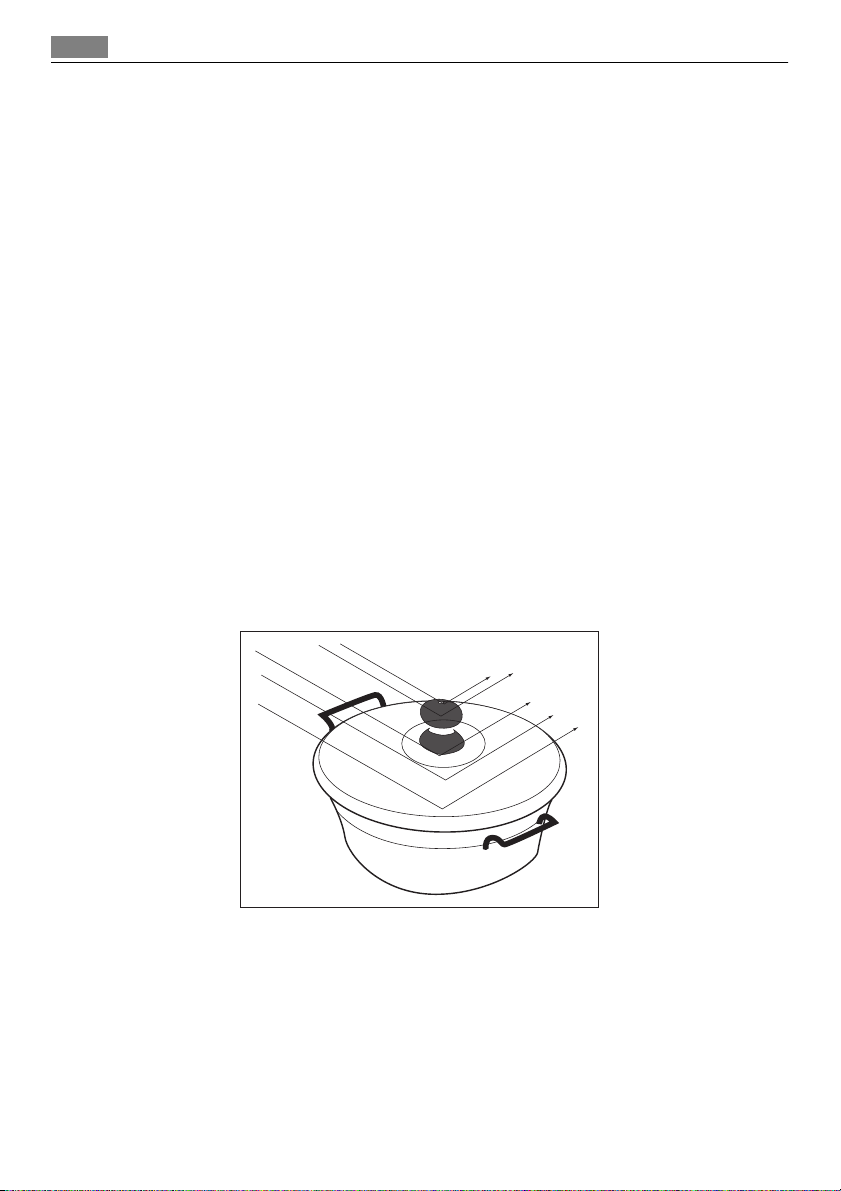
Lids
We recommend you use glass or plastic lids or cling film since:
1. This will stop excessive evaporation (mainly during very long cooking times);
2. The cooking times are shorter;
3. The food does not become dry;
4. The aroma is preserved.
The lid should have holes or openings so that no pressure develops. Plastic bags must also
be opened. Baby feeding bottles or jars with baby food and similar containers can only be
heated without their tops / lids otherwise they can burst.
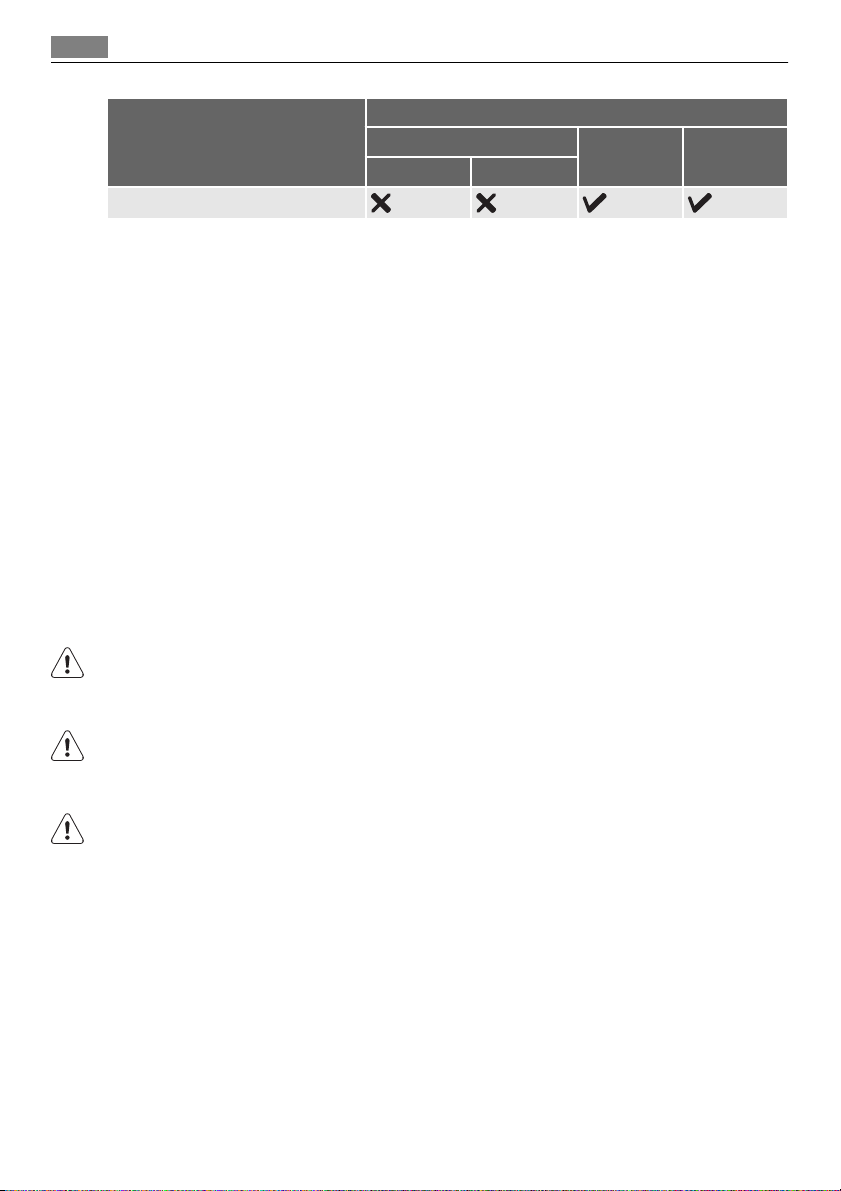
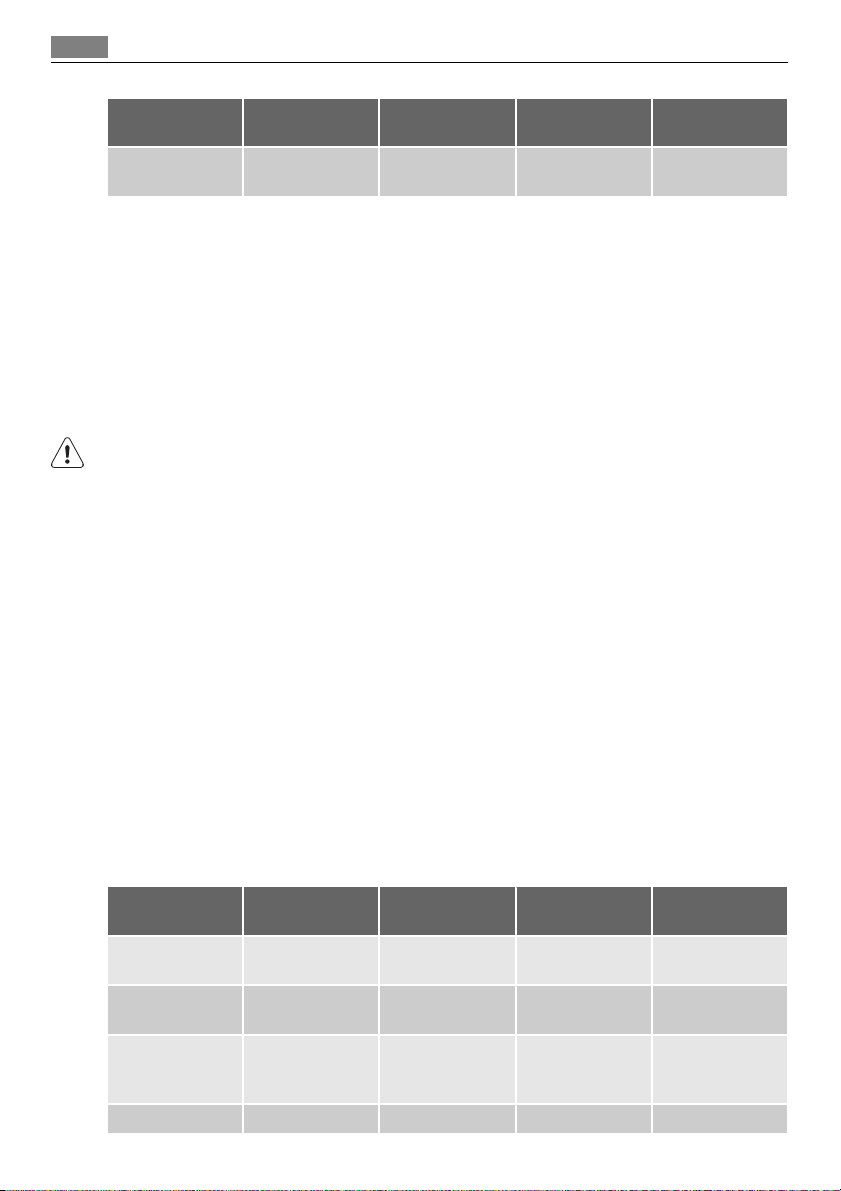
Oven utensils and accessories guide
The list below is a general guide.
• : Utensils and accessories to use
• : Utensils and accessories to avoid
Type of ovenware Operating mode
Glass and china 1)Home use, not
flame resistant, can be used in dish
washer
Glazed china Flame resistant glass
and china
China, stone ware 2) Unglazed or
glazed without metallic decorations
Clay dishes
structions in mind!)
Clay dishes
structions in mind!)
Plastic dishes
structions in mind!)
Keep the manufacturer’s in-
glazed
Keep the manufacturer’s in-
unglazed
Keep the manufacturer’s in-
Heat resistant to
100°C
Plastic dishes
structions in mind!)
Keep the manufacturer’s in-
Heat resistant to
250°C
Plastic films 3)Plastic film for food
Plastic films
Paper, cardboard, parchment
3)
Cellophane
4)
Aluminium foil
Aluminium wrappings
5)
Microwave Grill Grill + Mi-
Defrosting Cooking
crowave
Safety information
6
Type of ovenware Operating mode
Microwave Grill Grill + Mi-
Defrosting Cooking
Accessories (rectangular rack)
1) Without any gold or silver leaf edging; no lead crystal.
2) Keep the manufacturer’s instructions in mind!
3) Do not use metal clips for closing bags. Make holes in the bags. Use the films only to cover the food.
4) Do not use paper plates.
5) Only shallow aluminium containers without lids/tops. The aluminium cannot come into contact with the cavity
walls.
Food safety
• Do not heat food in a can in the microwave oven. Always remove the food to a suitable
container.
• Deep fat frying should not be done in the microwave oven, because the fat temperature
cannot be controlled, hazardous situations can result.
• Popcorn may be prepared in the microwave oven, but only in special packages or utensils
designed specifically for this purpose. This cooking operation should never be unattended.
• Pierce foods with nonporous skins or membranes to prevent steam buildup and bursting.
Apples, potatoes, chicken livers, and egg yolks are examples of items that should be
pierced.
• The contents of feeding bottles and baby food jars are to be stirred or shaken and the
temperature is to be checked before consumption, in order to avoid burns.
WARNING!
Liquids or other foods must not be heated in sealed containers since they are liable to
explode.
crowave
WARNING!
Microwave heating of beverages can result in delayed eruptive boiling, therefore care must
be taken when handling the container.
WARNING!
When heating liquids, e.g. soups, sauces and beverages in your microwave oven, overheating
the liquid beyond boiling point can occur without evidence of bubbling. This could result
in a sudden boil over of the hot liquid. To prevent this possibility the following steps should
be taken:
1. Avoid using straight-sided containers with narrow necks.
2. Do not overheat.
3. Stir the liquid before placing the container in the oven and again halfway through the
heating time.
4. After heating, allow to stand in the oven for a short time, stirring again before carefully
removing the container.
Before first use
WARNING!
Some products such as whole eggs and sealed containers - for example, closed glass jars may explode and should not be heated in this oven. Occasionally, poached eggs may explode
during cooking. Always pierce the yolk, then cover and allow the standing time of one
minute before removing cover.
It is quite normal for steam to be emitted around the door, or for misting to occur on the
door, or even for water droplets to appear below the door during the cooking cycle. This is
merely condensation from the heat of the food and does not affect the safety of your oven.
The door is not intended to seal the oven cavity completely.
Safety instructions when cooking with grill and combination modes
• The glass viewing window may break if water is spilled on it during grill cooking.
• Be sure to use an oven glove when loading and unloading the oven. Containers get very
hot in the oven, so be careful not to burn yourself. The turntable and metal rack also get
very hot so be sure to use an oven glove when handling them.
• Do not touch the inner or outer viewing window with metal components when loading
or unloading the oven. The inside of the door and oven get very hot so take care when
attending food in the oven.
• Do not put the turntable or containers in cold water or try to cool them quickly after
use.
• Do not place items on top of the cabinet. The top of the cabinet gets very hot, so anything
placed on it may be damaged by the heat.
• Preheat your oven only when using the Grill, never when using microwave or combination modes (Microwave and Grill)
WARNING!
When the appliance is used in combination mode, Children should only use the oven under
adult supervision due to the temperature generated.
7
WARNING!
The temperature of accessible surface may be high when the appliance is operating.
Before first use
In conventional ovens, heat radiated by electrical elements or gas burners slowly penetrates
the food from outside to inside. On account of this there is a major amount of energy is
wasted heating the air, the oven components and the food containers.
In a microwave oven, heat is generated by the food itself and the heat travels from inside
to outside. No heat is lost to the air, the walls of the oven cavity or the dishes and containers
(if these are suitable for use in microwave oven), in other words, only the food is heated.
Microwave ovens have the following advantages:
1. Shorter cooking times; in general these are up to 3/4 less than the time required for
conventional cooking.
2. Ultra-fast food defrosting, thus reducing the danger of bacterial development.
3. Energy savings.
4. Conservation of the nutritional value of foods due to the shorter cooking times.
Before first use
8
5. Easy to clean.
How a microwave oven works
In a microwave oven there is a high tension valve called a magnetron which converts
electrical energy into microwave energy. These electromagnetic waves are channelled to
the interior of the oven through a wave guide and distributed by a metallic spreader or
through a turntable.
Inside the oven the microwaves propagate in all directions and are reflected by the metal
walls, uniformly penetrating the food.
Why food heats up
Most foods contain water and water molecules vibrate when subjected to microwaves.
The friction between molecules produces heat which raises the temperature of the food,
defrosting it, cooking it or keeping it hot.
Since the heat arises inside the food:
• This can be cooked with little or no liquid or fats/oils;
• Defrosting, heating or cooking in a microwave oven is quicker than in a conventional
oven;
• The vitamins, minerals and nutritional substances in the food are conserved;
• The natural colour and aroma of the food are unchanged.
Microwaves pass through china, glass, cardboard or plastic but do not go through metal.
For this reason, metal containers or ones with metal parts must not be used in a microwave
oven.
Microwaves are reflected by metal ...
... but go through glass and china ...
... and are absorbed by foods.
Before first use
9
Description of functions
Symbol Function Microwave
Microwave 200W Slow defrosting for delicate foods; keeping food
400W Cooking with little heat; boiling rice. Rapid de-
600W Heating and cooking food
800W Cooking vegetables and food. Cooking and heat-
1000W Rapidly heating liquids
power
Foods
warm
frosting, heating baby food
ing carefully. Heating and cooking small portions
of food
Before first use
10
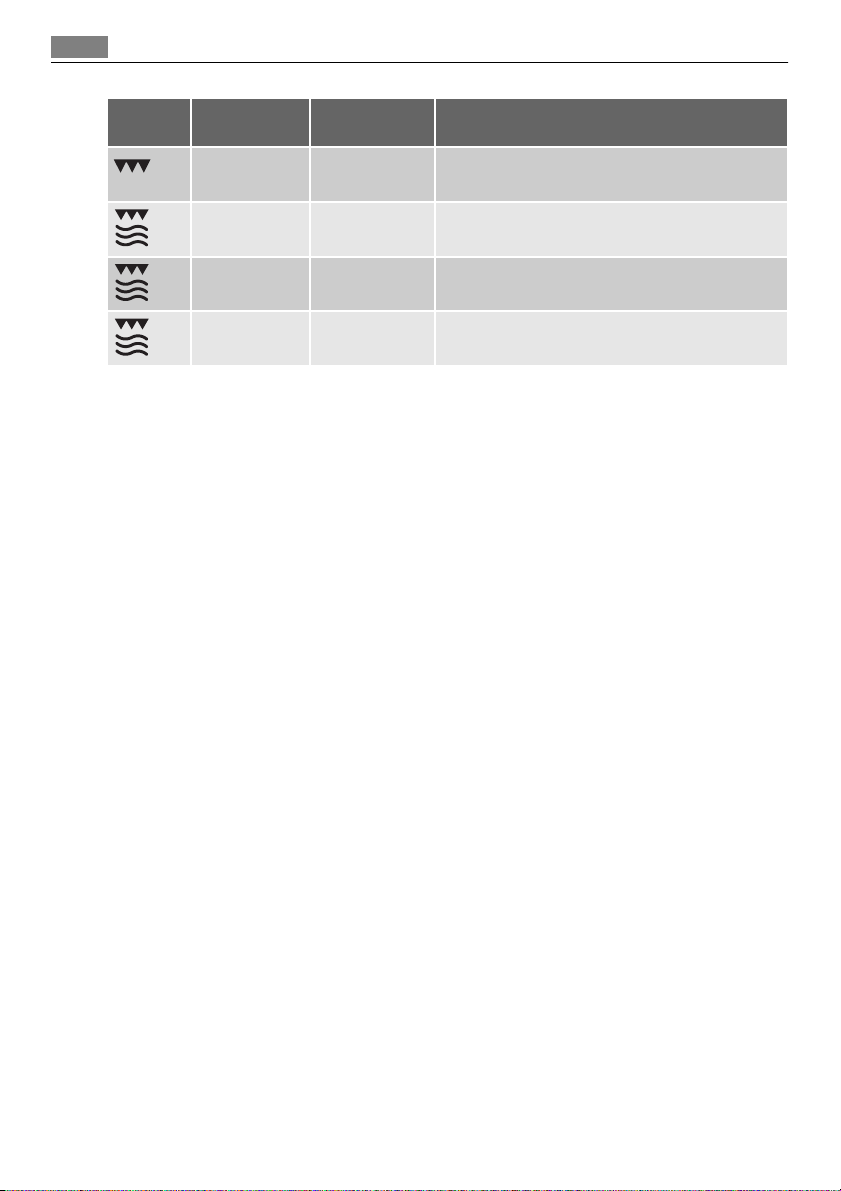
Symbol Function Microwave
Grill --- Grilling food
Microwave +
grill
400W Grilling poultry and meat
600W Cooking pies and cheese-topped dishes
power
200W Toasting food
Foods
Altering parameters
The operating parameters (time, power, temperature) can be altered when the oven is
operating or when the cooking process has been interrupted by proceeding as follows:
1. Select the parameter to be change with the Parameter selection keys. The respective
symbol and the display start blinking.
2. Set the desired value with the '+' and '–' keys.
3. Press the Confirmation key or wait 3 seconds to validate the new parameter value. The
display and symbols stop blinking.
End of a cooking cycle
At the end of the process you will hear three beeps and the display will show the word
“End”.
The beeps are repeated every 30 seconds until the door is opened or the Cancel key is
pressed.
Cancelling a cooking cycle
If you wish to cancel the cooking process, press the Cancel key twice.
You will then hear a beep and the time will appear on the display.
Interrupting a cooking cycle
You can stop the cooking process at any time by pressing the Cancel key once or by opening
the oven door.
In both cases:
• Microwave emission is stopped immediately.
•
The grill is de-activated but is still very hot. Danger of burning!
• The timer stops and the display shows the remaining amount of operating time.
If you wish, at this time you can:
1. Turn or stir the food to ensure it will be evenly cooked.
2. Change the process parameters.
3. Cancel the process by pressing the Cancel key.
To restart the process, close the door and press the Start key
Product description
F1 F2 F3
Product description
11
8
7
6
5
4
3
2
1. Door window glass
2. Interlock switch latches
3. Turntable drive shaft
4. Turntable support ring
5. Glass Turntable
6. Low grill rack
7. High grill rack
8. Crisping dish
9. Control Panel
10. Grill element
11. Oven Light
12. Grill fixing lug
9
12
10
11
1
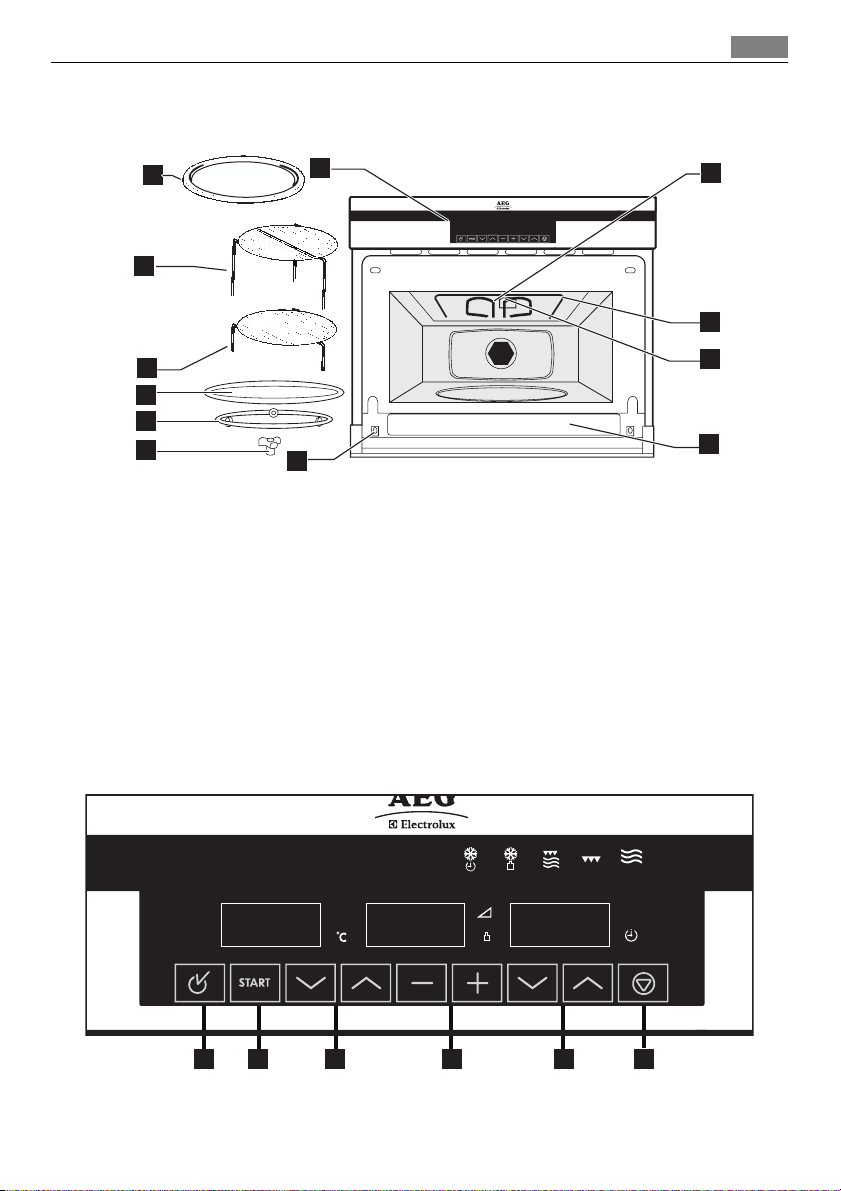
The control panel
1 2
1. Confirmation key
2. Start / Quick Start key
3. Parameter selection keys
5 6
min
34

F1 F2 F3
Operation
12
4. Plus and Minus keys
5. Function selection keys
6. Cancel
The display
+
_
Symbol descriptions
1. F1 - Automatic function
2. F2 - Automatic function
3. F3 - Automatic function
4. Defrost by time
5. Defrost by weight
6. Grill + microwave
7. Grill
8. Microwave
9. Time
10. Clock
11. Power
12. Weight
13. Temperature
Operation
123 564
13
12
11
8
7
min
9
10
Setting the clock
The clock display will flash to indicate that the time shown is not correct.
To set the clock:
1. Select the Clock Symbol with the Parameter selection keys (Hours will flash) (this is not
necessary if your microwave oven is first plugged in or after a power failure).
2. Set hours with the Plus and Minus keys.
3. Confirm the selection with the Confirmation key. (Min will flash)
4. Set inutes with the Plus and Minus keys.
5. Confirm the selection with the Confirmation key.
Hiding/Displaying the clock
If the clock display disturbs you, you can hide it.

Operation
To hide the clock:
1. Select the Clock Symbol with the Parameter selection keys.
2. Press and hold the Confirmation key for 3 seconds. The clock will be hidden but the
dots between the hours and the minutes will flash once per second.
To show the clock again, repeat the above procedure.
Child lock
This oven has a feature which locks it to prevent it being used by children. After the lock
has been set, no part of the microwave oven will operate until the child lock feature has
been cancelled.
To set the child lock
1. To lock the oven, press the Cancel key for 3 seconds. You will hear a sound signal and
the clock display will show the word “SAFE”. The oven is locked in this state and cannot
be used.
2. To unlock the oven, press the Cancel key again for 3 seconds. You will hear a sound
signal and the clock display will show the time again.
Time of day can be viewed by pressing the cancel button momentarily.
Stopping the turntable
1. To stop the turntable, press Confirmation and Cancel keys for 3 seconds to get the word
' PLAT OFF' in the display
2. To start turntable rotation again, repeat the above procedure.
Cooking with microwave
Use this function to cook and heat vegetables, potatoes, rice, fish and meat.
1. Select the Microwave function with the Function selection keys.
2. Select the Power Level with Parameter selection keys. The Power Level symbol and
display start blinking. If you do not change the power level the microwave operates
with the default power 800 W.
3. Set the power level with the '+' and '–' keys.
4. Press the Confirmation key to validate the power level. The display and symbol stop
blinking.
5. Select the Duration with Parameter selection keys. The Duration symbol and display
start blinking.
6. Set the duration with the '+' and '–' keys.
7. Press the Confirmation key to validate the duration. The display and symbol stop blink-
ing.
8. Start the cooking process by pressing the Start key.
When 1000 W power is selected, the duration is limited to a maximum of 15 minutes.
13
Quick start
Use this function to rapidly heat foods with high water content, such as water, coffee, tea
or thin soup.
1. Press the Start key. The microwave oven operates for 30 seconds at maximum power.
2. If you want to increase the operating time press the Start key again. Each time you
press this key the operating time will be increased by 30 seconds.
When 1000 W power is selected, the operating time is limited to a maximum of 15 minutes.

Operation
14
Cooking with grill
Use this function to brown the top of food quickly.
1. Select the Grill function with the Function selection keys.
2. Select the Duration with Parameter selection keys. The Duration symbol and display
start blinking.
3. Set the duration with the '+' and '–' keys.
4. Press the Confirmation key to validate the duration. The display and symbol stop blink-
ing.
5. Start the cooking process by pressing the Start key.
Cooking with microwave + grill
Use this function to cook lasagne, poultry, roast potatoes and toasted foods.
1. Select the Microwave + Grill function with the Function selection keys.
2. Select the Power Level with Parameter selection keys. The Power Level symbol and
display start blinking. If you do not change the power level the microwave operates
with the default power 600 W.
3. Set the power level with the '+' and '–' keys.
4. Press the Confirmation key to validate the power level. The display and symbol stop
blinking.
5. Select the Duration with Parameter selection keys. The Duration symbol and display
start blinking.
6. Set the duration with the '+' and '–' keys.
7. Press the Confirmation key to validate the duration. The display and symbol stop blink-
ing.
8. Start the cooking process by pressing the Start key.
Automatic defrost
Use this function to defrost meat, poultry, fish, fruit and bread quickly by weight.
1. Select the Defrost by Weight function with the Function selection keys.
2. Select the Program with Parameter selection keys. The Duration and Clock symbols and
the display start blinking.
3. Set the program with the '+' and '–' keys (refer to the table below).
4. Press the Confirmation key to validate the program. The display and symbols stop
blinking.
5. Select the Weight with Parameter selection keys. The Weight symbol and display start
blinking.
6. Set the weight with the '+' and '–' keys.
7. Press the Confirmation key to validate the weight. The display and symbol stop blinking.
8. Start the cooking process by pressing the Start key.
The following table shows the defrosting by weight function programmes, indicating
weight intervals, and defrosting and standing times (in order to ensure the food is of a
uniform temperature).
Programme Food Weight (g) Time (min) Standing time
Pr01 meat 100 - 2000 2 - 43 20 - 30
Pr02 Poultry 100 - 2500 2 - 58 20 - 30
(min)

Operation
15
Programme Food Weight (g) Time (min) Standing time
Pr03 Fish 100 - 2000 2 - 40 20 - 30
Pr04 Fruit 100 - 500 2 - 13 10 - 20
Pr05 Bread 100 - 800 2 - 19 10 - 20
Manual defrost
Use this function to defrost any type of food quickly by setting the defrost time.
1. Select the Defrost by Time function with the Function selection keys.
2. Select the Duration with Parameter selection keys. The Duration symbol and display
start blinking.
3. Set the duration with the '+' and '–' keys.
4. Press the Confirmation key to validate the duration. The display and symbol stop blink-
ing.
5. Start the cooking process by pressing the Start key.
To speed up the defrosting of dense foods over 450g (1lb), the oven may be started on full
power for 1 - 3 minutes, and then reduced to defrost until defrosting is complete. At the
end of this function a bell will be heard to signal the end of the program.
Automatic function F1 (heating food)
Use this function to heat various types of food.
1. Select the Automatic function F1 with the Function selection keys.
2. Select the Program with Parameter selection keys. The Duration and Clock symbols and
the display start blinking.
3. Set the program with the '+' and '–' keys (refer to the table below).
4. Press the Confirmation key to validate the program. The display and symbols stop
blinking.
5. Select the Weight with Parameter selection keys. The Weight symbol and display start
blinking.
6. Set the weight with the '+' and '–' keys.
7. Press the Confirmation key to validate the weight. The display and symbol stop blinking.
8. Start the cooking process by pressing the Start key.
The following table shows the Automatic Function F1 programmes, indicating weight intervals, and defrosting and standing times (in order to ensure the food is of a uniform
temperature).
Programme Food Weight (Kg) Time (min) Standing time
A 01 Soup 200 - 1500 3 - 5 Turn 1-2 x, keep
A 02 Pre-prepared
dishes dense food
A 03 Pre-prepared
dishes e.g. goulash
200 - 1500 3 - 20 Turn 1-2 x, keep
200 - 1500 3 - 18 Turn 1-2 x, keep
covered, 1-2 min.
covered, 1-2 min.
covered, 1-2 min.
(min)
(min)
16
Operation
Programme Food Weight (Kg) Time (min) Standing time
A 04 Vegetables 200 - 1500 2,6 - 14 Turn 1-2 x, keep
covered, 1-2 min.
Important Notes:
• Always use dishes for use in the microwave oven and a lid or cover to avoid loss of liquids.
• Stir or mix the foods several times during heating, especially when the oven emits a beep
and the display is flashing as follows: .
• The time required to heat the food will depend on its initial temperature. Food taken
straight from the fridge will take longer to heat up than food that is at room temperature.
If the food temperature is not suitable, select a greater or lesser weight next time you
heat up the food.
• After heating, stir the food or shake the container and then leave the food to stand for
some time to allow the temperature to become uniform throughout the food.
WARNING!
After heating the container may be very hot. Although microwaves do not heat up most
containers, these may heat up through heat transmission from food.
Automatic function F2 (cooking)
Use this function to cook fresh food
1. Select the Automatic function F2 with the Function selection keys.
2. Select the Program with Parameter selection keys. The Duration and Clock symbols and
the display start blinking.
3. Set the program with the '+' and '–' keys (refer to the table below).
4. Press the Confirmation key to validate the program. The display and symbols stop
blinking.
5. Select the Weight with Parameter selection keys. The Weight symbol and display start
blinking.
6. Set the weight with the '+' and '–' keys.
7. Press the Confirmation key to validate the weight. The display and symbol stop blinking.
8. Start the cooking process by pressing the Start key.
The following table shows the Automatic Function F2 programmes, indicating weight intervals, and defrosting and standing times (in order to ensure the food is of a uniform
temperature).
Programme Food Weight (Kg) Time (min) Standing time
B 01 Potatoes 200 - 1000 4 - 17 Turn 1-2 x, keep
covered, 1-2 min.
B 02 Vegetables 200 - 1000 4 - 15 Turn 1-2 x, keep
covered, 1-2 min.
B 03 Rice 200 - 500 13 - 20 One part rice, two
parts water, keep
covered
B 04 Fish 200 - 1000 4 - 1000 Keep covered
(min)
(min)
Operation
Important Notes:
• Always use dishes for use in the microwave oven and a lid or cover to avoid loss of liquids.
• Stir or mix the foods several times during heating, especially when the oven emits a beep
and the display is flashing as follows .
WARNING!
After heating the container may be very hot. Although microwaves do not heat up most
containers, these may heat up through heat transmission from food.
Preparation instructions:
• Fish pieces – Add 1 to 3 soup spoons of water or lemon juice.
• Rice – Add water equivalent to twice or three times the quantity of rice.
• Unpeeled potatoes – Use potatoes of the same size. Wash them and prick the skin several
times. Do not add water.
• Peeled potatoes and Fresh vegetables – Cut into pieces of the same size. Add a soup
spoon of water for every 100 g of vegetables, and salt to taste.
Automatic function F3 (defrosting and toasting)
Use this function to cook and toast various types of food.
1. Select the Automatic function F3 with the Function selection keys.
2. Select the Program with Parameter selection keys. The Duration and Clock symbols and
the display start blinking.
3. Set the program with the '+' and '–' keys (refer to the table below).
4. Press the Confirmation key to validate the program. The display and symbols stop
blinking.
5. Select the Weight with Parameter selection keys. The Weight symbol and display start
blinking.
6. Set the weight with the '+' and '–' keys.
7. Press the Confirmation key to validate the weight. The display and symbol stop blinking.
8. Start the cooking process by pressing the Start key.
The following table shows the Automatic Function F3 programmes, indicating weight intervals, and defrosting and standing times (in order to ensure the food is of a uniform
temperature).
Programme Food Weight (Kg) Time (min) Standing time
C 01 Pizza 300 - 550 3 - 9 Preheat the bak-
C 02 Deep frozen food 400 - 1000 8 - 14 Turn 1-2 x, keep
C 03 Frozen potato
dishes
200 - 450 10 - 12 Turn 1x
ing pan
covered, 1-2 min.
17
(min)
Important Notes:
• Always use dishes for use in the microwave oven and a lid or cover to avoid loss of liquids.
• Stir or mix the foods several times during heating, especially when the oven emits a beep
and the display is flashing as follows .

Hints and tips
18
WARNING!
After heating the container may be very hot. Although microwaves do not heat up most
containers, these may heat up through heat transmission from food.
Preparation instructions:
• Frozen pizza – Use pre-cooked frozen pizzas and pizzas-rolls.
• Deep-frozen food – Use lasagne, cannelloni, prawn soufflé, all frozen. Keep covered.
• Frozen potato dishes, frozen – Chips, potato croquettes and fried potatoes must be
suitable for preparation in the oven.
Hints and tips
Microwave
WARNING!
Read the section 'Important safety information' before cooking with your microwave.
Follow these recommendations when cooking with your microwave:
• Before heating or cooking foods with peel or skin (e.g. apples, tomatoes, potatoes, sausages) prick them so that they do not burst. Cut the food up before starting to prepare
it.
• Before using a container or dish make sure that it is suitable for microwave use (see the
section on types of ovenware).
• When cooking food with very little moisture (e.g. defrosting bread, making popcorn, etc.)
evaporation is very quick. The oven then works as if it was empty and the food may burn.
The oven and the container may be damaged in such a situation. You should therefore
set just the cooking time necessary and you must keep a close eye on the cooking process.
• It is not possible to heat large quantities of oil (frying) in the microwave.
• Remove pre-cooked food from the containers they come in since these are not always
heat resistant. Follow the food manufacturer’s instructions.
• If you have several containers, such as cups, for example, set them out uniformly on the
turntable plate.
• Do not close plastic bags with metal clips. Use plastic clips instead. Prick the bags several
times so that the steam can escape easily.
• When heating or cooking foods, check that they reach at least a temperature of 70°C.
• During cooking, steam may form on the oven door window and may start to drip. This
situation is normal and may be more noticeable if the room temperature is low. The
oven’s safe working is not affected by this. After you have finished cooking, clean up the
water coming from the condensation
• When heating liquids, use containers with a wide opening, so that the steam can evaporate easily.
Prepare the foods as per the instructions and keep in mind the cooking times and power
levels indicated in the tables.
Keep in mind that the figures given are only indicative and can vary depending on the initial
state, temperature, moisture and type of food. It is advisable to adjust the times and power
levels to each situation. Depending on the exact characteristics of the food you may need
to increase or shorten the cooking times or increase or decrease the power levels.

Hints and tips
Cooling with microwaves...
1. The greater the amount of food, the longer the cooking time. Keep in mind that:
– Double the quantity » double the time
– Half the quantity » half the time
2. The lower the temperature, the longer the cooking time.
3. Foods containing a lot of liquid heat up more quickly.
4. Cooking will be more uniform if the food is evenly distributed on the turntable. If you
put dense foods on the outside part of the plate and less dense ones on the centre of
the plate, you can heat up different types of food simultaneously.
5. You can open the oven door at any time. When you do this the oven switches off
automatically. The microwave will only start working again when you close the door
and press the start key.
6. Foods that are covered require less cooking time and retain their characteristics better.
The lids used must let microwaves pass through and have small holes that allow steam
to escape.
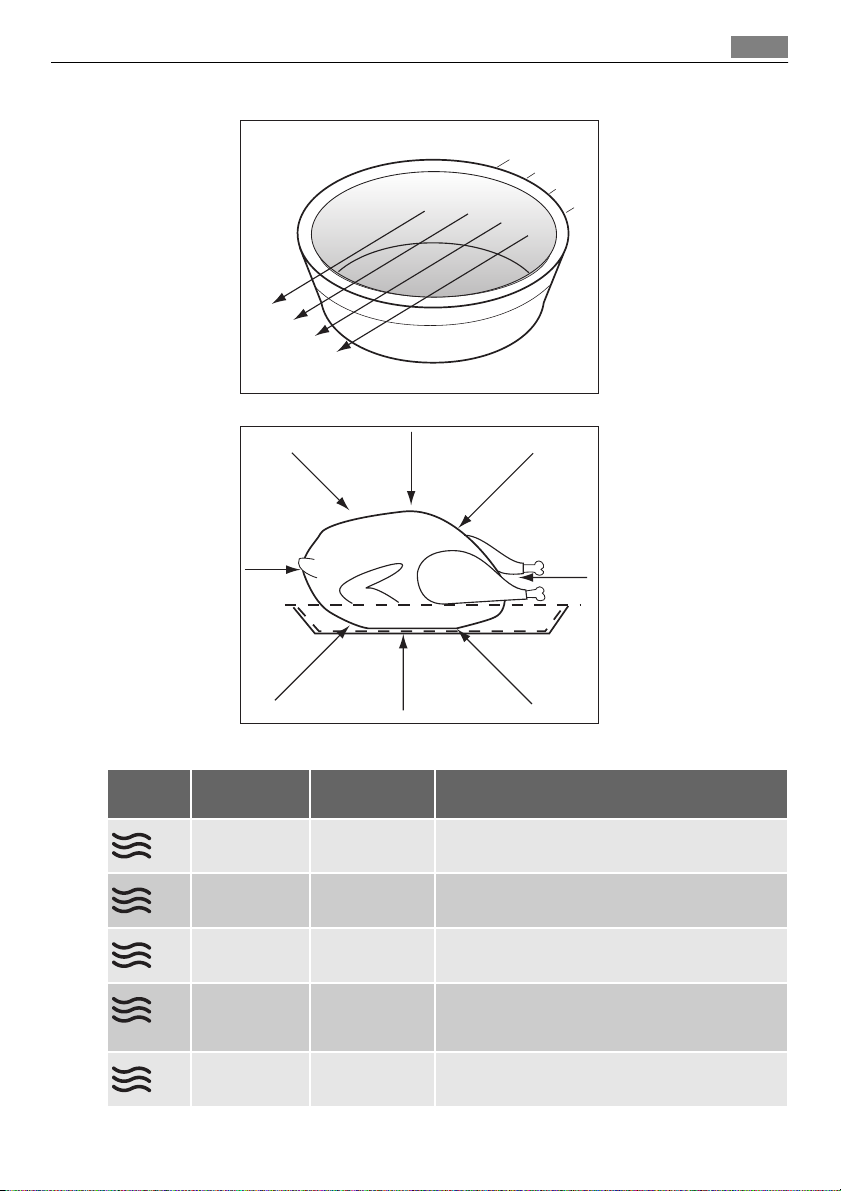
Defrosting
1. When defrosting, use only dishes that are appropriate for microwaves (china, glass,
suitable plastic).
2. The defrost function by weight and the tables refer to the defrosting of raw food.
3. The defrosting time depends on the quantity and thickness of the food. When freezing
food keep the defrosting process in mind. Distribute the food evenly in the container.
4. Distribute the food as best as possible inside the oven. The thickest parts of fish or
chicken drumsticks should be turned towards the outside. You can protect the most
delicate parts of food with pieces of aluminium foil. Important: The aluminium foil
must not come into contact with the oven cavity interior as this can cause electrical
arcing.
5. Thick portions of food should be turned several times.
6. Distribute the frozen food as evenly as possible since narrow and thin portions defrost
more quickly than the thicker and broader parts.
7. Fat-rich foods such as butter, cream cheese and cream should not be completely de-
frosted. If they are kept at room temperature they will be ready to be served in a few
minutes. With ultra-frozen cream, if you find small pieces of ice in it, you should mix
these in before serving.
8. Place poultry on an upturned plate so that the meat juices can run off more easily.
9. Bread should be wrapped in a napkin so that it does not become too dry.
10. Turn the food whenever the oven lets out a beep and the display flashes the word:
11. Remove frozen food from its wrapping and do not forget to take off any metal twist-
tags. For containers that are used to keep frozen food in the freezer and which can
also be used for heating and cooking, all you need to do is take off the lid. For all other
cases you should put the food into containers that are suitable for microwave use.
12. The liquid resulting from defrosting, principally that from poultry, should be discarded.
In no event should such liquids be allowed to come into contact with other foods.
13. Do not forget that by using the defrosting function you need to allow for standing
time until the food is completely defrosted.
19

Hints and tips
20
Grill
For good results with the grill, use the rectangular rack supplied with the oven.
Important points
1. When the microwave grill is used for the first time there will be some smoke and a
smell coming from the oils used during oven manufacture.
2. The oven door window becomes very hot when the grill is working. Keep children away.
3. When the grill is operating, the cavity walls and the rectangular rack become very hot.
You should use oven gloves.
4. If the grill is used for extended period of time it is normal to find that the elements will
switch themselves off temporarily due to the safety thermostat.
5.
Important! When food is to be grilled or cooked in containers you must check that the
container in question is suitable for microwave use. See the section on types of ovenware!
6. When the grill is used it is possible that some splashes of fat may go onto the elements
and be burnt. This is a normal situation and does not mean there is any kind of operating
fault.
7. After you have finished cooking, clean the interior and the accessories so that cooking
remains do not become encrusted.
Heat up the grill beforehand for 2 minutes. Unless indicated otherwise, use the rectangular
rack.
Place the grid on a bowl so that the water and the fat can drop. The times shown are merely
indicative and can vary as a function of the composition and quantity of the food, as well
as the final condition wished for. Fish and meat taste great if, before grilling, you brush
them with vegetable oil, spices and herbs and leave to marinate for a few hours. Only add
salt after grilling.
Sausages will not burst if you prick them with a fork before grilling.
After half the grilling time has passed, check on how the cooking is going and, if necessary,
turn the food over or brush it with some oil.
The grill is especially suitable for cooking thin portions of meat and fish. Thin portions of
meat only need to be turned once, but thicker portions should be turned several times. In
the case of fish, you should join the two ends, putting the tail in its mouth, and then put
the fish on the rectangular rack.
Microwave + grill
WARNING!
To avoid arcing do not use the rectangular rack when cooking with microwave and grill.
The microwave + grill function is ideal for cooking quickly and, at the same time, browning
foods.
Furthermore, you can also grill and cook cheese covered food.
The microwave and the grill work simultaneously. The microwave cooks and the grill toasts.
Before using a dish in the microwave oven make sure that it is suitable for microwave use.
Only use dishes or containers that are suitable for microwave use.
The dish to be used in the combined function must be suitable for microwave and grill use.
See the section on types of ovenware!
Keep in mind that the figures given are merely indicative and can vary as a function of the
initial state, temperature, moisture and type of food.

Something not working
If the time is not enough to brown the food well, put it under the grill for another 5 or 10
minutes.
Please follow the standing times and don’t forget to turn the meat pieces.
Unless indicated to the contrary, use the turntable plate for cooking.
The values given in the tables are valid when the oven cavity is cold (it is not necessary to
pre-heat the oven).
Something not working
WARNING!
Any type of repair must only be done by a specialised technician. Any repair done by a
person not authorised by the manufacturer is dangerous.
You do not need to contact Technical Assistance to resolve the following questions:
Problem Possible sollution (Check if.........)
The display is not showing! The time indication has been switched off
Nothing happens when I press the keys! The Child lock is active (cancel the child lock).
The oven does not work! The plug is correctly fitted in the socket.
The oven’s power is switched on.
The door is completely closed. The door should
There are any foreign bodies between the door
When the oven is operating I can hear some
strange noises!
The ovenware is touching the oven walls.
There are any loose items of cutlery or cooking
The food doesn’t heat up or heats very slowly! You have inadvertently used metal ovenware.
You have selected the correct operating times
The food you have put inside the oven is a larger
The food is too hot, dried out or burnt! Have you selected the correct operating time
I hear some noises after the cooking process is
finished!
The oven switches on but the interior light does
not go on!
close with an audible click.
and the cavity front.
There is any electrical arcing inside the oven
caused by foreign metallic objects.
tools inside the oven.
and power level.
amount or colder than you usually put in.
and power level.
This is not a problem. The cooling fan keeps on
working for some time. When the temperature
has dropped sufficiently, the fan will switch itself off.
If all the functions work properly it is probable
that the lamp has blown. You can keep on using
the oven.
21

Maintenance and cleaning
22
Replace the light bulb
To replace the light bulb,
1. Disconnect the oven from the power supply. Take the plug out of the socket or switch
off the oven’s power circuit.
2. Unscrew and remove the glass light cover (1).
3. Remove the halogen light bulb (2).
WARNING!
The bulb may be very hot.
4. Fit a new 12V / 10W halogen bulb.
WARNING!
Do not touch the light bulb surface directly with your fingers because you may damage
the bulb. Follow the lamp manufacturer’s instructions.
5. Screw the glass light cover into place (1).
6. Connect the oven again to the power supply.
2
1
Maintenance and cleaning
Cleaning is the only maintenance normally required.
WARNING!
Your microwave oven should be cleaned regularly, removing all food remains. If the microwave is not kept clean its surfaces may deteriorate, reducing the oven’s working life and
possibly resulting in a dangerous situation.
WARNING!
Cleaning should be done with the oven power switched off. Take the plug out of the socket
or switch off the oven’s power circuit.
Do not use aggressive or abrasive cleaning products, scourers that scratch surfaces or sharp
objects, since stains may appear.
Do not use high pressure or stream jet cleaning appliances.
Front surface
Normally you just need to clean the oven with a damp cloth. If it is very dirty, add a few
drops of dish washing liquid to the cleaning water. Afterwards, wipe the oven with a dry
cloth.

Maintenance and cleaning
Use a glass cleaning product and a soft cloth that does not release any fibres or threads.
Wipe from side to side without exerting any pressure on the surface.
Immediately remove lime, fat, starch or egg white stains. Corrosion can occur under these
stains.
Do not let any water get inside the oven.
Oven interior
After each time the oven is used, clean the inside walls with a damp cloth since this is the
easiest way to remove splashes or spots of food that may have stuck to the inside.
To remove dirt that is harder to shift, use a non-aggressive cleaning product. Do not use
oven sprays or other aggressive or abrasive cleaning products.
Always keep the door and the oven front very clean to ensure that the door opens and
closes properly.
Make sure water does not enter the microwave ventilation holes.
Regularly take out the turntable plate and the respective support and clean the cavity base,
especially after any liquid spillage.
Do not switch on the oven without the turntable and the respective support being in place.
If the oven cavity is very dirty, put a glass of water on the turntable and switch on the
microwave oven for 2 or 3 minutes at maximum power. The steam released will soften the
dirt which can then be cleaned easily using a soft cloth.
Unpleasant odours (e.g. after cooking fish) can be eliminated easily. Put a few drops of
lemon juice in a cup with water. Put a spoonful of coffee in the cup to avoid the water
boiling over. Heat the water for 2 to 3 minutes at maximum microwave power.
Oven ceiling
If the oven ceiling is dirty, the grill can be lowered to make cleaning easier.
WARNING!
To avoid the danger of burning, wait until the grill is cold before lowering it.
23
Proceed as follows:
1. Turn the grill support by 90º (1).
2. Lower the grill gently (2). Do not use excessive force as this may cause damage.
3. After cleaning the ceiling, put the grill (2) back in its place, carrying out the previous
operation.
The mica cover (3) located in the ceiling must always be kept clean. Any food remains that
collect on the mica cover can cause damage or provoke sparks.
Do not use abrasive cleaning products or sharp objects.
WARNING!
To avoid any risk, do not remove the mica cover.
The glass lamp cover (4) is located on the oven ceiling and can be removed easily for
cleaning. For this you just need to unscrew it and clean it with water and dish washing
liquid.

Environmental information
24
3
1
4
2
Accessories
Clean the accessories after each use. If they are very dirty, soak them first of all and then
use a brush and sponge. The accessories can be washed in a dish washing machine.
Make sure that the turntable plate and the respective support are always clean. Do not
switch on the oven unless the turntable and the respective support are in place.
Environmental information
The symbol on the product or on its packaging indicates that this product may not be
treated as household waste. Instead it should be taken to the appropriate collection point
for the recycling of electrical and electronic equipment. By ensuring this product is disposed
of correctly, you will help prevent potential negative consequences for the environment
and human health, which could otherwise be caused by inappropriate waste handling of
this product. For more detailed information about recycling of this product, please contact
your local council, your household waste disposal service or the shop where you purchased
the product.
Installation
Before installation
• Check that the input voltage indicated on the rating plate is the same as the voltage of
the power outlet you are going to use.
• Open the oven door and take out all the accessories and remove the packing material.
• Do not remove the mica cover on the ceiling of the interior! This cover stops fat and
pieces of food damaging the microwave generator.
WARNING!
Warning! The front surface of the oven may be wrapped with a protective film. Before using
the oven for the first time, carefully remove this film, starting on the inside.
• Make sure that the oven is not damaged in any way. Check that the oven door closes
correctly and that the interior of the door and the front of the oven opening are not
damaged. If you find any damage contact the Technical Assistance Service.

Installation
• DO NOT USE THE OVEN if the power cable or the plug are damaged, if the oven does not
function correctly or if it has been damaged or dropped. Contact the Technical Assistance
Service.
• Put the oven on a flat and stable surface. The oven must not be installed close to any
sources of heat, radios or televisions.
• During installation, make sure that the power cable does not come into contact with
any moisture or objects with sharp edges behind the oven. High temperatures can damage the cable.
WARNING!
after the oven is installed you must make sure you can access the plug.
After installation
• The oven is equipped with a power cable and a plug for single phase current.
• If the oven is to be installed on a permanent basis it should be installed by a qualified
technician. In such a case, the oven should be connected to a circuit with an all-pole
circuit breaker with a minimum separation of 3 mm between contacts.
WARNING!
THE OVEN MUST BE EARTHED.
• The manufacturer and retailers do not accept responsibility for any damage that may be
caused to people, animals or property if these installation instructions are not observed.
• The oven only functions when the door is closed correctly.
• After the first use, clean the inside of the oven and the accessories, following the cleaning
instructions given in the section 'Maintenance and cleaning'.
Fit the Turntable support (1) in the centre of the oven cavity and put the Turntable ring (2)
and the Turntable plate (3) on top, making sure they slot in. Whenever you use the microwave, the turntable plate and the respective accessories must be inside and correctly fitted.
The turntable plate can rotate in both directions.
25
3
2
1

Technical data
26
Installation diagrams
min 580
448-452
min.
460
520
100
560-568
558
-568
446
450/520
min. 550
542
22
450/520
min. 40
min. 5
455
595
22
542
455
446
595
22
min. 550
600
1. Push oven completely into the cabinet and centre it.
2. Open microwave door and fasten the appliance to the cabinet using the four screws
provided. Insert the screws through the front holes.
Technical data
Technical data category Value
AC Voltage (see rating plate)
Power required 3300 W

European Guarantee
Technical data category Value
Grill power 1500 W
Microwave output power 1000 W
Microwave frequency 2450 MHz
Exterior dimensions (WxHxD) 595 x 455 x 542 mm
Interior dimensions (WxHxD) 420 x 210 x 390 mm
Oven capacity. 32 ltr
Weight 35 kg
European Guarantee
This appliance is guaranteed by Electrolux in each of the countries listed at the back of this
user manual, for the period specified in the appliance guarantee or otherwise by law. If you
move from one of these countries to another of the countries listed, the appliance guarantee will move with you subject to the following qualifications:-
• The appliance guarantee starts from the date you first purchased the appliance which
will be evidenced by production of a valid purchase document issued by the seller of the
appliance.
• The appliance guarantee is for the same period and to the same extent for labour and
parts as exists in your new country of residence for this particular model or range of
appliances.
• The appliance guarantee is personal to the original purchaser of the appliance and cannot
be transferred to another user.
• The appliance is installed and used in accordance with instructions issued by Electrolux
and is only used within the home, i.e. is not used for commercial purposes.
• The appliance is installed in accordance with all relevant regulations in force within your
new country of residence.
The provisions of this European Guarantee do not affect any of the rights granted to you
by law.
27

Inhoud
28
Wij danken u voor uw keuze voor een van onze producten van hoogwaardige
kwaliteit.
Lees deze gebruiksaanwijzing alstublieft zorgvuldig door, zo kunt u zeker zijn van
optimale en professionele prestaties van uw apparaat. De handleiding zal u in staat
stellen om alle processen perfect en op de meest efficiënte wijze te laten verlopen.
Wij adviseren u deze handleiding op een veilige plaats te bewaren, dan kunt u hem
te allen tijde raadplegen. Geef deze handleiding ook aan een eventuele toekomstige
eigenaar van het apparaat.
Wij wensen u veel plezier met uw nieuwe apparaat.
Inhoud
Veiligheidsinformatie 28
Algemene veiligheid 28
Veiligheid van kinderen 30
Veiligheid van kookgerei 30
Voedselveiligheid 32
Veiligheidsinstructies voor het koken met de
grill en combinatiemodus 33
Voordat u de oven voor het eerst in gebruik
neemt 34
Hoe een magnetron werkt 34
Beschrijving van de functies 36
Parameters veranderen 36
Productbeschrijving 37
Werking 39
Tijd instellen 39
Kinderslot 39
Koken met de magnetron 39
Snelle start 40
Bereiding met de grill 40
Koken met de magnetron + grill 40
Automatisch ontdooien 41
Handmatig ontdooien 41
Veiligheidsinformatie
Automatische functie F1 (verwarmen van
voedsel) 41
Automatische functie F2 (koken) 42
Automatische functie F3 (ontdooien en
roosteren) 43
Adviezen 45
Hulp bij storingen 48
Vervanging van het ovenlampje 49
Onderhoud en reiniging 49
Plafond oven 50
Milieu-informatie 51
Installatie 52
Voor het installeren 52
Na het installeren 52
Installatieschema's 53
Technische gegevens 54
Garantie/serviceafdeling 54
Europese Garantie 58
www.electrolux.com 58
Wijzigingen voorbehouden
Algemene veiligheid
ZORGVULDIG LEZEN EN BEWAREN ALS NASLAGWERK
• De ingebouwde veiligheidsvergrendelingsschakelaars zorgen ervoor dat de magnetron
niet werkt als de deur open is.

Veiligheidsinformatie
29
• Ga hier niet zelf aan sleutelen en probeer niet om de oven te laten werken met de deur
open, aangezien dit kan leiden tot blootstelling aan microgolvenenergie.
• Zorg ervoor dat er geen voedselresten of resten schoonmaakmiddel ophopen op de afdichtoppervlakken van de deur. Raadpleeg het hoofdstuk Reiniging en Verzorging voor
schoonmaakinstructies.
• Het is in het bijzonder van belang dat de ovendeur naar behoren sluit en dat er geen
schade is aan de: (1) deur (verwrongen), (2) scharnieren en handgreep (kapot of niet goed
vast), (3) deurafdichting en afdichtingsoppervlak.
WAARSCHUWING!
Als de deur, scharnieren/handgrepen of deurafdichtingen zijn beschadigd, mag de magnetron niet worden gebruikt tot hij is gerepareerd door een erkend reparateur.
WAARSCHUWING!
Het is gevaarlijk als niet door de fabrikant opgeleid onderhoudspersoneel onderhoud uitvoert aan deze oven of er aanpassingen aan doet. Als onderhoud nodig is, neem dan contact
op met de dichtstbijzijnde erkende onderhoudsmonteur.
• Verwijder in geen geval de buitenste behuizing, de deur of het bedieningspaneel. Als u
dit doet kunt u blootgesteld worden aan een extreem hoge spanning.
• Installeer of plaats deze oven alleen in overeenstemming met de 'installatieinstructies'
in deze handleiding.
• Gebruik het apparaat waarvoor het is bedoeld, zoals beschreven in deze handleiding.
Gebruik geen corrosieve chemicaliën in dit apparaat. Dit type oven is specifiek ontworpen
voor het opwarmen, bereiden of ontdooien van voedsel. Het is niet ontworpen voor
industrieel of laboratoriumgebruik en ook niet voor commercieel gebruik. Hierdoor zal
de garantie komen te vervallen.
• Laat de oven niet werken als hij leeg is. Als er geen voedsel of water aanwezig is om de
energie van de microgolven te absorberen, kan de buis van de magnetron beschadigd
raken.
• Sla dit apparaat niet buiten op. Gebruik dit product niet in de nabijheid van water.
• Probeer geen kleding of kranten in de magnetron te drogen. Deze artikelen kunnen
ontbranden.
• Gebruik de ovenruimte niet om dingen in op te slaan. Laat geen papierproducten, kookgerei of voedsel in de ovenruimte achter als deze niet in gebruik is.
• De temperatuur van de toegankelijke oppervlakken kan hoog zijn als het apparaat in
werking is.
WAARSCHUWING!
Als rook wordt waargenomen, zet dan het apparaat uit of trek de stekker uit het stopcontact
en houd de deur gesloten om vlammen te doven. Gebruik nooit water.
WAARSCHUWING!
Dit apparaat is niet bedoeld voor gebruik door personen (met inbegrip van kinderen) met
beperkte lichamelijke, zintuiglijke of verstandelijke vermogens of een gebrek aan ervaring
en kennis, tenzij dit onder toezicht gebeurt van een voor hun veiligheid verantwoordelijke
persoon of tenzij zij van een dergelijke persoon instructies hebben ontvangen.

Veiligheidsinformatie
30
• Probeer het draaien van het draaiplateau niet met de hand te forceren. Dit kan storing
veroorzaken.
• Het apparaat is niet bedoeld om bediend te worden door middel van een externe timer
of een apart afstandsbedieningsysteem.
• Zorg ervoor dat de luchtventilatiegaten die zich op de bovenkant, achterkant, zijkant en
onderkant van de oven bevinden niet geblokkeerd zijn.
WAARSCHUWING!
Gebruik deze oven niet voor commerciële doeleinden. Deze oven is alleen bedoeld voor
huishoudelijk gebruik.
Veiligheid van kinderen
• Dit apparaat is ontworpen om bediend te worden door volwassenen. Houd toezicht op
kinderen om ervoor te zorgen dat ze niet aan de bedieningstoetsen zitten of met het
product spelen.
• Houd alle verpakkingsmaterialen uit de buurt van kinderen.
Veiligheid van kookgerei
Magnetronfunctie
Denk er bij de magnetronfunctie aan dat microgolven worden teruggekaatst door metalen
oppervlakken. Glas, porselein, klei, plastic en papier laten microgolven door.
Om deze reden kunnen metalen pannen en borden of schalen met metalen onderdelen
of versieringen niet in de magnetron worden gebruikt. Glazen producten en klei met
metalen decoratie of die metaal bevatten (bijv. loodkristal) kunnen niet in magnetrons
worden gebruikt.
De ideale materialen voor gebruik in magnetrons zijn glas, hittebestendig porselein of klei
of hittebestendig plastic. Erg dun, breekbaar glas of porselein moet alleen gedurende korte
tijd worden gebruikt (bijv. verwarmen).
Warm voedsel geeft de warmte af aan de borden, die erg heet kunnen worden. Daarom
moet u altijd een ovenwant gebruiken!
Hoe u ovengerei dat u wilt gebruiken kunt testen
Doe het voorwerp dat u wilt gebruiken gedurende 20 seconden bij het maximale vermogen
van de magnetron in de oven. Is het na die tijd koud en maar een beetje warm, dan is het
geschikt om te gebruiken. Wordt het echter erg warm of veroorzaakt het elektrische vonken,
dan is het niet geschikt voor gebruik in de magnetron.
Grill- en heteluchtfunctie
Voor de grillfunctie moet het ovengerei bestand zijn tegen een temperatuur van ten minste
300°C.
Plastic borden zijn niet geschikt voor gebruik in de grill.
Magnetron + grillfunctie
Voor de magnetron + grillfunctie moet het ovengerei geschikt zijn voor gebruik in zowel
de magnetron als de grill.
Aluminium bakjes en folie
Voorgekookt voedsel in aluminium bakjes of in aluminiumfolie kan in de magnetron worden
gedaan als de volgende aspecten in acht worden genomen:

Veiligheidsinformatie
31
Denk aan de aanbevelingen van de fabrikant die op de verpakking staan.
• De aluminium bakjes mogen niet hoger zijn dan 3 cm en mogen niet met de wanden
van de ovenruimte in contact komen (minimale afstand 3 cm). Aluminium deksels moeten worden verwijderd.
• Plaats het aluminium bakje direct op de plaat van het draaiplateau. Gebruikt u het
rechthoekige rooster, plaats het bakje dan op een porseleinen bord. Plaats het bakje nooit
direct op het rechthoekige rooster!
• De bereidingstijd is langer omdat de microgolven het voedsel alleen vanaf de bovenkant
bereiken. Indien u twijfelt, is het het beste om alleen schalen te gebruiken die geschikt
zijn voor gebruik in de magnetron.
• Aluminiumfolie kan worden gebruikt om tijdens het ontdooien microgolven terug te
kaatsen. Kwetsbaar voedsel, zoals gevogelte of gehakt, kan tegen overmatige hitte worden beschermd door de respectievelijke uiteinden/randen af te dekken.
•
Let op: aluminiumfolie mag niet in contact komen met de wanden van de ovenruimte
omdat dit elektrische vonken kan veroorzaken.
Deksels
We adviseren dat u glazen of plastic deksels of huishoudfolie gebruikt omdat:
1. Dit overmatige verdamping tegengaat (voornamelijk tijdens erg lange bereidingstijden);
2. De bereidingstijden korter zijn;
3. Het voedsel niet uitdroogt;
4. De smaak behouden blijft.
Het deksel moet gaatjes of openingen hebben zodat er geen druk opbouwt. Plastic zakjes
moeten ook geopend zijn. Flesjes babyvoeding of potjes met babyvoeding en vergelijkbare
verpakkingen kunnen alleesn worden verwarmd zonder de doppen/deksels omdat ze anders
kunnen barsten.
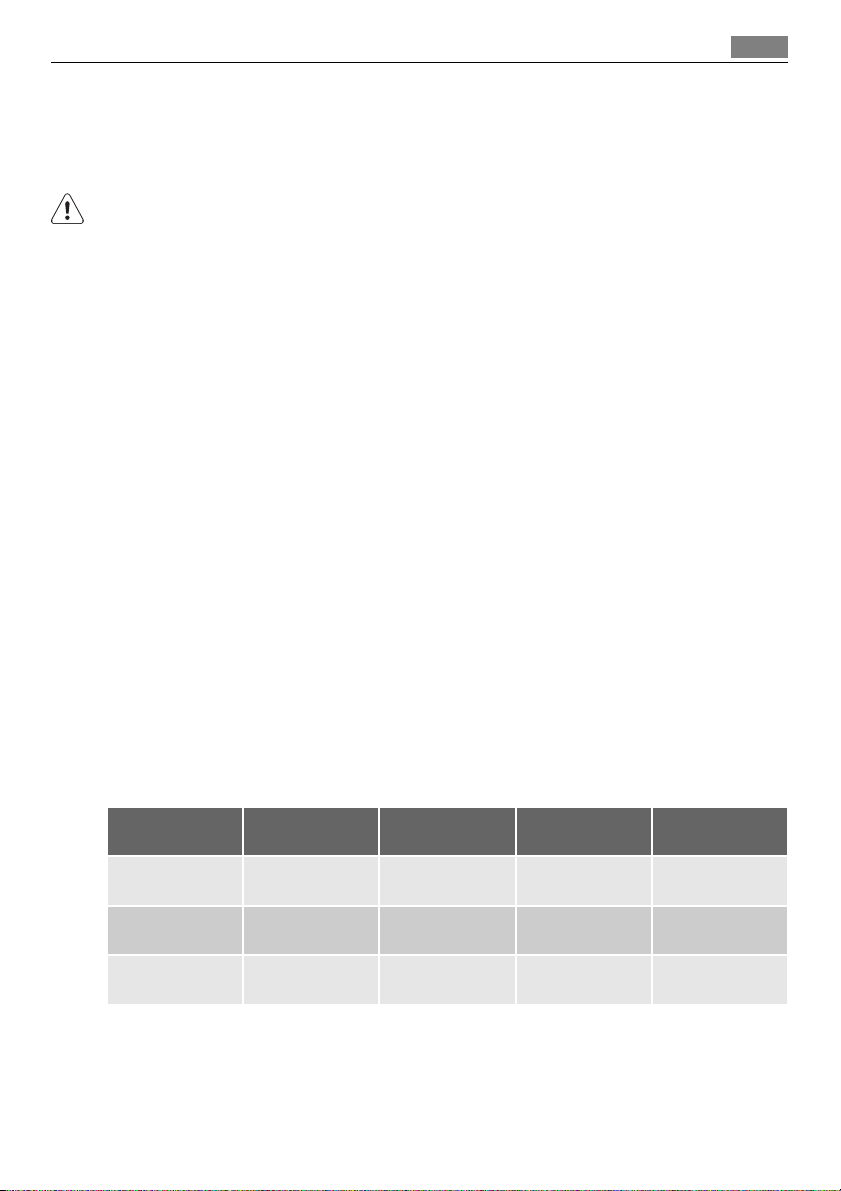
Handleiding ovengerei en -accessoires
De lijst hieronder is een algemene richtlijn.
• : Te gebruiken kookgerei en accessoires
• : Te vermijden kookgerei en accessoires
Soort ovengerei Bedieningsmodus
Glas en porselein 1)Voor thuisgebruik, niet vuurbestendig, mag in de
vaatwasser
Geglazuurd porselein, vuurbestendig glas en porselein
Porselein, aardewerk 2) Niet-geglazuurd of geglazuurd zonder metalen
versieringen
Schalen van klei
gen van de fabrikant!)
Denk aan de aanwijzin-
geglazuurd
Magnetron Grilleren Grill + Mag-
Ontdooien Gaar
netron

Veiligheidsinformatie
32
Soort ovengerei Bedieningsmodus
Magnetron Grilleren Grill + Mag-
Ontdooien Gaar
Schalen van klei
gen van de fabrikant!)
Plastic schalen
van de fabrikant!)
Denk aan de aanwijzin-
niet geglazuurd
Denk aan de aanwijzingen
Hittebestendig tot
100°C
Plastic schalen
van de fabrikant!)
Denk aan de aanwijzingen
Hittebestendig tot
250°C
Plastic folie 3)Plastic folie voor voedsel
Plastic folies
Papier, karton, perkament
3)
Cellofaan
4)
Aluminium folie
Aluminium verpakkingen
5)
Accessoires (rechthoekig rooster)
1) Zonder randjes van bladgoud of zilver; geen loodkristallen.
2) Denk aan de aanwijzingen van de fabrikant!
3) Gebruik geen metalen klemmen om zakken af te sluiten. Maak gaatjes in de zakken. Gebruik de folies alleen om
het voedsel af te dekken.
4) Gebruik geen papieren borden.
5) Alleen ondiepe aluminium bakjes zonder deksel. Het aluminium mag niet in contact komen met de wanden van
de ovenruimte.
netron
Voedselveiligheid
• Verwarm geen voedsel in een blik in de magnetron. Haal het voedsel er altijd uit en stop
het in een geschikt bakje.
• Er mag niet worden gefrituurd in de magnetron aangezien de temperatuur van het vet
niet kan worden gereguleerd en gevaarlijke situaties kunnen ontstaan.
• Popcorn kan in de magnetron worden bereid, maar alleen in speciale verpakkingen of
kookgerei dat hier speciaal voor is ontworpen. Deze bereiding dient altijd onder toezicht
te gebeuren.
• Prik gaatjes in voedsel met een niet-poreuze huid of membraan om opbouwen van stoom
en barsten te voorkomen. Appels, aardappels, kippenlevertjes en eidooiers zijn voorbeelden van producten waarin gaatjes moeten worden geprikt.
• De inhoud van melkflesjes en potjes babyvoeding moet worden geroerd of geschud en
de temperatuur moet voor consumptie worden gecontroleerd om brandwonden te
voorkomen.
WAARSCHUWING!
Vloeistoffen of andere levensmiddelen mogen niet in afgesloten containers worden verwarmd omdat ze kunnen exploderen.

Veiligheidsinformatie
WAARSCHUWING!
Het met de magnetron verwarmen van dranken kan leiden tot vertraagd, explosief koken
en daarom moet de container voorzichtig worden gehanteerd.
WAARSCHUWING!
Bij het verwarmen van vloeistoffen, zoals soepen, sauzen en dranken in de magnetron, kan
oververhitting van de vloeistof tot boven het kookpunt plaatsvinden zonder dat er bellen
worden waargenomen. Dit kan leiden tot plotseling overkoken van de hete vloeistof. Om
deze mogelijkheid te voorkomen moeten de volgende stappen worden uitgevoerd:
1. Vermijd het gebruik van verpakkingen met rechte zijkanten en nauwe halzen.
2. Niet oververhitten.
3. Roer de vloeistof voordat de verpakking in de oven wordt geplaatst en doe dit nogmaals
halverwege de verwarmingstijd.
4. Laat de verpakking na het verwarmen een korte tijd in de oven staan en roer nogmaals
voordat u de verpakking eruit haalt.
WAARSCHUWING!
Sommige producten zoals hele eieren en afgesloten verpakkingen, bijvoorbeeld gesloten
glazen potten, kunnen exploderen en mogen niet in deze oven worden verwarmd. In sommige gevallen kunnen gepocheerde eieren tijdens de bereiding exploderen. Prik de dooier
altijd in en dek deze vervolgens af en laat hem een minuut staan voordat de afdekking
wordt verwijderd.
Het is normaal dat tijdens de bereidingscyclus stoom ontsnapt rond de deur, of dat er damp
vormt op de deur, of dat er zelfs waterdruppels verschijnen onder de deur. Dit is slechts
condensatie van de warmte van het voedsel en is niet van invloed op de veiligheid van uw
oven. Het is niet de bedoeling dat de deur de ovenruimte volledig afsluit.
33
Veiligheidsinstructies voor het koken met de grill en combinatiemodus
• Het glazen kijkvenster kan barsten als er tijdens het bereiden met de grill water op wordt
gemorst.
• Draag een ovenwant bij het in- en uitladen van de oven. Verpakkingen kunnen erg heet
worden in de oven, dus wees voorzichtig zodat u zich niet brandt. Het draaiplateau en
het metalen rooster worden ook erg heet en draag dus een ovenwant als u ze vastpakt.
• Raak het binnenste of buitenste kijkvenster niet aan met metalen onderdelen bij het inof uitladen van de oven. De binnenkant van de deur en de oven worden erg heet, dus
wees voorzichtig als u voedsel in de oven plaatst.
• Plaats het draaiplateau of de verpakkingen niet in koud water en probeer ze ook niet
snel af te koelen na gebruik.
• Plaats geen dingen bovenop de kast. De bovenkant van de kast wordt erg heet, dus alles
wat erop wordt geplaatst kan beschadigd raken door de warmte.
• Verwarm de oven alleen voor als u de grill gebruikt, nooit bij gebruik van magnetron- of
combinatiefuncties (magnetron en grill)
WAARSCHUWING!
Als het apparaat in de combinatiemodus wordt gebruikt, mogen kinderen de oven alleen
gebruiken onder toezicht van een volwassene vanwege de temperatuur die wordt gegenereerd.

Voordat u de oven voor het eerst in gebruik neemt
34
WAARSCHUWING!
De temperatuur van het toegankelijke oppervlak kan hoog zijn als het apparaat in werking
is.
Voordat u de oven voor het eerst in gebruik neemt
Bij conventionele ovens dringt de warmte die uitgestraald wordt door de elektrische elementen of gasbranders langzaam in het voedsel door van buiten naar binnen. Hierdoor
wordt een belangrijk deel van de energie verspild met het opwarmen van de lucht, de
ovenonderdelen en de voedselverpakkingen.
In een magnetron wordt de warmte door het voedsel zelf gegenereerd en verspreidt zich
van binnen naar buiten. Er gaat geen warmte verloren aan de lucht, de wanden van de
ovenruimte of de schalen en verpakkingen (als deze geschikt zijn voor gebruik in de magnetron), met andere woorden: alleen het voedsel wordt verwarmd.
Magnetrons hebben de volgende voordelen:
1. Kortere bereidingstijden; in het algemeen zijn deze tot 3/4 korter dan de tijd die nodig
is voor een conventionele bereiding.
2. Ultra-snel ontdooien van voedsel, waarmee het gevaar van het ontwikkelen van bac-
teriën wordt verminderd.
3. Energiebesparing.
4. Behoud van de voedingswaarde van voedsel door kortere bereidingstijden.
5. Eenvoudig schoon te maken.
Hoe een magnetron werkt
In een magnetron bevindt zich een hoogspanningsklep (de magnetron genaamd) die elektrische energie omzet in microgolvenenergie. Deze elektromagnetische golven worden gekanaliseerd naar het binnenste van de oven door middel van een golfgeleider en worden
door een metalen spreider of een draaiplateau verspreid.
Binnen de oven planten de microgolven zich in alle richtingen voort en worden door de
metalen wanden teruggekaatst, zodat ze het voedsel gelijkmatig doordringen.
Waarom voedsel opwarmt
De meeste voedingsmiddelen bevatten water en watermoleculen vibreren als ze aan microgolven worden onderworpen.
De wrijving tussen moleculen produceert warmte die de temperatuur van het voedsel verhoogt, het ontdooit, kookt, of warm houdt.
Omdat de warmte in het voedsel zelf ontstaat:
• kan het worden bereid met weinig of geen vloeistof of vetten/oliën;
• is ontdooien, verwarmen of koken in een magnetron sneller dan in een conventionele
oven;
• blijven de vitaminen, mineralen en voedingsstoffen in het voedsel behouden;
• worden de natuurlijke kleur en smaak van het voedsel niet gewijzigd.
Microgolven gaan door porselein, glas, karton of plastic, maar niet door metaal. Om deze
reden mogen metalen verpakkingen of verpakkingen met metalen onderdelen niet in een
magnetron worden gebruikt.

Voordat u de oven voor het eerst in gebruik neemt
Microgolven worden door metaal teruggekaatst …
... maar gaan door glas en porselein heen ...
35
... en worden door voedsel geabsorbeerd.

Voordat u de oven voor het eerst in gebruik neemt
36
Beschrijving van de functies
Symbool Functie Vermogen mag-
Magnetron 200 W Langzaam ontdooien van kwetsbare voedings-
netron
Voedsel
middelen; warmhouden van voedsel
400 W Koken met weinig warmte; rijst koken. Snel ont-
600 W Verwarmen en koken van voedsel
800 W Het koken van groenten en voedsel. Voorzichtig
1000 W Snel verwarmen van vloeistoffen
Grilleren --- Grillen
Magnetron +
grill
400 W Het grillen van gevogelte en vlees
600 W Het bakken van taarten en met kaas gegratineerde
200 W Het roosteren van voedsel
dooien, opwarmen van babyvoeding
koken en verwarmen. Verwarmen en koken van
kleine hoeveelheden voedsel
schotels
Parameters veranderen
De werkingsparameters (tijd, vermogen, temperatuur) kunnen worden gewijzigd als de oven
in werking is of als het bereidingsproces is onderbroken door als volgt te werk te gaan:
1. Selecteer de parameter die gewijzigd moet worden met de parameterkeuzetoetsen. Het
bijbehorende symbool en het display beginnen te knipperen.
2. Stel de gewenste waarde in met de '+' en '–' toetsen.
3. Druk op de bevestigingstoets of wacht 3 seconden om de nieuwe parameterwaarde te
valideren. Het display en de symbolen stoppen met knipperen.
Einde van een bereidingscyclus
Aan het einde van het proces hoort u drie piepsignalen en wordt op het display het woord
'Einde' getoond.
De piepsignalen worden elke 30 seconden herhaald tot de deur wordt geopend of op de
toets Annuleren wordt gedrukt.
Een bereidingscyclus annuleren
Als u het bereidingsproces wilt annuleren, drukt u tweemaal op de toets Annuleren.
U hoort dan een piepsignaal en de tijd verschijnt op het display.

Productbeschrijving
Een bereidingscyclus onderbreken
U kunt het bereidingsproces op elk gewenst moment stoppen door eenmaal op de toets
Annuleren te drukken of de ovendeur te openen.
In beide gevallen:
• De emissie van microgolven stopt onmiddellijk.
•
De grill is uitgeschakeld maar nog wel erg heet. Risico van brandwonden!
• De timer stopt en het display toont de resterende hoeveelheid van de werkingstijd.
Indien gewenst kunt u nu:
1. Voedsel omdraaien of roeren om er zeker van te zijn dat het gelijkmatig wordt gekookt.
2. De procesparameters wijzigen.
3. Annuleer het proces door op de toets Annuleren te drukken.
Om het proces opnieuw te starten de deur sluiten en op de starttoets drukken
Productbeschrijving
37
8
7
6
5
4
3
9
2
1. Glas deurvenster
2. Grendels blokkeringsschakelaar
3. Aandrijfas draaiplateau
4. Ondersteunende ring draaiplateau
5. Glazen draaiplateau
6. Lage grillrooster
7. Hoge grillrooster
8. Gerecht knapperig maken
9. Bedieningsveld
10. Grill-verwarmingselement
11. Ovenlampje
12. Bevestigingsgreep grill
12
10
11
1

F1 F2 F3
F1 F2 F3
Productbeschrijving
38
Bedieningspaneel
min
1 2
1. Bevestigingstoets
2. Toets Start/Snelle start
3. Parameterkeuzetoetsen
4. Plus- en mintoetsen
5. Functiekeuzetoetsen
6. Annuleren
De melding
+
_
Symboolbeschrijvingen
1. F1 – Automatische functie
2. F2 – Automatische functie
3. F3 – Automatische functie
4. Ontdooien per tijd
5. Ontdooien per gewicht
6. Grill + Magnetron
7. Grilleren
8. Magnetron
9. Tijd
10. Klok
11. Vermogen
12. Gewicht
13. Temperatuur
123 564
13
5 6
8
7
min
11
12
34
9
10

Werking
Werking
Tijd instellen
Het display van de klok zal knipperen om aan te geven dat de aangegeven tijd niet correct
is.
Om het juiste tijdstip van de dag in te stellen:
1. Selecteer het kloksymbool met de parameterkeuzetoetsen (uren gaan knipperen) (dit is
niet nodig als de magnetron voor het eerst wordt ingeschakeld of na een stroomonderbreking).
2. Stel de uren in met de plus- en mintoetsen.
3. Bevestig de keuze met de toets Bevestigen. (De minuten zullen knipperen)
4. Stel de minuten in met de plus- en mintoetsen.
5. Bevestig de keuze met de toets Bevestigen.
Verbergen/Tonen van de klok
Als het klokdisplay u stoort, kunt u het verbergen.
De klok verbergen:
1. Selecteer het kloksymbool met de parameterkeuzetoetsen.
2. Druk op de toets Bevestigen en houd deze 3 seconden ingedrukt. De klok wordt ver-
borgen, maar de punten tussen de uren en de minuten zullen eenmaal per seconde
knipperen.
Herhaal de bovenstaande procedure om de klok weer te tonen.
39
Kinderslot
Deze oven heeft een voorziening die hem vergrendelt om te voorkomen dat hij door kinderen wordt gebruikt. Nadat het slot is ingesteld, werkt geen enkel onderdeel van de magnetron, totdat het kinderslot is geannuleerd.
Het kinderslot instellen
1. Druk om de oven te vergrendelen 3 seconden op de toets Annuleren. U hoort een
geluidssignaal en het klokdisplay zal het woord 'VEILIG' tonen. De oven is vergrendeld
en kan in deze toestand niet worden gebruikt.
2. Druk om de oven te ontgrendelen wederom 3 seconden op de toets Annuleren. U hoort
een geluidssignaal en het klokdisplay zal de tijd weer tonen.
De tijd kan worden bekeken door even op de toets Annuleren te drukken.
Het draaiplateau stoppen
1. Druk om het draaiplateau te stoppen op de toetsen Bevestigen en Annuleren gedurende
3 seconden tot het woord 'PLAT UIT' op het display verschijnt
2. Herhaal bovenstaande procedure om het draaiplateau weer te laten draaien.
Koken met de magnetron
Gebruik deze functie om groenten, aardappelen, rijst, vis en vlees te koken en op te warmen.
1. Selecteer de Magnetronfunctie met de functiekeuzetoetsen.
2. Kies het vermogen met de parameterkeuzetoetsen. Het symbool voor het vermogen en
het display beginnen te knipperen. Als u het vermogen niet wijzigt, werkt de magnetron
met een standaardvermogen van 800 W.

Werking
40
3. Stel het vermogen in met de '+' en–' toetsen.
4. Druk op de toets Bevestigen om het vermogen te valideren. Het display en het symbool
stoppen met knipperen.
5. Selecteer de duur met de parameterkeuzetoetsen. Het symbool voor de duur en het
display beginnen te knipperen.
6. Stel de duur in met de '+' en–' toetsen.
7. Druk op de toets Bevestigen om de duur te valideren. Het display en het symbool stop-
pen met knipperen.
8. Start het bereidingsproces door op de starttoets te drukken.
Als een vermogen van 1000 W wordt geselecteerd, is de duur beperkt tot een maximum
van 15 minuten.
Snelle start
Gebruik deze functie om snel voedsel met een hoog watergehalte op te warmen, zoals
water, koffie, thee of dunne soep.
1. Druk op de starttoets. De magnetron werkt gedurende 30 seconden op het maximale
vermogen.
2. Druk als u de werkingsduur wilt verlengen nogmaals op de starttoets. Elke keer dat u
op deze toets drukt, wordt de werkingsduur met 30 seconden verlengd.
Als een vermogen van 1000 W wordt geselecteerd, is de werkingsduur beperkt tot een
maximum van 15 minuten.
Bereiding met de grill
Gebruik deze functie om de bovenkant van voedsel snel te bruineren.
1. Selecteer de Grillfunctie met de functiekeuzetoetsen.
2. Selecteer de duur met de parameterkeuzetoetsen. Het symbool voor de duur en het
display beginnen te knipperen.
3. Stel de duur in met de '+' en–' toetsen.
4. Druk op de toets Bevestigen om de duur te valideren. Het display en het symbool stop-
pen met knipperen.
5. Start het bereidingsproces door op de starttoets te drukken.
Koken met de magnetron + grill
Gebruik deze functie voor de bereiding van lasagne, gevogelte, gepofte aardappelen en
geroosterde gerechten.
1. Selecteer de Magnetron + Grill-functie met de functiekeuzetoetsen.
2. Kies het vermogen met de parameterkeuzetoetsen. Het symbool voor het vermogen en
het display beginnen te knipperen. Als u het vermogen niet wijzigt, werkt de magnetron
met een standaardvermogen van 600 W.
3. Stel het vermogen in met de '+' en–' toetsen.
4. Druk op de toets Bevestigen om het vermogen te valideren. Het display en het symbool
stoppen met knipperen.
5. Selecteer de duur met de parameterkeuzetoetsen. Het symbool voor de duur en het
display beginnen te knipperen.
6. Stel de duur in met de '+' en–' toetsen.
7. Druk op de toets Bevestigen om de duur te valideren. Het display en het symbool stop-
pen met knipperen.
8. Start het bereidingsproces door op de starttoets te drukken.

Werking
Automatisch ontdooien
Gebruik deze functie om vlees, gevogelte, vis, fruit en brood snel per gewicht te ontdooien.
1. Selecteer de functie Ontdooien per gewicht met de functiekeuzetoetsen.
2. Selecteer het programma met de parameterkeuzetoetsen. Het symbool voor de duur
en de klok en het display beginnen te knipperen.
3. Stel het programma in met de '+' en–toetsen (raadpleeg de tabel hieronder).
4. Druk op de toets Bevestigen om het programma te valideren. Het display en de symbolen
stoppen met knipperen.
5. Selecteer het gewicht met de parameterkeuzetoetsen. Het bijbehorende symbool en
het display beginnen te knipperen.
6. Stel het gewicht in met de '+' en–' toetsen.
7. Druk op de toets Bevestigen om het gewicht te valideren. Het display en het symbool
stoppen met knipperen.
8. Start het bereidingsproces door op de starttoets te drukken.
De onderstaande tabel toont de programma's voor de functie ontdooien per gewicht en
geeft gewichtsintervallen weer en ontdooi- en rusttijden (om te garanderen dat het voedsel
een gelijkmatige temperatuur heeft).
Programma Gerecht Gewicht (g) Tijd (min) Rusttijd (min)
Pr01 Vlees 100 - 2000 2 - 43 20 - 30
Pr02 Gevogelte 100 - 2500 2 - 58 20 - 30
Pr03 Vis 100 - 2000 2 - 40 20 - 30
Pr04 Fruit 100 - 500 2 - 13 10 - 20
Pr05 Brood 100 - 800 2 - 19 10 - 20
41
Handmatig ontdooien
Gebruik deze functie om elke soort voedsel snel te ontdooien door de ontdooitijd in te
stellen.
1. Selecteer de functie Ontdooien per tijd met de functiekeuzetoetsen.
2. Selecteer de duur met de parameterkeuzetoetsen. Het symbool voor de duur en het
display beginnen te knipperen.
3. Stel de duur in met de '+' en–' toetsen.
4. Druk op de toets Bevestigen om de duur te valideren. Het display en het symbool stoppen met knipperen.
5. Start het bereidingsproces door op de starttoets te drukken.
Om het ontdooien van compact voedsel zwaarder dan 450 gram te versnellen, kan de oven
op vol vermogen worden opgestart gedurende 1-3 minuten, en vervolgens op ontdooien
worden gezet totdat het ontdooien is voltooid. Als deze functie is afgelopen klinkt er een
bel om het einde van het programma aan te geven.
Automatische functie F1 (verwarmen van voedsel)
Gebruik deze functie om verschillende soorten voedsel te verwarmen.
1. Selecteer de Automatische functie F1 met de functiekeuzetoetsen.
2. Selecteer het programma met de parameterkeuzetoetsen. Het symbool voor de duur
en de klok en het display beginnen te knipperen.
3. Stel het programma in met de '+' en–toetsen (raadpleeg de tabel hieronder).

Werking
42
4. Druk op de toets Bevestigen om het programma te valideren. Het display en de symbolen
stoppen met knipperen.
5. Selecteer het gewicht met de parameterkeuzetoetsen. Het bijbehorende symbool en
het display beginnen te knipperen.
6. Stel het gewicht in met de '+' en–' toetsen.
7. Druk op de toets Bevestigen om het gewicht te valideren. Het display en het symbool
stoppen met knipperen.
8. Start het bereidingsproces door op de starttoets te drukken.
De onderstaande tabel toont de programma's voor de Automatische Functies F1 en geeft
gewichtsintervallen en ontdooi- en rusttijden weer (om te garanderen dat het voedsel een
gelijkmatige temperatuur heeft).
Programma Gerecht Gewicht (kg) Tijd (min) Rusttijd (min)
A 01 Soep 200 - 1500 3 - 5 1-2 x draaien, af-
A 02 Kant-en-klare
maaltijden compact voedsel
A 03 Kant-en-klare
gerechten bijv.
goulash
A 04 Groente 200 - 1500 2,6 - 14 1-2 x draaien, af-
200 - 1500 3 - 20 1-2 x draaien, af-
200 - 1500 3 - 18 1-2 x draaien, af-
gedekt houden,
1-2 min.
gedekt houden,
1-2 min.
gedekt houden,
1-2 min.
gedekt houden,
1-2 min.
Belangrijke opmerkingen:
• Gebruik altijd schalen die geschikt zijn voor gebruik in de magnetron en een deksel of
afdekking om vloeistofverlies te voorkomen.
• Roer of meng het voedsel tijdens het verwarmen meerdere malen, vooral als de oven
piept en het display als volgt knippert: .
• De tijd die nodig is om het voedsel te verwarmen hangt af van de begintemperatuur
ervan. Voedsel dat direct uit de diepvries komt heeft langer de tijd nodig om op te warmen
dan voedsel dat al op kamertemperatuur is. Als de voedseltemperatuur niet geschikt is,
kies dan de volgende keer dat u het voedsel verwarmt een hoger of lager gewicht.
• Roer na het verwarmen het voedsel om of schud de verpakking en laat het voedsel enige
tijd rusten zodat de temperatuur zich gelijkmatig over het voedsel kan verdelen.
WAARSCHUWING!
Na het verwarmen kan de verpakking erg heet zijn. Hoewel microgolven de meeste verpakkingen niet verwarmen, kunnen ze wel opwarmen door warmteoverdracht vanuit het
voedsel.
Automatische functie F2 (koken)
Gebruik deze functie om vers voedsel te koken
1. Selecteer de Automatische functie F2 met de functiekeuzetoetsen.
2. Selecteer het programma met de parameterkeuzetoetsen. Het symbool voor de duur
en de klok en het display beginnen te knipperen.

Werking
43
3. Stel het programma in met de '+' en–toetsen (raadpleeg de tabel hieronder).
4. Druk op de toets Bevestigen om het programma te valideren. Het display en de symbolen
stoppen met knipperen.
5. Selecteer het gewicht met de parameterkeuzetoetsen. Het bijbehorende symbool en
het display beginnen te knipperen.
6. Stel het gewicht in met de '+' en–' toetsen.
7. Druk op de toets Bevestigen om het gewicht te valideren. Het display en het symbool
stoppen met knipperen.
8. Start het bereidingsproces door op de starttoets te drukken.
De onderstaande tabel toont de programma's voor de Automatische Functies F2 en geeft
gewichtsintervallen en ontdooi- en rusttijden weer (om te garanderen dat het voedsel een
gelijkmatige temperatuur heeft).
Programma Gerecht Gewicht (kg) Tijd (min) Rusttijd (min)
B 01 Aardappelen 200 - 1000 4 - 17 1-2 x draaien, af-
B 02 Groente 200 - 1000 4 - 15 1-2 x draaien, af-
B 03 Rijst 200 - 500 13 - 20 Een deel rijst,
B 04 Vis 200 - 1000 4 - 1000 Afgedekt houden
gedekt houden,
1-2 min.
gedekt houden,
1-2 min.
twee delen water,
afgedekt houden
Belangrijke opmerkingen:
• Gebruik altijd schalen die geschikt zijn voor gebruik in de magnetron en een deksel of
afdekking om vloeistofverlies te voorkomen.
• Roer of meng het voedsel tijdens het verwarmen meerdere malen, vooral als de oven
piept en het display als volgt knippert.
WAARSCHUWING!
Na het verwarmen kan de verpakking erg heet zijn. Hoewel microgolven de meeste verpakkingen niet verwarmen, kunnen ze wel opwarmen door warmteoverdracht vanuit het
voedsel.
Hoe nu verder:
• Stukken vis – Voeg 1 tot 3 soeplepels water of citroensap toe.
• Rijst – Voeg een hoeveelheid water toe die equivalent is aan twee tot drie maal de
hoeveelheid rijst.
• Ongeschilde aardappelen – Gebruik aardappelen van dezelfde grootte. Was ze en prik de
schil een aantal keer in. Voeg geen water toe.
• Geschilde aardappelen en verse groenten – Snijd deze in stukken van dezelfde grootte.
Voeg een soeplepel water toe voor elke 100 gram groenten en zout naar smaak.
Automatische functie F3 (ontdooien en roosteren)
Gebruik deze functie om verschillende soorten voedsel te koken en roosteren.
1. Selecteer de Automatische functie F3 met de functiekeuzetoetsen.

Werking
44
2. Selecteer het programma met de parameterkeuzetoetsen. Het symbool voor de duur
en de klok en het display beginnen te knipperen.
3. Stel het programma in met de '+' en–toetsen (raadpleeg de tabel hieronder).
4. Druk op de toets Bevestigen om het programma te valideren. Het display en de symbolen
stoppen met knipperen.
5. Selecteer het gewicht met de parameterkeuzetoetsen. Het bijbehorende symbool en
het display beginnen te knipperen.
6. Stel het gewicht in met de '+' en–' toetsen.
7. Druk op de toets Bevestigen om het gewicht te valideren. Het display en het symbool
stoppen met knipperen.
8. Start het bereidingsproces door op de starttoets te drukken.
De onderstaande tabel toont de programma's voor de Automatische Functies F3 en geeft
gewichtsintervallen en ontdooi- en rusttijden weer (om te garanderen dat het voedsel een
gelijkmatige temperatuur heeft).
Programma Gerecht Gewicht (kg) Tijd (min) Rusttijd (min)
C 01 Panpizza 300 - 550 3 - 9 Verwarm de bak-
C 02 Diepvriesvoedsel 400 - 1000 8 - 14 1-2 x draaien, af-
C 03 Bevroren aardap-
pelgerechten
200 - 450 10 - 12 1x draaien
pan voor
gedekt houden,
1-2 min.
Belangrijke opmerkingen:
• Gebruik altijd schalen die geschikt zijn voor gebruik in de magnetron en een deksel of
afdekking om vloeistofverlies te voorkomen.
• Roer of meng het voedsel tijdens het verwarmen meerdere malen, vooral als de oven
piept en het display als volgt knippert.
WAARSCHUWING!
Na het verwarmen kan de verpakking erg heet zijn. Hoewel microgolven de meeste verpakkingen niet verwarmen, kunnen ze wel opwarmen door warmteoverdracht vanuit het
voedsel.
Hoe nu verder:
• Diepvriespizza – Gebruik voorgebakken diepvriespizza's en pizzabroodjes.
• Diepvriesvoedsel – Gebruik lasagne, canneloni, garnalensoufflé, allemaal bevroren. Af-
gedekt houden.
• Bevroren aardappelgerechten – Patat, aardappelkroketten en gebakken aardappelen
moeten geschikt zijn voor bereiding in de oven.

Adviezen
Adviezen
Magnetron
WAARSCHUWING!
Lees het hoofstuk 'Belangrijke veiligheidsinformatie' voordat u gaat koken met uw magnetron.
Volg deze adviezen op wanneer u met uw magnetron kookt:
• Prik voedsel met een schil of vel (bijv. appels, tomaten, aardappels, worstjes) voor het
verwarmen of koken in zodat ze niet barsten. Snij het voedsel in stukken voordat u met
de bereiding begint.
• Zorg ervoor dat u zeker weet dat een verpakking of schaal geschikt is voor gebruik in de
magnetron voordat u hem gebruikt (zie het hoofdstuk over soorten ovengerei).
• Bij het koken van voedsel met erg weinig vocht (bijv. het ontdooien van brood, het maken
van popcorn etc.) gaat de verdamping erg snel. De oven werkt dan alsof hij leeg was en
het voedsel kan verbranden. De oven en de verpakking kunnen in een dergelijk geval
beschadigd raken. U moet daarom precies de benodigde bereidingstijd instellen en het
bereidingsproces goed in het oog houden.
• Het is niet mogelijk om grote hoeveelheden olie te verwarmen (frituren) in de magnetron.
• Haal voorgekookt voedsel uit de verpakking waar ze in zitten omdat deze niet altijd
hittebestendig zijn. Volg de instructies van de fabrikant van het voedsel op.
• Als u meerdere verpakkingen hebt, zoals kopjes, verspreid ze dan gelijkmatig over het
draaiplateau.
• Gebruik geen metalen klemmen om zakken af te sluiten. Gebruik in plaats daarvan plastic
klemmen. Prik de zakken meerdere malen in zodat de stoom gemakkelijk kan ontsnappen.
• Controleer bij het verwarmen of koken van voedsel dat ze ten minste een temperatuur
van 70°C bereiken.
• Tijdens het koken kan stoom worden gevormd op de ruit van de ovendeur en dit kan
gaan druppelen. Deze situatie is normaal en kan meer opvallen als de kamertemperatuur
laag is. De veilige werking van uw oven wordt hierdoor niet beïnvloed. Ruim als u klaar
bent met koken het water dat afkomstig is van de condens op
• Gebruik bij het verwarmen van vloeistoffen verpakkingen met een brede opening, zodat
de stoom gemakkelijk kan verdampen.
Bereid de voedingsmiddelen volgens de instructies en denk aan de bereidingstijden en
vermogens die in de tabellen zijn aangegeven.
Denk eraan dat de getallen slechts een indicatie zijn en kunnen variëren afhankelijk van de
initiële toestand, temperatuur, vochtgehalte en soort voedsel. Het is raadzaam om de tijden
en het vermogen aan elke situatie aan te passen. Afhankelijk van de precieze eigenschappen
van het voedsel moet u misschien de bereidingstijd verlengen of verkorten of het vermogen
verhogen of verlagen.
Koken met microgolven…
1. Hoe groter de hoeveelheid voedsel, hoe langer de bereidingstijd. Denk eraan dat:
– Een dubbele hoeveelheid " een dubbele bereidingstijd
– De helft van de hoeveelheid " de helft van de bereidingstijd
2. Hoe lager de temperatuur, hoe langer de bereidingstijd.
3. Voedsel dat veel vocht bevat, warmt sneller op.
45

Adviezen
46
4. Het koken zal gelijkmatiger gebeuren als het voedsel gelijkmatig is verdeeld op het
draaiplateau. Als u compact voedsel aan de buitenkant van het plateau plaatst en minder compact voedsel in het midden, kunt u verschillende soorten voedsel tegelijk verwarmen.
5. U kunt op elk gewenst moment de ovendeur openen. Als u dit doet, schakelt de oven
automatisch uit. De magnetron gaat pas weer werken als u de deur sluit en op de
starttoets drukt.
6. Voedsel dat is afgedekt heeft minder bereidingstijd nodig en behoudt zijn eigenschap-
pen beter. De deksels die worden gebruikt moeten microgolven doorlaten en kleine
gaatjes hebben waardoor stoom kan ontsnappen.
Ontdooien
1. Gebruik bij het ontdooien alleen schalen die geschikt zijn voor gebruik in de magnetron
(porselein, glas, geschikt plastic).
2. De ontdooifunctie per gewicht en de tabellen verwijzen naar het ontdooien van rauw
voedsel.
3. De ontdooitijd hangt af van de hoeveelheid en dikte van het voedsel. Houd bij het
invriezen van voedsel rekening met het ontdooien ervan. Verdeel het voedsel gelijkmatig in de verpakking.
4. Verdeel het voedsel zo goed mogelijk in de oven. De dikste delen van vis of kipdrum-
sticks moeten naar de buitenkant worden gedraaid. De zachtste delen van het voedsel
kunnen worden bedekt met stukjes aluminiumfolie. Let op: Het aluminiumfolie mag
niet in contact komen met de binnenkant van de ovenruimte aangezien dit elektrische
vonken kan veroorzaken.
5. Dikke delen voedsel moeten meerdere malen worden gedraaid.
6. Verdeel het bevroren voedsel zo gelijkmatig mogelijk aangezien smalle en dunne delen
sneller ontdooien dan dikkere en bredere delen.
7. Vetrijk voedsel, zoals boter, roomkaas en room mogen niet volledig worden ontdooid.
Als ze bij kamertemperatuur worden bewaard, zullen ze binnen een paar minuten klaar
zijn om te serveren. Als u in diepgevroren room kleine stukjes ijs vindt, moet u deze er
voor het serveren doorheen mengen.
8. Plaats gevogelte op een omgekeerd bord zodat de vleessappen er gemakkelijker uit
kunnen lopen.
9. Brood moet worden verpakt in een servet zodat het niet te droog wordt.
10. Draai het voedsel om als de oven piept en op het display het volgende woord knippert:
11. Verwijder bevroren voedsel uit de verpakking en vergeet niet om metalen sluitstrips
te verwijderen. Voor verpakkingen die worden gebruikt om bevroren voedsel in de
vriezer te bewaren en die ook kunnen worden gebruikt om te verwarmen en te koken,
hoeft u alleen het deksel eraf te nemen. In alle andere gevallen moet u het voedsel in
verpakkingen doen die geschikt zijn voor gebruik in de magnetron.
12. Het vocht dat ontstaat bij het ontdooien, in het bijzonder dat van gevogelte, moet
worden verwijderd. In geen geval mogen dergelijke vloeistoffen in contact komen met
ander voedsel.
13. Vergeet niet dat u door de ontdooifunctie te gebruiken tijd moet rekenen voor het
rusten tot het voedsel volledig is ontdooid.

Adviezen
Grilleren
Gebruik voor goede resultaten met de grill het rechthoekige rooster dat bij de oven wordt
geleverd.
Belangrijke punten
1. Als de grill van de magnetron voor de eerste keer wordt gebruikt, komt er wat rook en
stank vanaf van de oliën die worden gebruikt tijdens de fabricage van de oven.
2. De ruit van de ovendeur wordt erg heet als de grill in werking is. Houd kinderen erbij
weg.
3. Als de grill in werking is worden de wanden van de ovenruimte en het rechthoekige
rooster erg heet. U moet ovenwanten gebruiken.
4. Als de grill voor langere tijd wordt gebruikt, is het normaal dat onderdelen zich tijdelijk
uitschakelen als gevolg van de veiligheidsthermostaat.
5.
Let op! Als voedsel gegrild of gekookt moet worden in verpakkingen, moet u controleren dat de betreffende verpakking geschikt is voor gebruik in de magnetron. Zie het
hoofdstuk over soorten ovengerei!
6. Als de grill wordt gebruikt, is het mogelijk dat vetspatten op de verwarmingselementen
komen en verbranden. Dit is een normale situatie en betekent niet dat er een bedieningsfout heeft plaatsgevonden.
7. Maak als u klaar bent met koken de binnenkant en de accessoires schoon zodat koo-
kresten niet aankoeken.
Verwarm de grill van te voren 2 minuten op. Gebruik, tenzij anders aangegeven, het rechthoekige rooster.
Plaats het rooster op een schaal zodat het water en het vet eraf kunnen vallen. De tijden
die worden getoond zijn slechts een indicatie en kunnen variëren als functie van de samenstelling en hoeveelheid van het voedsel, evenals van de gewenste eindtoestand. Vis en
vlees smaken geweldig als ze voor het grillen worden ingewreven met plantaardige olie,
kruiden en specerijen en u ze een paar uur laat marineren. Voeg zout pas na het grillen toe.
Worstjes zullen niet openbarsten als u ze voor het grillen inprikt met een vork.
Controleer als de helft van de grilltijd is verstreken hoe het bereidingsproces verloopt, en
draai het voedsel indien nodig om of bestrijk het met wat olie.
De grill is met name geschikt voor het bereiden van dunne porties vlees en vis. Dunne porties
vlees hoeven misschien maar een keer te worden gedraaid, maar dikkere porties moeten
meerdere malen worden gedraaid. In het geval van vis moet u de twee uiteinden samenvoegen door de staart in de bek te stoppen en vervolgens legt u de vis op het rechthoekige
rooster.
47
Magnetron + grill
WAARSCHUWING!
Gebruik om vonken te vermijden het rechthoekige rooster niet als u met de magnetron en
grill kookt.
De magnetron + grillfunctie is ideaal om snel te koken en tegelijk voedsel te bruineren.
Bovendien kunt u ook met kaas bedekt voedsel grillen en bereiden.
De magnetron en de grill werken tegelijkertijd. De magnetron kookt en de grill roostert.
Controleer voordat u een schaal in de magnetron gebruikt dat deze geschikt is voor gebruik
in de magnetron. Gebruik alleen schalen of containers die geschikt zijn voor gebruik in de
magnetron.

Hulp bij storingen
48
Voor de magnetron + grillfunctie moet het ovengerei geschikt zijn voor gebruik in zowel
de magnetron als de grill. Zie het hoofdstuk over soorten ovengerei!
Denk eraan dat de getallen slechts een indicatie zijn en kunnen variëren afhankelijk van de
initiële toestand, temperatuur, vochtgehalte en soort voedsel.
Als de tijd niet voldoende is om het voedsel goed te bruineren, zet het dan nog 5 tot 10
minuten onder de grill.
Neem de rusttijden in acht en vergeet niet om de stukken vlees te keren.
Gebruik, tenzij anders wordt aangegeven, het draaiplateau om te koken.
De waarden in de tabellen gelden als de ovenruimte koud is (het is niet nodig om de oven
voor te verwarmen).
Hulp bij storingen
WAARSCHUWING!
Alle reparaties mogen alleen worden uitgevoerd door een gespecialiseerd technicus. Elke
reparatie die is uitgevoerd door iemand die niet door de fabrikant is erkend, is gevaarlijk.
U hoeft geen contact op te nemen met de Technische Dienst om de volgende problemen
op te lossen:
Probleem Mogelijke oplossing (Controleer dat.........)
Het display toont niets! De tijdindicatie is uitgeschakeld
Er gebeurt niets als ik op de toetsen druk! Het kinderslot is actief (annuleer het kinderslot).
De oven werkt niet! De stekker zit niet goed in het stopcontact.
De oven staat niet aan.
De deur is volledig gesloten. De deur moet slui-
Er bevindt zich iets tussen de deur en de voor-
Als de oven werkt, hoor ik vreemde geluiden! Er ontstaan elektrische vonken binnenin de oven
Het ovengerei raakt de wanden van de oven.
Er bevindt zich los bestek of kookgerei in de oven.
Het voedsel wordt niet warm of wordt maar
langzaam warm!
U heeft de juiste werktijden en vermogen gese-
Het voedsel dat u in de oven heeft gestopt is een
Het voedsel is te heet, uitgedroogd of verbrand! Heeft u de juiste werktijd en vermogen geselec-
ten met een hoorbare klik.
zijde van de ovenruimte.
die worden veroorzaakt door metalen voorwerpen.
U heeft onbedoeld ovengerei van metaal gebruikt.
lecteerd.
grotere hoeveelheid of is kouder dan u er gewoonlijk instopt.
teerd.

Onderhoud en reiniging
Probleem Mogelijke oplossing (Controleer dat.........)
Ik hoor wat geluiden nadat het bereidingsproces
klaar is!
De oven gaat aan maar het lampje binnenin niet! Als alle functies naar behoren werken, is het
Dat is geen probleem. De koelventilator blijft nog
enige tijd werken. Als de temperatuur voldoende
is gedaald, schakelt de ventilator zichzelf uit.
lampje waarschijnlijk gesprongen. U kunt de
oven blijven gebruiken.
Vervanging van het ovenlampje
Het lampje vervangen
1. Ontkoppel de oven van de stroomtoevoer. Haal de stekker uit het stopcontact of schakel
de stroomkring van de oven uit.
2. Schroef het glazen lampkapje los en verwijder deze (1).
3. Verwijder het halogeenlampje (2).
WAARSCHUWING!
Het lampje kan erg heet zijn.
4. Plaats een nieuw 12 V/10 W halogeenlampje.
WAARSCHUWING!
Raak het oppervlak van het lampje niet direct met uw vingers aan want hierdoor kan het
lampje beschadigen. Volg de instructies van de fabrikant van het lampje op.
5. Schroef het glazen kapje van het lampje weer op zijn plaats (1).
6. Sluit de oven weer aan op de stroomvoorziening.
49
2
1
Onderhoud en reiniging
Reiniging is het enige onderhoud dat normaal gesproken nodig is.
WAARSCHUWING!
Uw magnetron moet regelmatig worden schoongemaakt om alle voedselresten te verwijderen. Als de magnetron niet schoon wordt gehouden, kunnen de oppervlakken ervan verslechteren, waarmee de levensduur van de oven wordt verminderd en er waarschijnlijk een
gevaarlijke situatie kan ontstaan.
WAARSCHUWING!
Schoonmaken moet worden uitgevoerd als de oven is uitgeschakeld. Haal de stekker uit
het stopcontact of schakel de stroomkring van de oven uit.

Onderhoud en reiniging
50
Gebruik geen agressieve of schurende schoonmaakproducten, schuurmiddelen die krassen
maken op oppervlakken of scherpe voorwerpen, aangezien vlekken kunnen ontstaan.
Gebruik geen schoonmaakapparaten met hoge druk of een harde waterstraal.
Oppervlak voorzijde
Normaal gesproken hoeft u de oven alleen schoon te maken met een vochtige doek. Als hij
erg vies is, kunt u een paar druppels afwasmiddel aan het schoonmaakwater toevoegen.
Maak daarna de oven droog met een droge doek.
Gebruik een schoonmaakproduct voor glas en een zacht doekje dat geen vezels of draden
afgeeft. Veeg van de ene naar de andere kant zonder druk op het oppervlak uit te oefenen.
Verwijder kalk, vet, zetmeel of eiwitvlekken onmiddellijk. Onder deze plekken kan corrosie
optreden.
Laat geen water in de binnenkant van de oven komen.
Binnenkant oven
Maak elke keer dat de oven is gebruikt de binnenwanden schoon met een vochtige doek
aangezien dit de gemakkelijkste manier is om spetters of vlekken van voedsel te verwijderen
die mogelijk aan de binnenkant vastzitten.
Gebruik om vuil dat lastiger te verwijderen is een niet-agressief schoonmaakproduct. Gebruik geen ovensprays of andere agressieve of schurende schoonmaakmiddelen.
Houd de deur en de voorkant van de oven altijd erg schoon om te garanderen dat de deur
naar behoren opent en sluit.
Zorg ervoor dat er geen water in de ventilatiegaatjes van de magnetron komt.
Haal regelmatig het draaiplateau en bijbehorende steun eruit en reinig de onderkant van
de ovenruimte, vooral nadat vloeistof is geknoeid.
Schakel de oven niet in zonder dat het draaiplateau en de bijbehorende steun op hun plaats
zitten.
Als de ovenruimte erg vies is, zet dan een glas water op het draaiplateau en schakel de
magnetron 2 tot 3 minuten in op maximaal vermogen. De vrijgekomen stoom maakt het
vuil zachter dat vervolgens gemakkelijk kan worden verwijderd met een zachte doek.
Onaangename geurtjes (bijv. na het bereiden van vis) kunnen gemakkelijk worden geëlimineerd. Doe een paar druppels citroensap in een kopje water. Doe een lepel koffie in het
kopje om te voorkomen dat het water overkookt. Verwarm het water 2 tot 3 minuten op
het maximale vermogen van de magnetron.
Plafond oven
Als het plafond van de oven vies is, kan de grill worden verlaagd om het schoonmaken te
vergemakkelijken.
WAARSCHUWING!
Wacht om gevaar van verbranding te voorkomen tot de grill is afgekoeld voordat u hem
verlaagt.
Ga als volgt te werk:
1. Draai de grillsteun 90º (1).
2. Laat de grill voorzichtig zakken (2). Gebruik geen overmatige kracht aangezien dit
schade kan veroorzaken.

Milieu-informatie
3. Plaats de grill (2) na het schoonmaken van het plafond weer terug door de vorige
handeling uit te voeren.
De mica kap (3) die zich in het plafond bevindt, moet altijd schoon worden gehouden. Alle
voedselresten die zich op de mica kap ophopen kunnen schade of vonken veroorzaken.
Gebruik geen schuurmiddelen of scherpe voorwerpen.
WAARSCHUWING!
Verwijder om risico te vermijden de mica kap niet.
De glazen kap van de lamp (4) bevindt zich in het plafond van de oven en kan gemakkelijk
worden verwijderd om hem schoon te maken. Hiervoor hoeft u hem alleen los te schroeven
en schoon te maken met water en afwasmiddel.
3
1
4
2
Accessoires
Maak de accessoires na ieder gebruik schoon. Als ze erg vies zijn, laat ze dan eerst weken
en gebruik vervolgens een borstel en een spons. De accessoires kunnen in de vaatwasser
worden gewassen.
Zorg ervoor dat de plaat van het draaiplateau en de bijbehorende steun altijd schoon zijn.
Schakel de oven niet in zonder dat het draaiplateau en de bijbehorende steun op hun plaats
zitten.
51
Milieu-informatie
Het symbool op het product of op de verpakking wijst erop dat dit product niet als
huishoudafval mag worden behandeld, maar moet worden afgegeven bij een verzamelpunt
waar elektrische en elektronische apparatuur wordt gerecycled. Als u ervoor zorgt dat dit
product op de juiste manier wordt verwijderd, voorkomt u mogelijke negatieve gevolgen
voor mens en milieu die zich zouden kunnen voordoen in geval van verkeerde
afvalverwerking. Voor gedetailleerdere informatie over het recyclen van dit product, kunt
u contact opnemen met de gemeente, de gemeentereiniging of de winkel waar u het
product hebt gekocht.

Installatie
52
Installatie
Voor het installeren
• Controleer dat de ingangsspanning die op het typeplaatje wordt aangegeven hetzelfde
is als de spanning van de stroomtoevoer die u gaat gebruiken.
• Open de ovendeur en neem alle accessoires eruit en verwijder het verpakkingsmateriaal.
• Verwijder de mica kap op het plafond aan de binnenkant niet! Deze kap houdt vet en
stukjes voedsel tegen die de microgolvengenerator kunnen beschadigen.
WAARSCHUWING!
Waarschuwing! De voorzijde van de oven kan in beschermend folie zijn verpakt. Voordat u
de oven voor de eerste keer gebruikt, moet u dit folie voorzichtig verwijderen, beginnend
aan de binnenkant.
• Zorg ervoor dat de oven op geen enkele wijze beschadigd raakt. Controleer dat de oven-
deur goed sluit en dat de binnenkant van de deur en de voorkant van de opening van
de oven niet zijn beschadigd. Als u een beschadiging ziet, neem dan contact op met de
Technische Dienst.
• GEBRUIK DE OVEN NIET als de spanningskabel of stekker zijn beschadigd, als de oven
niet naar behoren functioneert of als hij is beschadigd of is gevallen. Neem contact op
met de Technische Dienst.
• Zet de oven op een vlak en stabiel oppervlak. De oven mag niet nabij warmtebronnen,
radio's of televisies worden geplaatst.
• Zorg er tijdens het installeren voor dat de spanningskabel niet in contact komt met vocht
of voorwerpen met scherpe randen achter de oven. Hoge temperaturen kunnen de kabel
beschadigen.
WAARSCHUWING!
nadat de oven is geïnstalleerd moet u ervoor zorgen dat u bij de stekker kunt.
Na het installeren
• De oven is uitgerust met een spanningskabel en een stekker voor gelijkstroom.
• Als de oven permanent moet worden geïnstalleerd, moet hij door een erkend monteur
worden geïnstalleerd. In zo'n geval moet de oven op een schakeling worden aangesloten
met een omnipolaire schakelaar met een minimale afstand van 3 mm tussen de contacten.
WAARSCHUWING!
DE OVEN MOET WORDEN GEAARD.
• De fabrikant en detailhandelaars aanvaarden geen verantwoordelijkheid voor enige
schade die wordt toegebracht aan mensen, dieren of eigendommen als deze installatieinstructies niet in acht worden genomen.
• De oven functioneert alleen als de deur op de juiste wijze gesloten is.
• Maak na het eerste gebruik de binnenkant van de oven en de accessoires schoon volgens
de schoonmaakinstructies die zijn gegeven in het hoofdstuk 'Onderhoud en reiniging.
Plaats de steun van het draaiplateau (1) in het midden van de ovenruimte en plaats de
draaibare ring (2) en de plaat van het draaiplateau (3) daarbovenop en zorg ervoor dat ze
goed in de gleuf vallen. Altijd als u de magnetron gebruikt, moeten de plaat van het draai-

Installatie
plateau en de bijbehorende accessoires op de juiste manier in de oven zijn geplaatst. Het
draaiplateau kan in beide richtingen draaien.
3
2
1
Installatieschema's
53
min 580
min.
460
558
-568
520
450/520
446
542
22
min. 40
min. 5
455
595
22

Technische gegevens
54
448-452
100
560-568
min. 550
542
455
446
595
min. 550
450/520
22
600
1. Duw de oven volledig in de kast en centreer hem.
2. Open de deur van de magnetron en maak het apparaat aan de kast vast met de vier
bijgeleverde schroeven. Plaats de schroeven in de gaten aan de voorkant.
Technische gegevens
Technische gegevens Waarde
Wisselspanning (zie typeplaatje)
Vermogen 3300 W
Vermogen grill 1500 W
Uitvoervermogen magnetron 1000 W
Frequentie microgolven 2450 MHz
Uitwendige afmetingen (BxHxD) 595 x 455 x 542 mm
Inwendige afmetingen (BxHxD) 420 x 210 x 390 mm
Ovencapaciteit. 32 liter
Gewicht 35 kg
NL
Garantie/serviceafdeling
NEDERLAND
Onze producten worden met de grootst mogelijke zorgvuldigheid geproduceerd. Desondanks kan het voorkomen dat er een defect optreedt. Onze servicedienst zal dit op verzoek
herstellen, zowel binnen als buiten de garantietermijn. De levensduur van het product wordt
daardoor niet negatief beïnvloed. Onderstaande garantievoorwaarden zijn gestoeld op de
EU Richtlijn 99/44/EG en het Burgerlijk Wetboek. De daaruit voortvloeiende rechten blijven

Garantie/serviceafdeling
55
onverlet. Ook de garantieverplichtingen van de verkoper naar de eindgebruiker blijven onaangetast.
Voor dit product verlenen wij garantie volgens onderstaande voorwaarden:
1. Wij verhelpen kosteloos met inachtneming van de voorwaarden 2 tot en met 15 gebreken aan het product die zich openbaren binnen 24 maanden vanaf de datum van
levering aan de eindgebruiker. In geval van professioneel of daarmee gelijk te stellen
gebruik is de garantie beperkt tot 12 maanden. Voor tweedehands producten geldt
eveneens een termijn van 12 maanden.
2. De garantieprestatie houdt in dat het product kosteloos wordt teruggebracht in de
toestand die het had voor het defect optrad. Gebrekkige onderdelen worden hersteld
of vervangen. Kosteloos vervangen onderdelen worden ons eigendom.
3. Het gebrek moet terstond gemeld worden om mogelijke verdere schade te voorkomen.
De garantieaanspraak vervalt indien het gebrek niet binnen twee maanden na vaststelling is gemeld.
4. Voor een beroep op garantie dient het aankoopbewijs met aankoop- en/of leveringsdatum te worden overlegd. Bij ontbreken daarvan dient ander overtuigend bewijs te
worden overlegd.
5. De garantie heeft geen betrekking op schade aan kwetsbare onderdelen, zoals (vitrokeramisch) glas, kunststof, rubber, die ontstaan is door onzorgvuldig gebruik.
6. De garantie heeft geen betrekking op kleine afwijkingen van de gestelde kwaliteit die
voor de waarde en deugdelijkheid van het product onbeduidend zijn.
7. De garantie geldt evenmin voor schade veroorzaakt door:
– chemische en elektrochemische inwerking van water,
– abnormale milieuomstandigheden in het algemeen,
– voor het product oneigenlijke bedrijfsomstandigheden,
– contact met agressieve stoffen.
8. De garantie heeft geen betrekking op gebreken door transportschade die buiten onze
verantwoordelijkheid is ontstaan, niet-vakkundige installatie of montage, verkeerd
gebruik, gebrekkig onderhoud, of het niet in acht nemen van de gebruiks- of montageaanwijzingen.
9. Het recht op garantie vervalt wanneer het defect werd veroorzaakt door herstelling
of ingrepen door derden die niet bevoegd of niet deskundig zijn, of wanneer het product voorzien werd van toebehoren of onderdelen die niet origineel zijn en daardoor
een defect veroorzaken.
10. Producten die gemakkelijk kunnen worden vervoerd dienen te worden overhandigd
aan of gezonden naar onze servicedienst. Herstelling ter plaatse kan slechts worden
gevraagd voor grote of ingebouwde producten.
11. Indien het product zodanig is ingebouwd, ondergebouwd, opgehangen of geplaatst
dat de benodigde tijd voor het in- en uitbouwen samen meer dan 30 minuten bedraagt,
worden de hierdoor ontstane extra kosten aan de gebruiker in rekening gebracht.
Schade die ontstaat door abnormale in- of uitbouw komt ten laste van de gebruiker.
12. Indien binnen de garantieperiode de herstelling van hetzelfde defect herhaaldelijk
mislukt of de herstellingkosten disproportioneel zijn wordt in overleg met de gebruiker
een gelijkwaardige vervanging geleverd. In geval van vervanging behouden we ons het
recht voor om een vergoeding te rekenen naar rato van de verstreken gebruiksperiode.
13. Herstelling onder garantie heeft geen verlenging van de garantietermijn noch aanvang
van een nieuwe garantietermijn tot gevolg.

Garantie/serviceafdeling
56
14. Op herstellingen geven wij een garantie van 12 maanden, uitsluitend op hetzelfde
gebrek.
15. Verdere of andere aanspraken, in het bijzonder vergoeding van schade ontstaan buiten
het product, zijn uitgesloten voor zover een aansprakelijkheid niet wettelijk is vastgelegd.
16. In geval van aansprakelijkheid zal een vergoeding de aankoopwaarde van het product
niet overtreffen, tenzij wettelijk anders is bepaald.
Deze garantievoorwaarden gelden voor in Nederland gekochte en/of in gebruik zijnde producten. Indien een product naar het buitenland wordt gebracht dient de gebruiker na te
gaan of het product voldoet aan de technische voorwaarden ( o.a. spanning, frequentie,
installatievoorschriften, gassoort, klimaatomstandigheden) in het betreffende land. Voor in
het buitenland aangeschafte producten dient de gebruiker zich te vergewissen van de bepalingen in Nederland. Noodzakelijke of gewenste aanpassingen vallen niet onder de garantie, en kunnen niet altijd worden aangebracht.
Ook na afloop van de garantietermijn staat onze servicedienst u ter beschikking.
Adres Servicedienst: Electrolux Service, Vennootsweg 1, 2404 CG ALPHEN AAN DEN RIJN
Reparatievoorwaarden
Onze reparatievoorwaarden zijn conform de afspraak tussen de Consumentenbond en Vlehan*.
Art. 1 Aan de consument zal na een melding van een storing zo mogelijk direct, doch uiterlijk
binnen één werkdag worden medegedeeld op welke dag het bezoek van de technicus zal
plaatsvinden. De reparatie zal als regel binnen zeven werkdagen na de melding zijn uitgevoerd.
Art. 2
a) Alvorens de reparatie wordt verricht zal de technicus een onderzoek uitvoeren naar de
vermoedelijke oorzaak van de gemelde storing. Aan de hand hiervan zal hij een zo
nauwkeurig mogelijke, gespecificeerde begroting maken van de totale reparatiekosten
inclusief voorrijkosten en diagnose-kosten. Desgevraagd zal deze begroting door de
technicus schriftelijk worden vastgelegd.
b) Indien de consument met het begrote bedrag niet akkoord gaat, zal op verzoek het te
repareren toestel worden teruggebracht in de staat waarin het aan de technicus werd
aangeboden. Nadat dit is geschied, zullen alleen de kosten van voorrijden en arbeidsloon
in rekening worden gebracht op basis van de werkelijke bestede tijd, danwel van een
vooraf vastgesteld tarief.
Art. 3 Indien tijdens het uitvoeren van de reparatie duidelijk wordt dat:
a) de oorspronkelijke reparatie door redelijkerwijs niet te voorziene omstandigheden niet
tegen het begrote bedrag kan worden uitgevoerd, of
b) ook andere dan in de begroting voorziene reparaties noodzakelijk zijn, zal overleg met
de consument plaatsvinden en een herziene kostenbegroting worden gemaakt. In geval
de consument daarmee alsnog niet akkoord gaat, geldt eveneens het in artikel 2b be-
paalde.
Art. 4 De reparatie zal zoveel mogelijk tijdens het eerste bezoek worden uitgevoerd. Indien
om het toestel in werkende staat te brengen een tweede bezoek noodzakelijk is, zal:
a) direct, doch uiterlijk binnen één werkdag door de betreffende service-organisatie of
door de technicus met de consument de datum voor een tweede bezoek worden af-
gesproken.
b) een herhalingsbezoek zal als regel binnen tien werkdagen na de melding plaatsvinden.

Garantie/serviceafdeling
57
c) voor een tweede of daaropvolgend bezoek zal geen voorrijtarief in rekening worden
gebracht, tenzij de noodzaak voor een herhalingsbezoek aan de consument is toe te
schrijven.
Art. 5 De consument ontvangt een gespecificeerde rekening met vermelding van type en
serienummer van het apparaat, omschrijving van de diagnose, toegepaste tarieven, gebruikte onderdelen en materialen en een korte omschrijving van de verrichte werkzaamheden. De betaling van de rekening dient tegen afgifte van een reparatienota direct contant
of door middel van een gegarandeerd betaalmiddel plaats te vinden.
Art. 6 Op elke uitgevoerde en betaalde reparatie zal bij normaal huishoudelijk gebruik een
volledige garantie van minimaal 3 maanden worden gegeven. Deze garantie omvat het
kosteloos uitvoeren van een hernieuwde reparatie. Op de uitgewisselde en betaalde onderdelen geldt een garantietermijn van 12 maanden. Bij een beroep op garantie op de
reparatie dient de consument op verzoek de gespecificeerde rekening van de voorgaande
reparatie aan de technicus te overleggen.
Art. 7 Indien na driemaal uitvoeren van eenzelfde reparatie hetzelfde defect bij normaal
huishoudelijk gebruik opnieuw optreedt binnen de onder art. 6 bedoelde garantietermijn
en redelijkerwijs een afdoend resultaat bij het opnieuw uitvoeren van de reparatie niet
verwacht kan worden, zal aan de consument een nieuw exemplaar of soortgelijk toestel
van hetzelfde merk worden aangeboden tegen bijbetaling op basis van een per product te
bepalen jaarlijks afschrijvingspercentage.
Art. 8 Vervangen onderdelen stelt de technicus weer ter beschikking van de consument,
met uitzondering van de onder garantie of tegen een gereduceerde prijs vervangen onderdelen.
Art. 9 Een reparatie dient op zodanige wijze te worden uitgevoerd, dat een toestel daarna
weer volledig voldoet aan de veiligheidsvoorschriften, die op grond van een van fabriekswege aangebracht veiligheidskeurmerk gelden, danwel bij het ontbreken daarvan, aan de
wettelijke vereisten terzake. Dit houdt ondermeer in, dat reparaties moeten worden uitgevoerd met originele en door de fabrikant ook terzake van veiligheidskeurmerken en -voorschriften gegarandeerde onderdelen.
*) Vereniging Leveranciers van Huishoudelijke Apparaten in Nederland
Adres service-afdeling, Nederland
AEG fabrieksservice Postbus 120 2400 AC Alphen aan den Rijn
Service-informatielijn (voor bezoek servicetechnicus en onder-
tel. 0172-468 300
delen)
Consumentenbelangen (voor algemene, product- of gebruiksin-
tel. 0172-468 172
formatie)
Vanzelfsprekend kunt u ook tijdens de lange levensduur van uw product op ons rekenen.
Daarom nodigen wij u van harte uit uw product kosteloos te registreren op onze internetsite
www.mijnapparaten.nl. Wij kunnen u dan nog beter van dienst zijn met informatie over
producten,gebruiksaanwijzingen, tips, innovaties, oplossingen voor onverhoopte storingen
etc.

Europese Garantie
58
Europese Garantie
Dit apparaat wordt door Electrolux in elk van de achter in deze handleiding genoemde
landen gedurende de in het bij het apparaat behorende garantiebewijs genoemde periode
of anderszins bij de wet gegarandeerd. Als u van een van deze landen verhuist naar een
ander van de hieronder genoemde landen, verhuist de garantie op het apparaat met u mee.
De volgende beperkingen zijn hierop van toepassing:
• De garantie op het apparaat begint op de datum van eerste aankoop van het apparaat.
Deze datum dient te worden aangetoond door overlegging van een geldig, door de
verkoper van het apparaat afgegeven aankoopbewijs.
• De garantie op het apparaat geldt voor dezelfde periode en in dezelfde mate voor ar-
beidsloon en onderdelen als van toepassing in uw nieuwe land van vestiging op dit
specifieke model of deze specifieke serie apparaten.
• De garantie op het apparaat is persoonlijk, geldt dus voor de oorspronkelijke koper van
het apparaat en kan niet worden overgedragen op een andere gebruiker.
• Het apparaat wordt geïnstalleerd en gebruikt in overeenstemming met de door Electrolux
afgegeven instructies en wordt alleen in huis gebruikt, dat wil zeggen, het apparaat wordt
niet gebruikt voor commerciële doeleinden.
• Het apparaat wordt geïnstalleerd in overeenstemming met alle relevante voorschriften
die in uw nieuwe land van vestiging van kracht zijn.
De voorwaarden van deze Europese garantie tasten geen van de aan u bij de wet verleende
rechten aan.
www.electrolux.com
Albania +35 5 4 261 450 Rr. Pjeter Bogdani Nr. 7 Tirane
Belgique/België/Belgien +32 2 363 04 44 Bergensesteenweg 719, 1502
Česká republika +420 2 61 12 61 12 Budějovická 3, Praha 4,
Danmark +45 70 11 74 00 Sjællandsgade 2, 7000 Frederi-
Deutschland +49 180 32 26 622 Fürther Str. 246, 90429 Nürn-
Eesti +37 2 66 50 030 Pärnu mnt. 153, 11624
España +34 902 11 63 88 Carretera M-300, Km. 29,900
France 08 44 62 26 53 www.electrolux.fr
Great Britain +44 8705 929 929 Addington Way, Luton, Be-
Lembeek
140 21
cia
berg
Tallinn
Alcalá de Henares Madrid
dfordshire LU4 9QQ

www.electrolux.com
59
Hellas +30 23 10 56 19 70 4, Limnou Str., 54627 Thessa-
Hrvatska +385 1 63 23 338 Slavonska avenija 3,
Ireland +353 1 40 90 753 Long Mile Road Dublin 12
Italia +39 (0) 434 558500 C.so Lino Zanussi, 26 - 33080
Latvija +371 67313626 Kr. Barona iela 130/2,
Lietuva +370 5 278 06 03 Ozo 10a, LT-08200 Vilnius
Luxembourg +352 42 431 301 Rue de Bitbourg, 7, L-1273
Magyarország +36 1 252 1773 H-1142 Budapest XIV,
Nederland +31 17 24 68 300 Vennootsweg 1, 2404 CG - Al-
Norge +47 81 5 30 222 Risløkkvn. 2 , 0508 Oslo
Österreich +43 18 66 400 Herziggasse 9, 1230 Wien
Polska +48 22 43 47 300 ul. Kolejowa 5/7, Warsza‐
Portugal +35 12 14 40 39 39 Quinta da Fonte - Edificio Gon-
Romania +40 21 451 20 30 Str. Garii Progresului 2,
Schweiz - Suisse - Svizzera +41 62 88 99 111 Industriestrasse 10, CH-5506
Slovenija +38 61 24 25 731 Gerbičeva ulica 98, 1000
Slovensko +421 2 43 33 43 22 Electrolux Slovakia s.r.o.,
Suomi www.electrolux.fi
Sverige +46 (0)771 76 76 76 Electrolux Service, S:t Görans-
Türkiye +90 21 22 93 10 25 Tarlabaşı caddesi no : 35
loniki
10000 Zagreb
Porcia (PN)
LV-1012, Riga
Hamm
Erzsébet királyné útja 87
phen aan den Rijn
wa
çalves Zarco - Q 35 -2774-518
Paço de Arcos
S4, 040671 RO
Mägenwil
Ljubljana
Electrolux Domáce spotre‐
biče SK, Seberíniho 1, 821
03 Bratislava
gatan 143, S-105 45 Stockholm
Taksim İstanbul

606162
Россия +7 495 937 7837 129090 Москва,
Україна +380 44 586 20 60 04074 Київ,
Олимпийский проспект,
16, БЦ "Олимпик"
вул.Автозаводська, 2а,
БЦ "Алкон"


63

www.electrolux.com
www.aeg-electrolux.nl
822192700-A-022009
 Loading...