

Page 1

KF 1050 AROMA TIME
KF 1064 AROMA TIME
KF1066 BLACK UNE
Kaffeeautomaten
Automatic coffee-makers
Cafetières
Macchine automatiche di cottura del caffè
Cafeteras automáticas
Gebrauchsanweisung
Operating instructions
Mode d’emploi
Istruzioni per l’uso
Instrucciones para el uso
Page 2
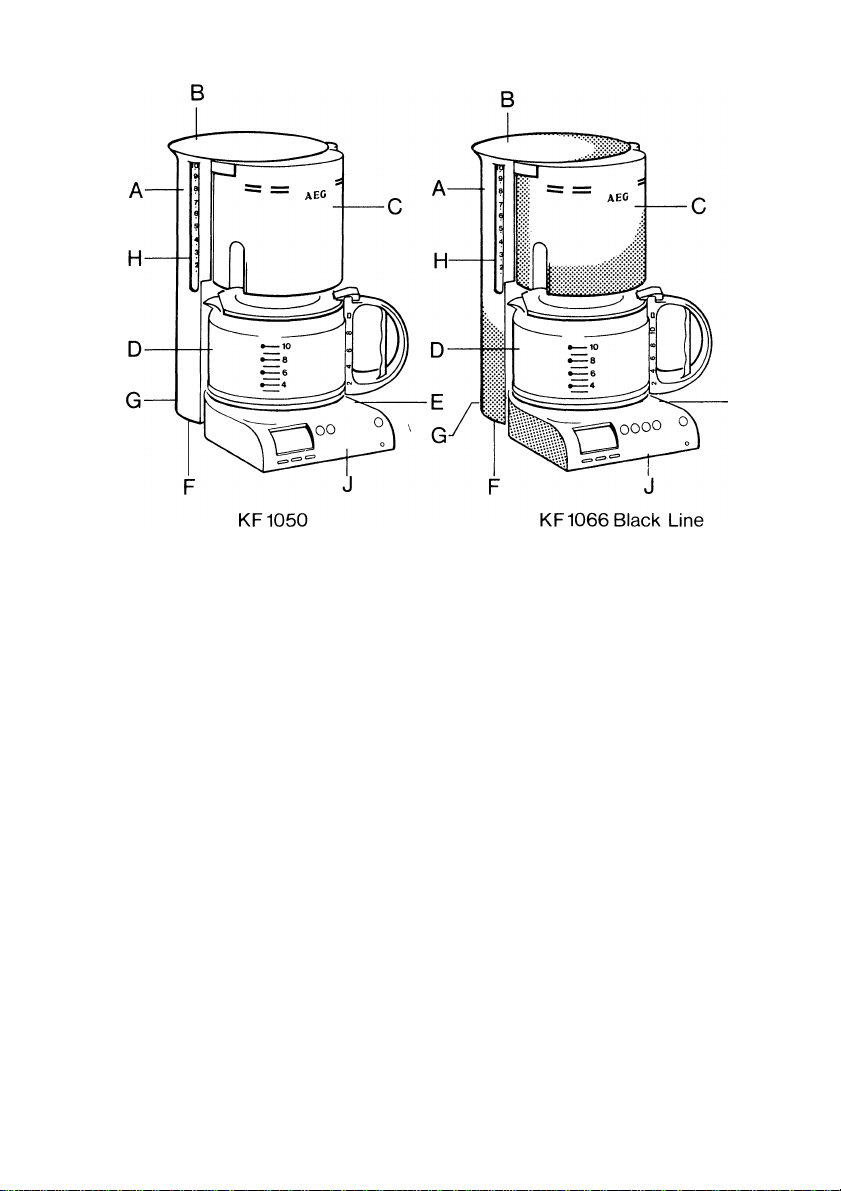
Ausstattung (Bild 1)
A = Frischwasserbehälter
B = Deckel für Frisch Wasserbehälter
C = Schwenkfilter mit Antitropfventil
D = Kaffeekrug mit Tassenmarkierung
E = Warmhalteplatte, beschichtet
F = Typschild (Geräteunterseite)
G = Kabelfach (Geräterückseite)
Fl = Wasserstandsanzeige
J = Sockel mit Bedienelementen
(siehe auch Abb. 2)
KF1064
Page 3
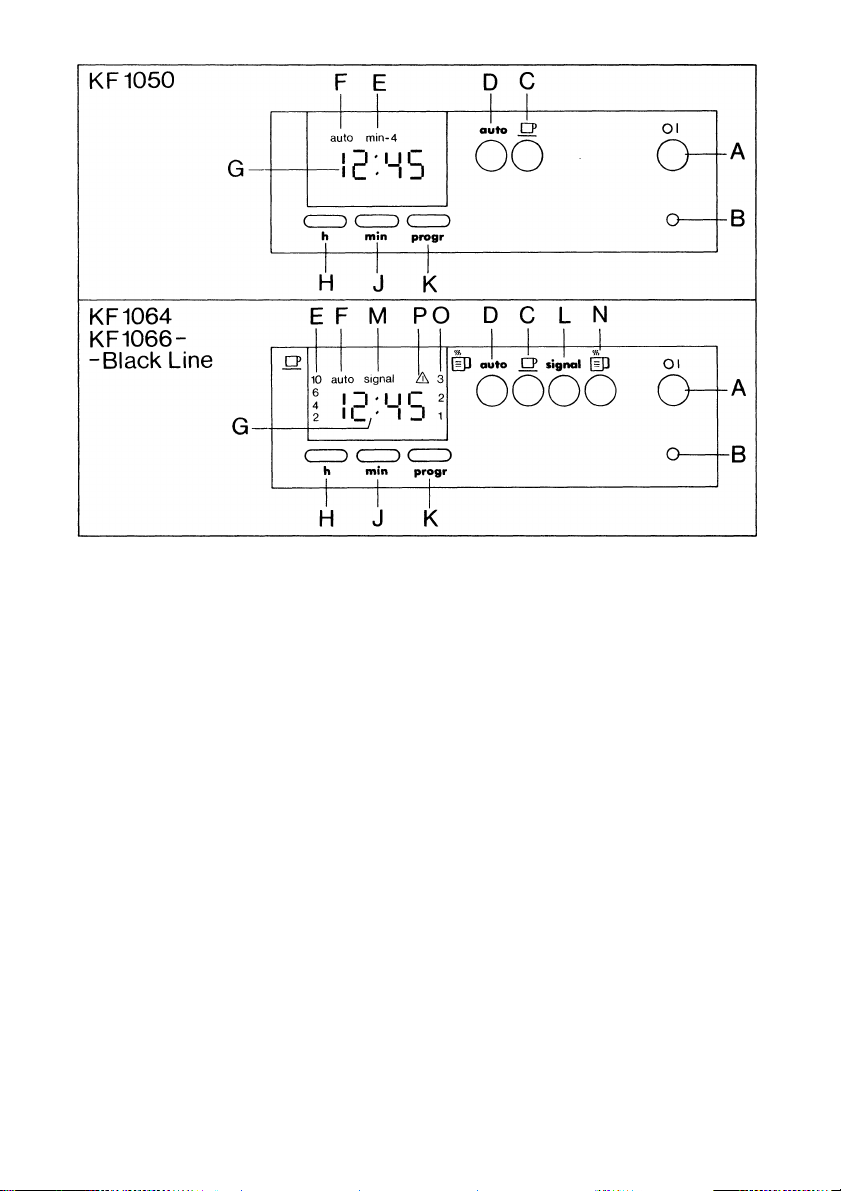
Bedienelemente (Bild 2)
A = Ein-/Ausschalter
B = Betriebsanzeige
C = Aromaschalter
- 2stufig bei KF1050
- 4stufig bei KF 1064/KF1066 Black Line
D = Ein-/Ausschalter für Timer
E = Anzeige für Tassenwahl
F = Anzeige für Timer AN
G = Anzeige für Uhrzeit
H = Uhrstelltaste für Stunden
J = Uhrstelltaste für Minuten
K = Programmiertaste für Timer
L = Ein-/Ausschalter für Kaffee-Fertig-Signal
M = Anzeige für Kaffee-Fertig-Signal AN
N = Taste zur Vorwahl der Warmhaltestufe
O = Anzeige für Warmhaltestufe
P = Entkalkungsanzeige
Page 4
Page 5

11
Page 6

Features (Fig. 1)
A = Fresh-water tank
B = Lid of fresh-water tank
C = Swivelling filter with anti-drip valve
D = Coffee jug with markings for number of cups
E = Coated warming plate
F = Rating plate (underneath)
G = Cable-store (underneath)
FI = Water level indicator
J = Base with controls (see also Fig. 2)
Controls (Fig. 2)
A = On/Off switch
B = Pilot light
C = Aroma switch
- 2-level on the KF1050
- 4-level on the KF 1064/KF1066 Black Line
D = On/Off switch for timer
E = Indicator of number of cups
F = Indicator showing timer ON
G = Indicator for time of day
FI = Timer setting button for hours
J = Timer setting button for minutes
K = Programming button for timer
L = On/Off switch for coffee’s-ready! signal
M = Indicator showing coffee’s-ready! signal ON
N == Button for pre-selecting warming level
O = Indicator for warming level
P = De-scaling indicator
12
Page 7

Congratulations!
on the purchase of your new AEG coffee machine.
You have now bought a modern, reliable appliance with which you will certainly be
only too glad to make plenty of good, fresh coffee.
As with any technical appliance, there are with this coffee machine one or two basic
principles that have to be observed and kept to. So please read the usage instruc
tions carefully and keep them in a safe place. Please pay particular attention to the
safety instructions.
Safety instructions
Before using the appliance for the first time it is absolutely essential that you read the operating instructions very carefully
1. The voltage available must be the same as that shown on the rating plate!
2. Never allow the electric lead to come into contact with the warming plate.
3. Never pull the plug out of the socket by tugging on the lead.
4. Never operate the appliance if:
- the lead is damaged
- there is visible damage to the housing.
5. Fortechnical reasons the warming plate, the overflow pipe, and the filter become
FIOT during operation. Keep children at a safe distance!
6. Never fill the appliance with water if it is hot. Switch the appliance off and allow it
to cool down for about 5 minutes.
7. Follow the instructions for de-scaling.
8. Before caring for or cleaning the appliance, make sure it is switched off and the
plug is pulled out of the socket.
9. Never immerse the appliance in water.
If any repair should be necessary, including the replacement of the lead, the appli
ance should be sent to the dealer from whom it was bought (as special tools have to
be used) or to an AEG Customer Service Centre (see list on last page).
Repairs to electrical appliances must only ever be carried out by qualified
electricians. Unauthorised tampering can lead to serious danger for the user. No
legal liability can be accepted for any damage arising from the appliance being used
for the wrong purpose or operated improperly. This appliance meets the require
ments of radio and tv interference suppression defined in EC Directive 87/308/EEC,
EN 55014/DIN VDE 0875 Part 1, and the standard covering the retroactive effect on
the mains EN 60555 Parts 1-3/DIN VDE 0838 Parts 1-3.
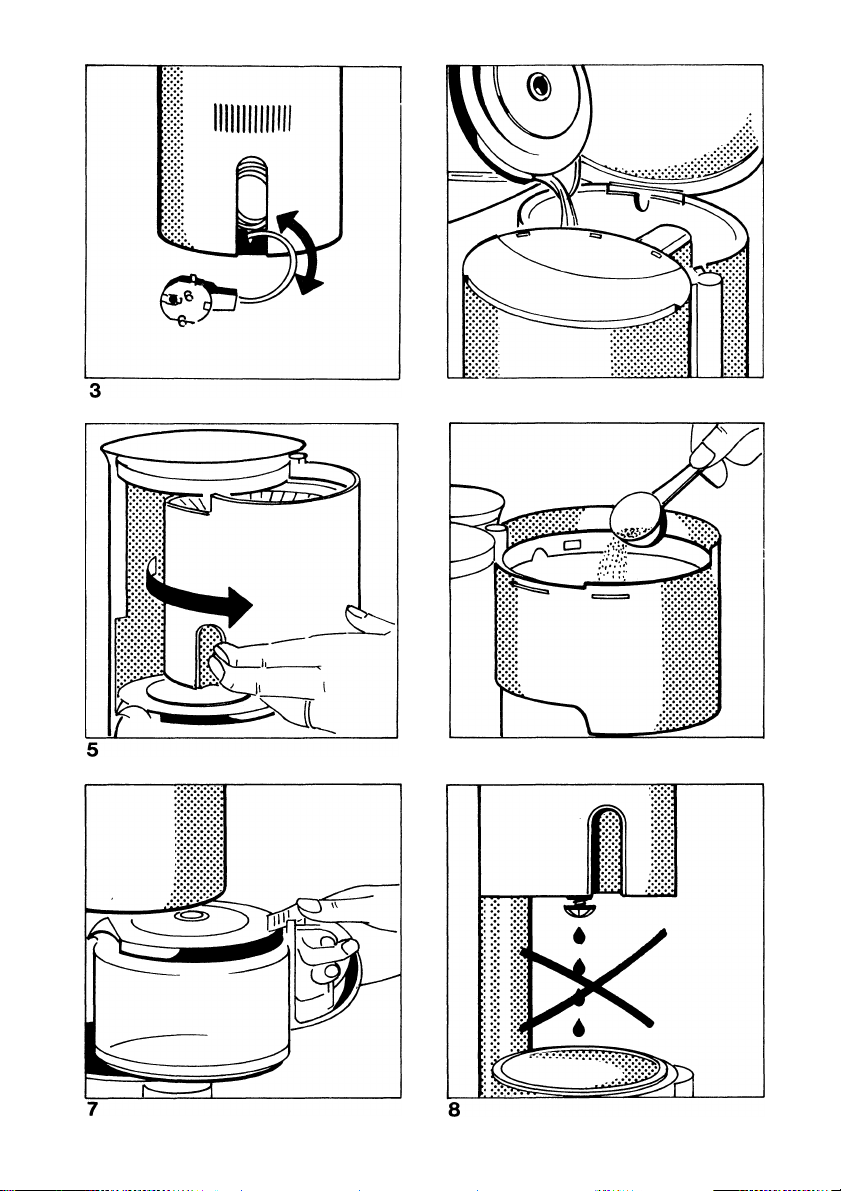
Cable compartment (Rg. 3)
Your coffee machine has a compartment for the lead. If the lead is longer than it
needs to be to reach the socket you can “park” the superfluous length in the com
partment at the back of the appliance.
13
Page 8

Before using the appliance for the first time
Before making coffee forthe first time, run the appliance once ortwice only with water
to ensure it is perfectly clean.
To dothis,fillthefresh-watercontainertothe highest marking with cold water, switch
on, and let it run through into the jug without any coffee or filter-paper in the filter.
Making coffee
1. Filling with water (Fig. 4)
Open the lid of the fresh-water tank (Fig. 1/B) and fill the tank with clear, cold water
from the tap. You can use the coffee jug to fill the required quantity. There are
markings showing the number of cups:
- inside the fresh-water tank
- on the coffee jug, and
- on the appliance’s outside water-level indicator.
The markings apply to the quantity of fresh water. The amount of coffee then
produced is less because the ground coffee absorbs water.
Close the lid of the fresh-water tank.
Never use hot water, and never pour milk, liquid coffee, tea, etc., into the fresh
water tank.
Note concerning the lid of the fresh-water tank
In order to prevent the hinge of the fresh-water tank lid from being broken off, the lid
will come out of its hinge mounting if it is opened too far towards the rear. To fit it back
into place, lay the lid on top of the fresh-water tank and press the lid down in the area
of the hinge until it clicks into place (Fig. 10).
2. Inserting filter paper
To open the filter, reach with yourfinger-tips into the slot and swing thefilter outwards
(Fig.5). Insert a paper filter, size 4, into the filter funnel. Please fold the side and bottom
fins of the filter paper inwards first.
3. Filling the ground coffee (Fig. 6)
Please use medium-grade ground coffee. The quantity of coffee you use is a matter
of your personal taste. One measure (about 6 or 7 grammes) per cup will produce
coffee of medium strength (by German standards). Swing the filter back into its
original position until you hear it click into place.
4. Place the coffee jug with its lid on the warming plate (Fig. 7).
5. Pre-select number of cups
Before switching the appliance on, select the required number of cups by using the
aroma switch “O” (Fig. 2/C).
14
Page 9

The length of time the coffee takes to brew is varied by means of the aroma switch.
Setting a small number of cups results in a longer brewing time, so that the water
remains in contact with the ground coffee for longer and the aromatic ingredients in it
are dissolved better.
- KF1050: Press the aroma switch once (Fig. 2/C), and the indicator will appear for
“min -4“ as the number of cups (Fig. 2/E). This switch setting will guarantee you
the full coffee aroma when you make up to four cups.
Press the aroma switch again (Fig. 2/C) and the indicator for “min -4” will vanish
from the display (Fig. 2/E). This is the correct setting for making two to ten cups.
- KF1064 and KF1066 Black Line: The aroma switch (Fig. 2/C) guarantees you
the full aroma regardless of the number of cups you make.
You can select whether you wish to make up to 2, up to 4, up to 6, or up to 10 cups
of coffee.
When you plug your coffee-maker in to the mains, the aroma level “Up to 10 cups”
will be selected because it is pre-set in the factory. The “10” will light up in the
indicator for the number of cups (Fig. 2/E).
By pressing, however, you can determine the number of cups to be made. Each
time you press the aroma switch (Fig. 2/C), the indicator for the number of cups
(Fig. 2/E) will move one step at a time downwards, starting with “10”.
When the appliance is next switched on again, the figure for the number of cups
will automatically appear which was selected last time.
6. Switching the appliance on
Flaving selected the number of cups, switch the appliance on by means of the
“01” button (Fig. 2/A). The pilot light (Fig. 2/B) will come on. After a few seconds,
hot water starts to flow into the filter.
Selecting the warming temperature (only KF 1064 and KF 1066 Black Line)
In addition to the aroma function,, your automatic coffee-maker provides every possi
bility for you to set it individually to suit your habits.
When you press the aroma switch (Fig. 2/C), the middle level^^ “2”, will appear
(Fig. 2/0) because it is pre-set in the factory. By pressing the “ip” button for the
warming level (Fig 2/N), however, you can pre-select a lower warming temperature
independently of this, at Level 1, or a high temperature at Level 3. The warming level
selected will appear in the display (Fig. 2/0).
When the appliance is next switched on again, the figure for the warming level will
automatically appear which was selected last time.
Initial brewing phase (only KF 1064 and KF 1066 Black Line)
Your coffe-makers has a function called an initial brewing phase to ensure the
maximum coffee aroma.
After the first small quantity of water has dampened the ground coffee in the filter, the
coffee-making cycle is then interrupted for a short time.
During this time, the ground coffee soaks up the water, thus enabling it to develop
its full aroma.
The result is the maximum coffee aroma.
15
Page 10

7. Taking the jug out
When the jug is taken out, the filter valve prevents drips from dropping onto the
warming plate. The warming plate always keeps the coffee hot enough to drink.
Automatic switch-off after end of cycle: As a safety device for your protection,
the appliance automatically switches itself off about two hours after it has finished
brewing, even if you have programmed the timer (see below).
Please remember: to make sure the coffee is of uniform strength, you should stir it
before pouring it out.
When the cycle has finished and you wish to fill more water into the tank for the next
batch of coffee, please switch the appliance off and wait a few minutes for it to cool
down.
Coffee’s-ready! signal (only on KF1064 and KF1066 Black Line)
Pressing the “signal” button (Fig. 2/L) will activate the Coffee’s-ready! signal, and the
lettering “signal” will appear in the display (Fig. 2/M). At the end of the brewing cycle
you will hear an audible signal to tell you; Coffee’s ready!
Once it has been activated, the Coffee’s-ready! signal will sound both in timer
operation (see next section) and in normal operation. Press the “signal” button once
again to turn the Coffee’s-ready! signal off, and the lettering “signal” will disappear
from the display.
Programming the timer
Your AEG coffee-maker possesses a timer with which the time of day can be set and
the coffee-maker programmed to switch itself on up to 24 hours later.
1. Setting the time of day
Setthe correct hours and minutes by means of the buttons “h” (Fig. 2/Fl) and “min”
(Fig. 2/J), which you press once each to advance the time by one hour or one
minute, if you hold these buttons down, the figures will run continue to run auto
matically in the display until you let go of the button again.
The buttons are secured against being accidentally re-set. To adjust the time of
day, you have to hold the buttons down for about two seconds before the time can
be altered.
2. Programming the switch-on time.
First press the “progr” button (Fig. 2/K). By pressing the “h” button (Fig. 2/FI) or
“min” (Fig. 2/J) immediately afterwards you can programmethe switch-on time in
just the same way as you set the time of day. The display reverts automatically
from the programmed time to the time of day.
Once the switch-on time has been programmed it remains pre-set, and can be
checked at any time by pressing the “progr” button (Fig. 2/K).
Note-.The switch-on time must be programmed before you can activate the timer.
3. Activating the timer
After you have programmed the switch-on time, activate the timer function by
pressing the “auto” button (Fig. 2/D). The lettering “auto” will appear in the display
(Fig. 2/F). The switch-on time previously selected will become active again every
24 hours in the timer-operation condition, i.e. so long as the letter “auto” is visible
in the display.
The data stored in the timer will not be lost if the power should fail for a short time.
16
Page 11

If you wish to use the appliance in the normal mode of operation again, press the
“auto” button once again and the “auto” lettering in the display will disappear.
You can also switch the appliance on directly with the “01” button (Fig. 2/A). The
lettering “auto” will then disappear from the display and the operational mode
indicator (Fig. 2/B) will light up.
Cleaning
The swivelling filter can betaken out for cleaning (Fig. 9). Swing itouttothe right as far
as it will go. It can then be lifted oulToclean the filtervalve thoroughly, please actuate
it several times while washing it up. To fit the swivelling filter back into place, hook it
on to the hinge jointfrom above and swing it in to the left. Clean the appliance all over
with a damp cloth - but never immerse it in water!
The coffee jug and its lid are safe in a dish-washing machine.
De-scaling
... SO that your coffee-maker will continue to serve you for many years
The service life of your coffee-maker will be longer if you de-scale it regularly. If you
use a gold filter, this must be taken out of the swivelling filter before de-scaling starts.
An environmentally friendly de-scaling agent should be used, such as is widely
available in the trade. Only ever use it in accordance with the manufacturer’s instruc
tions. You first fill the fresh-water tank with water, and then you add the de-scaling
agent to it. Then, swing the swivelling filter back into the appliance and place the
coffee jug, with its lid, on the warming plate. (Please note that the jug lid has the job of
opening the filter valve, so a cycle can only run properly if it is in place.) Leave the
solution for 15 minutes to work in.
- KF1050: Now switch the appliance on by means of the “Ol” button (Fig. 2/A)
and let the water and de-scaling agent run through.
- KF 1064 and KF 1066 Black Line: These appliances are equipped with a
de-scaling programme, which can be started at any time if the appliance is
switched off.
If de-scaling is necessary, the de-scaling display (Fig. 2/P) will start to flash.
It does not stop flashing until the appliance has been sufficiently de-scaled.
Fill the fresh-water tank with water and de-scaling agent as described above, and
then activate the de-scaling programme by pressing the “signal” button (Fig. 2/L)
and the button for pre-selecting the warming level (Fig. 2/N) both atthe same time
and holding them down for about 3 seconds. The de-scaling indicator in the
display now comes on and stays on, and the pilot light (Fig. 2/B) comes on to
show that the de-scaling programme has started. The water and de-scaling
agent will now remain in the through-flow heater for some minutes. This in
creases its cleaning effect. Once the de-scaling cycle has finished, the appliance
will switch itself off again. If the fresh-water tank has been filled to its maximum
level, the de-scaling cycle will take about 60 minutes.
17
Page 12

A second and even a third de-scaling cycle may be necessary, all according to the
level of scale build-up.
In order to prevent the de-scaling programme from affecting the flavour of your
coffee, after de-scaling the appliance switch it to normal operation and run at least
two cycles through it with plain water.
- KF1064 and KF1066 Black Line:
If the de-scaling indicator (Fig. 2/P) starts to flash again, you need to repeat the
de-scaling cycle at least once.
Rinse the coffee jug, jug lid, and swivelling filter thoroughly under running water.
Actuate the filter valve several times during this process.
Replacement parts/accessories
1. Coffee jug
If your coffee jug should ever get broken, you can purchase a replacementfrom your
dealer or from the AEG service centre, stating the model designation of your coffeemaker (see rating plate. Fig. 1/F).
2. Gold filter (Fig. 11)
You can purchase an AEG gold filter from your dealer orthe AEG service centre. This
is made of 23-carat gold, and takes the place of disposable paper filters. It is easy
to clean, and also suitable for brewing tea.
For the sake of the environment
Do not simply throw the packaging away, but follow these instructions:
- Cardboard packaging material can be handed in as salvage at your local wastepaper collection point.
If the following packaging materials have been used ...
- Plastic bags made of polythene (PE) can be handed in to your local PE collection
point.
- Padding made of expanded polystyrol (PS) are free of CFC’s and can be handed
in to your local collection point (recycling depot).
Please ask your local authority for the address of your nearest recycling depot.
After-sales service
We demand the highest quality of ourselves and our products.
But it is only with yourhelpthatwe can developand market appliances which exactly
meet your requirements.
So if you should nevertheless have any problem in using this appliance, please write
18
to us at the address enclosed.
 Loading...