


CERAMIC GLASS
PUZZLE COOKTOP
073700720
Instructions for installation and use UK

For your safety
The use of this new appliance is east. Nevertheless it is important to read carefully this handbook before installing and using the appliance
for the first time. In this way you can obtain the best performance, avoid wrong behaving, using the appliance in absolute safety and respect
the environment.
Installation
The installation of the appliance and the connection to the
electricity supply has to be carried out by QUALIFIED
PERSONNEL ONLY. Before any intervention it is necessary to
control the appliance is UNCONNECTED from the electricity
supply.
After having unpacked the appliance, make sure the product is
not damaged and that the alimentation cable is in perfect
conditions.
On the contrary. Please contact your retailed before installing
the appliance.
The manufacturer declines any responsibility in case of not
respecting the accident prevention rules.
Children safety
This appliance has to be used only by adults. Make sure
children do not touch the controls or play with this appliance.
The exposed/external elements of this appliance get hot while
cooking and remain hot for a certain period after blowing out.
Keep children away from the equipment until when the
equipment get cold.
While using
It is really important to keep this handbook with the equipment
for any future consultation. If you sell or give the equipment to
any other person, make sure you give to the new user this
handbook in order to be informed on the correct working of the
machine and related warnings.
This appliance is designed solely for household use for
cooking food, inside private houses and not for professional
purpose. Avoid to use this appliance for any other purpose. It
may cause hazard to modify or try to modify the features of this
product.
Keep properly cleaned the equipment. Food remaining may
cause fire risks.
In case of faults do not try to repair personally the equipment.
Repairs carried out by non competent personnel may cause
damages or fire risks.
First of all consult the content of this handbook.
If you do not find the information you need, please contact the
closest Assistance Centre.
The assistance to this appliance has to be carried out by the
authorized Technical Assistance Centre. Please ask for
original spare parts only.
During the cooking where greases or oils are used, look after
your foods, as these substances, if brought to high
temperatures, may blow up.
Avoid to let the hob working without a pot or with an empty
one.
2
Avoid to use the hob to heathen the room.
After having used this appliance please make sure all controls
are in “OFF” position.
Avoid to let liquids overflow or pour on the cooking area.
Do not leave anything on the hob. Accidental light up may
cause fire risks.
Avoided to use steam or steam appliances to in order to
clean up the equipment.
If you use an electrical outlet near this equipment, be careful
the cables the appliances you are using do not touch it and are
enough far away from the warm parts of this equipment.
Ceramic glass puzzle cook top
The ceramic glass cook top must never be used as a work
surface.
Do not put aluminium sheets or plastic containers on the
ceramic glass cooktop, neither whichever material that
can melt (sugar or foods to high sugar content) and to
damage therefore the glass. If this happens, clean
immediately as long as the surface is still warm . Use a
scraper protecting your hands. Avoid dropping any hard
object on the cook top surface: this could in fact provoke
to a leak or breach of the glass.
ATTENTION! If noticed the presence of a crack on the
glass, unconnected immediately the equipment from the
electrical network in order to avoid the risk of electric
shocks and contact the nearest Assistance Centre.
The use of unsuitable products for the cleaning of the
glass ceramic cannot discolour or scratch the glass. For
this reason, it is necessary to use exclusively SPECIFIC
PRODUCTS FOR THE CLEANING OF GLASS
CERAMIC TOPS.
Do not leave to fall nothing on the glass ceramic hob: this
might damage or break the glass surface
The use of unsuitable products for cleaning the ceramic glass
may fade or scratch the glass surface.
For this reason use exclusively special products for glass tops’
cleaning
.
These instructions are only valid for the countries
indicated by the symbols on the cover of the
instruction handbook and the appliance.

Index
Per l'Utente
For your Safety 2
Guide to the instructions’ reading 3
Use instructions 4
Cleaning and maintenance 5
Assistance and spare parts 6
Guarantee conditions 6
Suggestions for the
environment protection.
All the materials used are compatible with the environment and
recyclable. We be you to give your contribute for the
environment conservation, using the proper waste disposals
channels.
The unused appliances are not waste without value. Through
the ecological disposal, different materials used for the
production of Your appliance can be reclaimed.
Please take information on the actual possibilities for the
ecological disposal by your specialized retailer, or through your
local city office.
Before scrapping the appliance, cut the cable the supply cable
in order to make it useless.
For the installer
Technical features 7
Instructions for the installer 7
Connection to the electricity supply 8
Electrical diagram 9
Insertion and connection 11-12
The symbol on the product, or on the documents
accompanying the product, indicates that this appliance may
not be treated as household waste. Instead it shall be handed
over the applicable collection point for the recycling of
electrical and electronic equipment.
Disposal must be carried out in accordance with local
environmental regulations for waste disposal.
For more detailed information about treatments, recovery and
recycling of this product, please contact your local city office,
your household waste disposal service or the shop where you
purchased the product.
3
Guide to the instructions reading
These symbols will help you in finding quickly the most important information.
Safety information
"Step by step" instructions
Useful advices and suggestions
Information related to the environment protection
This appliance is in conformity with the following
Directives CEE:
- 73/23 e 90/683 (related to the Low Voltage);
-89/336 (related to the Electromagnetic
Compatibility);
- 90/396 (related to the Gas working appliances)
- 93/68 (related to the General Directives and
following modifications.
These instructions are only valid for the countries
indicated by the symbols on the cover of the
instruction handbook and the appliance.
What to do the first time of usage
On its first usage it is always suggestible to heathen the
appliance on its maximum speed for about 10 minutes, by
positioning on the cooking spaces a pot containing water so to
avoid eventual unpleasant smells caused by the thermal
isolation or production’s residuals. Air the room during the
entire operation
During the first minutes of working IT IS
ABSOLUTELY NORMAL that the appliance emits
smoke and unpleasant smells.
This inconvenience will disappear after a few minutes
of usage.
Usage instructions
Before using the appliance, remove all the
packing materials, advertising labels
included and eventual protective film.
The control knobs of the cooker
top
The cooking areas can be used by turning the correspondent
knob. (Figure 1).
The knob can be turned on 7 different positions, from "0"
(turned off) to "6" (maximum speed).
The hob has is equipped of a pilot light that turns on when the
hob is working.
Fig. 1
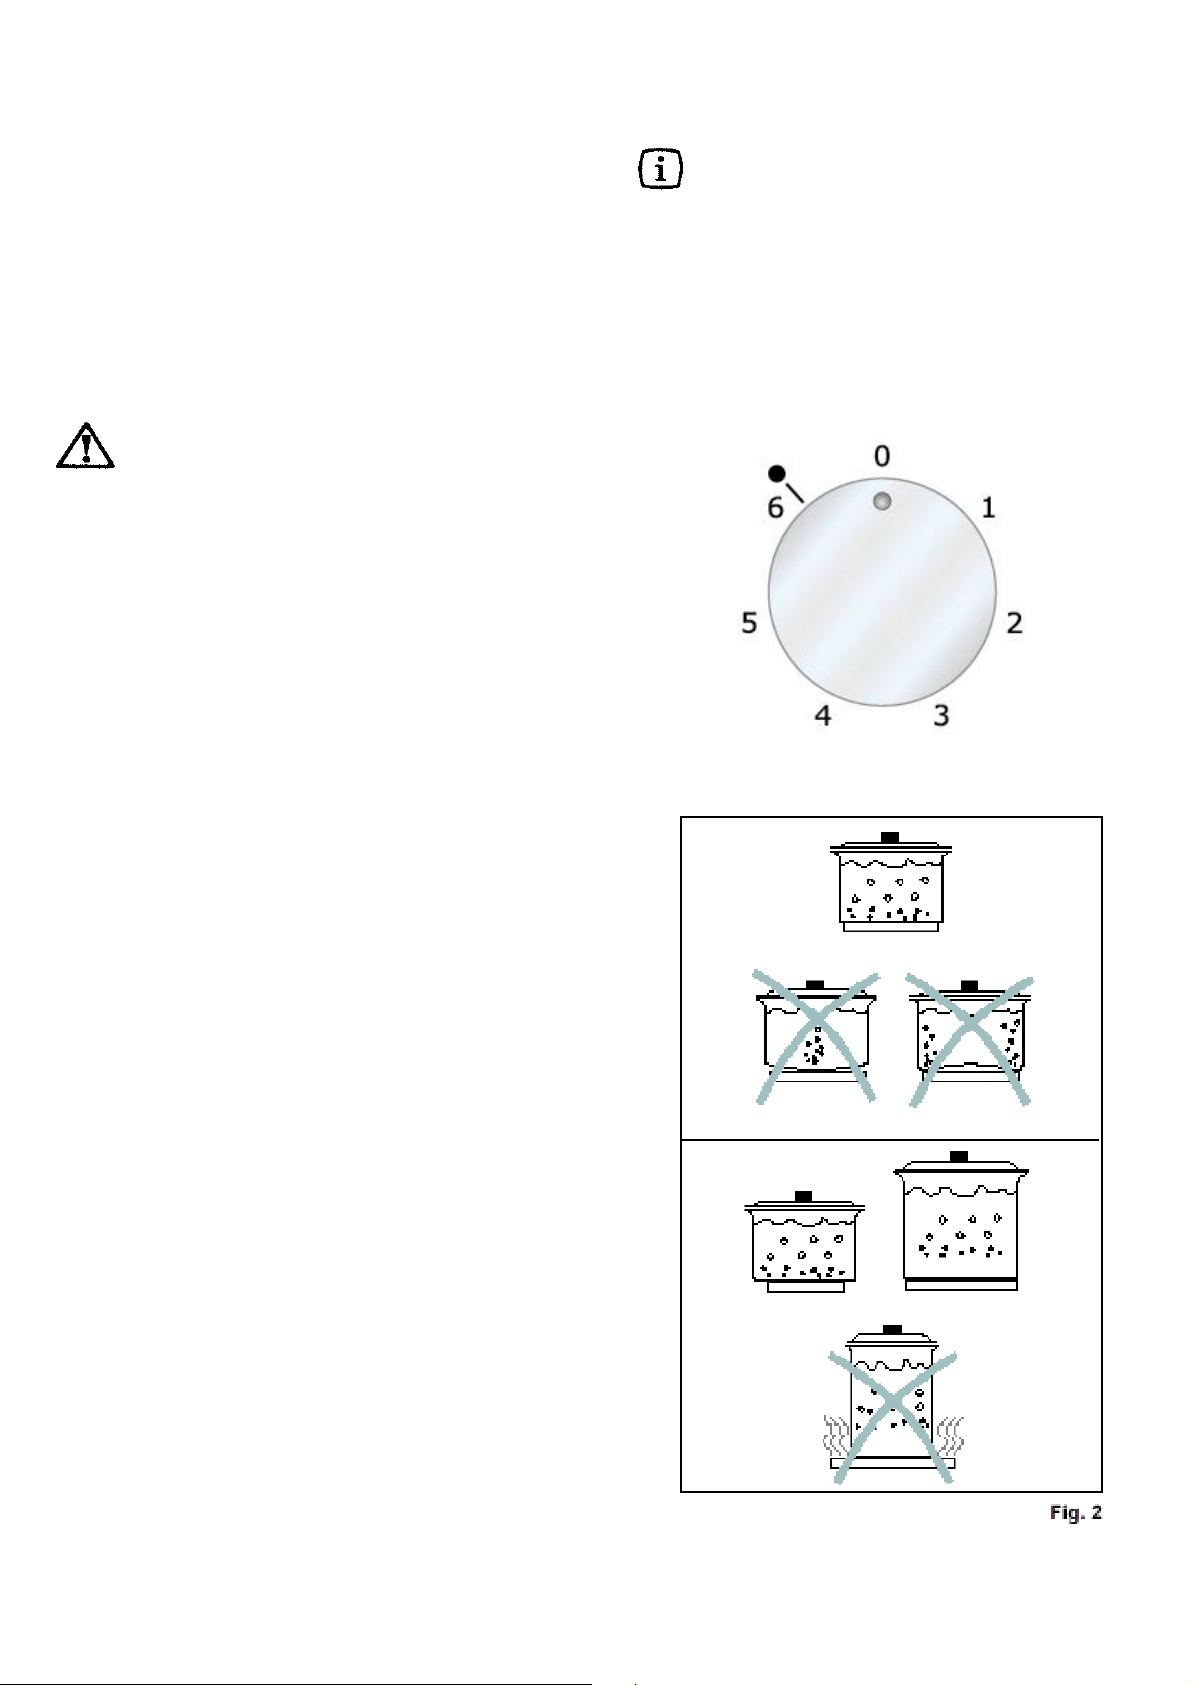
For a correct use of the burners.
For a better performance of the hobs and a smaller electrical
consume: (Figure 2):
• use recipients with a thick bottom only, that permit a better
heath distribution;
• prefer recipients with a flat bottom, that assure an ideal
heath transmission;
• use recipients which dimensions fit with the hob, in order to
cover completely the cooking area and to grant the use of
the all heath available;
• use recipients with a smooth bottom only. Recipients with a
rough bottom and/or damaged, in fact, may scratch the hob
surface;
• make sure that the pots’ bottoms are always dried and
cleaned, to grant a proper contact and a long endurance of
the hob and pots themselves;
• do not lean pots or pans on the hob edge;
• do not use the cooking areas as a support or working top ;
• do not put any kind of material between the hob and the pot;
4

• never cook food (eggs, grilled food) directly on the hob
surface;
• avoid that boiling liquids overflow and pour themselves on
the cooking;
• avoid to let the hob working without a pot or with an empty
one;
• do not leave anything one the hob. The accidental turning on
might cause fire.
• Turn on the hob only after having positioned the pot;
• Avoid to put hot pans or pots on the cold cooking areas;
• Do not warm up empty pots on the hob;
• Do not use the hob to warm up the room.
•
Materials: Pots with a copper or aluminium bottom are not
suggested as they can leave halos on the hob surface, which
are difficult sometimes to be removed.
Diameter: The diameter of the pot must correspond to the
diameter of the warming element.
The maximum thickness of the bottom is 2-3 mm.
For enamelled pots it is 4-6 mm. For stainless steel pots it
is…..
During the cooking where greases of oils
are used, look carefully at your cooking as
these substances can cause fire if brought
to an high temperature.
In the following diagram we supply you some suggestions on
the hob use. The indicated levels are purely by way of example
(as they may be subjected to different results depending on the
type of pot used and to the quantity of food cooked) and may
be adapted to the personal needs and tastes.
Cleaning and maintenance
Before any intervention the appliance has to be
unconnected from the electricity supply.
Avoid the use of steam or steam appliances.
General cleaning
Clean the stainless steel or aluminium parts with a humid
sponge and rinse accurately after any cleanings with a soft
cloth.
Avoid the use of seam sponges, steel wools, acids or abrasive
products that could damage the surfaces.
For persistent stains use normal non-abrasive detergents or
specific products, commonly on the market.
We recommend not to use seam sponges, steel wools or acids
for the cleaning.
Cleaning of the ceramic glass
Clean the hob when still warm
For the hob cleaning, use:
• blotting paper or a cloth wet on tepid water for the daily
cleaning of the;
• a specific scraper for glass ceramic tops to remove food
remaining or grease splashes;
5
• a specific product for the cleaning of the glass ceramic tops
to remove limestone traces, grease or aluminium from the
surface of the hob.
Before to start preparing the food, the surface has to be
cleaned with a humid cloth to remove dust or any remaining of
food previously cooked.
Attention! Do not use metal or abrasive sponges
or detergents, nor chemically aggressive
products like oven spray or stain removers
Do not use sweet detergents (for example
products for majolica cleaning), which, if not
properly rinsed, may cause a corrosive effect or
decant the hob surface.
Do not lean materials which could melt on the
hob, as aluminium sheets, plastic materials,
sugar or food containing sugar.
Attention! If one of these products melt on the
glass ceramic top, remove it with a scraper (while
the hob surface is still warm). Eventually,
complete the cleaning with a specific product.

Assistance and spare parts
This appliance, before leaving the warehouse, has been
tested and set by qualified personnel to obtain the best
working performance. If any repairs are required, they
have to be done with the maximum care and attention.
For this reason we recommend you to contact the
retailer who dealt with the sale or the closest Assistance
Centre, specifying the type of inconvenience, the
appliance model (Mod.), the product number (Prod.
No.) and the manufacturing number (Ser. No.). These
datum are indicated on the label on the last page of the
handbook.
Original spare parts, certified by the product
manufacturer and countersigned by this brand, are
available by our Technical Assistance Centres and
Authorized Spare Parts Shops only.
Guarantee conditions
This new appliance is covered by guarantee. The
guarantee conditions are fully indicated on the leaflet
“TOP SERVICE”, which will be found on the inside of the
appliance.
Keep carefully, with the leaflet “TOP SERVICE” the
receipt or the transport bill, useful to support the
purchase of his appliance and the date of it.
In case of intervention by the Assistance Service, show
these documents to the charged personnel. Without the
respect of this procedure, the Assistance Service will be
obliged to debit you any eventual repairs.
The Technical Assistance Service, throughout its
numerous authorized Centres, gives assistance in Italy
to the most prestigious brands of appliances. If
necessary you can look for the closest Centre by
consulting the “TOP SERVICE” leaflet.
6

Technical features
Power of electrical plates
External cooking area Ø 230 mm 1,45 kW
Internal cooking area Ø 137 mm 0,75 kW
Maximum total power 2,2 kW
Feeding tension 230 V 50 Hz
Dimensions for the recess
opening
Width 406+(1- 0) mm
Depth 472 mm
Instructions for the installer
The installation of the appliance and the connection to
the electric network must be by QUALIFIED
PERSONNEL ONLY. Before any intervention, it is
necessary to verify that the equipment is
disconnected from the electrical network.
• The sides of the cabinet where the appliance is
recessed must not to be higher than the worktop.
DO NOT install the appliance next to flammable
materials (blinds,...).
Before any intervention, it is necessary to verify that
the equipment is DISCONNECTED from the electrical
network.
THE CONSTRUCTOR COMPANY DECLINES
FROM ANY RESPONSABILITY IN CASE OF
DEMAGES CAUSED BY AN INSTALLATION NOT
IN COMPLIANCE WITH THE CURRENT
REGULATIONS AND WITHOUT RESPECTING
THE ACCIDENT PREVENTION RULES.
7

Electrical connection
The appliance is set up for a single-phase 230V feeling
voltage. The connection has to be carried out in compliance
with the current directives and law dispositions.
Before connecting the hob make sure that:
• The shaping valve and the electrical system can stand the
appliance load (see the serial number indicated on the rating
plate);
• The feed system of the appliance has a proper earth
connection, according the laws in force;
• The tap or the single-pole circuit breaker are easy to be
reached from the installed appliance.
Mount on the cable a suitable tap for the load and connect it to
a proper safety tap.
If a straight connection to the electricity is desired, it is
necessary to put a single-pole, with a minimum opening of
3mm dimensioned to the load and in compliance with the
current directives, between the appliance and the network.
The brown phase wire (coming out from the L terminal on the
terminal board) must be always connected to the phase of the
feeding network.
In any case the feeding wire has to be positioned so that it
cannot reach, anywhere in its length, a temperature higher
than 50°C.
An example of optimal current path is indicated on Fig. 3. The
wire is guided by the employment of clamps fixed on the side
of the furniture, in order to avoid any contact with the appliance
under the hob
Replacing the electrical power
cable
If necessary the electrical power must be replaced
exclusively with power cables type H05V2V2-F T90
suitable for the load and temperature rating.
It is also important that the earth wire (Yellow/Green)
must be at least 2 cm longer than the other phase
neutral (Figure 4-5).
The replacement of the cable has to be done by
qualified personnel only, in order to prevent any kind of
risks.
8
Fig.3
Fig.5 Fig.4

Electrical diagram of the hob
9

Typology of the hobs
Hob with thick edge
10
Flush-fitted hob

Positioning and connection
Cookers can be mounted on a furniture with a recess opening with dimensions shown in Figure 6.
The recess opening has to space at least 50 mm. From the back side. The eventual right or left side, if higher than the
hob, has to space at least is 100 mm. from the cut on the top.
The fixing of the hob to the top has to be done as follows:
Position the suitable dope, not issued, on the front, back and side edges of the worktop’s opening (as shown in
Figure 6).
Lean the hob on the opening of the furniture paying attention to centre it.
Fix the hob to the cabinet using the provided brackets (see Figure 8). The traction of the screws is enough to trace
the dope, whose excess could easily therefore be removed.
Fig.6
11

Dimensions of the hob
Fig.7
Fig.8
12

13
 Loading...