

Page 1

user manual
bruksanvisning
bruksanvisning
Ceramic glass induction hob
Glasskeramisk induksjonskoketopp
Glaskeramisk induktionshäll
EHD80170P
Page 2

2 electrolux
Electrolux. Thinking of you.
Share more of our thinking at www.electrolux.com
CONTENTS
Safety information 2
Installation instructions 3
Product description 5
Operating instructions 6
SAFETY INFORMATION
For your safety and correct operation
of the appliance, read this manual carefully before installation and use. Always
keep these instructions with the appliance even if you move or sell it. Users
must fully know the operation and safety features of the appliance.
General safety
Warning! Persons (including children)
with reduced physical sensory, mental
capabilities or lack of experience and
knowledge must not use the appliance.
They must have supervision or
instruction for the operation of the
appliance by a person responsible for
their safety.
Child safety
• Only adults can use this appliance. Children must get supervision to make sure
that they do not play with the appliance.
• Keep all packaging away from children.
There is a risk of suffocation.
• Keep children away from the appliance
when it is on.
Warning! Start the child safety device
to prevent small children and pets from
an accidental activation of the appliance.
Safety during operation
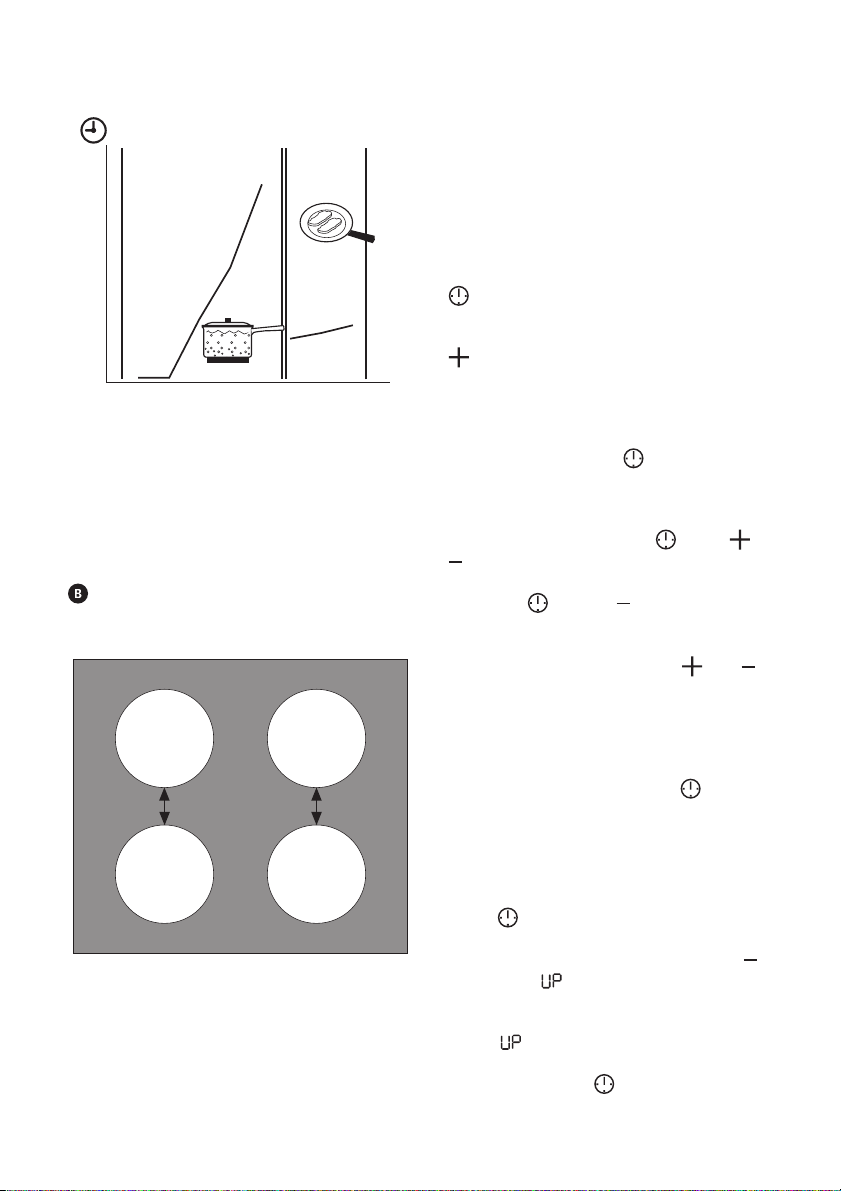
• Remove all packaging, stickers and layers from the appliance before the first use.
• Set the cooking zones to "off" after each
use.
• Risk of burns! Do not put metallic objects, for example cutlery or saucepan
lids, on the cooking surface, as they can
become hot.
Helpful hints and tips 8
Care and cleaning 10
What to do if… 10
Environment concerns 11
Subject to change without notice
• Users with an implanted pacemaker must
keep their upper body minimum 30 cm
from induction cooking zones that are
switched on.
Warning! Fire danger! Overheated
fats and oils can catch fire very quickly.
Correct operation
• Always monitor the appliance during operation.
• Only use the appliance for domestic cooking tasks!
• Do not use the appliance as a work or a
storage surface.
• Do not put or keep very flammable liquids
and materials, or fusible objects (made of
plastic or aluminium) on or near the appliance.
• Be careful when you connect the appliance to the near sockets. Do not let electricity bonds touch the appliance or hot
cookware. Do not let electricity bonds tangle.
How to prevent a damage to the
appliance
• If the objects or cookware fall on the
glass ceramic, the surface can be damaged.
• Cookware made of cast iron, cast aluminium or with damaged bottoms can
scratch the glass ceramic if you move
them on the surface.
• Do not let cookware boil dry to prevent
the damage to cookware and glass ceramics.
• Do not use the cooking zones with empty
cookware or without cookware.
• Do not cover the parts of the appliance
with aluminium foil.
Page 3

electrolux 3
• Do not cover the ventilation space of 5
mm between the worktop and front of
the unit below it.
INSTALLATION INSTRUCTIONS
Before the installation , note down
the serial number (Ser. Nr.) from the rating plate. The rating plate of the ap-
pliance is on its lower casing.
EHD80170P
58 GBD C2 AU
ELECTROLUX
220-240 V 50-60 Hz
Safety instructions
Warning! You must read these!
Make sure that the appliance is not damaged because of transportation. Do not
connect a damaged appliance. If it is
necessary, speak to the supplier.
Only an authorised service technician
can install, connect or repair this appliance. Use only original spare parts.
Only use built-in appliances after you assemble the appliance into correct builtin units and work surfaces that align to
the standards.
Do not change the specifications or
modify this product. Risk of injury and
damage to the appliance.
Fully obey the laws, ordinances, directives and standards in force in the country where you use the appliance (safety
regulations, recycling regulations, electrical safety rules etc.)!
Keep the minimum distances to other
appliances and units!
Install anti-shock protection, for example install the drawers only with a protective floor directly below the appliance!
Protect the cut surfaces of the worktop
against moisture with a correct sealant!
Seal the appliance to the work top with
no space left with a correct sealant!
949 594 166 01
Induction 7,4 kW
7,4 kW
Warning! If there is a crack on the
surface, disconnect power supply
to prevent the electric shock.
Protect the bottom of the appliance
from steam and moisture, e.g. from a
dishwasher or oven!
Do not install the appliance adjacent to
doors and below windows! If not, hot
cookware can be hit off the hob when
you open doors or windows.
Warning! Risk of injury from electrical
current. Carefully obey the instructions
for electrical connections.
• The electrical mains terminal is live.
• Make electrical mains terminal free of voltage.
• Install correctly to give anti-shock protection.
• Loose and incorrect plug and socket connections can make the terminal become
too hot.
• A qualified electrician must install the
clamping connections correctly.
• Use a strain relief clamp on cable.
• Use the correct mains cable of type
H05BB-F Tmax 90°C (or higher) for a single-phase or two-phase connection.
• Replace the damaged mains cable with a
special cable (type H05BB-F Tmax 90°C;
or higher). Speak your local Service Force
Centre.
The appliance must have the electrical installation which lets you disconnect the appliance from the mains at all poles with a contact opening width of minimum 3 mm.
You must have correct isolation devices:
line protecting cut-outs, fuses (screw type
fuses removed from the holder), earth leakage trips and contactors.
Page 4

4 electrolux
Assembly
min.
50 mm
min.
5 mm
min. 500 mm
min.
50 mm
=
R 5mm
490
+1
=
mm
min.
750
600mm
+1
mm
min.
25 mm
min.
5 mm
min.
38 mm
min.
5 mm
20 mm
If you use a protection box (additional
accessory), the front ventilation space
of 5 mm and protective floor directly below the appliance are not necessary.
Page 5

PRODUCT DESCRIPTION
Cooking surface layout
21
180
mm
180
mm
145
Control panel layout
mm
300
mm
electrolux 5
1 Induction cooking zone 1800W, with
the Power function 2800W
2 Induction cooking zone 2400W, with
the Power function 3700W
3 Control panel
4 Induction cooking zone 1400 W, with
Power function 2500W
5 Induction cooking zone 1800W, with
the Power function 2800W
345
1
2
12
4
3
5
10
6 7
9
811
Use the sensor fields to operate the appliance. Indicators, displays and sounds
tell which functions operate.
sensor field function
1
2
3
cooking zones' indicators of timer shows for which zone you set the time
4
the timer display shows the time in minutes
5
a heat setting indicators show the heat setting
6
7
8
a control bar to set the heat setting
9
starts and stops the hob
starts and stops the key lock or child lock
activates Power function
shows that:
• there is no cookware on the cooking zone
• the cookware is not correct
• automatic switch off is active
shows that cooking zone stays hot
Page 6

6 electrolux
sensor field function
10
11
12
/
+number in the timer display shows
that there is a malfunction.
Residual heat indicator
increases or decreases the time
selects the cooking zone
starts and stops STOP+GO
The induction cooking zones make the heat
necessary for cooking directly in the bottom
of the cookware. The glass ceramic is heated by the residual heat of the cookware.
Warning! Risk of burns from
residual heat!
OPERATING INSTRUCTIONS
On and Off
Touch
for 1 second to start or stop the
appliance.
Automatic Switch Off
The function stops the hob automatically if:
• all cooking zones are off.
• you do not set the heat setting after you
start the hob.
• you cover a sensor field with an object (a
pan, a cloth, etc.) for longer than 10 seconds. The sound operates until you remove the object.
Automatic Switch Off times
Heat setting
Stops after 6 hours 5 hours 4 hours 1.5 hours
1-2 3-4 5 6-9
The heat setting
• the hob gets too hot (e.g. when a saucepan boils dry). Before you use the hob
again, the cooking zone must be cool.
•
you use incorrect cookware.
on and after 2 minutes the cooking zone
stops automatically.
• you do not stop a cooking zone or
change the heat setting. After some time
comes on and the hob stops. See the
table.
Touch . The indicator flashes. Set the
heat setting (1-8). The indicator of the heat
setting comes on. The indicator above
comes on and after some time goes out.
The time of the automatic heat up changes
for different heat settings.
comes
Touch the control bar at the heat setting.
The heat setting indicators come on.
The automatic heat up
The Automatic heat up function sets the
highest heat setting for some time, and
then decreases to the necessary level.
Page 7
11
00
10
9
8
7
6
5
4
3
2
1
0
123456789
Switching the Power function on and off
The Power function makes more power available to the induction cooking zones. The
Power function is activated for 10 minutes
at most. After that the induction cooking
zone automatically switches back to the
highest heat setting (9). To switch on, touch
, the indicator above comes on. To
switch off, touch a heat setting (1-9).
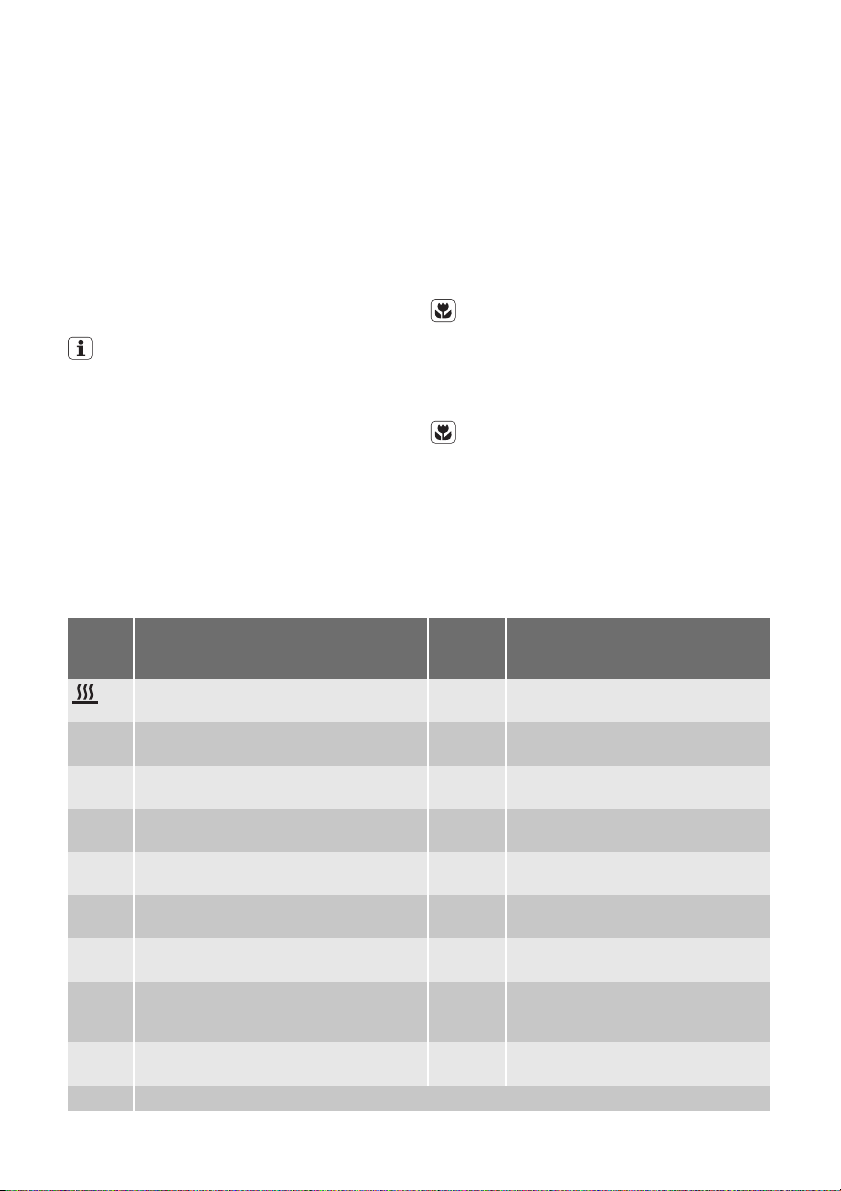
Power management
The power management divides the power
between two cooking zones in a pair (see
the figure). The power function increases
the power to the maximum level for one
cooking zone in the pair and automatically
decreases in the second cooking zone to a
lower power level. The display for the reduced zone alternates.
electrolux 7
Using the Timer
Count Down Timer
Use the Count Down Timer to set how long
the cooking zone operates for one cooking
session.
Set the Count Down Timer after the selection of the cooking zone.
You can set the heat setting before or after
you set the timer.
• Selection of the cooking zone: touch
again and again until the indicator of a
necessary cooking zone comes on.
•
Starting the Count Down Timer: touch
of the timer to set the time ( 00 -
99
minutes). When the indicator of the cooking zone flashes slower, the time counts
down.
• Checking the remaining time: select
the cooking zone with
. The indicator
of the cooking zone flashes faster. Display shows the remaining time.
• Changing the Count Down Timer: select the cooking zone with
touch or
.
• Stopping the timer: select the cooking
zone with
time counts backwards to
. Touch . The remaining
. The indi-
cator of the cooking zone goes out. To
switch off You can also touch
and
at the same time.
When the time elapses, the sound operates and
flashes. The cooking zone
00
switches off.
•
Stopping the sound: touch
CountUp Timer (Count up timer)
Use the CountUp Timer to monitor how
long the cooking zone operates.
•
Selection of the cooking zone (if
more than 1 cooking zone operate):
touch
again and again until the indica-
tor of a necessary cooking zone comes on.
•
Starting the CountUp Timer: touch
of the timer comes on. When the indi-
cator of the cooking zone flashes slower,
the time counts up, display switches between
and time elapsed (minutes)
• Checking the elapsed time: select the
cooking zone with
. The indicator of
Page 8

8 electrolux
the cooking zone flashes faster. Display
shows the elapsed time.
• Stopping the CountUp Timer: select
the cooking zone with
or to switch off the timer. The indicator
of the cooking zone goes out.
Minute Minder
You can use the timer as a Minute Minder
while cooking zones do not operate. Touch
. Touch or of the timer to select
the time. When the time elapses, the sound
operates and
•
Stopping the sound: touch
STOP+GO
function sets all cooking zones that
The
operate to the lowest heat setting.
When
heat setting.
The
tion.
•
•
Lock
You can lock the control panel, but not
It prevents an accidental change of the heat
setting.
To start this function touch
tor comes on.
The Timer stays on.
To stop this function touch
tor goes out.
When you stop the appliance, you also stop
this function.
The child safety device
This function prevents an accidental operation of the hob.
Starting the child safety device
•
operates, you cannot change the
function does not stop the timer func-
To activate this function touch
indicator comes on.
To deactivate this function touch
The heat setting that you set before
comes on.
Start the hob with
heat settings .
00
flashes.
and touch
. The
.
. The indica-
. The indica-
. Do not set the
•
Touch
comes on.
•
Stop the hob with
Switching off the child safety device
•
Start the hob with
heat settings . Touch
The indicator goes out.
•
Stop the hob with
Overriding the child safety device for one
cooking session
•
Start the hob with
comes on.
•
Touch
setting in less than 10 seconds. You
can operate the hob.
•
When you stop the hob with
child safety device operates again.
OffSound Control (Deactivation and
activation of the sounds)
Deactivation of the sounds
Deactivate the appliance.
Touch
on and go out. Touch
comes on, the sound is on. Touch ,
comes on, the sound is off.
When this function operates, you can hear
the sounds only when:
.
•
you touch
• the Minute Minder comes down
• the Count Down Timer comes down
• you put something on the control panel.
Activation of the sounds
Deactivate the appliance.
Touch
on and go out. Touch
comes on, because the sound is off. Touch
, comes on. The sound is on.
for 4 seconds. The indicator
.
. Do not set the
for 4 seconds.
.
. The indicator
for 4 seconds. Set the heat
for 3 seconds. The displays come
for 3 seconds.
for 3 seconds. The displays come
for 3 seconds.
, the
HELPFUL HINTS AND TIPS
Use the induction cooking zones with
suitable cookware.
Cookware for induction cooking zones
Important! In induction cooking a powerful
electromagnetic field generates an almost
instant heat inside the cookware.
Page 9
electrolux 9
Cookware material
•
correct: cast iron, steel, enamelled steel,
stainless steel, a multi-layer bottom
(marked as correct by a manufacturer).
• not correct: aluminium, copper, brass,
glass, ceramic, porcelain.
Cookware is correct for an induction hob if
…
• ... some water boils very quickly on a
zone set to the highest heat setting..
• ... a magnet pulls on to the bottom of the
cookware.
The bottom of the cookware must
be as thick and flat as possible.
Cookware dimensions : induction
cooking zones adapt to the dimension
of the bottom of the cookware automatically to some limit. But, the magnetic
part of the bottom of the cookware
must have a minimum diameter of approximately 3/4 of the cooking zones.
Operating noises
If you can hear
• whistling: you use one or more cooking
zones with high power levels and the
cookware is made of different materials
(Sandwich construction).
• humming: you use high power levels.
• clicking: electric switching occurs.
• hissing, buzzing: the fan operates.
The noises are normal and do not refer
to any defects.
Energy saving
• If possible, always put the lids on the
cookware.
• Put cookware on a cooking zone before you start it.
Öko Timer (Eco Timer)
To save the energy, the heater of the
cooking zone switches itself off earlier
than count down timer signal. The heating time reduction depends on cooking
level and cooking time.
Examples of cooking applications
The data in the table is for guidance only.
• cracking noise: cookware is made of different materials (Sandwich construction).
Heat
setting
Keep cooked foods warm as re-
-1
1-2 Hollandaise sauce, melt: butter, choco-
1-2 Solidify: fluffy omelettes, baked eggs 10-40
2-3 Simmer rice and milkbased dishes, heat-
3-4 Steam vegetables, fish, meat 20-45
4-5 Steam potatoes 20-60
4-5 Cook larger quantities of food, stews
6-7 Gentle fry: escalope, veal cordon bleu,
7-8 Heavy fry, hash browns, loin steaks,
9 Boil large quantities of water, cook pasta, sear meat (goulash, pot roast), deep fry chips
late, gelatine
ing up ready-cooked meals
and soups
cutlets, rissoles, sausages, liver, roux,
eggs, pancakes, doughnuts
steaks
Use to: Time Hints
quired
5-25 min Mix occasionally
min
25-50
min
min
min
60-150
min
as re-
quired
5-15 min Turn halfway through
Cover the food
Cook with a lid on
Add at least twice as much liquid as
rice, stir milk dishes part way through
Add a few tablespoons of liquid
Use max. ¼ l water for 750 g of potatoes
Up to 3 l liquid plus ingredients
Turn halfway through
Page 10
10 electrolux
The Power function is suitable for heating
large quantities of water.
Information on acrylamides
Important! According to the newest
scientific knowledge, if you brown food
(specially the one which contains starch),
acrylamides can pose a health risk. Thus,
we recommend that you cook at the lowest
temperatures and do not brown food too
much.
CARE AND CLEANING
Clean the appliance after each use.
Always use cookware with clean bottom.
Warning! Sharp objects and abrasive
cleaning agents will damage the
appliance.
For your safety, do not clean the appliance with steam blasters or high-pressure cleaners.
Scratches or dark stains on the glass
ceramic have no effect on how the appliance operates.
To remove the dirt:
1. – Remove immediately: melted plas-
tic, plastic foil, and food with sugar. If
not, the dirt can cause damage to the
appliance. Use a special scraper for
the glass . Put the scraper on the
glass surface at an acute angle and
move the blade on the surface .
– Remove after the appliance is suf-
ficiently cool: limescale rings , water
rings, fat stains, shiny metallic discolorations. Use a special cleaning agent
for glass ceramic or stainless steel.
2. Clean the appliance with a moist cloth
and some detergent.
3. At the end rub the appliance dry with
a clean cloth.
WHAT TO DO IF…
Problem Possible cause and remedy
You cannot start the appliance
or operate it.
A sound operates (6x) and the
appliance stops or a sound operates when the appliance is off.
The residual heat indicator does
not come on.
A sound operates and appliance
starts and stops again. After 5
seconds one more sound operates.
Heat setting alternates The Power management is active. See the section Power man-
• You touched 2 or more sensor fields at the same time. Only
touch one sensor field.
• There is water or fat stains on the control panel. Clean the control panel
•
The child safety device or key lock or
chapter Operating the appliance.
• Start the appliance again and set the heat setting in 10 seconds.
You covered one or more sensor fields. Uncover the sensor fields.
The cooking zone is not hot because it operated only for a short
time. If the cooking zone is supposed to be hot, speak to the After Sales Service.
You covered . Uncover the sensor field.
agement.
operates . See the
Page 11

Problem Possible cause and remedy
comes on
and number come on.
comes on
There is no signal when you
touch panel keys
• No cookware on the cooking zone. Put cookware on the cooking zone.
• Not correct cookware. Use the correct cookware.
• The diameter of the bottom of the cookware is too small for
the cooking zone. Move cookware to a smaller cooking zone.
• The automatic switch-off operates. Stop the appliance and
start it again.
• Overheating protection for the cooking zone operates. Switch
off the cooking zone. Switch on the cooking zone again.
There is an error in the appliance.
Disconnect the appliance from the electrical supply for some
time. Disconnect the fuse from the electrical system of the
house. Connect again. If
sales service.
There is an error in the appliance, because a cookware boils dry
or you use not correct cookware. Overheating protection for the
cooking zone operates. The automatic switch-off operates.
Switch off the appliance. Remove the hot cookware. After approx-
imately 30 seconds switch on the cooking zone again.
should disappear, residual heat indicator can stay. Cool down
the cookware and check it with the section "Cookware for the induction cooking zone".
The sound is off. Switch on the sound.
If you tried the above solutions and cannot
repair the problem, speak to your dealer or
the Customer Care Department. Give the data from the rating plate, three-digit-letter
code for the glass ceramic (it is in the corner of the cooking surface) and an error message that comes on.
electrolux 11
comes on again, speak to the after
If you operated the appliance incorrectly,
the servicing by a customer service technician or dealer will not be free of charge,
even during the warranty period. The instructions about the customer service and conditions of guarantee are in the guarantee booklet.
ENVIRONMENT CONCERNS
The symbol on the product or on its
packaging indicates that this product may
not be treated as household waste. Instead
it should be taken to the appropriate
collection point for the recycling of electrical
and electronic equipment. By ensuring this
product is disposed of correctly, you will
help prevent potential negative
consequences for the environment and
human health, which could otherwise be
caused by inappropriate waste handling of
this product. For more detailed information
about recycling of this product, please
contact your local council, your household
waste disposal service or the shop where
you purchased the product.
Packaging material
The packaging materials are friendly to
the environment and can be recycled.
The plastic components are identified
by marking: >PE<,>PS<, etc. Discard
the packaging materials as household
waste at the waste disposal facilities in
your municipality.
Page 12

12 electrolux
Electrolux. Thinking of you.
Les mer om hvordan vi tenker på www.electrolux.com
INNHOLD
Sikkerhetsinformasjon 12
Installasjonsanvisninger 13
Produktbeskrivelse 15
Brukerveiledning 16
SIKKERHETSINFORMASJON
For at du skal bruke apparatet korrekt
og sikkert, må du lese denne bruksanvisningen nøye før apparatet installeres.
Oppbevar denne bruksanvisningen
sammen med apparatet, også hvis du
selger det eller flytter. Den som bruker
apparatet må være godt kjent med sikkerhetsfunksjonene og hvordan apparatet betjenes.
Generelt om sikkerhet
Advarsel Personer (også barn) med
redusert fysisk eller psykisk helse, eller
som mangler erfaring og kunnskaper
om bruken, må ikke bruke apparatet.
De må ha tilsyn og gis instruksjon om
bruken av apparatet av en person som
er ansvarlig for deres sikkerhet.
Barns sikkerhet
• Dette apparatet skal kun brukes av voksne. Hold tilsyn med barn, slik at de ikke leker med apparatet.
• Hold all emballasje utenfor barns rekkevidde. Det er fare for kvelning.
• Hold barn borte fra apparatet når det er
koplet inn.
Advarsel Aktiver barnesikringen for å
hindre at små barn og husdyr kan
komme til å aktivere apparatet.
Sikkerhet under bruk
• Fjern all emballasje, klistremerker og belegg fra apparatet før første gangs bruk.
• Still kokesonene på "av" etter hver bruk.
• Forbrenningsfare! Ikke legg metallgjenstander, som f.eks. bestikk eller grytelokk
på kokefeltet, fordi de kan bli varme.
Nyttige tips og råd 18
Stell og rengjøring 20
Hva må gjøres, hvis... 20
Miljøvern 21
Med forbehold om endringer
• Brukere med pacemaker må holde overkroppen minst 30 cm fra induksjonskokesonene når de er slått på.
Advarsel Brannfare! Overopphetet
fett og olje kan ta fyr veldig raskt.
Riktig bruk
• Ha alltid tilsyn med apparatet under bruk.
• Apparatet skal kun brukes for matlaging i
private husholdninger!
• Ikke bruk apparatet som arbeidplate, og
ikke oppbevar ting på den.
• Ikke plasser eller oppbevar svært brennbar væske eller materiale, eller smeltbare
gjenstander (laget av plast eller aluminium) på eller i nærheten av apparatet.
• Vær forsiktig når du kopler apparatet til
stikkontakter som befinner seg nær apparatet. Ikke la ledninger komme borti apparatet eller varme kokeredskaper. Påse at
ledningene ikke floker seg.
Slik unngår du skade på apparatet
• Hvis gjenstander eller kokeredskaper faller ned på den glasskeramiske overflaten,
kan den bli skadet.
• Kokeredskap av støpt jern, støpt aluminium eller med skadde bunner kan skrape
den glasskeramiske overflaten hvis de skyves over den.
• Ikke la kokeredskaper tørrkoke, for å unngå skade på kokeredskapet og den glasskeramiske overflaten.
• Bruk aldri kokesonene med tomt kokeredskap eller uten kokeredskap.
• Ikke dekk til deler av apparatet med aluminiumsfolie.
• Ikke dekk til ventilasjonsåpningen, som
må være 5 mm mellom arbeidsbenken
og oversiden av enheten under den.
Page 13

electrolux 13
Advarsel Hvis det er sprekk i
overflaten, må strømforsyningen
INSTALLASJONSANVISNINGER
Før du monterer koketoppen bør du
notere serienummeret (Ser. Nr.) som
står på typeskiltet. Typeskiltet finner
du på den nedre delen av koketoppen.
EHD80170P
58 GBD C2 AU
ELECTROLUX
220-240 V 50-60 Hz
Sikkerhetsanvisninger
Advarsel Dette må du lese!
Kontroller at apparatet ikke er skadet
under transport. Ikke kople til et skadet
apparat. Hvis nødvendig, snakk med leverandøren.
Kun en autorisert servicetekniker kan installere, kople til eller reparere dette apparatet. Bruk kun originale reservedeler.
Innbygningsprodukter skal bare brukes
når de er bygd inn i egnede skrog og arbeidsbenker som oppfyller standardene.
Ikke modifiser eller endre spesifikasjonene på dette produktet. Fare for personskade eller skade på apparatet.
Følg lovene, forskriftene, direktivene og
standardene som gjelder i brukslandet
(sikkerhetsbestemmelser, forskrifter for
resirkulering, sikkerhetsregler for elektrik osv.)!
Overhold minimumsavstanden til andre
apparater og enheter!
Monter berøringsbeskyttelse. Ved montering av skuff direkte under koketpooen skal det for eksempel monteres
beskyttelsesplate!
Beskytt kantene på arbeidsbenken mot
fuktighet med en tetningslist som passer!
Apparatet må forsegles til arbeidsbenken uten mellomrom, med en tetningslist som passer!
949 594 166 01
Induction 7,4 kW
7,4 kW
kobles fra for å unngå elektrisk
støt.
Beskytt bunnen av apparatet mot
damp og fuktighet, f.eks. fra en oppvaskmaskin eller ovn!
Ikke installer apparatet ved siden av en
dør eller under et vindu! Ellers kan varme kokeredskaper skyves av platetoppen når dører og vinduer åpnes.
Advarsel Fare for personskade pga.
elektrisk strøm. Følg anvisningene om
elektrisk tilkopling nøye.
• Nettilkoplingsklemmen er strømførende.
• Skill nettilkoplingsklemmen fra strømnettet.
• Montér forskriftsmessig for å sikre berøringsbeskyttelse.
• Løse og uforsvarlige kontaktforbindelser
kan overopphete klemmen.
• Klemmeforbindelsene skal utføres av en
kvalifisert elektriker.
• Monter strekkavlaster for kabelen.
• Bruk riktig strømledning av type H05BBF Tmaks 90°C (eller høyere) for enkelfase- eller tofaseforbindelser.
• En skadet strømledning skal erstattes
med spesiell ledning (type H05BB-F
Tmaks 90°C; eller høyere. Snakk med serviceavdelingen.
Apparatet må ha en enhet i den elektriske installasjonen som gjør det mulig å kople apparatet fra hovedstrømmen ved alle poler
med en kontaktåpningsbredde på minst 3
mm.
Du må ha korrekte isoleringsenheter: ledningsbeskyttende strømbrytere, sikringer
(sikringer av skrutypen skal fjernes fra holderen), jordfeilbrytere og kontaktorer.
Page 14

14 electrolux
Montering
min.
50 mm
min.
5 mm
min. 500 mm
min.
50 mm
=
R 5mm
490
+1
=
mm
min.
750
600mm
+1
mm
min.
25 mm
min.
5 mm
min.
38 mm
min.
5 mm
20 mm
Hvis du bruker beskyttelsessettet ProBox (tilleggsutstyr), er 5 mm ventilasjonsåpning og annen deleplate mellom skuff og koketopp unødvendig.
Page 15

PRODUKTBESKRIVELSE
Oversikt over kokefeltet
21
180
mm
180
mm
145
mm
Betjeningsfeltets oppbygging
300
mm
electrolux 15
1 Induksjonskokesone 1800W, med po-
werfunksjon på 2800W
2 Induksjonskokesone 2400W, med po-
werfunksjon på 3700W
3 Betjeningspanel
4 Induksjonskokesone 1400W, med po-
werfunksjon på 2500W
5 Induksjonskokesone 1800W, med po-
werfunksjon på 2800W
345
1
2
12
4
3
5
10
6 7
9
811
Bruk sensorfeltene for å betjene koketoppen. Indikatorer, displayer og lydsignaler
forteller hvilke funksjoner som er aktive.
Sensorfelt Funksjon
1
2
3
Indikatorer for tidsuret til kokesonene viser hvilken sone tiden er innstilt for
4
display for tidsur viser tiden i minutter
5
Indikatorlampe for kokenivå viser effekttrinn
6
7
8
betjeningslinje hvor du kan stille inn effekttrinnet
9
slår av og på koketoppen
aktiverer og deaktiverer tastelåsen eller barnesikrin-
gen
aktiverer Power-funksjonen
viser at:
• det er ingen kokekar på varmesonen
• kokekaret er ikke av riktig type
• den automatisk utkoplingen er aktiv
viser at kokesonen fremdeles er varm
Page 16

16 electrolux
Sensorfelt Funksjon
10
11
12
/
+tall i tidsurdisplayet viser at det har
oppstått en funksjonsfeil.
Restvarmeindikator
øker eller reduserer tiden
velger kokesone
slår av og på STOP+GO
Induksjonskokesonene gir den nødvendige
varmen for tilberedning direkte i bunnen av
kokekaret. Glasskeramikken blir varmet opp
av restvarmen fra kokekaret.
Advarsel Forbrenningsfare pga.
restvarme!
BRUKERVEILEDNING
På og Av
Berør
i 1 sekund for å aktivere eller deak-
tivere apparatet.
Automatisk utkopling
Funksjonen slår komfyrtoppen av
automatisk hvis:
• alle kokesonene er av.
• du ikke stiller inn et effekttrinn etter at du
har slått komfyrtoppen på.
• du dekker et sensorfelt med en gjenstand
(en gryte, en klut, osv.) i mer enn 10 se-
Tider for automatisk utkopling
Effekttrinn
Slår seg av etter 6 timer 5 timer 4 timer 1,5 timer
1-2 3-4 5 6-9
Effekttrinn
kunder. Lydsignalet høres til du fjerner
gjenstanden.
• komfyrtoppen blir for varm (f.eks. hvis en
kasserolle koker tørr). Før komfyrtoppen
brukes igjen, må kokesonene være kalde.
•
du bruker feil kokeredskap.
vises og etter 2 minutter deaktiveres kokesonen automatisk.
• du ikke deaktiverer en kokesone eller endrer effekttrinn. Etter en stund vises
og komfyrtoppen deaktiveres. Se tabellen.
Pek på . Indikatoren blinker. Still inn effekttrinn (1-8). Indikatoren for effekttrinnet
tennes. Indikatoren over
tennes, og slår
seg av igjen etter en stund.
Den automatiske oppvarmingstiden varierer
i forhold til forskjellige effekttrinn.
Berør betjeningslinjen ved effekttrinnet. Effekttrinnindikatorene tennes.
Automatisk oppvarming
Den automatiske oppvarmingsfunksjonen
innstiller høyeste effekttrinn en stund, og
går så tilbake til nødvendig trinn.
Page 17

11
00
00
10
9
8
7
6
5
4
3
2
1
0
123456789
Slå powerfunksjonen på og av
Powerfunsjonen gir ekstra effekt til induksjonskokesonene. Powerfunksjonen er aktivert i maks 10 minutter. Deretter kopler induksjonskokesonen automatisk tilbake til
høyeste effekttrinn (9). Pek på
for å aktivere, indikatoren over tennes. For å deaktivere, pek på et effekttrinn (1-9).
Effektstyring
Effektstyringen deler effekten parvis mellom
to kokesoner (se bilde). Powerfunksjonen
øker effekten opp til maksimumsnivået for
et kokesonepar, og reduserer automatisk effektnivået for den andre kokesonen. Displayet for den reduserte sonen skifter.
electrolux 17
Bruke tidsuret
Tidsur med nedtelling
Bruk tidsuret til å stille inn hvor lenge en kokesone skal være aktiv under tilberedningen.
Still tidsuret når kokesonen er valgt.
Du kan velge effekttrinn før eller etter at du
stiller inn tidsuret.
•
Velge kokesone: berør
gjentatte ganger, til indikatoren for ønsket kokesone lyser.
•
Starte tidsur med nedtelling: berør
på tidsuret for å stille inn tiden ( 00 -
99
minutter). Når indikatoren for kokesonen
blinker langsommere, har nedtellingen
startet.
•
Vise resterende tid: velg kokesone
. Indikatoren for kokesonen blin-
med
ker raskere. Displayet viser gjenværende
tid.
• Endre tidsuret med nedtelling: velg kokesone med
•
Deaktivere tidsuret: velg kokesone
med
. Berør . Den gjenværende ti-
den teller ned til
berør eller .
. Indikatoren for ko-
kesonen slukkes. For å deaktivere kan du
også berøre
og samtidig.
Når tiden er omme, høres lydsignalet
og
blinker. Kokesonen slås av.
•
Deaktivere lydsignalet: berør
CountUp Timer (Tidsur med opptelling)
Bruk CountUp Timer til å følge med på hvor
lenge kokesonen er på.
• Valg av kokesone (hvis mer enn 1 ko-
kesone er på): berør
gjentatte ganger, til indikatoren for ønsket kokesone lyser.
•
Starte CountUp Timer: berør
uret
tennes. Når indikatoren for koke-
på tids-
sonen blinker langsommere, telles tiden
opp, displayet skifter mellom
og hvor
lang tid som har gått (minutter)
• Vise hvor lang tid som har gått: velg
kokesone med
. Indikatoren for kokesonen blinker raskere. Displayet viser
hvor lang tid som har gått.
• Deaktivere CountUp Timer: velg kokesone med
og berør eller for å slå
av tidsuret. Indikatoren for kokesonen
slokker.
Page 18

18 electrolux
Varselur
Du kan bruke tidsuret som et varselur uten
at kokesonene er aktive. Berør
eller på tidsuret for å stille inn tiden.
Når tiden er omme, høres lydsignalet og
blinker.
00
•
Deaktivere lydsignalet: berør
STOP+GO
Med
kesonene på laveste effekttrinn.
Når
trinnet.
sjonen.
•
•
Låse
Du kan låse betjeningspanelet, men ikke
trinnet.
Berør
dikatoren tennes.
Tidsuret er fortsatt på.
Berør
Indikatoren slokker.
Når du slår av koketoppen, deaktiverer du
også denne funksjonen.
Barnesikring
Denne funksjonen hindrer at komfyrtoppen
blir aktivert ved et uhell.
Aktivere barnesikringen
•
-funksjonen stilles alle de aktive ko-
er aktivert kan du ikke endre effekt-
-funksjonen deaktiverer ikke tidsurfunk-
Berør
Indikatoren tennes.
Berør
nen. Effekttrinnet som ble innstilt tidligere
aktiveres.
. Dette hindrer utilsiktet endring av effekt-
Aktiver komfyrtoppen med
inn effekttrinn .
for å aktivere denne funksjonen.
for å deaktivere denne funksjo-
for å aktivere denne funksjonen. In-
for å deaktivere denne funksjonen.
. Berør
. Ikke still
•
Pek på
nes.
•
Deaktiver komfyrtoppen med
Deaktivere barnesikringen
•
Aktiver komfyrtoppen med
inn effekttrinn . Pek på
Indikatoren slukker.
•
Deaktiver komfyrtoppen med
Deaktivere barnesikringen når du skal bruke
komfyrtoppen
•
Aktiver komfyrtoppen med
ren tennes.
•
Pek på
trinn innen 10 sekunder. Du kan betjene komfyrtoppen.
• Hvis du deaktiverer komfyrtoppen med
OffSound Control (Deaktivering og
aktivering av lydene)
Deaktivering av lydene
Deaktiver maskinen.
Berør
slukker. Berør
den er på. Berør
Når denne funksjonen er på, hører du lyder
bare når:
•
du berører
• Tidsuret kommer ned
• Tidsuret med nedtelling kommer ned
• du legger noe på betjeningspanelet.
Aktivering av lydene
Deaktiver maskinen.
Berør
slukker. Berør
di lyden er av. Berør
på.
i 4 sekunder. Indikatoren ten-
.
. Ikke still
i 4 sekunder.
.
. Indikato-
i 4 sekunder. Still inn effekt-
, blir barnesikringen aktiv igjen.
i 3 sekunder Displayene lyser og
i 3 sekunder. lyser, ly-
, lyser, lyden er av.
i 3 sekunder Displayene lyser og
i 3 sekunder. lyser, for-
, lyser. Lyden er
NYTTIGE TIPS OG RÅD
Bruk egnede kokeredskaper til induksjonskokesonene.
Kokeredskaper for
induksjonskokesoner
Viktig Ved induksjonskoking generer et
kraftig elektromagnetisk felt varme i
kokeredskapet nesten momentant.
Kokekarets materiale
•
riktig: støpejern, stål, emaljert stål, rustfritt stål, en bunn med flere lag (merket
med dette av fabrikanten).
• feil: aluminium, kobber, messing, glass,
keramikk, porselen.
Kokeredskapet er riktig for
induksjonskoketopp hvis …
• ... litt vann koker veldig raskt på en sone
med høyeste effekttrinn.
Page 19

electrolux 19
• ... en magnet fester seg til bunnen av kokeredskapet.
Kokeredskapets bunn må være så
tykk og jevn som mulig.
Kokekarets dimensjoner : induksjonskokesonene tilpasser seg til dimensjonen på kokekarets bunn automatisk.
Men den magnetiske delen av bunnen
til kokekaret må ha en minimunsdiameter på ca. 3/4 av kokesonene.
Lyder under drift
Hvis du kan høre
• knekkelyder: kokeredskapet er laget av
forskjellige materialer (Sandwichkonstruksjon).
• plystrelyder: to eller flere kokesoner er innstilt på høye effekttrinn og kokereskapet
er laget av forskjellige materialer (Sandwichkonstruksjon).
Ef-
fekttrinn
Holde ferdig tilberedt mat varm etter be-
-1
1-2 Hollandaise-sause, smelte: smør, sjoko-
1-2 Stivning: Eggeomelett, eggestand 10-40
2-3 Svelling av ris og melkeretter, varming
3-4 Dampkoke grønnsaker, fisk, kjøtt 20-45
4-5 Dampkoke poteter 20-60
4-5 Tilberede større matvaremengder, gryte-
6-7 Varsom steking: schnitzel, cordon bleu
7-8 Steking, potetlapper, hoftestykker, ste-
9 Koke opp mye vann, koke pasta, brune kjøtt (gulasj, grytestek), frityrkoke pommes frites
lade, gelatin
av ferdigretter
retter og supper
av kalv, koteletter, kjøttkaker, pølser, lever, sausejevning, egg, pannekaker,
smultringer
ker
Brukes for: Tid Tips
Powerfunksjonen egner seg for oppvarming
av mye vann.
• summelyder: du bruker høye effekttrinn.
• klikkelyder: det skjer elektriske koplinger.
• brumming, during: viften er aktiv.
Lydene er normale og henviser ikke til
feil.
Energisparing
• Legg om mulig alltid et lokk på kokeredskapet.
• Sett kokeredskapet på kokesonen
før du slår kokesonen på.
Öko Timer(Øko-tidsur)
For energisparing, koples varmeelementet for kokesonen av før tiden er ute.
Hvor mye tiden reduseres avhenger av
effektnivå og tilberedningstid.
Eksempler på tilberedningsmåter
Opplysningene i tabellen er kun veiledende.
hov
5-25 min Rør av og til
min
25-50
min
min
min
60-150
min
etter be-
hov
5-15 min Snu etter halve tiden
Dekk til maten
Tilberedes med lokk
Tilsett minst dobbelt mengde væske til risen, melkeretter omrøres av
og til
Tilsett noen få spiseskjeer væske
Bruk maks. ¼ l vann for 750 g poteter
Opptil 3 l væske pluss ingredienser
Snu etter halve tiden
Informasjon om akrylamider
Viktig Ifølge ny vitenskapelig viten kan
akrylamider utgjøre en helsefare når det
stekes ved høy temperatur (særlig mat som
inneholder stivelse). Vi anbefaler derfor at
Page 20

20 electrolux
du tilbereder maten ved så lav temperatur
som mulig og ikke steker den for hardt.
STELL OG RENGJØRING
Rengjør apparatet etter hver bruk.
Bruk alltid kokeredskaper med ren bunn.
Advarsel Skarpe og skurende
rengjøringsmidler skader apparatet.
For din sikkerhet, ikke rengjør apparatet med damp eller høytrykkspyler.
Striper eller mørke flekker i glasskeramikken påvirker ikke koketoppens funksjon.
Fjerne smusset:
1. – Fjern straks: smeltet plast, plastfolie
og mat som inneholder sukker. Hvis ik-
ke, kan smuss føre til at koketoppen
skades. Bruk spesialskrape til glasset.
Plasser skrapen på glassflaten i skarp
vinkel, og skyv bladet bortover flaten.
– Etter at toppen er avkjølt fjernes:
kalkringer, vannringer, fettflekker, blanke metalliske misfarginger. Bruk et
spesialrengjøringsmiddel som er egnet for glasskeramikk eller rustfritt stål.
2. Rengjør koketoppen med en fuktig klut
og litt rengjøringsmiddel.
3. Til slutt gnir du koketoppen helt tørr
med en ren klut.
HVA MÅ GJØRES, HVIS...
Problem Mulig årsak og løsning
Du kan ikke aktivere eller betjene koketoppen.
Et lydsignal høres (6 ganger) og
toppen slås av, eller et signal høres mens toppen er avslått
Restvarmeindikatoren vises ikke. Kokesonen er ikke varm fordi den bare har vært i bruk en kort
Det høres et signal og koketoppen aktiveres og deaktiveres
igjen. Etter 5 sekunder høres enda et lydsignal.
Effekttrinnet skifter. Strømstyringen er aktiv. Se avsnittet "Strømstyring".
vises.
og nummer vises.
• Du berørte 2 eller flere sensorfelt samtidig. Berør bare ett sensorfelt.
• Det er vann eller fettsprut på betjeningsfeltet. Tørk av betjeningsfeltet.
•
Barnesikringen eller tastelåsen eller
"Bruke komfyren".
• Aktiver toppen igjen og still inn effekttrinn innen 10 sekunder.
Du dekket til et eller flere sensorfelt. Avdekk sensorfeltene.
stund. Hvis kokesonen bør være varm, snakk med kundeservice.
Du dekket over . Rydd sensorfeltet.
• Ingen kokekar på varmesonen. Sett kokeredskap på kokesonen.
• Feil kokeredskap. Bruk riktig kokeredskap.
• Diameteren på kokekarets bunn er for liten for kokesonen. Flytt
kokeredskapet til en mindre kokesone.
• Den automatiske utkoplingen er aktiv. Slå toppen av og på igjen.
• Overopphetingsbeskyttelsen for kokesonen er aktiv. Slå av kokesonen. Slå kokesonen på igjen.
Det er en feil i toppen.
Kople den fra strømnettet en stund. Kople fra sikringen i husets
sikringsskap. Kople til igjen. Hvis
deservice.
er aktivert. Se kapittelet
vises igjen, snakk med kun-
Page 21

Problem Mulig årsak og løsning
vises.
Det kommer ingen lydsignaler
når du berører betjeningspanelet.
Det er en feil i koketoppen, fordi et kokekar har kokt tørt eller du
ikke bruker riktig kokekar. Overopphetingsbeskyttelsen for kokesonen er aktiv. Den automatiske utkoplingen er aktiv.
Slå av toppen. Ta av det varme kokekaret. Slå på kokesonen
igjen etter ca. 30 sekunder.
katoren kan fortsette å lyse. Kjøl ned kokekaret og sjekk avsnittet
"Kokekar for induksjonskokesoner".
Lydsignalene er deaktivert. Aktiver lydsignalene.
Hvis du har prøvd løsningsforslagene over
og ikke kan løse problemet, snakk med forhandleren eller serviceavdelingen. Oppgi
opplysningene på typeskiltet, tresiffret bokstavkode for den glasskeramiske overflaten
(den er på hjørnet av kokeflaten) og en feilmelding som vises.
MILJØVERN
Symbolet på produktet eller på
emballasjen viser at dette produktet ikke
må behandles som husholdningsavfall. Det
skal derimot bringes til et mottak for
resirkulering av elektrisk og elektronisk
utstyr. Ved å sørge for korrekt avhending av
apparatet, vil du bidra til å forebygge de
negative konsekvenser for miljø og helse
som gal håndtering kan medføre. For
nærmere informasjon om resirkulering av
dette produktet, vennligst kontakt
electrolux 21
skal da forsvinne, restvarmeindi-
Ved feil bruk, er hjelp av serviceverksted eller forhandler ikke gratis, selv innenfor garantiperioden. Anvisninger om kundeservice og
garantibetingelser finner du i garanti-heftet.
kommunen, renovasjonsselskapet eller
forretningen der du anskaffet det.
Emballasjemateriale
Embalasjen er miljøvennlig og resirkulerbar. Deler av plast er merket med:
>PE<,>PS<, osv. Kast emballasjematerialene som husholdningsavfall i riktig avfallsbeholder ved kommunens avfallsinnsamlingsstasjon.
Page 22

22 electrolux
Electrolux. Thinking of you.
Ta del av våra tankegångar på www.electrolux.com
INNEHÅLL
Säkerhetsinformation 22
Installationsanvisningar 23
Produktbeskrivning 25
Instruktioner för användning 26
SÄKERHETSINFORMATION
För din egen säkerhet och för att du
skall kunna använda diskmaskinen på
korrekt sätt är det viktigt att du noggrant läser igenom denna bruksanvisning innan du installerar och använder
diskmaskinen. Förvara bruksanvisningen nära till hands och se till att den också medföljer diskmaskinen om du flyttar eller säljer den. Alla användare måste ha fullgod kännedom om användningen av diskmaskinen och dess säkerhetsfunktioner.
Allmän säkerhet
Varning Personer (inklusive barn) med
nedsatt fysisk, sensorisk eller mental
förmåga, eller om de har bristande
erfarenhet och kunskap, får inte
använda denna produkt. De skall
övervakas eller instrueras vid
användning av produkten av en person
som ansvarar för deras säkerhet.
Barnsäkerhet
• Endast vuxna personer får använda denna produkt. Barn skall övervakas så att
de inte leker med produkten.
• Håll allt förpackningsmaterial utom räckhåll för barn. Risk för kvävning föreligger.
• Håll barn borta från produkten när den är
påslagen.
Varning Aktivera barnlåset för att
förhindra att småbarn eller husdjur
oavsiktligt sätter på produkten.
Säkerhet under användning
• Ta bort allt förpackningsmaterial, dekaler
och folier från produkten före användning.
• Stäng av kokzonerna efter varje användningstillfälle.
Råd och tips 28
Underhåll och rengöring 30
Om maskinen inte fungerar 30
Miljöskydd 31
Med reservation för ändringar
• Risk för brännskador! Lägg inte metallföremål såsom bestick eller kokkärlslock på
kokzonerna eftersom de kan bli heta.
• Användare som har en pacemaker implanterad måste hålla överkroppen på minst
30 cm avstånd från kokzoner som är påslagna.
Varning Brandrisk! Överhettade fetter
och oljor kan snabbt fatta eld.
Korrekt användning
• Övervaka alltid produkten under användning.
• Använd bara produkten för matlagning i
ett hushåll!
• Använd inte produkten som arbets- eller
avlastningsyta.
• Placera inte lättantändliga vätskor och material, eller smältbara föremål (plast eller
aluminium), på eller i närheten av produkten.
•Var försiktig när du ansluter produkten till
eluttag i närheten. Låt inte elektriska ledningar vidröra produkten eller heta kokkärl. Låt inte elektriska ledningar trassla in
sig.
Så här undviker du skador på produkten
• Ytan kan skadas om föremål eller kokkärl
faller på glaskeramiken.
• Kokkärl tillverkade av gjutjärn, gjuten aluminium eller med skadad botten kan repa
glaskeramiken om de dras över ytan.
• Låt inte kokkärl torrkoka för att undvika
skador på kokkärlen och glaskeramiken.
• Använd inte kokzonerna utan kokkärl eller
med tomma kärl.
• Täck aldrig någon del av produkten med
aluminiumfolie.
Page 23

electrolux 23
• Blockera inte ventilationsutrymmet på 5
mm mellan arbetsytan och produktens
front under arbetsytan.
INSTALLATIONSANVISNINGAR
Före installationen bör du anteckna
serienumret (Ser. Nr.) från typskylten.
Typskylten finner du på produktens
nedre ram.
EHD80170P
58 GBD C2 AU
ELECTROLUX
220-240 V 50-60 Hz
Säkerhetsföreskrifter
Varning Dessa måste du läsa!
Kontrollera att produkten inte har skadats under transporten. Nätanslut inte
produkten om den är skadad. Kontakta
vid behov återförsäljaren.
Endast en auktoriserad servicetekniker
får installera, ansluta eller reparera denna produkt. Använd endast originaldelar vid reparationer och utbyten.
Inbyggnadsprodukter får endast användas efter installation i lämpliga inbyggnadsenheter och arbetsbänkar enligt
gällande standarder.
Modifiera inte denna produkt och ändra
inte dess specifikationer. Det finns risk
för personskador och skador på produkten.
Gällande lagar, förordningar, direktiv
och standarder i landet där produkten
används måste följas (t.ex. säkerhetsbestämmelser, regler för kassering och
återvinning och elektriska säkerhetsbestämmelser)!
Minsta avstånd till andra apparater och
enheter skall observeras!
Installera skydd mot elektriska stötar. Installera exempelvis alltid lådorna med
en skyddsskiva direkt under produkten!
Skydda kanterna i arbetsskivans urtag
mot fukt med ett lämpligt tätningsmedel!
949 594 166 01
Induction 7,4 kW
7,4 kW
Varning Om ytan är spräckt, koppla
loss produkten från eluttaget för att
undvika elektriska stötar.
Täta produkten mot arbetsskivan, så
att det inte blir några springor, med ett
riktigt tätningsmedel!
Skydda produktens undersida mot
ånga och fukt, till exempel från en diskmaskin eller ugn!
Installera inte produkten intill dörrar eller
under fönster! Annars kan heta kokkärl
slås ned från hällen när dörrar eller fönster öppnas.
Varning Risk för skador på grund av
elektrisk ström. Följ noga
instruktionerna om elektriska
anslutningar.
• Nätanslutningsplinten är strömförande.
• Gör nätanslutningsplinten strömlös.
• Installera korrekt för att skydda mot elektriska stötar.
• Lösa eller felaktigt anslutna stickkontakter
eller eluttag kan orsaka överhettning i
kopplingsplinten.
• En behörig elektriker skall installera klämanslutningarna korrekt.
• Dragavlasta nätkabeln.
• Använd en nätkabel av typ H05BB-F
Tmax 90 °C (eller högre) för anslutning till
en eller två faser.
• Byt ut en skadad nätkabel mot en specialkabel (typ H05BB-F Tmax 90 °C eller högre). Kontakta vår lokala serviceavdelning.
Den elektriska installationen måste förses
med en frånskiljare som kan göra produkten strömlös i alla poler med en kontaktseparation på minst 3 mm.
Installationen måste ha korrekta isoleringsanordningar: strömbrytare, säkringar (säkringar av skruvtyp skall tas ur hållaren), jordfelsbrytare och kontaktorer.
Page 24

24 electrolux
Montering
min.
50 mm
min.
5 mm
min. 500 mm
min.
50 mm
=
R 5mm
490
+1
=
mm
min.
750
600mm
+1
mm
min.
25 mm
min.
5 mm
min.
38 mm
min.
5 mm
20 mm
Om du använder en skyddsbox "Probox" (tillbehör), är inte ventilationsutrymmet på 5 mm framtill och skyddsplåt direkt under produkten nödvändigt.
Page 25

PRODUKTBESKRIVNING
Beskrivning av hällen
21
180
mm
180
mm
145
mm
Beskrivning av kontrollpanelen
300
mm
electrolux 25
1 Induktionskokzon 1800 W, med effekt-
funktion 2800 W
2 Induktionskokzon 2400 W, med effekt-
funktion 3700 W
3 Kontrollpanel
4 Induktionskokzon 1400 W, med effekt-
funktion 2500 W
5 Induktionskokzon 1800 W, med effekt-
funktion 2800 W
345
1
2
12
4
3
5
10
6 7
9
811
Använd touchkontrollerna för att manövrera produkten. Indikeringar, displayer
och ljudsignaler markerar vilka funktioner som är aktiverade.
Touchkontroll Funktion
1
2
3
Timerindikeringar för kokzoner Visar vilken kokzon tiden är inställd för
4
Timerdisplay Visar tiden i minuter
5
Värmelägesdisplay Visar det inställda värmeläget
6
7
8
Inställningslist Ställer in värmen
9
Sätter på och stänger av hällen
Aktiverar och avaktiverar funktionslåset eller barnlå-
set
Aktiverar effektfunktionen
Visar att:
• det inte står något kokkärl på kokzonen
• kokkärlet är olämpligt att använda
• säkerhetsavstängningen är aktiverad
Visar att en kokzon fortfarande är varm
Page 26

26 electrolux
Touchkontroll Funktion
10
11
12
/
+ en siffra på timerdisplayen visar
att ett feltillstånd har inträffat.
Restvärmeindikator
Ökar eller minskar tiden
För att välja kokzon
Sätter på och stänger av STOP+GO
Induktionskokzonerna skapar den värme
som behövs för tillagningen direkt i kokkärlets botten. Glaskeramiken värms upp av restvärmen hos kokkärlet.
Varning Risk för brännskador på
grund av restvärme!
INSTRUKTIONER FÖR ANVÄNDNING
På och Av
Tryck på
i 1 sekund för att sätta på eller
stänga av produkten.
Säkerhetsavstängning
Funktionen stänger av hällen automatiskt
och om:
• Alla kokzoner är avstängda.
• Du inte ställer in ett värmeläge när du har
satt på hällen.
• En touchkontroll är täckt av ett föremål
(t.ex. ett kokkärl eller en trasa) längre än
Tider för säkerhetsavstängning
Värmeläge
Stängs av efter 6 timmar 5 timmar 4 timmar 1,5 timma
1-2 3-4 5 6-9
Värmeläge
10 sekunder. Ljudsignalen avges tills du
avlägsnar föremålet.
• Hällen blir för het (.ex. om ett kokkärl kokar torrt). Innan du använder hällen igen
måste kokzonen kallna.
• Du använder ett olämpligt kokkärl. Symbolen
tänds och efter 2 minuter
stängs kokzonen av automatiskt.
• Du inte stänger av en kokzon eller ändrar
värmeläget. Efter en stund tänds symbo-
och hällen stängs av. Se tabellen.
len
Tryck på . Indikatorn blinkar. Ställ in ett
värmeläge (1-8). Indikatorn för det valda vär-
meläget tänds. Indikatorn ovanför
och slocknar sedan efter en stund.
Tiden för snabbuppvärmningen varierar för
olika värmelägen.
tänds
Tryck på inställningslisten vid önskat värmeläge. Värmelägesindikatorerna tänds.
Snabbuppvärmning
Snabbuppvärmningen ställer in det högsta
värmeläget under en viss tid och minskar sedan till den inställda nivån.
Page 27

11
00
00
10
9
8
7
6
5
4
3
2
1
0
123456789
Sätta på / stänga av effektfunktionen
Effektfunktionen gör mer effekt tillgänglig för
induktionskokzonerna. Effektfunktionen är
aktiverad i högst 10 minuter. Därefter ställs
kokzonen automatiskt in på det högsta värmeläget (9). För att aktivera funktionen,
tryck på
. Indikatorn ovanför tänds. För
att stänga av funktionen, tryck på ett värmeläge (1-9).
Effektreglering
Effektregleringen delar upp effekten mellan
två kokzoner parvis (se figur). Effektfunktionen ökar effekten till den högsta nivån för
en kokzon i paret och minskar automatiskt
effektnivån för den andra kokzonen. Displayen för den reducerade kokzonen växlar.
electrolux 27
Använda timern
Nedräkningstimer
Använd nedräkningstimern för att ställa in
hur länge kokzonen ska vara i drift vid ett tillagningstillfälle.
Ställ in nedräkningstimern efter valet
av kokzon.
Du kan ställa in värmeläget innan eller efter
att du har ställt in timern.
•
Välj kokzon: tryck på
upprepade
gånger tills indikeringen för den önskade
kokzonen tänds.
•
Starta nedräkningstimern: tryck på
på timern för att ställa in tiden ( 00 -
99
minuter). När indikeringen för kokzonen
blinkar långsammare räknas tiden ned.
•
Kontroll av återstående tid: välj kokzonen med
. Kokzonens indikering blinkar fortare. På displayen visas den återstående tiden.
•
Ändra nedräkningstimern: välj kokzonen med
•
Stoppa timern: välj kokzonen med
Tryck på
nas ned till
tryck på eller .
.
. Den återstående tiden räk-
. Kokzonens indikering
slocknar. För att stänga av kan du även
trycka på
och samtidigt.
När tiden har förflutit hörs ljudet och
blinkar. Kokzonen stängs av.
•
Stänga av ljudet: tryck på
CountUp Timer (Tidtagningstimer)
Använd CountUp Timer för att kontrollera
hur länge kokzonen är igång.
• Val av kokzon (om mer än en kokzon
är i drift): tryck på
upprepade gånger
tills indikeringen för den önskade kokzonen tänds.
•
Aktivera CountUp Timer: tryck på
på timern tänds. När indikeringen för
kokzonen blinkar långsammare räknas tiden ned, och displayen växlar mellan
och tiden som gått (minuter)
• Kontroll av tiden som gått: välj kokzonen med
. Kokzonens indikering blin-
kar fortare. Displayen visar tiden som gått.
• Stoppa CountUp Timer: välj kokzonen
med
och tryck på eller för att
stänga av timern. Kokzonens indikering
slocknar.
Page 28

28 electrolux
Signalur
Du kan använda timern som en Signalur
när kokzonerna inte används. Tryck på
Tryck på
tiden. När tiden har förflutit hörs ljudet och
blinkar.
00
•
Stänga av ljudet: tryck på
STOP+GO
Funktionen
ner på det lägsta värmeläget.
När
get.
Funktionen
• För att aktivera denna funktion, tryck
• För att avaktivera denna funktion, tryck
på
tänds.
Lås
Du kan låsa kontrollpanelen, men inte
Funktionen förhindrar oavsiktliga ändringar
av vämeläget.
För att starta denna funktion, tryck på
Kontrollampan tänds.
Timern förblir på.
För att stoppa denna funktion, tryck på
Indikeringen slocknar
När du stänger av produkten stängs även
denna funktion av.
Barnlås
Denna funktion förhindrar oavsiktlig användning av hällen.
För att aktivera barnlåset:
•
Sätt på hällen med strömbrytaren
Ställ inte in något värmeläge.
•
Tryck på
eller på timern för att ställa in
ställer in alla påslagna kokzo-
är igång kan du inte ändra värmelä-
stoppar inte timerfunktionen.
. Kontrollampan tänds.
. Det tidigare inställda värmeläget
.
.
.
i 4 sekunder. Indikatorn tänds.
•
Stäng av hällen med
För att inaktivera barnlåset:
.
•
Sätt på hällen med strömbrytaren
Ställ inte in något värmeläge. Tryck på
i 4 sekunder. Indikatorn slocknar.
•
Stäng av hällen med
För att inaktivera barnlåset för ett enstaka
tillagningstillfälle:
•
Sätt på hällen med strömbrytaren
dikatorn tänds.
•
Tryck på
meläge inom 10 sekunder. Hällen kan
nu användas.
•
När du stänger av hällen med
ras barnlåset igen.
OffSound Control (Avaktivering och
aktivering av ljud)
Avaktivering av ljuden
Stäng av produkten.
Tryck på
och släcks. Tryck på
tänds, och ljudet är nu på. Tryck på .
tänds, och ljudet är nu avstängt.
När denna funktion är aktiv kan du höra ljud
när:
•
.
du trycker på
• signaluret ringer
• nedräkningstimern ringer
• du lägger något på kontrollpanelen.
Aktivering av ljuden
Stäng av produkten.
Tryck på
och släcks. Tryck på
tänds, eftersom ljudet är avstängt. Tryck på
. tänds. Ljudet är nu på.
i 4 sekunder. Ställ in ett vär-
i 3 sekunder. Displayerna tänds
i 3 sekunder. Displayerna tänds
.
.
i 3 sekunder.
i 3 sekunder.
.
. In-
aktive-
RÅD OCH TIPS
Använd induktionskokzonerna med
lämpliga kokkärl.
Kokkärl för induktionskokzoner
Viktigt Vid matlagning med induktion
genereras värme nästan omedelbart i
kokkärlet av ett kraftigt elektromagnetiskt
fält.
Kokkärlets material
•
Lämpliga: gjutjärn, stål, emaljerat stål,
rostfritt stål, botten med flera lager (märkt
som lämpligt av tillverkaren).
• Olämpliga: aluminium, koppar, mässing,
glas, keramik, porslin.
Kokkärl är lämpliga för en induktionshäll om:
• Lite vatten mycket snabbt kokar upp på
en kokzon som är inställd på det högsta
värmeläget.
• En magnet fastnar på botten är kärlet.
Page 29

electrolux 29
Kokkärlets botten skall vara så tjock
och plan som möjligt.
Kokkärlets mått: Induktionskokzonerna anpassar sig automatiskt till storleken på kokkärlets botten upp till en viss
gräns. Den magnetiska delen av kokkärlets botten måste dock ha en minsta diameter på cirka 3/4 av kokzonens storlek.
Ljud under användning
Om du hör
• knackande ljud: Är kokkärlet tillverkat av
olika material ("sandwichkonstruktion").
• vinande ljud: Använder du en eller flera
kokzoner med höga effektnivåer och kokkärlet är tillverkat av olika material ("sandwichkonstruktion").
• surrande ljud: Använder du höga effektnivåer.
• klickande ljud: Beror detta på elektriska
omkopplingar.
Vär-
melä-
ge
Varmhållning av tillagad mat efter be-
-1
1-2 Hollandaisesås, smältning: smör, chok-
1-2 Stanning: omeletter, äggstanning 10-40
2-3 Sjudning av ris och mjölkbaserade rät-
3-4 Ångkoka grönsaker, fisk, kött 20-45
4-5 Koka potatis 20-60
4-5 Tillagning av stora mängder mat, stuv-
6-7 Lätt stekning: schnitzel, cordon bleu, kot-
7-8 Hård stekning, potatiskroketter, fransys-
9 Koka stora mängder vatten, koka pasta, bryna kött (gulash, grytstek), fritera pommes frites
lad, gelatin
ter, värmning av färdiglagade rätter
ningar och soppor
letter, kroketter, korv, lever, ägg, pannkakor, munkar
ka, biff
Använd för: Tid Anvisning
Effektfunktionen är lämplig för att värma
upp stora mängder vatten.
Information om akrylamid
Viktigt Enligt de senaste vetenskapliga
• Vissland, surrande ljud: Beror detta på att
fläkten är i drift.
Dessa ljud är normala och innebär inte
att något är fel.
Spara energi
• Sätt om möjligt alltid ett lock på kokkärlet.
• Ställ kokkärlet på kokzonen innan du
sätter på den.
Öko Timer (Eco Timer)
För att spara energi stängs kokzonen
av tidigare än med en nedräkningstimer. Hur mycket uppvärmningstiden reduceras beror på tillagningsnivå och tillagningstid.
Exempel på olika typer av tillagning
Uppgifterna i tabellen är endast avsedda
som vägledning.
hov
5-25 mi-
nuter
minuter
25-50
minuter
minuter
minuter
60-150
minuter
efter be-
hov
5-15 minuter
Täck över maten
Rör om då och då
Tillaga med lock
Tillsätt minst dubbla mängden vätska som ris, rör om mjölkrätter under
tillagningen
Tillsätt några matskedar vätska
Använd max. 1/4 liter vatten för 750
gram potatis
Upp till 3 liter vätska plus ingredienser
Vänd efter halva tiden
Vänd efter halva tiden
bryns hårt (speciellt om de innehåller
stärkelse), vilket kan utgöra en hälsorisk. Vi
rekommenderar därför tillagning vid låga
temperaturer och att inte bryna mat för hårt.
rönen kan akrylamid bildas om livsmedel
Page 30

30 electrolux
UNDERHÅLL OCH RENGÖRING
Rengör produkten efter varje användningstillfälle.
Använd alltid kokkärl med ren botten.
Varning Vassa föremål och repande
rengöringsmedel skadar produkten.
Av säkerhetsskäl får produkten inte rengöras med ång- eller högtryckstvätt.
Repor eller mörka fläckar på glaskeramiken påverkar inte produktens funktion.
För att ta bort smuts:
1. –
Ta omedelbart bort: smält plast,
plastfolie och mat med socker. Smut-
sen kan skada produkten om du inte
gör detta. Använd en speciell skrapa
för glaset. Sätt skrapan snett mot glasytan och flytta bladet över ytan.
–
Avlägsna när produkten är tillräckligt sval: kalkavlagringsringar, vatten-
ringar, fettstänk, glänsande metalliska
missfärgningar. Använd ett speciellt
rengöringsmedel för glaskeramik eller
rostfritt stål.
2. Rengör produkten med en fuktig duk
och lite rengöringsmedel.
3. Torka sedan produkten torr med en
ren duk.
OM MASKINEN INTE FUNGERAR
Problem Möjlig orsak och åtgärd
Det går inte att starta eller använda produkten.
En ljudsignal avges (6 ggr.) och
produkten stängs av eller en ljudsignal avges när produkten är avstängd.
Restvärmeindikatorn tänds inte. Kokzonen är inte varm eftersom den bara har varit påslagen en
En ljudsignal avges och produkten sätts på och stängs sedan
av igen. Efter 5 sekunder avges
en ny ljudsignal.
Det inställda värmeläget växlar Effektregleringen är aktiverad. Se avsnittet "Effektreglering".
Symbolen tänds.
och en siffra tänds.
• Du har tryckt på två eller fler touchkontroller samtidigt. Tryck
bara på en touchkontroll.
• Det finns vatten eller fettstänk på kontrollpanelen. Rengör kontrollpanelen
•
Barnlåset eller funktionslåset är aktiverat eller funktionen
på. Se avsnittet "Användning av produkten".
• Sätt på produkten igen och ställ in värmeläget inom 10 sekunder.
En eller flera touchkontroller är övertäckta. Ta bort det som täcker touchkontrollerna.
kort stund. Kontakta kundtjänst om kokzonen ska vara varm.
Du har täckt över . Ta bort det som täcker touchkontrollen.
• Inget kokkärl på kokzonen. Ställ ett kokkärl på kokzonen.
• Kokkärlet är olämpligt att använda. Använd rätt typ av kokkärl.
• Diametern på kokkärlets botten är för liten för kokzonen. Flytta
kokkärlet till en mindre kokzon.
• Den automatiska avstängningen har aktiverats. Stäng av produkten och starta om den igen.
• Överhettningsskyddet för kokzonen har aktiverats. Stäng av
kokzonen. Sätt på kokzonen igen.
Det har uppstått ett fel på produkten.
Koppla loss produkten från eluttaget en stund. Slå ifrån säkri-
ngen i fastighetens elsystem. Anslut igen. Om
takta kundtjänst.
tänds igen, kon-
är
Page 31

Problem Möjlig orsak och åtgärd
Symbolen tänds.
Ljudsignaler avges inte när du
trycker på touchkontrollerna
Det har uppstått ett fel på produkten på grund av att ett kokkärl
har kokat torrt eller att du har använt ett olämpligt kokkärl. Överhettningsskyddet för kokzonen har aktiverats. Den automatiska
avstängningen har aktiverats.
Stäng av produkten. Ta bort det heta kokkärlet. Sätt på kokzo-
nen igen efter cirka 30 sekunder.
meindikatorn bör vara tänd. Låt kokkärlet kallna och kontrollera i
avsnittet "Kokkärl för induktionskokzoner" att det är lämpligt att
använda.
Ljudet är avstängt. Aktivera ljudsignalerna.
Kontakta återförsäljaren eller Kundtjänst om
du inte kan avhjälpa problemet med ovanstående förslag. Uppge data från typskylten, koden med tre siffror/bokstäver för glaskeramiken (den sitter i hörnet på hällen) och
det felmeddelande som visas.
MILJÖSKYDD
Symbolen på produkten eller
emballaget anger att produkten inte får
hanteras som hushållsavfall. Den skall i
stället lämnas in på uppsamlingsplats för
återvinning av el- och
elektronikkomponenter. Genom att
säkerställa att produkten hanteras på rätt
sätt bidrar du till att förebygga eventuellt
negativa miljö- och hälsoeffekter som kan
uppstå om produkten kasseras som vanligt
avfall. För ytterligare upplysningar om
electrolux 31
bör slockna och restvär-
Om du har hanterat hällen på fel sätt och
måste tillkalla en servicetekniker från vår
kundtjänst eller din återförsäljare är detta besök inte kostnadsfritt, inte heller under garantitiden. Anvisningar för kundservice och
garantivillkor finns i garantihäftet.
återvinning bör du kontakta lokala
myndigheter eller sophämtningstjänst eller
affären där du köpte varan.
Förpackningsmaterial
Förpackningsmaterialen är miljövänliga
och kan återvinnas. Plastdelarna är
märkta med t.ex. >PE<,>PS<, etc. Kassera förpackningsmaterialen i avsedda
behållare på kommunens sopstationer.
Page 32

www.electrolux.com/shop
892933182-A-052010
 Loading...