

Page 1
Page 2

- 2 -
For the User
Safety instructions 3
Information de sécurité 4
General advice 5
Damage in transit 5
Applications 5
Protecting the machine against freezing 5
Operating instructions
Test the machine by running a cycle 6
Care and cleaning 7
Rinse conditioner dispenser 7
Spray arm 7
Coarse strainer 7
Fine filter 7
Detergent dispenser 7
Cleaning 7
Loading 8
Controls and programme table 9
In the event of a fault 13
Trouble shooting list 13
Service and spare parts 14
For the Installer
Installation 10
Countertop Use 10
Positioning 10
Water supply 10
Discharge connection 10
Electrical connection 10
Built-In Use 11
Installation Tips 11
Water supply 11
Discharge connection 12
Electrical connection 12
Technical data 14
Contents
Page 3

Please read all instructions before using your
dishwasher. Use your dishwasher only as instructed in this Use and Care Manual. Installation
and grounding instructions are included with
your new diswasher for the installer´s reference.
• This dishwasher is designed to operate on regular
house current (115 V, 60 Hz). Use a separate circuit
equipped with a 15 ampere fuse or circuit breaker.
The appliance must be grounded. In the event of a
malfunction or breakdown, grounding will reduce
the risk of electric shock by providing a path of
least resistance for electric current. This appliance
is equipped with a cord having an equipmentgrounding conductor and a grounding plug. The
plug must be plugged into an appropriate outlet
that is installed and grounded in accordance with
all local codes and ordinances.
• Do not operate dishwasher unless metal cabinet
wrapper is properly in place. Electrical shock may
occur from exposed wires or other electrical components.
• Dispose of discarded appliance and shipping or
packing material properly.
• Keep young children and infants away from the
dishwasher when it is operating.
• Do not abuse, sit on, or stand on the door or dish
rack of the dishwasher.
• To reduce the risk of injury, do not allow children to
play in or on a dishwasher.
• Do not touch the heating element during or immediately after use.
• USE ONLY DETERGENTS OR WETTING
AGENTS RECOMMENDED FOR USE IN A
DISHWASHER AND KEEP THEM OUT OF
THE REACH OF CHILDREN.
• Always disconnect electrical power to the dishwasher before servicing.
• Improper connection of the equipment-grounding
conductor can result in a risk of electric shock.
Check with a qualified electrician or service representative if you are in doubt whether the appliance
is properly grounded. Do not modify the plug provided with the appliance; if it will not fit the outlet, have
a proper outlet installed by a qualified electrician.
• To avoid entrapment and/or suffocation, remove
the door from any dishwasher that is discarded or
otherwise not in use.
• Do not wash plastic items unless marked ”dishwasher safe” or the equivalent. Check with the
manufacturer for recommendations, if not marked.
Items that are not dishwasher safe may melt and
create a potential fire hazard.
• Under certain conditions, hydrogen gas may be
produced in a hot water system that has not been
used for 2 weeks or more. HYDROGEN GAS IS
EXPLOSIVE. If the hot water system has not been
used for such a period, before using the dishwasher, turn on all hot water faucets and let the water
flow from each for several minutes. This will release
any accumulated hydrogen gas. HYDROGEN
GAS IS FLAMMABLE. Do not smoke or use an
open flame during this time.
• Do not tamper with the controls. Any improper
adjustments may subject the user to risk of injury
or electrical shock.
• Locate sharp items so that they are not likely to
damage the door seal and load sharp knives with
the handles up to reduce the risk of cut-type injuries.
• To prevent children from opening the dishwasher
door, close and latch the door when not loading or
unloading.
• Do not use this dishwasher for any purpose other
than its intended use.
SAVE THESE INSTRUCTIONS
The instructions appearing in this Use & Care Manual are not meant
to cover every possible condition and situation that may occur.
Practice common sense and caution when installing, operating and
maintaining any appliance.
- 3-
Safety instructions
DANGER
WARNING
Page 4

- 4 -
Lisez attentivement cette notice et prenez connaissance des indications, conseils et mises en
garde concernant l’installation et l’utilisation de
votre lave-vaisselle. Pour éviter les erreurs et
accidents inutiles, il est important que tous ceux
qui utiliseront le lave-vaisselle en connaissent bien
le fonctionnement et les dispositifs de sécurité.
• Cet appareil doit être mis à la terre. En cas de
mauvais fonctionnement ou de bris de l’appareil, la
mise à la terre réduira les risques de choc électrique
en offrant un parcours de moindre résistance au
courant électrique. Cet appareil est pourvu d’un
cordon à conducteur de terre et d’une fiche de mise
à la terre. Brancher la fiche dans une prise installée
adéquatement et mise à terre conformément à tous
les codes et réglements locaux.
• Ne faites pas fonctionner le lave-vaisselle si tous
le panneaux du bâti ne sont pas en place.
• Le lave-vaisselle doit être utilisé par des adultes. Ne
laissez pas les enfants jouer avec les commandes.
• Evitez de vous asseoir ou de monter sur la porte
du lave-vaisselle.
• Pour éviter tout risque d’accident, ne laissez pas
les enfants jouer dans ou sur le lave-vaisselle.
• Ne Touchez pas l’élément chauffant pendant le
fonctionnement de l’appareil ou immédiatement
après.
• UTILISEZ LES DETERSIFS RECOMMANDES
POUR LAVE-VAISSELLE ET GARDEZ-LES HORS
DE LA PORTEE DES ENFANTS.
• Débrancher la machine avant et pendant toute
intervention technique (titer par exemple la fiche
hors de la rise murale).
• Une mauvaise connexion du conducteur de terre
peut présenter des risques de choc électrique.
Consulter un électricien ou un technicien qualifiés
si vous n’êtes pas certain que l’appareil est mis à
terre adéquatement. Ne pas modifier la fiche de
l’appareil. Si elle ne pénètre pas bien dans la prise,
faire installer une prise adéquate pas un électricien
qualifié.
• Enlevez la porte du lave-vaisselle lorsque vous le
remplacez ou le mettez au rebus.
• Ne pas laver d’articles en plastique à moins qu’ils
ne soient marqués ”Peut aller au lave-vaisselle” ou
l’équivalent. Si l’article ne porte aucune indication,
vérifiez auprés du fabricant.
• Dans certaines conditions, de l’hydrogène peut se
former dans un réseau d’eau chaude inutilisé depuis
deux semaines ou plus. L’HYDROGENE EST UN
GAZ EXPLOSIF. Si le système d’eau chaude n’a
pas èté utilisé depuis un certain temps, laissez
couler l’eau chaude des robinets pendant quelques
minutes avant de faire fonctionner le lave-vaisselle.
Cette mesure permettra à l’hydrogène de s’évaporer .
Ce gaz étant inflammable, attention de ne pas fumer
ni utiliser de flamme nue pendant cette période.
• Ne jouez pas avec les commandes.
• Placez les objets coupants de façon qu’ils ne puissent endommager le sceau de la porte. Placez les
couteaux le manche vers le haut de façon à ne pas
vous couper.
• N’utilisez le lave-vaisselle que pour laver la vaisselle.
CONSERVER CES INSTRUCTIONS
Information de sécurité
DANGER
AVERTISSEMENT
Page 5
- 5 -
Damage in transit
If you discover that the machine has suffered any
damage in transit to you, this should be reported
immediately to the firm which delivered it.
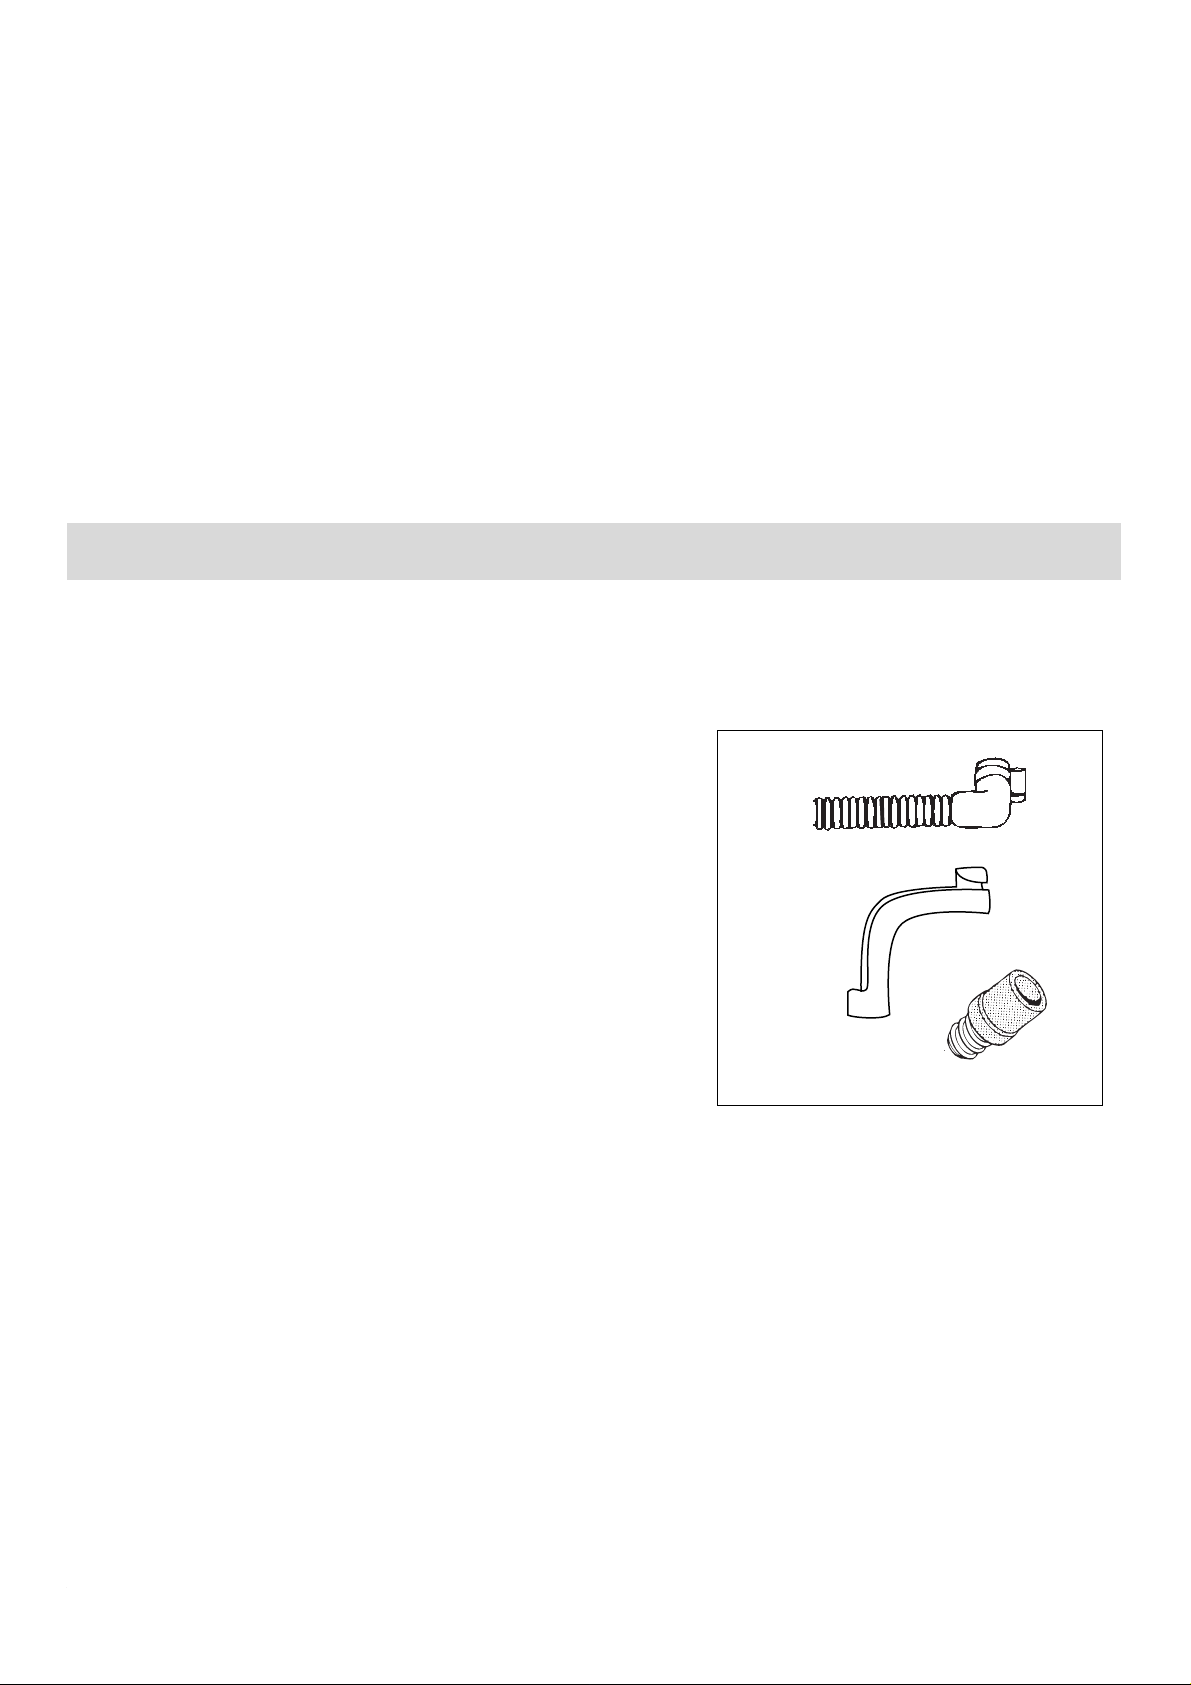
Check that the following accessories are supplied with
the dishwasher when you unpack it:
- Discharge hose (1)
- Hose clip (2)
- Elbow for discharge hose (3)
- Drain hose adapter (4)
Applications
This dishwasher is designed for washing household
utensils only. Using it for other purposes may damage
it and invalidate the guarantee.
Protecting the machine against freezing
Turn off the water supply to the machine. Undo and
drain the inlet and discharge hoses. To empty the inlet
valve: set the machine for a programme and run
machine for a few seconds.
General advice
1
2
3
THANK YOU for choosing a new Origo dishwasher. We hope it will give you every
satisfaction.
Please read through these instructions carefully. You will then quickly learn how to use
the machine and make the most of its features. Pull up a chair beside the machine so
that you can familiarise yourself with the various controls and functions as you read
the instructions.
Note! Save these instructions. Both you and any future owners will find them
useful to refer to periodically, as this dishwasher is made to last for many years.
4
Page 6

- 6 -
Scrape or rinse off solid food
remnants.
Load the dishwasher.
(See page 8: "LOADING")
Fill up the rinse conditioner
dispenser.
Put the correct amount of
detergent on the inner door.
Close the door.
Start the dishwasher by turning the programme knob to
the start position.
Check the strainers to see
whether they need cleaning
when the dishwasher has
finished the wash.
Operating Instructions
2.
1.
3.
4.
5.
Test the machine by running a cycle
Page 7

- 7 -
1
2
3
4
5
Care and cleaning
Rinse conditioner dispenser (1)
Use of a rinse conditioner will result in cleaner and
faster drying of the load, since it helps water and soil
to run off. Too much conditioner may result in streakiness, too little may cause white spots. The dispenser holds about 140 ml. This is enough for
40-70 wash cycles, depending on the dosage setting.
When the rinse conditioner level is approaching the
bottom of the scale it is time to refill the dispenser.
Swivel out the filler trough and carefully fill up with
rinse conditioner until the level reaches the red mark
on the level indicator tube. Do not overfill, and carefully wipe off any spillage to prevent sudsing problems. Don't forget to close the filler trough afterwards. Adjust the dosage setting according to the
hardness of the water. Begin with the lowest dosage
setting and increase as necessary by turning the
arrow clockwise. Note! Do not fill the rinse conditioner dispenser with liquid detergent.
Spray arm (2)
It is important to keep all the holes in the spray arm
clear. A clogged hole can seriously affect washing
efficiency. If the spray arm needs cleaning, unscrew
the nut clockwise (left-hand thread) and lift off the
spray arm. Clear the holes and shake out any food
remnants.
Coarse strainer (3)
The purpose of the coarse strainer is to catch large
objects such as toothpicks and pieces of eggshell.
Make sure that the strainer is always clean. Lift it out
and rinse it under running water whenever necessary.
Fine filter (4)
It is just as important to keep this filter clean. A dirty
or clogged filter will always impair washing efficiency.
The fine filter can easily be removed for cleaning
when you have removed the coarse strainer.
Detergent dispenser (5)
For a normal load pour about 1-2 tablespoons of
granular dishwasher detergent on the inner door.
Cleaning
If hard water causes lime deposit buildup, e.g. on
the heating element, follow these instructions:
1. Run on Wash cycle.
2. After dishwasher begins to fill, open door and
pour 1/4 cup of white vinegar into dishwasher.
Do not add dishes or detergent.
3. Run through the full cycle.
Page 8

- 8 -
Loading
How to load the dishwasher
The illustration shows the machine loaded with five place settings.
Your own dishes are not likely to be identical to this load, but if
you follow the advice below we are sure you will be pleased with
the results.
- Always place glasses, cups and bowls upside down.
- Incline deep dishes (soup plates etc.) so that the water can run
off when drying.
- Make sure that the dishes do not rest against each other. This
is particularly important in regard to the cutlery basket - nested
spoons, etc. simply cannot be properly washed. MAKE SURE
THAT THE WATER CAN GET AT ALL THE SOILED SURFACES.
- Make sure that cutlery with slender handles and other items do
not protrude through the openings in the basket and prevent the
spray arm from rotating.
- Never put silver and stainless steel objects together. When
these metals come into contact with each other a chemical
reaction occurs which stains the silver.
- China with a pattern applied on top of the glaze may not be suitable for machine washing as the colours may fade and lose
their lustre. The same applies to cutlery with wooden or plastic
handles.
- Not all plastic articles are machine washable. If you are in
doubt as to whether your plastic-ware can be washed in the
machine, we suggest you check by washing a single item or
else wash them by hand.
MAKE SURE YOU ALWAYS BUY ARTICLES THAT ARE
MACHINE WASHABLE IN FUTURE.
- Aluminium becomes dull and tarnished when machine washed.
The machine gets it clean, but at the expense of its appearance.
- Substances such as ketchup containing strong colouring
agents can cause temporary discoloration in the machine.
Rack and basket
Cutlery basket
Dish rack
Page 9

1 Selector knob
To start the machine:
- Turn the selector knob to the programme start.
The ON/OFF switch is built into the programselector.
To isolate the dishwasher from the electric circuit
completely, unplug it from the wall socket.
Door lock
To open the door, press the handle down.
Avoid opening the door when the machine is running.
If you open the door a little when the dishwasher has
finished washing, the dishes will be just as
dry after a short while.
- 9 -
Controls and programme table
1
Page 10

- 10 -
Installation
Countertop Use
Positioning
In its standard version the machine is intended for installation on a kitchen counter or worktop.
TO FUNCTION PROPERLY THE MACHINE MUST BE
FULLY LEVEL. Its height can be adjusted with the adjus-
table fe e t ( 8 mm each).
Water supply
The temperature of the water supply should not exceed
150° F and the pressure should be between 5 - 142
lbs/sq inch. It is important to have a faucet positioned
close to the machine and with easy access. Special threaded mixer taps are available, as well as adaptors for
older mixer taps. Consult your local plumbing supplier.
Insert the combination rubber washer/filter and connect
the inlet hose (1) to a tap with a 3/4" pipe thread. The inlet
hose must not be joined onto any form of extension hose.
If it is too short, the entire hose must be replaced with a
longer high-pressure hose, specially designed for the purpose. The machine end of this hose can be turned in any
direction. Loosen the retaining nut, turn the hose, then
retighten the nut.
A hose that attaches to a sink spray can burst if it is
installed on the same water line as the dishwasher. If your
sink has one, it is recommended that the hose be disconnected and the hole plugged.
Discharge connection
Connect the discharge hose to the pipe stub at the rear of
the dishwasher, using the hose clip supplied.
It is important to push the discharge hose (2) onto the
pipe stub as far as it will go and tighten the hose clip (3)
as hard as possible. Place the other end of the discharge
hose over the sink as illustrated.
The discharge hose must not at any point rise higher than
the top of the dishwasher. If it runs higher, operation of
the dishwasher might be impaired. It is also important to
ensure that the inside diameter of the hose is not less
than 13 mm at any point. If the discharge hose is too long
it can easily be cut to the right length.
- Cut the hose to a suitable length, using a sharp knife.
- Fit the elbow supplied onto the end of the hose.
Electrical connection
The dishwasher must be connected to an grounded wall
socket which should be easily accessible and protected by
a 15 Amp fuse. Before any work is carried out on the
machine it must be isolated from the electric supply, for
example by removing the plug from the wall socket.
1
2
3
Page 11

Built-In Use
Installation Tips
Direct from the box, the dishwasher may be installed in a
built-in manner. The use of the Origo Built-In Kit is recommended.
Clean dishes require adequate hot water. Supply water temperature of 140° F (60° C) is desirable; 120° F (49° C) is
minimum; 150° F (65° C) is maximum. A minimum water
supply line of 3/8” (outside diameter is recommended. Water
pressure should be 5 - 142 PSI.
A separate 15 Amp, grounded 115 V AC electrical supply is
required.
The connection point of the discharge hose to either the sink
drain line or the disposal shall not located on a plane above
the top of the installed dishwasher . If the dishwasher drain hose
is connected to a garbage disposal for the first time, remember to knock out the plug inside the disposal inlet.
To function properly, the dishwasher must be level. Each
foot is adjustable to approximately 5/16” for this purpose.
Minimum rough-in opening dimensions are:
19” W x 19” H x 19 1/2” D. Two trim kits are available to
complete the finished look:
For cutouts to 19 3/4” use PN
DW 119 TKE; for cutouts on
standard 24” wide cabinets use PN
DW 124 TK.
If holes are necessary in cabinet partitions to access water
and drain, it is best to restrict the cutouts to 2” diameter and
locate these in the very lower back corners of the rough-in
opening.
Water Supply
The water supply temperature should be approximately 140°
F, but not to exceed 150° F. The inlet filter fitting on the dishwasher is 3/4” pipe thread.
Note: Do not use the furnished drain hose as a water
supply line or a rubber garden hose.
Copper tubing, if used, must have a minimum outside diameter of 3/8”. High pressure plastic tubing with a minimum
inside diameter of 1/4” may be used where permitted by local
plumbing codes. All tubing or hose must be free of kinks and
debris. It is recommended to flush the
water line before con-
necting it to the inlet filter connection.
It is recommended that an accessible shut-off valve be instal-
led outside the dishwasher cabinet.
- 11 -
Installation
Drain hose
hole
Connecting to Disposer
Page 12

- 12 -
Installation
Built-In Use
Installation Tips
Discharge connection
Connect the discharge hose to the pipe stub at the rear
of the dishwasher, using the hose clamp supplied.
It is important to push the drain hose onto the drain port
as far as possible.
It is recommended that the dishwasher drain be connected to either an existing sink drain or disposal. Local
codes may require that the drain line be connected to
house plumbing with a drain air cap.
The drain hose attachment point must be located on
a plane below the top surface of the dishwasher.
If the hose attachment point at the sink or disposal is
located above the drain stub on the machine, the drain
hose must have a fixed loop (secured with suitable
clamp or support) at a height above the top of the dishwasher.
Connect the 3/4” drain hose adapter to the drain hose
end. Use a drain hose clamp (not included) to connect
the hose to the sink drain or disposer. Entry direct into
the sink drain must be above the trap.
Electrical connection
The dishwasher must be connected to an grounded wall
socket, preferably on a separate circuit protected by a
15 amp fuse or circuit breaker.
Only after the dishwasher has been positioned inside its
enclosure, secured and hoses connected should electrical connection be made.
"Y" Branch
Tailpiece
Drain hose
hole
Connection to Sink Drain
max 465 mm
Page 13

- 13 -
In the event of a fault
• If water leaks from the machine • Turn off the water supply tap or stopcock
immediately and isolate the machine from the
electrical supply by removing the plug from the
wall socket.
• Check that all seals, seams and connections are
watertight.
There is always a certain risk of leakages in any machine connected to a water supply, no matter what
water safety features it may have. Therefore it is advisable always to turn off the water supply tap when the
machine is not in use.
Check the following before calling a repairman:
• Dishwasher fails to start • Is the door properly closed?
• Is the water tap or stopcock on?
• Is the dishwasher plugged in?
• Has the fuse blown?
• Water not discharged at end of cycle • Did you open the door before the cycle ended?
• Are the strainers/filters clogged?
• Is the discharge hose blocked?
• Dishes not washed satisfactorily • Has anything prevented the spray arm from
rotating?
• Were the dishes packed too close together?
• Did you use enough detergent?
(Correct amount: about 1-2 tablespoons/load)
• Clean the strainers/filters!
• Check that the rinse conditioner dispenser is not
empty.
• Check that the spray arm holes are not clogged.
• Are the strainers/filters fitted correctly in place?
• Dishes dull or streaky • Limescale from hard water has probably formed in
the machine and is being deposited on the dishes.
Buy a limescale remover and follow the instructions
on the package to descale the dishwasher.
Trouble shooting list
Page 14

If you still cannot remedy the problem after following
the steps above, call a repairman.
Service and spare parts can be ordered from your
dealer. There you will also be able to obtain advice
on how to rectify the fault yourself, if possible.
Never attempt to repair the dishwasher yourself.
Repairs carried our by unauthorised or inexperienced
persons can cause injury or other machine faults.
Before calling the dealer or a service centre, make a
note of the details on the data plate affixed to the
rear of the dishwasher. Make a note of the following:
Date of purchase .........................................
Model: .........................................
Product number: .........................................
Serial number .........................................
SAVE YOUR RECEIPT AS PROOF OF YOUR
GUARANTEE.
Technical data
Service and spare parts
Capacity: 5 place settings
Dimensions: Width 17 - 3/4”
Height 18 - 1/16”
Depth 18 - 15/16”
Weight: 33 lbs
Voltage: 115 V, single-phase, 60 Hz
Fuse: 15 A
Rating: Heating element: 600 W
Total: 680 W
Water pressure: 5 - 142 lbs / sq inch
Temperature: Max. 150° F / Min 120° F
- 14 -
Page 15

- 15 -
Page 16

99-09
 Loading...