

Page 1

ÖKO_LAVAMAT 1370
TURBO sensortronic
The ecological washer-dryer
AEG
User Instruction Book
AUS
ERFAHRUNG
GUT
Page 2
Allow me to introduce myself
Page 3

Contents
Warnings
Before installing
Warnings (washing)
Warnings (drying)
The AEG Öko-System / Ecological hints
Installation instructions
Removing the transit devices
Positioning
Connection
Electrical connection
Connection to the mains water supply
Water drainage
Brief instructions
Preliminary operations for washing
Sorting and selecting garments
Pre-treatment
Precautions
Load sizes
Selecting the programme
Programme selector/switching on
Programme phase indicator
Option buttons and functions
Detergents
Choice of detergent
Amount of detergent
Preliminary water softening
Using the detergent
Programme chart (washing)
End of programme
Special rinse
Preliminary operations for tumble drying
Protect the environment
Preparation for tumble drying
Items not suitable for tumble drying
Drying code symbols
Selecting the drying programme
Drying only
Automatic washing and drying
Drying time chart
Maintenance and cleaning
Detergent dispenser drawer
Cleaning the filter/Emergency emptying
Other
How to deal with problems...
Customer service
Technical specifications
4
4
4
5
7
9
9
10
12
12
13
14
15
16
16
16
17
17
18
18
19
20
23
23
24
24
25
26
28
28
29
29
29
30
30
31
31
33
34
36
36
37
38
39
42
43
Page 4

Warnings
Before
installing...
- Follow the instructions for installation and electrical connection.
- Do not connect the appliance if it is damaged (for example dur
ing transport).
- Any water found in the detergent dispenser drawer is there as a
result of factory testing.
- To remove any manufacturing residues from the drum and
detergent dispenser drawer, carry out a wash cycle without any
laundry, with the machine set on the 60°C coloureds pro
gramme and with 1/2 a measure of detergent.
Warnings AEG household electrical appliances comply with general techni-
(washing) cal safety manufacturing standards and with ail safety regulations
on the use of electrical appliances. However, the manufacturer is
obliged to bring the following safety points to the attention of the
user:
- Before using the appliance, make sure that the voltage and type
of current indicated on its rating plate correspond to the mains
voltage and type of current in the place where it is to be
installed. The rating plate also gives details of the electrical pro
tection required.
- If the appliance is installed in a location which is not insulated
against frost, the emergency emptying procedure (see “Emer
gency emptying”) should be used whenever there is any risk of
the temperature dropping below zero.
- Always disconnect the appliance before cleaning it or carrying
out any maintenance. To be absolutely safe, check that the plug
is removed from the socket or that the mains switch or safety
circuit breaker are in the OFF position (see instructions for
installation and electrical connection).
- Avoid spraying the appliance with water.
- Never remove the plug from the socket by pulling the cable;
always take hold of the plug itself!
- Never start the appliance if:
■ the power supply cable is damaged
■ there are obvious signs of damage in the control panel area,
to the top or along the base.
- Repairs must only be carried out by qualified persons.
Inexperienced repairs can seriously endanger the user.
Always contact the Service Centre or an authorized dealer. Only
genuine AEG spares comply with all standards!
Page 5

- If the appliance is to be installed under a worktop in a fitted
kitchen or laundry room, the appliance cover must first be
removed and a protective plate must then be fitted, as
described in the installation instructions.
- Do not allow children to play with the appliance and keep pets
well away from it.
- For safety, when disposing of the appliance make sure that the
door catch is inoperative and cut off the power supply cable.
- The Manufacturer accepts no liability for damage caused by
incorrect or improper use of the appliance for purposes for
which it was not originally designed.
- Never put your hands in the drum whilst it is still rotating.
- Never touch the glass in the porthole door when the appliance
is being used on a high-temperature programme; the glass gets
very hot and can cause burns.
- There is a danger of scalding if the porthole door or filter cover
are opened during operation.
- The water drain hose must be properly fixed to avoid any risk of
scalding or flooding.
- In the event of a fault, close the mains water taps and discon
nect the appliance from the power supply by pulling out the
plug or switching the safety circuit breaker (or breakers) to the
OFF position.
- Keep packaging materials away from children, especially cello
phane which is particularly dangerous.
- If washing garments which have previously been dry cleaned,
first make sure that any remaining inflammable solvents have
completely evaporated.
- If the appliance is to be connected to a rainwater or other simi
lar source of water instead of the mains water supply, follow the
Water Board regulations.
The appliance must only be used to tumble dry normal house
hold laundry.
Dry only laundry which has previously been washed in water.
It is quite normal for the sides of the appliance to get hot during
drying. Avoid touching them!
Warnings
(drying)
Page 6

Never tumble dry quilted garments containing foam rubber or
similar materials; they could catch fire.
Never tumble dry fabrics stained with hair lacquer, nail varnish
remover or other similar substances whiqh would give off toxic
fumes.
Laundry dried in a tumble dryer comes out soft to the touch.
This means you can help protect the environment by using less
fabric softener in the wash.
If so-called “ecological” or “perfume-free” detergents are used,
tumble-dried laundry may not have the typical “smell of fresh
ness”. This is not due to a fault in your appliance, but simply to
the natural smell of the fabric which is not neutralised during
washing because the detergent contains no deodorants.
The Manufacturer accepts no responsibility for accidents
resulting from failure to observe the above safety recom
mendations.
Page 7

The AEG OKO-System / Ecological hints
This new machine is part of AEG’s OKO-System range, which
meets all requirements for modern handling of laundry with
reduced consumption of water, energy and detergent.
This is a rinsing and spinning process developed by AEG which
ensures the best washing results with reduced water consump
tion.
The automatic metering device automatically regulates the
amount of water used according to the size of load and type of
fabric.
The drum is fitted with special paddles which keep the water
moving upwards. In this way, the laundry is soaked more evenly
and faster.
Preliminary softening of the water, achieved by means of a twostage device for dispensing the softener and detergent, ensures
ecological operation even in very hard water areas.
All the materials used for packaging are non-polluting! They may
be disposed of quite safely.
Plastic materials can be recycled and are marked with the follow
ing symbols:
>PE< polyethylene
>PS< polystyrene
>PP< polypropylene
Sensortronic
Automatic
metering
Drum paddies
Preiiminary
water softening
Packaging
information
You are advised to dispose of all cardboard packaging in special
paper collection containers so that it can be recycled.
Page 8

Ecological
suggestions for
economical
washing
For medium soiling, use programmes without prewash. This
will save detergent and water.
Make full use of all the advantages offered by two-part deter
gents.
Always wash full loads for maximum savings.
Use the “ENERGY SAVING” (Economy) programme for nor
mally or lightly soiled cottons and coloureds.
For best results, even at low temperatures, remove individual
stains from laundry before washing.
Use minimum amounts of detergent. Follow the instructions
on the pack.
Page 9

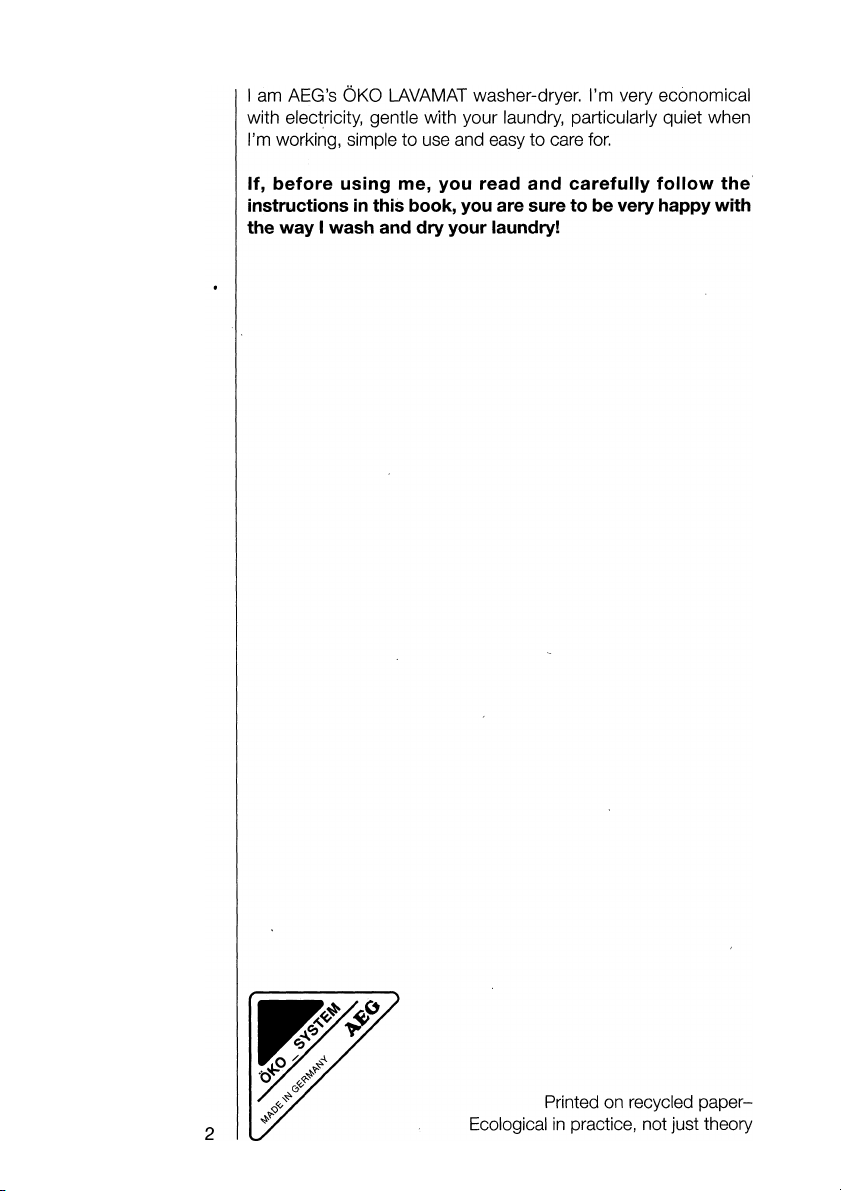
Installation instructions
All transit devices must be removed before installing and connecting the appliance.
Proceed as follows:
Using a spanner, remove the bolt on the right at the back of the
machine.
Gently lay the machine on its back, taking care not to squash the
hoses.
This can be done more easily by placing one of the corner pack
ing pieces between the machine and the floor.
Remove the polystyrene packing piece.
Removing the
transit devices
Peel off the adhesive strip and carefully remove the right-hand
polythene bag (1), then the left-hand bag (2) by pulling both
towards the centre of the machine.
Page 10
Set the machine upright and unscrew, the remaining two bolts on
the back.
Remove the three plastic pins from the holes in which the bolts
were fitted.
Blank off the holes with the plastic plugs supplied, which you will
find in the bag with the instruction book.
Hint:
Keep all transit devices for re-use in case you move house.
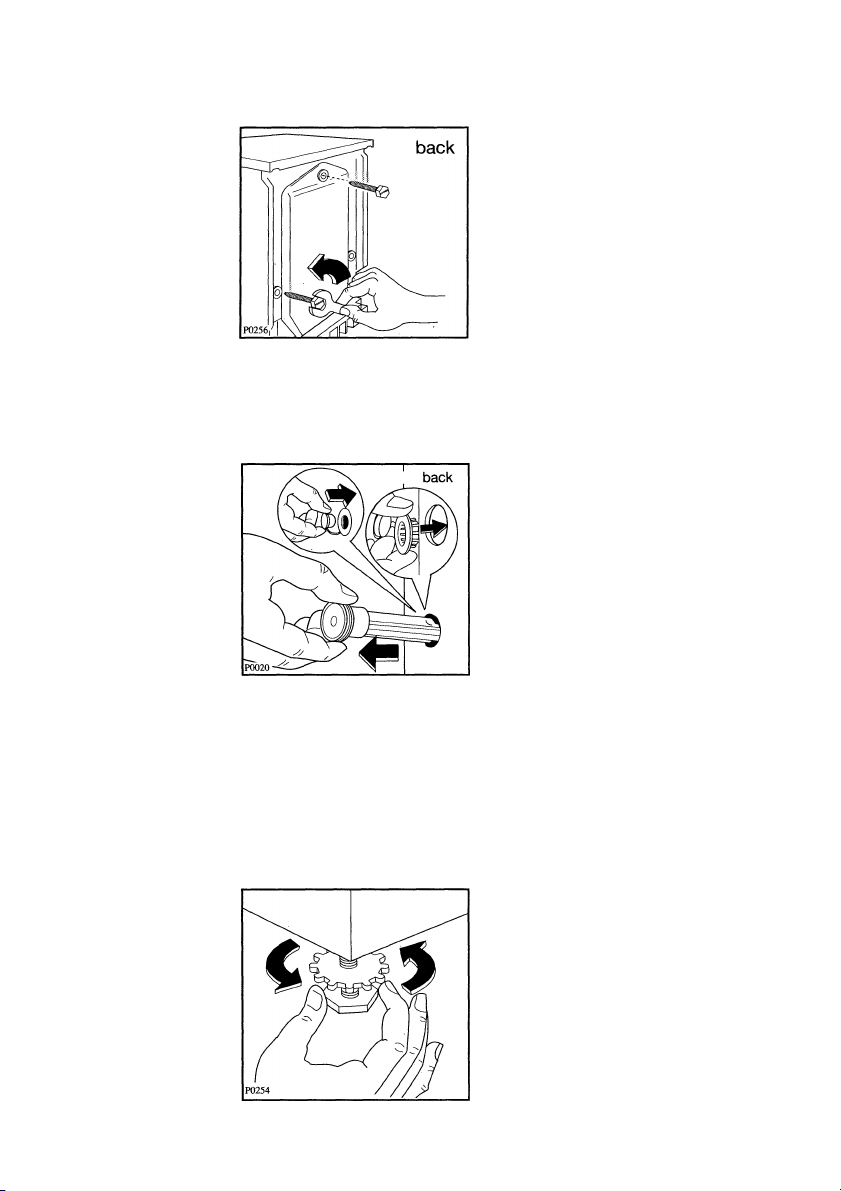
Positioning The machine stands on four adjustable rubber feet which can be
used to compensate any unevenness in the floor or to adjust the
machine to the correct height.
10
Page 11

Lock the feet in position by fully tightening up the locknuts.
The appliance must be level and resting on all four feet. It must
not tilt when pressure is exerted on one side only. If necessary,
use a spirit level to check that it is perfectly level.
The floor must be clean, dry and free of any wax residue or other
polish to prevent any risk of sliding. Never use viscous substances
to move the appliance by sliding it across the floor!
It is inadvisable to stand the appliance on long pile carpet or ,rugs
or on layers of foam rubber, as this could make it unstable. Place
a rubber mat beneath the appliance if the floor is made of very
small tiles.
If the appliance is to be placed on non-solid flooring, especially
made of wooden joists and flexible boards, a waterproof wood
panel, 15 mm thick, must be secured with screws to at least two
of the floor joists. If possible, the machine should be placed in a
corner of the room, as this is where the joists are most firmly fixed
and have less tendency to flex.
Never use wedges of wood, cardboard or other similar materials
to compensate for unevenness in the floor.
If space is tight and you cannot avoid placing the machine next to
a gas oven or coal burning stove, a sheet of insulating material
(85 X 57 cm), covered with aluminium foil on the side facing the
oven or stove, must be fitted between the two appliances.
Before building the machine in under a fitted kitchen worktop,
remove the cover and install a special protective plate, which is
available from your local Service Centre, part number 645 426 133.
11
Page 12

Connection
Electrical Details of the mains voltage, type of current and protection
connection required are given on the appliance rating plate which can be
found on the frame, after opening the porthole door.
WARNING: THIS APPLIANCE MUST BE EARTHED.
The manufacturer declines any liability should this safety
measure not be observed.
If the plug that is fitted to your appliance is not suitable for your
socket outlet, it must be cut off and the appropriate plug fitted.
Remove the fuse from the cut off plug.
The cut off plug should then be disposed of to prevent the hazard
of shocks in case it should be plugged into a 1 Samp socket in
another part of your home.
IMPORTANT
The wires in the mains lead are coloured in accordance with the
following code:
Green and Yellow - Earth
Blue - Neutral
Brown - Live
If you fit your own plug, the colours of the wires in the mains lead
of your appliance may not correspond with the markings identify
ing the terminals in your plug, proceed as follows:
Connect the Green and Yellow (earth) wire to the terminal in the
plug which is marked with the letter «E» or the earth symbol © ,
or coloured green and yellow.
Connect the blue (neutral) wire to the terminal in the plug which is
marked with the letter «N» or coloured black.
Connect the brown (live) wire to the terminal in the plug which is
marked with the letter «L» or coloured red.
The plug moulded onto the lead incorporates a fuse. For replace
ment, use a 13amp BS1362 fuse. Only ASTA or BSI approved
fuses should be used.
The plug must not be used if the fuse cover/carrier is lost. The cover/
carrier is indicated by the coloured insert at the base of the plug.
12
Page 13
A replacement cover/carrier must be obtained from your local
AEG Service Centre.
This appliance complies with the E.E.C. Directive No. 87/308 of
2.6.87 relative to radio interference suppression.
If the appliance is to be permanently connected to the power
supply you must install a circuit breaker with a gap of at least
3 mm between the contacts, which enables the appliance to be
completely isolated from the mains supply.
The mains supply cable must not be extended. If it is not long
enough, replace it with a new, longer cable or move the appliance
closer to the power socket.
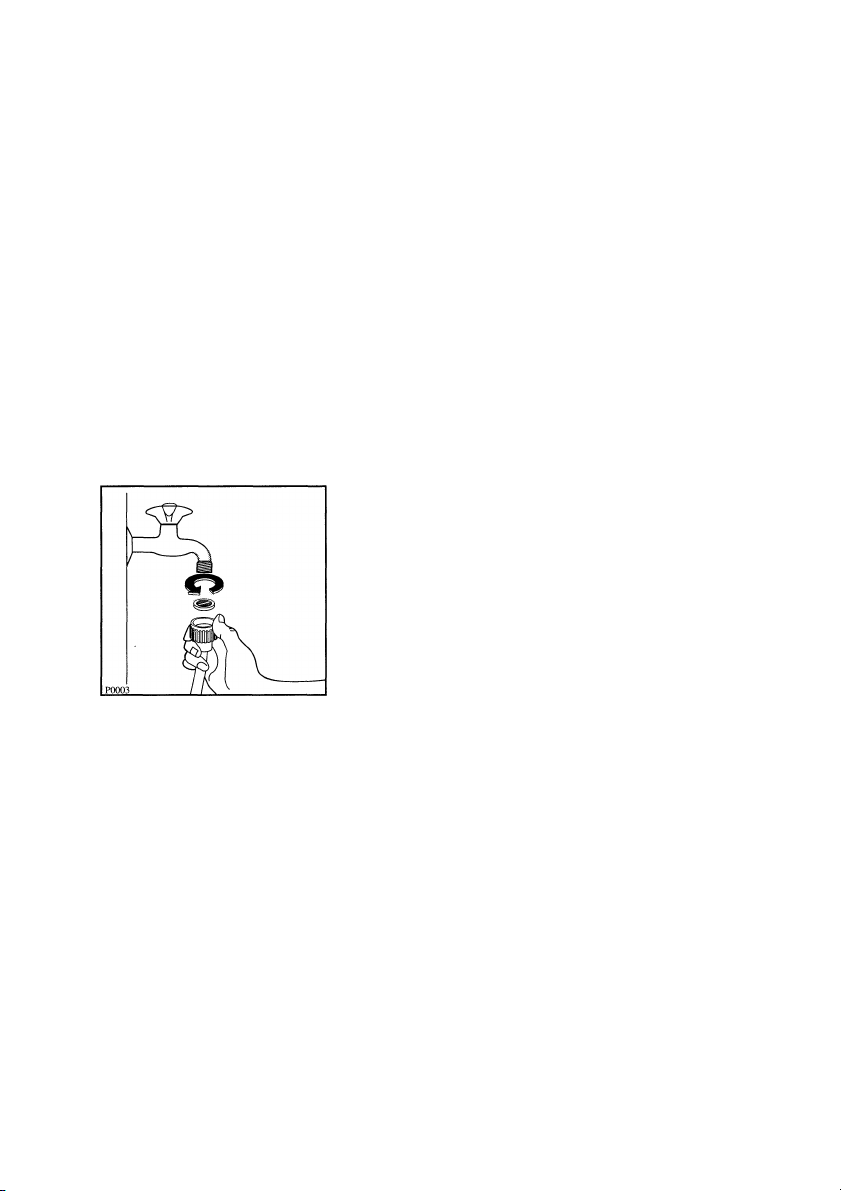
The appliance has two inlet valves, hot and cold, with female 3/4"
BSP thread connectors. The water inlets on the back of the
machine are colour coded, blue for cold and red for hot. Before
connecting the hoses.be sure to fit the mesh filters supplied.
If only a cold water supply is available, connect the two hoses to a
cold water outlet by means of a «Y» connection piece.
Installation should comply with local water authority and building
regulations’ requirements.
The appliance must be given a separate cold water supply and
not be connected to a mixer tap, a single outlet water heater or a
booster pump. A minimum water pressure of 7psi is required for
safe operation of the appliance.
If you cannot make the cold water connection direct from the ris
ing mains, you may be able to operate the appliance from your
cold water storage system.
There should be a minimum distance of 5.02m (16 V2 ft) between
the appliance’s inlet and the bottom of the tank.
There will be sufficient pressure for the hot water supply from the
hot water cylinder if the height between the appliance’s inlet and
the bottom of the cold water storage cistern (not between the
appliance and hot water cylinder) is at least 2.74m (9ft).
Connection to
the mains
water supply
13
Page 14
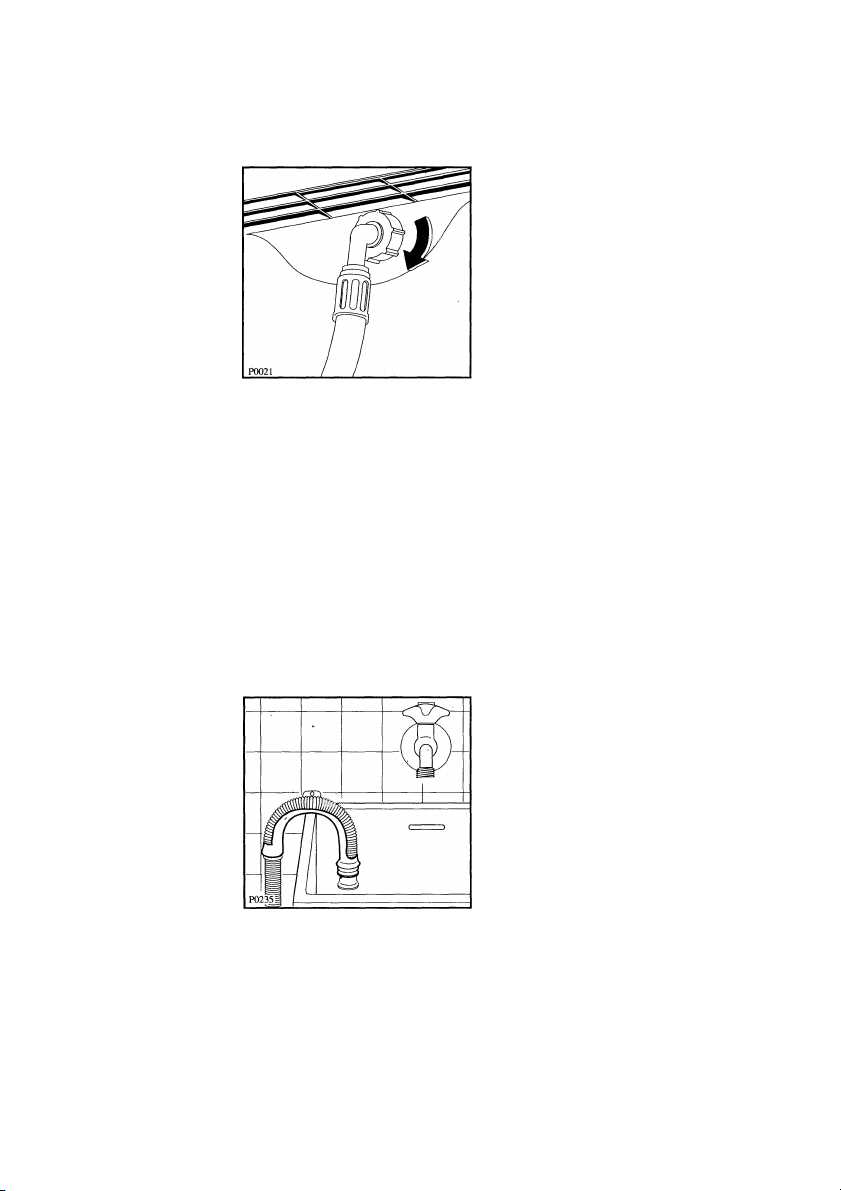
The end of the hose connected to the back of the machine can
be turned in any direction. Simply slacken the connector fitting,
position the hose as required and fully tighten the connector to
avoid leakage of water.
Water drainage
Every appliance is fitted with a pump for discharging the wash
and rinse water. This pump is controlled by the programme selec
tor mechanism and is capable of pumping water through the
drain hose to a height of up to 1 m above the surface on which
the machine is standing.
The curved end of the drain hose can be positioned in two ways:
Hooked over the edge of the sink. In view of the speed with
which the water comes out during the discharge phase, it is
important to ensure that the curved end of the hose cannot slip
off the edge of the sink. It should therefore be tied to the,tap with
a piece of string or secured to the wall with a hook, by inserting
the hook into the hole provided in the curved part of the hose.
Joined into a branch of the sink waste pipe. The branch
must be above the sink trap and at least 60 cm above the floor.
The drain hose may be extended up to a maximum length of
180 cm. Use an extension with an internal diameter the same as
that of the original hose. Use a suitable connector.
The hose extension must rest on the floor and only the part near
the drainage point must be raised.
14
Page 15

Brief instructions
■ Prepare the laundry
Sort and select garments, carry out any pre-treatment.
■ Switch the machine on
, Press the ON/OFF button
■ Select the programme
Turn the selector dial to the required programme
Press any option buttons required
■ Open the porthole door
■ Load the laundry into the machine
■ Close the porthole door
■ Measure out the detergent
■ Press the START/PAUSE button
■ At the end of the programme
Open the porthole door and remove the laundry.
■ Release the ON/OFF button
15
Page 16

Preliminary operations for washing
Sorting and
selecting
garments
Check that garments are machine-washable by looking at the
international wash code symbols on the label.
Whites
Coloureds
Synthetics
Delicate fabrics
Wool
Sort clothing according to type of fabric, degree of soiling and
wash temperature.
Wool garments marked with only the ^ symbol should not
be washed in your machine, but those on which the symbol is
accompanied by the words “non felting” or “machine-washa
ble” may be machine-washed.
Never machine-wash garments labelled with the following
symbols:
Hand wash only
Do not wash in water
ÌL
mi \4o_
\6o/ \mi
Pre-treatment
16
Dry clean only
Do not dry clean
May be bleached
Do not use bleach
Always follow the instruction “Wash separately”.
New coloured items often contain excess dye which could run
and stain other, lighter items in the wash. It is advisable to
wash these items separately the first time.
If possible, treat stains when they are still new. Use water, soap or
suitable detergents (stain remover spray, stick, paste, etc.).
® ©
:ùsi
0
Page 17

Empty all pockets
Be particularly careful to remove metal objects (paper clips,
safety pins, loose change, etc..).
Do up buttons and hooks, close zips and press studs.
Tie up loose b6lts or long apron strings.
Turn woollen garments, coloured embroidered garments and
those with sewn-on designs inside out.
Very small or delicate items (e.g. baby socks, tights) can
be protected by placing them inside a pillowcase with zip fas
tener, or inside long socks.
Treat net curtains with special care.
The fabric may be damaged by opening the window or when
removing the curtains for washing (pulled threads). Remove
metal or plastic hooks or enclose in a net or doth bag.
The manufacturer accepts no responsibility for any damage.
Net curtains should be spin dried only if the manufacturer’s
label states that this may be done.
Precautions
Whites/coloureds (cotton and linen)
Soak
Easy care fabrics
Delicate fabrics
Curtains
Woollens
Quick wash programme for
cottons/coloureds
Quick wash programme for
easy care/delicate fabrics
Whenever possible, load the machine to maximum capacity; full
loads are more economical.
Do not however exceed the maximum load as this could lead to
poor washing results.
Reduce the load when washing fabrics which are particularly sub
ject to creasing.
5.0 kg'
5.0 kg
2.0 kg
2.0 kg
15-20 m^ depending
on type of material
1.0 kg
2.5 kg
2.0 kg
Load sizes
(Maximum ioad
of dry iaundry)
17
Page 18

Selecting the programme
Programme selector/Switching on
The programme selector knob may be turned clockwise or anti
clockwise.
When the ON/OFF button is pressed the machine switches on
(power ON) or off.
ECONOMY
SOAKING
18
You may select normal washing and drying programmes, or the
following special programmes;
For normally or lightly soiled cotton and linen whites the
ECONOMY (E) programme may be used instead of the 95°C pro
gramme. The duration of the programme will be prolonged, but
the washing temperature is reduced to about, 67°C, so saving
energy. ’
For heavily soiled fabrics (except wool) the SOAK programme may
be selected.
The cycle is pertormed at 40°C and ends with water in the drum.
To drain the water depress the START/PAUSE button. After 18
hours soaking the water is drained automatically.
Page 19

This programme allows you to rinse and spin separately, items
which have been washed by hand.
GENTLE RINSE
This programme is for garments which have just been washed
and need starching. Dissolve powdered starch or dilute liquid
starch, then pour it into the dispenser compartment marked with
the ® symbol.
Water may be pumped out at the end of a programme, without
spinning.
Spin for cottons and coloureds.
Spin for easy care/delicate fabrics and for woolens.
Cancels the previously selected functions
Programme phase indicator
PREWASH
MAIN W ASH
RINSE HOLD
PUMP OUT
When a programme is selected, the lights corresponding to the
phases making up the programme come on,
When the programme starts, the light corresponding to the pro
gramme phase in progress comes on.
The end of the programme is indicated by the END light.
RINSE
SPIN
DRYING
END
O
o
o
o
o
o
O
o
STARCHING
PUMP OUT
SPIN
GENTLE SPIN
CANCEL
19
Page 20

Option buttons and functions
When these buttons are pressed, the corresponding pilot lights
come on. When they are pressed again, the lights go out.
If a button whose function is not compatible with the programme
selected is pressed, all the lights will start to flash. After about 1
second, they will go out.
ON
OFF
О
ON/OFF ■ ON/OFF button
When this button is pressed, the machine switches on.
The pilot light on the left comes on.
The pilot light corresponding to the Start/Pause button flashes
and the programme phase indicator shows the different phases
that make up the cycle.
When the button is pressed again, the machine switches off.
SPIN
■ Spin
700 - 900 - 1300
This button allows you to select a slower spin speed than normal.
If this button is not pressed spinning will automatically be per
formed at the maximum speed for the programme selected.
This is important when wishing to dry laundry in the
machine because you will save time and energy and you
will obtain better results with electronic drying.
If you select 900 or 700 rpm for cottons/coloureds the machine
will carry out an extra rinse.
By selecting 700 rpm for cottons/coloureds it is not possible to
dry automatically after washing.
Easy cares and wool are spun at a maxinrium of 900 rpm. The
spin speed may be reduced from 900 to 700 rpm.
For delicate fabrics, the maximum spin speed is 700 rpm.
If you select 700 rpm for easy cares, the machine will rinse with
more water.
20
DRYING
TIME
О
QUICK VARIO- PRE- START
WASH MATIC WASH INTENSIVE PAUSE
700 900 1300
ООО
SPIN
О
О О О О о
оооо о
Page 21

■ Quick wash
The quick wash option may be selected with all programmes,
except .the following: Economy, wool, délicates, intensive and all
programmes with prewash. It is particularly suitable for lightly
soiled loads. The washing time is reduced.
QUICK WASH
■ Variomatic
A specially gentle spin may be selected with all programmes, giv
ing the following effects:
- for cottons and coloureds, starching and spin programme
a VARIOMATIC spin programme is performed before the normal
final spin. The spin takes place in stages, so allowing the laun
dry to untangle itself during and at the end of the spin pro
gramme. The cycle time is increased.
- for easy cares/delicate fabrics
The “Rinse Hold” phase is eliminated and a single gentle spin is
performed at a maximum of 900 rev/min for easy cares, and
700 rev/min for delicate fabrics.
- for wool
The “Rinse Hold” phase is eliminated and a single gentle spin is
performed at a maximum of 900 rev/min.
■ Prewash
A programme with prewash may be selected for heavily soiled
items.
Result:
A prewash cycle at a maximum temperature of 40°C is performed
before washing.
VARIOMATIC
PREWASH
The prewash function cannot be used with the wool programme
or when the QUICK WASH button is-depressed.
■ Intensive
The intensive option may be selected with all programmes except
ECONOMY, WOOL, DELICATES and when the QUICK WASH
button is depressed. It allows thorough washing of heavily soiled
laundry. The wash cycle time is extended by 10 minutes.
INTENSIVE
21
Page 22

START/PAUSE
■ Start/Pause
After the machine has been switched on, the pilot light over this
button starts to flash.
When the button is pressed, the programme starts and the pilot
light goes out.
To interrupt the programme or to open the porthole door in the
middle of a programme, press this button again. The pilot light will
start to flash.
The door can only be opened after about 2 minutes.
When the button Impressed again, the programme resumes and
the light goes out.
Important: The door can only be opened if the water level is
lower than the bottom of the porthole. Otherwise, the water must
first be pumped out.
The START/PAUSE button can also be used to pump out the
water after the SOAK programme and after a RINSE HOLD pro
gramme: the soaking water is only pumped out, whilst in the other
programmes the machine will perform a short spin.
22
Page 23

Detergents
Any of the modern, commercially available detergents made for
use in domestic washing machines may be used.
The type of detergent used depends on the type of fabric and
soiling.
The various types of soiling are:
■ Dirt, e.g. dust, soot, sweat, organic stains, etc.
■ Stains which respond to bleach, e.g. red wine, fruit, vege
tables, etc.
■ Protein stains, e.g. blood, milk etc.
Detergents are available in the following forms:
■ Powder detergent, with bleaching agent
■ Liquid detergent, without bleaching agent
■ Colour-safe detergents for delicate fabrics and col
oureds, without bleaching agent and often also without whit-
eners
■ Detergents for wool, without bleach or enzymes, which will
not damage wool fibres.
■ Detergents for net curtains, with optical whiteners and
substances which prevent the curtains from yellowing in sun
light.
■ Building-block-system detergents which allow separate
dosing of the basic detergent, water softener and bleaching
agent.
Choice of
detergent
■ Water softening agents to reduce the hardness of tap
water.
■ Bleaching agents or stain removing salts, for concen
trated use on stains or as an additive with bleach-free deter
gents.
■ Pre-treatment agents, for removing stains prior to washing.
■ Fabric softeners, to eliminate static charge for easy cares
and to make fabrics feel soft.
■ Starches and dressing agents, to nnake garments hold
their shape and make them easier to iron.
■ Dyes and colour removers may be used in the washing
machine only if indicated on the product pack.
23
Page 24

Amount of
detergent
The amount of detergent used depends on the size of load, water
hardness and degree of soiling.
Refer to the instructions on the products.
Information on the hardness of water in residential areas can be
obtained from the Local Water Authorities.
Water hardness
Preliminary
water softening
Level
of hardness
• soft
II - medium
hard
IV - very hard
If the detergent manufacturer gives no indication of how much
detergent to use for a part load, we recommend that you reduce
the detergent measure by 1/3rd for a half load and that you use a
half measure of detergent for a minimum load.
The washer-dryer is fitted with a special device for preliminary sof
tening of the water by dispensing the softener and the detergent
in two stages. In programmes without prewash it enables the
softener and detergent to be dispensed separately for increased
saving on detergent, and therefore less water pollution.
Separate dispensing of the two substances means that initially,
only the softener is added to the water. When the detergent is
then added, because the water is already soft, it starts to act
immediately on dirt in the fabrics. This process ensures optimum
washing results, even with minimum measures of detergent.
Normal water softening agents should be measured out accord
ing to the hardness of the water, following the instructions on the
pack but, because of the preliminary softening device, you may
reduce the quantity by 20%. In this case, always use the amount
of detergent recommended on the detergent pack for level I
Clarke
degrees
less than 8
8-14
15-21
more than 21
°T.H. (French degrees)
less than 13
13-24
25-36
more than 36
hardness of water (soft).
Even when a prewash programme is selected, it is still possible
to protect the environment. Pour the detergent and water soften
ing agent together into the prewash and main wash dispenser
compartments.
You may obviously continue to use normal detergents without sof
tening agent, using an amount based on the pack recommenda
tions and the degree of water hardness.
24
Page 25

Softening agent or
prewash detergent
Main wash detergent
Liquid additives
.Programme chart
Using the
detergent
Warning:
■ For programmes with Prewash in which the softening agent
and detergent are poured into the same dispenser compart
ment, always pour in first the detergent and then the sof
tening agent.
If you prefer liquid detergents, use the dispenser supplied
with the product.
The measure of liquid additive used must not exceed the
‘MAX’ level mark on the dispenser drawer.
If thick fabric softeners or concentrated starches are
used, it is advisable to dilute them by pouring water into the
dispenser compartment, up to the ‘MAX’ level mark.
On the programme chart you will find the main washing and
drying programmes.
Powder
detergents
Liquid
detergents
Liquid additives
Programme
chart
25
Page 26

Programme chart (Washing)
Washing symbols
used on fabric
labels
XMi
Cottons/coloureds
Cottons (Whites)
Xgj Xgi
Easy cares (synthetics,
mixed fabrics)
\4^ \:^
Synthetics/net curtains/
Dresses and jackets
Wool/Wool mixtures/
Silk
Cottons/
easy cares
Programme selector
Whites 95
Coloureds 60 50 40 30
Energy saving programme
(Economy) E
Easy cares 60 50 40 30
Délicates 40 30
Wool 40 30 COLD
Soaking
Max. load
5 kg
2 kg
2 kg
1 kg
5 kg
2 kg
Easy cares/Delicates/
Wool
Cottons/Coloureds
All fabrics
Cottons/Coloureds
Easy cares/Delicates/
Wool
26
Gentle rinse
Starching
Pump out
Spin
Gentle spin
Cancel
2 kg
1 kg
5 kg
5 kg
5 kg
2 kg
1 kg
Page 27

Suitable option buttons
PRE-WASH QUICK WASH INTENSIVE VARIOMATIC
PRE-WASH VARIOMATIC
PRE-WASH QUICK WASH INTENSIVE VARIOMATIC
PRE-WASH VARIOMATIC
VARIOMATIC
VARIOMATIC
VARIOMATIC
27
Page 28

End of programme
Opening the
porthole door -
Switching off
At the end of the programme, open the porthole door when the
END light comes on.
Check that the drum has been completely emptied to avoid any
items accidentally left there being damaged in a subsequent wash
(e.g. shrinking), or their colour running into the next laundry load.
Clean the filter, especially after a drying programme.
Special rinse
The machine always operates with minimum water consumption.
Selecting
an additional
rinse cycle
Additional rinse
adjustment
device
28
An additional rinse may be selected with programmes for cottons
and easy cares.
This increases both the amount of water used and the pro
gramme time.
Pull out the detergent dispenser drawer until the rinse water
adjuster is accessible on the left-hand side.
Use a coin to turn the adjuster to the (••) symbol.
Page 29

Preliminary operations for tumbie drying
All washer-dryers consume power to dry laundry. The machine will
operate most economically if the advice below is followed:
Remove as much water as possible from the laundry!
The machine will use less energy if the laundry is thor
oughly spun before drying. A good spin reduces power con
sumption, shortens the drying time and enables the machine
to operate more economically.
Use optimum loads!
Keep to the loads recommended in the programme
chart to ensure economical drying. The following list may be
used as a guide to estimate the weight of common laundry
items:
Weight
Approximate dry weights of cotton items:
Bathrobe
Work shirt
Quilt cover
Sheet
Blouse
Towelling towel
Tea-cloth
Man’s shirt
Pillowcase
Nightdress/pyjamas
Tablecloth
Underwear
1200g
300-600 g
700 g
500 g
100 g
200 g
100 g
200 g
200 g
200-250 g
200-300 g
250 g
Protect the
environment...
As a dryer, the machine operates on the condensation principle.
However, even during the drying cycle, the water tap must
be left open and the water drain hose must discharge into a
sink or into a drain connection.
Load
Cottons/coloureds
Easy cares
max. 2.5 kg
max. 1.75 kg
Warning:
Washing loads which exceed these weights must be split
for drying, otherwise good results will not be achieved.
Preparation for
tumble drying
29
Page 30

Items not
suitable for
tumble drying
Particularly delicate fabrics such as synthetic net curtains, gar
ments made of wool or silk or with metal inserts, nylon stockings,
bulky items such as anoraks, bed covers, quilts, sleeping bags
should not be tumble dried.
Drying code
symbois
Always check whether garments are suitable for tumble drying.
This information is given on the label.
The following symbols are for drying:
May be tumble dried
□
Normal drying"(normal temperature)
□
Delicate drying (reduced temperature)
LLd
Do not tumble dry
Garments marked with the ^ symbol must never be tumble
dried.
30
Page 31

Selecting the drying programme
ON
OFF
O
If you wish to carry out a drying cycle on its own, turn the pro
gramme selector knob to DRYING. This is possible only in the
sector for cottons and easy care fabrics. Digit 10 will appear in the
display.
DRYING TIME selector button
With this button, the drying time can be adjusted in 5 minute
increments, up to a maximum of 130 minutes for cottons and col
oureds, or up to a maximum of 100 minutes for easy care fabrics.
The time selected appears on the display next to the button.
When selecting the drying time, take into account the type of fab
ric to be dried (cottons, coloureds, easy cares) and the degree of
drying required (extra dry, cupboard dry, iron dry).
Refer to the chart.
When selecting the drying time, you should also remember that it
includes a 10 minute cooling phase.
DRYING
TIME
O
700 900 1300 SPIN
# •
o
Drying only
For example, if you select a drying time of 60 minutes, the
machine will dry for 50 minutes and will then cool for the remain
ing 10 minutes.
As soon as the drying programme is started, the display shows
the remaining time, counting down in minutes'.
If you wish to delay the programme start, select the desired time
by depressing the relevant button and then depress the START/
PAUSE button.
Cooling phase
10 minutes before the end of the cycle, an automatic cooling
phase is carried out to cool the laundry.
This phase cannot be shortened, stopped or avoided, as this
could cause skin burns or damage to the laundry.
31
Page 32

Duration of drying cycle
The duration can vary according to:
- the speed of the final spin;
- the required degree of drying (extra dry, cupboard dry or iron dry)
- the type of laundry
- the size of load.
The chart on pages 34-35 shows normal drying times. With a little
experience, you will soon come to know the most suitable drying
times for your own laundry requirements.
Porthole door lock
After having started the required drying programme, the door
stays locked throughout the whole cycle.
Fibre residues
After drying fabrics which, lose bits of fibre, for example new
towels, it is advisable to carry out a delicate drying cycle to ensure
that any residue left in the drum is completely eliminated and does
not stick to laundry in the next load.
You should check the filter after each drying cycle and clean it if
necessary.
Additional drying
If, at the end of the programme, the laundry is still too damp, an
additional drying cycle may be selected.
Warning: Do not over-dry, so as to avoid creasing or shrink
ing of garments.
32
Page 33

NON-STOP operation can be used for
cottons •
easy cares
starching
spin
It cannot be used for delicate fabrics and wool.
Warning: When using NON-STOP operation for washing plus
drying, it is essential to keep to the following maximum loads:
Automatic
washing
and drying
(NON-STOP
operation)
Cottons
Easy cares
The drying time must be selected at the same time as the wash
programme and is displayed throughout the wash cycle.
Drying for cotton fabrics is carried out at full heating power, for
easy cares at reduced heating power.
If you wish to change the selected drying time during washing,
depress the Drying Time button until no digits appear in the dis
play and then select the new time.
max. 2.5 kg
max. 1.75 kg
Important: For cottons/coloureds it is not possible to reduce the
spin speed to 700 rpm when selecting the NON-STOP operation.
33
Page 34

Drying time chart
Indicative values for dry clothing
Degree of drying
Type of fabric
Examples of laundry/
clothing
Extra dry
Cupboard dry
Iron dry
Heavy cottons and linens
Cottons to be completely
dried
Easy care, synthetic and
mixed fabrics which do
not need ironing
Cottons and linens which
need ironing
Flannel sheets, linen
towelling bathrobes
Towels, T-shirts, fully
dried sheets, tea-cloths,
bathrobes
Synthetic mix Jumpers,
blouses, household
linen, baby clothes,
socks, underwear
Sheets, tablecloths, teacloths
Easy care, synthetic
and mixed fabrics which
need ironing
0 Reduced load to avoid creasing of these fabrics.
For loads not shown in the chart, select longer or shorter drying times as
required.
Synthetic fabric shirts,
household linen
34
Page 35

Load
kg
Spin speed
rpm
Cycle duration
min
2.50
1.00
2.50
1.00
1.75
1.000
2.50
700
900
1300
700
900
1300
700
900
1300
700
900
1300
700
900
700
900
700
900
1300
95-105
85- 95
80- 90
65-75
55-65
50-60
85-95
75-85
70-80
55-65
45-55
40-50
90-100
85-95
60-70
55-65
65-75
55-65
50-60
1.00
1.75 . .
1 .ООП
700
900
1300
700
900
700
900
45-55
35-45
30-40
75-85
70-80
45-55
40-50
35
Page 36

Maintenance and cleaning
Detergent From time to time, clean off any detergent residue remaining in the
dispenser bottom of the drawer compartments.
drawer - To do this, pull out and remove the drawer by pressing down
the catch.
The upper part of the liquid additive compartment can also be
removed for easy cleaning.
Drawer recess
Detergent residue can also accumulate inside the drawer recess,
which should be cleaned occasionally with an old toothbrush.
After cleaning, refit the drawer and push it fully in.
After each wash programme, partially pull out the detergent
drawer to let it dry.
36
Page 37

The filter collects fluff and any small objects which may acciden- Cleaning
tally have been left in the laundry. the filter /
If this filter gets clogged, the programmes will not function prop- Emergency
erly. emptying
The filter should therefore be cleaned from time to time. Hot water
remaining in the filter can scald! Allow it to cool before cleaning.
Open the filter cover.
Place a basin under the filter and unscrew it in order to remove it.
Remove the filter.
37
Page 38

Clean it under a running tap
The drum
Porthole door
Descaling
Control panel
The drum is made of stainless steel. Any rusty items left in the
laundry {see “Preliminary operations for washing”) could leave rust
stains on the surface of the drum. These stains can be removed
with a suitable stainless steel cleaner, available from the Service
Centre.
Remove any deposits or foreign objects from the rubber seal on
the porthole door.
Never close the porthole door immediately after washing; leave it
open to allow the drum to dry and ensure that the machine is
properly aired.
if the correct amount of detergent is used, descaling should not
be necessary. If, however, it does become necessary, use only
branded, non-corrosive descalers suitable for washing machines.
These are available from the Service-Centre.
If necessary, clean the control panel with warm water only.
38
Page 39

How to deal with problems...
. the machine does not start:
Check that the appliance is plugged in.
Check that a progrannnne has been selected.
Check that the START/PAUSE button has been pressed.
Check that the porthole door is firmly shut.
Check that the fuse has not blown.
. the door will not open:
Check whether a programme is in progress.
Check whether a programme without final spin has been
selected.
Check whether the water level is higher than the bottom of the door.
. the machine does not fill:
I
Check that the taps are on.
1
Check whether the filters in the inlet hoses are blocked.
If the machine takes longer than usual to fill with water, check
whether the filters in the inlet hoses are blocked.
To do this, shut the water taps. Unscrew the hoses from the
taps and remove the filters. Clean them with an old toothbrush
then refit them.
Tighten up the inlet hoses.
Problems you
can solve
yourself
. spinning starts slowly:
The electronic unbalance detection device has tripped
because the laundry is not evenly distributed in the drum.
When rotation of the drum is reversed the laundry re-distrib
utes itself. This may happep several times before the unbal
ance disappears and the spin resumes normally.
. the machine vibrates or is noisy:
I
With very small loads (for example just one bathrobe) the ma
chine may start to vibrate. This does not however affect per
formance.
I
Check that the support feet are correctly adjusted. Refer to
the installation instructions.
1 Check that all the transit bolts and packing have been re
moved. Refer to the installation instructions.
39
Page 40

... the machine does not empty or does not spin:
■ Check whether the drain hose is kinked.
■ Check whether the filter is blocked.
... spinning is uneven:
■ If an, excessive amount of foam has been formed, the machine
starts spinning and then stops until the foam has gone. Spin
ning then resumes normally.
When selecting the next programme, check the amount of
detergent used.
... the machine makes strange noises:
■ The machine is fitted with a modern starting system which
makes an unusual whistling or hissing noise, compared with
other machines.
This new system allows spinning to be started more gently
and provides better control of gradual increase in spin speed.
This improves machine performance and reduces water con
sumption.
... too much foam forms during washing:
■ Too much detergent is being used or the detergent is of the
wrong type. Check the amounts required.
... water is leaking from the bottom of the machine:
■ Check whether the inlet hose is leaking.
■ Check whether the drain hose clip has worked loose.
■ Check whether the drain hose is damaged.
■ ' Check that the filter is fully screwed in and properly fitted.
... washing results are poor:
■ Too little detergent has been used or detergent is of the wrong
type.
If insufficient detergent is used, the laundry will look grey and
lime deposits will be left in the machine. Use the correct
amount of detergent.
■ Check whether stains were adequately treated prior to wash
ing.
■ Check whether the programme and temperature selected
were correct.
... stains remain even though they have been treated before
washing:
■ Probably the stains are indelible. Check with an expert.
... there are grey marks on the laundry:
■ Laundry stained with grease, creams or oil has been washed
with insufficient detergent. The detergent was not strong
enough to shift these stains.
■ Check whether the temperature selected was too low.
40
Page 41

... the fabric softener has left marks on the laundry:
■ In this case the fabric softener, especially if of the concen
trated type, has come into direct contact with the laundry.
Wash out these marks immediately.
... detergent residue is left after the wash cycle:
■ This is most probably due to non soluble components con
tained in modern detergents, it is not a sign of inadequate
rinsing.
Brush or shake the garments and, if necessary, wash them
again.
... the fabric softener has not been introduced in the tub or
there is water left in the compartment marked with the [^J
symbol:
■ The drawer was pulled out whilst the machine was filling, or
the drawer was not fully inserted.
... foam remains after the last rinse:
■. Modern detergents can produce foam even after rinsing, but
this will not affect the quality of the wash.
... no water is visible in the drum:
■ Machines based on modern technology operate very eco
nomically using very little water. Their performance however is
excellent.
... the laundry is not sufficiently spun and there is still water in the drum:
■' Check whether the drain hose is kinked.
■ Check whether the filter is blocked.
... the machine does not dry:
■ Check that the drying time has been selected.
■ Check that the tap is open.
■ Check that the filter is not blocked.
■ Check that the drum has not been over-filled.
■ Check that the correct drying time has been selected. .
If the Service Centre is called out for one of the faults listed
above, or as a result of incorrect usage of the machine,
repairs will not be carried out free of charge, even if the
guarantee has not yet expired.
41
Page 42

Customer service
If you are unable to identify or resolve the problem by reading the
instruction book, contact our Service Department. Always start
by quoting the product code (E-Nr.) and the batch number (F-Nr)
shown on the rating plate.
L___ " -J
pD
For convenience, you are advised to note these details below.
E-Nr..............................................................
F-Nr.
.............................................................
AEG
Mod.
E-Nr.
F-Nr.
42
Page 43

Technical specifications
Dimensions:
With worktop:
Height 85.0 cm
Width 60.0 cm
Depth 60.0 cm
Without worktop:
Height 82.0 cm
Width 59.5 cm
Depth 57.0 cm
Connection
Details concerning electrical connection are given on the rating
plate.
When connecting the appliance, make sure that the mains supply
voltage' and type of current shown on the rating plate are the
same as those in the location where it is being installed.
Drum speed
Washing max. 55 rev/min
Spinning max. 1300 rev/min
selectable: 900/700 rev/min
Water pressure:
minimum (hot)
minimum (cold)
maximum
5psi
7psi
110psi
Net weight:
approx. 87 kg
43
Page 44

AEG
AEG Hausgeräte AG
Postfach 1036
D 90429 Nürnberg
© Copyright by AEG
H 243 219 640
124 983 030
124983030
ТАЛ//5
5 6 7 8 9 10 11 12 / 1994
GFP7516
 Loading...