

Page 1
11210
INSTRUCTION MANUAL
Page 2

Important Safety Instructions
When using an electrical appliance, basic safety precautions should always be followed, including the
following: Read all instructions before using your household sewing mac hine.
DANGER-To reduce the risk of electric shock :
Your household sewing machine should never be left unattended when plugged in. Always unplug your
machine from the electric outlet immediately after using and before cleaning.
Always unplug before changing lamp. Use a bulb 15 W max.
WARNING-to reduce: the risk of burns, fire, el e c tri c shoc k or injury to persons
- Do not allow to be used as a toy. Close attention is necessary when this sewing machine is used by or
near children.
- Use this machine only for its intended use as described in thi s manual.
- Never operate this sewing machine if it has a damaged cord or plug, if it is not working properly, if it
has been dropped or damaged or dropped into water. Return the sewing machine to the nearest
authorized dealer or service center for examination, repair, electrical or mechanical adjustment.
- If the supply cord that fixed with foot controller is damaged, it must be replaced by the manufacturer or
its service agent or a similar qualified person in order to avoid a hazard.
- Never operate the sewing machine with any air openings blocked. Keep ventilation openings of the
sewing ma ch ine and foot controll e r free from the accum u l ation of lint, dust and cloth.
- Never drop or insert any object into the opening.
- Do not use outdoors.
- Do not operate where aerosol (spray) products are being used or where oxygen is being administered.
- Do not put anything on the foot controller because the ma chine may accidentally start and the motor
or the foot controller may overheat.
- To disconnect turn all controls to the off position, then remove plug from outlet.
- Do not unplug by pulling on cord. To unplug, hold the plug, not the cord.
- Keep fingers away from all moving parts. Special care is required around the sewing needle.
- Always use the proper needle plate. The wrong plate can caus e the needle to break.
- Do not use bent needles.
- Do not pull or push fabric while stitching. It may deflect the needle.
- Switch the machine off when making any adjustments in the needle area, such as threading needle,
changing needle or changing presser foot and the like.
- Always unplug the sewing machine from the electric outlet when making any user servicing mentioned
in the instruction manual.
- Use only identical replacement parts.
- This appliance is not intended for use by persons (including children) with reduced physical, sensory
or mental capabilities, or lack of experience and knowledge, unless they have been given supervision
or instruction concerning use of the appliance by a person responsible for their safety.
- Children should be supervised to ensure that they do not play with the appliance.
SAVE THESE INSTRUCTIONS
Warning
When wor ki n g close to the needle b e ve r y careful n ot to prick your finger s. When you u se the machi ne
for the first time, put a piece of cloth under the presser foot und run the machine without thread for some
minutes. Dry any oil spots which may appear.
Please use for your sewing machine the ZHEJIA NG FOUNDE R press er foot, type KD-2902.
Power rating: 220 - 240V ~ , 50Hz
Current rating: 1.0A
Protection Class : II
The sound pressure level under normal operating conditions is 78dB (A).
- 1 -
Page 3

CONTENTS
Name of parts...........................................................................................3-4
Accessories................................................................................................. 5
Before sewing (Power supply and sewing lamp).......................................... 6
Removing extension table ........................................................................... 7
Free-arm sewing..........................................................................................7
Winding the bobbin......................................................................................8
Removing bobbin case and bobbin..............................................................9
Inserting bobbin into bobbin case ................................................................9
Inserting bobbin c ase into shuttle race.......................................................10
Threading upper thread & Twin needle threading...................................... 11
Drawing up the bobbin thread....................................................................12
Changing sewing directions.......................................................................12
Levelling the machine................................................................................13
Adjusting thread tension ............................................................................14
Changing needle .......................................................................................15
Insert “darning pla te “..................................................................................15
Fabric-Thread-Needle-table.......................................................................16
Sewing (pattern selector) and operation t able............................................17
To start sewing..........................................................................................18
How to finish stitches.................................................................................19
Straight stitch.............................................................................................20
Zigzag sewing............................................................................................20
Automatic embroidery................................................................................20
Overcasting...............................................................................................21
Straight and zigzag s tretch stitches ...........................................................21
Blind stitch............................................................................................22-23
Button sewing............................................................................................24
Binding ......................................................................................................24
Zipper sewing ............................................................................................25
Buttonhole sewing.....................................................................................26
Hemming...................................................................................................27
Twin needle...............................................................................................28
Embroidery................................................................................................28
Quilter........................................................................................................29
Seam guide...............................................................................................29
Maintenance (Cleaning and oiling) ............................................................30
Checking performance problems-Tr oubleshooting ....................................31
- 2 -
Page 4
NAME OF PARTS (FRONT VIEW)
12
1
2
3
11
10
4
9
8
7
6
5
1. Thread tension dial
2. Pattern selector dial
3. Bobbin winder stopper
4. Stitch length dial
5. Reverse button
6. Thread guide and needle clamp
7. Extension table
8. Shuttle cover
9. Presser foot
10. Face cover
11. Take up lever
12. Upper thread guide
- 3 -
Page 5
REAR VIEW
7
6
5
1
2
3
4
1. Presser foot lever
2. Thumb screw
3. Needle plate
4. Spool pin (B)
5. Hand wheel
6. Spool pin (A)
7. Bobbin winder spindle
- 4 -
Page 6
ACCESSORIES
Bobbin
(Use only original
plastic bobbins. )
Felt
Zigzag foot
(on machine)
Buttonhole foot
Screw driver
Needle
Spool pin (A)
Darning plate
Spool pin (B)
Needle plate
screw driver
Zipper foot
Buttonhole cutt er
- 5 -
Page 7
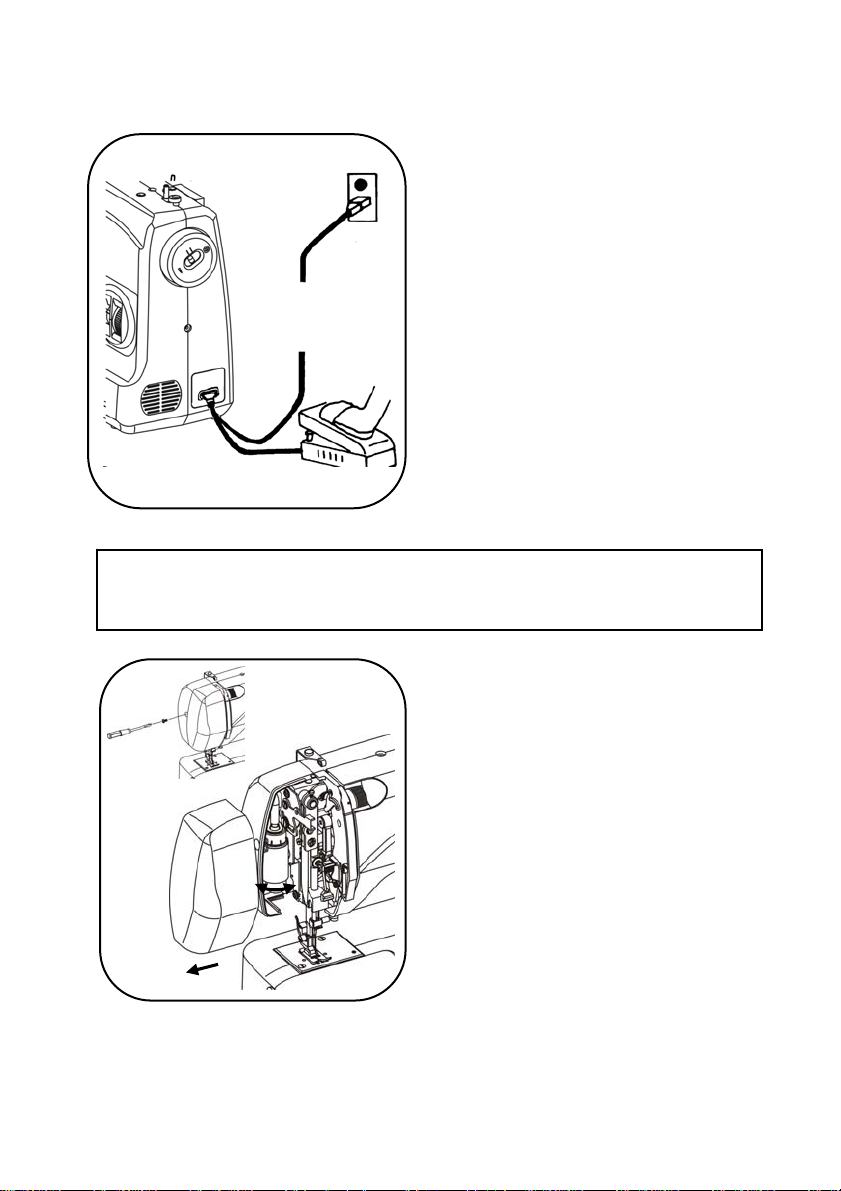
BEFORE SEWING
Power supply / Power suppl y plug
Power supply
Plug receptacle
machine plug
1. Fit plug into the machine.
2. Insert plug into the main socket.
3. Sewing speed can be varied by the foot
control.
Use only ZHEJIANG FOUNDER model
KD-2902 foot contr oller with sewing
machine.
Speed Controller
.CAUTION: Please always unplug the power plug before you change the bulb or
perform maintenance work to the machine so t hat you prevent deadly
peril and electr ic shock.
Sew lamp
Bulb replacement:
1. Open face cover in direction of arrow.
2. Remove bulb by unscrewing it
counter-clockwise.
3. Install a new bulb b y screwing it in
clockwise.
4. Use a 15 watt bulb. (m ax)
- 6 -
Page 8
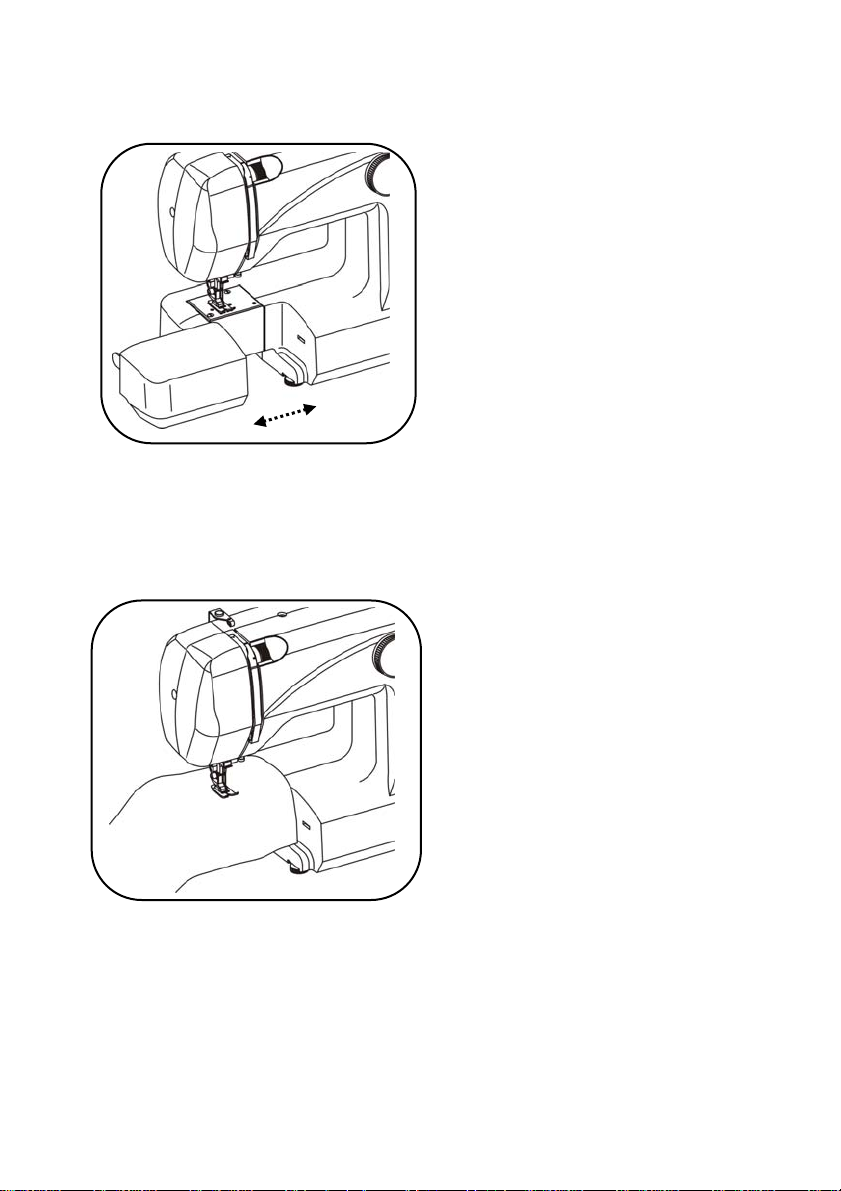
REMOVING EXTENSION TABLE
FREE-ARM SEWING
Hold the left end of the table and pull it
out in direction of the arrow.
1. This sewing machi ne can be used as
a flat bed machine but eas ily converts
to a free arm machine by removing
the extension tabl e.
2. Especially us eful for sewing sleeves,
pant legs, tubular fabrics etc. more
easily.
3. To sew tubular items just slip the
sleeve or leg of pants on the free arm
as shown on the illustration.
- 7 -
Page 9
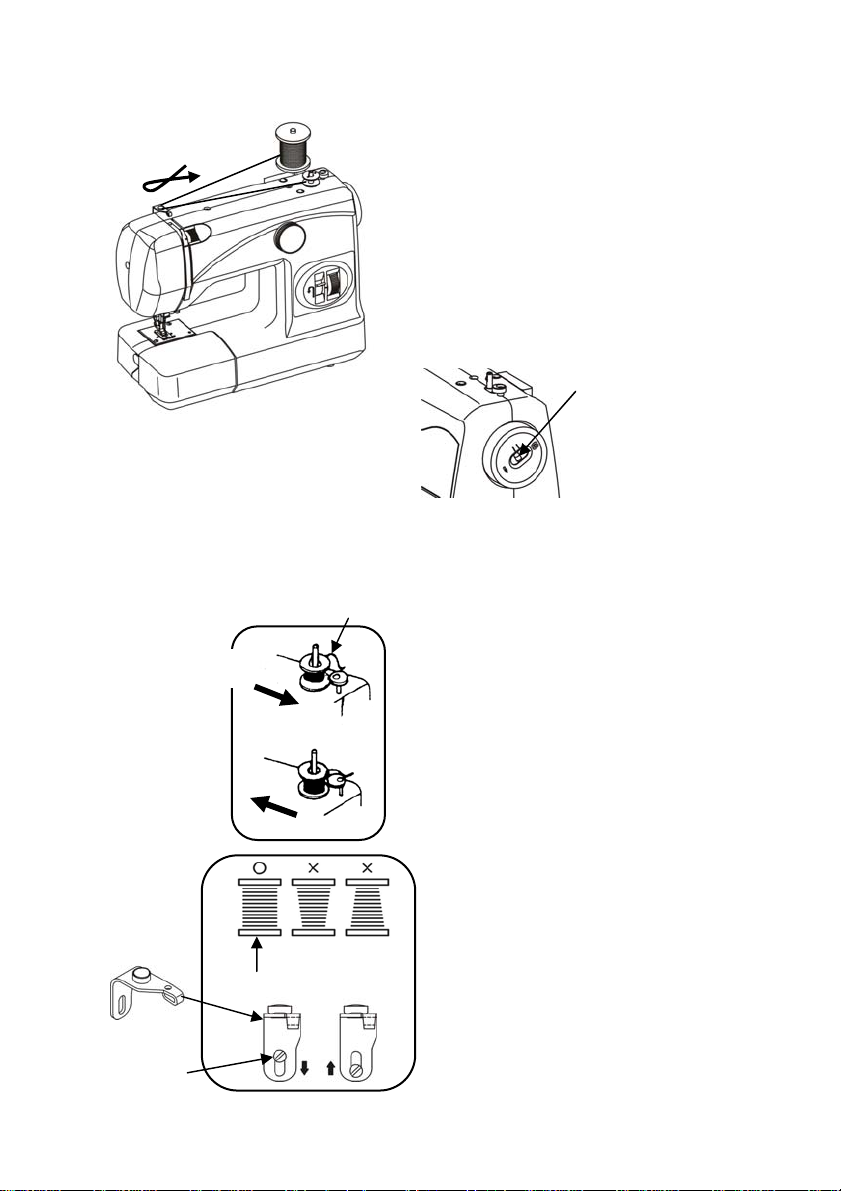
WINDING THE BOBBIN
Winder spindle
5 cm thread
Correct
1. Release by p ushing clutch button to
2. Push bobbin winder from left to right,
3. Push bobbin winder from right to left and
bobbin and lock by pushing it to needle.
then it starts winding.
move clutch button t o needle sign, then it
starts sewing.
Clutch button
Push bobbin winder spi ndle in directi on of
the arrow. When bobbin winding is
completed, return spindle to its original
position.
When bobbin winding is incorrect, r elease
the screw of the upper t hread guide and
adjust up or down unti l bobbin the
winding is balanced.
Screw
- 8 -
Page 10
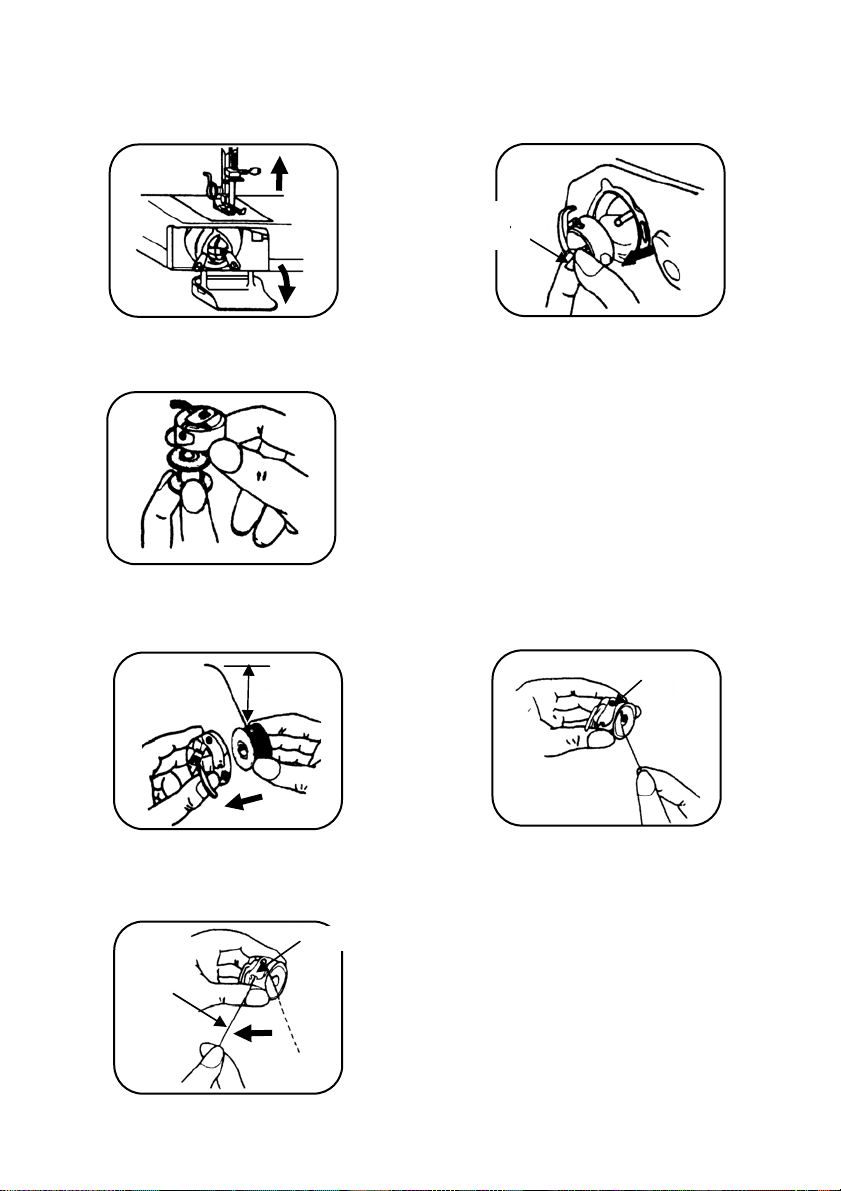
REMOVING BOBBIN CASE AND BOBBIN
Hinged latch
1. Raise the needle t o its highest
position and open shuttle race cover.
3. Release the latch and the bobbin will fall out
easily.
INSERTING BOBBIN INTO BOBBIN CASE
5 cm
2. Open the hinged lat ch of the bobbin
case and pull the bobbin case out of
the machine.
Slot
1. Pull 5 cm of thread from bobbi n and
insert it into bobbin case as shown.
2. Guide the end of thread into the slot.
10 cm
Tension spring
3. Pull the thread through the slot and under t he
tension spring and dr aw out about 10 cm of
thread.
- 9 -
Page 11

INSERTING BOBBIN CASE INTO SHUTTLE RACE
Finger
Hinged latch
1. Raise the needle to its highest position. Pull the thread to t he front, open the latch of
the bobbin case and hold it.
Insert
2. Holding the latch open, place bobbin case onto the center pin in the shuttle and
release latch.
- 10 -
Page 12

THREADING UPPER THREAD
Pass the thread fr om A to H as shown.
H
E
B
G
F
E
C
D
B
A
D
Twin needle threadi ng.
C
F
H
G
- 11 -
Page 13

DRAWING UP THE BOBBIN THREAD
1. Hold the upper thread with left hand, turn the
hand wheel slowly t owards you until the needle
goes down and comes up. Th en stop the hand
wheel when the take up lev er is at its highest
position.
Lightly draw up the upp er thread, by which the
lower thread will be brought up in a loop.
2. Pull out both threads and place them together
under presser foot to the rear of the machine.
3. Place fabric under presser foot from t he front,
lower presser foot.
4. Start to sew.
CHANGING SEWING DIRECTIONS
1. Lower needle down int o fabric and
raise presser foot, pivot the fabr ic
around the needle to change direction
as desired.
- 12 -
2. Lower the presser foot and start to sew.
Page 14

LEVELLING THE MACHINE
Down
Up
- 13 -
Page 15

ADJUSTING THREAD TENSION
Normal upper thread tension: 4 – 6
Upper thread tension may be adjusted
by turning the threa d tension dial.
Fabric
Incorrect
Correct
Upper thread
Bobbin thread
Inside of fabri c
Upper thread
Lower thread tension can be
increased by turni ng the screw of the
bobbin case slightly to the right
(clockwise). Turning it to the left
(counter -clockwise) decreases
tension.
- 14 -
Page 16

CHANGING NEEDLE
Needle clamp screw
Tighten
Loosen
Face flat side away from you
1. Raise the needle bar to its highest posi tion.
2. Loosen needle clamp screw and remove the old needle.
3. With the flat side of the needle facing away from you, insert t he needle as far up as it
will go.
4. Tighten the needl e clamp screw securely.
INSERT “DARNING PLATE“
Sometimes you will want to control the feeding of fabric yourself. Turn the needle bar to its
highest positi on and raise the presser foot over the needle plate, aligning two pins of the
darning plate with holes of needle plate. You may then determine the movement of the fabric
by yourself. See page 24 for button sewing application.
- 15 -
Page 17

FABRIC-THREAD-NEEDLE-TABLE
Please pay attenti on to the following list as a guide for sewing different types of f abric.
Fabric Thread Needle Length of Stitc hes
Straight
stitch
Stitch Length Dial
ZZ
Indication of
Upper
Tension
Light
Medium
Heavy
Nylon
Tricot
Silk
Woo l silk
Gingham 60-80
Thin Jersey 60 S Fiber
Gabardine 50 Silk
Denim
Jersey
Tweed
80 Cotton
60 S Fiber
silk
50 Silk
50 S Fiber
silk
Cotton
50 Cotton
50 S Fiber
50 Silk
70 (10)
80 (12)
80-90
(12-14)
80 (12)
90-100
(14-16)
80-90
(12-14)
80-90
(12-14)
1 - 3 1 - 4
0.5 - 3 0.5 - 4
0.5 - 3 0.5 - 4
- 16 -
Page 18

SEWING (PATTERN SELECTOR) AND OPERATION TABLE
Straight stitch
A
Zigzag
B-E
Blind stitch
F
Blind hem
G
Three step zigzag stitch
H
Slant over edge
I
Single overlock stitch
J
Honeycomb stitc h
K
Zigzag stitch
L
Stitch patterns
Stitch length Presser foot
Straight stretch stitch
M
N
O
Automatic embroidery
P
Q
Buttonhole
R-T
Free-hand embroidery
- 17 -
Without
Darning
plate
Page 19

TO START SEWING
Important hints:
1. Raise the take- up lever to its highest pos ition before starting and after stopping
sewing.
2. Hold both threads about 10 cms to the rear of the machine for the f irst two or three
stitches.
3. Sufficient fabric should be placed under needle before lowering the presser foot.
4. Depress foot/speed control and start to sew.
5. Test the machine stitches on a scrap of fabric you plan to use, adjusting the machine
for the length of the stitch and tension suitable to your fabric.
6. Separate the machin e from the power system i f you leave it unsupervis ed.
Attention
1. When turning the balance wheel manually, always turn it towar d you.
2. Guide the cloth gently with your hand.
3. To prevent breaking needles, always r aise the needle out of t he fabric when you stop
:
sewing.
- 18 -
Page 20

HOW TO FINISH STITCHES
1. Sew to the edge of seam.
2. Push the reverse button and sew in revers e for about 3-4 cms.
3. Raise needle to its highest position.
4. Lift the press er foot and pull the fabric out of the back of the machine.
Cutting thread slot
5. Cut threads as shown on the thread cutter.
- 19 -
Page 21

Q
STRAIGHT STITCH
1. This type of sti tching is used most frequently.
2. The zigzag presser foot can be used for bot h straight and zigzag sewing.
3. For sewing light fabric, use a smaller stitch size. (Ref er to page 16 for dial setting).
ZIGZAG SEWING
Pattern selector position
Satin stitching can be used for sewing
initials, patterns, appliqué, etc.
The zigzag stitch is a universal stitch. The
satin stitch pattern has short tense stitches
which can be used for sewing.
AUTOMATIC EMBROIDERY
N
O P
These stitches have a wi de range of
decorative and utility applications and are
particularl y suitable for woven fabrics.
The Scallop stit ch (N) is ideal for edging
collars, cuffs, tablecloths, serviettes etc. For
all the stitches, the stitch lengt h can be
reduced to achieve a close “satin st itch” if
required.
With satin stitch a paper backing, will
improve the result.
- 20 -
Page 22

OVERCASTING
Use these stitc hes for oversewing rough
edges.
STRAIGHT AND ZIGZAG STRETCH STITCHES
Use this stitch with knitted, tricot or other
stretchy fabr ics.
The stitch enables your seam to stretch
without breaking the thread.
- 21 -
Page 23

BLIND STITCH (Optional)
1. Fold fabric as shown.
2. Finish the seam as shown.
- 22 -
Page 24

Adjust the width to obtain the correct seam.
Wrong: Needle is not piercing edge
to fold at all.
(A)
Needle pierces the edge of fold too
much.
(B)
Correct seam.
(C)
- 23 -
Page 25

BUTTON SEWING (Optional)
Utilize the button presser foot.
Match
(Use Darning plate see page 15)
1. Place the darning plate properly.
2. Place button presser foot in position and attach it fir m ly.
3. Place the button between presser foot and fabric and lower the presser foot.
4. Manually turn hand wh eel towards you, ensuring that the needl e enters into both holes
of button without obstruction. (I ncrease or decrease width setting).
5. Sew about 7 stitches.
6. Pull both threads to the underside and ti e them together.
BINDING
To sew fabrics edge sel ect the multi-zigzag
stitch.
- 24 -
Page 26

ZIPPER SEWING
Utilize the zipper foot.
Select straight stitch.
1. Zipper foot is designed to sew cl ose to a raised edge,
thus preventing sewi ng on zipper.
2. Place zipper foot in position and attac h firmly.
3. Fold the fabric about 2 cm and place the fabric
under foot.
1. To sew the left side of the zipper, set the zipper on
the right side of the needle.
2. To sew the right s ide of the zipper, set it on the left
side of the needle.
Sew as illustrated.
- 25 -
Page 27

BUTTONHOLE SEWING
Use the buttonhole f oot.
Set the stitch length dial.
Pattern select or dial
Steps
1. Set dial t o “1“ position
2. Sew left side
3. Raise the needle
4. Set dial to “2“ position
5. Sew 5-6 stitches
6. Raise t he needle
7. Set dial to “3“ position
8. Sew right side
9. Raise the needle
10. Set dial to “4“ position
11. Sew 5-6 stitches
12. Raise the needle
Setting
Before sewing, fit buttonhole foot as
shown.
Cut buttonhole along centre with cutt er
as shown.
- 26 -
Page 28

HEMMING
(Optional)
3 mm
1 mm
20 mm
1. Raise the foot and the needle to its highest position. Replace t he foot with the picot foot.
2. Fold over the fabric edge by about 3 mm and place it under the foot. Sec ure the folded
edge with a few stit ches. Slide the hem of your project into the pi cot foot by pulling the
threads.
3. Lower the foot and sew the hem.
4. While sewing fo ld the fabric to the left a little and guide it into the hemmer foot.
5. Make sure that t he fabric does not move under the right half of the foot. The fabric must
be fed into the scroll of the hemmer sufficiently so that the project edge runs freely
through the groove under the foot.
Only suitable materials can be used and some practice may be necessary to achieve
the best results .
- 27 -
Page 29

TWIN NEEDLE
Please place second spoon pin ( B) into the position for twin needle sewing as page 4, no.
4 pic.
Put in the twin needle with the flat side backwards.
Thread the machine for normal sewing, leading b oth threads to needle and passing
their ends separately through its eye.
Sewing width should not exceed the third widest stitch width, as this will break the
needles.
EMBROIDERY
(Use Darning plate see page 15)
Remove the presser foot and attach the darning plate.
Lower feed dog and move the hooped fabric slowly in the desired dir ection until the
fabric has been embroi dered.
- 28 -
Page 30

QUILTER (Optional)
1. Slide the arm through the hole on top of the pres ser foot holder.
2. Move the quilter to the required sti tch distance.
SEAM GUIDE (Optional)
1. Use the seam guide to s ew long seams of an equal distance from the edge of the fabric.
2. Screw the guide on the r ight side of the needl e plate and adjust the desired distance.
3. While sewing, the edge of the fabric must touch the guide.
- 29 -
Page 31

MAINTENANCE
.CAUTION: When cleaning the machine or changi ng its lamp, disconnect it from
the mains. You avoid accidents through el ectric shock.
A
B
C
A
1. Raise needle to its highest position.
2. Take out the bobbin case.
3. Turn the latch k nob A as illustrated.
4. Take off shuttle race cover.
5. Take out shuttl e hook.
6. Clean and oil shut tle race and hook,
thereafter repl ace all parts in
reverse order.
Cleaning shuttle race
(A) Latch knob
(B) Shuttle race cover
(C) Shuttle hook
Open face cover and oil the parts indic ated.
Cleaning feed dog.
- 30 -
Page 32

CHECKING PERFORMANCE PROBLEMS – TROUBLESHOOTING
Problem Probable cause What to do
Fabric does not
move
Breaking needle
Breaking upper
thread
Breaking bobbin
thread
Machine
jamming
Puckering
- Feed teeth down
- Stitch length dial “0“ position
- Light presser foot pressure
- Incorrect insertion of needle
- Bent needle
- Fabric is being pul led
- Needle, thread and f abric do
not match
- Faulty adjustment of zigzag
width
- Improper threading
- Tight upper thread tension
- Bent needle
- Scratches or nicks on bobbin
case
- Tight bobbin thread tension
- Incorrect insertion of needle
- Improper threading
- Lint or thread in bobbin case
- Excessive tensi on
- Presser foot pr essure too
strong
- Needle, thread and f abric do
not match
- No oil
- Tension too tight
- Sewing foot press ure too
strong
- Incorrect fabric, needle,
and thread
- Raise feed teeth
- Set dial between 1 and 4
- Increase pressure
- Re-insert needle
- Replace needle
- Do not pull fabric
- Use correct needle an d thread
- Re-adjust zigzag wi dth
- Re-thread machine
- Reduce upper thread tension
- Replace needle
- Polish or replac e bobbin case
- Reduce bobbin thread tension
- Re-insert needle
- Rethread machine
- Clean bobbin case
- Re-adjust tension
- Change pressure accordingly
- Reduce proper needle and
thread according to type of
fabric
- Oil moving parts
- Reset
- Reduce sewing foot pr essure
- Use correct fabric, needle
and thread
- 31 -
Page 33

Guarantee 24 Months
The receipt of purchase with date of purchase is the certificate for the guarantee.
Please always keep carefully. In case of guarantee please contact our service
hotline number. The guaranteeing is only for material defect and production errors,
not for high mortality parts or damage on breakable parts; e.g. spool pin. The
sewing machine is only for private and not for commercial or industrial use.
Guarantee expires when there is improper or inappropriate use, use of force or
engagement from non – authorized services. Your legal rights are not restricted
through this guarantee. This guarantee is applied for the first buyer and is not
transferable.
SDC Vertriebs GmbH ; Mittelwegring 12
Servicehotline: + 49 (0)7271 / 9337-99
76751 Jockgrim
Use separate collection facilities to dispose electrical appliances. Contact
your local community for information.
Product Specifications:
Measures of machine: (L) 380 x (H) 320 x (W) 170 mm
Weight: 7,5 kg
75W (Motor 60W/Lamp 15W) 230V
TÜV/GS and CE certified
- 32 -
 Loading...