

Page 1

U
B
1
A
U
U
B
1
A
A
N
H
T
2
T
2
3 T
T
•
C
•
2 L
3 T
dob e P r emier e P r o H elp
sing H elp | C on t en ts | Inde x
ack
sing H elp
U sing Help
bout Help
dobe Systems Incorporated provides complete documentation in an Adobe PDF-based
help system. This help system includes information on all tools, commands, and features
of an application. It is designed for easy on-screen navigation and can also be printed and
used as a desktop reference. Additionally, it supports third-party screen-reader applica
tions that run in a Windows environment.
avigating in Help
elp opens in an Adobe Acrobat window with the Bookmarks pane open. (If the
Bookmarks pane is not open, click the Bookmarks tab at the left edge of the window.)
At the top and bottom of each page is a navigation bar containing links to this page (Using
Help), the table of contents (Contents), and the index (Index).
-
To move through pages sequentially, you can click the Next Page and the Previous
Page arrows; click the navigation arrows at the bottom of the page; or click Back to
return to the last page you viewed.
You can navigate Help topics by using bookmarks, the table of contents, the index, or the
Search (Acrobat 6) or Find (Acrobat 5) command.
o find a topic using bookmarks:
1
I
n the B ookmarks pane, click the plus sign (+) (Windows) or the right-facing arrow
(Mac OS) next to a bookmark topic to view its subtopics.
C
lick the b ookmark to go to that topic.
o find a topic using the table of contents:
1
C
lick C ontents in the navigation bar.
On the C ontents page, click a topic to go to that topic.
o view a list of subtopics, click the plus sign (+) (Windows) or the right-facing arrow
(Mac OS) next to the topic name in the Bookmarks pane.
o find a topic using the index:
1
D
o one of the f ollowing:
lick Index in the navigation bar, and then click a letter at the top of the page.
Ι
n the B ookmarks pane, expand the Index bookmark to view the letter subtopics;
then click a letter.
ocate the entry you want to view, and click the page number to go to that topic.
o view other entries for the same topic, click Back to return to the same place in the
index, and then click another page number.
sing H elp | C on t en ts | Inde x
ack
Page 2

U
B
2
A
U
U
B
2 T
2 T
T
2 T
3 T
P
A
T
C
dob e P r emier e P r o H elp
sing H elp | C on t en ts | Inde x
o find a topic using the Search command (Acrobat 6):
1 C hoose Edit > Search.
ype a word or phrase in the text box and click Search. Acrobat searches the document
and displays every occurrence of the word or phrase in the Results area of the Search PDF
pane.
o find a topic using the Find command (Acrobat 5):
1 C hoose Edit > Find.
ype a word or phrase in the text box and click Find. Acrobat searches the document,
starting from the current page, and displays the first occurrence.
o find the next occurrence, choose Edit > Find Again.
ack
sing H elp
rinting Help
lthough Help is optimized for on-screen viewing, you can print selected pages or the
entire file.
o print Help:
hoose File > Print, or click the Print icon in the Acrobat toolbar.
sing H elp | C on t en ts | Inde x
ack
Page 3

U
B
3
A
C on t en ts
U
B
3
C
L
Ke
A
T ut or
W or k
dob e P r emier e P r o H elp
sing H elp | C on t en ts | Inde x
ontents
ear ning A b out A dob e P r emier e P r o 4
y F ea tur es in
dob e P r emier e P r o 10
ials 15
ing with P rojects 40
Capturing and Importing Source Clips 63
Assembling a Sequence 103
Editing a Sequence 138
Adding Transitions 162
ack
Mixing Audio 171
Using the Adobe Title Designer 193
Superimposing and Compositing 219
Applying Effects 235
Producing Final Video 289
Keyboard Shortcuts 312
Legal Notices 314
sing H elp | C on t en ts | Inde x
ack
Page 4
Adobe Premiere Pro Help Learning About Adobe Premiere Pro
Using Help | Contents | Index Back 4
Learning About Adobe Premiere Pro
Welcome
Welcome to Adobe® Premiere® Pro, a revolutionary nonlinear video-editing application
that delivers a breakthrough render-free experience. Its high-performance toolset takes
video and audio production to a new level, giving you a professional edge. Built for the
superior performance of Microsoft Windows XP systems, Adobe Premiere Pro delivers the
power and precision you need to tell a story better and faster than ever before.
Adobe provides a variety of options for you to learn Adobe Premiere Pro, including online
Help and tool tips. You can also use the Adobe Web site to easily access a host of contin
ually updated Web resources for learning Adobe Premiere Pro, from tips and tutorials to
technical support information.
-
Adobe Acrobat® Reader® software, included on the Adobe Premiere Pro CD, makes it
possible to view Adobe PDF files. Many of the files on the Adobe Web site are in PDF
format.
Getting help
There are a number of ways to get the help you need in Adobe Premiere Pro. The following
table can help you find specific resources, based on the type of information you require.
If you . . . Try this . . .
Are new to all versions of
Adobe Premiere
Want information on installing Adobe Premiere Pro
• Browse through the information in “Working with Adobe Premiere
Pro” on page 5 for information on specific tasks.
• Choose Help > Contents. Then select “Looking at the Work Area”
from the links on the Contents tab.
• Go to www.adobe.com/products/premierepro and look for train-
ing information.
• Move the pointer over a tool to display the name of the tool.
• Use the Tip of the Day topics to get information on some of the key
Adobe Premiere Pro tasks. Choose Help > Tip of the Day.
Install the Adobe Premiere Pro application from the Adobe Premiere
Pro CD onto your hard drive; you cannot run the program from the
CD. Follow the on-screen installation instructions. For more detailed
information, see the HowToInstall.rtf file on the CD.
Are upgrading from a previous
version of Adobe Premiere
Using Help | Contents | Index Back 4
Go to the “Key Features” chapter to get information on functionality
that is improved from Adobe Premiere 6.0 and 6.5.
Page 5

Adobe Premiere Pro Help Learning About Adobe Premiere Pro
Using Help | Contents | Index Back 5
If you . . . Try this . . .
Want step-by-step instructions
Are looking for detailed
information about a feature
Are looking for background
information on digital video
Want answers to common
troubleshooting questions
Want a complete list of keyboard shortcuts
Try one of the tutorials available on the Adobe Web site. (See “Adobe
Premiere Pro support page” on page 8.)
Use the index or search for the feature in Help.
Go to www.adobe.com/products/premierepro and look for background information.
Search the Adobe Support Knowledgebase and Premiere Pro Top
Issues, which you can access from the Adobe Premiere Pro support
Web site at www.adobe.com/products/premierepro. (See “Adobe
Premiere Pro support page” on page 8.)
Look at the Keyboard Shortcuts Appendix.
Working with Adobe Premiere Pro
People work with Adobe Premiere Pro in many different ways. In this section, you’ll find
directions to specific information to help you accomplish some common Adobe Premiere
Pro tasks.
If you want to mix audio
• Create audio crossfades using the audio transitions in the Effects palette (see “Cross-
fading or fading out audio” on page 176).
• Record a voiceover microphone or other external analog source directly to a track by
using the Audio Mixer (see
• Control the volume level of each track in a sequence using the track sliders in the Audio
Mixer, and control clip gain using the Clip > Audio Options > Audio Gain command (see
“Adjusting gain or volume levels” on page 175).
• Apply effects to audio tracks using the Audio Mixer, or to audio clips using the Effects
palette (see
“Applying effects to audio tracks” on page 184 and “Applying effects to
audio clips” on page 185).
• Vary audio settings over time by using mixer automation (see “Automating audio
changes in the Audio Mixer window” on page 190) or by setting keyframes in the
Timeline window (see “Working with keyframes in the Timeline window” on page 222).
• Apply advanced editing techniques to your source clips by using Adobe Audition
(see “Using audio from Adobe Audition” on page 78).
“Capturing analog audio” on page 79).
®
If you want to superimpose or composite clips
Superimposing and compositing can be as simple as importing clips and stills, stacking
them on video tracks in the Timeline window, and using transparency to let clips on lower
tracks show through. Alpha channel transparency is automatically applied. For clips
without alpha channels, Adobe Premiere Pro provides many ways to apply transparency.
• Import clips (see “Importing clips” on page 81) containing an alpha channel
(see “Defining transparency terminology” on page 219).
Using Help | Contents | Index Back 5
Page 6

Adobe Premiere Pro Help Learning About Adobe Premiere Pro
Using Help | Contents | Index Back 6
• Make a clip uniformly transparent by changing the Opacity value (see “Adjusting
opacity” on page 221).
• If a clip’s transparency is defined by a specific color, apply a keying effect (see “Using
keys” on page 227).
• If transparent areas are marked by another file, such as a matte, apply the matte to the
clip (see
“Using matte keys” on page 230).
If you want to color correct a clip
Adobe Premiere Pro includes a number of image adjustment filters, including a comprehensive color correction filter. Moreover, you can accurately measure your adjustments
using industry standard waveform monitor and vectorscope.
• Select a clip in a sequence and cue the current frame to the clip (see “Editing clips in the
Timeline window” on page 138).
• If you plan to use the scope views, open a reference monitor and gang the reference
monitor and program view together (see
• Set the reference monitor’s display mode so that it displays one of the waveform
monitor or vectorscope options (see
and “Understanding the waveform monitor and vectorscope” on page 111).
• Apply the Color Corrector filter to the clip and adjust its parameters (see “Correcting
color in a clip” on page 254).
“Using a reference monitor” on page 112).
“Choosing a Display Mode setting” on page 110
If you want to prepare media created in other Adobe products for Adobe Premiere Pro
Adobe Premiere Pro accepts a wide range of file formats, but is particularly well integrated
with files created by other Adobe products. When you import files created with other
programs, such as Adobe Photoshop
smoothest and most efficient workflow:
• Make image adjustments (such as retouching or color correction) before importing a
file into Adobe Premiere Pro. Though you can make many of the same adjustments later
in Adobe Premiere Pro, making them beforehand can spare you unnecessary
processing time (see
“About Fixed effects” on page 235, “About Standard effects” on
page 235, and “Previewing a sequence” on page 157).
• Crop or resize still images to dimensions that are compatible with your Adobe Premiere
Pro project, taking differences in pixel aspect ratio into account (see
ratio” on page 99).
• Crop or resize oversized images that you want to animate in Adobe Premiere Pro to the
minimum dimensions you need to achieve the effect, and make sure that the image
doesn’t exceed the maximum dimensions allowed (see
page 102 and “Animating effects by using keyframes” on page 245).
• Create and save transparent areas as an alpha channel, and understand how Adobe
Premiere Pro interprets aspects of Adobe Illustrator and Adobe Photoshop files, such as
empty areas and clipping masks (see
• Understand which elements of an Adobe After Effects
Adobe Premiere Pro project (see
page 299).
®
and Adobe Illustrator®, take steps to achieve the
“About pixel aspect
“File-size limitations” on
“Importing still images” on page 82).
®
project can be transferred to an
“Opening a project in Adobe After Effects” on
Using Help | Contents | Index Back 6
Page 7

Adobe Premiere Pro Help Learning About Adobe Premiere Pro
Using Help | Contents | Index Back 7
If you want to customize your editing environment
Adobe Premiere Pro’s flexible interface lets you work the way that’s best for you and your
projects. You can fully customize the windows, workspaces, and most keyboard
commands to maximize your efficiency:
• Customize each window according to your editing style or the task at hand (see
“Customizing the Project window display” on page 50, “Using labels” on page 53,
“Customizing the Monitor window” on page 108, and “Using the Timeline window” on
page 114).
• Arrange and resize windows and palettes to suit your system or personal preferences,
and save the arrangement as a custom workspace (see
“Working with windows in
Adobe Premiere Pro” on page 44).
• Familiarize yourself with standard keyboard shortcuts, and create your own custom
shortcuts for nearly any command or function (see
“Using keyboard shortcuts” on
page 55 and the Keyboard Shortcuts Appendix).
If you want to burn your movies onto DVD discs
You can create DVDs directly in Adobe Premiere Pro if you have a DVD burner connected
to your computer. Adapt your projects easily for the DVD format:
• Ensure that your clips and transitions play back correctly by preparing your audio and
video clips for DVD (see
• Set sequence markers in the Timeline window to designate chapters in your DVD movie
(see
“About chapter links” on page 127).
• Select from a comprehensive list of transcoding options by choosing File > Export >
Export to DVD and selecting Encoding (see
“Requirements for DVD output” on page 291).
“Exporting to DVD” on page 289).
If you want to capture and export video
Adobe Premiere Pro is designed specifically to make DV capture and export a snap:
• Configure your video capture hardware according to the manufacturer's instructions.
Make sure that your hard drive has adequate space available and is fast enough for
video capture (see
• When you create a new project, choose a preset that matches your capture device's or
source material’s video specifications (see
• Choose File > Preferences > Device Control to set up your device controller. Select the
Scratch Disks preference to specify the hard disk that you'll capture video and audio to
(see
“Setting up device control equipment” on page 68 and “Using scratch disks” on
page 57).
• Choose File > Capture and set In and Out points as your video plays. Or use the Scene
Detect feature to capture DV segments that were created each time the camera's
Record button was pressed. When all your clips are logged, click the In/Out button to
capture them to the hard disk (see
page 69).
• Make sure that you specify the correct compressor and data rate for video export.
Review the steps for exporting to videotape in
recording” on page 297 and “Video export settings” on page 304.
“Avoiding DV capture problems” on page 96).
“Specifying project settings” on page 58).
“Using Capture window device controls” on
“Preparing a DV program for videotape
Using Help | Contents | Index Back 7
Page 8

Adobe Premiere Pro Help Learning About Adobe Premiere Pro
Using Help | Contents | Index Back 8
Other learning resources
In addition to the information included with your application, Adobe provides several
other learning resources.
Adobe Premiere Pro support page
On the Adobe Premiere Pro support page on the Adobe Web site, you’ll find product information and links for downloading plug-ins and updates, as well as information on training,
support, vertical market solutions, and Adobe Premiere Pro–related products. The many
useful learning tools available at www.adobe.com/products/premierepro include the
following:
• Step-by-step tutorials
• Updates, patches, and plug-ins
• Links to the Adobe Support Knowledgebase, containing the latest Adobe Premiere Pro
technical support solutions
• Training resources in print and online form
• A searchable database of answers to technical questions
• Links to user forums
Adobe Press
Adobe Press offers books that provide in-depth training in Adobe software, including the
acclaimed Classroom in a Book
purchasing Adobe Press titles, visit the Adobe Web site at www.adobe.com, or contact
your local book distributor.
®
series developed by experts at Adobe. For information on
The Adobe Certification program
The Adobe Certification program offers users, instructors, and training centers the opportunity to demonstrate their product proficiency and promote their software skills as
Adobe Certified Experts, Adobe Certified Instructors, or Adobe Authorized Learning
Providers. Certification is available for several different geographical regions. Visit the
Partnering with Adobe Web site at www.partners.adobe.com to learn how you can
become certified.
Adobe Solutions Network
The Adobe Solutions Network (ASN) provides various product and technical resources for
developing with Adobe Premiere Pro. Here, you can find software developer kits (SDKs),
sample libraries, the Developer Knowledgebase, and technical guides for areas such as
JavaScript.
To access the Adobe Solutions Network for Adobe Premiere Pro:
Go to partners.adobe.com/asn/premierepro/ (English only) on the Adobe Web site.
Registration
In order for Adobe to provide you with the highest quality software, offer technical
support, and inform you about new Adobe Premiere Pro software developments, please
register your application.
Using Help | Contents | Index Back 8
Page 9

Adobe Premiere Pro Help Learning About Adobe Premiere Pro
Using Help | Contents | Index Back 9
You can choose to submit the form directly or fax a printed copy. You can also register by
filling out and returning the registration card included with your software package.
Customer support
When you register your product, you may be entitled to technical support. Terms may vary
depending on your country of residence. For more information, refer to the technical
support card provided with the Adobe Premiere Pro documentation.
Adobe also provides several forms of automated technical support:
• See the ReadMe file installed with the program for information that became available
after this guide went to press.
• See the Adobe Premiere Pro support page for information on top support issues and
troubleshooting information for common problems. (See
page” on page 8.)
“Adobe Premiere Pro support
Using Help | Contents | Index Back 9
Page 10

Adobe Premiere Pro Help Key Features in Adobe Premiere Pro
Using Help | Contents | Index Back 10
Key Features in Adobe Premiere Pro
Introduction
Adobe Premiere Pro is a high-performance toolset that takes video and audio production
to a new level, giving you a professional edge. Delivering frame-accurate control for shortand long-format projects, Adobe Premiere Pro enables you to produce precise results
every time.
Create projects in a streamlined user interface
Adobe Premiere Pro allows you to arrange clips, view media, and create motion paths with
unprecedented ease. In addition, nested timelines allow new methods of displaying
footage for complex projects. The capture controls, keyframing features, and media
management tools allow you maximum flexibility with your media projects.
Browse media in the revised Project window Quickly arrange your clips by storyboarding in Icon view, which presents media in an orderly, interactive grid. Or, display
media in a detail-rich List view, which offers many information columns, plus an unlimited
number of user-defined columns. For information on the Project window, see
clip information in the Project window” on page 46.
Expanded Monitor window View a much wider range of media in the Monitor window,
including still images, audio, and color mattes allowing three-point edits. Dock or undock
the Effect Controls window with the Source view window for easy access to these controls.
Dynamically update the targeted timeline with changes. For information on the Monitor
window, see
Enhanced media management Select offline clips in Project window folders and easily
recapture them. Link and unlink clips in the Project window with files on your hard disk.
Delete an unwanted clip from the Project window and optionally delete it from your hard
disk to reclaim storage space. Use expanded criteria to search for clips. View the contents
of multiple folders at once and move content between them, or sort folder contents using
multiple criteria. For information on media management in Adobe Premiere Pro, see
“Naming, finding, and deleting Project window items” on page 47 and “Using List view
columns” on page 51.
Improved motion paths Create more exacting motion paths along which traveling
mattes, still images, and video clips can smoothly animate using revamped controls and
built-in support for subpixel positioning. New Ease-in, Ease-out keyframes provide more
natural and fluid motion. For information on motion paths, see
on page 240 and “Animating effects by using keyframes” on page 245.
“Using the Monitor window” on page 103.
“Using the Motion effect”
“Viewing
Using Help | Contents | Index Back 10
Page 11

Adobe Premiere Pro Help Key Features in Adobe Premiere Pro
Using Help | Contents | Index Back 11
Keyframeable visual effect parameters Use the new Effect Controls window to set
keyframes for individual effect parameters and create effects with unprecedented control.
For information on keyframing, see
“About the Effect Controls window” on page 237.
Customizable keyboard shortcuts Use the new Keyboard Customization window to
edit shortcuts for commands, tools, and other options to match your preferences. Save
custom shortcut sets to share with colleagues. For information on customizing keyboard
shortcuts, see
“Using keyboard shortcuts” on page 55.
Improved scene detection Specify a target folder in the Project window from the
Capture window. Keep an eye on available hard disk space, deck activities such as seeking
and shuttling, and other information during capture. For information on the capture
controls, see
“Using the Capture window” on page 64.
Create projects as part of a larger workflow
Adobe Premiere Pro works with leading Adobe tools such as Adobe After Effects®, Adobe
Photoshop
hardware. You can import and export your projects in a variety of formats to suit your
needs.
®
, and Adobe Encore™ DVD. It also works effortlessly with processors and video
Tighter Adobe integration Move easily between Adobe Premiere Pro and Adobe After
Effects because they work similarly. Import layered Adobe Photoshop files as flattened
clips, or as timelines with each layer on a separate track. Export projects as AVI and MPEG
files for use in Adobe Encore DVD, a creative tool for authoring sophisticated multilanguage DVDs. Timeline markers from Adobe Premiere Pro turn into DVD chapter points.
For information on how Adobe Premiere Pro works with Adobe Photoshop and Adobe
Illustrator files, see
“Importing still images” on page 82. For information on how Adobe
Premiere Pro works with Adobe After Effects, see “Opening a project in Adobe After
Effects” on page 299. For information about using chapter marks for use in Adobe Encore
DVD, see “Using sequence markers for comments, chapter links, and Web links” on
page 126. For information on working with audio in Adobe Audition, see “Using audio
from Adobe Audition” on page 78.
Extensive hardware support Work with a wide range of video hardware from Sony
DVCAM equipment and the latest digital video decks and camcorders to third-party
boards. Expand the capabilities in Adobe Premiere Pro to include support for SD and HD
thanks to its resolution independence and its built-in support for the new pixel aspect
ratios, time bases, and frame rates required for these formats. For information on hardware
supported in Adobe Premiere Pro, see
“About digital and analog sources” on page 92.
Extensive import and export capabilities Produce video and audio content for all
leading delivery media, including broadcast formats such as DV, SD, and HD; popular
optical formats, such as DVD, CD, VCD, and SVCD; and the Web. Adobe Premiere Pro works
with virtually any codec that Windows XP supports. A sample of supported video formats
includes MPEG1, MPEG2, DV, AVI, Windows Media 9 Series, Real Media 9 (export only),
QuickTime, Open DML (import only), and more. For information on export formats in
Adobe Premiere Pro, see
“File types available for export” on page 302.
Continuous rasterization of EPS files Scale imported EPS files freely without worry of
pixelization. Adobe Premiere Pro continuously rasterizes EPS files as you scale them.
See “Adjusting position, scale, rotation, and anchor point” on page 241.
Using Help | Contents | Index Back 11
Page 12

Adobe Premiere Pro Help Key Features in Adobe Premiere Pro
Using Help | Contents | Index Back 12
Export to AAF Easily exchange Adobe Premiere Pro projects for more finishing work:
Export them as AAF (Advanced Authoring Format) files, an industry-endorsed open inter
change format. For information on AAF, see “Exporting to AAF” on page 300.
Work with enhanced audio capabilities
Take advantage of powerful new audio controls and built-in ASIO and VST support to
make your audio punch like never before.
Powerful new audio controls Import and export the highest quality 24-bit, 96 KHz
audio files. Edit audio clips at the subframe, audio-sample level with precision up to 1/
96,000 of a second with 32-bit floating-point mathematical precision—for example, to
remove small pops and crackles. Create and work with multichannel audio to produce
surround-sound and other multichannel audio effects. Record professional voiceovers
directly to a timeline as it plays back. See
VST (Virtual Studio Technology) compatibility Sweeten audio with 17 powerful
industry-standard VST plug-ins that come with Adobe Premiere Pro, including Reverb, EQ,
Pitch Shift, Dynamics, DeNoiser, and MultibandCompressor. New VST plug-in support
enables you to expand your audio toolkit and use your favorite VST plug-ins with Adobe
Premiere Pro. Improve effects and mixing workflow and processing efficiency using sends
and submixes. For information on audio controls in Adobe Premiere Pro, see
your audio workflow” on page 171.
ASIO (Audio Stream Input/Output) compatibility Access the multichannel capabilities in a new generation of high-quality sound cards through built-in ASIO support in
Adobe Premiere Pro. For information on ASIO, see
page 182.
“Applying effects to audio tracks” on page 184.
“Planning
“Setting a track’s input source” on
-
Adjust color values with ease
Use native YUV processing and three-point color correction to adjust your colors to the
needs of your project.
Native YUV processing Preserve the color values of original DV and other source
footage—and improve application performance by avoiding color conversions—with
native support for YUV processing. For information on YUV processing in Adobe Premiere
Pro, see
Three-point color correction Make sure shots match, and correct exposure, colorbalance, and other jarring errors caused by lighting, cameras, and environment with the
new color correction filters in Adobe Premiere Pro. Adjust the hue, saturation, and
lightness for highlights, midtones, and shadows; replace a color throughout a clip with a
single selection; and more. Use built-in waveforms and vectorscopes to make sure that
clips share the same color spectrum and that your color adjustments fall within legal
broadcast limits. The Color Corrector uses 32-bit floating-point mathematical precision.
For information on color correction, see
vectorscope” on page 111, “About Fixed effects” on page 235, and “About Standard
effects” on page 235.
“Correcting color in a clip” on page 254.
“Understanding the waveform monitor and
Using Help | Contents | Index Back 12
Page 13

Adobe Premiere Pro Help Key Features in Adobe Premiere Pro
Using Help | Contents | Index Back 13
Edit with precision
Take advantage of Adobe Premiere Pro’s ability to apply transitions to multiple clips. Move
clips around easily and work with multiple edit points at once. Then preview how your
rendered footage will look before actually rendering it.
Take advantage of editing improvements Apply transitions on any video track, and
automatically apply default transitions to overlapping clips. Overwrite, as well as insert,
clips in a single move by dragging and dropping them on a timeline. Remove a group of
clips from one area—closing the open gap with a ripple delete—and insert them in
another area in a single action. Select and trim multiple edit points at once. Copy and
paste noncontiguous clip selections. View live updates in the Trim window, which shows
an edit in progress as you’re adjusting the clip. Toggle between video-frame-accurate and
audio-sample-accurate editing with a single click. For information on editing improve
ments in Adobe Premiere Pro, see “Applying and controlling Standard effects” on
page 244, “About the Effect Controls window” on page 237, “Removing parts of a
sequence” on page 146, “Trimming clips in the Timeline window” on page 148, and “Using
the Trim window” on page 156.
Render-free editing experience Play back full-resolution frames, including titles, transitions, effects, motion paths, and color correction on two channels, on-screen or on an
external video monitor—with no additional hardware support required. This new renderfree editing experience enables you to see exactly how your work will look, so you can
make more rapid edit decisions and ultimately deliver files more quickly. For information
on render-free editing, see
“Previewing a sequence” on page 157.
-
Work easily with digital video and export to DVD
Edit DV footage easily and export projects directly to DVD from Adobe Premiere Pro.
Enhanced DV device control Use the new scene-detection controls in Adobe Premiere
Pro to divide raw DV footage into scene-based clips. Also create low-resolution, scenebased clips for offline editing. Then, after assembling your rough cut, batch-capture fullresolution versions of only the clips you need. For information on DV device control,
see “Using device control” on page 67.
Direct export to DVD Export projects directly and burn DVDs for distribution of highquality video content. For information on exporting to DVD in Adobe Premiere Pro,
see “Exporting to DVD” on page 289.
Using Help | Contents | Index Back 13
Page 14
Adobe Premiere Pro Help Tutorials
Using Help | Contents | Index Back 15
Tutorials
Logging and Capturing Clips from DV Tape
In Adobe® Premiere® Pro, y ou can use the comprehensive set of controls in the Capture
window to log and automatically capture DV footage to your hard disk. You can quickly
and efficiently log clips you want to capture, then batch-capture them all in one session.
1. Connect your DV device.
Connect your camera or deck to your computer using an IEEE 1394 cable, and make sure
both the device and the computer are turned on. Make sure that the tape you want to
capture is loaded into the device.
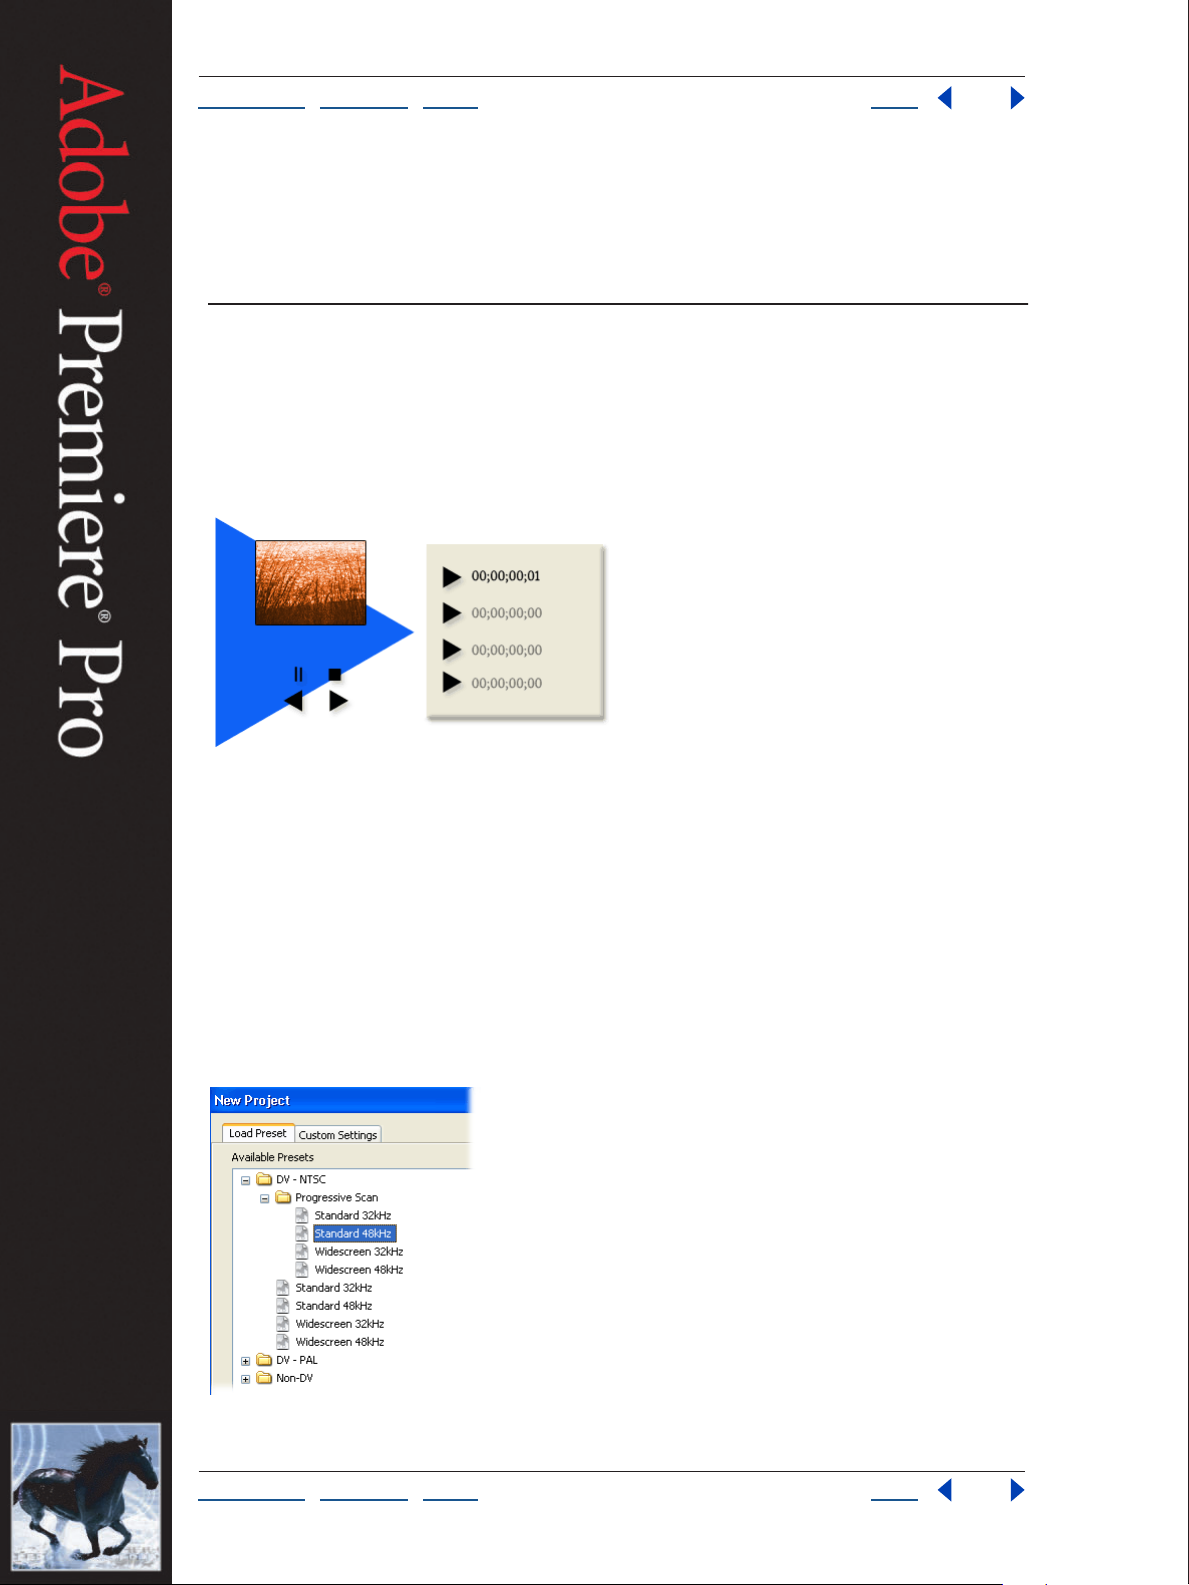
2. Prepare a project for the clips you’ll capture.
Start Adobe Premiere Pro and open or create a project that was created using one of the
DV presets in the New Project dialog box. When you use a DV-based preset, make sure the
preset’s audio sample rate (48 kHz or 32 kHz) matches the setting on your camera at the
time the tape was recorded.
Using Help | Contents | Index Back 15
Page 15
Adobe Premiere Pro Help Tutorials
Using Help | Contents | Index Back 16
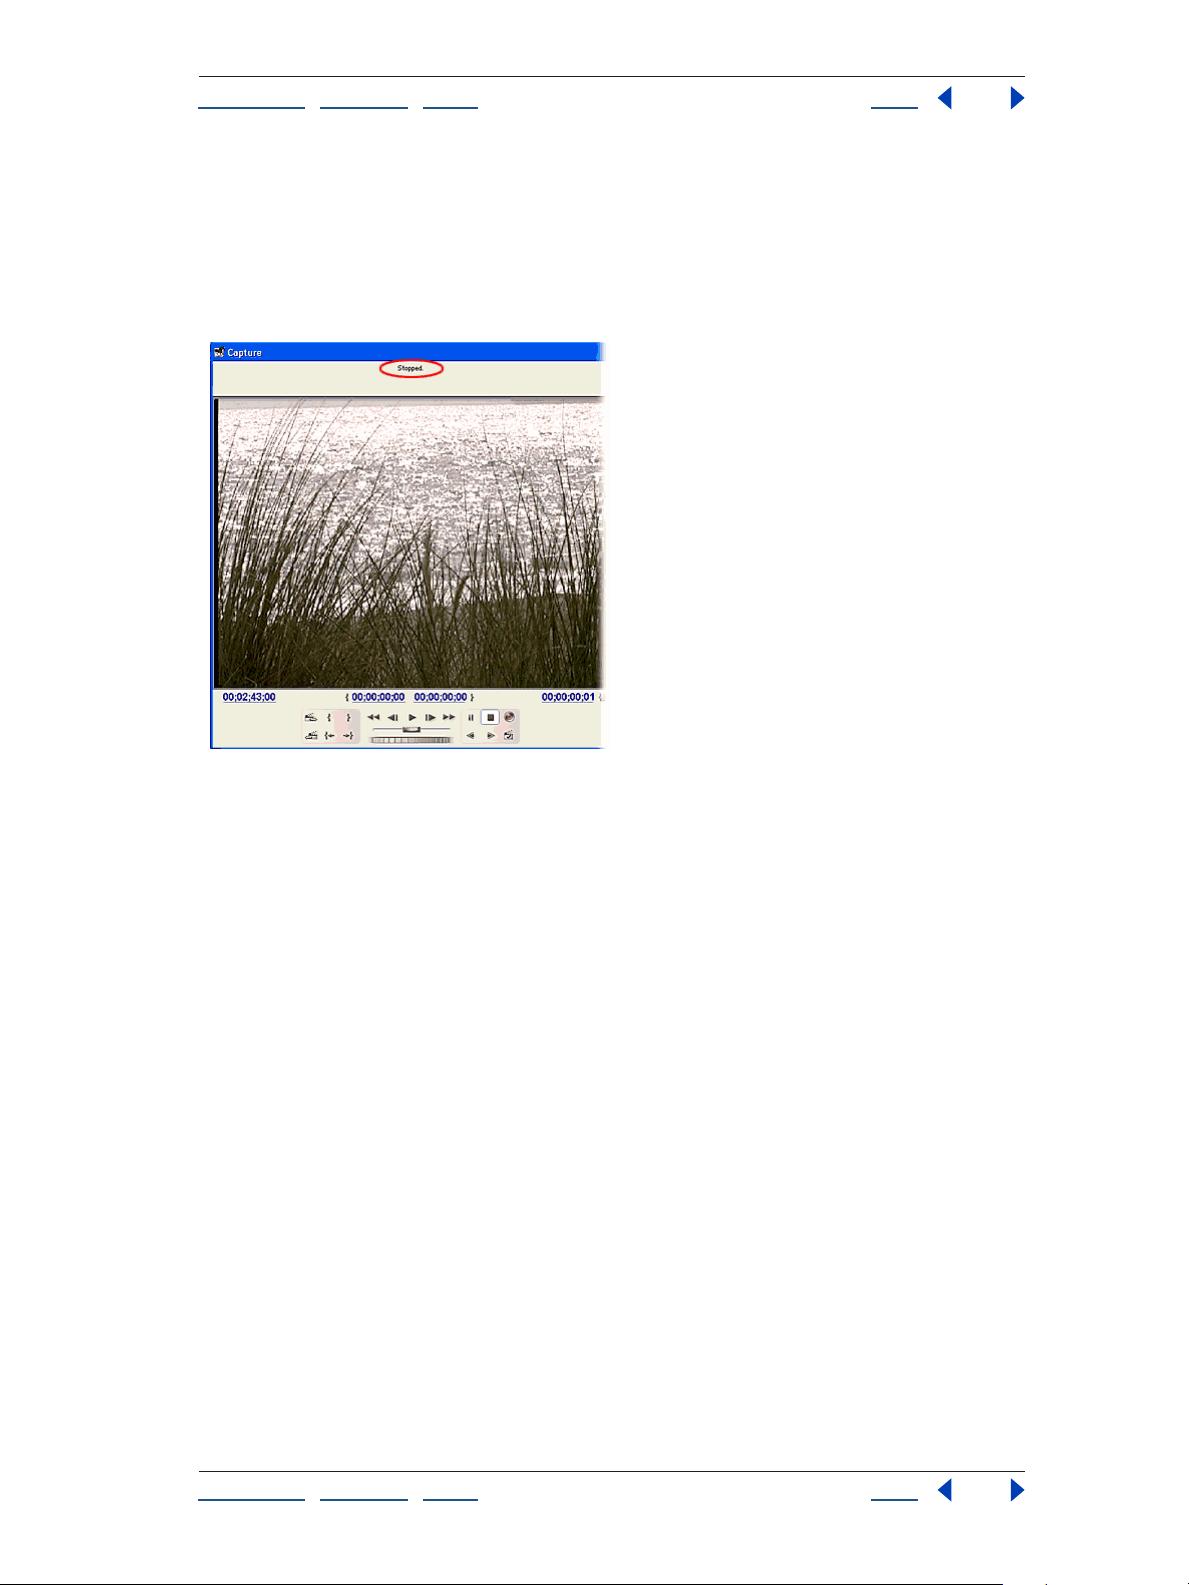
3. Open the Capture window and make sure it sees the device.
Choose File > Capture, or press F5. The status line above the preview area tells you
about the connection between your device and Adobe Premiere Pro. If the status line
reads “Capture device offline,” check to make sure all cable connections are secure and the
device is on. In some cases, you may need to click the Settings tab in the Capture window
and make sure the Device Control options are set correctly.
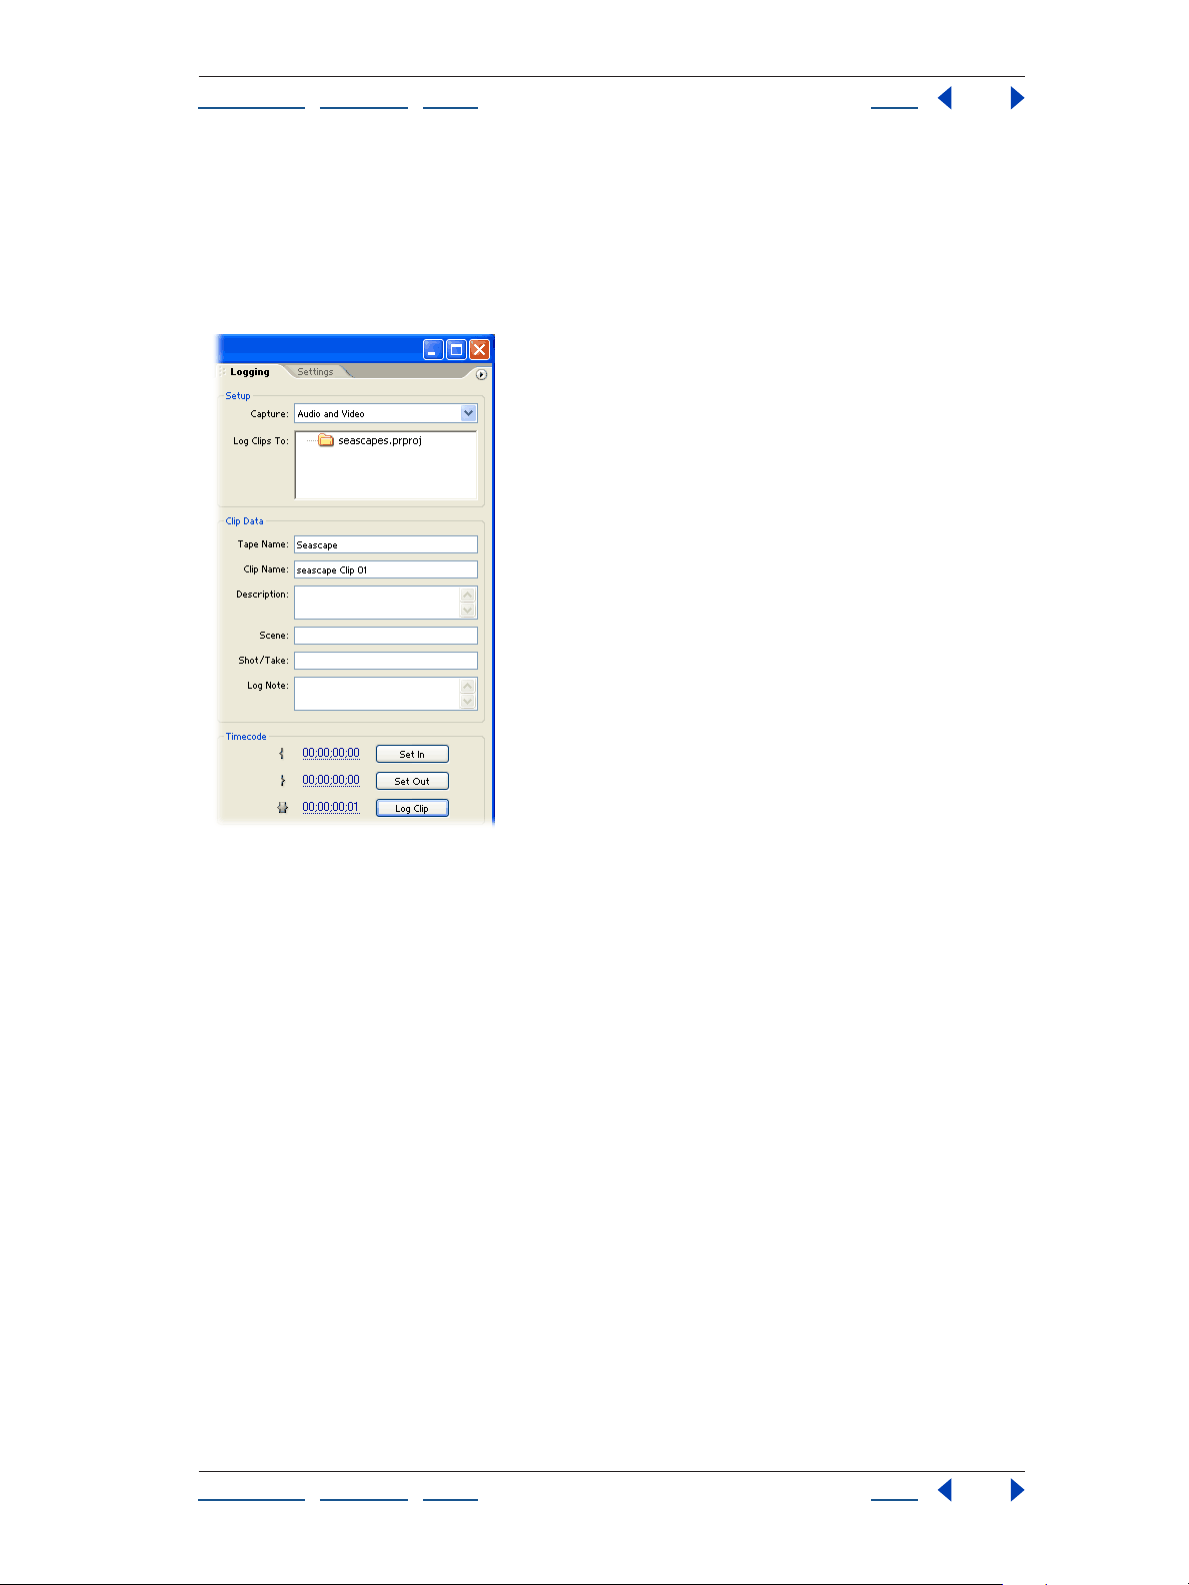
4. Set up the Logging tab.
In the Logging tab in the Capture window, make sure the settings in each section are the
way you want them.
The Setup section specifies whether to capture audio, video, or both, and where in the
project Adobe Premiere Pro will log the clip.
Note that logged clips are not captured immediately; they are stored as offline files in the
Project window until you use the Batch Capture command to actually capture them. If you
want to stored logged offline files separately in the Project window, create a new bin in
the Project window and it will appear in the Log Clips To option. You can set the locations
of captured files using the Settings tab.
Use the Clip Data section to set up the information you want entered with each logged
clip. This data becomes the default for each clip you log, so it’s a good idea to enter this
information before you start. You can also adjust the clip data as the content changes
during playback, because you can edit clip data while the tape is moving.
Using Help | Contents | Index Back 16
Page 16
Adobe Premiere Pro Help Tutorials
Using Help | Contents | Index Back 17
The only other options you may want to set before logging are Scene Detect and Handles.
Scene Detect automatically splits a tape into multiple clips based on scene breaks that
Adobe Premiere Pro detects, such as when you pause the tape while recording. Handles
are extra frames you capture so that you have flexibility for editing and transitions. For
transitions, you should capture the equivalent of at least one second of handles before
and after each scene.
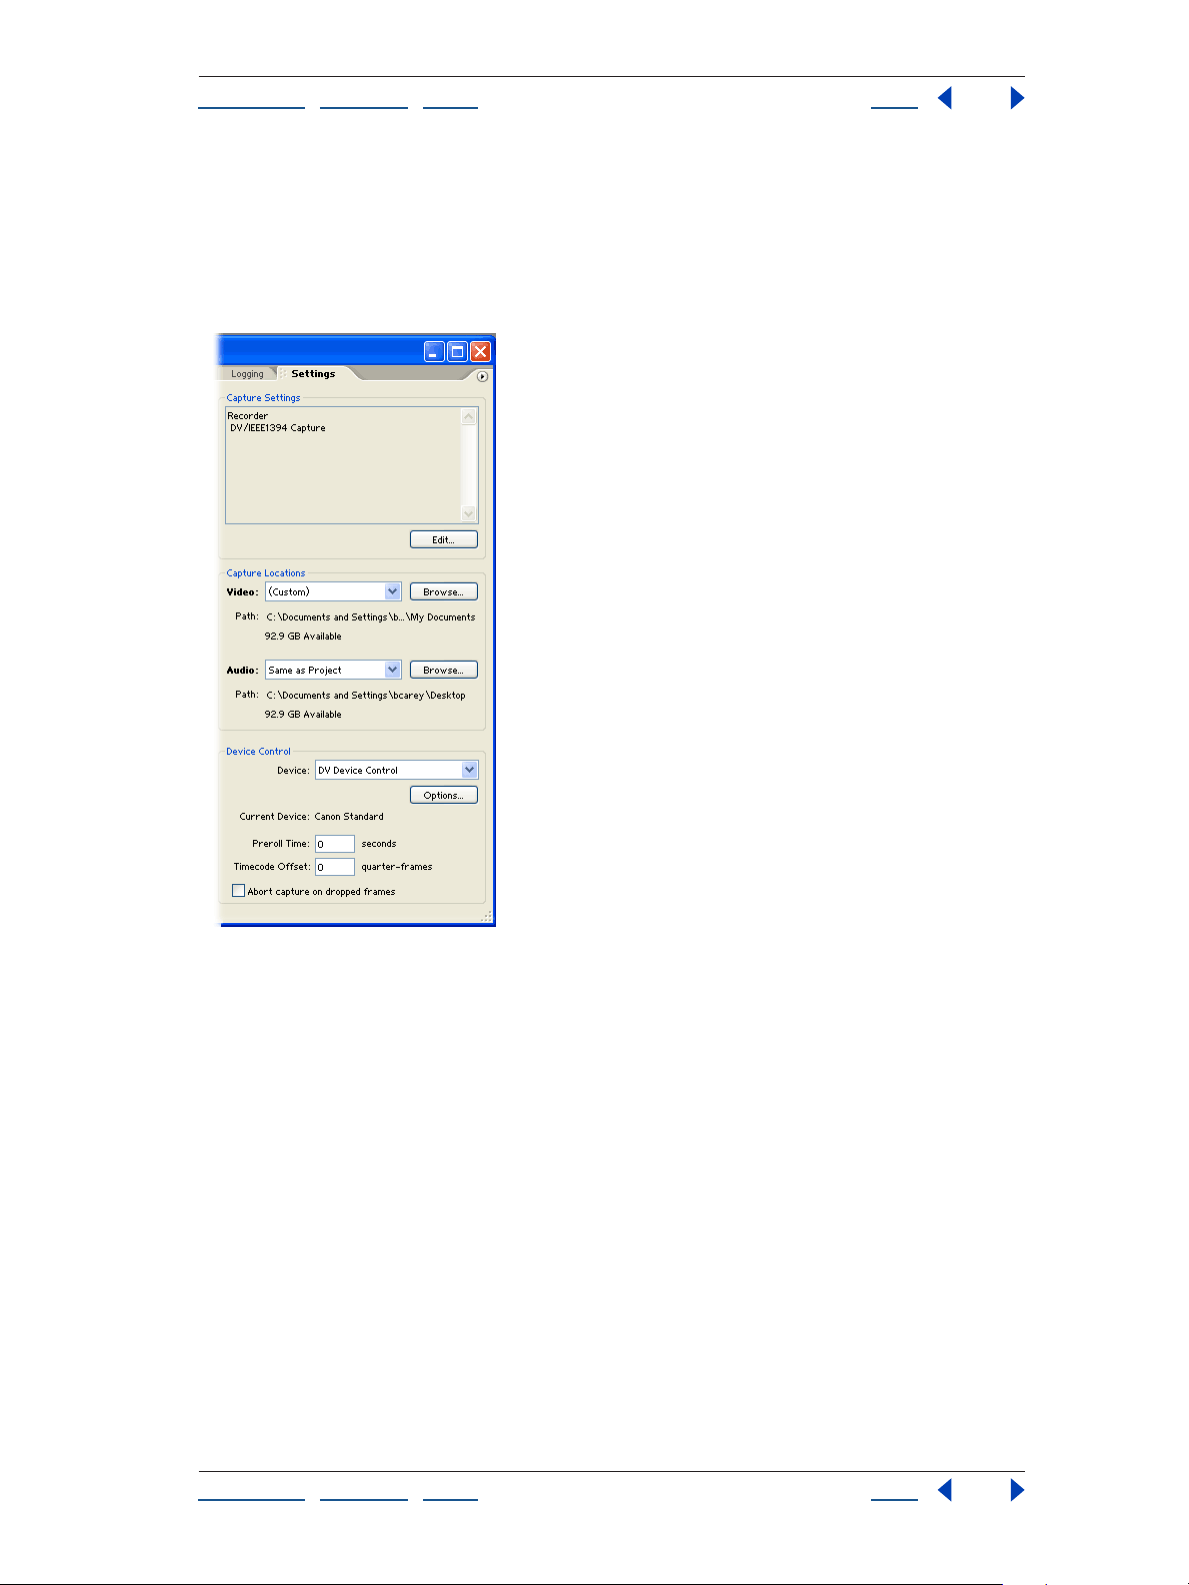
5. Adjust the Settings tab.
In the Settings tab in the Capture window, make sure the settings in each section are the
way you want them.
The Capture Locations settings let you specify the folder or disk where Adobe Premiere
Pro saves clips when they’re captured. By default, captured files are saved in the My
Documents folder.
Using Help | Contents | Index Back 17
Page 17
Adobe Premiere Pro Help Tutorials
Using Help | Contents | Index Back 18
The Device Control section includes Device settings you can adjust if Adobe Premiere Pro
has trouble recognizing your device. The lower part of the Device Control section contains
settings you can adjust in the course of normal capture; however, for DV capture the only
option you might use is Abort Capture On Dropped Frames. The Preroll Time and
Timecode Offset options are more commonly used when capturing footage from analog
devices.
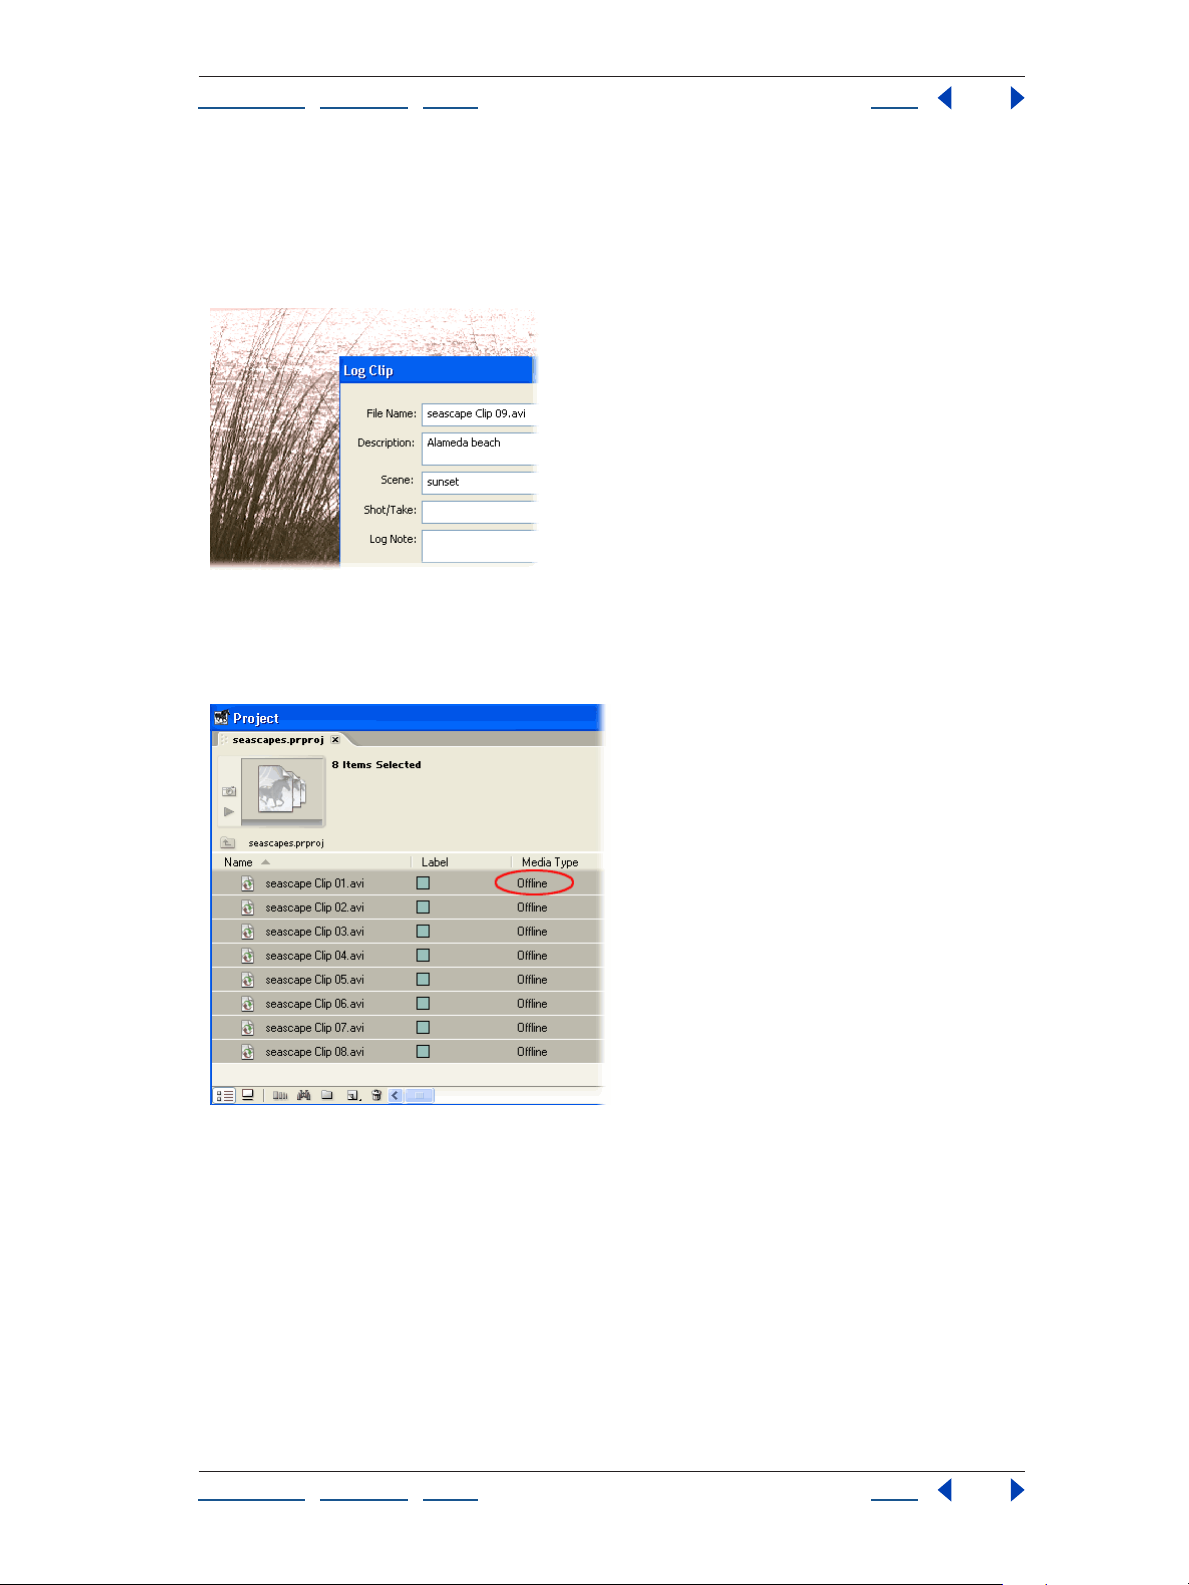
6. Log clips.
In the Capture window, use the tape transport controls to move to the first frame of the
first clip you want to capture, and then click Set In. Use the controls to move to the last
frame of the clip and then click Set Out. Click Log Clip, change the clip data as needed, and
then click OK. Adobe Premiere Pro adds the logged clip as an offline file in the Project
window. Repeat this step as many times as needed for the other clips you
want to log.
Using Help | Contents | Index Back 18
Page 18
Adobe Premiere Pro Help Tutorials
Using Help | Contents | Index Back 19
As you log clips, feel free to adjust options as necessary as the content on the tape
changes. For example, as the tape plays back, you can adjust the Log Clips To Bin or the
Clip Data options as you anticipate an upcoming scene. Or if you clicked Set In or Set Out a
little earlier or later than you intended to, you can type in a new timecode or slide the In or
Out point slightly by dragging the timecode numbers to the left or right.
7. Batch-capture logged clips.
You can batch-capture any clips you’ve logged, as long as your capture device is online.
Select offline files in the Project window, choose File > Batch Capture, and click OK.
You’ll see options in the Batch Capture dialog box, but you do not need to use them unless
you want to override the default capture settings. When batch capture finishes, the offline
clips in the Project window are replaced with the captured clips.
If you simply want to capture one or two clips quickly, there’s no need to log clips in
advance. Use the device controls in the Capture window to find the first frame you want to
capture and click Set In. Use the controls to find the last frame you want to capture, click
Set Out, and then click In/Out in the Capture section. When the clip is captured, enter clip
data when asked.
Using Help | Contents | Index Back 19
Page 19
Adobe Premiere Pro Help Tutorials
Using Help | Contents | Index Back 20
Generate a Sequence Automatically
Of all filmmaking tools, few are as useful as the storyboard. Before you shoot, a storyboard
helps you visualize and plan your project. During production—when you're acquiring
shots out of sequence, sometimes days apart—a storyboard can preserve your sense of
continuity. So once the shots are complete, it only seems natural to arrange them into
storyboard form before committing them to a rough cut. With Adobe
can organize clips in the Project window in storyboard fashion, then generate a sequence
automatically with video and audio transitions.
®
Premiere® Pro, you
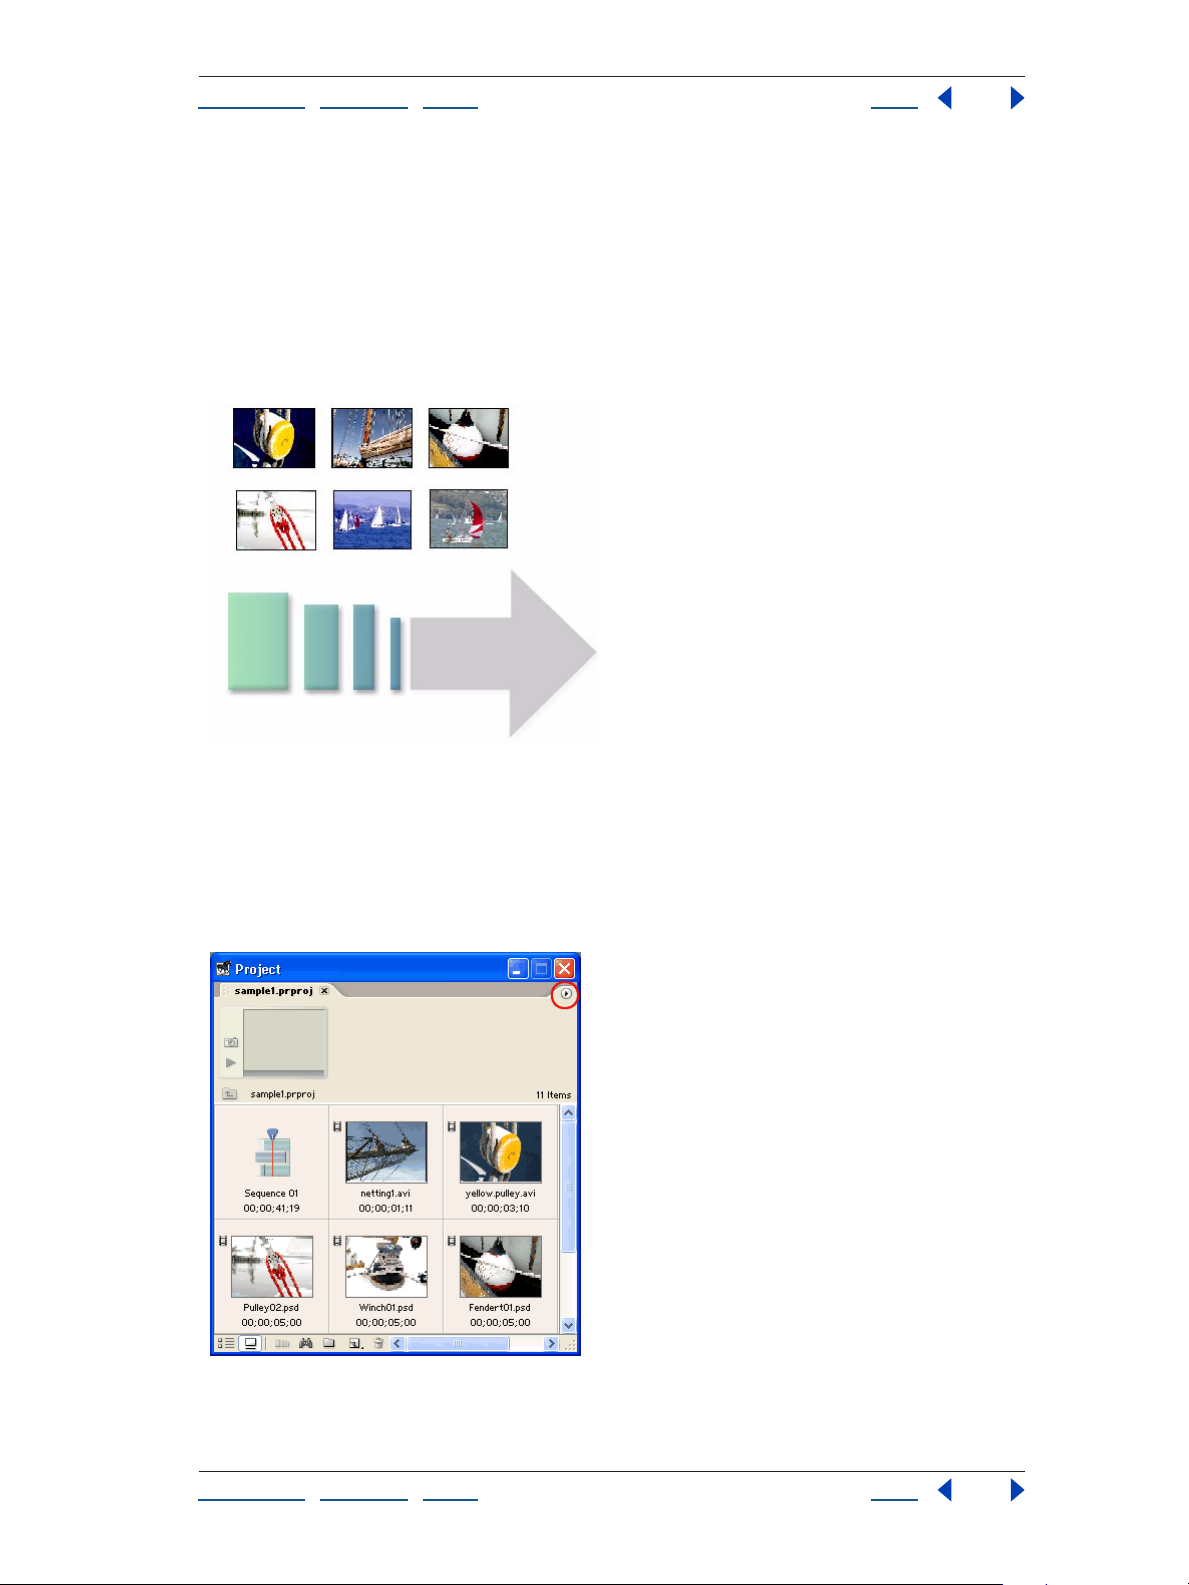
1. Set up the Project window.
In the Project window’s pop-up menu, choose View > Icon to display your clips in a storyboard-style grid. Go to the Project window’s pop-up menu again and choose Thumbnails
> Off to uncheck the option and make the clips appear as thumbnail images. To change
the size of the thumbnails, choose Thumbnails and select the size you prefer. Resize the
Project window to show all of your clips if necessary.
Using Help | Contents | Index Back 20
Page 20
Adobe Premiere Pro Help Tutorials
Using Help | Contents | Index Back 21
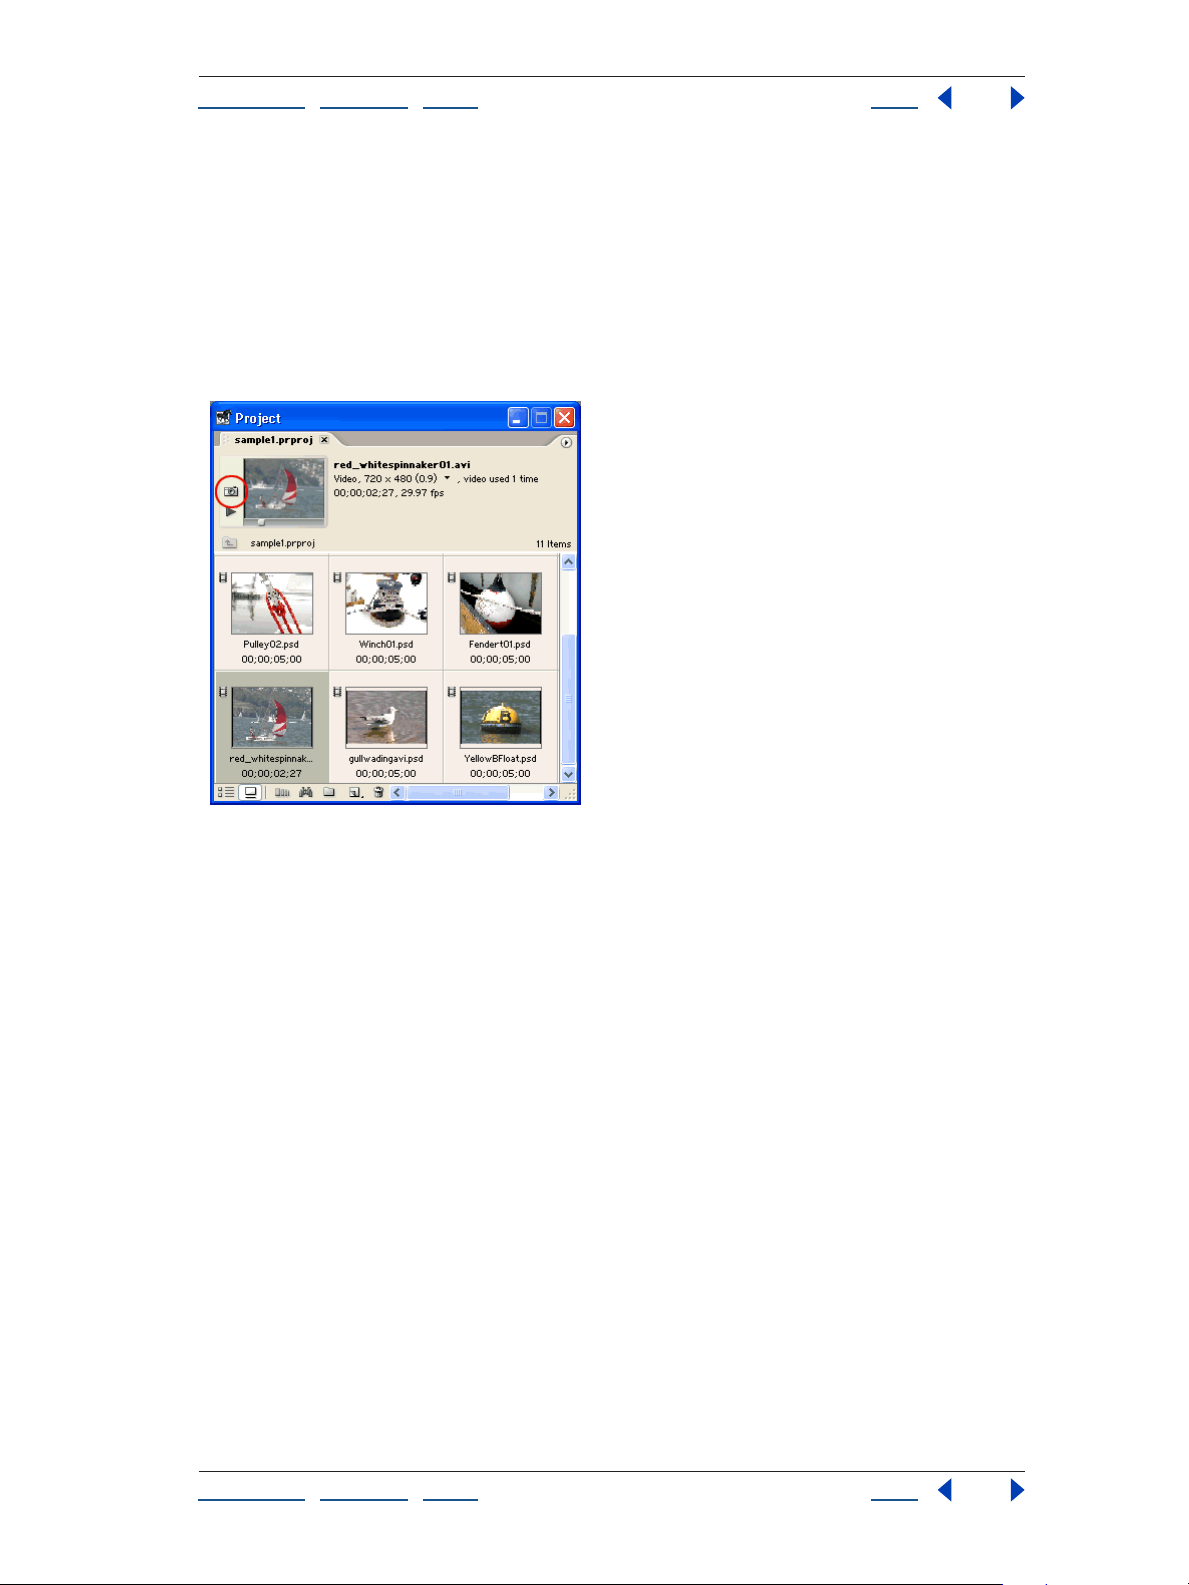
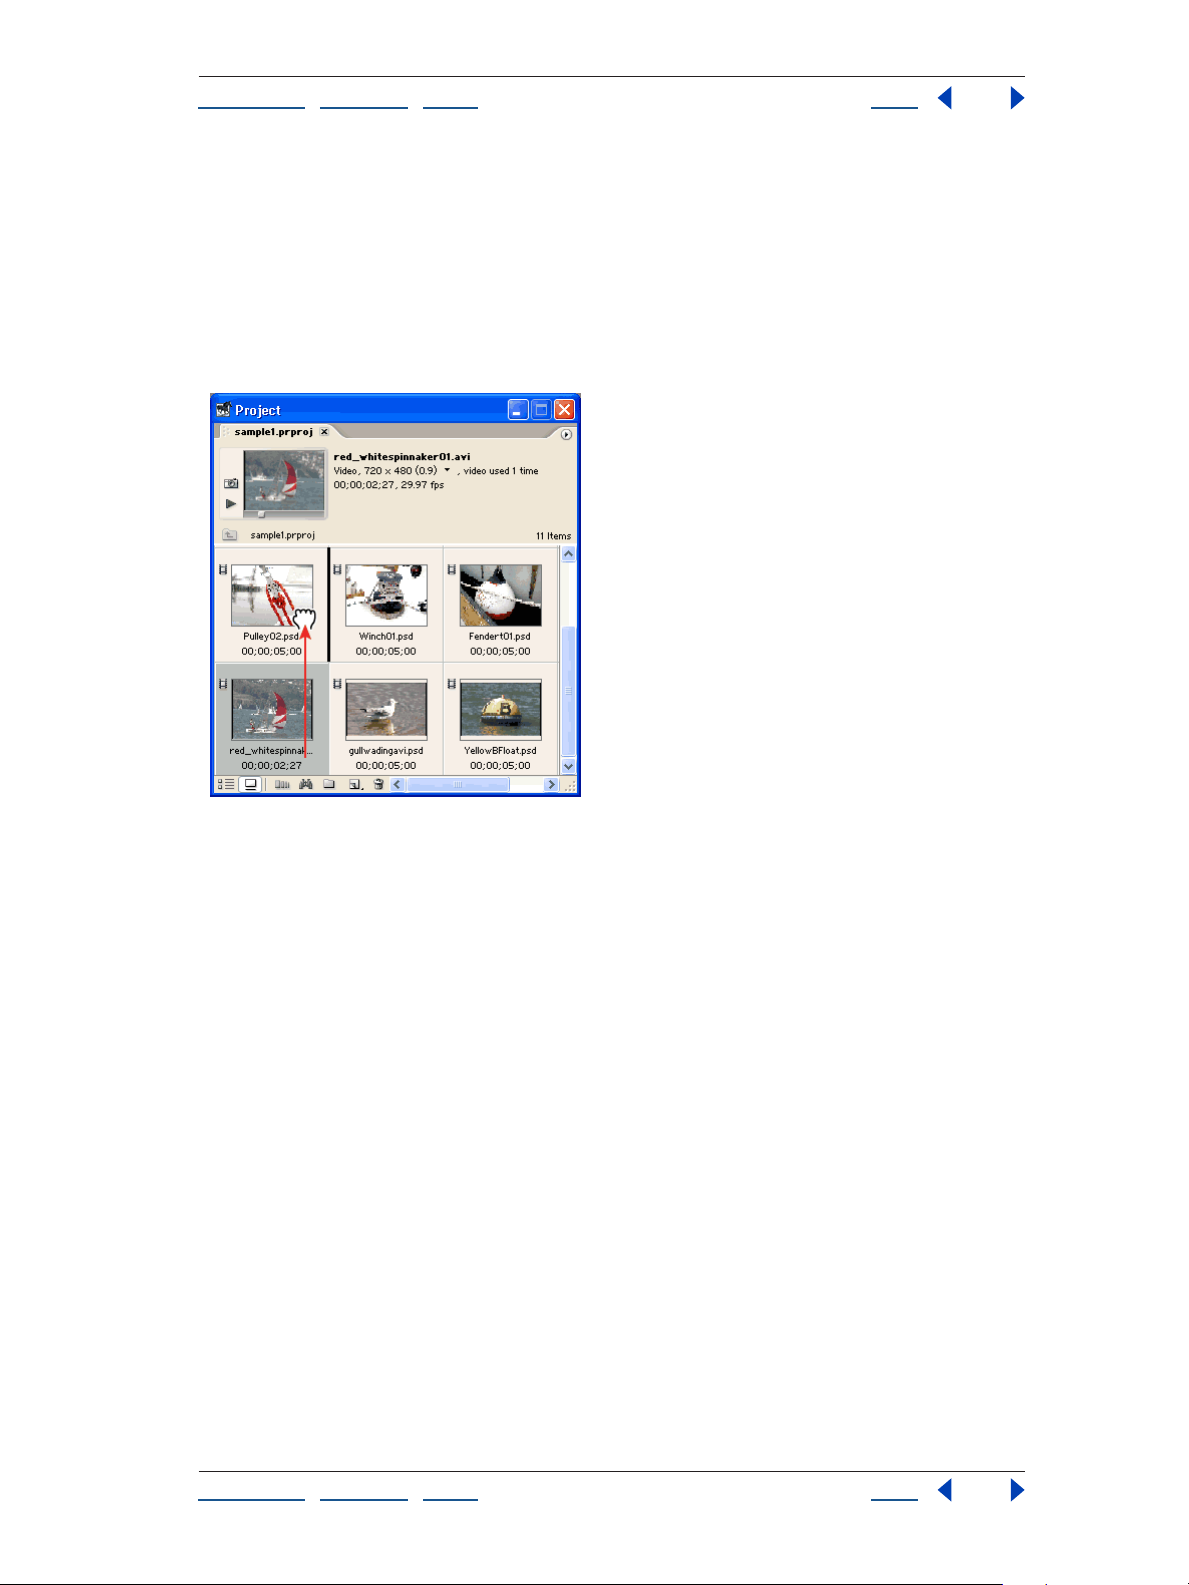
2. Set each clip’s thumbnail image.
Select a clip to view it in the preview area at the top of the Project window. Press the Play
button next to the preview image, or drag the scroll bar under the preview image to cue
the clip to a representative frame. When you’ve found an image that best signifies the
clip’s contents, click the Poster Frame button to set the clip’s thumbnail image.
If you do not set the poster frame, each clip’s In point (initially, a clip’s first frame) is used as
the thumbnail image. Even if you change the In point later for editing, it may not make the
best representative frame in a storyboard.
Using Help | Contents | Index Back 21
Page 21
Adobe Premiere Pro Help Tutorials
Using Help | Contents | Index Back 22
3. Arrange the clips into a storyboard.
In the Project window, drag the clips into the order you want them to appear in the
sequence. Arrange them from left to right, top to bottom, in storyboard fashion. You can
drag a marquee to select a group of clips or Ctrl-click to add or subtract from your
selection. Clips shift forward in the storyboard to make room for clips you drop into an
occupied space in the grid. To quickly move clips back into view that have shifted outside
the Project window, and to eliminate empty spaces between clips, choose Clean Up from
the Project window’s pop-up menu.
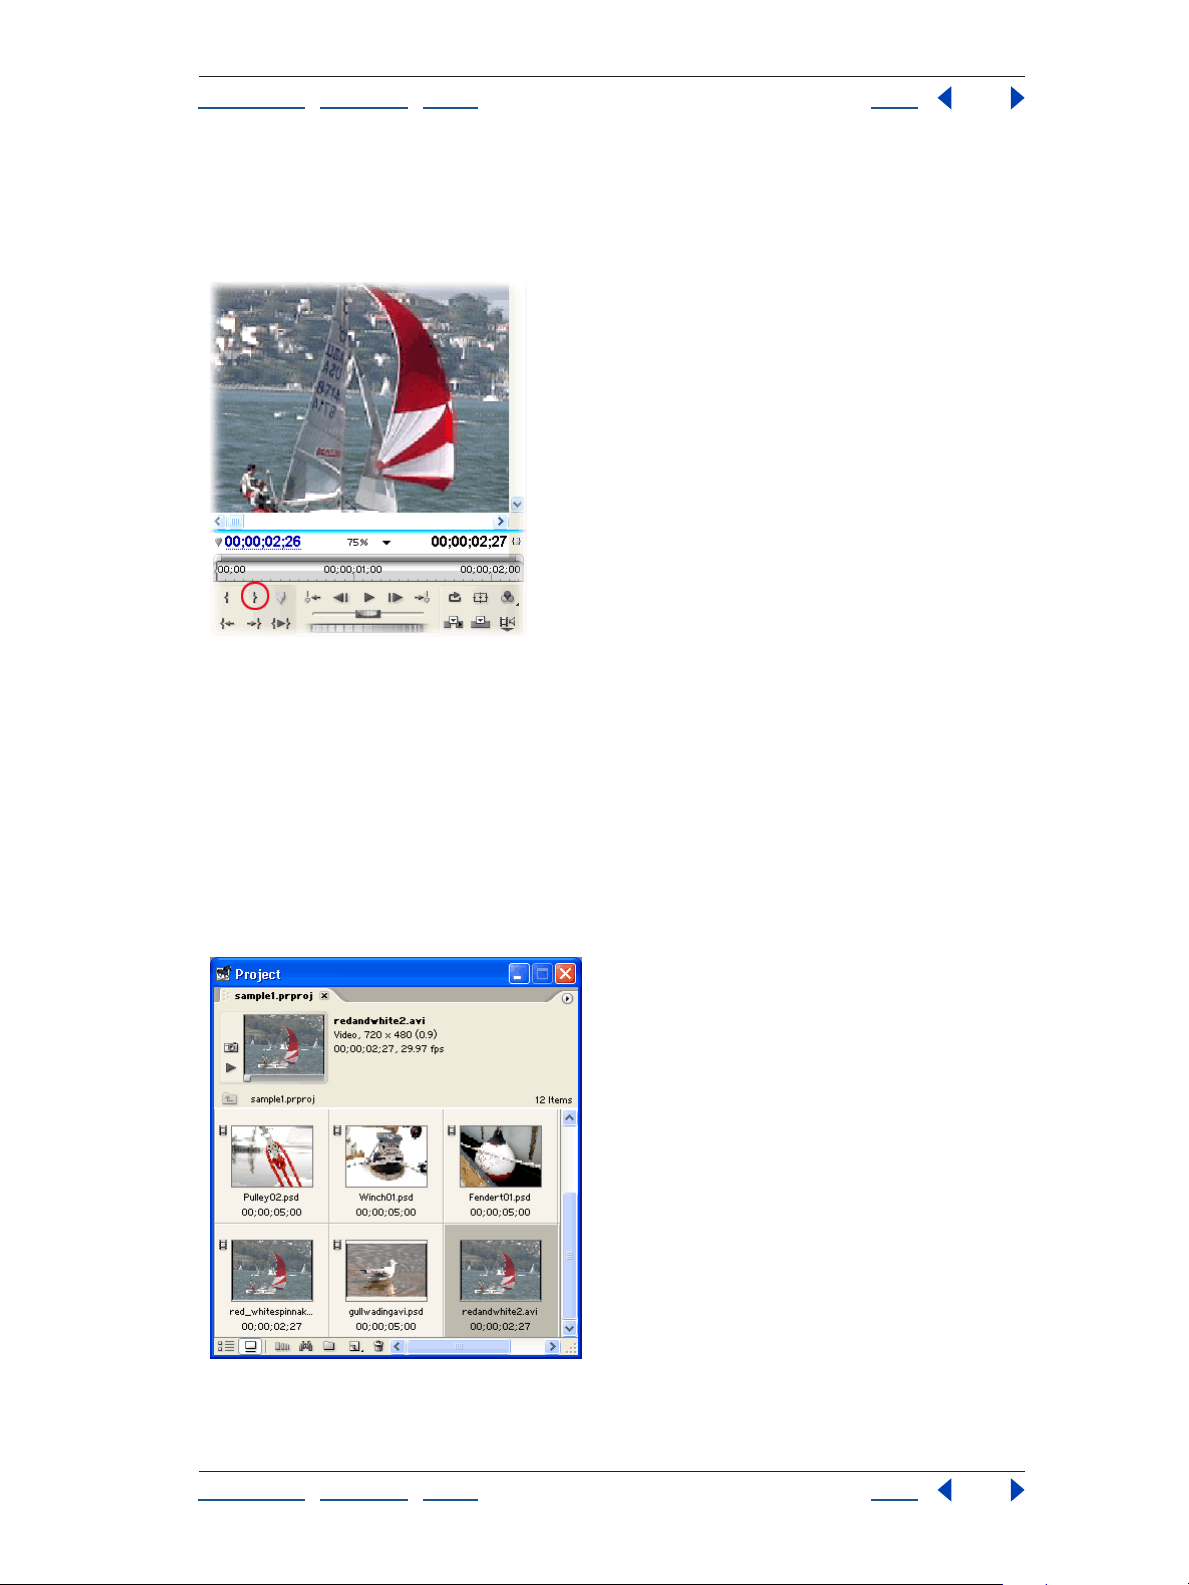
4. Edit your clips as needed.
You can double-click a clip to open it in the Source view of the Monitor window and use
the Source view’s playback controls to watch the clip. Define the first frame you want to
include in the sequence by clicking the Set In Point button in Source view, and define the
last frame you want to include by clicking the Set Out Point button.
Using Help | Contents | Index Back 22
Page 22
Adobe Premiere Pro Help Tutorials
Using Help | Contents | Index Back 23
You should set In and Out points to define the parts of the clips you want to use, especially
when the source clips include more footage than you plan to include in the final
sequence. However, you don’t need to be too meticulous: Many editors use the storyboard
method to create a quick rough cut and refine the sequence later.
5. Create duplicate clips as needed.
If you want to use parts of a clip more than once in a storyboard, you can create a
duplicate clip. Select a clip and choose Edit > Duplicate. With the duplicate clip selected,
choose Clip > Rename and give the clip a unique name. Repeat steps 2 through 4 for
duplicate clips.
It’s important to understand that you can add a source clip to a sequence as many times as
you want without creating a duplicate clip. However, duplicate clips can come in handy
when you want parts of the same media to appear in different places in a storyboard.
Similarly, you might create one or more duplicate clips from a very lengthy and unwieldy
clip. This way, you could treat each portion of the shot as a different clip.
Using Help | Contents | Index Back 23
Page 23
Adobe Premiere Pro Help Tutorials
Using Help | Contents | Index Back 24
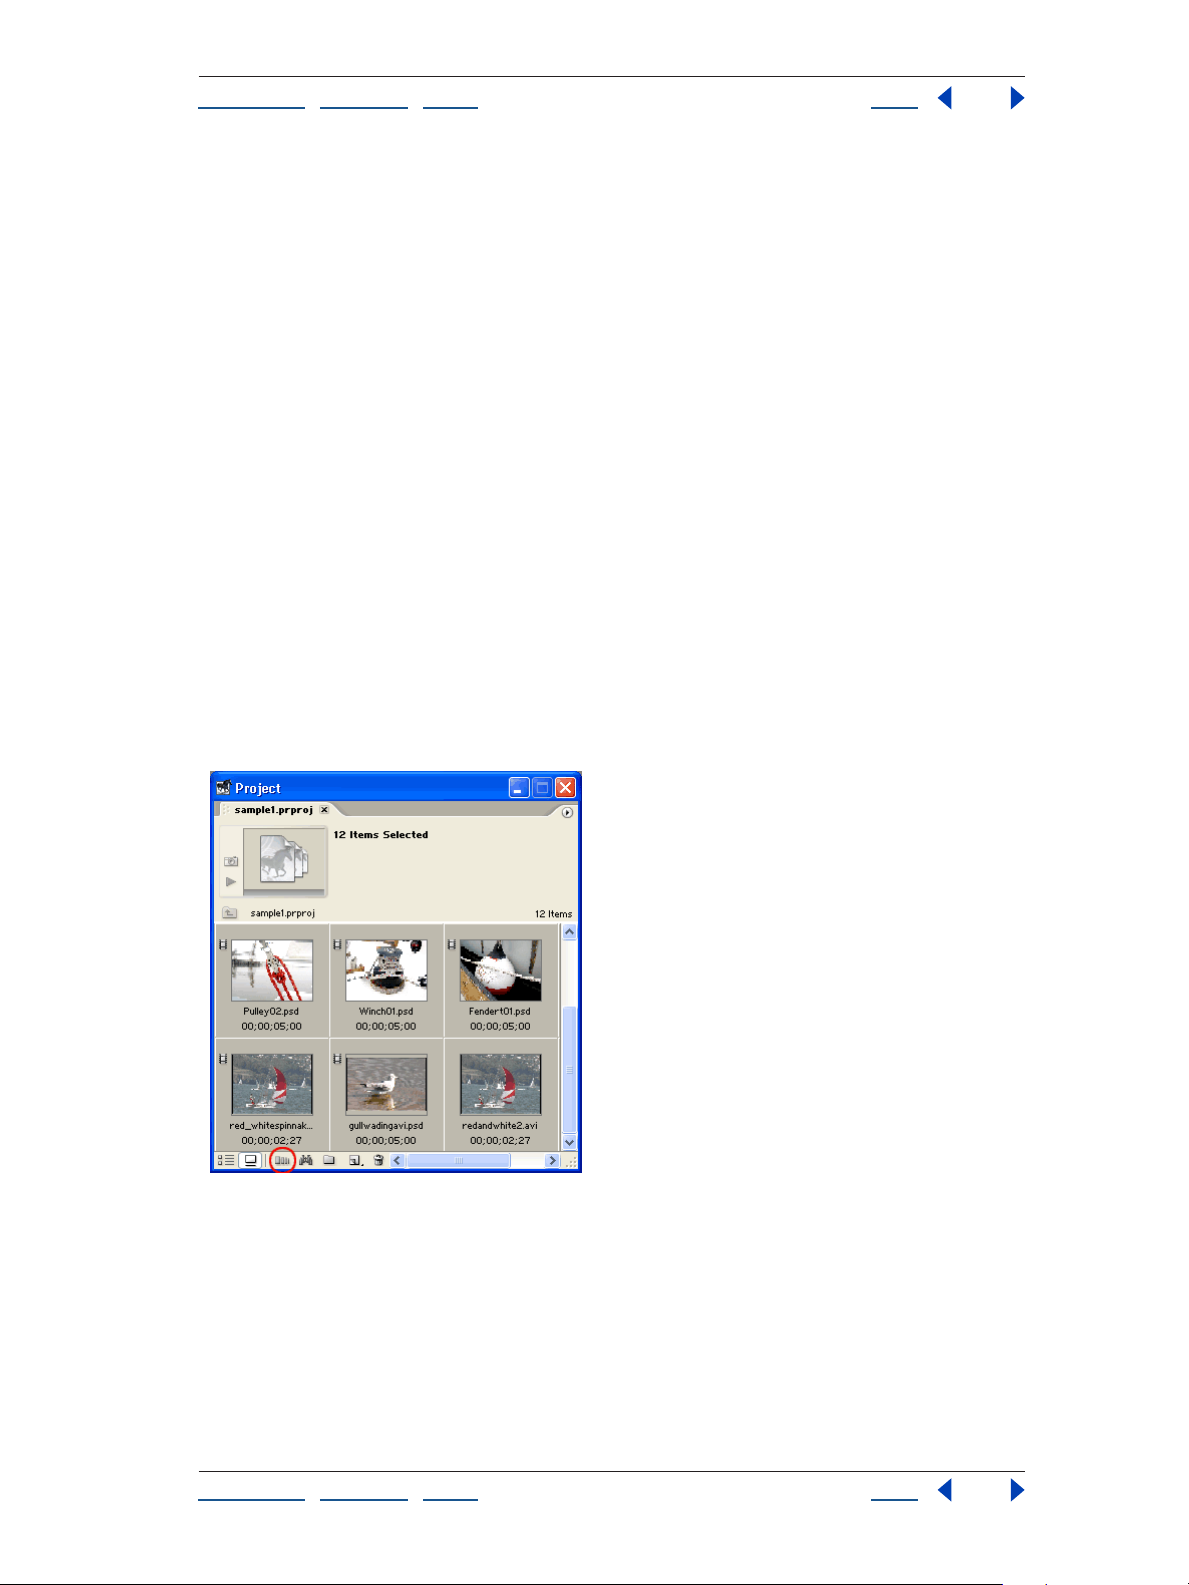
6. Select the clips to add to the sequence.
Once you’ve completed your storyboard, select the shots you want to include in the
sequence. To select all the shots in the Project window, choose Edit > Select All. If you
don’t want to include everything in the storyboard, you can drag a marquee to select a
group of shots or Ctrl-click to add and subtract shots from your selection.
The whole idea of a storyboard is to put your shots in sequential order. Nevertheless, you
can have Adobe Premiere Pro place them in the sequence according to the order you
select the clips instead.
7. Add clips to a sequence.
Click the Automate To Sequence button at the bottom of the Project window. Specify the
options you want in the Automate To Sequence dialog box. For Ordering, you can choose
Sort Order, because you’ve arranged your clips into a storyboard. For Placement, choose
Sequentially; because you’re creating a rough cut, you can place the clips one after the
other rather than at predefined points in the sequence. It does not matter what you
choose for Method—Insert Edit or Overlay Edit—because in this case, there aren’t any
clips in the sequence already. If you want a specific transition between each clip, check the
appropriate box or boxes to apply the default audio or video transition. Specify the
duration of the transitions by entering a value for Clip Overlap. To exclude either the video
or audio tracks, select the appropriate Ignore option.
When you click OK, the clips in your storyboard are instantly assembled into a sequence
according to the options you specified.
Using Help | Contents | Index Back 24
Page 24
Adobe Premiere Pro Help Tutorials
Using Help | Contents | Index Back 25
Animating an Adobe Photoshop File
You can make sophisticated compositions in Adobe® Premiere® Pro by adding motion
graphics to your video clips. Import multilayered graphics from Adobe
manipulate their scale, skew, and position. Every track is a compositing track that includes
an alpha channel so that transparency is built in. Just add layers, adjust, and go!
®
Photoshop® and
1. Import Adobe Photoshop files.
To take full advantage of new compositing capabilities in Adobe Premiere Pro, use
Photoshop files with transparent backgrounds, or add an alpha channel to an existing
Photoshop file. For example, you can create a logo on a single, transparent layer to
animate over video. (For instructions, see Adobe Photoshop Help.)
Import the Photoshop file as footage with merged layers and then add it to the topmost
track in the Timeline window. Add video clips to the lower tracks. Use the rate stretch tool
in the Timeline window to adjust the duration of the graphic to around five seconds.
Using Help | Contents | Index Back 25
Page 25
Adobe Premiere Pro Help Tutorials
Using Help | Contents | Index Back 26
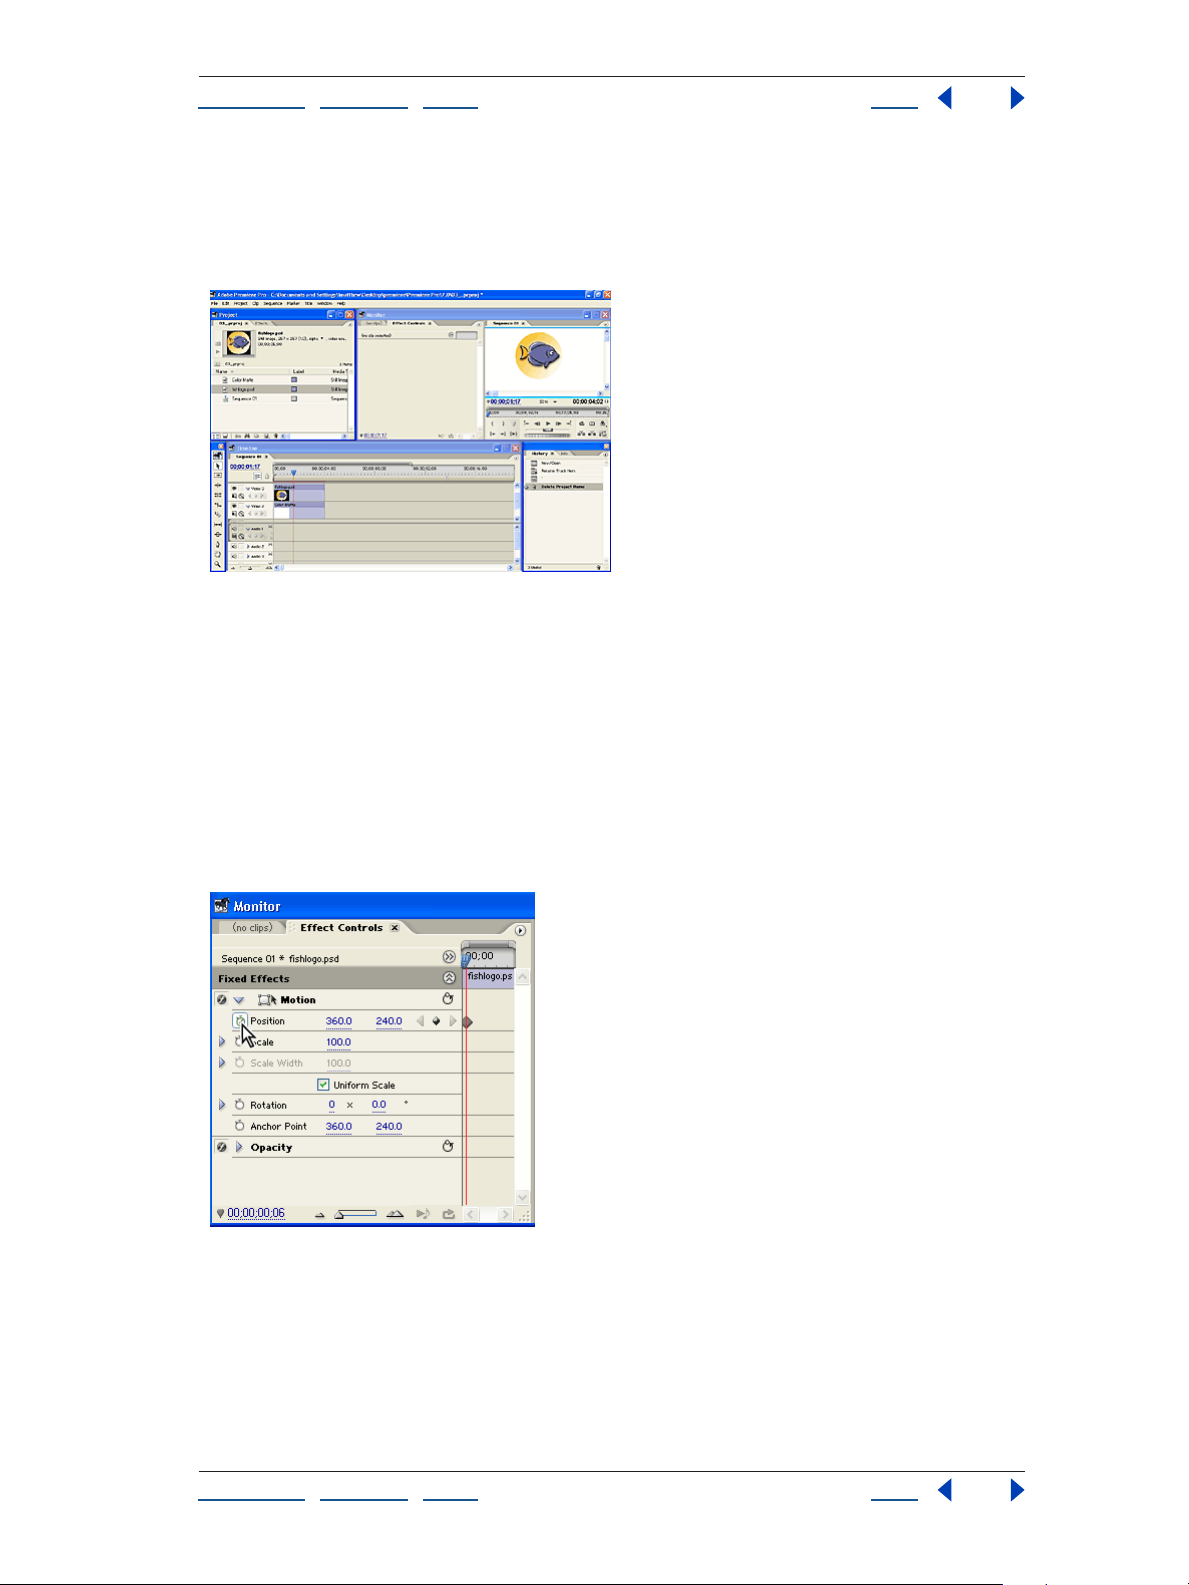
2. Optimize your work area to use effects.
Adobe Premiere Pro uses effects to animate layers and provides a workspace setting
designed specifically for this task. Choose Window > Workspace > Effects to open the
Effect Controls window, docked in the Monitor window. Click the tab to view its contents.
3. Set keyframes for the Motion effect.
To animate clips, use the Motion effect. This effect allows you to adjust the position, scale,
and rotation properties of a clip. Because these properties are intrinsic characteristics of a
clip, they are built into every clip. As such, the Motion, Opacity, and Volume effects appear
in the Effect Controls window whenever you select a clip in the Timeline window. To view
these effects, select the Photoshop file in the Timeline window.
To make Motion properties vary over a specific duration, you must set at least two
keyframes for each property. Adobe Premiere Pro interpolates values between these
keyframes. Expand the Motion effect in the Effect Controls window and click the
stopwatch for each property to establish starting keyframes.
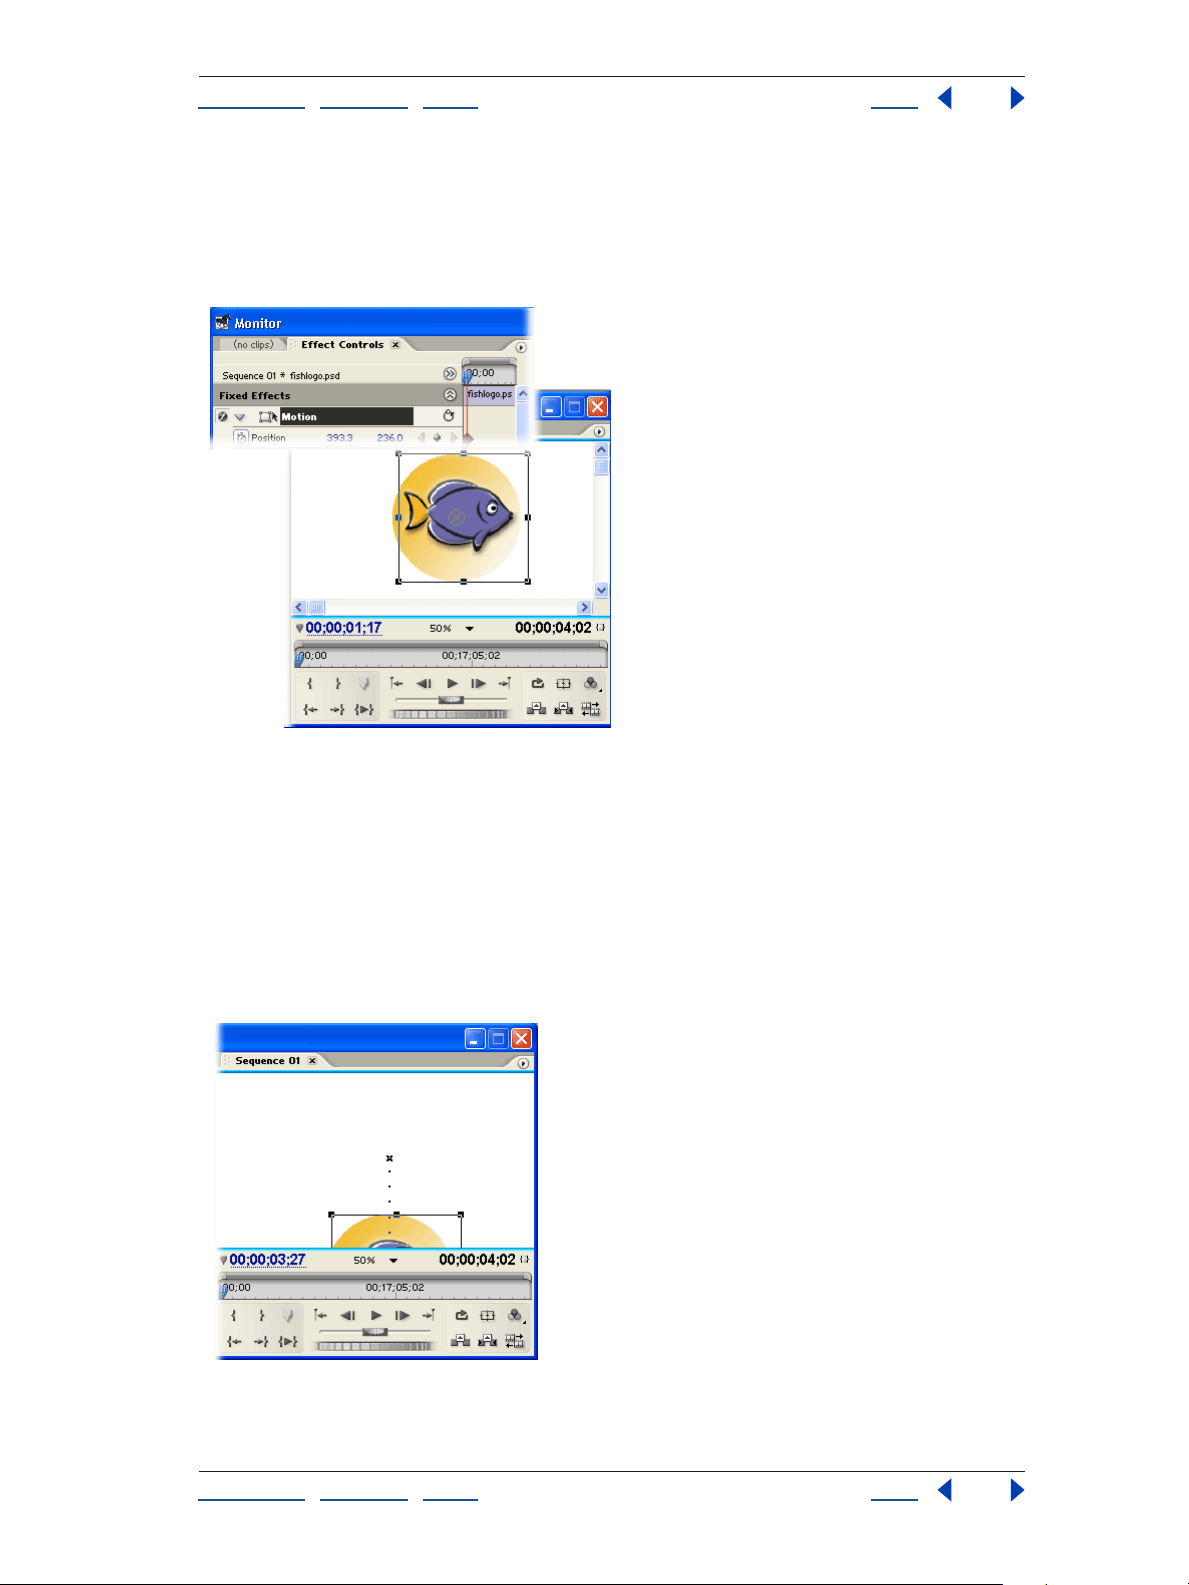
4. Adjust the clip handles.
The easiest way to animate scale and position is by directly manipulating clip handles
in the Program view of the Monitor window. To activate clip handles, select the
Motion effect in the Effect Controls window. Handles appear around the edges of the
image and an anchor point appears at its center. All adjustments are calculated around
the anchor point.
Using Help | Contents | Index Back 26
Page 26
Adobe Premiere Pro Help Tutorials
Using Help | Contents | Index Back 27
Next, position the selection tool on the image in the Program view. To adjust scale or
rotation, position the selection tool over a handle and drag when the rotation or scale
cursor appears. To adjust position, place the selection tool anywhere on the clip
(except on a clip handle) and drag. Use a combination of adjustments to set the graphic’s
starting position.
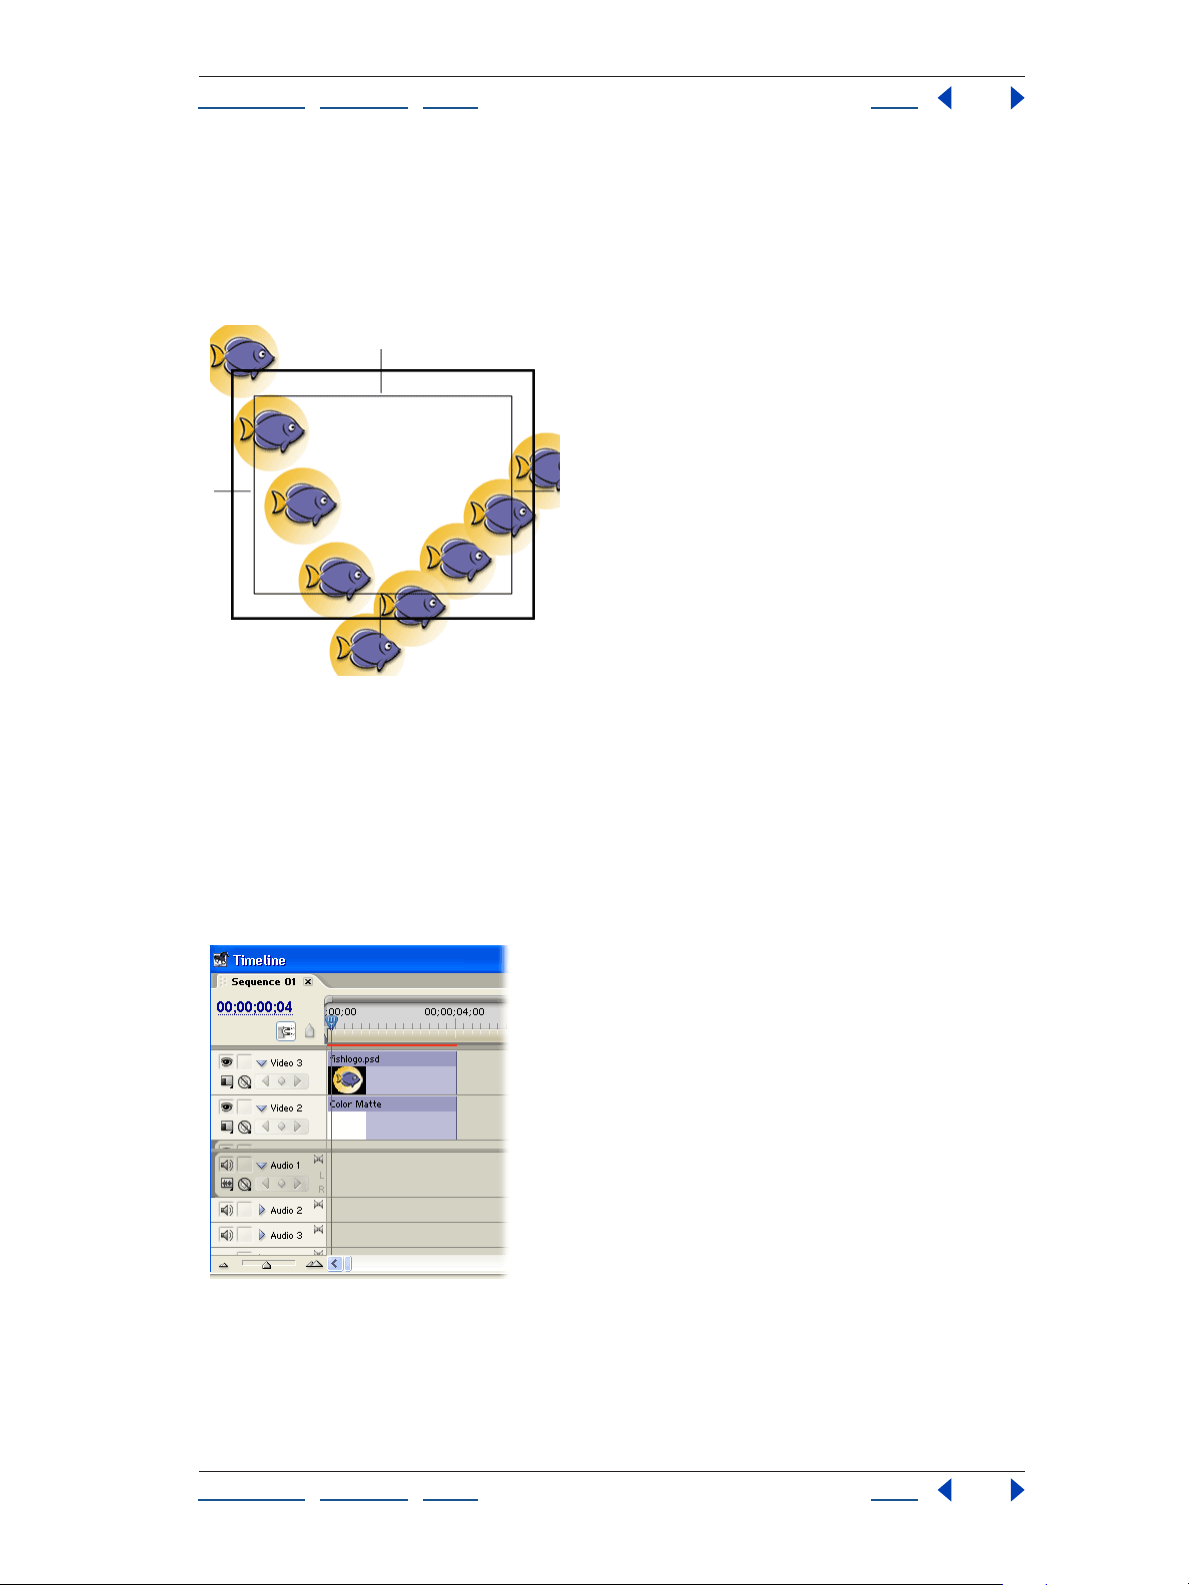
5. Animate the graphic.
In the Effect Controls window, move the current-time indicator to the end of the timeline.
When you adjust the Photoshop file in the Program view, Adobe Premiere Pro automati
cally creates new keyframes for each property value that you change. Change the
Photoshop file’s position, scale, and angle in the Program view, using the area in and
around the video frame. To see the entire video frame and work area, select a setting such
as 25% for the View Zoom Level in the Program view.
When you reposition the graphic, a dotted motion path appears in the Program view. Each
dot represents a frame in the timeline; X’s represent keyframes.
Using Help | Contents | Index Back 27
Page 27
Adobe Premiere Pro Help Tutorials
Using Help | Contents | Index Back 28
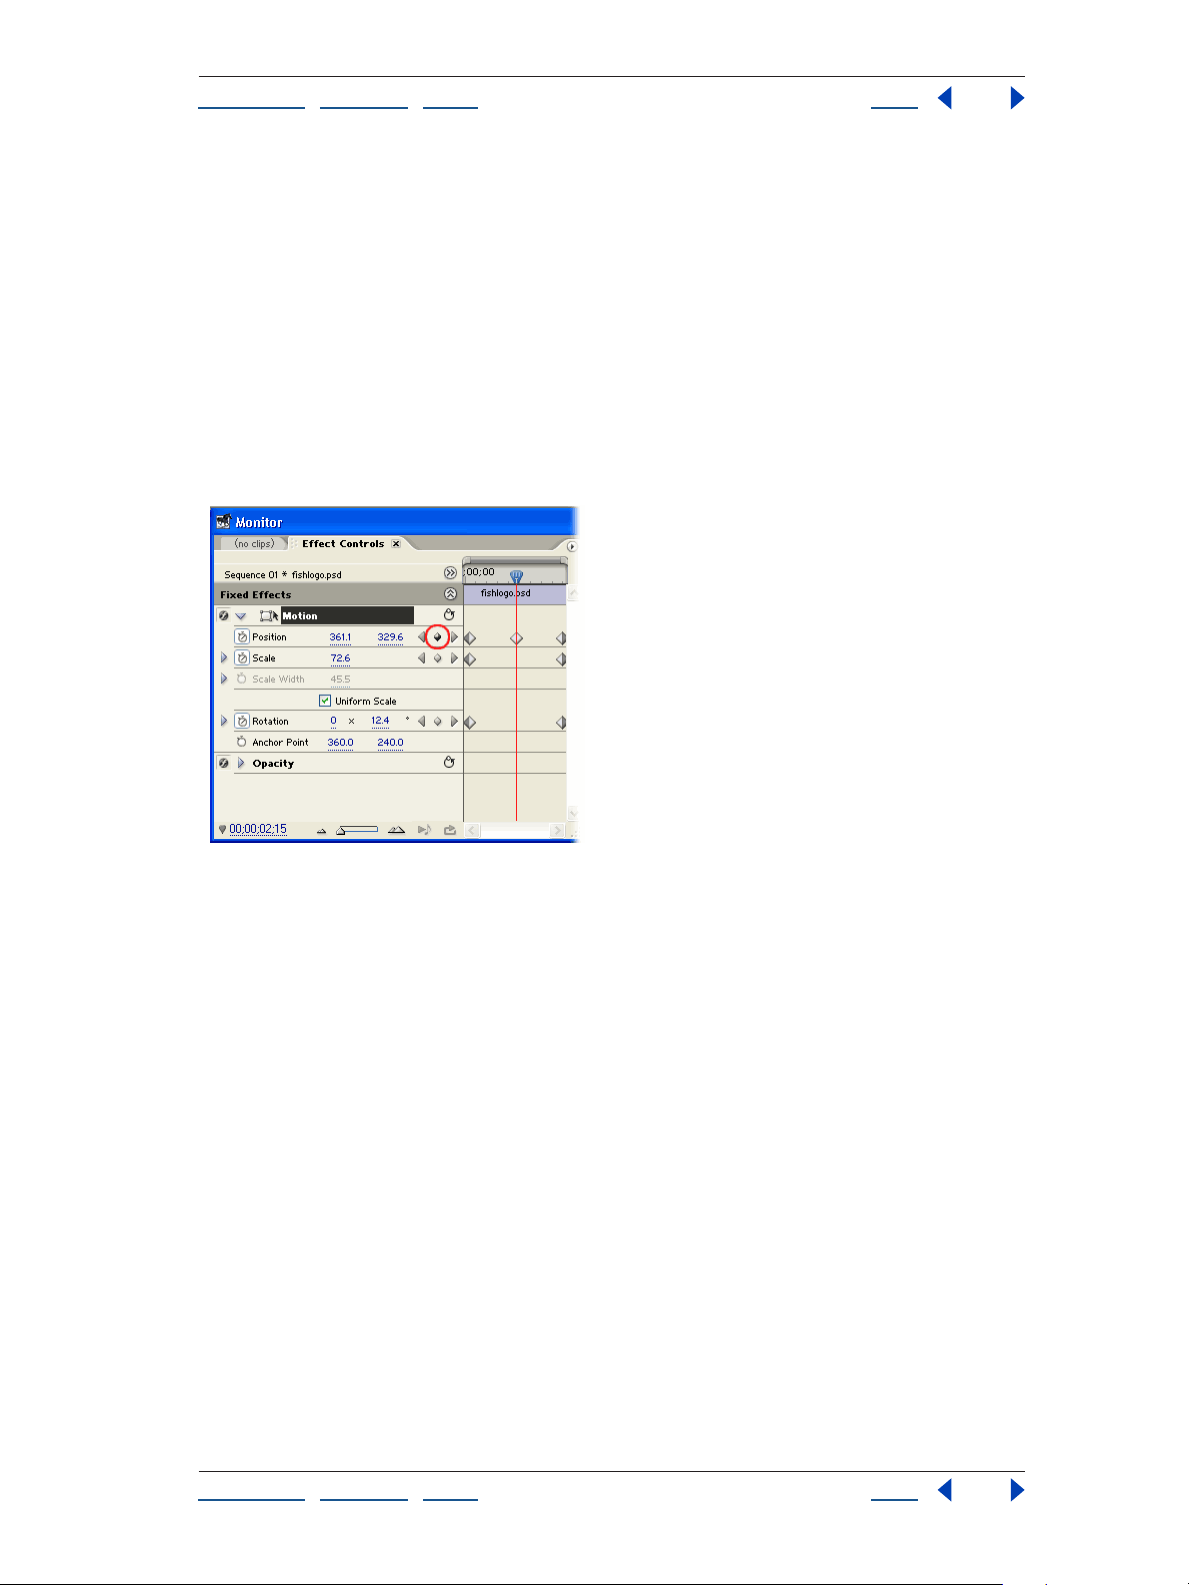
6. Adjust the motion path in the Program view.
To create more interesting animations, you can adjust the shape of the motion path and
change the interpolation method for your keyframes. In the Effect Controls window, move
the current-time indicator to the middle of the timeline and click the Add/Remove
Keyframe button to add a new Position keyframe. In the Program view, drag the new
keyframe (which appears at the center of the anchor point) so that the motion path forms
an angle.
Next, change the interpolation methods of the keyframe so that the graphic’s speed
varies, simulating realistic movement. Right-click the center keyframe you just created in
the Effect Controls window and choose Fast In from the menu that appears to accelerate
the clip’s movement as it approaches the keyframe. Right-click the keyframe again and
choose Easy Curve Out to slow its movement as it exits the keyframe.
7. Add other effects.
You can add other video effects by dragging them to the clip in the Timeline window from
the Effects window. Or you can animate the Opacity effect to make the Photoshop file fade
to black by setting two keyframes: one with a value of 100%, the second with a value of
0%.
8. Preview the animation.
When you’ve completed your animation, press the spacebar to preview the results.
You can animate any clip using the methods discussed here or you can use the Transform
effect to skew the clip in addition to adjusting its position, scale, and angle.
Using Help | Contents | Index Back 28
Page 28
Adobe Premiere Pro Help Tutorials
Using Help | Contents | Index Back 29
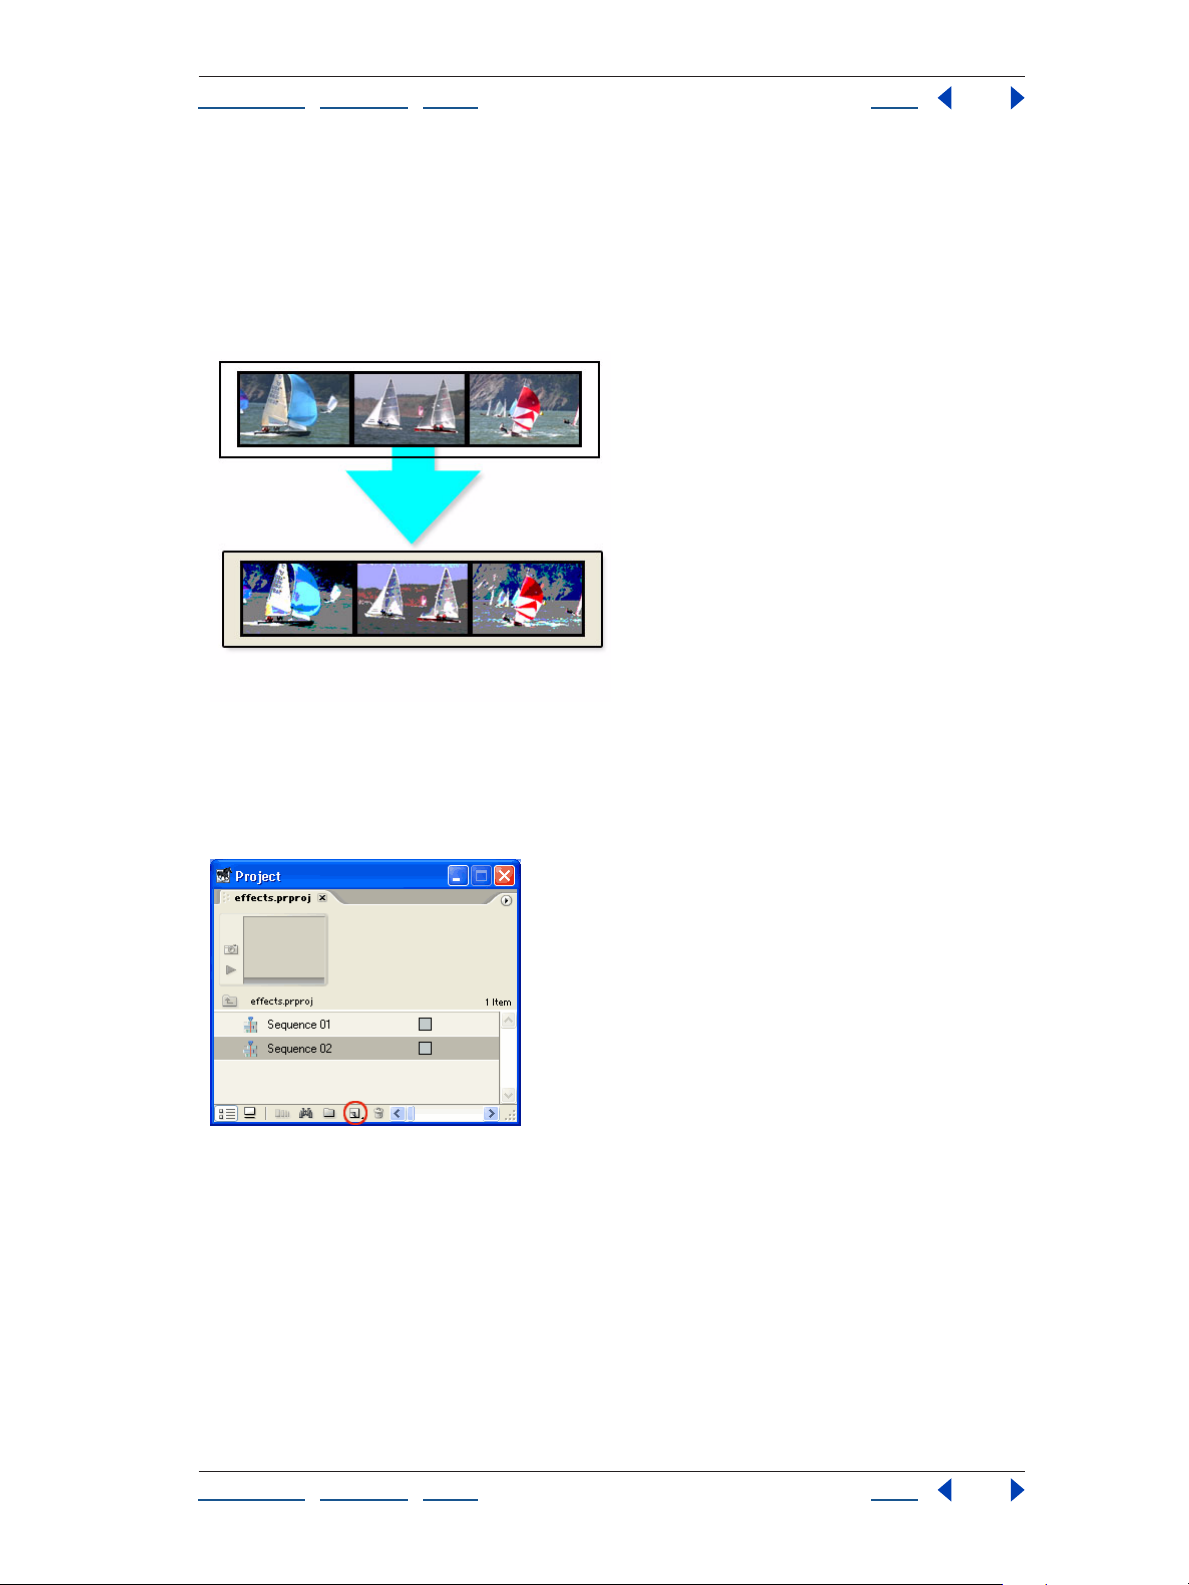
Apply an Effect to an Entire Nested Sequence
In Adobe® Premiere® Pro, y ou can nest a sequence within another sequence. When you
apply an effect to a nested sequence, the effect applies uniformly to all clips in the
sequence, so nesting is a great way to apply an effect to multiple clips at one time. Once
you organize each section of a video program into sequences, you can nest them all in a
master sequence for your video program.
1. Set up the sequences.
You’ll need to have at least two sequences to use nesting. An Adobe Premiere Pro project
contains one sequence by default, so create a second sequence by clicking the New Item
button in the Project window and choosing New Sequence.
2. Arrange the clips to which you want to apply an effect.
Choose File > Import, select a folder or one or more clips, and click Open. Drag the imported clips from the Project window to one of the sequences and arrange them as
needed.
Using Help | Contents | Index Back 29
Page 29
Adobe Premiere Pro Help Tutorials
Using Help | Contents | Index Back 30
You’ll be nesting the sequence containing clips in the other sequence, which is still empty.
You’ll use the other sequence as the master sequence for your video program.
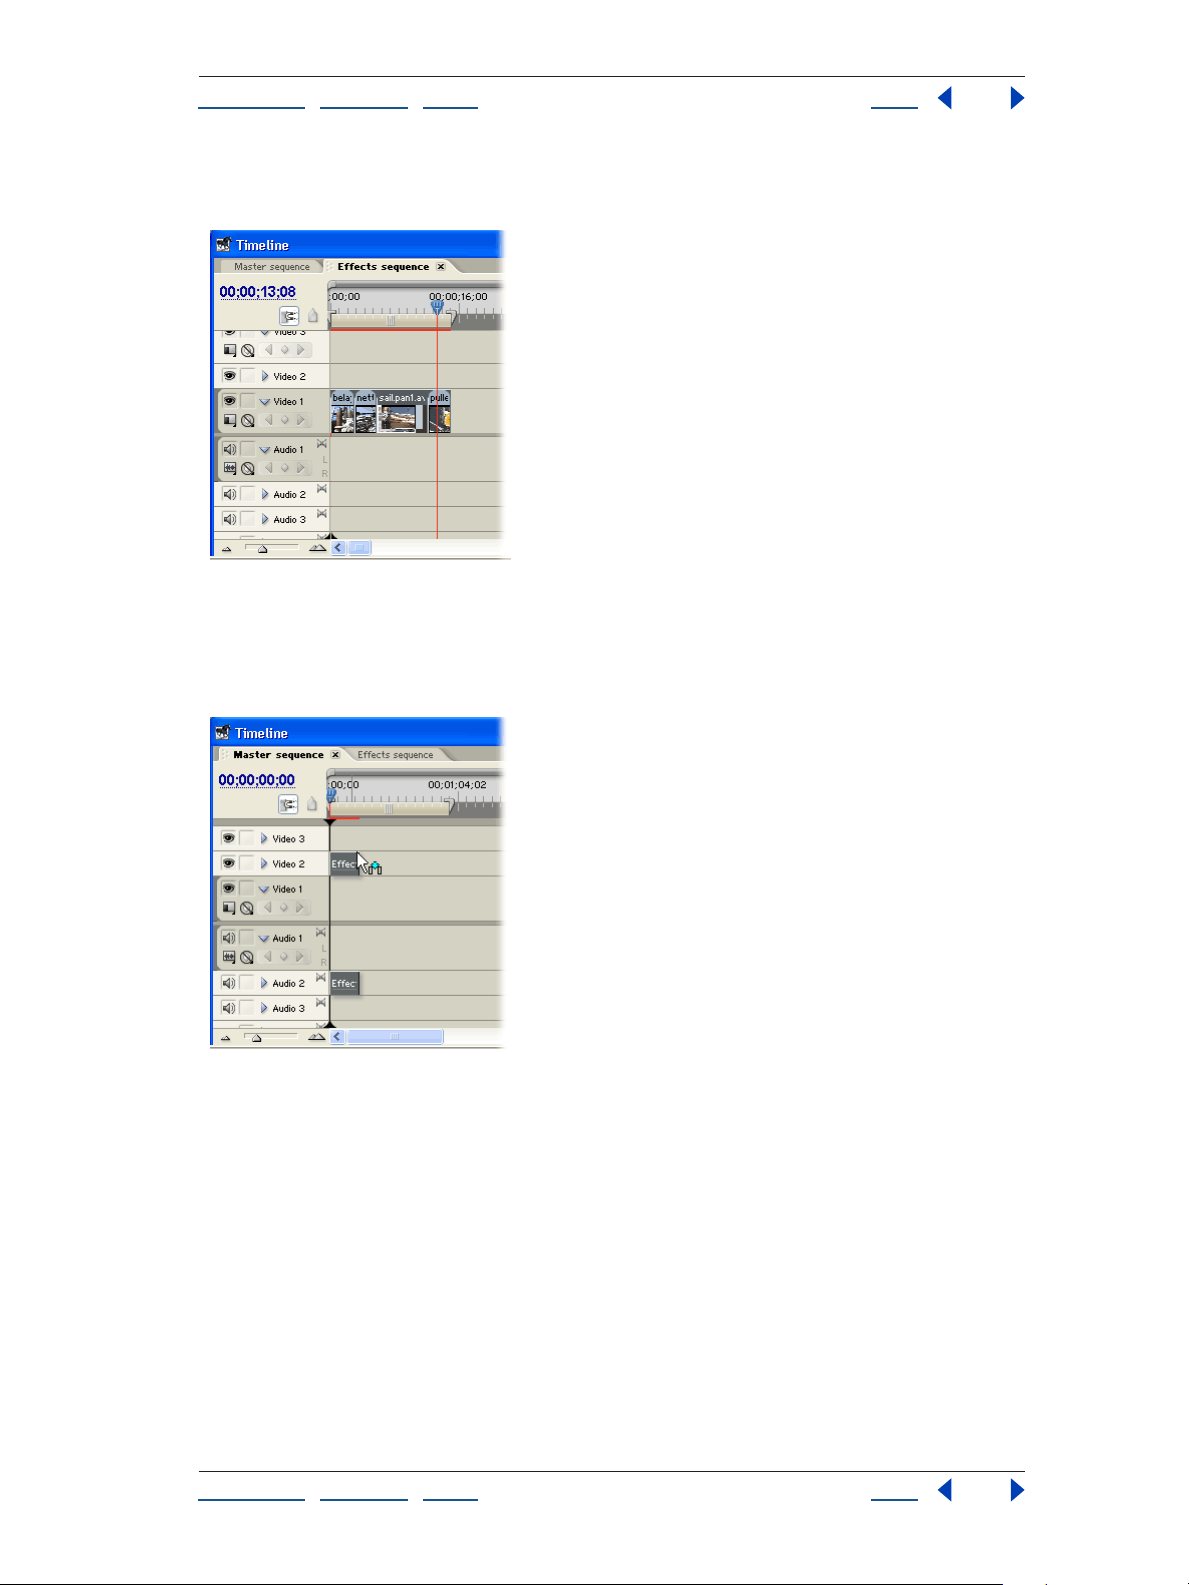
3. Add the sequence of clips to the master sequence.
In the Timeline window, click the tab for your master sequence to bring it to the front.
Then, in the Project window, drag the icon for the sequence containing clips to the master
sequence in the timeline.
Using Help | Contents | Index Back 30
Page 30
Adobe Premiere Pro Help Tutorials
Using Help | Contents | Index Back 31
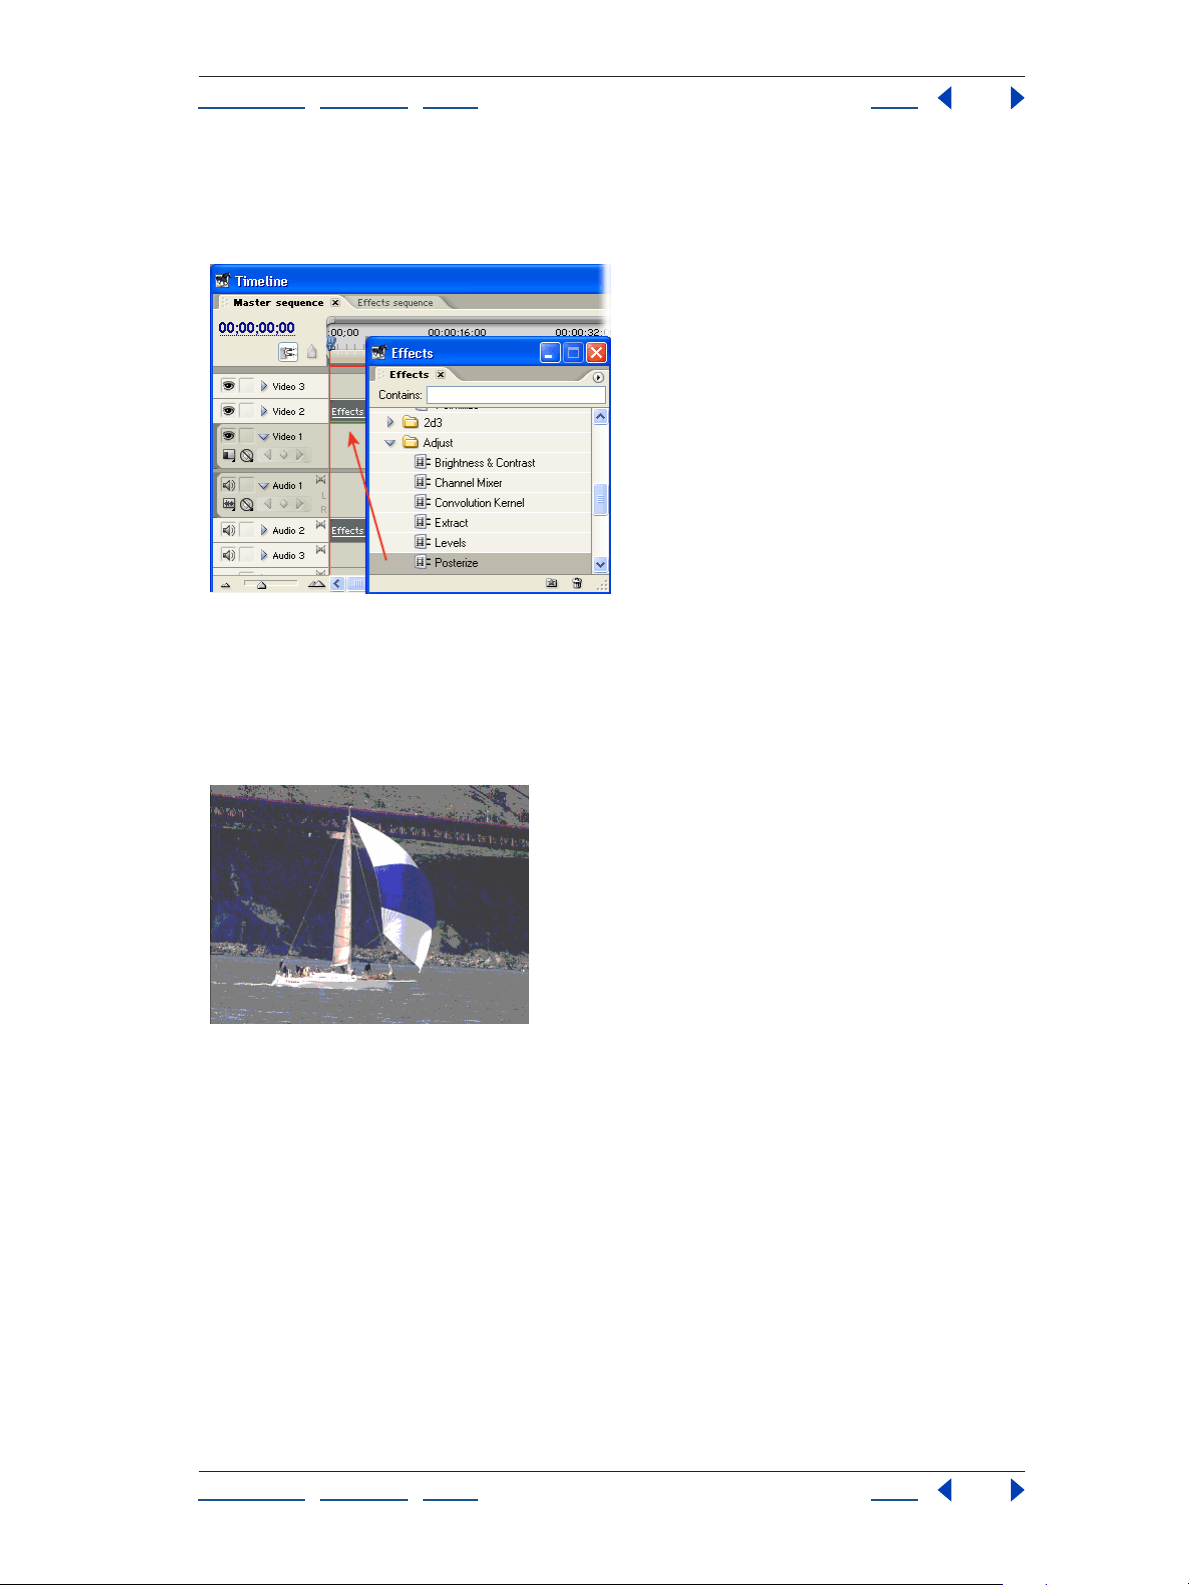
4. Apply the effect.
Choose Window > Effects, locate the effect you want to apply, and drag it to the nested
sequence in your master sequence.
5. Preview the effect.
Play back your master sequence. The effect is applied uniformly to all clips in the
nested sequence.
If you play back the nested sequence, you won’t see the effect applied, because it is
applied within the sequence where it’s nested.
Using Help | Contents | Index Back 31
Page 31

Adobe Premiere Pro Help Tutorials
Using Help | Contents | Index Back 32
Create Rolling Multicolumn Titles
Give the performers and crew in your productions the credits they deserve. By using the
tab stop and rolling title features in the Adobe Title Designer in Adobe
can easily create professional, rolling multicolumn titles.
®
Premiere® Pro, you
1. Set the title to roll.
In Adobe Premiere Pro, choose File > New > Title to open the Adobe Title Designer. From
the Title Type menu, choose Roll. If you intend to create rolling or crawling titles, make the
appropriate choice before creating the title.
2. Set the title boundaries.
Select the horizontal type tool, and drag in the drawing area to create a text box. If you
intend to create a long list of credits, you can drag the box so that it extends outside the
visible area. If you do drag the box outside of the visible area, use the scroll bar to return to
the top of the boundary.
Using Help | Contents | Index Back 32
Page 32

Adobe Premiere Pro Help Tutorials
Using Help | Contents | Index Back 33
3. Display the tab markers.
Choose Title > View > Tab Markers. No tab markers appear yet—you won’t see them until
you create tab stops.
4. Create tab stops.
Click the Tab Stops button . You create all tabs in this dialog box, using the ruler (which is
marked in increments of points) and the tab markers for placement. To create a tab, click
one of the three buttons in the Tab Stops window. The icons represent, from left to right,
left-justified text, centered text, and right-justified text. Then click in the area above the
ruler numbers. Note the stop that appears where you click, and note the tab marker that
appears in the Adobe Title Designer drawing area. Adjust the location of the tab stop by
dragging it along the ruler while following the location of the tab markers. Delete the stop
by dragging it off the ruler. (We created one left-justified stop in the center of the text
box.) After you create the tab stops, click OK.
You can open this dialog box to adjust the tab stops at any time during the process of
creating your title.
5. Select a font and font size.
Click the Font Browse button . In the Font Browser dialog box, scroll to find a font you want
to use and select it. Click OK. Then, in the Object Styles panel of the Adobe Title Designer
window, expand the Properties category. Set a font size by dragging. (To ensure
readability, use a font size higher than 14 points.)
Using Help | Contents | Index Back 33
Page 33

Adobe Premiere Pro Help Tutorials
Using Help | Contents | Index Back 34
The Font Browser is also a great tool for experimenting with fonts: Click a new font in the
list, and the font in the drawing area changes accordingly. Use the Font Browser to sample
a variety of fonts instantly.
6. Type your text.
Select the horizontal type tool, click where you want to type the first line of text, and begin
typing. After you type the first set of characters, press Tab and type the next set. Keep all
the characters on the same line. Usually, text in credits should not wrap; to prevent this,
decrease the Font Size value or increase the size of the text box. After you type all the
characters for that line, press Enter and repeat for the next line of text.
To view text that you type outside the visible area, use the scroll bars to the right of the
drawing area. If text extends past the bottom boundary of the text box, you can no longer
see it or scroll to see it. To view this hidden text, enlarge the text box by clicking the
selection tool and dragging any control point on the text box. Then select the horizontal
type tool before continuing to type text.
7. Set Roll/Crawl options.
Click the Roll/Crawl Options button . Make the appropriate selections, or enter the appropriate numbers in this dialog box to regulate the timing of the roll. Select Start Off Screen,
End Off Screen, or both, to set the place where the roll begins and ends. Enter a number in
the text boxes to set how many frames pass before the roll begins (Pre-Roll), how many
frames it takes the roll to progressively ramp up to the project frame rate (Ease-In), how
many frames the roll progressively slows down (Ease-Out), or how many frames the title
track plays after the title rolls off-screen (Post-Roll). After you specify settings, click OK.
Using Help | Contents | Index Back 34
Page 34

Adobe Premiere Pro Help Tutorials
Using Help | Contents | Index Back 35
The Crawl Direction choices in the Roll/Crawl Options dialog box pertain to text you typed
in a text box that is longer horizontally than it is vertically. In this instance, text would
move left or right across the image, or
crawl. If you choose to create a crawling title (not
represented here), select one of these options.
8. Preview the roll.
Close the title window and save the title when prompted. The title clip appears in the
Project window. Drag the clip to a superimpose track in the Timeline window (Video 2 and
higher). Place the current-time indicator at the beginning of the clip, and press Enter to
preview the roll.
By default, rolls begin from the bottom and move up through the visible area. To reverse
the direction so that the roll begins from the top and moves down, select the clip, choose
Clip > Speed/Duration, and then enter a value that is the negative of the displayed value.
For example, if the speed value is 100%, enter –100%.
Using Help | Contents | Index Back 35
Page 35

Adobe Premiere Pro Help Tutorials
Using Help | Contents | Index Back 36
9. Experiment with the settings.
Double-click the title clip to return to the Adobe Title Designer. Use the Font Browser or
the Font Size Object Style to adjust the characters. You may need to resize the text box to
accommodate the changes. You can also change the Roll/Crawl options to tweak the roll
timing.You can also create other object styles for the fonts, such as shadows, textures, and
sheens. Each of these adjustments may require additional resizing of the text box.
Burning DVDs in Adobe Premiere Pro
You can now burn your projects directly to DVD from the Timeline window in
Adobe® Premiere® Pro if you have a compatible DVD burner on your computer. Use your
DVD-R or DVD+R drive to create high-quality movies that you can play on most any
commercial DVD player. If you have Adobe
projects from Adobe Premiere Pro to add extra features, such as interactive menus.
1. Open a project.
In Adobe Premiere Pro, open an existing project. Make sure all clips in the project
have the same frame rate: 29.97 fps for NTSC, or 25 fps for PAL. Projects that use
DV presets and clips are best suited for DVD because they all use either 4:3 or 16:9
aspect ratios. However, if your project uses different settings, the DVD exporter resizes
clips automatically.
®
EncoreTM DVD, you can import DVD-ready
For best results, use audio clips with sample rates of 16 or 24 bits, and 48 kHz or 96 kHz.
Using Help | Contents | Index Back 36
Page 36

Adobe Premiere Pro Help Tutorials
Using Help | Contents | Index Back 37
2. Set sequence markers to create chapters.
To navigate to various points in your movie, place sequence markers at strategic points in
the Timeline window, such as the beginning of each new scene. To add numbered or
unnumbered markers, choose Marker > Set Sequence marker. Set markers no closer than
15 frames apart. Each marker serves as a chapter that you can navigate to by pressing the
Chapter buttons on your DVD remote control.
3. Add chapter information to markers.
If you want to add titles, buttons, and other graphic elements to your DVD, you can import
your sequence in Adobe Encore DVD or another DVD authoring application. Adobe
Premiere Pro allows you to create DVD-ready files in either Video For Windows format
(.AVI) by exporting sequences as movies or in MPEG-2 format (.M2V) by exporting your
sequences to the Adobe Media Encoder.
Using Help | Contents | Index Back 37
Page 37

Adobe Premiere Pro Help Tutorials
Using Help | Contents | Index Back 38
4. Define the length of the DVD movie.
Adobe Premiere Pro exports the entire timeline to DVD by default. To prevent the project
from exceeding the DVD’s capacity, define the area of the timeline you want to export by
dragging the work area bar.
5. Select your DVD burner.
When your project is ready for export, place an unused DVD disc in the DVD drive and
choose File > Export > Export To DVD. In the Export to DVD dialog box, name your DVD
disk and select the Chapter Markers At Timeline Markers option. Next, select DVD Burner
on the left, and choose your DVD Burner from the list. Make sure that the burner status
indicates that the DVD burner is on the system, and then choose a recording option.
6. Select your encoding settings.
Select Encoding from the list to view the DVD encoding presets from the pop-up menu.
Choose a setting based on the length of your sequence. If your sequence is feature length
(90–130 minutes), choose a setting with “4Mb” in it. If your sequence is under 90 minutes,
choose a setting with “7Mb” in it. To let Adobe Premiere Pro determine the best
compression for your content, choose a variable bit rate (VBR) setting over a constant bit
rate (CBR) setting.
Using Help | Contents | Index Back 38
Page 38

Adobe Premiere Pro Help Tutorials
Using Help | Contents | Index Back 39
7. Burn the DVD.
Once you’ve selected all your settings, click the Record button to start burning the DVD. If
you receive a message indicating that the required disc space is higher than the DVD disc's
capacity, choose a lower-quality encoding preset or shorten the export range of your
timeline and then try burning the DVD.
8. Play your movie.
When your DVD burner is done recording, play it on the DVD player in your computer or
on a standard DVD player to check the quality.
For a wider range of options, you can export your projects to Adobe Encore DVD, where
you can add titles, buttons, and multiple audio tracks to your DVDs.
Using Help | Contents | Index Back 39
Page 39

Adobe Premiere Pro Help Working with Projects
Using Help | Contents | Index Back 40
Working with Projects
About projects
A project is a single Adobe Premiere Pro file that contains video sequences and references
to the media associated with the sequences. A project also stores information about
sequences and media, such as settings for media capture, transitions, and audio mixing.
Within a single project file, you can edit individual segments as separate sequences, and
then combine the segments into a finished program by nesting them in a longer
sequence. Similarly, you can store multiple variations of a sequence in the same project.
You can organize a project’s media and sequences using bins, which work like the folders
in Windows Explorer.
Starting a new project
In most cases, you can start a project simply by using one of the presets provided in the
New Project dialog box. The presets included with Adobe Premiere Pro include common
project types. Preserve editing quality by using a preset that represents the specifications
of your original media. For example, if you shot footage on DV, use the DV preset. If you
need to specify lower-quality settings for output (such as streaming Web video), don’t
change your project settings—instead, change your export settings.
You can customize the project settings (General, Capture, Video Rendering, and Default
Sequence settings). However, it’s usually not necessary to do this because most workflows
are addressed by the presets in the New Project dialog box. Capture cards certified as
compatible with Adobe Premiere Pro may install their own optimized presets when you
install the software that comes with the card. If no preset is appropriate for your workflow,
see
“Working with windows in Adobe Premiere Pro” on page 44.
Note: The project settings must be correct when you create the project file. Once a project
is created, some project settings are locked, such as the timebase. This prevents unwanted
inconsistencies that could result from changing project settings later.
To start a new project:
1 Do one of the following:
• If Adobe Premiere Pro is closed, start Adobe Premiere Pro.
• If Adobe Premiere Pro is open but no project is open, click New Project.
• If an Adobe Premiere Pro project is already open, choose File > New Project.
2 When the New Project dialog box appears, do one of the following:
• To apply a preset, select it from the list of Available Presets.
• To customize settings, choose the preset that most closely matches your editing
environment, click Custom, and then select your specific project settings. See
project presets” on page 61.
“Creating
Using Help | Contents | Index Back 40
Page 40

Adobe Premiere Pro Help Working with Projects
Using Help | Contents | Index Back 41
3 For Location, specify where you want to store the project on disk.
4 For Name, type the name of the project, and then click OK.
Note: Whenever possible, specify a location and name that you won’t have to change
later. By default, Adobe Premiere Pro stores rendered previews, conformed audio files, and
captured audio and video in the folder where you store the project. Moving a project later
may require moving associated files also. To change default locations of captured files,
preview files, and conformed audio, choose Edit > Preferences > Scratch Disks.
Opening a project
Adobe Premiere Pro can open project files created using Adobe Premiere Pro or Adobe
Premiere 6.5 or later on Windows or Mac OS.
You can open only one project at a time. If you want to transfer the contents of one project
into another, import it. See
To open an existing Adobe Premiere Pro project:
Do one of the following:
• If Adobe Premiere Pro is closed, double-click the project file on the desktop.
• If Adobe Premiere Pro is open but no project is open, click Open Project, locate and
select the file, and then click Open. You can also click the project name in the Recent
Projects list if the project name is in the list.
“Importing another project” on page 85.
• If Adobe Premiere Pro is open and a project is open, choose File > Open, locate and
select the file, and then click Open. You can also choose the project name from the File
> Open Recent Projects submenu if the project name is on the menu.
Adobe Premiere Pro doesn’t store original source files in the project—it stores only a
reference to each source file based on its filename and location at the time you imported
it. If you later move, rename, or delete a source file, Adobe Premiere Pro is unable to find it
the next time you open the project. In this case, Adobe Premiere Pro displays the Locate
File dialog box. You can resolve this situation by selecting one of the following options:
Display Only Exact Name Matches Displays only the files that match the name of the
missing file when the project was last closed. If you know that the filename has changed,
deselect this option.
Select Replaces the missing file if you first locate and select the original file or its
replacement.
Find Starts the Windows XP Search feature.
Offline Replaces the missing file with an offline file, a blank placeholder that preserves all
references to the missing file throughout the project until you relink the offline file to the
original file.
Offline All Replaces all missing files with offline files, without asking you for confirmation.
Skip Removes all references to the missing file throughout the project. All instances of
the clip disappear from the Project and Timeline windows.
Using Help | Contents | Index Back 41
Page 41

Adobe Premiere Pro Help Working with Projects
Using Help | Contents | Index Back 42
Skip All Removes all references to all missing files throughout the project, without asking
you for confirmation.
Important: Select Skip or Skip All only when you are certain that you want to rework all
the instances where the file is used in the project. If you want to keep the file in the project
but can’t locate it at the moment, use Offline instead.
When you want to replace an offline file after the project is open, you don’t have to close
the project and then open it again. Instead, use the Link Media command. For more infor
-
mation, see “Using offline files” on page 87.
Note: Because a clip is only a reference to its source file, do not delete source files while you
are using them as clips in an Adobe Premiere Pro project (unless they were captured using
device control and you plan to recapture them). After you deliver the final movie, you can
delete source files if you do not plan to edit the project or use the source files again.
Saving a project manually or automatically
Saving a project saves your editing decisions, references to source files, and the most
recent arrangement of windows. Protect your work by saving often. If you prefer, Adobe
Premiere Pro can automatically save your project at a specified interval. For example, you
can set Adobe Premiere Pro to save a copy of your project every 15 minutes, producing a
series of files that represent the state of your project at each interval. Automatic saving
serves as an alternative to the Undo command, depending on how much the project
changes between each save. Because project files are quite small compared to source
video files, archiving many iterations of a project consumes relatively little disk space.
Adobe recommends saving project files to the same drive as your application. Archived
files are saved in the folder
Archive. For information about other ways of returning to earlier versions of a project, see
“Correcting mistakes” on page 44.
Note: Adobe Premiere Pro may ask if you want to save a project even though you haven’t
edited any sequences. This occurs because other attributes of the project may have
changed since the project was opened. Adobe recommends that you save changes when
asked.
For information about specifying where Adobe Premiere Pro stores associated project
files, such as captured video and audio, video and audio previews, and conformed audio
files, see
“Using scratch disks” on page 57.
[current user]/My Documents/Adobe/Premiere Pro/7.0/Project-
To save a project:
Do one of the following:
• Choose File > Save to save the currently open project.
• To save a copy of a project and continue working in the new copy, choose File > Save As,
specify a location and filename, and click Save.
• To save a copy of a project but continue working in the original project, choose File >
Save a Copy, specify a location and filename, and click Save.
There’s no need to save copies of a project when creating different segments or
versions
of the same video program. Simply create new or duplicate sequences within a single
project file.
Using Help | Contents | Index Back 42
Page 42

Adobe Premiere Pro Help Working with Projects
Using Help | Contents | Index Back 43
To automatically save a project or series of projects:
1 Choose Edit > Preferences > Auto Save.
2 Do any of the following, and then click OK:
• Select Automatically Save Projects, and type the number of minutes after which Adobe
Premiere Pro will save the project.
• Type a number for the Maximum Project Versions to specify how many versions of each
project file you want to save. For example, if you type 5, Adobe Premiere Pro saves five
versions of each project you open.
To open a project file created by the Auto Save preference:
1 Close the project if one is open.
2 Choose File > Open.
3 Locate and open the file in the folder My Documents/Adobe/Adobe Premiere Pro/7.0
Adobe Premiere Pro Auto-Save. (If no files are available, the Auto Save preference may be
turned off.)
Correcting mistakes
If you change your mind or make a mistake, Adobe Premiere Pro provides several ways to
undo your work. You can undo only those actions that alter the video program; for
example, you can undo an edit, but you cannot undo scrolling a window.
To correct mistakes:
Do one of the following:
• To undo the most recent change, choose Edit > Undo. (You can sequentially undo any
recent changes made to the project in any Adobe Premiere Pro window. The number of
changes is limited only by available memory.)
• To jump to a specific state of the project since the project was opened, select an item in
the History palette. See
• To undo all changes made since the last time you saved the project, choose File >
Revert.
• To undo changes made before the last time you saved a project, try opening a previous
version of your project in the Premiere Auto-Save folder, and then choose File > Save As
to store the project in a location outside of the Premiere Auto-Save folder. The degree
to which you can go back depends on the Auto Save preference settings. See
project manually or automatically” on page 43.
• To stop a change that Adobe Premiere Pro is processing (for example, when you see a
progress bar), press Esc.
“Using the History palette” on page 54.
“Saving a
• To close a dialog box without applying changes, click Cancel.
• To set all values in an applied effect back to the default values, click the Reset button
for the effect in the Effect Controls window.
Working with windows in Adobe Premiere Pro
Three named windows form the main work area in Adobe Premiere Pro:
Using Help | Contents | Index Back 43
Page 43

Adobe Premiere Pro Help Working with Projects
Using Help | Contents | Index Back 44
• The Project window is where you import, organize, and store references to clips. It lists
all source clips that you import into a project, though you don’t have to use every clip
you import. The Project window is also where you organize batch lists of offline files to
be captured and where clips are listed after you capture them.
• The Monitor window can include the Source and Program views. Use the Source view to
see an individual video clip and the Program view to see the current state of the video
program being edited in the timeline. You can also add the Effect Controls window as a
tab in the Source view.
• The Timeline window provides a schematic view of your program, including all
sequences, video, audio, and superimposed video tracks. Changes you make in this
window appear in the Program view.
Adobe Premiere Pro also provides specialized windows for tasks such as capturing video
(see
“Using the Capture window” on page 64), creating titles (see “Setting up a new title”
on page 194), applying and controlling effects (see “About the Effect Controls window” on
page 237), and mixing audio (see “Working with the Audio Mixer window” on page 173).
When you exit Adobe Premiere Pro, the positions of windows and palettes are saved with
the project file. In addition, you can create and save named window layouts as a
workspace available to any project. (See
“Using workspaces” on page 45.)
Using window and palette menus
In Adobe Premiere Pro, most windows and palettes include menus that appear by clicking
a button. In addition, all windows have context menus, the content of which depends on
the current task or mode. The commands found in window menus, palette menus, and
context menus are specific to individual windows or palettes.
To open window and palette menus:
Click the Menu button near the upper right corner of the window or palette.
To open window context menus:
Right-click in the window.
Using tabs in windows
Some Adobe Premiere Pro windows contain tabs that you can click to view the contents in
that window. These tabs can also be dragged away, forming separate windows. In Adobe
Premiere Pro, you can combine tabs in the following ways:
• The Monitor, Timeline, and Audio Mixer windows contain tabs that represent multiple
sequences. Clicking a tab activates that tab’s sequence in all three windows. The
Timeline window tabs representing multiple sequences can be dragged away to form
separate Timeline windows for each sequence.
• The History and Info palettes can be combined as a group of tabs.
• The Effect Controls window can be displayed as a tab within the Project window or
within the Source view of the Program window.
Use the following techniques to reorganize windows using tabs:
• To rearrange and separate a group of tabs, drag the tab for that window.
• To group a tab with another tab or window, drag its tab to another window. Note that
some tabs can be grouped only with certain other tabs, as noted above.
Using Help | Contents | Index Back 44
Page 44

Adobe Premiere Pro Help Working with Projects
Using Help | Contents | Index Back 45
• If a window contains more tabs than Adobe Premiere Pro can display at once, drag the
slider bar that appears above the tabs.
Using workspaces
Adobe Premiere Pro comes with preset window arrangements that let you reconfigure the
windows for specific tasks such as editing effects or audio. You can create and save custom
window layouts and apply them to any project. Saving a workspace preserves the location
of the Project, Monitor, Timeline, Effects, Effect Controls, and Audio Mixer windows.
To use a workspace:
Choose Window > Workspace, and choose a workspace.
To save a custom workspace:
1 Arrange and size windows the way you want.
2 Choose Window > Workspace > Save Workspace.
3 Type a name for the workspace, and click Save.
To delete a custom workspace:
Choose Window > Workspace > Delete Workspace, choose a name, and click Delete.
Adjusting user interface brightness
You can adjust the brightness of the background color in Adobe Premiere Pro windows
and palettes. For example, you may prefer to lower the brightness when working in a
darkened editing suite or when performing color corrections.
To adjust the brightness of window and palette backgrounds:
Choose Edit > Preferences > General, and specify a value for User Interface Brightness.
To minimize the visual impact of window elements, right-click the Windows desktop
and choose Properties, and customize options in the Appearance tab in the Display
Properties for Windows. For example, use the Windows Classic style or reduce the font size
of title bars (see Windows online Help).
Viewing clip information in the Project window
At the top of a Project window is the thumbnail viewer, which you can use to preview
individual clips. By default, the first frame of a clip appears in the thumbnail viewer and in
other places in the project where the thumbnail is displayed. You can override the default
thumbnail by designating any clip frame as a
To view a selected clip’s information:
Do any of the following:
• Examine the thumbnail viewer in the upper left corner of the Project window. If you
select multiple clips, the thumbnail viewer indicates how many clips are selected.
poster frame.
• Switch to List view, if necessary, and expand or scroll horizontally to view columns.
Some columns may be hidden; see
• Choose File > Get Properties For > Selection.
Using Help | Contents | Index Back 45
“Using List view columns” on page 51.
Page 45

Adobe Premiere Pro Help Working with Projects
Using Help | Contents | Index Back 46
To play back a clip in the Project window:
1 Select the clip.
2 Press the Play button on the thumbnail viewer. The Play button becomes a Stop
button. Press Stop to stop playback. (Playing the clip in the thumbnail viewer does not
affect Monitor window views.)
To designate a clip frame as a poster frame:
1 Select the clip in a Project window.
2 Press the Play button or drag the play slider on the thumbnail viewer in the upper left
corner of the Project window until the frame you want is displayed.
3 Click the Set Poster Frame button
You can also set the poster frame by right-clicking the thumbnail viewer and choosing
Set Poster Frame from the context menu.
Naming, finding, and deleting Project window items
Use the Project window tools to rename, find, and delete items. All media in your project
exist on your hard disk as files stored separately from the project—only a reference to
each file is added to the Project window in Adobe Premiere Pro. Whenever you rename,
edit, or delete a clip in Adobe Premiere Pro, the original file and filename remain
untouched on your hard disk.
Note: When you use the Project > Unlink Media command, you have the option of deleting
the actual source file along with its reference in the project. See
“Using offline files” on
page 87.
To rename a clip:
1 Select the clip, and choose Clip > Rename.
2 Type the new name, and press Enter.
You can also rename a selected clip by clicking its name once to select the text, typing
the new name, and pressing Enter. In addition, the Rename command is also available
when you right-click a clip.
To manage project items:
Do any of the following:
• To rename an original source file on disk, exit Adobe Premiere Pro and rename the file
on the Windows desktop. The next time you open the project, Adobe Premiere Pro asks
you to locate the file (see
• To delete an item from the Project window, select the item and press the Delete key.
• To delete all project items that aren’t used in sequences, sort the Project window list
“Opening a project” on page 41).
view by the Video Usage or Audio Usage columns to identify unused clips; then select
and delete them.
Note: Because Adobe Premiere Pro doesn’t store actual media files in the project, deleting
a clip from a project removes all of its instances from sequence but does not delete the
clip’s original media file from your hard disk.
Using Help | Contents | Index Back 46
Page 46

Adobe Premiere Pro Help Working with Projects
Using Help | Contents | Index Back 47
• To find any item in a project or folder, based on the contents of any column in List view,
choose Edit > Find or click the Find button
, specify options, and click Find.
Using source clips, clip instances, and duplicate clips
Clips can be used as source clips, clip instances, or duplicate clips. All types of clips can be
edited in sequences in the same way. The differences between clip types are as follows:
Source clip The clip originally imported into the Project window. It is listed in the Project
window only once by default. If you delete a source clip from the Project window, all of its
instances are also deleted.
Clip instance A dependent reference to a source clip, used in a sequence. Each time you
add a clip to a sequence, you create another instance of the clip. A clip instance uses the
name and source file reference used by its source clip; however, the name of a clip
instance is not updated if you change the name of its source clip. While clip instances are
not listed in the Project window, they are differentiated in the Source view menu if you
open instances there. The Source view menu lists instances by name, sequence name, and
In point.
Duplicate clip An independent copy of a source clip, which you create manually using
the Edit > Duplicate command. Unlike a clip instance, a duplicate clip maintains its own
reference to the original clip’s source media file on disk and exists as an additional clip in
the Project window. Also, a duplicate clip is not deleted when you delete its original.
Master and duplicate clips can be renamed independently. (See
deleting Project window items” on page 47.)
To create a duplicate clip:
1 In the Project window, select a clip, and choose Edit > Duplicate.
2 To rename the duplicate clip, select it, choose Clip > Rename, and type a new name for
the clip.
You can also create a duplicate clip by copying and pasting it in the Project window
(or its folders), by Ctrl-dragging a clip in the Project window, or by dragging a clip from
the Source view to the Project window.
“Naming, finding, and
Using bins
The Project window can include bins, which you can use to organize project contents in
much the same way as folders in Windows Explorer. Bins can contain media, sequences,
and other bins. You may want to use bins in the following ways:
• To store lists of offline files for batch capture.
• To store each sequence and its source media separately.
Using Help | Contents | Index Back 47
Page 47

Adobe Premiere Pro Help Working with Projects
Using Help | Contents | Index Back 48
• To organize media types, such as DV captures, Adobe Photoshop still images, and audio
files.
A
G
B
C
D
E
F
J K L M NIH
Project window
A. Close Project B. Thumbnail viewer C. Set poster frame D. Play thumbnail E. Bins
F. Clip G. Project window menu H. List view I. Icon view J. Automate to Sequence
K. Find L. New Bin M. New Item N. Delete Selected Items
To add a bin:
Click the New Bin button at the bottom of the Project window.
To delete one or more bins:
Select the bins and click the Delete icon at the bottom of the Project window.
If you click the New Bin button multiple times in a row, each new bin is nested inside
the previous new bin.
To move an item into a bin:
Drag the item to the Bin icon. You can move bins into other bins to nest them.
To display the contents of a bin:
Do one of the following;
• In List view, click the triangle beside the Bin icon to expand the bin.
• Double-click the bin.
• Click the Parent Bin button in the Project window to show the contents of an
enclosing (parent) bin when you’re viewing only the contents of a nested bin. You can
continue to click this button until the top-level contents of the Project window appear.
Using Help | Contents | Index Back 48
Page 48

Adobe Premiere Pro Help Working with Projects
Using Help | Contents | Index Back 49
Using libraries from Adobe Premiere 6.5 or earlier
Adobe Premiere 6.5 supports containers called libraries, which store clips from one or
several projects. A library is a separate file apart from any project. Although Adobe
Premiere Pro doesn’t directly support libraries, you can open a library. The library converts
to a bin when you open it as an Adobe Premiere Pro project. To store a set of clips so that
they are available for other projects, simply save a project that contains the clips, and
import that project into other projects (see
To import a library:
1 Choose File > Import.
2 Locate and select the library (.PLB) file, and then click Open.
“Importing another project” on page 85).
Customizing the Project window display
Each clip appears in the Project window with its clip name and detailed information about
the clip. You can view and sort clips in List view or Icon view, and you can customize the
information displayed in List view.
BA
Project window views
A. List view B. Icon view
To change the Project window view:
Do one of the following:
• Click the List View button or the Icon View button at the bottom of the window.
• Choose View > List or View > Icon from the Project window menu.
To arrange items in Icon view:
Drag an item to any square. As you drag, a vertical bar indicates where the item is going. If
you drag an item to a bin, the item goes inside the bin.
You can use Icon view for storyboarding and then use the Automate To Sequence
feature to move the storyboard into a sequence. See “Adding clips from the Project
window automatically” on page 134.
Using Help | Contents | Index Back 49
Page 49

Adobe Premiere Pro Help Working with Projects
Using Help | Contents | Index Back 50
To sort items in List view:
Click the column heading by which you want to sort the items. If bins are expanded, items
sort from the top level and down the Project window hierarchy. To reverse the sort order,
click the column heading again.
Note: To customize the columns in List view, see “Using List view columns” on page 51.
To customize general display options for the Project window:
Choose any of the following in the Project window menu:
• Choose View > Preview Area to hide or show the thumbnail viewer and clip infor-
mation.
• Choose Thumbnails > [command] to hide or set the size of thumbnails.
• Choose Clean Up to remove empty space between items in Icon view and arrange them
within the width of the Project window.
Using List view columns
Use the Project window’s List view to quickly evaluate, locate, or organize clips based on
specific properties.
To change the width of a list view column:
Position the mouse over a dividing line between column headings until the Column Resize
icon
appears; then drag horizontally.
To rearrange list view columns:
Drag a column heading horizontally. You cannot move the Name column.
To add a column:
1 Choose Edit Columns from the Project window menu.
2 Select a column name (after which the new column will appear), and click Add.
3 Type a name.
4 Choose a type. Text columns can contain any text you enter. Boolean columns provide a
check box. Click OK.
To customize List view columns:
Choose Edit Columns from the Project window menu, and do any of the following:
• To display a column, select the option next to the column.
• To rename a column, select a column name, click Rename, and edit the name.
• To remove a column, select a column name and click Remove.
• To rearrange columns, select a column name and click Move Up or Move Down. You can
also rearrange columns by dragging them horizontally in the Project Window.
Note: If you can’t locate or change a column attribute in the Edit Columns dialog box, the
attribute is locked by Adobe Premiere Pro and cannot be changed. For example, you can
change the names of columns you added, but not the names of columns built into Adobe
Premiere Pro.
The following fields are available in the List view:
Using Help | Contents | Index Back 50
Page 50

Adobe Premiere Pro Help Working with Projects
Using Help | Contents | Index Back 51
Name By default, displays the clip name on disk. You can change the name the clip uses
inside the project. You cannot remove the Name field. See
“Naming, finding, and deleting
Project window items” on page 47.
Label Color that helps identify and associate clips. See “Using labels” on page 53.
Media Type The kind of media, such as Movie or Still Image.
Media Start The timecode when capture started.
Media End The timecode when capture ended.
Media Duration Length of the captured media on disk, expressed in the currently
specified Time Display option (see
“Specifying General settings” on page 59).
Note: In Adobe Premiere Pro, all durations in any window include the frames specified by
the In point and Out point. For example, setting the In point and Out point to the same
frame results in a duration of one frame.
Video In Point The timecode of the In point as set in the Source or Project window.
Video Out Point The timecode of the Out point as set in the Source or Project window.
Video Duration The duration of the clip as defined by the Video In point and Out point
and incorporating any adjustments applied in Adobe Premiere Pro, such as changing the
clip speed.
Audio In Point The timecode of the In point as set in the Source or Project window.
Audio Out Point The timecode of the Out point as set in the Source or Project window.
Audio Duration The duration of the clip as defined by the Audio In point and Out point
and incorporating any adjustments applied in Adobe Premiere Pro, such as changing the
clip speed.
Video Info The frame size and aspect ratio of the clip, and whether an alpha channel is
present.
Audio Info The audio specifications of the clip.
Video Usage The number of times the video component of a clip is used in the project’s
sequences.
Audio Usage The number of times the audio component of a clip is used in the project’s
sequences.
Tape Name Text entered when the clip was logged during batch capture, if it was
captured using Adobe Premiere Pro or an earlier version of Adobe Premiere.
Description Text entered when the clip was logged during batch capture, if it was
captured using Adobe Premiere Pro or an earlier version of Adobe Premiere.
Comment Text intended for identification and sorting purposes.
Log Note Text that was entered using the Log Note option when a clip was captured
using the Capture window.
File Path Location of the file on disk, expressed as a folder path.
Capture Settings Whether a file has capture settings assigned in Adobe Premiere Pro.
For example, to be eligible for batch capture, clips must have capture settings. Choose a
command from the Clip > Capture Settings submenu to edit capture settings for a
selected clip.
Status Whether a clip is online or offline. If a clip is offline, this also indicates why.
Using Help | Contents | Index Back 51
Page 51

Adobe Premiere Pro Help Working with Projects
Using Help | Contents | Index Back 52
Offline Properties Whether the source of an offline clip contains video, audio, or both.
Scene Text that was entered using the Capture window’s Scene option when capturing
video using Adobe Premiere Pro.
Shot/Take Text that was entered using the Capture window’s Shot/Take option when
capturing video using Adobe Premiere Pro.
Client Text intended for the name of the client.
Compressor The compressor used by the clip. Not applicable to sequences.
Good Text intended to indicate preferred clips.
Using labels
Labels are colors that help you identify and associate clips. You assign and view labels in
the Project window. Label colors mark clips in the Project window’s Label column and in
the Timeline window.
To assign a label to a clip:
1 In the Project window, select a clip.
2 Choose Edit > Label, and choose a color.
To select all clips using the same label:
1 Select a clip that uses the label.
2 Choose Edit > Label > Select Label Group.
To edit label names or colors:
1 Choose Edit > Preferences > Label Colors.
2 Edit label names, or click a color swatch to edit a color.
To set default labels for a media type:
1 Choose Edit > Preferences > Label Defaults.
2 For any media type in the panel, select a label color.
Note: Label defaults affect clips you add to the Project window from the time you change
the defaults; the command doesn’t change label colors for clips already in the Project
window. To change label colors for clips already in the Project window, use the Edit >
Preferences > Label Colors command.
Working with palettes
Adobe Premiere Pro includes the toolbox, Info and History palettes. When displayed,
palettes always appear on top of all windows. The Info palette displays information about
the item selected in the Project or Timeline windows, or in the Source view’s clip menu.
The History palette lets you navigate among the available levels of undo. You can display,
hide, or recombine palettes as you work. You can display the toolbox vertically
or horizontally.
You can also adjust the brightness of the background color in palettes and windows. (See
“Adjusting user interface brightness” on page 46.)
Using Help | Contents | Index Back 52
Page 52

Adobe Premiere Pro Help Working with Projects
Using Help | Contents | Index Back 53
Changing palette display
You can change the display of palettes so that they are arranged effectively with windows.
To show and hide palettes:
Do one of the following:
• To show a palette, choose its name from the Window menu or click its tab if visible.
• To hide a palette, click the close box on its tab.
• To hide or show all open palettes, press the Tab key.
To group the Info and History palettes:
Drag one palette’s tab to another.
To separate a palette:
Drag a palette tab to another location.
To display the toolbox vertically or horizontally:
Right-click the background color of the toolbox (not an individual tool) and select an
orientation option.
If you have more than one monitor connected to your system and if your system
supports a multiple-monitor desktop, you can drag palettes to any monitor.
Using the Info palette
The Info palette displays information about a selected item. For clips, the Info palette
displays information such as duration, In point, and Out point. The information displayed
may vary depending on factors such as the media type and the current window. For
example, an empty space in the timeline, a rectangle in the Title window, and a clip in the
Project window display information unique to each item.
In the Info palette, the Video line indicates the frame rate, dimensions, and pixel aspect
ratio, in that order. The Audio line indicates the sample rate, bit depth, and channels, in
that order.
Using the History palette
Use the History palette to jump to any state of the project created during the current
working session. Each time you apply a change to some part of the project, the new state
of that project is added to the palette. You can modify the project from the state you
select. History states aren’t available for actions within the Capture and Adobe Title
Designer windows.
The following guidelines can help you with the History palette:
• Program-wide changes, such as changes to palettes, windows, and preferences, are not
changes to the project itself and so are not added to the History palette.
• Once you close and reopen the project, the previous states are no longer available in
the History palette.
• Choosing the Revert command deletes all the states that existed since the last save.
• The oldest state is at the top of the list, and the most recent one is at the bottom.
Using Help | Contents | Index Back 53
Page 53

Adobe Premiere Pro Help Working with Projects
Using Help | Contents | Index Back 54
• Each state is listed with the name of the tool or command used to change the project as
well as an icon representing the tool or command. Some actions generate a state for
each window affected by the action, such as the Adobe Title Designer. Actions you
perform in such a window are treated as a single state in the History palette.
• Selecting a state dims those below it, to indicate which changes will be removed if you
work from the project at that state.
• Selecting a state and then changing the project removes all subsequent states.
To display the History palette:
Choose Window > Show History.
To select a state:
Click the name of the state in the History palette.
To move around in the History palette:
Do any of the following:
• Drag the slider or the scroll bar in the palette.
• Choose Step Forward or Step Backward in the History palette menu.
To delete one project state:
Select the state, and do one of the following:
• Choose Delete in the History palette menu.
• Click the Delete icon , and then click Yes.
• Alt-click the Delete icon .
To clear all states from the History palette:
Choose Clear History in the History palette menu.
Using keyboard shortcuts
Because many commands and buttons have keyboard equivalents, you can edit a video
program with minimal use of the mouse. You can also create or edit keyboard shortcuts.
Using the default keyboard shortcuts
Adobe Premiere Pro provides a set of keyboard shortcuts. You can view and modify them
by using the Edit > Keyboard Customization command; see
shortcuts” on page 56. In the Keyboard Customization dialog box, the default shortcut set
is called Adobe Premiere Pro Factory Defaults. A full list of the factory default keyboard
shortcuts is available in the Keyboard Shortcuts Appendix.
To find the keyboard shortcut for a tool, button, or menu command:
Do one of the following:
• For a tool or button, hold the pointer over the tool or button until its tool tip appears. If
available, the keyboard shortcut appears in the tool tip after the tool description.
“Customizing keyboard
• For menu commands, look for the keyboard shortcut at the right of the command.
Using Help | Contents | Index Back 54
Page 54

Adobe Premiere Pro Help Working with Projects
Using Help | Contents | Index Back 55
• For keyboard shortcuts not shown in tool tips or on menus, see the Shortcuts Appendix,
or choose Edit > Keyboard Customization. The Keyboard Customization dialog box is
also a good place to look if you suspect that shortcuts might have been changed
(customized) by a user.
Customizing keyboard shortcuts
In addition to using the standard set of keyboard shortcuts, you can assign your own
custom shortcuts to nearly any menu command, button, or tool. By customizing shortcuts,
you can assign shortcuts to commands that don’t currently have shortcuts, reassign
shortcuts from commands you rarely use to commands you use often, or set shortcuts to
match other software you use. If other sets are available, you can choose them from the
Set pop-up menu in the Keyboard Customization dialog box. You can save different sets of
shortcuts and restore the default settings.
To create custom keyboard shortcuts:
1 Choose Edit > Keyboard Customization.
2 In the Keyboard Shortcuts dialog box, choose an option from the pop-up menu:
• Application displays commands found in the menu bar, organized by category.
• Windows displays commands associated with window buttons and pop-up menus.
• Tools displays a list of tool icons.
3 In the Command column, view the command for which you want to create a shortcut. If
necessary, click the triangle next to the name of a category to reveal the commands it
includes.
4 Click in the item’s shortcut field to select it.
5 Type the shortcut you want to use for the item. If the shortcut is already in use, you are
asked to either replace the existing shortcut or cancel.
6 To erase a shortcut so you can enter a different one, click Undo. Click Redo to restore the
previously entered shortcut.
7 Repeat the procedure to enter as many shortcuts as you want. When you’re finished,
click Save As, type a name for your Key Set, and click Save.
Note: Some commands are reserved by the operating system and cannot be reassigned to
Adobe Premiere Pro. Also, you cannot assign the + (plus) and – (minus) keys on the
numeric keypad because they are necessary for entering relative timecode values. You can
assign the plus and minus keys on the keyboard, however.
To remove a shortcut:
In the Keyboard Shortcuts dialog box, select the shortcut you want to remove, and click
Clear.
To remove a set of shortcuts:
In the Keyboard Shortcuts dialog box, select the key set you want to remove from the Set
pop-up menu and click Delete. When asked, confirm your choice by clicking Delete.
To switch to a different set of shortcuts:
Choose Edit > Keyboard Customization, and choose the set of shortcuts you want to use
from the Set pop-up menu.
Using Help | Contents | Index Back 55
Page 55

Adobe Premiere Pro Help Working with Projects
Using Help | Contents | Index Back 56
Using scratch disks
When you edit a project, Adobe Premiere Pro uses disk space to store files required by
your project, such as captured video and audio, conformed audio, and preview files that
you create manually or that are created automatically when exporting to certain formats.
Adobe Premiere Pro uses conformed audio files and preview files to optimize perfor
mance, allowing real-time editing, 32-bit floating-point quality, and efficient output.
All scratch disk files are preserved across work sessions. If you delete preview files or
conformed audio files, Adobe Premiere Pro automatically recreates them.
By default, scratch files are stored where you save the project. The scratch disk space
required increases as sequences become longer or more complex. If your system has
access to multiple disks, you can use the Edit > Preferences > Scratch Disks command to
specify which disks Adobe Premiere Pro uses for these files. This is best done before you
begin a project.
Types of scratch disks
While performance can be enhanced by setting each scratch disk type to a different disk,
you can also specify folders on the same disk. The following scratch disk options are
available in the Edit > Preferences > Scratch Disks command:
-
Captured Video Folder or disk where Adobe Premiere Pro stores video files that you
capture using the Capture window.
Captured Audio Folder or disk where Adobe Premiere Pro stores audio files that you
capture using the Capture window.
Video Previews Files created when you use the Sequence > Render Work Area
command, export to a movie file, or export to a DV device. If the previewed area includes
effects, the effects are rendered at full quality in the preview file.
Audio Previews Files created when you use the Sequence > Render Work Area
command, use the Clip > Audio Options > Render and Replace command, export to a
movie file, or export to a DV device. If the previewed area includes effects, the effects are
rendered at full quality in the preview file.
Conformed Audio Imported audio converted to Adobe Premiere Pro specifications for
consistent high-quality playback as you edit. (See
“Conforming audio” on page 192.)
Maximizing scratch disk performance
If your computer has only one hard disk, consider leaving all scratch disk options at their
default settings. For maximum performance, follow these guidelines:
• Set up scratch disks on one or more separate hard disks. In Adobe Premiere Pro, it’s
possible to set up each type of scratch disk to its own disk (for example, one disk for
captured video and another for captured audio).
• Specify your fastest hard disks for capturing media and storing scratch files. You can use
a slower disk for audio preview files and the project file.
• Specify only disks attached to your computer. A hard disk located on a network is
usually too slow. Avoid using removable media because Adobe Premiere Pro always
requires access to scratch disk files. Scratch disk files are preserved for each project,
even when you close the project. They are reused when you reopen the project
Using Help | Contents | Index Back 56
Page 56

Adobe Premiere Pro Help Working with Projects
Using Help | Contents | Index Back 57
associated with them. If scratch disk files are stored on removable media and the media
is removed from the drive, the scratch disk won’t be available to Adobe Premiere Pro.
• Although you can divide a single disk into partitions and set up partitions as scratch
disks, this doesn’t improve performance because the single drive mechanism becomes
a bottleneck. For best results, set up scratch disk volumes that are physically separate
drives.
Setting up scratch disks
You set up scratch disks in the Scratch Disk panel of the Preferences dialog box. Before
changing scratch disk settings, you can verify the amount of free disk space on the
selected volume by looking in the box to the right of the path. If the path is too long to
read, position the pointer over the path name, and the full path appears in a tool tip.
To specify scratch disks:
1 Choose Edit > Preferences > Scratch Disks.
2 For each scratch disk type, specify a disk location for Adobe Premiere Pro to store the
corresponding files (scratch files are stored in a subfolder named after the project).
My Documents Stores scratch files in the My Documents folder.
Same as Project Stores scratch files in the same folder where the project is stored.
Custom Indicates that the current path isn’t in the pop-up menu. The current path isn’t
changed until you click Browse to specify any available disk location.
Specifying project settings
When you start a new project, you can review and change project settings by clicking the
Custom Settings tab. You should do so only if none of the available presets matches the
specifications of your source media. When working in a project, you can review project
settings by choosing a command from the Project > Project Settings submenu. Note that
some settings can’t be changed after a project is created—verify all project settings before
starting a project.
Project settings are organized into the following categories:
General Settings Control the fundamental characteristics of the project, including the
method Adobe Premiere Pro uses to process video (Editing Mode), count time (Time
Display), and play back video (Timebase). See
Capture Settings Control how Adobe Premiere Pro transfers video and audio directly
from a deck or camera. (Other Project Settings panels do not affect capturing.) The
contents of this panel depend on the editing mode. For more information about capture
settings, see
page 94.
Video Previews Control the frame size, picture quality, compression settings, and aspect
ratios that Adobe Premiere Pro uses when you play back video from the Timeline window
(the window where you edit your video program). See
settings” on page 61.
“Digitizing analog video as DV” on page 94 and “Preparing for DV capture” on
“Specifying General settings” on page 59.
“Specifying Video Rendering
Using Help | Contents | Index Back 57
Page 57

Adobe Premiere Pro Help Working with Projects
Using Help | Contents | Index Back 58
Default Sequence Control the number of video tracks and the number and type of audio
tracks for new sequences you create. See
Note: If you must change project settings that are unavailable, you can create a new
project with the settings you want and import the current project into it. However, if you
import the current project into a project with a different frame rate of audio sampling rate,
check video and audio edits carefully. While edit positions made under the old settings are
preserved, they may not synchronize precisely with the new settings. Edits or changes you
make after importing are synchronized with the new settings.
“About audio channels and tracks” on page 173.
Specifying General settings
General settings should be set to match the specifications of the most significant source
media in your project (for example, if most of your footage is DV, use the DV Playback
editing mode). Changing these settings arbitrarily may result in a loss of quality. Choose
Project > Project Settings > General and specify the following options:
Editing Mode Determines which video method is used to play back sequences and
which compression methods appear in the Video Settings panel. The DV Playback and
Video For Windows editing modes are installed by default, and the DV Playback editing
mode is selected by default. Use the DV mode if you’re working with DV source media; the
Video For Windows editing mode can be useful for projects based on analog video or a
square-pixel aspect ratio. Manufacturers of video-capture cards or other video hardware
may provide plug-in software that adds editing modes for maximum quality and compati
bility with their hardware. If the DV Playback editing mode is selected, some video preview
settings can’t be changed because they must remain consistent with the DV standard.
-
Note: The Editing Mode setting should represent the specifications of the source media,
not the final output settings. Specify output settings when you export; see
video as a file” on page 296.
Timebase Specifies the time divisions Adobe Premiere Pro uses to calculate the time
position of each edit. In general, choose 24 for editing motion-picture film, 25 for editing
PAL (European standard) and SECAM video, and 29.97 for editing NTSC (North American
standard) video. Do not confuse timebase with the
export from sequences, although timebase and frame rate often use the same value.
Playback Settings This button is available when you use a DV preset, choose the DV
Playback editing mode, or install a plug-in that provides additional playback functions.
When you use the DV Playback editing mode, use this option to indicate where you want
your previews to play back: on your DV camcorder (or other connected device) or on your
desktop. For information on the playback settings available for third-party plug-ins, see
the documentation provided by the manufacturer of the plug-in.
Frame Size Specifies the dimensions, in pixels, for frames when you play back sequences.
In most cases, the frame size for your project should match the frame size of your source
media. Don’t change the frame size in order to compensate for slow playback—instead,
adjust playback resolution by choosing a different Quality setting from the Project
window menu, or adjust the frame size of final output by changing Export settings.
Pixel Aspect Ratio Sets the aspect ratio for individual pixels. Choose Square Pixels for
analog video, scanned images, and computer-generated graphics, or choose the format
used by your source media. If you use a pixel aspect ratio that is different from your video,
the video may play back and render with distortion. For more information, see
aspect ratios” on page 98.
frame rate of the video you play back or
“Exporting
“About
Using Help | Contents | Index Back 58
Page 58

Adobe Premiere Pro Help Working with Projects
Using Help | Contents | Index Back 59
Fields Specifies the field dominance, or which field of each frame’s interlaced fields is
drawn first. If you work with progressive-scan video, select No Fields (Progressive Scan).
Note that many capture cards capture fields regardless of whether you shot progressive
scan footage.
Display Format (video) Specifies the way time appears throughout the project. The time
display options correspond to standards for editing video and motion-picture film. For
broadcast NTSC video, choose 30 fps Drop-Frame Timecode if that is the time display used
by the original video. For video to be played back from the Web or CD-ROM, choose 30 fps
Non Drop-Frame Timecode. For PAL and SECAM video, choose 25 fps Timecode. For
motion-picture film, choose Feet + Frames 16mm or Feet + Frames 35mm. To count
individual frames and audio samples instead of timecode, choose Frames/Samples.
Title Safe Area Sets how much of the frame edge to mark as a safe zone for titles, so that
titles aren’t cut off by televisions that zoom the picture slightly to enlarge it. A rectangle
with cross-hairs marks the title-safe zone when you click the Safe Zones button in the
Monitor window. Titles are usually assumed to require a wider safe zone than action.
Action Safe Area Sets how much of the frame edge to mark as a safe zone for action so
that action isn’t cut off by televisions that zoom the picture slightly to enlarge it. A
rectangle marks the action-safe zone when you click the Safe Zones button in the Monitor
window.
Automatically Scale Imported Media to Project Size Adjusts imported video and still
images so that they fit within the frame, if they are larger or smaller than the frame.
Rate In general, higher rates provide better audio quality when you play back audio in
sequences, but they require more disk space and processing.
different rate from the original audio, also requires additional processing time and affects
the quality. Try to record audio at a high-quality sample rate, and capture audio at the rate
at which it was recorded.
Display Format (audio) Specifies whether audio time display is measured using audio
samples or milliseconds. Display Format applies when Audio Units is selected in the
Monitor window menu. (By default, time is displayed in frames, but it can be displayed in
audio units for sample-level precision when you are editing audio.)
Note: DV video and audio use standardized settings that are specified automatically
when you select DV Playback editing mode. When you use DV Playback editing mode,
avoid changing the Time Base, Frame Size, Pixel Aspect Ratio, Fields, and Sample Rate
settings.
Resampling, or setting a
Specifying Capture settings
If you’re capturing DV source media, you don’t need to change capture settings. When DV/
IEEE 1394 Capture is the selected capture format, no options are available because the
options are automatically set to the IEEE 1394 standard. Additional capture formats and
options may appear if you install other software, such as software included with a capture
card certified to be compatible with Adobe Premiere Pro.
To specify capture settings:
1 Choose Project > Project Settings > Capture.
2 Choose a Capture format and select options as desired.
Using Help | Contents | Index Back 59
Page 59

Adobe Premiere Pro Help Working with Projects
Using Help | Contents | Index Back 60
Specifying Video Rendering settings
Video rendering settings affect how Adobe Premiere Pro generates video when you select
Sequence > Render Work Area.
To specify video rendering settings:
1 Choose Project > Project Settings > Video Previews.
2 Select one of the following options:
Compressor Specifies the codec for Adobe Premiere Pro to apply when previewing
sequences. The codecs available depend on the Editing Mode option specified by your
preset or selected in the General Settings panel. Click Configure (if available) to set options
specific to the selected codec. If you specified an editing mode provided by a manufac
turer of a video-capture card or other hardware, see whether the documentation for the
hardware recommends a particular codec. Otherwise, consider specifying the same codec
as the source clip to preserve quality and to process edits quickly. If you want to play video
back through your capture card to an NTSC or PAL monitor, choose the codec specific to
your capture card. The codec cannot be configured for DV because it must use the
standard DV codec.
-
Note: If you use a clip in your video program without applying effects or changing frame
or time characteristics, Adobe Premiere Pro uses the clip’s original codec for playback. If
you make changes that require recalculation of each frame, Adobe Premiere Pro applies
the codec that you choose here.
Color Depth Indicates the color bit depth or number of colors to include in video played
back in sequences. This button may not be available if the selected compressor provides
only one option for bit depth. You can also specify an 8-bit (256-color) palette when
preparing a video program for 8-bit color playback, such as when using the Video For
Windows editing mode for the Web or for some presentation software. The Palette button
may be available when 256 Colors is chosen, if the selected editing mode and compressor
support creating custom palettes. When the button is available, click it and then select
either Make Palette From Movie (to derive a color palette from the frames used in the
video program) or Load Palette Now (to import a color palette you prepared and saved
previously). You can load color palettes stored in the .ACO (Photoshop color swatch), .ACT
(Photoshop color palette), or .PAL (Windows palette) format.
Optimize Stills Select this option to use still images efficiently in sequences. For example,
if a still image has a duration of 2 seconds in a project set to 30 fps, Adobe Premiere Pro
creates one 2-second frame instead of 60 frames at 1/30 of a second each. Deselect this
option if sequences exhibit playback problems when displaying still images.
Creating project presets
If none of the built-in presets matches your workflow, you can save a customized set of
project settings as a preset. This adds it to the list of presets in the Load Preset tab of the
Project Settings dialog box so that you can apply your custom preset to new projects. If
you want to back up or distribute preset files, you can find them in the Settings subfolder
of the Adobe Premiere Pro folder on your hard disk.
Using Help | Contents | Index Back 60
Page 60

Adobe Premiere Pro Help Working with Projects
Using Help | Contents | Index Back 61
If you have a capture card that is certified for use with Adobe Premiere Pro and it includes
presets for capturing from Adobe Premiere Pro, installing the card’s software also installs
the presets for you. Manufacturer-supplied preset files are tested to work well with the
manufacturer’s hardware, so you should not change the settings in them. For a list of
certified capture cards certified for use with Adobe Premiere Pro, see the Adobe Premiere
Pro product support page at www.adobe.com/products/premierepro.
To save the custom settings as a preset for use in other projects:
1 In the New Project Settings dialog box, click the Custom tab.
2 Specify settings, and then click Save Preset.
3 In the Save Project Settings dialog box, type a name and description (if desired) and
click OK.
Save and name your project settings even if you plan to use them in only one project.
Saving settings creates a backup copy of the settings in case someone accidentally
alters the current project settings.
Using Help | Contents | Index Back 61
Page 61

Adobe Premiere Pro Help Capturing and Importing Source Clips
Using Help | Contents | Index Back 63
Capturing and Importing Source Clips
About importing clips
You can import clips from any source—videotapes, motion-picture film, audio, still
images—as long as they exist as digital files stored on disk. Media that isn’t on disk, such
as videotape, must first be
and import clips and describe requirements for converting other media types before they
can be used digitally in your project.
captured to disk. The topics in this section cover how to capture
Capture checklist
For details about each of the following guidelines, search for these topics.
Be aware of the state of the timecode on your tape. If it’s frame-accurate (such as from a DV camera) and
continuous from start to finish, you have maximum flexibility when capturing. If it isn’t continuous, your
ability to batch capture and recapture may be limited. If it’s not frame-accurate (such as from a non-DV
home camera), you may want to set timecode manually.
Connect the DV or analog camcorder or deck to your system. See “Connecting a DV source” on page 93 or
“Connecting an analog video source” on page 94.
Set up your system for capture. See “Digitizing analog video as DV” on page 94 or “Preparing for DV
capture” on page 94.
If you use multiple hard drives, set up scratch disks before capturing because Adobe Premiere Pro defaults
to the My Documents folder for file storage. See “Using scratch disks” on page 57 or “Preparing for DV
capture” on page 94.
Capture video using any of the following methods:
• To capture video manually, see “Capturing clips without using device control” on page 71.
• To capture video manually using device control, see “Using device control” on page 67.
• To capture video automatically using device control, see “Batch-capturing video” on page 72.
Capture additional material using any of the following methods:
• To capture audio from an analog source, see “Capturing analog audio” on page 79.
• To import audio from an audio CD or other digital source, see “Importing digital audio” on page 78.
• To import still images, see “Importing clips” on page 81.
• To import animation or sequences, see “Importing an animation or still-image sequence” on page 84.
• To import a project, see “Importing another project” on page 85.
Using Help | Contents | Index Back 63
Page 62

Adobe Premiere Pro Help Capturing and Importing Source Clips
Using Help | Contents | Index Back 64
To use placeholders for missing files, see “Using offline files” on page 87.
To evaluate a clip, examine the columns in the List view of the Project window and see “Analyzing clip
properties and data rate” on page 89.
Using the Capture window
Use the Capture window to capture DV and analog video and audio clips. This window
includes a preview window, which displays video being captured, controls for recording
with and without device control, a Settings panel for viewing and editing your current
capture settings, and a Logging panel for entering batch capture settings. You can log
clips for batch capture only when using device control. In the Capture window, you can
specify independent disk locations for captured video and audio clips, and you can specify
a bin for storing the project’s references to the captured clips. For convenience, some
options available in the Capture window are also available in the Capture window menu.
If you already have experience capturing video, see “Logging and capturing for experi-
enced editors” on page 66.
Note: When performing anything other than capturing in Adobe Premiere Pro, close the
Capture window. The Capture window assumes primary focus when open, so leaving it
open while editing or previewing video disables output to the DV device and may decrease
performance.
A
E
Capture window
A. Status area B. Preview panel C. Tabs D. Window menu E. Device controls
CB D
To open the Capture window:
Choose File > Capture.
Using Help | Contents | Index Back 64
Page 63

Adobe Premiere Pro Help Capturing and Importing Source Clips
Using Help | Contents | Index Back 65
To hide the tabbed controls on the right side of the window:
Choose Collapse Window from the Capture window menu.
For details about troubleshooting capture, see “Avoiding DV capture problems” on
page 96.
Entering timecode values
As you capture and edit video, you’ll enter timecode values many times. For example,
you’ll enter timecode values to set In and Out points for clips, and to navigate the timeline.
For maximum flexibility, Adobe Premiere Pro provides multiple ways to enter timecode.
In Adobe Premiere Pro, the duration between the In and Out points includes the frames
indicated by the timecode. For example, if you enter the same timecode for the In and Out
points of a clip, the duration of the clip will be one frame. When entering timecodes, you
can substitute periods for colons or type numbers without punctuation. Adobe Premiere
Pro interprets the numbers you type as hours, minutes, seconds, and frames.
To enter timecode:
Do any of the following:
• To set a specific timecode, highlight the timecode, type a new timecode,
then press Enter.
• To adjust the current timecode by dragging, position the mouse over the timecode and
drag horizontally. For example, to set an earlier timecode, drag to the left.
• To adjust the current timecode using a relative value, type the + (plus) or – (minus) sign
along with the number of frames to add or subtract. For example, to subtract 5 frames
from the current timecode, highlight the entire timecode, type –5, then press Enter.
Logging and capturing for experienced editors
The Capture window is designed to support interactive clip logging and flexible, efficient
batch capture. If you have experience batch-capturing DV clips, this section can help you
quickly achieve a productive capture workflow in Adobe Premiere Pro.
Setting up
A batch list of logged clips appears as a list of offline files in the Project window. If you plan
to capture many clips, you may want to create bins in the Project window in advance so
that you can log each set of offline clips directly into its own bin. When you batch-capture,
the offline files are replaced by captured clips, maintaining the bin organization you set up
in advance.
You can capture audio and video to separate drives. Set the locations of new files by
choosing Edit > Preferences > Scratch Disks. If you don’t change the defaults, all files
captured or created by Adobe Premiere Pro are stored in the My Documents folder for the
user who is currently logged into Windows XP.
Logging clips interactively
Use the following tips to log clips using a flexible and interactive process:
Using Help | Contents | Index Back 65
Page 64

Adobe Premiere Pro Help Capturing and Importing Source Clips
Using Help | Contents | Index Back 66
• Log clips by using options in the Logging tab in the Capture window. Adobe Premiere
Pro uses the current data in the Setup and Clip Data sections as defaults for subsequent
logged clips, so if you want to log a series of clips into the same bin with similar logging
data, save work by specifying clip data before you start logging the series. When you
click the Log Clip button, a dialog box appears so that you can accept or change the clip
data.
• In the Clip Data section, specify a Tape Name, because Adobe Premiere Pro asks for it
every time you begin a batch capture.
• The Clip Name in the Clip Data section progresses in increments automatically. For
example, if you want to number a series of clips with the clip name “Car Chase,” enter
“Car Chase 01,” making sure that the clip name ends with the number. Subsequent
logged clips default to the next number, such as “Car Chase 02.”
• You can change Capture Window settings at any time. For example, if you see the action
changing as the tape plays back, you can get ready to capture the new upcoming
action by selecting a different bin to log subsequent clips into or by typing in a different
Description or Scene name. You don’t have to stop the tape as you change settings.
• You can operate the DV device and log clips using the keyboard. See the tool tips for
Capture Window controls, or choose Edit > Keyboard Customization to view or change
the shortcuts.
• You must click Log Clip to create a new offline file. This pauses the tape as you confirm
the clip data for the new offline file.
To log clips interactively:
1 Make sure that your DV device is online, then choose File > Capture. You can also open
the Capture window with a keyboard shortcut; the default shortcut is F5.
2 In the Logging tab, enter the settings you want to use as the defaults for Setup
and Clip Data.
3 Play the tape.
4 Click Set In or Set Out at any time, even as the tape plays back.
5 When you are satisfied with the In and Out points, click Log Clip, verify the clip data, and
click OK.
6 Repeat steps 3 and 4 as necessary.
For detailed information, see “Logging clips as offline files for batch capture” on page 72.
You can make slight timecode adjustments by typing relative timecode using the +
(plus) or – (minus) signs. For example, if you want to add 5 frames to the end of the
Out point, select the entire Out point timecode, type +5, and press Enter.
Batch-capturing tips
When you want to batch-capture a set of logged (offline) clips, simply select them in the
Project window and use the File > Batch Capture command, which is also available when
you right-click selected offline files. If you organized offline clips into bins, you can batchcapture an entire bin by selecting the bin.
Using Help | Contents | Index Back 66
Page 65

Adobe Premiere Pro Help Capturing and Importing Source Clips
Using Help | Contents | Index Back 67
Adobe Premiere Pro can capture video in the background so that you can perform other
tasks during capture. However, be aware that dropped frames may result if you perform a
system-intensive task while capturing. The chance of dropped frames is lower on a highperformance system.
For detailed information, see “Batch-capturing clips” on page 75.
If you require basic information about capturing in Adobe Premiere Pro, see “Capture
checklist” on page 63.
Using device control
You can use Adobe Premiere Pro and device control to simplify and automate video
capture and to export sequences to tape. Device control lets you precisely control the
device and view its source video directly from Adobe Premiere Pro, instead of operating
both Adobe Premiere Pro and the controls on the device. With device control, you can use
the Capture window to log each clip and then record all logged clips automatically. You
can use device control to capture video from or export video to analog or digital video
decks or cameras that support device control. Adobe Premiere Pro includes built-in
support for DV device control.
Note: Captured clips in Adobe Premiere Pro use two sets of timecodes. Media Start and
Media End mark the start and end, respectively, of the untrimmed captured media, and In
point and Out point refer to the start and end of the clip frames actually used in a
sequence.
For details about timecode, see “Using timecode for efficient capture” on page 89.
Setting up device control equipment
Before setting up device control, make sure that you have a frame-accurate tape deck or
camera that supports external device control and a cable that connects the deck to your
computer (such as an IEEE 1394 cable).
If you are using device control with a non-DV device, you’ll need an Adobe Premiere Pro–
compatible plug-in software module that lets you control the device directly from Adobe
Premiere Pro and source videotape recorded with timecode. Most DV devices meet this
requirement using Adobe Premiere Pro’s built-in DV device control. If you’re using DV, you
may be able to capture as soon as the device is recognized by Adobe Premiere Pro. If your
device isn’t recognized, you may need to set it up.
Note: The capabilities of device control vary depending on the brand and model of device
you’re using. For information, see the documentation that came with your device or with
its device-control software.
For details about connecting equipment, see “Connecting a DV source” on page 93 and
“Connecting an analog video source” on page 94.
To set up the capture device for device control:
1 Open the Device Control Preferences dialog box by doing one of the following:
• Choose Edit > Preferences > Device Control.
• In the Capture window, click the Settings tab.
2 Select DV Device Control from the Device pop-up menu.
Using Help | Contents | Index Back 67
Page 66

Adobe Premiere Pro Help Capturing and Importing Source Clips
Using Help | Contents | Index Back 68
3 Click Options, and do one of the following:
• If a DV device is connected, select the device brand and device type. If your particular
device is not listed, click Go Online for Device Info.
• If an analog device is connected, the options may vary depending on the Adobe
Premiere Pro plug-in software provided with the capture device. See the documen
-
tation for the capture device.
4 In the Device Control Options dialog box, check the status display. If the status is
Offline, Adobe Premiere Pro does not see your device and you need to check all your
connections and settings. If the status is Detected, Adobe Premiere Pro sees your device
but cannot control the tape (possibly because there is no tape inserted). If the status is
Online, Adobe Premiere Pro sees your device and can control the tape. Click OK.
5 In the Device Control panel, specify the following options as needed:
• Preroll Time indicates how far before the In point Adobe Premiere Pro winds the tape
before capture. The appropriate value varies depending on the device you are using.
• Timecode Offset indicates the number of quarter frames to adjust the timecode
stamped on the captured video so that it corresponds to the correct frame on the
original tape.
Setting up a project to use device control
Device control settings are available when you choose Edit > Preferences > Device
Control, or in the Device Control panel at the bottom of the Settings tab in the Capture
window. Device control settings apply to the entire project. You may find it more conve
nient to set up device control from the Capture window because you can set up additional
capture settings, such as capture locations, in the same window.
To set up a project for device control:
1 If you want captured clips to be saved to a specific bin in a project, make sure that the
project is open and the bin exists in the Project window. See
“Using bins” on page 48.
2 Choose File > Capture.
3 In the Settings tab, click Edit to verify that the capture settings are appropriate for your
device.
4 If device control has not been set up, choose a device from the Devices menu and click
Options to set it up, if necessary. See
“Setting up device control equipment” on page 68. If
you choose an analog capture device, options vary depending on the device—see the
documentation for your device driver.
5 Test the device control buttons to verify that they work and that you see video in the
Capture window preview.
6 In the Capture Locations section, make sure that the drives you designate for captured
video and audio have sufficient free space. If you want to change the locations, choose
Custom from the Video or Audio menu, click the corresponding Browse button, set the
location, and click OK.
-
7 Click the Logging tab. In the Setup section, make sure that the Capture menu setting is
correct and select a bin from the list if needed. If no bin is selected or the bin list is empty,
captured clips appear in the Project window.
Using Help | Contents | Index Back 68
Page 67

Adobe Premiere Pro Help Capturing and Importing Source Clips
Using Help | Contents | Index Back 69
8 Enter information into the Logging Data section as needed.
Note: To avoid confusion, make sure that the Tape Name is unique. Some types of device
control software may ask you to specify the Tape Name each time you insert a new tape.
The other Logging Data options aren’t required.
Using Capture window device controls
You can use the controls in the Capture window to operate the device as you log clips. The
jog control lets you navigate quickly to nearby frames, and the shuttle control
change the speed of the tape as you play it forward or backward. The Record button lets
you begin a manual capture.
If you press the Rewind button when the tape is stopped, the device rewinds the tape
at full speed. If you rewind when the tape is playing or paused, the device rewinds while
displaying video in the Capture window. You can press the J key to rewind at regular
speed, or press J multiple times to increase the rewinding speed.
If you press the Fast Forward button when the tape is stopped, the device moves the
tape forward at full speed. If you fast forward when the tape is playing or paused, the
device moves the tape forward while displaying video in the Capture window. You can
press the L key to fast forward the tape at regular speed, or press L multiple times to
increase the forwarding speed.
lets you
KJIFC D E G HBA
SRQPONML
Capture window playback controls
A. Next scene B. Set In point C. Set Out point D. Rewind E. Step back F. Play G. Step forward H.
Fast forward I. Pause J. Stop K. Record L. Previous scene M. Go To In point N. Go To Out point O.
Jog
P. Shuttle Q. Slow reverse R. Slow play S. Scene detect
To operate Capture window controls using the keyboard, see the tool tips in the
Capture window. You can change the shortcuts using the Edit > Keyboard Customi-
zation command.
Performing a capture using device control
When a device and the project are set up properly, you can begin capturing clips using
device control. First you mark In and Out points, and then you capture the clip. If you want
to mark In and Out points for many clips and have Adobe Premiere Pro capture all of the
clips at once, see
To capture an entire tape:
1 Choose File > Capture to open the Capture window.
“Batch-capturing video” on page 72.
2 Make sure that your device is online, as indicated above the preview in the Capture
window. If the message “Capture Device Offline” appears there, see
“Setting up device
control equipment” on page 68.
3 Rewind the entire tape to the beginning.
Using Help | Contents | Index Back 69
Page 68

Adobe Premiere Pro Help Capturing and Importing Source Clips
Using Help | Contents | Index Back 70
4 Click the Tape button near the bottom of the Logging tab in the Capture window.
To mark a clip to be captured using device control:
1 Choose File > Capture to open the Capture window.
2 Make sure that your device is online, as indicated above the preview in the Capture
window. If the message “Capture Device Offline” appears there, see
“Setting up device
control equipment” on page 68.
3 Use the controls in the Capture window to move to the first frame in the clip you want
to capture, and click the Set In button.
4 Use the controls in the Capture window to move to the last frame in the clip, and click
the Set Out button.
To move or play in relation to the In and Out points:
Do either of the following:
• To move the tape to the In point, click the Go To In Point button .
• To move the tape to the Out point, click the GoTo Out Point button .
You can also set In and Out points by entering timecode values in the Capture
window.
To capture a clip using device control:
1 In the Capture panel of the Logging tab in the Capture window, set the following
options as desired:
• Scene Detect creates separate clips at any scene breaks detected between the In and
Out points (see
• Handles captures the specified number of frames before the In point and after the Out
“Using automatic scene detection” on page 75).
point to provide flexibility for editing and transitions.
2 Do one of the following:
• To record a clip from the video as it plays in the Capture window, press the Record
button
• To capture from the In point to the Out point, click Capture In/Out. Adobe Premiere Pro
. T his doesn’t require setting In and Out points.
automatically moves the tape to the Preroll specified before the In point and captures
the clip. If you specified handles, those frames are included during the capture.
The captured file appears at the disk location you chose and is listed in the project in the
bin you specified (if any) with the name you gave it.
Note: To capture more than one set of In and Out points, see “Batch-capturing video” on
page 72.
Capturing clips without using device control
If you do not have a device that can be controlled by Adobe Premiere Pro, you can capture
video manually. You can manually operate both the playback device controls and the
Capture window controls in Adobe Premiere Pro.
To capture a clip with a noncontrollable device:
1 Make sure that the deck or camcorder is properly connected to your computer.
Using Help | Contents | Index Back 70
Page 69

Adobe Premiere Pro Help Capturing and Importing Source Clips
Using Help | Contents | Index Back 71
2 Choose File > Capture.
3 In the Capture window menu, make sure that Record Video and Record Audio are
selected or deselected as needed.
4 Use the controls on the deck or camcorder to move the videotape to a point several
seconds before the frame where you want to begin capturing.
5 Press the Play button on the deck or camcorder, and then click Record in the
Capture
6 When you see the point where you want to stop recording, wait a few seconds to
provide room for editing, and then press the Escape (Esc) key to stop recording.
7 When the Save Captured File dialog box appears, enter logging data and click OK. The
new file is listed in the Project window and is saved to the disk location specified in the
Settings tab in the Capture window.
window.
Batch-capturing video
Adobe Premiere Pro supports batch capturing—automatic, unattended capture of
multiple clips from an analog or DV device. First you
the tape. The log can be created either by logging clips visually using device control or by
typing In and Out points manually. In Adobe Premiere Pro, logged clips appear as a set of
offline (placeholder) clips in the Project window or in a bin. In the Project window list view,
the Capture Settings column indicates that a clip has specific capture settings assigned to
it. If none is assigned, the clip uses the default capture settings. You can capture any
number of logged, offline clips by selecting them and choosing the File > Batch Capture
command. When you begin capture, Adobe Premiere Pro automatically resorts entries by
tape name and timecode In points so that they’re captured as efficiently as possible.
log the clips you want to capture from
Using Help | Contents | Index Back 71
Page 70

Adobe Premiere Pro Help Capturing and Importing Source Clips
Using Help | Contents | Index Back 72
To save time by reducing the number of clips you log manually, consider using the Scene
Detect feature. Scene Detect automatically captures a separate clip whenever a break is
detected in the time stamp on the tape, such as when the camera’s pause button was
pressed during shooting. See
“Using automatic scene detection” on page 75.
Note: Batch capture is not recommended for the first and last 30 seconds of your tape
because of possible timecode and seeking issues. Instead, capture these sections
manually.
A
B
Preparing for batch capture
A. Clips selected for capture B. Capture Settings option
Logging clips as offline files for batch capture
Specify which scenes you want to use from the source tapes by logging scenes—setting
up the beginning and ending times—as a set of offline files for later capture. If you set up
device control in the Preferences dialog box to remotely control your camera or deck, you
can create offline files by using the clip-logging controls in the Capture window, and then
use the Capture window’s device controls to capture the logged clips automatically.
If you have a list of In points and Out points, you can log them manually by using the
following procedure without a device online; simply enter each clip’s In and Out points
and click the Log Clip button. You can also log frame numbers using a separate logging or
spreadsheet program and then import the spreadsheet into Adobe Premiere Pro as a
batch list; see
“Importing and exporting batch lists” on page 76.
Using Help | Contents | Index Back 72
Page 71

Adobe Premiere Pro Help Capturing and Importing Source Clips
Using Help | Contents | Index Back 73
To log clips using device control:
1 Choose File > Capture, and make sure that your device is online as indicated above the
preview in the Capture window. If it’s offline, see
“Setting up device control equipment”
on page 68.
Capture window with Logging tab active
2 Click the Logging tab, and type the Tape Name used for the video tape. (You may be
asked to specify the tape name each time you insert a new tape, depending on the device
control software and the video deck.)
3 Use Capture window controls to move to the first frame in the clip you want to capture,
and click the Set In button
. Depending on the device, you may not be able to capture the
first 4 to 10 seconds of a DV tape.
Note: In the Capture window, the Set In button and the Set Out button appear below the
image and in the Logging tab. You can also view or change shortcuts for these buttons
and other buttons by choosing Edit > Keyboard Customization.
4 Use the controls in the Capture window to move to the last frame in the clip you want
to capture, and click the Set Out button.
5 Click the Log Clip button. Change the logging data if necessary, and click OK.
6 Repeat steps 3 through 5 for each clip that you want to capture from this tape.
7 If you have another tape from which you want to capture clips, insert it, update the
Tape Name in the Capture window, and repeat steps 2 through 8.
8 Save the project.
To log clips manually using the Capture window:
1 Open the project (and bin, if necessary) where you want to add the entries.
2 Choose File > Capture.
Using Help | Contents | Index Back 73
Page 72

Adobe Premiere Pro Help Capturing and Importing Source Clips
Using Help | Contents | Index Back 74
3 Click the Logging tab. Next to the Set In button in the Timecode section, enter
timecode for the first frame of the clip, and click Set In.
4 Enter the last frame of the clip next to the Set Out button, and click Set Out.
5 Click Log Clip. For a description of the options in the Log Clip dialog box, see “Using
offline files” on page 87.
6 Repeat steps 2 through 5 for each entry in your log.
You can also log clips manually without having to open the Capture window, by
creating offline files. See “Using offline files” on page 87.
Specifying batch-capture settings
By default, the settings Adobe Premiere Pro uses to batch-capture offline files are the
project’s current capture settings. Offline files use capture settings in the following ways:
• If an offline file has its own capture settings, Adobe Premiere Pro uses those settings
when capturing it. If you capture an offline file using Adobe Premiere Pro, the resulting
clip maintains its capture settings so that it can easily be recaptured using the same
settings.
• If an offline file doesn’t have its own capture settings, Adobe Premiere Pro applies the
project’s capture settings.
• When you perform a batch capture (by choosing File > Batch Capture), you have an
opportunity to apply the same capture settings to all of the offline files you selected,
overriding the settings of individual offline files.
To see whether a clip has capture settings:
Look in the Capture Settings column in the Project window. If you can’t find the column,
you may have to scroll the Project window sideways to reveal this column, or the column
may be hidden. (To reveal hidden columns, choose Edit Columns from the Project window
menu, select them in the list, and click OK.)
To change a clip’s capture settings:
Select the clip in the Project window and choose Clip Capture Settings > Set Capture
Settings.
To remove a clip’s capture settings:
Select the clip in the Project window and choose Clip > Clear Capture Settings.
To specify extra frames to be captured at the ends of each batch-list entry:
1 Choose Handles from the Batch Capture window menu.
2 Type the number of frames of additional video that you want to capture before the In
point and after the Out point of the clip, and click OK.
Using Help | Contents | Index Back 74
Page 73

Adobe Premiere Pro Help Capturing and Importing Source Clips
Using Help | Contents | Index Back 75
Using automatic scene detection
Instead of manually logging In and Out points, you may want to use the Scene Detect
feature. Scene Detect analyzes the video for scene breaks indicated by the tape’s
timecode, such as those caused when you press the camera’s pause button while
recording. When Scene Detect is on and you perform a capture, Adobe Premiere Pro
automatically captures a separate file at each scene break it detects. Scene Detect works
whether you are capturing an entire tape or specific In and Out points. If you turn on
Scene Detect and capture using In and Out points, Scene Detect may break up clips
between the defined In and Out points if a scene break is detected.
To turn on automatic scene detection:
In the Capture window, do any of the following:
• Click the Scene Detect button below the image.
• Select Scene Detect in the Capture section of the Logging tab.
• Choose Scene Detect from the Capture window menu.
Batch-capturing clips
When you finish logging clips, you’re ready to batch-capture the clips. Unless specific clips
use their own capture settings, Adobe Premiere Pro captures the offline files using the
capture settings that were specified when the clips were logged. See
capture settings” on page 74. Choosing the Batch Capture command starts the batch-
capturing process for clips selected in the Project window.
For efficient capture, Adobe Premiere Pro captures clips from the start of a tape to the end
regardless of the order in which you selected the offline files. If you select offline files to be
captured from multiple tapes, Adobe Premiere Pro captures each tape’s clips in one pass,
so you have to insert each tape only once.
“Specifying batch-
To batch-capture clips:
1 In the Project window, select the offline files you want to capture or select a bin
containing the offline files you want to capture.
2 Choose File > Batch Capture.
3 If needed, specify a Handle Length to capture extra frames before and after the In and
Out points specified for each clip (see
“About clip handles and transitions” on page 170).
4 Do one of the following:
• To capture each selected clip using its own settings (or the project settings for clips that
have no capture settings), click OK.
• To specify settings that apply to all selected clips, click Override Clip Settings and
specify the settings you want. This option is rarely needed for DV capture.
5 Verify that the deck and source videotape are set up properly for capture,
and then click OK.
6 When the Insert Tape dialog box appears, insert the requested tape and click OK. If you
are capturing from multiple tapes, be ready to insert each of them as Adobe Premiere Pro
requests them.
To cancel batch capture:
Click the Stop button in the Capture Window, or press the Escape (Esc) key.
Using Help | Contents | Index Back 75
Page 74

Adobe Premiere Pro Help Capturing and Importing Source Clips
Using Help | Contents | Index Back 76
Troubleshooting batch capture
You can perform trouble-free batch captures if device control and the project’s capture
settings are set up properly and if the offline files you logged are consistent and free of
conflicting data. If you encounter problems with batch capture, make sure that all clips
you want to batch capture are set up with the proper settings:
• Each clip’s Status must be Offline. Verify this in the Project window List view. If
necessary, select the clip in the Project window and choose Project > Unlink Media. If
you select multiple clips and some are online, Adobe Premiere Pro captures the offline
files only.
• Tape Name, Media Start, and Media End must be specified in the Edit Offline File dialog
box for each offline file. As long as one selected offline file contains these settings, the
Batch Capture command is available, but only clips with all three required settings will
actually be captured. If necessary, verify this in the Project window List view or doubleclick each offline file to edit settings.
• Recording video, audio, or both must be supported by the selected capture device. For
example, audio isn’t captured if the capture device doesn’t capture audio. If settings
exist that can’t be captured, batch capture stops and the Capture Settings Error dialog
box appears.
• The filename of each clip (as specified in the Capture Settings dialog box) must not
conflict with a clip that already exists. If necessary, double-click each offline file to verify
this. If this isn’t resolved before you attempt a batch capture, Adobe Premiere Pro
slightly alters the filename of the clip so that batch capture can continue.
To manage capture errors when the Capture Settings Error dialog box appears:
Do one of the following:
• To fix the capture settings for any clips in the list, select one or more files in the list and
click Edit Settings.
• To omit the clips with invalid capture settings and proceed with the rest of the batch
capture, click Skip. Clips you skip are removed from the list and not captured.
• To apply the project’s current Capture Settings to any clips in the list, select the clips
and click Apply Defaults.
• To stop batch capture, click Cancel. No clips will be captured.
Importing and exporting batch lists
You can import a batch list as a tab-delimited text (.TXT) file or a comma-separated value
(.CSV) text file. When imported, each entry in the text batch list appears as an offline file in
the Project window. You can also export offline files as a .CSV batch list so that you can
transfer a logged clip list between projects and workstations. To see the format of a batch
list, export it and open the file in a text editor such as Notepad or in a spreadsheet appli
cation. A batch list text file may come from sources such as:
• Custom video-production software that uses a database or spreadsheet program to
generate a batch list
-
• Batch lists exported from Adobe Premiere 6.5
• Logging utilities such as Pipeline Autolog
Using Help | Contents | Index Back 76
Page 75

Adobe Premiere Pro Help Capturing and Importing Source Clips
Using Help | Contents | Index Back 77
When you import a batch list, the order of fields in the list must be as follows: tape name,
In point, Out point, clip name, and comment. When you export offline files as a batch list,
Adobe Premiere Pro orders the fields as follows: tape name, In point, Out point, clip name,
log note, description, scene, and shot/take. Exported field data is exported from the corre
sponding columns in the List view of the Project window.
To import a batch-list timecode log:
With a project open, choose Project > Import Batch List. Locate and select the file, and
click Open.
To export a batch-list timecode log:
1 Select the files that you want to log.
2 Choose Project > Export Batch List. Specify a filename and location, and click Save.
Recapturing clips
You can recapture clips in an existing project using batch capture. Clips can be recaptured
if the following are true:
• Clips are unlinked from their source files so that the clips become offline files, because
clips can be captured only from offline files.
-
• The unlinked source files are either deleted from the disk or are stored under a filename
other than the clip name specified in its offline file.
• Each offline file contains a tape name (to check this, double-click an offline file).
• The source media contains timecode. Adobe Premiere Pro can’t recapture clips if no
timecode exists on the source media.
To recapture clips:
1 If you want to override the capture settings for any clip that you intend to recapture, set
the clip’s Capture Settings (see
“Specifying batch-capture settings” on page 74).
2 In the Project window, select all the clips you want to recapture. If you want to select
clips in different bins, use List view, which allows viewing of multiple bins.
3 Choose Project > Unlink Media to disassociate the selected clips from their current
source files. In the Unlink Media dialog box, specify whether source media files remain on
disk or are deleted (see
“Using offline files” on page 87).
4 With the offline files still selected, choose File > Batch Capture. Adjust the settings as
described in
“Batch-capturing clips” on page 75.
5 Verify that the deck and source videotape are set up properly for capture, and then
click OK.
6 After recapturing is complete, save the project.
Using Help | Contents | Index Back 77
Page 76

Adobe Premiere Pro Help Capturing and Importing Source Clips
Using Help | Contents | Index Back 78
Importing digital audio
Adobe Premiere Pro can import digital audio clips stored as audio files or tracks in video
files. Digital audio is stored as binary data readable by computers. Most digital audio is
stored on computer hard disks, audio compact discs (CDs), or digital audio tape (DAT). If
you have capture hardware that can read digital audio data directly, such as an IEEE 1394
(FireWire/i.Link) connection, you can preserve the quality of your digital audio source
when capturing audio with the Capture window. When transferring digital audio to your
computer, use digital connections where possible. Any analog connection, such as
connecting a compact-disc player to a computer through analog audio jacks, reduces
audio quality.
For maximum editing performance, Adobe Premiere Pro conforms each imported audio
channel to 32-bit floating-point data at the project’s sample rate (see
on page 192). All imported audio is conformed, even audio tracks in video files.
Note: When you want to capture an audio-only file from a digital audio source, choose
Audio in the Capture window’s Capture pop-up menu.
For details about digital and analog sources, see “About digital and analog sources” on
page 92.
“Conforming audio”
Using audio from Adobe Audition
You can use Adobe Audition to perform advanced audio editing. If you export the audio
from Adobe Audition to an audio file format compatible with Adobe Premiere Pro, you can
import the audio into your Adobe Premiere Pro projects. If you turn on the Project Linking
option as you export audio from Adobe Audition, you can use the Edit > Edit Original
command in Adobe Premiere Pro to open an audio clip’s Adobe Audition project directly
from within Adobe Premiere Pro. See
page 145.
“Editing a clip in its original application” on
Using CD audio
You can use CD audio (CDA) files in a project, but before you can import them into Adobe
Premiere Pro, you need to convert them to a supported file format. You can convert CDA
files using an audio application such as Adobe Audition. Once you’ve converted the audio
file to compatible file format such as WAV, import it using the File
Note: Make sure that you own the copyrights or have licensed the copyrights to any CD
tracks you use.
> Import command.
Using compressed audio formats
Music stored in formats such as MP3 and WMA are compressed using a method that
removes some of the original audio quality. To play back compressed audio, Adobe
Premiere Pro must decompress the file and may need to resample it to match your output
settings. These conversions are likely to degrade audio quality. For this reason, use an
uncompressed or CD audio version of the audio clip whenever possible.
Using Help | Contents | Index Back 78
Page 77

Adobe Premiere Pro Help Capturing and Importing Source Clips
Using Help | Contents | Index Back 79
Capturing analog audio
If you want to use audio that is not yet in digital form, such as an analog cassette or a live
voiceover, you need to capture it. With the proper audio- or video-capture card, Adobe
Premiere Pro can capture audio that is synchronized with its source video or that is
independent of it.
The quality of digitized audio and the size of the audio file depend on the sample rate (the
number of samples per second) and
digitized audio. Also, digitizing stereo audio requires twice as much disk space as mono
audio. These parameters, controlled in the Capture Settings section of the Project Settings
dialog box, determine how precisely the analog audio signal is represented in digital form.
Higher sample rates and bit depths reproduce sound at higher levels of quality, but with
correspondingly larger file sizes. If you plan to export or play back the final cut from Adobe
Premiere Pro, capture audio at
even if those settings are higher than the settings you’ll specify for final export or
playback. This provides
audio gain or apply audio effects such as equalization or dynamic range compression/
expansion; see
Note: Although the DV format can record two independent stereo audio pairs, you cannot
capture the Stereo 2 pair in Windows.
“Applying and controlling Standard effects” on page 244.
the highest quality settings your computer can handle,
headroom, or extra data, that helps preserve quality if you adjust
bit depth (the number of bits per sample) of the
To set the location of a file captured from an audio-only source:
1 Choose Edit > Preferences > Scratch Disks.
2 For Captured Audio, select a location and click OK.
To capture an audio source or voiceover:
1 Connect the audio source or microphone to the sound input port on your computer or
sound card. If necessary, choose Edit > Preferences > Audio Hardware to configure the
input device; see “Setting a track’s input source” on page 213.
2 If you are recording a voiceover and want to preview the timeline as you record,
position the current-time indicator in the Timeline window a few seconds before the time
when you want the voiceover to begin.
Using Help | Contents | Index Back 79
Page 78

Adobe Premiere Pro Help Capturing and Importing Source Clips
Using Help | Contents | Index Back 80
3 In the Audio Mixer window, click the Record Enable button for any tracks on which
you want to record audio.
A
B
Audio Mixer recording controls
A. Record Enable button for track B. Record button for Audio Mixer
4 In the Audio Mixer window, click the Record button for the sequence. Adobe Premiere
Pro prepares the sequence for recording but moves the playhead only when you press the
Play button.
5 Select Meter Input(s) Only in the Audio Mixer window menu.
6 Test the input levels by playing the audio source or speaking into the microphone.
7 When you’re done testing, you may want to deselect Meter Input(s) Only in the Audio
Mixer window menu.
8 Play the audio source or start speaking into the microphone. Watch the Audio Mixer
level meters to ensure that the input levels for record-enabled tracks are high enough
without clipping.
9 Be ready to start the audio source or prepare to speak. Click the Play button in the
Audio Mixer, and then start the audio source or start speaking.
If no audio is recorded or you can’t hear your source audio, try playing the audio
through the computer’s speaker system without recording. If you still can’t hear it, the
audio source may not be properly connected. Check hardware connections, settings in
Audio Hardware preferences (choose Edit > Preferences > Audio Hardware), settings in
Control Panel’s Sounds and Audio Devices, and the documentation that came with your
computer and sound card.
Using Help | Contents | Index Back 80
Page 79

Adobe Premiere Pro Help Capturing and Importing Source Clips
Using Help | Contents | Index Back 81
Importing clips
You can import a single clip, multiple clips, or an entire folder of clips, either by using the
File > Import command or simply dragging them into the Project window. Clips cannot
exceed 4000 x 4000 pixels. If the software you use to create art does not let you specify
pixels as a unit of measure, specifying points may be sufficient.
If you import a clip and it appears horizontally or vertically distorted (stretched), its pixel
aspect ratio may not be interpreted correctly. If this is the case, inspect the pixel aspect
ratio for the clip and change it if necessary (see
ratios” on page 100). Adobe Premiere Pro continuously rasterizes EPS images, so you can
scale these files without pixelization. See “Adjusting position, scale, rotation, and anchor
point” on page 241.
Adobe Premiere Pro can import a number of video and audio formats.
Video formats: Type 2 AVI, MOV, MPEG/MPE/MPG, Open DML, and WMV
Note: Type 1 AVI clips must be rendered before they can be previewed from your DV device.
To render a Type 1 AVI clip, add it to a sequence in a DV project, and build a preview file of
that section of the timeline.
“Capturing or importing various aspect
Audio formats: AIFF, AVI, MOV, MP3, WAV, WMA
Still-image formats: AI, BMP/DIB/RLE, EPS, FLC/FLI, GIF, ICO, JPEG/JPE/JPG/JFIF, PCX,
PICT/PIC/PCT, PNG, PRTL (Adobe Title Designer), PSD, TGA/ICB/VST/VDA, TIFF
Sequence formats: AI, BMP/DIB/RLE, Filmstrip, animated GIF, PICT/PIC/PCT, TGA/ICB/VST/
VDA, TIFF, PSD
File format support is provided by plug-in software modules. Most software modules for
these formats are automatically installed with Adobe Premiere Pro. Some formats may
require that Apple QuickTime be installed.
If you’re using an Adobe application to create a clip for use in Adobe Premiere Pro,
turn on the Embed Project Link option in the originating Adobe application so that
you can use Adobe Premiere Pro’s Edit Original command to open the clip in the appli
-
cation used to create it. See “Editing a clip in its original application” on page 145.
To import one or more clips into the Project window:
Do one of the following:
• To import a single clip, choose File > Import. Locate and select the file,
and then click Open.
• To import multiple clips, choose File > Import. Hold down Control as you select each file
you want to import. Click Open.
• To import a clip that was recently imported into Adobe Premiere Pro, choose the file
from the File > Import Recent File submenu. The file may not appear if many other files
have been imported more recently or if Adobe Premiere Pro preferences have been
reset.
Using Help | Contents | Index Back 81
Page 80

Adobe Premiere Pro Help Capturing and Importing Source Clips
Using Help | Contents | Index Back 82
• To import a folder of clips, choose File > Import. Locate and select the folder you want
to import, and then click Folder. The folder imports as a new bin in the Project window,
with the folder’s contents listed inside the bin.
You can also import files and folders by dragging them from a desktop window to the
Project window in Adobe Premiere Pro.
Importing still images
You can import individual still images or convert a numbered sequence of still images into
a
single animation as you import (see “Importing an animation or still-image sequence”
on page 84). You can import still images with frame sizes up to 4000 x 4000 pixels. The
following guidelines affect how still images appear when you import them into Adobe
Premiere Pro:
• An imported still image uses the duration specified in the Edit > Preferences > Still
Image preferences. You can change the duration of a still image in the Timeline
window.
• The size and aspect ratio of imported still images is affected by the same factors that
affect imported video clips. See
• When preparing images in applications that support color management, such as Adobe
Photoshop, colors may appear more consistent between the application and Adobe
Premiere Pro if you prepare images in a video-friendly color space such as sRGB or NTSC
RGB.
“Importing clips” on page 81.
• For best results, create files with a frame size at least as large as the frame size of the
project, so that you don’t have to scale up the image in Adobe Premiere Pro. Scaling an
image larger than its original size can cause loss of sharpness. If you plan to scale up an
image, prepare it at a larger frame size than the project. For example, if you plan to scale
up an image 200% in a project, prepare the image at double the project frame size
before you import it.
To change the default duration for still images:
1 Choose Edit > Preferences > Still Image.
2 For Default Duration, specify the number of frames you want as a default duration for a
still image.
Note: Changing the default duration of still images does not affect the duration of still
images that are already part of a sequence.
When importing files through the Import dialog box, you can identify files visually if
you set the view to Thumbnails.
To change the duration of a still image in the timeline:
Do one of the following:
• Position the selection tool over either end of the image and drag.
• Select the clip, and choose Clip > Speed. Enter a new duration, and click OK.
To adjust the pixel aspect ratio of an imported still image:
1 Select the still image in the Project window.
Using Help | Contents | Index Back 82
Page 81

Adobe Premiere Pro Help Capturing and Importing Source Clips
Using Help | Contents | Index Back 83
2 Choose File > Interpret Footage.
3 Select an option in the Pixel Aspect Ratio section, and click OK:
• Use Pixel Aspect Ratio from File uses the original aspect ratio saved with the still image.
• Conform To lets you choose from a list of standard aspect ratios.
Importing Adobe Illustrator still images
You can import an Adobe Illustrator still-image file directly into an Adobe Premiere Pro
project. Adobe Premiere Pro
based image format used by Adobe Premiere Pro, a process known as
Premiere Pro automatically
Adobe Premiere Pro also converts all empty areas into an alpha channel, so that empty
areas become transparent in Adobe Premiere Pro. All layers in an Adobe Illustrator file are
merged when you import them into Adobe Premiere Pro.
If you want to define the dimensions of the Adobe Illustrator art when it is rasterized by
Adobe Premiere Pro, use Adobe Illustrator to set crop marks in the Adobe Illustrator file.
For information about setting crop marks in Adobe Illustrator, see the product’s documen
tation.
converts path-based Adobe Illustrator art into the pixel-
rasterization. Adobe
anti-aliases, or smooths, edges of the Adobe Illustrator art.
-
Importing Adobe Photoshop still images
You can import files from Adobe Photoshop 3.0 or later. However, Adobe Premiere Pro
does not support 16-bit TIFF images created in Adobe Photoshop or other graphics appli
cations. You can control how layered Adobe Photoshop files are imported; see “Importing
layered Adobe Photoshop files” on page 83. Empty (transparent) areas of nonflattened
Adobe Photoshop files are transparent when imported into Adobe Premiere Pro, because
the transparency is stored as an alpha channel (see
“Defining transparency terminology”
on page 219). This lets you import Adobe Photoshop graphics and superimpose them
over clips in other tracks with no extra effort.
In addition, you can import a layered Adobe Photoshop file as a sequence, allowing you to
set up animations in Adobe Photoshop and then import them into an Adobe Premiere Pro
project (see
“Importing layered Adobe Photoshop files” on page 83).
Importing layered Adobe Photoshop files
When you import a layered file saved in the Adobe Photoshop file format, you can choose
how to import the layers:
• Merge the layers, combining all layers into a flattened clip.
• Import only one of the layers from the file.
• Convert the layers into a sequence of frames in time.
These options are available in the Import Layered File dialog box, which appears when you
import a layered Adobe Photoshop file. Adobe Premiere Pro imports attributes that were
applied in the original file, including position, opacity, visibility, transparency (alpha
channel), layer masks, adjustment layers, common layer effects, layer clipping paths,
vector masks, and clipping groups. Note that a white background in Adobe Photoshop is
saved or exported as opaque white, while a checkerboard background indicates areas that
will translate into alpha channel transparency when the Photoshop file is saved or
exported to a format that supports alpha channels.
-
Using Help | Contents | Index Back 83
Page 82

Adobe Premiere Pro Help Capturing and Importing Source Clips
Using Help | Contents | Index Back 84
Converting layers into a sequence makes it easy to set up animations using layers in
Adobe Photoshop. When Adobe Premiere Pro converts layers to a sequence, the sequence
is imported into the Project window as a bin; each layer in the file becomes an individual
clip in the bin. Each clip’s name consists of the layer name followed by the name of the file
that contained it. In addition, Adobe Premiere Pro automatically creates a sequence in
which each layer is inserted in order at the default still-image duration. You can use this
sequence as a clip in other sequences.
Note: Some Adobe Photoshop layer attributes aren’t supported, such as non-normal
blending modes and the Knockout option. For best results, use basic transparency and
opacity in Adobe Photoshop.
To import a layered Adobe Photoshop file as a still image:
1 Choose File > Import.
2 In the Import dialog box, make sure that Photoshop or All Supported Media is selected
for Files of Type, and then locate and select a layered Adobe Photoshop file.
3 In the Import Layered File dialog box that appears, make sure that Footage is selected
in the Import As pop-up menu.
4 Choose Merged Layers to import all layers in the file as a single layer, or choose the layer
you want to import from the file.
5 Choose one of the following options in the Footage Dimensions pop-up menu, and
then click OK:
• Document Size resizes the file to the size of the document as specified in Project
Settings.
• Layer Size imports the file at the size of the merged layers or selected layer.
Note: When you import one layer as a single clip, its name in the Project window consists
of the layer name followed by the original filename.
To import a layered Adobe Photoshop or Adobe Illustrator file as a sequence:
1 Choose File > Import.
2 In the Import dialog box, make sure that All Supported Media is selected for Files of
Type, and then locate and select a layered file.
3 In the Import Layered File dialog box that appears, choose Sequence in the Import As
pop-up menu, and then click OK.
Importing an animation or still-image sequence
You can import an animation contained in a single file, such as an animated GIF. An
animation is different from a video in that it is generated synthetically, not by shooting live
action. Adobe Premiere Pro can also import a sequence of numbered still-image files and
automatically combine them into a single clip; each numbered file represents one frame.
Some applications, such as Adobe After Effects, can generate a numbered sequence of still
images. Images in a still-image sequence cannot include layers, so you need to flatten
images that will be part of a sequence. For information on layers and flattening, see the
documentation for the application that created the file.
Note: Changing the default duration of still images in the Preferences dialog box does not
affect the duration of still images that are part of a sequence.
Using Help | Contents | Index Back 84
Page 83

Adobe Premiere Pro Help Capturing and Importing Source Clips
Using Help | Contents | Index Back 85
When creating three-dimensional images or animations for use in Adobe Premiere Pro,
use the following guidelines whenever possible:
• Use broadcast-safe color filtering.
• Use the pixel aspect ratio and frame size specified in the project settings in Adobe
Premiere Pro.
• Use the appropriate field settings to match your project.
• If you’re using an Adobe application to generate the sequence, turn on the Embed
Project Link option so that you can open the sequence in the application that was used
to create it. See
“Editing a clip in its original application” on page 145.
To import numbered still-image files and compile them into a single clip:
1 Make sure that each still-image filename has the correct file extension, and make sure
that all filenames in the sequence contain an equal number of digits at the end of the
filename (before the filename extension)—for example,
file000.bmp, file001.bmp, and so
forth.
2 Choose File > Import.
3 Locate and select the first numbered file in the sequence, select Numbered Stills, and
click Open. When Numbered Stills is on, Adobe Premiere Pro interprets all of the
numbered files as a single sequence.
Importing another project
You can add the contents of an existing Adobe Premiere Pro (or earlier version) project to
an open project. When you import a project into an open project, the imported project’s
clips and sequences are added to the Project window in a bin named after the imported
project. The bin hierarchy of the imported project is maintained within its new bin in the
current project. All of the imported project’s special effects, such as transitions and effects,
are included. Use caution when importing a project into another project with a different
timebase or audio sample rate, because these differences may affect edit positioning and
audio quality.
Projects created in Adobe Premiere 5.1 or later can be imported directly into an Adobe
Premiere Pro project. To import an Adobe Premiere 5.0 or earlier project, first convert it to
an Adobe Premiere Pro project by opening and saving it in Adobe Premiere Pro (see
“Opening a project” on page 41). For projects saved in Adobe Premiere 6.x format or
earlier, the project’s timeline becomes a sequence at the top level of the bin that results
from importing the project.
Importing one project into another is the only way to transfer complete sequence and
clip information from one project to another.
To merge a project into a currently open project:
1 Choose File > Import.
2 Locate and select the project, and then click Open.
Note: In earlier versions of Adobe Premiere, storyboards were stored in files independent
of project files. While Adobe Premiere Pro contains all storyboard features within the
Using Help | Contents | Index Back 85
Page 84

Adobe Premiere Pro Help Capturing and Importing Source Clips
Using Help | Contents | Index Back 86
Project window, you can import storyboard files created in earlier versions of Adobe
Premiere Pro by using the File > Import command.
Changing the frame rate of a clip
You can use the Interpret Footage command to change the frame rate that Adobe
Premiere Pro assumes for a clip. Changing the frame rate changes the original duration
proportionally. For example, if you set a 10-second 24-fps clip to 48 fps, it becomes half as
long, with a new duration of 5 seconds. Be aware that a clip’s frame rate is reconciled with
the project’s frame rate. For example, if you change a 24-fps clip to 48 fps and it’s used in a
24-fps project, the project can display only every other frame of the clip.
You can also change clip speed and duration by choosing the Clip > Speed command for a
clip selected in the Timeline window. However, such a change affects only that clip
instance in the timeline. Using the Interpret Footage command changes how a file is inter
preted throughout a project.
To change the assumed frame rate of a media file:
1 In the Project window, select a clip.
2 Choose File > Interpret Footage, select a Frame Rate option, and click OK.
-
Creating a counting leader
If you plan to create film output from a sequence, you may want to add a counting leader.
A counting leader helps a projectionist verify that audio and video are working properly
and are synchronized. You can create and customize a
the beginning of a project. The leader is 11 seconds long.
To create a leader:
In the Project window, click the New Item button at the bottom of the Project Window
and choose Universal Counting Leader from the menu that appears. Specify the following
options as needed:
Wipe Color Specifies a color for the circular one-second wipe area.
Background Color Specifies a color for the area behind the wipe color.
Line Color Specifies a color for the horizontal and vertical lines.
Target Color Specifies a color for the double circles around the numeral.
Numeral Color Specifies a color for the countdown numeral.
Cue Blip on Out Displays a small cue circle in the last frame of the leader.
Cue Blip on 2 Plays a beep at the two-second mark.
Cue Blip at All Second Starts Plays a beep at the beginning of every second during
the
leader.
universal counting leader to add to
You can customize a counting leader clip by double-clicking it in the Project window.
Using Help | Contents | Index Back 86
Page 85

Adobe Premiere Pro Help Capturing and Importing Source Clips
Using Help | Contents | Index Back 87
Creating color bars and a 1-kHz tone
You can create a one-second clip containing color bars and a 1-kHz tone, as a reference for
calibrating video and audio equipment.
Some audio workflows must be calibrated at a specific tone level. The default level of the
1-kHz tone is 012 dB referenced to 0 dBfs. You can customize the tone level to match your
audio workflow by choosing Clip > Audio Options > Audio Gain with a clip selected. If you
select the bars and tone clip in the Project window, you set the default gain level for new
clip instances. If you select a clip in the Timeline window, you change the level for that clip
instance only.
To create color bars and a 1-kHz tone:
In the Project window, click the New Item button at the bottom of the Project Window
and choose Bars and Tone from the menu that appears.
Creating black video
Empty areas of a track appear black if no other visible clip areas are present on underlying
video tracks. If necessary, you can also create clips of opaque black video for use anywhere
in a sequence. A black video clip is a still image at the project frame size, with a five-second
duration. To create a clip of a different color, use a color matte (see
on page 233).
“Creating a color matte”
To create black video:
In the Project window, click the New Item button at the bottom of the Project Window
and choose Black Video from the menu that appears.
Using offline files
An offline file is a placeholder for a source file that isn’t currently available on disk. Offline
files remember information about the missing source files they represent, and they give
you flexibility when actual files are not available. If an offline file appears in the timeline, a
“Media Offline” message appears in the Program view and in the track.
When you use the Capture window to log clips from a tape, Adobe Premiere Pro automatically creates offline files containing the exact information required to capture the clips
later (see
offline files manually. Use offline files in situations such as the following:
• Clips are logged but not yet captured. Because offline files behave like captured clips,
you can organize the logged, offline files in the Project window and even lay out
sequences in the Timeline window before the offline clips are actually captured. When
the offline files are captured (or located, if they were captured but missing), they
replace the corresponding offline files.
• You want to capture logged clips using device control or batch capture. In Adobe
Premiere Pro, a batch-capture list is a set of offline clips; selecting specific offline clips
sets them up for batch capture (see
• You want to recapture clips used in the project. This requires making the online clips
offline by using the Project > Unlink Media command (see
page 77).
“Logging clips as offline files for batch capture” on page 72). You can also create
“Batch-capturing clips” on page 75).
“Recapturing clips” on
Using Help | Contents | Index Back 87
Page 86

Adobe Premiere Pro Help Capturing and Importing Source Clips
Using Help | Contents | Index Back 88
• A source file is unavailable when you open a project, so that Adobe Premiere Pro can’t
locate it automatically and you can’t locate it manually. Adobe Premiere Pro provides
Offline and Offline All buttons in this case (see
“Opening a project” on page 41).
To capture video using offline files, see “Batch-capturing video” on page 72.
Note: Online and offline clips as used in Adobe Premiere Pro are not directly related to the
concepts of online and offline editing. However, offline files may be used as part of an
offline editing workflow (draft-resolution capture for editing, high-resolution recapture for
final output).
For more information, see “Understanding offline and online editing” on page 98.
To create an offline file:
1 In the Project window, click the New Item button at the bottom of the Project
Window and choose Offline File from the menu that appears.
2 For Contains, select an option as needed.
3 For Tape Name, type the name of the tape containing the source video for the offline
clip.
4 For File Name, type the name of the file as you want it to appear on disk when you
capture it using Adobe Premiere Pro. If you’re creating an offline file for a source file that is
captured but isn’t on your computer yet, type the name of that file.
5 Enter a description, scene, shot/take, and log note as needed.
6 Enter timecode for the entire untrimmed clip, including any extra frames you plan to
capture for editing and transitions.
Note: To be eligible for capture, a clip must contain at least a tape name, filename, media
start, and media end.
To edit an offline file:
In the Project window, double-click the offline file, edit options as needed, then click OK.
To replace an offline file with a source file that’s already captured:
1 In the Project window, select one or more offline files.
2 Choose Project > Link Media.
3 Do one of the following, and click OK:
• Locate and select the actual source file.
• Click Cancel if you can’t locate the file you wanted to link to.
Note: If you selected more than one offline file, the Attach Which Media dialog box
appears in turn for each file you selected. Pay attention to the offline filename in the title
bar of the dialog box so that you relink the correct source file to each offline file.
To convert an online file into an offline file:
1 In the Project window, select one or more online files.
2 Choose Project > Unlink Media.
3 Select one of the following options, and click OK:
• Media Files Remain On Disk makes the selected files offline in the project but doesn’t
erase the source files from the disk.
Using Help | Contents | Index Back 88
Page 87

Adobe Premiere Pro Help Capturing and Importing Source Clips
Using Help | Contents | Index Back 89
• Media Files Are Deleted makes the selected files offline in the project and erases the
source files from the disk.
Note: If you select Media Files Remain On Disk and recapture a clip using the same
filename as the file left on disk, the original media file is replaced. To preserve original clips
without changing their names, move them to another folder or disk, or specify a different
filename for the clips you recapture.
Analyzing clip properties and data rate
Adobe Premiere Pro includes clip analysis tools that you can use to evaluate a file in any
supported format stored inside or outside a project. For example, after producing a video
clip to be streamed from a Web server, you can use clip analysis tools to determine
whether a clip you exported has an appropriate data rate for Internet distribution.
The Properties feature provides detailed information about any clip. For video files,
analyzed properties can include the file size, number of video and audio tracks, duration,
average frame rate, audio sample rate, video data rate, and compression settings. You can
also use the Properties feature to alert you to the presence of any dropped frames in a clip
you just captured. Use the data rate graph to evaluate how well the output data rate
matches the requirements of your delivery medium. It charts each frame of a video file to
show you the render keyframe rate, the difference between compression keyframes and
differenced frames (frames that exist between keyframes), and data rate levels at each
frame. The graph includes the following:
Data rate The line represents the average data rate.
Sample size The red bars represent the sample size of each keyframed frame.
Differenced frames sample size The blue bars represent the sample size of the differ-
enced frames between compression keyframes.
To see the properties of a clip:
1 Do one of the following:
• If the clip is in the Project window, select it to display a subset of its properties in the
preview area at the top of the Project window.
• If the clip is in the Source view, Timeline window, or Project window, select it and
choose File
• If the clip is not in the project, choose File > Get Properties For > File. Locate and select
the clip you want to analyze, and then click Open.
2 When you are finished, close the Properties window.
You can also view clip properties in the Source view, Timeline window, or Project
window by right-clicking a clip and choosing Properties from the context menu.
> Get Properties For > Selection.
Using timecode for efficient capture
DV cameras and high-end video decks record timecode, which marks specific frames
precisely. Timecode is important whenever you want to capture exactly the same frames
that were identified or captured previously, as in the following tasks:
• You want to log clips before you capture them.
Using Help | Contents | Index Back 89
Page 88

Adobe Premiere Pro Help Capturing and Importing Source Clips
Using Help | Contents | Index Back 90
• You plan to capture clips using batch (automated) capture.
• You want to recapture clips because the original files became corrupted or were
deleted.
• You plan to export sequences to another system by using AAF.
• You’re using a system in which you edit quickly with low-resolution captures, and later
re-capture the clips at full resolution and quality for the final version.
• You plan to synchronize captured video with audio recorded separately.
Timecode is not the same as the simple time counter found in home analog cameras and
VCRs, which reset to zero if you switch tapes or turn the device off and on. True timecode
consistently identifies specific frames on the tape because the timecode is stored on the
tape. If footage lacks timecode, you can add it by copying the video to a DV camera or
deck, and then capturing the video from the DV device.
Recording continuous timecode as you shoot
For best results, a tape’s timecode should be continuous—the timecode shouldn’t restart
from zero in the middle of the tape. If you set a capture In point such as 00:00:01:09 but it
occurs on the tape two or three times due to timecode restarts, Adobe Premiere Pro can’t
be certain which In point is the one you intend to capture. For this reason, discontinuous
timecode limits flexibility when batch-capturing or recapturing clips. If valid timecode is
present on the tape at the frame just before where you begin recording, subsequent
recording uses that timecode. To ensure that you always shoot continuous timecode,
practice the following procedures while shooting:
• As you start a shot, record at least 5 seconds of extra video before shooting the action.
• Before you stop recording, record at least 5 seconds of extra video.
• Before you resume recording, cue the end of the tape up to at least 1 second before the
end of the extra video.
• As you resume recording, check the timecode to verify that the timecode hasn’t
restarted to 00:00:00:00 in the middle of the tape. If the timecode restarts, stop
recording, rewind until the camera is once again within the proper timecode, and then
continue recording.
Striping a tape with timecode
Equipment such as DV cameras are designed to create continuous timecode if you record
without shuttling back and forth (such as when reviewing shots). However, timecode may
reset to 00:00:00:00 if you accidentally roll the tape into a completely unused area before
you shoot another scene. You can ensure continuous timecode by recording timecode
onto the tape before you use it. This process is called
necessary if you follow recommended practices (see
you shoot” on page 90), but if you decide to stripe tapes, do the following:
• You must ensure that all camera settings (particularly the audio sample rate) are exactly
the same as the settings you use when you shoot.
• Ensure that the settings are never changed as long as you shoot on that tape.
• When you record on a striped tape, start recording several seconds into the tape to
ensure that you’re recording after the striping starts.
striping the tape. Striping is not
“Recording continuous timecode as
Using Help | Contents | Index Back 90
Page 89

Adobe Premiere Pro Help Capturing and Importing Source Clips
Using Help | Contents | Index Back 91
To stripe a tape with timecode:
1 Put a completely unused tape in the camera.
2 If you’re using a camera, attach the lens cap and disable audio input.
3 Begin recording. Let the camera or deck run until the entire tape is recorded.
Replacing DV timecode
If the timecode on your tape isn’t continuous, you can create a copy, or dub, of the tape.
The device making the copy records new timecode that is continuous, so you can then
capture video (and the new timecode) from the copy.
To replace the timecode on a tape:
1 Load the tape you have shot into a DV camcorder or deck, and make sure that it is fully
rewound.
2 Load a new tape into a second camcorder or deck, which you will use to record the
copy.
3 If the recording device includes an option to record video with the timecode from your
original tape, be sure that this option is disabled. See the operating instructions for the
device for information on this option.
4 Connect the two devices using an IEEE 1394 cable to create a full-quality copy.
5 Connect the recording device to a television monitor.
6 Set both devices to VTR mode.
7 Make sure that the recording device is set to record from the IEEE 1394 port.
8 Begin recording the new tape and then start your original tape playing. Let the
camcorders or decks run until the entire original tape has been copied.
Note: The Scene Detect feature in Adobe Premiere Pro recognizes the starting and
stopping points recorded with the timecode on the original DV tape used to shoot the
scenes. Copying a tape replaces the timecode, so you won’t be able to use Scene Detect
when you capture the tape in Adobe Premiere Pro.
Capturing timecode
The timecode of a source video is captured when you use device control (DV or analog).
Timecode capture with controllable analog devices depends on the precision of your tape
deck. If
your system or
Note: Timecode is visible in the tape counter only on equipment that can recognize
timecode, unless the timecode has been burned-in, or recorded over the picture in a copy
of the tape. Most analog home VCRs cannot read or write timecode.
your tape deck cannot read the timecode accurately, you may have to calibrate
manually assign the timecode to your movie by matching frames.
Using Help | Contents | Index Back 91
Page 90

Adobe Premiere Pro Help Capturing and Importing Source Clips
Using Help | Contents | Index Back 92
Manually setting timecode for a clip
On some analog copies of video footage, the timecode appears not on the video track, but
as a
window dub or window burn superimposed on each video frame. This window dub lets
you see the timecode on a deck that can’t read true timecode (see
efficient capture” on page 89). Window dub timecode is also called burned-in, or visual,
timecode. Because a videotape with burned-in timecode usually doesn’t include true
timecode stored on the tape, clips captured from that tape aren’t marked with timecode
on your computer. However, you can manually set the timecode for each captured clip.
Because this
after capturing a
To set timecode manually for a clip:
1 Select the clip in the Project window.
2 Choose File > Timecode, specify options as needed, and click OK.
requires referring to the original videotape, this is best done immediately
clip.
“Using timecode for
About digital and analog sources
You can import clips from any source—videotapes, motion-picture film, audio, still
images—as long as they exist as digital files stored on disk. Source material exists in two
main forms:
• Digital media is stored in a file format that a computer can read and process directly.
Many newer cameras and audio recorders can save images and sound in a digital
format. All digital video (DV) camcorders and decks record video and audio in digital
format. Digital media stored on tape must be transferred to disk before Adobe Premiere
Pro can use it in a project. Adobe Premiere Pro can capture digital video from tape and
save it to disk as clips that you can then add to your project.
• Analog media must be digitized, or converted to digital form, before a computer can
store and process it. Some examples of analog media are motion-picture film, conven
tional audio tape, and slides. Adobe Premiere Pro, in conjunction with a capture card,
can digitize analog videotape such as Hi-8 and save it to disk as
add to your project.
Although digital media equipment is common, a great amount of video and audio
continues to be recorded and stored using analog equipment. You can digitize analog
video or audio directly into Adobe Premiere Pro if you use digitizing hardware to connect
analog devices to your computer. Video-digitizing hardware is built into some personal
computers, but can also be added to a system by installing a compatible hardware capture
card. For a list of compatible cards, see the Adobe Premiere Pro Web site
(www.adobe.com/products/premierepro).
clips that you can then
-
Using Help | Contents | Index Back 92
Page 91

Adobe Premiere Pro Help Capturing and Importing Source Clips
Using Help | Contents | Index Back 93
Connecting a DV source
To capture DV video, your computer must be able to connect to a DV device using IEEE
1394 (FireWire/i.Link). For detailed instructions on connecting your device, see your device
documentation. Adobe Premiere Pro’s built-in DV support relies on DV support in the
operating system. To provide DV support through their operating systems, Microsoft
requires IEEE 1394 interfaces that are compliant with the OHCI specification. Many
computers include OHCI-compliant IEEE 1394 ports on the computer, and almost all
current IEEE 1394 cards are OHCI-compliant. IEEE 1394 interfaces that are not supported
by the operating system require their own presets, driver software, and plug-ins written
specifically for Adobe Premiere Pro. If your computer does not have a built-in IEEE 1394
interface, you can purchase a hardware capture card that provides the interface (see your
computer’s documentation).
The first step in capturing DV video is to connect the camcorder or deck to the IEEE 1394
port or card in your system. Plug an IEEE 1394 connector into the DV In/Out port on the
camcorder or deck and plug the other end into the IEEE 1394 port on the system’s panel or
on the card installed in the system.
Connecting to the IEEE 1394 (FireWire/i.Link) port on the computer
Some DV camcorders require a connection to their power adapter to activate the IEEE
1394 port. Other camcorders may go into sleep mode or demo mode if left in the camera
mode without tape activity for a period of time. To avoid these problems, connect your
camcorder to its power adapter when setting it up for capturing or dubbing video. If the
camcorder goes into demo mode with the power adapter connected, turn off this feature
using the camcorder’s menu system.
Using Help | Contents | Index Back 93
Page 92

Adobe Premiere Pro Help Capturing and Importing Source Clips
Using Help | Contents | Index Back 94
Connecting an analog video source
To capture analog video, first connect the camcorder or deck to the capture card installed
in your system. Depending on your equipment, you may have more than one format
available for transferring video and audio, including component video, composite video,
and S-video. Refer to the instructions included with your camcorder and capture card.
A
B
Analog video connections
A. S-video connection B. Composite video and left-right audio connections
Digitizing analog video as DV
If you’re adding analog video to a DV project, you can digitize the analog video as if it were
DV. This process adds DV timecode so that you can avoid compatibility problems and
batch-capture using device control in Adobe Premiere Pro. There are several ways to
convert analog video to DV:
• Use a DV camcorder with an analog video input, dub the analog tape to DV format tape,
and then capture from the DV copy.
• If your DV camera supports IEEE 1394 output directly from analog input (without
having to record the analog input on tape first), connect the analog video signal to the
analog input port on the DV device and then connect the IEEE 1394 connector to the
computer. Set the Input Select on the DV device to the analog input and enable the
conversion mode in the device’s menu. Depending on the device, this mode may be
called Analog to Digital Converter, Analog to Digital Conversion with Pass-Through, or
E-E mode. For more information, see the documentation for your camera.
• Use a standalone analog-to-digital converter, such as the Sony DVMC-DA1, to digitize
the analog video to DV format without using a camcorder.
Note: Some capture cards support both analog and DV capture.
Preparing for DV capture
Capturing DV video differs from capturing analog video in several ways. Because the DV
image is converted directly to digital format in the camcorder, it is ready to be stored on a
hard disk and doesn’t need to be digitized in the computer. Therefore, DV input doesn’t
need to be captured in the sense that analog video does; it merely needs to be transferred
to your computer. To transfer DV, you need the following:
• A capture card or computer with an OHCI-compliant interface.
• A DV codec (compressor/decompressor). Adobe Premiere Pro uses its own DV codec
and can import DV media without further conversion.
• A hard disk capable of sustaining the 3.6-MB-per-second data rate of digital video.
Using Help | Contents | Index Back 94
Page 93

Adobe Premiere Pro Help Capturing and Importing Source Clips
Using Help | Contents | Index Back 95
• A project that was created using a DV preset in the New Project dialog box where all
settings match the footage you’re about to capture. For best results, make sure that the
preset or project you choose matches the standard format (NTSC or PAL) and the audio
rate (32
• Sufficient disk space for the captured footage. The length of a captured clip may be
limited by the file-size limits of your operating system; see
kHz or 48 kHz) used when you shot your video footage.
“File-size limitations” on
page 102.
Note: If the video you are capturing was shot in 16:9 format using an anamorphic
widescreen add-on lens, be sure to choose a Widescreen (cinema) DV preset. You’ll also
need to set the pixel aspect ratio for each individual clip after importing. If you don’t,
Adobe Premiere Pro treats the video as if it were in 4:3 format, resulting in distortion of the
aspect ratio. See
“Capturing or importing various aspect ratios” on page 100.
To prepare for DV video capture:
1 Connect the DV device (camcorder or deck) to your computer using an IEEE 1394
connection. The connection point on your DV device may be marked DV IN/OUT, i.Link, or
IEEE 1394.
2 Turn the DV device on, and do one of the following:
• If it’s a camera, set it to the playback mode, which may be labeled VTR or VCR.
• If it’s a deck, make sure that its DV input is set properly.
Note: Don’t set a camera to any of the recording modes, which may be labeled Camera or
Movie.
3 Start Adobe Premiere Pro. When the Welcome to Adobe Premiere Pro dialog box
appears, do one of the following:
• Click New Project, select the desired DV preset from the Load Preset tab, and click OK.
• Select an existing project and click OK. If you choose an existing project, it must use a
DV preset that matches the video and audio settings of the footage you’re going to
capture.
4 Choose Edit > Preferences > Scratch Disks, and specify the locations for Captured Video
and Captured Audio. See
“Using scratch disks” on page 57.
To set up capture preview options:
1 With a project open, choose Project > Project Settings > Capture, and click DV Settings.
2 Specify options for During Preview and During Capture, and click OK:
• Select Preview Video on Desktop to display video from the capture device in the
Capture window. Deselect this option if you prefer to monitor the video outside Adobe
Premiere Pro, such as on a camera’s built-in monitor. Turning off this option and the
next one may improve capture performance.
• Select Preview Audio on Desktop to play audio from the capture device through the
computer’s speakers. Deselect this option if you prefer to monitor the audio outside
Adobe Premiere Pro, such as through a camera’s built-in speaker.
Using Help | Contents | Index Back 95
Page 94

Adobe Premiere Pro Help Capturing and Importing Source Clips
Using Help | Contents | Index Back 96
3 Click OK to close the Project Settings dialog box.
Note: If you’re using the Capture window and a “No Device Control” or “Capture Device
Offline” message appears at the top of the Capture window, set up Device Control. See
“Using device control” on page 67.
Avoiding DV capture problems
If you run into problem while capturing DV footage, refer to Adobe Premiere Pro DV
capture topics or the documentation for your camera, deck, or capture card, or check the
Adobe Web site (www.adobe.com) for technical support. The following are common
issues and solutions that may arise when capturing DV video:
• If your device (camera or deck) goes into sleep mode, close and then reopen the
Capture window; or close the Capture window, turn the device off and back on, and
then reopen the Capture window. You can disable sleep mode on many cameras by
connecting them to AC power and ejecting the tape.
• Don’t be concerned if video looks grainy in the Capture or Monitor window. Video is
captured and stored at full quality and always plays at full quality on an NTSC or PAL
monitor. On slower systems, Adobe Premiere Pro may lower the quality of the capture
preview in order to ensure that sufficient CPU resources are available for full-quality
capture. You can change the display quality setting for Monitor window playback in the
Monitor window menu.
• If the video image does not appear in the Capture window, verify your device control
and capture settings. To adjust device control settings from the Capture window, click
the Settings tab; then click Options in the Device Control section. In the Device Control
Options dialog box, make sure that the Check Status option is set to Online. If it is not
set to Online, make sure that the options are set correctly, that your device is on and set
correctly, and that your IEEE 1394 connections are secure. To ensure that Adobe
Premiere Pro can see the device, quit Adobe Premiere Pro, leaving the device on, and
then restart Adobe Premiere Pro. Then open the Capture window, click the Play
button
• If captured audio and video are not in sync, make sure that sections of tape weren’t
, and click within the capture preview area.
skipped (completely unrecorded) between shots. Blank tape areas lack timecode,
which may cause interruptions in the camera time mode. When you capture the blank
area, the camera doesn’t transmit valid frames, but time continues to be marked. To
ensure proper timecode recording, see
“Recording continuous timecode as you shoot”
on page 90.
Using Help | Contents | Index Back 96
Page 95

Adobe Premiere Pro Help Capturing and Importing Source Clips
Using Help | Contents | Index Back 97
Preparing for analog capture
When you use an analog capture card, some capture settings you see within Adobe
Premiere Pro are actually provided to Adobe Premiere Pro by the plug-in software that
came with the capture card. Due to the differences among brands of capture cards,
specific options and supported formats can vary. This complex relationship between
video-capture cards and Adobe Premiere Pro can make it difficult to identify which part of
the system is responsible for a particular option or problem. Adobe, as well as most
capture card manufacturers, provides troubleshooting documents online that can help
you determine whether an option or problem you are working on is related to the videocapture card and its software or Adobe Premiere Pro. Check the Adobe Premiere Pro Web
site (www.adobe.com/products/premierepro) and the capture card manufacturer’s Web
site for links to troubleshooting resources. Use these online resources as well as
techniques such as process of elimination to determine whether the problem is with the
capture card or Adobe Premiere Pro.
Most of the supported capture cards install a settings file (preset) that you can select in the
Adobe Premiere Pro New Project dialog box, under the Load Preset tab. This preset
automatically sets all capture settings for optimal support with your capture card. If your
capture card provides a preset, Adobe recommends that you select it for projects in which
you capture clips or import captured clips and that you do not change the capture
settings in the Settings dialog box.
To prepare for capturing analog video:
1 Specify the disk locations for captured video and audio files. See “Using scratch disks”
on page 57.
Note: The length of a captured clip may be limited by the file-size limits of your operating
system (see
2 Set up the video source. For an editing mode provided with a video-capture card, see
the documentation included with the video-capture card.
3 Start Adobe Premiere Pro. When the Welcome to Adobe Premiere Pro dialog box
appears, do one of the following:
• Click New Project, select the capture card’s preset (if available) from the Load Preset tab,
and click OK.
• Select an existing project that was set up with the capture card’s preset and click OK.
4 After the project opens, choose Project > Project Settings > General. Click Playback
Settings.
5 In the Capture window, carefully check the settings in the Settings panel. If you need to
change the settings, click Edit. The settings in this dialog box are provided by the card
manufacturer’s plug-in software, not by Adobe Premiere Pro, and can vary depending on
the analog capture card’s brand and model. See the documentation for the software driver
provided by the manufacturer of the capture card.
To help determine the effects of your compression settings on the data rate of the
captured video, use the Adobe Premiere Pro Data Rate graph (see “Analyzing clip
properties and data rate” on page 89).
“File-size limitations” on page 102).
Using Help | Contents | Index Back 97
Page 96

Adobe Premiere Pro Help Capturing and Importing Source Clips
Using Help | Contents | Index Back 98
Understanding offline and online editing
Most DV editing is performed online (using full-resolution source files). When working
with analog source material or high-definition digital material, you can
Premiere Pro for either online or offline editing depending on the level of quality you
require and the capabilities of your equipment. The settings you specify for analog
capture are dictated by whether you plan to edit the program offline or online.
Note: Offline and online editing workflows are not directly related to online and offline file
terminology as used in Adobe Premiere Pro (see
using offline clips is part of an offline workflow.
“Using offline files” on page 87). However,
About online editing
Online editing is the practice of editing (including the rough cut) the same clips that are
used to produce the final cut. In the past, online editing was practical only on expensive
workstations. Editors with high-end requirements who could not afford a suitable online
system had to rent time at a production facility that owned one. Online editing is now
practical for a wider range of productions, such as broadcast television, due to the combi
nation of more powerful personal-computer hardware, more powerful software (such as
Adobe Premiere Pro), and the rise of DV as a high-quality standard that personal
computers can easily handle.
use Adobe
-
For online editing, you capture clips once at the level of quality required for the final
version of the video program. This is the default method of working when you use Adobe
Premiere Pro to capture and edit video, particularly DV.
About offline editing
In offline editing, y ou edit video using low-quality clips and produce the final version using
high-quality clips on a system with specialized, high-end hardware. Offline editing was
developed to save money by editing in a less expensive facility, but is less necessary with
the emergence of the DV format because current computers can handle DV-compressed
footage with reasonable performance. However, offline editing can still save time and disk
space on a desktop computer by initially capturing low-resolution clips that preview
quickly; for the final cut, the clips are recaptured at the actual, final resolution.
Offline editing is also useful when the final output, such as high-definition television or
motion-picture film, requires data rates that still challenge the more affordable desktop
computers. For example, you can complete an offline edit with Adobe Premiere Pro and
then export your project to the industry-standard Advanced Authoring Format (AAF) for
transfer to an editing system with more powerful hardware. You can then perform the final
online edit with full-resolution clips on that system.
About aspect ratios
Aspect ratio specifies the ratio of width to height. Video frames have an aspect ratio (frame
aspect ratio), and so do the pixels that make up the frame (pixel aspect ratio). Some video
cameras can record various frame aspect ratios, and different video standards use various
pixel aspect ratios.
Using Help | Contents | Index Back 98
Page 97

Adobe Premiere Pro Help Capturing and Importing Source Clips
Using Help | Contents | Index Back 99
When imported clips are created using a different pixel or frame aspect ratio than your
project, distortions can result. Adobe Premiere Pro automatically attempts to detect and
compensate for the pixel aspect ratio of source clips. If a clip appears distorted in Adobe
Premiere Pro, you can use Adobe Premiere Pro to manually indicate its pixel aspect ratio.
It's important to reconcile pixel aspect ratios before reconciling frame aspect ratios,
because an incorrect frame aspect ratio is often caused by misinterpreting a source clip's
pixel aspect ratio.
About frame aspect ratio
Frame aspect ratio describes the ratio of width to height in the dimensions of an image. For
example, DV NTSC has a frame aspect ratio of 4:3 (or 4.0 width by 3.0 height). For
comparison, a typical widescreen frame has a frame aspect ratio of 16:9; many cameras
that have a widescreen mode can record using this aspect ratio. Many films have been
shot using even wider aspect ratios.
416
3
A 4:3 frame aspect ratio (left), and a wider 16:9 frame aspect ratio (right)
9
When you import clips shot in one frame aspect ratio into a project that uses another
frame aspect ratio, you must decide how to reconcile the different values. For example,
there are two common techniques for showing a widescreen movie with a 16:9 frame
aspect ratio on a standard television with a 4:3 frame aspect ratio. You can fit the entire
width of the 16:9 frame in a black 4:3 frame (called
letterboxing), which results in black
bands above and below the widescreen frame. Or you can fill the 4:3 frame vertically with
the entire height of the 16:9 frame, varying the horizontal position of the 16:9 frame
behind the narrower 4:3 frame so that important action is visible in the 4:3 frame (called
pan & scan). In Adobe Premiere Pro, you can implement either technique by using Motion
effect properties such as Position and Scale (see
“Using the Motion effect” on page 240).
About pixel aspect ratio
Pixel aspect ratio describes the ratio of width to height in a single pixel of a frame. Pixel
aspect ratios vary because different video systems make various assumptions about the
number of pixels required to fill a frame. For example, many computer video standards
define a 4:3 aspect ratio frame as 640 pixels wide by 480 pixels tall, which results in square
pixels. At the same time, video standards such as DV NTSC define a 4:3 aspect ratio frame
as 720 x 480 pixels, which results in narrower, rectangular pixels because there are more
pixels within the same frame width. The computer video pixels in this example have a pixel
aspect ratio of 1:1 (square) while the DV NTSC pixels have a pixel aspect ratio of 0.9
(nonsquare). DV pixels, which are always rectangular, are vertically oriented in systems
producing NTSC video and horizontally oriented in systems producing PAL video. Adobe
Premiere Pro displays a clip’s pixel aspect ratio next to the clip’s image thumbnail in the
Project window.
Using Help | Contents | Index Back 99
Page 98

Adobe Premiere Pro Help Capturing and Importing Source Clips
Using Help | Contents | Index Back 100
If you display rectangular pixels on a square-pixel monitor without alteration, images
appear distorted; for example, circles distort into ovals. However, when displayed on a
broadcast monitor, the images appear correctly proportioned because broadcast
monitors use rectangular pixels. Adobe Premiere Pro can display and output clips of
various pixel aspect ratios without distortion because it attempts to automatically
reconcile them with the pixel aspect ratio of your project. You may occasionally encounter
a distorted clip if Adobe Premiere Pro interprets pixel aspect ratio incorrectly; if this
happens, you can correct the distortion by manually specifying the source clip’s pixel
aspect ratio. See
AB C
Pixel and frame aspect ratios
A. Square pixels and 4:3 frame aspect ratio B. Nonsquare pixels and 4:3 frame aspect ratio
C. Nonsquare pixels displayed uncorrected on a square-pixel monitor
“Setting pixel aspect ratio” on page 101.
Capturing or importing various aspect ratios
Adobe Premiere Pro attempts to automatically compensate for pixel aspect ratios and
preserve the frame size of imported images. The following list describes how Adobe
Premiere Pro treats images you import:
• When you capture or import video with either the D1 resolution of 720 x 486 or the DV
resolution of 720 x 480, Adobe Premiere Pro automatically sets the pixel aspect ratio for
that file to D1/DV NTSC (0.9). When you import footage with the D1 or DV resolution of
720 x 576, Adobe Premiere Pro automatically sets the pixel aspect ratio for that file to
D1/DV PAL (1.067). However, it is always a good idea to make sure that all files are inter
preted correctly by looking in the Project window or the File > Interpret Footage dialog
box.
• Adobe Premiere Pro automatically assigns pixel aspect ratios to files using entries in the
file Interpretation Rules.txt, located in the Plug-ins folder inside the Adobe Premiere Pro
folder. If a specific type of image is consistently misinterpreted (distorted) when you
import it, you add or change the entries in this file using a text editor such as Notepad.
If you want to override the pixel aspect ratio interpretation for files already in a project,
use the File > Interpret Footage command (see
page 101).
• By default, Adobe Premiere Pro attempts to preserve the size of imported clips. If size
isn’t preserved upon import, the Scale Clips to Project Dimensions When Adding to
Sequence option may be turned on in the Project > Project Settings > General dialog
box (this option is off by default).
“Setting pixel aspect ratio” on
-
If you want to change the size of an imported clip in Adobe Premiere Pro and its pixel
aspect ratio is correct, select the clip and change the Scale property of the Motion effect.
The Motion effect is available when you view the Effect Controls window with the clip
selected in the Timeline window.
Using Help | Contents | Index Back 100
Page 99

Adobe Premiere Pro Help Capturing and Importing Source Clips
Using Help | Contents | Index Back 101
Setting pixel aspect ratio
The preset you choose when you start a project sets the pixel aspect ratio for the project.
You can’t change the aspect ratio after it is initially set, but you can choose Project >
Project Settings > General to inspect the project’s aspect ratio. In addition, you can use the
File > Interpret Footage command to inspect and change the pixel aspect ratio that Adobe
Premiere Pro assumes for individual source clips in the Project window. By ensuring that
all files are interpreted correctly, you can combine footage with different ratios in the same
project and generate output that doesn’t distort the source images.
To set the pixel aspect ratio for imported files:
1 Select the file in the Project window.
2 Choose File > Interpret Footage, specify options in the Pixel Aspect Ratio section, and
click OK. For information about options in the Conform To pop-up menu, see
pixel aspect ratios for imported files” on page 101.
“Common
Common pixel aspect ratios for imported files
It is important to set the pixel aspect ratio for a file at its original ratio, not the ratio of the
final output. You can set pixel aspect ratios for clips and projects with these approximate
values:
Square Pixels Uses a 1.0 pixel aspect ratio. Use this setting if your source clip has a 640 x
480 or 648 x 486 frame size, or if the file was exported from an application that doesn’t
support nonsquare pixels.
D1/DV NTSC Uses a 0.9 pixel aspect ratio. Use this setting if your source clip has a 720 x
480 or 720 x 486 frame size and you want it to maintain a 4:3 frame aspect ratio. This
setting can also be appropriate for clips that were exported from an application that works
with nonsquare pixels, such as a 3D animation application.
D1/DV NTSC Widescreen Uses a 1.2 pixel aspect ratio. Use this setting if your source clip
has a 720 x 480 or 720 x 486 frame size and you want it to maintain a 16:9 frame aspect
ratio.
D1/DV PAL Uses a 1.0666 pixel aspect ratio. Use this setting if your source clip has a 720 x
576 frame size and you want it to maintain a 4:3 frame aspect ratio.
D1/DV PAL Widescreen Uses a 1.4222 pixel aspect ratio. Use this setting if your source
clip has a 720 x 576 frame size and you want it to maintain a 16:9 frame aspect ratio.
Anamorphic 2:1 Uses a 2.0 pixel aspect ratio. Use this setting if your source clip was
anamorphically transferred from a film frame with a 2:1 aspect ratio.
D4/D16 Standard Uses a 0.9481481 pixel aspect ratio. Use this setting if your source clip
has a 1440 x 1024 or 2880 x 2048 frame size and you want it to maintain a 4:3 frame aspect
ratio.
D4/D16 Anamorphic 8:3 Uses a 1.8962962 pixel aspect ratio. Use this setting if your
source clip has a 1440 x 1024 or 2880 x 2048 frame size and you want it to maintain an 8:3
frame aspect ratio.
Using Help | Contents | Index Back 101
Page 100

Adobe Premiere Pro Help Capturing and Importing Source Clips
Using Help | Contents | Index Back 102
Using square-pixel footage for output to DV
You can use square-pixel footage in a DV project and generate output that does not
appear distorted. Adobe Premiere Pro either upsamples (increases) the resolution or
downsamples (decreases) the resolution of a file that does not match the project frame
size. Because downsampling results in a higher-quality image, it is best to create files that
are larger than the project’s frame size so that Adobe Premiere Pro does not have to
upsample and enlarge the file.
To use square-pixel files in a D1 or DV project:
1 Prepare footage using one of the methods following this procedure.
2 Capture or import the file into Adobe Premiere Pro.
Prepare square-pixel files for us in a D1 or DV project using one of the following methods.
• If your final output is DV (NTSC), create and save it at a 720 x 540 frame size to prevent
upsampling, or 640 x 480 to prevent field distortion on a field-rendered file (such as a
3D animation).
• If your final output is DV (PAL), create and save it at a 768 x 576 frame size to prevent
upsampling and field distortion on a field-rendered file (such as a 3D animation).
• If your final output is D1 (NTSC), create and save it at a 720 x 540 frame size.
• If your square-pixel file was created and saved at the frame size used by your project
(such as 720 x 480), but not at the pixel aspect ratio of the project, you’ll want to
redesign your image using a different frame size (such as 720 x 540). This is necessary
when the application you use to prepare the file doesn’t support nonsquare pixels.
File-size limitations
The Adobe Premiere Pro Timeline window can contain up to 24 hours of video; however,
the actual file-size limitation is not determined by Adobe Premiere Pro but rather by your
capture card, operating system, and hard disk. Check your capture card and hard disk
documentation for information on support of large files.
Hard disk formatting greatly affects the ability to handle large source clips. Files on a hard
disk formatted using FAT32 are limited to 4 GB each, or about 18 minutes of DV footage.
Files on a hard disk formatted as NTFS are not limited by the file system, although files will
still be subject to limitations that may be imposed by other components of your videoediting system.
Using Help | Contents | Index Back 102
 Loading...