

Page 1

Chapter 1:
User Guide
Copyright
Page 2

© 2005 Adobe Systems Incorporated. All rights reserved.
®
Premiere® Pro 2.0 User Guide for Windows
Adobe
®
If this guide is distributed with software that includes an end user agreement, this guide, as well as the software described in it, is furnished under license and may be used or
copied only in accordance with the terms of such license. Except as permitted by any such license, no part of this guide may be reproduced, stored in a retrieval system, or transmitted, in any form or by any means, electronic, mechanical, recording, or other wise, without the prior written permission of Adobe Systems Incorporated.Pleasenotethatthe
content in this guide is protected under copyright law even if it is not distributed with software that includes an end user license agreement.
Thecontentofthisguideisfurnishedforinformationaluseonly,issubjecttochangewithoutnotice,andshouldnotbeconstruedasacommitmentbyAdobe Systems Incorporated. Adobe Systems Incorporated assumes no responsibility or liability for any errors or inaccuracies that may appear in the informational content contained in this guide.
Please remember that existing artwork or images that you may want to include in your project may be protected under copyright law. The unauthorized incorporation of such
material into your new work could be a violation of the rights of the copyright owner. Please be sure to obtain any permission required from the copyright owner.
Any references to company names in sample templates are for demonstration purposes only and are not intended to refer to any actual organization.
Adobe, the Adobe logo, Acrobat, Adobe Audition, Adobe Encore, Adobe Premiere, After Effects, Illustrator, InDesign, Photoshop, PostScript, and Version Cue are either registered trademarks or trademarks of Adobe Systems Incorporated in the United States and/or other countries.
Dolby is a trademark of Dolby Laboratories. Microsoft, OpenType, Windows, and Windows XP are either registered trademarks or trademarks of Microsoft Corporation in the
United States and/or other countries. Macromedia and Flash are trademarks of Macromedia Inc. All other trademarks are the property of their respective owners.
MPEG Layer 3 audio compression technology is licensed by Fraunhofer IIS and Thomson.
®
This Program was written with MacApp
: © 1985-1988 Apple Computer, Inc. Apple Computer, Inc. makes no warranties whatsoever, either express or implied, regarding this
Program, including warranties with respect to its merchantability or its fitness for any particular purpose. The MacApp software is proprietary to Apple Computer, Inc. and is
licensed to Adobe for distribution only for use in combination with Adobe Premiere Pro.
Proximity notices: © 1984, 1988, 1990 William Collins Sons & Co. Ltd. © 1988, 1990, 1997 all rights reserved, Proximity Technology, Inc.; © 1992 Hachette © 1992 all rights
reserved, Proximity Technology Inc.; © 1984 Editions Fernand Nathan © 1989 all rights reserved, Proximity Technology, Inc.; © 1991 Dr. Llui de Yzaguirre i Maura © 1990 all
rights reserved, Proximity Technology, Inc.; © 1989, 1990 IDE a.s. © 1989, 1990 all rightsreserved, Proximity Technology, Inc.; © 1995, 1997 Van Dale Lexicografie bv © 1996all
rights reserved, Proximity Technology, Inc.; © 1997 Bertelsmann Lexicon Verlang © 1997, 1999 all rights reserved, Proximity Technology, Inc.; © 1994, 1997, 2003 Franklin
Electronic Publishers© 1994, 2003 all rightsreserved, ProximityTechnology,Inc.; ©1990/1994 Merriam-Webster Inc./Franklin Electronic PublishersInc. ©1994, 1997 all rights
reserved, Proximity Technology, Inc.; © 1986, 1990/1997 William Collins Sons & Co. Ltd./Bertelsmann Lexicon Verlang © 1999 all rights reserved, Proximity Technology, Inc.;
© 1999 Oxford University Press © 2000 all rights reserved, Proximity Technology Inc.; © 1990/1990 Merriam-Webster Inc./William Collins Sons & Co. Ltd. © 1990, 1997 all
rights reserved, Proximity Technology, Inc.; © 1983 S. Fischer Verlag © 1997 all rights reserved, Proximity Technology, Inc.; © 1989 Zanichelli © 1989 all rights reserved,
Proximity Technology, Inc.; © 1997 Morphologic © 1997 all rights reserved, Proximity Technology, Inc.; © 1993-1995 Russicon Company Ltd. © 1995 all rights reserved,
Proximity Technology, Inc.; © 1990 Espassa-Calpe © 1990 all rights reserved, Proximity Technology, Inc.; © 1989 C.A. Stromberg AB © 1989 all rights reserved, Proximity
Technology, Inc.; © 1984 Merriam-Webster Inc. © 1984 all rights reserved, Proximity Technology, Inc.; © 1991 Text & Satz Datentechnik © 1991 all rights reserved, Proximity
Tech no log y, Inc.
Notice toU.S. Governmentend users:The Software and Documentationare “Commercial Items,” as thatterm is defined at 48C.F.R. §2.101,consisting of“C ommer cial C omputer
Software” and “Commercial Computer Software Documentation,” as such terms are used in 48 C.F.R. §12.212 or 48 C.F.R. §227.7202, as applicable. Consistent with 48 C.F.R.
§12.212 or 48 C.F.R. §§227.7202-1 through 227.7202-4, as applicable, the Commercial Computer Software and Commercial Computer Software Documentation are being
licensed to U.S. Government end users (a) only as Commercial Items and (b) with only those rights as are granted to all other end users pursuant to the terms and conditions
herein. Unpublished-rights reserved under the copyright laws of the United States. Adobe agrees to comply with all applicable equal opportunity laws including, if appropriate,
the provisions of Executive Order 11246, as amended, Section 402 of the Vietnam Era Veterans Readjustment Assistance Act of 1974 (38 USC 4212), and Section 503 of the
Rehabilitation Act of 1973, as amended, and the regulations at 41 CFR Parts 60-1 through 60-60, 60-250, and 60-741. The affirmative action clause and regulations contained in
the preceding sentence shall be incorporated by reference.
Adobe Systems Incorporated, 345 Park Avenue, San Jose, California 95110, USA.
Page 3

Contents
Chapter 1: Getting started with Adobe Premiere Pro 2.0
Installation and registration . . . . . . . . . . . . . . . . . . . . . . . . . . . . . . . . . . . . . . . . . . . . . . . . . . . . . . . . . . . . . . . 1
Adobe Help Center . . . . . . . . . . . . . . . . . . . . . . . . . . . . . . . . . . . . . . . . . . . . . . . . . . . . . . . . . . . . . . . . . . . . . . . 2
Using Help . . . . . . . . . . . . . . . . . . . . . . . . . . . . . . . . . . . . . . . . . . . . . . . . . . . . . . . . . . . . . . . . . . . . . . . . . . . . . . . . 3
Tips, training, and other resources . . . . . . . . . . . . . . . . . . . . . . . . . . . . . . . . . . . . . . . . . . . . . . . . . . . . . . . . . 5
New features . . . . . . . . . . . . . . . . . . . . . . . . . . . . . . . . . . . . . . . . . . . . . . . . . . . . . . . . . . . . . . . . . . . . . . . . . . . . . 8
Chapter 2: Workflow and workspace
Workflow and workspace basics . . . . . . . . . . . . . . . . . . . . . . . . . . . . . . . . . . . . . . . . . . . . . . . . . . . . . . . . . . 10
Customizing the workspace . . . . . . . . . . . . . . . . . . . . . . . . . . . . . . . . . . . . . . . . . . . . . . . . . . . . . . . . . . . . . . 18
Predefined workspaces . . . . . . . . . . . . . . . . . . . . . . . . . . . . . . . . . . . . . . . . . . . . . . . . . . . . . . . . . . . . . . . . . . 21
Chapter 3: Projects
Project basics . . . . . . . . . . . . . . . . . . . . . . . . . . . . . . . . . . . . . . . . . . . . . . . . . . . . . . . . . . . . . . . . . . . . . . . . . . . . 23
Aspect ratio . . . . . . . . . . . . . . . . . . . . . . . . . . . . . . . . . . . . . . . . . . . . . . . . . . . . . . . . . . . . . . . . . . . . . . . . . . . . . . 29
24P projects . . . . . . . . . . . . . . . . . . . . . . . . . . . . . . . . . . . . . . . . . . . . . . . . . . . . . . . . . . . . . . . . . . . . . . . . . . . . . 34
Improving performance . . . . . . . . . . . . . . . . . . . . . . . . . . . . . . . . . . . . . . . . . . . . . . . . . . . . . . . . . . . . . . . . . . 36
Correcting mistakes . . . . . . . . . . . . . . . . . . . . . . . . . . . . . . . . . . . . . . . . . . . . . . . . . . . . . . . . . . . . . . . . . . . . . . 38
iii
Chapter 4: Adobe Bridge
The basics of Bridge . . . . . . . . . . . . . . . . . . . . . . . . . . . . . . . . . . . . . . . . . . . . . . . . . . . . . . . . . . . . . . . . . . . . . . 40
Files and folders in Bridge . . . . . . . . . . . . . . . . . . . . . . . . . . . . . . . . . . . . . . . . . . . . . . . . . . . . . . . . . . . . . . . . 45
Running automated tasks with Bridge . . . . . . . . . . . . . . . . . . . . . . . . . . . . . . . . . . . . . . . . . . . . . . . . . . . . 50
Metadata in Bridge . . . . . . . . . . . . . . . . . . . . . . . . . . . . . . . . . . . . . . . . . . . . . . . . . . . . . . . . . . . . . . . . . . . . . . . 51
Adobe Stock Photos . . . . . . . . . . . . . . . . . . . . . . . . . . . . . . . . . . . . . . . . . . . . . . . . . . . . . . . . . . . . . . . . . . . . . 56
Comp images . . . . . . . . . . . . . . . . . . . . . . . . . . . . . . . . . . . . . . . . . . . . . . . . . . . . . . . . . . . . . . . . . . . . . . . . . . . . 59
Buying stock photos . . . . . . . . . . . . . . . . . . . . . . . . . . . . . . . . . . . . . . . . . . . . . . . . . . . . . . . . . . . . . . . . . . . . . 59
Stock Photos Accounts . . . . . . . . . . . . . . . . . . . . . . . . . . . . . . . . . . . . . . . . . . . . . . . . . . . . . . . . . . . . . . . . . . . 61
Chapter 5: Capturing, digitizing, and importing
Collecting assets . . . . . . . . . . . . . . . . . . . . . . . . . . . . . . . . . . . . . . . . . . . . . . . . . . . . . . . . . . . . . . . . . . . . . . . . . 65
Device control . . . . . . . . . . . . . . . . . . . . . . . . . . . . . . . . . . . . . . . . . . . . . . . . . . . . . . . . . . . . . . . . . . . . . . . . . . . 68
Capturing and digitizing . . . . . . . . . . . . . . . . . . . . . . . . . . . . . . . . . . . . . . . . . . . . . . . . . . . . . . . . . . . . . . . . . 71
Batch capturing . . . . . . . . . . . . . . . . . . . . . . . . . . . . . . . . . . . . . . . . . . . . . . . . . . . . . . . . . . . . . . . . . . . . . . . . . . 77
Timecode . . . . . . . . . . . . . . . . . . . . . . . . . . . . . . . . . . . . . . . . . . . . . . . . . . . . . . . . . . . . . . . . . . . . . . . . . . . . . . . . 83
Online and offline editing . . . . . . . . . . . . . . . . . . . . . . . . . . . . . . . . . . . . . . . . . . . . . . . . . . . . . . . . . . . . . . . . 86
Importing files . . . . . . . . . . . . . . . . . . . . . . . . . . . . . . . . . . . . . . . . . . . . . . . . . . . . . . . . . . . . . . . . . . . . . . . . . . . 86
Chapter 6: Managing and viewing assets
Customizing the Project panel . . . . . . . . . . . . . . . . . . . . . . . . . . . . . . . . . . . . . . . . . . . . . . . . . . . . . . . . . . . . 92
Organizing assets . . . . . . . . . . . . . . . . . . . . . . . . . . . . . . . . . . . . . . . . . . . . . . . . . . . . . . . . . . . . . . . . . . . . . . . . 94
Working with assets . . . . . . . . . . . . . . . . . . . . . . . . . . . . . . . . . . . . . . . . . . . . . . . . . . . . . . . . . . . . . . . . . . . . . . 96
Source and Program Monitors . . . . . . . . . . . . . . . . . . . . . . . . . . . . . . . . . . . . . . . . . . . . . . . . . . . . . . . . . . . . 98
Page 4

Playing assets . . . . . . . . . . . . . . . . . . . . . . . . . . . . . . . . . . . . . . . . . . . . . . . . . . . . . . . . . . . . . . . . . . . . . . . . . . . 102
Reference Monitor . . . . . . . . . . . . . . . . . . . . . . . . . . . . . . . . . . . . . . . . . . . . . . . . . . . . . . . . . . . . . . . . . . . . . . 104
Chapter 7: Editing a sequence
Editing overview . . . . . . . . . . . . . . . . . . . . . . . . . . . . . . . . . . . . . . . . . . . . . . . . . . . . . . . . . . . . . . . . . . . . . . . .106
Working in the Timeline panel . . . . . . . . . . . . . . . . . . . . . . . . . . . . . . . . . . . . . . . . . . . . . . . . . . . . . . . . . . . 107
Working with tracks . . . . . . . . . . . . . . . . . . . . . . . . . . . . . . . . . . . . . . . . . . . . . . . . . . . . . . . . . . . . . . . . . . . . . 111
Trimming clips in the Source Monitor . . . . . . . . . . . . . . . . . . . . . . . . . . . . . . . . . . . . . . . . . . . . . . . . . . . . 113
Assembling a sequence . . . . . . . . . . . . . . . . . . . . . . . . . . . . . . . . . . . . . . . . . . . . . . . . . . . . . . . . . . . . . . . . . 115
Trimming clips in a sequence . . . . . . . . . . . . . . . . . . . . . . . . . . . . . . . . . . . . . . . . . . . . . . . . . . . . . . . . . . . . 122
Changing clip attributes . . . . . . . . . . . . . . . . . . . . . . . . . . . . . . . . . . . . . . . . . . . . . . . . . . . . . . . . . . . . . . . . 127
Working with clips in a sequence . . . . . . . . . . . . . . . . . . . . . . . . . . . . . . . . . . . . . . . . . . . . . . . . . . . . . . . . 131
Rearranging clips in a sequence . . . . . . . . . . . . . . . . . . . . . . . . . . . . . . . . . . . . . . . . . . . . . . . . . . . . . . . . . 134
Previewing a sequence . . . . . . . . . . . . . . . . . . . . . . . . . . . . . . . . . . . . . . . . . . . . . . . . . . . . . . . . . . . . . . . . . . 136
Chapter 8: Editing: Beyond the basics
Using markers . . . . . . . . . . . . . . . . . . . . . . . . . . . . . . . . . . . . . . . . . . . . . . . . . . . . . . . . . . . . . . . . . . . . . . . . . .140
Editing audio in the Timeline panel . . . . . . . . . . . . . . . . . . . . . . . . . . . . . . . . . . . . . . . . . . . . . . . . . . . . . . 143
Creating special clips . . . . . . . . . . . . . . . . . . . . . . . . . . . . . . . . . . . . . . . . . . . . . . . . . . . . . . . . . . . . . . . . . . . . 146
Multiple sequences . . . . . . . . . . . . . . . . . . . . . . . . . . . . . . . . . . . . . . . . . . . . . . . . . . . . . . . . . . . . . . . . . . . . . 147
Subclips . . . . . . . . . . . . . . . . . . . . . . . . . . . . . . . . . . . . . . . . . . . . . . . . . . . . . . . . . . . . . . . . . . . . . . . . . . . . . . . . 149
Editing a multi-camera sequence . . . . . . . . . . . . . . . . . . . . . . . . . . . . . . . . . . . . . . . . . . . . . . . . . . . . . . . . 150
Working in other applications . . . . . . . . . . . . . . . . . . . . . . . . . . . . . . . . . . . . . . . . . . . . . . . . . . . . . . . . . . . 155
To copy and paste between Adobe After Effects and Adobe Premiere Pro . . . . . . . . . . . . . . . . . 156
Adobe Dynamic Link . . . . . . . . . . . . . . . . . . . . . . . . . . . . . . . . . . . . . . . . . . . . . . . . . . . . . . . . . . . . . . . . . . . . 158
iv
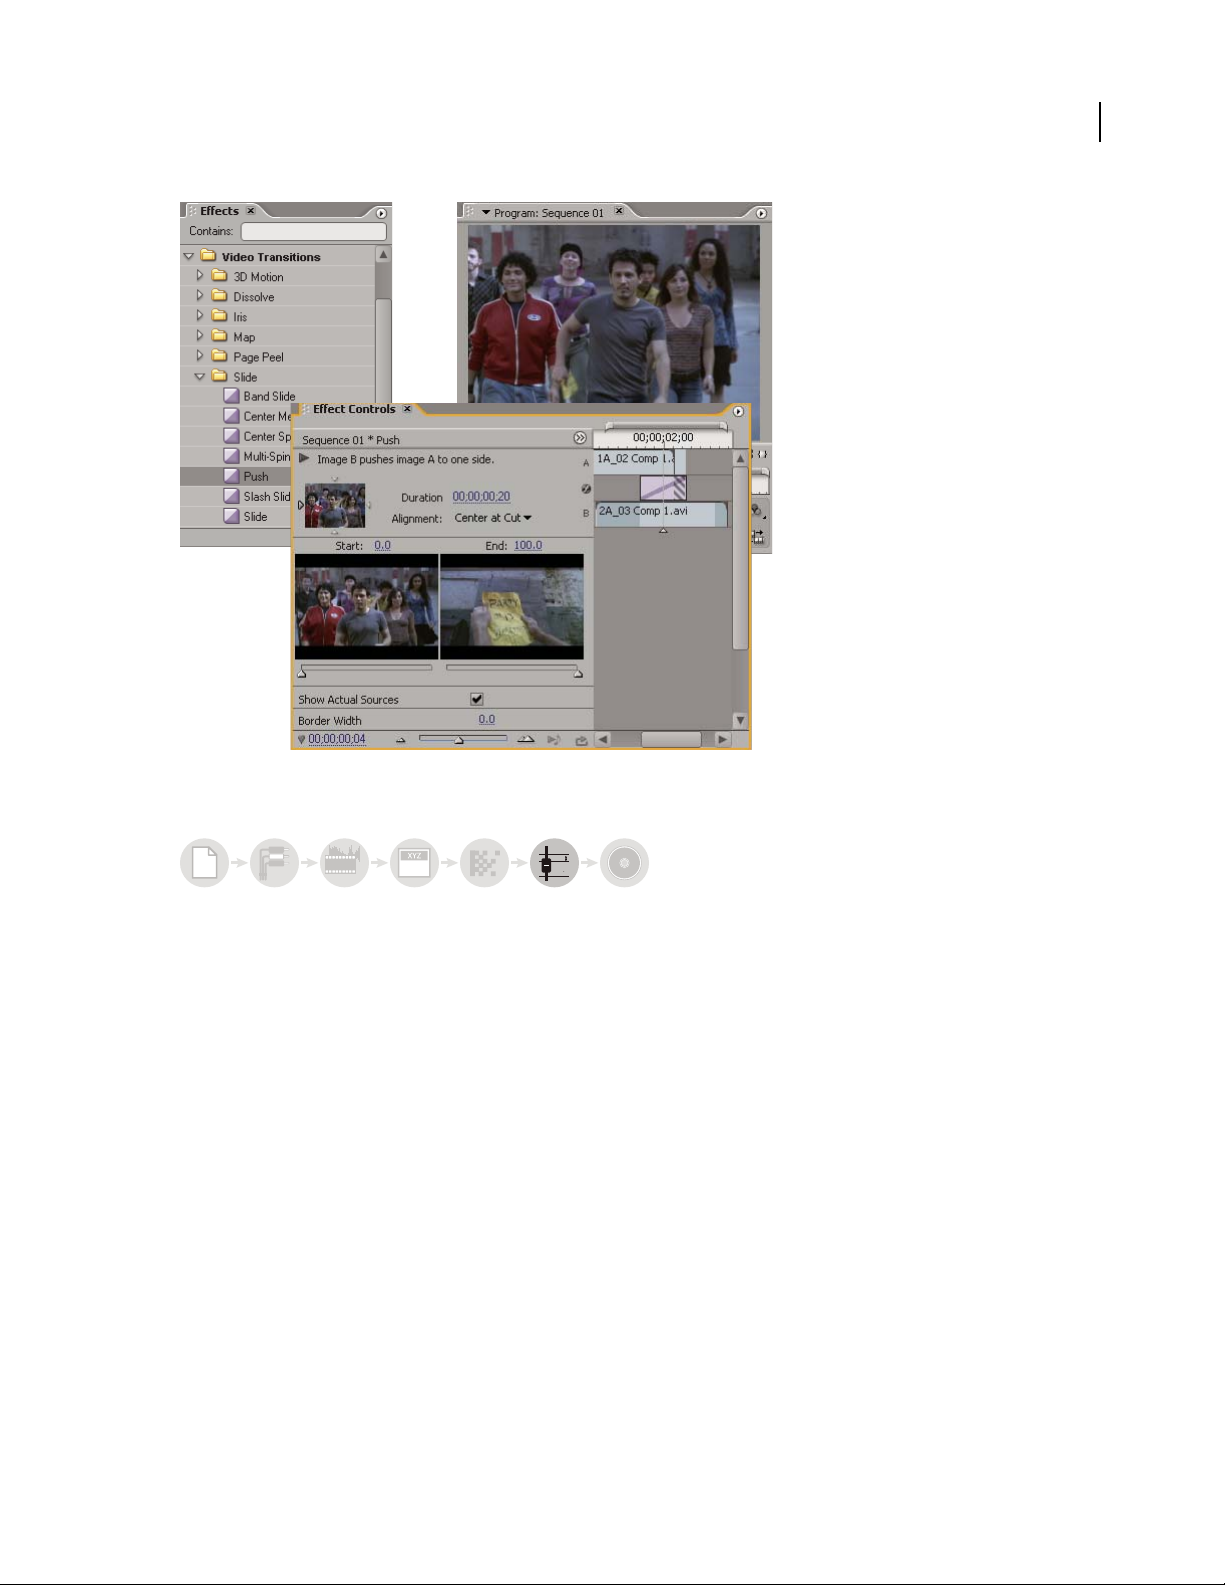
Chapter 9: Transitions
Transition overview . . . . . . . . . . . . . . . . . . . . . . . . . . . . . . . . . . . . . . . . . . . . . . . . . . . . . . . . . . . . . . . . . . . . .163
Adding transitions . . . . . . . . . . . . . . . . . . . . . . . . . . . . . . . . . . . . . . . . . . . . . . . . . . . . . . . . . . . . . . . . . . . . . . 165
Fine-tuning transitions . . . . . . . . . . . . . . . . . . . . . . . . . . . . . . . . . . . . . . . . . . . . . . . . . . . . . . . . . . . . . . . . . . 167
Customizable transitions . . . . . . . . . . . . . . . . . . . . . . . . . . . . . . . . . . . . . . . . . . . . . . . . . . . . . . . . . . . . . . . . 171
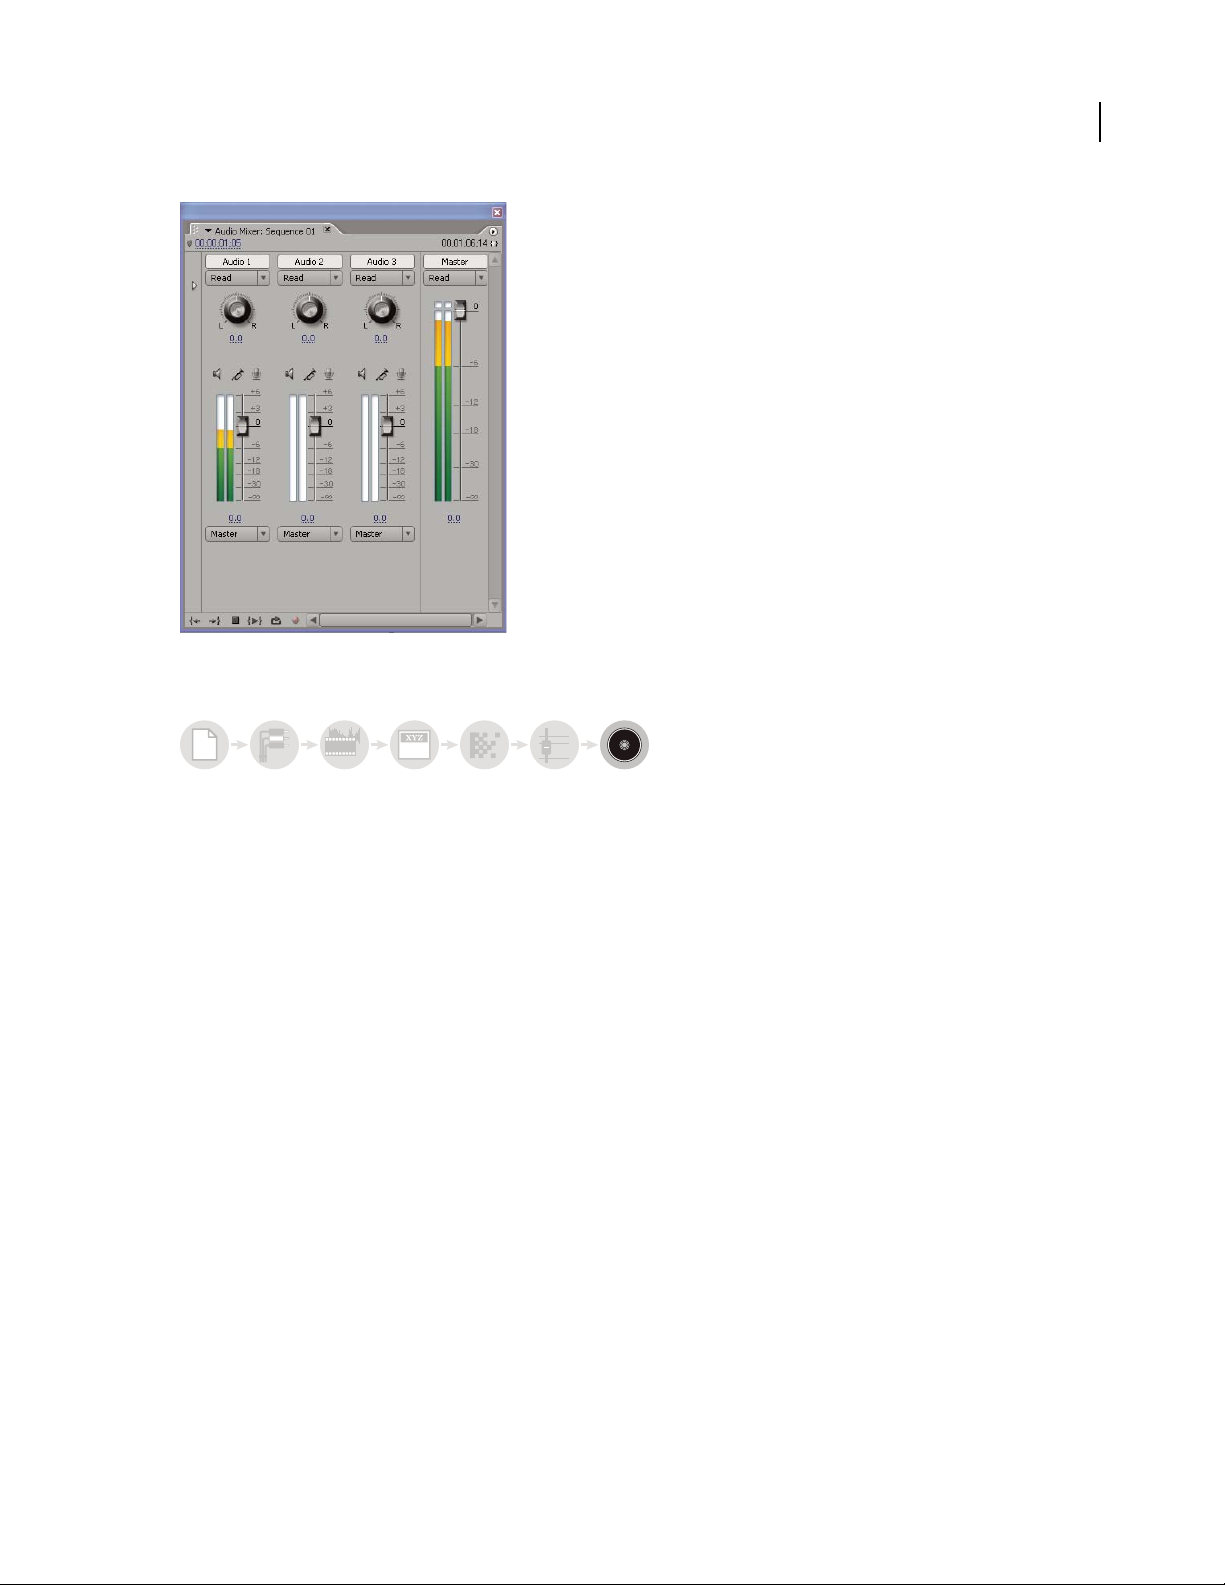
Chapter 10: Audio
Working with audio . . . . . . . . . . . . . . . . . . . . . . . . . . . . . . . . . . . . . . . . . . . . . . . . . . . . . . . . . . . . . . . . . . . . . 173
Working with clips, channels, and tracks . . . . . . . . . . . . . . . . . . . . . . . . . . . . . . . . . . . . . . . . . . . . . . . . . 179
Recording audio . . . . . . . . . . . . . . . . . . . . . . . . . . . . . . . . . . . . . . . . . . . . . . . . . . . . . . . . . . . . . . . . . . . . . . . . 184
Adjusting volume levels . . . . . . . . . . . . . . . . . . . . . . . . . . . . . . . . . . . . . . . . . . . . . . . . . . . . . . . . . . . . . . . . . 186
Audio transitions . . . . . . . . . . . . . . . . . . . . . . . . . . . . . . . . . . . . . . . . . . . . . . . . . . . . . . . . . . . . . . . . . . . . . . . . 189
Panning and balancing . . . . . . . . . . . . . . . . . . . . . . . . . . . . . . . . . . . . . . . . . . . . . . . . . . . . . . . . . . . . . . . . . . 190
Advanced mixing . . . . . . . . . . . . . . . . . . . . . . . . . . . . . . . . . . . . . . . . . . . . . . . . . . . . . . . . . . . . . . . . . . . . . . . 192
Applying effects to audio . . . . . . . . . . . . . . . . . . . . . . . . . . . . . . . . . . . . . . . . . . . . . . . . . . . . . . . . . . . . . . . 196
Automating audio changes . . . . . . . . . . . . . . . . . . . . . . . . . . . . . . . . . . . . . . . . . . . . . . . . . . . . . . . . . . . . . 199
Editing audio in Adobe Audition . . . . . . . . . . . . . . . . . . . . . . . . . . . . . . . . . . . . . . . . . . . . . . . . . . . . . . . . 201
Chapter 11: Using the Titler
Creating titles . . . . . . . . . . . . . . . . . . . . . . . . . . . . . . . . . . . . . . . . . . . . . . . . . . . . . . . . . . . . . . . . . . . . . . . . . . . 203
Using title templates . . . . . . . . . . . . . . . . . . . . . . . . . . . . . . . . . . . . . . . . . . . . . . . . . . . . . . . . . . . . . . . . . . . . 205
Page 5

Designing titles for television . . . . . . . . . . . . . . . . . . . . . . . . . . . . . . . . . . . . . . . . . . . . . . . . . . . . . . . . . . . . 206
Adding text to titles . . . . . . . . . . . . . . . . . . . . . . . . . . . . . . . . . . . . . . . . . . . . . . . . . . . . . . . . . . . . . . . . . . . . . 207
Formatting text . . . . . . . . . . . . . . . . . . . . . . . . . . . . . . . . . . . . . . . . . . . . . . . . . . . . . . . . . . . . . . . . . . . . . . . . . 209
Working with paragraph text . . . . . . . . . . . . . . . . . . . . . . . . . . . . . . . . . . . . . . . . . . . . . . . . . . . . . . . . . . . .211
Adding shapes and images . . . . . . . . . . . . . . . . . . . . . . . . . . . . . . . . . . . . . . . . . . . . . . . . . . . . . . . . . . . . . . 213
Working with objects in titles . . . . . . . . . . . . . . . . . . . . . . . . . . . . . . . . . . . . . . . . . . . . . . . . . . . . . . . . . . . . 218
Adding color, fills, texture, strokes, and shadows . . . . . . . . . . . . . . . . . . . . . . . . . . . . . . . . . . . . . . . . . 221
Working with styles . . . . . . . . . . . . . . . . . . . . . . . . . . . . . . . . . . . . . . . . . . . . . . . . . . . . . . . . . . . . . . . . . . . . . 225
Rolling and crawling titles . . . . . . . . . . . . . . . . . . . . . . . . . . . . . . . . . . . . . . . . . . . . . . . . . . . . . . . . . . . . . . . 227
Chapter 12: Animation
Animating effects . . . . . . . . . . . . . . . . . . . . . . . . . . . . . . . . . . . . . . . . . . . . . . . . . . . . . . . . . . . . . . . . . . . . . . . 230
Activating and selecting keyframes . . . . . . . . . . . . . . . . . . . . . . . . . . . . . . . . . . . . . . . . . . . . . . . . . . . . . .234
Adding and setting keyframes . . . . . . . . . . . . . . . . . . . . . . . . . . . . . . . . . . . . . . . . . . . . . . . . . . . . . . . . . . . 236
Moving and copying keyframes . . . . . . . . . . . . . . . . . . . . . . . . . . . . . . . . . . . . . . . . . . . . . . . . . . . . . . . . . 240
Controlling effect changes using keyframe interpolation . . . . . . . . . . . . . . . . . . . . . . . . . . . . . . . . . 242
Motion effect . . . . . . . . . . . . . . . . . . . . . . . . . . . . . . . . . . . . . . . . . . . . . . . . . . . . . . . . . . . . . . . . . . . . . . . . . . . 245
Chapter 13: Applying Effects
Working with effects . . . . . . . . . . . . . . . . . . . . . . . . . . . . . . . . . . . . . . . . . . . . . . . . . . . . . . . . . . . . . . . . . . . . 250
Applying, removing, and organizing effects . . . . . . . . . . . . . . . . . . . . . . . . . . . . . . . . . . . . . . . . . . . . . . 252
Adjusting effects . . . . . . . . . . . . . . . . . . . . . . . . . . . . . . . . . . . . . . . . . . . . . . . . . . . . . . . . . . . . . . . . . . . . . . . . 255
Customizing effect presets . . . . . . . . . . . . . . . . . . . . . . . . . . . . . . . . . . . . . . . . . . . . . . . . . . . . . . . . . . . . . . 258
Color and luminance . . . . . . . . . . . . . . . . . . . . . . . . . . . . . . . . . . . . . . . . . . . . . . . . . . . . . . . . . . . . . . . . . . . .260
Special color and luminance adjustments . . . . . . . . . . . . . . . . . . . . . . . . . . . . . . . . . . . . . . . . . . . . . . . . 273
Vectorscope and waveform monitors . . . . . . . . . . . . . . . . . . . . . . . . . . . . . . . . . . . . . . . . . . . . . . . . . . . . 279
v
Chapter 14: Effects: Reference
Gallery of effects . . . . . . . . . . . . . . . . . . . . . . . . . . . . . . . . . . . . . . . . . . . . . . . . . . . . . . . . . . . . . . . . . . . . . . . . 283
Adjust effects . . . . . . . . . . . . . . . . . . . . . . . . . . . . . . . . . . . . . . . . . . . . . . . . . . . . . . . . . . . . . . . . . . . . . . . . . . . 285
Blur and Sharpen effects . . . . . . . . . . . . . . . . . . . . . . . . . . . . . . . . . . . . . . . . . . . . . . . . . . . . . . . . . . . . . . . . 288
Channel effects . . . . . . . . . . . . . . . . . . . . . . . . . . . . . . . . . . . . . . . . . . . . . . . . . . . . . . . . . . . . . . . . . . . . . . . . . 291
Color Correction effects . . . . . . . . . . . . . . . . . . . . . . . . . . . . . . . . . . . . . . . . . . . . . . . . . . . . . . . . . . . . . . . . . 297
Distort effects . . . . . . . . . . . . . . . . . . . . . . . . . . . . . . . . . . . . . . . . . . . . . . . . . . . . . . . . . . . . . . . . . . . . . . . . . . . 306
GPU effects . . . . . . . . . . . . . . . . . . . . . . . . . . . . . . . . . . . . . . . . . . . . . . . . . . . . . . . . . . . . . . . . . . . . . . . . . . . . . 312
Image Control effects . . . . . . . . . . . . . . . . . . . . . . . . . . . . . . . . . . . . . . . . . . . . . . . . . . . . . . . . . . . . . . . . . . . 313
Keying effects . . . . . . . . . . . . . . . . . . . . . . . . . . . . . . . . . . . . . . . . . . . . . . . . . . . . . . . . . . . . . . . . . . . . . . . . . . . 317
Noise effects . . . . . . . . . . . . . . . . . . . . . . . . . . . . . . . . . . . . . . . . . . . . . . . . . . . . . . . . . . . . . . . . . . . . . . . . . . . .321
Noise & Grain effects . . . . . . . . . . . . . . . . . . . . . . . . . . . . . . . . . . . . . . . . . . . . . . . . . . . . . . . . . . . . . . . . . . . . 321
Perspective effects . . . . . . . . . . . . . . . . . . . . . . . . . . . . . . . . . . . . . . . . . . . . . . . . . . . . . . . . . . . . . . . . . . . . . . 324
Pixelate effects . . . . . . . . . . . . . . . . . . . . . . . . . . . . . . . . . . . . . . . . . . . . . . . . . . . . . . . . . . . . . . . . . . . . . . . . . . 326
Render effects . . . . . . . . . . . . . . . . . . . . . . . . . . . . . . . . . . . . . . . . . . . . . . . . . . . . . . . . . . . . . . . . . . . . . . . . . . 326
Stylize effects . . . . . . . . . . . . . . . . . . . . . . . . . . . . . . . . . . . . . . . . . . . . . . . . . . . . . . . . . . . . . . . . . . . . . . . . . . . 335
Time effects . . . . . . . . . . . . . . . . . . . . . . . . . . . . . . . . . . . . . . . . . . . . . . . . . . . . . . . . . . . . . . . . . . . . . . . . . . . . 342
Transform effects . . . . . . . . . . . . . . . . . . . . . . . . . . . . . . . . . . . . . . . . . . . . . . . . . . . . . . . . . . . . . . . . . . . . . . . 343
Transition effects . . . . . . . . . . . . . . . . . . . . . . . . . . . . . . . . . . . . . . . . . . . . . . . . . . . . . . . . . . . . . . . . . . . . . . . .344
Page 6

Video effects . . . . . . . . . . . . . . . . . . . . . . . . . . . . . . . . . . . . . . . . . . . . . . . . . . . . . . . . . . . . . . . . . . . . . . . . . . . . 346
Audio effects . . . . . . . . . . . . . . . . . . . . . . . . . . . . . . . . . . . . . . . . . . . . . . . . . . . . . . . . . . . . . . . . . . . . . . . . . . . 347
Chapter 15: Compositing
Transparency (masks, alpha channels) . . . . . . . . . . . . . . . . . . . . . . . . . . . . . . . . . . . . . . . . . . . . . . . . . . . 354
Compositing video . . . . . . . . . . . . . . . . . . . . . . . . . . . . . . . . . . . . . . . . . . . . . . . . . . . . . . . . . . . . . . . . . . . . . . 355
Defining transparent areas with keys . . . . . . . . . . . . . . . . . . . . . . . . . . . . . . . . . . . . . . . . . . . . . . . . . . . . 359
Creating transparency and solid colors with mattes . . . . . . . . . . . . . . . . . . . . . . . . . . . . . . . . . . . . . . 364
Chapter 16: Video output
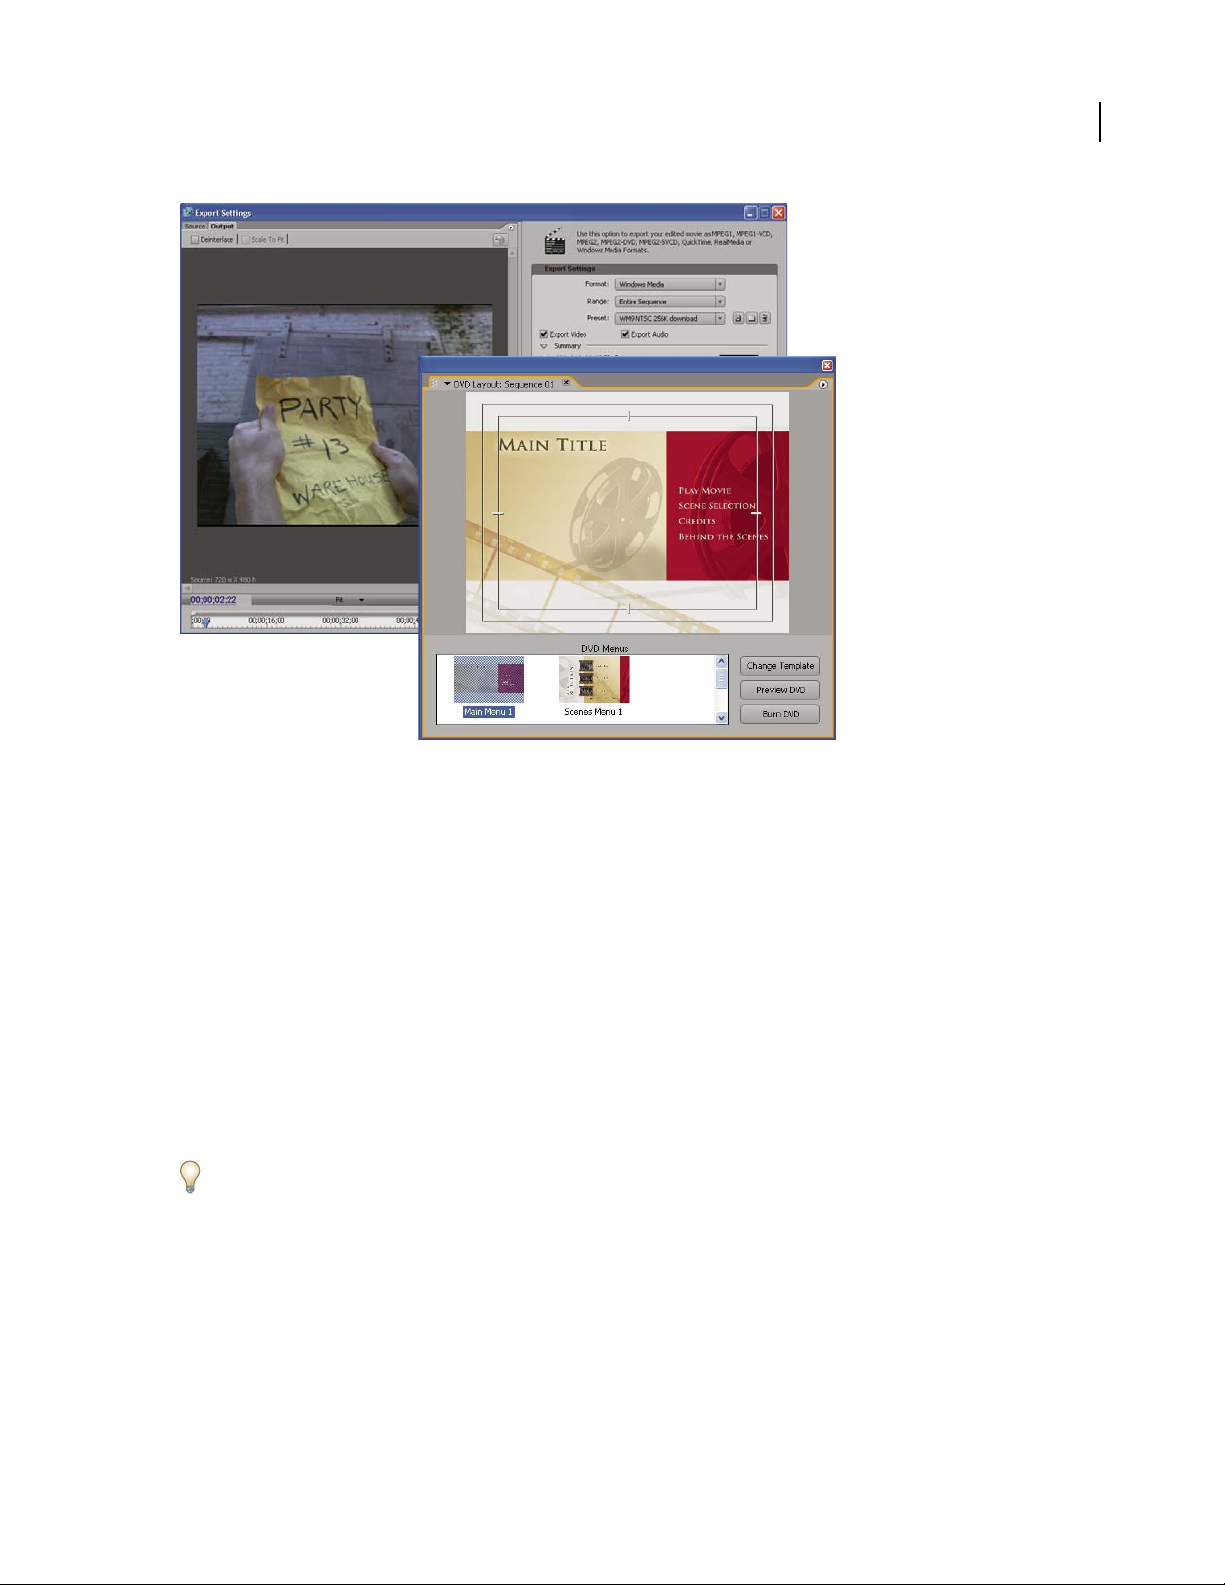
Exporting basics . . . . . . . . . . . . . . . . . . . . . . . . . . . . . . . . . . . . . . . . . . . . . . . . . . . . . . . . . . . . . . . . . . . . . . . . 370
Exporting to videotape or DVD . . . . . . . . . . . . . . . . . . . . . . . . . . . . . . . . . . . . . . . . . . . . . . . . . . . . . . . . . . 375
Exporting to files . . . . . . . . . . . . . . . . . . . . . . . . . . . . . . . . . . . . . . . . . . . . . . . . . . . . . . . . . . . . . . . . . . . . . . . . 378
Adobe Media Encoder . . . . . . . . . . . . . . . . . . . . . . . . . . . . . . . . . . . . . . . . . . . . . . . . . . . . . . . . . . . . . . . . . . 385
Exporting for online editing and collaboration . . . . . . . . . . . . . . . . . . . . . . . . . . . . . . . . . . . . . . . . . . . 396
Chapter 17: Creating DVDs
DVD creation overview . . . . . . . . . . . . . . . . . . . . . . . . . . . . . . . . . . . . . . . . . . . . . . . . . . . . . . . . . . . . . . . . . . 403
DVD markers . . . . . . . . . . . . . . . . . . . . . . . . . . . . . . . . . . . . . . . . . . . . . . . . . . . . . . . . . . . . . . . . . . . . . . . . . . . 405
Designing menu-based and autoplay DVDs . . . . . . . . . . . . . . . . . . . . . . . . . . . . . . . . . . . . . . . . . . . . . . 409
Previewing and burning DVDs . . . . . . . . . . . . . . . . . . . . . . . . . . . . . . . . . . . . . . . . . . . . . . . . . . . . . . . . . . . 414
vi
Chapter 18: Keyboard shortcuts
Finding and customizing keyboard shortcuts . . . . . . . . . . . . . . . . . . . . . . . . . . . . . . . . . . . . . . . . . . . . 417
Default keyboard shortcuts . . . . . . . . . . . . . . . . . . . . . . . . . . . . . . . . . . . . . . . . . . . . . . . . . . . . . . . . . . . . . 419
Index . . . . . . . . . . . . . . . . . . . . . . . . . . . . . . . . . . . . . . . . . . . . . . . . . . . . . . . . . . . . . . . . . . . . . . . . . . . . . . . . . . 427
Page 7

Chapter 1: Getting started with Adobe Premiere Pro 2.0
Installation and registration
To install
1 Close any Adobe
2 Insert the product disc into your computer’s DVD drive.
3 Double-click the disc icon, and then follow the on-screen instructions.
After installing the product for the first time on a computer, you will be prompted to activate your copy of the
product. (See “To activate” on page 1.)
For more detailed instructions for installing or uninstalling the product, see the ReadMe file on the product disc.
®
applications that are open.
1
To activate
Activation is a simple, anonymous process that you must complete within 30 days of installing the product.
Activation allows you to continue using the product, and it helps prevent casual copying of the product onto more
computersthanthelicenseagreementallows.Afteryouhaveinstalledtheproductforthefirsttimeonacomputer,
the Activation dialog box opens, prompting you to activate your copy of the product.
1 If the Activation dialog box is not already open, start the product and choose Help > Activate.
2 Follow the on-screen instructions.
Important: If you want to install the product on a different computer, you must first transfer the activation to that
computer. To transfer an activation, choose Help > Transfer Activation.
To learn more about activation, visit the Adobe website at
www.adobe.com/activation/main.html.
To register
Register your Adobe product to receive complimentary support on installation and product defects and notifications
about product updates.
Registering your product also gives you access to the wealth of tips, tricks, and tutorials in Resource Center and
access to Adobe Studio Exchange, an online community where users download and share thousands of free actions,
plug-ins, and other content for use with Adobe products.
Note: An active Internet connection is required for registration.
The Registration dialog box may open after activation, prompting you to register your copy of the product.
1 If the Registration dialog box is not already open, start the product and choose Help > Registration.
2 Follow the on-screen instructions.
Page 8

ADOBE PREMIERE PRO 2.0
User Guide
See also
“Resource Center” on page 6
Adobe Help Center
About Adobe Help Center
Adobe® Help Center is a free, downloadable application that includes three primary features.
Product Help Provides Help for Adobe desktop products installed on your system. (If no Adobe desktop products
are installed, topics for them aren’t available.) Help topics are updated periodically and can be downloaded through
Adobe Help Center preferences. For the products you’ve installed, Product Help also provides dynamic listings of
the top support issues and the most recent support documents published on Adobe.com.
Expert Support Provides information about Adobe Expert Support plans and lets you store details about plans
you’ve purchased. If you have an active support plan, you can also use the Expert Support section to submit web
cases—questions sent to Adobe support professionals over the web. To access links in the Expert Support section,
you must have an active Internet connection.
More Resources Provides easy access to the extensive resources on Adobe.com, including support pages, user
forums, tips andtutorials, andtraining. You can also use this areato storecontact information for friends,colleagues,
or support professionals, or even websites you turn to for inspiration or troubleshooting information.
2
See also
“Using Help” on page 3
“To search Help topics” on page 4
“To navigate Help” on page 4
“To view support documents” on page 3
To check for updates
Adobe periodically provides updates to software and to topics in Adobe Help Center. You can easily obtain these
updates through Adobe Help Center. An active Internet connection is required.
1 Click the Preferences button in the top-right corner.
2 In the Preferences dialog box, click Check For Updates. If updates are available, follow the on-screen directions to
download and save them.
You can also check for updates from within many Adobe applications by choosing Help > Updates.
To set Adobe Help Center preferences
1 Click the Preferences button in the top-right corner.
2 Set any of the following options, and click OK.
Region Specifies your geographical location. Changing this option may affect which services are available to you.
Language Specifies the language in which Expert Support content is displayed.
Page 9

ADOBE PREMIERE PRO 2.0
User Guide
Display Renewal Reminders For Expert Support Contracts Displays reminder screens when your Expert Support
plan has almost expired. Deselect this option if you’d like to turn off these reminders.
Enable Auto Login For Web Case Submission Allows you to submit support questions over the web. This option is
available only if you have an active Expert Support plan.
User Interface Language Specifies the language in which Adobe Help Center interface text is displayed.
Check For Updates Searches for new updates to software and Help topics as they become available from Adobe. This
option also lets you specify notification options and choose which applications to update.
Network Administrators Displays options for network administration.
To view support documents
From within Adobe Help Center, you can get up-to-the-minute listings of the top support issues and the most recent
documents added to the support knowledgebase. Each time you start Adobe Help Center, it uses RSS (Really Simple
Syndication) technology to gather this information from the Adobe website and update the listings dynamically.
1 In Adobe Help Center, click Product Help and select a product from the For menu.
2 Click the Contents tab in the navigation pane, and do either of the following:
• Click Recent Documents to display a summary of the most recent documents for the selected product.
• Click Top Issues to display a summary of the top issues documents for the selected product.
3 To view a document in full on the Adobe website, click its link. (An active Internet connection is required.)
3
To display More Resources
The More Resources section in Adobe Help Centerprovides easy accessto some of the content andservices available
from the Adobe website, including support, training, tutorials, and forums.
❖ To display this section, click More Resources.
To add contact information in More Resources
1 Click More Resources, and then click Personal Contacts.
2 Do any of the following:
• To add a contact, click New, type the contact information you want to save, and click OK.
• To edit a contact, click a contact in the list, click Edit, make changes to the information, and click OK.
• To delete a contact, click a contact in the list, and then click Delete. To confirm the deletion, click Yes.
Using Help
Using Help
The complete documentation for using your Adobe product is available in Help, a browser-based system you can
access through Adobe Help Center. Help topics are updated periodically, so you can always be sure to have the most
recent information available. For details, see “To check for updates” on page 2.
Page 10

ADOBE PREMIERE PRO 2.0
User Guide
Important: Adobe Help systems include all of the information in the printed user guides, plus additional information
not included in print. A PDF version of the complete Help content, optimized for printing, is also provided on the CD or
DVD in the product box.
See also
“To navigate Help” on page 4
“To search Help topics” on page 4
To navigate Help
❖ Do any of the following:
• To view Help for a product, choose the product name from the For menu.
• To expand or collapse a section, click the blue triangle to the left of the section name.
• To display a topic, click its title.
See also
“To use bookmarks” on page 5
4
To search Help topics
Search using words or phrases to quickly find topics. You can search Help for one product or for all Adobe products
you’ve installed. If you find a topic that you may want to view again, bookmark it for quick retrieval.
1 In Adobe Help Center, click Product Help, and choose a product from the For menu.
2 Type one or more words in the Search For box, and choose an option from the In menu:
This Product Searches Help for the selected product.
All Products Searches Help for all Adobe products you have installed.
3 Click Search. Topics matching the search words appear in the navigation pane, grouped by product and listed in
order of relevance.
4 To view a topic, click its title.
5 To return to the navigation pane, do one of the following:
• Click the Home button.
• Click the Back button.
• Click Next Topic or Previous Topic.
See also
“To print a topic from Help” on page 5
“To use bookmarks” on page 5
Page 11

ADOBE PREMIERE PRO 2.0
User Guide
Search tips
The search feature in Adobe Help Center works by searching the entire Help text for topics that contain any of the
words typed in the Search For box. These tips can help you improve your search results in Help:
• If you search using a phrase, such as “shape tool,” put quotation marks around the phrase. The search returns only
those topics containing all words in the phrase.
• Make sure that the search terms are spelled correctly.
• If a search term doesn’t yield results, try using a synonym, such as “web” instead of “Internet.”
To print a topic from Help
1 Select the topic you want to print, and click the Print button.
2 Choose the printer you’d like to use, and then click Print.
To change the view
By default, Adobe Help Center opens in Full view. Full view gives you access to the Product Help, Expert Support,
and More Resources sections. Switch to Compact view when you want to see only the selected Help topic and you
want to keep the Help window on top of your product workspace.
5
❖ Click the view icon to switch between Full and Compact views.
To use bookmarks
You can bookmark especially helpful topics for easy access, just as you bookmark pages in a web browser, and reread
them at another time.
• To view bookmarks, click the Bookmarks tab in the navigation pane.
• To create a bookmark, select the topic you want to mark, and click the Bookmark button . When the New
Bookmark dialog box appears, type a new name in the text box if desired, and then click OK.
• To delete a bookmark, select it in the Bookmarks pane, and click the Delete button. Click Yes to confirm the
deletion.
• To rename a bookmark, select it in the Bookmarks pane, and then click the Rename Bookmark button . In the
dialog box, type a new name for the bookmark and then click OK.
• To move a bookmark, select it in the Bookmarks pane, and then click the Move Up button or the Move Down
button .
Tips, training, and other resources
Learning resources
Adobe provides a wide range of resources to help you learn and use Adobe products.
• “Total Training Video Workshop DVD” on page 6: Professional training videos from experts.
• “Resource Center” on page 6: Videos, tips and tricks, and other learning material on Adobe products.
• “Other resources” on page 7: Training, books, user forums, product certification, and more.
Page 12

ADOBE PREMIERE PRO 2.0
• Support: Complimentary and paid technical support options from Adobe.
• “Extras and other downloads” on page 8: Other software and content.
See also
“About Adobe Help Center” on page 2
“Using Help” on page 3
Total Training Video Workshop DVD
Presented by experts in their fields, Total Training videos provide overviews, demonstrations of key new features,
and many useful tips and techniques for beginning and advanced users. Look for accompanying step-by-step
instructions to selected Total Training videos in monthly updates to Resource Center.
In addition to the Total Training Video Workshop DVD included with your software, short Total Training web
videos on a variety of products and topics are also available in Resource Center, and complete Total Training
courseware can be purchased online from the Adobe Store.
See also
“Resource Center” on page 6
User Guide
6
Resource Center
Resource Center provides a wealth of tips, tricks, tutorials, and instructional content in video, PDF, and HTML
formats, authored by experts from Adobe and its publishing partners. You can search the entire collection or sort by
product, topic, date, and type of content; new content is added monthly. Resource Center is available in English,
French, German, and Japanese. Find it from the home page of the Adobe website.
Page 13
ADOBE PREMIERE PRO 2.0
User Guide
7
Tips and tutorials in Resource Center
Forfreecontentandadd-ons,visitAdobeStudioExchange,anonlinecommunitywhereusersdownloadandshare
thousands of free actions, plug-ins, and other content for use with Adobe products. To visit Adobe Studio Exchange,
go to Resource Center from the home page of the Adobe website.
See also
“Total Training Video Workshop DVD” on page 6
“Other resources” on page 7
Other resources
Additional sources of information and help are available for Adobe products.
• Visit the Training area of the Adobe website for access to Adobe Press books; online, video, and instructor-led
training resources; Adobe software certification programs; and more.
• Visit the Adobe user forums, where users share tips, ask questions, and find out how others are getting the most
out of their software. User forums are available in English, French, German, and Japanese from the main Support
page of your local Adobe website.
• Visit the Support area of the Adobe website for additional information about free and paid technical support
options. Top issues are listed by product on the Adobe U.S. and Adobe Japan websites.
• ClickMoreResourcesinAdobeHelpCentertoaccessmanyoftheresourcesontheAdobewebsiteandtocreate
your own list of frequently visited user groups and websites and valuable contacts.
Page 14

ADOBE PREMIERE PRO 2.0
User Guide
• For complete developer documentation and resources, visit the Developers area of the Adobe website at
http://partners.adobe.com/public/developer/main.html. For additional backgroundersand instructional content,
visit Resource Center.
Extras and other downloads
Your product includes Adobe Stock Photos, an integrated service available within Adobe Bridge that lets you search,
view, try, and buy royalty-free stock photography from leading stock libraries. Because of the tight integration
between Stock Photos and Adobe products, you can download images directly into your projects.
TheDownloadsareaoftheAdobewebsiteincludesfreeupdates,tryouts,andotherusefulsoftware.Inaddition,the
Plug-ins section of the Adobe Store provides access to thousands of plug-ins from third-party developers, helping
you automate tasks, customize workflows, create specialized professional effects, and more.
Adobe periodically provides downloadable updates to topics in Adobe Help Center and to Adobe Help Center
software itself.
See also
“About Adobe Bridge” on page 40
“About Adobe Stock Photos” on page 56
8
“Resource Center” on page 6
“Other resources” on page 7
“About Adobe Help Center” on page 2
New features
What’s new
With version 2.0, Adobe Premiere® Pro builds on its field-proven strengths, extends its reach to new formats, and
provides users with even greater support for workflow integration and productivity. Here’s a quick look at some of
the new features that help make Adobe Premiere Pro 2.0 an integral part of Adobe’s comprehensive solution for even
the most demanding productions.
Customizable efficient workspaces The Adobe user interface now allows you even greater ability to customize and
save workspaces of your own design. You can dock panels to one another in groups or pull any panel out of a group.
When you resize a panel, the others in the workspace expand or contract as necessary to give you the most efficient
use of the space.
Uncompressed HD support Capture, edit, and output full-resolution uncompressed, high-definition video through
HD VTRs and other devices by way of an HD-enabled SDI card.
SD-SDI support Capture, edit, and output standard-definition digital video in either NTSC or PAL standards
through an SD-SDI card.
Native HDV editing Log, batch-capture, and edit HDV footage in real time without a need for additional HDV
plug-ins.
Macromedia Flash export Export your video in Macromedia
®
Flash™, a popular format for delivery on the web and
to mobile devices.
Page 15

ADOBE PREMIERE PRO 2.0
Professional VTR support Control video decks using RS-422 or RS-232 protocols.
Feet + frames timecode Display timecode in standard film formats when working with captured film footage.
Scrolling Timeline panel Choose how the Timeline panel is displayed during previews. Set the Timeline Playback
User Guide
Auto-Scrolling preference to Smooth Scroll to see the ruler and tracks move past a stationary indicator showing the
current playback location. Choose Page Scroll to see the timeline advance by a full screen each time the playback
indicator reaches the edge of the panel. Or choose No Scroll to allow the indicator to move through a stationary
timeline past the edge of the panel.
GPU-accelerated rendering Tap into your Direct3D 9.0-capable graphics card to speed previews and the rendering
of effects.
DVD authoring from the timeline Author menu-driven orautoplay DVDs and burn them straight from the timeline
for quick client reviews and test disks.
Adobe Bridge Access, manage, and manipulate files from any of your Adobe Creative Suite applications through a
single interface.
Integrated titling tool Create text and graphics titles from scratch, templates, or user-defined styles.
Lighting effects filter Add multiple spot, directional, or omni lights for varied looks within a scene.
After Effects integration Drag and drop and copy and paste to co-edit compositions between Adobe After Effects
®
and Adobe Premiere Pro. Additionally, users of Adobe Production Studio can use Dynamic Link. With Dynamic
Link,youdon’tneedtorenderanAfterEffectscompositiontoviewandedititinanAdobePremiereProSequence.
9
Clip notes Send edited videos embedded in PDF files to your clients, and read their timecode-specific comments
from markers that appear in the timeline of Adobe Premiere Pro.
Support for 4096x4096 frames Import, edit, and output image sequences at the 2K and 4K resolutions often used
for online feature-film work.
Multicam editing Edit footage from multiple-camerashoots with ease. View up to four source trackssimultaneously
in the quad-view monitor, and switch between them in real time while previewing their output in the Program
Monitor. Create sequences by switching between sources in real time the way you would with a video switcher in a
live production.
Subclip creation Trim a master clip into any number of subclips, each with its own In and Out points. You can store
subclips as unique clips in the Project panel and use them independently in your sequences. You can, for example,
apply different effects to different subclips made from the same master clip.
Audio clip and track effects Apply multiple effects to audio clips or tracks. Adobe Premiere Pro now includes a set
of VST-format plug-ins for audio enhancement.
Digital Cinema export Export any project as a Windows Media 9 Series for Digital Cinema file at 720p or 1080p
resolution, with accompanying 5.1 channel surround-sound. This helps you take advantage of the growing digital
cinema trend at major film festivals.
Page 16
Chapter 2: Workflow and workspace
0
3
6
0
3
0
3
Workflow and workspace basics
Workflow overview
Whether you’re using Adobe Premiere Pro to edit video for broadcast, DVD, or the web, you’re likely to follow a
similar workflow.
+
aabcabc
1234567
Premiere Pro workflow
1. Start or open project 2. Capture and import assets 3. Assemble and refine sequence 4. Add titles 5. Add transitions and effects 6. Mix
audio 7. Export
Start or open a project
10
aabcabc
6
Openanexistingproject,orstartanewonefromtheAdobePremiereProQuickstartscreen.Whenstartinganew
project, you can specify the video standard and format of sequences. (See “About projects” on page 23.)
Quickstart screen
Capture and import video and audio
aabcabc
6
Page 17
ADOBE PREMIERE PRO 2.0
0
3
User Guide
Using the Capture panel, transfer footage directly from a DV camera or deck. With the proper hardware, you can
digitize andcapture other formats, from VHS to HDV. Eachfile you captureto your hard disk automatically becomes
a clip in your project.
11
Project panel and Capture panel
Using the Project panel, you can import a variety of digital media, including video, audio, and still images. Adobe
®
Premiere Pro also imports Adobe Illustrator
artwork or Adobe Photoshop®layered files, and translates Adobe After
Effects projects for a seamless, integrated workflow. You can create synthetic media, such as standard color bars,
color backgrounds, and a countdown. (See “About capturing, digitizing, and importing” on page 65.)
In the Project panel you can label, categorize, and group your footage into bins to keep a complex project organized.
Using the Project panel icon view, you can arrange clips in a storyboard fashion to visualize or quickly assemble a
sequence.
Assemble and refine a sequence
aabcabc
6
Using the Source Monitor, you can view clips, set edit points, and mark other important frames before adding clips
to a sequence. You can view audio as a detailed waveform and edit it with sample-based precision. (See “About the
Source and Program Monitors” on page 98.)
Page 18
ADOBE PREMIERE PRO 2.0
0
3
User Guide
12
Source Monitor, Program Monitor, and Timeline panel
You add clips to a sequence in the Timeline panel by dragging or by using controls in the Source Monitor. You can
automatically assemble clips into a sequence that reflects their order in the Project panel. You can view the edited
sequence in the Program Monitor or watch the full-screen, full-quality video on an attached television monitor. (See
“About the Timeline panel” on page 107 and “Adding clips to a sequence” on page 115.)
Refine the sequence by manipulating clips in the Timeline panel, with either context-sensitive tools or tools in the
Tools panel. Use the specialized Trim Monitor to fine-tune the cut point between clips. By nesting sequences—using
a sequence as a clip within another sequence—you can create effects you couldn’t achieve otherwise.
Add titles
aabcabc
6
Usingthe Adobe Premiere Profull-featured Titler, create stylish still titles, title rolls, or titlecrawls that you can easily
superimpose over video. If you prefer, you can modify any of a wide range of provided title templates. As with any
clip, you can edit, fade, animate, or add effects to the titles in a sequence. (See “About the Titler” on page 203.)
Page 19

ADOBE PREMIERE PRO 2.0
3
User Guide
13
Title r
Add transitions and effects
aabcabc
6
The Effects panel includes an extensive list of transitions and effects you can apply to clips in a sequence. You can
adjust these effects, as well as a clip’s opacity and motion, using the Effect Controls panel.The Effect Controls panel
also lets you animate a clip’s properties using traditional keyframing techniques. As you adjust transitions, the Effect
Controls panel displays controls designed especially for that task. Alternatively, you can view and adjust transitions
and a clip’s effect keyframes in the Timeline panel. (See “About transitions” on page 163 and “Working with effects”
on page 250.)
Page 20
ADOBE PREMIERE PRO 2.0
3
User Guide
14
Effects and Effect Controls panels
Mix audio
+
aabcabc
6
For track-based audio adjustments, the Audio Mixer faithfully emulates a full-featured audio mixing board,
complete with fade and pan sliders, sends, and effects. Adobe Premiere Pro saves your adjustments in real time, on
the fly. With the proper sound card, you can record audio through the sound mixer, or mix audio for 5.1 surround
sound. (See “Mixing audio tracks and clips” on page 175.)
Page 21
Audio Mixer
0
3
ADOBE PREMIERE PRO 2.0
User Guide
15
Export
aabcabc
6
Deliver your edited sequence in the media of your choice: tape, DVD, or movie file. With the DVD Layout panel,
you can produce a DVD complete with navigational menus all from within Adobe Premiere Pro. And using the
Adobe Media Encoder, even formats with extensive options—MPEG1, MPEG2, and formats for delivery via the
web—are customized to the needs of your viewing audience quickly and easily. (See “About export” on page 370.)
Page 22
ADOBE PREMIERE PRO 2.0
User Guide
16
Export Settings dialog box and DVD Layout panel
About the Adobe workspace
Adobe video and audio applications provide a consistent, customizable workspace. Although each application has its
own set of panels (such as Tools, Properties, Timeline, and so on), you move and group panels on your computer
screen in the same way across products.
The main window of a program is the application window. The various panels are organized in this window in an
arrangement called a workspace. The default workspace contains groups of panels as well as panels that stand alone.
You customize a workspace by arranging the panels, usually by dragging them, in the layout that best suits your style
of working. You can create and save several custom workspaces for different tasks—for example, one for editing and
one for previewing.
You can drag panels to new locations, move panels into or out of a group, place panels alongside each other, and
undock a panel so that it floats in a new window above the application window. As you rearrange panels, the other
panels resize automatically to fit the window.
YoucanusefloatingwindowstocreateaworkspacemorelikethoseinpreviousversionsofAdobeapplications,orto
place panels on multiple monitors.
Page 23

ADOBE PREMIERE PRO 2.0
User Guide
BC
A
17
Example of workspace
A. Application window B. Grouped panels C. Panels
To display menus
In addition to choosing from the menus at the top of your screen, you can choose from context menus, which display
commands relative to the active tool or selected item. Panel menus display commands relative to the active panel.
• To display panel menus, click the triangle in the upper right corner of the panel.
• To display context menus, right-click a panel.
About the Info panel
The Info panel displays information about a selected item. For clips, the Info panel displays information such as
duration, In point, and Out point. The information displayed may vary depending on the media type, the current
window, and soon. Forexample, theInfo panel displays information unique toan emptyspace in the Timeline panel,
a rectangle in the Titler, and a clip in the Project panel display.
In the Info panel, the Video line indicates frame rate, dimensions, and pixel aspect ratio, in that order. The Audio
line indicates sample rate, bit depth, and channels, in that order.
Page 24

ADOBE PREMIERE PRO 2.0
User Guide
Using tools
The Tools panel contains a number of tools for editing sequences in the Timeline panel. When you select a tool, the
pointer generally changes shape according to your selection. For example, when you select the Razor tool and
position the pointer over a clip in the Timeline panel, the icon changes to a razor. However, the Selection tool icon
may change to reflect the task currently being performed. In some cases, pressing a modifier key (such as Shift) as
you use a tool changes its function, and its icon changes accordingly. Select tools from the Tools panel, or use a
keyboard shortcut. You can resize the Tools panel and orient it vertically or horizontally.
Note: The Selection tool is the default tool. It’s used for everything other than specialized functions. If the program isn’t
responding as you expect, make sure that the Selection tool is selected.
A B C D E F G H I J K
To ol b ox
A. Selection tool B. Track Selection tool C. Ripple Edit tool D. Rolling Edit tool E. Rate Stretch tool F. Razor tool G. Slip tool H. Slide tool
I. Pen tool J. Hand tool K. Zoom tool
See also
“History panel” on page 38
18
Customizing the workspace
Drop zones
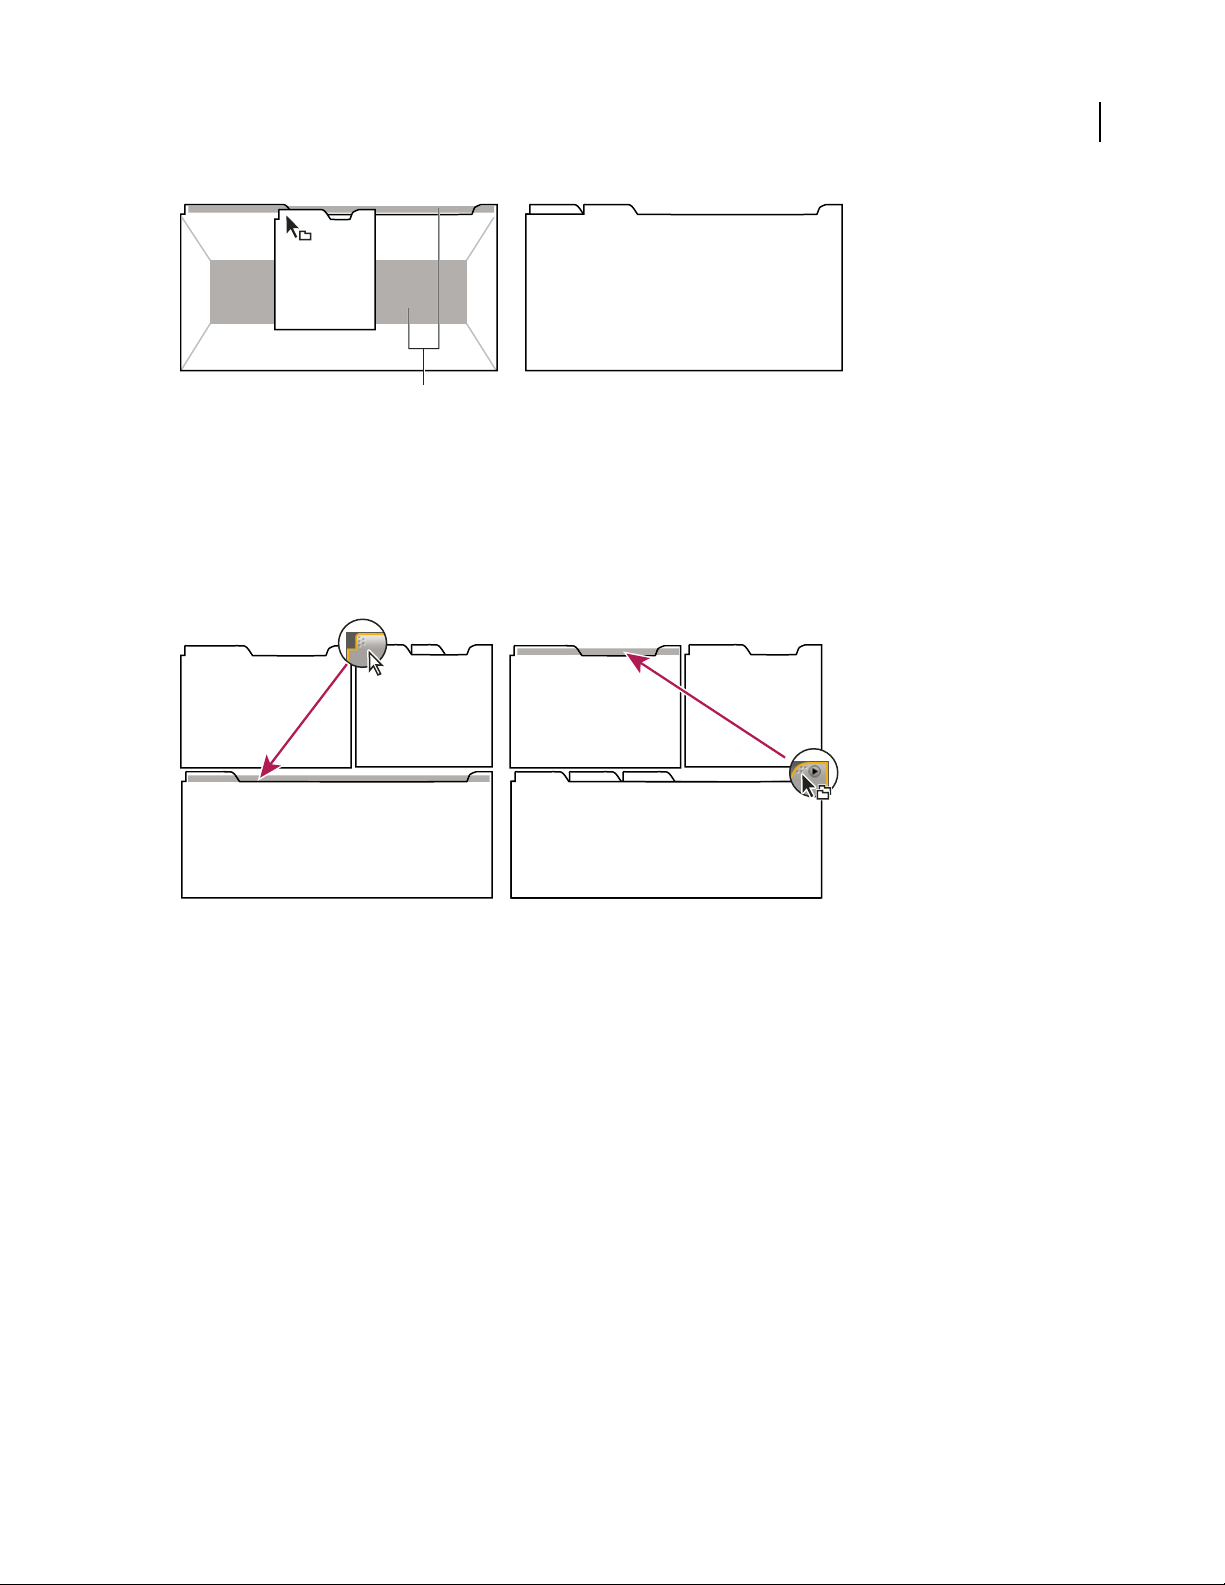
Drop zones are areas onto which you can drop or move panels. As you drag a panel, the drop zones become
highlighted. The drop zone determines where and how the panel is inserted into the workspace. Dragging a panel to
a drop zone results in one of two behaviors: docking or grouping.
Docking
Drop zones along the edges of a panel, group, or window are docking zones. Docking a panel places it adjacent to the
existing group, resizing all groups to accommodate the new panel.
C
A
B
Dragging panel (A) onto docking zone (B) to dock it (C)
Grouping
Thedropzoneinthemiddleofapanelorgroup,aswellasthezonealongthetabareaofapanel,aregroupingzones.
Grouping a panel adds it to an existing group, placing it at the top of the stacking order. Grouping a panel does not
resize other groups.
Page 25
ADOBE PREMIERE PRO 2.0
User Guide
19
A
B
Dragging panel (A) onto grouping zone (B) to group it with existing panels (C)
C
To dock or group panels
You dock and group panels by dragging them onto drop zones. As you drag a panel over a drop zone, the zone
becomes highlighted to provide a visual reference for the drop.
Drag the gripper area in the upper left corner of a panel’s tab to move an individual panel. Drag the group gripper at
the upper right corner to move an entire group.
A
Dragging panel gripper (A) to move one panel; dragging group gripper (B) to move entire group
B
1 Selectthepanelyouwanttodockorgroupbyclickingitstab.Ifthepanelisnotvisible,chooseitfromtheWindow
menu to open it.
2 Drag the panel by its tab onto the desired drop zone. The application docks or groups the panel, according to the
type of drop zone.
See also
“Drop zones” on page 18
Page 26
ADOBE PREMIERE PRO 2.0
User Guide
To open a panel in a floating window
You can open a panel in a floating window. You can add panels to the floating window or otherwise modify it, as you
do the application window. You can use floating windows to create a workspace like those in earlier versions of
Adobe applications, or to make use of a secondary monitor.
❖ Select the panel you want to open (if it’s not visible, choose it from the Window menu), and then do one of the
following:
• Ctrl-click (Windows) or Command-click (Mac OS) and drag the panel or group from its current location. When
you release the mouse, the panel or group appears in a new floating window.
• Drag the panel or group outside the application window. (If the application window is maximized, drag the panel
to the Windows task bar.)
To close a panel or window
When you close a panel group in the application window, the other groups are resized to make use of the newly
available space. When you close a floating window, the panels within it close, too.
❖ Click the Close button on the panel or window that you want to close.
To resize panel groups
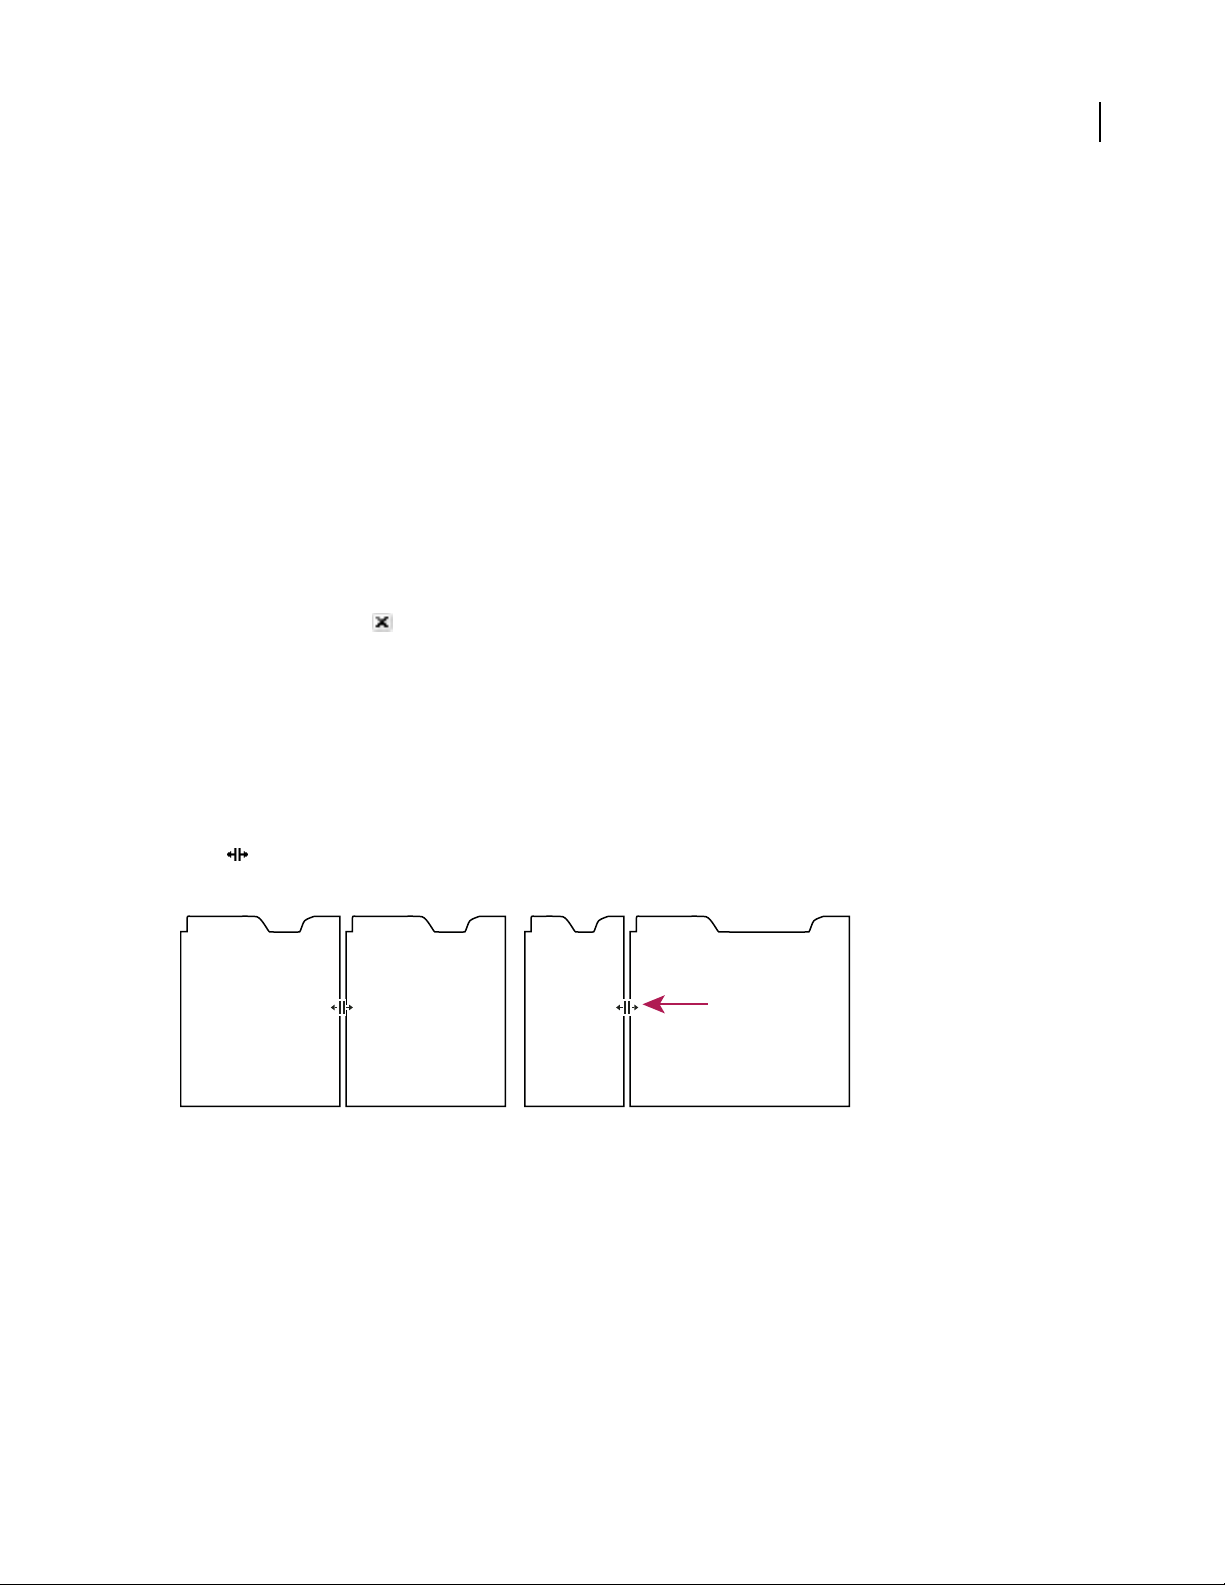
The dividers between panel groups have resizehandles. You resize a group in onedirection at a time, either vertically
or horizontally. When you drag a divider between panel groups, all groups that share the divider are resized. For
example, suppose your workspace contains three panel groups stacked vertically. If you drag the divider between the
bottom two, they are resized, but the topmost group doesn’t change.
20
1 Position the pointer over the divider between the panel groups that you want to resize. The pointer changes
shape .
2 Hold down the mouse button, and drag to resize the panel groups.
A
Dragging the divider between panel groups to resize them.
A. Original group with divider selected B. Resized groups
B
Working with multiple monitors
You can use multiple monitors to increase the available screen space. When you work with multiple monitors, the
application window appears on the main monitor, and you place a floating window on the second monitor. Monitor
configurations are stored in the workspace.
Page 27

ADOBE PREMIERE PRO 2.0
User Guide
To brighten or darken the user interface
Adobe Premiere Pro lets you brighten or darken the application’s graphical user interface (GUI). For example, you
may prefer to lower the brightness when working in a darkened editing suite or when making color corrections.
Changing the brightnesspreference affects panels, windows, anddialog boxes but doesn’t affect scroll bars, title bars,
andmenusthataren’tinsidepanels.Inaddition,thebrightnesspreferencedoesn’taffecttheapplicationbackground
on Windows.
1 Choose Edit > Preferences > User Interface.
2 Drag the User Interface Brightness slider to the left or right. Click Default Brightness to restore the default
brightness level.
3 To set the interface to match the background color specified by the Windows operating system’s current
appearance settings, select Use Windows Background Color.
To change the Windows operating system’s appearance settings, right-click the Windows desktop and choose
Properties, and then customize options in the Appearance tab in Display Properties For Windows. Consider using
the Windows Classic style to reduce the font size of title bars (see Windows online Help).
To use the Events panel
Adobe Premiere Pro Events lists warnings, error messages, and other information you can use to identify and
troubleshoot problems, particularly those associated with plug-ins and other components from third-party developers. An alert icon , , on the status bar notifies you of an error. Double-clicking the icon opens the Events
panel, and clearing the associated item from the Events panel removes the icon from the status bar.
21
1 Do either of the following:
• Double-click the alert icon in the status bar.
• Choose Window > Events.
2 Do any of the following:
• To learn more about an item in the list, select it and click Details.
• To clear the events list, click Clear All.
Predefined workspaces
To use an Adobe workspace
Each Adobe video and audio application includes several workspaces for various tasks. For example, Adobe Encore
DVD has workspaces for editing in the Timeline and for designing slideshows, menus, and navigation. You can
choose a workspace at any time. When you choose one of these workspaces, the current workspace is redrawn
accordingly.
❖ With the project you want to work on open, choose Window > Workspace, and select the desired workspace.
To create or modify a workspace
As you modify a workspace, the application trackschanges, savingany modifications with the project. The next time
you open the project, the most recent version of the workspace is used. You can also choose to restore the original
layout of the workspace.
®
Page 28

ADOBE PREMIERE PRO 2.0
User Guide
Youcansaveanyworkspace,asacustomworkspaceatanytime.Oncesaved,newandeditedworkspacesappearin
the Workspace menu on the local computer. If a project with a custom workspace is opened on a system other than
the one on which it was created, the application looks for a workspace with a matching name. If the application finds
a match (and the monitor configuration matches), it uses that workspace; if it can’t find a match (or the monitor
configuration doesn’t match), it opens the project using the current local workspace.
❖ Arrange the framesand panels as desired, thenchoose Window >Workspace > Save Workspace, and enter aname
for the workspace. Click Save.
To delete a workspace
1 Choose Window > Workspace > Delete Workspace.
2 Choose the workspace you want to delete, and then click Delete.
22
Page 29

Chapter 3: Projects
Project basics
About projects
A project is a single Adobe Premiere Pro file that contains sequences and references to the assets (clips, still images,
and audio files) associated with the sequences. A project stores information about sequences and assets, such as
settings for capture, transitions, and audio mixing. Also, the project file contains the data from all of your editing
decisions, such asthe In and Out points for trimmed clipsand the parameters for each special effect. Adobe Premiere
Pro creates a folder on your hard drive at the start of each new project. By default, this is where it stores the files it
captures, the preview and conformed audio files it creates, and the project file itself.
Every project includes a Project panel. This acts as a storage area for all files used in the project.
To create a project
In most cases, you can start a project simply by using one of the presets provided in the New Project dialog box. The
presets included with Adobe Premiere Pro include common project types. Preserve editing quality by using a preset
that conforms to the specifications of your original assets. For example, if your project uses footage mostly in DV
format, use a DV preset. If you need to specify lower quality settings for output (such as streaming web video), don’t
change your project settings—instead, change your export settings later.
23
If your computer has a capture card compatible with Adobe Premiere Pro, its own optimized presets may appear in
the Available Presets list.
Theprojectsettingsmustbecorrectwhenyoucreatetheprojectfile.Onceaprojectiscreated,someprojectsettings,
such as the timebase settings, are locked. This prevents unwanted inconsistencies that could result from changing
project settings later.
1 Either choose New Project on the Welcome screen that appears when Adobe Premiere Pro starts up or, after the
application is open, choose File > New > Project.
2 Do one of the following:
• To apply a preset, select it from the Available Presets list.
• To customize settings, choose the preset that most closely matches your editing environment, click Custom
Settings, and then select your specific project settings. For Location, specify where you want to store the project
on disk.
3 Type the name of the project, and then click OK.
Note: Whenever possible, specify a location and name that you won’t have to change later. By default, Adobe Premiere
Pro stores rendered previews, conformed audio files, and captured audio and video in the folder where you store the
project. Moving a project file later may require moving its associated files as well.
About project settings
Project settings establish the general parameters for a given project. They control parameters such as how Adobe
Premiere Pro works with your source device and video and audio files, how it renders your previews, and so on. All
project settings apply to the whole project, and most can’t be changed after a project is created.
Page 30

ADOBE PREMIERE PRO 2.0
User Guide
Presets are groups of project settings. Adobe Premiere Pro comes with several groups of presets installed: Adobe
SD0-SDI, Adobe HD-SDI, Adobe HDV, DV-NTSC, DV-PAL, and DV-24P. These contain the correct project
settings for the most typical project types. When creating a new project, you can either select from among the
standard presets or customize a group of project settings and save the customized group as a custom preset.
When you start a new project, you see a dialog box displaying a number of presets with selected default settings for
all these parameters. You can choose one of these presets. Alternatively, you can create your own custom presets
tailored to the needs of your project. If you want full control over almost all the project’s parameters, you must start
a new project and customize its presets.
After you begin working in a project, you can review project settings, but you can change only a few of them. Choose
Project > Project Settings to view the settings you can change.
Project settings are organized into the following categories:
General Settings Control the fundamental characteristics of the project, including the method Adobe Premiere Pro
uses to process video (Editing Mode), count time (Display Format), and play back video (Timebase).
Capture Settings Control how Adobe Premiere Pro transfers video and audio directlyfrom a deck orcamera. (None
of the other project settings options affect capturing.) The contents of this panel depend on the editing mode. If
you’re capturing DV footage, you don’t need to change capturesettings. When DV/IEEE 1394 Capture is the selected
capture format, no options are available because the options are automatically set to the IEEE 1394 standard.
Additional capture formats and options may appear if you install other software, such as software included with a
capture card certified to be compatible with Adobe Premiere Pro.
24
Video Rendering Controls the frame size, picture quality, compression settings, and aspect ratios that Adobe
Premiere Pro uses when you play back video from the Timeline panel (where you edit your video program).
Default Sequence Controls the number of video tracks and the number and type of audio tracks for new sequences
you create.
Note: If you must change project settings that are unavailable, you can create a new project with the settings you want
and import the current project into it. However, if you import the current project into a project with a different frame
rate or audio sampling rate, check video and audio edits carefully. Although edit positions made under the old settings
are preserved, they may not synchronize precisely with the new settings. Edits or changes you make after importing are
synchronized with the new settings.
To customize project settings
To customize most project settings, you must start a new project, select an existing preset, and then customize the
preset settings.
1 Click New Project or choose File > New > Project.
2 In the Load Preset panel, select the preset that most closely matches your video footage or the needs of your
capture card.
3 In the Custom Settings panel, modify the General, Capture, Video Rendering, and Default Sequence settings to
match the needs of your project.
4 To save your custom settings as a preset that you can use for future projects, click Save Preset. A dialog box asks
youtonameanddescribethecustompreset.Hereyoucanchoosewhethertosavethedevicecontrolsettingsaspart
of the preset.
5 Specify where to save the project on disk, give it a name, and then click OK.
Page 31

ADOBE PREMIERE PRO 2.0
User Guide
General settings
Choose General settings thatconform to the specificationsof the dominant source files in your project (for example,
if most of your footage is DV, use the DV Playback editing mode). Changing these settings arbitrarily may result in
a loss of quality.
Editing Mode Specifies which video method is used to play back sequences, which timebases are made available,
which compression methods appear in the Video Settings panel, and which display formats are available. Choose an
Editing Mode option that best matches the specifications of your source footage and/or capture card. This modedoes
not determine the format of your final movie. You specify output settings when you export.
Timebase Specifies thetime divisionsAdobe Premiere Pro uses to calculatethe time position of each edit. In general,
choose 24 for editing motion-picture film, 25 for editing PAL (European standard) and SECAM video, and29.97 for
editing NTSC (North American standard) video. Do not confuse timebase with the frame rate of the video you play
back or export from sequences, although timebase and frame rate are often set to the same value. The options listed
for Timebase vary according to the editing mode you selected.
Playback Settings Displays playback options for most of the editing modes. Select it to display a dialog box of
Realtime Playback, Export, 24P Conversion Method, and Desktop Display Mode options. You can also choose
whether to disable video output when Adobe Premiere Pro is in the background, and whether to enable aspect ratio
correction on external devices.
Frame Size Specifies the dimensions, in pixels, for frames when you play back sequences. In most cases, the frame
sizeforyourprojectshouldmatchtheframesizeofyoursourcefiles.Don’tchangetheframesizetocompensatefor
slow playback—instead, adjust playback resolution by choosing a different Quality setting from the Project panel
menu, or adjust the frame size of final output by changing Export settings.
25
Pixel Aspect Ratio Sets the aspect ratiofor individual pixels. Choose SquarePixels for analog video, scannedimages,
and computer-generated graphics, or choose the format used by your source. If you use a pixel aspect ratio that is
different from that of your video, the video may play back and render with distortion.
Fields Specifies the field dominance, or which field of each frame’s interlaced fields is drawn first. If you work with
progressive-scan video, select No Fields (Progressive Scan). Note that many capture cards capture fields regardless
of whether you shot progressive scan footage.
Display Format (Video) AdobePremiereProcandisplayanyofseveralformatsoftimecode.Youmaywanttoseethe
project’s timecode in a film format, for example, if you are editing footage captured from film; or in simple frame
numbers if your assets were imported from an animation program. Changing the Display Format option does not
alter the frame rate of clips or sequences—it changes only how their timecodes are displayed. The time display
options correspond to standards for editing video and motion-picture film. For Frames and Feet + Frames
timecodes, you can change the starting frame number tomatch the time-counting method of another editing system
you may be using.
TheoptionsmadevisibleintheDisplayFormatfielddependontheEditingModeselected.Youcanchoosefromthe
following Display Format options, depending on which editing mode is selected:
• 30 fps Drop-Frame Timecode Reports time in hours, minutes, seconds, and frames, separating units with
semicolons. Drop-frame timecode assumes a rate of 30 frames per second, but skips some numbers by design: To
accommodate the NTSCactual frame rate of 29.97fps drop-frametimecode skips, or drops, two frame numbers (not
the actual frames of video) each minute except every tenth minute. Use for output to NTSC videotape.
30 fps drop-frame timecode as indicated by semicolons
Page 32

ADOBE PREMIERE PRO 2.0
User Guide
• 30 fps Non Drop-Frame Timecode Reports time in hours, minutes, seconds, and frames, separating units with
colons. It assumes a rate of 30 frames per second and does not drop frame numbers. Use for output to computer
displays via the web or CD-ROM.
30 fps non drop-frame Timecode as indicated by colons
• 24 fps Timecode Reports time in hours, minutes, seconds, and frames; separating units with colons. Use for 24P
footage and to output to 24-fps formats for film and DVD distribution.
24 fps timecode showing “23” as highest possible number of frames before next second
• 25 fps Timecode Reports time in hours, minutes, seconds, and frames, separating units with colons. Use for
output to PAL videotape.
25 fps timecode showing “24” as highest possible number of frames before next second
26
• Feet + Frames 16mm Reports time in feet and frames, assuming the frame rate of 16mm film: 40 frames per foot.
Use for output to 16mm film.
Feet + frames 16mm timecode showing “39” as highest possible number of frames before next foot
• Feet + Frames 35mm Reports time in feet and frames, assuming the frame rate of 35mm film: 16 frames per foot.
Use for output to 35mm film.
Feet + frames 35mm timecode showing “15” as highest possible number of frames before next foot
• Frames Reports time solely in a running count of frames. Does not assign measurements of either time or spatial
length. Use to output sequential stills such as those generated for an animation or DPX film editor.
Frames timecode simply numbers each frame in sequential order.
Note: When working with NTSC video assets, youshould usually use 30 fps drop-frame timecode. This format conforms
with the timecode base inherent in NTSC video footage and displays its duration most accurately.
Title Safe Area Specifies how much of the frame edge to mark as a safe zone for titles, so that titles aren’t cut off by
televisions that zoom the picture slightly to enlarge it. A rectangle with cross hairs marks the title-safe zone when
you click the Safe Margins button in the Source Monitor or Program Monitor. Titles are usually assumed to require
a wider safe zone than action.
Page 33

ADOBE PREMIERE PRO 2.0
User Guide
Action Safe Area Specifies how much of the frame edge to mark as a safe zone for action so that action isn’t cut off
bytelevisionsthatzoomthepictureslightlytoenlargeit.Arectanglemarkstheaction-safezonewhenyouclickthe
Safe Margins button in the Source Monitor or Program Monitor.
Sample Rate In general, higher rates provide better audio quality when you play back audio in sequences, but they
require more disk space and processing. Resampling, or setting a different rate from the original audio, also requires
additional processing time and affects the quality. Try to record audio at a high-quality sample rate, and capture
audio at the rate at which it was recorded.
Display Format Specifies whether audio time display is measured using audio samples or milliseconds. Display
Format applies when Audio Units is selected in the Source Monitor or Program Monitor menu. (By default, time is
displayed in frames, but it can be displayed in audio units for sample-level precision when you are editing audio.)
Note: DV video and audio use standardized settings that are specified automatically when you select DV Playback
editing mode. When you use DV Playback editing mode, avoid changing the Timebase, Frame Size, Pixel Aspect Ratio,
Fields, and Sample Rate settings.
See also
“Previewing on a monitor using a video card” on page 138
27
Video Rendering settings
Video Rendering settings affect how Adobe Premiere Pro generates video when you select Sequence > Render Work
Area.
Maximum Bit Depth Maximizes the color bit depth, up to 32 bits, to include in video played back in sequences. This
setting may not be available if the selected compressor provides only one option for bit depth. You can also specify
an 8-bit (256-color) palette when preparing a video program for 8-bit color playback, such as when using the
Desktop editing mode for the web or for some presentation software.
Previews These options—File Format, Compressor, and Color Depth— specify how Adobe Premiere Pro plays
previews. Select a combination that gives the best quality previews while keeping rendering time and file size within
tolerances acceptable for your system. For certain editing modes, these settings cannot be changed.
Note: If you use a clip in your video program without applying effects or changing frame or time characteristics, Adobe
Premiere Pro uses the clip’s original codec for playback. If you make changes that require recalculation of each frame,
Adobe Premiere Pro applies the codec that you choose here.
Optimize Stills Uses still images efficiently in sequences. For example, if a still image has a duration of 2 seconds in
a project set to 30 fps, Adobe Premiere Pro creates one 2-second frame instead of 60 frames at 1/30 of a second each.
Deselect this option if sequences exhibit playback problems when displaying still images.
Save and name your project settings even if you plan to use them in only one project. Saving settings creates a backup
copy of the settings in case someone accidentally alters the current project settings.
To open a project
Adobe Premiere Pro can open project files created with Adobe Premiere Pro or Adobe Premiere 6.x for either
Windows or Mac OS. You can open only one project at a time. Ifyou want to transfer the contents of one project into
another, import them.
1 Choose File > Open Project.
2 Browse to the project file and select it.
Page 34

ADOBE PREMIERE PRO 2.0
User Guide
3 Select Open.
To locate missing files
Adobe Premiere Pro doesn’t store video, audio, or still image files in the project file—it stores only a reference to each
of these files based on its file name and location at the time you imported it. If you later move, rename, or delete a
source file, Adobe Premiere Pro can’t find it automatically the next time you open the project. In this case, Adobe
Premiere Pro displays the Where Is The File dialog box.
1 Locate the file using the Look In field or the Find button.
2 Select the file and choose Select.
Note: Do not delete source files while you are using them as clips in an Adobe Premiere Pro project unless they were
captured using device control and you plan to recapture them. After you deliver the final movie, you can delete source
files.
To skip missing files
You don’t need to locate missing files to continue working on a project. Instead, you can substitute offline files as
placeholders for the missing files. You can continue editing with these offline files, but you must bring the originals
back online before rendering your movie.
28
When you want to bring a file back online after the project is open, you don’t have to close the project and open it
again. Instead, use the Link Media command.
❖ Choose one of the following in the Where Is The File dialog box:
Offline Replaces a missing file with an offline file, a placeholder that preserves all references tothe missing file every-
where in the project. Unlike the temporary offline file created by Skip, the one generated by Offline persists between
sessions, so you won’t have to locate missing files every time the project is opened.
Offline All Like Offline, Offline All replaces all missing files with persistent offline files.
Skip Replaces a missing file with a temporary offline file for the duration of a session. When you close your project
and then reopen it, you see a dialog that asks you to locate the file or allows you to skip it again.
Skip All Like Skip, Skip All replaces all missing files with temporary offline files.
Important: Select Skip or Skip All only when you are certain that you want to rework all the instances where the file is
used in the project. If you want to keep the file in the project but can’t locate it at the moment, use Offline instead.
To save a project
Saving a project saves your editing decisions, references to source files, and the most recent arrangement of panels.
Protect your work by saving often.
Adobe Premiere Pro may ask whether you want to save a project even though you haven’t edited any sequences. This
occursbecauseotherattributesoftheprojectmayhavechangedsincetheprojectwasopened.It’susuallybesttosave
changes when asked.
❖ Do one of the following:
• Choose File > Save to save the current project.
• To save a copy of a project and continue working in the new copy, choose File > Save As, specify a location and
file name, and click Save.
Page 35

ADOBE PREMIERE PRO 2.0
User Guide
• To save a copy of a project but continue working in the original project, choose File > Save a Copy, specify a
location and file name, and click Save.
Note: There’s no need to save copies of a project when creating different segments or versions of the same video program.
Simply create new or duplicate sequences within a single project file.
To change the Auto Save settings
By default Adobe Premiere Pro automatically saves your project every 20 minutes and retains the last five versions
of the project file on the harddisk. You can revert to a previously saved version at any time. Archiving many iterations
of a project consumes relatively little disk space because project files are much smaller than source video files. It’s
usuallybesttosaveprojectfilestothesamedriveasyourapplication.ArchivedfilesaresavedintheAdobePremiere
Pro Auto-Save folder.
1 Choose Edit > Preferences > Auto Save.
2 Do any of the following, and then click OK:
• Select Automatically Save Projects, and type the number of minutes between saves.
• For Maximum Project Versions,enter the number of versions of a project file you want to save. For example, if you
type 10, Adobe Premiere Pro saves the ten most recent versions.
29
To open an Auto Save project
1 Choose File > Open project.
2 Browse to the Adobe Premiere Pro Auto-Save folder, located in the same scratch disk location as captured video
files. If no files are available, the Auto Save preference may be turned off.
3 Open the project file containing the version you want to use.
Aspect ratio
About aspect ratio
Aspect ratio specifies the ratio of width to height. Video and still picture frames have a frame aspect ratio, and the
pixels that make up the frame have a pixel aspect ratio. Some cameras can record various frame aspect ratios, and
different video standards use different pixel aspect ratios.
You set the frame and pixel aspect ratios for an Adobe Premiere Pro project when you create it. Once they are set,
you cannot change them for that project. You can, however, use assets created with different aspect ratios in that
project.
Adobe Premiere Pro automatically tries to compensate for the pixel aspect ratio ofsource files. If an asset still appears
distorted, you can manually specify its pixel aspect ratio. It's important to reconcile pixel aspect ratios before reconciling frame aspect ratios, because an incorrect frame size can be due to a misinterpreted pixel aspect ratio.
Frame aspect ratio
Frame aspect ratio describes the ratio of width to height in the dimensions of an image. For example, DV NTSC has
a frame aspect ratio of4:3 (or 4.0width by 3.0 height)and a typical widescreen frame has a frame aspect ratio of 16:9.
Many cameras that have a widescreen mode can record using the 16:9 aspect ratio. Many films have been shot using
even wider aspect ratios.
Page 36

416
ADOBE PREMIERE PRO 2.0
User Guide
30
3
A 4:3 frame aspect ratio (left), and wider 16:9 frame aspect ratio (right)
9
When you import clips shot in one frame aspect ratio into a project that uses another frame aspect ratio, you must
decide how to reconcile the different values. For example, there are two common techniques for showing a
widescreen movie with a 16:9 frame aspect ratio on a standard television with a 4:3 frame aspect ratio. You can fit
the entire width of the 16:9 frame in a black 4:3 frame (called letterboxing), which results in black bands above and
below the widescreen frame. Or you can fill the 4:3 frame vertically with the entire height of the 16:9 frame, varying
the horizontal position of the 16:9 frame behind the narrower 4:3 frame so that important action is visible in the 4:3
frame (called pan & scan). In Adobe Premiere Pro, you can implement either technique by using Motion effect
properties such as Position and Scale.
AB
C D
NTSC displays
A. 16:9 NTSC footage B. DVD player display using original widescreen format on widescreen TV screen C. 16:9 image on a 4:3 TV screen
cropped using automatic pan and scan D. 16:9 image on a 4:3 TV screenusing automaticletterboxing to reduce overall frame size and display
entire image
Page 37

ADOBE PREMIERE PRO 2.0
User Guide
Pixel aspect ratio
Pixel aspect ratio describes the ratio of width to height of a single pixel in a frame. Pixel aspect ratios vary because
different video systems make various assumptions about the number of pixels required to fill a frame. For example,
many computer video standards define a 4:3 aspect ratio frame as 640 pixels wide by 480 pixels high, which results
in square pixels. Video standards such as DV NTSC define a 4:3 aspect ratio frame as 720 x 480 pixels, which results
in narrower, rectangular pixels because there are more pixels within the same frame width. The computer video
pixels in this example have a pixel aspect ratio of 1:1 (square), whereas the DV NTSC pixels have a pixel aspect ratio
of 0.9 (nonsquare). DV pixels, which are always rectangular, are vertically oriented in systems producing NTSC
video and horizontally oriented in systems producing PAL video. Adobe Premiere Pro displays a clip’s pixel aspect
ratio next to the clip’s image thumbnail in the Project panel.
Ifyoudisplayrectangularpixelsonasquare-pixelmonitorwithoutalteration,imagesappeardistorted;forexample,
circles distort into ovals. However, when displayed on a broadcast monitor, the images appear correctly proportioned
because broadcast monitors use rectangular pixels. Adobe Premiere Pro can display and output clips of various pixel
aspect ratios withoutdistortionbecause it attemptsto automatically reconcile them withthe pixel aspect ratio of your
project. You may occasionally encounter a distorted clip if Adobe Premiere Pro interprets pixel aspect ratio incorrectly. You can correct the distortion by manually specifying the source clip’s pixel aspect ratio.
31
AB C
Pixel and frame aspect ratios
A. 4:3 square-pixel image displayed on 4:3 square-pixel (computer) monitor B. 4:3 square-pixel image interpreted correctly for display on 4:3
non-square pixel (TV) monitor C. 4:3 square-pixel image interpreted incorrectly for display on 4:3 non-square pixel (TV) monitor
Using assets with various aspect ratios
Adobe Premiere Pro automatically attempts to preserve the image aspect ratio of imported assets, sometimes
changing the pixel aspect ratio, the frame dimensions, or both so that the asset does not appear cropped or distorted
when used in a sequence. Assets created in an Adobe Creative Suite application contain metadata that allows Adobe
Premiere Pro tomake the calculations automatically and precisely. For assets lacking this metadata, Adobe Premiere
Pro applies a set of rules to interpret pixel aspect ratio.
When you capture or import NTSC footage with the ATSC frame size of 704 x 480, the D1 frame size of 720 x 486,
or the DV frame size of 720 x 480, Adobe Premiere Pro automatically sets the pixel aspect ratio for that asset to
D1/DV NTSC (0.9). When you capture or import footage with the HD frame size of 1440 x 1080, Adobe Premiere
Pro automatically sets the pixel aspect ratio for that file toHD 1080 Anamorphic (1.33).When youcapture or import
PAL footage with the D1 or DV resolution of 720 x 576, Adobe Premiere Pro automatically sets the pixel aspect ratio
for that file to D1/DV PAL (1.067).
For other frame sizes, Adobe Premiere Pro assumes that the asset was designed with square pixels and changes the
pixel aspect ratio and frame dimensions in a way that preserves the asset’s image aspect ratio. If the imported asset
is distorted, you may need to change the pixel aspect ratio manually.
When you drag an asset into a sequence, Adobe Premiere Pro centers the asset in the program frame by default.
Depending on its frame size, the resulting image may be too small or overcropped for the needs of the project. If so,
youmayneedtochangeitsscale.YoucandothismanuallyorhaveAdobePremiereProdoitautomaticallywhenever
you drag an asset into a sequence.
Page 38

ADOBE PREMIERE PRO 2.0
User Guide
It is always a good idea tomake sure that files are interpreted correctly. You can read an asset’s frame dimensions and
pixel aspect ratio near the preview thumbnail and in the Video Info column of the Project panel. You can also find
this data in the asset’s Properties dialog box, the Interpret Footage dialog box, and the Info panel.
See also
“To return a logo to its original size or aspect ratio” on page 218
“About the Info panel” on page 17
To change pixel aspect ratios
The preset you choose when you create a project sets the frame and pixel aspect ratios for the project. You can’t
change these after you save the project file, but you can change the pixel aspect ratio that Adobe Premiere Pro
assumes for individual assets. For example, if a square-pixel asset generated by a graphics or animation program
looks distorted in Adobe Premiere Pro, you can correct its pixel aspect ratio to make it look right. By ensuring that
all files are interpreted correctly, you can combine footage with different ratios in the same project and generate
output that doesn’t distort the resulting images.
1 Select the file in the Project panel.
2 Choose File > Interpret Footage, specify options in the Pixel Aspect Ratio section, and click OK.
32
See also
“To adjust the pixel aspect ratio of an imported still image” on page 88
To scale assets manually
When you drag an asset into a sequence, by default Adobe Premiere Pro preserves its frame size and centers the asset
in the program frame. You can rescale the asset without distortion if its pixel aspect ratio has been interpreted
correctly.
1 Drag the asset into a sequence and select the asset.
2 Open the Effect Controls panel.
3 Click on the arrow next to the Motion effect to reveal the motion controls.
4 Click on the arrow next to the Scale control within the Motion effect to reveal the Scale slider.
5 Move the Scale slider left or right to decrease or increase the size of the frame.
To scale assets automatically
When you drag an asset into a sequence, Adobe Premiere Pro preserves its frame size and centers the asset in the
program frame. Instead, you can automatically scale imported assets to the project’s default frame size.
1 Choose Edit > Preferences > General.
2 Select Default Scale To Frame Size.
3 Click OK.
Page 39

ADOBE PREMIERE PRO 2.0
User Guide
About square-pixel footage
Many graphics and animation programs generate square-pixel assets meant for display on square-pixel computer
monitors. Adobe Premiere Pro, however, typically generates files with non-square pixels for display on television
sets. Adobe Premiere Pro automatically conforms square-pixelassets to the project’s pixelaspect ratio.After the asset
is conformed, however, it no longer has its original frame aspect ratio. Also, its frame aspect ratio is not likely to
match that of the project, even if it did before it was conformed.
For example, suppose you generate a square-pixel asset at 720 x 540 and import it into an Adobe Premiere Pro DV
project with an aspect ratio of 720 x 540. In this case, the asset will be wider than the screen when it is conformed.
YoucanusetheScalecontroltosetthesizeoftheasset’sframewithintheproject’sframe.However,topreservethe
asset’s frame aspect ratio, Adobe Premiere Pro often needs either to crop the asset or to frame it within black bars.
You can prevent this kind of cropping and framing by generating assets from your square-pixel graphics or
animationprogramsinaframeaspectratiothat,whenconformed,matchestheproject’sframesizeexactly.Forbest
results, use programs such as Adobe Photoshop and After Effects that include pixel aspect ratio settings, and set the
frame dimensions and pixel aspect ratio to match those of your project. If the pixel aspect ratio setting is unavailable
in your program, do not try to match the frame dimensions (for example, 720 x 540). Instead, ensure that the overall
frame aspect ratio matches that of your project (for example, 4:3 or 16:9). Adobe Premiere Pro automatically adjusts
the video so that it is not distorted.
If your square-pixel program requires frame dimensions, use the option that matches your project’s output:
33
• 4:3 DV (NTSC) or ATSC SD—create and save the square-pixel file at 720 x 534.
• 4:3 D1 (NTSC)—create and save the square-pixel file at 720 x 540.
• 4:3 DV or D1 (PAL)—create and save the file at 768 x 576.
• 16:9 DV (NTSC)—create and save the file at 864 x 480.
• 16:9 D1 (NTSC)—create and save the file at 864 x 486.
• 16:9 DV or D1 (PAL)—create and save the file at 1024 x 576.
• 16:9 1080i HD—create and save the file at 1920 x 1080.
• 16:9 720p HD—create and save the file at 1280 x 720.
To correct recurring misinterpretations
Adobe Premiere Pro automatically assigns pixel aspect ratios to files according to a file of rules. If a specific type of
image is consistently misinterpreted (distorted) when you import it, you can change the relevant rule.
1 Open a text editor, such as Notepad.
2 From within the text editor, go to the Adobe Premiere Pro Plug-ins folder.
3 Open the file named Interpretation Rules.txt.
4 Edit the rule that you want to modify, and choose Save.
Page 40

Common pixel aspect ratios for assets
Common pixel aspect ratios for assets
Asset Pixel aspect ratio When to use
ADOBE PREMIERE PRO 2.0
User Guide
34
Square pixels 1.0 Your footage has a 640 x 480 or 648 x 486 frame size, is
D1/DV NTSC 0.9 Yourfootage hasa 720 x486 or 720x 480 framesize, and
D1/DV NTSC Widescreen
D1/DV PAL 1.0666 Yourfootage has a720 x576 framesize, andyour desired
D1/DV PAL Widescreen 1.422 Yourfootage has a720 x576 framesize, andyour desired
Anamorphic 2:1 2.0 Yourfootage was shot using ananamorphic film lens, or
HDV 1080/DVCPRO HD
720 (After Effects), HD
Anamorphic 1080
(Adobe Premiere Pro)
DVCPRO HD1080 (After
Effects only)
1.2 Yourfootage hasa 720 x486 or 720x 480 framesize, and
1.33 Your footage has a 1440 x 1080 or 960 x 720 frame size
1.5 Your footage has a 1280 x 1080 frame size and your
1920 x 1080 HD (not HDV or DVCPRO HD), is 1280 x 720
HD or HDV, or was exported from an application that
doesn’t support nonsquare pixels. This setting can also
be appropriatefor footage that wastransferred from film
or for customized projects.
your desiredresult is a4:3 frame aspectratio.This setting
can also be appropriate for footage that was exported
from an application that works with nonsquare pixels,
such as a 3D animation application.
your desired result is a 16:9 frame aspect ratio.
result is a 4:3 frame aspect ratio.
result is a 16:9 frame aspect ratio.
was anamorphically transferredfrom a film frame with a
2:1 aspect ratio.
and your desired result is a 16:9 frame aspect ratio.
desired result is a 16:9 frame aspect ratio.
24P projects
About 24P footage
Because support for 24P footage is built into Adobe Premiere Pro, you need to make only minor preparations to
capture,import, and export 24P projects. Adobe Premiere Pro includes project presets for 24P;after you create a 24P
project, you import and capture your footage as usual.
Adobe Premiere Pro also includes two options for playback of 24P footage. Both options convert footage so that it
plays back at 29.97 fps, but with subtle visual and performance differences.
In Adobe Premiere Pro, you can edit images that were captured using 24P and 24P Advance (24PA) interlacing
schemes. These formats allow you to capture footage to NTSC DV tape at 24 progressive frames per second.
Page 41

ADOBE PREMIERE PRO 2.0
User Guide
Working with the 24P modes is useful when you intend to author a progressive scan DVD. Because Adobe Premiere
Pro recognizes 24P modes,you canperform yourcapture and edits within the program. Then, you can use theAdobe
Media Encoder to export the file from Adobe Premiere Pro. After you export the file, you can open it in Adobe
Encore DVD, author your DVD, and then simultaneously export the project and burn it to DVD as a 24P MPEG-2
stream. The resulting DVD is playable on any DVD player and exhibits no interlacing artifacts if you have a
480p-capable (progressive scan-capable) DVD player and television. Alternatively, you can export the Adobe
Premiere Pro 24P project in a format, such as still-image sequences, appropriate for transfer to film.
Note: Adobe Premiere Pro accepts 24P and 24PA footage only from cameras using the 24P schemes.
To create a 24P project
1 Open a new project.
2 In the New Project dialog box, choose the Load Preset tab.
3 From the Available Presets list, choose the DV - 24P folder.
4 Choose the 24P format that matches your footage.
5 Select a location, type a name for your project, and click OK.
Note: If you capture 24P footage, Adobe Premiere Pro recognizes the footage as 24P and treats it accordingly, regardless
of your project settings.
35
To set 24P playback options
1 Choose Project > Project Settings > General.
2 Click the Playback Settings button.
3 In the 24p Conversion Method pane, select one of the following options:
Repeat Frame (ABBCD) Duplicates frames where necessary to maintain 29.97 fps playback. This option uses fewer
CPU resources.
Interlaced Frame (2:3:3:2) Combines the frames in a telecine-like scheme to maintain 29.97 fps playback. This
option produces smooth playback but uses more CPU resources.
4 Click OK in the Playback Settings dialog box, and click OK in the Project Settings dialog box.
To simulate film transfer
By default, Adobe Premiere Pro converts 24P DV footage to play back at 24P. If you prefer the film transfer look,
however, you can make it play 24 fps footage at 29.97 fps.
Additionally, you can apply any of a number of third-party film-look plug-in effects to the master sequence. These
plug-ins can often performtelecine-style conversion, or add grainor colorcorrection to simulate variousfilm stocks.
Pay close attention to lighting and, during shooting, use tripods and do slow pans to create the appearance of using
a heavy film camera. Attention to these details will give your project more of a film look.
1 Right-click a 24P clip in the Project panel.
2 Select Interpret Footage.
3 Under Frame Rate, check Remove 24p DV Pulldown.
4 Click OK.
Page 42

ADOBE PREMIERE PRO 2.0
User Guide
About 24P timecode
When you import 24P footage, Adobe Premiere Pro treats it as 23.976 fps progressive scan footage. Because of this,
when you work with 24P footage in a 24P project, the timecode is displayed as 24 fps. However, the camera records
and logs 24P footage in 30 fps nondrop-frame timecode. When you log 24P footage for capture, you log clips
according to the camera’s timecode count of 30 fps nondrop-frame timecode.
For example, a clip that you log for capture may have an In point of 00:01:00:28. However, as an offline clip in a 24P
project, the In point is shown as 00:01:00:23. In addition, mixing non-drop-frame footage with drop-frame footage
can cause larger differences in timecode display between the project and the clip, with minutes, seconds, and entire
durations seemingly out of sync. Be aware of these discrepancies as you edit.
To display 24P source timecode
If you use30 fps nondrop-frame timecode for projects containing 24P footage, Adobe Premiere Pro drops every fifth
framefromthe24Pfootagetimecodecount.Whenyouviewthepropertiesofyour24Pclip,theframerateisshown
as 23.976, but the timebase as 29.97. If you’d prefer to read a clip’s original timecode, do the following:
1 Right-click the clip in the Project panel.
2 Select Interpret Footage > Use Frame Rate from File.
36
Improving performance
About scratch disks
When you edit a project, Adobe Premiere Pro uses disk space to store files required by your project, such as captured
video and audio, conformed audio, and preview files that you create manually or that are created automatically when
exporting to certain formats. Adobe Premiere Pro uses conformed audio files and preview files to optimize performance, allowing real-time editing, 32-bit floating-point quality, and efficient output.
All scratch disk files are preserved across work sessions. If you delete preview files or conformed audio files, Adobe
Premiere Pro automatically recreates them.
By default, scratch disk files are stored where you save the project. The scratch disk space required increases as
sequences become longer or more complex. For best performance, it is recommended that you dedicate a hard drive
or drivesstrictly to yourmedia assets. Specify these dedicateddisks as yourscratch disks. If your systemhas multiple
disks, you can use the Edit > Preferences > Scratch Disks command to specify which disks Adobe Premiere Pro uses
for media files. This is best done when you set up a new project.
In terms of performance, it’s usually best to dedicate a different disk to each asset type, but you can also specify
folders on the same disk. You can specify unique scratch disk locations for the following types of file:
Captured Video Video files that you create using File > Capture.
Captured Audio Audio files that you create using File > Capture.
Video Previews Files created when you use the Sequence > Render Work Area command, export to a movie file, or
export to a device. If the previewed area includes effects, the effects are rendered at full quality in the preview file.
Audio Previews Files created when you use the Sequence > Render Work Area command, use the Clip > Audio
Options > Render And Replace command, export to a movie file, or export to a DV device. If the previewed area
includes effects, they are rendered at full quality in the preview file.
Page 43

ADOBE PREMIERE PRO 2.0
User Guide
Media Cache Files created by the Media Cache feature, including conformed audio files, PEK audio files and video
index files (for MPEG).
DVD Encoding Files created when you export movies to a DVD folder.
To specify scratch disks
You set up scratch disks in the ScratchDisk pane of the Preferences dialog box. Before changing scratch disksettings,
youcanverifytheamountoffreediskspaceontheselectedvolumebylookingintheboxtotherightofthepath.If
the path is too long to read, position the pointer over the path name, and the full path appears in a tool tip.
1 Choose Edit > Preferences > Scratch Disks.
2 Identify a location for each type of file named in the dialog box. Adobe Premiere Pro creates a subfolder named
for each file type (for instance, Captured Video) and storesthe folder’s associated files in it. The pull-down menu lists
three default locations:
My Documents Stores scratch files in the My Documents folder.
Same As Project Stores scratch files in the same folder where the project file is stored.
Custom Allows you to specify a location of your choosing. Choose Custom, then click Browse and browse to any
available folder.
37
Maximizing scratch disk performance
For maximum performance, follow these guidelines:
• If your computer has only one hard disk, consider leaving all scratch disk options at their default settings.
• Set up scratch disks on one or more separate hard disks. In Adobe Premiere Pro, it’s possible to set up each type
of scratch disk to its own disk (for example, one disk for captured video and another for captured audio).
• Specify only partitions formatted for the NTFS file format as scratch disks. FAT32 partitions do not support large
file sizes.
• Specify your fastest hard disks for capturing footage and storing scratch files. You can use a slower disk for audio
preview files and the project file.
• Specify only disks attached to your computer. A hard disk located on a network is usually too slow. Avoid using
removable media because Adobe Premiere Pro always requires access to scratch disk files. Scratch disk files are
preserved for each project, even when you close the project. They are reused when you reopen the project
associated with them. If scratch disk files are stored on removable media and the media are removed from the
drive, the scratch disk won’t be available to Adobe Premiere Pro.
• Although you can divide a single disk into partitions and set up partitions as scratch disks, this doesn’t improve
performance because the single drive mechanism becomes a bottleneck. For best results, set up scratch disk
volumes that are physically separate drives.
Page 44

ADOBE PREMIERE PRO 2.0
User Guide
Correcting mistakes
To correct mistakes
In case you change your mind ormake a mistake,Adobe PremierePro providesseveral ways toundo your work. You
can undo only those actions that alter the video program; for example, you can undo an edit, but you cannot undo
scrolling in a window.
❖ Do one of the following:
• To undo the most recent change, choose Edit > Undo. (You can sequentially undo as many as 100 recent changes
made to the project in any Adobe Premiere Pro panel. )
• To jump to a specific state of the project since the project was opened, select an item in the History panel.
• To undo all changes made since the last time you saved the project, choose File > Revert.
• Toundochangesmadebeforethelasttimeyousavedaproject,tryopeningapreviousversionofyourprojectin
the Premiere Auto-Save folder, and then choose File > Save As to store the project in a location outside of the
Premiere Auto-Save folder. The number of previous versions saved depends on the Auto Save preference settings.
• To stop a change that Adobe Premiere Pro is processing (for example, when you see a progress bar), press Esc.
• To close a dialog box without applying changes, click Cancel.
• To set all values in an applied effect back to the default values, click the Reset button for the effect in the Effect
Controls panel.
38
See also
“To change the Auto Save settings” on page 29
“To open an Auto Save project” on page 29
History panel
Use the History panel to jump to any state of the project created during the current working session. Each time you
apply a change to some part of the project, the new state of that project is added to the panel. You can modify the
project from the state you select. History states aren’t available for actions within the Capture and Titler panels.
The following guidelines can help you with the History panel:
• Program-wide changes, such as changes to panels, windows, and preferences, are not changes to the project itself
and so are not added to the History panel.
• After you close and reopen the project, the previous states are no longer available in the History panel.
• The oldest state is at the top of the list, and the most recent one is at the bottom.
• Each stateis listed with the name of the tool or commandused to change the project as well as an icon representing
the tool or command.Some actionsgeneratea state for each panelaffected by the action,such as the Titler. Actions
you perform in such a panel are treated as a single state in the History panel.
• Selecting a state dims those below it, to indicate which changes will be removed if you work from the project at
that state.
• Selecting a state and then changing the project removes all subsequent states.
Page 45

ADOBE PREMIERE PRO 2.0
To work with the History panel
❖ Do any of the following:
• To select a state, click the name of the state in the History panel.
• To navigate in the History panel, drag the panel’s slider or scroll bar; or choose Step Forward or Step Backward
from the panel menu.
• To delete a project state, select the state. Then choose Delete from the panel menu or click the Delete icon and
click OK; alternatively, Alt-click the Delete icon.
• To clear all states from the History panel, choose Clear History from the panel menu.
User Guide
39
Page 46

Chapter 4: Adobe Bridge
The basics of Bridge
About Adobe Bridge
Adobe Bridge is across-platform applicationprovided with Adobe Creative Suite and Adobe Production Studio. You
can use Bridge to organize, browse, and locate the assets you need to create content for print, the web, television,
DVD, film, and mobile devices. Bridge keeps native Adobe files (such as PSD and PDF) as well as non-Adobe application files available for easy access. You can drag assets into your layouts, projects, and compositions as needed,
preview them, and even add metadata (file information), making the files easier to locate.
File browsing FromBridgeyoucanview,search,sort,manage,andprocessimagefiles.YoucanuseBridgetocreate
new folders; rename, move, and delete files; edit metadata; rotate images; and run batch commands. You can also
view information about files and data imported from your digital or DV camera.
Version Cue If you have Adobe Creative Suite 2, you can use Bridge as a central location from which to use Adobe
®
Version Cue
applicationforeachfile,includingnon-Adobeapplicationfiles.Also,youcancreatenewVersionCueprojects,delete
projects, create versions, save alternates, and set access privileges in Bridge.
. From Bridge, you can browse all the files in a project in one place without having to start the native
40
Note: Adobe Version Cue is not included with Production Studio.
Bridge Center If you have Adobe Creative Suite 2, Adobe Bridge includes Bridge Center, where you can view news
readersinyourwebbrowser,seeyourmostrecentactivity,readabouttipsandtricksforusingAdobeproducts,save
groups of files, and more. Adobe CreativeSuite 2 users can also use Bridge to specify color management settings and
access scripts that help automate your workflow.
Note: Bridge Center is not included with Production Studio.
Camera Raw If you have Adobe Photoshop
files from Bridge, edit them, and save them in a Photoshop-compatible format. You can edit the image settings
directly in the Camera Raw dialog box without starting Photoshop. If you don’t have Photoshop or After Effects
installed, you can still preview the camera raw files in Bridge.
Stock Photos Click Adobe Stock Photos from the Favorites pane in Bridge to search leading stock libraries for
royalty-free images. You can download low-resolution, complimentary versions of the images and try them out in
your projects before purchasing them.
Color management You can use Bridge to synchronize color settings across Adobe Creative Suite 2 applications.
This synchronization ensures that colors look the same no matter which Creative Suite application you view them in.
®
or Adobe After Effects installed, you can open or import camera raw
See also
“About Adobe Stock Photos” on page 56
The Bridge work area
These are the main components of the Adobe Bridge window:
The Look In menu Lists the folder hierarchy, as well as favorite and recent folders. This menu gives you a quick way
to find folders containing the items you want to display. The menu is at the top of the Bridge window.
Page 47

ADOBE PREMIERE PRO 2.0
User Guide
The Favorites panel Gives you quick access to folders as well as to Adobe Stock Photos and collections. If you have
Adobe Creative Suite 2, you also have access to Version Cue and Bridge Center.
The Folders panel Shows the folder hierarchy. Use it to navigate to the correct folder.
The Preview panel Displays a preview of the selected file. The preview is separate from, andtypically larger than, the
thumbnail image displayed in the content area. You can reduce or enlarge the preview.
The Metadata panel Contains metadata information for the selected file. If multiple files are selected, shared data
(such as keywords, date created, and exposure setting) is listed.
The Keywords panel Helps you organize your images by attaching keywords to them.
To start and quit Bridge, and to return to an application
Do any of the following:
• To open Bridge from an application, choose File > Browse from your application.
• (Windows) To open Bridge directly, choose Adobe Bridge from the Start menu.
• (Mac OS) To open Bridge directly, double-click the Adobe Bridge icon . By default, this is located in the Appli-
cations/Adobe Bridge folder.
• To quit Bridge, choose File > Exit (Windows) or Bridge > Quit Bridge (Mac OS).
• To return to the last open application that started Bridge, choose File > Return To [Application].
41
If Production Studio is installed, using File > Browse to launch Bridge within a Production Studio application lets
you double-click a file to open or import it within that application. For example, if you choose File > Browse from
within Adobe Premiereand then double-clicka Photoshop file, the file is added to the Premiere Project panel, not opened
in Photoshop.
See also
“To manage files with Bridge” on page 47
To create and close Bridge windows
❖ Do one of the following:
• Choose File > New Window to create a full-size Bridge window.
• Choose File > Close Window. In Windows, this command quits Bridge as well.
See also
“The Bridge work area” on page 40
To use Bridge in Compact mode
SwitchtoCompactmodewhenyouwanttoshrinktheBridgewindow.InCompactmode,thepanelsarehiddenand
the content area is simplified. A subset of common Bridge commands remains available from the pop-up menu at
the upper right portion of the window.
Page 48

ADOBE PREMIERE PRO 2.0
User Guide
By default, the Compact mode Bridge window floats on top of all windows. (In Full mode, the Bridge window can
movebehindapplicationwindows.)Thisfloatingwindowisusefulbecauseitisalwaysvisibleandusableasyouwork
in different applications. For instance, you might use Compact mode after you select the files you plan to use, and
then drag them into the application as needed.
1 Click the Switch To Compact Mode button .
2 Do any of the following:
• Choose commands from the menu at the top right of the Bridge window.
• Click the Switch To Ultra Compact Mode button to hide the content area, further minimizing the Bridge
window. You can click the button again to return to Compact mode.
• Click the Switch To Full Mode button to return to Full mode, displaying the content area and the panels, and
letting Bridge move behind the current application window.
See also
“The Bridge work area” on page 40
To adjust the Bridge window
You can adjust the Bridge window by moving and resizing the panels. For example, you can enlarge the Preview panel
to display bigger thumbnails. However, you can’t move panels outside the Bridge window.
42
❖ Do any of the following:
• Drag a panel by its tab up or down into another panel area.
• Drag the horizontal divider bar between panels to make them larger or smaller.
• Drag the vertical divider bar between the panels and the content area right or left to resize the panels or content
area.
• Click the Show/Hide Panes button at the lower left of the Bridge window to display or hide the panels.
• Choose View, followed by the name of the panel you want to display or hide.
See also
“The Bridge work area” on page 40
To select Bridge workspaces
A Bridge workspace is a certain configuration or layout of the work area. You can select either a premade workspace
or a custom workspace that you have previously saved.
❖ Choose Window, followed by the name of the workspace you want, or choose Window > Workspace, followed by
one of the following commands:
Lightbox Displays just the content area of Bridge, so that you can concentrate on viewing the files.
File Navigator Displays the content area in Thumbnails view, along with the Favorites panel and Folder panel.
Metadata Focus Displays the content area in Thumbnails view, along with the Metadata panel prominently shown.
Filmstrip Focus Displays just the content area, in Filmstrip view.
Page 49

ADOBE PREMIERE PRO 2.0
User Guide
To save and delete Bridge workspaces
You can save the current Bridge layout (that is, the work area configuration) as a workspace and reuse it later. By
saving Bridge in various configurations, you can work in (and quickly switch between) different layouts of the work
®
area. For instance, you might use one workspace to sort new photos and another to work with Adobe InDesign
❖ Choose Window > Workspace, followed by one of these commands:
Save Workspace Saves the current Bridge layout as a workspace so that you can reuse it later, even if you move a
files.
panelorchangetheviewinthecontentarea.Ifyouchoosethiscommand,enteranamefortheworkspaceandclick
Save.YoucanalsoassignakeyboardshortcuttotheworkspaceandspecifywhethertosavethelocationoftheBridge
window as part of the workspace.
Delete Workspace Deletesthesavedworkspace.Ifyouchoosethiscommand,choosetheworkspacefromthemenu,
and click Delete.
Reset To Default Workspace Restores the workspace to the default configuration.
To set Bridge preferences
1 Choose Edit > Preferences (Windows) or Bridge > Preferences (Mac OS).
2 Select any of the preferences categories on the left:
General Controls the general appearance settings.
43
Metadata Controls which sections and fields are displayed in the Metadata panel.
Labels Assigns names to each color label and specifies whether you need to press Ctrl as part of the keyboard
shortcut combination to apply labels and ratings to files.
File Type Associations Specifies which application to use from Bridge to open files of the named type. For any file
type, you can click the name of the application (or None) and click Browse to locate an application to use. You can
also reset the file type associations to their default settings as well as hide any file types that don’t have an associated
application.This affects only those files that you open with Bridge, and overrides theExplorer (Windows) and Finder
(Mac OS) settings.
Adobe Stock Photos Specifies Adobe Stock Photos settings.
Advanced Specifies advanced settings, including cache options and language options.
3 Click OK.
See also
“Bridge General preferences” on page 43
“Bridge Advanced preferences” on page 44
“To set Adobe Stock Photos preferences” on page 64
Bridge General preferences
Set any of the following General preferences and click OK:
Background Specifies the darkness of the content area in which thumbnails are shown.
Show Tooltips Specifies whether to display Bridge help information when you position the pointer over an item.
(This preference does not affect settings for Version Cue tool tips, which display metadata for items.)
Page 50

ADOBE PREMIERE PRO 2.0
User Guide
Additional Lines Of Thumbnail Metadata Specifies whether to show additional metadata information with thumb-
nailsinthecontentarea.Ifyouselectthisoption,youcanchoosethetypeofmetadatatoshowfromtheassociated
menu. You can display up to three extra lines of information.
Favorites Items Specifies what items to show in the Favorites panel. Certain options are dimmed if you do not have
those items.
Reveal Scripts In Explorer/Finder Opens the folder that contains scripts (the commands available in the Tools
menu).
Reset All Warning Dialogs Resets warning notices in Bridge to their default settings.
Bridge Advanced preferences
Set any of the following Advanced preferences and click OK:
Do Not Process Files Larger Than Specifies the maximum file size of documents for which Bridge automatically
creates thumbnails. Displaying large files can slow performance.
Number Of Recently Visited Folders To Display In The Look In Popup Sets the number of most recently viewed
folders that appear in the Look In menu.
Language Sets the language used in the Bridge interface.
44
Double-Click Edits Camera Raw Settings In Bridge Opens camera raw files in the Adobe Camera Raw dialog box in
Bridge.
Use A Centralized Cache File Places the two cache files created for each folder you view in a centralized folder. A
centralized cache is generally easier to use than a distributed cache. For instance, when the cache is centralized, you
don’t have to search in multiple, distributed locations if you want to remove the cache. To specify a new name or
location for this centralized cache folder, click Choose.
Use Distributed Cache Files When Possible Placesthetwocachefilescreatedforeachfolderdisplayedintheviewed
folder,ifpossible.Forinstance,it’snotpossibletoplacethecachefilesintheviewedfolderifthatfolderisonaburned
CD. In that case, Bridge places the cache files in the centralized folder instead. However, if you are burning a CD,
using a distributed cache means that you don’t have to export the cache to the CD, because it is already in the folder
being burned to the CD.
Note: Cache files are hidden files. To view them in Bridge, choose View > Show Hidden Files.
To work with the cache in Bridge
The cachestores thumbnail, metadata,and file information to shortenloading times when you return to a previously
viewed folder. However, storing the cache takes up disk space.
Note: Purging the cache deletes the metadata cache and thumbnail cache. If the metadata can’t be written to a file, label
and rating information is lost as well.
❖ Choose any of the following commands from the Tools > Cache submenu:
Build Cache For Subfolders Builds, asa background process, a cache for the selected folder and all the folders within
it (except aliases/shortcuts to other folders). This shortens the time spent waiting for the cache to be displayedas you
look in subfolders.
Purge Cache For This Folder Clears the cache for the selected folder. This command is useful if you suspect that the
cache for a folder is old and needs to be regenerated.
Page 51

ADOBE PREMIERE PRO 2.0
User Guide
Purge Central Cache Clears the entire centralized cache and any distributed cache in the currently viewed folder,
freeing room on the hard drive. The command does not otherwise clear local caches.
Export Cache Exports the cache, allowing you to burn a CD with the cache already generated. Because the folder
cache is written into the folder, the thumbnail cache and metadata cache are available after you burn the CD. This
option is active only if you chose Use A Centralized Cache File in the Preferences dialog box.
Files and folders in Bridge
To view file and folder thumbnails in Bridge
The content area of Bridge displays thumbnails of the files and folders of the selected folder, along with information
about them. You can specify how you want files and folders to be displayed in the content area.
❖ Do any of the following:
• Drag the Thumbnail slider at the bottom of the Bridge window to adjust the size of thumbnails.
• Choose View > As Thumbnails to display items in a grid.
• Choose View > As Filmstrip to display thumbnails in a scrolling list along with an extra-large thumbnail of the
currently selected item. Click the Back button or Forward button directly below the extra-large thumbnail to go
to the previous or next thumbnail. Click the Switch Filmstrip Orientation button to change from a horizontal
slide show to a vertical one. Note that you can page through a PDF preview in Filmstrip view.
• Choose View > As Details to display a scrollable list of thumbnails along with information about the selected file.
• Choose View > As Versions And Alternates to display a scrollable list of thumbnails, including thumbnails of any
Version Cue alternates and versions for each item (Adobe Creative Suite 2 only). Only the current file appears
unless you have created an alternates group containing the file or created previous versions of the file. Click Alternates View or Versions View at the top right of the content area to display thumbnails of alternates or versions. In
Alternates View, you can also create alternates groups containing files that are not in the current folder.
• Choose View > Show Thumbnail Only to view thumbnails without any text information listed. However, Version
Cue tool tips still display Version Cue information when you position the pointer over the thumbnail.
• Choose View > Slideshow to view thumbnails as a slide show that takes over the entire screen. This is a quick and
easywaytodisplayandworkwithlargeversionsofallthegraphicsfilesinafolder.Instructionsonhowtousethe
slide show are displayed on the screen when you choose this command.
45
Depending on the view you’re in, you can display extra file information by positioning the pointer over a thumbnail
in the content area. For files in Version Cue projects (Adobe Creative Suite 2 only), you can also choose File >
Versions or File Alternates. This command opens a dialog box that lets you work with the file’s versions or alternates
without having to select that view in the Bridge content area.
To specify how files and folders are shown in Bridge
You can specify what type of files and folders you want to display as thumbnails in the content area, as well as the
order in which to display them.
❖ Choose any of the following commands from the View menu:
• Sort, followed by the order in which you want to sort files. Choose Ascending to sort in ascending rather than
descending order. Choose Manually to sort by the last order in which you dragged the files.
Page 52

ADOBE PREMIERE PRO 2.0
• Show Hidden Files to display hidden files, such as cache files and Version Cue files that have been provisionally
User Guide
removed (not permanently deleted) from Version Cue projects.
• Show Folders to display folders as well as individual files.
• Show All Files to display all files regardless of type, even non-Adobe files that Bridge doesn’t normally display.
• Show Graphic Files Only to display only files in graphic file formats, such as EPS, JPEG, BMP, PS, TIFF, and GIF.
• Show Camera Raw Files Only to display only camera raw files.
• Show Vector Files Only to display only files created with drawing programs such as Adobe Illustrator
®
, and EPS
and PS files.
• Refresh (or choose Refresh from the Folders panel menu) to update the content area. This is useful, for instance,
when you perform certain Version Cue actions that don’t automatically refresh the view in the content area.
Closing and reopening Bridge also refreshes the view.
YoucanalsoclickUnfilteredatthetoprightoftheBridgewindowandchoosethefilesyouwanttodisplaybasedon
their rating or label. The Unfiltered menu operates independently of the View > Sort commands.
To navigate folders and files with Bridge
❖ Do any of the following:
• Select theFolders paneland click to select the folder you want. Click the plus sign(Windows) or triangle(Mac OS)
next to a folder or double-click the folder to open subfolders within it.
• Select the Favorites panel and click to select the folder you want.
• Choose a folder from the Look In menu. You can click the Go Back button, Go Forward button, or Go Up button
next to the menu to navigate within the current folder listed in the menu.
46
See also
“To specify how files and folders are shown in Bridge” on page 45
To select files in Bridge
Before you can work with a file, you need to select it. You can select more than one file at a time.
❖ Do one of the following in the current folder:
• Click the thumbnail of a file.
• To select contiguous files, Shift-click them.
• To select noncontiguous files, Ctrl-click (Windows) or Command-click (Mac OS) them.
• To select all labeled or unlabeled files, choose Edit > Select Labeled or Edit > Select Unlabeled.
• To select the opposite of the current selection, choose Edit > Invert Selection.
To open files in Bridge
You can open files in Bridge, even files that were not made with Adobe applications.
1 Select the file in the current folder.
2 Do one of the following:
• Choose File > Open.
Page 53

ADOBE PREMIERE PRO 2.0
User Guide
• Press Enter (Windows) or Return (Mac OS).
• Double-click the file in the content area or Preview panel.
• Choose File > Open With, followed by the name of the application with which to open the file.
• Drag the file into the working area of an application, such as an open Illustrator document.
• Drag the file onto the application icon.
• Choose File > Open In Camera Raw to edit the Adobe camera raw settings for the file.
• Choose File > Open In Adobe Encore DVD As, followed by the file type (Asset, Menu, Timeline, or Slideshow)
you want to use (Windows only).
If you choose File > Browse to launch Bridge within a Production Studio application, double-clicking a file opens or
imports that file within the application.
To manage files with Bridge
Adobe Bridge makes it easy to drag and drop files, move them between folders, copy and duplicate them, and
otherwise manipulate them.
Note: IfyouhaveAdobeCreativeSuite2,youcanalsouseAdobeVersionCuefromBridgetomanagefilesyouauthor.
You can create and manage revisions to files kept in Version Cue projects. Version Cue is also a convenient environment
for collaborative file management in workgroups. You can manage not only Adobe Creative Suite files but also other
Adobe and non-Adobe files.
47
❖ Do any of the following:
To delete files Select the files and click the Delete button or press Delete.
To copy files and folders Select the files or folders and choose Edit > Copy, or Ctrl-drag (Windows) or Option-drag
(Mac OS) the file or folders to a different folder.
To move files to another folder Select the files and drag them to a different folder. (When you search for Adobe
Stock Photos, you can’t drag images to other areas, because some images may be comp thumbnails. To drag a comp
image, first download it and then drag it from the downloaded comp’s folder.)
To quickly attach an image to an e-mail message, drag the image from Bridge and drop it into the e-mail message.
To display the location of a file in the operating system Select the file and choose File > Reveal In Explorer
(Windows) or File > Reveal In Finder (Mac OS).
To find the location of a file in a collection Select a file and choose File > Reveal In Bridge. A collection is a saved
search. By default, if you select a file in a collection, the file is listed as being located in the folder “File Results.”
Selecting Reveal In Bridge moves you to the folder in which the file is located.
To place files into an application SelectthefilesandchooseFile >Place,followedbythenameoftheapplication.For
instance, you can use this command to place a JPEG image into Illustrator. You can also drag files from Bridge into
an application. Depending on the file, the document into which you want to place it may need to be opened first.
To drag files out of Bridge Selectthefilesanddragthemontothedesktoporintoanotherfolder.Thisactionmoves
the file onto the desktop or folder.
To drag files into Bridge Select one or more files on the desktop, in a folder, or in another application that supports
drag and drop, and drag them into the content area in Bridge. The files are moved from their current folder into the
one displayed in Bridge. (If the file you are dragging is in a different mounted volume than Bridge, the file is copied
into Bridge.)
Page 54

ADOBE PREMIERE PRO 2.0
User Guide
Drag a file or folder onto the Preview panel to display the contents of the folder in Bridge.
To manage folders with Bridge
❖ Do any of the following:
To create new folders Choose File > New Folder. Then, enter a name when the folder appears in the content area.
To delete folders Select the folder and press Delete.
To add folders to Favorites Choose a folder from the Look In menu or Folders panel or select it in the content area.
Then choose File > Add To Favorites. You can also drag the folder from the content area to the Favorites panel.
To remove folders from Favorites In the Favorites panel, select the folder you want to remove. Then choose File >
Remove From Favorites.
To reorganize folders in the Favorites panel Drag the folder to the desired location in the panel.
To rotate images with Bridge
You can rotate the view of JPEG, PSD, TIFF, and camera raw file images in Bridge. Rotating an image in Bridge may
rotate it in the application in which it was created as well. Rotating does not affect the data in the image file.
48
1 Select one or more images in the content area.
2 Choose Edit > Rotate 90˚ Clockwise, Rotate 90˚ Counterclockwise, or Rotate 180˚.
To label files with Bridge
Labeling files with a certain color is a flexible way to mark a large number of files quickly. Using the View > Sort
menu or Unfilter button, you can choose to view files according to their color label.
For example, suppose you’ve just imported a large number of images and are viewing them in Bridge. As you review
each new image, you can label those you want to keep. After this initial pass, you can use the Unfilter button to
display and work on files that you’ve labeled with a particular color.
You can assign names to labels through the Preferences dialog box. The name is then added to the file’s metadata
when you apply the label.
Note: When you view folders, Bridge shows both labeled and unlabeled files until you choose another option. Also,
purging the cache deletes labels from files that don’t support XMP write (such as BMP, DCS, Pict, PS6 PDF, and PSB
files), locked files, or read-only files (such as files on CDs).
1 Select one or more files.
2 Do one of the following:
• To label files, choose a color from the Label menu.
• To remove labels from files, choose Label > No Label.
See also
“To specify how files and folders are shown in Bridge” on page 45
Page 55

ADOBE PREMIERE PRO 2.0
User Guide
To rate files with Bridge
When assigning ratings tofiles, you can award from zero tofive stars. Using theView > Sort menu or Unfilter button,
you can choose to view files according to their rating.
For example, suppose you’ve just imported a large number of images and are viewing them in Bridge. As you review
eachnewimage,youcanratethemfrombesttoworst.Afterthisinitialpass,youcanviewonlyfilesyou’veratedwith
four or five stars and work on those.
1 Select one or more files.
2 Do any of the following:
• In Thumbnail view, click the dot representing the number of stars you want to give the file. (Dots do not appear
in very small thumbnail views. If necessary, rescale the thumbnail view until the dots appear.)
• Choose a rating from the Label menu.
• To add or remove one star, choose Label > Increase Rating or Label > Decrease Rating.
• To remove all stars, choose Label > No Rating.
See also
“To specify how files and folders are shown in Bridge” on page 45
49
To search for files and folders with Bridge
You can perform searches with Bridge. You can narrow your search by adding multiple search criteria. You can even
save your search criteria as a collection, so that you can perform the same search again later.
1 Choose Edit > Find.
2 In the Find dialog box, choose asource folder from the Look In menu. By default, the menu displays the currently
active folder. Click the Browse button to navigate to another folder.
3 (Optional) Select Include All Subfolders to expand the search to any subfolders in the source folder.
4 (Optional) Select Search Past Versions Of Version Cue Files to include past versions of Adobe Version Cue files,
as well as current ones, in the search (Adobe Creative Suite 2 only).
5 (Optional) Select Show Find Results In A New Browser Window to display the search results in a new Bridge
window. If left unselected, the search results appear in the content area of the current window.
6 Choose a criterion for your search by selecting an option from the leftmost Criteria menu.
7 Select a limiter from the center Criteria menu.
8 Enter the search text in the text box at the right, if needed. You can enter basic search terms such as AND, OR,
and * (for wild cards).
9 To add search criteria, click the plus sign button. To remove search criteria, click the minus sign button.
10 Click Find. Bridge displays the files that match the search criteria, and you can navigate through the files.
11 (Optional) To save the search criteria to perform the same search again, click Save As Collection. Enter a name
for the collection. Select Start Search From Current Folder to search from the same folder in the future. Then, click
Save. The search criteria are saved in the Collections folder listed in the Favorites panel.
See also
“To search with criteria saved as collections” on page 50
Page 56

ADOBE PREMIERE PRO 2.0
User Guide
To search with criteria saved as collections
If you saved search criteria by using the Save As Collection option in the Find dialog box, you can run that search
again by using that collection.
1 Select Collections in the Favorites panel or Look In menu.
2 Double-click the collection you want.
A new Bridge window appears containing the results of the search.
See also
“To search for files and folders with Bridge” on page 49
Running automated tasks with Bridge
To run automated tasks with Bridge
The Tools menu contains submenus for various commands available in the different Adobe applications. For
instance, if you have Adobe Photoshop installed, you can use the commands under the Tools > Photoshop submenu
to make picture packages and create Photomerge panoramas using photos you select in Bridge. Running these tasks
from Bridge saves time because you don’t have to open each file individually.
50
Note: Third parties can also create and add their own items to the Tools menu for added functionality in Bridge. For
information about creating your own scripts, see Bridge JavaScript Scripting Reference.
1 Selectthefilesorfoldersyouwanttouse.Ifyouselectafolder,thecommandisappliedwherepossibletoallfiles
in the folder.
2 Choose Tools > [Application], followed by the command you want. (If your application doesn’t have any
automated tasks available, no application name appears in the menu.)
For information about a particular command, see the documentation for that application.
To batch-rename files with Bridge
You can rename files andfolders ina group, orbatch. When you batch-rename files, you canchoose the samesettings
for all the selected files.
1 Do one of the following:
• Select the files that you want to rename.
• Select a folder in the Folders panel. The new setting will apply to all the files in the folder.
2 Choose Tools > Batch Rename.
3 Set the following options and click Rename:
• For Destination Folder, select whether you want to place the renamed files in the same folder or in a different
folder, move them to another folder, or place a copy in another folder. If you select Move To Other Folder or Copy
To Other Folder, click Browse to select the folder.
• For New Filenames, choose elements from the menus or enter text into the text boxes. The specified elements and
text are combined to create the new file name. You can click the + button or - button to add or delete elements. A
preview of the new file name appears at the bottom of the dialog box.
Page 57

ADOBE PREMIERE PRO 2.0
User Guide
Note: If you choose Sequence Number, enter a number. The number is automatically incremented for each file named.
• Select Preserve Current File Name In XMP Metadata if you want to retain the original file name in the metadata.
• For Compatibility, select the operating systems with which you want renamed files to be compatible. The current
operating system is selected by default, and cannot be deselected.
Metadata in Bridge
About metadata
Metadata is information about the file, such as the author’s name, resolution, color space, copyright, and keywords
applied to it. You can use metadata to streamline your workflow and organize your files. This information is stored
in a standardized way using the Extensible Metadata Platform (XMP) standard on which Adobe Bridge and the
Adobe Creative Suite applications are built. XMP is built on XML, and in most cases the information is stored in the
file so that it cannot be lost. If it is not possible to store the information in the file itself, XMP metadata is stored in
a separate file called a sidecar file.
Many of the powerful Bridge features that allow you to organize, search, and keep track of your files and versions
depend on XMP metadata in your files. Bridge provides two ways of working with metadata: through the Bridge
Metadata panel and through the File Info dialog box. These methods provide different views into the XMP metadata
stored in the file. In some cases, multiple views may exist for the same property. For example, a property may be
labeled Author in one view and Creator in another, but both refer to the same underlying property. Even if you
customize these views for specific workflows, they remain standardized through XMP. The Advanced view in the
File Info dialog box displays the fundamental values being stored.
51
Metadata that is stored in other formats, such as EXIF, IPTC (IIM), GPS, and TIFF, is synchronized and described
with XMP so that it can be more easily viewed and managed. Other applications and features (for example, Adobe
Version Cue) also use XMP to communicate and store information such as version comments. For instance, when
yousaveafileinVersionCue,youmightaddthecommentthatyourotatedthefilewhenyouworkedonit.Lateron,
you could use Bridge to navigate to that Version Cue project and search for the term “rotate” to locate that file.
In most cases the metadata remains with the file even when the file format changes, for example, from PSD to JPG.
Metadata is also retained when those files are placed in an Adobe InDesign layout.
You can use the XMP Software DevelopmentKit to customize thecreation, processing, and interchange of metadata.
For example, you can use the XMP SDK to add fields to the File Info dialog box. More information on XMP and the
XMP SDK is available from the Adobe Solutions Network on the Adobe Website.
About the Metadata panel in Bridge
From the Metadata panel, you can view and edit the metadata for selected files, use metadata to search for files, and
use templates to append and replace metadata. Metadata preserves information about the contents, copyright status,
origin, and history of documents. Version Cue uses metadata to manage files.
You can specify the types of metadata displayed in the Metadata panel.
®
Note: If you have applied metadata to an Adobe Acrobat
keywords are still attached to the PDF file.
Depending on the selected file, the following types of metadata appear in the Bridge Metadata panel:
File Properties Describes the characteristics of the file, including the size, creation date, and modification date.
PDF file, some keywords may not appear; however, these
Page 58

ADOBE PREMIERE PRO 2.0
User Guide
IPTC Core Displays editable metadata. You can add captions to your files as well as copyright information. IPTC
Core is a new specification that was approved by IPTC (International Press Telecommunications Council) in
October 2004. It differs from the older IPTC (IIM, legacy) in that new properties have been added, some property
names have changed, and some properties have been deleted. You can display the older IPTC (IIM, legacy) metadata
by selecting it from the Metadata options in the Preferences dialog box.
IPTC (IIM, legacy) Displays editable metadata. As with IPTC Core, you can add captions to your files as well as
copyright information.This set of metadata is hidden by default, because it has been superseded by IPTC Core.
However, you can choose it by selecting it from the Metadata options in the Preferences dialog box.
Fonts Lists the fonts used in Adobe InDesign files.
Swatches List the swatches used in Adobe InDesign files.
Camera Data (Exif) Displays information assigned by digital cameras. EXIF information includes the camera
settings used when the image was taken.
GPS Displays navigational information from a global positioning system (GPS) available in some digital cameras.
Photos without GPS information don’t have GPS metadata.
Camera Raw Displays settings applied by the Camera Raw plug-in.
Edit History Keeps a log of changes made to images with Photoshop.
52
Adobe Stock Photos Lists information about images obtained from Adobe Stock Photos.
Version Cue Lists any Version Cue version information about the file.
Note: Depending on the applications you are using, custom panels for various properties may appear here as well.
To view metadata with Bridge
❖ Do any of the following:
• SelectoneormorefilesandviewtheinformationintheMetadatapanel.Ifyouselectmultiplefiles,onlymetadata
that is common to the files appears. Use the scroll bars to view hidden categories. Click the triangle to display
everything within a category.
You can change the font size in the panel by choosing Increase Font Size or Decrease Font Size from the panel menu.
• Select one or more files and choose File > File Info. Then, select any of the categories listed on the left.
• Choose View > As Details or View > As Versions And Alternates to display the metadata next to the thumbnails
in the content area. This is especially useful for viewing Version Cue files.
• Position the pointer over a thumbnail in the content area. (Metadata appears in a tool tip only if Show Tooltips is
selected in General preferences.)
To edit metadata with Bridge
1 Click the pencil icon to the far right of the metadata field you want to edit.
2 Type in the text box to edit or add metadata.
3 Press Tab to move through metadata fields.
4 When you have finished editing the metadata, click the Apply button at the bottom of the Metadata panel. To
cancel any changes you’ve made, click the Cancel button at the bottom of the panel.
Page 59

ADOBE PREMIERE PRO 2.0
User Guide
To specify the metadata displayed in the Metadata panel
1 Do one of the following:
• Choose Preferences from the Metadata panel menu.
• Choose Edit >Preferences (Windows) or Bridge > Preferences (Mac OS), and thenclick Metadata from the liston
the left side of the dialog box.
2 Select the metadata fields that you want to display in the Metadata panel.
3 Select the Hide Empty Fields option if you don’t want to view fields with no information in them.
4 Click OK.
To add metadata using the File Info dialog box
The File Info dialog box displays camera data, other file properties, an edit history, copyright and authorship information (if any), and custom metadata panels (if the application has installed them). You can add metadata directly
from the File Info dialog box. If you select multiple files, the dialog box shows where different values exist for a text
field. Any information you add to a field is applied to all selected files.
Note: You can also view metadata in the Metadata panel, in certain views in the content area, and by placing the pointer
over the thumbnail in the content area.
53
1 Select one or more files.
2 Choose File > File Info.
3 Select any of the following from the list on the left side of the dialog box:
Description Lets you enter document information about the file, such as document title, author, description, and
keywords that can be used to search for the document. You can also choose text from the menu to the right of the
text fields. To specify copyright information, select Copyrighted from the Copyright Status pop-up menu. Then
enter the copyright notice string and the URL of the person or company holding the copyright.
Audio Data 1 Lets you enter information about the audio file, including the title, artist, and album.
Audio Data 2 Lists information about the audio file, including bit rate, duration, and loop settings.
Categories Lets you enter information based on Associated Press categories.You can also choose text from the menu
to the right of the text fields. The Categories option appears only if Adobe Photoshop is installed.
History Displays Adobe Photoshop history log information for images saved with Photoshop. The History option
appears only if Adobe Photoshop is installed.
Camera Data 1 Displays read-only information about the camera and settings used to take the photo, such as make,
model, shutter speed, and f-stop. The Camera Data 1 option appears only if Adobe Photoshop or Production Studio
is installed.
Camera Data 2 Lists read-only file information about the photo, including pixel dimensions and resolution. The
Camera Data 2 option appears only if Adobe Photoshop or Production Studio is installed.
Adobe Stock Photos Lists read-only information about images obtained from Adobe Stock Photos.
Video Data 1 Lists information about the video file, including video frame width and height; and lets you enter
information about the video file, including tape name and scene name.
Video Data 2 Lists information about the video, including alternate tape name and timecode values.
Page 60

ADOBE PREMIERE PRO 2.0
User Guide
Origin Lets you enter file information that is useful for news outlets, including when and where the file was created,
transmission information, special instructions for handling the file, and headline information. You can also choose
text from the menu to the right of the text fields.
Advanced Displays fields and structures for storing metadata using namespaces and properties, such as file format
and XMP, EXIF, and PDF properties. You can do any of the following with the information listed:
• Click Save to export the metadata to a text file (with the .xmp file-name extension).
• Click Replace to replace the metadata in the existing files with metadata saved in an XMP file. Values in existing
properties are replaced with the new values.
• Click Append to add the metadata in the existing files to metadata saved in an XMP file. Values in existing
properties are not replaced, and new values are appended or inserted where appropriate.
• Click Delete to remove the currently selected Advanced property. You can Shift-click to select multiple properties.
Note: Hold down the Alt key (Windows) or Optionkey (Mac OS) to change these commands to Replace All, Append All,
and Delete All. These commands then affect all information in the file; that is, EXIF information that is not modifiable
by the user, such as the f-stop and the Photoshop file ID information, as well as user-modifiable information, such as
document title and keywords. Holding down Alt (Windows) or Option (Mac OS) alsodisplays the Resetbutton to restore
the previous settings.
4 Click OK to apply the changes.
54
To work with metadata templates in Bridge
You can modify the metadata in the File Info dialog box and save it as a template for use with other files.
1 Create a new file using an Adobe Creative Suite or Production Studio application. This creates a file without
metadata from any other source.
2 Select the file.
3 Choose File > Info.
4 Enter the desired information in the File Info dialog box.
5 Choose any of the following from the menu at the upper right of the File Info dialog box:
• To save the metadata in the File Info dialog box as a template for use with other files, choose Save Metadata
Template. Enter a name for the template and click Save.
• To delete an existing metadata template, choose Delete Metadata Template. Choose the template you want to
delete from the menu in the dialog box and click Delete.
• To open the folder containing metadata templates, choose Show Templates.
6 Click OK. You can now also apply metadata templates to files with the Append Metadata and Replace Metadata
commands in the Tools menu and in the Metadata panel menu.
To apply metadata templates to files in Bridge
After you have saved metadata for one file, you can apply it to others.
1 Select one or more files.
2 Choose either of the following commands from the Metadata panel menu or the Tools menu:
• Append Metadata, followed by the nameof the template. This command applies thetemplate metadata only where
no metadata value or property currently exists in the file.
Page 61

ADOBE PREMIERE PRO 2.0
User Guide
• Replace Metadata, followed by the name of the template. This command completely replaces any existing
metadata in the file with the metadata in the template.
To apply keywords to files with Bridge
The Keyword panel lets you create and apply Bridge keywords to files. Keywords can be organized into categories
called keyword sets.Usingkeywords,youidentifyfilesbasedontheircontent.Later,youcanviewallfileswithshared
keywords as a group.
Note: Bridge keywords are distinct from XMP keywords created with the File Info dialog box. The latter are displayed
in Version Cue files in the “Other Metadata” section of the File Info dialog box.
❖ Do any of the following:
• To add a keyword to files, select one or more files. In the Keywords panel, click the box next to the name of the
keyword you want to add. A check mark appears in the box next to the keyword when it’s added to a file.
• Toaddasetofkeywordstofiles,selectoneormorefiles.IntheKeywordspanel,clicktheboxnexttothenameof
the keyword set. A check mark appears in the box next to the keyword set when it’s added to a file.
Create a group of frequently used keywords so that you can apply them as a group.
• To remove keywords from a file, select the file, and then click the box next to the name of the keyword or keyword
set that you want to remove.
• To create a new keyword, click the New Keyword button at the bottom of the panel or choose New Keyword
from the panel menu. A new default keyword name appears in the panel. To create the new keyword, type over
the default name and press Enter (Windows) or Return (Mac OS).
• To create a new keyword set, click the New Keyword Set button at the bottom of the panel or choose New
Keyword Set from the panel menu. A new default keyword set name appears in the panel. To create the new
keyword set, type over the default name and press Enter (Windows) or Return (Mac OS).
• To rename a keyword or keyword set, select the keyword or keyword set and choose Rename from the panel menu.
Then, type over the name in the panel and press Enter (Windows) or Return (Mac OS).
55
Note: When you rename a keyword, the keyword’s name isn’t changed in files that currently contain it. The original
name stays in the file.
• To move a keyword to a different keyword set, drag the keyword from one set to another.
• Todeleteakeyword,selectthekeywordbyclickingitsname,andthenclicktheDeleteKeywordbutton atthe
bottom of the panel or choose Delete from the panel menu.
Note: Keywords that you get from other users appear in the Other Keywords category until you recategorize them. To
make these keywords permanent in Bridge, select the keyword and then choose Persistent from the context menu.
• To find a file using the keyword, choose Find from the panel menu.
Note: You can’t modify keywords in search results for Adobe Stock Photos.
See also
“To search for files and folders with Bridge” on page 49
Page 62

ADOBE PREMIERE PRO 2.0
User Guide
Adobe Stock Photos
About Adobe Stock Photos
Adobe Stock Photos lets you view, try, and buy royalty-free images from leading stock libraries. With Adobe Stock
Photos, you won’t have to interrupt your design process to find quality images. Instead, from inside your favorite
applications, you can use the powerful search capabilities of Adobe Stock Photos to find and download images.
From Bridge, the Favorites pane gives you quick access to these stock images. With your computer connected to the
Internet, simply click the Adobe Stock Photos icon to start browsing thousands of available images. Because of the
tight integration between Stock Photos and Adobe applications, you can download images from Adobe Stock Photos
directly into many Adobe applications.
In the design process, you need the flexibility to try different images before deciding which one you want. Adobe
Stock Photos gives you the option to download low-resolution, complimentary (comp) versions of images you’re
considering. You can work with the comps until you make your final decision, at which point you can purchase and
download a high-resolution image.
For maximum convenience, you can open an account with Adobe. The benefit of opening an account is that you
enter your personal information only once, greatly simplifying the checkout process. You can also look back at
previous purchases, and even download photos again after you purchase them.
56
See also
“About comp images” on page 59
“Benefits of Stock Photos accounts” on page 61
“Buying stock photos” on page 59
Searching for images in Adobe Stock Photos
ThereareafewwaystosearchforimagesinStockPhotos.Ifyouneedhelpgettingaprojectstarted,abroadsearch
may yield a fund of possibilities and suggest areas to explore. If you have a clear idea of what you need, then you can
use Advanced Search to narrow the field.
Related keywords also help you find photos. After you find photos, you can start a new search by selecting one or
more related keywords. Each image is associated with keywords that help you find similar images. The more
keywords you select, the narrower the search results.
Photos matching the search criteria appear as thumbnails in the main Bridge window. You can resize the thumbnail
by dragging the Thumbnail slider at the bottom of the screen. When you click an image in search results, a lowresolution comp image appearsin thePreview pane (it may take several seconds for the imageto appear in the pane).
To enlarge the comp, simply resize the Preview pane. You can view metadata information about the image in the
Metadata pane under Adobe Stock Photos Metadata.
YourprevioussearchesareautomaticallysavedinPreviousPhotosintheFavoritespane.ClickPreviousSearchesto
display the list. To see the search results, double-click a search. To delete a search, select it and press the Delete key
(Windows), right-click the search and then choose Send To Recycle Bin (Windows), or Control-click the search and
choose Move To Trash (Mac OS).
Page 63

ADOBE PREMIERE PRO 2.0
User Guide
Allthumbnailsfromrecentsearchesaresavedonyourcomputer.Havingthethumbnailsavailableofflineishelpful
ifyouwanttobrowsethroughtheimageswhenyourcomputerisn’tconnectedtotheInternet.However,thethumbnails do take up some space on your hard drive. At some point, if you want to delete these thumbnails, delete the
searches (as described above), or remove them manually from the default file location: My Documents/AdobeStockPhotos/Previous Searches (Windows), or Documents/AdobeStockPhotos/Previous Searches (Mac OS).
See also
“To adjust the Bridge window” on page 42
“To view file and folder thumbnails in Bridge” on page 45
To search for stock photos
1 In Bridge, click Adobe Stock Photos in the Favorites pane.
2 Inthetextboxatthetopofthescreen,typethewordorphrasethatdescribesthesubjectofthephotosyouwant
to search for.
3 Click the Search button or press Enter.
Images matching the search criteria are displayed in batches. (There is a preference for changing the number of
images displayed in a batch.) To view more images, click More Results.
57
See also
“Search tips for stock photos” on page 58
“To view image price and keywords” on page 58
To use Advanced Search
Advanced Search is a powerful tool that helps you find exactly the right photo. You can combine several search
criteria to narrow your results.
1 In Bridge, click Adobe Stock Photos in the Favorites pane.
2 Click the Advanced Search button .
3 Search using any combination of the following options:
• Type a descriptive keyword or keywords in the text box to find related images. Alternatively, type an image ID, if
you know the ID of the photo you want to use.
• To restrict searches to a specific media type, choose one or more options under Media Types.
• To search by the orientation of the photo, select the acceptable shapes under Orientation.
• Select the name of one or more providers to limit the search.
4 Click the Search button to display images matching the search criteria.
See also
“Search tips for stock photos” on page 58
To search with related keywords
1 In Bridge, click Adobe Stock Photos from the Favorites pane.
Page 64

ADOBE PREMIERE PRO 2.0
User Guide
2 Inthetextboxatthetopofthescreen,typethewordorphrasethatdescribesthesubjectofthephotosyouwant
to search for.
3 In the search results, click a photo to select it.
4 Do one of the following:
• Click the Get Price & Keywords button.
• Right-click the image (Windows) and choose Get Price & Keywords from the menu.
5 When the Price & Keywords dialog box appears, select keywords under Keywords For This Image. The more
keywords you select, the narrower the search.
6 When you finish selecting keywords, click the Search Again button to begin a new search using the keywords.
To view image price and keywords
You can view size and price information, as well as related keywords, in the Image Detail dialog box.
1 In the search results window, click an image to select it.
2 Do one of the following:
• Click the Get Price & Keywords button.
• Right-click the image (Windows) and choose Get Price & Keywords from the menu.
3 To close the dialog box, click the Close button.
58
Note: ThecurrencydisplayedinthePrice&Keywordsdialogboxmaynotbethenativecurrencyofyourbillingcountry;
it is the supported currency for purchases made from your country. When you purchase photos from Adobe Stock Photos,
your credit card will be billed in the supported currency.
Search tips for stock photos
Here are some helpful pointers for refining your searches:
Misspelled words Double-check your search entries to make sure they’re spelled correctly.
Trademarked names Brand names may not return full search results. Instead, search for the item by its general
name.
Exact phrase searches To view images that exactly match a phrase, type the whole phrase in the Search text box. You
can enter Boolean operators such AND, OR, or NOT to narrow your search.
Search by subject To search for a specific subject, use nouns that describe the main subject of a photo, such as
“bicycle” or “house,” as well as adjectives that modify the nouns, such as “vintage” or “red.” To narrow the search
further, use verbs that describe an action in the photo.
Search by concept Try searching with concepts, or perceptions, such as “romance,” “vitality,” “frustration,” or
“excitement,” to find an inspiring image.
Search by style To find photos that reflect a specific photographic or artistic technique, try searching onterms such
as “profile”, “studio shot,” or “clipping path.”
Page 65

ADOBE PREMIERE PRO 2.0
User Guide
Comp images
About comp images
Comp images are free, nonwatermarked, low-resolution versions of stock photos that you can download. You can
use compsto capture a feeling, idea, or concept before choosing the final image for aproject. Comps are not licensed
for production, but you can use them in mock-ups or other preliminary work. Because comps are low-resolution
images, they’re not suitable for printing or publishing. After an evaluation period, you can purchase a highresolution version of the image to continue working with the photo.
Metadata is bundled with comp images. This metadata is used in Adobe applications to recognize images as stock
photos, even if you rename them. You canpurchase high-resolution versions of the images later, even after you move
a comp to a project folder or create other versions of the image.
You can view your downloaded comps by clicking Downloaded Comps in the Favorites pane, or you can navigate to
the default folder where comps are saved: My Documents/AdobeStockPhotos (Windows) or Documents/AdobeStockPhotos (Mac OS). You can move downloaded comps to any folder you want. To delete a comp in the Stock
Photos window, right-click it and then choose Send To Recycle Bin (Windows) or Control-click it and choose Move
To Trash (Mac OS).
For more information on using comps, see the terms of service (TOS), which describe when and for how long you
can use a comp. A Terms Of Service link is available on the main Adobe Stock Photos screen.
59
To download comps from Adobe Stock Photos
1 In the search results, click a photo to select it.
2 Do one of the following:
• Click the Download Comp button.
• Right-click the photo (Windows) and select Download Comp from the menu.
• Click Get Prices & Keywords and select Free Comp Image in the dialog box.Click the icon to download the comp.
To view saved comps in Stock Photos
To help you keep track of downloaded comps, you can view them in Bridge. If you decide to purchase a comp, put
the comp in your shopping cart.
1 In the Favorites pane, click Adobe Stock Photos.
2 Click Downloaded Comps to see the comps.
Buying stock photos
Buying stock photos
It’s simple to buy images through Adobe Stock Photos. When you find the photos you want to buy, put them in your
shopping cart. The photos remain in your cart until you’re ready to complete your purchase. When you finish
browsing, you can check out and have your images automatically downloaded to your computer.
Having an account with Adobe speeds the checkout process. Because your contact and billing information is saved,
you can complete your purchase with just a few clicks.
Page 66

ADOBE PREMIERE PRO 2.0
User Guide
Adobe Stock Photos maintains a secure site, and you can rest assured that your personal information is kept in strict
confidence. Any information you enter is used only for Adobe Stock Photos purposes.
To view your photos, click Purchased Images in the Favorites pane, or navigate to the default Stock Photos folder:
My Documents/AdobeStockPhotos (Windows) or Documents/AdobeStockPhotos (Mac OS).
See also
“To buy photos” on page 60
To place photos in the shopping cart
As you find photos you want to purchase, add them to the shopping cart until you’re ready to check out.
1 In the search results window, right-click (Windows) or Control-click (Mac OS) a photo, and then choose Add To
Cart from the context menu. You see a dialog box confirming that the photo is your shopping cart.
2 Click OK to continue, or click View Shopping Cart to see the contents of your cart.
If you want to disable this dialog box, select Don’t Show Again.
To buy photos
1 To access your shopping cart, click the Shopping Cart icon.
2 Choosearesolutionforthephotosyouwanttobuy.(Youcanremoveanitemfromtheshoppingcartatanytime
by clicking the Delete icon .)
3 Click Check Out.
4 Do one of the following:
• If you have an Adobe account, enter your ID and password.
• If you want to open an Adobe account, click Set Up An Account. You are prompted to enter your billing and
account information.
• Ifyouwanttobuytheimageswithoutanaccount,clickContinueAsGuest.Youarepromptedtoenteryourbilling
information. Click Continue.
5 Do one of the following:
• If you have an Adobe account, confirm your billing information and click Continue.
• If you don’t have an Adobe account, enter your billing information and click Continue.
6 In theOrder Summary page, confirm your choices. To delete a photofrom the shopping cart, click the Delete icon.
7 If you have a promotion code, enter it in the Promotion Code text box and click Apply. You see any changes made
to your order as a result of applying the promotion code.
8 Click the check box to accept the terms of the Adobe Stock Photos License Agreement (click the blue text to read
the agreement).
9 Finally, click the Purchase Now button to complete the checkout process. Your purchase is processed, then you’re
prompted to download your photos.
10 Click Start Download. After the photos are saved, click View Purchased Imagesif you want to start working with
them right away.
60
Page 67

ADOBE PREMIERE PRO 2.0
User Guide
11 To view the receipt for your purchase, in the Thank You page click View Receipt. You can also monitor the
progress of the download by clicking Open Download Status. When you finish, click Find More Images if you want
to find new photos, or click Go To Your Account.
If you have been working with a comp version of the image you purchased, you need to replace the comp with the
high-resolution image in your art.
Note: Todeletethelistofhigh-resolutionimageswaitingfordownloadfromtheDownloadStatusscreen,chooseEdit>
Preferences (Windows) or Bridge > Preferences (Mac OS). Select Adobe Stock Photos, and then click the Clear Now
button.
See also
“To create a Stock Photos account” on page 62
“To set Adobe Stock Photos preferences” on page 64
To view order details
A benefit of having an Adobe account is that you can go back and view your previous orders.
1 In Adobe Stock Photos, click the Your Account button .
2 In the Your Account page, click View Order History.
3 The Your Order History page shows all of your previous orders. To view details about a particular order, click the
order number (highlighted in blue).
4 IntheOrderDetailpage,youcanseethebillinginformation,aswellasadescriptionofthephotosyoupurchased.
Click Return To Your Account if you’re done, or click Return To Order History if you want to review other orders.
61
You can also redownload the photos you purchased.
Stock Photos Accounts
Benefits of Stock Photos accounts
Creatingan Adobe account makes purchasing photos quick and easy. When you log in with your e-mail addressand
password, you can work with your account in several ways:
Manage your profile After you complete the registration process, modify your account information anytime by
clicking the Your Account link in the navigation bar.
See your order history Track orders made through Adobe Creative Suite Stock Photos to check the specific items
ordered, the total cost of the purchase, or the order date.
Download previously purchased items again Access your order history and click Re-download to replace a lost or
corrupted file for up to one year from the original purchase date.
Shop with ease Purchase photos without providing profile information. Adobe Stock Photos automatically enters
your name and address when you make any purchases. All your personal information is securely stored.
Page 68

ADOBE PREMIERE PRO 2.0
User Guide
To create a Stock Photos account
1 In Adobe Stock Photos, do one of the following:
• Click the Your Account button , and then click the Continue button under Set Up An Account.
• If you have photos in the shopping cart, click the Shopping Cart icon, and then click Checkout. Click Set Up An
Account.
2 If you haven’t chosen your billing country, you see adialog box witha list of countries. Choose the country of your
billing address and click Continue.
3 In the text boxes, type your e-mail address and choose a password (at least six characters long and containing a
mix of letters and numbers).
4 Enter your billing address, and then type your payment information. The billing address must exactly match the
address where your credit card statements are mailed.
5 When you finish, click Continue.
After you create your account, Adobe Stock Photos sends a confirmation e-mail to the address you entered.
To log into your Stock Photos Account
1 In Adobe Stock Photos, click the Your Account button .
2 When prompted, type your e-mail address and password, and then click Continue. If your login is successful, the
Your Account page appears.
62
If you’re having trouble logginginto youraccount, makesure thatyou have spelled your e-mailaddress andpassword
correctly. Also make sure that you haven’t pressed the Caps Lock or Number Lock keys.
To edit your Stock Photos account profile
Your account profile includes your name and password settings.
1 Click the Your Account button .
2 Log into your account.
3 In the Your Account page, click Edit Your Profile. Do any of the following:
• To change your password, type a new word in the Password text box. Passwords can contain only letters and
numbers and must be at least six characters long.
• To sign up to get e-mail from Adobe Stock Photos about promotions or other special information, select the check
box.
4 To confirm your changes, click Save. To go back to the main Your Account page without saving changes, click
Return To Your Account.
To change Stock Photos account address information
You can change your default billing address or add other addresses. Make sure that any new addresses match the
address on your credit card billing statements exactly to avoid any problems.
1 Click the Your Account button .
2 Log into your account.
3 In the Your Account page, click Edit Your Address.
Page 69

ADOBE PREMIERE PRO 2.0
User Guide
4 Do any of the following:
• To change the nickname associated with the default address, type a new name in the Billing Address Nickname
text box.
• Type any changes to the default address in the text boxes.
• To add a new address to your account, click Add New Address, and then enter the information in the text boxes.
• To edit a non-default address, click Edit under the address, and make any changes.
• To make an address the default, click Set Default under the address.
• To delete an address, click Delete under the address.
5 To confirm your changes, click Save. To go back to the main Your Account page without saving changes, click
Return To Your Account.
To change Stock Photos account payment information
You can change your saved credit card information or add additional credit cards. Enter your credit card number
without spaces or dashes. You can give each credit card a nickname to keep track of which card you’re using.
1 Click the Your Account button .
2 Log into your account.
3 In the Your Account page, click Edit Your Payment Information.
4 Do any of the following:
• To change the nickname of the default credit card, type a new name in the Payment Nickname text box.
• To change the default credit card number, type the new number in the Credit Card Number text box, and then
choose the expiration date for the new card from the month and year menus.
• To add a new card to your account, click Add New Payment Method, and then type a nickname and the card
number. Enter the expiration date.
• To delete a payment method, click Delete under the payment nickname.
5 To confirm your changes, click Save. To go back to the main Your Account page without saving changes, click
Return To Your Account.
63
To download previously purchased images from Stock Photos
To download previously purchased images, you need to have a Stock Photos Account. You can download images
onto a different computer than the one you used to purchase the photos originally (see the license agreement for
information about restrictions).
1 Click the Your Account button .
2 In the Your Account page, click View Order History.
3 In the Your Order History page, click the order number (highlighted in blue) of the photo you want to download
again.
4 In the Order Detail page, click the arrow under Download. The photo is downloaded. By default, purchased
images are located at My Documents/AdobeStockPhotos/Purchased Images (Windows) or Documents/AdobeStockPhotos/Purchased Images (Mac OS).
Page 70

ADOBE PREMIERE PRO 2.0
User Guide
To set Adobe Stock Photos preferences
1 In Adobe Bridge, choose Edit > Preferences (Windows) or Bridge > Preferences (Mac OS).
2 Select Adobe Stock Photos from the list on the left.
3 Set any of the following preferences, and then click OK:
Thumbnails Per Search Group To set how many thumbnail images are displayed in a search group, choose an option
from the Thumbnails Per Search Group menu.
Search language To search using a different language, select the language from the Search Language menu. Note
that you get the best results from most providers if you search in English. This setting doesn’t affect the interface
display language.
Destination folder for downloads To select a new default folder in which to store photos, downloaded comps, and
purchased photos, click Change Location. Click Reset to restore the default location.
Billing Country Or Region To change your default billing country, choose the name of the country from the Billing
Country menu. The currency displayed next to the Billing Country menu may not be the native currency of that
country (not all currencies are supported). Instead, it’s the currency Adobe allows for that country. Your credit card
is billed in the supported currency.
Alert messages To enable or disable the messages that appear when you download a comp or add a photo to your
shoppingcart,selectordeselectDisplayMessageAfterDownloadingComporDisplayMessageAfterAddingImage
To Shopping Cart.
64
Automatic downloading to default folder To save your photos automatically to your default folder, select Auto-
Download Images After Purchasing Them. Deselect this option if you want to choose a location in which to save the
photos (for example, in a Version Cue project or other project-specific folder on your computer).
Downloading after lost connection To resume downloading automatically after a connection is lost, select Resume
Interrupted Downloads When Bridge Starts.
Page 71

Chapter 5: Capturing, digitizing, and importing
Collecting assets
About capturing, digitizing, and importing
To bring media files (assets) into an Adobe Premiere Pro project, you can capture, digitize, or import them,
depending on the type of source material:
Capture You capture digital video files from tape. That is, you transfer them from the source videotape to the hard
drive. All digital camcorders and decks record video in digital formats, but it must be captured (transferred to disk)
before Adobe Premiere Pro can use it in a project. Adobe Premiere Pro’s capture function, in conjunction with a
digital port or capture card (for example, IEEE 1394 or SDI), can capture digital video from tape and save it to disk
as files that you can then add to your project.
Digitize You digitize analog video. Analog video is recorded by analog camcorders and decks. The data must be
digitized (converted to digital form) before a computer can store and process it. Adobe Premiere Pro’s capture
function, in conjunction with a digitizer card—or a device that can convert analog video to digital—can convert
analog video to digital files readable by Adobe Premiere Pro.
65
Import Use the Import command to bring files—for example, still images or audio you’ve downloaded—that are
already on your hard drive into your Adobe Premiere Pro project. Adobe Premiere Pro lets you import numerous
types of digital files.
Capture panel
Use the Capture panel (choose File > Capture) to capture digital or analog video and audio. This panel includes a
preview, which displays video being captured, controls for recording with or without device control, a Settings pane
for editing your capture settings, and a Logging pane for logging clips for batch capturing. For convenience, some
options available in the Capture panel are also available in the Capture panel menu.
You can control certain source devices, such as camcorders and decks, directly from the Capture panel, provided
your computer has an Adobe Premiere Pro-compatible IEEE1394, RS-232, RS-422, LANC, or Control-M controller.
If your source device lacks any of these interfaces, you still use the Capture panel, but you must cue, start, and stop
your source device using its controls.
Note: WhennotcapturinginAdobePremierePro,closetheCapturepanel.TheCapturepanelassumesprimaryfocus,
so leaving it open while editing or previewing video disables output to the source device and may decrease performance.
Page 72

A C B D
ADOBE PREMIERE PRO 2.0
User Guide
66
Capture panel
A. Status area B. Preview C. Tab s D. Panel menu E. Device controls
E
To set the capture format
1
With a project open, choose Project > Project Settings > Capture.
2 From the Capture Format menu, choose the settings that match your source material.
To set capture preferences
1
Choose Edit > Preferences > Capture.
2 Specify whether you want to cancel capture on dropped frames, report dropped frames, or generate a batch log
file.
3 Select whether to use device control timecode. If a device controller is in use (for example, for RS-422/232 or
LANC-controlled devices), the last selection enables Adobe Premiere Pro to record the timecode supplied by the
controller instead of attempting to record any timecode that might be written to the source tape.
File size limits
Adobe Premiere Pro does not limit the size of files. However, your capture card, operating system, or hard disk may
set such a limit. Check your capture card and hard disk documentation for information on support of large files.
The format of your hard disk greatly affects its ability to handle large files. FAT32 formatting limits each file to 4 GB,
or about 18 minutes of DV footage. NTFS formatting doesn’t limit file size, although files are still subject to limitations that may be imposed by other components of your video-editing system. This is why it is best to use
NTFS-formatted disks as the scratch disks where you capture video and for the target drives where you export video
files.
Page 73

ADOBE PREMIERE PRO 2.0
User Guide
Supported file formats for import
Adobe Premiere Pro can import a number of video and audio formats. It also supports 10-bit color depth, necessary
for editing standard and high-definition footage.
File format support is provided by plug-in software modules. Most of these software modules are installed automatically with Adobe Premiere Pro.
Supported video and animation file formats
You can import any of the following types of video and animation files:
• ASF
• Type 2 AVI
• MPEG, MPE, MPG, M2V
• QuickTime (MOV; requires QuickTime player)
• DLX
• Windows Media File (WMV)
• Animated GIF
• Filmstrip (FLM)
67
Note: Type 1 AVI clips must be rendered before they can be previewed from a DV device. To render a Type 1 AVI clip,
add it to a sequence in a DV project, and build a preview file of that section of the Timeline panel.
Supported audio file formats
You can import any of the following types of audio files:
• Audio Interchange File Format (AIFF)
• AV I
• MP3,
• MPEG, MPG
• QuickTime (MOV; requires QuickTime player)
• WAVE (WAV)
• WMA
Supported still-image file formats
You can import any of the following types of still-image files:
• Adobe Illustrator (AI)
• Adobe Photoshop (PSD)
• Bitmap (BMP, DIB, RLE)
• EPS
• GIF
• ICO
• JPEG, JPE, JPG, JFIF
• PCX
Page 74

• PICT, PIC, PCT
• Portable Network Graphics (PNG)
• PTL, PRTL (Adobe Title Designer)
• Targa (TGA, ICB, VDA, VST)
• TIFF
• PSQ
Note: You can import layered Illustrator and Photoshop files as sequences.
Supported video project file formats
You can import any of the following types of video project files:
• Adobe Premiere 6.0 or 6.5 (PPJ)
• Adobe Premiere Pro (PRPROJ)
• Advanced Authoring Format (AAF)
• After Effects Project (AEP)
• EDL
• PLB
ADOBE PREMIERE PRO 2.0
User Guide
68
See also
“File formats supported for export” on page 381
Device control
About device control
You can use Adobe Premiere Pro’s device control to simplify and automate video capture and to export sequences to
tape. Device control lets you precisely control devices, such asdecks and camcorders, with capture andbatch capture
controls. With device control, you can use the Capture panel to log each clip and then use the Batch Capture
command to record logged clips automatically.
Adobe Premiere Procontrols devices throughits built-insupport ofIEEE 1394 and its support of compatible RS-232,
RS-422, LANC, and Control-M controllers. Regardless of type, if your device isn’t automatically recognized, you
need to set it up. Before setting up device control, make sure that you have a tape deck or camcorder that supports
external device control and a cable that connects the device to your controller, computer, or both.
To set up a project for device control
Some device control settings are available when you choose Edit > Preferences > Device Control, and others are in
theDeviceControlsectionatthebottomoftheSettingspaneoftheCapturepanel.Devicecontrolsettingsapplyto
the entire project.
1 Choose Edit > Preferences > Capture.
Page 75

ADOBE PREMIERE PRO 2.0
User Guide
2 SelectoneormoreoftheCaptureoptions.Ifyouareusingadevicecontrollerthatgeneratesitsowntimecode(for
example,a LANC controllerfor aHi8 camcorder),select Use Device Control Timecode. Thisreplaces theunreadable
timecode recorded on the tape with the controller’s timecode. Click OK.
3 Ifyouwantcapturedclipstobesavedtoaspecificbininaproject,makesurethattheprojectisopenandthatthe
bin exists in the Project panel.
4 Choose File > Capture.
5 In the Settings pane, click Edit to verify that the capture settings are appropriate for your device.
6 Click Save to save a group of project settings. Click OK when you’ve selected the correct settings for your device.
7 In the Capture Locations section of the Settings pane, make sure that the drives you designate for captured video
and audio have sufficient free space. If you want to change the locations, choose Custom from the Video or Audio
menu, click the corresponding Browse button, set the location, and click OK.
8 IntheDeviceControlsection,ifdevicecontrolhasnotbeensetup,chooseadevicefromtheDevicesmenuand
click Options to set it up. Options vary depending on the device; see the documentation for your device driver.
9 Test the device control buttons in the Capture panel to verify that they work and that you see video in the preview.
10 Click Logging. In the Setup area, make sure that the Capture menu setting is correct, and select a bin from the
list if needed. If no bin is selected or the bin list is empty, captured clips appear in the Project panel.
11 Enter information into the Clip Data area as needed.
69
Note: To avoid confusion, make sure that the tape name is unique. Some types of device control software may ask you
to specify the Tape Name setting each time you insert a new tape. The other Logging Data options aren’t required.
To set up a device for device control
Adobe Premiere Pro supports the control of devices such as camcorders and VTRs. Itcontrols DV and HDV devices
by way of IEEE 1394 connections and serially controlled devices by way of RS-232, RS-422, LANC, or Control-M
controllers installed on a given computer.
1 Open the Device Control Preferences dialog box by doing one of the following:
• Choose Edit > Preferences > Device Control.
• In the Capture panel, click Settings.
2 Select the type of device you want to control from the Devices pop-up menu.
3 Click Options, and do one of the following:
• If you are connecting a DV or SDI device, select the device brand and device type. If your particular device is not
listed, click Go Online For Device Info.
• If you are connecting a serial device, specify Protocol, Port, Time Source, and Time Base settings.
4 In the Device Control Options dialog box, check the status display:
Offline Adobe Premiere Pro does not see your device, and you need to check all your connections and settings.
Detected Adobe Premiere Pro sees your device but cannot control the tape (possibly because there is no tape
inserted).
Online Adobe Premiere Pro sees your device and can control the tape. Click OK.
Page 76

ADOBE PREMIERE PRO 2.0
5 In the Device Control section of the Settings pane, specify the following options as needed:
Preroll Time Indicates how much before the In point Adobe Premiere Pro starts playing the tape before capture. The
User Guide
appropriate value varies depending on the device you are using.
Timecode Offset Indicates the number of frames to adjust the timecode embedded in the captured video so that it
corresponds with the timecode number of the same frame on the source tape.
To calibrate an RS-422 or RS-232 device
1
Select File > Export > Export To Tape.
2 Click Options.
3 Enter the number of offset frames, as appropriate for your device, to the Delay Movie Start, Manual Edit Timing,
and Preroll boxes.
To control an RS-422 or RS-232 device
1
Select Edit > Preferences > Device Control.
2 From the Devices menu, select Serial Device Control.
3 Click Options.
4 In the VTR And Port Control section, select a protocol and port for your device.
5 In the Time Control section, select a time source and timebase for your device.
70
Device controls in the Capture panel
You can use the controls in the Capture panel to operate the device as you log clips. The jog control lets
you navigate quickly to nearby frames, and the shuttle control lets you change the speed of the tape as you
play it forward or backward. The Record button lets you begin a manual capture.
If you press the Rewind button when the tape is stopped, the device rewinds the tape at full speed. If you
rewind when the tape is playing or paused, the device rewinds while displaying video in the preview.
If you press the Fast Forward button when the tape is stopped, the devicemoves thetape forward at full speed.
Ifyoufastforwardwhenthetapeisplayingorpaused,thedevicemovesthetapeforwardwhiledisplayingvideoin
the preview.
If you press the Previous Scene button, the tape shuttles to the previous start point and pauses. If you press the
Next Scene button, the tape shuttles to the start point of the next scene and pauses.
You can also press the J, K, and L keys to control your device. J rewinds the tape; L fast forwards it, and K pauses it.
The speed of forward or reverse increases each time you press J or L. To rewind or forward one frame at a time, hold
down K and press J or L once. To slowly rewind or forward, hold down K+J or K+L.
To operate Capture panel controls using the keyboard, see the tool tips in the Capture panel. You can change the
shortcuts by choosing Edit > Keyboard Customization. You can also shuttle to a tape location by typing its timecode
into the Capture Panel’s In Point or Out Point timecode display and pressing Enter.
Page 77

ADOBE PREMIERE PRO 2.0
User Guide
Capturing and digitizing
System requirements for capturing
To capture digital video footage, your editing system needs the following components:
• For DV or HDV footage, either an OHCI-compliant IEEE 1394 (FireWire, iLink) port or capture card, or a
non-OHCI-compliant IEEE 1394 capture card with presets, drivers, and plug-ins written specifically for Adobe
Premiere Pro.
• For HD footage, an Adobe Premiere Pro-compliant HD capture card with an SDI input. Adobe Premiere Pro
natively supports the AJA HD SDI card.
• A codec (compressor/decompressor) for the type of data you need to capture. Adobe Premiere Pro has its own
codecs for importing DV and HDV footage. Plug-in software codecs are available for other types. Hardware
codecs are built into some capture cards.
• A hard disk capable of sustaining the data rate of the type of digital video you need to capture.
• Sufficient disk space for the captured footage. The length of a captured clip may be limited by your operating
system.
• A project that was created using a preset in the New Project dialog box in which all settings match the footage you
plan to capture.
71
Note: Some DV and HDV camcorders require a connection to their power adapters to activate their IEEE 1394 ports.
Other camcorders may go into sleep mode or demo mode if left in the camera mode without tape activity for a period of
time. To avoid these problems, connect your camcorder to itspoweradapterwhensettingitupforcapturingordubbing
video. If the camcorder goes into demo mode with the power adapter connected, turn off this feature using the
camcorder’s menu system.
To prepare for digital video capture
1 After connecting the digital device to your computer using an IEEE 1394 or SDI connection, turn the device on,
and do one of the following:
• If it’s a camera, set it to the playback mode, which may be labeled VTR or VCR.
• If it’s a deck, make sure that its output is set properly.
Note: Don’t set a camera to any of the recording modes, which may be labeled Camera or Movie.
2 Start Adobe Premiere Pro. When the Welcome screen appears, do one of the following:
• Click New Project, select the desired preset from the Load Preset panel, and click OK.
• Select an existing project. The project must use a preset that matches the video and audio settings of the footage
you’re going to capture.
3 Choose Edit > Preferences > Scratch Disks, and specify the locations for Captured Video and Captured Audio.
Note: Adobe Premiere Pro supports high bit-depth (greater than 8-bit) video necessary for editing standard and high
definition footage.
Page 78

ADOBE PREMIERE PRO 2.0
User Guide
To capture without device control
If you do not have a device that can be controlled by Adobe Premiere Pro, you can capture video manually. You have
to operate both the playback device controls and the Capture panel controls in Adobe Premiere Pro.
1 Make sure that the deck or camcorder is properly connected to your computer.
2 Choose File > Capture.
3 In the Setup area of the Logging pane, choose your media type from the Capture pop-up menu.
4 Use the controls on the deck or camcorder to move the videotape to a point several seconds before the frame
where you want to begin capturing.
5 Press the Play button on the deck or camcorder, and then click the red Record button in the Capture panel.
6 Record a few seconds beyond the end of the footage you need, to provide room for editing. Press the Esc key to
stop recording.
WhentheSaveCapturedFiledialogboxappears,enterloggingdataandclickOK.ThenewfileislistedintheProject
panel and is saved to the disk location specified in the Settings pane of the Capture panel.
Capturing with device control
When a device and the project are set up properly, you can begin capturing clips using device control. You can
captureanentiretapeoryoucanmarkInandOutpointsforeachclip,andthencapturetheclip.YoucanlogInand
Out points for any number of clips and have Adobe Premiere Pro capture as many as you like in a batch.
72
To capture an entire tape
1
In the Capture panel, make sure that your device is online, as indicated above the preview.
2 Insert a tape into your device. Adobe Premiere Pro prompts you to name the tape. Be sure not to give any two
tapes the same name.
Including a unique number in the name can help you avoid using the same name twice.
3 In the Setup area of the Logging pane, choose your media type from the Capture pop-up menu.
4 Rewind the tape to its beginning.
5 If you want to create a separate file for each new scene on the tape, select Scene Detect in the Capture area.
6 If you want to capture some frames extending beyond the In and Out points of each clip, enter that number of
frames in the Handles box in the Capture area.
7 Click the Tape button.
To select and capture a clip
1
In the Capture panel, make sure that your device is online, as indicated above the preview.
2 Insert a tape into your device. Adobe Premiere Pro prompts you to name the tape. Be sure not to give any two
tapes the same name.
3 In the Setup area of the Logging pane, choose your media type from the Capture pop-up menu.
4 UsethecontrolsintheCapturepaneltomovetothefirstframeyouwanttocapture,andclicktheSetInbutton.
Then move to the last frame you want to capture, and click the Set Out button.
5 If you want to capture some frames extending beyond the In and Out points of each clip, enter the number of
frames for these handles in the Handles setting of the Capture section.
Page 79

ADOBE PREMIERE PRO 2.0
User Guide
6 Click the In/Out button in the Capture area of the Logging pane to capture the clip you’ve identified.
See also
“To set up a project for device control” on page 68
“To set up a device for device control” on page 69
To use automatic scene detection
Instead of manually logging In and Outpoints, you can use the Scene Detect feature. Scene Detect analyzesthe video
for scene breaks as indicated by the tape's Time/Date stamp, such as those caused when you press the camera’s pause
button while recording. When Scene Detect is on and you perform a capture, Adobe Premiere Pro automatically
captures a separate file at each scene break it detects. Scene Detect works whether you are capturing an entire tape
or just asection between specific In and Out points. If you turn on Scene Detect and capture using In and Out points,
Scene Detect may break up clips between the defined In and Out points if a scene break is detected.
SceneDetectlogsscenesforbatchcapturingwithoutalteringthetape’sprogress.Italsologsscenesthatoccuracross
timecode breaks.
❖ In the Capture panel, do either of the following:
• Click the Scene Detect button below the image.
• Select Scene Detect in the Capture area of the Logging pane.
73
Common capture issues
Ifyourunintoproblemswhilecapturingdigitalfootage,refertoAdobePremiereProHelporthedocumentationfor
your camera, deck, or capture card. You can also check the Adobe website for technical support. The following are
common issues that may arise when you capture digital video:
• If your device (camera or deck) goes into sleep mode, close and then reopen the Capture panel; or close the
Capture panel, turn the device off and back on, and then reopen the Capture panel. You can disable sleep mode
on many cameras by connecting them to AC power and ejecting the tape.
• If video looks grainy in the Capture panel or Monitor panel, Adobe Premiere Pro may have decreased display
qualitytopreservecapturequality.Videoiscapturedandstoredatthequalityyoudetermineandalwaysplaysat
that quality on an NTSC or PAL monitor. On slower systems, Adobe Premiere Pro may lower the quality of the
capture preview in order to ensure that sufficient CPU resources are available for full-quality capture.
• If the video image does not appear in the Capture panel, verify your device control and capture settings. Then,
leaving the device on, restart Adobe Premiere Pro.
• If captured audio and video are not in sync, make sure that sections of tape weren’t skipped (left unrecorded)
between shots. Blank tape areas lack timecode, which may cause interruptions in the camera time mode. When
you capture the blank area, the camera doesn’t transmit valid frames, but time continues to be marked.
• If no audio is recording, try playing a source through the computer’s sound input and speaker system without
recording. If you can’t hear it, the audio source may not be connected properly or audio parameters may not be
set properly. Check hardware connections, Sounds And Audio Devices in the Windows Control Panel, and mixer
settings, and refer to the documentation for your sound card. In Adobe Premiere Pro, select Edit > Preferences,
and check the settings for Audio, Audio Hardware, and Audio Output Mapping.
Page 80

To determine if your device is online
1
Select File > Capture.
2 In the Device Control area of the Settings pane, click Options.
3 In the Options dialog box, click Check Status.
ADOBE PREMIERE PRO 2.0
User Guide
Digitizing analog video
In order to editvideo shot inan analog format, you must first digitizeit. You candigitize itby routing thevideo signal
through either a digital camcorder that can digitize on the fly or a digitizing device installed in your computer. Alternatively, you can dub the analog footage to a digital format, and then capture the video from a digital device through
a capture card as any other digital source. Depending on your equipment, you may be able to digitize analog video
from any of several signal types, including component video, composite video, and S-video. Some digitizers provide
device control. They connect to your source device through RS-232, RS-422, LANC, or Control-M jacks, enabling
youtocontrolthedevicethroughAdobePremierePro’sCapturepanelandtoperformbatchcapturing.Refertothe
instructions included with your camcorder and digitizer/capture card.
A
B
74
Analog video connections
A. S-video connection B. Composite video and left-right audio connections
About capture card settings
Some of the capture settings you see in Adobe Premiere Pro may be from the plug-in software that came with your
digitizer/capture card. Because ofthe differences among brands of cards,specific options and supported formats can
vary. This complex relationship between video-capture cards and Adobe Premiere Pro can make it difficult to
identify which part of the system is responsible for a particular option or problem. Adobe, as well as most capture
card manufacturers, provides troubleshooting documents online that can help you determine whether an option or
problem is related to the video-capture card and its software or to Adobe Premiere Pro. Check the Adobe Premiere
Pro website and the capture card manufacturer’s website for troubleshooting resources.
Most of the supported capture cards install a settings file (preset) that you can select in the Adobe Premiere Pro New
Project dialog box, in the Load Preset pane. This preset automatically sets all capture settings for optimal support of
your capture card. For best results, use your capture card’s preset, if provided, and don’t change the capture settings
in the Custom Settings pane.
To digitize analog video
1
Quit Adobe Premiere Pro.
2 Connect your analog device’s video and audio outputs to your digital device’s (digitizer, digital camcorder or
digital deck) analog inputs.
3 If the digital device is an external digitizer, deck, or camcorder, connect its digital output (IEEE 1394 or SDI) to
the computer’s digital port of the same type.
4 If the digital device is a digitizer with device controls, connect its device control port (RS-232, RS-422, LANC, or
Control-M) with the analog device’s port.
Page 81

ADOBE PREMIERE PRO 2.0
User Guide
5 Turn on both devices.
6 If the digital device is a camcorder, put it into VTR or VCR (not Camera) mode.
7 Set the input selection control on the digital device to the correct analog input.
8 Start Adobe Premiere Pro.
9 When the Welcome screen appears, do one of the following:
• Click New Project, select the capture card’s preset (if available) from the Load Preset pane, and click OK.
• Select an existing project that was set up with the capture card’s preset.
10 Select File > Capture.
11 In the Capture panel, carefully check the settings on the Settings pane. If you need to change them, click Edit.
(The settings in this dialog box are provided by the card manufacturer’s plug-in software, not by Adobe Premiere
Pro, and vary according to the analog capture card’s brand and model. See the documentation for the software driver
provided by the manufacturer of the capture card.)
12 Do one of the following:
• If the digital device offers no device control, cue up your source using the analog device’s own controls. Press Play
on the analog device and click the Record button in the Capture panel.
• If the digital device offers device control, capture or log footage using the Capture panel’s controls, as you would
with a digital source.
75
To help determine the effects of your compression settings on the data rate of the captured video, use the Adobe
Premiere Pro Data Rate graph.
Digitizing analog audio
If you want to use audio that is not yet in digital form (for example, from an analog cassette or a live microphone),
you need to digitize it through an audio or audio/video digitizer/capture card.
The quality of digitized audio and the size of the audio file depend on the sample rate (the number of samples per
second) and bit depth (the number of bits per sample) of the digitized audio. Also, stereo audio requires twice as
much disk space as mono audio. These parameters, controlled in the Capture Settings section of the Project Settings
dialog box, determine how precisely the analog audio signal is represented in digital form. Higher sample rates and
bit depths reproduce sound at higher levels of quality, but with correspondingly larger file sizes. Capture audio at the
highest quality settings your computer can handle, even if those settings are higher than the settings you’ll specify
for final export or playback. This provides headroom, or extra data, thathelps preserve quality when you adjust audio
gain or apply audio effects such as equalization or dynamic range compression/expansion. Although the DV format
can record two independent stereo audio pairs, Adobe Premiere Pro can capture only one stereo pair. It may be
possible to select either stereo pair 1, stereo pair 2, or a mix of both stereo pairs, depending on the DV hardware you
are using. Consult your DV equipment guide.
To set the location for captured audio
1
Choose Edit > Preferences > Scratch Disks.
2 For Captured Audio, select a location and click OK.
To record a voice-over
1
Connect the microphone to the mic-level input jack on your computer or sound card. If necessary, choose Edit >
Preferences > Audio Hardware to configure the input device.
Page 82

ADOBE PREMIERE PRO 2.0
User Guide
2 If you want topreview the Timelinepanel as you record, position the current-time indicator in the Timeline panel
a few seconds before the time when you want the voice-over to begin.
3 In the Audio Mixer, click the Record Enable button for any tracks on which you want to record audio.
A
76
Audio Mixer recording controls
A. Record Enable button for track B. Record button for Audio Mixer
B
4 In the Audio Mixer, click the Record button for the sequence. Adobe Premiere Pro prepares the sequence for
recording but moves the playhead only when you press the Play button.
5 Select Meter Input(s) Only in the Audio Mixer menu to meter only your sound card’s inputs.
6 Test the input levels by speaking into the microphone.
7 When you finish testing, deselect Meter Input(s) Only to meter the project’s audio tracks also.
8 Speak into the microphone again. Watch the Audio Mixer level meters to ensure that the input levels for
record-enabled tracks are high but not clipping.
9 Click the Play button in the Audio Mixer, and then start speaking your voice-over.
See also
“About audio” on page 173
To record an analog source
You can record audio from an analog source device, such as a cassette deck or turntable.
1 Connect the analog source to the appropriate input jack on your computer or sound card. If necessary, choose
Edit > Preferences > Audio Hardware to configure the input device.
2 If you want topreview the Timelinepanel as you record, position the current-time indicator in the Timeline panel
a few seconds before the time when you want the recording to begin.
3 In the Audio Mixer, click the Record Enable button for any tracks on which you want to record audio.
Page 83

ADOBE PREMIERE PRO 2.0
User Guide
4 In the Audio Mixer, click the Record button for the sequence. Adobe Premiere Pro prepares the sequence for
recording but moves the playhead only when you press the Play button.
5 Select Meter Input(s) Only in the Audio Mixer panel menu to meter only your sound card’s inputs.
6 Test the input levels by playing a selection from the analog source.
7 When you finish testing, deselect MeterInput(s) Onlyin the Audio Mixer panel menu to meter the project’s audio
tracks also.
8 Play a selection from the analog source again. Watch the Audio Mixer level meters to ensure that the input levels
for record-enabled tracks are high but not clipping.
9 Click the Play button in the Audio Mixer, and then press Play on the source device.
See also
“About audio” on page 173
Batch capturing
77
About batch capturing
Adobe Premiere Pro supports batch capturing—automatic, unattended capture of multiple clips from a controllable
device. You can define a batch by selecting a group of clips you have logged. These appear as offline (placeholder)
clips in the Project panel or in a bin. You can capture any number of logged, offline clips by selecting them and
choosing File > Batch Capture. When you begin capture, Adobe Premiere Pro automatically re-sorts entries by tape
name and timecode In points so that they’re captured as efficiently as possible.
To save time by reducing the number of clips you log manually, consider using Scene Detect. See “To use automatic
scene detection” on page 73.
When you want to batch capture a set of logged (offline) clips, select them in the Project panel and choose File >
Batch Capture. If you organized offline clips into bins, you can batch capture an entire bin by selecting the bin.
Adobe Premiere Pro can capture video inthe background so that you can perform other tasks during capture.When
you start either a manual capture or batch capturing in Adobe Premiere Pro, you can minimize the Adobe Premiere
Pro application or switch to another application without stopping capture. After you restore the Adobe Premiere Pro
window, you canclick anywhereinside it to haltcapture. However, be aware that frames may drop out if you perform
a system-intensive task while capturing. Thechance of dropped frames is lower on a high-performance system, such
as one with dual processors.
Note: Batch capturing is not recommended for the first and last 30 seconds of your tape because of possible timecode and
seeking issues. Capture these sections manually.
Page 84

ADOBE PREMIERE PRO 2.0
User Guide
A
78
Preparing for batch capturing
A. Clips selected for capture B. Capture Settings option
B
See also
“About device control” on page 68
To log clips for batch capturing
You can specify whichshots you want to use from source tapesby logging them asa set of offline files for later capture.
If you set device-control options in the Preferences dialog box to remotely control your camera or deck, you can
create offline files by using the clip-logging controls in the Capture panel, and then use the Batch Capture command
to capture the logged clips automatically.
If you have a list of In and Out points, you can log them manually without a device online; simply enter each shot’s
In and Out points and click the Log Clip button. You can also log frame numbers using a separate logging or spreadsheet program and then import the spreadsheet into Adobe Premiere Pro as a list of offline files.
1 In the Capture panel, make sure that your device is online, as indicated above the preview.
2 Insert a tape into your device. Adobe Premiere Pro prompts you to name the tape. Be sure not to give any two
tapes you log the same name.
3 Use the controls in the Capture panel to move to the first framein your first shot,and click the Set In button. Then
move to the last frame in the shot and click the Set Out button.
4 In the Setup area of the Logging pane, choose your media type from the Capture pop-up menu.
5 If you want to capture some frames extending beyond the In and Out points of each clip, enter the number of
frames for these handles in the Handles setting of the Capture section.
6 Click the Log Clip button in the Timecode area of the Logging pane to log the clip you identified. Name the clip
when prompted. Adobe Premiere Pro logs the clip by placing an offline file for it in the Project panel.
7 Repeat steps 2 through 6 to log each shot you want to batch capture.
Page 85

Capture panel with Logging active
ADOBE PREMIERE PRO 2.0
User Guide
79
To log clips interactively
1 Make sure that your deviceis connected andin VTR orVCR (not Camera)mode, and then choose File > Capture.
2 In the Logging pane, enter the settings you want to use as the defaults for Setup and Clip Data.
3 Play the tape. Click Set In or Set Out at any time, even as the tape plays. Repeat as necessary.
4 When you are satisfied with the In and Out points, click Log Clip, verify the clip data, and click OK.
You can make slight timecode adjustments by using the plus sign (+) or minus sign (–). For example, to add five
frames to the end of the Out point, select the entire Out point timecode, type +5, and press Enter.
Tips for logging clips interactively
•
Set options on the Logging pane of the Capture panel. Adobe Premiere Pro uses the current data in the Setup and
Clip Data sections as defaults for subsequent logged clips. If you want to log a series of clips into the same bin with
similar logging data, save work by specifying clip data before you start logging the series. When you click the Log
Clip button, a dialog box appears so that you can accept or change the clip data.
• In the Clip Data section, specify a tape name. Adobe Premiere Pro asks for this name every time you begin batch
capturing
• The Clip Name in the Clip Data section progresses in numerical increments automatically. For example, if you
want to number a series of clips with clip names starting with Car Chase, enter Car Chase 01, making sure that
the clip name ends with the number. Subsequent logged clips default to the next number, such as Car Chase 02.
• You can change Capture panel settings at any time. For example, if you see the action changing as the tape plays
back, you can get ready to capture the new upcoming action by selecting a different bin to log subsequent clips
into or by typing a different name for Description or Scene. You don’t have to stop the tape as you change settings.
• You can operate the device and log clips using the keyboard. See the tool tips for Capture panel controls, or choose
Edit > Keyboard Customization to view or change the shortcuts.
• YoumustclickLogCliptocreateanewofflinefile.Thispausesthetapeasyouconfirmtheclipdataforthenew
offline file.
Page 86

ADOBE PREMIERE PRO 2.0
User Guide
Specifying batch-capture settings
A batch list of logged clips appears as a list of offline files in the Project panel. If you plan to capture many clips, you
may want to create bins in the Project panel in advance so that you can log each set of offline clips directly into its
own bin. When you batch capture, the offline files are replaced by captured clips, maintaining the bin organization
you set up in advance.
Youcancaptureaudioandvideotoseparatedrives.SetthelocationsfornewfilesbychoosingEdit>Preferences>
Scratch Disks. If you don’t change the defaults, all files captured or created by Adobe Premiere Pro are stored in the
same folder in which it stores the project files.
By default, the settings that Adobe Premiere Pro uses to batch capture offline files are the project’s current capture
settings. If an offline file has its own capture settings, Adobe Premiere Pro uses those settings when capturing it; the
resulting clip maintains its capture settings so that it can easily be recaptured using the same settings. For example,
if a clip’s settings specify capture at a frame size of 720 x 480 in a project with a frame size of 320 x 240, Adobe
Premiere Pro captures the clip at 720 x 480 unless you change its default. You can override a clip’s capture settings by
choosing the Override Capture Settings option in the Batch Capture dialog box.
To specify capture settings
You can assign capture settings to an offline file that are different from the project’s, for example, to capture the clip
at a resolution higher than the project’s.
80
• To determine whether the offline file already has its own capture settings, look in the Capture Settings column in
the Project panel. Scroll right to see this column. If an offline file has its own capture settings, its box in this
column has a check mark. If the column is hidden, choose Edit Columns from the Project panel menu; then select
Capture Settings. Click OK.
• To find out or change the capture settings for an offline file, select the clip in the Project panel, and choose Clip >
Capture Settings > Set Capture Settings. The Capture Format menu lets you view the clip’s capture format or
choose a new one. Typically, choose a format that matches that of the source footage.
• To remove a clip’s capture settings, select the clip in the Project panel and choose Clip > Capture Settings > Clear
Capture Settings. By default, Adobe Premiere Pro captures this clip with the project’s capture settings.
See also
“To set up a project for device control” on page 68
“To set up a device for device control” on page 69
To batch capture clips
1 Select the offline clips that you want to capture, and then choose File > Batch Capture.
2 In the Batch Capture dialog box, do any of the following:
• Choose Capture With Handles and enter the number of frames for the handles if you want to capture frames
beyond the In and Out points identified for each clip in the batch.
• Choose Override Capture Settings if you want to replace the capture settings of individual clips in the batch with
the project’s default settings.
3 Verify that the deck and source videotape are set up properly for capture, and then click OK.
4 IntheInsertTapedialogbox,inserttherequestedtapeandclickOK.Ifyouarecapturingfrommultipletapes,be
ready to insert them when prompted.
Page 87

ADOBE PREMIERE PRO 2.0
User Guide
5 If you want to stop batch capturing, click the Stop button in the Capture panel, or press the Esc key.
Troubleshooting batch capturing
You can perform trouble-free batch capturing if device control and the project’s capture settings are set up properly
and if the offline files you logged are consistent and free of conflicting data. If you encounter problems with batch
capturing, make sure that all clips you want to batch capture are set up with the proper settings:
• Each clip’s Status must be Offline. Verify the status in the Project panel List view. If a clip is not offline, select it in
the Project panel and choose Project > Unlink Media. If you select multiple clips and some are online, Adobe
Premiere Pro captures the offline files only.
• Tape Name, Media Start, and Media End must be specified in the Edit Offline File dialog box for each offline file.
Aslongasoneselectedofflinefilecontainsthesesettings,theBatchCapturecommandisavailable,butonlyclips
with all three settings are captured. If necessary, verify this in the Project panel List view or double-click each
offline file to edit settings.
• Recording video, audio, or both must be supported by the selected capture device. For example, audio isn’t
captured if the capture device doesn’t capture audio. If settings exist that can’t be captured, batch capturing stops
and the Capture Settings Error dialog box appears.
• Thefilenameofeachclip(asspecifiedintheCaptureSettingsdialogbox)mustnotduplicatethefilenameofan
existing clip. If necessary, double-click each offline file to verify that its name is unique. If you select an offline file
with a duplicate name for batch capturing, Adobe Premiere Pro slightly alters the name of that clip when it
captures it. In this way, it avoids overwriting the other file with the same name.
81
To manage capture errors when the Capture Settings Error dialog box appears, do one of the following:
• To fix the capture settings for any clips in the list, select one or more files in the list and click Edit Settings.
• To omit the clips with invalid capture settings and proceed with the rest of the batch capture, click Skip. Clips you
skip are removed from the list and are not captured.
• To stop batch capturing, click Cancel. No clips are captured.
To import and export batch lists
You can import a batch list as a tab-delimited text (TXT) file or a comma-separated value (CSV) text file. When
imported, each entry in the text batch list appears as an offline file in the Project panel. You can also export offline
files as a CSV batch list so that you can transfer a logged cliplist between projects and workstations.Tosee the format
of a batch list, export it and open the file in a text editor such as Notepad or in a spreadsheet application. A batch list
text file may come from sources such as Adobe Premiere 6.5, logging utilities such as Pipeline Autolog, or custom
video-production software that uses a database or spreadsheet program to generate a batch list.
When you import a batch list, the order of fields in the list must be as follows: tape name, In point, Out point, clip
name, and comment. When you export offline files as a batch list, Adobe Premiere Pro orders the fields as follows:
tapename,Inpoint,Outpoint,clipname,lognote,description,scene,andshot/take.Exportedfielddataisexported
from the corresponding columns in the List view of the Project panel.
• Toimportabatch-listtimecodelog,openaprojectandchooseProject>ImportBatchList.Locateandselectthe
file, and click Open.
• Toexportabatch-listtimecodelog,selectthefilesthatyouwanttolog.ThenchooseProject>ExportBatchList.
Specify a file name and location, and click Save.
Page 88

ADOBE PREMIERE PRO 2.0
User Guide
Offline files
An offline file is a placeholder for a source file that isn’t currently available on disk. Offline files contain information
about the missing source files they represent, and they give you flexibility when actual files are not available. If an
offline file appears in the Timeline panel, “Media Offline” appears in the Program Monitor and in the track.
When you use the Capture panel to log clips from a tape, Adobe Premiere Pro automatically creates offline files
containing the exact information required to capture the clips later. You can also create offline files manually. Use
offline files in situations such as the following:
• Clips are logged but not yet captured. Because offline files behave like captured clips, you can organize the logged
offline files in the Project panel andeven lay out sequences with them in the Timeline panel before the offline clips
are actually captured. When the offline files are captured (or located, if they were captured but missing), they
replace the corresponding offline files.
• You want to capture logged clips using device control or batch capturing. In Adobe Premiere Pro, a batch-capture
list is a set of offline clips; selecting specific offline clips sets them up for batch capturing.
• You want to recapture clips used in the project. This requires making the online clips offline by using the Unlink
Media command.
• Asourcefileisunavailablewhenyouopenaproject,sothatAdobePremiereProcan’tlocateitautomaticallyand
you can’t locate it manually. Adobe Premiere Pro provides Offline and Offline All buttons in this case.
82
Note: Online and offline clips in Adobe Premiere Pro are not related to the concepts of online and offline editing.
To create an offline file
1
In the Project panel, click the New Item button at the bottom of the panel and choose Offline File from the
menu.
2 For Contains, select an option as needed.
3 For Tape Name, type the name of the tape containing the source video for the offline clip.
4 ForFileName,typethenameofthefileasyouwantittoappearondiskwhenyoucaptureitusingAdobePremiere
Pro.Ifyou’recreatinganofflinefileforasourcefilethatiscapturedbutisn’tonyourcomputeryet,typethenameof
that file.
5 Enter a description, scene, shot/take, and log note as needed.
6 Enter the timecode for the entire untrimmed clip, including any extra frames you plan to capture for editing and
transitions.
Note: To be eligible for capture, an offline file must contain at least a tape name, file name, and Media Start and Media
End settings.
To edit an offline file
❖ In the Project panel, double-click the offline file, edit options as needed, and then click OK.
To replace an offline file with a captured source file
1
In the Project panel, select one or more offline files.
2 Choose Project > Link Media.
3 Select the source file, and click Select.
Page 89

ADOBE PREMIERE PRO 2.0
User Guide
Note: If you selected more than one offline file, the Attach Which Media dialog box appears in turn for each file you
selected. Pay attention to the offline file name in the title bar of the dialog box so that you relink the correct source file
to each offline file.
To convert an online file to offline
1
In the Project panel, select one or more online files.
2 Choose Project > Make Offline.
3 Select one of the following options:
Media Files Remain On Disk Makestheselectedfilesofflineintheprojectbutdoesn’terasethesourcefilesfromthe
disk.
Media Files Are Deleted Makes the selected files offline in the project and erases the source files from the disk.
Note: IfyouselectMediaFilesRemainOnDiskandrecaptureaclipusingthesamefilenameasthefileleftondisk,the
original media file is replaced. To preserve original clips without changing their names, move them to another folder or
disk, or specify different file names for the clips you recapture.
Timecode
83
About timecode
Many camcorders and high-end video decks record timecode, which marks specific frames with unique addresses.
Timecode is important whenever youwant to capture exactly thesame frames thatwere identified or captured previously, as in the following tasks:
• You want to log clips before you capture them.
• You plan to capture clips using batch (automated) capture.
• You want to recapture clips because the original files became corrupted or were deleted.
• You plan to export sequences to another system by using AAF or EDL.
• You’re using a system in which you edit quickly with low-resolution captures, and later recapture the clips at full
resolution and quality for the final version.
• You plan to synchronize captured video with audio recorded separately.
Unlike the numbers on time counters found in home VCRs, timecode is recorded onto videotape as part of the video
signal. If footage lacks timecode, you can add it by copying it with a camera or deck that writes timecode. You can
then log or capture the video from that device.
For best results,timecode should run continuously fromthe beginning to the end ofthe tape; itshouldn’trestart from
zero anywhere in the middle. In editing, if you log a capture In point such as 00:00:01:09 but that number occurs on
the tape two or three times because of timecode restarts, Adobe Premiere Pro can’t be certain which 00:00:01:09 is
the place to start its capture. It can easily capture the wrong clips from tapes with discontinuous timecode.
To ensure unbroken timecode, you need to either shoot it continuously or stripe your tape with it before shooting.
Page 90

ADOBE PREMIERE PRO 2.0
User Guide
To ensure that you always shoot continuous timecode, record at least 5 seconds of extra video past the end of the
action in any shot. If you review aclip in the camera,be sure to rewind the tape back into that 5-second margin before
recording again. Your camcorder reads the timecode from the frame on which you stop and begins recording timecode
withtheverynextframenumberwhenyoustartyournextshot.Becareful;ifyouleaveagapbetweenthelastframeof
the previous shot and the first frame of the next, the camcorder begins writing timecode at 00:00:00:00 again.
Striping or replacing timecode
You can ensure continuous timecode by recording timecode onto the tape before you use it. This process is called
striping the tape. Stripingis notnecessary if you follow recommended shooting practices, but it can protectyou from
accidentally breaking timecode by miscuing a tape in your camera.
To stripe a tape with timecode
1
Put an unused tape in the camera. It should have no timecode.
2 If you’re using a camera for striping, attach the lens cap and disable audio recording.
3 Ensure that all camera settings (particularlythe audiosample rate) are exactlythesameasthesettingsyouwilluse
when you shoot. Use all these same settings whenever shooting on that tape.
4 Begin recording. Let the camera or deck run until the entire tape has been recorded.
5 Before you record video on a striped tape, play about 30 seconds of it from the beginning. Verify that the
camcorderisreadingthetimecodeyoustripedbeforeyoustartshooting.The30-secondemptyleadonthetapealso
helps in batch capturing.
84
Check your camera’s settings whenever changing tapes, especially when reinserting a tape you had begun shooting
previously. Though you may want to use different settings for different tapes, it’s best to use the same settings from
beginning to end of each tape. These should match the settings used when first striping that tape.
To replace DV timecode
If your source footage is in DV format and its timecode isn’t continuous, you can replace its timecode by making a
DVcopy,ordub,ofthetape.TheDVdevicemakingthecopyrecordsnewtimecodethatiscontinuous,soyoucan
then log and capture video, with the new timecode, from the copy.
Note: This technique does not work when dubbing to the DVCAM format or using a Panasonic AG-DV2500 as the
record deck.
1 Load the tape you shot into a camcorder or deck, and fully rewind it.
2 Load a new tape into a second camcorder or deck, which you will use to record the copy.
3 If the recording device includes an option to record video with the timecode from your original tape, be sure that
this option is disabled. See the operating instructions for the device for information on this option.
4 If both devices are digital, connect them using a digital connection, such as IEEE 1394 or SDI. This will make a
full-quality copy.
5 Connect the recording device to a television monitor.
6 Set both devices to VTR mode.
7 Make sure that the recording device is set to record from the digital port.
8 Beginrecordingthenewtapeandthenstartyouroriginaltapeplaying.Letthecamcordersordecksrununtilthe
entire original tape has been copied.
Page 91

ADOBE PREMIERE PRO 2.0
User Guide
Note: Scene Detect recognizes the starting and stopping points for each shot by looking for jumps in the timestamps.
Because copying a tape this way creates a single clip with a continuous timestamp, you can’t use Scene Detect when you
capture the copy in Adobe Premiere Pro.
Capturing timecode
The timecode of source video is captured when you use device control. Timecode capture with controllable analog
devices depends on the precision of your tape deck. If your tape deck cannot read the timecode accurately, you may
have to calibrate your system or manually assign the timecode to your movie by matching frames.
Note: Timecode is visible in the tape counter only on equipment that can recognize timecode, unless the timecode has
been burned in or recorded over the picture in a copy of the tape. Most analog home VCRs cannot read or write timecode.
To set timecode manually for a clip
At times you may want to change the timecode from that recorded by Adobe Premiere Pro. For example, you
captured footage from a DV copy of a Hi8 tape originally recorded with RCTC (Rewritable Consumer Time Code).
The DV copy, and the video files on your computer copied from it, carry the DV timecode, not the original RCTC.
For convenience in referencing shot logs made for the original Hi8 tape, you want to reset the timecode to the
original RCTC numbers.
1 Select the clip in the Project panel.
2 Choose File > Timecode, specify options as needed, and click OK.
85
To enter timecode
As you capture and edit video, you enter timecode values many times. For example, you enter timecode values to set
In and Out points for clips and to navigate the Timeline panel. Adobe Premiere Pro provides many ways to enter
timecode.
In Adobe Premiere Pro, the duration between the In and Out points includes the frames indicated by the timecode.
For example, if you enter the same timecode for the In and Out points of a clip, the duration of the clip is one frame.
When entering timecode, you can substitute periods for colons or type numbers without punctuation. Adobe
Premiere Pro interprets the numbers you type as hours, minutes, seconds, and frames.
• To set a specific timecode, select the timecode, type a new timecode, and then press Enter.
• To adjust the current timecode by dragging, drag the timecode horizontally. For example, to set an earlier
timecode, drag to the left.
• To adjust the current timecode by using a relative value, type the plus sign (+) or minus sign (–) and the number
of frames to add or subtract. For example, to subtract five frames from the current timecode, select the entire
timecode, type –5, and then press Enter.
Page 92

ADOBE PREMIERE PRO 2.0
User Guide
Online and offline editing
About online and offline editing
For online editing, you capture clips at the level of quality required for the final version of the video program. This is
the default method of working in Adobe Premiere Pro. Online editing works well when the speed and storage
capacity of the host computer are adequate to the demands of the video formats used. For example, most modern
computers can handle the datarate of DV in full resolution. They may be challenged, however, by the greater
demands of, for example, HDV or HD footage. For many videographers, that’s where offline editing comes in.
In offline editing, you capture low-quality clips for editing purposes, but recapture them at high resolution when it’s
timetofinish,render,andexportyourfinalproduct.Editingthelow-resolutionclipsallowsstandardcomputersto
edit excessively large assets, such as HDV or HD footage, without losing performance speed or running out of
storage. It also lets editors use laptops to edit—for example, while on location.
You may edit a project entirely online. Onthe other hand, you may editin a two-phase workflow: making your initial
creative decisions offline, then switching to online for finishing tasks like fine-tuning, grading, and color correction.
You can complete an offline edit of, for example, an HD project with Adobe Premiere Pro and then export your
project to the Advanced Authoring Format (AAF) or EDL for transfer to an editing system with more powerful
hardware. You can then perform the final online edit and rendering, at full HD resolution, on that system.
86
To recapture clips
You can recapture clips in an existing project using batch capturing. Clips can be recaptured only if they have been
unlinked from their source files, becoming offline files, and if the source medium contains timecode.
1 If you want to override the capture settings for any clip that you intend to recapture, set the clip’s Capture settings.
2 In the Project panel, select all the clips you want to recapture. If you want to select clips in different bins, use List
view, which lets you view multiple bins.
3 Choose Project > Make Offline. The selected clips are dissociated from their current source files.
4 In the Make Offline dialog box, specify whether the source media files are to remain on disk or be deleted.
5 With the offline files still selected, choose File > Batch Capture. Adjust the settings as necessary.
6 Verify that the deck and source videotape are set up properly for capture, and then click OK.
7 After recapturing is complete, save the project.
Importing files
To import files
You can import video, audio, graphics, and photo files of a variety of formats into an Adobe Premiere Pro project.
You can import a single file, multiple files, or an entire folder. Frame sizes cannot exceed 4096 x 4096 pixels. If the
software you use to create art does not let you specify pixels as a unit of measure, specifying points may be sufficient.
Page 93

ADOBE PREMIERE PRO 2.0
User Guide
If you import a file and it appears horizontally or vertically distorted (stretched), its pixel aspect ratio may not be
interpreted correctly. Change the pixel aspect ratio for the file if necessary. Adobe Premiere Pro continuously
rasterizes EPS images, so you can scale these files without pixelation.
• To import clips, choose File > Import. Locate and selecta file, or hold down Control and select multiple files. Click
Open.
• To import a recently imported clip, choose File > Import Recent File > [file name].(Thefilenamemaynotappear
if Adobe Premiere Pro preferences have been reset.)
• To import a folder of clips, choose File > Import. Locate and select the folder, and then click Import Folder. The
folder imports as a new bin in the Project panel with the folder’s contents.
You can also import files and folders by dragging them from Windows Explorer into the Project panel.
See also
“About aspect ratio” on page 29
Importing digital audio
You can import digital audio clips stored as audio files or tracks in video files. Digital audio is stored on computer
hard disks, audio CDs, or digital audio tape (DAT) as binary data readable by computers. To keep quality as high as
possible, transfer digital audio files to your computer via digital connections. Avoid digitizing the analog outputs
from your audio sources through your sound card.
87
For maximum editing performance, Adobe Premiere Pro conforms each imported audio channel to 32-bit
floating-point data at the project’s sample rate. All imported audio is conformed, even audio tracks in video files.
Note: If you want to capture an audio-only file from a digital video source, choose Audio from the Capture pop-up menu
in the Logging pane of the Capture panel.
YoucanuseCDaudio(CDA)filesinaproject,butbeforeyoucanimportthemintoAdobePremierePro,youneed
toconvertthemtoasupportedfileformat,suchasWAV.YoucanconvertCDAfilesusinganaudioapplicationsuch
®
as Adobe Audition
.
Note: Make sure that you own the copyrights or have licensed the copyrights to any CD tracks you use.
See also
“Supported file formats for import” on page 67
Using compressed audio formats
Music stored in formats such as MP3 and WMA are compressed using a method that removes some of the original
audio quality. To play back compressed audio, Adobe Premiere Pro must decompress the file and may need to
resample it to match your output settings. These conversions are likely to degrade audio quality. For this reason, use
an uncompressed or CD audio version of the audio clip whenever possible.
Using audio from Adobe Audition
You can use Adobe Audition to perform advanced audio editing. If you export the audio from Adobe Audition to an
audio file format compatible with Adobe Premiere Pro, you can import the audio into your Adobe Premiere Pro
projects. If you select the Project Linking option as you export audio from Adobe Audition, you can choose Edit >
Edit Original in Adobe Premiere Pro to open an audio clip’s Adobe Audition project directly from within Adobe
Premiere Pro.
Page 94

ADOBE PREMIERE PRO 2.0
User Guide
Importing still images
You can import still images with frame sizes up to 4096 x 4096 pixels, individually or in groups. The size and aspect
ratio of imported still images are affected by the same factors that affect other imported assets, for example, whether
they use square pixels.
An imported still image uses the duration specified in the Still Image preferences. You can change the duration of a
still image in a Sequence panel.
To change the default duration for still images
1
Choose Edit > Preferences > General.
2 For Still Image Default Duration, specify the number of frames you want as a default duration for a still image.
Note: Changing the default duration of still images does not affect the duration of still images that are already part of a
sequence.
To change the duration of a still image in the Timeline panel
❖ Do one of the following:
• Drag the Selection tool over either end of the image.
• Select the clip, and choose Clip > Speed. Enter a new duration, and click OK.
88
To adjust the pixel aspect ratio of an imported still image
1
Select the still image in the Project panel.
2 Choose File > Interpret Footage.
3 Select an option in the Pixel Aspect Ratio section, and click OK.
4 Select one of the following:
Use Pixel Aspect Ratio From File Uses the original aspect ratio saved with the still image.
Conform To Lets you choose from a list of standard aspect ratios.
Note: When using Photoshop to generate images for use in video projects, it’s best to use the Photoshop preset named for
the video format you’ll use. Using the preset ensures that your images are generated with the correct aspect ratio.
See also
“About aspect ratio” on page 29
Importing Photoshop images
You can import files from Adobe Photoshop 3.0 or later. Adobe Premiere Pro supports 16-bit as well as 8-bit
Photoshop files. You can control how layered Photoshop files are imported. Empty (transparent) areas of nonflattened Photoshop files are transparent when imported into Adobe Premiere Pro, because the transparency is stored
as an alpha channel. This lets you import Photoshop graphics and superimpose them over clips in other tracks with
no extra effort.
In addition, you can import a layered Photoshop file as a sequence, enabling you to set up graphics in Photoshop and
then import them into an Adobe Premiere Pro project.
See also
“To create a new Photoshop file in your project” on page 155
Page 95

ADOBE PREMIERE PRO 2.0
User Guide
Importing Illustrator images
You can import an Adobe Illustrator still-image file directly into an Adobe Premiere Pro project. Adobe Premiere
Pro converts path-based Illustrator art into the pixel-based image format used by Adobe Premiere Pro, a process
known as rasterization. Adobe Premiere Pro automatically anti-aliases, or smooths, edges of the Illustrator art.
Adobe Premiere Pro also converts all empty areas into an alpha channel, so that empty areas become transparent.
If you want to define the dimensions of the Illustrator art when it is rasterized, use Illustrator to set crop marks in
the Illustrator file. For information about setting crop marks, see Illustrator Help.
To import a layered Photoshop or Illustrator file
When you import a layered file saved in Photoshop or Illustrator file formats, you can choose how to import the
layers in the Import Layered File dialog box:
• Merge the layers, combining all layers into a flattened clip.
• Import only one of the layers from the file.
• Convert the layers into a sequence of frames.
Adobe Premiere Pro imports attributes that were applied in the original file, including position, opacity, visibility,
transparency (alpha channel), layer masks, adjustment layers, common layer effects, layer clipping paths, vector
masks, and clipping groups. A white background in Photoshop exports as opaque white, whereas a checkerboard
background indicates areas that translate into alpha channel transparency when the Photoshop file is exported to a
format that supports alpha channels.
89
Converting layers into a sequence makes it easy to set up graphics using layers in Photoshop or Illustrator. When
AdobePremiereProconvertslayerstoasequence,thesequenceisimportedintotheProjectpanelasabin;eachlayer
in the file becomes an individual clip in the bin. Each clip’s name consists of the layer name followed by the name of
the file that contained it. In addition, Adobe Premiere Pro automatically creates a sequence in which each layer is
inserted in order at the default still-image duration. You can use this sequence as a clip in other sequences.
Note: Some Photoshop layer attributes aren’t supported, such as special blending modes and the Knockout option. For
best results, use basic transparency and opacity in Photoshop.
1 Choose File > Import.
2 In the Import dialog box, locate and select the layered file. (If the file name doesn’t appear, make sure that All
Supported Files is selected for Files Of Type.)
3 In the Import Layered File dialog box, select either Footage or Sequence from the Import As pop-up menu.
4 Choose Merged Layers to import all layers in the file as a single layer, or choose the layer you want to import from
the file.
5 Choose one of the following options from the Footage Dimensions pop-up menu, and then click OK:
Document Size Resizes the file to the size of the document as specified in Project settings.
Layer Size Imports the file at the size of the merged layers or selected layer.
Note: When you import one layer as a single clip, its name in the Project panel consists of the layer name followed by the
original file name.
Preparing still images
When you prepare still images in applications that support color management, such as Photoshop, colors mayappear
more consistent between the application and Adobe Premiere Pro if you prepare images in a video-friendly color
space, such as sRGB or NTSC RGB.
Page 96

ADOBE PREMIERE PRO 2.0
User Guide
Forbestresults,createfileswithaframesizeatleastaslargeastheframesizeoftheprojectsothatyoudon’thaveto
scale up the image in Adobe Premiere Pro. Scaling an image larger than its original size can cause loss of sharpness.
If you plan to scale up an image, prepare it at a larger frame size than the project. For example, if you plan to scale
up an image 200%, prepare the image at double the project frame size before you import it.
Importing animations
You can import an animation contained in a single file, such as an animated GIF. You can also import a sequence of
numbered still-image files andautomatically combine them into a single video clip; each numbered file becomes one
frame of video. Importing a sequence is useful for animations exported as a series of numbered still images by applications like After Effects. The images in the series cannot include layers. For information on layers and flattening,
see the application’s documentation.
When creating three-dimensional images or animations for use in Adobe Premiere Pro, follow these guidelines
whenever possible:
• Use broadcast-safe color filtering.
• Use the pixel aspect ratio and frame size specified in the project settings in Adobe Premiere Pro.
• Use the appropriate field settings to match your project.
• If you’re using an Adobe application to generate the sequence, select the Embed Project Link option so that you
can open the sequence in the application that was used to create it.
90
To import numbered still-image files as one clip
1
Make sure that each still-image file name contains an equal number of digits at the end and has the correct file
extension—for example, file000.bmp, file001.bmp, and so forth.
2 Choose File > Import.
3 Locate and select the first numbered file in the sequence, select Numbered Stills, and click Open. When
Numbered Stills is selected, Adobe Premiere Pro interprets each of the numbered files as a single frame in a video
clip.
Note: Changing the defaultduration of still images in the Preferences dialogbox doesnot affect the duration of numbered
stills imported into a video clip. Each still becomes one frame when imported in this way.
Importing earlier projects
You can add the contents of an Adobe Premiere 6.0 or 6.5 project into an open Adobe Premiere Pro project. The
importedproject’sclipsandsequencesareaddedtotheProjectpanelinabinnamedaftertheimportedproject.The
bin hierarchy of the imported project is maintained within its new bin. All of the imported project’s special effects,
such as transitions and effects, are included. Use caution when importing a project into another project with a
different timebase or audio sample rate, because these differences may affect edit positioning and audio quality.
Importing a project into another project is the only way to transfer its complete sequence and clip information.
Note: In earlier versions of Adobe Premiere, storyboards were stored in files independent of project files. Adobe Premiere
Pro contains all storyboard features within the Project panel, but you can import storyboard files created in earlier
versions by choosing File > Import.
Page 97

ADOBE PREMIERE PRO 2.0
User Guide
Importing libraries
Adobe Premiere 6.5 supports containers called libraries, which store clips from one or several projects in files. A
library (PLB) is a file apart from any project file. Although Adobe Premiere Pro doesn’t directly support libraries, it
allows you to import PLB library files. A library converts to a bin when you import it into an Adobe Premiere Pro
project. To store a set of clips to make them available for other projects, simply save a project that contains the clips,
and import that project into other projects.
91
Page 98

Chapter 6: Managing and viewing assets
Customizing the Project panel
To change Project panel views
After you obtain an asset, its name appears in the Project panel. The Project panel lists detailed information about
eachassetinyourproject.YoucanviewandsortassetsineitherListvieworIconview.Listviewdisplaysadditional
information about each asset. You can customize the information it displays to meet the needs of your project.
92
B A
Project panel views
A. List view B. Icon view
• To change from one view to another, click the List View button or the Icon View button at the bottom of
the panel, or choose View > List or View > Icon from the Project panel menu.
• To arrange items in Icon view, drag an item to any square. As you drag, a vertical bar indicates where the item is
going. If you drag an item to a bin, the item goes inside the bin.
You can use Icon view for storyboarding and then use the Automate To Sequence feature to move the storyboard into
a sequence.
• To sort items in List view, click the column heading by which you want to sort the items. If bins are expanded,
items sort from the top level and down the Project panel hierarchy. To reverse the sort order, click the column
heading again.
• To hide or show the thumbnail viewer and clip information, choose View > Preview Area from the Project panel
menu.
• To hide or set the size of thumbnails, choose Thumbnails from the Project panel menu.
• To removeempty space between items inIconview and arrangethem within thewidth of the Project panel, choose
Clean Up from the Project panel menu.
To add a column
1 Choose Edit Columns from the Project panel menu.
Page 99

ADOBE PREMIERE PRO 2.0
User Guide
2 Select the name of the column after which the new column will appear, and click Add.
3 Type a name.
4 Choose a type. Text columns can contain any text you enter. Boolean columns provide a check box. Click OK.
To customize List view columns
The columns in the Project panel’s List view tell various things about the assets listed. You can select which columns
Adobe Premiere Pro will display, rename columns, and change their order.
Choose Edit Columns from the Project panel menu, and do any of the following:
• To display a column, select the option next to the column.
• To rename a column, select a column name, click Rename, and edit the name.
• To remove a column, select a column name and click Remove.
• To move a column to the left in List view, select its name and click Move Up. To move it to the right, click Move
Down.
You can make certain adjustments to the Project panel:
• To change the width ofa List view column,position the mouse over adividing line between columnheadings until
the Column Resize icon appears; then drag horizontally.
• To sort by a column, click a column name to switch between ascending and descending sorts.
• Rearrange columns by dragging them horizontally in the Project panel.
93
Note: If you can’t locate or change a column attribute in the Edit Columns dialog box, the attribute is locked by Adobe
Premiere Pro and cannot be changed. For example, you can change the names of columns you added, but not the names
of columns built into Adobe Premiere Pro.
See also
“List view columns” on page 93
List view columns
The names of most of the Project panel’s columns are self-explanatory. Following are definitions for the less obvious
ones:
Name By default, displays the asset’s file name. You can change the name the asset uses within the project. You
cannot remove the Name field from the List view.
Label Color that helps identify and associate assets.
Media Duration Length of the source file, expressed in the currently specified Display option.
Note: In Adobe Premiere Pro, all durations in any panel include the frames specified by the In point and Out point. For
example, setting the In point and Out point to the same frame results in a duration of one frame.
Video Duration The duration of a clip’s video component as defined by the Video In point and Out point and incor-
porating any adjustments applied in Adobe Premiere Pro, such as changing the clip speed.
Audio Duration The duration of an asset’s audio component as defined by the Audio In point and Out point and
incorporating any adjustments applied in Adobe Premiere Pro, such as changing the clip speed.
Video Info The frame size and aspect ratio of the asset, and whether an alpha channel is present.
Page 100

ADOBE PREMIERE PRO 2.0
User Guide
Video Usage The number of times the video component of an asset is used in the project’s sequences.
Audio Usage The number of times the audio component of an asset is used in the project’s sequences.
Tape Name The name of the source tape, as entered when the clip was logged or captured.
Description Optional description of the asset, entered when the clip was logged or captured.
Comment Optional comment, entered when the asset was logged or captured, intended for identification and
sorting purposes.
Log Note Optional text that was entered using the Log Note option when an asset was captured using the Capture
panel.
File Path Location of the file on disk, expressed as a folder path.
Capture Settings Indicates whether a file has capture settings assigned in Adobe Premiere Pro.
Status Whether an asset is online or offline. If a clip is offline, this also indicates why.
Offline Properties Whether the source of an offline file contains video, audio, or both.
Scene ScenenamethatwasenteredusingtheCapturepanel’sSceneoption.Itcanbehelpfultousescenenamesfrom
a script here to help organize your work.
Shot/Take Shot and/or take name that was entered using the Capture panel’s Shot/Take option.
94
Good Indicates preferred assets.
To define a different thumbnail for a clip
By default, the first frame of a clip appears in the thumbnail viewer and in other places in the project where the
thumbnail is displayed. You can override the default thumbnail by designating any clip frame as a poster frame.
1 Select the clip in a Project panel.
2 Press the Play button or drag the play slider on the thumbnail viewer in the upper left corner of the Project
panel until the frame you want is displayed.
3 Click the Set Poster Frame button .
You can also set the poster frame by right-clicking the thumbnail viewer and choosing Set Poster Frame.
Organizing assets
About bins
The Project panel can include bins, which you can use to organize project contents in much the same way as folders
in Windows Explorer. Bins can contain source files, sequences, and other bins. You may want to use bins in the
following ways:
• To store lists of offline files for batch capture.
• To store each sequence and its source files separately.
• To organize files by type, such as video, still images, and audio files.
 Loading...