

Page 1

ADOBE® PREMIERE® ELEMENTS
September 2013
Help and tutorials
Page 2

Contents
What’s new 1...................................................................................................................................................
What’s new 2.............................................................................................................................................................................
Workspace 5....................................................................................................................................................
Workspace 6..............................................................................................................................................................................
Importing media through Embedded Elements Organizer 11....................................................................................................
Creating a video project 13..............................................................................................................................
Creating a project 14.................................................................................................................................................................
Saving and backing up projects 16............................................................................................................................................
Project settings and presets 18.................................................................................................................................................
Viewing a project s files 22........................................................................................................................................................
Viewing clip properties 25..........................................................................................................................................................
Undoing changes 28..................................................................................................................................................................
Working with scratch disks 30...................................................................................................................................................
Creating instant movies 32........................................................................................................................................................
Importing and adding media 35.......................................................................................................................
Adding media into Adobe Premiere Elements 36......................................................................................................................
Add numbered image files as a singleclip 43............................................................................................................................
5.1 audio import 44....................................................................................................................................................................
Creating specialty clips 46.........................................................................................................................................................
Guidelines for adding files 48....................................................................................................................................................
Set duration for imported stillimages 51....................................................................................................................................
Working with scratch disks 52...................................................................................................................................................
Working with offline files 54.......................................................................................................................................................
Working with aspect ratios and field options 55.........................................................................................................................
Supported devices and file formats 59......................................................................................................................................
Sharing files between Adobe Premiere Elements and Adobe Photoshop Elements 61............................................................
Importing and Exporting movies using Adobe Revel 62............................................................................................................
Creating specialty clips 64.........................................................................................................................................................
Arranging movie clips 66.................................................................................................................................
Arranging clips in the Quick viewtimeline 67.............................................................................................................................
Arranging clips in the Expert view timeline 70...........................................................................................................................
Creating a picture-in-picture overlay 78.....................................................................................................................................
Grouping, linking, and disablingclips 80....................................................................................................................................
Working with clip and timeline markers 82................................................................................................................................
Previewing movies 87................................................................................................................................................................
Editing clips 92.................................................................................................................................................
Trimming clips 93.......................................................................................................................................................................
Split clips 101.............................................................................................................................................................................
Replace footage 102..................................................................................................................................................................
Changing clip speed and duration 103......................................................................................................................................
Freezing and holding frames 105..............................................................................................................................................
Working with source clips 106...................................................................................................................................................
Trimming Unwanted Frames - Guided Edit 109........................................................................................................................
Editing frames with Auto Smart Tone 111.................................................................................................................................
Adding Transitions between video clips - Guided Edit 113........................................................................................................
Adding Brightness Contrast Color - Guided Edit 115................................................................................................................
Page 3

Applying transitions and special effects 117....................................................................................................
Transition basics 118.................................................................................................................................................................
Applying transitions to clips 119................................................................................................................................................
Adjusting transitions 123............................................................................................................................................................
Effects basics 126......................................................................................................................................................................
Finding and organizing effects 128............................................................................................................................................
Working with effect presets 129.................................................................................................................................................
Superimposing and transparency 131.......................................................................................................................................
Reposition, scale, or rotate clipswith the Motion effect 136.......................................................................................................
Pan and zoom to create video-likeeffect 139.............................................................................................................................
Create a Vignetting effect 144...................................................................................................................................................
Create special transitions 145...................................................................................................................................................
Creating a Picture in Picture - Guided Edit 147.........................................................................................................................
Effects reference 149.................................................................................................................................................................
Editing frames with Auto Smart Tone 186.................................................................................................................................
Applying and removing effects 188............................................................................................................................................
Applying effects using Adjustment layers 192...........................................................................................................................
Adjust temperature and tint 194.................................................................................................................................................
Adding Title to your movie - Guided Edit 195............................................................................................................................
Adding sound effects to a video 197..........................................................................................................................................
Adding Scores to your movie - Guided edit 198........................................................................................................................
Adding music scores to video clips 200.....................................................................................................................................
Add FilmLooks effects 203........................................................................................................................................................
Add a Split Tone Effect 204.......................................................................................................................................................
Add an HSL Tuner effect 205....................................................................................................................................................
Creating titles 206............................................................................................................................................
Creating and trimming titles 207................................................................................................................................................
Editing and formatting text 213..................................................................................................................................................
Applying styles to text and graphics 216...................................................................................................................................
Adding shapes and images to titles 218....................................................................................................................................
Arranging objects in titles 221....................................................................................................................................................
Adding color and shadows to titles 225.....................................................................................................................................
Designing titles for TV 229.........................................................................................................................................................
Exporting and importing titles 231.............................................................................................................................................
Adding Narration to your movie - Guided Edit 232....................................................................................................................
Mixing audio 233..............................................................................................................................................
Using soundtracks 234..............................................................................................................................................................
Create narrations 237................................................................................................................................................................
Mixing audio and adjusting volume 239.....................................................................................................................................
Creating disc menus 243.................................................................................................................................
Types of discs and menu options 244.......................................................................................................................................
Working with menu markers 246...............................................................................................................................................
Creating disc menus 251...........................................................................................................................................................
Previewing menus 257..............................................................................................................................................................
Saving and sharing your movies 258...............................................................................................................
Sharing from the Publish And Share panel 259.........................................................................................................................
Create DVD files for web 260....................................................................................................................................................
Sharing to DVD or Blu-ray Disc 261..........................................................................................................................................
Sharing for PC playback 265.....................................................................................................................................................
Page 4

Sharing to the web 269..............................................................................................................................................................
Sharing to mobile phones and players 270...............................................................................................................................
Supported file types for saving and exporting 272.....................................................................................................................
Compression and data-rate basics 274.....................................................................................................................................
Common settings for sharing 276..............................................................................................................................................
Archiving projects 281...............................................................................................................................................................
Working with projects 283................................................................................................................................
Working with scratch disks 284.................................................................................................................................................
Viewing clip properties 286........................................................................................................................................................
Viewing a project s files 289......................................................................................................................................................
Undoing changes 292................................................................................................................................................................
Saving and backing up projects 294..........................................................................................................................................
Project settings and presets 296...............................................................................................................................................
Creating a project 300...............................................................................................................................................................
Keyboard shortcuts 302...................................................................................................................................
Using default shortcuts 303.......................................................................................................................................................
Customizing shortcuts 304........................................................................................................................................................
Glossary 306....................................................................................................................................................
Glossary 307..............................................................................................................................................................................
Page 5

What's new
1
Page 6

What's new
2
Guided view for new users
Auto Smart Tone
More Film Looks
New Film Looks
Yesteryear
Scores and sound effects
Motion tracking
Video Adjustment Layers
The current release of Adobe Premiere Elements has a number of new features that help you transform video footage to impressive movies.
Guided view for new users
In Adobe Premiere Elements 12, Guided view makes movie-making simpler and easier. Guided view helps you edit video clips by guiding you
through a series of steps. You can perform tasks like trimming unwanted frames, or adding scores to video clips to slightly more complex tasks like
animating the graphics in your video clips, with easy to follow step-by-step guided assistance.
Click the Guided view to view the Guided Edits available to help you transform raw video footage to better movie clips. Add the video clip on the
timeline and then select a Guided Edit from Quick or Expert view. There are Guided Edits to help you in your movie-making endeavors. For
example, removing footages, adding narration, adding titles, and so on.
To the top
To the top
Auto Smart Tone
Auto Smart Tone is a powerful tool for automatically bringing your dull, dim, or washed-out videos to life. This feature uses a smart algorithm to
modify the brightness and contrast of your video. The Auto Smart tone feature applies a correction to the scenes in your video. There is a
controller that you can move around on the frame to fine-tune the results.
Auto Smart Tone to modify video clips
To the top
More Film Looks
More Film Looks have been added under Effects on the Action bar. You can apply these to your video clips to achieve effects like Animated,
Trinity, Cross Process, and Yesteryear. To achieve that perfect effect after applying a film look, enhance the effect, To enhance an effect, adjust
the equivalent presets in Adjust/Applied Effects panel.
New Film Looks
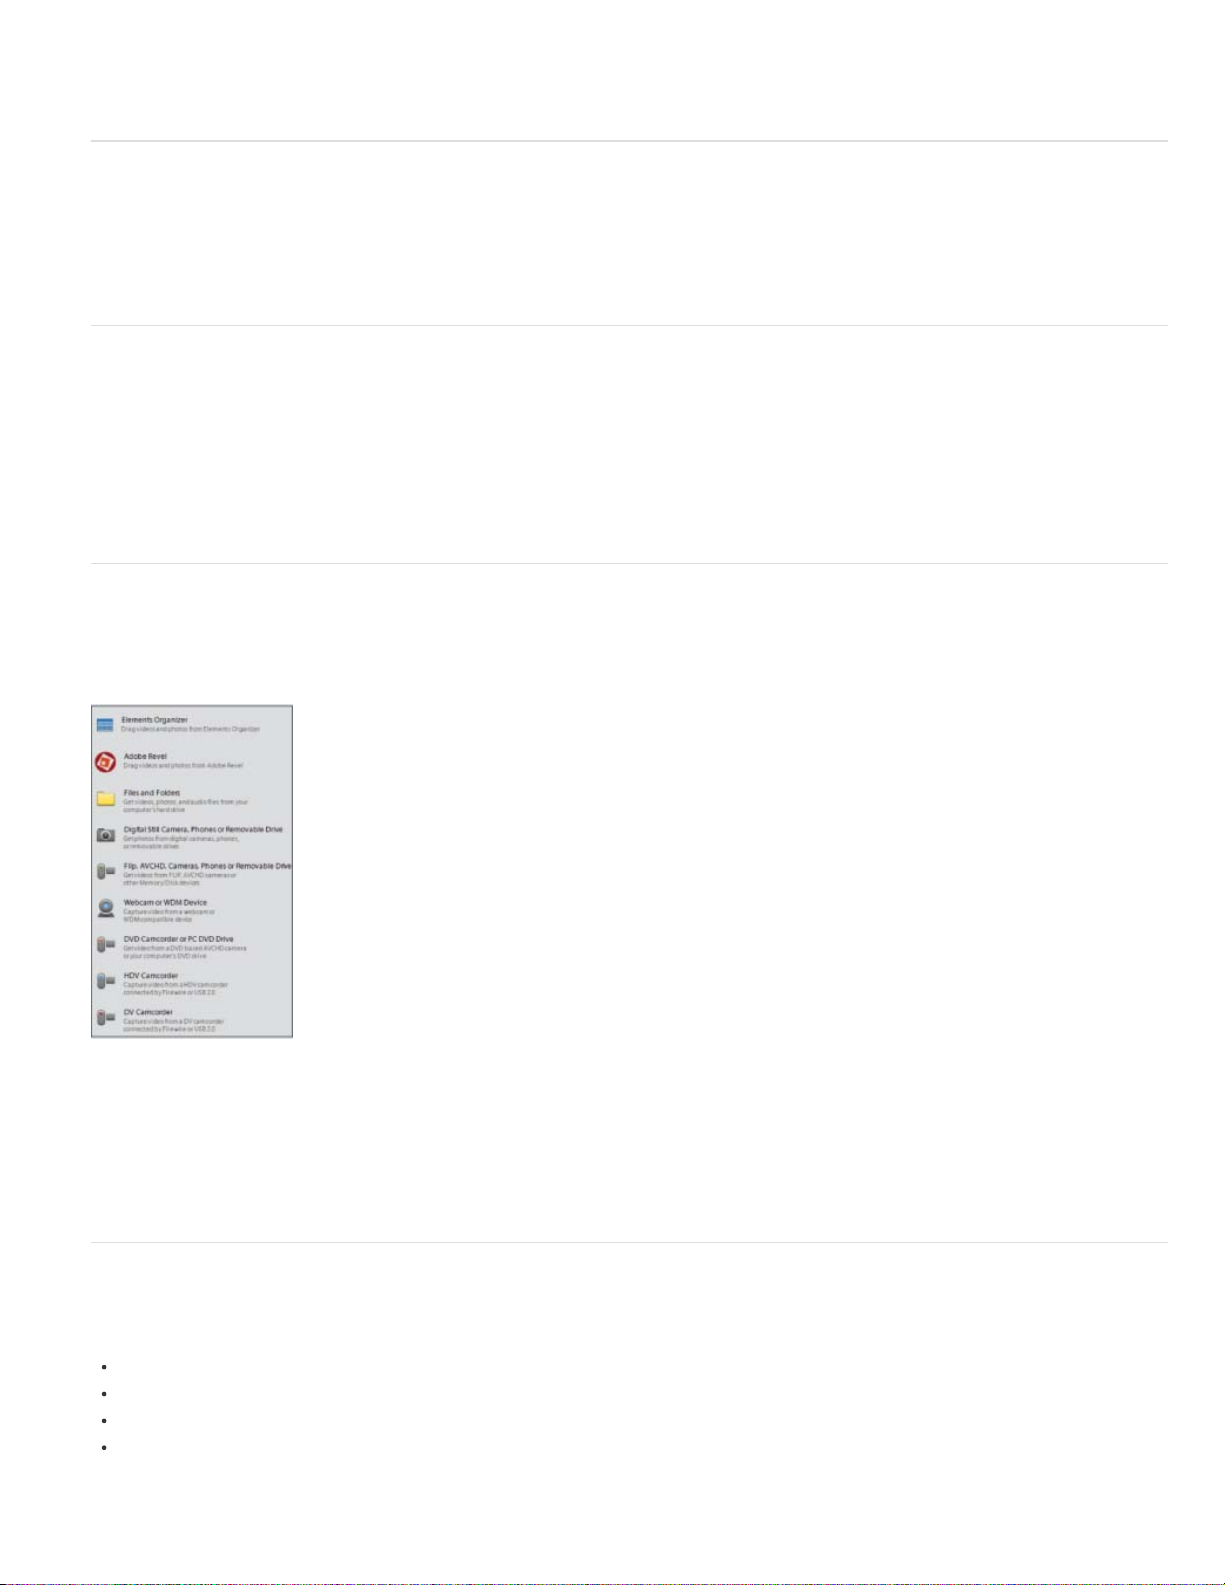
Page 7
Yesteryear
3
Before Yesteryear Film Look
After applying the new Yesteryear Film Look
To the top
Scores and sound effects
You can now add scores to video clips and thus enhance the musical atmosphere of the video. A score here refers to an audio track that you can
drag-and-drop to a video in the timeline. A score in terms of duration played includes an intro, a body, and an extro. The music played in a score
dynamically fits to the length of the video track. If you reduce the time of the score track, down or stretch it out, it rebuilds itself to match the
duration. Despite any truncation in the score, it has the same intro and extro, there was earlier.
Also, there are sound effects that help you to make a creative point or emphasizing a certain portion of the video clip or movie. These effects are
added to the video background.
To the top
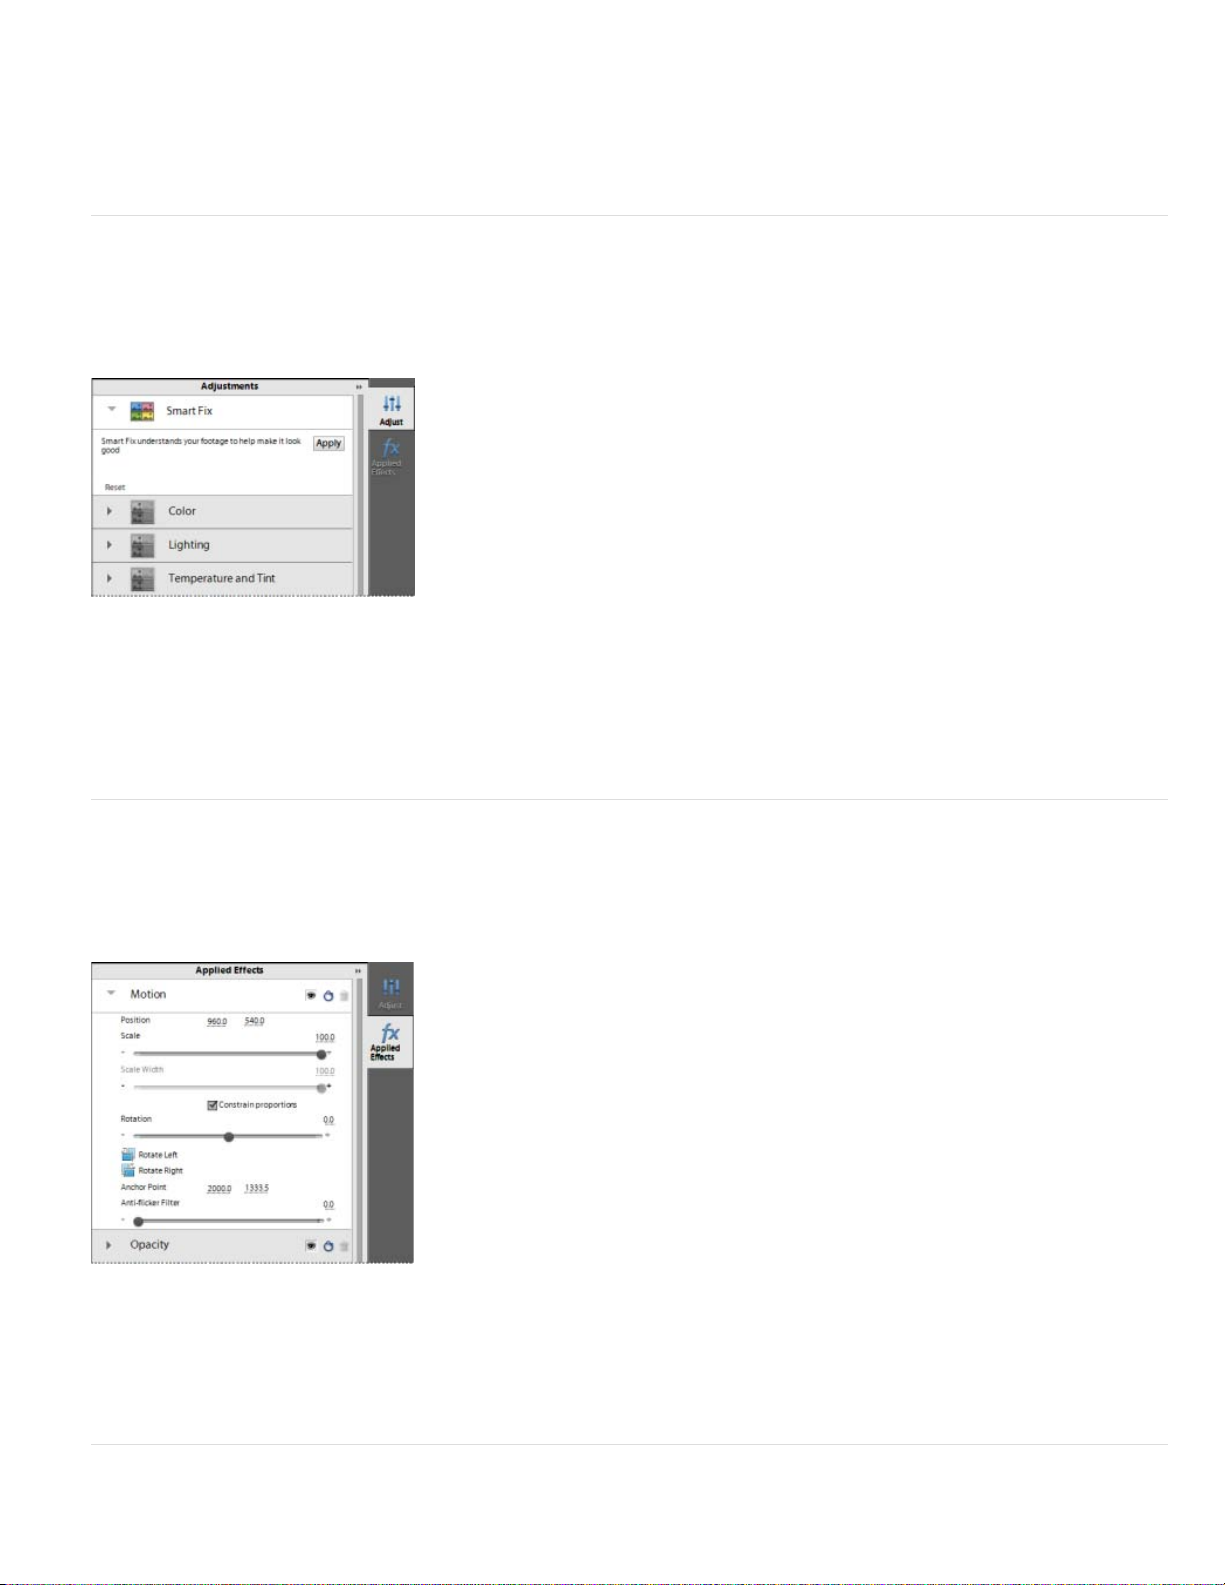
Motion tracking
Motion Tracking gives you the ability to track the movement of an object in a video clip. You can attach clipart like still images, graphics, or video
clips to the object. These objects then move together on the screen. Motion tracking is a new animation-like effect that helps track a certain object
easily in a video clip.
Adobe Premiere Elements enables you to put easily resizeable frames on particular objects to track them as per the intent. Therefore, you can
create movie compositions to follow the motion when there are many objects in a clip and draw user attention to a particular object. For example,
can be used in a car race to draw attention to a particular vehicle.
Tracking movement of an object
Page 8

To the top
4
Video Adjustment Layers
Adjustment layers help apply the same effects to multiple clips. Effects applied to an adjustment layer affect all the layers below it. You can use
combinations of effects on a single adjustment layer. You can also use multiple adjustment layers to control more effects. Adjustment layers can
be applied in both Quick and Expert mode.
Twitter™ and Facebook posts are not covered under the terms of Creative Commons.
Legal Notices | Online Privacy Policy
Page 9

Workspace
5
Networks and removable media with Digital Video
troubleshooting (Oct. 19, 2012)
Page 10

Workspace
6
Welcome screen
Quick view
Guided view
Expert view
Add Media panel
Quick view timeline
Expert view timeline
Action bar
Adjust panel
Applied Effects panel
Publish and Share panel
The Adobe Premiere Elements workspace presents a simplified interface for enthusiasts. It organizes features into the Quick, Guided, and Expert
view based on their complexity.
The Quick view aggregates basic features that enthusiasts commonly use to quickly edit video footage and share with others. It optimizes common
tasks that you perform with clips, such as editing clips, creating menus for DVDs and Blu-ray discs, and sharing movies.
The Expert view includes advanced features and tools, such as Audio Mixer, Time Stretch, that professionals use to perform intricate video editing
tasks.
The Guided view helps you edit movies by guiding you sequentially though a series of steps. This ease of use helps edit movie clips and apply
various effects with a guided approach.
To the top
Welcome screen
When you first launch Adobe Premiere Elements, the Welcome screen opens.
Click Video Editor to open an existing project or create a project in the workspace.
Access the Elements Organizer to organize, tag, and perform basic editing tasks on your media before importing them into Adobe Premiere
Elements.
Customize launch options
By default, the Welcome screen opens when you launch Adobe Premiere Elements for the first time.
Click the Settings button on the Title bar to specify the window or application that you want displayed on subsequent launches of Adobe Premiere
Elements.
Select one of the following launch options:
Welcome Screen: Launches the Welcome screen each time you open Adobe Premiere Elements. This option is enabled by default.
Organizer: If you use Elements Organizer to organize your media before editing them in Adobe Premiere Elements, choose this option.
Video Editor: Select this option if you want the Adobe Premiere Elements workspace to open every time you launch Adobe Premiere
Elements.
To the top
Quick view
Use the options in the Quick view to add titles, effects, and transitions, background music, and graphics to your clips. Pan or zoom your clip, if
necessary, or use Smart Trim for a crisper video. Use Instant Movie to automate movie creation steps.
Page 11
The Quick view contains the Add Media panel, Quick view timeline, Action bar, Adjust panel, Applied Effects panel, and the Share panel.
7
To the top
Guided view
The Guided view provides instructions on how to perform various tasks in both Quick and Expert views. In one of the views, select a guided edit
from the Guided tab and follow the instructions.
To the top
Expert view
In addition to the panels available in the Quick view, the Expert view contains the Project assets panel.
This panel contains the media files you import into your Premiere Elements project. Use the panel options to organize the files as a list or in a grid.
The grid view displays a thumbnail for each file. If you add any media asset to the timeline, a green icon appears below the thumbnail for the
asset.
To the top
Add Media panel
The Add Media panel lets you add media files from various sources to the Quick view timeline so you can rearrange and edit them.
Add Media panel
Use the Add Media panel to add media files from sources, such as video cameras, flip videos, webcams, digital still cameras, WDM devices,
mobile phones, Adobe Revel account, and folders on your hard disk.
To the top
Quick view timeline
The Quick view timeline contains the following tracks:
Video: Edit your video clips and images in this track
Titles: Add text titles to your clips here
Sound: Add background music and other sounds to your movie
Narration: Include recorded narrations for your movie here
Page 12
8
Quick view timeline
The Quick view timeline displays each clip as a series of frames that span the entire clip length. You can trim unwanted portions within individual
frames and rearrange them. You can also swap the position of a clip with another to make a coherent movie sequence.
To the top
Expert view timeline
For more advanced editing, use the Expert view timeline. The Expert view timeline graphically represents your movie project as video and audio
clips arranged in vertically stacked tracks. When you capture video from a digital video device, the clips appear sequentially as they occur.
Expert view timeline
The Expert view timeline uses a time ruler to display the components of your movie and their relationship to each other over time. You can trim
and add scenes, indicate important frames with markers, add transitions, and control how clips are blended or superimposed. Compared to the
Quick view, the Expert view timeline has more tracks.
To the top
Action bar
The Action bar contains options that provide easy access to common features you use for editing tasks. Use the options to add titles, transitions,
special effects, graphics, music, and markers to your clips.
The Action bar contains the following options:
Organizer: Opens Elements Organizer to let you organize and manage your media files
Instant Movie: Automatically guides you through the movie creation process. It lets you quickly select movie templates and edit clips. Instant
Movie also lets you add theme-based effects, titles, transitions, and audio to your movie. You can change settings as desired.
Tools: Provides options that let you add cool effects to your video. For example, use Time Remapping and Smart Mix to add sophisticated motion
effects to your video. You can choose Smart Trim to let Premiere Elements automatically edit your footage for a crisper video.
Transitions: Provides transitions you can use between your movie clips. The Transition contextual control appears automatically when you apply a
transition for the first time. Use it to modify the transition properties. To open the Transition contextual control later, double-click the transition. The
Expert view provides more transition effects compared to the Quick view.
Titles and Text: Contains pre-formatted title templates you can use in your movie. The Title contextual control appears automatically when you
apply a title to your movie for the first time. Use it to modify the title properties. To open the Title contextual control later, double-click the title. The
Expert view provides more title templates compared to the Quick view.
Effects: Shows special effects and presets you can apply to clips in your movie. To edit a special effect after applying it, click Applied Effects to
modify the properties in the Applied Effects panel. Compared to the Quick view, the Expert view provides more effects that are organized under
Page 13
various categories.
Audio: Lets you add theme music to your movie. You can select multiple music clips from here, and they are played in the order selected. Click
9
Use Smart Sound to choose third-party music plug-ins for your movie.
Graphics: Lets you add graphic images, such as clip art and callouts (thought bubbles or speech balloons) to specific portions in your clips.
Adjust panel
The Adjust panel lets you adjust the inherent properties of your clip, for example color and lighting. You can also use the Smart Fix tool to enhance
the quality of your video footage.
Adjust panel
To the top
To display the Adjust panel, select the clip and then click Adjust on the right. If you add a title to your clip, use the Adjust panel to alter its
properties, if required.
To the top
Applied Effects panel
The Applied Effects panel lets you view the properties of effects already applied to your clip. The panel provides various options that enable you to
modify the applied effects.
Applied Effects panel
To display the Applied Effects panel, select the clip to which effects are applied, and click Applied Effects on the right.
To the top
Publish and Share panel
Page 14
Use the Share panel to save and share (export) your finished project.
10
Publish and Share panel
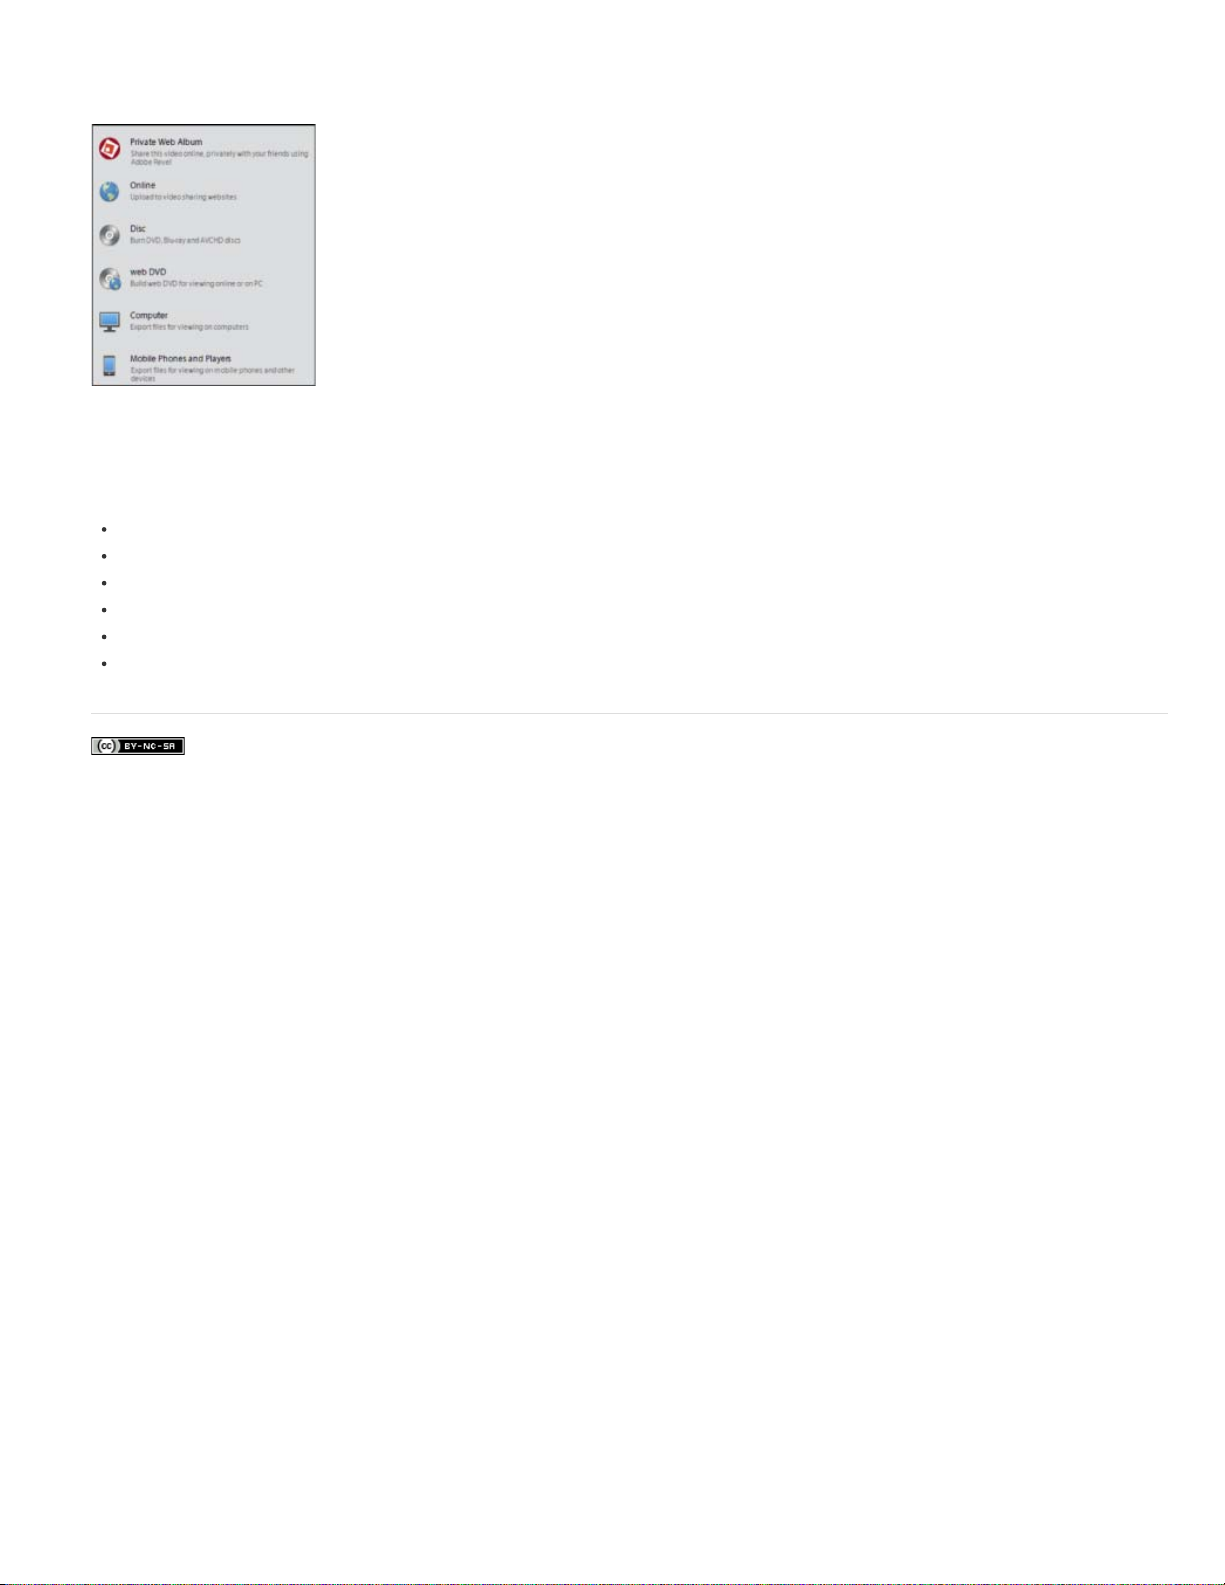
You can save your project for viewing on the web, a mobile phone, a computer, DVD, Blu- ray disc, and more.
Private Web Album: For sharing to your Adobe Revel library.
Online: For video that can be uploaded to video sharing websites, such as Facebook, YouTube, and Vimeo
Disc: For copying your movie to DVDs, Blu- ray or AVCHD discs
Web DVD: For high-quality video that can be viewed online or on your computer
Computer: For video that can be viewed on computers
Mobile phones and players: For video that can be played on mobile phones and other devices
Twitter™ and Facebook posts are not covered under the terms of Creative Commons.
Legal Notices | Online Privacy Policy
Page 15

Importing media through Embedded Elements Organizer
11
You can import media (photos, videos, and audio) in Elements Organizer to the Adobe Premiere Elements Editor workspace. You can import
media present in a catalog to PRE workspace. However, the media that has been organized into albums in Elements Organizer appears as local
albums in the Embedded Elements Organizer. The Embedded Elements Organizer or Embedded EO enables you to add media to the timeline
directly. You can access the Embedded EO option from the Add Media drop-down list.
Note:
The creation and deletion of albums is not possible in Embedded EO.
Accessing media through Embedded EO
You can now access the albums created in Elements Organizer from PRE Editor worskpace itself. There is an Embedded Elements Organizer
option present under Add Media that enables access to EO albums. To import media through Elements Organizer, follow these steps:
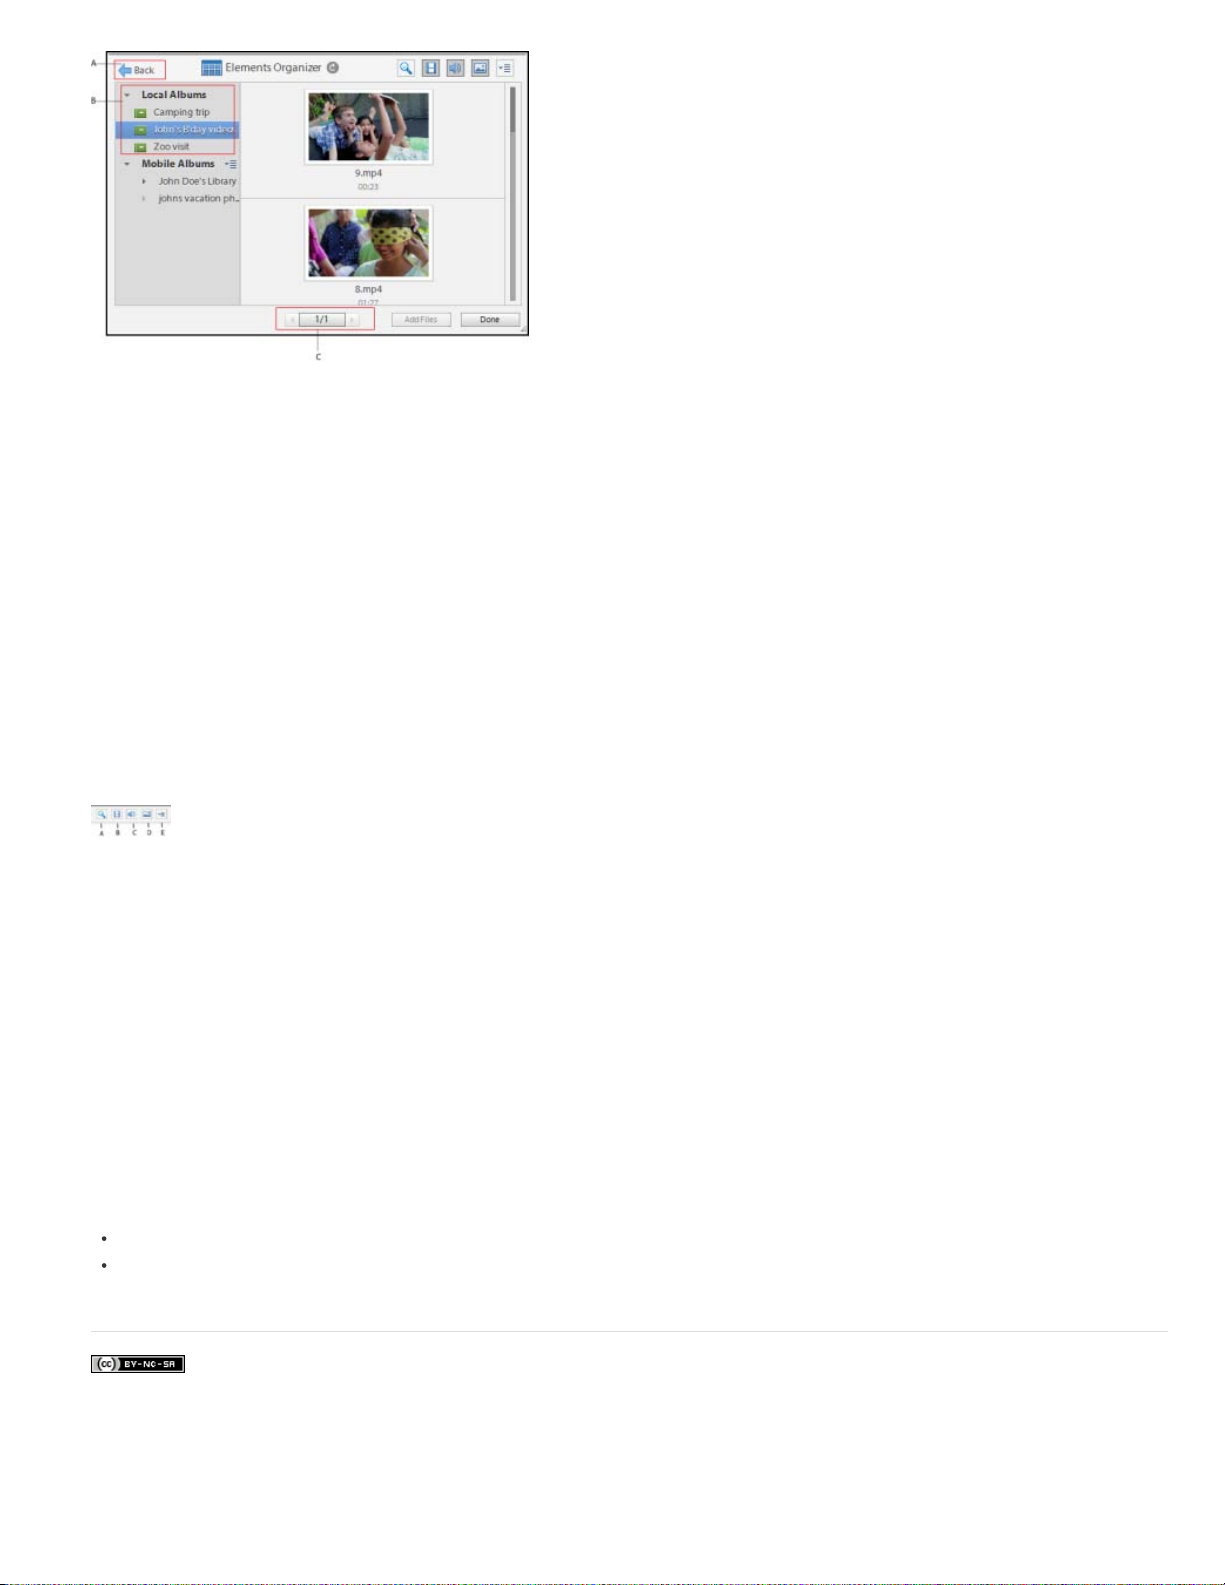
1. Click Add Media > Elements Organizer.
2. Click Local Albums. The albums created in Elements Organizer are displayed nder Local Albums. Click on an Album to display the media
present under that album in Embedded EO.You can click again on the album to deselect it, this refreshes the media visible in Embedded EO
and displays all the media available in the Elements Organizer catalog.
Click on the Show Still Image icon if nothing is displayed in Embedded EO.
3. Double-click on a video or audio file to preview it in the Source Monitor.
4. Click on a file to select it. Click Add Files to add it to the timeline.
You can select multiple files and add them to the timeline. Also, you can drag and drop media from the Embedded EO to specific points in
the video on the timeline.
5. Click Done once you are through adding the files to exit Embedded EO.
Working with files in the Embedded EO
You can perform various tasks on your files in the Embedded EO panel. Click Add Media > Elements Organizer to access this panel. You can
perform the following tasks in this panel:
Page 16
12
Embedded EO workspace
Embedded EO is primarily a workspace to view the media files present in Elements Organizer. You can view, sort, and import media from here.
You can resize the Embedded EO window. The resizing is not retained once you exit the application. However, the following three are important
part of the Embedded EO option:
A. Back button
B. Local Albums
Click Back to return to the Add Media options.
Click Local Albums to view the media in the Elements Organizer catalog. Click an album to view the media present in that
album.
C. Previous and Next button
You can view upto 1000 files in Embedded EO.
Note:
Click the previous or next button to move through the displayed media.
Embedded EO panel buttons
A. Search content
Click this icon to open a text box. Enter the search criteria and press Enter to search for a specific media file. This is not a live
search so must press Enter after entering your search criteria.
B. Show Video
C. Show Audio
D. Show Still Image
Click this icon to view video files only.
Click this icon to view audio files only.
Click this icon to view photos only.
E. Select order
Click this to sort the files by date or the batches in which they were imported. You can sort the photos in the following ways:
Newest/Oldest first: Sorts the files by creation date. Default order of display in Embedded EO is newest first.
Import batch: Sorts the files according to the batches in which they were imported. The rendition vidoes are not visible when files are sorted
by the Import batch option.
Twitter™ and Facebook posts are not covered under the terms of Creative Commons.
Legal Notices | Online Privacy Policy
Page 17

Creating a video project
13
Page 18

Creating a project
14
Projects
Review project presets and settings
Start a new project
Open a project
Projects
Premiere Elements creates a project file for every new project that you want to publish or save to work on it later. You can also create a project
before importing media.
The project file references the media that you add to a project including videos, images, titles, and themes.
Project files are small in size. They include title files and references to the source files that you capture or import. Because the project files store
references, avoid moving, renaming, or deleting the source files so that Premiere Elements can locate them.
Review project presets and settings
When you create a project, you can review the default preset and settings by clicking the Change Settings button in the New Project dialog. Adobe
Premiere Elements automatically adjusts your project settings based on the type of media you import.
To the top
To the top
1. In Premiere Elements, select File > New Project.
2. Click Change Settings.
Start a new project
1. Do one of the following:
From the Welcome screen, click Video Editor and select New Project.
If Premiere Elements is open, choose File > New Project.
2. (Optional) To change the project settings, click Change Settings, select a different preset, and click OK.
Note:
After you change your project settings, you cannot modify them later.
If you do not change the project settings, Adobe Premiere Elements uses the settings of your previous project. Alternatively, it creates an
NTS/PAL AVCHD full HD project based on your region settings.
You can import a clip whose settings do not match the settings of an empty project. Adobe Premiere Elements overwrites the project
settings with the settings of your clip when you drop it on to the Expert view timeline.
To the top
By default, the folder where you save your project also stores rendered previews, conformed audio files, and captured audio and video. These
files are large, so save them to your largest, fastest hard drive. To store the files separately from projects, choose Edit > Preferences > Scratch
Page 19

To the top
Disks.
15
Open a project
You can open only one project at a time. To ensure that Premiere Elements can open an existing project, ensure that both the project file (.PRE)
and the source files are accessible on your computer.
Do one of the following:
In the Welcome screen, click Video Editor and then click Existing Project. Choose the project name. (If the project isn’t listed, choose
Open, select the project file, and click Open.)
If Premiere Elements is open, choose File > Open Project or Open Recent Project; then select the project file, and click Open.
In Windows®, double-click the project file.
note: Premiere Elements can open projects you create in earlier versions. However, previous versions cannot open projects you create in
later versions. If you have multiple versions of Premiere Elements installed, open a project from within the software. Alternatively, rightclick/ctrl-click the file and choose the application.
Twitter™ and Facebook posts are not covered under the terms of Creative Commons.
Legal Notices | Online Privacy Policy
Page 20

Saving and backing up projects
16
Save a project
Back up a project with Auto Save
Open an Auto Save project
Save a project
Saving a project saves your editing decisions, references to source files, and the most recent arrangement of panels. Protect your work by saving
often.
To save the currently open project, choose File > Save.
To save a copy of a project, choose File > Save As, specify a location and filename, and click Save.
To save a copy of a project and continue working in the original project, choose File > Save A Copy. Specify a location and filename, and
click Save.
Tip: To specify where Premiere Elements stores project-related files, such as captured video and audio, and previews, set up a scratch disk.
Back up a project with Auto Save
To the top
To the top
To revisit editing decisions or recover from a crash, enable the Auto Save option. This option automatically saves backup project files to the Adobe
Premiere Elements Auto-Save folder at a specified time interval. For example, you can set Premiere Elements to save a backup copy every 15
minutes.
Automatic saving serves as an alternative to the Undo command, depending on the project changes between each save. Because project files are
smaller compared to source video files, archiving multiple versions of a project consumes less disk space.
1. Choose Edit > Preferences > Auto Save.
2. Do one of the following, and then click OK:
Select Automatically Save Projects, and enter the duration in minutes after which Adobe Premiere Elements saves the project.
Type a number for the Maximum Project Versions to specify how many versions of each project file you want to save. For example, if
you type 5, Premiere Elements saves five versions of each project you open.
note: Each time you open a project, save it at least once before the Auto Save option takes effect.
To the top
Open an Auto Save project
1. Do either of the following:
Start Adobe Premiere Elements. In the Welcome screen, click Video Editor and then click Existing Project.
In Adobe Premiere Elements, choose File > Open Project.
2. In the project folder, open the file in the Adobe Premiere Elements Auto-Save folder. (If no files are available, the Auto Save preference is
Page 21

Note:
possibly turned off.)
17
When you start Premiere Elements after a crash, a message prompts whether you want to open the last saved version of your
project.
Twitter™ and Facebook posts are not covered under the terms of Creative Commons.
Legal Notices | Online Privacy Policy
Page 22

Project settings and presets
18
About project settings and presets
Dynamic sequence preset
Create or change project presets
Check your project’s settings
About project settings and presets
Project settings determine the properties of your video and audio project assets. For example, they determine their format (DV, HDV, AVCHD),
source (hard disk or Flash memory camcorder), and aspect ratio (standard or widescreen video). Project setting also specify the frame rate, audio
sample rate, upper or lower field first, and bit depth for your project.
When you start a new project, Premiere Elements applies a project preset to it. A project preset is a collection of preconfigured project settings.
You can use the default project preset for the television standard for the Premiere Elements version installed on your computer.
NTSC (National Television Standards Committee) is the television standard for the Americas, the Caribbean, Japan, South Korea, and Taiwan.
PAL (Phase Alternating Line) is the standard format for Europe, Russia, Africa, Middle East, India, Australia, New Zealand, South Pacific, China,
and other parts of Asia.
Because you can’t change the project preset after starting a project, verify the format of your source footage before selecting a project preset.
If you specify lower quality settings for output (such as streaming web video), do not change your project settings. Change your export settings
instead.
To the top
To the top
Dynamic sequence preset
When you add a movie clip to the Expert view timeline, Adobe Premiere Elements automatically changes your project settings in the background
to match the clip properties. They include dimension, fps, pixel aspect ratio, and field order.
To the top
Create or change project presets
Adobe Premiere Elements includes default project presets for media from common sources, including DV camcorders, cameras, DVD discs, and
mobile phones. You cannot create a custom project presets or change a project preset after selecting a preset and starting a project.
To change the project preset when starting a new project, click the Change Settings button in the New Project dialog. Select the preset that
matches your footage.
If you add a movie clip whose preset does not match the project’s preset to the Expert view timeline, a message appears. Click Yes to let Adobe
Premiere Elements change the project’s settings to use the closest available preset. For more information, see Dynamic Sequence Preset.
Select a project preset
By default, Premiere Elements uses an AVCHD preset for the television standard you specify when you install the program. Select a new preset to
create projects in a different format, television standard, or frame aspect ratio.
The preset you select becomes the default, which is used for all new projects, until you select another preset. If you choose a preset temporarily,
change it when you’ve finished using it.
1. Start Premiere Elements.
Page 23

2. In the Welcome screen, click Video Editor, and then click New Project. (Or, choose File > New > Project.)
19
3. In the New Project dialog box, click Change Settings.
4. Select the preset that matches the format and standard of the footage you want to edit. For example, to edit most HDV footage from 1080i
camcorders, choose HDV 1080i 30 or HDV 1080i 25.
5. Click OK.
6. Provide a name and location for your project, and click OK.
Change the settings of an open project
After you create a project, you can only make minor display-related changes to the project settings.
Note:
You cannot change the Editing mode and the format of Preview files after you create a project.
1. Choose Edit > Project Settings > General.
2. In the Project Settings dialog box, specify project settings for General, Capture, and Video Rendering.
3. Click OK.
To the top
Check your project’s settings
Project presets include project settings under three categories: General, Capture, and Video Rendering. After you start a project, you can’t change
most of the settings, such as frame rate, size, and aspect ratio. However, you can review the settings to ensure that the media you want to add to
the project is compatible.
Open the project in Premiere Elements, and choose Edit > Project Settings > [category].
Note:
Third-party products, such as PCs, capture cards, and hardware bundles sometimes include custom presets. See the third-party
documentation for details.
NTSC vs PAL presets
NTSC presets conform to the NTSC standard, where each video frame includes 525 horizontal lines displayed at 29.97 frames per second. The
Standard NTSC preset applies to footage that has a 4:3 aspect ratio. The Widescreen NTSC preset applies to footage that has a 16:9 aspect ratio.
PAL presets conform to the PAL standard, where each video frame includes 625 lines displayed at 25 frames per second.
General settings
General settings (Edit > Project Settings > General) control the fundamental characteristics of a project. They include the editing mode used to
process video, frame size, aspect ratios, count time (Display Format), and playback settings (Timebase). These settings match the most common
source media in your project. For example, if most of your footage is DV, use the DV Playback editing mode. The quality of your video can
deteriorate if you change these settings arbitrarily.
General settings include the following options.
Page 24

Editing Mode
20
Fields, and Sample Rate preview settings. The editing mode determines these settings.
note: The Editing Mode setting represents the specifications of the source media, not the final output settings. Specify output settings when you
export a project.
Identifies the television standard and format for the project. You cannot change the Timebase, Frame Size, Pixel Aspect Ratio,
Timebase
Playback Settings
functions. For a DV editing mode, this option indicates where you want your previews to play. For information on the playback settings for
third-party plug-ins, see the developer documentation.
Frame Size
source media. You can’t change the frame size to compensate for slow playback. However, you can adjust the playback settings: Right-click/ctrlclick the monitor and choose Playback Settings. Adjust the frame size of the output by changing the Export settings.
Pixel Aspect Ratio
different from your video, the video can appear distorted when you render it and play.
Fields
footage with fields, even if the footage was recorded as progressive scan.
Display Format (video)
and motion-picture film. For DV NTSC video, choose 30-fps Drop-Frame Timecode. For DV PAL video, choose 25-fps Timecode.
Title Safe Area
rectangle with crosshairs marks the title-safe zone when you click the Safe Zones button in the monitor. Titles require a wider safe zone than
action.
Specifies the time divisions used to calculate the time position of each edit (PAL: 25, NTSC: 29.97).
This button is available if you use a DV preset, a DV editing mode, or install a plug-in that provides additional playback
Specifies the frame pixels for your project playback. In most cases, the frame size for your project matches the frame size of your
Sets the aspect ratio for pixels. The video format (PAL or NTSC) determines this ratio. If you use a pixel aspect ratio that is
Specifies the field dominance, or the order in which the two interlaced fields of each frame are drawn. Premiere Elements captures DV
Specifies the way time appears throughout the project. The time display options correspond to standards for editing video
Specifies the frame edge area to mark as a safe zone for titles, so that titles aren’t cut off by TVs that zoom the picture. A
Action Safe Area
rectangle marks the action -safe zone when you click the Safe Zones button in the monitor.
Sample Rate
require more disk space and processing. Record audio at a high-quality sample rate, and capture audio at the rate at which it was recorded.
Display Format (audio)
in audio samples. However, you can display time in milliseconds for sample-level precision when you are editing audio.
Specifies the frame edge area to mark as a safe zone for action so that TVs that zoom the picture do not exclude the action. A
Identifies the audio sample rate for the project preset. In general, higher rates provide better audio quality in projects, but they
Specifies whether audio time display is measured by using audio samples or milliseconds. By default, time is displayed
Capture settings
Capture settings (Edit > Project Settings > Capture) control how video and audio are transferred directly from a deck or DV camcorder. (Other
Project Settings panels do not affect capturing.)
Video Rendering settings
Video Rendering settings control the picture quality, compression settings, and color depth that Premiere Elements uses when you play video from
the Expert view timeline.
To access Video Rendering settings, choose Edit > Project Settings > Video Render. These settings include the following options:
Maximum Bit Depth
increases precision but decreases performance.
Allows Premiere Elements to use up to 32-bit processing, even if the project uses a lower bit depth. Selecting this option
Page 25

File Format
Compressor
Specifies the format of the preview video.
21
Identifies the codec (compressor/decompressor) that Premiere Elements applies to generate movie previews. The project preset
defines the codec. You cannot change it because it must conform to the DV standard.
note: If you don’t apply effects to your clip or change its frame/time characteristics, Adobe Premiere Elements uses the clip’s original codec for
playback. If your changes necessitate frame recalculation, Adobe Premiere Elements applies the codec identified here.
Optimize Stills
Select this option to use still images efficiently in projects. For example, you can use an image that has a duration of 2 seconds in
a 30-fps project. Premiere Elements creates a 2-second frame instead of 60 frames, each with a duration of 1/30 second. Deselect this option if
projects encounter playback problems when displaying still images.
Twitter™ and Facebook posts are not covered under the terms of Creative Commons.
Legal Notices | Online Privacy Policy
Page 26

Viewing a project’s files
22
Project Assets panel overview
Rename a source file in a project
Find an item in a project
Locate missing files for a project
Delete a clip
Project Assets panel overview
The Project Assets panel lets you preview source material for your projects. Select the Expert view and then click Project Assets.
You can view the contents of a project using the list view or the grid view. Use the panel options menu to switch between the views.
The grid view displays a snapshot of the video you imported into the project. The Project Assets panel indicates files that you use in the Expert
view timeline with a green icon. Use the Search box to search for files within the panel.
Display and arrange media items
In the Project Assets panel, you can display items in the List view. The List view lets you view more items simultaneously, search, and sort items
by properties such as media type and duration.
To the top
To sort items in List view, click the column heading by which you want to sort the items. (For example, click Media Type to sort items by
type.) If folders are expanded, items sort from the top level and down the Project Assets panel hierarchy. To reverse the sort order, click the
column heading again.
To see more of the column headings in List view, drag the right side of the Project Assets panel to the right. Alternatively, drag the scroll bar
at the bottom of the panel to the right.
Organize clips in folders
The Project Assets panel can include folders into which you can organize project contents in the same way as folders in Windows Explorer.
Folders can contain media files or subfolders. Consider using folders to organize media types, such as DV captures, Adobe Photoshop Elements
still images, and audio files.
In the Project Assets panel, do any of the following:
Note:
To access the Project Assets panel, select Project Assets in the Expert view.
To add a folder, click the New Folder icon at the bottom of the Project Assets panel. In the list view, if you click New Folder multiple times
in a row, each new folder is nested inside the previous new folder.
To move an item into a folder, drag the item to the Folder icon. You can move folders into other folders to nest them.
To display the contents of a folder, double- click the folder. Alternatively, in List view, click the triangle beside the Folder icon to expand
the folder.
To navigate to parent folders, click the appropriate icon. You can click and hold this button to see a list of all the folders above the one
currently listed. You can also jump to a folder by highlighting it and releasing the mouse button.
To the top
Page 27

Rename a source file in a project
23
To rename a clip, select it, choose Clip > Rename, type the new name, and press Enter. (The change affects only references used in the
project; the name of the original source file in the Project workspace and Windows remains the same.)
To rename an original source file, close Premiere Elements, and rename the file in Windows. The next time you open the project, Premiere
Elements asks you to locate the file.
Tip: You can also rename a selected clip by clicking its name once to select the text, typing the new name, and pressing Enter.
Find an item in a project
Right-click an item in the Expert view timeline, and select Reveal In Project.
To find an item on the hard drive, right-click the clip, choose Properties, and note the path at the top of the Properties panel.
Locate missing files for a project
Premiere Elements doesn’t store original source files in a project—it references the name and location of each source file when you import it. If
you later move, rename, or delete a source file in Windows, the Where Is The File dialog box opens when you next open the project.
In addition to source files, a project also references preview files. Preview files allow you to preview effects in real time without having to render
them—a process that can take hours. Preview files can be re-created if necessary.
To the top
To the top
Note:
After you create the final movie, you can delete source files if you do not plan to reuse them. If you plan to re-edit the movie in the future,
archive the project with the Project Archiver before deleting source files.
In the Where Is The File dialog box, choose one of the following options:
Display Only Exact Name Matches
know that the name of a file has changed, deselect this option.
Replaces the missing file with the original or replacement file.
Select
Starts the Windows XP Search feature.
Find
Skip Previews
Replaces the missing file with an offline file. The offline file acts as a placeholder for related clips in the Project Assets panel and the
Skip
Expert view timeline.
Skip All
Ignores missing preview files so you aren’t asked to find them.
Replaces all missing clips with offline files without asking you for confirmation.
Displays only the files that match the name of the missing file when the project was last closed. If you
To the top
Delete a clip
Because Premiere Elements doesn’t store media files in the project, deleting a clip from a project removes all instances from a movie. However,
Premiere Elements does not delete the clip’s source file from the Windows desktop. To conserve disk space, delete the source file.
To delete a media file from the Project workspace, do one of the following:
Page 28

Select the file in the panel and click the Delete icon.
24
Right-click/ctrl- click it in the Expert view timeline, and choose Delete. You can also delete by selecting the file and pressing the Delete key.
The file is deleted from the Elements Organizer, but it is not deleted from your hard disk.
Tip: To identify unused items in a project, see the Video Usage and Audio Usage columns in List view. To display these columns, scroll to
the right. A green check mark (list view) and a green dot (grid view) indicates that the asset is being used in the project.
Twitter™ and Facebook posts are not covered under the terms of Creative Commons.
Legal Notices | Online Privacy Policy
Page 29

Viewing clip properties
25
See an overview of basic clip properties
View comprehensive file information
Customize List view properties
View details about effect properties
See an overview of basic clip properties
To view the basic properties of a clip, right-click/ctrl-click the clip in the Project Assets panel, choose Properties.
View comprehensive file information
Premiere Elements includes tools that you can use to evaluate a file in any supported format stored inside or outside a project. For example, you
can determine whether a clip you exported has an appropriate data rate for Internet distribution. Video file properties can include file size,
number of video and audio tracks, duration, average frame rate, audio sample rate, video data rate, and compression settings. In addition, they
include information about dropped frames in captured clips.
Use the Get Properties feature to check for dropped frames in a clip you captured. Use the Data Rate Analysis graphs to evaluate how well the
output data rate matches the requirements of your delivery medium. The graphs depict the render keyframe rate, the difference between
compression keyframes and differenced frames (frames that exist between keyframes). They also depict the data rate levels at each frame.
To the top
To the top
Do one of the following:
If the clip is in the Expert view timeline, select it and choose File > Get Properties For > Selection.
If the clip is not in the project, choose File > Get Properties For > File. Locate the clip you want to analyze and then click Open.
To the top
Customize List view properties
You can customize the List view to display only the information you want to see. You can also rename columns, add columns of your own,
rearrange columns, and change the width of columns.
Specify which properties appear in List view
The Name property appears by default, and displays the clip name on disk. You cannot remove the Name property using the Edit Columns
dialog box. You can change the name the clip uses inside the project.
1. Open the Project Assets panel.
2. Right-click/ctrl- click in the Media view, and choose Edit Columns. Ensure that you click an area outside the rows containing the assets.
3. Select any of the following properties you want to appear in Media view, and click OK:
Page 30

Displays a check mark if the clip is used in the project.
26
Used
Media Type
Frame Rate
Media Duration
Settings dialog box.
note: In Premiere Elements, all durations in a panel include the frames that the In point and Out point specify. For example, setting the In
point and Out point to the same frame results in a duration of one frame.
Video Duration
Elements, such as changing the clip speed.
Audio Duration
Elements, such as changing the clip speed.
Video Info
Audio Info
Video Usage
Media, such as Movie or Still Image.
The frame rate of the clip, such as 29.97 fps.
Length of the captured media on disk, expressed in the Display Format specified in the General section of the Project
The duration of the clip the Video In point and Out point define. Incorporating any adjustments applied in Premiere
The duration of the clip the Audio In point and Out point define. Incorporating any adjustments applied in Premiere
The frame size and aspect ratio of the clip, and whether an alpha channel is present.
The audio specifications of the clip.
The number of times the video component of a clip is used in the movie.
Audio Usage
Status
Client
The number of times the audio component of a clip is used in the movie.
Specifies whether a clip is online or offline. If a clip is offline, this option also indicates why.
Field for adding a client’s name or other details.
Adjust columns in List view
Use the List view to quickly evaluate, locate, or organize clips based on specific properties.
1. Open the Project Assets panel.
2. Do any of the following:
To change the width of a column, position the pointer over a dividing line between column headings until the Column Resize icon
appears. Then, drag horizontally.
To create a column, right-click/ctrl-click and choose Edit Columns, click Add and select a column name (after which the new column
appears). Type a name and choose a type for the new column, and click OK. Text columns can contain any text you enter. Boolean
columns provide a check box.
To display a column, right-click/ctrl-click and choose Edit Columns, and then click the box next to the column name you want to
display.
To sort columns in ascending or descending order, click their heading.
To rearrange columns, right-click/ctrl-click and choose Edit Columns, select a column name, and click Move Up, or Move Down.
note: Premiere Elements locks some column attributes. You can’t locate or change these attributes in the Edit Columns dialog box.
Page 31

For example, you can change the names of columns you added, but not the names of columns built in Premiere Elements.
View details about effect properties
27
1. Select a clip in the Quick view timeline or the Expert view timeline.
2. Click the Applied Effects button and view the properties in the Applied Effects panel.
Twitter™ and Facebook posts are not covered under the terms of Creative Commons.
Legal Notices | Online Privacy Policy
To the top
Page 32

Undoing changes
28
Undo changes incrementally
Undo any previous change
Undo changes incrementally
If you change your mind about an edit or effect, Premiere Elements provides several ways to undo your work. You can undo only those actions
that alter video content; for example, you can undo an edit, but you cannot undo scrolling a panel.
To undo or redo the most recent change, choose Edit > Undo. (You can sequentially undo a series of recent changes.)
To undo a change, and all successive changes that occurred since you last opened a project, delete it from the History panel.
To stop a change that Premiere Elements is processing (for example, when you see a progress bar), press Esc.
To undo all changes made since you last saved the project, choose File > Revert.
To undo changes made before you last saved a project, try opening a previous version in the Adobe Premiere Auto -Save folder. Then choose
File > Save As to store the project outside the Adobe Premiere Auto-Save folder. The number of changes you can undo depends on the Auto
Save preference settings.
To the top
To the top
Undo any previous change
The History panel records the changes you make to a project. Each time you add a clip, insert a marker, or apply an effect, the History panel adds
that action to its list. The tool or command you used appears in the panel along with an identifying icon. You can use the panel to quickly undo
several changes. When you select a change in the panel, the project returns to the state of the project at the time of that change. The more recent
changes turn gray and disappear when you make your next change.
The History panel records changes only for the current session. Closing a project or choosing the Revert command clears the History panel. While
the panel lists most changes, it does not list individual changes within some panels, nor does it list program-wide changes, such as Preferences
settings.
To display the History panel, choose Window > History.
To select a change in the History panel, click it.
To delete a selected change, click and then click OK.
To move around in the History panel, drag the slider or the scroll bar in the panel. Or, choose Step Forward or Step Backward from the
History panel menu.
To clear all changes from the History panel, choose Clear History from the History panel menu, and then click OK.
Page 33

List of changes in the History panel
29
Twitter™ and Facebook posts are not covered under the terms of Creative Commons.
Legal Notices | Online Privacy Policy
Page 34

Working with scratch disks
30
About scratch disks
Types of scratch disks
Set up a scratch disk
Maximizing scratch disk performance
About scratch disks
When you edit a project, Premiere Elements uses disk space to store scratch files for your project. These include captured video and audio,
conformed audio, and preview files. Adobe Premiere Elements uses conformed audio files and preview files to optimize performance, allowing
real-time editing, high processing quality, and efficient output. All scratch disk files are preserved across work sessions. If you delete conformed
audio files, Premiere Elements automatically recreates them. If you delete preview files, they are not be recreated automatically.
By default, scratch files are stored where you save the project. The scratch disk space required increases as your movie becomes longer or more
complex. If your system has access to multiple disks, choose Edit > Preferences > Scratch Disks / Adobe Premiere Elements 12 > Preferences >
Scratch Disks. Specify the disks Premiere Elements uses for these files. For best results, set up your scratch disks at the very beginning of a
project, before capturing or editing.
Types of scratch disks
To the top
To the top
While performance can be enhanced by setting each scratch disk type to a different disk, you can also specify folders on the same disk. Select
Edit > Preferences > Scratch Disks / Adobe Premiere Elements 12 > Preferences > Scratch Disks to set the following scratch disk options.
Captured Video
Captured Audio
Video Previews
file, or export to a DV device. If the previewed area includes effects, the effects are rendered at full quality in the preview file.
Audio Previews
are also created when you choose Clip > Audio Options > Render And Replace, export to a movie file or DV device. If the previewed area includes
effects, the effects are rendered at full quality in the preview file.
Media Cache
performance when reading media files.
DVD Encoding
Premiere Elements places preview files, encoded files, media cache files, and other types within subfolders of the folders you specify for
Note:
these types. Each subfolder is named for the type of scratch files it contains.
Folder or disk for video files and stop-motion still image files that you capture using the Capture panel.
Folder or disk for audio files that you capture using the Capture panel.
Folder or disk for video preview files. These files are created when you choose Timeline > Render Work Area, export to a movie
Folder or disk for audio preview files. These files are created when you choose Timeline > Render Work Area command. They
Folder or disk for audio peak files, audio conform files, video index files, and other files Premiere Elements creates to improve
Folder or disk for encoded video and audio files that are generated when you create a DVD.
To the top
Set up a scratch disk
You set up scratch disks in the Scratch Disks panel of the Preferences dialog box. To verify the amount of free disk space on the selected volume,
see the box to the right of the path. If the path is too long to read, place the pointer over the path, and the full path appears in a tool tip.
Page 35

1. Choose Edit > Preferences > Scratch Disks / Adobe Premiere Elements 12 > Preferences > Scratch Disks.
31
2. For each scratch disk type, specify a disk location for Premiere Elements to store the corresponding files. Choose one of these options from
the pop -up menu:
My Documents
Same As Project
Custom
Stores scratch files in the My Documents folder.
Stores scratch files in the same folder where the project is stored.
Indicates that the current path isn’t in the pop-up menu. The current path isn’t changed until you click Browse to specify any
available disk location.
Maximizing scratch disk performance
If your computer has only one hard disk, consider leaving all scratch disk options at their default settings.
If it has more than one, choose large, secondary hard drives for scratch disks and not the main load drive. In Premiere Elements, you can
place each type of scratch file onto its own disk. For example, you copy video to one disk and audio to another.
Defragment scratch disks regularly by using the Disk Defragmenter tool in Windows or a third-party utility. To use the Disk Defragmenter tool,
choose Start > All Programs > Accessories > System Tools > Disk Defragmenter. For more instructions, see the documentation provided with
Windows or the third-party utility.
Specify your fastest hard disks for capturing media and storing scratch files. You can use a slower disk for audio preview files and the project
file.
Specify only disks attached to your computer. The throughput from a hard disk on a network is too slow. Avoid using removable media as
scratch disks because Premiere Elements always requires access to scratch disk files. Scratch disk files are preserved for each project, even
when you close the project. Premiere Elements reuses these files when you reopen the project associated with them. If scratch disk files are
stored on removable media and the media is removed from the drive, the scratch disk is not available to Premiere Elements.
You can divide a single disk into partitions and set up each partition as a virtual scratch disk. However, partitioning doesn’t improve
performance because the single drive mechanism is a bottleneck. For best results, set up scratch disk volumes on actual separate drives.
To the top
Twitter™ and Facebook posts are not covered under the terms of Creative Commons.
Legal Notices | Online Privacy Policy
Page 36

Creating instant movies
32
Create an Instant Movie from the workspace
Edit an Instant Movie
From an expert: InstantMovie basics
Instant Movie lets you quickly create a professional-looking, edited movie, complete with titles, soundtrack, effects, and transitions by using a
simple (and quick) step-by-step process. When you create an Instant Movie, Adobe Premiere Elements analyzes your clips (if they have not
already been analyzed). It applies Smart Tags as necessary, edits the clips, and applies a theme of your choice. You can personalize the theme by
using your own title and ending credits. In addition, you can supply your own music or effects.
The analysis option is enabled by default. If you have disabled analysis, smart tags are not used.
Movie themes create movies with a specific appearance. For example, the Wedding Doves theme adds an elegant introduction and conclusion,
flying white doves overlay, and wedding background music. The Comic Book theme creates a fun kids party video by adding stylish effects, such
as Color Emboss and large artistic fonts in the title. Each theme uses a unique editing style for selecting, trimming, and sequencing clips.
The default duration for a theme is approximately 4-6 minutes. You can use Instant Movie on all of the clips in your movie. Alternatively, use it on
a subset to create a montage or special feature at the beginning or end of a DVD.
You can choose various themes. You can apply all of the properties in a theme, or choose to add only a subset. Likewise, you can add a theme to
an entire sequence in the Quick view timeline/Expert view timeline. Alternatively, you can choose to add it to only a single clip.
To the top
Create an Instant Movie from the workspace
1. From the Quick view timeline or the Expert view timeline, select the clips that you want to include in your movie.
2. From the Action bar, click Instant Movie.
3. Choose a theme for your movie or download a template. To download and online template for your instant movie:
a. Right-click/Ctrl-click the movie theme template.
b. Click Download Now to download selected template. Click Download All to download all the templates.
c. (Optional) Click the Download In Background button to let the content download in the background while you continue to work in Adobe
Premiere Elements.
To preview a movie theme, move the mouse cursor over the theme’s thumbnail to see a description, and click the Play button to watch a
preview. Click Next.
4. Specify the properties for the movie, as desired:
Page 37

33
Opening and Closing Titles: Opening and closing titles can be multiple lines. However, for best results, keep the opening title to one
line.
InstantMovie: Specifies whether you want to perform an auto edit, which automatically trims the clips and adds them to the project
based on their Smart Tags. And whether to analyze clips and apply Smart Tags to them.
Apply To: Specifies whether to apply the theme to the entire project or to the selected clips in the Quick view timeline/Expert view
timeline.
Music: Specifies whether to use the theme music, your own music (click Browse to locate and open it), or no music. You can select
multiple music clips, and they are played in the order selected. Drag the slider between Music/Sound FX and My Clips to set the amount
of soundtrack and audio effects used versus the sound from your clips. InstantMovie syncs with the beats of the music, so changing the
song can significantly change the results. In addition, changing the song changes the duration of the movie to match the duration of the
new song.
Speed And Intensity: Enables you to control the speed of cuts and amount of effect. Click the triangle beside the Speed And Intensity
option and use the slider to adjust the speed of cuts and amount of effect.
Duration: Specifies the length of the finished movie. Match Music creates a movie to the length of the theme music. This parameter lets
you specify the exact length of time by dragging hours, minutes, and seconds. Use All Clips ensures all the selected clips are used and
bases the length of time on their duration.
Note: If you specify a duration that is longer than the theme music, the music will loop. If the duration is shorter than the length of the theme
music, the music ends with the last clip.
Sequence: Specifies whether clips are arranged according to the Time/Date stamp or according to the theme’s editing rules.
Theme Content: Specifies which aspects of the theme are included in the final movie. Select or deselect any of the options. If some of
your clips have effects already applied, you can choose to keep the applied effects, or remove them and apply the theme’s effects
instead.
Render Preview: If this option is enabled, the instant movie is rendered after it is created and placed on the timeline. Rendering
improves the frame rate of the movie for playback.
To the top
Edit an Instant Movie
When you create an Instant Movie, Adobe Premiere Elements combines all the clips into a single clip. You can break apart this combined clip if
you want to edit or replace the individual clips. Use the Replace Clip command to quickly replace one clip with another without having to trim and
edit the new clip to fit. Alternatively, change the effects or overlays applied to the clip.
Because Instant Movie is created using beat detect on the added music clip, changing the Audio clip may not produce a well-synced video.
Twitter™ and Facebook posts are not covered under the terms of Creative Commons.
Page 38

Legal Notices | Online Privacy Policy
34
Page 39

Importing and adding media
35
Networks and removable media with Digital Video
troubleshooting (Oct. 19, 2012)
Page 40

Adding media into Adobe Premiere Elements
36
Add media from Embedded Elements Organizer
Import from Adobe Revel
Add files from Files and Folders
Import photos from your digital camera, phones, or removable drive
Import from Flip, AVCHD, cameras, phones, or removable drives
Capture video from DV/HDV camcorders, webcams, and WDM devices
You can add media to Premiere Elements using one of these methods:
capturing from live or recorded sources
importing files from other types of storage
adding from the Project Assets panel
recording narrations from a microphone
When you add media files to Premiere Elements, they are added to the Quick view timeline and the Expert view timeline. In addition, they are
added to the Project Assets panel in the Expert view.
A thumbnail, called a clip, represents each file in the Project Assets panel. Clips, whether they contain audio, video, or images, are the building
blocks of your movies.
To add new media into Premiere Elements, click Add Media.
Use any of the following options in the Add Media panel to add media files:
Add Media panel
Elements Organizer
video and images to the Quick view/Expert view timeline or the Project Assets panel.
Adobe Revel
view/Expert view timeline or the Project Assets panel.
Files And Folders
Select this option to add media from the albums in Elements Organizer. From the Elements Organizer application, drag
Select this option to add media from Adobe Revel. From the Adobe Revel online albums, drag video and images to the Quick
Import videos, photos, and audio files from your personal computer’s hard drive.
Page 41

Digital Still Camera, Phones, or Removable Drive
37
Premiere Elements - Media Downloader window. It also imports media from devices that store video files in Flash memory, or on a disk
Import photos from a camera, mobile phone, or through USB. This option opens the Adobe
Flip, AVCHD, Cameras, Phones or Removable Drive
include Flip and other compact video cameras, AVCHD, DVD, DSLR and other cameras, and mobile phones.
Webcam Or WDM Device
DVD Camcorder or PC DVD Drive
in AVCHD format from a DVD Camcorder. This option opens the Adobe Premiere Elements - Video Importer window.
DVD drive is not detected in Mac OS.
Note:
HDV Camcorder
DV Camcorder
Capture video from an HDV camcorder through FireWire (IEEE 1394). This option opens the Capture window.
Capture video from a DV camcorder through FireWire (IEEE 1394) or USB. This option opens the Capture window.
Capture video from a webcam or WDM-compatible capture device. This option opens the Capture window.
Import video from your DVD based AVCHD camers or your computer's DVDdrive. You can import media files
Add media from devices that store video files in Flash memory or on a disk. Such devices
Add media from Embedded Elements Organizer
1. Click Add Media, and select Elements Organizer. The Embedded Elements Organizer option launches.
2. In the Embedded EO workspace, locate the album containing your media.
To the top
3. Drag one or more media files to the Quick view timeline or Expert view timeline in Adobe Premiere Elements.
To the top
Import from Adobe Revel
You can import media (photos and videos) uploaded to libraries in Adobe Revel to Adobe Premiere Elements Editor workspace. Media uploaded to
Adobe Revel are available in the Mobile album section of Embedded EO and Adobe Revel menu options. The Adobe Revel option is present
under Add Media. To import media from Adobe Revel to PRE workspace, follow these steps:
1. Click Add Media > Adobe Revel.
2. Click Mobile Albums. The libraries created in Adobe Revel are displayed under Mobile Albums. Click on an Album to display the media
present under that album in the Adobe Revel dialog box.You can click again on the album to deselect it, this refreshes the media visible in
Adobe Revel and displays all the media available in the Adobe Revel library.
3. Click on a file to select it. Click Add Files to add it to the timeline.
You can select multiple files and add them to the timeline. Also, you can drag and drop media to specific points in the video on the timeline.
4. Click Done after importing the files from Adobe Revel.
To the top
Add files from Files and Folders
Page 42

Click Add Media, and then click Files And Folders. Locate and select the files that you want, and click Open. To add an entire folder, select it
and click Import Folder.
38
Drag files or folders from Windows Explorer to the Project Assets panel.
Drag files from Windows Explorer directly to the Quick view or Expert view timeline.
Note:
You can also use the Elements Organizer to access files that are stored on your hard drive. Files that you added to the Elements Organizer
from either Premiere Elements or Adobe Photoshop Elements are displayed.
Import photos from your digital camera, phones, or removable drive
1. Connect the digital camera, or mobile phone to your computer.
Note:
Install any drivers your device requires. Consult the manual.
2. In Adobe Premiere Elements, select Add Media >Digital Still Camera, Phones Or Removable Drives, and then click Advanced Dialog.
To the top
Adobe Premiere Elements - Photo Downloader (Advanced Dialog view)
3. Choose the drive or device from the Get Photos From pop-up menu. Thumbnails of all importable files appear in the dialog box.
4. To specify a location for the saved files, do one of the following:
To save files to the default Adobe folder, leave the location as it appears in the dialog box.
To specify a different location, click Browse (Windows)/Choose (Mac OS) and choose a folder. Alternatively, click Make New Folder
(Windows)/New Folder (Mac OS) to create a folder and name it.
To create one or more subfolders for grouping files by criteria, click the triangle next to the Create Subfolder field. Choose one of the
options from the pop-up menu for naming the subfolder.
To rename the files in the folder consistently, click the triangle next to the Rename Files field. Choose an option from the pop-up menu
for naming the files. The filename defaults to the folder name you enter. When the files are added to the folder and the Project Assets
panel, the filenames are in increments of 0001. For example, if you enter summer, the filenames are changed to summer0001.vob,
summer0002.vob, and so on.
5. Select files to add to the Project Assets panel. A check mark below the file’s thumbnail indicates that the file is selected. By default, all files
are selected. Click an option to remove the check mark and exclude a file. You can also select or deselect all files by using the Check All
button or the Uncheck All button.
6. If you are using metadata, you can select Preserve Current Filename In XMP.
7. Click the triangle next to Apply Metadata, select a template, and fill in the Creator and Copyright fields.
8. Click Get Media. You can click Cancel in the Progress dialog box at any time to stop the process.
Note:
If you don’t intend to use all the files you add, you can delete them from the Project Assets panel. Deleting files from the panel doesn’t
delete them from your hard drive.
Page 43

To the top
39
Import from Flip, AVCHD, cameras, phones, or removable drives
Many types of devices other than DV camcorders, HDV camcorders, webcams, and WDM devices record and store video.
Using the video importer, you can import video clips from tapeless camcorders, FLIP and AVCDHD camera, removable memory devices, and
mobile devices.
You can also import files from removable media, such as DVDs, memory cards, and multimedia cards. These files are copied to the hard drive
location you specify. The files are also added to the Project Assets panel.
Note:
On Mac OS, Video Importer does not list external DVD drives. Use internal Superdrive in this case.
You can add clips directly to the Quick view/Expert view timeline without first creating a project. When you add a clip to either timeline, Adobe
Premiere Elements automatically changes your project settings to match the clip properties.
However, if you add a clip to an existing project whose preset does not match the clip’s preset, a message appears. Click Yes to let Adobe
Premiere Elements change the project’s settings to use the closest available preset.
Note:
Image files cannot be imported using this option. To import images, use the Photos From Cameras Or Devices option in the Add Media
panel.
1. Do one of the following:
Place the DVD into your computer’s DVD drive.
Connect your card reader such as SD card or memory stick to your computer.
Connect the digital camera, mobile phone, or other device to your computer using the USB 2.0 port.
USB 2.0 port
Note:
Install any drivers your device requires. Consult the manual.
2. Click Add Media.
3. Click the device from which you want to import:
Videos From Flip Or Camera
DVD Camera Or Computer Drive
The Video Importer dialog box appears.
note: Video Importer cannot import media from external hard drives. If you want to import media from an external hard drive, use the
Files And Folders option in the Add Media panel.
4. In the Source Menu, select the device from which you want to download movie clips.
Page 44

The contents of the device or disk are displayed in the panel below the Source menu. The number of files, and the size of the content is
displayed at the bottom of the panel containing the content.
40
5. Do one of the following:
To import all the content displayed in the panel, click Check All.
To import a few clips, click deselect All, and select only those clips that you want to import.
Note:
To preview the contents of a clip, click the clip. Click the Play button in the Preview panel.
6. To specify a location for the saved files, do one of the following:
To save files to the default Adobe folder, leave the location as it appears in the dialog box.
To specify a different location, click Browse (Windows)/Choose (Mac OS) and choose a folder. Alternatively, click Make New Folder
(Windows)/New Folder (Mac OS) to create and name a new folder.
7. Select a naming convention for the downloaded files using the Presets menu.
Filename
Folder Name - Number
so on.
Retains the filenames the camcorder assigns.
If your folder name is Wedding Pics, the clips are assigned the names Wedding Pics-001, Wedding Pics-002, and
Date - filename
on which the movies were transferred to your computer.
note: To rename files, delete them from the Project Assets panel in the Expert view, and reimport them.
Custom Name - Number
Holiday-001, My Holiday- 002, and so on.
8. (Optional) If you want to delete the selected files in the camera after import, select the option After Copying Delete Originals.
9. (Optional) If you do not want the imported clips added to the Quick view/Expert view timeline after import, deselect Add To Timeline. The
imported clips are added only to the Project panel.
10. (Optional) If you want to create an InstantMovie using the selected clips, select Create InstantMovie.
11. Click Get Media. You can click Cancel in the Progress dialog box at any time to stop the process.
Note:
If you don’t intend to use all the files you add, you can delete them from the Project Assets panel. Deleting files from the panel doesn’t
delete them from your hard drive. This practice is recommended for large VOB files.
Adds a timestamp to the filename the camcorder assigns. The timestamp is the current date and time - the date and time
Enter a custom name in the Name field. For example, if you enter My Holiday in the field, the clips are named My
To the top
Capture video from DV/HDV camcorders, webcams, and WDM devices
Devices, such as DV camcorders, HDV camcorders, webcams, and WDM devices capture live video.
Using the Capture window, you capture live video from these devices and copy the video clips to the hard drive location you specify.
You can add these clips to Adobe Premiere Elements by dragging them from Windows Explorer to the Quick view/Expert view timeline.
You can also drag the clips to the Project Assets panel in the Expert view.
Alternatively, use the File And Folders option in the Add Media panel to add the clips to the Quick view/Expert view timeline.
Page 45

1. Do one of the following:
41
Turn on the webcam to capture live footage
Connect the DV camcorder, HDV camcorder, or the WDM device to your computer using the FireWire (IEEE 1394) port.
FireWire port
Note:
Install any drivers your device requires. Consult the manual.
2. Click Add Media.
3. From the Add Media panel, select the option for the device using which you want to capture video:
DV Camcorder
HDV Camcorder
Webcam Or WDM
The Capture window appears.
4. In the Capturing Source menu, select the device from which you want to capture video clips. The video that the device captures is displayed
in the panel below the Capturing Source menu.
Note:
You can extract frames using stop motion or full motion from the integrated camera's webcam feed.
5. Click the Capture button.
6. Specify a name for the captured video.
7. To specify a location for the video, do one of the following:
To save files to the default Adobe folder, leave the location as it appears in the dialog box.
To specify a different location, click Browse (Windows)/Choose (Mac OS) and choose a folder. Alternatively, click Make New Folder
(Windows)/New Folder (Mac OS) to create and name a new folder.
8. Click Add Media and select Files And Folders.
9. Browse to the location where you saved the video files and add them to the Quick view/Expert view timeline.
Note:
You can also use Windows Explorer to locate the saved video files and drag them to Adobe Premiere Elements.
Page 46

Twitter™ and Facebook posts are not covered under the terms of Creative Commons.
42
Legal Notices | Online Privacy Policy
Page 47

Add numbered image files as a singleclip
43
1. Make sure that each still-image filename has the correct filename extension. All filenames in the sequence must contain an equal number of
digits before the extension for example, file000.bmp, and file001.bmp.
2. Do one of the following:
Click Add Media and choose Files And Folders.
Choose File > Add Media from > Files And Folders.
3. Locate and select the first image in the sequence. From the Files Of Type menu, select Numbered Stills, and click Open.
Premiere Elements interprets all of the numbered files as a single sequence.
note: For information on changing the duration of images, see “Set duration for imported images” in Help.
Twitter™ and Facebook posts are not covered under the terms of Creative Commons.
Legal Notices | Online Privacy Policy
Page 48

5.1 audio import
44
Drag clips to the Monitor window
Adobe Premiere Elements facilitates importing and playing clips with 5.1 audio in the same format as the project preset. You can create movies
combining AVCHD video and stereo audio and 5.1 audio and stereo audio. You can move clips from track to track in the Expert view timeline
regardless of whether the audio is 5.1 or stereo. If you import 5.1 audio file to the stereo channel, it is converted to 5.1 and the other way round.
To create a 5.1 channel track, drag a 5.1 onto the empty area on the Expert view timeline of a stereo project. Alternatively, drag a channel audio
video clip or a 5.1 channel audio only clip. A 5.1 channel track in a stereo project is created. To create a stereo track in a 5.1 channel project,
drag-and-drop a stereo clip into the empty area on Expert view timeline. A stereo track in a 5.1 channel project is created.
1. Do one of the following:
From the Welcome screen, click New Project.
If Adobe Premiere Elements is open, choose File > New Project.
2. Click Change Settings to change the preset used. Select Full HD 1080i 30 5.1 channel from the AVCHD folder, and click OK.
3. In the New Project dialog box, specify a name and location for the project, and click OK.
In the Expert view timeline, you can see 5.1 beside the Audio tracks. You can now include clips to your project. However, the audio is
mapped to a channel type depending on how you insert the media file.
To the top
Drag clips to the Monitor window
When you drag clips onto the Monitor window, the audio is mapped to the channel type of Audio 1 track.
However, when you drag onto the Monitor window, you are presented with the following additional options. The audio mappings change depending
on the option you select.
Insert After This Scene
end of the existing clip.
Split And Insert
where the CTI is pointing. The clip is inserted.
Place On Top
track's channel type. If there is no empty track, a new track is created matching the channel type of the selected clip. Adobe Premiere Elements
places the video on the CTI, in a track above the existing video. The new video file overlaps the existing video clip.
Picture In Picture
track's channel type. If there is no empty track, a new track is created matching the channel type of the selected clip. Adobe Premiere Elements
places the existing and the inserted videos simultaneously. The user can see both the videos.
If there is an empty track above Video 1/Audio 1, the selected clip is inserted on that track, and mapped to the corresponding
Audio is mapped to the Audio one track, and the clip is inserted in the Video 1/Audio 1 track. The clip is inserted at the
Audio is mapped to the Audio 1 track, and the clip is inserted in the Video 1/Audio 1 track. The current clip is split at the point
If there is an empty track above Video 1/Audio 1, the selected clip is inserted on that track, and mapped to the corresponding
Place On Top, And Apply Videomerge
to the corresponding track's channel type. If there is no empty track, a new track is created matching the channel type of the selected clip. Adobe
Premiere Elements places the video on the CTI, in a track above the existing video and applies Videomerge effect on the new video. The
underlying and the top videos can be seen.
If there is an empty track above Video 1/Audio 1, the selected clip is inserted on that track and mapped
Page 49

Replace Clip
45
Note:
Legal Notices | Online Privacy Policy
The clip is replaced and the mapping matches the channel type of the replaced clip’s track.
When you drop an audio-only clip into the Monitor window, it is placed on the Soundtrack track and mapped to stereo.
Twitter™ and Facebook posts are not covered under the terms of Creative Commons.
Page 50

Creating specialty clips
46
Add color bars and a 1-kHz tone
Create and add a black video clip
Create a colored matte for a background
Change the tone level of clips
You generate Specialty clips by using panel options in the Project Assets panel. They reside in the Project Assets panel along with your added
clips.
You can create universal counting leaders, color bars, a 1-kHz tone, black video, and colored backgrounds for your project. Use Specialty clips for
calibration of your video or simply as footage.
Add color bars and a 1-kHz tone
You use the color bars and 1- kHz tone clips in tandem at the beginning of a video. Color bars are multicolored vertical bars at the beginning of
broadcast videos that help broadcasters calibrate the color for a video.
The 1-kHz tone is a short tone (1-kHz frequency) that broadcasters use to adjust audio levels. Broadcasters set it at a specific level for reference,
and then decrease or increase their audio levels to match this frequency. Because some audio workflows are calibrated at a specific tone level,
you can customize the tone level to match your audio workflow.
To the top
1. Click Project Assets.
2. In the Project Assets panel, click New Item from the panel options and choose Bars And Tone.
A Bars And Tone clip is placed in the Project Assets panel and in the Expert view timeline.
Create and add a black video clip
You add black video clips to separate multiple movies or to create pauses in a movie. You can also use a black video clip for a title.
1. Click Project Assets.
2. In the Project Assets panel, click New Item from the panel options and choose Black Video.
Create a colored matte for a background
You can create a clip consisting of a full-frame matte of solid color, which you can use as a solid background for titles or animated clips.
To the top
To the top
Brightly colored mattes can serve as temporary backgrounds to help you see transparency more clearly while you adjust a key effect.
1. Click Project Assets.
2. In the Project Assets panel, click New Item from the panel options and choose Color Matte.
Page 51

3. Choose a color in the Adobe Color Picker dialog box, and click OK.
47
A color matte clip is placed into both the Project Assets panel and the Expert view timeline.
Change the tone level of clips
1. Select a clip using one of the following methods:
To set the level for all new clip instances, click New Item from the panel options in the Project Assets panel. Then, select the Bars And
Tone option.
To set the level for only one clip instance, select the clip in the Expert view timeline.
2. Choose Clip > Audio Options > Audio Gain.
3. In the Clip Gain dialog box, do one of the following, and click OK:
Drag the value control left to decrease, or right to increase, volume.
Highlight the value control and type a number to increase or decrease volume. Positive numbers increase it. Negative numbers decrease
it.
The Normalize option adjusts the peak amplitude in the selected clips to the user-specified value. For example, this option adjusts the
gain of a clip with a peak amplitude of -6 dB to +6 dB. Ensure that Normalize All Peaks To is set to 0.0 dB.
To the top
Twitter™ and Facebook posts are not covered under the terms of Creative Commons.
Legal Notices | Online Privacy Policy
Page 52

Guidelines for adding files
delete conformed audio files, Premiere Elements regenerates them when you open related projects.
48
Guidelines for adding video files
Guidelines for adding audio files
Guidelines to add image files
Guidelines for adding an animation or still-image sequence
Guidelines for adding video files
You can add various video file formats to your project. Imported video and sequence files can have frame sizes up to 4096 x 4096 pixels.
Before you add video files that you did not capture yourself, make sure you can view the video outside Premiere Elements. Usually,
double-clicking a video file opens a playback application, such as Windows Media Player and QuickTime player. (Be sure to use the most
up-to-date version of Windows Media Player.) If you can play back your file in the player application, you can usually use that file in Premiere
Elements.
note: To play back VOB (Video Object) files, use the DVD player that came with your DVD burner.
When adding video files, consider the following:
MPEG file compatibility
An MPEG file can be imported or played in Premiere Elements if it meets the following criteria:
The file must be in a format that Premiere Elements supports.
The compressor used to create the file must be compatible with the Premiere Elements decompressor.
The compatibility requirements for playing compressed files are less stringent than the requirements for editing them. MPEG files that play in
Windows Media Player and QuickTime can be imported or played in Premiere Elements if they meet the compatibility requirements.
note: The first time you import an MPEG-2 file, Premiere Elements automatically activates the components if you are connected to the Internet. If
you are not connected to the Internet, you are prompted to activate the MPEG-2 component. The instructions appear in the Activating Component
dialog box.
Type 1 AVI file render requirements
Render these files before you can preview them from your DV camcorder. To render a Type 1 AVI clip, add it to the Quick view/Expert view
timeline. Build a preview file of that section of the Quick view/Expert view timeline by pressing Enter. If the clip must be rendered, a red line
appears above the clip in the Quick view/Expert view timeline.
DVD file protection
If the DVD is a motion-picture disc that uses copy protection, you cannot add the files.
To the top
Guidelines for adding audio files
When you add audio files to a project, they are conformed to the audio sample rate specified in the Project Settings dialog box. During that
process, you’ll see a progress bar in the lower- right corner of the application window. You can play back conformed audio instantly at high quality
because it’s consistent with all other audio in the project.
By default, conformed audio is stored at the location C:\Users\<username>.<domain>\AppData\Roaming\Adobe\Common\. You can change the
default location of the media cache by choosing one of the following options:
(Windows) Edit > Preferences > Scratch Disks.
(Mac OS) Adobe Premiere Elements 12 > Preferences > Scratch Disks.
Note:
After you conform an audio clip, you don’t have to confirm it again unless you delete the corresponding file in the Media Cache folder. If you
To the top
Page 53

When adding audio files, consider the following:
49
Stereo and mono files
your project. To create a stereo version of a mono file, the mono channel is copied to both the left and right channel in the new stereo track. In this
case, both channels contain the same information.
5.1 surround sound files
mp3 and WMA files
back compressed audio, Premiere Elements (like most video editing applications) must decompress and possibly alter the file’s sample rate.
Compressing can degrade the audio quality.
CD files
included with Windows XP, can perform this task. You can also use Adobe Audition to rip the CD at various quality settings and perform complex
audio-processing functions on the file. If you plan to air or distribute your movie, ensure that you own the copyright, or have licensed the copyright
to your CD audio.
Internet files
pre-encoded settings that don’t allow you to play them in Premiere Elements.
If you want to add audio from a CD, copy, or rip, the audio tracks to your hard drive using another application. Windows Media Player,
You can download music from the Internet for your projects. WMA (Windows Media Audio) and AAC (QuickTime) files can have
You can add many of the stereo audio files that you can open in another audio player, such as Windows Media Player, to
Importing clips containing 5.1 audio adds a 5.1-channel audio track to your project.
Formats such as mp3 and WMA are compressed using a method that reduces some of the original audio quality. To play
To the top
Guidelines to add image files
By default, Premiere Elements scales images to fit the project frame size. You can override this behavior and instead add your files at the size at
which they were created. You can also set the default duration for all images that you add by changing the value in General Preferences.
You can add still images with frame sizes up to 4096 x 4096 pixels. Create files with frame size equal to or more than the frame size of your video.
Choosing the appropriate frame size ensures that you don’t enlarge the image in Premiere Elements. When you scale up an image, it often
becomes pixelated. Create it at a larger frame size than the project. For example, if you plan to scale an image 200%, create the image at double
the project frame size before you add it.
You can also add animations, which are saved as a sequence of numbered still -image files.
When adding still-image files, consider the following:
Photoshop Elements files
JPEG files
import them again.
TIFF images
Photoshop or other applications. Empty (transparent) areas of nonflattened Photoshop files appear transparent in Premiere Elements because the
transparency is stored as an alpha channel.
RGB mode
consult your product’s user guide about color management. RGB mode produces colors that are suitable for video.
If you are having trouble importing JPEG files to Premiere Elements, open them in Photoshop Elements and resave them. Then try to
You can add files from Photoshop 3.0 or later. However, Premiere Elements doesn’t support 16-bit TIFF images created in
When you are editing or creating your still images, make sure that you do all of your work in RGB mode. For more information,
Premiere Elements works well with images and video templates you create in Photoshop Elements.
To the top
Guidelines for adding an animation or still-image sequence
The frames in an animation are drawn as graphics and, therefore, are not scenes of live action, as in conventional digital video. Premiere Elements
can also add a sequence of numbered still-image files and automatically combine them into a single clip; each numbered file represents one
frame. Some applications, such as Adobe After Effects®, can generate a numbered sequence of still images. Images in a still-image sequence
Page 54

cannot include layers. Flatten images that are part of a sequence. For information on layers and flattening, see the documentation for the
application that created the file.
50
Note:
Changing the default duration of still images in the Preferences dialog box does not affect the duration of still images that are part of a
sequence.
When creating three-dimensional images or animations for use in Premiere Elements, use the following guidelines whenever possible:
Use broadcast-safe colors. Most applications that create animations (such as Adobe After Effects) allow you to check for broadcast -safe
colors. See your application’s documentation for more information.
Use the pixel aspect ratio and frame size specified in the project settings in Premiere Elements.
Use the appropriate field settings to match your project.
You can use an Adobe application (such as Photoshop) to generate the sequence. Select Embed Project Link to open the sequence in the
application that was used to create it. For example, select a PSD file in the Project Assets panel in Premiere Elements. Then, choose Edit >
Edit Original to open the file in Photoshop with the original layers intact.
Twitter™ and Facebook posts are not covered under the terms of Creative Commons.
Legal Notices | Online Privacy Policy
Page 55

Set duration for imported stillimages
51
Change the default duration for still images
Set a unique duration for a still image
When you add a still image, you can assign a specific duration to it. The duration specifies how much time the image occupies in the Quick
view/Expert view timeline. You can set a default duration for all still images that you add, and you can change their duration in the Quick
view/Expert view timeline.
The frame rate of your project determines the amount of time that a certain number of frames occupies. If you specify 30 frames for a 29.97
frame-per-second (fps) NTSC project, each still image has a duration of about one second. For PAL, if you specify 25 frames for a 25-fps project,
each still image in the Quick view/Expert view timeline has a duration of one second.
Change the default duration for still images
1. Do one of the following:
On Windows, select Edit > Preferences > General. On Mac OS, select Adobe Premiere Elements 12 > Preferences > General.
Right-click/ctrl- click in the Project Assets panel and choose Still Image Duration.
To the top
2. For Still Image Default Duration, specify the number of frames you want as a default duration.
Note:
Changing the default duration of still images does not affect the duration of still images already in the Quick view/Expert view timeline
or Project Assets panel. To apply the new default length to all still images in your project, delete them from the Project Assets panel and
reimport them into your project.
Set a unique duration for a still image
Do one of the following:
In the Expert view, position the Selection tool over either end of the image, and drag.
Select the clip and choose Clip > Time Stretch. Enter a new duration and click OK.
Twitter™ and Facebook posts are not covered under the terms of Creative Commons.
Legal Notices | Online Privacy Policy
To the top
Page 56

Working with scratch disks
52
About scratch disks
Types of scratch disks
Set up a scratch disk
Maximizing scratch disk performance
About scratch disks
When you edit a project, Premiere Elements uses disk space to store scratch files for your project. These include captured video and audio,
conformed audio, and preview files. Adobe Premiere Elements uses conformed audio files and preview files to optimize performance, allowing
real-time editing, high processing quality, and efficient output. All scratch disk files are preserved across work sessions. If you delete conformed
audio files, Premiere Elements automatically recreates them. If you delete preview files, they are not be recreated automatically.
By default, scratch files are stored where you save the project. The scratch disk space required increases as your movie becomes longer or more
complex. If your system has access to multiple disks, choose Edit > Preferences > Scratch Disks / Adobe Premiere Elements 12 > Preferences >
Scratch Disks. Specify the disks Premiere Elements uses for these files. For best results, set up your scratch disks at the very beginning of a
project, before capturing or editing.
Types of scratch disks
To the top
To the top
While performance can be enhanced by setting each scratch disk type to a different disk, you can also specify folders on the same disk. Select
Edit > Preferences > Scratch Disks / Adobe Premiere Elements 12 > Preferences > Scratch Disks to set the following scratch disk options.
Captured Video
Captured Audio
Video Previews
file, or export to a DV device. If the previewed area includes effects, the effects are rendered at full quality in the preview file.
Audio Previews
are also created when you choose Clip > Audio Options > Render And Replace, export to a movie file or DV device. If the previewed area includes
effects, the effects are rendered at full quality in the preview file.
Media Cache
performance when reading media files.
DVD Encoding
Premiere Elements places preview files, encoded files, media cache files, and other types within subfolders of the folders you specify for
Note:
these types. Each subfolder is named for the type of scratch files it contains.
Folder or disk for video files and stop-motion still image files that you capture using the Capture panel.
Folder or disk for audio files that you capture using the Capture panel.
Folder or disk for video preview files. These files are created when you choose Timeline > Render Work Area, export to a movie
Folder or disk for audio preview files. These files are created when you choose Timeline > Render Work Area command. They
Folder or disk for audio peak files, audio conform files, video index files, and other files Premiere Elements creates to improve
Folder or disk for encoded video and audio files that are generated when you create a DVD.
To the top
Set up a scratch disk
You set up scratch disks in the Scratch Disks panel of the Preferences dialog box. To verify the amount of free disk space on the selected volume,
see the box to the right of the path. If the path is too long to read, place the pointer over the path, and the full path appears in a tool tip.
Page 57

1. Choose Edit > Preferences > Scratch Disks / Adobe Premiere Elements 12 > Preferences > Scratch Disks.
53
2. For each scratch disk type, specify a disk location for Premiere Elements to store the corresponding files. Choose one of these options from
the pop -up menu:
My Documents
Same As Project
Custom
Stores scratch files in the My Documents folder.
Stores scratch files in the same folder where the project is stored.
Indicates that the current path isn’t in the pop-up menu. The current path isn’t changed until you click Browse to specify any
available disk location.
Maximizing scratch disk performance
If your computer has only one hard disk, consider leaving all scratch disk options at their default settings.
If it has more than one, choose large, secondary hard drives for scratch disks and not the main load drive. In Premiere Elements, you can
place each type of scratch file onto its own disk. For example, you copy video to one disk and audio to another.
Defragment scratch disks regularly by using the Disk Defragmenter tool in Windows or a third-party utility. To use the Disk Defragmenter tool,
choose Start > All Programs > Accessories > System Tools > Disk Defragmenter. For more instructions, see the documentation provided with
Windows or the third-party utility.
Specify your fastest hard disks for capturing media and storing scratch files. You can use a slower disk for audio preview files and the project
file.
Specify only disks attached to your computer. The throughput from a hard disk on a network is too slow. Avoid using removable media as
scratch disks because Premiere Elements always requires access to scratch disk files. Scratch disk files are preserved for each project, even
when you close the project. Premiere Elements reuses these files when you reopen the project associated with them. If scratch disk files are
stored on removable media and the media is removed from the drive, the scratch disk is not available to Premiere Elements.
You can divide a single disk into partitions and set up each partition as a virtual scratch disk. However, partitioning doesn’t improve
performance because the single drive mechanism is a bottleneck. For best results, set up scratch disk volumes on actual separate drives.
To the top
Twitter™ and Facebook posts are not covered under the terms of Creative Commons.
Legal Notices | Online Privacy Policy
Page 58

Working with offline files
54
About offline files
Edit an offline file
Replace an offline file with a file on your computer
About offline files
An offline file is a placeholder for a source file that Premiere Elements cannot currently find on your hard drive. Offline files remember information
about the missing source files they represent. If an offline file appears in the Quick view/Expert view timeline, a “Media Offline” message appears
in the monitor and in the Quick view/Expert view timeline.
Edit an offline file
1. In the Expert view, click Project Assets.
2. In the Project Assets panel, double-click the offline file. Where Is The File [name of the file] dialog box appears. Locate the source file,
select the file, and click Select.
To the top
To the top
3. Right-click/Ctrl-click the file and select Edit Original to edit the file.
Replace an offline file with a file on your computer
1. In the Expert view, click Project Assets.
2. In the Project Assets panel, select one or more offline files.
3. Choose Edit > Locate Media.
4. Locate and select the actual source file, and click Select.
Note:
If you selected more than one offline file, the Attach Which Media dialog box appears in turn for each file you selected. Pay attention
to the offline filename in the title bar of the dialog box so that you relink the correct source file to each offline file.
Twitter™ and Facebook posts are not covered under the terms of Creative Commons.
Legal Notices | Online Privacy Policy
To the top
Page 59

Working with aspect ratios and field options
55
Understanding aspect ratios
Capturing or adding various aspect ratios
View a project’s aspect ratio
Adjust pixel aspect ratio for a still image or source clip
Use square-pixel files in a D1 or DV project
Set field options for imported interlaced video
Understanding aspect ratios
The aspect ratio specifies the ratio of width to height. Video frames have an aspect ratio (frame aspect ratio) as do the pixels that make up the
frame (pixel aspect ratio). Some video camcorders can record various frame aspect ratios, and the NTSC and PAL video standards use different
pixel aspect ratios. If an image of a circle appears oval-shaped, there can be a mismatch between the aspect ratios of the image and your project.
Premiere Elements automatically attempts to detect and compensate for the pixel aspect ratio of source clips so that distortion doesn’t occur. If a
clip appears distorted in Premiere Elements, you can manually change its pixel aspect ratio. It's important to reconcile pixel aspect ratios before
reconciling frame aspect ratios. Misinterpretation of a source clip’s aspect ratio causes incorrect frame aspect ratio.
Frame aspect ratio
To the top
Frame aspect ratio describes the ratio of width to height in the dimensions of an image. For example, DV NTSC has a frame aspect ratio of 4:3 (or
4.0 width by 3.0 height). For comparison, a typical widescreen frame has a frame aspect ratio of 16:9; many camcorders that have a widescreen
mode can record using this aspect ratio. Many films are shot using even wider aspect ratios.
A 4:3 frame aspect ratio (left), and a wider 16:9 frame aspect ratio (right)
When you add clips into a project with a different frame aspect ratio, decide how to reconcile the different values. You can show a widescreen
movie with a 16:9 frame aspect ratio on a standard TV with a 4:3 frame aspect ratio in two ways. Use the Letterboxing technique to fit the entire
width of the 16:9 frame into a black 4:3 frame. Black bands appear above and below the widescreen frame.
Alternatively, use the Pan and scan technique to fill the 4:3 frame with only a selected area of the 16:9 frame. Although this technique eliminates
the black bars, it also eliminates part of the action. Premiere Elements automatically letterboxes any 16:9 footage that you add into a 4:3 aspect
ratio project.
Pixel aspect ratio
Pixel aspect ratio describes the ratio of width to height in a single pixel of a frame. Pixel aspect ratios vary because different video systems make
different assumptions about the number of pixels required to fill a frame. For example, many computer video standards define a frame that has a
4:3 aspect ratio as 640 x 480 pixels. Pixels that are square, which have an aspect ratio themselves of 1:1, perfectly fill the horizontal and vertical
space the frame defines. However, video standards such as DV NTSC (standard for DV camcorders in the U.S.) define a 4:3 aspect ratio frame as
720 x 480 pixels. Consequently, to fit all of these pixels in the frame, the pixels must be narrower than the square pixels. These narrow pixels are
called rectangular pixels, and they have an aspect ratio of 0.9:1, or 0.9 as they are commonly called. DV pixels are vertically oriented in systems
producing NTSC video and horizontally oriented in systems producing PAL video. Premiere Elements displays a clip’s pixel aspect ratio next to the
clip’s image thumbnail in the Project Assets panel.
Page 60

If you display rectangular pixels on a square-pixel monitor, images appear distorted, for example, circles distort into ovals. However, when
56
displayed on a broadcast monitor, the images appear correctly proportioned because broadcast monitors use rectangular pixels. Premiere
Elements exports clips of various pixel aspect ratios without distortion. It automatically adjusts the pixel aspect ratio of your project to the pixel
aspect ratio of the clips. You can encounter a distorted clip if Premiere Elements interprets pixel aspect ratio incorrectly. Correct the distortion by
manually by specifying the source clip’s pixel aspect ratio.
Pixel and frame aspect ratios
A. Square pixels and 4:3 frame aspect ratio B. Nonsquare pixels and 4:3 frame aspect ratio C. Nonsquare pixels displayed uncorrected on a
square-pixel monitor
To the top
Capturing or adding various aspect ratios
Premiere Elements attempts to automatically compensate for pixel aspect ratios and preserve the frame size of added images. Images that you
add are treated in the following ways:
Add video with D1 resolution 720 x 486 or DV resolution 720 x 480. Premiere Elements automatically sets the video’s pixel aspect ratio to
D1/DV NTSC (0.9). For a footage with D1 or DV resolution 720 x 576, Premiere Elements sets its pixel aspect ratio to D1/DV PAL (1.067).
However, it helps to see the Project Assets panel or the Interpret Footage dialog box to ensure that all files are interpreted correctly.
Premiere Elements automatically assigns pixel aspect ratios to files by using the Interpretation Rules.txt file in the Premiere Elements/Plug -in
folder. If a specific type of image is consistently misinterpreted (distorted), modify the entries in the Interpretation Rules.txt file. If you want to
override the pixel aspect ratio interpretation for files already in a project, use the Interpret Footage command.
To change the size of a clip in Premiere Elements, select the clip and change the Scale property of the Motion effect. The Motion effect is
available in the Properties view with the clip selected in the Expert view timeline.
To the top
View a project’s aspect ratio
The preset you choose when you start a project sets the pixel aspect ratio for the project. You can’t change the aspect ratio after it is initially set.
Choose Edit > Project Settings > General.
To the top
Adjust pixel aspect ratio for a still image or source clip
To combine diverse footage within a project and generate an output without distorting source images, ensure that all files are interpreted correctly.
Note:
When you set the pixel aspect ratio of a file, use its original ratio, not the ratio of the project and final output.
1. In the Expert view, click Project Assets.
2. Select the still image or source clip.
3. Choose File > Interpret Footage.
4. In the Pixel Aspect Ratio section, select Use Pixel Aspect Ratio From File to use the original ratio of the file. Alternatively, choose one of the
Page 61

following from the Conform To menu:
57
Square Pixels
this setting if the file was exported from an application that supports only square pixels.
D1/DV NTSC
you maintain a 4:3 frame aspect ratio for the clip. Use this setting for clips exported from an application that works with nonsquare pixels,
such as a 3D animation application.
note: For more information about D1, see the Glossary in Premiere Elements Help.
D1/DV NTSC Widescreen
setting lets you maintain a 16:9 frame aspect ratio.
D1/DV PAL
4:3 frame aspect ratio.
D1/DV PAL Widescreen
maintain a 16:9 frame aspect ratio.
Anamorphic 2:1
aspect ratio.
Uses a 1.0 pixel aspect ratio. Use this setting if your source clip has a 640 x 480 or 648 x 486 frame size. You can also use
Uses a 0.9 pixel aspect ratio. Use this setting if your source clip has a 720 x 480 or 720 x 486 frame size. This setting lets
Uses a 1.2 pixel aspect ratio. Use this setting if your source clip has a 720 x 480 or 720 x 486 frame size. This
Uses a 1.0666 pixel aspect ratio. Use this setting if your source clip has a 720 x 576 frame size and you want it to maintain a
Uses a 1.4222 pixel aspect ratio. Use this setting if your source clip has a 720 x 576 frame size and you want it to
Uses a 2.0 pixel aspect ratio. Use this setting if your source clip was amorphically transferred from a film frame with a 2:1
HD Anamorphic 1080
Uses a 1.333 pixel aspect ratio.
To the top
Use square-pixel files in a D1 or DV project
You can use square -pixel footage in a DV project and generate output that does not appear distorted. Premiere Elements either “upsamples”
(increases) or “downsamples” (decreases) the resolution of a file that does not match the project frame size. Downsampling results in a
higher-quality image. Create files that are larger than the project’s frame size so that Premiere Elements need not upsample and enlarge them.
Prepare the file by using one of the following methods, and then capture or add the file to Premiere Elements:
If your final output is DV (NTSC), create and save it at a 720 x 540 frame size. Saving at this frame size prevents upsampling or 640 x
480 to prevent field distortion on a field-rendered file.
If your final output is DV (PAL), create and save it at a 768 x 576 frame size. Saving at this frame size prevents upsampling and field
distortion on a field -rendered file.
If your final output is D1 (NTSC), create and save it at a 720 x 540 frame size.
The frame size of a square-pixel image can match the frame size of your project (for example 720 x 480). However, if they have different
pixel aspect ratios, redesign the image using a different frame size (such as 720 x 540). Redesigning is necessary when the application
you use to prepare the file doesn’t support nonsquare pixels.
To the top
Set field options for imported interlaced video
In most video, each frame consists of two fields. One field contains the odd-numbered lines in the frame, and the other contains the
even-numbered lines. The fields are interlaced, or combined, to create the complete image. Adobe Photoshop Elements includes a reverse field
order preset for video imported from a hard disk or Flash memory camcorder that uses upper fields first. You can capture source footage with
upper fields first. For this footage, ensure that your project uses either the Standard or Widescreen preset from the Flash Memory Camcorders
presets folder.
Page 62

Ordinarily, interlacing isn’t apparent to a viewer. However, each field captures the subject at a different time. Due to the time difference, playing a
clip in slow- motion or creating a freeze frame makes the two fields discernible. You observe the same behavior when you export a frame as a still
58
image. To avoid this situation, you can deinterlace the image. Deinterlacing eliminates one field and either duplicates or interpolates the lines of
the remaining field.
Reversing the field dominance, the order in which the fields are recorded and displayed, can cause playback problems. When the field dominance
is reversed, motion appears jerky because the fields no longer appear in chronological order. Fields are reversed when the original videotape’s
field dominance is the opposite of the field dominance of the video-capture card used to capture the clip. Fields are also reversed when the field
dominance of the original videotape and the video-editing software are opposite to each other. Reversing can also happen when you set an
interlaced clip to play backward.
To avoid these complications, you can deinterlace the image. Deinterlacing eliminates one field and either duplicates or interpolates the lines of
the remaining field. You can also set field options for an interlaced clip so that the clip’s picture and motion quality are preserved in certain
situations. These include changing the clip speed, exporting a filmstrip, playing a clip backward, or freezing a video frame.
1. Select a clip in the Expert view timeline, and choose Clip > Video Options > Field Options.
2. Select Reverse Field Dominance to change the order in which the clip’s fields appear. This option is useful when the field dominance of the
clip doesn’t match your equipment or when you play a clip backward.
3. For Processing Options, select one of the following choices, and click OK.
None
Does not process the clip’s fields.
Interlace Consecutive Frames
useful for converting 60 fps progressive-scan animations into 30 -fps interlaced video because many animation applications don’t create
interlaced frames.
Always Deinterlace
Converts interlaced fields into whole progressive-scan frames. Premiere Elements deinterlaces by discarding one field
Converts pairs of consecutive progressive-scan (noninterlaced) frames into interlaced fields. This option is
and interpolating a new field based on the lines of the remaining field. It keeps the field specified in the Field Settings option in the Project
Settings. If you specified No Fields, Premiere Elements keeps the upper field unless you selected Reverse Field Dominance, in which case it
keeps the lower field. This option is useful when freezing a frame in the clip.
Flicker Removal
Prevents thin horizontal details in an image from flickering by slightly blurring the two fields together. An object as thin as
one scan line flickers because it can appear only in every other field.
Twitter™ and Facebook posts are not covered under the terms of Creative Commons.
Legal Notices | Online Privacy Policy
Page 63

Supported devices and file formats
59
Supported devices
Supported file types for import
Verify whether Adobe Premiere Elements supports the file format and the device from which you import the file.
Supported devices
For a list of supported devices, see http://kb2.adobe.com/cps/873/cpsid_87347.html.
Supported file types for import
In addition to capturing footage, you can import image, video, and audio files. You can add files from folders on your computer, accessory hard
drives, and mobile phones. You can also add files from DVDs, Blu -ray discs, CDs, digital cameras, other devices, or the Internet. Adobe
Premiere Elements 12.0 supports DV, HDV, WDM, and AVCHD formatted video.
Files that you add to a project are visible in the Project Assets panel in the Expert view. Adobe Premiere Elements automatically adds them to
Elements Organizer.
note: Some file formats require activation of components before you can add them to a project.
To the top
To the top
Supported video formats
Adobe Flash® (.swf)
AVI Movie (.avi)
AVCHD (.m2ts, .mts, .m2t)
DV Stream (.dv)
MPEG Movie (.mpeg, .vob, .mod, .ac3, .mpe, .mpg, .mpd, .m2v, .mpa, .mp2, .m2a, .mpv, .m2p, .m2t, .m1v, .mp4, .m4v, .m4a, .aac, 3gp,
.avc, .264)
QuickTime Movie (.mov, .3gp, .3g2, .mp4, .m4a, .m4v)
TOD (.tod)
Windows Media (.wmv, .asf) - Windows only
note: To import video from mobile phones (.3gp and .mp4), you must have the most recent version of QuickTime installed on your
computer.
Supported image formats
Adobe Photoshop® (.psd)
Adobe Premiere Elements title (.prtl)
Bitmap (.bmp, .dib, .rle)
Page 64

CompuServe GIF® (.gif)
JPEG® (.jpg, .jpe, .jpeg, .gif)
60
Pixar Picture (.pxr)
Portable Network Graphic (.png)
RAW (.raw, .raf, .crw, .cr2, .mrw, .nef, .orf, .dng)
Supported audio formats
Advanced Audio Coding (.aac)
Dolby® AC-3 (.ac3)
Macintosh® Audio AIFF (.aif, .aiff)
MP3® Audio (.mp3)
MPEG® Audio (.mpeg, .mpg, .mpa, .mpe, .m2a)
QuickTime (.mov,.m4a)
Windows Media (.wma) - Windows only
Windows WAVE (.wav)
note: Dolby AC-3 is imported as a stand-alone.ac3 file or as part of an encoded audio file in a .vob (DVD) or .mod (JVC® Everio) file, but
exported as Dolby Digital Stereo only.
Activate a component for import
Some file formats such as MPEG-2, MPEG4(SP), and AMR require component activation before you can add them to a project. If you are
connected to the Internet, component activation occurs automatically. If you are not connected to the Internet, the Activating Component dialog
box appears.
1. When the Activating Component dialog box appears, connect to the Internet.
2. In the Activating Component dialog box, click Copy to copy the serial number.
3. Click the URL to go to the activation website.
4. Paste the serial number into the ID box on the website.
The website displays a key for unlocking.
5. Copy the key, paste it in the Activating Component dialog box, and then click OK.
Twitter™ and Facebook posts are not covered under the terms of Creative Commons.
Legal Notices | Online Privacy Policy
Page 65

Sharing files between Adobe Premiere Elements and Adobe
61
Photoshop Elements
You can access all images in a Photoshop Elements catalog directly from the Elements Organizer workspace of Premiere Elements. You can also
add, edit, and manage your images, and then drag them to the Quick view/Expert view timeline of Adobe Premiere Elements for use in your
project.
Adobe Photoshop Elements and Premiere Elements are designed to work together, whether you purchase the products separately or bundled in
one package. These programs seamlessly combine digital photography and video editing, letting you create exciting video projects. The two
programs support many of the same file types, which makes the transfer of most files between them easy and efficient. For example, you can
catalog PSD files in Photoshop Elements and then add them to the Quick view/Expert view timeline directly from the Elements Organizer in
Premiere Elements.
note: The Photoshop Elements Organizer shows clips of audio AVI files with broken video thumbnail icons. However, they play correctly. The
Photoshop Elements Editor can import individual video frames from ASF, AVI, MPEG, and Windows Media files. (Choose File > Import > Frame
From Video.)
Here are a few ways you can share files between Photoshop Elements and Premiere Elements:
Organize your photos, video clips, and audio clips in either Premiere Elements or Photoshop Elements. Find the assets using Elements
Organizer in either application and add them to a project.
Capture video in Premiere Elements and open it from the Elements Organizer and create and edit still images from the video.
(Windows only) Create a slideshow in Photoshop Elements 6.0 or later with captions, transitions, effects, music, narration, graphics, and
titles. Import the slideshow into Premiere Elements to edit further or burn to DVD. Alternatively, import individual photos into Premiere
Elements and create the slideshow there.
note: The Send To Adobe Premiere Elements command in Photoshop Elements works only when you use Photoshop Elements 6.0 or later
with Adobe Premiere Elements 4.0 or later.
Customize menu templates in Photoshop Elements, and then use them in your Premiere Elements project. (Menu templates are PSD files
stored in the Premiere Elements application folder.)
Create a Photoshop Elements file with your video project’s settings, enhance it in Photoshop Elements, and then use it in Premiere Elements.
Twitter™ and Facebook posts are not covered under the terms of Creative Commons.
Legal Notices | Online Privacy Policy
Page 66

Importing and Exporting movies using Adobe Revel
62
Importing photos from Adobe Revel
Upload files to Adobe Revel
Sync media from Adobe Revel
Adobe® Revel™ is a photo app for your Mac, iPad, and iPhone. Keep your photos organized using albums and captions. Use the editing tools in
Revel to easily make all your photos look amazing. And share photos privately on AdobeRevel.com or publicly on your favorite social networks.
Everything you do in Revel is automatically synced across all your devices - so you always have access to your latest photos and photo edits no
matter where you are or what device you're using.
You can visit the official Adobe Revel website for more information.
Importing photos from Adobe Revel
You can import media (photos and videos) uploaded to libraries in Adobe Revel to Adobe Premiere Elements Editor workspace. Media uploaded to
Adobe Revel are available in the Mobile album section of Embedded EO and Adobe Revel menu options. The Adobe Revel option is present
under Add Media. To import media from Adobe Revel to PRE workspace, follow these steps:
1. Click Add Media > Adobe Revel
To the top
2. Click the
Click exclamation mark to sign in
3. Enter your Adobe ID and password, and then click Sign In.
Note:
downloaded content becomes local media. The media files which were not downloaded are not visible in the local albums.
4. Click Mobile Albums. The libraries created in Adobe Revel are displayed under Mobile Albums. Click on an Album to display the media
present under that album in the Adobe Revel dialog box.You can click again on the album to deselect it, this refreshes the media visible in
Adobe Revel and displays all the media available in the Adobe Revel library.
5. Double-click on a video or audio file to preview it in the Source Monitor.
6. Click on a file to select it. Click Add Files to add it to the timeline.
You can select multiple files and add them to the timeline. Also, you can drag and drop media to specific points in the video on the timeline.
icon next to Adobe Revel.
The catalog refreshes if you sign in as a diferent user. Th Adobe Revel album of previous user becomes local albums and all
7. Click Done once you are through adding the files to exit the dialog box.
To know how to access files in Elements Organizer from Adobe Revel
Access your media anywhere using Adobe Revel
Page 67

To the top
63
Upload files to Adobe Revel
You can share your videos with friends using Adobe Revel. The friends and family who can view your Adobe Revel libraries are able to view the
media uploaded. To publish a video to Adobe Revel, follow these steps:
1. Select the video you want to upload to Adobe Revel.
2. Click Publish + Share > Private Web Album.
3. Click Adobe ID. Enter your Adobe ID and password. Click Sign In.
4. Click Complete Authorization.
5. Enter the following details:
Movie name: Enter the movie name.
Library: Select the library from the dropdown list to select which library you want to upload the video to.
Album: Select the albums from the dropdown list to select which album in that library the video is uploaded to.
6. Click Start Sharing. Check Allow Downloads to allow other users accessing your private Adobe Revel account to download the video.
To the top
Sync media from Adobe Revel
You can synchronize all or specific media files from your Adobe Revel account to Elements Organizer. These files would then be available under
Mobile Albums in the PRE Editor workspace. To sync media files, follow these steps:
1. Launch Elements Organizer.
2. Click Edit > Preferences > Adobe Revel.
3. Click Sign In. Enter your Adobe Revel login credentials.
4. Select from the following options:
All my Photos and Videos: Select this option to download all the files to Elements Organizer.
Specific Photos and Videos that I select: Select this option to select the specific files you want to download from your Adobe Revel
account.
Twitter™ and Facebook posts are not covered under the terms of Creative Commons.
Legal Notices | Online Privacy Policy
Page 68

Creating specialty clips
64
Add color bars and a 1-kHz tone
Create and add a black video clip
Create a colored matte for a background
Change the tone level of clips
You generate Specialty clips by using panel options in the Project Assets panel. They reside in the Project Assets panel along with your added
clips.
You can create universal counting leaders, color bars, a 1-kHz tone, black video, and colored backgrounds for your project. Use Specialty clips for
calibration of your video or simply as footage.
Add color bars and a 1-kHz tone
You use the color bars and 1- kHz tone clips in tandem at the beginning of a video. Color bars are multicolored vertical bars at the beginning of
broadcast videos that help broadcasters calibrate the color for a video.
The 1-kHz tone is a short tone (1-kHz frequency) that broadcasters use to adjust audio levels. Broadcasters set it at a specific level for reference,
and then decrease or increase their audio levels to match this frequency. Because some audio workflows are calibrated at a specific tone level,
you can customize the tone level to match your audio workflow.
1. Click Project Assets.
2. In the Project Assets panel, click New Item from the panel options and choose Bars And Tone.
A Bars And Tone clip is placed in the Project Assets panel and in the Expert view timeline.
Create and add a black video clip
You add black video clips to separate multiple movies or to create pauses in a movie. You can also use a black video clip for a title.
1. Click Project Assets.
2. In the Project Assets panel, click New Item from the panel options and choose Black Video.
Create a colored matte for a background
You can create a clip consisting of a full-frame matte of solid color, which you can use as a solid background for titles or animated clips.
Brightly colored mattes can serve as temporary backgrounds to help you see transparency more clearly while you adjust a key effect.
1. Click Project Assets.
2. In the Project Assets panel, click New Item from the panel options and choose Color Matte.
3. Choose a color in the Adobe Color Picker dialog box, and click OK.
A color matte clip is placed into both the Project Assets panel and the Expert view timeline.
To the top
To the top
To the top
Change the tone level of clips
1. Select a clip using one of the following methods:
To set the level for all new clip instances, click New Item from the panel options in the Project Assets panel. Then, select the Bars And
Tone option.
To set the level for only one clip instance, select the clip in the Expert view timeline.
2. Choose Clip > Audio Options > Audio Gain.
3. In the Clip Gain dialog box, do one of the following, and click OK:
Drag the value control left to decrease, or right to increase, volume.
Highlight the value control and type a number to increase or decrease volume. Positive numbers increase it. Negative numbers decrease
it.
The Normalize option adjusts the peak amplitude in the selected clips to the user-specified value. For example, this option adjusts the
To the top
Page 69

gain of a clip with a peak amplitude of -6 dB to +6 dB. Ensure that Normalize All Peaks To is set to 0.0 dB.
Legal Notices | Online Privacy Policy
65
Page 70

Arranging movie clips
66
Page 71

Arranging clips in the Quick viewtimeline
67
Quick view timeline overview
Adding clips in the Quick view timeline
Move a clip in the Quick view timeline
Copy and paste clips in the Quick view timeline
Zoom in or out of the Quick view timeline
Delete a clip in the Quick view timeline
The video tutorial provides an overview of using the Quick view timeline in Adobe Premiere Elements 11.
Quick view timeline overview
The Quick view timeline provides a stage on which you can quickly arrange your clips into a movie. It displays each clip as a series of frames that
span the entire clip length. Move the slider to the right to zoom out and see your entire video. Move the slider to the left to zoom in and see a clip
in more detail. The Quick view timeline has the following tracks:
Title: Add a title for your clip on this track
Video: Edit your video on this track
Sound: Place background music and other sounds
Narration: Add a narration for your clip to this track
Use the Quick view timeline to quickly assemble your clips into a movie. Click the scissor icon on the current-time indicator to split a clip and
remove an unwanted portion. You can also use the panels in the Action bar to add titles, transitions, special effects, and music to your clips.
To the top
Quick view timeline
To the top
Adding clips in the Quick view timeline
Drag clips directly to the Quick view timeline from Windows Explorer (Finder in Mac OS). You can also use the Add Media panel to add clips to the
Quick view timeline from various sources.
After adding clips, use the Quick view timeline to rearrange them. You can insert a clip before another, after another, or even split it before
inserting.
Place a clip in the Quick view timeline
1. Drag a clip from Windows Explorer (Finder in Mac OS) to the Quick view timeline. When you drag the clip over the Quick view timeline, a
vertical green line indicates the drop zone where you can place the clip. When the pointer changes to the insert icon, release the mouse
button.
2. Drag the clip from Windows Explorer (Finder in Mac OS) to the Monitor panel. The clip is automatically placed in the Quick view timeline.
Page 72

Insert a clip before another in the Quick view timeline
68
Drag the clip from Windows Explorer (Finder in Mac OS) on to a clip in the Quick view timeline.
The new clip appears in front of the one on which you dropped it, and subsequent clips shift to the right.
Insert a clip after another in the Quick view timeline
1. In the Quick view timeline, select the clip after which you want to insert the new clip.
2. Drag the clip from Windows Explorer (Finder in Mac OS) to the Monitor panel or the Quick view timeline.
The new clip appears to the right of the selected clip, and subsequent clips shift to the right.
Move a clip in the Quick view timeline
1. Drag a clip from a location in the Quick view timeline to a different location before or after another clip. Place the clip in the drop zone
(indicated by a vertical green line) when the pointer changes to the insert icon.
To the top
2. Release the mouse button.
The clip moves to its new location and all subsequent clips shift to the right.
To the top
Copy and paste clips in the Quick view timeline
You can rearrange clips in a movie by copying and pasting them within your project. You can copy and paste multiple clips at a time, and either
insert them between existing clips or overlay existing frames. The clips maintain their relative spacing in time.
Adobe Premiere Elements 11 pastes clips to the Video 1 or Audio 1 track at the location of the current-time indicator. However, you can avoid this
action by manually copying clips on multiple tracks. When you paste a clip in the Quick view timeline, the current- time indicator moves to the end
of a clip. This feature enables easy and efficient handling of consecutive paste operations.
1. In the Quick view timeline, select one or more clips in the movie. To select only the audio or video of linked clips, Alt-click the desired clip.
2. Choose Edit > Copy.
3. In the Quick view timeline, position the current-time indicator at the point you want to paste, and do one of the following:
To overlay the clips and replace existing footage on the track, choose Edit > Paste.
To insert the pasted clips and shift existing footage, choose Edit > Paste Insert.
You can also copy a clip’s attributes—motion, opacity, volume, and other effects—and paste them into another clip.
To the top
Zoom in or out of the Quick view timeline
Page 73

When you zoom in on the Quick view timeline, it is magnified around the current-time indicator, letting you examine smaller increments of media.
You can also zoom in as you add a clip, magnifying the location around the pointer rather than the current-time indicator. This technique lets you
69
see the exact placement of the insertion point before you release the mouse.
In contrast, zooming out displays more of the Quick view timeline, giving you a visual summary of the movie.
In the Quick view timeline, do one of the following:
To zoom in or out as you add a clip, drag the clip to the Quick view timeline. Hold down the mouse button, and press the Equals (=) key
to increase the zoom factor or press the Minus (–) key to decrease it.
To zoom in or out as you add a clip, drag a clip to the Quick view timeline. Hold down the mouse button, and press the semicolon (;) key
to increase the zoom factor. Press the Minus (–) key to decrease the zoom factor.
To zoom in on the Quick view timeline, drag the Zoom slider to the right, or click the Zoom In button.
To zoom out of the Quick view timeline, drag the Zoom slider to the left, or click the Zoom Out button.
To toggle between viewing the entire movie in the Quick view timeline and the previous zoom level setting, click the Fit To Visible
Timeline icon. Alternatively, press the Backslash (\) key. Make sure that the Quick view timeline is active before pressing the Backslash (\)
key. You can also zoom in and out by pressing the Equals (=) or Minus ( -) keys on the keyboard (not the numeric keypad).
To zoom out so that the entire movie is visible in the Quick view timeline, press the Yen sign (¥) key. Make sure that the Quick view
timeline is active before pressing the Yen sign (¥) key.
Note:
The steps described to zoom in and zoom out of the Quick view timeline also apply to the Expert view timeline.
Delete a clip in the Quick view timeline
To the top
1. Select a clip in the Quick view timeline.
2. Right-click/ctrl- click the clip and choose one of the following:
Delete and close gap
Delete audio
Legal Notices | Online Privacy Policy
Removes the audio from your movie.
Twitter™ and Facebook posts are not covered under the terms of Creative Commons.
Deletes the clip and removes the gap by adjusting the position of one or more clips
Page 74

Arranging clips in the Expert view timeline
70
Expert view timeline overview
Add clips to the Expert view timeline
Replace a clip in the Expert View timeline
Select, move, align, and delete clips in the Expert view timeline
Create a duplicate clip in the Expert view timeline
View the duration of selected clips in the Expert view timeline
Customize Expert view timeline tracks
The video tutorial provides an overview of using the Expert view timeline in Adobe Premiere Elements 11.
Expert view timeline overview
The Expert view timeline graphically represents your movie project as video and audio clips arranged in vertically stacked tracks. When you
capture video from a digital video device, the clips appear sequentially as they occur.
The Expert view timeline uses a time ruler to display the components of your movie and their relation with each other over time. You can trim and
add scenes, indicate important frames with markers, add transitions, and control how clips are blended or superimposed.
The zoom controls on the Expert view timeline let you zoom out to see your entire video, or zoom in to see clips in more detail. You can also
change how the clips appear in the tracks, and resize the tracks and the header area.
To the top
Expert view timeline
A. Current-time indicator B. Time ruler C. Zoom control D. Video track E. Audio track
Tracks in the Expert view timeline
Tracks let you layer video or audio and add compositing effects, picture-in-picture effects, overlay titles, soundtracks, and more. With multiple
audio tracks, you can add a narration to one track and background music to another track. The final movie combines all the video and audio
tracks.
By default, the Expert view timeline contains three tracks for video (or images) and audio, a narration track, and a sound track. You can drag
linked clips (clips that include both audio and video) to a track.
For linked clips, the video and audio components appear together (video directly above audio) in their respective tracks (such as Video1 and
Audio1). To see all of the tracks, you may have to scroll up or down the Expert view timeline.
A new track is inserted if you drag and release a clip above the topmost video track. There is no limit to the number of tracks a project can
contain. You can add or delete tracks at any time, even before adding clips.
A movie must contain at least one of each type of track (the track can be empty). The video track order is important because any clip located in
Video 2 also overlays the Video 1 track. Audio tracks are combined in playback so the track order is not relevant.
Tip: You can specify the default number and type of tracks in new movies.
Page 75

71
Default tracks
A. Video 2 track B. Audio 2 track C. Video1 track D. Audio 1 track E. Narration track F. Soundtrack
Expert view timeline tools
Use the tools at the top of the Expert view timeline to play a clip, stop playback, or change playback speed. Use the panels in the Action bar to
add titles, transitions, special effects, and music. You can also add markers, detect musical beats, open the Audio Mixer, or add narration.
Move through the Expert view timeline
When placing and arranging clips in the Expert view timeline, move the current-time indicator to the appropriate location. In the time ruler, the
current-time indicator corresponds to the frame displayed in the Monitor panel.
A vertical line extends from this current-time indicator through all the tracks. Zooming in and out of the Expert view timeline can help you identify
the exact location for placing a clip or performing an edit.
In the Expert view timeline, do any of the following:
Drag the current-time indicator.
Click the time ruler where you want to position the current-time indicator.
Press Shift while dragging the current-time indicator to snap it to the edge of the closest clip or marker.
Drag the time display (below the Monitor panel) to the desired time value.
Click the time display (at the bottom of the Monitor panel), type a valid time, and then press Enter. (You need not type leading zeros,
colons, or semicolons. However, Adobe Premiere Elements interprets numbers under 100 as frames.)
You can use the Home or End keys on the keyboard to skip between the beginning and end of the movie. The Page Up and Page Down
keys move the current-time indicator to the previous and next clips respectively. The Right or Left Arrow keys move the current-time
indicator forward or back by a frame. Pressing Shift+Right Arrow or Shift+Left Arrow moves the current-time indicator forward or back by
five frames each time.
To the top
Add clips to the Expert view timeline
When you insert a clip into the Expert view timeline, adjacent clips on all tracks shift to accommodate the new clip. By shifting all clips together,
the audio and video of the existing clips remain in sync.
Sometimes, you don’t want all clips to shift with each insertion. For example, when you add background music that superimposes the entire movie,
you don’t want clips to shift.
To shift specific clips togather, press the Alt key as you insert. At a time, you can shift specific clips simultaneously on a maximum of two tracks.
These include the track receiving the insertion and the track containing the linked audio or video (if any). The affected tracks shift together,
remaining aligned. The clips on other tracks are unaffected.
Page 76

Insert a clip, shift clips in the Expert view timeline
72
Do one of the following:
Drag the clip from the Project Assets panel to the desired location in the Expert view timeline. When the pointer changes to the Insert
icon, release the mouse.
Move the current-time indicator to the desired location in the Expert view timeline. Then select the clip in the Project Assets panel and
choose Clip > Insert.
Insert a clip, shift clips on only the target and linked tracks
Alt-drag the clip from the Project Assets panel to the desired location in the Expert view timeline. When the pointer changes to the Insert
icon, release the mouse.
If you drag a clip into the blank space above the topmost video track (for video) or below the lowest audio track (for audio), Adobe Premiere
Elements creates a new track for the clip. If the clip contains both audio and video, it creates both a new video and new audio track.
Overlay a clip in the Expert view timeline
The easiest way to replace a portion of a video is to overlay it with other footage. When you overlay a clip, the clip you add replaces any existing
frames starting at the location you designate.
If the new clip is 40 frames long, it overlays 40 frames of the existing clip. The frames following the overlay, if any, remain at the same location in
the track. Overlays do not change the length of the movie unless the overlay extends beyond the end of the movie.
Do one of the following:
Ctrl-drag/Cmd-drag the clip from the Project Assets panel to the first frame you want to overlay. When the pointer changes to the Overlay
icon, release the mouse.
Move the current-time indicator to the first frame you want to overlay, select the clip in the Project Assets panel, and then choose Clip >
Overlay.
Place one clip above another in the Expert view timeline
You can place one clip above another without replacing a section of the lower clip as is done with an overlay. You can use clips stacked in this
way, for example, with various keying effects.
1. In the Expert view timeline, drag the current-time indicator to a location above a video clip where you want to overlay another clip.
2. Shift-drag a clip from the Project Assets panel, and drop it on to the Monitor panel.
3. Choose Place On Top.
Adobe Premiere Elements drops the second clip into the first available video track at the location of the current- time indicator.
To the top
Replace a clip in the Expert View timeline
Page 77

To replace a clip in the middle of the Expert view timeline, without altering the length or changing the effects or overlays, use the Replace Clip
command. This option is useful when editing expanded instant movies.
73
1. From the Project Assets panel, select the clip you want to use.
2. In the Expert view timeline, right-click/ctrl- click the clip you want to replace and choose Replace Clip From Project Assets.
If the incoming clip is longer in duration, it is trimmed from the end to match the existing duration of the outgoing clip.
If the incoming clip is shorter in duration, a warning message appears giving you the choice to cancel the replace action or use black frames
to fill the excess duration.
Select, move, align, and delete clips in the Expert view timeline
After you’ve added a clip to your movie, you may need to rearrange clips, copy and paste scenes, and delete other clips. Several techniques let
you select individual clips, a range of clips, or only the audio or video portion of a linked clip.
Select clips in the Expert view timeline
Using the mouse cursor, do any of the following:
To the top
To select a single clip, click the clip in the Expert view timeline. If the clip is linked or grouped, clicking one clip selects the other linked or
grouped clips.
To select only the audio or video portion of linked clips, Alt-click the desired clip.
To select a single clip within a group, Alt-click the desired clip.
To select multiple clips, Shift-click each clip you want to select. (Shift-click a selected clip to deselect it.)
To select sequential clips, drag a rectangle (marquee selection) that includes the clips you want to select.
To add a range of clips to the current selection, Shift -drag a marquee around the clips.
Selecting a range of clips by dragging a marquee
Move a clip in the Expert view timeline
You can easily rearrange clips in the Expert view timeline by dragging. By using the same techniques you use to add a clip, you can choose to
insert or overlay clips when you move them.
To move a clip and insert it so all tracks shift after insertion, drag the clip to the desired location. When the pointer changes to the Insert
icon, release the mouse button.
To move a clip and overlay another clip in the movie, drag the clip to the first frame you want to overlay, and then press Ctrl/Cmd. When the
pointer changes to the Overlay icon, release the mouse button.
Page 78

To move only one clip of a linked pair, Alt-select the clip you want to move. Drag it to the desired location. If you want to shift clips only on
the target tracks, release the mouse button when the pointer changes to the Insert icon. If you want to overlay another clip, press the Ctrl
74
key, and when the pointer changes to the Overlay icon, release the mouse.
Align clips by using the Snap option
The Snap option, which is enabled by default, makes it easier to align clips with each other or with particular points in time. You can move a clip
with the Snap option selected. The clip automatically aligns with the edge of another clip, a marker, the start and end of the time ruler, or the
current-time indicator.
Snapping also helps ensure that you don’t inadvertently perform an insert or overlay edit when dragging. As you drag clips, a pop-up window
displays the distance, in frames, that you have moved them. A negative number indicates you’ve moved them toward the beginning of the movie.
Choose Timeline > Snap. A check mark indicates that the option is enabled.
Delete a clip in the Quick view timeline or Expert view timeline
Deleting a clip from a movie doesn’t delete it from the project. The clip is still available in the Project Assets panel.
1. In the Quick view timeline or Expert view timeline, select one or more clips. (Alt-click to select only the audio or video portion of a clip.)
2. Do one of the following:
To delete clips and leave a gap of the same duration, called clearing, choose Edit > Delete.
To delete a clip and close the resulting gap, called a ripple deletion, choose Edit > Delete And Close Gap, or press the Delete or
Backspace key.
Note:
When a clip is deleted from the Quick view timeline, a transition that follows the clip is also deleted. When a clip is deleted from the
Expert view timeline, the preceding and following transitions are deleted.
Delete empty space between clips in the Expert view timeline
You can quickly delete empty space between clips in the Expert view timeline by using the Delete And Close Gap command. Alternatively, press
the Delete or Backspace key. Both techniques shift adjacent clips over to fill the gap.
In the Expert view timeline, do one of the following:
Right-click the empty space, and choose Delete And Close Gap.
Select the space you want to delete, and press the Delete or Backspace key.
note: If the gap is small and difficult to select, move the current-time indicator to the gap and click the Zoom In button.
To the top
Create a duplicate clip in the Expert view timeline
Each time you drag a source clip from the Project Assets panel to the Expert view timeline, you create a clip instance. This instance shares the
source clip’s default In and Out points. If you delete the source clip in the Project Assets panel, all instances of the clip in the Expert view timeline
are deleted.
To create clip instances with different default In and Out points, duplicate the source clip in the Project Assets panel. If you delete a duplicate clip
in the Project Assets panel, all instances of it in the Expert view timeline are deleted.
Page 79

1. In the Project Assets panel, select a clip and choose Edit > Duplicate.
75
2. To rename the duplicate clip, select it in the Project Assets panel, and do one of the following:
Choose Clip > Rename and type a new name.
Click the text and type a new name.
You can also create a duplicate clip by copying and pasting, or Ctrl -dragging a clip in the Project Assets panel.
To the top
View the duration of selected clips in the Expert view timeline
The Info panel shows you the total duration of multiple clips selected in either the Quick view timeline or the Expert view timeline. This information
is often useful when editing a movie. For example, you may want to find music to fit a scene or replace a few clips with different footage.
If you select clips in the Project Assets panel, the Information panel displays the total duration of all the clips you select. If you select clips in the
Quick view timeline or the Expert view timeline, the Information panel displays the total duration of the selected clips.
The duration is calculated from the In point of the first selected clip to the Out point of the last selected clip. If the clips are not contiguous in the
tracks, the duration may be longer than the total duration of the clips.
1. Make sure that the Info panel is visible. If not visible, choose Window > Info.
2. In the Project Assets panel, Quick view timeline, or the Expert view timeline, select the desired clips. The Info panel displays the number of
items selected and the total duration of those items.
You can view the duration of a single clip in a tool tip by positioning the cursor over a clip in the Quick view timeline or the Expert view
timeline.
To the top
Customize Expert view timeline tracks
You can customize Expert view timeline tracks to suit the needs of your project.
Add a track to the Expert view timeline
1. Choose Timeline > Add Tracks.
2. In the Add Tracks dialog box, type the number of tracks you want to add in the Add field for video or audio tracks.
3. To specify the placement of added tracks, choose an option from the Placement pop-up menu for each type of track added, and click OK.
Resize tracks
Tracks have three preset sizes: Small, Medium, and Large. The Large view is helpful for viewing the clip thumbnails and adjusting effects, such as
the opacity or volume of a clip. You can also resize tracks manually and resize the width of the track header area to accommodate long track
names. If your movie contains several tracks, you can adjust the relative proportion the tracks to favor the tracks you need to see.
By default, track names are hidden. To view track names, resize the track header section.
Resize the height of a track
Page 80

In the Expert view timeline, do one of the following:
76
Right-click/ctrl- click an empty track of the Expert view timeline, and choose Track Size. Then choose Small, Medium, or Large.
In the track header area of the Expert view timeline, position the pointer between two tracks so that the Height Adjustment icon appears.
Then, drag up or down to resize the track below (for video) or the track above (for audio).
Changing track height in the Expert view timeline
Resize the track header section of the Expert view timeline
In the Expert view timeline, position the pointer over the right edge of the track header (where track icons are listed) so that the Resize icon
appears. Then, drag the right edge. (The icons at the top of the track header limit its minimum width. The maximum width is about double the
minimum width.)
Rename a track
1. In the Expert view timeline, right-click/ctrl- click the track’s name (for example, Video 1) and choose Rename.
2. Type a new name for the track and press Enter, or click outside the box.
Delete empty tracks from the Expert view timeline
Do one of the following:
Choose Timeline > Delete Empty Tracks.
Right-click/ctrl- click in an empty track in the Expert view timeline and choose Delete Empty Tracks.
Customize how clips display in the Expert view timeline
You can display clips in the Expert view timeline in different ways, depending on your preference or the task at hand. You can choose to display a
thumbnail image at the beginning of the clip. Alternatively, you can display a thumbnail image at the head and tail or along the entire duration of
the clip (default view). For an audio track, you can choose to display or hide the audio waveform of the audio contents.
Set Display Style buttons let you set how tracks are displayed in the Expert view timeline.
Displaying thumbnail images across the duration of the clip gives you a sense of the progression of the clip. However, do not confuse the
Page 81

boundary between thumbnails as the actual boundary between frames. Think of the thumbnails as a storyboard or sketch of the clip’s content.
Click the Set Video Track Display Style button or the Set Audio Track Display Style button at the left corner of the track. Each time you click,
77
the track’s display style toggles to a different view.
To see more volume detail when viewing an audio waveform in the Expert view timeline, increase the track height.
Adobe also recommends
Twitter™ and Facebook posts are not covered under the terms of Creative Commons.
Legal Notices | Online Privacy Policy
Page 82

Creating a picture-in-picture overlay
78
Create a picture-in-picture overlay in the Quick view
Create a picture-in-picture overlay in the Expert view
Delete a picture-in-picture overlay
You can place one video clip in a small frame over a background video clip that covers the entire screen. This effect is called a picture-in-picture
overlay.
Picture-in- picture overlay
For information about superimposing one clip over another by creating transparent backgrounds, see About superimposing and
Note:
transparency.
Create a picture-in-picture overlay in the Quick view
1. Place the CTI on the clip in the Quick view timeline that you want to use as the background clip.
The selected clip appears in the Monitor panel.
2. Do one of the following:
From the Graphics panel, drag an image on to the background clip in the Monitor panel. If necessary, adjust the duration of the overlay
in the Picture In Picture dialog box.
From Windows Explorer, drag a clip or image on to the background clip in the Monitor panel, and select Picture In Picture. If necessary,
adjust the duration of the overlay in the dialog box.
3. To adjust the position of the superimposed clip, drag it to the desired location in the Monitor panel.
Note:
If the superimposed clip is longer than the background clip, it appears over successive clips in the Quick view timeline for its entire duration.
The clip also appears superimposed over those clips during playback.
To the top
To the top
Create a picture-in-picture overlay in the Expert view
1. Place the CTI on the clip in the Expert view timeline that you want to use as the background clip.
The selected clip appears in the Monitor panel.
Page 83

2. Do one of the following:
79
From the Graphics panel, drag an image on to the background clip in the Monitor panel.
From Windows Explorer, drag a clip or image on to the background clip in the Monitor panel, and select Picture In Picture.
From the Project Assets panel, drag a clip or image on to the background clip in the Monitor panel, and select Picture In Picture
3. To adjust the position of the superimposed clip, drag it to the desired location in the Monitor panel.
Note:
If the superimposed clip is longer than the background clip, it appears over successive clips in the Expert view timeline for its entire
duration. The clip also appears superimposed over those clips during playback.
Delete a picture-in-picture overlay
1. Depending on the view you are in, make sure that the Quick view timeline or the Expert view timeline is active.
2. Right-click/ctrl- click the superimposed clip in the Quick view timeline or the Expert view timeline.
3. Select Delete.
To the top
The superimposed clip disappears from the Quick view timeline (or the Expert view timeline) and the Monitor panel.
Twitter™ and Facebook posts are not covered under the terms of Creative Commons.
Legal Notices | Online Privacy Policy
Page 84

Grouping, linking, and disablingclips
80
Group and ungroup clips
Link video and audio clips
Synchronize linked clips
Enable and disable clips
Group and ungroup clips
In the Quick view timeline or the Expert view timeline, you can group clips so that you can move, disable, copy, or delete them together. When
you group a linked clip with other clips, both the audio and video portions of the linked clip are included in the group.
To group clips, select multiple clips, and choose Clip > Group.
To ungroup clips, click any clip in the group to select the group, and choose Clip > Ungroup.
To select one or more clips in a group of clips, Alt-click a single clip in a group. Shift+Alt-click to select additional clips in a group.
Link video and audio clips
To the top
To the top
Most video includes a soundtrack. In the Project Assets panel, clips that contain both video and audio appear as a single item. When you add the
clip to a movie in the Expert view timeline, the video and audio appear on separate tracks with the video directly above the audio.
The video and audio remain linked. When you drag the video portion in the Expert view timeline, the linked audio moves with it, and vice versa.
For this reason, audio/video pairs are called linked clips. In the Expert view timeline, the names of linked clips are underlined and identified with a
[V] for video or [A] for audio.
Linked clips share same name with either [V] or [A] appended and are underlined.
All editing tasks (such as moving, trimming, or changing the clip speed) act on both parts of a linked clip. You can temporarily override the link by
pressing the Alt key when you initiate editing tasks. You can also place the video or audio portion separately.
Link and unlink video and audio clips
You can link a video clip and an audio clip so that they act as a unit. When you select, trim, split, delete, move, or change the speed of one, you
affect the other clip as well. You can temporarily override the link as needed. In the Expert view timeline, the names of linked clips are underlined
and identified with a [V] for video or [A] for audio.
To link video and audio clips, Shift- click a video and audio clip to select them both, and then choose Clip > Link Audio And Video.
To unlink video and audio clips, select a linked clip and choose Clip > Unlink Audio And Video. (Though the audio and video are unlinked,
they are both still selected. Reselect either clip to use it separately.)
To select linked clips individually, Alt-click the desired clip. After selecting it, you can move or trim the clip independently of its linked clip.
Page 85

To quickly delete an audio or video clip without unlinking it, right-click/ctrl-click the clip and choose either Delete Audio or Delete Video from the
81
menu.
Delete only the audio or video portion of a linked clip
In the Expert view timeline, do one of the following:
Right-click/Ctrl-click the linked clip and choose Delete Audio or Delete Video.
Alt-click the audio or video portion to select it alone, and press the Delete or Backspace key.
Select a linked click and choose Clip > Unlink Audio And Video. Reselect either clip and choose Edit > Clear or Edit > Delete And Close
Gap.
The clips shift over to fill the gap left by the deleted clip.
To the top
Synchronize linked clips
Adobe Premiere Elements automatically places video and its audio on separate tracks in the Expert view timeline. However, it links the clips so
that they remain in sync as you trim or move them.
If you Alt-drag one of the clips out of sync, Adobe Premiere Elements displays the number of offset frames next to the clip name in the Expert
view timeline.
Even if you unlink the clips, Adobe Premiere Elements keeps track of the offset, and displays it again if you relink them. You can have Adobe
Premiere Elements automatically resynchronize the clips. Depending on the clips, you can choose between two methods of synchronizing.
In the Expert view timeline, right-click/ctrl- click the offset number of the clip you want to move.
The clip you right-click/ctrl-click moves or adjusts to align with the other clip, which remains in place.
To the top
Enable and disable clips
Occasionally, you might want to disable a clip while you try a different editing idea or to shorten the processing time. Disabling a clip hides it when
you view the movie in the Monitor panel or when you export the movie. You can still move or change a disabled clip.
Select one or more clips in the Quick view timeline or the Expert view timeline, and choose Clip > Enable.
The check mark next to the command disappears when you disable a clip, and the clip appears dimmed in the Quick view timeline and the
Expert view timeline.
Twitter™ and Facebook posts are not covered under the terms of Creative Commons.
Legal Notices | Online Privacy Policy
Page 86

Working with clip and timeline markers
82
About clip and timeline markers
Add clip and timeline markers
Insert comments, chapter information, or URL links in a timeline marker
Move and delete markers
Go to a clip or timeline marker in the Expert view timeline
About clip and timeline markers
You can place markers to indicate important points in a clip or movie. Markers can help you position, arrange, and synchronize clips. They even let
you add comments to the Expert view timeline.
A movie or a clip can contain up to 100 numbered markers (labeled from 0 to 99). Moreover, it can have unlimited unnumbered markers. You can
also add menu markers for use in creating a disc menu in Adobe Premiere Elements.
Working with clip and timeline markers is much like working with In and Out points. However, In and Out points set the actual start and end points
of a clip. Markers are only for reference and do not affect clips in the finished movie.
To the top
Markers in the Expert view timeline
A. Timeline Marker B. Menu marker C. Markers menu D. Beat marker
note: The Detect Beats button creates markers at the major beats in your soundtrack so that you can synchronize clips to beats.
Markers you add to a clip placed in a movie appear only in that instance of the clip. Markers you add to a source clip appear in each instance of
the clip that you subsequently add to the movie. Adding markers to a source clip doesn’t affect instances of the clip already in a movie.
When you select a clip in the Project Assets panel, the Monitor panel displays only the clip markers within the clip.
When you select a clip in the Expert view timeline, it displays only timeline markers. Clip markers appear as icons within the clip in the Expert view
timeline. However, timeline markers appear in the time ruler.
Note:
For information on adding, moving, and deleting markers in a clip or movie, see Working with clip and timeline markers in Adobe Premiere
Elements Help.
To the top
Add clip and timeline markers
You can add markers to a clip in the Project Assets panel, to an instance of a clip in the Expert view timeline, or to the time ruler. Markers are of
two types: clip markers and timeline markers.
In general, you add clip markers to signify important points within an individual clip (for example, to identify a particular action or sound). You add
timeline markers to the time ruler to mark scenes, title locations, or other significant points within the movie. Timeline markers can include
comments and URLs to link web pages.
You can number markers or use unnumbered markers. Use numbered markers if you plan to use many markers. You can quickly jump, say, from
marker number 5 to marker number 40 if the markers are numbered. If they are unnumbered, you can only jump between adjacent markers.
If you want to use markers to log comments, numbering them makes them easy to reference. For example, you can log comments, such as
Page 87

“Check the color at marker 12,” or “See comments at marker 42” for a collaborator.
83
Add a marker to a source clip or clip instance
1. Do one of the following:
To add a marker to a source clip, double-click the clip in the Project Assets panel.
To add a marker to a clip instance, double-click the clip in the Expert view timeline.
The clip opens in the Preview window.
2. Move the current-time indicator in the Preview window to the frame where you want to set the marker.
3. Choose Clip > Set Clip Marker, and select either Unnumbered, Next Available Numbered, or Other Numbered.
4. If you chose Other Numbered, type a number in the Set Numbered Marker field, and click OK.
If you added the marker to the source clip, it is saved in the clip and is visible in all subsequent instances of the clip in the Expert view timeline.
If you added the marker to the clip instance, it is visible only in the particular instance of the clip in the Expert view timeline.
Add a marker to the Expert view timeline
1. Click an empty space in a video or audio track in the Expert view timeline. The Expert view timeline becomes active and any previous
selected clip is deselected.
2. Move the current-time indicator in the Expert view timeline to the frame where you want to set the marker.
3. Right-click/ctrl- click in the timeline ruler or the Monitor panel, or choose Timeline > Set Timeline Marker, and choose one of the following:
Unnumbered
Next Available Numbered
Other Numbered
Tip: You can insert markers while a movie or clip plays. Click the Set Unnumbered Marker icon in the Monitor panel, or press the asterisk
key, at the locations you want to mark.
The marker appears in the time ruler of the Expert view timeline, at the location of the current -time indicator.
Sets an unnumbered marker.
Sets a numbered marker using the lowest unused number.
Opens a dialog box in which you can specify any unused number from 0 to 99.
To the top
Insert comments, chapter information, or URL links in a timeline marker
In addition to indicating important frames of a movie, timeline markers can also contain comments, chapter numbers, or URLs. You can include
comments, chapter numbers, or web links only in timeline markers, not clip markers.
If you import your movie into Adobe® Encore®, you can use timeline markers to specify chapter links. Encore automatically converts timeline
markers with text or numbers in the Chapter field to chapter points. It also places the contents of the Comment field into the Description field of the
Page 88

chapter point.
84
For your online movie, if you can design frame-based web pages, use timeline markers to change other parts of the web page.
Timeline markers can specify a URL and web-page frame. When you include the movie in a frame-based web page, the browser displays each
specified link in the specified frame.
As the movie plays, your web page can change as each marker is reached. For example, in a family web page, as your vacation movie plays, you
can populate the other frames of the web page with commentary and still images about the vacation. This technique requires careful planning to
coordinate the frames and content. You must export the movie using a file type that supports web markers: QuickTime or Windows Media.
You can set the markers to be longer than one frame in duration. In the Expert view timeline, the right side of a timeline marker’s icon extends to
indicate its duration.
1. In the time ruler in the Expert view timeline, double -click a timeline marker to open the Marker dialog box.
2. Do any of the following:
To create a comment, type a message in the Comments field.
To change the duration of the marker, drag the duration value or click the value to select it, type a new value, and press Enter.
To create a chapter point for Adobe Encore, enter the chapter name or number in the Chapter box.
To create a web link, enter the web address and frame number in the URL and Frame Target boxes. The frame number must match a
frame in the web page containing the movie.
3. To enter comments or specify options for other timeline markers, click Previous or Next.
4. Repeat steps 1-3 until you are finished modifying timeline markers, and click OK.
To the top
Move and delete markers
You can drag markers in the Expert view timeline. To change the existing clip markers in the movie, open an instance of the clip in the Preview
window and make changes. You can’t manipulate clip markers directly in the Expert view timeline.
Timeline markers are not attached to the frames they mark. When you insert a clip, the existing timeline markers remain in their original position in
the time ruler. However, clip markers shift with the clip.
Move a marker
In the time ruler of the Expert view timeline, drag the marker to a new position. Dragging beyond either edge of the time ruler scrolls the time
ruler.
Note:
You can’t move a clip marker in the Expert view timeline. Instead, open the clip in the Preview window and drag the marker in the
Preview window time ruler.
Delete a timeline marker
1. In the Expert view timeline, move the current -time indicator to the timeline marker.
To place the current-time indicator precisely on a marker. Either zoom in completely on the time ruler so you can see its exact location or
choose Timeline > Go To Timeline Marker, and choose Next, Previous, or Numbered from the menu.
2. Choose Timeline > Clear Timeline Marker, and choose an option from the menu.
Timeline Marker At Current Time Indicator
Deletes the timeline marker at the current time. (If the option is not available, you have not
Page 89

All Markers
placed the current-time indicator precisely on the marker.)
85
Numbered
note: You can’t remove a timeline marker by dragging it away from the time ruler.
Deletes all timeline markers from the movie.
Deletes a numbered timeline marker from a list of numbered markers.
Delete a clip marker
1. Select the clip in the Expert view timeline.
2. Move the current-time indicator to the clip marker.
To place the current-time indicator precisely on a marker, zoom in completely on the time ruler so you can see its exact location.
Alternatively, choose Clip > Go To Clip Marker, and choose Next, Previous, or Numbered from the menu.
3. Choose Clip > Clear Clip Marker, and choose an option from the menu:
Current Marker
precisely on the marker.)
All Markers
Numbered
Deletes the marker at the current time. (If the option is not available, you may not have placed the current-time indicator
Deletes all clip markers from the clip.
Deletes a numbered clip marker from a list of all numbered markers.
Clear all markers
1. Do one of the following:
To clear all clip markers from a clip, select the clip in the Expert view timeline.
To clear all timeline markers from the Expert view timeline, make sure that no clips are selected in the movie.
2. Choose either Clip > Clear Clip Marker > All Markers or Timeline > Clear Timeline Marker > All Markers.
Go to a clip or timeline marker in the Expert view timeline
To the top
1. Do one of the following:
To move to a clip marker in a clip, select the clip in the Expert view timeline.
To move to a timeline marker in a movie, make sure that no clips are selected in the Expert view timeline.
2. Choose either Clip > Go To Clip Marker or Timeline > Go To Timeline Marker, and choose Next, Previous, or Numbered from the menu.
To help position clips at a marker, make sure that the Snap command is selected in the Timeline menu. (A check mark indicates it is
selected.) Then, clips will snap to the markers as you drag them into position in the Expert view timeline.
Page 90

Twitter™ and Facebook posts are not covered under the terms of Creative Commons.
86
Legal Notices | Online Privacy Policy
Page 91
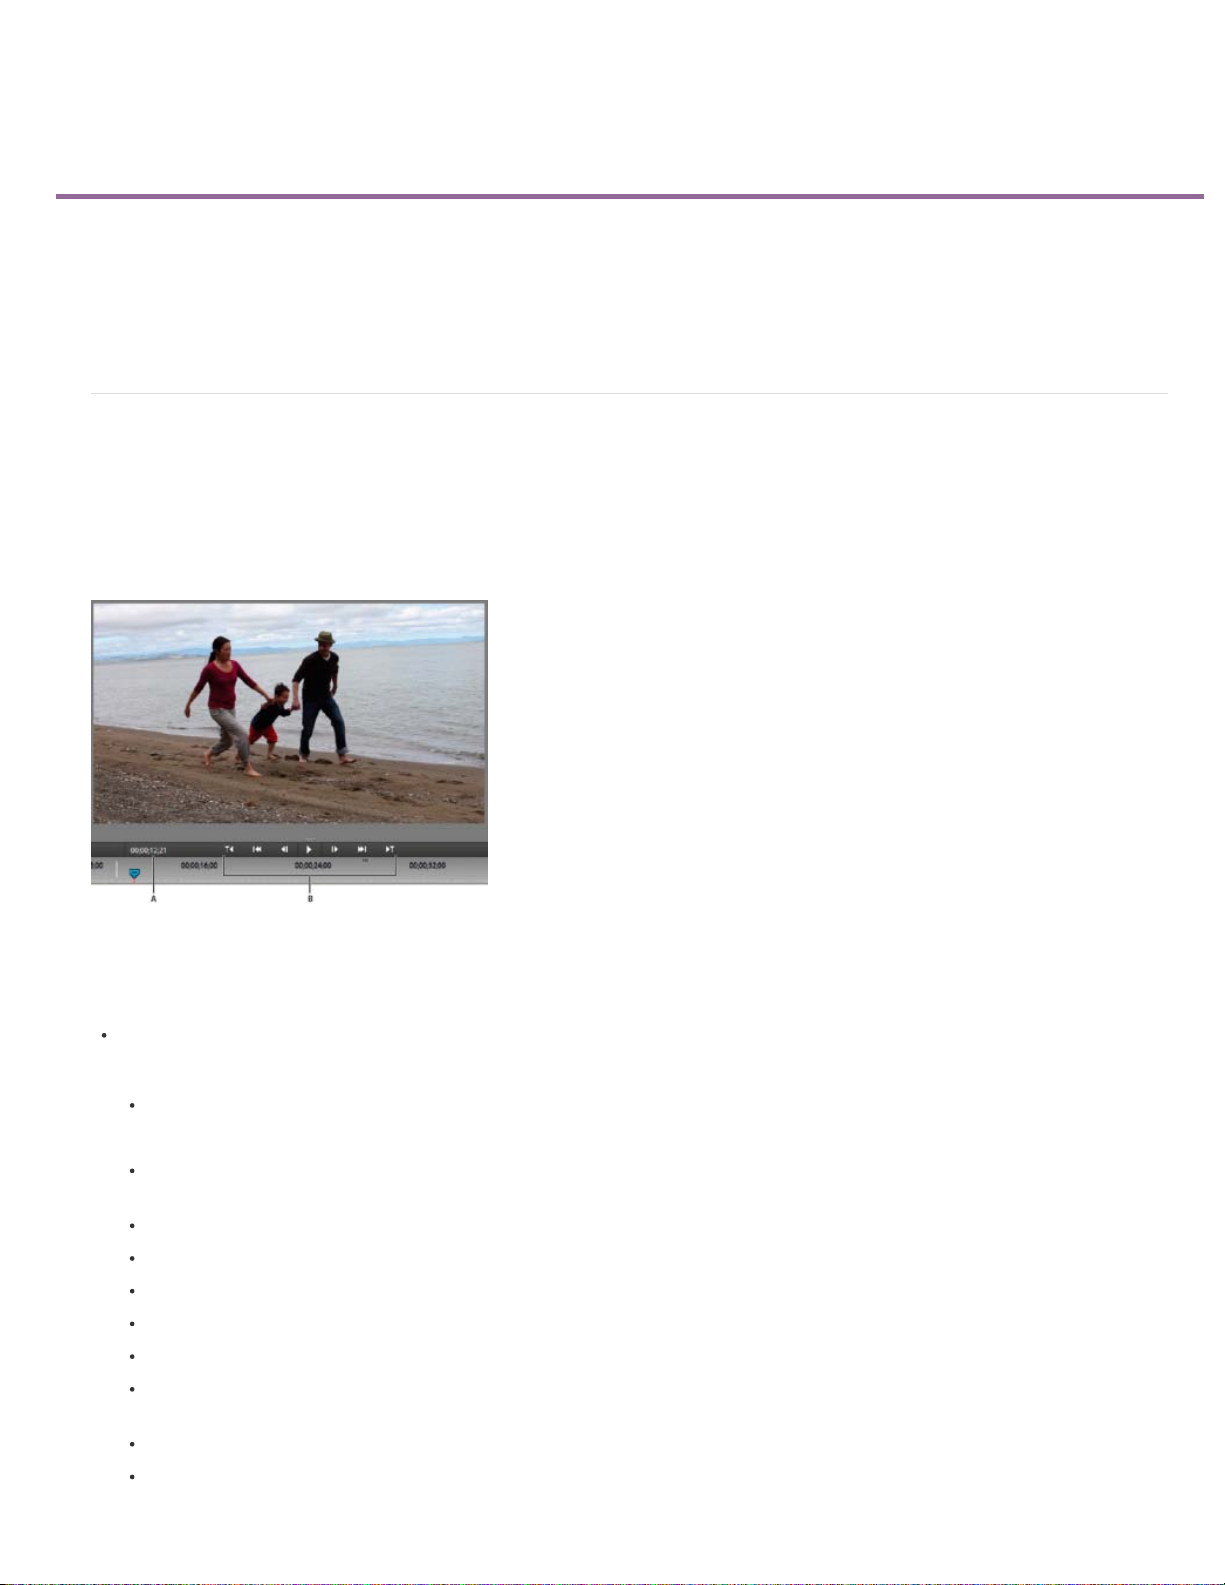
Previewing movies
87
Preview a movie in the Monitor panel
Preview in full-screen mode
Preview on a TV monitor
Render an area for preview
Delete preview files
Preview a movie in the Monitor panel
You can preview all or part of a movie at any time in the Monitor panel. To preview a movie, Adobe Premiere Elements must first prepare the clips
on all the tracks for viewing, applying effects, motion, opacity, and volume settings. Video quality and frame rate are dynamically adjusted to let
you preview the movie in real time. Movies that use only cuts between clips generally preview at normal quality and frame rate. Complex movies
(with effects and layered video and audio) may require rendering before you can preview them.
To the top
Monitor panel
A. Current time B. Playback controls
Do any of the following in the Monitor panel:
To preview the movie, click the Play button, or press the spacebar.
note: To set the current -time indicator to the beginning of the movie, press the Home key.
To change the quality of the playback, right-click/ctrl -click inside the monitor panel. Select Playback Quality > Highest. The CPU usage
and RAM consumption of your computer increases when you change the setting to Highest.
To pause the preview, click the Pause button, or press the spacebar.
To control the speed of the preview, drag the shuttle slider to the right. The clip plays faster the further you drag the shuttle slider.
To play in reverse, drag the shuttle slider to the left. The clip rewinds faster the further you drag the shuttle slider.
To go forward one frame, click the Frame Forward button. To go forward five frames, Shift-click the Frame Forward button.
To go backward one frame, click the Frame Back button. To go backward five frames, Shift-click the Frame Back button.
To jump to a different frame, click the current-time display, and type the new time. (Colons or semicolons aren’t required. However,
Adobe Premiere Elements interprets numbers under 100 as frames.)
To go to the end of the previous clip (the cut or edit point), click the Go To Previous Edit Point button.
To go to the beginning of the next clip, click the Go To Next Edit Point button.
Page 92

Preview one clip from the Quick view timeline
88
Double-click the clip in the Quick view timeline.
Scroll the Expert view timeline during preview
You can set an option to automatically scroll the Expert view timeline from right to left, when a sequence is larger than the visible timeline. This
way you don’t have to zoom out to see the entire sequence.
1. On Windows®, select Edit > Preferences > General. On Mac® OS, select Adobe Premiere Elements 12 > Preferences > General.
2. Choose an option from the Timeline Playback Auto-Scrolling menu.
No Scroll
Page Scroll
Smooth Scroll
Doesn’t scroll the Expert view timeline.
Scrolls the visible section of the Expert view timeline one page at a time.
Scrolls the Expert view timeline while the current -time indicator stays in the center of the visible timeline.
View safe zones in the Monitor panel
You can view safe zone margins (guides) in the Monitor panel to determine if any text or objects in your project fall outside the safe zone. When
text or objects fall outside the safe zone, they may be clipped when played back on certain screens. Safe zone margins are for your reference and
are not included in previews or export.
Safe zones in the Monitor panel
A. Action-safe margin B. Title-safe margin
Right-click/ctrl- click in the Monitor panel, and choose Safe Margins. A check mark next to the name indicates the safe zone margins are on.
The standard action- and title-safe margins are 10% and 20%, respectively. However, you can change the dimensions of the safe zones
in the Project Settings dialog box.
To the top
Preview in full-screen mode
To see the greatest detail in a clip or movie, preview it in full -screen mode. This mode fills the computer screen with video, suggesting how clips
and movies appear on TV screens. Full-screen previews also let you easily share your work with others in the room.
Page 93

Preview a movie in full-screen mode
89
Click the Play Full Screen button in the upper-right corner of the application. The preview pane fills the screen, and playback starts
automatically.
Pause, reverse, and advance a full-screen preview
In addition to playing and pausing a full-screen preview, you can reverse or advance in single -frame increments.
1. To display the control bar, move the pointer to the bottom of the screen.
In full-screen preview, move the pointer across the screen to display the player controls.
2. Click the Pause, Frame Back, or Frame Forward buttons.
Exit full-screen mode
1. To display the control bar, move the pointer to the bottom of the screen.
2. To the right of the control bar, click Exit.
To the top
Preview on a TV monitor
You can preview the movie on a TV or video monitor by using many camcorders or analog-digital converters (digitizers). The Project Settings
dialog box contains options for previewing through a DV device. It is important to have the hardware correctly configured before choosing these
settings.
Note:
Make sure that the TV or video monitor is connected to the camcorder or analog-digital converter. In addition, ensure that the device is
properly connected to your computer, typically through an IEEE 1394 port. Set the device to output analog audio and video to the monitor. Some
devices will detect a monitor automatically, while others require you to choose a menu option. (See the documentation provided with the device for
more information.)
1. Choose Edit > Project Settings > General, and click the Playback Settings button.
Page 94

2. In the Realtime Playback section, select these options:
90
Select the Desktop Video Display During Playback option if you want to preview through the Monitor panel and your TV monitor.
Deselect this option if playback through the Monitor panel is jerky.
For External Device, choose the option that matches the camcorder or analog-digital converter you’re using to drive your TV monitor.
For Aspect Ratio Conversion, choose Hardware (If supported).
Choose External Device Audio to monitor sound as well as video through the TV monitor. This option keeps the two in sync on playback.
note: Realtime Playback plays previews instantly in fully rendered final quality. With render-free editing, you can review editing decisions
as you make them and experiment more freely. For best playback frame rates, use a Pentium® 4, 3-GHz system or better.
3. In the Export section, for External Device, choose whether to export to the specified device. This option doesn’t affect playback.
4. In the Desktop Display Mode section, choose Accelerated GPU Effects if your display adapter supports DirectX®. Otherwise, choose
Compatible or Standard, whichever gives best playback results on your system.
5. Leave the remaining Playback Settings as set by Adobe Premiere Elements, and click OK.
6. In the Project Settings dialog box, click OK.
To the top
Render an area for preview
More complex movies and InstantMovies (with effects and layered video and audio) require more processing time to display properly. If Adobe
Premiere Elements can’t display an area at full speed and quality, it adds a thin, red line in the time ruler of the Expert view timeline.
To preview one of these areas, you can first render it. Rendering processes the layers and effects and saves the preview into a file, which Adobe
Premiere Elements can use each time you preview that section of the movie. Once rendered, a section doesn’t require re-rendering, unless
changes are made to it. (In the Expert view timeline, rendered areas are marked with a green line.)
note: If you make significant changes to a rendered area, the preview file is no longer useful, and the green line changes to red. To preview
complex effects at the full frame rate, you’ll have to re-render the area.
You designate the area to render by using the work area bar in the Expert view timeline.
Set the area to be rendered
Drag the textured center of the work area bar over the section you want to preview. Make sure that you drag the work area bar from its
center. Otherwise, move the current-time indicator.
If the textured center is not visible, Alt-drag the work area bar over the section you want to preview.
Position the current -time indicator, and press Alt+[ to set the beginning of the work area.
Position the current -time indicator, and press Alt+] to set the end of the work area.
Alt-double-click the work area bar to resize it to the width of the movie.
Double-click the work area bar to resize it to the width of the time ruler, or the length of the entire movie, whichever is shorter.
Tip: Position the pointer over the work area bar to display a tool tip that shows the work area bar’s start timecode, end timecode, and
duration.
Render a preview
Set the work area bar over the area you want to preview, and click the Render button or choose Timeline > Render Work Area. (The
rendering time depends on your system’s resources and the complexity of the segment.)
You can also render a preview by setting the work area bar and pressing Enter (Windows) or Home (Mac).
Page 95

To the top
91
Delete preview files
When you play a movie, Adobe Premiere Elements combines the tracks and effects in the background, while playing the movie in the Monitor
panel.
If you render the movie, Adobe Premiere Elements creates preview files and saves them on your hard disk. Once rendered, Adobe Premiere
Elements doesn’t process the tracks and effects again and can play the preview files directly. Similarly, preview files can save time when you
export the movie because Adobe Premiere Elements can use the information stored in the preview files rather than render again.
With the Expert view timeline or Quick view timeline active, choose Timeline > Delete Rendered Files. When prompted, click OK.
Note:
It is important to delete preview files using the Delete Render Files command rather than deleting them directly in Windows. Projects
refer to preview files in the same way they refer to source media. If you move or delete preview files without using the command, the next
time you open the project, Adobe Premiere Elements prompts you to locate the files.
Adobe also recommends
Twitter™ and Facebook posts are not covered under the terms of Creative Commons.
Legal Notices | Online Privacy Policy
Page 96

Editing clips
92
Networks and removable media with Digital Video
troubleshooting (Oct. 19, 2012)
Page 97

Trimming clips
93
About trimming and retrieving clips
About Smart trimming
Trim a clip from the Quick view timeline
Trim in the Expert view timeline
Trim in the Preview window
About trimming and retrieving clips
When you build a movie, you rarely use an entire clip. To define the frames you want to use, set In and Out points. The In point is the first frame
of the clip you want to use. The Out point is the last frame of the clip you want to use.
Setting In and Out points does not delete frames from the hard drive. Instead, it isolates the portion you want included in the movie. In and Out
points act like a window over the clip, showing only the frames from the In point to the Out point. You can move In and Out points as needed to
regain any frames you might have trimmed.
To the top
In and Out points serve as a window over a clip
A. In point B. Trimmed frames C. Out point
You can trim frames from either end of a clip. To trim frames from the middle of a clip, first split the clip (which creates two parts of the original
clip). Then, trim the unwanted frames from the end of the first new clip or the beginning of the second.
You can trim a clip in the Preview window, the Monitor panel, the Quick view timeline, or the Expert view timeline. You can retrieve frames from
source clips (clips not yet placed in the Quick view timeline or the Expert view timeline) using the Preview window. You can retrieve frames from
clips in the Quick view timeline or the Expert view timeline.
To the top
About Smart trimming
You can create a refined good-quality video file by removing unwanted sections. Adobe Premiere Elements 11 enables you to efficiently handle
blurred, shaky, and unwanted low-quality and low- interest sections of your video file. You can easily and quickly edit and fine-tune the video files.
Smart trimming enables you to trim the low-quality sections of a video file. Smart trim can be done manually and automatically. You can trim clips
from the Quick view timeline or the Expert view timeline.
Page 98

Smart trimming is of two types, manual and automatic. Manual Smart trimming is the default mode. In this mode, you can specify the options that
94
determine the trimmable sections. In the automatic Smart trim mode, Premiere Elements automatically determines the trimmable sections. You can
choose to delete them or retain them.
Smart Trim
Manual Smart Trim
1. To enable Smart Trim, click Tools on the Action bar and then select Smart Trim from the Tools panel. By default, Manual Smart Trim Mode
is enabled.
Note:
When you are in the manual Smart Trim mode, you see the message, Smart Trim Mode: Trim or Delete The Highlighted Sections,
above the Monitor panel. You also see the Smart Trim Options button.
2. (Optional) Click the Smart Trim Options button on top. In the Smart Trim Options dialog, use the slider to specify the Quality and Interest
options. The values set here determine the trimmable sections. If you do not set the options here, default settings are used.
Premiere Elements analyzes the clip, and highlights the sections of the clip that need trimming. The highlighted sections depend on the
values set for the Quality Level and Interest Level options. Striped patterns are used to highlight the trimmable sections.
3. (Optional) View the bad-quality tags that Adobe Premiere Elements 11 applied on the trim sections by hovering the mouse over the Smart
Trim section of the clip.
4. To select trim sections in a clip, do one of the following:
Double-click the clip in the Expert view timeline to select all the trimmable sections in a single clip.
To select all the trimmable sections in multiple clips, drag a marquee around the selected clips in the Expert view timeline. Right-
click/ctrl-click the trim sections, and choose Select All.
To select all the trimmable sections in multiple clips in the Quick view timeline or the Expert view timeline, select Ctrl-A. Rightclick/ctrl-click a section > Select All.
The selected trim sections are highlighted. When you select a trimmable section, all trimmable sections turn into blue-striped sections.
note: To choose selected trim sections from multiple clips, first select the clips, and select the trim sections.
5. Right-click/ctrl- click a trimmable section (the blue-striped region). The following options are displayed:
Trim
Enables you to trim the selected trimmable section.
Keep
Enables you to retain the selected trimmable section.
Select All
Smart Trim Options
Selects all the trimmable sections in the current selection.
Displays the Smart Trim options.
Page 99

6. Select Trim to trim the trimmable region, or select Keep to retain the trimmable section. You can also trim clips using the Delete key on the
keyboard.
95
7. (Optional) To undo the previous trim action, right-click/ctrl-click the clip in the Expert view timeline, and select Undo Smart Trim.
To exit the Smart Trim mode, click the Done button.
Automatic Smart Trim
1. To enable automatic Smart Trim, click Tools on the Action bar and then select Smart Trim from the Tools panel.
2. Click the Smart Trim Options button above the Monitor panel.
3. In the Smart Trim Options dialog, select Automatic.
4. (Optional) Use the slider to specify the Quality and Interest options. The values set here determine the trimmable sections. If you do not set
the options, default settings are used.
5. Click Save.
Premiere Elements analyzes the clip and highlights the sections of the clip that need trimming. The Automatic Smart Trim confirmation
dialog is displayed.
Note:
If a clip is not selected, striped patterns are used to highlight the Smart Trim sections of the clip.
Smart Trim options
Smart trimming uses quality factors such as brightness, blur, shaky, and contrast and interest factors such as face, motion, and dialog as criteria to
trim the clips. You can set the levels of quality and interest before trimming the clips.
Quality Level
Enables you to specify the levels of quality factors that Premiere Elements uses to determine the trimmable sections. The quality factors include
blur, shaky, brightness, focus, and contrast. If you move the slider to the extreme right, all low -quality sections are highlighted as trimmable
sections. As you move the slider toward the left, the trimmable sections reduce. If you move the slider to the extreme left, only low-quality sections
are highlighted for trimming.
Interest Level
Enables you to specify the levels of interest that Premiere Elements uses to determine the trimmable sections in a clip. The interest factors include
faces, dialog, close up, camera moves like pan and zoom, and the number of people in a group.
note: You cannot use Interest as the only factor to determine the trimmable section. Interest and Quality factors work together. Trim sections
reduce when you move the slider from right to left. A clip that is low in quality or interest gets trimmed. A clip that is high in quality or interest
doesn’t get trimmed.
Smart Trim options
Page 100

Access Smart Trim options
96
To access the Smart Trim options, enable Smart Trim and do one of the following:
Click the Smart Trim Options button on the top of the Monitor panel.
Right-click/ctrl- click a trimmable selection, and select Smart Trim Options.
Trim a clip from the Quick view timeline
You can directly trim clips in the Quick view timeline.
1. Select the clip in the Quick view timeline.
2. Position the pointer over the edge of the clip you want to trim until the correct icon appears:
Trim-In icon to trim the beginning of a clip.
Trim-Out icon to trim the end of a clip.
To the top
3. Drag the trim handles to the desired frame. The Monitor panel displays the frames as you drag, also showing the frame from the adjacent
clip (if any). Subsequent clips in the track shift in time to compensate for the edit, but their durations remain unchanged
Remove frames from the middle of a clip
You can retain material at the beginning and end of a clip for your movie, but remove material from its middle. Split the clip right before the
unwanted section begins, to create two clips. Then, trim the unwanted material from the beginning of the second clip.
1. In the Quick view timeline, select the clip containing unwanted material. The clip appears in the Monitor panel.
2. Drag the current-time indicator on the Quick view timeline to the frame where the unwanted material begins.
3. Click the Scissor button on the current -time indicator.
The original clip is split into two clips in the Quick view timeline.
4. Double-click the clip to the right of the split. This opens the clip in the Preview window.
5. In the Preview window, drag the current- time indicator to the frame just after the last frame of unwanted material,
6. Click the Set In Point button. This trims the unwanted material from the beginning of the second clip and shortens the clip in the Quick view
timeline, leaving a gap between it and the clip before.
The unwanted material is removed from the beginning of the second clip (or end of the first clip, if you chose to edit that clip). The gap
created between the first and second clips is automatically closed.
7. Right-click/ctrl- click in the gap in the Quick view timeline, and then click Delete And Close Gap.
 Loading...