

Page 1
cs2
®
GoLive
®
Adobe
SDK Programmer’s Guide
bbc
Page 2

© 2005 Adobe Systems Incorporated. All rights reserved.
Æ
Adobe
Creative Suite 2 GoLive® CS2 SDK Programmer’s Guide for Windows® and Macintosh®.
NOTICE: All information contained herein is the property of Adobe Systems Incorporated. No part of this publication (whether in hardcopy or
electronic form) may be reproduced or transmitted, in any form or by any means, electronic, mechanical, photocopying, recording, or
otherwise, without the prior written consent of Adobe Systems Incorporated. The software described in this document is furnished under
license and may only be used or copied in accordance with the terms of such license.
This publication and the information herein is furnished AS IS, is subject to change without notice, and should not be construed as a
commitment by Adobe Systems Incorporated. Adobe Systems Incorporated assumes no responsibility or liability for any errors or
inaccuracies, makes no warranty of any kind (express, implied, or statutory) with respect to this publication, and expressly disclaims any and
all warranties of merchantability, fitness for particular purposes, and noninfringement of third party rights.
Any references to company names in sample templates are for demonstration purposes only and are not intended to refer to any actual
organization.
Adobe, the Adobe logo, Acrobat, and GoLive are either registered trademarks or trademarks of Adobe Systems Incorporated in the United
States and/or other countries.
Apple, Mac, Macintosh, and Mac OS are trademarks of Apple Computer, Inc., registered in the United States and other countries. Microsoft
and Windows are either registered trademarks or trademarks of Microsoft Corporation in the United States and other countries. JavaScript
and all Java-related marks are trademarks or registered trademarks of Sun Microsystems, Inc. in the United States and other countries. UNIX is
a registered trademark of The Open Group.
All other trademarks are the property of their respective owners.
If this guide is distributed with software that includes an end user agreement, this guide, as well as the software described in it, is furnished
under license and may be used or copied only in accordance with the terms of such license. Except as permitted by any such license, no part
of this guide may be reproduced, stored in a retrieval system, or transmitted, in any form or by any means, electronic, mechanical, recording,
or otherwise, without the prior written permission of Adobe Systems Incorporated. Please note that the content in this guide is protected
under copyright law even if it is not distributed with software that includes an end user license agreement.
The content of this guide is furnished for informational use only, is subject to change without notice, and should not be construed as a
commitment by Adobe Systems Incorporated. Adobe Systems Incorporated assumes no responsibility or liability for any errors or
inaccuracies that may appear in the informational content contained in this guide.
Adobe Systems Incorporated, 345 Park Avenue, San Jose, California 95110, USA.
Page 3

Contents
Preface........................................................................................................................................10
About Adobe GoLive CS2 SDK ................................................................................................................................................10
About This Book............................................................................................................................................................................11
Who should read this book ................................................................................................................................................11
What is in this book ...............................................................................................................................................................11
Document conventions .......................................................................................................................................................12
Typographical conventions .........................................................................................................................................12
JavaScript common properties...................................................................................................................................12
Where to Go for More Information ........................................................................................................................................13
1 Installing and Configuring the GoLive SDK............................................................................. 14
Installing the GoLive CS2 SDK..................................................................................................................................................14
Installing the core set of tools and sample extensions ............................................................................................14
Installing the core extensions .....................................................................................................................................14
Uninstalling an extension.............................................................................................................................................15
Configuring GoLive for Extension Development..............................................................................................................15
Enabling the Extend Script module ................................................................................................................................15
Enabling and disabling modules......................................................................................................................................16
Debugging Your Scripts.............................................................................................................................................................17
Error logs ...................................................................................................................................................................................17
2 How to Create an Extension...................................................................................................... 18
About Adobe GoLive CS2 Extensions ................................................................................................................................... 18
What can extensions do? .................................................................................................................................................... 18
Anatomy of an Extension .......................................................................................................................................................... 19
Extension-building tools .....................................................................................................................................................20
Example Main.html File..............................................................................................................................................................21
Creating An Extension Module................................................................................................................................................21
Creating the Main.html file................................................................................................................................................. 22
Adding SDK Tags and JavaScript Functions to the Module..........................................................................................23
Adding the module tag .......................................................................................................................................................24
Adding event-handling functions ...................................................................................................................................24
Summary ...................................................................................................................................................................................26
3 The JavaScript Environment.....................................................................................................27
JavaScript Objects in the GoLive Environment .................................................................................................................27
Objects, elements, and properties................................................................................................................................... 27
Accessing attribute values.................................................................................................................................................. 27
Naming objects and attributes .........................................................................................................................................28
JavaScript object collections..............................................................................................................................................29
Using the global object arrays ....................................................................................................................................29
Comparing objects..........................................................................................................................................................30
Updating references to objects ........................................................................................................................................30
Scope of Variables and Functions .......................................................................................................................................... 31
Releasing Memory .................................................................................................................................................................32
Handling Events............................................................................................................................................................................32
Defining and Registering Event Handlers .....................................................................................................................33
3
Page 4

Adobe GoLive CS2 SDK
SDK Programmer’s Guide Contents 4
Nesting Event Handlers .......................................................................................................................................................34
Sharing Data...................................................................................................................................................................................34
Persistent shared data.......................................................................................................................................................... 35
Non-persistent shared data................................................................................................................................................35
Communicating with other extensions .........................................................................................................................35
Sending messages to other extension modules..................................................................................................36
Responding to a broadcast ..........................................................................................................................................36
Delays and Timeouts...................................................................................................................................................................36
Timed tasks...............................................................................................................................................................................37
Setting the JavaScript timeout..........................................................................................................................................37
Progress bars ...........................................................................................................................................................................37
Starting a progress or busy bar...................................................................................................................................38
Updating a progress or busy bar................................................................................................................................38
Progress bar example.....................................................................................................................................................39
4 Menus and Toolbars .................................................................................................................. 40
Creating Custom Menus ............................................................................................................................................................40
Basic example..........................................................................................................................................................................40
Adding the menu bar tag....................................................................................................................................................41
Defining the Menu................................................................................................................................................................. 41
Defining menu items ............................................................................................................................................................42
Creating submenus ...............................................................................................................................................................43
Defining menu behavior .....................................................................................................................................................43
Using one handler to react to multiple items ....................................................................................................... 44
Capturing events in the menu object ...................................................................................................................... 44
Complete simple menu example.....................................................................................................................................45
Assigning Keyboard Shortcuts to Menu Items .................................................................................................................. 45
Setting a Menu Item’s State Programmatically ................................................................................................................. 46
Setting a menu item’s checked state..............................................................................................................................46
Setting a menu item’s enabled state .............................................................................................................................46
Initializing menu items......................................................................................................................................................... 47
Adding Items to GoLive Menus...............................................................................................................................................48
Extending Context Menus.........................................................................................................................................................50
Registering context menu handlers................................................................................................................................ 51
Defining context menu handlers ..................................................................................................................................... 51
Creating Toolbars .........................................................................................................................................................................52
5 Windows and Controls .............................................................................................................. 54
Types of Windows ........................................................................................................................................................................54
Dialog windows...................................................................................................................................................................... 54
Positioning windows ............................................................................................................................................................54
Using the Dialog Editor tool............................................................................................................................................... 55
Modal Dialog Windows ..............................................................................................................................................................58
Defining the modal dialog window ................................................................................................................................ 58
Opening and closing modal dialogs ...............................................................................................................................58
Displaying a modal dialog............................................................................................................................................ 58
Closing a modal dialog..................................................................................................................................................60
Palette Windows...........................................................................................................................................................................60
Showing and hiding palettes .....................................................................................................................................61
The Inspector window ...................................................................................................................................................62
Control Containers.......................................................................................................................................................................63
Creating panels.......................................................................................................................................................................63
Page 5

Adobe GoLive CS2 SDK
SDK Programmer’s Guide 5
Creating tab panels ...............................................................................................................................................................63
Creating split panels .............................................................................................................................................................64
Autolayout of Localized Controls ...........................................................................................................................................65
Adding Controls to Windows...................................................................................................................................................66
Creating different types of controls ................................................................................................................................67
Creating radio button groups .....................................................................................................................................68
Creating text input fields .............................................................................................................................................. 68
Creating source and preview controls .....................................................................................................................69
Creating controls with parameters ...........................................................................................................................69
List controls........................................................................................................................................................................70
Adding controls to a window dynamically...................................................................................................................72
Providing Behavior for Controls.............................................................................................................................................. 73
Handling events for a target control...............................................................................................................................73
Handling simple clicks ...................................................................................................................................................73
Handling different actions............................................................................................................................................73
Handling editing actions...............................................................................................................................................74
Handling events in a control’s parent window ........................................................................................................... 74
Creating Custom Controls......................................................................................................................................................... 76
Defining user interactions with custom controls ....................................................................................................... 76
Drawing custom controls....................................................................................................................................................76
Updating a control’s appearance immediately ....................................................................................................77
Defining drag-and-drop for custom controls ..............................................................................................................77
Control as Sender of a Drag Event.............................................................................................................................77
Receiving a drop event..................................................................................................................................................77
6 Custom Elements .......................................................................................................................78
Overview.......................................................................................................................................................................................... 78
Tags for creating custom elements .................................................................................................................................78
Defining A Custom Element .....................................................................................................................................................79
Defining the tag for a custom element..........................................................................................................................79
Redefining Tags Locally.................................................................................................................................................79
Defining the custom tag’s palette icon and HTML content ...................................................................................80
Creating a Palette Entry in the Objects Palette .................................................................................................................81
Adding Palette Entries to a Built-in Tab ...............................................................................................................................81
Adding palette entries to a customized tab.................................................................................................................82
Defining the appearance of a custom element ....................................................................................................82
Initializing a custom element box.................................................................................................................................... 83
Displaying a custom element box ...................................................................................................................................84
Drawing into container boxes ....................................................................................................................................84
drawBox Examples ..........................................................................................................................................................84
Resizing a custom element box ........................................................................................................................................86
Built-in undo support ...........................................................................................................................................................86
Inspecting a Custom Element..................................................................................................................................................86
Initializing the Inspector window ....................................................................................................................................87
Responding to changes in the Inspector ...................................................................................................................... 87
Multiple Inspectors................................................................................................................................................................88
Supporting the Undo and Redo Commands ..................................................................................................................... 88
Undo support and document parsing ...........................................................................................................................88
The document’s undo history ........................................................................................................................................... 89
Creating the undo object.................................................................................................................................................... 89
Initializing the undo object ................................................................................................................................................89
Page 6

Adobe GoLive CS2 SDK
SDK Programmer’s Guide 6
Implementing the undoSignal Function.......................................................................................................................90
Updating Images Dynamically ................................................................................................................................................91
Creating pictures.................................................................................................................................................................... 92
Drawing the image................................................................................................................................................................92
Deleting pictures....................................................................................................................................................................93
7 Editing Documents Programmatically..................................................................................... 94
The GoLive Document Object Model ..................................................................................................................................94
The Markup Tree........................................................................................................................................................................... 94
Reparsing and object references .....................................................................................................................................95
Markup editing options................................................................................................................................................. 95
Automatic and explicit reparsing .............................................................................................................................96
Working With Documents.........................................................................................................................................................97
Opening documents.............................................................................................................................................................97
Open a document in a document window............................................................................................................97
Display layout view .........................................................................................................................................................98
Open a document without displaying it .................................................................................................................98
Manipulating open documents ........................................................................................................................................98
Make an open document window frontmost .......................................................................................................98
Count open documents ................................................................................................................................................98
Validate document objects ..........................................................................................................................................99
Working with style sheets...................................................................................................................................................99
Creating a new HTML page ................................................................................................................................................99
Saving documents.............................................................................................................................................................. 100
Closing documents ............................................................................................................................................................ 100
Working with Selections in Document Windows .......................................................................................................... 100
Retrieving the current selection .................................................................................................................................... 101
Setting the current selection .......................................................................................................................................... 102
Using the range object...................................................................................................................................................... 102
Accessing selections through the document source............................................................................................. 104
Retrieving Objects from the Markup Tree ........................................................................................................................ 104
Retrieving individual markup objects ......................................................................................................................... 105
Retrieving multiple markup objects............................................................................................................................. 106
Editing Source Code Through Markup Objects ............................................................................................................. 106
Using Markup Objects to Edit HTML Directly............................................................................................................ 106
Overriding document encoding for elements ......................................................................................................... 107
8 Editing with Layout ................................................................................................................. 108
Layout View and the Layout Objects ................................................................................................................................. 108
Editing displayed elements through layout objects .............................................................................................. 109
Getting the layout objects for tables, cells, and layout grids........................................................................ 109
Editing Attributes of Managed Objects ................................................................................................................ 109
Example: Using layout objects................................................................................................................................. 110
Editing displayed elements through markup objects ........................................................................................... 111
Editing Text in Layout View ................................................................................................................................................... 112
Manipulating text elements............................................................................................................................................ 113
Adding text ..................................................................................................................................................................... 113
Setting the cursor position........................................................................................................................................ 113
Finding and replacing text ........................................................................................................................................ 114
Selecting and deselecting text ................................................................................................................................ 114
Manipulating Text Styles ........................................................................................................................................................ 115
Applying styles to selected text..................................................................................................................................... 116
Page 7

Adobe GoLive CS2 SDK
SDK Programmer’s Guide 7
Editing existing styles and stylesets ............................................................................................................................. 117
Inserting Elements in Layout View...................................................................................................................................... 117
Inserting raw HTML ............................................................................................................................................................ 118
Working with Tables in Layout View .................................................................................................................................. 118
Table styles............................................................................................................................................................................ 118
Applying a table style within a table ..................................................................................................................... 119
Table cells............................................................................................................................................................................... 119
Cell styles................................................................................................................................................................................ 120
Working with Layout Grids .................................................................................................................................................... 121
Adjusting the grid............................................................................................................................................................... 121
Sizing and positioning elements on the grid............................................................................................................ 121
9 Managing Files and Folders....................................................................................................123
Overview....................................................................................................................................................................................... 123
Using File Objects...................................................................................................................................................................... 123
Acquiring file objects ........................................................................................................................................................ 124
Determining the location of a file or folder......................................................................................................... 124
Validating file objects.................................................................................................................................................. 124
Accessing folders ............................................................................................................................................................... 125
Getting a file object from the user................................................................................................................................ 126
Creating a new file object ................................................................................................................................................ 126
Moving, Copying, and Deleting Files and Folders......................................................................................................... 127
Moving and copying files................................................................................................................................................. 127
Moving and copying folders........................................................................................................................................... 128
Deleting files or folders..................................................................................................................................................... 128
Working With Document Files ............................................................................................................................................. 128
Creating a document file.................................................................................................................................................. 128
Reading the contents of an existing file ..................................................................................................................... 129
Opening a markup document file .......................................................................................................................... 129
Opening other files ...................................................................................................................................................... 129
Changing encoding in a file...................................................................................................................................... 129
Working With Folders .............................................................................................................................................................. 130
Creating folders ................................................................................................................................................................... 130
Retrieving the contents of a folder .............................................................................................................................. 130
Getting files from a file object.................................................................................................................................. 130
Getting files from a siteReference object............................................................................................................. 131
Retrieving the contents of subfolders................................................................................................................... 132
Working with Remote Files ................................................................................................................................................... 133
Using HTTP protocol .......................................................................................................................................................... 133
Using FTP and DAV protocol........................................................................................................................................... 133
Exchanging Data with Remote Hosts ............................................................................................................................... 134
Establishing a simple HTTP connection...................................................................................................................... 134
Establishing an internet server....................................................................................................................................... 135
Example: A chat server...................................................................................................................................................... 135
10 Managing Web Sites................................................................................................................ 137
Creating Files and Folders in GoLive Web Sites ............................................................................................................ 137
Adding files and folders.................................................................................................................................................... 137
Using templates................................................................................................................................................................... 138
Deleting files and folders ................................................................................................................................................. 139
Managing the Site Window ................................................................................................................................................... 139
Selecting site files programmatically........................................................................................................................... 139
Page 8

Adobe GoLive CS2 SDK
SDK Programmer’s Guide 8
Creating custom columns in the Site window ......................................................................................................... 139
Using event handlers to display custom column content............................................................................. 140
Using named properties to display custom column content....................................................................... 140
Removing a custom column at runtime............................................................................................................... 141
Working With Site Documents ............................................................................................................................................. 142
Making a document’s Site window frontmost......................................................................................................... 142
Copying files ......................................................................................................................................................................... 143
Working with Version Control Systems............................................................................................................................. 145
11 Localization and Translation ..................................................................................................149
Dynamic UI Localization ......................................................................................................................................................... 149
Creating the localization table ....................................................................................................................................... 149
Creating a localization table in GoLive ................................................................................................................. 150
Creating an external localization table ................................................................................................................. 151
Using the localization table............................................................................................................................................. 151
Translating attribute value strings ......................................................................................................................... 151
Translating JavaScript strings................................................................................................................................... 152
Localization test features ................................................................................................................................................. 152
Document Source Translation .............................................................................................................................................. 153
Defining a translator .......................................................................................................................................................... 153
Inspecting translated elements ..................................................................................................................................... 154
12 Extending GoLive Actions .......................................................................................................156
GoLive Action Types................................................................................................................................................................. 156
Adding actions to a page ................................................................................................................................................. 156
Creating Your Own Actions ................................................................................................................................................... 157
Changing action icons ...................................................................................................................................................... 158
Anatomy of an Action File...................................................................................................................................................... 158
Action Tags .................................................................................................................................................................................. 160
csactionclass ......................................................................................................................................................................... 160
csactionparam...................................................................................................................................................................... 161
JavaScript Source for Actions................................................................................................................................................ 163
Layout Grid .................................................................................................................................................................................. 163
Action Tutorials .......................................................................................................................................................................... 165
Tutorial 1: Customizing the Actions Inspector ......................................................................................................... 165
Tutorial 2: Go to previous page action........................................................................................................................ 166
Tutorial 3: Resize window action ................................................................................................................................... 167
13 Debugging Scripts ...................................................................................................................170
Enabling Debug Services........................................................................................................................................................ 170
Using the JavaScript Command Shell ................................................................................................................................ 171
Executing JavaScript commands .................................................................................................................................. 172
The Internal JavaScript Source Debugger........................................................................................................................ 173
Controlling code execution in the script Debugger window ............................................................................. 174
Customizing the Debugger Window ................................................................................................................................ 175
Troubleshooting Tips............................................................................................................................................................... 177
Null and undefined values............................................................................................................................................... 177
Case sensitivity..................................................................................................................................................................... 177
Line breaks in palette entries and string literals ...................................................................................................... 177
A Using External Libraries ..........................................................................................................178
About External Libraries.......................................................................................................................................................... 178
Installing external libraries .............................................................................................................................................. 179
Page 9

Adobe GoLive CS2 SDK
SDK Programmer’s Guide 9
Installing an external JavaScript library................................................................................................................ 179
Installing Binary Libraries........................................................................................................................................... 179
External JavaScript Libraries ................................................................................................................................................. 179
Including an external JavaScript file ............................................................................................................................ 180
Calling JavaScript library functions .............................................................................................................................. 180
External Binary Libraries ......................................................................................................................................................... 181
Implementing external binary libraries ...................................................................................................................... 181
Including C header files.............................................................................................................................................. 181
Bit Alignment ................................................................................................................................................................. 181
Initializing the JavaScript engine............................................................................................................................ 182
Defining external library functions ........................................................................................................................ 182
Registering external functions................................................................................................................................. 184
Implementing optional termination code .......................................................................................................... 184
Calling C library functions from JavaScript................................................................................................................ 184
Evaluating JavaScript expressions in C functions ................................................................................................... 185
Performance Issues................................................................................................................................................................... 186
Glossary .................................................................................................................................... 188
Index .........................................................................................................................................192
Page 10
Preface
Welcome to the Adobe® GoLive CS2 SDK Programmer’s Guide. This book and its companion volume, the
GoLive CS2 SDK Programmer’s Reference, describe how to extend the Adobe GoLive® CS2 Web-site
development environment.
About Adobe GoLive CS2 SDK
The Adobe GoLive CS2 SDK (Software Development Kit) enables you to extend the behavior and user
interface of GoLive CS2. Using the GoLive CS2 SDK, you can create tools tailored to your specific GoLive
tasks. The SDK can create, customize, and extend most aspects of the GoLive user interface, such as:
● Menus and menu items
● Floating palettes and task-specific dialogs that include text, graphics, and controls
● Custom HTML elements, such as <mytag>, that can be edited in an Inspector palette
● Custom controls, that you can add as drag-and-drop items in the Objects palette
● Custom columns in the Site window
In addition, the SDK give you programmatic options for working with GoLive CS2:
● Programmatic file and Web-site resource manipulation, both local and remote
● Programmatic manipulation of the content of HTML and other markup documents
● Document parsing options for encoding, translation, localization, and non-HTML tags
Adobe GoLive CS2 SDK uses ExtendScript
, Adobe’s extended implementation of JavaScript, which is used
by all Adobe Creative Suite 2 applications that provide a scripting interface. (The GoLive documents refer
to JavaScript and ExtendScript interchangeably.) In addition to implementing the JavaScript language
according to the W3C specification, ExtendScript provides certain additional features and utilities, which
are described in Chapter 5, “
ExtendScript Tools and Features,” i n th e GoLive CS2 SDK Programmer’s
Reference.
You use ExtendScript to create extension
s to GoLive CS2. Creating an extension is similar to creating a
Web page or a Web application — to design the appearance of your extension you use the GoLive user
interface to add SDK-provided tags to an HTML document. See Chapter 2, “
How to Create an Extension”
for more information.
When the user interacts with one of your extension’s user interface items, the SDK calls one or more
JavaScript functions that you have created to provide the extension item’s behavior. However, you don’t
need to be a JavaScript expert to use this SDK. If you’ve used HTML to create Web page content, and
perhaps added some interactivity to that page with JavaScript, you’re already familiar with the concepts
behind ExtendScript extensions.
The SDK enables even inexperienced JavaScript users to create simple extensions with custom menus and
dialogs easily. Yet it is comprehensive and powerful: The SDK provides numerous JavaScript objects and
methods to perform tasks on a document, on a site, in the GoLive environment, on local and remote file
systems including HTTP, FTP, and DAV servers. Virtually all of the user commands in GoLive are made
available in JavaScript. Using JavaScript to automate repetitive tasks, you can, for example, edit all the
documents on your site programmatically.
10
Page 11
Adobe GoLive CS2 SDK
SDK Programmer’s Guide Preface 11
Because the files that define extensions use HTML syntax, you can use GoLive itself — including your own
custom extensions — to create additional extensions to the GoLive design environment. In the same way
that you can create JavaScript scripts to generate and manipulate HTML files, you can write JavaScript
scripts to generate and manipulate GoLive extensions. Using this technique you could, for example, use
JavaScript scripts to customize menu items in GoLive according to the contents of a database.
Optionally, extensions can call custom libraries written in the C and JavaScript programming languages.
You can even use XML to define entirely new structured markup languages and documents to GoLive,
providing practically unlimited extensibility.
About This Book
This book, GoLive CS2 SDK Programmer’s Guide, describes methodologies and techniques for using the
GoLive CS2 SDK to extend and customize Adobe GoLive CS2.
This book is a companion to the GoLive CS2 SDK Programmer’s Reference, which provides reference
descriptions of SDK tags, objects, and methods. Open both documents in Adobe Acrobat® to use the live
cross-reference links between the two books.
This book does not document the JavaScript language or how to use the Adobe GoLive CS2 application.
For a listing of some helpful publications, see Where to Go for More Information
.
Who should read this book
This book is for anyone who wants to extend the capabilities of Adobe GoLive using JavaScript and the
special markup tags that the GoLive CS2 SDK provides. This book assumes that:
● You know how to create pages and Web sites in Adobe GoLive, as described in the Adobe GoLive CS2
User Guide.
● You are a programmer with a working understanding of the HTML and JavaScript languages, and have
written some of your own JavaScript scripts.
Most GoLive extensions do not use shared libraries. However, if you are familiar with shared libraries in
Microsoft® Windows® and Mac OS®, you can use them to extend GoLive even further. For more
information, see Appendix A, “
What is in this book
This book contains the following chapters:
● Chapter 1, “Installing and Configuring the GoLive SDK,” describes how to install the GoLive CS2 SDK
and enable the appropriate modules.
● Chapter 2, “How to Create an Extension,” describes what an extension is and what extensions can do. It
provides a tutorial that creates a simple “Hello, World” extension.
● Chapter 3, “The JavaScript Environment,” describes how GoLive makes JavaScript objects available to
extensions and discusses other application-level considerations such as variable scoping, data sharing
and communication among extensions, and timing issues.
Using External Libraries.”
● Chapter 4, “Menus and Toolbars,” describes how to add custom menus, submenus, and menu items to
GoLive.
● Chapter 5, “Windows and Controls,” describes how to create modal dialogs and floating palettes, and
add the user-interface controls that allow users to interact with your extension.
Page 12

Adobe GoLive CS2 SDK
SDK Programmer’s Guide Preface 12
● Chapter 6, “Custom Elements,” describes how to define a custom element, with an icon the user can
drag from the Objects palette into a GoLive document in a document window.
● Chapter 7, “Editing Documents Programmatically,” describes how extensions can use JavaScript code
to manipulate document content.
● Chapter 8, “Editing with Layout,” describes how you can manipulate document content while GoLive’s
Layout view is open, with a minimum of reparsing and redisplay flicker.
● Chapter 9, “Managing Files and Folders,” describes how to manipulate files and folders on disk.
● Chapter 10, “Managing Web Sites,” describes how to work with a Web site’s file resources and how to
work with and customize the GoLive Site window.
● Chapter 11, “Localization and Translation,” describes dynamic language localization and source code
transformation.
● Chapter 12, “Extending GoLive Actions,” describes how to create and edit GoLive actions, JavaScript
scripts you can add to a page and edit with an Inspector.
● Chapter 13, “Debugging Scripts,” describes how to use the internal JavaScript Debugger.
● Appendix A, “Using External Libraries,” describes how to create external C or JavaScript libraries your
extension can call from JavaScript.
● “Glossary,” lists and defines many of the specialized terms uses in these books.
Document conventions
This book uses the following typographic and terminology conventions.
Typographical conventions
Monospaced font
Italics Variables or placeholders in code. For example, in name="myName", the text
Blue underlined text
Sans-serif bold font
Note: Notes like this one highlight issues that deserve extra attention, key requirements, and common
errors.
A hyperlink you can click to go to a related section, in this book or the
Literal values and code, such as JavaScript code, HTML code, filenames, and
pathnames.
myName represents a value you are expected to supply, such as name="Fred".
Also indicates the first occurrence of a new term.
companion volume.
The names of GoLive UI elements (menus, menu items, and buttons).
The > symbol is used as shorthand notation for navigating to menu items. For
example,
Edit > Cut refers to the Cut item in the Edit menu.
JavaScript common properties
Because most objects provided by the SDK provide a name property, the Objects chapter in the GoLive CS2
SDK Programmer’s Reference (companion volume to this guide), does not list
Similarly, the Reference does not list properties and methods provided by the JavaScript language itself.
For example, it is common for JavaScript objects to provide a
toString method, and many of the objects
name properties explicitly.
Page 13

Adobe GoLive CS2 SDK
SDK Programmer’s Guide Preface 13
the SDK supplies implement this method. However, the Reference does not describe such methods unless
they differ from the standard JavaScript implementation.
Where to Go for More Information
This book documents the Adobe GoLive CS2 SDK only. It does not describe the JavaScript language or
how to use the GoLive CS2 application.
For documentation of the JavaScript language or descriptions of how to use it, see any of numerous works
on this subject, including the following:
JavaScript: The Definitive Guide, 4th Edition; Flanagan, D.; O’Reilly 2001; ISBN 0-596-00048-0
JavaScript Programmer’s Reference; Wootton, C.; Wrox 2001; ISBN 1-861004-59-1
JavaScript Bible. 5th Edition; Goodman, D. and Morrison, M.; John Wiley and Sons1998; ISBN
0-7645-57432
Page 14
1
Installing and Configuring the GoLive SDK
The first part of this chapter describes how to install the GoLive CS2 SDK and introduces the JavaScript
environment that GoLive provides for extensions. The next part specifies the file and folder structure you
must use to create an extension. This chapter concludes with an example of a simple extension that writes
messages in the JavaScript Debugger window.
Installing the GoLive CS2 SDK
The GoLive CS2 SDK requires version 8.0 of Adobe GoLive CS2 and is included in the default installation.
Updates to the SDK and to this documentation set are available at http://partners.adobe.com/asn
Installing the core set of tools and sample extensions
This section describes how to install an extension in GoLive. GoLive CS2 SDK files are initially installed in a
subfolder of the Adobe application folder called
with the SDK are in the
Samples and Tools folders.
Adobe GoLive SDK 8.0r1. The extensions provided
.
Each sub-folder in the
recommended that you install the core set of sample extensions and tools, and use them to help learn
about and create your own extensions.
Once you have become familiar with the use of the tags, scripts, and objects these samples illustrate, you
can remove any or all of them, as you prefer.
Samples and Tools folders holds a different example of an extension. It is
Installing the core extensions
To install an existing extension, in most cases you simply copy or move the folder to the
GoLive_dir/Modules/Extend Scripts folder. See the Release Notes for a list of samples whose
installation requires more than this; in these cases, the installation instructions are included in the
extension's
➤ The following steps make the core extensions available to GoLive:
1. Quit GoLive if it is running.
2. Copy at least the following extension folders from the
Adobe GoLive 8.0/Modules/Extend Scripts folder:
● Custom Box
● KeyMap
● Markup Tree
● Menus and Dialogs
● Palettes
Main.html file or in the Release Notes.
GoLiveSDK_dir/Samples folder to the
3. Copy the contents of the GoLiveSDK_dir/Samples/Common folder to the
Adobe GoLive 8.0/Modules/Extend Scripts/Common folder.
14
Page 15

Adobe GoLive CS2 SDK
SDK Programmer’s Guide Installing and Configuring the GoLive SDK 15
4. Copy the following folders from the GoLiveSDK_dir/Tools folder to the
GoLive_dir/Modules/Extend Scripts folder:
● Dialog Editor
● Edit Extension
● Extension Builder
5. Start GoLive.
When GoLive starts, it loads all of the extensions present in the
Extend Scripts folder.
Uninstalling an extension
To remove an extension from GoLive, remove its folder from the Extend Scripts folder and restart
GoLive.
You can deactivate an extension without removing it; see Enabling and disabling modules
Configuring GoLive for Extension Development
Developing GoLive extensions is an iterative process that generally requires you to restart GoLive
whenever you need to load a new version of the extension you are developing. JavaScript-only changes
can be reloaded from the
Enabling the Extend Script module
The built-in Extend Script module must be enabled before you can load or run any extensions. The module
is enabled by default. Disabling this module disables all GoLive extension capabilities, which you normally
do not want to do.
➤ If this module has become disabled, you can re-enable it as follows:
JavaScript Debugger without restarting GoLive.
.
1. Select Edit > Preferences.
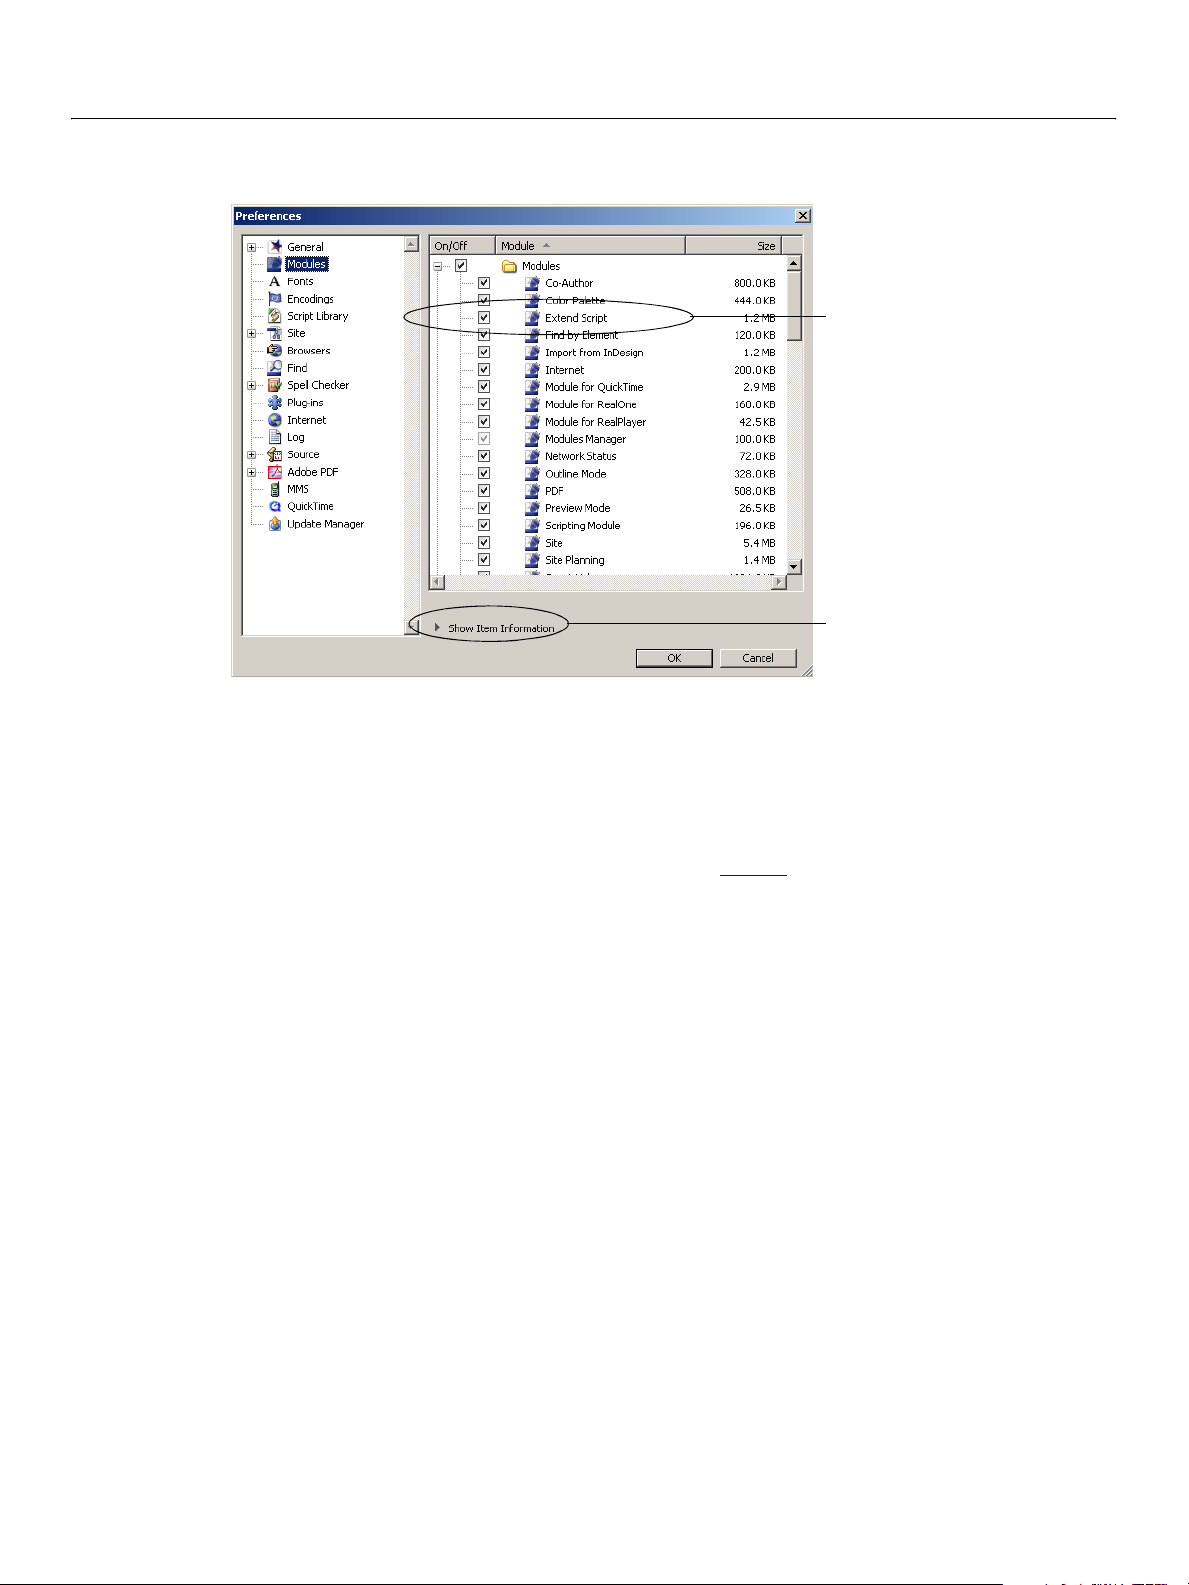
2. In left panel of the
Preference dialog, select Modules.
Modules are listed on the right by folder name.
Page 16
Adobe GoLive CS2 SDK
SDK Programmer’s Guide Installing and Configuring the GoLive SDK 16
3. In the list of modules, check the Extend Script module.
ExtendScript module checked
Show description of selected module
4. Click OK to confirm your changes and dismiss the Preferences panel.
5. Quit GoLive and restart it.
Enabling and disabling modules
GoLive packages much of its functionality in units known as modules. An extension that you develop
using the SDK is simply another kind of module that GoLive can use. To add some particular new
functionality to GoLive, you can install and enable the module that provides it. You can also disable or
remove a module to remove its associated features and behaviors.
To turn off an extension but leave the extension in the
Preferences
modules any extensions you want to turn off. The change takes effect when you restart GoLive.
The precise set of modules you can disable successfully depends on the features your extension or site
uses—you cannot disable a module your site or your extension requires for its functionality.
Note: Do not disable the Extend Script module. If this module is not enabled, GoLive cannot load or run
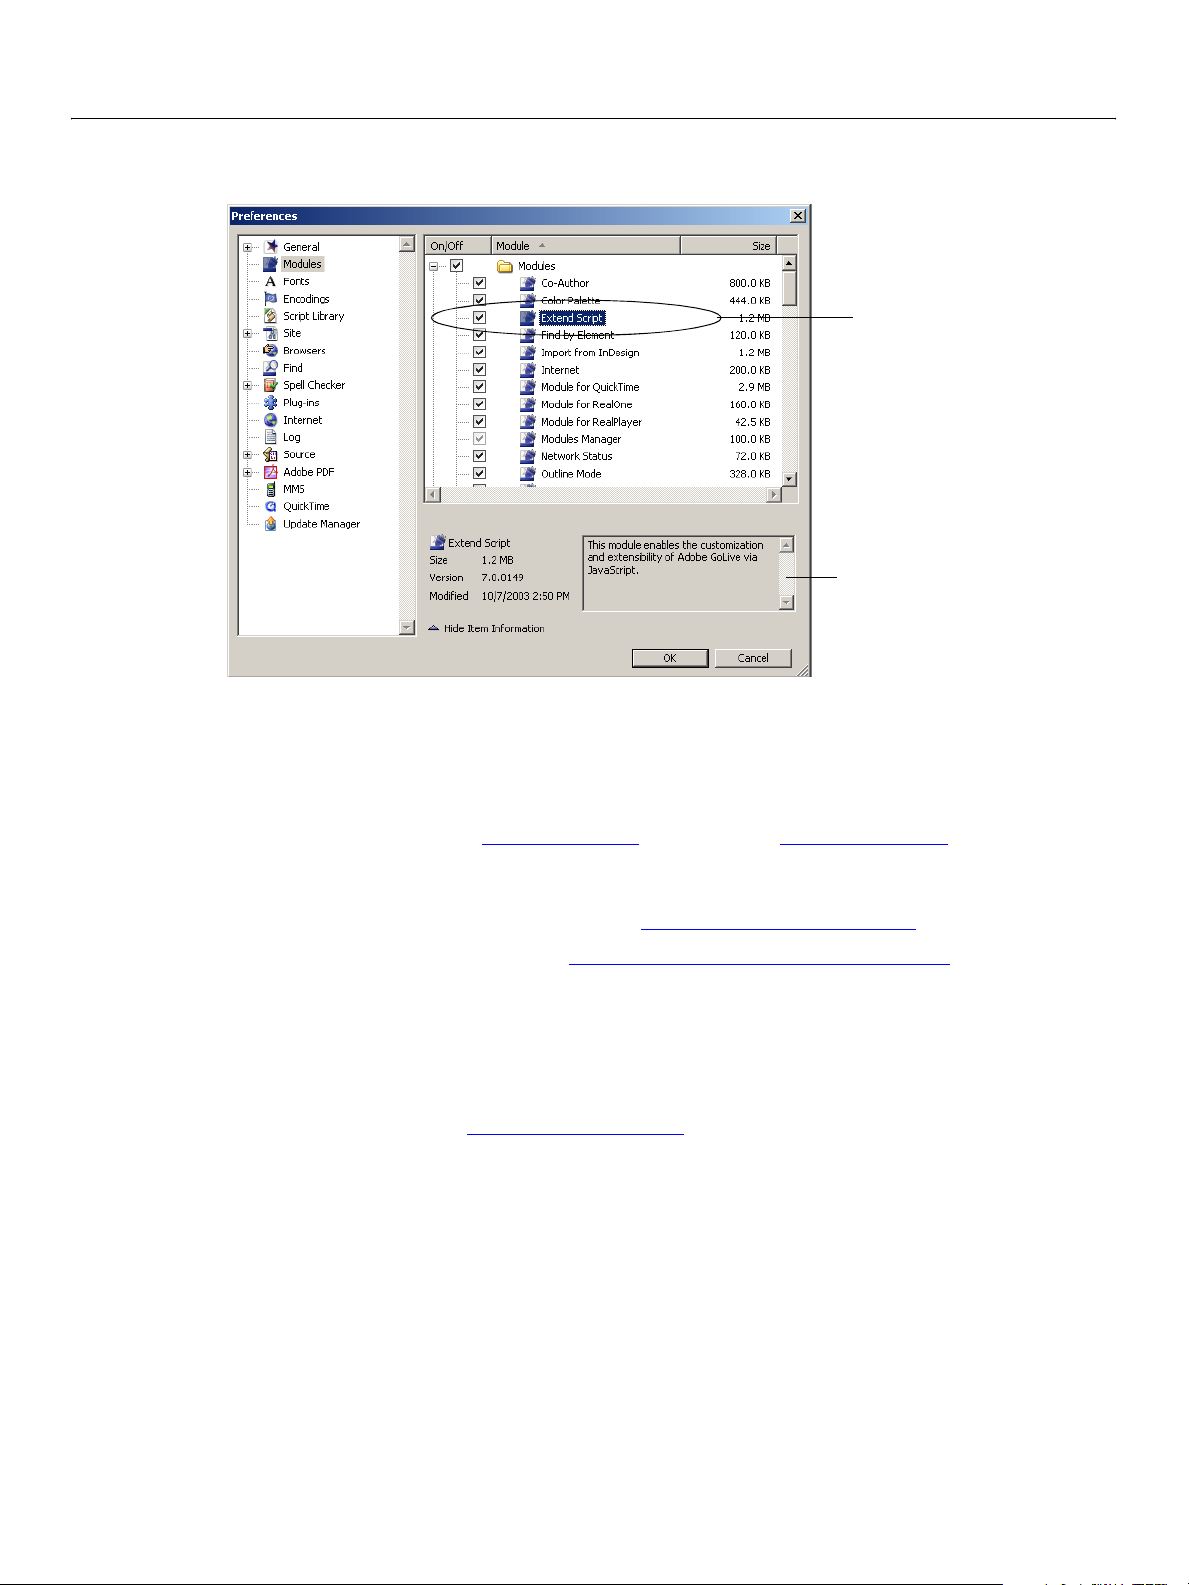
If you are not sure whether you need to enable a particular module, you can get a description of it in the
Preferences dialog
dialog to display Modules, as shown in the figure above. In the list of modules, uncheck the
any extensions.
Extend Scripts folder, use the Edit >
➤ Getting descriptions of modules
1. Select Edit > Preferences, and in the left panel of the Preferences dialog, select Modules.
2. In the right pane, click to select the module to be described.
3. If
Show Item Information appears at the bottom of the modules list, as shown in the figure above, click it
to reveal the item information pane.
Page 17
Adobe GoLive CS2 SDK
SDK Programmer’s Guide Installing and Configuring the GoLive SDK 17
A description of the selected module appears in the item information pane:
ExtendScript module selected
Description of selected module
Debugging Your Scripts
You can use either the internal GoLive JavaScript Debugger window to develop and debug your scripts, or
the ExtendScript Toolkit, which is available to all Creative Suite 2 applications. To choose one or the other
debugging environment, set the internalDebugger
(the default), the GoLive JavaScript Debugger is active. You can use the Debugger’s console to set the
value to
● The GoLive JavaScript Debugger is described in Chapter 13, “Debugging Scripts.”
● The ExtendScript Toolkit is described in Chapter 5, “ExtendScript Tools and Features,” of t h e GoLive CS2
These tools are complete development environments that allow you do more than just test your code—
you can use them, for example, to edit documents interactively. To become familiar with the JavaScript
environment in GoLive, try entering some JavaScript expressions into the Command field of a Debugger
window; press E
shell is ready for use; if not, see Enabling Debug Services
Error logs
All script errors are written to a log that is displayed in the Log window, which you can access through the
File >Log command. Double click a script error entry in the log window to opens the script file in the
debugger and go to the error line. If an extension file contains a script tag that refers to an non-existing
file, a warning is written to the log.
false, making the ExtendScript Toolkit active.
SDK Programmer’s Reference.
NTER to evaluate the expression. If you get a response in the output view, the command
property of the settingsSDK Object. When it is true
.
When a run-time error occurs in an extension script, an alert window displays the error message before the
error is written to the log. Run-time errors in other scripts, such as startup scripts, are written to the log
without an alert message.
Page 18

2
How to Create an Extension
Like a plug-in, an extension provides new capabilities to its host environment. With the GoLive CS2 SDK,
you can use ExtendScript (Adobe’s ECMAScript-compliant version of JavaScript) and HTML to create
extensions that extend and customize the Adobe GoLive web-design environment.
About Adobe GoLive CS2 Extensions
An extension that you create for Adobe GoLive CS2 using the SDK is actually an HTML file that GoLive uses
in a special way. Creating an extension is similar to creating a web page: you add tags and scripts to this
file to define content. Instead of defining content for a web page, however, you use tags that define
menus, dialogs, palettes, inspectors, and additional objects in the GoLive design environment. You can
also create custom tags to define objects of your own.
When GoLive loads an extension, it makes the object defined in that extension available to GoLive users
through the GoLive UI and through UI elements that you define.
● You can add to the GoLive menus, and create your own menus.
● You can add to GoLive windows—for example, add custom components to the Objects palette—or
create your own dialogs and palettes.
● You can create custom elements, to extend the kind of markup a user can add to a page with GoLive’s
simple drag-and-drop technique, and customize the GoLive Inspector to make it display and modify
your component’s attributes.
● You can extend GoLive to integrate with other applications, web services, and more.
What can extensions do?
One of the most popular uses of an extension is the programmatic editing of files written in HTML, XML,
ASP, JSP, and other markup languages.
To ease your learning curve, GoLive allows you to use familiar tools for this task. The JavaScript DOM in
GoLive works just like the one in a web browser, providing programmatic access to the markup elements
in an HTML file through the
would.
The SDK can operate directly on documents in Layout view, allowing you to create extensions that
automate the creation or modification of HTML pages. The SDK can also operate on documents without
displaying them, enabling extensions to process batches of files rapidly.
In addition to supporting standard JavaScript DOM events, GoLive provides additional events that support
the programmatic modification of documents and sites in the GoLive design environment. Responding to
an event in your extension is similar to responding to one in a web page: you define an appropriately
named JavaScript function within the HTML file’s
selection event, you define and register a handler function for that event inside a <script> element in
the
Main.html file that defines the extension.
The GoLive DOM supports not just HTML, but XML (Extensible Markup Language). This ability enables
GoLive to recognize other markup languages, such as those which define server-side tags, as well as the
markup object. You can edit HTML files just as a browser or other HTML editor
<script> element. For example, to respond to the
18
Page 19

Adobe GoLive CS2
SDK Programmer’s Guide How to Create an Extension 19
special <jsx… > tags the SDK provides. As a result, you can edit an extension’s Main.html file (or any of
the other file types noted) in a GoLive document window, just like any other markup document.
GoLive CS2 SDK provides enhanced support for site-level operations, including notification of changes in
the content or organization of the Site window, and programmatic selection of site assets according to
criteria you specify. For example, an extension can select all files in the site that would take longer than a
minute to download at 56kbps. You might then process each selected file in some way. For example, you
might compress it, downsample it, or reformat it in some way that would reduce the time required to
download it.
In addition to its extended DOM and event model, the GoLive object model provides access to the GoLive
application itself, which in turn makes available a host of other services and content.
The GoLive application provides access to:
● The GoLive user interface (Menus, Dialogs, Palettes, Inspectors, Site window, Document windows, Site
reports, built-in localization).
● User settings, global stylesheets, preferences, shared data, other extensions.
● Custom/server tag support and special parsing behavior.
● You can create extensions that provide your own customized tags and content as icons in the Objects
palette. You can also preprocess documents before the GoLive parser reads them, to deal with
encoding issues or to mimic the effects of server-side code in Layout view, which is the graphical
editing view in GoLive.
● Automation and macros: apply automated edits to every file in a site, or generate entire sites
programmatically.
● Dynamic Content database content.
● Resources on network and WebDAV servers.
The typical extension can and does, of course, define things for itself in its own code, such as its own user
interface items, custom functions, custom tags, SDK-provided tags, HTML tags, localization, source
translation, and more. To accomplish this, you’ll just add tags and functions to an extension’s
file as you might add them to a web page: tags go in the file’s
JavaScript functions go in the file’s
XML support enables even further extensibility, allowing GoLive to grow rapidly and conform easily to
new standards that may emerge in the future.
Anatomy of an Extension
At its most basic, an extension consists of a Main.html file in a subfolder of the Extend Scripts folder,
called the extension folder. The extension folder can contain other files the extension requires, such as
images. These additional files can be kept in subfolders. For example, the
contains the extension’s
image files.
The extension’s
Main.html file contains markup tags and JavaScript that define the extension. At startup
time, GoLive interprets these tags and scripts to load an extension in the GoLive environment. The
Main.html file should be an xHTML UTF-8 encoded markup document.
Main.html file, and also an Images subfolder that holds external .gif and .jpg
Main.html
<head> and <body> elements, and
<script> elements.
Custom Box extension’s folder
The extension defines objects using the GoLive SDK xHTML tags, and also defines the behavior for those
objects using JavaScript code.
Page 20

Adobe GoLive CS2
SDK Programmer’s Guide How to Create an Extension 20
● The Main.html file defines the extension’s menus, controls, inspectors, palettes, and custom tags. You
can combine the special SDK tags with standard HTML tags as necessary.
● The <jsxmodule> tag defines the extension’s name and some basic behavioral features.
● Various SDK-defined tags such as <jsxdialog> and <jsxmenu> define the extension’s objects, such as
windows, menus, and UI controls.
● JavaScript code contained in a <script> element in the Main.html file defines your own functions
and your implementations of GoLive event-handling functions. When an event is triggered in one of
your extension’s objects (for example, when the user interacts with an extension’s custom menu,
dialog, or palette), GoLive calls your extension’s handler for that event.
Extension-building tools
The GoLive CS2 SDK includes powerful tools that make extension building easy. These tools are found in
GoLiveSDK_dir
the
Scripts
● Extension Builder
folder, as described in Installing the core set of tools and sample extensions.
This tool creates the skeleton code for an extension, together with the extension folder in the proper
location. It opens the skeleton
specific objects and behavior.
/Tools folder. To use them, copy them into the
Main.html file in GoLive’s Layout view, so that you can edit it to define
GoLive_dir
/Modules/Extend
The skeleton provides the file framework, including basic HTML (such as enclosing
tags), and basic elements needed for an extension, such as the
<jsxmodule> and <script> tags. It
<html> and <body>
provides for easy automatic insertion of common objects, such as menus and windows, and provides a
JavaScript script with placeholder function definitions (without body code) of the callback functions
initializeModule, startModule, and terminateModule.
When this tool is installed correctly, you can invoke it by choosing
● Edit Extension
This tool complements the
Extension Builder, allowing you to open and edit an extension’s
Extensions > New Extension.
Main.html file after you first create it. Invoke it by choosing Extensions > Edit Extension. Together, you
can use these tools to iteratively modify and test your extension, restarting GoLive as needed to load
new objects.
● Dialog Editor
This tool helps you design dialogs and add them to your extension. It adds a dialog-building tab to the
Objects palette, with UI controls that you can easily drag into GoLive’s Layout view of your extension’s
Main.html file.
For a step-by-step walkthrough of how to use these tools to build an extension quickly and easily, see
GoLive CS2 SDK:Getting Started, in the
The step-by-step tutorial in this chapter (Creating An Extension Module
extension from scratch, to help you understand the framework and requirements that the
Builder
tool takes care of for you.
GoLive_dir
/Adobe GoLive SDK folder.
) walks you through creating an
Extension
Page 21

Adobe GoLive CS2
SDK Programmer’s Guide How to Create an Extension 21
Example Main.html File
This incomplete example shows the basic structure of the Main.html file for an extension with some
typical components, such as a menu item, dialog box with UI controls, a custom element with an
Inspector, and event-handling functions:
<html>
<body>
<jsxmodule ...>
// define JavaScript event-handling functions
<script>
function initializeModule (){
if confirm ("Modify...?"){
fileGetDialog(...);}
...}
function menuSignal (menuItem){
if (menuItem.name == "myItem") {
//do something
}
...}
...
</script>
// add a menu item to a GoLive menu
<jsxmenubar>
<jsxmenu ...>
<jsxitem name="myItem" title="MyItem" >
</jsxmenu>
</jsxmenubar>
// define a dialog with UI controls
<jsxdialog ... >
<jsxcontrol ...>
...
</jsxdialog>
// define a custom element and add it to the Objects palette
<jsxelement name="myTag" …>
<jsxepalettegroup name="myTag" ...>
<jsxpaletteentry name="myTag" ...>
// define an Inspector for the custom element
<jsxinspector name="myTag" ...>
<jsxcontrol type="edit" ...>
...
</jsxinspector
</body>
</html>
Creating An Extension Module
Every extension takes the form of a Main.html file that resides in its own uniquely named folder in the
Extend Scripts folder. This section describes how to create the file and folder structure GoLive expects
extensions to have.
To begin creating an extension, first create the extension folder. Create a folder with a unique name and
place it in the
Adobe GoLive CS_
Lang
/Modules/Extend Scripts/ folder.
Page 22

Adobe GoLive CS2
SDK Programmer’s Guide How to Create an Extension 22
In this folder, create a new file named Main.html. You can use any text or HTML editor to edit this file,
including Adobe GoLive CS2 itself.
Creating the Main.html file
The Main.html file contains the markup tags and JavaScript that define an extension.
➤ To create a Main.html file:
1. In GoLive, create a new page, using File > New Document. In the dialog, select Favorites and HTML
Page, then click OK.
This automatically creates and displays an HTML document with basic page elements such as
<body>.
and
2. Switch to Source view and add a
<body>
<jsxmodule name="My First Extension">
<p>
</p>
</body>
<jsxmodule> tag in the <body> element before the <p> start tag:
For more information on this tag, see Adding the module tag below.
3. Add a
<script> element after <jsxmodule>:
<body>
<jsxmodule name="My First Extension">
<script>
</script>
<p>
</p>
</body>
Typically, the <script> element is placed inside the <body> element, but you can put it inside the
<head> element.
4. Inside the
<script> element, add the following event handling function:
<head>
<script>
function initializeModule() {
menubar["Test"].items["Item1"].addEventListener("menuSignal",
'function(e){Window.alert(e.target.name + " was selected!");}')
}
</script>
For more information on defining and using JavaScript functions in an extension, see Adding
event-handling functions below.
Page 23

Adobe GoLive CS2
SDK Programmer’s Guide How to Create an Extension 23
5. After the </script> end tag, add special SDK tags for a menu and menu item:
</script>
<jsxmenubar>
<jsxmenu name="Test" title="Test menu">
<jsxitem name="Item1" title="Item 1">
</jsxmenu>
</jsxmenubar>
<p>
</p>
The file should now look like this:
<!DOCTYPE html PUBLIC "-//W3C//DTD HTML 4.01 Transitional//EN">
<html>
<head>
<meta http-equiv="content-type"
content="text/html;charset=iso-8859-1">
<meta name="generator" content="Adobe GoLive 7">
<title>Welcome to Adobe GoLive 7</title>
</head>
<body bgcolor="#ffffff">
<jsxmodule name="My First Extension">
<script>
function initializeModule() {
menubar["Test"].items["Item1"].addEventListener(
"menuSignal", 'function(e){
Window.alert(e.target.name + " was selected!");}')
}
</script>
<jsxmenubar>
<jsxmenu name="Test" title="Test menu">
<jsxitem name="Item1" title="Item 1">
</jsxmenu>
</jsxmenubar>
<p>
</p>
</body>
</html>
6. Save the document as Main.html in a new folder named My First Extension in the Extend
Scripts
7. To test your extension, restart GoLive. Select
was selected.
folder.
Test menu>Item 1. This should display an alert “Item 1
”
Congratulations! You have just created your first extension to GoLive. That is really all there is to creating a
basic extension using the GoLive CS2 SDK.
Adding SDK Tags and JavaScript Functions to the Module
This section illustrates some development techniques by walking you through a simple extension that
writes a message in the JavaScript Debugger window and displays a user alert. In this exercise, you add
tags and scripts to the body of a
Main.html file such as the one you created above.
Page 24
Adobe GoLive CS2
SDK Programmer’s Guide How to Create an Extension 24
Adding the module tag
GoLive packages much of its functionality in units known as modules. To add some particular new
functionality to GoLive, a user can install and enable the module that provides it. A GoLive user can also
disable or remove a module to remove its associated features and behaviors.
An extension that you develop using the SDK is simply another kind of module that GoLive can use. Like
the built-in modules, extensions can be enabled and disabled in the Preferences dialog.
Each module must have a unique name that represents it in the global JavaScript namespace. To define
the name of your extension’s module, add to your extension’s
provides a
// Main.html file for Hello example
<html>
</html>
name property:
<body>
<jsxmodule name="HelloModule" debug>
<script>
// functions that provide your extension’s behavior go here
</script>
// Tags that define your extension go here.
</body>
Main.html file a <jsxmodule> tag that
When GoLive loads this Main.html file, it creates a module object to represent this extension and sets the
value of the object’s
name property to the HelloModule string. The presence of the debug attribute
enables debugging services in the JavaScript Debugger window. Always remove the
commercial versions of your extension.
The
<jsxmodule> tag and all of its attributes are optional. If you do not supply this tag, or if this tag’s name
attribute is missing, GoLive assigns a default value to the
represent your extension. However, it is recommended that you explicitly define your own
name attribute so you can use it for debugging purposes.
Adding event-handling functions
The JavaScript functions that provide an extension’s behavior reside within its <script> tags. Many of
these functions are event handlers, which you register for particular event target objects. GoLive calls
these functions in response to specific events, such as the GoLive user clicking on something or entering
text. Your extension can provide a handler to respond to a specific event in a specific object, such as the
selection of a menu item or the opening of a document. When the event occurs in a target object, GoLive
looks for all registered handlers for that event in that object, and if it finds one, executes it.
The GoLive CS2 SDK Programmer’s Reference provides the names and syntax of all the event and event
target objects, and describes the handlers that you can define. Most of them are optional; you only need to
supply handlers for the events you need to respond to.
Module startup and termination events are handled by functions with predefined names. For example, on
startup, GoLive checks all loaded modules for implementations of the
startModule functions. If your module needs to perform any initialization, it can do it in these functions.
initializeModule function is called as soon as the module is loaded, and can perform any
The
initialization that does not depend on other modules, and the
modules are loaded. Similarly, your implementation of the
housekeeping tasks before GoLive unloads your extension.
debug attribute from
name property of the module object it creates to
<jsxmodule>’s
initializeModule and
startModule function is called after all
terminateModule function can perform
Page 25
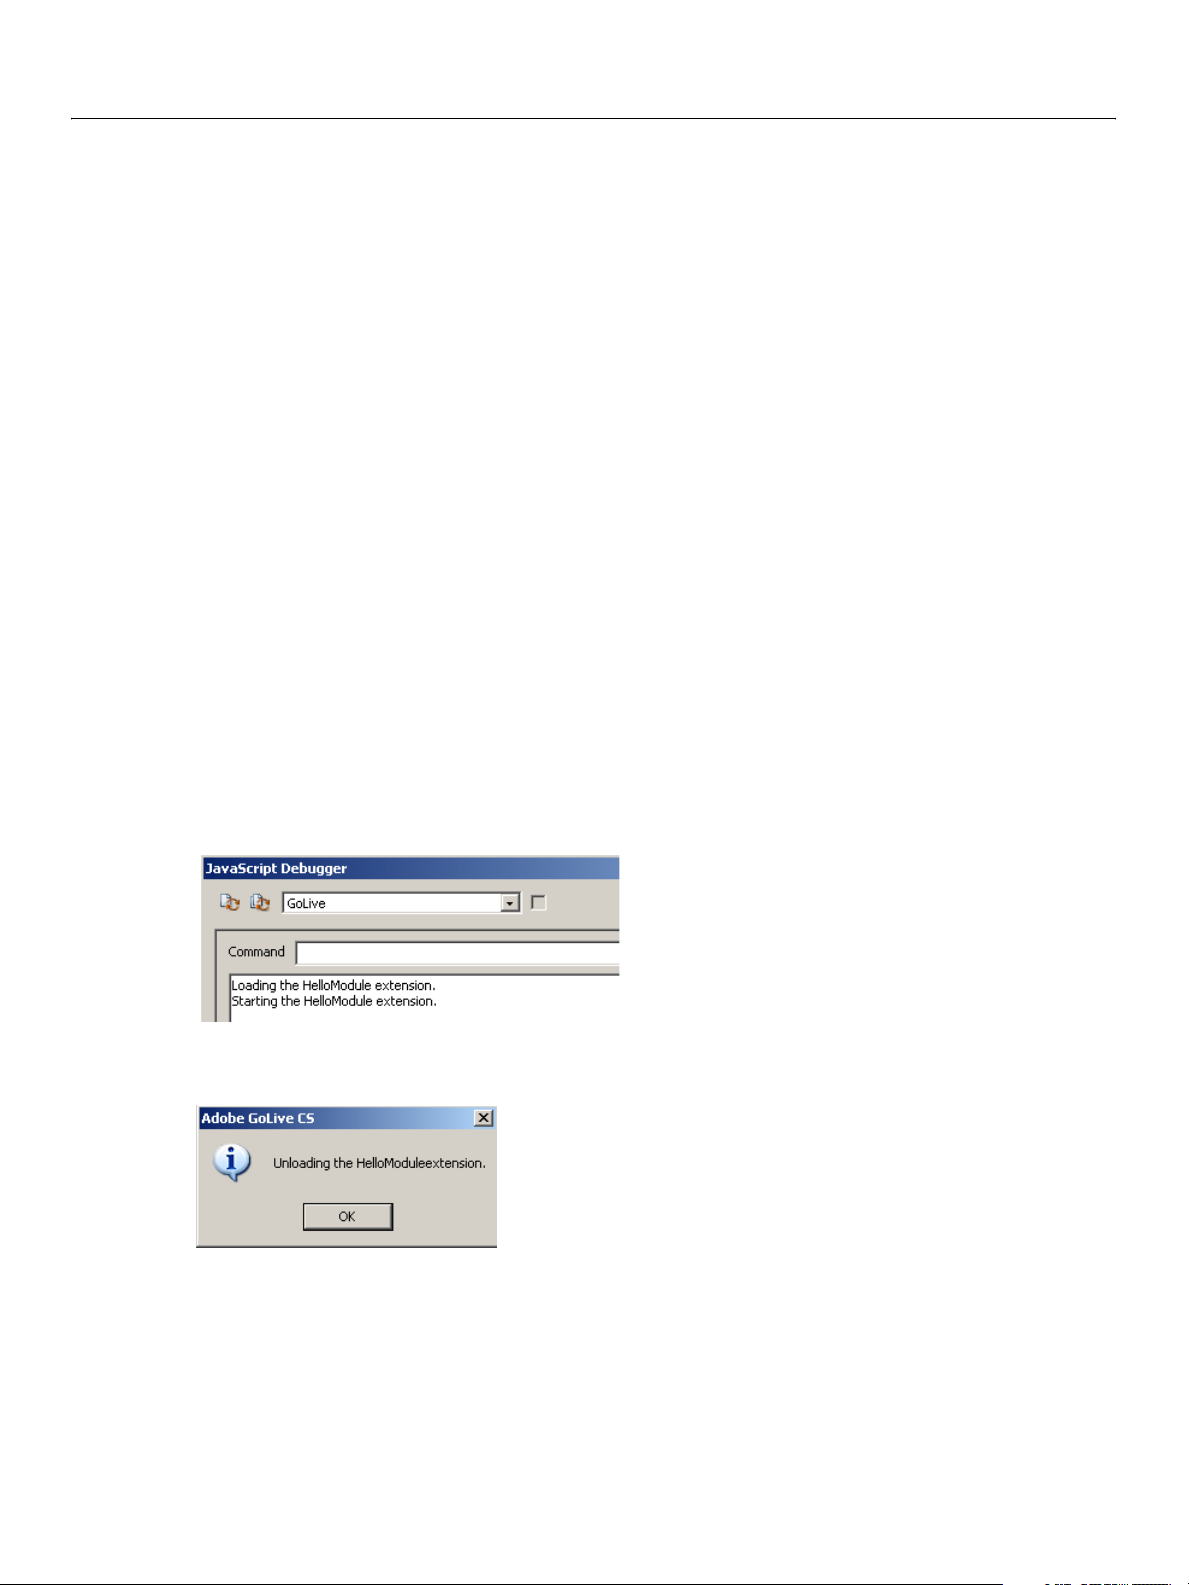
Adobe GoLive CS2
SDK Programmer’s Guide How to Create an Extension 25
The following example shows very simple implementations of the initializeModule, startModule, and
terminateModule functions.
// Main.html file for Hello example
<html>
<body>
<jsxmodule name="HelloModule" debug>
<script>
// functions that provide your extension’s behavior go here
function initializeModule() {
writeln ("Loading the " + module.name + " extension.");
}
function startModule() {
writeln ("Starting the " + module.name + " extension.");
}
function terminateModule() {
Window.alert ("Unloading the " + module.name + "extension.")
}
</script>
// Tags that define your extension’s data go here.
</body>
</html>
In this example, the initializeModule and startModule functions simply display messages in the
JavaScript Debugger window before the extension runs. The body of these functions consist of a
statement that uses the
name property of the module object to identify the currently executing extension.
writeln
When you start GoLive and it loads this extension (along with all other extensions), the text is displayed in
the Output panel in the GoLive JavaScript Debugger or in the ExtendScript Toolkit:
For the
terminateModule function, you might not see such a display before GoLive quits. To make sure
you see this message, the example function displays the text in a user alert like this one:
To do this, the function uses a globally available static function of the
Window class:
function terminateModule() {
Window.alert ("Unloading the " + module.name + "extension.")
}
GoLive does not unload this extension and complete the exit process until you click OK in the user alert
dialog.
Page 26
Adobe GoLive CS2
SDK Programmer’s Guide How to Create an Extension 26
If you place this Main.html file in a HelloModule folder in the Modules/Extend Scripts folder and
restart GoLive, you should see the loading and starting messages in the JavaScript Debugger window
when GoLive restarts. When you quit GoLive, you see the alert before the application exits.
Typically, your
objects, and the
event handlers to, for example, respond to clicks on menu items it has added, or to text entry in controls it
has defined. For more examples, see Defining menu behavior
Summary
This short example introduces most of the concepts required to understand start using the SDK to define
your own extensions. You have now seen how to:
● Create the Main.html file that defines an extension module.
● Add SDK tags to that file to define extension data.
● Implement and register event-handling functions for events of interest to your extension.
initializeModule function registers the event handlers that provide behavior for your
terminateModule function unregisters the handlers. An extension generally provides
, and Providing Behavior for Controls.
● The next several chapters of this book describe how to add tags that create menus, dialogs, and
custom markup elements in the GoLive environment.
● For a complete list and description of the GoLive CS2 SDK objects, functions, and properties, see
Chapter 1, “
● For a complete list and description of all tags that the SDK defines, see Chapter 2, “Tags,” i n the
Objects,” in the GoLive CS2 SDK Programmer’s Reference.
GoLive CS2 SDK Programmer’s Reference.
● See "Handling Events" on page 32 for an introduction to the event-handling mechanism.
● Further chapters show event-handling for different functional areas. For example, Chapter 4,
“Menus and Toolbars,” describes how your extension can respond to the selection of a menu item it
defines.
● For a complete list and description of all event and event target objects the SDK defines, see
Chapter 3, “
● Use the JavaScript Debugger window to examine your extension’s data and evaluate expressions
Events and Event Handlers,” i n the GoLive CS2 SDK Programmer’s Reference.
within your extension’s execution scope.
Before beginning a serious extension development project, be sure to become more acquainted with
the GoLive JavaScript Debugger, a fully featured, internal source debugger. Chapter 13, “Debugging
Scripts,” describes this useful tool in detail.
Page 27
3
The JavaScript Environment
This chapter discusses JavaScript and ECMAScript/ExtendScript concepts and usage in GoLive, including:
● JavaScript Objects in the GoLive Environment
● Scope of Variables and Functions
● Handling Events
● Sharing Data
● Delays and Timeouts
JavaScript Objects in the GoLive Environment
GoLive provides access to data and objects in a way that JavaScript programmers will find familiar. Those
new to JavaScript will discover that the GoLive environment usually provides multiple ways to access data
and objects. This section describes various ways an extension’s JavaScript code can access data and
objects in the GoLive environment.
Objects, elements, and properties
GoLive JavaScript objects can represent parts of a document, or GoLive components:
● When GoLive loads a markup document, it generates objects to represent the markup tree of a
document. Collectively, the objects that represent portions of the markup document are known as
markup objects
s. Markup objects can represent HTML markup elements (as defined by a tag and its
attributes), and also comments, text blocks, and other types of markup such as entities or
sections.
● When GoLive loads an extension definition file (that is, the Main.html file for your extension), it
creates JavaScript objects to represent the GoLive components you define, such as windows, UI
controls, and menu items. For example, a
a window Object
.
There are various ways to obtain a reference to a JavaScript object, depending on the object’s type.
● You can retrieve most component objects by name from global properties, such as the menus and
dialogs collections.
● Objects that represent HTML page content are available from the markup tree; you get the root object
from the document Object
properties and methods allow you to navigate the tree.
● GoLive passes relevant objects as event-object property values to event-handling functions.
For information on retrieving a particular object, see that object’s description in the GoLive CS2 SDK
Programmer’s Reference.
Accessing attribute values
CDATA
<jsxdialog> element in your extension definition results in
for the page (document.documentElement), and that object’s
The attributes of an element (whether it is a document markup element or an element in your extension
definition) appear as the properties of the corresponding JavaScript object. For example, the
name
27
Page 28
Adobe GoLive CS2 SDK
SDK Programmer’s Guide The JavaScript Environment 28
attribute of the element becomes the name property of the object. Access to JavaScript properties is
case-sensitive; that is, the
Thing attribute creates the Thing property, not the thing property. When
writing JavaScript code, observe case accordingly.
JavaScript uses the symbol
been explicitly set, that property has a value of
(rather than its value) is
undefined to indicate a null state. When a property exists, but no value has
undefined. If a property has never been defined, its state
undefined. To test whether a property exists in JavaScript, you must test the
state (not the value), by checking whether the name has a defined type; for example:
// correct test
if (typeof (myProperty) != undefined)
// do something
Do not use the following test. This tests the property’s value, rather than its state, and results in a run-time
error if the property does not exist:
// incorrect test
if (myProperty != undefined)
// if myProperty does not exist, an error occurs
When you must test a property’s value with a case-sensitive comparison, you can use the toLowerCase
method of the JavaScript
String object. For example, this tests an element object’s tagName property,
disregarding the value’s case:
if (currElt.tagName.toLowerCase()) == (tagToGet.toLowerCase())
For element Objects, attributes are also represented by objects, which are themselves nodes in the
markup tree. Use an
attribute object, rather than accessing the attribute directly by name, as a property of the
element object’s getAttributeNode and setAttributeNode functions to access the
element object.
By using these methods, you avoid potential problems with referencing names that contain special
characters, such as hyphens.
Naming objects and attributes
The value of an element’s name attribute must follow JavaScript naming conventions. If more than one
element or object uses the same name, the results of name-based object retrieval are unpredictable, so
you must take care to ensure that your names are unique. One way to do this is to use a unique prefix or
postfix in all of your extension’s names. For example, the following element definitions begin the value of
each element’s
<jsxmenubar> // opens definition of all menus
<jsxmenu name="Hello" title="Hello, GoLive!"> // Hello menu
</jsxmenu> // closes definition of Hello menu
</jsxmenubar> // closes definition of all menus
When the SDK loads an extension containing these elements, it creates a menu object that appears in the
JavaScript global
var myMenu = menubar["ADBEHello"];
name attribute with the letters ADBE.
<jsxitem name="This" title="Do Something"> // menu item
<jsxitem name="That" title="Do Something Else” > menu item
menus collection. You can use the name to retrieve this menu from the collection:
Page 29
Adobe GoLive CS2 SDK
SDK Programmer’s Guide The JavaScript Environment 29
JavaScript object collections
The SDK makes commonly used objects available as the elements of array-like structures that all
extensions can access. GoLive updates the contents of these structures dynamically as these objects are
created and deleted.
The SDK implements many of these structures as collection Object
s. This is like an array that provides
access to its elements by name or index; however, collections are not actually arrays; not every collection
provides numeric access to its elements, as an
array object does.
Each of these global properties contains a collection object that GoLive updates dynamically:
Object JavaScript Access Contents
boxCollection
boxes global property Read-only array of all boxes in the
current document.
controlCollection
controls
global property
Controls.
windowObj.controls property
dialogCollection
dialogs global variable The current document’s windows and
dialogs that have run at least once.
Read-only.
documentCollection
history
htmlStyleSetCollection
LinkCollection
documents global property Documents open in GoLive.
document.history property Undo actions for the document.
app.htmlStyles
property Every HTMLStyleSet Object in the
Window > Styles palette.
boxObj.links property Links to all files that reference this box
(in links) and all files this box
references (out links).
MarkupCollection
markupObj.subElements Immediate subelements of the
markup object.
MenuCollection
menus
global variable All menus currently available in
GoLive.
MenuItemCollection
PictureCollection
ServerInfoCollecton
WebsiteCollection
menubar[value].items property
menuObj.items.propName
pictures
app.server
website.server property
websites
global property All pictures accessible to this module.
property
global property All web sites currently open in GoLive.
All the menu items belonging to a
menu.
All servers known to GoLive.
All web servers for a site.
Using the global object arrays
These examples use the menus array to illustrate how you retrieve objects from global arrays. This array
provides access to all of the menus and menu items added to GoLive by extensions. Most of the arrays
work the same way; exceptions are noted in the GoLive CS2 SDK Programmer’s Reference.
Page 30

Adobe GoLive CS2 SDK
SDK Programmer’s Guide The JavaScript Environment 30
The following JavaScript defines a menu Sample, with one item, MyItem. The SDK creates a menu object
named
sample and a menuitem object named item1:
<jsxmenu name="sample" title="Sample" ...>
<jsxitem name="item1" title="MyItem" ...>
</jsxmenu>
The following retrieves the Sample menu from the menuCollection object in the menubar global
variable, and stores the retrieved
var sampleMenu = menubar["sample"]
menu object in the sampleMenu variable:
In this case, “Sample” is the title of the menu, as displayed to the user, while “sample” is the name of the
menu object, which you use to access it programmatically.
The following retrieves the menu item by name from the collection in the
items property the sample
menu:
menubar["sample"].items["item1"]
Alternatively, you can retrieve the menu item directly, using its name as a property name of the sample
menu:
menubar["sample"].item1
GoLive also makes each menu available as a JavaScript object in the global namespace. Thus, the following
simple line of JavaScript retrieves the menu item from the
sample.item1
sample menu.
Many collections can be accessed by numeric index as well as by name. For example, if item1 is the first
menu item:
menubar["sample"].items[0] // 0-based index of first item
This is only reliable for the items, not for menus; because other extensions can also add menus, you cannot
rely on the order. Some collections, like the
Most of the time, an object’s unique
name property provides the most reliable way to retrieve it.
controls collection, do not support numeric access at all.
Comparing objects
To ascertain an object’s identity, you can compare the value of its name property to a known string, or you
can compare object references directly. For example, you could test the name of a menu item in any of the
following ways:
if (item.name == "item1") // compare object name to known string value
if (item == menubar["sample"].items["item1"]) // compare objects
if (item == sample.item1) // another object comparison example
Updating references to objects
GoLive generates objects to represent the markup tree of a document when it loads that document. It
regenerates these objects if the documents changes; this is know as reparsing the document. If you save a
reference to an object that GoLive generated as the result of interpreting a markup tag, you must update
that reference any time the document containing the tag changes. For details, see Chapter 7, “
Documents Programmatically.”
Editing
Page 31

Adobe GoLive CS2 SDK
SDK Programmer’s Guide The JavaScript Environment 31
Scope of Variables and Functions
You use standard JavaScript syntax to define your extension’s variables and functions. When a Main.html
file defines a “global” variable or function, GoLive actually creates the variable or function within the scope
of the extension module the file defines, not in the JavaScript global namespace. It is available within the
execution scope of that module. It is not available to other extensions.
The only truly global values in the GoLive JavaScript environment are those provided by system-defined
global variables such as the
every extension. For a complete listing and description, see Appendix E, “
GoLive CS2 SDK Programmer’s Reference.
To demonstrate variable scope in the JavaScript Debugger window, add the following highlighted lines to
the
Main.html file that you created in Chapter 2, “How to Create an Extension,” and restart GoLive.
// Main.html file for Hello example
<html>
<body>
<script>
var myGlobal = "Hamburg, Liverpool, and London."
function fabFour()
{
}
app variable and the document variable. These properties are available to
Scoping in JavaScript in the
writeln ("The Fab Four played in " + myGlobal);
function initializeModule()
{
writeln ("Loading the " + module.name + " extension.");
fabFour();
}
function terminateModule()
{
Window.alert ("Unloading the " + module.name + "extension.")
}
</script>
<jsxmodule name="HelloModule" debug>
</body>
</html>
The new code just adds another writeln statement, but packages it as an extension-specific function.
From within the body of this function, the
myGlobal variable is accessible as a global variable. However, it
is not accessible to any other modules.
The JavaScript Debugger shows the current scope in its module list. To set the execution scope to the
HelloModule extension, choose its module name from the pulldown menu, as shown here.
Page 32

Adobe GoLive CS2 SDK
SDK Programmer’s Guide The JavaScript Environment 32
To set the global variable, type the following into the command line:
myGlobal = "Hartford, Hereford, and Hampshire."
Then run the function from the command line:
fabFour();
The function prints the changed string to the output window, using the new value of the global variable.
You might think you could access another module’s variable by evaluating
JavaScript expression, but it is not that simple. You can use the common Object
extensions if necessary, although most extensions do not need to do so; see Sharing Data
Releasing Memory
For optimum performance, you should release unused memory as soon as possible. You can set unneeded
JavaScript variables to
Before it unloads your extension, GoLive calls the terminateModule
outside the JavaScript environment, your implementation of this function can be used to release them.
Handling Events
GoLive 8 implements a WC3-compliant event-handling mechanism, which defines event objects of various
types which encapsulate information about events, and event targets, GoLive objects in which events can
occur. The following GoLive objects act as event targets:
app
module
document
box
menu
menuItem
window
control
module.var or some similar
to share data among
.
null to make them available for garbage collection.
function. If you allocate any resources
Each of these objects inherits the addEventListener function, which allows you to register a handler
for a type of event that can occur in that object. When the event occurs in that object, your handler is
passed a single argument, one of the Event Object Types
, which encapsulates information about the
event, such as where and when it occurred.
For example, a
menuSignal event can occur in a menuItem object, and you can register a handler for
that event that responds to the selection of a menu item that your extension added. Your handler is
passed a menuEvent
● Your handlers for the menuSignal and control events such as onClick will implement much of the UI
functionality. See Chapter 4, “
object.
Menus and Toolbars" and Chapter 5, “Windows and Controls," for
examples.
● Register handlers with the document Object for document events such as selection and save.
● Register handlers with the app Object for the opened and new events, which occur when the user
opens or creates a new document.
● Terminating the GoLive application generates the appterm event in the app Object. You can register a
handler for this event to do any cleanup that your extension requires.
Page 33

Adobe GoLive CS2 SDK
SDK Programmer’s Guide The JavaScript Environment 33
● Other events allow more specialized responses, such as defining the appearance of a custom control
when it needs to be redrawn (see Chapter 6, “
Custom Elements").
For a complete list of events and the circumstances that generate them, see Chapter 3, “
Handlers" in the GoLive CS2 SDK Programmer’s Reference.
Note: Event handling has changed significantly in this release. See Compatibility with Previous Event
Handlers in the GoLive CS2 SDK Programmer’s Reference.
Defining and Registering Event Handlers
You must register a handler for a specific event in each event target object that should respond to that
event. For example, if your extension defines two menu items, you could register a handler to respond to
the menuSignal
function to register for a specific event in that object.
An event handler takes a single argument, the
separate named function, or you can define it inline during registration. Inline code can be a locally
defined function that takes the event-object argument, or a simple statement.
For example, supposing that your extension adds a menu item with the name
menu, you can register an event handler for the item in any of the following ways:
➤ To define the handler as a separate function:
//define the handler function
function doThisHandler (menuEvt) {
Window.alert ("You chose" + menuEvt.name);
}
//register the handler for a target
function initializeModule() {
menubar['Hello'].items['doThisItem'].addEventListener( 'menuSignal',
}
in each of the menuItem Objects. Use the event target object’s addEventListener
event object. You can define an event handler as a
doThisHandler)
Events and Event
doThisItem to the Hello
➤ To define the handler inline during registration:
// register a locally-defined function
function initializeModule() {
menubar['Hello'].items['doThisItem'].addEventListener( 'menuSignal',
function (e) {'Window.alert ("You chose" + e.name);'})
}
—or—
// register inline source code
function initializeModule() {
menubar['Hello'].items['doThisItem'].addEventListener( 'menuSignal',
'Window.alert ("You chose the Do This menu item")')
}
It is possible to register an event handler at any time. You can, for convenience, use your extension’s
initialization function to register your handlers:
// Register event handler
function initializeModule() {
menubar['Hello'].items['doThisItem'].addEventListener( 'menuEvent',
Page 34

Adobe GoLive CS2 SDK
SDK Programmer’s Guide The JavaScript Environment 34
doThisHandler)
}
It is not necessary to unregister handlers on termination; the shutdown process does so automatically. To
unregister a handler before termination, use the target object’s
removeEventListener function.
Nesting Event Handlers
When an event is generated for a child object in a hierarchy (such as a control in a tab panel in a window),
GoLive goes through an event capture phase before executing the handler registered with the event
trigger object, and then goes through a "bubbling" phase after executing that handler.
During the capture phase, GoLive looks for handlers for the event that are registered with ancestor objects
of the target. It starts at the topmost level and runs the first handler it finds. It then runs any handler that is
registered with the target object itself. After executing the target’s handler, it "bubbles" back out through
the ancestor objects, running the first registered handler that it finds on the way out.
For example, suppose a dialog window contains a panel which contains a button. A script registers an
event handler function for the
and a third handler at the
the handler for the topmost parent (the
target
button object’s local handler. Finally, during the bubbling phase, GoLive calls the handler
registered with the immediate parent, the
mouseEvent at the window object, another handler at the panel object,
button object (the actual target). In this case, when the user clicks the button,
window object) is called first, during the capture phase, then the
panel object.
This allows you to execute multiple handlers for the same event occurrence, or to handle events at a
higher level. For example, you could register a
of or in addition to handlers registered with the individual controls in the window.
If you define multiple handlers for the same event in nested objects, or use the same handler at different
levels:
● Check the eventPhase property of the event object to see whether the handler has been invoked in
the capture, at-target, or bubbling phase.
● Check the currentTarget property of the event object for the object where the currently executing
handler was registered. In the capture and bubbling phase, this is an ancestor of the
Sharing Data
You can get GoLive user preferences programmatically, and also create your own extension preferences.
You can set values that persist across user sessions, or that are available to other extension only during a
single session. You can also communicate with other running extensions and share data with them.
● Extension modules can use a prefs Object to store persistent user preference data that is available to all
extensions. The attribute Object
● The common Object provides a place to share non-persistent data with other extensions.
● The app Object’s broadcast method allows one extension to send a message to another, and optionally
receive a reply from that extension’s broadcast
mouseEvent handler with a parent window object, instead
target object.
provides read-only access to a subset of GoLive's global preferences.
event handler.
You cannot share or save objects, which are ephemeral. The
strings with other extensions.
broadcast method can only exchange
Page 35

Adobe GoLive CS2 SDK
SDK Programmer’s Guide The JavaScript Environment 35
Persistent shared data
Extensions can create their own preference data which persists across between user sessions and is
available to all extension modules. This feature enables all extensions to share a common set of
preferences and to store persistent data.
The prefs Object
are stored as properties of this object. Create a new preference value simply by writing to a
property. For example, this creates a
prefs.myModule = "Version 1.0";
All other modules can check for the presence of this module:
if (prefs.myModule == "Version 1.0")...
When GoLive quits, it saves the prefs values along with all other preference data. The next time GoLive
starts, it makes this data available to all modules again.
Note: You cannot save Javascript objects as
in the prefs global variable makes preference data available to all extensions. Preferences
Non-persistent shared data
The common Object provides a means of sharing non-persistent string and primitive data among all
currently running extensions. You cannot store objects in the
The
common object provides no predefined properties. Your extension can call the common object’s
create method to create a new namespace for shared properties in the common object; the namespace is
then available to all extensions as a property of the
For example, the following creates a namespace to hold properties of a particular extension, then adds a
property with an assigned value:
prefs
myModule preference that holds "Version 1.0" as its value:
pref values.
common object.
common object.
common.create("myExt");
common.myExt.myProperty = myValue;
Communicating with other extensions
The broadcasting mechanism enables an extension to send a message to another extension requesting
that it perform a task. Optionally, the called extension can return a result string.
When one extension module needs to communicate with another extension module, it calls the app
Object’s broadcast method. This method generates a broadcastEvent, containing the message argument.
An extension that responds to messages from other extensions defines a handler for the
broadcastEvent and registers it in the module Object.
Your handler for the
respond to the broadcast message, and optionally returns a result string in the
event object.
Use of the broadcast mechanism is entirely optional. If your extension does not need to communicate with
other extensions, it need not implement a
broadcastEvent checks the message property, performs any tasks necessary to
broadcastEvent handler.
answer property of the
Page 36

Adobe GoLive CS2 SDK
SDK Programmer’s Guide The JavaScript Environment 36
Sending messages to other extension modules
The broadcast method sends its argument to the broadcastSignal method of any or all running
extension modules.
broadcast(argument [, targets]);
This method converts the argument value to a string, stores the name of the calling module and the
argument string to a
The optional targets value is a list of modules to call, in calling order. By default, the
generates the event in every extension module.
broadcastEvent object, and generates this event in the target module or modules.
broadcast method
Each called module’s registered
broadcastEvent handler must return a string value or undefined.
Broadcasting terminates as soon as any extension’s handler returns a value. (The handler can also store a
response in the
answer property of the event object.)
This method’s result is the return value supplied by the last handler. If none of the called modules supply a
return value, the
broadcast method’s return value is undefined.
Responding to a broadcast
To receive and respond to messages from other extensions, your extension must define a handler for the
broadcast
according to the
sets in the object’s
event and register it with the app object. A called module’s handler determines its actions
message and sender values in the passed broadcastEvent object. The value the handler
answer property is returned as the broadcast method’s return value. For example:
function handleBroadcast(bcastEvt) {
switch (bcastEvt.message)
{
case thisValue:
bcastEvt.answer=5;
case thatValue:
bcastEvt.answer="Yes";
case anotherValue: {
var myResult = myFunction();
if (myResult)
bcastEvt.answer=myResult.toString()
else
bcastEvt.answer="undefined";
}
default:
bcastEvt.answer="undefined";
}
}
//register handler
function initializeModule(){
app.addEventListener( 'broadcastSignal', handleBroadcast)
}
Delays and Timeouts
● GoLive has a global timer that you can use to schedule execution of your own scriptlets.
● You can set a JavaScript timeout value to avoid an infinite loop or other failure in an extension’s
JavaScript code that could otherwise halt GoLive indefinitely.
Page 37

Adobe GoLive CS2 SDK
SDK Programmer’s Guide The JavaScript Environment 37
● You can display a progress bar or busy bar to the user while your extension performs lengthy
processing tasks.
Timed tasks
You can evaluate a JavaScript expression after a specified delay. The startTimer global function
accepts a scriptlet and a timeout. The scriptlet is stored internally and executed as soon as the timeout has
elapsed. Optionally, the scriptlet can be scheduled for repeated execution. For example, you might
schedule a script to run once per second.
The following code prints a counter in the JavaScript Output window every second:
counter = 0; myTimer = startTimer ("writeln (++counter)", 1000, true);
Note that the startTimer method’s return value is required to stop this code’s execution. To do so, pass
this value to the
stopTimer (myTimer);
stopTimer method, as the following statement does.
Setting the JavaScript timeout
You can specify the amount of time GoLive waits for JavaScript code to return control before it exits the
current script unconditionally. Without this feature, an infinite loop or other failure in an extension’s
JavaScript code could halt GoLive indefinitely.
By default, GoLive waits forever for a JavaScript function call to complete. If you are not confident that a
JavaScript function can complete its task in a reasonable amount of time, you may prefer to specify the
amount of time GoLive waits for a response. Each extension can specify its own timeout that GoLive uses
to execute that extension’s scripts.
To set the script execution timeout, your extension’s
that provides a
timeout attribute. The value of this attribute is the number of seconds GoLive waits for a
script to return control before it exits the script. Values of
Main.html file must include a <jsxmodule> tag
0 or false restore the default behavior of never
timing out.
<html>
<body>
// give scripts ten seconds to complete before unconditional exit
<jsxmodule timeout=10>
// scripts and SDK tags go here
</body>
</html>
Note: An external library that calls an extension can specify a separate temporary script execution timeout
for each JavaScript call. For more information, see the description of the
Appendix A, “
Using External Libraries.
JSAEval function in
Progress bars
To provide user feedback during lengthy operations, your extension can display a progress bar dialog or
busy bar dialog. You can specify the title and the text to be shown while processing. For example:
app.startProgress( 'Please wait', 'Progress: 0%', false); //show bar
app.setProgress(0,6, 'Progress: 60%');//update periodically
Page 38

Adobe GoLive CS2 SDK
SDK Programmer’s Guide The JavaScript Environment 38
A busy bar does not display a progress value; instead, it rotates the spiral indicator about once a second.
For example:
app.startProgress( 'Please wait', 'Processing', true); //busy bar
These are the same dialogs GoLive displays as part of its own user interface. Three methods of the app
Object make these dialogs available to extensions:
● The startProgress method initializes and displays the progress dialog.
● The setProgress method updates the status bar or busy bar display.
● The stopProgress method hides the progress dialog.
As an alternative to these globally-available predefined dialogs, you can define a progress-bar control in
your own window; see Creating controls with parameters
.
Starting a progress or busy bar
The startProgress method has this syntax:
app.startProgress(title [, message, doBusy, seconds])
● You must specify the string that appears in the progress window’s title bar, such as "Please wait" in
the examples.
● The optional message argument provides the initial status message displayed when the dialog opens.
● The method opens a progress bar, unless you pass true for the optional doBusy argument.
● The optional seconds argument is a number of seconds to delay before Golive displays the dialog. For
example, a value of
2 means that GoLive displays the dialog only for operations that take more than 2
seconds to complete.
Updating a progress or busy bar
While the progress window is displayed, your code must update the position of the progress bar. It can
optionally update the message text as well. Your code must also determine whether the user clicked the
Stop button and act accordingly to abort the operation in progress. To perform these tasks, call the
setProgress method periodically:
setProgress( value, [message])
● The value argument is a value between 0 and 1 that specifies the portion of the progress bar to be
drawn. For example, the value
.50 specifies that 50 per cent of the progress bar is drawn to indicate a
task half completed.
Page 39

Adobe GoLive CS2 SDK
SDK Programmer’s Guide The JavaScript Environment 39
● The optional message argument is the string to display as the new status message. You can update a
busy bar with a new status message; it ignores the value argument.
The
setProgress method returns false when the user clicks Stop in the dialog. Your code should
respond to this condition by aborting the operation that is in progress and closing the dialog. During
lengthy operations, it is especially important to call the
extension can respond quickly if the user clicks
Stop.
setProgress method regularly, so that your
When the lengthy operation is completed (or the user clicks
Stop), call the stopProgress method to
close the dialog.
Progress bar example
This example displays a progress bar. The doSomeWork function is your own code that performs the task
on which you are reporting progress.
function progressDemo() {
var percentDone = 0;
var continue = true;
app.startProgress("Progress Demo", "Starting, please wait.", busy);
while (continue && percentDone < 100) {
doSomeWork(); // your own code
percentDone += 1; // simply 1 to 100 for sample
continue = app.setProgress(percentDone/100,
'Progress: ' + percentDone + '%';)
}
if (!continue) writeln ("User clicked Stop.");
app.stopProgress();
}
Page 40

4
Menus and Toolbars
This chapter describes how you can use the GoLive CS2 SDK to add menus and menu items to the GoLive
menu bar and context menus, and add toolbars to the GoLive main toolbar.
Note: This chapter does not describe pop-up menus, which are controls that appear in dialog windows.
For information on popup menus, see "
● To create a custom menu in the GoLive menu bar, your extension defines the menu and menu items,
and defines and registers event handlers which GoLive calls when the user chooses a menu item. You
can add submenus, enable and disable a menu programmatically, and check and uncheck menu items.
You can also add menu items to the predefined menus in the GoLive menu bar.
● The GoLive CS2 SDK provides limited access to some of GoLive’s context menus. Your extension can
define an event handler for a context menu that extends that menu by adding submenus or menu
items. See Extending Context Menus
● Similarly, to create a toolbar, your extension defines the toolbar and its controls (typically buttons with
icons), and defines and registers event handlers for the controls. See Creating Toolbars
Creating Custom Menus
You can add a custom menu to the GoLive menu bar in your extension definition (the Main.html file)
using the three menu SDK tags. To create a custom menu or menu item when your extension is loaded,
place these tags in an extension’s
Adding Controls to Windows" on page 66.
below.
below.
Main.html file:
● One <jsxmenubar> binary tag per Main.html file surrounds all the other tags that add menus to the
GoLive menu bar.
● The <jsxmenu> tag defines a custom menu that appears to the left of the Window menu in the GoLive
menu bar.
● The <jsxitem> tag defines a custom menu item that appears in a custom menu.
GoLive adds custom menus to the menu bar at the left of the Window menu. You cannot specify the order
in which GoLive loads multiple custom menus. However, the items in a menu always appear in the order
the
Main.html file defines them.
Your script can also add menu items and submenus to existing menus at run time, using a menu Object
addItem or addChild function. The addChild function can add either an item or a submenu; it creates
and returns the
creates both a submenu and its menu items, see "
When the user chooses a menu item, GoLive generates a menuSignal
target. Your extension must define a
and register it for with the
item for which it is registered.
Basic example
This example defines the custom menu shown below:
’s
menu or menuItem object as well as modifying the existing menu. For an example that
Context menu example" on page 51.
with that menuItem Object as its
menuSignal handler to implement the behavior of your menu item,
menuItem object. GoLive calls this function whenever the user chooses the
<jsxmenubar> // opens definition of all menus
40
Page 41

Adobe GoLive CS2 SDK
SDK Programmer’s Guide Menus and Toolbars 41
<jsxmenu name="Hello" title="Hello, GoLive!"> // custom menu
<jsxitem name="doThis" title="Do Something"> // menu item 1
<jsxitem name="doThat" title="Do Something Else" > //menu item 2
</jsxmenu> // closes definition of Hello menu
</jsxmenubar> // closes definition of all menus
<jsxmenu ... >
<jsxitem ... >
When GoLive runs this extension, the custom menu appears in the GoLive menu bar. When the user
chooses one of these custom menu items, GoLive calls the
function. The
<script> section of the Main.html file for the extension defines the handler function and
menuItem’s registered menuSignal handler
registers it for the proper event in each object where that event can occur:
<script>
// define handler functions
function doThisMenu(menuEvt) {
Window.alert("You chose the Do Something item.");
}
function doThatMenu(menuEvt) {
Window.alert("You chose the Do Something Else item.");
}
// register handlers with menu item objects
function initializeModule() {
menubar['Hello'].items['doThat'].addEventListener( 'menuSignal',
doThisMenu);
menubar['Hello'].items['doThat'].addEventListener( 'menuSignal',
doThatMenu);
}
</script>
Adding the menu bar tag
The <jsxmenubar> opening tag must precede all of the tags that define custom menus and custom
menu items. Its companion
menus and custom menu items. The
// Main.html file
<html>
<body>
<!-- The Hello GoLive Menu ------------------->
<jsxmenubar> // opens definition of all menus and menu items
// Tags that define your menu & menu items go here.
</jsxmenubar> // closes definition of all menus and menu items
</body>
</html>
</jsxmenubar> closing tag must close all the HTML that defines custom
Main.html file must contain only one <jsxmenubar> tag set.
Defining the Menu
Inside the <jsxmenubar></jsxmenubar> tags, the <jsxmenu> tag defines the name of your custom
menu. Its syntax looks like this:
<jsxmenu name="name" title="Menu text"></jsxmenu>
Page 42

Adobe GoLive CS2 SDK
SDK Programmer’s Guide Menus and Toolbars 42
The name attribute specifies the name used to access the menu in the JavaScript namespace, while the
title attribute specifies the text that appears as the menu’s title in the GoLive menu bar.
In this example, this defines the top level of the menu:
// Main.html file for Hello example
<html>
<body>
<!-- The Hello GoLive Menu ------------------->
<jsxmenubar> // opens definition of all menus and menu items
<jsxmenu name="Hello" title="Hello, GoLive!">
// Tags that define your menu items will go here.
</jsxmenu>
</jsxmenubar> // closes definition of all menus & menu items
</body>
</html>
You use the name, rather than the title, to access the menu when this extension is running:
myMenu = menubar["Hello"];
If you omit the name property or supply no value for it, GoLive uses the value of the title property as the
default value of
name. To retrieve the menu reliably, the name must be unique in the JavaScript
namespace.
Unlike most of the objects in an extension, menus are a resource shared by all extension modules. The
menus global array makes all menus defined by all extensions available to all extensions. If a <jsxmenu>
element’s
name attribute duplicates the name property of an existing menu object defined by any module
the SDK has already loaded, GoLive appends the element’s menu items to that existing menu.
Defining menu items
The <jsxmenu></jsxmenu> tags that define a custom menu enclose one or more <jsxitem> tags. Each
<jsxitem> tag defines a menu item that appears in the custom menu. The syntax for this tag is:
<jsxitem name="name" title="Item text" [dynamic]>
As for the menu itself, the name attribute specifies the name used to access the menu item in the
JavaScript namespace, while the
UI.
The optional
Initializing menu items
In the example, this defines the two custom menu items.
// Main.html file for Hello example
<html>
dynamic attribute specifies that this item needs to be initialized on startup. For details, see
<body>
<!-- The Hello GoLive Menu ------------------->
<jsxmenubar> // opens definition of all menus and menu items
<jsxmenu name="Hello" title="Hello, GoLive!">
<jsxitem name="doThis" title="Do Something">
<jsxitem name="doThat" title="Do Something Else">
</jsxmenu>
</jsxmenubar> // closes definition of all menus & menu items
</body>
title attribute specifies the text that appears in the menu in the GoLive
.
Page 43

Adobe GoLive CS2 SDK
SDK Programmer’s Guide Menus and Toolbars 43
</html>
These menu items appear in the menu in the same order that their definitions appear in the <jsxmenu>
element.
Creating submenus
A submenu is an item in a menu that cascades into another menu. To define a submenu, use the
<jsxmenu> within the <jsxmenu> tag set for the parent menu, among the <jsxitem> tags that define
the menu’s items. The submenu can include menu items that are themselves submenus.
For example:
<!-- Submenu Example ------------------->
<jsxmenubar>
<jsxmenu name="HelloMenu" title="Hello, GoLive!">
<jsxitem name="doThis" title="Do Something" dynamic>
<jsxitem name="doThat" title="Do Something Else">
<jsxmenu name="subMenu" title="Submenu">
<jsxitem name="toggle" title="Toggle Check for Subitem 2">
<jsxitem name="sub2" title="Subitem">
<jsxmenu name="anotherSubMenu" title="Yet Another Submenu">
<jsxitem name="anotherSubItem" title="Another Subitem">
</jsxmenu>
</jsxmenu>
</jsxmenu>
</jsxmenubar>
This produces the menu hierarchy shown here:
Notice that GoLive automatically adds the arrow indicating the submenu.
Defining menu behavior
You define the behavior of your menu by registering a handler for menu events that occur in each
menuItem object. When the user chooses a menu item, GoLive generates the menuSignal event, and calls
any handler for that event that is registered with that menu item. Your extension must define a handler
function that takes the desired action.
function myMenuItem1Select(menuEventObj) {
// code that acts on the user’s choice of menu item
}
Your extension must then register this handler with the menuItem object, which it would typically do in
the initialization function:
function initializeModule() {
item1=menubar['myMenu'].items['myMenuItem1'];
item1.addEventListener( 'menuSignal', myMenuItem1Select);
}
Page 44

Adobe GoLive CS2 SDK
SDK Programmer’s Guide Menus and Toolbars 44
Using one handler to react to multiple items
In this example, a single handler function that is registered with all of the items in the menu extracts the
name of the event target object, and uses it in a
menu item the user chose:
// define a handler for the menuSignal event
function doMenuItem(menuEvt) {
switch (menuEvt.target.name) {
case "doThis": Window.alert("You chose the Do Something item.");
break;
case "doThat": Window.alert("You chose the Do Something Else item.");
break;
default: Window.alert ("Something went wrong...");
}
}
// register the handler for both menu items
function initializeModule() {
item1=menubar['Hello'].items['doThis'];
item2=menubar['Hello'].items['doThat'];
item1.addEventListener( 'menuSignal', doMenuItem);
item2.addEventListener( 'menuSignal', doMenuItem);
}
switch statement that varies its actions according to the
Each case displays an alert box that simply names the menu item chosen, as shown here. This dialog closes
when the user clicks
OK.
Capturing events in the menu object
Events can be captured in the actual target’s parent object, which allows you to define your code at a
higher level, if you wish. To take advantage of this feature, use a third argument to the registration
function; the
function with the parent menu.
For example, to register the handler defined above at the menu level:
// register the handler for both menu items with the parent menu
function initializeModule() {
}
The target is still the item where the user clicked, so the handler code still prints the name of the clicked
item. If you register another handler at the item level, it is executed after this one. If you need to
distinguish which handler is executing, the
which object is currently handling the event.
capture argument defaults to false, but when you set it to true, you can register the
menubar['Hello'].addEventListener( 'menuSignal', doMenuItem, true);
localTarget property of the menuEvent object tells you
For details of how multiple handlers are executed when an event fires, see How registered event-handlers
are called in the GoLive CS2 SDK Programmer’s Reference.
Page 45

Adobe GoLive CS2 SDK
SDK Programmer’s Guide Menus and Toolbars 45
Complete simple menu example
Here is the complete Main.html file that defines a working Hello, GoLive! menu.
// Main.html file for Hello example
<html>
<head>
<meta http-equiv="content-type" content="text/html;charset=UTF-8">
<meta name="generator" content="Adobe GoLive 6">
<title>Menus Extension</title>
</head>
<body>
<script>
// define a handler for the menuSignal event
function doMenuItem(menuEvt) {
switch (menuEvt.target.name) {
case "doThis": Window.alert("You chose Do Something item.");
break;
case "doThat": Window.alert("You chose Do Something Else item.");
break;
default: Window.alert ("Something went wrong...");
}
}
// register the handler for both menu items with the parent menu
function initializeModule() {
menubar['Hello'].addEventListener( 'menuSignal', doMenuItem, true);
}
</script>
<!-- The Simple Menu ------------------->
<jsxmenubar>
<jsxmenu title="Hello, GoLive!">
<jsxitem name="doThis" title="Do Something">
<jsxitem name="doThat" title="Do Something Else">
</jsxmenu>
</jsxmenubar>
</body>
</html>
Assigning Keyboard Shortcuts to Menu Items
You can assign a keyboard shortcut to a menu item dynamically at run time, using the menuItem Object’s
setShortCut function. This function takes as its arguments a modifier string and an alphabetic character.
The item’s handler is executed when the user presses all specified modifiers with the specified character.
For example:
menus['file'].items['btBrowse'].setShortCut('control+alt','o');
Modifier keys include shift, control, and alt. You can specify the single value control, or any two or
three values combined with a plus operator. All of these are legal values:
"control"
"control+shift"
"control+alt"
Page 46

Adobe GoLive CS2 SDK
SDK Programmer’s Guide Menus and Toolbars 46
"shift+alt"
"control+shift+alt"
You cannot, however, specify only alt or only shift.
The value
assigns the A
resulting shortcut key combination in Windows is C
"control" assigns the CTRL key in WIndows, and the CMD key in MacOS. The value "alt"
LT key in Windows, and the OPT key in Mac OS. In the example above, for instance, the
TRL+ALT+o, and in Mac OS is CMD+OPT+o.
You are responsible for assigning a keyboard shortcut that is not already in use. If there is a conflict, the
result is unpredictable.
Setting a Menu Item’s State Programmatically
You can enable or disable menu items programmatically, and check or uncheck items. You can choose to
initialize a menu item’s enabled or checked state dynamically when it is first displayed.
Setting a menu item’s checked state
You can s e t a menuItem object’s checked property to specify whether GoLive is to place a check mark
next to the object’s corresponding menu item. A value of
mark, as shown for the
Subitem menu item in the example above. The actual appearance of the checked
state depends on the host operating system.
In this example, the registered handler for the
user chooses the
<!-- Check mark Example ------------------->
Toggle Check for Subitem 2 menu item.
menuSignal event toggles this property each time the
true specifies that the menu item has a check
<jsxmenubar>
<jsxmenu name="myMenu" title="Hello, GoLive!">
<jsxitem name="doThis" title="Do Something">
<jsxmenu name="subMenu" title="Submenu">
<jsxitem name="toggle" title="Toggle Check for Subitem 2">
<jsxitem name="sub2" title="Subitem">
</jsxmenu>
<jsxitem name="doThat" title="Do Something Else">
</jsxmenu>
</jsxmenubar>
<script>
function initializeModule() {
menubar['myMenu'].items['toggle'].addEventListener( 'menuSignal',
function(e){e.target.checked = !e.target.checked;});
}
</script>
Setting a menu item’s enabled state
You can s e t a menuItem object’s enabled property to specify whether the menu item is enabled or
disabled. This is a Boolean property; when the value is
false, the menu item is disabled or inactive; it is “grayed out” and does not respond to clicks. Menu items
true, the item is enabled, or active. When it is
Page 47

Adobe GoLive CS2 SDK
SDK Programmer’s Guide Menus and Toolbars 47
are enabled by default. You do not need to set enabled to true unless you have previously disabled the
item.
This figure show an enabled menu item, which is drawn in black and can be chosen by the user, and a
disabled menu item, which is drawn in gray and cannot be chosen by the user.
active or enabled, can be selected
inactive or disabled, cannot be selected
This example creates these menu items, and a
enabled property explicitly to disable it.
<!-- Enable/Disable Example ------------------->
<jsxmenubar>
<jsxmenu name="myMenu" title="MyUniqueMenuName">
<jsxitem name="enableItem" value="Enabled">
<jsxitem name="disableItem" value="Disabled">
</jsxmenu>
</jsxmenubar>
<script>
. . .
function initializeModule() {
menubar['myMenu'].items['disableItem'].addEventListener( 'menuSetup',
function(e){ e.target.enabled = false; });
}
. . .
</script>
This script accesses the MyMenu menu and the disableItem menu item in the global namespace to
register the handler that sets the
Initializing menu items
menuSetup event handler sets a menuItem object’s
enabled property.
You can specify an initial checked or enabled state for a menu item, if you specify that the item is dynamic.
The optional
dynamic attribute of the <jsxitem> tag marks its menu item as one that GoLive initializes
before displaying the menu. This attribute takes no value; if it is present, the item is initialized. You provide
the initialization behavior by implementing an event handler for the menuSetup
event, and registering it
with the dynamic menu item.
Each time the user opens a menu defined by an extension, GoLive triggers the
calls any handler function that is registered for each of the items that provide the
menuSetup event, and
dynamic attribute. The
handler can then initialize the item for display, setting, for example, its checked and enabled states, and its
initial value.
In this example, both menu items require dynamic initialization.
<jsxmenubar>
<jsxmenu name="BGColr" title="Background">
<jsxitem name="bgcolred" title="Set BG Red" dynamic>
<jsxitem name="bgcolgrn" title="Set BG Green" dynamic>
</jsxmenu>
</jsxmenubar>
Page 48

Adobe GoLive CS2 SDK
SDK Programmer’s Guide Menus and Toolbars 48
The setColorMenu function for the extension that defines these menu items sets the enabled and
checked states of each menu item, according to whether the current document’s background color is red,
green, or some other color.
<script>
// define handler fn
function setColorMenu( menuEvt )
{
// begin with menu item unchecked
menuEvt.target.checked = false;
if (document && document.documentElement)
{// set enabled & checked states according to background color
var tree = document.documentElement;
var bodyElement = tree.getSubElement("body");
if (bodyElement)
{
var colorAttribute = bodyElement.getAttribute(‘bgcolor’);
switch (menuEvt.target.name)
{
// allow user to change color to red if isn't red now
case "bgcolred":
// place checkmark at menu item if bgcolor is red now
menuEvt.target.enabled = (colorAttribute != "red")
menuEvt.target.checked = (colorAttribute == "red")
break;
// allow user to change color to green if isn't green now
case "bgcolgrn":
// place checkmark at menu item if bgcolor is green now
menuEvt.target.enabled = (colorAttribute != "green")
menuEvt.target.checked = (colorAttribute == "green")
break;
} // end switch
} // end if bodyElement
} // end if document
else
{// disable dynamic menu items if no document or no element
menuEvt.target.enabled = false;
}
}
// register handler fn
function initializeModule() {
app.addEventListener( 'menuSetup',setColorMenu);
}
</script>
Adding Items to GoLive Menus
Besides adding your own menus on the GoLive menu bar, you can add new menu items to the existing,
predefined GoLive menus. Typically, an extension adds items to the
items to the other menus.
Special menu, but you can also add
Page 49

Adobe GoLive CS2 SDK
SDK Programmer’s Guide Menus and Toolbars 49
To add your own menu items to an existing menu, place your <jsxitem> tags inside a <jsxmenu>
element whose
from the global
file
edit
type
special
view
window
help
site
diagram
movie
name attribute has that menu’s name. Your script can access all existing menus by name
app.menubar array. The names of predefined menus are:
Menu items that you add can be appended to the bottom of the menu, or placed with respect to existing
items. When GoLive appends multiple custom items to a menu, their order in the menu reflects the order
in which GoLive loaded the modules that define the menu items, as well as the order in which each
extension’s
Main.html file defines them when read from top to bottom. You cannot control the order in
which GoLive loads modules, but each extension’s menu items always appear in the order that the
Main.html file defines them.
This example adds items to the Special menu:
<jsxmodule name="DynamicMenus">
<jsxmenubar>
<jsxmenu name="special">
<jsxitem name="one" title="Special One" location="end" dynamic>
<jsxitem name="two" title="Special Two" location="end">
<jsxitem name="three" title="Special Three"location="end">
</jsxmenu>
</jsxmenubar>
<script>
initializeModule() {
app.addEventListener( "menuSetup", menuSetupHandler );
app.addEventListener( "menuSignal", menuClicked );
}
function menuSetupHandler( evObj ) {
if (evObj.target.name == "one" )
item.checked = !item.checked;
}
function menuClicked( evObj ) {
if (evObj..target.name == "one")
alert ("Selected: " + item.title);
}
</script>
When the module containing this code is loaded, you see the menu items Special One, Special Two, and
Special Three at the end of the
Special menu.
You can place items in an existing submenu by specifying the location and the submenu’s JavaScript
name. For example, this adds an item to the end of the Templates submenu in the Special menu:
<jsxmenubar>
<jsxmenu name="TMPL">
<jsxitem name="myTemplate" title="My Template"
Page 50

Adobe GoLive CS2 SDK
SDK Programmer’s Guide Menus and Toolbars 50
location="end" >
</jsxmenu>
</jsxmenubar>
You can also place items in a menu with respect to exiting items, using the JavaScript name of the existing
menu item, and a
location value of before or after. For example, this adds a menu item immediately
before the first separator in the Special menu:
<jsxmenubar>
<jsxmenu name="special">
<jsxitem name="myItem" title="My Special Item"
location="before" lname="dsp1" >
</jsxmenu>
</jsxmenubar>
The JavaScript names of both submenu entries and menu items are provided in Appendix B, “Menu
Names of the GoLive CS2 SDK Programmer’s Reference.
Extending Context Menus
The GoLive CS2 SDK provides limited access to some of GoLive’s context menus, through the context
menu events. These events are triggered when the user opens or makes a selection in the context menu.
You can extend the context menus by adding submenus or menu items. You do not define these
submenus and menu items in XML; rather you create them programmatically, in an event handler that is
called when the context menu is first created. The same handler is called whenever the user opens the
context menu or selects an item in it. Your handler should provide the behavior of any menu items you
have added.
Events provide access to the following context menus:
Event Generated for:
cmImageBox
cmTextSelection
cmLayout
cmLayoutSubDoc
cmLayoutSubView
cmSource
cmSiteSectionPDF
cmSiteSectionPublish
Context menu for images in the Layout view.
Context menus for text selections in the Layout view.
Context menus in the Layout view.
The Document submenu of context menus in the Layout view.
The View submenu of context menus in the Layout view.
Context menus in the Source view.
The context menu for the Export Adobe PDF Preset dialog.
The Publish Server section of the context menu for files listed in the
Site window.
cmSiteSectionLinks
cmSiteSubLinks
cmSiteSubNew
The context menu for files listed in the In & Out Links palette.
The Update Files Dependent On submenu of the context menu for
files listed in the Site window.
The New submenu of the context menu for the Site window.
Page 51

Adobe GoLive CS2 SDK
SDK Programmer’s Guide Menus and Toolbars 51
Event Generated for:
cmSiteSubOpen
The Open submenu of the context menu for files listed in the Site
window.
cmSiteSubPublish
The Publish Server submenu of the context menu for the Site
window.
cmSiteSubSettings
The Settings submenu of the context menu for the Site window.
Registering context menu handlers
The target for all context-menu events is the app Object. That is, to register a handler for any of the events,
register it with the
view’s context menu:
<script>
// define handler
function myLayoutCMSub(cmEvt) {
//body of function adds submenu, responds to selection
}
// register handler with app
function initializeModule() {
app.addEventListener( 'cmLayout', myLayoutCMSub);
}
</script>
app object. For example, to register a handler that adds a submenu to the Layout
Defining context menu handlers
Handlers are passed the contextMenuEvent object; this object’s action property contains the specific
action that generated the event. Actions are:
close: A submenu was closed.
: The context menu has been set up; the script can add submenus or menu items to it.
extend
: A submenu was opened.
open
: The context menu is about to open; the script can set the enabled state of items.
setup
: A menu item was clicked.
signal
Your handler must check the action, and provide a response:
● To add submenus and menu items, check for the extend action, which occurs when the menu is first
created.
● To respond to a menu item selection, check for the signal action. This is like the menuSignal event for
menu-bar menus.
● To enable or disable menu items, check for the setup action. This is like the menuSetup event for
menu-bar menus.
➤ Context menu example
This example adds a new item and a submenu with two items to the Layout view context menu, in
response to the extend action. When one of the new items is selected, this handler prints out a notification
in response to the signal action:
function startModule()
{
app.addEventListener ( 'cmLayout',
Page 52

Adobe GoLive CS2 SDK
SDK Programmer’s Guide Menus and Toolbars 52
function( cmEvt ) {
switch( cmEvt.action ) {
case 'extend': {
cmEvt.menu.addChild( 'item', 'TestItem', 'TestItem', true );
var sm = cmEvt.menu.addChild( 'menu', 'TestMenu', 'TestMenu',
true );
sm.addChild( 'item', 'Sub1' );
sm.addChild( 'item', 'Sub2' );
}
break;
case 'signal':
writeln( 'Context Menu Event: ' + cmEvt.type + ' , '
+ cmEvt.action + ' for item: ' + cmEvt.menu.title );
break;
}
);
}
Creating Toolbars
Your extension can add toolbars to the GoLive main toolbar. A toolbar is represented programmatically as
a window Object
; in Windows, it can be undocked from the main toolbar and displayed as a separate
window. You can use the window object’s properties to show and hide it, for example. For a complete
discussion of windows, see Chapter 5, “
Your extension can define a toolbar in XML using the
Windows and Controls."
<jsxtoolbar> element. As a window, the toolbar
contains controls, which are typically (but not necessarily) buttons with icons. You can define the toolbar
contents in the XML as
For example, the following creates a toolbar called "My Toolbar," represented by a
<jsxcontrol>elements contained within the <jsxtoolbar> tags.
window object with the
name "myToolbar," which contains two button icons and a popup menu:
<jsxtoolbar name="myToolbar" title="My Toolbar" width="200">
<jsxcontrol name="tbbutton1" picture="icon1" type="button" value=""
posx="2" posy="2" height="20" width="24" />
<jsxcontrol name="tbbutton2" picture="icon2" type="button" value=""
posx="28" posy="2" height="20"width="24" />
<jxscontrol name="testPopup" posx="55" posy="2" type="popup"
value="one,two,three" height="100" width="100" />
</jsxtoolbar>
The icons in this example are defined by <img> tags:
<img src="testIcon1.gif" alt="" name="icon1" height="19" width="24"
border="0">
<img src="testIcon2.gif" alt="" name="icon2" height="19" width="24"
border="0">
To make the toolbar controls respond to user interaction (a mouse click, for example), you must define and
register event handlers for them; see "
Providing Behavior for Controls" on page 73.
When you create a toolbar in XML, it is automatically visible in the main toolbar, and its title is
automatically added to the toolbars section of the Window menu. When you undock the toolbar (on
Windows) the title appears as the title of the separate window.
Page 53

Adobe GoLive CS2 SDK
SDK Programmer’s Guide Menus and Toolbars 53
You cannot create toolbars programmatically, and you cannot access the toolbar’s window object through
the
Window.find method. The toolbar windows are, however, in the dialogs list, and can be accessed by
name.
● The window object’s visible property controls whether the toolbar is shown.
● You can add controls programmatically using the toolbar window object’s add method. See "Adding
Controls to Windows" on page 66.
The controls on the toolbar are in the
children list of the toolbar object, and can be accessed by name.
For example, to register an event handler for one of the toolbar buttons defined above:
<script>
function initializeModule() {
tb = dialogs["myToolbar"];
tb.children["tbbutton1"].addEventListener("onClick",
"function (e){writeln(e.target.name + "was clicked.");});
}
</script>
The visible property of an individual control determines whether it appears on the toolbar when the
toolbar is shown.
Page 54

5
Win dows a nd Control s
This chapter describes the different types of windows and how to create them, how to add various kinds of
controls to the windows, and how to define the behavior of the controls.
Types of Windows
The SDK window Object represents windows that you create in extensions, and also gives you access to
GoLive windows. The static functions of the Window Class
(including the GoLive JavaScript Debugger—see Chapter 13, “
access to the predefined dialogs: alert
allow you to retrieve existing windows by type
Debugging Scripts”) and also give you
, confirm, and prompt.
When you create windows for your extension, using the
<jsxinspector> tags, they are represented in GoLive by window objects. In addition to giving you
programmatic access to the window itself, this object allows you to add controls to the window
dynamically (in addition to those defined statically in your extension); see Adding controls to a window
dynamically.
Dialog windows
The SDK provides tags you can use to create two kinds of dialog windows:
● A modal dialog. This window requires a response before allowing the user to proceed. It contains a
control, such as an
dialogs. A dialog defined with the
● A modeless dialog. This window floats above open document windows without requiring a user
response. It is never terminated but can be hidden. The Objects palette and the
examples of palette
displayed modelessly.
When an extension includes one of these tags, GoLive creates a window Object
You can get these objects by name from the global dialogs
The means by which you open or close a dialog depends first on whether the dialog is modal or modeless.
● For information on creating, opening, and closing a modal dialog, see Modal Dialog Windows.
<jsxdialog>, <jsxpalette>, and
OK button, that can dismiss the dialog. The alert windows are examples of modal
<jsxdialog> tag is displayed modally.
Inspector window are
windows. A dialog defined with the <jsxpalette> or <jsxinspector> tags is
to represent the window.
array.
● For information on creating, opening, and closing a palette, see Palette Windows. The <jsxpalette>
and
<jsxinspector> dialogs are both modeless, but they are displayed and hidden differently.
Positioning windows
You can specify the position and size of a window when you create it, using attributes of the
<jsxdialog> or <jsxpalette> tag. When GoLive reads such a tag and creates a window object, these
attributes become properties of the object, so you can change the coordinates or size of the window by
setting the
The
frameBounds property of the window object provides a more convenient way to get or set the size
and placement of the dialog window it draws. This property holds a bounds Object
and location of this window’s frame.
x, y, width, and height properties.
that contains the size
54
Page 55

Adobe GoLive CS2 SDK
SDK Programmer’s Guide Windows and Controls 55
The frameBounds property of the Inspector window is read-only. When the Inspector window is inactive,
the dimension values are all zero. For other kinds of dialogs, assigning a new
bounds object to this
property sets the associated dialog window’s size and location.
// assume we created <jsxpalette name="myPalette" ... >
// get myPalette from the global dialogs array
var dlg = dialogs["myPalette"];
// hide it if its showing
if (dlg.visible == true)
dlg.visible = false;
// new location is (10, 10) and new size is 100x100 pixels
dlg.frameBounds = {location:{x:10, y:10}, size:{width:100, height:100}};
// show the palette
dlg.visible = true;
Using the Dialog Editor tool
The SDK provides a tool called the Dialog Editor in the SDK Extend Scripts folder. To use it, you
must select it in the Modules panel of the Preferences dialog, and restart GoLive—see Installing the core
set of tools and sample extensions.
The
Dialog Editor helps you to use GoLive as a visual editor in which to design your extension’s
dialogs, palettes, and inspectors. The tool adds the
Dialog Editor object types commonly-used dialog
controls to the Objects palette. In addition to being a very useful application-building tool, the
Editor
is itself a sample of a GoLive extension, which you can study to help you design and build your
own extensions.
➤ To use the Dialog Editor tool:
1. Open the extension’s Main.html file in the GoLive Layout view.
2. Open the Objects palette.
3. Select the
Objects palette
Layout Grid entry
Dialog Editor object type from the object type menu.
object type menu
Dialog
Page 56

Adobe GoLive CS2 SDK
SDK Programmer’s Guide Windows and Controls 56
4. Begin by creating a layout grid that will contain the other controls in the dialog. Drag the Layout Grid
palette entry onto the GoLive document window.
A Layout Grid object appears.
Layout Grid object
Inspector for
selected object
The Layout Grid object will become a
<table> element in the dialog window you are creating.
5. In the document window, click the Layout Grid object once to select it. A border and handles appear,
and the Inspector window displays the layout grid’s properties.
6. Drag the handles or use the controls in the Inspector window to set the size and position of the Layout
Grid object to the size you want for the new dialog window.
7. Define your dialog’s content:
● For each control, drag an icon from the Dialog Editor palette onto the Layout Grid object in the
document window.
GoLive creates a new element and displays its inspector window.
● Set the new element’s name attribute to a unique value.
Page 57

Adobe GoLive CS2 SDK
SDK Programmer’s Guide Windows and Controls 57
Static Text object
Checkbox object
Note: Controls dropped on a layout grid are implemented as table elements. Such controls ignore the
width and height attributes their enclosing dialog specifies. Instead, they use the table’s width
and
height attributes as the size of their enclosing container.
8. Select the finished dialog by clicking the Layout Grid once.
9. Display the Source Code tab.
Static Text
object
Checkbox
object
When the Layout Grid is selected, the Source Code window highlights the code that defines the dialog.
You can edit the code if you want.
This generated code defines the window and its controls. You must add code to display and dismiss the
window; see Modal Dialog Windows
implement the behavior of the controls you have added; see Providing Behavior for Controls
and Palette Windows. You must also define event handlers to
.
Page 58

Adobe GoLive CS2 SDK
SDK Programmer’s Guide Windows and Controls 58
Modal Dialog Windows
This section describes how to define a modal dialog window, add controls to it, display it, and interpret the
returned values.
Defining the modal dialog window
The <jsxdialog> element defines a modal dialog window. Other tags define the window content, such
as text and buttons. This tag has the following syntax:
<jsxdialog name="objectName" title="winTitle" width="NumOfPixels"
height="
</jsxdialog>
When it loads the extension that contains this tag, GoLive creates a window Object to represent the
window. If you supply the optional
can get the object by its JavaScript name from the global dialogs
Windows, not on Mac OS.
This example defines an empty modal dialog window:
NumOfPixels" [resize]>
resize attribute, the resulting dialog is interactively resizeable. You
array. The window title appears only on
<jsxdialog name="testDialog" title="Test Dialog" width="215" height="200">
// jsxcontrol tags defining content such as text & controls go here
</jsxdialog>
● You must add <jsxcontrol> tags that define the UI controls in the window. See Adding Controls to
Windows.
● Every <jsxdialog> element must contain at least one <jsxcontrol> element that can dismiss the
modal dialog; otherwise, the user cannot exit the dialog. See Closing a modal dialog
Opening and closing modal dialogs
A modal dialog is one that grabs the mouse and keyboard focus, allowing no user input in other windows
until the user dismisses it. In GoLive, the function that opens the dialog does not return until the user
dismisses the dialog. When the user does dismiss it, GoLive passes a value to the function with which you
opened the dialog, which tells it what specific action the user took.
● To di splay a window object defined with the <jsxdialog> tag, call the object’s show method. See
Displaying a modal dialog
● The user must dismiss a modal dialog by interacting with its controls. See Closing a modal dialog.
Displaying a modal dialog
To display a modal dialog, call the window object’s show function. This function does not return until the
user dismisses the dialog. When the
.
show function completes, it returns one of the following values:
.
0: The user clicked
1: The user clicked
2: The user interacted with a control other than the
Your extension can use this return value to take appropriate action. For example, if the
Cancel.
OK.
OK or Cancel buttons.
show function
returns 1, your extension would accept the current values of the controls in the dialog as valid user input. If
it returns 0, your extension would discard the user’s input to the dialog.
Page 59

Adobe GoLive CS2 SDK
SDK Programmer’s Guide Windows and Controls 59
After the dialog closes, all of its control objects remain available in the JavaScript namespace, and you
can continue to access their property values.
The following example shows two ways to use the
● For a dialog that allows the user only to accept or reject the choice it offers, you can use the
straightforward approach of the
● For a dialog that offers several exit points, take the approach demonstrated by the myRegDialog
case—it uses the
show function’s return value in a switch statement to determine its actions
mySimpleDialog case.
show function’s return value.
according to the button that dismissed the dialog.
// define handler for menu items
function whichDialog(menuEvt) {
switch(menuEvt.target.name) {
// how to call show for simple Cancel/OK dialog
case "mySimpleDialog":
if (myOtherDialog.show())
Window.alert("That was a wise decision!");
else
Window.alert ("Are you sure you want to cancel?");
break;
// how to call show for multi-button dialog
case "myRegDialog":
// shareware registration dialog example
switch (myRegDialog.show())
{
case 1:
// accept user input
var userName = myDialog.myNameField.value;
var credit = myDialog.myCreditCardField.value;
break;
case 0:
// restore defaults
myDialog.myNameField.value = "";
myDialog.myCreditCardField.value = "";
break;
case 3:
// a third alternative
myDialog.myNameField.text = "Demo User";
myDialog.myCreditCardField.value = "DEMO DEMO DEMO DEMO";
setUpAsDemoVersion();
break;
} // end switch myRegDialog.show
break;
} // end switch menuItem
} // end function
// register handler
function initializeModule() {
app.addEventListener( 'menuSignal', whichDialog, true);
}
Page 60

Adobe GoLive CS2 SDK
SDK Programmer’s Guide Windows and Controls 60
Closing a modal dialog
To close a modal dialog window, you must add one or more controls that can dismiss it. There are two
ways to dismiss a dialog:
● Any control created with a name attribute of dialogok, dialogcancel, or dialogother closes the
dialog automatically when the user clicks that control. A control with any other name does not
automatically dismiss its dialog.
● The hide method of the window Object dismisses the dialog unconditionally. The argument to this
method specifies the value that the
event handler that executes the
Creating a Cancel button
A control of type button with name dialogcancel is a pushbutton that closes its dialog. This
example defines a
<jsxcontrol type="button" name="dialogcancel" value="Cancel"
</jsxcontrol>
Cancel button:
posx="80" posy="138" width="60" height="18">
Creating an OK button
show method returns when it exits. You can add a control with an
hide function; see Providing Behavior for Controls.
GoLive recognizes a control of type button with name dialogok as a button that closes the dialog
when the user clicks it. Additionally, this button has a special outlined appearance that identifies it as the
default choice in the dialog—that is, its action is executed when the user presses the R
You can make any
true. This example defines an OK button whose enterOK property is automatically set to true:
<jsxcontrol type="button" name="dialogok" value="OK"
</jsxcontrol>
Palette Windows
The Window menu contains a list of all palettes defined in loaded modules; they are hidden until selected.
Selected (visible) palettes are checked in the menu. GoLive defines some palettes, such as the Objects
palette and the Inspector, but your extension can define additional palettes.
The <
jsxpalette> tag creates a floating palette window that provides its own palette menu. When you
load an extension containing this tag, GoLive creates a window Object
When it loads your extension, GoLive adds the palette window’s title to the Window menu. For example,
the palette shown in this figure appears as the
always exists while GoLive is running. When the user closes it, GoLive hides the palette from view, but does
not destroy the
ETURN or ENTER key.
edit or button control behave this way by setting the control’s enterOK property to
posx="80" posy="138" width="60" height="18">
to represent it.
Script Palette item in the Window menu. A palette window
window object for the window.
Page 61

Adobe GoLive CS2 SDK
SDK Programmer’s Guide Windows and Controls 61
A <jsxpalette> element has this syntax:
<jsxpalette name="objectName" title="TitleOfPalette"
width="
// for controls, add <jsxcontrol> elements here
// for palette menu, add <jsxmenu> and <jsxitem> elements here
</jsxpalette>
NumOfPixels" height="NumOfPixels" >
The title attribute defines the palette’s title as it appears in the Window menu and on the tab of the
palette window.
● The palette window can contain any of the user-interface controls, defined by <jsxcontrol> tags
within the
dialogother do not close or hide the window, as they do for modal dialogs. For more information,
see Adding Controls to Windows
● Each palette can have its own right-corner flyout menu. To define a menu for your palette, add
<jsxmenu> and <jsxitem> elements within the <jsxpalette> tags. You cannot define more than
<jsxpalette> tags. For a palette, the special names dialogok, dialogcancel, or
.
one menu for each palette, but that palette menu can define submenus.
This example creates the palette shown in the figure above.
<!-- Palette ------------------->
<jsxpalette name="myPalette" title="Script Palette" width="215"
height="164">
<jsxcontrol type="custom" name="custom" posx="10" posy="10"
width="112" height="32">
<jsxcontrol type="Button" name="button" value="Hello?"
posx="48" posy="96" width="112" height="32">
<!-- Palette Menu ------------------->
<jsxmenu name="firstMenu" title="test">
<jsxitem name="item1" title="Item 1" dynamic>
<jsxitem name="item2" title="Item 2">
<jsxitem name="item3" title="Item 3">
<jsxitem name="item4" title="Item 4">
</jsxmenu>
</jsxpalette>
Showing and hiding palettes
By default, GoLive displays your palette window the first time it loads the extension that provides the
<jsxpalette> tag. In subsequent user sessions, GoLive displays or hides the palette according to
whether it was displayed or hidden at the end of the previous GoLive user session.
To show or hide a palette window programmatically, assign a Boolean value to the
window object. Set it to false to hide the window, and set it to true to display the window.
its
visible property of
Page 62

Adobe GoLive CS2 SDK
SDK Programmer’s Guide Windows and Controls 62
// assume we created <jsxpalette name="myPalette" ... >
// get myPalette from the global dialogs array
var dlg = dialogs["myPalette"];
// show it if its hidden
if (dlg.visible == false)
dlg.visible = true;
Only <jsxpalette> dialogs provide this behavior. The visible property is read-only in the window
objects that
<jsxinspector> or <jsxdialog> elements create.
Reading a value of
true for the visible property indicates only that the palette is not hidden; it does
not guarantee that it is positioned within the boundaries of the user’s screen. Dialogs that use offscreen
drawing techniques can have a visible value of
system’s screen. For more information, see Using the Dialog Editor tool
true when displayed outside the boundaries of the host
.
The Inspector window
GoLive provides a single Inspector window that all extensions share. When a box Object becomes the
focus of input in Layout view, GoLive populates this Inspector with controls provided by the
<jsxinspector> element that has the same classid value as the box object.
Before actually displaying the new controls, the SDK calls any handler that is registered for the
inspectEvent in the box object or custom control object. Your handler initializes the Inspector’s
controls with values it retrieves from the target
When the input focus changes to another object, the Inspector is repopulated with that object’s controls.
Interaction with a control invokes any registered event handlers; see Providing Behavior for Controls
The user can show or hide the current Inspector or any other palette window by choosing its name from
the
Window menu. JavaScript callers cannot control the display of the Inspector window.
box object or custom element being inspected.
.
Page 63

Adobe GoLive CS2 SDK
SDK Programmer’s Guide Windows and Controls 63
Control Containers
A window can use containers called panels, to group controls. You can define reusable groups of controls,
called panel resources. You can define tabbed panels, such as those in a palette, and split panels that
contain exactly two subpanels with a movable boundary line.
Creating panels
A panel, also called a view, is simple a rectangular area that can contain controls or other panels or groups.
You define it using the
<jsxdialog ...>
<jsxview name="JSname" title="
height="
<!-- Controls definition here -->
</jsxview>
</jsxdialog>
You can also define a panel outside a window, as a panel resource. A panel resource defines a reusable
group of controls. One resource definition can be reused in a number of windows. For a panel resource,
omit the position parameters:
<jsxview> tag. You can define it directly inside a dialog or palette:
viewTitle" width="numPixels"
numPixels" posx="numPixels", posy="numPixels">
<jsxview name="resourceName" title="resourceTitle" width="numPixels"
height="
<!-- Control definitions here -->
</jsxview>
After it is defined, you can include a resource in a window, specifying it by name and setting the position.
For example:
<jsxdialog name="UIResourceTest" title="UIResourceTest" width="" height="">
<jsxview resource="myResPanel" name="Test Panel" posx="10" posy="10">
</jsxdialog>
The panel resource is included in the window along with all of its controls.
A panel is represented in GoLive by the JavaScript panel Object
define statically, as part of the panel definition, you can add controls to a panel dynamically, using the
panel object’s add method; see Adding controls to a window dynamically.
You can create also create a panel programmatically by adding a control of
object using its
add method.
Creating tab panels
A tab panel contains subpanels that are all the same size, but have a labeled tab at the top. They overlay
one another, and only the top one is visible, except for the tabs. The user can select a panel (bring it to the
top) by clicking the tab. There are many examples of tabbed windows in GoLive, such as the Image
Property Inspector. The tab panel cannot contain controls directly; it contains only the subpanels as direct
children, and these in turn contain controls.
numPixels">
. In addition to those controls that you
type="panel" to a window,
You define a tab panel using the
window element such as
the tab panel element, or you can use panel resources. For example:
<jsxdialog name="UITabTest" title="UITabTest" width="" height="">
<jsxdialog>. You can define the subpanels and their controls directly inside
<jsxtabview> tag. The tab panel element must be defined within a
Page 64

Adobe GoLive CS2 SDK
SDK Programmer’s Guide Windows and Controls 64
<jsxtabview posx="10" posy="9" width="235" height="136">
<jsxview resource="tabpanel1" name="tabpanel1"
height="84" width="201">
<jsxview resource="tabpanel2" name="tabpanel2"
height="84" width="201">
<jsxview resource="tabpanel3" name="tabpanel3"
height="84" width="201">
</jsxtabview>
</jsxdialog>
The tab panel is represented in GoLive by the JavaScript tabpanel Object. You can create also create a tab
panel programmatically by adding a control of
type="tabpanel" to a window, object using its add
method.
Creating split panels
A split panel contains exactly two subpanels, which can be arranged horizontally or vertically. The
boundary between the two panels can be moved with the mouse. A split panel can be contained in a
dialog, palette, or inspector window, or in another panel. You define it using the
The following example creates a split panel whose two subpanels each contain one control. One contains
a file list and the other a hierarchy.
<jsxsplitview> tag.
<jsxpalette name="splitlist" title="Splitlist" width="200" height="200">
<jsxsplitview posx="0" posy="0" width="200" height="200"
halign="scale" valign="scale">
<jsxview posx="0" posy="0" width="100" height="200"
halign="scale" valign="scale">
<jsxcontrol type="filelist" value="add items" posx="0" posy="0"
width="100" height="200" halign="scale" valign="scale">
</jsxview>
<jsxview posx="0" posy="0" width="100" height="200"
halign="scale" valign="scale">
<jsxcontrol type="hierarchy" value="items" posx="0" posy="0"
width="100" height="200" halign="scale" valign="scale">
</jsxview>
</jsxsplitview>
</jsxpalette>
This code fragment does not set up the contents of the controls. For the complete example, see Creating
hierarchies and file lists.
The split panel is represented in GoLive by the JavaScript splitpanel Object
split panel programmatically by adding a control of
add method.
type="splitpanel" to a window, object using its
. You can create also create a
Page 65

Adobe GoLive CS2 SDK
SDK Programmer’s Guide Windows and Controls 65
Autolayout of Localized Controls
GoLive translates UI strings to the language for the current locale of the computer it is running on. For
details, see Dynamic UI Localization
languages, this can affect the appearance of your control layout.
. Because the length of the string can be different in different
You can include the
feature for that window. When autolayout is enabled, GoLive automatically adjusts the sizes and locations
of controls to allow for different string lengths in different languages. It can resize static text fields to grow
or shrink with changes in language, and move controls to accommodate other controls that have changed
size.
The
<jsxlayoutline> tag defines a vertical line in the window. The specified location of the line is
shown as a red, dashed line in the figure, but is not actually displayed in GoLive. The controls on one side
of the line change size to allow for localized strings, and the controls on the other side change position to
accommodate the changes in the first group. By default, those on the left change size, and those on the
right change position.
<jsxlayoutline> tag in a window or panel definition to enable the autolayout
layout line
The inspector for the
length, define the position of the line in the window. If you set direction to true, the default behavior
is reversed: controls to the right of the line change size, and those to the left of the line change position.
<jsxlayoutline> tag is shown at the right of the figure. The attributes, x, y, and
Page 66

Adobe GoLive CS2 SDK
SDK Programmer’s Guide Windows and Controls 66
Adding Controls to Windows
Use the <jsxcontrol> tag to define a variety of UI controls within a dialog window. The value of its type
attribute specifies whether the tag defines a pushbutton, checkbox, radio button, text field, popup menu,
or custom control. For a complete list of allowed types, see the GoLive CS2 SDK Programmer’s Reference.
● In addition to the control types provided by the SDK, you can create custom controls; see Creating
Custom Controls.
● You can also customize a control’s response to user interaction; see Providing Behavior for Controls.
When it loads an extension containing a
Depending on the
that control. For example, a
type value, the object has a set of JavaScript properties and functions appropriate to
control of type button provides the appearance and behavior of a
<jsxcontrol> tag, GoLive creates a control Object Types.
pushbutton.
All
control objects have common behaviors, such as the ability to draw themselves in the location you
specify. They also have common attributes, such as those which specify the control’s position. Any of your
<jsxcontrol> tags can define these attributes, and your JavaScript code can get or set the
corresponding properties in the
The
<jsxcontrol> tag can accept the following attributes:
<jsxcontrol type="KindOfControl" name="JavaScriptName"
value="
width="
halign="
control objects.
InitialValue" posx="NumOfPixels" posy="NumOfPixels"
NumOfPixels" height="NumOfPixels"
option" valign="option" >
All attributes are required, except halign and valign, which are not used for modal dialogs. For details
of the attribute values, see the GoLive CS2 SDK Programmer’s Reference.
When it loads an extension containing this tag, GoLive creates a control Object Types
control. You can get the object by its JavaScript name from the parent window Object
Each type of
control object also has specialized attributes and functions that apply only to that type. For
to represent the
’s children array.
example, text-entry fields can capture keystrokes, but radio buttons cannot. If you call a function or
property for a control of the wrong type, the call is ignored or returns a default value. For example, if you
write a JavaScript statement that tries to set the
itemCount property of a radio button, the control
ignores the statement because radio buttons have no such property. Similarly, if you try to call the
addItem function of any control other than a popup menu, GoLive ignores the call.
An element’s attributes become properties of the object GoLive creates. For example, you can reposition a
control dynamically by setting new values for its
bounds or size and location properties.You can hide
a control by positioning it outside the boundaries of the dialog that contains it.
Page 67

Adobe GoLive CS2 SDK
SDK Programmer’s Guide Windows and Controls 67
Creating different types of controls
This example illustrates the use of the <jsxcontrol> tag to create the controls shown in this dialog box:
A sample dialog with various control types
type="checkbox"
type="static"
type="radiobutton"
type="popup"
type="edit"
type="buttonedit"
type="editarea"
type="color"
type="button"
name="dialogOk"
name="dialogCancel"name="dialogOther"
These controls include examples of static text, editable text, checkboxes, radio buttons, a popup menu,
and a color selector. For many additional examples of the use of controls, see the sample code in the SDK.
<jsxdialog name="myModalDialog" title="Burger Order Form" width="280"
height="400" >
<jsxcontrol type="static" name="trimmingsPrompt"
value="Which trimmings would you like on your burger?"
posx="10" posy="10" width="240" height="18">
<jsxcontrol type="checkbox" name="lettuceBox" value="Lettuce"
posx="10" posy="30" width="60" height="18">
<jsxcontrol type="checkbox" name="tomatoBox" value="Tomato"
posx="80" posy="30" width="60" height="18">
<jsxcontrol type="checkbox" name="pickleBox" value="Pickle"
posx="150" posy="30" width="60" height="18">
<jsxcontrol type="checkbox" name="onionBox" value="Onion"
posx="220" posy="30" width="60" height="18">
<jsxcontrol type="static" name="cookingPrompt"
value="How would you like it cooked?" posx="10" posy="60"
width="200" height="50">
<jsxcontrol type="radiobutton" name="rareRadio" value="Raw" posx="10"
posy="80" width="60" height="18" group = "cookBtn">
<jsxcontrol type="radiobutton" name="medRadio" value="Pinkish" posx="70"
posy="80" width="60" height="18" group = "cookBtn">
<jsxcontrol type="radiobutton" name="wellRadio" value="Burnt" posx="140"
posy="80" width="60" height="18" group = "cookBtn">
Page 68

Adobe GoLive CS2 SDK
SDK Programmer’s Guide Windows and Controls 68
<jsxcontrol type="static" name="bunPrompt" value="Which kind of bread?"
posx="10" posy="110" width="300" height="18">
<jsxcontrol type="popup" name="breadMenu"
value="Baguette, Pita, Rye, Sourdough, Wheat"
posx="10" posy="135" width="90" height="18">
<jsxcontrol type="edit" name="custNameField" value="signal whenever
focus changes" posx="10" posy="170" width="150" height="18">
<jsxcontrol type="buttonedit" name="phoneField"
value="signal when focus AND content changes"
posx="10" posy="200" width="200" height="18">
<jsxcontrol type="editarea" name="commentField"
value="never calls onChange handler" posx="10"
posy="230" width="200" height="60">
<jsxcontrol type="static" name="chipsPrompt"
value="Click the box to change its color."
posx="10" posy="304" width="300" height="18">
<jsxcontrol type="color" name="color" posx="10" posy="330" width=30
height=19>
<jsxcontrol type="button" name="dialogOther" value="Change"
posx="10" posy="365" width="60" height="18">
<jsxcontrol type="button" name="dialogCancel" value="Cancel"
posx="80" posy="365" width="60" height="18">
<jsxcontrol type="button" name="dialogOk" value="OK"
posx="153" posy="365" width="60" height="18">
</jsxdialog>
Creating radio button groups
A control of type radiobutton is a button that specifies a user option. Radio buttons can use the
optional
For example, you might use this attribute to group
The value of the
the window that have the same
group attribute to specify that the values offered by the grouped buttons are mutually exclusive.
On and Off radio buttons as mutually exclusive choices.
group attribute can be any string that is unique within the window. All radio buttons in
group value are mutually exclusive. When the user clicks any button in
the group, GoLive deselects all other buttons in the group.
These
<jsxcontrol> tags define the radio buttons that appear in the previous example as belonging to
the same group, named
// grouped radio buttons
<jsxcontrol type="radiobutton" name="rareRadio" value="Raw" posx="10"
<jsxcontrol type="radiobutton" name="medRadio" value="Pinkish" posx="70"
<jsxcontrol type="radiobutton" name="wellRadio" value="Burnt" posx="140"
cookBtn:
posy="80" width="60" height="18" group = "cookBtn">
posy="80" width="60" height="18" group = "cookBtn">
posy="80" width="60" height="18" group = "cookBtn">
Creating text input fields
When the SDK interprets a <jsxcontrol> tag with type="edit", "editarea", "buttonedit", or
"password", it creates a control object with type=edittext, but with property values set to obtain
different default behaviors. All of these controls are text fields allow user input, but they signal events
differently, so your handlers are called for different user actions. You can define the response to user input
Page 69

Adobe GoLive CS2 SDK
SDK Programmer’s Guide Windows and Controls 69
by defining an onChange event handler; the exact action that triggers the event depends on the type of
the control and its property values. See ‘
Handling editing actions’ on page 74.
Creating source and preview controls
The source control is a complete JavaScript source editor, with line numbering, source completion, and
so on. The user can change preferred settings using the same preference controls or context menu as in
the other GoLive Source views.
The
value of a source control is the content of the source code to display:
<jsxcontrol name="mySrc" type="source"
value="function test(){writeln(’this is a test function’);}"
posx="15" posy="15" width="225" height="140">
The preview control is a web browser display; it provides complete HTML rendering and navigation in a
UI control. You can render local HTML pages in a
browse pages on the web. The control can also display content such as QuickTime and Macromedia®
Flash™ (SWF).
preview control in your window, and can access and
Use the preview object functions
● Use setSource or setFile to specify what to display.
● Use goForward, goBack, and goHome to navigate within the display history programmatically.
to control the display:
Creating controls with parameters
To initialize the numeric limits of the scrollbar, slider, and progressbar controls, enclose
<jsxparam> elements in the <jsxcontrol> element. For each of these, you must specify minimum and
maximum values, using parameters named
For example, to create a
<jsxcontrol name="ctrl1" type="progressbar" posx="15" posy="15"
width="225" height="16">
<jsxparam name="min" value="0">
<jsxparam name="max" value="10">
</jsxcontrol>
progressbar control:
The direction (horizontal or vertical) of the control is given by its metrics. If the height value is greater
than the
For a
move one line) and
width value, it is vertical; otherwise it is horizontal.
scrollbar control, you must also initialize line (a delta value for when you click the marker to
page (a delta for when you click the bar to move one page):
<jsxcontrol name="ctrl1" type="scrollbar" posx="15" posy="15"
width="225" height="16">
<jsxparam name="min" value="0">
<jsxparam name="max" value="1">
<jsxparam name="line" value="0.01">
<jsxparam name="page" value="0.1">
</jsxcontrol>
min and max.
For a slider control, initialize steps (the number of tick marks):
<jsxcontrol name="ctrl1" type="slider" posx="15" posy="15"
width="225" height="16">
Page 70

Adobe GoLive CS2 SDK
SDK Programmer’s Guide Windows and Controls 70
<jsxparam name="min" value="0">
<jsxparam name="max" value="10">
<jsxparam name="steps" value="10">
</jsxcontrol>
List controls
List controls contains an items property, which contains an array of item objects. Each list item is a control
of type
a list item, the corresponding
determines what action to take in response to the click. See Providing Behavior for Controls
The
manipulating the list items, such as add
● A control of type list is a simple list box, which contains list items. You can choose to make it
● A control of type combobox or popup creates an edit field with a popup menu of list items. The menu
item (or in some cases node) that represents a selectable choice in the list. When the user selects
item object is the target of an onClick event. Your handler for this event
.
parent of an item object is the list control that contains that item. List controls have methods for
and remove. There are four kinds of list control:
multicolumn, and to enable multiple selection of items. See Creating a multicolumn list box
.
can contain separators. When the user selects an item in the list, it becomes the new value in the edit
field.
● The hierarchy control type displays a hierarchical representation of dynamic data. The control
object’s
items property contains an array of list item and node objects. Nodes are items that can
contain subitems, or other nodes.
Each node in the tree has a text label, and can have an icon displayed to the left of the label. You can
assign a second icon to show the expanded state of a node. See Creating hierarchies and file lists
● The filelist control type is a tree that displays a file and folder hierarchy for a selected local or
remote filesystem location, and allows the user to make multiple selections. The top of the
.
filelist
control contains a popup menu that allows the user to select among loaded documents and sites. The
filelist object’s text property contains the label for this menu.
When the user selects a location from the popup menu, the contained files and folders are displayed in
the body of the control. Each file or folder is displayed using the URL string, with a checkbox to indicate
its selection state. You can access the displayed
object’s
items property. Each node’s selected property reflects and controls the selection state in
the parent. See Creating hierarchies and file lists
item and node objects through the filelist
.
Creating a multicolumn list box
The listbox control can have one or more columns, with or without a title bar. You define these using
<jsxlistcolumn> elements within the <jsxcontrol> element.
To create a one column listbox with a title bar:
<jsxcontrol name="list" type="list" posx="15" posy="15"
width="225" height="140">
<jsxlistcolumn title="My List" value="value1,value2,value3">
</jsxcontrol>
To create a listbox with three columns and no title bar:
<jsxcontrol name="list" type="list" posx="15" posy="15"
width="225" height="140">
<jsxlistcolumn value="column1,column2,column3">
<jsxlistcolumn value="column1,column2,column3">
<jsxlistcolumn value="column1,column2,column3">
Page 71

Adobe GoLive CS2 SDK
SDK Programmer’s Guide Windows and Controls 71
</jsxcontrol>
Creating hierarchies and file lists
This extension file defines a split panel that contains both a file list and a hierarchy. Both are created from a
list of folders and their contained files. An event handler performs the expansion of nodes in the hierarchy
control.
<!DOCTYPE html PUBLIC "-//W3C//DTD HTML 4.01 Transitional//EN">
<html>
<head>
<meta http-equiv="content-type" content="text/html;charset=utf-8">
<meta name="generator" content="Untitled Page">
<title>Untitled Page</title>
</head>
<body bgcolor="#ffffff">
<p><jsxmodule name="Splitlist" debug="true"></p>
<p> <script>
function startModule() {
var icon1= createPicture( module.folder.absurl + '/gl.png' );
var icon2= createPicture( module.folder.absurl + '/icon.png' );
var folders = [ app.folder, app.tempFolder, app.settingsFolder,
app.modulesFolder, app.userSettingsFolder,
app.appSettingsFolder];
var win = dialogs[’splitviewParent’];
var panelparent = win.children[’mySplitview’];
var filelist = panelparent.children[’fPanel’].children[’myflist’];
for( var f=0; f<folders.length; f++ )
filelist.add( 'item', folders[f] );
var hierarchy = panelparent.children[’hPanel’].children[’myhier’];
for( var h=0; h<folders.length; h++ ) {
var node = hierarchy.add( 'node', folders[h].toString(), h,
{ icon:icon1.name, expandIcon:icon2.name } );
node.addEventListener (
'onExpand', function(e) {
if( e.target.items.length <= 0 ) {
var f = new JSXFile( e.target.text );
if( f.exists ) {
var subitems = f.getContent();
for( var s=0; s<subitems.length; s++ )
e.target.add( 'item', subitems[s], s,
{ icon:icon2.name } );
}
}
}
);
}
}
</script> </p>
<jsxpalette name="splitviewParent" title="Splitlist"
width="200" height="200">
<jsxsplitview name="mySplitview" posx="0" posy="0"
Page 72

Adobe GoLive CS2 SDK
SDK Programmer’s Guide Windows and Controls 72
width="200" height="200"
halign="scale" valign="scale">
<jsxview name="fPanel" posx="0" posy="0"
width="100" height="200"
halign="scale" valign="scale">
<jsxcontrol name="myflist" type="filelist" value="add items"
posx="0" posy="0" width="100" height="200"
halign="scale" valign="scale">
</jsxview>
<jsxview name="hPanel" posx="0" posy="0"
width="100" height="200"
halign="scale" valign="scale">
<jsxcontrol name="myhier" type="hierarchy" value="items"
posx="0" posy="0" width="100" height="200"
halign="scale" valign="scale">
</jsxview>
</jsxsplitview>
</jsxpalette>
</body> </html>
The following figure shows the window created by this code, with the filelist control on the left and
the
hierarchy control on the right:
Adding controls to a window dynamically
In addition to those controls that GoLive creates by interpreting tags in an extension’s Main.html file,
your JavaScript code can create controls dynamically during a GoLive session; for example, in response to
a user choice in a menu or dialog defined by your extension. A control you create dynamically is
represented by the appropriate type
You can add dynamic controls to a window Object
calling the parent’s add
● For information on the complete range of controls that you can create dynamically, see the GoLive CS2
function with a set of parameters appropriate to the control type.
SDK Programmer’s Reference.
● For examples of using these controls, see the Dynamic UI sample included with the GoLive CS2 SDK.
control object, just like those created from scripts.
or a panel Object. You create a dynamic control by
Page 73

Adobe GoLive CS2 SDK
SDK Programmer’s Guide Windows and Controls 73
Providing Behavior for Controls
If you need to respond to changes in the state of a control object while a modal dialog or palette
window is displayed, you can define and register an event handler for the appropriate event in that object.
For example, you can define a handler to update the appearance of the window in response a user clicking
or entering text in a control.
Event handlers are optional; if the only information GoLive needs from your dialog is whether the user
accepts or rejects the information it displays, you do not need to define an event handler. You can
determine whether the user clicked
show.
Handling events for a target control
Whenever the user interacts with a control created by your extension, GoLive generates an event with that
control object as its target. You can register a handler for the event that takes any action necessary to
respond to the change in the control’s state. For example, when a user clicks a control, GoLive generates
an onClick
control object, or with its parent or any ancestor up to the application itself.
event with that control as the target. You can register a handler for that event with the
OK, Cancel, or something else by examining the value returned by
Handling simple clicks
An event handler takes one argument, an event object. There are different Event Object Types that
contain information about the specific event that occurred. All event types have a
which tells you which object generated the event. The
onClick event, for example, is the UIEvent object, and its target property contains the control object
where the user clicked.
The following
figure on page 67
same dialog.
// Handler for Other button
function otherClicked( eventObj ) {
if eventObj.target="dialogOther"{
}
// Register handler
function intializeModule( ) {
app.addEventListener( 'onClick', otherClicked);
}
onClick event handler adds functionality to the Other button in the dialog shown in the
. When the user clicks Other, the function changes the color of the color control in the
var currColor = dialogs['burgerDialog'].children['myColor'].value ;
if (currColor == 'red')
dialogs['burgerDialog'].children['myColor'].value = 'green';
else
dialogs['burgerDialog'].children['myColor'].value = "red";
}
event object that is passed to handlers for the
target property,
Handling different actions
Different events occur in response to different actions. For example, if the user moves the cursor over a
control, GoLive generates the mouseControl
is passed to mouseControl
handlers. In addition to the target, this object contains the X and Y
event with that control as the target. The mouseEvent object
Page 74

Adobe GoLive CS2 SDK
SDK Programmer’s Guide Windows and Controls 74
coordinates of where the event occurred, and a mode value to indicate which specific mouse action
occurred:
0: Mouse button was pressed.
1: Mouse moved while the button was pressed.
2: Mouse button was released
3: Mouse was positioned over a custom control with the button not pressed.
Handling editing actions
For editable controls, GoLive generates the onChange event. The circumstances under which a text-input
field signals this event vary according to the type and the values of the
onNoChanged properties.
● When onNoChanged is true, the control responds whether or not the text content has changed;
when it is
● When onChange is true, the control responds when the user clicks outside it.
● When onEnter is true (as it is for the type buttonedit) the control responds when the user presses
E
NTER, and also has an optional Enter button, controlled by a user preference.
● When multiline is true (as it is for the type editarea) the control has multiple lines, and responds
false, the control responds only if the content has changed.
to each keypress, as well as loss of focus.
onChange, onEnter, and
The type that you specify in the tag that creates an edit control sets certain default behavior; you can vary
this by changing the property values.
Type Description Updating Behavior
edit
Edit field Creates a control in which onChange="true" and
onNoChanged="false".
By default, this control generates the onChange
event
when the content has changed and the control loses
the focus.
password
buttonedit
Password entry field Like the edit type, but displays user input as asterisks.
Edit field with Enter button Creates a control in which onEnter="true" and
onNoChanged="false". The control also has an optional
Enter button (controlled by a user preference).
By default, this control generates the onChange
event
when the content has changed and the user presses
E
NTER.
editarea
Multiline edit field Creates a multiline edit field (multiline="true")which
generates the onChange
event whenever a key is
pressed or when the control gains or loses the focus,
regardless of whether the content has changed.
Handling events in a control’s parent window
When an event is generated for a control (or any other nested object), GoLive looks for handlers for that
event that are registered with ancestor objects of that control—such as the containing panel, and its
containing window. It starts at the highest level and runs the first handler it finds, before running any
Page 75

Adobe GoLive CS2 SDK
SDK Programmer’s Guide Windows and Controls 75
handler that is registered with the target object itself. After executing the target handler, it "bubbles" back
out through the ancestor objects, running the first registered handler that it finds on the way out.
This allows you to execute multiple handlers for the same event occurrence, or to handle events at a
higher level. For example, you could register an onClick
the dialog in the figure on page 67
, instead of or in addition to handlers registered with the individual
event handler with the dialog window object for
controls. A handler registered at the parent level would use a switch or other conditional construct to
determine which individual control was the actual target of the event. The parent object where this
handler was registered is passed in the event object’s
currentTarget property.
When you register a handler with a parent or ancestor of the actual target object, you must specify the
third argument,
function initializeModule() {
dialogs[’burgerDialog’].addEventListener( 'onClick',
capture, to be true:
handleControlClicks, true);
Typically, you register handlers at the application level, and determine the target object in the handler
function. For example, the following handler, registered with the application, prints out which control was
clicked:
// register handler with application
function initializeModule()
{
// Any control clicked
app.addEventListener( 'onClick', ctrlClickHandler,
true);
}
// define handler
function ctrlClickHandler( eventObj )
{
switch ( eventObj.target.name )
{
case 'lettuceBox':
writeln( "lettuce checkBox" );
break;
case 'tomatoBox':
writeln( "Tomato checkBox" );
break;
case 'rawRadio':
writeln( "Raw Radio" );
break;
case 'medRadio':
writeln( "Pinkish Radio" );
break;
case 'breadMenu':
writeln( "List value selected: " + eventObj.target.value );
break;
case 'myColor':
writeln( "Color: " + eventObj.target.value);
break;
// Source dialog
case 'checkLinNumbers':
writeln( "Line numbers: " + eventObj.target.value);
break;
case 'srcArea':
Page 76

Adobe GoLive CS2 SDK
SDK Programmer’s Guide Windows and Controls 76
writeln( "Color: " + eventObj.target.sourceArea );
break;
// URL Getter Dlg
case 'urlgetter':
writeln( "URLGetter: " + eventObj.target.value);
break;
// Preview Dlg
case "previewBtn":
eventObj.target.parent.children['previewObj'].setFile(
eventObj.target.parent.children['editPreview'].value );
default:
writeln( "Click: " + eventObj.target.name
+ eventObj.target.value );
}
}
For details of how multiple handlers are executed when an event fires, see How registered event-handlers
are called in the GoLive CS2 SDK Programmer’s Reference.
Creating Custom Controls
You can code custom controls entirely in JavaScript. Create a custom control using the tag <jsxcontrol
type="custom"
You must provide functions that draw the appearance of the control, and you can optionally provide
functions that implement its behavior in response to user events. For an example of a custom control, see
the
Key Map sample that the SDK provides.
Defining user interactions with custom controls
When the user interacts with a custom control, GoLive generates the one of the control-interaction events,
such as onClick
Your extension’s event handlers must call the custom
changed state due to the user interaction. Custom controls that do not need to respond to user input need
not define event handlers.
Drawing custom controls
The visual representation of a custom control in the Layout view is a box Object. Whenever GoLive needs
to draw a custom control in a dialog or palette, it generates the drawControl
draw it in layout view, it generates the drawBox
paintEvent
or rectangles. Your handler can call the
custom control on the screen. It can also call the drawing methods of picture Object
elsewhere, such as in the
object, which contains a draw Object that provides basic drawing operations for lines, circles,
… >
or mouseControl.
event. In either case, it passes your registered handler a
draw object’s functions to paint the visual representation of the
initializeModule function.
control object's refresh method to reflect a
event, and when it needs to
s you have created
This
draw object is valid only during the execution of the function that receives it as an argument.
Attempting to use the
fails once, it is never called again in that session.
draw object outside this function generates a runtime error. If a drawing function
Page 77

Adobe GoLive CS2 SDK
SDK Programmer’s Guide Windows and Controls 77
Updating a control’s appearance immediately
If you need to draw the appearance of a custom control outside the context of the paintEvent handler, you
can obtain a temporary draw object by calling the control’s beginDraw
to draw the control’s new appearance immediately. When the drawing operation is complete, you must
call the control’s endDraw
valid between these calls.
function to terminate the temporary object. The temporary draw object is only
function. Use the returned object
Only one temporary
That is, each call to the
you can call the
draw object can exist at any time. You cannot nest calls to the beginDraw method.
beginDraw method must be matched by a call to the endDraw method before
beginDraw method again.
Defining drag-and-drop for custom controls
Custom controls are able to handle certain drag-and-drop actions. You can start a drag from a custom
control and drop it on the layout view of your document or onto another control. You can also receive
something dropped on a custom control such as files, HTML code, or an HTML color value.
For an example that implements both a draggable control and a control that can receive a drop, see the
DragNDrop sample that the SDK provides.
Control as Sender of a Drag Event
Any event handler for your custom control can start a drag-and-drop action. Call the control object’s
awaitDrag function to detect if a drag action has been started. If it has, call the dispatchEvent
function to perform the drag operation, optionally displaying a custom cursor image, and check the
Boolean return value to determine if the drag has been received somewhere.
There are three drag-and-drop types, indicated by the dragDropEvent
colors.
flavor value: html, files, or
Receiving a drop event
If you define a custom control to be a drop target, you must define and register a dragControl event
handler. GoLive passes this handler the dragDropEvent
drag-and-drop action. Your handler must set the
true if your control can handle the drag-and-drop action, and false if your control cannot handle this
action. The
To improve performance, do any intensive computation the first time
and release it when the
handle property is valid when the event’s state value is check.
state becomes exit or drop.
object that contains information about the
handle property of the dragDropEvent object to
state is check, cache the result,
Page 78

6
Custom Elements
This chapter describes the characteristics of custom elements that you can define using the SDK. It
describes how define a custom element, install it in the Objects palette, and provide behavior for it.
Overview
Your extension can define a custom HTML element, and add it to the Objects palette, where a user can
select it and drop it into a page in Layout view. You can completely customize the element’s appearance in
Layout view. You can define an Inspector for your element, so that the user can inspect and edit its
attributes.
A custom element has a custom tag name that represents it in the GoLive design environment. This tag
can provide content defined by any combination of other custom tags, SDK-defined tags, and standard
HTML tags.
GoLive has other built-in ways of creating or inserting HTML code in a page, such as templates and
snippets; see the Adobe GoLive CS2 User’s Guide for details.
This chapter describes the steps required to create a custom element and add it to the Objects palette:
● Define the custom element with its custom tag; see Defining A Custom Element.
● Add the element to one of the tabs in the Objects palette; see Creating a Palette Entry in the Objects
Palette.
● Create and register event-handling functions to define how an instance of the custom element in a
GoLive document window appears in the Layout view and responds to user actions. See Defining the
appearance of a custom element.
● Implement the Inspector window that allows the user to edit the custom element’s attributes. See
Inspecting a Custom Element
.
Tags for creating custom elements
Use the following tags to create custom elements:
● The <jsxelement> tag defines the tag name of a custom tag, such as <mytag>. along with any
attributes you want.
● The <jsxpaletteentry> tag defines the palette entry for a custom element. It specifies what content
is to be added to the page when this item is dropped there, and what picture to show in the Objects
palette.
● The <jsxpalettegroup> tag groups palette entries into a new or existing tab on the Objects palette.
● The <jsxinspector> tag defines the Inspector dialog for the custom element.
● You can u s e the <img> tag or the createPicture global function to specify the images to use for the
palette entry and tab, and a placeholder image for the custom element in Layout view.
When the user creates an instance of a custom element by dragging the palette entry to a document,
GoLive creates objects for the new document content:
● An element Object represents the custom element in a GoLive document.
78
Page 79

Adobe GoLive CS2 SDK
SDK Programmer’s Guide Custom Elements 79
● A box Object represents the custom element’s appearance in Layout view. You must define and
register event handlers to draw the appearance.
The Inspector that you define using the
set properties of the
The
<jsxelement>, <jsxpaletteentry>, and <jsxinspector> tags each have a classid
element object.
attribute that associates the various components with a particular custom element.
Defining A Custom Element
Use a pair of SDK elements to define a custom element:
● The <jsxelement> tag defines the tag name and attributes of the custom element.
● The <jsxpaletteentry> tag with the same ID defines the content that GoLive adds to the page when
the user drops this element there. It also specifies a picture to use for this entry in the Objects palette.
The
classid attribute associates these elements (and optionally a <jsxinspector> element as well).
The value of a
in the extension.
For an example of how to use this feature, see the
Defining the tag for a custom element
The <jsxelement> tag defines the name and type of a custom element in the GoLive environment:
classid attribute can be any text string that is not already used as an identifier elsewhere
<jsxinspector> tag interacts with the box object to get and
Custom Box sample extension.
<jsxelement tagName="nameOfCustomTag" classid="yourUniqueID"
type="
</jsxelement>
● The tagName value is the name of your custom element. For example, tagName="mytag" defines the
<mytag> custom element in the GoLive environment. The name of a custom tag must consist of
kindOfElement">
lowercase characters only.
● The classid value associates this tag with a <jsxpaletteentry> element, and optionally with a
<jsxinspector> element.
● The type value specifies the kind of element this tag defines, such as a binary tag, a container, a
server-side include, or some other kind of element. The type defines certain aspects of the element’s
behavior and appearance. For example, if you specify
type="head", when the user drops this
element into a page, it adds its content to the head section of that page. For a complete list valid types,
see the GoLive CS2 SDK Programmer’s Reference.
The following example defines the
<jsxelement tagName="mytag" classid="myclass" type="plain">
<mytag> tag:
The type value of plain specifies that this is an HTML tag that draws a placeholder graphic in Layout
view.
Redefining Tags Locally
You can create tag definitions that are valid only for a particular language flavor or glue. The glue attribute
of the <
jsxelement> tag specifies the context for the custom element that it defines.
Page 80

Adobe GoLive CS2 SDK
SDK Programmer’s Guide Custom Elements 80
For example, the following code creates a new <img> element that GoLive uses only in a WML document:
<jsxelement tagname="img" glue="wml">
When no glue attribute is present, this element replaces the img element application-wide.
Defining the custom tag’s palette icon and HTML content
The <jsxpaletteentry> tag associates two important items with the custom tag defined by
<jsxelement>:
● The HTML code this tag adds to the page when the user drops its icon in a GoLive document.
● The icon that represents the custom tag in a <jsxpalettegroup> tab in the Objects palette.
The
<jsxpaletteentry> tag has this syntax:
<jsxpaletteentry
display="
picture="
<
customTagName attribute1 attribute2 ... attributeN >
</
</jsxpaletteentry>
DescriptionOfTag" classid="yourUniqueID"
paletteImage" hilitePicture="paletteImageOver">
customTagName>
● The display value is a short description of the custom element. It appears in the Objects palette as a
tooltip, when the mouse cursor pauses over the custom icon.
display string
● The classid associates this tag with its companion <jsxelement> and <jsxinspector> tags.
● The picture and hilitePicture attributes specify the image that appears in the Objects palette.
GoLive automatically scales these pictures to 24x24 pixels, but it is generally best to supply a picture of
the right size. The value is the
extension’s
● The content of the <jsxpaletteentry> tag is the actual markup that this entry adds to the page.
Main.html file.
name attribute of an <img> element defined elsewhere in the
The content can be any combination of custom tags, SDK-defined tags, and standard HTML tags. All of
it, including any comments, is added to a document where this entry is dropped.
Here is an example
Objects palette, where it is represented by the
drags it to a page, the
<jsxpaletteentry> element that adds the custom <mytag> element to the
paletteIcon image. When the user selects the icon and
<mytag> element is added to the page header:
<jsxpaletteentry display="Sample Box for <mytag> tag"
classid="myclass" picture="paletteIcon">
<mytag name="My Name" title="My Title" info="My Info" type="head">
</mytag>
</jsxpaletteentry>
Page 81

Adobe GoLive CS2 SDK
SDK Programmer’s Guide Custom Elements 81
Creating a Palette Entry in the Objects Palette
The <jsxpalettegroup> element specifies the tab in which a group of palette entries appear in the
Objects palette. You extension can use this element to add entries to any of the built-in Objects palette
tabs, or it can define a new tab.
The
<jsxpalettegroup> element has this syntax:
<jsxpalettegroup
name="
picture="
<!-- <jsxpaletteentry> elements -->
</jsxpalettegroup>
● The content of the tag is the collection of palette entries in this group.
● The name attribute specifies the tab’s name in the JavaScript global namespace.
● To add entries to one of the built-in Objects palette tabs, specify one of the predefined tab names,
and specify the sort order for this entry group. See Adding Palette Entries to a Built-in Tab
● To add entries to a tab created by another extension module, specify the name of that existing tab.
This is otherwise the same as adding to a built-in tab.
tabName" display="tabDescription" tabOrder="sortCodeForNewTab"
tabIcon" order=”sortCodeForIconGroupsInExistingTab”>
).
● To create a new tab to display these entries, specify a unique name, and specify additional attributes
for the new tab; see Adding palette entries to a customized tab
Adding Palette Entries to a Built-in Tab
You can add a custom palette entry to any built-in tab. To add this group of palette entries to one of the
built-in Objects palette tabs, specify one of the predefined tab names. The predefined names are:
Basic
Smart
Forms
Head
Frames
Site
Site Extras
QuickTime
Extensions
If you do not specify the name attribute, Extensions is the default tab.
When you add entries to an existing tab:
● Omit the display, picture, and taborder attributes; the built-in tabs provide these values, and
you cannot change them.
.
● Provide the order attribute to sort this group of entries into the existing entry groups in the tab.
All tabs other than Basic contain a single entry group; you can add your entry group to the left or right of
any existing group. You cannot insert entries into an existing group. Existing palette entry groups have
predefined order values. (For a listing of all
Appendix A, “
Object Palette Sort Order in the GoLive CS2 SDK Programmer’s Reference.) The value of your
order values used by the built-in palette icons, see
order attribute places it with respect to the existing group or groups in the tab; a smaller value places all
the entries in this group before (that is, to the left of) an existing entry group, while a higher value places
your group to the right. The entries within your group appear in the order your extension defines them.
Page 82

Adobe GoLive CS2 SDK
SDK Programmer’s Guide Custom Elements 82
If you omit the order attribute, the default value is 30000, which places your entry group at the end of all
existing entries.
Adding palette entries to a customized tab
When you specify a unique name for the palette group, it creates a new object type in the Objects palette.
When you are creating a new tab:
● The display string pops up when the mouse pointer pauses over this type.
● The picture specifies the icon for the new type. GoLive automatically scales this picture to 12x12
pixels, but it is best to supply a picture of the correct size. The value is the name of the corresponding
<img> tag. If you are adding elements to a predefined tab, omit this attribute.
● The taborder specifies where this type goes, in relation to the existing types.
Types are sorted by
you are adding elements to a predefined type, omit this attribute. For a listing of all
used by the built-in types, see Appendix A, “
taborder value from least to greatest, with higher values appearing to the right. If
taborder values
Object Palette Sort Order in the GoLive CS2 SDK Programmer’s
Reference.
When you add entries to a custom object type, the entries appear in the order in which they are defined; if
you supply an
order attribute, it is ignored.
Defining the appearance of a custom element
When the user drags a custom element from the Objects palette to a GoLive document window, GoLive:
● Inserts the contents of the <jsxpaletteentry> tag for this element into the document
● Creates a box Object to manage the visual representation of the custom element in the Layout view.
Your extension must define and register event handlers with the
inspect the custom box. You can specify the element’s appearance in Layout view using a predefined
image, or by drawing it with drawing utility functions.
box object to initialize, draw, resize, and
Page 83

Adobe GoLive CS2 SDK
SDK Programmer’s Guide Custom Elements 83
You can provide event handlers to respond to various user-interaction events for your custom element:
Event Triggering action Description
parseBox
drawBox
boxResized
The document is
reparsed: for example,
box dropped on page,
containing document
is read, switch from
Layout to another
view
Register handler with the document object.
boxEvent object passed to the handler contains the
The
affected
box object. It also contains the height and width, and
the reason for the event:
2: Box was repositioned
3: Custom element dropped from Objects palette or
pasted from clipboard.
The handler can initialize the box’s appearance according to
the current property values.
The window
containing the box
must be redrawn: for
example, box
dropped on page, box
resized, box selected
Register handlers with the box object.
GoLive passes handlers a
draw Object
. The handler can draw the visual representation
of the custom element. Use the
paintEvent object, which contains a
draw object to display text,
draw rectangles and ovals, or set color in the custom box, or
draw the graphics defined with
<img> tags in the custom box.
Box resized Register handlers with the box object.
GoLive passes handlers a
boxEvent object, which contains the
new width, and new height. The handler can update the
height and width in the markup elements associated with the
box, and update the Inspector’s height and width controls.
inspectBox
control
interaction
Box selected Called if the Inspector window is open. Register handlers with
Inspector control
changed
events
Initializing a custom element box
GoLive initializes a box object in response to any of the following events:
● The user drops an Objects palette icon onto a GoLive document window.
● GoLive reads a document containing a custom HTML element defined by the <jsxelement> and
<jsxpaletteentry> elements.
box object.
the
GoLive passes handlers an
contains the Inspector
inspectEvent object, which
window object associated with the
target box. The handler can update the Inspector window.
Register handlers with the
GoLive passes handlers a
box object.
UIEvent object, or a mouseEvent
object which contains the location and details of the mouse
action that triggered the event.
The handler can make the appropriate change in the markup
for the custom element being inspected. Changing the
markup may in turn cause the parseBox
or drawBox events to
fire.
● The user switches to the Layout view from another view in the document window.
Page 84

Adobe GoLive CS2 SDK
SDK Programmer’s Guide Custom Elements 84
To initialize the custom box, GoLive calls the parseBox handler you have registered for the document
object, or for the
box’s height and width as specified by the
app object (to capture the event at the top level). For example, the handler might set the
height and width attributes of the custom HTML element.
Typically, the handler saves values for use by subsequent event handler calls. It can also save previous
values for use by undo operations.
The event object contains the box Object
custom element. This
box object’s element property provides JavaScript access to the custom element’s
attributes. For example, to initialize the
could use JavaScript code like this:
function updateBox(boxEvt) {
var box=boxEvt.box;
box.width = (box.element.width == undefined) ? 48 : box.element.width;
box.height = (box.element.height == undefined) ? 48 : box.element.height;
box.url = (box.element.src == undefined) ? "none" : box.element.src;
box.link = box.createLink(box.url);
// save document reference for controlSignal undo
box.link.document = document;
}
//register as parseBox handler at the top level, called whenever your
//custom box is parsed
function initializeModule() {
app.addEventListener( 'parseBox', updateBox);
}
Displaying a custom element box
Whenever it needs to display the custom element’s placeholder graphic in Layout view, GoLive calls the
drawBox
Object that provides methods to draw lines, circles, rectangles, or images. Your handler can call these
methods,and optionally methods of your own picture Object
custom element on the screen.
handler registered for the target box object. The passed paintEvent object contains a draw
, which provides access to the HTML code associated with the
height and width attributes of the custom box, your handler
, to paint the visual representation of the
Note: Yo u r drawBox
handler should only call drawing functions. Do not create objects, reparse
documents, download files, or perform any other time-intensive processing within the body of the
handler.
The
draw object is valid only during the execution of the function that receives it as an argument.
Attempting to use the
draw object outside this function generates a runtime error.
Drawing into container boxes
The four box margin attributes describe the width of each of the margins in the container box. When
drawing container boxes, you can only draw into the margin area. For example, specifying
topMargin=20 and bottomMargin=10 creates at the top of the box a 20-pixel high drawing area that is
as wide as the box, as well as a 10-pixel high area of similar width at the bottom of the box.
drawBox Examples
Here is a simple example of a drawBox handler function:
// define a picture object to represent the placeholder graphic by name
<img src="Images/draw.gif" name="placeholderGraphic">
Page 85

Adobe GoLive CS2 SDK
SDK Programmer’s Guide Custom Elements 85
// define the drawBox handler to create visual representation of box
function drawMyBox(paintEvt) {
var box = paintEvt.target;
var drawObj = paintEvt.draw;
if (box.element.color != undefined)
drawObj.setColor(box.element.color);
else
// paint a white background and frame it in black, before
// drawing the custom placeholder graphic on top of the background
// Inset the drawing by 1 px to leave room for the selection border
drawObj.setColor("white");
drawObj.fillRect(1, 1, box.width-2, box.height-2);
drawObj.setColor("black");
drawObj.frameRect(1, 1, box.width-2, box.height-2);
// Get picture dimensions from box
placeholderGraphic.width = box.width;
placeholderGraphic.height = box.height;
// draw the image
placeholderGraphic.draw(1, 1);
}
// register the drawBox handler for the box object
function initializeModule() {
var myBox = boxes[myboxname];
myBox.addEventListener( 'drawBox', drawMyBox);
}
The handler uses the draw object (passed in the paintEvent object) to paint a white background and
black frame before drawing the custom placeholder graphic on top of this background. It then sets the
width and height of the
box. Finally, it calls the
picture object for the placeholder graphic to the values specified by the custom
draw function of the picture object to redraw the visual representation of the
custom box.
The
draw object’s setColor method specifies the color used for drawing. It accepts color values
specified as any valid HTML color name, such as
"red", "#FF0000", or "#F00". The method also accepts
integer triplets specifying red, green, and blue values from 0 to 255. These all set a color to red:
setColor ("#FF0000")
setColor ("red")
setColor (255, 0, 0)
For additional examples of the use of the draw object, see the Custom Box and Multiple
Inspectors
sample extensions and the custom drawing functions in the Dialog Editor sample code
that the SDK provides.
Page 86

Adobe GoLive CS2 SDK
SDK Programmer’s Guide Custom Elements 86
Resizing a custom element box
When the user resizes the box associated with a custom element, GoLive calls the boxEvent handler
registered with the
extension, and sets the attributes of the custom element accordingly.
For example:
function resizeMyBox(boxEvt) {
var box = boxEvt.target;
if (box.width <= 640)
box.element.width = width;
if (box.height <= 480)
box.element.height = height;
}
//register the handler with the box object
function initializeModule() {
var myBox = boxes[myboxname];
myBox.addEventListener( 'resizeBox', resizeMyBox);
}
box object. Your handler validates the new height and width values as needed by your
Built-in undo support
GoLive provides built-in undo support for dropping and resizing custom boxes. The user can undo or redo
such operations by choosing the
Undo or Redo item from the Edit menu.
To undo and redo other operations involving your custom element, you must implement supporting code;
see Supporting the Undo and Redo Commands
Inspecting a Custom Element
The Inspector window is always available in the Window menu. Typically, the Inspector window provides a
user interface for getting and setting the attributes or content of a custom element.
When the user selects any modifiable page element in the GoLive document window, GoLive passes to the
Inspector window a unique value that identifies the kind of element selected. The Inspector window
customizes itself accordingly, displaying the controls appropriate for manipulating that element’s
properties or attributes. GoLive provides inspectors for all built-in elements the user can modify. To
initialize the Inspector window appropriately for a custom element, GoLive uses the
you provide with the same
controls that populate the Inspector window when its corresponding custom element is selected.
<jsxinspector name="objectName" title="nameInWindowMenu"
classid="
// jsxcontrol tags that provide inspector window controls go here
</jsxinspector>
yourUniqueID" width="anInteger" height="anInteger" >
classid value as the custom element. The <jsxinspector> tag specifies
.
<jsxinspector> tag
Because the Inspector window is a palette window, defining a <jsxinspector> element is very similar
to defining a
● Use the name, title, width, and height attributes just as you would use the same-named attributes
of the
● Use <jsxcontrol> tags to define the contents of your inspector dialog just as you would use them to
define the contents of a
<jsxpalette> element:
<jsxpalette> tag. For more information, see Palette Windows.
<jsxpalette> window.
Page 87

Adobe GoLive CS2 SDK
SDK Programmer’s Guide Custom Elements 87
● Set the classid attribute to the same value used by the <jsxelement> and <jsxpaletteentry>
tags for the custom element this window inspects.
Here is a very simple example of the use of the
sample extension, which defines only one control:
<jsxinspector name="inspector" title="MyTag Inspector" classid="myclass"
width="215" height="164">
<jsxcontrol type="URLGetter" name="urlGetter" posx="10" posy="10"
width="200" height="21">
</jsxinspector>
Initializing the Inspector window
Before displaying the Inspector window, GoLive calls the parseBox handler registered for the box object.
Your handler must initialize the controls in the Inspector window to reflect the current values of the
properties of the custom element.
Here is a simple
the user inspects the box, this handler initializes the control to show the
function setUrlLink(boxEvt) {
var box = boxEvt.box;
box.inspector.children['urlGetter'].setLink(box.links[0]);
}
// register handler for parseBox event in document object
function initializeModule() {
var urlgetter = dialogs[myinspectorname].children[mycontrolname];
urlgetter.addEventListener( 'onChange', setUrlLink);
}
parseBox handler function for an inspector that has one control, a urlgetter. When
<jsxinspector> element (taken from the Custom Box
box object’s first links value:
Responding to changes in the Inspector
When the state of a control in the inspector window changes, GoLive generates the appropriate event, and
calls any handlers that the extension has registered for the control, passing the changed control object in
the event object argument. You then update the appearance of the custom box and the attributes of its
markup elements according to the current value of the control.
The following code example shows an event handler function that implements Inspector window
functionality. The event is registered with the control, a
of the control, and its
Inspector. The handler updates the link value in the custom element associated with the box.
function urlChanged(evtObj) {
control=evtObj.target;
// get the box object from the Inspector window
var box = control.parent.box;
box.element.src = box.link.url;
// after updating properties, redraw the box
box.refresh ();
}
// register the handler with the urlgetter control
function initializeModule() {
var urlgetter = dialogs.[myinspectorname].children[mycontrolname];
box property provides access to the custom box that has the same classid as the
urlgetter. The Inspector window is the parent
Page 88

Adobe GoLive CS2 SDK
SDK Programmer’s Guide Custom Elements 88
urlgetter.addEventListener( 'onChange', urlChanged);
}
This example only considers the controls in the custom element’s Inspector. However, in a real extension,
your handler’s
switch statement must provide a case expression for every control to which the
extension must respond, including those in other windows.
Multiple Inspectors
You can define multiple inspectors and specify which to use for the box object. To create more than one
inspector, define additional inspectors with different
<jsxinspector name="insp1" title="one" classid="myclass">
...
</jsxinspector>
<jsxinspector name="insp2" title="two" classid="alternate">
...
</jsxinspector>
At runtime, specify the Inspector that a box should use by setting its classid property. For example, this
specifies that the
"alternate"
myBox object should use the Inspector created from the <jsxinspector classid=
… > element:
classid values,:
var myBox = boxes[myboxname];
myBox.classid = "alternate";
Supporting the Undo and Redo Commands
GoLive provides built-in undo support for dropping and resizing the boxes that represent custom
elements in Layout view. The user can undo or redo such operations by choosing the
from the
support yourself.
The steps required to implement undo support for a single task are:
● Creating the undo object
● Initializing the undo object
● Implementing the undoSignal Function
Undo support and document parsing
You can add undo support for any operation that does not cause GoLive to reparse. To undo an operation,
you use a saved value, such as a name, to retrieve a previously changed
document discards the entire markup tree, making the markup object required by the
unavailable. Thus, when Layout view is open:
Edit menu. For other operations involving your custom element, you must implement undo
Undo or Redo item
markup object. Reparsing the
undo object
● Operations on many SDK-defined elements can be undone completely, because they do not cause
reparsing. For a complete list of elements that can be changed without reparsing, see Appendix C,
“Managed Layout Tags in the GoLive CS2 SDK Programmer’s Reference.
● Most operations involving non-SDK elements cannot be undone, because they do cause reparsing.
(Note that even if your particular extension does not cause Layout view to reparse the document, the
user or another extension may cause a reparse.)
Page 89

Adobe GoLive CS2 SDK
SDK Programmer’s Guide Custom Elements 89
The document’s undo history
The document.history property returns a document.history Object you can use to inspect or
manipulate the active document’s undo/redo history. You can set the history list’s
index property to
cause GoLive to execute any undo or redo actions necessary to restore the document to any state in the
history.
Creating the undo object
Each operation that is to support undo/redo must provide an undo Object that holds three kinds of data:
● Data used to perform the operation
● Data required to undo its effects
● Data required to redo the operation
Typically, you create this object from within the body of the function that performs the operation to be
undone; typically, this would be an event handler function. For example, your handler for the onChange
event in an
edit control might create an undo object that GoLive can use to undo changes to the
control’s value.
Custom box event-handlers are an exception to this rule. Your parseBox
create their own
undo objects. Doing so may interfere with the built-in undo actions GoLive already
provides for such operations. If this happens, your script terminates with the runtime error message “There
is already an open undo action.”
For operations other than dropping a custom element on the page or resizing its box, create an
object by calling the document Object
performs the operation to be undone. This method returns the undo object, which you can then initialize.
The
createUndo method takes a string argument, which GoLive uses to customize the display of Undo
and
Redo items in the Edit menu. In this example, the “Set URL” argument causes GoLive to display
Undo Set URL and Redo Set URL menu items as necessary:
var myUndo = document.createUndo ("Set URL");
Initializing the undo object
The createUndo method creates an empty undo object; that is, the object has no properties. You
initialize the object by creating properties to store the data your function needs to perform an operation,
undo its effects, or redo its effects. Add properties to the
assigning values to them. When you have finished adding properties to the
back to GoLive by calling the undo object’s
This example stores the
hold information needed to undo this operation:
undo object in a local variable, then creates several properties in the object to
and drawBox handlers must not
undo
’s createUndo method from within the body of the function that
undo object by simply declaring them and
undo object, you must pass it
submit method.
// save old & new URLs into undo object & submits undo object to GoLive
function urlChanged( evObj ) {
// get the box from the Inspector
var box = evObj.target.parent.box;
// set undo (link.document was set in parseBox handler
// to the document this box was inserted into)
var undo = box.link.document.createUndo ("Change link");
undo.kind = "Link";
Page 90

Adobe GoLive CS2 SDK
SDK Programmer’s Guide Custom Elements 90
undo.box = box.name;
undo.oldSrc = box.element.src;
undo.newSrc = box.link.url;
// this causes undoSignal() to be called
undo.submit();
}
// register handler with urlgetter control
function initializeModule() {
var urlgetter = controls[mycontrolname];
urlgetter.addEventListener( 'onChange', urlChanged);
}
An undo object property can only store the path to a JavaScript object —it does not store the actual
object or maintain a JavaScript object reference to it. If you need to ensure that an object will be available
to the
undo object, you must save it in a global variable outside of the undo object or the function that
creates the
undo object. This includes native JavaScript objects such as String, Date, or Number objects, as
well as objects you create using JavaScript.
If your extension implements more than one command that can be undone, you must create a property
that you can use to specify the command that is to be undone. In this example, the
kind property serves
that purpose:
undo.kind = "Link";
You may also need to store values you can use to retrieve objects later, such as their unique name
properties.
undo.boxName = box.name;
As soon as you submit the undo object, GoLive makes it available to the user in the History palette. If
necessary, however, you can still add properties to an
Implementing the undoSignal Function
When you call the submit method, and thereafter when the user issues the command to undo or redo a
task, GoLive generates an undoSignal
the undo and redo functionality.
The undoEvent
object passed to the handler contains the undo Object and an action code. The code
indicates whether your method should do the operation for the first time, undo the operation, or redo the
operation:
0
1
2
Do Undo object’s submit method was called. Do the operation for the first time.
Undo User issued the Undo command. Undo the operation.
Redo User issued the Redo command. Reverse the effects of the Undo operation.
in the module Object. Your handler for this event must implement
undo object even after it has been submitted.
Your handler can provide undo and redo code for any number of operations. To determine which
operation to perform, use the
you created it. Use a
to the particular
switch statement to customize the actions of the undoSignal function according
undo object GoLive passes to it.
kind property (or its equivalent) that you added to the undo object when
For example:
function myUndoHandler (undoEvt) {
Page 91

Adobe GoLive CS2 SDK
SDK Programmer’s Guide Custom Elements 91
switch (undoEvt.undo.kind) {
case "Link":
undoLink (undoEvt.undo, undoEvt.action);
break;
// assume we’ve created these additional undo actions
case "TextColor":
undoTextColor (undoEvt.undo, undoEvt.action);
break;
case "What":
undoSomethingElse (undoEvt.undo, undoEvt.action);
break;
}
}
//register the handler with the module object
function initializeModule() {
var myModule = modules[mymodulename];
myModule.addEventListener( 'undoSignal',myUndoHandler);
}
Because each case in an undo handler must handle three cases of its own (Do, Undo, and Redo), you can
improve the readability of your code by creating helper functions to perform each task. In this example,
the
undoLink function provides the data needed to change the url property of a custom box, undo the
change, and redo the change:
function undoLink (undo, action) {
// get the real box behind the name
var box = boxes[undo.boxName];
// undo
if (action == 1) {
box.url = undo.oldURL; //get the saved URL
// do or redo
else
box.url = undo.newURL; //get the new URL
}
}
In this simple example, the url property can hold only two possible values, so this function can treat the
Do and Redo action codes exactly the same. Of course, your functions can handle the Do and Redo action
codes separately if necessary.
Note: Do not call the
action. Do not call the
reparse or reformat methods of the document Object from within an undo
setInnerHTML or setOuterHTML methods of the markup Object from
within an undo action if doing so would cause GoLive to reparse the document.
Updating Images Dynamically
GoLive uses the picture Object to represent images, such as those in the Objects palette, and those you
use to represent a custom element in Layout view. When you use the
your extension definition, the SDK creates a corresponding
custom elements that you can update dynamically, create
function
createPicture.
<img> tag to define a static image in
picture object. To create images for your
picture objects explicitly using the global
Images can be very large, so be sure to delete any unused
picture objects.
Page 92

Adobe GoLive CS2 SDK
SDK Programmer’s Guide Custom Elements 92
Creating pictures
To cr eate a new picture object, call the createPicture global function, passing as its argument the
URL to an image file:
myPict = createPicture (Images/myImage.jpg)
Yo ur drawBox or other event handler can create picture objects on demand and store them as the
properties of the placeholder box of your custom element. For example:
function updateBox(boxEvt) {
var box=boxEvt.box;
box.width = (box.element.width == undefined) ? 48 : box.element.width;
box.height = (box.element.height == undefined) ? 48 : box.element.height;
box.pict = (box.element.pict == undefined) ? "none" : box.element.pict;
box.link = box.createLink(box.pict);
// link object is for the urlgetter
box.myPict = createPicture(box.element.pict);
}
//register the handler with the document object
function initializeModule() {
var myDoc = documents[mydocname];
myDoc.addEventListener( 'drawBox', updateBox);
}
Drawing the image
When the placeholder box for your custom element is passed to the drawBox or boxResized methods,
these methods can call the stored
screen.
Note: Do not create pictures in the
methods should call drawing functions only. Anything other than drawing functions will slow down
performance in redrawing your object, and may cause GoLive to terminate abnormally.
To cause the
the box:
myPict = createPicture(box.element.pict);
myPict.width = box.width;
myPict.height = box.height;
myPict.draw(0,0); //0 offset to position pic at origin of box
This example draws a framed background for the placeholder, by calling methods of the draw Object
passed in the paintEvent
of the frame and background visible after the image is painted on the screen:
function myDrawBox(paintEvt) {
// Inset the drawing by 1 pixel to leave room for the border
picture object to draw itself, call its draw method. For example, this draws the image to fill
var box=paintEvt.target;
var draw=paintEvt.draw;
if (box.element.color != undefined)
draw.setColor(box.element.color);
else
draw.setColor("white");
draw.fillRect(1, 1, box.width-2, box.height-2);
draw.setColor("black");
picture object’s draw method to draw the referenced image on the
drawBox or boxResized methods. Your implementations of these
object. The offset arguments to the picture object’s draw method leave a pixel
Page 93

Adobe GoLive CS2 SDK
SDK Programmer’s Guide Custom Elements 93
draw.frameRect(1, 1, box.width-2, box.height-2);
// draw current image, created in parseBox()
box.myPict.width = box.width;
box.myPict.height = box.height;
box.myPict.draw(1,1); //offset by one pixel
}
//register the handler with the box object
function initializeModule() {
var myBox = boxes[myboxname];
myBox.addEventListener( 'paintEvent', myDrawBox);
}
Yo ur boxResized method must provide similar code. For an example, see the Custom Box sample
provided with the SDK.
Deleting pictures
A picture object can require significant amounts of memory. For best performance, dispose of
unneeded references as soon as possible. If you do not delete unused
dedicated to them is freed when GoLive quits. However, deleting pictures as soon as they are no longer
needed can improve performance and minimize memory requirements.
picture objects, all of the memory
To delete a picture, call the
myPict = createPicture (Images/myImage.jpg);
...
//when finished with the image
disposePicture (myPict);
disposePicture global function:
Page 94

7
Editing Documents Programmatically
When GoLive opens a markup document, it creates a document object model (DOM) to provide
programmatic access to the document and its contents. This chapter describes how extensions can use
JavaScript and the DOM objects to manipulate the contents of pages and sites.
For examples of many of the concepts and techniques described here, see the
included with the SDK.
The GoLive Document Object Model
GoLive can edit various kinds of markup documents—that is, documents written in a text-based markup
language such as HTML or XML. Although the examples in this chapter are HTML-based, keep in mind that
your extensions can use similar techniques to edit other kinds of markup documents.
In the GoLive DOM, the document Object
content. and allows you to manipulate the document in various ways, such as saving it to and loading it
from a file. Manipulating the document, of course, does not change the file until you save the changes.
(The file is represented by a file Object
document object called a site document represents a web site, rather than a document; see Working With
Site Documents. This chapter discusses only markup documents.
The JavaScript
frontmost window.
A set of objects, collectively known as markup objects, represent the content of the document, including
markup elements, comments, text blocks, and so on. The markup objects have a hierarchical relationship
that reflects that of the source code; see The Markup Tree
programmatic changes to the document’s source code; see Editing Source Code Through Markup Objects
document global variable provides access to the document object displayed in the
represents the document itself. It provides access to the
; see Chapter 9, “Managing Files and Folders.” ) A sp eci a l t ype o f
Markup Tree sample
. You can use markup objects to make
.
Another set of objects, called layout objects, allow you access to the visual representation of markup
objects that GoLive displays in the Layout view. These allow you to edit the document programmatically
while it is open in the Layout view. See Chapter 8, “
The Markup Tree
The GoLive CS2 SDK allows you to edit HTML and other markup documents interactively in many ways.
The SDK allows your extension to make the same kinds of changes programmatically, using SDK objects
and their JavaScript functions.
When GoLive reads a markup document, it creates JavaScript objects to represent the content. For each
document, there is a hierarchy of markup objects with parent-child relationships—the markup tree. The
structure of the markup tree reflects the structure of the markup elements in the document’s source code.
An HTML document, for example, always contains one
element. An optional
Subelements of the
that contain other elements.
Editing with Layout.
<html> element, which contains a <body>
<head> element may contain other elements that provide text, scripts, or both.
<body> element provide the document’s content, such as text, graphics, or elements
94
Page 95

Adobe GoLive CS2 SDK
SDK Programmer’s Guide Editing Documents Programmatically 95
The document’s markup tree has the same structure: the object for the <html> element is the parent of
the
head and body objects. The object for the <body> element might have, for example, a header ruler
and paragraph elements as its children.
The markup objects are of various types, depending on what kind of content they represent. However,
they all share the properties and functions of the Node Interface
tree, and of the Markup Interface
, which allows you to access the markup content.
, which allows you to navigate the markup
The markup tree always contains an
html node, a body node and a head node, even if the document’s
HTML source does not provide all of these elements. When you open an HTML document that is missing
any of these elements, GoLive creates a virtual element for the missing piece—that is, a markup object that
is not associated with an element in the document source code. You cannot edit the source representation
of a virtual element because it is not present in the document.
The root of the markup tree is the virtual element
documentElement property. It is present in the markup tree for every GoLive HTML document, but it is not
in the document’s source code and it cannot be edited. It is the only markup object that has no parent—
that is, the value of
document.documentElement.parent is null.
Reparsing and object references
There are various ways to edit a document programmatically; one of the factors in deciding which to use is
whether and when you want the edited document to be reparsed.
When you make changes to a document’s content, GoLive must parse the document in order to reflect
those changes in the DOM—that is, it must recreate the object structure for the document. A document
must be reparsed to realize changes to the HTML source that you make through the markup objects, and
to display those changes in any document window.
In many circumstances, GoLive reparses a document automatically. You can force reparsing, if necessary,
by calling the
document.reparse method.
GoLiveMarkup, contained in the document’s
Reparsing generates a new
document object and an entirely new tree of markup objects. If Layout view is
open, it also generates new layout objects. This invalidates any JavaScript references to previously existing
objects—that is, variables holding markup or layout objects become invalid. Whenever the document is
reparsed, you must reinitialize such variables to reference current JavaScript objects.
After parsing a document, GoLive calls your extension’s
parseBox method. Your implementation of this
method can update your extension’s JavaScript object references. For example, it can extract current
references to documents from the
reinitialize any variables that hold references to the old
documents global array or the document global property, and
document object or its properties.
Markup editing options
You can access and modify the HTML source code for a document directly, through the markup objects, or
indirectly, through the layout objects:
● When Layout view is open, you can use the layout objects to make some changes that can be displayed
without reparsing. However, these objects are only available for a subset of elements (see Chapter 8,
“Editing with Layout). For layout objects, GoLive automatically reparses if necessary and updates the UI
immediately before passing you the object.
● When Layout view is not open, the layout objects are not available. You must use markup objects to
edit the document programmatically; see Editing Source Code Through Markup Objects
.
Page 96

Adobe GoLive CS2 SDK
SDK Programmer’s Guide Editing Documents Programmatically 96
Automatic and explicit reparsing
GoLive automatically reparses a document in these circumstances:
● After GoLive executes a JavaScript event handler where the markup was modified. For example:
function doDocChange(docEvt)
{
var elt=docEvt.target.documentElement;
elt.getSubElement(“body”).setInnerHTML(“new text”);
//upon leaving this fn, autoreparse occurs
}
● When you switch the display view of a document by setting the document Object’s view property.
● When you access a textArea Object from the textArea property of a document object or markup
object.
● When you access a layout Object from the layout property of a markup object.
● When you call the app Object’s startProgress or setProgress method.
Generally, if you change the markup in any circumstance that does not cause GoLive to automatically
reparse, you must reparse explicitly to realize the changes in the source code and display views of the
document. In some cases, however you do not need to reparse. You do not need to reparse when:
● You add, remove, or modify the value of an attribute.
● You modify markup that you have created but not yet incorporated into the document.
● You modify markup contained in a custom box for a binary element, if the box is not a container.
● You modify one of the following:
● a head item (not the head tag itself, or a subitem of a head item)
● a text item part of the body section
● an HTML table or part of a table
if the modified markup is not one of these tags:
p, div
h1,h2, h3, h4, h5, h6
dl, ul, ol, li, dd, dt
address, center
If your extension operates in Layout view and edits the HTML source of any element that does not have a
layout object, your extension must interact correctly with the automatic reparsing behavior that the
Layout view provides. To do so, it must:
● Request a reparse of the document when appropriate.
● Avoid causing reparses from within the body of its parseBox, undoSignal, or other event handlers.
That is, these handlers must not:
● Perform operations that cause GoLive to reparse the document.
● Call the reparse method.
● Call the setInnerHTML or setOuterHTML functions if doing so will cause GoLive to reparse the
document.
For more information, see the technical notes and support information at http://partners.adobe.com/asn
.
Page 97

Adobe GoLive CS2 SDK
SDK Programmer’s Guide Editing Documents Programmatically 97
Working With Documents
You can use the functions and properties of the document object to perform basic document operations
such as creating, opening, and saving the documents displayed in GoLive’s document windows.
Every
document object’s properties provide:
● A description of its type:
markup: A markup tree
: A GoLive site document
site
javascript
: A style-sheet document
css
unknown: All other types of documents
● A title string displayed to the user
● A unique JavaScript name
● A file object representing the disk file from which it was read
● The line break mode (Mac OS, Windows, or UNIX®) it uses
● A description of how it is displayed: Layout view, Source view, Outline view, and so on
: A JavaScript document
● Access to its undo history
If the
document object represents a markup document (type="markup"), additional properties provide:
● Access to the tree of markup elements GoLive generated when interpreting the document
● A reference to the site that contains the document. This reference is always available, even when the
site file is not open. You can use it to navigate among the documents in a site programmatically.
● A reference to the Site window if it is open
If the
document object represents a web site (type="site"), additional properties reference:
● The root folder of the site
● The home page of the site
Opening documents
An extension can open a document in Layout view, or it can open the document for manipulation without
displaying it in a window. An extension that batch-processes multiple pages, for example, works much
faster if it does not need to update the GoLive UI. However, other extensions, such as custom palette
entries, must interact with document windows and other UI windows.
Open a document in a document window
To open an existing file or document in a document window, use the app Object’s openDocument
method:
var theDoc= app.openDocument(“myFolder/myDoc.html”);
This method returns the document object for the specified file, or null if it cannot find the file.
To allow your user to select a document file, call the
fileGetDialog global function. This displays the
operating system’s standard file browser dialog. If the user selects a file, the function returns the
corresponding file Object
. To open the document, call the file object’s openDocument method:
Page 98

Adobe GoLive CS2 SDK
SDK Programmer’s Guide Editing Documents Programmatically 98
var fileObj = fileGetDialog();
if (fileObj)
fileObj.openDocument();
Display layout view
The SDK operates only in Layout view. Before manipulating the contents of a document window
programmatically, be sure the window is displaying Layout view.
To display an open document in Layout view, set the
// make frontmost window display Layout view
document.view == "layout";
Open a document without displaying it
You must open a document to edit it. However, depending on your development goals, you can choose to
open a document without displaying it in a window.
To open an HTML file for programmatic editing without displaying it in a document window, use the
openMarkup method of the app or file object. Note that the openMarkup method fails if the document
is already displayed in a document window.
When no document window is open, GoLive provides no automatic reparsing behavior. It reparses only
when you explicitly call the
The
openMarkup method returns a document object, giving you access to the markup objects for the
content. Because it does not open a window, there are no layout objects. You can display alternative user
feedback, such as Progress bars
reparse method.
.
Manipulating open documents
The properties of the document object allow you to manipulate it in various ways.
document object’s view property to layout:
Make an open document window frontmost
To make a window frontmost, assign its document object to the global document variable:
// make the nth document frontmost
document = documents[
// make the mydoc.html document window frontmost
document = documents["mydoc.html"];
// make a previously saved document frontmost
document = mySavedDocumentObject;
n];
Count open documents
The documents global variable is a collection of all currently open documents. The length property is
the number of documents currently open in GoLive. For example, this alerts the user when more than one
document is open:
function processMyDocs()
{
// Bail out if more than one document is open.
Page 99

Adobe GoLive CS2 SDK
SDK Programmer’s Guide Editing Documents Programmatically 99
if (documents.length > 1)
{
Window.alert("Make sure only one document is open and try again.");
return;
}
// otherwise, process documents here
}
Validate document objects
The frontmost window can display various kinds of documents. A document object can represent a
markup document, a site document, or some other kind of document. Test the
sure you have the right type of document before working with it.
type property to make
When no document is open, the global
a
document object.
● When the Site window is frontmost, this object’s type="site".
● When the object represents a markup document, its type="markup".
● For all other documents, such as plain text documents, image files, and so on, type="unknown".
Working with style sheets
When an HTML document contains CSS style information, the document object’s styleSheets property
provides access to that information. You can examine the style information through the CSSStyleSheet
Objects found here, and the rule objects that are referenced by the style-sheet objects.
Access through the original markup document is read-only. To add or modify style information, you must
load the associated style-sheet file as a separate document. The resulting
css. You can open and edit it interactively or programmatically as you would a markup document.
● For a document of type markup, the styleSheets property contains an array of CSSStyleSheet
objects for all embedded and imported style sheets.
● For a document of type stylesheet, the styleSheets property contains an array with only one
element, the
CSSStyleSheet object for that style sheet.
Creating a new HTML page
document variable returns null or undefined. Otherwise, it holds
document object has the type
to create a new HTML page and display it in a document window, call the app Object’s newDocument
method:
var theDoc = app.newDocument();
if (theDoc)
{
// do something with doc here
}
This is equivalent to choosing the File > New Page menu item in GoLive. It creates an HTML document that
holds default content, and automatically displays it in a document window.
Page 100

Adobe GoLive CS2 SDK
SDK Programmer’s Guide Editing Documents Programmatically 100
Saving documents
To save a document, call the document object’s save or saveAs method. For example, this saves the
contents of the frontmost document:
document.save();
If the document has not been saved before, GoLive displays a dialog box in which to specify a file name
and the location. If the document has been saved previously, the method updates the file from which it
read the document’s original content.
To write the document’s contents to disk for the first time without displaying the
a pathname to the
// myPathname and myFilename are strings
document.saveAs(myPathname + myFilename + ".html");
The pathname must observe the file-naming conventions of the platform on which GoLive is running. It is
recommended that you use URLs as pathnames to avoid dealing with folder delimiter differences. For
more information on pathnames, see Chapter 8, “
Closing documents
To close a document, call the document.close method:
document.close();
If the document has unsaved changes, the close method prompts you to save or discard changes. To
save changes without prompting, pass a valid pathname to the
method. To discard changes without prompting, pass
document.close(true); // discard changes to doc
To close all open documents, calling the app.quit method. This is the same as choosing the File > Quit
menu item.
Save As dialog box, pass
document object’s saveAs method:
Editing with Layout”.
saveAs method before calling the close
true as the optional discard argument:
Working with Selections in Document Windows
The document.selection property holds the current selection, as set interactively in the document
window, or programmatically. When you change the selection programmatically, the change is reflected
in the displayed document.
A document selection is represented by a document.selection Object
an element, a part of an element, an entire element, multiple elements, or nothing. The value of the
selection object’s type property describes what is selected, or where the cursor is positioned if
nothing is selected:
none
point
Nothing is selected. In the document’s HTML source code, the cursor is positioned between
element definitions. For example:
<elt1>|<elt2>
Nothing is selected. In the document’s HTML source code, the cursor is inside an element
definition, for example:
< … | … >
. The selection can be a point within
 Loading...