

Page 1

Adam Equipment
MDW-250 L
Service Manual
Adam Equipment Co. Ltd.
p.n. 6094, Rev. B1, June 2005
© Adam Equipment Company 2005
Page 2

© Adam Equipment Company 2005
Page 3

CONTENTS
1.0 INTRODUCTION .............................................................................................2
2.0 KEYS AND DISPLAY DESCRIPTION .............................................................2
3.0 TROUBLESHOOTING THE MDW-250L..........................................................3
4.0 TECHNICAL SPECIFICATIONS......................................................................4
5.0 SETTING UP THE SCALE...............................................................................4
6.0 FUNCTION ......................................................................................................5
6.1 WEIGHING...................................................................................................5
6.2 MEASURING HEIGHT .................................................................................6
7.0 USER CALIBRATION ......................................................................................6
8.0 WARNING........................................................................................................8
9.0 ADJUSTMENT AND REPAIRS........................................................................9
9.1 ADJUSTMENT .............................................................................................9
9.2 REPAIRS......................................................................................................9
9.2.1 ELECTRONICS REPAIR ..........................................................................9
9.2.2 MECHANICAL REPAIR............................................................................9
10.0 SECTIONAL VIEW OF MDW-250L ...............................................................11
© Adam Equipment Company 2005
Page 4
1.0 INTRODUCTION
The MDW 250L scale is a Digital Physician Scale. It is an accurate electronic device
with advanced design and stable performance. It is designed to measure both the
weight and the height of a person.
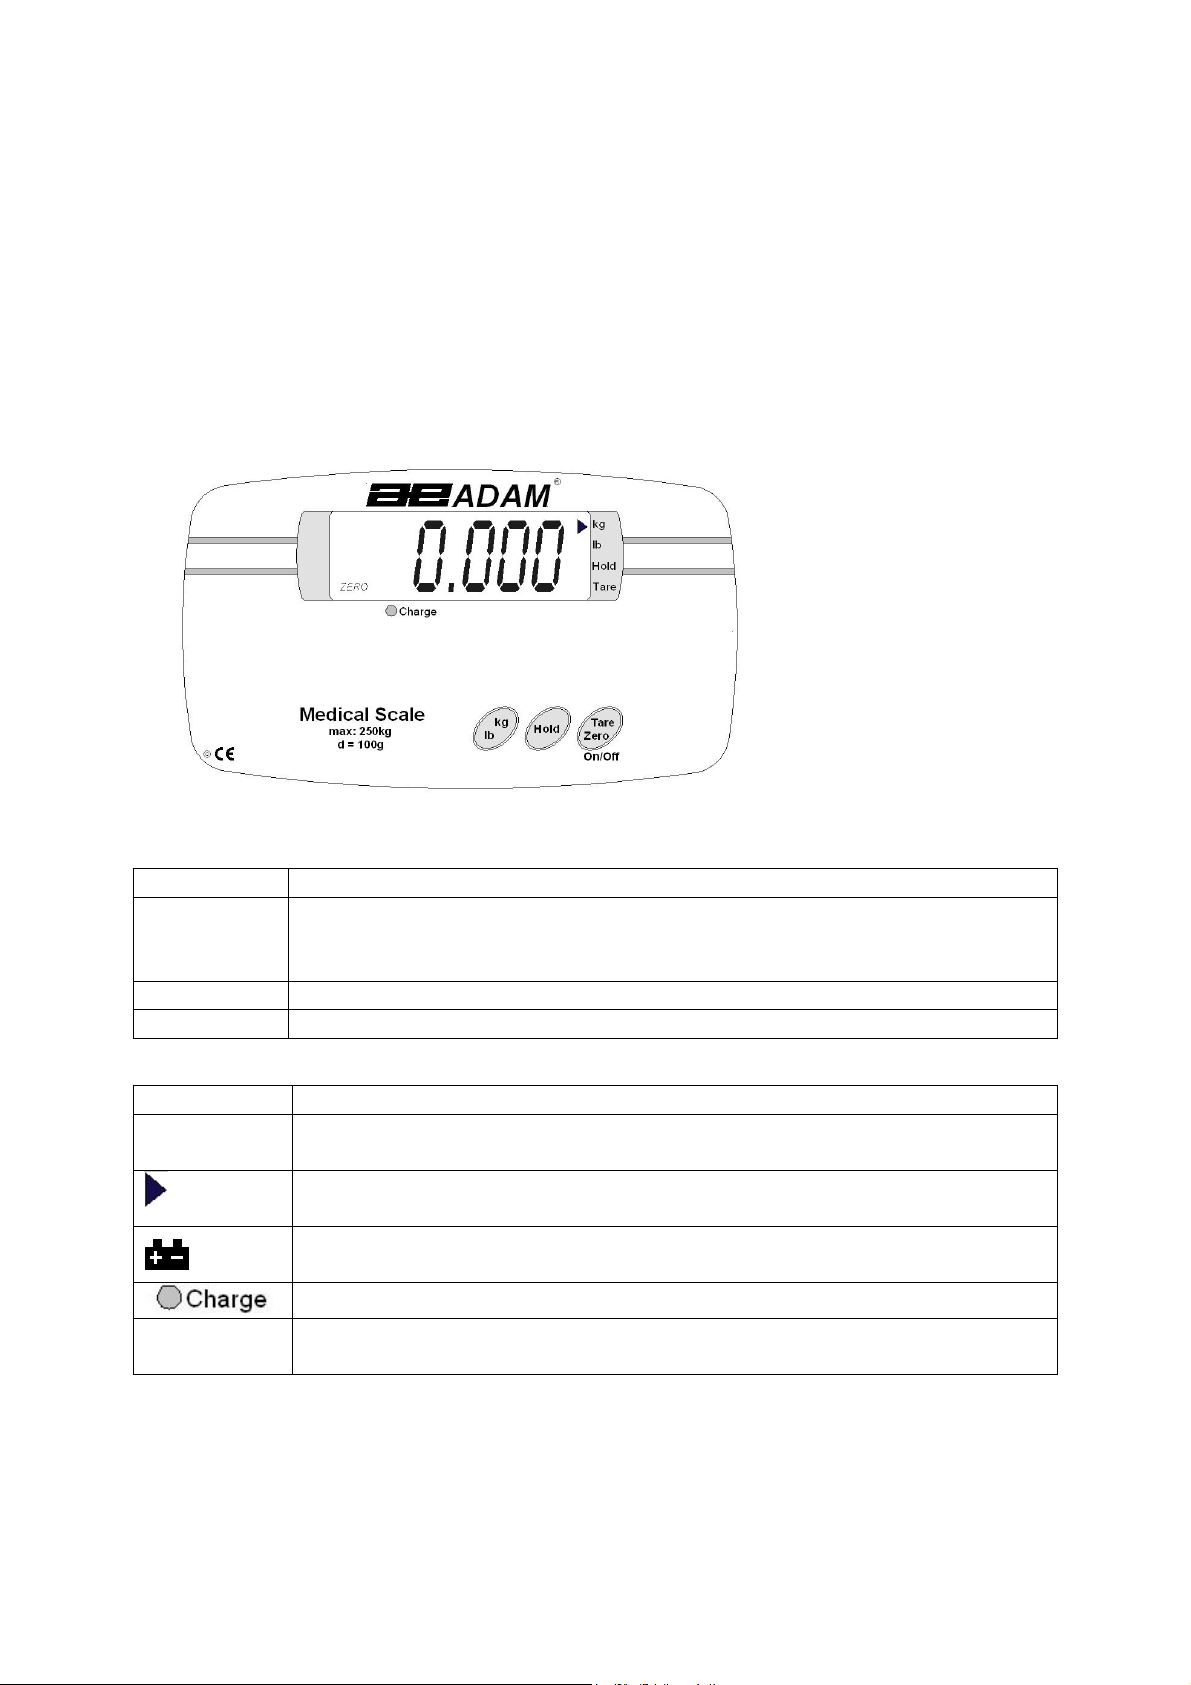
2.0 KEYS AND DISPLAY DESCRIPTION
KEYS FUNCTIONS
[Tare/Zero
On/Off]
To turn the scale on or off.
To zero the scale if the display drifts from zero.
To tare the scale, if necessary.
[Hold] To lock the reading even if the person to be weighed is moving.
[Kg/ lb] To toggle the weighing unit between Kg. and lb
DISPLAY DESCRIPTIONS
ZERO This indicator will be displayed in the left corner when the scale
reaches zero.
The arrow indicator will point at Kg, lb, Hold or/and Tare marked near
the LCD panel, as on when they are chosen.
When the battery is low, this symbol will be displayed in the left of the
display. Connect the adapter to recharge the battery.
The charge light will be on when the battery is recharging.
Full
Full
FullFull
When the load on the platform is over the maximum capacity, it will
appear on the display.
© Adam Equipment Company 2005 2
Page 5

3.0 TROUBLESHOOTING THE MDW-250L
PROBLEMS SUGGESTIONS
Nothing happens when
[On/off] is pressed
Display turns ON but then
goes off
Display shows “
FULL”
and
does not change when the
person to be weighed
stands on the platform
The scale does not weigh
accurately
Display does not change
Press the switch situated on side
of the indicator to ON, for battery
operation
Charge the battery
Check whether the cable from the
base is properly plugged into the
socket on the indicator
Check whether the cable is
damaged
Calibrate the scale
Check the kg/lb selection before
weighing
Charge the battery
Check the cable
The person on the scale should
not move
Check nothing is rubbing against
the platform
Check the base assembly is not
damaged
Replace the PCB
Check HOLD is not activated
© Adam Equipment Company 2005 3
Page 6

4.0 TECHNICAL SPECIFICATIONS
Maximum capacity 250 kg
Minimum capacity 2 k g
Scale division 100 g
Height range 70cm-190cm
Division of measurement 0.5cm
Accuracy class
Display LCD
Size of platform 372X272cm
Overall dimension 535X275X940mm
Deadweight 13Kg
Environment for Use Temperature: 5’C-40’C;
Humidity: <85℅ RH
Power AC 220V through an adapter
Battery Internal, re-chargeable
6V, 5 hours approx.
5.0 SETTING UP THE SCALE
• Take the Physician scale out of the box.
• Remove the two M4 screws from the bottom of the pillar.
• Rotate the pillar and secure it to an upright position using the two M4
screws.
• Slide the pole cover to the bottom.
• Remove the M6 screw at the top of the pillar and turn the indicator
panel to 180 degree. Tighten the M6 screw until the indicator panel is
secured.
© Adam Equipment Company 2005 4
Page 7

• Position the height measuring rod and secure it by fixing its threaded
end.
• Connect the adapter power supply to the main power supply and put
the switch at the rear of the scale to ON.
6.0 FUNCTION
6.1 WEIGHING
• Place the Physician Scale on an even floor and press the [On/Off] key.
• The instrument performs a self-test after which it is ready for operation.
The display will show “
software revision number), “
battery) and then will show “
SCALE
10.0.0.0.0
0.0000
”, “
250.00
” with an arrow symbol, indicating
” (Capacity), “
”, “
DC. 6.00
Ur x.xx
” (the voltage of the
” (the
the last chosen unit (kg or lb).
• Press the [On/Off] key for 2 or 3 seconds and the machine switches
off. If the machine is not to be used for a long time, the main power
switch shall be turned off.
• The scale has a back-light which is switched on every time the scale is
turned on or the [On/Off] key is pressed during the operation.
• When in the weighing mode, press [On/Off], the scale will show
“
0.000
” when the initial zero is within 4℅of the maximum capacity.
• The person to be weighed can step on to the platform now. The weight
will be display in Kg. or lb. depending on the units chosen by the user.
• If the weighing value is to be tared to obtain the net value, press the
[On/Off] key again.
• Press the [kg/lb] key for changing the weighing unit to kg or lb. An
arrow will indicate towards the chosen unit.
© Adam Equipment Company 2005 5
Page 8

• Overload display: When “
the load on the platform is over the maximum capacity. Under these
circumstances, it is necessary to reduce the load otherwise the sensor
or the platform will be damaged.
• Hold Function: To lock the weighing result, press the [Hold] key. The
arrow indicator will point towards HOLD and it will the show a steady
reading even if the person on the platform is moving or goes away from
the scale and will not affect the next weighing. To release the function,
press the [Hold] key again.
• Do not press the [On/Off] key if you do not want to weigh as pressing
the [On/Off] key will switch the scale to ON.
6.2 MEASURING HEIGHT
• While measuring the height, it is necessary to pull up the measuring
board at a right angle with the inside tube.
• When the tube is pulled out straight, it is sufficient to measure the
height form 70-126cm. The number can be obtained upon the conjoint
place where the upper part of middle tube screw meets with the inside
tube scale.
• Further, if the middle tube is pulled out straight, it is possible to
measure the height from 126-190cm. The reading can be obtained at
the conjoint place where the upper part of outside tube screw meets
with the middle tube scale.
FULL
” appears on the display, it shows that
7.0 USER CALIBRATION
1. Press [On/Off] key when the display shows ”
2. Press [On/Off] key again.
If the display is not showing “
span jumper on PCB to ON.
Start again by pressing [On/off].
The display shows “
3. Select “
© Adam Equipment Company 2005 6
Id01
” for 100g increments and press the [On/Off] key once.
Id01
”, “
Id-02
Id01
” open the upper housing and switch the
”, “
Id05
”, “
SCALE
Id10
”,”
Id-20
”.
”, “
Id-50
”.
Page 9

4. The indicator will show the selection capacity: “
P1000
” “
P2000
”….”
P5000
”,
Select “
P2500
” for 250kg, then press the [On/Off] key once.
5. Indicator will automatically show the decimal points: “
“
T0.000
6. Indicator will display “
”, “
POT 0
”. Select the “
ULOAD
PT0.0
”. Press the [On/Off] key again.
” and press the [On/Off] key again.
7. Indicator will show the internal value. After it is stable, it will show “
POT 0
” “
PT0.0
” “
LOAd
8. Put the mass (suggest the full capacity) and press the [On/Off] key, the
indicator shows the internal value (after loading) and the will show “
Ld-In
stable.
9. Press the [On/Off] key. Then press the [Hold] key. The last digit of the
display will be moving from “
0-9
”. Press the [Hold] key, the digit will move
forward to one position. When the figure displayed is same as the capacity of
the standard weight, press the [On/Off] key.
For example: If a 10 kg weight is used instead of full capacity:
After you process till the step (9) as above, press the [On/Off] key.
The indicator will show: “
0.0
”. Press the [Hold] key, the last digit will be
T0.00
”.
” after
”
automatically jumped from “
[Hold] key three times. Now, the “
and the display will be changed to “
0
” to”9”. When the figure jumps to “1”, press the
1
” will be moved to the 3
10.0
”. At this time you are required to
rd
forward position
press the [On/Off] key immediately.
Next the display will show the current weight on the pan.
10. The Calibration is now complete.
11. Set the span jumper on the PCB to OFF position and re-seal the indicator.
12. If the selections made during calibration are not as described as above, the
scale may still work but will not show accurate results. In such cases, re-do
the calibration as shown above.
© Adam Equipment Company 2005 7
Page 10

8.0 WARNING
• Do not dismantle the weighing machine without following the necessary
instructions.
• Do not jump while standing on the load-bearing board. This may damage
the sensor inside.
• Do not move the weighing machine violently and abruptly. It is
recommended to move and put down the weighing machine gently.
• It is suggested to wipe the stains with soft cloth soaked with detergent and
to wipe later with soft cloth too. Do not use organic solutions and boiled
water to wipe the stains. Do not use water for cleaning.
• Keep the weighing machine in a dry and clean environment. Do not
expose it outdoor or use it in locations near fire, under direct sunshine or
with high temperature.
• When lifting the height meter, it is suggested to pull it straight along the
pipe without using excessive force.
• The [On/Off] key on the screen board only switches off the screen power
instead of the entire power to the weighing machine. Therefore, it is
necessary to switch off the main power supply when the weighing
machine is not in use for a long time. Otherwise the battery may be
damaged as a result of over-discharge of electricity.
© Adam Equipment Company 2005 8
Page 11

9.0 ADJUSTMENT AND REPAIRS
9.1 ADJUSTMENT
The users can not make any adjustments other than Calibration.
9.2 REPAIRS
9.2.1 ELECTRONICS REPAIR
The most common electrical problems are-
1> Broken cables between the base and indicator,
2> Broken cables or poor connections on cables within the indicator.
3> Lead Acid battery has reached the end of its life.
Check the cables for loose connections, poor contact or abrasions on the sides and
replace as necessary.
The battery for the scales is a Lead Acid type with 6V, 5AH capacity. If the battery
must be replaced, use another Lead Acid battery of similar capacity only.
If the battery shows less than 6.5Vdc after charging, it is probably not holding the
charge and should be replaced.
The electronics used in the MDW- 250L scales consist of a main PCB assembly with
a second small PCB for the keys. The main PCB assembly is not user serviceable.
If a problem is found on the PCB, it should be replaced.
Contact your Dealer or Adam Equipment for assistance.
9.2.2 MECHANICAL REPAIR
The mechanics of the scale consists of a lever system to transfer the weight to the
single load cell. The lever system has series of bearings and knife edges to transfer
the weight from the platform to the load cell.
© Adam Equipment Company 2005 9
Page 12

Any broken knife edges, bent “S” links or severe misalignment can cause poor
weighing results. Inspect for damage and try to re-align parts if necessary. If any of
the mechanical parts are damaged or missing, it is usually not possible to do a costeffective repair.
Contact your Dealer or Adam Equipment for assistance.
If the load is being directed to the load cell properly and still the weighing results are
not satisfactory, then the load cell may be faulty.
A couple of tests which are to be done to verify the load cell are as follows-
• Within the indicator identify the load cell connector on the PCB. Voltage
measurement between pins 1 and 4 should be 5Vdc ±5%. If this voltage is
not correct then the main PCB should be replaced.
• Voltage between pins 2 and 3 should be approximately 0 to 1mv. This
voltage should increase as the load is applied to the platform up to about 8mv.
With 250kg on the scale, if the voltage is zero and does not increase- check
the cable connecting the load cell to the indicator.
• If the voltage with 0 kg load is greater than 2mv then the load cell is likely to
be damaged.
• If the voltage does not change with load then check the mechanical linkage to
the load cell. Otherwise the load cell is damaged.
© Adam Equipment Company 2005 10
Page 13

10.0 DIAGRAMS
© Adam Equipment Company 2005 11
Page 14

Page 15

accordance with the instruction manual, may cause harmful interference to radio communications.
Manufacturer’s Declaration of Conformity
This product has been manufactured in accordance with the harmonised European standards, following the
provisions of the below stated directives:
Electro Magnetic Compatibility Directive 89/336/EEC
Low Voltage Directive 73/23/EEC
Adam Equipment Co. Ltd.
Bond Avenue
Denbigh East Estate
Milton Keynes, MK1 1SW
United Kingdom
FCC COMPLIANCE
This equipment has been tested and found to comply with the limits for a Class A digital device,
pursuant to Part 15 of the FCC Rules. These limits are designed to provide reasonable protection
against harmful interference when the equipment is operated in a commercial environment. The
equipment generates, uses, and can radiate radio frequency energy and, if not installed and used in
Operation of this equipment in a residential area is likely to cause harmful interference in which case
the user will be required to correct the interference at his own expense.
Shielded interconnect cables must be employed with this equipment to insure compliance with the
pertinent RF emission limits governing this device.
Changes or modifications not expressly approved by Adam Equipment could void the user's authority
to operate the equipment.
@Adam Equipment Company 2005
Page 16

ADAM EQUIPMENT is an ISO 9001:2000 certified global organisation with more
than 30 years experience in the production and sale of electronic weighing
equipments. Products are sold through a world wide distributor network -supported
from our company locations in the UK, USA and SOUTH AFRICA. The company
and their distributors offer a full range of Technical Services such as on site and
workshop repair, preventative maintenance and calibration facilities.
ADAM’s products are predominantly designed for the Laboratory, Educational,
Medical and Industrial Segments. The product range can be classified as follows:
− Analytical and Precision Laboratory Balances
− Top Loading Balances for Educational establishments
− Counting Scales for Industrial and Warehouse applications
− Digital Weighing/Check-weighing Scales
− High performance Platform Scales with extensive software
features including parts counting, percent weighing etc.
− Digital Electronic Scales for Medical use
− Retail Scales for price computing
Adam Equipment Co. Ltd.
Bond Avenue
Milton Keynes
MK1 1SW
UK
Phone:+44 (0)1908 274545
Fax: +44 (0)1908 641339
e-mail:
sales@adamequipment.co.uk
Adam Equipment Inc.
26, Commerce Drive
Danbury, CT
06810
USA
Phone: +1 203 790 4774
Fax: +1 203 792 3406
e-mail:
sales@adamequipment.com
Adam Equipment S.A. (Pty) Ltd.
P.O. Box 1422
Kempton Park 1620
Johannesburg
Republic of South Africa
Phone +27 (0)11 974 9745
Fax: +27 (0)11 392 2587
e-mail:
sales@adamequipment.co.za
© Copyright by Adam Equipment Co. Ltd. All rights reserved. No part of this
publication may be reprinted or translated in any form or by any means without the
prior permission of Adam Equipment.
Adam Equipment reserves the right to make changes to the technology, features,
specifications and design of the equipment without notice.
All information contained within this publication was to the best of our knowledge
timely, complete and accurate when issued. However, we are not responsible for
misimpressions which may result form the reading of this material.
The latest version of this publication can be found on our Website.
Visit us at www.adamequipment.com
© Adam Equipment Company 2004
 Loading...