

Page 1

DOMIX 35
Water Doser Mixer
ENGLISH: p. 1
ESPAÑOL: p. 5
Operator’s Manual
CODE 2600103 – 07.03.2003
Belshaw Bros., Inc.
1750 22
Seattle, WA 98144
Phone: 206-322-5474
Fax: 206-322-5425
Toll Free: 1-800-578-2547
E-mail: service@belshaw.com
http://www.belshaw.com
nd
Ave S.
Page 2
2600103/07.03.2003
Fig. 1
Fig. 1
Page 3
2600102 / 11.XII.2001
2
Fig. 2
Page 4
2600103/07.03.2003
Page 5

2600102 / 11.XII.2001
Fig. 3
2
Page 6

2600102 / 11.XII.2001
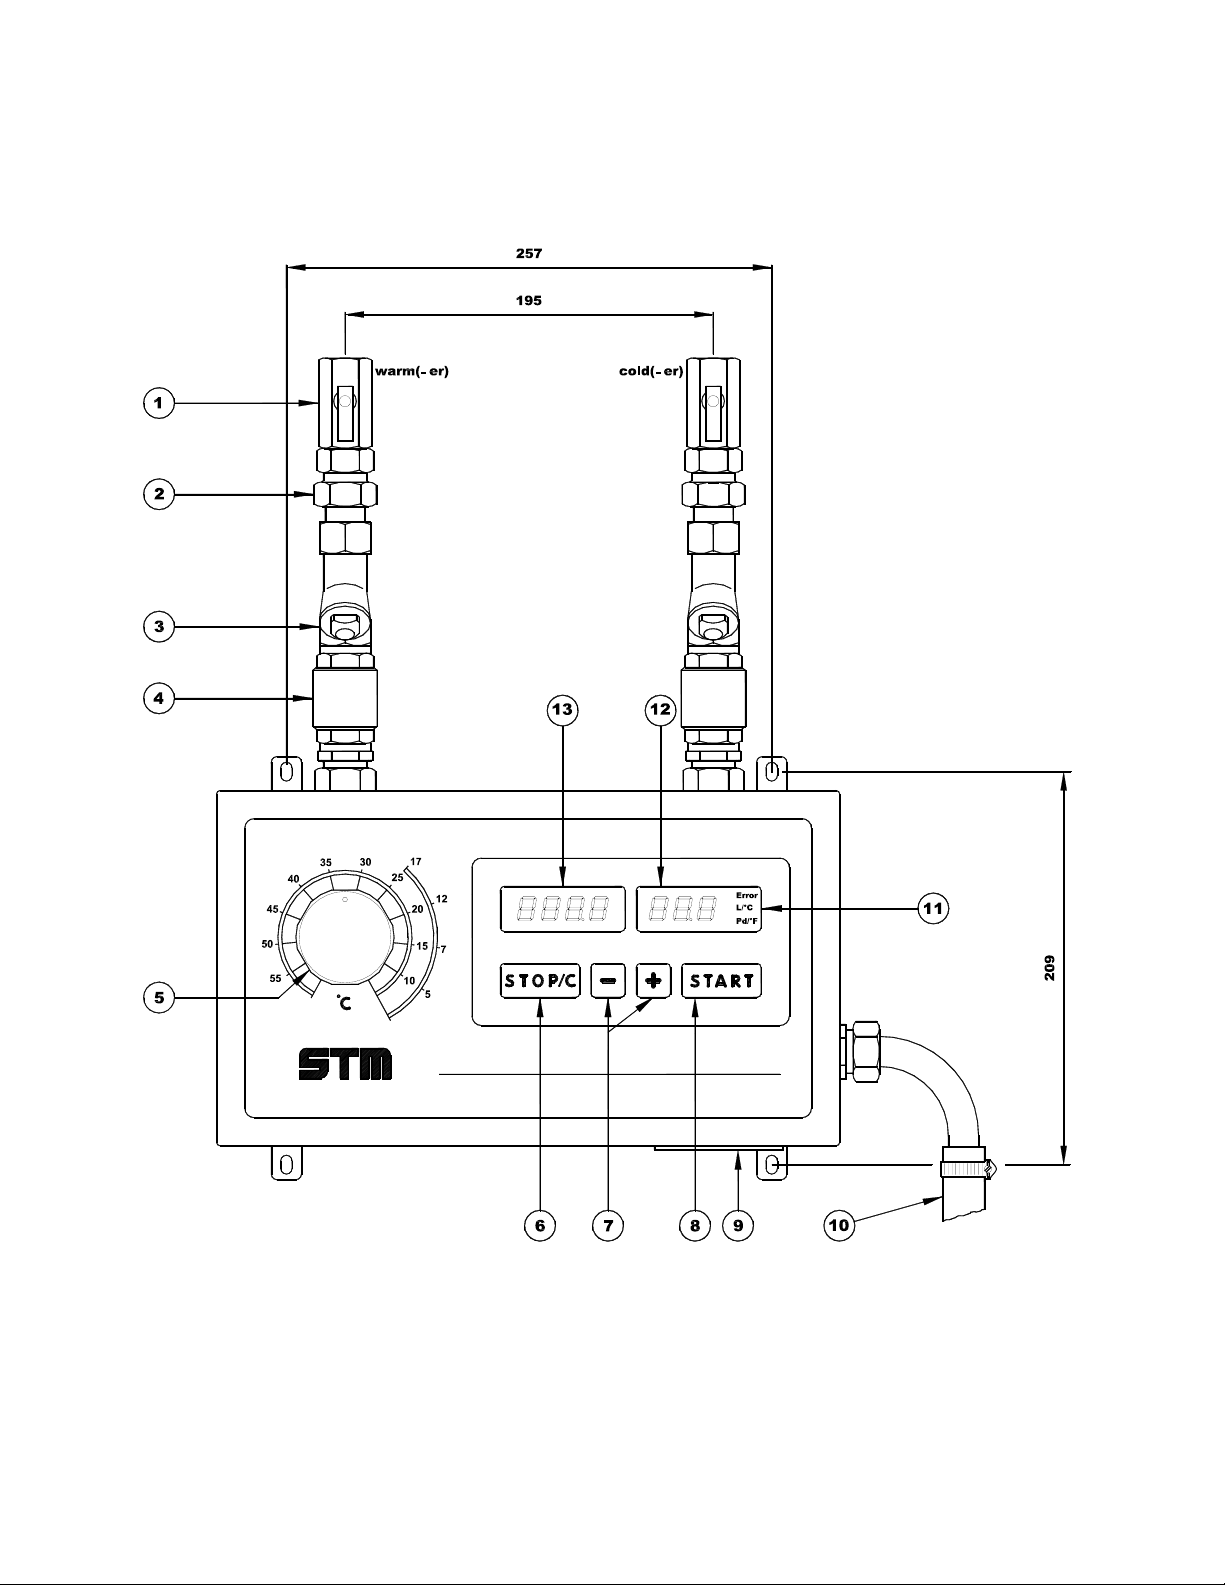
DESCRIPTION
(see figure 1)
1. Ball-taps with OR gasket.
2. OR gasket-type unions for an easier installation.
3. Double stainless steel net filters for water impurities.
4. No-return valves .
5. Regulation knob for setting temperature, with reference scale.
6. Key STOP/C for manual stop or eventual clearing of memory.
7. Keys
8. Key START for starting or restarting water delivery.
9. Supply plug, with fuse and spare, and remote pump control plug, with fuse and spare.
10. 2,5m delivery hose with stainless steel terminals.
11. Series of function control lights.
12. Digital display of electronic internal thermometer, showing °C with tenths or °F.
13. Digital display for selected, yet to be delivered (during batching), or already discharged
+ and - for setting the quantity.
(after pressing STOP) litres (or pounds).
TECHNICAL FEATURES
Software DOX35.02a
Water connections 1/2”
Max. inlet water temperature 65°C
Temperature setting range 2°C – 60°C
Temperature precision 1°C
Max. inlet water pressure 5bar
Min. inlet water pressure 1bar
Max. ratio between the two inlet pressures 1 : 5
Max. dosage quantity 999,9l
Dosing precision 1%
Water delivery at 1bar and 20°C 18l/min.
Water delivery at 5bar and 20°C 40l/min.
Voltage (see equipment rating plate) 230 or 110V
Frequency 50/60Hz
Power absorption 25VA
Supply fuse 250V 250mA delayed
Pump remote control fuse 250V 6,3mA delayed
1
Page 7

2600102 / 11.XII.2001
INSTALLATION
In the case of hard water (with high limescale content = hardness in French degrees higher
than 25-30) it is necessary to employ an ion exchange water softener. This unit must be
calibrated so as to maintain a residual hardness ranging between 5 and 10 French degrees.
We advise against the use of electronic water softeners, since their efficacy has not been
proved yet.
Fix the doser on the wall at a height from the floor of 1350 ÷ 1550mm using the two wall
plugs supplied. The 90° wall plug hook is supplied to provide support for the water delivery
outlet elbow.
Do not place other machines below the DOSER .
Arrange the water inlet tubings, mounting the ball taps (1) at their ends.
Connect the doser to the ball gates valve using connectors (2).
Connect the delivery tube (10) to the machine.
Provide connection to an adeguate power supply (see equipment rating plate near the
plug 6), monophase, 50 or 60Hz, using the supplied flying socket, fitted with a three core
cable with min. section 3 x 1mm². It is advisable to use an external switch.
If a pump remote control is required, use the power socket provided to supply the remote
contactor of the pump(s). The employment of such pump is necessary when the inlet
pressure is less than 0,5bar, for example when using unpressurized water heaters or
refrigerators.
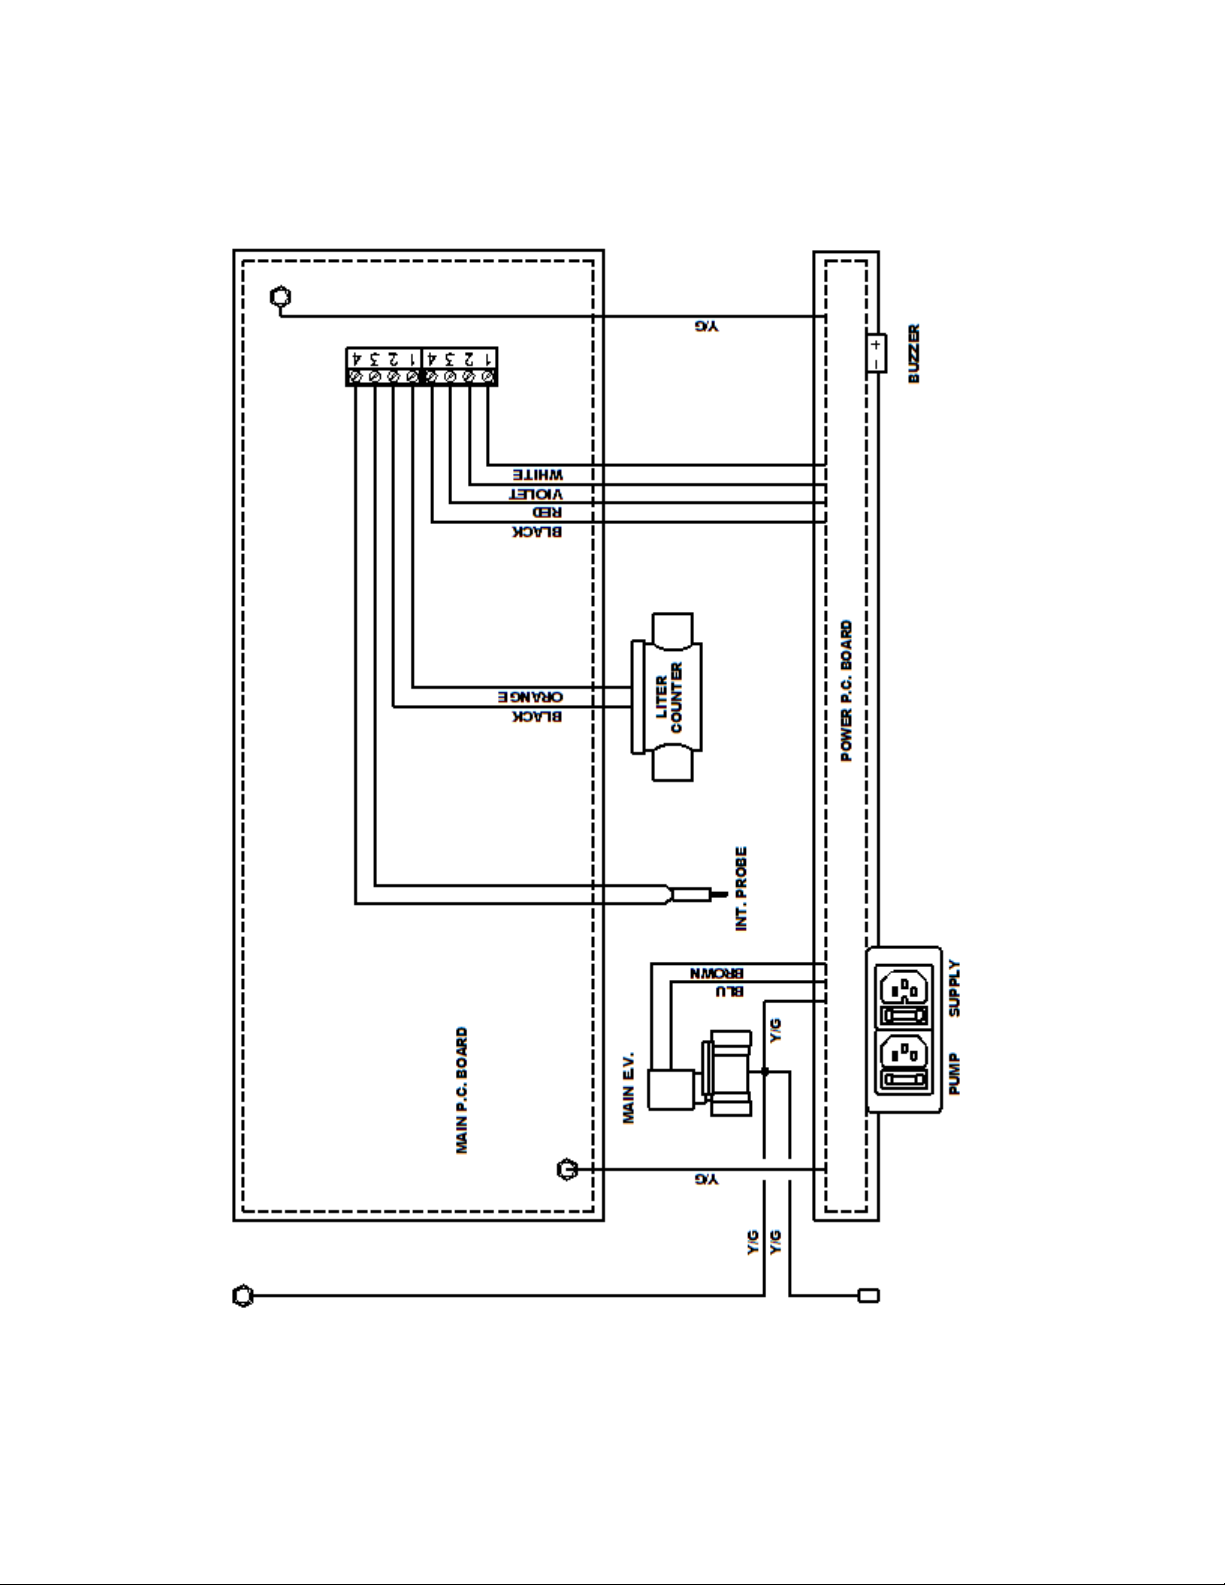
The plug has the following wiring diagram:
MAX 3A resistive
2
Page 8

2600103/07.03.2003
OPERATING INSTRUCTIONS
Switch on the doser using the external switch (or by plugging in the flying socket).
Set desired water quantity using
Increments/decrements may be obtained in three different ways:
+ and - keys. Setting appears on display (13).
1. step by step: pressing once
2. continuous: keeping constant pressure on + and - keys
3. fast: 3 seconds after keepi n g constant pressure on + or - key.
Press START key (8).
Water delivery may be stopped at any time by pressing STOP/C key (6). Quantity of water
delivered will then flash on display (12). To resume delivery of remaining water press START
key. Press STOP/C key and the original litre setting will reappears on display. Press STOP/C key
again to clear memory.
Water temperature is selected by turning the temperature regulation knob (5): the
temperature is shown on the electronic thermometer display (12). When regulating the
water temperature wait a few seconds between adjustments so as to allow the
temperature to stabilize.
Quantity in memory is retained at the end of each dosing. Simply press START key if identical
successive dosing are desired.
Memory is protected against power failure; pre-set dosing can be resumed pressi ng START
key when power is restored.
To ensure optimum operation the warm water temperature must be at least 10°C higher
than the required delivery water temperature and the cold water should be at least 5°C
lower. Low temperatures (below 10° - 15°C) may be obtained only when using a
refrigerator.
+ and - keys
FAULTY OPERATIONS AND REMEDIAL ACTION
If during water delivery the litres display flashes and the buzzer sounds intermittently and no
water flows out of the DOX, press the STOP/C key and then the START key:
Á If no water flows out of the machine and after 10-12 seconds fault indication restarts,
check the water pipes and ball valve, probably water is not reaching the doser.
Á If the water pipes are not obstructed, the water taps are all open and water arrives
regularly to the doser, check that the filter (3) is clean and then press the START key. If the
fault persists, the solenoid valve coil is faulty.
Ask for technical assistance.
3
Page 9

2600102 / 11.XII.2001
If during dosing, water is at first delivered regularly, but the litres display does not decrement
accordingly or decrements very slowly and/or irregularly, and after a while water delivery
stops, the buzzer sounds and display flashes:
press the STOP/C key and then the START key:
Á If after 10-12 seconds the anomaly reoccurs probably the internal litre counter is faulty.
Request technical assistance.
All displays and led indicators remain off:
check the fuse located next to the power supply plug, the housing can be opened with a
screwdriver.
If necessary, replace the fuse using the spare, located in the same housing.
If, after replacing the fuse, the fault persists, request technical assistance.
The device discharges water regularly but the temperature display flashes: the internal
temperature probe is faulty.
Request technical assistance.
MAINTENANCE INSTRUCTIONS
To guarantee a long working life for the internal components, clean the filter (3) regularly,
particularly if the water supply has a high limescale content. Clean also filters upstream of
the machine regularly (if mounted).
To clean the external surfaces of the doser-mixer, use a soft sponge and water or possibly a
neutral detergent; for more resistant grime, use turpentine.
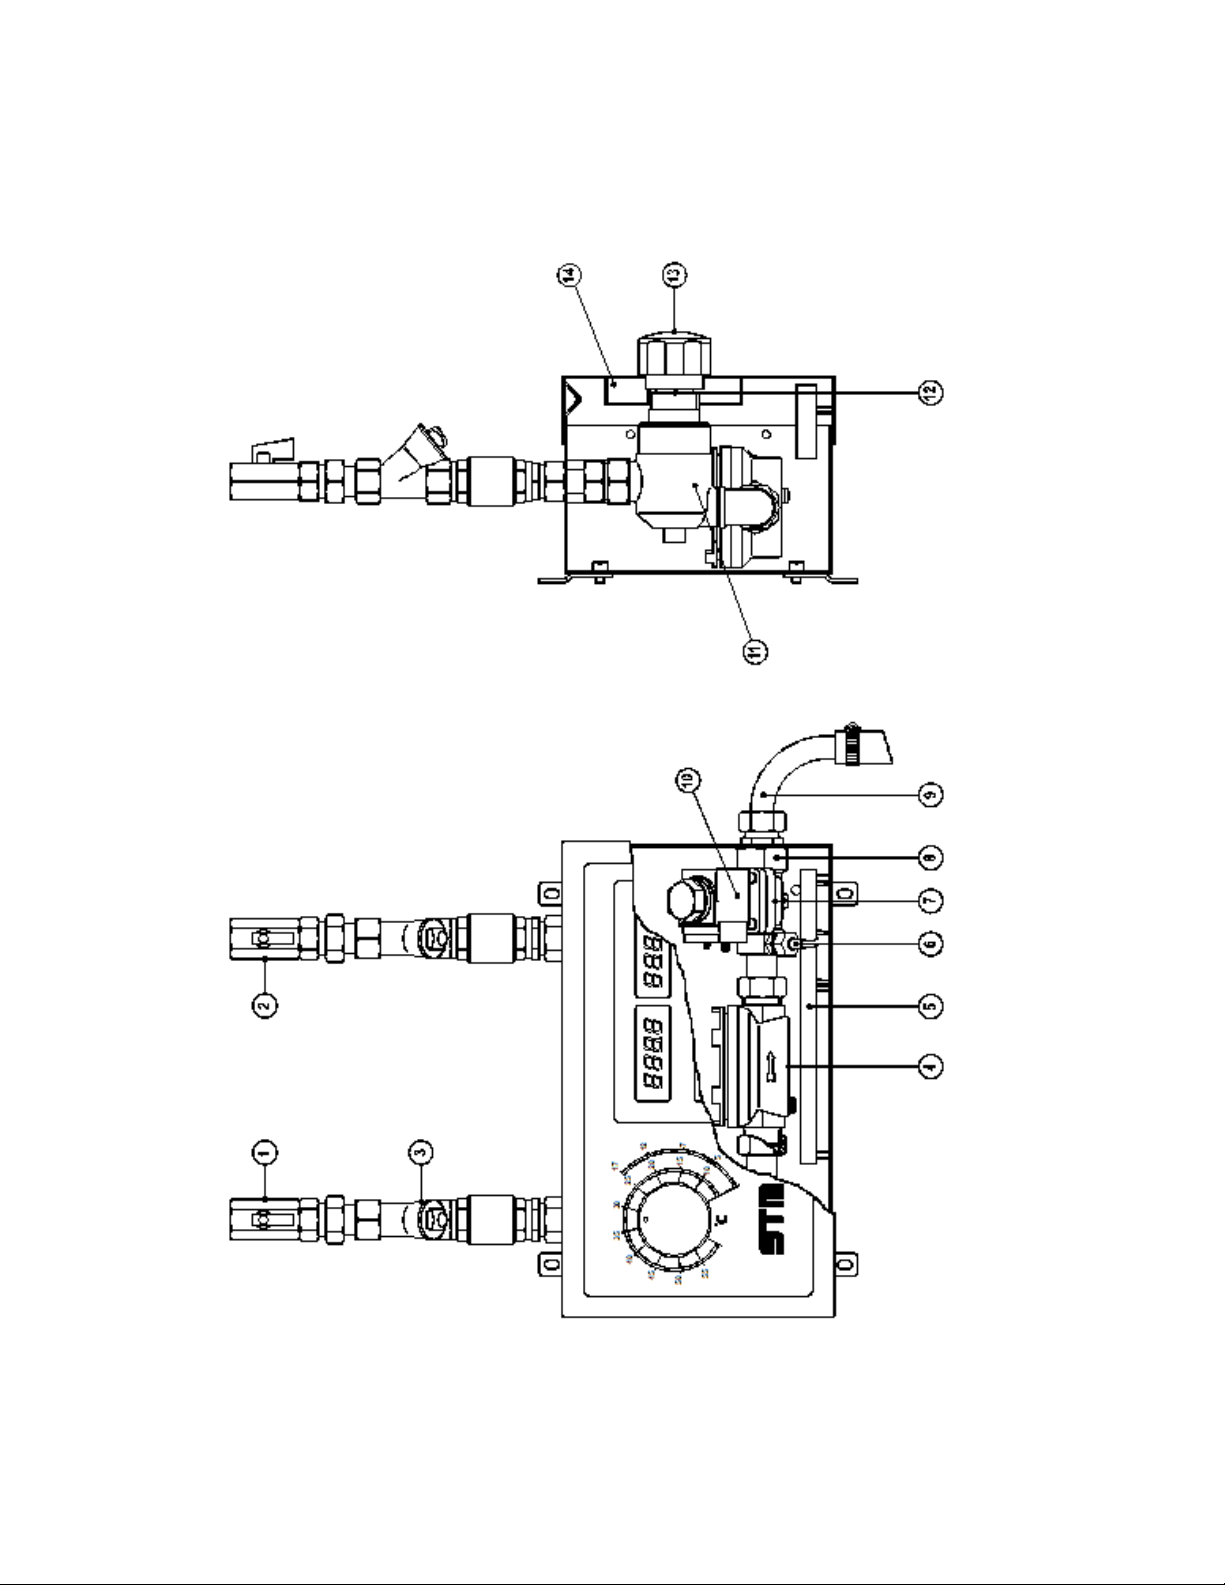
DOMIX 35 SPARE PARTS
(see figure n° 3)
POS.
1 Hot water ball gate valve (red, left) 3801229 /
2 Cold water ball gate valve (black, right) 3801228 /
3 Filter – no return valve assembly 3801230 /
4 2 wires liter counter 3801007 /
5 Actuators electronic board /plugs 3811547 3811548
6 Internal probe 3812522 /
7 Electrovalve internal kit 4400451 /
8 Electrovalve group with coil 3801136 3801138
9 Ø 16mm delivery hose 3801209 /
10 Electrovalve coil 4400405 4400406
11 Mixing unit without knob 3801309 /
12 Thermostatic sensor 4400351 /
13 Regulating knob 3801208 /
14 Cover with electronics 3811044 /
4
DESCRIPTION CODE
230V 50Hz 110V 60Hz
Page 10

2600103/07.03.2003
DESCRIPCION
(Véase figura n. 1)
1. Llaves rápidas de esfera con guarnición OR.
2. Boquillas para facilitar la instalación.
3. Filtros de impurezas de doble red inox.
4. Válvulas de no retorno.
5. Guantelete para la regulación de la temperatura, con escala de referencia.
6. Tecla STOP/C para parar manualmente o anular la memoria visualizada.
7. Teclas
8. Teclas START para el empiezo o la reanudación de la dosificación.
9. Enchufe de alimentación completo de fusible y repuesto y toma para telemando bomba,
con fusible y repuesto.
10. Tubo de dosificación en acero inox, de 2,5m.
11. Serie de espías de señalación.
12. Display digital del termómetro electrónico interior, con décimos de grado °C o °F .
13. Display digital para los litros programados, aún no descargados (durante la dosificación), o
+ y - para programar la cantidad.
ya descargados (después de haber pulsado STOP).
CARACTERISTICAS TECNICAS
Software DOX35.02a
Empalmes agua 1/2”
Temperatura máxima del agua a la entrada 65°C
Campo de regulación da 2 a 60°C
Precisión de la temperatura 1°C
Presión máxima del agua a la entrada 5bar
Presión minima del agua a la entrada 1bar
Máxima relación entre las presiones de entrada 1 : 5
Dosificación máxima 999,9l
Precisión de dosificación 1%
Capacidad agua a 1bar y 20°C 18l/min.
Capacidad agua a 5bar y 20°C 40l/min.
Tensión (véase plaquita sobre el aparato) 230 o 110V
Frecuencia 50/60Hz
Potencia absorbida 25VA
Fusible para alimentación 250V 250mA retardado
Fusible para telemando bomba 250V 6,3A retardado
5
Page 11

2600102 / 11.XII.2001
INSTALACION
En la eventualidad de que se tenga que usar agua dura (con elevado conteni do de sales
de calcio = dureza en grados franceses superior a los 25-30) es practicamente
indispensable el empleo de un ablandador del agua por intercambio de iones. Este
aparato debe ser tarado de manera que la dureza residual se mantenga entre los 5 y los 10
grados franceses. No se aconseja el empleo de ablandadores de agua del tipo electrónico
puesto que su eficacia no ha sido probado todavía.
Fijar el Dosificador a la pared a una altura de 1350÷1550mm del suelo utilizando los 2
tapones a expansión incluìdos. El gancho de 90°, sirve como soporte para fijar a la par ed la
curva de descargo del agua.
No montar máquina alguna bajo el aparato.
Preparar los tubos de llegada del agua, colocando en sus partes finales las llaves de esfera
(1).
Conectar hidráulicamente el aparato por las boquillas (2).
Introducir el tubo de dosificación (10) en su sitio.
Alimentar la máquina con la correcta tensión (véase plaquita informativa al lado del
enchufe 6 sobre el aparado), monofásica 50 o 60Hz, utilizando la toma volante incluida que
debe conectarse con cabe tripolar de una sección mínima 3x1mm
un interruptor externo.
Para el eventual mando remoto de la bomba, utilizar la apropiada toma de ali mentación
del teleruptor de la bomba, o bien de las bombas. El empleo de la bomba es indispensable
cuando la presión en entrada es inferior a 0,5bar, como por ejemplo en el caso de
calentadores o refrigeradores sin presión.
La toma tiene el siguente esquema eléctrico:
MAX 3A resistive
. Se aconseja preveer
6
Page 12

2600103/07.03.2003
INSTRUCCIONES PARA EL USO
Proporcionar tensión al aparato por el interruptor externo (o insertando la toma volante).
Seleccionar mediante las teclas
sobre el display (12). Para programar fácilmente las gruesas cantidades, las velocidades de
incremento son tres: paso-paso, continua, continua rápi da; para conseguir las últimas dos
hay que tener apretadas la tecla
Apretar la tecla START (8).
En cualquier momento se puede interrumpir manualmente el suministro de agua apretando
la tecla STOP/C (6). En seguida sobre el display (13) parpadea la cantidad de agua
descargada; si se quiere terminar la dosificación es suficiente apretar de nuevo la tecla
START, en caso contrario apretando de nuevo la tecla STOP/C se vuelve a seleccionar la
cantidad en memoria. Apretando una vez más STOP/C se repone a cero la memoria.
Utilizar el relativo mando de regulación (5) para regular la temperatura del agua de la
manera deseada, controlandola sobre el termometro electrónico (12). Para efectuar una
eventual corrección, esperar unos instantes antes de intervenir de nuevo, para permitir que
la temperatura se establezca.
Para dosificaciónes sucesivas iguales, es suficiente apretar la tecla START, puesto que el
aparato está dotado de memoria. Aún faltando la tensión durante la dosificación, los
datos en memoria no serán borrados y cuando la tensión regrese será suficiente apretar
otra vez la tecla START para completar regularmente la descarga.
Para lograr las mejores condiciones de funcionamiento, el agua caliente debe de tener
una temperatura de por lo menos 10°C superior a la temperatura deseada y el agua fría
por lo menos 5°C inferior. Las bajas temperaturas (debajo de los 10°/15°C) se obtienen sólo
mediante un refrigerador.
+ y - la cantidad de agua deseada, que aparecerá
+ o - .
IRREGULARIDADES DE FUNCIONAMIENTO
Y RELATIVAS SOLUCIONES
Durante la descarga el display de los litros parpadea, el avisador acústico suena a
intermitencia y del DOX no sale agua: apretar la tecla STOP/C y luego apretar la tecla
START;
Á Si el agua no sale del aparato y después de 10-12 segundos empieza de nuevo la
anomalia, controlar la tubería y el cierre del agua, puesto que probablemente no llega
agua al aparato.
7
Page 13

2600102 / 11.XII.2001
Á Si la tubería no está obstruida, los cierres están todos abiertos y el agua llega
regularmente (controlar también el estado de limpieza del filtro 3) y apretando la tecla
START la anomalia todavía sigue, es posible que la bobina de la electroválvula esté rota.
Pedir la intervención de la asistencia.
Si durante el descargo al principio el agua sale regularmente, pero sobre el display de los
litros no se reponen los números o lo hacen muy lentamente y/o no regularmente y después
de un rato se para el descargo, el display de los litros parpadea y el avisador acústico
suena a intermitencia: apretar la tecla STOP/C, luego la tec la START;
Á Si después de 10-12" se presenta de nuevo la anomalia, está roto el cuenta-litros interno.
Pedir la intervención de la asistencia.
Á Todos los displays y los led están apagados: controlar el fusible puesto al lado de la to ma
de corriente en su apropiado sitio, que será necesario abrir con un destornillador.
Substituirlo, si necesario, con el repuesto ahí mismo incluído.
Á Si aún substituyendo el fusible la anomalia continúa, pedir la intervención del Servicio
Asistencia.
El aparato marcha normalmente, pero el display de temperatura parpadea: la sonda e stá
estropeada. Pedir la intervención del Servicio Asistencia.
MANUTENCION
Para la duración de los órganos internos, limpiar con frecuencia los filtros (3), sobre todo si
hay presencia de caliza y los demás filtros antes de la máquina.
Para limpiar utilizar una esponja suave con agua y event ualmente jabón neutro; en caso
de suciedad más resistiva usar aguarrás.
REPUESTOS DOMIX 35
(Véase figura n° 3)
POS. DESCRIPCION CODIGO
230V 50Hz 110V 60Hz
1 Cierre de bola ag. caliente (rojo, izq.) 3801229 /
2 Cierre di bola ag. fría (negro,der.) 3801228 /
3 Grupo filtro-válvula no ritorno 3801230 /
4 Cuentalitros 2 hilos 3801007 /
5 Placa Actuadores/ tomas 3811547 3811548
6 Sonda interna 3812522 /
7 Kit interno E. V. 4400451 /
8 Grupo electroválvula con bobina 3801136 3801138
9 Tubo descarga ø 16 completo 3801209 /
10 Bobina para E. V. 4400405 4400406
11 Grupo mezclador sin prilla 3801309 /
12 Elemento termostático 4400351 /
13 Perilla de regulación 3801208 /
14 Tapa c/electrónica 3811044 /
8
Page 14

2600103/07.03.2003
9
 Loading...