

Page 1

Convection Ovens
Model BXC Smartbake
4-Tray & 10-Tray
Belshaw Bros., Inc.
1750 22nd Ave. S.
Seattle, WA 98144
Phone: 206-322-5474 • Fax: 206-322-5425
Toll Free: 1-800-578-2547
E-mail: service@belshaw.com
http://www.belshaw.com
Page 2

Page 3

If you accept the machine from the shipping
company, you are, in effect, saying that the
machine is in good condition, and you must pay
for the machine. Belshaw cannot pay for
shipping damage, because the freight company
has accepted the machine from Belshaw in good
condition, and is responsible for its safe delivery.
For your protection, inspect the machine to see
that no parts are bent, scratched, or otherwise
damaged. If any damage has occurred in
shipping, file a freight claim with the shipping
company immediately.
WARNING
Keep this manual available at all times for
use.
EQUIPMENT RECORD
Please provide the information below when you correspond with us about your machine.
Purchased by _____________________________________________________________________
Installed by ______________________________________________________________________
Date of Installation ________________________________________________________________
Model number ___________________________________________________________________
Serial number
0206
MN-1881EN
Belshaw Bros., Inc.
1750 22nd Ave. S.
Seattle, WA 98144
Phone: 206-322-5474 • Fax: 206-322-5425
Toll Free: 1-800-578-2547
E-mail: service@belshaw.com • http://www.belshaw.com
Page 4

Page 5

Contents
Sections
1 Installation 1
Unpacking the oven 1
Dimensions and Specifications 1
Installation 2
Initial Cleaning 2
Programming the control panel 3
2 Operation 5
Operating conditions 5
Operating using programmed settings 5
3 Cleaning and Maintenance 7
Daily cleaning 7
Weekly cleaning 7
Maintenance 8
Lubrication 8
4 Troubleshooting 10
Troubleshooting Fault Analysis 11
5 Diagrams 33
Limited Warranty Insert
Belshaw Bros., Inc. • 1750 22nd Ave. S. • Seattle, WA 98144 • Phone 206-322-5474 • Fax 206-322-5425
BXC Smartbake Oven MN-1881EN iii
Page 6

Preface
The Belshaw BX Smartbake convection oven is a
computerized, compact, electric oven with a
capacity for either four or 10 trays. Each tray is
26” x 18”.
The convection oven is made of stainless steel
and is fitted with a removable tray rack, allowing
easy cleaning of its internal surfaces.
The 4-tray oven is designed to be stackable
without separate support, allowing the system to
grow with your business without taking up a
large area.
The 10-tray oven is equipped with an integral,
energy efficient steam system. A double glazed
door also helps to increase energy efficiency, and
the oven base is supplied with locking castors.
The high-speed fan and ring element provides
efficient air circulation, helping produce a range
of high-quality products.
To help ensure safe and efficient operation of the
oven, the operator must work safely at all times,
read this manual, and follow its instructions and
warnings. A thorough understanding of how to
install, maintain, and safely operate the
convection oven will help prevent production
delays and injuries.
• Electrical access panels must not be opened
unless the main supply to the oven is
isolated.
• Any chimneys or ducts fitted above the ovens
should be insulated.
• All connections must be made in accordance
with the regulations of the country where the
oven is installed.
• Do not touch the oven, its windows, or
immediate surroundings during or shortly
after use, as these surfaces may be hot.
• Use only Belshaw parts in this oven.
• Do not change the construction of this oven.
• The owner of the oven is legally obligated to
instruct staff using the oven in its operation
and in these safety regulations. The
instructions must stay in the oven’s working
area.
• This oven uses a steam generator. Hard
water must be properly treated before use.
To use the convection oven safely, heed the
following warnings and all other warnings that
appear in this manual.
• Use the oven only for baking bread,
confectionery, and savory products. Do not
use for any other items without consulting
Belshaw.
• All repairs and maintenance of electrical
units must be done by authorized electricians.
Belshaw Bros., Inc. • 1750 22nd Ave. S. • Seattle, WA 98144 • Phone 206-322-5474 • Fax 206-322-5425
iv MN-1881EN BXC Smartbake Oven
Page 7

Installation 1
Unpacking the oven
1. Move the crate containing the oven to the
workstation.
2. Remove the machine from the shipping crate,
being careful not to lose, loosen or damage
any parts.
3. Remove all packing materials from the
machine.
4. Inspect the machine to see that no parts have
been damaged during shipping. If any
damage has occurred, file a freight claim
with the shipping company immediately.
IMPORTANT
Keep this manual available for future
reference.
Dimensions and Specifications
2618 4 tray oven 2618 10 tray oven
Height
Depth, door closed, including
handle
Width
Operational clearance*
21 inches 74 inches
44 inches 53.5 inches
33.5 inches 33.5 inches
2” back and sides, 10” top
2” back and sides, 10” top
Total power
Electric
Supply cable
Loading
Fan drive
Tray size
Tray capacity
Damper
Noise level
* Operational clearance is the amount of space required at the back, sides, and top of the oven to allow
adequate air circulation.
Belshaw Bros., Inc. • 1750 22nd Ave. S. • Seattle, WA 98144 • Phone 206-322-5474 • Fax 206-322-5425
BXC Smartbake Oven MN-1881EN 1
7. 5 kW 17 kW
208 V, 3-phase + N + E, 60Hz,
fused at 35A
6 feet of cable provided 6 feet of cable provided
7 kW concentric ring element
Direct to motor Direct to motor
26” x 18” 26” x 18”
4 5, 9, or 10
Butterfly type
Less than 85 dB Less than 85 dB
208 V, 3-phase +N + E, 60Hz,
fused at 58A
16 kW (2 - 8 kW concentric
ring elements)
Butterfly type
Page 8
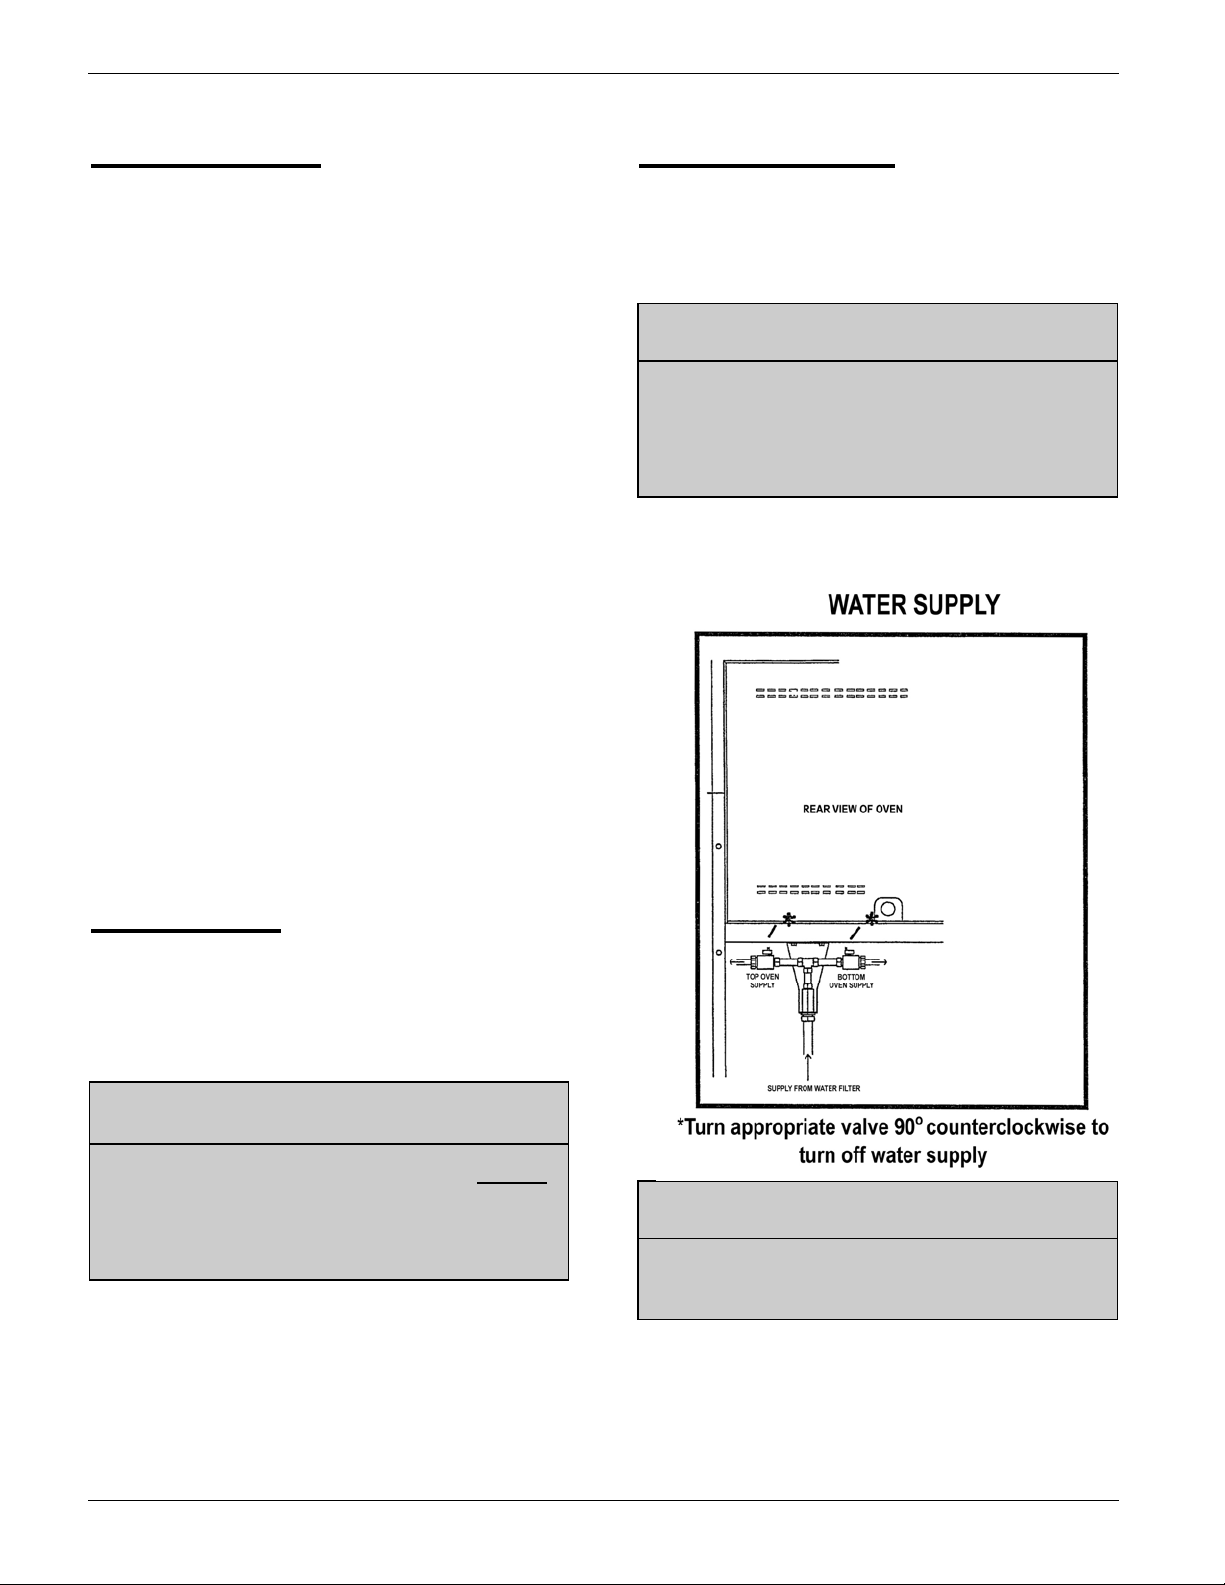
Water Supply
• The BX Smartbake oven is fitted with a
steam generator. In areas with hard water,
the water supply to the oven must be treated
with an appropriate protecting water
treatment device. It is the sole responsibility
of the customer to provide and maintain an
appropriate water treatment system.
• For stacked ovens, the water supply should
be shut off by closing the shut-off valves.
(See Figure 1-1)
• For non-stacked ovens, the water supply
should be shut off at the nearest shut-off
point.
The BX Smartbake oven needs the following for
the water supply:
• ¾” BSP female thread on the oven.
• 3 foot-long hose with ¾” B.S.P. female
fittings at both ends (included)
Initial Cleaning
Carefully wipe the interior of the oven and all
accessories with a clean cloth soaked in warm
soapy water and allow the oven to dry
completely.
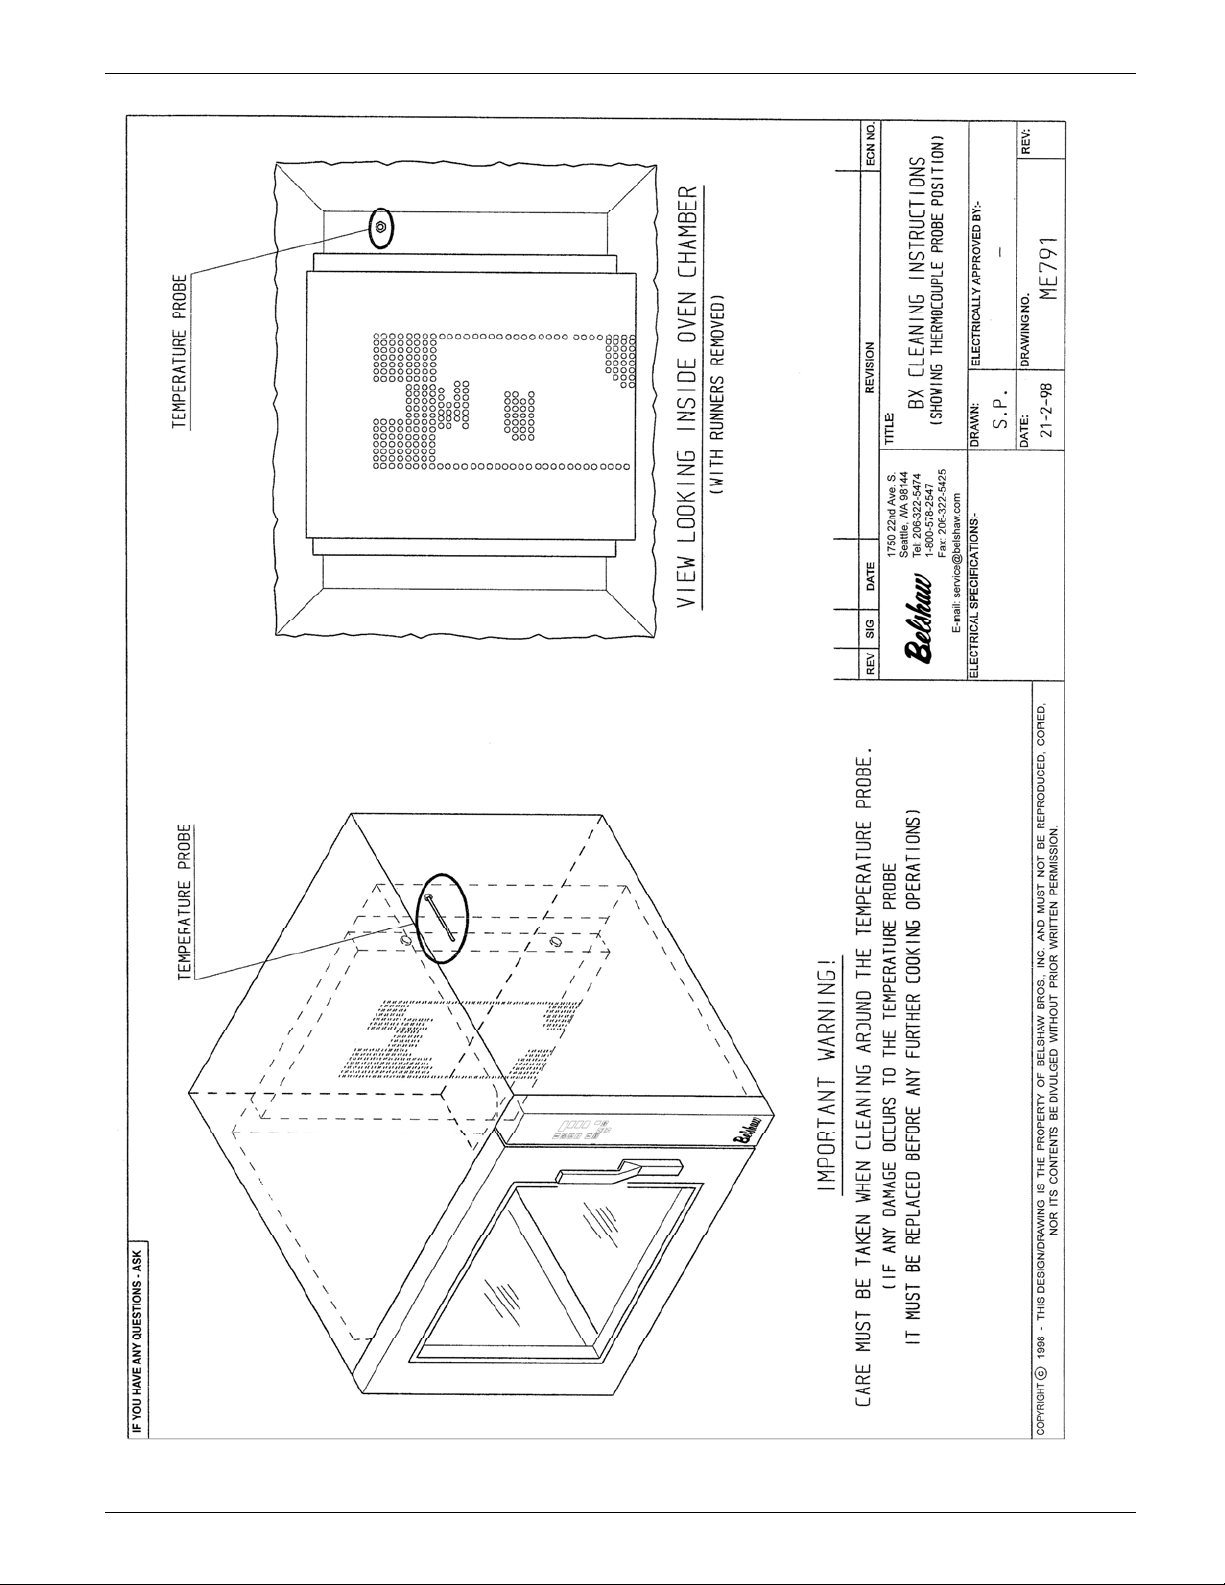
IMPORTANT
When cleaning the inside of the 4-tray
oven, be careful not to damage the control
probe protruding from the upper corner of
the chamber’s rear wall.
• Inline backflow valve (customer must
provide and fit)
• 15-60 p.s.i. water pressure
Installation
The BX oven should be connected to a local
means of isolation.
• To stop the oven in an emergency, switch off
at the wall isolator.
NOTE
When stacking two BX4 ovens, you MUST
install the Stacking Kit (Part Number
M159-00-00100) between the ovens. Please
refer to Figure 5-1 in Section 5.
WARNING
Do not allow water to enter the control
panel or rear access panel.
Figure 1-1. Turning off the water supply.
Belshaw Bros., Inc. • 1750 22nd Ave. S. • Seattle, WA 98144 • Phone 206-322-5474 • Fax 206-322-5425
2 MN-1881EN BXC Smartbake Oven
Page 9
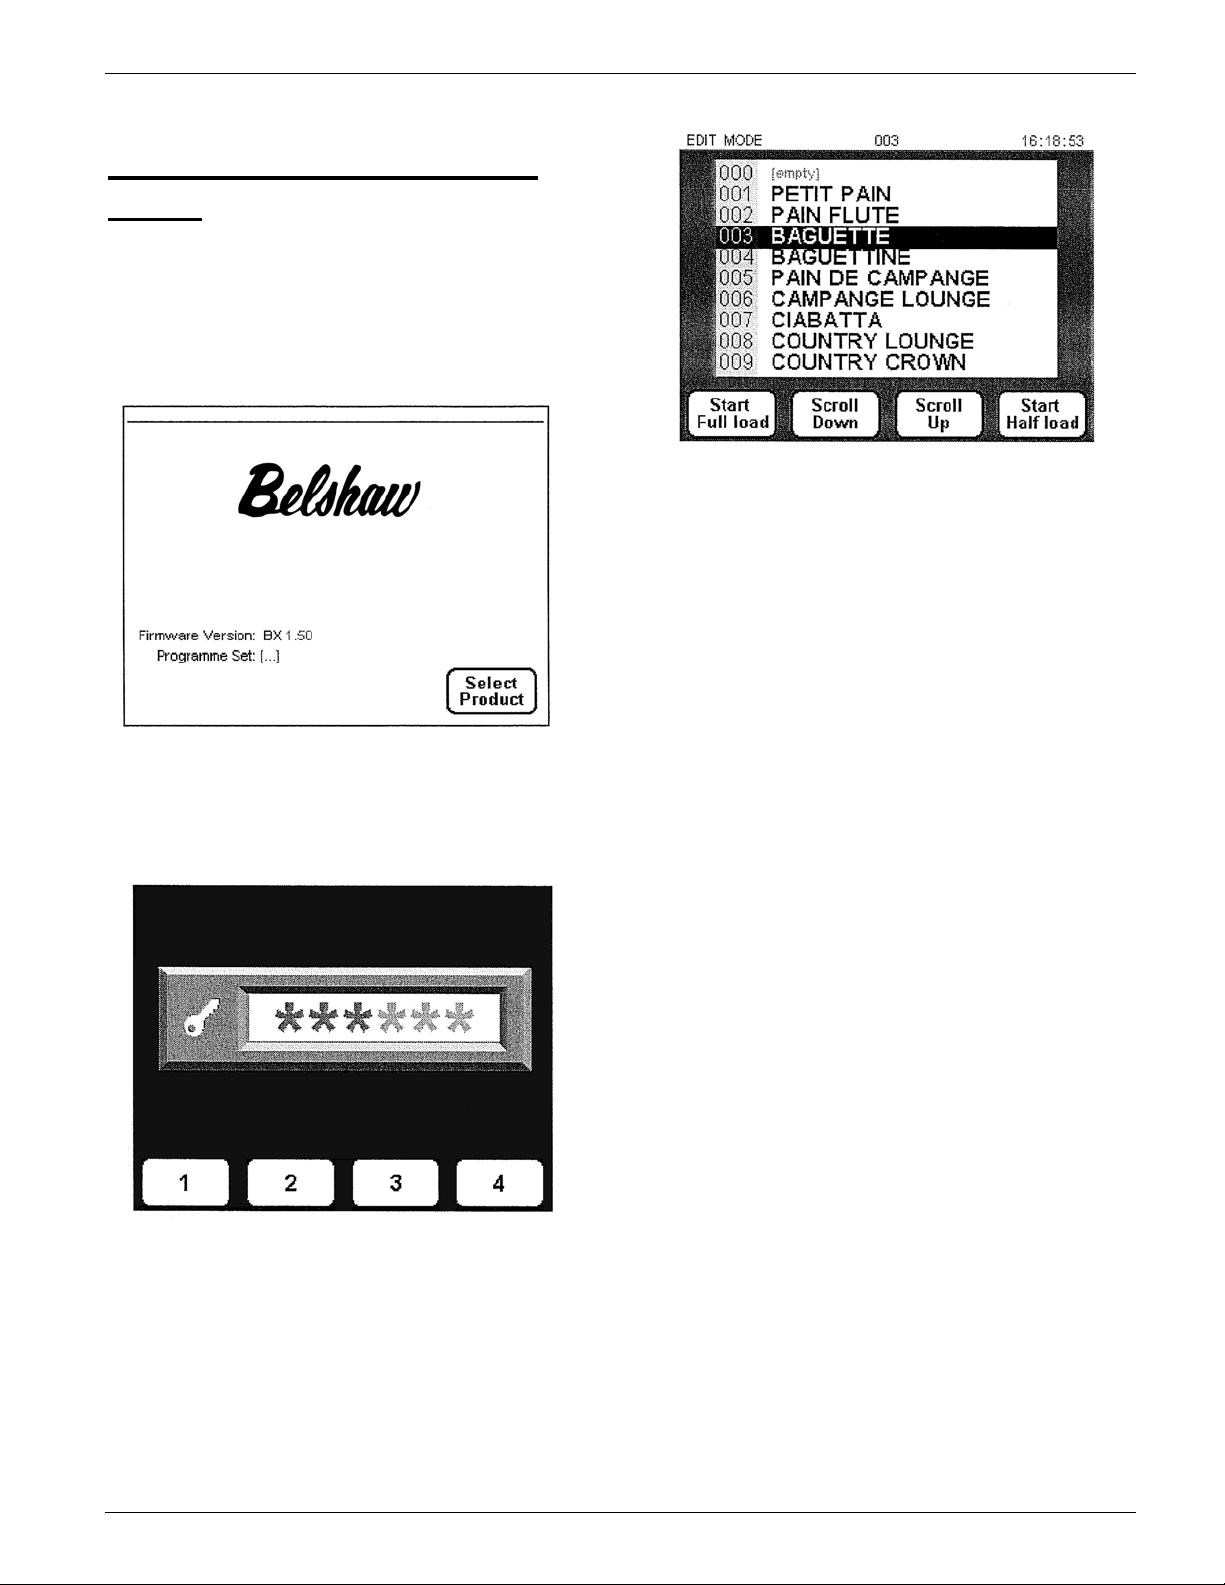
Programming the control
panel
The BX Smartbake oven is capable of storing 99
preset bake settings. To program these settings
into the oven, follow these instructions.
1. Press the Stop button to get to the first screen
(see Figure 1-2).
Figure 1-4
4. Press button 1 for full bake set-up or button 4
for ½ bake set-up. All parameters for the
program can now be set.
5. The oven is capable of six different phases
per bake, and if fewer are required, the time
can be left at 0 to leave that phase
inoperative.
Figure 1-2
2. Press button 2 for the pass code screen (see
Figure 1-3).
Figure 1-3
3. Enter the pass code using the numbered
buttons (default is 111111). The following
screen will appear (see Figure 1-4).
• To move across the screen, press button
4.
• To move back, press button 1.
• To increase the value of the parameter,
press button 3.
• To decrease the value of the parameter,
press button 2.
6. Program Title: To set the program title,
press button 6 to go up the alphabet and
button 5 to go down the alphabet.
When all parameters are complete, press Stop
three times to save the setting. Repeat this
process for each program required.
Belshaw Bros., Inc. • 1750 22nd Ave. S. • Seattle, WA 98144 • Phone 206-322-5474 • Fax 206-322-5425
BXC Smartbake Oven MN-1881EN 3
Page 10
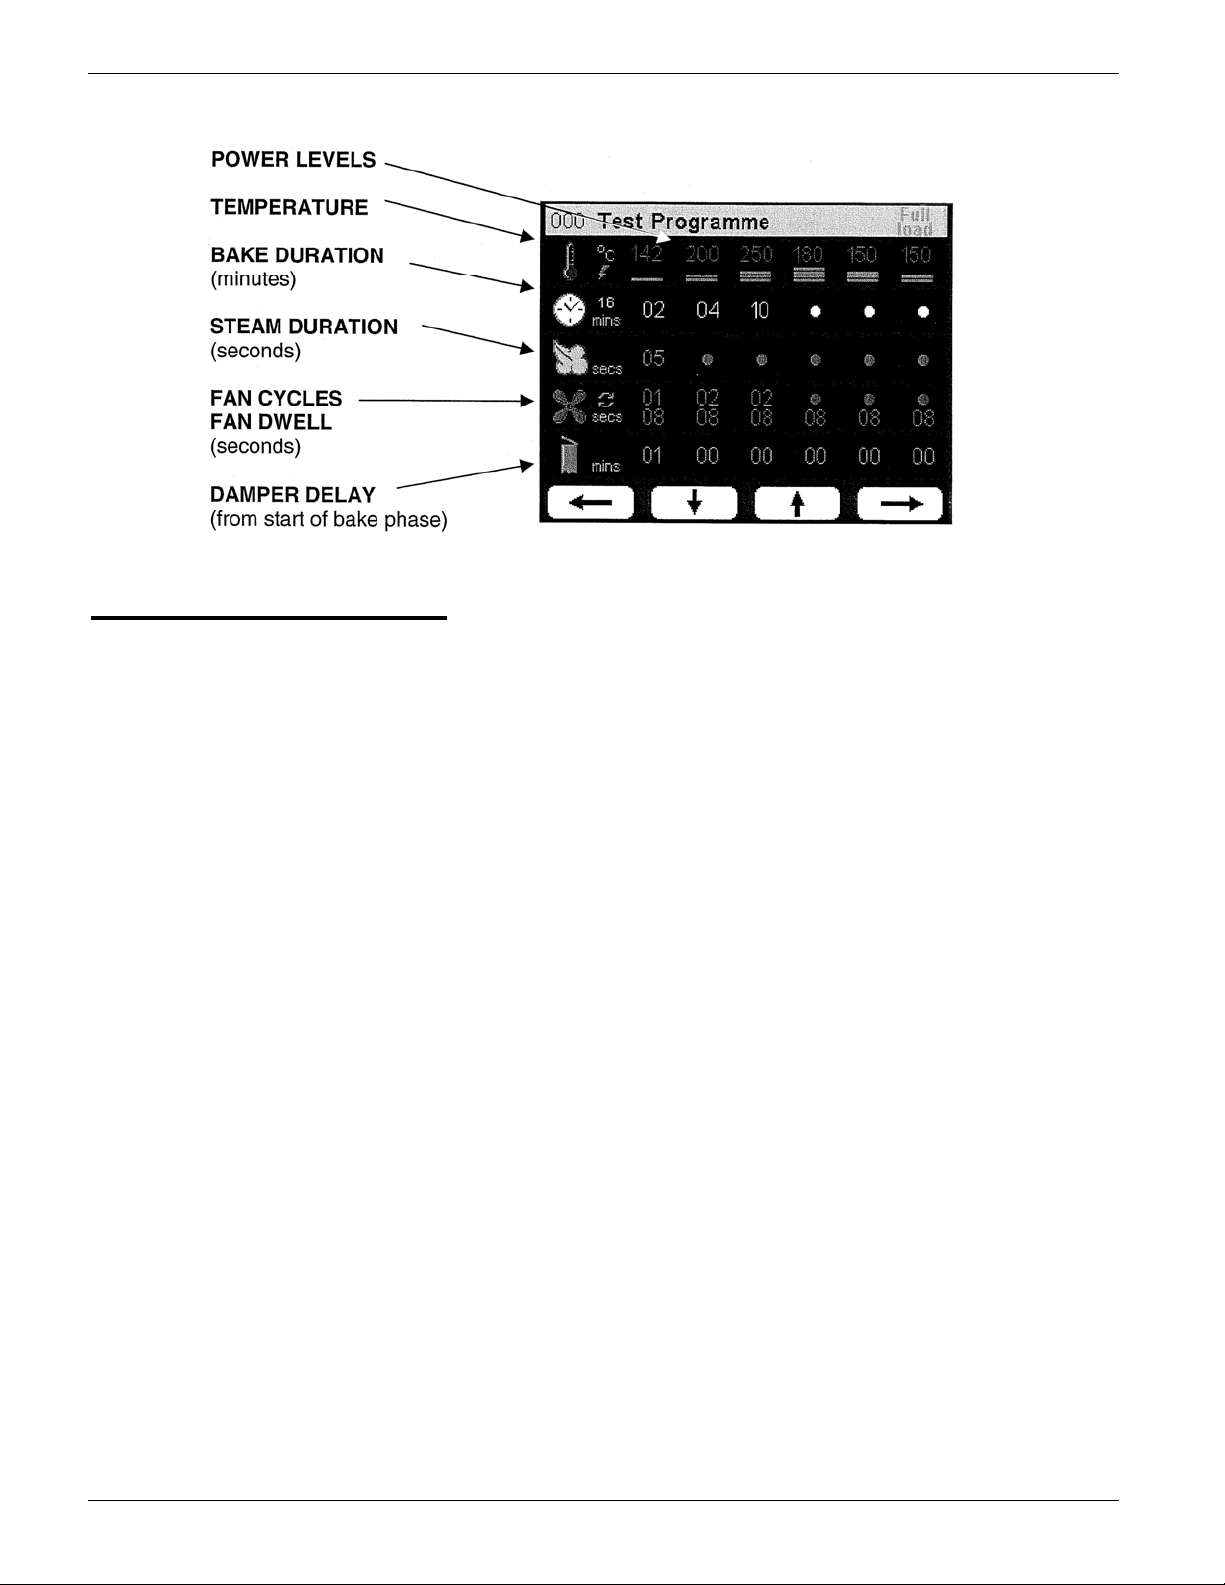
Function of settings:
Note: The heating elements are off during the
Fan Dwell time.
Power Levels: Not used in current
configuration.
Temperature: The temperature the oven will
bake at for the specified phase. Can be set
from 122°F to 482°F (50°C to 250°C)
Bake Duration: The length of time in minutes
the oven will bake in the specified phase.
For example, Phase 1 set at 2 min., Phase 2
set at 4 min., and Phase 3 set at 10 min. has a
total bake time of 16 minutes.
Steam Duration: The length of time in seconds
that steam will be injected into the oven at
the beginning of the phase.
Note: Can be set from 0 to 20 seconds and
will only operate if the temperature is above
250°F (120°C).
Fan Cycles: The number of times the fan will
reverse rotation from clockwise to
counterclockwise and back.
Damper Delay: The amount of time in minutes
the damper will wait before opening during
one bake cycle.
Note:
• Can be set from 0 to 99.
• If this time is set higher than the total
bake time, the damper will not open.
• The damper will only open once during
a complete bake cycle and will close at
the end of the bake cycle.
Note: Can be set from 0 to 9. Do not set the
fan cycles number higher than 1 cycle per
minute of bake time.
Fan Dwell: The amount of time in seconds that
the fan will stay off during a rotation change.
Note: Can be set from 8 to 15.
Belshaw Bros., Inc. • 1750 22nd Ave. S. • Seattle, WA 98144 • Phone 206-322-5474 • Fax 206-322-5425
4 MN-1881EN BXC Smartbake Oven
Page 11
Operation 2
Operating conditions
For the most efficient operation, the following
instructions must be followed. Failure to comply
with these guidelines may affect the warranty.
• The ambient temperature around the oven
must not exceed 115°F (40°C).
• The ventilation around the oven should be
enough to ensure that there is no
condensation on or around the oven from
steam.
• It is the customer’s responsibility to arrange
for adequate ventilation and operational
clearance at the back and sides of the oven to
allow circulation of air.
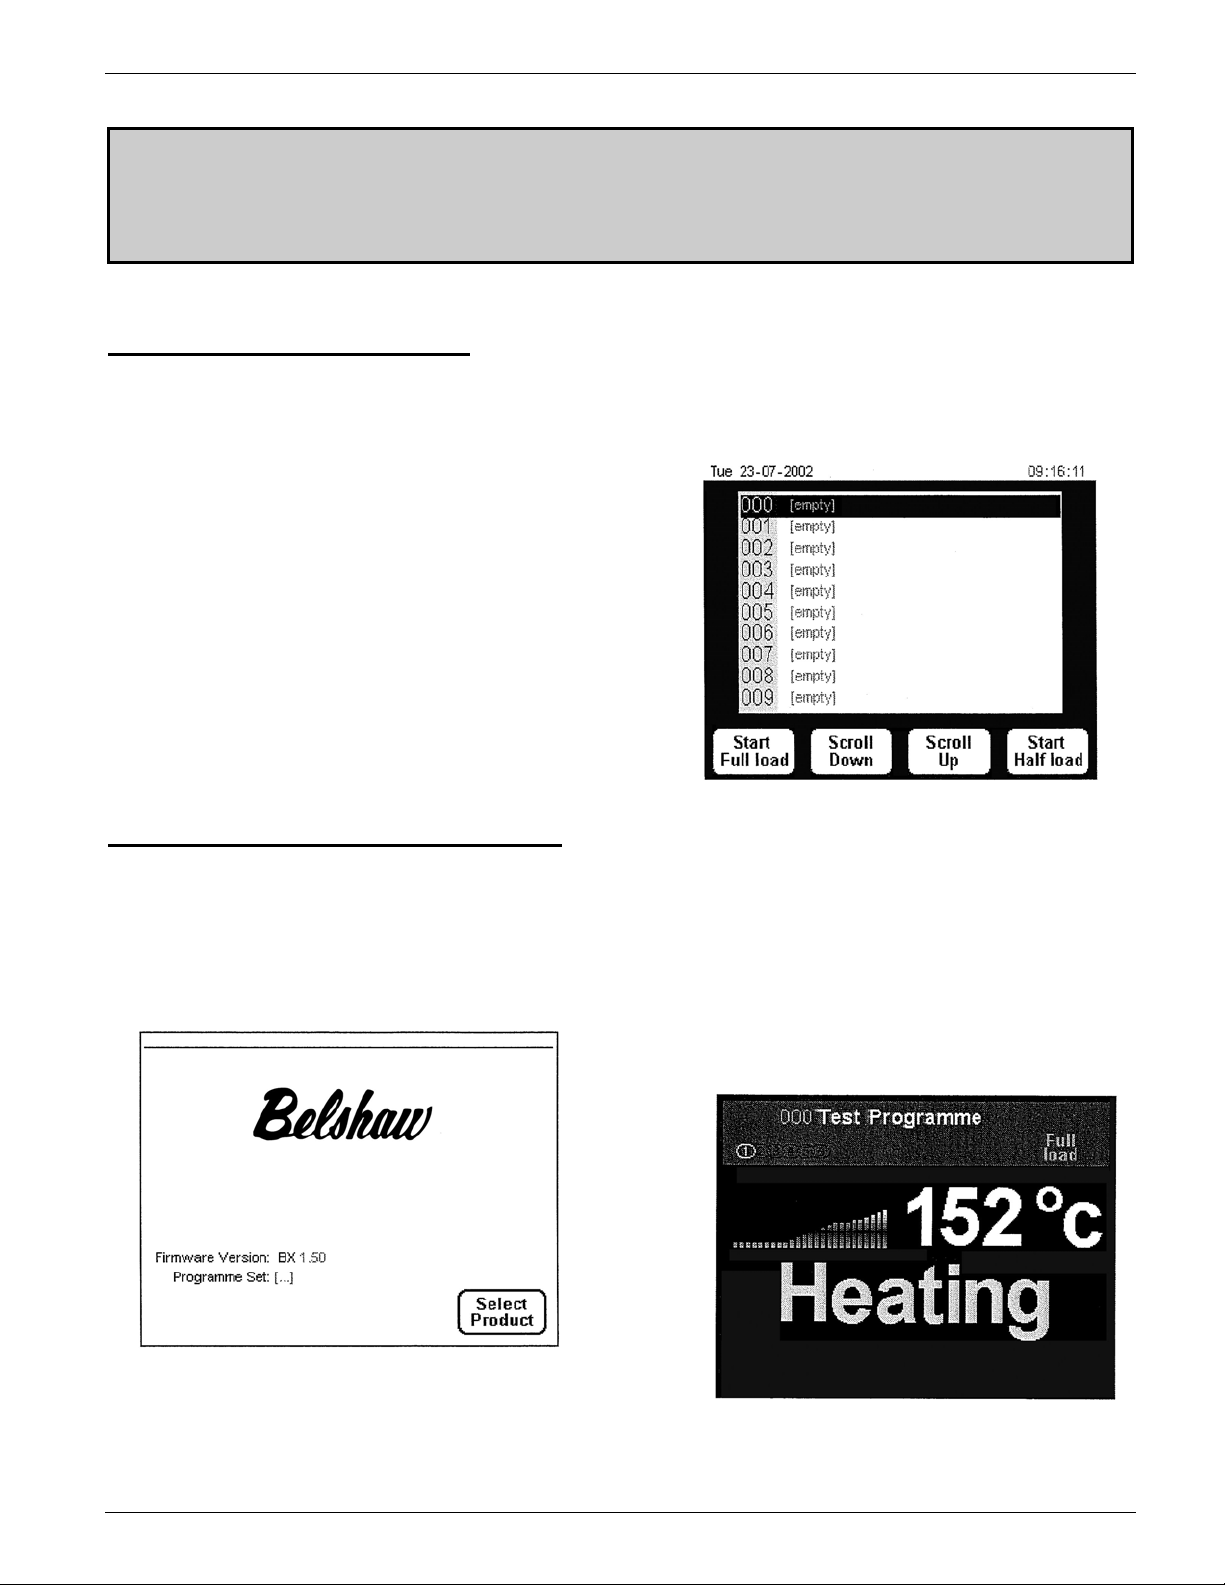
Running Pre-set programs
1. Connect water ensuring there are no leaks.
2. Connect the power to a suitable outlet.
3. Turn on the oven by pressing the green
button and the following screen will appear
(Figure 2-1):
4. Press Button 4 (which corresponds to the
“select product” option in Figure 2-1) and the
program list will appear (Figure 2-2). If the
oven has not been programmed, see the
section on programming on page 3.
Figure 2-2
5. Highlight the desired program by pressing
buttons 2, 3, 5, or 6 to scroll down, up, 10
down, or 10 up, respectively.
6. Start heating the oven by pressing button 4
for a ½ load bake or button 1 for a full load
bake. The following screen will appear
(Figure 2-3). To stop heating, press the
stop/Back button at any time.
Figure 2-1
Figure 2-3
Belshaw Bros., Inc. • 1750 22nd Ave. S. • Seattle, WA 98144 • Phone 206-322-5474 • Fax 206-322-5425
BXC Smartbake Oven MN-1881EN 5
Page 12
WARNING
Stand clear of the oven door when opening
to avoid the hot steam and vapor. Hot
steam or vapor may cause severe burns.
WARNING
Always preheat the oven to required
temperature. Do not place product directly
into a cold oven.
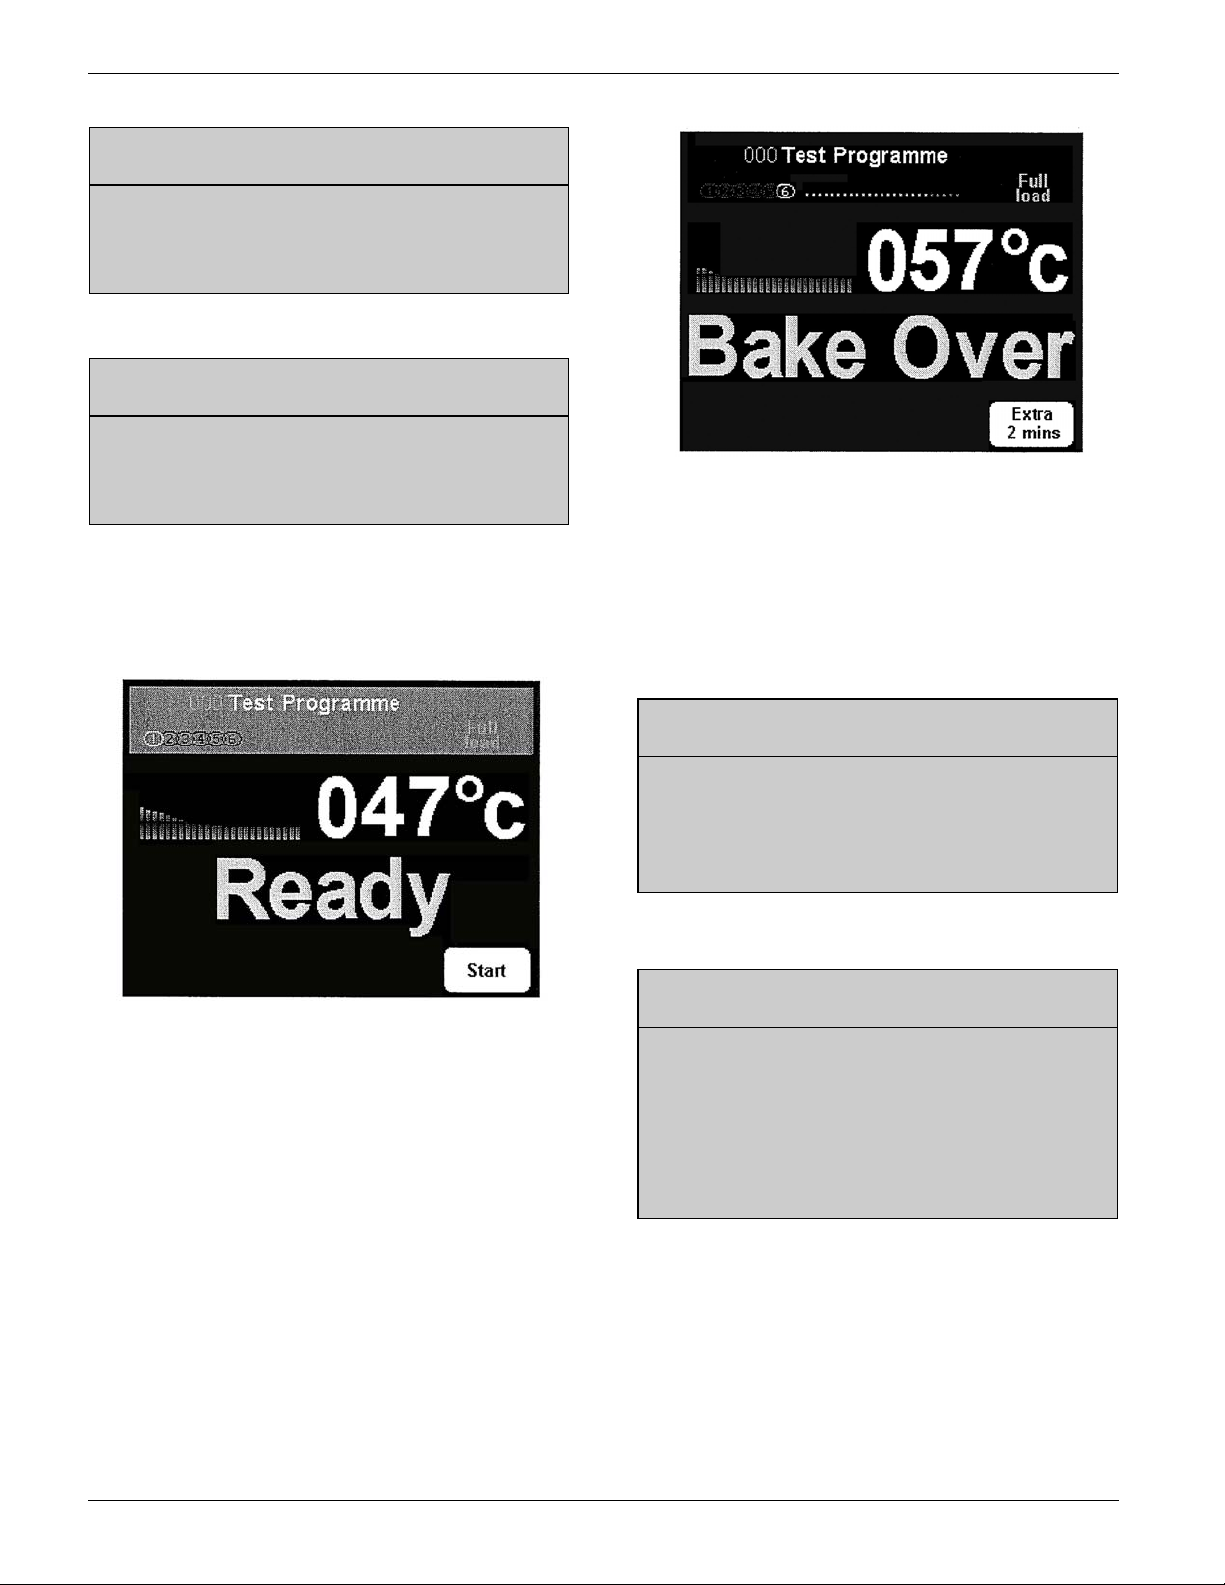
7. When the oven is ready, the following screen
will appear (Figure 2-4). Load the product
and press the button corresponding to the
Start option (button 4).
Figure 2-5
9. Upon pressing the Stop button, the screen
will revert to the program screen (Figure 2-
2).
10. To bake in a preheated oven, select a new
program with keys 2 and 3. Then follow
instructions 6-8.
Figure 2-4
8. When the bake time is over, the buzzer will
sound and the screen will read “Bake Over”
(Figure 2-5). Press stop and remove the
product or press button 4 to extend the bake
time by two minutes. The Stop button may
be pressed at any time to stop the bake.
NOTE
During heating, button 1 can be pressed at
any time to check the settings. Press button
1 again or wait 10 seconds to return to the
previous screen.
NOTE
Until the oven is up to the target
temperature, the display will show
“Heating;” then the display will show
“Ready” and the oven will stay at the
target temperature until baking starts or
another program is selected.
Belshaw Bros., Inc. • 1750 22nd Ave. S. • Seattle, WA 98144 • Phone 206-322-5474 • Fax 206-322-5425
6 MN-1881EN BXC Smartbake Oven
Page 13

Cleaning and Maintenance 3
4. Open the oven door and remove the internal
Daily Cleaning
1. Disconnect the oven from main power supply
and allow to cool completely before cleaning.
2. Use only approved chloride-free cleaning
fluid for daily cleaning.
3. Sweep any debris (after the oven has been
allowed to cool) onto removable oven trays
and remove for cleaning.
4. Brush down and wipe oven front, back, and
sides.
racking from the sides of the oven by lifting
and unlatching the racking. Wipe the interior
of the oven with a damp cloth.
5. On the BX-4, open the inner door glass by
removing two screws shown in Figure 3-1.
The glass is hinged to allow a more thorough
cleaning.
5. Carefully clean the oven with a damp cloth
that has been soaked in a solution of mild
detergent and hot water, being extra careful
around control switches. In the 4-tray oven,
be sure the control probe protruding from the
upper rear corner inside the oven is not
damaged (see page 9).
6. Do not let any liquid enter the control panel
or rear access panel.
7. Do not remove the rear paneling inside the
oven. This allows access to the fan
assembly, which is not safety interlocked and
could cause injury.
8. Dry completely.
Weekly Cleaning
1. Complete the daily cleaning.
2. Carefully clean off any burnt-on debris using
an appropriate oven cleaner, following the
manufacturer’s instructions. Do not allow
the oven cleaner to get in the control panel.
Figure 3-1. Removing the inner door glass
(BX-4 only).
6. Clean the glass with a suitable glass cleaner.
7. Wipe down the oven and clean the racking
with a damp cloth.
8. Reassemble all parts back in the oven after
cleaning.
3. Scrub the cabinet wheels (if fitted) with a
mild detergent and hot water, using a nylon
cleaning brush.
Belshaw Bros., Inc. • 1750 22nd Ave. S. • Seattle, WA 98144 • Phone 206-322-5474 • Fax 206-322-5425
BXC Smartbake Oven MN-1881EN 7
Page 14

WARNING
In the 4-tray oven, do not damage the
control probe protruding from the upper
corner of the inside rear wall of the oven
chamber.
WARNING
Make sure water does not enter the control
panel or rear access panel.
WARNING
Do not remove the rear paneling inside the
oven. This allows access to the fan
assembly and could cause injury.
• If the steaming operation deteriorates, clean
the pipe aperture with a pin to remove any
build-up.
Lubrication
This machine does not require special
lubrication.
Maintenance
• Check for frayed or bare cables. The
machine must not be used if there are frayed
or bare cables.
• Follow cleaning instructions exactly.
• Check condition of the rubber door seal.
Repair or replace if necessary.
• If the light bulb burns out, use the following
instructions to replace it.
a. Disconnect the oven from the main power
supply and allow to cool.
b. Remove the glass front from the lamp
unit.
c. Remove the bulb by unscrewing
counterclockwise and replace with a new
bulb.
d. Refit the glass front.
e. Reconnect the oven to the main power
supply and test the lights.
Belshaw Bros., Inc. • 1750 22nd Ave. S. • Seattle, WA 98144 • Phone 206-322-5474 • Fax 206-322-5425
8 MN-1881EN BXC Smartbake Oven
Page 15
Belshaw Bros., Inc. • 1750 22nd Ave. S. • Seattle, WA 98144 • Phone 206-322-5474 • Fax 206-322-5425
BXC Smartbake Oven MN-1881EN 9
Page 16

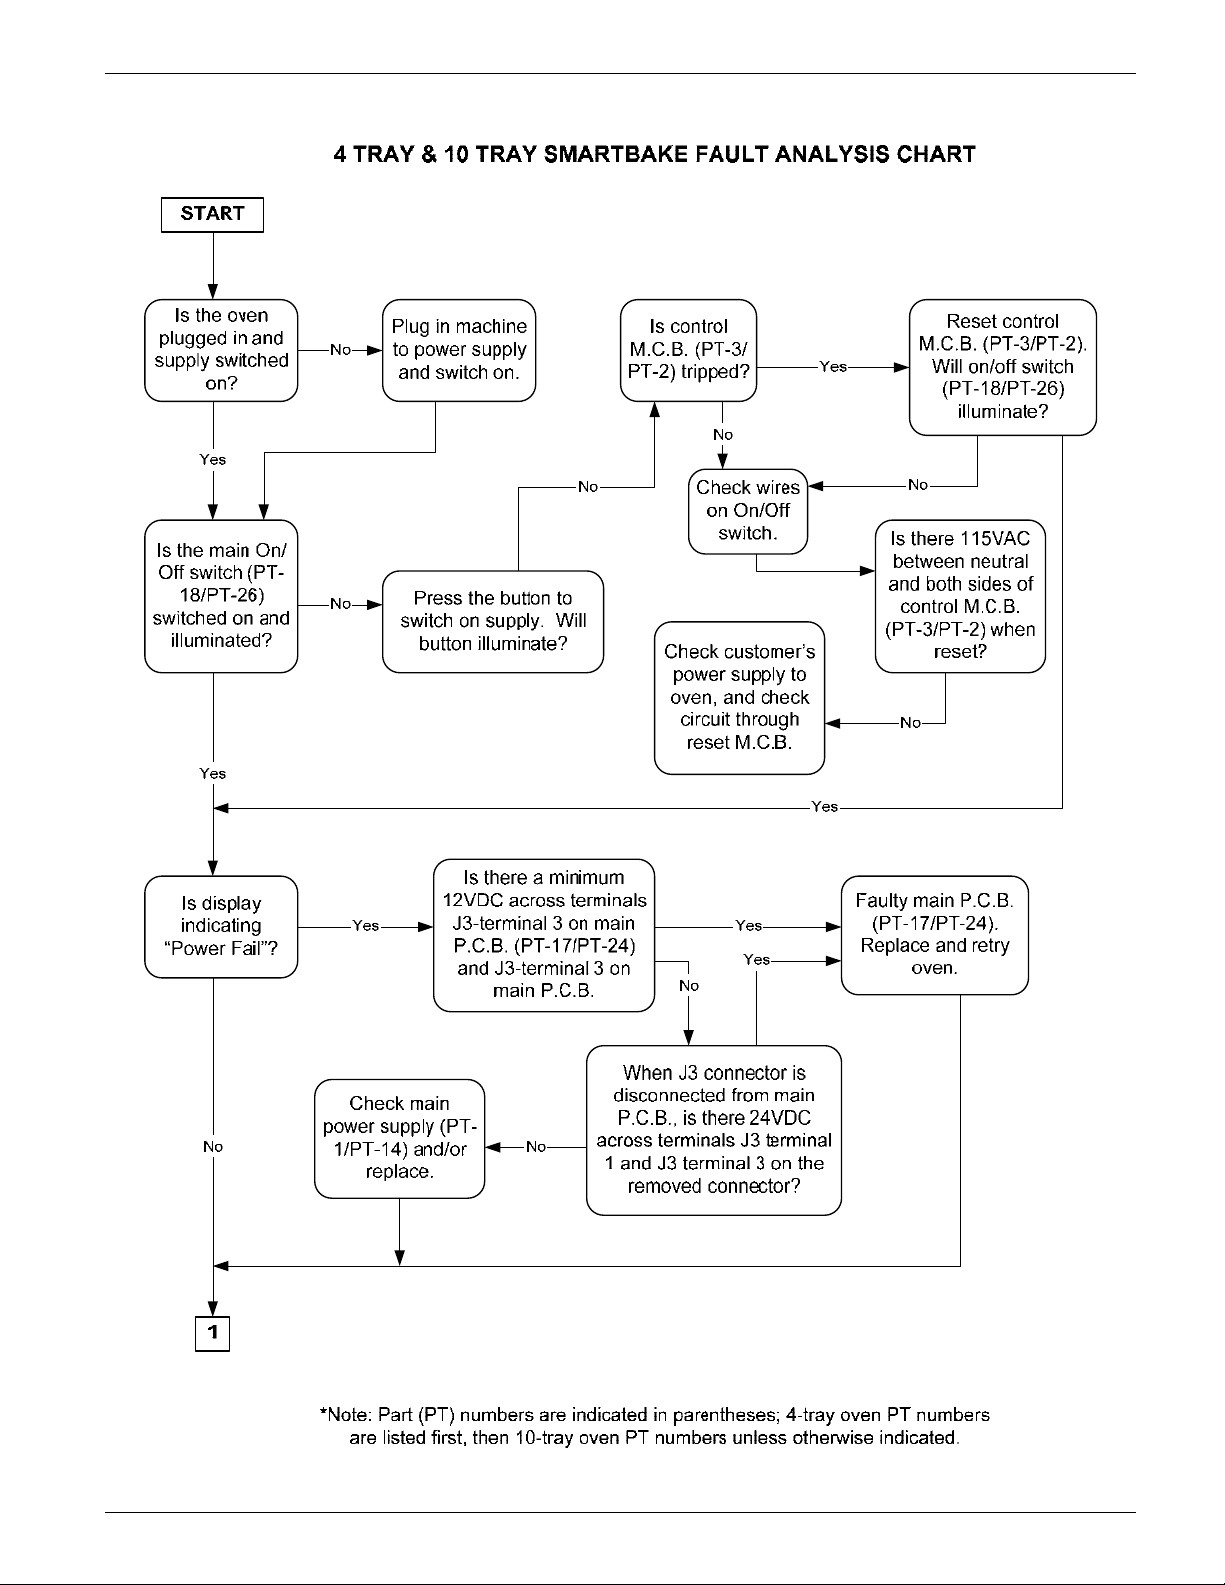
Troubleshooting 4
The following pages contain troubleshooting/
fault analysis charts for the Classic convection
oven.
Belshaw Bros., Inc. • 1750 22nd Ave. S. • Seattle, WA 98144 • Phone 206-322-5474 • Fax 206-322-5425
10 MN-1881EN BXC Smartbake Oven
Page 17
Belshaw Bros., Inc. • 1750 22nd Ave. S. • Seattle, WA 98144 • Phone 206-322-5474 • Fax 206-322-5425
BXC Smartbake Oven MN-1881EN 11
Page 18

Belshaw Bros., Inc. • 1750 22nd Ave. S. • Seattle, WA 98144 • Phone 206-322-5474 • Fax 206-322-5425
12 MN-1881EN BXC Smartbake Oven
Page 19

Belshaw Bros., Inc. • 1750 22nd Ave. S. • Seattle, WA 98144 • Phone 206-322-5474 • Fax 206-322-5425
BXC Smartbake Oven MN-1881EN 13
Page 20

Belshaw Bros., Inc. • 1750 22nd Ave. S. • Seattle, WA 98144 • Phone 206-322-5474 • Fax 206-322-5425
14 MN-1881EN BXC Smartbake Oven
Page 21

Belshaw Bros., Inc. • 1750 22nd Ave. S. • Seattle, WA 98144 • Phone 206-322-5474 • Fax 206-322-5425
BXC Smartbake Oven MN-1881EN 15
Page 22

Belshaw Bros., Inc. • 1750 22nd Ave. S. • Seattle, WA 98144 • Phone 206-322-5474 • Fax 206-322-5425
16 MN-1881EN BXC Smartbake Oven
Page 23

Belshaw Bros., Inc. • 1750 22nd Ave. S. • Seattle, WA 98144 • Phone 206-322-5474 • Fax 206-322-5425
BXC Smartbake Oven MN-1881EN 17
Page 24

Belshaw Bros., Inc. • 1750 22nd Ave. S. • Seattle, WA 98144 • Phone 206-322-5474 • Fax 206-322-5425
18 MN-1881EN BXC Smartbake Oven
Page 25

Belshaw Bros., Inc. • 1750 22nd Ave. S. • Seattle, WA 98144 • Phone 206-322-5474 • Fax 206-322-5425
BXC Smartbake Oven MN-1881EN 19
Page 26

Belshaw Bros., Inc. • 1750 22nd Ave. S. • Seattle, WA 98144 • Phone 206-322-5474 • Fax 206-322-5425
20 MN-1881EN BXC Smartbake Oven
Page 27

Belshaw Bros., Inc. • 1750 22nd Ave. S. • Seattle, WA 98144 • Phone 206-322-5474 • Fax 206-322-5425
BXC Smartbake Oven MN-1881EN 21
Page 28

Belshaw Bros., Inc. • 1750 22nd Ave. S. • Seattle, WA 98144 • Phone 206-322-5474 • Fax 206-322-5425
22 MN-1881EN BXC Smartbake Oven
Page 29

Belshaw Bros., Inc. • 1750 22nd Ave. S. • Seattle, WA 98144 • Phone 206-322-5474 • Fax 206-322-5425
BXC Smartbake Oven MN-1881EN 23
Page 30

Belshaw Bros., Inc. • 1750 22nd Ave. S. • Seattle, WA 98144 • Phone 206-322-5474 • Fax 206-322-5425
24 MN-1881EN BXC Smartbake Oven
Page 31

Belshaw Bros., Inc. • 1750 22nd Ave. S. • Seattle, WA 98144 • Phone 206-322-5474 • Fax 206-322-5425
BXC Smartbake Oven MN-1881EN 25
Page 32

Belshaw Bros., Inc. • 1750 22nd Ave. S. • Seattle, WA 98144 • Phone 206-322-5474 • Fax 206-322-5425
26 MN-1881EN BXC Smartbake Oven
Page 33

Belshaw Bros., Inc. • 1750 22nd Ave. S. • Seattle, WA 98144 • Phone 206-322-5474 • Fax 206-322-5425
BXC Smartbake Oven MN-1881EN 27
Page 34

Belshaw Bros., Inc. • 1750 22nd Ave. S. • Seattle, WA 98144 • Phone 206-322-5474 • Fax 206-322-5425
28 MN-1881EN BXC Smartbake Oven
Page 35

Belshaw Bros., Inc. • 1750 22nd Ave. S. • Seattle, WA 98144 • Phone 206-322-5474 • Fax 206-322-5425
BXC Smartbake Oven MN-1881EN 29
Page 36

Belshaw Bros., Inc. • 1750 22nd Ave. S. • Seattle, WA 98144 • Phone 206-322-5474 • Fax 206-322-5425
30 MN-1881EN BXC Smartbake Oven
Page 37

Belshaw Bros., Inc. • 1750 22nd Ave. S. • Seattle, WA 98144 • Phone 206-322-5474 • Fax 206-322-5425
BXC Smartbake Oven MN-1881EN 31
Page 38

Page 39

Diagrams 5
This section contains diagrams detailing the electrical components of the 4-tray and 10-tray BXC
convection ovens.
Stacking Kit Arrangement, 5-1
4-tray BXC Oven (starts on page 35)
Electrical Components, M189E25-01000
PCB Connections, M158E25-21000
PCB Outputs, M189E25-01100
Power Circuit Diagram, M189E25-00100
Control Circuit & 24V DC Power Supply, M189E25-00400
Fan Motor Connections & Heating Element Wiring, M189E25-00500
10-tray BXC Oven (starts on page 41)
Electrical Components, M150E25-55000
Main Control Panel Layout, M150E25-20200
PCB Connections, M150E25-51400
PCB Outputs, M150E25-20400
Interior Light & Power Supply Circuit, M150E25-20500
Motor Power Circuit Diagram,
M150E25-20600
Heating Power Circuit Diagram,
M150E25-20700
Fan Motor Connections & Heating Element Wiring, M150E25-20300
Belshaw Bros., Inc. • 1750 22nd Ave. S. • Seattle, WA 98144 • Phone 206-322-5474 • Fax 206-322-5425
BXC Smartbake Oven MN-1881EN 33
Page 40

Figure 5-1. Stacking Kit Arrangement for BX Ovens
Notes for Figure 5-1:
1. Position ovens in stacked arrangement locating the base projections of the top oven in the dimples in
the top of the lower oven.
2. Remove the rear covers of the ovens. Knock out the Blanking Plate in the damper tube of the upper
oven (fixed with silicone sealant)
3. Recover the knocked out Blanking Plate from the pre-installed flexible duct and discard safely.
4. Fit the end of the flexible ducting over the top damper tube of the lower oven and clamp with the
jubilee (worm drive) clip.
5. Replace the rear covers of the ovens.
Belshaw Bros., Inc. • 1750 22nd Ave. S. • Seattle, WA 98144 • Phone 206-322-5474 • Fax 206-322-5425
34 MN-1881EN BXC Smartbake Oven
Page 41

Belshaw Bros., Inc. • 1750 22nd Ave. S. • Seattle, WA 98144 • Phone 206-322-5474 • Fax 206-322-5425
BXC Smartbake Oven MN-1881EN 35
Page 42

Belshaw Bros., Inc. • 1750 22nd Ave. S. • Seattle, WA 98144 • Phone 206-322-5474 • Fax 206-322-5425
36 MN-1881EN BXC Smartbake Oven
Page 43

Belshaw Bros., Inc. • 1750 22nd Ave. S. • Seattle, WA 98144 • Phone 206-322-5474 • Fax 206-322-5425
BXC Smartbake Oven MN-1881EN 37
Page 44

Belshaw Bros., Inc. • 1750 22nd Ave. S. • Seattle, WA 98144 • Phone 206-322-5474 • Fax 206-322-5425
38 MN-1881EN BXC Smartbake Oven
Page 45

Belshaw Bros., Inc. • 1750 22nd Ave. S. • Seattle, WA 98144 • Phone 206-322-5474 • Fax 206-322-5425
BXC Smartbake Oven MN-1881EN 39
Page 46

Belshaw Bros., Inc. • 1750 22nd Ave. S. • Seattle, WA 98144 • Phone 206-322-5474 • Fax 206-322-5425
40 MN-1881EN BXC Smartbake Oven
Page 47

Belshaw Bros., Inc. • 1750 22nd Ave. S. • Seattle, WA 98144 • Phone 206-322-5474 • Fax 206-322-5425
BXC Smartbake Oven MN-1881EN 41
Page 48

Belshaw Bros., Inc. • 1750 22nd Ave. S. • Seattle, WA 98144 • Phone 206-322-5474 • Fax 206-322-5425
42 MN-1881EN BXC Smartbake Oven
Page 49

Belshaw Bros., Inc. • 1750 22nd Ave. S. • Seattle, WA 98144 • Phone 206-322-5474 • Fax 206-322-5425
BXC Smartbake Oven MN-1881EN 43
Page 50

Belshaw Bros., Inc. • 1750 22nd Ave. S. • Seattle, WA 98144 • Phone 206-322-5474 • Fax 206-322-5425
44 MN-1881EN BXC Smartbake Oven
Page 51

Belshaw Bros., Inc. • 1750 22nd Ave. S. • Seattle, WA 98144 • Phone 206-322-5474 • Fax 206-322-5425
BXC Smartbake Oven MN-1881EN 45
Page 52

Belshaw Bros., Inc. • 1750 22nd Ave. S. • Seattle, WA 98144 • Phone 206-322-5474 • Fax 206-322-5425
46 MN-1881EN BXC Smartbake Oven
Page 53

Belshaw Bros., Inc. • 1750 22nd Ave. S. • Seattle, WA 98144 • Phone 206-322-5474 • Fax 206-322-5425
BXC Smartbake Oven MN-1881EN 47
Page 54

Belshaw Bros., Inc. • 1750 22nd Ave. S. • Seattle, WA 98144 • Phone 206-322-5474 • Fax 206-322-5425
48 MN-1881EN BXC Smartbake Oven
Page 55

US/Canada/Mexico Limited Warranty and Return Policy
Belshaw Brothers Inc. warrants parts of its manufacture and assembly of equipment to be free from
defects in workmanship and material which would result in product failure under normal use and
service. Belshaw’s entire liability under this Warranty is limited to either repairing or replacing at its
factory or; on user’s premises, at Belshaw’s option, any equipment or parts thereof, which shall be
determined by Belshaw to be defective. If necessary to return parts to the factory they must be shipped
transportation charges prepaid. This shall be purchaser’s sole and exclusive remedy.
Belshaw reserves the right to make changes in design; or add any improvement, at any time without
incurring any obligations to install, the same, on equipment previously sold.
This warranty is expressly in lieu of any and all other warranties express or implied, including:
implied warranties of merchantability and fitness for any particular purpose, and all other
obligations or liabilities what so ever on Belshaw’s part. All statutory or implied warranties,
other than title, are expressly nullified and excluded.
Belshaw neither assumes nor authorizes any person to assume for it any obligation or liability
in connection with the sale of Belshaw’s products or parts thereof.
Possession, use/or operation of equipment, or parts sold hereunder for any other than their designed
purpose, or use of equipment which is in poor repair, modified, improperly operated, or neglected is
done at the owner’s risk. Belshaw hereby disclaims any liability for these actions and shall not be liable
for defects in or for any damages or loss to the property sold which is attributable to such actions.
Under no circumstances shall Belshaw be liable for any indirect, special, incidental, or
consequential damages arising out of, or from the use of Belshaw’s product by buyer, it
assignees, employees, agents or customers.
Belshaw makes no express warranties except those contained in this Warranty concerning the product
sold hereunder. No modification or alteration of this Warranty shall be made except by Belshaw in
writing.
Warranty Period / Guidelines
This limited warranty shall extend for a period of one year from date of shipment and to the original
owner only. It covers parts (manufactured by Belshaw) and labor. This warranty covers only items sold
within the United States, Canada and Mexico. A pre-authorization must be obtained from Belshaw
before any warranty work is carried out, failure to do so may void the warranty of the product.
Limited Warranty
With respect to parts not manufactured by Belshaw, warranty coverage shall be limited to the original
part manufacturer’s warranty, or the Belshaw limited warranty, whichever is the lesser coverage period.
In no case will the warranty be in excess of 18 months after date of shipment of the equipment.
Replacement parts provided under the terms of this warranty are warranted for the remainder of the
original warranty period applicable to the product.
Belshaw Brothers Inc. 1750 22
Revised 04/04/2006 US/Canada/Mexico Limited Warranty Page 1
nd
Avenue S. Seattle, WA 98144-4590 Phone (206) 322-5474 Fax: (206) 322-5425
Page 56

Exclusions
This warranty excludes from its coverage and does not apply to: (a) solenoid and relay coils; (b) lamps;
(c) “O” rings; (d) belts; and (e) impellers. These items are excluded because (1) failure is usually due to
causes beyond our control; (2) it is not practical to accurately determine the failure cause; and (3) the
normal life of the parts is shorter than our warranty period.
Procedure for Return:
To speed up your credits for returned equipment, we have a return goods policy and procedure. Our
procedure starts with a phone call to (206) 322-5474 or Service Department for a return authorization.
When contacting Service Dept. you should be ready to give:
• Customer name, address, phone number and individual’s name, Invoice number and date,
Model number and serial number, reason for return, i.e. credit, exchange, warranty, or repair.
Description of item and problem.
When we get this information we will issue you a Return of Goods Authorization Number (RGA). This
number must be marked clearly on the outside of the package. If the package is not clearly marked
with the RGA#, then the package will be returned unopened to the sender. The RGA# will be open for
30 days, if returnable goods have not been received within the 30 days, then RGA# will be voided.
Return goods must be:
• Returned freight prepaid, packaged securely and carefully so that in-transit damage cannot occur.
• Marked so the package contains the RGA# in the first line of the address line, “Attn: RGA#” (the
number being the number given you by the Belshaw service department.)
Please note the following:
• If the returned goods were sent to you due to our mistake, then we will pay all freight charges via
our choice of carrier.
• If the returned goods failed while in service and are still covered by warranty, they need to be
returned freight prepaid by you. We will then replace the goods at no charge.
• When returning parts for re-stock: our minimum re-stocking charge is 20% of original invoice
amount or $20 (whichever is greater), providing the equipment is in new, never-been-used
condition. Restocking charges may be increased above the minimum, depending on how much
rework the returned goods need. Final determination will be made after factory inspection of goods.
• No RGA# will be issued if the item in question was invoiced anytime prior to 180 days of the
request
Following these guidelines will help expedite the processing of your return.
Belshaw Brothers Inc. 1750 22
Revised 04/04/2006 US/Canada/Mexico Limited Warranty Page 2
nd
Avenue S. Seattle, WA 98144-4590 Phone (206) 322-5474 Fax: (206) 322-5425
 Loading...