

Page 1

Owner's Manual
Page 2

Copyright Notice
This owner's manual is copyrighted, all rights reserved. It may not, in whole or in part, be copied, photocopied, reproduced, translated, or reduced to any electron medium or
machine readable form without prior consent in writing from U.S. Divers Co., Inc.
Trademark Notice
U.S. Divers® and Aqua-Lung® are registered tradmarks of U.S. Divers Co., Inc.
Warranty
U.S. Divers Co., Inc. guarantees the Monitor 3 Air under the U.S. Divers 30-Day Satisifaction Guarantee and makes available the T wo year W arranty
30-Day Satisfaction Guarantee.
If you are not completely satisfied with the performance of this product for the first 30 days after purchase, return it to your U.S. Divers Pro-Line Dealer for an exchange of equal
U.S. Divers Co., computer products. It does require a proof of purchase receipt to be returned with the product.
Two-Year Limited Warranty
After receipt of a completed warranty card, U.S. Divers will extend a two year limited warranty. U.S. Divers Co., Inc. warrants this product to be free of material defects and/or
craftsmanship under normal, recreational SCUBA use (non-commercial or non-military use) and with annual maintenance described within this manual. Should the Monitor 3 Air
prove to be defective, it will be repaired or replaced, at U.S. Divers’ discretion, free of charge, excluding shipping and handling charges.
Limitations
This warranty specifically does not extend to the plastic computer face, battery, accidental damage, abuse, modification or tampering. The original warranty card must be on file at
U.S. Divers to be eligible for the two-year coverage and any warranty service. This card is supplied in this manual and must be mailed within 15 days of purchase. Warranty is nontransferable and applies to the original owner only. Warranty service does not include the price of labor. It covers replacemen t or repair of parts only.
Warranty Conditions
Product must have been purchased from an Authorized U.S. Divers Pro-Line Dealer. If this product is obtained from any other source, you are considered the second owner, in which
case the warranty is void. This warranty only applies to non-commercial use. Warranty does not apply to commercial, military, or rental use. The manufacturer will replace or repair
any unit containing a manufacturing or materials defect if notified within 24 months from the date of purchase by the original owner. It is the buyer’s responsibility to establish with
U.S. Divers or an Authorized U.S. Divers Pro-Line Dealer that the unit has such a defect, and for returning it to the service center post-paid and well protected against damage in
transit, accompanied by proof of the original purchase date and details of the fault noted. Servicing, or tampering by unauthorized parties will invalidate the warranty. The buyer
shall not subject the unit to “dry” pressure testing. Any such testing must be carried out with the unit submersed in water. Repair under warranty will not apply to any unit which has
been subjected to sever shock or abuse, and not maintained in accordance with the care instructions.
Disclaimer of Liability
U.S. Divers Co., its distributors, and retailers MAKE NO WARRANTIES, either expressed or implied, with respect to the Monitor 3 Air, the programs contained therein, or this
instruction manual except for those stated in the preceding paragraph. IT IS EXPRESSLY UNDERSTOOD that by buying or using the Monitor 3 Air, the owner, or any other person who
uses it, accepts it “AS IS” with the entire risk as to its quality, performance, merchantability, or fitness for any particular purpose being with the buyer or user. This excludes
replacement of defective parts to the original owner, in the first two years after purchase under the conditions set forth in the preceding limited warranty section.
BY PURCHASING THE MONITOR 3 AIR, IT IS AGREED AND UNDERSTOOD THAT IN NO EVENT WILL U.S. DIVERS CO., ITS DISTRIBUTORS, OR RETAILERS BE HELD LIABLE FOR ANY
PERSONAL INJURIES FROM ITS OPERATION, OR FOR ANY OTHER DAMAGES WHETHER DIRECT, INDIRECT, INCIDENTAL, OR CONSEQUENTIAL, EVEN IF U.S. DIVERS HAS BEEN
ADVISED OF SUCH DAMAGES.
Some states do not allow the exclusion or limitation of implied warranties or liabilities for incidental damages, so the above limitation or exclusion may not apply to you.
Monitor 3 Air Owner's Manual, Part Number 7454-95
©1995 U.S. Divers Co., Inc.
Page 3
Pay special attention to warnings and cautions, which
are denoted by this symbol:
WARNINGS alert you to any procedure or situation
that may result in serious injury or death.
CAUTIONS alert you to any situation or technique
that will result in damage to the product.
Safety Considerations
You must carefully read this entire manual before using
your Monitor 3 Air.
WARNING: Diving has many inherent risks. Decompression sickness is among the most serious of
those risks. Even if you follow the instructions in
this manual carefully, it is possible that you may be
seriously injured or die from decompression
sickness, or some other inherent risk of SCUBA
diving. Unless you are fully aware of these risks and
are willing to personally accept and assume
responsibility for those risks, do not use the Monitor
3 Air!
The Monitor 3 Air is a sophisticated decompression tool to
assist a trained and certified SCUBA diver in making
decisions concerning dive planning and execution. As with
any tool, the Monitor 3 Air may be misused if the following
safety and operational precautions are not strictly followed.
If they are followed, careful use of the Monitor 3 Air can
increase your diving enjoyment and reduce the risk of
decompression sickness (DCS); if they are not followed, you
will be placing yourself at serious risk for DCS.
Page 4

The Monitor 3 Air is a technically advanced tool based on a
biophysical model of decompression theory. However,
neither it nor any other diving computer (or table) can
actually monitor the physical changes that occur in your
body as you dive. Each diver varies in his or her susceptibility to decompression sickness, and that susceptibility may
vary from day to day. Decompression modeling is an inexact
science; it is based, at least partly, on certain unproven
assumptions. Therefore, you must dive responsibly and to
carefully follow all standard safe diving practices as well as
the warnings and cautions contained in this manual.
Guidelines for Using the Monitor 3 Air
The following guidelines for using the Monitor 3 Air are
derived from the latest medical research and the recommendations of the American Academy of Underwater
Sciences for diving with dive computers. Following these
guidelines will increase your safety while diving, but cannot
guarantee that decompression sickness will not occur.
1 . In accordance with the recommended maximum diving
limit of all instructional agencies, do not dive deeper
than 130 feet (40 meters).
2 . Do not use the Monitor 3 Air for planned decompres-
sion diving. The decompression algorithm contained in
the Monitor 3 Air should be used only for emergency or
unintended decompression.
3 . On all no-decompression dives with the Monitor 3 Air,
make a safety stop for three to five minutes between 10
and 30 feet (3 and 12 m) before surfacing.
4 . Never use the Monitor 3 Air for repetitive, “rectangular”
dives deeper than 60 feet (18 meters). A rectangular
dive is a dive that is performed for its duration at a
uniform depth.
5 . Always make the deepest dive of the day first when
repetitive dives are planned, and for each successive
dive make sure that the deepest portion of that dive is
done at the beginning of the dive.
Page 5

6. The Monitor 3 Air is designed for dives made with
compressed air only. Do not use the Monitor 3 Air for
dives made with nitrox or other mixed gases.
7 . All divers using dive computers to plan dives and
indicate or determine no-decompression/decompression status must use their own computer.
8 . If the Monitor 3 Air fails at any time during the dive,
the dive must be terminated and appropriate procedures (including a slow ascent and a 3 to 5 minute
safety stop) should be initiated immediately.
9 . On any given dive, all divers in a buddy group must
follow the most conservative dive computer for that
particular dive.
10 . No dive computer can account for dives made without
it. Do not dive for a period of at least 24 hours before
starting a dive series with the Monitor 3 Air,
11. You MUST follow the ascent rates as indicated by the
Monitor 3 Air. If the computer fails, ascend to surface
no faster than 60 ft/min (18 m/min).
12 . You MUST be familiar with all signs and symptoms of
DCS before using the Monitor 3 Air! Seek IMMEDIATE
treatment for decompression sickness should any of
these signs or symptoms occur after a dive! There is a
direct correlation between effective treatment and the
delay between the onset of symptoms and the treatment for decompression sickness.
13. Always observe the optical alarm signals of the Monitor
3 Air. Avoid situations of increased risk for DCS which
are marked with a warning sign in this manual.
14. Never dive the Monitor 3 Air to its limits, as well as
other dive computers and tables. Give yourself a
margin of safety by always leaving a few minutes of nostop time before making an ascent.
15. Avoid repeated ascent and descents (yo-yo diving) while
using the Monitor 3 Air.
16 . DO NOT perform repetitive decompression dives. Doing
so increases the risk of DCS.
17. Carefully inspect your Monitor 3 Air computer for any
signs of damage or malfunction before every dive.
Page 6

Table of Contents
Safety Considerations ..............................................................i
Guidelines for Using the Monitor 3 Air .....................................ii
Introduction 1
What is a “Dive Computer” ....................................... 2
Definition of Compartments .................................................... 2
Multi-Level Diving ................................................................... 2
Diving Responsibly ................................................................ 3
Features of the Monitor 3 Air....................................4
The Computer Screen ............................................................ 4
The Electrical Contacts .......................................................... 4
The T ransmitter ...................................................................... 6
Preparation 7
Attaching the Transmitter to Your Regulator .............8
Pairing the Wrist Unit to the Transmitter................... 9
Using the Monitor 3 Air Without the Transmitter.....12
Checking the Battery Power...................................12
Diving with the Monitor 3 Air 13
Preparation for the Dive .........................................14
Functions During the Dive ......................................16
Current Depth........................................................................16
Dive time ...............................................................................17
Maximum depth.....................................................................17
Ascent Rate ..........................................................................18
No-Stop Time ........................................................................19
Cylinder Pressure .................................................................20
Antenna Symbol ....................................................................20
Graphic Air Time Remaining..................................................21
Digital Air Time Remaining ....................................................21
High Air Consumption Warning.............................................. 22
Decompression Stop Information ..........................................23
T otal Ascent Time ..................................................................24
SOS Mode ............................................................................24
Functions at the Surface ........................................25
Upon surfacing ......................................................................25
Surface Mode ........................................................................25
Surface mode icon ................................................................25
Wait-to-fly Time .....................................................................26
Desaturation Time .................................................................27
Surface Interval Time ............................................................27
Microbubble W arning.............................................................28
Page 7

Diving at Altitude.....................................................29
Altitude sectors .....................................................................29
Exceeding the Altitude Limit ..................................................30
Summary of Attention Messages and Alarms .........31
Attention Messages...............................................................31
Alarms...................................................................................33
Memory Mode 35
Care & Maintenance 49
Overview ................................................................50
Care Before the Dive..............................................50
Care During the Dive..............................................50
Care After the Dive.................................................51
Annual Dealer Inspections & Factory Service ........51
Overview ................................................................36
Downloading the Memory to a PC..........................36
Activation................................................................38
Scrolling through Logged Dives..............................39
Exiting Memory Mode.............................................39
Pre-Dive Planning Mode 41
Overview ................................................................42
Activation from Ready-Mode ..................................42
Activation from Surface Mode ................................44
Planning a Decompression Dive ............................46
Operating Temperature...........................................52
Replacing the Battery .............................................52
Reference 53
Technical Specifications .........................................54
ZH-L8 ADT Algorithm .............................................55
U.S. Divers Online..................................................57
Warranty Registration.............................................59
Page 8

Page 9

Introduction
Congratulations on the purchase of your Monitor 3 Air dive
computer. Our designers have condensed important dive
planning information into a user-friendly dive instrument.
By combining graphics with bold alphanumerics, we have
created an easy-to-use computer that provides dive data at
a glance.
As with all diving equipment, it is important to understand
the features and functions of the Monitor 3 Air. Before
using the Monitor 3 Air, it is essential to read this manual
in its entirety. Contained within this easy to read manual
are illustrations to aid you in the complete understanding
of the computer.
Section 1 instructs you on preparing the Monitor 3 for its
first use. Section 2 explains all the functions and screen
displays while on a dive. Section 3 shows you how to recall
the dive memory. Instructions on planning a future dive are
given in Section 4. Care & Maintenance tips are covered in
Section 5. Lastly, the reference section contains the
technical specifications and a description of the algorithm.
2
What is a “Dive Computer”
DEFINITION OF COMPARTMENTS
A dive computer is an instrument that mathematically
simulates the absorption and release of nitrogen by
hypothetical tissue types in the human body. These
hypothetical tissues are commonly referred to as “compartments.” Each compartment absorbs and releases nitrogen
at different rates. The Monitor 3 Air tracks these compartments constantly, providing you with up-to-the-minute
decompression information.
MULTI-LEVEL DIVING
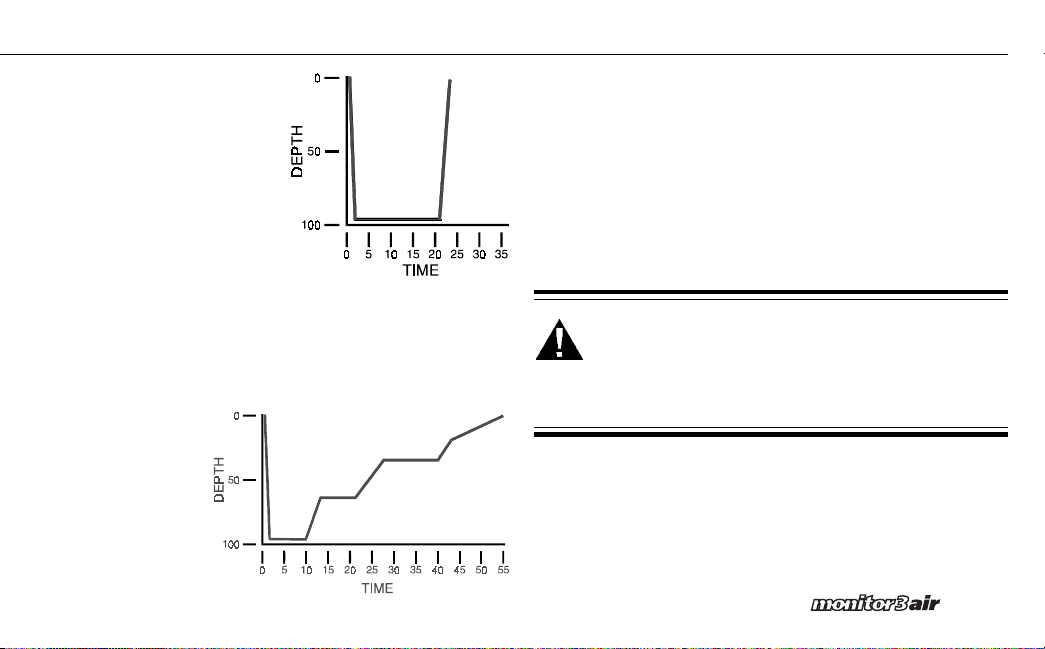
If you use, or have used, dive tables you know the total
amount of time you can stay under water is based on the
maximum depth reached during the dive. Dive tables, such
as the U.S. Navy dive tables, assume that you immediately
descend to a single depth, stay at that depth for the
duration of the dive, then immediately surface from that
depth. This type of dive profile is referred to as a rectangular dive profile (figure 1). In reality, however, most recreational divers go to the deepest depth first and make a
gradual ascent to the surface. This type of dive profile is
referred to as a multilevel dive profile (figure 2).
Page 10
Introduction
Multilevel diving is where the
Monitor 3 Air excels. By
continuously calculating the
nitrogen absorption/release
of all the compartments, the
computer updates the
amount of no-decompression
time (NDT) you have left. As
you ascend to shallower
depths, the computer credits
you with more allowable
NDT; if you go deeper, it
reduces the NDT available.
Figure 2
Multi-Level Profile
Figure 1
Rectangular Profile
DIVING RESPONSIBLY
Years of research and thousands of dives have gone into the
mathematical formulas used by the Monitor 3 Air. However,
the computer does not have special sensors attached to
your body; it doesn’t know if you are tired, dehydrated,
overweight, or out of shape. For this reason, U.S. Divers
recommends that you never push the no-decompression
limits of the computer. Always leave a comfortable safety
margin in respect to no-decompression time, air time and
ascent speed. Let the computer assist you in making your
dive plan. Do not let it control your dive.
WARNING: Using the Monitor 3 Air will not prevent
the possibility of decompression sickness, but using
it sensibly reduces this risk. Any sport diver,
however, must accept that there is no device or
procedure which will totally prevent the possibility
of a decompression accident.
3
Page 11

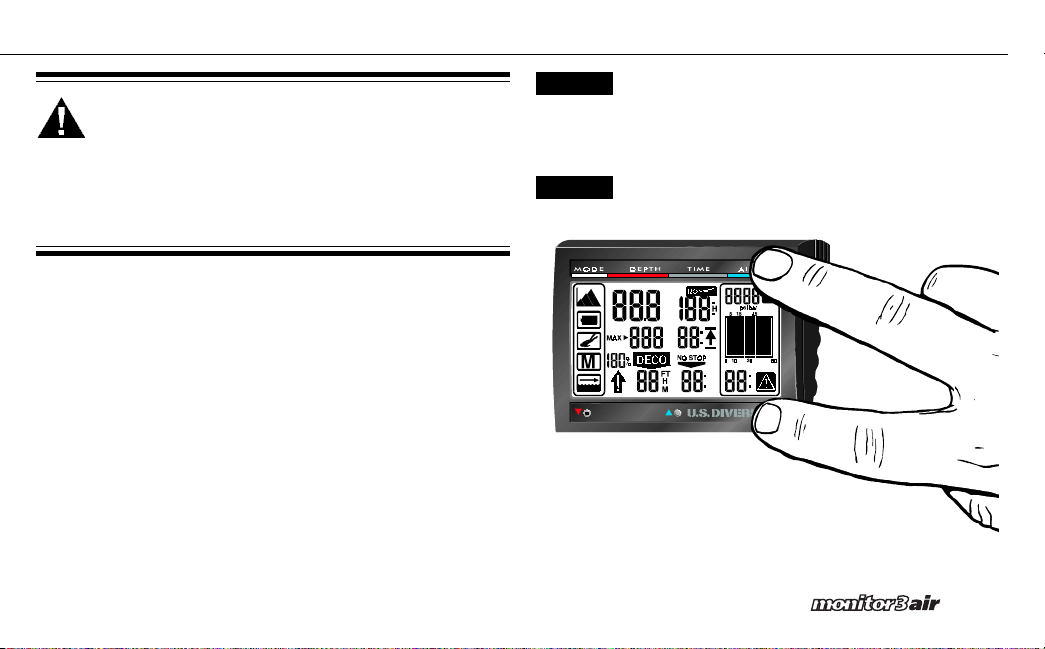
Features of the Monitor 3 Air
The Monitor 3 Air is made up of two compact units: the
computer/display unit which is usually worn on the wrist,
and the high pressure (HP) transmitter which is screwed
into the regulator first-stage HP port.
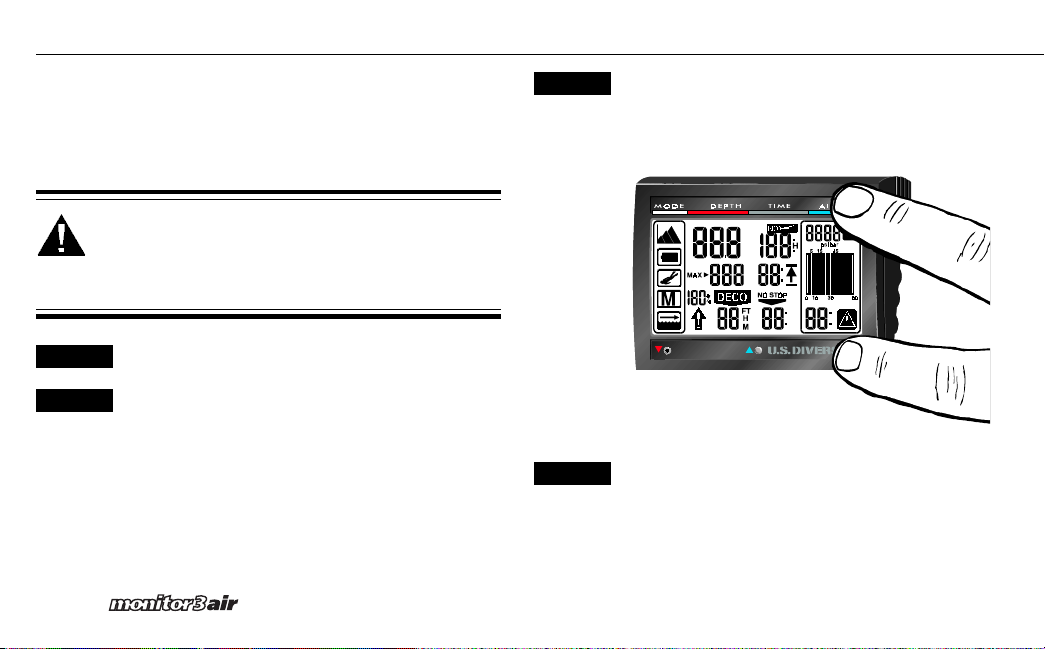
THE COMPUTER SCREEN
The Monitor 3 Air has a large liquid crystal display (LCD)
and features large numbers and graphics. The screen is
luminous for easy reading during low light dives, including
night dives and cave dives.
The screen is organized into four zones (see figure on
opposite page): The MODE zone, DEPTH zone, TIME zone
and AIR zone. The Mode Zone has five icons which indicate
altitude, low battery, Pre-dive Planning Mode, Memory
Mode, and Surface Mode.
Next to the Mode Zone is the Depth Zone. This grouping of
numbers includes the current depth, maximum depth
decompression stop depth, and ascent rate information.
Beside the Depth Zone is the Time Zone. The Time Zone
shows total dive time, total ascent time, no stop time, and,
while in decompression, decompression stop time.
To the far right of the screen is the Air Zone. The Air Zone
shows current cylinder pressure, a graphical representation
4
of air time remaining and a digital readout of remaining air
time. In addition, their are two warning icons: one for
interrupted transmission and the other for high breathing
rate.
THE ELECTRICAL CONTACTS
All surface operations and mode changes are made by the
use of four electrical contacts placed around the Monitor 3
Air's screen. These contacts are identified as A, B, C and D
(see figure on opposite page). As a rule, contact A is always
touched in conjunction with one of the other three contacts. After entering different modes, such as Memory
Mode or Pre-Dive Planning Mode, contact B always
decreases a value, and contact C always increases a value
(always in combination with A). To make contact, simply
moisten your fingertips and touch the appropriate pair of
contacts at the same time. Release the contact as soon as
the operation has been activated, usually no more than one
second.
Page 12
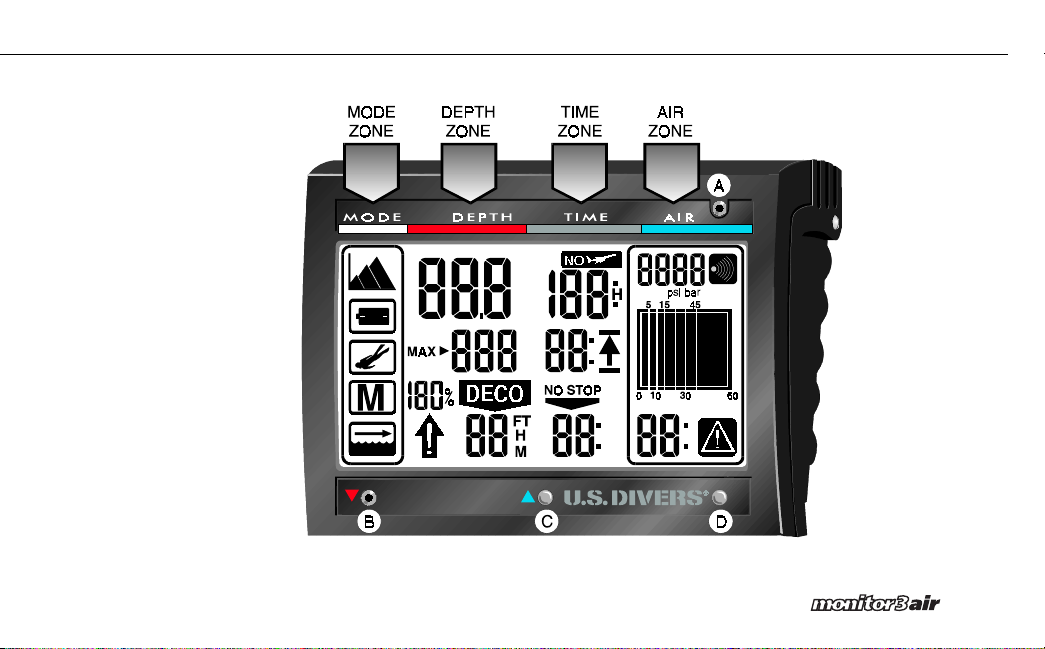
Monitor 3 Air display
zones and contact letter
designations
Introduction
5
Page 13
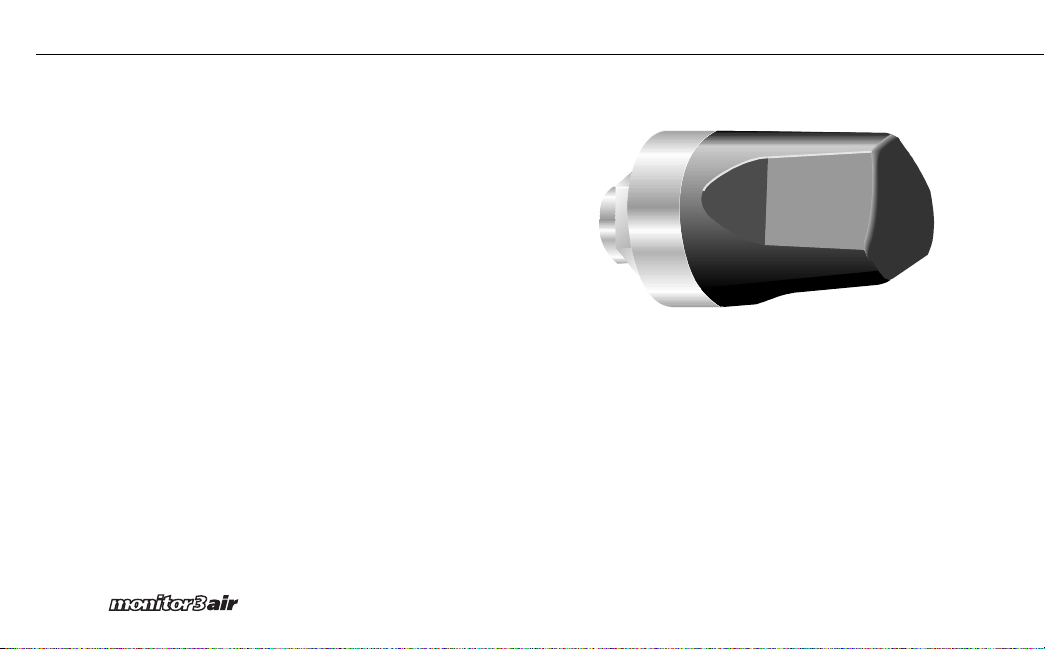
THE TRANSMITTER
The compact transmitter module screws into a standard
7
/16" HP port. The transmitter automatically activates when
it senses pressure from the cylinder. Once activated, it
sends pressure information via a low frequency radio wave
to the wrist unit.
One of the unique features of the transmitter is that it
sends along a special code each time it transmits pressure
information. The computer "listens" to the code, and, if it is
the correct code, accepts the pressure information. This
feature allows more than one Monitor 3 Air system to be
used without information becoming mixed up, i.e. you
reading your dive buddy's air information.
6
The Transmitter
Page 14

In this section:
☛
Attaching the Transmitter to the
Regulator
☛
Pairing the Wrist Unit with the
Transmitter
☛
Using the Monitor 3 Air Without
the Transmitter
☛
Checking battery power
Page 15
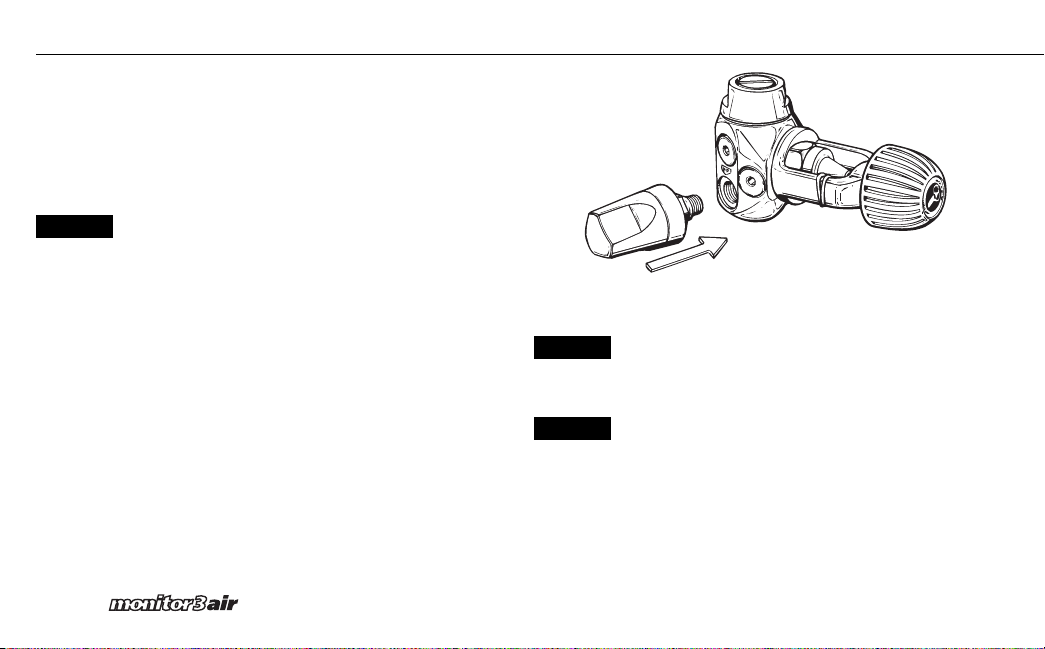
Section 1: Preparation
Attaching the Transmitter to Your
Regulator
Upon purchasing the Monitor 3 Air have your Authorized
U.S. Divers Dealer attach the transmitter to your first-stage
regulator. If this is not possible, follow the simple steps
listed below to do it yourself:
STEP 1
8
If your regulator is attached to a charged
SCUBA cylinder, turn the valve handle to the
closed position and vent any air in the regulator
by pressing the second-stage purge button.
Remove the regulator from the cylinder. If you
currently have a gauge attached to your firststage regulator, remove it using the appropriate
sized wrench, otherwise remove the high
pressure (HP) port plug from your first-stage
regulator using the appropriate size wrench.
The HP port on all U.S. Divers regulators is
clearly marked with the letters “HP”.
NOTE: The transmitter has 7/16" threads. On
some early model first-stages the HP port is only
3
/8". If this is the case with your regulator, you
need to get a 7/16" female to 3/8" male HP
adapter (U.S. Divers part number 1017-85) from
your U.S. Divers dealer.
STEP 2
STEP 3
Thread the transmitter into the HP port of the
first-stage until finger-tight. Using a 3/4" openend wrench, tighten the hose fitting until snug.
DO NOT overtighten.
Attach the first-stage to a charged SCUBA
cylinder. Slowly turn the cylinder valve on-off
handwheel counterclockwise until the valve is
completely open. Submerge the first stage in
water and check for any leaks. If you detect
leaks, take your regulator and transmitter to
your U.S. Divers dealer and have the O-ring
inspected and/or replaced. Then have the U.S.
Divers dealer attach the transmitter to your
regulator.
Page 16
Section 1: Preparation
CAUTION: DO NOT use the transmitter as a carrying
handle. Doing so may damage the transmitter
requiring its replacement. If the first-stage is
attached to a cylinder, make sure to secure the
cylinder so it doesn’t fall over and damage the
transmitter (or regulator). A transmitter damaged
due to user neglect is not covered under the
warranty.
Pairing the Wrist Unit to the Transmitter
For a transmitter and a wrist unit to work together they
must be first “paired”. Once paired, they will continue to
work together until such time the transmitter is introduced
to another wrist unit. When the transmitter sends a packet
of data to the wrist unit, it sends along a special code that
only the paired wrist unit recognizes. If the code is correct,
then the wrist unit accepts the data packet. This way you
will never get erroneous information from a nearby Monitor
3 transmitter (i.e. your dive buddy’s transmitter).
To pair a transmitter to a wrist unit, follow this step-bystep procedure:
STEP 1
STEP 2
Fit your regulator to a charged SCUBA cylinder.
DO NOT open the valve yet.
Activate the Monitor 3 Air by touching contacts
A&D.
9
Page 17
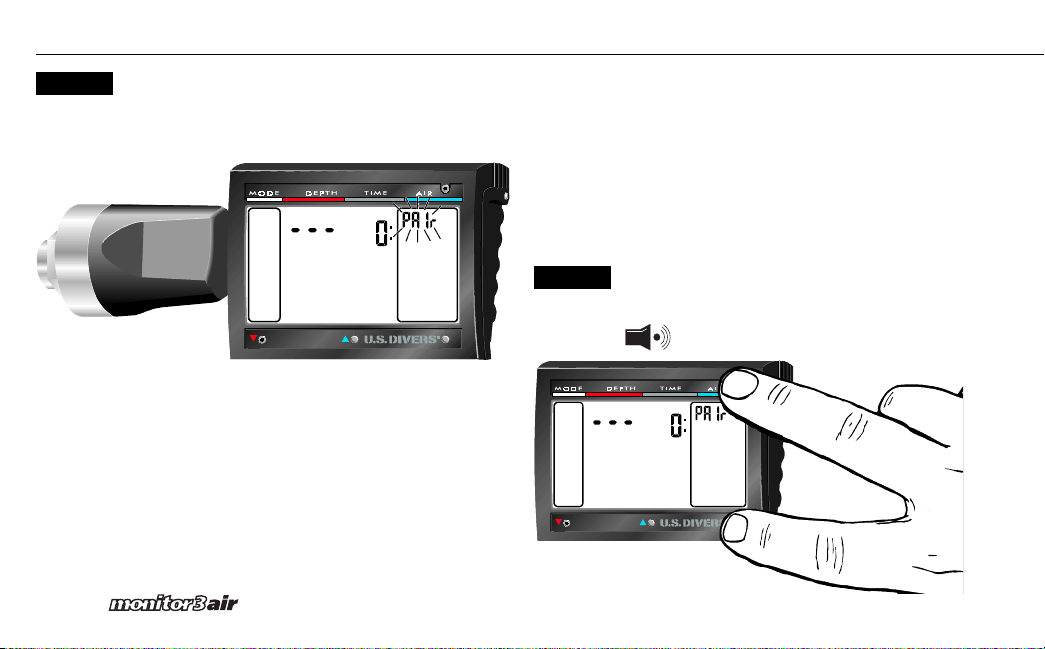
Section 1: Preparation
STEP 3
10
Place the Monitor 3 Air wrist unit directly against
the transmitter. Turn on the cylinder valve.
Within six seconds the message “PAIr” will appear
flashing in the upper tank pressure display.
STEP 4
Touch contacts A and D as soon as “PAIr” appears
(within 5 seconds). The computer will confirm
with a beep and ‘PAIr” will stop flashing.
Page 18
Section 1: Preparation
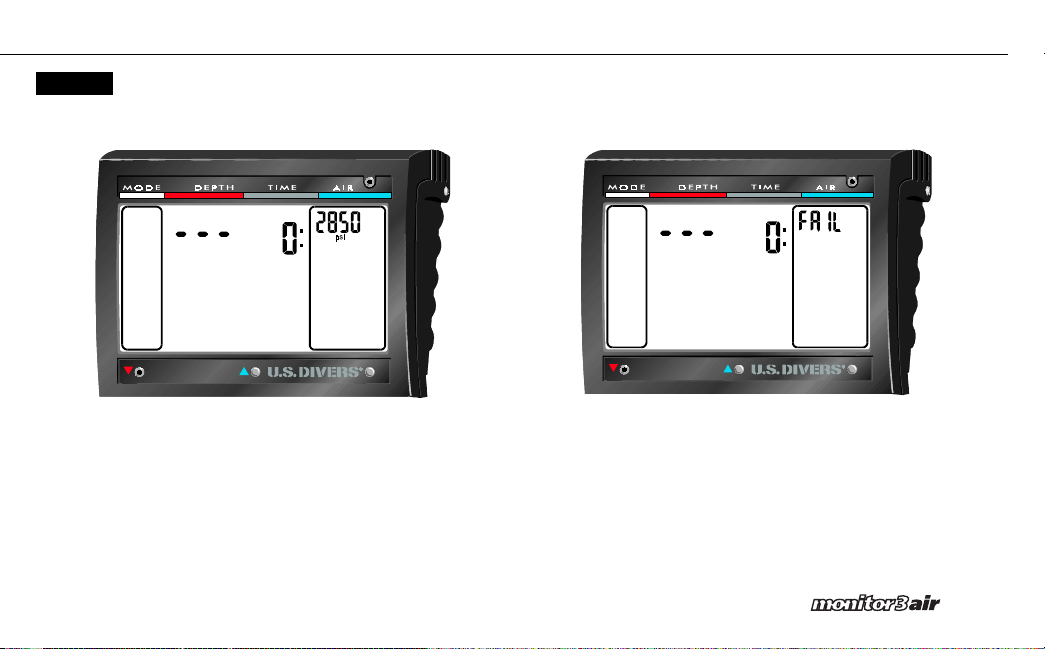
STEP 5
The first cylinder pressure reading will be
displayed within 15 seconds.
If the procedure is not successful, a FAIL message will
appear. If this happens, close the cylinder valve, purge all
air from the regulator and repeat the procedure.
11
Page 19
Section 1: Preparation
Once paired, the Monitor 3 Air will always display the tank
pressure of the cylinder to which the transmitter is
connected, whenever it is in range.
Note: The pairing procedure only needs to performed once,
before the first use. After that, the only time you need to
perform the pairing procedure is when you use a new
transmitter, new computer, or have the battery changed.
Always check the cylinder pressure before every dive.
For best possible reception, it is best to fit the transmitter
on the same side of the regulator first-stage where you will
wear the wrist unit. For example, if you wear the computer
on your left wrist, mount the transmitter on the left side of
the regulator.
Using the Monitor 3 Air Without the
Transmitter
If, for any reason, you are unable to use the transmitter,
you can still use the wrist unit as a dive computer. It will
provide all the normal information found in the MODE,
DEPTH and TIME zones. However, the influence of breathing rate and work load will not be taken into account in the
decompression calculations. The AIR ZONE will remain
blank and you will need to monitor your cylinder pressure
using a conventional gauge.
12
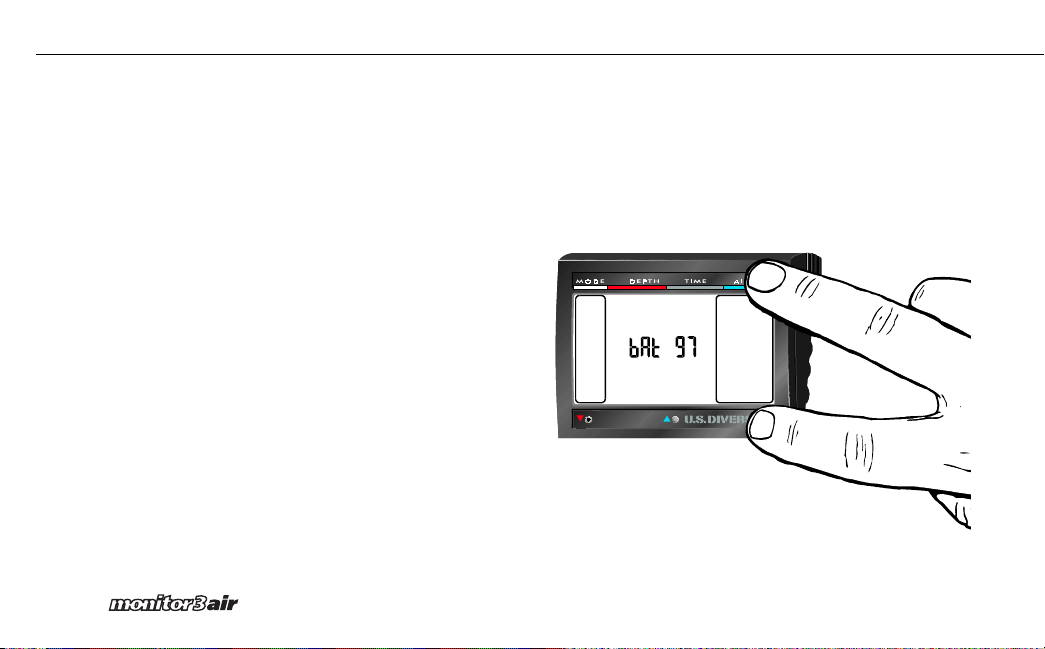
Checking the Battery Power
You can manually check the battery power of the Monitor 3
Air. While in Ready Mode or Surface Mode, touch contacts
A&D. The word "bat" will be displayed along with the
battery power. Battery power is given as a percentage, with
99% being the highest percentage displayed. Its a good idea
to check the battery power before you start a series of dives.
Page 20

In this section:
☛
Preparation for the dive
☛
Functions during the dive
☛
Functions at the surface
☛
Summary of Messages and Alarms
Page 21
Section 2: Diving with the Monitor 3 Air
Preparation for the Dive
Note: The following preparation instructions assume that
the transmitter is installed correctly into your first-stage
regulator (see page 8) and that it is paired with the Monitor
3 Air computer (see page 9).
WARNING: If the Monitor 3 Air transmitter is not
correctly installed or not paired with the computer,
it will not perform properly. If you rely on the
computer in this condition to plan your dive, you
risk serious injury or death.
STEP 1
STEP 2
14
Mount the regulator (with transmitter attached)
onto the SCUBA cylinder.
If your cylinder has a reserve valve, commonly
referred to as a “J”-valve, make sure the reserve
lever is in the full open position (lever is pulled
down).
STEP 3
STEP 4
Switch on the Monitor 3 Air by touching
contacts A and D. Check the display to make
sure all the display elements are lit.
Open the cylinder valve. The transmitter
switches on automatically when it senses
pressure.
Page 22
Section 2: Diving with the Monitor 3 Air
STEP 5 STEP 6
Check the cylinder pressure reading. The
cylinder pressure reading appears about 10
seconds after turning on the valve.
The Monitor 3 Air is now in Ready Mode. The
computer switches to Dive Mode after entering
the water and submerging below four feet. The
depth indication may be delayed for a few
seconds.
15
Page 23
Section 2: Diving with the Monitor 3 Air
Functions During the Dive
Current Depth
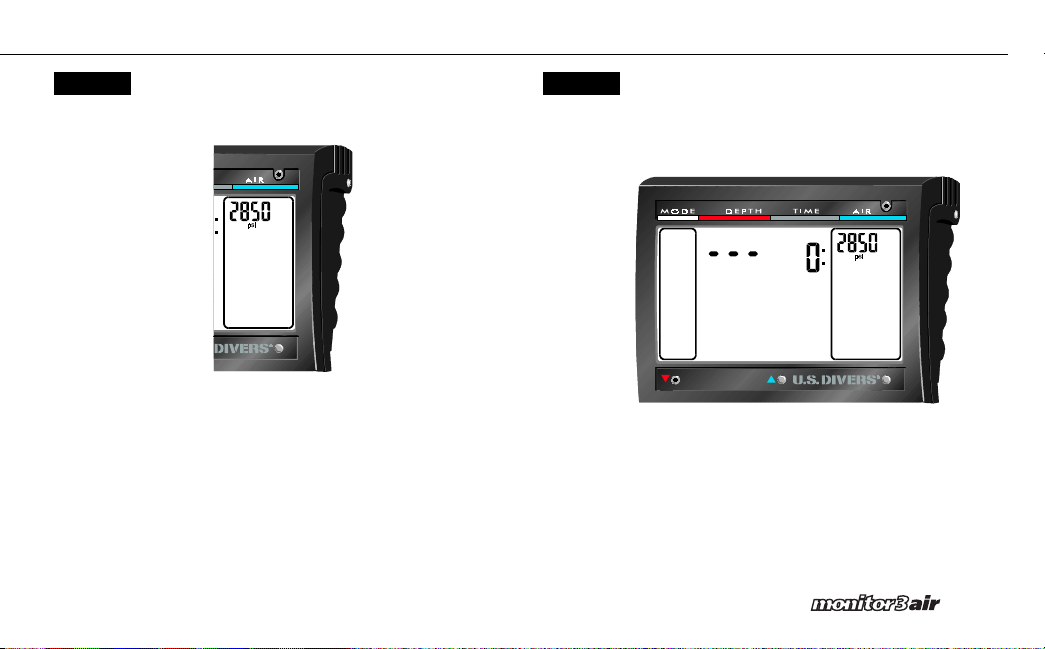
Current depth is displayed in one-foot increments down to a
maximum of 330 feet. When the depth is two feet or less,
the depth display is replaced with three dashes.
Note: Depth measurement is based on freshwater. When
diving is salt water, the depth displayed will be slightly
greater than the actual depth, depending on the salinity of
the water.
16
Current depth
display at 100 feet
Current depth
display at 2 feet
or shallower
Page 24

Section 2: Diving with the Monitor 3 Air
Dive Time
Dive time, which is displayed in minutes, is the amount
of time spent below a depth of 4 feet. While the dive time
is running, the colon to the right of the number flashes
in one-second intervals. Maximum dive time displayed is
199 minutes.
Note: If a dive lasts longer than 199 minutes, dive time will
roll over to 0 minutes.
Dive time
display
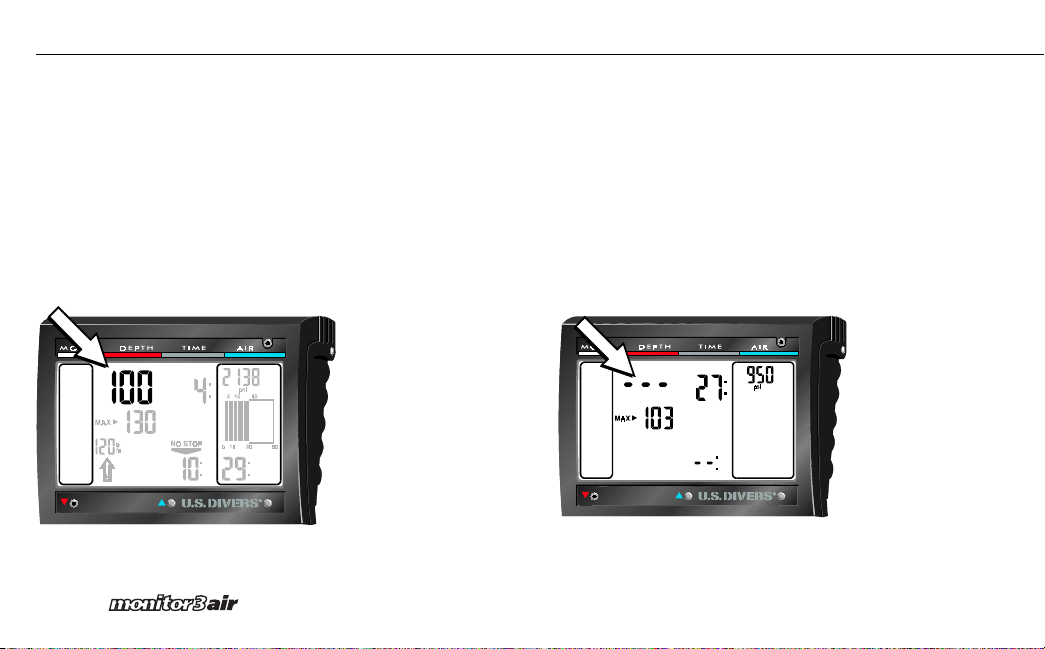
Maximum Depth
Maximum depth is the deepest depth reached during the
dive. It is only displayed when the actual depth is more
than three feet shallower than the maximum depth.
Maximum depth
display
17
Page 25

Section 2: Diving with the Monitor 3 Air
Ascent Rate
The optimal ascent rate varies between 23 and 67 ft/min.
depending on the depth. Ascent rate is displayed as a
percentage of the allowable ascent rate (rounded to the
nearest 10 %). For example, if the allowable ascent rate at
the current depth is 67 ft/min, and you ascend at 33 ft/
min, the ascent rate will display 50%. If you ascend at 67
ft/min the ascent rate will show 100%.
WARNING: The prescribed ascent rate must be
observed at all times! Exceeding the prescribed
ascent rate can lead to microbubble formation
which can lead to serious injury or death due to
decompression sickness.
Ascent Rate
Display
18
If the ascent rate is 100% or more, the arrow appears. If
the ascent rate exceeds 140%, the arrow starts flashing.
Also, an acoustic alarm sounds when ascent rate is 110%
or greater. The intensity of the alarm increases as the
percentage over the allowable rate increases. Below is a
summary of the ascent warnings.
Ascent
Optical
Rate
Alarm
WARNING: Reduce your ascent speed whenever
the above alarms appear. Failure to do so may lead
to serious injury or death due to decompression
sickness.
Acoustic
Alarm
Page 26

Section 2: Diving with the Monitor 3 Air
Some Notes on ascent rate:
- The Monitor 3 Air may require a decompression stop due
to an improper ascent rate, even if you stay within the
no-stop limits.
- Decompression time necessary for the prevention of
microbubbles can increase greatly if the ascent rate is
exceeded.
- At great depth, ascending too slowly may cause
heightened saturation of tissues and increase both
decompression time and total ascent time. At shallow
depth, a slow ascent may shorten decompression time
because the tissues are desaturating during a shallow,
slow ascent.
- Excessive rates of longer periods are entered in the dive
computer's memory
No-Stop Time
No-Stop Time is the amount of time you can stay at the
current depth without making required decompression
stops. This number is displayed in minutes, with 99 being
the highest number displayed. If 99: is displayed, you
have 99 minutes or more of no-stop remaining. No-stop
time is easily identified by the no-stop arrow located
directly above it.
No-Stop Time
Display
19
Page 27
Section 2: Diving with the Monitor 3 Air
WARNING: There is an acoustic alarm if no-stop
time is less than one minute. In this last minute, the
no-stop display shows a flashing 0. In order to
prevent a decompression dive, you must ascend
immediately.
WARNING: It is unsafe diving practice to “push”
the Monitor 3 Air, or any other decompression tool,
to its limits. Avoid no-stop times of less than 3
minutes at any given depth.
No-stop time at 0
minutes remaining
20
Cylinder Pressure
Cylinder pressure is
displayed in pounds
per square inch (psi)
in 1 psi increments.
Antenna Symbol
If, during the dive, there is an
interruption in the transmission of air
data to the Monitor 3 Air for more
than 30 seconds, the antenna symbol
will appear, accompanied by an
acoustic warning. If sensible data is
not received within 40 seconds after
the antenna symbol appears, the air
pressure reading will be replaced by
four dashes, and all air time information will disappear. The most likely
cause of transmission interruption is
the position of the computer in
relation to the transmitter. As soon as data is transmitted again, the computer will display the cylinder
pressure and air time information.
Page 28
Section 2: Diving with the Monitor 3 Air
Graphic Air Time Remaining (ATR)
The graphic air time remaining box gives you, at a quick
glance, the amount of air you have left. As your air time
lowers, the box empties. For example, if the box is filled
up to the 45 minute level, you have between 45 and 60
minutes of air time remaining; if the box is filled to the 30
minute level, you have between 30 and 45 minutes of air
time.
Graphic Air Time
Remaining Display
Digital Air Time Remaining (ATR)
Digital air time remaining gives you the amount of time,
displayed in minutes, that you can stay at the current
depth and still be able to:
- carry out all required decompression stops
- Make a safe ascent to the surface at the permitted
ascent rate
- Arrive at the surface with at least 580 psi remaining in
your cylinder.
Note: The ending psi level can be altered with the PC
interface kit.
Digital Air Time
Remaining Display
21
Page 29

Section 2: Diving with the Monitor 3 Air
WARNING: Never allow the ATR to go below three
minutes. If the ATR goes below three minutes there
is a danger of insufficient air supply for the ascent
as well as an increased risk of decompression
sickness and serious injury or death may result.
WARNING: Correct calculation of ATR when using a
reserve or “J”-type valve is possible only if the
reserve lever of the valve is in the open (down)
position during the dive.
Note: The acoustic alarm on exceeding the ATR is
suppressed at depths less than 23 feet if the Monitor 3 is in
a no-decompression stop phase.
High Air Consumption Warning
The high air consumption warning appears when you
significantly increase your breathing rate. This could be
the result of sudden physical effort, emergency situation,
or significant leak in the air supply. When this symbol
appears, reduce exertion and breathe more slowly.
22
WARNING: If the ATR drops below three minutes, an
acoustic attention signal sounds at the ATR digits
start to flash.
WARNING: When the last minute has passed
(ATR=0) an acoustic alarm is activated every 4
seconds. The digital ATR and graphical ATR start to
flash. Start your ascent immediately!
High Air
Consumption
Warning
Page 30
Section 2: Diving with the Monitor 3 Air
Decompression Stop Information
If you exceed the no-stop limits, the Monitor 3 will
replace the no-stop time with the deepest (first) decompression stop depth (in feet) along with the amount of
decompression time (in minutes) at that depth. When a
decompression stop has been completed, the next
shallower decompression stop is displayed, along with its
required stop time. When all decompression stops are
completed, the DECO arrow disappears and the NO STOP
arrow reappears.
WARNING: If you ascend shallower than the
required decompression stop depth, the DECO
arrow will start flashing and an acoustic alarm will
sound. Due to the formation of microbubbles,
decompression obligation can increase greatly if a
decompression stop is ignored. When the surface
is reached during the decompression alarm, the
DECO arrow continues to flash to point out the
risk of a decompression accident. If you do not
descend immediately to the required stop depth,
the Monitor 3 will enter SOS Mode. Any decompression violation longer than one minute is
entered in the computers logbook. Ignoring
decompression stops may lead to serious injury
or death due to decompression sickness.
Decompression
stop information
display
23
Page 31

Section 2: Diving with the Monitor 3 Air
Total Ascent Time
Total Ascent Time is the addition of all the decompression
stop times plus the amount of time it takes to ascend from
the current depth to the first decompression stop.
Note: Total ascent time is calculated with an optimal
ascent rate of 100% and normal workload. High workloads
and different ascent rates may change the total ascent
time.
Total Ascent
Time Display
24
SOS Mode
If you ignore your decompression stop and return to the
surface (shallower than 4 feet) for more than three
minutes, the Monitor 3 Air switches to SOS Mode. In SOS
Mode, the computer displays SOS instead of current
depth. While in SOS Mode, the computer cannot be used
for 24 hours. SOS Mode can influence the computer's
calculations for three days after the incident due to the
presence of microbubbles.
Page 32

Section 2: Diving with the Monitor 3 Air
Functions at the Surface
Upon surfacing
After reaching the surface, the Monitor 3 automatically
switches into wait-mode for five minutes. This is the
amount of time necessary to recognize the end of the
dive. The five minute delay allows you to come to the
surface to orient yourself, then resume the dive. If you
stay at the surface longer than 5 minutes, the dive is
entered into the logbook and the Monitor 3 Air switches
into surface mode.
Display immediately
upon surfacing
Surface Mode
Note: Surface mode will stay visible for 3 minutes. After that,
the screen will go blank to save battery power. To reacti-
vate the surface mode display, touch contacts A and D.
Surface mode icon
Five minutes after surfacing, the Monitor 3 enters Surface
Mode. While in Surface Mode, the Surface Mode Icon
appears at the bottom of the icon window.
Surface mode icon
display
25
Page 33

Section 2: Diving with the Monitor 3 Air
Wait-to-fly Time
Wait-to-fly time is the minimum amount of time you
should wait before flying in a commercial airliner. Wait-tofly time is displayed in hours and is denoted by the no-fly
symbol immediately above it.
WARNING: Flying while the Monitor 3 Air is still
displaying wait-to-fly time may lead to serious
injury or death from decompression sickness.
Wait-to-fly
time display
26
Wait-to-fly Recommendations
The Divers Alert Network (DAN) has made the following
recommendations regarding wait-to-fly time:
1 . A minimum surface interval of 12 hours would be
required in order to be reasonably assured a diver will
remain symptom free upon ascent to altitude in a
commercial jetliner (altitude up to 8000 ft/2400 m).
2 . Divers who plan to make daily, multiple dives for
several days, or make dives that require decompression stops should take special precautions and wait
for an extended surface interval beyond 12 hours
before flight.
Both the Undersea and Hyperbaric Medical Society
(UHMS) and DAN agree that:
"There can never be a flying after diving rule that is
guaranteed to prevent decompression sickness completely.
Rather, there can be a guideline that represents the best
estimate for a conservative surface interval for the vast
majority of divers. There will always be an occasional diver
whose physiological makeup or special diving circumstances will result in the bends."
U.S. Divers recommends that you follow either the DAN
recommendation, or the wait-to-fly time shown by the
Monitor 3 Air, which ever is longer.
Page 34

Section 2: Diving with the Monitor 3 Air
Desaturation Time
Desaturation time is the amount of time it takes to
completely off-gas any residual nitrogen in your system.
Desaturation time is displayed in hours and minutes.
Desaturation
time display
Surface Interval Time
Surface interval time is shown immediately after accessing
Memory Mode. For more information on accessing Memory
Mode, see page 38, steps 1 and 2.
27
Page 35

Section 2: Diving with the Monitor 3 Air
Microbubble Warning
Repetitive diving may cause microbubbles to accumulate
in the lungs if the surface interval between dives is not
long enough. Ignoring decompression stops or an
excessive ascent rate can also lead to bubble formation.
In order to reduce the risk of decompression sickness for
future repetitive dives, the surface interval should be
planned long enough to reduce the risk of decompression
sickness. If the Monitor 3 Air calculates that the formation of microbubbles may occur during the surface
interval, it will advise the diver to extend the surface
interval. The display “Atn” (= attention) is visible in the
depth display area during the surface mode. While “Atn”
is displayed, the diver should not undertake another dive.
Note: If a dive has to be made while Atn is displayed,
the amount of Atn-time for the following dive can
increase considerably. During the dive, no-stop times will
be much shorter and decompression times will increase.
28
Microbubble
formation warning
Atn = Attention
Page 36

Section 2: Diving with the Monitor 3 Air
Diving at Altitude
The Monitor 3 Air measures the atmospheric pressure
even while in Sleep Mode. If the computer detects a higher
altitude, it automatically switches on and displays the
adaptation time. This is the time after which your body is
considered desaturated and stable at the given altitude.
Altitude adaptation
time display
Adt=Adapt
Altitude sectors
Atmospheric pressure is influenced by altitude and
weather. The Monitor 3 Air is interested only in the actual
atmospheric pressure value for use in decompression
calculations. However, it indicates the altitude sector
which corresponds most closely with this pressure for
normal weather conditions. The altitude sectors and their
corresponding altitude is illustrated below.
switches at
approx 8.85 psi
switches at
approx 10.51 psi
switches at
approx 11.81 psi
switches at
approx 13.12 psi
29
Page 37

Section 2: Diving with the Monitor 3 Air
Even the smallest differences in the pressure sensors can
cause two computers at the same altitude to display
different altitude sectors. (Notice how the altitude sectors
overlap in the illustration.) These differences are not
meaningful and do not interfere with the operation of the
computer. However, if there is an altitude indication while
at sea level, or two computers differ by 2 altitude sectors,
contact your U.S. Divers dealer for service.
Note: In order to assure optimal decompression even at
higher altitudes, the 10-foot decompression stop is divided
into a 13-foot stop and 7-foot stop. Therefore, the pre-
scribed decompression stops, in order, are 7 ft, 13 ft, 20 ft,
30 ft ... 80 ft.
Exceeding the Altitude Limit
The Monitor 3 Air operates normally up to an altitude of
13,123 ft.. Above that (atmospheric pressure below 8.99
psi), the computer will not show any decompression
information or remaining air time. Also, Pre-Dive Planning
Mode cannot be started, since decompression information
is not available.
If the altitude limit is exceeded, the Monitor 3 Air will
display "HI" along with all the altitude sectors.
30
Altitude adaptation
display upon
exceeding the
altitude limit
Diving display when
altitude limit has
been exceeded
Page 38
Summary of Attention Messages and
Alarms
The Monitor 3 Air draws your attention to certain situations and warns you of unsafe diving practices. Attention
messages and alarms are always visual and acoustical
while underwater; they are only optical at the surface
except for the decompression alarm.
Attention Messages
Attention messages are given by symbols, letters, or
flashing figures. In addition, two short beeps can be heard,
in intervals of 4 seconds, in two different frequencies.
Attention messages appear in the following situations:
Altitude dive
During a change to a higher
altitude, the Monitor 3 Air
displays an altitude sector icon
and the corresponding adaptation time.
Section 2: Diving with the Monitor 3 Air
End of no-stop time
To avoid making a decompression dive,
a "0" flashes during the last minute of
no-stop time to alert you to ascend to
a shallower depth. Also, two beeps are
sounded.
Air Time Remaining is less than 3
minutes
To avoid a potential out-of air
situation, immediately begin your
ascent.
31
Page 39

Section 2: Diving with the Monitor 3 Air
Lost transmission
If the computer does not
receive data from the transmitter, the antenna symbol is
displayed, accompanied by
two beeps. If this occurs
frequently, check the position
of the transmitter or computer. If situation persists for
more than 40 seconds, air
information will no longer be
displayed.
Lost transmission
after 40 seconds
32
High air consumption
When there is a significant
increase in the air consumption, the warning icon
appears, accompanied by
two beeps. Relax and breathe
more slowly.
Microbubble warning (Atn)
This message is displayed when
the Monitor 3 Air calculates that
there is an excess of
microbubbles in your body
tissues. Do not dive while this
message is displayed. If you dive
while the message is displayed,
no-stop times will be reduced
and decompression times will be
longer.
Page 40

Section 2: Diving with the Monitor 3 Air
Alarms
Alarms are communicated to you by symbols, letters, or
flashing icons. In addition, an acoustic warning sounds
during the duration of the alarm. An alarm occurs in the
following situations.
Fast ascent
Reduce your ascent rate (see
page 18 for more details on
ascent rate)
Air Time Remaining = 0
The air supply may be
insufficient to safely reach
the surface. Start your
ascent immediately.
Missed decompression stop
Descend to the prescribed
decompression stop at
once.
33
Page 41

Section 2: Diving with the Monitor 3 Air
Low computer battery
While diving, "bAt' alternates with the maximum depth display. During
Surface Mode or Ready Mode, "bAt" flashes in the maximum depth position.
This indicates battery charge is nearing 0%.
Low transmitter battery
While diving, the "bAt" message
alternates with the cylinder
pressure display. In Ready
Mode or Surface Mode, it
flashes in place of the tank
pressure. This indicates
battery charge is nearing 0%.
34
Page 42

In this section:
☛
Activating Memory Mode
☛
Scrolling through logged dives
Page 43

Section 3: Memory Mode
Overview
The Monitor 3 Air wrist unit is able to display the details of
the last 19 dives. Any dive that lasts two minutes or longer
is entered into memory. After the memory is filled with all
19 dives, the oldest dive is deleted for each new dive
entered. All the dive information stays in memory until the
battery is removed.
The illustration on the opposite page shows all the information that is logged for each dive.
36
Downloading the Memory to a PC
With the use of a separate interface kit, the Monitor 3 Air
has the ability to download the details of the last 37 dives to
an IBM compatible computer. In addition, detailed information on the last 200
minutes of diving,
sampled every 20
seconds, allows the
software to plot a graph
depicting your actual
dive profile and display
the computer information anywhere along the
profile.
The interface kit and
software available from
your Authorized U.S.
Divers dealer.
Note: The procedures for downloading data to a personal
computer are described in the manual that comes with the
interface kit.
Page 44
Section 3: Memory Mode
37
Page 45

Section 3: Memory Mode
Activation
STEP 1
38
From
contacts A & C. The computer will emit one beep
and the Memory Mode icon will appear in the
mode zone. If activating from Surface Mode, the
current surface interval also appears.
Ready Mode
or
Surface Mode
, touch
Surface interval
time appears
when activated
from Surface
Mode
STEP 2
Touch Contacts A & D to confirm the selection.
After a few moments, the information for the
most recent logged dive appears.
Note: If you are only checking surface time, you
can immediately return to Surface or Ready
Mode by touching contacts A & B instead of
touching A & D.
Page 46

Section 3: Memory Mode
Scrolling through Logged Dives
To scroll back through the memory (towards the oldest
dive), touch contacts A & C. To scroll forward through the
memory (towards the most recent dive), touch contacts
A & B.
Scroll back through
logged dives
Scroll forward
through logged dives
Note: The absence of a previous surface interval means that
the logged dive was the first dive after a complete
desaturation.
Exiting Memory Mode
To exit Memory Mode, touch contacts A&D. If there is no
activity for three minutes while in Memory Mode, the
computer will automatically switch back to Surface or
Ready Mode.
39
Page 47

Section 3: Memory Mode
40
Page 48

In this section:
☛
Activation from Ready Mode
☛
Activation from Surface Mode
☛
Planning a Decompression Dive
Page 49

Section 4: Pre-Dive Planning Mode
Overview
The Monitor 3 Air has a built-in dive planner that allows
you to plan both no-stop dives and decompression dives.
The planner takes into account the temperature of the most
recent dive and altitude.
WARNING: Planned decompression dives violate the
responsible diving practice standards of every major
diving organization. Recreational or sport scuba
divers should not attempt decompression dives.
Only professional divers with extensive experience,
training, and the appropriate equipment for decompression diving (including the presence of an onboard recompression chamber) should attempt to
plan a decompression dive. Those who attempt
decompression dives must be willing to accept an
increased risk of decompression sickness.
You can access the Pre-Dive Plan Mode form either Ready
Mode or Surface Mode. When you access the planner from
Surface Mode, you have the option of adding surfaceinterval time to plan for a dive at some point later in the
day.
42
Activation from Ready-Mode
From
STEP 1
NOTE: Always moisten
your fingertips before
touching the contacts.
Otherwise, you cannot
get a good electrical
connection. Contacts
only need to be
touched momentarily
unless noted other-
wise.
Ready Mode,
computer will emit one beep and the Dive Plan
Icon will appear in the mode zone.
touch contacts A & B. The
Ready Mode
Page 50
Section 4: Pre-Dive Planning Mode
STEP 2
Touch contacts A & D to confirm the selection.
The word RUN will flash for about five seconds
and then start scrolling through the available
time-depth combinations.
STEP 3
The Monitor scrolls from 50 to 200 feet in 10-foot
increments. For each depth the computer gives
the maximum allowable no-stop time at that
depth.
Note: If you want to stay longer than the no-stop
time limit, proceed to "Planning a Decompres-
sion Dive" on page 46.
43
Page 51
Section 4: Pre-Dive Planning Mode
Activation from Surface Mode
From
STEP 1
44
Surface Mode
computer will emit one beep and the Dive Plan
Icon will appear in the mode zone.
, touch contacts A & B. The
Surface Mode
STEP 2
Touch contacts A & D to confirm the selection.
The words "Add" and "Int" appear along with a
flashing surface interval time.
Page 52
Section 4: Pre-Dive Planning Mode
STEP 3
Note: Surface interval
time increases in 15
minute increments for
the first 6 hours, 30
minute increments
from 6 to 12 hours, and
1-hour increments
after that.
If you do not want to add any additional surface
time, go to step 4. If you do want to add surface
time, touch contacts A & C. If you add too much
surface time and want to decrease it, touch
contacts A & B.
Increase Time
Decrease Time
STEP 4
Note: If you want to stay
longer than the no-stop
time limit, proceed to
"Planning a Decompres-
sion Dive" on page 46.
After adding the desired amount of surface
interval time, touch contacts A & D. The word
"run" flashes for a few moments, then the
Monitor starts scrolling from 50 to 200 feet in
10-foot increments. For each depth the computer gives the maximum allowable no-stop time
at that depth.
45
Page 53

Section 4: Pre-Dive Planning Mode
Planning a Decompression Dive
Before planning a decompression dive, reread the
import warning at the beginning of this section.
STEP 1
46
When the Monitor 3 Air scrolls to the desired
depth, touch contacts A & D. The word “Add”
appears in the depth zone, the flashing dive time
is now one minute more than the allowable nostop time, and all decompression information is
displayed, including stop depth, stop time, and
total ascent time.
STEP 2
Increase the dive time by touching contacts
A & C. If you increase the dive time too much
and want to reduce it, touch contacts A & B.
Decrease Time
Increase Time
Page 54

Section 4: Pre-Dive Planning Mode
STEP 3
When you reach the desired dive time, release
the contacts and, after a few moments, the
Monitor 3 Air will display the new decompression information. You can then, as shown in
step 2, increase and decrease the dive time as
you wish.
Note: If there is no activity during the Pre-Dive
Planning Mode for three minutes, the Monitor 3
Air automatically returns to Surface Mode or
Ready Mode.
STEP 4
To return to the pre-dive scrolling, touch
contacts A & D. If you want to return to Surface
Mode or Ready Mode, touch contacts A & D for
about three seconds.
WARNING: If two or more divers using
computers are planning a dive, planning
for all divers must be based on the dive
computer showing the shortest no-stop
times. Failure to do this may lead to
serious injury or death from decompression sickness.
47
Page 55

Section 4: Pre-Dive Planning Mode
48
Page 56

Page 57

Section 5: Care & Maintenance
Overview
The Monitor 3 Air is a robust instrument designed to
withstand the rigors of SCUBA diving. However, you still
need to protect it from shock, extreme heat, chemical
attack, and tampering.
Even though the Monitor 3 Air’s material is tough and
durable, it is susceptible to chemical attack and scratches.
Chemical attack can be in the form of spray propellants,
gasoline fumes in your garage or boat, and alcohol. U.S.
Divers can replace scratched gauge faces. However, small
scratches naturally disappear underwater.
CAUTION: Never use aerosol sprays, including
silicone sprays, on or near the Monitor 3 Air. The
propellants may chemically attack the plastic,
causing the plastic case to crack.
50
Care Before the Dive
The Monitor 3 Air’s plastic housing is made of a shock
resistant resin. This housing protects the Monitor 3 Air
from the normal bumps that occur when diving. However,
the computer cannot withstand the impact of heavy objects,
such as weight belts or SCUBA cylinders. Impact from
heavy objects is the most common cause of computer
damage. When you set up your dive gear on a boat or the
beach, keep the Monitor 3 Air in its protective case until
you are ready to dive. Never leave the computer exposed
where someone could accidentally step on it or drop
something on it.
Care During the Dive
The most common damage inflicted on a computer while
underwater is scratches to the computer face. Avoid
inserting your hand into rocky holes while wearing the
computer on your wrist (i.e. reaching into a lobster hole to
capture the tasty crustacean!)
CAUTION: Scratches to the computer body or gauge
face are not covered by the Two-Year Limited
Warranty
Page 58

Section 5: Care & Maintenance
Care After the Dive
CAUTION: If the Monitor 3 Air transmitter is not
attached to a first-stage regulator while soaking
(explained below), make sure that water is not
allowed to enter the high pressure inlet. Water
entering the transmitter may cause damage to the
internal components.
After each day of diving, soak the Monitor 3 Air in a warm,
fresh water bath to dissolve salt crystals. To dissolve heavy
salt buildup, use a slightly acidic vinegar/water bath. After
removing the computer from the bath, rinse thoroughly
with fresh water. Towel dry the computer before final
storage. Place the Monitor 3 Air in a cool, dry and protective
case to transport.
The transmitter should be rinsed at the same time the
regulator is rinsed. Make sure the transmitter is attached
to the first-stage. Connect the first-stage to a charged
SCUBA cylinder. Turn on the cylinder valve and submerge
the whole regulator/tank system in a bath of water. By
applying pressure to the regulator, you absolutely prevent
any water from entering the regulator and transmitter.
Annual Dealer Inspections & Factory
Service
Factory service was discontinued in 1997. Please contact
the original manufacturer, Uwatec, at 800-467-2822.
51
Page 59

Section 5: Care & Maintenance
52
Operating Temperature
The Monitor 3 Air operates normally between 12oF to 122oF
o
C to 50oC). You may notice the liquid crystal display
(-10
(LCD) becoming sluggish at extremely low temperatures.
This is normal and will not affect the computer’s accuracy.
It is possible to damage the electronics if left exposed to
direct sunlight or in a hot, confined space (like a car
trunk). After the dive, cover the computer and keep it out of
the sun. If inadvertently left in direct view of the sun, the
LCD may become totally black. If this occurs, immediately
immerse the Monitor 3 Air in water. The display should
recover its normal appearance after a few minutes. Damage
from extreme heat or cold is not covered under the twoyear limited warranty.
Replacing the Battery
The Monitor 3 Air's battery is not user-replaceable. It must
be returned to the factory for replacement. Factory service
was discontinued in 1997. Please contact the original
manufacturer, Uwatec, at 800-467-2822.
Page 60

Page 61

Section 6: Reference
Technical Specifications
Operational Performance
Depth Range: ................... 0-330 feet
Time Measurement:.......... 0-199 min.; Quartz timing
Air Pressure Range: .. .. ... .. . 3625 psi
Temperature Range: .. .... ...14oF to 122oF
Display: . . . . .. . . . . .. . . . .. . . . . .. . . . . . High contrast, custom liquid
crystal with back luminescence
Data Transmission: . .. .. .... . Long wave radio transmission
Transmitter Connection: .. 7/16" UNF regulator HP port
Dive Log Mode ....... ..... .... .. Stores last 37 dives in memory
After 37 dives, adds latest dive
to memory, deletes oldest dive
(37 most recent dives are
retained in memory)
Altitude range: . . . . . . . . . . . . . . . . . 0-13,200 feet above sea level;
Full computer functions up to
13,200 ft.
Battery: . .. . . . . .. . . . .. . . . .. . . . . .. . . . LR07 long life lithium battery
(factory replaceable only)
54
No-Decompression Model
• ZH-L8 ADT
• 8 tissue compartments, 5 to 640 minutes
• Decompression stop depths at 10 to 80 feet in 10-foot
increments
Page 62

Section 6: Reference
ZH-L8 ADT Calculation Model
The Monitor 3 Air uses a new calculation model known as
the ZH-L8 ADT. This model uses eight compartments or
"tissue" groups with half-times ranging from 5 to 640
minutes. This calculation model is based on the most
current research conducted by the late Dr. A.A. Buhlmann.
Most computer decompression models only take into
account time and depth; the Monitor 3 Air model also
factors in other physiological factors, including temperature, breathing rate and workload.
Workload and Temperature
Blood perfusion to the body's organs is not constant. Skin
and muscle tissues are especially subject to changes in
blood perfusion, depending on temperature and workload.
Changes in blood perfusion to these organs change their
nitrogen saturation tolerance. The ZH-L8 ADT model takes
these effects into account and thus the "skin" and "muscle"
compartments in the Monitor 3 Air have variable half-time
periods and saturation tolerances.
Decompression information is calculated according to the
diver's individual workload and decrease in skin temperature. The decrease in skin temperature is based upon the
water temperature and the dive time. By considering these
changes in saturation, the time that must be spent at the
surface prior to flying can be considerably lengthened,
depending on the depth, time, and temperature of a dive, as
well as the diver's workload during that dive.
Microbubble Formation
The ZH-L8 ADT model considers nitrogen in both its
dissolved and gaseous phase (microbubbles). Formation of
microbubbles is considered to be a strong indicator of a
high risk of decompression sickness. The model calculates
the formation of microbubbles depending on various
assumed influences in arterial and venous blood. During
normal, slow ascents, microbubbles form mainly in venous
blood. During fast ascents, microbubbles may also form in
arterial blood and the body's tissues. If a particular dive
profile results in the formation of microbubbles, decreased
bottom time and/or increased decompression times, and
increased wait-to-fly times, will be indicated.
Microbubbles can form if the diver makes a fast ascent,
ignores decompression stops, or makes repeated ascents
during a dive (yo-yo diving). These microbubbles can form
in arterial blood and body tissues. If these microbubbles
partially impair circulation, the rate of gas diffusion and
saturation tolerance of surrounding tissues are changed. If
required, both decompression time and remaining bottom
time will be adjusted in such a way that already existing
microbubbles will stop growing. Increased decompression
55
Page 63

Section 6: Reference
time will also assist those local areas of impaired circulation
to desaturate with less risk of decompression sickness.
The calculation of microbubbles results in altered ascent
instructions. If microbubbles are assumed to be present
based on the data used by the Monitor 3 Air, the ascent rate
is reduced to 23 feet/minute. This will help prevent the
formation of microbubbles in the arterial circulation and
minimizes formation of microbubbles in the venous
circulation after the dive.
Summary
With its new decompression model, the Monitor 3 Air is a
versatile tool which can increase your diving comfort and
safety. As with any diving tool, however, ultimate responsibility for diving safety remains with the individual diver.
The same responsible diving practices taught by all diving
certifications are still absolutely necessary in order to safely
dive with the Monitor 3 Air.
56
 Loading...