

Page 1
ふ
WM+PD4000477D
MS-70
MX-50
MF-50
ML-50
Page 2
1.
1. This manual and Marks
1.1.
All safety messages are identified by the following, “
ANSI Z535.4 (American National Standard Institute: Product Safety Signs and
Labels). The meanings are as follows:
This is a hazard alert mark.
This mark is the IEC417 mark for "Caution. Hot surface".
Do not to uch part s affixed with this mark without adequate protection.
This mark informs you about the operation of the product.
This manual is subject to change without notice at any time to improve the product.
Product specifications are subject to change without any obligation on the part of
the manufacturer.
Under the copyright laws, the instruction manual and the software (program)
described in it are copyrighted, with all rights reserved.
The software may be installed into one computer and may not be installed into other
computers without the prior written consent of A&D Company. Copying includes
translation into another language, reproduction, conversion, photocopy and offer or
loan to another person.
The purchaser may make one copy of the software for backup purposes.
The manual and the software may not be copied, in whole or part, except as
described above.
Windows is a registered trademark of the Microsoft Corporation.
2004 All rights reserved.
This manual and Marks
This manual and MarksThis manual and Marks
WARNING
CAUTION
A potentially hazardous situation which, if not avoided, could
result in death or serious injury.
A potentially hazardous situation which, if not avo ided, m ay result
in minor or moderate injury.
WARNING
” or “
CAUTION
”, of
Page 3

Contents
Contents
ContentsContents
1. Safety and Compliance..................................................................3
2. Precautions...................................................................................5
2.1. Installing the Analyzer..................................................................... 5
2.2. During Use ...................................................................................... 6
2.3. After Use and Maintaining the Analyzer ........................................... 7
3. Outline and Features.....................................................................8
4. Packing List and Names of each part...........................................10
4.1. Display and Keys............................................................................12
5. Preparations ...............................................................................14
5.1. Installing the Analyzer................................................................... 14
5.2. Setting the Clock and Calendar...................................................... 15
5.2.1. Operation.............................................................................................. 15
5.3. Proper Operation for Precision Measurement ................................. 16
5.3.1. Operation of the sample .......................................................................16
5.3.2. Operation of the analyzer......................................................................16
5.3.3. The Glass Fiber Sheets ( of accessory)................................................... 17
6. Measurement Procedure..............................................................18
6.1. Standard Mode Operation.............................................................. 18
6.1.1. ACCURACY............................................................................................18
6.1.2. Operation.............................................................................................. 18
6.2. Quick Mode Operation................................................................... 21
6.2.1. ACCURACY............................................................................................21
6.2.2. Operation.............................................................................................. 21
6.3. Program Number........................................................................... 24
6.3.1. Storing a Measurement Program to a Program Number ..........................24
6.3.2. Recalling a Measurement Program with a Program Number....................24
7. Measurement Programs ..............................................................25
7.1. List of Measurement Programs....................................................... 25
7.1.1. ACCURACY of the Standard Mode and Quick Mode............................... 26
7.1.2. Analyzing mode of the Automatic Mode ............................................... 27
7.1.3. Analyzing mode of the Timer Mode ...................................................... 27
7.1.4. Drying Program (Heating Pattern and Drying Termperature).................27
7.1.5. Meas ur em e nt Unit .................................................................................. 28
7.2. Procedures to Store a Measurement Progr am................................. 29
7.2.1. Standard Drying....................................................................................29
7.2.2. Ramp Drying.........................................................................................32
7.2.3. Step Drying...........................................................................................36
MS-70 / MX-50 / MF-50 / ML-50 1
Page 4

8. Check Function...........................................................................41
8.1. Self-Check Function.......................................................................41
8.1.1. Operation.............................................................................................. 41
8.2. Test Sample (Sodium Tartrate Dihydrate)....................................... 42
9. Connecting to a Printer...............................................................43
9.1. Print samples................................................................................. 44
9.1.1. Example To Print The Whole Data At One Time.....................................44
9.1.2. Example To Print Selected Items ........................................................... 45
9.1.3. Explanation for Print Item.....................................................................47
10. Connecting to a Computer .........................................................49
10.1. RS-232C Serial Interface................................................................ 50
10.2. Output Format............................................................................... 51
10.3. Command...................................................................................... 52
11. Data Memory Function............................................................... 53
11.1.1. Preparation ......................................................................................... 53
11.1.2. Output All Data at One Time...............................................................54
11.1.3. Delete All Data at One Time................................................................54
12. Calibration.................................................................................55
12.1. Identification Number (ID No.) ....................................................... 55
12.1.1. Setting the ID Number ........................................................................ 55
12.2. Calibration of the Weighting Sensor............................................... 56
12.2.1. Operation............................................................................................ 56
12.3. Calibration of Drying Temperature (for MS-70 and MX-50)
12.3.1. Operation............................................................................................ 58
........................... 58
13. Function Table...........................................................................60
13.1.1. Operation............................................................................................ 61
14. Maintenance ..............................................................................62
14.1. Cleaning the Heater Unit................................................................ 62
14.2. Replacement of the Halogen Lamp................................................. 63
14.3. Factory Settings............................................................................. 64
14.3.1. Operation............................................................................................ 64
14.4. Troubleshooting............................................................................ 65
14.5. Error Message................................................................................ 66
15. Specifications............................................................................. 67
15.1. Dimensions ................................................................................... 68
15.2. Accessories and Peripheral Equipment........................................... 69
16. Index.........................................................................................70
MS-70 / MX-50 / MF-50 / ML-50 2
Page 5
2.
2. Safety
2.2.
WARNING
Do not use a sample that could make a dangerous chemical reaction and cause an
explosion or poisonous gas, when the sample is dried.
Keep flammables away from the analyzer.
Parts of the analyzer become very hot. Materials placed near it might catch fire.
Do not use the analyzer in ambient ignitable gas. It may cause explosion and fire.
Use a power source (voltage, frequency, outlet type) adapted to the specification of
the analyzer. If excessive voltage is used, the analyzer may overheat and be
damage or cause a fire.
Turn off the power switch and remove the power cord from the power outlet, when
replacing the halogen lamp. Touching an electrode of the halogen lamp connector
carelessly, it may cause to receive an electric shock.
Do not disassemble the analyzer. It may cause an err or, damage, receiving an electric
shock or fire. If the analyzer needs service or repai r, contact the l ocal A&D deal er .
Avoid getting the analyzer wet. It is not a water-resistant structure. If there is leakage
of liquid into the analyzer, it may cause damage to the analyzer or receiving electric
shock.
Do not look at the active halogen lamp to protect your eyes from damage.
Do not drop, hit or crack the glassware including the halogen lamp, to avoid an
injury.
When the halogen lamp is used beyond 5000 hours, we recommend replacing the
lamp with a new one to avoid trouble.
When discarding a halogen lamp, do not break it to avoid scattering glass and injury.
Safety and Compliance
Safety Safety
and Compliance
and Complianceand Compliance
CAUTION
Do not touch the heater cover, the halogen lamp, glass-housing, pan handle, sample
pan and sample without adequate protection, it could cause a burn or scald. Parts of
the analyzer are very hot when a measurement finishes. For operation, use the
specified grips of the heater cover and pan handle. Use the standard accessory
tools.
Do not touch parts affixed with the mark, because they may get very hot and
dangerous.
When the analyzer is used in a room where hot air does not diffuse, it may
unexpectedly overheat. In this case, adjust the drying temperature or move the
analyzer to a place with adequate ventilation.
Avoid leaving the analyzer in direct sunlight, as that could cause discoloration of the
case or a malfunction.
MS-70 / MX-50 / MF-50 / ML-50 3
Page 6

Compliance with FCC Rules
Compliance with FCC Rules
Compliance with FCC RulesCompliance with FCC Rules
Please note that this device generates, uses and can radiate radio frequency energy.
This device has been tested and has been found to comply with the limits of a Class
A computing device pursuant to Subpart J of Part 15 of FCC rules. These rules are
designed to provide reasonabl e pr otection against interfere nce whe n this device is
operated in a commercial environment. If this unit is operated in a residential area, it
may cause some interference and under these circumstances the user would be
required to take, at his own expense, whatever measures are necessary to
eliminate the interference.
(FCC = Federal Communications Commission in the U.S.A.)
Compliance with Council Directives
Compliance with Council Directives
Compliance with Council DirectivesCompliance with Council Directives
This device features radio interference suppression and safety regulation in
compliance with the following Council Directives
Council directive 89/336/EEC EN61326 EMC directive
Council directive 73/23/EEC EN61010-1 Low voltage directive
MS-70 / MX-50 / MF-50 / ML-50 4
Page 7
3.
3. Prec
---
---Caution for M
------
Do not install the analyzer in a dangerous place.
Maintain the following ambient condition to operate the analyzer.
5°C to 40°C (41°F to 104°F), 85%RH or less (no condensation)
Keep flammables away from the analyzer.
Do not put anything on the heater cover.
Do not install the analyzer in a small airtight room. If the analyzer is used in an
There is the voltage label on the back panel of the analyzer.
Confirm that the rated voltage of the halogen lamp is correct for your power supply
Ground the analyzer using the ground terminal of the power cord.
Do not change the setting of the I/II switch on the rear of the analyzer. If the
3.3.
3.1.
3.1. Installing the Analyzer
3.1.3.1.
Caution for Measure
Caution for MCaution for M
airtight room, hot air does not diffuse, the sample may unexpectedly overheat. In this
case, the safety circuit of the halogen lamp activates. Move the analyzer to a place
with adequate ventilation or adjust the drying temperature.
Confirm that voltage, frequency and outlet type is correct for your local voltage.
voltage. (Refer to 15.4.Trou bl esh ooting)
Voltage Label
100 - 120 V
200 - 240 V
incorrect setting is used, it may damage the analyzer or cause a fire.
Precautions
PrecPrec
Installing the Analyzer
Installing the AnalyzerInstalling the Analyzer
autions
autionsautions
easurement Safety
easureeasure
ment Safety ---
ment Safety ment Safety
Power Supply Voltage
AC 100 V to AC 120 V
AC 200V to AC 240 V
---
------
The Rate d Vol tag e of Ha log en La mp
AC 120 V
AC 240 V
---
---Caution for Precision Measurement
Caution for Precision Measurement---
------
Caution for Precision MeasurementCaution for Precision Measurement
Confir m t he fol low i ng c ond i tio n, be ca us e t he w eig hi ng s ens or ( S.H . S.) i s v er y se nsi ti ve .
T he weighing surface should be solid and free from vibration, drafts and as level as
possible.
Install the analyzer in a stable place avoiding vibration and shock.
Install the analyzer where it not affected by heaters or air conditioners.
Ensure a stable powe r source.
Keep the analyzer away from equipment that generates magnetic fields.
Discharge static electricity.
---
------
MS-70 / MX-50 / MF-50 / ML-50 5
Page 8
r
r
y
3.2.
3.2. During Use
3.2.3.2.
---
---Caution for M
Caution for Measure
------
Caution for MCaution for M
Operate the analyzer using the following procedure.
During Use
During UseDuring Use
easurement Sa
easureeasure
ment Safety
ment Sament Sa
fety ---
---
fety fety
------
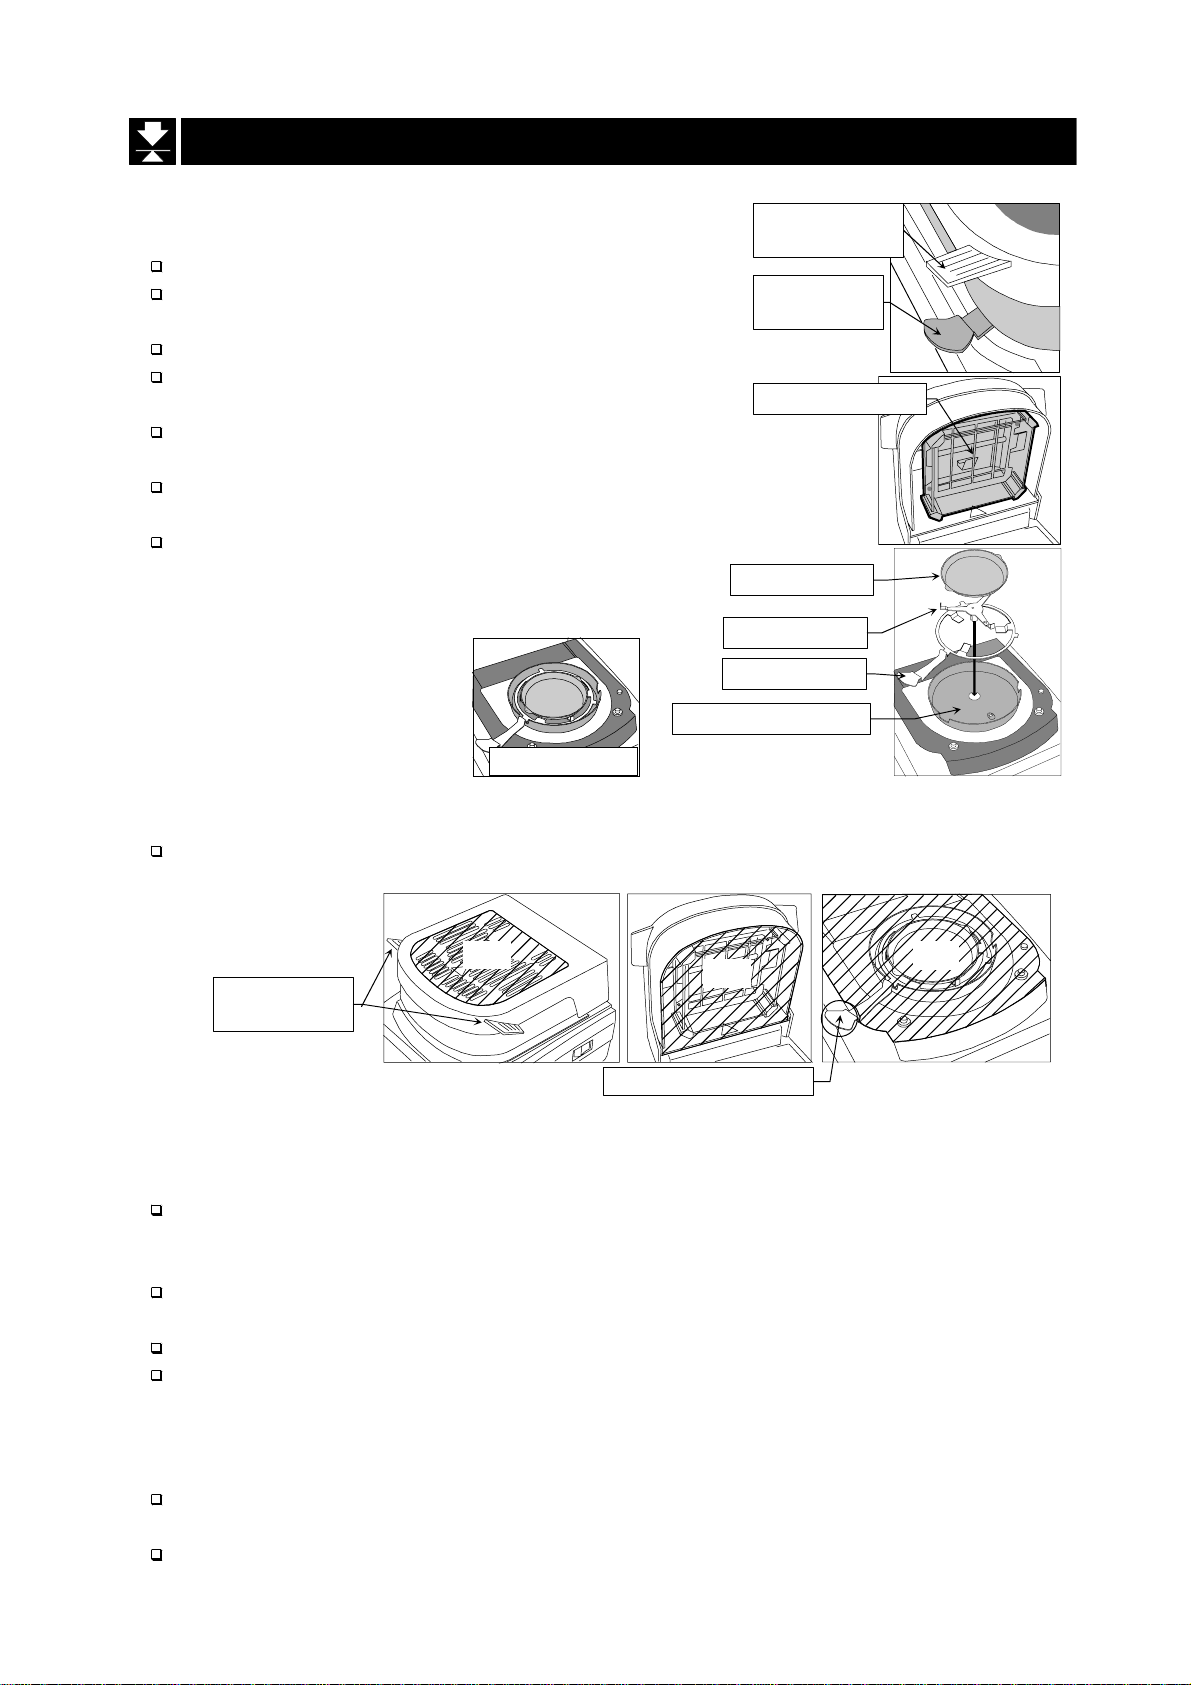
Grip of heater
cove
Put the sample pan in the correct position.
Handle the grip of the heater cover to open and
close it.
Grip of pan
handle
Use the pan handle to move the sample pan.
Do not touch hot parts around the grass-housing,
when the cover is opened.
Glass-housing
The glass-housing is very hot. It may cause a burn,
if touched.
The sample pan and pan handle is very hot, when
finishing measurement. Allow them cool down.
Use the tweezers or spoon to move the sample.
Put correctl
Sample pan
Pan support
Pan handle
Breeze break ring
Grips and Hot Parts.
Hot parts are as follows:
Use the following grips to operate the analyzer.
Grips of
heater cove
Hot
Hot
Grip of pan handle
Hot
Do Not Measure a Dangerous Sample.
Do not use an explosive, flammable or noxious substance as a sample.
Do not use a sample that makes a dangerous substance by drying it.
Do not use unknown substances.
When a sample surface becomes dry first and the inner pressure increases, the
sample may explode. Do not use such a sample.
Turn off the power switch if a sample catches fire.
The case of the analyzer is made of a flame-retardant substance (UL94V0).
Do Not Put any Flammable Matter Around the Analyzer.
During and after measurement, parts of the analyzer become very hot. Do not put
flammable matter near the analyzer.
Do not put any thing on the heater cover.
MS-70 / MX-50 / MF-50 / ML-50 6
Page 9
Caution for Heating (Drying).
When the drying temperature is set to 200°C and measurement is started, the
thermostat of the halogen lamp may work after 30 minutes. When the halogen lamp
has cooled down, the next measurement can be started. If necessary, change the
drying time and temperature.
When a measurement is started and the time passes one hour, the maximum
temperature is automatically regulated to 160°C for safety.
Operation to Stop Measurement
During measurement, the STOP key is always effective. If there is an error or danger,
press the STOP key.
3.3.
3.3. After Use and Maintaining the Analyzer
3.3.3.3.
After Use and Maintaining the Analyzer
After Use and Maintaining the AnalyzerAfter Use and Maintaining the Analyzer
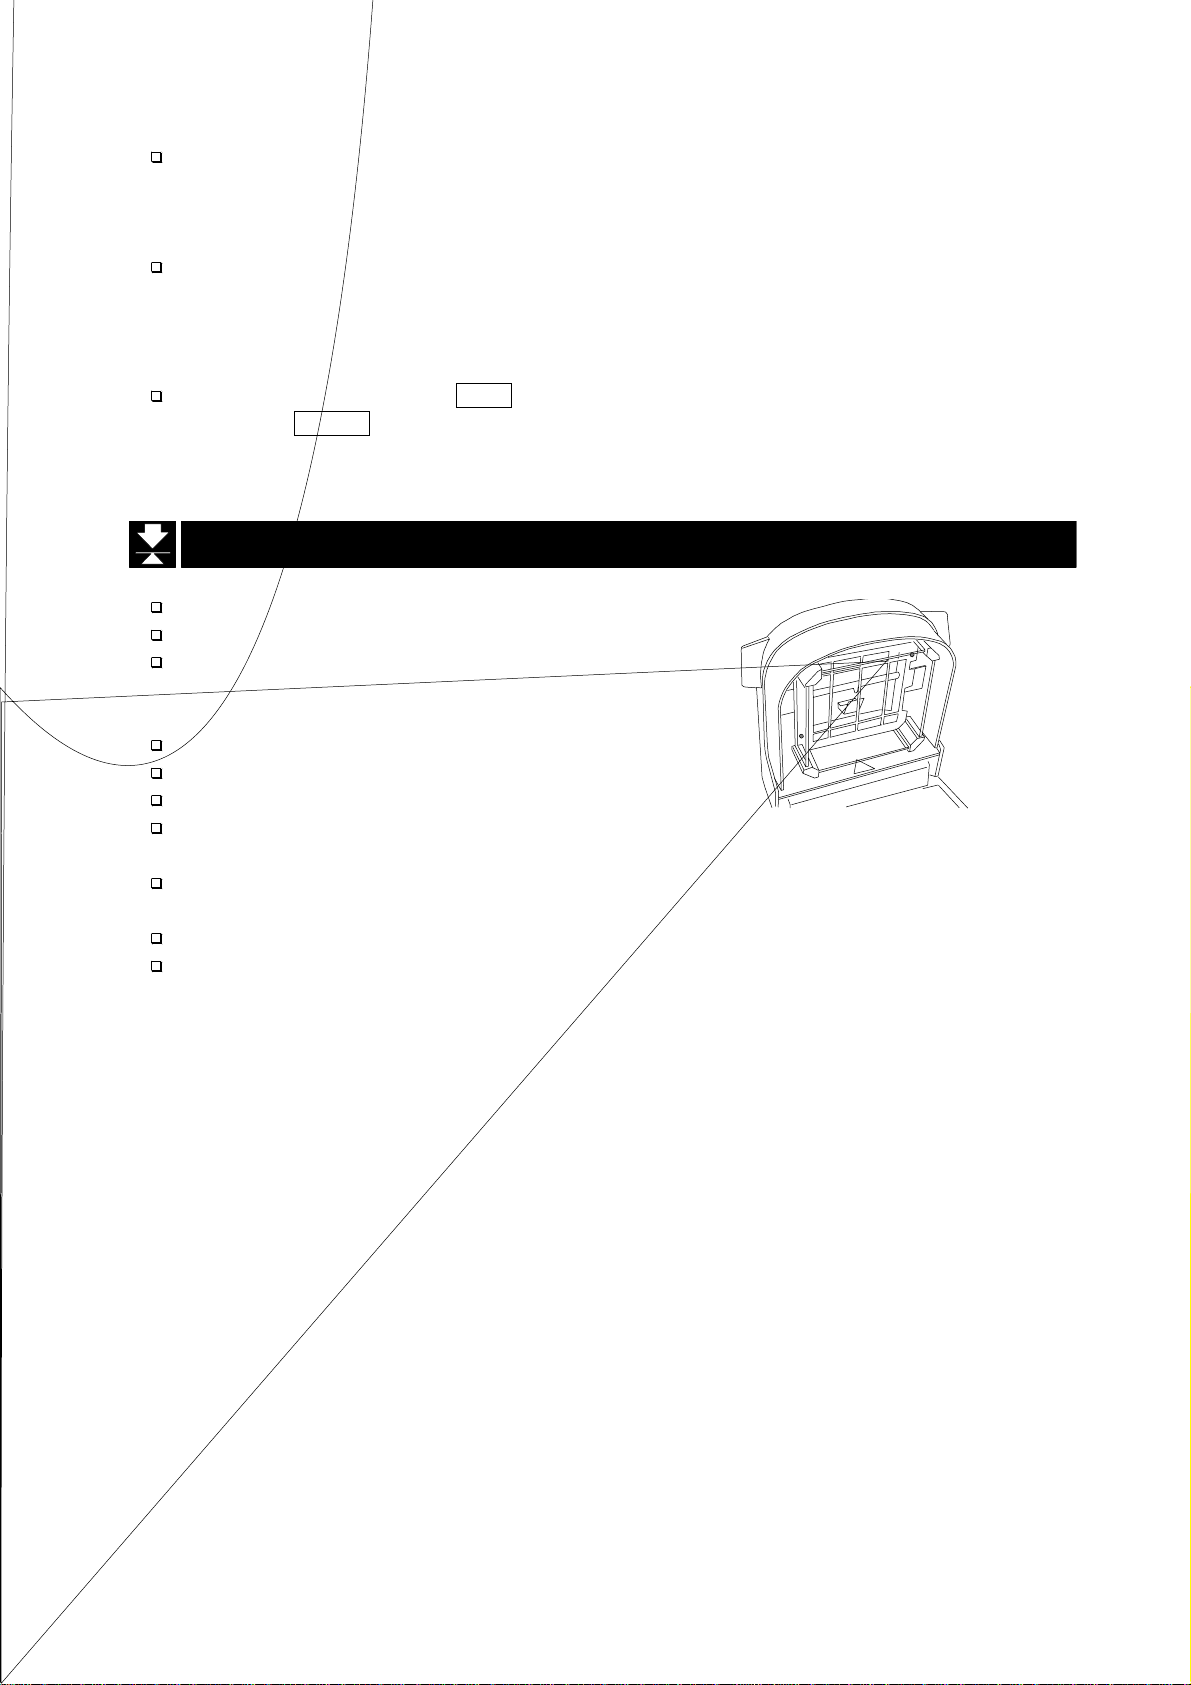
Put dust cover on the analyzer after it is cool.
Clean the glass-housing carefully.
Clean fingerprints from the halogen lamp to keep
its life. Refer to "15.2.Replacement of the
Halogen Lamp".
Avoid mechanical shock to the analyzer.
Do not disassemble the analyzer.
Protect the analyzer from excessive dust.
Use the packing box (special container) to move
the analyzer.
Clean the analyzer with a lint free cloth that is
moistened with warm water and a mild detergent.
Do not use organic solvents to clean the analyzer.
Do not disassemble or remodel the analyzer.
MS-70 / MX-50 / MF-50 / ML-50 7
Page 10

4.
4. Outline and
4.4.
The moisture analyzer is built using a super hybri d sensor (S.H.S.) ad opt ed i n an
analytical balance. Therefore, the result is more precise and gets greater repeatability.
An analyzer using the S.H.S. has high sensitivity, needs only a sample quantity of a
few grams, and the analysis time becomes shorter.
A 400W halogen lamp is used as the heating source and the temperature on the
sample pan can reach 200°C within two minutes.
There are five analysis modes.
Standard mode..... T he mois ture content can be obtained with setti ngs of t he
Quick mode........... Sample is he ated up for approx imately three mi nutes at 200°C so
Automatic mode.... When the change of moisture content per one minute is less than
Timer mode ............ The sample is dried for a preset ti me and the r esult is o btain ed.
Manual mode..........This mode can stop the meas ureme nt by key oper atio n and the
The heating patterns can be used to analysis mode without quick mode.
(For ML-50, standard drying and quick drying can be used only)
Standard drying..... Maintains a const ant dry ing tem peratur e.
Ramp drying........... Increases the dry ing t emper ature gent ly.
Step drying............. Uses multiple steps of the dry ing te mperatur e.
Quick drying........... Heats up 200°C for few minutes and uses a constant dry ing
The analyzer can store and recall proper individual settings for each sample using a
The data memory function can store results and output them at one time.
The software "WinCT-Moisture", the standard accessory of the MS-70 and MX-50,
The software " WinCT", the standard accessory of the MF-50, is communication
program number (PROG No.).
Ma x i m u m progr am nu m b e r
Maximum number of storable results
has a function that can make a graph of the change of moisture content in realtime
and has an optimum temperature search program that judges heating at an
appropriate temperature setting.
software for transmitting data to a computer using Microsoft Windows.
Outline and Features
Outline and Outline and
drying temperature and accuracy.
that analysis time becomes shorter. The moisture content can
be obtained with settings of the drying temperature and
accuracy.
the preset termination value, the measurement is automatically
stopped an d th e res ult i s o bt aine d.
result is decided.
temperatur e.
Features
FeaturesFeatures
MS-70 / MX-50 MF-50 ML-50
20 sets 10 sets 5 set s
MS-70 / MX-50 MF-50 ML-50
100 50 30
MS-70 / MX-50 / MF-50 / ML-50 8
Page 11

The analyzer is equipped with a serial interface as standard. It can be connected to
a printer or computer.
The analyzer can calibrate the weighing sensor (Use special mass.) and drying
temperature (Use temperature calibrator for MS-70 and MX-50 except MF-50 and
ML-50). The analyzer can output the data required at GLP, GMP and ISO at the end
of the calibration.
The analyzer has a self check function that can detect function errors.
The analyz er displ ays the current change of moisture content per one minute [%/ min]
in real-time. It can be used for the refer ence to find th e analyzing mode.
The sample pans included in the standard accessory can be used repeatedly.
There is a test sample that is used to check the moisture accuracy. (The test sample
is a part of standard accessory except ML-50)
The glass fiber sheets can be used to quick and precision measurement for liquid
sample. (The glass fiber sheets are a part of standard accessory except ML-50)
A reference card is built into the bottom of the analyzer.
Principle
Principle and Use
PrinciplePrinciple
and Use
and Use and Use
The moisture analyzer, based on the principle of thermogravimetric analysis, dries a
sample using a halogen lamp and obtains the moisture content in % and other
results by the difference between the wet weight and dry weight.
MS-70 / MX-50 / MF-50 / ML-50 9
Page 12
r
r
5.
5. Packing List and Names of each part
5.5.
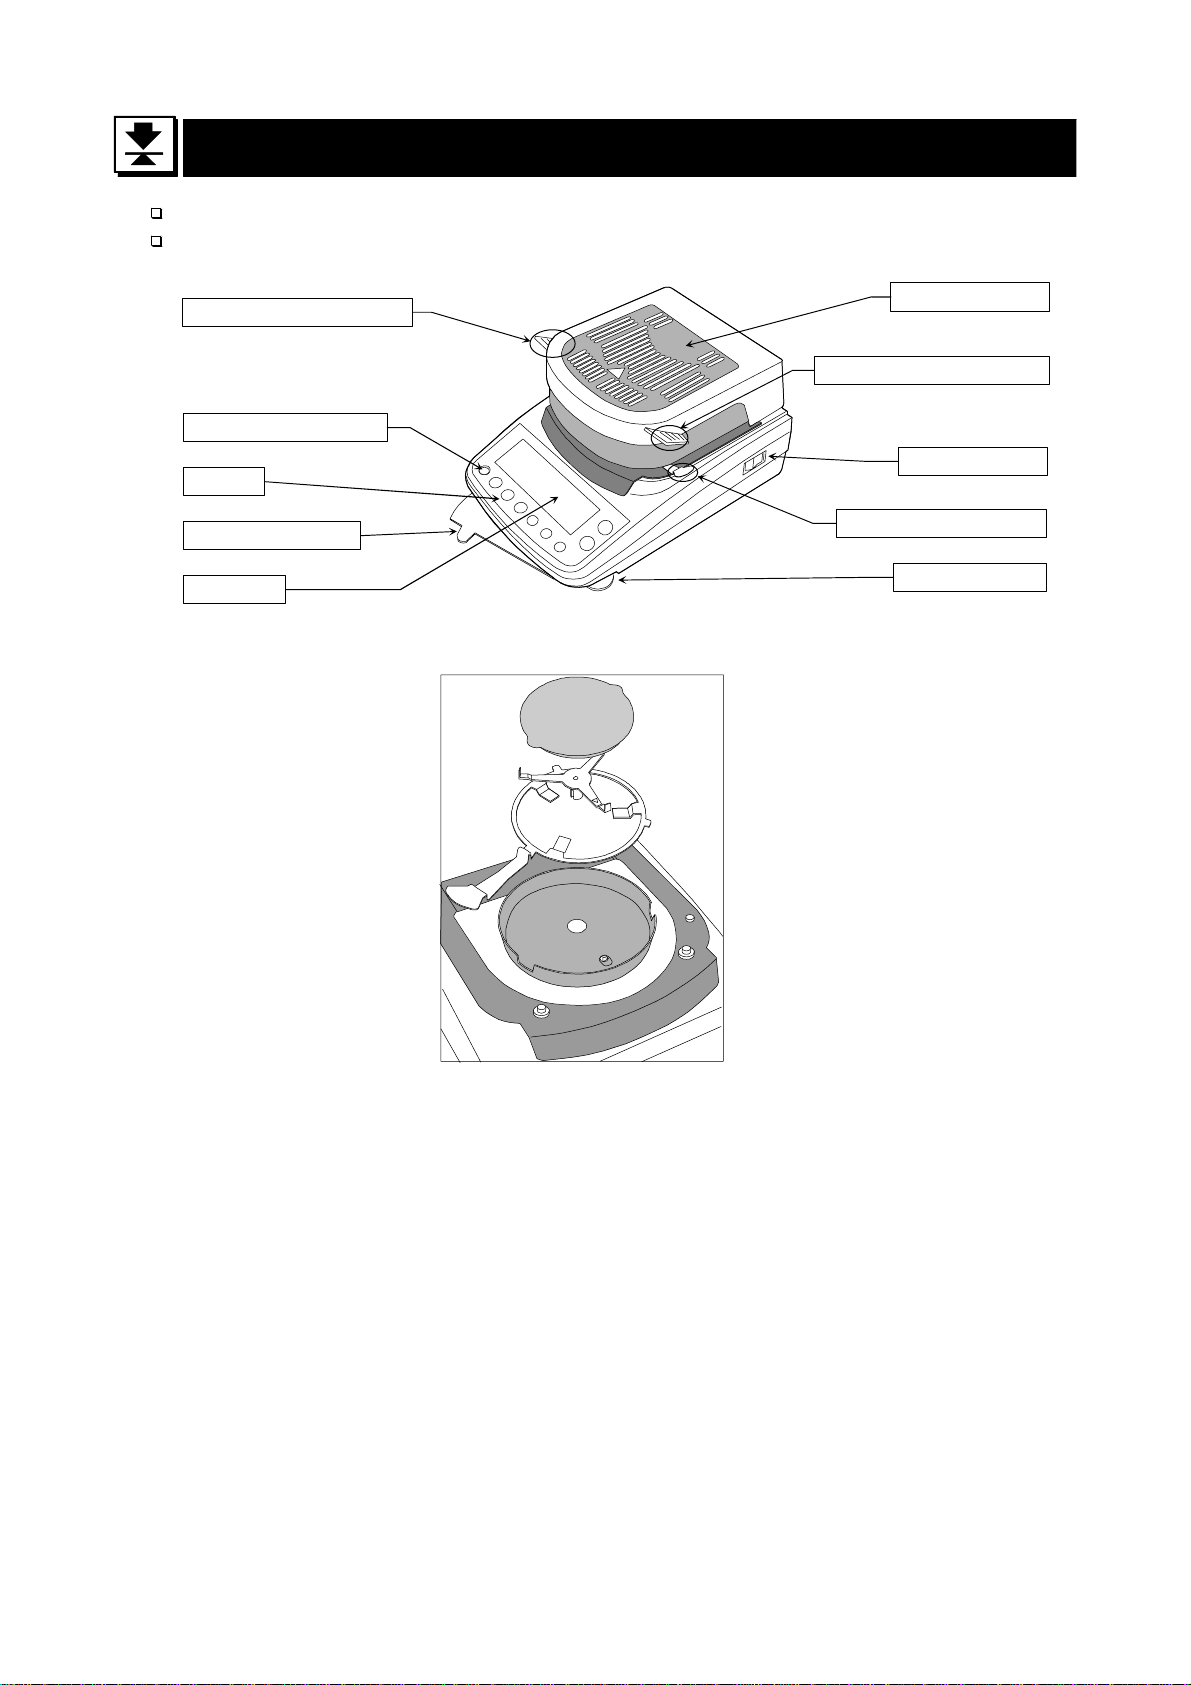
Keep the packing box to move the analyzer.
Packing list as follows:
Grips of heater cover
Bubble spirit level
Keys
Reference card
Display
Packing List and Names of each part
Packing List and Names of each partPacking List and Names of each part
Heater cove
Grips of heater cove
Power switch
Grip of pan handle
Leveling foot
MS-70 / MX-50 / MF-50 / ML-50 10
Page 13
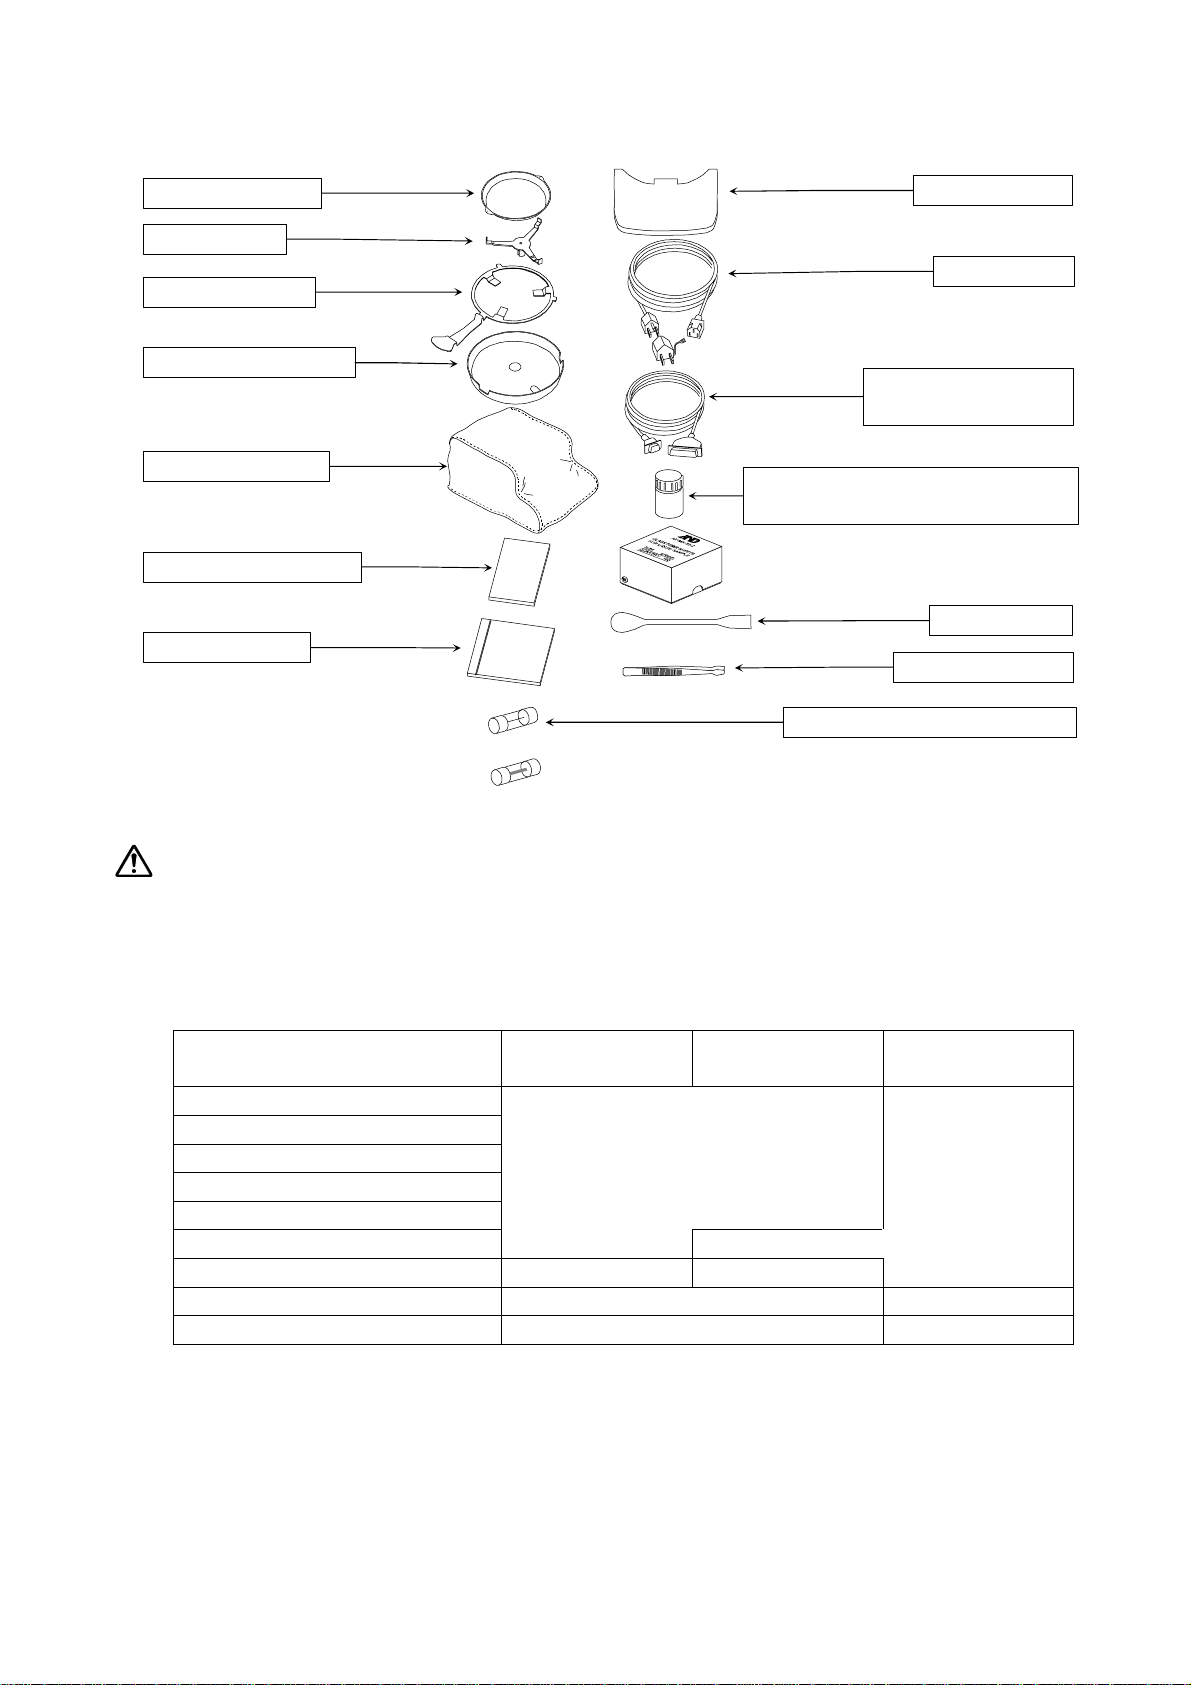
All Accessories
All Accessories
All AccessoriesAll Accessories
Sample pan #1
Pan support
Pan handle
Breeze break ring
Dust cover
Instruction manual
CD-ROM
#1
#1
#1
Display cover
Power cord
RS-232C serial
interface cable
#1
Test sample
#1
Sodium tartrate dihydrate, 30g
Spoon
Tweezers
#1
#1
Caution
Please confirm that the analyzer is correct for your local voltage, receptacle
type and power cord.
#1
#1 Differences of Accessory
#1#1
Differences of Access or y
Differences of Access or yDifferences of Access or y
Dust cover
Test sample
Glass fiber sheets
Spoon
Tweezers
RS-232C serial interface cable
CD-ROM WinCT-Moisture WinCT
Sample pan 20 10
Pan handle 2 1
MS-70
MX-50
Included.
MF-50 ML-50
Not included.
They can be
purchased by
your or der.
MS-70 / MX-50 / MF-50 / ML-50 11
Page 14
°C
5.1.
5.1. Display and Keys
5.1.5.1.
Display and Keys
Display and KeysDisplay and Keys
654
7
3
2
1
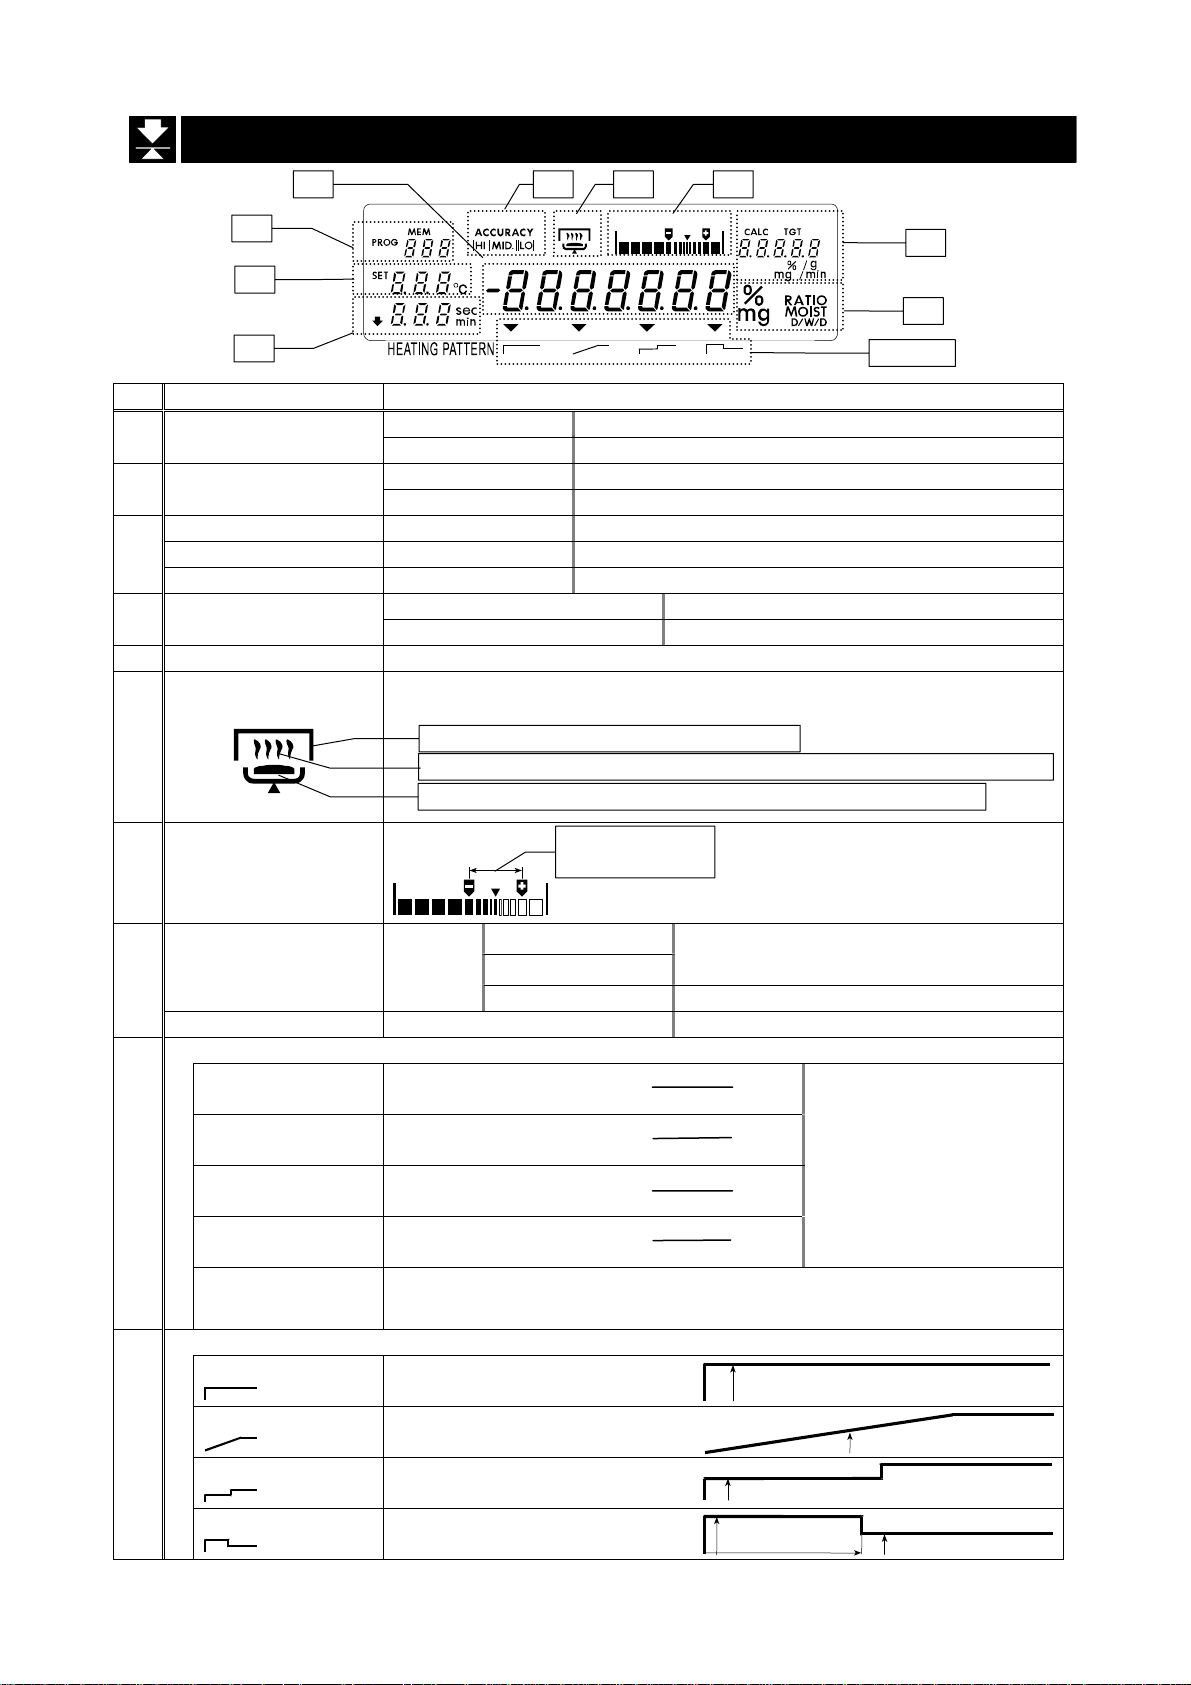
Name State and Meaning
1 Time
Temperature of
2
sample pan
At gram display Preset time is displayed at timer mode
At measurement Analysis time
At gram display Set temperature of sample pan
At measurement Current temperature of sample pan
PROG: Program No. At gram display Program number of measurement program
3
MEM: Data No. Storing data Data number of data memory function
Analysis mode At setting Symbols: 5td, quc, U-a, U-t, U-m
4 Value
At gram display Sample quantity [g]
At measurement Current moisture content [%]
5 Accuracy Accuracy indicator of measurement
Operation indicator Indicator of heater cover, sample and drying process
Sample needs at least 0.1 g or more to start measurement.
6
7 Level indicator
Lights when heater cover is closed
Blinks during measurement. Disappears when not measuring
Sample mark: Lights when the sample is 0.1 g or more.
Proper sample
quantity range
Reference of sample quantity
for standard mode and quick
mode.
Target quantity
8
At gram
display
St andard mode
Quick mode
Target quanti ty o f sample [g]
Automa tic mo de Preset ter mi nat i on value [%/min.]
Drying rate At measurement Current drying rate [%/min.]
Measurement unit
9
% MOIST
D D/W/D
% MOIST
D D/W/D
% MOIST
D D/W/D
% MOIST
D D/W/D
g
Moisture content W - D
is based on W W
Moistur e co nten t (Atr o) W - D
is based on D D
D
Dry content
W
W
Ratio
D
x100
x100
x100
x100
Gram value
8
9
10 #2
W: Wet sample mass
D: Dried sample mass
Heating pattern #1
St andard drying Maintains a constant
10
MS-70 / MX-50 / MF-50 / ML-50 12
Ramp dry ing
S tep dry ing
Quick drying
drying tem per atur e.
Increases th e dryi ng
temper at ur e g e nt ly.
Uses multiple steps of
the dryi ng temp era tur e.
Quick mode
Drying temperature
Drying temperature
Drying temperature
200
approx. 3min.
Drying temperature
Page 15
#1
ML-50 can select "standard drying " and "quick drying" only.
#2
ML-50 does not display "heating patt er n" .
Display Samples for Analysis Mode
Display Samples for Analysis Mode
Display Samples for Analysis ModeDisplay Samples for Analysis Mode
Analysis mode
St andard mode
Quick mode
Automatic mode
Timer mode
Manual mode
Symbols
( during settings)
5td
quc
U-a
U-t
U-m
(after settings and before measurement)
Gram display
Key Operation and Key Functions
Key Operation and Key Functions
Key Operation and Key FunctionsKey Operation and Key Functions
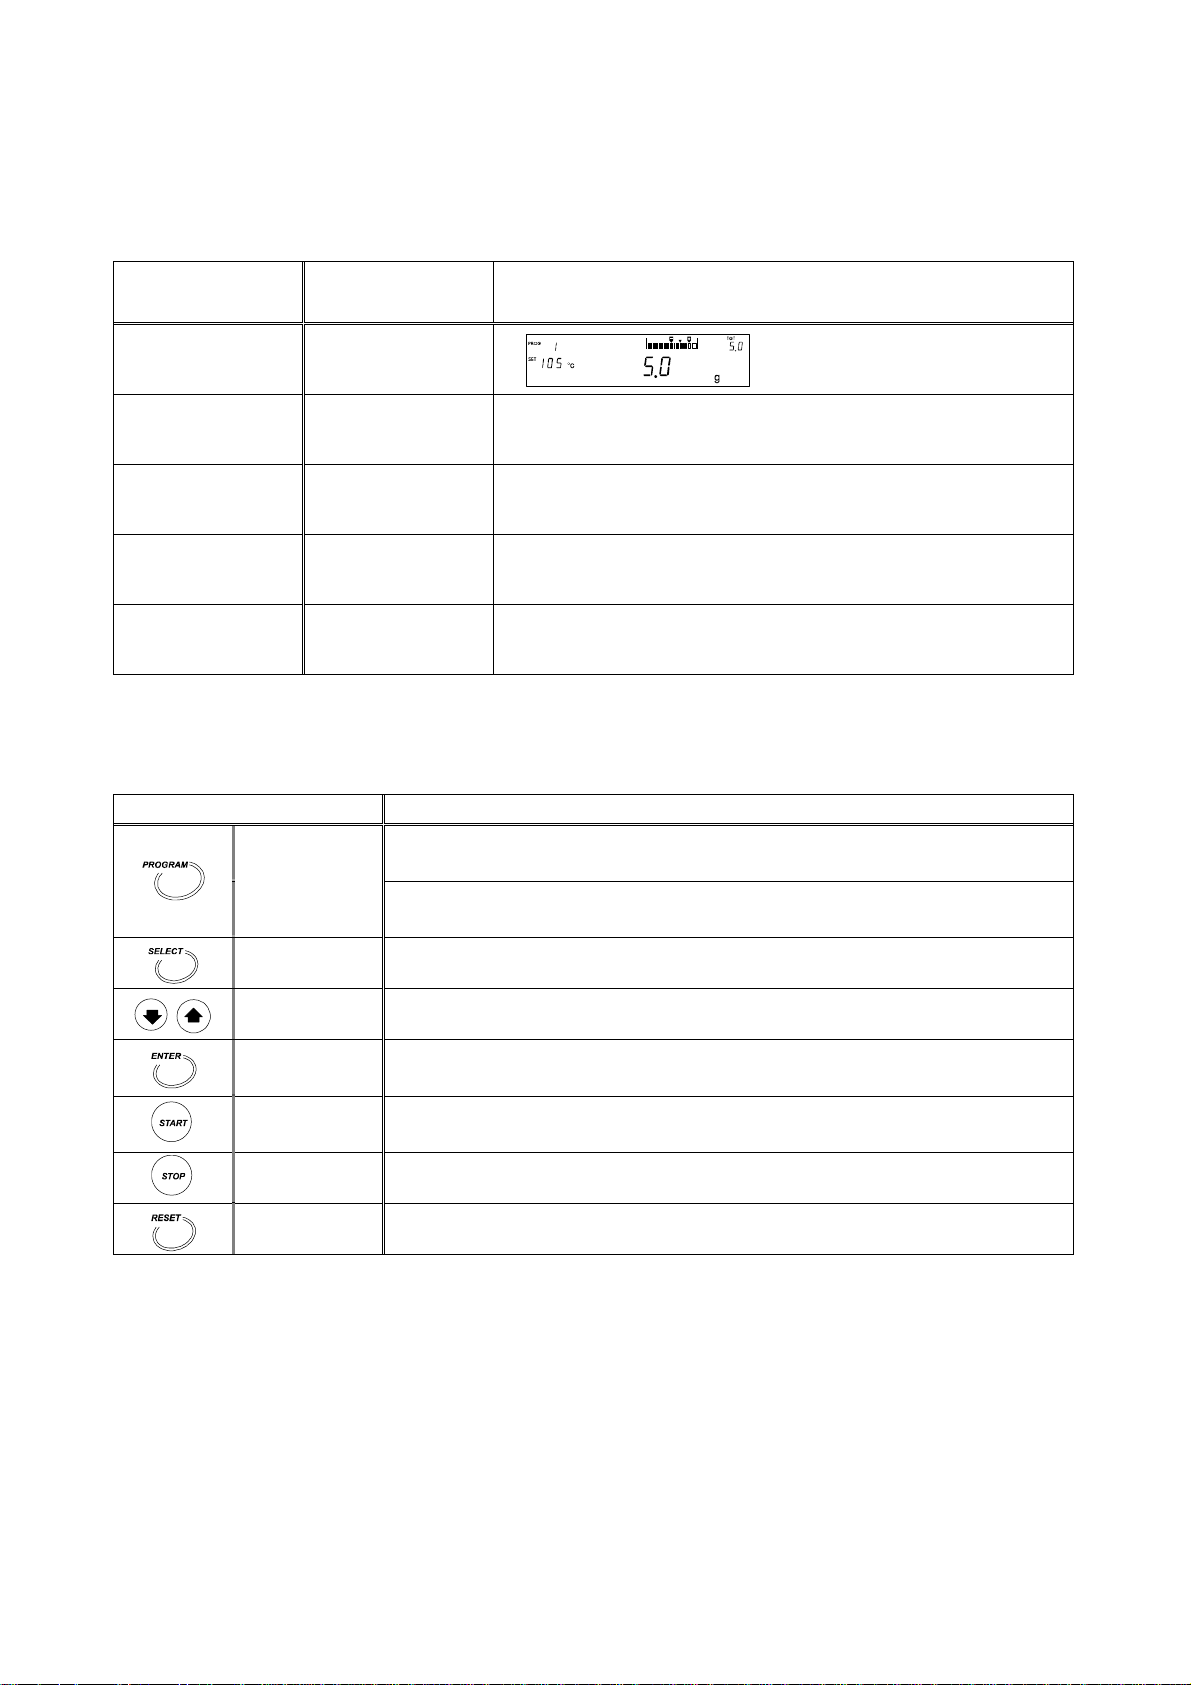
Keys Function and action
Stores or recalls measurement program with the program
PROGRAM
number during the gram display.
Selects a heating pattern while the drying temperature is
selected.
,
SELECT Selects item in the measurement program.
↓ , ↑ Changes value of item in the measurement program.
ENTER
STAR T
Stores current condition in the measurement program number.
Output data at measurement.
St ar t pr epared measurement
Sample needs at least 0.1 g or more to start measurement.
STOP Stop current measurement
RESET Sets the display to zero in the unit of gram. Cancel key.
MS-70 / MX-50 / MF-50 / ML-50 13
Page 16
6.
6. Preparation
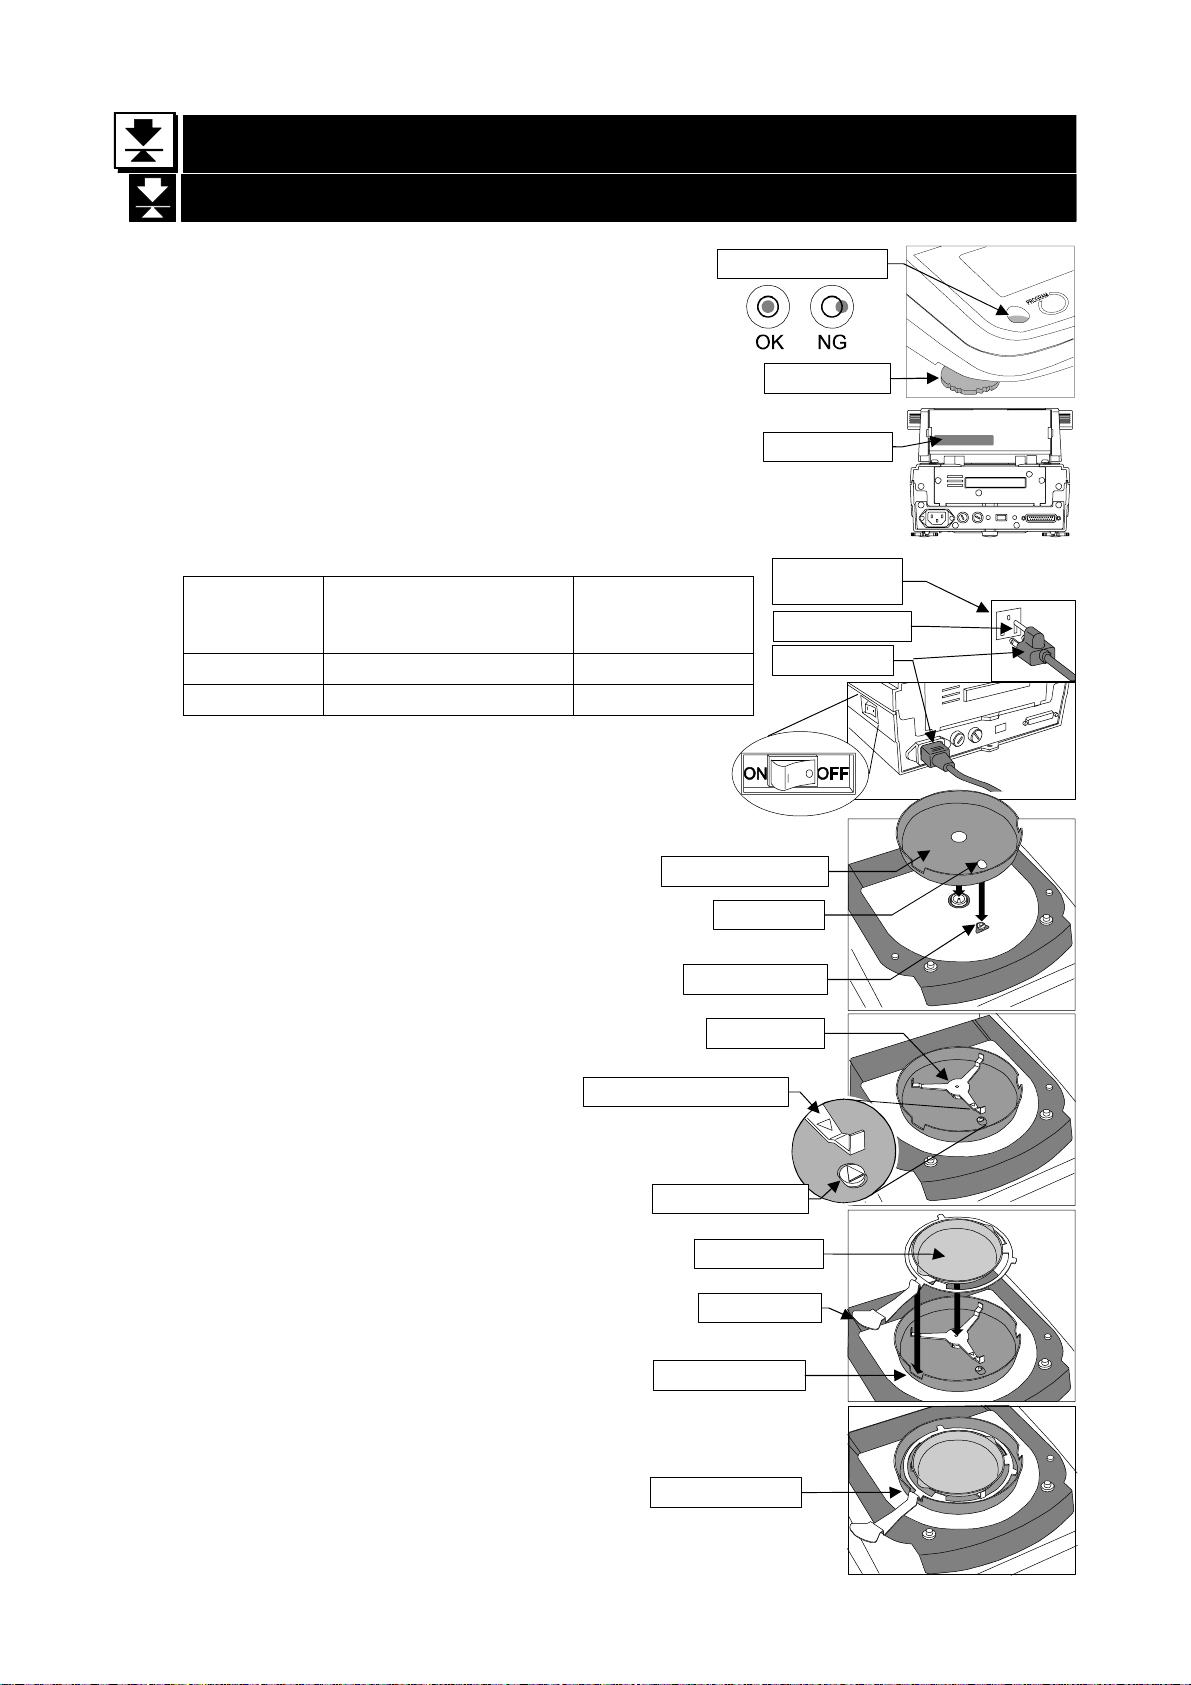
1. Select the place to install the analyzer.
2. Level the analyzer by adjusting the leveling feet
3 . Read the power supply voltage label on the back of
Confirm that voltage, frequency and outlet type
Confirm that the rated voltage of the halogen
4. Confirm that the power switch is
5. Connect the power cord. Ground
6. Align the gu ide h ole of t he br eeze
7. Install the pan support.
8. Put the sample pan on the pan
And hook the pan handle on the
6.6.
6.1.
6.1. Installing the Analyzer
6.1.6.1.
Refer "3.1.Installing the Analyzer".
and confirm it using the bubble spirit level.
the heater cover.
is correct for your local voltage.
lamp is correct to your power supply voltage.
Voltage
Label
100 - 120 V AC 100 V to AC 120 V
200 - 240 V AC 200V to AC 240 V
"OFF" position.
the analyzer with the earth
terminal on the power cord.
break ring to the guide on body.
Align together the ∆ signs on the
pan support and body.
handle.
notch in the rim of the breeze
break ring.
Preparationssss
PreparationPreparation
Installing the Analyzer
Installing the AnalyzerInstalling the Analyzer
Power Supply Voltage
The Rated
Voltage of the
Halogen Lamp
AC 120 V
AC 240 V
Sign ∆ on pan support
Breeze break ring
Guide hole
Guide on body
Pan support
Sign ∆ on body
Sample pan
Pan handle
Notch in the rim
Bubble spirit level
Leveling foot
Voltage label
Outlet with a
earth terminal
Earth terminal
Power cord
Example
Notch in the rim
MS-70 / MX-50 / MF-50 / ML-50 14
Page 17

6.2.
6.2. Setting the Clock and C
6.2.6.2.
Setting the Clock and Calendar
Setting the Clock and CSetting the Clock and C
alendar
alendaralendar
MS-70 / MX-50 / MF-50 / ML-50 15
Page 18
6.3.
6.3. Proper Operation for Precision Measurement
6.3.6.3.
6.3.1.
6.3.1. Operation of the sample
6.3.1.6.3.1.
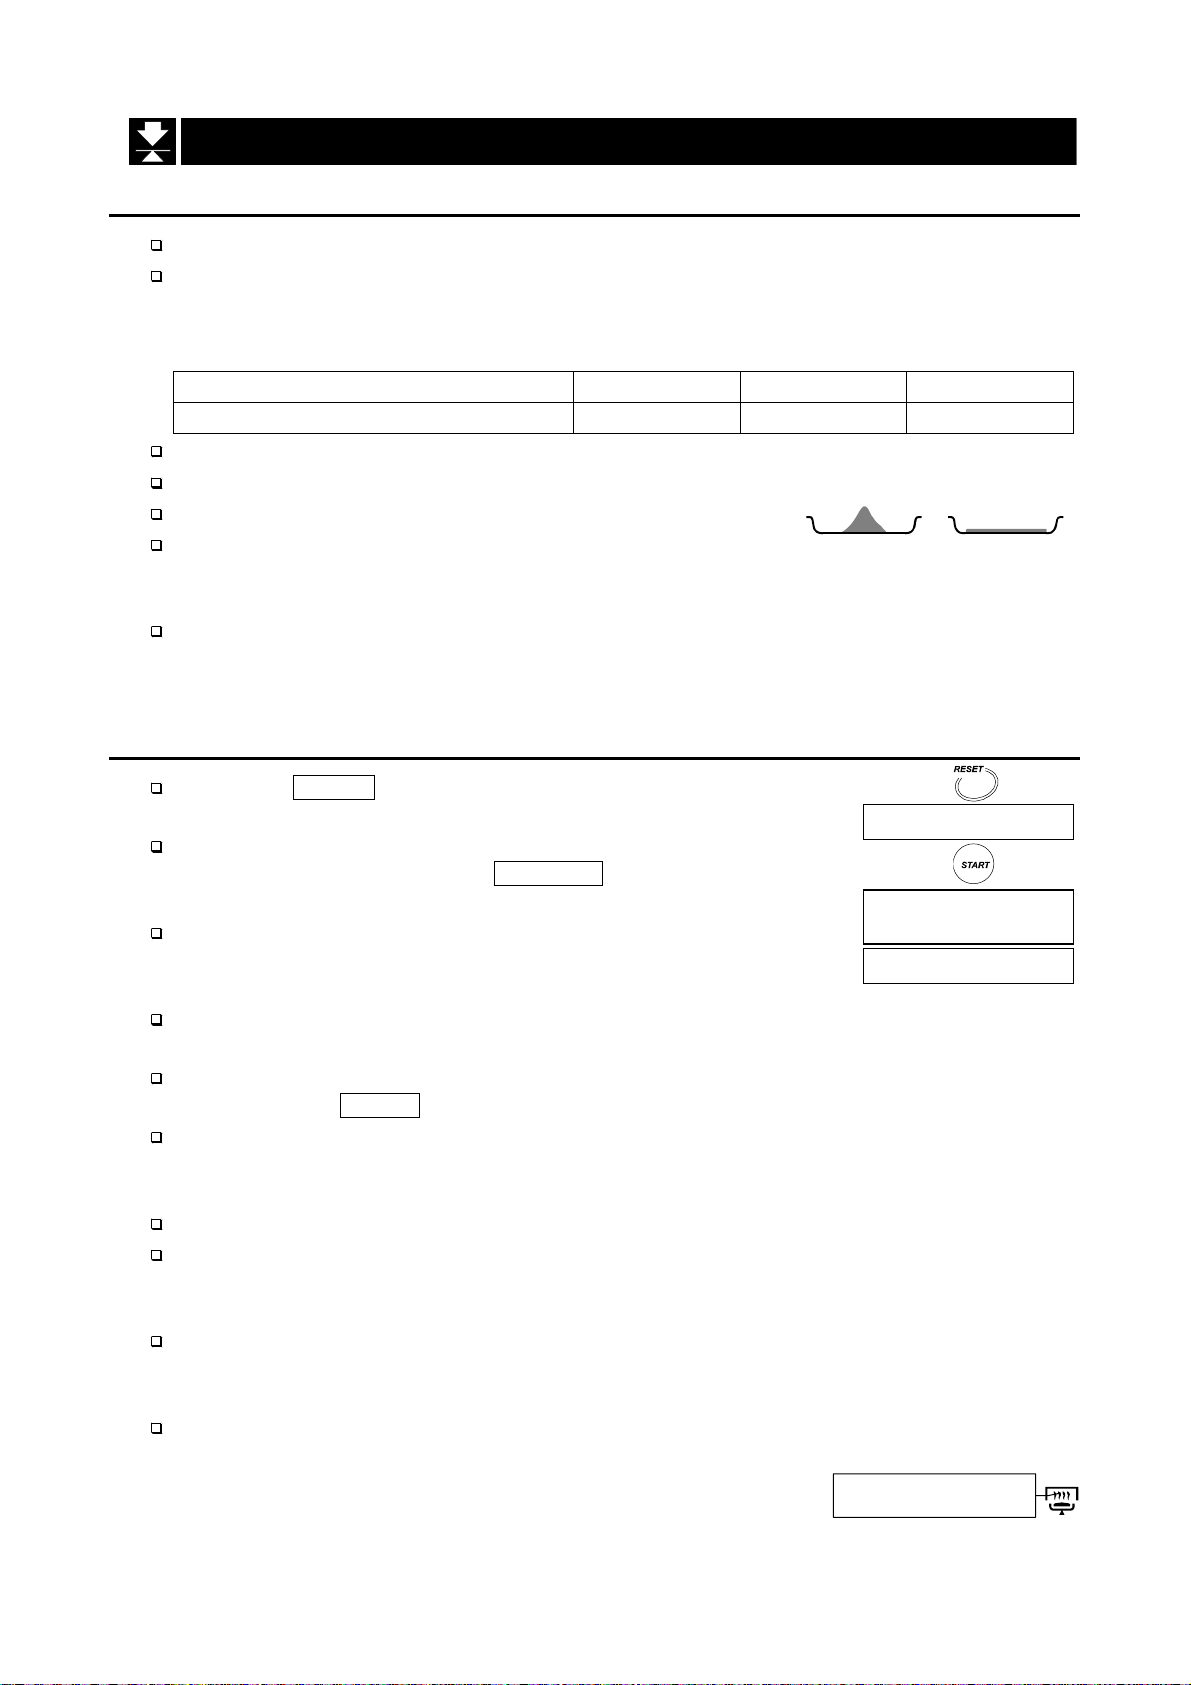
Use a proper sample quantity. If the quantity is small, precise r esults ma y not be possibl e.
If the moisture content of the sample (example: plastic) can be estimated that is less
If the measurement is repeated, maintain the same sample quantity.
Crush grai n sa mple s to a s mal l, u nifor m p owder for a quic k dr ying pr ocess .
Spr ead the s ampl e as eve nly as p ossi ble .
The analyzer is designed to measure the moisture content
When measuring a liquid or liquid state sample that may make a film on the surface, we
Operation of the sample
Operation of the sampleOperation of the sample
than 1%, the mass of moisture is not enough for the measurement, when measuring
light sample, the result may not be accurate. Consider the following sample mass for the
measurement.
An estimate of moisture content 1% 0.5% 0.1%
Necessary mass for measurement 2 g at least 5 g at least 20 g at least
of the sample by its weight change. If the sample includes
volati le ma tter, it may vap oriz e d uri ng dry ing ca usi ng a m easur em ent erro r.
recommend you use a glass fiber sheet (AX-MX-32-2).
Proper Operation for Precision Measurement
Proper Operation for Precision MeasurementProper Operation for Precision Measurement
No good Good
6.3.2.
6.3.2. Operation of the analyzer
6.3.2.6.3.2.
Press the RESET key to display the zero value before each
Check that the displayed sample weight is stable before
Select the proper Analysis Mode to finish a measurement. Use
The analyzer needs a pre-heating process before measurement. When measuring
The pre-heating process is as follows: Put a sample pan, instead of a sample, on the
Use a sample on the sample pan that has cooled to room tempe ratu re. W hen a sample
Do not pile up sample pans during a measurement.
Avoid drift and vibration of air conditioners. It may cause "measurement error" and
When the difference between ambient temperature and sample temperatu re is small, it
Check the activation of the halogen lamp with the operation indicator .
Operation of the analyzer
Operation of the analyzerOperation of the analyzer
measurement.
measurement. Press the START key to start a
measurement.
the change of moisture content per one minute [%/m in] that is
displayed during measurement as a reference value.
samples repeatedly or continuously, the first result is always different from the others.
pan. Press the
is put on a hot sample pan, the moisture conte nt is diffused before measurement, and
precise results are not possible. We recommend you use multiple sample pans.
"unstable value". In particular, because MS-70 is sensitive instrument, it is nece ssary to
consider these influences.
may cause temperature control error.
Example
Example
: If the heating temperature is set to 50°C, it is affected by an room temperature.
: If low heating temperature is set, the brightness of halogen lamp becomes dark.
START key to heat it. The analyzer temperature becomes equilibrium.
0.000g
%/min
Result display
Check the activation
with blinking
5.43
2.02
%
MS-70 / MX-50 / MF-50 / ML-50 16
Page 19
6.3.3.
6.3.3. The Glass Fiber Sheet
6.3.3.6.3.3.
The Glass Fibe r Shee tssss
The Glass Fibe r Shee tThe Glass Fiber Sheet
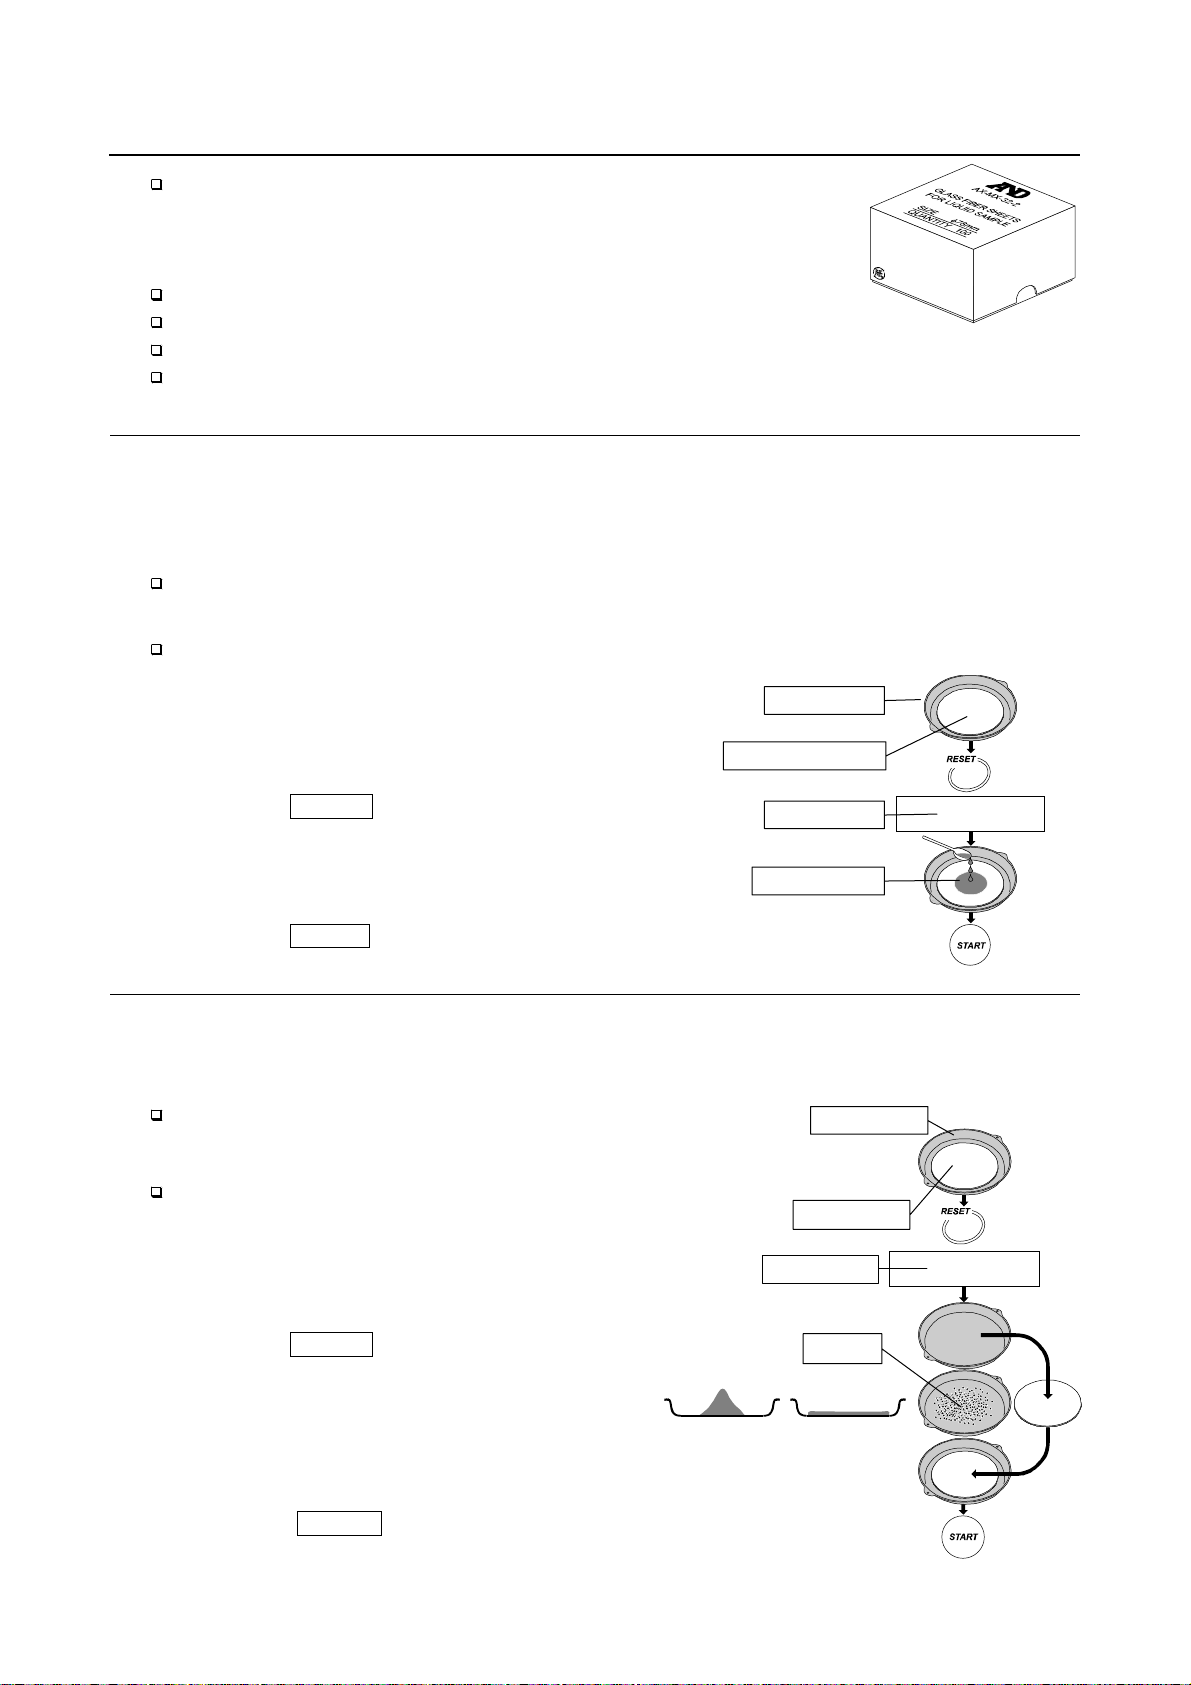
Use the glass fiber sheet to measure the moisture content
that is included in the following samples. When this sheet is
used, vaporization of moisture is speeded up and moisture
measurement result becomes quick and precise.
This accessory (AX-MX-32-1) is a package of 100 glass fiber sheets.
This accessory is inclued in the packing for MS-70, MX-50 and MF-50.
Purchase this accessory by your order for ML-50.
Use the glass fiber sheet (AX-MX32-1) for high surface tension liquid sample.
Example 1 : "Liquid Sample" Or "Meltable Sample"
When the glass fiber sheet is used for these measurements, moisture is more apt to
vaporize because of expanding the surface area and space. And the glass fiber
sheet has the effect of preventing a surface film from forming at drying process.
A sample including a lot of moisture
Milk, yogurt, soybean milk, condensed milk, ketchup, resin, liquid paste, hand soap, etc.
:
A sample that melts and adheres to the sample pan.
Example
: Chewing gums, caramel, hony, etc.
Procedure
Procedure
ProcedureProcedure
(Preparation before heating)
(Preparation before heating)
(Preparation before heating) (Preparation before heating)
1 Put the glass fiber sheet on the sample pan.
2 Press the RESET key to display zero.
3 Soak the sample into the glass fiber sheet or put the
sample on the glass fiber sheet.
4 Press the START key to start the measurement.
Sample pan
Glass fiber sheet
Zero display
Liquid sample
0.000g
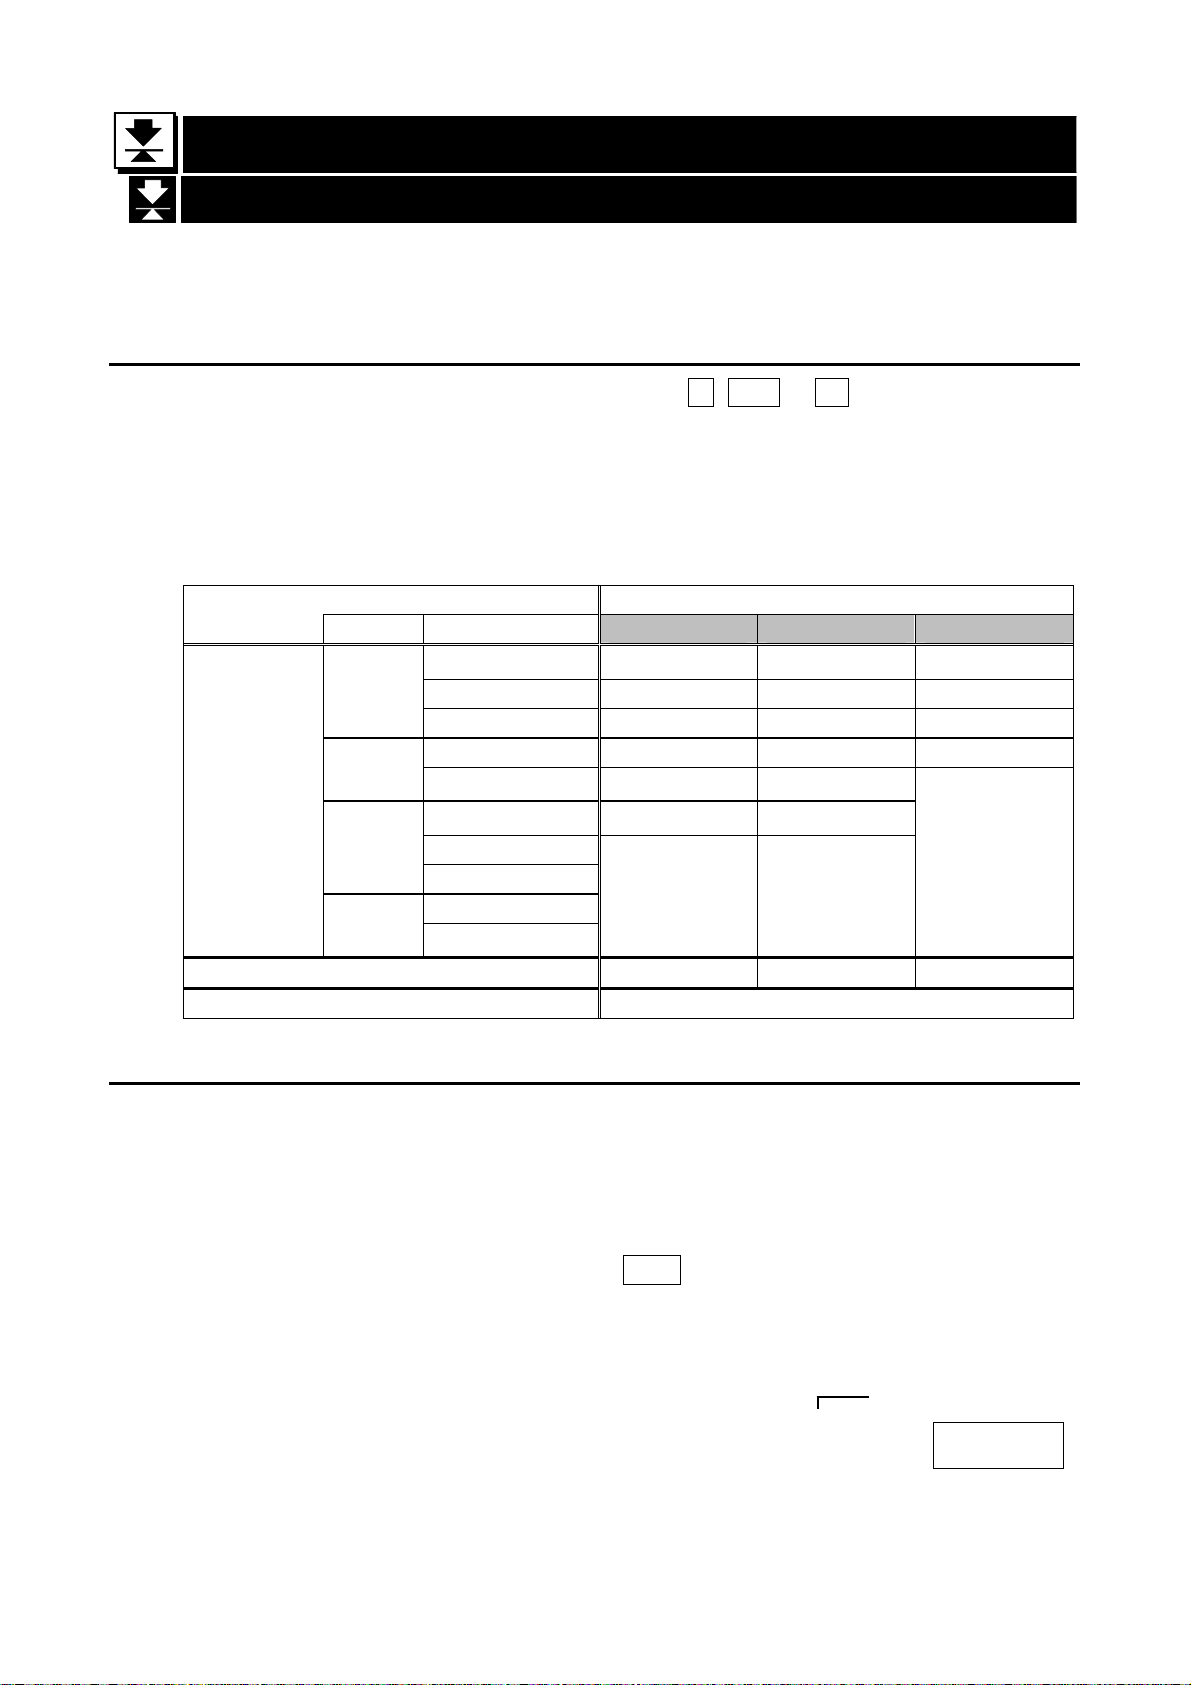
Example 2 : "If The Sample's Surface Is Apt To Carbonize"
When the sample is covered with a glass fiber sheet, carbonization of the sample surface
decreases. Therefore the measurement result becomes repeatable and precise.
A sample including a lot of sugar, protein and oil
Example:
Hony, soybean powder, green tea leaves, cookies, etc.
A sample that has dark surface and is apt to carbonize
Example
Procedure
Procedure
Procedure Procedure
: Coffee, peanuts, etc.
(Preparation before heating)
(Preparation before heating)
(Preparation before heating)(Preparation before heating)
1 Put a glass fiber sheet on the sample pan.
2 Press the RESET key to display zero.
3 Remove the glass fiber sheet.
4 Put the sample on the pan.
Cover the sample with the glass fiber sheet.
No good Good
Spread the sample as
evenly as possible.
5 Press the START key to start the measurement.
Sample pan
Glass fiber
Zero display
Sample
0.000g
MS-70 / MX-50 / MF-50 / ML-50 17
Page 20
7.
7. Measurement Procedure
The standard mode can obtain the moisture content with settings of ACCURACY
7.1.1.
7.1.1. ACCURACY
7.1.1.7.1.1.
ACCURACY of measurement can be set either HI, MID. o r LO.
The sample quantity is automatically selected by ACCURACY.
The termination value of the analyzing mode is automatically selected by
The analysis mode is the program to finish the measurement when a change of
The settings are as follows: Specify an ACCURACY.
7.7.
7.1.
7.1. Standard Mode Operation
7.1.7.1.
and drying program (heating pattern, drying temperature).
ACCURACY
ACCURACYACCURACY
ACCURACY and minimum scale value of % display.
moisture content per one minute becomes smaller than a preset termination value.
Preset
Termination
value
Measurement Procedure
Measurement ProcedureMeasurement Procedure
Standard Mode Operation
Standard Mode OperationStandard Mode Operation
ACCURACY
Model Minimum scale HI MID. LO
0.001 % 0.01 %/min 0.02 %/min 0.05 %/min
MS-70
MX-50
MF-50
ML-50
Sample quantity 1 0 g 5 g 1 g
Use Precise result
0.01 % 0.02 %/min 0.05 %/min 0.10 %/min
0.1 % 0.10 %/min 0.20 %/min 0.50 %/min
0.01 % 0.02 %/min 0.05 %/min 0.10 %/min
0.1 % 0.10 %/min 0.20 %/min
0.05 % 0.05 %/min 0.10 %/min
0.1 %
1 %
0.1 %
1 %
0.10 %/min 0.20 %/min
↔
Quick measurement
0.50 %/min
7.1.2.
7.1.2. Operation
7.1.2.7.1.2.
This operation explanation uses the following example of the MX-50:
Refer to "8.Selection of Measurement Method" for detail.
Input Parameters
Analysis mode...................................Standard mode
Drying temperature............................130 °C
ACCURACY....................................... LO
Sample quantity.................................Approximately 1 g (Automatic selection)
Analysis mode...................................0.10 %/min (Automatic selection)
Stored Parameters (Factory Settings for the MX-50)
Heating pattern..................................Standard drying ( )
Measurement unit...............................Moisture content is based
Mini mum sc a le value of % dis p lay........0.01 %
Minimum scale value of gram display ...0.001 g
Data memory function........................Not used
MS-70 / MX-50 / MF-50 / ML-50 18
Operation
Operation Operation
on a wet sample
% MOIST
D/W/D
Page 21

1. Turn on the analyzer.
The gram unit (of weighing mode) is displayed.
Enter the Standard Mode
Enter the Standard Mode
Enter the Standard ModeEnter the Standard Mode
2. Press the SELECT key to display an analysis
mode and press the ↓ or ↑ key to select 5td .
Select ACCURACY
Select ACCURACY
Select ACCURACYSelect ACCURACY
3. Press the SELECT key to select ACCURACY.
When ACCURACY is selected, HI, MID. or LO blinks.
4. Press the ↓ or ↑ key to select LO of ACCURACY.
Set Drying Temperature at the Sample Pan
Set Drying Temperature at the Sample Pan
Set Drying Temperature at the Sample PanSet Drying Temperature at the Sample Pan
5. Press the SELECT key to select t he drying
temperature.
6. Press the ↓ or ↑ key to set 130 °C.
Store the Parameters and Finish the Operation
Store the Parameters and Finish the Operation
Store the Parameters and Finish the OperationStore the Parameters and Finish the Operation
7. Press the ENTER key to store the parameters.
The weighing mode is automatically displayed.
Put a Sample on the Pan
Put a Sample on the Pan
Put a Sample on the PanPut a Sample on the Pan
8. Put the breeze break ring, pan support, pan handle
and sample pan in order. (With no sample.)
9. Close the heater cover.
10. When displaying a stable value, Press the RESET
key. Avoid mechanical vibration, breeze and
environmental noise during measurement. If it
deviates from zero display, press the RESET key.
Preparation
Close
MS-70 / MX-50 / MF-50 / ML-50 19
Page 22
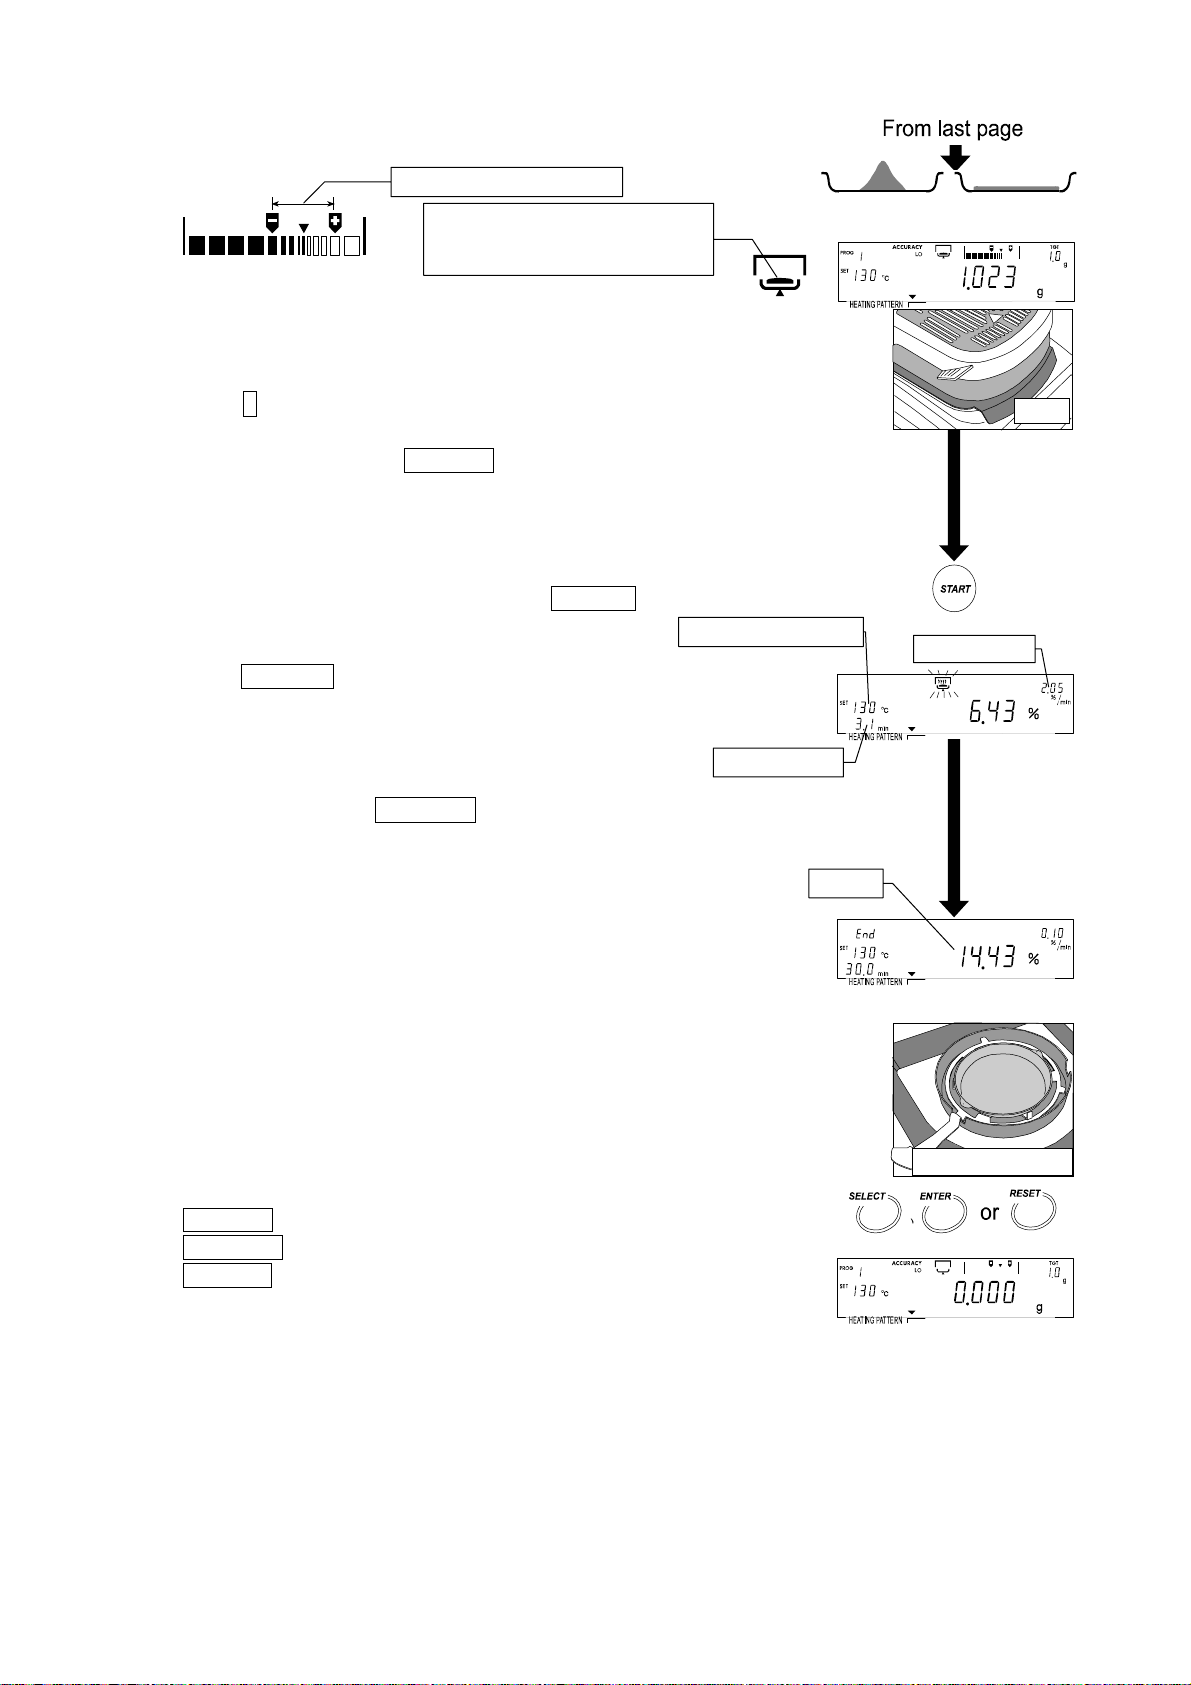
11. Open the heater cover. Put in a sample using the
level indicator.
Range of proper sample
Sample needs more than 0.1 g.
Significant sample is indicated
segment.
Caution
The sample needs to be more than 0.1 g.
Spread the sample evenly.
12. If the ↑ key is pressed during gram display, analysis
mode, measurement uni t and mi ni mum scale v al ue
are displayed. If the ENTER key is pressed, the
sample mass is output.
Start the Measurement
Start the Measurement
Start the MeasurementStart the Measurement
13. Close the heater cover. Press the
after a stable value is displayed.
START key
Drying temperature
14. If the SELECT key is pressed during measurement,
other units can be displayed temporarily and its
measurement values can be output.
Caution
Do not press the SELECT key while
sampling data.
No good Good
Close
Drying rate
Analysis time
Result
Finish the Measurement
Finish the Measurement
Finish the MeasurementFinish the Measurement
15. When the change of moisture content per one
minute (drying rate) reaches the preset termination
value, the measurement is completed and the
buzzer beeps.
16. Open the heater cover and remove the sample
using the pan handle.
17. Press the following key to return to gram display.
ENTER key.....Outputs (Prints) result.
SELECT key ... Returns to the weighing mode.
RESET key..... Returns to the weighing mode and
displays zero.
18. If the same condition is used, proceed to step 8.
If changing the condition, proceed to step 2.
The sample pans can be washed and reused.
There is the Reference card on the bottom of the analyzer.
Remove sample
MS-70 / MX-50 / MF-50 / ML-50 20
Page 23
7.2.
7.2. Quick Mode Operation
7.2.7.2.
T he quick mode can ob tain the moisture conten t with
settings of ACCURACY and drying temperature.
Sample is heated up at 200°C for approximately three
minutes so that moisture content is measured quickly.
7.2.1.
7.2.1. ACCURACY
7.2.1.7.2.1.
ACCURACY of measurement can be set either HI, MID. o r LO.
The sample quantity is automatically selected by ACCURACY.
The termination value of the analysis mode is automatically selected by
Analysis mode is the program to finish the measurement when a change of moisture
The settings are as follows: Specify an ACCURACY.
ACCURACY
ACCURACYACCURACY
ACCURACY and minimum scale value of % display.
content per one minute becomes smaller than a preset termination value.
Preset
Termination
value
Quick Mode Operation
Quick Mode OperationQuick Mode Operation
Heating pattern
200°C
Approx. 3 min.
ACCURACY
Model Minimum scale HI MID. LO
0.001 % 0.02 %/min 0.05 %/min 0.05 %/min
MS-70
MX-50
MF-50
ML-50
Sample quantity 5 g 2 g 1 g
Use Precise result
0.01 % 0.05 %/min 0.10 %/min 0.20 %/min
0.1 % 0.10 %/min 0.20 %/min 0.50 %/min
0.01 % 0.05 %/min 0.10 %/min 0.20 %/min
0.1 % 0.10 %/min 0.20 %/min 0.50 %/min
0.05 %
0.1 %
1 %
0.1 %
1 %
0.10 %/min 0.20 %/min 0.50 %/min
0.20 %/min 0.50 %/min 1.00 %/min
↔
Quick measurement
Drying temperature
7.2.2.
7.2.2. Operation
7.2.2.7.2.2.
This operation explanation uses the following example of the MX-50 :
Refer to "8.Selection of Measurement Method" for detail.
Input Parameters
Analysis mode...................................Quick mode
Heating pattern..................................Quick drying (
Drying temperature............................130 °C
ACCURACY....................................... LO
Sample quantity.................................Approximately 1 g (Automatic selection)
Analyzing mode.................................0.20 %/min (Automatic selection)
Stored Parameters (Factory Settings for the MX-50)
Measurement unit...............................Moisture content is based
Mini mum sc a le value of % dis p lay........0.01 %
Minimum scale value of gram display ...0.001 g
Data memory function........................Not used
MS-70 / MX-50 / MF-50 / ML-50 21
Operation
Operation Operation
on a wet sample
, Automatic selection)
% MOIST
D/W/D
Page 24

1. Turn on the analyzer.
The gram unit (of weighing mode) is displayed.
Enter the Quick Mode
Enter the Quick Mode
Enter the Quick ModeEnter the Quick Mode
2. Press the SELECT key to display an analysis
mode and press the ↓ or ↑ key to select quc .
Select ACCURACY
Select ACCURACY
Select ACCURACYSelect ACCURACY
ML-50 does not display
3. Press the SELECT key to select ACCURACY.
When ACCURACY is selected, HI, MID. or LO blinks.
4. Press the ↓ or ↑ key to select LO of ACCURACY.
Set Drying Temperature at the Sample Pan
Set Drying Temperature at the Sample Pan
Set Drying Temperature at the Sample PanSet Drying Temperature at the Sample Pan
5. Press the SELECT key to select t he drying
temperature.
6. Press the ↓ or ↑ key to set 130 °C.
Temperature
Quick mode
Quick drying
ACCURACY
Store Parameters and Finish the Operation
Store Parameters and Finish the Operation
Store Parameters and Finish the OperationStore Parameters and Finish the Operation
7. Press the ENTER key to store the parameters.
The weighing mode is automatically displayed.
Put
Put a
a Sample on the Pan
Put Put
Sample on the Pan
a a
Sample on the PanSample on the Pan
8. Put the breeze break ring, pan support, pan handle
and sample pan in order. (With no sample.)
9. Close the heater cover.
10. When displaying a stable value, Press the
RESET key.
Avoid mechanical vibration, breeze and environmental
noise during measurement. If it deviates from zero
display, press the RESET key.
Preparation
Close
MS-70 / MX-50 / MF-50 / ML-50 22
Page 25

11. Open the heater cover. Put in a sample using the
level indicator.
Range of proper sample
Sample needs more than 0.1 g.
Significant sample is indicated
segment.
Caution
The sample needs to be more than 0.1 g.
Spread the sample evenly.
12. If the ↑ key is pressed during gram display, analysis
mode, measurement uni t and mi ni mum scale v al ue
are displayed. If the ENTER key is pressed,
sample mass is output.
Star
Start the Measurement
t the Measurement
StarStar
t the Measurementt the Measurement
13. Close the heater cover. Press the START key
after a stable value is displayed.
Drying temperature
14. If the SELECT key is pressed during measurement,
other units can be displayed temporarily and its
measurement values can be output.
Caution
Do not press the SELECT key while
Analysis time
sampling data.
Finish the Measurement
Finish the Measurement
Finish the MeasurementFinish the Measurement
15. When the change of moisture content per one
minute (drying rate) reaches the preset termination
value, the measurement is completed and the
buzzer beeps.
16. Open the heater cover and remove the sample
using the pan handle.
17. Press the following key to return to gram display.
ENTER key.....Outputs (Prints) result.
SELECT key ... Returns to the weighing mode.
RESET key..... Returns to the weighing mode and
displays zero.
18. If the same condition is used, proceed to step 8.
If changing the condition, proceed to step 2.
The sample pans can be washed and reused.
There is the Reference card on the bottom of the analyzer.
No good Good
Close
Drying rate
Result
Remove sample
MS-70 / MX-50 / MF-50 / ML-50 23
Page 26

7.3.
7.3. Program Number
7.3.7.3.
Program Numbe r
Program Numbe rProgram Number
The measurement conditions of all program numbers are set to the standard mode at the
factory. The analyzer can store and recall proper individual settings for each sample with
the program number (PROG No.).
MS-70 / MX-50 20 sets PROG 1 to 20
MF-50 10 sets PROG 1 to 10
ML-50 05 sets PROG 1 to 5
Program number
The same measurement program is stored in all program
numbers with factory settings.
Analysis mode.....................Standard mode
Heating pattern....................Standard drying
Memory number
Caution If the data memory function is active, the data memory number (MEM) is
displayed, in place of the program number (PROG).
7.3.1.
7.3.1. Storing a
7.3.1.7.3.1.
Storing a Mea surem ent
Storing a Storing a
Measurement Program
MeasurementMeasurement
Program to a Program Number
Program Program
to a Program Number
to a Program Number to a Program Number
Displaying or recalling a PROG number, a measurement program can be renewed.
1. Press and hold the PROGRAM key in gram display.
Program number
PROG "1
0.000g
2. Press the ↓ or ↑ key to select a program number
PROG "2
3. Press the ENTER key to use the selected number.
4. Press the SELECT key to edit the parameters.
end
PROG 2
0.000g
5. Edit parameters of a measurement program.
Refer to "8.Selection of Measurement Method"
Edit measurement
program.
6. Press the following key to return to the gram display.
RESET key..... Cancels the operation and returns to the
ENTER key.....St o r e s p a r a m e t e r s t o t h e s e l e c t e d n u m b er.
weighing mode.
end
PROG 2
0.000g
7.3.2.
7.3.2. Recalling a
7.3.2.7.3.2.
Recalling a Measurement
Recalling a Recalling a
Measurement Program
MeasurementMeasurement
Program with a Pro
Program Program
with a Program Number
with a Pro with a Pro
gram Number
gram Numbergram Number
Stored measurement programs can be recalled with a program number.
1. Press and hold the PROGRAM key in the gram display.
2. Press the ↓ or ↑ key to select a program number
Program number
PROG "1
PROG "2
0.000g
3. Press the ENTER key to use the selected number.
MS-70 / MX-50 / MF-50 / ML-50 24
end
PROG "2
0.000g
Page 27

8.
8. Measurement
There are five analysis modes.
8.8.
8.1.
8.1. List of
8.1.8.1.
Measurement Programs
MeasurementMeasurement
List of Measurement
List of List of
Measurement Programs
MeasurementMeasurement
Programs
Programs Programs
Programs
Programs Programs
Measurement Programs
Drying Prog ra m
St andard
Mode
5td
Quick Mode
quc
Automatic
Mode
U-a
Timer Mode
U-t
Manual Mode
U-m
Drying rate: Change of moisture content per one minute [%/min]
Analyzing mode to Finish
Measurement
Measurement condition is
automatically selected by
ACCURACY and minimum
value of % display.
When drying rate is less than
preset termination value,
measurement is completed
automatically .
When drying rate is less than
preset termination value,
measurement is completed
automatically .
Sample is dried for a preset
time. 1min. to 480min.
Measurement is completed
by the STOP key. Max.
480 min.
Heating pattern
MS-70, MX-50,
MF-50
St andard drying
Ramp dry ing
S tep dry ing
Quick drying
St andard drying
Ramp dry ing
S tep dry ing
ML-50
St andard
drying
St andard
drying
Drying
Temperature
50°C
to
200°C
MS-70 / MX-50 / MF-50 / ML-50 25
Page 28

8.1.1.
8.1.1. ACCURACY of the Standard Mode and Quick Mode
8.1.1.8.1.1.
ACCURACY of measurement can be set either HI , MID. or LO .
The sample quantity is automatically selected by ACCURACY.
The termination value of the analyzing mode is automatically se lected by ACCURACY
The analyzing mode is the program to finish the measurement when a change of
The settings are as follows: Specify an ACCURACY.
Drying rate: Change of moisture content per one minute [%/min]
Standard Mode
Standard Mode
Standard ModeStandard Mode
ACCURACY of the Standard Mode and Quick Mode
ACCURACY of the Standard Mode and Quick ModeACCURACY of the Standard Mode and Quick Mode
and minimum scale value of % display.
moisture content per one minute becomes smaller than a preset termination value.
ACCURACY
Model Minimum scale HI MID. LO
0.001 % 0.01 %/min 0.02 %/min 0.05 %/min
Preset
Termination
value
MS-70
MX-50
MF-50
ML-50
Sample quantity 1 0 g 5 g 1 g
Use Precise result
0.01 % 0.02 %/min 0.05 %/min 0.10 %/min
0.1 % 0.10 %/min 0.20 %/min 0.50 %/min
0.01 % 0.02 %/min 0.05 %/min 0.10 %/min
0.1 % 0.10 %/min 0.20 %/min
0.05 % 0.05 %/min 0.10 %/min
0.1 %
1 %
0.1 %
1 %
0.10 %/min 0.20 %/min
↔
Quick measurement
0.50 %/min
Quick Mode
Quick Mode
Quick ModeQuick Mode
Preset
Termination
value
ACCURACY
Model Minimum scale HI MID. LO
0.001 % 0.02 %/min 0.05 %/min 0.05 %/min
MS-70
MX-50
MF-50
ML-50
Sample quantity 5 g 2 g 1 g
Use Precise result
0.01 % 0.05 %/min 0.10 %/min 0.20 %/min
0.1 % 0.10 %/min 0.20 %/min 0.50 %/min
0.01 % 0.05 %/min 0.10 %/min 0.20 %/min
0.1 % 0.10 %/min 0.20 %/min 0.50 %/min
0.05 %
0.1 %
1 %
0.1 %
1 %
0.10 %/min 0.20 %/min 0.50 %/min
0.20 %/min 0.50 %/min 1.00 %/min
↔
Quick measurement
MS-70 / MX-50 / MF-50 / ML-50 26
Page 29

8.1.2.
8.1.2. Analyzing mode of the Automatic Mode
8.1.2.8.1.2.
Analyzing mode of the Automatic Mode
Analyzing mode of the Automatic ModeAnalyzing mode of the Automatic Mode
When the change of moisture content per one minute is less than the preset value,
the measurement is automatically completed.
Preset Termination
Range
value to complete
measurement
MS-70 MX-50 MF-50 ML-50
2.00 %/min
1.00 %/min
0.50 %/min Available Available
0.20 %/min Available range range
0.10 %/min Available range
0.05 %/min range
0.02 %/min
(Factory s e ttin g )
(Factory s e ttin g )
(Factory s e ttin g )
(Factory s e ttin g )
0.01 %/min
0.005 %/min
0.002 %/min
0.001 %/min
Unavailable item
8.1.3.
8.1.3. Analyzing mode of the Timer Mode
8.1.3.8.1.3.
Analyzing mode of the Timer Mode
Analyzing mode of the Timer ModeAnalyzing mode of the Timer Mode
Sam p le is d r i e d f o r a p r e s e t analy sis time.
Drying Time 1 minute to 480 minutes.
Setting interval : 1 minute during 1 minute to 60 minutes.
5 minutes during 60 minutes to 480 minutes.
Factory setting: 10 minutes.
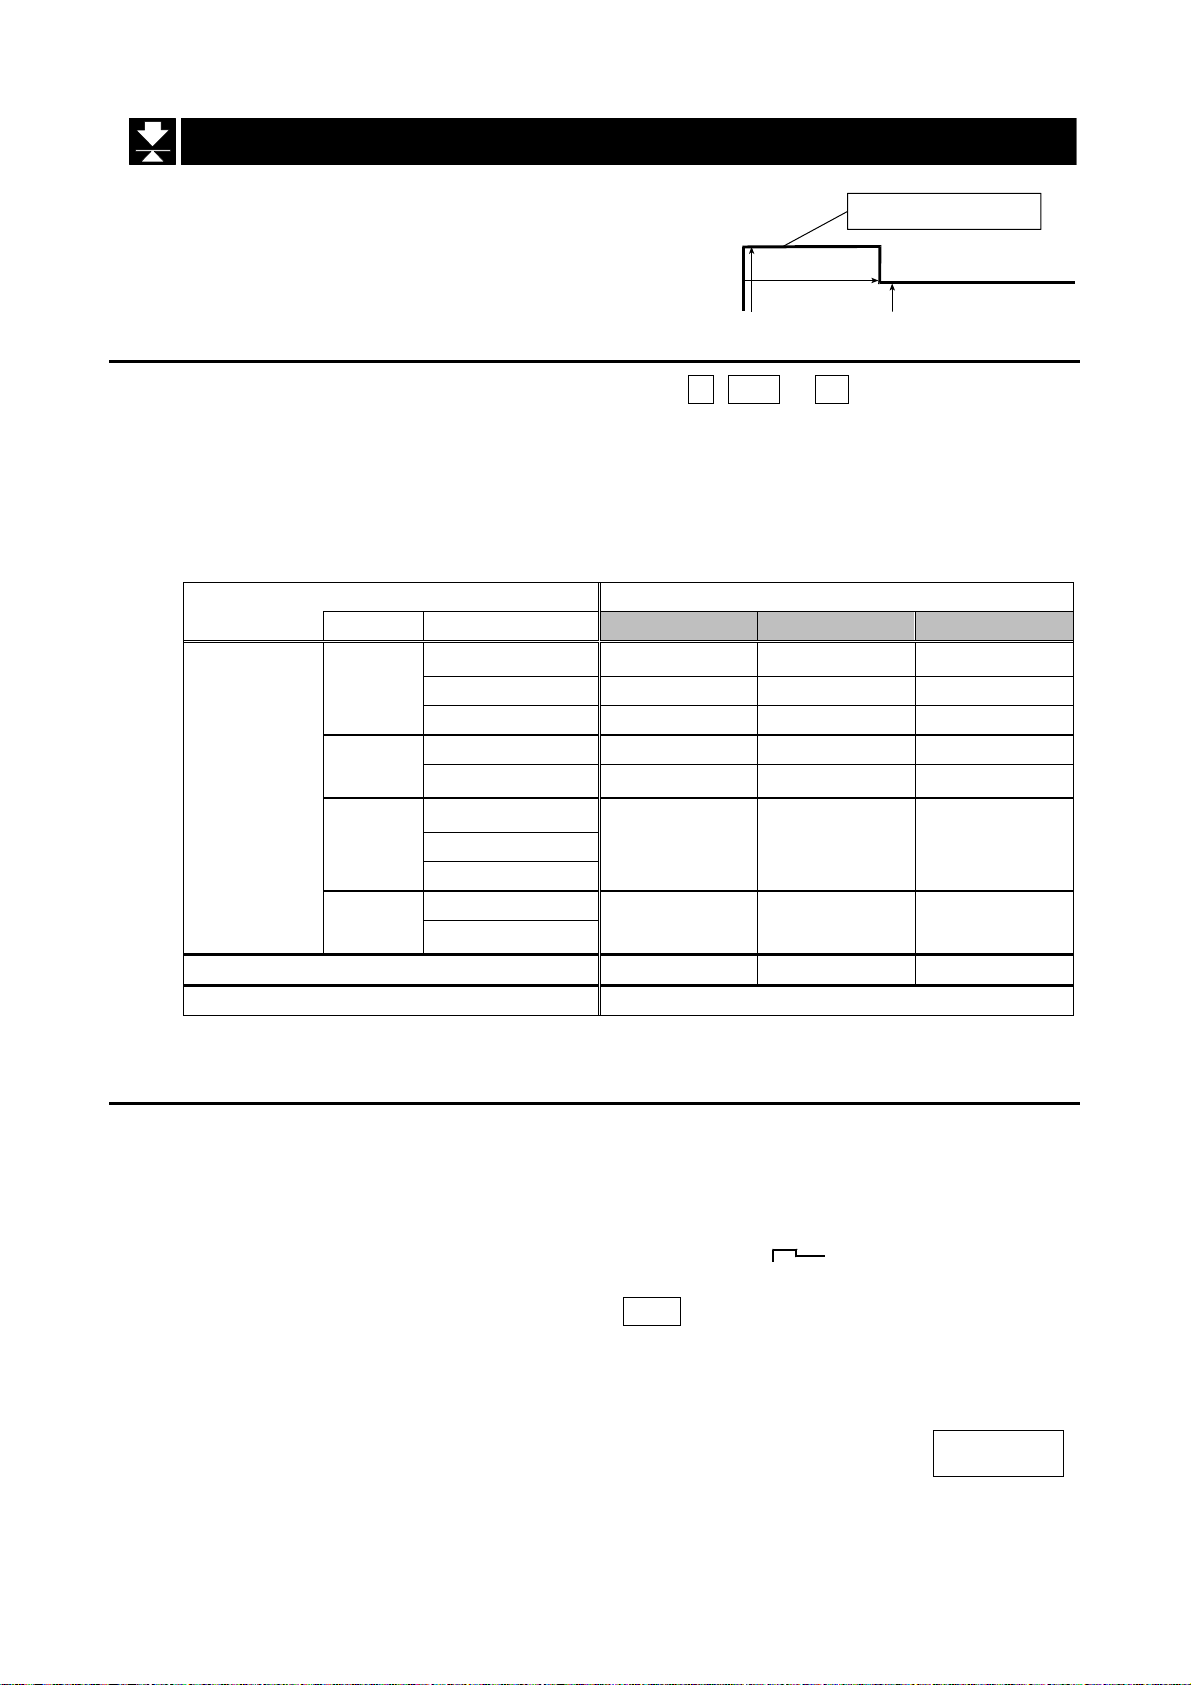
8.1.4.
8.1.4. Drying Program (
8.1.4.8.1.4.
Heating patte r n
Heating patte r n
Heating patte r nHeating patte r n
Drying Program (Heating Pattern and Drying Termperature)
Drying Program (Drying Program (
Heating Pattern and Drying Termperature)
Heating Pattern and Drying Termperature)Heating Pattern and Drying Termperature)
St andard Mode,
Automatic Mode,
Timer Mode Quick Mode
Manual Mode
Standard drying
Ramp drying
Step dr ying
Quick drying
Temperature
50°C
Temperature1
Temperature2
Time
Stage 1
-
Temperature
Time
Stage 2
Temperature
50°C
Temperature1
Time2
Time1
Stage 1
Time
Temperature
Time1
Temperature2
Time2
Stage 2
-
3 min.
-
-
-
200°C
Temperature
"Temperature 1" can be set higher than "temperature 2" in step drying.
ML-50, can select standard drying and quick drying only, does not display heating pattern.
MS-70 / MX-50 / MF-50 / ML-50 27
Page 30

How to Select quick mode (Extr acts)
How to Select quick mode (Extr acts)
How to Select quick mode (Extr acts)How to Select quick mode (Extr acts)
Press the SELECT key during the gram display.
Display quc using the ↓ or ↑ key .
ML-50 is does not display heating pattern.
How to Select a
How to Select a He ating pattern
How to Select a How to Select a
Heating pattern with out quick mode (Extracts)
Heating patte r nHeating patte r n
without quick mode (Extracts)
without quick mode (Extracts) without quick mode (Extracts)
Press the SELECT key to select temperature
during the gram display.
Press the PROGRAM key to select a symbol of
heating pattern are displayed in order.
ML-50 can select standard drying and quick drying only.
Display examples during settings
Display examples during settings
Display examples during settingsDisplay examples during settings
Temperature
Temperature
Heating pattern
Time
Temperature
Time1
Heating pattern
Temperature2
Time2
Heating pattern
Quick mode
"q"u"c
Heating pattern
"1"0"5°C
DDDDrying Temperature at the Sample Pan
rying Temperature at the Sample Pan
rying Temperature at the Sample Panrying Temperature at the Sample Pan
Drying temperature range.................50°C to 200°C, 1°C interval.
When a measuremen t is sta rted a nd on e hour pa sse s, the maxim um t empe ratu re is
automatically regulated to 160°C for safety.
8.1.5.
8.1.5. Measurement
8.1.5.8.1.5.
Measurement Unit
Measurement Measurement
Unit
UnitUnit
Unit Formula Display
Moisture content is based on
wet sample mass
Moisture content (Atro) is based on
dried sample mass
Dry content
Ratio
W - D
*
1
W
W - D
D
D
W
W
*
2
D
x 100
x 100
x 100
x 100
% MOIST
D /W/D
% MOIST
D /D
% RATIO
D/W/D
% RATIO
W/D
Gram value g
W: Wet sample mass D: Dried sample mass
*
1: Factory settings
*
2: When result reaches to 999%, measurement is s topped.
MS-70 / MX-50 / MF-50 / ML-50 28
Page 31

8.2.
8.2. Procedures to Store a Measurement Program
8.2.8.2.
8.2.1.
8.2.1. Standard Drying
8.2.1.8.2.1.
Standard Drying
Standard DryingStandard Drying
Procedures to Store a Measurement Program
Procedures to Store a Measurement ProgramProcedures to Store a Measurement Program
This explanation uses the following parameters and sample displays of MX-50.
Drying temperature
Standard Mode, Automatic Mode, Manual Mode Timer Mode
Drying temperature
Time
Common Items
Program number.......................................... 2 ( PROG 2 )
Drying program Heating pattern ....................Standard drying ( )
Drying temperature..............160°C
Measurement unit...............................................Moisture content
% MOIST
D /W/D
Minimum scale value during measurement.. 0.01 %
Minimum scale value of gram display.......... 0.001 g
Sample quantity........................................... Approximately 5 g
Data memory function.................................. Not used
Items for Standard Mode
Analysis mode............................................. Standard mode (Symbol: 5td )
ACCURACY................................................. MID.
Analyzing mode to finish a measurement.........Automatic setting by ACCURACY
Items for Automatic Mode
Analysis mode............................................. Automatic mode (Symbol: U-a )
Analyzing mode to finish measurement............0.05 %/min
Items for Timer Mode
Analysis mode............................................. Timer mode (Symbol: U-t )
Analyzing mode to finish measurement............10 minutes
Items for Manual Mode
Analysis mode............................................. Manual mode (Symbol: U-m )
1. Display the gram unit (of the weighing mode).
Select a Program Number to Edit the Me asurement Program
Select a Program Number to Edit the Me asurement Program
Select a Program Number to Edit the Me asurement ProgramSelect a Program Number to Edit the Me asurement Program
2. Press the PROGRAM key and press the ↓ or
↑ key to select a program number.
3. Press the ENTER key to use the number.
Program number
4. The analyzer displays end and returns to the
weighing mode.
Caution If the data memory function is active, the data
memory number (MEM) is displayed in place of the
program number (PROG).
MS-70 / MX-50 / MF-50 / ML-50 29
PROG 1
PROG "2
0.000g
end
PROG 2
0.000g
Page 32

Select an Analysis Mode
Select an Analysis Mode
Select an Analysis ModeSelect an Analysis Mode
5. Press the SELECT key to select a symbol, it will
blink. Select an analysis mode using the ↓ or ↑ key .
If standard mode is used, select 5td .
If automatic mode is used, select U-a .
If timer mode is used, select U-t .
If manual mode is used, select U-m .
Set ACCURACY for the Standard Mode
Set ACCURACY for the Standard Mode
Set ACCURACY for the Standard ModeSet ACCURACY for the Standard Mode
6. Select ACCURACY with the SELECT key.
Select MID. with the ↓ or ↑ key.
When ACCURACY is sel ected, HI , MID. or LO blinks.
Set the Heatin g Patter
Set the Heatin g Patternnnn
Set the Heatin g PatterSet the Heating Patter
7. Select dr ying temperature with the SELECT key.
Select standard drying of the heating
pattern with the PROGRAM key.
Analysis mode
Automatic mode
Timer mode
Manual mode
ACCURACY
"1"0"5°C
0.000g
Standard drying
"U"-"a
0.000g
St andard
mode
ACCURACY
MID.
Set the Drying Temperature
Set the Drying Temperature
Set the Drying TemperatureSet the Drying Temperature
8. Set 160°C with the ↓ or ↑ key.
Set the Preset Termination Value for
Set the Preset Termination Value for Automatic
Set the Preset Termination Value for Set the Preset Termination Value for
Automatic MMMMode
AutomaticAutomatic
9. Select the preset termination value with the
SELECT key.
Select 0.05 [%/min] with the ↓ or ↑ key .
Set the Analysis Time for the
Set the Analysis Time for the Timer
Set the Analysis Time for the Set the Analysis Time for the
10. Select time with the
SELECT key.
Timer MMMMode
TimerTimer
ode
odeode
Select 10.0 [min] with the ↓ or ↑ key .
Set the
Set the Measurement
Set the Set the
Measurement Unit
MeasurementMeasurem ent
Unit
Unit Unit
11. Select a measurement unit with the SELECT
key . Select a moisture content (based on a wet
sample ) with the ↓ or ↑ key.
Drying temperature
ode
odeode
Preset termination value
Analysis Time
Standard mode
Manual mode
Measurement unit
"1"6"0°C
0.000g
Automatic
Timer mode
0.000g
"1"0."0 min
0"%
mode
"0."0"5
%/min
"M"O"I"S"T
"/"W
Set the Minimum Scale Value of the % Display
Set the Minimum Scale Value of the % Display
Set the Minimum Scale Value of the % DisplaySet the Minimum Scale Value of the % Display
12. Select % display with the SELECT key.
Select 0.01 [%] with the ↓ or ↑ key.
MS-70 / MX-50 / MF-50 / ML-50 30
Minimum scale
value of %
display
"0".0"1%
Page 33

Set
Set the Minimum Scale Value of the Gram Display
the Minimum Scale Value of the Gram Display
Set Set
the Minimum Scale Value of the Gram Displaythe Minimum Scale Value of the Gram Display
13. Select gram display wit h the SELECT key.
Select 0.001 [g] with the ↓ or ↑ key.
Store the Parameters and Finish the Operation
Store the Parameters and Finish the Operation
Store the Parameters and Finish the OperationStore the Parameters and Finish the Operation
14. Press the ENTER ke y to store the new parameters
for the measurement program to program number 2.
Pressing the key, the weighing mode is automatically
displayed. When PROG 2 is recalled, the settings
can be used.
To cancel the new parameters and return to the
weighing mode, press the RESET key.
Minimum scale
value of gram
display
"0."0"0"1g
0.000g
Gram display of
weighing mode
MS-70 / MX-50 / MF-50 / ML-50 31
Page 34

8.2.2.
8.2.2. Ramp Drying
8.2.2.8.2.2.
Standard
Standard Mode, Automatic Mode or
Standard Standard
Ramp Drying
Ramp DryingRamp Drying
Mode, Automatic Mode or Manual
Mode, Automatic Mode or Mode, Automatic Mode or
(ML-50 can not select ramp drying)
Manual MMMMode
Manual Manual
ode
odeode
Refer to page 34 for Timer Mode
This explanation uses the following parameters and sample displays of MX-50.
50°C
Ramp time
Final dr ying tem per atur e
Common Items
Program number.......................................... 3 ( PROG 3 )
Drying program Heating pattern ....................Ramp drying (
Final drying temperature.....160°C
Ramp time............................5.0 minutes
)
Measurement Unit...............................................Moisture content
% MOIST
D /W/D
Minimum scale value during measurement.. 0.01 %
Minimum scale value of gram display.......... 0.001 g
Sample quantity........................................... Approximately 5 g
Data memory function.................................. Not used
Items for Standard Mode
Analysis mode............................................. Standard mode (Symbol: 5td )
ACCURACY................................................. MID.
Analyzing mode to finish measurement ............Automatic setting by ACCURACY
Items for Automatic Mode
Analysis mode............................................. Automatic mode (Symbol: U-a )
Analyzing mode to finish measurement............0.05 %/min
Items for Manual Mode
Analysis mode............................................. Manual mode (Symbol: U-m )
1. Display gram unit (of the weighing mode).
Select a Program Number to Edit the Me asurement Program
Select a Program Number to Edit the Me asurement Program
Select a Program Number to Edit the Me asurement ProgramSelect a Program Number to Edit the Me asurement Program
PROG 1
0.000g
2. Press the PROGRAM key and press the ↓ or
↑ key to select a program number.
3. Press the ENTER key to use the number.
Program number
PROG "3
4. The analyzer displays end and returns to the
weighing mode.
Caution If the data memory function is active, the data
memory number (MEM) is displayed in place of the
end
PROG 3
0.000g
program number (PROG).
MS-70 / MX-50 / MF-50 / ML-50 32
Page 35

Select an Analysis Mode
Select an Analysis Mode
Select an Analysis ModeSelect an Analysis Mode
5. Press the SELECT key to s el ect a symbol, it will
blink. Select an analysis mode using the ↓ or ↑
key.
If standard mode is used, select 5td .
If automatic mode is used, select U-a .
If manual mode is used, select U-m .
Set ACCURACY for Standard Mode
Set ACCURACY for Standard Mode
Set ACCURACY for Standard ModeSet ACCURACY for Standard Mode
6. Select ACCURACY with the SELECT key.
Select MID. with the ↓ or ↑ key.
When ACCURACY is sel ected, HI , MID. or LO blinks.
Set the Heating Pattern
Set the Heating Pattern
Set the Heating PatternSet the Heating Pattern
7. Select dr ying temperature with the SELECT key.
Se lect ramp drying of heating pattern with
the PROGRAM key.
Set the Final Drying Temperature
Set the Final Drying Temperature
Set the Final Drying TemperatureSet the Final Drying Temperature
Final drying temperature
8. Set 160°C with the ↓ or ↑ key.
Set the Ramp Time
Set the Ramp Time
Set the Ramp TimeSet the Ramp Time
9. Set 5.0 minutes with the ↓ or ↑ key.
Set the Preset Termination Value for
Set the Preset Termination Value for Automatic
Set the Preset Termination Value for Set the Preset Termination Value for
Automatic MMMMode
AutomaticAutomatic
10. Select preset termination value with the SELECT
key . Sel ect 0.05 [%/min] with the ↓ or ↑ key.
"U"-"a
ACCURACY
ACCURACY
MID.
""1"0"5°C
0.000g
Ramp drying
"1"6"0°C
0.000g
Ramp time
0.000g
5.0 min
ode
odeode
Preset termination value
Standard mode
Manual mode
0.000g
Automatic
mode
"0."0"5
%/min
Set the
Set the Measurement
Set the Set the
11. Select measurement unit with the
Measurement Unit
Measurement Measurement
Unit
UnitUnit
SELECT key.
Select a moisture content (based on a wet
sa mple ) with the ↓ or ↑ key.
Set the Minimum Scale Value of the % Display
Set the Minimum Scale Value of the % Display
Set the Minimum Scale Value of the % DisplaySet the Minimum Scale Value of the % Display
12. Select % display with the SELECT key.
Select 0.01 [%] with the ↓ or ↑ key.
Set the Minimum Scale Value of the Gram Display
Set the Minimum Scale Value of the Gram Display
Set the Minimum Scale Value of the Gram DisplaySet the Minimum Scale Value of the Gram Display
13. Select gram display wit h the SELECT key.
Select 0.001 [g] with the ↓ or ↑ key.
MS-70 / MX-50 / MF-50 / ML-50 33
Measurement unit
Minimum scale
value of % display
Minimum scale
value of gram
display
0"%
"0."0"1%
"0."0"0"1g
"M"O"I"S"T
"/"W
Page 36

Store Parameters and Finish the Operation
Store Parameters and Finish the Operation
Store Parameters and Finish the OperationStore Parameters and Finish the Operation
14. Press the ENTER key to store the new parameters of
the measurement program to program number 3.
160°C
0.000g
Pressing the key, the weighing mode is automatically
displayed.
When PROG 3 is recalled, the settings can be used.
Gram display of
weighing mode
To cancel the new parameters and return to the
weighing mode, press the RESET key.
Timer Mode
Timer Mode
Timer ModeTimer Mode
Refer to page 32 for Standard Mode, Automatic Mode or Manual Mode
This explanation uses the following parameters and sample displays of MX-50.
50°C
Ramp time
Final drying temperat ure
Drying time
Common Items
Program number.......................................... 4 ( PROG 4 )
Analysis mode............................................. Timer mode (Symbol: U-t )
Drying program Heating pattern ....................Ramp drying ( )
Final drying temperature.....160°C
Ramp time............................5.0 minutes
Drying time...........................10.0 minutes
Measurement unit...............................................Moisture content
% MOIST
D /W/D
Minimum scale value during measurement.. 0.01 %
Minimum scale value of gram display.......... 0.001 g
Sample quantity........................................... Approximately 5 g
Data memory function.................................. Not used
1. Display gram unit (of the weighing mode).
Select a Program Number to Edit the Me asurement Program
Select a Program Number to Edit the Me asurement Program
Select a Program Number to Edit the Me asurement ProgramSelect a Program Number to Edit the Me asurement Program
PROG 1
0.000g
2. Press the PROGRAM key and press the ↓ or
↑ key to select a program number.
Program number
3. Press the ENTER key to use the number.
PROG "4
4. The analyzer displays end and returns to the
Caution If the data memory function is active, the data
weighing mode.
memory number (MEM) is displayed in place of the
end
PROG 4
0.000g
program number (PROG).
MS-70 / MX-50 / MF-50 / ML-50 34
Page 37

Select an Analysis Mode
Select an Analysis Mode
Select an Analysis ModeSelect an Analysis Mode
5. Press the SELECT key to select a symbol, it
will blink. Select U-t of the timer mode with
the ↓ or ↑ key. (Press these keys to select it)
Set the Heating Pattern
Set the Heating Pattern
Set the Heating PatternSet the Heating Pattern
6. Select d rying temperature with the SELECT key.
Select ramp drying of t he heating pattern
with the PROGRAM key.
Set the Final Drying Temperature
Set the Final Drying Temperature
Set the Final Drying TemperatureSet the Final Drying Temperature
7. Set 160°C with the ↓ or ↑ key.
Set the Ramp Time
Set the Ramp Time
Set the Ramp TimeSet the Ramp Time
Final drying temperature
8. Set 5.0 minutes with the ↓ or ↑ key.
Analysis mode
"1"0"5°C
0.000g
Ramp drying
0.000g
Ramp Time
1
"5."0 min
"U"-"t
0.000g
"1"6"0°C
Set the Analysis Time
Set the Analysis Time
Set the Analysis TimeSet the Analysis Time
9. Set 10.0 minutes with the ↓ or ↑ key.
Set a Measurement Unit
Set a Measurement Unit
Set a Measurement UnitSet a Measurement Unit
10. Select a measurement unit with the SELECT
key. Select moisture content (based on a wet
sa mple ) with the
Set the Minimum Scale Value of the % Display
Set the Minimum Scale Value of the % Display
Set the Minimum Scale Value of the % DisplaySet the Minimum Scale Value of the % Display
↓ or ↑ key.
11. Select the % display with the SELECT key.
Select 0.01 [%] with the ↓ or ↑ key.
Set the Minimum Scale Value of the G
Set the Minimum Scale Value of the Gram Display
Set the Minimum Scale Value of the GSet the Minimum Scale Value of the G
ram Display
ram Displayram Display
12. Select gram display wit h the SELECT key.
Select 0.001 [g] with the ↓ or ↑ key.
Store the Parameters and Finish the Operation
Store the Parameters and Finish the Operation
Store the Parameters and Finish the OperationStore the Parameters and Finish the Operation
13. Press the ENTER key to store the new parameters
of the measurement program to program number 4.
Pressing the key, the weighing mode is
automatically displayed. When PROG 4 is recalled,
the settings can be used.
To cancel the new parameters and return to the
weighing mode, press the RESET key.
Analysis time
2
"1"0."0 min
Measurement unit
Minimum scale
value of % display
Minimum scale
value of gram
display
0"%
"0."0"1%
"0."0"0"1g
160°C
0.000g
10.0 min
Gram display of
weighing mode
"M"O"I"S"T
"/"W
MS-70 / MX-50 / MF-50 / ML-50 35
Page 38

8.2.3.
8.2.3. Step Drying
8.2.3.8.2.3.
Standard Mode, Automatic Mode or
Standard Mode, Automatic Mode or Manual
Standard Mode, Automatic Mode or Standard Mode, Automatic Mode or
Step Drying
Step DryingStep Drying
Manual MMMMode
Manual Manual
ode
odeode
Refer to page 38 for Timer Mode
This explanation uses the following parameters and sample displays of MX-50.
"Temperature 1" can be set higher than "temperature 2" in step drying.
Common Items
Program number.......................................... 5 ( PROG 5 )
Drying program Heating pattern ....................Step drying ( )
Drying temperature 1 ..........120°C
Drying temperature 2 ..........160°C
Time......................................5.0 minutes
Measurement Unit...............................................Moisture content
% MOIST
D /W/D
Minimum scale value during measurement.. 0.01 %
Minimum scale value of gram display.......... 0.001 g
Sample quantity........................................... Approximately 5 g
Data memory function.................................. Not used
Items for Standard Mode
Analysis mode............................................. Standard mode (Symbol: 5td )
ACCURACY................................................. MID.
Analyzing mode to finish measurement ............Automatic setting by ACCURACY
Items for Automatic Mode
Analysis mode............................................. Automatic mode (Symbol: U-a )
Analyzing mode to finish measurement............0.05 %/min
Items for Manual Mode
Analysis mode............................................. Manual mode (Symbol: U-m )
1. Display gram unit (of the weighing mode).
Select a Program Number to Edit the Me asurement Program
Select a Program Number to Edit the Me asurement Program
Select a Program Number to Edit the Me asurement ProgramSelect a Program Number to Edit the Me asurement Program
PROG 1
0.000g
2. Press the PROGRAM key and press the ↓ or
↑ key to select a program number.
3. Press the ENTER key to use the number.
4. The analyzer displays end and returns to the
weighing mode.
Caution If the data memory function is active, the data
memory number (MEM) is displayed in place of the
program number (PROG).
MS-70 / MX-50 / MF-50 / ML-50 36
Page 39

Select an Analysis Mode
Select an Analysis Mode
Select an Analysis ModeSelect an Analysis Mode
5. Press the SELECT key to blink a symbol, it will
blink. Select an analysis mode using the ↓ or ↑ key .
If standard mode is used, select 5td .
If automatic mode is used, select U-a .
If manual mode is used, select U-m .
Set ACCURACY for the Standard Mode
Set ACCURACY for the Standard Mode
Set ACCURACY for the Standard ModeSet ACCURACY for the Standard Mode
6. Select ACCURACY with the SELECT key.
Select MID. with the ↓ or ↑ key.
When ACCURACY is sel ected, HI , MID. or LO blinks.
Set the Heating Pattern
Set the Heating Pattern
Set the Heating PatternSet the Heating Pattern
7. Select drying temperature 1 with the SELECT
key. Select step drying of the heating
pattern with the PROGRAM key.
Set Drying Temperature 1
Set Drying Temperature 1
Set Drying Temperature 1Set Drying Temperature 1
Drying temperature 1
8. Set 120°C to drying temperature 1 with
the ↓ or ↑ key.
Analysis
Auto mati c mod e
Manual mode
ACCURACY
Step drying
"U"-"a
0.000g
Standard
mode
ACCURACY
MID.
"1"0"5°C
"1"2"0°C
1
Set the Time
Set the Time
Set the TimeSet the Time
9. Select time with the SELECT key.
Set 5.0 minutes with the ↓ or ↑ key.
Set Drying Temperature 2
Set Drying Temperature 2
Set Drying Temperature 2Set Drying Temperature 2
10. Select drying Temperature 2 with
the SELECT key.
Set 160°C with the ↓ or ↑ key.
Set the Preset Termination Value for
Set the Preset Termination Value for Automatic
Set the Preset Termination Value for Set the Preset Termination Value for
Automatic MMMMode
AutomaticAutomatic
11. Select a preset termination value with the
SELECT key. Select 0.05 [%/min] with
the ↓ or ↑ key.
Set
Set Measurement
Measurement Unit
Set Set
Measurement Measurement
Unit
UnitUnit
12. Select meas ure men t uni t wi th t he SELECT key.
Select moisture content (based on a wet
sa mple ) with the ↓ or ↑ key.
Time
"5."0 min
Drying temperature 2
"1"6"0°C
2
ode
odeode
Preset termination value
Standard mode
Manual mode
Measurement unit
0"%
Automatic
mode
"0."0"5
%/min
"M"O"I"S"T
"/"W
MS-70 / MX-50 / MF-50 / ML-50 37
Page 40

Set the Minimum Scale Value of the % Display
Set the Minimum Scale Value of the % Display
Set the Minimum Scale Value of the % DisplaySet the Minimum Scale Value of the % Display
13. Select the % display w i th the SELECT key.
Select 0.01 [%] with the ↓ or ↑ key.
Set the Minimum Scale Value of the Gram Display
Set the Minimum Scale Value of the Gram Display
Set the Minimum Scale Value of the Gram DisplaySet the Minimum Scale Value of the Gram Display
Minimum scale
value of % display
14. Select the gram display with the SELECT key.
Select 0.001 [g] with the ↓ or ↑ key.
Store the Parameters and Finish the Operation
Store the Parameters and Finish the Operation
Store the Parameters and Finish the OperationStore the Parameters and Finish the Operation
Minimum scale
value of gram
display
15. Press the ENTER key to store the new parameters of
the measurement program to program number 3.
Pressing the key, the weighing mode is automatically
displayed.
When PROG 3 is recalled, the settings can be used.
To cancel new parameters and return to weighing
mode, press the RESET key.
"0."0"1%
"0."0"0"1g
160°C
0.000g
Gram display of
weighing mode
Timer Mode
Timer Mode
Timer ModeTimer Mode
Refer to page 36 for Standard Mode, Automatic Mode or Manual Mode
This explanation uses the following parameters and sample displays of MX-50.
Drying temperature 1
Time 1
Stage 1 Stage 2
Drying temperature 2
Time 2
"Temperature 1" can be set higher than "temperature 2" in step drying.
Common Items
Program number.......................................... 6 ( PROG 6 )
Analysis mode............................................. Timer mode (Symbol: U-t )
Drying program Heating pattern ....................Step drying ( )
Drying temperature 1 ..........160°C
Drying temperature 2 ..........120°C
Time 1 ..................................5.0 minutes
Time 2 ..................................10.0 minutes
Measurement unit...............................................Moisture content
% MOIST
D /W/D
Minimum scale value during measurement.. 0.01 %
Minimum scale value of the gram display.... 0.001 g
Sample quantity........................................... Approximately 5 g
Data memory function.................................. Not used
MS-70 / MX-50 / MF-50 / ML-50 38
Page 41

1. Display gram unit (of the weighing mode).
Select a Program Number to Edit the Me asurement
Select a Program Number to Edit the Me asurement Program
Select a Program Number to Edit the Me asurement Select a Program Number to Edit the Me asurement
Program
ProgramProgram
2. Press the PROGRAM key and press the ↓ or
↑ key to select a program number.
Program number
3. Press the ENTER key to use the number.
4. The analyzer displays end and returns to the
weighing mode.
Caution If the data memory function is active, the data
memory number (MEM) is displayed in place of the
program number (PROG).
Select an Analysis Mode
Select an Analysis Mode
Select an Analysis ModeSelect an Analysis Mode
5. Press the
SELECT key to select a symbol, it
Analysis mode
will blink. Select U-t of the timer mode with
the ↓ or ↑ key. (Press these keys to select it)
PROG 1
PROG "6
0.000g
end
PROG 5
"U"-"t
0.000g
0.000g
Set the
Set the Heating Pattern
Set theSet the
Heating Patter n
Heating Patter n Heating Pattern
6. Select dr ying temperature with the SELECT key.
Select step drying of the heating pattern
with the PROGRAM key.
Set Drying Temperature 1
Set Drying Temperature 1
Set Drying Temperature 1Set Drying Temperature 1
Drying Temperature 1
7. Set 120°C with the ↓ or ↑ key.
Set Time 1
Set Time 1
Set Time 1Set Time 1
8. Select time 1 with the
SELECT key.
Set 5.0 minutes with the ↓ or ↑ key.
Set Drying Temperature 2
Set Drying Temperature 2
Set Drying Temperature 2Set Drying Temperature 2
Drying Temperature 2
9. Select Drying Temperature 2 with the SELECT key.
Set 160°C with the ↓ or ↑ key.
Step drying
"1"0"5°C
"1"2"0°C
1
Time 1
1
"5."0 min
"1"6"0°C
2
Set Time 2
Set Time 2
Set Time 2Set Time 2
10. Se l e c t time 2 wi th the
SELECT key.
Set 10.0 minutes with the ↓ or ↑ key .
MS-70 / MX-50 / MF-50 / ML-50 39
Time 2
2
"1"0."0 min
Page 42

Set t
Set the
he Measurement
Set tSet t
Measurement Unit
he he
Measurement Measurement
Unit
UnitUnit
11. Select measurement unit with the SELECT key.
Select the moisture content (based on wet
sa mple ) with the ↓ or ↑ key.
Set the Minimum Scale Value of the % Display
Set the Minimum Scale Value of the % Display
Set the Minimum Scale Value of the % DisplaySet the Minimum Scale Value of the % Display
12. Select the % display w i th the SELECT key.
Select 0.01 [%] with the ↓ or ↑ key.
Set the Minimum Scale Value of the Gram Display
Set the Minimum Scale Value of the Gram Display
Set the Minimum Scale Value of the Gram DisplaySet the Minimum Scale Value of the Gram Display
13. Select the gram display with the SELECT key.
Select 0.001 [g] with the ↓ or ↑ key.
Store the Parameters and Finish the Operation
Store the Parameters and Finish the Operation
Store the Parameters and Finish the OperationStore the Parameters and Finish the Operation
14. Press the
ENTER key to store the new parameters of
the measurement program to program number 6.
Pressing the key, the weighing mode is automatically
displayed.
When PROG 6 is recalled, the settings can be used.
To cancel the new parameters and return to the
weighing mode, press the RESET key.
0"%
"0"0"1%
"0."0"0"1g
1
0.000g
"M"O"I"S"T
"/"W
MS-70 / MX-50 / MF-50 / ML-50 40
Page 43

9.
9. Check Function
Use the self-check function to check whether there is an error or inaccurate result.
Caution
Do not put flammable matter near the analyzer.
Do not put anything on the heater cover.
9.1.1.
9.1.1. Operation
9.1.1.9.1.1.
1. Display the gram unit (of the weighing mode).
2. Press and hold the PROGRAM key to
3. Put the breeze break ring, pan support, pan
If Clo5e is displayed, the heater cover is
4. The check function needs approximately one
Good result...Displays CH pa55 , sounds
Error..............The b u z zer sounds and an error
Refer to 15.5. Error Message for details.
9.9.
9.1.
9.1. Self
9.1.9.1.
During the check, the heater is turned on and the temperature sensor is checked.
Operation
OperationOperation
display CH .
handle and sample pan in order. (Do not put
a sample on the pan.)
Close the heater cover.
Press the ENTER to start the check.
not closed. When it is clo sed, the self-che ck
function is started.
minute.
Check Function
Check FunctionCheck Function
Self----Check Function
SelfSelf
Check Function
Check Function Check Function
buzzer and returns to weighing
mode automatically.
code is displayed.
0.000g
Press and hold
CH
Do not put sample
Preparation
Checking
CH . . . .
Good result
CH pa55
0.000g
Weighing mode
Example: CH no
error 0
Ht err
MS-70 / MX-50 / MF-50 / ML-50 41
Page 44

9.2.
9.2. Test Sample (S
9.2.9.2.
---
---Test sample (S
Test sample (Sodium tartrate dihydrate, Na
------
Test sample (STest sample (S
Test Sample (Sodiu m
Test Sample (STest Sample (S
odium tartrate dihydrate, Na
odium tartrate dihydrate, Naodium tartrate dihydrate, Na
odium TTTTartrate
odium odium
artrate DDDDihydrate
artrate artrate
CCCC
HHHH
2222
OOOO
4444
4444
ihydrate))))
ihydrateihydrate
•2H
•2H
OOOO )
•2H•2H
6666
2222
)---
---
) )
------
Sodium tartrate dihydrate is used to check the accuracy of measurement for the
analyzer.
As an ideal substance on theory, sodium tartrate dihydrate includes moisture
content of 15.66% in the molecule. But the moisture content may change due to
conditions of storage.
The moisture content of 15.0 to 16.0% is obtained by the method below.
(Unit % is based on wet sample)
Sodium tartrate is contained in food (example : wine). If it may irritate the eyes and
nose, wash with water.
The test sample can not be used repeatedly. Dispose of it as flammable matter.
In case of MS-70 MX-50 and MF-50, test sample is included in these packing list.
In case of ML-50, purchase the test sample of accessory.
Caution A hot sampl e p an may cause an er ror. Allo w the p an to cool b efore the next test .
Measurement
Measurement
MeasurementMeasurement
1. Enter the following parameters.
Analysis mode......................................Standard mode (Symbol: 5td )
Drying program Heating pattern...........Standard drying ( )
Drying temperature..... 160°C
ACCURACY..........................................MID.
Sample quantity....................................Approximately 5 g is selected by
ACCURACY automatically.
Measurement unit...................................... Moisture content
% MOIST
D /W/D
2. Pre-heating process.
Put a sample pan, instead of a sample, on the pan.
Press the START key to heat it. The analyzer
Pre-heating process
temperature becomes equilibrium.
3. Press the RESET key to make zero display.
0.000g
Spread the sample as evenly as possible.
No good Good
4. Press the START key to start the measurement.
The result is displayed after 8 minutes normally.
If the results is between 15.0 to 16.0%, the analyzer
Result
works properly.
15.80%
5. Press the following key to complete the measurement.
ENTER key.....Outputs (Prints) the results.
SELECT key ... Returns to the weighing mode.
,
or
RESET key..... Returns to the weighing mode and
displays zero.
MS-70 / MX-50 / MF-50 / ML-50 42
Page 45

10.
10. Connecting to a Printer
10.10.
Connecting to a Printer
Connecting to a PrinterConnecting to a Printer
The analyzer can be connected to a compact dot-matrix printer (AD-8121B) using
the RS-232C interface. The results and record adapted to GLP, GMP and ISO can
be printed.
GLP: Good Laboratory Practice,
GMP: Good Manufacture Practice,
ISO: International Organization for Standardization
The statistical calculation data of the result and the graph data of the change of
moisture content per one minute can be printed using the function of the AD-8121B.
Use the AD-8121B accessory cable to connect them.
Setting List
Setting List
Setting ListSetting List
Analyzer settings
Use
prt 5-d pU5e info
Result and measurement prog r am
(Excluding statistics calculation)
Result with statistical calculation
Trace of change of moisture content
per one minute
Data for GLP, GMP and ISO
0
,1 0 1 1,2
0,1 0 0,1 0
2 0 0,1 0
0,1,20 0 1,2
Refer to "14. Function Table" to detail of settings.
Read the instruction manual of the printer.
Connect to RS-232C
interface of the analyzer.
Compact dot-matrix printer (AD-8121B)
AD-8121B
settings
MODE 3
Dump printing
MODE 1
MODE 2
Interv al pr inti ng
MODE 3
Dump printing
Accessory cable
of AD-8121B
MS-70 / MX-50 / MF-50 / ML-50 43
Page 46

}
}
}
}
}
}
}
}
}
10.1.
10.1. Print samples
10.1.10.1.
10.1.1.
10.1.1. Example To Print The Whole Data At One Time
10.1.1.10.1.1.
This example is printed items of "analyzer information", "measurement program",
Preparation of Parameters
Preparation of Parameters
Preparation of ParametersPreparation of Parameters
1: Factory settings
How To Print
How To Print
How To PrintHow To Print
Select a parameter to print "Me a sure m e nt d a ta". R e f e r to "14 . Function Table"
Example To Print The Whole Data At One Time
Example To Print The Whole Data At One TimeExample To Print The Whole Data At One Time
"measurement data" and "signature space" at one time.
Device Parameter Description
Analyzer
AD-8121B
prt 0
prt 1
Print samples
Print samplesPrin t sa mples
prt 0 1 When pressing the ENTER key , the result is outputted.
prt 1
5-d 0 1 Result is outputted only.
pU5e 1 1 Approx. two seconds interval in each line.
info 1
MODE 3 Dump print (Received data is printed as it is)
When pressing the ENTER key, the result is outputted.
Data is outputted after measurement automatically.
Data is outputted after measurement automatically .
To print items at one time.
Print Example
Print Example
Print ExamplePrint Example
ьььььььььььAü&üD Factory
MODELььььььMX-50 Product
S/NьььььP1234567 Serial number
IDьььььььLAB-123 ID number. 2
PROGRAMüüüüNo.ü1 PROG No.
MODEüüüüSTANDARD
ььььььььььььMID.
DRYINGüüSTANDARD
ьььььььььь160üüC
UNITüüüüMOIST/üW Measurement Unit
ü-ü-ü-ü-ü-ü-ü-ü-
INITIALüWEIGHT
ьььььььь5.678üüg
FINALüWEIGTH
ьььььььь4.567üüg
RESULTüüMOIST/üW
ьььььььь19.57üü%
ANALYSISüTIME
ьььььььььь6.7min
DATEüü2004/09/30
TIMEüüüü12:34:56
REMARKS
ü-ü-ü-ü-ü-ü-ü-ü-
SIGNATURE
ü-ü-ü-ü-ü-ü-ü-ü-
2: ID number can be changed. Refer to "13.1. Identification Number (ID No.)"
Analysis mode. Refer to10.1.3
Drying prog ra m. Re fer to 10. 1.3
Wet weight
Dried weight
Measurement Result
Analysis time
Date. Refer to 10.1.3
Remarks. Refer to 10.1.3
Signature. Refer to 10.1.3
Analyzer information
Measurement
program
Measurement data
Signature space
MS-70 / MX-50 / MF-50 / ML-50 44
Page 47

10.1.2.
10.1.2. Example To Print Selected Items
10.1.2.10.1.2.
Example To Print Selected Items
Example To Print Selected ItemsExample To Print Selected Items
This print example is printed multiple measurement data and a suit of items
specified from "analyzer information", "measurement program" or "signature space".
When the title data is the same, it is economical use.
Preparation of Parameters
Preparation of Parameters
Preparation of ParametersPreparation of Parameters
Device Parameter Description
prt 0 1 When pressing the ENTER key , the result is outputted.
Data is outputted after measurement automatically .
Analyzer
prt 1
5-d 0 1 Result is outputted only.
pU5e 1 1 Approx. two seconds interval in each line.
To print specified item.
AD-8121B
info 2
MODE 3 Dump print (Received data is printed as it is)
1: Factory settings
How To Print " Ana lyze r
How To Print " Analyz e r Informat ion" and "M easur ement Prog ram"
How To Print " Ana lyze r How To Print "Analyze r
1. Display the gram unit (of the weighing mode).
2. Press and hold the ENTER key.
Information" and "M easur ement Prog ram"
Information" and "M easur ement Prog ram"Information" and "M easur ement Prog ram"
Press and hold
0.000g
5ig li5t
Or
3. Press the SELECT key to select li5t .
4. Press the ENTER key to print them.
li5t
5. Display the gram unit (of the weighing mode).
0.000g
Print
How To Print "
How To Print "Measurement Data
How To Print "How To Print "
Measurem ent Da ta""""
Measurem ent Da taMea su rem ent Da ta
Select a parameter to print "Me a sure m e nt d a ta". R e f e r to "14 . Function Table"
prt 0
prt 1
How To Print "
How To Print "Signature Space
How To Print "How To Print "
1. Display the gram unit (of the weighing mode).
When pressing the ENTER key, the result is outputted.
Data is outputted after measurement automatically.
Signature Space""""
Signature SpaceSignature Spa ce
0.000g
Press and hold
2. Press and hold the ENTER key.
5ig li5t
Or
3. Press the SELECT key to select 5ig .
4. Press the ENTER key to print "signature space".
5ig
5. Display the gram unit (of the weighing mode).
0.000g
Print
MS-70 / MX-50 / MF-50 / ML-50 45
Page 48

Print Example
}
}
}
}
}
}
}
}
}
}
}
}
}
}
}
}
}
}
}
}
}
Print Example
Print ExamplePrint Example
ьььььььььььAü&üD Factory
MODELььььььMX-50 Product
S/NьььььP1234567 Serial number
IDьььььььLAB-123 ID number.
PROGRAMüüüüNo.ü1 PROG No.
MODEüüüüSTANDARD
ььььььььььььMID.
DRYINGüüSTANDARD
ьььььььььь160üüC
UNITüüüüMOIST/üW Measurement Unit
ü-ü-ü-ü-ü-ü-ü-ü-
INITIALüWEIGHT
ьььььььь5.678üüg
FINALüWEIGTH
ьььььььь4.567üüg
RESULTüüMOIST/üW
ьььььььь19.57üü%
ANALYSISüTIME
ьььььььььь6.7min
DATEüü2004/09/30
TIMEüüüü12:34:56
REMARKS
ü-ü-ü-ü-ü-ü-ü-ü-
INITIALüWEIGHT
ьььььььь5.791üüg
FINALüWEIGTH
ьььььььь4.680üüg
RESULTüüMOIST/üW
ьььььььь19.19üü%
ANALYSISüTIME
ьььььььььь7.8min
DATEüü2004/09/30
TIMEüüüü12:57:12
REMARKS
ü-ü-ü-ü-ü-ü-ü-ü-
INITIALüWEIGHT
ьььььььь5.432üüg
FINALüWEIGTH
ьььььььь4.321üüg
RESULTüüMOIST/üW
ьььььььь20.45üü%
ANALYSISüTIME
ьььььььььь5.4min
DATEüü2004/09/30
TIMEüüüü13:24:57
REMARKS
ü-ü-ü-ü-ü-ü-ü-ü-
SIGNATURE
ü-ü-ü-ü-ü-ü-ü-ü-
*
1
Analysis mode. Refer to 10.1.3
Drying program. Refer to 10.1.3
Wet weight
Dried weight
Measurement Result
Analysis time
Date. Refer to 10.1.3
Remarks. Refer to 10.1.3
Wet weight
Dried weight
Measurement Result
Analysis time
Date. Refer to 10.1.3
Remarks. Refer to 10.1.3
Wet weight
Dried weight
Measurement Result
Analysis time
Date. Refer to 10.1.3
Remarks. Refer to 10.1.3
Signature. Refer to 10.1.3
Analyzer information
Measurement
program
Measurement data
Measurement data
Measurement data
Signature space
*
1: ID number can be changed. Refer to "13.1. Identification Number (ID No.)"
MS-70 / MX-50 / MF-50 / ML-50 46
Page 49

10.1.3.
2
9
C
10.1.3. Expl
10.1.3.10.1.3.
"Analyzer information" and "Measurement program"
"Analyzer information" and "Measurement program"
"Analyzer information" and "Measurement program""Analyzer information" and "Measurement program"
Explanation for Print Item
anation for Print Item
ExplExpl
anation for Print Itemanation for Print Item
Analysis Mode A Part of Print and Description
Standard mode
5td
Quick mode
quc
Automatic mode
U-a
Timer mode
U-t
Manual mode
U-m
MODEüüüüSTANDARD
ььььььььььььььHI
MODEьььььььQUICK
ььььььььььььььHI
MODEüüüAUTOMATIC
ьььььь0.10ü%/min
MODEьььььььTIMER
ььььььььь
MODEььььььMANUAL
0.0min
Standard mode
ACCURACY
HI、 MID. or LO
Quick mode
ACCURACY
HI、 MID. or LO
Automatic mode
Analyzing mode to finish
measurement
Timer mode
Analysis time
Manual mode
""""Heating pattern
Heating pattern""""
Heating patternHeating pattern
Heating pattern A Part of Print and Description
Standard drying
Ramp dry ing
Step dry ing
Quick drying
DRYINGüüSTANDARD
ьььььььььь140üüC
DRYINGььььььRAMP
15.0minüüü110üüC
DRYINGььььььSTEP
ü8.0minüüü180üüC
ььььььььььь
DRYINGьььььQUICK
ьььььььььь130üüC
Ramp time
Time of st age 1
5üü
Standard drying
Drying temperature
Ramp dry ing
Final dr ying tem per atur e
Step dry ing
Drying temperature of stage 1
Drying temperature of stage 2
Quick drying
Drying temperature
ML-50 can select standard drying and quick drying only .
MS-70 / MX-50 / MF-50 / ML-50 47
Page 50

""""Measurement
UNIT
MOIST
W
UNIT
MOIST
D
UNIT
RATIO
W
UNIT
RATIO
D
UNIT
g
Measurement Unit"
Measurement Measurement
Moisture content is based on
wet sample mass 1
Moistur e cont ent ( Atro) is
based on dried sample mass
Dry content
Ratio 2
Gram value
Unit"
Unit"Unit"
Unit
A Part of Print
üüüü
üüüü
üüü
üüü
ььььььььььь
/ü
/ü
üD/
üW/
W - D
W
W - D
D
D
W
W
D
W: Wet sample mass D: Dried sample mass
1: Factory settings
2: When result reaches to 999%, measurement is stopped.
Formula Display
x 100
% MOIST
D /W/D
x 100
% MOIST
D /W/D
x 100
% RATIO
D/W/D
x 100
-
% RATIO
D/W/D
g
"Date"
"Date"
"Date""Date"
It is printed date and time of the built-in clock in the analyzer.
Arrangement of the calendar is the same setting of the built-in clock.
Refer to ".6.2 Setting the Clock and Calendar "
If you need to adjust the clock, refer to ".6.2 Setting the Clock and Calendar "
""""RRRRemarks Space"
DATEüü2003/08/01
TIMEüüüü13:24:57
emarks Space"
emarks Space"emarks Space"
For instance: This space can use for a comment about samples.
"Signature Space"
"Signature Space"
"Signature Space""Signature Space"
REMARKS
ü-ü-ü-ü-ü-ü-ü-ü-
SIGNATURE
ü-ü-ü-ü-ü-ü-ü-ü-
MS-70 / MX-50 / MF-50 / ML-50 48
Page 51

11.
11. Connecting to a Computer
11.11.
Connecting to a Computer
Connecting to a ComputerConnecting to a Computer
The analyzer can be connected to personal computer using the RS-232C interface.
The analyzer is the Data Communication Equipment type (DCE).
Use a straight-through type cable.
The MS-70 and MX-50 have the following standard accessory cable for RS-232C.
If it is necessary to connect a cable to the MF-50 and ML-50, purchase the cable of
accessory AX-MX-40. If purchasing the RS-232C cable on the market, check the
interface connections and type.
RS
RS----232C Cable Included As A Standard Accessory Of The MS
232C Cable Included As A Standard Accessory Of The MS----70 and MX
RSRS
232C Cable Included As A Standard Accessory Of The MS232C Cable Included As A Standard Accessory Of The MS
70 and MX----50
70 and MX70 and MX
50
5050
Length 2m, straight-through type for modem
Computer side
D-Sub 9 pins
Female connector
Inch screw thread
Analyzer side
D-Sub 25 pins
Male connector
Metric screw thread
T he MS-70 and MX-50 have the standard accessory software "WinCT-Moisture" for
Windows. It has the function to make graphs of the change of moistu re content in
realtime and has an optimum temperature search program that judges heating at an
appropriate temperature setting. Refer to "English Readme.txt" on the CD-ROM for
the details.
The MF-50 has the standard accessory software " WinCT" for Windows. It can
transmit data to a computer and can be used to monitor data and to check the
measurement condition.
There is the accessory AX-MX-42 of the software " WinCT" for Windows.
MS-70 / MX-50 / MF-50 / ML-50 49
Page 52

11.1.
11.1. RS
11.1.11.1.
RS
RS----232C Serial Interface
232C Serial Interface
RSRS
232C Serial Interface232C Serial Interface
RS----232C Serial Interface
232C Serial Interface
RSRS
232C Serial Interface232C Serial Interface
Transmission system EIA RS-232C
Transmission form Asynchronous, bi-directi onal, half duplex
Data format Baud rate 2400bps
Data bits 7bits
Parity EVEN
Stop bit 1bit
Code ASCII
Terminator CR LF (CR: 0Dh, LF: 0Ah)
Bit format
St ar t bi t
Data bits
Stop bi t
Parity bit
RS-232C
-5 V to -15 V
+5 V to +15 V
Pin Connections
Pin Connections
Pin ConnectionsPin Connections
2.6mm, metric screw thread
MX-50 and MF-50 (DCE) Computer (DTE)
Pin No. Signal Name 2 Description
1 FG Frame ground
Direction
-
Signal Name
FG
2 RXD Receive data ← TXD
3 TXD Transmit data → RXD
4 RTS Ready to send 3 ← RTS
5 CTS Clear to send 3 → CTS
6 DSR Data set ready → DSR
7 SG Signal ground
16, 18, 19,
21, 23
Internal use Do not connect 1
-
SG
Other Not used
1: Normal DOS/V cables do not use these terminals.
2: Signal names of the analyzer side are the same as the DTE side with TXD and
RXD reversed.
3: RTS and CTS control are not used. CTS output is HI always.
MS-70 / MX-50 / MF-50 / ML-50 50
Page 53

r
r
r
r
r
r
11.2.
11.2. Output Format
In Case of Format omitted Te mpe r ature Data (Function Table
In Case of Format omitted Te mpe r ature Data (Function Table 5555----d 0
In Case of Format omitted Te mpe r ature Data (Function Table In Case of Format omitted Te mpe r ature Data (Function Table
11.2.11.2.
Output Format
Output FormatOutput Format
d 0 )
)
d 0d 0
) )
The format consists of fifteen characters except the terminator.
A polarity sign is placed before the data with the leading zeros. If the data is zero,
the plus sign is used.
The unit is or .
The position of decimal point and minimum display are changed by models.
Sign of ASCII code
0Dh Carriage return
0Ah Line feed
20h Space
Sample Mass F
Sample Mass Format
Sample Mass FSample Mass F
ormat (Gram Di spl ay)
ormatormat
(Gram Display)
(Gram Display) (Gram Display)
Header Mass data Unit Terminato
Positive Overload F
Positive Overload Format
Positive Overload FPositive Overload F
ormat (Too heavy weighing,
ormatormat
(Too heavy weighing,
(Too heavy weighing, (Too heavy weighing,
Header Polarity Overload Terminato
Negative Overload F
Negative Overload Format
Negative Overload FNegative Overload F
ormat (Too light weighing,
ormatormat
(Too light weighing,
(Too light weighing, (Too li ght weig hing,
Header PolarityOverload Terminato
Moi
Moisture Content (during weighi ng or after weighing)
sture Content (during weighing or after weighing)
MoiMoi
sture Content (during weighing or after weighing)sture Content (during weighing or after weighing)
In case of the MS-70
Header Moisture content Unit Terminato
In case of the MX-50 or MF-50
eeee
display)
display)
----eeee
display) display)
display)
display)
display) display)
Header Moisture content Unit Terminato
In case of the ML-50
MS-70 / MX-50 / MF-50 / ML-50 51
Header Moisture content Unit Terminato
Page 54

In Case of Format included Temperature Data (Function Table
In Case of Format included Temperature Data (Function Table 5555----d 1
In Case of Format included Temperature Data (Function Table In Case of Format included Temperature Data (Function Table
d 1 )
d 1d 1
The first 3 figures are the temperature data.
The format consists of nineteen characters except the terminator.
In case of the MS-70
)
) )
MS-70 / MX-50 / MF-50 / ML-50 52
Page 55

12.
12. Data Memory Function
12.12.
Data Memory Function
Data Memory FunctionData Memory Function
The data memory function automatically stores each result when finishing a measurement.
MS-70 / MX-50 MF-50 ML-50
Maximum number 100 data 50 data 30 data
The stored data can be output to a printer at one time and can be output to a computer
using RsCom and Rskey that are Windows applications stored in the CD-ROM of
WinCT-Moisture or WinCT at one time.
The stored data can be deleted at one time.
The function can select either storing each result or not at data of the function table.
Data is stored at each measurement.......... data 1
Data is not stored........................................ data 0
When using t he data memory function, MEM is displayed.
W hen displaying fUll , the function can not store the next data. The function can
store new data after deleting the stored data.
Caution
When pressing the STOP key during a measurement except manual mode,
the result is not stored.
Set data 1 before measurement, if it is necessary to store each result with data
memory function.
Memory function sign
Number of data
Full memory
12.1.1.
12.1.1. Preparation
12.1.1.12.1.1.
Preparation
PreparationPreparation
This example selects "store result" at data of the function table.
1. Display the gram unit (of the weighing mode).
Press and hold
2. Press and hold the SELECT key to enter the
function table.
3. Press the SELECT key to display data .
3. Press the SELECT key several times and press
the ↓ or ↑ key to display data "1 .
Store result
5. Press the ENTER key to store the new settings.
Press the RESET key to return to the weighing mode.
MEM is displayed when the memory function is effective.
0.000g
Cl adj
data
data "1
5-d
MEM
0.000g
0
MS-70 / MX-50 / MF-50 / ML-50 53
Page 56

12.1.2.
data
data
data
data
data
data
data
data
12.1.2. Output All Data at One Time
12.1.2.12.1.2.
Output All Data at One Time
Output All Data at One TimeOutput All Data at One Time
1. Display the gram unit (of the weighing mode).
Number of data
2. Press and hold the ENTER key to display out .
3. Press the ENTER key to display out "n"o .
4. Press the ↓ or ↑ key to display out "g"o .
5. Press the ENTER key to output the data in order.
Data is output to the peripheral equipment (printer or
computer) connected to the RS-232C interface.
6. When output is finished, end is displayed.
7. Press the RESET key to return to the weighing mode.
MEM
0.000g
30
Press and hold
out
out "n"o
out "g"o
MEM
out "g"o
1
Output data in order
MEM
out "g"o
30
end
Clr
MEM
0.000g
30
12.1.3.
12.1.3. Delete All Data at One Time
12.1.3.12.1.3.
Delete All Data at One Time
Delete All Data at One TimeDelete All Data at One Time
1. Display the gram unit (of the weighing mode).
2. Press and hold the ENTER key to display out .
3. Press the SELECT key to display Clr .
Press the ENTER key to enter the mode.
4. Press the ↓ or ↑ key to display Clr "g"o .
Clear all data
5. Press the ENTER key to delete all stored data.
6. When deleting is finished, end is displayed.
Data is cleared
MEM
0.000g
fUl
Press and
out
Clr "n"o
Clr "g"o
end
MEM
0.000g
0
Clear data
MS-70 / MX-50 / MF-50 / ML-50 54
Page 57

13.
13. Calibration
13.13.
The moisture content is calculated with a ratio of wet weight and dried weight.
Therefore, the absolute value of weighing does not influence the calculation of the
moisture content, but it is necessary to get precise weighing for GLP, GMP and ISO.
Use a 20g mass or a 50g mass to calibrate the weighing sensor.
When calibratin g the weighin g sens or, you can output the calib ration re port adap ted
to GLP, GMP and ISO.
There is a certified temperature calibrator (accessory AX-MX-43, only for MS-70 and
MX-50) to calibrate the pan temperature for precise temperature control.
When calibrating the temperature, you can output the calibration report adapted to
GLP, GMP and ISO.
The analyzer can store an ID number to be used in the calibration report. The
number can be used for management an d maintenance of the analyzer
13.1.
13.1. Identification Number (ID No.)
13.1.13.1.
The ID number consists of the following seven characters.
Characters 0 1 2 3 4 56789 Space -(hyphen)
Display
Characters A B C D E F G H I J K L M N O P Q
Display
Characters R S T U V W X Y Z
Display
Calibration
CalibrationCalibration
Identification Numbe r (ID No.)
Identification Numbe r (ID No.)Identification Numbe r (ID No.)
0 1 2 3 4 56789
a b C d e fgHijkl
r s t U v wxyz
-
m N o p q
13.1.1.
13.1.1. Setting the ID Number
13.1.1.13.1.1.
1. Turn on the analyzer.
2. Press and hold the SELECT key to enter the function
3. Press the SELECT key to display id .
4. Press the ENTER key.
5. Set the ID number using the following keys.
↓, ↑ key............. Selects a value for the figure.
ENTER key..... Store s t h e I D N o . a n d p r o c eeds to step 6.
6. Press the RESET key to return to the weighing mode.
Setting the ID Number
Setting the ID NumberSetting the ID Number
The gram unit (of weighing mode) is displayed.
table. Then Cl adj is displayed.
Example: lab-123
SELECT key ... Selects a figure.
0.000g
Press and
Cl adj
id
lab-123
0.000g
MS-70 / MX-50 / MF-50 / ML-50 55
Page 58

13.2.
13.2. Calib
13.2.13.2.
A standard mass of 20g or 50g can be used for the calibration
A 20g standard mass (AX-MX-41) is recommend.
Caution
Avoid vibration and drafts that affect the calibration. If affected, the analyzer
may be unable to calibrate the weighing sensor.
Use a 20g mass for the calibration, because the height between the weighing
pan and glass-housing is 26 mm. If a tall mass is used, open the glass-housing
and avoid external influence.
13.2.1.
13.2.1. Operation
13.2.1.13.2.1.
Operation
OperationOperation
Calibration of the Weighting Sensor
CalibCalib
ration of the Weighting Sensor
ration of the Weighting Sensorration of the Weighting Sensor
1. Display the gram unit (of the weighing mode).
2. Install the weighing pan, pan support and pan handle.
Close the heater cover.
3. Press and hold the PROGRAM key to display CH .
4. Press the SELECT key to display Cal .
5. Press the ENTER key to display Cal 0 .
6. If 20g mass is used, ......Press the ENTER key.
Proceed to step 8.
If 50g mass is used, ...... Press the SELECT key.
Proceed to step 7.
7. Press the ↓ or ↑ ke y t o s e l e c t 50.000g.
Press the ENTER key to store it.
end , Cal 0 are displayed in order.
8. When displaying Cal 0 , press the ENTER key
to input "Data to display ZERO". The standard
mass value is displayed (Example: 20g).
9. Open the heater cover and put the standard mass
on the center of the pan and press the ENTER
key to input "mass value". end is displayed.
10. Remove the mass to return to the weighing
mode
If the report for GLP, GMP and ISO is to be
output (Refer to page 60), glp is displayed.
The output co ndition for the report is selected in
the function table.
glp
0.000g
Preparation
Press and hold
CH
Cal
Cal 0
50.000g
end
The input data to display ZERO
Mass value
Standard mass
20
The input of mass value
end
Remove mass
0.000g
MS-70 / MX-50 / MF-50 / ML-50 56
Page 59

Calibration R
}
Calibration Report
Calibration RCalibration R
eport Example for the Weighi
eporteport
Example for the Weighing Sensor Adapted to GLP, GMP and ISO
Example for the Weighi Example for the Weighi
ng Sensor Adapted to GLP, GMP and ISO
ng Sensor Adapted to GLP, GMP and ISOng Sensor Adapted to GLP, GMP and ISO
Preset the following parameters to print data to AD-8121B
Device Parameter Description
Interval pU5e 1 1 Approx. two seconds interval in each line.
Analyzer
AD-8121B
Output format
adapted to GLP,
GMP and ISO
MODE 3 Dump print (Received data is printed as it is)
info 1
or
info 2
Calibration report is printed at "Calibration of the
Weighting Sensor" and "Calibration of Drying
Temperature".
1: Factory settings
...........A & D ........Manufacture
MODEL......MX-50 ........Model
S/N.....K1234567 ........Serial number
ID.......LAB-123 ........ID number
DATE..2004/09/30 ........Date
TIME....13:57:24 ........Time
CALIBRATED
..........WEIGHT
CAL.WEIGHT
.......20.000..g
SIGNATURE
........Signature
- - - - - - - -
} Calibration type
Calibration mass
MS-70 / MX-50 / MF-50 / ML-50 57
Page 60

13.3.
13.3. Calibration of Drying Temperature
13.3.13.3.
The temperature calibrator (accessory AX-MX-43)
adjusts the drying temperature on the pan. Put the
sensor on the pan and input measurement data at
100°C and 160°C.
Each adjustment needs fifteen minutes. The buzzer
sounds at the end.
t-Up is displayed after no adjustment for five
minutes during the operation and calibration is
stopped. Press any key to return to weighing mode.
Refer to the instruction manual of the certified
temperature calibrator (accessory AX-MX-43).
13.3.1.
13.3.1. Operation
13.3.1.13.3.1.
Operation
OperationOperation
Calibration of Drying Temperature
Calibration of Drying TemperatureCalibration of Drying Temperature
(for MS
(for MS----70 a n d M X
(for MS(for MS
70 and MX----50)
70 and MX70 and MX
Sensor pan
Thermometer
50)
50)50)
1. Replace the weighing pan with the sensor pan
of the temperature calibrator.
2. Curve the sensor wire so it does not touch the
heater cover and glass-housing when closing
heater cover.
Level the sensor pan.
Do not leave a gap between the pan support
and the sensor.
3. Turn on the analyzer.
4. Press and hold the PROGRAM key
5. Press the SELECT key to display t-Cal .
6. Press the ENTER key.
7. Press the START key to start the 100°C
8. After fifteen minutes, the buzzer sounds and blinks
9. Press the ENTER key to store the new data and
Level the sensor pan.
Curve the sensor wire so as not to touch heater cover.
Display the gram unit (of the weighing mode)
measurement.
"1"0"0°C . Adjust the blinking value to the
thermometer value using the ↓ or ↑ key. (Example :
97°C)
to start the 160°C mea surement.
Sensor pan
Leave no gap
Leave no gap
Leave no gap
0.000g
t-Cal
15 min.
Buzzer
100℃ "1"0"0℃
100℃ "9"7℃
15 min.
MS-70 / MX-50 / MF-50 / ML-50 58
Page 61

10. After fifteen minutes, the buzzer sounds and the display
blinks "1"6"0°C . Adjust the blinking value to the
thermometer value using the ↓ or ↑ key . (Example: 162°C)
11. Press the ENTER key to store the new data, to finish
the adjustment and to return to the weighing mode.
If the report for GLP, GMP and ISO is output,
glp is displayed. Output condition is
selected in the function table.
glp
When the heater cover is opened during measurement or
the STOP key is pressed, calibration is stopped and the
analyzer displays the weighing mode.
Buzzer
160℃ "1"6"0℃
160℃ "1"6"2℃
end
0.000g
0.000g
Calibration R
Calibration Report
Calibration RCalibration R
eport Example for Temperatur
eporteport
Example for Temperature Sensor Adapted to GLP, GMP and ISO
Example for Temperatur Example for Temperatur
e Sensor Adapted to GLP, GMP and ISO
e Sensor Adapted to GLP, GMP and ISOe Sensor Adapted to GLP, GMP and ISO
Preset the following parameters to print data to AD-8121B
Device Parameter Description
Interval pU5e 1 1 Approx. two seconds interval in each line.
Analyzer
AD-8121B
Output format
adapted to GLP,
GMP and ISO
MODE 3 Dump print (Received data is printed as it is)
info 1
or
info 2
Calibration report is printed at "Calibration of the
Weighting Sensor" and "Calibration of Drying
Temperature".
1: Factory settings
...........A & D ........Manufacture
MODEL......MX-50 ........Model
S/N.....K1234567 ........Serial number
ID.......LAB-123 ........ID number
DATE..2004/09/30 ........Date
TIME....12:34:56 ........Time
CALIBRATED
.....TEMPERATURE
TARGET....ACTUAL
100..C.....97..C ........100°C target value measurement value
160..C....162..C ........160°C target value measurement value
SIGNATURE
........Signature
- - - - - - - -
} Calibration type
MS-70 / MX-50 / MF-50 / ML-50 59
Page 62

14.
14. Function Table
14.14.
The function table can store the following parameters to control the analyzer.
Details of the Function Table
Details of the Function Table
Details of the Function TableDetails of the Function Table
Item and Display Symbol
Clock Cl adj
Decimal point dp
Data output
mode
function
Form selection 5-d
Interval pU5e
Output format
adapted to
GLP, GMP and
ISO
Function Table
Function TableFunction Table
Param-
eter
Set date and time for the built-in clock.
Refer to "6.2. Setting the clock and calendar"
0 1 Dot " . "
1 Comma " , "
0 1 Key mode Data is output by the ENTER key
prt
data
info
1 Auto print mode Data is output after measurement.
2 Stream mode
0 1 Not used. Data memory
1 Data is stored at each measurement
0 1 Moisture content is output.
1 Moisture content and temperature are output. 2
0 Continuous output
1 1 Output with approx. two seconds interval in each line.
0 1 Not used
To output (print) items with "analyzer
1
2
information", "measur e men t prog r a m",
"measurement data" and ""signature
space" at one time. 3
To output (print) items specified from
"analyzer information", "measurement
program" and "signature space".
Description
Select decimal point of data.
Data is output continuously during
measurement.
Output of
calibration
report.
4
5
ID number id Set ID number. Used for the calibration report.
Factory
settings
1: Factory settings
2: Use a computer because the AD-8121B printer can not print this correctly.
RsTemp and RsFig contained in the software "WinCT-Moisture" that is the standard
accessory of the MS-70 and MX-50 can not output this correctly.
3: Refer to "10.1.1. Example To Print The W hole Data At One Time".
4: Refer to "10.1.2. Example To Print Selected Items".
5: Calibration report is outputted in "Calibration of the Weighting Sensor" and
"Calibration of Drying Temperature".
MS-70 / MX-50 / MF-50 / ML-50 60
Clr Resets the analyzer to the factory settings.
Page 63

14.1.1.
14.1.1. Operation
14.1.1.14.1.1.
Operation
OperationOperation
1. Display the gram unit (of the weighing mode).
2. Press and hold the SELECT key to enter the function table.
Select an Item
Select an Item
Select an ItemSelect an Item
3. Select an item using the following keys.
Item
Example: Data output mode prt is selected.
SELECT key ... Selects a figure.
ENTER key.....Enters to the selected item.
RESET key..... Cancels the operation and
returns to the weighing mode.
Select a Parameter
Select a Parameter
Select a ParameterSelect a Parameter
Last parameter
4. Select a parameter using the followi ng key s.
Example: Auto pri nt m ode prt 1 is selected.
↓,
↑ key ............ Selects a parameter.
New parameter
ENTER key.....Stores the parameter and proceeds
to the next item.
RESET key.....Cancels the operation and returns
to the weighing mode.
5. If you want to finish the operation, press the
RESET
key to return to the weighing mode.
0.000g
Cl adj
prt
○
prt "0
○
prt "1
data
0.000g
Example, Use Comma for Decimal Point
Example, Use Comma for Decimal Point
Example, Use Comma for Decimal PointExample, Use Comma for Decimal Point
1. Press and hold the SELECT key to enter the function table.
2. Press the SELECT key to display dp .
3. Press the ENTER key to enter the item.
4. Press the ↓ or ↑ key to display dp "1 .
Last parameter
New parameter
5. Press the ENTER key to store the new parameter.
6. Press the RESET key to return to the weighing
mode.
0.000g
Cl adj
dp
○
dp 0
dp 1
prt
0.,000g
MS-70 / MX-50 / MF-50 / ML-50 61
Page 64

15.
15. Maintenance
15.15.
Turn off the power switch and remove power cord during
maintenanc e.
Cool down all parts of the analyzer before maintenance.
Pan support, sample pan and breeze break ring can be removed.
Clean the analyzer with a lint free cloth that is moistened with
warm water and a mild detergent.
Do not use organic solve nts to cl ean the analyz er .
Dry the parts and reassemble them. Refer to "3. Precautions" and
"6.1. Ins tal ling t he Analyzer"
Use the original packing material and box for transportation.
Maintenance
MaintenanceMaintenance
Outlet
Power cord
Example
15.1.
15.1. Cleaning the Heater Uni
15.1.15.1.
Clean the glass-housing when it is stained (not clear) to
maintai n the dry ing per forma nce.
The glass-housing can be removed by removing two
screws.
Remove fingerprints from the halogen lamp to keep its life.
Do not touch to reflective surface of the metal reflector.
If the surface is touched, it may be the cause of a drying
temperature error.
Do not touch the temperature sensor that is at the side
of halogen lamp. If the surface is touched, it may be the
cause of a drying temperature error.
Cleaning the Heater Unitttt
Cleaning the Heater UniCleaning the Heater Uni
Halogen lamp
Screw
Screw
Heater unit
Metal reflector
Glass-housing
MS-70 / MX-50 / MF-50 / ML-50 62
Temperature sensor
Page 65

g
15.2.
15.2. Replacement of the Halogen Lamp
15.2.15.2.
Replacement of the Halogen Lamp
Replacement of the Halogen LampReplacement of the Halogen Lamp
Replace the halogen lamp, when the drying time is excessive or the lamp is defective.
Use the halogen lamp of accessory AX-MX-34-120V or AX-MX-34-240V that is adapted
to your local voltage. The life of the halogen lamp is approximately 5000 hours.
Caution
Remove power cord be fore replacement. If the power cord i s not removed duri ng
lamp replacement, it may cause receiving an electric shock.
Read the power supply voltage label on the back of the heater co ver and confirm
that the rated voltage of the halogen lamp is correct for your power supply voltage.
Voltage Label
The Rate d Vol tag e of
Accessory number
the Halogen Lamp
100 - 120 V
200 - 240 V
AC 120 V
AC 240 V
AX-MX-34-120V
AX-MX-34-240V
Do not drop, throw or crack the halogen lamp. Broken glass may cause an injury.
Clea n the surface of the halogen lamp. If there is a stain
or fingerprint, it ma y short en li fe o f the hal o gen lamp. Do
not touch the lamp directly.
Dispose o f a used hal ogen lamp that kee ps its shape. If
it is broken, glass may spread and cause injury.
We recommend that you re place the halogen
lamp, when it exceeds the rated life.
Affix the lamp wire to the hook so that the
lamp wire does not touch the glass-housing
and heat er cov er.
1. Turn off the power switch and remove
power cord.
2. Check rated voltage of the halogen
lamp that is printed around the holder .
3. Check that the lamp is cool.
4. Remove the two screws holding the
glass-housing.
5. Remove halogen lamp.
6. Install the new halogen lamp so that there is
downward projection of the heat and light.
7. Affix the lamp wire to the hook.
8. Affix the glass-housing with the two screws.
Glass-housin
Do not pinch the wire between the glass housing and lid.
MS-70 / MX-50 / MF-50 / ML-50 63
Page 66

15.3.
15.3. Factory Settings
15.3.15.3.
Factory Settings
Factory SettingsFactory Settings
This function can set the following parameters to factory settings.
All measurement programs
All results stored in memory function.
All parameters of the function table
ID number is reset to 0000000.
Order of calendar and date.
15.3.1.
15.3.1. Operation
15.3.1.15.3.1.
Operation
OperationOperation
1. Turn on the analyzer. The gram unit (of the weighing
mode) is displayed.
2. Press and hold the SELECT key to enter the function
table.
3. Press the SELECT key to display Clr .
4. Press the ENTER key to enter the item.
5. Press the ↓ or ↑ key to display Clr "g"o .
Caution
If pressing the ENTER key with
Clr
Clr """"nnnn"o
ClrClr
"o and
"o"o
pressing the RESET key, operation is canceled.
6. Press the ENTER key to reset.
And end is displayed.
7. Press the RESET key to return to the weighing mode.
0.000g
Cl adj
Clr
Clr "n"o
Clr "g"o
end
Cl adj
0.000g
MS-70 / MX-50 / MF-50 / ML-50 64
Page 67

15.4.
15.4. Troubleshooting
15.4.15.4.
1111....In the Case that
In the Case that PPPProper
In the Case thatIn the Case that
Troubleshooting
TroubleshootingTroubleshooting
roper RRRResults
roper roper
esults are
esults esults
are not be
areare
not be OOOObtained.
not be not be
btained.
btained.btained.
Use the self-check function. Refer to 9.1.Self-Check Function .
Check repeatability . ( Weig h the same mass several times in
the weighing mode.) A taller mass may touch the
glass-housing. Use a short mass if possible. If a tall 50g mass
is used, open the heater cover and avoid external influence.
The height from sample pan to glass-housing is 26 mm.
Check whether the test sample can be measured correctly.
Maximum height
of mass is 26 mm.
Avoid the breeze from an air conditioner and vibration.
Chec k s a m p l e c o n d i t ion. R e f er to 6. 3 . Pr oper Operation for Precision Measurement
Check measurement procedure and pre-heating process. Refer to 6.3.Proper
Operation for Precision Measurement
2222....
IIIIn Case that
n Case that the
n Case t h at n Case t h at
It requires six seconds to light the halogen lamp using
the LLLLam p does not
amp does not LLLLiiiigh
the the
amp does not amp does not
ght or
t or it takes Too Long
ghgh
it takes Too Long to
t or t or
it takes Too Long it takes Too Long
to RRRReach the
each the DDDDrying
to to
each the each the
rying TTTTemperature.
rying rying
emperature.
emperature.emperature.
Halogen lamp
the START key.
When the heater cover is opened, power is not
supplied to the halogen lamp.
When an overheat has occu rred, power is not supplied to
the halogen lamp until the halogen lamp becomes cool.
Read rated
voltage
Check the rated voltage of the halogen lamp that is
printed around the holder.
Read the power supp ly voltage label on the back of the heater cover and confirm that
the rated voltage of the halogen lamp is correct for your power supply voltage.
Voltage Label Power Supply Voltage
100 - 120 V AC 100 V to AC 120 V
200V - 240 V AC 200V to AC 240 V
Is a fuse blown? Check the fuses after removing
The Rated Voltage of
the Halogen Lamp
AC 120 V
AC 240 V
Power supply voltage label
Accessory number
AX-MX-34-120V
AX-MX-34-240V
the power cord. Check the rated value and put
new fuses into the correct holders.
Do you measure a lower drying temperature after
a high drying temperature? If the lamp is hotter
than the drying temperature, the measurement
can not be started.
Check that the sample pan is cool.
Other cases, the halogen lamp may be defective.
Fuse, T100mA 250V
Fuse, T6.3A 250V
Replac e wi th a n ew ha log en la mp. Refe r to "15.2 .
Replacement of the Halogen Lamp".
MS-70 / MX-50 / MF-50 / ML-50 65
Page 68

15.5.
15.5. Error Message
15.5.15.5.
Error Message
Error MessageError Message
CH no Internal Error
An internal error indicated by the result of the self-check function. If repair is
needed, contact the local A&D dealer.
Cl pf Clock Battery Error
Press any key and input the date and time. Refer to "6.2. Setting the Clock
and Calendar ".
Cl err Clock Error
Contact the local A&D dealer to repair the analyzer.
Clo5e Heater Cover Error
The heater cover is opened when starting self-check function. If it is closed,
the self-check function is started.
error0 Internal Error
Turn the power switch off and then on .
Check the frequency of the power supply.
Contact the local A&D dealer to repair the analyzer , if the error is not cleared.
error3 IC Error
error8 Contact the local A&D dealer to repair the analyzer.
error9
Ht err Temperature Control Error
Contact the local A&D dealer to repair the analyzer, if an error is not cleared
when turning the power switch off for more than a half hour and rechecking it.
t-Up Time Error at Temperature Calibration
There is no key operation for five minutes during temperature calibration.
If pressing any key, the weighing mode is displayed.
e Positive Overload, Overweight
The sample has exceeded the weighing capacity.
If the weighing sample pan is empty and this error is displayed, contact the
local A&D dealer to repair the analyzer.
-e Negative Overload, Sample Pan Error
The weight value is too light.
Check the pan, pan support and press the RESET key.
Calibrate the weighing sensor.
If an error can be not cleared, contact the local A&D dealer to repair the analyzer .
MEM
Full Memory
The number of results stored in memory has reached the upper limit.
fUl
Clear the data to store the new results. Refer to "12. Data M emory Function".
MS-70 / MX-50 / MF-50 / ML-50 66
Page 69

16.
16. Specifications
MS-70 MX-50 MF-50 ML-50
Measurement method 400 W halogen lamp, thermogravimetric analysis
Drying temperature
range at sample pan
Heating pattern
T emperature calibration By Accessory AX-MX-43 ---
Sample weight range 0.1 g to 71 g 0.1 g to 51 g
Accuracy: Repeatability of measurement, (Standard deviation)
Moisture content 1
over 5 g sample 0.01 % 0.02 % 0.05 % 0.1 %
over 1 g sample 0.05 % 0.1 % 0.2 % 0.5 %
Weighing mode 0.0005 g 0.001 g 0.002 g 0.005 g
Minimum reading
Moisture content
Weighing mode 0.0001 g 0.001g 0.002g 0.002g
Measurement programs
M oisture content (Wet-base)
Moisture content (Dry-base, Atro)
Dry content
Ratio
Number of memory 20 sets 10 sets 5 sets
Data memory function 100 results 50 results 30 results
Communication
16.16.
St andard mode
Quick mode
Automatic mode
Analysis mode
Timer mode
Manual mode
Measurement unit
Specifications
SpecificationsSpecifications
St andard drying, Ramp drying,
S tep dryi ng, Quic k dryi ng
0.001 %,
0.01 %,
0.1 %
Sample weight and termination value is automatically set with
ACCURACY and % display. When drying rate reaches the
termination value, measurement is automatically completed. ( 2)
St andard drying, Ramp drying, Step drying S ta ndard dry ing
Sample weight and termination value is automatically set with
ACCURACY and % display. When drying rate reaches the
termination value, measurement is automatically completed. ( 2)
Quick drying
When drying rate is less than preset termination value,
measurement is automatically completed. (
St andard drying, Ramp drying, Step drying S ta ndard dry ing
After heating for the preset drying time, measurement is
automatically stopped. (1min. to 480 min.)
St andard drying, Ramp drying, Step drying S ta ndard dry ing
When pressing the key at an y time, measurement is stopped and
the result is decided.
St andard drying, Ramp drying, Step drying S ta ndard dry ing
Weight (g)
50°C to 200°C (1°C increments)
0.01 %,
0.1 %
0.05%,
0.1 %,
1 %
2)
St andard dr ying,
Quick drying
0.1%,
1 %
MS-70 / MX-50 / MF-50 / ML-50 67
Page 70

MS-70 MX-50 MF-50 ML-50
Operation environment 5°C to 40°C (41°F to 104°F), 85%RH or less (no condensation)
Sample pan
Power source,
Maximum current
(r.m .s)
Maximum consumption
AC100V to 120V , 3A or AC200V to 240V, 1.5A
,
Please confirm that this analyzer is correct for your local
50Hz or 60Hz, Approximately 400W
φ85 mm
MS-70 / MX-50 / MF-50 / ML-50 68
Page 71

16.2.
16.2. Accessories and
16.2.16.2.
Accessories
Accessories
AccessoriesAccessories
Sample pan (φ85 mm, 100 pcs) AX-MX-31
Glass fiber sheet, φ70 mm, ( Filter paper, 100 sheets)
Use for high surface tension liquid sample.
Glass fiber sheet, φ78 mm, ( Glass paper, 100 sheets)
The same sheet as accessory. Use liquid sample.
Test sample (Sodium tartrate di hy dr ate, 30g x12 pcs) AX-MX-33
Halogen lamp for AC 100V to 120 V AX-MX-34-120V
Halogen lamp for AC 200V to 240 V AX-MX-34-240V
Pan handle ( 2 pcs) AX-MX-35
Tweezers (2 pcs) AX-MX-36
Spoon (2 pcs) AX-MX-37
Display cover (5 pcs) AX-MX-38
Dust cover AX-MX-39
RS-232C cable ( 2m , 25 pins - 9 pi ns) AX-MX-40
Calibration mass (20g, equivalent to OIML class F1) AX-MX-41
WinCT-Moisture (CD-ROM: Application software for Windows) AX-MX-42
Certified Temperature calibrator (only for MS-70 and MX-50) AX-MX-43
Accessories and Peripheral
Accessories and Accessories and
Name Order number
Peripheral Equipment
PeripheralPeripheral
Equipment
Equipment Equipment
AX-MX-32-1
AX-MX-32-2
Peripheral
Peripheral equipment
PeripheralPeripheral
AD-8121B Dot matrix compact printer
Function: Statistical function, interval printing, chart printing,
Character: 5x7 dot, height 2.5mm/01.in., 16 characters/line
Power source: AC adapter or alkaline batteries
equipment
equipment equipment
MS-70 / MX-50 / MF-50 / ML-50 69
Page 72

17.
17. Index
17.17.
%/min---------------------------- 18, 21, 26, 28
, ENTER key --------------------------- 13
, PROGRAM key ------------------- 13
, RESET key --------------------------- 13
, SELECT key ------------------------ 13
, START key --------------------------- 13
, STOP key ----------------------------- 13
and key --------------------------- 13
、Standard drying-------- 13, 29, 42
、Quick drying ---------------------- 13
、Ramp drying ------------ 13, 32, 34
、Step drying -------------- 13, 36, 38
Sign ∆ ----------------------------------------- 14
、Operation state indicator ---------- 12
、Level indicator ------------- 12
ACCURACY ------------------- 18, 21, 25, 26
AD-8121B -------------------------------- 43, 69
Ambient condition -----------------------------5
Analysis mode-----------------------------8, 25
Analyzing mode------------------------- 25, 28
Auto print mode------------------------------ 60
Automatic mode--------8, 25, 27, 28, 36, 38
Baud rate -------------------------------------- 50
Breeze break rin g---------------6, 10, 11, 14
Bubble spirit level----------------------- 10, 14
Calendar --------------------------------------- 15
Calibration------------------------------------- 55
Calibration report ----------------------- 57, 59
Cancel key ------------------------------------ 13
CH------------------------------------------------ 41
CH no------------------------------------------ 66
CH pa55---------------------------------------- 41
Character -------------------------------------- 55
Cl pf------------------------------------------ 66
Cl adj ----------------------------------------- 60
Cl err ----------------------------------------- 66
Clo5e-------------------------------------- 41, 66
Clock--------------------------------------- 15, 60
Clr ----------------------------------------- 54, 60
Clr go ----------------------------------------- 64
Comma----------------------------------------- 60
Command ------------------------------------- 52
Continuous measurement----------------- 16
Index
IndexIndex
CR------------------------------------------------51
CTS----------------------------------------------50
data ----------------------------------------53, 60
Data bits ----------------------------------------50
Data memory----------------------------------53
Data memory function ----------------------60
Data output mode----------------------------60
Decimal point----------------------------------60
Display ------------------------------------------12
Display cover----------------------------------1 1
dmy-----------------------------------------------15
Dot -----------------------------------------------60
dp-------------------------------------------------60
Dried sample mass --------------------------28
Dry content-------------------------------------28
Heating pattern ---------------------- 8, 13, 27
Drying rate -------------------------------------25
Drying temperature------25, 27, 33, 35, 58
DSR----------------------------------------------50
Dust cover--------------------------------------11
e --------------------------------------------------66
-e-------------------------------------------------66
Earth terminal ---------------------------------14
ENTER key ------------------------------------13
error0------------------------------------------66
error3------------------------------------------66
error8------------------------------------------66
error9------------------------------------------66
Factory settings-------------------------------60
FG------------------------------------------------50
fUll ----------------------------------------53, 66
Fuse ----------------------------------------10, 11
Glass fiber sheet ------------------------11, 17
Glass-housing------------------- 6, 10, 11, 63
glp------------------------------------------56, 59
GLP-------------------------------43, 56, 59, 60
GMP ------------------------------43, 56, 59, 60
Gram value ------------------------------------28
Grip ------------------------------------------ 6, 10
Halogen lamp ------5, 8, 10, 11, 14, 63, 65
Header------------------------------------------51
Heater cover-----------------------------------10
HI---------------------------------------18, 21, 26
Ht err------------------------------------------66
I/II-------------------------------------------------- 5
id-------------------------------------------------60
ID number---------------------------------55 , 60
Indicators---------------------------------------12
info ---------------------------------------------60
MS-70 / MX-50 / MF-50 / ML-50 70
Page 73

ISO ------------------------------- 43, 56, 59, 60
Key mode-------------------------------------- 60
Keys--------------------------------------------- 12
Leveling foot ----------------------------- 10, 14
LF------------------------------------------------ 51
li5t--------------------------------------------- 45
LO ------------------------------------- 18, 21, 26
Manual mode----------------8, 25, 27, 36, 38
Mass --------------------------------------- 56, 65
mdy ---------------------------------------------- 15
Measurement program--------------------- 25
MEM ---------------------------------- 24, 53, 66
MID.----------------------------------- 18, 21, 26
MOIST /D------------------------------------ 28
MOIST /W ----------------------------------- 28
Moisture content------------------- 28, 55, 60
out ---------------------------------------------- 54
Output format---------------------------- 51, 60
Pan handle -------------------------- 10, 11, 14
Pan support ------------------------- 10, 11, 14
Parity-------------------------------------------- 50
Polarity ----------------------------------------- 51
Power cord ------------------------------- 10, 11
Power input ----------------------------------- 10
Power supply voltage label -------5, 14, 65
Power switch----------------------------- 10, 14
Pre-heating process ------------------------ 16
Printer-------------------------------------- 43, 69
PROG----------------------------------------8, 24
PROGRAM key ------------------------------ 13
prt ---------------------------------------------- 60
quc ---------------------------------------------- 25
Quick drying------------------------- 27, 36, 38
Quick mode -----------------8, 25, 27, 36, 38
Ramp drying -----------8, 27, 32, 34, 36, 38
Ratio -------------------------------------------- 28
RATIO D/W --------------------------------- 28
RATIO W/D --------------------------------- 28
Reference card------------------------------- 10
Repeatability---------------------------------- 16
Report ------------------------------------- 57, 59
RESET key------------------------------------ 13
RS-232C----------------------------- 10, 49, 50
RTS----------------------------------------------50
RXD----------------------------------------------50
Sample mass----------------------------------25
Sample pan--------------------------- 6, 10, 11
5-d------------------------------------------51, 60
SELECT key-----------------------------------13
SG------------------------------------------------50
5ig-----------------------------------------------45
Sodium tartrate dihydrate------------------42
Spoon -------------------------------------------11
Standard accessories------------------10, 11
Standard drying------- 8, 27, 29, 36, 38, 42
Standard mode ------------ 8, 25, 27, 36, 38
START key-------------------------------------13
5td------------------------------------------13, 25
Step drying----------------------- 8, 27, 36, 38
Stop bit------------------------------------------50
STOP key --------------------------------------13
Stream mode----------------------------------60
t-Cal--------------------------------------------58
Temperature------------------------------------ 5
Temperature sensor-------------------------58
Terminator --------------------------------50, 51
Test sample-------------------------------10, 42
Thermogravimetric analysis---------------- 9
Thermometer----------------------------------58
Timer mode------------- 8, 25, 27 , 28, 36, 38
Test sample------------------------------------11
t-Up ---------------------------------------------66
Tweezers---------------------------------------11
TXD----------------------------------------------50
U-a------------------------------------------13, 25
U-m------------------------------------------13, 25
Unit------------------------------------------28, 51
U-t------------------------------------------13, 25
Weighing sensor ------------------------55, 56
Wet sample mass----------------------------28
WinCT--------------------------------------- 8, 49
WinCT-Moisture -------------------------- 8, 49
ymd-----------------------------------------------15
Zero display------------------------------------13
MS-70 / MX-50 / MF-50 / ML-50 71
Page 74

MEMO
MS-70 / MX-50 / MF-50 / ML-50 72
Page 75

MS-70 / MX-50 / MF-50 / ML-50 73
 Loading...