

Page 1
Analytical Balance
BM-5
BM-5D
BM-20
BM-22
BM-252
BM-200
BM-300
BM-500
1WMP
D4002195F
Page 2

© 2019 A&D Company , Limited. All rights reserved.
No part of this publication may be reproduced, transmitted, transcribed, or translated into any lang uage in
any form by any means without the written permission of A&D Company, Limited.
The contents of this manual and the specifications of the ins trument covered by this manual are subject to
change for improvement without notice.
Windows, Word and Excel are regi stered trademarks of Microsoft Corpora tion.
Page 3

Contents
Basic Operation
Adapting to the Environment
Selecting Functions
1. Introduction .............................................................................................................................. 3
1.1. Features ............................................................................................................................... 4
1.2. Compliance .......................................................................................................................... 5
2. Unpacking the Balance ........................................................................................................... 6
3. Installi ng th e Bala nce and Prec auti ons ................................................................................... 9
3.1. Installi ng th e Bala nce ........................................................................................................... 9
3.2. Precautions Before Use ..................................................................................................... 12
3.3. Precautio ns D uri ng Us e ..................................................................................................... 14
3.4. Precautio ns After Use ........................................................................................................ 15
3.5. Precautio ns for P ower Su pply ........................................................................................... 15
4. Display Symbols and Key Oper ati on .................................................................................... 16
5. Weighing U ni ts ...................................................................................................................... 17
5.1. Units ................................................................................................................................... 17
5.2. Storing Active Units ............................................................................................................ 21
5.3. Selecting Uni t s and Weighing Modes ................................................................................ 22
6. Weighing................................................................................................................................ 24
6.1. Basic Operat ion (Gram Mode) .......................................................................................... 24
6.2. Smart Rang e ...................................................................................................................... 26
6.3. Counting Mode (PC) .......................................................................................................... 27
6.4. Percent Mode (%) .............................................................................................................. 29
6.5. Ionizer (Neutraliz ati on D ev ice) ........................................................................................... 30
6.6. Monitoring the Clock and Environment al S ensor s ............................................................ 32
6.7. Repeatability T est ............................................................................................................... 33
7. Response Adj ustment ........................................................................................................... 34
7.1. Automatic Response Adjus tment ...................................................................................... 34
7.2. Manual Response Adjust ment ........................................................................................... 35
8. Calibration ............................................................................................................................. 36
8.1. Calibration Group ............................................................................................................... 36
8.2. Automatic Se lf Cali br ation ................................................................................................. 37
8.3. Calibratio n U sing t he Int ern al M as s ................................................................................... 38
8.4. Calibratio n Test Using the I nter nal Ma ss ........................................................................... 39
8.5. Calibratio n U sing a n Ext ern al Weight ................................................................................ 40
8.6. Calibratio n Test Using an External Weig ht ........................................................................ 41
8.7. Correcting the In tern al Mass Value ................................................................................... 42
9. Function Switch and Initialization .......................................................................................... 43
9.1. Permit or Inhi bit .................................................................................................................. 43
9.2. Initializi ng the B alan ce ....................................................................................................... 44
10. Function T able ....................................................................................................................... 45
10.1. Setting the Function T able ................................................................................................. 45
10.2. Details o f th e F unct io n Table ............................................................................................. 47
10.3. Descriptio n of t he C l ass "Env ir on men t, Dis pl ay " ............................................................... 49
10.4. Description of the Item "Data Output Mode" ..................................................................... 51
BM series 1
Page 4

10.5. Description of the Item "Data Format" ............................................................................... 52
Interface and Communication
Maintenance
10.6. Data Format Examples ...................................................................................................... 55
10.7. Clock and Calendar Function ............................................................................................ 57
11. ID Number and GLP Report.................................................................................................. 58
11.1. Setting the ID Number ....................................................................................................... 58
11.2. GLP Report ........................................................................................................................ 59
12. Data Memory ......................................................................................................................... 65
12.1. Notes on U sing D at a M e mory ........................................................................................... 65
12.2. Data Memory for Weighing Data ....................................................................................... 65
12.3. Data Mem ory for C ali br ati on an d C ali bra tion Test Data .................................................... 69
13. Underhook ............................................................................................................................. 71
14. Density M easur e ment ( Specific gravity ) ............................................................................... 72
15. Password Function ................................................................................................................ 75
15.1. Balance So f tw are Version 1.50 to 1. 64 ............................................................................. 75
15.2. Balance Sof twar e Version 1.660 or later ........................................................................... 76
15.3. Using the Password Function ............................................................................................ 77
15.4. Entering th e Passw ord Be for e We ighi ng .......................................................................... 78
15.5. Logging Out ....................................................................................................................... 80
15.6. Stor i ng or C h angi ng th e P assw or d .................................................................................... 81
15.7. Changing the Passw ord .................................................................................................... 82
15.8. Deleting th e Passw ord (U5ER 0 1~10) ............................................................................ 83
15.9. Forgotten Pas sw ord ........................................................................................................... 83
16. Standard Input and Output Interface ..................................................................................... 84
16.1. RS-232C Interface ............................................................................................................. 84
16.2. Connecting to Peripheral Equipment ................................................................................. 85
16.3. Commands ........................................................................................................................ 89
17. Key Lock Function ................................................................................................................. 94
17.1. Locking All the Keys ........................................................................................................... 94
17.2. Locking t he Specified Key s ................................................................................................ 95
18. Checking th e Bala nce S oftw are Version............................................................................... 95
19. Maintenance .......................................................................................................................... 96
19.1. Cleaning an d Handli ng t he Bal ance .................................................................................. 96
19.2. Error Codes ........................................................................................................................ 96
19.3. Other Dis play ..................................................................................................................... 98
19.4. Checking th e Bala nce P erfor manc e and Env iro nmen t ..................................................... 99
19.5. Asking for Re pai r ............................................................................................................... 99
20. Specifications ...................................................................................................................... 100
20.1. External D ime nsi ons ........................................................................................................ 102
20.2. Options and Peripheral Equipment ................................................................................. 103
21. Terms/Index ......................................................................................................................... 107
21.1. Terms ............................................................................................................................... 107
21.2. Index ................................................................................................................................ 108
2 BM series
Page 5

1.
Introduction
About this manual
Balance software version
18. Checking the Balance Software Version
This manual describes how the BM series balan ces wo rk and how to ge t the mo st out of them in
terms of performance. Read this manual thoroughly before using the balance and keep it at hand
for future r efere nce.
This manual cons ists of the fol low ing fi ve par ts:
Basic operati on
Adapting to the environment
Selecting functi ons
Interface and communication
Maintenance
..............................
...........
..........................
..........
..................................
Describes precautions, the balance's construction and basic
operation.
Describes response (and stability) adjustment to adapt to the
environmen t w her e t her e is v ibr ati on or dr afts , t he w ay to
maintain w eig hing pr ec i sio n i n a v ari a tio n o f a mbi ent
temperatur e, cal ibra tion an d cali brati on tes t.
Describes fu ncti ons o f the bal ance .
Describes the ser i al i nt e rfac e us e d for c o mmuni c ati ng w ith a
computer t hat req u ests w eig hing data and controls the
balance, and for us e with a pr int er
Describes mai nt ena nc e, er r or c ode s, tr oubl es ho oti ng,
specifica tions and opti ons .
Some balance operations vary depending on the balance software version. For details on
checking t he s o ftw are ver si on , r efer t o “
”.
BM series 3
Page 6

1.1.
Features
15. Password Function
BM-5D
BM-22
BM-5, BM-5D, BM-20
BM-22
AD-1688
A built-i n i oni z er can eliminate static electricity from the weighing sample before weighing,
reducing wei ghi ng error s.
Each electrode unit of the ionizer is desi g ned t o be re mov ed, cl ea ned an d r epl ac ed.
Automatic self calibration, using the internal mass, adapting to changes in temperature.
Response adj ust ment a dapti ng to dr afts and/or vibr ation in the e nvir onmen t automatically.
Memory function to store weighing data and calibration data.
When only weighing data is stored, a maximum of 200 data can be stored.
Interval mode to stor e the weig hing data per io dical ly.
Good labor at ory pr acti c e ( GLP) / Good manufacturing practice (GMP) data can be output using
the RS-232C serial inter face .
A built-i n cl oc k and cal end ar t hat c a n add the tim e and dat e to th e outp ut dat a. (Changing the
clock sett ing c an b e l i mite d to t he ad mini st rat or . Re fer to “
The password function can be use d t o r es tri ct bala nc e us er s or c ha nge s t o t he fun cti on s et ti ngs .
”.)
The key lo ck func ti on disables the bal anc e key op erati on an d enabl es the bal anc e to be o perat ed
only by comma nds fr om ext ernal devi ces.
Underhook , for meas uri ng de nsi ty a nd w eig hing m agn eti c mat eri als .
Multiple wei ghi ng unit s w ith most of the co mmo n units used ar oun d the w orld.
Gram, Milligram, Counting mode, Per cent mode, Ounce (Avoir), Troy Ounce, Metric carat, Momme,
Pennyweight, Grain (UK), Tael (pres et at the factory), Tola (India), Messghal and Densi ty mode
The
The micro tube holder is included in the accessories of the
Density mod e for cal cul ating the d ensity of a sol id.
The BM series balances are equip ped wit h an RS-2 32 C s eri al i nt er fac e an d a USB inter face t o
(readability: 1 μg) after zer oing a tare wei ght , if wi thin the w eig hing c apac ity .
communicate with a computer. While outputting data to a printer using the RS-232C interface,
data can be transmitted to a computer at the same time using the US B i nter fac e.
Using the RS-232C interface and the Windows communication tools softw are (WinCT) enables bi-
directional communication between a Windows computer and the balance.
The current v ersi on of the WinCT can be downl oaded from the A&D website.
and
are equi ppe d wit h a smart range function to weigh in the precision range
and
.
Connecting the US B inter face o f the bal anc e by a cabl e to a Window s comp uter allow s
transmissi on of t he weig hing data t o Excel or Word.
When multipl e bala nces have th e BM-08 Ethern et i nter fa ce i nstal l ed i n pl ace of th e U SB i nt er fac e
and connected to a LAN, data can be acquired from each of them using the WinCT-Plus so ftw ar e.
When the accessory data logger (
using a computer.
4 BM series
) is c onnected, weigh ing data can be stored without
Page 7

1.2.
Compliance
1.2.1.
Compliance with FCC Rules
Please note that this equipment gene rates, uses and can radiate radio frequency energy. This
equipment has b een tes t ed and h as been f ound to com p ly with the limit s of a C las s A comp utin g
device pursuant to Subpart J of Part 15 of FCC rules. These rules are designed to provide
reasonable protection against interference when equipment is operated in a commercial
environment. If this unit is operated in a residential area, it may cause some interference and
under these circumstances the user would be required to take, at his own expense, whatever
measures ar e neces sar y to eli mina te the i nter feren ce.
(FCC = Fe der al C om muni ca tio ns Co mmi ssi on in th e U. S. A.)
BM series 5
Page 8
2.
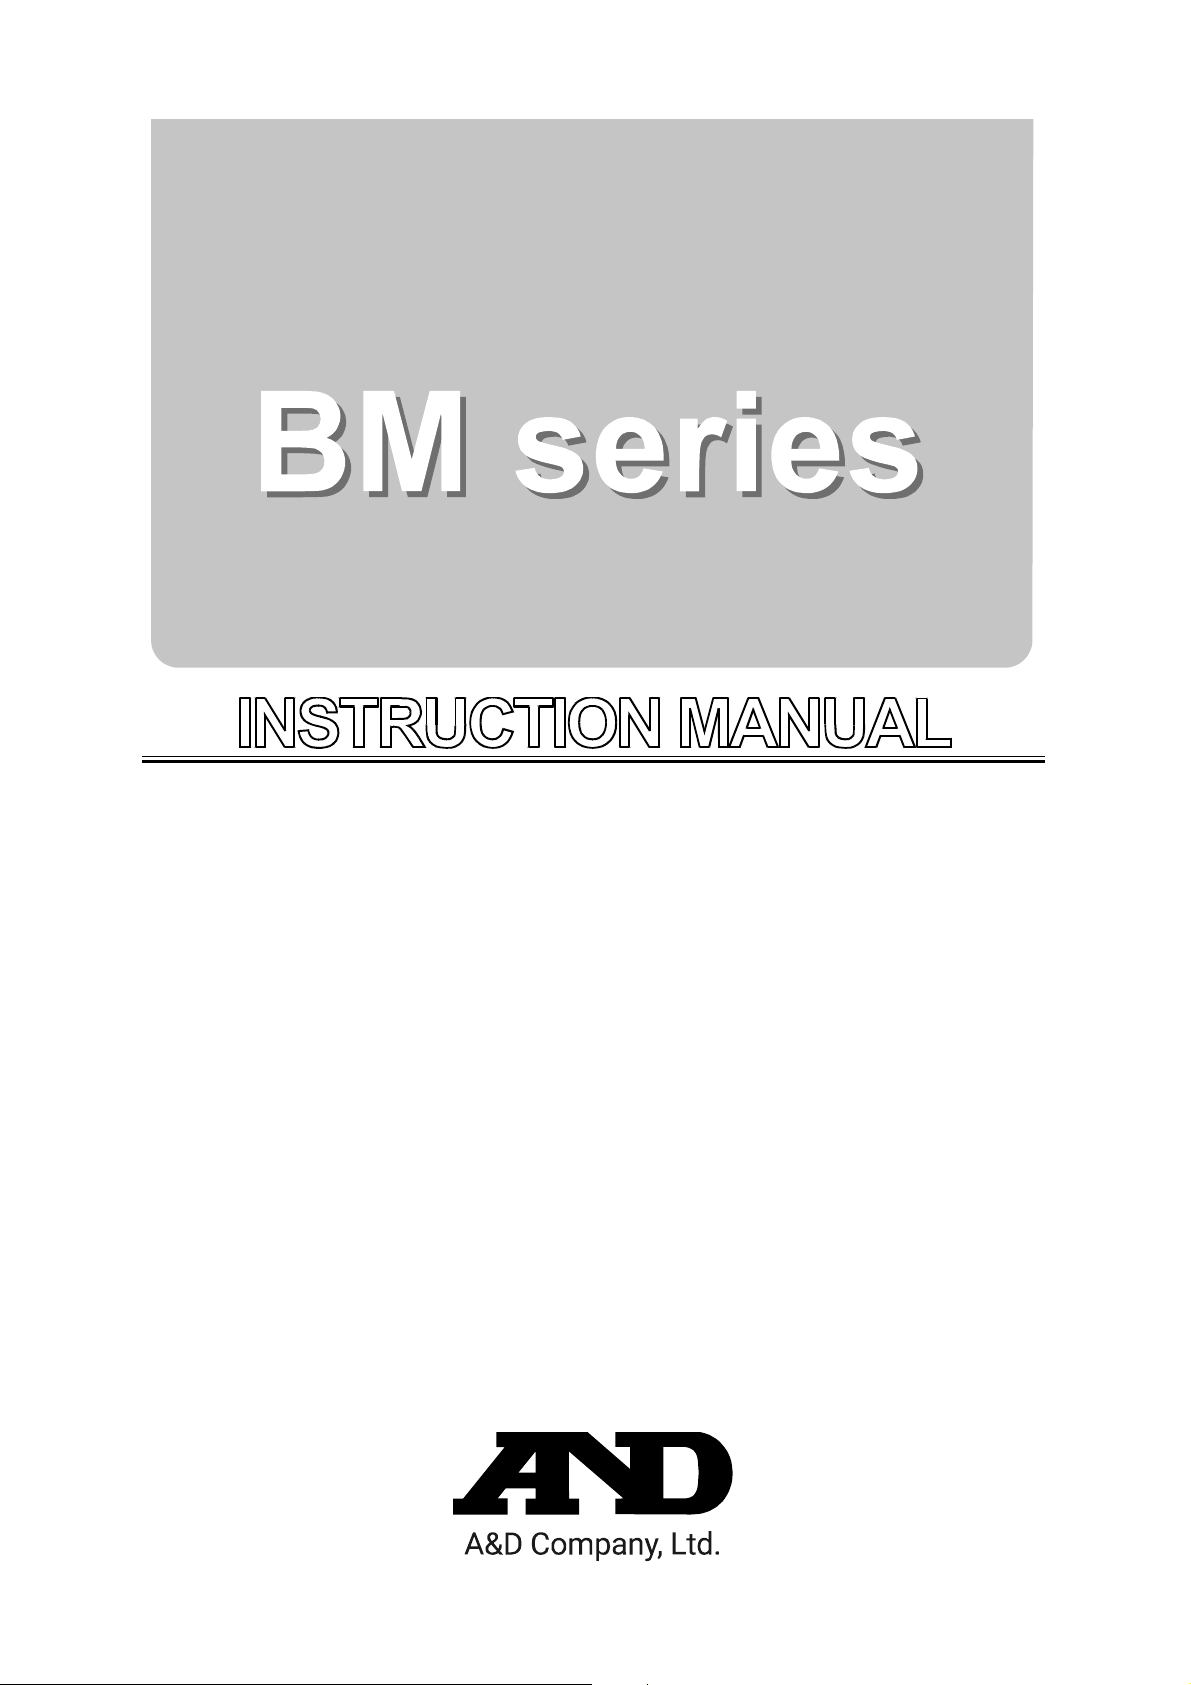
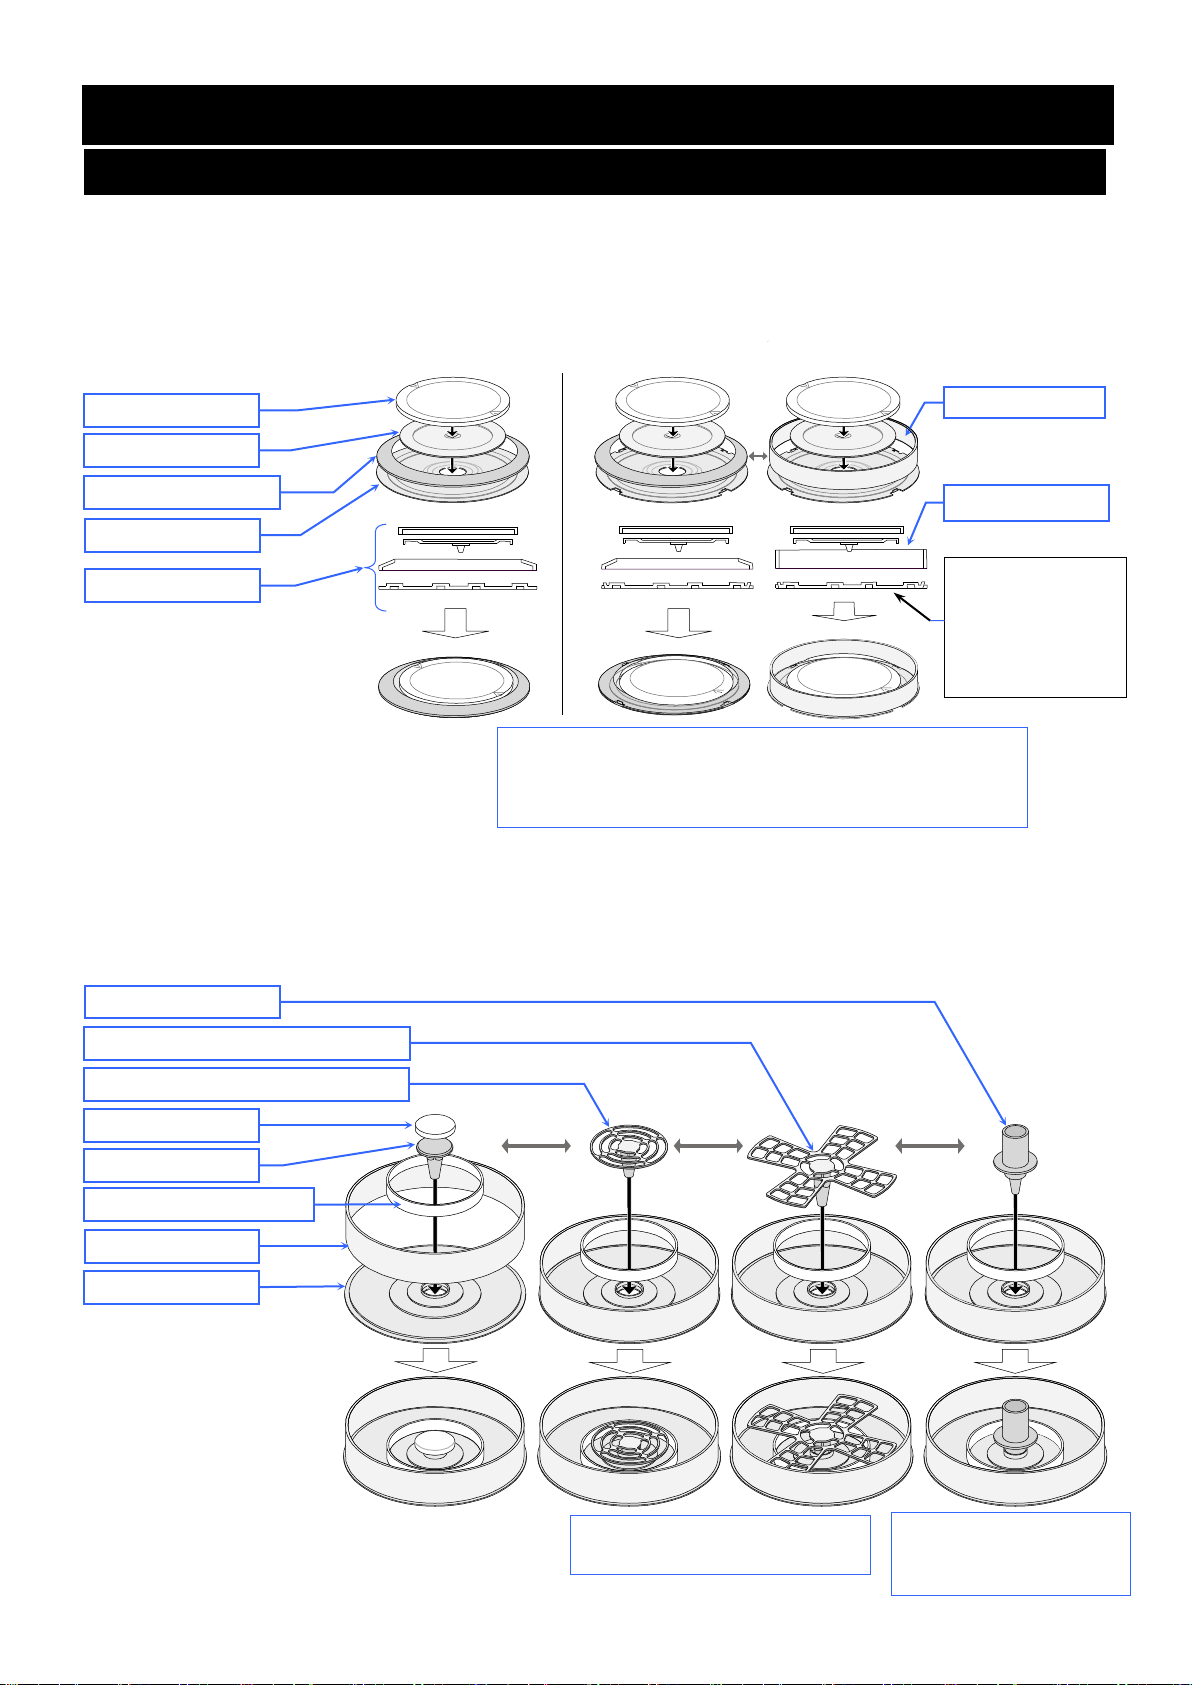
Unpacking the Balance
Accessories for each model
BM-5, BM-5D, BM-20, BM-22
BM-252
BM-200, BM-300
BM-500
Tabletop Breeze break (M)
Unpack the balan ce carefull y. Keep the pa cking materia l to be used fo r transport ing the balance
in the future. See the illustrations to confirm that everything is included.
Small weighing Large weighing
pan for filter pan for filter
Weighing pan Pan support
Micro tube holder
Small fine range ring
Fine range ring
Dust plate
φ15, 0.8 mL φ12, 0.3 mL φ8, 0. 05 mL
Large Medium Small
Round aluminum analytical pans (
10 pieces each
Weighing pan Pan support
Fine range ring
Breeze break ring
Dust plate
)
Weighing pan
Pan support
Breeze break ring
Dust plate
6 BM series
Page 9
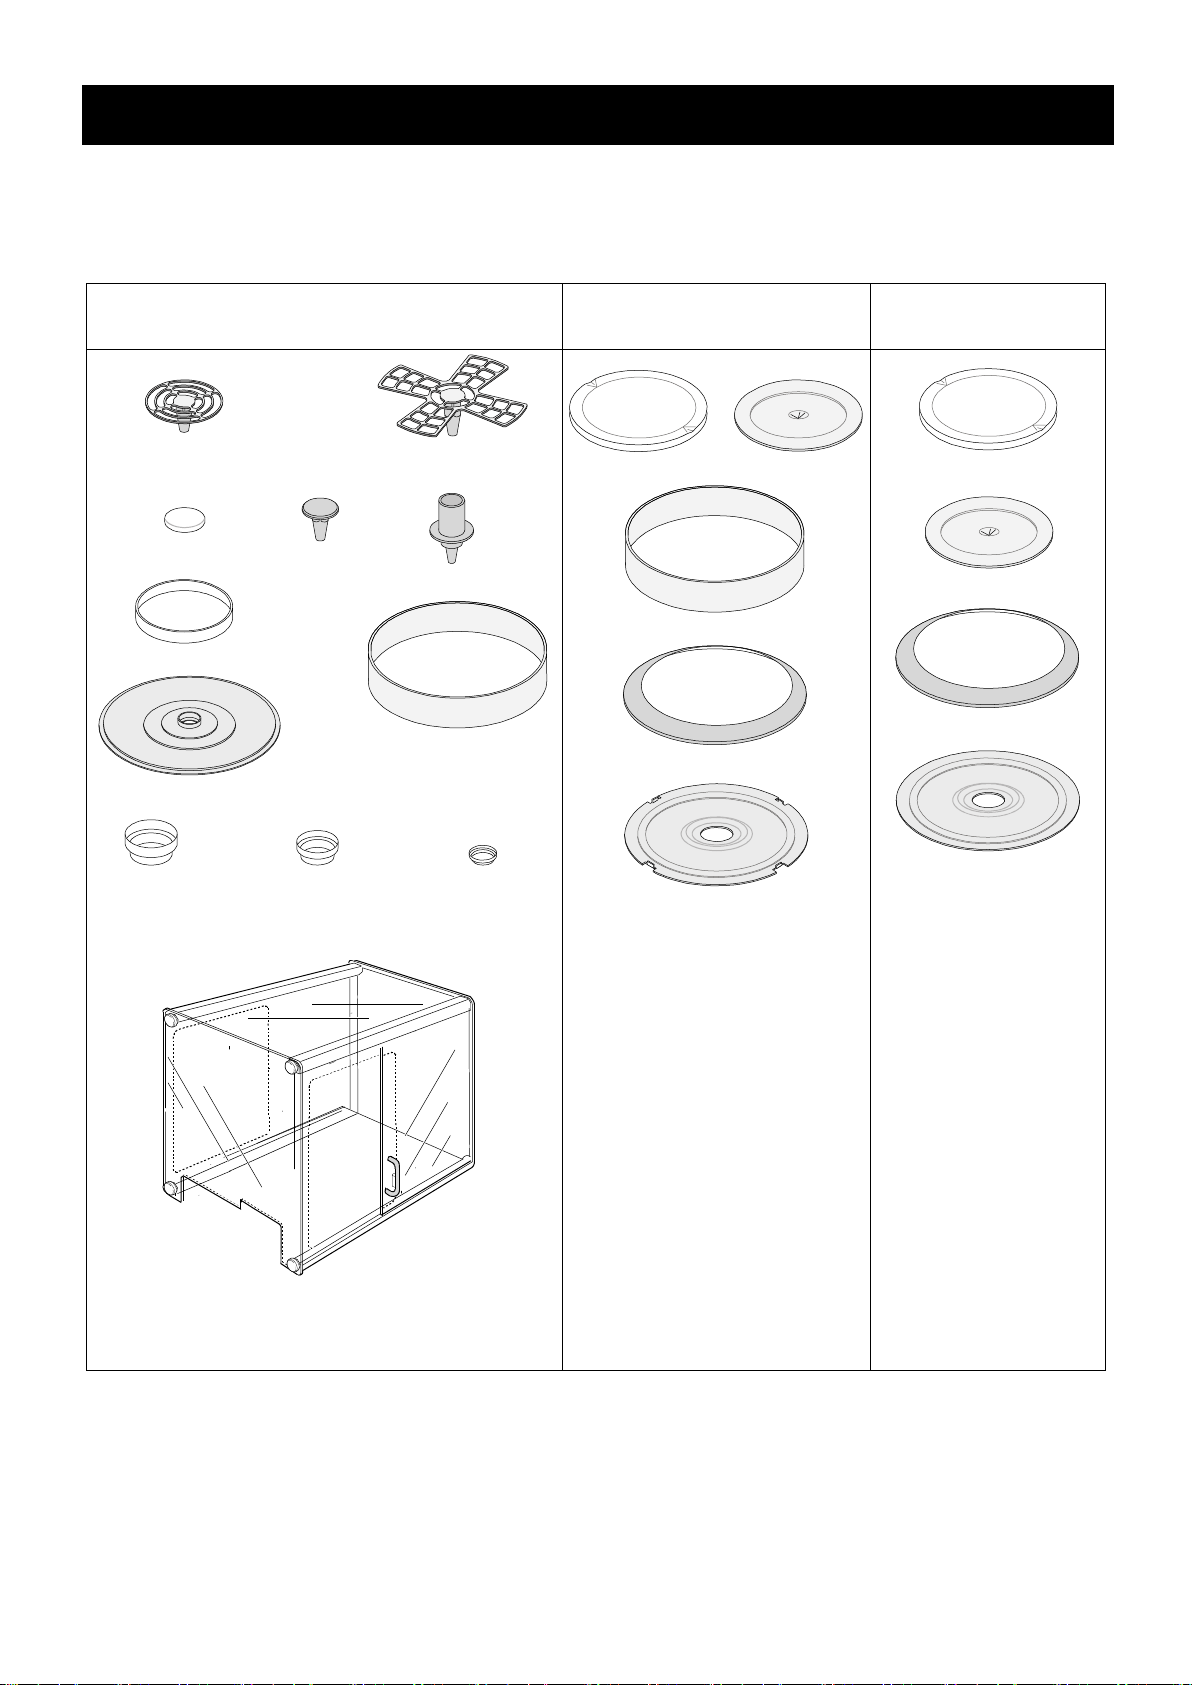
Common accessories
AC adapter AC adapter labels
Data logger
232C interface of
(1.5 m or 1.8 m)
(PET resin)
Tweezers
Use it to avoid temper atur e changes
n the
weighing chamber, thus to perform
D-sub 9 pins
Positions to place the AC adapter labels
Attach t he AC adapter l abel s to the AC adapter
as shown in the illus trati on.
Notes
Please confirm that the AC adapter ty pe is correct for your local
voltage and receptacle type.
Please use the dedicated AC adapter specified for the balance.
Do not use the AC adapter provided with the balance for other
models or equipment with which the AC adapter may not be
compatible.
If you use the wrong AC adapter, the balance and other equipment
may not operate properly.
USB cable
Body cover
BM series 7
Display cover
Cover during storag e to prevent dust and dirt contamination.
The cover can b e used for the b alanc e wit h the AC adapter and other cabl es
connected.
Separation plate
If unnecess ary, r emov e it.
AD-1688
The weighing data can be
stored when connected to
the RSthe balance.
AD-1689
Tweezers for handling a weight.
due to having your hand i
accurate calibratio n.
Page 10
Grounding terminal
Anti-theft device
AC adapter jack
USB interface
External key jack
Cap the termi nal with the acces sory
RS-232C serial interface
D-su b 9 pins
Outlet example
Serial number
Ionizer
Electrode unit of the
ionizer
Separation plate
If unnecessary , remove it.
Joint handle
Bubble spirit level
Leveling foot
Glass door handle
The handle can be jointed to the joint handle
Neutralization
area
Glass door handle
Display cover
LED of the ionizer
Example of BM-20
Weighing
chamber
Display
Keys
When jointed to the right (left) g lass
door handle, the right (left) glass
door c an be opened or closed with
the left (right) joint handle.
The handle for the glass door .
rubber cap whe n it is not used.
8 BM series
Page 11
3.
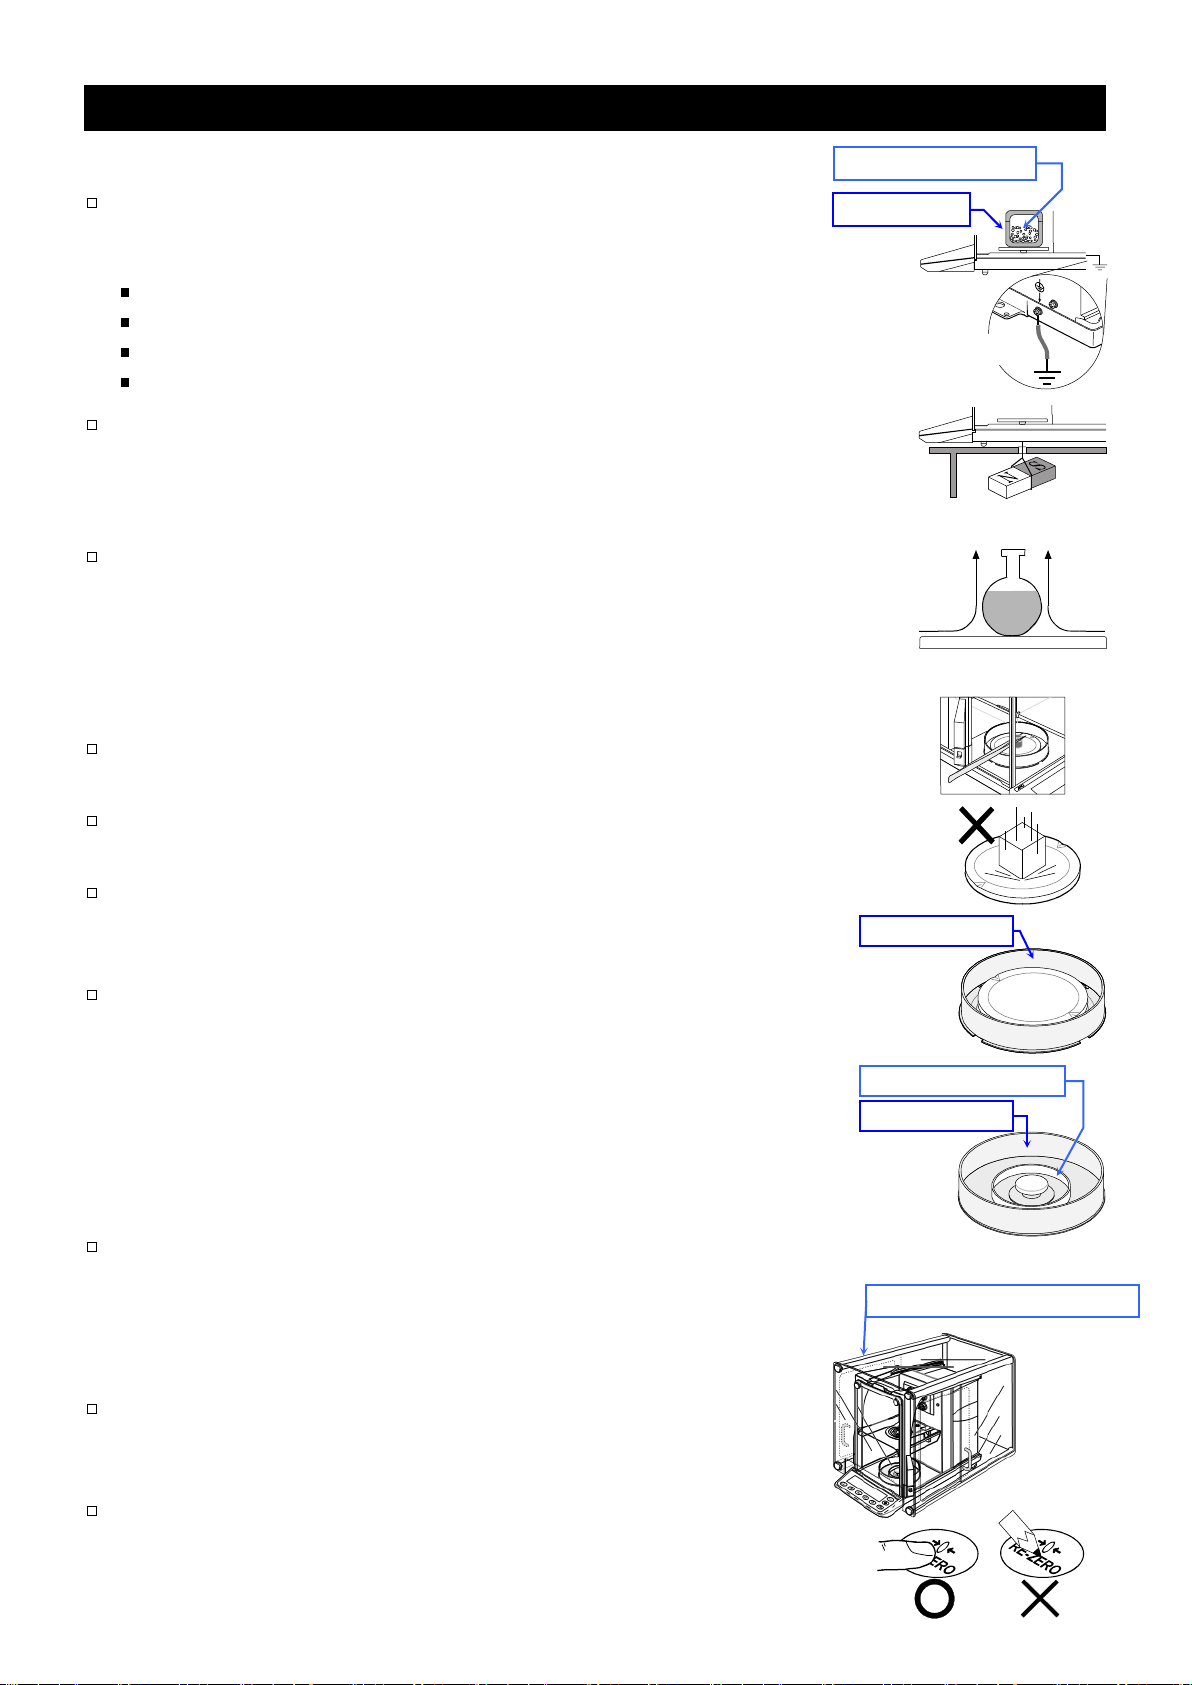
Installing the Balance and Precautions
3.1.
Installing the Balance
3.2. Precautions Before Use
BM-200, BM-300, BM-500 BM-252
BM-5, BM-5D, BM-20, BM-22
Weighing pan
Breeze break ring
Dust plate
Pan support
Use the fine r ange ri ng in pl ace o f the bre eze br eak
ring
with
Fine range ring
Sectional view
Pan support
Weighing pan
Small fine range ring
Dust plate
Fine range ring
Large weighing pan for filter
Small weighing pan for filter
Choose the w eighing pan
appropriate to the filt er s ize.
Micro tube holder
Use the holder for
of φ12 m m or less .
Fine range ring
Note
1 Place the balance on a sol id wei ghi ng tabl e. Refer to "
a place to install the balance.
2 Assemble the weighing pan and other parts in accordance with the model and use as sh own bel ow.
" for det ails on
to avoid err ors ca used by draf t s when weighing
a readability of 0.01 mg.
The mounting
direction (head /
tail) of the dust
plate.
Note When using the micro tube holder for the BM-5 and BM-5D:
The micro tube holder is ap proxima tely 2 g heavier than the sta ndard pan (w eighing pan a nd
pan support). When a micro tube holder is used for the BM-5 and BM-5D, the available weighing
range will be up to approximately 3 g including the tare such as a micro tube and test tube.
BM series 9
micro tube or t est tu be
Page 12
Assembling the parts in the weighing chamber
3.1.2
Removing and attaching the separation plate
Adjusting the Level
Screw
Hook
Separ ation plate
Leveling
f
BM-252, BM-200 BM-252
BM-300, BM-500
Bubble spirit level
BM-5, BM-5D, BM-20, BM-22
oot
3 If the separation plate is not necessary, remove the
screw and take the plate off. Refer to "
.
".
4 Adjust the level of the balance using the leveling feet.
(Refer to "
" on page 14.)
5 Confirm that the AC adapter type is correct for your local
voltage and power receptacle type.
6 Connect the specified AC adapter to the balance. Warm
up the balance for at least one hour wit h nothing on the
weighing pan.
10 BM series
Page 13
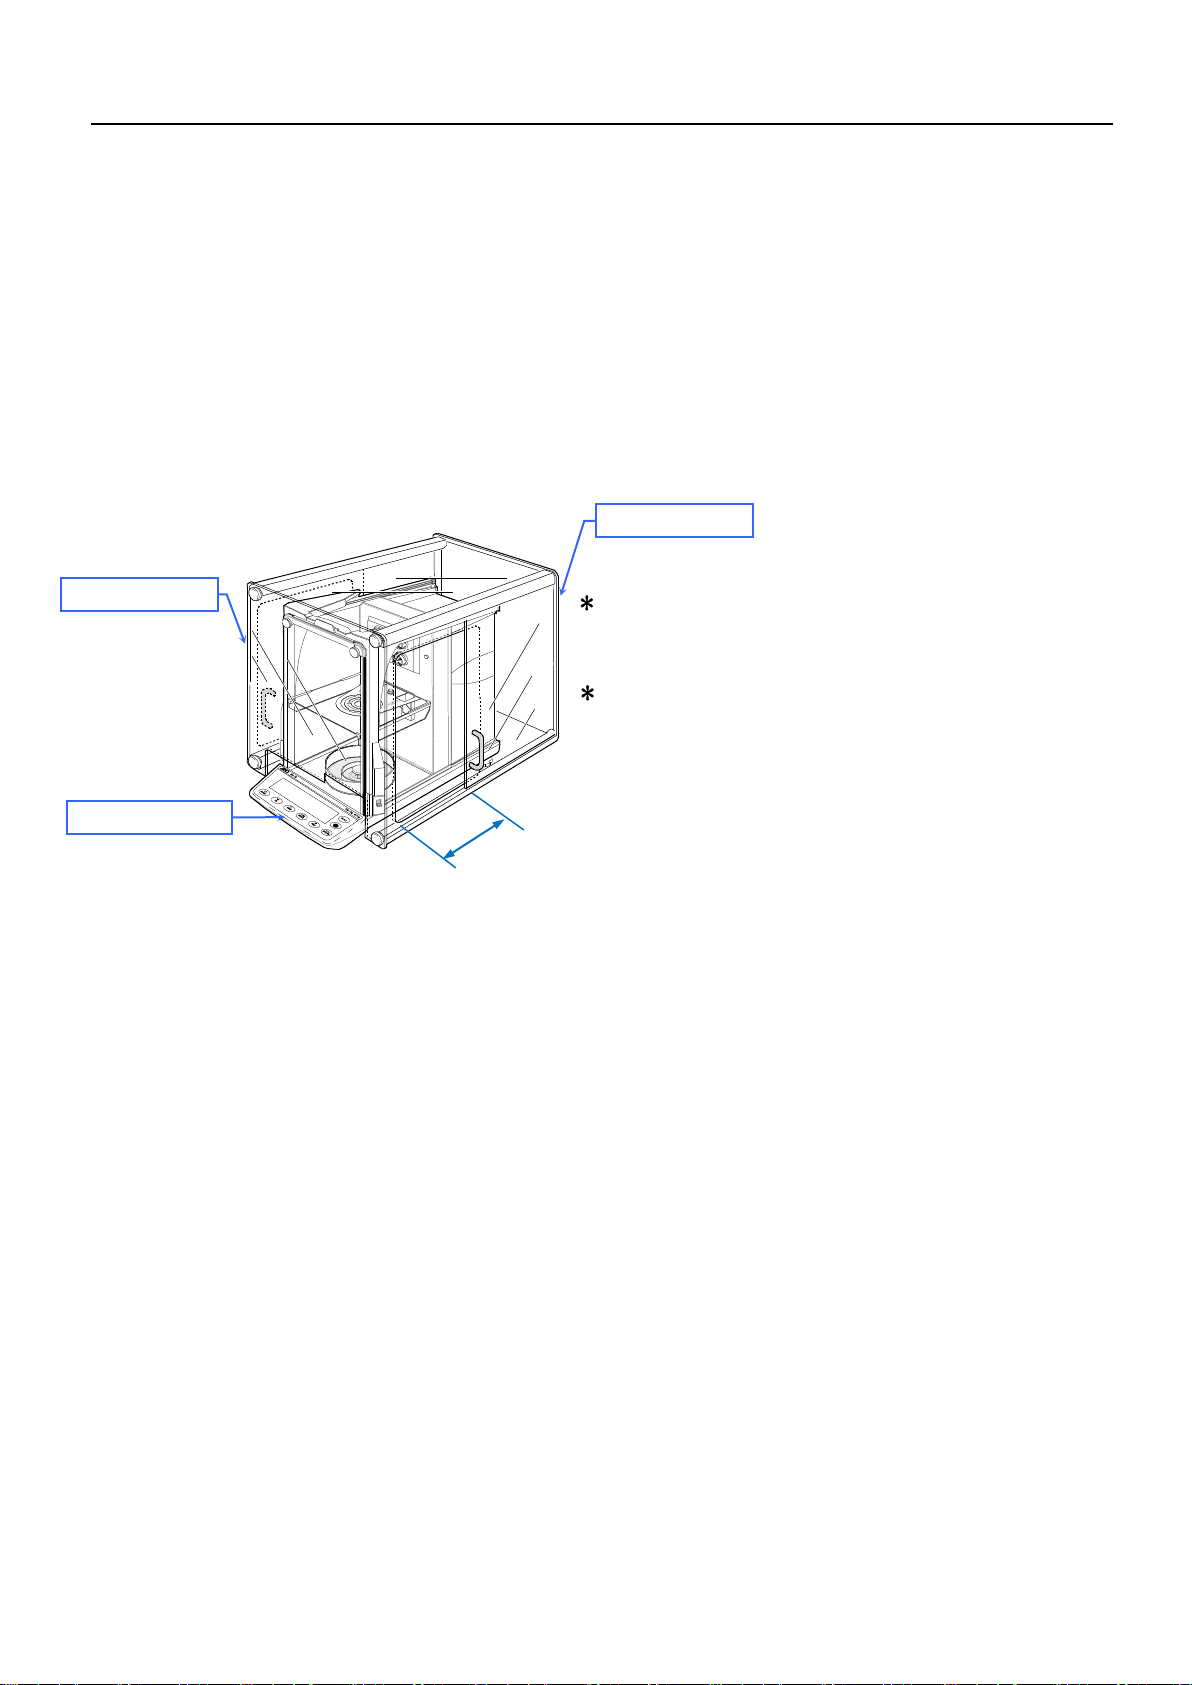
3.1.1.
•
•
BM series
Front p anel
Rear panel
A
How to use the Tabletop breeze break (For BM-5, BM5D, BM-20, BM-22)
Features
T his Tabletop breeze break is used to prevent from ambient drafts due to air conditioning and body motion so as
to reduce weighing error.
Be sure to install this breeze break on the balance, as it is affected by even the slightest wind.
This breeze break is designed for the BM series with most suitable use.
The transparent panel assembly consists of antistatic plastic material, which protects the balance from static
electricity.
The rear panel is equipped the hole that i s used to pass the RS-232C and AC adapter cables through.
How to install
We recommend to install the tabletop breez e break (M) in a
position where the display of the balance can be seen
easily and the balance can be operated properly .
Minimize the opening width A of the slide door as narrow
as possible so as to reduce influence of ambient drafts.
Caution
Do not use organic solvents to clean the breeze break because it may damage the transparency and anti-static
properties of the p anels.
Use a sof t l int free clot h dampe ned wi th warm wate r a nd a mil d de tergent whe n cle aning the br eeze br eak.
BM series 11
Page 14

3.1.2.
Removing and attaching the separation plate
Removing the separation plate
Attaching the separation plate
3.2.
Precautions Before Use
BM-5, BM-5D, BM-20
BM-22
AD-
1671
AD-8922A
BM-5, BM-5D, BM-20
BM-22
AD-1672/AD-1672A
AD-1676
Hook
Screw
Step
1
Step
1
Step
2
Step
3
Step
3
Step 4 Hook
Separation plate
Note Take care not to dama ge th e sep ar atio n p lat e when handlin g it.
1 Support the separation plate and
remove the screw from the plate.
2 Lift the plate and unhook the hooks.
3 Rotate the plate on the axis of the front edge.
Rotate the plate on the axis of the back edge.
4 Remove the plate from the chamber.
Use the arrow s in rev erse t o atta ch the pl ate.
5 Insert the plate i nto the chamber.
6 Rotate the plate on the axis of the back edg e.
Rotate the plate on the axis of the front edge.
Level the pla te.
7 Insert the hooks and hook the plate.
8 Support the plate and secure t he scr ew.
To ensure that you g et the m ost from y our bal anc e, please tr y t o follow thes e conditi ons as closel y as
possible, especiall y for the
The best oper a ting t e mper at ure i s ab out 20° C / 6 8°F at a bout 50 % R el ativ e Hu midi ty .
The weighing room should be free of dust.
Clean the weighing chamber and its surroundings to prevent foreign matter from invading,
especially when wei ghi ng a v ery sm all a mou nt of sample.
The weighing table shoul d be soli d and free from vibr ation, drafts ( such as frequen tly openi ng doors
or windows) and as level as possible. W e recommend that you use the anti-vibration table (
) and the remote c ontroller (
Do not install the balance where it will be subject to vibration. Corners of rooms on the first floor are best.
Do not install the balance near a heater, air conditioner, or in a breeze. The influence of breezes
can be reduced by using the tabletop breeze break (L) (
breeze break (M) (
).
) for the
and
that are sensitive.
and
.
) or t he tabletop
Do not instal l the b alanc e in dir ect sun light . Av oid ex cessi ve te mperat ure c hang es.
Do not use the bal anc e near o ther equip ment w hich pr oduc es mag neti c fiel ds.
Adjust the lev el of t he bala nce usi ng th e lev elin g feet .
Please warm u p the bal anc e for at least one ho ur. Plug in the AC adap ter as usual .
Calibrate the balance if it is installed for the first time or relocated, or w hen a weig hing pan is repl aced.
Ensure a stabl e pow er s our ce w hen usi ng th e A C a dap ter .
Do not place or use the balance where there is flammable or corrosive gas present.
12 BM series
Page 15
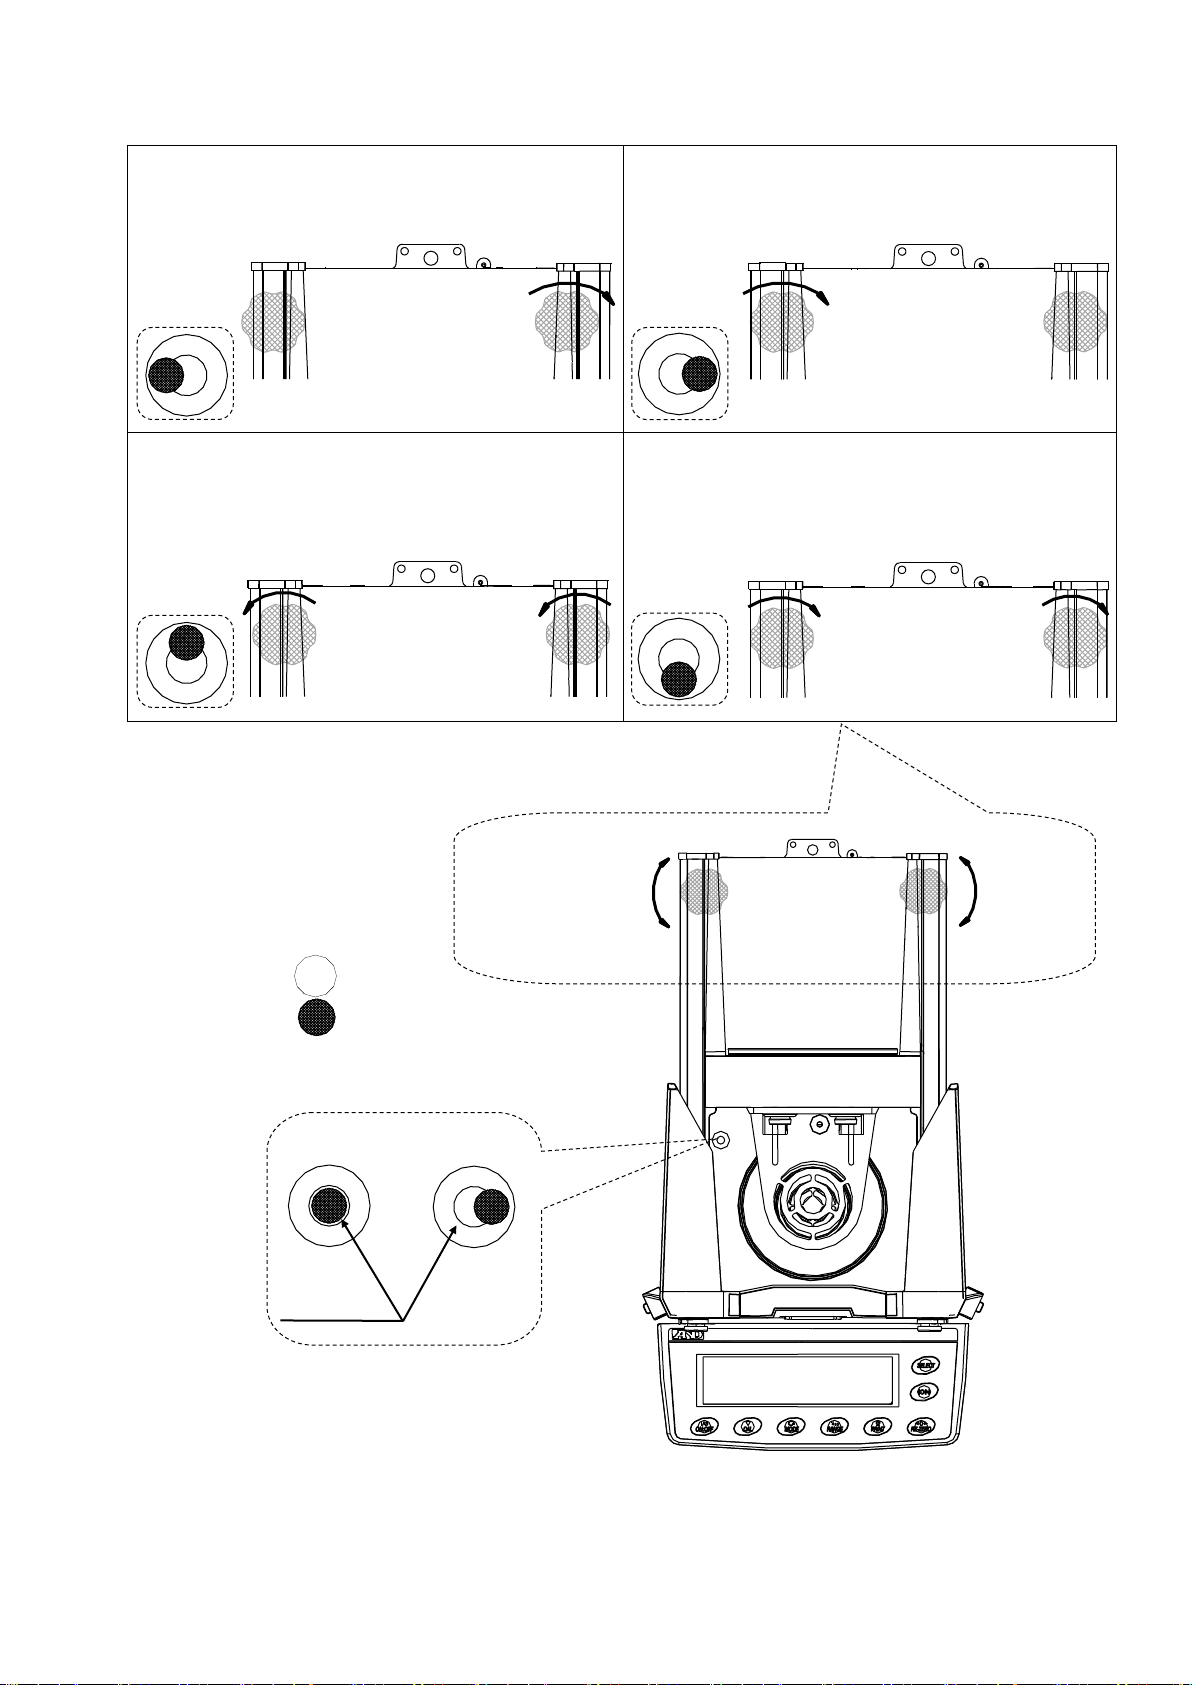
Adjusting the level
When the bubble is off to the left:
on the rear right in the
When the bubble is off to the right:
Turn the leveling foot on the rear left in the
When the bubble is off to the backward
:
leveling feet on the rear in the
When the bubble is off to the forward
:
Turn both leveling feet on the rear in the
Up
Down
Bubble spirit level
Turn the leveling foot
clockwise direction.
Level
clockwise direction.
Level
position
Turn both
counterclockwise direction at the same time.
Level
Red circle
Bubble
OK NO
Red circle
Leveling foot
Down
position
clockwise direction at the same time.
Level
水平器
Leveling foot
Up
BM series 13
Page 16
3.3.
Precautions During Use
13. Underhook
BM-252
BM-5
BM-5D, BM-20
BM-22
BM-5, BM-5D, BM-20
BM-22
Grounding
Metal case
Charged mat erial
Magnetic material
40°C
20°C
Draft Weighing pan
Fine range ring
BM-252
Shock
BM-5
BM-5D
BM-20
BM-22
Fine range ring
Small fine range ring
Tabletop breeze break (M)
BM-5
BM-5D
BM-20
BM-22
Note the foll owi ng i t ems t o ge t ac cur at e w eig hi ng dat a.
Discharge static electricity from the weighing sample. When a
weighing s ampl e (pl as ti cs, ins ul at or, etc .) co ul d hav e a s ta tic
charge, the weight value is influenced. Ground the balance, and
Eliminate the static electricity using the built-in ionizer.
Try to keep the ambient humidity at or above 45% RH in the room.
Use a metal shield case.
Wipe a charged material (plastic sample, etc.) with a damp cloth.
This balance us es a s trong magnet as part o f t he bal a nce assembly,
so please use caution when weighing magnetic materials. If there is
a problem, use the underhook (refer to "
suspend the m aterial away from th e in fluence of t he mag net.
Eliminate temperature differences between the weighing sample and
the environment. When a sample is warmer (cooler) than the ambient
temperature, the sample will appear lighter (heavier) than the true
mass. This error is due t o the r ising (fall ing) draft around t he sa mple. If
you touch the sample, the same type of error will occur. Do not touch
the sample directly with your hand. Use tweez ers or other to ols.
") to
Do not drop things upon the weighing pan, or place a weight
beyond the range of the balance on the weighing pan.
Make each weighing gently and quickly to avoid errors due to
changes in t he e nv iro nm ental c o ndi tio ns.
Use the fine range ring and attach the separation plate (in condition
at shipping from factory) in order to avoid weighing errors caused by
drafts when weighing using the
Use the small fine range ring and fine range ring and attach the
separation plate ( in condition at shipping from factory) in order to avoid
weighing err ors caused by dr afts wh en weighing using the
reduce the influence of breezes, mini mize o perati on o f doors o f the
weighing c ham ber . In addition , i n or der to w eigh m ore acc ura tely
while reduc i ng t he ef fect s o f the s urro undi ng environment, be sur e t o
install the tabletop br e ez e br eak (M) to the weighing cha mber .
The weighing value of the
may change after the stabilization indicator is displayed. We
recommend that you set a certain amou nt of wait time (appro x. 10
seconds) before reading the value after the stabilization indicator is
displayed.
or
(readability: 0.01 mg and 0.001 mg). To
(r eadability: 0.01 mg).
and
,
If contamination may be a problem, perform sampling operations
outside the weighing c hamber in order to prevent the sample from
scattering in the weighing chamber.
Take into consideration the affect of air buoyancy on a sample
when more acc uracy is requi red .
14 BM series
Page 17

Do not use a sharp instr ument (suc h as a pen cil or ball p oint pe n) to
3.4.
Precautions After Use
3.5.
Precautions for Power Supply
BM-5, BM-5D, BM-20
BM-22
press the keys, use your finger only.
Press the RE-ZERO key before e ac h w eig hin g to pr ev ent po ssi ble
errors.
Keep the bala nce i nter i or fr ee o f foreign matter (dust, liquid or metal
fragments).
Avoid mech ani ca l s hock t o y our bal a nce.
Do not disassemble the balance. Contact your local A&D dealer if your balance needs service
or repair .
Do not use solvents to clean the balance. F or best cleaning, wipe wit h a dry lint free cloth or a
lint free c lot h tha t i s moi ste ned w ith w arm wat er a nd a mil d d et erge nt .
Keep the balance interior free of foreign matter (dust, liquid or metal fragments).
Do not remove the AC adapter while the internal mass is in motion, for example, right after the
AC adapter is co nn ecte d, or dur ing c ali bra tio n u si ng the i n ter nal m ass .
If the AC adapter is removed under the co nditions described above, the internal ma ss will be
left unsecur ed, that may caus e mech anical dam age wh en th e b ala nc e is mov ed.
Before removing the AC adapter, press the ON:OFF key and confirm that zero is displayed in
the weighing mode.
After connecting the AC adapter to the balance, warm up the balance for at least one hour
before wei ghi ng.
When the AC adapter is c onn ecte d, the ba lance is in the standb y mo de if the s tandb y ind ica tor
is on. This is a normal state and does not harm the balance. For accurate weighing, we
recommend that the AC adapter be kept connected , especially for the
and
.
BM series 15
Page 18
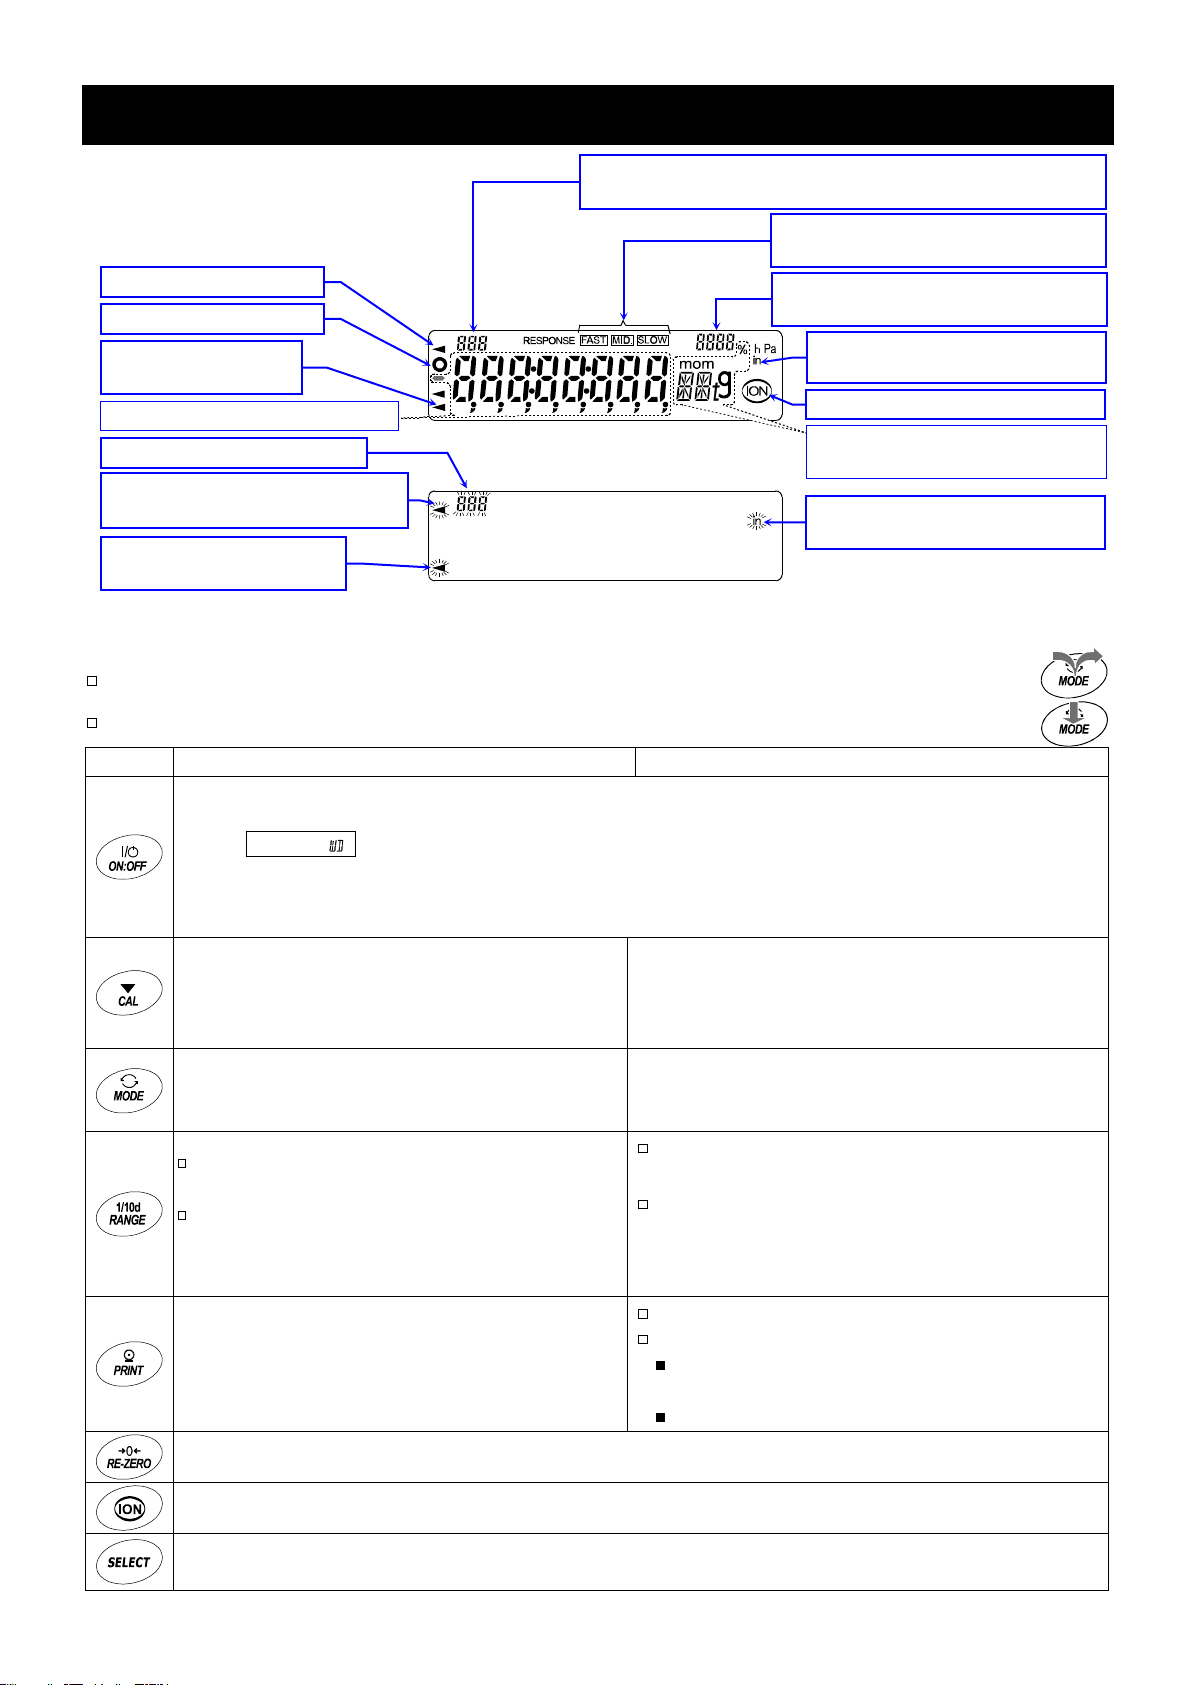
4.
Display Symbols and Key Operation
Display
12. Data Memory
Key operation
Key
When pressed and released
When pressed and held (approx. 2 seconds)
Turns the display on and off. The stan dby indicator i s displayed whe n the display is tur ned off.
15.4. Entering
the Password Before Weighing
and turn t he dis play off.
Cancels the operation when performing
mass.
Switches the preset w ei ghi ng uni ts stor ed
Refer to "5. Weighing Units".
Displays the function table menu.
10. Function Table
Refer to "6.7. Repeatability Test".
No function at the factor y set ting .
The data m emory menu is di spl ayed .
The key to moni tor the time and dat e, and the environmental sensors (temper ature, humidity, barometric
pressure), for several seconds. Refer to "6.6. Monitoring the Clock and Environmental Sensors".
Response indicator for approx. 30
seconds when weighing st arts.
The amount of stored data w ith data memory function
Humidity (%)
St a nd by i ndi cat or o f
interval memory func tio n
Ionizer oper ati on indi cat or
Units.
Refer to "5. Weighing Units".
Active indicator of
interval memory function
Prior notice indicator of
automatic self calibration
St abilization indicator
The current data number
St a nd by i ndi cat or
of power s uppl y
Blinking indicators
Weighing data or stored data
Active processing indicator
Density mode, Display lock
Right and left glass door indi cator
Barometric pressure (hPa)
Processing indicator
The interval memory function is used to store the weighing data periodically. Refer to "
Press and release the key immediately or "Click the key"
Press and hold the key (for approx. 2 seconds)
When the display is turned on, the weighing mode is enabled. If the passw ord func tion i s
used,
This key is av ailabl e an ytime . Pres sing the key during oper atio n will inte rrup t the oper ati on
function settings.
Enters the calibration mode us ing the internal
in the function table.
In the weighing mode, turns the minimum
weighing v alue on and off.
In the counting or perc ent mode, ent ers
the unit mass stor ing mode or ref erence
mass storing m ode.
is displayed to prompt you to enter a pas sword. Refer to "
pa55
".
..............................................................................
...................................................................
Displays other items of the calibration menu.
Performs automatic response adjustment.
Refer to "
Perform s a r ep eat ab ili ty t est w hen pr ess ed
and held for ano ther 2 s econ ds aft er th e
function t able me nu is di splay ed.
".
".
The key to output the weighing data to a
printer or per son al com puter (or stor e it i n
memory) dep endi ng on the f uncti on tabl e
settings. (Factory sett ing = out put)
The key to se t t he dis pl ay t o z er o.
The key to tur n the io niz er on and off.
16 BM series
By changing the function tabl e:
"Title block" and "End block" for GLP /
GMP report ar e out put.
Page 19

5.
Weighing Units
5.1.
Units
5.2. Storing Active Units
Gram
g
1 g
-
-
Ounce (Av oir)
oz
28.349523125 g
Metric Carat
ct
0.2 g
Tael (HK ge n eral , Sing a por e)
37.7994 g
Tael (Taiw an)
37.5 g
Density mode
DS
Refer to "14. Density Measurement"
14. Density Measurement
The units and weighing modes can be selected and sto red in the function table as described i n
"
The sequence of displaying them can be arranged to fit the frequency of use.
They are stored and are mai ntai ne d i n n on-volatile m emory , eve n if the AC ada pter i s remov ed.
If the law in your area permits, you may use all of the units. You can disable the units that you
don't regul arly use. An d you are able to turn th em bac k on.
If a weighing mode (or unit of mass) has been turned off, that mode or unit will be missing in the
sequence. Ta el has four varie ties, o ne of which c an be sel ect ed and i nstall ed at the fac tory .
Press the MODE key to select a unit or mo de for wei ghi ng.
For details ab out th e unit s and mo des, see the t able b elow :
Name (unit, mode) Abbreviation Display u nit Conversio n fact or
".
Milligram mg
Counting mo de PC
Percent mode %
Troy Ounce ozt 31.1034768 g
Momme mom 3.75 g
Pennyweight dwt 1.55517384 g
Grain (UK) GN 0.06479891 g
Tael (HK jewelry) 37.429 g
tl
Tael (Chin a) 31.25 g
Tola (Indi a) t 11.6638038 g
Messghal m 4.6875 g
0.001 g
Density mode
To use the densit y mod e, it mu st be st ored i n the fu ncti on tabl e as described on page 21.
For details about t his mod e, r efer to "
To s elec t the den sity mode, pres s the MODE key until the pr ocess ing i ndict or blinks with
the unit "g" dis pl ayed.
BM series 17
".
Page 20
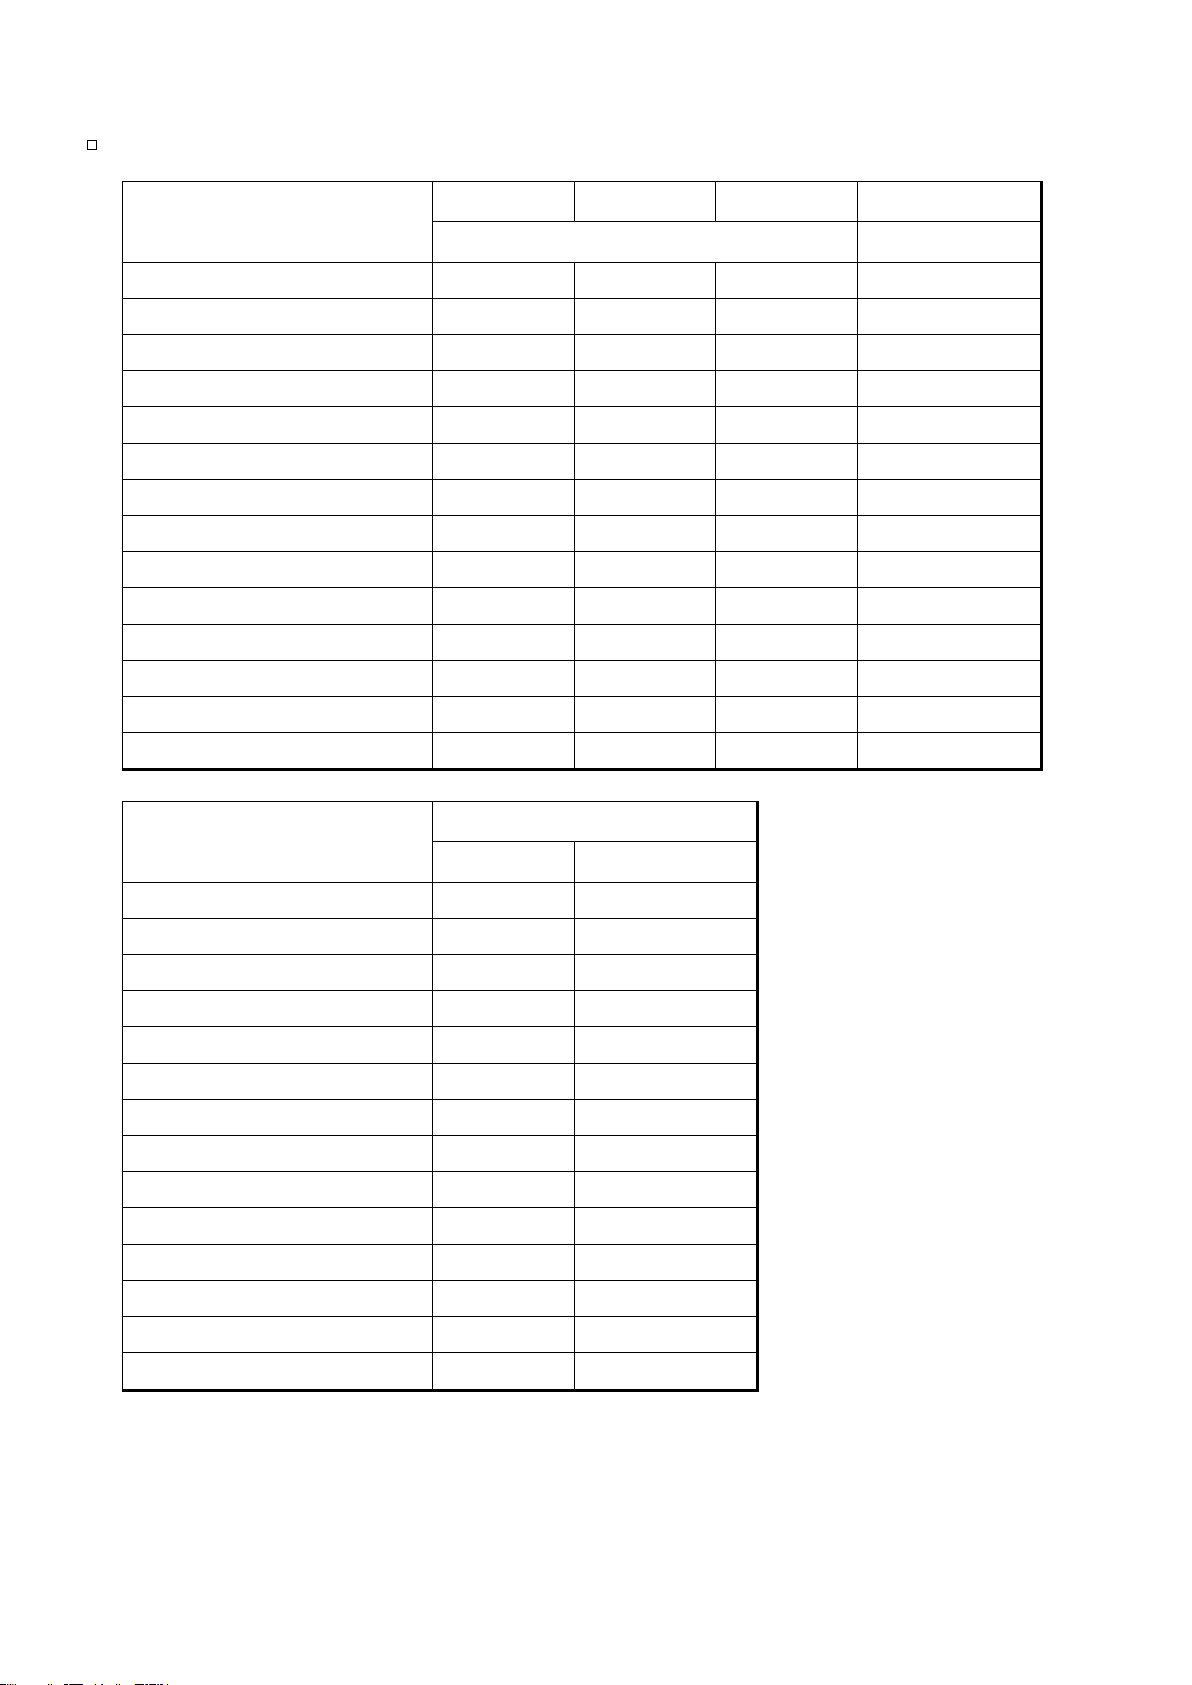
Capacity and readability for the BM-252, BM-200, BM-300, BM-500
BM-200
BM-300
BM-500
Gram
220
320
520
0.0001
Milligram
220000
320000
520000
0.1
Ounce (Avoir)
7.76
11.2
18.3
0.00001
Troy Ounce
7.07
10.2
16.7
0.00001
Metric Carat
1100
1600
2600
0.001
Momme
58.6
85.3
138
0.0001
Pennyweight
141
205
334
0.0001
Grain (UK)
3395
4938
8024
0.002
Tael (HK general, Singapore)
5.82
8.46
13.7
0.00001
Tael (HK jewelry)
5.87
8.54
13.8
0.00001
Tael (Taiwan)
5.86
8.53
13.8
0.00001
Tael (China)
7.04
10.2
16.6
0.00001
Tola (India)
18.8
27.4
44.5
0.00001
Messghal
46.9
68.2
110
0.0001
BM-252
Gram
250
0.00001
Milligram
250000
0.01
Ounce (Avoir)
8.81
0.000001
Troy Ounce
8.03
0.000001
Metric Carat
1250
0.0001
Momme
66.6
0.00001
Pennyweight
160
0.00001
Grain (UK)
3858
0.0002
Tael (HK general, Singapore)
6.61
0.000001
Tael (HK jewelry)
6.67
0.000001
Tael (Taiwan)
6.66
0.000001
Tael (China)
8.00
0.000001
Tola (India)
21.4
0.000001
Messghal
53.3
0.00001
The tables b elow in dica te the w eigh ing ca pacity and t he rea dabil ity for eac h bala nce.
Unit
Capacity
Readability
Unit
Capacity
Readability
18 BM series
Page 21

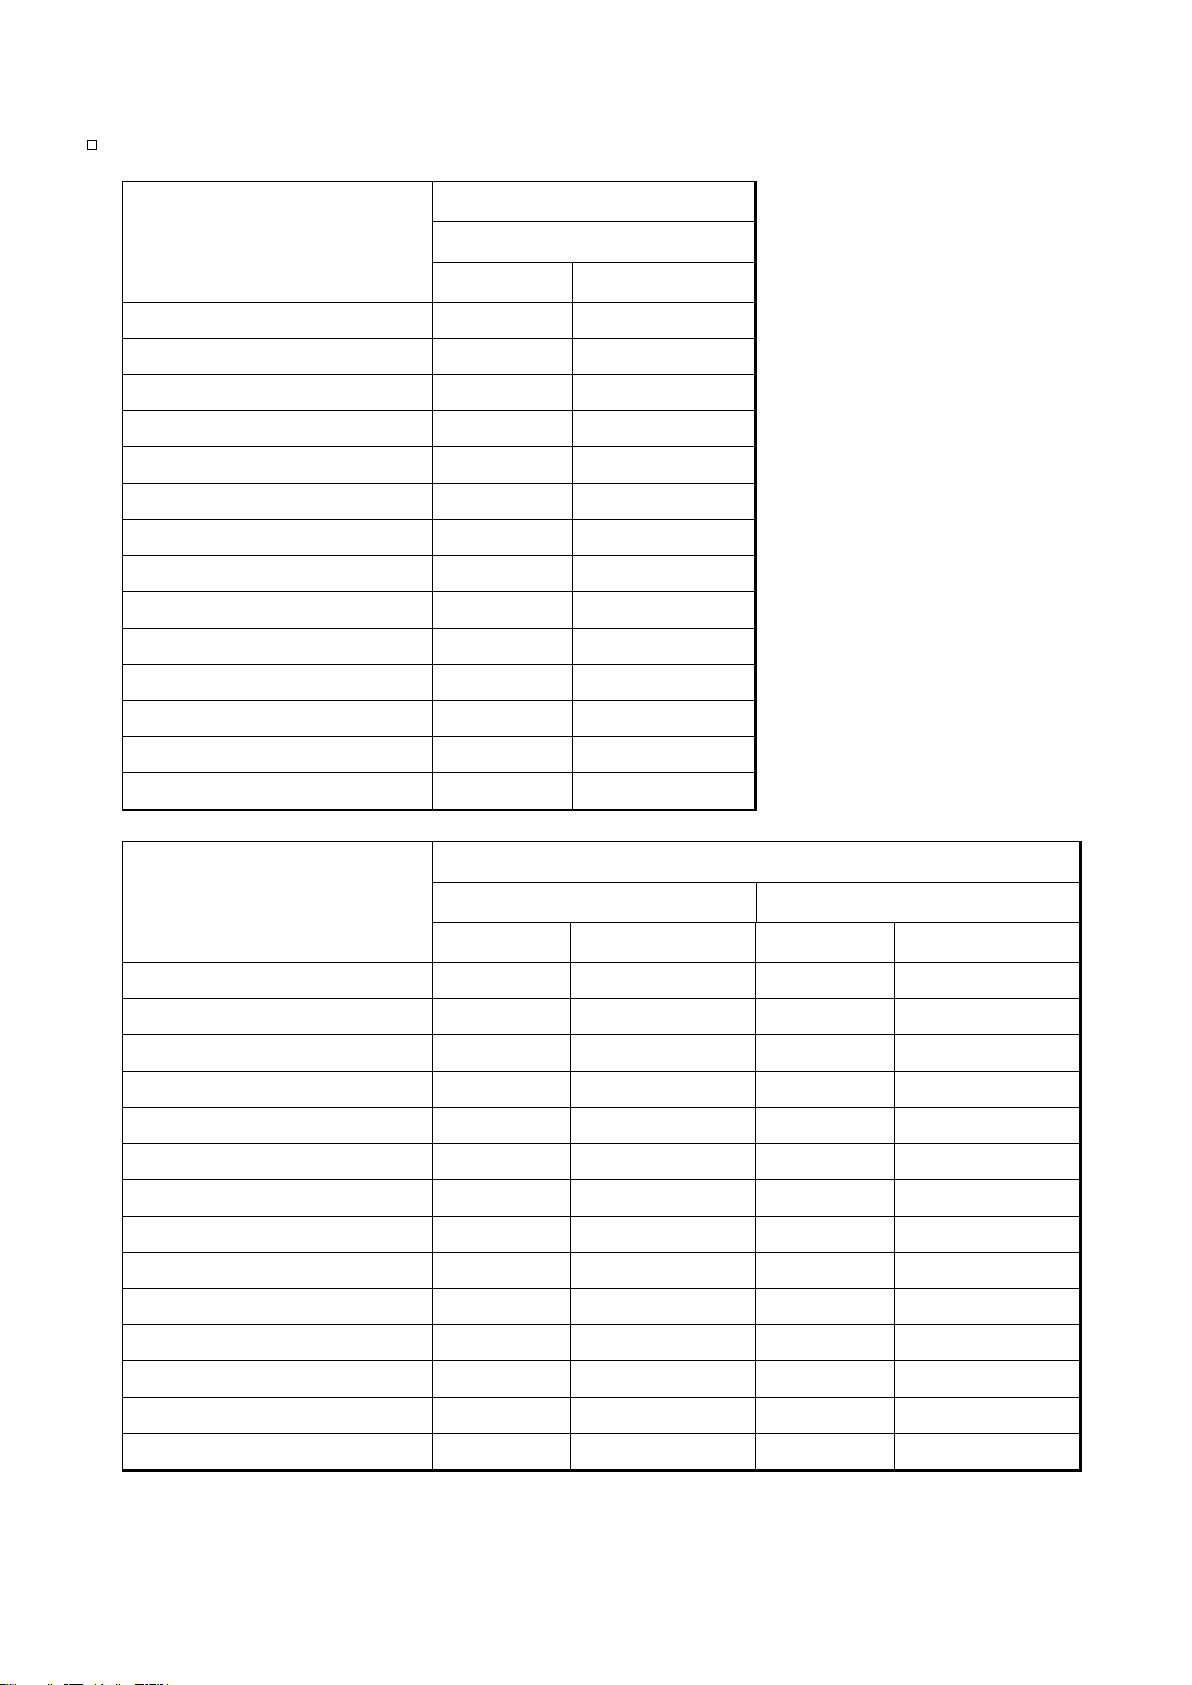
Capacity and readability for the BM-5
BM-5D
BM-5D
BM-5
Gram
5.20
0.000001
Milligram
5200
0.001
Ounce (Avoir)
0.183
0.0000001
Troy Ounce
0.167
0.0000001
Metric Carat
26.0
0.00001
Momme
1.38
0.000001
Pennyweight
3.33
0.000001
Grain (UK)
80.1
0.00002
Tael (HK general, Singapore)
0.137
0.0000001
Tael (HK jewelry)
0.138
0.0000001
Tael (Taiwan)
0.138
0.0000001
Tael (China)
0.166
0.0000001
Tola (India)
0.444
0.0000001
Messghal
1.10
0.000001
BM-5D
Gram
2.10
0.000001
5.20
0.00001
Milligram
2100
0.001
5200
0.01
Ounce (Avoir)
0.0737
0.0000001
0.183
0.000001
Troy Ounce
0.0671
0.0000001
0.167
0.000001
Metric Carat
10.5
0.00001
26.0
0.0001
Momme
0.560
0.000001
1.38
0.00001
Pennyweight
1.34
0.000001
3.33
0.00001
Grain (UK)
32.4
0.00002
80.1
0.0001
Tael (HK general, Singapore)
0.0551
0.0000001
0.137
0.000001
Tael (HK jewelry)
0.0560
0.0000001
0.138
0.000001
Tael (Taiwan)
0.0560
0.0000001
0.138
0.000001
Tael (China)
0.0671
0.0000001
0.166
0.000001
Tola (India)
0.179
0.0000001
0.444
0.000001
Messghal
0.444
0.000001
1.10
0.00001
and
The
is equipped with the precision range and standard range of the smart range function.
Unit
Precision range
Capacity Readability
Unit
Precision range Standard range
Capacity Readability Capacity Readability
BM series 19
Page 22
Capacity and readability for the BM-20
BM-22
BM-22
BM-20
Gram
22.0
0.000001
Milligram
22000
0.001
Ounce (Avoir)
0.776
0.0000001
Troy Ounce
0.707
0.0000001
Metric Carat
110
0.00001
Momme
5.86
0.000001
Pennyweight
14.1
0.000001
Grain (UK)
339
0.00002
Tael (HK general, Singapore)
0.582
0.0000001
Tael (HK jewelry)
0.587
0.0000001
Tael (Taiwan)
0.586
0.0000001
Tael (China)
0.704
0.0000001
Tola (India)
1.88
0.0000001
Messghal
4.69
0.000001
BM-22
Gram
5.10
0.000001
22.0
0.00001
Milligram
5100
0.001
22000
0.01
Ounce (Avoir)
0.179
0.0000001
0.776
0.000001
Troy Ounce
0.163
0.0000001
0.707
0.000001
Metric Carat
25.5
0.00001
110
0.0001
Momme
1.36
0.000001
5.86
0.00001
Pennyweight
3.27
0.000001
14.1
0.00001
Grain (UK)
78.7
0.00002
339
0.0001
Tael (HK general, Singapore)
0.134
0.0000001
0.582
0.000001
Tael (HK jewelry)
0.136
0.0000001
0.587
0.000001
Tael (Taiwan)
0.136
0.0000001
0.586
0.000001
Tael (China)
0.163
0.0000001
0.704
0.000001
Tola (India)
0.437
0.0000001
1.88
0.000001
Messghal
1.08
0.000001
4.69
0.00001
and
The
is equipped with the pr ecisi o n r ang e an d s ta ndar d r ang e o f the s mart r ang e func ti on.
Unit
Precision range
Capacity Readability
Unit
Precision range Standard range
Capacity Readability Capacity Readability
20 BM series
Page 23
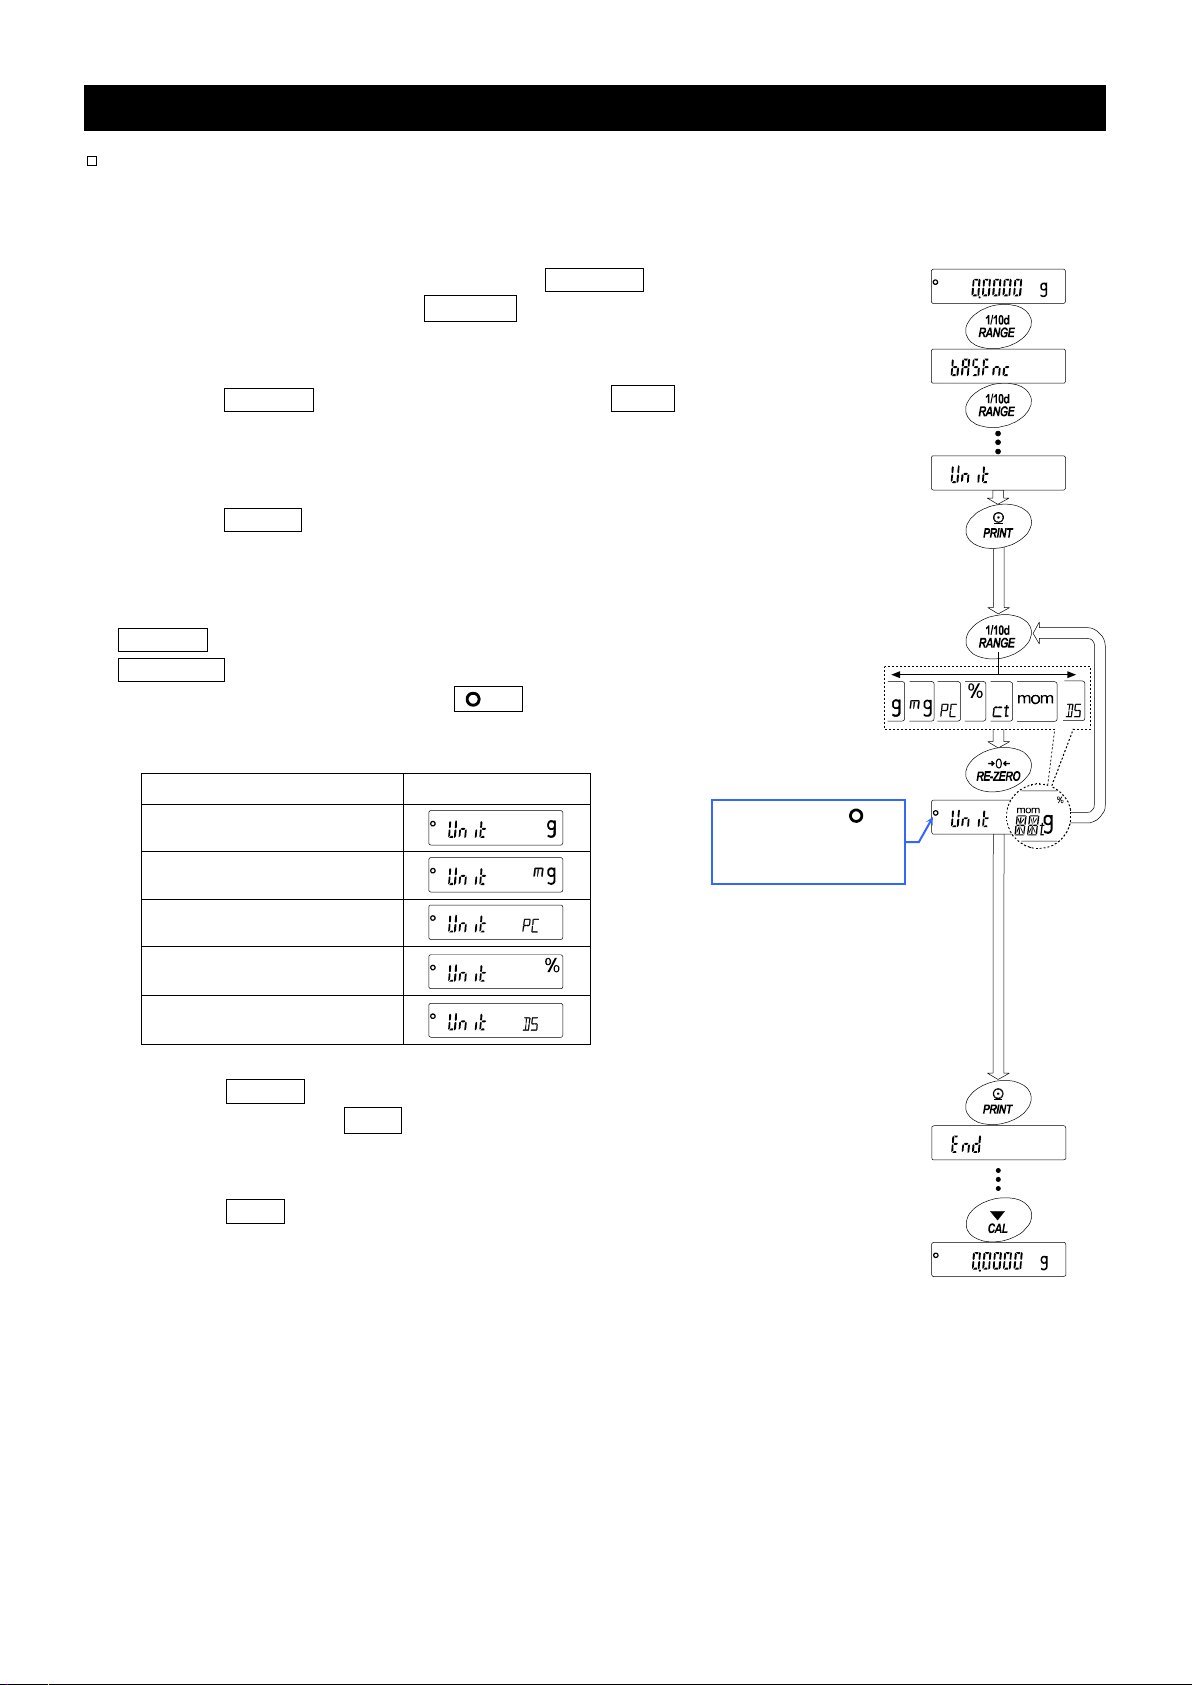
5.2.
Storing Active Units
Unit
Display
Specify the unit
Press and hold
Press several times
The indicator is
units specified.
Store
Selection key
Examples
The units and mod es ca n be sel ecte d and store d in the functi on ta ble.
The sequence of displaying them can be arranged to fit the frequency of use.
The units stor ed ar e m ai ntai ne d i n n on-volatile m emory , eve n if the AC ada pter i s remov ed.
1 In the weighing mode, press and hold the RANGE
key (for approx . 2 seconds) until ba5fnc is displayed,
and then release the key.
2 Press the RANGE key several tim es to dis pl ay Unit .
3 Press the PRINT key to enter the uni t sele cti on mod e.
4 Specify a unit or mode in the or der to be dis play ed
using the foll ow ing k ey s.
RANGE key
RE-ZERO key
Examples
.........
To display t he unit s seq uenti ally.
......
To specify a uni t or m ode.
The indica tor appears when
the display ed unit or mo de is spec ifi ed.
(approx. 2 seconds)
Gram g
Milligram mg
Counting mode PC
Percent mode %
Density mode DS
5 Press the PRINT key to st ore t he uni ts or mod es.
The balance di splay s end and then display s the n ext
menu item of the function table.
6 Press the CAL key to exit the function table.
Then the bala nce r etur ns to the w eig hing mode w i th th e
selected un it.
displayed at the
BM series 21
Page 24
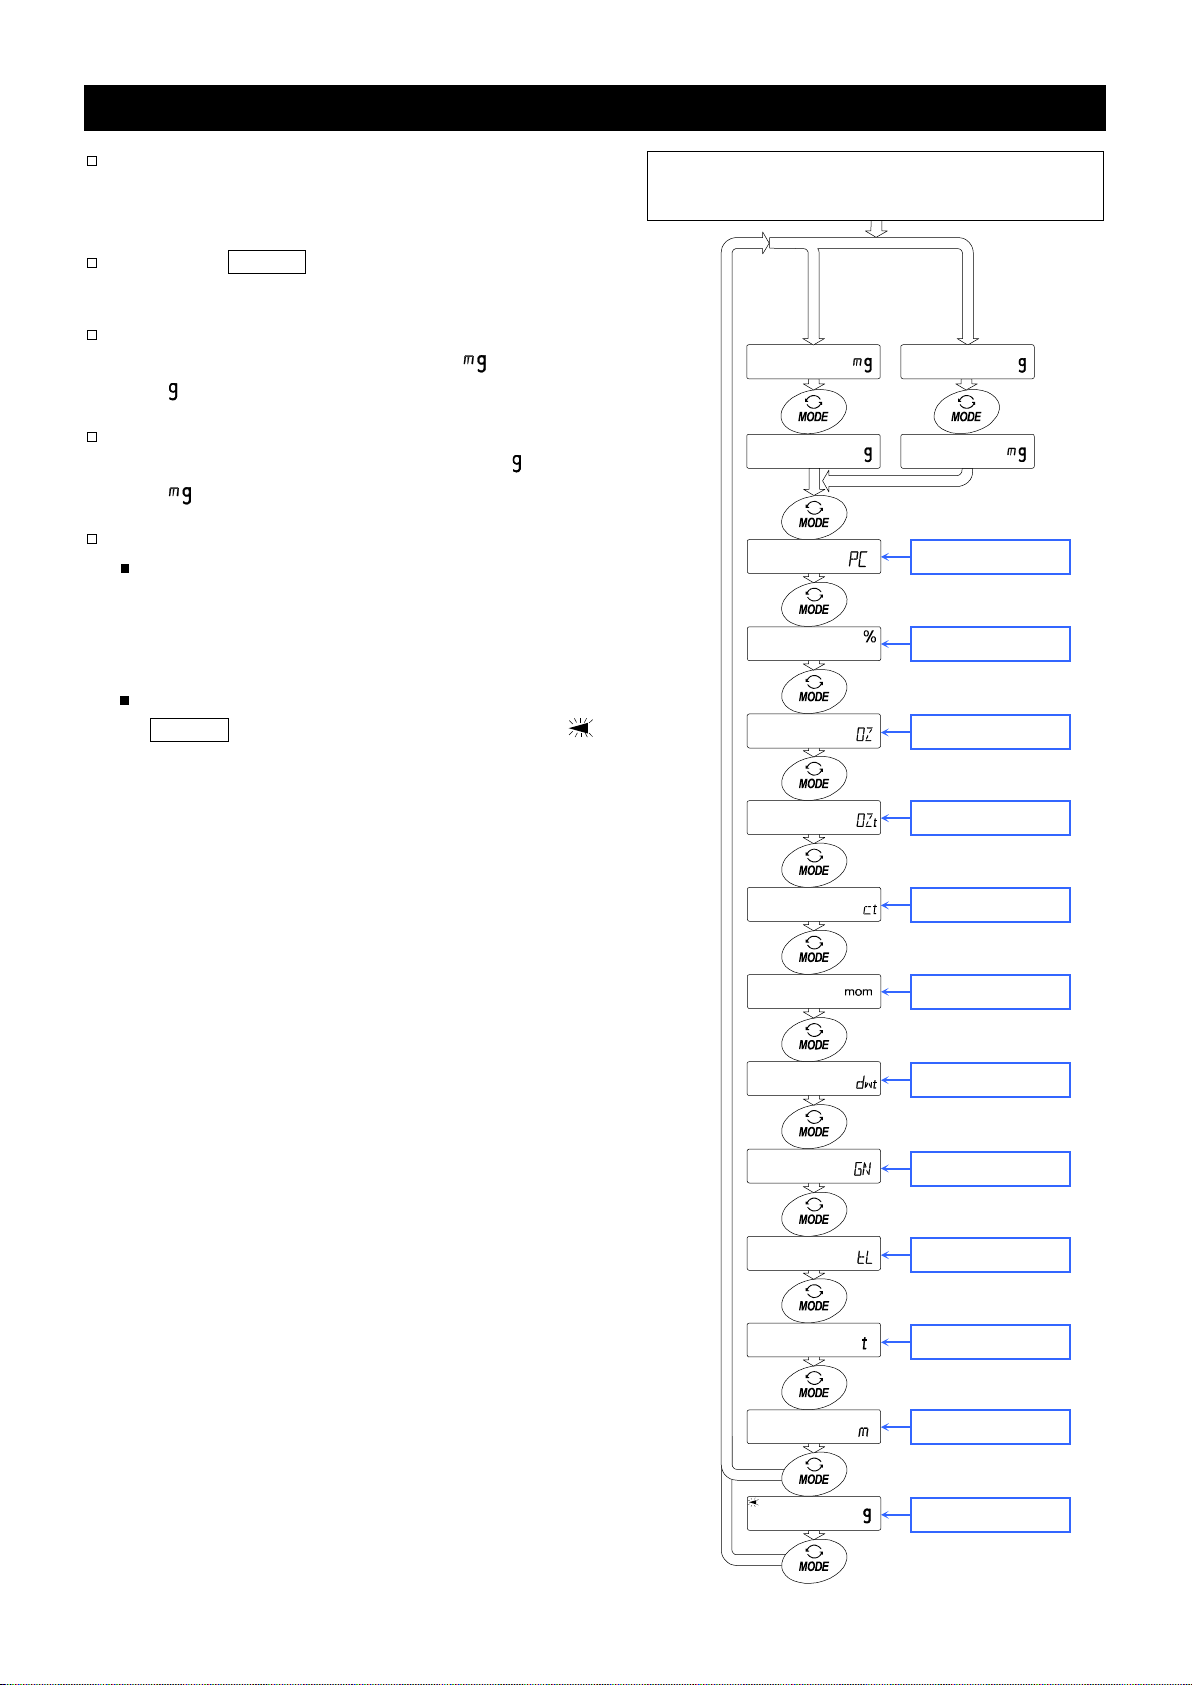
5.3.
Selecting Units and Weighing Modes
5.2. Storing Active Units
BM-5, BM-5D, BM-20
BM-22,
BM-252, BM-200, BM-300
BM-
500
14. Density Measurement
The unit sequence of the factory settings.
Turning the display on.
BM-5 BM-252
BM-5D BM-200
BM-20 BM-300
BM-22 BM-500
Counting mode
Percent mode
Ounce (Avoir)
Troy Ounce
Metric Carat
Momme
Pennyweight
Grain (UK)
Tael
Tola (India)
Messghal
Density mode
Preset the seq uenc e of dis playi ng uni ts and
weighing mod es to fi t th e freq uency of use .
Refer to "
Press th e MODE key in the weighing mode to
display the u nits and weighing modes in order.
For the
the units preset at the factory, (Milligram)
and (Gram), are dis pla yed in this order.
".
and
For the
and (Milligram), are di s play ed in this order.
Density mode
To use the densit y mod e, it mu st be stored in
To selec t the density mode, press the
, the units preset at the factory, (Gram)
the function table as described on page 21.
Refer to "
details about the mode.
MODE key until the pr ocessi ng indi ct or
blinks with t he unit "g" di splay ed.
and
" for
22 BM series
Page 25
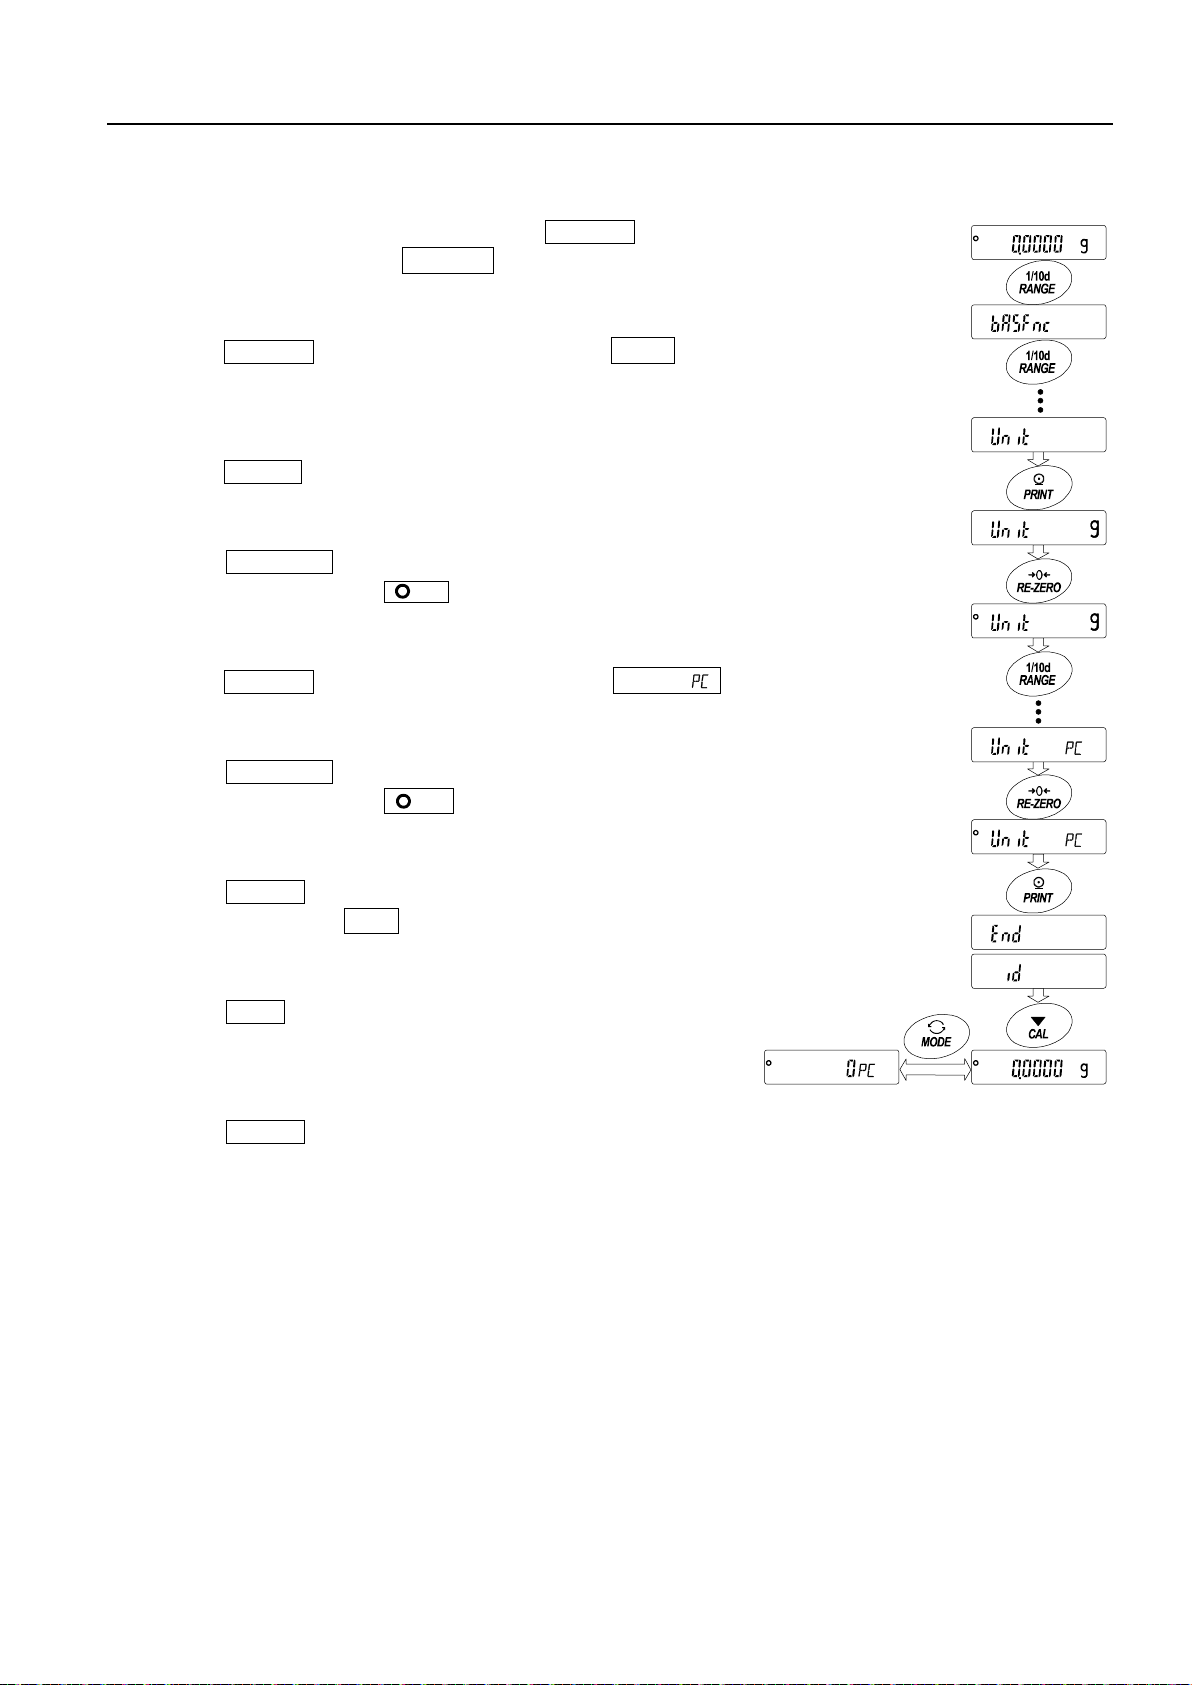
5.3.1.
Unit Setting Example
Press several times
Press several times
Specify gram
Specify counting mode
Store
Press and hold
The example below sets the units in the order with g (gram) as the first unit followed by PC
(counting mo de) .
1 In the weighing mode, press and hold the RANGE key
(for approx. 2 seconds) until ba5fnc is displayed, and
then release the key.
2 Press the RANGE key several tim es to dis pl ay Unit .
3 Press the PRINT key to enter the uni t sele cti on mod e.
4 Press the RE-ZERO key to specify the unit of g.
The stabili za tio n i ndi c ator appears when the unit is
specified.
5 Press the RANGE key several tim es to dis pl ay Unit .
6 Press the RE-ZERO key to speci fy the u nit of PC.
The stabili za tio n i ndi c ator appears when the unit is
specified.
7 Press the PRINT key to st ore t he uni ts.
The balance di splay s end and then displays the next
menu item of the function table.
8 Press the CAL key to exit the fu nctio n tabl e. The n the
balance r etur ns to th e w eig hi ng mod e wi th g , th e uni t
selected first.
9 Press the MODE key to switch between g and PC.
(approx. 2 seconds)
BM series 23
Page 26
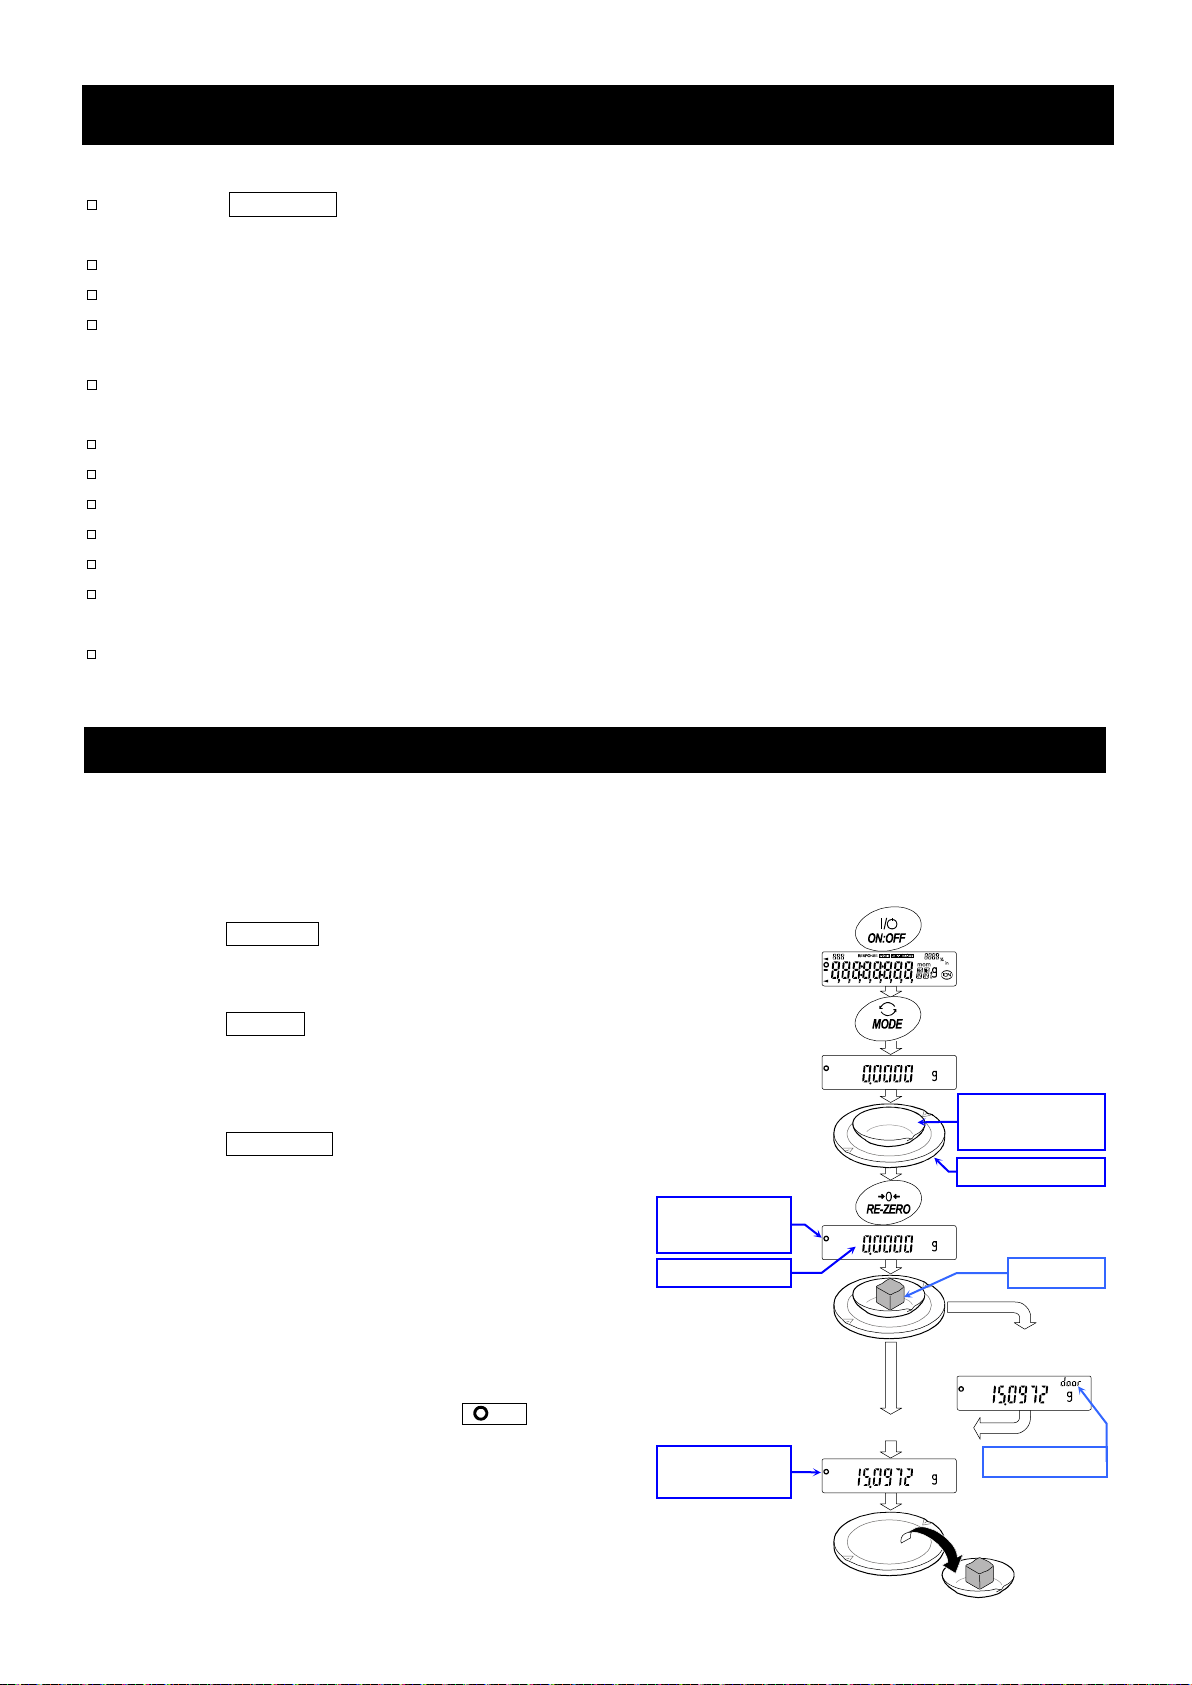
6.
Weighing
Precautions for the weighing operation
8. Calibration
BM-5, BM-5D, BM-20
BM-22
3. Installing the Balance and Precautions
6.1.
Basic Operation
4. Display Symbols and Key Operation
Container
(tare)
Weighing pan
Stabilization
Stabilization
indicator
The glass door
is not closed
Close the door
Remove
Zero display
Press the key
to select a unit,
Warning
Sample
Press the RE-ZERO key each time, before placing a sample on the weighing pan, to prevent
possible er r ors .
Place a sample in the center of the weighing pan gently.
Temperatur e c h ange s d uri ng me as urem ent ma y cau se w ei ghing errors.
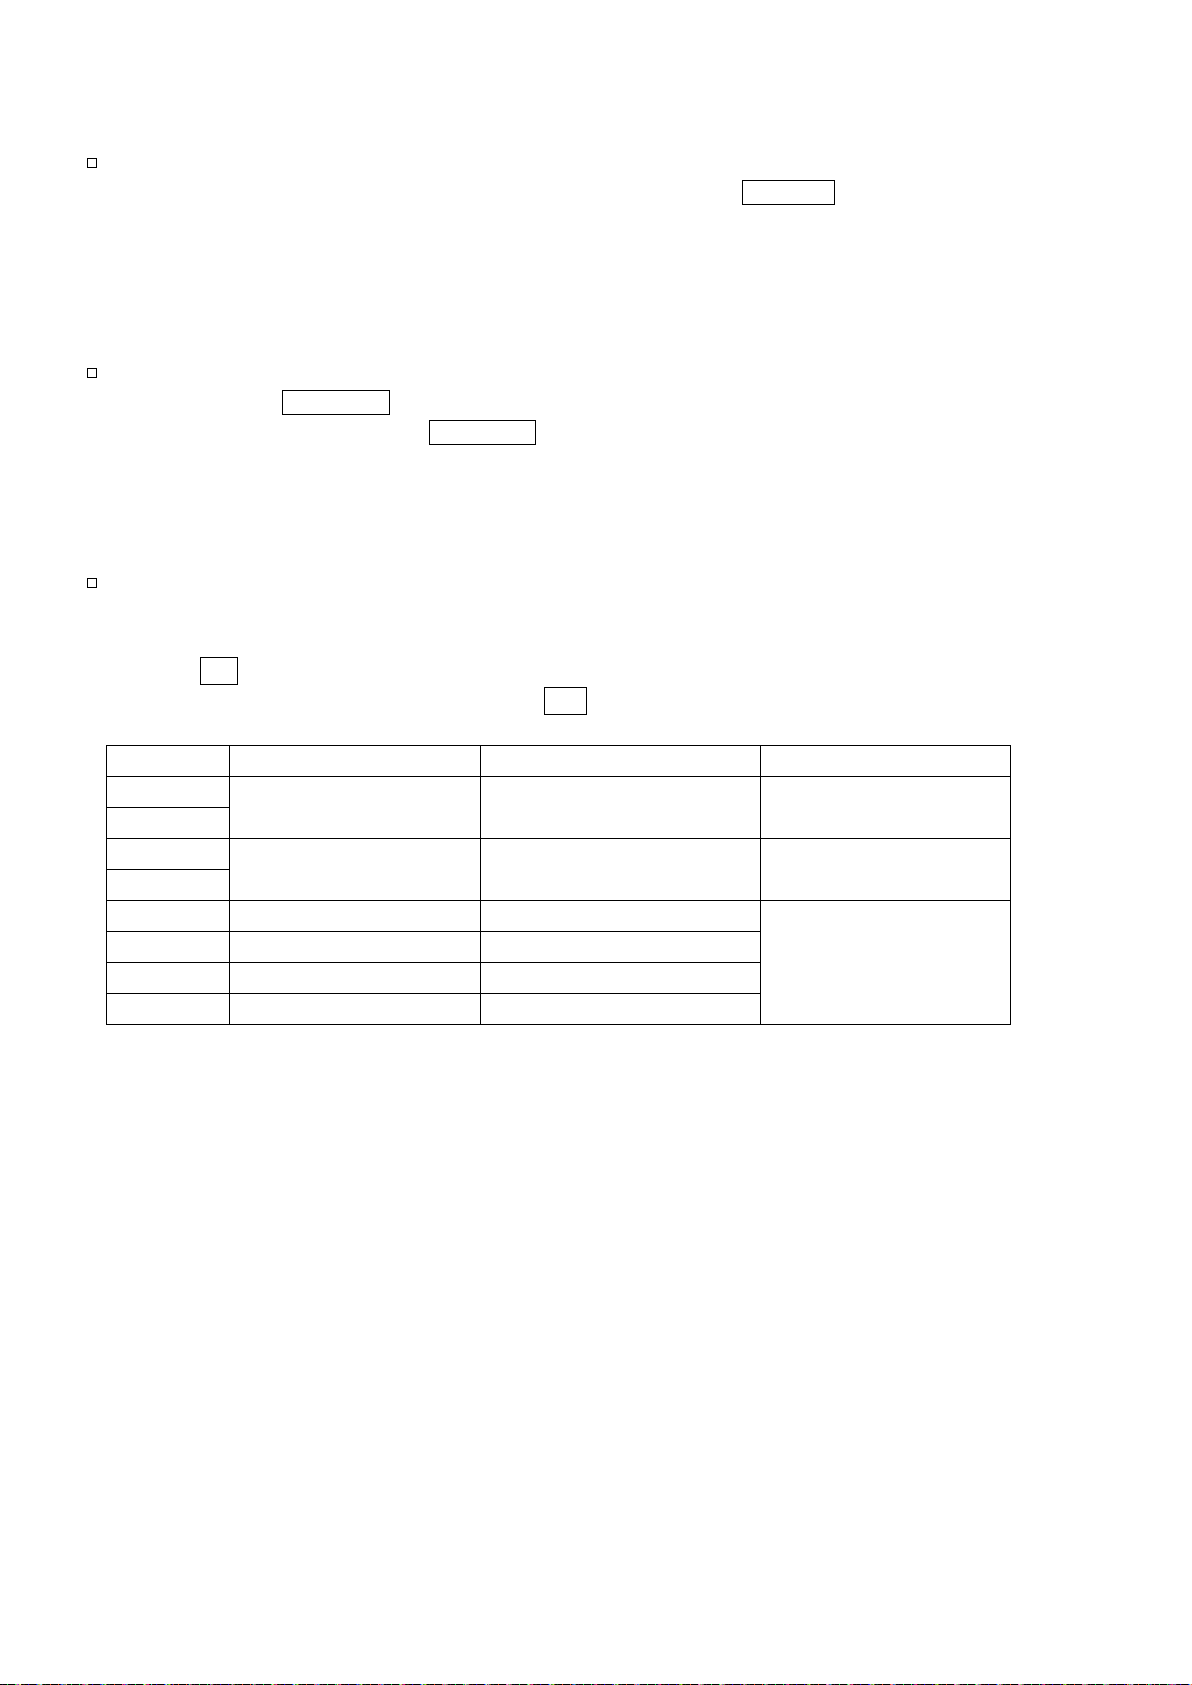
Shorten the o perati on ti me as much as possib le. (
Material w ith an el ectr os tati c c har ge or th at is mag neti c may ca us e w eig hing er r ors.
Use a pair of tweezers to avoid a temperature change due to having your hand in the weighing
chamber.
Do not dr op thi ng s on t he pan , or plac e a w eig ht on th e p an t hat is b ey ond th e w eig hing r ang e.
Keep the ar ea clea n and dr y.
Do not pr ess k ey s w ith a sh arp i nstr u men t (s uc h as a pe ncil or b all poi nt pe n).
For precisi on w eighi ng, ke ep the AC adapt er co nnecte d to th e bala nce.
Calibrate periodi cally to mai ntain w eighi ng acc uracy . Refer to "
For the
precision wei ghi ng c an be p er for med .
Consider section "
and
Opening and closing door, placing and removing sample)
, perfo rm p re-weighing of the container (tare) so that
" for the w eighing opera tion .
".
Refer to "
Note When turning the bala nce on with a ta re weight pl aced on the
1 Press the ON:OFF key to turn the displ ay on.
2 Press the MODE key to select a unit, if neces sary .
3 Place a container (tare) on th e w eig hi ng pan, i f ne ces sar y.
Press the RE-ZERO key to c anc el th e tar e w eight .
Then zero is dis pl ayed .
Tare : A vessel placed on the pan, but not
4 Place a sample on the pan or in the container.
Close the door .
5 Wait for th e stab iliz ation indic ator to be
displayed, and th e n rea d the v al ue.
6 Remove the sample and container from the pan.
pan, the b alan c e au to mati c ally d isp lay s t he zer o d isp l ay .
to be included in the weighing data.
Example: Container.
(Gram Mode)
" before operation.
indicator
if necessary.
24 BM series
Page 27
Zero operation, tare operation and weighing range
Model
Power on zero range
Zero range
-E di splay range
BM-5
BM-5D
BM-20
BM-22
BM-252
Approx. ±25 g
Approx. -37 g to +5.0 g
BM-200
Approx. ±22 g
Approx. -37 g to +4.4 g
BM-300
Approx. ±32 g
Approx. -37 g to +6.4 g
BM-500
Approx. ±52 g
Approx. -37 g to +10.4 g
When weighing is started
The balance will determine the reference zero point when the ON:OFF key is press ed to en ter
the weighing mode.
Depending on the load condition at that time, the balance will automatically judge whether to
perform zero or tar e o pe rati on . T he c o ndit ion for deter mi ni ng w hi ch i s us ed i s " p ower on z ero
range", a nd w he n p ow er o n zer o r a nge i s ex ce ede d, t h e t ar e oper ati on i s p erf or med.
Re-zero operation
By pressi ng the RE-ZERO key, t he dis pl ay can be set t o zer o.
The re-zero operation with the RE-ZERO key will autom ati call y j udg e w heth er t o per for m z er o or
tare operation.
The condit ion for det er mi ning w hich is us ed i s "z ero ra nge ", and w hen z ero r ang e i s ex ceed ed , t he
tare operation is performed.
Weighing range
The range th at t he bal anc e c a n wei gh v arie s depe ndi ng on th e m odel .
When the t ot al a moun t ( ne t w eig ht + tar e w ei gh t) dis pl ay ed for eac h mo del ex c ee ds t h e max i mu m
display,
When exceeded in the negative direc tion, -E is displayed.
E is displ aye d t o in dic a te t ha t t he w ei ghi ng r ang e i s ex ceed e d.
Approx. ±0.1 g Approx. -3.0 g to +0.1 g Less than approx. -3 g
Approx. ±2.2 g Approx. -3.0 g to +0.4 g Less than approx. -3 g
Less than approx. -37 g
BM series 25
Page 28
6.2.
Smart Range
BM-5D
BM-22
Example
Precision range and standard range
BM-5D
BM-22
Precision range
Container (tare)
Weighing sample
The smart range for the
(high resol uti o n).
Smart rang e fu nctio n
The rang e switc hes a uto matic ally, depending o n the val ue dis playe d.
Pressing t he RE-ZERO key allows weig hing in the precis ion r ange, r egar dless of the tare value .
The rang e c a n be fix e d to t he s t an dar d r ang e b y pres sing t he RANGE key.
1 Press the RE-ZERO key to use t he prec isi on rang e.
The balance di splay s ze ro.
2 Place a container (tare) on the weig hi ng p an .
When the value of the container (tare) exceeds the
precision range, the balance automatically switches
to the standard range.
3 Press the RE-ZERO key to use t he prec isi on rang e.
The balance di splay s ze ro.
4 Place the weighing sample in the container (tare).
When the sample is within the precision range,
the weighing value can be read in high resolution.
and
consists of the standard range and precision range
Standard r ang e
Precision range
Precision range
Model Unit Precision range Standard range
Refer to pag es 20 and 21 for other u nits.
Milligram 0.000 to 2100.009 2100.01 to 5200.08
Gram 0.000000 to 2.100009 2.10001 to 5.20008
Milligram 0.000 to 5100.009 5100.01 to 22000.08
Gram 0.000000 to 5.100009 5.10001 to 22.00008
26 BM series
Page 29
6.3.
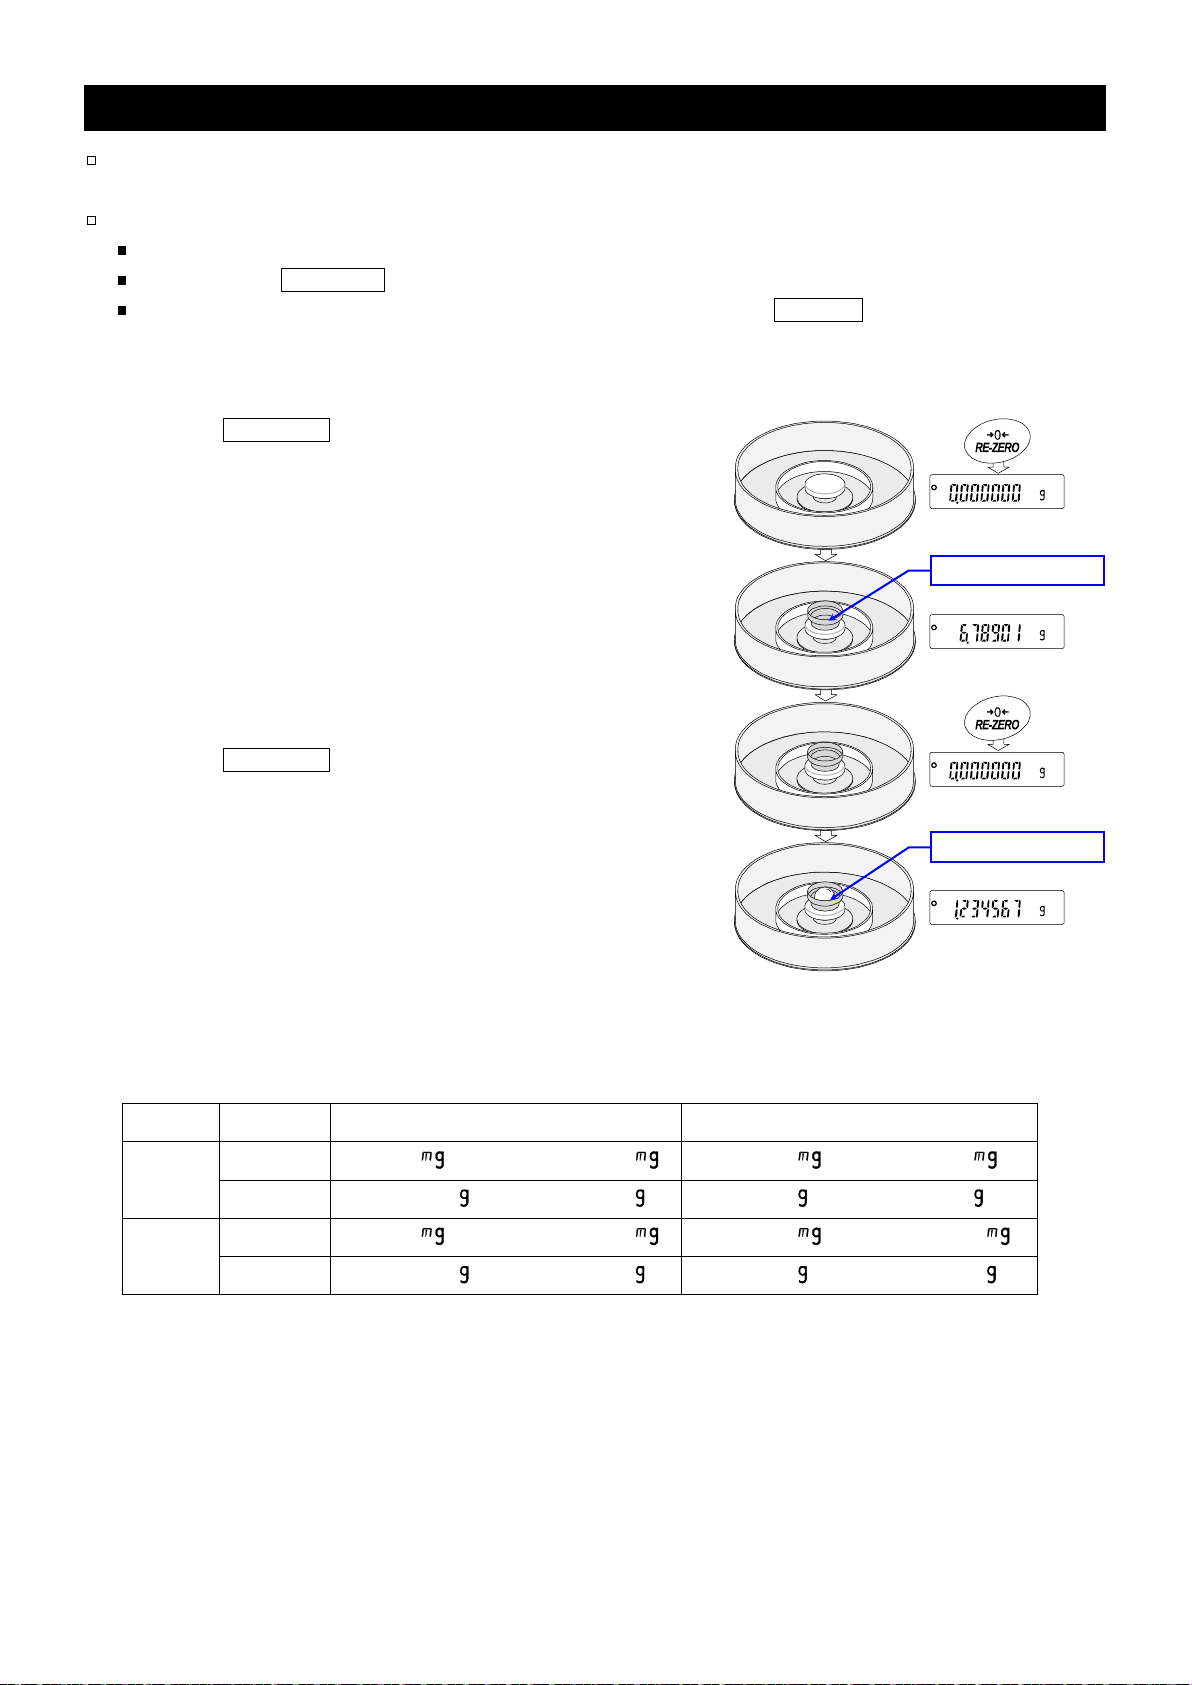
Counting Mode (PC)
Selecting the counting mode
Storing a sample unit mass (Weighing input mode)
50 -
lo
Counting operation
Weighing pan
Container
(tare)
25 samples
Place samples
Counting result
To
Step
8 when using
This is the mode to determi ne the num ber of objects in a sam ple based on the standard sample
unit mass. The un it mass means an average m ass of the samples. The sm aller the variation in
the samples is, the more accurate the count will be. The balance is equ ipped with the Aut omatic
Counting Ac cur ac y I mpr ov e ment (AC AI) func ti on to i mpr ov e t he cou nti n g acc ur acy .
Notes
Use samples with a unit mass of 1 mg or more for count ing.
If the samp le u ni t m as s v ari ab le i s t oo la rge , it m ay caus e a cou n tin g e rro r.
To improve the counting performance, use the ACAI function frequently or divide the
samples into several groups and count each group.
1 Press the MODE key to sel ec t t he u nit (counting mode).
2 Press the RANGE key to enter th e sam ple uni t m as s s tor ing mo de .
3 Select the number of samples using the RANGE key.
It may be set to 10 , 25, 50 or 10 0.
Note A greater number of s amp les wi ll yield more accurate
counting result.
4 Place a container (tare) on th e w eig hi ng pan, i f ne ces sar y.
Press the RE-ZERO key to ca ncel th e w eig ht ( tar e) .
The number specified in Step 3 appears.
Example
5 Place the number of samples specified on the pan.
In this exampl e, 25 pi ec es.
6 Wait for the stabilization indic ator to be di splay ed.
Press the PRINT key to calculate and store the unit mass.
Then the bala nc e dis pl ay s 25 and is set to count samples
with this unit mass. To improve the accuracy of the unit mass,
proceed to Step 8.
Notes
If the balance judges that the mass of the samples is too light
to acquire accurate w eighing, i t displa ys an error requirin g the
addition of more samples to th e specified number.
Example:
25 samples and press the PRINT key. When the unit mass is
stored correctly, the balance proceeds to the counting mode.
: 25 0 is displayed if 25 is s el ect ed i n St ep 3.
appears, requiring 25 more samples. Add
the ACAI function.
If the balance judges that the mass of the samples is too light (
0.0001g
The sample unit mass is stored in non-volatile memory, and
is maintai ned even if the A C ada pt er is remo v ed .
7 Place the samples to be counted on the pan.
Read the result and remove the samples from the pan.
BM series 27
) and cannot be stored as t he unit mass, it display s
under
.
Page 30
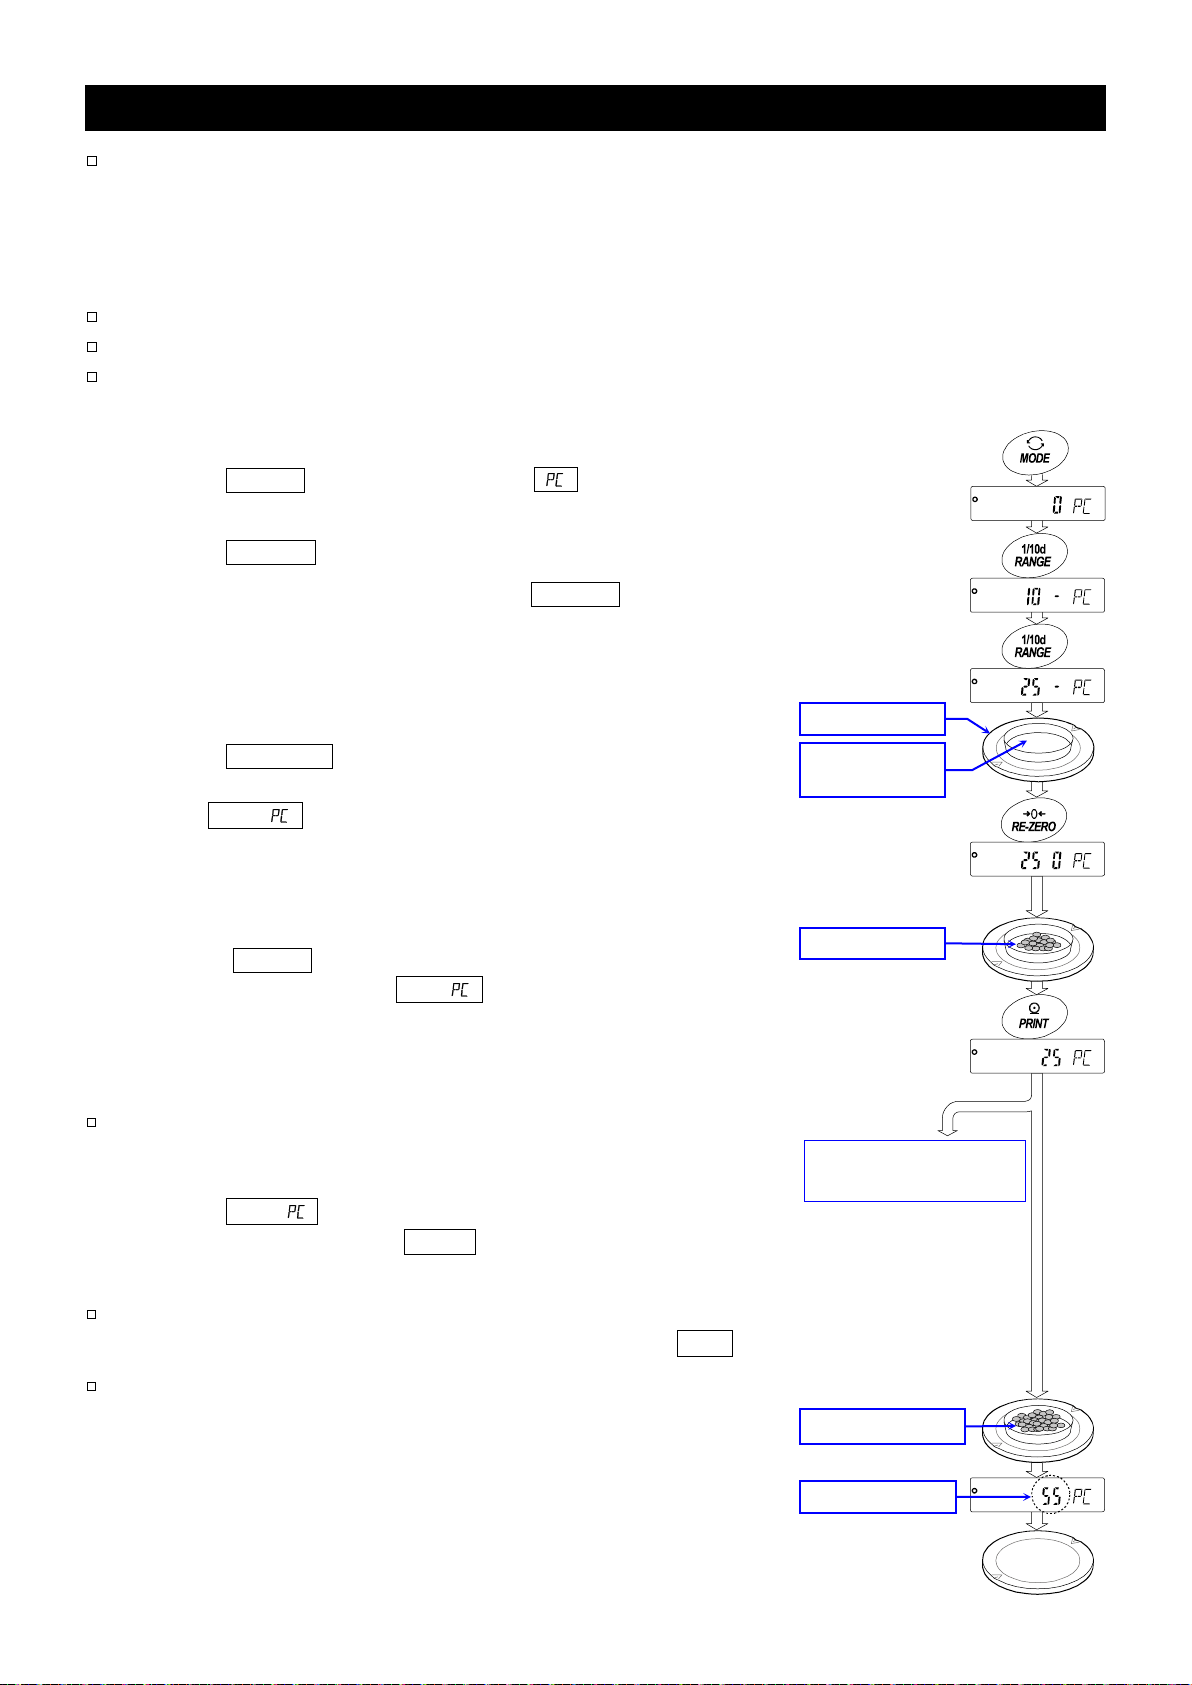
Counting mode using the ACAI function
From S tep 6 on
Add a few more
samples.
The indica tor t urns
on at prop er r a nge.
The indicator blin ks
during calc ul ati o n.
The indica tor t urns
mass is im pr oved.
Repeat
The ACAI is a function that improves the accuracy of the unit mass automatically by increasing
the number of samples as the counting process.
ACAI: Automatic C ount ing A cc uracy Impr ov em ent
Proceed to Step 8 a fter s toring a unit mass on the previ ous p age.
8 If a few more samples are added, the processing
indicator turns on. To prevent an error, add three or
more. The processing indicator does not turn on if
overloaded. Try to add the same number of samples
as displayed .
9 The balance re-calculates the unit mass while the
processing indicator is blinking. Do not touch the
balance or samples on the pan until the processing
indicator t urns o ff.
10 Counting accuracy is improved when the processing
indicator t urns o ff.
Each time the above operation is performed, a more
accurate unit mass will be obtained. There is no
definite upper lim it to the ACAI ran ge for the number
of samples exceeding 100. Try to add the same
number of samples as displayed.
11 Remove all the samples used in ACAI and proce ed
with the counting operation using the improved unit
mass.
off after the unit
the previ ous page
28 BM series
Page 31

6.4.
Percent Mode (%)
Selecting the percent mode
5. Weighing Units
Storing the 100% reference mass
BM-252, BM-200
BM-300, BM-500
BM-5, BM-5D
BM-20, BM-22
100% mass
Readability
100% mass
Readability
0.0100 g to 0.0999 g
1 %
0.00100 g to 0.0099 g
1 %
0.1000 g to 0.9999 g
0.1 %
0.01000 g to 0.0999 g
0.1 %
1.0000 g to
0.01 %
0.10000 g to
0.01 %
lo
Reading the percentage
100% mass
Place sample
Percentage
Weighing pan
Container
(tare)
The percent mode dis play s the weight value in per cent age co mpar ed to a 100 % re ferenc e mass
and is used for tar get w eig hi ng or c hec ki ng t he sa mpl e v ari anc e.
1 Press the MODE key to selec t t he uni t % (Percent mod e).
If the percent mode cannot be selected, refer to "
".
2 Press the RANGE key to enter the 100% reference mass
storing mode.
3 Place a container (tare) on the w ei ghi ng pa n, i f nec ess ary .
Press the RE-ZERO key to ca ncel th e w eig ht ( tar e) .
The balance di splay s 100 0 % .
4 Place the sample to be set as the 100% reference mass on
the pan or i n th e c ont ai ner .
5 Press the PRINT key to st ore t he r e fere nce mas s.
The balance di splay s 100.00 % .
Notes
The read abi lity depends on the 100% mass.
If the b alan c e ju dg es t hat th e mas s o f th e sa mpl e is t oo li ght
(
under 0.01g
The 100% refer ence mass can be stor ed in t he non-volatile
memory and is maintaine d ev en if the A C adapter is remov ed.
6 Remove the sample.
) to be u sed as a r ef er ence , it d isp l ay s
.
7 P lace a sample to be compared to the refe rence mass on
the pan. The disp layed percentage is based on the 100%
reference m ass.
BM series 29
Page 32

6.5.
Ionizer
Operation
BM-5, BM-5D, BM-20, BM-22
BM-252
6.5.1.
Maintenance of the Electrode Units
Replacing the electrode units
Ionizer
LED
Sample
Sep aration plate
Press
In neutralization
Weighing mode
Example: Display of BM-20
Electrode unit
Step
1
Step
2
Cleaning
Electrode needle
The BM series is equipped with four ionizer electrode units to neutralize static electricity from a
charged weighing sample.
Neutral iz ing st a tic el ect ri cit y b ef ore w ei ghi ng w ill im prov e stability, reducing err or s.
Neutralizing ion : The discharge electrodes of the ionizer continuously generate bi polar ions by corona
Static electricity : In general, when the ambient humidity is less than 45% RH, nonconductors
(Neutralization Device)
discharge. Applying these ions to the w eighing sample neutralizes the stat ic charge.
such as powders, paper and plastics easily become charged with static
electricity. The influence of the static electricity may cause a weighing error of
several milligrams. The ionizer effectively neutr al iz es t h e el ectr ic al ch arg e.
1 Place the sample to be weighed on the center
(of the metallic circle) of the separation plate to
neutralize t he static charge.
2 Press the ION key to star t th e neutr aliz atio n.
The mark and the LED blink .
The neutral iz at ion w i ll s t op a f ter t he pre se t ti m e
of "Neutralization time (ion)" in the fu nc ti on
table (th e fact ory set ting is 3 sec onds) .
The readability of the
neutralization.
Pressing the ION key during neutralization stops
the neutralization.
Notes
Keep the weighing sample away from the electrodes
while neutralizing. Placing the sample too close to the
electrodes may cause the s ample to beco me ch arged .
Remove any obstacle between electrodes and the weighing sample.
When using the ionizer for a long time, dust and stains may
stick to the electrodes. Clean them periodically to maintain
performance.
When needles of the electrodes are worn down and
neutralization ability is not restored after cleaning them,
replace all four electrodes with new ones. The standard life of
an electr ode uni t is appr oxi matel y 1000 0 hours .
is switched to 0.1 mg while performing the
and
1 Turn the el ectrode units 45 degrees counter clock wi se and
remove them from th e ioni zer.
2 Replace all four uni ts with new ones .
Note Do not replace, remove an d clean the el ectr ode s while the ionizer is in op eratio n as
there is a d ang er of e lect rica l shoc k.
3 Turn the el ectr ode u nit s 45 degrees clockwise and insert them into the ioniz er .
30 BM series
Page 33

6.5.2.
Controlling the Ionizer Externally
Ionizer function External control i np ut
AX-SW137-PRINT
AX-SW137-REZERO
key
key
key
key
key
key
Pin No.
Description
1
GND
2
RE-ZERO Exter nal con t ac t i np ut
3
PRINT External c on t ac t i npu t
Assign the
key
key on
the AD-8922A.
It is possible to control the BM ioniz er function by connecting the remote c ontroller
(AD-8922A) or the foot switch (AX-SW137-PRINT, AX-SW137-REZERO).
When specifying "on" to “AD-8922A control (8922)” in the
function table (ionfnc 8922 on), the balance assigns the
function of the ION key to the MODE key on the AD8922A.
ION
to the MODE
When specifying “External con tr ol i np ut (e-5)” in “Ionizer func tion (ionfnc)”, the follow ing
functions can be assigned to AX-SW137-PRINT (option) or AX-SW137-REZERO (option)
terminals.
ionfnc e-5 0
ionfnc e-5 1 PRINT
ionfnc e-5 2 ION
PRINT
RE-ZERO
ION
RE-ZERO
Factory settings
By using aφ3.5 stereo plug MP-013LC (Marushin Electric Mfg. Co., Ltd.) or an equivalent product, you
can create your own switch.
(To us e a switch, you need to solder theφ3.5 stereo plug and the switch that y ou obtain yoursel f. )
External contact input terminal Compatible plug: φ3.5 mm 3-pole stereo plug
MP-013LC or t h e equivalent
Example of external contact input terminal
External contact input circuit Pin assignments
When pin 1 and pin 3 or pin 1 and pin 2 are shorted 100 ms or longer, the switch can operate the
balance in the same way as the balance PRINT key or the RE-ZERO key , respectively.
AX-SW137-PRINT or AX-SW137-REZERO (optional foot swi tches sold separately) can be used.
BM series 31
Page 34

6.6.
Monitoring the Clock and Environmental Sensors
Specifications of the environmental sensors
Sensor
Resolution
Measurement range
Applicable range
Temperature
±1.5 °C
5 °C to 40 °C
Humidity
±10 %
0 % to 100 %
Barometric pressure
±10 hPa
300 hPa to 1 100 hPa
20. Specifications
Operation
10.7. Clock and Calendar Function
5-td
10.2. Details of the Function Table
5-tp
10.2. Details of the Function Table
Humidity Barometric pressure
Temperature
Weighing mode
In the weighing mode, the built-in clock and environmental sensors (temperature, humidity,
barometric pressure) can be monitored and temperature data can be output in the function
settings.
Notes
The environmental sensors are built in to the balance casing. There fore, these values are
not in accordance with the environmental c ondition.
Refer to "
Press the SELECT key in the weighing
mode. The current time, date and sensor
values (temperature, humidity, barometric
pressure) are displayed for several seconds
in order. The balance returns to the
weighing mode automatically.
When pressing the SELECT key
while the current data is displayed,
the display proceeds to the next
data.
When pressing the CAL key
while the current data is displayed,
the balance returns to the weighing
mode.
Notes
When adjusting the built-in clock, ref er to "
When adding the ti me and date to t he output data, refer to “Time/Date output (
"
When adding temp erature data to the output data, refer to “Temperature output (
of "
32 BM series
5 °C to 40 °C
" for the balance operating conditions.
Time
5 seconds
Date
5 seconds
Environmental sensors
10 seconds
Weighing mode
".
".
".
)” of
)”
Page 35

6.7.
Repeatability Test
20. Specifications
BM-5, BM-5D
BM-20, BM-22
BM-252, BM-200, BM-300, BM-500
Press and hold
Release
In measurement
Cancel
or
Result
Counter
Example of BM-20
Weighing m ode
Weighing m ode
Repeatability is an index of variation in weighing values when the same mass is repeatedly
loaded and unloaded. St andard deviation is generally used for the indicator of repeatability.
The repeatability test measures t he i nt ern al ma ss 10 times a nd dis play s th e s t and ard devi ati on .
Use the repeatability test function to inspect the perform ance of the balance when changing the
environment or when moving the balance to a new l ocat io n.
Example: "Standard deviation = 0.2 mg" means that the results of repeated measurements of the
same mass fall wit hin th e range o f ±0.2 mg at a frequency of about 68%.
Notes
When the password function is used, the repeatability test function is available only when
logged in as an administrator ( AdmIN).
The repeatability test uses the internal mass. Therefore, the o btained standard de viation
may disagree with that of the repeatability of "
deviation as a reference.
Model Internal mas s
Approx. 5 g
Approx. 20 g
". Regard the standard
Approx. 190 g
1 Press and hold the RANGE key (for approx. 4 seconds)
until rep te5t is displayed , and the n rel ease
the key.
2 When rep te5t is displayed, the me asure ment
is automatically started, "r"e"p blinks and the
measuremen t c oun t ( 0 to 10) is di spl ay ed.
To cancel the current measurement,
press the CAL key.
Note Avoid vibration and breeze s f or
precise measurement during this test.
3 At the end of the measurement,
the stand ard dev iati on of th e
repeata bility is dis play ed.
(approx. 4 seconds)
St andard deviation
4 Press the CAL key or PRINT key
to return to the w eig hi ng mo de.
BM series 33
Page 36

7.
Response Adjustment
Indicator
Parameter
Response Stability
FAST
Fast response, Sensitive value
Slow response, Stable value
MID.
SLOW
7.1.
Automatic Response Adjustment
CH ng
CH e
7.2. Manual Response Adjustment
Press and hold
Result
Response indicator
This function stabilizes the weight value by reducing the influence on weighing that is caused
by drafts and/or vibration at the place where the balance is installed. The adjustment of the
function can be performed by analyzing the environment automatically or hand-operation.
The state of the function has three stages as follows :
Cond 0
Cond 1
Cond 2
This function automatically updates the response adjustment by analyzing the influence of
the environment using the internal mass.
1 Press and hold the MODE key (for approx. 2 seconds)
until RESPONSE is display ed, and then release th e key.
(approx. 2 seconds)
2 The balance automa tic a lly set s t he r es po nse ch ara ct erist ic .
Caution Do not allow vibration or drafts to affect the
balance during adjustment.
3 After automatic adjustment, the balance displays end ,
returns to the weighing mode and displays the updated
response i ndi cat or for a bout t hir ty se cond s.
Notes
If the auto mat ic r espo n se adj u stm ent fa ils , t he b al an ce
displays
as breeze and vibration, also c heck t he wei ghin g pan.
Then, perform adjustment again. Press the CAL key
to return to the weighing mo de.
If there is anything on the weighing pan, the balance
displays
Press t he CAL key to return to the weighing mode.
If the automatic respo nse adjust me nt is not helpful, try
"
. Check the ambi ent condi tions suc h
. Remove the substance fr om the pan.
".
Release
34 BM series
Page 37

7.2.
Manual Response Adjustment
Cond
ba5fnc
Display
Cond(Condition
FAST 0
MID. 1
SLOW
2
Cond
ba5fnc
10. Function Table
Press and hold
press again immediately
Select a parameter
Result
Release and wait
1 Pr ess and hold the MODE key (for approx. 2 seconds)
until RESPONSE is displayed, and then release the key.
Press the MODE key again imm edi atel y.
2 Select a setting for t he r es po nse a djus tmen t using the
MODE key. Either FAST , MID. or SLOW can be
selected.
3 The balance displays 1end1, returns to the weighing
mode and displays the updated response indicator for
about thir ty s ec on ds.
Notes
When the response adjustment is selected, the
"Condition (
Display (
changed accordingly as shown b elow.
)" parameter of "Environment,
)" in the function table will be
(approx. 2 seconds)
Release and
)
The response adjustment s etting can be c hanged
by the "Condition (
"Environment, Display (
table. F o r d etai ls , r ef er t o “
)" parameter of
)" in the function
”.
BM series 35
Page 38

8.
Calibration
8.1.
Calibration Group
Calibration (Sensitivity adjustment)
Calibration test(Sensitivity check)
info
10. Function Table
10.7. Clock and Calendar Function
info
data
12. Data Memory
Note on using an external weight
Model
Usable weight
Adjustabl e ra nge
BM-5
1 g 2 g 5 g*
BM-5D
1 g 2 g 5 g*
BM-20
1 g 2 g 5 g 10 g 20 g*
BM-22
1 g 2 g 5 g 10 g 20 g*
BM-252
10 g 20 g 50 g 100 g 200 g*
-15.00 mg to +15.99 mg
BM-200
50 g 100 g 200 g*
BM-300
50 g 100 g 200 g* 300 g
BM-500
50 g 100 g 200 g* 300 g 500 g
Since the balance's resolution is high, weighing values may change due to gravity and daily
environment al ch anges. It is n ecess ary to p erfor m calibr ation ( sensit ivit y adjus tment) wi th the w eight
in order to k eep the weighi ng v alues from cha nging even i f grav ity or the env iron ment cha nges.
Calibrate the balance if it is installed for the first time or relocated, or when the weighing values
change significantly in daily inspection.
Calibration means to adjust the weighing value of the balance using the reference weight or
internal mass. Calibration test means to weigh with the reference weight and compare how much
the result deviates from the reference value. (Calibration test does not perform adjustment.)
Automatic self calibration ------------------------- Automatically adjusts the balance using the internal mass
depending on the temperature change of the operating
environment.
Calibration using the internal mass ----------- Using the internal mass, adjusts the balance with a single touch.
Calibration using an external weight ---------- Using an external weight, adjusts the balance.
Calibration test using the internal mass ------ Checks the accuracy of weighing using the internal mass and
outputs the result.
*No adjustment is made.
Calibration test using an exter nal weight ---- Checks the accuracy of weighing using an external weight
(target weight) and output s the result.
*No adjustment is made.
Notes
Do not allow vibration or draft s to affect the balan ce during calibrat ion.
When using the data output for GLP / GMP using the RS-232C interface, set "GLP output (
the function table. Ref er to "
If the time and date are incorrect, refer to "
Calibration test is av ailable on ly when "GLP output (
The calibration and calibration test data can be stored in memory. When using memory,
set "Data me mory (
)" of the function table. Ref er to "
". The time and date can be added to the GLP report.
" and adju st them .
)" is set to "1" , "2" or "3".
" for details.
)" of
The accuracy of an ex ter nal weight can in fluenc e the ac cur acy o f weighi ng.
Select a weig ht for cali brat ion an d cali brati o n t est fro m t h e fol l owi ng t a ble.
Bold ty pe*: Factory set ti ng s. Th e w ei ght v al ue can be a djus te d w ithi n the r ange a bov e.
36 BM series
-3.000 mg to +3. 099 mg
-30.0 mg to +30.9 mg
Page 39

About the internal mass
8.7. Correcting the Internal Mass Value
Display
8.2.
Automatic Self Calibration
Automatic self calibration due to changes in temperature
9.1. Permit or Inhibit
Caution
The internal mass may change due to corrosion or other damage caused by the operating
environment, or due to aging. Check the internal mass periodically and correct the internal mass
value if n eces sar y . Refer to "
".
This indicat or me ans th at t he bal anc e i s measuring calibr atio n data.
Do not allow vibration or drafts to affect the balance while the indicator is
displayed.
This function automatically calibrates the balance when the balance detects an ambient
temperature change. If GLP output is selected in the function table, the balance outputs the
calibration report or stores the data in memory. Automatic self calibration functions even if the
display is tur ne d o ff ( st a ndby mode) . Ref er t o "
" for the operation.
To maintain the calibrated stat e, keep t he weighing pan clear whil e n ot in u s e.
If something is on the weighing pan, the balance decides that it is in use and does not
perform aut om at ic sel f c al ibr ati on.
When performing a long term weighing with something placed on the pan, installing the
balance in a system or considering the importance of continuous data, turn off automatic
self calibratio n.
Notes
When turning on the balance with nothing on the pan, if a sample heavier than 0.5 g is
placed on the pan, the balance detects the state that a sample is placed on the pan and
does not perform automatic self calibration.
Indicates that the balance detects changes in ambient temperature and automatic
self calibration will start. If the balance is not used for several minutes with this
indicator ( ) blinking, the balance per f orm s a uto mati c s el f cali bra tio n . Th e bli nki ng
duration dep ends on the operating environment.
Indicates that the balance is measuring calibration data. Do not allow vibration or
drafts to affect the balance while this indicator is displayed. After calibration, the
balance ret urns to indic ate th e prev ious di spl ay.
The balance can be used while the indicator blinks. But, to maintain the accuracy, stop
using the balance and confirm that there is nothing on the pan and allow the balance to
perform self c alib rat ion .
BM series 37
Page 40

8.3.
Calibration Using the Internal Mass
11.2. GLP Report
12. Data Memory
GLP output
This func ti on c ali br ate s the bal an ce usi ng the i nt ernal m as s.
The only op er ati on r eq uir ed i s to pr ess the CAL key.
1 Connect the AC adapter and warm up the balance for at
least one hour with nothing on the weighing pan.
2 Press the CAL key to displ ay Cal in .
3 The balance performs calibr atio n using the in ter nal mass .
Do not allow vibrat ion or drafts to aff ect t he bala nce.
4 If GLP output is set, glp is displayed, the calibration report is
output to the RS -232C interface and is stored in memory. R efer to
"GLP output (info)" and "Data memory (data)" of the function
table in "
end is displayed after calibration.
5 The balance will a u tom atic all y r et urn t o t he w ei ghing mode a fter c ali br ati on.
6 Confirm weighing acc uracy using cali brati on tes t (CC in).
" and "
".
38 BM series
Page 41

8.4.
Calibration Test Using the Internal Mass
Model
Internal mass
Nor mal range
BM-5, BM-5D
5.00000 g
±0.02 mg
BM-20, BM-22
20.00000 g
±0.02 mg
BM-252, BM-200
BM-300, BM-500
Press and hold
GLP output
This functi on checks the accuracy of weighing us ing t he i nt er nal mas s.
Calibratio n test does n ot per form a djust ment.
1 Connect the AC adapter and warm up the balance
for at least one hour with nothing on the weighing
pan.
2 Press and hold the CAL key until CC in is
displayed, and th en rel eas e the key .
3 The balance measur es t he z ero p oint .
Prevent vibration and drafts to affect the balance.
4 The measured zero poi nt data is displ ay ed.
5 The balance measures the int ernal mass .
Prevent vibration and drafts to affect the balance.
6 The value of the intern al mas s is dis play ed.
The normal r ang e of the value is as follows:
Release
200.0000 g ±0.2 mg
7 glp is displayed and the calibration test report is output
to the RS-232C interface and is stored in memory. Refer to
"GLP output (info)" and "Data memory (data)" of the
function t able.
end is displayed after the calibration test.
8 The balance automatically returns to the weighing mode.
BM series 39
Page 42

8.5.
Calibration Using an External Weight
9.1. Permit or Inhibit
11.2. GLP
Report
12. Data Memory
MODE (-)key
Press and hold
Release
Select a weight
Place the weight
Remove the weight
Adjust the value
GLP output
Example:
New value
This function calibrates the balance using an ex ter nal w eig ht.
Note Automatic self cal ibr at io n (d ue to ch ang e s in tem pe rat ur e) is en abl ed in t h e fa cto ry
setting. Th er efo re , ev en aft er c alib rat io n u sin g an ext ern al weight , t h e b alan c e may
perform aut om at ic sel f c al ibr ati on wh enev er it det ect s chang es in t emper atur e.
When considering the importance of continuous data or managing the balance using the
external weight only, refer to "
1 C onnect the AC adapter an d warm up the balance f or at
least one hour with nothing on the weighing pan.
2 Press and hold the CAL key until Calout is
displayed, and th en rel eas e the key .
3 When Cal 0 is displayed, proceed as follows:
If you want to change the calibrati on weight, press
the RANGE key and proceed to Step 4.
If you use the calibration weight value stored in
the balanc e, proc e ed t o Step 5.
4 Specify the calibr ati on w eig ht val ue as fol l ows :
RANGE key
RE-ZERO (+)key
PRINT key
CAL key
5 Confirm that there is nothing on the pan and press the
PRINT key. The bal an ce meas ures the zer o poin t.
Do not allow vibrat ion or drafts to aff ect t he bala nce.
The balance di splay s th e cali brati on w eight value.
6 Place the displayed calibration weight on the pan and press
the PRINT key. The balance measures the calibration
weight. Do not allow vibration or drafts to affect the balance.
7 end is displayed.
Remove the weight from the pan.
8 If GLP output is set, glp is displayed and the calibration
report is output and stored. Refer to "G LP output (info)" and
"Data memory (data)" of the function table in "
9 The balance will au to mati cal ly r etur n t o the w eig hing mod e.
10 Place the calibration weight on the pan and confirm that the
value displayed is correct. If it is not within the range, check
the ambient conditions such as breeze and vibration, and also
check the weighing pan. Then, repeat Steps 2 to 10.
40 BM series
............
...............
" an d "
..........
To switch bli nking digit s.
.....
To select the calibration weight or adjust the
calibration weight value. Refer to page 36.
To store t he new c ali bra tio n w eigh t v al ue.
Even if the AC adapter is removed, th e
data is maintained in non-volatile memory.
To cancel the operation and return to
Cal 0 .
".
" to set the function switch to “inhibit”
New value
100.0012 g
Page 43

8.6.
Calibration Test Using an External Weight
11.2. GLP Report
12.
Data Memory
MODE (-)key
Pres s and hold
Select a weight
Place the weight
Remove the weight
Adjust the value
GLP output
Example:
New value
This functi on ch ecks the accuracy of w eighing using an external weight.
This is av ai labl e onl y when t he "GLP output (info)" paramet er i s set t o "1", "2" or "3".
Calibratio n test does n ot per form a djust ment.
1 Connect the AC adapter and warm up the balance for at least
one hour with nothing on the weighing pan.
2 Press and hold the CAL key until CC out is displayed,
and then release the key.
3 When CC 0 is display ed, proceed as foll ows :
If you want to change the target weight, press the RANGE
key and proceed to Step 4. A list of usable weights is on
page 36.
If the current target weight value is used, pr oceed to Step 5.
4 Specify the target weight v al ue as foll ow s:
RANGE key
RE-ZERO (+)key
........
To switch bli nking digit s.
...
To select the target w eight or adju st the
weight val ue . R efer t o page 36.
PRINT key
..........
To store the new target weight value.
Even if the AC adapter is removed, the
data is maintained in non-volatile memory.
CAL key
.............
To cancel the operation and return to
CC 0 .
5 Confirm that there is nothing on the pan and press the
PRINT key. The bal an ce meas ures the zer o poin t.
New value
100.0012 g
Do not allow vibrat ion or drafts to aff ect t he bala nce.
The balance di splay s th e target w eig ht val ue.
6 Place the displayed target weight on the pan and press
the PRINT key. The balanc e meas ures the target weight.
Do not allow vibrat ion or drafts to aff ect t he bala nce.
7 end is displayed.
Remove the weight from the pan.
8 glp is displayed and the calibration test report is output and
stored. Refer to "GLP output (info)" and "Data memory
(data)" of the function table in "
".
" and "
9 The balance will automatically return to the weighing mode.
Release
BM series 41
Page 44

8.7.
Correcting the Internal Mass Value
Model
Correction reference value
Correction range
BM-5, BM-5D
5.00000 g
±1.5 mg
BM-20, BM-22
20.00000 g
±1.5 mg
BM-252, BM-200, BM-300, BM-500
200.0000 g
±1.5 mg
BM-300
Internal mass correc tion
Press and hold Press
Press and hold
(approx. 2 seconds)
Weighing
Weighing mode
Function switches
Function table
Corrected value
Standby
Internal mass correction switch
Function table switch
Perform calibration
using the internal mass
200 g
200 g
Correct the internal mass
The same mass
199.9994g
200.0000 g
Corrected value
The balance can correct the internal mass
value within the range shown below. This
function corrects the internal mass value to
conform to an external weight. The corrected
by +0.6 mg at 200 g.
mass value is maintained in non-volatile
memory even if the AC adapter is removed.
The internal mass value is corr ected as follows:
Example: With the
, 200.0000 g is corrected by +0.6 mg (200.0000 g) . When performing a
+0.6 mg correction with a 100 g external weight, the correction value will be +1.2 mg in
accordance wi th th e refe rence v alue o f 200 g .
1 Perform calibration using the internal mass. Weigh an external
weight and get the correction value.
Calibrate with this
internal mass
2 Press the ON:OFF key to turn the display o ff.
3 While pressing and holding the PRINT key and the RANGE key,
press the ON:OFF key. p5 is displayed.
4 Press the PRINT key to display the function switches. Set
the function table switch and internal mass correction switch
to "1" as shown t o the ri ght usi ng th e foll owing keys.
RANGE key
RE-ZERO key
PRINT key
CAL key
..........
.......
............
...............
To select the bl inki ng di git.
To change the value of the blinking digit.
To store the new val ue and return to the weighing mode.
To cancel the c urr ent oper at io n.
5 Press and hold the RANGE key (for approx. 2 sec onds) to enter
the function table and r elease the k ey when ba5fnc is displayed.
6 Press the RANGE key sever al ti mes t o display C5 in .
7 Press the PRINT key.
Correct t he i nt ern al mas s v alu e usi ng t he fol low i ng k ey s.
RE-ZERO (+)key
MODE (-)key
PRINT key
....
........
...........
To increase the value.
To decreas e t he val ue .
To store the new v alue and display the next
menu ite m of the functi on table.
CAL key
............
To cancel the curren t operatio n and display
the next menu i tem o f th e func tion ta ble.
mode
8 Press the CAL key to return to the weighing mode.
9 Press the CAL key to calibrate the balance using the
internal ma ss.
10 Check that the corr ecti on has been p erfor med pr operl y wit h the
external w eig ht . I f t he v alu e i s i nc orr ect , r ep eat th e corr ec tio n.
42 BM series
Page 45

9.
Function Switch and Initialization
9.1.
Permit or Inhibit
Function table
1 To p ermit correc tion .
See Note 1.
See Note 1.
The balanc e s tor es par a meter s th at must n ot be c h ang ed u ni nt enti on al ly .
Example: Calibration data for accurate weig hing, Data for adapting to the operating environment,
Control data for the RS-232C interface.
The balance is equipped with five switches for the purpose of protect ing parameters as show n above.
Each switch can select either "permit" or "inhibit". "Inhibit" protects parameters against
unintenti onal o pera ti ons .
In addition to the above, when usi ng balances with software vers ion 1.660 or later , the password
function ca n be used to res tri ct cali brati on fu ncti ons.
1 Press the ON:OFF key to turn the display of f.
2 While pressing and holding the PRINT key and the RANGE key,
press the ON:OFF key to display p5 .
3 Press the PRINT key. Then the balanc e dis play s the func ti on swit ches .
4 Specify the switches usi ng th e foll owing keys .
RANGE key
RE-ZERO key
...........
........
To select the bl inki ng di git.
To change the parameter of the selected switch.
0 To inhibit changes. (Cannot be used.)
1 To permit changes. (Can be used.)
PRINT key
CAL key
............
...............
To store the new para met er and re turn to the wei ghi ng mod e.
To cancel the operation ( Clr is displayed ). To retur n to t h e w eighi n g
mode, press t he CAL key once agai n.
(The displ ay s h ow n le ft i ndi ca te s th e fact ory s et ti ngs)
0 To in hibi t chang es to th e func tion table.
1 To p ermit chang es to t he func tion table.
Calibratio n u si ng t he i ntern al m ass
0
Software ver. 1.00 to 1.64
To inhibit cali bra tion using t he int ernal mass .
Software ver. 1.660 or later pA55 0 To inhibi t cali brati on usi ng th e inter nal ma ss.
1 To permit calibr atio n using the int ernal mass .
pA55 1 , 2
To inhibit calibration using the internal mass when
logged in as a user (
U5
E
R
) or a guest (
Calibration using an external weight
0
Software ver. 1.00 to 1.64
To inhibit c al ibr at ion u sing an ex ter nal w eig ht.
Software ver. 1.660 or later pA55 0 To inhibi t cali br ati o n usi ng an ex ter nal w eig ht.
pA55 1 , 2
1 To per mit ca libr ati o n us i ng a n ex t ern al w eig ht.
To inhibit calibration using an external weight when
logged in as a user (
U5
E
R
) or a guest (
Automatic self calibration (for variation of ambient temperature)
0 To i nhi bi t a ut oma tic s elf calibration.
1 To per mit aut o mati c s el f cal i brat io n.
Internal mass correction
0 To in hibi t corr ectio n.
GUE
GUE
5
T
).
5
T
).
BM series 43
Note 1: The operation is permitted when logged in as an administrator ( ).
Page 46

9.2.
Initializing the Balance
9.1. Permit or Inhibit
Press and hold Press
This functi on rest ores the fol low ing par ame ters t o the factory settings.
Calibration data
Function table (excludi ng the ti me an d date)
Sample unit mas s val ue (co unti ng mod e),
100% refer enc e mass v alu e ( per cen t mode)
The data that is stored in the balance using the data memory function
External weig ht val ue
Function switch settings ("
Liquid density and temperature in the density mode
Note Be sure to calibrate th e balan ce aft er init iali zat ion.
1 Press the ON:OFF key to turn the display off.
2 While pressing and holding the PRINT key and the
RANGE key, press t he ON:OFF key to display p5 .
3 Press the RANGE key to display Clr .
4 Press the PRINT key to display Clr no .
To cancel the operation, press the CAL key.
5 Press the RE-ZERO key to displ ay Clr go .
6 Press the PRINT key to ini ti aliz e the bala nce .
The balanc e w il l au to mati cal ly r etur n t o the w eig hing mode.
")
44 BM series
Page 47

10. Function Table
10.1.
Setting the Function Table
Display symbol and keys
Setting procedure
The functio n tabl e read s or rew rite s the p aramet ers t hat are stor ed in th e bala nce.
These para meters are mai ntai ned i n non-volatile m emory , ev en i f the A C ada p ter is re mov ed.
The function table menu consists of two layers. The first layer is the "Class" and the second layer
is the "Item".
The symbol " " indicates that the parameter displayed is in effect.
When pressed and held (for approx. 2 sec onds) in the weighing mode, enters the
function table mode.
Selects the class or item in the function table mode.
Changes the parameter.
When a class is displayed, enters an item in the class.
When an item is displayed, stores the new parameter and displays the next
class.
When an item is displayed, cancels the new parameter and displays the next
class.
When a class is displayed, exits the function table mode and returns to the
weighing mode.
1 In the weighing mode, press and hold the RANGE key (for approx. 2 seconds) until ba5fnc is
displayed, and th en rel eas e the key .
2 Press the RANGE key to s el ect a c l ass .
3 Press the PRINT key to enter the clas s.
4 Press the RANGE key to select an item.
5 Press the RE-ZERO key to select a paramet er for the sel ecte d ite m.
6 Repeat Steps 4 an d 5 t o sel ec t other i te ms o f the cl ass .
7 To store the parameters of th e sel ected class , pr ess the PRINT key.
Then the next c lass i s displ ay ed.
To cancel th e c ur rent o per ati on, pr es s th e CAL key. Then the next class is di spl ayed.
8 To specify parameters for another class, proceed to Step 2.
To finish the setting, press the CAL key to return to the weighing mod e.
BM series 45
Page 48

Weighing mode
Class
Finish
Weighing mode
Item
Item
Parameter
Parameter
Item
Step 1
Step 2
Step 3
Step 4
Step 4
Step 5
Step 7
Step 8
Step 5
Setting example
This example sets the "Data memory (data)" parameter to "1" (To sto re the weighing data) and the
"Interval time (int)" parameter to “5" (1 minute) .
Start
Press and hold (for approx. 2 s econds)
Press several times
Press several times
Press 2 times
Press 5 times
"Interval time"
"Data memory"
"Stores the w eighi ng data "
"1 minute"
46 BM series
Page 49

10.2.
Details of the Function Table
Class
Item and Parameter
Description
0
Fast response, sensitive value FAST
1
MID.
2
Slow response, stable value SLOW
0
Stable range is ±1 digit
1
±2 digit #1
2
Stable range is ±3 digits
ploc
off
OFF
Display lock function to meas ure the
on
ON
0
OFF
1
Normal
2
Strong
3
Very strong
Display refresh rate
0
5 times/sec ond
1
10 times/s ec ond
0
Point (.)
1
Comma (,)
p-on
off
OFF
Turns on the weighing mode display
on
ON
beep
off
OFF
Sounds a beep when a key is
on
ON
Cl adj
Clock
10.7. Clock and Calendar Function
The time and date are added to
the output d ata.
Accepts the
key only
when the di spl ay is st ab le.
Auto print mode A
Reference = zero
Outputs da ta w he n t he di spl ay i s
Auto print mode B
Reference = last stable value
With data 0, output s dat a
interval me mory.
0
Plus only
Displayed val ue > Reference
1
Minus only
Displayed val ue < Reference
2
Both
Regardless of dis playe d valu e
0
10 digits
1
100 digits
2
1000 digits
0
Not used
1
Stores the weighing data
2
Stores the calibrati on data
BM-300
BM-252
BM-300
ba5fnc
Environment
Display
Cond
Condition
5t-b
Stability band width
Display lock function
trc
Zero track ing
5pd
pnt
Decimal point
Can be changed by
response adj ust ment.
The stabili za tio n i ndi c ator
illuminates when the display
fluctuatio n i s w it hin th e r ang e.
volume dispensed f rom the pipette.
Keeps zer o dis pl ay by tr acki ng
zero drift.
Period to refresh the display
Decimal poin t for mat
dout
Data output
Auto display-ON
Beep
Refer to "
prt
Data output m ode
ap-p
Auto print pol ari ty
ap-b
Auto print
difference
0
Key mode
1
2
Stream mode /
3
Interval mode
when the AC adapter is connected.
touched.
"
PRINT
stable and conditions of ap-p,
ap-b and the refere nce v alue are
met.
continuously; with data 1, uses
Difference between reference
value and dis pl ay ed v al ue
#2
data
Data memory
:
#1
The unit of readabili ty is dig it.
Example: If 1 mg displ ay is selec ted us ing t he RANGE key for the
#2
Usable readability of the balance is one digit.
Example: I n gr a m di spl ay , one digit is 0.01 mg for the
BM series 47
Factory set ting s.
Related items:
prt, int, d-no, 5-td, info
and 0.1 mg for the
, 1 mg is one digit.
.
Page 50

Class
Item and Parameter
Description
0
Every meas ur emen t
1
2 seconds
2
5 seconds
3
10 seconds
4
30 seconds
5
1 minute
6
2 minutes
7
5 minutes
8
10 minutes
d-no
Data number output
off
No output
12. Data Memory
on
Output
0
No output
10.7. Clock and
Calendar Function
1
Time only
2
Date only
3
Time and date
5-id
ID number output
off
No output
Selects whet her or not t he ID
on
Output
pU5e
Data output p ause
off
No pause
on
Pause (1.6 se conds)
at-f
Auto feed
off
Not used
Selects whet her or not aut oma tic
feed is performed.
on
Used
0
No output
Refer to "11. ID Number and
GLP Report
version 1.660 or later.
1
AD-8121 format
2
General (balanc e clock data)
3
General (external device clock data) #3
ar-d
Zero after output
off
Not used
Adjusts zer o auto matic ally a fter
on
Used
5-tp
Temperature output
off
Not output
on
Output
0
600 bps
1
1200 bps
2
2400 bps
3
4800 bps
4
9600 bps
5
19200 bps
0
7 bits, even
1
7 bits, odd
2
8 bits, none
Crlf
0
CR LF
CR: ASCII cod e 0Dh
1
CR
0
A&D standar d form at
10.5. Description of
the Item "Data Format"
1
DP format
2
KF format
3
MT format
4
NU format
5
CSV format
dout
Data output
int
Interval time
5-td
Time/Date output
info
GLP output
Interval ti m e i n t he i nt er v al
memory mode when using
prt 3,, data 1
Refer to "
Selects whet her or not t he time or
date is ad ded t o th e w ei ghti ng
data. Refer to "
" for details.
number is output.
Selects t he d ata o utp ut i nt erv al .
" for details .
#3 Available for balances with software
"
5if
Serial
interface
bp5
Baud rate
btpr
Data bit, pari ty bit
Terminator
type
Data format
data is output
Adds temperature to data output
LF: ASCII cod e 0Ah
Refer to "
".
: Factory settings.
Caution The balance may not transmit the data completely at the specified refresh rate, depending
48 BM series
on the baud rate or data added to t he weighing data such as tim e, date and ID number.
Page 51

Class
Item and Parameter
Description
Timeout
off
No limit
Selects the wait ti me to r eceiv e
a command.
on
1 second
AK, Error code
off
No output
on
Output
d5 fnc
function
Unit
5. Weighing Units
Displayed only w he n t he i nt er nal ma ss v al ue c or re cti on
8. Calibration
ID number set ting
11. ID Number and GLP Report
0
3 seconds
6.5. Ionizer
1
10 seconds
2
Manual operation (max. 10 min.)
off
The ION key is not used.
on
Assigns the ION key to the MODE key on AD-8922A.
0
Assigns the
key and
key.
1
Assigns the
key and
key.
2
Assigns the
key and
key.
door
Door sensor
function
6.1. Basic Operation
Used
0
Not used
15. Password
Function”
1
Used (Limits w eighing operati ons)
2
Used (Allows basi c weighing)
ADM
Password in put by user 1
Password input by user 10 #5
10.3.
Description of the Class "Environment, Display"
Condition ( Cond )
5if
t-Up
Serial
interface
Density
erCd
ldin
Liquid density input
Unit
C5 in
Internal mas s corr ecti on
id
ion
Neutralization time
ionfnc
Ionizer
8922
AD8922A control
function
e-5
External control input
0 Water temperature
1 Liquid density
Refer to "
switch is set to 1. Refer to "
Refer to "
PRINT
PRINT
ION
AK: ASCII code 06h
Available only w hen d ensi ty
mode is sel ec te d
".
".
".
Refer to "
RE-ZERO
ION
RE-ZERO
".
off
d-dt
Door sensor
locfnc
Password
function
pa55 #4
Password fun cti on
loc no.
Password
#4
Only “Not used (0)” and “U sed (1)” are availabl e for balanc es wi th sof tw are v er si on 1.50 to 1.64.
Not used
on
Password i np ut by t he a dmini str at or
IN
U5e
R
01
|
|
U5eR 10
:
Factory set ting s.
Refer to "
Refer to "
.
All the param eters are av ail abl e for bal anc es w i th s o ftw are ver si on 1 . 660 or l at er .
#5
Available for balan ces w ith so ftwar e versi on 1. 660 or later .
For balances with software version 1.50 to 1.64, only the password input by the administrator is
available.
Cond 0 This parameter is for sensitive response to the fluctu ation of a mass val ue. Used for
powder target weighing, weighing a very light sample or when quick response weighing
is require d. A fter s etti ng, t he b al ance di spl ay s FAST .
"
Cond 2 This parameter is for stable weighing with slow response. Used to prevent a weight
value from dri fti ng due t o vibr atio n or dra fts. After setti ng, th e bal ance di splay s SLOW .
Note In automatic respon se adju stm ent, this pa ramet er is se lect ed auto mati cally .
BM series 49
Page 52

Stability band width ( 5t-b )
Display lock function ( ploc )
Zero tracking ( trc )
Display refresh rate ( 5pd )
Decimal point ( pnt )
Auto display-ON ( p-on )
Blinking processing indicator
Processing indicator
St abilization indicator
This item controls the width to regard a mass value as a stable value. When the fluctuation per
second is less than the parameter, the balance displays the stabilization indicator and outputs or
stores the data. The parameter influences the "Auto print mode".
5t-b 0 This parameter is used for sensitive response of the stabilization indicator. Used for
exact weig hi ng.
5t-b 2 This parameter ignores slight fluctuations of a mass value. Used to prevent a mass
value from dri fti ng due t o vibr atio n or dra fts.
This functi o n is us ed to l oc k t he dis pl ay w he n m eas uri ng th e vol u me dis pens e d fr om the pipette.
With "Display lock function is used (ploc on)" selected in the funct ion table, when the liquid is
dispensed into the weigh ing bottle from the pipette and a stable weighing value is obtained , the
balance calculates an averag e v alu e and dis pl ay s th e r es ult (l ock ed) .
When using this function for the measurement of a small volume, the influence of liquid
evaporation can be reduced.
Caution Even i f the weighing bottle (evaporator trap) to reduce the water evaporation is
used, at least 0.05 mg (0.05 ) evaporation will occur.
When canceling t his fun ction , pres s the RE-ZERO key.
Calculating Locked result
This function tracks zero point drift caused by changes in the environment and stabilizes the zero
point. When t he w ei ghi n g da ta i s only a few di gi ts, turn t he func tio n off for accur ate w eighing .
trc 0 The tracking function is not used. U sed for weig hing a very light sampl e.
trc 1 The normal tracking function is used.
trc 2 The strong tracking fun cti on is us ed.
trc 3 The very strong tr acki ng fun cti on i s u se d. U s ed for s t able z er o dis pl ay .
The periodic time to refresh the display. This parameter influences "Baud rate", "Data output
pause" and the data output rate of "Stream mode".
The decimal point forma t can be s elect ed.
When the AC a dapter is pl ugged in , the displ ay is au tomat ically turn ed on without pressing the
ON:OFF key, to display the weighing mode. Used when the balance is built into an automated
system. One hour warm up i s nec essary for a ccur ate weig hing.
50 BM series
Page 53

10.4.
Description of the Item "Data Output Mode"
Key mode
Auto print modes A and B
Auto print mode A
Auto print mode B
Stream mode
Interval mode
The parameter setting of "Data output mode (prt)" applies to the performance when the "Data
memory (data)" parameter is set to "1" (to store the weighing data) and when the data is
transmitted using the RS-232C i nter f ace.
When the PRINT key is pressed with the stabilization indictor turned on, the balance outputs or
stores the wei ghi ng dat a and t he disp lay bl inks on e tim e.
Required set ting dout prt 0 Key mode
When the displayed value is stable and the conditions of "Auto print polarity", "Auto print
differenc e" a nd the r efer ence value ar e met , the balanc e outp uts or stor es th e weighi ng da ta.
When the PRINT key is pressed with the stabilization indictor turned on, the balance outputs or
stores the da ta and t he dis play blink s one ti me.
Example For weighing each time a sample is placed and removed, with "ar-d" set
to "1" (to adjus t zero aft er the d ata is ou tpu t).
Requir ed s et ting dout prt 1 Auto print mode A (reference = zero)
dout ap-p Auto print pol ari ty
dout ap-b Auto print difference
dout ar-d
on
Zero after output
Example For weighing whi l e a sa mple is a dde d.
Requir ed s et ting dout prt 2 Auto print mode B (reference = last stable value)
dout ap-p Auto print polarity
dout ap-b Auto print difference
The balance outputs the weighing data continuously regardless of the display condition. When the
display refresh rate is set to 5 times / second (5pd 0), the data output rate is also set to the same
5 times / second. The display does not blink in this mode. The interval memory mode is used
when the "Data memor y (data) " par am eter i s s et to "1" (to stor e t he wei ghi ng dat a).
Example For monitoring dat a on a co mputer .
Requir ed s et ting dout prt 3 Stream mode
dout data 0 Data memory function i s not us ed
ba5fnc 5pd Display refresh rate
5if bp5 Baud rate
Caution The balance may not transmit the data completely at the specified refresh rate, depending
on the baud rate or data added to t he weighing data such as time, date and ID number.
The balance outputs the weighing data periodically regardless of the display condition and the
display blinks one time. When the "Data memory (data)" parameter of "Data o utput (dout)" is set
to "1" (to store th e weig hing d ata), the weighing d at a is p erio dic all y stor ed in m emor y.
Pressing the PRINT key starts output and pressing the PRINT key again during output stops the output.
Example For periodical weighing without a personal computer command and to
output all of the data, to a computer, at one time.
Requir ed s et ting dout prt 3 Interval mode
dout data 1 Data memory function is used
dout int Interval time
BM series 51
Page 54

Header 8-numerical character data Unit Terminator
St able header St able header of counting mode
Header Data Unit Terminator
10.5.
Description of the Item "Data Format"
A&D standard format 5if type 0
DP (Dump print) format 5if type 1
KF format 5if type 2
St able header St able header of counting mode
Header Data Unit Terminator
St able value
Data Unit Terminator
This format i s used when th e perip heral equi pmen t can rec eiv e the A& D for mat.
With an AD-8121B printer, use MODE 1 or 2. With an AD-8127 printer, use the external key
printing mo de, ma nual printi ng mod e, auto prin ting mode or interv al pri nti ng mod e.
This forma t consi sts of fift een or sixte en ch aract ers ex cludi ng th e termi nator.
A header o f tw o c h ara cter s i n dic ates t he bal anc e c ondi ti on .
The polarity sign is placed before the data with the leading zeros. If the data is zero, the plus sign is applied.
The unit, con sisti ng of three ch aract ers , foll ows the data .
Unstable header
Overload header
This format i s used when th e perip heral equi pmen t canno t rec eive th e A&D for mat.
With an AD-8121B printer, us e MODE 3. With an AD-8127 printer , use t he dum p printi ng mo de.
This format c onsis ts of s ix teen ch aract ers ex cludi ng the termi nator .
A header o f tw o c h ara cter s i n dic ates t he bal anc e c ondi ti on . N o ov er loa d hea der is used.
The polarity sign is placed before the data, with spaces in place of leading zeros, if the dat a is not
zero or overlo ade d.
The unit, con sisti ng of three ch aract ers , foll ows the data .
Unstable header
This is the Karl-Fischer moisture meter format and is used when the peripheral equipment can
only communicate using this format.
This format c onsis ts of f ourt een ch aract ers excl uding t he ter minat or.
This format h as no he ader charac ter s.
The polarity sign is placed before the data, with spaces in place of leading zeros, if the dat a is not
zero or overlo ade d.
This format o utpu ts the unit o nly for a stabl e value .
Unstable value
52 BM series
Page 55

MT format 5if type 3
NU (numerical) format 5if type 4
CSV format 5if type 5
ID number dout 5-id on
ID number Data number Date Time Weighing data
Data Terminator
St able header
Header Data Unit Terminator
This format is used when the peripheral equipment of other manufacturer is connected. Please
note that the connection is not guaranteed.
A header o f tw o c h ara cter s i n dic ates t he bal anc e c ondi ti on .
The polarity sign i s used only for negati ve da ta.
The weighing data uses spaces in place of the leading zeros.
The charac ter l eng th o f this format changes dependent upon the unit
This format outputs only numerical data.
This format c onsis ts of t en char act ers ex cludi ng the ter minator .
The polarity sign is placed before the data with the leading zeros. If the data is zero, the plus sign
is used.
This format separates the data of A&D standard format and the unit by a comma ( , ).
This format o utpu ts the unit ev en whe n the data is overloaded.
When a com ma ( , ) i s s ele ct ed for t he d eci mal poi nt, t he s epar at ors ar e s et to s emic olo n ( ; ).
When the ID number, data number, time and date are added in "Data output (dout)" of the
function table, outputs ID number, data number , date, time and weighing data in this order and
separates each item by a comma and treats all the items as one group of data.
Note When the balance is connected to a personal computer via the USB interface, the
The number to identify a specific balance.
This format c onsis ts of ei ght c harac ters ex clu ding the ter mina tor.
Unstable header
Overload header
St able header (When data is output using the PRINT key)
ID number, d ata nu mb er, ti me and dat e cannot be added to the weighing data.
BM series 53
Page 56

Data number dout d-no on
Date dout 5-td 2
3
Time dout 5-td 1
3
Temperature dout 5-tp on
Data number Terminator
This format outputs the data number just before the data is transmitted using the RS-232C
interface.
This format consists of six character s excluding the terminator.
When CSV format (5if type 5) is selected, the period ( . ) is replaced with a comma ( , ).
The date output order can be changed in " Time/Dat e output (5-td)" and "Clock (Cl adj)".
This format outputs the year in a four-digit format.
This format outputs the time in a 24-hour format.
or
or
This format outputs the temperature. The unit i s "C".
Note Humidity and barometric pressure are not output.
54 BM series
Page 57

10.6.
Data Format Examples
Stable
Unstable
Overload
Overload
Positive error
Negative error
Space, ASCII 20h
Carriage Return, ASCII 0Dh
Line Feed, ASCII 0Ah
BM series 55
Page 58

Units
A&D D.P. KF MT
g
mg
Counting mode
Perc ent mode
Ounce (Avoir)
Troy Ounce
Metric Carat
Momme
Pennyweight
Grain
Tael (HK general, Singapore)
Tael (HK, jewelry)
Tael (Taiwan)
Tael (China)
Tola (India)
Messghal
Density
Space, ASCII 20h
56 BM series
Page 59

Stor e new date
Stor e new time
The current
time
New time
The current
date
New date
Press and hold
Press several times
10.7.
Clock and Calendar Function
Operation
Checking the current time
Storing a new time
Checking the current date
Storing a new date
Quitting the operation
The balance is equip ped w ith a cl ock an d cale ndar functi on. When
"GLP output (info)" and "Time/Date output (5-td)" ar e used, the time
and date can be added to the output data. The operation is as follows:
1 In the weighing mode, press and hold the RANGE key (for approx.
2 seconds) until ba5fnc is displayed, and then releas e the key.
2 Press the RANGE key sever al ti mes t o display Cl adj .
3 Press the PRINT key to enter the time an d date setting mode.
(approx. 2 seconds)
4 The current time is di spl ay ed w it h all t he dig its bl ink i ng.
To change the time, press the RE-ZERO key and proceed to
When the time is correct, press the RANGE key and proceed to
To exit the mode, press the CAL key and proceed to
Step
8.
Step
5.
Step
5 Set the time in a 24-hou r for mat usi ng the fol low ing k eys.
RE-ZERO (+)key
MODE (-)key
RANGE key
PRINT key
CAL key
.............
...
.......
........
.........
To increas e t he v al u e b y on e.
To decreas e t he val ue by on e.
To select the di git to chang e the val ue.
To store the new time and proceed to
To cancel the operation and pr ocee d to
Step
6.
Step
6.
6 The current date is displayed with all t he dig its bl ink ing .
To change the dis pl ay o rder o f y ear (y), month (m) and day (d),
press the MODE key. The date is out p ut i n t he or der as sp eci fie d.
To change the date, press the RE-ZERO key and proceed to
When the date is correct, press the CAL key and proceed to
To change the tim e ag ai n, pr ess t he RANGE key and pr oc eed
back to
Step
4.
Step
Step
7.
8.
7 Set the date using th e foll owing keys .
RE-ZERO (+)key
MODE (-)key
RANGE key
PRINT key
CAL key
.............
...
........
........
..........
To increas e t he v al u e b y on e.
To decreas e t he val ue by on e.
To select the di git s to ch ange th e val ue.
To store the new date and proceed to
To cancel the operation and proceed t o
Step
Step
8.
8.
8 The balance displays the next menu item of the function table.
Press the CAL key to exit the mode an d r et ur n to th e w eig hi ng mod e.
6.
Note Do not enter invalid values such as non-existing time and date in this function.
When the c lo ck b ac kup b atter y has be en d eplet ed , t h e ba lance displays rtc pf .
Under this co ndit io n , p ress any key and set the t i me and d ate . T he d ead bat t ery
only aff ects t h e cl oc k an d c al end ar f un ctio n . Ev en so , t he f un ct ion wor ks no rm ally
as long a s th e A C adap ter is con ne cte d t o t h e bal an c e.
BM series 57
Page 60

11. ID Number and GLP Report
12. Data Memory
10.7. Clock and Calendar Function
11.1.
Setting the ID Number
The ID number is used to identify the balance when Good Laboratory Practice (GLP) or Good
Manufacturing Practice (GMP) is used.
The output format for GLP/GMP compliant report is selected in "GLP output (info)" of the fu nction
table and can be output to a personal comp uter or prin ter us ing t he RS-232C serial inter face .
The GLP/GMP compliant report includes the balance manufacturer, model, serial number, ID
number, date, time and space for sign ature. The calibration report and the ca libration test report
include the weight used an d the re sult.
The balance c an out put th e follow ing report s for GLP / GMP using the RS-232C serial i nt er fac e.
"Ca libr ati o n r epor t" o f the automatic self cali brat ion and the calibration using the in terna l mass .
"Cali brat io n r ep ort " o f t h e cal i brat ion u sing a n ex ter nal w eig ht .
"Cali brat io n test r epor t " o f t he c ali bra tio n test usi ng t h e int er nal mass.
"Calibration test report" of the calibration test using an external weight.
"Titl e bloc k" and " End bl ock" fo r the w eighi ng da ta.
Calibration report and calibration test report can be stored in memory and several reports can be
output at the same time. Refer to "
The ID number is main tain ed in n on-v ol atile memor y eve n if the AC a dapt er is re move d.
Refer to "
When an AD-8127 printer is connected to the balance and outputs the GLP report, the time and
date can be added to the report using the clock function of the printer . (Av ail abl e for bala nc es wi th
software version 1.660 or later) This is very useful for managing the time and date using the AD-
8127 password lock function to prevent them from being falsified.
To output the GLP/GMP compliant r ep ort , set the AD-812 7 print er t o the dum p printi ng m ode.
" for checking and storing the time and date.
" for details.
1 Press and hold the RANGE key (for approx. 2 seconds) until ba5fnc is displayed, and then
release the key.
2 Press the RANGE key several ti mes t o dis play id .
3 Press the PRINT key. Set the ID number using the following keys.
RE-ZERO key
RANGE key
PRINT key
CAL key
4 When ba5fnc is displayed, press the CAL key to return to th e w eighing mode.
Display ch ara cte r table
.....
To set the char acter of the digi t selec ted.
Refer to the dis pl ay cha racter tabl e show n below.
........
To select the di git to chang e the ch arac ter.
..........
.............
To store the new ID nu mber an d displ ay ba5fnc .
To cancel the new ID number and display ba5fnc .
58 BM series
Page 61

11.2.
GLP Report
Notes on outputting the GLP/GMP compliant report to a printer
16.2. Connecting to Peripheral Equipment
Calibration report using the internal mass
data 0
Manufacturer
===========
MODEL
S/N
ID
DATE
TIME
CALIBRATED(INT.)
SIGNATURE
-
To output the GLP/GMP compliant report to an AD-8121B printer, AD-8127 printer or to a
personal computer, set the "GLP output (info)" paramete r of the function table to "1" (AD-8121
format), "2" (General format using the balance built-in clock data) or "3" (General format using the
external dev ice cl ock da ta) .
Refer to "
With an AD-8121B printer, us e MODE 3. If MODE1 is used, selec t temporarily the dump print mode
by pressing the STAT. key of the AD-8121B printer.
With an AD-8127 printer, use th e du mp prin ting mod e.
If the external key printing mode is used, pres s and hold the ENT key of the AD-8127 printer (for
approx. 2 s econds) to sw itch between the external key printing mode and the dump printing mode.
If the data memory function is used (except data 0), the GLP out put cannot be out put
automatically.
If the time and date are not correct when the balance built-in clock data is output (info 1, 2), set the
correct time and date in "Clock (Cl adj)" of the function table.
“info 3” is availabl e for balances with softw are ver si on 1.660 or later.
" for connec tion t o a print er.
Note If the data memory function is used (except
cannot be output.
Key operation
1 Press the CAL key to display Cal in . The balance per forms c alibr ation usi ng th e inter nal mass.
2 If GLP output is us ed, glp is displayed and the calibration report is output.
3 The balance returns to the weighing mode.
Function setting "info 1" Function setting "info 2"
AD-8121 format
=====01234567
======LAB-0123
==2011/02/20
====12:34:56
Space, ASC II 20h
CR Carriage ret urn, A SCII 0Dh
LF Line feed, ASCII 0Ah
--------------
<TERM>
BM series 59
A=&=D
=====BM-300
Serial number
Calibration type
Terminator, CR , LF or CR
Model
ID number
Date
Time
Signature
), the "Title block " a nd "End block"
General format using the balance built-in clock data
Page 62

Outputting the clock d at a of t he ext ern al d evic e “ info 3”
info 3
Manufacturer
Model
Serial number
Calibration type
Signature
AD-8127 data
Function setting "
A & D
BM
12345678
LAB
2018/06/18
12:34:56
Date
ID number
Time
When the "GLP output (info)" parameter of the function table is set to "3", the clock data of
external devices such as a printer or a personal computer can be used instead of the balance
built-in clock data for the GLP/GMP compliant report. This is useful for standardizing the clock
data using the clock fun ction of an ex ternal devi ce.
Notes
To output th e clock d ata of an exter nal devi ce, the extern al d evice such as an A D-8127
printer or Windows communication tools sof tware WinCT RsCom must have a function t o
output the time and date when < ESC>D or < ESC>T is received.
Even w ith
the calibration report.
set, the data memory function saves the balance built-in clock data for
General format using the external device clock data
info 3"
MODEL
S/N
ID
DATE
TIME
CALIBRATED(INT.)
SIGNATURE
-300
-0123
60 BM series
Page 63

Calibration test report using the internal mass
data 0
Manufacturer
-----------
MODEL
S/N
ID
DATE
TIME
CAL
ACTUAL
-------
----
TARGET
----
SIGNATURE
-
Note Calibration test does not perform adjustment.
Key operation
1 Press and hold the CAL key to display CC in and release the key.
2 CC is displayed and the balance is checked automatically.
3 The zero point is measur ed and th e weig ht val ue is di splay ed for a few s econds .
4 The internal mass i s wei ghed an d the w ei ght v al ue is di spl ay ed for a few se co nds .
5 If GLP output is us ed, glp is dis play ed and t he c ali bra ti on tes t r ep or t i s ou tp ut.
6 The balance returns to the weighing mode.
Command
This calibr ati o n te st c an be p er for med w ith the TST command.
Function setting "info 1" Function setting "info 2"
AD-8121 format
CR Carriage ret urn, A SCII 0Dh
LF Line feed, ASCII 0Ah
BM series 61
If the data memory function is used (except
block" cannot be output.
A-&-D
-----BM-300
-----01234567
------LAB-0123
--2011/02/20
----12:34:56
.TEST(INT.)
0.0000--g
+200.0002--g
+200.0000--g
Calibration test type
Target weight value
Model
Serial number
ID number
Date
Time
Zero point value
Target weight
Signature
--------------
Space, ASC II 20h
<TERM>
Terminator, CR , LF or CR
), the "Title block" and "End
General format using the balance built-in clock data
Page 64

Calibration report using an external weight
data 0
Manufacturer
-----------
MODEL
S/N
ID
DATE
TIME
CALIBRATED(EXT.)
CAL.WEIGHT
----
SIGNATURE
-
Note If the data memory function is used (except
cannot be output.
Key operation
1 Press and hold the CAL key to display Cal out and release the k ey .
2 Cal 0 is displ ay ed.
3 To updat e t he c al ibr ati on w ei gh t v alue , pr ess th e RANGE key and pro ceed to S tep 4.
To use the preset calibration weigh t val ue, pr oceed t o Step 5.
4 Specify the calibr ati on w ei ght v alue u sing t he foll ow i ng key s.
RANGE key
RE-ZERO (+)key
MODE (-)key
PRINT key
5 Press the PRINT key. The zero point is measured and the weight value is displayed for a few
seconds.
6 Place the displayed weight on the pan. Press t he PRINT key to measure the weight and the
weight value is di spl ay ed for a few se co nds.
7 end is displayed. Remove the weight from the pan.
8 If GLP output is us ed, glp is displayed and the calibration report is output.
9 The balance returns to the weighing mode.
Function setting "info 1" Function setting "info 2"
AD-8121 format
-----01234567
------LAB-0123
--2011/02/20
----12:34:56
+200.0000--g
--------------
Space, ASC II 20h
<TERM>
CR Carriage ret urn, A SCII 0Dh
LF Line feed, ASCII 0Ah
62 BM series
........
To select the bl inki ng di git.
...
To increas e t he v al u e o f the bl inki ng di gi t.
.......
To decrease the value of the blinking digi t.
.........
-----BM-300
To store the new val ue.
A-&-D
Serial number
ID number
Calibration type
Calibration weight
Signature
Terminator, CR , LF or CR
Model
Date
Time
), the "Title block " a nd "End block"
General format using the balance built-in clock data
Page 65

Calibration test report using an external weight
data 0
Manufacturer
-----------
MODEL
S/N
ID
DATE
TIME
CAL.TEST(EXT.)
ACTUAL
-------
----
TARGET
----
SIGNATURE
-
Note Calibration test does not perform adjustment.
Key operation
1 Press and hold the CAL key to display CC out and release the key.
2 Cal 0 is displayed.
3 To update the target weight value, press the RANGE key and proceed to Step 4.
To use the preset target weight value, proceed to Step 5.
4 Specify the target weight value using the following keys.
RANGE key
RE-ZERO (+)key
MODE (-)key
PRINT key
5 Press the PRINT key. The zero point is measured and the weight value is displayed for a few seconds.
6 Place the displayed target weight on the pan. Press the PRINT key to measure the weight. The weight
value is displayed for a few seconds.
7 end is displayed. Remove the weight from the pan.
8 If GLP output is us ed, glp is displayed and the calibration test report is output.
9 The balance returns to the weighing mode.
Function setting "info 1" Function setting "info 2"
AD-8121 format
Space, ASC II 20h
CR Carriage ret urn, A SCII 0Dh
LF Line feed, ASCII 0Ah
BM series 63
-----01234567
------LAB-0123
--------------
<TERM>
If the data me mory function is used (exce pt
cannot be output.
..........
............
-----BM-300
To select the blinking digit.
....
To increase the value of the blinking digit.
.........
To decrease the value of the blinking digit.
To store the new value.
A-&-D
Model
Serial number
ID number
--2011/02/20
----12:34:56
0.0000--g
+200.0002--g
+200.0000--g
Calibration test type
Target weight value
Date
Time
Zero point value
Target weight
Signature
Terminator, CR , LF or CR
), the "Title blo ck" and "End b lock"
General format using the balance built-in clock data
Page 66

Title block and end block
data 0
-----------
MODEL
S/
ID
DATE
START
TIME
WT
WT
WT
WT
WT
WT
WT
WT
END
:40
15
SIGNATURE
-
Title block
When the weight values are recorded as GLP data, a " Title block" is inserted at the beginni ng and
an "End bl ock " is i nser t ed at th e en d of a gr ou p o f w eig ht v al ues in th e GLP r ep or t.
Note If the data memory function is used (except
Key operation
1 With the weighing data displayed, press and hold the PRINT key (for approx . 2 seconds) until
5tart is displayed, and th en rel ease t he key . The " Title bl oc k" i s out put .
2 The weighing data is output according to the parameter setting of the data output mode (prt) of
the functi on tabl e.
3 Press and hold the PRINT key (for approx. 2 seconds) until recend is displayed, and then
release the key. T he "End block" is output.
Function setting "info 1" Function setting "info 2"
AD-8121 print er for mat
Space, ASC II 20h
CR Carriage r eturn, ASCII 0Dh
LF Line feed, ASCII 0Ah
64 BM series
cannot be output.
A-&-D
-----BM-300
N-----01234567
------LAB-0123
--2011/02/20
----12:34:56
--+123.4567--g
--+123.4612--g
--+123.4623--g
--+123.4634--g
--+123.4511--g
--+123.4534--g
--+123.4712--g
--+123.4645--g
TIME----12
--------------
<TERM>
Terminator, CR , LF or CR
Manufacturer
Model
Serial number
ID number
Date
Time
Weighing data
Time
Signature
End block
), the "Title block" and "End block"
General format using the balance built-in clock data
Page 67

12. Data Memory
Excluding the time and date
Up to 200 sets
Calibration report: Using the internal mass and an external weight
12.1.
Notes on Using Data Memory
10. Function
Table
Releasing "Clr" or "err"
12.2.
Data Memory for Weighing Data
Features
Upper left of
the dis play
Data memory is a function to store weighing data and calibration data in memory. The data stored in
memory are available for outputting at one time to a printer or personal c omputer.
Weighing data
Calibration test report: Using the internal mass and an external weight
To use the memory function, set the "Dat a memory (data)" parameter and the
"Time/Date output (5-td) " parameter of the function table. R efer to "
For weighing data, the data content s to be stored and the storage c apacity depend
on the "Time/Date output (5-td) " parameter setting.
If a different type of data exis ts in memory, "Clr" blinks in the upper left of the
display to prompt you to delete the data.
For example: You want to store weighing data but calibration data or unit mass
data remains in memory. "Clr" blinks.
If the stored data is corrupted, "err" blinks in the upper left of the display.
Under such a condition, before storing data, delete the data in memory as follows:
" for details on setting the data memory.
Including the time and date Up to 100 sets
Automatic self calibration
Last 50 sets
1 P ress and hold the PRINT key (for approx. 2 seconds) until SClr "n"o with "no" blinking is displayed,
and then r elease the key .
2 Press the RE-ZERO key to displ ay Clr "g"o with "go" blinking.
3 Press the PRINT key to del e te al l t h e d ata i n me mory .
4 The balance dis play s end and returns to the weig hing mod e.
The balance can store 200 sets o f weighi ng data in memory (if the time and date are added, the
balance can store 100 sets ). Even if the AC ad apter is r emoved, the data is maintained in the memory.
It is not necess ary to conn ect a printer or pers onal comp uter to the bal anc e conti nual ly, b ecau se
the balance s tore s the w eighing data in memor y.
The data memor y fu nction does n ot occ upy a pr inter or pers onal comp uter w hile weighing.
The data in me mory ca n be dis play ed on the balance for confirmation.
The da ta in m emory can be output at on e time t o a print er or p erson al co mput er.
Comment: Select ite ms for a ddi ti on t o t he out put d ata, s uc h as t he ID num ber , d ata numb er, ti me
and date, in th e func tion setti ngs.
BM series 65
Page 68

Storing the weighing data
Clr
Enabling the data memory function
Note If "
1 Set the "Data memory (data)" parameter t o "1" (To st ore the weighing d ata) .
2 Specify whether or not to add the time and date using the "Time/Date output (5-td) " parameter.
3 The storing mode depend s on the "D ata o utpu t mode ( prt)" param eter set ti ng.
Four modes ar e avail abl e to stor e dat a.
" blinks in the upper left of the display, delete the data in memory.
Key mode
Auto print mode A
Auto print mode B
Interval mode
...........................
..............
..............
......................
When the PRINT key is press ed and the dis pl ay ed v alu e is sta bl e, the
balance st ores t he w ei g hing data.
When the displayed value is stable and the conditions of "Auto print
polarity", "Aut o print diff erenc e" and z ero p oint (r efere nce val ue) are met,
the balance s tore s the w eighing data .
When the displayed value is stable and the conditions of "Auto print
polarity", "Auto print difference" and last stable data (reference value)
are met, t he bal anc e s t ores t he w ei ghi ng dat a.
Weighing data is stored at an interval specified in "Inter val time (int)".
Press the PRINT key to start a nd stop t his m ode.
1 Press and hold the RANGE key (for approx. 2 seconds)
until ba5fnc is displayed, and then release the key.
2 Press the RANGE key several times to display dout .
3 Press the PRINT key.
Press and hold
(approx. 2 seconds)
Press several times
4 Press the RANGE key several times to display data .
5 Press the RE-ZERO key to display data 1 .
6 Press the PRINT key to store the setting.
7 Press the CAL key to return to the weighing mode.
Press several times
66 BM series
Page 69

Display symbols for data memory
fUl
Setting the function table
Item
Mode
Data output
mode
Auto print polarity,
difference
Data memory
function
Key mode
Not used
Auto print mode A
prt 1
to
to
data 1
Auto print mode B
Interval mode
prt 3
Not used
data 1
int 0 to 8
No
No
200 sets
Yes
Time only
No
5-id off
Date only
5-td 2
Yes
Both
Memory data being displayed
Interval memory
standby indicator
Interval memory
active indicator
Number of data
in memory
Data number of the data
currently displayed
Memory full
Weighing data
being displayed
Notes
When weighing data is being stored in memory, the data can be output to a personal
computer using the RS-232C interface at the same time.
"
" indicates that memory is full or the memory capacity has been reached. More data
cannot be sto re d un l ess th e m emo ry d ata is d elet ed .
Automatic self calibration cannot be used while the interval memory mode is active.
The following commands cannot be us ed during d ata stor age.
Parameter settings for each output mode are as follows:
prt 0
ap-a 0
prt 2 data 1
Additional par amet er set ting s, as fol low s:
Data number
ID number
d-no off
d-no on
5-id on
ap-b 0
Time and date
2
2
Interval time
data 1
Not used
5-td 0
5-td 1
100 sets
5-td 3
BM series 67
Page 70

Recalling the memory data
Transmitting all memory data at one time
Function Table
16.2. Connecting to Peripheral Equipment
Indicators
Weighing data
Weighing data with
Confirm that the "Data memory (data)" parameter is set to "1".
1 Press and hold the PRINT key (for approx. 2 seconds) until reCall
is display ed, and then releas e t he k ey . The type of data appears in
the upper left of the display as shown to the right.
2 Press the PRINT key to enter the me mory recall m ode.
Recall the dat a in me mory using th e foll owing keys .
RE-ZERO key
MODE key
PRINT key
With RANGE held down, pr ess t he CAL key
CAL key
3 Press the CAL key to return to t he weig hing mode.
.....
.........
..........
.............
To proceed to the nex t data set.
To go back to th e prev ious d ata se t.
To transmit the current data using the RS-232C
interface.
To delete the current data.
To exit the me mory recall m ode.
Confirm tha t the "S erial int erfac e (5if)" para met ers ar e set pro perly .
Refer to "10.
" and "
without time and date
time and date
".
1 Press and hold the PRINT key (for approx. 2 seconds)
until reCall is display ed, and th en r eleas e the k ey .
2 Press the RANGE key to dis play out .
3 Press the PRINT key to display out "n"o with "no"
blinking.
4 Press the RE-ZERO key to display out "g"o with
"go" blinki ng .
5 Press the PRINT key to transmit all data using the
RS-232C i nter fac e.
6 The balance displays Clear when all data is
transmitted.
Press the CAL key to return to the weig hing mode.
Press and hold
(approx. 2 seconds)
Transmit all data
68 BM series
Page 71

Deleting all memory data at one time
12.3.
Data Memory for Calibration and Calibration Test Data
Features
Storing the calibration and calibration test data
Clr
Indicator
1 Press and hold the PRINT key (for approx. 2 seconds)
until reCall is displayed, and t hen rel e as e th e k ey.
2 Press the RANGE key sever al ti mes t o display
Clear .
3 Press the PRINT key to display Clr "n"o with "no"
blinking.
4 Press the RE-ZERO key to display Clr "g"o with
"go" blinki ng .
5 Press the PRINT key to delete all data .
6 The balance displays end and returns to the
weighing mod e.
Press and hold
(approx. 2 seconds)
Press several times
Calibration data (when and how it is performed) and calibration test
data can be s tor ed i n me mory .
All the data in m emor y is avail abl e to be ou tput at one ti me to a pr int er
or personal c ompu ter.
Up to 50 data sets of the latest calibration or calibration test can be
stored. When the memory capacity has been reached, "fUl" is
displayed in the upper left of the display.
Note If "
Store the c ali br ati on an d c ali bra ti on t es t dat a a s foll ow s:
1 Set the "Data memory (data)" parameter t o "2" (to st ore th e cali brati on d ata).
" appears blinking in t he uppe r left of the displ ay , delete the data in m emory .
2 Set the "GLP output (info)" parameter to "1", "2" or "3".
3 W ith the settings above, each time ca libration or calibration test is performed, the
BM series 69
data is st or ed auto mati c all y .
Page 72

Transmitting the memory data
5if
10. Function Table
16.2. Connecting to Peripheral Equipment
data
Deleting data stored in memory
Notes
Confirm th at t h e " Seri al int erf a ce (
Refer to "
Confirm that the "Data memory (
1 Press and hold the PRINT key (for approx. 2 seconds)
until out is displ ayed , and then release the key .
2 Press the PRINT key to display out "n"o with "no"
blinking.
3 Press the RE-ZERO key to display out "g"o with
"go" blinki ng .
4 Press the PRINT key to transmit all memory data using
the RS-232C interface.
5 The balance displays Clear when all memory data
is output.
Press the CAL key to return to the weig hing mode.
" and "
1 Press and hold the PRINT key (for approx. 2 seconds)
until out is displ ayed , and then release the key.
)" paramet ers ar e set pr operl y .
)" parameter i s set to "2".
Press and hold
(approx. 2 seconds)
Press and hold
(approx. 2 seconds)
".
2 Press the RANGE key to display Clear .
3 Press the PRINT key to display Clr "n"o with "no"
blinking.
4 Press the RE-ZERO key to display Clr "g"o with
"go" blinki ng .
5 Press the PRINT key to delet e all da ta.
6 The balance displays end and returns to the
weighing mode when all the data has been deleted.
70 BM series
Page 73

13. Underhook
Bottom
Underhook
Cap
Solid table
equipped with a hole.
Weighing pan
The underhook can be used for magnetic materials or density measurement. The built-in
underhook is revealed by removing the cap on the bottom of the balance. Use the underhook as
shown bel ow.
Caution
Do not apply excessive force to the underhook.
When not in use, attach the cap to prevent dust from
getting into the balance.
Do not push the underhook upward
When turning the balance over, parts and weighing
sample in the weighing chamber will fall off. (Parts: the
weighing pan, pan support, breeze break ring, fine range
ring and dust plate )
Remove them first .
When the cap is removed, a weighing error may occur,
because of drafts entering into the internal portion of the
balance. Arrange the room condition.
1 Remove the cap on the bottom of the balance.
2 Hang your weighing pan on the underhook.
Place the balance on the solid tabl e.
BM series 71
Page 74

14. Density Measurement (Specific gravity)
5.2. Storing Active Units
Formula to obtain the density
Prior to measurement: Changing the function table
5.2. Storing Active Units
Unit
d5 fnc
5if
Class
Item and Parameter
Description
Density function
Liquid density input
0
Water temperature
Liquid density
A
ρ
The balance is equ ip ped with a d ens ity mo de . It c alcu la tes t he den s ity of a s olid u s ing t he weight
of a sample in air and the weight in liquid. We recommend the use of the AD-1653 Density
Determination Kit.
Notes
The density mode was not selected fo r use when the balance was shipped from th e factory.
To use this mode, change the function table settings to activate the density mode.
Refer to "
When the density mode is selected, t he response adjustment function canno t be used.
The readability is 0.0001 g while using the density mode.
The density can be obtained by the following formula.
Where ρ : Density of a sample
A : Weight value of a sample in air
B : Weight value of a sample in liq uid
ρ0 : Density of a liquid
Prior to measurement, change the function tabl e as follows:
1 Selecting the density mode.
The density mode is not available in the factory setting. To use the mode, select it (unit of Unit .)
in the function tabl e. Re fer to "
one of the weig hing units by pr essing the MODE key.
2 Selecting a way to set the density of a liquid.
Select the liquid density input method from the function table below.
= x ρ0
A - B
".
". Then, the densi ty mode ca n be s elec t ed as
Note The following function table is displayed only when the unit of
of the density function (
72 BM series
d5 fnc
ldin
) is displayed after
1
F
actory setting.
.
is active. The table
Page 75

Entering the density of a liquid
Entering the water temperature (
ldin 0 )
The relation between the water temperature and density
°C
+0
+1
+2
+3
+4
+5
+6
+7
+8
+9
0
0.99984
0.99990
0.99994
0.99996
0.99997
0.99996
0.99994
0.99990
0.99985
0.99978
10
0.99970
0.99961
0.99949
0.99938
0.99924
0.99910
0.99894
0.99877
0.99860
0.99841
20
0.99820
0.99799
0.99777
0.99754
0.99730
0.99704
0.99678
0.99651
0.99623
0.99594
30
0.99565
0.99534
0.99503
0.99470
0.99437
0.99403
0.99368
0.99333
0.99297
0.99259
40
0.99222
0.99183
0.99144
0.99104
0.99063
0.99021
0.98979
0.98936
0.98893
0.98849
Entering the density directly (
ldin 1 )
Press and hold
Press and hold
Two ways to set the density of a liq uid ar e available in the function tabl e, "Liq uid dens ity input ( ldin): by
entering the water temperature or by entering the density dir ectly.
1 Press the MODE key as necessary to select the density mode.
Press and hold the MODE key (for approx. 2 s econds) to select to "water
temperature" or "liquid density ". In the density mode : The unit is "g (gram)". The
processing indicator ( ) blinks. Response adjustment is off.
If you cancel the density mode, press the MODE key.
2 Press and hold the MODE key (for approx. 2 seconds). The water
temperature currently set (unit: °C, factory setting : 25°C) is
displayed. Use the following key s to change the value.
RE-ZERO (+)key
MODE (-)key .......... To decrease the temperature by one degree.
....
To increase the temperature by one degree.
(0°C is displayed after 99°C)
(99°C is displayed after 0°C)
(approx. 2 seconds)
PRINT key ............ To store the new water temperature, display
end and return to the density mode. Proceed
to Step 1.
CAL key ............... To cancel the change and return to the density mode.
Proceed to Step 1.
g/cm3
Press and hold the MODE key (for approx. 2 seconds). The density
currently set (unit : g / cm3, factory setting : 1.0000g / cm3) is
displayed.
Use the following keys to change the v alue.
The range to set the density is 0.0000g / cm3 to 1.9999g / cm3.
(approx. 2 seconds)
RE-ZERO (+)key
MODE (-)key
PRINT key
CAL key
BM series 73
RANGE key
...............
.....
..........
..........
............
To increase the value of the digit selected.
To decrease the value of the digit selected.
To select the digit to change the value.
To store the change, display end and return to the density mode. (Step 1).
To cancel the change and return to the density mode. (Step 1)
Page 76

Measuring the density ( specific gravity )
From "Entering the
density of a liquid"
Place sample on
the pan in air
Move sample from
Remove sample
Output or store
Output or store
Output or store
Weighing in air.
g lights. blinks.
Weighing in air.
g lights. blinks.
Weighing in liquid.
g lights. lights.
Density display.
g turns off. lights.
Note If the liquid temperature or the type of liquid is changed during measurement, input
the value of the liquid density again as neces sary. The density displ ay is four decim al
places. The readability cannot be changed with the RANGE key.
The density (or specific gravity) is displayed after "Weighing
in air" and " Weighing in liquid". The procedure of each
measurement is as follows:
g : gram. : the processing indicator
1 Enter the density mode. (g lights. blinks.)
Place nothing on both pans and press the RE-ZERO key
to display zero.
2 Place the sample on the pan in air (g lights.
and wait for the weight value to be stable.
To store or output the weight value, press the PRINT key.
Press the RANGE key to con fir m t he w eig ht val ue
in air and pr oce ed to the n ext s te p.
Note If negative value or e (out of range) is
displayed, the RANGE key is inactive.
3 Move the sample to the pan in liqui d (g lights. lights.)
and wait for the weight value to be stable.
To store or output the weight value, pres s the PRINT key.
Press the RANGE key to confirm the weight value in
liquid and proceed to the next step.
Note If e (out of range) is displayed, the RANGE
key is inactive.
4 To stor e or output the density value, press the PRINT
key. (Unit : . g turns off. lights.)
Press the RANGE key to measure another sample
and proceed to Step 2.
5 If the liquid temperature or the type of liquid is changed
during measurement, input the value of the liqui d density
again as necessary.
6 Press the MODE key to proceed to other modes.
blinks.)
the p an in air to the
pan in liquid
74 BM series
Page 77

15. Password Function
15.1.
Balance Software Version 1.50 to 1.64
No password function.
The password function can be used to restrict balance use or functi ons . It is useful for preventi ng
the time and date setting from being falsified and preventing users from changing other function
settings.
Password: Four digits (4 x 4 x 4 x 4 = 256 outcomes) using the MODE , RANGE , PRINT and
RE-ZERO keys.
At the fac tory s et ti ng, the password function has been disabled.
Settings r el ated t o t he p assw or d func ti on ar e pe rfor m ed i n t he fu ncti on t able.
Note The password funct ion v aries depen ding on the b alance software version.
Two setting s ar e avail able i n “Password function (LocFnc) ” of the function table.
pA55 0
pA55 1
pA55 0 (No password function)
No password is required. Anybody can per form weighing, use all the balance functions and make
changes to them.
pA55 1 (Entering a password is required before start ing weighing.)
The adminis trator (ADMIN ) sets a uni que pa ssw ord to restrict balanc e users . Only one
password by t he ad minist rat or can be set.
The correct passw ord must be ent ered for the balanc e to en ter th e weighing mode.
Entering a password is required before starting weighing.
BM series 75
Page 78

15.2.
Balance Software Version 1.660 or later
No password function.
Entering a password is required before starting weighing.
Logging in by the administrator password is required before making changes.
All the functions and settings can be used.
A password can be set for each of 10 users.
Initialization and changes to the settings are restricted,
including the clock setting.
No password
The balance cannot be used.
Administrator (
IN)
All the functions and settings can be used.
Guest (
5T)
*No password
Initialization and changes to the settings are restricted,
including the clock setting.
Items restricted depending on the login level
Weighing
Entering password
before weighing
Administrator
(
IN)
User
(U5ER
)
Guest
(
5T)
Three sett ings are avai labl e in “Password func ti on (LocFnc) ” of the function table.
pA55 0
pA55 1
pA55 2
pA55 0 (No password function)
No password is required. Anybody can per form weighing, use all the balance functions and make
changes to them.
pA55 1 (Entering a password is required before starting weighing.)
The adminis trator (ADMIN ) sets un ique pass wor ds to r est ri ct bal an ce us ers. Pr es sing the
ON:OFF key before wei ghing w il l pr om pt you to enter a passw ord .
The correct passw ord must be ent ered for the balanc e to en ter th e weig hing m ode.
Two login lev els ar e ava ilabl e: admi nis trat or (ADMIN ) and us er (U5ER 01 to 10).
Administrator (ADMIN)
User (U5ER 01 to 10)
pA55 2 (Logging in by the administrator password is r equired before making changes .)
Anybody ca n p er for m w eig hi ng, but ini ti al iz ati on a nd c ha nge s to t he s et t ings ar e restricted,
including th e clo ck setti ng. Even if the ON:OFF key is pressed to start weighing, a p assw or d
will not be required.
Two login lev els ar e ava ilabl e: admi nis trat or (ADMIN ) and gue st (GUE5T).
ADM
GUE
When weighing is started by pressi ng the ON:OFF key while holdi ng dow n the CAL key in
the standby mode, the balance will prompt you to ent er th e admini str ato r passw ord.
Login level
ADM
01 to 10
GUE
Required
Not required
Calibration Changes to the settings *1
Available Available
Available or
not available
*2
Not available
*1: Response adjustmen t, r epe atabi l ity t est, func ti on sw i tch a nd i niti al iz ati on, funct io n s ett ing s
(clock set ti ng)
*2: Available under ordin ary circu mstanc es, bu t no t avail abl e to user s and g uests w hen th e
administra tor s ets th e funct ion s witc h to “inhibit”.
76 BM series
Page 79

15.3.
Using the Password Function
yE5
yE5
“15.6. Storing or Changing the Password”
(0)
(1)
Press and hold
Press several times
No is selected.
No
Switch between YES/No
No
YES is selected.
No
Confirm
Press
The passw ord fun ctio n can be switc hed a mong “Not used(0)”, “Used(1)” and “Used(2)” in
“Pas swor d func tion (locfnc) ” of the function table.
1 In the weighing mode, press and hold the RANGE key (for
approx. 2 s econds) until ba5fnc is displayed, and then
release the key.
(approx. 2 seconds)
0.0000
RANGE
bA5Fn
2 Press the RANGE key sever al ti mes t o display locfnc .
RANGE
LocFnc
3 Press the PRINT key to display pa55 ""0 .
To cancel the operation, press the CAL key.
PA55
4 Press the RE-ZERO key to switch the numbers. Display “1” or
“2”.
PA55
0
1
5 Press the PRINT key to display 5ure :ye5 " " with "No"
blinking ( sel ec ted) .
6 Press the RE-ZERO key to swit ch bet wee n "
" and "No".
7 Display 5ure :"y"e"5 with "
" blinking (s el ect ed) .
8 Press the PRINT key to store the new setting. The password
function can now be used.
9 loc no is displayed. To store or chang e the password,
proceed to Step 3 in
Not to store or change the password, press the CAL key to
return to the weighing mode.
Note When the bal ance software version is 1.50 to 1.64,
only “Not used
” or “Used
” is available.
.
5urE : YE5
5urE : YE5
5urE : YE5
5urE : YE5
End
Loc no.
0.0000
BM series 77
Page 80

15.4.
Entering the Password Before Weighing
15.4.1.
1 (Entering a password is required before starting weighing
)
ER
PA55
Enter four characters
No operatio n
Correct
Weighing mode
Display off
Full segments
Login level
Incorrect
1 In the standby mode, press the ON:OFF key.
2 After U5
you to ent er a p ass w ord .
3 Enter a four-digit passw ord us ing t he foll ow ing k ey s.
The display will turn off automatically after ten minutes of
non-operation.
MODE key ............. To enter m
pA55
PA55 WD , ---- is displayed to pr omp t
RANGE key ........... To enter r
PRINT key ............. To enter p
RE-ZERO key ........ To enter 2
CAL key ................ To go back one character
4 When the password is correct, the balance
displays t he log in l ev el, t urn s al l the di spl ay
segments on, and then enters the weighing mode.
U5ER
PA55 WD
PA55
----
RANGE
PA55
2222
for 10 minutes
When the administrator password is entered, you
are logged in as an administrator.
The default password set at the factory is 2222
(press the RE-ZERO key four times) , for
administrator level.
When the password is incorrect, the balance
displays FA iL , sounds th e buz z er t hr ee ti mes
and turns the di spl ay off .
Note When the balance software version is 1.50 to 1.64,
the login level is not displayed when logged in.
When the balance software version is 1.660 or later,
enter the administrator password to log in as an
administrator.
password
LoG
In : ADMIN
0.0000
password
FA iL
78 BM series
Page 81

15.4.2.
2 (Logging in by the administrator password is required before making changes
)
Logging in as an administrator (
IN)
Logging in as a guest (
5T)
While holdi ng down
Enter four characters
No operatio n
Correct
Weighing mode
Display off
Full segments
Login level
Incorrect
Weighing mode
1 In the standby mode, while holding down the CAL key, press
the ON:OFF key.
2 Enter a four-digit passwor d using the follow ing keys.
The display will turn off automatically after ten minutes of
non-operation.
MODE key ............. To enter m
pA55
ADM
RANGE key ........... To enter r
PRINT key ............. To enter p
RE-ZERO key ........ To enter 2
CAL key ................ To go back one character
3 When the password is correct, the balance
displays t he log in l ev el, t urn s al l the di spl ay
segments on, and then enters the weighing mode.
ADMIN
PA55 WD
PA55
----
RANGE
PA55
2222
for 10 minutes
The default password set at the factory is 2222
(press the RE-ZERO key four times), for
administrator level.
When the password is incorrect, the balance
displays FA iL , sounds th e buz z er t hr ee ti mes
and turns the di spl ay off .
1 In the standby mode, press the ON:OFF key.
2 After , the balance en ters th e
weighing mod e.
LoG
In : GUE5T
GUE
password
LoG
In : ADMIN
0.0000
password
FA iL
LoG
In : GUE5T
0.0000
BM series 79
Page 82

15.5.
Logging Out
Display off
Weighing mode
1 To log out, press the ON:OFF key to turn the display off.
With the function pA55 1 set , t he pas sw or d wi l l n eed to be
entered agai n to en ter the weig hing mo de fro m the s tand by
mode.
0.0000
80 BM series
Page 83

15.6.
Storing or Changing the Password
IN
“15.7. Changing the Password”
loc no.
Press and hold
(approx. 2 seconds)
Press several times
Login level
Press
Refer to “15.7. Changing
ER
ER
The password can be changed in "Password (loc no..)" of the function table.
1 In the weighing mode, press and hold the RANGE key (for
approx. 2 s econds) until ba5fnc is displayed, and then
release the key.
2 Press the RANGE key several t imes t o di s play loc no. .
3 Press the PRINT key to display t he login level (ADMIN).
4 Press the RANGE key to display t he l og in lev el to be
changed (ADM
/U5ER 01 to 10).
The stabili za tio n i ndi c ator ap pear s at a l og in l ev el w her e
a password has been stored. (The password can be
changed.)
5 To change the password, press the PRINT key. For details,
refer to
.
the Password”.
bA5Fn
Loc no.
several
times
0.0000
RANGE
RANGE
AdMIN.
RANGE
01
U5
RANGE
10
U5
Notes
To log out, press the ON:OFF key to turn the display off.
With the function pA55 2 set, the adm ini str a tor p as s word is re qui red to
log in as an administrator. No password needs to be stored for U5ER 01
When the balance software version is 1.50 to 1.64, only one password
can be stored . Whil e the ba lanc e displ ay s
to display the current password.
BM series 81
to 10.
, press the PRINT key
Page 84

15.7.
Changing the Password
“15.6. Storing or Changing the Password”
“15.8. Deleting the
password”
yE5
yE5
U5ER 01
10
No
No
Refer to “15.6. Storing or
Current p assw ord
No
No
Confirm
No operatio n
Enter the 4th
character
Display off
Back key
PA55
PA55
PA55
ER
Press twice
1 Refer to
to display t he l og in l ev el t o be c ha nge d.
2 Press the PRINT key to display the cur re nt pas swor d.
The default password set at the factory is 2222 (press
the RE-ZERO key four times), for administrator level.
3 Enter a new four-digit password usi ng th e foll ow ing keys .
The display will turn off automatically after ten minutes of
non-operation.
MODE key ............. To enter m
RANGE key ........... To enter r
PRINT key ............. To enter p
RE-ZERO key ........ To enter 2
CAL key ................ To go back one character
CAL key (press and hold for approx. 2 second s)
................ To delete the password
Refer to
4 The new password is dis play ed.
5 5urE :YE5 is displayed with "No" blinking
(selected).
Press the CAL key to return to the fourth character
entry position.
6 Press the RE-ZERO key to display 5urE :YE5
with "
" blinking (s elect ed).
7 While “
” is blinking, press the PRINT key to store the
new password.
8 When setting is complete, end and then the next
login level is displayed.
To set a password for the next lev el, follow the procedure
starting from Step 2.
To finish the operation, press the CAL key twice to
return to the weighing mode.
.
Changing the Password”.
ADM IN
2222
RANGE
MRP2
for 10 minutes
MRP2
5urE : YE5
5urE : YE5
5urE : YE5
End
01
U5
0.00
Notes
If you hav e forgotten t he pass word, the b alance cannot be used. Make a
record of the password and keep it where y ou can refer to it if needed.
The same password as the ad ministrat or pass word cannot b e use d for
82 BM series
to
.
Page 85

15.8.
Deleting the Password(U5ER 0 1~10)
“15.7. Changing the Password”
“15.6. Storing or Changing the Password”
“15.7.
Changing the Password”
15.9.
Forgotten Password
No
Go
Press and hold
No
Go
Refer to “15.7. Changing the Password”.
ER
1 Refer to
to select the
user whose pas sw ord to be delet ed and displ ay th e
password.
2 Press and hold the CAL key (for approx. 2 seconds )
(approx. 2 seconds)
to display Clear (blinking).
3 Press the PRINT key to display Clear .
4 Press the RE-ZERO key to switch betw een "Go" and
"No".
5 While Clear is displayed, pre ss the PRINT key
to delete the password.
The balance di splay s end and then displ ay s the
login level.
Note The administrator password cannot be deleted, but it can be
changed.
Refer to
to change it.
and
M5P2
PA55
CLEAR
CLEAR
CLEAR
End
01
U5
If you h ave forgotten the p assw or d, t he bal ance cann ot be use d.
Contact y our lo cal A&D de aler to undo the password.
BM series 83
Page 86

16. Standard Input and Output Interface
16.1.
RS-232C Interface
D-Sub 9 pin assignments
Pin No.
Signal name
Direction
Description
1 -
-
No connection
2
RXD
Output
Transmit data
3
TXD
Input
Receive data
4 - -
No connection
5
SG -
Signal ground
6
DSR
Output
Data set ready
7
RTS
Input
Request to send
8
CTS
Output
Clear to send
9 - -
No connection
Start bit
Data bits
Parity bit
Stop bit
-5V to -15V
RS-232C
Balance side
DCE
Computer side
DTE
Inside of balance
Terminal example
+5V
#4-40UNC
The balance is a DCE device. Connect the balance to a personal computer (DTE) using a straight
through cable.
Transmission system : EIA RS-232C
Transmission form : Asynchronous, bi-directional, half duplex
Transmission rate : 10 times/second or 5 times/second (same as data refresh rate)
Data format : Baud rate : 600, 1200, 2400, 4800, 9600, 19200 bps
Data bits : 7 or 8 bits
Parity : Even, Odd (Data bits 7 bits)
None (Data bits 8 bi ts)
Stop bit : 1 bit
Code : ASCII
+5V to +15V
Signal names other than TXD and RXD are DTE-side names.
84 BM series
TXD 2
RXD 3
RTS 7
CTS 8
DSR 6
SG 5
RXD
TXD
RTS
CTS
DSR
SG
Page 87

1 2 3
4
MODE
ON
1 2 3 4
MODE
ON
16.2.
Connecting to Peripheral Equipment
16.2.1.
Connecting to the AD-8121B Printer
Factory
AD-8121B
AD-8121B
AD-8121B
Data output m ode
ap-p
Auto print pol ari ty
Auto print difference
5-id
ID number output
Data number output
5-td
Time/Date output
Data output p ause
at-f
Auto feed
Baud rate
btpr
Data bit, pari ty bit
Terminator
type
Data format
11.2. GLP Report
AD-8121B
DIP switch
1 2
3
4
MODE
ON
Print at re cei vi ng dat a.
1 2 3 4
MODE
ON
Print by
key operation or built-in timer.
1 2 3 4
MODE
ON
Print at re cei vi ng dat a.
When connecting the AD-8121B printer to the balance for printing weighing data, configure the printer
and the balance as follows
Class Item and Parameter
prt
settings
MODE 1
MODE 2
0 0,1, 2 3 0,1, 2
MODE 3
0
No setting
#1
dout
Data output
ap-b
d-no
#1
1
off off off off, on
off off off off, on
0 0 0 0,1, 2, 3
pU5e
off off off off, on #2
off off off off, on
bp5
2 2 2 2
5if
Serial
interface
Crlf
0 0 0 0
0 0 0 0
0 0 0 1
#1 Set the paramet ers w hen aut o prin t mode A or B (prt 1 or 2) is select ed.
#2 Set on when multiple lin es are pr int ed. Ex ample : When adding ID number, set on.
Notes
Refer to "
" for print samples.
Settings of AD-8121B
MODE
MODE 1
MODE 2
MODE 3
Standard mo de, st atisti cal calc ulati on mod e
DATA
Standard mode, interval mode, chart mode
Dump print mode
Description
DIP switch No.3 : Handling unstable data
ON To print
OFF Not to print
DIP switch No.4 : Data input specificati ons (Interface selection)
ON Current loop
OFF RS-232C
BM series 85
Page 88

16.2.2.
Connecting to the AD-8127 Printer
Function settings of the printer
AD-8127
Printing mode settings
When printing the balance weighing data
key or its
“Auto print” mode.
When printing the balance weighing data
rinting” key or its
When printing charts with the printer .
MANUAL
CHART
When printing the balance’s statistical
When printing the balance’ s GLP report.
Function settings of the balance
Balance
Data output mode
Balance
Data format
When printing the balance weighing data
“Auto print” mode.
When printing the balance weighing data
with the printer’s “Printing” key or its
When printing charts with the printer .
When printing the balance’s statistical
When printing the balance’ s GLP report.
“10. Function Table”
When connecting the AD-8127 printer to the balance for printing weighing data, configure the printer
and the balance as follows accordi ng to the usage examples.
Usage example
with the balance’s PRINT
with the printer’s “P
“Int erval printing” mode.
calculation result s.
□ Refer to the instruction m anual o f the AD-8127 printer for how to c hang e the functi on sett ings of the
AD-8127 printer.
Multi print er
EXT.KEY
AUTO
TIMER
DUMP
Usage example
with the balance’s PRINT key or its
“Int erval printing” mode.
calculation result s.
□ Refer to
0,1, 2 0
3 0
0,1, 2 1
for how to change the function setting s of the balance.
86 BM series
Page 89

16.2.3.
Connecting to a Computer Using the RS-232C Interface
Features
Using Windows Communication Tools Software (WinCT)
RsCom
RsKey
RsWeight
Using the WinCT software, the balance can do the following:
The balance is of the DCE t ype (Data Communi cation Equi pment), which can be connected to a
personal computer using the RS-232C interface. Before connection, read the personal computer
manual thoroughly. Use a standard DCE cable for connection (cable type: straight-through).
When Windows is used as an ope rat in g system in a personal computer, the WinCT software can
be used to transmit the weighing data to the personal computer. The current version of the WinCT
can be downloaded from the A&D website. Confirm the windows version supported by this
software w hen downl oa ding. Refer to the WinCT instruction manual in the A&D website. The
WinCT software has three communication methods: "RsCom" , "RsKey" and "RsWeight".
RsCom can transmit commands to control the balance.
RsCom can make bi-directional communication between the balance and a personal computer
using the R S-232C inter fac e .
RsCom can display or store the data using a text file format. RsCom can also print the data using
a printer co nnecte d to th e perso nal co mput er.
When several ports of a personal computer have bal anc es co nnec te d, t he per s on al co mpu ter c an
communica te wit h each bal anc e simul tane ously .
RsCom can share a p erso nal co mput er wi th other applic ati on sof twar e.
RsCom can receiv e the bal anc e GLP r epor t.
RsKey can transmit the weighing data output from the balance directly to other application
software suc h as Mi cros oft Ex cel.
RsKey ca n b e us ed w ith mos t a ppli ca ti on so ftw are.
RsKey can r eceiv e the balanc e GLP r epor t.
Can retrieve the w eig ht data from th e ba la nce and di spl ay the data as a graph in real time.
Can calculate and display the m axi mu m, mini m um, av erag e, s t and ar d dev ia tio n and co e f fici en t of
variation.
Analyzing the weighin g data an d the st atistics in put by "RsKey "
The weighing dat a ca n be input directly int o an E xcel worksheet. Then, Excel can analyze the data to
obtain total, averag e, standard devi ation, maxi mum and minimum v alues, and display them in a g raph.
Controlling the balance u sing comma nds from a person al compute r
By using "RsCom", the personal computer sends commands such as "re-zero" or "send weighing
data" to the balance and controls the balance.
Printing the balance GLP report using your printer
The balanc e GLP r epor t can be pr int ed usi ng a pri nter connec ted to the per sona l com puter .
Receiving weigh ing data at a certa in int erv al
The weighing data can be received at a certain interval and data characteristic with elapsed time
can be obtained.
Using the balance memory function
The data can be stored in the balance’s memory. Of the data stored, the weighing data and
calibration data can be transmitted to a personal computer at one time.
Using a p er son al com pu ter as an ext ern a l in d icat or
With the "RsKey" test mode function, a personal computer can be used as an external weight
indicator for the balance. (To do this, set the balance data output mode to stream mode.)
BM series 87
Page 90

16.2.4.
Connecting to a Computer Using the USB Interface
Features
Using the USB interface
Examples
The weighing data can be transmit ted to a personal computer when connecting the balance and
personal computer via the USB interface. The app licable operating sys tem is Windows 7 or later, as of
December 2018.
The USB interface uses standard device driv er so ftware and do es not r equir e ins tallat ion o f
special driver software. By simply connecting, weighing data can be transmitted.
The data can be transmitted to most application software (ex.: EXCEL, WORD, Notepad).
Notes
The balance can transmit the weighing data only without the header and unit.
The USB interface of t he balance cannot r eceive th e command th at cont rols the balan ce.
When using the command, conne ct to th e RS-232C interface of the balance. When
connecting the USB int erfac e of a personal com puter to the RS-232C interface of the
balance, u se t he USB converter (AX-USB-9P).
Do not use the screen saver or suspend mod e of a p erso nal c ompu t er.
Even if st r eam mod e is u s ed, out put wil l b e perfo rm ed app ro xim at ely 2 times/seco nd du e
to key input operation.
To add the ID number, data number, t ime an d date to t he weighing dat a or t o output th e
GLP report, set the “Data output pause (PU5E)” parameter of “Data output (dout)” to “on”
(Pause 1.6 sec ond s). T he tim e and th e date ar e sepa rat ed by a dot when output .
When the “Data format (tYPE )” par am eter i s set to “5” (CSV for mat ), th e ID n umb er , d ata
number, time and date cannot be added to th e weighing data.
1 Start the Windows of the personal computer .
Connect the AC adapter to the b alanc e and press the ON:OFF key to turn the displ ay on.
2 Connect the personal co mput er to the balance usi ng th e USB cabl e.
Note Do not use stream mode of data output mode (dout: prt 3).
3 At the first connection only, the USB driver softwar e is aut o matic al ly i nstal l ed.
4 Open the applica tio n (e x .: EX CE L) tha t i s to r ec eiv e the w ei ghi ng d ata.
Move the curs or ont o the po siti on to input the weig hing data.
5 Press the PRINT key to input the weighing d ata at th e position of the cursor.
6 To finish the oper ati o n, r e mov e t he U SB c abl e.
Case 1: T ran smit t ing t he weighing data with key operation
Data output mode of the balance: Key mode (factor y s ett i ng) , dout: prt 0
Press th e PRINT key to transmit the weighing data. (basic use)
Case 2: Tran smitt ing the st able weighing data
Data output mode of the balance: Auto print mode A and B, dout: prt 1 or 2
When a sample is placed and the stabilizati on i n dic ator is
displayed, the weighing data is transmitted. This mode is useful
when repea ting t he w eighi ng.
Case 3: T ran smit t ing t he weighing data periodically
Data output mode of the balance: Interval mode, dout: prt 3, data 1 and int
The weighing data is transmitted per i odi cally .
The interval time : 2, 5, 10, 30 seconds, 1, 2, 5, 10 minute(s).
88 BM series
Page 91

16.3.
Commands
16.3.1.
Command List
(Crlf)”
(5if)
Commands to query weighing data
C
Cancels the S or SIR command.
Q
Requests the weighing data immediately .
S
Requests the weighing data when stabiliz ed.
SI
Requests the weighing data immediately .
SIR
Requests the weighing data continuously .
Commands to control the balance
CAL
Same as the CAL key. Calibration using the internal mass.
OFF
Turns the display off.
ON
Turns the display on.
P
Same as the ON:OFF key. Turning the display on or off.
PRT
Same as the PRINT key.
R
Same as the RE-ZERO key. Zero display.
#1
RNG
Same as the RANGE key. Changing the readability.
TR
Tares the balance. Canceling the c ontainer’s weight.
#1
TST
Performs c alibration test. Calibration test usi ng the internal mass.
U
Same as the MODE key. Changing the unit.
KL
LK
Commands to request data
?ID
Requests the identification number.
?PT
Outputs the tare value.
#1
?SN
Requests the serial number of the balance.
?TN
Requests the model name of the bal ance.
?LK
Output s the status of the specified key lock (disable) setting.
Command to set data
PT:∗∗∗.∗∗∗∗
g
Sets the tare value.
#1
Note Before transmitti ng a co mman d , ad d t h e ter min at or that is spe cif ied in the “Terminator
paramet er o f “ Ser ial int erf a ce
” in the function ta ble.
Sets locki ng or unlocking of the key lock (function to disable all keys).
Set s the specified to be locked ( disabled) #1
?KL
#1
Command R ass umes the poi nt a s z er o an d s et s t he dis play t o z ero .
Command TR cancels the t are w ei gh t w hen t he dis pl ay ed v al ue is g r eat er th an z er o.
The canceled tare value can be read using the command ?PT.
Command PT:∗∗∗.∗∗∗∗
An example of this command sets a negative target value and fills with the sampl e until the
display beco mes zero. For details , ref er to pag e 93.
Step 1
Place a container.
Step 2
Set the display t o zero u sing th e R co mmand.
Step 3
Set a target value us ing the PT : comma nd.
Outputs the status of the key lock (function to disable all keys) settings.
g sets t he tar e v al ue di gi tal ly .
BM series 89
Page 92

16.3.2.
Acknowledge Code and Error Codes
16.3.3.
Settings Related to RS-232C
When the " AK, Error code (erCd)" parameter of "Serial interface function (5if)" is set to "on", the
balance ou tpu ts < AK> c od e or er r or c ode to each comman d as foll ow s:
<AK> (06h) Acknowledge in ASCII code.
When the balance receives a command to request data and cannot process it, the balance
transmits a n error code ( EC, Exx).
When the balance receives a command to request data and can process it, the balance outputs
the data.
When the bala nc e r ec eives a command to con trol the balance and cannot process it, the balance
transmits a n error code ( EC, Exx).
When the balan ce receives a command to control the balan ce and can process i t, the balance
transmits the acknowledge code.
<AK> (06h) Acknowledge in ASCII code.
Among commands to control the balance, the following transmit the acknowledge code both
when the balance receives the command and when the balance has accomplished the command.
If the command cannot be processed properly, the balance transmits an error code (EC, Exx).
This error ca n b e r es olv ed u sing the CAL command. xx is error code nu mber .
CAL command (Calibration com mand us ing int ernal mass )
ON command (Display ON comm and)
P command (Display ON/OFF c om man d)
R command (RE-ZERO command)
TR command (Tare command)
TST command (Calibration test com mand)
When a communication error has occurred due to external noise, or a parity error has occurred
due to transmission error, the balance transmits an error code (EC, Exx). In this case, send the
command again. xx is error code number.
Concerning the RS-232C, the balance has two functions: "Data output (dout)" and "Serial interface
(5if) ". Set each function as necessary.
90 BM series
Page 93

16.3.4.
Command Examples
ON command (turning the display on)
Computer
Time
Balance
R command (Re-zeroing the display)
Computer
Time
Balance
CAL command (Calibration with internal mass)
Computer
Time
Balance
All segments
This example uses "erCd on" of "5if" so that the <AK> (06h) code is output.
ON command
R command
St andby mode
Command received
All segments are displayed
Command completed
Zero display
Weighing mode
Command received
In process
Command completed
Zero display
CAL command
Zero display
Command received
Command completed
Zero display
BM series 91
Page 94

Error code
Computer
Time
Balance
Weighing with a tare
Computer
Time
Balance
This example is of an error using the R command. "erCd on" is used. The balance transmits an error
code when the received command cannot be achie ved.
R command
CAL command
Weighing mode (unstable)
Command received
In process
When the R command cannot be
achieved due to unstable weighing:
Error code
When the CAL command is received, the
balance returns to the weighing mode.
Command completed.
Weighing mode
This example uses "erCd on" of "5if" so that the <AK> (06h) code is output.
R command
TR command
S command
?PT command
Sets the display to zero
Command received
In process
Command completed
Zero display
Place a container
Tares
Command received
In process
Command completed
Zero display
(Net value)
(Tare value)
92 BM series
Page 95

Setting a negative target value and filling with a sample until the display
becomes zero
Computer
Time
Balance
This example uses "erCd on" of "5if" so that the <AK> (06h) code is output.
R command
PT: command to set a target weig ht of 10 g
Place a container
Before command
execution
Command received
In process
Command completed
Zero display
Command received
Target weight display
Fill with sample until the
display becomes zero
BM series 93
Page 96

17. Key Lock Function
“16.3. Commands”
17.1.
Locking All the Keys
Command string
Description
∗∗∗
(Enter 000 or 001 in place of ∗∗∗.)
KL:000 Unlocks all the keys.
KL:001 Locks all the keys
?KL
KL,001 All keys locked.
Sending specified commands to the balance will lock the keys on the balance to disable the key
functions. This is useful for controlling the balance only by an external device such as a personal
computer.
Even if the keys are locked, key operations using comma nds ar e avail abl e. For d etail s on
commands to op erat e the keys, r efer t o
The key lock st ate ca n be che cked using t he co mmand to reques t the stat e of the bala nce key s.
The key lo ck st ate i s ma int ai ned unt il the bala nce rec eiv es the key unlo cki ng co mmand or the
balance is tur ned o ff by r emovi ng the AC adap ter.
The key lock function (KL command a nd LK command) is availabl e for balances with software v ersion
1.660 or later.
.
Using the KL command, all the keys on t he balance can be disabled.
KL:
Requests the state of the all key lock function.
KL,000 All key s unlocked.
94 BM series
Page 97

17.2.
Locking the Specified Keys
Bits
Decimal
Keys
0 1 ON:OFF
1 2 CAL 2 4
MODE 3 8
RANGE
4
16
PRINT
5
32
RE-ZERO
6
64
SELECT
7
128
ION
Example 1: Locking all the keys excluding the PRINT key
Example 2: Unlocking all the keys
Command string
Description
∗∗∗∗∗
of ∗∗∗∗∗.)
Locks the specified keys.
?LK
Requests the state of the specified key lock function.
e.g. 2: LK,00000 All keys unlocked.
18. Checking the Balance Software Version
Entering numerical values ∗∗∗∗∗ to the LK comm and will lock specified keys on the balance to disable
their key functions. Set the numerical values ∗∗∗∗∗ by adding the decimal numbers converted from bits
assigned to each key as shown bel ow.
1 Add the decimal numbers corresponding to the keys to be locked.
1 (ON:OFF) + 2 (CAL) + 4 (MODE)+ 8 (RANGE) + 32 (RE-ZERO) + 64 (SELECT) +128 (ION)
= 239
2 Send the LK command to the balance with the sum that is obtained in Step 1. LK:00239
1 Send the LK comm and to the bal ance wi th 0, which indic ates no keys to be locked. LK:00000
LK:
(Enter the numerical values
00000 to 00255 in place
e.g.: LK:00239 Locks all the keys excluding the PRINT key.
e.g.1: LK,00239 Spe cified keys locked.
The balance specifications vary depending on the balance software
version. Follow the steps below to check the balance software
version.
1 Unplug the AC adapter from the balance and plug it back in.
2 P- *.*** is displayed with the software versi on in place
of *.***.
BM series 95
P- 1.663
Page 98

19. Maintenance
19.1.
Cleaning and Handling the Balance
3. Installing the Balance and Precautions
19.2.
Error Codes
Display Error code
Description
The balance cannot stabilize due to an environmental problem. Check
nd the pan. Prevent vibration, drafts, temperature changes, static
Confirm that there is nothing on the pan and perform the
The internal mass application mechanism does not function properly.
The calibration weigh t is too light. Conf irm the calibra tion weight value.
key two times to return to the
nnot store the s ample for the counting mode or fo r the
Clean the balance with a lint free cloth that is moistened with warm water and a mild detergent.
Do not use org ani c s ol ven ts to c l ean th e ba la nc e.
Do not disassemble th e balance. C ontact the l ocal A&D deal er if the bal ance needs ser vice or r epair.
Use the origi nal pa cking materi al fo r tra nspor tati on.
Consider "
Internal error
EC,E00
EC,E11
If this error is displayed continuously, contact your local A&D dealer to
repair the balance.
Stability error
arou
electricity and magnetic fields, from influencing the balance.
Press the CAL key to ret urn to t he weig hing mode.
" when han dli ng the b alan ce .
EC,E16
EC,E17
EC,E20
EC,E21
Internal mass error
Applying the internal mass does not yield a change in the mass value as
specified.
weighing op erati on fr om the beginni ng ag ain.
Internal mass error
Perform t he w eig hi ng oper ati on fro m the beg in ning ag ain.
Calibration weight error
The calibration weight is too heavy. Confirm the calibration weight value.
Press the CAL key to r etur n t o the w eig hing mode.
Calibration weight error
Press the CAL key to retur n to the weig hing mode.
Overload error
A sample beyond the balance weighing capacity has been placed on the
pan. Remov e t he s a mpl e fr om the pa n.
Weighing pan error
The mass val ue i s t o o li ght . Confirm that the weighing pan and pan s upport
are properly installed. Press the ON:OFF
weighing mode. If the error sti ll persists , calibrate the bal ance.
Sample mass error
96 BM series
The balance ca
percent mod e beca use i t is too li ght. Use a lar ger sample.
Page 99

Display Error code
Description
Unit mass error
The sample unit mass for the counting mode is too light. Storing and
key withou t adding sam ples will shift the balance to
The automatic response adjustment cannot be performed because the
Check the ambient conditions such as breeze, vibration and magnetic
Press any key and set the time and date. The clock and calendar
AC adapter is connected to the
Low battery error
Confirm whether the correct AC adapter is used.
g data in memory has reached the maximum
capacity. Delete data in memory to store new data. For details, refer to
12. Data Memory
12. Data Memory
Type of memory set in the function table and type of data stored are
12. Data Memory
he stored data. To use the memory function,
12.1.
Notes on Using Data Memory
using it for co unti ng wil l caus e a coun ting error .
Add samples to reach the specified number and press the PRINT key.
Pressing the PRINT
the counting mode. But , for acc urate counting , be sure t o add samples.
Automatic response adjustment zero error
The automatic response adjustme nt cannot be pe rformed bec ause there
is something on the pan. Clear the pan. Press the CAL key to return to
the weighing mode.
Automatic response adjustment un stable error
(Check NG)
(Blinking)
(Illuminated)
mass value i s un st able .
fields, al so ch eck th e w eig hi ng p an.
Press the CAL key to return t o the w eighi ng mod e.
Clock battery error
The clock bac kup b att ery has be en de pl eted .
function works normall y as long as the
balance. If this er ror ap pear s freq uentl y, co ntac t the loc al A&D deal er.
V oltage of the power supply drops.
Memory full
The amount of weighin
"
".
Memory full
The amount of calibration or calibration test data in memory has reached
the maximum capacity (50 sets).
The data in memor y will be delet ed automatically to store new data. For
details, refer to "
".
Memory type error
differ ent. F or det ai ls , r e fer to "
Memory data error
A fatal error occurs in t
delete all the o ld data and resolve the erro r. For details, refer to "
".
Communications error
EC,E00
A protocol er ror oc curr ed in co mmuni cati ons.
Confirm the format, baud rate and parity.
Undefined command error
BM series 97
EC,E01
An undefined command was received.
Confirm the command.
".
Page 100

Display Error code
Description
EC,E02
", the balance did not
The received data exceeds the range that the balance can accept.
If an error described above cannot be resolved or other errors are
19.3.
Other Display
15. Password Function
EC,E03
EC,E04
EC,E06
Not ready
A received c om mand can not b e pr oc ess ed.
Examples:
The balance recei ved a "Q" command, but not in the weighing mode.
The balance received a " Q" command while processing a RE-ZERO
command.
Adjust the del ay ti me to tra nsmi t a com mand.
Timeout error
When the timeout parameter is set to "t-Up on
receive the next character of a command within the time limit of one
second. Confirm the communication.
Excess char acter s err or
The balanc e r ec eiv ed e x cessi v e ch ara ct ers in a c omm and .
Confirm the command.
Format error
A command includes incorrect data.
Example:
The data is numeric al ly inc orr ect.
Confirm the command.
Parameter settin g erro r
EC,E07
Confirm the parameter range of the command.
Other er ror cod e
When this indicator blinks, automatic self calibration is required. The indicator
Note The balance can be used while this indicator is blinking. We recommend that you
This is the display to prompt you to enter a password. When the password function is
blinks when the bala nce detects change s in ambient tem perature. If the ba lance
is not used for several minutes with this indicator blinking, the balance performs
automatic self calibration. The blinking duration depends on the operating
environment.
perform automatic self calibr ation for p recisi on weighin g.
used, the correct password must be entered for the balance to enter the weighing
mode.
For details, refer to "
displayed, c ont act the lo cal A&D deal er.
".
98 BM series
 Loading...