


 Loading...
VDSL2/GigE
Wireless 11n
Gateway
Model #: T1200H, T2200H
User Manual
Ver 1.0
Solutions for the Digital Life™
Table of Contents
Introduction |
1 |
Minimum System Requirements |
1 |
Features |
2 |
Getting to Know the Gateway |
3 |
Using the Home Screen |
7 |
Accessing the Home Screen |
7 |
Icon Bar |
9 |
General Information |
10 |
Connection Status |
11 |
Home Network |
12 |
Firewall/Diagnostics |
13 |
Configuring Wireless Settings |
14 |
Accessing Wireless Settings |
14 |
Basic Settings |
16 |
Advanced Settings |
19 |
WPS |
21 |
Wireless MAC Authentication |
23 |
Wireless Distribution System |
24 |
Configuring Firewall Settings |
26 |
Accessing Firewall Settings |
26 |
Firewall |
28 |
IPv6 Firewall |
29 |
Port Forwarding |
30 |
Applications |
31 |
DMZ Hosting |
32 |
IPv6 DMZ Hosting |
33 |
UPnP |
34 |
Configuring Advanced Setup |
35 |
Accessing Advanced Setup |
35 |
Services Blocking |
37 |
Website Blocking |
38 |
Scheduling Access |
39 |
DSL Bonding Settings (T2200H only) |
40 |
WAN IP Addressing |
41 |
IPv6 LAN Settings |
42 |
DHCP Reservation |
43 |
LAN IP and DHCP Settings |
44 |
i
Table of Contents |
|
IPv6 WAN Settings |
45 |
Dynamic DNS |
46 |
DNS Host Mapping |
48 |
Port Bridging |
49 |
HPNA Settings |
49 |
Admin Password |
50 |
Storage Service |
51 |
Rebooting the Gateway |
51 |
Restoring Factory Default Settings |
52 |
Speed Test |
53 |
Ping Test |
54 |
TCP Dump Debug |
55 |
Iperf Test |
56 |
IPv6 Ping Test |
57 |
Traceroute |
58 |
IPv6 Traceroute |
59 |
Time Zone |
59 |
Language Settings |
60 |
HPNA Diagnostics |
61 |
DNS Cache |
62 |
IGMP Settings |
63 |
Upgrade History |
63 |
SIP ALG |
64 |
Tool Box |
64 |
DLNA |
65 |
xDSL Diagnostics |
65 |
Viewing the Gateway’s Status |
66 |
Accessing Status Tables |
66 |
Connection Status |
68 |
Line 1/Line 2 Status |
69 |
WAN Ethernet Status |
70 |
Routing Table |
70 |
Firewall Status |
71 |
NAT Table |
71 |
Wireless Status |
72 |
Modem Utilization |
74 |
LAN Status |
75 |
ARP Table |
75 |
Interface Statistics |
76 |
Multicast Statistics |
76 |
System Log |
77 |
ii
Table of Contents
Specifications |
78 |
General |
78 |
Wireless Operating Range |
79 |
LED Indicators |
79 |
Environmental |
79 |
Notices |
80 |
Regulatory Compliance Notices |
80 |
Modifications |
80 |
GPL (General Public License) |
81 |
Limited Warranty |
82 |
iii

Introduction 1
Thank you for choosing the VDSL2/GigE Wireless 11n Gateway. With its powerful wireless N radio, gigabit Ethernet switch, and WAN port, as well as its dual-core processor and support for HPNA, the Gateway will propel you to new speeds as you traverse the Internet. We are sure the Gateway will provide you with years of hassle-free performance.
Minimum System Requirements
•Active ADSL2+ service
•Computer with a 10 Mbps or 10/100/1000 Mbps Ethernet connection
•Microsoft Windows 2000, XP, Vista; Mac OS 7.1+, 8.0+, 9.0+, OS X+
1
VDSL2/GigE Wireless 11n Gateway
•Internet Explorer 4.0 or higher (5.x+ recommended) or Netscape Navigator 4.0 or higher (4.7+ recommended)
•TCP/IP network protocol installed on each computer
Features
•Gigabit Ethernet (WAN and LAN)
•VDSL 2 access technology (backward compatible to ASDL2+/ASDL2)
•HPNA coax support
•Optional Java Virtual Machine and Java Runtime software
•TR-069 support with remote management
•TR-064 local management
•64-, 128-, and 256-bit WEP/WPA/WPA2 wireless LAN security
•IEEE 802.3 Ethernet standard compliance
•Four 10/100/1000 Base-T Ethernet ports (LAN)
•One 10/100/1000 Base-T Ethernet ports (WAN)
•DHCP server option
•MAC address cloning
•QoS support, including diffserv and random early detection
•PPPoE support
•External Radius support
•Web-based configuration support
•FTP firmware upgradeable
•Web download support
•802.11b/g/n support
2
Chapter 1 Introduction
•WPS support
•Advanced firewall
•ALG
Getting to Know the Gateway
This section contains a quick description of the Gateway’s lights, ports, etc. The Gateway has several indicator lights (LEDs) and a button on its front panel, and a series of ports and switches on its rear panel.
Front Panel
The front panel of the Gateway features 11 LEDs: Power, DSL, Internet, WAN Ethernet, Internet, Ethernet (4), Wireless, USB, and WPS Push Button.
Power
The Power LED displays the Gateway’s current status. If the Power LED glows steadily green, the Gateway is receiving power and fully operational. When the Power LED is rapidly flashing, the Gateway is initializing. If the Power LED is glows red when the Power cord is plugged in, the Gateway has suffered a critical error and technical support should be contacted. If the Power LED is flashing red, the Gateway is performing a firmware update.
DSL
The DSL LED illuminates when the Gateway is connected to an ADSL line. If the DSL LED is flashing, the Gateway is in training for DSL service.
Internet
When the Internet LED glows steadily, the Gateway is connected to the DSL provider. When it flashes, data traffic is passing across the Gateway.
3
VDSL2/GigE Wireless 11n Gateway
WAN Ethernet
When the WAN Ethernet LED glows steadily, the Gateway is connected to an
Ethernet WAN. When it flashes, it signifies that data traffic is traveling across the connection.
LAN Ethernet
The LAN Ethernet LEDs illuminate when the Gateway is connected to another device via one of its LAN Ethernet ports. When one of the LAN Ethernet LEDs flashes, data traffic is passing across the corresponding connection.
HPNA
The HPNA LED illuminates when the Gateway is connected to another device via its HPNA port. When it flashes, data traffic is passing across the connection.
USB
The USB LED illuminates when a USB device is connected via the Gateway’s USB port. This port is not currently operational, but may be enabled in a future firmware update.
Wireless
The Wireless LED illuminates when the Gateway is connected wirelessly, assuming the Gateway’s Wireless feature is turned on.
WPS Button
The WPS button activates WPS (WiFi Protected Setup) on the Gateway. To use WPS, press the WPS button on the Gateway, then, within two minutes, press the WPS button on a device you wish to connect to the Gateway’s wireless network. The device will automatically join the Gateway’s wireless network. Repeat for other wireless devices.
4
Chapter 1 Introduction
Rear Panel
The rear panel of the Gateway features 8 ports (Phone, HPNA, LAN Ethernet, WAN Ethernet, USB, and Power), as well as a Reset button.
DSL Port (Single on T1200H; Dual on T2200H)
The DSL port is used to connect the Gateway to a DSL line connection.
HPNA Port
The HPNA port is used to connect the Gateway to an HPNA connection via coaxial cable.
LAN Ethernet Ports (4)
The LAN Ethernet ports are used to connect computers to the Gateway via Ethernet cable. The Ethernet ports are 10/100/1000 Mbps auto-sensing ports, and either a straight-through or crossover Ethernet cable can be used when connecting to the ports.
WAN Ethernet Port
The WAN Ethernet port is used to connect the Gateway to a WAN via an
Ethernet cable.
USB Port
The USB port is used to connect the Gateway to a USB device. This port is not currently operational, but may be enabled in a future firmware update.
Reset Button
Depressing the Reset button for 5 seconds will restore the Gateway’s factory default settings. The reset process will start after releasing the button.
5
VDSL2/GigE Wireless 11n Gateway
Power Port
The Power port is used to connect the Power cord to the Gateway.
WARNING! Do not unplug the Power cord from the Gateway during the reset process. Doing so may result in permanent damage to the Gateway.
6
Using the |
2 |
|
|
Home Screen |
|
This chapter gives a short overview of the Home screen of the Gateway’s firmware, including explanations of the Home screen’s sections and links.
Accessing the Home Screen
To access the Home screen:
1. Open a Web browser. In the “Address” text box, type: http://192.168.1.254
then press Enter on the keyboard.
7
VDSL2/GigE Wireless 11n Gateway
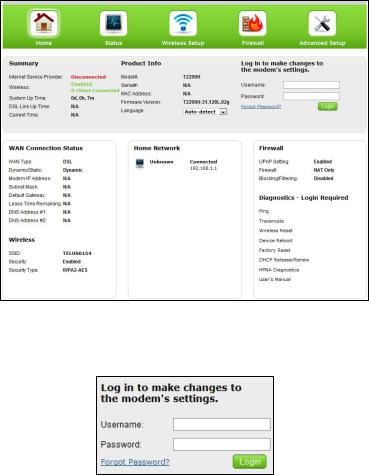
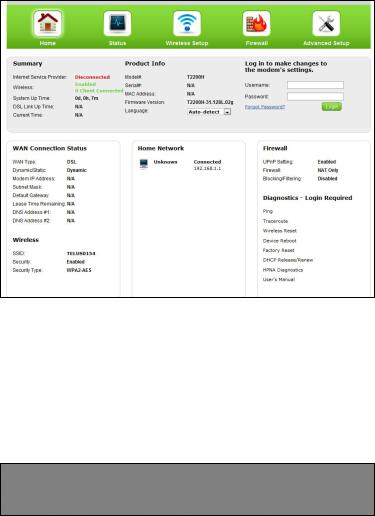
2. The Gateway’s Home screen appears.
3.Enter the username “admin” and the password (printed on the label located on the bottom of the Gateway) in the Username and Password text boxes at the top right side of the screen, then click Login.
8
Chapter 2 Home Screen
4. You can now access all of the Home screen’s options.
Icon Bar
At the top of the Home screen is the Icon Bar. Here, you can quickly access the other four main sections of the Gateway’s firmware by clicking on the appropriate icon: Status (see chapter 6 for more details); Wireless Setup (see chapter 3 for more details), Firewall (see chapter 4 for more details); and Advanced Setup (see chapter 5 for more details). Clicking Home in any other firmware screen generates the Home screen.
9
VDSL2/GigE Wireless 11n Gateway
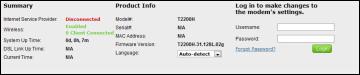
General Information
The next section of the Home screen is the General Information section.
This section is divided into three subsections: Summary, Product Info, and
Login Status.
Summary
The Summary subsection contains four status lines. Broadband displays the status of the Gateway’s broadband connection (connected or disconnected). Wireless displays the status of the Gateway’s wireless network (enabled or disabled), and also whether any wireless devices are connected to the network. System Up Time displays the length of time the Gateway has gone between reboots. DSL Link Up Time displays how long the DSL link has been active.
Product Info
The Summary subsection contains four information lines. Model# displays the model number of the Gateway. Serial# displays the serial number of the Gateway. MAC Address displays the Gateway’s MAC address. Firmware Version displays the Gateway’s firmware version number.
Login Status
The Login Status subsection displays whether you have logged into the Gateway’s firmware. If not, enter your user name and password in the appropriate text boxes. If you are logged in, you can log out by clicking Log Out.
10
Chapter 2 Home Screen
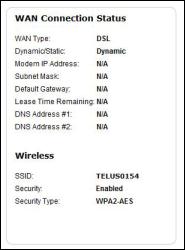
Connection Status
This subsection of the Home screen displays the status of various parameters regarding the Gateway’s wired and wireless networks.
This section contains two subsections: WAN Connection Status and Wireless.
WAN Connection Status
The WAN Connection Status subsection contains a number of status lines that pertain to the Gateway’s WAN (Internet) connection: WAN Type, Dynamic/Static (type of IP address used), Modem IP Address, Subnet Mask, Default Gateway, Lease Time Remaining, DNS Address #1, and DNS Address #2.
Wireless
The Summary subsection contains three information lines. SSID displays the name of the Gateway’s wireless network. Security displays whether the wireless network has security enable. Security Type displays the type of security enabled.
11
VDSL2/GigE Wireless 11n Gateway
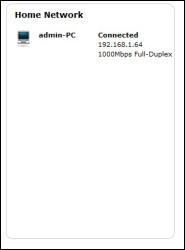
Home Network
This section of the Home screen details the devices connected to the Gateway’s networks (either wired or wireless). Information provided includes the device’s IP address and the speed of the connection.
12
Chapter 2 Home Screen
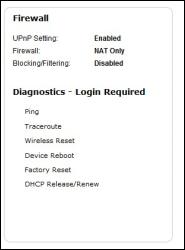
Firewall/Diagnostics
This subsection of the Home screen displays the status of various parameters regarding the Gateway’s firewall, as well as list of diagnostics tests.
This section contains two subsections: Firewall and Diagnostics.
Firewall
The Firewall subsection contains a number of status lines that pertain to the Gateway’s firewall security: UPnP Setting, Firewall (type of firewall used), and Blocking/Filtering. For more information about the Gateway’s firewall settings, see chapter 4 of this manual.
Diagnostics
The Diagnostics subsection contains six links to commonly used diagnostics tools: Ping; Traceroute ; Wireless Reset; Device Reboot; Factory Reset; and DHCP
Release/Renew.
13

Configuring |
3 |
|
|
Wireless Settings |
|
This chapter explains the options provided in the Wireless section of the Gateway’s firmware, including setting up wireless security and WPS.
Accessing Wireless Settings
To access the Wireless screens:
1. Open a Web browser. In the “Address” text box, type: http://192.168.1.254
then press Enter on the keyboard.
14

Chapter 3 Wireless Settings
2.The Gateway’s Home screen appears. Enter your user name and password, then click the Wireless Setup icon from the row of icons at the top of
the screen.
3.The Wireless Settings screen appears, with various options listed in the menu on the left side of the screen.
15
VDSL2/GigE Wireless 11n Gateway
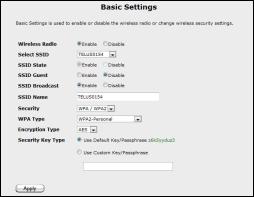
Basic Settings
Click Basic Settings from any Wireless screen to generate the Basic Settings screen. This screen displays a series of settings relating to the core functionality of the Gateway’s wireless capabilities.
Wireless Radio
Click in the Enable radio button to activate the Gateway’s wireless radio. Clicking in the Disable radio button turns off the wireless radio.
Select SSID
Select an ISP-configured SSID (wireless network name) from the drop-down list.
SSID State
Enable or disable this option, which activates the Gateway’s ability to use multiple SSIDs, by clicking in the appropriate radio button.
16
Chapter 3 Wireless Settings
SSID Guest
Enable or disable this option, which activates the Gateway’s ability to host a guest SSID, by clicking in the appropriate radio button. Setting up a guest SSID allows the user to provide a separate network on the Gateway that can access the Internet, but does not allow access to devices (printers, other computers, etc.) connected
to the Gateway’s main network. Guest SSID networks are usually created to allow temporary access to the Internet to one-time users.
SSID Broadcast
Click in the Enable radio button to activate SSID broadcasting, which allows any computer searching for available wireless networks to detect this network (however, if this network is protected with some form of wireless security, they will not be able to join the network unless they know the security password). Clicking in the Disable radio button turns off SSID broadcasting.
SSID Name
If applicable, enter the name of the Gateway’s wireless network in this text box.
Security
There are four choices available in this drop-down list:
WPA/WPA2
This form of wireless security is the default setting on the Gateway. When selected, you can select the WPA Type (WPA orWPA2-Personal, WPA Personal, or WPA2-Personal), Encryption Type (AES, TKP, or Both), and whether to use the Gateway’s automatically generated default key/passphrase, or create one of your own, then click Apply to save your changes.
17

VDSL2/GigE Wireless 11n Gateway
WEP
WEP stands for Wired Equivalent Privacy. To use WEP, select it from the
Security drop-down list, then select the Authentication Type (Open or Shared). Finally, select whether to use the Gateway’s automatically generated default key/ passphrase, or create one of your own (the more keys used, the stronger the security), then click Apply to save your changes.
WEP + 802.1x
802.1x WEP is a robust security protocol that uses port control with dynamically changing encryption keys automatically updated over the network. 802.1x WEP uses a RADIUS (Remote Authentication Dial-in Service) server for authentication purposes. This server must be physically connected to the Gateway. Also, the user must enable the RADIUS client embedded in the Gateway.
1.Enter the RADIUS server IP address in the Radius Server IP text box.
2.Enter the RADIUS server’s port number in the Radius Port text box.
18

Chapter 3 Wireless Settings
3.Enter the RADIUS server’s shared secret in the Radius Key text box.
4.Enter the group key interval in the Group Key Interval text box.
5.Click Apply to save your changes.
Off
Selecting Off from the Security drop-down list leaves the Gateway’s wireless network completely open, allowing anyone to join the network.
Advanced Settings
Click Advanced Settings from any Wireless screen to generate the Advanced Settings screen.
These settings should only be adjusted by experienced technical users who are extremely familiar with wireless networking concepts. After making any changes in this screen, click Apply to save them.
19
VDSL2/GigE Wireless 11n Gateway
Compatibility Mode
Allows you to modify the Gateway’s wireless network to allow certain devices to join, based on the device’s compatibility. Choices include Compatible Mode
(802.11b, 802.11g, and 802.11n), Balanced Mode (802.11g + n only), Performance Mode (802.11n only), Legacy Mode (802.11 b + g only), 802.11g only, and 802.11b only.
Maximum Spatial Streams
Spatial streams boost the efficiency of the wireless network, resulting in higher speeds across the network. However, the more spatial streams you use, the less stable the wireless network connections. Choices include Auto (adjusts spatial streams automatically), 1, and 2.
Channel Width
Choices include 20 Mhz and 40 Mhz.
Control Channel
Choices include None (20 Mhz channel width only), Lower, and Upper.
MSDU Aggregation, MPDU Aggregation
Enable or disable these options by selecting the appropriate choice from the dropdown lists. They should only be changed if requested by your ISP.
WMM, WMM Power Save
Enable or disable these options by clicking in the appropriate radio buttons.
20
Chapter 3 Wireless Settings
Channel
Select the channel at which the Gateway’s wireless network operates. Choices include channels 1 through 11, and Auto Detect, which allows devices on the network to automatically detect the channel.
Wireless Power Level
Adjust the power of the Gateway’s wireless network signal by selecting a percentage from 10% to 100% from the drop-down list
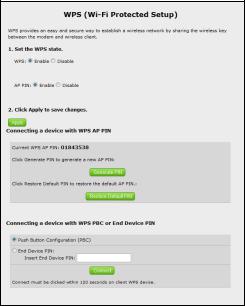
WPS
Click WPS in any Wireless screen to generate the WPS (Wi-Fi Protected Setup) screen. WPS provides a simple method of setting up a wireless network by automatically sharing the network key between the Gateway and other wireless devices.
21
VDSL2/GigE Wireless 11n Gateway
To set up WPS:
1.Enable WPS by clicking in the Enable radio button.
2.Click Apply to save your changes.
3.If connecting a device to the wireless network with a WPS AP PIN, write down the PIN displayed after Current WPS AP Pin, then enter the PIN in the device’s WPS AP PIN configuration.
4.If connecting a device to the wireless network with PBC (Push Button Configuration), click Connect, then press the PBC-compatible button on the device within two minutes.
5.If the connecting device uses the End Device PIN method, enter the PIN in the appropriate text box, then enter in the device’s End Device PIN configuration.
22
Chapter 3 Wireless Settings
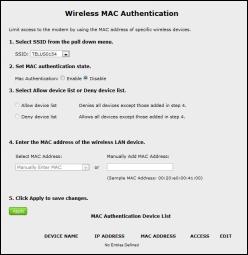
Wireless MAC Authentication
Click MAC address control in any Wireless screen to generate the Wireless MAC Authentication screen. MAC addresses are alphanumeric designations provided to every networkable device that act as unique identifiers. Using MAC addresses, you can allow or deny access to the Gateway’s wireless network to the wireless devices of your choice.
To set up wireless MAC authentication:
1.Select the SSID from the SSID drop-down menu.
2.Turn on the MAC authentication by clicking in the Enable radio button next to MAC Authentication.
3.To allow or delete certain devices from the Gateway’s wireless network, click in the appropriate radio button (Allow device list or Deny device list).
4.Enter the device’s MAC address by either selecting it from the Select MAC
23
Loading...