


802.11n and 802.11ac Wi-Fi Router
Model # C3000A
User Manual
0535-00xx-000
Table of Contents
1 Introduction |
4 |
Package Contents |
5 |
Minimum System Requirements |
5 |
Features |
5 |
Getting to Know the Router |
6 |
Connecting the Router |
9 |
2 Accessing the Home Screen |
11 |
Accessing the Home Screen |
11 |
Icon Bar |
12 |
Connection Status |
12 |
3 Checking the Router’s Status |
13 |
Accessing the Status Screens |
13 |
Connection Status |
14 |
Line 1/Line 2 Status |
14 |
WAN Ethernet |
14 |
Routing Table |
15 |
Firewall Status |
15 |
NAT Table |
15 |
Wireless Status |
16 |
Advanced Wireless Status |
16 |
Wireless Monitor |
16 |
Modem Utilization |
17 |
LAN Status |
17 |
ARP Table |
17 |
Network Devices |
17 |
Interface Statistics |
18 |
Multicast Statistics |
18 |
System Log |
18 |
4 Configuring Wireless Settings |
19 |
Accessing Wireless Settings |
19 |
i
C3000A 802.11n and 802.11ac Wi-Fi Router
Basic Settings |
20 |
Advanced Settings |
21 |
WPS |
21 |
MAC Address Control |
21 |
WDS |
22 |
Band Steering |
22 |
5 Configuring Firewall Settings |
23 |
Accessing Firewall Settings |
23 |
Firewall |
24 |
IPv6 Firewall |
24 |
Port Forwarding |
24 |
Applications |
25 |
DMZ Hosting |
25 |
IPv6 DMZ Hosting |
26 |
UPnP |
26 |
5 Advanced Settings |
27 |
Accessing the Advanced Setup Screens |
27 |
Services Blocking |
28 |
Website Blocking |
28 |
Scheduling Access |
28 |
Parental Controls |
28 |
WAN IP Addressing |
29 |
IPv6 WAN Settings |
29 |
RFC1483 Transparent Bridge |
30 |
IPv6 LAN Settings |
30 |
DHCP Reservation |
30 |
Dynamic DNS |
30 |
DNS Host Mapping |
31 |
IP QoS Upstream Settings |
31 |
IP QoS Downstream Settings |
31 |
IPv6 Q0S |
32 |
Remote GUI |
32 |
Remote Telnet |
32 |
Dynamic Routing |
32 |
Admin Password |
33 |
Storage Device Info |
33 |
Samba Configuration |
33 |
ii
C3000A 802.11n and 802.11ac Wi-Fi Router
Reboot |
34 |
Restore Defaults |
34 |
Upgrade Firmware |
34 |
Check for New Firmware Link |
34 |
LAN IP Settings |
35 |
Static IP LAN |
35 |
Speed Test |
35 |
Ping Test |
35 |
Tcpdump Debug |
36 |
Iperf Test |
36 |
IPv6 Ping Test |
36 |
Traceroute |
36 |
IPv6 Traceroute |
37 |
Time Zone |
37 |
Language Settings |
37 |
DNS Cache |
37 |
IGMP Setting |
38 |
Upgrade History |
38 |
ALG |
38 |
Tool Box |
38 |
DLNA |
39 |
xDSL Diagnostics |
39 |
Print Server |
39 |
A Specifications |
40 |
General |
40 |
Wireless Operating Range |
41 |
LED Indicators |
41 |
Power Adapter |
41 |
Environmental |
42 |
Notices |
43 |
Warranty |
43 |
Important Safety Instructions |
43 |
FCC Class B Equipment |
44 |
Important Note on Wi-Fi |
45 |
Contact Info |
46 |
iii
Introduction 1
Congratulations for purchasing the C3000A 802.11n and 802.11ac Wi-Fi Router. The Router is a single platform device that supports universal WAN access, FTTN, FTTdp, FTTB, or FTTP. With support for advanced 802.11ac 4x4 WiFi, the Router enables blazing fast HD video
streaming, with multi-channel HD video throughput. The Router also offers an unprecedented level of security, helping protect your network resources. It has also been designed to deliver unparalleled WiFi performance, using dual-band WiFi supporting speeds up to 2.3 Gbps.
4
C3000A 802.11n and 802.11ac Wi-Fi Router
Package Contents
•Black Power adapter
•Yellow cable (Ethernet, 6 ft.)
•White cable (Ethernet, 10 ft.)
•Green cable (RJ14, 12 ft.)
•Quick Start Guide
•Installation Guide
•Wall-mount template
•Vertical stand
Minimum System Requirements
•Active ADSL2+ service
•Computer with an 10 Mbps or 10/100/1000 Mbps Ethernet connection
•Microsoft Windows 10, 8, 7; Mac OS OS X+
•TCP/IP network protocol installed on each computer
Features
•ADSL2+, VDSL2, and WAN Ethernet in a single CPE
•Dual Band WiFi delivering up to 2.3 Gbps with 802.11ac 4x4 5GHz and 802.11n 3x3 2.4GHz
•Optimized for IPTV and Video over WiFi
5
Introduction
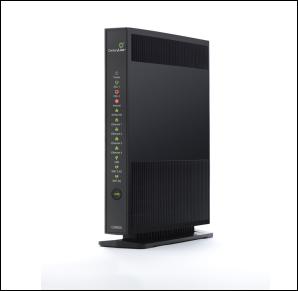
Getting to Know the Router
This section contains a quick description of the Router’s lights, ports, and other features. The Router has several indicator lights (LEDs) and a button on its front panel, and a series of ports and switches on its rear panel.
Front Panel
The front panel of the Router features 13 LEDs and a WPS (Wireless Protected Setup) button.
Power
The Power LED illuminates green when the Router is properly connected to a WAN Internet connection.
DSL 1/DSL2
The DSL LEDs illuminate green when the Router is properly connected to a DSL Internet connection.
Internet
The Internet LED illuminates green when the Router is properly connected to a WAN Internet connection.
Ethernet
The Ethernet LED illuminates green when the Router is properly connected to a WAN Ethernet connection.
Ethernet 1/2/3/4
The Ethernet LEDs illuminate green when the Router is properly connected to a LAN Ethernet connection.
6
C3000A 802.11n and 802.11ac Wi-Fi Router
USB
The USB LED illuminates green when the Router is properly connected to a USB connection.
Wi-Fi 2.4G/5G
The Wi-Fi LEDs illuminate green when the Router’s wireless network is operating and properly configured in each band.
WPS Button
The WPS button is used when connecting a wireless device to the Router’s wireless network using WPS.
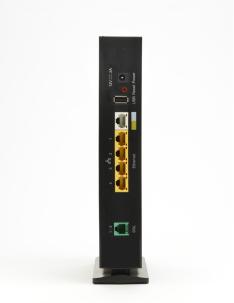
Rear Panel
The rear panel of the Router features 8 ports, and a Reset button.
Power Port
The Power port is used to connect the Power cord (Model No. CDS024T-W120U by Adapter Tech) to the Router.
Reset Button
Depressing the Reset button for 10 seconds will restore the Router’s factory default settings. The reset process will start after releasing the button.
WARNING! Do not unplug the Power cord from the Router during the reset process. Doing so may result in permanent damage to the Router.
7
Introduction
WAN Ethernet Port
The WAN Ethernet port is used to connect the Router to a WAN connection via an Ethernet cable.
LAN Ethernet Ports (4)
The LAN Ethernet ports are used to connect computers to the Router via Ethernet cable. The Ethernet ports are 10/100/1000 Mbps autosensing ports, and either a straight-through or crossover Ethernet cable can be used when connecting to the ports.
USB Port
The USB port is used to connect the Router to a USB device.
DSL Port (Single & Bonded)
The DSL port is used to connect the Router to a DSL wall outlet via DSL cable.
8
C3000A 802.11n and 802.11ac Wi-Fi Router
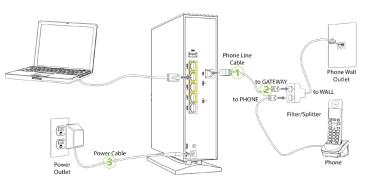
Connecting the Router
There are many variables involved when connecting the Router, depending on the type of Internet service available. The figure below shows the possible connections available for the Router.
Connecting a Computer to the Router
To connect a computer to the Router to access the Router’s graphical user interface (GUI):
1.Get the Router and black Power cord from the box.
2.Plug the black Power cord in the black port on the back of the Router and then into a power outlet.
3.Plug the yellow Ethernet cable from the box into one of the four yellow Ethernet ports on the back of the Router.
4.Make sure the computer is powered on, then plug the other end of the yellow Ethernet cable into an Ethernet port on the computer.
9
Introduction
5.Make sure that the LED on the LAN port into which the Ethernet cable is plugged glows steadily green. This may take a few moments.
6.The computer should either be configured with a statically defined IP address and DNS address, or instructed to automatically obtain an IP address using the Network DHCP server. The Router is set up, by default, with an active DHCP server, and it is recommended to leave this setting as is.
10
Accessing the |
2 |
|
|
Home Screen |
|
This chapter gives a short overview of the Home screen of the Router’s graphical user interface (GUI).
Accessing the Home Screen
To access the Home screen:
1.Open a Web browser on computer connected, via Ethernet cable, to one of the Router’s LAN ports. In the Address text box, type:
http://192.168.0.1
then press Enter on the keyboard. 2. The Router’s Home screen appears.
The Router’s GUI is now accessible.
11
C3000A 802.11n and 802.11ac Wi-Fi Router
Icon Bar
At the top of the Home screen is the Icon Bar. Here, you can quickly access the other four main sections of the Router’s GUI by clicking on the appropriate icon: Status (see chapter 3 for more details); Wireless Setup (see chapter 4 for more details); Firewall (see chapter 5 for more details); Advanced Setup (see chapter 6 for more details). Clicking Home in any other screen generates the Home screen.
Connection Status
The bottom of the Home screen consists of connection and device information relating to the Router. There are no configurable options here.
12
Checking the |
3 |
Router’s Status |
This chapter explains the options available on the Status screens, which display information about the Router’s network connections.
Accessing the Status Screens
To access the Router’s Status screens:
1. Open a Web browser. In the Address text box, type: http://192.168.0.1
then press Enter on the keyboard.
2.The Router’s Main screen appears. Click the Status icon.
3.The Connection Status screen appears. “Connection Status” is under the “Internet Service” group.
From here, all the Status screens can be accessed from the menu on the left.
13
C3000A 802.11n and 802.11ac Wi-Fi Router
Connection Status
Clicking Connection Status from any Status screen generates the Connection Status (see figure above). Information concerning devices connected to the Router’s network, whether wired or wireless, is displayed here, along with the connected device’s IP address, MAC address, and (if applicable) IPv6 address.
Line 1/Line 2 Status
Click Line 1 Status from any Status screen to generate the Line 1 Status screen. This screen displays the Router’s DSL connection parameters
for DSL Line 1 port. Clicking Line 2 Status genreates the Line 2 Status screen, which displays the connection parameters for the Router’s DSL Line 2 port.
WAN Ethernet
Click WAN Ethernet Status from any Status screen to generate the WAN Ethernet Status screen. This screen displays the Router’s WAN (wide area network) parameters.
14
 Loading...