


timeQplus User Guide
06-0414-000 Rev. B
Contacting Acroprint
When contacting customer support, please have your product CD and registration information available.
Mailing Address:
Acroprint Time Recorder Company, Inc timeQplus Support
5640 Departure Drive Raleigh, North Carolina 27616
Phone:
Toll Free: |
(800) 334-7190 |
Web/Internet:
Email: supportdept@acroprint.com
Website: http://www.acroprint.com
06-0414-000 Rev. B |
ii |
Table of Contents |
|
Welcome .......................................................................................................................... |
1 |
Getting Started ................................................................................................................ |
2 |
Before Getting Started ............................................................................................................... |
3 |
timeQplus Setup Wizard ............................................................................................................ |
4 |
timeQplus Administrator Functions.............................................................................. |
5 |
timeQplus Navigation Bar.......................................................................................................... |
6 |
Employees................................................................................................................................... |
7 |
Managing Employees ................................................................................................................ |
7 |
Employee Options ..................................................................................................................... |
9 |
Employee Finger/Face/Hand Enrollment................................................................................... |
9 |
Removing Employee Finger/Face/Hand Templates................................................................ |
10 |
Messages................................................................................................................................... |
10 |
Setup.......................................................................................................................................... |
11 |
General .................................................................................................................................... |
11 |
Holidays ................................................................................................................................... |
13 |
Work Codes ............................................................................................................................. |
13 |
Shifts.......................................................................................................................................... |
15 |
Shift Settings............................................................................................................................ |
15 |
Lunch Rules ............................................................................................................................. |
19 |
Overtime .................................................................................................................................. |
21 |
7th Day Overtime..................................................................................................................... |
22 |
Holidays ................................................................................................................................... |
22 |
Salaried Shift Settings ............................................................................................................. |
22 |
Punch Editing............................................................................................................................ |
24 |
Managing Transactions ........................................................................................................... |
25 |
Editing Total Time Accumulations ........................................................................................... |
26 |
Printing Time Cards ................................................................................................................. |
27 |
Reports ...................................................................................................................................... |
28 |
Generating a Report ................................................................................................................ |
28 |
Future Transactions Report ..................................................................................................... |
29 |
Export......................................................................................................................................... |
29 |
Exporting Time and Attendance Data...................................................................................... |
30 |
Unapproved Timecards ........................................................................................................... |
30 |
Advanced Payroll Integration................................................................................................... |
31 |
File Payroll Export Formats ..................................................................................................... |
31 |
Custom Export File Builder ...................................................................................................... |
32 |
QuickBooks® Payroll Integration............................................................................................. |
36 |
Peachtree Complete Accounting ............................................................................................. |
38 |
WellsFargo, Premier, QwikPay and Intuit PC Access Import File ........................................... |
40 |
06-0414-000 Rev. B |
iii |
ADP Version 7.0 ...................................................................................................................... |
40 |
Generic V2.0............................................................................................................................ |
41 |
Generic ASCII file Export......................................................................................................... |
42 |
Genesys & Oryel Payroll Export .............................................................................................. |
42 |
PayChex Paylink Export .......................................................................................................... |
44 |
PayChex Preview Export ......................................................................................................... |
44 |
PayChex IM0007 Import File ................................................................................................... |
45 |
PrimePay PrimeLink Export..................................................................................................... |
45 |
Heartland Plus One Fixed Length File..................................................................................... |
46 |
Supervisors ............................................................................................................................... |
47 |
Managing Administrators and Supervisors.............................................................................. |
47 |
Supervisor Preferences ........................................................................................................... |
49 |
Time Clock................................................................................................................................. |
50 |
Adding an Ethernet Connected Time Clock ............................................................................ |
51 |
Adding a Serial Connected Time Clock................................................................................... |
54 |
Adding a USB Flash Drive Time Clock.................................................................................... |
56 |
Assigning/Removing Employees to/from Time Clocks............................................................ |
56 |
Loading Employee Data onto a USB Time Clock.................................................................... |
57 |
Uploading Punch Data from the USB flash drive to the timeQplus server .............................. |
58 |
Poll and Update ....................................................................................................................... |
59 |
Changing Time Clock Connection Types ................................................................................ |
60 |
Copying Multiple Finger Templates from One Time Clock to Another .................................... |
62 |
Hand Punch............................................................................................................................... |
63 |
System Utilities ......................................................................................................................... |
64 |
Date Tools................................................................................................................................ |
64 |
timeQplus Settings................................................................................................................... |
66 |
timeQplus Supervisor Functions................................................................................. |
67 |
timeQplus Navigation Bar........................................................................................................ |
68 |
Employees................................................................................................................................. |
69 |
Work Codes ............................................................................................................................. |
70 |
Messages................................................................................................................................... |
73 |
Punch Editing............................................................................................................................ |
74 |
Reports ...................................................................................................................................... |
74 |
Time Clock................................................................................................................................. |
74 |
Virtual Clock .................................................................................................................. |
75 |
Login to Virtual Clock............................................................................................................... |
76 |
Submit Employee Time Slip .................................................................................................... |
77 |
IN/OUT Board ............................................................................................................................ |
78 |
Glossary......................................................................................................................... |
79 |
06-0414-000 Rev. B |
iv |

Welcome
The timeQplus system allows a company's time & attendance to be managed from a single Windows-based PC.
Key Time and Attendance Features:
•Easily review employees’ time totals past and present
•Edit Time Sheets
•Save and print reports
•Export data to various file formats and payroll programs
•Create Work Codes and assign to employees
•Report on Archived Pay Periods
•Submit Single Punch or Multiple Punches (TimeSlips)
•Submit Future Transactions using TimeSlips Feature
06-0414-000 Rev. B

This chapter provides information on how to get started with timeQplus. It contains the following sections:
¾Before Getting Started
¾timeQplus Setup Wizard
06-0414-000 Rev. B

Getting Started
Before Getting Started
Before using timeQplus for the first time, you may find it helpful to have your company’s pay period and time and attendance policies handy.
Here is a list of configuration settings you will review and modify as needed:
1.Adjust the following items located in the Setup section as desired:
•Current Pay Period Start Date
•Pay Period Length
•Pay Period Start Date
•Holiday pay policies
•Time card approval policies
•Date Format
•Time Totals Format
2.For each shift used, adjust the following items located in the Shifts and Lunches section as desired:
•Set up shift rules
•Maximum Time on the Clock
•Pay Interval Rounding
•Day Change Offset
•Overtime Thresholds
•7th Day Overtime
•Set up lunch rules
3.Add Employees to the timeQplus System.
4.Add Supervisors to the timeQplus System and then assign employees to those Supervisors.
After completing the Setup Wizard, we recommend launching the timeQplus software and generating a Rules Setup Report (click Reports on the navigation bar, then select Rules Setup). Preview or print this report to verify the application has been configured correctly to reflect your company’s time and attendance policies.
After checking this report for accuracy and (if necessary) making any desired changes, you may begin adding employees.
Notes:
•Most settings can be changed at any time and will affect only the total time accumulations in the Previous and Current Pay Period.
•Changes to the next pay period start date will lengthen or shorten the duration of the current pay period, but not affect the Previous Pay Period.
06-0414-000 Rev. B |
3 |
Getting Started
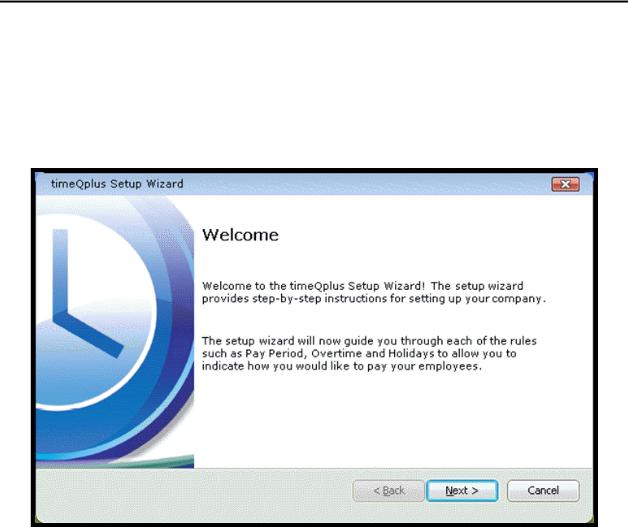
timeQplus Setup Wizard
The first time you launch timeQplus, the system will open the timeQplus Setup Wizard. This wizard will walk you through a setup procedure to establish the initial settings for your timeQplus system. The application is configured with default settings, however, if you choose, you can simply click through the initial pay period setup, add employees and start clocking IN and OUT. However, we strongly suggest updating these default settings as needed to conform to your company’s policies.
If you are upgrading from a previous version of either Attendance Rx Version 2 or timeQplus Version 3 you must still go through the Setup wizard, but simply press the Enter key for each input. Your existing settings will later be automatically imported from your existing database.
For new installations, before you proceed through the Setup Wizard, you may find it helpful to review the
Before Getting Started section.
At any time during the Setup Wizard, you can use the Back button to review or change previous settings. When you have entered all your company’s information, click the Finish button to complete the process and start timeQplus.
Note: Each of these settings can be changed at any time during normal operation using the Setup and Shifts screens on the timeQplus Navigation Bar. If you cancel the wizard before completing the setup, timeQplus will automatically run the Setup Wizard again the next time the software is started.
06-0414-000 Rev. B |
4 |

timeQplus has two level of system access:
1.Administrator – has total access to all system functions and data.
2.Supervisor – has limited access with the ability to view/edit employee information (including time cards) and run reports for assigned employees only.
This chapter provides detailed information on timeQplus functions specific to the administrator role. It contains the following sections:
¾timeQplus Navigation Bar
¾Employees
¾Messages
¾Setup
¾Shifts
¾Punch Editing
¾Reports
¾Export
¾Supervisors
¾Time Clock
¾System Utilities
06-0414-000 Rev. B
timeQplus Administrator Functions
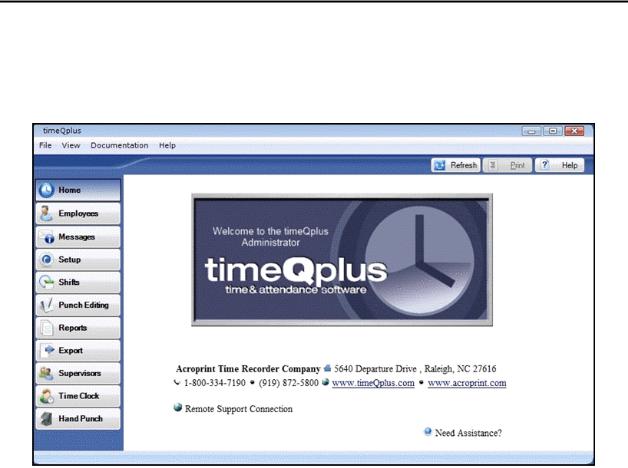
timeQplus Navigation Bar
The timeQplus Navigation Bar allows an administrator to manage the timeQplus software. An administrator can update any configuration settings, add and delete employees, approve time cards and TimeSlips, export timeQplus data to payroll, and view/print reports.
To see the Navigation Bar, double click the timeQplus icon on your desktop. Ensure that you are connecting to the correct server and then enter your Administrator Login and Password.
Click the buttons on the left Navigation bar to access these Administrator functions:
• |
Employees |
Manage employee information and shift assignments |
|
• |
Messages |
View and edit your Company and Employee messages |
|
• |
Setup Setup company pay rules, Holidays, and Work Codes |
||
• |
Shifts |
Define shift hours, lunch rules, overtime, and holiday pay |
|
• |
Punch Editing View and edit employee Time Cards & Time Slips |
||
• |
Reports |
Print or preview reports |
|
• |
Export |
Export time cards to payroll or a service provider |
|
• |
Supervisors |
Manage administrators and supervisors |
|
• |
Time Clock |
Manage time clock devices |
|
• |
Hand Punch Manage hand punch devices |
||
06-0414-000 Rev. B |
6 |
timeQplus Administrator Functions
Employees
The Employees screen allows an administrator to enter and view all employees and their information. An administrator can add a new employee, delete or modify an existing employee, assign employees to Time Clocks, or assign Work Codes to employees (please reference the Work Codes section in the timeQplus Supervisor Functions chapter for more information). An administrator can also enroll finger, face, and/or hand templates after capturing the templates on an appropriate Time Clock.
To access the Employees screen, click the Employees button on the left Navigation Bar or click View on the top menu and choose Employees.
Managing Employees
To Add an Employee:
•On the Employees screen, type the new employee information into the top blank row, entering the employee's Lastname, Firstname, MI (optional), Badge (optional), UserID, employee Number (optional), Shift, and Hire Date.
oNote: If you wish, employee UserIDs and Numbers can be set to auto-increment by adjusting the Employee Options located on the top menu bar under ‘File’.
•Press ENTER to save the new employee information and automatically create another blank line at the top for additional employee entries.
•To erase input information before adding a new employee, press the ESC key on your keyboard, or click the Refresh button on this screen.
If employees will be using proximity/barcode/magstripe badge Time Clocks to punch, ensure the Badge field corresponds with the number on the actual badge assigned to the employee on the Time Clock. Refer to the TQ600 User Manual for more information.
If employees will be using biometric finger reader or facial recognition Time Clocks to punch, make a note of the UserID assigned to each employee. It may be a good idea to print the Employee Profiles report, which lists each employee’s UserID, which will be used to enroll the employee’s finger/face on the time clock. Refer to the TQ600 User Manual for more information on capturing finger/face templates.
06-0414-000 Rev. B |
7 |
timeQplus Administrator Functions
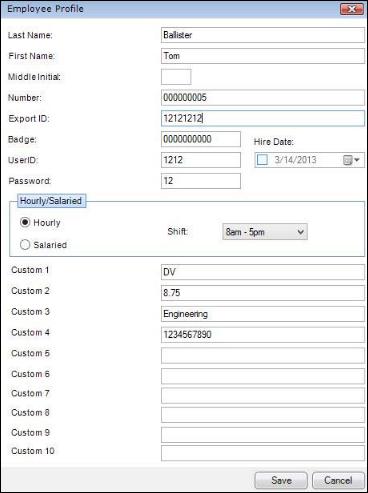
To Edit an Employee:
•From the Employees screen – On the Employees screen, simply type the updated information directly into the appropriate field and press ENTER.
•From the Employee Profile screen – Click anywhere on the row containing the employee to be edited. Click the Detail button at bottom right to launch the Employee Profile window. This screen allows additional employee information to be recorded and saved. The Password field must be populated with the password the employee will be using to punch at the Virtual Clock and/or a connected Time Clock. There are also ten custom fields that can be used for creating Custom Payroll Exports. You can update the employee’s information and then click Save. Click Cancel to return to the Employees screen without saving.
To Delete an Employee:
•Click the Employees button on the left Navigation Bar or click View on the top menu bar and choose Employees.
•Click anywhere on the row containing the employee to be deleted.
•Click the Delete button at lower right.
Note: You will not be able to delete an employee who has punches in the current or previous pay periods. The employee will be marked for deletion (shown with a red line through the row), and will be automatically deleted when the employee no longer has active punches in the current or previous pay periods.)
•Click Yes to confirm the deletion, or click No to cancel.
06-0414-000 Rev. B |
8 |
timeQplus Administrator Functions
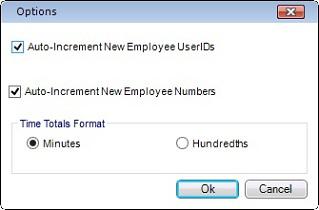
Employee Options
The Employee Options feature allows an administrator to determine the format of time totals viewed by employees using the Virtual Clock. Time can be displayed in either minutes or hundredths. Employee Options also allows employee UserIDs and Numbers to be auto incremented when adding new employees to timeQplus.
To Change Employee Options:
•Click File on the top menu bar and choose Employee Options.
•Select your preference for Time Totals Format. You may choose to display time totals in minutes or hundredths.
•To have the software automatically increment new employee UserIDs, check the Auto Increment New Employee UserIDs box.
•To have the software automatically increment new employee Numbers, check the Auto Increment New Employee Numbers box.
•Click Ok when done. To exit without saving changes, click Cancel.
Employee Finger/Face/Hand Enrollment
Collecting, enrolling, and assigning an employee’s Finger, Face, or Hand on a Time Clock is a three step process.
1.Collect the employee’s Finger/Face/Hand template on the Time Clock.
•For detailed instructions, refer to the TQ600 User Manual for finger templates, the TQ600F User Manual for face templates, and the Hand Punch User Manual for hand templates. These documents can be found under Documentation on the top menu bar.
•You will need to know the User ID assigned to the employee in timeQplus. You may find it helpful to print an Employee Profiles report to ensure you record the templates with the correct USER ID.
2.Associate the template with the employee record in the software.
•On the Employees screen, select the row containing the employee’s name.
•Click the appropriate Enroll or Remove button and follow the on-screen instructions.
3.Assign the employee to additional Time Clocks.
•On the Time Clock screen, select the Time Clock the employee will be using to punch. If using a hand punch, click the Hand Punch tab and select the appropriate time clock.
•Select the employee’s name in the Unassigned Employees list and click the rightpointing arrow button to move that employee’s name to the Assigned Employees list. Click the Save button to save the assignment.
Note: Employees can be assigned to and are able to punch at multiple Time Clocks.
06-0414-000 Rev. B |
9 |
timeQplus Administrator Functions
Removing Employee Finger/Face/Hand Templates
1.On the Employees screen, select the row containing the employee’s name.
2.Click the appropriate Enroll or Remove button for the template you wish to delete and follow the on screen instructions.
Note: Once an employee’s template has been removed from timeQplus, it will remain on all time clocks to which the employee was assigned until after the next scheduled/manual poll or update occurs. Please see the Time Clocks section, Poll and Update for more information.
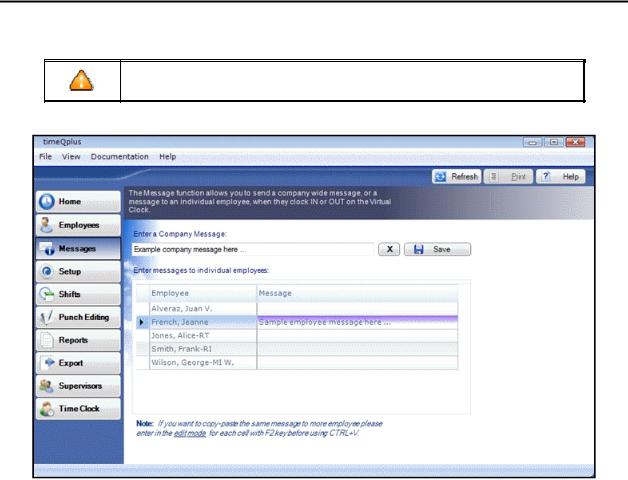
Messages
The Messages screen allows an administrator to display a company-wide or employee-specific message to employees when they punch at a PC on the Virtual Clock.
Note: Messages will only appear on the Virtual Clock screen when an employee punches. Messages will not display on connected Time Clocks.
To create or edit a company-wide message:
•To access the Messages screen, click the Messages button on the left Navigation Bar or click View on the top menu and choose Messages.
•Enter a company-wide message in the Enter a Company Message field. This message will appear on the PC screen after each employee punches at the PC.
•Click the Save button to save the message or click the X button to delete the Company Message.
Note: You must delete the Company Message when you no longer wish it to display. It will continue to display on the PC screen after each employee punch as long as it exists on this screen.
To create or edit employee-specific messages:
Enter employee-specific messages in the Message field next to the employee’s name. This message will appear once on this employee’s PC screen after the next punch.
06-0414-000 Rev. B |
10 |

timeQplus Administrator Functions
Setup
The Setup screen allows an administrator to adjust variables related to the clock, time calculations, pay periods, holidays and Work Codes. Most items can be changed at any time and the change will be reflected in the total time accumulations for the current and previous pay periods only.
To access the Setup screen, click the Setup button on the left Navigation Bar or click View on the top menu bar and choose Setup. Three tabs are available for editing: General, Holidays, and Work Codes.
General
The following items may be edited using the General tab:
•Pay Period – timeQplus supports WEEKLY, BI-WEEKLY, SEMI-MONTHLY, and MONTHLY Pay Periods.
•Time Card Approvals – timeQplus can be configured to require that timecards be approved by a supervisor (or an administrator) before they can be exported to payroll.
06-0414-000 Rev. B |
11 |
timeQplus Administrator Functions
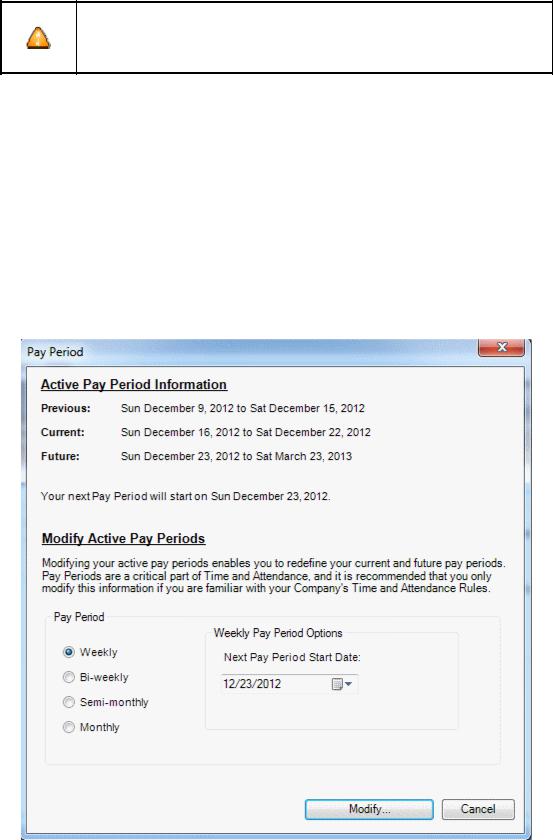
To Change the Pay Period Length:
Be aware that pay periods are a critical part of time and attendance tracking. Changing pay periods can have legal and personnel implications. Exercise caution when changing the pay period after the timeQplus software has been configured and is in use.
1.Click the Modify button in the Pay Period section of the General tab. This will open the Modify Active Pay Periods screen.
The available choices are:
o Weekly - Employees are paid once per week
o Bi-weekly - Employees are paid every two weeks
o Semi-Monthly - Employees are paid twice per month
oMonthly - Employees are paid once per month
2.Change the Next Pay Period Start Date if necessary to reflect the new pay period starting date. You may either click the downward-facing arrow at the right of the field to open a calendar from which you can select the desired date, or you may simply type the desired date directly in the
Next Pay Period Start Date field.
3.Click the Modify button to save your changes. To exit without saving changes, click the Cancel button.
06-0414-000 Rev. B |
12 |
timeQplus Administrator Functions
To configure Time Card Approvals preferences:
•Check the “Do not export unapproved Time Cards for Hourly Employees” box to prevent the export of unapproved time cards for hourly employees.
•Check the “Do not export unapproved Time Cards for Salaried Employees” box to prevent the export of unapproved time cards for salaried employees.
•Click the Save button when done. To quit without saving changes, select another option from the left Navigation Bar or click the Refresh button at top right and then click No in the Save Changes dialog box.
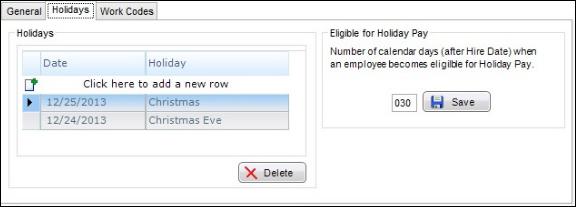
Holidays
Optionally, timeQplus can track paid holidays and include this information when exporting to payroll. The timeQplus software does not automatically calculate holiday dates; they will need to be manually entered each year. If your company requires that an employee work a certain number of days before becoming eligible for paid holidays, this can also be configured on this screen.
The following items may be edited using the Holidays tab:
•Holiday Dates - Enter the date or select a date from the popup calendar. Enter the name of the holiday and press Enter to save. Repeat to add additional holidays.
To delete a holiday, click to highlight the holiday you want to remove, and then click the Delete button.
•Employee Eligibility for Holidays - In the ‘Eligible for Holiday Pay’ box, enter the number of days a new employee must work before becoming eligible for Holiday Pay and then click Save. To quit without saving changes, select another option from the left Navigation Bar or click the Refresh button at top right and then click No in the Save Changes dialog box.
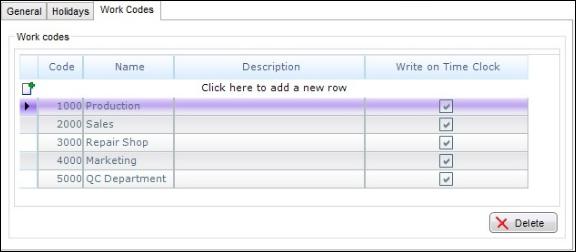
Work Codes
Work Codes are used to allow a company to calculate how an employee’s work time is applied to a specific department, project, task, etc. Work codes can be entered, edited or deleted using the Work Codes tab on the Setup Screen. This list is referred to as the Master List of Work Codes. timeQplus can be configured to include work code information when exporting punch data to payroll.
The following items may be edited using the Work Codes tab:
•Code – the work code number. After entering the first code number, timeQplus will auto increase the next work code number by 1. You may choose to keep the new number or just type over to input another of your choice.
•Name – the work code name.
•Description – a description of the work code; optional but can be very useful.
06-0414-000 Rev. B |
13 |
timeQplus Administrator Functions
•Write to Time Clock – Must be checked before the work code can be assigned to employees or used on any Time Clock (including the Virtual Clock).
The following applies to Hourly employees only:
•A Work Code must have "Write to Time Clock" set before it can be assigned to employees and used on any Time Clock, including the Virtual Clock.
•Work Code assignments are managed on the Employees screen. Please see the Work Codes section in the timeQplus Supervisor Functions chapter for detailed instructions.
•Work Codes can be used on TQ600 Time Clocks (Facial, Biometric, Proximity, Barcode, and Magstripe), and on the Virtual Clock.
•There are two modes for using Work Codes on connected Time Clocks (the Virtual Time Clock handles Work Codes a bit differently). Consult the user manual for details on setting the mode on each Time Clock.
oMode 3 - A Time Clock configured to Mode3 will allow employees to choose only their assigned Work Codes stored in that Time Clock.
oMode 4 - A Time Clock configured to Mode 4 will allow any employee to choose any Work Code that has been stored in that Time Clock.
•Because the Virtual Clock is controlled entirely by the timeQplus software, it reacts differently to Work Codes:
oIf an employee is assigned Work Codes, then only those Work Codes are available to choose when punching.
oIf an employee has no Work Codes assigned, then all Work Codes with ‘Write on Time Clock’ checked will be available for use when punching.
•A punch is considered a ‘Transfer’ if a Work Code different from the previous punch is selected.
•All OUT punches will have the same Work Code as the previous punch, which could be either an
IN or a TRANSFER.
The following applies to Salaried Employees only:
•To assign a salaried employee a work code, select the employee on the Punch Editing screen.
•In the Transaction area, select the date.
•Select ‘Reg’ from the Type drop down list and enter the time [HH:MM].
•Select a work code from the Work Code drop down list and click Insert to save changes.
06-0414-000 Rev. B |
14 |
timeQplus Administrator Functions
Shifts
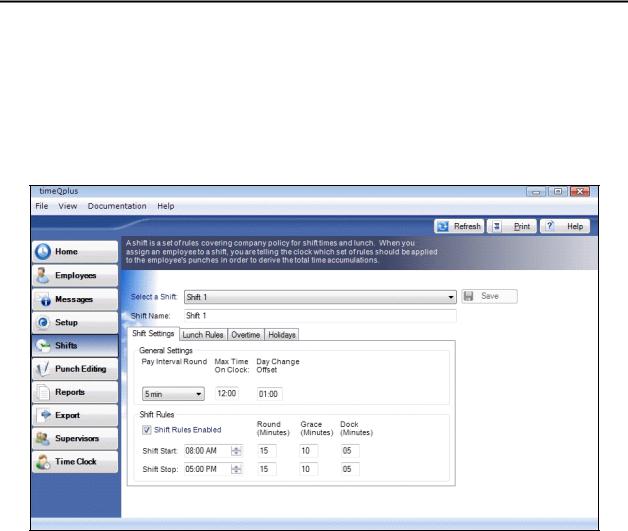
A shift can be defined as a set of rules enforcing company policy for a group of employees, related to start and stop times, lunch times, overtime, and holidays. When an employee is assigned to a shift, the software then refers to the set of rules defined for that shift and applies those rules to that employee's transactions in order to derive the total time accumulations.
Up to twelve different shifts can be defined in timeQplus. A shift can be a traditional shift, a department, a group within a department, etc. Each shift may be defined differently with its own set of rules.
To access the Shifts screen, click the Shifts button on the left Navigation Bar or click View on the top menu bar and choose Shifts. The Shifts screen consists of four tabs: Shift Settings, Lunch Rules,
Overtime, and Holidays.
Shift Settings
Under the Shift Settings tab, the following items may be edited: Pay Interval Round, Max Time on Clock, Day Change Offset, Shift Start, Shift Stop, Round, Grace, and Dock. Each setting is described in the sections that follow. Note: Definitions for all these settings can be found in the Glossary.
To edit a shift’s settings:
•Select a shift to edit from the Select a Shift drop-down list.
•To change the name of a shift, simply type the new name in the Shift Name field.
•Click the Shift Settings tab to modify Pay Interval Round, Max Time on Clock, and Day Change Offset. Check the Shift Rules Enabled box to modify Shift Start, Shift Stop, Round, Grace and Dock values. Click the Save button when finished. If you do not wish to make use of the Round, Grace or Dock features, leave the minutes set to zero.
Pay Interval Rounding
Pay Interval Rounding causes time worked totals for each employee to be rounded to the nearest one, five, six, ten or fifteen minute increment. It will not affect the actual punch time recorded in the software, only the worked time totals. If you do not wish for your worked time totals to be rounded, set the Pay Interval Rounding value to one minute (this is the default).
06-0414-000 Rev. B |
15 |
timeQplus Administrator Functions
Example 1:
Pay Interval Round time set to 10 minutes.
•Punch at 10:14 will be treated as though it occurred at 10:10.
•Punch at 10:15 will be treated as though it occurred at 10:20.
Example 2:
Pay Interval Round time set to 15 minutes.
•Punch at 10:07 will be treated as though it occurred at 10:00.
•Punch at 10:08 will be treaded as though it occurred at 10:15.
To edit Pay Interval Round:
•Click the Shifts button on the left Navigation Bar or click View on the top menu bar and choose Shifts. Select the shift you want to modify, and then select the ‘Shift Settings’ tab.
•Choose the desired Pay Interval Round value from its drop-down list. Choices include 1, 5, 6, 10 or 15 minute(s). The default value for Pay Interval Rounding is 1 minute.
•Click the Save button when done. To quit without saving changes, select another option from the left Navigation Bar or click the Refresh button at top right and then click No in the Save Changes dialog box.
Max Time on Clock
The Max Time on Clock setting prevents the system from calculating erroneously large worked time totals (and possible overtime) due to missed punches. The system assumes that an employee has missed a punch after the maximum time on the clock has been exceeded. The system will change the employee's status to Out with zero accumulated time after the maximum time has passed since the last In/Transfer punch. A flag will also be set that there is a missing punch on the Punch Editing screen and on the Time Card and Hours Summary reports.
You can then enter the missing punch via Punch Editing so the employee’s time can be correctly calculated.
The default value for Max Time on Clock is twelve hours (12:00).
Note: To disable this feature, set Max Time on Clock to zero hours (00:00).
To edit the Max Time on Clock setting:
•Click the Shifts button on the left Navigation Bar or click View on the top menu bar and choose Shifts. Select the shift you want to modify, and then select the ‘Shift Settings’ tab.
•Enter the desired value in the Max Time on Clock field.
•Click the Save button when done. To quit without saving changes, select another option from the left Navigation Bar or click the Refresh button at top right and then click No in the Save Changes dialog box. Changing Max Time on Clock will apply to the Previous, Current and all future Pay Periods.
Day Change Offset
A normal day by default begins at exactly 12:00 AM. Some companies, however, may have employees who work shifts that end at 12AM or even into the next day. Also, there may be shifts that begin at 12AM or earlier.
Day Change Offset can be used to 'move' such employees’ workday change time backward or forward from 12AM so their hours are credited to the proper workday. The Day Change Offset field displays HH:MM.
•If you do not have employees that begin or end work through 12AM, leave this setting at the default value [00:00].
06-0414-000 Rev. B |
16 |
timeQplus Administrator Functions
•If you have employees that begin work on Day1 but end work on Day2, and the hours worked should be allocated to Day1, set Day Change Offset to the following calculated value:
[Shift Stop Time + Shift Stop Round]
Example: If your shift stops at 4:30 AM and you have a 30-minute shift stop round, the Day Change Offset is set to [5:00].
•If you have employees that begin work on Day1 and end work on Day2, and the hours worked should allocated to Day2, set the Day Change Offset to the NEGATIVE of the following calculated value:
[12:00 – Shift Start Time + Shift Start Round]
Example: If your Shift starts at 11:00 PM and you have a 15-minute shift start round, the Day Change Offset is set to [-01:15].
To edit Day Change Offset:
•Click the Shifts button on the left Navigation Bar or click View on the top menu bar and choose Shifts. Select the shift you want to modify, and then click on the ‘Shift Settings’ tab.
•Enter the appropriate value in the Day Change Offset field.
•Click the Save button when done. To quit without saving changes, select another option from the left Navigation Bar or click the Refresh button at top right and then click No in the Save Changes dialog box.
Shift Rules
Check the Shift Rules Enabled box to modify Shift Start, Shift Stop, Round, Grace and Dock values. Click the Save button when finished. If you do not wish to make use of the Round, Grace or Dock features, leave the minutes set to zero. The following table describes each setting in more detail.
Shift Name: The name of this shift as you would like it to appear on reports and screen displays.
Shift Start Time: The time of day employees are scheduled to start work. Pay careful attention to the AM and PM settings to ensure your times are set correctly.
Shift Stop Time: The time of day employees are scheduled to stop work. Pay careful attention to the AM and PM settings to ensure your times are set correctly.
06-0414-000 Rev. B |
17 |

timeQplus Administrator Functions
Shift Round: The number of minutes before the scheduled Start time that an employee’s "early" punch in will be treated as if it occurred exactly at the scheduled Start time, or the number of minutes after the scheduled Stop time that an employee’s "late" punch out will be treated as if it occurred exactly at the scheduled Stop time.
This setting allows employees to clock in a few minutes early or clock out a few minutes late, say, for time spent getting a cup of coffee in the morning or gathering their personal belongings before leaving work, without accumulating overtime. It does not change the actual punch time recorded by the system, only how that punch is treated for the purpose of calculating the employee’s worked time.
You can set different numbers of minutes for Start Round and Stop Round, if desired. If you do not wish to use this setting, set Start Round and Stop Round to zero.
 Note that U.S. law prohibits rounding of more than 15 minutes.
Shift Grace: The number of minutes after the scheduled Start time that an employee’s "late" punch in is still considered on time, or the number of minutes before the scheduled Stop time that an employee’s "early" punch out is considered on time.
This setting allows an employee to clock in a few minutes late or clock out a few minutes early without being docked. It does not change the actual punch time recorded by the system, only how that punch is treated for the purpose of calculating the employee’s worked time.
You can set different numbers of minutes for Start Grace and Stop Grace, if desired. If you do not wish to use this setting, set Start Grace and Stop Grace to zero.
Shift Dock: The number of minutes an employee will lose from their daily total for punching in late or punching out early outside of the parameters of the Shift Grace setting.
Shift Dock works together with Shift Grace to determine employees’ calculated work time. If an employee clocks in or out during the time designated as Shift Grace, the employee’s time will not be docked. If Start Dock is set to zero, an employee who clocked in one minute after the end of the Start Grace period would only be docked the amount of time elapsed form the end of Start Grace. In other words, if your Shift Grace period is set to five minutes, an employee who punches in six minutes late would only be docked one minute.
You can use the Shift Dock setting to override the effect of the Shift Grace period for employees who punch in a few minutes outside the
Shift Grace period.
For instance, if you set Start Grace to five minutes and Start Dock to 10 minutes, an employee who clocked in at three minutes after the scheduled shift start time (within the Shift Grace period) would not be docked. That employee’s punch would be treated as though it had occurred at the shift start time for the purpose of calculating employee worked time.
However, if an employee clocked in at seven minutes after the scheduled shift start (outside the five minute Shift Grace period but within the 10 minute Shift Dock period), that employee’s punch would
06-0414-000 Rev. B |
18 |
timeQplus Administrator Functions
be treated as though it had occurred at 10 minutes after the shift start for the purpose of calculating the employee’s work time.
If an employee clocked in at twelve minutes after the scheduled shift start (outside the periods covered by both Shift Grace and Shift Dock), that punch would simply be treated as though it occurred at its actual time for the purpose of calculating the employee’s worked time.
You can set different numbers of minutes for Start Dock and Stop Dock if desired. If you do not wish to use this setting, set Start Dock and Stop Dock to zero.
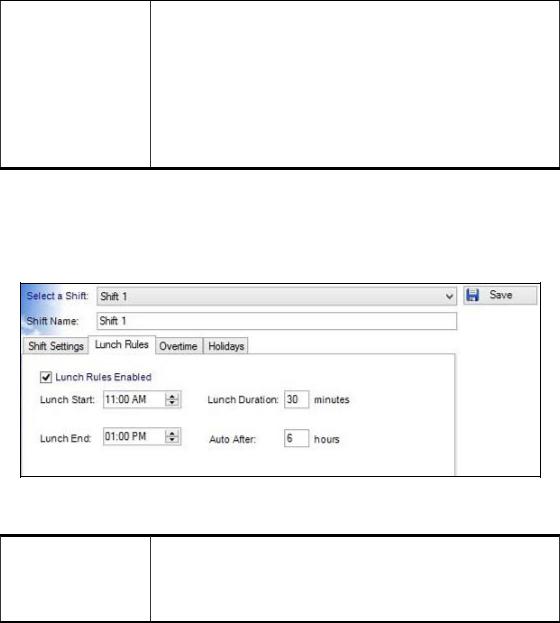
Lunch Rules
If you wish to apply lunch rules, click the Lunch Rules tab and then check the Lunch Rules Enabled box. Enter the scheduled Lunch Start, Lunch End, Lunch Duration, and Auto After values. Click the Save button when done. To disable the Lunch Duration and/or Auto After feature, set their values to zero.
The following table describes each lunch setting in more detail.
Lunch Start: The earliest time of day at which an employee can punch out for lunch. If an employee clocks out before this time, the system assumes the punch does not relate to a lunch period, and lunch rules will not be applied.
06-0414-000 Rev. B |
19 |

timeQplus Administrator Functions
Lunch End: The latest time of day at which an employee should punch in from lunch.
The system assumes employees will take their entire lunch break within the window between Lunch Start and Lunch End. It assumes a return after Lunch End indicates a longer- than-normal lunch period.
If an employee clocks out to lunch after Lunch Start but before Lunch End (which puts Lunch Rules in effect), then clocks in from lunch after Lunch End, the difference between Lunch End and the time the employee actually clocks in will be added to the Lunch Duration to calculate the total time deducted from the employee’s hours worked total for lunch.
You may need to adjust the hours worked totals for such employees using the Punch Editing screen if the time deducted exceeds their actual lunch time taken.
If you find you consistently have to make this adjustment for many employees, you may wish to consider modifying your Lunch End setting to a later time.
Lunch Duration: The minimum number of minutes subtracted from time worked totals for each lunch period. If an employee is clocked out for lunch longer than the designated Lunch Duration, the system will deduct the actual amount of time the employee is clocked out. However, if an employee takes a shortened lunch – that is, clocks out after the designated Lunch Start and clocks back in before the amount of time set in the Lunch Duration field has elapsed – the system will automatically deduct the full Lunch Duration.
This setting can be useful in structured environments such as a production line, where employees must take standardlength lunch breaks. Enforcing a standard Lunch Duration will ensure you do not overpay employees in the event they clock back in from lunch early before they can actually start work.
In other types of environments, use caution with this setting to ensure you do not underpay employees who take shortened lunch breaks. You may need to adjust the hours worked totals for such employees using the Punch Editing screen if the time deducted exceeds their actual lunch time taken.
Auto Lunch After: The length of time an employee can be on the clock before the system assumes they have missed punching out for lunch and automatically deducts the Lunch Duration from their hours worked total. If the Lunch Duration field is set to zero, the Auto Lunch After setting will have no effect.
Use caution with this setting. If an employee skips lunch, and you have Auto Lunch After configured, the Lunch Duration will automatically be deducted from their hours worked total. You must manually add that time back using the Punch Editing screen in order to avoid underpaying that employee.
06-0414-000 Rev. B |
20 |
timeQplus Administrator Functions
You can view the adjustments made to individual punches by the system as dictated by the shift and lunch rules you configured by selecting a punch affected by these rules in the Punch Editing screen and clicking the DETAILS button.
Overtime
Overtime specifies the amount of time an employee must work before overtime will begin to accumulate. The threshold amounts may be set on both a daily basis and/or weekly basis. Both the daily and weekly overtime thresholds may be set at two different levels to reflect company policy.
Example 1:
If you pay overtime based only on the number of hours worked in a week, not on the number of hours worked in a given day, set the Daily Level 1 and Daily Level 2 to 24:00 hours. If you do not pay a second level of overtime on a weekly basis, set Weekly Level 2 to 168:00 hours.
Example 2:
You pay employees at 1.5 times their pay rate (time and a half) if a given employee works over 40 hours in a week and 2 times the normal pay rate (double time) if the employee works over 48 hours in a week. To implement these rules, set Weekly Level 1 to 40 hours and Weekly Level 2 to 48 hours. If an employee then works 60 hours in a particular week, the totals generated will be:
•Regular: 40:00
•Overtime 1: 08:00
•Overtime 2: 12:00
To edit the Overtime Threshold Values:
•Click the Shifts button on the left Navigation Bar or click View on the top menu bar and choose Shifts. Select the shift you want to modify, and then click the ‘Overtime’ tab.
•Check the Overtime Enabled box and type the desired overtime thresholds in the Daily Level 1,
Daily Level 2, Weekly Level 1 and Weekly Level 2 fields.
•Click the Save button when done. To quit without saving changes, select another option from the left Navigation Bar or click the Refresh button at top right and then click No in the Save Changes dialog box.
06-0414-000 Rev. B |
21 |
timeQplus Administrator Functions
7th Day Overtime
When enabled, 7th Day Overtime will promote all hours worked on the seventh consecutive worked day to the next higher pay level (Overtime 1 or Overtime 2), provided that the 7 consecutive days start at the beginning of the a given week of the pay period. This rule affects only the Daily Overtime calculations and will not overwrite any Weekly Overtime rule settings. To enable 7th Day Overtime, check the ‘Enable 7th Day Overtime’ box on the Overtime tab.
Note: This feature was designed to accommodate a law commonly referred to as California Overtime.
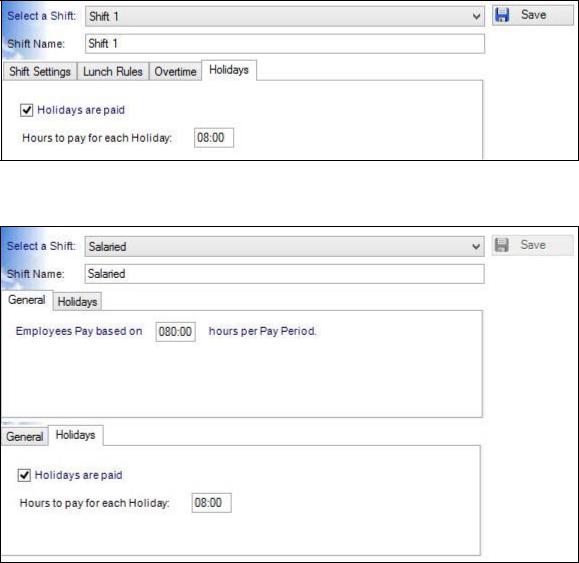
Holidays
You can override the company-wide settings regarding holiday pay for individual shifts. If you wish holidays to be paid for employees assigned to this shift, check the ‘Holidays are paid’ box and then enter the number of hours to be paid for each holiday. Click the Save button when done. To quit without saving changes, select another option from the left Navigation Bar or click the Refresh button at top right and then click No in the Save Changes dialog box.
Salaried Shift Settings
The Salaried shift determines how salaried employees will be paid.
To Change Salaried Employee Settings:
•Click the Shifts button on the left Navigation Bar or click View on the top menu bar and choose Shifts. Select ‘Salaried’ from the ‘Select a Shift’ drop down list.
06-0414-000 Rev. B |
22 |
timeQplus Administrator Functions
•Under the General tab, you can specify the number of hours per Pay Period to pay salaried employees. The default value is 40 hours, which can be updated if necessary. This value is exported every pay period to payroll.
•If salaried employees are to be paid for holidays, then under the Holidays tab, check the Holidays are paid box and enter the number of hours to pay for each holiday in the Hours to pay for each Holiday field; the default is 8:00 hours.
•Click the Save button when done. To quit without saving changes, select another option from the left Navigation Bar or click the Refresh button at top right and then click No in the Save Changes dialog box.
06-0414-000 Rev. B |
23 |
 Loading...