


Micro-computer Electronic Time Clock
User Manual

For more information on Acroprint products
Acroprint offers a complete line of standard Time Recorders, state-of-the-art Electronic Time Recorders, Document Time Stamps, Watchmen’s Systems, HRx Human Resource Software, and
Time & Attendance Systems.
Time for Business….
5640 Departure Drive
Raleigh, NC 27616-1841 919.872.5800
In USA 800.334.7190
Fax: 919.850.0720 email: sales@acroprint.com
Visit our Web Site: www.acroprint.com
Register online at www.acroprint.com
All Rights Reserved. ©2003
Acroprint Time Recorder Company
|
Table of Contents |
|
I. |
Introduction ................................................................................. |
1 |
|
Overview.......................................................................................................... |
1 |
|
Specifications ................................................................................................... |
1 |
|
Accessories ...................................................................................................... |
1 |
|
Features ............................................................................................................ |
2 |
II. |
Package Contents......................................................................... |
2 |
III. |
Location of Components ............................................................. |
3 |
IV. |
Getting Started............................................................................. |
3 |
|
Installing clock dial battery.............................................................................. |
3 |
V. |
Setting the ATR120...................................................................... |
4 |
|
Programming Hints .......................................................................................... |
4 |
|
Selecting day of week ...................................................................................... |
5 |
|
Setting the time ................................................................................................ |
7 |
|
Setting the year, month, and date ..................................................................... |
7 |
|
Setting Daylight Saving Time .......................................................................... |
8 |
|
Setting the day change time ............................................................................. |
9 |
|
Setting the printing format ............................................................................... |
9 |
|
Setting the two-color printing and internal signal tone .................................. |
10 |
|
Setting signal duration ................................................................................... |
13 |
|
Setting auto column shift print position ......................................................... |
13 |
|
Setting how the hour will print....................................................................... |
15 |
|
Setting the password ...................................................................................... |
16 |
|
Exiting program mode ................................................................................... |
16 |
VI. |
Installing your ATR120 ............................................................. |
16 |
|
Wall-mounting ............................................................................................... |
17 |
VII. Operating your ATR120 ............................................................ |
18 |
|
VIII. Maintenance .............................................................................. |
19 |
|
Replacing the ribbon ...................................................................................... |
19 |
IX. Troubleshooting......................................................................... |
20 |
Location of fuses............................................................................................ |
21 |
Error codes ..................................................................................................... |
21 |
I.Introduction
Overview
The ATR120 is an electronic across-the-card time clock, which can be used for a weekly or a biweekly pay period. The unique ATR121 Time Card offers a weekly time card on the front and a biweekly time card on the back. The day progresses across the card from left to right in six columns. This is accomplished by pressing one of the card-positioning buttons (IN-OUT) on top of the clock. The pay period (day of week) moves down the card, top to bottom. You may select the time of day you want this “day change” to occur. You may also select the starting day of your pay period during the easy set up procedure.
The ATR120 offers two-color printing so employee punches outside normal punch times will print in RED allowing for quick and easy auditing of exception punches. The built-in signal can be programmed to audibly denote start and stop work times. The large analog clock face, not electronically synchronized with the digital display, is easy to read from across the room.
With a built-in battery back-up, auto daylight saving adjustments and a perpetual calendar, the ATR120 Time Clock will always print the correct time.
Specifications
Power Source: 115VAC/60Hz Power Consumption: 0.3V Clock Accuracy: ±3s per week
Ambient Temperature: 23°F 104ºF (-5 40 ) Ambient Humidity: 20% 80%
Analog Clock: 1 AA Battery (1.5V)
Size: 8.1"W × 8.85"H × 4.93"D (205mm W × 225mm H × 125mm D)
Accessories:
To assure proper operation please use the accessories designed to work with the ATR120.
ATR121 Weekly/Bi-Weekly Time Card. Part Number 09 9110 000 Model 120R Time Card Rack holds 25 ATR121 Time Cards.
Part Number 81 0120 000
ATR122 Two-Color Replacement Ribbon Cassette. Part Number 39 0127 000
1

Features
Compact design for desktop or wall mounting
Weekly or bi-weekly pay periods
Digital display shows time and date and is synchronized with dot matrix printer
9-pin dot matrix printer that allows for 12 or 24-hour & 60/100 print format
Easily distinguish printing time between AM and PM. PM minutes or hundredths are over scored 8:00 (8:00 PM)
2-color (red/black) cassette ribbon can be programmed so punches outside of schedule will print in red
Built-in signal tone to denote start and stop times
Daylight Saving Time and perpetual calendar
Password for program protection
II.Package Contents
Unpack the time clock and check its contents to ensure that it and all of the accessories shown below are included.
2
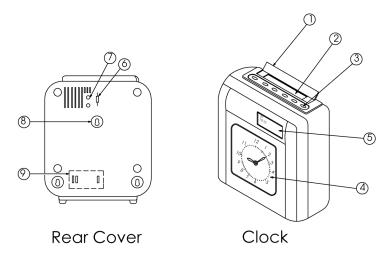
III.Location of Components
1.Anti-dust cover
2.Time card receiver
3.In/Out advance buttons (6)
4.Analog clock (Clock dial)
5.Display
6.Program mode switch
7.Reset (return to original factory settings)
8.Wall-mounting keyholes
9.Fuse access door
IV. Getting started
Installing clock dial battery
The front cover must be opened before the clock dial battery can be installed. Opening the front cover also allows you to set the clock's analog time. You will need to do this occasionally to synchronize the clock dial to the digital display and printer.
3

To open the front cover, turn the clock on its back and remove the two outer screws on bottom of clock. Stand the clock
upright with the back facing you. With both thumbs press down on IN1 and OUT3 buttons while using your fingers to push cover away.
The clock dial panel is shipped locked into place. You have the option of removing the tab that locks the clock panel into place for easy access when setting the clock. If you remove the locking tab, we suggest you keep the tab. To remove the locking tab, unfasten the screw located in the front cover and remove the screw and clip. The screw and clip may be stored by securing it into the post screw hole below where it was removed. It is not necessary to remove the locking tab to install the battery or to adjust the clock dial time setting.
Once the front cover is open, you will be able to install the battery and to set the time on the dial. Opening the front cover also allows you to access the ribbon cassette.
V.Setting the ATR120
Programming Hints
The ATR120 incorporates features to make the task of time and attendance faster and easier.
The simplest way to program the ATR120 is to set all of the functions, at one time, while in the program mode. Although, you may set functions independently it is recommended that you follow the program sequence.
When programming the time, and the time of day for events to occur, the display will show time in a 24-hour format (i.e. 3:00 PM will be 15:00).
To place the clock in the program mode, set the program switch located on back of clock, in the upper left corner from “NOR” to “PRO” (top position). This now activates the 6 manual card-positioning switches (“IN1”, “OUT1”, etc.) on top of the
4
clock to function as program switches. With the dust cover open you will find that these program switches are numbered 1 – 6 to simplify programming the ATR120
The first switch on the top left of the clock (IN1) functions as the feature selection switch and will advance you through the program mode. This switch also allows you to skip over a feature and advance to the next feature without programming. Once a feature is selected, switches “OUT2” through “IN3” will be used for programming. We'll refer to the switches as buttons one through six.
The last switch on the right, button six or “OUT3” is used to save the program selection to memory. IMPORTANT: If OUT3 is flashing in the lower right corner of the display, the programmed changes have not been saved.
IN1 |
OUT1 |
IN2 |
OUT2 |
IN3 |
OUT3 |
|
|
|
O |
O |
O |
1 |
2 |
3 |
4 |
5 |
6 |
Select |
|
|
|
|
Save |
|
------------- |
Programming Switches------------- |
|
|
|
|
|
(When in the PRO mode) |
|
|
|
To return to the original factory settings press the “RESET” button located to the left of the PRO/NOR switch on back of the clock.
Note: Each time you modify the program, you must press button six to save the program changes. OUT3 flashes in the lower right corner of the digital display until the programming change is saved. If OUT3 is flashing in the lower right corner of the display, the program changes have not been saved.
Selecting day of week
The ATR120 can be programmed for either weekly or biweekly pay periods.
For weekly pay periods, program the time clock as follows:
Enter the programming mode by setting the switch on the back of the ATR120 to the PRO position. The display indicates 1-31.
5
 Loading...