

Page 1
INSTALLATION PROCEDURES
HydroFix™//
Hydrostatic Release Unit (HRU)
Model No.: HRU-100
Product No.: 9490.1
Y1-06-0276, Rev. B
Page 2

CAUTION: Before proceeding to install, test or use your new ACR
Electronics’ product, please read this Product Support Manual in its entirety.
If you have questions regarding the contents of the manual, please contact our
Technical Service Department at ACR Electronics, Inc., Telephone +1 (954)
981-3333. Please be ready to provide the technician with the page number you
wish to discuss. If you have a question that is not covered in the manual,
please visit our website and access the Frequently Asked Questions (FAQs)
section for further information or call our Technical Service Department. The
website address is www.acrelectronics.com. If in the future you lose this
manual, you may access and print a replacement on the ACR website.
Y1-06-0276B 1
Page 3
Table of Contents
SECTION 1 – INTRODUCTION _________________________________ 3
SECTION 2 – PREPARING TO INSTALL ___________________________ 4
SECTION 3 – HOW TO DETERMINE HRU EXPIRATION DATE _________ 6
SECTION 4 – INSTALLING THE HRU IN A SeaShelter3™ BRACKET _____ 7
SECTION 5 – INSTALLING THE HRU IN A SeaShelter2™ BRACKET _____ 9
SECTION 6 – INSTALLING THE HRU IN A SeaShelter™ BRACKET _____ 11
APPENDIX A – WARRANTY, NOTICES __________________________ 13
PLEASE READ ALL WARNINGS, CAUTIONS AND NOTES
CAREFULLY
Y1-06-0276B 2
Page 4

SECTION 1 – INTRODUCTION
Congratulations and thank you for purchasing the ACR HydroFix™
Hydrostatic Release Unit (HRU) replacement for your ACR Category I
EPIRB.
ACR designs, manufactures and distributes quality products knowing
they are used to save lives. Many of our products are required to be
tested and approved by regulatory bodies worldwide. We believe in
going beyond those specifications to ensure our products work when
needed in real world conditions. With proper care and maintenance your
ACR product will last for years.
ACR is proud to be certified to ISO 9001: 2008, the International
Standard for Quality.
This manual provides installation instructions for the HydroFix™
Hydrostatic Release Unit (HRU), model HRU-100, in supported ACR
Cat I brackets only.
Y1-06-0276B 3
Page 5
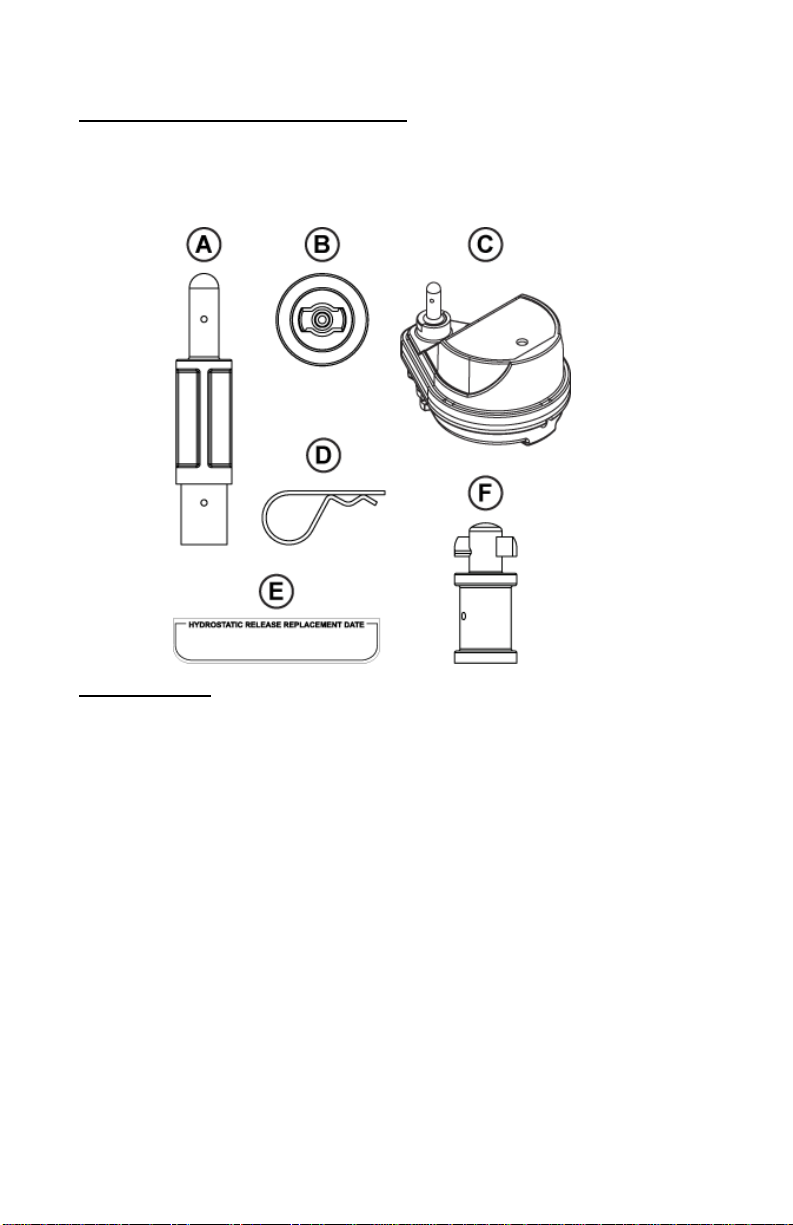
Figure 1
SECTION 2 – PREPARING TO INSTALL
UNPACKING THE HydroFix™ HRU
The HydroFix™ HRU Kit is a universal kit in that it is used for Category I
ACR EPIRBs. The kit components that are required to replace the HRU
in a particular model will vary with the EPIRB bracket you are servicing.
The content of the universal HRU kit includes the following:
Figure 1 items:
A Category I bracket (SeaShelter™) release rod
B Keyed bracket adapter
C Replacement hydrostatic release unit (HRU)
D Cotter pin, large
E HRU expiration label
F Category I bracket (SeaShelter™
) release rod
3
Y1-06-0276B 4
Page 6

If any of the above is missing, please contact ACR Electronics’
Technical Service by email at service@acrelectronics.com or by phone
at +1 (954) 981- 3333.
Equipment that may be required but is not included:
// Black indelible marker
// Phillips-head screwdriver
// Flat-head screwdriver
// Pliers
The following notes, cautions and warnings apply to all EPIRBs and
must be followed for personal safety and proper HRU replacement.
bracket to malfunction.
replaced).
care to hold the spring in place during removal and installation of the
new HRU to prevent injury.
Notes, Cautions and Warnings
WARNING: Failure to replace the entire assembly can cause the
WARNING: Do not use any parts from the old HRU (the one being
WARNING: The HRU holds down the ejector spring. Take great
WARNING: Stow the EPIRB in a dry location as it will activate if out
of the bracket and wet.
WARNING: Non-ACR-supplied hydrostatic release units must not be
installed in ACR Category I EPIRB brackets. ACR cannot and does not
warrant the performance of other manufacturers’ products. Installation of
a non-ACR-supplied HRU voids the warranty and potentially jeopardizes
your safety.
CAUTION: Visually check the EPIRB when removing it from the
bracket. It must be sent back to ACR for check up and/or refurbishment
if ANY of the following conditions exist:
• Cracks to the exterior plastics
• Activation indicator break tab is broken
• Moisture appears inside the EPIRB
• Lacquer is not present in one of the screws or appears to have been
tampered with
NOTE: Some parts in this kit will not be used. Refer to Figure 1 and the
instructions for your specific model for details. Discard unused parts.
Y1-06-0276B 5
Page 7

Date of Installation Example:
Date of installation of New HRU or
first installation of EPIRB including
new HRU: August 1, 2011.
This unit will need to be replaced in
August 2013.
Mark off “AUG 8” and “2013” on the
HRU date calendar
Date of Manufacture Example:
On the bottom of the HRU a date of
manufacture is pin stamped: 0810.
This unit will need to be replaced in
August 2014.
Mark off “AUG 8” and “2014” on the
HRU date calendar
Figure 2
SECTION 3 – HOW TO DETERMINE HRU EXPIRATION
DATE
The ACR HydroFix™ HRU is a replaceable part and, as such, has
dating associated with it. The HRU must be replaced two (2) years
from the install date or four (4) years from the date of manufacture,
whichever is less.
The HRU has a calendar on its top side; the calendar should be marked
with the expiration date at the time of installation, according to the
following instructions.
Y1-06-0276B 6
Page 8

Figure A
SECTION 4 – INSTALLING THE
HRU IN A SeaShelter3™ BRACKET
The following ACR EPIRBs are compatible
with the SeaShelter3™ (ACR P/N 9501):
GlobalFix™ iPRO, GlobalFix™
PRO, Satellite3 406™ or models
RLB-36 and higher
Contents of the HydroFix™ HRU Kit that you
will need:
HydroFix™ Replacement Hydrostatic
Release Unit (C)
Large cotter pin (D)
HRU expiration label (E)
SeaShelter3™ release rod (F)
Instructions:
1.) Remove the front cover of the bracket and carefully release the
EPIRB from the bracket.
2.) Remove the old HRU unit and rod from
the bracket by pressing the spring
release back and rotating the old HRU
out of the bracket.
3.) Take the SeaShelter3™ release rod (M)
and place it on top of the rod on the
HRU, aligning the two sets of holes on
the base (see Figure A).
4.) Place large cotter pin (H) inside the two
holes, securing the two rods together.
5.) Mark the expiry date on the HRU according to the instructions in
Section 3.
6.) Record the expiration date on the HRU expiration label (K) with an
indelible marker.
7.) Push the release spring back against the bracket aligning the holes
on the spring with the holes on the back of the bracket.
Y1-06-0276B 7
Page 9

Figure B
8.) Take the assembled HRU and place the
end of the HRU through the slot.
9.) Turn the HRU to the left side of the
bracket (see Figure B).
10.) This will lock the HRU and spring into
place. Carefully release the HRU and
make sure it is securely in place.
11.) Reinstall the beacon with the lanyard
facing toward the back of the bracket.
12.) Place the bracket top cover on top of the
bottom cover.
13.) Make sure the bottom hinge and the top
handle are securely connected.
14.) Place HRU expiration label (K) on the
outside of your bracket in a visible
location.
Y1-06-0276B 8
Page 10

Figure A
SECTION 5 – INSTALLING THE HRU IN A SeaShelter2™
BRACKET
The following ACR EPIRBs are compatible with
the SeaShelter2™ (ACR P/N 9435/9455):
GlobalFix™ 406
RapidFix™ 406
SATELLITE2 406™
Or models RLB-35, RLB-32, RLB-33
Contents of the HydroFix™ HRU Kit that you will need:
HydroFix™ Replacement
Hydrostatic Release Unit (C)
SeaShelter™ release rod
(A)
Keyed bracket adapter (B)
Large cotter pin (D)
HRU expiration label (E)
Instructions:
1.) Remove the front cover of the bracket and carefully release the
EPIRB from the bracket.
2.) Remove the old HRU unit and rod from the
bracket by pressing the spring release back
and sliding the old HRU up and out of the
bracket.
3.) Take the SeaShelter2™ release rod (A) and
place it on top of the rod on the HRU,
aligning the two sets of holes on the base
(see Figure A).
4.) Place large cotter pin (H) inside the two
holes, securing the two rods together.
5.) Place keyed bracket adapter (D) on the bottom of the HRU. This
part is keyed so that it will fit together only one way. Turn to the right
until it snaps into place.
6.) Mark the expiry date on the HRU according to the instructions in
Section 3.
Y1-06-0276B 9
Page 11

Figure B
7.) Record the expiration date on the HRU expiration label (K) with an
indelible marker.
8.) Push the release spring back against the bracket aligning the holes
on the spring with the holes on the back of
the bracket.
9.) Take the assembled HRU and place the
washer end of the HRU through the larger
top hole and slide down into the smaller
slot.
10.) Turn the HRU to the left side of the bracket
(see Figure B).
11.) This will lock the HRU and spring into
place. Carefully release the HRU and make
sure it is securely in place.
12.) Reinstall the beacon with the lanyard facing
toward the back of the bracket.
13.) Place the bracket top cover on top of the bottom cover and
maneuver the HRU rod to come out the rod hole on the bracket.
14.) Make sure the bottom hinge and the top bracket are securely
connected.
15.) Place a cotter pin into the top of the HRU release rod locking the top
cover in place.
16.) Place HRU expiration label (K) on the outside of your bracket in a
visible location.
Y1-06-0276B 10
Page 12

Figure A
SECTION 6 – INSTALLING THE HRU IN A SeaShelter™
BRACKET
The ACR SeaShelter™ is a discontinued
product that looks like this:
Contents of the HydroFix™ HRU Kit that you will need:
HydroFix™ Replacement Hydrostatic Release Unit (E)
SeaShelter™ release rod (A)
Keyed bracket adapter (D)
Large cotter pin (H)
HRU expiration label (K)
Tools required: Flat-head screwdriver
Instructions:
1.) Remove the front cover and
carefully release the EPIRB
from the bracket. If the front
cover of the SeaShelter™
contains a metal bushing
where the HRU rod is secured
close (see Figure A), use a
flat-head screwdriver and pry
the bushing out of the top case and discard. This bushing prevents
the HRU rod from securing to the cotter pin.
2.) Remove the old HRU unit and rod from the bracket by pressing the
spring release back and sliding the old HRU up and out of the
bracket.
3.) Take SeaShelter™ release rod (A) and place it on top of the rod on
the HRU aligning the two sets of holes on the base (see Figure B).
4.) Place large cotter pin (H) inside the two holes, securing the two rods
together.
Y1-06-0276B 11
Page 13

Figure C
Figure B
5.) Place keyed bracket adapter (D) on the
bottom of the HRU. This part is keyed so that
it will fit together only one way. Turn to the
right until it snaps into place.
6.) Mark the expiry date on the HRU
according to the instructions in Section 3.
7.) Record the expiration date on the HRU
expiration label (K) with an indelible marker.
8.) Push the release spring back against the
bracket aligning the holes on the spring with
the holes in the back of the bracket.
9.) Take the assembled HRU and place the washer end of the HRU
through the larger top hole and slide down
into the smaller slot (see Figure C), locking
the HRU and spring into place.
10.) Carefully release the HRU and make sure it
is securely in place.
11.) Reinstall the beacon with the lanyard facing
toward the back of the bracket.
12.) Put the top cover on the base, maneuvering
the HRU through the rod hole on the
bracket.
13.) Verify the bottom hinge and the top bracket
are securely connected.
14.) Place a cotter pin into the top of the HRU
release rod, locking the top cover in place.
15.) Place HRU expiration label (K) on the
outside of the bracket in a visible location.
Y1-06-0276B 12
Page 14

APPENDIX A – WARRANTY, NOTICES
LIMITED WARRANTY
This product is warranted against factory defects in material and workmanship for a
period of 1 (one) year* from date of purchase or receipt as a gift. During the warranty
period ACR Electronics, Inc. will repair or, at its option, replace the unit at no cost to
you for labor, materials and return transportation from ACR. For further assistance,
please contact our Technical Service Department at ACR Electronics, Inc., 5757
Ravenswood Road, Fort Lauderdale, FL 33312-6645. Email:
service@acrelectronics.com, Fax: +1 (954) 983-5087, Telephone: +1 (954) 981-
3333.
This warranty does not apply if the product has been damaged by accident or
misuse, or as a result of service or modification performed by an unauthorized
factory. Except as otherwise expressly stated in the previous paragraph, THE
COMPANY MAKES NO REPRESENTATION OR WARRANTY OF ANY KIND,
EXPRESS OR IMPLIED, AS TO MERCHANTABILITY, FITNESS FOR A
PARTICULAR PURPOSE, OR ANY OTHER MATTER WITH RESPECT TO THIS
PRODUCT. The Company shall not be liable for consequential or special damages.
To place the warranty in effect, register online at www.acrelectronics.com or return
the attached card within 10 days.
*Five years for the following products: EPIRB, PLB, S-VDR, SSAS.
NOTICES
ACR Electronics diligently works to provide a high quality Product Support Manual,
however, despite best efforts, information is subject to change without notice, and
omissions and inaccuracies are possible. ACR cannot accept liability for manual
contents. To ensure that you have the most recent version of the Product Support
Manual, please visit the ACR website at www.acrelectronics.com.
©2009 by ACR Electronics, Inc., part of Cobham plc. All rights reserved.
Reproduction in whole or in part is permitted only with permission of ACR
Electronics, Inc.
Ongoing product improvements may change product specifications without notice.
Trademarks or registered trademarks are the property of their respective owners.
Y1-06-0276B 13
 Loading...