

RS232
4
S-Video Output
VGA
Video Output
Y
Y
D-Sub
D-Sub
R
W
D-Sub
D-Sub
USB
USB
RS232
USB
USB
1
2
3
5
6
7
4
2
8
8
X1161 series
E62405SP
R
INSTALLATION
INTERFACE CONNECTOR
Note: Connector interface is subject to model’s specifications
molex
molex
English
Lietuvių
Quick Start
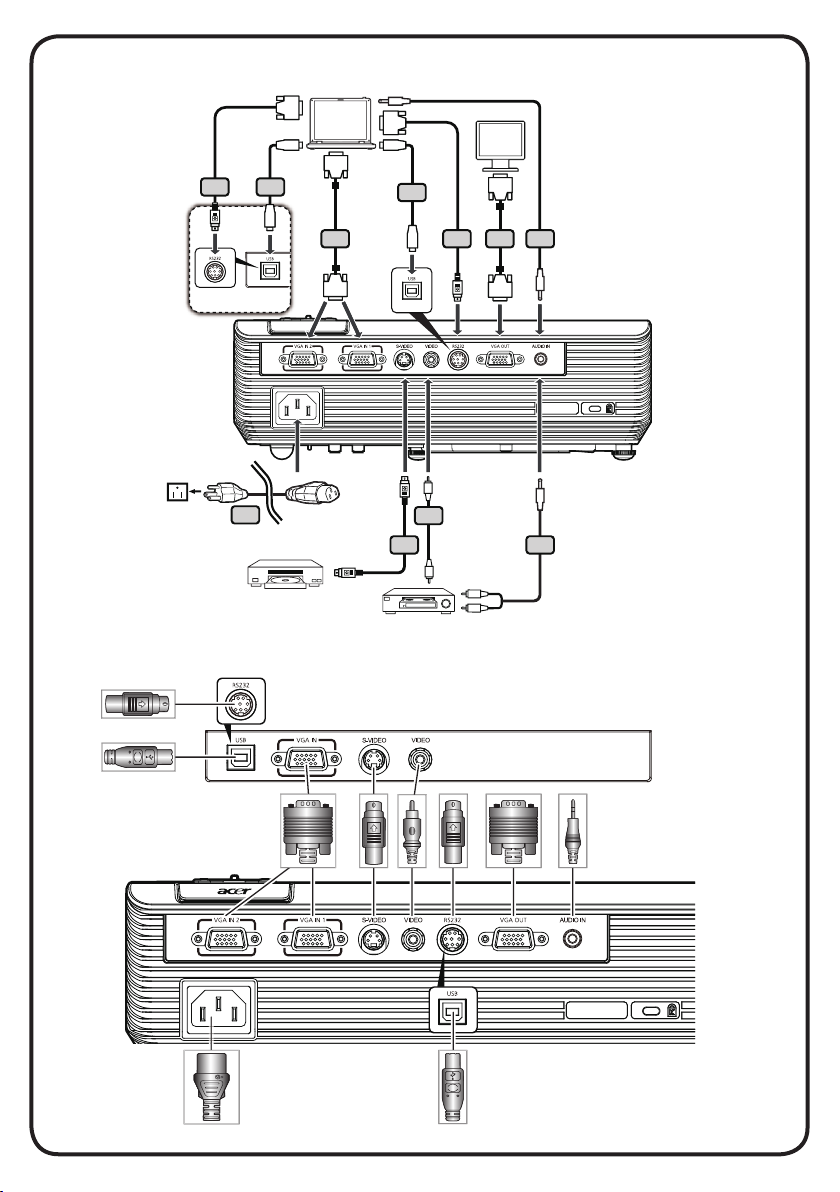
INSTALLATION
1. Power Cord
2. VGA Cable
3. Composite Video Cable
4. RS232 Cable
5. S-Video Cable
6. Audio Cable Jack/Jack
7. Audio Cable Jack/RCA
8. USB Cable
Note: Connector interface is subject to model’s specifications
Note: “(*)” Only for X1161N series.
INTERFACE CONNECTOR
Connecting to a Computer
1. Ensure the projector and your
computer are turned off.
2. Connect one end of the VGA cable
to the “VGA IN” connector on the
projector; connect the other end to
the VGA connector on the computer
and tighten the screws.
3. Connect one end of the power cord
into the AC power socket on the
projector; connect the other end to an
electrical outlet.
Powering On the Projector
1. Remove the lens cap.
2. Turn on the projector first and then
the computer.
3. Adjust the position, focus and zoom.
4. Run you presentation.
Powering Off the Projector
1. Press the power button twice.
2. Do not remove AC power cord from
outlet until the projector fan shut
down.
(*)
(*)
(*)
Greitas startas (pradėjimas)
INSTALIACIJA (įrengimas)
1. Galios (energijos) laidas
2. VGA kabelis
3. Kombinuotas Video kabelis
4. RS232 kabelis
5. S-Video kabelis
6. Audio kabelis Jack/Jack
7. Garso kabelio jungtis/RCA
8. USB kabelis
Pastaba: Jungties sąsaja priklauso nuo modelio techninių
charakteristikų
Pastaba: „(*)“ Taikoma tik X1161N serijai
SĄSAJOS JUNGTIS
Prijungimas prie kompiuterio
1. Įsitikinkite, kad projektorius ir Jūsų
kompiuteris yra įjungti.
2. Pajunkite VGA kabelio galą prie
“VGA IN”
VGA galą į lizdą kompiuterije ir
pritvirtinkite varžtus.
3. Pajunkite galios laido galą į AC galios
lizdą projektoriuje; kitą galą pajunkite
prie electros išėjimo (rozetės).
Projektoriaus maitinimo įjungimas
1. Pašalinkite lęšio gaubtą.
2. Pirma įjunkite projektorių,
paskui–kopiuterį.
3. Suregulioukite poziciją, fokusą ir
padininimo planą.
4. Paleiskite savo prezentaciją.
Projektoriaus maitinimo išjungimas
1. Du kartus paspauskite įjungimo
mygtuką.
2. Neišimkite AC galios laido iš elektros
lizdo kol neišsijungs projektoriaus
ventiliatorius.
(*)
(*)
lizdo projektoriuje, o kitą
(*)
 Loading...