

Page 1

Acer Altos 500
System Guide
Page 2

Copyright
Copyright 1998 by Acer Incorporated. All rights reserved. No part
of this publication may be reproduced, transmitted, transc ribed, stored
in a retrieval system, or translated into any language or computer
language, in any form or by any means, electronic, mechanical,
magnetic, optical, chemical, manual or otherwise, without the prior
written permission of this company.
Disclaimer
This company makes no representations or warranties, either
expressed or implied, with respect to the contents hereof and
specifically disclaims any warranties, m erchantability or fitnes s for any
particular purpose. Any software described in this manual is sold or
licensed "as is". Should the programs prove defective following their
purchase, the buyer (and not this company, its distributor, or its dealer)
assumes the entire cost of all necessary servicing, repair, and any
incidental or consequential damages resulting from any defect in the
software. Further, this company reserves the right to revise this
publication and to make changes from time to time in the contents
hereof without obligation to notify any person of such revision or
changes.
All brand and product names mentioned in this manual are trademarks and/or
registered trademarks of their respective companies.
ii
Page 3

IMPORTANT SAFETY
INSTRUCTIONS
1. Read these instructions carefully. Save these instructions for
future reference.
2. Follow all warnings and instructions marked on the product.
3. Unplug this product from the wall outlet before cleaning. Do not
use liquid cleaners or aerosol cleaners. Use a damp cloth for
cleaning.
4. Do not use this product near water.
5. Do not place this product on an unstable cart, stand, or table.
The product may fall, causing serious damage to the product.
6. Slots and openings in the cabinet and the back or bottom are
provided for ventilation; to ensure reliable operation of the produc t
and to protect it from overheating, these openings must not be
blocked or covered. The openings should never be block ed by
placing the product on a bed, sofa, rug, or other similar surface.
This product should never be placed near or over a radiator or
heat register, or in a built-in installation unless proper ventilation is
provided.
7. This product should be operated from the type of power indicated
on the marking label. If you are not sure of the type of power
available, consult your dealer or local power company.
8. This product is equipped with a 3-wire grounding-type plug, a plug
having a third (grounding) pin. This plug will only fit into a
grounding-type power outlet. This is a safety feature. If you are
unable to insert the plug into the outlet, contact your electrician to
replace your obsolete outlet. Do not defeat the purpose of the
grounding-type plug.
iii
Page 4

9. Do not allow anything to rest on the power cord. Do not locate
this product where persons will walk on the cord.
10. If an extension cord is used with this pr oduct, m ake sur e that the
total ampere rating of the equipment plugged into the ex tension
cord does not exceed the extension cord ampere rating. Also,
make sure that the total rating of all products plugged into the wall
outlet does not exceed 15 amperes.
11. Never push objects of any kind into this product through cabinet
slots as they may touch dangerous voltage points or short out
parts that could result in a fire or electr ic shock . Never s pill liquid
of any kind on the product.
12. Do not attempt to service this product yourself, as opening or
removing covers may expose you to dangerous voltage points or
other risks. Refer all servicing to qualified service personnel.
13. Unplug this product from the wall outlet and refer servicing to
qualified service personnel under the following conditions:
a. When the power cord or plug is damaged or frayed
b. If liquid has been spilled into the product
c. If the product has been exposed to rain or water
d. If the product does not operate nor mally when the operating
instructions are followed. Adjust only those controls that are
covered by the operating instructions since improper
adjustment of other c ontrols may result in damage and will
often require extensive work by a qualified technician to
restore the product to normal condition.
e. If the product has been dropped or the cabinet has been
damaged
f. If the product exhibits a distinct change in performance,
indicating a need for service
14. Replace battery with the same type as the product's battery we
recommend. Us e of another battery may present a risk of f ire or
explosion. Refer battery replacement to a qualified serviceman.
iv
Page 5

15. Warning! Battery may explode if not handled properly. Do not
recharge, disassemble or dispose of in fire. Keep away from
children and dispose of used battery promptly.
16. Use only the proper type of power supply cord set (provided in
your keyboard/manual accessories box) for this unit. It should be
a detachable type: UL listed/CSA certified, type SJT, rated 6A
125V minimum, VDE approved or its equivalent. Maximum
length is 15 feet (4.6 meters).
v
Page 6

FCC Class A Radio Frequency
Interference Statement
WARNING!
This equipment has been tested and found to comply with the limits for
a Class A digital device, pursuant to Part 15 of FCC Rules. These
limits are designed to provide reasonable protection against harmful
interference when the equipment is operated in a commercial
environment. This equipm ent generates, uses, and can radiate radio
frequency energy and, if not installed and used in accordance with the
instruction manual, may cause harmful interference to radio
communic ations. Operation of this equipment in a residential area is
likely to cause harmful interference in which case the user will be
required to correct the interference at his own expense.
Notice 1:
The changes or modifications not expressly approved by the party
responsible for com pliance could void the user's authority to operate
the equipment.
Notice 2:
If the EUT was tested with special shielded cables, the operator’s
manual for such product s hall also contain the following statement or
its equivalent:
Shielded interface cables and/or AC power cord, if any, must be used
in order to comply with the emission limits.
vi
Page 7

About this Manual
Getting Started
This system guide aims to give you all the necessary information to
enable you to operate the Altos 500 system.
Manual Structure
This system guide consists of four chapters.
Chapter 1 System Housing
This chapter describes the assembly and disassembly of the
system housing. It also shows you how to install housing
components.
Chapter 2 System Board
This chapter describes the main board. Also, It introduces the
system’s unique features and powerful architecture.
Chapter 3 BIOS Utility
This chapter explains the BIOS parameter functions. It tells how
to configure the system by setting the parameters.
Chapter 4 SCSI/VGA Combo Card
This chapter describes the function and installation of the
SCSI/VGA combo card.
vii
Page 8

Conventions
The following are the conventions used in this manual:
Text entered by user
Option Items
, , , etc. Represent the actual keys that you
Represents text input by the user.
Represents options that you can
select on the screen.
have to press on the keyboard.
NOTE
Gives bits and pieces of additional
information related to the current
topic.
CAUTION
Gives precautionary measures to
avoid possible hardware or
software problems.
viii
Page 9

Table of Contents
Chapter 1 System Housing
Standalone System.......................................................................1-1
Features ....................................................................................1-2
Front Panel .....................................................................1-2
Rear Panel .....................................................................1-3
Internal Structure .............................................................1-4
Opening the Housing Panels........................................................1-5
Front Panel .....................................................................1-5
Left Panel .....................................................................1-6
Installing Disk Drives and Hot-Swap Cage...................................1-7
3.5-inch Drive...................................................................1-7
5.25-inch Drives...............................................................1-8
Hot-Swap Cage................................................................1-9
Hard Disk Drive Tray......................................................1-13
Installing a System Board...........................................................1-14
Installing an Expansion Board ....................................................1-15
Installing a CPU or Memory Board .............................................1-16
LVD SCSI Backplane Board.......................................................1-17
Jumpers and Connectors...............................................1-18
Chapter 2 System Board
Major Components .......................................................................2-2
System Board Layout with Network Connector ...............2-3
System Board Layout without Network Connector ..........2-4
ix
Page 10

Jumpers and Connectors.............................................................2-5
Jumper and Connector Locations with a Network
Connector...............................................................2-5
Jumper and Connector Locations without a
Network Connector ................................................2-6
Jumper Settings ..............................................................2-7
Connector Functions.......................................................2-7
ESD Precautions.......................................................................... 2-8
Installing the Pentium II processor...............................................2-9
Attaching the Processor Fan Sink...................................2-9
Installing a Pentium II Processor...................................2-12
Removing a Pentium II Processor.................................2-14
Memory Upgrade........................................................................2-15
Memory Configurations.................................................2-15
Installing a DIMM...........................................................2-16
Removing a DIMM.........................................................2-16
Reconfiguring the System.............................................2-17
Installing Expansion Cards.........................................................2-17
Installing PCI Cards.......................................................2-17
Installing ISA Cards.......................................................2-18
Installing an AGP Card..................................................2-19
Error Messages..........................................................................2-20
Software Error Messages.............................................. 2-21
System Error Messages................................................2-21
Correcting Error Conditions........................................... 2-23
x
Page 11

Chapter 3 BIOS Utility
Entering Setup..............................................................................3-2
System Information.......................................................................3-4
Processor .....................................................................3-5
Processor Speed .............................................................3-5
Internal Cache Size..........................................................3-5
External Cache ................................................................3-5
Floppy Drive A..................................................................3-5
Floppy Drive B..................................................................3-5
IDE Primary Channel Master...........................................3-6
IDE Primary Channel Slave.............................................3-6
IDE Secondary Channel Master ......................................3-6
IDE Secondary Channel Slave.........................................3-6
Total Memory...................................................................3-6
Serial Port 1.....................................................................3-7
Serial Port 2.....................................................................3-7
Parallel Port .....................................................................3-7
PS/2 Mouse .....................................................................3-7
Product Information ......................................................................3-8
Product Name..................................................................3-8
System S/N .....................................................................3-8
Main Board ID..................................................................3-8
Main Board S/N................................................................3-9
System BIOS Version......................................................3-9
DMI BIOS Version............................................................3-9
Disk Drives..................................................................................3-10
Floppy Drives.................................................................3-10
xi
Page 12

LS-120 Drive Compatible As.........................................3-11
IDE Drives ..................................................................3-11
Onboard Peripherals..................................................................3-16
Serial Ports 1 and 2.......................................................3-16
Parallel Port ..................................................................3-17
Onboard Device Settings ..............................................3-18
Power Management...................................................................3-20
Power Management Mode............................................3-20
Power Switch < 4 sec....................................................3-21
System Wake-up Event.................................................3-21
Boot Options...............................................................................3-22
Boot Sequence..............................................................3-22
First Hard Disk Drive.....................................................3-23
Fast Boot ..................................................................3-23
Silent Boot ..................................................................3-23
Num Lock After Boot..................................................... 3-23
Memory Test .................................................................3-24
Configuration Table.......................................................3-24
Boot from LANDesk Service Agent............................... 3-24
Date and Time............................................................................ 3-25
Date .............................................................................3-25
Time .............................................................................3-26
Advanced Options......................................................................3-27
Memory/Cache Options.................................................3-27
PnP/PCI Options...........................................................3-29
CPU Frequency.............................................................3-32
xii
Page 13

System Security..........................................................................3-34
Setup Password.............................................................3-34
Power-on Password.......................................................3-37
Disk Drive Control..........................................................3-38
Load Default Settings..................................................................3-40
Abort Settings Change................................................................3-40
Exit Setup ..................................................................................3-41
Chapter 4 SCSI/VGA Combo Card
Card Layout .....................................................................4-1
Jumper Settings...............................................................4-2
Connector Functions........................................................4-2
Card Installation...............................................................4-2
xiii
Page 14

Page 15

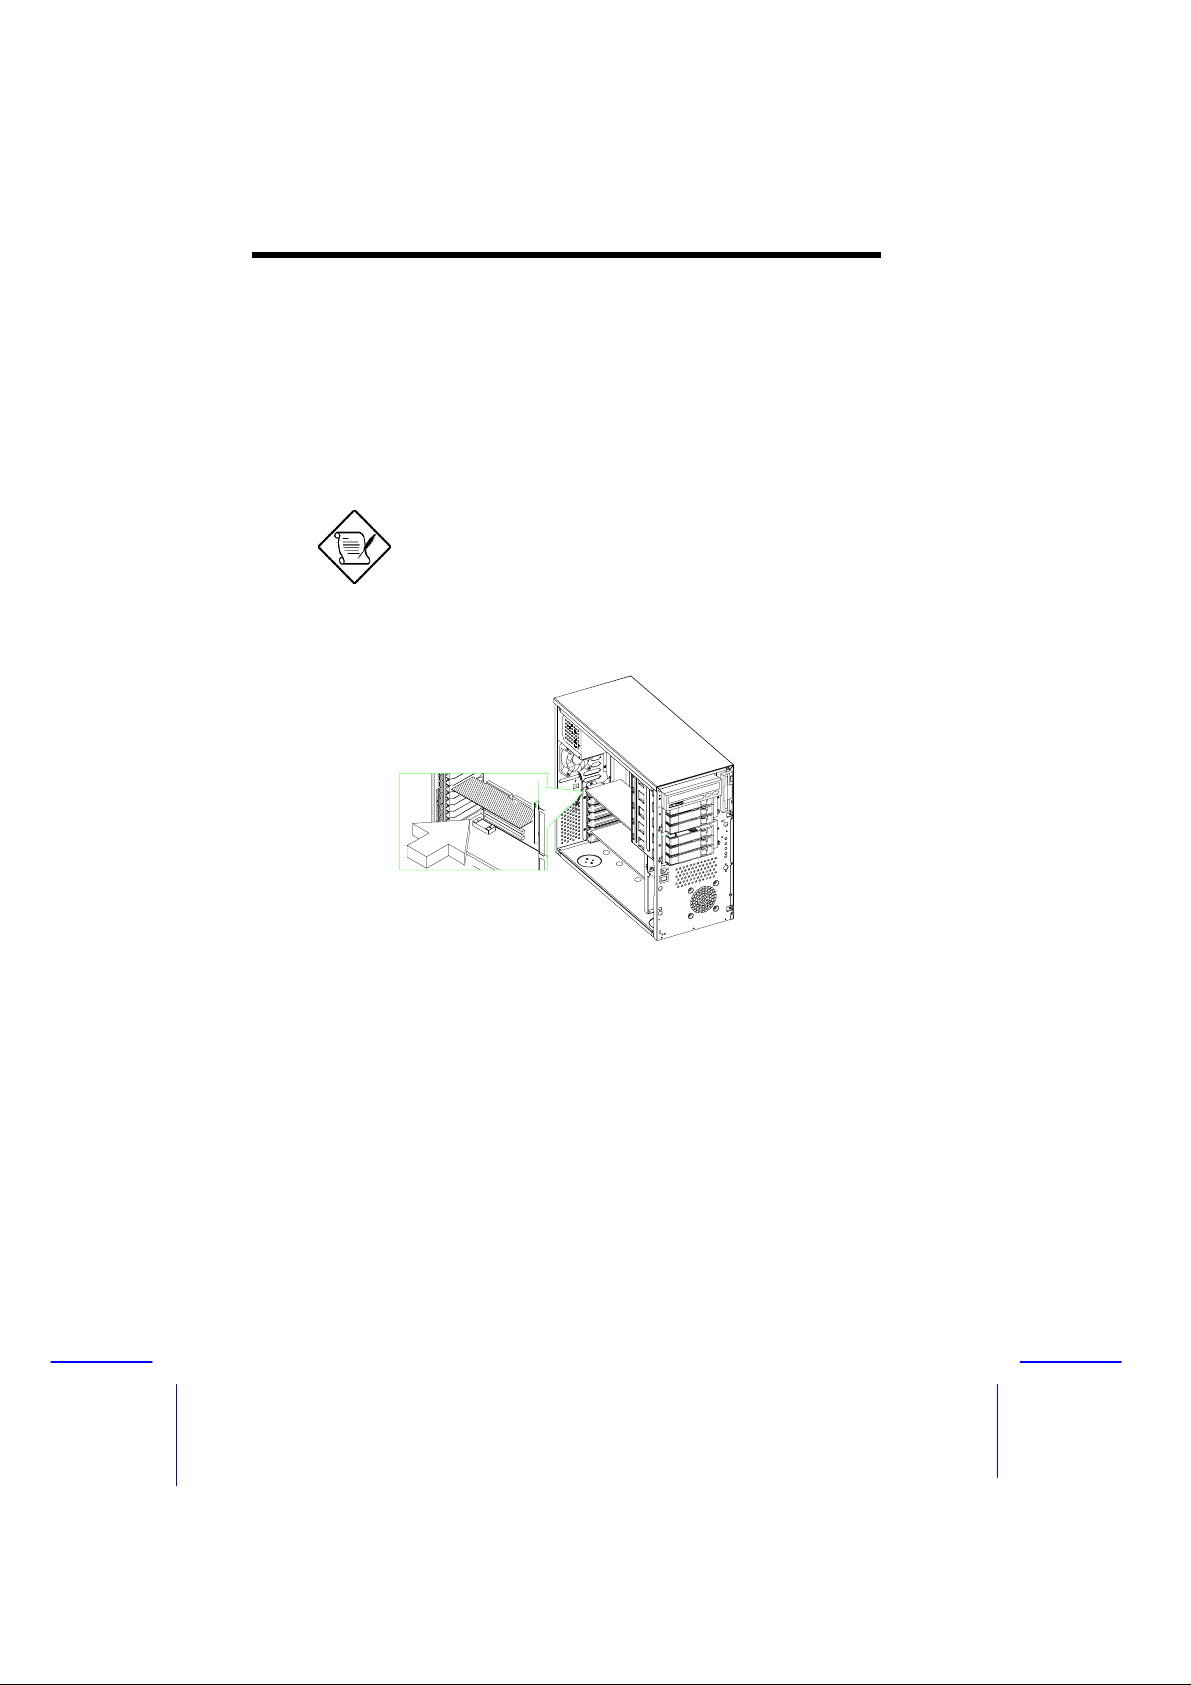
Chapter 1 System Housing
This chapter describes the features of the IDM hous ing and tells you
how to install the basic system components such as disk drives, a
system board, or expansion boards. Descriptive illustrations
accompany the installation procedures.
If you receive a complete system, the basic
components are already installed.
Standalone System
For a standalone system, rotate the feet outward to stabilize the
housing.
Getting Started 1-1
Page 16
Features
Front Panel
Panel Door
Keylock
1-2 Altos 500 System Guide
Page 17
Rear Panel
Power Supply
Power Socket
SCSI Expansion
Slots
Housing Fan
COM port
slots
System Board
Expansion Port
Slots
connectors
Expansion Slots
System Housing 1-3
Page 18
Internal Structure
The figure below shows the housing internal struc ture and some of the
basic system components.
Power Supply
5.25-inch Drive Bays
3.5-inch Drive Bay
Housing Fan
Power Switch
Expansion
Card Slots
Backplane Board
Hot-Swap Cage
(SCSI)
Power LED
Hard Disk Drive LED
System Status LED
Removable Hard Disk
Drive Trays
1-4 Altos 500 System Guide
Page 19
Opening the Housing Panels
Front Panel
Keylock
Unlock the housing with the key and then pull the panel to access the
drive trays.
System Housing 1-5
Page 20
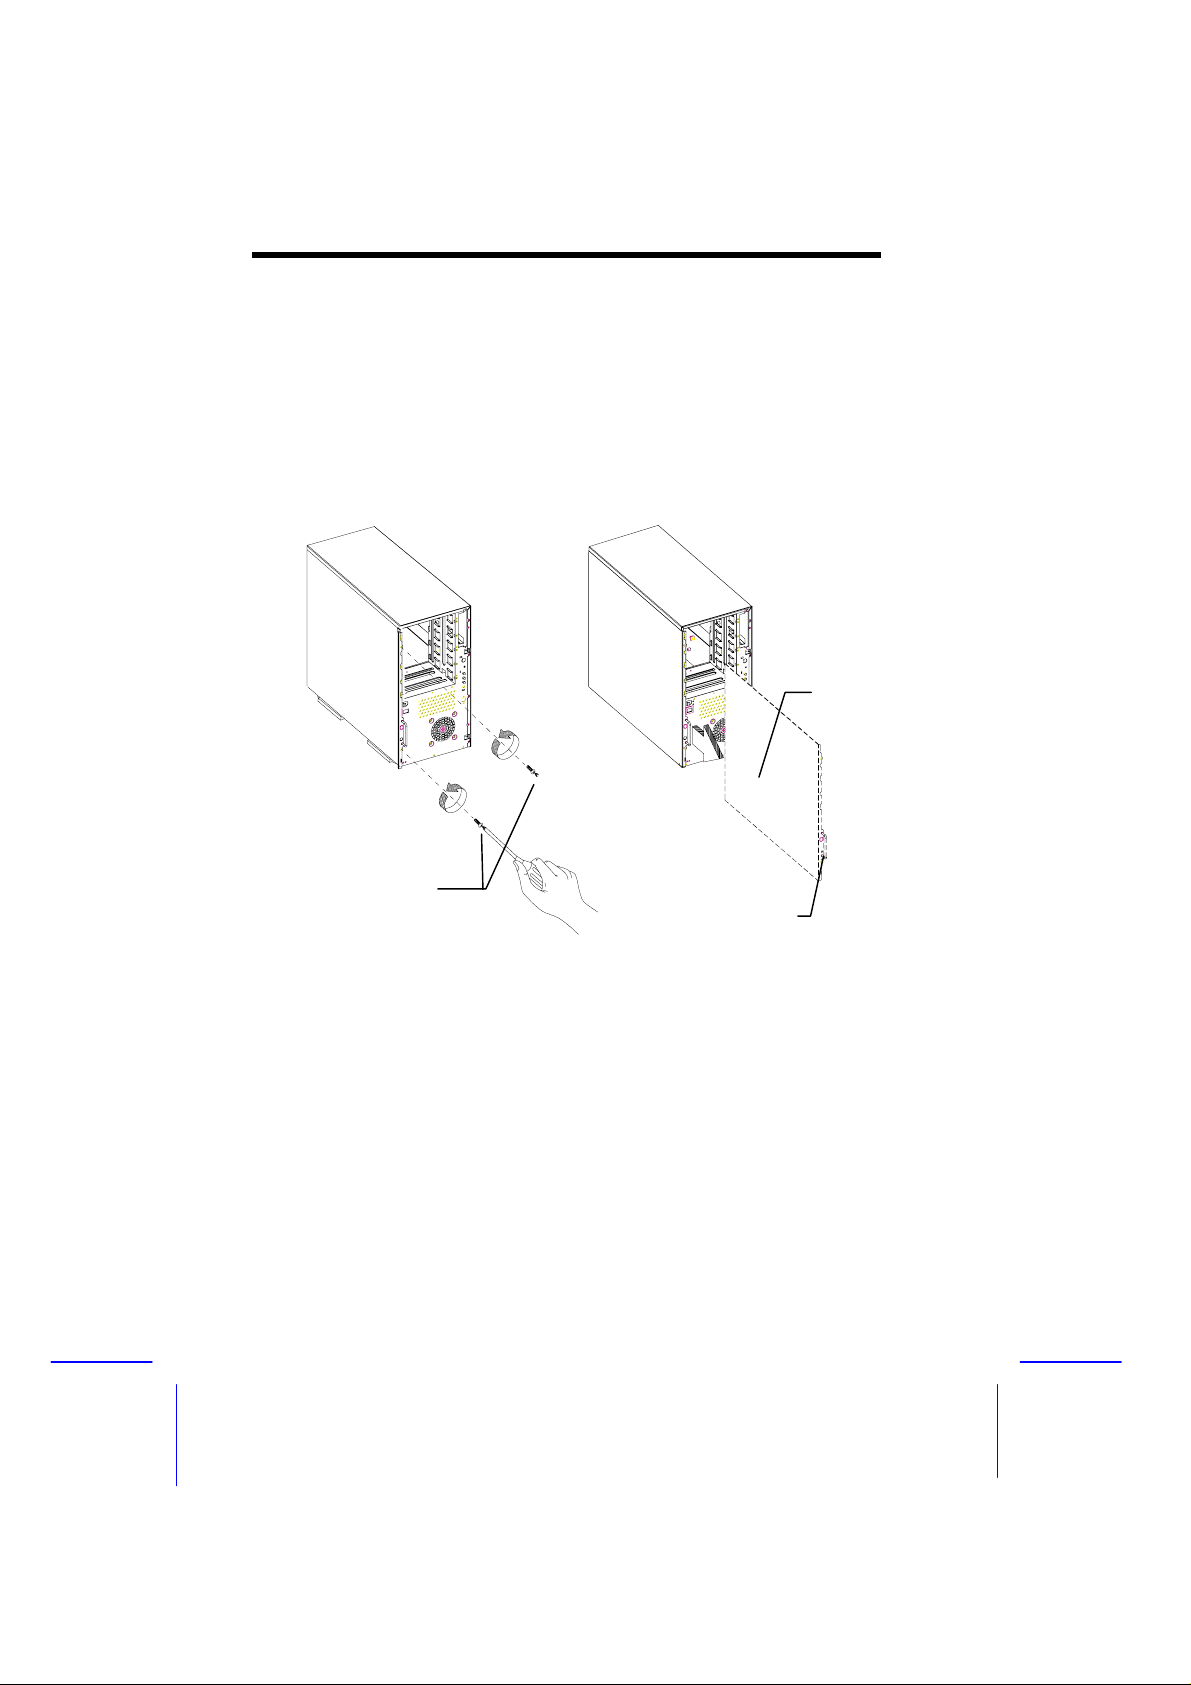
Left Panel
To remove the left panel:
1. Use a screw driver to remove the two screws securing it to the
rear panel.
2. Pull the panel handle to slide the left panel open.
Left panel
screws
Left Panel Handle
1-6 Altos 500 System Guide
Page 21
Installing Disk Drives and Hot-Swap Cage
Turn off the power switch and unplug the
power cord before installing or removing
diskette drives.
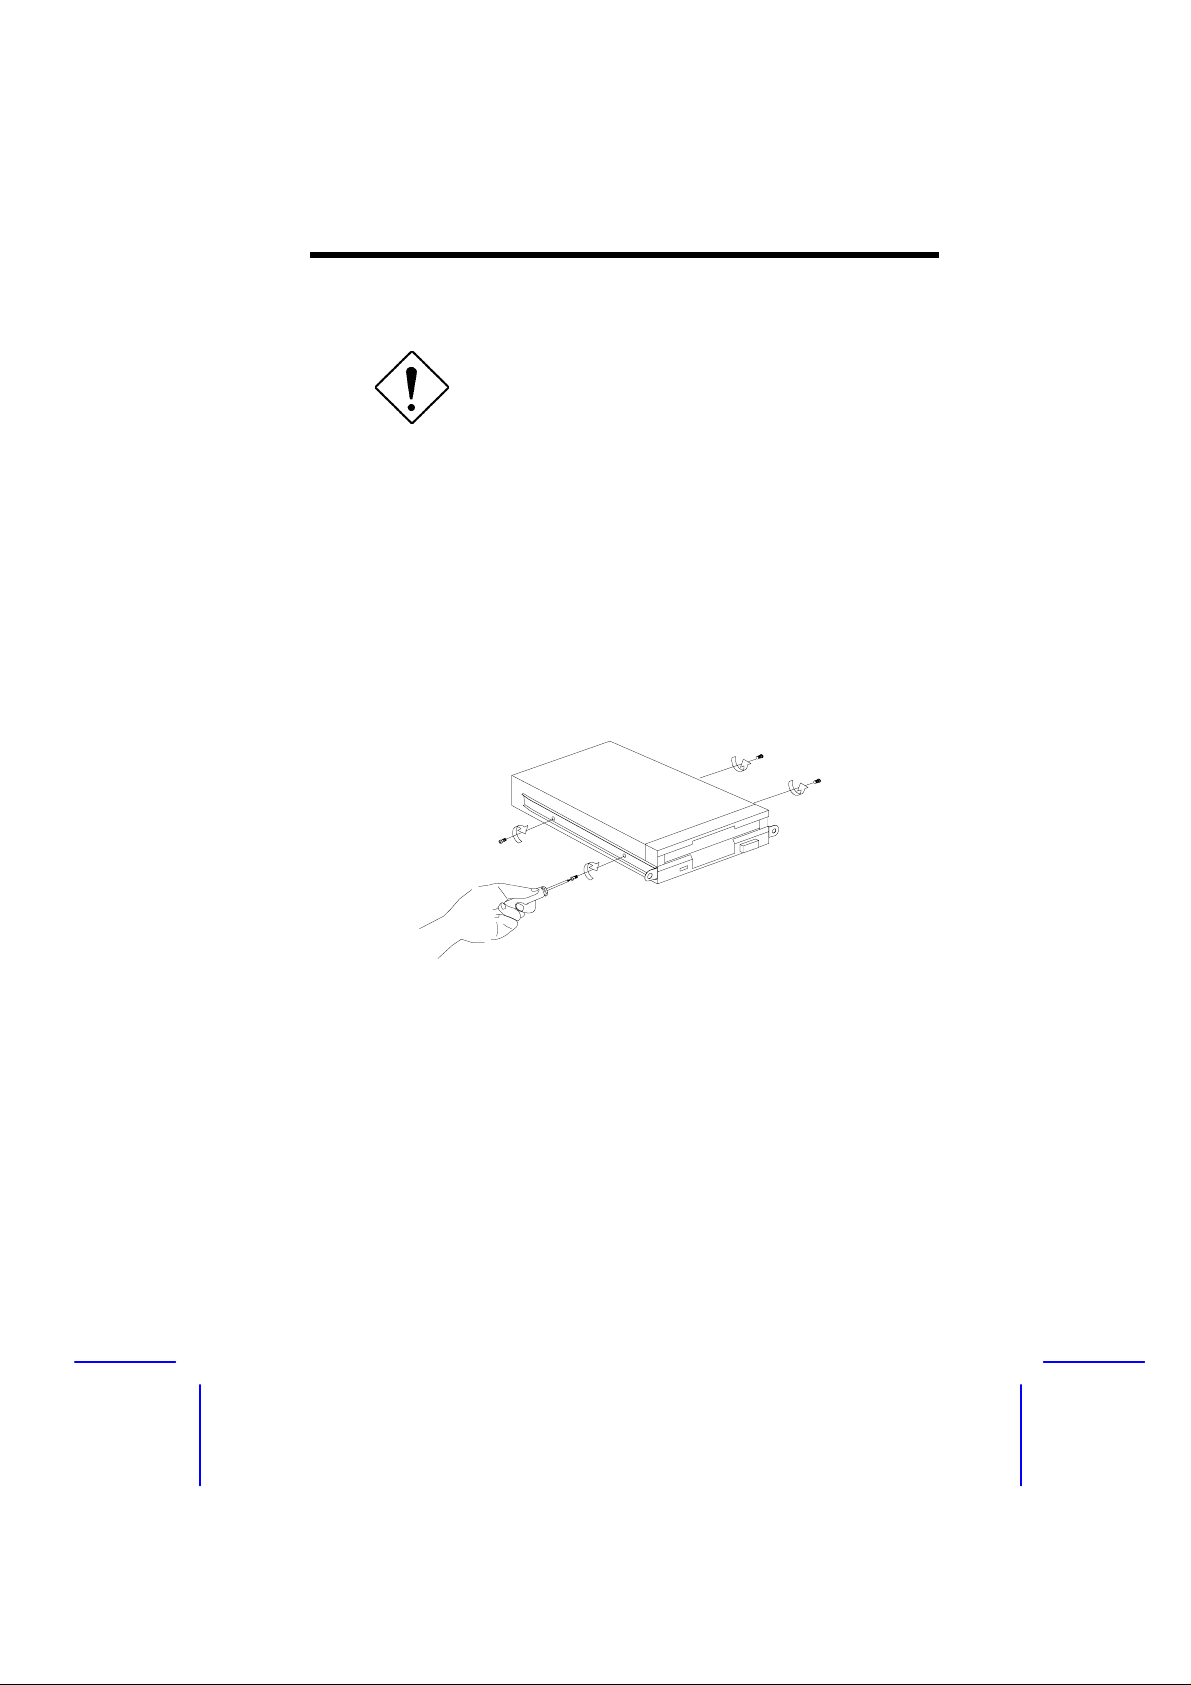
3.5-inch Drive
1. Open the front panel and remove the left panel of the housing.
See the Opening the Housing Panels section for more information.
2. Remove the screws attaching the 3.5-inch drive f rame (2 pieces)
to the housing.
3. Secure a 3.5-inch drive on the drive frame with four screws as
shown below.
System Housing 1-7
Page 22
4. Insert the drive into the drive bay and secure it with two screws.
5. Connect the diskette drive cables.
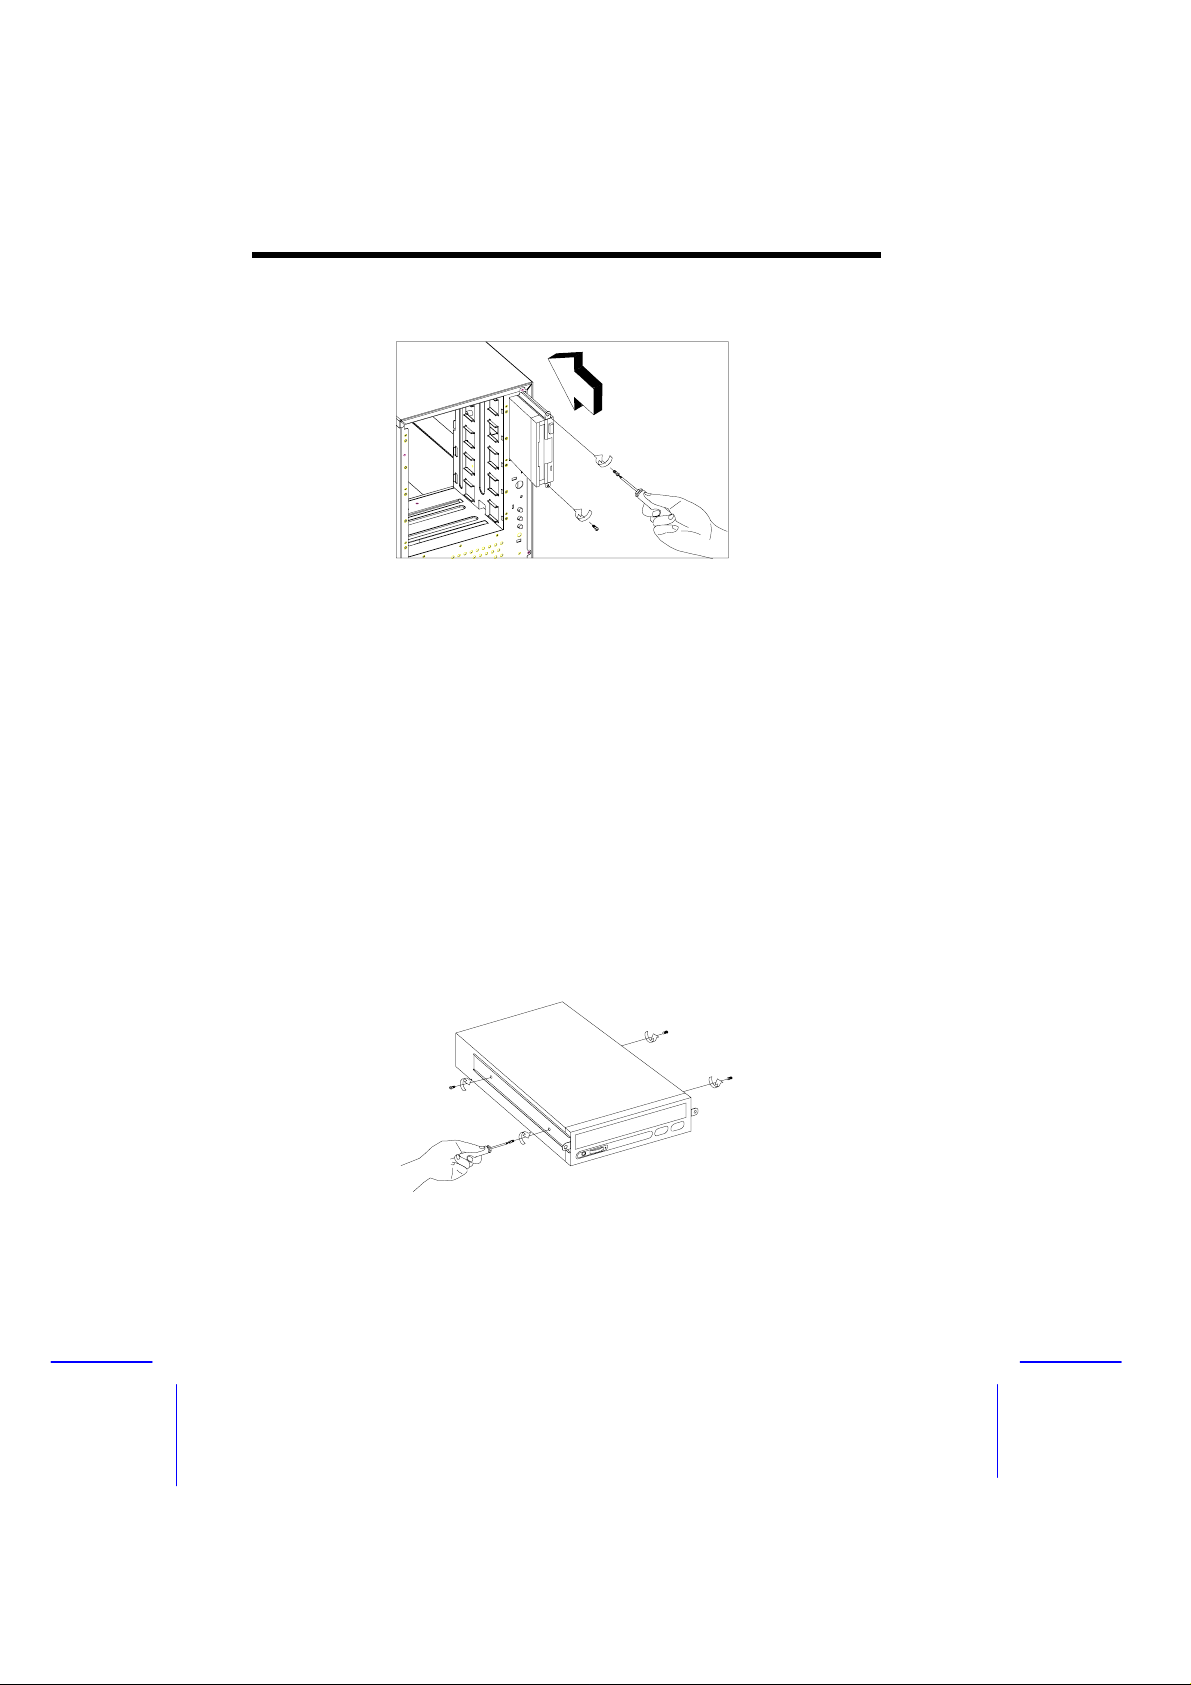
5.25-inch Drives
You may install a CD-ROM, digital audio tape (DAT), hard disk,
diskette drive or any other 5.25-inch device into the drive bay.
1. Open the front panel. See the Opening the Housing Panels
section for more information.
2. Remove the sc rews attaching the 5.25-inch dr ive fram e (2 pieces)
to the housing.
3. Attach the drive guides on the sides of a 5.25-inch drive with two
screws on each side.
1-8 Altos 500 System Guide
Page 23
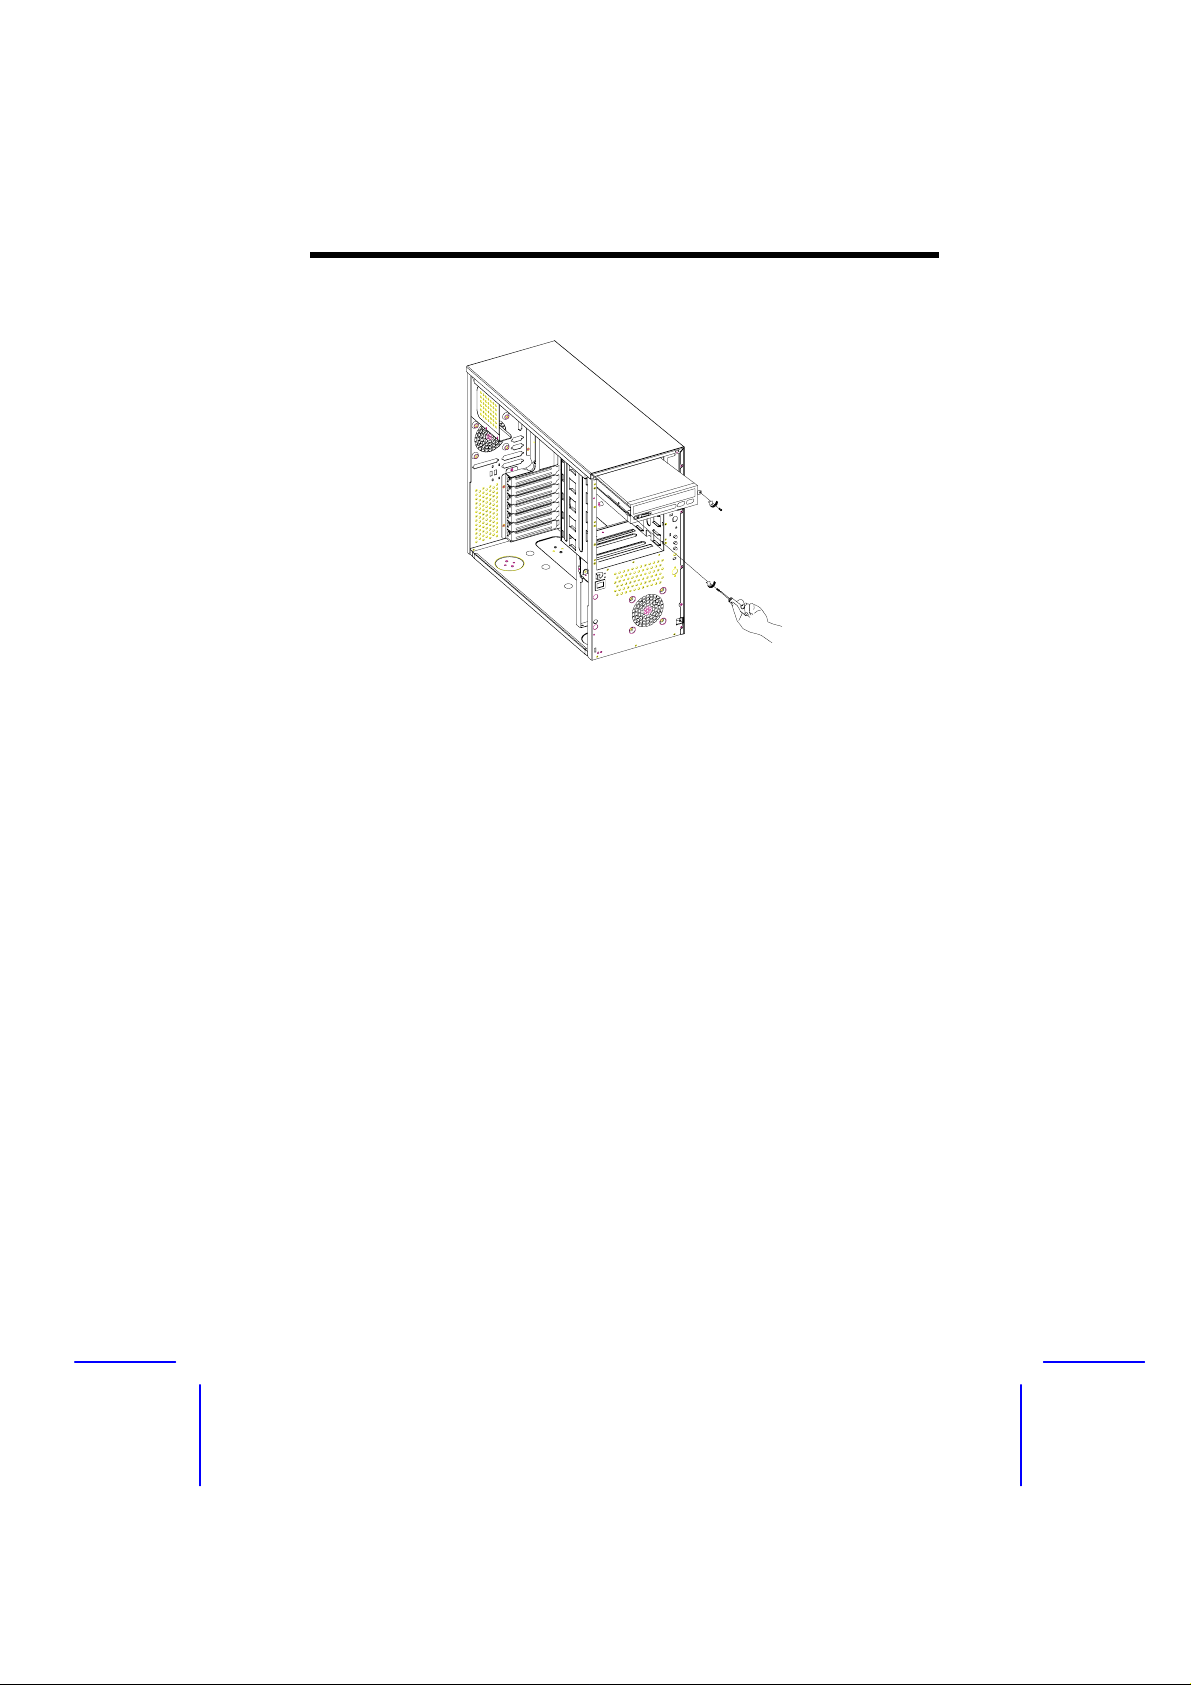
4. Insert the drive into the drive bay and secure it with two screws.
5. Connect the signal and power cables to the drive.
Hot-Swap Cage
The hot-swap cage box includes the following components:
•
One hot-swap cage (with back plane board attached)
•
Three hard disk drive tray
•
One system board connector cable
•
Two Hard disk drive fault LED connector cable
To install the hot-swap cage into the housing:
1. Open the front panel and remove the left panel of the housing.
See the Opening the Housing Panels section for more information.
System Housing 1-9
Page 24
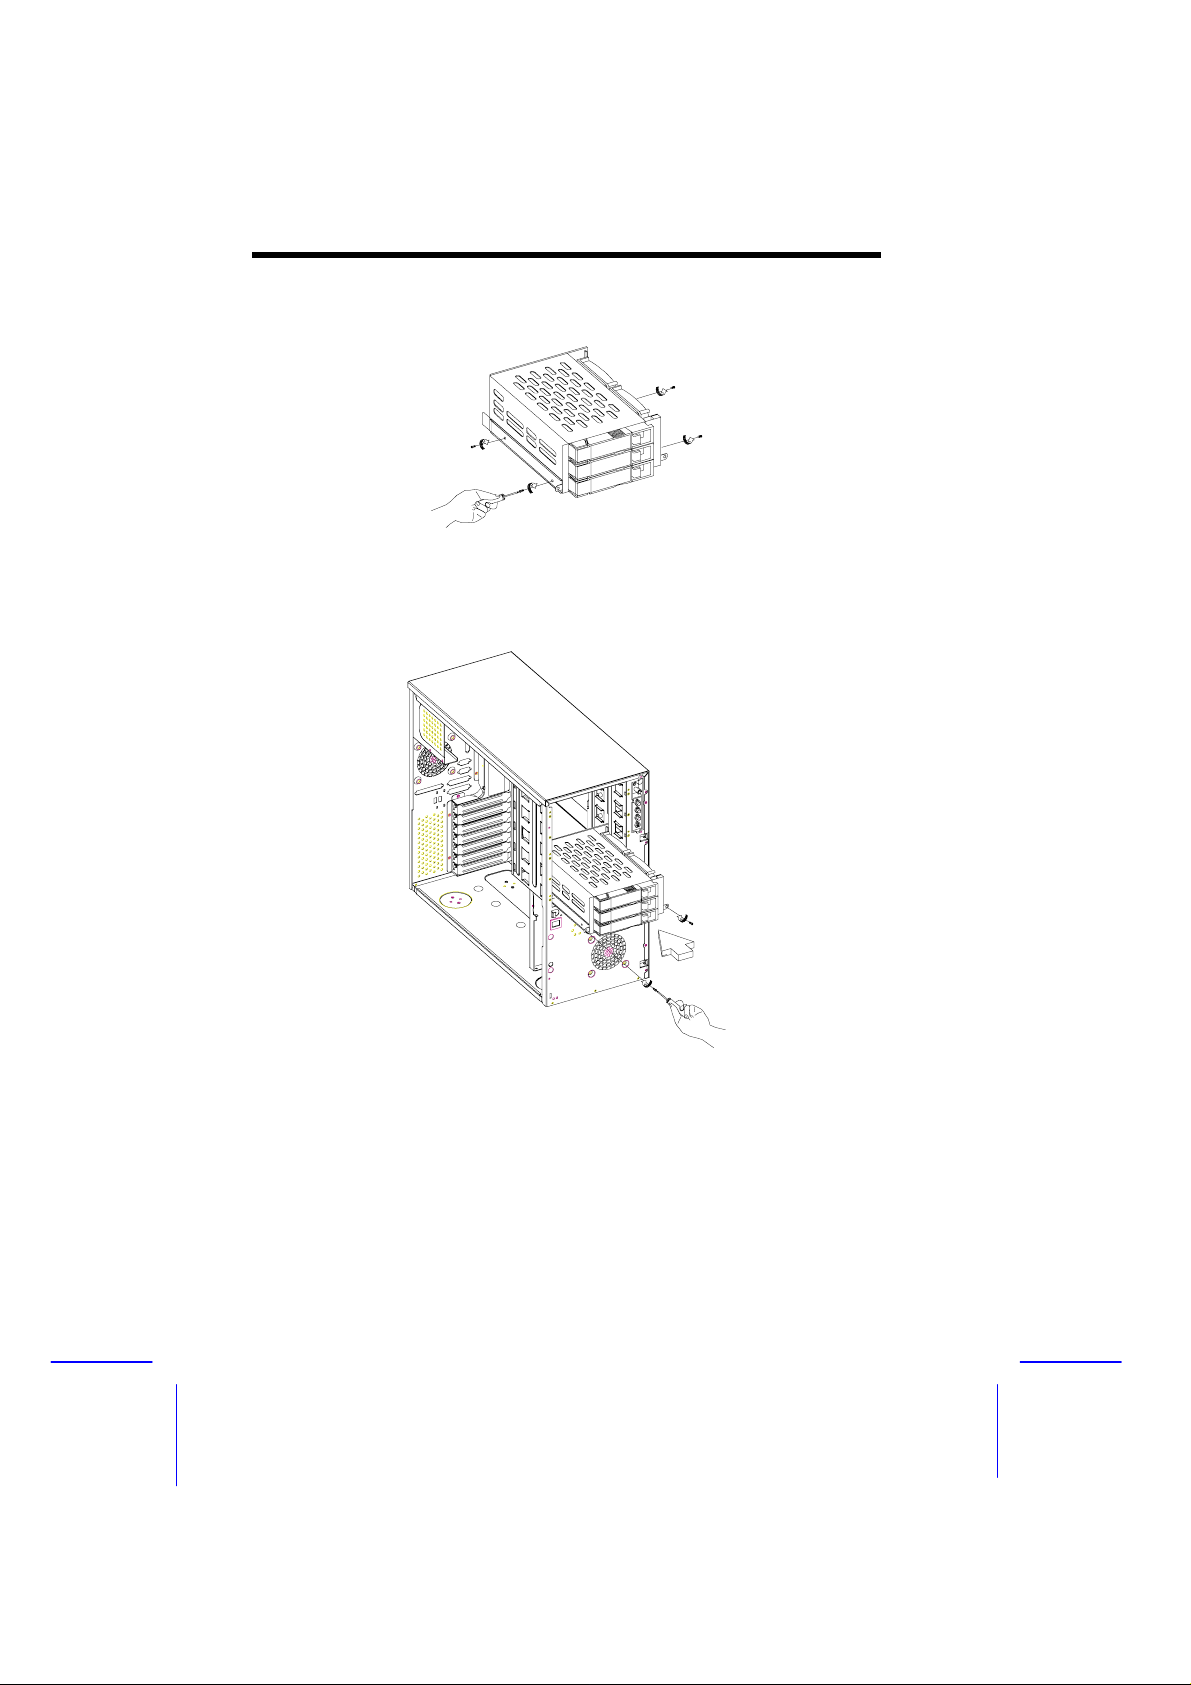
2. Attach the drive guides on the sides of the hot-swap cage with two
screws on each side.
3. Insert the hot-swap cage into the housing and secure the hot-swap
cage with two screws.
1-10 Altos 500 System Guide
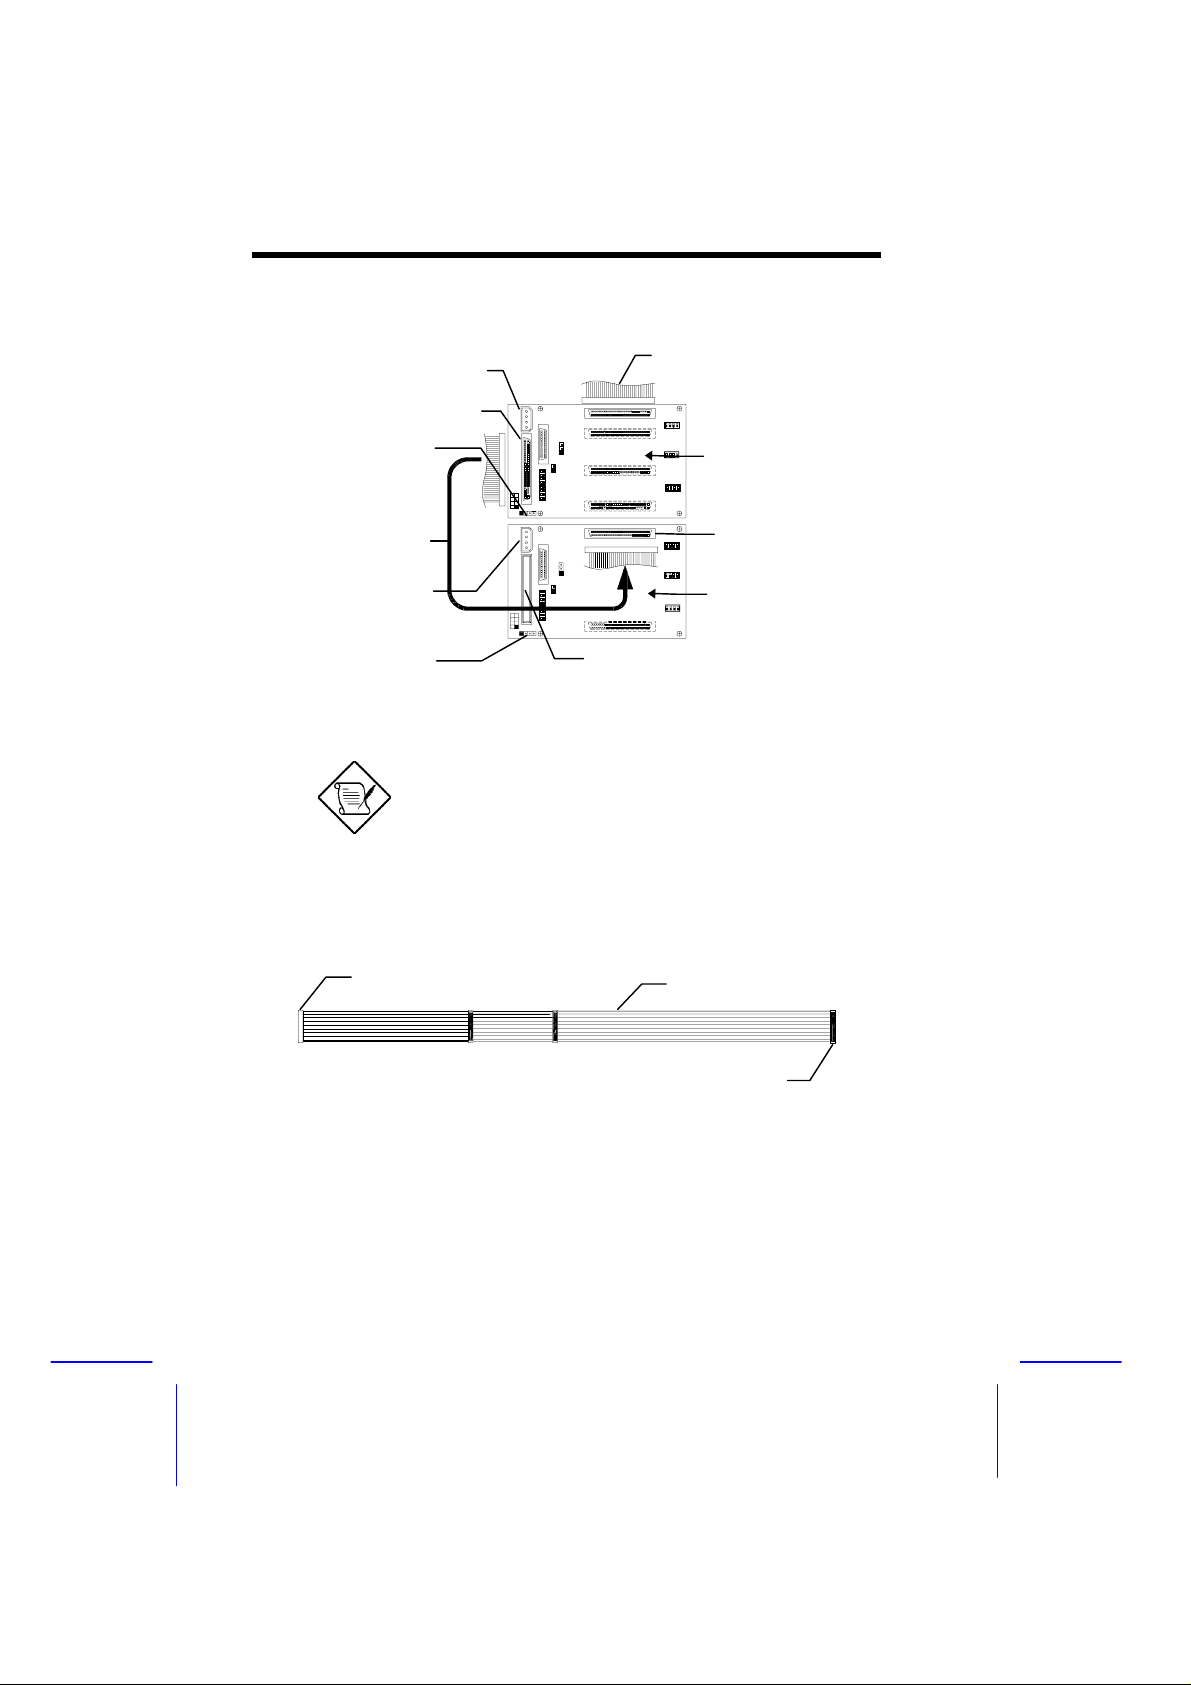
Page 25

4. Attach the power cable, the SCSI term inator, the HDD fault LED
cable, and the system board connector cable to the backplane
board and attach the other end of the connector cable to the
system board. For the location of the SCSI connector, please
refer to the system board manual.
Single Hot-swap Cage Configuration
System board
Power connector
SCSI Terminator
CN3: Connect to system
board’s HDD Fault LED
There are two kinds of HDD Fault LED cable
supplied. The cable with two 4-pin connector
should be use with AcerAltos 1100 and
AcerAltos 11000 systems. The other cable
with AcerPro Station 7000.
connector cable
System Housing 1-11
Page 26
Cascading Hot-swap Cage Configuration
CN1: To system
Power connector
board connector
CN3: Connect to 2nd
CN8
hot-swap cage HDD
Fault LED connector
SCSI Connector
cable
Power connector
CN3: Connect to
system board’s HDD
Fault LED connector
The SCSI connector cable and the threeconnector HDD fault LED cable is an optional
item needed for installing two hot-swap
cages. Consult your dealer for the av ailability
of this cable.
System Board Connector Cable
Connect this side to
the 1st
hot-swap
1st hot-swap
CN1
2nd hot-swap
SCSI Terminator
Red Strip
Connect this side to
the system board
1-12 Altos 500 System Guide
Page 27
SCSI Connector Cable
Connect this side to
the 1st
hot-swap
Red Strip
Connect this side to
the 2nd hot-swap
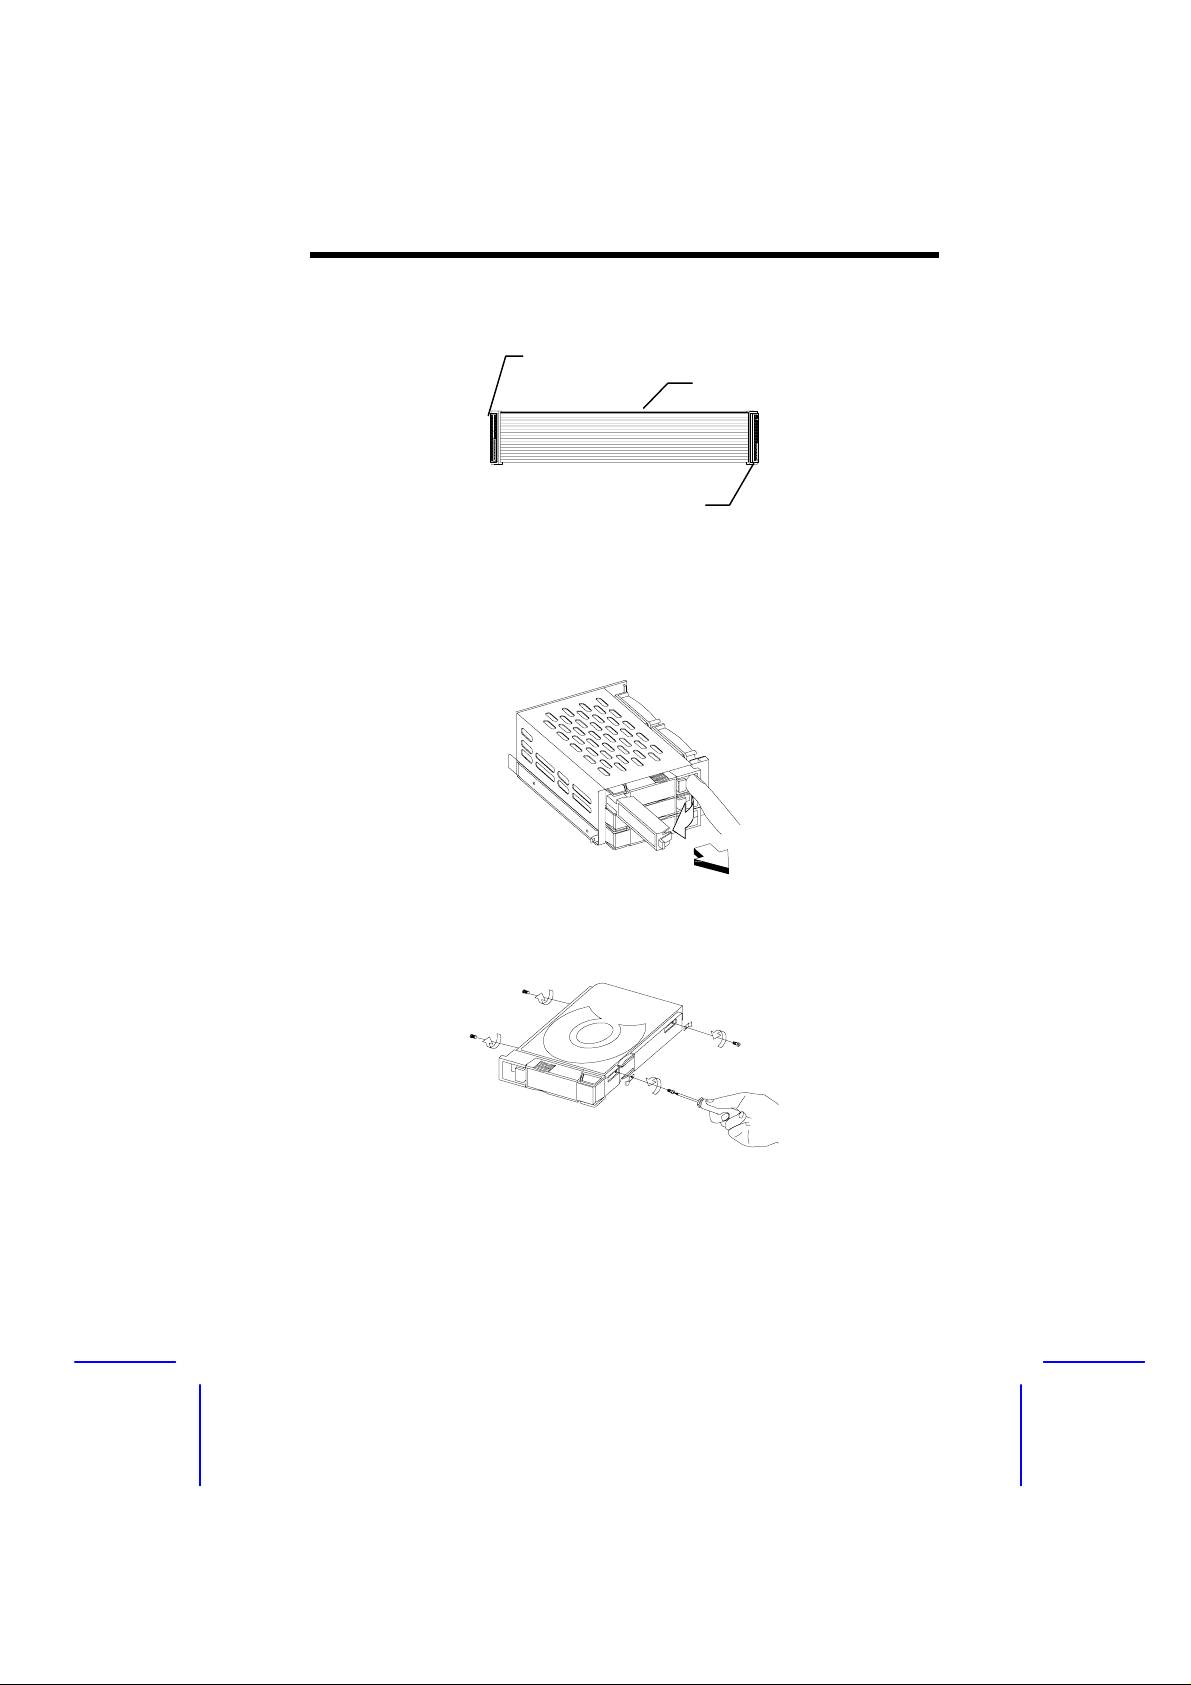
Hard Disk Drive Tray
1. Use your finger to release the drive tray as shown below and then
pull it out.
2. Place a hard disk on the tray. Secure it with four sc rews and four
metal support braces as shown below.
System Housing 1-13
Page 28

4. Insert the tray into the hot-swap cage and then close the lever as
shown below.
Installing a System Board
The housing accommodates various system board sizes. You can
rearrange the pegs on the system board plate to fit the board that you
wish to install.
System Board
Align the system board holes to the pegs with the external ports fac ing
the rear of the housing. Secure the board with eight screws.
1-14 Altos 500 System Guide
Page 29
Installing an Expansion Board
1. Remove an expansion slot bracket cover. Save the screw to
secure the expansion board.
2. Align an expansion board with the open slot and insert the golden
fingers into the expansion bus connector.
3. Secure the board with the screw.
System Housing 1-15
Page 30
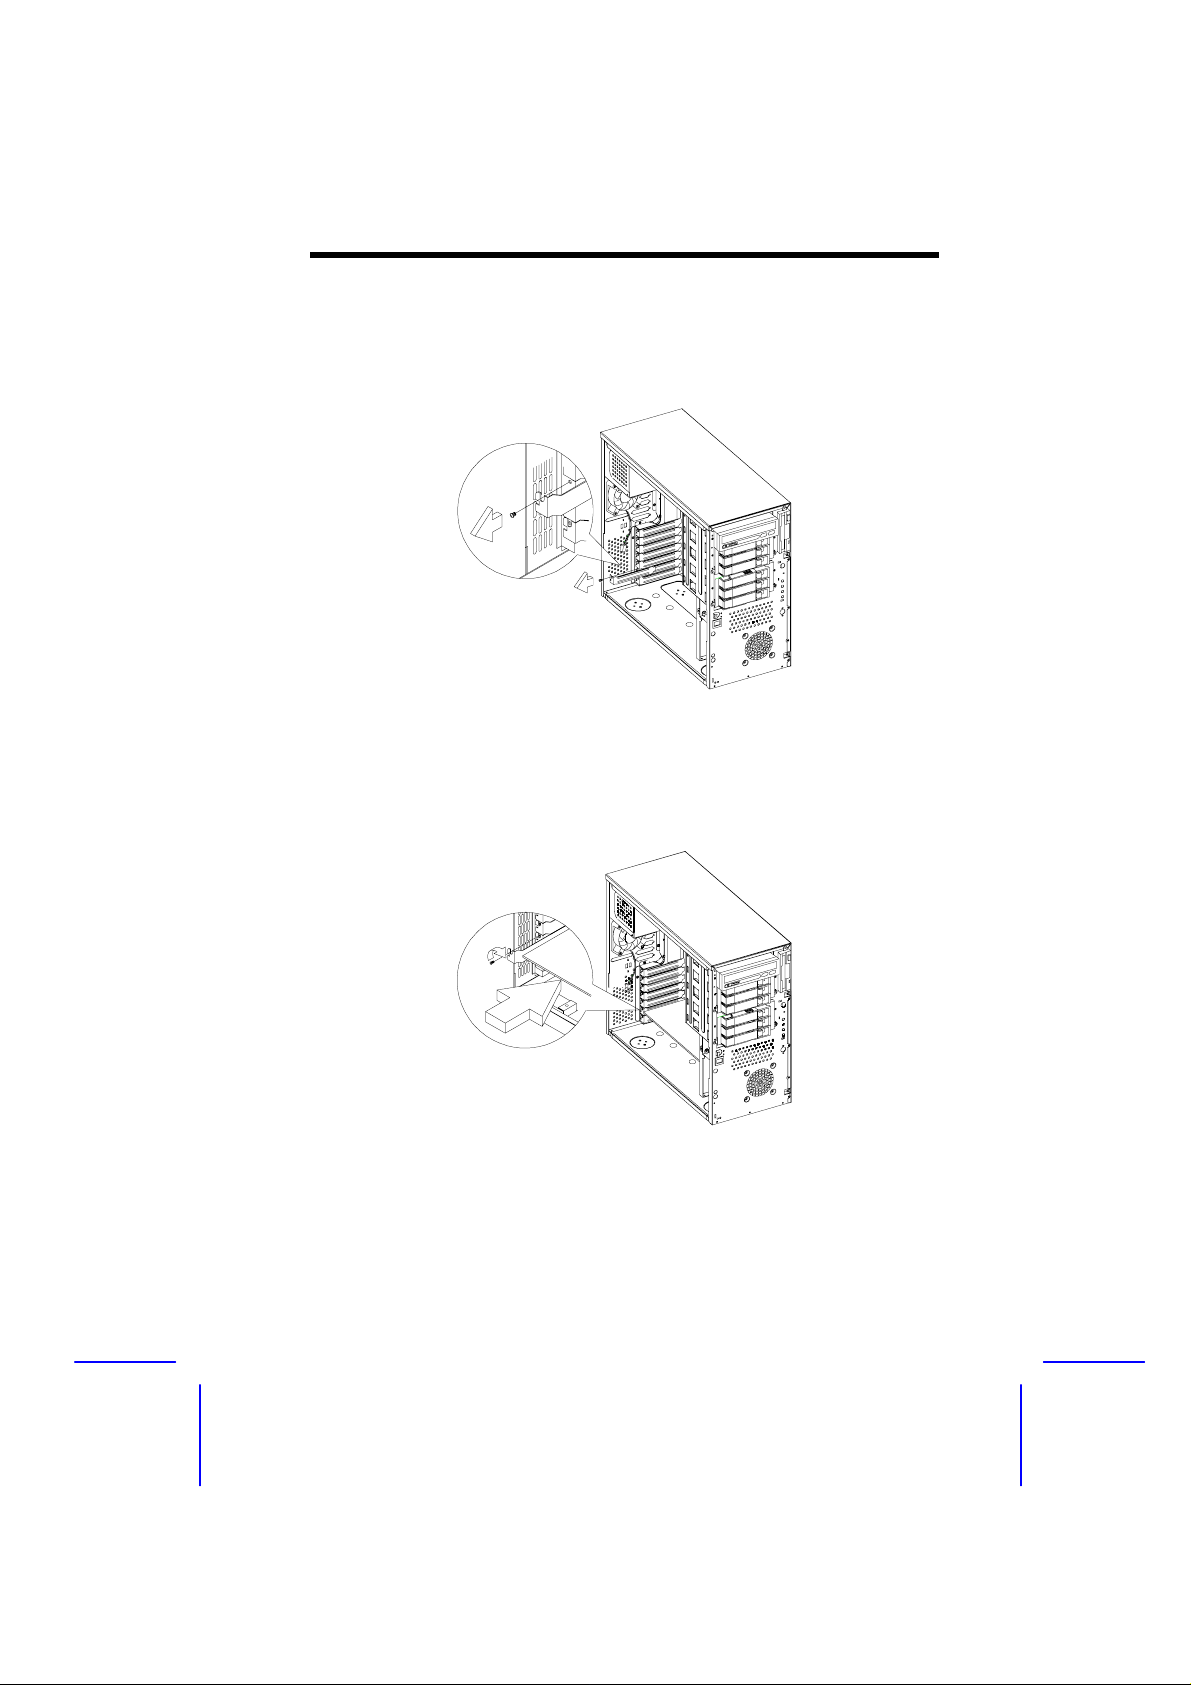
Installing a CPU or Memory Board
Follow these steps to install a CPU or memor y board if your system
board does not include them.
1. Remove a bracket opposite the CPU or memory board slot.
2. Insert the board into the slot.
Make sure that the board is properly seated
in the slot.
3. Secure the board with a screw.
4. Align the plastic support bar with the board edge.
1-16 Altos 500 System Guide
Page 31

5. Insert the right end of the bar into the hole near the hard disk
drive frame and the left end into the hole on the rear panel.
Left End
Right End
LVD SCSI Backplane Board
The LVD SCSI hot-swap cage includes a hot plug SCA single-ended
backplane, LED board, and the hard drive cage itself. It supports
three 1-inch SCA-II SCSI hard drives in one channel with active
terminator built-in. The SCA II connector design allows for the
addition and removal of SCSI drives without shutting down the system.
System Housing 1-17
Page 32

Jumpers and Connectors
Jumper Setting Function
2
JP1 1-2
2-3
JP4 Short
Open
Connector Description
CN1 SCSI 68-pin P connector - In
CN2 Front power LED connector
CN3 I2C Buffer connector
CN5 Slot 1
CN7 Slot 2
CN8 SCSI 68-pin connector - Out
CN9 Slot 3
JP5 Power connector
S1 Slot 1 ID switch
S2 Slot 2 ID switch
S3 Slot 3 ID switch
I
21h
23h
Terminator Power Source
Both from Backplane and Host
Only from Host
C Buffer ID
1-18 Altos 500 System Guide
Page 33

Chapter 2 System Board
This high-performance system board supports the Intel Pentium II
CPU running at 233 up to 350 and 400 MHz. Integrated with the Intel
440BX system controller, which consists of the PCI/AGP controller and
the PCI/ISA IDE accelerator (PIIX4), the M11E combines the new
generation of Pentium II power with unmatched graphics performance.
The PCI/AGP controller host bus interface supports a Pentium II
processor with 66 or 100 MHz bus frequency. It also provides a 72-bit
DRAM that supports synchronous DRAM (SDRAM) DIMMs. The
PCI/AGP controller introduces a new technology, which is the
Accelerated Graphics Port (AGP) interface. Supporting up to 133 MHz
data transfer speed, the AGP interface boosts graphics performance.
The PIIX4 is a multifunction PCI device controller implementing
system functions including PCI IDE, universal serial bus (USB)
host/hub, and enhanced power management. It also supports Ultra
DMA/33 synchronous DMA-compatible devices.
The system board utilizes both the ISA and the PCI local bus
architecture. Two ISA, five PCI bus slots (including one PCI/ISA
shared slot), and one AGP slot reside on the boar d to allow installation
of either master or slave devices.
Three memory banks composed of 168-pin dual inline memory
module (DIMM) sockets support a maximum system memory of
384 MB using 128-MB DIMMs. The sockets only supports SDRAMtype DIMM.
BIOS Utility 2-1
Page 34

It also supports the USB (Universal Serial Bus) connector, and other
standard features such as two UART NS16C550 serial ports, one
enhanced parallel port with an Enhanced Parallel Port (EPP)/Ex tended
Capabilities Port (ECP) feature, a diskette drive interface, and two
embedded hard disk interfaces. The board also includes a built-in
10/100 Mb/s Intel 82558 LAN chip that supports Wak e- O n-LAN ( WOL)
(only for models with LAN feature).
Major Components
The system board has the following major components:
•
Exclusive slot for Intel Pentium II processor
•
Three DIMM sockets that accept 16-, 32-, 64- and 128-MB
DIMMs
•
Two ISA, four PCI (five PCI for boards without LAN), and one
AGP expansion slots (including one PCI/ISA shared slot)
•
256-KB Flash ROM for system BIOS
•
10/100 Mb/s Intel 82558 LAN chip that supports Wake-On-LAN
(WOL) (manufacturing option)
•
Enhanced IDE hard disk and diskette drive interface
•
PS2 power connector
•
System controller chipset
•
External ports:
• USB connector
• RJ-45 jack (manufacturing option)
• Parallel port
• PS/2-compatible keyboard port
• PS/2-compatible mouse port
• Serial port 1 and 2
2-2 Altos 500 System Guide
Page 35

System Board Layout with Network Connector
19
20
21
22
1
2
3
5
4
6
7
8
9
1 PS/2 mouse port
2 PS/2 keyboard port
3 USB connectors
4 Serial port 2
5 Parallel port
6 Serial port 1
7 RJ-45 connector
8 Intel 82C558 Ethernet controller
9 BIOS
10 ISA slots
11 PCI slots
18
17
16
15
14
13
12
11
10
12 AGP slot
13 Battery
14 Intel 82371EB
15 IDE1 connector
16 IDE2 connector
17 FDD connector
18 Intel 440BX
19 DIMM sockets
20 Voltage regulators
21 CPU slot
22 Power connector
BIOS Utility 2-3
Page 36

System Board Layout without Network Connector
18
19
20
1
2
3
5
4
6
1 PS/2 mouse port
2 PS/2 keyboard port
3 USB connectors
4 Serial port 2
5 Parallel port
6 Serial port 1
7 BIOS
8 ISA slots
9 PCI slots
10 AGP slot
17
16
15
14
13
12
11
10
7
11 Battery
12 Intel 82371EB
13 IDE1 connector
14 IDE2 connector
15 FDD connector
16 Intel 440BX
17 DIMM sockets
18 Voltage regulators
19 CPU slot
20 Power connector
9
8
2-4 Altos 500 System Guide
Page 37

Jumpers and Connectors
Jumper and Connector Locations with a Network
Connector
The blackened pin of a jumper or connector
represents pin 1.
BIOS Utility 2-5
Page 38

Jumper and Connector Locations without a Network
Connector
The blackened pin of a jumper or connector
represents pin 1.
2-6 Altos 500 System Guide
Page 39

Jumper Settings
Jumper Setting Function
Password Security
JP3 1-2
2-3*
BIOS
JP4 1-2*
2-3
Connector Functions
Connector Function
CN1 Suspend 5V
CN2 CPU thermal sensor connector
CN3 CPU fan connector
CN4 LAN Jack (RJ45) (optional)
CN5 Power connector
CN6 Floppy disk connector
CN7 USB connectors
CN8 COM1 (lower right), COM2 (lower left), and
Parallel port (above)
CN9 Upper: PS/2 mouse connector
Lower: PS/2 keyboard connector
CN10 Enhanced IDE 2 connector
CN11 Enhanced IDE 1 connector
CN12 Hard disk LED connector
CN13 SCSI disk LED connector (for M11E Combo
Card)
CN15 Wake up On LAN connector
CN16 Power switch
Check password
Bypass password
Acer
OEM
BIOS Utility 2-7
Page 40

Connector Function
CN19 Housing fan connector
CN20 Audio line-in connector (reserved* )
CN21 Modem Ring-In wake up connector
CN22 Turbo LED connector
JP1 Power LED connector
JP2 System reset connector
JP5 Housing intrusion switch connector
ESD Precautions
Always observe the following ESD (electrostatic discharge)
precautions before installing any system component:
1. Do not remove any system component fr om its pac kaging unless
you are ready to install it.
2. Wear a wrist grounding strap before handling electronic
components. Wrist grounding straps are available at most
electronic component stores.
DO NOT attempt the procedures in the
following sections unless you are confident of
your capability to perform them. Otherwise,
ask a service technician for assistance.
*
Reserved items are items that are supported by the system board but not available
in the current version.
2-8 Altos 500 System Guide
Page 41

Installing the Pentium II processor
The following section will briefly explain and illustrate how to install the
Pentium II processor.
You have to attached the fan sink before
installing the Pentium II processor into the
system board.
Attaching the Processor Fan Sink
There are currently two kinds of fan sink. Both of them can be easily
attach to the Pentium II processor m odule. The new fan s ink includes
a new metal retention bracket to hold the Pentium II processor m odule
more securely.
The Pentium II processor module comes with holes on one side to
hold the clips of the fan sink. The upper set of holes (near the latches)
on the processor are wider and should match the wider ends of the
clips on the fan sink. The lower set of holes are smaller and should
match the narrow ends of the fan sink clips.
Wide Clip Ends
Wide Holes
Narrow Holes
BIOS Utility 2-9
Metal
Retention
bracket
Page 42

Follow these steps when installing the fan sink and fan into the
Pentium II processor module:
1. Remove the thermal tape protector at the back of the fan sink.
2. Insert the wide clip ends into the wide holes on the processor and
the narrow clip ends into the narrow holes.
3a. Use a screwdriver to press and lock in the wide end of a clip first.
Then without lifting the screwdriver, point it downward to press
and lock the narrow end of the clip.
2-10 Altos 500 System Guide
Page 43

3b. Using your fingers, push down the metal brack et until it c lick s into
the CPU cartridge and then push the metal bracket’s handle to
lock the metal bracket into place.
BIOS Utility 2-11
Page 44

Installing a Pentium II Processor
Follow these steps to install the Pentium II proc essor to the sock et on
the CPU board.
1a. Place the retention mechanism over the proces sor socket on the
CPU board. Secure it with the screws that came with the
package.
1b. Place the retention mechanism over the proces sor socket on the
CPU board. Secure it with the plastic pegs that came with the
package as shown below.
2. With the processor module golden fingers pointing downward,
align the processor to the posts of the retention mec hanism then
lower it down.
2-12 Altos 500 System Guide
Page 45

The golden fingers of the Pentium II module
are slotted such that it only fits in one
direction. Make sure that the module groove
matches the one on the processor socket.
3. Press down the processor module until the golden fingers
completely fit into the socket.
4. Press the latches on the sides to loc k the process or module into
place.
BIOS Utility 2-13
Page 46

Removing a Pentium II Processor
Follow these steps to remove the Pentium II CPU module from the
slot.
1. Unlock the latches that secure the processor module.
2. Firmly hold the processor module and pull it out of the socket.
2-14 Altos 500 System Guide
Page 47

Memory Upgrade
The three 168-pin sockets onboard supports SDRAM-type DIMMs
only. You may install 16-MB, 32-MB, 64-MB, or 128-MB DIMMs f or a
maximum 384-MB system memory.
The SDRAM DIMMs should work under 3.3 volts; 5-volt memory
devices are not supported. Memory modules with a timing setting of
66 MHz are defined under unbuffered DIMM specifications, while 100
MHz modules are defined under Intel PC-100 SDRAM specifications.
Do not use both 66 MHz (unbuffered) and
100 MHz (registered) SDRAM together. This
might cause your system to malfunction.
Each of the sockets represents one independent bank. This allows
you to install DIMMs with different capacities to form a configuration.
Memory Configurations
Bank 0 Bank 1 Bank 2 Total Memory
16 MB 16 MB
16 MB 16 MB 32 MB
16 MB 16 MB 16 MB 48 MB
32 MB 32 MB
32 MB 32 MB 64 MB
32 MB 32 MB 32 MB 96 MB
64 MB 64 MB
64 MB 64 MB 128 MB
64 MB 64 MB 64 MB 192 MB
128 MB 128 MB
128 MB 128 MB 256 MB
128 MB 128 MB 128 MB 384 MB
BIOS Utility 2-15
Page 48

Installing a DIMM
To install a DIMM, align it with the socket and pres s it down until the
holding clips secure the DIMM in place.
The DIMM socket is slotted to ensure proper
installation. If you slip in a DIMM but it does
not completely fit, you may have inserted it
the wrong way. Reverse the orientation of
the DIMM.
Removing a DIMM
To remove a DIMM, press the holding clips on both sides of the soc k et
outward to release the DIMM.
Place your forefingers on the top of the DIMM
before you press the holding clips to gently
disengage the DIMM from the socket.
2-16 Altos 500 System Guide
Page 49

Reconfiguring the System
Reconfigure the system after installing or removing DIMMs.
Follow these steps to reconfigure the system:
1. Reboot the system. A memory error message appears, indicating
that the total memory does not match the value stored in CMOS.
2. Press
3. Press
boots with the new memory configuration.
+ + .
twice to exit Setup and reboot the system. The system
Installing Expansion Cards
Installing PCI Cards
To install PCI cards:
1. Locate the PCI slots on the system board.
2. Remove the bracket on the housing opposite an empty PCI slot.
3. Insert a PCI card into the slot. Make sure that the card is properly
seated.
BIOS Utility 2-17
Page 50

4. Secure the card to the housing with a screw.
When you turn on the system, BIOS automatically detects and assigns
resources to the PCI devices.
Installing ISA Cards
Both PnP and non-PnP ISA cards require specific IRQs. When
installing ISA cards, mak e sure that the IRQs required by these cards
are not previously assigned to PCI devices to avoid resource conflicts.
Follow these steps when installing ISA cards:
1. Remove all PnP cards installed in the system, if any.
2. Install non-PnP ISA cards.
3. Turn on the system.
4. Use Windows 95 or ICU to m anually assign the appropriate IRQ s
to the cards. This ensures that BIOS will not use the resourc es
assigned to the non-PnP ISA cards.
2-18 Altos 500 System Guide
Page 51

BIOS detects and configures only PnP cards.
5. Turn off the system.
6. Locate the expansion slots and install the PnP ISA and PCI
cards.
7. Turn on the system. This time PnP BIOS automatically
configures the PnP ISA and PCI cards with the available
resources.
Installing an AGP Card
When inst alling an AGP card, m ake s ure that the IRQ requir ed by this
card is not already assigned to a PCI or ISA device to avoid resource
conflicts.
BIOS Utility 2-19
Page 52

Follow these steps when installing an AGP card:
1. Locate the AGP slot on the mainboard.
2. Insert an AGP card into the slot. Make sure that the card is
properly seated.
When you turn on the system, BIOS automatically detects and
assigns resources to the AGP device.
BIOS detects and configures only PnP cards.
Error Messages
Do not continue using the computer if you receive an error m es s age of
any type. Note the message and take corrective action. This sec tion
describes the types of error messages and lists their corresponding
corrective measures.
There are two general types of error messages:
•
Software
2-20 Altos 500 System Guide
Page 53

•
System
Software Error Messages
Software error messages are returned by your operating system or
application. These messages typically occur after you boot the
operating system or when you run your application. If you receive this
type of message, consult your application or operating system manual
for help.
System Error Messages
A system error message indicates a problem with the computer itse lf.
A message of this type normally appears during the power-on self-test,
before the operating system prompt appears.
Message Action
CMOS Battery Error Replace the battery or contact
your dealer.
CMOS Checksum Error Run Setup.
CPU BIOS Update Code
Mismatch
Diskette Drive Controller Error
or Not Installed
Diskette Drive Error Check the CMOS settings in
Diskette Drive A Type
Mismatch
Diskette Drive B Type
Mismatch
Equipment Configuration Error Modify DRAM configuration to
Hard Disk Controller Error Run Setup.
Contact your dealer.
Check and connect the control
cable to the diskette controller.
Setup and the diskette drive cable
connections.
Run Setup and select the proper
drive type.
Run Setup and select the proper
drive type.
agree with one of the options in
chapter 2, Memory
Configurations.
BIOS Utility 2-21
Page 54

Message Action
Hard Disk 0 Error Check all cable connections.
Replace hard disk.
Hard Disk 1 Error Check all cable connections.
Replace hard disk.
Hard Disk 0 Extended Type
Error
Hard Disk 1 Extended Type
Error
I/O Parity Error Contact your dealer.
Keyboard Error or No
Keyboard Connected
Keyboard Interface Error Replace the keyboard or contact
Memory Error at:
MMMM:SSSS:OOO (W:XXXX,
R:YYYY)
where:
M: MB, S: Segment,
O: Offset,
X/Y: write/read pattern
Memory Size Mismatch
CPU Clock Mismatch
Onboard Serial Port 1 Conflict Run Setup and disable the port.
Onboard Serial Port 2 Conflict Run Setup and disable the port.
Onboard Parallel Port Conflict Run Setup and disable the port.
Pointing Device Error Check and connect pointing
Pointing Device Interface
Error
Run Setup.
Run Setup.
Check and connect the keyboard
to the system unit.
your dealer.
Check DIMMs on the system
board. Contact your dealer.
Check the memory size based on
the system specifications. Check
the internal cable connections. If
you are sure that connections and
values are correct, ignore the
message. If the message
reappears, ask for technical
assistance.
device.
Replace the pointing device or
contact your dealer.
2-22 Altos 500 System Guide
Page 55

Message Action
Press F1 key to continue or
Ctrl-Alt-Esc for Setup
Real Time Clock Error Run Setup and set the time and
Press Esc to turn off NMI, any
key to reboot
Press
Setup.
date.
Press
error.
Press any other key to reboot the
system.
or
+ + to enter
to disregard the NMI
Correcting Error Conditions
As a general rule, if an error message says "Press F1 to continue," it is
caused by a configuration problem, which can be easily corrected. An
equipment malfunction is more likely to cause a fatal error, i.e., an
error that causes complete system failure.
Here are some corrective measures for error conditions:
1. Run Setup. You must know the correct configuration values for
your system before you enter Setup, which is why you should
write them down when the system is correctly configured. An
incorrect configuration is a major cause of power-on error
messages, especially for a new system.
2. Remove the system cover, f ollowing the directions in the housing
installation manual. Check that the jum pers on the system board
and any expansion boards are set correctly.
3. If you cannot access a new disk, it m ay be because your disk is
not properly formatted. Format the disk f irst us ing the FDISK and
FORMAT commands.
4. Check that all connectors and boards are secure.
If you go through these steps and still receive an er ror message, the
cause may be an equipment malfunction.
BIOS Utility 2-23
Page 56

If you are sure that your configuration values are correct and your
battery is in good condition, the problem may lie in a damaged or
defective chip.
In either case, contact an authorized service center for assistance.
2-24 Altos 500 System Guide
Page 57

Chapter 3 BIOS Utility
Most systems are already configured by the manufacturer or the
dealer. There is no need to run Setup when starting the computer
unless you get a Run Setup message.
The Setup program loads c onfiguration values into the battery-backed
nonvolatile memory called CMOS RAM. This mem ory area is not part
of the system RAM.
If you repeatedly receive Run Setup
messages, the battery may be bad. In this
case, the system cannot retain configuration
values in CMOS. Ask a qualified technician for
assistance.
Before you run Setup, make sure that you have s aved all open files.
The system reboots immediately after you exit Setup.
BIOS Utility 3-1
Page 58

Entering Setup
To enter Setup, simultaneously press the key combination
+ + .
You must press + +
while the
system is booting. This key combination does
not work during any other time.
The Setup Utility Main Menu appears:
Setup Utility
System Information
•
Product Information
•
Disk Drives
•
Onboard Peripherals
•
Power Management
•
Boot Options
•
Date and Time
•
System Security
•
Load Default Settings
•
Abort Settings Change
•
The system supports two BIOS Utility levels: Basic and Advanced.
The above screen is the BIOS Utility Basic Level screen. T his allows
you to view and change only the basic configuration of your system.
If you are an advanced user, you may want to check the detailed
configuration of your system. Detailed system configurations are
contained in the Advanced Level. To view the Advanced Level, pres s
. The screen shows the BIOS Utility Advanced Level main menu.
Setup Utility
3-2 Altos 500 System Guide
Page 59

System Information
•
Product Information
•
Disk Drives
•
Onboard Peripherals
•
Power Management
•
Boot Options
•
Date and Time
•
System Security
•
Advanced Options*
•
Load Default Settings
•
Abort Settings Change
•
The asterisk (*) mark indicates that the
parameter appears only when you are in the
Advanced Level.
The parameters on the screens show default
values. These values may not be the s ame as
those in your system.
The grayed items on the screens have fixed
settings and are not user-configurable.
Use the arrow keys , , , and to move around the Setup
Utility screen.
Use
to move to the next page or to return to the previous
page if the setup screen has more than one page available.
Press
to return to the Main menu.
BIOS Utility 3-3
Page 60

System Information
The following screen appears if you select System Information from
the Main menu:
System Information
Processor ...........................Pentium II
Processor Speed .....................300 MHz
Internal Cache Size .................32 KB, Enabled
External Cache Size .................512 KB, Enabled
Floppy Drive A ......................1.44 MB, 3.5-inch
Floppy Drive B ......................None
IDE Primary
IDE Primary
IDE Secondary Channel Master ........None
IDE Secondary
Total Memory ........................xxx MB
1st Bank ..........................SDRAM, xxx MB
2nd Bank ..........................None
3rd Bank .........................None
The System Inform ation menu shows the current basic configuration
of your system.
The next screen shows page 2 of the System Information menu.
Channel Master ..........Hard Disk, xxx MB
Channel Slave ...........None
Channel Slave ........None
System Information
Serial Port 1......................3F8h, IRQ 4
Serial Port 2......................2F8h, IRQ 3
Parallel Port......................378h, IRQ 7
PS/2 Mouse.........................Installed
The sections below explain the parameters.
3-4 Altos 500 System Guide
Page 61

Processor
The Processor parameter specifies the type of processor currently
installed in your system. The system supports Intel Pentium II
processors.
Processor Speed
The Processor Speed param eter specif ies the speed of the processor
currently installed in your system. The system can support Pentium II
processors running at 233, 266, 300, 333, 350, and 400 MHz and
Celeron processors running at 266 MHz.
Internal Cache Size
This parameter s pecif ies the f irst-level or the internal m em ory (i.e., the
memory integrated into the CPU) size, and whether it is enabled or
disabled.
External Cache
This parameter specifies the second-level cache memory size
currently supported by the system. The available cache sizes are 256
KB or 512 KB (depending on the CPU installed).
Floppy Drive A
This parameter specifies the system’s current diskette drive A settings.
Floppy Drive B
This parameter specifies the system’s current diskette drive B settings.
BIOS Utility 3-5
Page 62

IDE Primary Channel Master
This parameter specifies the current configuration of the IDE device
connected to the master port of the primary IDE channel.
IDE Primary Channel Slave
This parameter specifies the current configuration of the IDE device
connected to the slave port of the primary IDE channel.
IDE Secondary Channel Master
This parameter specifies the current configuration of the IDE device
connected to the master port of the secondary IDE channel.
IDE Secondary Channel Slave
This parameter specifies the current configuration of the IDE device
connected to the slave port of the secondary IDE channel.
Total Memory
This parameter s pecifies the total amount of onboard m emory. The
memory size is automatically detected by BIOS during the POST. If
you install additional memory, the system automatically adjusts this
parameter to display the new memory size.
1st Bank/2nd Bank/3rd Bank
The 1st Bank, 2nd Bank, and 3r d Bank parameters indicate the type
and size of DRAM installed in DIMM sockets 1, 2, and 3 res pectively.
None
The
location of the DIMM sockets, refer to chapter 2.
3-6 Altos 500 System Guide
setting indicates that there is no DRAM installed. For the
Page 63

Serial Port 1
This parameter shows the serial port 1 address and IRQ setting.
Serial Port 2
This parameter shows the serial port 2 address and IRQ setting.
Parallel Port
This parameter shows the parallel port address and IRQ setting.
PS/2 Mouse
The BIOS utility automatically detects if there is a pointing device
connected to your system. If there is, this parameter displays the
Installed
setting. Otherwise, this is set to
None.
BIOS Utility 3-7
Page 64

Product Information
The Product Inform ation contains the general data about the system,
such as the product name, serial number, BIOS version, etc. This
information is necessary for troubleshooting (may be required when
asking for technical support).
The following figure shows how the Product Information screen
appears:
Product Information
Product Name ...........................xxxxxxxxx
System S/N .............................xxxxxxxxx
Main Board ID ..........................xxxxxxxxx
Main Board S/N ........................xxxxxxxxx
System BIOS Version ....................v3.1
DMI BIOS Version .......................2.00.1
Product Name
This parameter specifies the official name of the system.
System S/N
This parameter specifies the system’s serial number.
Main Board ID
This parameter specifies the system board’s identification number.
3-8 Altos 500 System Guide
Page 65

Main Board S/N
This parameter specifies the system board’s serial number.
System BIOS Version
This parameter specifies the version of the BIOS utility.
DMI BIOS Version
This parameter specifies the version of the DMI (Desktop
Management Interface) BIOS version. DMI enables sof tware to collec t
information about a computer environment.
BIOS Utility 3-9
Page 66

Disk Drives
Select Disk Drives to input configuration values for disk drives.
The following screen shows the Disk Drives menu:
Disk Drives
Diskette Drive A.......................[xx-MB, xx-inch]
Diskette Drive B.......................[ None ]
LS-120 Drive as........................[ Normal ]
IDE Primary Channel Master
•
IDE Primary Channel Slave
•
IDE Secondary Channel Master
•
IDE Secondary Channel Slave
•
Floppy Drives
To enter the configuration value for the first floppy drive (drive A),
highlight the Floppy Drive A parameter. Press
the options and select the appropriate value.
or key to view
Possible settings for the Floppy Drive parameters are:
[ None ]
•
[360 KB, 5.25-inch]
•
[1.2 MB, 5.25-inch]
•
[720 KB, 3.5-inch]
•
[1.44 MB, 3.5-inch]
•
[2.88 MB, 3.5-inch]
•
Follow the same procedure to conf igure floppy drive B. Choose
if you do not have a second floppy drive.
3-10 Altos 500 System Guide
None
Page 67

LS-120 Drive Compatible As
This parameter allows you not only to enable the LS-120 device
installed in your system, but also to specify the function of the device.
The setting affects how BIOS will detect the device.
Possible settings are:
Normal
•
drive. The drive needs the LS-120 device driver to operate.
Drive A
•
standard diskette drive A exists, BIOS automatically identifies it
as drive B. If a standard diskette drive B exists, it autom atically
becomes inaccessible.
If two LS-120 drives exist, BIOS recognizes them as drive A and
drive B, respectively.
Drive B
•
standard diskette drive B exists, it becomes inaccessible.
Hard Disk
•
In this setting, format the LS-120 drive as any other hard disk and
assign it a drive letter C, D, E, and so on. See the documentation
that came with the LS-120 drive for more information.
In this setting, BIOS does not support the LS-120
BIOS recognizes the LS-120 drive as drive A. If a
BIOS recognizes the LS-120 drive as drive B. If a
BIOS recognizes the LS-120 drive as a hard disk.
IDE Drives
To configure the IDE drives connected to your system, select the
parameter that represents the channel and port where the desired
hard disk to configure is connected. The options are:
IDE Primary Channel Master
This parameter lets you configure the hard disk drive c onnected to the
master port of IDE channel 1.
BIOS Utility 3-11
Page 68

IDE Primary Channel Slave
This parameter lets you configure the hard disk drive c onnected to the
slave port of IDE channel 1.
IDE Secondary Channel Master
This parameter lets you configure the hard disk drive c onnected to the
master port of IDE channel 2.
IDE Secondary Channel Slave
This parameter lets you configure the hard disk drive c onnected to the
slave port of IDE channel 2.
The following screen appears if you select any of the IDE Drive
parameters:
IDE Primary/Secondary
Channel Master/Slave
Type ...........................[ Auto ]
Cylinder .....................[ XXXX ]
Head .........................[ XXXX ]
Sector .......................[ XXXX ]
Size .........................[ XXXX ] MB
Hard Disk Size > 504MB .........[ Auto ]
*Hard Disk Block Mode ...........[ Auto ]
*Advanced PIO Mode ..............[ Auto ]
*Hard Disk 32-bit Access ........[Enabled ]
*DMA Transfer Mode ..............[Auto]
*CD-ROM Drive DMA Mode ..........[Disabled]
The above parameters marked with ‘*’ will only
appear if you access the advanced configuration
level in the Main Menu. Please refer to the
Entering Setup section for more information.
Type
3-12 Altos 500 System Guide
Page 69

This parameter lets you specify the type of hard disk installed in your
system. If you want BIOS to automatically configure your hard disk,
select
Auto
. If you know your hard disk type, you can enter the
setting manually.
Setting this parameter also sets the Cylinder, Head, Sector, and Size
parameters.
Cylinder
This parameter specifies the number of cylinders of your hard disk,
and is automatically set depending on your Type parameter setting.
Heads
This parameter specifies the number of heads of your hard disk, and is
automatically set depending on your Type parameter setting.
Sectors
This parameter specif ies the number of s ectors of your hard disk , and
is automatically set depending on your Type parameter setting.
Size
This parameter specifies the size of your hard disk, in MB.
Enhanced IDE Features
Hard Disk Size > 504 MB
When set to
Auto
, the BIOS utility automatically detects if the installed
hard disk supports the f unction. If supported, it allows you to use a
hard disk with a capacity of more than 504 MB. This is m ade pos sible
through the Logical Block Address (LBA) mode translation. However,
this enhanced IDE feature works only under DOS, Windows 3.x,
Windows 95, and Windows NT 3.5 and above. Other operating
systems require this parameter to be set to
Disabled
.
BIOS Utility 3-13
Page 70

Hard Disk Block Mode
This function enhances dis k perform ance depending on the hard disk
in use. If you set this parameter to
detects if the installed hard disk drive supports the Block Mode
function. If supported, it allows data transfer in blocks (multiple
sectors) at a rate of 256 bytes per cycle. To disregard the feature,
change the setting to
Disabled.
Advanced PIO Mode
Auto
, the BIOS utility automatically
When set to
hard disk supports the f unction. If suppor ted, it allows for fas ter data
recovery and read/write timing that reduces hard disk activity time.
This results in better hard disk perfor m ance. T o disregar d the featur e,
change the setting to
Enabling this parameter im proves s ystem perf orm anc e by allowing the
use of the 32-bit hard disk ac cess. This enhanc ed IDE feature works
only under DOS, Windows 3.x, Windows 95, and Novell NetW are. If
your software or hard disk does not support this function, set this
parameter to
The Ultra DMA and Multi-DMA modes enhanc e hard disk perfor mance
by increasing the transfer rate. However, besides enabling these
features in the BIOS Setup, both the Ultra DMA and Multi-DMA modes
require the DMA driver to be loaded. By setting this parameter to
Auto
, BIOS automatically sets the appropriate DMA mode for your
hard disk.
Auto
, the BIOS utility automatically detects if the installed
Disabled.
Hard Disk 32-bit Access
Disabled
.
DMA Transfer Mode
CD-ROM Drive DMA Mode
3-14 Altos 500 System Guide
Page 71

Set this parameter to
ROM drive. This improves the system performance since it allows
direct memory access to the CD-ROM. To deactivate the function, s et
the parameter to
Enabled
Disabled
to enable the DMA mode for the CD-
.
BIOS Utility 3-15
Page 72

Onboard Peripherals
The Onboard Peripheral Configuration allows you to configure the
onboard communic ation por ts and the onboar d devic es. Selecting this
option displays the following screen:
Onboard Peripherals
Serial Port 1 ....................... [Enabled ]
Base Address ..................... [3F8h]
IRQ .............................. [4]
Serial Port 2 ....................... [Enabled ]
Base Address ..................... [2F8h]
IRQ .............................. [3]
Parallel Port ....................... [Enabled ]
Base Address ..................... [378h]
IRQ .............................. [7]
Operation Mode ................... [Standard]
ECP DMA Channel ................ [-]
•
Onboard Device Settings
Serial Ports 1 and 2
These parameters allow you to enable or disable serial ports 1 and 2.
Base Address
This function lets you set a logical base addr ess f or serial por ts 1 and
2. The options are:
3F8h
•
IRQ
This function lets you assign an interrupt for serial ports 1 and 2. T he
options for serial ports 1 are IRQ
2 are IRQ
3-16 Altos 500 System Guide
3
and 10.
•
2F8h
3E8h
•
4
and 11. The options for serial port
•
2E8h
Page 73

The Base Address and IRQ parameters for
each port are configurable only if the port is
enabled.
Parallel Port
This parameter allows you to enable or disable the parallel port.
Base Address
This function lets you set a logical base address for the parallel port.
The options are:
3BCh
•
IRQ
This function lets you assign an interrupt for the parallel port. The
options are IRQ
Operation Mode
This item allows you to set the operation mode of the parallel port.
Standard Parallel Port
(SPP)
Standard and
Bidirectional
5
and 7.
The Base Address and IRQ parameters are
configurable only if Parallel Port is enabled.
If you install an add-on card that has a parallel
port whose address conflicts with the onboard
parallel port, a warning appears on the screen.
Check the parallel port address of the add-on
card and change the address to one that does
not conflict.
Setting Function
378h
•
Allows normal speed one-way operation
Allows normal speed operation in a twoway mode
•
278h
BIOS Utility 3-17
Page 74

Setting Function
Enhanced Parallel Port
(EPP)
Extended Capabilities
Port (ECP)
ECP DMA Channel
Allows bidirectional parallel port
operation at maximum speed
Allows parallel port to operate in
bidirectional mode and at a speed higher
than the maximum data transfer rate
This item becom es ac tive only if you select
Port (ECP)
as the operation mode. It allows you to assign DMA
Extended Capabilities
channel 1 or DMA channel 3 for the ECP parallel port function.
Onboard Device Settings
The Onboard Device Settings menu allows you to configure the
onboard communic ation por ts and the onboar d devic es. Selecting this
option from the Onboard Peripherals menu displays the following
screen:
Onboard Device Settings
Floppy Disk Controller.............. [Enabled ]
IDE Controller...................... [Both ]
PS/2 Mouse Controller............... [Enabled ]
USB Host Controller................. [Disabled]
USB Legacy Mode................... [--------]
SMBus Interrupt(IRQ9)............... [Disabled]
Onboard Ethernet Chip............... [Enabled ]
Floppy Disk Controller
This parameter lets you enable or disable the onboard floppy disk
controller.
3-18 Altos 500 System Guide
Page 75

IDE Controller
Set this parameter to
controller;
controllers; or
PS/2 Mouse Controller
This parameter enables or disables the onboard PS/2 mouse
controller.
USB Host Controller
This parameter lets you enable or disable the USB controller on board.
When enabled, it activates the USB function of the system. When
disabled, it deactivates the function.
This function, when enabled, lets you use a USB keyboard in DOS.
Set this to
SMBus Interrupt (IRQ9)
The System Management Bus (SMBus) is used for controlling and
getting information from devices on a motherboard. It was designed
for hybrid devices based on analog semiconductor technologies and
with limited digital capabilities. This par am eter allows you to enable or
disable this feature.
Both
Disabled
Disabled
Primary
to enable both primary and secondary IDE
to disable all IDE controllers.
USB Legacy Mode
to deactivate the USB keyboard function in DOS.
to enable only the primary IDE
Onboard Ethernet Chip
This parameter allows you to enable or disable the onboard network
feature.
BIOS Utility 3-19
Page 76

Power Management
The Power Management menu allows you to configure the system
power-management feature.
The following screen shows the Power Management param eters and
their default settings:
Power Management
Power Management Mode................. [Enabled]
IDE Hard Disk Standby Timer......... [Off]
System Sleep Timer.................. [Off]
Sleep Mode........................ [----]
Power Switch < 4 sec. ................ [Suspend]
System Wake-up Event
Modem Ring Indicator................ [Enabled]
Power Management Mode
This parameter allows you to reduce power consumption. W hen this
parameter is set to
system timers. Setting it to
power-management feature and its timers.
Enabled
, you can configure the IDE hard disk and
Disabled
deactivates the
IDE Hard Disk Standby Timer
This parameter allows the hard disk to enter standby mode after
inactivity of 1 to 15 minutes, depending on your setting. W hen you
access the hard disk again, allow 3 to 5 seconds (depending on the
hard disk) for the disk to return to normal speed. Set this parameter to
OFF
if your hard disk does not support this function.
3-20 Altos 500 System Guide
Page 77

System Sleep Timer
This parameter s ets the system to the lowest power-s aving mode after
a specified period of inactivity. Any keyboard or mouse action or any
activity detected from the IRQ channels resumes system operation.
Sleep Mode
This parameter lets you specify the power-saving mode that the
system will enter after a specified per iod of inactivity. The options are
Standby
This parameter bec omes configurable only if the System Sleep T imer
is enabled. Any keyboard or mouse action, or any enabled monitored
activities occurring through the IRQ channels resume system
operation.
and
Suspend
modes.
Power Switch < 4 sec.
When set to
power switch is pressed for less than 4 seconds. When set to
Suspend
than 4 seconds.
Power Off,
, the system enters the suspend mode when pres sed for les s
the system automatically turns off when the
System Wake-up Event
The system wake-up event allows the system to resume operation
when the modem ring indicator is enabled.
Modem Ring Indicator
When
suspend mode. The default setting is
BIOS Utility 3-21
Enabled
any fax/modem activity wakes up the system from
Enabled
.
Page 78

Boot Options
This option allows you to specify your preferred setting for bootup.
The following screen appears if you select Boot Options from the
Basic Configuration menu:
Boot Options
Boot Sequence
st
[Floppy Disk]
1
nd
2
[Hard Disk ]
rd
3
[IDE CD-ROM ]
First Hard Disk Drive................. [ IDE]
Fast Boot............................. [Auto]
Silent Boot........................... [Enabled]
Num Lock After Boot................... [Enabled]
Memory Test........................... [Enabled]
*Configuration Table................... [Enabled]
Boot from LanDesk Service Agent....... [Disabled]
The above parameter marked with ‘*’ will only
appear if you access the advanced configuration
level in the Main Menu. Please refer to the
Entering Setup section for more information.
Boot Sequence
This parameter allows you to specify the boot search sequence during
POST.
1st.
•
•
•
3-22 Altos 500 System Guide
The system checks this drive first.
2nd.
The system then checks this drive if it can not boot from the
st
1
3rd.
specified drive.
st
1
If the
and
nd
2
searches fail then it boots from this drive.
Page 79

BIOS will display an error message if the drive(s) specified is not
bootable.
First Hard Disk Drive
This parameter specifies whether the BIOS utility will boot from an
EIDE hard disk drive or a SCSI hard disk drive. The system will
automatically boot from an EIDE hard disk if your system does not
have a SCSI hard disk drive. The default setting is
IDE
.
Fast Boot
This parameter allows the system to boot faster by skipping some
.
POST routines. The default setting is
Auto
Silent Boot
This parameter enables or disables the Silent Boot function. When set
Enabled
to
identification logo during POST and while booting. After booting the
screen displays the operating system prompt (such as DOS) or logo
(such as W indows 95). If any error occurs while booting, the system
automatically switches to the text mode.
, BIOS is in graphical mode and displays only an
Even if your setting is
while booting by pressing
enter setup” message on the screen.
When set to
you see the system initialization details on the screen.
Disabled
Enabled
, BIOS is in the conventional text mode where
, you may also switch to the text mode
when you see the “Ctrl-Alt-Esc key to
Num Lock After Boot
This parameter allows you to activate the Num Lock function upon
booting. The default setting is
BIOS Utility 3-23
Enabled
.
Page 80

Memory Test
When set to
RAM test during the POST routine. When set to
system detects only the memory size and bypasses the test r outine.
The default setting is
Enabled
, this parameter allows the system to perform a
Disabled
, the
Enabled.
Configuration Table
This parameter allows you to enable or disable the appearance of the
configuration table after POST but befor e booting. The configuration
table gives a summar y of the hardware devices and settings that BIO S
detected during POST.
Boot from LANDesk Service Agent
When set to
Agent network instead of your desktop system. T he LANDesk Service
Agent is IEEE-standards-based code that intervenes in the boot
process. Please refer to your LANDesk Manual for more information.
When set to
the Boot Sequence parameter.
Enabled
Disabled
, the system boots from a LANDesk Service
, the system boots from the drive specified in
3-24 Altos 500 System Guide
Page 81

Date and Time
The real-time clock keeps the system date and time. After setting the
date and time, you do not need to enter them every time you turn on
the system. As long as the internal battery remains good
(approximately seven
keep the date and time accurately even when the power is off.
Date................................... [Fri Jun 11,1998]
Time................................... [HH:MM:SS]
Date
Highlight the items on the Date param eter and press or to set
the date following the weekday-month-day-year format.
years) and connected, the clock continues to
Boot Options
Valid values for weekday, month, day, and year are:
•
Weekday
•
Month
•
Day
•
Year
BIOS Utility 3-25
Sun, Mon, Tue, Wed, Thu, Fri, Sat
1
12
to
1
31
to
1980
to
2079
Page 82

Time
Highlight the items on the Time parameter and press or to set
the time following the hour-minute-second format.
Valid values for hour, minute, and second are:
00
00
00
to
to
to
23
59
59
•
•
•
Hour
Minute
Second
3-26 Altos 500 System Guide
Page 83

Advanced Options
Advanced Option configuration is available
only in the Advanced Level.
The Advanced Options configuration menu allows you to configure the
system memory, PCI device settings, and CPU frequency.
Do not change any settings in the Advanced
Configuration if you are not a qualified
The following screen shows the Advanced Options parameters:
•
•
•
technician to avoid damaging the system.
Advanced Options
Memory/Cache Options
PnP/PCI Options
CPU Frequency
Memory/Cache Options
The Memory/Cache Options allows you to configure the advanced
system memory functions.
BIOS Utility 3-27
Page 84

Memory/Cache Options
Internal Cache(CPU Cache)........... [Enabled ]
External Cache...................... [Enabled ]
Cache Scheme...................... Write Back
Memory at 15MB-16MB Reserved for ... [System]
Memory Parity Mode.................. [Disabled]
Internal Cache (CPU Cache)
This parameter enables or disables the f irst-level or internal memor y,
that is, the memory integrated into the CPU. The default setting is
Enabled
.
External Cache
This parameter enables or disables the external cache m emory. The
external cache is incorporated in the CPU module.
Cache Scheme
This parameter s hows the cache scheme status only as
mode.
Write-back
updates the cache but not the memory when
Write-back
there is a write instruction. It updates the mem ory only when there is
an inconsistency between the cache and the memory.
Memory at 15MB-16MB Reserved for
To prevent memory address conflicts between the system and
expansion boards, reserve this m emory range for the us e of either the
system or an expansion board.
3-28 Altos 500 System Guide
Page 85

Memory Parity Mode
This parameter allows you to enable or disable the ECC (Error
Checking and Correction) feature. The ECC featur e enables BIOS to
detect and correct data errors. Dis able this parameter if you want to
disregard the function.
PnP/PCI Options
The PnP/PCI Options allows you to specify the settings for your PCI
devices. Selecting this option displays the following screen:
For system board with LAN
PnP/PCI Ooptions
PCI IRQ Setting ........... [ Auto ]
PCI Slot 1 .............. [--] [--] [--] [--]
PCI Slot 2 .............. [--] [--] [--] [--]
PCI Slot 3 .............. [--] [--] [--] [--]
PCI Slot 4 .............. [--] [--] [--] [--]
Onboard LAN ............. [--]
AGP ..................... [--]
PCI IRQ Sharing.............. [No]
VGA Palette Snoop ........... [Disabled]
Graphics Aperture Size....... [64] MB
Plug and Play OS............. [Yes]
Reset Resource Assignments... [No ]
INTA INTB INTC INTD
BIOS Utility 3-29
Page 86

For system board without LAN
PnP/PCI Ooptions
PCI IRQ Setting ........... [ Auto ]
PCI Slot 1 .............. [--] [--] [--] [--]
PCI Slot 2 .............. [--] [--] [--] [--]
PCI Slot 3 .............. [--] [--] [--] [--]
PCI Slot 4 .............. [--] [--] [--] [--]
PCI Slot 5 .............. [--] [--] [--] [--]
AGP ..................... [--]
PCI IRQ Sharing.............. [No]
VGA Palette Snoop ........... [Disabled]
Graphics Aperture Size....... [64] MB
Plug and Play OS............. [Yes]
Reset Resource Assignments... [No ]
PCI IRQ Setting
INTA INTB INTC INTD
Select
(PnP) devices installed on your system. Otherwise, select
Auto
to let BIOS automatically configure the plug-and-play
Manual
.
Refer to your manual for technical information about the
PCI card.
PCI Slots
When you set the PCI IRQ Setting parameter to
Auto
, these
parameters specify the auto-assigned interrupt for each of the PCI
devices. If you set the PCI IRQ Setting parameter to
Manual
, you need
to specify the interrupt that you want to assign for each PCI device
installed in your system.
3-30 Altos 500 System Guide
Page 87

Onboard LAN
When you set the PCI IRQ Setting param eter to
specifies the auto-assigned interr upt for the onboard LAN. If you set
the PCI IRQ Setting parameter to
interrupt that you want to assign for the onboard LAN installed in your
system.
This item shows the assigned interrupt for the onboard accelerated
graphics port (AGP) controller.
PCI IRQ Sharing
Setting this parameter to
two different devices. To disable the feature, select
If there are no IRQs available to assign for the
remaining device function, we recommend that you
enable this parameter.
VGA Palette Snoop
This parameter per mits you to use the palette snooping feature if you
installed more than one VGA card in the system.
Yes
Manual
AGP
allows you to assign the same IRQ to
Auto
, this parameter
, you need to specify the
No
.
The VGA palette snoop function allows the control palette register
(CPR) to manage and update the VGA RAM DAC (Digital Analog
Converter, a color data storage) of each VGA card installed in the
system. The snooping process lets the CPR send a signal to all the
VGA cards so that they can update their individual RAM DACs. The
signal goes through the cards continuously until all RAM DAC data has
been updated. This allows the display of multiple images on the
screen.
BIOS Utility 3-31
Page 88

Some VGA cards have required settings for
this feature. Check your VGA card manual
before setting this parameter.
Graphics Aperture Size
This parameter deter mines the eff ective size of the graphics apertur e.
Graphics aperture is the address range that the AGP video and the
CPU use to manage graphical objects. The lowest setting is 8 MB and
the highest is 256 MB.
Plug and Play OS
When this parameter is set to
devices such as SCSI cards. When set to
boot and non-boot devices such as sound cards.
Set this parameter to
system is Windows 95.
Reset Resource Assignments
No
Yes
.
Set this parameter to
non-PnP or PnP ISA cards. This clears all res ource assignm ents and
allows BIOS to reassign resources to all installed PnP devices the next
time the system boots. After clearing the resource data, the
parameter resets to
Yes
, BIOS initializes only PnP boot
No
, BIOS initializes all PnP
Yes
only if your operating
to avoid IRQ conflict when installing
CPU Frequency
This parameter dis plays your CPU’s speed and bus frequency. It also
allows you to specify the voltage setting for your current CPU.
Selecting this option displays the following screen:
3-32 Altos 500 System Guide
Page 89

CPU Frequency
Bus Frequency ................66/100 MHz
CPU Multiple .................[3]
Processor Speed ..............xxx MHz
Bus Frequency
The bus frequency refers to the speed by which data is transferred
between internal computer components and the CPU or the main
memory of the CPU. A fast bus allows data to be transferred faster,
which makes applications run faster.
CPU Multiple
This parameter sets the Core/bus ratio of your system. The clock
speed of the bus does not necessar ily equal the CPU’s (core). The
bus clock speed is often slower than the CPU clock speed.
Processor Speed
The processor speed is the speed at which a microprocessor executes
instructions. Clock speeds are expr essed in megahertz (MHz), with 1
MHz being equal to 1 million cycles per second. The faster the clock ,
the more instructions the CPU can execute per second.
BIOS Utility 3-33
Page 90

System Security
The Setup program has a number of security features to prevent
unauthorized access to the system and its data.
The following screen appears if you select System Security from the
Main menu:
System Security
Setup Password ..................[None]
Power-on Password ...............[None]
Operation Mode ................[Normal]
Disk Drive Control
Floppy Drive ..................[Normal]
Hard Disk Drive ...............[Normal]
Setup Password
The Setup Password prevents unauthorized access to the BIOS utility.
To set or change a Password:
1. Make sure that JP3 is set to 2-3 (bypass password). See chapter
2 for the location of JP3.
You cannot enter the BIOS utility if a Setup
password does not exist and JP3 is set to 1-2
(password check enabled).
By default, JP3 is set to 2-3 (Bypass password).
Enable
2.
menu by pressing the
the Setup Password parameter in the System Security
or
arrow key. The Setup Password
window appears:
3-34 Altos 500 System Guide
Page 91

Setup Password
Enter your new Setup Password twice. Setup Password
may be up to 7 characters long.
Enter Password.................. [xxxxxxx]
Enter Password again............ [xxxxxxx]
Set or Change Password
3. Type a password in the Enter Password field. The password may
consist of up to seven characters.
Be very careful when typing your password
because the characters do not appear on the
screen.
4. Press
. Retype your password in the Enter Password again
field to verify your first entry.
5. Highlight Set or Change Password and press
6. Press
to return to the System Security menu and then press
.
again to exit Setup. The Exit Setup screen appears:
Exit Setup
Settings have been changed.
Do you want to save to CMOS settings?
[Yes] [No]
7. Press
Yes
to save your settings and exit the Setup Utility. Your
password will be saved to CMOS.
For the password to take effect you must set jumper JP3 to 1-2
(Check password):
BIOS Utility 3-35
Page 92

1. Turn off and unplug the computer.
2. Open the com puter housing and set J P3 to 1-2 (C heck password)
to check the password function. See chapter 2 for the loc ation of
JP3.
3. Close your computer’s housing and reboot your system.
The next time you want to enter the BIOS utility, you must key in your
Setup password.
To remove your Setup Password:
Disable
1.
menu by pressing the
the Setup Password parameter in the System Security
or
arrow key to select
None
.
2. Press
to return to the System Security menu and then press
again to exit Setup. The Exit Setup screen appears:
Exit Setup
Settings have been changed.
Do you want to save to CMOS settings?
[Yes] [No]
3. Press
Yes
to save your settings and exit Setup Utility. Your
previous password will be removed from CMOS.
Remember to set JP3 to 2-3 (Bypass
password) because you won’t be able to
access Setup Utility if a password does not
exist and JP3 is set to 1-2 (Check password).
To set JP3 to 2-3 (Bypass password):
1. Turn off and unplug the computer.
3-36 Altos 500 System Guide
Page 93

2. Open the computer housing and set JP3 to 2-3 (Bypass password)
to bypass the password function. See chapter 2 for the location of
JP3.
3. Close your computer’s housing and reboot your system.
To bypass Setup Password:
If you forget your setup password, you can bypass the password
security feature by hardware. Follow these steps to bypass the
password:
1. Turn off and unplug the computer.
2. Open the computer housing and set JP3 to 2-3 (Bypass
password) to bypass the password function. See chapter 2 for the
location of JP3.
3. Turn on the system and enter the BIOS utility. This time, the
system does not require you to type in a password.
You can either change the existing Setup
password or remove it by selecting
to the previous section for the procedure.
None
. Refer
Power-on Password
The Power-on Password secures your system against unauthorized
use. Once you set this password, you have to type it whenever you
boot the system. To set this password, enter the Setup Utility, selec t
System Security, and then highlight the Power-on Password
parameter. Follow the same procedure as in setting the Setup
password.
Make sure to set JP3 to 1-2 to enable the
Power-on password.
BIOS Utility 3-37
Page 94

Power-on Password
Enter your new Power-on Password twice. Power-on
Password may be up to 7 characters long.
Enter Password ..................[ ]
Enter Password again ............[ ]
Set or Change Password
Operation Mode
This function lets you enable or disable the password prompt display.
When set to
boot. When set to
Normal
, the password prompt appears before system
Keyboard Lock
, the password prompt does not
appear; however, your system will not respond to any keyboard or
mouse input until you enter the correct password.
Disk Drive Control
The disk drive contr ol features allow you to control the floppy drive or
the hard disk drive boot f unction to prevent loading operating system s
or other programs from a certain drive while the other drives are
operational (under DOS mode only).
Floppy Drive
Setting Description
Normal Floppy drive functions normally
Write Protect All Sectors Disables the write function on all
sectors
Write Protect Boot Sector Disables the write function only
on the boot sector
Hard Disk Drive
Setting Description
3-38 Altos 500 System Guide
Page 95

Normal Hard disk drive functions
normally
Write Protect All Sectors Disables the write function on all
sectors
Write Protect Boot Sector Disables the write function only
on the boot sector
BIOS Utility 3-39
Page 96

Load Default Settings
Use this option to load the default settings for the optimized system
configuration. When you load the default settings, some of the
parameters are grayed-out with their fixed settings. These grayed
parameters are not user-configurable.
The following dialog box appears when you select Load Default
Settings from the main menu:
Load Default Settings
Do you want to load default settings?
[Yes] [No]
Select
Select
Yes
to load the default settings.
No
to ignore the message and return to the BIOS utility.
Abort Settings Change
Use this option to disregard your changes to the BIOS and reload your
previous settings.
The following dialog box appears when you select Abort Settings
Change from the main menu:
Abort Settings Change
Do you want to abort settings change?
[Yes] [No]
Select
settings. After reload, the main menu appears on screen.
Select
Yes
to disregard your changes and reload your previous
No
to ignore the message and return to the BIOS utility.
3-40 Altos 500 System Guide
Page 97

Exit Setup
Examine the system conf iguration values . When you are satis f ied that
all the values are correct, write them down. Store the rec orded values
in a safe place. In the future, if the batter y loses power or the CMOS
chip is damaged, you will know what values to enter when you rerun
Setup.
Press
to leave Setup Utility. The following dialog box appears:
Exit Setup
Do you really want to exit Setup?
[Yes] [No]
Use the arrow keys to select your response. Press .
If you made any changes to the Setup Utility, the dialog box below is
displayed.
Exit Setup
Settings have been changed.
Do you want to save CMOS settings?
[Yes] [No]
Use the arrow keys to select your response. Select
changes in CMOS. Select
Press
to exit.
No
to retain the old configuration values.
Yes
to save the
BIOS Utility 3-41
Page 98

Page 99

Chapter 4 SCSI/VGA Combo
Card
The combo card includes ex ternal video (CN6) and 68-pin W ide SCSI
interface (CN4).
The SCSI controller chipset (AIC-7880P) is a completely integrated,
single chip SCSI host adapter for motherboard applications. Ultra
speed SCSI technology maximizes transfer s peed of up to 40MB/s in
high performance workstations and servers for greatest utilization of
the 133 MB/s PCI local bus.
The ATI 3D Rage Pro VGA controller chipset is a highly integrated 64
bit graphics accelerator with support for 3D and motion video like
MPEG-2. It also incorporates comprehensive support for Intel's
Accelerated Graphics Port (AGP) including 66 or 133 MHz fully
pipelined operation with sidebands.
Card Layout
SCSI/VGA Combo Card 4-1
Page 100

Jumper Settings
Jumper Setting Function
ROM Remapping
JP1 1-2
VGA Feature
JP2 1-2
VGA Controller
JP3 1-2
Interrupt
JP4 1-2
2-3
2-3*
2-3*
2-3*
*
Connector Functions
Connector Function
CN1 68-pin Wide SCSI connector
CN2 50-pin Fast SCSI-II connector
CN3 ATI Multimedia connector
CN4 Ultra SCSI connector
CN5 LED connector
CN6 VGA connector
Map top 8K to bottom 8K
No remapping
Disabled
Enabled
Disabled
Enabled
Enabled
Disabled
Card Installation
Follow these steps to install the SCSI/VGA combo card.
1. Remove a bracket cover opposite an empty PCI slot.
*
Default setting
4-2 Altos 500 System Guide
 Loading...