

Page 1

Table of Contents
Precautions...................................................................................................................... 1
Package contents............................................................................................................. 2
Installation instructions ................................................................................................. 2
Assembling the Monitor .............................................................................................. 2
Detaching the Monitor................................................................................................. 3
Adjusting the Viewing Angle ...................................................................................... 3
Connecting the Devices ............................................................................................... 3
Switching the Power.................................................................................................... 4
Adjusting display settings .............................................................................................. 5
External Controls......................................................................................................... 5
OSD options .................................................................................................................... 6
OSD Menu................................................................................................................... 6
Troubleshooting.............................................................................................................. 9
General specifications................................................................................................... 10
English
Precautions
• The monitor may be damaged if placed too near a source of heat. Be
aware of the location of radiators, cookers, open fires etc.
• Do not cover the slots and openings on the back or top of the cabinet as
the monitor requires ventilation. The monitor should be located in a wellventilated room to prevent the possibility of overheating.
• Do not allow sharp objects such as knives, pens, or pencils near the
screen. If such objects touch the screen, the LCD panel will be
permanently scratched.
• When cleaning this monitor, disconnect it from the electric socket to
avoid any danger of electrocution. A soft, lint-free cloth should be used
to clean the outside of the monitor. A cloth very slightly moistened with
a mild detergent solution will clean stubborn stains. Keep liquids away
from the display screen, including sprays. Do not spray liquid directly - it
is best to lightly spray on to a cloth and wipe. If liquid gets inside the
monitor it can cause electrical shock and/or damage to the unit.
• If you encounter a problem, please check the "Troubleshooting" section
first. If this does not resolve the problem do not attempt to repair the
monitor by yourself; opening or removing covers can lead to injury or
death through electrocution among other hazards. Please contact a
qualified engineer if you find the troubleshooting section does not help.
1
Page 2
English
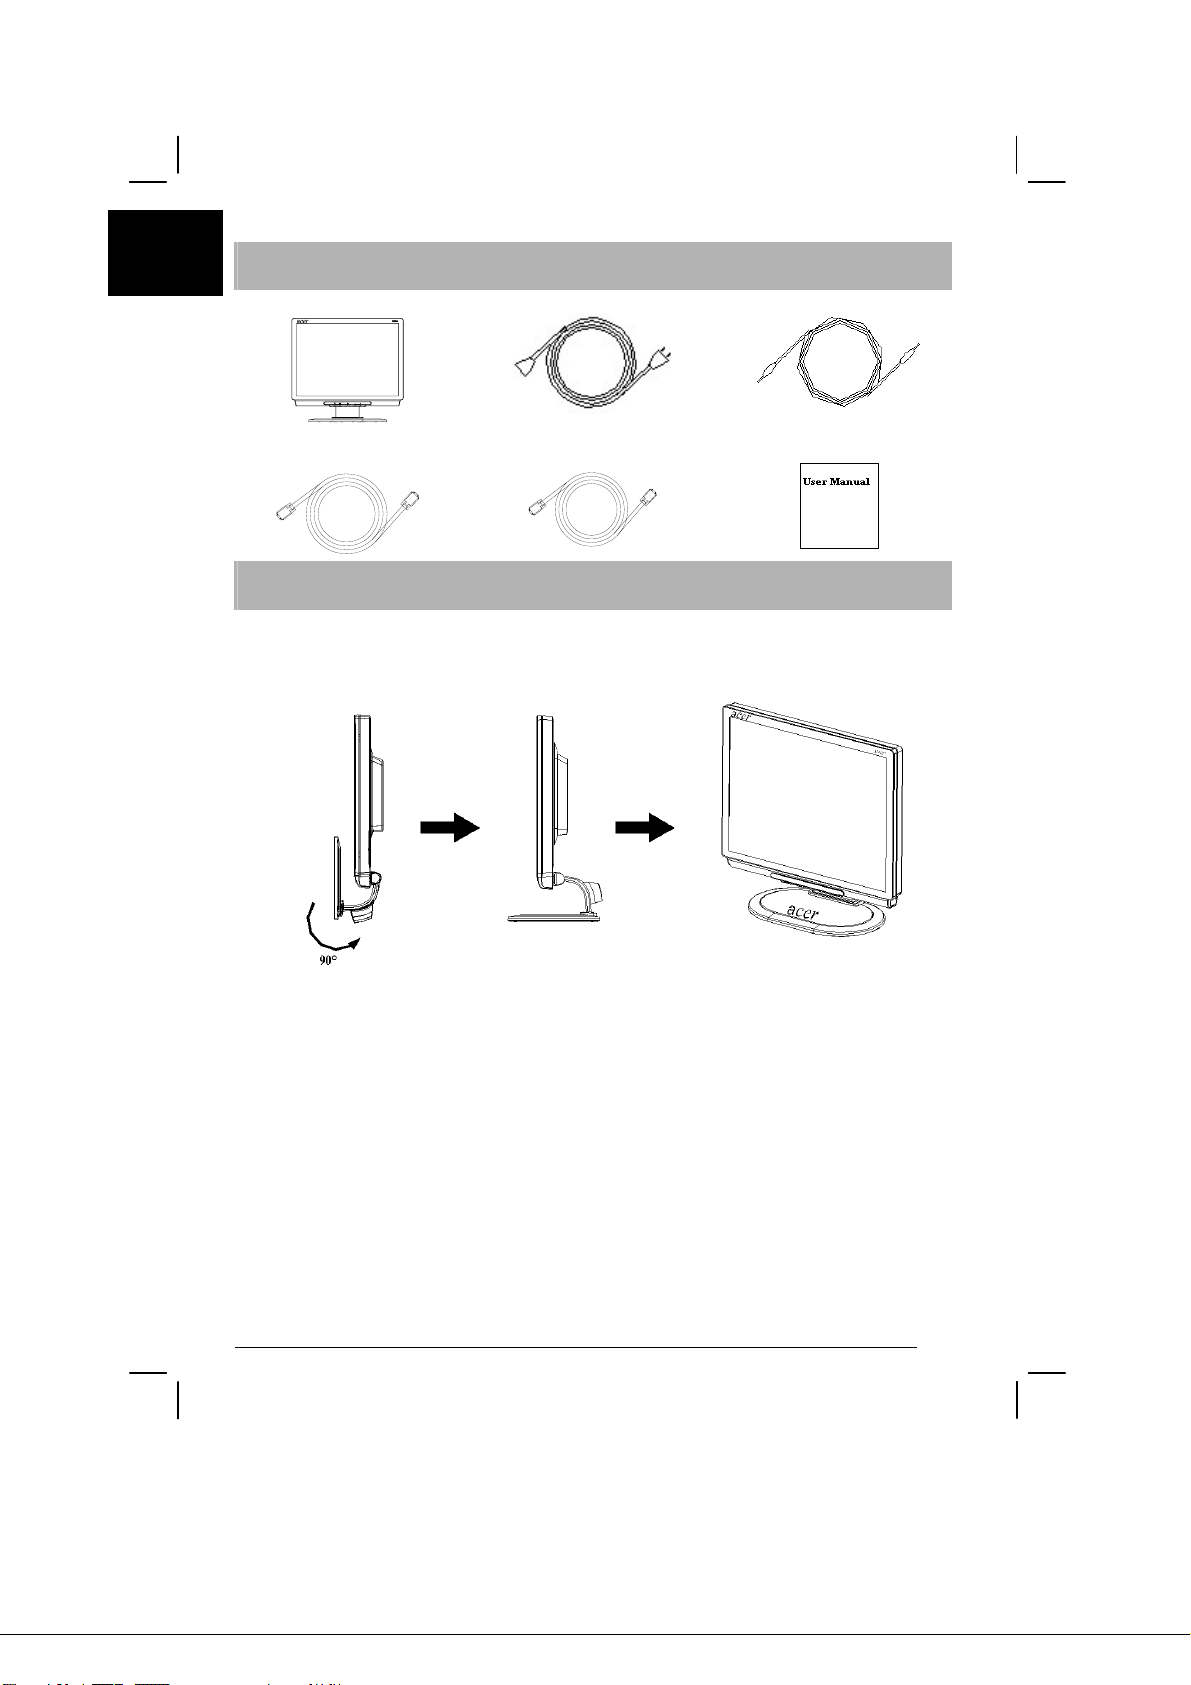
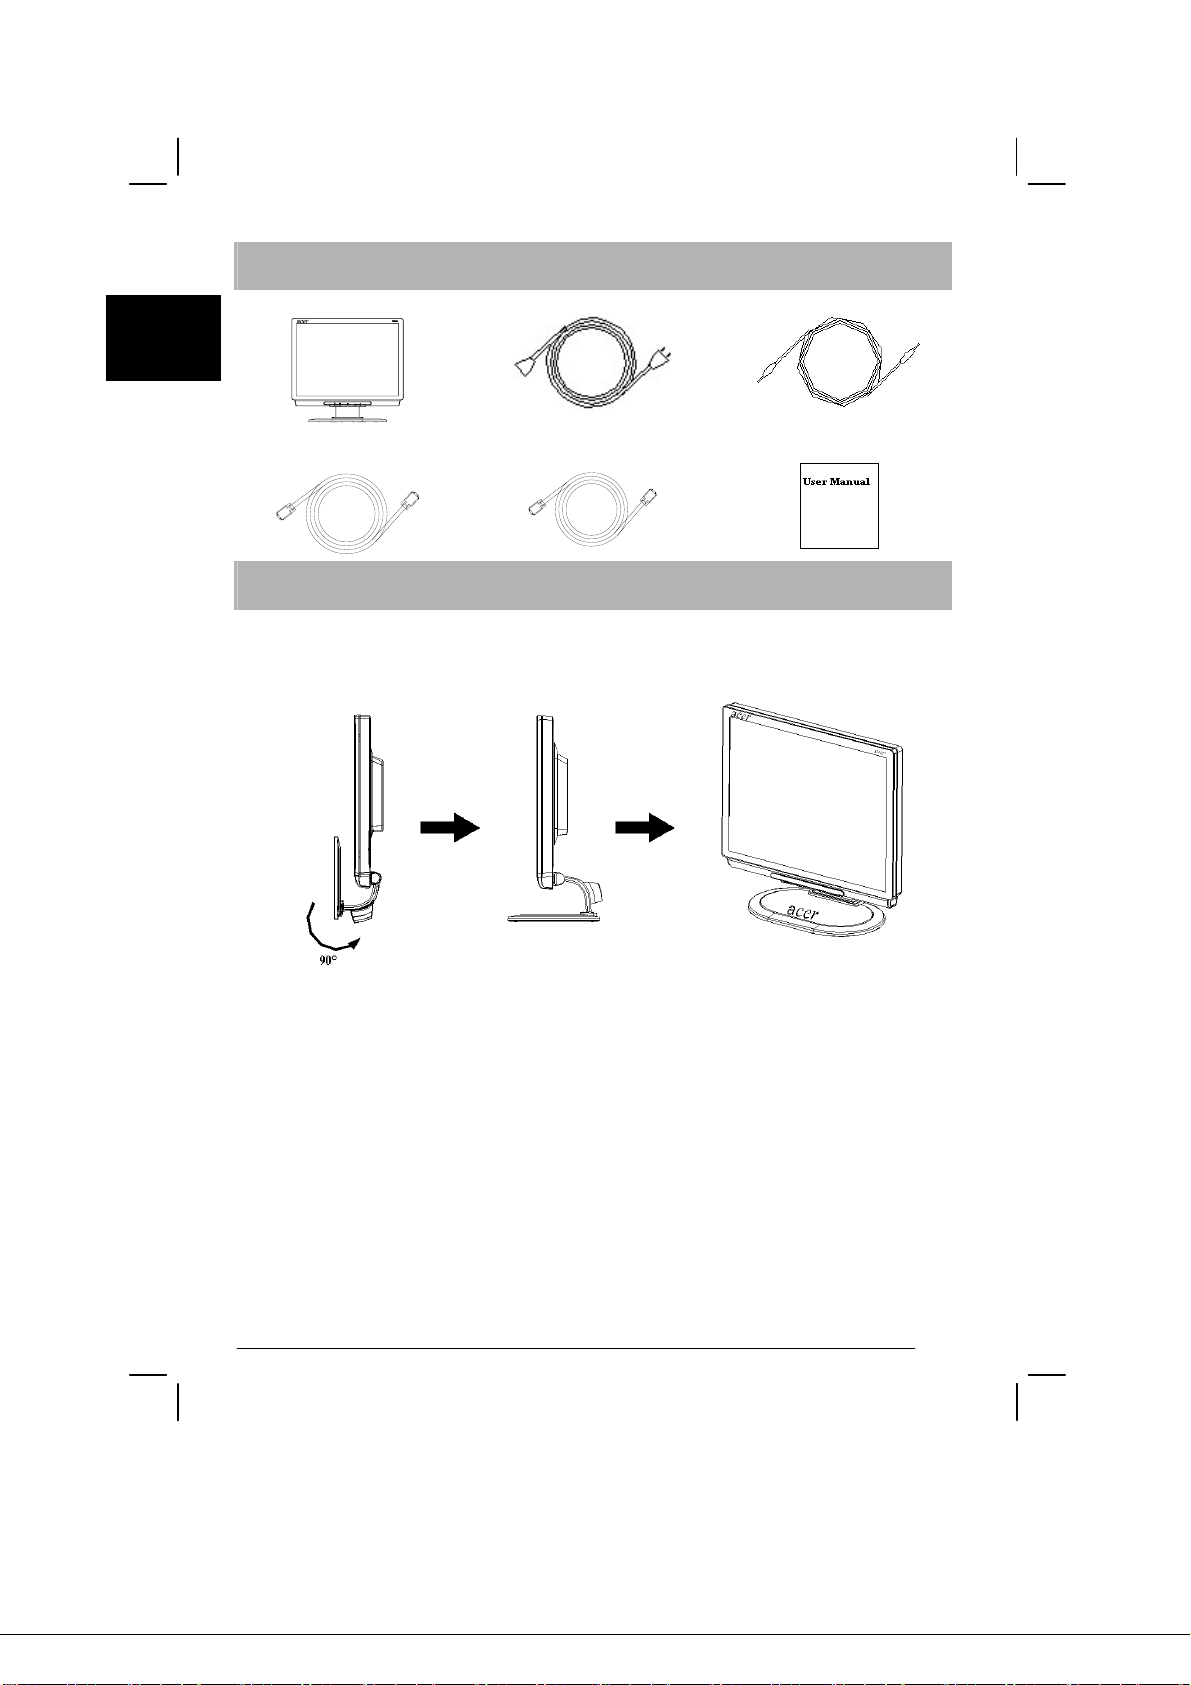
LCD Monitor
VGA Cable
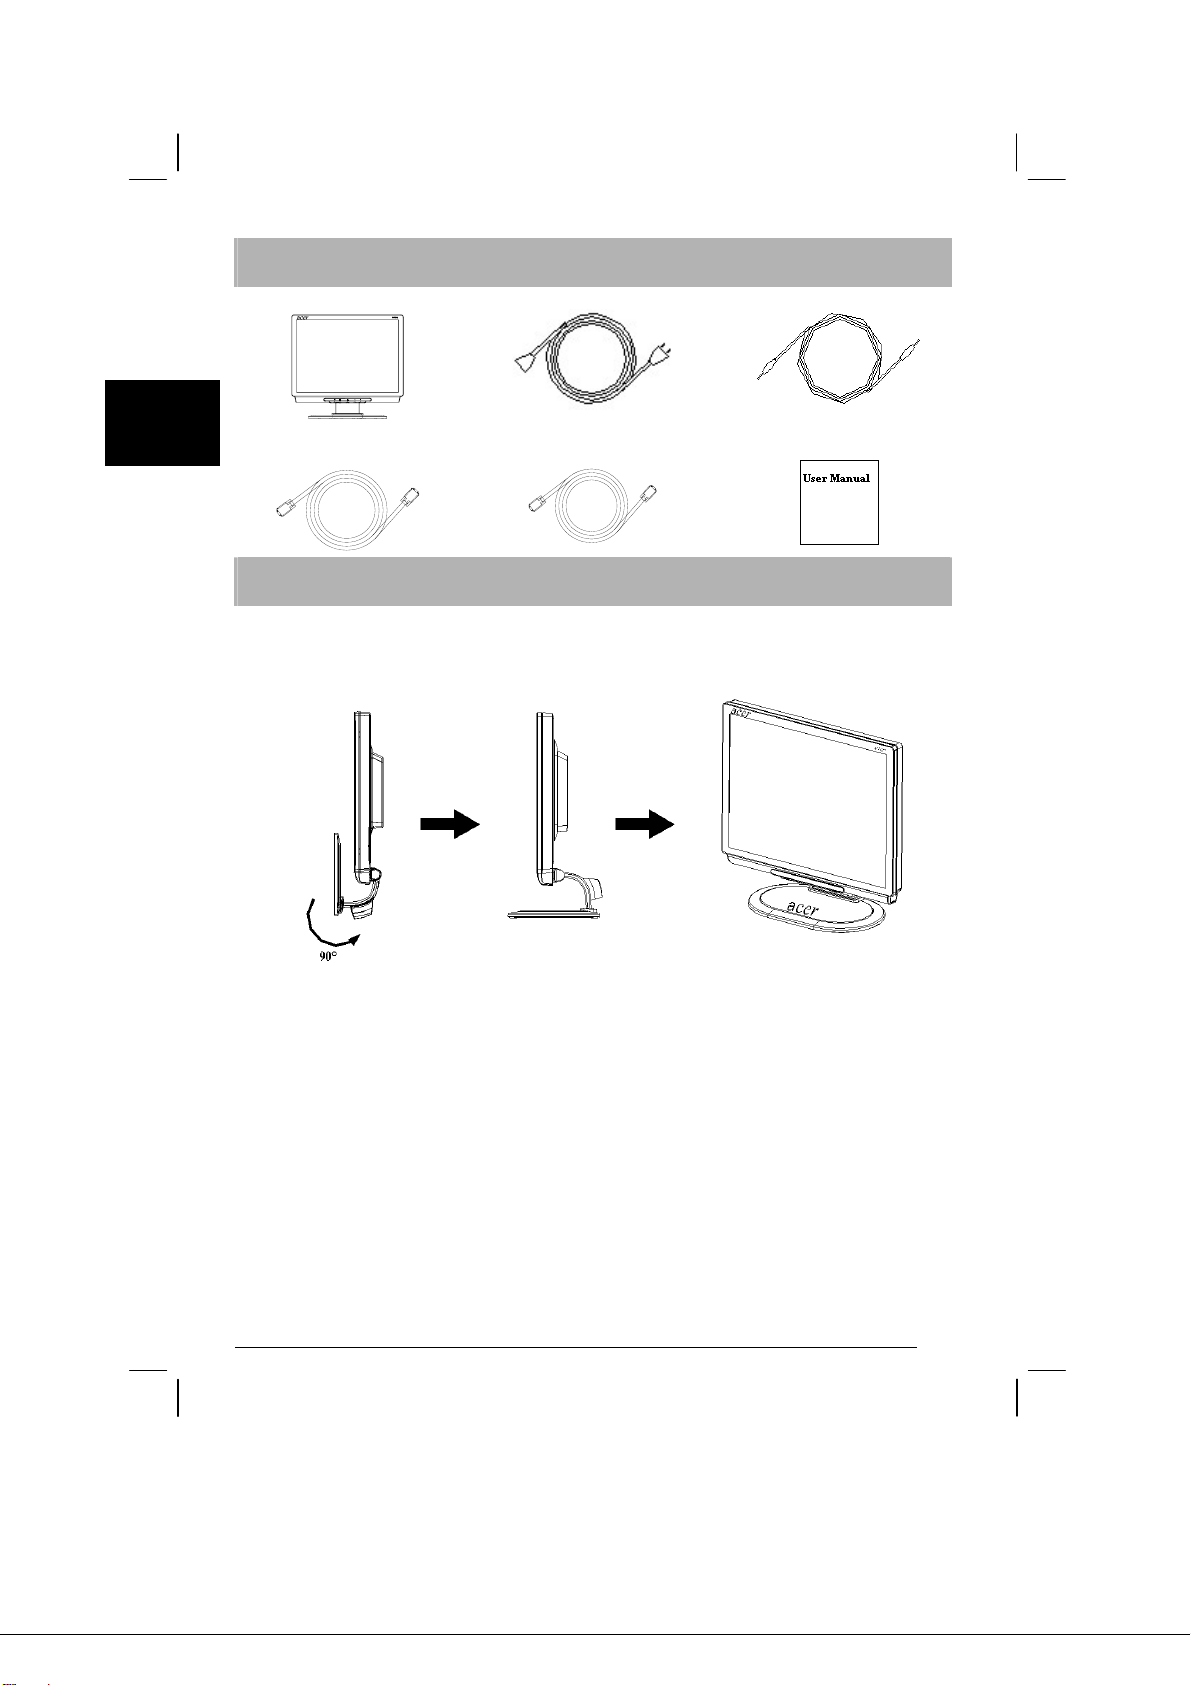
Package contents
Power Cord
DVI-D Cable
Installation instructions
Audio Cable
User Manual
Assembling the Monitor
1. Along the track , twist 90° for the
base.
Important
First, find a clean, flat surface to place the monitor after removing it from the stand.
Place a clean dry cloth under the monitor to protect it further.
2. Put the monitor on flat table or plate.
2
Page 3
Repackage the Monitor
Save the original box and packing material in case you have to
ship or transport the monitor.
Repackage the monitor:
1. Unplug the AC power cord to make sure the power is off.
2. Twist the base to close the monitor as left picture.
Put it into carton。
English
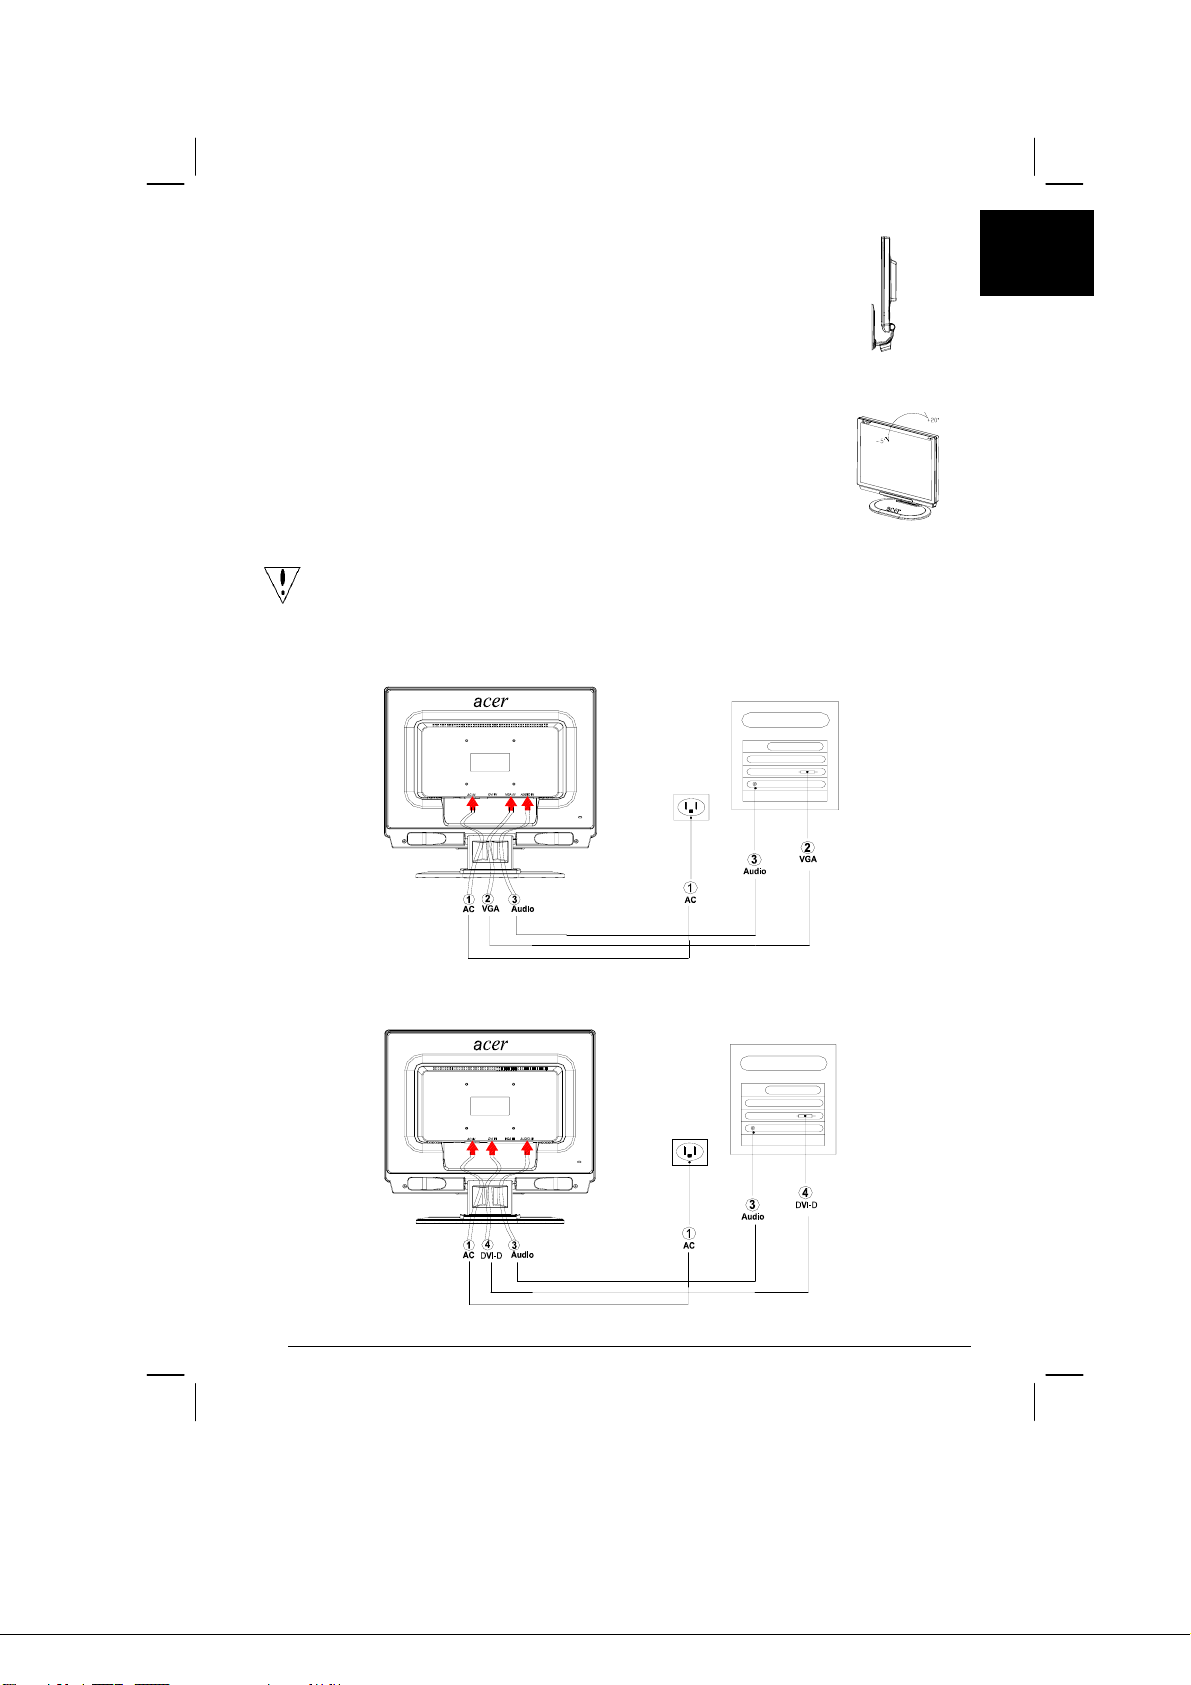
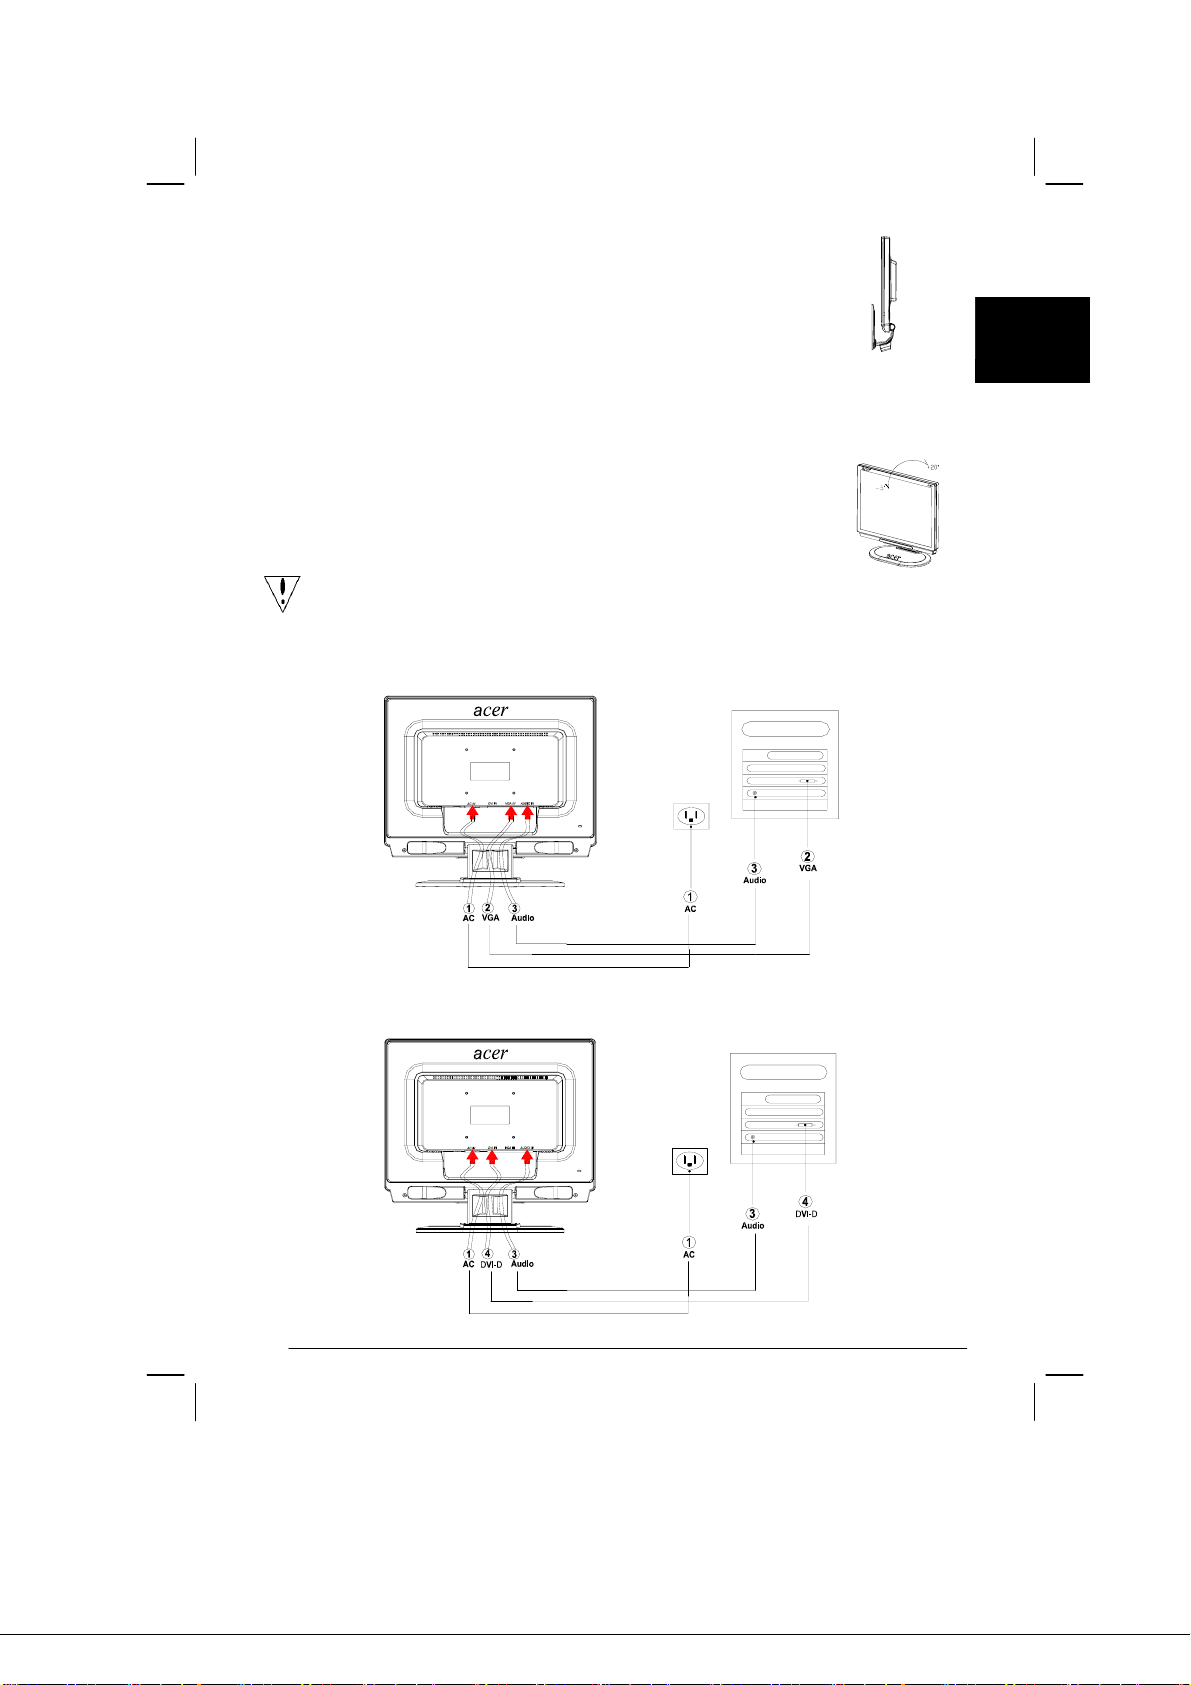
Adjusting the Viewing Angle
The viewing angle of the monitor ranges is from -5°~20°
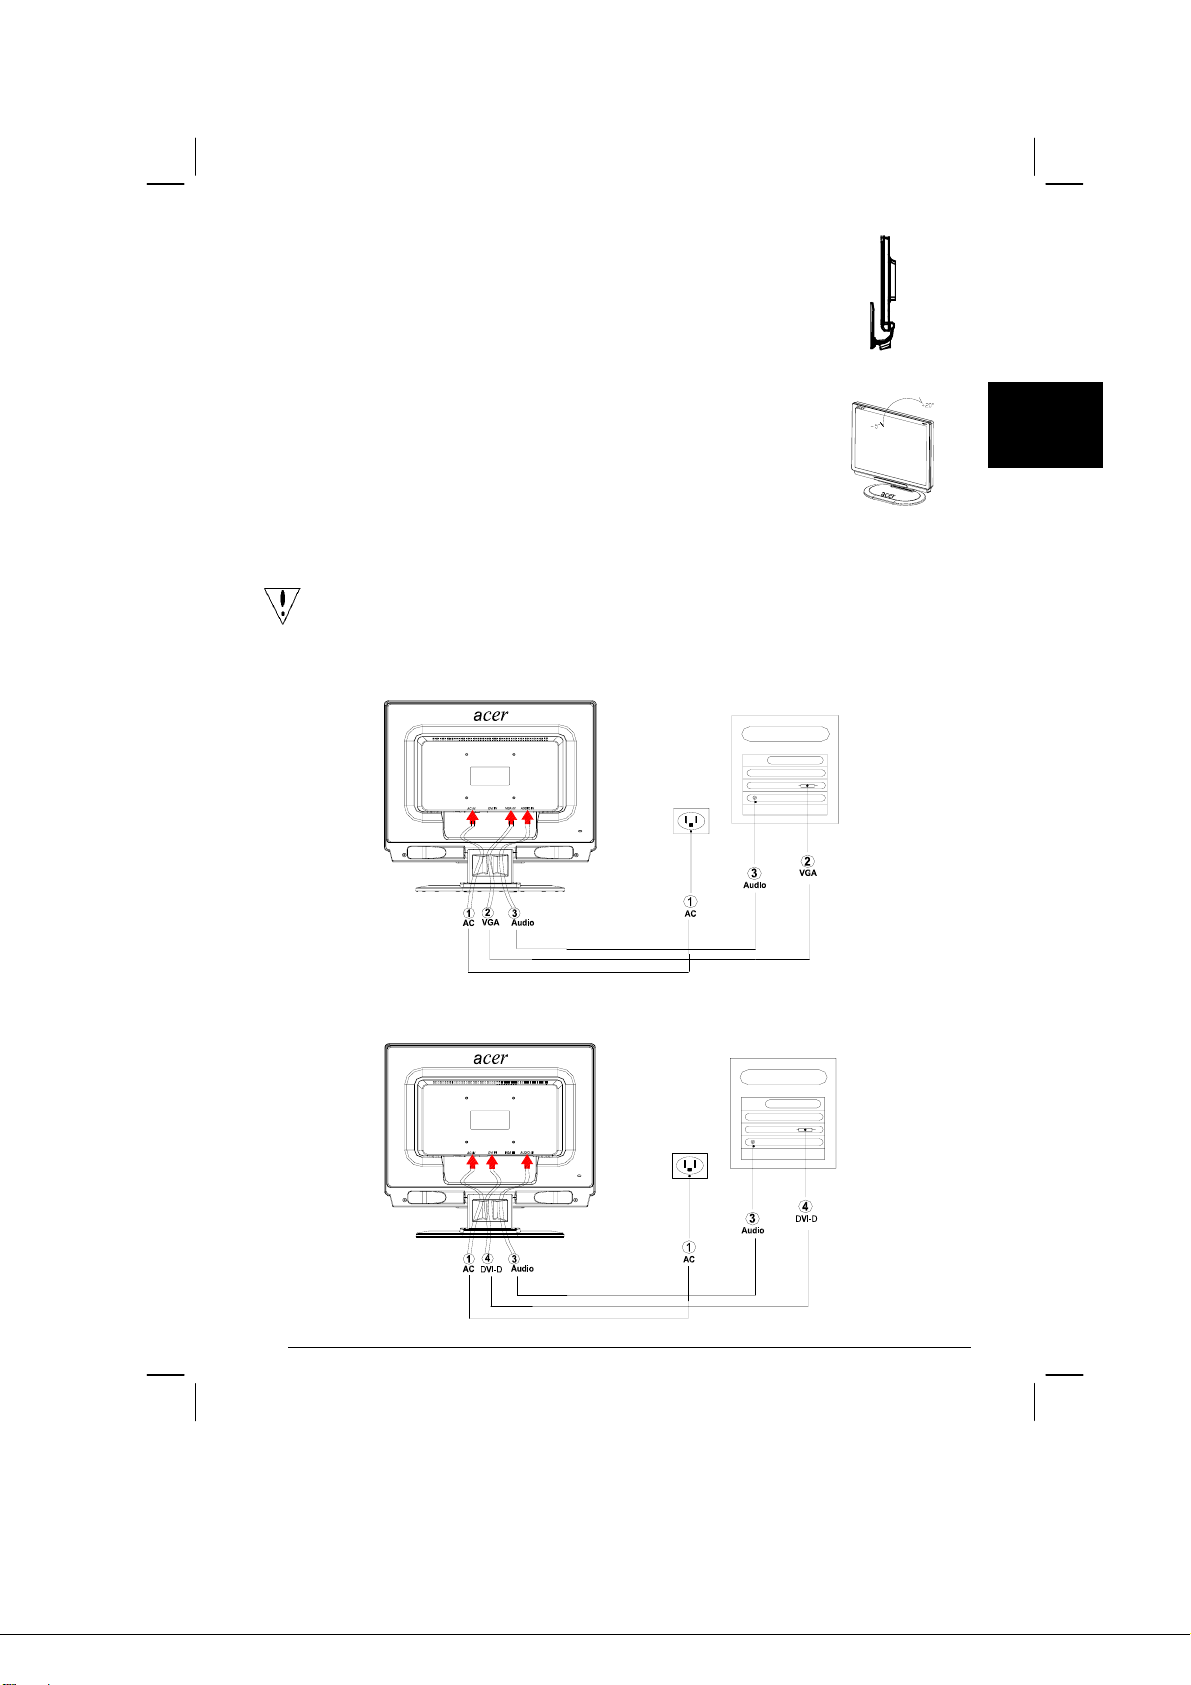
Connecting the Devices
Caution: Make sure that the computer and the monitor are both disconnected
Connect A: Monitor-to-PC VGA Cable
from the power supply.
Connect B: Monitor-to-PC DVI-D Cable
3
Page 4
English
c
Power Code Attach the monitor to the power cord which should then be
inserted into a properly grounded electric socket.
d
VGA Cable Connect the signal cable to the VGA output socket of the
graphics card on the computer. Then tighten the
thumbscrews on the connector.
e
Audio cable
f
DVI-D Cable Connect the signal cable to the DVI-D output socket of the
Connect the audio input socket of the LCD monitor and the
computer by means of the audio cable.
graphics card on the computer. Then tighten the
thumbscrews on the connector.
!WARNING:
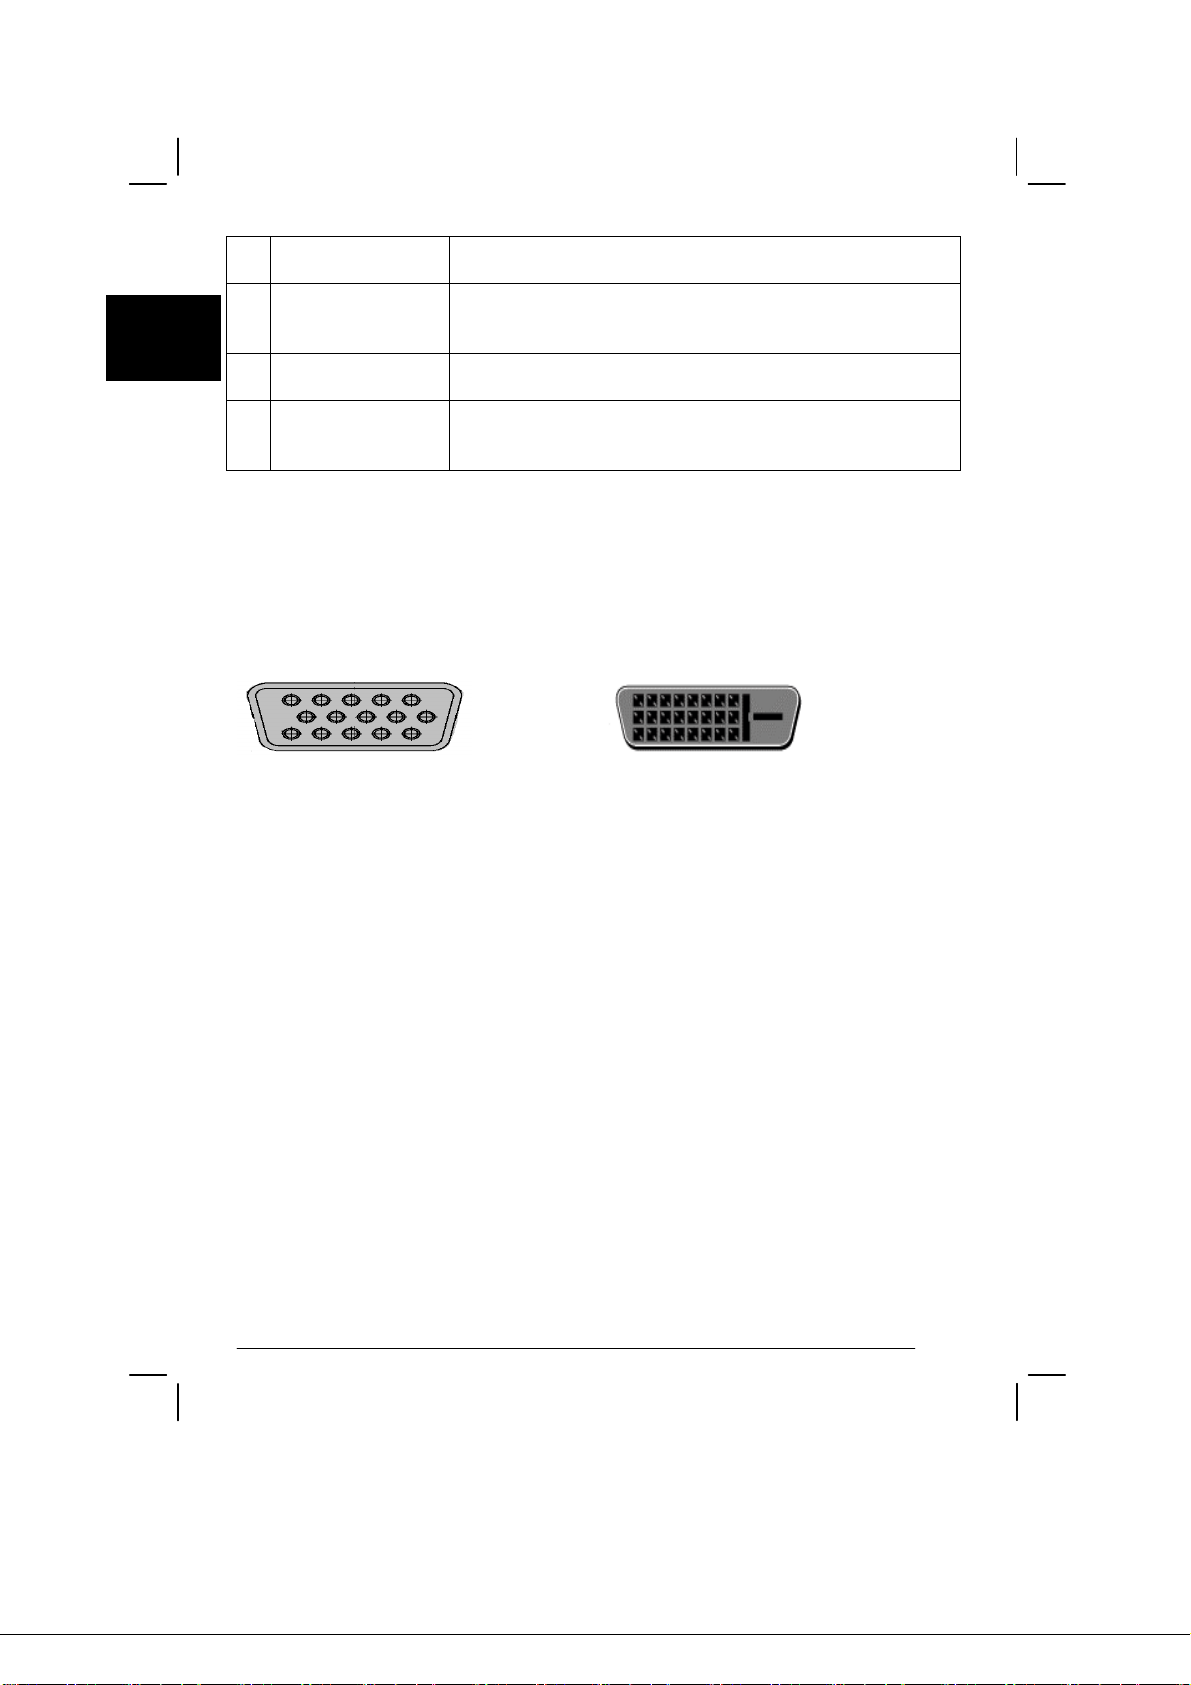
1. Make sure the VGA card of your computer to connect the correct cable.
2. Make sure the shape of the plug matches the shape of the socket it is inserted into.
And that none of the pins are bent or otherwise damaged.
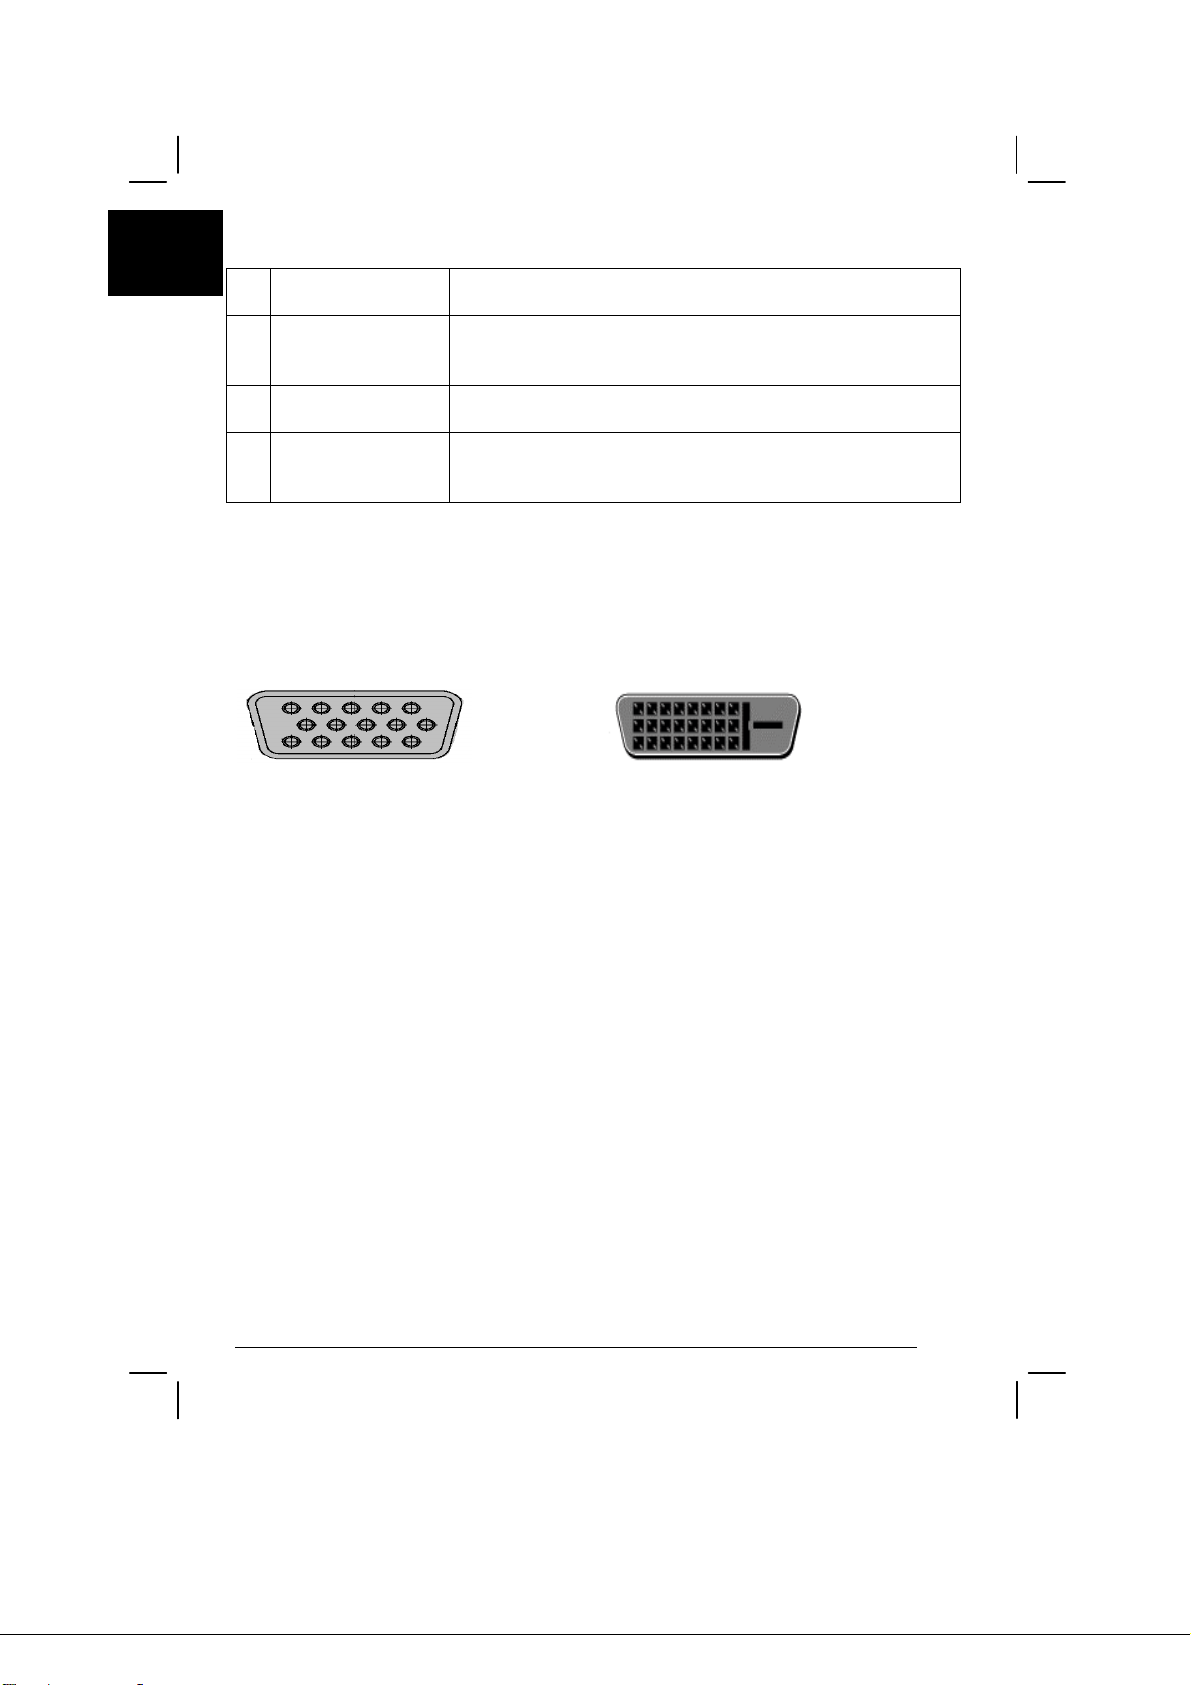
VGA
DVI-D
Switching the Power
1. First, turn on the hard power switch which is beside the AC power socket of monitor.
2. Switch the power on to the monitor.
3. Then switch the power on to the computer.
4. When you see the LED on the power button go blue, and the other button go green,
this indicates the computer is ready for use. Allow about 10 seconds for the video
signal to appear. If you do not see the blue light on the power button or a video signal,
check the connections.
4
Page 5

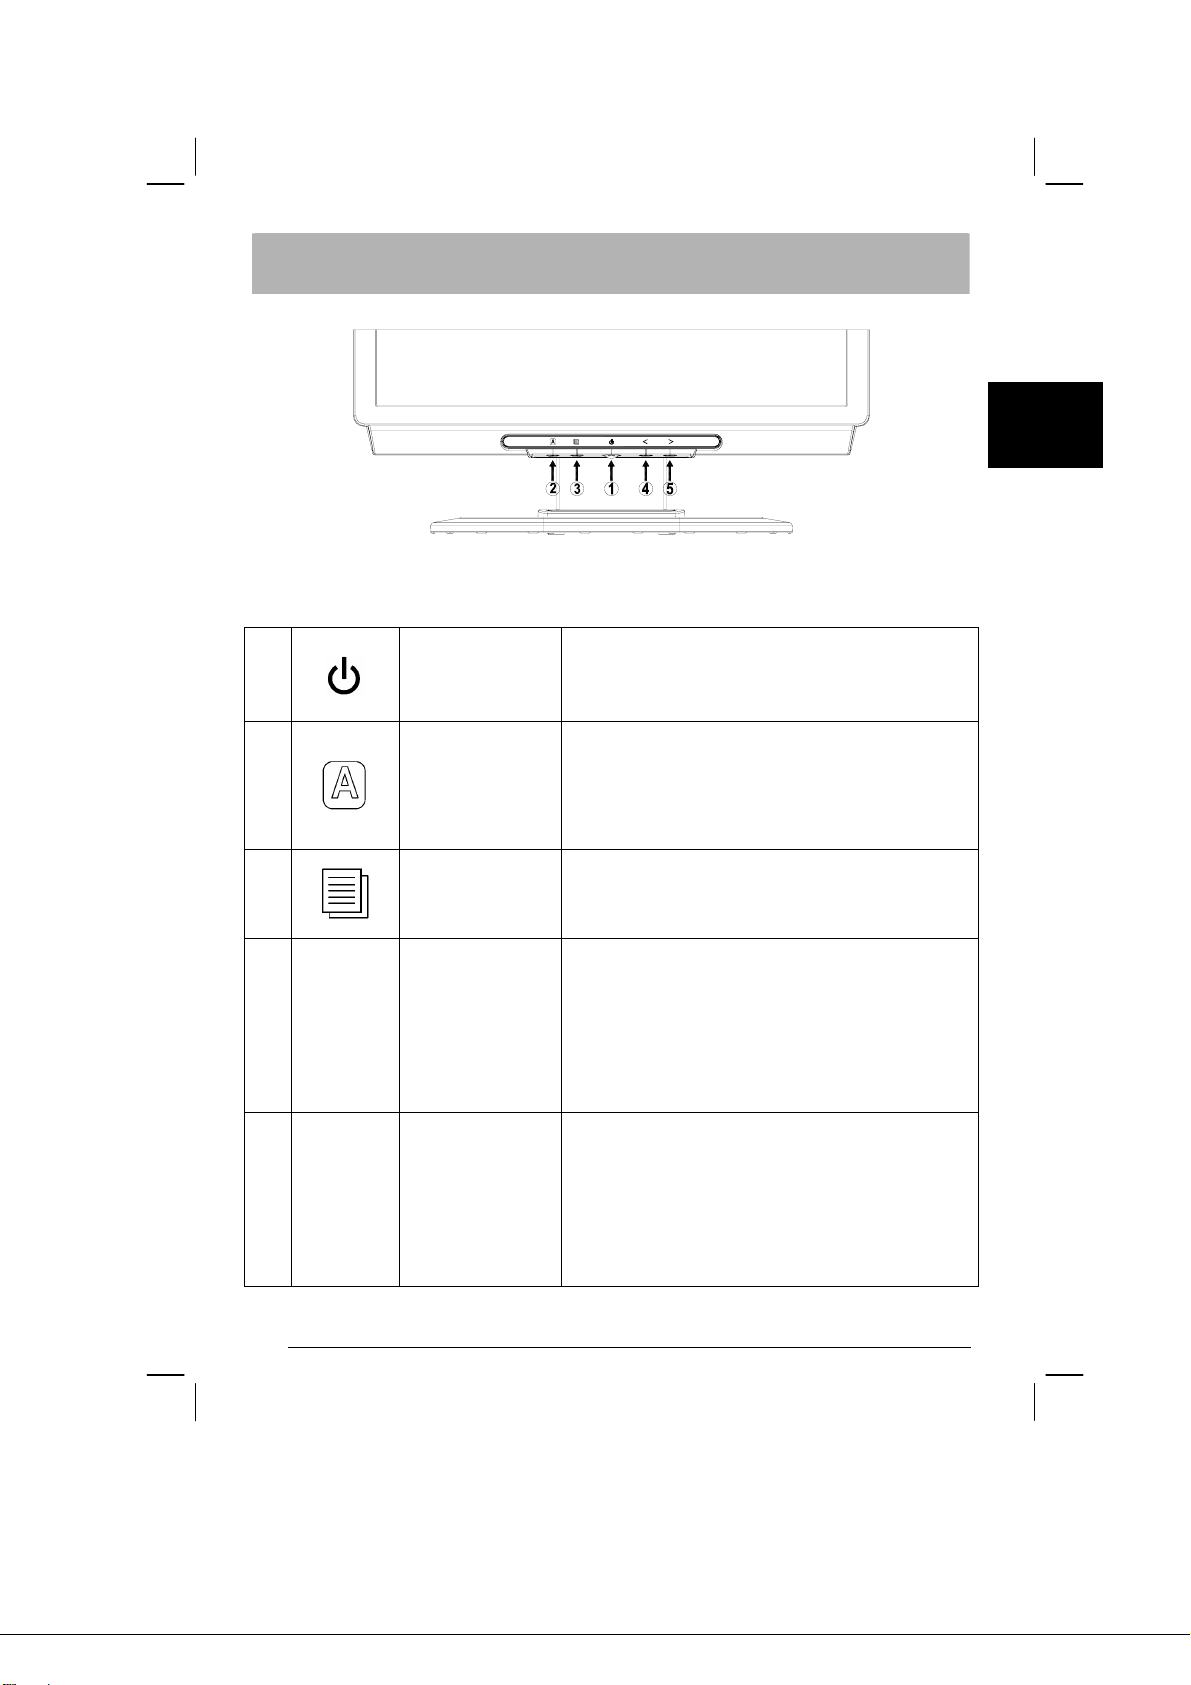
Adjusting display settings
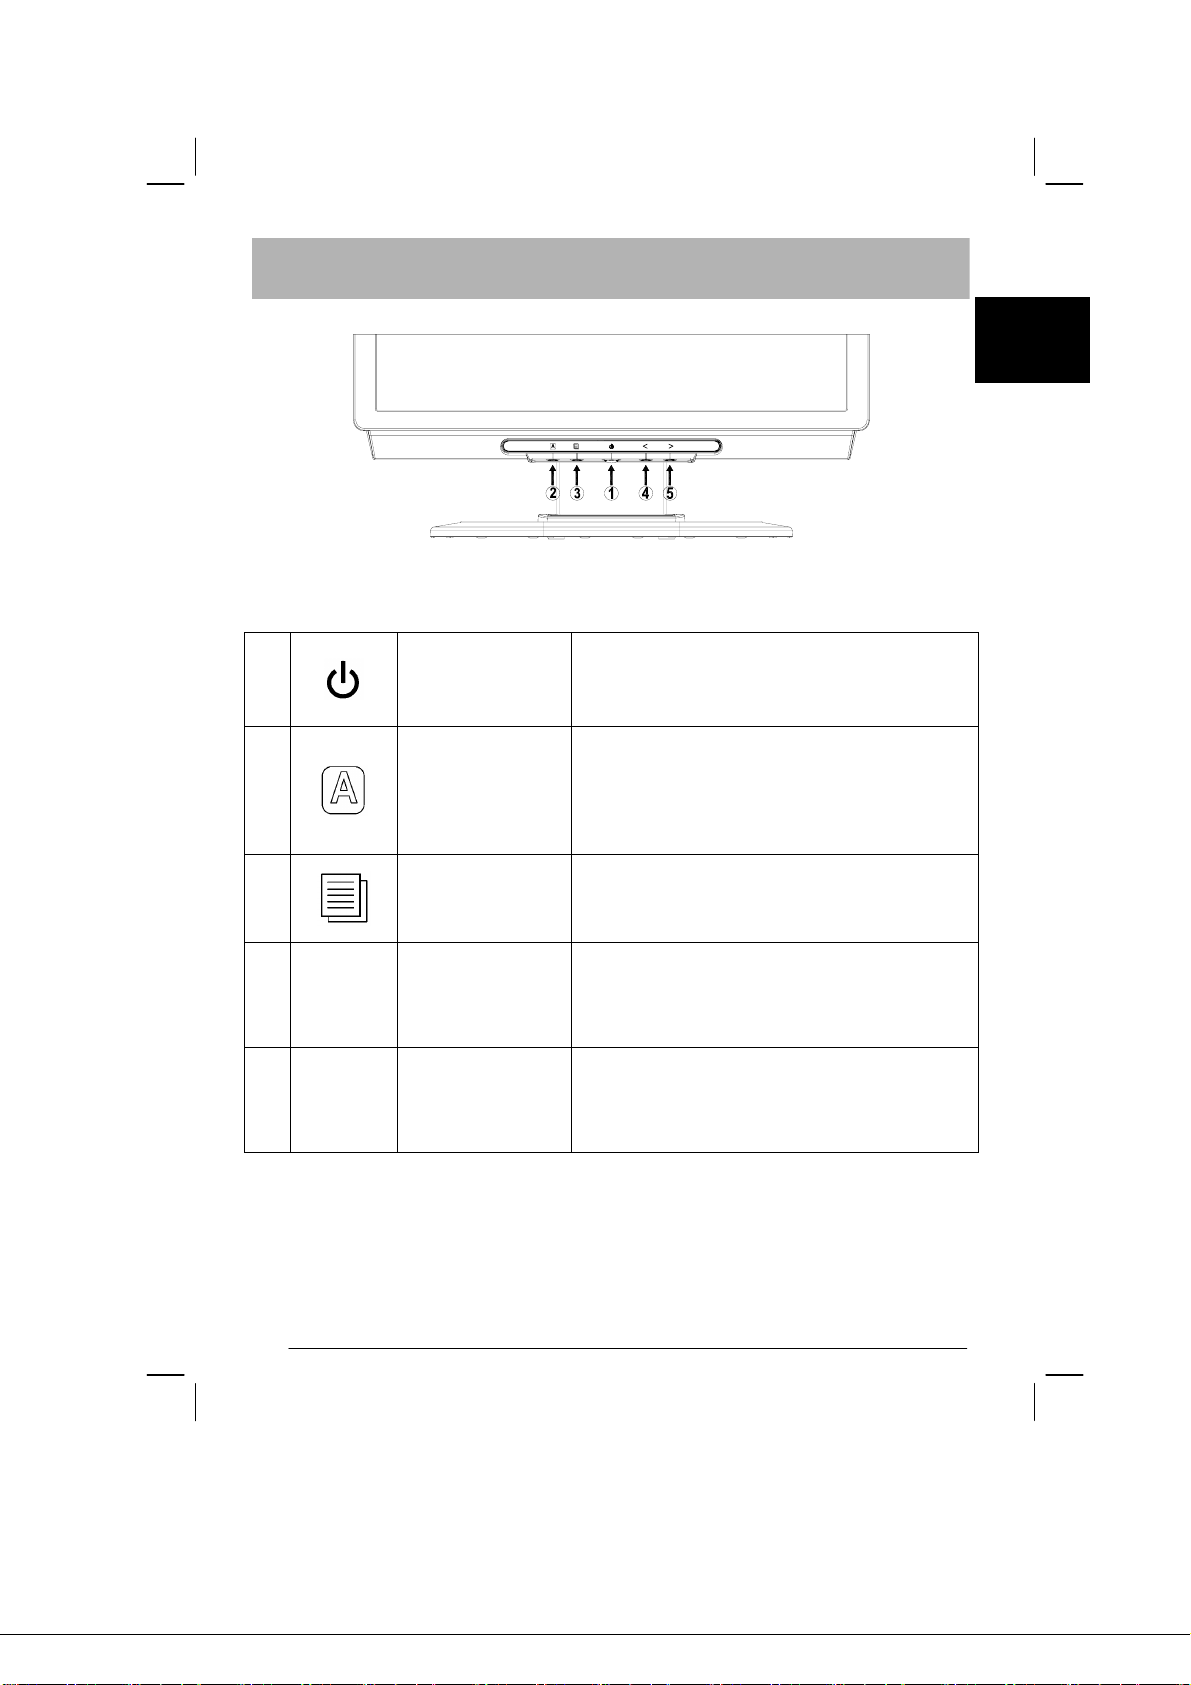
External Controls
1
2
3
POWER
AUTO
OSD Function
Power on/off
Blue: power on
Orange: in sleep mode
If OSD is active, press to exit a selection in
OSD. If OSD is inactive, press and the monitor
will automatically optimize the position, focus
and clock of your display.
Press to view OSD.
Press again to enter a selection in OSD.
English
If OSD is active, press to select or adjust OSD
4
5
<
>
MINUS
PLUS
options. If OSD is inactive, press once, then
press the buttons marked < or > to adjust the
volume.
If OSD is active, press to select or adjust OSD
options. If OSD is inactive, press once, then
press the buttons marked < or > to adjust the
volume.
5
Page 6

English
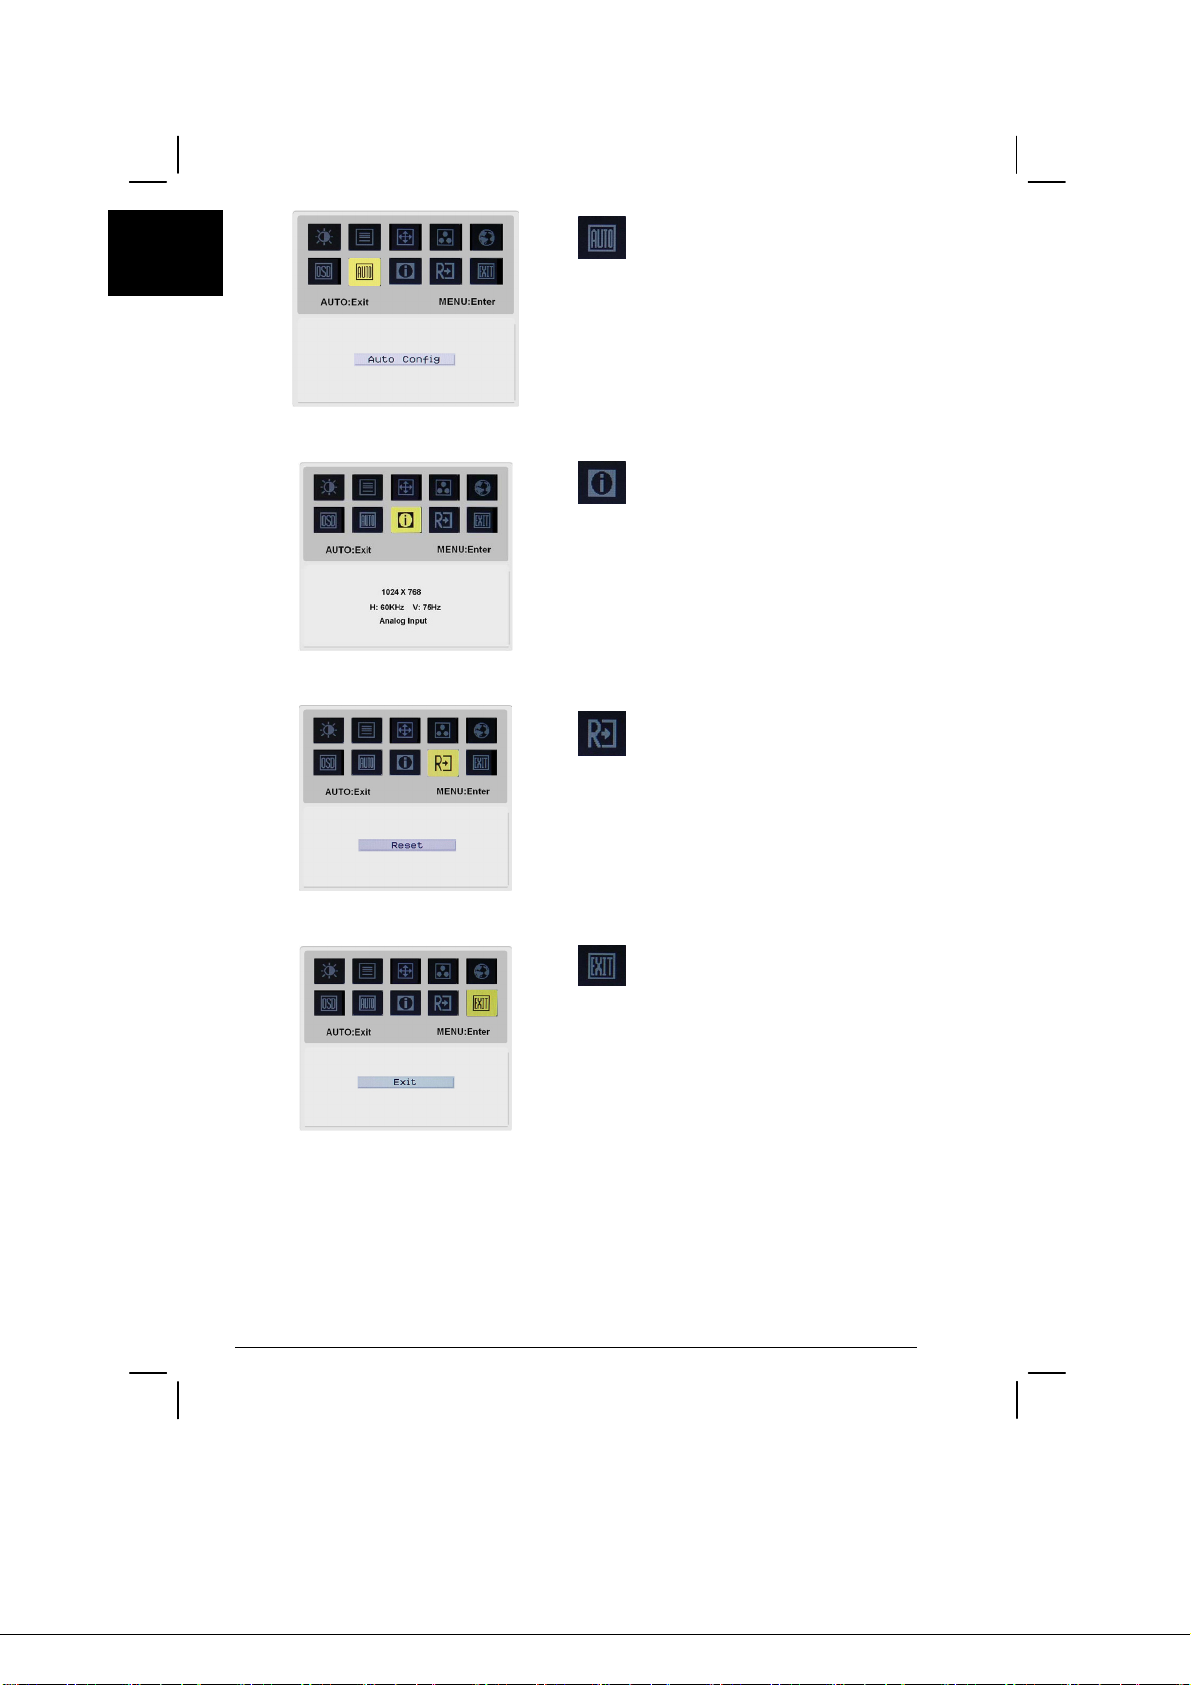
OSD options
Please refer to "External Controls" on Page 5.
To adjust the OSD settings:
1. Press the MENU button to open the OSD menu. Press again to enter a selection
of 10 functions on OSD.
2. Use the buttons marked < or >, to highlight a control, then adjust the control to
the desired level.
3. When you have finished making all selections, press the AUTO button to exit
the OSD.
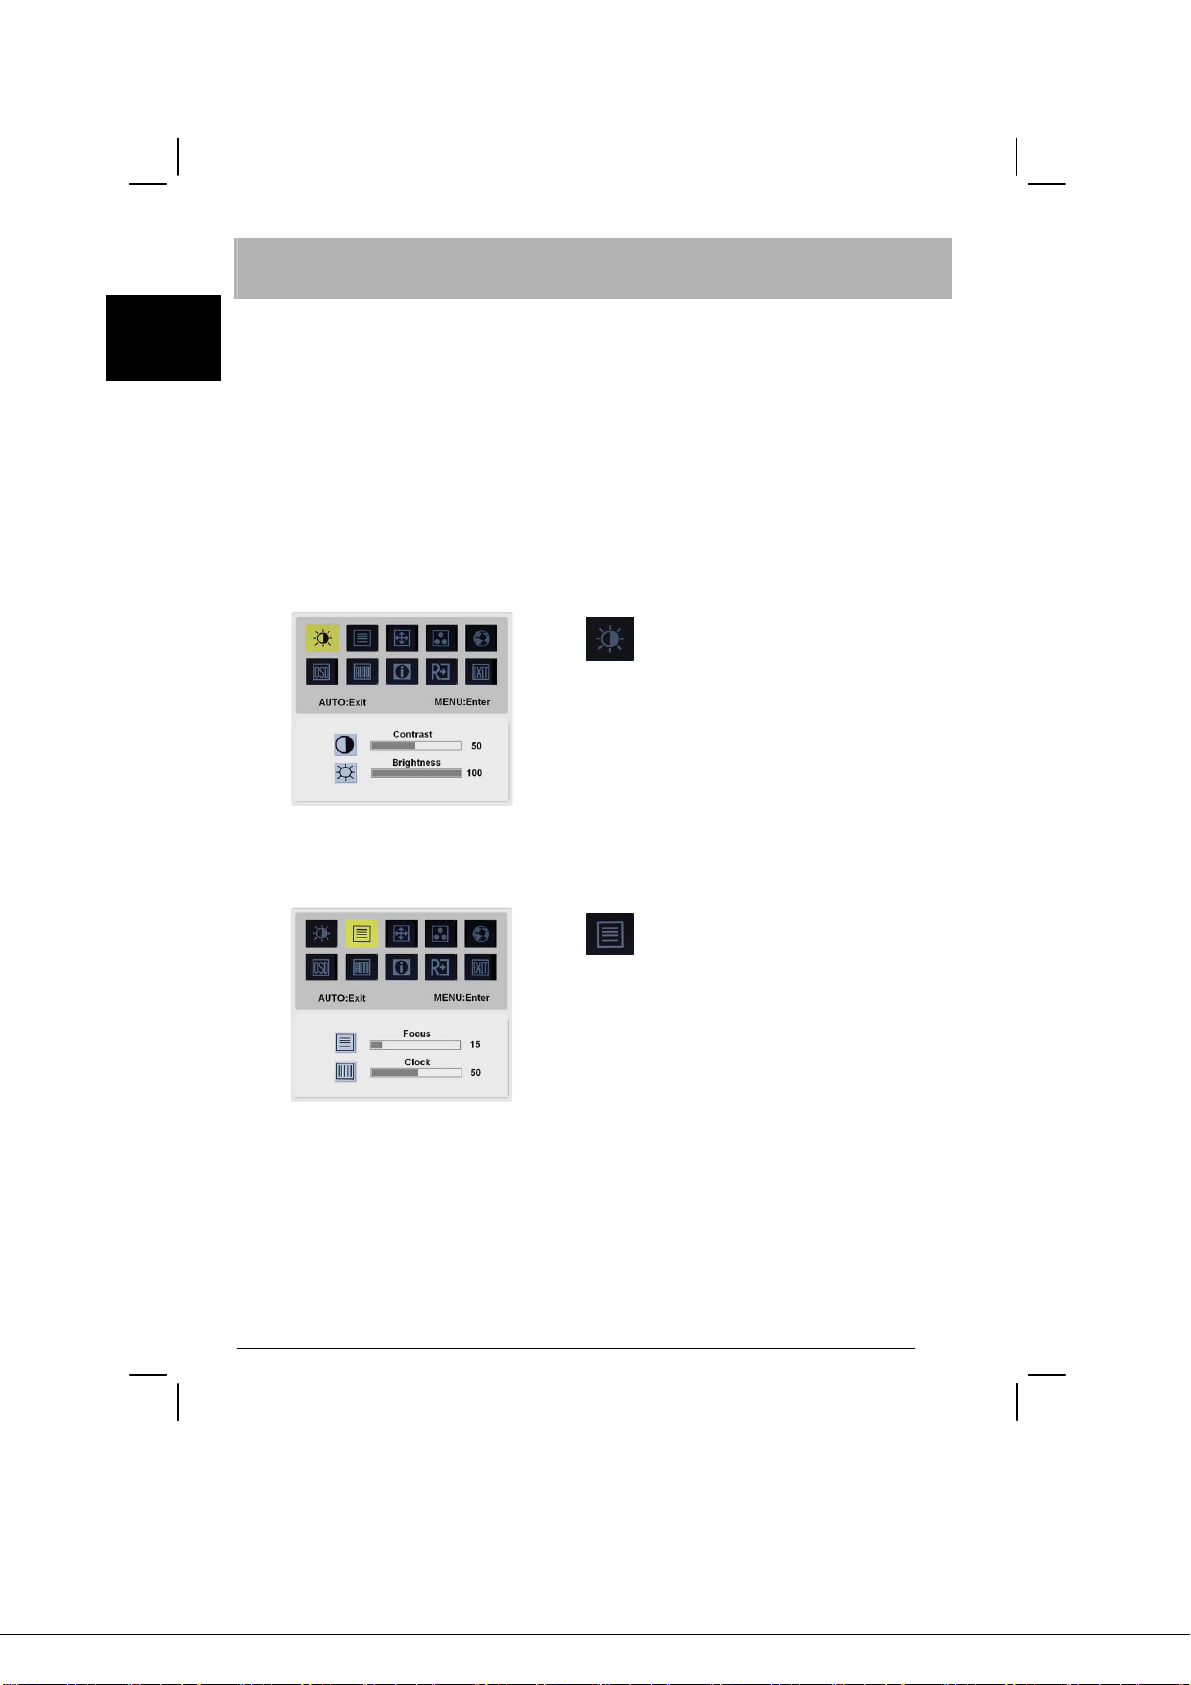
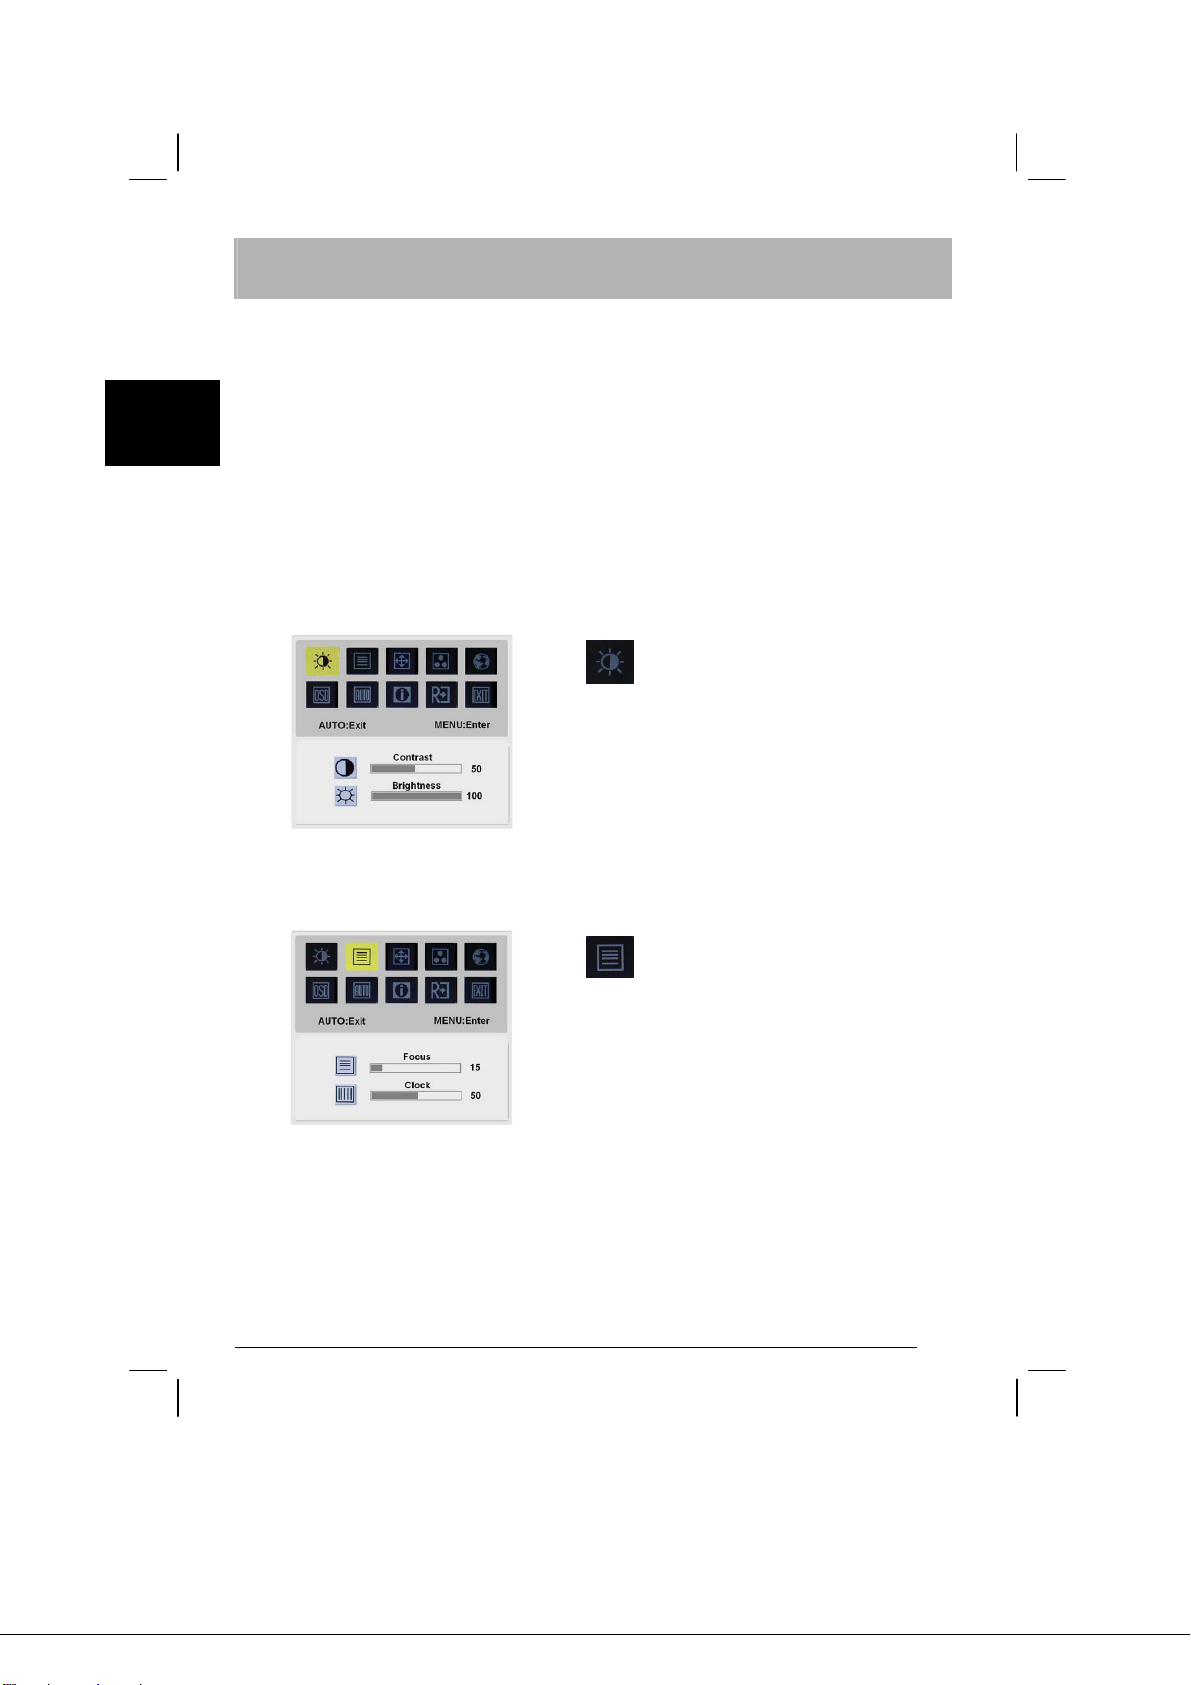
OSD Menu
Contrast:
This adjusts dark and light shades of color
relative to each other to achieve a
comfortable contrast.
Brightness:
This adjusts the brightness of the picture on
the screen.
Focus:
This removes any horizontal distortion and
makes the picture clear and sharp.
Clock:
If there are any vertical stripes seen on the
background of the screen this renders them
less noticeable by minimizing their size. It
also changes the size of the horizontal
screen.
6
Page 7
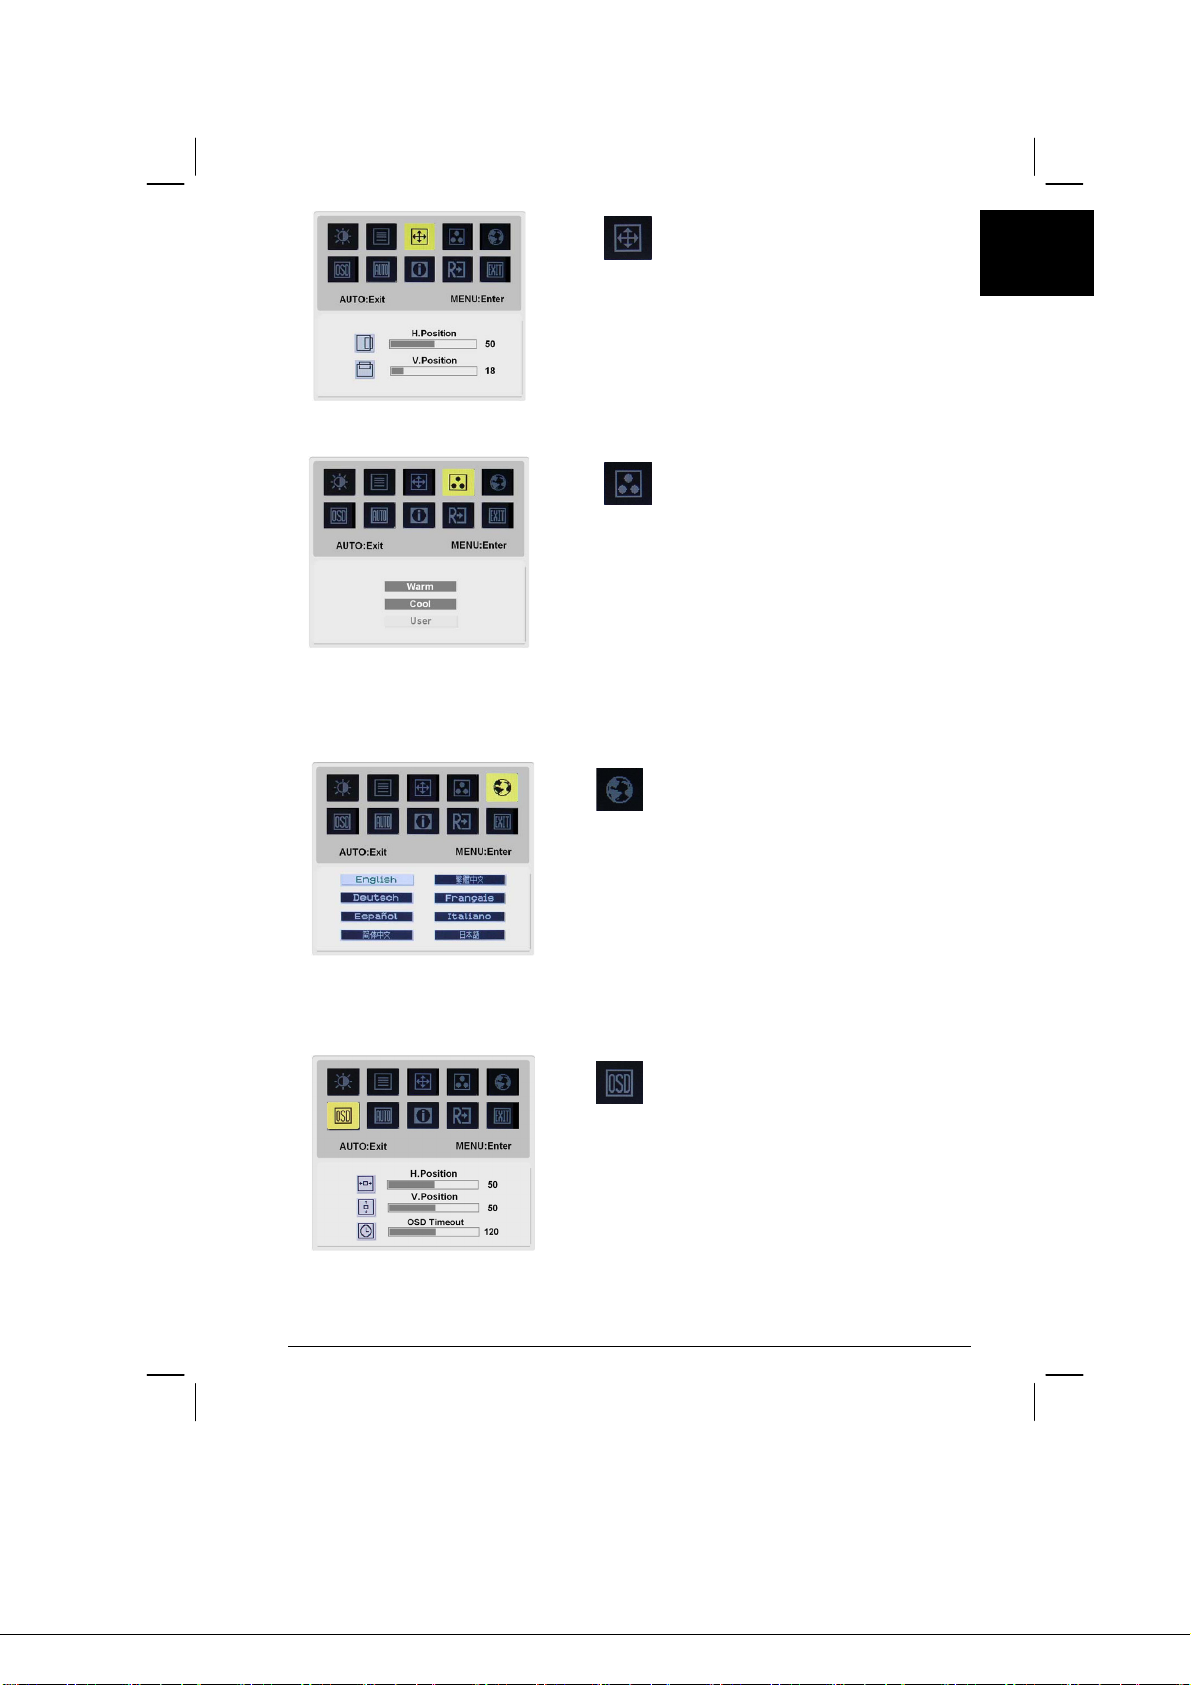
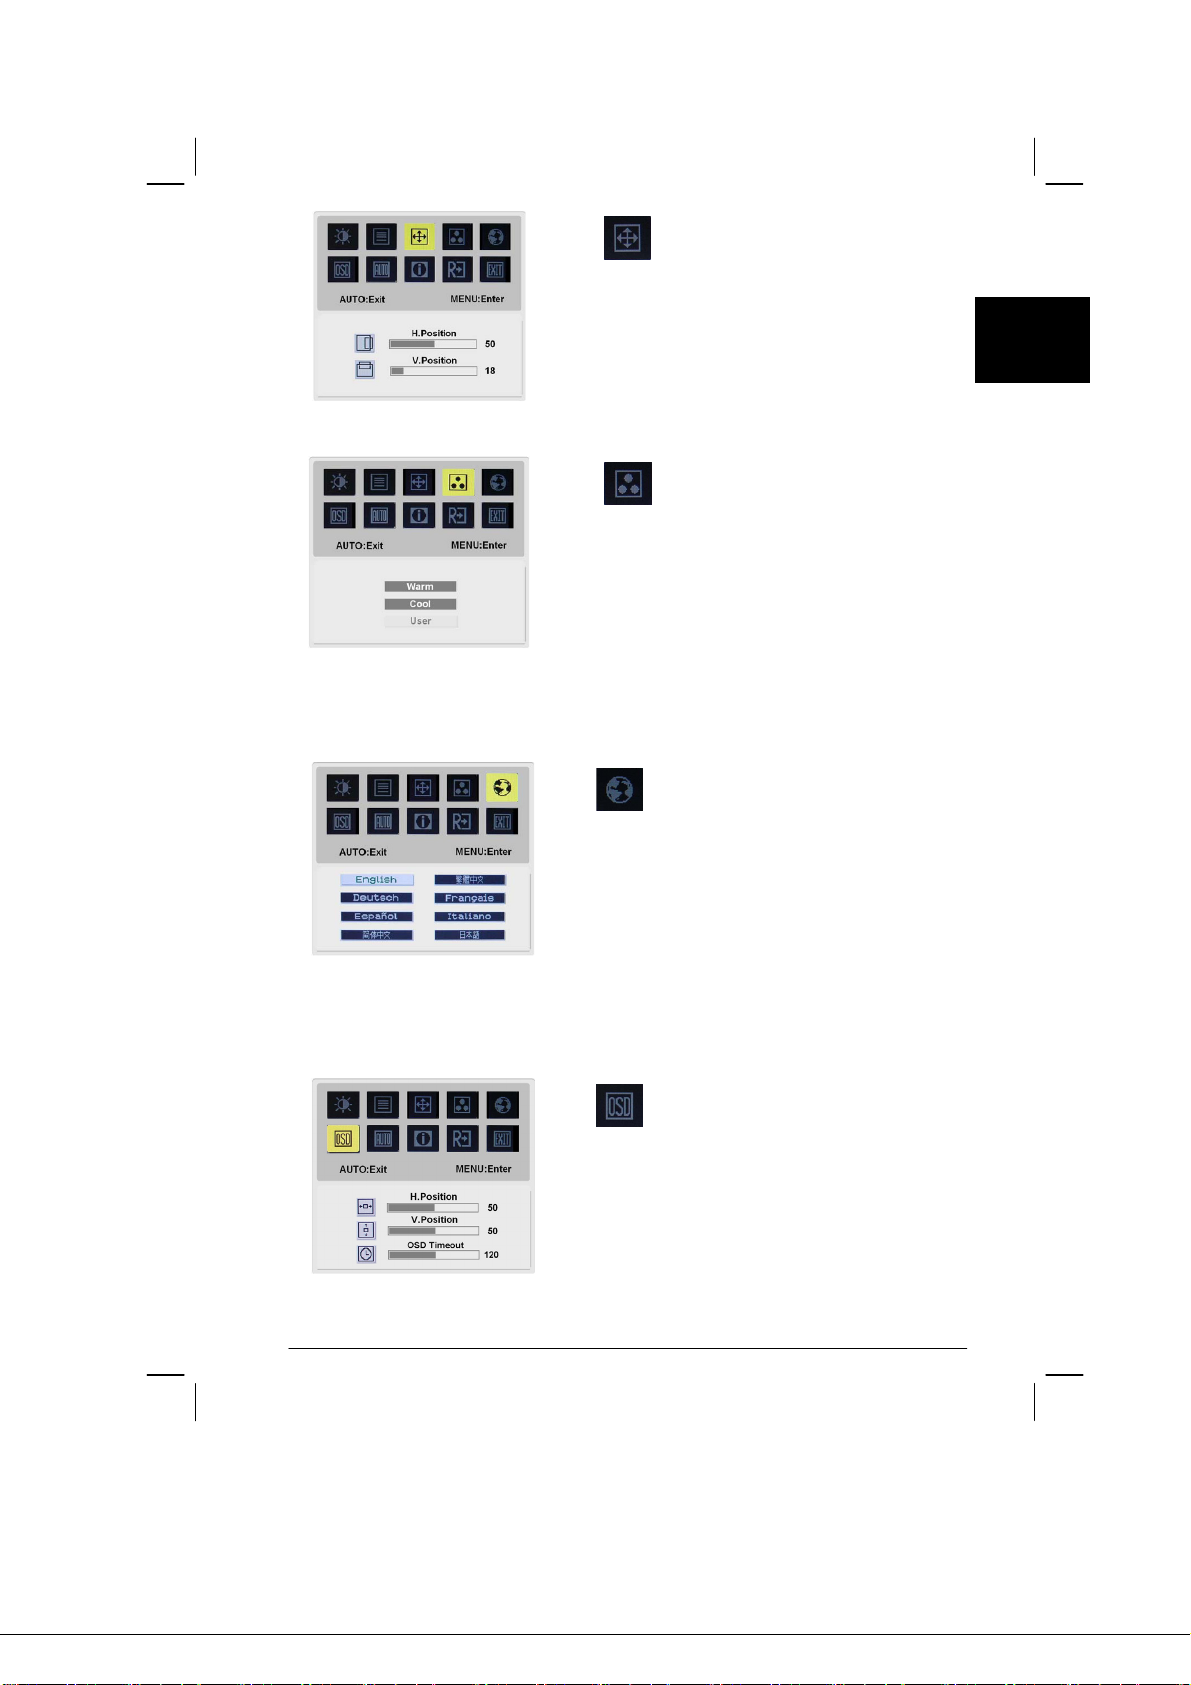
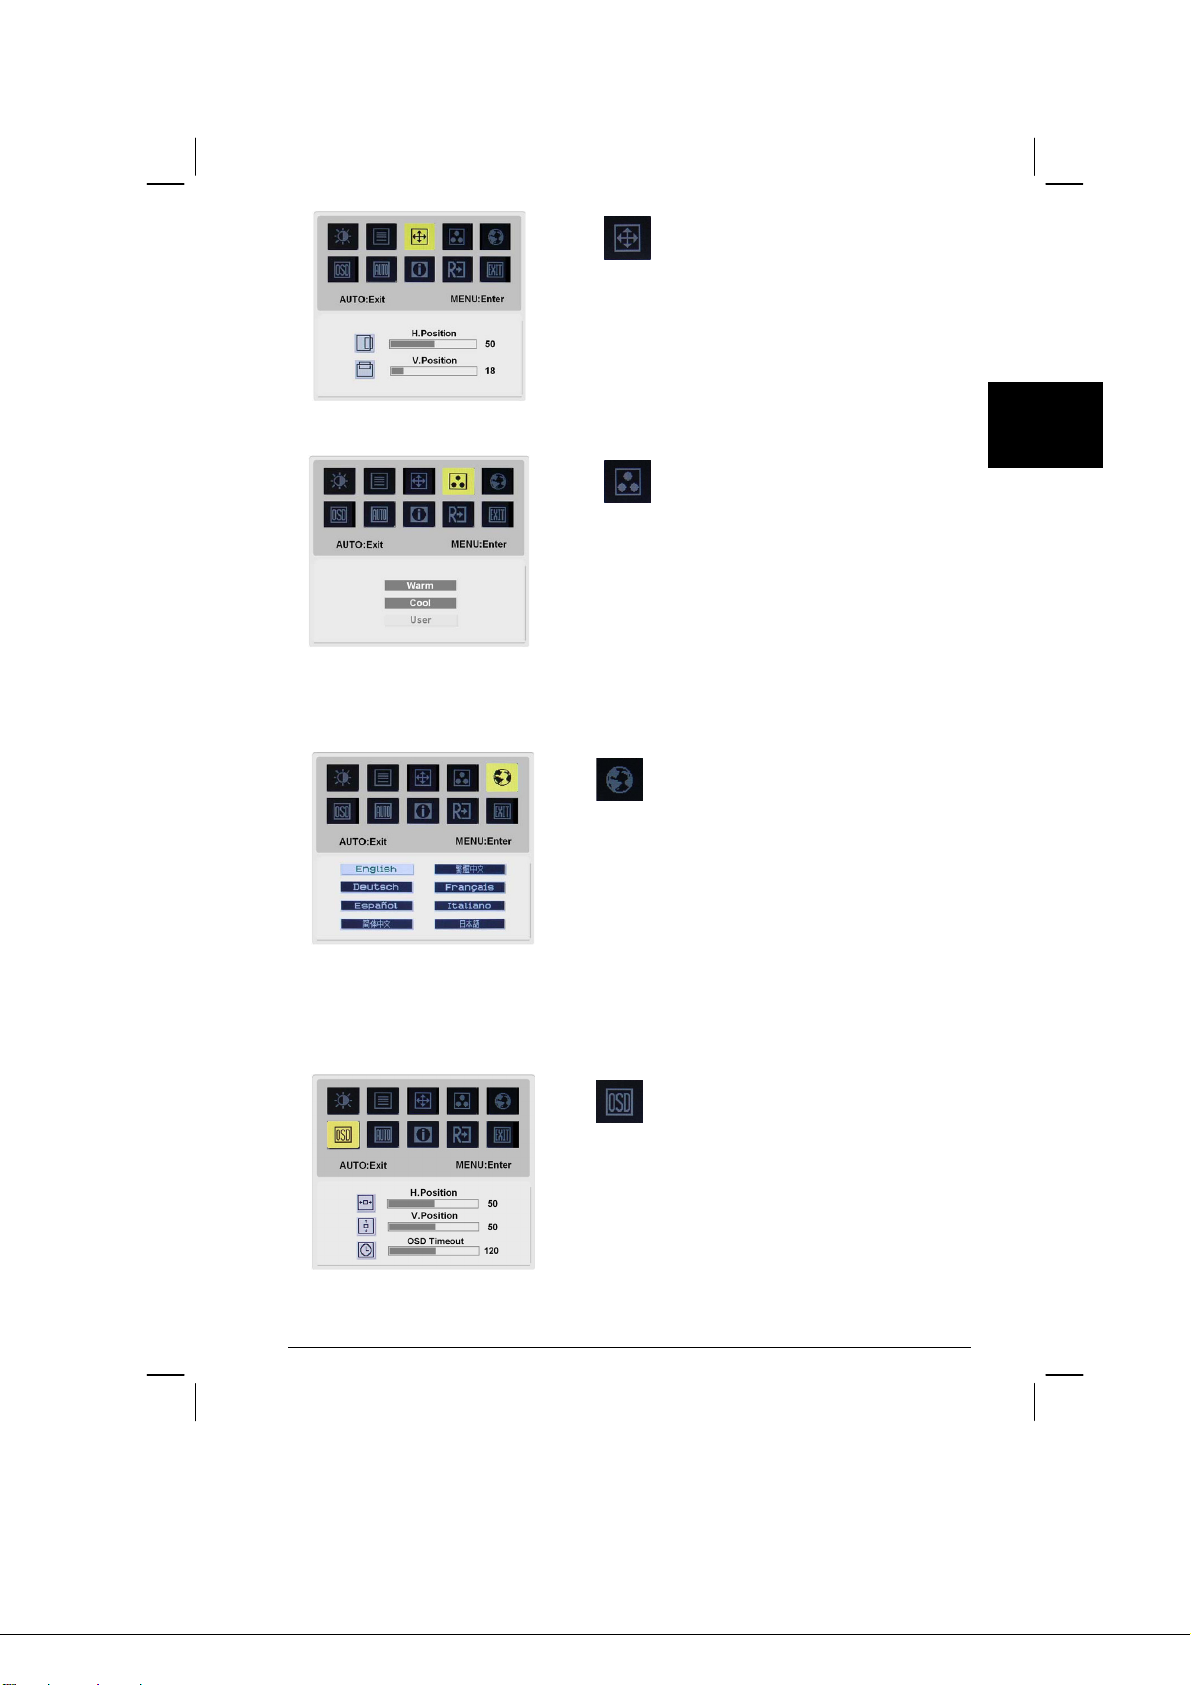
H-Position:
This adjusts the horizontal.
V-Position:
This adjusts the vertical.
English
COLOR:
There are three ways of adjusting color:
Warm (Reddish white)
Cool (Bluish white)
User defined:
You can adjust the colors red, green and blue
to the intensity you desire.
LANGUAGE:
Select the OSD menu language from
English-English, Deutsch -German,
Español-Spanish, 简体中文-Simplified
Chinese, 繁體中文-Traditional Chinese,
Français -French, Italiano -Italian,
and 日本語-Japanese.
OSD SETTING:
H-Position
V-Position
OSD Timeout
This changes the position of the OSD window
on the screen and staying time.
7
Page 8
English
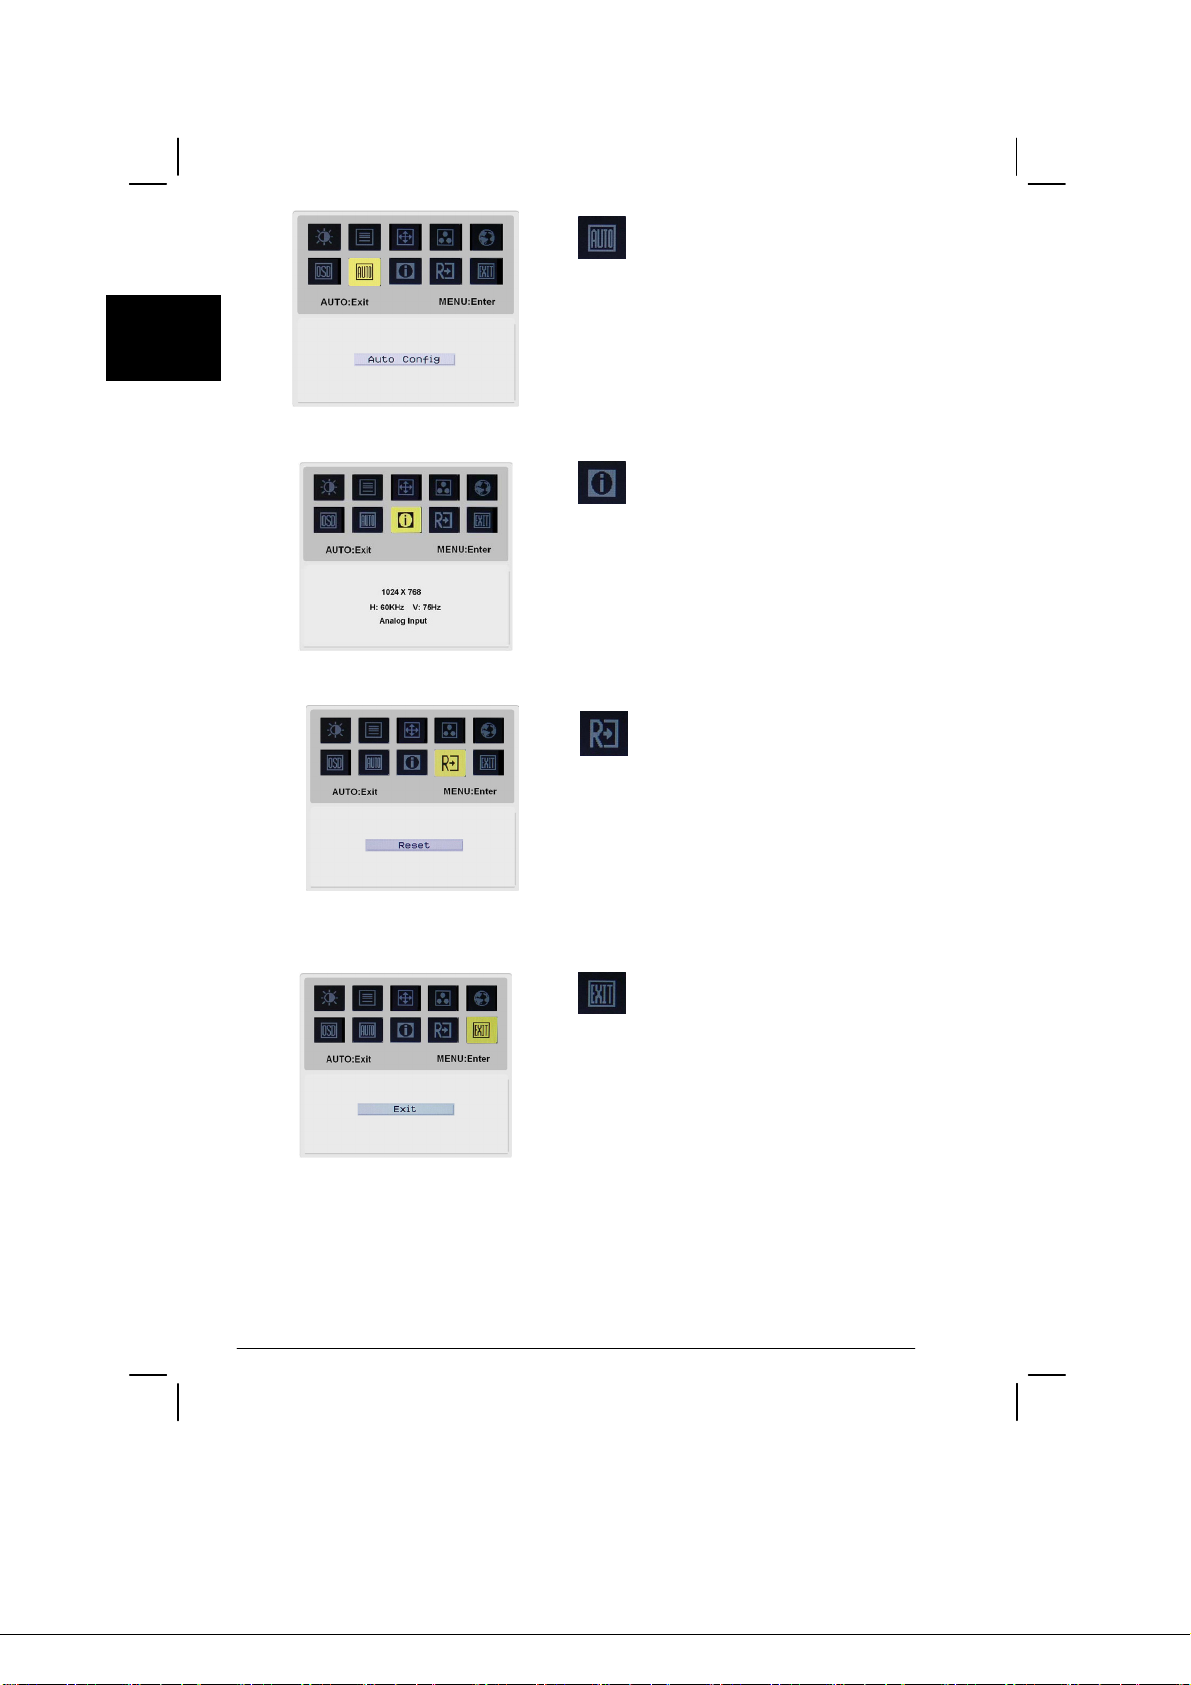
Auto Config :
System runs auto-configuration.
INFORMATION:
This shows brief information on the screen.
Reset:
Recall to default settings.
Exit:
Exit from OSD.
8
Page 9
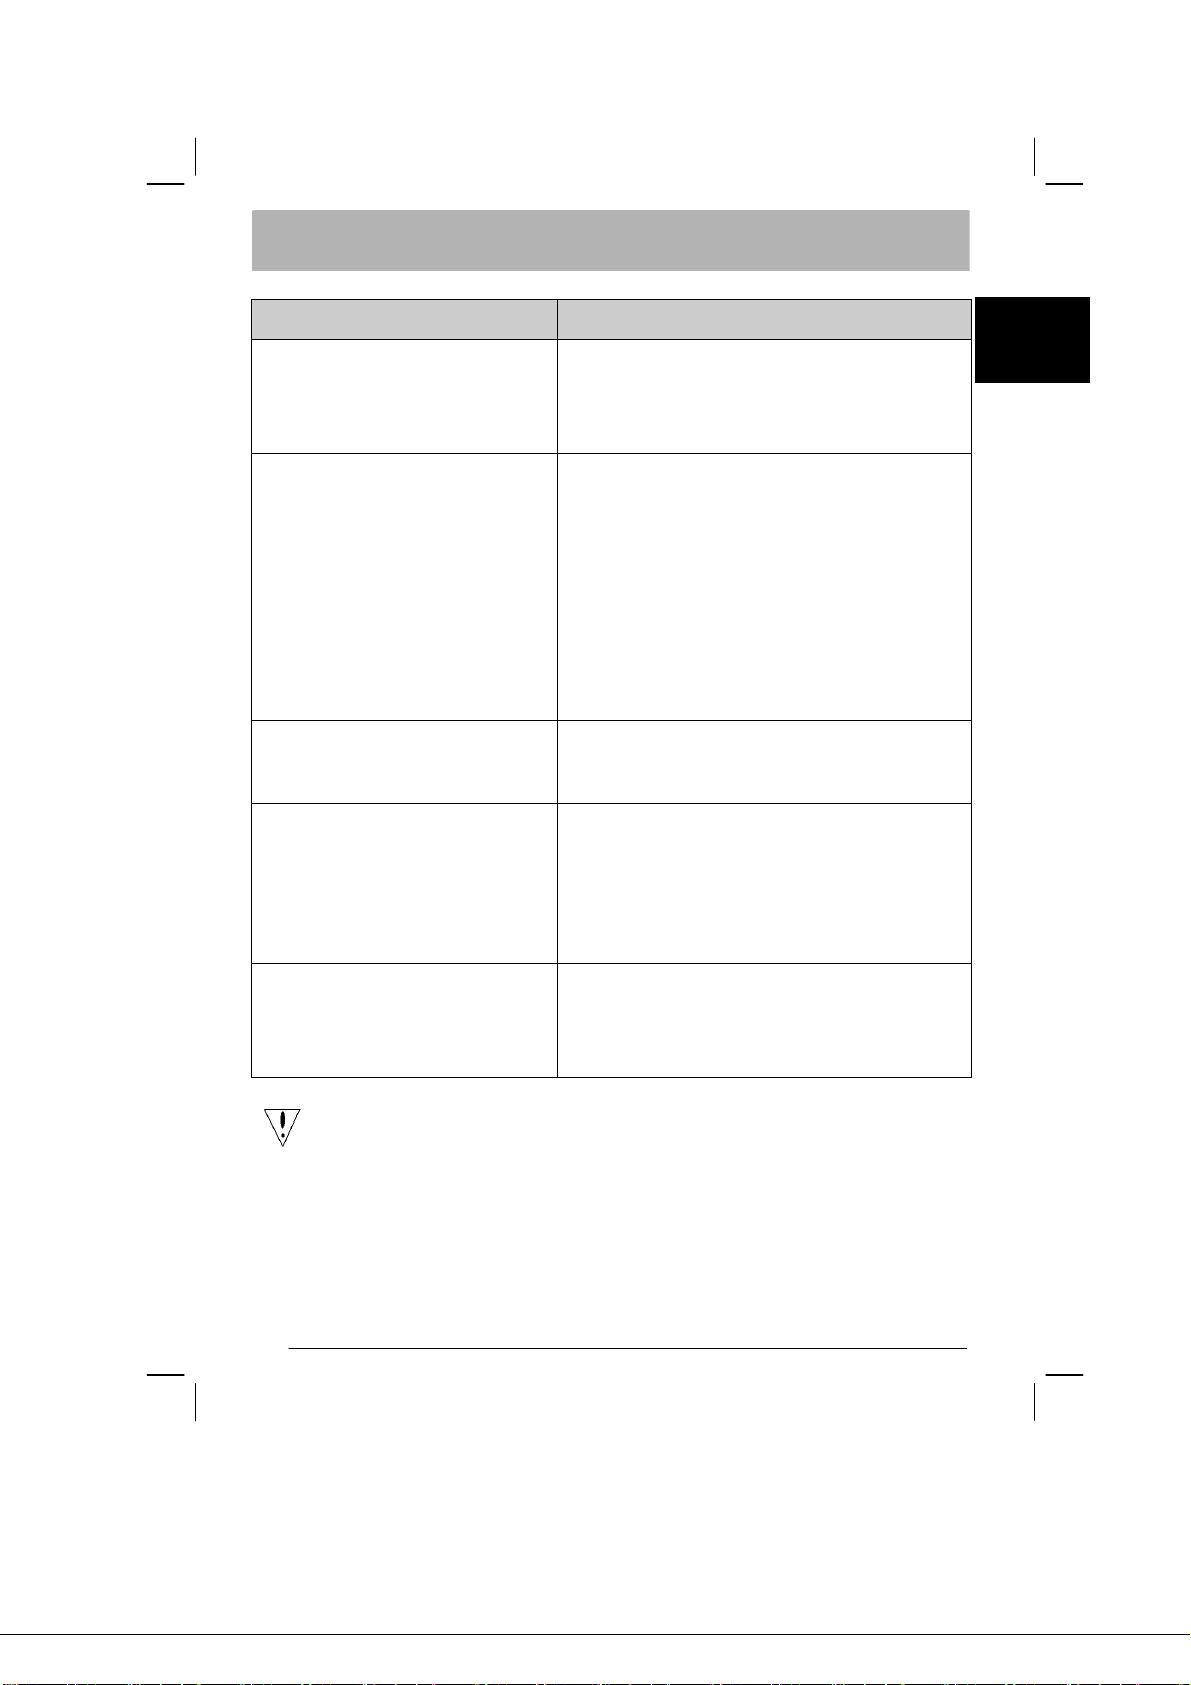
Troubleshooting
Problems Possible Solutions
Power LED is not ON
No Picture
Picture shows inappropriate colors
Picture bounces or a wave pattern
is present in the picture
English
• Check to see if the power switch is in the
ON position.
• Ensure that the Power Cord is connected.
• Check to see if the power switch is in the
ON position.
• Ensure that the Power Cord is connected.
• Ensure the video cable is securely
connected to the back of the monitor and
the computer.
• Move the mouse or press any key on the
keyboard to bring the monitor out of "active
off" mode.
• See "Color Adjustment" to adjust RGB
color or to select color temperature.
• Move or switch off electrical devices that
may be causing interference.
• Inspect the monitor's video cable and ensure
that none of the pins are bent.
Image is not sized or centered
properly
Caution: Do not attempt to service the monitor yourself or open the computer
yourself. Please refer all servicing to qualified service personnel if
the problems cannot be solved in "Troubleshooting" section.
• Press select/auto key and the monitor will
automatically optimize the position of your
display.
• See "Position adjustment".
9
Page 10
English
General specifications
Item Specification
LCD Panel
Display 20-inch Flat panel active-matrix TFT LCD
Max resolution UXGA 1600×1200 pixels
Pixel Pitch 0.255 mm
Color 16.7M
Brightness 250 cd/m² (Typical)
Contrast Ratio 600:1 (Typical)
Response Time 15ms +10ms /25ms (Tr+Tf / typical)
View Angle of Horizontal 85° / 85° (Min.)
View Angle of Vertical 85° / 85° (Min.)
External Controls
Power Button ON/ OFF
Control Buttons AUTO, MENU, < , >
OSD Function
Contrast / Brightness Contrast / Brightness
Focus / Clock Focus / Clock
Position Position
Color Color
Language Language
OSD setting OSD setting
Auto config Auto config
Information Information
Reset Reset
Exit Exit
Video Interface
Video Analog 0.7V / Digital TMDS
Sync TTL (+/ -)
Audio 2W x 2
Plug & Play DDC2B
Power
Power Source 100~240V AC, 50/60 Hz
Power consumption during normal
operation
Power consumption during active off
operation
Dimension and Weight
Dimension (W×H×D) 449X439X197 mm (with stand)
449X426X134 mm (without stand)
Weight (Net/ Gross) 7.0 Kg/ 9.2 Kg
< 60W
< 3W
10
Page 11
Table des matières
Précautions.................................................................................................................... 11
Contenus de l'emballage .............................................................................................. 12
Instructions d'Installation............................................................................................ 12
Assembler l'écran....................................................................................................... 12
Détacher l'écran ......................................................................................................... 13
Ajustement de l'angle de vue ..................................................................................... 13
Connexion des Appareils........................................................................................... 13
Mise en marche par interrupteur................................................................................ 14
Ajustement des réglages de l'affichage ....................................................................... 15
Contrôles Externes..................................................................................................... 15
Options de l'OSD .......................................................................................................... 16
Menu de l'OSD ......................................................................................................... 16
Dépannage..................................................................................................................... 19
Spécifications Générales............................................................................................... 20
Français
Précautions
• L'écran peut être endommagé s'il est place trop près d'une source de
chaleur. Restez conscient par rapport à l'emplacement des radiateurs,
cuisinières, des feux ouverts etc.
• Ne couvrez pas les fentes et ouvertures de l'arrière ou du haut du meuble
comme l'écran requiert d'être ventilé. L'écran doit être situé dans une
pièce bien ventilée pour éviter toute possibilité de surchauffe.
• Ne laissez pas d'objets pointus comme des couteaux, stylos, ou crayons
près de l'écran. Si de tels objets touchent l'écran, le panneau LCD sera
rayé de manière permanente.
• Quand vous nettoyez cet écran, débranchez la prise électrique pour éviter
tout risque d'électrocution. Un chiffon doux et sans ouate doit être utilisé
pour nettoyer l'extérieur de l'écran. Un chiffon très légèrement mouillé
avec une solution détergente douce effacera les taches les plus
résistantes. Gardez les liquides éloignés de l'écran d'affichage, incluant
les aérosols. Ne vaporisez pas de liquides directement – il est préférable
de vaporiser légèrement sur un chiffon et d'essuyer. Si le liquide pénètre
à l'intérieur de l'écran cela peut causer un choc électrique et/ou
endommager toute l'unité.
• Si vous rencontrez un problème, veuillez vous référer la section
"Dépannage" d'abord. Si cela ne résout pas le problème n'essayez pas de
réparer l'écran vous-même; ouvrir ou enlever les couvercles peut
conduire à la blessure ou à la mort par électrocution entre autres
dangers. Contactez un ingénieur qualifié si la section dépannage ne vous
aide pas.
11
Page 12
Français
Ecran LCD
Câble VGA
Contenus de l'Emballage
Cordon d'alimentation
Câble DVI-D
Instructions d'installation
Câble Audio
Manuel de l'Utilisateur
Assemblage de l'écran
1. Le long de la ligne tracée, tournez à
90° pour la base.
Important
Premièrement, trouvez une surface propre, plate pour placer l'écran après l'avoir retiré de
son support. Placez un chiffon propre et sec sous l'écran pour le protéger davantage.
2. Posez l'écran sur une table plate ou
sur une plaque.
12
Page 13
Remballage de l'écran
Gardez la boite originale et le matériel d'emballage in case
vous auriez à expédier ou transporter l'écran.
Remballez l'écran:
1. Débranchez le cordon d'alimentation AC pour être sûr que
courant est coupé.
2. Tournez la base pour fermer l'écran comme sur l'image de gauche.
Mettez-le dans le carton。
Ajustement de l'Angle de vue
L'échelle de l'angle de vue de l'écran est compris entre -5°~20°
Connexion des appareils
Précaution: Assurez-vous que l'ordinateur et l'écran sont tous les deux
Connecter A: Ecran-au-Cable PC VGA
déconnectés de la source de courant.
Français
Connecter B: Ecran-au- Câble PC DVI-D
13
Page 14
c
Code Courant Fixez l'écran au cordon d'alimentation qui doit donc être
inséré dans une prise de terre correctement.
d
Français
Câble VGA Connectez le câble signal à la prise de sortie VGA de la
carte graphique sur l'ordinateur. Puis serrez les vis sur le
connecteur.
e
Câble Audio
f
Câble DVI-D Branchez le câble de signal à la prise de sortie DVI-D de la
Branchez la prise d'entrée audio de l'écran LCD et de
l'ordinateur avec le câble audio.
carte graphique sur l'ordinateur. Puis serrez les vis sur le
connecteur.
!AVERTISSEMENT:
1. Assurez vous que la carte VGA de votre ordinateur est connecté au bon câble.
2. Assurez vous que la forme de la prise corresponde à la forme de la prise dans
laquelle elle sera insérée.Et qu'aucune des broches ne soit courbée voire
endommagée.
VGA
DVI-D
Mise en marche par interrupteur
1. Premièrement, poussez l'interrupteur de mise en marche situé à côté de la prise de
courant AC de l'écran.
2. Mettez l'écran sous tension.
3. Puis mettez l'ordinateur sous tension.
4. Quand vous voyez le voyant sur le bouton de tension devenir bleu, et les autres
boutons devenir vert , cela indique que l'ordinateur est prêt à l'emploi. Laissez environ
10 secondes pour que le signal vidéo apparaisse. Si vous ne voyez pas la lumière
bleue sur le bouton de tension ou un signal vidéo, vérifiez les connexions.
14
Page 15
Ajustement des réglages de l'affichage
Contrôles Externes
1
2
ALIMENTATION
AUTO
Français
Marche/Arrêt
Bleu: marche
Orange: en mode sommeil
Si l'OSD est actif, pressez pour quitter une
sélection dans l'OSD. Si l'OSD est inactif,
appuyez et l'écran optimisera automatiquement
la position, la netteté et la fréquence de votre
affichage.
Pressez pour voir l'OSD.
3
4
5
<
>
Fonction OSD
MOINS
PLUS
Pressez une autre fois pour entrer une sélection
dans l'OSD.
Si l'OSD est actif, pressez pour sélectionner ou
ajuster les options de l'OSD. Si l'OSD est
inactif, pressez une fois, puis pressez les
boutons marqués < ou > pour ajuster le volume.
Si l'OSD est actif, pressez pour sélectionner ou
ajuster les options de l'OSD Si l'OSD est
inactif, pressez une fois, puis pressez les
boutons marqués < ou > pour ajuster le volume.
15
Page 16
Options de l'OSD
Français
Veuillez vous référer à "contrôles Externes" en Page 5.
Pour ajuster les réglages de l'OSD:
1. Pressez le bouton MENU pour ouvrir le menu de l'OSD. Pressez encore pour entrer
une sélection de 10 fonctions sur l'OSD.
2. Utilisez les boutons marques < ou >, pour mettre en surbrillance une commande,
puis ajuster la commande vers le niveau désiré.
3. Quand vous avez fini toutes les sélections, pressez sur AUTO pour quitter l'OSD.
Menu OSD
Contraste:
Ceci ajuste l'aspect sombre et clair des
couleurs respectives à chacune pour atteindre
un contraste confortable.
Luminosité:
Ceci ajuste la luminosité de l'image sur
l'écran.
16
Netteté:
Ceci enlève toute déformation horizontale et
rend l'image claire et fine.
Fréquence:
S'il y a des rayures verticales visibles dans
le fond de l'écran ceci les rendra moins
perceptibles en minimisant leur taille. Cela
change aussi la taille horizontale de l'écran.
Page 17
H.Position:
Ceci ajuste l'horizontale.
V.Position:
Ceci ajuste la verticale.
Français
COULEUR:
Il y a trois façons d'ajuster la couleur:
Chaud (blanc rougeâtre)
Clair (blanc bleuté)
Utilisateur défini:
Vous pouvez ajuster les couleurs rouge, vert
et bleue vers l'intensité désirée.
LANGUE:
Sélectionnez la langue de l'OSD sur le menu
des langues
English- Anglais, Deutsch -Allemand,
Español- Espagnol, 简体中文-Chinois
Simplifié, 繁體中文- Chinois Traditionnel,
Français -Français, Italiano -Italien,
et 日本語-Japonais.
REGLAGE DE L'OSD:
H.Position
V.Position
Délai de l'OSD
Ceci change la position de la fenêtre de l'OSD
sur l'écran et le temps d'attente.
17
Page 18
Français
Autoréglage:
Le Système gère la Autoréglage.
INFORMATION:
Ceci montre une brève information sur
l'écran.
Restaurer:
Rappel vers les réglages par défaut.
Quitter:
Quitter OSD.
18
Page 19
Dépannage
Problèmes Solutions Possibles
Le voyant LED n'est pas sous
tension
Pas d'image
L'image montre des couleurs
inappropriées
L'image rebondit ou un dessin de
vague est présent sur l'image
• Vérifiez si l'interrupteur est dans la position
"ON" (en marche).
• Assurez-vous que le cordon d'alimentation
est branché.
• Vérifiez si l'interrupteur est dans la position
"ON" (en marche).
• Assurez-vous que le cordon d'alimentation
est branché.
• Assurez-vous que le câble vidéo est branché
en sûreté au derrière de l'écran et de
l'ordinateur
• Déplacez la souris ou presses une touché du
clavier pour mettre l'écran hors mode
inactif. ("active off") .
• Voir "Ajustement de couleur" pour ajuster
la couleur RVB ou sélectionnez la
température de couleur.
• Déplacez ou éteignez les appareils
électriques qui peuvent causer des
interférences.
• Inspectez le câble vidéo de l'écran et
assurez-vous qu'aucune des broches ne soit
courbée.
Français
L'image n'est pas dimensionnée ou
centrée correctement
Précaution: N'essayez pas de réviser l'écran vous même ou d'ouvrir l'ordinateur
vous-même. Veuillez faire appel à un personnel qualifié pour toute
révision si les problèmes ne peuvent être résolus avec la partie
"Dépannages".
• Pressez la touché sélect/auto et l'écran
optimisera automatiquement la position de
votre affichage.
• Voir " Ajustement de Position ".
19
Page 20
Français
Spécifications Générales
Appareil Spécification
Panneau LCD
Affichage
Résolution Max. UXGA 1600×1200 pixels
Niveau de Pixels 0.255 mm
Couleur 16.7M
Luminosite 250 cd/m² (Typique)
Rapport de Contraste 600:1 (Typique)
Temps de Réponse 15ms +10ms /25ms (Tr+Tf / typique)
Angle de vue Horizontal 85° / 85° (Min.)
Angle de vue Vertical 85° / 85° (Min.)
Contrôles Externes
Bouton de Marche/Arrêt MARCHE/ ARRET (ON/OFF)
Boutons de contrôle AUTO, MENU, < , >
Fonctions de l'OSD
Contraste / Luminosite Contraste / Luminosite
Netteté / Fréquence Netteté / Fréquence
Position Position
Couleur Couleur
Langue Langue
Réglage de l'OSD Réglage de l'OSD
Config Auto Config Auto
Information Information
Restaurer Restaurer
Quitter Quitter
Interface Vidéo
Vidéo Analog 0.7V / TMDS Digitale
Sync TTL (+/ -)
Audio 2W x 2
Plug & Play DDC2B
Courant
Source de Courant 100~240V AC, 50/60 Hz
Consommation de courant pendant
fonctionnement normal
Consommation de courant pendant
fonctionnement inactif
Dimension et Poids
Dimension (L×H×l) 449X439X197 mm (avec support)
449X426X134 mm (sans support)
Poids (Net/ Global) 7.0 Kg/ 9.2 Kg
Panneau plat de 20-pouces matrice active TFT
LCD
< 60W
< 3W
20
Page 21
Inhaltsverzeichnis
Vorsichtsmaβnahmen................................................................................................... 21
Verpackungsinhalt ....................................................................................................... 22
Installationsanleitung................................................................................................... 22
Zusammensetzen des Monitors.................................................................................. 22
Wiederverpacken des Monitors ................................................................................. 23
Anpassen des Blickwinkels ....................................................................................... 23
Anschliessen der Peripheriegeräte............................................................................. 23
Stromanschluβ ........................................................................................................... 24
Einstellen des Displays ................................................................................................ 25
Externe Kontrollen..................................................................................................... 25
OSD Optionen............................................................................................................... 26
OSD Menű................................................................................................................. 26
Troubleshooting............................................................................................................ 29
Allgemeine Spezifikationen.......................................................................................... 30
Deutsch
Vorsichtsmaβnahmen
• Der Monitor kann beschädigt werden, wenn er zu nahe an einer
Waermequelle plaziert wird. Bitte berücksichtigen Sie die Position von
Heizkörpern, Kochern, offenen Feuers usw..
• Bedecken Sie nicht die Schlitze und die Öffnungen auf der Rückseite
oder der Oberseite der Verkleidung, weil der Monitor Belüftung
benőtigt. Der Monitor sollte sich in einem gut gelüfteten Raum befinden
um die Möglichkeit der Überhitzung zu verhindern.
• Plazieren Sie nicht scharfe Gegenstände wie Messer, Federn oder
Bleistifte nahe dem Schirm. Wenn solche Gegenstände den Schirm
berühren, wird die LCD Verkleidung dauerhaft verkratzt.
• Wenn Sie den Monitor säubern, trennen Sie ihn erst von der Stromqűlle,
um jede mögliche Gefahr eines Elektroschocks zu vermeiden. Ein
weiches, fusselfreies Tuch sollte benutzt werden, um die Außenseite des
Monitors zu säubern. Ein Tuch etwas angefeuchtet mit einer milden
reinigenden Lösung säubert störrische Flecken. Halten Sie Flüssigkeiten
fern vom Bildschirm, einschließlich von Sprays. Sprühen Sie nicht mit
Flüssigkeit direkt - sondern am besten auf ein Tuch - dann abwischen.
Wenn Flüssigkeit in den Monitor eindringt, kann sie einen elektrischen
Schlag und/oder Beschädigungen verursachen.
• Wenn Sie ein Problem antreffen, schlagen Sie bitte zűrst im Kapitel
Troubleshooting nach. Falls Sie dort keine Lősung finden kőnnen,
versuchen Sie keinesfalls den Monitor selbst zu reparieren; das Öffnen
oder das Entfernen der Abdeckungen können zu Verletzung oder Tod
durch Elektroschock führen. Treten Sie bitte mit einem qualifizierten
Monteur in Verbindung, falls Sie im Kapitel Troubleshooting keine
Lősung finden kőnnen.
21
Page 22
Deutsch
LCD Monitor
VGA Kabel
Verpackungsinhalt
Stromkabel
DVI-D Kabel
Installationsanleitung
Audio Kabel
Bedienung sanleitung
Aufbau des Monitors
1. Den Fuβ entlang der Schiene um
90Grad drehen.
Wichtig
Suchen Sie zuerst eine saubere, flache Oberfläche, um den Monitor darauf zu stellen,
nachdem Sie ihn vom Fuβ entfernt haben. Plazieren Sie ein sauberes trockenes Tuch
unter den Monitor, um ihn weiter zu schützen.
2. Den Monitor auf einen Tisch oder
flache Platte stellen.
22
Page 23
Wiederverpacken des Monitors
Heben sie den Orginalkarton auf, falls sie den Monitor
tttransportieren
Oder versenden műssen.
Wiederverpacken des Monitors:
1. Unterbrechen Sie die Stromverbindung, ziehen Sie das Netzkabel.
2. Drehen Sie den Fuβ des Monitors, wie auf dem Bild links.
Legen Sie den Monitor in den Karton。
Anpassen des Blickwinkels
Der Blickwinkel des Monitors kann von 5°~20° eingestellt werden.
Verbindung der Geräte
Achtung: Stellen Sie sicher, daβ Computer und Monitor von der Stromqűlle
Verbindung A: Monitor-zum-PC VGA Kabel
getrennt sind.
Deutsch
Verbindung B: Monitor-zum-PC DVI-D Kabel
23
Page 24

c
Netzkabel Verbinden Sie den Monitor mit dem Netzkabel, und stecken
Sie es nur in eine ordnungsgemäβ geerdete Steckdose.
d
VGA Kabel Verbinden Sie das VGA Kabel mit dem entsprechenden
VGA output Stecker der Grafikkarte des Computers. Danach
ziehen Sie bitte die Schrauben am Stecker an.
e
Deutsch
Audio Kabel
f
DVI-D Kabel Verbinden Sie das Bildsignal Kabel mit dem DVI-D output
Verbinden Sie den Audio input Stecker des Monitors mit
Hilfe des Audio Kabels mit dem Computer.
Stecker der Graphikkarte des Computers. Ziehen Sie
anschliessend die Schrauben am Stecker an.
!WARNUNG:
1. Stellen Sie sicher, daβ die VGA Karte Ihres Computers mit den richtigen Kabeln
verbunden ist.
2. Stellen Sie sicher, daβ die Form des Steckers der Form der Schnittstelle entspricht
bevor Sie den Stecker einstecken. Achten Sie darauf keinen der Pins umzuknicken
oder zu beschädigen.
VGA
DVI-D
Strom einschalten
1. Zuerst betätigen Sie bitte den Hauptstromschalter neben dem AC
Stromeingangstecker des Monitors.
2. Dann schalten Sie den Strom am Monitor ein.
3. Dann schalten Sie den Strom am Computer ein.
4. Wenn die LED-Anzeige am Einschaltknopf blau leuchtet und die am anderen Knopf
grűn leuchtet ist der Computer einsatzbereit.
Videosignal erscheint. Wenn Sie nicht das blau Licht auf der LED-Anzeige am Einschaltknopf
oder ein Videosignal sehen kőnnen, überprüfen Sie die Anschlüsse
Warten Sie ungefähr 10 Sekunden, bis das
.
24
Page 25
Anpassung der Display Einstellungen
Externe Kontrollen
1
2
Power
AUTO
Deutsch
Power an/aus
Blau: Strom an
Orange: Im Stromsparmodus
Wenn OSD aktiviert ist, Taste AUTO drűcken,
um eine Auswahl zu treffen. Falls OSD nicht
aktiviert ist, drűcken Sie die OSD Taste und der
Monitor stellt automatisch die optimale Position,
Fokus und Takt des Displays ein.
Drűcken um OSD zu aktivieren.
3
4
5
<
>
OSD Funktion
MINUS
PLUS
Wiederholt drűcken um eine Auswahl in OSD zu
treffen.
Wenn OSD aktiviert ist, drűcken Sie die Minus
Taste um OSD Optionen auszuwählen. Treffen
Sie Ihre Auswahl durch nochmaliges drűcken der
OSD Taste und mit der Minus Taste kőnnen Sie
dann weiter im Menű navigieren. Wenn OSD
nicht aktiviert ist, kőnnen sie mit < oder > die
Lautstärke regeln.
Wenn OSD aktiviert ist, drűcken Sie die Plus
Taste um OSD Optionen auszuwählen. Treffen
Sie Ihre Auswahl durch nochmaliges drűcken der
OSD Taste und mit der Plus Taste kőnnen Sie
sich dann weiter im Menű bewegen. Wenn OSD
nicht aktiviert ist, kőnnen sie mit < oder > die
Lautstärke regeln.
25
Page 26
OSD Optionen
Bitte schlagen Sie die Erklärung zu externen Kontrollen auf Seite 2 nach.
Anpassung der OSD Einstellungen.
Deutsch
1. Drűcken Sie die MENU Taste um das OSD Menű zu őffnen. Drűcken sie die Taste
nochmals um eine Auswahl aus den 10 Funktionen zu treffen.
2. Benutzen Sie die Tasten < oder >, um eine Kontrollfunktion zu markieren, dann
stellen Sie die Kontrolle auf das gewűnschte Niveau ein.
3. Wenn Sie alle Einstellungen vorgenommen haben, drűcken Sie die AUTO Taste um
das OSD-Menű zu verlaβen.
OSD Menu
Kontrast:
Zur Einstellung von Dunkel- und
Hellschattierungen der Farben relativ
zueinander um einen angenehmen Kontrast.
Helligkeit:
Zur Einstellung der Helligkrit des
Bildschirms.
26
Fokus:
Diese Funktion behebt jegliche horizontale
Verzerrung und sorgt fűr ein klares und
scharfes Bild.
Takt:
Diese Funktion verringert die Grőβe und
Sichtbarkeit von mőglicherweise
vorhandenen vertikalen Streifen auf dem
Bildschirmhintergrund.Hier kőnnen Sie
ebenso die Breite des sichtbaren Bildes auf
dem Bildschirm einstellen.
Page 27
H.Position:
Zur Einstellung der horizontalen Position des
sichtbaren Bildes auf dem Bildschirm.
V.Position:
Zur Einstellung der vertikalen Position des
sichtbaren Bildes auf dem Bildschirm.
Deutsch
Farbe:
Es gibt drei Mőglichkeiten die Farbe
einzustellen:
Warme (rőtliches weiβ)
Kalte (bläuliches weiβ)
Benutzer definiert:
Sie kőnnen die Farben Rot, Grűn und Blau
gemäβ Ihrer gewűnschten Intensität
einstellen.
Sprache:
Wählen Sie das die OSD Menűsprache aus
English-English-Englisch, German –
German-Deutsch,
Español-Spanish-Spanisch, 简体中文-
Simplified Chinese-vereinfachtes chinesisch,
繁體中文-Traditional Chinese-traditionelles
chinesisch, Français –French- Franzősisch,
Italiano –Italian-Italienisch und 日本語-
Japanese - japanisch.
OSD Fenster-Einstellung:
H.Position
V.Position
OSD-Timeout
Hier kőnnen Sie die Position des OSD Menű
Fensters und seine Verweildauer auf dem
Bildschirm einstellen.
27
Page 28

Autom. Abgl.:
Das System benutzt die autom. Abgl.
Deutsch
INFORMATION:
Hier kőnnen Sie kurz die
Bildschirmeinstellungen, wie Pixel und
Frequenz einsehen.
Rűcksetzen:
Rűckkehr zu den ursprűnglichen
Einstellungen (Hersteller).
28
Beenden:
OSD-Menű verlassen.
Page 29
Troubleshooting
Probleme Lősungsvorschläge
Power LED leuchtet nicht
Kein Bild
Fehlerhafte Farben auf dem
Bildschirm
Das Bild springt oder verläuft in
einem Wellenmuster
• Stellen Sie sicher, daβ die Power Taste in
der ON-Position ist.
• Vergewissern Sie sich das das Netzkabel
ordnungsgemäβ verbunden ist.
• Stellen Sie sicher, daβ die Power Taste in
der ON-Position ist.
• Vergewissern Sie sich das das Netzkabel
ordnungsgemäβ verbunden ist.
• Prűfen Sie ob das Videokabel fest mit
Computer und Monitor verbunden ist.
• Bewegen Sie die Maus oder drűcken sie
irgendeine Taste auf der Tastatur um den
Monitor aus dem "active off" Mode zu
wecken.
• Stellen Sie die Farben gemäβ dem Kapitel
Farbeinstellung ein. Wählen Sie entweder
RGB-Farbeinstellung oder Einstellung nach
Farb-Temperatur.
• Entfernen oder deaktivieren Sie alle
elektrischen Geräte, die eine Stőrung
verursachen kőnnten aus der Nähe des
Monitors.
• Űberprűfen Sie das Video Kabel des
Monitors, insbesondere den Stecker. Sind
ein oder mehrere Pins beschädigt?
Deutsch
Die Bildgrőβe oder –position ist
nicht korrekt
Achtung: Versuchen Sie nicht den Monitor selbst zu warten oder zu őffnen.
Bitte geben Sie alle notwendigen Reparaturen nur an einen
qualifizierten Kundendienst weiter, falls das Problem nicht mit Hilfe
des Troubleshooting-Kapitels gelőst werden kann.
• Drűcken Sie die AUTO-Taste und der
Monitor wird automatisch die Position des
Bildes optimieren.
• Sehen Sie auch "Positionseinstellung”
29
Page 30
Deutsch
Allgemeine Spezifikationen
Artikel Spezifikation
LCD Bildschirmrahmen
Display-Grőβe 20” Flat panel active-matrix TFT LCD
Maximale Auflősung UXGA 1600×1200 pixels
Pixelabstand 0.255 mm
Farben 16.7M
Helligkeit 250 cd/m² (Typisch)
Kontrast Rate 600:1 (Typisch)
Reaktionszeit 15ms +10ms /25ms (Tr+Tf / typisch)
Horizontaler Blickwinkel 85° / 85° (Min.)
Vertikaler Blickwinkel 85° / 85° (Min.)
Externe Kontrollen
Power Taste ON/ OFF
Kontroll Taste AUTO, MENU, < , >
OSD Funktion
Kontrast / Helligkeit Contrast / Brightneβ
Fokus / Takter Focus / Clock
Position Position
Farbe Color
Sprache Language
OSD Einstellung OSD setting
Automat. Konfigurierung Auto config
Information Information
Reset Reset
Exit Exit
Video Schnittstelle
Video Analog 0.7V / Digital TMDS
Synkronisation TTL (+/ -)
Audio 2W x 2
Plug & Play DDC2B
Power
Energiequelle 100~240V AC, 50/60 Hz
Energieverbrauch bei normalem
Gebrauch
Energieverbrauch während active off
Einstellung
Dimensionen und Gewicht
Dimensionen (B×H×T) 449X439X197 mm (mit Ständer)
449X426X134 mm (ohne Ständer)
Gewicht (Netto/Brutto) 7.0 Kg/ 9.2 Kg
< 60W
< 3W
30
Page 31

Tabla de Contenidos
Precauciones.................................................................................................................. 31
Contenido del paquete.................................................................................................. 32
Instrucción de instalación ............................................................................................ 32
Ensamblaje del Monitor……………………………………………………………...32
Separación del Monitor.............................................................................................. 33
Ajuste del Angulo de Visión...................................................................................... 33
Conección de los Dispositivos................................................................................... 33
Encendido .................................................................................................................. 34
Configuración y Ajuste del Display ............................................................................ 35
Controles Externos.................................................................................................... 35
opcciones OSD ............................................................................................................. 36
Menú OSD................................................................................................................ 36
Soplución de problemas ............................................................................................... 39
Características Generales ............................................................................................ 40
Español
Precauciones
• El monitor puede ser dañado si se lo coloca cerca de superficies
calientes. Sea cuidadoso al colocarlo cerca de radiadores, cocina, fuego
encendido, etc.
• No cubra las ranuras y aberturas de la parte trasera y superior del
gabinete del monitor a modo de obstruir la ventilación. El monitor
deberá ser colocado en lugares bien ventilados para evitar posibles
recalentamientos.
• No acerque objetos puntiagudos como cuchillos, bolígrafos o lápices
cerca de la pantalla. Si los mismos tocaran la pantalla, el panel LCD
quedará permanentemente dañado.
• Cuando limpie el monitor, desconéctelo de la fuente de energía para
evitar riesgo de electrocución. Un paño suave y adecuado deberá ser
utilizado para limpiar el exterior del monitor. Se recomienda un paño
ligeramente humedecido con un detergente suave para limpiar manchas.
Mantenga cualquier líquido alejado de la pantalla, incluyendo sprays. No
rocíe líquidos directamente – es recommendable rocíar el líquido sobre el
paño para limpiar. Si el líquido se filtrase dentro del monitor podría
causar una descarga eléctrica y/o daño en la unidad.
• Si encuentra algún problema,por favor primero revise la sección de
“Solución de problemas”.Si no resuelve el problema no intente reparar el
monitor por Ud. mismo, abriendo o removiendo los componentes puede
producir heridas o riesgo de muerte además de otros riesgos. Por favor
contacte a un personal cualificado si no resuelve su problema con la
sección de “Solución de problemas”.
31
Page 32

Español
Monitor LCD
Cable VGA
Contenido del Paquete
Cable de fuente
Cable DVI-D
Instrucciones de Instalación
Audio Cable
Manual del Usuario
Ensamblaje del Monitor
1. A lo largo de la línea, gire la base 90° .
Importante
Primero, encuentre una superficie limpia y plana para colocar el monitor después de
retirarlo del stand. Coloque un paño seco debajo del monitor para una mejor pretección.
2. Coloque el monitor sobre superficie
plana.
32
Page 33

Empaque del Monitor
Guarde la caja original y los materiales de empaque en caso que
Ud. deba transportar el monitor.
Empaque del monitor:
1. Desconecte el cable del adaptador para asegurar que está
apagado.
2. Gire la base hacia el monitor como se muestra en el dibujo.Colóquelo dentro de la
caja。
Ajuste del Angulo de Visión
El rango de ángulo de visión del monitor es de -5°~20°
Conección de los Dispositivos
Precaución: Asegúrese que la computadora y el monitor están desconectados
Conección A: Monitor-a-PC Cable VGA
Conección B: Monitor-a-PC Cable DVI-D
de la fuente de energía.
Español
33
Page 34

c
Código de poder Conecte el monitor al cable de poder que deberá ser
insertado en la toma de tierra adecuado.
d
Cable VGA Conecte la señal de cable a la toma de salida VGA de la
tarjeta gráfica de la computadora. Luego ajuste los tornillos
en el conector.
e
Español
Audio cable
f
Cable DVI-D Conecte el cable de la señal a la toma de salida DVI-D de
Conecte la entrada de audio del monitor LCD y la
computadora por medio del audio cable.
la tarjeta gráfica en la computadora. Luego ajuste los
tornillos en el conector.
!Advertencia:
1. Asegúrese de la tarjeta VGA de su computadora para conectar el cable correcto.
2. Asegúrese que la forma del enchufe encaje con la forma del enchufe a ser insertado.
Y que los alfileres no estén doblados o dañados.
VGA
DVI-D
Encendiendo la Energía
1. Primero, encienda el botón de encendido que se encuentra al costado del poder AC
del monitor.
2. Encienda la energía en el monitor.
3. Luego encienda el poder en la computadora.
4. Cuando visualize que el botón de encendido LED esté en azul, y el otro botón esté en
verde, esto indica que la computadora está lista para usar.
Espere 10 segundos para que la señal de video aparezca. Si no visualiza la señal azul
en el botón de encendido o en la señal de video, chequee las conecciones.
34
Page 35

Configuración y ajuste del display
Controles Externos
1
2
ENCENDIDO
AUTO
Español
Encendido on/off
Azul: encendido on
Naranja: en modo sleep
Si el OSD está activado, presione para salir de la
sellección OSD. Si el OSD está inactivo,
presione y el monitor automáticamente
optimizará la posición, enfocando y
sincronizando el reloj de su display.
Presione para ver el OSD.
3
4
5
<
>
Función OSD
MINUS
PLUS
Presione una vez más para entrar en sección
OSD.
Si el OSD está activado, presione para
seleccionar el ajuste OSD. Si el OSD está
inactivo, presione una vez, luego presione los
botones marcados< o > para ajustar el volúmen.
Si el OSD está activado, presione para
seleccionar el ajuste OSD. Si el OSD está
inactivo, presione una vez, luego presione los
botones marcados< o > para ajustar el volúmen
35
Page 36

Opciones OSD
Por favor refiérase a “Controles externos” en la pág 5.
Para ajustar las opciones OSD:
1. Presione el botón MENU para desplegar el menu OSD. Presione una vez más para
ingresar a la sección de 10 funciones en OSD.
2. Utilice los botones marcados < o >, para seleccionar un control, luego ajuste el
Español
control al nivel deseado.
3. Una vez finalizado la selección de opciones, presione el botón de AUTO para salir
del OSD.
Menú OSD
Contraste:
Esta opción ajusta las sombras de oscuridad
y luz relativas a otras para lograr el contraste
adecuado.
Brillo:
Ajusta el brillo de la imagen de la pantalla.
36
Nitidez:
Remueve cualquier distorción horizontal y
hace la imagen clara y nítida.
Reloj:
Si hubiera alguna raya vertical en el fondo de
pantalla,esta opción minimiza l tamaño de
las rayas horizontales de la pantalla.
Page 37

H.Posicion:
Esto ajusta la horizontal
V.Posicion:
Esto ajusta la vertical.
COLOR:
Hay tres formas de ajustar el color:
Cálido (blanco rojizo)
Frío (blanco azulado)
Definido por el usuario:
Ud. puede ajustar los colores rojo, verde y
azul a la intensidad deseada.
Español
IDIOMA:
Seleccione el menú de idioma del OSD a
English-Inglés, Deutsch-Alemán,EspañolEspañol, 简体中文- Chino simplificado,
繁體中文 Chino Tradicional, Français-
Francés,Italiano-Italiano,y 日本語-
Japonés.
AJUSTE OSD
H.Posicion
V.Posicion
T. de espera OSD
Esto cambia la posición de la ventana OSD de
la pantalla y se mantiene el tiempo.
37
Page 38

Español
Autoajuste:
El sistema corre en autoajuste.
INFORMACION:
Esto muestra una breve información en la
pantalla.
Reiniciar:
Restaura los ajustes por defecto.
Salida:
Salida del OSD
38
Page 39

Solución de Problemas
Problemas Posibles Soluciones
El poder LED no está en
Encendido
No hay Imágen
La imágen muestra colores
inapropiados
La imágen muestra saltos o modelo
de ondas
• Chequee para ver si el interruptor de
encendido se encuentra en la posición ON.
• Asegúrese que el cable de Poder esté
conectado.
• Chequee para ver si el interruptor de
encendido se encuentra en la posición ON.
• Asegúrese que el cable de Poder esté
conectado.
• Asegúrese que el cable de video esté
seguramente conectado a la parte trasera del
monitor de la compuatdora.
• Mueva el mouse o presione cualquier tecla
del teclado para activar el monitor del
“modo desactivo”
• Refiérase a “Ajuste de Colores” para ajustar
el color RGB o seleccione la temperature
del color.
• Mueva o apague los artefactos eléctricos
que puedan causar interferencia.
• Inspeccione el cable de video del monitor
para asegurarse que ninguno de los alfileres
esté doblado.
Español
La imágen no está proporcionada o
centrada correctamente
Precaución: No intente hacer un service al monitor o abrir la computadora por
su cuenta. Por favor refiérase a los servicios del personal
cualificado si el problema no pudieran resolverse con la sección
de “Solución a Problemas”
• Presione la opción selección/auto y el
monitor automáticamente optimizará la
posición de su display.
• Vea “Ajuste de Posición”.
39
Page 40

Español
Características Generales
Artículo Característica
Panel LCD
Display Panel plano activo-matrix TFT LCD 50.8 cm.
Resolución Máx. UXGA 1600×1200 píxeles
Pixel Pitch 0.255 mm
Color 16.7M
Brillo 250 cd/m² (Típico)
Radio de Contraste 600:1 (Typical)
Tiempo de Respuesta 15ms +10ms /25ms (Tr+Tf / Típico)
Angulo de Visión Horizontal 85° / 85° (Min.)
Angulo de Visión Vertical 85° / 85° (Min.)
Controles Externos
Botón de Encendido ON/ OFF
Botones de Control AUTO, MENU, < , >
Función OSD
Contraste/ Brillo Contraste/ Brillo
Focus / Reloj Focus / Reloj
Posicion Posicion
Color Color
Idioma Idioma
Ajuste OSD Ajuste OSD
Auto config Auto config
Información Información
Reiniciar Reiniciar
Salida Salida
Video Interface
Video Analog 0.7V / Digital TMDS
Sync TTL (+/ -)
Audio 2W x 2
Plug & Play DDC2B
Encendido
Fuente de Poder 100~240V AC, 50/60 Hz
Consumo de Energía durante
operación normal
Consumo de Energía durante
operación inactiva
Dimensión y Peso
Dimensión (W×H×D) 449X439X197 mm (con stand)
449X426X134 mm (sin stand)
Peso (Net/ Gross) 7.0 Kg/ 9.2 Kg
< 60W
< 3W
40
Page 41

Indice
Avvertenze..................................................................................................................... 41
Contenuto dell’imballo................................................................................................. 42
Istruzioni di montaggio ................................................................................................ 42
Montaggio del monitor .............................................................................................. 42
Disinserzione del monitor.......................................................................................... 43
Regolazione del grado di inclinazione....................................................................... 43
Collegamento dei dispositivi ..................................................................................... 43
Accensione................................................................................................................. 44
Regolazione del display dei comandi........................................................................... 45
Controlli esterni ......................................................................................................... 45
Opzioni OSD ................................................................................................................. 46
Menu OSD................................................................................................................. 46
Ricerca e correzione guasti.......................................................................................... 49
Descrizione generale..................................................................................................... 50
Avvertenze
• Il monitor potrebbe venir danneggiato se posto troppo vicino ad una
fonte di calore. Fare attenzione alla vicinanza a termosifoni, fornelli,
fuochi, ecc.
• Non ostruire le fessure di aerazione sul retro ed in cima al monitor in
quanto esso necessita di raffreddamento. Il monitor deve essere collocato
in una stanza ben ventilata per evitarne il surriscaldamento.
• Evitare di lasciare oggetti appuntiti, come ad esempio coltelli, penne o
matite, vicino allo schermo: se tali oggetti entrassero a contatto con lo
schermo, il pannello LCD ne risulterebbe graffiato permanentemente.
• Ricordarsi di disinserire il monitor dalla presa elettrica prima di pulirlo,
per evitare di rimanere fulminati. Usare un panno morbido per la pulizia
esterna del monitor; un panno leggermente inumidito con del detergente
liquido delicato potrà essere usato sulle macchie più resistenti. Tenere
sostanze liquide e spray lontani dallo schermo. Non spruzzare sostanze
liquide direttamente sullo schermo: è consigliabile spruzzare i detergenti
su un panno prima di effettuare le operazioni di pulizia. Se sostanze
liquide venissero inavvertitamente versate all’interno del monitor,
potrebbe verificarsi un corto circuito e/o il danneggiamento
dell’apparecchio.
• In caso di difficoltà, fare prima di tutto riferimento alla sezione "Ricerca
e correzione guasti". Se questo non dovesse bastare a risolvere il
problema, non cercare di riparare il monitor personalmente, in quanto
l’apertura o la rimozione dei pannelli di rivestimento potrebbe portare,
tra le altre cose, a lesioni o morte per folgorazione. Si prega di contattare
un ingegnere qualificato nel caso in cui il paragrafo "Ricerca e
correzione guasti" non dovesse essere d’aiuto.
Italiano
41
Page 42

Contenuto dell’imballo
Monitor LCD
Cavo VGA
Italiano
Cavetto elettrico
Cavo DVI-D
Istruzioni di montaggio
Cavetto audio
Manuale d’impiego
Montaggio del monitor
1. Curvare di 90°il piedistallo seguendo
la scalanatura.
Importante
Per prima cosa, assicurarsi che la superficie ove verrà collocato il monitor, dopo averlo
rimosso dal supporto, sia pulita e piana; quindi, porre un panno asciutto e pulito sotto al
monitor per proteggerlo ulteriormente.
2. Collocare il monitor su un tavolo o una
superfice piana.
42
Page 43

Come rimballare il monitor
Conservate lo scatolone originale e i materiali d’imballaggio nnen
nell’eventualità che dobbiate spedire o trasportare il monitor.
Come rimballare il monitor:
1. Disinserire il cavetto elettrico AC per accertarsi che il monitor
sia s pento.
2. Piegare il piedistallo come nella figura accanto per chiudere il monitor.Mettere il
monitor nello scatolone.
Regolazione del grado di inclinazione
Il grado di inclinazione del monitor varia da -5°~20°.
Collegamento dei dispositivi
Attenzione: Assicurarsi che il computer e il monitor siano entrambi disinseriti
Collegamento A: Monitor-a-Cavo PC VGA
dalla rete elettrica.
Italiano
Collegamento B: Monitor-a-Cavo PC DVI-D
43
Page 44

c Cavetto elettrico Collegare il monitor al cavetto elettrico e successivamente
inserirlo ad una presa elettrica adeguata.
d Cavo VGA Collegare il cavo del segnale alla presa di uscita VGA della
scheda grafica del computer, quindi avvitate le viti di
sicurezza del raccordo.
e Cavo audio
f Cavo DVI-D Collegare il cavo del segnale alla presa di uscita DVI-D
Italiano
!AVVERTENZA:
1. Assicurarsi che la scheda VGA del vostro computer sia collegata al cavo corretto.
2. Assicurarsi che la forma della spina combaci esattamente con la forma della presa in
cui va inserita; e che nessuno degli aghi nella spina sia piegato o in alcun modo
danneggiato.
Collegare il monitor LCD al computer con il cavo audio,
inserendo le presa di entrata del cavo.
della scheda grafica del computer, quindi avvitate le viti di
sicurezza del raccordo.
VGA
DVI-D
Accensione
1. Per prima cosa, accendete l’interruttore posto accanto alla presa di corrente del
monitor.
2. Accendete il monitor.
3. Accendete il computer.
4. Quando il LED sul tasto di accensione diventa blu, e l’altro tasto verde, il computer è
pronto per l’uso. Aspettate 10 secondi fino alla comparsa del segnale video. Se non
vedete la luce blu sul tasto di accensione o un segnale video, controllate i
collegamenti.
44
Page 45

Regolazione del display dei comandi
Controlli esterni
1
2
3
POWER
AUTO
Funzioni OSD
on/off (acceso/spento)
Blu: acceso
Arancione: in attesa
Se lo OSD è attivato, premere per una selezione
OSD. Se lo OSD non è attivato, premere e il
monitor ottimerà automaticamente la posizione,
la nitidezza e l’orologio del vostro display.
Premere per visualizzare il menu OSD.
Premere di nuovo per una selezione OSD.
Italiano
Se lo OSD è attivato, premere per scegliere o
4
5
<
>
MENO
PIU’
modificare le opzioni OSD. Se lo OSD non è
attivato, premere una volta, e poi premere il tasto
< oppure > per regolare il volume.
Se lo OSD è attivato, premere per scegliere o
modificare le opzioni OSD. Se lo OSD non è
attivato, premere una volta, e poi premere il tasto
< oppure > per regolare il volume.
45
Page 46

Opzioni OSD
Fate per favore riferimento ai "Controlli esterni" a pagina 5.
Per regolare le funzioni OSD:
1. Premere il tasto MENU per aprire il menu OSD. Premere di nuovo per scegliere tra
le 10 funzioni OSD.
2. Usare I tasti < oppure > per evidenziare un comando, quindi regolare il comando al
livello desiderato.
3. Al termine della selezione, premere il tasto AUTO per uscire dal menu OSD.
Italiano
Menu OSD
Contrasto:
Regolazione del tono di colore chiaro/scuro per
ottenere un contrasto gradevole.
Luminosità:
Regolazione della luminosità dell’immagine sullo
schermo.
Nitidezza (Messa a fuoco):
Per eliminare l’effetto di distorsione orizzontale e
rendere l’immagine chiara e nitida.
Orologio:
In presenza di righe verticali sul fondo dello
schermo, questo comando serve a renderle meno
evidenti minimizzandone le dimensioni. Serve
inoltre a modificare le dimensioni dello schermo
orizzontale.
46
Page 47

O.Posizion:
Regolazione della posizione orizzontale.
V.Posizion:
Regolazione della posizione verticale.
COLORE:
Ci sono tre modi di regolare il colore:
Caldo (bianco rossastro)
Freddo (bianco bluastro)
Utente:
Potete regolare i colori rossa, verde e blu
all’intensità che preferite.
Italiano
LINGUA:
Selezionate il menu OSD per la lingua:
English-Inglese, Deutsch -Tedesco,
Español-Spagnolo, 简体中文-Cinese
semplificato, 繁體中文-Cinese tradizionale,
Français -Francese, Italiano -Italiano,
e 日本語-Giapponese.
Impostazione OSD:
O.Posizion
V.Posizion
Intervallo OSD
Per modificare la posizione della finestra di
dialogo OSD sullo schermo e il suo tempo di
visualizzazione.
47
Page 48

Autoregolazione:
Il sistema procede all’autoregolazione
.
INFORMAZIONI:
Italiano
Questo comando mostra delle brevi
informazioni sullo schermo.
Restare:
Per ritornare all’impostazione in default.
Uscita:
Per chiudere il menu OSD.
48
Page 49

Ricerca e correzione guasti
Problema Possibile Soluzione
Il LED d’accensione non è acceso • Controllare se l’interruttore d’accensione è
su ON.
• Assicurarsi che il cavo elettrico sia
collegato.
Non c’è immagine • Controllare se l’interruttore d’accensione è
su ON.
• Assicurarsi che il cavo elettrico sia
collegato.
• Assicurarsi che il cavo video sia ben
collegato al retro del monitor e al computer.
• Muovere il mouse o premere un tasto
qualsiasi per riattivare il monitor dopo lo
spegnimento automatico.
Italiano
L’immagine presenta colori distorti • Andare a "Regolazione del colore" per
regolare il colore RGB o per selezionare la
temperatura del colore.
L’immagine balla oppure è
attraversata da un’onda
L’immagine non è squadrata
oppure non è ben centrata
• Muovere o spegnere i dispositivi elettrici
che potrebbero essere causa di interferenza.
• Ispezionare il cavo video del monitor e
assicurarsi che nessuno degli aghi nella
presa sia piegato.
• Premere il tasto select/auto e il monitor
ottimerà automaticamente la posizione del
vostro display.
• Andare a "Regolazione della posizione".
Attenzione: Non cercate di revisionare il monitor o di aprire il computer
personalmente. Lasciate le operazioni di revisione al personale
qualificato se il vostro problema non può essere risolto
consultando il paragrafo "Ricerca e correzione guasti".
49
Page 50

Descrizione generale
Pezzo Descrizione
Panello LCD
Display
Massima risoluzione UXGA 1600×1200 pixels
Pixel Pitch 0.255 mm
Colore 16.7M
Luminosità 250 cd/m² (standard)
Proporzione Contrasto 600:1 (standard)
Italiano
Tempo di reazione 15ms +10ms /25ms (Tr+Tf / standard)
Angolazione orizzontale 85° / 85° (Min.)
Angolazione verticale 85° / 85° (Min.)
Controlli esterni
Tasto accensione ON/ OFF
Tasti controllo AUTO, MENU, < , >
Funzioni OSD
Contrasto / Luminosità Contrasto / Luminosità
Nitidezza/Orologio Nitidezza/Orologio
Posizion Posizion
Colore Colore
Lingua Lingua
Impostazione OSD Impostazione OSD
Autoregolaz. Autoregolaz.
Informationi Informationi
Restare Restare
Uscita Uscita
Interfaccia video
Video Analogico 0.7V / Digitale TMDS
Sync TTL (+/ -)
Audio 2W x 2
Plug & Play DDC2B
Consumo
Fonte elettrica 100~240V AC, 50/60 Hz
Consumo d’energia durante l’uso < 60W
Consumo d’energia durante la fase di
riposo
Dimensioni e peso
Dimensioni (W×H×D) 449X439X197 mm (con piedistallo)
449X426X134 mm (senza piedistallo)
Peso (Netto/Lordo) 7.0 Kg/ 9.2 Kg
Pannello piatto di 20 pollici a matrice attiva
TFT LCD
< 3W
50
Page 51

Inhoudstafel
Voorzorgsmaatregelen ................................................................................................. 51
Inhoud van het pakket ................................................................................................. 52
Installatie instructies .................................................................................................... 52
Installeren van het beeldscherm................................................................................. 52
Aansluiten van het beeldscherm ................................................................................ 53
De zichthoek aanpassen............................................................................................. 53
Aansluiten van de stroombronnens............................................................................ 53
De stroomsterkte veranderen ..................................................................................... 54
Aanpassen van de beeldscherm-settings..................................................................... 55
Externe controlepunten.............................................................................................. 55
OSD opties..................................................................................................................... 56
OSD Menu................................................................................................................. 56
Probleemgevallen.......................................................................................................... 59
Algemmene specificaties............................................................................................... 60
Voorzorgsmaatregelen
• Het beeldscherm kan beschadigd worden als het te dicht bij een
warmtebron wordt geplaatst. Pas op voor radiatoren, kookvuren, open
vuren, enz.
• Gelieve de openingen in de achterzijde van de kast niet af te sluiten
vermits het beeldscherm verluchting nodig heeft. Het beeldscherm moet
geplaatst worden in een goed verluchte kamer om oververhitting te
voorkomen.
• Plaats geen scherpe objecten zoels messen, pennen of potloden naast het
beeldscherm. Als deze objecten het beeldscherm aanraken, dan is het
LCD paneel voor altijd beschadigd.
• Als u het beeldscherm schoonmaakt, dan moet u de stroom uitschakelen
om gevaar voor electrocutie te vermijden. U moet een zachte, stofvrije
doek (eventueel met een klein beetje detergent) gebruiken voor het
schoonmaken van het beeldscherm. Gelieve geen vloeistoffen en
spuitbussen in de buurt te plaatsen van het beeldscherm. Gelieve niet op
het beeldscherm te spuiten, het is beter om op een doek een beetje
detergent aan te brengen en dan schoon te maken. Als er vloeistof in het
beeldscherm komt, dan kan dit elektrische schokken veroorzaken en het
toestel beschadigen.
• Als er zich een probleem voordoet, gelieve het hoofdstuk
probleemgevallen na te kijken, eerste sectie. Indien dit het probleem niet
oplost, probeer dan niet om het beeldscherm zelf te repareren; het openen
of verwijderen van covers kan tot verwondingen of dood door
electrocutie leiden.
Gelieve een gekwalificeerd ingenieur te contacteren als u geen oplossing
vindt in het hoofdstuk probleemoplossingen.
Nederlands
51
Page 52

Nederlands
LCD Beeldscherm
VGA Kabel
Inhoud van het pakket
Stroomkabel
DVI-D Kabel
Installatie Instructies
Audiokabel
Gebruiksaanwijzing
Aansluiten van het beeldscherm
1. Draai het beeldscherm 90° rond zijn
as.
Belangrijk
Maak eerst dat u een schoon, vlak oppervlak heeft om het beeldscherm op te plaatsen
nadat u het van zijn standaard heeft verwijderd. Plaats een schone en droge doek onder
het beeldscherm om het verder te beschermen tegen beschadiging.
2. Plaats het beeldscherm op een vlakke
tafel of plaat.
52
Page 53

Herverpakking van het beeldscherm
Bewaar de originele verpakking voor het eventueel transporteren
van het beeldscherm.
Herverpakking van het beeldscherm:
1. Trek de AC stekker uit om er zeker van te zijn dat de power
uit is.
2. Draai de as van het beeldscherm zoals op de foto.
Plaats het beeldscherm in de doos.
De zichthoek aanpassen
De zichthoek van het beeldscherm ligt tussen -5°~20°
Aansluiten van de stroombronnen
Opgelet: Zorg ervoor dat de computer en het beeldscherm beiden afgesloten
Aansluiting A: Beeldscherm naar PC VGA Kabel
zijn van de stroom.
Aansluiting B: Beeldscherm naar PC DVI-D Kabel
Nederlands
53
Page 54

c
Stroom Code Verbind het beeldscherm met de stroomkabel, dat dan op
zijn beurt moet worden aangesloten in een stroompunt.
d
VGA kabel Verbind de signaal kabel met de VGA output socket van de
grafische kaart van de computer. Bevestig dan de schroeven
aan de connectie.
e
Audio kabel
f
DVI-D Cable Sluit de signaal kabel aan met de DVI-D output socket met
Verbind de audio input socket van het beeldscherm en de
computer door middel van de audio kabel.
de grafische kaart van de computer. Bevestig dan de
schroeven aan de connector.
!OPGELET:
1. Zorg dat de VGA kaart van de computer de juiste kabel aansluit.
2. Zorg ervoor dat de vorm van de plugs gelijk is aan de vorm van de socket waarin ze
Nederlands
worden aangesloten en dat geen van de pins gebogen of beschadigd is.
VGA
DVI-D
Veranderen van de stroomsterkte
1. Eerst drukt u op de hard power knop aan die u vindt naast de AC power socket van
het beeldscherm.
2. Zet de stroom van het beeldscherm aan.
3. Zet de stroom van de computer aan.
4. Als de LED op de stroomtoets blauw wordt en de andere toetsen groen, dan betekent
dat dat de computer klaar is voor gebruik. Wacht 10 seconden vooraleer het signaal
van de video verschijnt. Als er geen blauw licht verschijnt op de powertoets of indien
er geen videosignaal komt, dan moet u de connecties nakijken.
54
Page 55

Aanpassen van de beeldscherm-settings
Externe Controlepunten
1
2
STROOM
AUTO
Stroom aan/uit
Blauw: stroom aan
Oranje: stilstand
Als OSD actief is, dan drukt u exit om een sectie
OSD te beeindigen. Als OSD niet-actief is, dan
drukt u en het beeldscherm zal automatisch zijn
positie optimaliseren, focussen en de tijd
aanduiden.
Nederlands
Druk om OSD te zien.
3
4
5
<
>
OSD Functie
MIN
PLUS
Druk opnieuw om een selectie aan te duiden in
OSD.
Als OSD actief is, druk om een OSD-optie te
selecteren of veranderen. Als OSD niet-actief is,
druk 1-maal, dan druk de toetsen < of > om het
volume aan te passen.
Als OSD actief is, druk om een OSD-optie te
selecteren of veranderen. Als OSD niet-actief is,
druk 1-maal, dan druk de toetsen < of > om het
volume aan te passen.
55
Page 56

OSD opties
Zie “Externe Controlepunten" op Pagina 5.
Om de OSD-settings aan te passen:
1. Druk op de MENU toets om het OSD menu te openen. Druk nogmaals om een
selectie te maken uit de 10 OSD-functies.
2. Gebruik de toetsen < of >, om de controle op te lichten, en pas dan de controle aan
dat het gewenste niveau.
3. Als u klaar bent met alle selecties, druk dan op de AUTO-toets om het OSD te
beeindigen.
OSD Menu
Nederlands
KONTRAST:
Hier worden de lichte en donkere schaduwen
van kleurschakeringen aangepast om een
goed kontrast te krijgen.
HELDERHEID:
Hier wordt de helderheid van de foto op het
scherm aangepast.
56
FoKus:
Hier wordt alle horizontale vaagheid
verwijderd en wordt de foto klaar en scherp
gemaakt.
Clock:
Als er vertikale strepen op de achtergrond
van het scherm zijn dan wordt dit hier
minder zichtbaar gemaakt door hun grootte
te minimaliseren. Het verandert ook de
grootte van het horizontale scherm.
Page 57

H-Position:
Dit past horizontaal aan.
V-Position:
Dit past vertikaal aan.
KLEUR:
Er zijn 3 manieren om de kleuren aan te
passen:
Warme (rood-wit)
Koude (blauw-wit)
Zoals de gebruiker het wenst:
U kan de kleuren aanpassen naar de
intensiteit die uzelf verlangt.
Nederlands
TAAL:
Verander de OSD menu taal naar
English-Engels, Dutsch -Nederlands,
Español-Spaans, 简体中文-Vereenvoudigd
Chinees, 繁體中文-Traditioneell Chinees,
Français -Frans, Italiano -Italiaans,
en 日本語-Japans.
OSD SETTING:
H-Position
V-Position
OSD Timeout
Hier wordt de positie van he OSD-venster op
het scherm en de overgebleven tijd
weergegeven.
57
Page 58

Nederlands
AUTO CONFIG:
Het systeem is automatisch geconfigureerd.
INFORMATIE:
Hier wordt kort informatie gegeven op het
scherm.
RESET:
Ga terug naar vorige settings.
EXIT:
Exit van OSD.
58
Page 59

Probleemgevallen
Problemen Oplossingen
Power knop staat niet AAN
Geen beeld
De afbeelding toont slechte kleuren
De afbeelding beweegt of er is een
golfpatroon in de foto
De afbeeldingen is niet op schaal
of mooi uitgelijnd.
Let op:
Probeer niet om het beeldscherm zelf te repareren of de computer te openen.
Gelieve een gekwalificeerd ingenieur te contacteren als u geen oplossing
vindt in het hoofdstuk probleemoplossingen.
• Kijk of de stroomswitch aan staat.
• Verzeker u ervan dat de stroomkabel
aangesloten is.
• Kijk of de stroomswitch aan staat.
• Verzeker u ervan dat de stroomkabel
aangesloten is.
• Verzeker u ervan dat de videokabel goed is
aangesloten in de achterzijde van de
monitor en de computer.
• Verplaats de muis of druk een willekeurige
toets in om het beeldscherm uit “active off”
toestand te brengen.
• Zie "Kleur aanpassing" om RGB kleur aan
te passen of selecteer kleurtemperatuur.
• Verplaats of doe alle stroombronnen uit die
deze tegenwerking kunnen veroorzaken.
• Controleer de vidaokabel van het
beeldscherm en verzeker u ervan dat geen
enkele van de pins gebogen is.
• Druk op auto toets en het beeldscherm zal
automatisch de positie van de afbeelding
optimaliseren.
• Zie "Positie aanpassing".
Nederlands
59
Page 60

Algemene specificaties
Item Specificatie
LCD Paneel
Display 20-inch vlak paneel actieve matrix TFT LCD
Max resolutie UXGA 1600×1200 pixels
Pixel Pitch 0.255 mm
Kleur 16.7M
Heiligkrit 250 cd/m² (Typical)
Kontrast Ratio 600:1 (Typical)
Antwoord tijd 15ms +10ms /25ms (Tr+Tf / typical)
Zichthoek Horizontaal 85° / 85° (Min.)
Zichthoek Verticaal 85° / 85° (min.)
Externe Controlepunten
Stroom toets ON/ OFF
Nederlands
Stroom
Afmetingen en Gewicht
449X426X134 mm (zonder standaard)
Controle toetsen AUTO, MENU, < , >
OSD Functie
Kontrast / Heiligkrit Kontrast / Heiligkrit
Fokus / Clock Fokus / Clock
Positie Positie
Kleur Kleur
Taal Taal
OSD setting OSD setting
Auto config Auto config
Informatie Informatie
Reset Reset
Exit Exit
Video Interface
Video Analog 0.7V / Digital TMDS
Sync TTL (+/ -)
Audio 2W x 2
Plug & Speel DDC2B
Stroombron 100~240V AC, 50/60 Hz
Stroomverbruik gedurende normaal
gebruik
Stroomverbruik gedurende actief-uit
operatie
Afmetingen (HXBXL) 449X439X197 mm (met standaard)
Gewicht (Netto/ Bruto) 7.0 Kg/ 9.2 Kg
< 60W
< 3W
60
Page 61

Innehållsförteckning
Försiktighetsåtgärder................................................................................................... 61
Paket innehåll................................................................................................................ 62
Installations instruktioner ........................................................................................... 62
Sätta ihop skärmen..................................................................................................... 62
Ta loss skärmen ......................................................................................................... 63
Justera tittande vinkeln .............................................................................................. 63
Ansluta alla delar ....................................................................................................... 63
Sätta på strömmen...................................................................................................... 64
Justera Skärm inställningar ........................................................................................ 65
Externa kontrollanordningar...................................................................................... 65
OSD valmöjligheter...................................................................................................... 66
OSD Meny................................................................................................................. 66
Felsökning ..................................................................................................................... 69
Allmäna specifikationer ............................................................................................... 70
Försiktighetsåtgärder
• Skärmen kan ta skada om den placeras för nära hetta. Se till att den inte
placeras för nära element, spis, öppen eld etc.
• Se till att inte täcka över öppningarna bak och på toppen av höljet
eftersom skärmen behöver ventilation. Skärmen borde placera I ett väl
ventilerat rum för att förebygga eventuell överhettning.
• Tillåt inte skarpa objekt, såsom knivar eller pennor att komma nära
skärmen. Om ett sådant objekt nuddar LCD skärmen finns det risk för att
skärmen blir permanent repad.
• När skärmen ska rengöras, se till att koppla ur den så att det inte finns
risk för elektrisk shock. En mjuk trasa borde amvändas för att rengöra
skärmens utsida. En fuktig trasa, något fuktad med ett mild
rengöringsmedel kan användas för att rengöra svåra fläckar. Tillåt inte
vätskor eller spray på skärmen. Istället för att spraya på skärmen, är det
bättre att först spraya på en trasa ock sedan använda trasan för att gnida
på skärmytan. Om vätska kommer in på insidan av skärmen kan detta
leda till elektrisk shock och/eller skada enheten.
• Om du stöter på problem, var vänlig se felsöknings sidan först. Om du
inte finner svaret där, försök inte att reparera skärmen själv. Att öppna
eller ta bort höljet kan leda till kroppsskada eller till och med dödsfall
genom elektrisk ström. Var vänlig kontakta en kvalificerad ingenjör om
du inte kan finna ditt svar i felsöknings sidan.
Svenska
61
Page 62

LCD Skärm
VGA Kabel
Paket innehåll
Ström kabel
DVI-D Kabel
Installations instruktioner
Ljud kabel
Användar Manual
Sätta ihop skärmen
Svenska
1. Längs spåret, vrid 90° för sockeln.
Viktigt
Först, finn en ren plan yta där du kan placera skärmen efter det du har avlägsnat den från
stativet. Placera en torr, mjuk trasa under skärmen för att ytterligare skydda den.
2. Sätt skärmen på ett plant bord eller en
platta.
62
Page 63

Åter-förpacka skärmen
Spara original förpackningen I fall dus kulle behöva
flytta skärmen I framtiden.
För att åter+förpacka skärmen:
1. Koppla ur ström kabeln för at vara säker på att strömmen är av.
2. Vrid sockeln, se bild till höger.
Förpacka i kartongen。
Justera tittande vinkeln
Vinkeln kan justeras från -5°~20°
Ansluta alla delar
Observera: Se till att både datorn och skärmen inte är inkopplade till
Anslut A: Skärm-till-PC VGA Kabeln
vägguttaget.
Anslut B: Skäm-till-PC DVI-D Kabeln
Svenska
63
Page 64

c
Ström Anslut skärmen till ström kabeln som sedan ska kopplas in
till ett korrekt grundad elektrisk uttag.
d
VGA Kabel Anslut signal kabeln till VGA utgående uttaget på datorns
grafik kort. Sedan ska skruvarna på kontakten dras åt.
e
Ljud Kabel
f
DVI-D Kabel Anslut signal kabeln till DVI-D utgående uttaget på datorns
Använd ljud kabeln för att koppla LCD skärmens input uttag
till datorn.
grafik kort. Sedan ska skruvarna på kontakten dras åt.
!VARNING:
1. Se till att koppla rätt kabel till datorns VGA kort.
2. Se till att kontakten passar uttaget som den pluggas in till.
Och att ingen av kontaktens `pinnar´ är böjd eller på något annat vis är skadad.
Svenska
VGA
DVI-D
Sätta på strömmen
1. Först ,sätt på ström knappen som är placerad vid sidan av AC ström uttaget på
skärmen.
2. Sätt på strömmen till skärmen.
3. Sedan, sätt på strömmen till datorn.
4. När du ser LED lampan på ström knappen bli blå och den andra knappen bli grön så
indikerar det att datorn är redo att användas. Vänta 10 sekunder på video signalen.
Om du inte ser det blåa ljuset på ström knappen eller du erhåller inte en video signal,
kontrollera alla kontakter och kopplingar.
64
Page 65

Justera Skärm inställningar
Externa kontrollanordningar
Ström av/på
1
2
3
SRÖM
AUTO
OSD Funktion
Blå: Ström på
Orange: I ´sovande´ läge
Om OSD är aktiverad, tryck här för att lämna ett
val i OSD. Om OSD är avaktiverat, tryck här för
att ha skärmen automatiskt optimera position,
focus och klockan på skärmen.
Tryck för att se OSD.
Tryck igen för att välja i OSD.
Svenska
Om OSD är aktiverad, tryck här för att justera
4
5
<
>
MINUS
PLUS
OSD valmöjligheter. Om OSD är avaktiverat,
tryck här en gång, sedan tryck på knapparna,
markerade < eller >, för att justera volymen.
Om OSD är aktiverad, tryck här för att justera
OSD valmöjligheter. Om OSD är avaktiverat,
tryck här en gång, sedan tryck på knapparna,
markerade < eller >, för att justera volymen.
65
Page 66

OSD valmöjligheter
Var vänlig se "
För att justera OSD inställningar:
1. Tryck MENY knappen för att öppna OSD menyn. Tryck igen för att välja utav 10
olika OSD funktioner.
2. Använd knapparn markerade < eller >, för att framhäva en kontroll, sedan an du
justera kontrollen till efterönskad nivå.
3. När du är klar, tryck på AUTO knappen för att lämna OSD.
Externa kontrollanordningar" på Sid. 5
OSD Meny
Kontrast:
Dettajusterar mörk och ljus färg nyanser I
förhållande till varandra, för att erhålla en
Svenska
komfortabel kontrast.
Skärpa:
Detta justerar bildens skärpa.
66
Fokus:
Detta tar bort eventuell horisontal distorsion
och skapar en skarp och klar bild.
Klocka:
Om eventuella vertikala linjer kan ses i
skärmens backgrund kan denna funktion
göra dem mindre synliga genom att minska
deras storlek. Denna funktion kan också
ändra skärmens horisontella storlek.
Page 67

H-Position:
Detta justerar horisontalt.
V-Position:
Detta justerar vertikalt.
Färg:
Det finns 3 sätt för att justera färgen:
Varm (Röd-vit)
Sval (Blå- vit)
Användar definierad:
Du kan justera färgerna röd, grön och blå till
den intensitet du efterönskar.
Språk:
Välj OSD meny språk från
English-Engelska, Deutsch -Tyska,
Español-Spanska, 简体中文-Förenklad
Kinesiska, 繁體中文-Traditionell Kinesiska,
Français -Franska, Italiano -Italienska,
och 日本語-Japanska.
Svenska
OSD Inställning:
H-Position
V-Position
OSD Timeout
Detta ändrar OSD menyns position i skärmen
och hur länge den är synlig.
67
Page 68

Svenska
Auto Config :
Systemet kör en auto-konfiguration.
INFORMATION:
Detta visar kortfattad information på skärmen
Reset:
Återställa till fabriks inställningen
68
Exit:
Lämna OSD menyn.
Page 69

Felsökning
Problem Möjliga lösningar
Ström LED lampan är inte PÅ
Ingen Bild
Bilden visar olämpliga färger
Bilden ´hoppar´ eller ett mönster
av vågor kan ses i bilden
Bildens storlek är inte korrekt eller
bilden är inte korrekt centrerad
Observera: Försök inte att reparera skärmen själv eller öppna datorn. Var
vänlig kontakta kvalificerad service personal om du inte kan finna
ditt svar i felsöknings sidan.
• Se till att ström knappen är i PÅ positionen.
• Se till att ström kabeln är ansluten till
vägguttaget.
• Se till att ström knappen är i PÅ positionen.
• Se till att ström kabeln är ansluten till
vägguttaget.
• Se till att video kabeln säkert ansluten till
skärmens och datorns baksida.
• Rör på musen eller tryck på en tangent på
tangentbordet för at ´väcka upp´ skärmen ur
"active off" läget.
• Se "Färg Justering" för att justera RGB färg
eller för att välja färg temperatur.
• Flytta eller stäng av eventuella elektriska
apparater som möjligen orsakar
störningarna.
• Inspektera skärmens video kabel och se till
att ingen av kontaktens ´pinnar´är böjd.
• Tryck select/auto knappen och skärmen
kommer att automatiskt optimera bildens
position.
• Se "Position justering".
Svenska
69
Page 70

Allmäna specifikationer
Item Specification
LCD Panel
Skärm 20-tum Flat panel aktiv-matrix TFT LCD
Max resolution UXGA 1600×1200 pixels
Pixel Pitch 0.255 mm
Färg 16.7M
Skärpa 250 cd/m² (Typical)
Kontrast Proportion 600:1 (Typical)
Respons Tid 15ms +10ms /25ms (Tr+Tf / typical)
Horisontal tittar vinkel 85° / 85° (Min.)
Vertikal tittar vinkel 85° / 85° (Min.)
Externa Kontroller
Ström Knapp ON/ OFF (På/Av)
Kontroll Knapp AUTO, MENU, < , >
OSD Funktion
Contrast / Brightness Kontrast / Skärpa
Focus / Clock Fokus / Klocka
Svenska
Ström
Dimension och Höjd
449X426X134 mm (utan fot)
Position Position
Color Färg
Language Språk
OSD setting OSD inställning
Auto config Automatisk inställning
Information Information
Reset Återställa
Exit Utgång
Video Interface
Video Analog 0.7V / Digital TMDS
Sync TTL (+/ -)
Ljud 2W x 2
Plug & Play DDC2B
Ström källa 100~240V AC, 50/60 Hz
Ström förbrukning under normal
användning
Ström förbrukning under ´active off ´
användning
Dimension (V×H×D) 449X439X197 mm (med fot)
Vikt (Net/ Gross) 7.0 Kg/ 9.2 Kg
< 60W
< 3W
70
Page 71

Indice
Preucacoes..................................................................................................................... 71
Items do monitor........................................................................................................... 72
Intrucoes para instalacao............................................................................................. 72
Inatalacao de uma estacao de trabalho ergometrica................................................... 72
Embalar o monitor..................................................................................................... 73
Ajustando o anglo de visao........................................................................................ 73
Regulacao do monitor................................................................................................ 73
Ligacao do monitor.................................................................................................... 74
Ajustando o Display ..................................................................................................... 75
Controle externos....................................................................................................... 75
Opcoes do OSD ............................................................................................................. 76
Menu OSD................................................................................................................. 76
Solucoes para problemas.............................................................................................. 79
Especificacoes gerais..................................................................................................... 80
Precaucoes
• O Monitor pode ser danificado se mantido em contato direto com
radiacao solar ou proximo a aquecedores, folgoes, lareiras e outras fontes
de calor.
• Nao manter obstruidas ou tapadas as aberturas da caixa do monitor, elas
sao destinadas a ventilacao. O monitor deve ser mantido em um
ambiente ventilado para prevenir super aquecimento. Objetos
pontiagudos nao devem ser usados para tocar a tela do monitor, pois ele
pode ficar permanentemente aranhado.
• Objetos pontiagudos nao devem ser usados para tocar a tela do monitor,
pois ele pode ficar permanentemente aranhado.
• Quando limpar o monitor, primeiramente desconecta-lo da tomada
eletrica, para evitar qualquer risco de xoque. Usar tecido limpo e macio
para limpar a parte externa do monitor. O uso de um pouco de
detergente, apenas para levemente umidecer o pano, pode faciltar a
limpeza de sujeiras mais insistentes, esfreguar delicadamente.
• Se encontrado qualquer tipo de falha, verifique “solucao de problemas”
na primeira seccao. Se o problema nao for resolvido, nao tente concertalo voce mesmo, o contato com o interior do monitor pode acarretar em
xoque eletrico e em casos mais graves ate mesmo morte. Por favor
contactar um tecnico qualificado, se a secao de solucao para problemas
nao ajudar.
Português
71
Page 72

Português
Monitor LCD/LCD
Monitor
Cabo VGA/VGA Cable
Instrucoes para intalacao
Componentes
Cabo de forca/Power Cord
Cabo DVI-D/DVI-D Cable
Cabo de audio/Audio Cable
Manual do usuàrio/User
Manual
Fixacao do monitor
1. Ajuste a base em um anglo de 90
graus.
Importante
Primeiramente ache uma superficie plana e limpa, entao coloque o monitor em cima de
um tecido limpo e seco para proteger o monitor.
2. Coloque o monitor em uma superfìcie
plana e estavel.
72
Page 73

Embalando o monitor
Guarde a caixa original do monitor, em caso de transporta-lo
Embalando o monitor:
1. Desconecte o cabo de forca AC para ter certeza de que a forca
esta desliguada.
2. Gire a base do monitor para desliga-lo como mostra a figura a esquerda.
Ajustando o anglo de visao
O anglo de visao do monitor varia de 5 a 20 graus.
Regulacao do monitor
Cuidado: Certifique-se de que o computador e o monitor estao desliguados
Conexao A: Monitor com cabo PC VGA
do plugue da tomada..
Conexao B: Monitor com cabo PC DVI-D
Português
73
Page 74

c
Power Code Ligue o monitor ao cabo power, que devera ser ligao a uma
tomada com potencial eletroco adequado.
d
VGA Cabo Conecte o cabo do sinal ao VGH output soquete do cartao de
graficos do computador. Entao aperte o encaixe
e
Audio cabo
f
DVI-D Cabo Conecte o cabo do sinal ao soquete output DVD-D do cartao
Conecte o soquete input audio do monitor LCD, e o cabo de
audio do computador.
de grafico do computador. Entao aperte o encaixe
ATENCAO:
1. Certifique-se de que o cartao VGA do seu computador esta conectado ao seu
correspondente cabo
2. Certifique-se de que o formato dos plugues e soquetes se encaixao, e que nehum
dos pinos estejao tortos ou danificados.
Português
VGA
DVI-D
Liguando o monitor
1. Primeiro ligue o botao de forca que esta atras da porta de corrente AC power do
monitor.
2. Ligue o moniotor.
3. Ligar o computador.
4. Quando voce ver o LED do butao power tornar-se azul, e o outro butao verde, isso
indica que o computador esta pronto pra ser usado. Permita que o sinal do video
apareca por dez segundos. Se nao ascender uma luz azul no butao power, ou sinal de
video, verifique as conexoes.
74
Page 75

Controle externo
1
2
3
Ligar
AUTO
Funcao OSD
Ajustando o Display
Ligar/desligar
Azul: Ligado
Laranja: modo sleep
Se o OSD estiver ativo, Pressione EXIT na
selecao OSD. SE OSD estiver inativo, pressione
e o monitor ira automaticamente optimizar a
posicao,facus e relogio no seu display.
Pressione para visualizar OSD
Pressione novamente para selecionar OSD.
Português
Se Osd estiver ativo, pressione para para
4
5
<
>
MENOS
MAIS
selecionar ou ajustar as opcoes do OSD. Se o
OSD estiver inativo, pressione uma vez, entao
pressione < ou> para ajustar o volume.
SE o OSD estiver ativo, pressione para
selecionar as opcoes do OSD. Se o OSD estiver
inativo, pressione uma vez, entao pressione os
butoes < ou> para ajustar o volume.
75
Page 76

Português
Opcoes do OSD
Verificar em controles externos na pagina 5.
Para ajustar o OSD:
1. Pressione em Menu para abrir o OSD. Pressione novamente para selecionar as dez
funcoes do Osd.
2. Use os butoes < ou >, para ajustar o nivel desejavel.
3. Apos selcionar todas as opcoes, pressione o butao AUTO para sair do OSD.
CONTRASTE:
Para atingir um contraste adequado entre as
cores, promovendo uma melhor qualidade de
imagem.
BRILHO/BRIGHTNESS:
Ajuste do brilho das imagens na tela.
Focus/Focus:
Para remocao de qualquer distorcao
horizontal, promovendo uma imagen mais
nìtida.
Relogio:
Em caso de qualquer tipo de falha vertical no
fundo da tela, esta funcao ira torna-lo menos
perceptivel, diminuindo o seu
tamanho.tambem muda o tamanho horizontal
da tela.
76
Page 77

H-Position:
Para o ajuste horizontal
V-Position:
Para ajuste vertical
CORES:
Hà tres formas de ajuste para cores:
Quente (branco avermelhado)
Frio (branco azulado)
Voce pode ajustar as cores vermelho, verde e
azul na intensidade desejavel.
LINGUAS:
Selecione no OSD menu linguas
English-Ingles, Deutsch -Alemao,
Espanhol-espanhol, 简体中文-chines
simplificado, 繁體中文-chines tradicional,
Français -frances, Italiano -Italian,
and 日本語-japones.
Português
Configurando OSD:
H-posicao
V-posicao
OSD Timeout
Essa funacao muda a posicao da janela OSD
na tela e a hora da tela.
77
Page 78

AUTO CONFIG:
Ativa o sistema de auto configuracao
INFORMATION:
Essa janela mostra as frequencias horizontais
e verticais, a polaridade da sincronizacao e a
resolucao das imagens recebidas do
computador ou da placa de video.
Português
RESET:
Para resetar todos os ajustes
EXIT:
Para sair do OSD
78
Page 79

Solucao para problemas/Troubleshooting
Problemas Possiveis solucoes
O LED power nao esta ligado
Sem imagem
Imagem mostrando cores
improprias
Prescenca de ondas nas imagens
• Verifique se o botao power esta na posicao
ON
• Certifique-se de que o fio esta devidamente
conectado.
• Verificar se o botao POWER esta na
posicao ON
• Garanta que o fio esta conectado.
• Certifique-se de que o cabo de video esta
seguramente conectado a parte traseira do
computador.
• Mova o mouse ou pressione qualquer tecla,
para fazer com que o moniotr sai do modo
“active off”
• Ver " Color Adjustment " para ajustar cores
RGB ou para selecionar a temperatura da
cor
• Mover objetos eletronicos que estao nas
proximades, e que estejao causando
interferencia.
• Verifique o cabo de video do monitor e
assegure de que nehum dos pinos estao
frouxos.
Português
A imagem nao esta centrada ou no
tamanho adequado.
Cuidado: nao tente abrir o computador. Procurar um profissional qualificado,
se os problemas nao puderem ser solucionados.
• Pressione select/auto e o moniotr ira
automaticamente regular a posicao do seu
display
• Ver ” ajuste de posicao”.
79
Page 80

Português
Especificacoes gerais
Item Especificacao
LCD Panel
Display 20-inch Flat panel active-matrix TFT LCD
Resolucao maxima UXGA 1600×1200 pixels
Pixel Pitch 0.255 mm
cores 16.7M
brilho 250 cd/m² (Typical)
Contrast 600:1 (Typical)
tempo 15ms +10ms /25ms (Tr+Tf / typical)
Anglo de visao horizontal 85° / 85° (Min.)
Anglo de visao vertical 85° / 85° (min.)
Controle externos
Butao Power ON/ OFF
Butoes deControle AUTO, MENU, < >
Funcao OSD
Contraste / Brilho Contraste / brilho
Focus / Relogio Focus / Relogio
Posicao Posicao
Colres Cores
Linguas Linguas
OSD ajustes OSD ajustes
Config. Auto. Config. Automatica
Informacoes Informacoes
Reset Reset
Exit Exit
Video Interface
Video Analog 0.7V / Digital TMDS
Sync TTL (+/ -)
Audio 2W x 2
Plug & Play DDC2B
Power
potencia 100~240V AC, 50/60 Hz
Consumo de energia durante
operacao normal
Consume de energia durante a
operacao do modo active off .
Dimension and Weight
Dimensao (W×H×D) 449X439X197 mm (with stand)
449X426X134 mm (without stand)
peso (Net/ Gross) 7.0 Kg/ 9.2 Kg
< 60W
< 3W
80
Page 81

Содержание
Меры предосторожности........................................................................................... 81
Состав упаковки......................................................................................................... 82
Инструкция по установке......................................................................................... 82
Сборка монитора...................................................................................................... 82
Отсоединение монитора......................................................................................... 83
Регулировка угла обзора ........................................................................................ 83
Подключение компонентов .................................................................................... 83
Подключение питания............................................................................................. 84
Регулировка установки дисплея.............................................................................. 85
Внешний контроль................................................................................................... 85
Выбор Открытых программных средств (OSD) .................................................. 86
OSD Меню................................................................................................................ 86
Выявление и устранение неисправностей ............................................................. 89
Общие характеристики ............................................................................................. 90
Меры предосторожности
• Монитор может быть поврежден, если его установить вблизи
источников тепла. Помните о размещении батарей
центрального отопления, газовых плит, открытого огня и т. п.
• Не закрывайте разъемы и отверстия системного блока,
поскольку он нуждается в вентиляции. Монитор следует
размещать в хорошо проветриваем помещении во избежании
возможности перегрева.
• Не позволяйте таким предметам как ножи, ручки, карандаши
находиться вблизи экрана дисплея. Если предметы такого
типа будут касаться экрана, панель жидкокристаллического
дисплея (LCD) будет постоянно иметь множество царапин.
• При протирании монитора, отсоедините его от розетки во
избежание опасного поражения электрическим током. Для
протирания внешней части монитора следует использовать
мягкую, неволокнистую ткань. Слегка увлажненная в слабом
растворе моющего средства ткань устранит самые стойкие
пятна. Держите жидкость подальше от экрана дисплея,
включая аэрозоли. Не распрыскивайте жидкость
непосредственно на экран, лучше слегка увлажните ткань
аэрозолем и протрите. Если жидкость попадёт внутрь
монитора, это может вызвать электрический шок или
повредить узел.
• Если вы столкнулись с проблемой, пожалуйста проверьте
сначала раздел «Выявление и устранение неисправностей».
Если же это не решит проблему, не пытайтесь исправить
монитор сами; открывание или смещение крышки может
привести к травме или смерти ,среди других опасных
факторов, через поражение электрическим током.
Пожалуйста, обратитесь к квалифицированному инженеру,
если «Выявление и устранение неисправностей» не поможет.
Pусский
81
Page 82

Жидкокристаллический
монитор(LCD)
Состав упаковки
Шнур питания
Аудио шнур
Шнур видеоадаптера
(VGA)
Сборка монитора:
Pусский
Шнур машиннонезависимого файла
(DVI-D)
Инструкция по
Инструкция по установке
эксплуатации
1. Покрутите по направлению на 90° к
основе.
2. Поместите монитор на плоский стол
или панель.
Примечание
Сначала найдите чистую, плоскую поверхность после извлечения его со стенда.
82
Page 83

Repackage the Monitor
Сохраните первоначальные упаковочные
материалы в случае
необходимости транспортировки или
перегрузки монитора.
1. Извлеките шнур переменного питания из розетки, чтобы убедиться, что
монитор отключён.
2. Проверните основу, чтобы закрыть монитор, как указано на рисунке слева.
Положите монитор в коробку.
Регулировка угла обзора
Угол обзора монитора -5°~20°
Подключение компонентов
Осторожно: Убедитесь, что компьютер и монитор отключены от
Подключение A: Монитор к -PC VGA шнуру
источников питания.
Подключение B: Монитор к PC DVI-D шнуру
Pусский
83
Page 84

Шнур питания Подсоедините монитор к шнуру питания,
c
Шнур видеоадаптера
d
(VGA)
Аудио шнур
e
Шнур машинно-
f
независимого файла
(DVI-D)
который затем подключается к хорошо
заземлённой электрической розетке.
Соедините сигнальный кабель к выходному
разъему VGA графической карты на компьютере.
Затем привинтите винтики на соединительном
звене.
Соедините входной аудио разъему
жидкокристаллического монитора (LCD) и
компьютер при помощи аудио шнура.
Соедините сигнальный кабель к DVI-D
выходному разъему графической карты на
компьютере. Затем привинтите на
соединительном звене.
!Внимание:
1. Убедитесь, что VGA карта подсоединена к соответственному, правильному
шнуру.
2. Убедитесь, что форма контактных штекеров совпадает с формой разъемов, в
которые они вставлены.А также убедитесь, что ни один и контактных
штырьков не согнут или повреждён.
Pусский
VGA
DVI-D
Подключение питания
1. Сначала включите кнопку «Сеть», которая находится рядом с гнездом
переменного питания компьютера.
2. Включите монитор.
3. Затем включите компьютер.
4. Когда вы видите, что светодиодный индикатор на кнопке «Сеть» синего цвета,
а другие зелёного, это означает, что компьютер готов к работе. Подождите 10
секунд, чтобы появился видео сигнал. Если синий цвет не появился на кнопке
«Сеть» или нет видеосигнала , проверьте соединения.
84
Page 85

Регулировка установки дисплея
Внешнее управление
1
Питание
Вкл./ Выкл.
Синий: питание включено
Оранжевый: в режиме ожидания.
2
3
4 <
5 >
Функции выбора
AUTO
программных
средств (OSD)
MINUS
PLUS
Если выбор открытых программных
средств (OSD) в действии, нажмите чтобы
выйти на выбор OSD. Если OSD не в
действии, нажмите монитор автоматически
оптимизирует положение, фокусирует и
синхронизирует ваш дисплей.
Нажмите, чтобы увидеть выбор открытых
программных средств OSD.
Нажмите, чтобы выбрать программные
средства в OSD.
Если OSD в действии , нажмите, чтобы
выбрать или отрегулировать опции OSD.
Если OSD в действии, нажмите один раз,
затем нажмите клавишу обозначенную <
или > , чтобы отрегулировать объем.
Если OSD в действии, нажмите, чтобы
выбрать или отрегулировать опции. Если
OSD в действии, нажмите один раз, затем
нажмите клавишу обозначенную < или > ,
чтобы отрегулировать объем.
Pусский
85
Page 86

Опции открытых программных средств (OSD)
Пожалуйста обратитесь к "Внешнему управлению" на ст. 5
Чтобы урегулировать установку OSD:
1. Нажмите клавишу MENU, чтобы открыть OSD menu. Нажмите снова, чтобы
войти в выбор 10 функций OSD.
2. Используйте клавиши обозначенные < или>, тобы выдвинуть на первый план
управление, затем установите управление желаемого уровня.
3. Когда вы закончите все подборы, нажмите клавишу AUTO, чтобы выйти с
OSD.
Меню открытых программных средств (OSD)
Контраст:
Это регулирует темные и яркие оттенки,
цветовых взаимоотношений, для того
чтобы достичь удобного контраста.
Яркость:
Pусский
Это регулирует яркость картинки на
экране.
86
Фокус:
Это снимает горизонтальное искажение и
делает картинку чистой четкой.
Синхронизирование:
Если видны какие-либо вертикальные
полосы на заднем плане экрана, Это
заставляет их быть менее заметными,
сводя до минимума их размер. Это также
изменяет величины горизонтального
экрана.
Page 87

H-Позиция:
Регулирует горизонталь.
V-Позиция:
Регулирует вертикаль.
Цвет:
Есть три способа регулировки цвета:
Теплый: Красновато-белый
Прохладный : Синевато-белый
Выбранный пользователем:
Вы можете регулировать красный,
зеленый, синий цвет для усиления по
вашему желанию.
Язык:
Выберите из OSD меню English
английский, Deutsch -немецкий,
Español - испанский, 简体中文-
упрощённый
традиционный китайский, Français французкий, Italiano –итальянский ,
и 日本語-японский.
китайский
, 繁體中文-
Pусский
OSD установка:
H-позиция
V- позиция
OSD тайм-аут
Изменяет позицию OSD окна на экране
пребывание.
емя
вр
87
Page 88

Автоконфигурация :
Система ведет автоконфигурацию
.
Информация:
Показывает короткую информацию об
экране.
Pусский
Перезагрузка:
Возвращает к невыполненной установке.
Выход:
Выход с OSD.
88
Page 89

Выявление и устранение неисправностей
Проблема Possible Solutions
Светодиодный индикатор не
включен
Нет картинки • Проверьте кнопку «Сеть», которая
Картинка показывает
неприемлемые цвета.
Картинка кратковременно
колеблется или подёргивается
Визуальное изображение не
выдержанное по размеру или не
выровненное по центру.
Осторожно: Не пытайтесь отрегулировать монитор или открыть
компьютер сами. Пожалуйста обратитесь в сервис или
квалифицированному персоналу если проблема не может
быть решенной в разделе «Выявление и устранение
неисправностей».
• Проверьте кнопку «Сеть», которая
должна быть в позиции ON
• Убедитесь, что шнур питания
подсоединен.
должна быть в позиции ON
• Убедитесь, что шнур питания
подсоединен.
• Убедитесь, что видео шнур надёжно
подключен к задней части монитора и
компьютера.
• Подвигайте «мышкой» или нажмите
любую клавишу на клавиатуре, чтобы
привести монитор в активизируемое
состояние.
• Проверьте «Регулировку цвета», чтобы
откорректировать сигнал основных
цветов изображения.
• Отодвиньте или выключите
электроприборы, которые могут
вызывать помехи.
• Проверьте видео шнур монитора и
убедитесь, что ни один разъём не согнут.
• Нажмите клавишу select/auto и монитор
автоматически отрегулирует позицию на
вашем дисплее.
• Проверьте "Регулировку положения".
Pусский
89
Page 90

Общие характеристики
Наименование Характеристика
Жидкокристаллическая
панель
Дисплей
Максимальное разрешение UXGA 1600×1200 пиксел
Элемент изображения 0.255 mm
Цвет 16.7 M
Яркость 250 cd/m² (Обычая)
Степень контрастности 600:1 (Обычная)
Время реакции 15ms +10ms /25ms (Tr+Tf / обычное)
Угол обзора по горизонтали 85° / 85° (Min.)
Угол обзора по вертикали 85° / 85° (Min.)
Внешнее управление
Кнопка “Сеть” ON/ OFF
Кнопки управления AUTO, MENU, < , >
Функции открытых программных
средств OSD
Контраст / Яркость Contrast / Brightness
Синхронизирование Focus / Clock
Фокус/
Pусский
Позиция Position
Цвет Color
Язык Language
Установка открытых
программных средств
Автоконфигурация Auto config
Информация Information
Перезагрузка Reset
Выход Exit
Видеоинтерфейс
Видео Analog 0.7V / Digital TMDS
Синхронизация TTL (+/ -)
Аудио 2W x 2
“Включи и работай” DDC2B
Питание
Источник питания 100~240V переменного тока, 50/60 Hz
Энергетические затраты во время
обычной работы
Энергетические затраты во время
активизированой работы
Размеры и вес
Размеры (W×H×D) 449X439X197 mm (со стендом)
449X426X134 mm (без стенда)
Вес (Нетто/ Брутто) 7.0 Kг/ 9.2 Kг
20-дюймовая плоская панель активная
матрица TFT LCD
OSD setting
< 60W
< 3W
90
Page 91

目 錄
安全規定........................................................................................................................ 91
系統配備及附件............................................................................................................ 92
安裝說明........................................................................................................................ 92
裝機........................................................................................................................... 92
裝箱步驟................................................................................................................... 93
調整視角................................................................................................................... 93
連線........................................................................................................................... 93
開啟電源................................................................................................................... 94
螢幕線上操作................................................................................................................ 95
功能控制說明........................................................................................................... 95
OSD MENU 操作: .......................................................................................................... 96
OSD Menu.................................................................................................................. 96
問題處理........................................................................................................................ 99
產品規格...................................................................................................................... 100
安全規定
• 不要把顯示器放在靠近熱源的地方,如電暖器或陽光直射的地方。
顯示器要放在平穩、通風的地方。
• 顯示器外殼上的開口或小孔是通風用的,切勿將之蓋住或置入任何
物品。
• 液晶顯示幕容易刮傷,應避免以指甲或筆尖碰觸。
• 清潔前,請先切斷電源。請使用不掉棉屑的軟質布料擦拭,而非一
般的紙巾。必要時可以使用玻璃亮光劑,但是切勿直接噴灑在螢幕
上。
• 請勿自行修理本產品! 不當的拆卸可能會有危險性! 若有無法藉由
【問題處理】排除的故障,請洽專業的維修服務人員。
繁體中文
91
Page 92

系統配備及附件
液晶顯示器
訊號線(VGA)
電源線
訊號線(DVI-D)
音源線
使用手冊
安裝說明
裝機
繁體中文
1. 將顯示器螢幕與底座沿著底座上的
軌道扭轉 90°.
重要
在你開始前,先將乾淨的毛巾或布料鋪在一平坦的表面上以便取下的顯示器螢幕
能被放置在乾淨平坦的地方,不受到損害。輕輕的取出顯示器,再將底座調整至
適當位置。
92
2. 使顯示器平穩置於桌面上。
Page 93

裝箱步驟
如果需要再裝箱,請保留原始紙箱和包裝材料。
再裝箱步驟如下:
1. 拔掉電源線(請確認所有周邊設備的電源都己關閉)。
2. 請將顕示器與底座扭轉成如右圖,再放入紙箱。
調整視角
您可調整此顯示器螢幕的視角從 -5°~ +20°
連線
注意: 在開始連線前,請確定關閉顯示器及電腦的電源。
連線 A: 訊號線(VGA)
繁體中文
連線 B : 訊號線(DVI-D)
93
Page 94

c
電源線 將電源線凹形端插入顯示器背後的(AC IN)插槽上,電源
線凸形端插頭插入 AC 電源插座
d
訊號線(VGA) 訊號線的一端連接顯示器(VGA IN) 插槽上,請將另一端
接上 PC 的顯示卡輸出端,並將螺絲鎖上
e
音源線
f
訊號線(DVI-D) 訊號線的一端連接顯示器( DVI-D IN) 插槽上,請將另一
將音源線上的一端插入顯示器上的音源輸入孔
(AUDIO IN),另一端接上 PC 的音源輸出端
端接上 PC 的顯示卡輸出端,並將螺絲鎖上
!警告:
1. 請確認你的顯示卡,連接合適的訊號線。
2. 請注意 PIN 腳數和連接方向,不要壓迫彎曲指針
VGA
DVI-D
開啟電源
1. 先將顯示器上電源插座旁的開關打開。
2. 再將控制面板上的電源開關打開。
3. 打開電腦的電源。
4. 控制面板上電源鈕上的 LED 燈會呈現藍色,其他按鈕 LED 燈會呈現綠色,螢
繁體中文
幕影像會在十秒後出現。如果 LED 燈不是藍色或是沒有任何影像出現,請檢
查連線是否正常。
94
Page 95

功能控制說明
螢幕線上操作
1
2
3
4
5
<
>
電源開關 藍色—電源開啓 橘色—省電模式
自動調整鈕
OSD Function
向左/ 減少鍵
向右/ 增加鍵
未進入 OSD : 執行自動調整功能
已進入 OSD : 退出 OSD 選單
未進入 OSD : 顯示 OSD 選單
已進入 OSD : 確認 OSD 選項
未進入 OSD : 直接按此鈕可作為調整/減少
“ 音量 ” 的快速鍵。
已進入 OSD : 按此鈕 選擇 / 減少該調整功能
未進入 OSD : 直接按此鈕可作為調整/ 增加
“ 音量 ”的快速鍵。
已進入 OSD : 按此鈕 選擇 / 增加該調整功能
繁體中文
95
Page 96

OSD MENU 操作:
當您按下 MENU 鍵可以叫出 OSD 功能表,繼續按 MENU 鍵可選擇功能表中十種
功能中的某一個項目。在 OSD 功能視窗上選定您想要調整的功能,接著按自動調
整鈕 AUTO 鍵將畫面字體由藍轉紅後便可進行調整。請利用
想要的狀態即可。
OSD Menu
Contrast (對比):
用來調整螢幕影像的對比度
Brightness (亮度):
用來調整螢幕影像的亮度
< , >鍵將畫面調至您
繁體中文
Focus (相位)
調整圖像的焦距 (相位)
Clock (時脈)
調整像素的頻率。
96
Page 97

H-Position (水平位置):
用來將螢幕影像往左或往右移。有效設定
值為 0 至 100。
V-Position (垂直位置):
用來將螢幕影像往上或往下移。有效設定
值為 0 至 100。
COLOR(色彩)
您可以選擇系統所提供的三種色調之一:
Warm 暖色調:
Cool 冷色調
User 使用者自定
自行定義 RED (紅) ,GREEN (綠) ,BLUE
(藍) 的值。
LANGUAGE (語言):
共有八種語言可供切換,分別是
English-英文、Deutsch-德文、
Español- 西班牙文、简体中文-簡體中文、
繁體中文、Français-法文、
Italiano-義大利文、 日本語-日文。
繁體中文
OSD SETTING (OSD 設定):
H-Position (水平位置)
V-Position (垂直位置)
OSD Timeout (OSD 顕示時間設定)
用來設定 OSD 功能表在螢幕中的位置及畫
面停留的時間。
97
Page 98

Auto Config (自動調整)
系統自動調整畫面。
INFORMATION (模式資訊):
顯示訊號種類、解析度與頻率。
Reset (恢復出廠模式)
會將 OSD 功能表上所有的設定值重新設定
繁體中文
回系統的預設值。
Exit (結束調整)
98
Page 99

問題處理
問題 可能奏效的解決方法
電源 LED 未亮
無圖像
圖像有色彩缺陷
圖像跳躍或出現波紋狀
螢幕圖像未居中或大小不對
注意: 絕對不要自己拆機器或自行維修;如果問題無法以上列的方式解
決,請找您的經銷商處理
• 檢查電源開關是否處於 ON
• 應連接電源線
• 檢查電源開關是否處於 ON
• 應連接電源線
• 確定訊號線有準確地插入槽中
• 在使用的過程中,顯示器可能會因為省電
設計而自動關閉,請隨意按一個鍵看影像
是否恢復。
• 請參考【色彩設定】來調節 RGB 色彩或
選擇色調。
• 移除周遭可能會造成電子干擾的電子設
備。
• 檢查顯示器的信號線並確保插針不發生彎
曲。
• 可以按自動調整鈕來將螢幕自動調到最佳
狀態。
• 參考位置設定。
繁體中文
99
Page 100

產品規格
項目 規格
LCD 螢幕
螢幕 20-inch Flat panel active-matrix TFT LCD
解析度(最大值) UXGA 1600×1200 pixels
最小顯示單位 0.255 mm
色彩 16.7M
亮度 250 cd/m² (Typical)
對比率 600:1 (Typical)
回應時間 15ms +10ms /25ms (Tr+Tf / typical)
水平目視角度 85° / 85° (Min.)
垂直目視角度 85° / 85° (Min.)
使用者控制鈕
電源鈕 ON/ OFF
OSD 鈕 AUTO, MENU, < , >
OSD 控制項目
Contrast / Brightness 對比 / 明亮設定
Foucs / Clock 相位 / 時脈設定
Position 位置設定
Color 色彩設定
Language 語言設定
OSD setting OSD設定
Auto Config 自動調整
Information 模式資訊
繁體中文
Reset 恢復出廠模式
Exit 結束調整
輸入訊號
Video Analog(類比) 0.7V / Digital(數位)TMDS
Sync TTL (+/ -)
Audio 2W x 2
隨插即用 DDC2B
電源
內建的通用性電源 100~240V AC, 50/60 Hz
正常狀態下的最大耗電量 < 60W
省電狀態下的最大耗電量 < 3W
尺寸與重量
尺寸(W×H×D) 449X439X197 mm (with stand)
449X426X134 mm (without stand)
重量 (淨重/毛重) 7.0 Kg/ 9.2 Kg
100
 Loading...