


P170/P175/P190/P195 PERSONAL
SHREDDER - 230V MACHINES
ILLUSTRATED PARTS LISTS
AND
SERVICE INS
Compiled by D Bird Issue No 18
Approved b
y P Aries (Technical Manager) Date 23/06/03
TRUCTIONS

ILLUSTRATED PARTS MANUAL
P170/P175/P190/P195 PERSONAL
SHREDDER - 230V MACHINES
TABLE OF CONTENTS
ILLUSTRATED PARTS MANUAL
P170/P175/P190/P195 PERSONAL
SHREDDER 230V MACHINES
Contents Page 1-2
Preface Page 3
Illustrations and Parts Lists with
Recommended Spares Pages 4 – 13
CUTTING HEADS
Model P170/P190(4mm), Straight Cut Diagram Pages 4 – 5
Model P175/P195(4 x 40mm), Cross Cut Diagram Pages 6 – 7
CABINETS AND ELECTRICAL
Models P170/P175 (No Door) Diagram Pages 8 – 10
Models P190/P195 (With Door) Diagram Pages 11 – 13
SERVICE INSTRUCTIONS Pages 14 – 21
Section 1 - Top Cover Page 14 – 15
Section 2 - Cutting Heads Page 16
Section 3 – Auto Start Mechanism Page 17
Section 4 – Gears Page 18
Section 5 – Electric Motor Page 19
Section 6 – Cutter Shafts, Strippers and Stripper Plates Page 20 – 21
Paper Shields and Tie Bars (Stripper Support Bars)
Section 7 – Internal Fuse Replacement Page 22
230V Machines 1 24/06/03

ILLUSTRATED PARTS MANUAL
P170/P175/P190/P195 PERSONAL
SHREDDER - 230V MACHINES
SPECIFICATIONS Pages 23 – 26
Model P170 Page 23
Model P175 Page 24
Model P190 Page 25
Model P195 Page 26
WIRING DIAGRAMS Pages 28 – 31
Models P170, P190 (To S/No A739611) Page 28
Models P170, P190 (From S/No A739612) Page 29
Models P175, P195 (To S/No A739611) Page 30
Models P175, P195 (From S/No A739612) Page 31
AMENDMENT RECORD SHEET Pages 32 - 33
230V Machines 2 24/06/03

ILLUSTRATED PARTS MANUAL
P170/P175/P190/P195 PERSONAL
SHREDDER - 230V MACHINES
PREFACE
This manual provides the instructions for the replacement of all the components that may become worn
or damaged. Details of replacement parts and ordering information are given in associated illustrated
parts list. For operating instructions see:-
OI-539
Illustrated Parts Lists
For each machine, these give full details of the replacement part numbers with supporting diagrams to
show the location of the components.
Service Instructions
For each machine, these give the recommended servicing procedure with supporting pictorial diagrams
for added clarity
WARNING
1. Check the machine RATING PLATE DETAILS are compatible with the electrical mains supply.
2. Disconnect the electrical mains supply before removing any covers.
3. After removing the cover on single phase machines, DISCHARGE the capacitor by shorting out its
connections. (BEWARE: PAPER DUST IS A POTENTIAL FIRE HAZARD).
4. The Shredder MUST have a sound Electrical Earth Connection.
NOTE: THE ELECTRIC MOTOR IS PROTECTED BY AN AUTOMATIC THERMAL
OVERLOAD CUT-OUT.
230V Machines 3 24/06/03

ILLUSTRATED PARTS MANUAL
P170/P175/P190/P195 PERSONAL
SHREDDER - 230V MACHINES
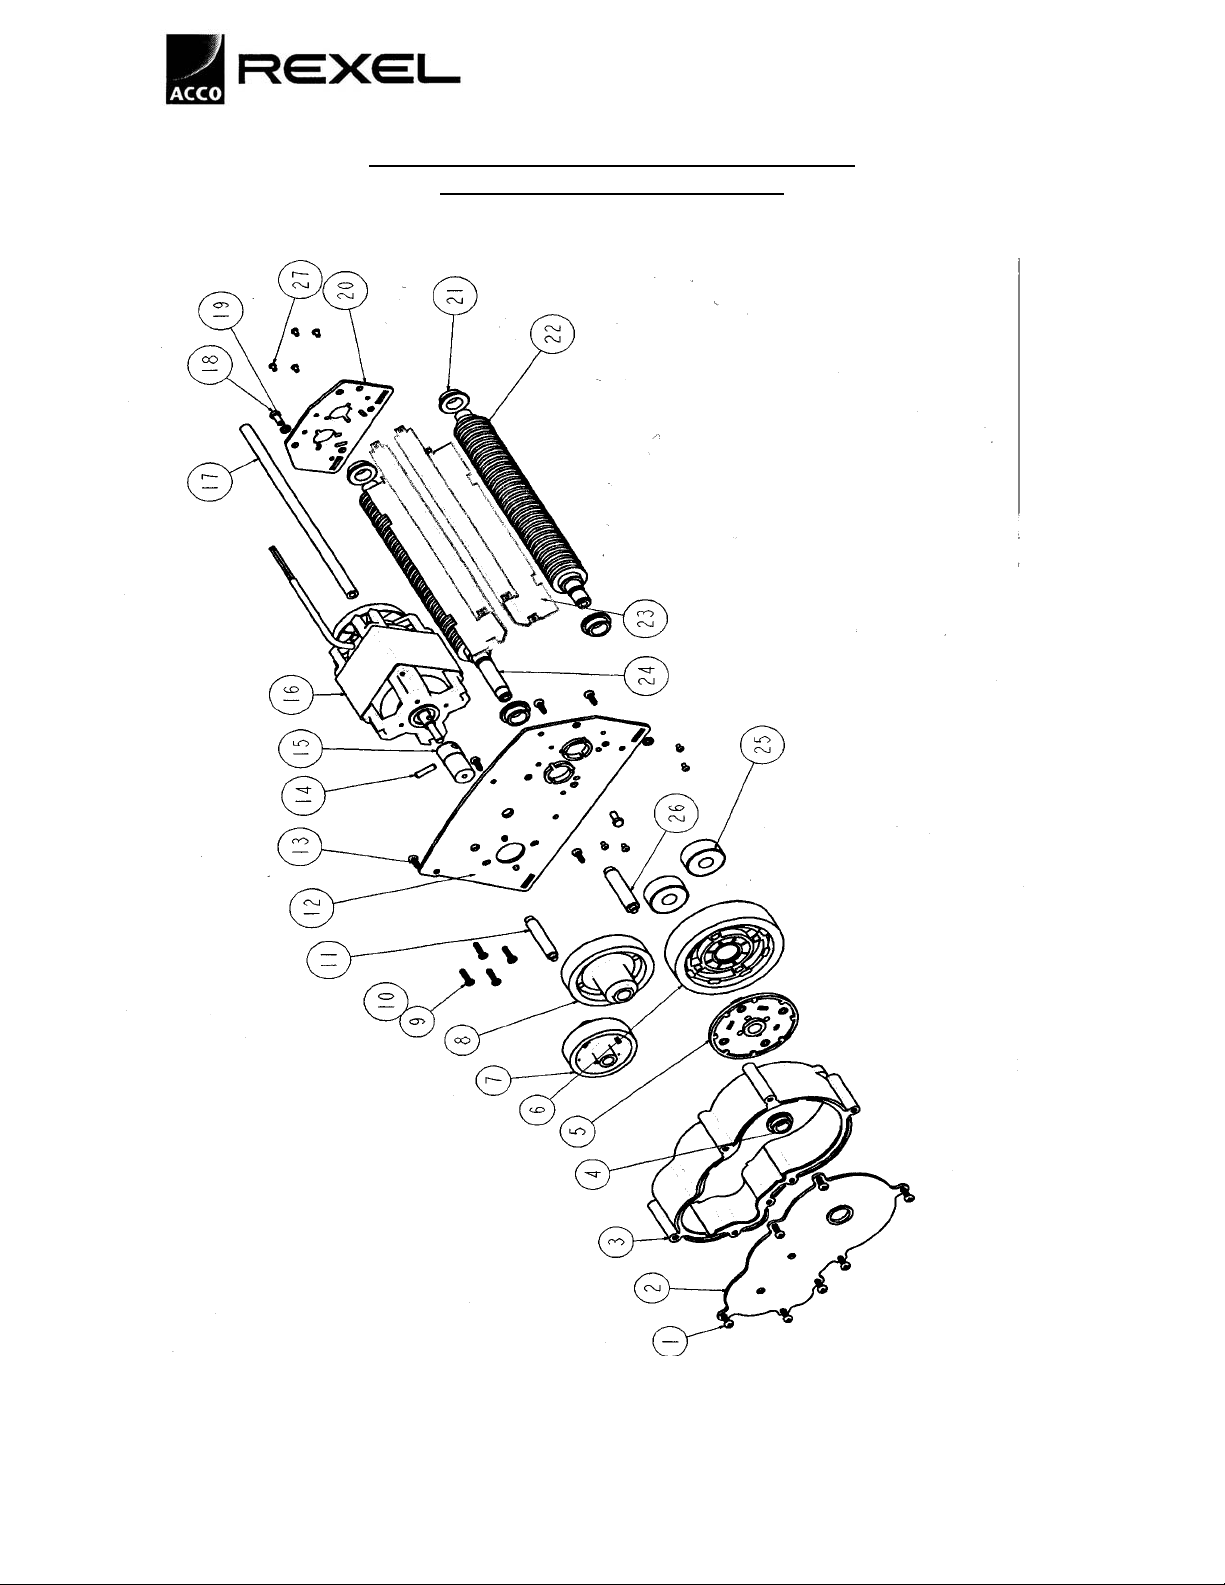
MODEL P170/P190 (4MM) STRAIGHT CUT
SHREDDER - CUTTING HEAD
No Description Part Qty Comments
1 Gearcase – Cover Loc’n Plate Screw SCR707 7
2a Cover Location Plate D55538 1 To S/No A754919 – See Issue 17
2b Cover Location Plate D56070 1 From S/No A754920 – See Issue 17
3 Gearcase Cover D55533 1
4 Bearing BSH63 1 Assembled to item 2
5 Lost Motion Collar D55530 1
6 Main Gearwheel 48T D55529 1
71st Red’n Wheel/2nd Red’n Pinion D55527 1
82nd Red’n Wheel/3rd Red’n Pinion D55528 1
9 Motor Screw SCM125 4
10 Motor Insulator D55539 2 To S/No A627403 – See Issue 8
11 Gear Spigot 10mm dia D55532 1
12a Motor Side Frame D55522 1 From S/No A627404 – See Issue 8
12b Motor Side Frame D55566 1 To S/No A627403 – See Issue 8
12c Motor Side Frame D55599 1 From S/No A – See Issue 16
13 Motor Side Frame – Gearcase Screw SCR707 5
14 Motor Drive Pin PEG77 1
15 Motor Pinion 15T D55526 1
16a Motor 230V-ATB SL20-311 1 To S/No A627403 – See Issue 8
16b Motor 230V-Rotamatika SL20-315 1 From S/No A627404 – See Issue 8
16c Electrical Warning Decal D000425 1 Attached to item16a/b, Euro variants only
17 Tie Bar D55524 1 See Issue 2
18 Tie Bar Screw SCM15 2 See Issue 2
19 Tie Bar Shakeproof Washer SHK4 2 See Issue 2
20a Cutting Head Side Frame RH D55523 1 To S/No A – See Issue 16
20b Cutting Head Side Frame RH D55598 1 From S/No A – See Issue 16
21 Cutter Shaft Bearings BSH77 4 Assembled 2 off per side frame
22 Cutter Shaft (Driven) – 4mm D55516 1
23a Stripper Plate – 4mm D55517 2 To S/No A733241 – See Issue 14
23b Stripper Spotweld Assembly (Front) A56077 1 From S/No A733242 to S/No A739611 – See Issue 14
23c Stripper Spotweld Assembly (Front) A56100 1 From S/No A739612 – See Issue 15
23b Stripper Spotweld Assembly (Rear) A56087 1 From S/No A733242 to S/No A739611– See Issue 14
23c Stripper Spotweld Assembly (Rear) A56099 1 From S/No A739612 – See Issue 15
24 Cutter Shaft (Drive) – 4mm D55515 1
25 1:1 Gear D55531 2
26 Gear Spigot 12mm dia D55552 1
27 Rivets RTS19 8
28 Circlip TRU74 1 Not Shown – Secures 1:1 Gear on Item 22
Assemblies
Cutting Head assembly (Spares) A55567SP 1 Comprises items 11, 12a, 16b, 16c, 17, 18, 19, 20a, 21,
22, 23a, 24, 25, 26, 27 and 28 – See Issue 14
Cutting Head assembly (Spares) A55608SP 1 Comprises items 11, 12c, 16b, 16c, 17, 18, 19, 20b, 21,
22, 23c, 24, 25, 26, 27 and 28 – See Issue 16
230V Machines 4 24/06/03
ILLUSTRATED PARTS MANUAL
P170/P175/P190/P195 PERSONAL
SHREDDER - 230V MACHINES
MODELS P170/P190 (4MM) STRAIGHT CUT
SHREDDER – CUTTING HEAD
230V Machines 5 24/06/03
ILLUSTRATED PARTS MANUAL
P170/P175/P190/P195 PERSONAL
SHREDDER - 230V MACHINES
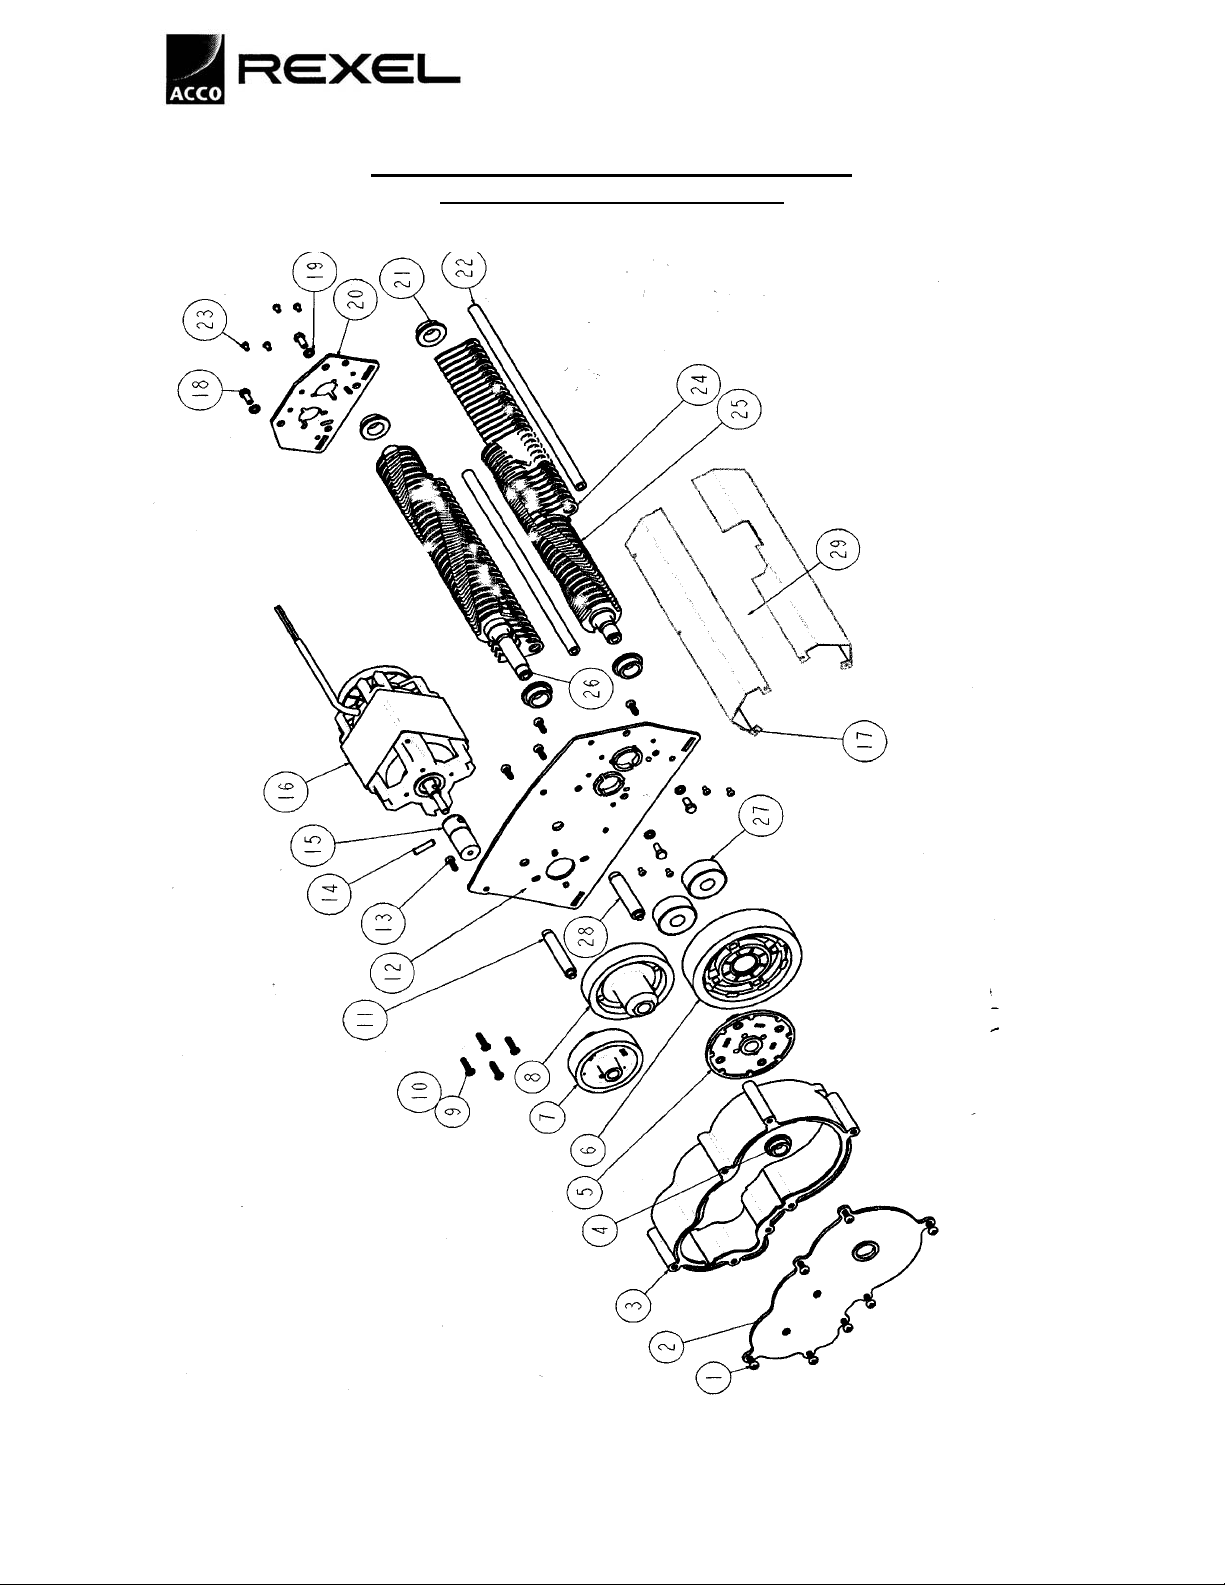
MODEL P175/P195 (4 X 40MM)
CROSS CUT SHREDDER - CUTTING HEAD
No Description Part Qty COMMENTS
1 Gear Case-Cover Loc’n Plate Screw SCR707 7
2a Cover Location Plate D55538 1 To S/No A754919 – See Issue 17
2b Cover Location Plate D56070 1 From S/No A754920 – See Issue 17
3 Gear Case Cover D55533 1
4 Bearing BSH63 1
5 Lost Motion Collar D55530 1
6 Main Gearwheel 48T D55529 1
71st Red’n Wheel/2nd Red’n Pinion D55527 1
82nd Red’n Wheel/3rd Red’n Pinion D55528 1
9 Motor Screw SCM125 4
10 Motor Insulator D55539 2 To S/No A627403 (Except EU Models) – See Iss 8
10 Motor Insulator D55539 2 To S/No A634377 (EU Models only) – See Iss 9
11 Gear Spigot 10mm dia D55532 1 Assembled to item 12
12a Motor Side Frame D55522 1 From S/No A627404 (Except EU Models) – See Iss 8
12b Motor Side Frame D55566 1 To S/No A627403 (Except EU Models) – See Iss 8
12a Motor Side Frame D55522 1 From S/No A634378 (All Models) – See Iss 9
12b Motor Side Frame D55566 1 To S/No A6634377 (EU Models only) – See Iss 9
12c Motor Side Frame D55599A 1 From S/No A – See Issue 16
13 Motor Side Frame-Gear Case Screw SCR707 5
14 Motor Drive Pin PEG77 1
15 Motor Pinion 15T D55526 1
16a Motor 230V-ATB SL20-311 1 To S/No A627403 (Except EU Models) – See Iss 8
16a Motor 230V-ATB SL20-311 1 To S/No A634377 (EU Models only) – See Iss 9
16b Motor 230V-Rotamatika SL20-315 1 From S/No A627404 (Except EU Models) – See Iss 8
16b Motor 230V-Rotamatika SL20-315 1 From S/No A634378 (All Models) – See Iss 9
16c Electrical Warning Decal D000425 1 Attached to item 16a/b, Euro variants only
17a Paper Shield Rear D55564 1 To S/No A610113 – See Issue 11
17b Paper Shield Rear D55580 1 From S/No A610114 to A – See Issue 16
17c Paper Shield Rear D56083 1 From S/No A – See Issue 16
18a Tie Bar Screw SCM15 5 Was 4 off – See Issue 16
18b Tie Bar Countersunk Screw SCM156 3 From S/No A – See Issue 16
19a Tie Bar Shakeproof Washer SHK4 5 Was 4 off – See Issue 16
19b Tie Bar C/sunk Shakeproof Washer SHK13 2 From S/No A – See Issue 16
20a Cutting Head Side Frame RH D55523 1 To S/No A – See Issue 16
20b Cutting Head Side Frame RH D55598 1 From S/No A – See Issue 16
21 Cutter Shaft Bearings BSH77 4 Assembled 2 off per side frame
22 Tie Bar D55524 4 Was 2 off – See issue 16
23 Rivets RTS19 8
24a Stripper D55513 60 To S/No A – See Issue 16
24b Stripper D56079 120 From S/No A – See Issue 16
25 Cutter Shaft (Driven) D55512 1
26 Cutter Shaft (Drive) D55511 1
27 1:1 Gear D55531 2
28 Gear Spigot 12mm dia D55552 1 Assembled to item 12
29a Paper Shield Front D55554 1 To S/No A610113 – See Issue 11
29b Paper Shield Front D55579 1 From S/No A610114 to A - See Issue 16
29c Paper Shield Front D56082 1 From S/No A - See Issue 16
30 Circlip TRU74 1 Not Shown – Secures 1:1 Gear to Item 25
Assemblies
Cutting Head assembly (Spares) A55568SP 1 Comprises items 11, 12c, 16b, 17c, 18, 19, 20b, 21, 22,
23, 24b, 25, 26, 27, 28, 29c and 30 – See Issue 16
230V Machines 6 24/06/03
ILLUSTRATED PARTS MANUAL
P170/P175/P190/P195 PERSONAL
SHREDDER - 230V MACHINES
MODELS P175/P195 (4X40MM) CROSS CUT
SHREDDER – CUTTING HEAD
230V Machines 7 24/06/03

ILLUSTRATED PARTS MANUAL
P170/P175/P190/P195 PERSONAL
SHREDDER - 230V MACHINES
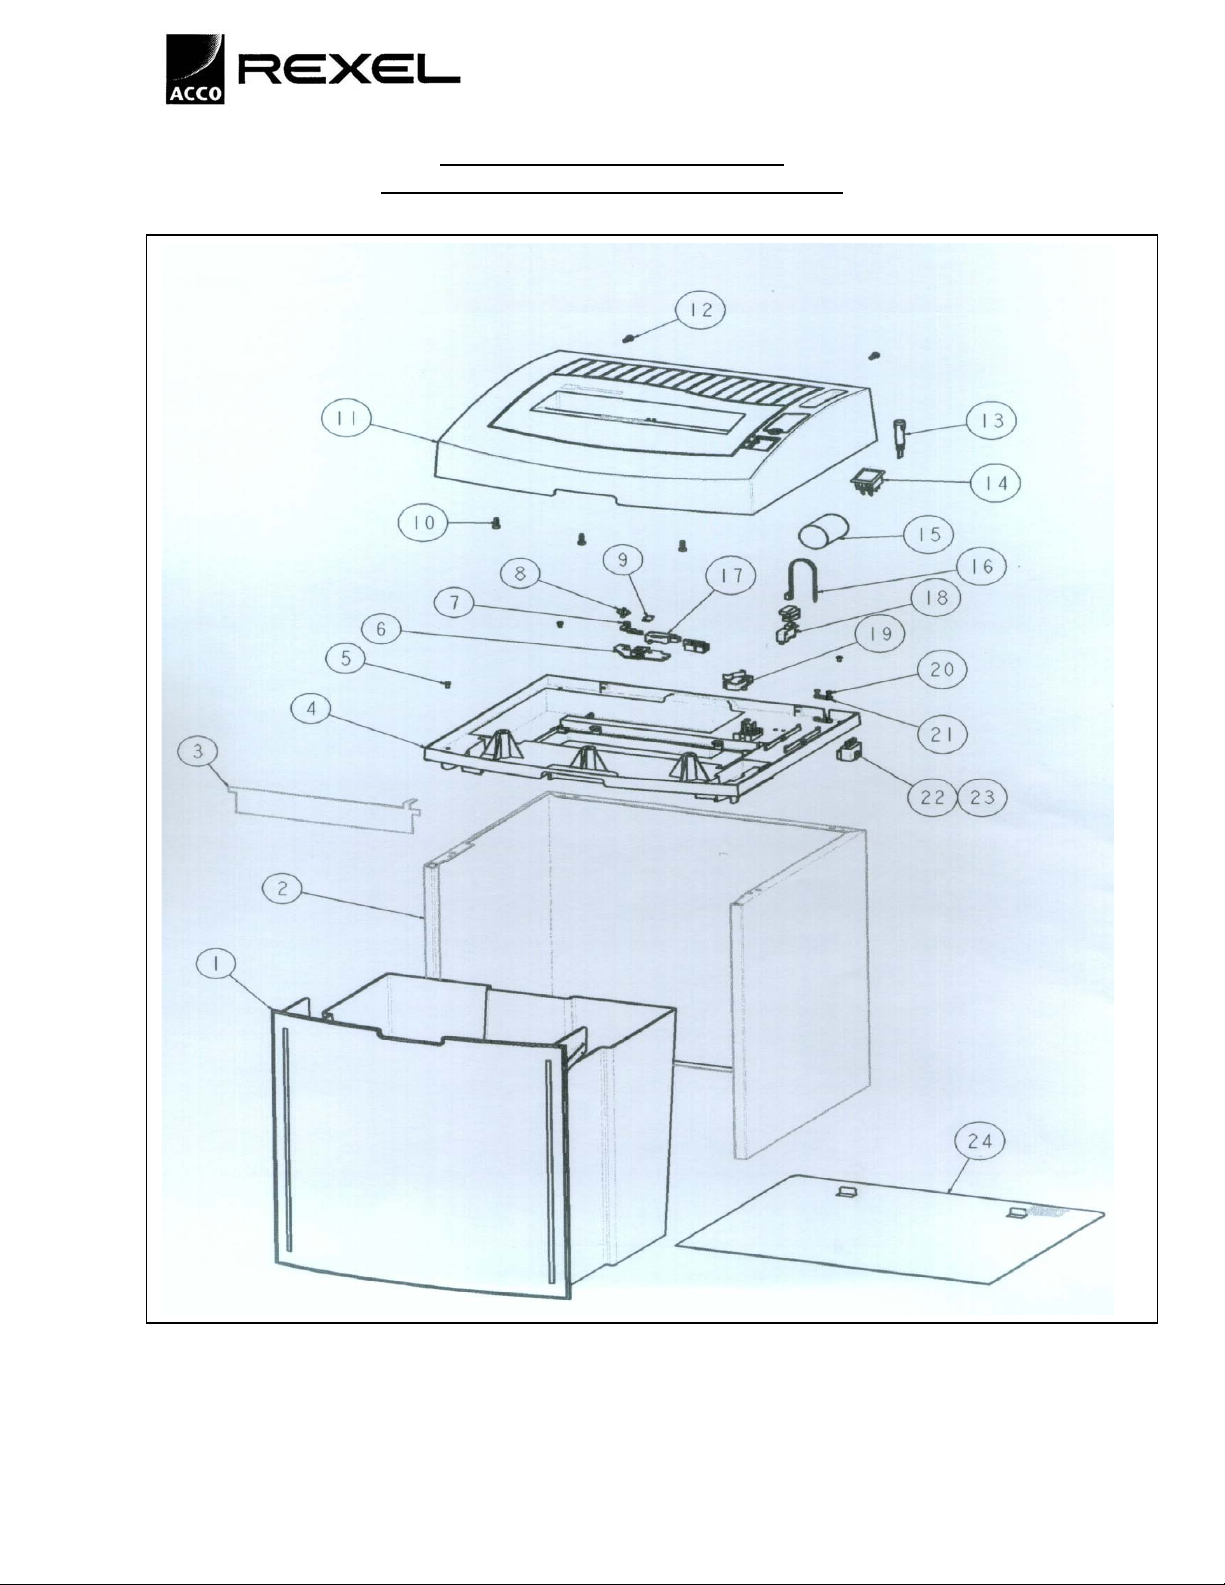
MODEL P170/P175 SHREDDER
(NO DOOR) – CABINET AND ELECTRICS
No Description Part Qty Qty COMMENTS
P170 P175
1 Bin D55502 1 1
2 Shredder Stand D55508 1 1
3 Bin Full Flap D55537 1
4 Plastic Base D55501 1 1 ABS UL94-V0 Matl to S/N A680835 – See Iss 13
4 Plastic Base D55501 1 1 HIPS UL94-HB Matl from S/N A680836 – See Iss 13
4 Plastic Base D55501B 1 1 From S/No A739612 – See Issue 15
5 Plastic Base-Shr Stand Rivet RTS19 4 4
6 Auto Start Cover D55548 1 1 To S/No A739611– See Issue 15
7 Auto Start Swing Arm D55547 1 1 To S/No A739611 – See Issue 15
8 Auto Start Lever D55546 1 1 To S/No A739611 – See Issue 15
9 Rotary Damper SL18-363 1 1 To S/No A739611 – See Issue 15
10 Plastic Base-T/Cover Screw SCR707 3 3
11a Top Cover D55500 1 1 ABS UL94-V0 Matl to S/N A680835 – See Issue 13
11b Top Cover D55500 1 1 ABS UL94-HB Matl from S/N A680836 – See Iss 13
11c Top Cover D56095B 1 1 From S/No A739612 – See Issue 15
12 Plastic Base-T/Cover Screw SCR661 2 2
13a Neon Indicator – Green SL10-67 1 In non FR Material to S/N A680835 – See Issue 13
13a Neon Indicator – Amber SL10-68 1 In non FR Material to S/N A680835 – See Issue 13
13b Neon Indicator – Amber SL10-71 1 In FR Material from S/N A680836 – See Issue 13
13b Neon Indicator – Green SL10-72 1 In FR Material from S/N A680836 – See Issue 13
14 Mains Switch D55526 1 1
15a Capacitor – 7MFD – 230V SL6-72 1 To S/No A627403 – See Issue 8
15a Capacitor – 7MFD – 230V SL6-72 1 To S/No A634377 (EU X Cut Models only) – See Iss 9
15b Capacitor – 8MFD – 230V SL6-75 1 From S/No A627404 – See Issue 8
15b Capacitor – 8MFD – 230V SL6-75 1 From S/No A634378 (All X Cut Models) – See Iss 9
16 Cable Tie SL18-362 1 1 For Securing Capacitor
17 Micro Switch – Auto Start SL8-170 1 1 Ultra Light Force
18 Micro Switch – Bin Full SL8-169 1 Low Force – See Issue 6
19 Micro Switch – Interlock SL8-172 1 3mm Gap
19 Micro Switch – Interlock SL8-175 1 From S/No A634378 (All X Cut Models) – See Issue 9
19 Insulation Plate SL8-176 1 From S/No A634378 (All X Cut Models) – See Issue 9
20 Cable Clamp Screws SCR717 2 2
21 Cable Clamp SL18-361 1 1
22 Fused Terminal Block SL16-12 1 1
23 Fuse – 5A Ceramic SL15-21 1 1
24 Base D55509 1 1
25 Cord Set – UK SL4-115 1 1 Cord Set fitted depends on SKU ordered. Not shown.
25 Cord Set – Euro SL4-116 1 1 Cord Set fitted depends on SKU ordered. Not shown.
26a Wiring Lengths – S Cut EU/UK A55556 1 Not shown – See Note and issue 10
26a Wiring Lengths – X Cut EU/UK A55558 1 Not shown – See Note and issue 10
26b Wiring Lengths – S Cut EU/UK A55590 1 Not shown – See Note and issue 15
26b Wiring Lengths – X Cut EU/UK A55591 1 Not shown – See Note and issue 15
27 Cable Tie SL17-144 6 6 Not shown – Used to secure wiring. Was 5 off – See
Issue 18
28a Model No Decal (Green) D000421 1 Not shown – Not Austr’n – See Issue 7
28b Model No Decal (Lilac) D000422 1 Not shown – See Issue 7
28c Model No Decal (Blue) D000427 1 Not shown – Austr’n only – See Issue 7
29 PCB/Sensor Assembly SL17-315 1 1 Not shown – From S/No A739612 – See Issue 15
30 PCB/Sensor Assembly Screw SCR717 6 6 Not shown – From S/No A739612 – See Issue 15
31 Blue Wire Loom (Used in D55603SP 1 1 Part of IR Auto Start Kit – See Issue 15
230V Machines 8 24/06/03

A55601SP & A55602SP only)
32 Grey Wire (Used in A55601SP
& A55602SP only)
33 White Wire (Used in A55601SP
& A55602SP only)
ILLUSTRATED PARTS MANUAL
P170/P175/P190/P195 PERSONAL
SHREDDER - 230V MACHINES
D55604SP 1 1 Part of IR Auto Start Kit – See Issue 15
D55605SP 1 1 Part of IR Auto Start Kit – See Issue 15
Shredder Stand & Base Spot
Weld Assembly
IR Auto Start Kit – S/Cut
(Spares)
IR Auto Start Kit – X/Cut
(Spares)
A55507 1 1 Comprises items 2 & 24
A55601SP 1 Comprises items 11c, 13b, 16, 27, 28a, 29, 30, 31, 32
& 33 – See Issue 15
A55602SP 1 Comprises items 11c, 13b, 16, 27, 28b, 29, 30, 31, 32
& 33 – See Issue 15
Note To S/No A739611 – See Issue 15. Included in the
Wiring Length drgs is a RC Network (SL18-373), to
satisfy EMC requirements and an Auto Start Micro
Switch (SL8-170). Refer Wiring Diagrams WD427 &
WD428.
From S/No A739612 – See Issue 15. Above RCN &
AS M/Switch are replaced by PCB/Sensor Assembly
(SL17-315). Refer Wiring Diagrams WD441 &
WD442
230V Machines 9 24/06/03
ILLUSTRATED PARTS MANUAL
P170/P175/P190/P195 PERSONAL
SHREDDER - 230V MACHINES
MODEL P170/P175 SHREDDER
(NO DOOR) - CABINET AND ELECTRICS
230V Machines 10 24/06/03

ILLUSTRATED PARTS MANUAL
P170/P175/P190/P195 PERSONAL
SHREDDER - 230V MACHINES
MODEL P190/P195 SHREDDER
(WITH DOOR) – CABINET AND ELECTRICS
No Description Part Qty Qty COMMENTS
P190 P195
1 Bin D55502 1 1
2 Hinge Pin D55542 2 2
3 Door A55575 1 1 See Issue 3
4 Bin Full Flap D55537 1
5 Shredder Stand D55505 1 1
6 Plastic Base D55501 1 1 ABS UL94-V0 Matl to S/N A680835 – See Issue 13
6 Plastic Base D55501 1 1 HIPS UL94-HB Matl from S/N A680836 – See Iss 13
6 Plastic Base D55501B 1 1 From S/No A739612 – See Issue 15
7 Plastic Base-Shr Stand Rivet RTS19 4 4
8 Plastic Base-T/Cover Screw SCR707 3 3
9 Auto Start Cover D55548 1 1 To S/No A739611 – See Issue 15
10 Auto Start Swing Arm D55547 1 1 To S/No A739611 – See Issue 15
11 Auto Start Lever D55546 1 1 To S/No A739611 – See Issue 15
12 Rotary Damper SL18-363 1 1 To S/No A739611 – See Issue 15
13a Top Cover D55500 1 1 ABS UL94-V0 Matl to S/N A680835 – See Issue 13
13b Top Cover D55500 1 1 ABS UL94-HB Matl from S/N A680836 – See Iss 13
13c Top Cover D56095B 1 1 From S/No A739612 – See Issue 15
14 Plastic Base-T/Cover Screw SCR661 2 2
15a Neon Indicator – Green SL10-67 1 In non FR Material – to S/N A680835 – See Issue 13
15a Neon Indicator – Amber SL10-68 1 In non FR Material – to S/N A680835 – See Issue 13
15b Neon Indicator – Amber SL10-71 1 In FR Material – from S/N A680836 – See Issue 13
15b Neon Indicator – Green SL10-72 1 In FR Material – from S/N A680836 – See Issue 13
16 Mains Switch SL8-168 1 1
17a Capacitor – 7MFD –230V SL6-72 1 To S/No A627403 – See Issue 8
17a Capacitor – 7MFD – 230V SL6-72 1 To S/No A634377 (EU X Cut Models only) – See Iss 9
17b Capacitor – 8MFD – 230V SL6-75 1 From S/No A627404 – See Issue 8
17b Capacitor – 8MFD – 230V SL6-75 1 From S/No A634378 (All X Cut Models) – See Issue 9
18 Cable Tie SL18-362 1 1 For Securing Capacitor
19 Micro Switch – Auto Start SL8-170 1 1 Ultra Light Force
20 Micro Switch – Bin Full SL8-169 1 Low Force – See Issue 6
21 Cable Clamp Screws SCR717 2 2
22 Cable Clamp SL18-361 1 1
23 Fused Terminal Block SL16-12 1 1
24 Fuse – 5A Ceramic SL15-21 1 1
25 Micro Switch – Interlock SL8-172 1 3mm Gap
25 Micro Switch – Interlock SL8-175 1 From S/No A634378 (All X Cut Models) – See Issue 9
25 Insulation Plate SL8-176 1 From S/No A634378 (All X Cut Models) – See Issue 9
26 Base D55506 1 1
27 Cord Set – UK SL4-115 1 1 Cord Set fitted depends on SKU ordered. Not shown.
27 Cord Set – Euro SL4-116 1 1 Cord Set fitted depends on SKU ordered. Not shown.
28a Wiring Lengths – S Cut EU/UK A55556 1 Not shown – See Note and issue 10
28a Wiring Lengths – X Cut EU/UK A55558 1 Not shown – See Note and issue 10
28b Wiring Lengths – S Cut EU/UK A55590 1 Not shown – See Note and issue 15
28b Wiring Lengths – X Cut EU/UK A55591 1 Not shown – See Note and issue 15
29 Cable Tie SL17-144 6 6 Not shown – Used to secure wiring. Was 5 off. See
Issue 18
30a Model No Decal (Yellow) D000423 1 Not shown – Not Austr’n – See Issue 7
30b Model No Decal (Mauve) D000424 1 Not shown – See Issue 7
30c Model No Decal (Orange) D000428 1 Not shown – Austr’n only – See Issue 7
31 PCB/Sensor Assembly SL17-315 1 1 Not shown – From S/No A739612 – See Issue 15
230V Machines 11 24/06/03

ILLUSTRATED PARTS MANUAL
P170/P175/P190/P195 PERSONAL
SHREDDER - 230V MACHINES
32 PCB/Sensor Assembly Screw SCR717 6 6 Not shown – From S/No A739612 – See Issue 15
33 Blue Wire Loom (Used in
D55063SP 1 1 Part of IR Auto Start Kit – See Issue 15
A55601SP & A55602SP only)
34 Grey Wire (Used in A55601SP
D55064SP 1 1 Part of IR Auto Start Kit – See Issue 15
& A55602SP only)
35 White Wire (Used in A55061SP
D55065SP 1 1 Part of IR Auto Start Kit – See Issue 15
& A55602SP only)
Shredder Stand & Base Spot
Weld Assembly
IR Auto Start Kit – S/Cut
(Spares)
IR Auto Start Kit – X/Cut
(Spares)
A55504 1 1 Comprises items 5 & 24
A55601SP 1 Comprises items 13c, 15b, 18, 29, 30a, 31, 32, 33, 34
& 35 – See Issue 15
A55602SP 1 Comprises items 13c, 15b, 18, 29, 30b, 31, 32, 33, 34
& 35 – See Issue 15
Note To S/No A739611 – See Issue 15. Included in the
Wiring Length drgs is a RC Network (SL18-373), to
satisfy EMC requirements and an Auto Start Micro
Switch (SL8-170). Refer Wiring Diagrams WD427 &
WD428.
From S/No A739612 – See Issue 15. Above RCN &
AS M/Switch are replaced by PCB/Sensor Assembly
(SL17-315). Refer Wiring Diagrams WD441 &
WD442
230V Machines 12 24/06/03

ILLUSTRATED PARTS MANUAL
P170/P175/P190/P195 PERSONAL
SHREDDER - 230V MACHINES
MODEL P190/P195 SHREDDER
(WITH DOOR) - CABINET AND ELECTRICS
230V Machines 13 24/06/03

ILLUSTRATED PARTS MANUAL
P170/P175/P190/P195 PERSONAL
SHREDDER - 230V MACHINES
IMPORTANT NOTE
ALWAYS:-
DISCONNECT FROM MAINS SUPPLY BEFORE WORK STARTS
DISCHARGE MAINS CAPACITOR BY SHORTING TERMINALS
SECURE COMPONENTS WITH NEW GRIP RINGS
REPLACE WIRE STRAPS AS REQUIRED, TO HOLD WIRE FIRMLY IN
PLACE AND TO PREVENT FOULING MOVING PARTS AND SHARP
EDGES.
ALWAYS THOROUGHLY TEST MACHINE BEFORE PLACING BACK
INTO SERVICE
SECTION 1 – TOP COVER
Removal for VISUAL INSPECTION ONLY
1. Locate and unscrew top cover fixing screws – three under base moulding (open door first
where fitted and remove bin) and two at the rear of top cover.
2. Lift off cover and place to the side on non-abrasive material. Take care not to stretch or
twist internal wiring.
Removal for WORK INSIDE MACHINE(To S/No A739611)
1. Remove cover as above.
2. Disconnect push on connectors from on the blue wire connected to the Neon, the grey wire
connected to the Capacitor and the brown and black wires connected to the Rocker Switch
(note wire positions on this switch).
3. Place cover to one side on non-abrasive material.
Removal for WORK INSIDE MACHINE(From S/No A739612)
1. Remove cover as above.
2. Disconnect push on connectors from on the blue wire connected to the Neon, the grey and
blue wires connected to the Auto Start PCB and the brown and black wires connected to the
Rocker Switch (note wire positions on both switch and PCB).
3. Place cover to one side on non-abrasive material.
230V Machines 14 24/06/03

ILLUSTRATED PARTS MANUAL
P170/P175/P190/P195 PERSONAL
SHREDDER - 230V MACHINES
Replacement of Top Cover (All Models)
1. Refit all push fit connectors to Neon, Capacitor, Auto Start PCB (where fitted) and Rocker
Switch as previously marked.
2. Fit lid, down at front initially then ease over rear flange, ensuring wiring loom is not
trapped between flanges.
3. Replace top cover fixing screws (three under base moulding and two at rear).
4. Test operation.
230V Machines 15 24/06/03

ILLUSTRATED PARTS MANUAL
P170/P175/P190/P195 PERSONAL
SHREDDER - 230V MACHINES
SECTION 2 – CUTTING HEAD (ALL MODELS)
Removal
1. Remove top cover away from machine, as described in Section 1.
2. Mark wires to prove location and disconnect three wires from the Motor (two wires to the
Capacitor and one wire to the loom).
3. Remove the Motor Earth Wire to the Side Frame (UK versions only) and the Mains Earth
Wire to the Side Frame.
4. Cut the cable ties securing Motor Wires to the base moulding.
5. Carefully prise back plastic lugs in base locating side frames and raise side frame clear of
lugs.
6. Lift out the cutting head and place it on the workbench, supported so as not to place load on
the bin full flap (where fitted).
Replacement
1. Refit cutting head by locating the side frames onto the location lugs and press down until
lugs latch into slots in the side frames.
2. Re-attach Motor Wires and Mains Earth Wire securely (noting previous marking).
3. Secure Motor Wires to base moulding with new cable ties.
4. Replace Top Cover as Section 1.
5. Test operation.
230V Machines 16 24/06/03

ILLUSTRATED PARTS MANUAL
P170/P175/P190/P195 PERSONAL
SHREDDER - 230V MACHINES
SECTION 3 – AUTO START MECHANISM
Removal (To Serial No A739611)
1. Remove Top Cover as Section 1.
2. Remove the two screws securing the Auto Start Cover.
3. Lift out the Auto Start Swing Arm, Auto Start Lever, Rotary Damper and Auto Start Micro
Switch, noting the orientation of these components in their respective positions.
Removal (From Serial No A739612)
1. Remove Top Cover as Section 1.
2. Remove remaining white wire from Auto Start PCB noting its position.
3. Unclip 3 Starlok ‘push-on’ washers securing Auto Start wires.
4. Remove 6 screws securing PCB and Sensors to Top Cover and lift clear, noting sensor wire
routing.
Replacement (To Serial No A739611)
1. Re-assemble Micro Switch, Rotary Damper, Auto Start Lever and Auto Start Swing Arm in
the correct orientation as removed, ensuring all parts are clean and free from any
contamination likely to affect the operational characteristics of the Auto Start Mechanism.
2. Replace Auto Start Cover and secure using two screws removed previously.
3. Replace Top Cover (section 1).
4. Test operation of Auto Start Mechanism using single sheet of 80 gsm paper.
Replacement (From Serial No A739612)
1. Replace PCB and Sensors in Top Cover and secure using 6 Screws.
2. Route Sensor wires as previously noted and refit 3 Starlok ‘push-on’ washers. Note. If
pillars were damaged in initial removal, cable tie the sensor wires to the web adjacent to the
paper entry.
3. Re-connect white wire to the Auto Start PCB at previously noted position.
4. Replace Top Cover (section 1).
5. Test operation of Auto Start Mechanism using single sheet of 80 gsm paper.
230V Machines 17 24/06/03

ILLUSTRATED PARTS MANUAL
P170/P175/P190/P195 PERSONAL
SHREDDER - 230V MACHINES
SECTION 4 - GEARS
Removal
1. Remove top cover and cutting head as described in Sections 1 and 2.
2. Remove five screws securing gear case cover to side frame, and remove gear case
cover/cover location plate complete.
3. Remove final reduction gearwheel (including lost motion collar) first followed the
two compound gears.
4.
TIMING OF GEARS – ALL CROSS
CUT MACHINES
Before removing the 1:1 gears, mark which teeth
mesh including the spline mesh so that on reassembly, their exact alignment can be
reproduced – this is essential for machine
performance and safe operation.
5. Remove circlip from driven cutter shaft and then remove both1:1 gears (using puller)
noting which gear came from each shaft and its mounting orientation on the shaft.
.
Replacement
1. Slide the 1:1 gears into place on their shafts, noting match marking for mesh on both
the spline and running teeth engagement for cross cut models and re-fit circlip to
driven cutter shaft.
2. Install the second reduction compound gear first followed by the first reduction
compound gear and then the final reduction gear and lost motion collar.
3. Refit gear case cover/cover location plate assembly to side frame and secure using
five screws.
4. Replace cutting head in to base moulding and re-connect motor wires as section 2.
5. Replace top cover as section 1.
6. Test machine operation.
230V Machines 18 24/06/03

ILLUSTRATED PARTS MANUAL
P170/P175/P190/P195 PERSONAL
SHREDDER - 230V MACHINES
SECTION 5 – ELECTRIC MOTORS
Removal
1. Remove top cover and cutting head as described in Sections 1 and 2.
2. Remove five screws fixing gear case cover and cover location plate to the motor side frame.
3. Remove the gear case cover, the cover location plate and reduction gear train (including lost
motion collar) as section 4.
4. Remove four countersunk screws securing the motor and two plastic motor insulators (one
each side) to the motor side frame.
5. Note angular position of the motor wires, then pull the motor out of its location in the side
frame and lift out of the assembly.
Replacement
1. Fit motor insulator onto the motor spigot, and insert into the side frame. Locate other motor
insulator over the motor shaft on other side of side frame and secure with four countersunk
screws
2. Re-build gear train (including lost motion assembly) as Section 4.
3. Re-assemble the cutting head into base moulding as section 2.
4. Replace top cover as section 1.
5. Test operation.
230V Machines 19 24/06/03

ILLUSTRATED PARTS MANUAL
P170/P175/P190/P195 PERSONAL
SHREDDER - 230V MACHINES
SECTION 6 – CUTTER SHAFTS, STRIPPERS AND STRIPPER
PLATES, PAPER SHIELDS AND TIE BARS (STRIPPER
SUPPORT BARS).
Removal
1. Remove top cover and cutting head as described in Sections 1 and 2.
2. Remove gear case cover, the cover location plate and reduction gear train (including lost
motion collar) as section 4.
Straight Cut Shredders
3. Remove the rivets securing the stripper plates to both side frames.
4. Support cutting head on motor side frame and remove tie bar screws.
5. Remove upper most side frame.
6. Supporting cutter shaft and stripper plate assembly remove motor side frame.
7. Place cutter shaft and stripper plate assembly horizontally on flat surface, and disengage
stripper plates.
Cross Cut Shredders
3. Invert cutting head such that it is supported on the top of both side frames and remove
stripper support bar screws from the motor side frame only.
4. Remove rivets securing the paper shield to the opposite end side frame.
5. Supporting the cutting head assembly on the motor side frame remove the cutter shaft
assembly as one unit (including strippers, stripper support bars and non motor side frame).
6. Place the cutter shaft assembly horizontally on flat surface and remove stripper support bar
screws, withdraw stripper support bars and remove strippers. Dismantle cutter shafts from
small side frame.
Replacement
Straight Cut Shredders
1. Engage stripper plate to the each cutter shaft and locate cutter shafts together.
2. Assemble cutter shaft assembly to motor side frame and rivet to stripper plates.
230V Machines 20 24/06/03

ILLUSTRATED PARTS MANUAL
P170/P175/P190/P195 PERSONAL
SHREDDER - 230V MACHINES
3. Assemble small side frame to opposite end of cutter shafts and rivet to stripper plates.
4. Insert the tie bars between both side frames and secure using tie bar screws.
5. Re-assemble the reduction gear train (including lost motion collar), cover location plate and
gear case cover as section 4.
6. Re-assemble cutting head assembly complete as section 2.
7. Replace top cover as section 1.
8. Test operation.
Cross Cut Shredders
1. Assemble cutter shafts to small side frame.
2. Locate strippers to cutter shafts and insert stripper bars into strippers. Align stripper bars
with holes in small side frame and secure using stripper bar screws.
3. Place cutter shaft assembly (including strippers and stripper bars) into motor side frame and
rivet paper shields to small side frame. Align stripper bars with holes in motor side and
secure using stripper bar screws.
4. Re-assemble the reduction gear train (including lost motion collar), cover location plate and
gear case cover as section 4.
5. Re-assemble cutting head assembly complete as section 2.
6. Replace top cover as section 1.
7. Test operation.
230V Machines 21 24/06/03

ILLUSTRATED PARTS MANUAL
P170/P175/P190/P195 PERSONAL
SHREDDER - 230V MACHINES
SECTION 7 – INTERNAL FUSE REPLACEMENT
All Models – (UK and Euro)
Removal
1. Remove the top cover as described in section 1.
2. The Fuse is assembled in the Fuse holder adjacent to the entry of the Mains Input cable.
3. Remove Fuse by removing plastic Fuse carrier from the Fuse holder assembly.
4. Replace Fuse in Fuse carrier with correct 5 Amp Fuse Replacement Type T5AH250V
Ceramic Fuse (Rexel Part No SL15-21).
5. Important - Do not use any other type of fuse, as the above fuse is a Time Delay fuse
specific to this application.
6. Re-assemble Fuse carrier to Fuse holder.
7. Replace top cover as section 1.
8. Test operation.
230V Machines 22 24/06/03

ILLUSTRATED PARTS MANUAL
P170/P175/P190/P195 PERSONAL
SHREDDER - 230V MACHINES
MODEL P170
Power Supply 230V 50Hz
Height 515 mm (20.28 inches)
Width 400 mm (15.75 inches)
Depth 370 mm (14.57 inches)
Weight 17 kg (37.4 lbs)
Entry Width 240 mm (9.45 inches)
Shred Size Nominal 4mm (0.16 inches) straight
Cutting Capacity 15 sheets of 70 gsm at 230V
Motor Power 100W
Feed Rate 4 M/min single sheet
Power on Display None
Auto on Display Neon (GREEN)
Automatic Start/Stop Yes
Dimensions of Waste Container
(HxWxD)
360mm x 365mm x 315mm
Waste Container Capacity 37 litres – See Issue 5
230V Machines 23 24/06/03

ILLUSTRATED PARTS MANUAL
P170/P175/P190/P195 PERSONAL
SHREDDER - 230V MACHINES
MODEL P175
Power Supply 230V 50Hz
Height 51.5 mm (20.28 inches)
Width 400 mm (15.75 inches)
Depth 370 mm (14.57 inches)
Weight 18 kg (39.6 lbs)
Entry Width 240 mm (9.45 inches)
Shred Size Nominal 4mm x 40mm (0.16 x 1.57 inches)
Cutting Capacity 7 sheets of 70 gsm at 230V
Motor Power 100W
Feed Rate 4 M/min single sheet
Power on Display None
Auto on Display None
Bin full/Bin removed Neon (AMBER)
Automatic Start/Stop Yes
Dimensions of Waste Container
360mm x 365mm x 315mm
(HxWxD)
Waste Container Capacity 37 litres – See Issue 5
230V Machines 24 24/06/03

MODEL P190
ILLUSTRATED PARTS MANUAL
P170/P175/P190/P195 PERSONAL
SHREDDER - 230V MACHINES
Power Supply
230V 50Hz
Height 605 mm (23.82 inches)
Width
400 mm (15.75 inches)
Depth 370 mm (14.57 inches)
Weight 19 kg (41.8 lbs)
Entry Width
240 mm (9.45 inches)
Shred Size Nominal 4mm (0.16 inches) straight
Cutting Capacity
16 sheets of 70 gsm at 230V – See
Issue 4
Motor Power 100 watts
Feed Rate 4 M/mm single sheet
Power on Display
None
Auto on Display Neon (GREEN)
Automatic Start/Stop Yes
Dimensions of Waste Container
360mm x 365mm x315mm
HxWxD)
Waste Container Capacity 40 litres – See Issue 5
230V Machines 25 24/06/03

MODEL P195
ILLUSTRATED PARTS MANUAL
P170/P175/P190/P195 PERSONAL
SHREDDER - 230V MACHINES
Power Supply
230V 50Hz
Height 605mm (23.82 inches)
Width
400 mm (15.75 inches)
Depth 370 mm (14.82 inches)
Weight 20 kg (44 lbs)
Entry Width
240 mm (9.45 inches)
Shred Size Nominal 4mm x 40mm (0.16 x 1.57 inches)
Cutting Capacity 9 sheets of 70 gsm @ 230V
Motor Power 100 watts
Feed Rate 4 M/min single sheet
Power on Display
None
Auto on Display None
Bin full/Bin removed Neon (AMBER)
Automatic Start/Stop
Dimensions of Waste Container
360mm x 365mm x 315mm
Yes
(HxWxD)
Waste Container Capacity 40 litres – See Issue 5
230V Machines 26 24/06/03


WIRING DIAGRAM P170/P190.
To S/No A739611
ILLUSTRATED PARTS MANUAL
P170/P175/P190/P195 PERSONAL
SHREDDER - 230V MACHINES
230V Machines 28 24/06/03

WIRING DIAGRAM P170/P190
From S/No A739612
ILLUSTRATED PARTS MANUAL
P170/P175/P190/P195 PERSONAL
SHREDDER - 230V MACHINES
230V Machines 29 24/06/03

WIRING DIAGRAM P175/P195
To S/No A739611
ILLUSTRATED PARTS MANUAL
P170/P175/P190/P195 PERSONAL
SHREDDER - 230V MACHINES
230V Machines 30 24/06/03

WIRING DIAGRAM P175/P195
From S/No A739612
ILLUSTRATED PARTS MANUAL
P170/P175/P190/P195 PERSONAL
SHREDDER - 230V MACHINES
230V Machines 31 24/06/03

ILLUSTRATED PARTS MANUAL
P170/P175/P190/P195 PERSONAL
SHREDDER - 230V MACHINES
AMENDMENT RECORD SHEET
ISSUE DECRIPTION SERIALNOCARO
NO
2 Page 4 - item 17, Tie bar (drg No D55524) quantity reduced from 2 to
1, item 18 tie bar screw (SCM15) reduced from 4 to 2, and item 19 tie
bar shakeproof washer (SHK4) reduced from 4 to 2.
3 Page 10 – item 3, now supplied as a complete assembly incorporating
Magnet and Magnet cover
4 Sheet Capacity for P-190 in Specifications amended from 17 sheets
to 16 sheets of 70 gsm
5 Waste Container Capacity for P170/P175 & P190/P195 increased
from 35 Litres to 37 & 40 Litres respectively.
6 Pages 8 and 10 – Items 18 and 20 respectively. Part no changed from
SL8-171 to SL8-169
7 Pages 8 and 10 – Model No Decals, Item 28 and Item 30 added
respectively.
8 ATB Motor + Insulators + 7MFD capacitor replaced by Rotomatika
Motor + 8MFD capacitor on all models except EU Cross Cut models
9 ATB Motor + Insulators + 7MFD capacitor replaced by Rotomatika
Motor + 8MFD capacitor with Double Interlock Switch on all Cross
Cut models. Wiring Diagram updated.
10 Wiring looms A55557 and A55559 have been combined into A55556
and A55558 respectively, by deleting earth wire.
11 Page 6 – Additional part no D55580 and D55579 added to items 17
and 29 respectively
12 Pages 8 and 10 – EMC suppression parts namely ‘X2 Capacitor,680K
and 82 Ohm resistors’ are now contained in a single RC Network
(SL18-373) within Wiring Loom
13 Pages 8 and 10 – Items 4 and 6 resp – Plastic Base (D55501) Matl
changed from ABS UL94-V0 to HIPS UL94-HB. Items 11 and 13
resp – Top Cover (D55500) Matl changed from ABS UL94-V0 to
ABS UL94-HB. Items 13 and 15 resp – Flame Retardent neons
added.
14 Page 4 - Part No D55517 – Stripper Plate x 2 off, now included as 1
off each in Part No A56077 – Stripper Spotweld Assembly (Front)
and A56087 – Stripper Spotweld Assembly (Rear).
15 Auto Start function changed from Mechanical Rotary Damper to
Electronic Infra Red Sensor/PCB Assembly resulting in changes to
the Top Cover, Plastic Base and Wiring Lengths on all Models, and
Stripper Spotweld Assemblies on Straight Cut Models only.
16 Pages 4 & 6 – Changes to both Side Frames and Cutter Shafts (on all
models), Paper Infeed Chutes only (on x/cut models) with increased
number of Tie Bars and associated fixings (on x/cut models), as a
result adopting Slimline improvements to the P Range models.
17 Page 4 – Part No D55538 – Cover Location Plate replaced by
D56070 as used on Slimline Models. Pages 4 & 6 - All spares
A583489 324
- 350
- 369
- 380
- 413
- 408
A627404 433
A634378 461
A634378 455
- 384
A657391 485
A680836 506
A733242 637
A739612 638
A751308 642
A754920 671
230V Machines 32 24/06/03

ILLUSTRATED PARTS MANUAL
P170/P175/P190/P195 PERSONAL
SHREDDER - 230V MACHINES
assemblies other than replacement cutting heads deleted.
18 Pages 8 and 11, Part No SL17-144 - Cable Tie used to secure wiring
increased from 5 off to 6 off, to meet Approval requirements. Wiring
Diagrams on Pages 29 and 31 updated accordingly.
- 667
230V Machines 33 24/06/03
 Loading...