

Page 1
Table of Contents
Table of Contents .........................................................................................1
Usage Notice ................................................................................................ 2
Precautions ..........................................................................................................2
Introduction .................................................................................................. 4
Product Features ..................................................................................................4
Package Overview ...............................................................................................5
Product Overview .................................................................................................6
Main Unit ........................................................................................................................ 6
Control Panel .................................................................................................................7
Connection Ports ...........................................................................................................8
Wireless Remote Control ...............................................................................................9
Installation .................................................................................................. 10
Connecting the Projector ....................................................................................10
Powering On/Off the Projector ...........................................................................11
Powering On the Projector ........................................................................................... 11
Powering Off the Projector ...........................................................................................12
Warning Indicator ......................................................................................................... 12
Adjusting the Projected Image ...........................................................................13
Adjusting the Projector Image Height ..........................................................................13
Adjusting the Projector Zoom / Focus .......................................................................... 14
Adjusting Projected Image Size ...................................................................................14
User Controls .............................................................................................15
Control Panel & Remote Control ........................................................................15
On-Screen Display Menus .................................................................................17
How to Operate ............................................................................................................17
Menu Tree ....................................................................................................................18
Language .....................................................................................................................19
Image-I ........................................................................................................................ 20
Image-II (Computer Mode) ...........................................................................................22
Image-II (Video Mode) .................................................................................................24
Audio ............................................................................................................................26
Management ................................................................................................................27
Lamp Setting ............................................................................................................... 30
Appendices ................................................................................................ 31
Troubleshooting ..................................................................................................31
Replacing the Lamp .............................................................................................35
Compatibility Modes ...........................................................................................36
Ceiling Mount Installation ...................................................................................37
1
... English
Page 2
Usage Notice
Precautions
Follow all warnings, precautions and maintenance as recommended in this user’s guide to maximize the life of your unit.
Excessive use of your unit may invalidate your warranty
(normal use defined as 8 hours a day 5 days a week).
Warning- Do not look into the projector’s lens when the lamp is
on. The bright light may hurt your eyes.
Warning- Children should be supervised at all times when
projector is in use.
Warning- To reduce the risk of fire or electric shock, do not
expose this product to rain or moisture.
Warning- Please do not open or disassemble the product as this
may cause electric shock.
Warning- When changing the lamp, please allow unit to cool
down, and follow all changing instructions.
Warning- This product will detect the life of the lamp itself.
Please be sure to change the lamp when it shows
warning messages.
English ...
Warning- Reset the “Lamp Reset” function from the On Screen
Display “Lamp Setting” menu after replacing the lamp
module (refer to page 30).
Warning- When switching the projector off, please ensure the
projector completes its cooling cycle before
disconnecting power.
Warning- Turn on the projector first and then the signal sources.
Warning- Do not use lens cap when projector is in operation.
Warning- When the lamp reaches the end of its life, it will burn
out and may make a loud popping sound. If this
happens, the projector will not turn back on until the
lamp module has been replaced. To replace the lamp,
follow the procedures listed under “Replacing the
Lamp” (refer to page 35).
2
Page 3
Usage Notice
Do:
Turn off the product before cleaning.
Use a soft cloth moistened with mild detergent to clean the
display housing.
Disconnect the power plug from AC outlet if the product is not
being used for a long period of time.
Don’t:
Block the slots and openings on the unit provided for
ventilation.
Use abrasive cleaners, waxes or solvents to clean the unit.
Use under the following conditions:
- In extremely hot, cold or humid environments.
- In areas susceptible to excessive dust and dirt.
- Near any appliance that generates a strong magnetic field.
- Place in direct sunlight.
3
... English
Page 4
Introduction
Product Features
This product is an SVGA single chip 0.55” DLPTM projector.
Outstanding features include:
True SVGA, 800 x 600 addressable pixels
Single Dark Chip2TM DLPTM technology
NTSC/NTSC4.43/PAL/PAL-M/PAL-N/SECAM and
HDTV compatible (480i/p, 576i/p, 720p, 1080i)
Multi-Auto functions: Auto detection, Auto image and
Auto saving the adjustments
Full function remote control
User friendly multilingual on screen display menu
Advanced digital keystone correction and high
quality full screen image re-scaling
English ...
User friendly control panel
One built-in speaker with 2 Watt amplifier
SXGA, XGA compression and VGA re-sizing
Mac compatible
4
Page 5
Introduction
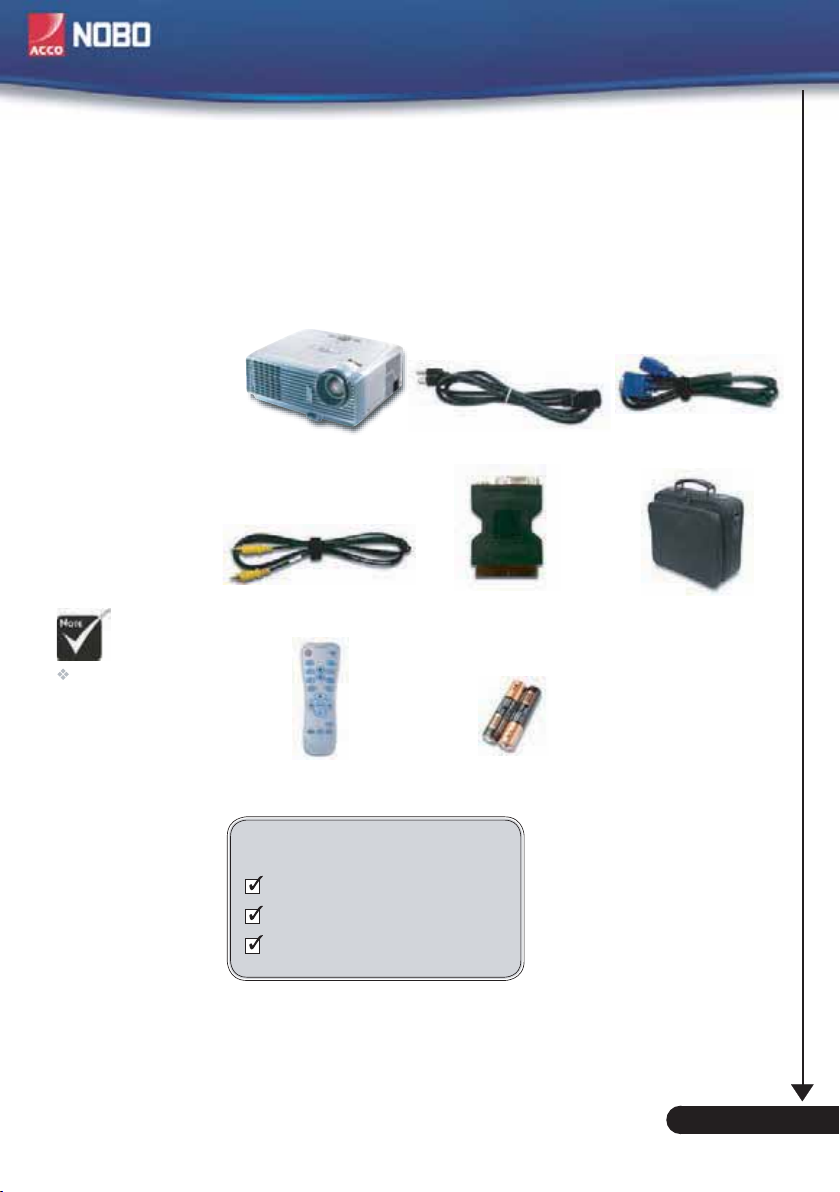
Package Overview
This projector comes with all the items shown below. Check to
make sure your unit is complete. Contact your dealer immediately if anything is missing.
Due to the differ ence in applica-
tions for each
country, some
regions may have
different
accessories.
Projector with lens cap
Composite Video Cable
1.8m
Wireless Remote
Control
Documents :
User’s Guide
Quick Start Guide
Warranty Card
Power Cord 1.8m VGA Cable 1.8m
SCART RGB/S-Video
Adaptor
(available in European
version only)
2 x AAA Batteries
Carrying Case
5
... English
Page 6
Introduction
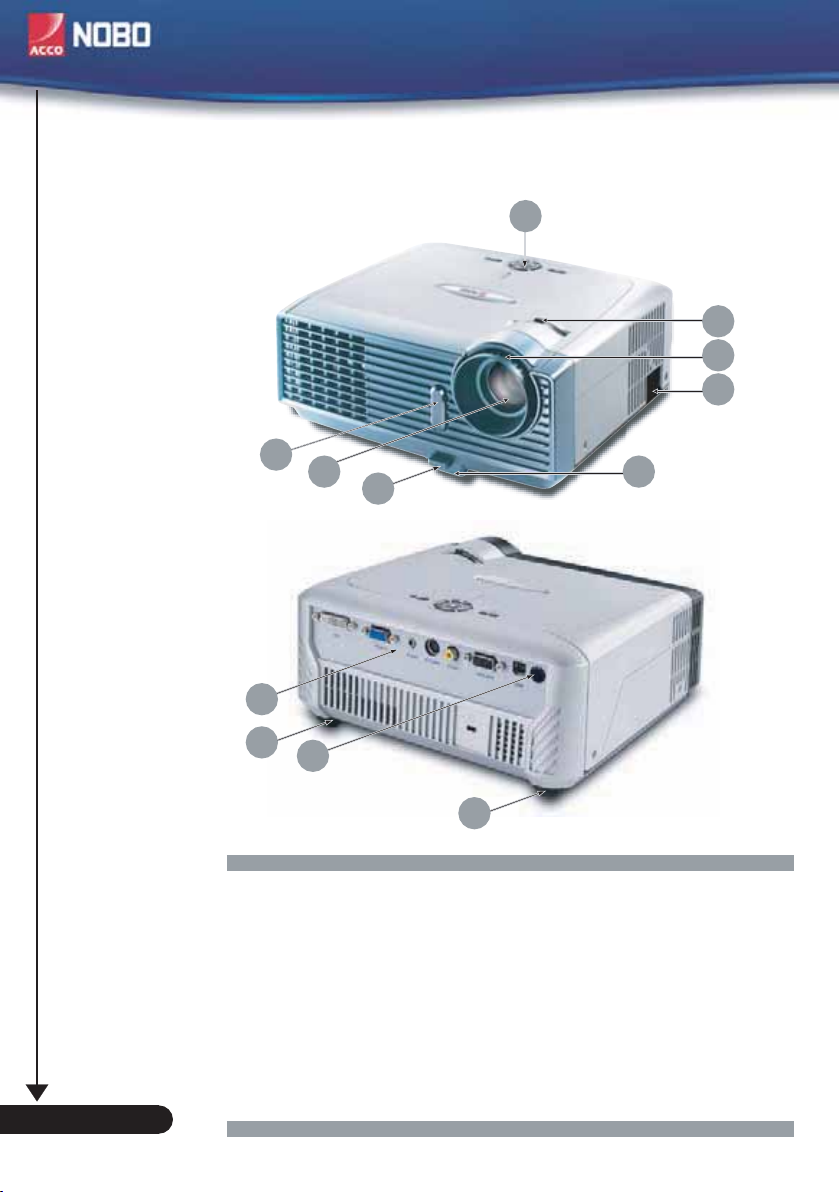
Product Overview
Main Unit
8
7
9
10
8
1
2
3
4
5
6
English ...
10
1. Control Panel
2. Zoom Lever
3. Focus Ring
4. Power Socket
5. Elevator Foot
6. Elevator Button
7. Zoom Lens
8. IR Receivers
9. Connection Ports
10. Tilt Adjusting Feet
6
Page 7
Introduction
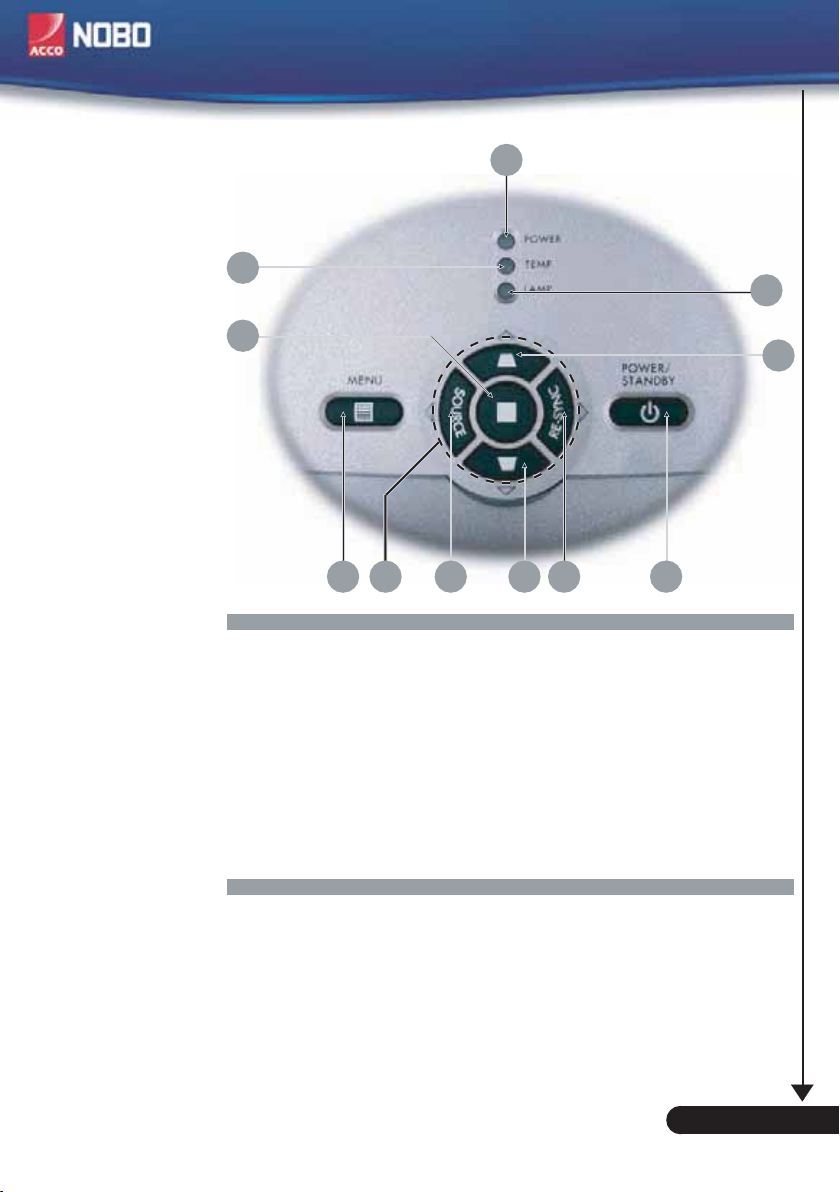
Control Panel
2
10
8
1. Power Indicator LED
2. Temp Indicator LED
3. Lamp Indicator LED
4. Keystone Correction
5. Power/Standby
6. Re-Sync
7. Source
8. Four Directional Select Keys
9. Menu (On/Off)
10. Enter
1
3
4
4
59 67
7
... English
Page 8
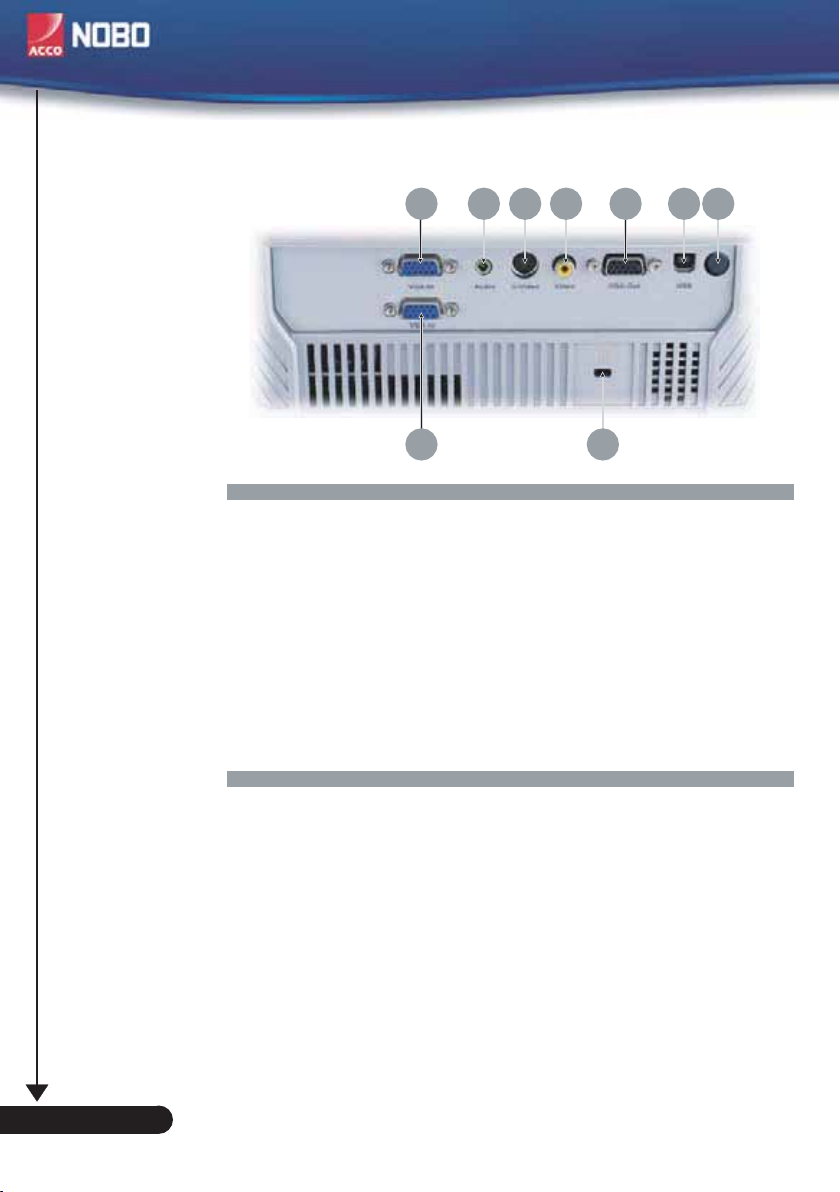
Introduction
Connection Ports
7 123456
8
1. IR Receiver
2. USB Connector
3. Monitor Loop-through Output Connector
4. Composite Video Input Connector
5. S-Video Input Connector
6. Audio Input Connector
7. PC Analog signal/SCART RGB/HDTV/Component Video
Input Connector
8. PC Analog signal/HDTV/Component Video Input
Connector
9. KensingtonTM Lock Port
9
English ...
8
Page 9
Introduction
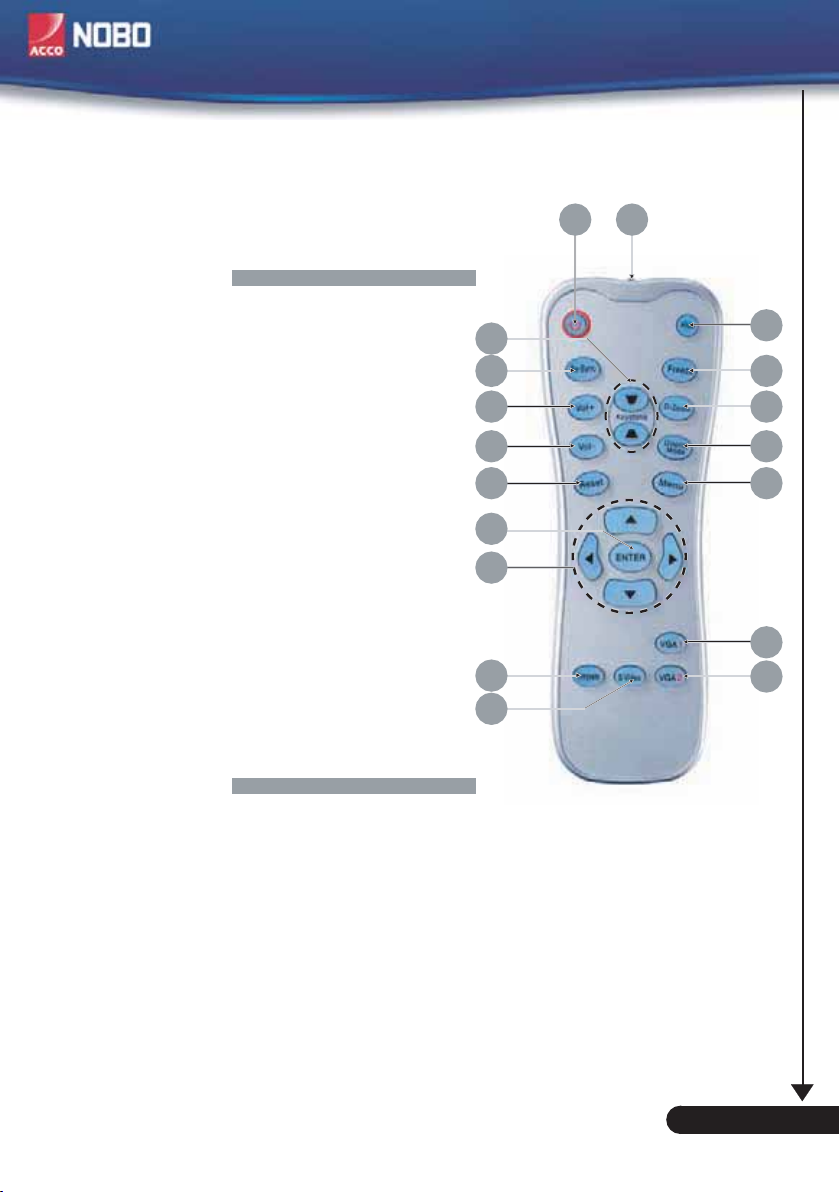
Wireless Remote Control
1. Power
2. IR LED
3. Hide
4. Freeze
5. D-Zoom
6. Display Mode
7. Menu
8. Keystone Correction
9. Re-Sync
10. Volume +
11. Volume -
12. Reset
13. Enter
14. Four Directional
Select Keys
15. VGA1 Source
16. VGA2 Source
17. Composite Video
Source
18. S-Video Source
8
9
10
11
13
14
17
18
1
2
3
4
5
6
712
15
16
9
... English
Page 10
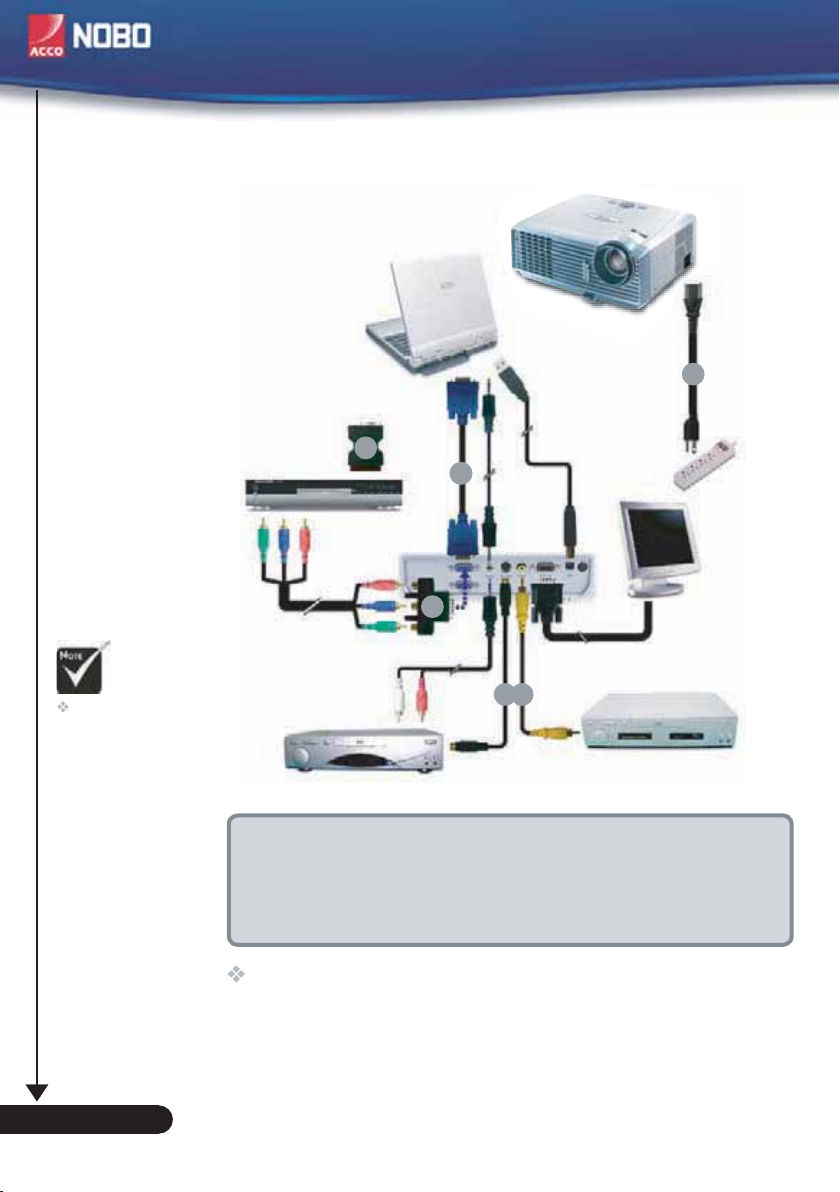
Installation
Connecting the Projector
Due to the differ ence in applica-
tions for each
country, some
regions may have
different
accessories.
RGB
DVD Player, Set-
top Box,
HDTV receiver
1. .............................................................................................................Power Cord
2. ..............................................................................................................VGA Cable
3. ......................................SCART RGB/S-Video Adaptor (For European Only)
4. ........................................................................................ Composite Video Cable
5. ...................................................................S-Video Cable (Optional Accessory)
6. ................................... D-15 to RCA Adapter for YPbPr (Optional Accessory)
3
6
S-Video Output
USB
1
32
5
4
Video Output
English ...
To ensure the projector works well with your computer,
please set the display mode of your graphic card less than or
equal to 800 X 600 resolution. Make sure the timing of the
display mode is compatible with the projector. Refer to the
“Compatibility Modes” section on page 36.
10
Page 11
11
... English
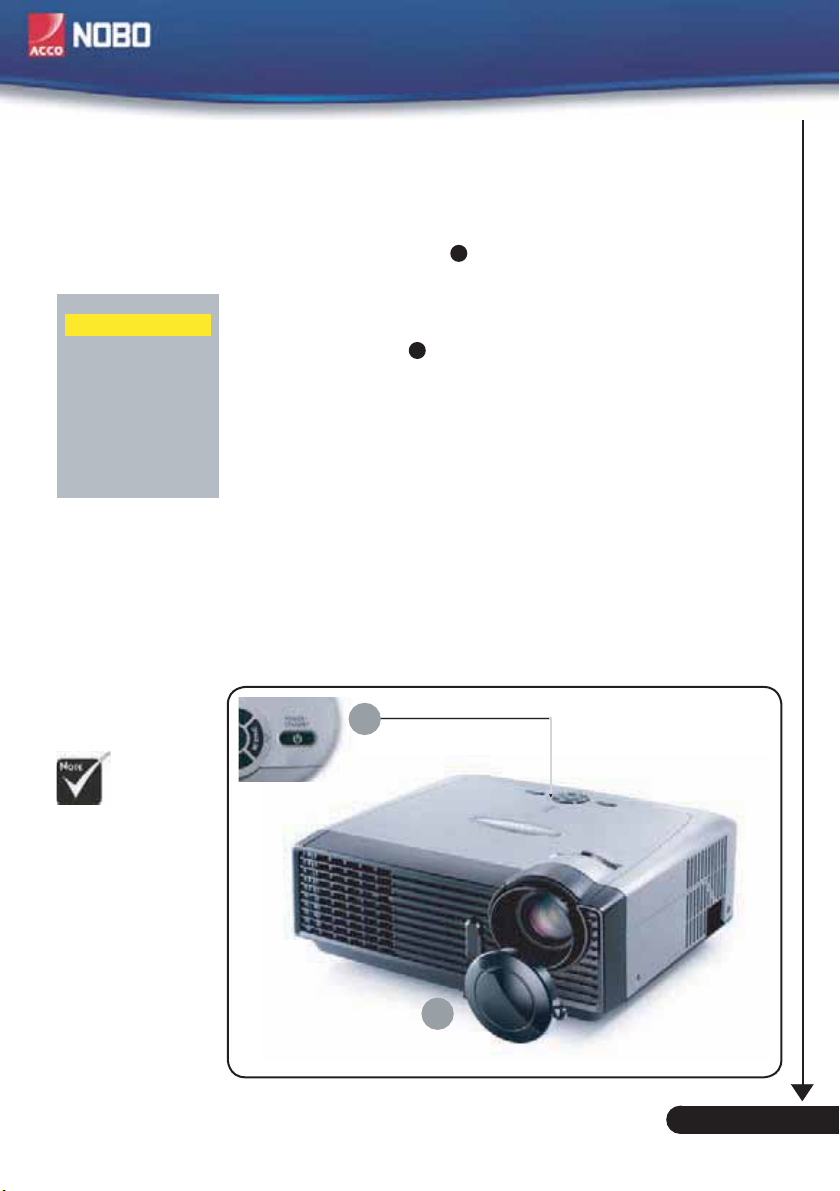
Powering On the Projector
1. Remove the lens cap.
2. Ensure that the power cord and signal cable are securely
connected. The Power LED will flash green.
3. Turn on the lamp by pressing “Power/Standby” button on
the control panel. The Power LED will turn green.
The first time you use the projector, you can select your
preferred language from the quick menu after the startup
screen display.
4. Turn on your source (computer, notebook, video player,etc.).
The projector will detect your source automatically.
If you connect multiple sources at the same time, use the
“Source” button on the control panel or remote control
to switch.
Powering On/Off the Projector
Turn on the projector
first and then the signal
sources.
1
Power/Standby
2
Lens Cap
Quick Menu
Installation
Select Language
English
Deutsch
Français
Italiano
Español
Português
Nederlands
Polski
Press Enter to Set
1
2
Page 12
Installation
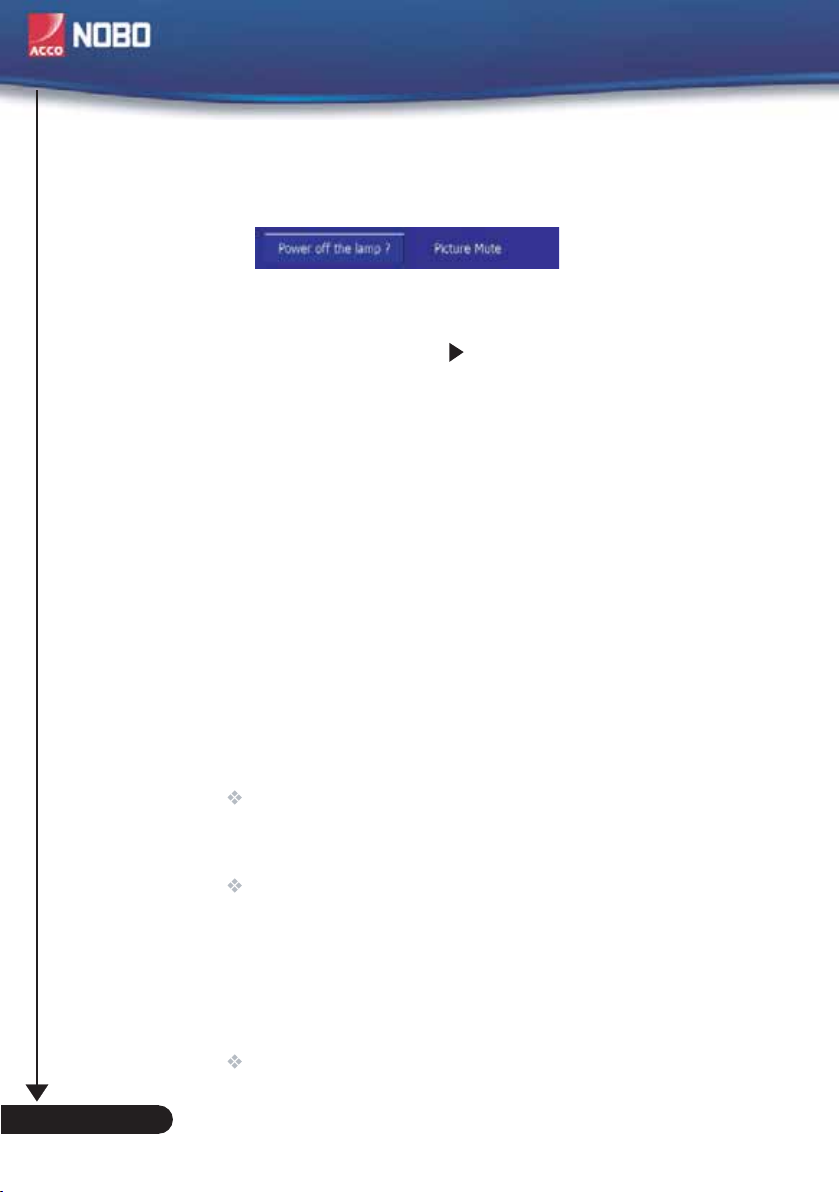
Powering Off the Projector
1. Press the “Power/Standby” button to turn off
the projector lamp, you will see a message “
” displayed on the projector’s screen. Press the “Power/Standby” button again
to confirm, otherwise the message will disappear after 5
seconds.
Please note that if the key is pressed instead, the projec-
tor will enter the “Picture Mute” mode and no image will
be displayed. To exit the “Picture Mute” mode, press the
“Power/Standby” button again.
2. The cooling fans continue to operate for about 30 seconds
for cooling cycle and the Power LED will turn green. When
the Power LED begins flashing, the projector has entered
standby mode.
If you wish to turn the projector back on, you must wait
until the projector has completed the cooling cycle and has
entered standby mode. Once in standby mode, simply press
“Power/Standby” button to restart the projector.
3. Disconnect the power cord from the electrical outlet and the
projector.
4. Do not turn on the projector immediately following a power
off procedure.
English ...
12
Warning Indicator
When the “LAMP” indicator lights solid red, the projector
will automatically shut itself down. Please contact your local
reseller or service center (refer to pages 33~34).
When the “TEMP” indicator lights solid red for about 60
seconds, it indicates the projector has overheated. The
projector will automatically shut itself down.
Under normal conditions, the projector can be switched on
again after it has cooled down. If the problem persists, you
should contact your local dealer or our service center
(refer to pages 33~34).
When the “TEMP” indicator flashes red for about 5 seconds,
it indicates the fan failed. Please contact your local dealer or
our service center (refer to pages 33~34).
Page 13

Installation
Adjusting the Projected Image
Adjusting the Projector Image Height
The projector is equipped with an elevator foot for adjusting the
image height.
To raise the image:
1. Press the elevator button .
2. Raise the image to the desired height angle , then release
the button to lock the elevator foot into position.
3. Use to fine-tune the display angle.
To lower the image:
1. Press the elevator button.
2. Lower the image, then release the button to lock the
elevator foot into position.
3. Use to fine-tune the display angle.
Elevator Button
3
3
1
1
2
3
2
Elevator Foot
3
Tilt Adjusting
Feet
13
... English
Page 14

Installation
Adjusting the Projector Zoom / Focus
You may turn the zoom lever to zoom in or out. To focus the image, rotate the focus ring until the image is clear. The projector
will focus at distances from 4.9 to 39.4 feet (1.5 to 12.0 meters)
with mechanical travel.
Zoom Lever
Focus Ring
Adjusting Projection Image Size
304.9"
(774.5cm)
203.3"
(516.3cm)
184.9"
(469.6cm)
277.3"
(704.4cm)
38.1"
(96.8cm)
34.7"
(88.1cm)
Diagonal
76.2"
(193.6cm)
69.3"
(176.1cm)
127.1"
(322.7cm)
115.6"
(293.5cm)
177.9"
(451.8cm)
161.8"
(410.9cm)
English ...
14
4.9'
(1.5m)
9.8'
(3.0m)
16.4'
(5.0m)
23.0'
(7.0m)
26.3'
(8.0m)
39.4'
(12.0m)
Screen
(Diagonal)
Screen
Size
Max.
38.1"(96.8cm)
Min. 34.7"(88.1cm) 69.3"(176.1cm) 115.6"(293.5cm) 161.8"(410.9cm) 184.9"(469.6cm) 277.3"(704.4cm)
Max.(WxH)
Min.(WxH)
Distance
30.5" x 22.9"
(77.4 x 58.1cm)
27.8" x 20.8"
(70.5 x 52.9cm)
4.9'(1.5m)
76.2"(193.6cm)
61.0" x 45.7"
(154.9 x 116.2cm)
55.4" x 41.6"
(140.9 x 105.7cm)
9.8'(3.0m)
? This graph is for user’s reference only.
127.1"(322.7cm)
101.7" x 76.3"
(258.2 x 193.6cm)
92.5" x 69.4"
(234.8 x 176.1cm)
16.4'(5.0m)
177.9"(451.8cm)
142.3" x 106.7"
(361.4 x 271.1cm)
129.4" x 97.1"
(328.7 x 246.5cm)
23.0'(7.0m)
203.3"(516.3cm)
162.6" x 122.0"
(413.0 x 309.8cm)
147.9" x 110.9"
(375.7 x 281.8cm)
26.3'(8.0m)
304.9"(774.5cm)
243.9" x 182.9"
(619.6 x 464.7cm)
221.8" x 166.4"
(563.5 x 422.6cm)
39.4'(12.0m)
Page 15

User Controls
Control Panel & Remote Control
There are two ways for you to control projector functions:
Remote Control and Control Panel.
Remote ControlControl Panel
Using the Control Panel
Power/Standby
Refer to the “Power On/Off the Projector” section on pages
11-12.
Source
Press “Source” to choose RGB, Component-p, Component-i,
S-Video, Composite Video and HDTV sources.
Menu
Press “Menu” to launch the on-screen display (OSD) menu.
To exit OSD, press “Menu” again.
Keystone /
Adjusts image distortion caused by tilting the projector (±15
degrees).
Four Directional Select Keys
Use to select items or make adjustments to your
selection.
Enter
Confirm your selection of items.
Re-Sync
Automatically synchronises the projector to the input source.
15
... English
Page 16

English ...
16
User Controls
Using the Remote Control
Power
Refer to the “Power On/Off the Projector” section on pages 11-12.
Re-Sync
Automatically synchronises the projector to the input source.
Volume + / - (Vol+/Vol-)
Increases/decreases speaker volume.
Reset
Changes the adjustments and settings to the factory default
value.
Hide
Press “Hide” to hide image, press again to restore display of the
image.
Keystone /
Adjusts image distortion caused by tilting the projector (±15
degrees).
Freeze
Press “Freeze” to pause the screen image.
D-Zoom
Press “D-Zoom” button to zoom in on an image.
Display Mode
Select the display mode from PC, Movie, Game, sRGB and User.
Four Directional Select Keys
Use to select items or make adjustments to
your selection.
Enter
Confirm your selection of items.
Menu
Press “Menu” to launch the on-screen display menu. To exit
OSD, press “Menu” again.
VGA1
Press “VGA1” to choose VGA1 connector.
VGA2
Press “VGA2” to choose VGA2 connector.
S-Video
Press “S-Video” to choose S-Video source.
Composite
Press “composite” to choose composite video source.
Page 17

User Controls
On Screen Display Menus
The Projector has multilingual On Screen Display menus that
allow you to make image adjustments and change a variety of
settings. The projector will automatically detect the source.
How to operate
1. To open the OSD menu, press “Menu ” on the Remote Control
or Control Panel.
2. When OSD is displayed, use keys to select any item in the
main menu. While making a selection on a particular page, press
or “Enter” key to enter sub menu.
3. Use keys to select the desired item and adjust the
settings by
4. Select the next item to be adjusted in the sub menu and adjust as
described above.
5. Press “Menu ” to confirm, and the screen will return to the main
menu.
6. To exit, press “Menu ”again. The OSD menu will close and the
projector will automatically save the new settings.
key.
Sub Menu
Main Menu
Setting
17
... English
Page 18

User Controls
Menu Tree
English/Deutsch/Français/Italiano/Español/
Português/Nederlands/Polski
English ...
18
Page 19

User Controls
English
Français
Deutsch
Italiano
Español
Polski
Português
Nederlands
Language
Language
Choose the multilingual OSD menu . Use the or key to select
your preferred language.
Press “Enter” to finalise the selection.
19
... English
Page 20

User Controls
Image-I
Display Mode
There are many factory presets optimised for various types of
images.
O
PC: For computer or notebook.
O
Movie: For home theater.
O
Game : For game.
O
sRGB: For standard colour.
O
User: Memorise user’s settings.
Brightness
Adjust the brightness of the image.
O
Press the
O
Press the
Contrast
The contrast controls the degree of difference between the lightest
and darkest parts of the picture. Adjusting the contrast changes
the amount of black and white in the image.
O
Press the
Press the
O
Keystone (Keystone Correction)
to darken the image.
to lighten the image.
to decrease the contrast.
to increase the contrast.
English ...
Adjust image distortion caused by tilting projector. (±15 degrees)
Colour
Press “Enter” to adjust the red, green and blue colours.
White Peaking
Use the white peaking control to set the white peaking level of
DMD chip. 0 stands for minimal peaking, and 10 stands for
20
Page 21

User Controls
maximum peaking. If you prefer a stronger image, adjust towards
the maximum setting. For a smooth and more natural image,
adjust towards the minimum setting.
Colour Temp.
Adjust the colour temperature. At a higher temperature, the screen
looks colder; at a lower temperature, the screen looks warmer.
21
... English
Page 22

User Controls
Image-II
(Computer Mode)
Frequency
“Frequency”changes the display data frequency to match the
frequency of your computer’s graphic card. If you experience a
vertical flickering bar, use this function to make an adjustment.
Tracking
“Tracking” synchronises the signal timing of the display with the
graphic card. If you experience an unstable or flickering image, use
this function to correct it.
H.Position (Horizontal Position)
Press the to move the image left.
Y
Press the to move the image right.
Y
V. Position (Vertical Position)
Press the to move the image down.
Y
Press the to move the image up.
Y
Degamma
This allows you to choose a degamma table that has been fine tuned to bring out the best image quality for the input.
Aspect Ratio
Use this function to choose your desired aspect ratio.
English ...
22
4:3 : The input source will be scaled to fit the projection
Y
screen.
16:9 : The input source will be scaled to fit the width of
Y
the screen.
Window: When a 4:3 image is bigger than a 16:9 screen,
Y
select the “Window” mode to fit the image onto the screen
without changing the projection distance.
Page 23

16:9 Image Position:
O
Image Position at window mode will also be
moved accordingly.
User Controls
WindowOriginal Pixel
16:9 Image Position
Adjust the image position to up or down, when you select the
aspect ratio to 16:9.
O
Press the
Press the to move the image up.
O
to move the image down.
23
... English
Page 24

User Controls
User Controls
Image-II
(Video Mode)
Degamma
This allows you to choose a degamma table that has been fine tuned to bring out the best image quality for the input.
Saturation
Adjusts a video image from black and white to fully saturated
colour.
Press the
O
Press the
O
Tint
Adjusts the colour balance of red and green.
O
Press the
to decrease the amount of colour in the image.
to increase the amount of colour in the image.
to increase the amount of green in the image.
“Saturation”, “Tint”
O
and “Sharpness” function is not supported
under DVI-D mode.
English ...
24
Press the
O
to increase the amount of red in the image.
Sharpness
Adjusts the sharpness of the image.
O
Press the
Press the
O
to decrease the sharpness.
to increase the sharpness.
Aspect Ratio
Use this function to choose your desired aspect ratio.
4:3 : The input source will be scaled to fit the projection
O
screen.
O
16:9 : The input source will be scaled to fit the width of
the screen.
Window: When a 4:3 image is bigger than a 16:9 screen,
O
select the “Window” mode to fit the image onto the screen
without changing the projection distance.
Page 25

O
16:9 Image Position:
Image Position at window mode will also be
moved accordingly.
User Controls
WindowOriginal Pixel
16:9 Image Position
Adjust the image position to up or down, when you select the
aspect ratio to 16:9.
Press the
O
O
Press the to move the image up.
to move the image down.
25
... English
Page 26

User Controls
Volume
Press the to decrease the volume.
O
Press the
O
Mute
O
Choose the left icon to turn mute on.
O
Choose the right icon to turn mute off.
to increase the volume.
Audio
English ...
26
Page 27

User Controls
Management
Menu Location
Choose the menu location on the display screen.
Projection
O
The factory default setting.
O
When you select this function, the projector reverses the image
so you can project behind a translucent screen.
O
When you select this function, the projector turns the image
upside down for ceiling-mounted projection.
O
When you select this function, the projector reverses and turns
the image upside down at same time. You can project from
behind a translucent screen with ceiling mounted projection.
Front-Desktop
Rear-Desktop
Front-Ceiling
Rear-Ceiling
Signal Type
Select signal type RGB or Video sources.
Source Lock
When this function is turned off, the projector will search for other
signals if the current input signal is lost. When this function is
turned on, it will search specified connection port.
High Altitude
Choose “On” to turn on High Altitude mode. This operates the fans
at full speed continuously to allow for proper high altitude cooling
of the projector.
27
... English
Page 28

User Controls
Security Settings
A. Press “Enter” to set password. (First time)
1. Password must be 4~8 bits, the default value is “0000”.
2. Displayed on the screen by “*” while inputting.
3. Use
“Enter” key to confirm your selection.
4. Move to
5. On this screen, press the “Menu” key which will automatically
jump to then press the “Enter” key to confirm your selection.
(“Menu” can be switched over between the position and
6. When there is an input error go to to delete this bit. (You can
press the “Menu”, key and then press the key.)
B. Press “Enter” to set security protection.
keys to select your input bits, and then press
and then press the “Enter” key to confirm finally.
at present)
English ...
28
O
Security Mode
On: Choose “On” to use security verification while the user
I
switches on the projector.
Off: When the user switches on projector without password.
I
Timer: Displays the usable hours when switching on the projec-
I
tor. When the time remaining is 0, the time out message will
appear, and then press “Menu” or “Enter” to input password.
O
Timer Setting: When the Timer is selecting, this function can be
used.
Change Password: Press “Enter” to change the password.
O
Page 29

User Controls
1. Input the old password.
2. Changes a new password.
3. Confirms the password, please input the new password once
again.
4. Password must be 4~8 bits, Default value is “0000”.
5. Displayed on the screen by “*” while inputting.
6. Use
the “Enter” key to confirm your selection.
7. Move to
8. On this Screen, press the “Menu” key to switch between the
position at present to, Old Password, New Password, Confirm
Password and
9. When there is an input error go to
(You can press the “Menu”, and then press the
Zoom
O
Press the to reduce the size of an image.
O
Press the
keys to select your input bits, and then press
and then press the “Enter” key to confirm finally.
.
to delete the bit.
key.)
to magnify an image on the projection screen.
Reset
Choose “Yes” to return the display parameters on all menus to the
factory default settings.
29
... English
Page 30

User Controls
Lamp Setting
Lamp Hours
Display the cumulative lamp operating time.
Lamp Reset
Reset the lamp life hour after replacing a new lamp.
Lamp Reminding
Choose this function to show or to hide the warning message when
the changing lamp message is displayed. The message will show up
30 hours before end of life.
ECO Mode
Choose “On” to dim the projector lamp which will lower power
consumption and extend the lamp life by up to 130%. Choose ”Off”
to return to normal mode.
Auto Power Off (min)
Sets the interval of power-off of the system, if there is no signal
input (in minutes).
English ...
30
Page 31

Appendices
Troubleshooting
If you experience trouble with the projector, refer to the
following information. If the problem persists, please
contact your local reseller or service center.
Problem: No image appears on screen
O
Ensure all the cables and power connections are correctly and
securely connected as described in the “Installation” section.
O
Ensure the pins of connectors are not crooked or broken.
O
Check if the projection lamp has been securely installed. Please
refer to the “Replacing the lamp” section (page 35).
O
Make sure you have removed the lens cap and the projector is
switched on.
O
Ensure that the “Hide” feature is not turned on.
Problem: Partial, scrolling or incorrectly displayed image
O
Press “Re-Sync” on the remote control or control panel.
If you are using a PC:
O
For Windows 3.x:
1. In the Windows Program Manager, double click the “Windows
Setup” icon in the main group.
2. Verify that your display resolution setting is less than or equal
to 1280 x 1024.
For Windows 95, 98, 2000, XP:
1. From the “My Computer” icon, open the “Control Panel”
folder, and double click the “Display” icon.
2. Select the “Settings” tab.
3. Click on the “Advanced Properties” button.
If the projector is still not projecting the whole image, you will
also need to change the monitor display you are using. Refer to
the following steps.
4. Verify the resolution setting is less than or equal to 1280 x 1024
resolution.
31
... English
Page 32

Appendices
5. Select the “Change” button under the “Monitor” tab .
6. Click on “Show all devices.” Next, select “Standard monitor
types” under the SP box; choose the resolution mode you need
under the “Models” box.
O
If you are using a Notebook:
1. First, follow the steps above to adjust resolution of the
computer.
2. Press the toggle output settings. example:[Fn]+[F4]
Compaq=> [Fn]+[F4]
Dell => [Fn]+[F8]
Gateway=> [Fn]+[F4]
IBM=> [Fn]+[F7]
Mac Apple:
System Preference-->Display-->Arrangement-->Mirror
display
If you experience difficulty changing resolutions or your
O
monitor freezes, restart all equipment including the projector.
Packard
Hewlett
NEC=> [Fn]+[F3]
Toshiba => [Fn]+[F5]
=> [Fn]+[F4]
Problem: The screen of the Notebook or PowerBook computer
is not displaying a presentation
If you are using a Notebook PC:
O
Some Notebook PCs may deactivate their own screens when a
second display device is in use. Each has a different way to be
reactivated. Refer to your computer’s documentation for detailed
information.
Problem: Image is unstable or flickering
Use “Tracking” to correct it.
O
O
Change the monitor colour setting from your computer.
Problem: Image has vertical flickering bar
O
Use “Frequency” to make an adjustment.
Check and reconfigure the display mode of your graphic card to
O
make it compatible with the product.
English ...
32
Problem: Image is out of focus
Adjusts the Focus Ring on the projector lens.
O
Page 33

Appendices
Make sure the projection screen is between the required distance 4.9
O
to 39.4 feet (1.5 to 12.0 meters) from the projector (refer to page 14).
Problem: The image is stretched when displaying 16:9 DVD
The projector automatically detects 16:9 DVD and adjusts the aspect
ratio by digitizing to full screen with 4:3 default setting.
If the image is still stretched, you will also need to adjust the aspect
ratio by referring to the following:
Please select 4:3 aspect ratio type on your DVD player if you are
O
playing a 16:9 DVD.
If you can’t select 4:3 aspect ratio type on your DVD player, please
O
select 4:3 aspect ratio from the on screen menu.
Problem: Image is reversed
O
Select “Management-->Projection” from the OSD and adjust the
projection direction.
Problem: Lamp burns out or makes a popping sound
O
When the lamp reaches its end of life, it will burn out and may
make a loud popping sound. If this happens, the projector will not
turn on until the lamp module has been replaced. To replace the
lamp, follow the procedures in the “Replacing the Lamp” section
(refer to page 35).
Steady light =>
No light =>
Problem: LED lighting message
Message
Standby State
(Input Power Cord)
Lamp Lighting
Power On
Power Off (Cooling)
Error (Lamp Fail)
Error (Thermal Fail)
Error (Fan Fail) Flashing
Error (Over Temp.)
Error (Lamp Breakdown)
Power-LED
(Green)
Flashing
Temp-LED Lamp-LED
33
... English
Page 34

Appendices
Problem: Message Reminders
Fan failed:
O
Over temperature:
O
O
Replacing the lamp:
O
Password error :
Time out:
O
Appendices
English ...
34
Page 35

Warning: Lamp
compartment is hot!
Allow it to cool down
before changing lamp!
Appendices
Replacing the lamp
The projector will detect the lamp life itself. It will show you a
warning message
“ ”
When you see this message, change the lamp as soon as possible.
Make sure the projector has cooled down for at least 30
minutes before changing the lamp.
Warning: To
reduce the risk of
personal injury, do not
drop the lamp module
or touch the lamp bulb.
The bulb may shatter
and cause injury if it is
dropped.
1
2
3
4
Lamp Replacing Procedure:
1. Switch off the power to the projector by pressing the Power/
Standby button.
2. Allow the projector to cool down for at least 30 minutes.
3. Disconnect the power cord.
4. Use a screwdriver to remove the screw from the cover.
5. Push up and remove the cover.
6. Remove the 2 screws from the lamp module.
7. Pull out the lamp module.
To replace the lamp module, reverse the previous steps.
2
3
4
1
35
... English
Page 36

Remark :
1.> “
”compressed
*
computer image.
2.> The column of Digital is support DVI-D
connector.
Appendices
Compatibility Modes
(ANALOG)
Mode Resolution
VESA VGA 640 x 350
VESA VGA 640 x 350 85 37.9
VESA VGA 640 x 400 85 37.9
VESA VGA 640 x 480 60 31.5
VESA VGA 640 x 480 72 37.9
VESA VGA 640 x 480 75 37.5
VESA VGA 640 x 480 85 43.3
VESA VGA 720 x 400 70 31.5
VESA VGA 720 x 400 85 37.9
VESA SVGA 800 x 600 56 35.2
VESA SVGA 800 x 600 60 37.9
VESA SVGA 800 x 600 72 48.1
VESA SVGA 800 x 600 75 46.9
VESA SVGA 800 x 600 85 53.7
* VESA XGA 1024 x 768 60 48.4
* VESA XGA 1024 x 768 70 56.5
* VESA XGA 1024 x 768 75 60.0
* VESA XGA 1024 x 768 85 68.7
* VESA SXGA 1152 x 864 70 63.8
* VESA SXGA 1152 x 864 75 67.5
* VESA SXGA 1280 x 1024 60 63.98
* VESA SXGA 1280 x 960 60 60.0
MAC LC 13” 640 x 480 66.66 34.98
MAC II 13” 640 x 480 66.68 35
MAC 16” 832 x 624 74.55 49.725
* MAC 19” 1024 x 768 75 60.24
* MAC 1152 x 870 75.06 68.68
MAC G4 640 x 480 60 31.35
* i MAC DV 1024 x 768 75 60
* i MAC DV 1152 x 870 75 68.49
V.Frequency
(Hz)
70 31.5
H.Frequency
(kHz)
English ...
36
Page 37

Please note that
O
damage resulting from
incorrect installation
will invalidate the warranty.
Appendices
Ceiling Mount Installation
1. To prevent damaging your projector, please use the ceiling
mount package for installation.
2. If you wish to use a third party ceiling mount kit, please
ensure the screws used to attach a mount to the projector
meet the following specifications:
Screw type: M2.6
Maximum screw length: 10mm
Minimum screw length: 8mm
37
... English
 Loading...