

ABUS TVVR36520 operation manual
ABUS Wi-Fi Network Video Recorder
TVVR36500
User guide
Version 1.2, 04/27/2017

English
This user guide contains important installation and operation information.
Make sure that this user guide is handed over when the
product is given to other persons.
Keep this user guide to consult later.
You will find a list of contents with the corresponding
page numbers in the contents.

Contents
Important safety information .......................................................................................................................................... 6
Explanation of symbols .................................................................................................................................................... 6
Intended use .................................................................................................................................................................... 6
General ............................................................................................................................................................................ 6
Power supply ................................................................................................................................................................... 6
Overload/overvoltage ....................................................................................................................................................... 7
Cable ................................................................................................................................................................................ 7
Installation location/operating environment ..................................................................................................................... 7
Care and maintenance ..................................................................................................................................................... 8
Accessories ...................................................................................................................................................................... 8
Start-up ............................................................................................................................................................................ 8
Children ............................................................................................................................................................................ 8
Introduction ...................................................................................................................................................................... 9
General information ......................................................................................................................................................... 9
Unpacking the device ....................................................................................................................................................... 9
Scope of delivery of the recorder ..................................................................................................................................... 9
Scope of delivery of video surveillance sets .................................................................................................................... 9
Device overview ............................................................................................................................................................. 10
System displays/Systemoperation .............................................................................................................................. 11
Status displays ............................................................................................................................................................... 11
LED illumination ............................................................................................................................................................. 11
General .......................................................................................................................................................................... 11
Operating with a mouse ................................................................................................................................................. 11
On-screen keyboard ...................................................................................................................................................... 11
Quickstart guide ............................................................................................................................................................. 12
Before you start .............................................................................................................................................................. 12
Connections at the back of the device ........................................................................................................................... 12
Installing the hard disk drive .......................................................................................................................................... 12
Make the connections .................................................................................................................................................... 12
Starting the device ......................................................................................................................................................... 12
Configuring the device ................................................................................................................................................... 13
Switching off the device, locking, rebooting ................................................................................................................... 13
Local setup wizard ......................................................................................................................................................... 14
Recorder password note ................................................................................................................................................ 14
Camera password note .................................................................................................................................................. 14
Setting up the system .................................................................................................................................................... 15
Administrator set up ....................................................................................................................................................... 15
System time and date .................................................................................................................................................... 15
Access point settings ..................................................................................................................................................... 16
Network settings ............................................................................................................................................................ 16
Hard disk drive management ......................................................................................................................................... 17
Camera assistant ........................................................................................................................................................... 17
Camera recording .......................................................................................................................................................... 17
Web interface setup wizard ........................................................................................................................................... 18
IP installer ...................................................................................................................................................................... 18
Login .............................................................................................................................................................................. 18
Recorder password note ................................................................................................................................................ 18
Setting up the system .................................................................................................................................................... 19
Administrator set up ....................................................................................................................................................... 19
Access point settings ..................................................................................................................................................... 19
3

Contents
Hard disk drive management ......................................................................................................................................... 20
Camera assistant ........................................................................................................................................................... 20
Camera recording .......................................................................................................................................................... 20
Live view ......................................................................................................................................................................... 21
Overview ........................................................................................................................................................................ 21
Status symbols ............................................................................................................................................................... 21
Pop-up menu with mouse operation .............................................................................................................................. 21
Selection bar in the camera image ................................................................................................................................ 22
Settings .......................................................................................................................................................................... 22
Playback in live view ..................................................................................................................................................... 23
General .......................................................................................................................................................................... 23
Device menu ................................................................................................................................................................... 25
Menu overview ............................................................................................................................................................... 25
Settings ........................................................................................................................................................................... 26
Configuration.................................................................................................................................................................. 27
General settings ............................................................................................................................................................. 27
General network ............................................................................................................................................................. 29
Network configuration .................................................................................................................................................... 30
Wi-Fi ............................................................................................................................................................................... 33
Alarm .............................................................................................................................................................................. 33
Exceptions ..................................................................................................................................................................... 35
User ................................................................................................................................................................................ 35
Camera ............................................................................................................................................................................ 37
Camera .......................................................................................................................................................................... 37
OSD ............................................................................................................................................................................... 38
Image ............................................................................................................................................................................. 39
PTZ ................................................................................................................................................................................ 39
Motion ............................................................................................................................................................................ 39
Private Zone ................................................................................................................................................................... 41
Tamper Surveillance ...................................................................................................................................................... 41
Video Loss ..................................................................................................................................................................... 42
Recording ....................................................................................................................................................................... 43
Time Schedule ............................................................................................................................................................... 43
Parameter ...................................................................................................................................................................... 44
Holiday ........................................................................................................................................................................... 45
HDD ................................................................................................................................................................................. 46
Hard disk drives ............................................................................................................................................................. 46
General .......................................................................................................................................................................... 46
Advanced settings .......................................................................................................................................................... 47
Panic recording .............................................................................................................................................................. 48
Recording ....................................................................................................................................................................... 48
Alarm .............................................................................................................................................................................. 48
Data Export ..................................................................................................................................................................... 49
Duration.......................................................................................................................................................................... 49
Event .............................................................................................................................................................................. 49
Maintenance ................................................................................................................................................................... 50
System Info .................................................................................................................................................................... 50
Log Search ..................................................................................................................................................................... 50
Import/Export ................................................................................................................................................................. 51
4

Contents
Update............................................................................................................................................................................ 51
Default settings .............................................................................................................................................................. 51
Network .......................................................................................................................................................................... 52
HDD Detect .................................................................................................................................................................... 53
Shutdown ....................................................................................................................................................................... 53
Fault rectification ........................................................................................................................................................... 54
Technical data ................................................................................................................................................................ 55
Disposal .......................................................................................................................................................................... 56
Notes on EC directives for waste electrical and electronic equipment .......................................................................... 56
Notes on RoHS EU Directive ......................................................................................................................................... 56
Glossary .......................................................................................................................................................................... 57
Technical terms used ..................................................................................................................................................... 57
About the internal hard disk drive ............................................................................................................................... 59
5
Contents
Signal word
Indicates a risk of injur y or health
Indicates a risk of injur y or health
Indicates possible damage to the
1.
2.
Required action to be carried out in a set order
•
• …
List without a set order, given either in the text
or warning notice
Important safety information
Explanation of symbols
The following symbols are used in this guide and on the
device:
Symbol
Warning
Warning
Important
Note Indicates important information.
The following annotations are used in the text:
Meaning
…
…
…
Meaning
hazards.
hazards caused b y electric al vo ltage.
device/accessories.
General
Before using this device for the first time, please read the
following instructions caref ully and observe all warning
information, even if you are familiar with the use of electronic devices.
Warning
All guarantee claims are invalid in the event of
damage caused by non-compliance with this user
guide.
We cannot be held liable for resulting damage.
Warning
In the event of personal or material damage
caused by improper operation or non-compliance
with the safety information, we cannot be held liable.
All guarantee claims are void in such cases.
Retain this handbook for future reference.
If you sell or pass on the device to third parties, you must
include these instructions with the de vice.
This device has been manufactured in accordance with
international safety standards.
Intended use
Only use the device for the purpose for which it was built
and designed. Any other use is considered unintended!
This device may only be used for the following purpose(s):
• This 4-channel video recorder is used in combination
with connected video signal sources (network cameras) and video output devices (TFT monitors) for
object surveillance.
Note
Data storage is subject to national data privacy
guidelines.
When carrying out the installation, adv ise your
customers of the existence of these guidelines.
Power supply
• Only operate this device through a power source
which supplies the mains power specified on the type
plate.
• If you are unsure of the power supply available to
you, contact your energy provider.
Warning
Prevent data loss.
Always use the device with an uninterruptable
power supply UPS with surge protection.
• Disconnect the device from the power supply before
carrying out maintenance or installation work.
• The on/off switch on this device does not fully dis-
connect it from the mains supply.
• To fully disconnect the device completely from the
mains, the mains plug must be withdrawn from the
mains socket. The device should therefore be positioned so that there is always direct and unimpeded
access to the mains plug and the plug can be removed immediately in the event of an emergency.
6

Should it be necessary to open the device, refer to
Contents
• To eliminate the risk of fire, the mains plug should be
removed from the mains socket prior to an extended
period of non-use. Prior to uns tab le weat her and/or
when there is a danger of lightning strike, separate
the device from the mains network. Alternatively,
connect the device to a UPS.
Warning
Never open the device yourself! There is the danger of electric shock.
trained technicians or your specialist installation
contractor.
• The installation or replacement of a hard disk drive
should only be carried out by trained personnel or
your specialist installation contractor.
Warning
Installations or modifications not carried out by
trained technicians invalidate the warranty.
We recommend that the installation of a hard disk
drive is carried out by a specialist installation contractor.
Improper installation of the hard disk drive invalidates the warranty.
Overload/overvoltage
• Avoid overloading electrical sockets, extension ca-
bles and adapters, as this can result in fire or electric
shock.
• Use surge protection to prevent damage caused by
overvoltage (e.g. in electrical storms).
Cable
• Always grasp all cables by the plug connector and do
not pull the cable itself.
• Never grasp the power cable with wet hands, as this
can cause a short circuit or electric shock.
• Do not place the device itself, items of furniture or
other heavy objects on the cable and ensure that it
does not become kinked, especially at the connector
plug and at the connection sockets.
• Never tie a knot in the cable and do not bundle it to-
gether with other cables.
• All cables should be laid so that they cannot be trod-
den on, or cause a hazard.
• Damaged power cables can cause fire or electric
shock. Check the power cable from time to time.
• Do not modify or manipulate the power cable or plug.
• Do not use any adapter plug or extension cable that
does not conform to applicable safety standards, and
do not interfere with the mains or power cables.
Installation location/operating environment
• Place the device on a firm, level surface and do not
place any heavy objects on the device.
• The device is not designed for operation in spaces
with high temperatures or humidity (e.g. bathrooms),
or excessive accumulation of dust.
• Operating temperature and operating humidity:
0°C to 40°C, maximum 90% relative humidity. The
device may only be operated in a temperate climate.
Ensure that:
• adequate ventilation is always guaranteed (do not
place the device on a shelf, thick carpet, bed or wherever ventilation slits may be covered. Always leave a
10 cm gap on all sides)
• no direct sources of heat (e.g. radiators) can affect
the device
• the device must not be exposed to direct sunlight or
strong artificial light
• the device is not in the immediate vicinit y of magnet ic
fields (e.g. loudspeakers)
• no naked lights (e.g. lit candles) are on, or next to the
device
• contact with sprayed or dripping water and caustic
fluids is prevented
• the device is not operated in the vicinity of water, in
particular, the device should never be submerged (do
not place objects containing fluids, e.g. vases or
drinks, on or near the device)
• no foreign bodies penetrate the device
• the device is not exposed to wide temperature varia-
tions, as otherwise there may be condensation from
humidity causing electrical short circuits
• the device is not exposed to excessive shock or vibration.
7

Contents
and low-voltage circuit.
Care and maintenance
Maintenance is necessary if the device has been damaged (e.g. damage to the power cable and plug, or the
housing), or if liquids or foreign bodies have got into the
interior of the device, or if it has been ex pos ed to ra in or
damp, or if it does not work properly or has been
dropped.
• When conducting maintenance work (e.g. cleaning),
disconnect the device from the mains.
• If smoke, unusual noises or smells develop, switch
the device off immediately and unplug from the
socket. In such cases, the device should not be used
until it has been inspected by a qualified technician.
• Have all maintenance tasks carried out by qualified
technicians only.
• Never open the housing on the device or accesso-
ries. If the housing is open, there is the risk of fatal
electric shock.
• Clean the device housing and the remote control with
a damp cloth.
• Do not use solvents, white spirit, thinners etc. These
may damage the surface of the device.
• Do not use any of the following substances:
Brine, insect spray, solvents containing chlorine or
acids (ammonium chloride), or scouring powder.
• Rub the surface gently with the cotton cloth until it is
completely dry.
Warning
The device operates with a dangerous voltage
level. The device should therefore only be opened
by authorised technicians. All servicing and
maintenance tasks must be carried out by authorised companies. Inadequate repair work can
cause a fatal hazard for the user.
Accessories
• Only connect devices that are expressly suitable for
the intended purpose. Otherwise, hazardous situations or damage to the device can occur.
Start-up
• Observe all safety and operating instructions before
operating the device for the first time.
• Only open the housing to install the hard disk drive.
Warning
When installing the device in an existing vi deo
surveillance system, ensure that all devices have
been disconnected from the mains power circuit
Warning
If in doubt, have a specialist technician carry out
assembly, installation and connection of the device.
Improper or unprofessional work on the power
supply system or domestic installations puts both
you and others at risk.
Connect the installations so that the mains power
circuit and low-voltage circuit always run separately from each other. They should not be connected at any point or become connected as a result of a malfunction.
Children
• Do not allow electrical devices to be handled by chil-
dren. Do not allow children to use electrical devices
unsupervised. Children may not properly identify
possible hazards. Small parts may be fatal if swallowed.
• Also keep packaging film away from children. There
is the risk of suffocation.
• This device is not intended for children. If used incor-
rectly, parts under spring tension may fly out and
cause injury to children (e.g. to eyes).
8

“Apply”/“Confirm” before leaving the tab or menu.
Contents
Introduction
Dear Customer,
Thank you for purchasing this product.
ABUS Security-Center hereby declares that this type of
wireless system TVVR36500, complies with RED Directive 2014/53/EU. Additionally, this device complies
with the requirements of the following EU directives: the
EMC Directive 2014/30/EU and the RoHS Directive
2011/65/EU. The full EU Declaration of Conformity text
can be found at:
www.abus.com/product/TVVR36500
To ensure this condition is maintained and that safe operation is guaranteed, it is your obligation to observe this
user guide.
Please read the entire user guide carefully before putting
the product into operation, and pay attention to all operating instructions and safety information.
All company names and product descriptions are trademarks of the corresponding owner. All rights reserved.
If you have any questions, please contact your specialist
installation contractor or specialist dealer.
Disclaimer
This user guide has been produced with the greatest of care. Should you identify any omissions or
inaccuracies, please contact us at the address
shown on the back of the guide. ABUS SecurityCenter GmbH does not accept any liability for
technical and typographical errors, and reserves
the right to make changes to the product and user
guides at any time and without prior warning.
ABUS Security-Center GmbH is not liable or responsible for direct or indirect damage resulting
from the equipment, performance and use of this
product. No guarantee is made for the contents of
this document.
Note
Be aware that alterations to the recorder carried
out via the software must be accepted by clicking
Unpacking the device
Handle the device with extreme care when unpacking it.
Packaging and packaging aids can be reused and, as far
as possible, should be sent for recycling.
We recommend the following:
Paper, cardboard and corrugated cardboard as well as
plastic packaging items should be placed in the appropriate recycling containers.
If no such facility exists in the area, these materials
should be put into the general household waste.
If the original packaging has been dam aged, start by inspecting the device. If the device shows signs of damage, return it in the original packaging and contact the
manufacturer.
Scope of delivery of the recorder
• ABUS 4-channel Wi-Fi Network Video Recorder
• USB mouse
• PSU
• Network cable
• CD
• Quickstart guide
Scope of delivery of video surveillance sets
• ABUS 4-channel Wi-Fi Network Video Recorder
• 2 x Wi-Fi network cameras
• Pre-installed 2.5" 1 TB hard disk drive
• USB mouse
• 3 x power supply units for recorders and cameras
• Network cable
• CD
• Quickstart guide
General information
To use the device properly, read this user handbook
thoroughly and retain it for later use.
This handbook contains instructions for the operation
and maintenance of the recorder. Please contact an authorised specialist company for repair of the device.
9
Contents
Device o verview
Front
Rear
10
System displays/Systemoperation
Status displays
The following status displays provide information about
the operating status:
• LED on the front of the device
• Icons (display elements) on the monitor
Note
Note the remarks in the separate quickstart guide.
LED illumination
Note
Refer to the overview on page10.
Double-click
Switch between the scr een display of s ingle
and multiple images in t he liv e v iew and during playback.
Click and drag
Set up private masks or alarm zones
Right Single-click
Open the pop-up menu.
Return to the previous menu.
Scroll
wheel
In live view
display previous/next camera
Contents
Status Role
Lit blue continu-
System status OK
ously
Off
Device is switched off.
General
The device can be controlled using the following:
• USB mouse
• Web interface
• CMS software
Operating with a mouse
Note
The further descriptions contained in this user
guide involve using a mouse.
The device is suitable for use with a USB mouse.
Connect the mouse to the USB port.
Button
Left Single-click
Role
Selection in the m enu, activation of an input
field or a tab, display of the Quick Set menu.
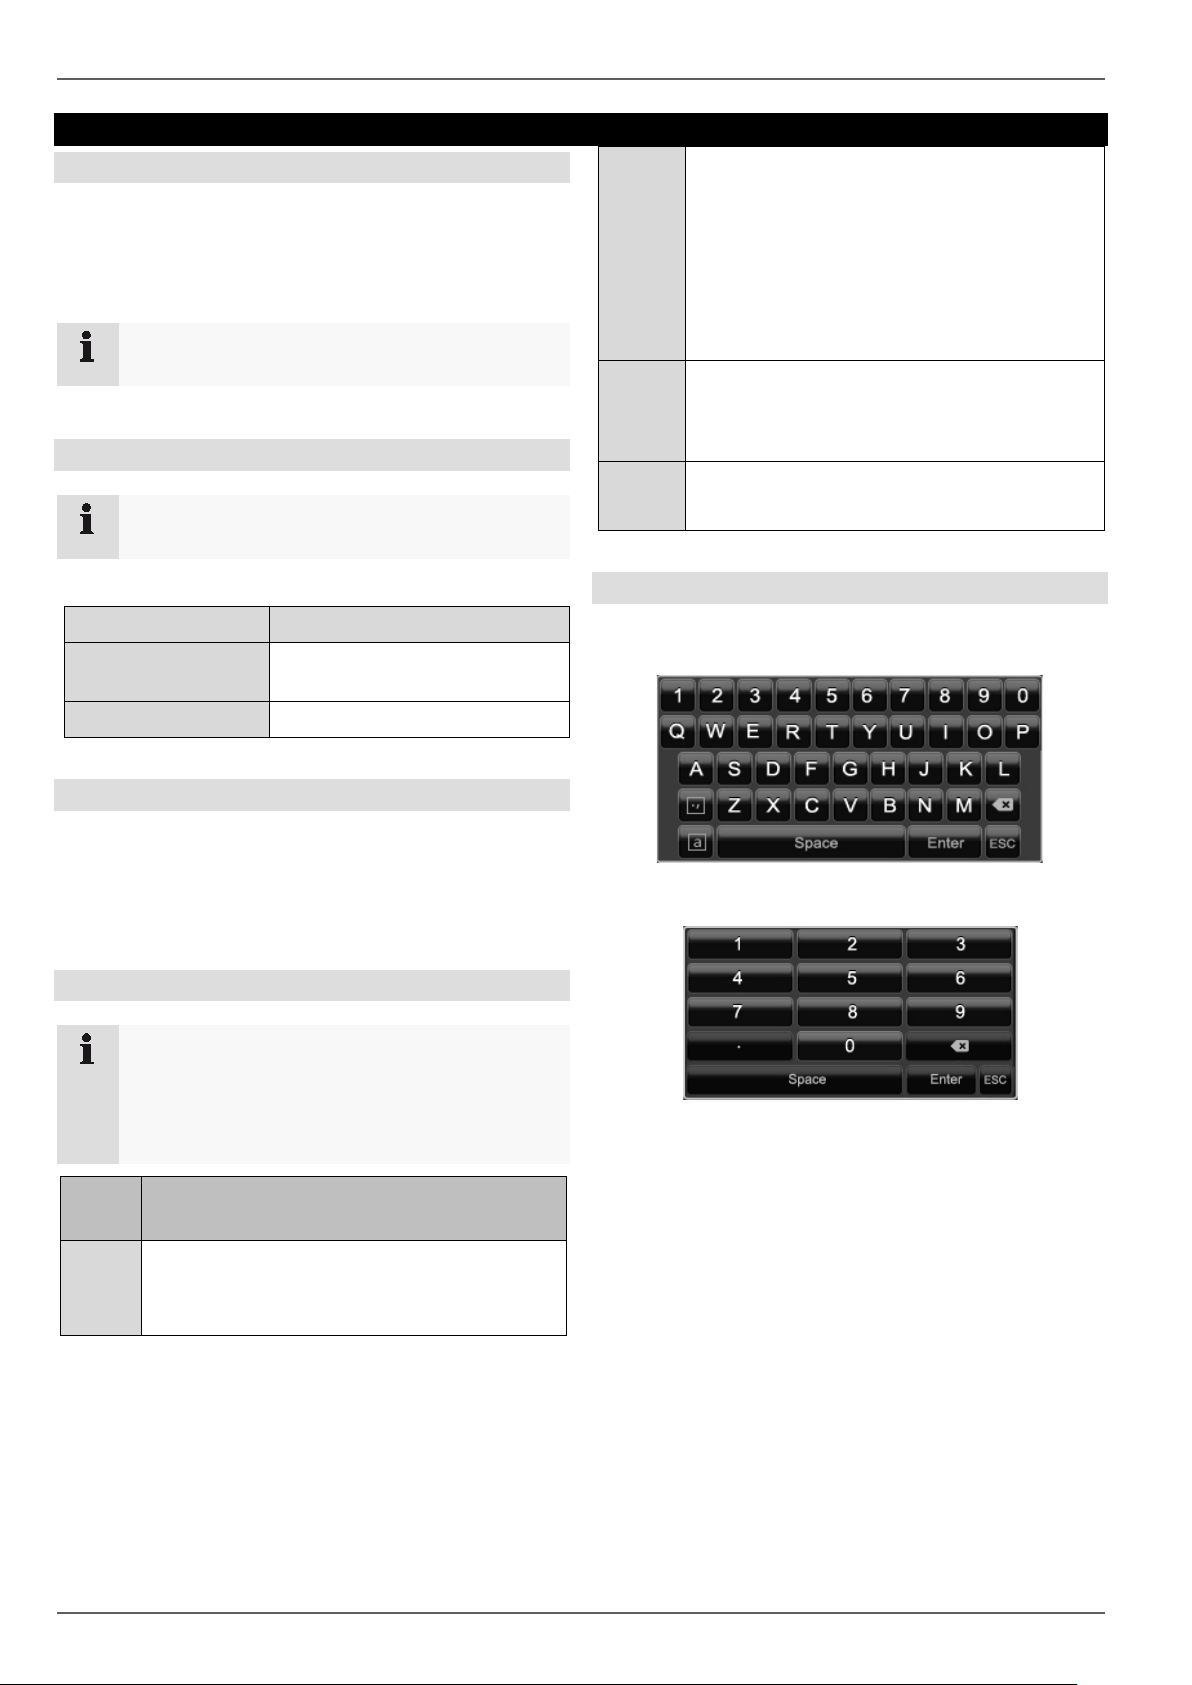
On-screen keyboard
If you click with the mouse in a text input field, the onscreen keyboard appears:
For simple figure input, the following on-screen keyboard
appears:
The keys have exactly the same function as a computer
keyboard.
• To input a figure, click on it with the left mouse key.
• To finish the entry, click on Enter.
• To delete the figure in front of the cursor, click on .
• To switch between upper and lower case text, click
on the framed a. The active setting is indicated
above the keyboard.
• To cancel an entry, or to leave the field, click on
ESC.
11
Contents
Only use hard disk drives that are authorised for
Quickstart guide
Before you start
The following preparations must be completed:
• 1. Pay attention to the general information, safety
information as well as statements on placement and
connection, see page7.
• 2. Check the contents of the package for complete-
ness and damage.
Note
Note the remarks in the separate quickstart guide.
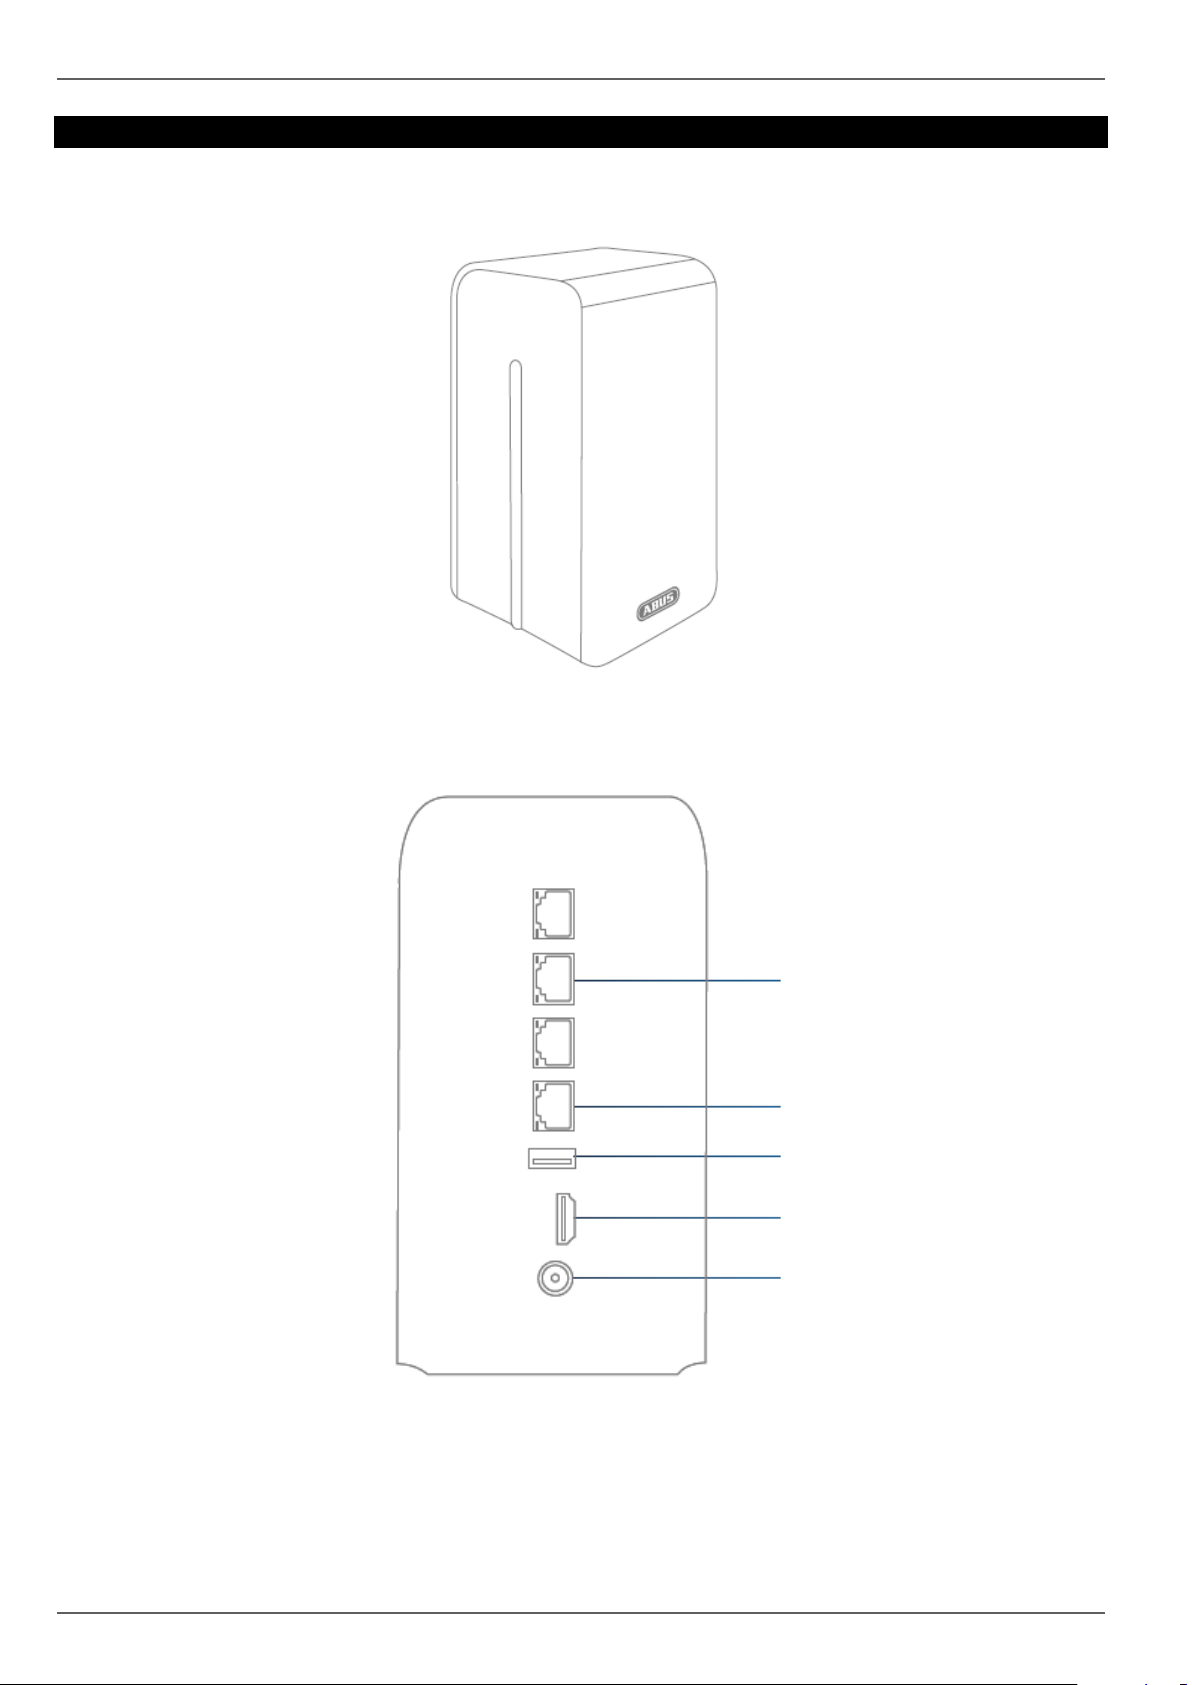
Connections at the back of the device
Note
Refer to the overview on page10.
No. Name
Role
1 3x RJ45 - Ethernet
Ethernet connections for additional devices
2 RJ45 - Router
Ethernet connection for the router
3 USB
Connection for a mouse
4 HDMI
Connection for a HDMI monitor
5 Power supply
12 V DC
Installing the hard disk drive
Warning
Switch the device off and disconnect it from the
mains electricity.
Ensure proper grounding to avoid static discharge.
1. To install a hard disk drive, see separate quickstart
guide.
2. Open the lower flap on the recorder
3. Push the hard disk drive into the intended slot
4. Check that the hard disk drive is mounted correctly
to the recorder’s plug connections
5. Close the housing
video recording and 24/7 operation.
Make the connections
Note
Observe the minimum radius when laying the cables. Do not kink the cables.
1. Connect all cameras to the recorder.
2. Connect the recorder to the router via the network
cable. (Router port)
3. Connect the monitor using the HDMI connection.
4. Connect the mouse to the USB port.
5. Connect the device to the mains power supply, it will
then start automatically. The video surveillance sets
also include a distributor cable which enables multiple cameras and the recorder to be operated using a
single power supply unit.
Starting the device
Important
The device may only be connected to a mains
voltage supply as specified on the type plate.
For security purposes, use an uninterruptible
power supply (UPS).
When the device is connected to the power supply, it
starts up automatically and the LED status bar glows.
1. During the start-up procedure, the device carries out
a self-test. The fan will also be tested during the device’s start-up procedure and then switches to a
quiet mode.
2. Finally, the setup wizard appears. Click on this to go
to live view.
Note
12
Contents
Configuring the device
Note
Note the remarks in the separate quickstart guide.
• Carry out the individual steps in the ‘setup wizard’,
see page14.
• The following settings are configured one after the
other: (Sequence)
Select the operator console language
Administrator configuration
Time settings (date, time etc.)
Access point settings
Network settings
Hard disk drive management (initialisation
etc.)
Camera settings
Recording settings
Note
From the ABUS home-page (www.abus.com),
find out if new firmware updates are available
for this device and install these.
Note
Later alteration of date and time can lead to loss
of data.
Note the explanation of:
Description
PAGE10
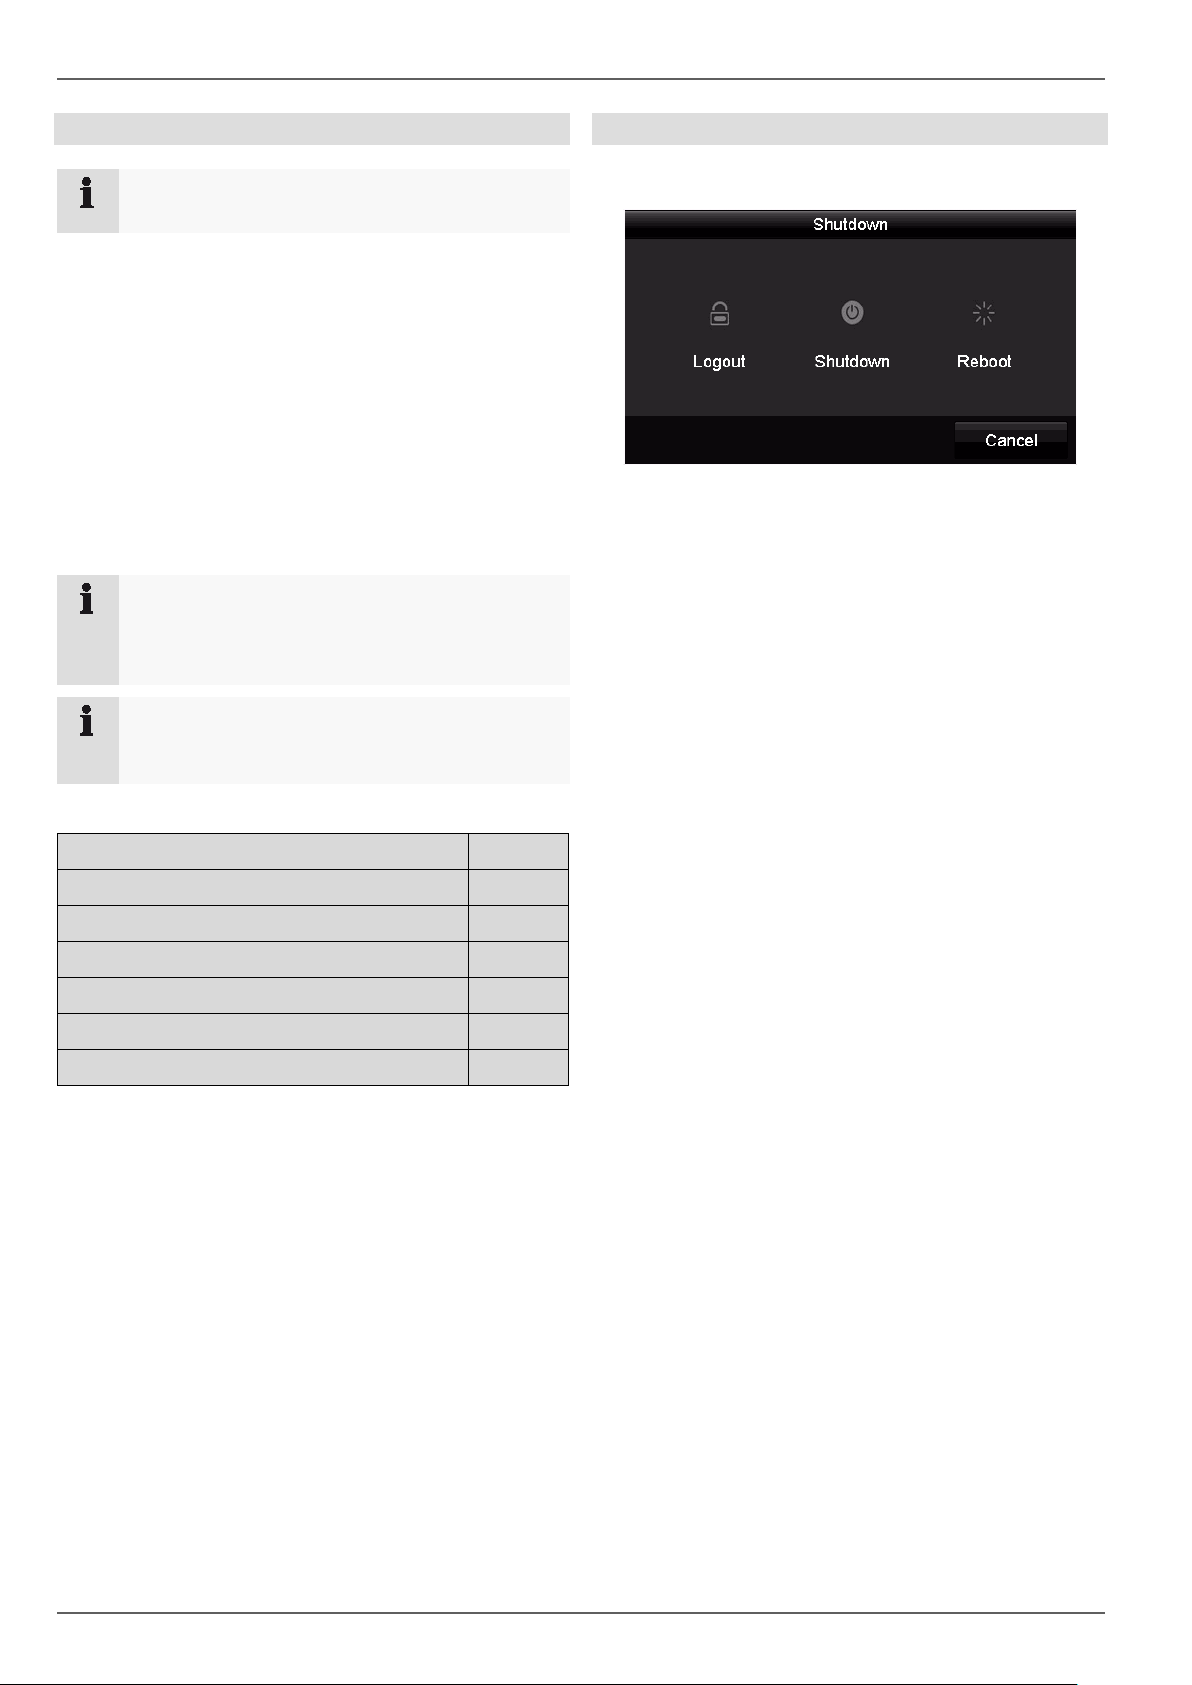
Switching off the device, locking, rebooting
In the main menu, click on Shutdown. The overview appears.
1. To switch off, select the Shutdown option and confirm the query with Yes. The device is switched off.
Now pull out the plug of the power supply unit.
2. To lock the system, select the left hand symbol Log-
out. The user interface is locked. To reach the menu,
a password must be entered.
3. To reboot, select the right hand symbol Reboot. The
device carries out a reboot.
Switching on the device
• Plug in the power supply unit to start the device.
Live view
Playback
Network
Recording
Data export
Fault rectification
PAGE18
PAGE23
PAGE29
PAGE43
PAGE49
PAGE54
13
Local setup wizard
1 2 3 4 5
Local setup wizard
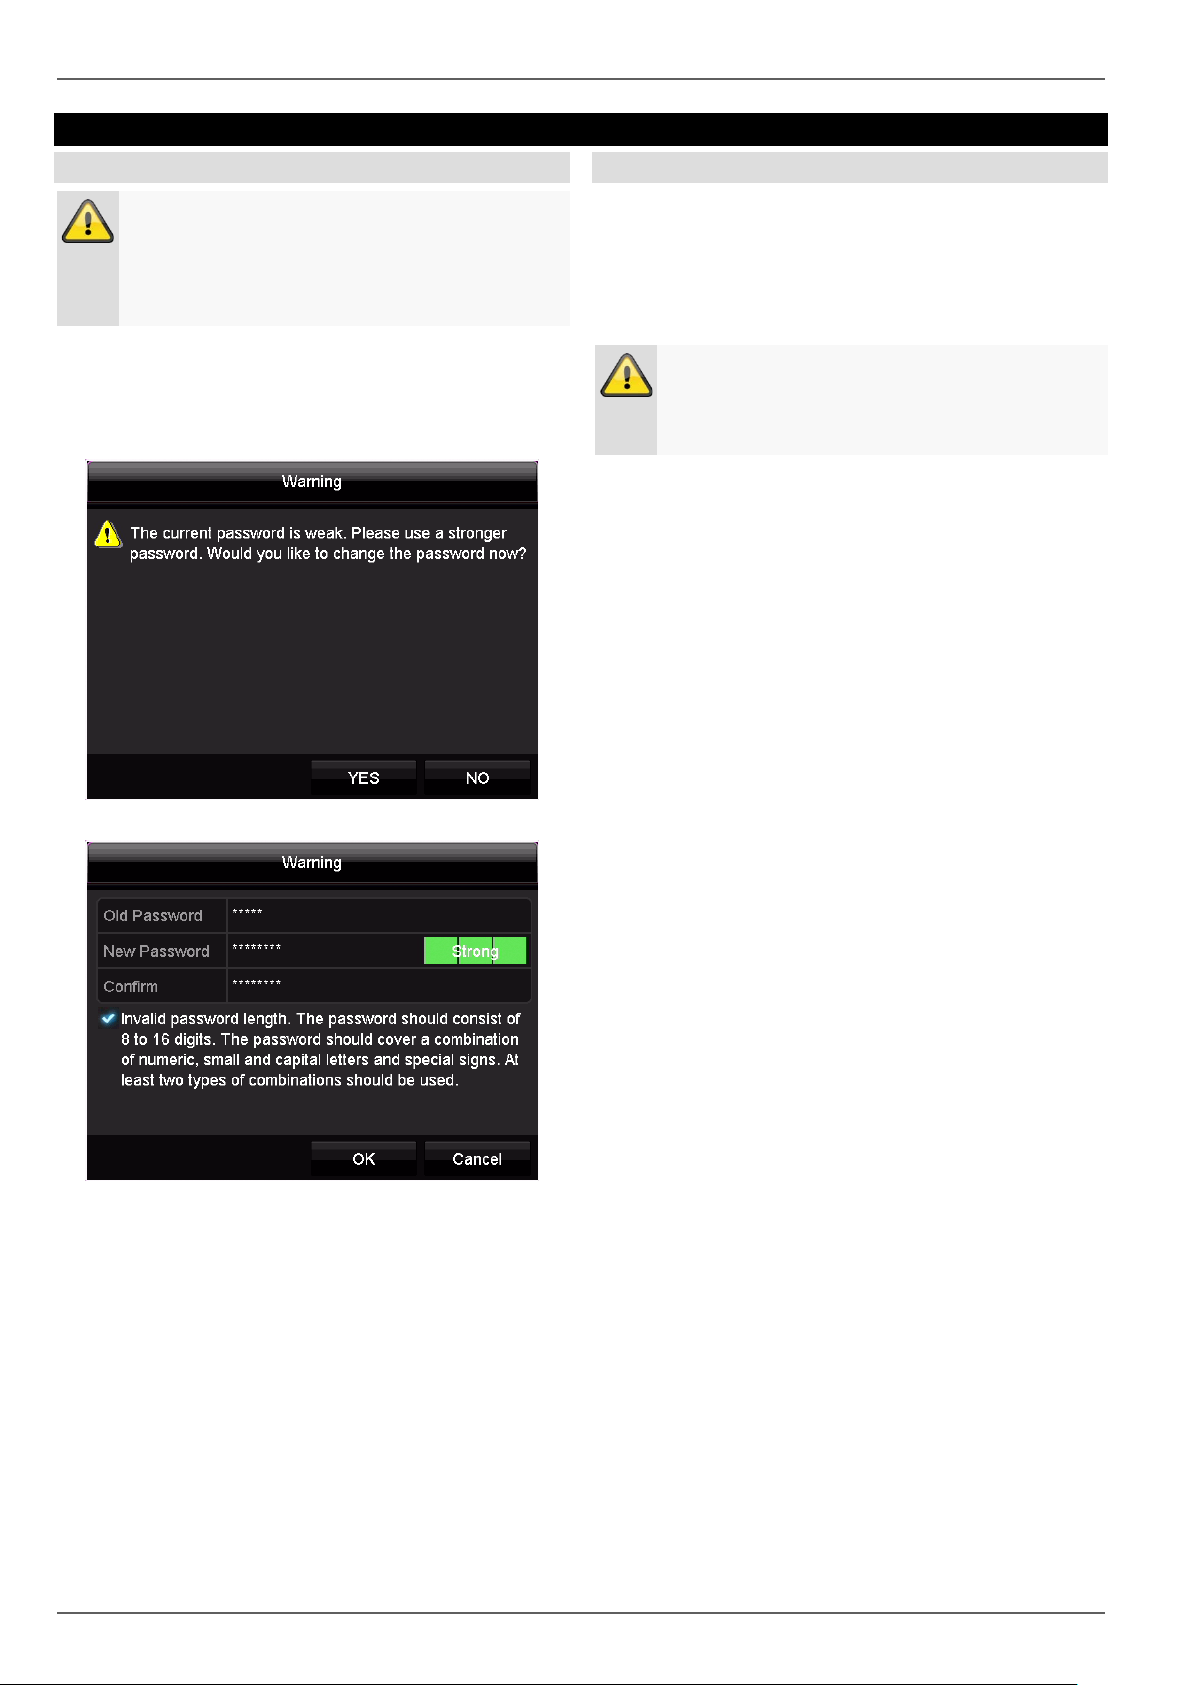
Recorder password note
Warning
Note down the admin password.
The preset password is:
“
Each time the device is started it will be checked if the
preset admin password “12345” has already been
changed. If it has not been changed, a notice reminding
you to change the password will appear each time.
”.
Camera password note
Each time the device is started it will also be checked if
the preset camera password is used for one of the added
cameras. Then a message will be displayed. Please find
the preset password and follow the necessary steps to
change it as described in the respective camera manual.
Note
Once you have changed the password on the
camera, this password must also be stored under
the camera on the recorder.
Click on ‘Ok’ to acknowledge the message.
Click on Yes to change the recorder password.
Enter the preset password “12345” and enter a new
password for your recorder. Pursuant to the description,
this must be made up of 8–16 characters and fulfil two of
the three specified criteria.
Then press ‘Ok’ to save the changes.
14
Local setup wizard
Setting up the system
The setup wizard guides you through the required basic
settings for the system. The network video recorder will
then be ready for recording and monitoring.
Note
All the advanced settings can be found in the device menu, see the overview on page25.
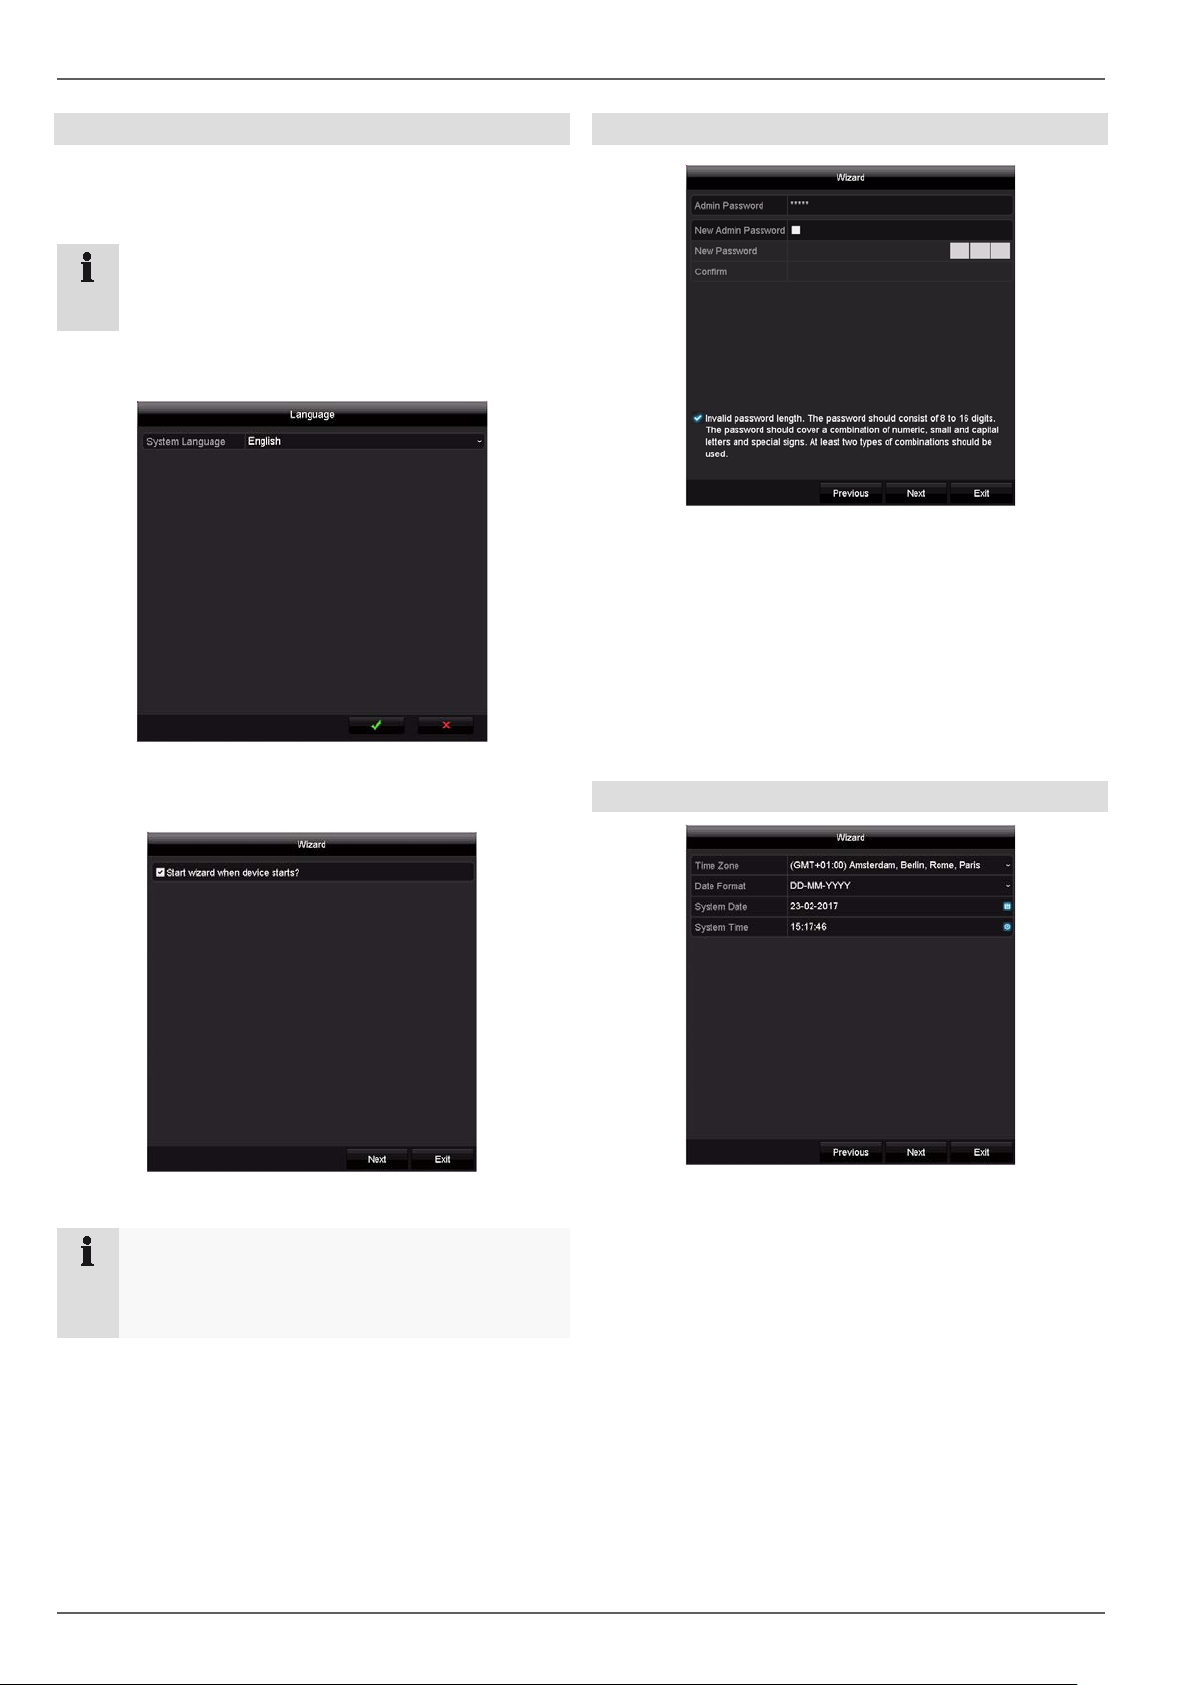
The first time you switch on the recorder, the language
selection will appear:
• Click on the input field and select your language from
the list. To proceed, click on
appears:
. The following query
Administrator set up
1. Click on the input field and enter the admin password.
If you have already changed the password, enter the
password you selected here.
2. To assign a new password, enable the ‘checkbox’ in
front of New Admin Passw ord .
3. Enter the new password and confirm the entry in the
field below.
4. Click on Next.
System time and date
• Click on Next to start the wizard.
Note
After the system has been set up the ‘checkbox’
can be deactivated, the tick is hidden and the wizard no longer starts automatically.
15
1. Enter the system time consisting of date and time.
2. Finish the setting by clicking
on Next.
Local setup wizard
manually.
ternet, it should be given a fixed network address.
wizard.
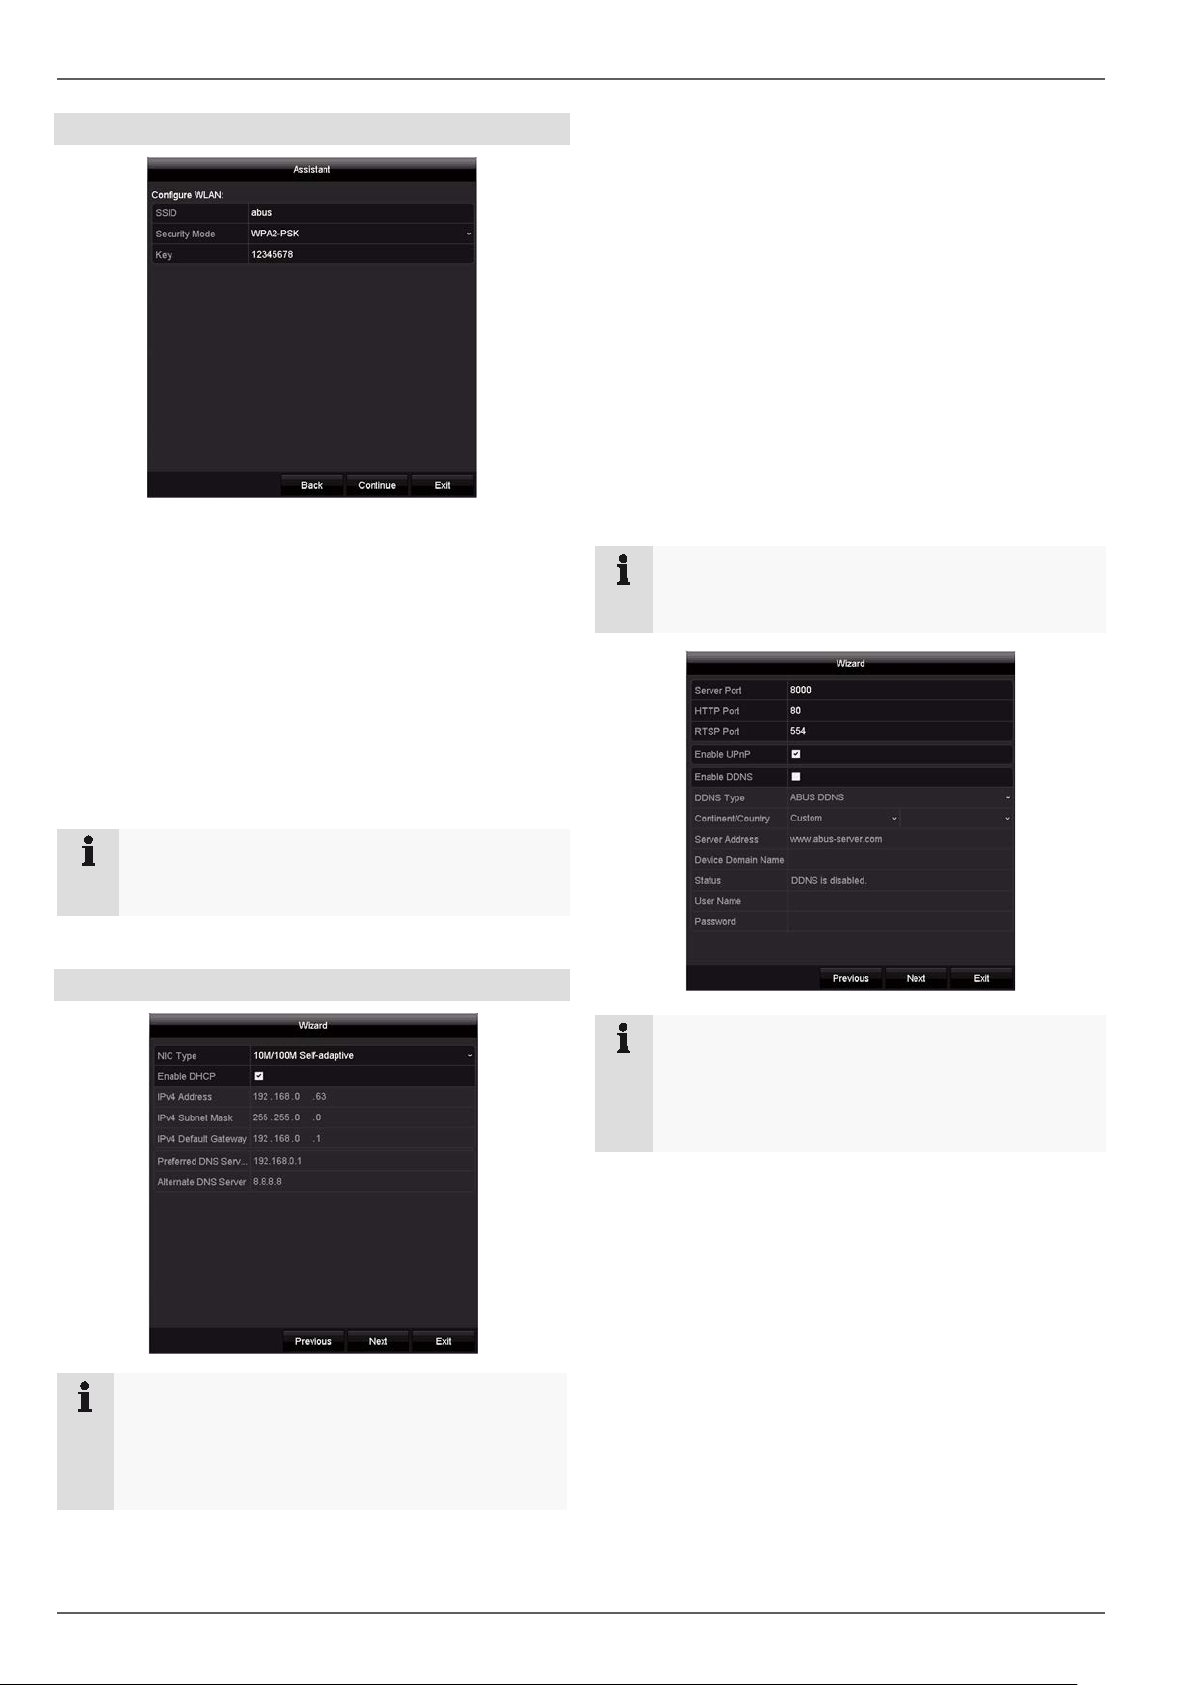
Access point settings
1. The SSID is the name of the Wi-Fi network created
by the recorder. Change the name to one of your
choice
2. Set the security mode.
(Recommended: WPA2-PSK)
3. The key is the password necessary for connection to
the recorder’s Wi-Fi network. Change the password
to one of your choice. It must contain at least eight
characters.
4. Finish the setting by clicking
on Next.
1. DHCP active: if the DHCP has been set up in the
network router, activate the DHCP ‘checkbox’ All
network settings are then completed automatically.
2. DHC P inac ti ve: enter t he d ata m anual ly (IPv4 address, IPv4 subnet mask as well as the default set
up for the IPv4 Gateway = IPv4 address of the
router). Alternatively you can also enter the address
of the DNS server, which is required for email dispatch.
A typical address assignment could appear as follows:
• IPv4 address: 192.168.0.50
• IPv4 subnet mask: 255.255.255.0
• IPv4 default gateway: 192.168.0.1
• Preferred DNS server: 192.168.0.1
Note
When the device is accessed remotely via the in-
Note
Changing the SSID settings can take up to two
minutes.
Network settings
Note
Ask the network administrator responsible
whether the DHCP can be selected or the IP address and additional settings have to be done
Note
If at the time of the initial installation there is no
detailed data on port and DDNS configuration,
then use the default settings recommended by the
1. Server port: network port for remote access via
PC software and App
2. HTTP port: network port for remote access to the
web interface of the recorder.
3. Enable UPnP: enables the automatic configuration of the port releases on the router and device
display in the windows network environm ent.
4. Enable DDNS: enables the DDNS function for
comparison of the external IP addresses with a
DDNS provider.
5. DDNS type: select the DDNS provider. There is
free DDNS access via abus-server.com.
6. Server address: not necessary for ABUS server.
7. User name and password: not necessary for
ABUS server.
16
Local setup wizard
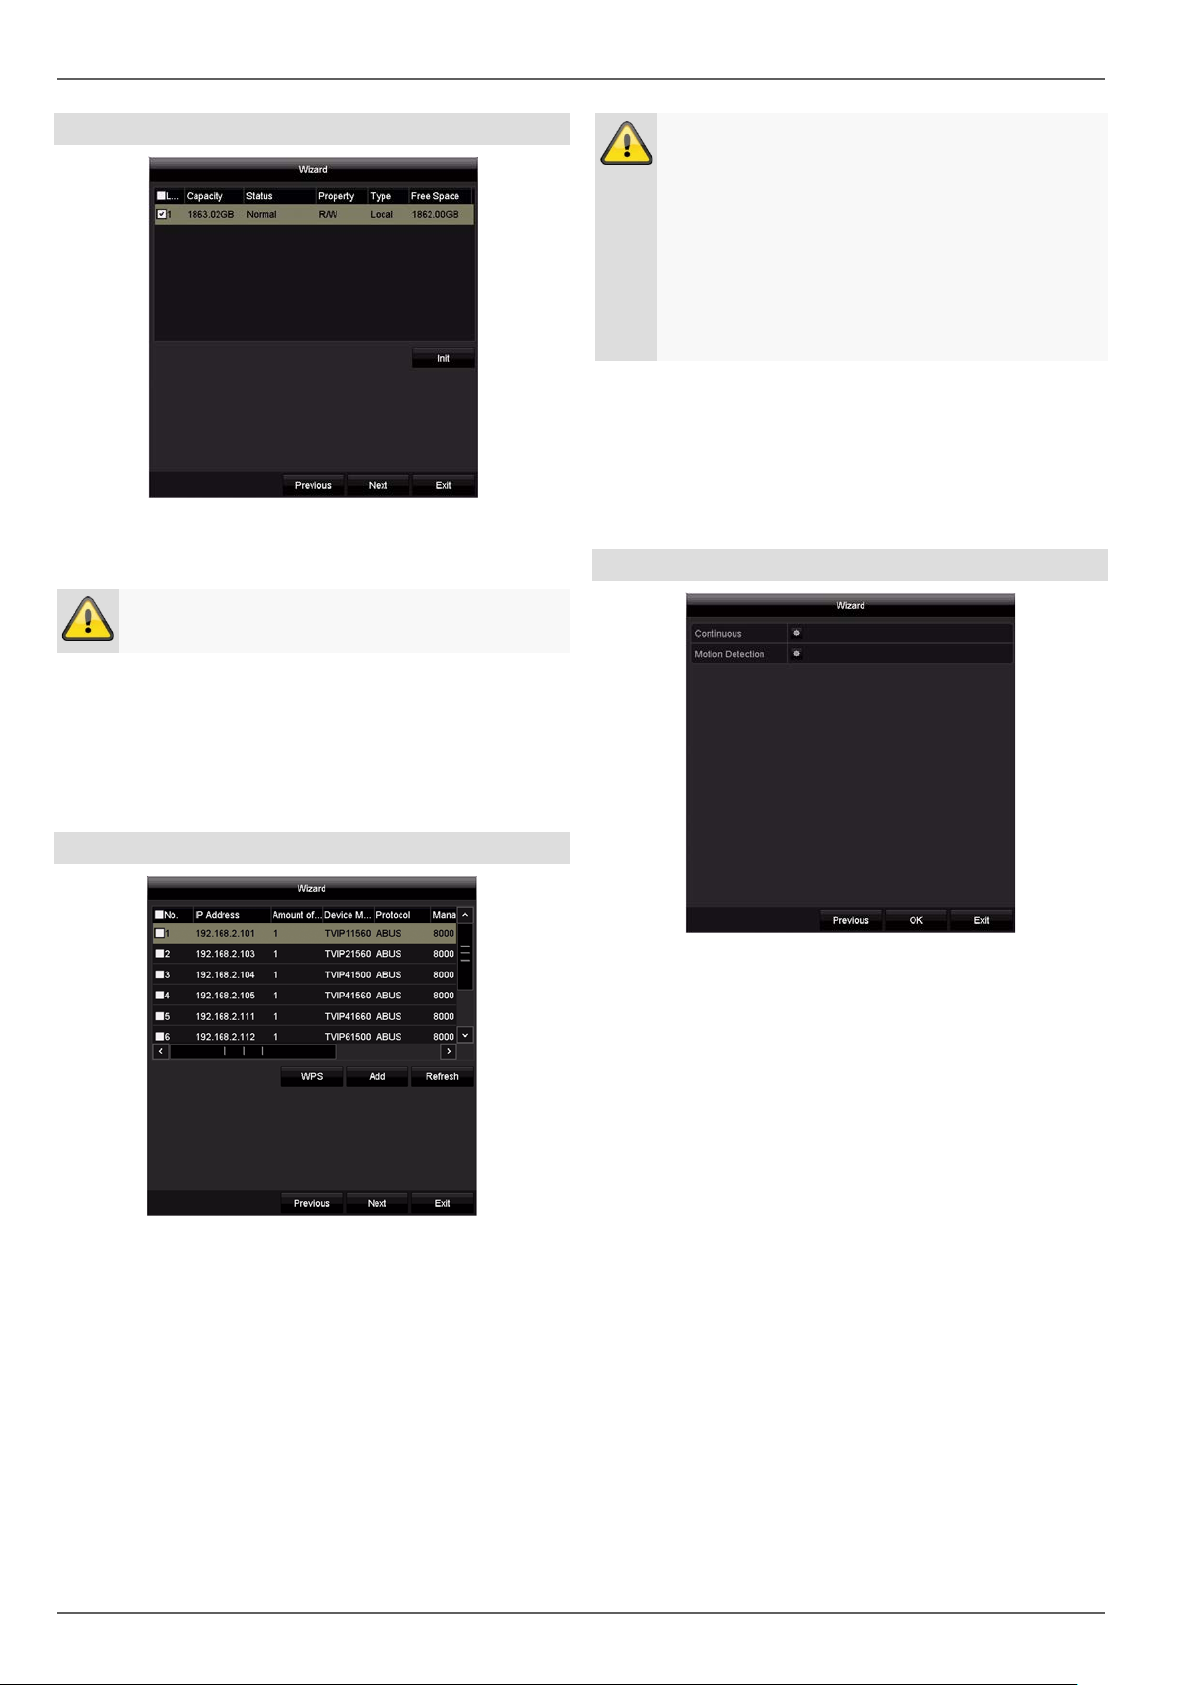
Hard disk drive management
1. To set up a hard disk drive, enable the ‘checkbox’
with a left click and then click on Init.
Warning
This will delete all data found on the disc.
2. Click on OK to acknowledge the security prompt.
The hard disk drive is set up for use. Progress is
shown on the status bar.
3. Complete the setting by selecting OK and then click
on Next.
Note
If the installation via WPS function was not
properly functioning for a camera, the alternative
ist to connect the camera with a network-cable
with on of the three LAN-Ports of the recorder.
Use then a PC to gain access of the Webinterface
of the camera. There you can setup the WiFi-connection to the recorder manually in the Configuration -> advanced settings -> network -> WiFI
menu.
2. Click on Search to display the network cameras in
your network.
3. To add network cameras, arm the desired cameras
and click on Add.
4. Click on Next to continue with the setup.
Camera recording
Camera assistant
1. Using WPS you can quickly and easily establish a
Wi-Fi connection between a camera and the recorder. To do this, click on WPS and fol low the instructions. Before you can then search for and add
the camera, wait the two minutes as displayed until
the camera has established a connection with the recorder. Only one camera can be connected during
each WPS procedure
1. Choose continuous recording to activate continuous
recording for all channels.
5. Choose motion recording to activate motion-detection-based recording for all channels.
6. Finish the setting and the setup wizard with OK.
17
Web interface setup wizard
“1 2 3 4 5
Web interface setup wizard
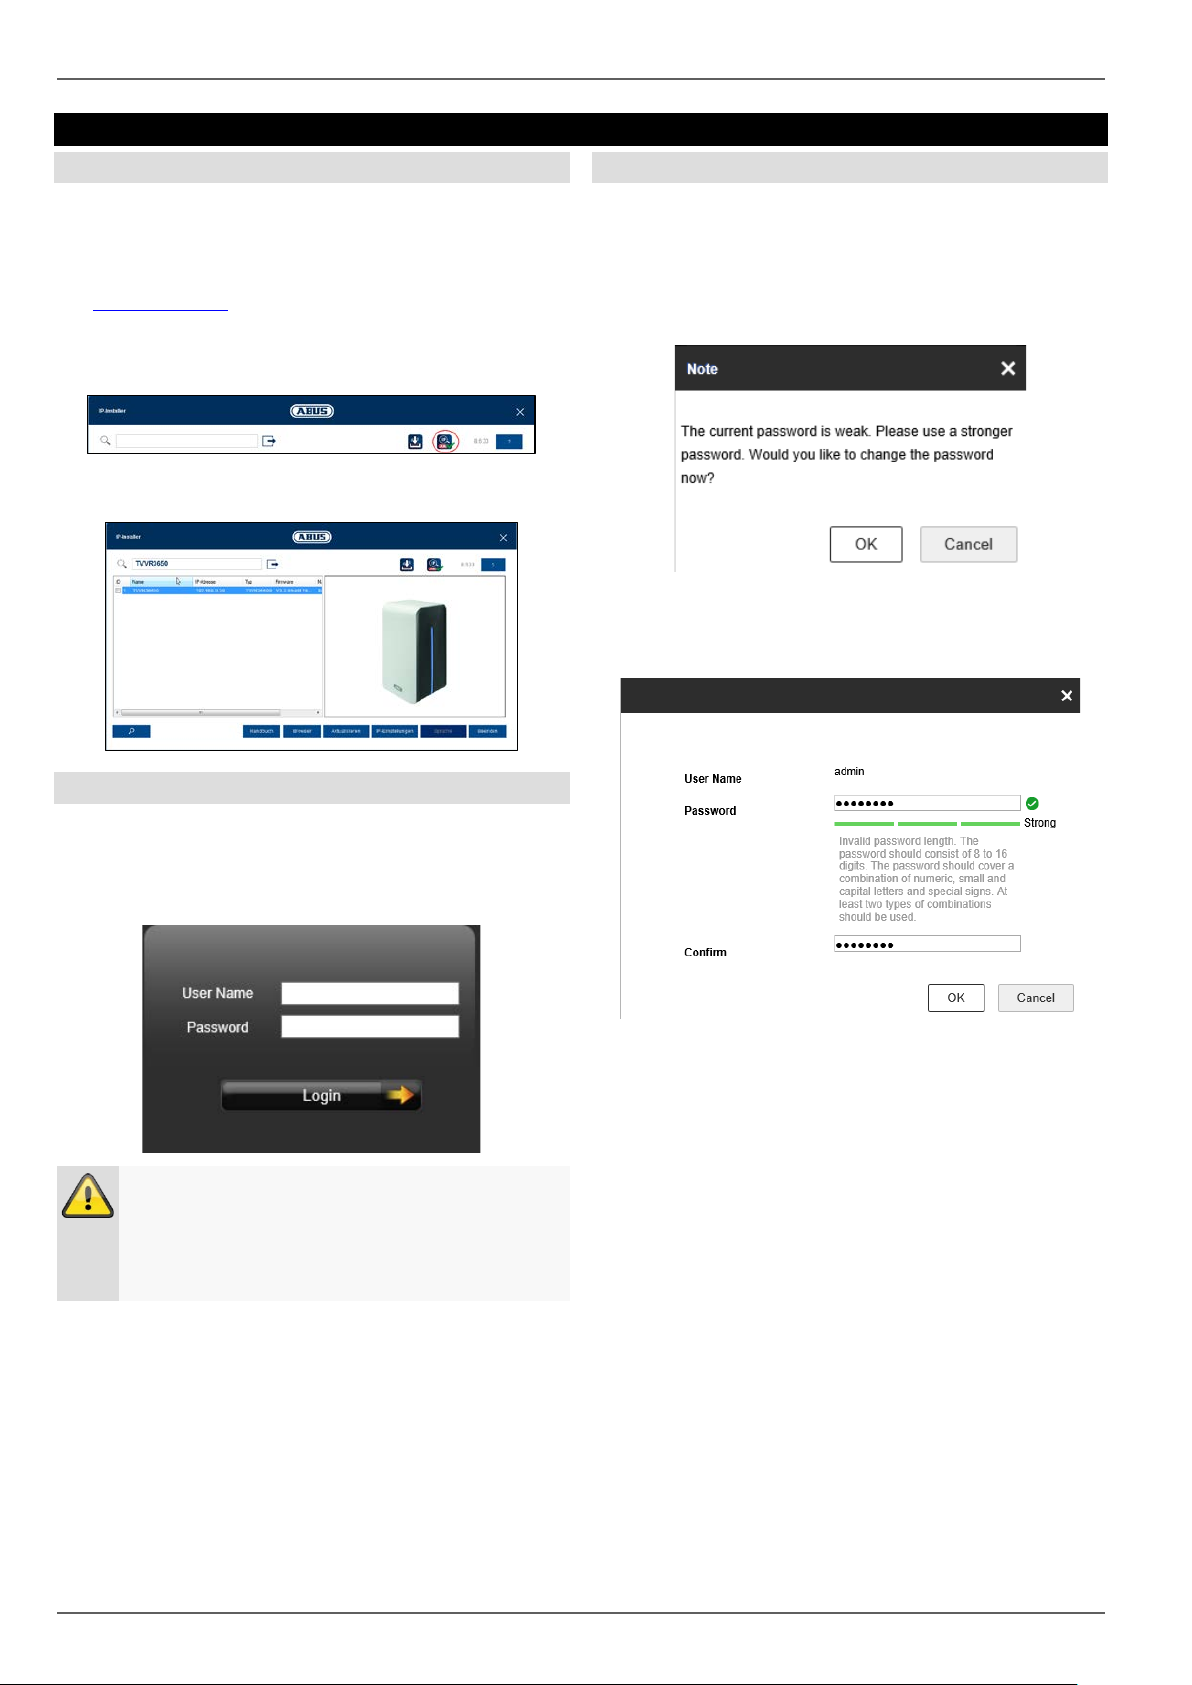
IP installer
If the recorder has been connected to your network, you
can search for it using the IP installer.
To do this, insert the CD provided into your PC. Alternatively you can download the installation file from
the www.abus.com
Following installation, launch the IP Installer. Make sure
that you have the most current version of the IP installer.
You will see this indicated on the icon (red circle)
Then, search for the recorder. The web interface is automatically opened by a double-click on the entry.
website.
Recorder password note
Each time the device is started it will be checked if the
preset admin password “12345” has already been
changed. If this has not been changed, a notice will appear following each login reminding you to make the
change.
Click on OK to change the recorder password.
Login
At the start of the setup wizard, first log in with the preset
user.
User name: admin
Password: 12345
Warning
Note down the admin password.
The preset password is:
”.
Enter the preset password “12345” and enter a new
password for your recorder. Pursuant to the description,
this must be made up of 8–16 characters and fulfil two of
the three specified criteria.
Then press ‘Ok’ to save the changes.
18
 Loading...