

Page 1

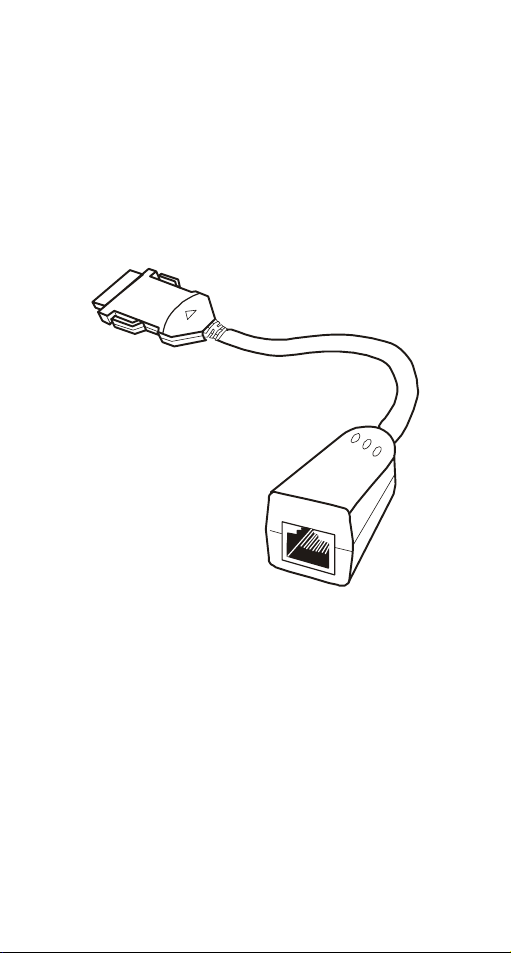
10/100Mbps Dual Speeds
Fast Ethernet PC Card
Quick Installation Guide
Page 2

HARDWARE INSTALLATION
1. Locate the PCMCIA slot of your system.
2. Align the PCMCIA Fast Ethernet Attached Port
PC Card toward the PCMCIA slot. Push evenly
and steadily until it is seated.
3. Connect the attached RJ-45 port with an
Ethernet Hub/Switch.
4. You are now ready to continue the software
installation.
- 1 -
Page 3
LED Indicators
• 100M/FULL: grows orange at 100 Mbps, green
at FULL duplex.
• LINK/RX: grows green when connected to the
network, blinks green when receiving datum.
• POWER/TX: grows green when power is on,
blinks green when transmitting datum.
L
L
U
X
F
R
/
X
/
T
k
M
/
n
0
i
R
0
L
E
1
W
O
P
- 2 -
Page 4

SOFTWARE INSTALLATION
Windows NT 3.51
1. In Main Group of NT 3.51, open Control Panel
and click on Network icon.
2. In Network Settings dialog box, push Add
Adapter... button. The Add Network Adapter
dialog box will appear.
3. Choose <Other> requires disk from
manufacturer from the network adapter card list
and press Continue..
4. When Windows NT prompts for manufacturer
disk, insert driver diskette and press OK until
the Network Setting Change dialog box
appears.
5. Restart now to have the card take effect.
Windows NT 4.0
Assumed that the Network Services already
installed in the NT 4.0 system.
1. Insert the Fast Ethernet PC Card into any one
of PC Card Slots in system.
2. Power up Windows NT 4.0
3. Open My Computer
4. Open Control Panel
5. Run the Network
6. Select Adapters page.
7. Press Add to add network adapter.
8. Press Have Disk button.
9. Insert the driver disk into drive A:
10. Specify the path to A:\ and press OK
- 3 -
Page 5
11. A dialog box will appear to adjust the driver's
settings. The resources assignment to the
adapter must be unique in the system.
12. Press OK when all setting are completed.
13. Press Close to complete network setting
Windows 95 Installation
1.Assumed that the drivers of PC Card slot are
well installed. The System Icon in the Control
Panel can report on its functionality. Apart from
above mentioned, any questions on this layer
need to be taken up with the computer's
manufacturer.
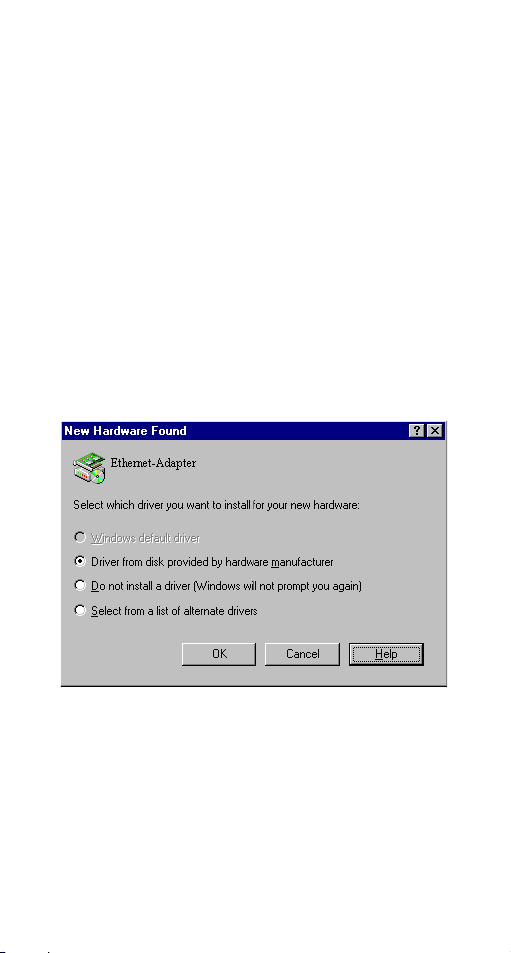
2.Insert the PC Card into the slot. In New
Hardware Found dialog box, select Driver from
disk provided by hardware manufacturer.
3.Please input the path, A:\ and insert driver
diskette. The driver will be installed and you
may be asked for the original Windows 95
CD/disks.
4.For the first time installation, please click
Network icon in Control Panel to add Protocols,
Client and Service if you needed.
- 4 -
Page 6
5.Reboot the machine and the card will be fully
functional.
Windows 98 Installation
1. Assumed that the drivers of PC Card slot are
well installed. The System Icon in the Control
Panel can report on its functionality. Apart from
above mentioned, any questions on this layer
need to be taken up with the computer's
manufacturer.
2. Insert the PC Card into the slot. In New
Hardware Found dialog box, select Driver from
disk provided by hardware manufacturer.
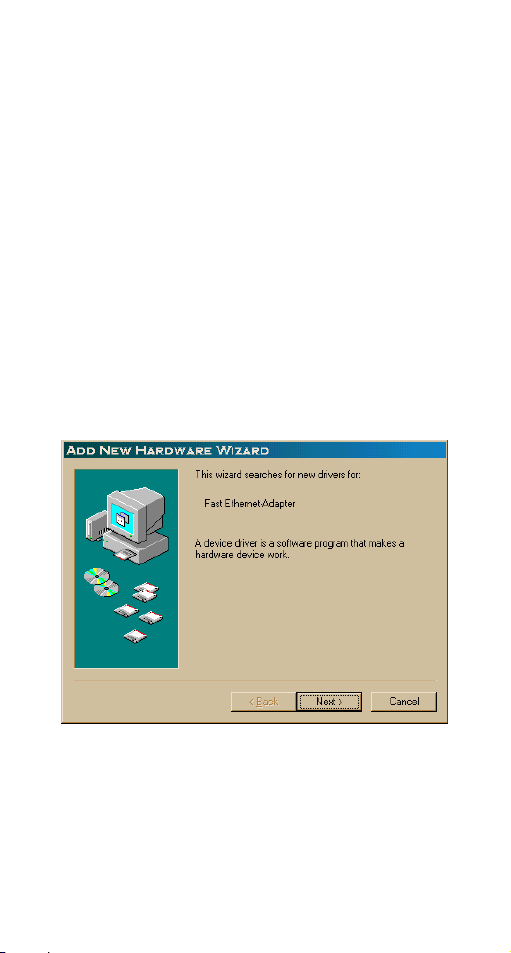
3. Windows will prompt a ADD NEW
HARDWARE WIZARD dialog box, then press
Next.
4. Then Windows will prompt a ADD NEW
HARDWARE WIZARD dialog box. In this time,
select Search for the … and press Next.
- 5 -
Page 7

5. Windows will prompt a ADD NEW
HARDWARE WIZARD dialog box. In this time,
select Floppy disk drives and please insert
driver diskette. Then press Next, the driver will
be installed and you may be asked for the
original Windows 98 CD/disks.
6. For the first time installation, please click
Network icon in Control Panel to add Protocols,
Client and Service if you needed.
7. Reboot the machine and the card will be fully
functional.
- 6 -
Page 8

Windows 2000 Installation
1. Assumed that the drivers of PC Card slot are
well installed. The System Icon in the Control
Panel can report on its functionality. Apart
from above mentioned, any questions on this
layer need to be taken up with the computer's
manufacturer.
2. Insert the PC Card into the slot, and wait for
the install wizard.
3. Windows will prompt a Found New
Hardware Wizard dialog box, then press Next.
4. Then Windows will prompt a Install
Hardware Device Drivers dialog box. In this
time, select Search for a suitable driver for
my device (recommanded) and press Next.
- 7 -
Page 9

5. Windows will prompt a Locate Driver Files
dialog box. In this time, select Floppy disk
drives and please insert driver diskette. Then
press Next, the driver will be installed and you
may be asked for the original Windows 2000
CD/disk.
- 8 -
Page 10

6. For the first time installation, please click
Network icon in Control Panel to add
Protocols, Client and Service if you needed.
7. Reboot the machine and the card will be fully
functional.
Installation for Windows Workgroup 3.11
NDIS3 Driver for Workgroup
1. Click on "Network Setup" icon in "Network"
program group.
2. In "Network Settings" dialog box, click mouse
on "Networks..." button to select the network
operating system.
3. In "Networks" dialog box, check the radio
button before "Install Microsoft Windows
Network" and "No Additional Network".
Press OK to go back to the Network Settings
screen.
4. Click on "Drivers..." button to select network
driver.
5. In "Network Drivers" dialog box, press "Add
Adapter..."button to enter "Add Network
Adapter" dialog box. Select "Unlisted or
Updated Network Adapter" and press OK.
6. Windows will prompt an "Install Driver"
dialog box. In this time, put the software
diskette into floppy drive and press OK.
7. Select the "Enhanced mode NDIS3 for...."
string and press OK.
8. Follow Windows instructions to complete the
- 9 -
Page 11

installation and exit Windows.
9. Run INSTALL.EXE from driver diskette's root
directory.
10. Select "Windows for Workgroup" in
"Network Operating System" screen and enter
"Driver Install" screen.
11. If current settings are acceptable, select "Start
Installation" and go to step 13. Otherwise,
select "Modify Parameters" to make settings
changed.
12. Move cursor to focus on the setting you want to
make change and press Enter to select a fit
value. When the configuration is accepted,
press Enter on the OK field to exit the screen.
Back to step 11.
13. Select "NDIS Server (LAN Manager,...)" as
the network server you will attach to and press
Enter key.
14. Installation program starts copying related files
from diskette to the destination directory and
modifies AUTOEXEC.BAT and NET.CFG
under user's agreement.
15. Installation is complete. Please reboot the
computer to have the driver take effect.
NDIS2 Driver for Workgroup
1. Click on "Network Setup" icon in "Network"
program group.
2. In "Network Settings" dialog box, click mouse
on "Networks..." button to select the network
operating system.
- 10 -
Page 12

3. In Networks dialog box, check the radio button
before "Install Microsoft Windows Network"
and "No Additional Network". Press OK to
go back the Network Settings screen.
4. Click on "Drivers..." button to select network
driver.
5. In "Network Drivers" dialog box, press "Add
Adapter..." button to enter "Add Network
Adapter" dialog box. Select "Unlisted or
Updated Network Adapter" and press OK.
6. Windows will prompt an "Install Driver"
dialog box. In this time, put the software
diskette into floppy drive and press OK.
7. Select the "Real mode NDIS2 for...." string
and press OK.
8. Follow Windows instructions to complete the
installation and exit Windows.
9. Run INSTALL.EXE from driver diskette's root
directory.
10. Select "Windows for Workgroup" in
"Network Operating System" screen and enter
"Driver Install" screen.
11. If current settings are acceptable, select "Start
Installation" and go to step 13. Otherwise,
select "Modify Parameters" to make settings
changed.
12. Move cursor to focus on the setting you want to
make change and press Enter to select a fit
value. When the configuration is accepted,
press Enter on the OK field to exit the screen.
- 11 -
Page 13

Back to step 11.
13. Select "NDIS Server(LAN Manager,...)" as
the network server you will attach to and press
Enter key.
14. Installation program starts copying related files
from diskette to the destination directory and
modifies AUTOEXEC.BAT and NET.CFG
under user's agreement.
15. Installation is complete. Please reboot the
computer to have the driver take effect.
ODI Driver for Workgroup
1. Click on "Network Setup" icon in "Network"
program group to install network driver.
2. In Network Settings dialog box, click on
"Networks..." button to select the network
operating system.
3. In "Networks" dialog box, check the radio
button before "Install Microsoft Windows
Network" and "Others:" Then select one of
Netware Shell, 3.X or 4.0 and above, and press
OK to go back the "Network Settings" screen.
4. Click on "Drivers..." button to select network
driver.
5. In Network Drivers dialog box, press "Add
Adapter..."button to enter "Add Network
Adapter" dialog box. Select "Unlisted or
Updated Network Adapter" and press OK.
6. Windows will prompt an "Install Driver"
dialog box. In this time, put the software
diskette into floppy drive and press OK.
- 12 -
Page 14

7. Select the "Netware ODI Driver ...." string and
press OK.
8. Follow Windows instructions to complete the
installation and exit Windows.
9. Run INSTALL.EXE from driver diskette's root
directory.
10. Select "Windows for Workgroup" in
"Network Operating System" screen and enter
"Driver Install" screen.
11. If current settings are acceptable, select "Start
Installation" and go to step 13. Otherwise,
select "Modify Parameters" to make settings
changed.
12. Move cursor to focus on the setting you want to
make change and press Enter to select a fit
value. When the configuration is accepted,
press Enter on the OK field to exit the screen.
Back to step 11.
13. Select "Novell Netware Server" as the network
server you will attach to and press Enter key.
14. Installation program starts copying related files
from diskette to the destination directory and
modifies AUTOEXEC.BAT and NET.CFG
under user's agreement.
15. Installation is complete. Please reboot the
computer to have the driver take effect.
Novell Netware
Menu Installation
1. Run INSTALL.EXE from driver diskette's root
- 13 -
Page 15

directory.
2. Select "Netware 3.x or 4.x workstation" in
"Network Operating System" screen and enter
"Driver Install" screen.
3. If current settings are acceptable, select "Start
Installation" and go to step 5. Otherwise, select
"Modify Parameters" to make settings
changed.
4. Move cursor to focus on the setting you want to
make change and press Enter to select a fit
value. When the configuration is acceptable,
press Enter on the OK field to exit the screen.
Back to step 3.
5. Installation program starts copying related files
from diskette to the destination directory and
modifies AUTOEXEC.BAT and NET.CFG
under user's agreement.
6. Installation is complete. Please reboot the
computer to make your Netware connection.
Manual Installation
1. Copy the A:\NETWARE\LE100ODI.COM file
from diskette to the Netware client directory
containing Novell's LSL.COM,
IPXODI.COM and NETx.COM files.
2. Follow Novell's instructions on using ODI
programs. You can substitute the
LE100ODI.COM whenever a reference is made
to the Hardware Specific Module.
A typical ODI workstation startup batch file
includes:
- 14 -
Page 16

>LSL ; Link Support Layer Module
provided by Novell
>LE100ODI ; Hardware Specific Module
>IPXODI ; IPX Protocol Stack Module
provided by Novell
>NETx ; DOS Shell Support Module
provided by Novell
>LOGIN
Novell Client Installation
1. Run the NetWare Client Install v1.21-
- Get the 4 Client disks from the network
administrator or
- Run the \NWCLIENT\INSTALL.EXE in
a previous installation
2. A message appears on the screen asking you
whether or not you want the program to
perform modifications on your
AUTOEXEC.BAT and CONFIG.SYS files.
3. Answer "Yes". The program then modifies
your AUTOEXEC.BAT and CONFIG.SYS files
accordingly and creates backup copies.
4. The following message appears:
-Install support for MS Windows? (Y/N):
5. Answer accordingly and provide a path if
necessary.
6. The program displays the following:
Configure your workstation for
- 15 -
Page 17

backup by a NetWare server running
software such as SBACKUP? (Y/N): No
7. Answer accordingly and provide a path if
necessary.
8. Select a driver for your network board.
9. From the driver list, select "Other Drivers".
10. Go to the Insert the Driver Disk dialog box and
specify the path where the ODI driver and INS
files reside. For example: C:\NETWARE.
11. Press Enter and select the target ODI driver.
12. Specify the driver's optional settings.
13. Press F10 to save to new configuration.
14. Highlight "Install press here" and press <Enter>
to install.
15. The program copies the necessary files for
NetWare Client. Continue the installation
procedure to completion. Upon completion, a
new NET.CFG file will be created in your DOS
directory. Typically, this file contains the
following lines:
Link Driver LE100ODI
PORT 320
INT 11
#FRAME Ethernet_802.3
FRAME Ethernet_802.2
:
Edit STARTNET.BAT for the ODI workstation
- 16 -
Page 18

performs the following:
SET NWLANGUAGE=ENGLISH
--Set NetWare 4.X to English language
LSL --Link Support Layer
Module provided by Novell
LE100ODI --Hardware Specific
Module
IPXODI --IPX Protocol Stack
Module provided by Novell
VLM --DOS Support Module
provided by Novell
F: --Change to connected
device
LOGIN .ADMIN --Login to file server as
user ADMIN
16. Run STARTNET to access the Novell network.
MS LAN Manager
1.View the README.TXT on the installation
diskette in the \NDIS2 directory. Before installing
the drivers, please ensure that the Microsoft LAN
Manager has been installed in the target path. The
installation program will check and modify the
PROTOCOL.INI file for LAN Manager.
2.Run INSTALL.EXE from root directory of driver
diskette.
3.Select Microsoft LAN Manager item on the menu
screen.
4.If current settings are acceptable, select Start
- 17 -
Page 19

Installation and go to step 6. Otherwise, select
Modify Parameters to make setting changed.
5.Move cursor to each field you want to make a
change and press <Enter> to select a fit value. When
the configuration are set completely, press <Enter>
on the OK field to exit the screen and go back to
step 4.
6.Installation program starts to copy related files
from driver diskette to the destination directory and
modifies CONFIG.SYS and PROTOCOL.INI under
user’s agreement.
7. Please reboot the computer to load driver and
start LAN Manager in batch.
Example of PROTOCOL.INI: used by LAN
Manager
[PROTMAN]
DRIVERNAME = PROTMAN$
DYNAMIC = YES
PRIORITY = NETBEUI
[NETBEUI_XIF]
- 18 -
Page 20

Drivername = netbeui$
SESSIONS = 6
NCBS = 12
BINDINGS = "LE120NDS_NIF"
LANABASE = 0
[LE120NDS_NIF]
; protocol.ini session for LAN driver.
IOADDRESS = 0x320
INTERRUPT = 11
DRIVERNAME = LE100NDS$
Packet Driver
1.Run INSTALL.EXE from root directory of
driver diskette.
2.Select Packet Driver item on the menu
screen.
3.If current settings are acceptable, select Start
Installation and go to step 5. Otherwise, select
Modify Parameters to make setting changed.
4.Move cursor to focus on the field you want to
make a change and press <Enter> to select a fit
value. When the configuration are set
completely, press <Enter> on the OK field to
exit the screen and go back to step 3.
5.Installation program starts to copy related
files from diskette to the destination directory
and modifies AUTOEXEC.BAT under user’s
agreement.
6.Please reboot the computer to load the driver.
- 19 -
 Loading...