

Abit KR7A-133R Quick Installation Guide

IInnttrroodduuccttiioonn
Thank you for buying an ABIT motherboard. This motherboard is
designed for AMD Socket A Athlon
processors. It supports the AMD Socket-A structure, with up to 3 GB
(Unbuffered) or 4 GB (Registered) of DDR memory, super I/O, and
Green PC functions. KR7A-133R’s built-in HighPoint HPT 372 chipset
gives you the capability to support Ultra DMA 133 and RAID functions.
For more detailed information on this motherboard, please refer to our full
version of the user’s manual. This quick installation guide is meant for
experienced system builders. If this is your first attempt at setting up
computer system, we suggest that you to read the full version manual first,
or ask a technician to help you set up the computer system.
™
XP, Athlon™ and Duron™
PPaacckkiinngg CChheecckklliisstt
Please check that your package is complete. If you discover any damaged
or missing items, please contact your retailer or dealer.
! One ABIT KR7A-133 or one KR7A-133R motherboard
! One 80-wire/40-pin ribbon cable for master and slave Ultra DMA 133,
Ultra DMA 100, Ultra DMA 66 or Ultra DMA 33 IDE devices
(KR7A-133 Only)
! Two 80-wire/40-pin ribbon cable for master and slave Ultra DMA 133,
Ultra DMA 100, Ultra DMA 66 or Ultra DMA 33 IDE devices
(KR7A-133R Only)
! One ribbon cable for 3.5” floppy disk devices
! One compact disc for support drivers and utilities
! One USB cable
! One DIY bag
! One user’s manual for the motherboard
! One quick installation guide for the motherboard
! One floppy disk for HPT 372 drivers (KR7A-133R Only)
4200-0244-02 Rev. 1.00
KKRR77AA--113333//KKRR77AA-- 113333RR MMootthheerrbbooaarrdd
PPllaacceemmeenntt
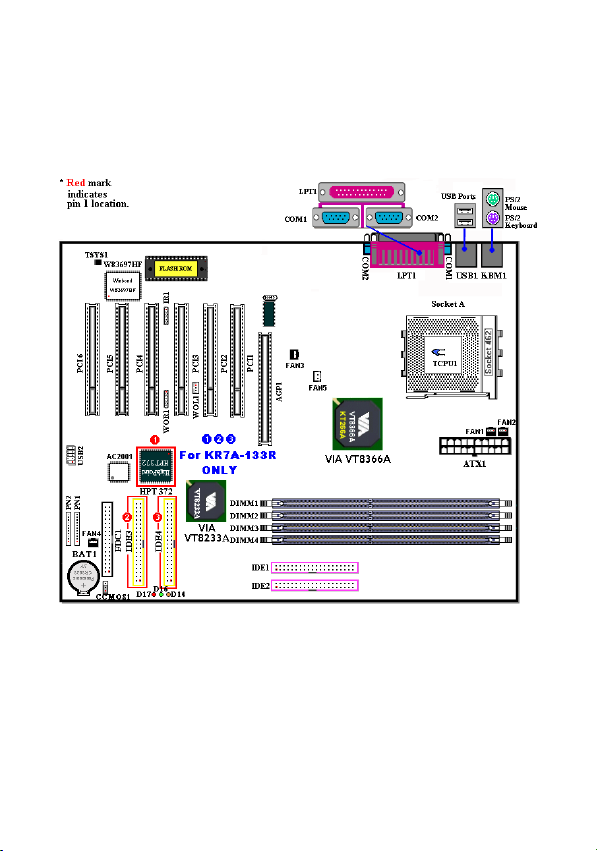
The Figure 1 shows the KR7A-133/KR7A-133R layout diagram. We
show all major components on this diagram for your reference.
FFiigguurree 11.. KKRR77AA--113333//KKRR77AA--113333RR LLaayyoouutt DDiiaaggrraamm
As above !, " and # are only shown on the KR7A-133R motherboard.
! is a RAID controller and " and # are connectors for two IDE channels.
The motherboard is enclosed in a transparent anti-static box, and you must
take it out carefully. The motherboard has many sensitive electronic
components that can be damaged by static electricity.
After you check all box contents and unpack the motherboard from the box,
you can install the processor onto the motherboard.
 Loading...