


www.3rsystem.co.kr www.rbox.co.kr
POSEIDON
Liquid cooler series User manual
3R SYSTEM.Co.,Ltd 3F.#28-9 Wonhyoro1-Ga, Yongsan-gu,Seoul,Korea Tel:82-2-702-0687 Fax:82-2-704-8909
● 저희 ㈜쓰리알 시스템의 포세이돈 시리즈를 구입해 주셔서 감사합니다. 본 설명서에는 제품의 설치 방법이 설명되어 있으니 사용 전에 반드시 읽고 내용을
충분히 숙지 하도록 부탁 드립니다.
● Thank you for purchasing our product. Before installing or using your Poseidon liquid cooler, read this manual carefully and follow instructions to
ensure reliable performance of the product.
● Gracias por comprar nuestro producto. Antes de la instalación o del uso de su Poseidon Liquid Cooler, lea este manual cuidadosamente y siga
las instrucciones para asegurarse un resultado correcto de este producto.
● 본제품의 품질에는 만전을 기하고 있습니다만 만일 본 제품이 물이 새거나 내부 구성 부품의 누락이 있을 때에는 제품 구입 후 2주 이내 또는 제품 설치 전
반드시 구입처에 연락하여 주시기 바랍니다.
● Every Poseidon liquid cooler has been thoroughly tested and has been shipped in perfect operating condition. In the event leakage is found or
parts are missing, please contact your dealer within 2 weeks after the date of purchase, and do not install it on your system.
● Cada Poseidon liquid cooler ha sido probado meticulosamente y ha sido enviado en perfectas condiciones para su uso. Si encuentra alguna fuga,
o le falta algún componente, por favor, contacte con su distribuidor en el plazo de 2 semanas de haber adquirido este producto y no lo instale
en su equipo.
▶ 기호 설명
제품 사용시 꼭 알아야 할 내용입니다.
제품 사용시 참고할 내용입니다.
제품 사용시 피해야 할 내용입니다.
▶ Instruction symbols
A must read
Recommendation
Warning/Caution
▶Símbolos
ES NECESARIO LEER
Recomendaciones.
Advertencias
■ CONTENTS
NOTE
■ I-1. WCL02,WCL03 PRECAUTIONS
■ I-2. WCL02,WCL03 INFORMATION
OPTION
■ IV-1. WCL02 , WCL03
OPTION PARTS
WCL02
■ II-1. WCL02 PARTS
■ II-2. WCL02INFORMATION
■ II-3. WCL02 INSTALLATION (Step1-14)
■ II-4. WCL02 TROUBLESHOOTING
WCL03
■ III-2. WCL03 INFORMATION
■ III-3. WCL03 INSTALLATION(Step1-4)
■ III-4. WCL03 LACK OF COOLANT
■ III-5. WCL03 TROUBLESHOOTING
■ III-6. WCL03 OPTIONAL PARTS INSTALLATION
I-1.시작하기 전에 ( Precautions ) , Precauciones
본제품의 설치 작업을 시작하기 전에 반드시 전원을 꺼주시고 전원 코드를 콘센트에서 분리하여주십시오. 감전이나 고장의 원인이 될 수 있습니다.
• Before installing this product, please make sure your system is turned off and unplugged, to reduce the risk of electrical shock
or damaging the product.
• Antes de instalar este producto, por favor, asegúrese de que su sistema esté apagado y desenchufado para reducir el riesgo de electrocución o
dañar el producto.
본제품의 모서리 또는 요철 부분의 처리에 만전을 기하고 있습니다만 설치할 때 다치지 않도록 주의하여 주시기 바랍니다.
• Take care not to be scratched with sharp edges while installing this product to your system.
• Tenga cuidado de no usar herramientas afiladas o puntiagudas mientras instala este producto en su equipo.
본 제품은 퍼스널 컴퓨터용으로 제작되어 있으므로 다른 용도로 사용을 삼가 주시기 바랍니다.
• This product is intended for the use with a personal computer only. Use of this product in other applications voids all warranties.
• Este producto está fabricado para el uso exclusivo en ordenadores personales. El uso de este producto en cualquier otro tipo de aplicaciones
eliminará su garantía.
본 제품은 프라스틱과 알루미늄(A3003등)등을 사용하여 제작되어 취급 중 무리한 힘을 가하면 파손의 위험이 있으므로 주의 하여 주시기 바랍니다.
• Always handle this product with care. Avoid applying excessive force to the product as it can damage the product.
• Manipule este producto siempre con cuidado. Evite aplicar excesiva fuerza sobre el producto ya que podría dañarlo.
용액 자체에 자극성이 있으므로 마시지 마시고 눈 또는 피부점막에 접촉하지 않도록 주의 바랍니다. 만약의 사고 발생시에는 흐르는 물에 15분 이상 씻
어낸 후 의사와 상담 바랍니다.
• The liquid inside this product is irritative. Avoid physical contact. If it happens to contact with bare skin or eyes, wash it off promptly. If irritation
persists, consult a doctor.
• El líquido que se encuentra dentro del producto es irritante. Evite su contacto físico. Si esto ocurre y el líquido entra en contacto con su piel u
ojos, lávalos con abundante agua. Si la irritación persiste, consulte a su médico.
제품을 임의로 분해 하거나 다른 부품과 결합하여 사용할 경우 부식, 동작불량 등의 문제가 발생할 수 있으며 이로 인해 문제가 발생했을 경우에는 본사
에서 사후 지원을 받을 수 없습니다.
• Do not attempt to disassemble this product or combine it with unoriginal components from other manufacturers under any conditions. Execution of
these will void the warranty.
• No intente desmontar este producto o combinarlo con componentes no originales de otros fabricantes bajo ningún concepto. Este tipo de
intentos eliminarán su garantía.
■ III-1. WCL03 PARTS

본 제품을 설치 시 튜브가 꺾이거나 꼬이면 정상적으로 작동하지 않을 수 있으므로 튜브가 꺾이거나 꼬이지 않도록 각별히 주의 하여 주시기 바랍니다.
작동유량 저하로 인한 성능저하나 모터 과부하등으로 고장의 원인이 될 수 있습니다.
• While installing this product, please be sure that the tubes are not folded or twisted, so as to not hinder normal flow of the liquid, as reduced
flow rate will lower the performance and continual overload on the pump motor may result in a breakdown of the motor eventually.
• Mientras instale el producto, por favor, asegúrese de que los tubos no estén doblados o enroscados, esto podría dificultar el flujo normal del
líquido. La reducción del flujo producirá un menor rendimiento del producto así como una continua sobrecarga en el motor de la bomba, que
podría dar lugar a la ruptura de su producto.
본제품이 큰 충격이나 낙하 등을 하지 않도록 주의하여 주시기 바랍니다. 충격이나 낙하 시 누수나 고장의 원인이 될 수 있습니다.
• Do not drop this product or apply impact upon it. This may damage the product or cause leakage.
• No golpee ni deje caer el producto. Esto podría dañarlo o producirle alguna fuga.
설치 및 동작에 관한 의문사항이 있을 경우에는 홈페이지(www.3rsystem.co.kr)를 참고 하시기 바랍니다.
• If you have questions about the installation or operation of the product, please visit our website (www.3rsystem.co.kr).
• Si tiene alguna pregunta sobre la instalación o la forma de operar de su producto, por favor, visítenos en nuestra página web
사용 설명서에 기재된 내용을 따르지 않아 발생하는 문제에 대해서는 사후 지원을 받으실 수 없습니다.
• We, 3R SYSTEM, cannot provide after-sale service for a problem or damage which resulted from not following the instructions in this manual.
• Nosotros, 3R SYSTEM, no podemos proveerle de un servicio post-venta por un problema o un daño en su producto como resultado de no haber
seguido las instrucciones de este manual.
본 제품 내부에 순환되는 액체는 부동액(에틸렌 글리콜)성분이 포함되어 있습니다. 본 제품은 주변온도 0 ~ 65 ℃ 의 환경에서 사용하여 주시기 바랍니다.
• The circulating liquid in this product contains an antifreeze (ethylene glycol). Ambient temperature for operation is 0 ~ 65°C.
• El líquido circulante que se encuentra en este producto contiene anticongelante, (glucógeno etileno).
La temperatura ambiente recomendada para operar es 0 ~ 65°C.
성능개선이 필요하거나 기타의 사유로 제품의 형태 및 사양이 예고 없이 수정될 수 있습니다.
• Specifications and improvements in the design of this product and this manual are subject to change without any prior notice.
• Las especificaciones y mejoras en el diseño de este producto y manual están sujetas a cambio sin previo aviso.
작동액을 모두 교환 할 경우에는 별도 판매하는 정품 작동액을 구입하여 사용하시기 바랍니다.
• In case you feel the need for replacing all of the liquid, please purchase and use our official replacement coolant.
• En el caso de que usted necesite cambiar todo el líquido, por favor, use nuestro recambio oficial de refrigerante.
구입일로부터 1년 내에 정상적인 사용환경에서 발생한 문제에 대해서는 무상수리 및 교환을 해 드립니다
다른 컴퓨터 부품에 발생한 문제에 대해서는 본사가 보상해 드리지 않습니다.
• During the period of one year from the date of purchase, 3R SYSTEM will repair or replace defective parts at its expense, on condition that the
product has been used in a normal environment and conditions specified above. 3R SYSTEM is not liable for the damage for any other computer
components.
•3R SYSTEM reparará o reemplazará las partes defectuosas sin coste alguno, por el período de un año desde la fecha de compra, siempre y cuando
el producto haya sido usado en un ambiente normal y y en las condiciones especificadas más arriba. 3R SYSTEM no se hace responsable del daño
de ningún otro componente de su equipo.
본 설명서의 내용을 무단으로 복제하는 것은 금지되어 있으며 사용 설명서의 내용은 필요에 따라 수정될 수 있습니다.
• It is prohibited to duplicate or copy this manual without permission from 3R SYSTEM.
• Prohibido duplicar o copiar este manual sin permiso de 3R SYSTEM.
제품의 최신 정보에 관해서는 홈페이지에 수시로 갱신하고 있으므로 관심을 가지고 보아 주시기 바랍니다.
• For the latest information on our products, please visit our website.
• Para las últimas noticias de nuestros productos, por favor, visítenos en nuestra página web: www.3rsystem.co.kr
I-2.WCL02, WCL03 INFORMATION
INSTALLATION
SPACE
AIR
FLOW
PERFORMANCE
PUMP
CPU
WCL02-90Cu
105 mm
155 mm
80mm후면 팬 부착 홀을 보유한 대부분의 케이스에 적용가능하며 위 적
용 size를 확인하여 주시기 바랍니다.
200 W (Max.)
Fan 4,000 RPM - 200W
Fan 2,000 RPM - 170W
DC12V 4W
1200cc/Min (Head) 650mm
INTEL : Socket 478 , Socket 370 - P4 3.4C , Presscott 3.4E , P3 , CELERON
AMD : Socket A , Socket 462 , Socket 754 - BARTON 3200 , DURON SERIES
CLIP Option Parts : AMD64 3200 , Xeon (Socket 603) , LGA775 (Socket T) - 2004.SEP
WCL03-90Cu
80 mm
200W (Max.)
Fan 4,000 RPM - 200W
Fan 2,000 RPM - 170W
DC12V 4W
600 cc/Min (Head) 350mm
WCL03-120CuWCL02-120Cu
125 mm
145 mm
120mm후면 팬 부착 홀을 보유한 대부분의 케이스에 적용 가능하며
위적용size를 확인하여 주시기 바랍니다.
230 W (Max.)
Fan 3,000 RPM - 230W
Fan 2,000 RPM - 190W
DC12V 4W
1200cc/Min (Head) 650mm
80 mm
230 W (Max.)
Fan 3,000 RPM - 230W
Fan 2,000 RPM - 190W
DC12V 4W
600 cc/Min (Head) 350mm
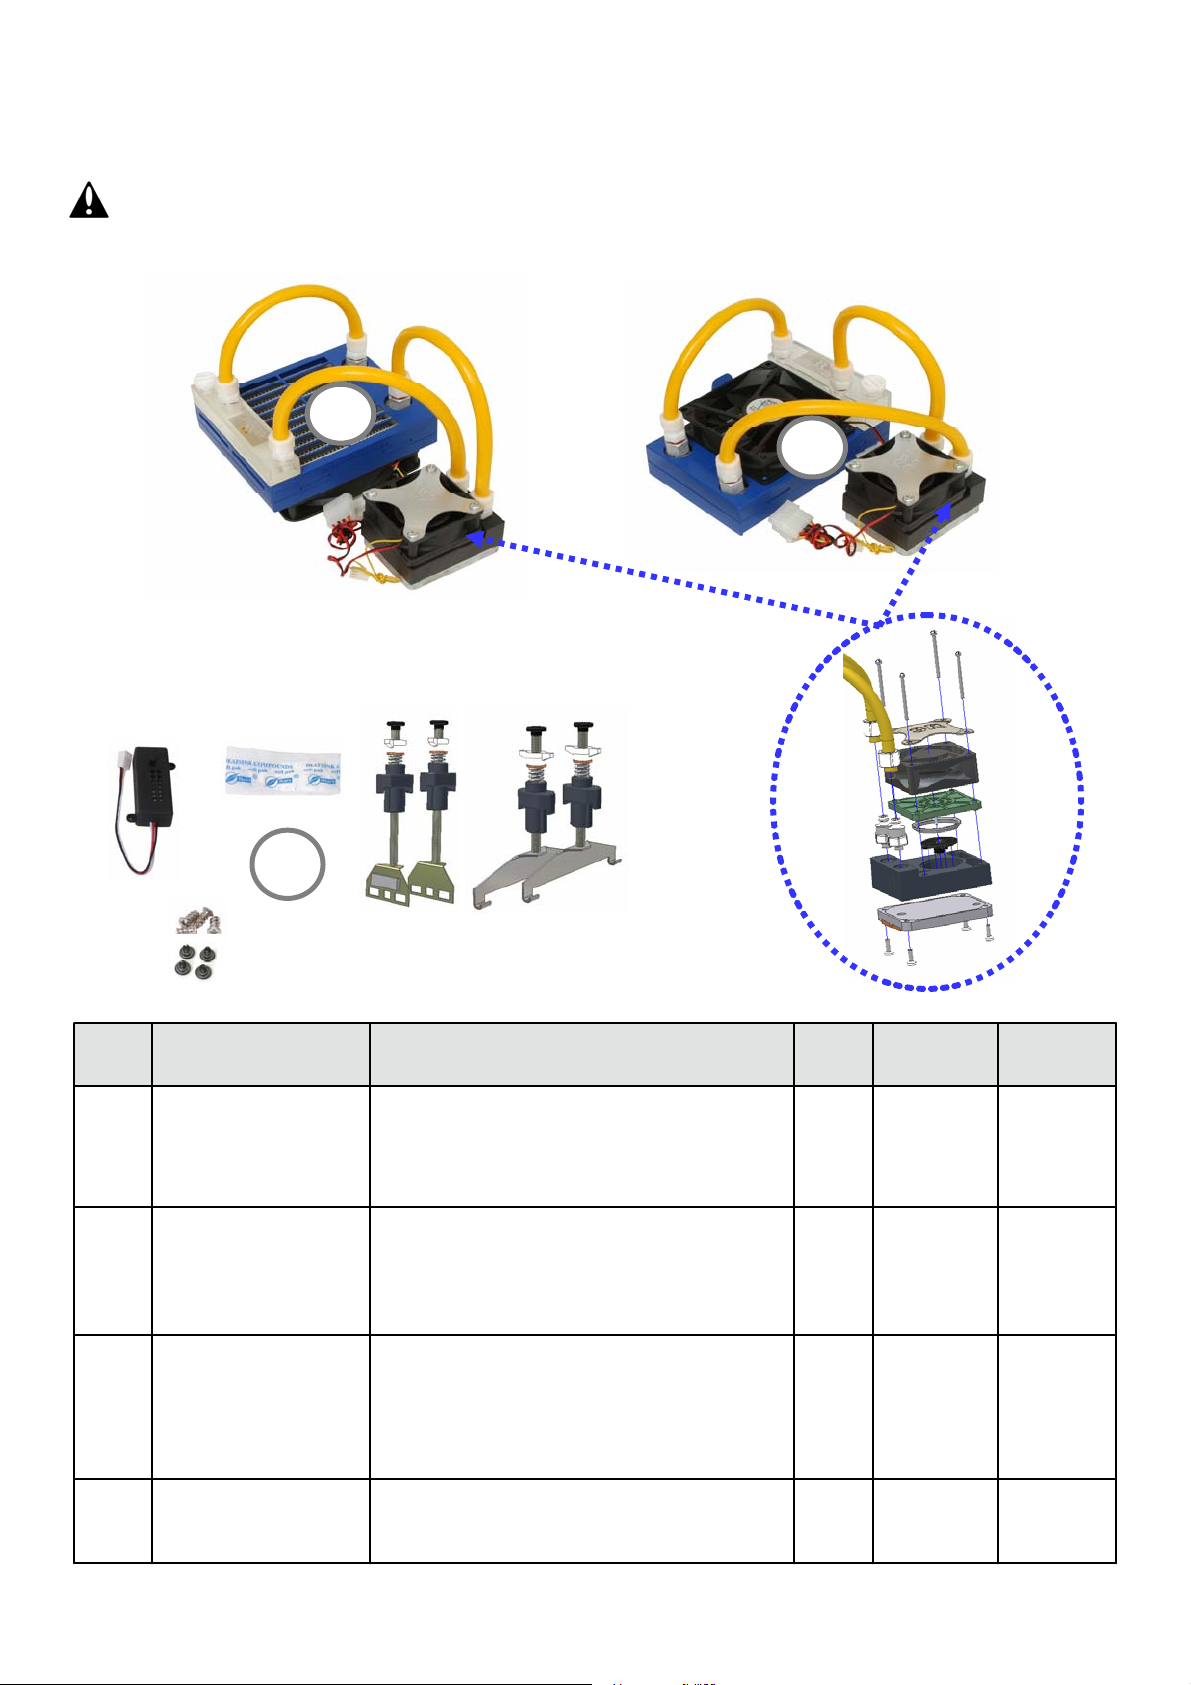
■ III-1. WCL03 SERIES PARTS
제품을 조립하기 전에 반드시 구성 부품을 확인하여 주세요. 결품이 발견될 경우 구입후 3일 이내에
구입점에 연락하여 주시면 내용을 확인하여 부품을 발송하여 드리겠습니다.
After unpacking, please check the contents of a box and be sure everything is included.
1
2
3
120MM 라디에타 고정볼트
90 MM 라디에타 고정볼트
120Cu90CuQtyDescriptionPart NameNo.
High Performance Heat-exchanger (120mm)
WCL03-120Cu Set
1
WCL03-90Cu Set
2
AMD Clip Set
AMD 64 Clip Set (Option)
3
P-4 Clip Set
Thermal Grease
Bolt
Fan Controller
Water Tank
Radiator Cooling FAN (120mm x 120mm x 25t)
Magnet Pump (4W)
Aluminum Water Block with Cu Plate
High performance Heat-exchanger (90mm)
Water Tank
Radiator Cooling FAN (92mm x 92mm x 25t)
Magnet Pump (4W)
Aluminum Water Block with Cu Plate
for AMD CPU Motherboard
for AMD 64 CPU Motherboard
for INTEL P-4 CPU Motherboard
Thermal Grease
for Fixing the Radiator
Radiator Fan Speed Control
1 set
1 set
1 set
1 set
1 set
4 sets
1 pc
○
○
○○
4
1 pcQuick Installation GuideQuick Installation Guide
○○

■ III-2. WCL03 INFORMATION
Basic Coolant Flow [기본 작동액 흐름)
WATER TANK
RADIATOR
FAN (AIR)
Water Block InatallationDirection [ 자켓 설치 방향]
■ III-3. WCL03 INSTALLATION
PUMP UNIT
CPU WATER BLOCK
CPU
제품을 PC에 설치하기 전에 먼저 전원을 연결하여 시험하고 PC에 설치 하는 순서로 되어 있습니다.
제품의 설치순서는 자켓 펌프세트를 먼저 설치하고 라디에타를 고정한 후 전원을 연결하여 사용하는 순서로 되어 있습니다.
STEP 1: WCL03 INSTALLATION
1. 구입하신 쿨러의 펌프 측에 전원을 연결하고 작동상태를 점검 합니다.
2. 냉각수가 정상적으로 순환하고 누수가 없으면 전원을 분리하고 설치를 시작합니다.
1. Before start installing, connect the power cable.
2. Be sure coolant flow is not hindered.
3. Be sure there is no trace of leak on tubes and fittings
WCL03-120Cu
From : PC Power
DC 12V
ON
WCL03-90Cu
From : PC Power
DC 12V
ON

STEP 2: WCL03 INSTALLATION - WATER BLOCK / PUMP UNIT FIXING
1. 반드시 PC의 전원을 OFF 하고 전원 콘센트를 뽑은 후 설치를 시작 하십시오.
2. 본체를 수평 방향으로 눕혀서 작업하면 쉽게 장착할 수 있습니다.
3. 자켓 펌프세트의 장착 정확도 및 장력에 따라 CPU냉각 성능에 영향을 미치므로 주의하여 설치하시기 바랍니다.
■ P-4 CPU
1. PC의 전원을 끄고 PC의 케이스를 열어 마더보드가 보이도록 합니다.
2. 쿨링팬의 전원을 뽑고 달려있는 쿨러를 제거 합니다.
이때 메모리등 주변기기가 손상이 가지 않도록 주의 해야 하며 PC을 수평으로 놓고 작업하면 편리합니다.
3. CPU 표면을 깨끗이 닦고 [그림1] 과같이CPU표면과 자켓면에 열전도 그리스를 얇게 펴서 바릅니다.
4. 자켓 펌프세트를 CPU표면에 닿도록 올려 놓습니다.
5. 제공된 P-4용 클립 하나를 사용해서 [그림 2]와 같은 방향으로 약간 고정합니다.
이때 나비너트를 최대한 풀어놓고 설치하면 설치가 편합니다.
6. 같은 방법으로 나머지 클립을 사용해서 [그림 3]과같이고정합니다.
7. 정확하게 클립이 소켓에 걸렸으면 [그림 4]와 같이 나비너트를 사용하여 장력을 조정 합니다.
이때 한쪽 장력을 조금 조정하고 반대쪽을 조정하는 것을 반복하여 균일한 힘이 가해지도록 조정해야 합니다.
함께 연결된 라디에터 장치가 PC의 다른 부품에 접촉되어 피해가 없도록 주의 하십시오.
8. 장력 조정이 끝난 후 손으로 자켓 펌프 세트를 움직여서 고정 상태를 확인합니다.
Apply
1
1. Apply thermal grease.
Grease
2
2. P-4 CPU Clip Assembly
3
3. P-4 CPU Clip Assembly
Parts
4
4. Clip Tension Control
■ AMD64CPU (Needs Optional Parts)
1. PC의 POWER을 OFF후 PC의 CASE를 열어 마더보드가 보이도록 합니다.
2. 쿨링팬의 전원을 뽑고 달려있는 쿨러를 제거 합니다.
이때 메모리 등 주변기기가 손상이 가지 않도록 주의 해야 하며 PC을 수평으로 놓고 작업하면 편리합니다.
3. CPU 표면을 깨끗이 닦고 [그림1] CPU표면과 자켓면에 열전도 그리스를 얇게 펴서 바릅니다.
4. 자켓 펌프세트를 [그림2]와같이CPU표면에 닿도록 올려 놓습니다.
5. 제공된 AMD64용 클립 하나를 사용해서 [그림 3]과같은방향으로약간고정합니다.
이때 나비너트를 최대한 풀어놓고 설치하면 설치가 편합니다.
6. 같은 방법으로 나머지 클립을 사용해서 [그림 4]와같이고정합니다.
7. 정확하게 클립이 소켓에 걸렸으면 [그림 5]와 같이 나비너트를 사용하여 장력을 조정 합니다.
이때 한쪽 장력을 조금 조정하고 반대쪽을 조정 하는 것을 반복하여 균일한 힘이 가해지도록 조정해야 합니다.
함께 연결된 라디에터 장치가 PC의 다른 부품에 접촉되어 피해가 없도록 주의 하십시오.
8. 장력 조정이 끝난 후 손으로 자켓 펌프 세트를 움직여서 고정 상태를 확인합니다.
1 2 3 4 5
Apply
Grease
1. Apply thermal grease.
2. Water Block / Pump Unit Fixing
3. AMD64 CPU Clip LH Assembly
4. AMD64 CPU Clip RH Assembly
Parts
Tension Control
5. Clip Tension Control

■ AMDCPU
1. 반드시 PC의 POWER을 OFF 하고 전원 콘센트를 뽑은 후 설치를 시작 하십시오.
2. 본체를수평방향으로눕혀서작업하면쉽게장착할수있습니다.
3. AMD CPU의 경우 자켓 펌프세트의 중앙에서 벗어난 곳에서 CPU가 접촉되므로 설치에 주의를
기울이지 않으면 제품 본래의 성능을 발휘하지 못할 수도 있으므로 주의 하시기 바랍니다.
Please pay special attention while installing a water block / pump unit on AMD CPU since the CPU core is
located off-center on the plate and incorrect installation will greatly lower the cooling performance. Be sure
the unit is placed in the right Direction and a correct clip is used in a designated place.
CLIP INSTALLATION DIRECTION
W/O FOAM
ATTACHED
소켓 방향과 스폰지 부착 클립의 사용
1. PC의 전원을 끄고 PC의 케이스를 열어 마더보드가 보이도록 합니다.
2. 쿨링팬의 전원을 뽑고 달려있는 쿨러를 제거 합니다.
이때 메모리 등 주변기기가 손상이 가지 않도록 주의 해야 하며 PC을 수평으로 놓고 작업하면
편리합니다.
3. CPU 표면을 깨끗이 닦고 [그림1]과같이CPU표면과 자켓면에 열전도 그리스를 얇게 펴서 바릅니다.
4. 자켓 펌프세트를 [그림2]와같이CPU표면에 닿도록 올려 놓습니다.
5. 제공된 AMD용클립중스폰지(foam)가 부착된 것을 사용해서 [그림 3]과같은방향으로약간고정합니다.
이때 나비너트를 최대한 풀어놓고 설치하면 설치가 편합니다.
* 그림3, 그림 5의 확대부분을 참고하여 설치 하시기 바랍니다.
6. 다른 클립 하나를 사용해서 [그림 4]와같이고정합니다.
7. 정확하게 클립이 소켓에 걸렸으면 [그림 5]와 같이 나비너트를 사용하여 장력을 조정합니다.
이때 한쪽 장력을 조금 조정하고 반대쪽을 조정 하는 것을 반복하여 균일한 힘이 가해지도록
조정해야 합니다.
함께 연결된 라디에터 장치가 PC의 다른 부품에 접촉되어 피해가 없도록 주의 하십시오.
8. 장력 조정이 끝난 후 손으로 자켓 펌프 세트를 움직여서 고정 상태를 확인합니다.
W/ FOAM ATTACHED
Water block Direction
1
APPLY
GREASE
1. Apply thermal grease.
5
5. Clip Tension Control
2
FOAM
2. Water Block / Pump Unit Fixing 3. AMD CPU LH Clip (W/ FOAM) Fixing 4. AMD CPU RH Clip Fixing
3
FOAM
4
Parts
FOAM
FOAM
TENSION CONTROL

STEP 3: WCL03 INSTALLATION STEP 4: WCL03 INSTALLATION
- Radiator Bolt Fixing
Parts
Parts
WCL02-120CuWCL02-90Cu
반드시 제공된 볼트를 사용하여 주시기 바랍니다.
다른 볼트를 사용하면 라디에타를 손상 시킬 수 있습니다.
Air flow
WCL02-120Cu
Air flow
WCL02-90Cu
CHECK LIST
1. Secure Settling of Radiator & Pump (라디에타, 펌프 고정 상태 점검)
2. No Trace of Leakage on Tube & Fitting (누수점검)
3. No Overly Bent Tube, Smooth Flow (호스 꺾임 점검)
- Radiator & Pump Unit Cable Connection
1. Pump Unit 4-pin Cable → PC Power DC 12V 4-pin
2. Radiator Fan 3-pin Cable → Fan Controller
3. Fan Controller 3-pin Cable → Motherboard Fan Terminal
4. Pump Unit 1-pin Cable → CPU Fan Terminal
With PC Power ON , Check Water Flow for 2~3 Minutes
(Check Tube’s Bend )
전원을 켜고 2-3분간 작동 상태를 점검하세요
Noise Control ( Use Fan Controller )
팬콘트롤러를 조정하세요
4
From : PC Power
DC 12V
1
2
3
Parts
1
2
3
■ III-4. WCL03 TROUBLESHOOTING
냉각 효과 저하 LOW
COOLING
PERFORMANCE
펌프 소음 발생
ABNORMAL PUMP
NOISE
냉각수 순환 정지
COOLANT NOT
CIRCULATING
1. CPU와 자켓의 장력 부족
Insecure Mounting of the Water Block on CPU
2. 자켓장착방향오류
Water Block Mounted in Wrong Direction
3. 냉각수 흐름 방향 오류
Wrong Coolant Flow Direction
4. 라디에타 Fan 방향 오류
Radiator Fan Mounted in Wrong Direction
5. 라디에타 Fan 풍량 저하
Insufficient Air Flow by Radiator Fan
6. 호스 꺽임
Overly Bent or Twisted Tube(s)
1. 작동액 부족
Lack of Coolant
2. 기타 소음
Unknown Source
1. 호스 꺽임
Overly Bent or Twisted Tube(s)
2. 펌프 고장
Pump Breakdown
4
www.3rsystem.co.kr www.rbox.co.kr
조치 (SOLUTIONS)검사 (POSSIBLE CAUSES)증상 (SYMPTOM)
1. CPU 클립 장력조정 (Step 2 참조)
Adjust tension on the CPU clips. (Refer to Step 11.)
2. 자켓 장착 방향수정 (III-2 항 참조)
Refer to Section III-2.
3. 냉각수 흐름 방향 수정 (III-2 항 참조)
Refer to Section III-2.
4. 라디에타 Fan 방향수정 (I-2 항 참조)
Refer to Section I-2.
5. 라디에타 Fan 풍량 조정 (Step 4 참조)
Adjust radiator fan RPM. (Refer to Step 4.)
6. 호스꺽임조정(Step 3 참조)
Unbend or untwist it. (Refer to Step 3.)
1. 작동액 보충 (III-5항 참조)
Fill the water tank up. (Refer to Section III-5)
2. 구입처를 통한 A/S
Contact customer service.
1. 호스꺽임조정(Step 3 참조)
Unbend or untwist it. (Refer to Step 3.)
2. 구입처를 통한 A/S
Contact customer service.
누수발생
LEAKAGE
1. 연결부 누수 발생
Leakage in the Joint Area
2. 부품 누수
Leakage from Certain Units
1. 구입처를 통한 A/S
Contact customer service.
2. 구입처를 통한 A/S
Contact customer service.

■ III-5. LACK OF COOLANT
1) There might be some natural evaporation after 1 or 2 years ofoperation.
2) You need to refill the coolant when ;
- you hear some strange sound from the water pump.
- the coolant is not flowing.
● When you first install the water cooler, there might be too much air inside of the water pump, which makes the system work poorly.
In this case, please uninstall the water cooler and shake the pump while placing the water tank to a higher position than the pump unit. This will remove the air
from inside the pump unit.
Refilling Coolant.
1.You need to shut down the system and unplug the power cord from the power outlet before you begin.
2.Open the cap of the water tank and refill the coolant using distilled water which can be purchased fr om a pharmacy or a CVS. use a syringe or a dropper.
3. After you finish first refill, please repeat procedure 1 &2 once more after running the system for 5 minutes or more.
● Please be careful with the liquid not to drop on the system. Please avoid any physical contact, especially eye area and bare skin. The
fluid inside this product may cause irritation if it contacts your body.
● Incase of contact, immediately flush eyes or skin with plenty of water. If irritation persists, call a physician.
1. PC Power OFF
2. Radiator Unit Separation from Case
3. Water Tank Cover Open
4. Refilling Coolant
5. Cover Closed & Radiator Fixing
1. PC POWER OFF
2. Pump Unit Separation from Case
3. Water Tank Cover Open
4. Refilling Coolant
5. Cover Closed & Pump Unit Fixing
Falta de refrigerante
a. Puede ocurrir una evaporacion natural despues de 2 o 2 años de funcionamiento.
b. Usted necesita rellenar de refrigerante cuando:
- oiga algun ruido extraño proveniente de la bomba de agua.
- el refrigerante no fluye.
● Cuando reinstale el sistema de refrigeracion liquida, puede contener demasiado aire en su interior de la bomba de agua el cual provoca que el sistema no
funcione adecuadamente. En este caso, por favor desinstale el sistema y agite la bomba de agua para eliminar el aire de la bomba. Después de esto, reinstale el
sistema.
Rellenando de refrigerante.
a. Necesita apagar el sistema y desenchufar el cable de alimentacion exterior del la fuente de aliemntacion antes de empezar.
b. Abra el capuchin del deposito y llene de refrigerante usando agua pura que puede adquirir en una famarcia o en su distribuidor usando una jeringa.
c. Despues de que termine el primer llenado, por favor hagalonuevamente despues de funcionar con el sistema durante 5 minutos.
● Por favor sea cuidadoso con el liquido, no permita que se derrame dentro de su ordenador. El fluido que contiene el producto puede causar irritacion en contacto
con el cuerpo. Por favor evite todo contacto del fluido con el cuerpo, tenga especial cuidado con los ojos y el contacto directocon la piel.
작동액 부족
a. 제품을 정상적으로 사용했을 경우 1~2년 후에 자연 증발로 인한 작동액의 부족 현상이 발생할 수 있습니다.
b. 다음과 같은 증상이 있을 때에는 작동액의 보충이 필요합니다.
- . 꼬르록, 꼬르륵 하는 모터 이상음 발생할 때
- . 작동액 부족으로 인한 순환이 안될 때
● 사용 중 철거 및 재설치 할 때에 펌프부분에 다량의 공기가 유입되면 펌프의 기능을 상실할 수 있으며 이때에는 제품을
철거하여 물통을 위로하고 펌프부분을 흔들어 펌프내부의 공기를 물통 쪽으로 이동시키고 작동 하십시오.
작동액보충방법
a. PC의 전원을 모두 off 합니다.
b. 물탱크 뚜껑을 열고 주사기나 스포이드로 약국에서 구입할 수 있는 증류수를 주입합니다.
c. 주입 후 5분 정도 시험 가동 후 증류수를 재주입 합니다
● 증류수 주입시 주변 기기에 접촉되지 않도록 주의하십시오.
● 작동액을 마시거나 피부점막에 접촉되지 않도록 주의하십시오 . ( 접촉시 흐르는 물에 세척 하십시오. )

■ III-6. WCL03 SERIES OPTIONAL PARTS INSTALLATION ( Coolant Flow )
제품 구성 후 반드시 전원을 연결해 작동액 순환상태, 누수상태, 등을 시험 후 10분 이상 시운전 하고 PC에 장착 하십시오.
Pump Unit 내부에 기포가 많이 있으면 순환이 되지 않을 수 있으니 전원 연결 시험 시 기포를 제거 하십시오
After assembly, and before installing, operate the cooler for more than 10 minutes to check that the liquid circulates normally without any trace of leakage.
(Residual bubbles inside of the pump unit hinders the circulation of the liquid. Remove the bubbles while testing.
SETUP EXAMPLE 1
WATER TANK
RADIATOR CPU WATER BLOCK
FAN (AIR)
SETUP EXAMPLE 2
WATER TANK
RADIATOR
FAN (AIR)
SETUP EXAMPLE 3
WATER BLOCK
Pump & Water Tank
TANK & PUMP
CHIPSET
Chipset Water Block
Pump & Water Tank
TANK & PUMP
CHIPSET
Chipset Water Block
RADIATOR
FAN (AIR)
External 120mm Radiator
PUMP UNIT
CPU
PUMP UNIT
CPU WATER BLOCK
CPU
PUMP UNIT
RADIATOR
FAN (AIR)
SETUP EXAMPLE 4
WATER TANK
RADIATOR
FAN (AIR)
VGA Water Block
VGA CHIPSET
VGA Water Block
VGA
Pump & Water Tank
TANK & PUMP
Chipset Water Block
RADIATOR
FAN (AIR)
External 120mm Radiator
RADIATOR
FAN (AIR)
External 120mm Radiator
CPU WATER BLOCK
CPU
PUMP UNIT
CPU WATER BLOCK
CPU

■IV-1 WCL02 , WCL03 SERIES OPTIONAL PARTS
www.3rsystem.co.kr www.rbox.co.kr
No.
Power - Fluid
No. : W00XA1-01750
CPU Water Block
DescriptionPictureDescriptionPictureNo.
No. : W02XA1-01830
1
Pump & Water tank
2
Chipset Water Block
3
VGA Water Block
4
Power – Fluid (150mml)
Distilled Water 85%
Ethylene Glycol & etc.
No. : W00XA1-01760
Pump & Water tank (1set)
Clip (10 Φ ) (2 ea)
DC 12 V 4W(±15%)
No. : W00XA1-01770
Chipset Water Block (1 ea)
Chipset Clip (1set)
Thermal Grease (1ea)
Tube Fitting (2 ea)
No. : W00XA1-01780
VGA Water Block (1ea)
VGA Clip (1set)
Thermal Grease (1ea)
Tube Fitting (2 ea)
9
10
11
12
90mm Fan & Controller
120mm Fan & Controller
Silicone Tube
Water Block Al / Cu Plate
(1ea)
Thermal Grease (1ea)
Tube Fitting (2 ea)
AMD Clip, P-4 Clip
No. : W00XA1-01840
90 Fan (4000 rpm) (1ea)
Fan Controller (1 ea)
Fan bolt (4 ea)
No. : W00XA1-01850
120 Fan (3000 rpm) (1ea)
Fan Controller (1 ea)
Fan bolt (4 ea)
No. : W00XA1-01860
Silicone Tube ( 2M )
External 120mm Radiator
5
120mm Radiator
6
90mm Radiator
7
Safety Module
8
No. : W00XA1-01790
(Assembled)
120mm Radiator (1set)
Radiator Stand (1ea)
120mm Fan(3000) (1ea)
Fan Controller (1ea)
Fan Cover (1ea)
Tube Fitting (2 ea)
No. : W00XA1-01800
120mm Radiator(1set)
Tube Fitting (2 ea)
Fan Bolts (4 ea)
No. : W00XA1-01810
90mm Radiator (1set)
Tube Fitting (2 ea)
Fan Bolts (4 ea)
No. : W00XA1-01820
System
Protection Unit (1set)
13
14
15
16
80mm Fan Bracket
03-AMD64 Clip
02-AMD64 Clip
120 mm Stand
No. : W00XA1-01870
Bracket (1ea)
For Chieftec Case
No. : W03XA1-01880
AMD64 Clip ( 2 ea)
No. : W02XA1-01890
AMD64 Clip ( 2 ea)
No. : W00XA1-01900
Wcl02-120 radiator
Stand
Optional Parts(Scheduled for SEP. 2004)
LGA775
INTEL CPU LGA775 (socket T) Clip – No. : W00XA1-01920
17
Xeon (socket 603) Clip
No. : W00XA1-01910
INTEL CPU Xeon
(socket 603) Clip
 Loading...