


3R SYSTEM
Korean( )韓國語▶ 3 page
English( )英語▶24page
Japanese( )日本語▶46page

3R SYSTEM
사용 설명서를 읽기 전에
제품 사용시 위험 경고를 나타냅니다/.
제품 사용시 참고적인 사항을 나타냅니다
제품 사용시 주의해야 할 사항을 나타냅니다
Copyright 2002 3R Systemⓒ
▶ 제품의 형태 및 사양은 변경될 수 있습니다.
사용 설명서의 내용은 필요에 따라 수정될▶
수 있습니다.
▶ 고객지원 요청 전에 본 사용 설명서를 다시
한번 읽어 주시기 바랍니다.
▶ 본 설명서의 내용을 무단으로 복제하는 것은
금지되어 있습니다.
▶ 제품 설치 이전에 사용 설명서를 충분히 숙
지한 후 설치를 시작하시기 바랍니다.

3R SYSTEM
차례◆
사용 설명서를 읽기 전에 ‥‥‥‥‥‥‥‥ 3
차 례 ‥‥‥‥‥‥‥‥‥‥‥‥‥‥‥‥‥‥ 4
제 장 제품을 설치하기 전에1
제품의 특장점1-1. ‥‥‥‥‥‥‥‥ 5
제품 구성품 확인1-2. ‥‥‥‥‥‥‥‥ 6
부품의 세부 설명1-3. ‥‥‥‥‥‥‥‥ 7
제 장 설치 가이드2
기본 준비사항2-1 ‥‥‥‥‥‥‥‥ 12
설치요약2-2 ‥‥‥‥‥‥‥‥‥‥‥ 13
설치 세부사항2-3 ‥‥‥‥‥‥‥‥ 14
동작 전 확인사항2-4 ‥‥‥‥‥‥‥‥ 19
최종 동작2-5 ‥‥‥‥‥‥‥‥‥‥‥ 20
제 장 사용중 주의사항3 ‥‥‥‥‥‥‥‥ 21
제장부록4 ‥‥‥‥‥‥‥‥‥‥‥ 22
제 장 별매 옵션품목5 ‥‥‥‥‥‥‥‥ 23

3R SYSTEM
제품을 설치하기 전에1.◆
제품의특장점1-1.
1. 물을 이용한 냉각장치로 공랭식에 비하여 월등한
효율을 나타내어 시스템 안정성과 최고의 성능을
발휘하는데 도움을 줍니다.
컴퓨터 작동 소음의 주 원인인 시스템 팬을 최소화2.
할수있어저소음 컴퓨터 구현이 쉬워집니다.
인텔3.
의시스템에장착이 가능합니다.
최소화된 설계로 시스템4. 내부에모든부품을장착
가능합니다.
5. 소형의 크기에 비해 고효율의 성능을 나타낼 수
있도록 설계 되었습니다.
6. 미려한 외관으로 튜닝된 시스템에 장착시 보다 아름
답고 짜여진 모습을 표현할 수 있습니다.
7. 무엇보다도 쉬운 장착에 초점을 두고 설계했기 때문에
초보자도 쉽게 장착이 가능합니다.
8.사용중문제가될수있는부식이나 누수 문제를
근본적으로 차단하여 별도의 유지 보수가 필요 없습/
니다.
9. 제품의 성능개선 및 튜닝을 위한 다양한 옵션이
마련되어 있습니다.
펜티엄 및 AMD™
애슬론 계열등™ 대부분

3R SYSTEM
제품 구성품 확인1-2.
라디에이터⑴
라디에이터용 팬⑵
아쿠아튜브(2m)⑶
펜티엄 소켓용 고정 어댑터478⑸™
펌프 전원 연결용 플러그220V⑹
호스 고정용 클램프⑺
물통 쿨러 고정용 볼트 개/(4/8)⑼
물통 베이스⑽
물통 뚜껑⑾
물 주입구용 뚜껑⑿
전선출입구⒀
워터펌프⒁
자켓CPU⑷
자켓 고정용 클립CPU⑻

3R SYSTEM
부품의 세부설명1-3.
라디에이터⑴
워터쿨러의 가장 핵심적인
부품으로 에서 교환된CPU
열이 외부공기로 식혀지는
열교환이 이루어지는 장소입
니다 라디에이터의 얇은.
판에는 여러 개의 구멍이 있
는다공파이프로이루어져
있으며 이 파이프에 브레이징
용접의 한 종류로(Brazing:
금속 접합시 발생되는 열 저항을 없앤 방식으로 방열 및
열교환기 등에는 필수적인 방법 된 핀들로 열이 방출되며)
열방출을 돕기위해서 팬을 사용합니다 입수구 및 출수구로.
사용되는 개의 관과 전면 팬과 후면에 팬을 가변식으로2
장착할수있게설계하여어떠한케이스에도장착이가능하도록
설계되었습니다.
라디에이터용 팬80⑵㎜
라디에이터의 열 교환을
용이하게 만들기 위해 장착
하는 팬으로 중풍량의 핀4
팬을 채택하였습니다 만.족할
정도의 성능과 비교적 적은
소음으로 선별된 제품으로
일반적인 사용에 가장 적합한
제품입니다 팬의 경우.
사용 목적에 따라 성능을
위한 고풍량의 팬 혹은 저,
소음을 위한 저풍량의 팬으
로 변경하여 사용하시는 것도 가능합니다.

3R SYSTEM
아쿠아튜브 2m⑶
쉬운 장착을 고려하여
적당한 연성을 가지고 또한
사용중 누수의 위험을 없애기
위해 충분한 두께를 확보한
튜브로 옅은청색의 아름다운
색상을 가지고 있어 기존
제품군들의 장기간 사용시
착색 문제등을 해결하였습
니다.
자켓CPU⑷
에서 발생하는 열을CPU
흐르는물로전달해주는
역할을 합니다 워터쿨러의.
핵심부품중 하나로 내부에
수많은 다공성 핀이 배열되어
빠른 유속과 충분한 열교환을
이뤄냅니다 표면에 크롬.도금
처리를 하여 외관상 품격을
높이고 내구성을 향상시켰으
며 제조시 특수 구리가 함유된 특수 소재를 택하여 뛰어난
열 전도율을 나타냅니다.
⑸인텔
장착용 어댑터
사용범위를 가지고 있음에
비해 다양한 제품군에 장착
가능하도록 핀 소켓478
고정용 어댑터를 제공합니다.
메인보드의 가이드와 CPU
구입시 제공되는 클립을
이용하여 간편하게 고정할
수 있도록 고안된 제품입니다.
펜티엄4 478™소켓
기존 수냉 제품군이 제한적인

3R SYSTEM
펌프 전원 연결용 플러그220V⑹
펌프조립및전선을처리하기용이하게
하기 위해서 플러그 부분을 별도 처리
하여 제일 마지막 단계에 장착하여 사
용할 수 있도록 제공되는 부품입니다.
튜브 고정용 클램프⑺
각 입출수구에 클램프 없이도 충분한
결합력을 확보하여 누수의 위험은
없으나 보다 안전한 고정을 확보하기
위하여 클램프를 제공합니다 원터치 방식으로 손쉽게 장.착이
가능합니다.
자켓 고정용 클립CPU⑻
AMD
(Socket A) 및 인텔
펜티엄 계열3(Socket™
에장착할때사용370)
되는 클립입니다.
원터치 클립으로 두 번의 조작으로 결합 및 분리가 가능하
며 또한 충분한 장력을 확보합니다.
계열Athlon™
고정용 볼트⑼
물통 뚜껑 고정용 볼트 개와 라3Ø 4
디에이터에쿨러를고정시킬때및케
이스 장착시에 사용되는 볼트 개4Ø 8
를 제공합니다 여분이 더 제공됩니.(
다.)
3R SYSTEM
물통 베이스⑽
물을저장하며교환재충전이
가능하도록 되어 있습니다.
일정량의 순환용 물을 확보하여
급격한 온도변화를 막는 백업
역할을 수행합니다 투명도가.
높고 강도가 높은 폴리카보네
이트 재질을 사용하여 미려한
외관과 충분한 강성을 확보하여
튜닝시에 강점을 가지며 사용
시에 생길수 있는 누수현상등
을 미연에 예방하고 있습니다.
함께 제공되는 고무패킹을 이용하여 밀폐를 해 주셔야 합니다.
물통 뚜껑⑾
입출수 및 펌프 고정용 부분을
가지고있고전선출입부및
물보충용 물주입구를 가지고
있습니다 별도의 튜브 고정용.
부품을 사용하지 않고 바로 고
정되는 방식을 사용하여 손쉬운
결합 및 누수의 위험성을 차단
합니다 제공되는 고무패킹과.
함께 물통 베이스에 밀착되어 안전한 방수
를 이뤄냅니다.
물주입구용뚜껑⑿
초기 물 주입 및 사용중 물 교환 보충을 손/
쉽게 할 수 있도록 별도의 주입구를 마련하
였습니다.

3R SYSTEM
전선출입부⒀
펌프로 인해서 필수적으로 전선이 물통부분
에서 나와야 하는 문제를 해결하는 부품으로
손쉬운 조립과 완전한 방수성을 지니고 있습
니다.
워터펌프⒁
전체적인 워터쿨링 시스템에
물 순환을 담당하는 부품으로 물통
내부에 장착하는 수중펌프 방식으로
저소음을 실현하였고 저소음 저발
열에 비하여 충분한 성능을 나타내
는 제품입니다.
경고스티커 등⒂
경고문구 스티커로 외부에 부착을 권합니다PC
물통 고정용 양면테잎
아쿠아튜브 펌프 전원선 보호테잎/
라디에이터 공기유출 차단용 접착패드

3R SYSTEM
워터쿨러 설치 가이드2.◆
기본 준비사항2-1.
아쿠아튜브절단용호스커터혹은가위⑴
아쿠아튜브 절단시 필요한 공구로
시중에서 구할 수 있는 그림과 같
은 호스커터를 준비하거나 일반적
인 가위로도 충분히 절단이 가능합
니다.
볼트 고정용 드라이버⑵
라디에이터에 팬을 고정할 때 및 케이스
장착시에 사용할 드라이버를 준비합니다.
그림의 부분에 들어갈 수 있는 보통보다
약간 가는 굵기의 십자 드라이버가 필요합
니다.
전선 피복 제거용 니퍼⑶
펌프 콘센트 부위 조립시에 사용할 수 있도록 피복제거용
니퍼 혹은 칼 등을 준비합니다.
내부 순환용 물⑷
순환시킬 물을 준비합니다 일반적인 수돗물로 사용해도.
별 문제는 없습니다만 제품의 내구성 및 안정성을 높이기
위해서는 증류수를 사용하는 것이 좋습니다 증류수는 가까.
운 약국 등에서 손쉽게 구할 수 있습니다.
충분한양의휴지⑸
순환테스트및물주입시어느정도의물이흐를수있기
때문에이를제거할수있는휴지등을미리준비해두는
3R SYSTEM
것이 좋습니다.
3R SYSTEM
설치 요약2-2.
⑴ 아쿠아 튜브 절단
⇩
⑵ 물통셋 결합
⇩
⑶ 라디에이터 셋 결합 및 장착
⇩
⑷자켓장착CPU
⇩
⑸ 물통위치고정
⇩
⑹ 펌프 전원 콘센트 조립
⇩
⑺최종확인
⇩
⑻동작
3R SYSTEM
설치의 세부 순서2-3.
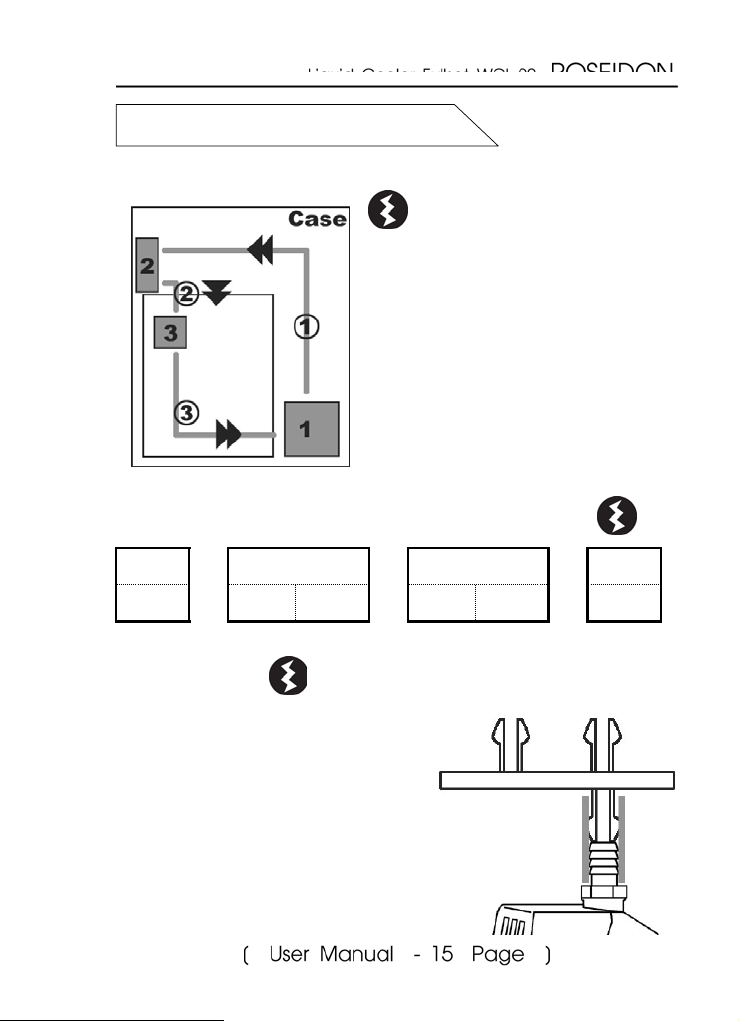
튜브의 길이를 맞추어 절단한다⑴
그림에서 의 길이만①②③ 큼의
개의 아쿠아튜브가 필요3하며
각 부분의 길이를 정확히 측정하여
측정된 길이만큼 미리 튜브를
절단합니다 약 정도. 5~10㎝ 여
유를 두고 절단하여 두는 것이 좋
습니다 제공된 튜브의 길이가.
충분하므로 어느정도 여유분을
확보해 두는 것이 중요합니다.
대형 케이스등에 장착시 튜브의
길이가 부족할 경우 본사에서 별
도로 구입이 가능합니다.
물 순환의 순서는 일반적인 경우 다음과 같습니다.
물통1.
⇨
출수구 입수구 출수구 입수구 출수구 입수구
①
물통셋 결합⑵
물통 뚜껑에서 그림과 같이①
위아래로 돌출부가 있는 부분이
출수부입니다 아래의 돌출.부와
워터펌프의 출수구가 연결됩
니다.
아쿠아튜브를 절단하여4②㎝
아랫부분에 끼운 후 워터펌프의
출수부와 그림과 같이 되도록
연결합니다.
라디에이터2.
⇨
②
자켓3.
⇨
물통1.
③

3R SYSTEM
③ 물통 뚜껑의 구멍 개중 작은2
구멍이 전선 출입구 결합부입니
다 이곳에 제공된 전선출구용.
부품을 결합합니다.
누수의 위험이 있으므로 강한 힘으
로 조여주어야 합니다.
그 후 워터펌프에서 나오는 전선
을 이곳을 통하여 뽑은 후 강하게
조여줍니다.
④ 물통 뚜껑부분과 베이스 부분을
결합합니다 베이스 부분 위에.
제공된 고무패킹을 얹고 그림과
같이 위치할 수 있도록 펌프를 배치
하며 펌프를 위치할 때 펌프와 뚜
껑간을 고정한 튜브가 빠지지 않도
록 주의합니다.
⑤ 뚜껑과 베이스를 볼트로 고정합니다.
볼트 고정시 그림과 같이 대각선 방향
으로 약간씩 힘을 주면서 결합을 하
며 패킹이 충분히 밀착된 상태가 되
면 조이는 것을 중단합니다 과도한.
힘을 가할 경우 뚜껑 혹은 베이스의
볼트 고정부위가 파손될 우려가 있
습니다.
⑥ 튜브 고정시에는 미리 튜브에 클램프를 끼워 넣어
결합한 뒤 클램프를 결합부위로 이동시켜 조여주시기
바랍니다 특별한 경우가 아니면 클램프 없이도 누수.
혹은 튜브 분리등의 문제는 일어나지 않습니다.
3R SYSTEM
라디에이터셋 결합⑵
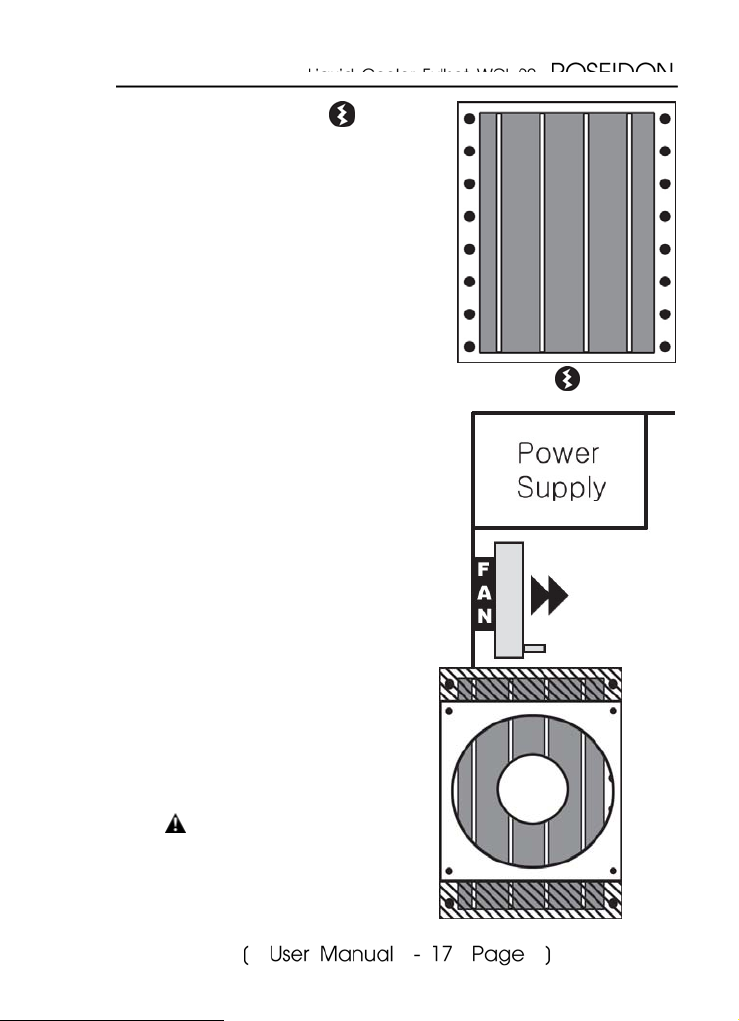
① 라디에이터의 뒷면을 보면
그림과 같이 미리 팬을 장착80
할수 있는 홀이 여러개가 있습
니다 이홀을이용해서다양한.
위치로 팬을 고정할 수 있는데
케이스 내부 사정에 따라 고정
할 위치에 맞춰 팬을 정확히
고정하여야 합니다 또한 고.정시
충분한 힘으로 조여 주어야
진동으로 인한 소음을 예방할 수 있습니다.
일반적인 경우라면 보통 후면②
에 미리 팬을 장착할 공간이80
그림과 같이 준비되어 있을 것
입니다 이곳에 고정을 하는 것.
을권장하며방향은별다른장
애물이 없다면 가로방향 즉 입/
출수구가 수직으로 설치하는 것
이방열에도움을줍니다 또한.
팬의 고정 위치도 파워서플라이
등에 걸리지 않는다면 라지
에이터 중앙에 위치할 것을
권장합니다.
팬의 방향은 케이스 외부의③
공기가 라디에이터를 거쳐
내부로 들어갈 수 있도록 맞
춰줍니다.
④
제공된 스폰지 패드를 그
림에서 사선으로 표시된 부
분에 맞춰 절단하여 막아주
실 것을 권해드립니다 냉각.

3R SYSTEM
효율을 높이는데 도움을 줍니다.
추가팬의 장착을 위하여 라지에이터 전면에도 팬 고정⑤
을 위한 홀이 준비되어 있습니다 기존에 사용하고 있는.
팬이 있다면 풍향에 주의해서 함께 설치할 것을 권장합
니다.
⑥
공간이 허락된다면 가능한 가로방향
으로 설치할 것을 권합니다 효율상 가.
로방향시 효율이 더 올라갑니다 가로.
방향 설치시에는 아랫부분이 입수구가
되며 윗부분이 출수구가 됩니다 세로.
방향 장착시는 전면 기준으로 좌측이 입
수구이고 우측이 출수구입니다.
라디에이터는
열 교환이 실
제로 이뤄지는
곳이므로 가능한 물이 오래 머
물러 있어야 효율이 올라갑니
다이로인해. 중력의 역방향으로 물을 밀어 올려주는
방식을 택한다면 보다 오랜 시간 물이 머물러 있을 수
있기 때문에 가로방향 설치를 권장하는 것입니다.
소켓타입 의 자켓 장착-1 CPU⑷
-Intel Pentium3 , Celeron / AMD™™ Athlon , Duron™™계열
그림과 같이 자켓이 장착될 수CPU①
있도록 클립을 이용하여 장착합니다.
장착시 일반적인 경우라면 메인보드②
가 세워져 있는 상태에서 아래쪽이 입
수구가 되며 위쪽이 배수구가 됩니다.
수평으로 장착되는 데스크탑 계
열이나 혹은 동일선상에 위치하
는 경우에는 입출수의 구분이 없
으므로 장착이 용이한 방향으로
결정하여 튜브를 장착해 주시기

3R SYSTEM
바랍니다.
자켓을 장착하기 전에 미리 튜브를 장착한 상태에서 결③
합하시기 바랍니다 자켓을 장착한 후 튜브를 끼울 시.
의 코어가 손상CPU 될가능성이있습니다.
인텔펜티엄 핀 의자켓장착-2 4 478 CPU⑷
그림과같이자켓을제공된어댑터에넣은후메인보드①
의 쿨러가이드에 넣습니다. CPU
구입시 제공된 쿨러에서 고정클립
을 제거하여 쿨러고정시와 같이
쿨러가이드에 끼운후 레버를 넘겨
고정합니다.
② 장착시 일반적인 경우라면 메인보드가 세워져 있는
상태에서 아래쪽이 입수구가 되며 위쪽이 배수구가 됩니다.
메인보드가 수평하게 위치되는 데스크탑 계열이나 혹은
동일선상에 위치하는 경우에는 입출수의 구분이 없으므
로 장착이 용이한 방향으로 결정하여 튜브를 장착해 주
시기 바랍니다.
물통셋위치고정⑸
고정이 편리한 곳에 물통셋을 위치합니다 케이스 바닥.면에
별다른 장애물이 없는 평평한 곳을 골라 가능한 양면테잎
등으로 고정할 것을 권합니다 케이스 이동시나 충격을.
받았을 경우 물통이 넘어가는 것을 예방합니다.
워터펌프 콘센트 조립⑹
① 워터펌프의 전원코드를 비어있는 슬롯 혹은
입출력포트중 빈곳을 이용하여 케이스 외부로 빼
냅니다.
전원코드의 피복을 절단하여 그림과 같이 만듭②
니다.
제공된 용 콘센트를 분해하여 양쪽에 각각220V③
한선씩을 넣고 조인후 재 조립합니다.
최종확인 및 완성⑺
다음장에 자세하게 점검사항 및 동작전 주의사항을 설명

3R SYSTEM
하겠습니다.

3R SYSTEM
동작 전 확인사항2-4.
순
서
⑴
입출수구의 배열이 정확히 되었는지
확인합니다.
각 튜브의 연결부위에 클램프가 정확히
⑵
고정이 되었는지 확인합니다.
각 튜브 연결부에 가볍게 힘을 주어
⑶
당겨서 이탈되는지 여부를 확인합니다.
물통 뚜껑부위에 패킹의 밀착상태를
⑷
확인하여 공간이 뜨는 부분이 없는지
확인합니다.
라지에이터 고정이 정확히 되었는지
⑸
확인합니다.
라지에이터 냉각용 팬의 풍향이 정확
⑹
한지 확인합니다.
자켓의 고정상태가 확실한지 확인합니다.
어느정도 힘을 가했을 때 움직이지
⑺
않는 정도면 충분한 장력으로 고정된
것입니다.
확인내용 체크
에서 언급된 순서대로 튜브 및2-3-⑴
물통 내부에서 워터펌프와 연결부가
⑻
이탈되지 않았는지 확인합니다.
전원 코드 부분의 조립이 정확한지
⑼
확인합니다.

3R SYSTEM
최종확인 및 동작2-5.
모든 점검사항이 완료되었으면 컴퓨터로 들어가는 모든⑴
전원을 차단합니다.
각종 카드류 들도 제거합니다.⑵
물통의 주입구를 이용하여 물을 넣습니다.⑶
펌프가 완전히 잠길 정도까지 물을 넣은 후 펌프에 전원⑷
을 초간 넣어 일차적으로 물을 순환시킵니다1~2 .
각 연결부위에 누수되는 부분이 없는지 확인합니다.⑸
누수되는 부위가 있다면 그 부분을 정확히 재 결합합니다.⑹
누수되는 부위가 없다면 일차 순환으로 줄어든 만큼 물을⑺
재 보충합니다.
다시 펌프의 전원을 공급하여 순환이 원활한지 확인한 후⑻
펌프가 완전히 잠길 정도로 물을 추가해 줍니다.
이상이 없는지 확인되면 펌프의 전원을 제거한 후 컴퓨터⑼
를 재조립 합니다.
재조립한후펌프에전원을넣어순환시키며자켓및라⑽
지에이터를 가볍게 수차례 두들겨 남아있는 여분의 공기를
제거합니다.
이제 정상적으로 사용하시면 됩니다.⑾
사용중 수위가 펌프 높이 이하로 내려갈 경우 펌프가 과⑿
열될 우려가 있으니 주의하시기 바랍니다.

3R SYSTEM
사용중 주의사항3.◆
사용중 발생할지 모르는 누수를 예방하기 위해서 컴퓨터를
이동하였다거나 혹은 충격을 받았을 경우 작동을 중지하고
모든 부분을 다시 한번 확인합니다.
컴퓨터에 가해지는 충격으로 워터탱크가 넘어질 가능성
을 예방하기 위해서 제공되는 양면테잎을 이용해서 물통을
장착면에 고정시켜 주시기 바랍니다.
아쿠아튜브 및 워터펌프 전원선이 케이스의 날카로운 부
분 혹은 컴퓨터 내부의 부품에 의하여 손상받을 수 있는 부
분은 제공된 투명스티커를 부착하여 조치해 주시기 바랍니다.
컴퓨터의전원을켠후펌프의전원공급을하지않았을
경우 가 과열로 손상될 가능성이 있습니다 이를 예방CPU .
하기 위해 대부분의 메인보드의 바이오스 셋업에서 제공하는
특정온도 이상 올라가면 자동으로 전원을 차단하는 기능을
활성화 시켜 주시기 바랍니다 제공된 경고 스티커를 활용하.
여 주의를 환기시켜 주시기 바랍니다.
제품의 성능 향상등을 목적으로 제공된 부품 이외의,
제품을 결합하여 사용할 경우 부식등의 문제가 발생할수있
으며 이로 인한 문제는 본사는 책임지지 못합니다.
구입일로부터 년 내에 정상적인 사용환경에서 발생한1
문제에 대해서는 무상수리 및 교환을 해 드립니다 그러나.
파생된다른컴퓨터부품에발생한문제에 대해서는 본사는
보상해 드리지 않습니다.
설치 및 동작에 관한 의문사항은 신속한 기술지원을
약속드립니다.
Case Manufacture
3R SYSTEM
고객지원 :

3R SYSTEM
부록4.◆
온도센서 장착시 유의점4-1.
일반적으로 시중에서 판매되는 온도계의 박막센서를
장착시 의 코어 측면으로 위치시켜 주시기 바랍니다CPU .
코어 바로 위에 장착시 코어파손 온도센서 손상 코어CPU , ,
와자켓의밀착이충분치않아과열등의현상이나타날수
있습니다.
제품의 성능 향상을 위한 팁4-2.
일반적으로 발열량이 만족할 만한 성능이 나오지 않는
경우 내부에 장착된 라디에이터를 외부로 장착하는PC PC
방법이 있습니다 아쿠아 튜브만 보다 길게 절단하여 여분의.
슬롯 혹은 입출력 포트등의 빈곳을 이용하여 워터펌프 전원
코드와 함께 뽑아내어 케이스팬 장착부위에 외부로 장착을
하게 되면 추가적인 온도 하락이 가능합니다.
와 자켓의 밀착이 충분치 않을 경우 동전등 약간의CPU
두께를 가진 금속을 클립과 자켓의 고정부 사이에 끼우면 추
가적인 온도 하락이 가능합니다.

3R SYSTEM
별도 판매 옵션 부품5.◆
홈페이지 에서 확인가능합니다- (http://www.3rsystem.co.kr)
워터펌프 자동전원용 릴레이 스위치⑴
의 전원을 켰을 때 자동으로 펌프가 동작할 수PC
있도록 자동으로 제어해 주는 장치입니다.
워터탱크용 튜닝 베이스⑵
고휘도 장착및물통부분홀더로안정된장착LED
감과 고휘도 장착으로 본체 튜닝시에 진가LED PC
를 발휘합니다.
고휘도 튜닝 펜티엄 어댑터4⑶
펜티엄 어댑터에 고휘도 를 장착하여 현란한4LED
모습을 나타낼 수 있습니다.
라디에이터 팬 컨트롤러⑷
필요에따라팬의풍량을 단으로조절할수있는3
장치입니다 일반적인 사용시와 과부하 사용시 등에.
편리하게 적용이 가능합니다.
장착용 온도계PC⑸
의 온도 및 시스템 온도 순환되는 물의 온도등CPU ,
을 측정하고 싶을 경우 장착하여 실시간 모니터링이
가능합니다.
현재 준비중인 제품이 있으며 바로 홈페이지에서 확인 가능합니다.

3R SYSTEM
Before You Read
Warning
Reference
Precautions
Copyright 2002 3R Systemⓒ
Specification and configuration of▶
products may be changed.
This manual may be amended.▶
Read all of the manual before requesting▶
help.
It is prohibited to copy the contents of▶
this manual.
Begin the installation after you are familiar▶
with the instructions.

3R SYSTEM
Contents◆
Before You Read …………………………… 24
Contents …………………………………… 25
1. Before Installation
1-1. Features …………………… 26
1-2. Components …………………… 27
1-3. Product details …………………… 28
2. Installation Guide
2-1. Preparatory instruments ……… 33
2-2. Installation Summary ………… 34
2-3. Installation Details ………… 35
2-4. Check before Operation ……… 41
2-5. Final Operation ………………… 42
3. Precautions ……………………………… 43
4. Appendix ………………………………… 44
5. Option Parts ……………………………… 45

3R SYSTEM
1. Before Installation◆
1-1.FEATURES
1.Thedifferencebetweenaliquidcoolerand
traditional air coolers is even more substantial
during overheated CPU conditions. A liquid
cooler is able to scale more efficiency to
disperse heat production.
2. A liquid cooler can contribute toward a
noiseless system by reducing fan noise.
3. It is able to be to install in most systems such
as Intel
AMD
4. Due to the small size of design, every part can
be installed inside the system.
5. High performance despite its small size.
6. An elegant look of the Liquid cooler, and well
organized in modified Systems.
7. The system is easy to set up for beginners as
well, due to the focus on simple assembly.
8. The problems that concern users, such as the
leaks and decay of water tubing are basically
intercepted. Therefore it wont need additional
repair work.
9. Provided various optional functions to improve
efficiency and tuning.
Athlon .™
Pentium III , Pentium 4 , and the™™

3R SYSTEM
1-2.Components
Radiator⑴
Radiator Fan⑵
Aqua Tube (2m)⑶
CPU Jacket⑷
P4 socket Adapter⑸
220V Plug for Pump power supply⑹
Clamptofixhose⑺
Clip to attach CPU Jacket⑻
BoltstoattachCoolerandWaterTank⑼
The Water Tank Base⑽
The Water Tank Cover⑾
The Water Entry Cap⑿
Cable Gate⒀
The Water Pump⒁

3R SYSTEM
1 - 3. The Parts Details
Radiator⑴
It is the most important
part of the Water Cooler
system. This is the part
that exchanges the heat
of the CPU into the air.
The thin board of Radiator
is made up of pipes with
lots of holes. Overheated air emits into the Fins Brazed
in the Pipes and A Fan assists the exhaust to radiate.
(*Brazing: A kind of welding, which protects thermal
Resistance and it is essential method for the heat and
a heat exchanger as well). There are tubes for the entry
and exit of water, and front or rear fan could be
installed variably. It is possible to install in any case.
Radiator Fan (80 )⑵㎜
This intermediate speed
fan with 4 pins is to
exchange the heat. It appro
-priates for general use
since it can furnish high
performance and minimal
noise. It is possible to
replace intermediate fan
by higher or lower speed
fan depends on aim..

3R SYSTEM
Aqua Tube (2m)⑶
In consideration of easy
installation, Light blue Aqua
tube has enough flexibility,
and ample thickness to
protect from leak.
CPU Jacket⑷
The CPU Jacket plays an
important role to transmit
heat from CPU to flowing
water. It is one of
principal parts consisted
of pressed fins with holes
inside Jacket. The pressed
fins help the water flow
fast and facilitate an
exchange heat. By treating
the CPU jacket with
coated chrome, it looks refined exterior and promoted
durability as well. The advantage of using Special
material for CPU jacket
contained copper displays
High performance of heat
conduction.
Intel, P4 478 socket⑸
Adapter
There is a limited space
to place water coolers in.
It is possible to install the
water cooler into Pentium4
systems by using a 478
Pin socket adapter. This
is a device to fix product
simply by using MB's guide and clips which are
provided when a CPU is purchased.

3R SYSTEM
220V Pump Power Supply Plug⑹
The plug is connected separately to
install easily as a last step.
Clamps to fix tubes⑺
There is no risk of leaking without
Clamps, due to strong coupling.
Using Clamps is an additional step
to feel secure as to leaking
problem.
Clips to attach CPU Jacket⑻
Used in settling CPU
Jacket in AMD Athlon
(Socket A), and Intel
Pentium III (Socket
370). By operating clips
just twice by one touch and adding enough tension, it
is possible for both combination and separation.
Volts⑼
4x3 volt for Water Tank / 8x4∅∅
volts to fix cooler to Radiator and to
install in a case. ( more pcs will be
supplied for spare.)

3R SYSTEM
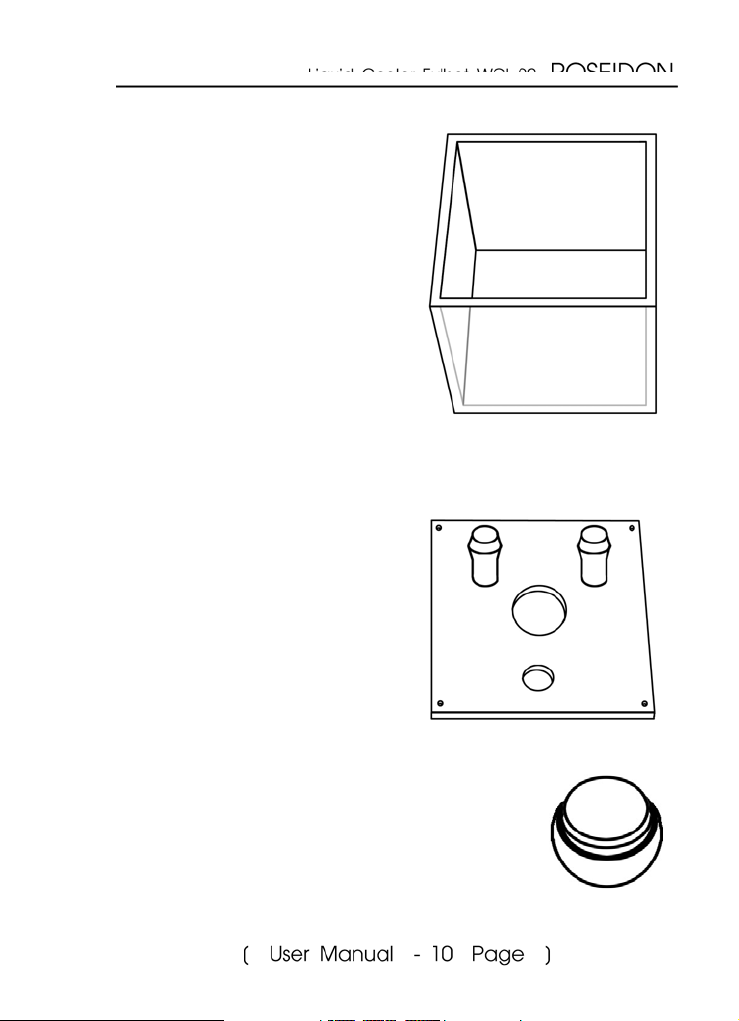
The Water Tank Base⑽
Storage and Exchange of
Water. By keeping water
circulation in tank, it is
possible to prevent a sudden
rising temperature. It's
obvious that the water tank
made of Polycarbonated
which is high transparency
and intensity, has a strong
advantage of tuning. Don't
worryaboutanyleaks.
The Water Tank Cover⑾
There are an entry and an
exit of water, a place to fix
pump, gate for cable, and a
hole to inject water in a
Cover. Without any special
parts to fix tube, adopting
the way to settle with screws
is easy combination and interception of leak. The
Rubber packing can adhere to Water Tank Base and
achieve safe waterproof.
The Water Entry Cap⑿
An entry cap is provided to fill up the
water easily.

3R SYSTEM
Cable Gate⒀
SinceacableconnectedtoPumpin
water tank, the Cable should be come out
of tank through this gate with Easy
assembling and completed Waterproof.
The Water Pump⒁
The water pump circulates
water through the whole water
coolingsystem. Duetoit's
installation in the water tank, it
is noiseless.
Warning Sticker, etc.⒂
It is recommendable to attach the warning
sticker on your computers.
Double-sidetapetoaffixtheWaterTank
Aqua tube/Protection tape for Water Pump
power cables
Adhesive pad to protect outflow of Air from
Radiator

3R SYSTEM
2. Installation Instructions◆
2-1.Arrangement
Hose cutter or Scissors to cut down Aqua tube⑴
Take a look at the picture on the
right. It is possible to cut the
hose with hose cutter or general
purpose scissors purchased
everywhere.
Screwdriver to fix bolt⑵
A Thin screwdriver is need for the
supplied bolts.
Nipper to remove wire⑶
Nipper or Knife requires to get rid of
wire in assembling Pump Plug.
Water Circulation⑷
Keeps Water to Circulate through the pipes. Faucet water
can be used: however, the use of distilled water is highly
recommended to ensure its optimum operation.
* Distilled water can be found every drugstore.
Tissue Paper⑸
During test of circulation and pouring water in the first
stage, there might be leak water. It's better to keep
tissue paper handy.
3R SYSTEM
2 - 2. Installation Abstract
⑴ Cutting Aqua tube
⇩
⑵ Water tank Combination set
⇩
⑶ Radiator Combination set and installation
⇩
⑷ Setting up CPU Jacket
⇩
⑸ Fixing up Water tank
⇩
⑹AssemblingPumpPlug
⇩
⑺Finaltest
⇩
⑻Operation

3R SYSTEM
2-3.SettinginOrder
Cutting the Tube⑴
3piecesofAquatube
requireaslongasthe
length of in a picture.①②③
Each part should be measured
exactly and cut the tubes
accordingtothemeasurementin
advance. It is better to provide
5-10cm for spare length to
install in a bigger case in the
future. In case of shortage of
tube, just contact us to
purchase it.
The general order of water circulation is as follows.
1.Water
Tank
Exit Entry Exit Entry Exit Entry
Tank Set
placed on upper and lower
part of the cover as seen a
picture Lower protrusion would
beconnectedtoaWaterPump
Exit
⇨
2.Radiator
①
Combination of Water⑵
The Water tank Exit is①
⇨
3. CPU Jacket
②
⇨
③
1.Water
Tank

3R SYSTEM
Cut Aqua tube down by 4cm②
and then insert it in lower
protrusion. As seen a picture, it
should be connected to a Water
Pump exit.
Small one of two holes on③
Water Cover is a Cable Gate.
Warning! Fasten it carefully since
theremightcauseleak. PulloutTheWaterPump
Cable and let it fastened tight.
The Water tank Cover and Base④
should be combined. Put the Rubber
Packing on the Water tank Base and
set Pump as seen a picture. Pay
attention to Tube settled between
the Pump and the Cover, not to
take off.
Fix the Cover and the Base with⑤
volts. Stop fixing in adhered.
Otherwise it might break the parts
due to excessive force.
When fixing Tube, it's better to⑥
put Clamps on Tube in advance. Just
move clamps toward the place back
and forth to fasten. It is obvious that
the solution of leak and separation of
theTubecanbesolvedwithoutClampsexceptunusual
case.

3R SYSTEM
Setting Radiator⑶
There are several holes in①
the back of the Radiator to
install an 80mm fan. Users can
place the fan wherever they want
by using particular holes. When
you choose the holes used to
affix the fan, think about the
spaceinsidethecasesoasnot
to cause obstacles. It should be fastened tight in order
to reduce vibration noise.
In general, there is room for②
an 80mm cooling fan at the rear,
as seen in the picture. A
Radiator can be installed in this
space. Setting it horizontally in
the vertical position of an entry
and an exit helps diffuse the
heat emitted from the computer
effectively. It is recommended
that users affix the fan in the center of the Radiator, as
long as it doesn't disturb a power supply.
The direction of Fan should be settled to let air③
keep in through Radiator.

3R SYSTEM
Provided holes in front Radiator as well to fix the④
fan in case of additional installation. If you have an
extra of course it's able to add it with respect of the
direction of the air circulation.
⑤
-tally so as to increase the utility as
long as the space is big enough. In
case of horizontality, the lower part is
an entrance and the upper part is an
exit. In case of verticality, the right side
is an exit and the left is an entrance.
Since the Radiator is the place to
gravity, the water keeps in long time.
⑥ Cut the sponge pad according
It is recommended to set horizon
interchange the heat, the water
should be remained in Radiator as
long as possible for high
performance. By choosing the way
of pushing the water against
to an oblique line in a picture and
wrap the space to protect outflow
of air. It is helpful for effective
cooling system.

3R SYSTEM
-1 Socket type CPU jacket installation⑷
-Intel Pentium3 , Celeron / AMD™™ Athlon ,™
Duron Families™
It is installed by using the clips①
accordingtothepicture.
Usually when setting up the MB,②
the upper side of the jacket is an
entry and the lower is an exit. In case of a Desktop MB
that is oriented horizontally, it can be installed either
way, regardless of an entry and exit.
A Tube should be inserted to the Jacket in③
advance, then combine Jacket with the CPU. When the
tube is inserted after fixed Jacket to the CPU, there can
be damage of CPU Core.
-2 Intel P4 , 478 Pin CPU jacket⑷
Firstly put the Jacket into①
Adapter and then put it in Cooler
guard on MB. Remove Clip fixed
in the Cooler which was supplied
by purchasing CPU, and insert it cooler guard and fix it
by pulling lever out.
Usually when setting up the MB, the upper side of②
thejacketisanentryandthelowerisanexit.Incase
of a Desktop MB that is oriented horizontally, it can be
installed either way, regardless of an entrance and exit.

3R SYSTEM
Fixing Water Cooler Set⑸
Put the Water Tank set in the easy place to fix. It is
recommended to affix in plane floor by using
double-side tape. It prevents water tank from falling
over in moving and getting a impact.
WaterPumpPlugassembling⑹
The power cable for water pump should be①
taken out of Case through blank slot or any
other space.
Make the cable as seen a picture by cutting②
down the coated wire.
Disjoin 220v Plug and connect it again after③
insertion for each wire to the holes.
Final test and completion⑺
It refers to next chapter in detail

3R SYSTEM
2 - 4. Check List before operation
No Content Chk
Check the orders of an entry , exit and
⑴
tube as mentioned 2-3-(1)
ChecktheClampsfixedtoeach
⑵
connected part
Check if there is possibility to separate by
⑶
pullingtheconnectedplace
Check adhesion if there is space between
⑷
water Cover and rubber packing
⑸ Check the Radiator fixed.
Check the wind shifts of fan
⑹
.
Check if the Jacket fixed with sufficient
⑺
tension
Check if there is possibility of separation
between water pump and connected
⑻
place.
Check the condition of cable plug
⑼
assembling

3R SYSTEM
2-5.FinalConfirmation
When test all done, the power in Computer⑴
has to be shut down.
Remove Cards⑵
Pour water into an Entrance⑶
Pour water until the pump is soaked.⑷
Ensure there are no leaks⑸
If there is any leak, recombine⑹
If not any leak, make compensation for⑺
water used for circulation
Check Circulation of water by Plugging in⑻
pump and pour water till the pump soak
When finished, let computer fixed again after⑼
power off.
After refixed and make pump operated . By⑽
tapping Jacket and Radiator, remaining air
can be removed.
Operate⑾
Keep the pump soaked in water to avoid⑿
overheating

3R SYSTEM
3. Precautions◆
After transportation the system, do not operate until
the system is checked to prevent leaks. (Affix the water
tank with double-side tape to prevent it from falling over
due to an excessive impact.)
Aqua tube and The Water Pump power cable may be
damage due to the edge of case and other peripherals
in computer. It is recommendable to wrap the part by
tape.
While a computer works with the pump shut off, it
might cause damage to overheat CPU. Therefore, it is
recommended to use Bios setup on MB which will shut
off the power supply automatically when it reaches a
critical temperature. (Pay attention to Warning sticker)
We can't guarantee the rust protection of any other
parts used which we don't furnish.
One year Warranty
We can't guarantee the damage to other computer
peripherals.
We support swift technical assistance for more
information.
Case Manufacture
3R SYSTEM

3R SYSTEM
4. APPENDIX◆
4 - 1. Install thermometer sensor
When installed the membrane of thermometer,
it should be placed lateral CPU core.
In case it sets on CPU core, damage of CPU core
, thermometer senor, and overheating maybe occured.
4 - 2. Tip for high performance
In case that you are not satisfied with
efficiency of water cooler systems, it is possible to
install Radiator outside PC to drop in temperature.
If adhesion between CPU and CPU Jacket
insufficient, it's enable to drop in temperature by
inserting a coin or metal between Clip and CPU
Jacket.

3R SYSTEM
◆5.OptionParts(Sold separately)
Please visit our website for more information.
(http://www.3rsystem.co.kr)
-
(1) Automatic Relay Switch for Water pump
A device to operate the pump automatically.
(2) Tuning base for Water Tank
It is a device to support Water Tank with stability and
high intensity beam by installing Ultra-LED.
(3) Ultar-LED Tuning P4 Adapter
P4 Adapter with ultra-bright LED displays high
luminosity.
(4) Fan controller for Radiator
Thefanspeediscontrolledby3stepsasoccasion
demands.
(5) Thermometer for PC
It is possible to check the temperature of CPU, inside
Systems, and Cycling water whenever you want.

3R SYSTEM
Copyright 2002 3R Systemⓒ
、。
、。
、。
、
。
。
、
。
。

3R SYSTEM
◆

3R SYSTEM
、 。
。
、
、
。
。
、
。
、 、
。
。
、
。
。

3R SYSTEM
ラジエ タ⑴ ーー
CPUジャケット⑷
Pentium 4 478 裝着用ソケット⑸™
ホスバンド⑺ ー
CPU 固定ジャケット クリップ⑻
/(4/8)水槽 固定 個ファン ボルト⑼
水槽⑽
水槽ふた⑾
注水口ふた⑿
電線⒀
ウォ タ ポンプ⒁ ーー
用ラジエ タ ファン⑵ ーー
(2 )ホスメトル⑶ ーー
(220V)電源ポンプ プラグ⑹

3R SYSTEM
、
。
。
、
。、
、
、
、
。
、
。
、
。
。

3R SYSTEM
、
。
。
。
、
。
。
、
ソケット
。
、
、。
、
、
。、
。

3R SYSTEM
。
、
、。 。
、
。
。
、、 、
。、
、
、
。
。
、
。
、
、
。

3R SYSTEM
。
、。
。
、、
。
。

3R SYSTEM
2. 裝着ガイド◆
、
、
。。
、
。
。
。
。
、
。。
、
。

3R SYSTEM

3R SYSTEM
。
。
、
。
、
。
、
。
、。
、
。
。
。
。
。
、。

3R SYSTEM
、
、
。
。
、
。
、
。
。
。
。
。
、
、 、
。、 。
。
。
。

3R SYSTEM
、
。
。
。
、。
。
。
。
。
。
。
、
、
。
。
。
。
。

3R SYSTEM
、
。
。
、
。
、
。
Intel Pentium
。
、
、 。
、。
。
。
。
。 、
。
。
。
。

3R SYSTEM
、
。
、。
。
。
。
。
。
。
。
。

3R SYSTEM
。
。
。
。
、。
。
。
。
、。
。
、
、。
。

3R SYSTEM
、
、、、
。
、
。
。
。
、
。
。
。
、
。
。
、
。
。
。
Case Manufacture
3R SYSTEM

3R SYSTEM
、
。
、 CPU 。
。
。
、。
、

3R SYSTEM
。 、。
。、
。
。
。
。
。
、
、
。 。
 Loading...