


POSEIDON WCL-03
Installation Guide
Table of contents
Precautions and Instruction symbols 1
Pre-installation Note 3
I. Special features and Advantages 4
II. Product Components 5
III. Product Details 7
IV. Product Installation Procedure 10
V. Coolant Refill 21
Copyright 3R SYSTEM. CO., LTD. 2004
1

Meaning of instruction symbols
Requirement: Must read before use
Reference or recommendation
Warning: Must avoid
Precaution :
When you need to refill the fluid, you must use distilled
water which can be purchased from a pharmacy or a CVS,
otherwise warranty will be void.
Please avoid any physical contact, especially eye area and
bare skin. The fluid inside this product may cause irritation
if it contacts your body. Incase of contact, immediately
flush eyes or skin with plenty of water. If irritation
persists, call a physician.
2
Pre-installation Note
Product description and specification may change without
prior notice due to performance improvement and user
community requests.
The content of this installation guide may be modified as
needed.
Please read this guide book before requesting technical
support.
It is prohibited to duplicate or copy any part of this guide
without permission from 3R System.
Please read and understand all instructions prior to
installation.
Your product warranty will be void when any problems
incurred for not following instructions in this guide.
Your product warranty will be void when combine(use)
with any non-original part which may cause internal
corrosion or product failure.
When you need to refill the fluid, you must use distilled
water which can be purchased from a pharmacy or a CVS,
otherwise warranty will be void.
During the warranty period, 3R System will repair or
replace defective parts at no charge. This warranty is valid
for products used in normal condition only. However, 3R
System will not be liable for any consequential damages of
any other computer components.
Warranty period: 1 year.
3

I. Special features and Advantages
1. In comparison to air-cooling devices, water-cooling devices
provide good system stability by preventing abrupt system
temperature change and improving cooling performance.
2. WCL-03 is compatible with wide range of CPUs including
Intel Pentium III, IV/ AMD Athlon, and Duron.
3. It does not require any external devices, with WCL-03’s
compact design, whole system can be installed internally.
4. Simple and easy installation, even beginners have no
problem.
5. All supplemental parts are made of the same material. It
was to prevent all corrosion possibilities.
6. WCL-03 eliminated any possibility of leakage with special
design attention on integrated CPU jacket and water pump
7. Cooling performance has improved with redesigned CPU
intercooler. Even with compact design of WCL-03.
4

II. Product Components
1. Components’ T itle
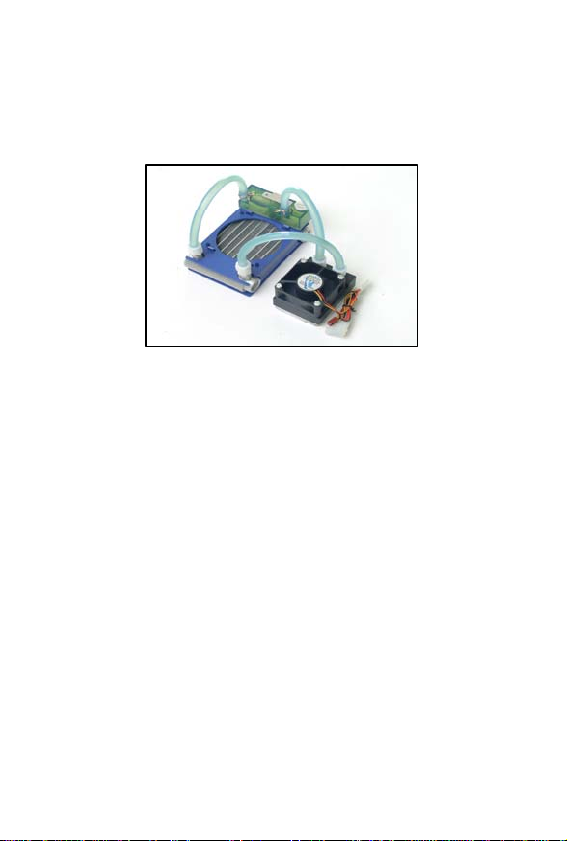
1) CPU Jacket, Radiator and Water Tank Assembly
2) Fan Bracket
3) Silent 80mm Fan
4) AMD/ Intel CPU Clip
5) Sticker
6) Fan Screws
7) Thermal Grease
8) Radiator Pad
9) Installation Guide
5
Optional Parts
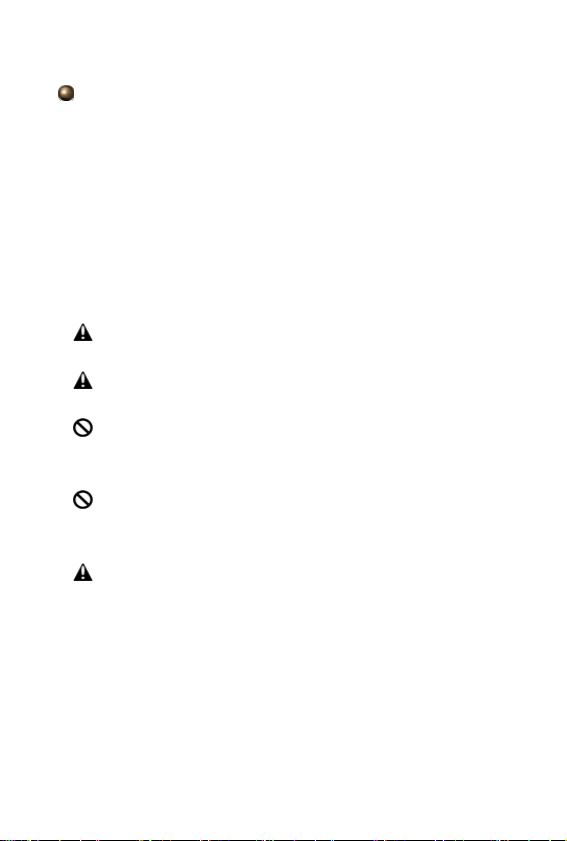
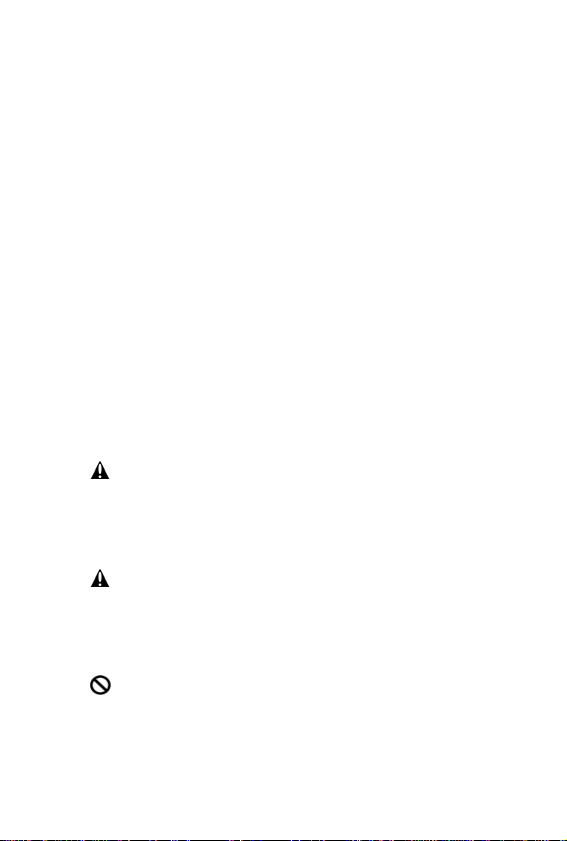
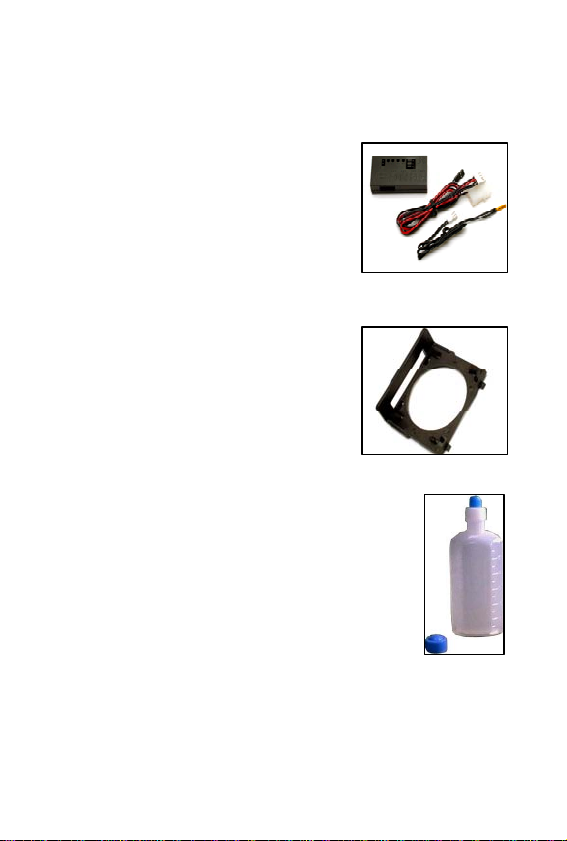
1) System protection unit
:WCL-03/SPM
In case of system overheating or
failure, this optional device can
provide warning and/or automatic
system shutdown. In addition to
this optional device, you may
activate standard overheat protection feature available
from various motherboard manufacturers.
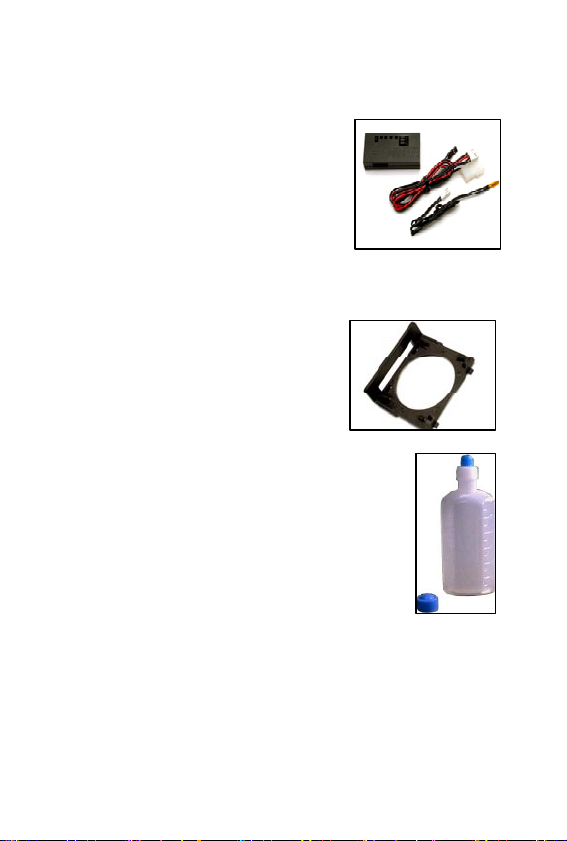
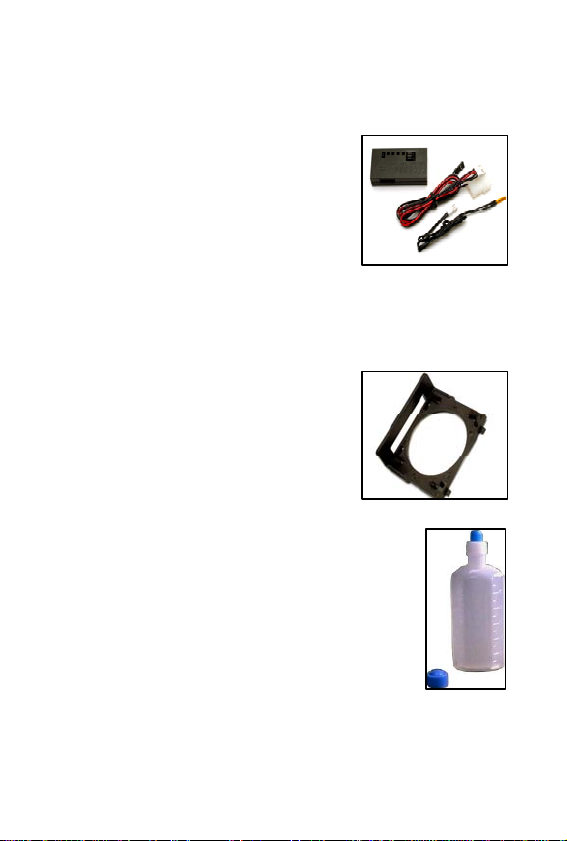
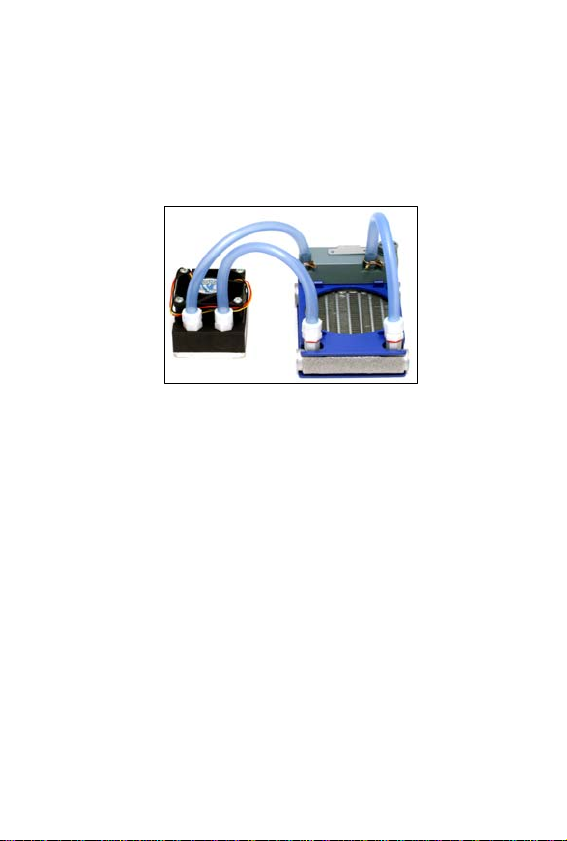
2) Fan bracket for none standard
type chassis. :WCL-03/BRK
If you are using none standard
type chassis like Chieftec’s, you
need to use this bracket to install
the fan and radiator.
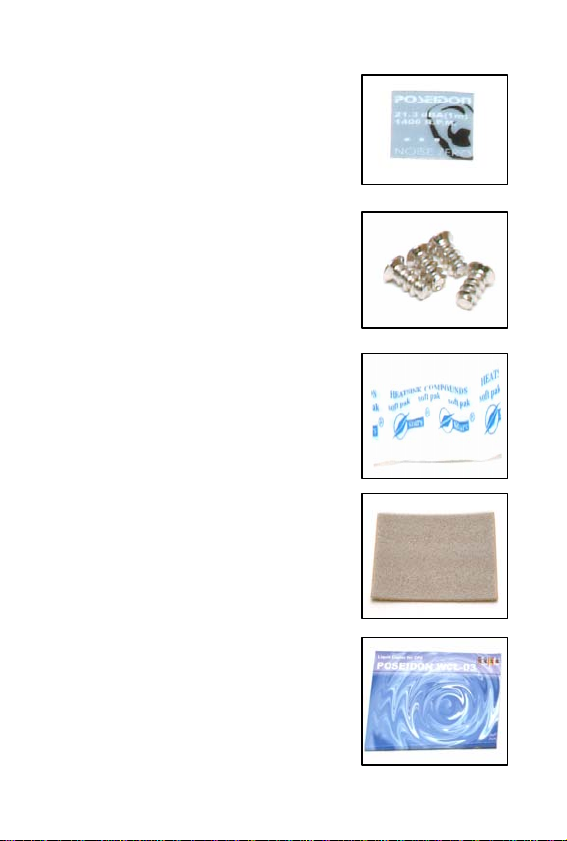
3) Coolant (150 ml) : WCL-03/CW
This coolant is the same as the one inside
liquid of the cooler.
4) Athlon64 CPU CLIP : WCL-03/A64
This clip is CPU Clip for Athlon64
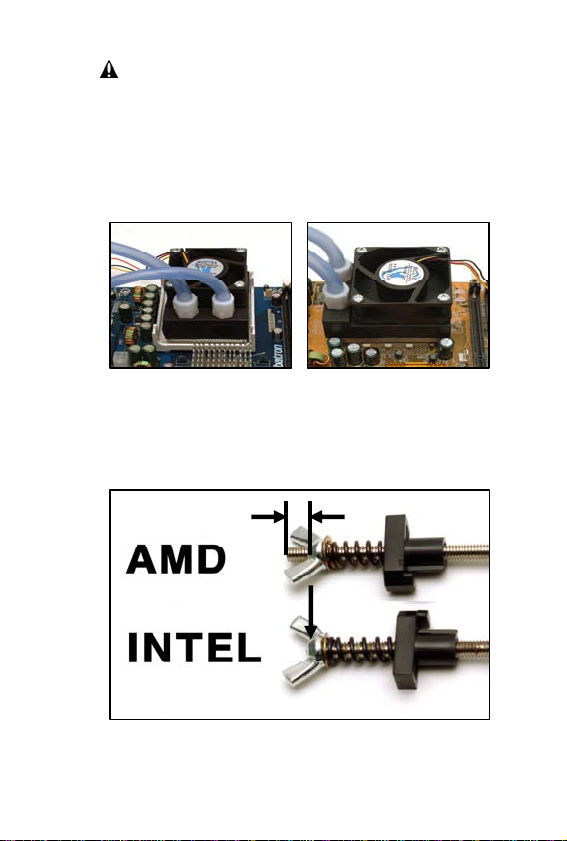
5) JACKET For Graphic Card : WCL-03/VGA
This WATER JACKET is for VGA CARD.
6

III. Product Details
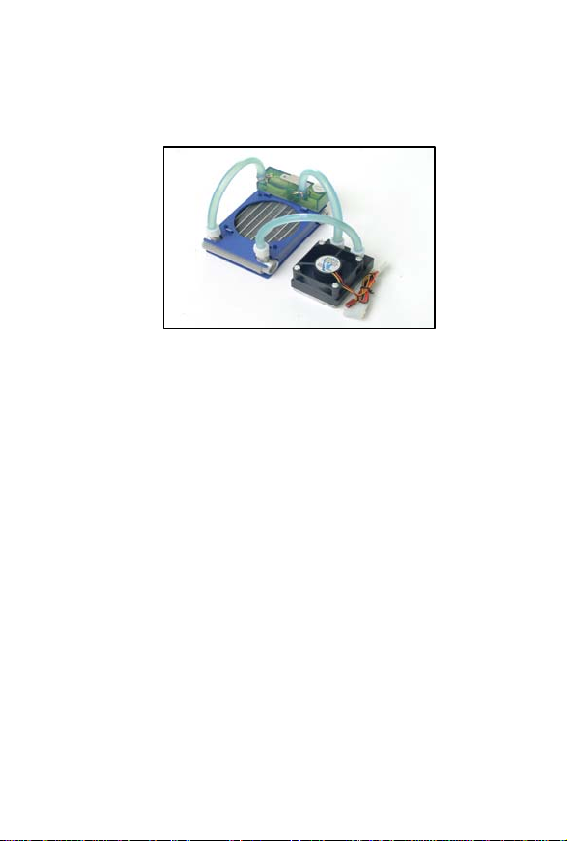
1. CPU Jacket, Radiator and Water Tank Assembly
1) CPU Jacket and Water Pump Assembly
① CPU Jacket: 0.5 mm (0.012 inches) fins on the internal
surface of CPU jacket creates the most surface area for
most efficient cooling performance.
② Water pump: integrated with CPU jacket and
eliminated any possibility of leakage.
2) Radiator and Water Tank Assembly
① Radiator: maximized internal surface area creates best
thermal efficiency.
② Water Tank: makes it free from natural evaporation
problem for 1 to 2 years. The coolant can be refilled
through the water tank.
7

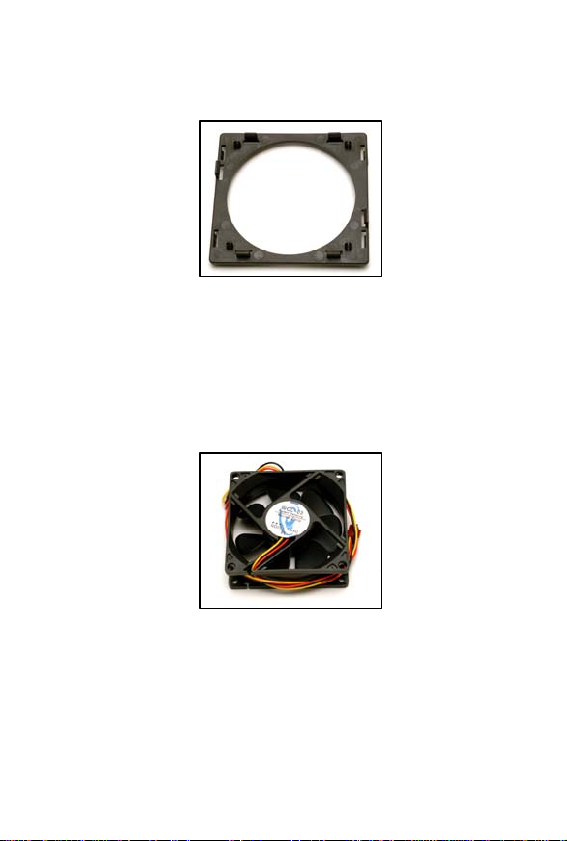
2. Fan Bracket
Install radiator onto any existing case
fans easily using this fan bracket.
(19 page)
3. 80mm Silent Cooling Fan
Average Speed : 2000RPM,
Noise Level : About 20 dBA.
It may be replaced with high speed fan
or low speed fan for your specific use.
4. AMD/ Intel CPU Clip
INTEL AMD
It can have variable tension control. Selecting appropriate
tension for your system will prevent any damage to CPU core.
5. Sticker
It shows your system is protected by
reliable water cooling unit.
8

6. Fan Screws
Used when you do not wish to use the
included fan bracket and fasten directly
to radiator housing.
7. Thermal Grease
Apply and rub gently on your CPU
core, this will allow most efficient
thermal conductivity between CPU
jacket and CPU core.
8. Radiator Pad
It is for preventing any reverse airflow.
When you install fan onto radiator
housing, you can use this pad between
the fan and radiator housing to prevent
any reverse airflow.
9. Installation guide book
This book guides you how to install.
Maintenance instructions are given to
you.
9
IV. Product Installation Procedure
1. CPU Jacket Installation
1)
Proper CPU Jacket Placement
① Vertical Installation:
Install as shown on the right.
② Horizontal Installation:
Install as shown on the right.
2)
Thermal grease application:
Prior to installing CPU jacket, apply thinly over the CPU
core and spread gently over the core.
10

3) Circuit board installation (Optional)
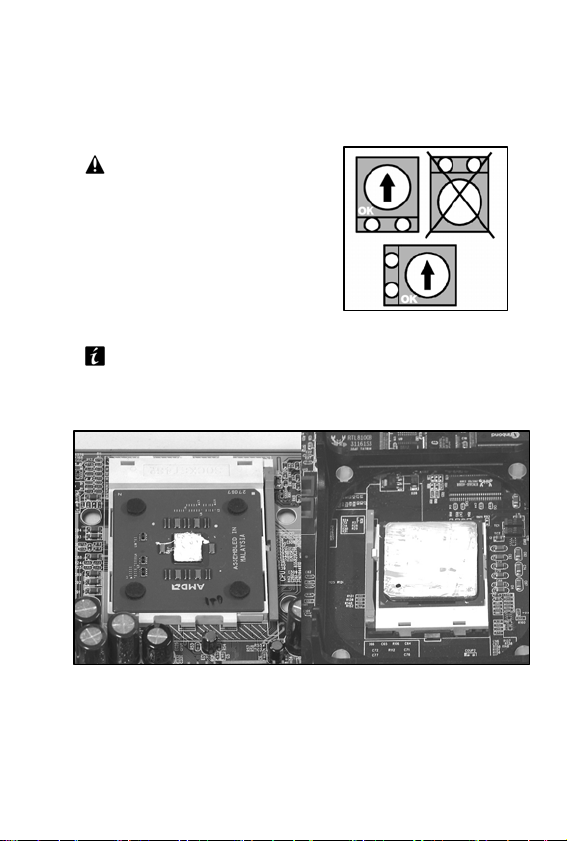
① Temperature sensor installation
1
a
As above pictures, you should place the sensor
adjacent to the core. DO NOT place the sensor on the
core.
b You may use any double-sided tape to attach the
sensor in place.
c For more accurate measurement, you may apply
thermal grease over the sensor as well.
d
Be careful not to damage the sensor during
installation as the sensor may slide onto the core.
11
2
4)
Clip installation
① AMD Athlon ,Duron/Intel Pentium 3/ Pentium4
a Place the CPU jacket on the CPU.
INTEL AMD
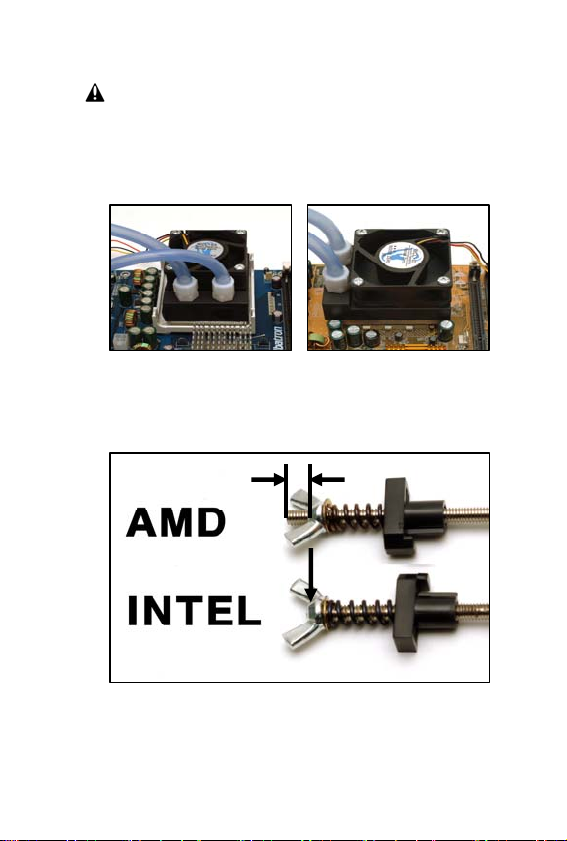
b Adjust the nut as shown in the picture below.
12
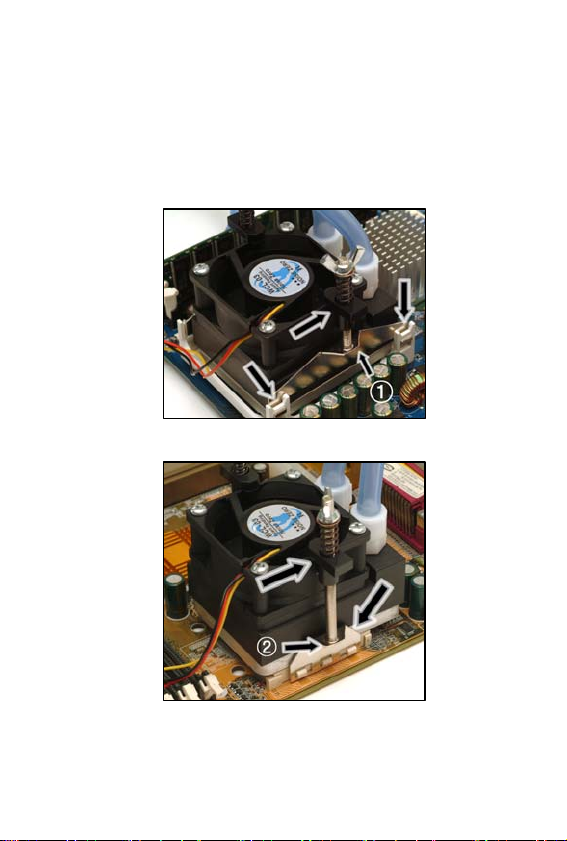
c Slide the clips into the CPU socket or retention
mechanism.
Align the CPU jacket and clip assembly with the
retention mechanism or CPU socket and place the clip
head on the top edge of the water pump.
Intel
AMD
13

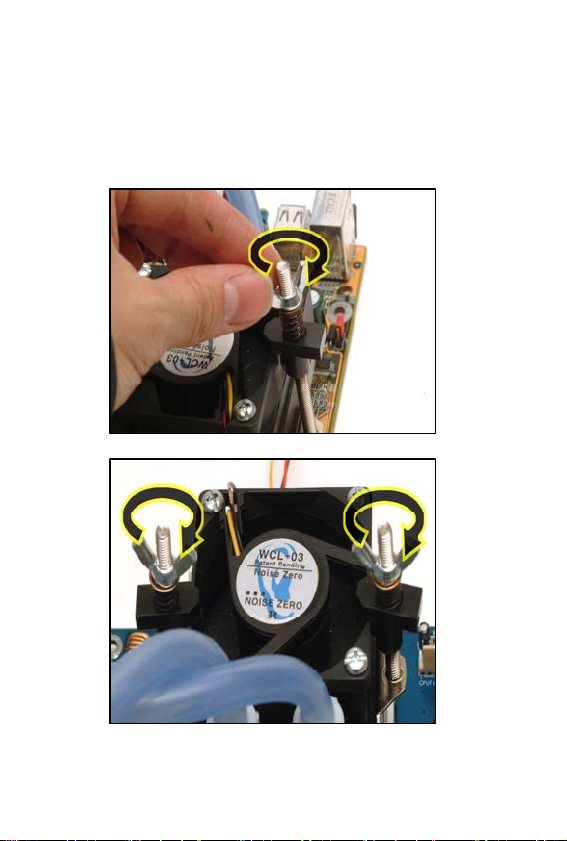
d Secure the CPU jacket with the nut until CPU jacket
is stable in place.
14
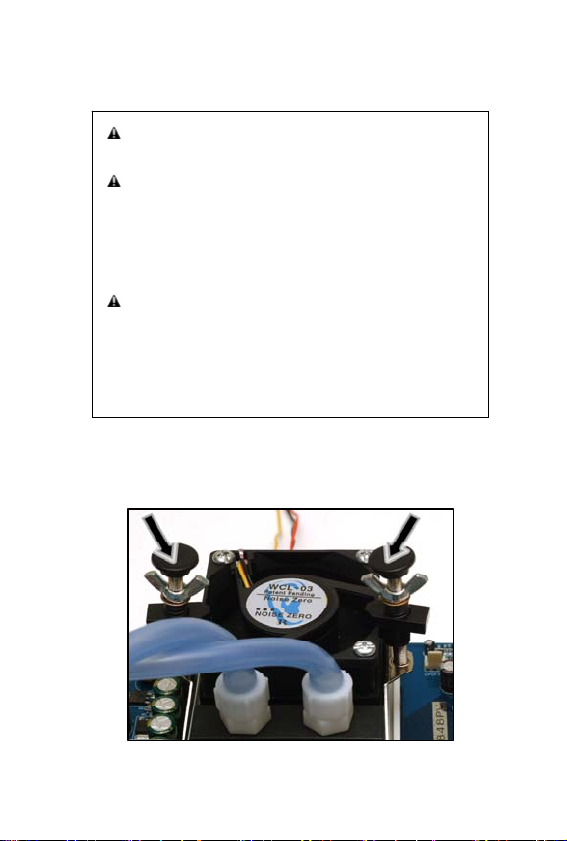
Bit by bit, one after the other, tighten up each nut so
that equal pressure is given to both clips.
Giving excessive pressure may cause damage on CPU
core or result in other critical impairment. Please be
cautious never to tighten up the clip beyond the point
the spring normally allows without getting pressed
out of shape.
We, 3R SYSTEM , are not responsible for any
malfunction or damage of the product and any
damage on your system or system components,
including CPU core damage, all of which resulted
from giving too much pressure to the clips.
e After you finish with the settling with the CPU jacket,
please cover the top of the clip with the clip cap.
15
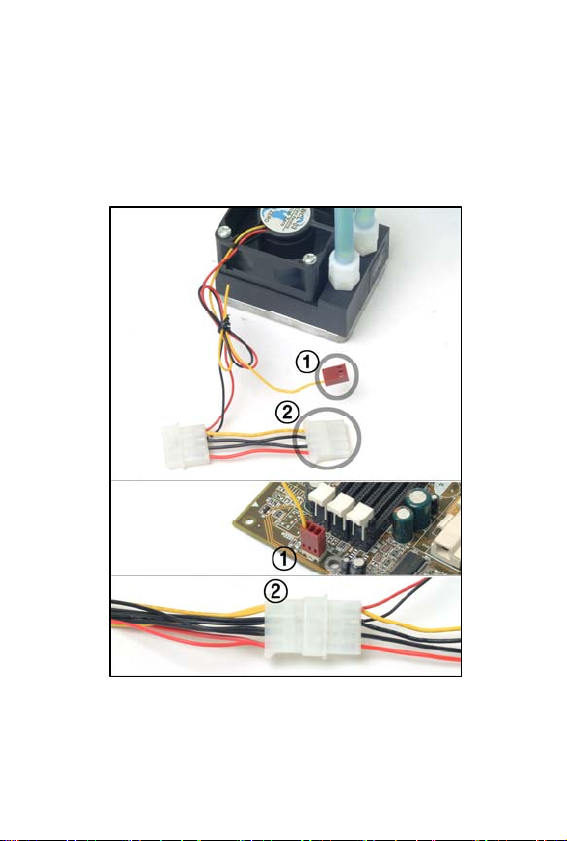
f When CPU jacket is securely installed, connect its
power RPM signal connector to the power outlet from
the PSU (Power Supply Unit) and the CPU fan
connector on motherboard.
16

p
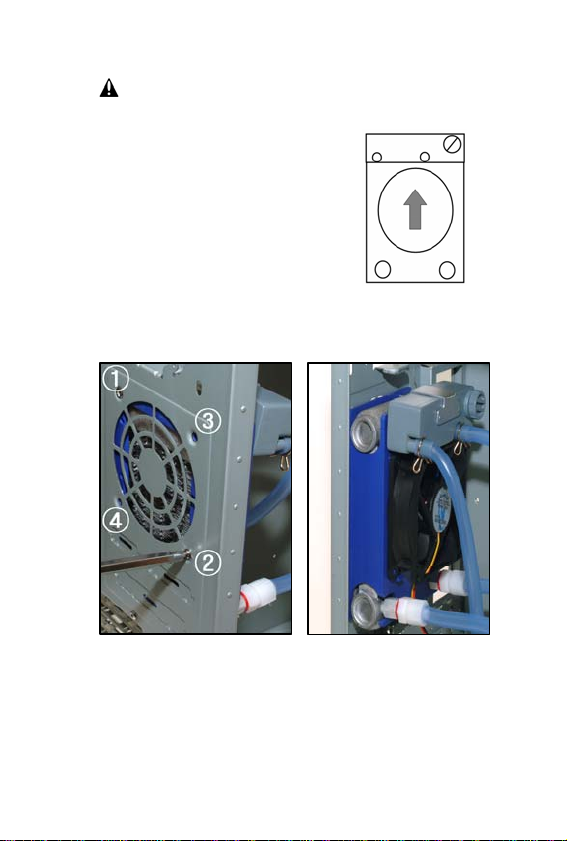
5) Radiator and water tank Installation
① Attach the water tank on the radiator using the clip.
② Install radiator to have inflow and
outflow valve at the bottom and
place the water tank on top.
③ Attach the radiator rear of the
chassis where you can install an 80mm case fan.
17
Please take care that the hoses are not bent while
installing.
Cli

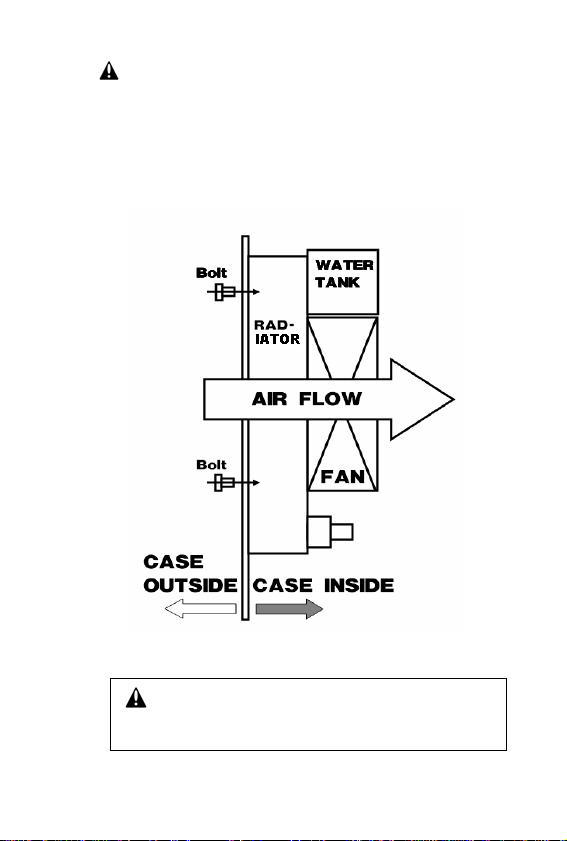
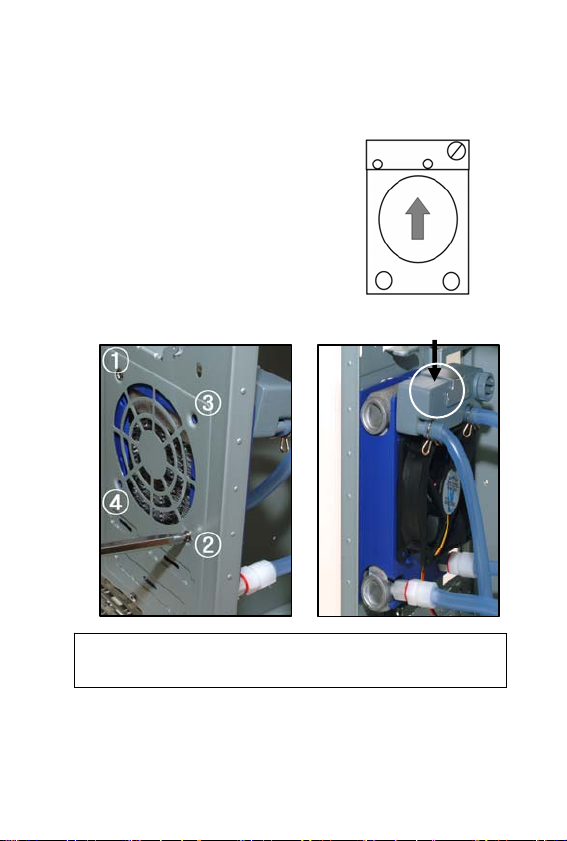
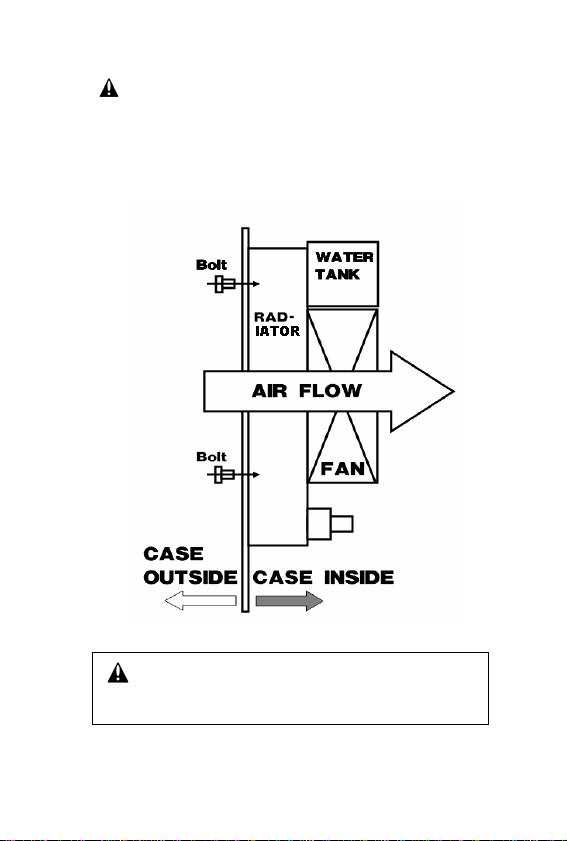
6) Fan Installation
① In c a se of using included fan
Please install the fan as shown in the picture below.
The direction of the air flow is very important
to the performance.
18

② In case of using high speed 80mm fan like 3,500
RPM or higher
Please install the fan as shown in the picture below.
19

2.
Reverse front case fan flow direction
1. As shown, if there is a front inflow case fan, it may interfere
with radiator fan airflow.
2.
In this case, reverse the front inflow fan to the front
outflow case fan. This will assist radiator fan(s) airflow.
V. Coolant Refill.
1.
Lack of coolant
a. There might be some natural evaporation after 1 or 2 years o
20

pump
g
V. Coolant Refill
1. Lack of coolant
1) There might be some natural evaporation after 1 or 2 years
of the operation.
2) You need to refill the coolant when ;
- you hear some strange sound from the water pump.
- the coolant is not flowing.
Even if there is lack of coolant the cooling unit
will not be dama
Please keep the water tank side up all the time.
When you reinstall the water cooler, there might
be too much air inside of the water pump which
makes the system doesn’t work properly. In this
case, please uninstall the system and shake the
pump with water tank upside to remove the air
from the
21
ed.
. After that, reinstall the system.
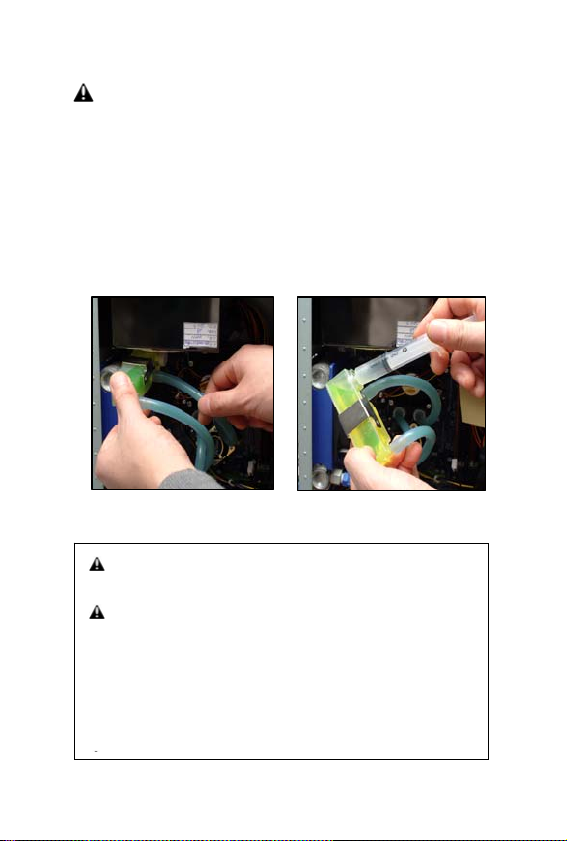
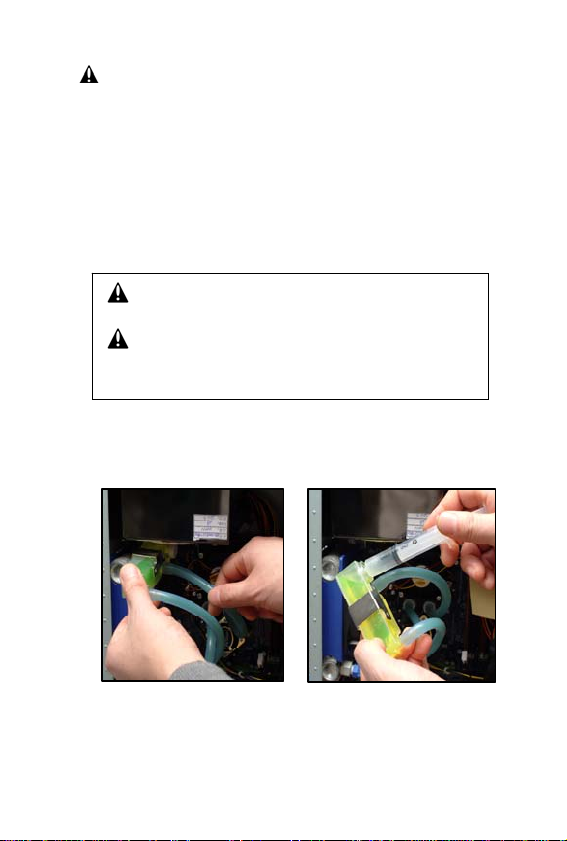
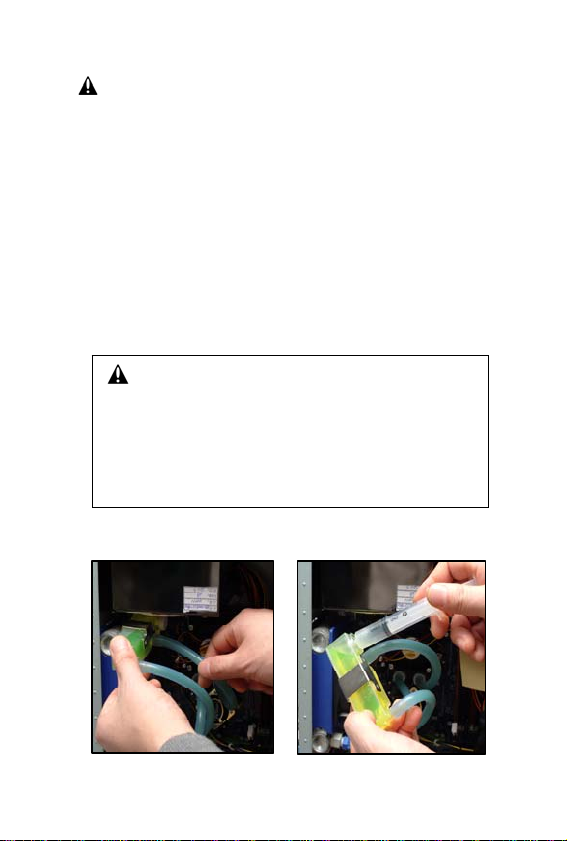
2. Refilling Coolant.
1) You need to shut down the system and unplug the power
code from the power outlet before you begin.
2) Open the cap of the water tank and refill the coolant using
distilled water which can be purchased from a pharmacy or
a CVS using a syringe or a dropper.
3) After you finish first refill, please repeat procedur e 1 & 2
once more after running the system for 5 minutes or more.
Detach the water tank Refill the coolant
Please be careful with the liquid not to drop on the
system.
Please avoid any physical contact, especially eye
area and bare skin. The fluid inside this product
may cause irritation if it contacts your body.
Incase of contact, immediately flush eyes or skin
with plenty of water. If irritation persists, call a
physician.
22

POSEIDON WCL-03
Installation Guide
¾ 기호설명 및 주의사항 ...............24
¾ 시작하기 전에 ...........................25
¾ I. 제품의 특징 ...........................27
¾ II. 제품 구성품 ...........................28
¾ III. 부품 상세 설명 ...............30
¾ IV. 제품 장착 방법 ...............34
¾ V. 작동액 보충 ...........................45
23

▶ 기호 설명
▶ 주의사항
본 제품 내부에 순환되는 액체는 최고의 냉각 성
능과 제품 보호를 위해 개발된 액체입니다. 기타
성능향상등의 목적으로 내부 순환 액체를 보충하
고자 할 때에는 약국에서 구입할 수 있는 증류수
로 보충할 수 있습니다.
용액 자체에 자극성이 있으므로 마시지 마시고 눈
또는 피부점막에 접촉하지 않도록 주의 바랍니다.
만약의 사고 발생시에는 흐르는 물에 씻어낸 후
의사와 상담 바랍니다
제품 사용시 꼭 알아야 할 내용입니다.
제품 사용시 참고할 내용입니다.
제품 사용시 피해야 할 내용입니다.
24
▶ 시작하기 전에
▪ 성능개선이 필요하거나 사용자의 요구사항이 있을 때 제품
의 형태 및 사양이 예고 없이 수정될 수 있습니다.
▪ 본 사용 설명서의 내용은 필요에 따라 수정될 수 있습니다.
▪ 고객지원 요청 전에 본 사용 설명서를 다 시 한번 읽어 주 시기
바랍니다.
▪ 본 설명서의 내용을 무단으로 복제하는 것은 금지되어 있습니다.
▪
제품 설치 이전에 사용 설명서 를 충분히 숙지한 후 설치를
시작 하시기 바랍니다.
▪
사용 설명서에 기재된 내용을 따르지 않아 발생하는 문제
에 대해서는 사후 지원을 받으실 수 없습니다.
▪
제품을 임의로 분해 하거나 다른 부품과 결합하여 사용할
경우 부식, 동작불량 등의 문제가 발생할 수 있으며 이로 인
25

해 문제가 발생했을 경우에는 본사에서 사후 지원을 받을 수
없습니다.
▪
제품에 주입된 작동액 외에 다른 종류의 작동액을 사
용하시면 성능 및 내구성에 영향을 미치므로 다른 종류의
작동액 사용을 삼가 주시기 바랍니다.
작동액을 모두 교환 할 경우에는 별도 판매하는 정품 작동
액을 구입하여 사용하시기 바랍니다.
단, 작동액 부족시 약국에서 판매하는 증류수를 사용하여
보충할 수 있습니다.
▪
구입일로부터 1년 내에 정상적인 사용환경에서 발생한 문
제에 대해서는 무상수리 및 교환을 해 드립니다. 그러나 다
른 컴퓨터 부품에 발생한 문제에 대해서는 본사가 보상해 드
리지 않습니다.
▪ 설치 및 동작에 관한 의문사항이 있을 경우에는 신속하게
기술지원을 해 드릴 것을 약속 드립니다.
26

I. 제품의 특징
1. 본 제품은 물을 이용한 컴퓨터 CPU 냉각장치로 일반 공
냉식 쿨러에 비하여 월등한 냉각성능을 발휘함은 물론이고
적정온도 유지와 급속한 온도변화를 예방하여 시스템 안정
성 향상에 도움을 줍니다.
2. Intel Pentium III, IV / AMD Athlon, Duron 등 대부분의 시
스템과 호환이 가능합니다.
3. 최소화된 컴팩트 시스템 구현으로 시스템 내부에 모든 부
품 장착 가능하므로 별다른 외부 장치가 필요치 않습니다.
장착과정이 간단하여 초보자들도 쉽게 장착할 수 있습
4.
니다.
5. 모든 부품을 단일 소재로 제작하여 사용 중 발생할 수 있
는 부식문제를 근본적으로 보완 하였습니다.
구동부와 순환부의 분리된 특수 설계로 누수에 대한
6.
문제를 해결하였습니다.
독특한 내부구조를 채택하여 소형화된 사이즈에 비하
7.
여 월등한 성능을 나타냅니다.
27

II. 제품 구성품
1. 기본 구성품 명칭
1. CPU 자켓 + 라디에이터 + 물탱크 Set
2. 팬 브라켓
3. 80mm 저소음 쿨링팬
4. AMD / Intel P4 CPU 클립
5. 스티커
6. 팬 고정용 나사
7. 열전도 그리스
8. 라디에이터 밀폐용 접착패드
9. 제품 사용 설명서
28
2. 별도 구성품 ( 별도 판매품 )
1. 시스템 보호용 회로 및 센서 :
본 장치는 쿨러의 동작이상 등으로
과열의 위험이 있을 때 시스템을 닫
거나 경고를 해줌으로서 시스템이
과열되는 경우를 사전에 차단 합니
다. 본 제품과 함께 일반적인 시스
템 메인보드 바이오스에서 제공하는
시스템 전원 차단기능을 활성화 시켜 과열시 시스템 손상
을 미연에 예방하시기 바랍니다.
2. 라디에이터 장착 보조 브라켓 :
나사로 고정되지 않는 특수 한 케이
스의 경우 본 브라켓을 사용하여
80mm FAN 및 라디에이터 하우징에
결합합니다. (적용케이스: Chieftec,
마이크로닉스 케이스등)
WCL-03/SPM
WCL-03/BRK
3. 작동액 (150 mml) : WCL-03/CW
본 제품이 최적의 성능을 발휘 할 수 있도록
제조된 액체로써 냉각 효율향상 및 부식방지
효과가 있습니다.(원액 으로 주입)
4. 애슬론 64 CPU 클립 :
애슬론 64 CPU 장착용 클립
5. 그래픽 카드용 자켓 :
그래픽 카드의 칩셋 냉각을 위한 제품 입니다.
29
WCL-03/A64
WCL-03/VGA
III. 부품 상세 설명
1. CPU 자켓 + 라디에이터+ 물탱크 Set
A. CPU 자켓
i. CPU 자켓 : 자켓 내부에 미세 간격의 알루미늄
핀을 브레이징 처리하여 다중 수로를 형성, 면적
에 비하여 최대의 냉각 효율을 나타냅니다.
ii. 워터펌프 : 자켓 상부에 워터펌프가 위치하여 최
소의 공간을 차지하며, 구동부와 순환부를 분리
하여 누수의 위험을 최소화 했습니다.
B. 라디에이터 + 물탱크 셋
i. 라디에이터 : 미세 간격의 수로를 가지고 있는
알루미늄 튜브에 방열 성능이 좋은 핀을 브레이
징 처리하여 최대의 열 교환 효율을 나타냅니다.
ii. 물 탱크 : 장기간 (1~2년) 사용시 자연 증발로
인한 유량 부족시 증류수를 보충할 수 있도록
구성되어 있습니다.
30
2. 팬 브라켓
제공된 팬 외 고풍량 80mm 쿨링팬 혹은 사용하는 케이스에
장착된 기본 배기팬에 클립식으로 장착하여 라디에이터 하우
징에 결합합니다 (IV-F-②항 참조 - 44p )
3. 80mm 저소음 쿨링팬
A. 기본 분당 회전수 약 2,000 RPM의 저풍량 팬이며
소음레벨 20dBA 내외로 저소음을 유지합니다.
B. 사용목적에 따라 고풍량 혹은 저풍량 팬으로 교체
사용 가능합니다.
31

4. AMD / Intel CPU 클립
INTEL AMD
메인보드의 변경에 따른 장착압력 변화를 조절할 수 있도록
설계되어 있으며 적정압력 유지로 CPU 코어에 대한 손상을
예방할 수 있습니다.
5. 스티커
수냉시스템을 장착 사용하고 있음을
표시할 수 있도록 제작된 스티커 입니
다.
6. 팬 고정용 나사
케이스에 라디에이터 하우징이나
80mm FAN을 결합할 때 사용합니다.
32

7. 열전도 그리스
장착시 CPU 자켓과 CPU 코어 간에
최대한 밀착되도록 하고 또한 열 전도
율을 향상 시키기 위해 제공되며 CPU
코어 위로 얇게 발라주시면 됩니다
8. 라디에이터 밀폐용 접착패드
라디에이터 하우징에 팬이 결합되는
부분 이외의 공간을 차단합니다.(공기
의 역류를 방지하여 효율을 유지합니
다.)
9. 제품 사용 설명서
제품 내용 및 장착법, 주의사항이 기
록된 메뉴얼 입니다.
33

IV. 제품 장착 방법
1. CPU 자켓 장착
A. 자켓 위치 및 방향
①. 수직방향 장착시 : 그림과
같은 방향으로 장착 바랍니다.
②. 수평방향 장착시 : 그림과
같이 장착바랍니다.
B. 열전도그리스 사용
자켓 결합 이전에 CPU코어 위쪽에 살짝 덮는 정도로 열전
도 구리스를 발라줍니다.
34

온도센서 장착
C.
①. 온도센서 장착
1
2
a. 그림을 참조하여 코어 위로 센서가 위치하지 않
도록 주의하여 설치 바랍니다.
b. 센서의 고정은 양면테이프등을 이용하여 센서를 확
실하게 고정시켜 주시기 바랍니다.
c. 정확한 동작을 원하신다면 센서 윗부분까지 열전도
그리스를 도포해 줍니다.
d. 자켓 장착시 위치가 이동하여 센서가 파손되지
않도록 주의해 주세요.
35
①,②부분의 센서 케이블은 CPU 코어 높이보
다 반드시 낮아야 합니다.

D. 클립장착
①. AMD Athlon / Duron /
Intel Pentium III/ Intel Pentium IV
a. 자켓을 CPU위에 올려 놓습니다.
INTEL AMD
b. 클립의 나비 너트조절은 사용보드에 따라 다르나
대략 다음 그림과 같이 조정 합니다.
36

c. 클립을 CPU 소켓(AMD), 쿨러 소켓(P4)의 클립 고
정부에 결합하고 클립헤드를 펌프모터에 걸어 장착합
니다.( ①,②돌출부가 서로 바깥쪽에 위치)
Intel
AMD
37

d. 나비너트를 돌려서 적당한 장력으로 조정합니다.
이때 자켓을 손으로 약간만 비틀어 단단히 고정이 되었
는지 확인합니다. 이때 쉽게 움직인다면 다시 나비 너
트를 조심씩 더 조여 줍니다.
38

1. 양쪽의 클립이 동일한 압력을 받도록 양쪽
을 번갈아 가면서 조금씩 조여 갑니다.
2. 과도한 압력이 가해지면 코아 파손등 고장
의 원인이 될 수 있으므로 끝까지 조이지 않도록
합니다.
3. 클립을 과도한 압력으로 조여서 사용 중
발생되는 코아 파손등의 고장은 당사에서 책임지
지 않습니다.
e. 이상이 없을 경우 제공된 클립캡을 고정합니다.
39

f. 클립장착이 완료된 다음 펌프에 연결된 커넥터를
Power Supply와 메인보드의 CPU FAN 커넥터에 결합
합니다.
40

라디에이터 및 물통의 장착
p
1. 물통에 부착된 클립을 이용하여 물통을 라디에이터 케
이스에 고정합니다.
2. 라디에이터를 케이스에 장착하는
방향은 물통이 위로 가고 라디에이터
입/출수구의 호스가 아래로 가도록 장
착합니다.
3. 제공된 나사로 CASE 뒷면의
80mm FAN 고정위치에 라디에이터를 장착합니다.
장착시 호스가 꺽이지 않도록 주의 바랍니다.
41
Cli
E. 팬의 장착
①. 제공된 기본 FAN을 사용할 경우 (기본 장착)
라디에이터의 FAN 고정 장치에 그림과 같이 장착합니다.
42
공기 흐름의 방향은 제품의 동작특성에 영향
을 미치므로 반드시 지켜주시기 바랍니다.

②. 별도의 고풍량(3,500rpm이상) FAN을 사용 할 경우
제공된 FAN 브라켓을 이용하여 다음과 같이 장착합니
다.
43

2. 전면부 흡기 팬 방향 변경
A. 케이스 내부에 2차 흡기팬인 전면부 팬이 장착되어 있
을 경우 공기흐름의 변동으로 충분한 냉각이 되지 않을
수 있습니다.
B. 이 경우 전면부 흡기팬의 방향을 배기방향으로 장착
하여 주시면 케이스 내부 환기를 비롯하여 전체적인 냉각
성능이 향상됩니다.
44
V. 작동액 보충
1. 작동액 부족
a. 제품을 정상적으로 사용했을 경우 1~2년 후에 자연 증
발로 인한 작동액의 부족 현상이 발생할 수 있습니다.
b. 다음과 같은 증상이 있을 때에는 작동액의 보충이 필요
합니다.
- . 꼬르록, 꼬르륵 하는 모터 이상음 발생할 때
- . 작동액 부족으로 인한 순환이 안될 때
작동액 부족으로 인한 제품 파손에 대한 염려
는 없습니다.
사용중 본 제품을 철거 하거나 이동 설치 할
때, 제품을 보관할 때는 항상 물탱크가 위를 향하
도록 유지 하십시오.
사용중 철거 및 재설치 할 때에 펌프부분에
다량의 공기가 유입되면 펌프의 기능을 상실 할
수 있으며 이때에는 제품을 철거하여 물통을 위
로하고 펌프부분을 흔들어 펌프내부의 공기를 물
통쪽으로 이동시키고 작동 하십시오.
45
2.
작동액 보충 방법
a. PC의 전원을 모두 off 합니다.
b. 물탱크 뚜껑을 열고 주사기나 스포이드로 약국에서 구
입할 수 있는 증류수를 주입합니다.
c. 주입 후 5분정도 시험 가동 후 증류수를 재주입 합니다.
증류수 주입시 주변 기기에 접촉되지 않도록
주의하십시오.
작동액을 마시거나 피부점막에 접촉되지 않도
록 주의하십시오 .
[1] 물통을 분리합니다. [2] 증류수를 주입합니다
( 접촉시 흐르는 물에 세척 하십시오. )
46

POSEIDON WCL-03
ユーザーズマニュアル
ご注意事項と記号の説明 48
ご使用になる前に 49
I. 製品の特長 50
II. 製品の構成 51
III. 構成品の詳細説明 53
IV. 製品装着方法 56
V. 冷却水の補充 67
VI. 故障と思ったら 68
Copyright 3R SYSTEM. CO., LTD. 2004
47

(株)3RシステムのPOSEIDONシリーズWCL-03をお買い上げいただき誠
にありがとうございます。
■ 記号の説明
製品使用の場合、必ずお読みいただく内容です。
製品使用の場合、参照していただく内容です。
製品使用の場合、禁止しなければならない内容です。
■ ご注意事項
本製品内部を循環する冷却液は最適な冷却性能と製品
保護のために開発された液体です。その他性能向上などの
目的の為、冷却液を交換した場合製品の保証ができませ
ん。
冷却液は刺激性があるので飲むとか目または肌、粘膜に接
触しないようご注意ください。もし、事故発生の場合は、直ち
に流水で洗浄後、医師にご相談ください。
48

ご使用になる前に
• 製品設置前にユーザーズマニュアルを充分に読んでから設置を始め
てください。
• サポートセンターへ問い合わる前にユーザーズマニュアルをもう一回確
認してください。
•
製品の性能向上などの目的で提供された部品以外を使用する
場合、腐蝕または動作不良などの問題が発生する場合があり、
保証対象外になります。
• 保証期間中製品に故障が発生した場合は、購入者の負担なし
で交換及び修理致します。但し、お使いいただく方の不注意ま
たは故意による改造・分解などによる、ユーザーが説明書の内
容を守らなくて発生する故障に対しては保証の適用から除かれ
ます。また,プログラム,レコード及びデータの紛失や破損, パソコ
ンの紛失や破損などユーザーの不注意によって発生された故障
や破損またはユーザーズマニュアルの内容を守らなくて発生され
る各種故障,破損及び事故に対しては一切の補償責任を負い
ません。
• 保証期間内外にかかわらず、また製品の製造上の不具合に関し
て発生した2次的損害*1に関してはメーカー及び販売元は一
切保証いたしません(*1水漏れのより本製品以外に生ずる、物
理的破損及びデータの消失等)
製品に注入された冷却水以外に他の種類の冷却水を使う場合
•
性能及び耐久性に影響を与える恐れがありますので他の種類の冷
却水の使用をご遠慮ください。冷却水を補充する場合には別売り純
正品冷却水を使ってください。
• 製品の形態及び仕様は製品の性能向上や改善などの為予告
なしで変更される場合があります。ユーザーズマニュアルの内容も
場合によって予告なしに変更される場合があります。
• このユーザーズマニュアルの内容を無断で使用・複製することを禁止
します。
WCL-03の保証期間は購入日から1年です。
•
49

I. 製品の特長
1. ポセイドンWCL-03は水を利用した水冷CPUクーリングキットで一般
空冷式クーラーに比べ、より高い冷却性能で適正温度の維持や急
速な温度変化を予防してパソコンシステムの安全性向上の為に開
発された水冷キットです。
2. システム作動騒音の主な原因であるファンを最少化し、作動速度
を低めて使用が可能で静音システムに最適なキットです。
3. Intel Pentium III、4 / AMD Athlon、Duronなど幅広いCPUと高
い互換性を提供します。
4. キット全体のサイズが最小化されてシステム内部にすぐ搭載可能で
す。
5. 装着が簡単で初めての方でも手軽くシステムに搭載が可能です。
6. 部品を単一素材化した事で使用中に発生する腐蝕などの問題を
根本的になくした製品です。
7. 特殊な駆動部と循環部が分離された設計の為、漏水に対する問
題を解決した製品です。
8. 内部の構造が特殊開発され小型化されたサイズに比べ、より高い
冷却性能を実現した製品です。
50

II. 製品の構成
1. 構成の内容
1. CPUジャケット・ラジエーター・水タンクセット
2. ファンブラケット
3. 80mm静音クーリングファン
4. AMD/Intel CPUクリップ(キャップ付)
5. ロゴステッカー
6. ファン固定用ネジ
7. 熱伝導グリース
8. ラジエーター密閉用接着スポンジ
9. ユーザーズマニュアル(日本語)
51

2. 別売り製品
1) システム保護用センサーモジュール
(モデル WCL-03/SPM)
クーラーの動作異常などでシステムのクーラ
ーが過熱される場合、システムのシャットダ
ウン及び警告を発生するモジュールです。
本製品を使わない場合にはマザーボードバ
イオスにある過熱時のシステム電源遮断機
能を利用してシステム損傷をあらかじめ予防してください。
2) ラジエーター装着補助ブラケット
(モデル WCL-03/BRK)
ネジで固定されない特殊なケースの場合こ
のブラケッを使って80mmファン及びラジエー
ターハウジングに結合します。
(適用ケース:チプテック,マイクロニックスケース等)
3) 冷却水(原液150mml)
(モデル WCL-03/CW)
本製品が最適な性能の為に開発された液体です。
冷却効率向上及び腐食防止効果があります。
4) Athlon64用CPUクリップ
(モデル WCL-03/A64)
Athlon64用CPUクリップです。2004年5月販売開始予定です。
5) VGA Card用 GPU ジャケット
(モデル WCL-03/VGA)
この水ジャケットは VGA カードのためである。
52
III. 構成品の詳細説明
1 CPUジャケット・ラジエーターセット・水タンクセット
A. CPUジャケットとポンプセット
①. CPUジャケット:ジャケット内部の微細間隔のアルミニウムピンをブ
レイジング処理して多重水路を形成、面積に比べて最大限の
冷却効率を実現しました。
②. ウォーターポンプ:ジャケット上部にウォーターポンプが位置して最
小の空間を占めて、駆動部と循環部を分離して漏水の危険を根
本的になくしました。
B. ラジエーターと水タンクセット
①. ラジエーター: 微細間隔の水路で構成されているアルミニウムチ
ューブにスリットピンをブレイジング処理して最大の熱交換効率を実
現しました。
②. 水タンク: 長期間(1~2年)使用の場合、自然蒸発により冷却
水が不足してきた場合、蒸溜水を補うように構成されています。
53

2 ファンブラケット:
同梱された高風量・静音80mmクーリングファ
ンまたはケースに装着された基本排気ファンに
クリップ式に装着してラジエーターハウジングに
結合します。(66p)
3 80mm静音クーリングファン
1) 2000RPMのファンので20dBA以内で静
音を維持します。
2) 使用目的によって高風量または低風量
ファンの入れ替え使用が可能です。
4 AMD/Intel CPUクリップ(キャップ付)
Intel用 AMD用
マザーボードの変更による張力変化を調節するように設計されています。
適正な張力維持でCPUコア等に対する損傷も予防します。
5 ロゴステッカー
3Rシステム水冷キット用ロゴステッカーです。
54

6 ファン固定用ネジ
ケースにラジエーターハウジングや80mm ファン
を取り付ける場合に使います。
7 熱伝導グーリス
装着の時CPUジャケットとCPUコアをより密着
させ、また熱伝導率を高めるために使用します。
CPUコアの上で薄く塗ってください。
8 ラジエーター密閉用接着スポンジ
ラジエーターハウジングにファンが結合される部
分以外を遮断して空気の逆流を防止して効
率をあげます。
9 ユーザーズマニュアル(日本語)
55

IV. 製品装着方法
1 CPUジャケット装着方法
ジャケットの位置と方向
1)
垂直または水平方向装着の時:絵の
ような方向で装着します。
放熱グリースの使用
2)
CPUジャケットの装着前にCPUコアの上に放熱グリースを、
薄く塗てください。
56

3) システム保護用センサーモジュール
①. 温度センサー装着
(WCL-03/SPM:別売り)搭載方法
1
絵のようにCPUコアの上にセンサーが載らないようにご注意ください。
a.
b. センサーの固定は両面テープ等を利用してはっきりと固定させてくだ
さい。
c. 正確な動作の為センサー上部に放熱グリースを薄く塗ってください。
ジャケット装着の時位置が移動してセンサーが破損されないよう
d.
に気を付けてください。
①、②部分のセンサーケーブルはCPUコア高さより必ず低く
なければいけません。
57
2

クリップ装着
4)
① AMD Athlon・Duron / Intel Pentium III・Intel Pentium III
a ジャケットをCPUの上に載せます。
INTEL AMD
b クリップナットの高さ調節は使用ボードによって違いますが、次の
絵のように調整します。
58

c クリップをCPUソケット(AMD)、クーラーソケット(P4)のクリップ固定
部に引っ掛けてクリップヘッドをポンプモーターにかけて装着します。
(①、②のクリップの突出部(フック)が外側に向くようにします)
Intel
AMD
59
d ナットを回転させて適当な張力に調整します。この時ジャケット
を手で少しだけ動かして固定されたか確認します。この時、容易
に動いたらまたナットを締めます。
60

両方のクリップが等しい圧力を受けるように両方を相互
に少しずつ締めて行きます。
過度な圧力が加わるとコア破損等や故障の原因にな
るので最後まで締めないようにします。
クリップの締めすぎによる過度な圧力で起きたコア破損
等の故障は弊社の責任ではなく、保証対象外になるので
ご注意ください。
e 次にキャップをはめます。
61
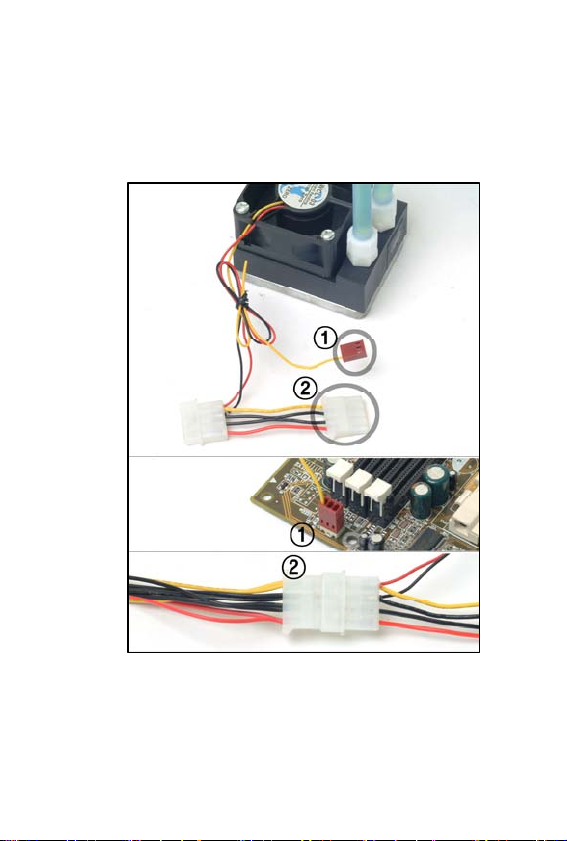
f 次はポンプコネクターをマザーボードのCPUファンコネクター(①)と
電源4ピンコネクタ(②)に接続します。
ポンプコネクター
CPUファンコネクター
電源4ピンコネクター
62
5) ラジエーターの搭載
① 水タンク固定用クリップで水タンクとラジエーターケースを固定します。
② ラジエーターの装着方向は水タンクが上
で、ラジエーター口/出水口のチューブが
下の位置なるように装着します。
③ 付属のネジでケース裏の80mmファン固
定位置にラジエーターを装着します。
水タンク固定用クリップ
固定時にチューブが折れ曲がったり、はさまったり、絡んだり
しないようご注意ください。
63

6) ファンの装着
① 付属の基本ファンを使う場合(基本装着)
ラジエーターとファンを次の絵のように装着します。
風の方向はケースの外から内部に流れるように装着します。
64
風の方向性は製品の性能に影響を与えるのでご注意
ください。
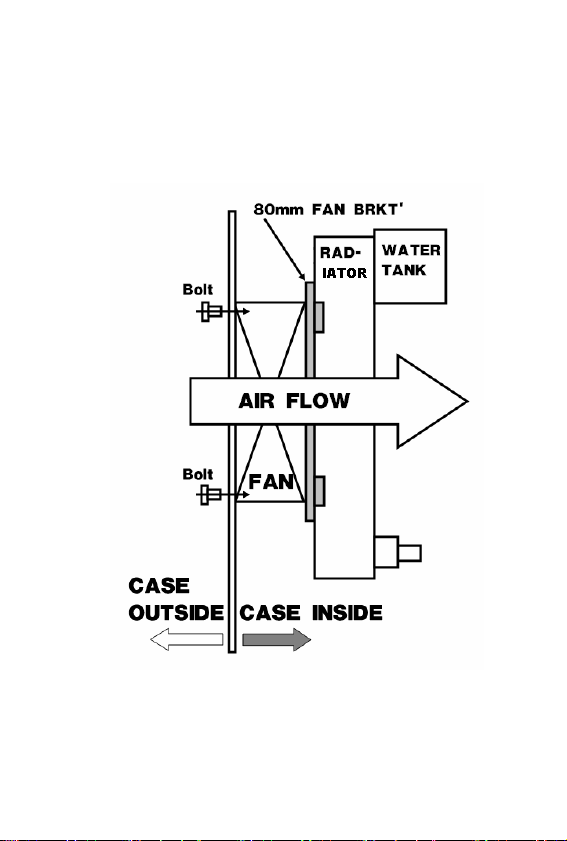
② 別売りの高性能(3,500rpm以上)ファンを搭載する場合
WCL-03性能向上のために付属ファン以外の高性能ファンの搭載が可能
です。この場合は付属のファンブラケットを利用して次のように装着します。
65

前面部吸気ファンの方向変更
2
1) ケース内部に2次吸気の前面部ファンが装着されている場合空
気流れの変動で十分な冷却にならない場合があります。
2) この場合は前面部吸気ファンの方向を排気方向に変更して
装着するとケース内部換気を含めて全体的な冷却性能が向上しま
す。
66

V. 冷却水の補充
1. 冷却水の自然蒸発
1) 製品を正常に使用時1-2年後には自然蒸発による冷却水の不
足現象が発生します。
2) 次のような症状がある場合には冷却水の補充が必要です。
① ポンプ部に異常音が発生の場合
② 冷却水不足で水の循環に問題がある場合
冷却水不足によって製品自体の故障の原因にはなりませ
んが、冷却性能が低下します。
冷却水を飲むとか肌に触れないように気を付けてください。
(万一、肌に触れた場合はすぐに流水で洗ってください。)
2. 冷却水補充方法
1 まず、安全に冷却水補充の為、パソコンの電源を落としてください。
(電源ケーブルも抜いておきます。)
2 水タンクをラジエーターから分離後水タンクを開いて注射器やスポイトで
薬局で販売している蒸溜水を注入します。
3 注入後5分くらい試験稼動し、その後再度蒸溜水を注入します。
水タンクをラジエーターから分離
67
蒸溜水を注入

VI. 故障と思ったら
1 冷却性能が十分ではないと思ったら
1) CPUジャケットの点検
①. ジャケット方向点検: <IV-1 CPUジャケット装着方法>のジャケッ
ト方向設定を確認してください。
②. ジャケット中心点検:ジャケットが正確にCPUコアの中心部に位
置しない場合正しい性能が出なくなります。ジャケットを少しずつ移
動させて正確に中心に位置するようにしてください。ジャケットの微
細な移動の時にはジャケットクリップをとり除く必要はないです。
ジャケットを固定するクリップの張力点検: ジャケットを固定す
③.
る張力不足でCPUコアとの密着が不十分でうまく熱交換ができな
い状態です。ジャケットを手で動かしてみて容易に動かないぐらいに
ジャケットの張力を<IV-1-D>を参照)再調節してください。
放熱グリース使用量の点検: 放熱グリースの塗布量が必要
④.
以上に多いとか少ない場合熱交換効率が減少します。提供され
た放熱グリースがコアの上に薄く塗布されるように使ってください。
温度センサー等の異質物点検: コアとジャケットの間に温度
⑤.
センサーあるいはその他の異質物が有り密着を邪魔する場合熱交
換効率が落ちます。CPU温度が下がらない場合はジャケット下の
部分に異質物がないかを再確認してください。
2) ラジエーターの点検
①. ラジエーター方向点検: <IV-1-5) ラジエーターの搭載>のラジエ
ーター方向設定を参考して正確な方向で設置されているか確認
してください。
ラジエーター装着ファンの方向点検: ケース外部の空気がラ
②.
ジエーターを冷やしてくれる状態が一番効率的でラジエーターの温
度を下げます。もう一度ラジエーターに装着されたファンの方向を確
68

認してください。<IV-1-6) ファンの装着>を参照>
ラジエーターファンの空気流出点検: ラジエーターに装着され
③.
たファンからラジエーターに通過される空気量に比べて外部に流出
される空気量が多い場合効率が落ちます。ファンが装着される部
分以外には同梱されたスポンジを使って蜜閉してください。
十分な空気の流れがない場合点検: ケースのファン装着部に
④.
空気の流れを邪魔する障害物が有る場合(グリルなど)冷却効率
が低下します。この場合は別途の高風量ファンを装着してください。
<IV-1-6) ファンの装着>を参照>
3) システム内部の空気の流れを点検
①. システム内部の前面部吸気ファンの方向点検: ケース内に別
途の吸気ファンが装着されている場合ケース内部に圧力がかかり、
ラジエーターを通じる空気吸入が十分ではなくなります。この場合
全面部ファンを反対方向(排気方向)に装着してください。
②. 空気の流れの異常点検: ケース内部にラジエーターの周りにID
Eケーブル等の空気の流れを邪魔する配線がある場合整理してく
ださい。<IV-2 前面部吸気ファンの方向変更>を参照>
2 製品の動作状態が異常と思ったら
異常騷音発生の時 :異常騷音が発生した場合、ファンに配
1)
線等の障害物がないか確認してください。または冷却水の量をチェッ
クしてください。
漏水の場合: WCL-03は一つ一つ厳しいテストと特殊密閉設
2)
計で漏水現象を根源的に防止し、安全に使用していただける水冷
キットです。万一衝撃などが原因でジャケット/ラジエーターあるいはそ
の他部分で漏水が発生の場合は、パソコン稼動を直ちに停止して
漏水部をチェックしてサポートセンターにお問い合わせください。
69

POSEIDON WCL-03
Installation Guide
¾ Precauciones y Simbolos.......................................71
¾ Notas Anteriores a la Instalacion...........................72
¾ I . Caracteristicas Especiales y Ventajas...............74
¾ II . Componentes del Producto...............................75
¾ III. Detalles del Producto.........................................77
¾ IV. Procedimiento de Instalacion del Producto….80
¾ V. Recarga del liquido Refrigerant.........................91
70

▶ Significado de los simbolos
Indica una nota que es un requisito.
Indica una nota que es una referencia o una
recomendación.
Indica una nota que es una advertencia.
▶ Precaucion:
Si necesita rellenar el sistema de fluido, debe usar
agua pura que puede comprar en una farmacia o
CSV. El uso de cualquier otro tipo de fluido anula la
garantia del producto.
El fluido que contiene el producto puede causar
irritacion en contacto con el cuerpo. Por favor evite
todo contacto del fluido con el cuerpo, tenga especial
cuidado con los ojos y el contacto directo con la piel.
71

▶ Nota anteri or a la inst alaci on
▪ La descripcion y especificaciones tecnicas del producto
pueden modificarse sin previo aviso por motivos de mejora o
peticiones los usuarios.
▪ El contenido de esta guia de instalacion puede ser modificado
si fuera necesario.
▪ Antes de demandar soporte especializado,
esta guía a fondo.
▪ Esta prohibida la duplicacion o copia de cualquier
parte de esta guia sin permiso expreso de 3R System.
Por favor tenga un conocimiento profundo de esta guia
▪
antes de la instalacion.
▪
La garantia del producto sera anulada en caso de
problemas surgidos por no seguir las intrucciones de esta
guia.
por favor revise
▪ La garantia del producto sera anulada en caso de que
combine piezas no originales con el producto, las cuales
podrian causar corrosion interna o fallo del producto.
Por favor use unicamente liquido refrigerante original de
▪
3R SYSTEM el cual puede ser adquirido en su distribuidor. Si
utiliza otro tipo de liquidos pueden suceder problemas
inesperados con el producto.
72

Durante el periodo de garantia, 3R System reparara o
▪
reemplazara las partes defectuosas sin cargo. Esta garantia
es unicamente valida para productos usados en condiciones
normales. Por otra parte, 3R System no sera responsible de
cualquier daño o perjuicio sobre otros components del
ordenador.
Periodo de Garantia : Europa 2 años y el resto 1 año.
▪ El sistema del 3R garantiza proveer un soporte rapido para
los problemas de instalacion y de operacion que puedan
surgir.
73

I. Caracteristicas Especiales y Ventajas
1. En comparacion con los sistemas de refrigeracion por aire,
la refrigeracion por agua provee de una alta estabilidad del
sistema impidiendo los cambios bruscos de temperatura y
mejorando significativamente la eficacia en refrigeracion.
2. WCL-03 es compatible con gran variedad de CPUs,
incluyendo a Athlon Intel Pentium III, IV/AMD, Duron.
3. Con el diseño compacto del WCL-03, el sistema completo
puede ser instalado internamente. No requiere ningun
dispositivo externo.
Con una simple instalacion, los principiantes no
4.
tendran problemas.
5. Todas las partes suplementarias estan hechas del mismo
material. Esto impide toda posibilidad de corrosion
Gracias al diseño especial integrado del bloque de agua
6.
y la bomba,
7.
eficacia de refrigeración ha mejorado con el nuevo rediseño
del sistema.
el WCL-03 elimina cualquier posibilidad de fuga.
Incluso con un diseño tan compacto del WCL-03, la
74

II. Componentes del Producto
1. Nombres de los components
1. El Bloque de la CPU, el Radiador y el deposito
2. Adaptador del ventilador
3. Ventilador Silencioso de 80mm
4. Clip AMD / Intel
5. Pegatina
6. Tornillos del ventilador
7. Silicona Termica
8. Almohadilla del radiador
9. Guia de Instalacion
75
2. Partes Opcionales
1. Unidad de proteccion del sistema : WCL-03/SPM
En caso de sobrecalentamiento o
fallo del sistema, este producto
opcional provee alarmas y/o apagado
automatico del sistema.
Adicionalmente a este sistema,
puede activar las protecciones anti
sobrecalentamiento disponibles por
parte de numerosos fabricantes de
placas base.
★]
[
2. adaptador para instalar el
ventilador y el radiador.
: WCL-03/BRK
Adaptador de ventilador para
carcasas no estandar
Si utiliza carcasas no estandar como
las Chieftec, necesita usar este
adaptador para instalar el ventilador y
el radiador.
3. Refrigerante (150 mml) : WCL-03/CW
Este refrigerante es el mismo que el que
lleva internamente el producto.
4. Athlon64 CPU CLIP : WCL-03/A64
Athlon64 : Instalacion del Bloque de CPU
5. Bloque del VGA : WCL-03/VGA
Esta Bloque de VGA está para la TARJETA de VGA.
76
III. Detalles del Producto
1. Instalacion del bloque de la CPU, el radiador y el
deposito
A. Instalacion del bloque de la CPU y el radiador
i. Bloque de la CPU: laminas de 0.5 mm (0.012
pulgadas) en la superficie interna del bloque
producen una gran superficie de contacto para
una maxima eficacia en refrigeración.
ii. .La bomba de agua: esta integrada en el bloque
77
de la CPU y elimina cualquier posibilidad de fuga.
B. Instalacion del Radiador y del deposito
i. Radiador : superficie interna maximizada para
proveer la maxima eficiencia termica.
ii. .Deposito : soluciona el problema de la
evaporacion natural a los 1 o dos años de vida. El
refrigerante puede ser rellenado a traves del
deposito.

2. Adaptador del Ventilador
Instale el radiador dentro de
cualquier caja facilmente
usando este adaptador de
ventilador. (Vea tambien IV-F② 89p)
3. Ventilador Silencioso de 80mm
Velocidad maxima: 2000
RPM Nivel de ruido:
alrededor de 20 dBA.
Puede ser reemplazado
por ventiladores de alta o
baja velocidad.
4. Clip AMD/ Intel:
INTEL AMD
Puede tener control de la tension variable. Seleccionando la
tension apropiada para su sistema previene de cualquier
daño al núcleo del procesador.
78
5. Pegatina:
Muestra que su sistema esta
protegido por un fiable sistema de
refrigeracion liquida.
6. Tornillos del Ventilador
Uselos cuando no se desee utilizar el
adaptador del ventilador y quiera
sujetarlo directamente a la carcasa
del radiador.
7. Silicona Termica:
Permite una conductividad termica
mas eficiente entre el bloque de la
CPU y el nucleo de la CPU.
Apliquelo y extiendalo finamente
sobre el nucleo de la CPU.
8. La almohadilla del radiador:
Se utiliza para impedir cualquier
corriente de aire inversa.
usted instala el ventilador encima de
radiador,
entre el ventilador y la carcasa del
radiador para impedir cualquier
corriente de aire inversa.
9. Libro Guia de Instalacion :
Le guia en la instalacion. Ademas
incluye las instrucciones de
mantenimiento.
puede usar esta almohadilla
Cuando
79

IV. Procedimiento de Instalacion del Producto
1. Instalacion del Bloque de CPU
A. Colocacion correcta del
Bloque de CPU
Instalacion Vertical: Instale como
se muestra en el dibujo
Instalacion Horizontal: Instale
como se muestra en el dibujo
B. La aplicacion de silicona termica:
Antes de la instalacion del bloque de CPU,
capa delgada sobre el nucleo de la CPU y extiendalo hasta
cubrir la totalidad del nucleo.
La instalacion de la placa electronica (Opcional)
80
apliquelo en una

C. La instalacion de la placa electronica
(Opcional)
①. Instala cion del sensor de temp eratura
1
2
a. Como se puede ver en la foto, NO SE COLOCA el
sensor en
b.
sensor en el lugar corespondiente.
el nucleo. Coloquelo adyacente al nucleo.
Puede usar cualquier doble cinta para pegar el
c. .Para una medida mas precisa, aplique silicona
termica sobre el sensor.
Debe ser cuidadoso para no dañar el sensor
d.
durante la instalacion ya que el sensor puede deslizarse
encima del nucleo.
81
El cable del sensor debe situarse mas bajo
que el nucleo de la CPU
D. Instalacion del Clip
①. AMD Athlon / Duron /
Intel Pentium III/ Intel Pentium IV
a. Coloque el bloque de CPU sobre la CPU.
INTEL AMD
b. .Ajuste la tuerca como se muestra en la foto de abajo.
82

c. Deslice los clips en el socket o el mecanismo de
retencion de la CPU. Alinee el bloque de CPU y el clip
de montaje con el mecanismo de retencion o el socket
de la CPU y situe la cabeza del clip en el borde superior
de la bomba.
Intel
AMD
83

d. Asegure el bloque de la CPU con la tuerca hasta que
la CPU este estable en su lugar.
84

1. poco a poco, una tras otra, apriete cada
tuerca hasta que se suministre la misma
presion a ambos clips.
2. Suministrar una presion excesiva a la
CPU puede dañarla gravemente. Por favor
sea cauteloso y nunca sobrepase la presion
maxima que soporta la CPU.
3. Nosotros, 3R SYSTEM no somos
responsables de cualquier mal
funcionamiento o daño en su sistema,
incluyendo daños en el nucleo de la CPU,
debido a una excesiva presion realizada por
los clips.
e. Despues de que termine con la instalacion del bloque
de CPU por favor cubra los clips con los capuchones
85

f. .Cuando el bloque de la CPU este instalado de forma
segura, conecte el cable de RPM a la placa base y el de
alimentación a la fuente de alimentacion.
86
E. Instalacion del Radiador y el deposito
1. Una el deposito al radiador
usando el clip.
2. Instale el radiador de manera
que las valvulas de entrada y salida
esten en la parte superior
3. Instale el radiador en la parte
trasera del chasis donde pueda
instalar un ventilador de caja de 80mm.
La direccion del flujo del aire es muy importante para el
rendimiento.
87
F. 1. Instalacion del ventilador
①. En caso de usar el ventilador suministrado
favor Instale el ventilador como se muestra en el dibujo.
La direcccion del flujo de aire es muy
importante para el rendimiento.
88

②. En caso de usar un ventilador de alta velocidad de
80mm fan como un 3,500 RPM o superior
Por favor Instale el ventilador como se muestra en el
dibujo.
89

2. Direcccion contraria en el flujo de aire en el frontal
A. Comos se muestra, si hay un ventilador de entrada de
aire en el frontal, puede interferir con el flujo de aire del
radiador.
B. En este caso, cambia la direccion del ventilador
frontal para que expulse aire al exterior. Esto ayudara al
flujo de aire del radiador
90

V. Rellenado de refrigerante
1.
Falta de refrigerante
a. Puede ocurrir una evaporacion natural despues de 2 o 2
años de funcionamiento.
b. Usted necesita rellenar de refrigerante cuando:
- oiga algun ruido extraño proveniente de la
bomba de agua.
- el refrigerante no fluye.
Incluso aunque halla poco refrigerante el
producto no se dañara.
91
Por favor mantenga el deposito de agua
hacia arriba en todo momento.
Cuando reinstale el sistema de refrigeracion
liquida, puede contener demasiado aire en su
interior de la bomba de agua el cual provoca
que el sistema no funcione adecuadamente. En
este caso, por favor desinstale el sistema y
agite la bomba de agua para eliminar el aire de
la bomba. Después de esto, reinstale el
sistema.
2.
Rellenando de refrigerante.
a. Necesita apagar el sistema y desenchufar el cable de
alimentacion exterior del la fuente de aliemntacion antes
de empezar.
b. .Abra el capuchin del deposito y llene de refrigerante
usando agua pura que puede adquirir en una famarcia o
en su distribuidor usando una jeringa.
c. Despues de que termine el primer llenado, por favor
hagalo nuevamente despues de funcionar con el
sistema durante 5 minutos.
Por favor sea cuidadoso con el liquido, no permita qu
e se derrame dentro de su ordenador. El f luido qu e conti
ene el producto puede causar irritacion en contacto co
n el cuerpo. Por favor evite todo contacto del fluido co
n el cuerpo, tenga especial cuidado con los ojos y el
contacto directo
con la piel.
[1]Extraiga el deposito [2]Rellene de refrigerante
92
 Loading...