

Page 1
Instructions for Use for M 5560
Directives d’utilisation du modèle M5560
Instrucciones para uso del M 5560
Instruções de Uso - Modelo 5560
4/03
Halogen Curing Light
Lampe de photopolymérisation à halogène
Lámpara de fotopolimerizado de luz halógena
Luz halógena de polimerização
Elipar
™
2500
K
RC
T
F
E
P
M5560
Page 2

TABLE OF CONTENTS
Page
Safety Information ............................................................................................................ 3
Diagram of Light ........................................................................................................ 3
Glossary of Symbols .................................................................................................. 3
Intended Use .............................................................................................................. 4
Caution Statements .................................................................................................... 4
Assembly ........................................................................................................................ 4
Operating Instructions .................................................................................................... 4
Cleaning Instructions ...................................................................................................... 5
Bulb Replacement .......................................................................................................... 6
Light Guide Replacement ................................................................................................ 6
Troubleshooting .............................................................................................................. 7
Curing Performance Test ................................................................................................ 7
Repair Information .......................................................................................................... 7
Accessories and Spare Parts .......................................................................................... 7
Technical Details ............................................................................................................ 7
Warranty .......................................................................................................................... 8
2
Page 3
3
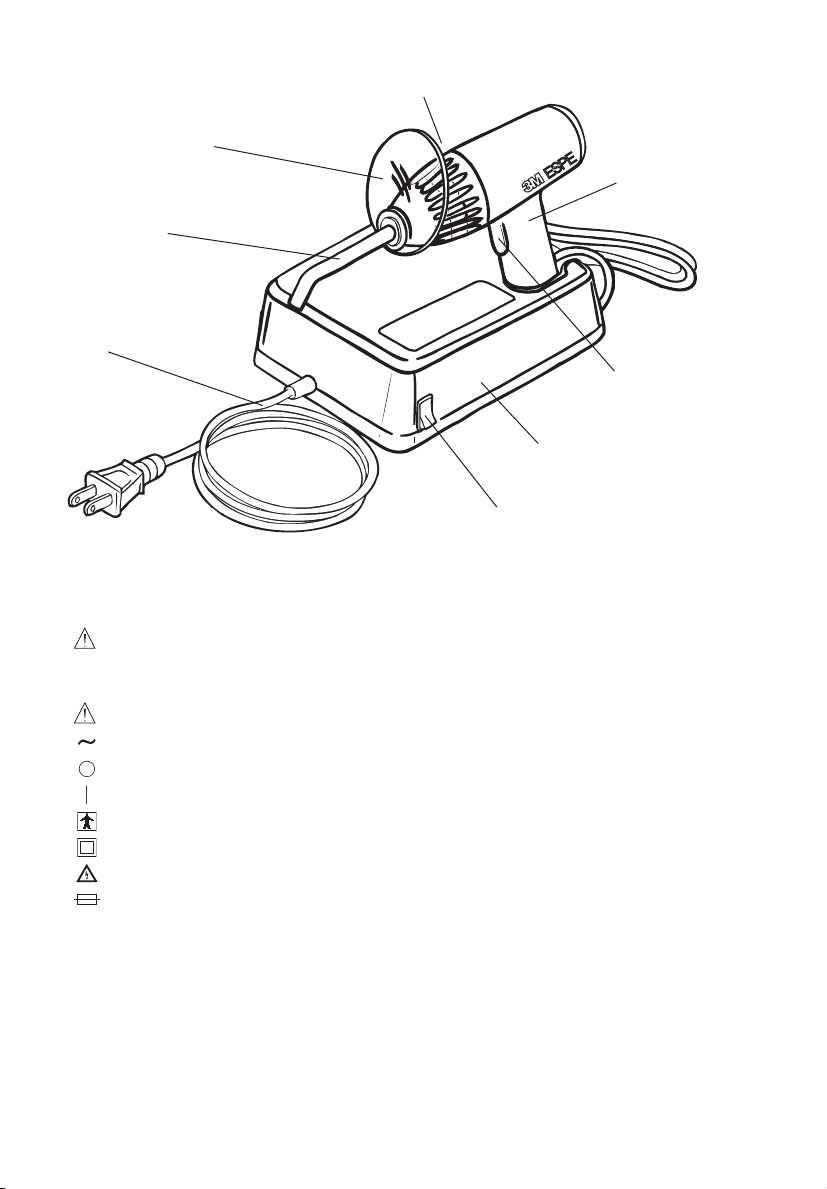
8. Main Switch and
Indicator Light
6. Power Module
2. Handpiece push
button
3. Nose Cone
5. Eyeshield
4. Light Guide
7. Power Cord
Read and understand all safety information before operating
Glossary of Symbols
Attention, Consult Accompanying Documents
Alternating Current.
OFF (Power: Disconnection from the Main).
ON (Power: Connection to the Main. Green indicator light for ON position).
Type BF Equipment
Class II Equipment - double insulated
Dangerous Voltage
Fuse
1. Handpiece
Page 4

Intended Use:
The Elipar 2500, manufactured for 3M ESPE, is a high intensity source of blue light (400-500 nm)
designed and tested for polymerizing visible light-cure dental materials such as Z100™ Restorative,
Single Bond and Vitremer™ Core Buildup/Restorative, manufactured by 3M ESPE. It consists of a power
module with handpiece holder, a handpiece that contains the light source, and a fused glass fiber optic
light guide. It has been designed for table top use or wall mount. Consult any restorative manufacturer’s
instructions for proper technique and curing times. If not using 3M ESPE products, perform a curing
performance test as outlined on page 7 of this instruction booklet.
(Note: For mounting, follow the instructions included with the mounting kit.)
Assembly
1. Slide the eyeshield onto the light guide.
2.
Insert the straight end of the light guide into the chuck mechanism in the front cover of the handpiece until
it stops solidly. The light guide may be rotated to any convenient position by rotating the nose cone.
3.
Connect the power cord into the correct supply outlet; refer to the specification label on the power module.
4. Place the handpiece in the handpiece holder.
Operating Instructions
CAUTION
Consult the restorative manufacturer’s instructions for proper technique and curing times.
CAUTION
• The fiber optic light guide is provided in a nonsterile condition and must be sterilized prior
to use. Refer to Cleaning Instructions.
• Do not immerse unit in water. Refer to Cleaning Instructions.
•Prolonged exposure may cause retinal damage.
•Prolonged exposure to an area may cause oral tissue trauma.
• The use of an eyeshield or protective glasses that effectively block light below 500 nm
wavelength is recommended for dental staff.
• Do not look directly at the light guide and do not stare at light reflected from tooth surface.
• Do not expose light to persons with extreme brightness sensitivity caused by cataract
surgery or photosensitizing drugs.
•Avoid close or prolonged viewing of the curing process.
• This product has not been designed for use with flammable anesthetics or in other
explosive environments.
• If it is necessary to change the line plug to fit your outlet type, contact a qualified service
person in your area.
• Handpiece bulb, fuse, light guide and eyeshield are the only user serviceable components.
• The power module has dangerous internal voltage. It can only be serviced by an
authorized service center.
• Do not turn off the main power switch until the fan has stopped in order to allow the unit to
cool down.
• Allow the light guide to cool to room temperature before handling to avoid risk of burn.
• Before attempting bulb replacement, make sure the cooling fan has completed the cooling
cycle and has stopped rotating to avoid risk of burn from bulb. Turn off the main switch.
Disconnect the power cord from the wall outlet.
• Do not attempt to replace any cracked or scratched optical filter or heat filter.
It is important that the heat filter be properly placed to avoid any tissue trauma. Send
curing light to a qualified service center.
• Do not operate the unit without the optical filter and heat filter.
4
Page 5

Operation:
1. Press the power (green) switch on the side of the base unit to the “I” position. The green indicator light
will glow, and the unit is now ready for use.
2. Rotate the nose cone to optimize the position of the light guide and hold the light guide no further than
2 mm from the dental material.
NOTE: When a colorless transparent matrix is used to provide anatomical form, the light guide
may be placed directly against the matrix a few seconds after polymerization has begun to avoid
movement of material.
3. Depress the handpiece push-button to activate the bulb. A single audible tone will be heard every
10 seconds. Depressing the handpiece push-button a second time will immediately deactivate
the bulb.
NOTE:The handpiece cooling fan will automatically start at the beginning of, and continue
throughout, the curing time cycle. It will continue running until the unit has cooled sufficiently.
4. When the curing operation is complete, return the handpiece to the holder.
5. To turn the base unit off, depress the power (green) switch on the side of the base unit to the
“0” position.The green indicator light will turn off.
ROUTINE CARE
Plastic
Cleaning/Disinfecting - Turn off the main power (green) switch and unplug the unit before cleaning.
The base unit and handpiece may be cleaned by wiping with a soft cloth moistened slightly with
alcohol or disinfectant. Be careful to prevent entry of liquid into components. Always wipe off any
excess alcohol or disinfectant.
NOTE: Disinfectants with basic glutaraldehyde as an active ingredient are not recommended.
Alcohol should be less than 30% concentration.
Light Guide
1. Carefully handle the light guide to avoid damaging the polished ends.
2. Periodically examine both ends of the light guide. If they are dull or white, check the cure performance
using the Curing Performance Test described in this manual.
3. Do not contaminate the light guide with unpolymerized restorative material to avoid diminished light
transmision.
4. The light guide and eyeshield should be disinfected after each use to prevent transfer of
microorganisms between patients.
Cold Sterilization - Soak the light guide in an alkaline glutaraldehyde type of cold sterilizing solution.
Follow manufacturer’s instructions regarding dilution and recommended exposure times. Use of other
types of solutions (e.g., phenolics) may cause decreased output intensity.
Autoclave - Follow manufacturer’s instructions regarding exposure times. Generally a minimum of 15 minutes
at 121° C (252° F). 15 psi (1000hPa) is recommended. Do not autoclave the light guide at temperatures
above 136° C.
Eyeshield - Dissemble the rubber O-ring from the shield. Clean any debris off the surface with a dull
instrument. Soak shield in an alkaline glutaraldehyde type of cold sterilizing solution for the minimum
amount of time recommended per manufacturer.
CAUTION
Allow the light guide to cool to room temperature before handling to avoid risk of burn.
5
Page 6

Bulb Replacement
1. Remove the nose cone by placing the thumb on a textured
snap-in tab located between two slits and the forefinger on
the other textured snap-in tab located between two slits.
Gently squeeze the tabs while pulling downward at an
angle to separate the nose cone from the handpiece.
2. Grasp the outside rim of the reflector and pull it forward,
separating the bulb pins from the socket. The bulb and
integral reflector are changed as a unit.
Note: Inspect the optical filter in the nose cone.
Remove dust or other contaminants with a soft cotton
swab. A chipped or cracked filter should be replaced
immediately by an authorized service center.
3. 3. Hold the new bulb/reflector unit by the reflector rim. Align
the bulb pins and push the unit securely into the socket.To
ensure expected performance and safety, replace bulb with
3M ESPE part number 78-8131-1662-7 only.
Note: Fingerprints on the inside of the reflector or
the bulb can adversely affect performance. Remove
fingerprints with a cotton swab moistened slightly
with alcohol.
4. Replace the nose cone by holding it at a slight angle
to the handpiece. Insert the side opposite the snap-in tabs
into the groove of the handpiece. While gently squeezing
the tabs, rotate the nose cone to align it into the handpiece
until it is fully seated and snaps into position.
5. Release the snap-in tabs and rotate the nose cone on
the handpiece to assure it is correctly positioned and
rotates freely.
Light Guide Replacement:
1. Hold the handpiece by placing one hand firmly around the nose cone area.
2. Grasp the light guide firmly with the other hand.
3. Pull light guide straight out of nose cone receptacle.
4. Push replacement light guide firmly into nose cone receptacle.
CAUTION
Allow unit to cool sufficiently before replacing the light guide. The metal sleeve of light
guide could still be very hot.
6
3
4
2
CAUTION
To avoid risk of burn, make sure the cooling fan
has completed the cooling cycle and has stopped
rotating. Turn off the main switch. Disconnect the
power cord from the wall outlet.
Do not attempt to replace any filters. Improper
placement or missing a heat filter could lead to
tissue burn. Send curing light to an authorized
service center.
1
Page 7

Troubleshooting:
Condition Remedy
Main indicator light inoperative 1. Check electrical supply.
2. Send unit to an authorized service center.
Curing bulb inoperative 1. Replace bulb.
2. Send unit to an authorized service center.
No time signal tone 1. Send unit to an authorized service center.
Reduced curing performance 1. Check intensity with hand held radiometer.
2. Clean light guide exit tip. Consult
cleaning instructions.
3. Clean optical filter in nose cone with a soft cotton swab.
4. Check intensity output.
5. Check optical filter in nose cone for chips or cracks. If
chips or cracks are present on optical filter, send unit to
an authorized service center.
6. Replace light guide.
7. Replace bulb.
8. Check intensity output.
9. Send unit to an authorized service center.
Handpiece turns on, immediately hear 1. Fan possibly blocked, therefore send unit
5 beeps and handpiece shuts off to an authorized service center.
Unit overheats. Five consecutive beeps, 1. Let unit cool down for 10 minutes.
bulb shuts off during curing cycle Restart bulb. If, after a few minutes the bulb shuts off
again after 5-beep signal, or if the bulb will not restart,
send the unit to an authorized service center.
Curing Performance Test
Lay a clean polyester matrix band on white paper and place a clear or white plastic form on the band.
The form should be a cylindrical hole 3-6 mm diameter through material 2.0-2.5 mm thick. Pack
restorative material into the form, cover with polyester and press flat. Direct the curing light at the top
surface (from less than 2 mm) of the sample and cure for the recommended time. Remove the polyester
strips and examine the condition of cure. The bottom surface should appear glassy and resist scratching
by a sharp explorer, indicating adequate cure. (Consult manufacturer’s instructions for other criteria for
correct cure).
If the surface is soft or dull, repeat the test procedure using incrementally longer curing times until
adequate cure is attained, and adjust curing time accordingly. If the adjusted time exceeds 200% of
normal, verify that the restorative material has not degenerated, or correct curing light problems as
directed in the Troubleshooting table.
Repair
Obtain qualified repair service only from 3M ESPE authorized service facilities.
Contact:
3M Health Care Service Center
Suite 200 Bldg. 502
3350 Granada Ave. North
Oakdale, MN 55128
(800) 292-6298
Replacement Parts and Accessories - Can be purchased from authorized dealer
Item 3M ESPE Stock Number
Bulb/12V, 75W 78-8131-1662-7
Light guide - 8 mm diameter 78-8131-1657-7
Light guide - 13 mm diameter 78-8131-1658-5
Mounting Kit 78-8131-1663-5
Eyeshield - 8 mm 78-8131-1660-1
Eyeshield - 13mm 78-8131-1661-9
Specifications
Note: This manual is used for all versions of the 3M ESPE Elipar 2500, M5560.
Operation of equipment - Continuous Duty
- Unit will operate continuously for 5 minutes before automatic shutoff, at which time
the unit may be restarted immediately
7
Page 8

Light Source:
- 75 watt tungsten/halogen bulb. Average life 4000 cycles at 20 seconds each.
- Optically filtered light output for peak power in 400-500 nm band.
- Fused fiber-optic light guide.
- 13 mm and 8 mm diameter optional light guide aperture
Electrical:
- Electronically regulated bulb voltage
- 106 VA input power
- Fuse: See product name plate for correct rating.
- Model versions for worldwide electrical supply characteristics. See product nameplate for correct
supply voltage.
Electrical versions available: 50/60 Hz
240V; 230V; 220V; 120V; 110V; 100V
Note: Be sure your unit is correctly rated for your specific electrical supply
- Unit is double insulated and uses plug configurations according to individual primary
country specifications.
Protective features:
- Thermal overload protector in handpiece.
- Optical filter blocks light outside peak curing band.
- Protection against electrical shock (Type BF)
- Double insulated power supply
-Low voltage handpiece circuit.
- Protection against ingress of water: ordinary
Transport and Storage Conditions:
- Ambient temperature range -40° C to +70° C
- Relative humidity range of 10% to 80%, excluding condensation
- Atmospheric pressure of 500 hPa to 1060 hPa
Dimensions:
-Power module: 2.7 in. x 6.8 in. x 5.5 in. (69 mm x 173 mm x 141 mm) (2.7kg)
- Handpiece: 6.6 in. x 2.1 in. x 5.5 in. (167 mm x 53 mm x 139 mm) (0.3kg)
Safety Regulations:
M5560 fulfills the following standards:
- UL Standard 2601-1 /CSA C22.2 No. 601.1/EN60601-1
- Other country specific deviations to IEC601-1 through CB certification.
Electro Magnetical Compatibility
M5560 complies with IEC 601-1-2 Draft 2
No person is authorized to provide any information which deviates from the information provided in this
instruction sheet.
Warranty
3M ESPE warrants this product will be free from defects in material and manufacture for a period of two
years from date of purchase. 3M ESPE MAKES NO OTHER WARRANTIES INCLUDING ANY IMPLIED
WARRANTY OF MERCHANTABILITY OR FITNESS FOR A PARTICULAR PURPOSE. User is
responsible for determining the suitability of the product for user's application. If this product is defective
within the warranty period, your exclusive remedy and 3M ESPE's sole obligation shall be repair or
replacement of the unit if the unit was new when it was purchased and it is promptly returned to the
following address:
3M Health Care Service Center
Suite 200, Bldg. 502
3350 Granada Ave. North
Oakdale, MN 55128
800 292 -6298
This warranty does not cover lamps and fiber optic light guides.
Limitation of Liability
Except where prohibited by law, 3M ESPE will not be liable for any loss or damage arising from this
product, whether direct, indirect, special, incidental or consequential, regardless of the theory asserted,
including warranty, contract, negligence or strict liability.
8
 Loading...