

Page 1
Software Guide for Windows XP and Windows 2000
For ET 3200 Series Computers
About this guide
This document provides instructions to help get your
3M Dynapro ET 3200 series computer up and running as
quickly as possible with driver software for Windows XP
and Windows 2000 operating systems.
This document explains how to:
Customize tou ch responses and othe r software settin gs
to suit your application.
Download a TouchSurroundTM button definition file.
Create and change TouchSurround buttons.
Copy a TouchSurround button definition file to other
computers.
Set a backlights saver with a special “safe touch”
feature.
There ar e also app endices with:
A list of virtual keys for defining TouchSurround
buttons.
Troublesho oting guideline s.
Instructions on how to install and uninstall driver
software.
Customizing touch responses
Touch responses can be configured using the following
tools.
Beep on Touch
Double touch settings (Double Touch Speed, Timed
Double Touch Delay)
Drag and Drop
1. To change any of these settings you must open the
Configuration Utility dialog box. Depending on your
computer’s operating system, from the Windows
desktop, select:
For Windows XP operating system:
Start » All Programs » Touch » Configurati on.
or
For Windows 2000 operating system:
Start » Programs » Touch » Configuration.
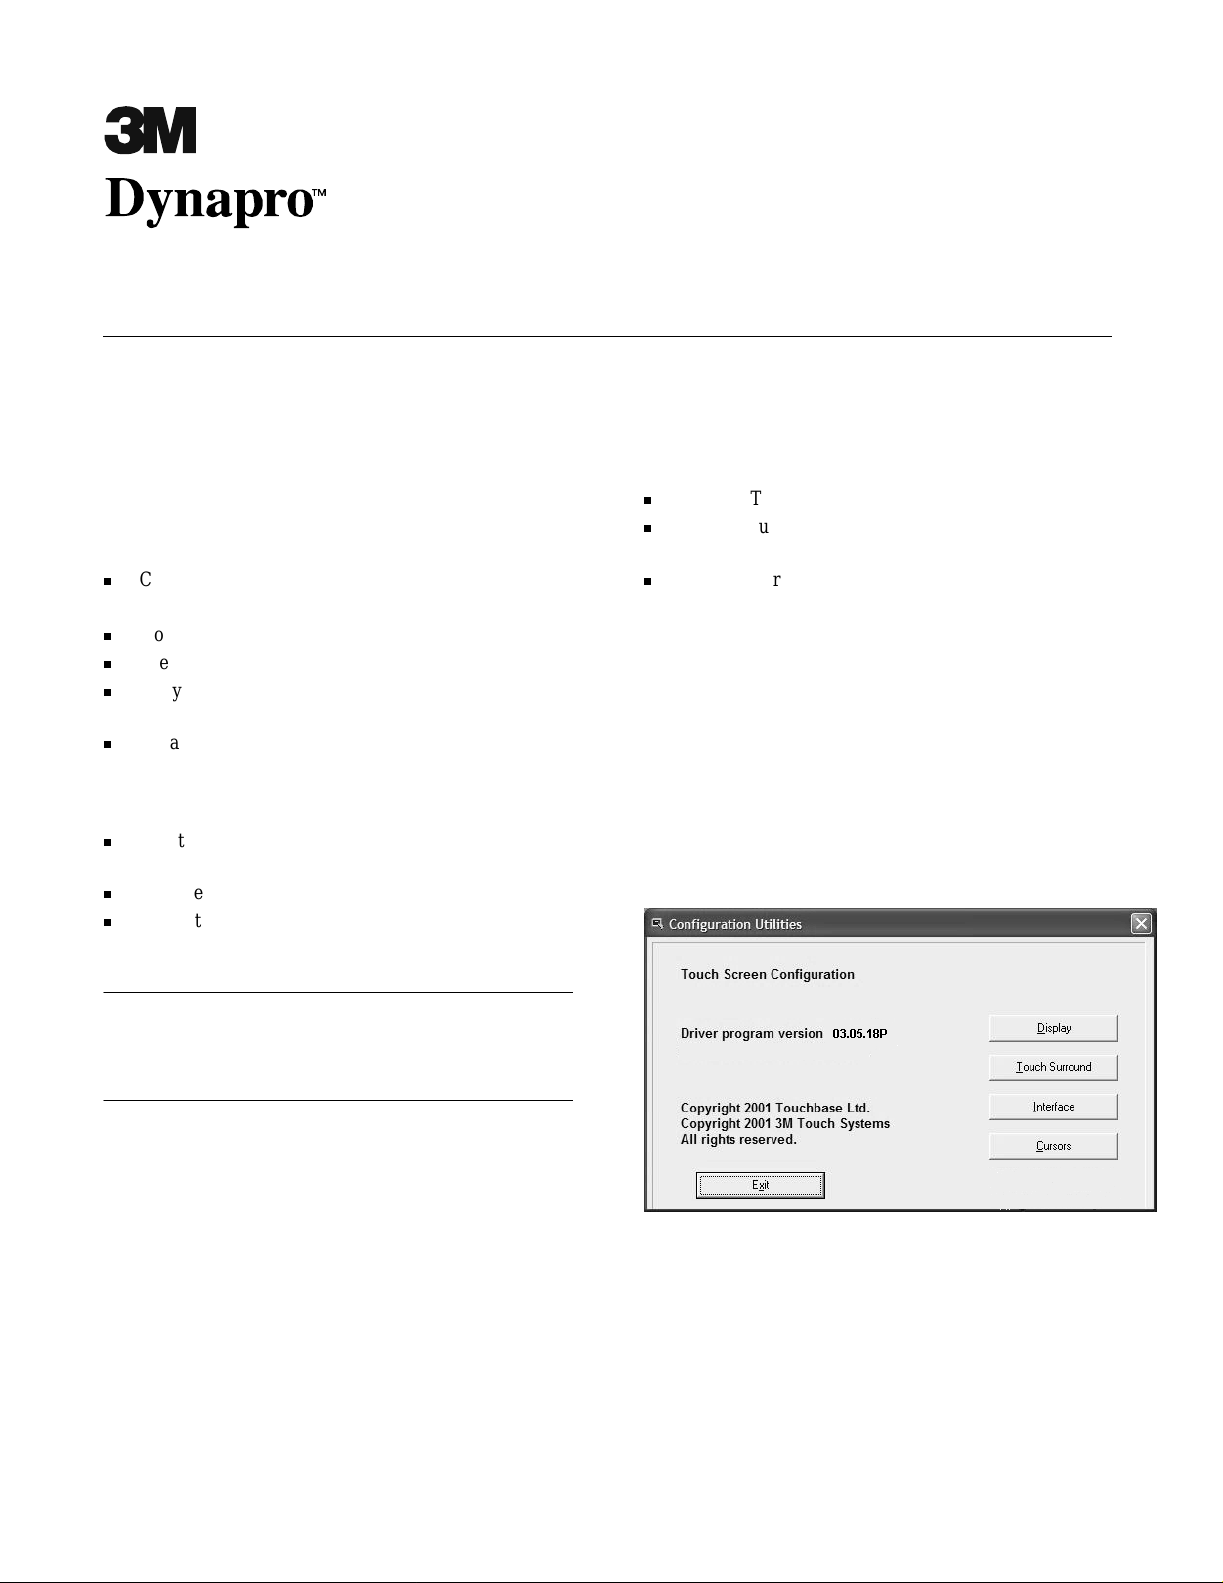
The Configuration Utilitie s dialog box appears.
Important
If your ET 3200 series computer was shipped with softwar e
drivers for Windows XP/2000, you can ignore the appendix on
installing/uninstalling drivers.
3M Touch Systems Proprietary Information
2. In the Configuration Utilities di alog box, select
Display.
1
Page 2

Software Guid e for Windows XP and Windows 2000
The Display dial og box appears.
3. Follow the instru ctions below for the touch response
setting(s) (Beep on Touch, Double Touch sett ings,
Drag and Drop) that you wish to change. Changes to
touch response settings are saved immediately.
4. When all desired change s are made to touch response
settings, select
OK to exit the Display dialog box.
Beep on Touch
Select the Beep on Touch chec k box to have the computer
beep on each touch. It is useful to have Beep on Touch
enabled while setting other configuration options.
Double touch settings
The touch screen can d etect a double t ouch. A do uble t ouch
has the same effect as the double click of a mouse.
There are two double touch features:
Double Touch Speed
Timed Double Touch
Doubl e Touch Speed
The Double Touch Speed slider allows you to adjust the
time betwee n t wo touc hes tha t will b e ac cepte d as a dou ble
touch (instead of be ing read as two separate touches).
To set Double Touch Speed:
1. Touch the screen twic e quickly (on the Test Box or
another icon), as if you were double-clic ki ng a mouse.
2. Adjust the Double Touch Speed slider as desired
between Slow (minimum) and Fast ( maxim um).
Tips
If Double Touch Speed is set at Slow (minimum ), what you
intend to be two separate touches may be recog nized as a
double touch.
If Double Touch Speed is set at Fast (maximum), it may be
difficult to generate a double touch. In other words, two or
more successive touches may be recognized as a single
touch.
3. To test a new setting, double touch the Test Box at
your preferred double touch speed.
If the face in the Test Box changes (either from
‘sad’ to ‘happy’ or from ‘ha ppy’ to ‘sad’), the test
is successful.
If the fa ce does n’ t cha nge, adj us t th e s li der a nd tr y
double touching the Test Box again. Repeat the
procedure of a djus tin g and te sti ng un til you ha ve a
successful test.
Timed Do ubl e Touch
This allows you to ge nerate a double touch effect with a
single touch.
To set Timed Double Touch, follow these steps:
1. If it is not already sele cted, select the
check box.
Touch
Timed Double
2. Touch the Test Box and hold your touch there. When
the fa ce in the Test Bo x changes (either from ‘sad’ t o
‘happy’ or from ‘happy’ to ‘sad’), the double touch
has been generated.
(With Beep on Touch enabl ed, you can choose an
interval bet ween touches by listening for an initial
beep followed by a second beep.)
3. Move the Ti med Double Touch Delay slider between
Short and Long to decrease or increase the time
between the initial touch and the generation of a
double touch.
3M Touch Systems Proprietary Information
2
Page 3
Tips
If you position the slider at Short (minimum delay), it takes
about 0.2 seconds to generate a double touch.
If you position the slider at Long (maximum delay), it takes
about tw o seconds to generate a doubl e touch.
3M DynaproTM ET 3200 Series Computers
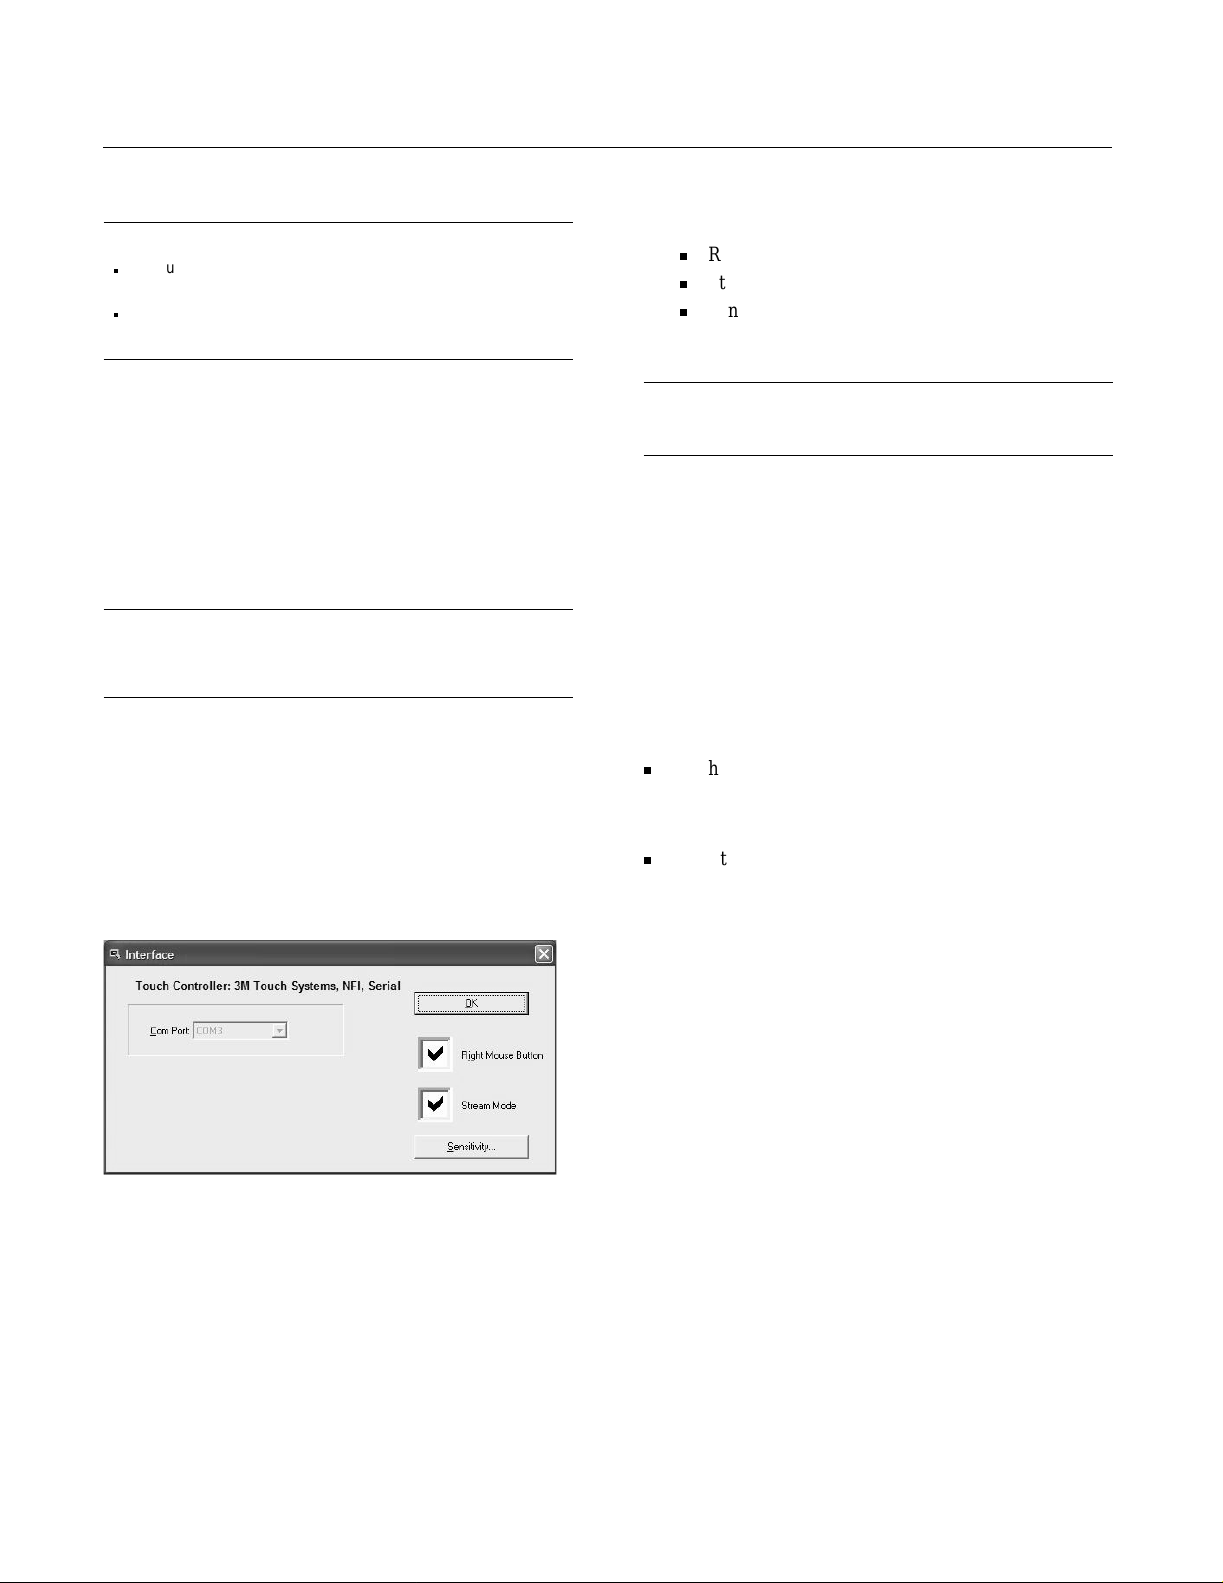
2. Make your desired changes to Interface set tings for:
Right Mouse Button
Stream Mode
Sensitivity
Information on each Interface setting appe ars below
4. Adjust and test the setting until the time between
touches is right for your application.
Drag & Dr op
Selecting t he Drag & Drop check box al lows you to select
an object on the scre en, drag i t, and t hen — by relea sing the
touch — drop it at a new location on the screen.
Important
For optimal performance, do not choose Drag & Drop unless
your application requi res it.
Changing controller interface settings
To change controller int erface set tings, follow these steps:
1. In the Configuration Utilitie s dialog box, select
Interface.
The Interface dialog box appears.
Important
The COM port is not configurable.
3. Changes to Interface settings are saved immediately.
When you are finished making changes, select
OK to
exit the Interf ac e dialog box.
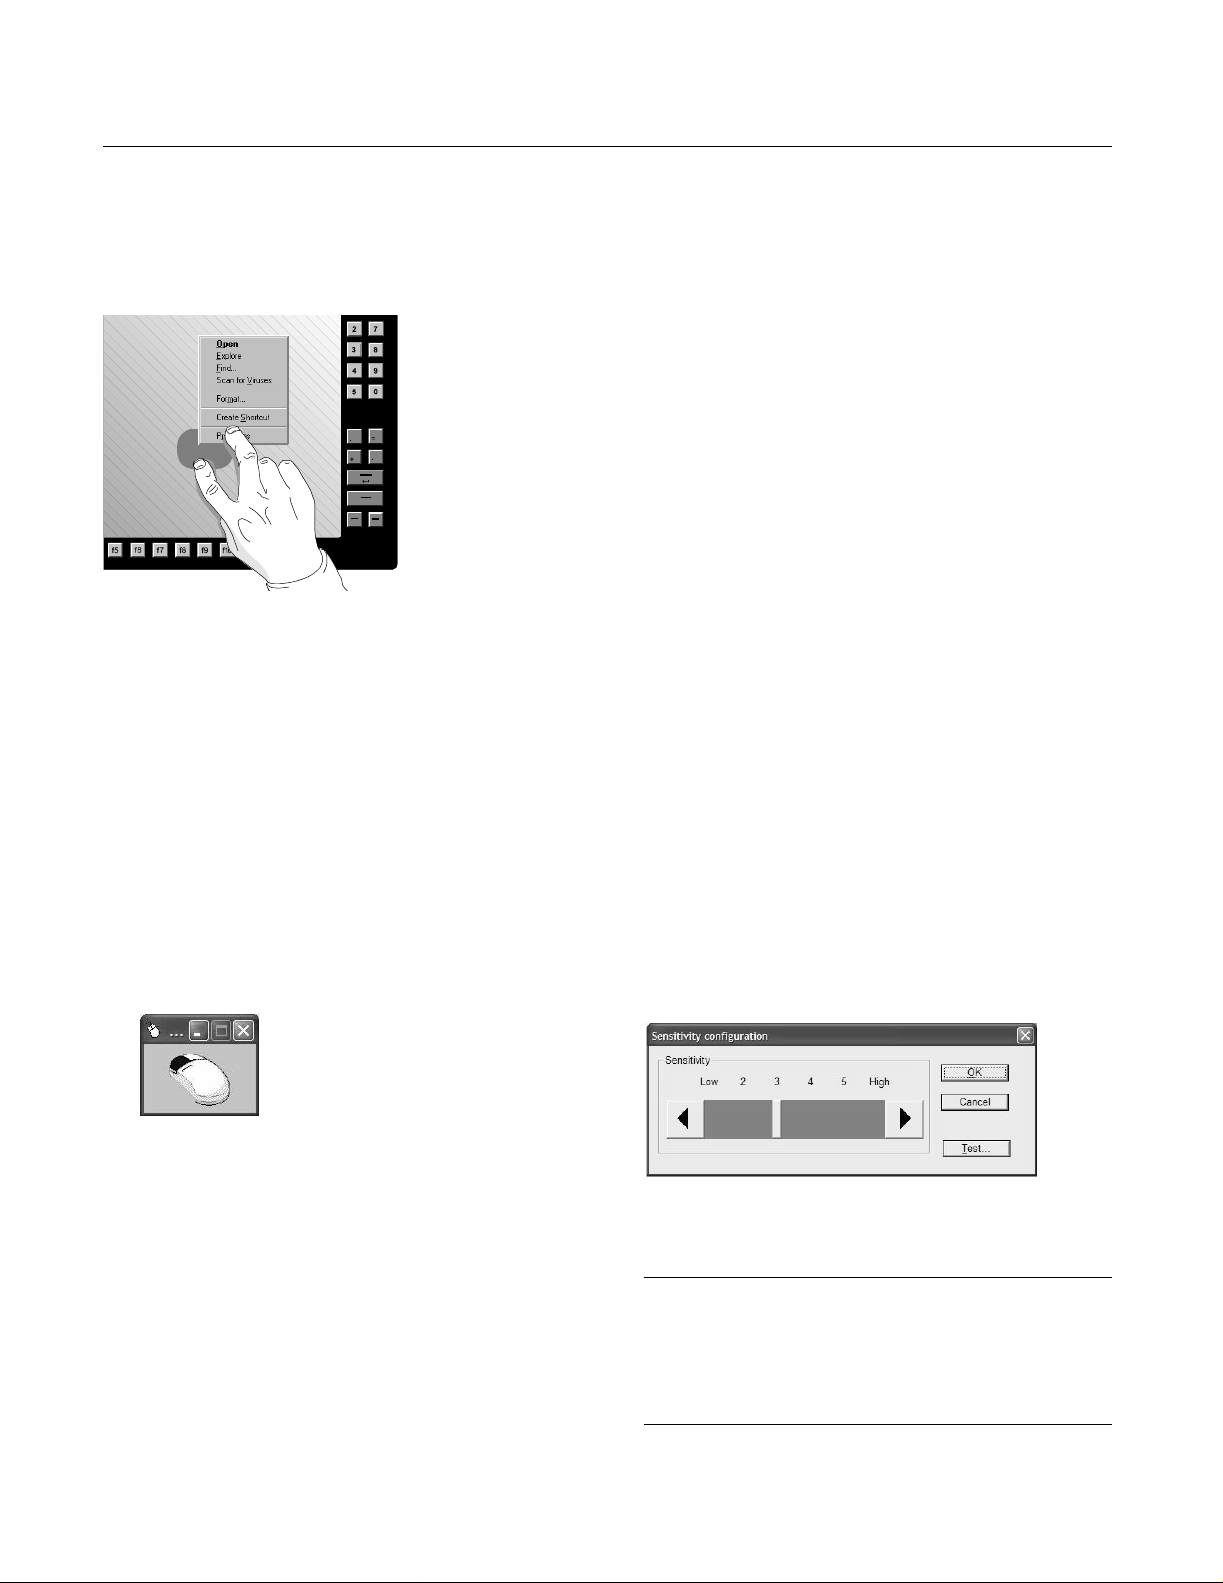
Right mouse button functions
With right mouse button functions enabled, you can
display th e same menu by t ouch that wou ld appear by rightclicking a mouse.
Right mouse button func tions can be achieved by using one
of two tools:
Right Mouse Button (set in the Interface dialog box).
This is enable d by defa ult.
or
Event Selector
If you regularly need ri ght mouse button functionality, the
Right Mouse Butt on is the most eff icie nt to ol. Howeve r, if
you need right mouse button functions only occasionally,
you might prefer to use a tool called the Event Selector.
Right Mouse Button
To use the Ri g h t M o us e Bu t to n , fol l ow th e se s t ep s:
1. In the Interface dialog box, select the
check box.
Button
2. Touch an object on the screen to select it. Leave your
finger there.
3M Touch Systems Proprietary Information
3
Right Mouse
Page 4
Software Guid e for Windows XP and Windows 2000
3. Using another finger, brie fly touch the screen
diagonally opposite the first touch.
The right-mouse menu appears
Event Selector
The Event Sele ctor is a n icon that can reside on the deskt op
and allow the user to ch ange a single touch from a left
mouse button func tion (the def ault) to a right mouse but ton
function.
To use the Ev en t Selector , fol lo w th e se s te p s:
1. Depending on your computer’s operati ng system,
from the Windows desktop, select:
For Windows XP oper a ting sy s tem:
Start » All Programs » Touch » Event Selector.
or
For Windows 2000 operating system:
Start » Programs » Touch » Event Selector.
2. The Event Sele ctor wind ow open s with t he lef t mous e
button (the default) selected.
4. Select an obje ct to which you want to apply a right
mouse button funct ion.
As soon as you make one selection with the Event
Selector set for a right mouse button event, the Event
Selector will toggle back to the left mouse button
function.
Stream Mode
Stream Mode, which is ena bled by default, helps ensure
that the host co m pu ter is im m e di at ely inf or med whe n a
touch is withdrawn. This feature is especiall y desirable for
applications where safety is a concern (e.g., industrial
settings).
Stream Mode compensa tes for any possible “nois e”
between the touch s creen controller and the computer by
sending three “untouch” messages as soon as a touch is
withdrawn and then sending regular subsequent untouch
mess a ges until th e next to u c h occur s.
Sensitivity
Use the Sensitivi ty Configurati on dialog box to adjust how
readily a t ouch is detect ed by the touch s creen. The higher
the setting, the mor e sensitive is the screen .
A very high setting is useful when the user is wearing
heavy gloves. A lower setting is useful when an ungloved
finger is used.
To adjust Sens itivity, follow these steps:
1. From the Interface dialog box, select the
button.
The Sensitivity Configuration dialog box appears.
Sensitivity
3. To turn on right mouse butt on function, select the
right button on the mouse icon. The right mouse
button will be selected and the left mouse button will
not be.
3M Touch Systems Proprietary Information
2. To reduce sensitivity, press the left arrow. To inc rease
sensitivity , press the right arrow.
Important
If you save sensiti vity at “Low”, the l owest setting, an error
message may appear after the unit is powered down and
powered up again (or after the unit is restarted). If such a
message does appear, the error box may be closed and the
‘error’ message ignored.
4
Page 5
3M DynaproTM ET 3200 Series Computers
3. T o che ck a new touch screen sensiti vit y sett ing, se lect
the T est butto n. Note: It may tak e up t o 10 seconds f or
a change of sensitivity to take effect.
4. Adjust and test until you are satisfied with the
sensitivity setting .
5. To save sensit ivity changes, select
Interface dia log box and then select
OK to return to the
OK to return to
the Configuration Utilities dialog box.
Cursor setting
If an appli cati on requi res that t he cu rsor/po int er not app ear
on the display , it can be hidden.
Important
Before setti ng the cur sor to Bla nk , be sure th at your
application does not require the regular use of a mouse. A
blank cu rsor will make it very difficult to use a mouse.
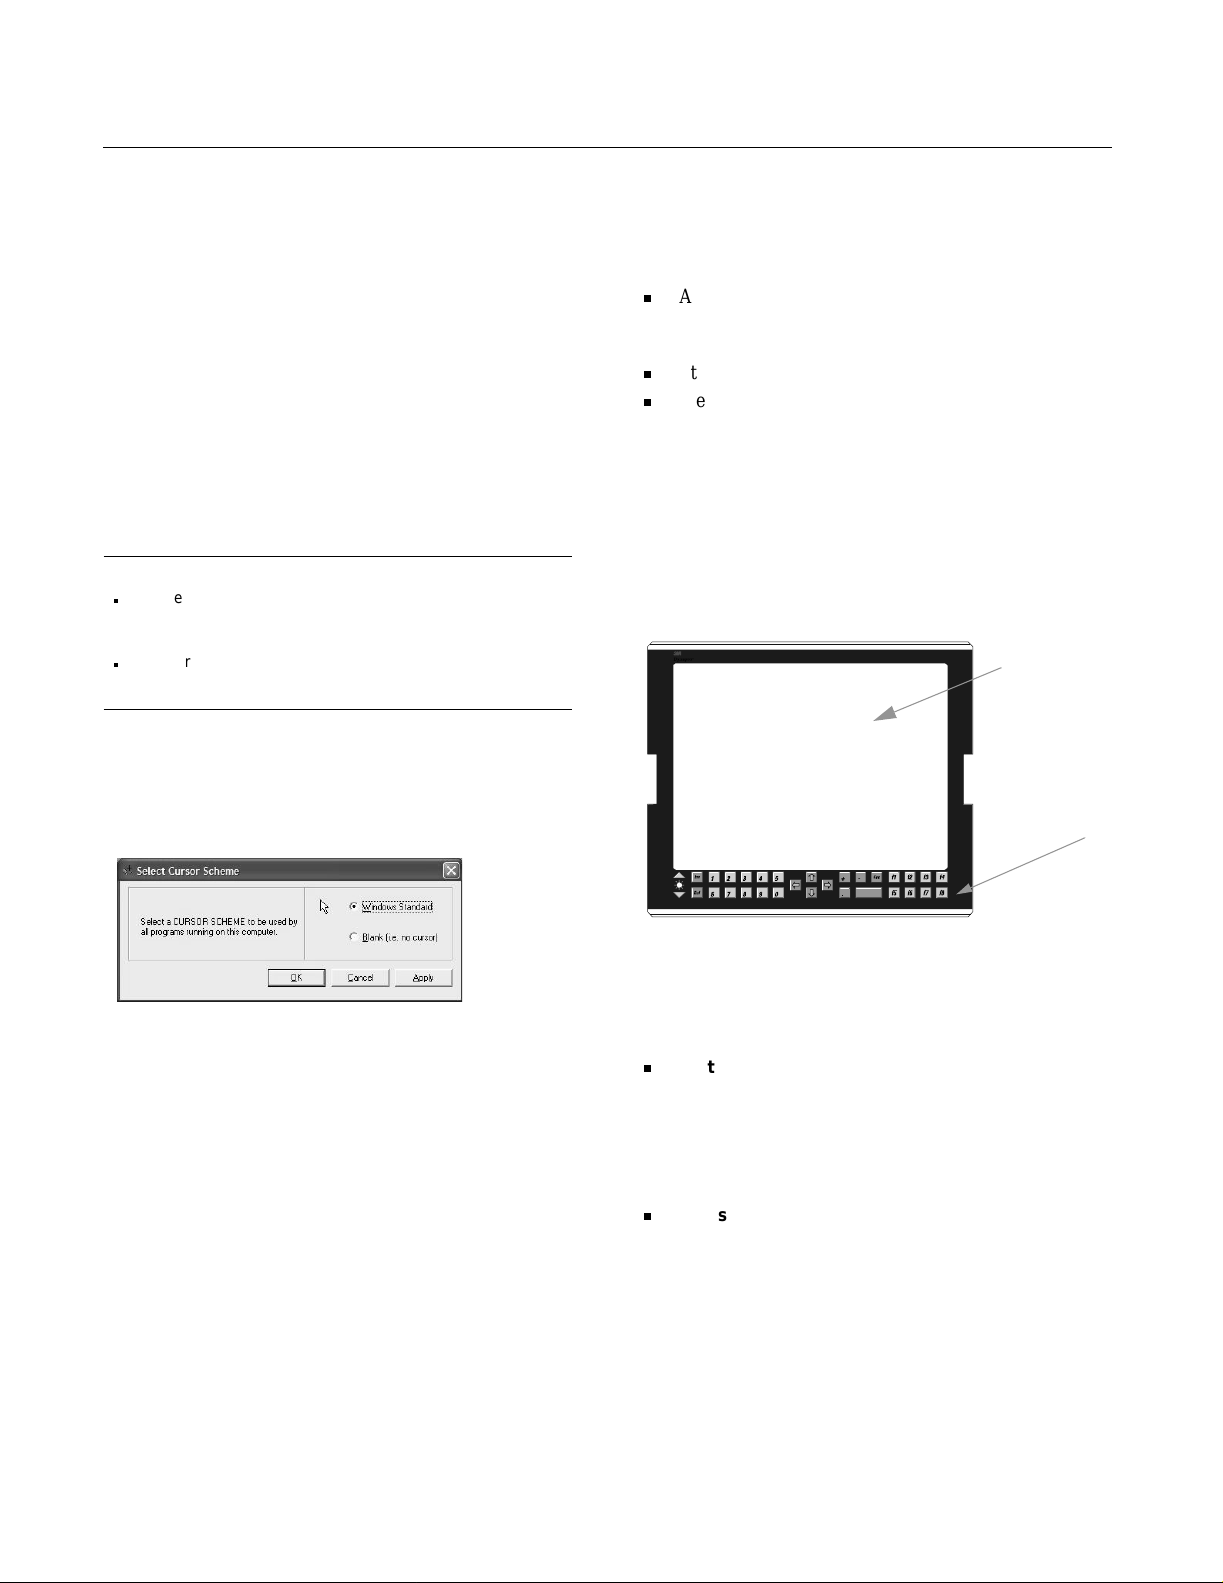
The cursor choice made in the Select Cursor Scheme dialog
box affects all programs running on the host computer.
To set a Blan k cursor, follow these steps:
1. From the Configuration Utiliti es dialog box, select
Cursors.
The Select Cursor Schem e dia log box appears.
TouchSurroundTM buttons
This section includes :
An overview of TouchSurrou nd and how to use a
graphic underla y in configuring touch-sensitive
buttons.
Steps for downloadi ng a button definition file.
Steps for creating and changing TouchSurround
buttons.
TouchSurround overview
The TouchSurround is the area surrounding the di sp lay
area of a touch screen. The TouchSurround can be
configured with touch-sensitive buttons to perform
keyboard and other functions.
Display area
TouchSurround
2. To hide the cursor, select
3. Select
OK (or Apply) to save settings.
Blank.
To help set up TouchSurround buttons, ther e is a graphic
underlay beneath the touch screen of an ET 3200 series
computer.
Your graphic underla y will be one of the following:
A standard TouchSurround under lay supplied by
3M Touch System s. The driver software for
Windows XP and Windows 2000 comes with predefined buttons for the standard underlay. (The
illustra tion above i s an example of a standard unde rlay
for the 3M Dynapro ET 3250 Computer.)
A custom underlay fr om 3M Touch System s. If you
have a custom und erl ay from 3M To uch Sy stems, you
probably did not receive a button definition file to
match your underlay . You will need to set your own
button d efinitions. For instructions on how to set your
own button defin iti ons, see “Creating a bu tto n” belo w.
3M Touch Systems Proprietary Information
5
Page 6
A custom underlay designed by you or another
vendor
will no t co me with p re-defi ned butto ns unles s
you originally ordered a 3M Touch Systems graphic
underlay with your uni t. For instruction s on how to set
your own button definitions, see “Creating a button”
below.
Downloading TouchSurroundTM button definition files
TouchSurround button definition files are included with
the Windows XP/2000 driver software. There is a button
definition file for each model of the ET 3200 series
computers.
To save the butto n definiti on fil e for use wi th your ET 3200
series computer:
1. Find the button definition registry file on the floppy
disk that came with your uni t. Pick the registry file
that has a name similar to you r computer.
Registry files for ET 3200 series computers are:
3210LN.reg (for ET 3210 “Long” computer)
3210SN.reg (for ET 3210 “Short” computer)
3250.reg (for ET 3250 computer)
3250MD.reg (for ET 3250 computer with moisture
deflector.
Software Guid e for Windows XP and Windows 2000
Creating a button
Summary
To create a new TouchSurr ound but ton, fol low thes e steps :
1. Name the new button and define its press and/or
releas e ac ti o n s .
2. Align the new button on the touch screen.
3. Review and, if necess ary, edit the definition.
Important
If you do not need to create new TouchSurround buttons, but
want to change the definition of an existing button, refer to
“Step 3: Checking and editing a button” on page 9.
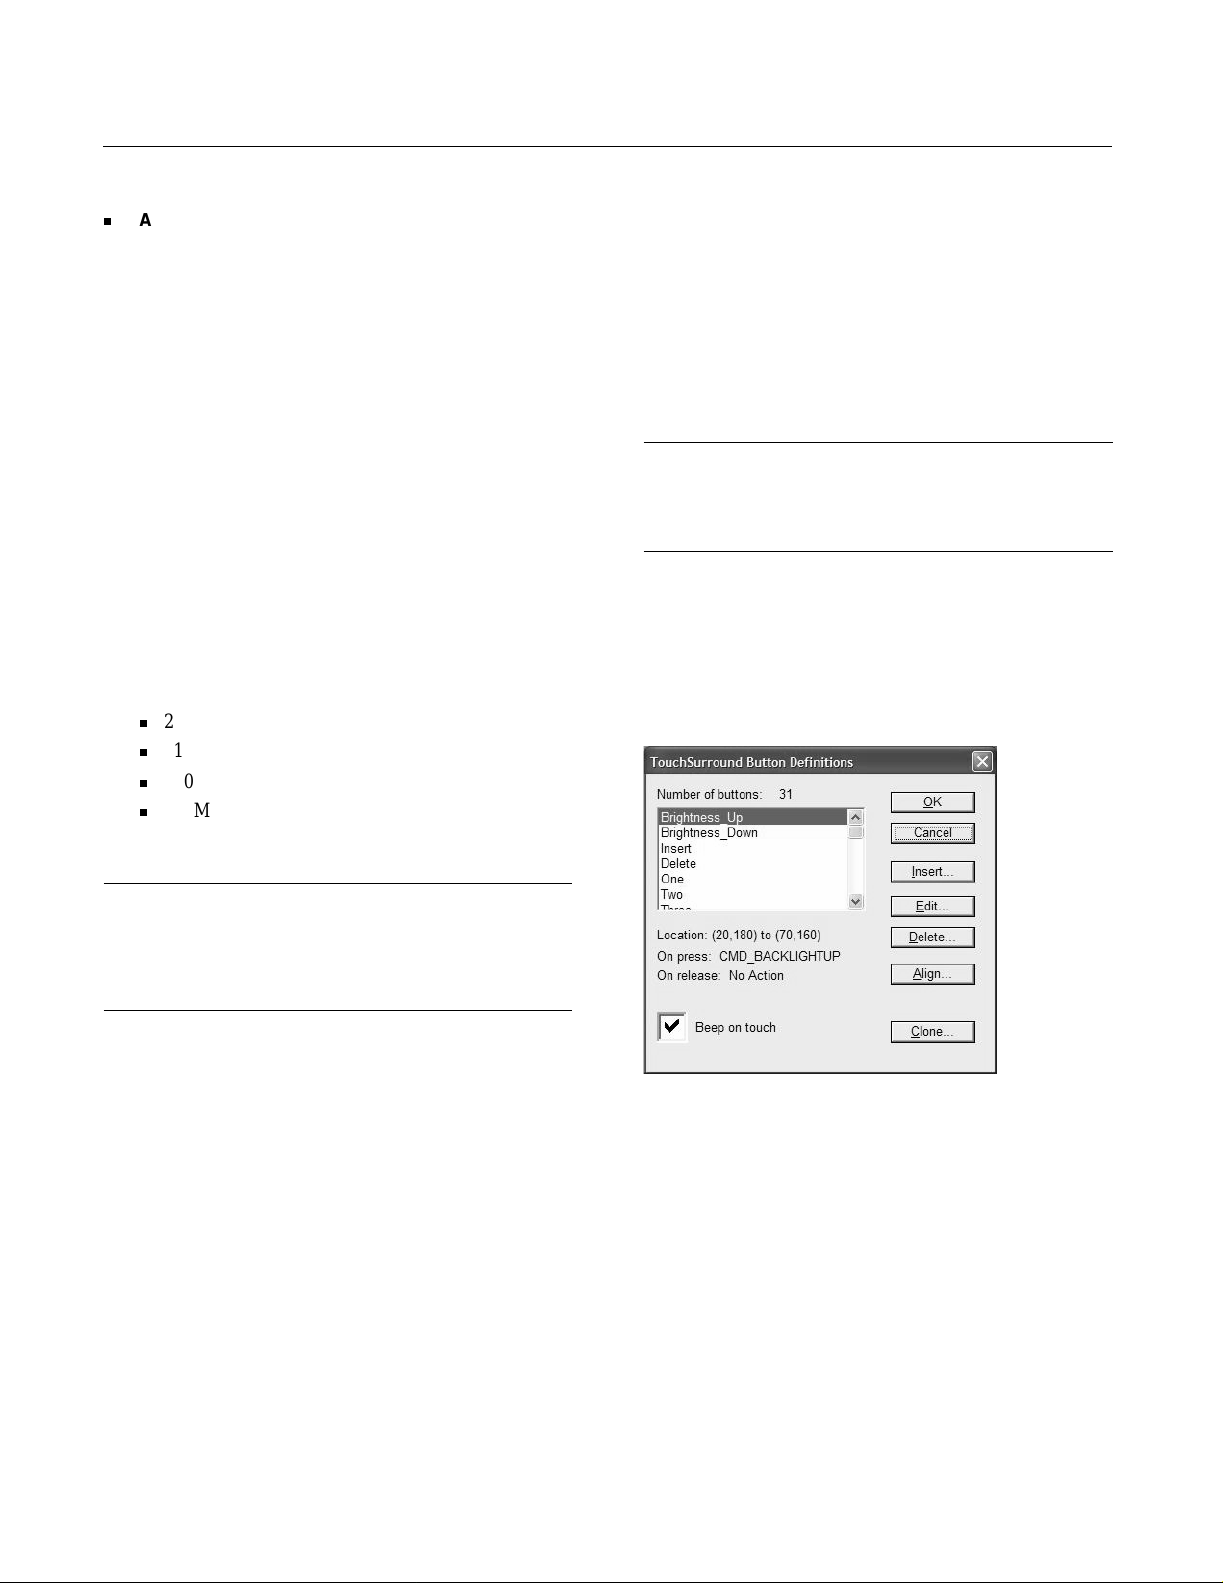
Step 1: Naming and defining a button
1. From the Configuration Utilities dialog box, sele ct
TouchSurround.
The TouchSurround Button Definitions dialog box
appears.
Important
Be sure t o choos e th e corr ect re gist ry fi le for your E T 3200 ser ies
computer. Registry files are not interchangeable (e.g., a registry
file fo r an E T 3210 c omp ut er wil l n ot f u nct i on p r op erl y wi t h an ET
3250 computer).
2. Double-click on the button definition registry file
appropriate for your computer.
A dialog box appears to ch eck that you want to copy
the button definition file to your computer’s registry.
3. Select
Yes. A dialog box appears confirming that the
button definition file was copied successfully.
4. Select
5. Select
OK.
OK in the TouchSurround Button Definitions
dialog box to save the downloaded button defi nition
file.
3M Touch Systems Proprietary Information
6
Page 7

3M DynaproTM ET 3200 Series Computers
2. Select Insert. The Define A Button dialog box
appears.
3. Select “NewButton” and type in its place the name of
the button you want to c r eate.
Important
Button names must be unique. Duplicate names are not
accepted.
Spaces in button names are not accepted.
By choosing from the list of button actions in the
Button Pres s and Button Release drop-down menus,
you can define a button to execute a keyboard
command (using “Virtual Keys”) or to insert an
ASCII character.
4. In the Define A Button dialog box, find the drop-
down menus for Button Press and Button Rele ase.
A TouchSurround
TM
button can be defined to perform
an action when:
Pressed
Released
Both pressed and re leased
5. From the Button Press and/or the Button Release
menus, select a Virtual Key (VK) or ASCII character:
Vi rtual keys and their functions are listed in
Appendix A.
ASCII key. To define a butt on to inject an ASCII
key, select
ASCII Key in the Button Press and/or
Button Release box (or use the keyboard s hortcut:
‘a’) and then enter the desired ASCII character or
ASCII string in the check box labelled “Key(s)”.
To modify an ASCII key definition, select Alt,
Ctrl, or Shi f t.
ASCII definitions may also be modified by
checking Autorepeat or Sticky St ate:
Autorepeat. Select Autorepeat if you want an
ASCII character or string to be repeated for as
long as there is an uninterrupted touch.
3M Touch Systems Proprietary Information
7
Page 8

Software Guid e for Windows XP and Windows 2000
Sti cky state (for defi ning a button to “hold down”
a Shift, Alt, or Ctrl key). Select Sticky state to
create a butt on tha t will h ave t he eff ec t of “ hol ding
down” a modifie r (Alt , Ctrl , or Shi ft) and app lying
the modifier to the ne xt button pressed.
To define a sticky stat e button, in the Define a
Button dialog box, follow these steps:
a. Give the sticky button a name in the Name
box.
b. Select the Sticky state check box.
c. Choose whether you want the sticky button to
be defined to “hold down” the Alt, Ctrl, or
Shift key, and then select the appropriate
modifier box (Alt, Ctrl, or S hift) in the Button
Press section of the dialog box.
Important
A Sticky state button may be defined:
With Button Press fields, but not with Button Release fields.
With only one modifier check box (Alt, Ctrl, or Shift) selected.
A button de fin ed wit h St ic ky s ta te w i ll mo di fy a b utt on d ef ine d
as an ASCII character, but will not modify one defined as an
ASCII string.
For example, pressing a button defined as a sticky shift key
and then pressing a butto n defined as “c” (while a wor d
processing program is active) will produce a “C”. However,
pressing a sticky shift key a nd then pressing a button defi ned
as “cat” will produce “cat” (not “CAT ” or “Cat”).
d. After al igning the button (see “Step 2:
Aligning a button”), the sticky button , when
touched, will apply its function to the next
button pressed.
5. To save the defini tion of your new button, sele ct
to return to the TouchSurround
TM
Button Definitions
OK
dialog box.
6. If Beep on Touch is desired for the new button, select
the name of the button in th e button defi nit ion lis t and
then select the Beep on Touch check box.
7. To finish creating the new button, follow the steps in
“Step 2: Aligning a button” below.
Defining a button to hold down the shift key
(A Sticky State example)
Y ou ca n de fine a but ton t o ap ply a Shif t fu ncti on to the next butt on
pressed. Here’s how:
1. Create a button and name it Shift (or anoth er name of your
choosing).
2. In the Define a Button dialog box, select the Sticky S tate
chec k bo x.
3. In Button Press field, select None.
4. S elec t the Shi ft chec k box.
Follow the other steps in this section (Aligning a button, Checking
and edit ing a button).
Step 2: Aligning a button
Setting t he location of a but ton on the t ouch scr een is cal led
aligning. But ton alignment defines th e x an d y coordina tes
of a TouchSurround button on the touc h screen.
Guidelines
When al ig n i ng a but to n , f ol l ow th e s e st ep s :
Do not rest your hands anywhe re on the surfa ce of the
touch screen or bezel. The presence of a hand on the
touch screen will affect the button coordinates.
Use an alig nmen t to o l fo r g r ea test accu ra c y .
Position the but ton at least 0.25 inches (6.4mm) from
the edg e of the bezel.
Make sure that the size of the button is at least as large
as the fingerprint of an index finger: about 0.7 inches
(12.7mm) on each side.
Steps
To align a button, follow these steps:
1. In the TouchSurround But ton Definitions dialog box,
select the name of th e button for which you want to
set coordina tes.
2. Select
Align.
3. Follo w th e on - s c r een inst r u ct io n s to s el ect the
location of the button’s top left corner and bottom
right corner. Hold the alignment tool at a 90-degree
angle to the surf ac e of the touch screen.
4. To save the button alignment, select
OK to return to
the Configuration Utilities dialog box. If you do not
return to the Configuration Utilities dial og box, your
button definition and alignment settings will not be
saved.
3M Touch Systems Proprietary Information
8
Page 9

3M DynaproTM ET 3200 Series Computers
Step 3: Checking and editing a button
To check and edit the configuration of a button, follow
these st ep s :
1. Open the Configurat ion Utilities dialog box.
2. Select
TouchSurround
TM
to open the TouchSurround
Button Defin itions dialog box.
3. From the list of button na mes, s ele ct the on e you want
to check .
Information about the selected button appears in the
dialog box (below the button list).
Location shows the x and y coordi nates of the
button on the screen (coordinates of the butt on’s
top left corner and bottom r ight corner). These
coordinates were set when you aligned the button
in Step 2.
On press and On release show the press and
release actions you set when you defined the
button in Step 2.
Beep on touch check box shows whether the
TouchSurround button is defined to beep when
pressed.
Other information may app ear between On
release
and the Beep on touch check box.
In the scree n cap ture a bove, for example, the re is a
notice that the button selected in the
TouchSurround Button Definition dialog box is
overlapping another button.
T o e nsure op tim al accuracy of button s, o ne or both
of the overlapping buttons should be redefined so
ther e is no ov erla p .
4. If you want to edi t the configuration of a button, refer
to the following ta ble to find the steps for making the
desired change.
To make this
kind of edit to a
button...
Change name
Change
press/release
action(s)
Change
location on
touch screen
Delete
...Follow these steps
1. In TouchSurround Button Definitions
dialog box, select the button name you
want to change.
2. Select Edit. The Define A Button dialog
box appe ars, showing the na me of the
selecte d bu tto n you wan t to edi t.
3. Select the name of the button you want to
change an d type in t he lis t box the bu tto n’s
new name.
4. To save changes, select
the TouchSurround Button Definitions
dialog box and then select
the Configuration Utilities dialog box.
1. In TouchSurround Button Definitions
dialog box, select the button name you
want to change.
2. Select
3. Make de sire d ch ange s to t he but to n pre ss
4. To save changes, select
Edit. The Define A Button dialog
box appe ars, showing the na me in the list
box of the button you want to edit.
and/or r elease actions ( for details, see
“Step 1: Naming and defining a button”).
the TouchSurround Button Definitions
dialog box and then either : (a) select
OK to return to
OK to return to
OK to return to
Align and follow the screen prompts; or
(b) select
Utilities dialog box.
1. In TouchSurround Button Definitions
dialog box, sel ect the name of the button
you want to change.
2. Select
3. The new location information is saved
when alignment is finished.
1. In TouchSurround Button Definitions
dialog box, sel ect the name of the button
you want to change.
2. Select
3. Select
OK to return to the Configuration
Align. Follow the screen prompts.
Delete.
OK to save the deleti on .
3M Touch Systems Proprietary Information
9
Page 10

Software Guid e for Windows XP and Windows 2000
Copying custom button definitions to another computer
To copy button definitions from one computer
(the “source”) to another (the “ target”), follow these steps:
1. In the TouchSurround
box of the source com puter, select
definitions will be copied.
2. A message will appear confirming the name and
location of the copied button definition file.
3. Note the path of the cloned file and select
4. Locate the button definition file on the source
computer and copy it t o the sy stem fol der of the tar get
computer.
5. In the target computer’s system folder, find the
definition file name and double-click it.
A dialog box appears asking whether to add the
definition file in form ation to the registry.
6. Select
Yes.
A dialog box appears verifying that the file transfer
has occurred.
TM
Button Definitions dialog
Clone. The button
OK.
9. To save the cloned button definitions, select
return to the Configura tion Utilities dialog box. The
Configuration Utilities dialog box appears.
OK and
Backlights saver
You can extend the life of the computer’s backlights (and
conserve power) by setting the operating system’s energy
saver — which is, in effect, a backlights saver — in the
Display control panel.
The en ergy s av er al lows y ou t o “ tu r n o ff t h e mo nit o r” af ter
a specified number of minutes of inactivity. For basic
instructions on how to set the energy saver, refer to the
documentation for your Windows XP or Windows 2000
operating system.
If your ET 3200 series computer is running an application
or is in a setting in which safety is a concern, 3M Touch
Systems recommends setting up a “safe touch” backlights
saver.
“Safe Touch” backlights saver
A “safe touch” setting ensures that a touch to the touch
screen to rea ctiva te t he b ackli ghts d oes no t un int entiona lly
activate a touc h sc ree n button that could have harmful
consequences for pe ople or property.
To create a “safe touch” backlights sav er with
Windows XP or Windows 2000 operating sys tems, follo w
these st ep s :
1. Close all Windows operating system applications.
7. Select
8. Select
OK.
TouchSurround to open the TouchSurround
Button Defin itions dialog box.
In the TouchSurround Button Definitions box, you
should see the but ton definitions from the source
computer.
3M Touch Systems Proprietary Information
2. Depending on your opera ting system, from the
Windows desktop, select :
For Windows XP operating system:
Start » Control Panel » Appearance and Them es »
Display.
or
For Windows 2000 operating system:
Start » Settings » Control Panel » Displ ay.
The Display propert ies dialog box appears.
3. Select the
10
Screen Saver tab.
Page 11

3M DynaproTM ET 3200 Series Computers
4. In the screen saver section of the dialog box, enter in
the “Wait” box the number of minutes that you want
to elapse from th e la s t tim e the s cr e en is to u ch e d to
when the screen saver is activated.
Note: If you are using the Windows XP operating
system, 3M Touch Systems recommends selecting
Blank for the t ype of screen saver. Other screen saver
types may conflict with the Windows XP operating
system.
5. In the energy save r section of the dialog box, select
Power. The Power Scheme dialog box ap pears (Note:
In Windows 2000, this dialog box is called Power
Options Properties).
6. In the “Turn off monitor” pull-down menu, set the
number of min u t es th a t w il l el ap se from th e last time
the screen is touche d to when the energy saver is
activated. T he period chosen must be at least on e
minut e gr ea ter than the time you set for the screen
saver.
7. Select
OK.
3M Touch Systems support services
3M Touch Systems provides extensive support services
through our web site and te chnical support orga nization.
Visit www.3Mtouch.com
software and drivers, obtain regularly updated technical
documentation on 3M Touch Systems products, and learn
more about our company.
Whenever you contact Technical Support, please provide
the following information:
Part number and seria l num ber
, to download touch screen
Customer and technical support for
3M Dynapro products
Technical Support for 3M Dynapro products is availab le
Monday through Friday from 7:30 .a.m. to 4:00 p.m.,
Pacif ic Time. To contact customer service and technical
support for 3M Dyna pro products, refer to the following
table:
Area Contact information
USA and
Canada
Outside
USA and
Canada
General information
Tel 800-667-0374 (toll free) ; Fax 604-521-4629
E-mail etsales@mmm.com
Web site www.3Mtouch.com
Customer service
Tel 800-667-0374 (toll free); Fax 604-521-4629
E-mail 3MTScustomerservice@mmm.com
Technical support
Tel 800-667-0374 (toll free) ; Fax 604-521-4629
E-mail 3Mdynaprotechsupport@mmm.com
General information
Tel 604-521-3962; Fax 604-521-4629
E-mail etsales@mmm.com
Customer service
Tel 800-667-0374; Fax 604-521-4629
E-mail 3MTScustomerservice@mmm.com
Technical support
Tel 604-521-3962; Fax 604-521-4629
E-mail 3Mdynaprotechsupport@mmm.com
Returning products
All returned 3M Dynapro industrial products must be
accompanied by a Return Authorization number. Fo r
details, contact Customer Service at 3M Touch Systems.
Current driver version
Opera ting sy s t em u sed
Information on additional peripherals
Additional information
For information on software for 3M Dynapro industrial
products runn ing with Windows NT, 98, 95, and MS-DOS,
refer to the 3M Dynapro
Guide
. This document may be ordered from 3M Touch
Systems or downloaded from www.3Mto uch.com
3M Touch Systems Proprietary Information
11
Configuration Util ities User’s
.
Page 12

3M Touch Systems Worldwide Offices
All offices can be reac hed through the web site:
www.3Mtouch.com
Country Telephone
United States 978-659-9000
Australia +61 395-8 2- 4 79 9
Canada 604-521-3962
France +33 (1) 45 -13 - 90 -30
Germ an y +49 (0) 211-5990 7-0
Hong Kong/China (852) 2333-6138
Italy +39 (0) 39-230-2230
Japan +81 (4) 4811-1133
Korea +822 552 3198
.
Software Guid e for Windows XP and Windows 2000
Singapore +65-96279173
Spain +34 934-1 5- 6 28 5
T aiwan +886-2-2704-9011
3M Touch Systems Proprietary Information
12
Page 13

Appendix A
Virtual Keys for Defining T ouchSurr ou ndTM Buttons
Vir tu al Keys
This table shows all avail able Tou chSurr ound virtual keys
(VKs) that are listed in the Button press and Button release
drop-down lists in the Define A Button dialog box.
Virtual Key Keyboard Key
ASCII Key An ASCII key
CMD_ BA C KL I G HT DOWN Decr ea se s backli gh t br ig htness
CMD_BACKLIGHTUP Increase backlight brightness
CMD_LOGOFF Windows logout
CMD_TOUCH Enables the user to toggle touch
screen function s on or off.
When CMD_TOUCH is enabled, it
is safe to wipe down the touch
screen with a damp cloth without
danger of activating bu ttons.
T ouch screen functions are unavailable until the CMD_TOUCH
button i s pres sed ag ain except for
the part of the screen where a
button is defined with
CMD_TOUCH.
None No VK setting
VK_ADD Add
VK_APPS Right mouse button (contextual
menu)
VK_BACK Backspace
VK_CAPITAL Caps lock
VK_DECIMAL Decimal
VK_DELETE Delete
VK_DIVIDE Divide
VK_DO W N Down arrow
VK_END Page end
VK_ESCAPE Esc
VK_F1 through VK_F24 Function keys
Virtual Key Keyboard Key
VK_HOME Home
VK_INSERT Insert
VK_LE FT Left arro w
VK_LWIN Left Windows Start
VK_MULTIPLY Multiply
VK_NEXT Page down
VK_NUMLOCK Number lock
VK_NUMPAD0 through
VK_NUMPAD9
VK_PAUSE Br eak / Pause
VK_PRIOR Page up
VK_RETURN Return
VK_RIGHT Right arrow
VK_RWIN Right Windows start
VK_SCROL L Scroll lock
VK_SNAPSHOT Print screen / SysRq
VK_SPACE Space
VK_SUBTRACT Minus
VK_TAB Tab
VK_UP Up arrow
Number pad keys
3M Touch Systems Proprietary Information
13
Page 14

Page 15

Appendix B
T roubleshooting
General strategies
Most strategies for troubleshootting ET 3200 series
computers (inc luding explanations of touch screen error
messages) are outlined in the ET 3200 Series Computer
User’s Guide.
Other strategies
Troubleshooting strategies for iss ues specific to the
software for Windows XP and Windows 2000 operating
systems appear below.
Touch screen needs re-aligning
If you notice that the touch screen alignment is not ideal,
you can re-align usi ng one of the following methods:
Download TouchSurroundTM butto n defi nit ion
file. By download ing the button defini tion file fo r your
ET 3200 se ries compu ter (for s teps, se e “Downloa ding
TouchSurroundtm button definition files‚” on page 6,
the buttons and th e touch screen are re-aligne d.
Keyboard shortcut. If you have a keyboard, make
sure that the Configura tion Utilities dialog box is
active and then select Alt-A. Follow the prompts and,
when the Check Alignme nt dialog box appears, select
OK.
Start up error message
After powering down and power ing up again or after
restart in g th e co mp u t er , th i s e rr o r me s sage appe ar s:
To resolve this error, follow these steps:
1. Check the touch screen Se nsitivity setting. If it is set
to the lowes t s etting, change it to a high er s etting (see
“Sensitivity‚” on pag e 4).
2. Restart the computer.
10-inch displays and Windows XP
operating system
If you install th e Windows XP operating system onto a
3M Dynapro
3210 or ET 3215 computers — without changing the
display re solution, touch screen perform ance will not be
optimal.
Microsoft Corporation has designed Windows XP to have
default display resolution that is no lower than 800 X 600.
To change the display resolution for ET 3210 or ET 3215
computers, follow these steps:
1. Depending on your Windows operating system, from
the Windows desktop, select:
For Windows XP operating system:
Start » Control Panel » Appearance and Them es »
Display.
or
For Windows 2000 operating system:
Start » Settings » Control Panel » Displ ay.
The Display Properties dialog box appears .
2. In the Display Properties dialog box, select the
Settings tab.
TM
computer with a 10-inch display — ET
3. Select
4. Select
5. Select
3M Touch Systems Proprietary Information
15
» Advanced » Monit or tab.
Properties » Driver tab.
Update Driver » Install from a List or sp eci fic
location (advanced) » Next
.
Page 16

Software Guid e for Windows XP and Windows 2000
6. Select Don’t search. I will choose the dri ver to
install » Next
7. Uncheck
8. Select
(640 X 480)
9. Select
.
Show compatible hardware.
Standard monitor types » Digital flat Panel
.
Next » Finish » Close.
10. Restart the computer. After r estarting, resolution is
640 X 480.
11. Upon restarting, a Display Settings pop-up balloon
may appear. To prevent this ba lloon from appearing
with eve r y r estart, follow these steps:
a. When the balloon app ea r s, click on it with a
mouse. A Display Settings dialog box appears .
b. Ch ec k the box next to
me this dialog box
In the future, do not show
and then select No. The
balloon and dial og box should not appear again.
TM
12. Install the 3M Dynapro
driver software for
Windows XP /2000. For instructions, see “Installing
and setting up driver software‚” on page 17.
3M Touch Systems Proprietary Information
16
Page 17

Appendix C
Installing and Uninstalling Software
Who should use this appendix?
Refer to this appendix if:
You are upgrading your ET 3200 series computer to
use Windows XP/2000 touch scre en driver software.
As part of a troubleshooting strategy, you need to
uninstall and then re-install your Windows XP/2000
touch screen driver so ftware.
Installing and setting up driver
software
To install and s et up t he dri ver software, follow t hese steps :
1. Before instal li ng the sof twar e, fir st unins tall any other
touch screen software.
2. Close all open Windows programs.
.
TM
touch
3. Save to your hard drive th e 3M Dynapro
screen software for Windows XP and Windows 2000
operating sy stems. You may do so by downloading
the software from www .3Mtouch.com
4. Find the dow nloaded software on your machine and
run
Setup.exe. The Welcome dialog box appears.
5. Select
Next and follow the screen prompts to:
Review th e li cense agr eemen t.
Select the folder for the software.
Select the destination direct ory.
Select the controller.
Select the port for the controller.
The Ready to Install dialog box appears.
6. Select
Next. The Installing UPDD progress ba r
appears.
7. When the progress bar disappears, either:
The Install Successful dialog box appear s. In this
case, select
your computer, sele ct
Finish and, when prompted to re-boot
Yes. After rebooting, the
Initialize dialog box appears.
Important
While installing and setting up the touch screen software, make
selections using a keyboard or a mouse. Do not make selections
by touch until after software is fully installed and set up.
8. Using a keyboard or a mouse, select
Continue. The
Baseline dialog box appears.
9. Select
Skip. Baseli n e in f o r m a tion is bu il t in to your
ET 3200 series computer. The Linearization Data
Download dialog box appears.
10. Select
Skip. Linearization information does not need
to be downloa ded. It is built into your ET 3200 series
computer. The Touchscreen Alignment dialog box
appears.
11. Select
Start and follow screen prompts to a lign the
touch screen. The Che ck Alignment dialog box
appears.
12. Select
OK by touch within 10 seconds.
The Initialize dialog box appears. Go to 8.
or
Important
If OK is not selected within 10 seconds, the touch screen
software will not function.
3M Touch Systems Proprietary Information
17
Page 18

Software Guid e for Windows XP and Windows 2000
13. After selecting OK, either:
The Install Succ essful dialog box appear s. (Thi s
will happen if you were not prompted to reboot
the computer at
7). Select Finish.
or
No further dialog boxes appear.
14. The software is installe d and s et up.
Uninstalling software
If it i s ever nec essary to un install the touc h screen software,
follow th ese step s:
1. Depending on your Windows operating system, from
the Windows desktop, select:
For Windows XP oper a ting sy s tem:
Start » Control Panel » Add or Remove Progr ams.
or
For Windows 2000 operating system:
Start » Settings » Control Panel » Add/Remo ve
Programs.
The Add/Remove Programs dialog box appears.
7. To make sure that there are no rem nants of the touch
screen software tha t may have been missed during
uninstall, follow these steps:
a. Depending on your computer’s W indows
operating syst em , from the Windows desk top,
select:
For Windows XP operating system:
Start » Control Panel » Printers and Other
Hardware » Mouse.
or
For Windows 2000 operating system:
Start » Settings » Control Panel » System »
Mouse.
The Mouse Properties dialog box appears.
b. Select the
c. If the
Hardware tab.
Universal Pointer De vice Driver appe ar s in
the list of devices, select it and then select the
Properties button. The Universal Pointer De vice
Driver Properties dialog box appears.
d. Select the
Driver tab and then select the Uni nstall
button.
2. Check to see if the Universal Pointer Device Driver
appears in the “Currently installed programs” list.
If the UPDD driver is no t li st ed, go to Step 7.
3. Select the Universal Pointer Device Driver and then
select the
Change/Remove button. The Uninstall
window appears.
4. Select
Next. The Complete dialog box appears to
confirm that the software is uninstalle d.
5. Select Next to end the uninstall procedure.
Important
If there are any other touch screen drivers installed (see the list
of “Currently installed programs” in the A dd/Remove Programs
window) , uninsta ll thos e drive rs before at tempt ing to re-in stal l the
UPDD touch screen driver.
6. Restart the computer.
Note: Although there is not an on-screen prompt to
restart the computer at this stage, it is recommended
that you do so.
e. Restart the system.
f. Re-install and re-initialize following the steps in
“Install ing and setting up driver software‚” on
page 17.
g. If, after successful ly installing/init ializing, the
touch screen does not function, c ontact 3M Touch
Systems technical support (see “3M Touch
Systems suppor t services‚” on page 11).
3M Touch Systems Proprietary Information
18
Page 19

Copyright
This manual is © 3M 2003. All rights reserved.
Reproduc tion of the c ontent s of t hi s cop yri gh ted ma nua l in who le
or in part, by any means, electronic or mech anical, for any
purpose, without written permis sion of 3M Touch Systems, a
subsidiary of 3M, is prohibited.
Notice
Given the vari e ty of fa ctors tha t ca n affect t h e us e an d
performance of a 3M Touch Systems Product (the “Prod uct”),
includ ing that solid state equipment has operation characteristics
diffe rent from electromechanical eq uipment, some of which
factors are uniquely within User’s knowledge and control, it is
essential that User evaluate the 3M Touch Systems Product and
software to determine whether it is suitable for User’s particular
purpose an d suit ab le for U ser ’s met hod of ap pli ca tion . 3 M Touc h
Systems’ statements, engineering/technical information, and
recommendations are provided for User’s convenience, but their
accura cy or completeness is not warranted. 3M Touch Systems
product s and software are not specifically designed for use in
medi ca l devic es as define d by Un ited S ta tes fede ra l law. 3M
Touch Syst ems pr oducts and so ftw are shou ld not be used in such
applicat ions without 3M Touch Systems’ expre ss written cons ent.
User shou ld contact its sales representative if User’s opportunity
involv es a medical de vice application.
Important notice to purchaser
Specifications are subject to change without notice. These 3M
Touch Systems’ Products and software are warranted to meet
their published specifications from the date of shipment and for
the period stated in the specification. 3M Touch Systems makes
no additional warranties, express or implied, including but
not limited to any implied warranties of merchantability or
fitness for a particular purpose.
User is responsible for determining whet her the 3M Touch
Systems Products and software are fit for User’s particular
purpose and suitable for its method of production, including
intellectual property liability for User's application. If the Product,
software or software media is proven not to have met 3M Touch
Systems’ warranty, then 3M Touch System s’ sole obligation and
User’s and Purchaser’s exclusive remedy, will be, at 3M Touch
Systems’ option, to repair or replace that Prod uct quantity o r
softwar e media or t o refund its purc hase pr ice. 3M Touc h System s
has no obligation under 3M Touch Systems’ warranty for any
Product, software or software m edia that has been modified or
damaged through misuse, accident, neglect, or subsequent
manufact ur in g oper at io ns or as semb li es by anyon e o the r th an 3M
Touch Systems. 3M Touch Systems shall not be liable in any
action ag ainst it in any way related to the Products or
software for any loss or damages, whether non-specified
direct, ind irect, speci al, incident al or consequenti al (including
downtime, loss of profits or goodwill) regardless of the legal
theory as serted.
Edition
January 2003
Document Number: 19009 (Rev. 1.2)
Trademarks
3M Dynapro, TouchSurround, and Near Field Imaging are
trademark s of 3M. Wi ndow s and Windows NT are registered
trademarks of Microsoft Corporation in the United States and/or
other co untries.
3M Touch Systems
3M Optical Systems Division
800 Carleton Court
Annacis Island
New Westminster, BC
Canada V3M 6L3
www.3Mtouch.com
Worldwide Manufacturing Plants
Methuen, Massachusetts
Milwaukee, Wisconsin
Vancouver, BC, Canada
For more i nformation on 3M touch products, visit
3Mtouch.com or call toll-fre e 1-800-667-0374.
© 3M 2003
19009 (Rev. 1.2)
 Loading...