

Page 1
3
Digital Media System 815
eBeam Software for Interactive
Whiteboard
Operator’s Guide
Guide de l’operateur
Benutzerhandbuch
Guida dell’operatore
Guía del operador
February 2007 • 78-6970-9485-8-C • Copyright © 2007, 3M Company. All Rights Reserved.
Page 2

Page 3

™
3M
Digital Media System 815
Contents
Contents
ENGLISH ...................................................................................................... 5
What is eBeam Interactive? ...........................................................................................................................7
Setup ..............................................................................................................................................................8
Getting Started With eBeam Interactive ......................................................................................................12
Scrapbook ....................................................................................................................................................22
Shared Meetings ..........................................................................................................................................45
Power Point Presentations ...........................................................................................................................56
Troubleshooting ...........................................................................................................................................62
ENGLISH
ENGLISH
FRANÇAIS ................................................................................................. 63
Description de eBeam Interactive ................................................................................................................67
Configuration ...............................................................................................................................................68
Mise en route de eBeam Interactive ............................................................................................................72
Scrapbook ....................................................................................................................................................82
Réunions partagées ....................................................................................................................................106
Présentations PowerPoint ..........................................................................................................................117
Dépannage .................................................................................................................................................123
DEUTSCH ................................................................................................ 125
Was ist eBeam Interactive? ........................................................................................................................129
Einrichten ...................................................................................................................................................130
Erste Schritte mit eBeam Interactive .........................................................................................................134
Scrapbook ..................................................................................................................................................144
Geleitete Meetings .....................................................................................................................................170
PowerPoint-Bildschirmpräsentationen ......................................................................................................182
Fehlerbehebung ..........................................................................................................................................189
ITALIANO ................................................................................................. 191
Definizione di eBeam Interactive ..............................................................................................................195
Configurazione ...........................................................................................................................................196
Introduzione a eBeam Interactive ..............................................................................................................200
Scrapbook ..................................................................................................................................................211
Meeting condivisi ......................................................................................................................................236
Presentazioni PowerPoint ..........................................................................................................................246
Risoluzione dei problemi ...........................................................................................................................253
FRANÇAIS
DEUTSCH
ITALIANO ESPAÑOL
ESPAÑOL ................................................................................................ 255
¿Qué es eBeam Interactive? .......................................................................................................................259
Configuración ............................................................................................................................................260
Introducción a eBeam Interactive ..............................................................................................................264
Scrapbook ..................................................................................................................................................274
Reuniones compartidas ..............................................................................................................................298
Presentaciones de PowerPoint ...................................................................................................................310
Solución de problemas ...............................................................................................................................317
© 3M 2006. All Rights Reserved.
3
Page 4

Page 5

™
3M
Digital Media System 815
Contents
Contents
What is eBeam Interactive? ....................................................................... 7
Setup ............................................................................................................ 8
Minimum System Requirements ...................................................................................................................8
Setup Checklist ..............................................................................................................................................8
Hardware Setup..............................................................................................................................................8
Software Setup .............................................................................................................................................10
Calibration ...................................................................................................................................................11
Technical Support ........................................................................................................................................11
Getting Started With eBeam Interactive ................................................. 12
Navigating with the Interactive Tools ..........................................................................................................12
Interactive Tools Preferences .......................................................................................................................13
The Interactive Stylus ..................................................................................................................................13
Windows Taskbar Menu ..............................................................................................................................14
Desktop Interactive Tools ............................................................................................................................14
Desktop Annotation Interactive Tools .........................................................................................................18
Scrapbook ................................................................................................. 22
What is Scrapbook? .....................................................................................................................................22
Scrapbook Menus ........................................................................................................................................24
Summary of Scrapbook Interactive Tools ...................................................................................................32
Scrapbook Toolbar .......................................................................................................................................37
Playback Toolbar .........................................................................................................................................40
Background Images .....................................................................................................................................41
Import a PowerPoint Presentation ...............................................................................................................42
Import an Excel Spreadsheet .......................................................................................................................42
Import a Word Document ............................................................................................................................43
Scrapbook Options .......................................................................................................................................43
Supported File Types ...................................................................................................................................44
Automatic File Saving .................................................................................................................................44
ENGLISH
© 3M 2006. All Rights Reserved.
5
Page 6

Contents
3M™ Digital Media System 815
Shared Meetings ....................................................................................... 45
What is a shared meeting? ...........................................................................................................................45
Hosting/Sharing a Meeting ..........................................................................................................................45
Join a Meeting .............................................................................................................................................47
Sending an Invitation ...................................................................................................................................48
Proxy Server Setup ......................................................................................................................................49
ENGLISH
Archive a Meeting .......................................................................................................................................49
Retrieve a Meeting .......................................................................................................................................50
View Participants .........................................................................................................................................54
Adding a Meeting Server .............................................................................................................................55
Power Point Presentations ...................................................................... 56
Starting/Ending a PowerPoint Slideshow ....................................................................................................56
Summary of PowerPoint Interactive Tools ..................................................................................................57
Navigating a PowerPoint Slideshow ............................................................................................................60
Annotating a PowerPoint Slideshow ...........................................................................................................60
Saving Annotations to the PowerPoint File .................................................................................................61
Slideshow Options .......................................................................................................................................61
Troubleshooting ........................................................................................ 62
6
© 3M 2006. All Rights Reserved.
Page 7

™
3M
Digital Media System 815
What is eBeam Interactive?
What is eBeam Interactive?
eBeam Interactive is the ultimate communications system that turns your 3M Digital Media System 815 into a powerful,
fully interactive digital presentation system. The 3M Digital Media System 815 contains a small, lightweight receiver that
communicates with software on your presentation PC. During a presentation, the receiver captures every written, drawn or
projected whiteboard image and transfers the information to your computer where the e-beam softare creates a complete,
stroke-by-stroke record of the presentation.
You can use the 3M Digital Media System 815 with your computer for recording white board notations or with the projector
for interactive presentations controlled directly from the projected image. No matter how you use it, the eBeam software
records everthing from your presentation.
The 3M Digital Media System 815 helps you raise the reach and level of participation in classroom discussions, faculty/
administration meetings, corporate brainstorming, sales demonstrations, product design reviews and training sessions. Use
eBeam to lower travel costs by holding productive, interactive meetings on your local network or across the Internet. Share
presentation results easily by printing, faxing or e-mailing files, or by archiving them for anytime Internet access.
From the conference room to the classroom, the 3M Digital Media System 815 is the perfect solution for more effective
meetings and increased teamwork.
The eBeam Interactive software includes some of the following features:
• Control your PowerPoint presentations like never before. Run the entire slideshow from the projection area. Annotate your
slides and even save the annotations back into the original PowerPoint file.
• Share your presentation and/or notes over the Internet or your intranet in real time.
• Allow remote users to log in and annotate the presentation in real time.
• Archive complete presentations and discussions.
• Use your projection area as a virtual whiteboard.
• Replay, edit, fax, print, and annotate images from your meetings or attach them to e-mail messages.
• Copy and paste notes into most popular office applications.
ENGLISH
This guide describes the many features included in the eBeam Interactive system. For the most up to date FAQs, go to
www.e-beam.com.
© 3M 2006. All Rights Reserved.
7
Page 8
Setup
3M™ Digital Media System 815
Setup
Minimum System Requirements
• Windows-compatible computer with Pentium™ II 400 MHz+ Processor
• Windows 2000, XP, Tablet PC
• 256mb Available Memory
ENGLISH
• 10mb free hard drive space
• Bluetooth enabled or USB
Setup Checklist
The complete system setup is described on the 3M Digital Media System 815 Software and Documentation CD.
Important: Keep or record all CD Keys and serial numbers for registration, update, and support purposes.
To set up your system:
1. Set up your 3M Digital Media System 815. See Hardware Setup.
2. Install eBeam Interactive software.
Use the 3M Digital Media System 815 Software and Documentation CD to install the software. Keep or record the CD-
Key posted on the installation CD for registration, update, and support purposes.
You can also download eBeam Interactive software from www.e-beam.com.
3. Connect the software to the 3M Digital Media System 815. See Connecting the Software to the 3M Digital Media System 815.
4. Calibrate. See Calibration.
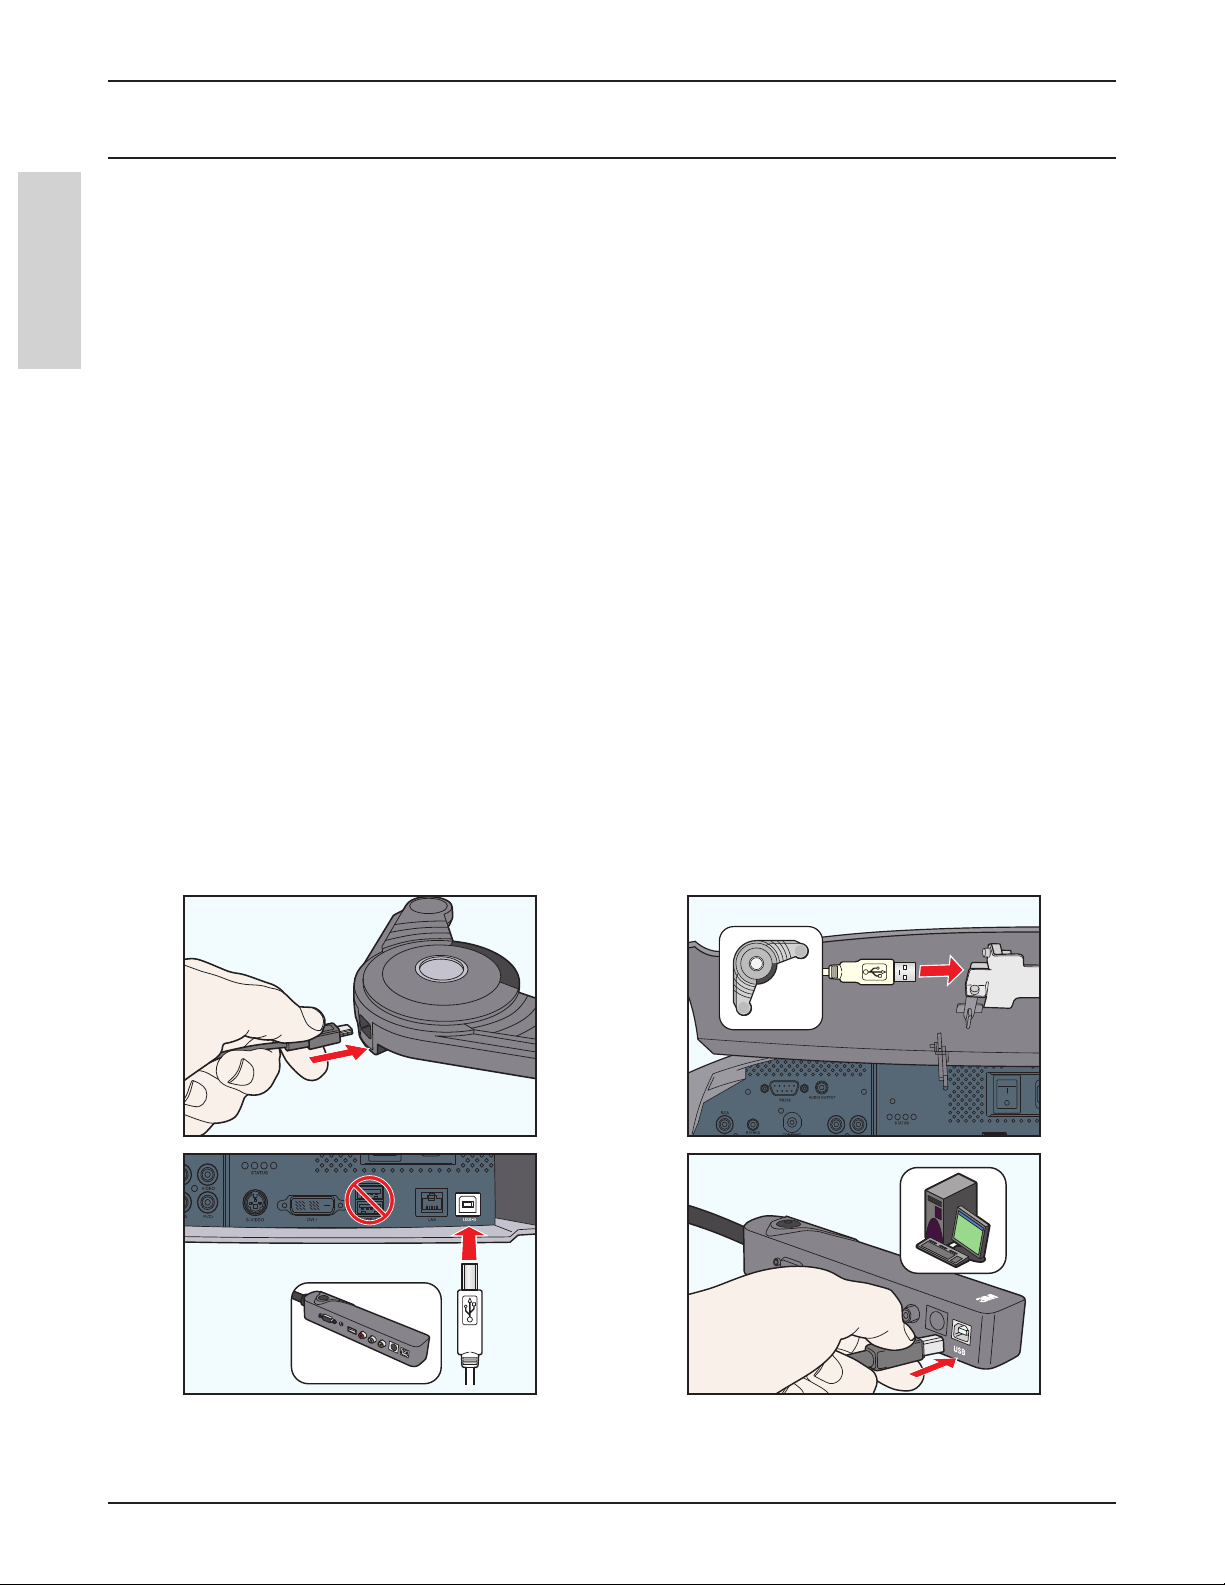
Hardware Setup
1 2
3 4
8
© 3M 2006. All Rights Reserved.
Page 9
™
USB Cable
Connection Panel Cable
Connection
Panel
Annotation
Pod
Annotation
Pod
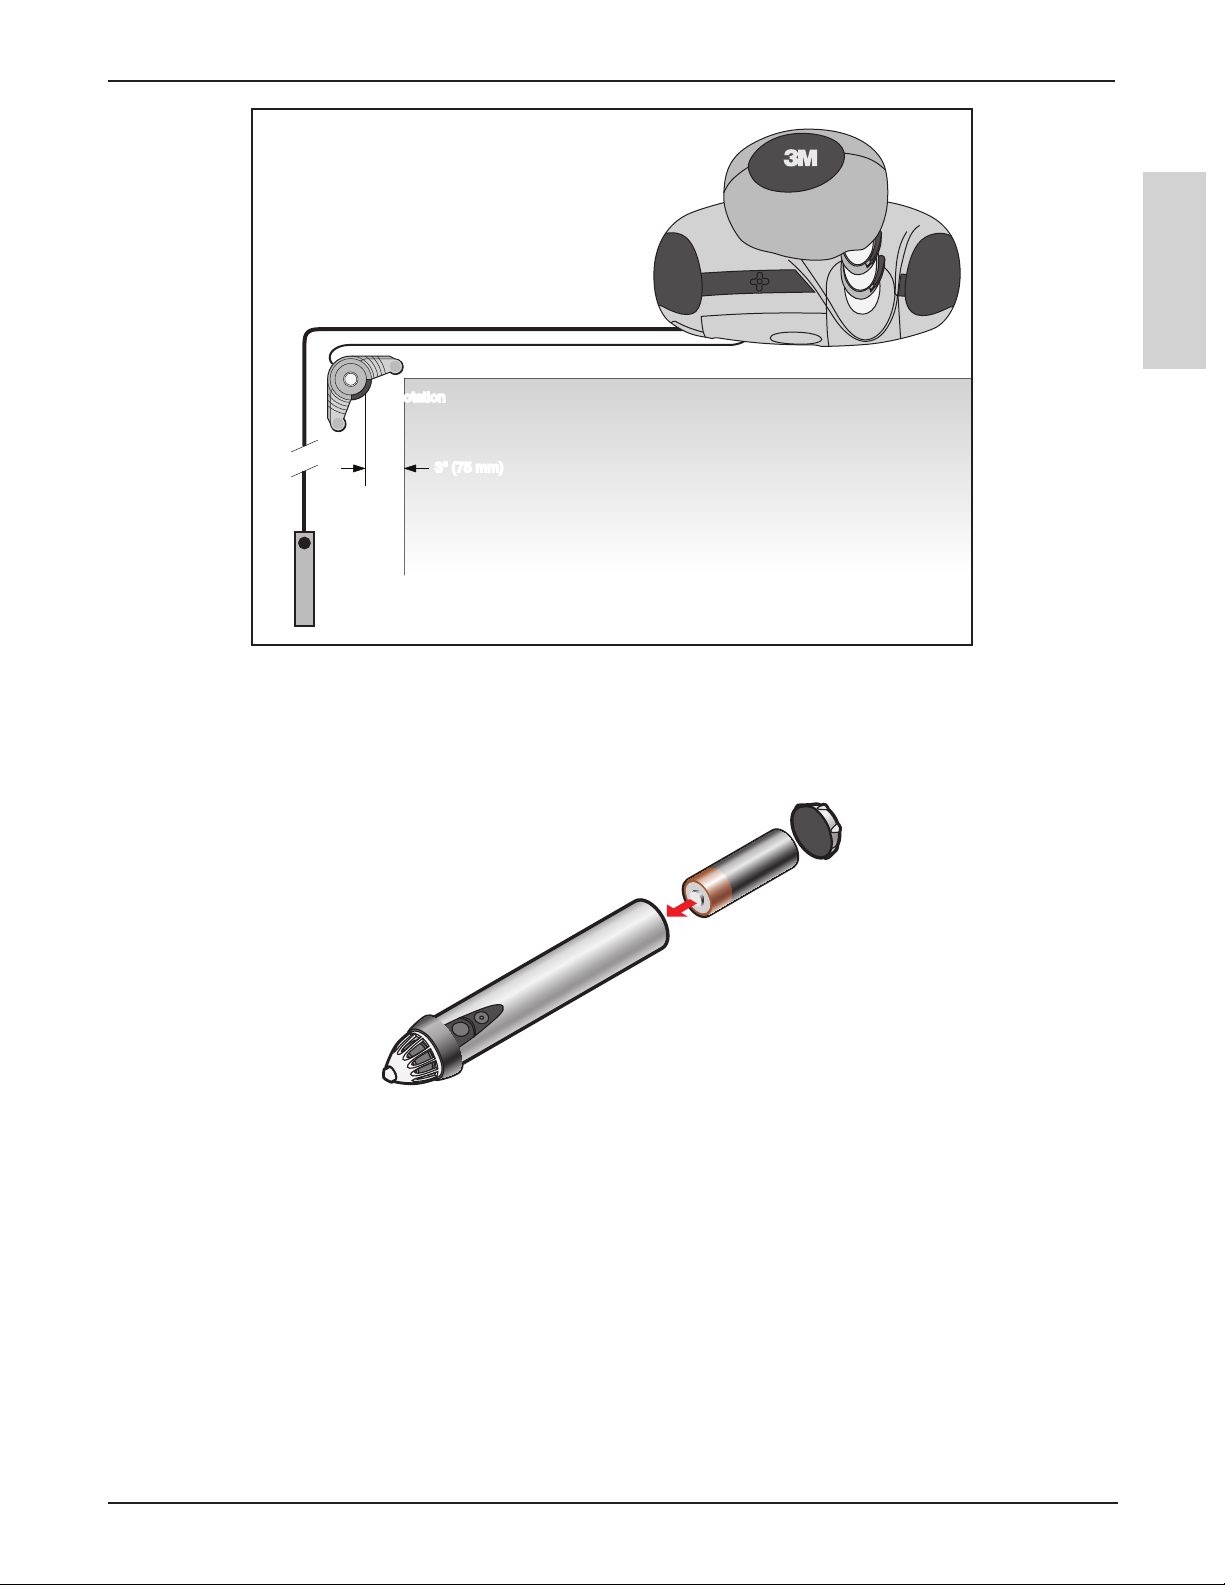
3" (75 mm)3" (75 mm)
3M
Digital Media System 815
Setup
ENGLISH
Interactive Stylus Set Up
The Interactive Stylus takes one AA battery. To insert battery, unscrew the bottom of the Interactive Stylus and drop in battery
(+) side down. Screw the bottom back in completely.
© 3M 2006. All Rights Reserved.
9
Page 10

Setup
3M™ Digital Media System 815
Software Setup
The eBeam Interactive software can be installed from the installation CD that came in the box.
eBeam Interactive software can also be downloaded from www.e-beam.com.
Connecting eBeam Software to the 3M Digital Media System 815
Each time you launch the eBeam Interactive software, the software will attempt to connect to your 3M Digital Media System
ENGLISH
815. Be sure you have performed the Hardware Setup before attempting the software-to-3M Digital Media System 815
connection.
1. Locate the eBeam Interactive desktop icon on your computer.
2. Double-click the icon to launch the software.
3. If the Detect eBeam dialog appears, your device may require additional setup. See Hardware Not Detected.
Hardware Not Detected
When the software does not detect a 3M Digital Media System 815, it displays an eBeam not detected message and opens
the Detect eBeam dialog window. This window displays a list of ports, and shows which ports are available.
The Detect eBeam dialog box includes the following controls:
Port Status list List of all ports on your computer and whether they are currently available.
Help Opens the eBeam Interactive Help system to this topic.
Setup Opens the Options dialog to the Hardware Settings tab.
Cancel Cancels the detection process, but allows you to keep working in the software.
Retry Attempts to detect the 3M Digital Media System 815 again using either your Hardware Settings in
the Options dialog, or your selection from the port list.
If your 3M Digital Media System 815 is not detected, the first thing to do is to make sure that the Hardware Setup is complete
and that you know what COM port your 3M Digital Media System 815 is using. See the 3M Digital Media System 815
Operator and Product Safety Guide.
Check the communications port selected in the list of ports. You may need to change the port selection in the list to match the
communications port for your receiver.
To detect the 3M Digital Media System 815 on a different port:
1. Select the Setup button.
2. Under Communication Port, select a different COM port or Autodetect.
3. Select OK.
4. Select the Retry button.
10
© 3M 2006. All Rights Reserved.
Page 11

™
3M
Digital Media System 815
If no ports are listed, or if the software is still unable to detect the 3M Digital Media System 815:
• Make sure the 3M Digital Media System 815 is set up properly, powered up, and connected to your computer. Refer to the
3M Digital Media System 815 Operator and Product Safety Guide.
• Check that the selected port is the correct port. Is the correct communication port selected?
• If Autodetect is selected, change the setting to connect using Connect To and attempt the connection again.
• Is there a PDA (Palm or PocketPC device) attached to your computer? If so, shut down all programs (such as
synchronization programs) currently running which might be holding open a communication port for that PDA.
Note: If a 3M Digital Media System 815 is not detected, eBeam software Interactive Tools will not activate. The 3M Digital
Media System 815 serves as a hardware security key that activates the full feature set of the eBeam Interactive software. Most
features of the software are available only when a 3M Digital Media System 815 is detected.
Getting Started with eBeam Interactive
Calibration
What is Calibration?
eBeam Interactive software requires set of reference points area so the software can correctly map to your desktop and
capture your markups and projections. The calibration process allows you to indicate 9 specific points within the projection
area that correspond to points on your computer desktop.
ENGLISH
Calibrating eBeam software
Each time you start up the eBeam Interactive software, you will be prompted to calibrate. Always perform the calibration step
unless you are certain the projector and the eBeam receiver have not been moved since the last use. If you are unsure, peform
the calibration.
To calibrate the eBeam Interactive software:
1. Connect the eBeam Interactive software to the 3M Digital Media System 815.
2. To start the calibration:
• When prompted to calibrate, select Yes, or
• Select the Calibrate button from the Desktop Interactive Tools palette.
Technical Support
Technical Support is available through the eBeam support website at http://www.e-beam.com/support/.
Please have all product information as well as your product registration number (CD-Key) ready.
© 3M 2006. All Rights Reserved.
11
Page 12
Getting Started with eBeam Interactive
3M™ Digital Media System 815
Getting Started With eBeam Interactive
Navigating with the Interactive Tools
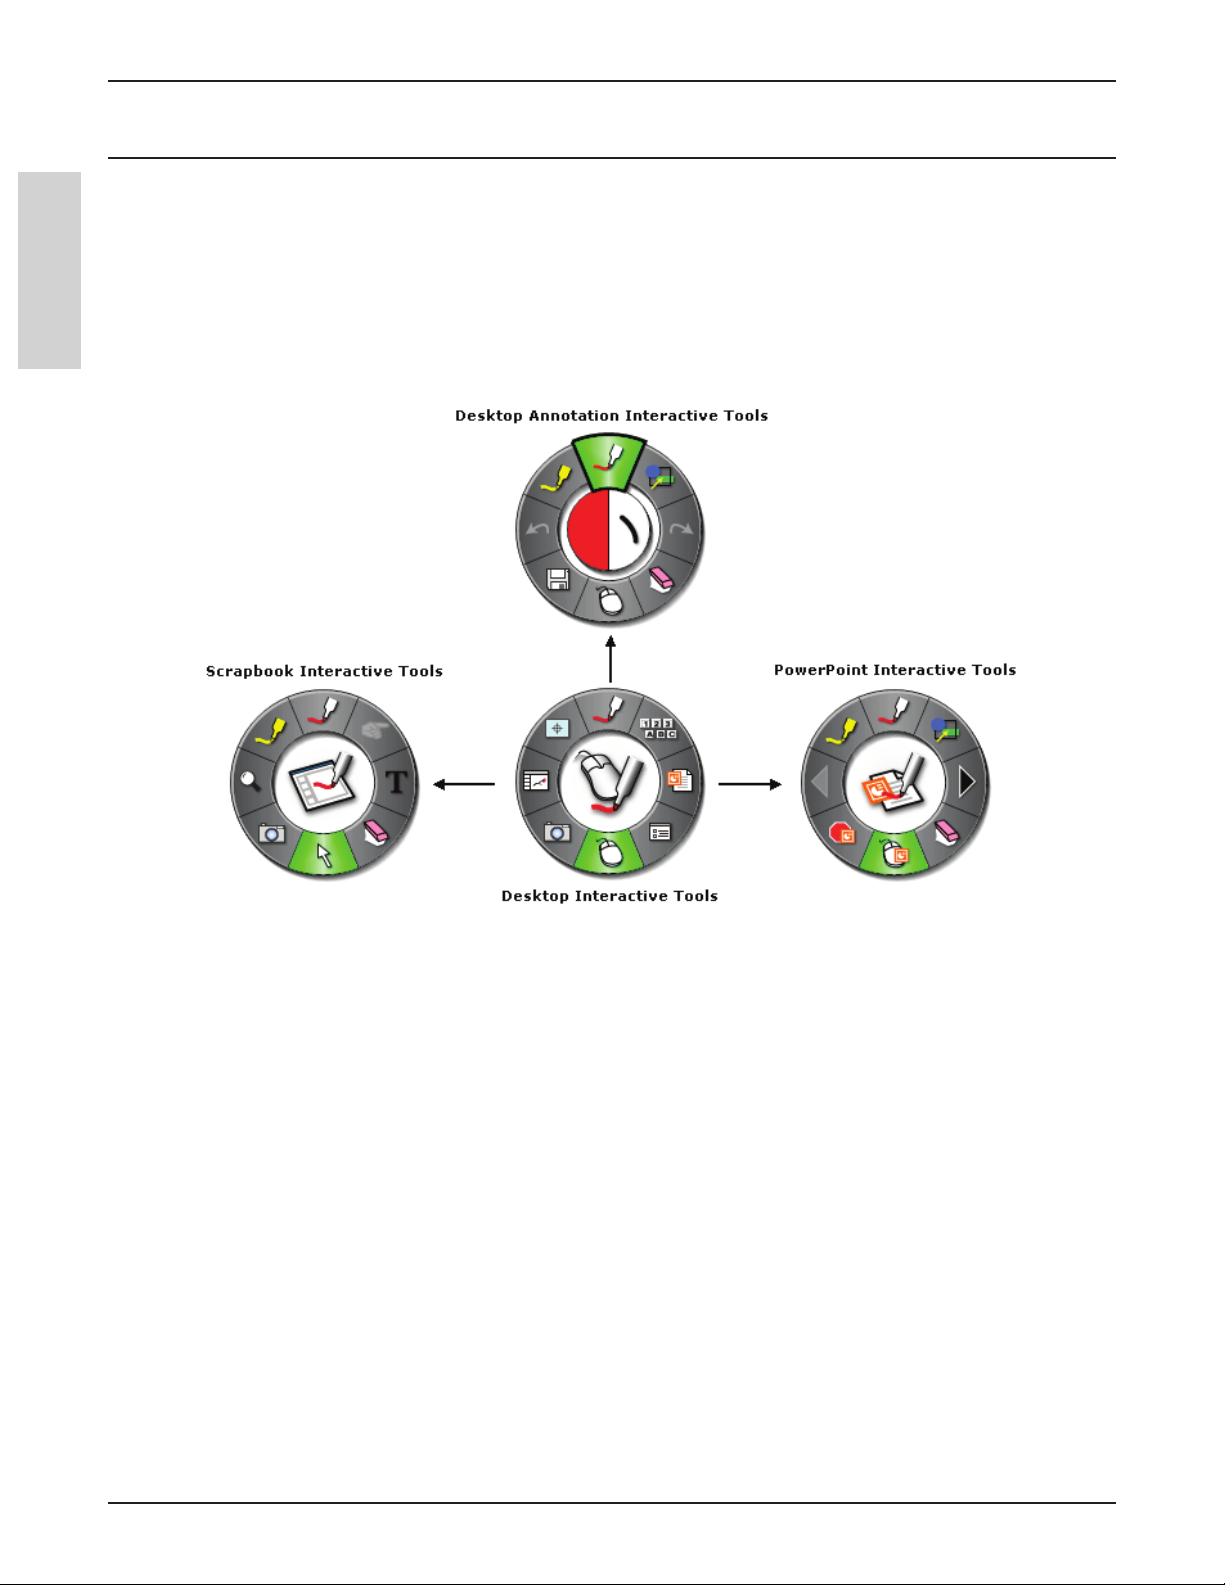
You navigate through the eBeam Interactive software using the Interactive Tools palettes. There are four Interactive Tools
palettes. See the Interactive Tool palette flow chart below to see how all tool palettes are accessed.
Note: If the 3M Digital Media System 815 is not detected, the Interactive Tools palettes will not activate. The 3M Digital
ENGLISH
Media System 815 serves as a hardware security key that activates the full feature set of the eBeam Interactive software.
When a 3M Digital Media System 815 is not available, you do have access to a standard annotation toolbar that can be used
in the Scrapbook.
• Desktop Interactive Tools: (Main tool palette. All other Interactive Tools are accessed through the Desktop Interactive
Tools.) The Desktop Interactive Tools palette allows you to access all of the major features and options of the eBeam
Interactive system.
• Desktop Annotation Interactive Tools: The Desktop Annotation Interactive Tools palette gives you all of the tools you
need when you are annotating your desktop.
• Scrapbook Interactive Tools: The Scrapbook Interactive Tools palette gives you the annotation and navigation tools
necessary for working in Scrapbook. This Interactive Tools palette is available only when Scrapbook is the active
application. Any time you select an area of the screen that is not part of Scrapbook the Scrapbook Interactive Tools palette
will change to the Desktop Interactive Tools palette. To restore the Scrapbook Interactive Tools palette, select an area on
Scrapbook.
• PowerPoint Interactive Tools: The PowerPoint Interactive Tools palette gives you the tools necessary to annotate and
navigate a PowerPoint slideshow. This Interactive Tools palette will appear any time eBeam Interactive software is running
and you start a PowerPoint slideshow, even if you open a slideshow straight from Explorer instead of through the Desktop
Interactive Tools palette.
12
© 3M 2006. All Rights Reserved.
Page 13
™
3M
Digital Media System 815
Getting Started with eBeam Interactive
Interactive Tools Preferences
Each of the Interactive Tools palettes can be shown, hidden, moved, resized, and the transparency changed based on your
preferences.
To show or hide an Interactive Tool palette:
• Press the Show/Hide Interactive Tools button on the Interactive Stylus.
• Select the Interactive Tools menu item from the Windows taskbar menu.
To move an Interactive Tool palette:
• Drag the Interactive Tool palette to a new location by placing the tip of the Interactive Stylus in the center of the
Interactive Tool palette and dragging to the new location.
• The Interactive Tools palettes will appear in the location where you show or hide the Interactive Tool palette using the
Interactive Stylus.
See Wheel Properties for a description of how to resize and modify the transparency of an Interactive Tool palette.
The Interactive Stylus
The eBeam Interactive Stylus was created specifically for use with the eBeam Interactive projection system. The Interactive
Stylus behaves exactly like a mouse attached to your computer.
ENGLISH
In this document, we refer to a tap on the board as opposed to a mouse click to indicate that you are using the eBeam
Interactive Stylus to perform an action.
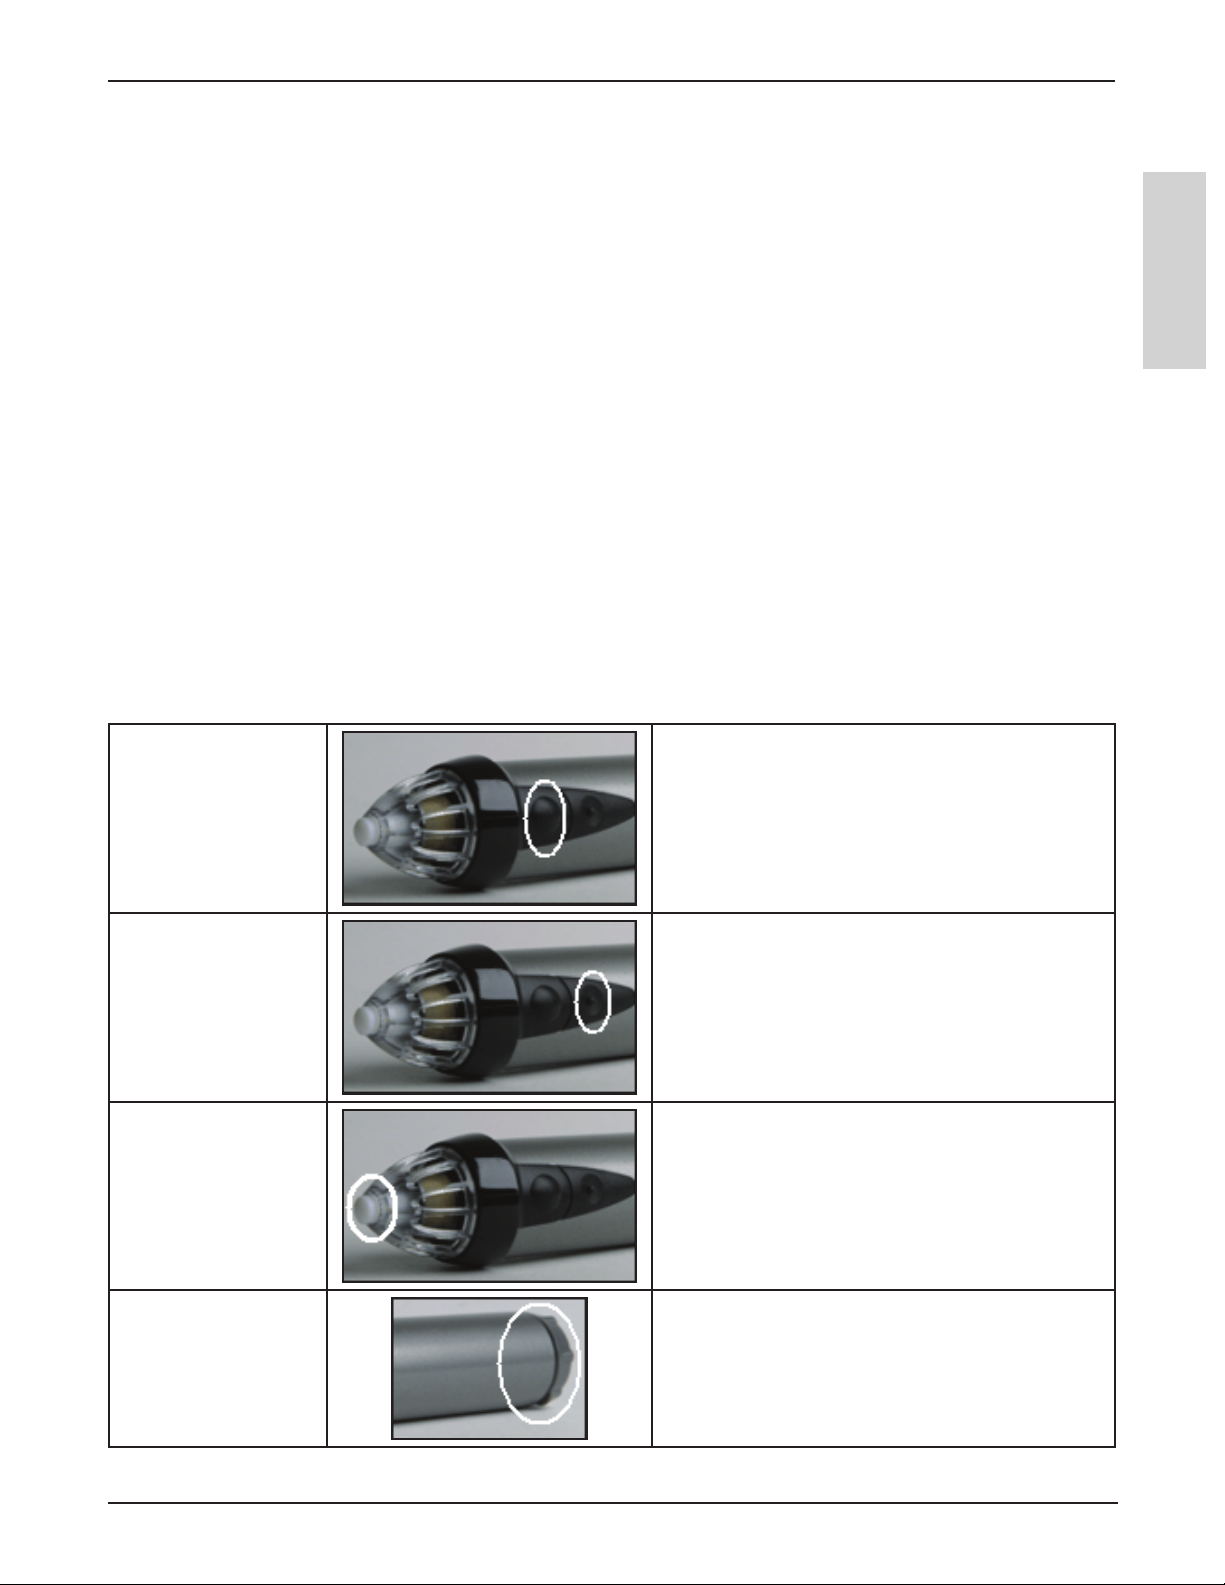
The following table shows the different components of the Interactive Stylus and what those components do.
Button A - Menu
Button
Button B - Show/Hide
Interactive Tools
Button
Pen Tip The Pen Tip performs the same action as the left-click
Button A, the Menu Button is the equivalent of the
right-click button on your mouse.
Button B, the Show/Hide Interactive Tools Button
shows/hides the eBeam Interactive menu.
button on your mouse.
Battery Cap The battery cap unscrews counter-clockwise to allow
you to insert or replace the AA battery.
© 3M 2006. All Rights Reserved.
13
Page 14
Getting Started with eBeam Interactive
3M™ Digital Media System 815
Windows Taskbar Menu
The eBeam Interactive menu appears as an icon in the Windows system tray when the software is running. The following
menu items are offered from the system tray menu:
Menu Item Description
Interactive Tools Shows/hides the Desktop Interactive Tools.
Scrapbook Opens Scrapbook.
ENGLISH
Calibrate Interactive Area... Initiates the calibration. The 3M Digital Media System 815 must be detected by the
software before calibration can begin.
Detect System
Options...
About eBeam Interactive... Displays the About dialog box for the eBeam Interactive software. To close, tap
Help Opens a sub-menu with the following options:
Exit Completely closes the eBeam Interactive software. If you have Scrapbook open, you will
Attempts to detect the 3M Digital Media System 815. See
3M Digital Media System 815.
Opens the eBeam Interactive Options dialog box. See Options.
anywhere in the About dialog box.
• Contents: Opens the eBeam Interactive help system to the main page.
• Online Support: Opens your web browser and loads the www.e-beam.com support
page.
• Registration: Opens your web browser and loads the www.e-beam.com registration
page.
• Common Questions: Opens your web browser and loads the www.e-beam.com FAQs
page.
• Software Updates: Opens your web browser and loads the www.e-beam.com
downloads page.
be prompted to first save the Scrapbook file.
Connecting the Software to the
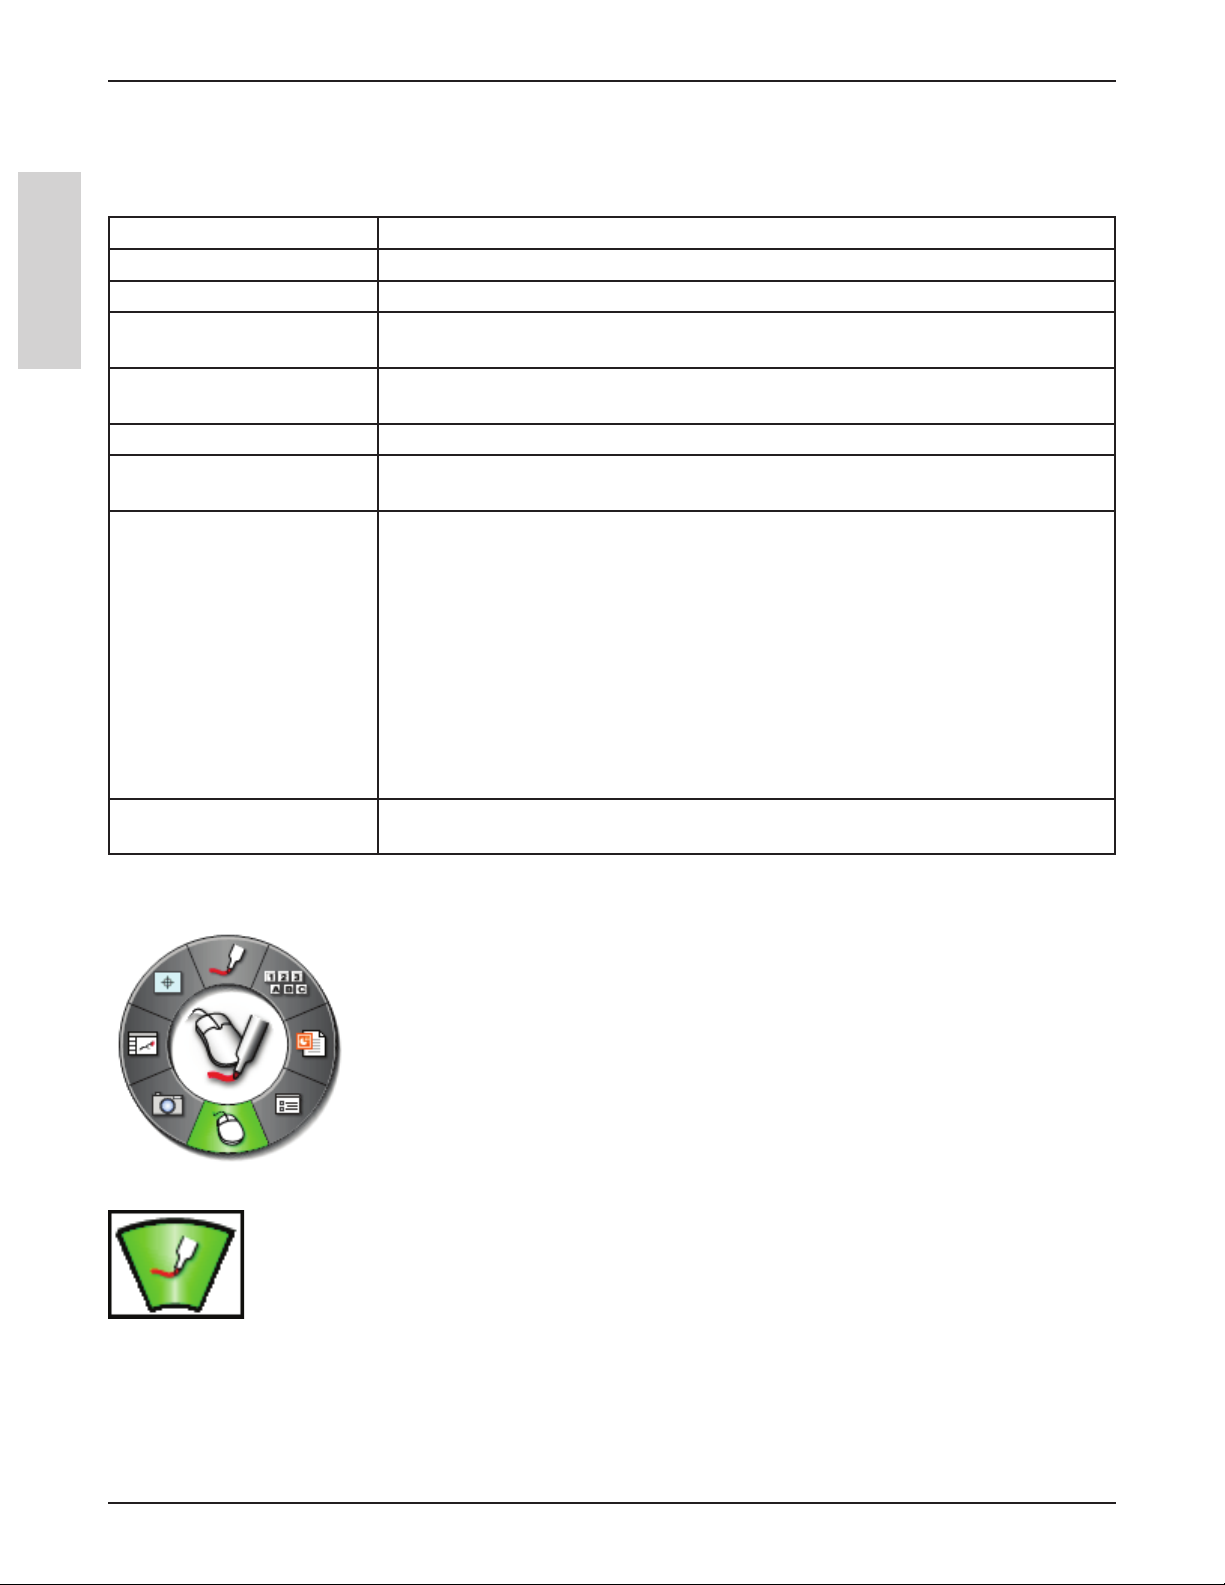
Desktop Interactive Tools
The Desktop Interactive Tools palette is the main tool palette for the eBeam Interactive
software. All other tool palettes and software features can be accessed from the Desktop
Interactive Tools.
See Interactive Tools Preferences for information on moving, showing, hiding, and changing
the appearance of the Interactive Tools.
Note: If the 3M Digital Media System 815 is not detected, eBeam Destop Interactive Tools will
not activate. The 3M Digital Media System 815 serves as a hardware security key that
activates the full feature set of the eBeam Interactive software. Most features of the software
are available only when the 3M Digital Media System 815 is detected.
Pen - Annotation
Selecting the Pen tool allows you to annotate your desktop and causes the Desktop Interactive Tools palette to change to the
Desktop Annotation Interactive Tools palette.
14
© 3M 2006. All Rights Reserved.
Page 15
™
3M
Digital Media System 815
Getting Started with eBeam Interactive
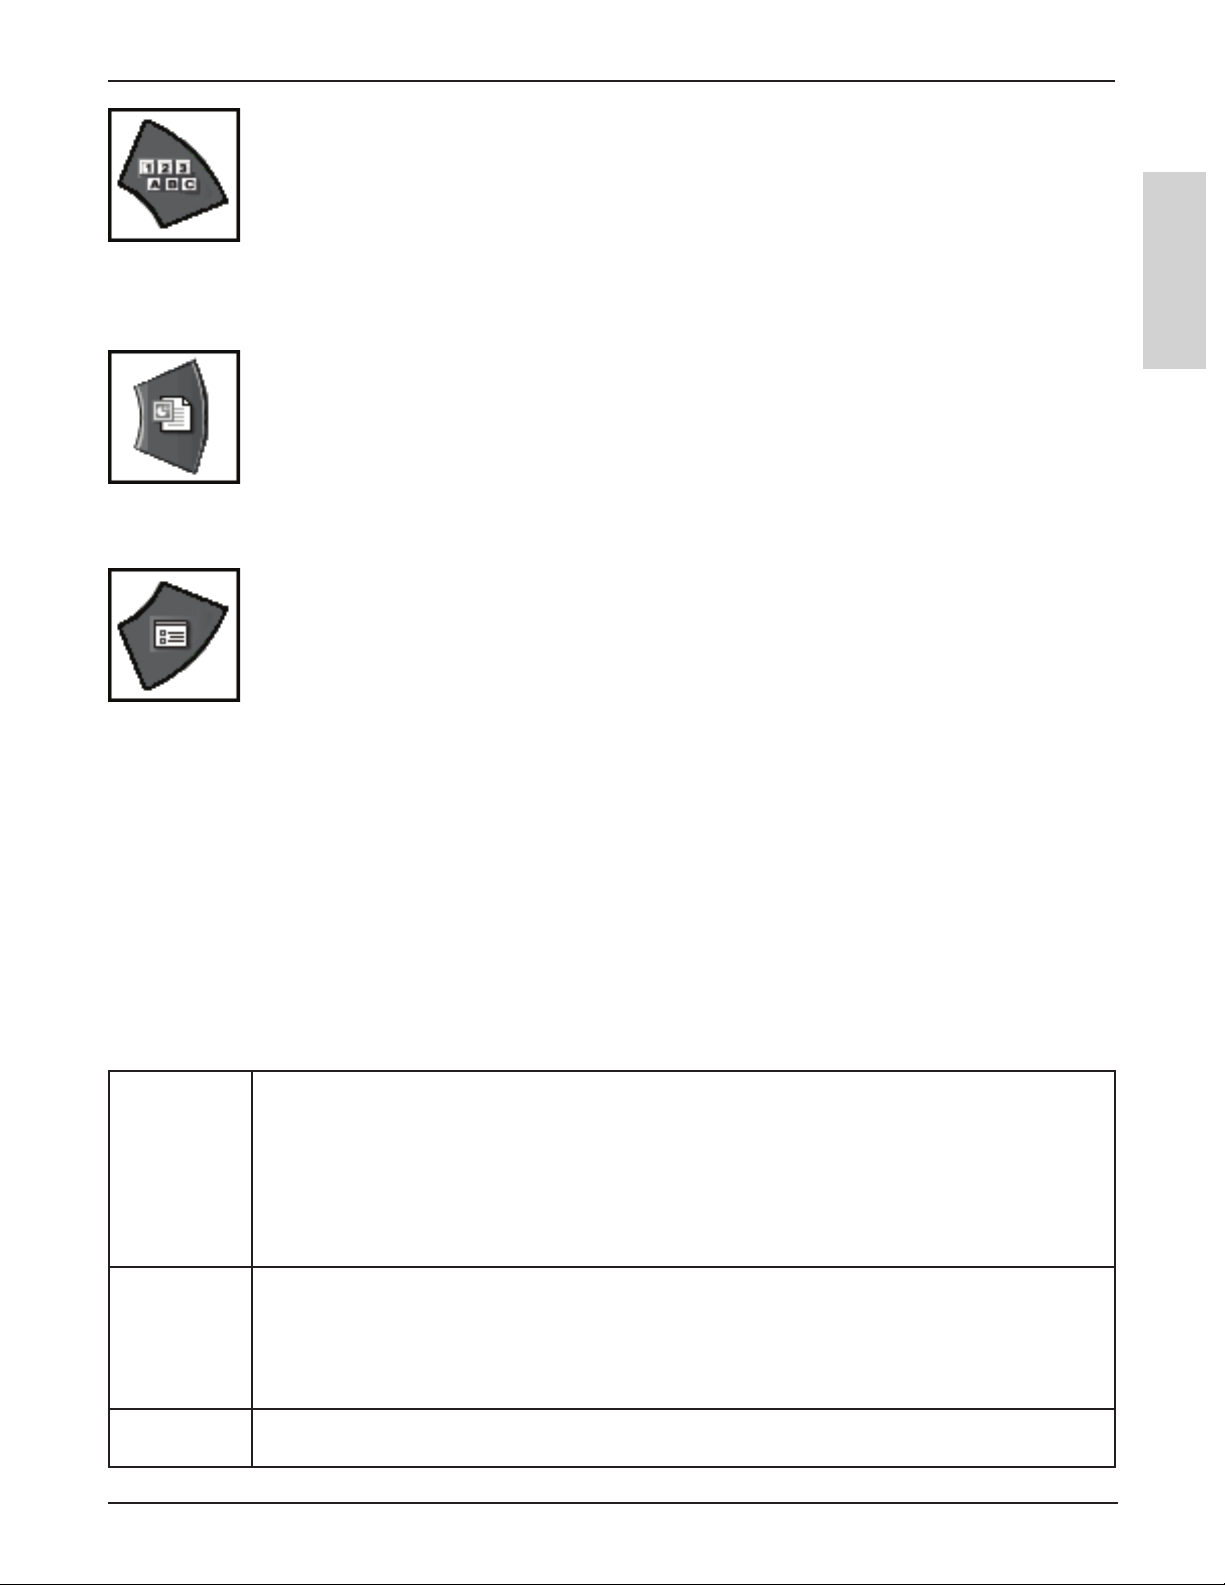
On-Screen Keyboard
Selecting On-Screen Keyboard opens the Windows On-Screen Keyboard to be used to enter text using the Interactive
Stylus. Close the On-Screen Keyboard by selecting the “On-Screen Keyboard” button again or selecting the close button on
the On-Screen Keyboard.
Start PowerPoint Presentation
Selecting Start PowerPoint Presentation opens the standard Open File dialog to enable you to find a PowerPoint
presentation. See Starting/Ending a PowerPoint Slideshow for more information.
ENGLISH
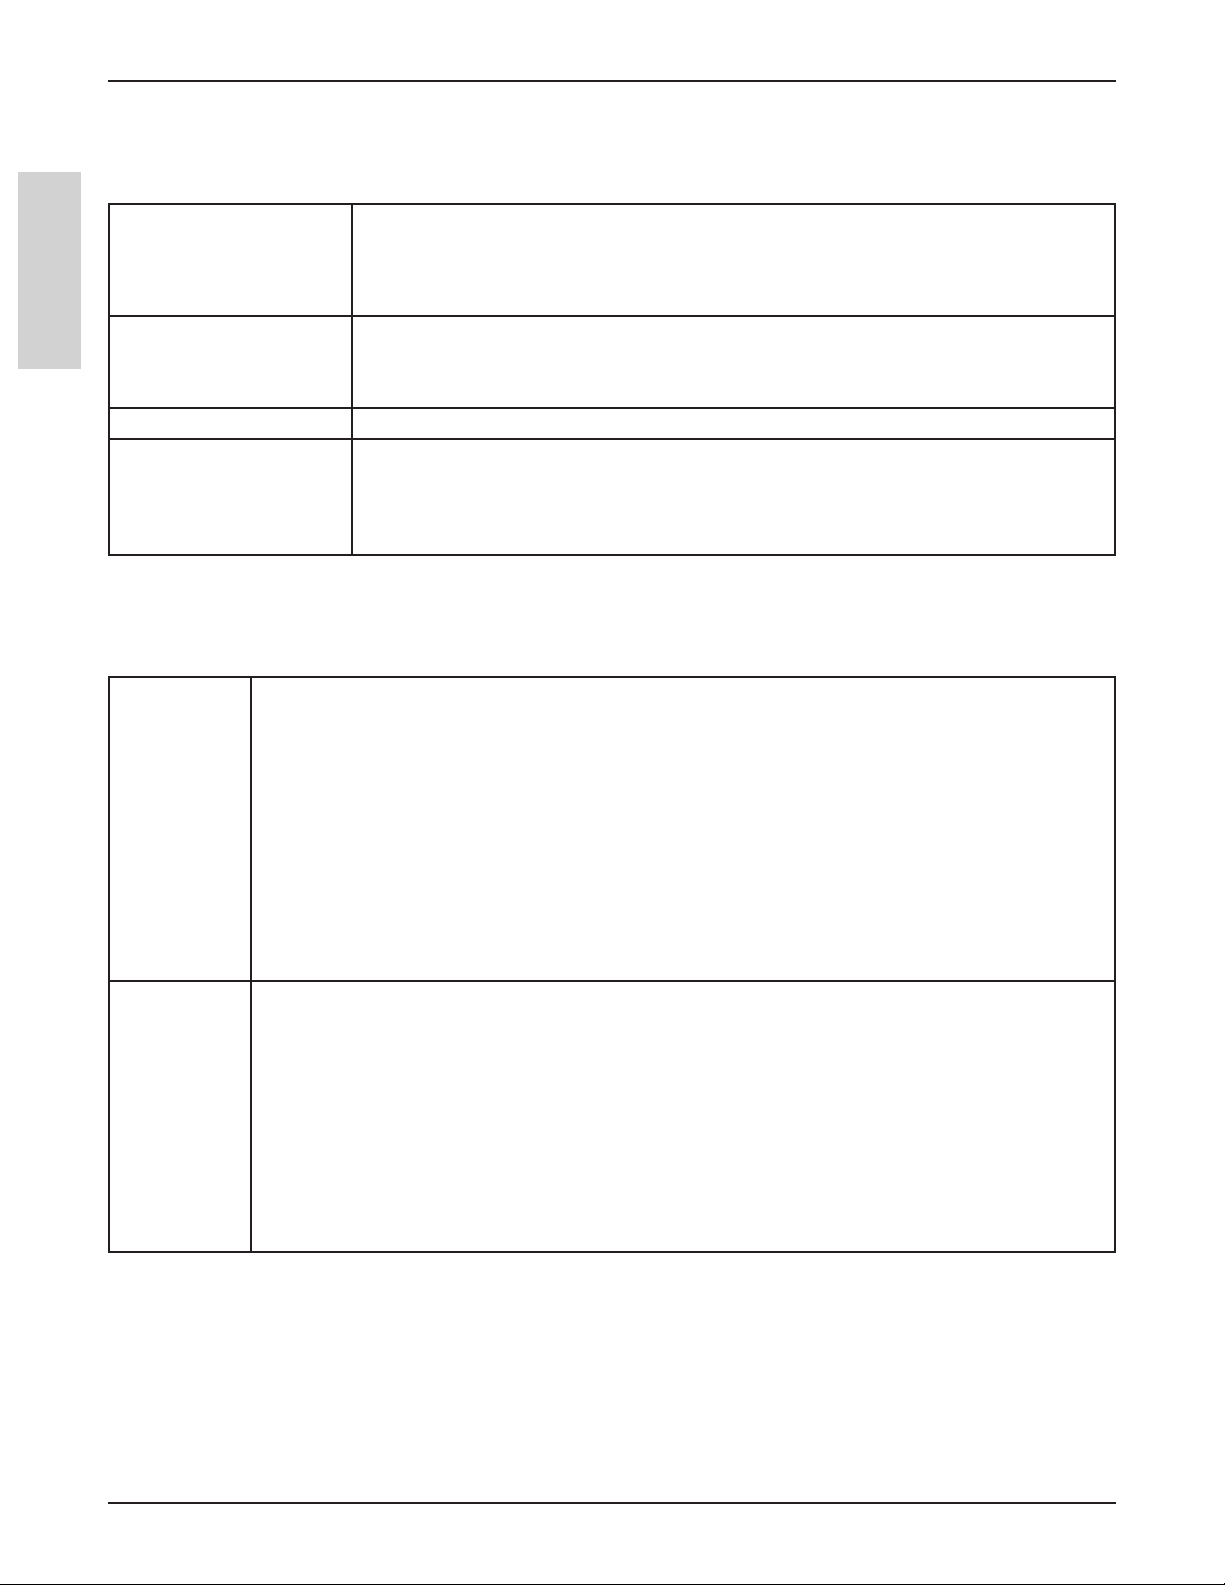
Options
Selecting Options launches the Interactive Options dialog box. The Interactive Options dialog allows you to set the following
setup options and preferences:
• Wheel Properties: Set the Interactive Tools appearance and behavior.
• Hardware Settings: Set the communication port options.
• Annotations: Set annotation preferences.
• Software Updates: Set how often to check for updates.
You can also launch Interactive Options from the Windows Taskbar menu, by selecting Options… from the eBeam
Interactive menu.
Wheel Properties
The Wheel Properties tab in the Options dialog allows you to set the Interactive Tools appearance and behavior. Available
preferences are described in the table below.
Appearance • Palette Size: The “Palette Size” option allows you to select how big or small the Interactive Tools
palette will be.
• Transparency: The “Transparency” option allows you to select how visible the Interactive Tools
palette will be. This option is useful during a presentation if you wish the Interactive Tools palette to
remain on the screen, but not to draw attention.
Note: If the Interactive Tools palette becomes too transparent, select the “Restore Default” button from
the “Wheel Properties” tab to restore to the default transparency.
Features • Hide cursor when drawing: The Hide Cursor When Drawing option allows you to hide the Windows
selector arrow while you annotate your desktop or a PowerPoint Presentation.
• Double-click eraser clears screen: The Double-Click Eraser Clears Screen option allows you to
double-click the Eraser tool to erase all annotations created while annotating your desktop or during a
PowerPoint Presentation.
Restore
Defaults
The Restore Defaults button causes all Appearance and Features settings to be returned to their default
settings.
© 3M 2006. All Rights Reserved.
15
Page 16
Getting Started with eBeam Interactive
Hardware Settings
The Hardware Settings tab in the Options dialog allows you to set the Interactive Tools appearance and behavior. Available
preferences are described in the table below.
3M™ Digital Media System 815
Communication Port
(COM Port)
ENGLISH
Hardware Diagnostics... Displays information used by technical support to diagnose environmental problems.
System Information... Opens the Windows System Information dialog box.
Check for Firmware
Upgrade...
Annotations
The Annotations tab in the Options dialog allows you to set behavior for how desktop and PowerPoint annotations are saved.
Available options are described in the following table.
After
Annotating the
Desktop
Navigating
an Annotated
PowerPoint
Sliceshow
When you finish annotating your desktop (see Mouse Tool), you can keep a record of the annotated
desktop as a new page in Scrapbook. Options for desktop annotation are Save, Discard, or Prompt to
Decide.
• Always save as new Scrapbook page: The annotated page becomes a new page in Scrapbook. Save
the Scrapbook file to keep the new Scrapbook page.
• Always discard annotations: The annotated page is automatically discarded. No record is kept.
• Ask me each time: When you finish annotating the desktop, you will be prompted to save the
annotated page as a new page in Scrapbook. You will have the choice to save or discard the page.
• Open Scrapbook after saving annotations: Default setting – opens Scrapbook. This setting gives
you immediate feedback that your annotation has been placed in Scrapbook. Save the Scrapbook file
to keep the new Scrapbook page.
When you change slides in a PowerPoint Slideshow, you must choose whether or not to save annotations
into the PowerPoint file as objects. Options for desktop annotation are Save, Discard, or Prompt to
Decide.
• Always add objects to PowerPoint file: The annotations are automatically saved to each slide as
an object on the slide. You must save the PowerPoint file to keep the annotations permanently. See
Navigate a PowerPoint Slideshow.
• Always discard annotations: The annotations are automatically discarded. No record is kept.
• Ask me each time: Each time you change slides, you will be prompted to save the annotations as
objects. You must save the PowerPoint file to keep the annotations permanently. See Navigate a
PowerPoint Slideshow.
• Autodetect: If Autodetect is selected, the eBeam Interactive software will automatically
attempt to connect to the 3M Digital Media System 815 on COM port.
• Connect To: The Connect To option allows you to manually specify which
communication port to connect to the 3M Digital Media System 815 on.
The 3M Digital Media System 815 must be connected to the PC and detected by the eBeam
Interactive software.
Automatically checks for firmware upgrades posted on the eBeam web site and allows you to
install an update if found.
The 3M Digital Media System 815 must be connected to the PC and it must be detected by
the eBeam Interactive software.
Software Updates
The Software Updates tab in the Options dialog allows you to check for the latest version of eBeam Interactive software.
The top area of the Software Updates tab describes current software status, including version number and the date the
software version was last checked.
The lower area of the Software Updates tab allows you to specify a schedule for periodically checking for new eBeam
software. Schedule options are as follows:
16
© 3M 2006. All Rights Reserved.
Page 17
™
3M
Digital Media System 815
• Every time the application is started
• Every specified number of days
• Never
Select the Check Version Now button to check your version and display its status in the top area of the Software Updates tab.
Select the Go to the Software Updates button to link directly to www.e-beam.com and download the latest software.
Getting Started with eBeam Interactive
Mouse
The Desktop Mouse Tool switches you from annotating your desktop to navigating your desktop.
The Mouse Tool remains selected until a different tool from the Desktop Interactive Tools palette is selected.
Snapshot
ENGLISH
Snapshot allows you to take a picture of the current screen and save it into Scrapbook.
• Select the Snapshot Tool button from the Desktop Interactive Tools palette to open the Take Snapshot dialog.
• Select one of the following options:
• Capture screen: Captures the entire desktop and saves image into Scrapbook.
• Capture a selection: Minimizes the Scrapbook and the cursor becomes a cross hairs. To select an area to capture, use
the Interactive Stylus to draw a selection rectangle.
The captured image is saved as a new page in Scrapbook.
Scrapbook
Selecting Scrapbook launches the eBeam Interactive Scrapbook. See What is Scrapbook? for more information. If
Scrapbook was minimized, selecting the Scrapbook button will restore the window. If Scrapbook is open, selecting the
Scrapbook button will minimize the window.
Calibrate
Selecting Calibrate starts the eBeam Interactive calibration process. You will be prompted to perform a 9-point calibration.
You can also start Calibration from the Calibrate Interactive Area... menu item in the eBeam Interactive Windows taskbar
menu.
To calibrate, the software must be connected to the 3M Digital Media System 815. See Calibration and Connecting the
Software to the 3M Digital Media System 815 for more information.
© 3M 2006. All Rights Reserved.
17
Page 18
Getting Started with eBeam Interactive
3M™ Digital Media System 815
Desktop Annotation Interactive Tools
The Desktop Annotation Interactive Tools appear when you select Annotate Your Desktop
(see Desktop Interactive Tools - Pen Tool). The Desktop Annotation Interactive Tools palette
give you all of the tools you will need to annotate your desktop.
When you select Annotate Your Desktop, a snapshot is taken of your desktop at that moment
and turned into a image that you can write on. A translucent frame appears around the border
ENGLISH
See Interactive Tools Preferences for information on moving, showing, hiding, and changing the appearance of the Interactive Tools.
Note: If the 3M Digital Media System 815 is not detected, eBeam Destop Interactive Tools will not activate. The 3M Digital
Media System 815 serves as a hardware security key that activates the full feature set of the eBeam Interactive software. Most
features of the software are available only when the 3M Digital Media System 815 is detected.
Pen Tool
of the screen and an annotate icon appears in the lower left corner of your screen to indicate
that you are annotating the desktop image and not navigating your desktop.
To finish annotating and return to desktop navigation and the Desktop Interactive Tools, select
the Mouse Tool.
The Pen Tool allows you annotate the desktop freehand in one of eight solid colors.
When the Pen Tool is selected, the Pen Tool button becomes highlighted and the center of the Desktop Annotation Interactive
Tools palette changes to show the current color and line width settings.
The Pen Tool remains selected until you select Eraser, Highlighter, Shapes, or Mouse Tools.
Change Color • Select the color in the center of the Desktop Annotation Interactive Tools palette. The outer ring of
the menu changes to display all other color options.
• Select a color on the outer ring.
Once a color has been selected, the center of the Desktop Annotation Interactive Tools palette changes
to display the selected color. This color will remain selected until a new color is selected.
Change Line
Width
• Select the line width in the center of the Desktop Annotation Interactive Tools palette. The outer
ring of the menu changes to display the four line width options available.
• Select a line width on the outer ring.
Once a line width has been selected, the center of the Desktop Annotation Interactive Tools palette
changes to display the selected line width. This line width will remain selected until a new line width
is selected.
18
© 3M 2006. All Rights Reserved.
Page 19
™
3M
Digital Media System 815
Getting Started with eBeam Interactive
Shapes Tool
The Shapes Tool allows you draw shapes on your desktop in one of eight solid colors.
When the Shapes Tool is selected, the Shapes Tool button becomes highlighted and the center of the Desktop Annotation
Interactive Tools palette changes to show the current color and line width settings.
The Shapes Tool remains selected until you select the Eraser, Highlighter, Pen, or Mouse Tools.
Change Shape • Select the shape in the center of the Desktop Annotation Interactive Tools palette. The outer ring of
the menu changes to display all other shape options.
• Select a shape on the outer ring.
Once a shape has been selected, the center of the Desktop Annotation Interactive Tools palette changes
to display the selected shape. This shape will remain selected until a new shape is selected.
Change Color • Select the color in the center of the Desktop Annotation Interactive Tools palette. The outer ring of
the menu changes to display all other color options.
• Select a color on the outer ring.
Once a color has been selected, the center of the Desktop Annotation Interactive Tools palette changes
to display the selected color. This color will remain selected until a new color is selected.
Change Line
Width
• Select the line width in the center of the Desktop Annotation Interactive Tools palette. The outer
ring of the menu changes to display the four line width options available.
• Select a line width on the outer ring.
ENGLISH
Once a line width has been selected, the center of the Desktop Annotation Interactive Tools palette
changes to display the selected line width. This line width will remain selected until a new line width
is selected.
Redo Tool
The Redo Tool allows you to redo the last undone annotation, provided you had previously used the Undo Tool. If you
have used Undo multiple times, you can redo the changes back to the beginning of the series. Redo is disabled once a new
annotation occurs.
© 3M 2006. All Rights Reserved.
19
Page 20
Getting Started with eBeam Interactive
3M™ Digital Media System 815
Eraser Tool
The Eraser Tool allows you to erase desktop annotation marks made using the Desktop Annotation Interactive Tools palette.
When the Eraser Tool is selected, the Eraser Tool button becomes highlighted and the center of the Desktop Annotation
ENGLISH
Interactive Tools palette changes to show the current eraser thickness setting.
The Eraser Tool remains selected until the Pen, Highlighter, Shapes, or Mouse Tools are selected.
Set Eraser Thickness • Select the thickness from the center of the Desktop Annotation Interactive Tools palette. The
outer ring of the menu changes to display all four thickness options available.
• Select a thickness on the outer ring.
Once a thickness has been selected, the center of the Desktop Annotation Interactive Tools
palette changes to display the selected thickness. This thickness will remain selected until a new
thickness is selected.
Mouse Tool
The Desktop Mouse Tool switches you from annotating your desktop to navigating your desktop. It also changes the Desktop
Annotation Interactive Tools palette to the Desktop Interactive Tools palette.
Save Tool
The Save Tool allows you to save a snapshot of the annotated desktop into Scrapbook as a new page. As the new page is
being saved, a save icon will appear on your desktop. You must save the Scrapbook if you want to keep the page permanently.
Undo Tool
Undo erases the previous annotation. It is possible to select Undo multiple times until the page is blank.
20
© 3M 2006. All Rights Reserved.
Page 21
™
3M
Digital Media System 815
Scrapbook
Highlighter Tool
The Highlighter Tool allows you annotate the desktop freehand in one of eight translucent colors.
Note: Some highlighter colors may not be visible on some computer backgrounds.
When the Highlighter Tool is selected, the Highlighter Tool button becomes highlighted and the center of the Desktop
Annotation Interactive Tools palette changes to show the current color and line width settings.
The Highlighter Tool remains selected until you select the Eraser, Pen, Shapes, or Mouse Tools.
Change Color • Select the color in the center of the Desktop Annotation Interactive Tools palette. The outer ring
of the menu changes to display the eight color options available.
• Select a color on the outer ring.
Once a color has been selected, the center of the Desktop Annotation Interactive Tools palette
changes to display the selected color. This color will remain selected until a new color is selected.
Change Line Width • Select the line width in the center of the Desktop Annotation Interactive Tools palette. The outer
ring of the menu changes to display the four line width options available.
• Select a line width on the outer ring.
Once a line width has been selected, the center of the Desktop Annotation Interactive Tools palette
changes to display the selected line width. This line width will remain selected until a new line
width is selected.
ENGLISH
© 3M 2006. All Rights Reserved.
21
Page 22
Scrapbook
3M™ Digital Media System 815
Scrapbook
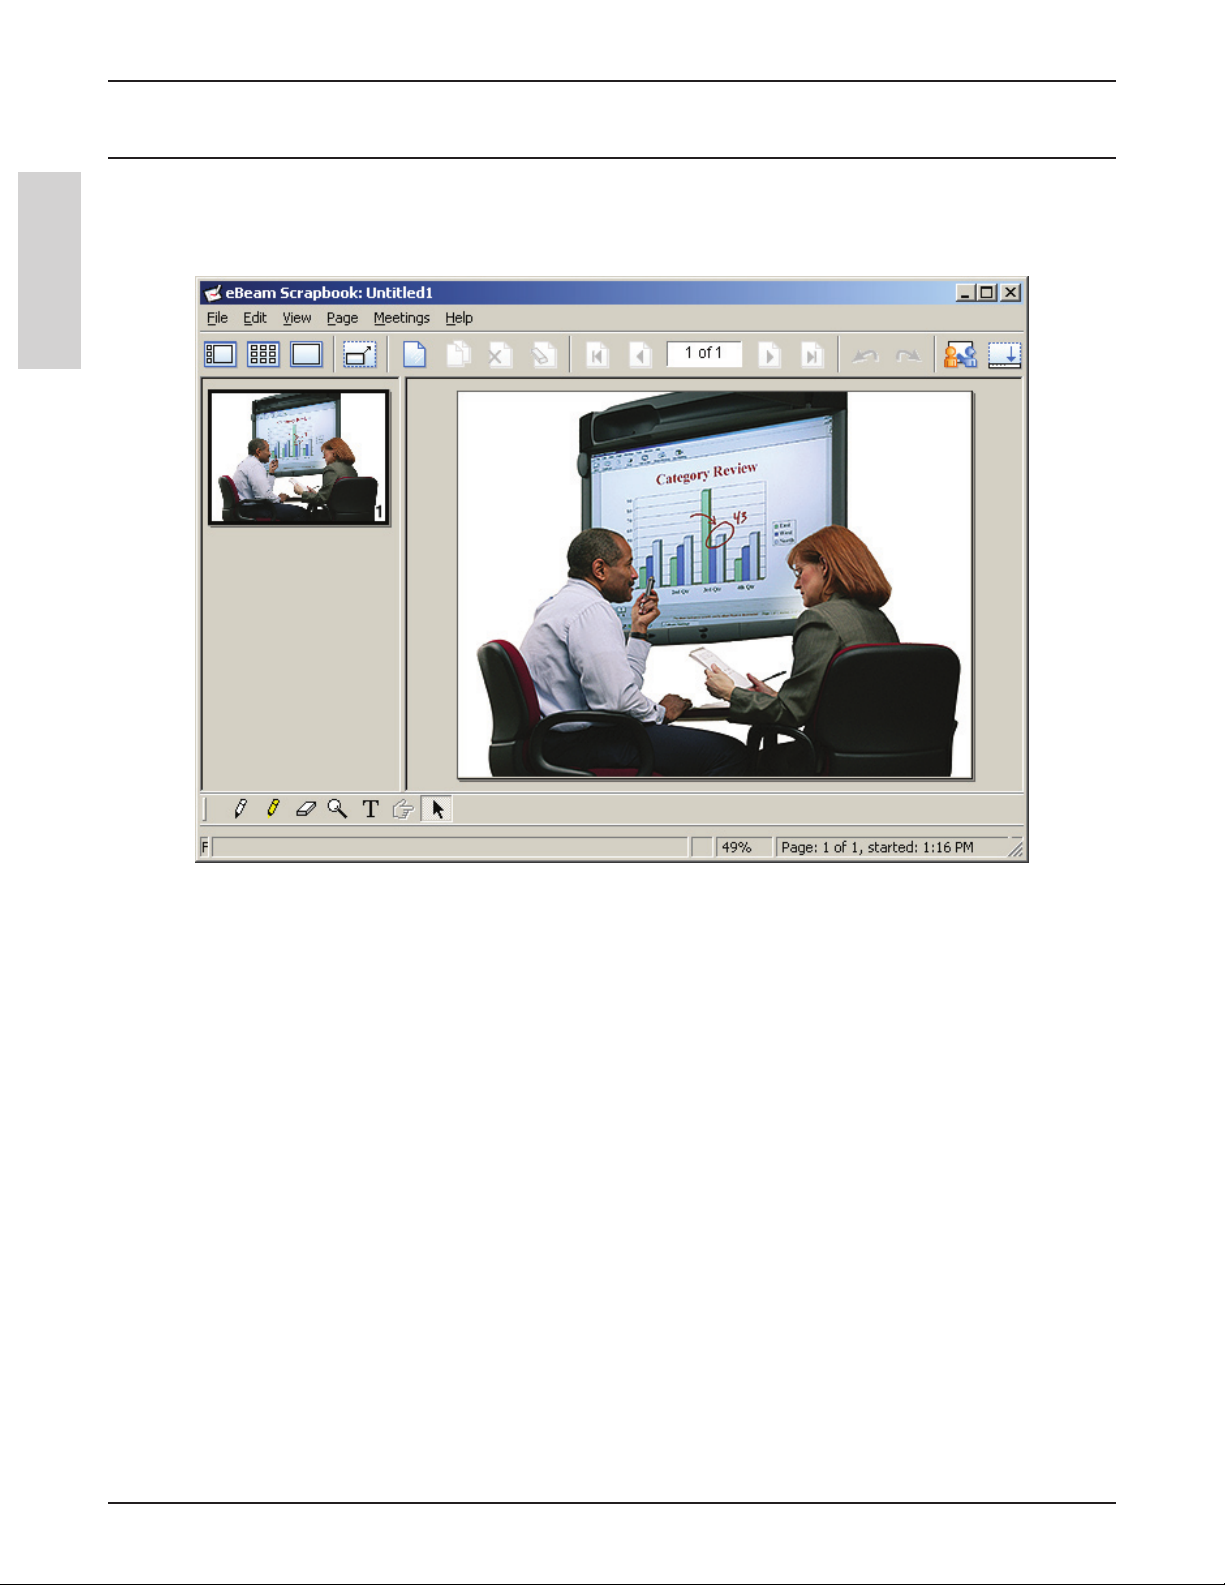
What is Scrapbook?
eBeam Interactive’s Scrapbook application turns your 3M Digital Media System 815 into a digital workspace.
ENGLISH
Scrapbook allows you to:
• Digitally take notes while brainstorming, planning, etc.
• Store screen shots.
• Import PowerPoint, Excel, Word, and image files and then annotate over those image files.
• Play back, edit, and annotate pages from your Scrapbook meeting file and then attach them to e-mail messages, faxes, or
simply print.
• Share meetings over the Internet/intranet with anyone, anywhere, in real time.
• Automatically save your meeting file to ensure that you never accidentally lose an important set of notes or a presentation.
All data brought into Scrapbook is saved as a collection of pages in a Scrapbook meeting file.
Note: If the 3M Digital Media System 815 is not detected, Scrapbook will activate but will not be fully functional. The 3M
Digital Media System 815 serves as a hardware security key that activates the full feature set of the eBeam Interactive
software. Most features of the software are available only when the 3M Digital Media System 815 is detected.
22
© 3M 2006. All Rights Reserved.
Page 23

™
3M
Digital Media System 815
Scrapbook
What is a Meeting?
A meeting is a collection of notes and images stored as pages in a Scrapbook meeting file (*.esb). Scrapbook allows one
meeting at a time to be open.
A single meeting may have one or more participants who are sitting in one room using eBeam to capture notes and diagrams.
A single meeting may also have participants who are located in other locations, such as another floor in your building,
another state, or even another country. This process of having participants attend your meeting over the Internet/intranet in
real time is called Sharing a Meeting.
Scrapbook Views
Scrapbook gives you two ways to look at your meeting data: in a Page, or as a Thumbnail. Pages and Thumbnails are
combined to create views. Scrapbook has three view options:
• Page and Thumbnails View
• Thumbnails View
• Page View
Switching Between Views
You can switch between views using the View menu or the Scrapbook application toolbar. To switch to a view:
• Page and Thumbnails View:
• Choose View > Normal, or
• Press ctrl+1, or
• Select the View Page and Thumbnails button from the Scrapbook application toolbar.
• Thumbnails View:
• Choose View > Thumbnails, or
• Press ctrl+2, or
• Select the View Thumbnails button from the Scrapbook application toolbar.
• Page View:
• Choose View > Page, or
• Press ctrl+3, or
• Select the View Page button from the Scrapbook application toolbar.
ENGLISH
Page and Thumbnails View
When the Page and Thumbnails View is selected, a scrollable column of Thumbnails is displayed on the left side of the
Scrapbook window, while one full page is displayed on the right side of the Scrapbook window. Features of the Page and
Thumbnails View include:
• Scrollable column of thumbnails for viewing all pages included in the Scrapbook meeting.
• Drag and drop page reordering.
• Sizable thumbnails column. Resize by dragging the boundary between the thumbnails and the page.
• Clicking on any thumbnail display its large view as the page on the right side of the Scrapbook window.
• Page Selection tools in the Scrapbook application toolbar.
• Meeting file playback. (Page and Thumbnails View or Page View only).
• Background Image import into the displayed page.
• Page annotation using Scrapbook Interactive Tools or the standard annotation toolbar.
© 3M 2006. All Rights Reserved.
23
Page 24
Scrapbook
Thumbnails View
When the Thumbnails View is selected, only Thumbnails are displayed in the Scrapbook window. The Thumbnails View
is very useful for giving you a summary of the pages in your meeting and allowing you to find individual pages rapidly.
Features of the Thumbnails View include:
• Scrollable column of Thumbnails for viewing all pages included in the Scrapbook meeting.
• Drag and drop page reordering.
• Clicking on any Thumbnail display its large view as the page on the right side of the Scrapbook window.. This is useful if
ENGLISH
you would like to:
• Import a Background Image
• Add a new page after the selected Thumbnail using Page > New or the New Page button from the Scrapbook toolbar.
• Duplicate a page to be inserted after the selected Thumbnail using Page > Duplicate or the Duplicate Page button
from the Scrapbook toolbar.
• Delete a page using Page > Delete or the Delete Page button from the Scrapbook toolbar.
• Print a page using File > Print.
• Instantly display Thumbnail in Page View with a double-tap (Interactive Stylus) or double-click (mouse).
Page View
When the Page View is selected, only a single page is displayed in the Scrapbook window. The Page View is the most used
view in Scrapbook. Features of the Page View include:
• Page Selection tools in the Scrapbook application toolbar.
• Background Image import into the displayed page.
• Page annotation using Scrapbook Interactive Tools or the standard annotation toolbar.
• Page menu options for add a new page, duplicating a page, deleting or page.
• Meeting file playback. (Page and Thumbnails View or the Page View only).
3M™ Digital Media System 815
Scrapbook Menus
File Menu
File Menu options are described below:
New New creates a new Scrapbook meeting file after closing any previously opened meetings.
To create a new Scrapbook meeting file:
1. Choose File > New or press ctrl+n.
2. If a meeting is open when New is chosen, Scrapbook prompts you to save the current
meeting. Select Yes to save the meeting, No to close the meeting without saving, or Cancel
to remain in the current meeting.
A new meeting is created every time Scrapbook opens.
Open... Open allows you to open a Scrapbook (*.esb) file and a eBeam Software (*.wbd) file.
To open a Scrapbook file:
1. Choose File > Open, or press ctrl+o.
A standard Open File dialog box appears.
2. Navigate to the *.esb file, and select that file.
3. Select OK.
24
Note: Scrapbook will also open *.wbd files created by previous versions of eBeam Software.
© 3M 2006. All Rights Reserved.
Page 25
™
3M
Digital Media System 815
Scrapbook
Import Background
Image...
Save Save allows you to save a Scrapbook (*.esb) file. To save a Scrapbook file:
Save As... Save As allows you to save a new Scrapbook (*.esb) file, or to save an existing Scrapbook
Import Background Image allows you to import an image file to the background of the
currently selected page.
To import a background image:
1. Choose File > Import Background Image...
2. A standard Open File dialog box opens. Navigate to the image file, and select that file to
open.
See Background Images for more information.
1. Choose File > Save, or press ctrl+s.
2. If the file has been saved before, it is saved again under the existing name.
If this is the first time the meeting has been saved, the standard Save As dialog box opens.
meeting file under a new name.
To save a Scrapbook file:
1. Choose File > Save As.
2. The standard Windows Save As dialog box opens.
3. Enter a meeting name and select the folder location. The default folder location is under My
Documents in My Scrapbook.
ENGLISH
4. Select the file type. See Supported File Types for more information.
5. Select the page range to save by selecting the appropriate Page Range radio button located
at the bottom of the Save As dialog:
• All - The default range is All pages. This is also the only option available when the
Scrapbook file has only one page.
• Selected - Saves only selected pages. You can select multiple pages by clicking on each
thumbnail while holding down the ctrl key.
• Pages - Allows you to select a range of pages to save.
Note: If you have not previously saved the file, any unselected pages will be lost when you use
the Selected or Pages options and are saving to either *.esb or *.wbd.
6. Select OK.
© 3M 2006. All Rights Reserved.
25
Page 26
Scrapbook
Save As Web Page... Save As Web Page allows you to save a Scrapbook (*.esb) meeting file in HTML format for
posting to the Internet/intranet as a web page.
To save a Scrapbook file in HTML format:
1. Choose File > Save As Web Page...
The Save As dialog box appears, then
2. Enter a meeting name and select the folder location. The default folder location is under My
ENGLISH
Documents in My Scrapbook.
3. Select the page range to save by selecting the appropriate Page Range radio button located
at the bottom of the Save As dialog:
• All - The default range is All pages. This is also the only option available when the
Scrapbook file has only one page.
• Selected - Saves only selected pages. You can select multiple pages by clicking on each
thumbnail while holding down the ctrl key.
• Pages - Allows you to select a range of pages to save.
3M™ Digital Media System 815
4. Select
Archive Meeting Archive Meeting allows you to archive your Scrapbook meeting file on an eBeam server.
See Archive a Meeting for more information.
Note: This option is available only if the 3M Digital Media System 815 is connected to the
software and detected.
Retrieve Meeting Retrieve Meeting allows you to retrieve an archived Scrapbook meeting file from an eBeam
server.
See Retrieve a Meeting for more information.
Page Setup... Page Setup opens the Page Setup dialog box. The Page Setup dialog box allows you to choose
header and footer information for a printed Scrapbook page and allows you to add a border for
the printed page.
Allows changes to page numbering format, meeting name, and date and time formats.
Print Setup... Print Setup opens the standard Windows Print Setup dialog box. The Print Setup dialog box
allows you to select all desired printer settings, including portrait or landscape orientation and
paper source.
The Print Setup dialog also allows you to select how to print highlighter annotations. By
default, highlighter annotations are printed solid and may block other annotations. To print
highlighter annotations as transparent:
1. Choose File > Print Setup.
Save.
2. Select Print Highlighter Strokes as Transparent Marks.
3. Select OK.
Print Page Print Page prints only the selected/displayed page to your Windows default printer.
Print... Print opens the standard Windows Print dialog box. This dialog allows you to select a page
range and the number of copies you want to print. The default settings are to print all pages in
the file and to print one copy.
To print the Scrapbook File:
1. Choose File > Print, or
2. Press ctrl+P.
26
© 3M 2006. All Rights Reserved.
Page 27
™
3M
Digital Media System 815
Send... Send allows you to send a Scrapbook meeting file (*.esb) as an attachment via any MAPI-
compliant mail system, such as Microsoft Exchange.
To send a Scrapbook meeting file via email:
1. Choose File > Send to open the Send dialog box.
2. Select the file format and page range from the Send dialog box
3. Select OK.
Scrapbook opens an untitled e-mail message in your MAPI-compliant mail program with your
file as an attachment. Use your address book to fill in names of the recipients, and send the
email as you normally would.
You can save a Scrapbook meeting in any file format (except HTML) that is suitable for an
e-mail attachment. See Supported File Types for more information. The HTML format option
is not available for sending.
Exit
Exit closes eBeam Scrapbook, but does not close the Interactive Tools. See Windows Taskbar
Menu for more information.
If you have not saved your Scrapbook file, you will be prompted to save the file before
Scrapbook closes.
Scrapbook
ENGLISH
Edit Menu
Edit Menu options are described below:
Undo Undo erases the previous annotation. It is possible to perform multiple Undos until all annotations
have been erased.
To Undo:
1. Choose Edit > Undo, or
2. Select the Undo button from the Scrapbook Toolbar, or
3. Press ctrl+Z.
Redo Redo allows you to redo the last undone annotation, provided you had previously used the Undo Tool.
If you have used Undo multiple times, you can redo the changes back to the beginning of the series.
Redo is disabled once a new annotation occurs.
To Redo:
1. Choose Edit > Redo, or
2. Select the Redo button from the Scrapbook Toolbar, or
3. Press ctrl+Y.
Cut Cut is used with the Text Tool to cut and paste text within active text boxes.
To cut text from text box:
1. Highlight the text in the text box.
2. Choose Edit > Cut, or press ctrl+X.
© 3M 2006. All Rights Reserved.
27
Page 28
Scrapbook
Copy Copy allows you to copy a section of a Scrapbook page to paste into another application. To copy a
section of a page:
1. Use the Selector Tool to define an area to copy.
2. Choose Edit > Copy, or press ctrl+C.
3. Open another application such as MS Word or MS Paint and paste.
It is not possible to paste copied data into another Scrapbook page. However, copied data is contained
ENGLISH
Paste Paste is used with the Text Tool to cut and paste text within active text boxes.
Select All Select All allows you to select an entire Scrapbook meeting page that can then be copied and pasted
Options... Options opens the Scrapbook Options dialog box.
in the clipboard, and can be included in a Scrapbook meeting page as a background image.
To paste:
1. Copy text from another application or another Scrapbook text box.
2. Choose Edit > Paste, or press ctrl + V.
into another application. Select all can also be selected by pressing ctrl+A.
3M™ Digital Media System 815
View Menu
View Menu options are described below:
Normal (View Page and
Thumbnails)
Thumbnails
Page
Full Screen View Full Screen View maximizes the current page to full screen size. The Scrapbook application
Normal allows you to switch to the Page and Thumbnails View. See Scrapbook Views for more
information. Switch to the Page and Thumbnails View by:
• Choose View > Normal, or
• Press ctrl+1, or
• Select the View Page and Thumbnails (Normal) button from the Scrapbook Toolbar.
Thumbnails allows you to switch to the Thumbnails View. See Scrapbook Views for more
information. Switch to the Thumbnails View by:
• Choose View > Thumbnails, or
• Press ctrl+2, or
• Select the View Thumbnails button from the Scrapbook Toolbar.
Page allows you to switch to the Page View. See Scrapbook Views for more information. Switch
to the Thumbnails View by:
• Choose View > Page, or
• Press ctrl+3, or
• Select the View Page button from the Scrapbook Toolbar.
toolbar becomes a floating toolbar that can be closed.
To go to full screen:
• Choose View > Full Screen, or
• Select the Full Screen button from the Scrapbook Toolbar, or
• Press F11.
28
To return to normal screen size:
• Right-click the screen (press Button A on the Interactive Stylus), and select Full Screen Off
from the menu that appears, or
• Select the Full Screen button from the Scrapbook Toolbar, or
• Press F11.
© 3M 2006. All Rights Reserved.
Page 29
™
3M
Digital Media System 815
Participants Participants opens the Particpants window so you can see who has joined a shared Scrapbook
meeting. To open the Participants window:
• Choose View > Participants, or
• Press ctrl+4, or
• Select the Participant View button from the Scrapbook Toolbar.
See What is Sharing? and View Participants for more information.
Toolbar (Show/Hide
Toolbars)
Zoom To Zoom To allows you to zoom in or out on the currently displayed page.
Zoom In Zoom In allows you to zoom in on the currently displayed page. Each time you choose Zoom In,
Choosing the Toolbar menu option causes a sub-menu to open with the following three
selections:
• Interactive Tools: Choose this menu selection to show or hide the Interactive Tools for
Scrapbook.
• Playback: Choose this menu selection to show or hide the Playback toolbar.
• Status Bar: Choose this menu selection to show or hide the Scrapbook status bar.
Choosing the Zoom To menu option causes a sub-menu to open with the following zoom
selections: 500%, 300%, 200%, 100%, 50%, and 25%.
The page will remain at the selected zoom value until a new zoom value is chosen.
For more information, see Zoom Tool.
the zoom will increase by a factor of 1.25 to no greater than 2000%.
Scrapbook
ENGLISH
To zoom in on a page:
• Choose View > Zoom In, or
• Press ctrl+Num +
The page will remain at the selected zoom value until a new zoom value is chosen.
For more information, see Zoom Tool.
Zoom Out Zoom Out allows you to zoom out on the currently displayed page. Each time you choose Zoom
Out, the zoom out will decrease by a factor of 1.25 to no less than 25%.
To zoom out of a page:
• Choose View > Zoom Out, or
• Press ctrl+Num -
The page will remain at the selected zoom value until a new zoom value is chosen.
For more information, see Zoom Tool.
Fit Page Fit Page compresses or expands the page to fit into the page display area. Fit Page can also be
selected by pressing ctrl+0.
All pages will fit into the page display area until a different zoom value is selected.
For more information, see Zoom Tool.
Actual Size Actual Size zooms the page to 100%.
The page will remain at actual size until a new zoom value is selected.
© 3M 2006. All Rights Reserved.
29
Page 30
Scrapbook
3M™ Digital Media System 815
Page Menu
Page Menu options are described below:
New New creates a new blank page in the Scrapbook meeting.
To create a new page:
• Choose Page > New, or
ENGLISH
Clear Clear clears all annotations from the displayed/selected page.
Duplicate Duplicate creates a copy of the displayed/selected page and makes the copy the displayed/selected
• Select the New Page button from the Scrapbook Toolbar.
The new page is inserted directly after the displayed/selected page.
To clear a page, select the page to be cleared, and:
• Choose Page > Clear, or
• Select the Clear Page button from the Scrapbook Toolbar.
page.
To duplicate a page:
1. Select the page to be duplicated.
2. Choose Page > Duplicate, or
3. Select the Duplicate Page button from the Scrapbook Toolbar.
The duplicated page is inserted directly after the selected/displayed page.
Delete Delete deletes the displayed/selected page.
To delete a page:
1. Select the page to be deleted.
2. Choose Page > Delete, or
3. Select the Delete Page button from the Scrapbook Toolbar.
Delete All Delete All deletes all pages from the Scrapbook meeting. All data will be lost.
Next Page/Previous
Page
Next Page navigates to the next page in the Scrapbook meeting. This option is available only when
the last page in the meeting is not displayed/selected.
To select Next Page:
1. Choose Page > Next Page.
2. Select the Next Page button from the Scrapbook Toolbar.
3. Press the page down button on your keyboard.
Previous Page navigates to the previous page in the Scrapbook meeting. This option is available
only when the first page in the meeting is not displayed/selected.
To select Previous Page:
1. Choose Page > Previous Page.
30
2. Select the Previous Page button from the Scrapbook Toolbar.
3. Press the page up button on your keyboard.
© 3M 2006. All Rights Reserved.
Page 31

™
3M
Digital Media System 815
Go To Page... Go To Page allows you to select the page to be displayed by typing in or selecting a page number.
To go to a page:
Scrapbook
1. Choose Page > Go To Page to open the “Go To Page” dialog.
2. Select a page using the up-and-down arrow buttons, or type the page number into the text box.
3. Select OK.
Or:
Use the Page Selection tools on the Scrapbook Toolbar.
Playback
Background Image... Background Image allows you to import an image file or screen capture to the background of the
See
Playback for more information.
currently selected page.
See Background Images for more information.
Meetings Menu
Meetings Menu options are described below:
Share/End Meeting... Share Meeting allows a meeting host to share a Scrapbook meeting over the Internet/
intranet. While a meeting is shared, this menu option changes to End Meeting.
See Share a Meeting for more information.
Join Meeting/Leave
Meeting...
Join Meeting allows invited participants to log into a shared Scrapbook meeting. The
participant will need to know the meeting name and a password (if applicable) prior to
attempting to log in to the meeting. While participating in a meeting, this menu option
changes to Leave Meeting.
ENGLISH
See Join a Meeting for more information.
Send Invitation... Send Invitation allows the meeting host to send e-mail invitations to all invited participants
for the shared Scrapbook meeting.
See Sending an Invitation for more information.
Allow Annotations Allow Annotations allows the host to decide whether or not to allow the participants to add
annotations in the shared Scrapbook meeting.
See Meeting Host Tools for more information.
Synchronize Participants Synchronize Participants allows the meeting host keep the participants on the same page.
While Synchronize Participants is on, the host controls which page is displayed.
See Meeting Host Tools for more information.
Participant Information... Participant Information displays information about each participant and the host.
Information includes Participant Name, time logged in, IP Address, Interactive or not, and
any notes.
See View Participants for more information.
Dismiss Participant Dismiss Participant allows the meeting host to remove a participant from the shared
Scrapbook meeting.
See Meeting Host Tools for more information.
© 3M 2006. All Rights Reserved.
31
Page 32

Scrapbook
3M™ Digital Media System 815
Help Menu
Help Menu options are described below:
Scrapbook Help Scrapbook Help opens the help system for the eBeam Interactive software.
Online Support If you have an Internet connection, selecting Online Support opens the eBeam Technical Support
Web page. Use this page to send questions to eBeam Technical Support.
Registration If you have an Internet connection, selecting Registration opens the eBeam Registration Web
ENGLISH
Common Questions If you have an Internet connection, selecting Common Questions opens the eBeam Common
Software Updates If you have an Internet connection, selecting Software Updates opens the eBeam Software
About eBeam
Scrapbook...
page. Use this page to register your product to guarantee ongoing technical support, product
information, and product updates.
Questions page.
Updates page.
About eBeam Scrapbook opens the software information dialog for Scrapbook.
This page includes version, copyright, and technology patents information.
Summary of Scrapbook Interactive Tools
Scrapbook Interactive Tools appear when Scrapbook is the active window. The Scrapbook
Tools palette give you all of the tools you need to annotate pages, zoom, and capture images
into a page.
See Interactive Tools Preferences for information on moving, showing, hiding, and changing
the appearance of the Interactive Tools.
Please note the following important points:
• If you select anywhere outside the Scrapbook window, the Scrapbook Tools palette will
change to the Desktop Interactive Tools palette.
• If the 3M Digital Media System 815 is not detected the Scrapbook Interactive Tools palette will not activate. The 3M
Digital Media System 815 serves as a hardware security key that activates the full feature set of the eBeam Interactive
software. When the 3M Digital Media System 815 is not detected, you are given access to anannotation toolbar that can
only be used in Scrapbook.
Pen Tool
The Pen Tool allows you annotate the displayed page freehand in one of eight solid colors.
When the Pen Tool is selected, the Pen Tool button becomes highlighted and the center of the Scrapbook Interactive Tools
palette changes to show the current color and line width.
The Pen Tool remains selected until you select the Eraser, Highlighter, Shapes, or Mouse Tools.
32
© 3M 2006. All Rights Reserved.
Page 33

™
3M
Digital Media System 815
Change Color • Select the color in the center of the Scrapbook Interactive Tools palette. The outer ring of the menu
changes to display all other color options.
• Select a color on the outer ring.
Once a color has been selected, the center of the Scrapbook Interactive Tools palette changes to
display the selected color. This color will remain selected until you select a new color.
Change Line
Width
• Select the line width in the center of the Scrapbook Interactive Tools palette. The outer ring of the
menu changes to display the four line width options available.
• Select a line width on the outer ring.
Once a line width has been selected, the center of the Scrapbook Interactive Tools palette changes to
display the selected line width. This line width will remain selected until you select a new line width.
Scrapbook
Pointer Tool
The Pointer Tool allows each participant in a meeting to point to data anywhere within the meeting window. Each
participant’s pointer is displayed in a different color.
ENGLISH
Note: The Pointer Tool is enabled only during a shared meeting. See Share a Meeting for more information.
When the Pointer Tool is selected, the Pointer Tool button becomes highlighted and the center of the Scrapbook Interactive
Tools palette displays the pointer logo.
To point to data during a
shared meeting
To move the pointer • Use the Interactive Stylus or your mouse to drag the pointer within the page to a new
Show/Hide/Rotate pointer • Select the Pointer Tool button from the Scrapbook Interactive Tools palette.
• Select the Pointer Tool button from the Scrapbook Interactive Tools palette.
• Tap/Click within the page to show the pointer
location.
• Select the Pointer Tool button again to show the outer ring containing the pointer options.
Available options are (beginning from the top and moving clockwise around the outer ring
of the Scrapbook Tools palette):
• Rotate pointer counter-clockwise: Rotates the pointer 90 degrees in a counter-
clockwise direction.
• Show Pointer: Shows the pointer on the screen.
• Rotate pointer clockwise: Rotates the pointer 90 degrees in a clockwise direction.
• Hide Pointer: Hides the pointer.
• Select an option.
© 3M 2006. All Rights Reserved.
33
Page 34

Scrapbook
3M™ Digital Media System 815
Text Tool
The Text Tool allows you to add a text box to the displayed page.
When the Text Tool is selected, the Text Tool button becomes highlighted and the center of the Scrapbook Interactive Tools
ENGLISH
palette displays the Text Tool.
The Text Tool remains selected until you select the Pen, Highlighter, Shapes, or Mouse Tools.
Create a Text Box on
the page
Move or Edit a Text
Box
Set Text Attributes 1. Select the Text logo from the center of the Scrapbook Interactive Tools palette to open the
1. Select the Text Tool.
2. Tap/Click within the page.
• To enter text in the text box, tap/click the on-screen keyboard icon in the bottom right corner
of the text box to use the Windows on-screen keyboard, or type in text from your keyboard.
• To close the text box, tap/click anywhere outside of the text box or select a new tool to close
the text box.
1. Select the Text Tool
2. Tap/Click directly on top of the text that you wish to move/modify to make the text box
active.
3. Make all text changes.
• To move the text box, tap/click and drag the edge of the text box.
• To close the text box, tap/click anywhere outside of the text box or select a new tool.
Font dialog.
2. Select the font type, style, size, color, etc.
3. Select OK.
Once the text attributes have been selected they will remain set until you select new attributes.
Eraser Tool
The Eraser Tool allows you to erase annotation marks on the displayed Scrapbook page.
When the Eraser Tool is selected, the Eraser Tool button becomes highlighted and the center of the Scrapbook Interactive
Tools palette changes to show the current eraser thickness.
The Eraser Tool remains selected until you select the Pen, Highlighter, Shapes, or Mouse Tools.
Set Eraser Thickness • Select the thickness from the center of the Scrapbook Interactive Tools palette. The outer
ring of the menu changes to display all four thickness options available.
• Select a thickness on the outer ring.
Once a thickness has been selected, the center of the Scrapbook Interactive Tools palette
changes to display the selected thickness. This thickness will remain selected until you select a
new thickness.
34
© 3M 2006. All Rights Reserved.
Page 35

™
3M
Digital Media System 815
Scrapbook
Select Tool
The Select Tool allows you select a rectangular area of the displayed page so that you can copy and paste the selection into
another application.
The Select Tool remains selected until you select a different tool from the Scrapbook Interactive Tools palette.
See Select All for more information.
Snapshot Tool
Snapshot allows you to take a picture of the current screen and save it into Scrapbook.
ENGLISH
Take a Snapshot of our
Desktop (excluding the
Scrapbook window)
Take a Snapshot of your
Desktop that includs the
Scrapbook
1. Select the Snapshot Tool button from the Scrapbook Interactive Tools palette to open the
Take Snapshot dialog.
2. Select one of the following options:
• Capture screen: The entire desktop is captured and saved into Scrapbook.
• Capture a selection: Scrapbook minimizes and the cursor becomes a cross hair. To select
an area to capture, use the Interactive Stylus to draw a selection rectangle.
The captured image is saved as a new page in Scrapbook.
Scrapbook is minimized during the screen capture process to allow you to get an
unobstructed snapshot of your desktop. To include Scrapbook in a snapshot:
1. Tap/Click an empty area on the Windows Start menu bar. Scrapbook Interactive Tools
with change to Desktop Interactive Tools.
2. Select the Snapshot Tool from the Desktop Interactive Tools palette.
3. Select Capture Screen or Capture a selection and follow the procedure described above.
Once the captured image has been saved into Scrapbook, the Desktop Interactive Tools
palette will change to the Scrapbook Interactive Tools palette.
© 3M 2006. All Rights Reserved.
35
Page 36

Scrapbook
3M™ Digital Media System 815
Zoom Tool
The Zoom Tool allows you to zoom into or out of the page displayed in Scrapbook.
When the Zoom Tool is selected, the Zoom Tool button becomes highlighted the center of the Scrapbook Interactive Tools
ENGLISH
palette changes to show the zoom logo.
The Zoom Tool remains selected until you select another tool from the Scrapbook Interactive Tools palette.
Change the Zoom
Value of the page
1. Select the Zoom Tool button from the Scrapbook Interactive Tools palette.
2. Select the Zoom Tool button again to display the outer option ring.
3. Select a zoom value. The available zoom options, beginning from the plus sign and moving
clockwise around the Tools palette are:
• Zoom in (plus sign): Zooms in to the page by a factor of 1.25 to no greater than 2000%
• 300%
• 500%
• Fit Page: Compresses or expands the page to fit into the page display area. Fit Page can also be
selected by pressing ctrl+0.
• Zoom out (minus sign): Zooms out of the page by a factor of 1.25 to no lower than 25%
• 50%
• 100%
• 200%
Highlighter Tool
The Highlighter Tool allows you to annotate the displayed page freehand in one of eight translucent colors.
Note: Some highlighter colors may not be visible on some computer backgrounds.
When the Highlighter Tool is selected, the Highlighter Tool button becomes highlighted and the center of the Scrapbook
Interactive Tools palette changes to show the current color and line width.
The Highlighter Tool remains selected until you select the Eraser, Pen, Shapes, or Mouse Tools.
Change Color • Select the color in the center of the Scrapbook Interactive Tools palette. The outer ring of the
menu changes to display the eight color options available.
• Select a color on the outer ring.
Once a color has been selected, the center of the Scrapbook Interactive Tools palette changes to
display the selected color. This color will remain selected until you select a new color.
Change Line Width • Select the line width in the center of the Scrapbook Interactive Tools palette. The outer ring of
the menu changes to display the four line width options available.
• Select a line width on the outer ring.
Once a line width has been selected, the center of the Scrapbook Interactive Tools palette changes to
display the selected line width. This line width will remain selected until you select a new line width.
36
© 3M 2006. All Rights Reserved.
Page 37

™
3M
Digital Media System 815
Scrapbook
Standard Annotation Toolbar
The Standard Annotation Toolbar can be accessed in Scrapbook by selecting View > Toolbar > Tools (only when the
3M Digital Media System 815 is not detected).
The tools on the standard annotation toolbar include (from left to right):
Marker The Marker tool allows you to annotate the displayed page freehand in one of four solid colors. The
color can be selected from the palette that appears when the Marker tool is selected.
Highlighter The Highlighter tool allows you to annotate the displayed page freehand in one of four transparent
colors. The color can be selected from the palette that appears when the Highlighter tool is selected.
Eraser The Eraser tool allows you to erase the annotation marks made with the annotation tools. The eraser
size can be selected from the palette that appears when the Eraser tool is selected.
Zoom The Zoom tool allows you to adjust the viewing size of the displayed page. The range of zoom values
are 25-2000%. Holding down the Shift key reverses the zoom direction. A zoom value can also be
selected from the pull-down list that appears when the Zoom tool is selected.
Text The Text tool allows you to add text annotations to a page in any size, font, and color available on your
computer. The size, font, and color may be selected from the palette that appears when the Text tool is
selected.
Pointer The Pointer tool allows each participants in a meeting to point to data anywhere within the meeting
window. Each participant’s pointer is displayed in a different color.
ENGLISH
The Pointer tool is only enabled during a shared meeting.
The Pointer direction (right, left, up, down) can be selected from the palette that appears when the
Pointer tool is selected. You can also hide the Pointer by selecting the Hide Pointer button from the
palette that appears when the Pointer tool is selected.
Selector The Selector tool allows you to draw a selection rectangle and copy the selection. The selected
rectangle can then be pasted into another application.
Scrapbook Toolbar
The follow options are available on the Scrapbook Application Toolbar:
Normal (View Page and Thumbnails) /Thumbnails/
Page View
Normal, Thumbnails, and Page allow you to switch between the
different Scrapbook Views.
You can also switch between views by pressing the following
combination of keys:
• Normal: ctrl+1
• Thumbnails: ctrl+2
• Page: ctrl+3
© 3M 2006. All Rights Reserved.
37
Page 38

Scrapbook
Full Screen Full Screen maximizes the current page to full screen size. The
Scrapbook application toolbar becomes a floating toolbar.
To go to full screen:
1. Choose View > Full Screen, or
2. Select the Full Screen button from the Scrapbook application
toolbar.
3M™ Digital Media System 815
ENGLISH
New Page New Page creates a new blank page in the Scrapbook meeting.
Duplicate Page Duplicate Page creates a copy of the displayed/selected page and
Delete Page Delete Page deletes the displayed/selected page.
To return to normal screen size:
1. Right-click the screen (press Button A on the Interactive Stylus),
and select Full Screen Off from the menu that appears, or
2. Select the Full Screen button from the Scrapbook Toolbar.
To create a new page:
1. Choose Page > New, or
2. Select the New Page button from the Scrapbook Toolbar.
The new page is inserted directly after the displayed/selected page.
makes the copy the displayed/selected page.
To duplicate a page:
1. Select the page to be duplicated.
2. Choose Page > Duplicate, or
3. Select the Duplicate Page button from the Scrapbook Toolbar.
The duplicated page is inserted directly after the selected/displayed
page.
To delete a page:
1. Select the page to be deleted.
2. Choose Page > Delete, or
3. Select the Delete Page button from the Scrapbook application
toolbar.
Clear Page Clear Page clears all annotations from the displayed/selected page.
To clear a page:
1. Select the page to be cleared.
2. Choose Page > Clear, or
3. Select the Clear Page button from the Scrapbook application
toolbar.
38
© 3M 2006. All Rights Reserved.
Page 39

™
3M
Digital Media System 815
Page Selection The Page Selection buttons are used to choose which page to display
by selecting the page number. From left to right, the Page Selection
buttons are:
• Jump to First Page
• Previous Page
• Next Page
• Jump to Last Page
Jump to First Page and Previous Page are disabled when Page 1 is
displayed. Next Page and Jump to Last Page are disabled when the
last page is displayed.
You can also select the page number by typing the page number
directly into the text box and pressing enter, or using the Go To
Page... option found in the Page Menu.
Undo Undo erases the previous annotation. It is possible to undo until the
page is blank.
To Undo:
1. Choose Edit > Undo, or
2. Select the Undo button from the Scrapbook application toolbar, or
Scrapbook
ENGLISH
3. Press ctrl+Z.
Redo Redo allows you to redo the last undone annotation, provided you
had previously used Undo. If you have used Undo multiple times,
you can redo the changes back to the beginning of the series. Redo is
disabled once a new annotation occurs.
To Redo:
1. Choose Edit > Redo, or
2. Select the Redo button from the Scrapbook application toolbar, or
3. Press ctrl+Y.
Share/End Meeting Share Meeting allows a meeting host to share a Scrapbook meeting
over the Internet/intranet.
While a meeting is being shared, this button becomes the End
Meeting button.
See Share a Meeting for more information.
Join Meeting Join Meeting allows invited participants to log into a shared
Scrapbook meeting.
See Join a Meeting for more information.
Participant View Participant View opens the Participants window. The Participants
window allows you to see who is attending a shared Scrapbook
meeting.
The Participants window can also be opened by pressing ctrl+4.
See What is Sharing? and View Participants for more information.
Move Toolbar The Move Toolbar button allows you to move the toolbar to the top
or bottom of the application window.
© 3M 2006. All Rights Reserved.
39
Page 40

Scrapbook
3M™ Digital Media System 815
Playback Toolbar
The Playback Toolbar can be opened by choosing View > Toolbar > Playback.
The Playback Toolbar allows you to replay the meeting like a movie. The meeting can then be played forward, line by line,
and at varying speeds. Playback can be restricted to either the current page, or set to play all pages.
ENGLISH
Some uses for the Playback Toolbar:
• Viewing the meeting chain of events.
• Branching, which returns the meeting to a specific point and then duplicates the page. The duplicated page will create
a new page with meeting data to the selected point, allowing you to explore a new idea without manually duplicating
previous work, and keeping the previous page intact.
The following Playback tools are available on the Playback Toolbar, or the Playback sub-menu on the Page Menu.
Jump to Beginning Jumps to the beginning of the Scrapbook meeting or the page (depending on if All Pages has been
selected).
Drag Control Slider Allows you to step through the meeting forward or reverse by using the Interactive Stylus or your
mouse to drag the drag bar on the drag line, or to immediately jump to a specific point in the meeting
by dragging the drag bar to a location on the drag line.
Play Replays the Scrapbook meeting or the page from beginning to end (depending on if All Pages has
been selected). While playing, the Play button changes to a Stop button, allowing you to stop the
playback.
Jump to End Jumps to the end of the Scrapbook meeting or the page (depending on if All Pages has been
selected).
All Pages Sets the number of pages played. If All Pages is checked, selecting Play causes the entire meeting to
be played back. If All Pages is not checked, only the currently displayed page is played back. This
option can also be set in the Page > Playback sub-menu.
Loop Replays the Scrapbook meeting or the page from beginning to end (depending on if All Pages has
been selected). This option can also be set in the Page > Playback sub-menu.
Play Speed Sets the speed at which the meeting is played. The slowest speed is 0.5x; the fastest speed is 8.0x.
This option can also be set in the Page > Playback sub-menu.
Note: Playback is enabled only when the Page and Thumbnails View or Page View are selected. See Scrapbook Views for
more information.
40
© 3M 2006. All Rights Reserved.
Page 41

™
3M
Digital Media System 815
Scrapbook
Background Images
You can locate the Background Images option under File > Import Background Image or Page > Background Image.
The Background Images option allows you to import a file, screen capture, or data from the clipboard as a background image
on the displayed/selected page. The background image remains in the background of the page. Any annotations remain
visible in front of the background image.
During a shared meeting, background images are displayed to all participants. See Share A Meeting for more information
about shared meetings.
Supported file formats for background images:
• Bitmap (*.bmp)
• Graphic Files (*.gif, *.jpg, *.ico, *.emf, *.wmf)
• Excel Spreadsheets (*.xls). See Import an Excel Spreadsheet.
• PowerPoint Presentations (*.ppt). See Import a PowerPoint Presentation.
• Word Document (*.doc, *.rtf). See Import a Word document.
• If you attempt to load a file type that is not supported the page will display a file icon and the filename, but will not attempt
to load that file into the page.
Import a background image:
Drag-and-Drop The easiest way to import a background image is to drag the file from Windows
Explorer and drop it onto the Scrapbook window. Supported image file formats will load
automatically into the background of the displayed page. Excel, PowerPoint, and Word
files will cause the associated import dialog boxes to open.
Quick Import from the File
Menu
All import options from Page
Menu
Selecting File > Import Background Image opens a standard Open File dialog box.
This allows you to navigate directly to the file location and select OK to load the
file. Supported image file formats will load automatically into the background of the
displayed page. Excel, PowerPoint, and Word files will cause the associated import
dialog boxes to open.
Selecting Page > Background Image opens the Background Image dialog box. The
Background Image dialog allows you to import a file, to load and image from clipboard,
to choose how those image will be scaled in the Scrapbook window, and to remove a
background from the displayed page or selected thumbnail.
ENGLISH
Background Image dialog options:
All options affect the displayed page or selected Thumbnail in Scrapbook.
• Load Image: Opens the standard Open dialog box. To load an image, navigate to and
• Load from Clipboard: Loads data from the computer’s clipboard as the background
• Remove Image: Removes the background image from the page. Any annotations will
• File Scaling Options:
See Import a PowerPoint Presentation, Import an Excel Spreadsheet, or Import a Word
Document for more information about importing these file formats.
© 3M 2006. All Rights Reserved.
select the file you want to load into the page background, and then select OK.
image. If there is no data in the computer’s clipboard, this button is disabled.
remain on the page.
• Do Not Scale: The file is imported into the background as is.
• Scale Proportionally: The file is scaled to fit as much of the page as possible while
retaining the aspect ratio.
• Scale to Fit: The file is scaled to fit the page completely. The aspect ratio is not
preserved.
41
Page 42

Scrapbook
3M™ Digital Media System 815
Import a PowerPoint Presentation
This section covers procedures for importing PowerPoint slide images into Scrapbook. For more on how background images
are used in Scrapbook, see Background Images.
Importing a PowerPoint Presentation into Scrapbook
1. Choose Page > Background Image, and use the Load Image button to locate the PowerPoint (*.ppt) file. For details on
ENGLISH
how to use the Load Image button, see Background Images.
You can also drag-and-drop a PowerPoint (*.ppt) file onto the page to open it as a background image.
The Multiple Page Background Image dialog box appears, with a description of the presentation size and a list of options.
2. Decide how much of the presentation you want to include as a background image by choosing one of the following:
• Load many images and use them for new pages—loads slides that fall within the range you specify.
• Load one image only and use it for the current page—loads one image that you specify by scrolling to the appropriate
slide number.
3. Select OK.
Improving PowerPoint Image Quality
The Scrapbook import typically decreases the file size of PowerPoint slides that contain high quality images by converting
the images into a lower quality image format. This means that the images shown in Scrapbook are not as sharp or clear as the
original PowerPoint slides.
If you want retain the high image quality of the original PowerPoint slides, do the following when importing to Scrapbook:
1. Choose Edit > Options menu.
2. Select the Preferences tab.
3. Check the Use original image quality checkbox found under PowerPoint Presentation Import.
Checking Import the best quality images causes the high image quality of the original PowerPoint slide to be maintained
as the file is imported into Scrapbook. However, checking this option also results in higher PC memory consumption and
increases the time required to save, share, and join meetings.
Import an Excel Spreadsheet
This section covers procedures for importing Excel images into Scrapbook. For more on how background images are used in
Scrapbook, see Background Images.
Importing an Excel Spreadsheet into Scrapbook
1. Choose Page > Background Image, and use the Load Image button to load the Excel (*.xls) file. For details on how to
use the Load Image button, see Background Images.
You can also drag-and-drop an Excel (*.xls) file onto the page to open it as a background image.
2. If there is more than one worksheet in the *.xls file, the Excel Spreadsheet Import dialog box opens. Specify to either:
• Load the data from one sheet only, or
• Load data from many sheets and use them for new pages.
3. To load data from one sheet only, specify the sheet and the range of cells to be used. You can preview the image by
clicking the Show Preview button.
4. To load data from many sheets, specify the sheets to be used. You can also choose to have the first loaded image placed on
the last existing meeting page.
Note: The number of sheets, rows and columns you can import are limited by the amount of memory in your computer.
42
© 3M 2006. All Rights Reserved.
Page 43

™
3M
Digital Media System 815
Scrapbook
Import a Word Document
This section covers procedures for importing Word images into Scrapbook. For more on how background images are used in
Scrapbook, see Background Images.
Importing a Word Document into Scrapbook
1. Choose Page > Background Image, and use the Load Image button to locate the Word (*.doc) file. For details on how to
use the Load Image button, see Background Images.
You can also drag-and-drop a Word (*.doc) file onto the page to open it as a background image.
2. If there is only one page in the Word document, Scrapbook will load the single page.
3. If there are multiple pages in the Word document, the Multiple Page Background Image dialog will open. Specify to
either:
• Load many images and use them for new pages—loads pages that fall within the range you specify.
• Load one image only and use it for the current page—loads one image that you specify by scrolling to the appropriate
slide number.
4. Select OK.
Scrapbook Options
ENGLISH
The Scrapbook Options dialog box allows you to set preferences and settings specific to Scrapbook. Other options and
settings for eBeam Interactive can be found in Options accessed through the eBeam Interactive menu on the Windows
taskbar.
The Scrapbook Options dialog contains two tabs:
• Preferences Tab
• Proxy Server Tab (See Proxy Server Settings for Proxy settings information).
Preferences Tab
The Preferences tab allows you to set:
• File autosave/backup settings - Please see Autosave for more information.
• Image quality for PowerPoint Presentation file import - Please see Improving PowerPoint Image Quality for more
information.
© 3M 2006. All Rights Reserved.
43
Page 44

Scrapbook
Supported File Types
Supported file formats for Save As and Send from the File Menu.
• eBeam Scrapbook File (*.esb)
• eBeam Software File (*.wbd)
• PDF (*.PDF)
• Vector PDF (*.PDF)
ENGLISH
• HTML (*.HTM) (not available for Send. See also Save As Web Page... from the File Menu)
• 24-bit Bitmap (*.BMP)
• 256 color Bitmap (*.BMP)
• Monochrome Bitmap (*.BMP)
• EPS monochrome (*.EPS)
• JPEG (*.JPG)
• TIFF (*.TIF)
• Metafile (*.emf)
• PowerPoint Presentation (*.ppt)
• PowerPoint Show (*.pps)
3M™ Digital Media System 815
Automatic File Saving
The “File Saving” feature ensures that you don’t lose your meeting data if the power goes out, your laptop runs out of battery
life, etc.
To adjust your automatic file saving settings:
1. Choose Edit > Options.
2. Select the Preferences tab.
3. Set the following options in File Saving box:
• Save Recovery File Every: Enable or disable automatic file saving by checking/unchecking this option.
• XX Minutes: Choose how often your Scrapbook meeting file will be automatically saved by changing the number of
minutes. The default “File Saving” setting is every 10 minutes.
44
© 3M 2006. All Rights Reserved.
Page 45

™
3M
Digital Media System 815
Shared Meetings
Shared Meetings
What is a shared meeting?
A Shared Scrapbook Meeting is a meeting that is broadcast over your local intranet or over the World Wide Web (Internet).
At one location, the meeting coordinator/host uses the 3M Digital Media System 815 and eBeam software to host or
“broadcast” the meeting over the network (see Hosting/Sharing a Meeting). Remote participants use the eBeam Interactive
software or a web browser to log into the meeting (see Join a Meeting).
The meeting is held in real time, which means that remote participants see the notes and annotations as they are created.
If the meeting coordinator allows participants this option, participants can annotate meeting pages, highlighting important
points, and adding notes that can be seen by all other participants as well as the coordinator.
To allow remote participants (located outside of your local network firewall) to access your shared meeting, the meeting
server must be located on the Internet. eBeam currently hosts a meeting server that may be used by any eBeam system user.
Hosting/Sharing a Meeting
The following explains how to host/share a meeting over your local intranet or the internet.
If you share the meeting on your local intranet, only people within your intranet can access the meeting. If you share your
meeting over the internet (using an eBeam server), participants from any internet location can access your meeting.
To share a meeting, you must be connected to the 3M Digital Media System 815. Also, if there is any possibility that your
network uses a proxy server, see Proxy Server Setup.
You can host one shared meeting from eBeam Interactive software at any time.
ENGLISH
See:
• Hosting A Shared Meeting
• Leaving A Shared Meeting
For meeting host specific tools, see Meeting Host Tools found in the View Participants section.
© 3M 2006. All Rights Reserved.
45
Page 46

Shared Meetings
3M™ Digital Media System 815
Hosting a Shared Meeting
1. Choose Meetings > Share Meeting, or select the Share Meeting button from the Scrapbook Toolbar to open the Share
Meeting dialog.
2. Under Meeting Information, enter the following:
Meeting Name The meeting name is the name shown in the Join Meeting dialog box. The meeting name is
saved as the default name for subsequent meetings, until you change it. The meeting name
ENGLISH
My Name
Notes Any notes/comment you would like to include.
Publish Meeting Name Select Publish Meeting Name if you want the name of the meeting to be visible to network
Password/Confirm/Use
Password
Send Meeting Invitation Meeting invitations are e-mail invitations that are sent out using your standard e-mail client.
Archive Meeting on the
Server
can be up to 20 characters.
The name displayed in the Participants View. See
users who are attempting to join a meeting using either the Join Meeting (see Joining
a Meeting for more information) dialog box, or the Meetings web page located at
www.e-beam.com.
If you do not publish the name, guests will need to know the full meeting name beforehand
and manually type it into the Join Meeting dialog box.
If a password is required, check the Use Password checkbox and type the same password
into both the Password and Confirm text boxes.
The password must be at least 6 characters, and can be up to 20 characters.
If Send Meeting Invitation is checked, the Send Invitation dialog box opens once you select
the Share Meeting button. See Sending an Invitation for more information.
An archived meeting allows other eBeam users to search for, view, download, edit, and/or
delete your eBeam meeting (based on the archive privileges you select). If Archive Meeting
on the Server is checked, the Archive Meeting dialog opens after you select the Share
Meeting button. See Archive a Meeting for more information.
View Participants.
Note: While the Archive Meeting dialog appears after selecting the Share Meeting button, your selected archive parameters
are not saved to the server until you select the End Meeting button. However, meeting data is cached on the server in case the
meeting unexpectedly quits.
Note: During your meeting, you may change your meeting parameters at any time by choosing Meeting > Archive Meeting.
3. Under Server Information, select the server that will host the meeting.
The pull-down menu lists the eBeam Server and any other servers you have previously added to your server list.
See Adding a Meeting Server for more information.
Note: For Windows, if you wish to host the meeting from your computer, select Use my PC to Host this Meeting, and then type
in a port number. For most occasions, the default port value of 80 is best.
4. Notify guests of the meeting name, meeting time, and password, if required. See Sending an Invitation for more
information.
5. Select Share.
Your shared meeting is now available on the network using the specified meeting server.
If you experience any problems sharing a meeting, see Troubleshooting Shared Meetings for the answers for some of the most
common problems.
46
© 3M 2006. All Rights Reserved.
Page 47

™
3M
Digital Media System 815
To leave a shared meeting at any time:
1. Select the “Share/End Meeting” button from the Scrapbook Application Toolbar.
Shared Meetings
2. Choose Meetings > End Meeting
Important Note: When the meeting host ends a shared meeting, all participants are disconnected from the meeting. As the
meeting host, make sure the meeting is completely over before attempting to close the meeting.
Join a Meeting
There are two ways you can join a meeting:
• Using eBeam Scrapbook
• Using a Web Browser
Using Scrapbook to Join a Meeting
1. Open Scrapbook from:
• the Desktop Interactive Tools palette, or
• the eBeam Interactive Windows taskbar menu, or
• the eBeam Interactive > Scrapbook menu option found in the Windows Start bar.
2. Choose Join Meeting from the Scrapbook Toolbar.
3. In the Join Meeting dialog box, select the meeting server, enter your name, and select a meeting name from the Meeting
list.
The Meeting list shows active meetings whose names have been published.
ENGLISH
If the pull-down menu does not include the meeting server you want, you can manually type the server name. You can
also add a server to your server list, so that you can quickly select it on another occasion. See Adding a Meeting Server for
more information.
4. Select Refresh to update the list of published meetings.
If the meeting appears with a Lock icon, enter the password.
If the meeting is not listed, enter the meeting name, and a password if required.
5. Select Join.
To leave a meeting, choose Meetings > Leave Meeting From…, or select the Leave Meeting button from the Scrapbook
Application Toolbar.
Note: When the meeting host ends a shared meeting, all participants are disconnected from the meeting. Once disconnected,
participants can continue to print, save, annotate, and modify their Scrapbook record of the meeting.
Note: Desktop Interactive Tools, Desktop Annotation Interactive Tools, Scrapbook Interactive Tools, and PowerPoint
Interactive Tools are available only when the 3M Digital Wall Display is detected. If you have joined a meeting through
Scrapbook and would like to annotate, you can access the Standard Annotation Toolbar.
Using a Web Browser to Join a Meeting
1. Launch Internet Explorer.
2. In the URL text box (Address or Location), type the IP address or DNS name of the computer hosting the eBeam session.
If the meeting is hosted by the eBeam server, type www.e-beam.com and select the Meetings button.
3. Type your name in the My Name text box, and the meeting name in the Meeting Name text box. In the Meeting Password
text box, type the password, if required.
4. Select Join a Meeting.
© 3M 2006. All Rights Reserved.
47
Page 48

Shared Meetings
If the meeting is in session, the eBeam window appears in your Web browser. Participants will see the full contents of the
meeting.
Remote participants cannot print or save the meeting to disk. However, the host can save the meeting and make it available
for viewing in a Web browser or another application.
To leave a meeting, choose Leave Meeting from the Meeting menu.
3M™ Digital Media System 815
Sending an Invitation
ENGLISH
You can invite others to a shared meeting by sending an e-mail invitation that contains a link or URL to the meeting. In order
to send email invitations:
• You must use the Share Meeting dialog to set up a shared meeting, or
• You must currently be sharing a meeting.
Note: Remote participants cannot send out invitations.
Sending an E-mail Invitation from the Share Meeting Dialog
1. In the Share Meeting dialog, check the Send Meeting Invitation checkbox. Set up the remainder of the Share Meeting
dialog as described in Hosting/Sharing a Meeting.
2. The Select Language dialog opens. Select the language to be used for the e-mail invitation and then select Continue. At
this point, your e-mail program might ask you to select the e-mail profile to be used.
3. A new e-mail with the Meeting Request information opens. Enter the e-mail addresses of the recipients in the To: field.
4. Select Send.
The e-mail invitation includes a link for downloading the latest eBeam Software and links to enable the user to join the
meeting via their Web browser or eBeam Software.
Sending an E-mail Invitation from the Meetings Menu
1. Make sure you are sharing a meeting. See Hosting/Sharing a Meeting for more information.
2. Choose Meetings > Send Invitation to open the Select Language dialog.
3. Select the language to be used for the e-mail invitation and then select Continue. At this point, your e-mail program might
ask you to select the e-mail profile to be used.
4. A new e-mail with the Meeting Request information opens. Enter the e-mail addresses of the recipients in the To: field.
5. Select Send.
The e-mail invitation includes a link for downloading the latest eBeam Software and links to enable the user to join the
meeting via their Web browser or eBeam Software.
Accepting an Email Invitation
You can accept an e-mail invitation in one of the following ways:
• Select the http: link to join through your web browser.
• Select the file: link to join through your copy of eBeam Scrapbook. The latest version of the eBeam Interactive software or
the eBeam Software v2.3 can be downloaded from the www.e-beam.com downloads page.
• Manually open your browser, and copy and paste the link into the browser.
• Open Scrapbook, select the Join button, and manually fill in all of the meeting fields using information provided by the
invitation.
See Sending an Invitation for more information.
48
© 3M 2006. All Rights Reserved.
Page 49

™
3M
Digital Media System 815
Shared Meetings
Proxy Server Setup
If your company uses a proxy server, your computer will not be able to access meetings on the eBeam Server (which is
outside your company’s firewall) until you enable the proxy server and enter the proxy server settings.
The Edit > Options dialog box gives you a place to enter settings for an HTTP proxy server. Proxy servers, which act as
intermediaries between individual workstations and the Internet, provide security and other administrative functions for
companies that use the Internet.
Setting up a proxy server:
1. Choose Edit > Options... to open the Scrapbook Options dialog.
2. Select the Proxy Server tab.
3. You have several options for setting up the proxy server:
ENGLISH
Automatic
Configuration
Manual Configuration Enter the IP address or DNS name and the Port of the proxy server.
Authentication Authentication allows you to check Use Authentication (Basic Only) checkbox. You then type
Use IE Settings Use IE Settings attempts to get your proxy server settings by looking at the proxy server settings
Other Options Sometimes it is not possible to locate proxy server settings without going through your IS
If you are unable to find the Proxy information as described above, consult your network administrator.
• Automatically detect proxy server: Attempts to establish a connection with the proxy server
by trying to get proxy server information from either the DNS or DHCP servers in your local
network.
• Use configuration script: Uses a pre-defined network setup script (provided by your IS
department) to establish a connection with the proxy server. The script is a file whose URL
must be entered into the Address text box. An example of an address is: http://myserver:9090/
proxy.pac.
in your network User ID and Password. In many cases this will allow you to access internet
meetings through your proxy server.
for Internet Explorer on your computer.
department. Two more possible options for locating proxy server settings yourself are:
• Windows: In Netscape, go to the Edit menu>Preferences. Select Advanced and then select
Proxies. If Manual Proxy configuration is checked, select the View button. Use the address
and port number listed under HTTP.
• Go to the Internet Control Panel, select the Advanced tab, and then the Firewalls icon. All
proxy server information is displayed.
Archive a Meeting
Archive Meeting allows you to archive your Scrapbook meeting file on an eBeam server. The meeting can later be retrieved
to be viewed, edited, printed, or shared.
There are two areas in eBeam Scrapbook where you can select to archive a meeting.
• While hosting a shared meeting, go to the the Share Meeting dialog and select the Archive Meeting on the Server
checkbox to have the Archive Meeting Screen open after the Share button has been selected. See Hosting/Sharing a
Meeting for more information about sharing a meeting.
• After creating/completing a meeting: you have the choice of archiving that meeting (to the server) for viewing and/or
downloading by other eBeam users or only for those users with password-access.
To select this option:
• Save the meeting
• Choose File > Archive Meeting
• Select the server to archive the meeting on and select Continue. The Archive Meeting Screen will open next.
© 3M 2006. All Rights Reserved.
49
Page 50

Shared Meetings
3M™ Digital Media System 815
Archive Meeting Screen
Use the Archive Meeting Screen to define meeting information, security access requirements, the file access expiration
period, and review the Conditions of Use.
Meeting Information Section
• Meeting Name: Retain the current saved meeting name or create a new name for the archived meeting.
• Publish Meeting Name checkbox: Check to have archived meeting published (available for searching)
ENGLISH
Access Security Section
• Password Access: Check the box to require a specified password before an eBeam user can retrieve your archived
meeting. If checked, enter a password, and then re-enter it for confirmation.
• Security Code: Check the box to require a specified security code before an eBeam user can edit or delete the archived
meeting file.
Note: if the box is checked, but no security code is specified, the defined password is automatically used.
Access Period Section
• The text appearing in this section displays the current expiration period for storing and accessing the archived meeting file.
After this time, the file is deleted from the server.
• Select the Change button to edit the current criteria via the Access Period Screen, as described below.
Access Period Screen
• Meeting Storage: Choose the default, or select a specific date.
• Meeting File Availability: Define the duration the archived meeting will be available for other eBeam users to view and/or
download.
• Always (until deleted): Available until the same defined final date as meeting storage date.
• During Specific Time Period: Specify exact days and times for starting and ending availability.
Note: End Date may also be until the file is deleted from the server (see final meeting storage date) by checking the Until
Deleted box.
• Summary Section: Text appearing in this section displays the updated expiration period for storing and accessing the
archived meeting file. After this time, the file is deleted from the server.
Archive Meeting Buttons
• Conditions of Use: Select this button to review the conditions of use for the eBeam product.
• Help: Select to display the context-sensitive help for this screen.
• Archive: When all your selections are complete, select the Archive button.
• Cancel: Select to cancel your archive request.
Retrieve a Meeting
Retrieve a meeting by choosing the File > Retrieve Meeting menu selection to open the Retrieve Archived Meeting screen.
You may search and retrieve archived meetings for viewing or downloading at any time, though some meetings may require
password-access.
The following topics describe the elements and activities available to you via the Retrieve Archived Meeting screen.
• Recent Archived Meetings Screen
• Edit Archived Meeting Screen
• By Meeting Name Screen
• Full Search Screen
50
© 3M 2006. All Rights Reserved.
Page 51

™
3M
Digital Media System 815
Shared Meetings
Recent Archived Meetings Screen
Use the Recent Archived Meetings screen to list, edit, delete, and/or retrieve previously archived eBeam meetings.
Note: Editing and deleting a meeting may required a security code. If required, you will be prompted.
Select Archived Meeting Server
• Use the selector to choose the eBeam server where the archived meeting resides. If necessary, you may also select the
Browser button and manually search for the server location.
Meeting Columns and Options
• Time-span selector: Choose between displaying Todays meetings through all meetings archived to the eBeam server
within the last 90 days.
• Meeting count: Displays the number of meetings found, and the meetings displayed.
• Meeting Name: Name of the archived meeting.
• File Size: Size of the archived meeting file.
• Owner: Name of the user workstation that archived the meeting.
• Archived: Date the meeting was archived to the server.
• Expires: Date the archived meeting is no longer available for retrieving, editing, etc., and will be permanently deleted
from the server.
Note: You can sort the meeting list based on any of the above column headings by selecting any heading.
• Refresh Button: Use at any time to refresh the current meeting list, including any recent meetings archived by other
eBeam users.
• Retrieve Button: After highlighting an archived meeting, select the Retrieve button to retrieve that meeting.
ENGLISH
Note: A dialog box appears allowing you to open the meeting, download the meeting to a specified location, or cancel your
request.
• Edit Button: After highlighting an archived meeting, if the Edit button is available, you can edit the archive parameters for
that meeting. See Edit Archived Meeting Screen for screen details.
Note: You may be prompted for a security code to edit the meeting.
• Delete Button: After highlighting an archived meeting, if the Delete button is available, you can delete that meeting.
Note: A password and a security code may be required for deletion. A prompt will appear, asking you to confirm your
deletion request.
• Close Button: Select to close the screen.
Edit Archived Meeting Screen
Use the Edit Archive Meeting screen to edit meeting information, security access requirements, and the file access expiration
period.
Meeting Information Section
• Meeting Name: Retain or change the current archived meeting name.
• Publish Meeting Name checkbox: Check to have archived meeting name published (available for searching).
Access Security Section
• Password Access: Check the box to require a specified password before an eBeam user can retrieve your archived
meeting. If checked, enter a password, and then re-enter it for confirmation.
• Security Code: Check this box (default) to require a specified security code before an eBeam user can edit or delete the
archived meeting file.
Note: If the box is checked, but no security code is specified, the defined password is automatically used.
© 3M 2006. All Rights Reserved.
51
Page 52

Shared Meetings
Access Period Section
• Meeting Storage: Choose the default or select a specific date.
• Meeting File Availability: Define the duration the archived meeting will be available for other eBeam users to download.
Select one of the following.
• Always (until deleted): Available until same final date as defined file storage date.
• During Specific Time Period: Specify exact days and times for starting and ending availability.
Note: End Date may also be until the file is deleted from the server by checking the Until Deleted checkbox.
ENGLISH
• Summary Section: Text appearing in this section displays the updated expiration period for storing and accessing the
archived meeting file. After this time, the file is deleted from the server.
Change Archived Meeting Buttons
• Help Button: Select to display the context-sensitive help for this screen.
• Apply Button: When all your selections are complete, select the Apply button.
• Cancel Button: Select to cancel your edit request.
3M™ Digital Media System 815
By Meeting Name Screen
Use this screen to retrieve a specifically defined archived meeting.
Select Archived Meeting Server
• Use the selector to choose the eBeam server where the archived meeting resides. If necessary, you may also select the
Browser button and manually search for the server location.
Archived Meeting Name and Password
• Meeting Name: Enter the exact name of the archived meeting.
Note: This entry is case-sensitive.
• Password: If required, enter the case-sensitive password for the desired archived meeting.
• Retrieve Button: Select the Retrieve button to retrieve that meeting.
Note: A dialog box appears allowing you to open the meeting, download the meeting to a specified location, or cancel your
request.
Meeting Name Buttons
• Retrieve Button: After entering the exact name of the archived meeting, select the Retrieve button to retrieve the meeting.
Note: a dialog box appears allowing you to open the meeting, download the meeting to a specified location, or cancel your
request.
• Edit Button: After entering the exact name of the archived meeting, if the Edit button is available, you can edit the archive
parameters for that meeting. See Edit Archived Meeting Screen for screen details.
Note: You may be prompted for a security code to edit the meeting.
• Delete Button: After entering the exact name of the archived meeting, if the Delete button is available, you can delete that
meeting.
Note: a password and a security code may be required for deletion. A prompt will appear, asking you to confirm your deletion
request.
• Close Button: Select to close the screen.
52
© 3M 2006. All Rights Reserved.
Page 53

™
3M
Digital Media System 815
Shared Meetings
Full Search Screen
Use the Full Search screen to locate one or more archived meetings by meeting name, owner name, and/or date and time.
Select Archived Meeting Server
• Use the selector to choose the eBeam server where the archived meeting resides. If necessary, you may also select the
Browser button and manually search for the server location.
Search Criteria Options
You can select one or more of the search options described below.
• Search by Meeting Name: Searches by meeting name. Select the checkbox to specify this search method. The meeting
name may be case-sensitive. To search for a meeting by name, enter the name exactly, partially, or begin with the first
letters for the search.
• Search by Owner Name: Searches by the name of the owner workstation of the archived meeting. Select the checkbox
to specify this search method. The owner name may be case-sensitive. To search for a meeting by owner name, enter the
name exactly, partially, or begin with the first letters for the search.
• Case-Sensitive Search Checkbox: Check to have Meeting and/or Owner Name entry search be case-sensitive.
• Exact Name: Select to have search find archived meetings that exactly match the Meeting and/or Owner Name entry.
• Name Starts With: Select to have search find meetings that start with the Meeting and/or Owner Name entry.
• Name Contains: Select to have search find meetings that contain some portion of the Meeting and/or Owner Name entry.
• Search by Archiving Date/Time: Use this section to define date/time ranges for searching archived meetings.
• From Date: Select the beginning date for the meetings you want to retrieve. You can also use the calendar icon to
automatically enter a date.
• To Date: Select the ending date for the meetings you want to retrieve. You can also use the calendar icon to automatically
enter a date.
ENGLISH
Search Result Columns
• Meeting Name: Name of the archived meeting.
• File Size: Size of the archived meeting file.
• Owner: Name of the user workstation that archived the meeting.
• Archived: Date the meeting was archived to the server.
• Expires: Date the archived meeting is no longer available for downloading, editing, etc., and will be permanently deleted
from the server.
Note: You can sort the meeting list based on any of the above column headings by clicking on any heading.
Full Search Screen Buttons
• Search: When you have completed all your selections, select Search. The results are displayed in the Search Results
section.
• Retrieve: After highlighting an archived meeting, select the Retrieve button to retrieve that meeting.
Note: a dialog box appears allowing you to open the meeting, download the meeting to a specified location, or cancel your
request.
• Edit: After highlighting an archived meeting, if the Edit button is available, you can edit the archive parameters for that
meeting. See Edit Archived Meeting Screen for screen details.
Note: You may be prompted for a security code to edit the meeting.
• Delete: After highlighting an archived meeting, if the Delete button is available, you can delete that meeting.
Note: a password and a security code may be required for deletion. A prompt will appear, asking you to confirm your
deletion request.
• Close: Select to close the screen.
© 3M 2006. All Rights Reserved.
53
Page 54

Shared Meetings
3M™ Digital Media System 815
View Participants
View Participants allows you to see information about every participant logged into a shared meeting. To open the “View
Participants” window while participating in a shared meeting:
• Choose View > Participants, or
• Press ctrl+4, or
• Select the View Participants button from the Scrapbook Toolbar.
ENGLISH
The View Participants window lists the follow information:
Participant Name The name of the participant as entered in the My Name text box in the Join Meeting dialog
box. See Join a Meeting for more information.
Interactive/View Only Write permission is displayed by an icon. When the participant has permission to annotate the
meeting, a pen icon is displayed. When the participant does not have permission to annotate
the meeting, the pen icon is displayed with a line through it.
Connected At Displays the time the participant connected to the meeting.
IP Address Displays the participant’s IP Address.
Notes Displays any notes entered into the Notes field in either the Share Meeting or Join Meeting
dialog box. See Join a Meeting for more information.
You can find additional participant information selecting a participant name and either pressing Button A on the Interactive
Stylus or right-clicking the name with your mouse and choosing Participant Information from the displayed menu.
Meeting Host Tools
The following tools are available only to the meeting host (the person who set up the shared meeting).
Set View Only/
Interactive
Dismiss Participant(s) Dismiss Participant allows the meeting host to disconnect a participant from the meeting. To
Synchronize Participants If the meeting host has selected Synchronize Participants remote participants are only able to
The meeting host can set a participant status to View Only or Interactive. An Interactive
participant is able to annotate the page. A view only participant is only able to view the page, but
not able to annotate. To set a participant status to View Only or Interactive, select the participant
in the View Participants window, and then select the Set View Only/Interactive button.
You can select multiple by holding down the ctrl button on your keyboard and clicking
participant names.
The Set View option is also available when you select a participant name and either press Button
A on the Interactive Stylus or right-click the name with your mouse then choose the Allow
Annotations option.
dismiss a participant from the meeting, select the participant in the View Participants window,
and then select the Dismiss Participant button.
The Dismiss Participant option is also available when you select a participant name and either
press Button A on the Interactive Stylus or right-click the name with your mouse then choose the
Dismiss Participant option.
view the page that the host is viewing. However, remote participants are still able to annotate
the page.
54
© 3M 2006. All Rights Reserved.
Page 55

™
3M
Digital Media System 815
Shared Meetings
Adding a Meeting Server
When you share or join a meeting, you must choose a meeting server. You can enter the server information each time, or you
can create a list of frequently used servers and select from this list whenever you share or join a meeting.
To add a meeting server to your list:
1. Choose Share Meeting or Join Meeting from the Meetings Menu or from the Scrapbook Application Toolbar.
2. In the Share Meeting or Join Meeting dialog under Server/Server Information, select the server button alongside the server
pull-down list to open the Meeting Servers dialog.
3. Select the Add button.
4. Type the server name, the DNS name or IP address of the server you want to add to your list, and the port number.
Note: It is also possible to automatically search your local intranet for eBeam servers by selecting the Search button.
Note: The default port number is 80.
5. Select OK.
The new server is added to the meeting servers list.
ENGLISH
© 3M 2006. All Rights Reserved.
55
Page 56

Power Point Presentations
3M™ Digital Media System 815
Power Point Presentations
Starting/Ending a PowerPoint Slideshow
The integrated PowerPoint Slideshow features allow the user to view, navigate, and annotate a PowerPoint slide show, and to
then save those annotations back into the original PowerPoint presentation.
ENGLISH
Starting a PowerPoint Slideshow
1. Select the Start PowerPoint Presentation button from the Desktop Interactive Tools palette.
2. In the Open dialog that appears, navigate to and select a (*.ppt) file.
• The PowerPoint file opens in slideshow mode, and
• Desktop Interactive Tools changes to PowerPoint Interactive Tools.
3. Begin navigating and annotating your PowerPoint slideshow.
Ending a PowerPoint Slideshow
A PowerPoint slideshow will automatically quit to the main PowerPoint application after the last slide in the presentation.
You can also end the PowerPoint slideshow by selecting the End PowerPoint Presentation tool from the PowerPoint
Interactive Tools palette.
For more information, see:
• PowerPoint Interactive Tools
• Navigating a PowerPoint Slideshow
• Annotating a PowerPoint Slideshow
• Saving Annotations to a PowerPoint File
56
© 3M 2006. All Rights Reserved.
Page 57

™
3M
Digital Media System 815
Power Point Presentations
Summary of PowerPoint Interactive Tools
PowerPoint Interactive Tools appear when a PowerPoint slideshow has been started. The
PowerPoint Interactive Tools palette give you all of the tools you will need to annotate slides
and navigate in the slideshow.
See Interactive Tools Preferences for information on moving, showing, hiding, and changing
the appearance of the Interactive Tools.
Note: If the 3M Digital Media System 815 is not detected, the PowerPoint Interactive Tools palette
will not activate. The 3M Digital Media System 815 serves as a hardware security key that activates
the full feature set of the eBeam Interactive software. Most features of the software are available only
when a 3M Digital Media System 815 is detected.
Pen Tool
The Pen Tool allows you annotate the displayed PowerPoint slide freehand in one of eight solid colors.
When the Pen Tool is selected, the Pen Tool button becomes highlighted and the center of the PowerPoint Interactive Tools
palette changes to show the current color and line width.
ENGLISH
The Pen Tool remains selected until you select the Eraser, Highlighter, Shapes, or Mouse Tools.
Change Color • Select the color in the center of the PowerPoint Interactive Tools palette. The outer ring of the
menu changes to display all other color options.
• Select a color on the outer ring.
Once a color has been selected, the center of the PowerPoint Interactive Tools palette changes to
display the selected color. This color will remain selected until you select a new color.
Change Line
Width
• Select the line width in the center of the PowerPoint Interactive Tools palette. The outer ring of the
menu changes to display the four line width options available.
• Select a line width on the outer ring.
Once a line width has been selected, the center of the PowerPoint Interactive Tools palette changes to
display the selected line width. This line width will remain selected until you select a new line width.
© 3M 2006. All Rights Reserved.
57
Page 58

Power Point Presentations
3M™ Digital Media System 815
Shapes Tool
The Shapes Tool allows you draw shapes on the displayed PowerPoint slide in one of eight solid colors.
When the Shapes Tool is selected, the Shapes Tool button becomes highlighted and the center of the PowerPoint Interactive
ENGLISH
Tools palette changes to show the current color and line width.
The Shapes Tool remains selected until you select the Eraser, Highlighter, Pen, or Mouse Tools.
Change Shape • Select the shape in the center of the PowerPoint Interactive Tools palette. The outer ring of the
menu changes to display all other shape options.
• Select a shape on the outer ring.
Once a shape has been selected, the center of the PowerPoint Interactive Tools palette changes to
display the selected shape. This shape will remain selected until you select a new shape.
Change Color • Select the color in the center of the PowerPoint Interactive Tools palette. The outer ring of the
menu changes to display all other color options.
• Select a color on the outer ring.
Once a color has been selected, the center of the PowerPoint Interactive Tools palette changes to
display the selected color. This color will remain selected until you select a new color.
Change Line
Width
• Select the line width in the center of the PowerPoint Interactive Tools palette. The outer ring of the
menu changes to display the four line width options available.
• Select a line width on the outer ring.
Once a line width has been selected, the center of the PowerPoint Interactive Tools palette changes to
display the selected line width. This line width will remain selected until you select a new line width.
Slide Forward
The Slide Forward Tool allows you to advance the PowerPoint slideshow forward by one slide.
If you have annotated the current page, selecting the Slide Forward Tool will require you to decide whether you would like to
save your annotations as objects in the PowerPoint file.
In the Interactive Options dialog, under the Annotations tab, you can set your preference to:
• Always add objects to PowerPoint file, or
• Always discard annotations, or
• Ask me each time.
See Slideshow Options for more information.
58
© 3M 2006. All Rights Reserved.
Page 59

™
3M
Digital Media System 815
Power Point Presentations
Eraser Tool
The Eraser Tool allows you to erase (from the displayed slide) annotation marks made using the tools from the PowerPoint
Interactive Tools palette.
When the Eraser Tool is selected, the Eraser Tool button becomes highlighted and the center of the PowerPoint Interactive
Tools palette changes to show the eraser icon.
The Eraser Tool erases one annotation at a time. If a line was drawn, selecting that line with the Eraser Tool causes the entire
line to be erased.
The Eraser Tool remains selected until you select the Pen, Highlighter, Shapes, or Mouse Tools.
Mouse Tool
The PowerPoint Mouse Tool switches you from annotating a PowerPoint slideshow into navigating a PowerPoint slideshow.
The Mouse Tool remains selected until you select a different tool from the PowerPoint Interactive Tools palette.
Exit PowerPoint Presentation Tool
ENGLISH
The Exit PowerPoint Presentation Tool causes the PowerPoint slideshow to quit to the PowerPoint application and for
the PowerPoint Interactive Tools palette to change to the Desktop Interactive Tools palette.
Note: If you have chosen to save annotations into the PowerPoint file as objects, you must also select the “Save” button in
the PowerPoint application to permanently save the annotations into the file. See Save Annotations to the PowerPoint File for
more information.
Slide Back
The Slide Back Tool allows you to move the PowerPoint slideshow back by one slide.
If you have annotated the current page, the Slide Back Tool will ask you to decide whether you would like to save your
annotations as objects in the PowerPoint file.
In the Interactive Options dialog, under the Annotations tab, you can set your preference to:
• Always add objects to PowerPoint file, or
• Always discard annotations, or
• Ask me each time.
See Slideshow Options for more information.
© 3M 2006. All Rights Reserved.
59
Page 60

Power Point Presentations
3M™ Digital Media System 815
Highlighter Tool
The Highlighter Tool allows you annotate the displayed slide freehand in one of eight translucent colors.
Note: Some highlighter colors may not be visible on some backgrounds.
ENGLISH
When the Highlighter Tool is selected, the Highlighter Tool button becomes highlighted and the center of the PowerPoint Inte
ractive Tools palette changes to show the current color and line width.
The Highlighter Tool remains selected until you select the Eraser, Pen, Shapes, or Mouse Tools.
Change Color • Select the color in the center of the PowerPoint Interactive Tools palette. The outer ring of the
menu changes to display the eight color options available.
• Select a color on the outer ring.
Once a color has been selected, the center of the PowerPoint Interactive Tools palette changes to
display the selected color. This color will remain selected until you select a new color.
Change Line Width • Select the line width in the center of the PowerPoint Interactive Tools palette. The outer ring of
the menu changes to display the four line width options available.
• Select a line width on the outer ring.
Once a line width has been selected, the center of the PowerPoint Interactive Tools palette changes
to display the selected line width. This line width will remain selected until you select a new line
width.
Note: Translucent colors (as seen on screen during annotation) will appear different when saved into the original PowerPoint file.
Navigating a PowerPoint Slideshow
You can navigate a PowerPoint slideshow using the PowerPoint Interactive Tools.
After starting a PowerPoint slideshow, you can use the following tools to navigate within the slideshow:
• Slide Forward Tool: Allows you to advance the PowerPoint slideshow forward by one slide while annotating the
slideshow. See Slideshow Options for more information.
• Slide Back Tool: Allows you to move the PowerPoint slideshow back by one slide while annotating the slideshow.
See Slideshow Options for more information.
• Mouse Tool: Brings the Interactive Software out of annotation mode and allows you to use the PowerPoint Tools or
advance a slide by tapping the screen using the Interactive Stylus.
• Exit PowerPoint Presentation Tool: Causes the PowerPoint slideshow to quit to the PowerPoint application and for
the PowerPoint Interactive Tools palette to change to the Desktop Interactive Tools palette. Use this tool when you would
like to stop the slideshow before you have reached the final slide.
To annotate a slide, select the Pen Tool, the Shapes Tool, or the Eraser Tool.
Annotating a PowerPoint Slideshow
You can annotate a PowerPoint slideshow using the PowerPoint Interactive Tools.
After starting a PowerPoint slideshow, you can use the following tools to annotate within the slideshow:
• Pen Tool: Allows you to annotate the displayed PowerPoint slide freehand in one of eight solid colors.
• Shapes Tool: Allows you to draw shapes on the displayed PowerPoint slide in one of eight solid colors.
• Eraser Tool: Allows you to erase (from the displayed slide) annotation marks made using the tools from the PowerPoint
Interactive Tools palette.
60
© 3M 2006. All Rights Reserved.
Page 61

™
3M
Digital Media System 815
• Slide Forward/Slide Back: Allows you to advance the PowerPoint slideshow forward by one slide or move the slideshow
back one slide while annotating the slideshow. See Slideshow Options for more information.
Once you have begun annotating the desktop, you must select the Mouse Tool to switch you back into navigating the
slideshow presentation.
Note: PowerPoint animations and transitions may not work as expected when annotating a PowerPoint slideshow.
Power Point Presentations
Saving Annotations to the PowerPoint File
eBeam Interactive can save your annotations over the PowerPoint slideshow to the original PowerPoint file as objects.
1. Start a PowerPoint slideshow and annotate the slideshow.
2. As you navigate through the PowerPoint slideshow, you will be asked whether or not to keep your annotations depending
on how you have set the slideshow options that can be found under the Annotations tab in the Interactive Options dialog,
accessed through:
• the Options button on the Desktop Interactive Tools palette, or
• the eBeam Interactive Windows Taskbar Menu.
Note: If you select Always discard annotations from the Annotations tab in the Interactive Options dialog, annotations are
discarded every time you change slides, and it is not possible to save your annotations to the original PowerPoint file.
3. When you reach the end of your PowerPoint slideshow, or select the Exit PowerPoint Presentation tool from the
PowerPoint Interactive Tools palette, the PowerPoint slideshow exits to the PowerPoint application.
ENGLISH
Note: At this point, your annotations have not been saved to the PowerPoint file. If you close the PowerPoint application
without saving, the annotations will be lost.
4. Save the PowerPoint file.
Your annotations are now saved directly into the PowerPoint file and can be viewed or manipulated as objects in the
PowerPoint file.
Slideshow Options
PowerPoint Slideshow Options can be found under the Annotations tab in the Interactive Options dialog, which you can
access by selecting one of the following:
• The Options button on the Desktop Interactive Tools palette, or
• The eBeam Interactive Windows taskbar menu.
PowerPoint slideshow preferences allow you to specify how saving your annotations in a PowerPoint slideshow will be
handled.
Under When navigating an annotated PowerPoint presentation:, you have the following options:
• Always add objects to PowerPoint file: Select this option to always keep annotations each time you change a slide in
PowerPoint slideshow mode.
• Always discard annotations: Select this option to automatically discard annotations each time you change a slide in
PowerPoint slideshow mode.
• Ask me each time: This is the default option. Select this option to be asked whether or not to keep annotations each time
you change a slide in PowerPoint slideshow mode.
© 3M 2006. All Rights Reserved.
61
Page 62

Troubleshooting
Troubleshooting
eBeam Hardware Detection
Problem Resolution
The Detect eBeam dialog box appears
repeatedly.
ENGLISH
Shared Meetings
Problem Resolution
After selecting Share Meeting, you see
the message To share a meeting, the
eBeam Hardware must be connected
and detected.
Unable to Share or Join a meeting over
the eBeam meeting server.
Using a cable modem or dsl and unable
to Share or Join a meeting over the
eBeam meeting server.
3M™ Digital Media System 815
• See
Hardware Not Detected.
• Check that all eBeam cables are connected as shown in the setup instructions.
• Disconnect the cables, reconnect the cables and select Retry from the Detect
eBeam dialog box.
• To serve as a meeting host for a shared meeting, your computer must be
attached to the 3M Digital Media System 815. See Hosting/Sharing a
Meeting.
• If you are attempting to share a meeting, make sure that you have the 3M
Digital Media System 815 connected.
• If your network/internet connection is behind a firewall or proxy server, you
must set up the proxy server. See Proxy Server Setup.
• If you are attempting to share a meeting, make sure that you have the eBeam
receiver connected.
• If your network/internet connection is behind a firewall or proxy server, you
must set up the proxy server. See Proxy Server Setup.
Even if you think you aren’t behind a proxy server/firewall, you might be. Your
ISP might have a firewall set up, causing this problem.
If you suspect that is the case, try the following:
• Add a new server (see Adding a Meeting Server) with a DNS:
meetings.e-beam.com, and port: 443.
Unable to see shared meeting names in
the Join Meeting dialog box.
How do I set up the proxy server?
Interactive tools Not Found
If the 3M Digital Media System 815 is not detected the Interactive Tools palette will not activate. The 3M Digital Media
System 815 serves as a hardware security key that activates the full feature set of the eBeam Interactive software. Most
features of the software are available only when a 3M Digital Media System 815 is detected.
• When the meeting host shares the meeting through the Share Meeting dialog
box (see Hosting/Sharing a Meeting), they can select whether or not to
publish the meeting name. If the meeting name is published, then it will show
up in the Join Meeting dialog box. If the meeting name is not published, then
other meeting participants must manually type the meeting name into the
meeting name text box.
• To publish the meeting name, make sure that the Publish meeting name
checkbox in the Share Meeting dialog box is checked.
• Does your intranet have a proxy server/firewall? Most intranets do. If you
have not done so, enable your proxy server. See Proxy Server Setup.
• See
Proxy Server Setup.
62
© 3M 2006. All Rights Reserved.
Page 63

3
Digital Media System 815
eBeam Software pour tableau
blanc interactif de lux
Guide de l’operateur
FRANÇAIS
Février 2007 • 78-6970-9485-8-C • Copyright © 2007, 3M Company. Tous droits réservés.
Page 64

Page 65

™
3M
Digital Media System 815
Table des matières
Table des matières
Description de eBeam Interactive ........................................................... 67
Configuration ............................................................................................ 68
Configuration minimale du systëme ............................................................................................................68
Liste de contrùle de la configuration ...........................................................................................................68
Configuration matèrielle ..............................................................................................................................68
Configuration logicielle ..............................................................................................................................70
Connexion du logiciel au rècepteur .............................................................................................................70
Calibrage ......................................................................................................................................................71
Assistance technique ....................................................................................................................................71
Mise en route de eBeam Interactive ....................................................... 72
Navigation avec les outils interactifs ...........................................................................................................72
Prèfèrences des outils interactifs .................................................................................................................73
Stylet interactif .............................................................................................................................................73
Menu Barre des tçhes de Windows .............................................................................................................74
Outils interactifs de l’espace de travail .......................................................................................................74
Outils interactifs d’annotation de l’espace de travail ..................................................................................78
FRANÇAIS
Scrapbook ................................................................................................. 82
Description de Scrapbook ............................................................................................................................82
Menus Scrapbook ........................................................................................................................................85
Rèsumè des outils interactifs Scrapbook .....................................................................................................93
Images d’arriëre-plan .................................................................................................................................101
Importer une prèsentation PowerPoint ......................................................................................................102
Importer une feuille de calcul Excel..........................................................................................................103
Importer un document Word ......................................................................................................................103
Options Scrapbook .....................................................................................................................................104
Types de fichiers pris en charge ................................................................................................................104
Enregistrement automatique de fichier ......................................................................................................104
© 3M 2007. Tous droits réservés.
65
Page 66

Table des matières
3M™ Digital Media System 815
Réunions partagées ............................................................................... 106
Description d’une rèunion partagèe ...........................................................................................................106
Hèbergement/partage d’une rèunion ..........................................................................................................106
Se joindre une rèunion ...............................................................................................................................107
Envoi d’une invitation ................................................................................................................................108
Configuration du serveur proxy .................................................................................................................109
Archiver une rèunion .................................................................................................................................110
Rècupèrer une rèunion ...............................................................................................................................111
Afficher les participants .............................................................................................................................115
Ajout d’un serveur de rèunion ...................................................................................................................116
Présentations PowerPoint ..................................................................... 117
Lancement/arrít d’un diaporama PowerPoint ............................................................................................117
Rèsumè des outils interactifs PowerPoint .................................................................................................117
Naviguer dans un diaporama PowerPoint .................................................................................................121
FRANÇAIS
Annotation d’un diaporama PowerPoint ...................................................................................................121
Enregistrement des annotations dans un fichier PowerPoint ....................................................................122
Options de diaporama ................................................................................................................................122
Dépannage .............................................................................................. 123
66
© 3M 2007. Tous droits réservés.
Page 67

™
3M
Digital Media System 815
Description de eBeam Interactive
Description de eBeam Interactive
Grçe au systëme eBeam Interactive, transformez des tableaux et des surfaces de projection ordinaires en systëmes de
prèsentation numèrique puissants et entiërement interactifs.
Un petit rècepteur eBeam lèger se fixe en quelques minutes sur un tableau blanc et est reliè l’ordinateur par un c‚ble ou un
adaptateur sans fil Bluetooth. Le systëme eBeam Interactive capture et transfëre ensuite chaque image projetèe, dessinèe ou
ècrite afin de crèer une copie complëte et dètaillèe.
Vous amèliorez ainsi les discussions de classe, les rèunions administratives ou universitaires, les brainstorming d’entreprise,
les dèmonstrations de ventes, les revues de conception de produits et les sessions de formation. Vous pouvez partager le
rèsultat en imprimant, faxant ou en envoyant les fichiers par e-mail. Vous pouvez archiver les fichiers pour y accèder tout
moment par Internet. En outre, eBeam allëge votre budget: vous organisez des rèunions productives via le rèseau local ou
Internet afin de supprimer les temps de trajet et les dèpenses connexes.
Fixè un tableau blanc ou une surface de projection standard, le systëme eBeam Interactive utilise votre projecteur et votre
ordinateur pour vous permettre d’effectuer des prèsentations interactives directement partir de l’image projetèe. Vous n’avez
plus besoin de faire la navette entre l’ordinateur et le devant de la piëce chaque fois que vous voulez changer de diapositive.
Qu’il s’agisse d’une salle de confèrence ou d’une salle de classe, le systëme eBeam Interactive constitue la solution idèale
pour des rèunions plus efficaces et un travail d’èquipe renforcè.
Le logiciel eBeam Interactive contient certaines des fonctions suivantes:
• Contrùlez vos prèsentations PowerPoint comme jamais. Lancez tout le diaporama depuis la zone de projection. Annotez
les diapositives et enregistrez les annotations dans le fichier PowerPoint d’origine.
• Partagez votre prèsentation et/ou vos notes sur Internet ou sur l’intranet en temps rèel. Les utilisateurs distants peuvent se
connecter et annoter la míme prèsentation.
• Archivez des prèsentations et des discussions complëtes.
• Utilisez la zone de projection comme tablau blanc virtuel.
• Lisez, modifiez et annotez des images provenant des rèunions et joignez-les aux e-mails, aux fax ou imprimez-les
simplement.
• Copiez et collez des notes dans les applications bureautiques les plus courantes.
• Et bien d’autres fonctions passionnantes...
Ce systëme d’aide dècrit les nombreuses fonctions intègrèes au systëme eBeam Interactive. Pour obtenir les FAQ les plus
rècentes, visitez le site www.e-beam.com.
FRANÇAIS
© 3M 2007. Tous droits réservés.
67
Page 68

Configuration
3M™ Digital Media System 815
Configuration
Configuration minimale du systëme
• Ordinateur compatibleWindows avec processeur Pentium™ II, 400MHz
• Windows 2000, XP, Tablet PC
• 256mb Mémoire disponible
• 10Mo d’espace disponible sur le disque dur
• Un portUSB ou une connexion Bluetooth disponible
Liste de contrùle de la configuration
La configuration complëte du systëme est dècrite sur le CD d’installation de eBeam Interactive.
Important: conservez ou enregistrez toutes les clès CD et numèros de sèrie des fins d’enregistrement, de mise jour et
d’assistance.
Pour configurer votre systëme:
1. Configurez votre matèriel eBeam. Reportez-vous Configuration matèrielle.
FRANÇAIS
2. Installez le logiciel eBeam Interactive.
Utilisez le CD d’installation eBeam Interactive pour installer le logiciel. Conservez ou enregistrez la clè CD situèe sur le
CD d’installation des fins d’enregistrement, de mise jour et d’assistance.
Vous pouvez ègalement tèlècharger le logiciel eBeam Interactive partir du site www.e-beam.com.
3. Connectez le logiciel au rècepteur. Reportez-vous Connexion du logiciel au rècepteur.
4. Calibrez. Reportez-vous Calibrage.
Configuration matèrielle
1 2
3 4
68
© 3M 2007. Tous droits réservés.
Page 69

™
USB Cable
Connection Panel Cable
Connection
Panel
Annotation
Pod
Annotation
Pod
3" (75 mm)3" (75 mm)
3M
Digital Media System 815
Configuration
FRANÇAIS
Configuration du stylet interactif
Le stylet interactif utilise une pile AA. Pour insèrer la pile, dèvissez le fond du stylet interactif et placez le cùtè positif (+) de
la pile au fond. Revissez entiërement le fond du stylet.
© 3M 2007. Tous droits réservés.
69
Page 70

Configuration
3M™ Digital Media System 815
Configuration logicielle
Le logiciel eBeam Interactive peut ítre installè partir du CD d’installation fourni dans le coffret.
Il est ègalement possible de tèlècharger le logiciel eBeam Interactive partir du site www.e-beam.com.
Connexion du logiciel au rècepteur
Chaque fois que vous lancez le logiciel eBeam Interactive, il essaiera de se connecter au rècepteur eBeam. Vèrifiez que vous
avez bien effectuè la configuration matèrielle du rècepteur avant d’essayer d’ètablir la connexion logiciel/rècepteur.
1. Cherchez l’icùne eBeam Interactive sur le bureau de votre ordinateur.
2. Cliquez deux fois sur l’icùne pour lancer le logiciel.
3. Si la boîte de dialogue Détecter eBeam s’affiche, le pèriphèrique peut avoir besoin d’une configuration complèmentaire.
Reportez-vous Matèriel non dètectè.
Matèriel non dètectè
A chaque lancement du logiciel eBeam Interactive, le logiciel va essayer de se connecter au rècepteur eBeam.
Lorsque le logiciel ne dètecte aucun rècepteur eBeam, il affiche un message «eBeam non dètectè» et ouvre la boóte de
FRANÇAIS
dialogue Dètecter eBeam. Cette boóte de dialogue affiche une liste des ports, dont ceux qui sont disponibles.
La boóte de dialogue Dètecter eBeam contient les commandes suivantes:
Liste de statut des ports Rèpertorie tous les ports de l’ordinateur et les ports actuellement disponibles.
Aide Ouvre le systëme d’aide eBeam Interactive ce sujet.
Configuration Ouvre la boÌte de dialogue Options l’onglet Règlages matèriels.
Annuler Annule le processus de dètection, mais vous permet de continuer travailler dans le logiciel.
Rèssayer Tente de dètecter de nouveau le matèriel l’aide des règlages matèriels de la boóte de dialogue
Options ou l’aide de la sèlection de la liste des ports.
Si le rècepteur n’est pas dètectè, la premiëre chose faire est de vèrifier que la configuration matèrielle est terminèe et que vous
connaissez le portCOM utilisè par le rècepteur. Reportez-vous Configuration matérielleou à Configuration sans fil Bluetooth
pour obtenir des informations concernant la configuration.
Vèrifiez le port de communication sèlectionnè dans la liste des ports. Vous aurez peut-ítre besoin de modifier la sèlection du
port dans la liste afin de le faire correspondre au port de communication du rècepteur.
Pour dètecter le rècepteur sur un port diffèrent:
1. Sèlectionnez le bouton Configuration.
2. Sous Port de communication, sèlectionnez un autre port COM ou Dètection automatique.
3. Sèlectionnez OK.
4. Sèlectionnez le bouton Rèessayer.
70
© 3M 2007. Tous droits réservés.
Page 71

™
3M
Digital Media System 815
Si aucun port n’est rèpertoriè ou si le logiciel ne dètecte toujours pas le rècepteur:
• Vèrifiez que le matèriel est correctement configurè, alimentè et reliè l’ordinateur. Reportez-vous aux instructions de
configuration fournies dans le coffret du produit et reportez-vous aux instructions dans les sections Configuration
matérielle ou Configuration sans fil Bluetooth.
• Vèrifiez que le port sèlectionnè est correct.
• Si l’option Dètection automatique est sèlectionnèe, modifiez le paramëtre de connexion pour utiliser Connexion et
essayez de rètablir la connexion.
• Un assistant personnel (appareil Palm ou PocketPC) est-il reliè l’ordinateur? Dans ce cas, fermez tous les programmes
(tels que les programmes de synchronisation) en cours d’exècution qui pourraient bloquer un port de communication pour
l’assistant personnel.
Remarque: si aucun récepteur eBeam n’est dètectè, les Outils interactifs eBeam ne s’activeront pas. Le rècepteur eBeam sert
de clè de sècuritè matèrielle qui active toutes les fonctionnalitès du logiciel eBeam Interactive. La plupart des fonctions du
logiciel sont uniquement disponibles lorsqu’un rècepteur est dètectè.
Mise en route de eBeam Interactive
Calibrage
Description du calibrage
Le logiciel eBeam Interactive a besoin d’une zone de points de rèfèrence afin de pouvoir synchroniser l’espace de travail
et capturer les marques et les projections que vous effectuez. Le processus de calibrage vous permet d’indiquer 9points
spècifiques dans la zone de projection qui correspondent aux points du bureau de votre ordinateur.
FRANÇAIS
Calibrage du logiciel eBeam
A chaque dèmarrage du logiciel eBeam Interactive, vous serez invitè le calibrer. Effectuez toujours l’ètape de calibrage sauf
si vous ítes certain que le projecteur ou le rècepteur eBeam n’ont pas ètè dèplacès depuis la derniëre fois. Si vous n’en ítes
pas certain, effectuez le calibrage.
Pour calibrer le logiciel eBeam Interactive:
1. Connectez le logiciel eBeam Interactive au matèriel.
2. Pour dèmarrer le calibrage:
• Lorsque vous ítes invitè effectuer le calibrage, sèlectionnez Oui, ou
• Sèlectionnez le bouton Calibrer dans la palette d’outils interactifs de l’espace de travail.
Assistance technique
L’assistance technique est disponible sur le site Web d’assistance eBeam l’adresse http://www.e-beam.com/support/.
Veuillez avoir toutes les informations relatives au produit ainsi que le numèro d’enregistrement du produit (clè CD)
disponibles.
© 3M 2007. Tous droits réservés.
71
Page 72

Mise en route de eBeam Interactive
3M™ Digital Media System 815
Mise en route de eBeam Interactive
Navigation avec les outils interactifs
Vous naviguez dans le logiciel eBeam Interactive l’aide des palettes Outils interactifs. Il existe quatre palettes Outils
interactifs. Sèlectionnez un lien ci-dessous pour obtenir de l’aide relative cette palette d’outils. Reportez-vous au diagramme
des palettes Outils interactifs ci-dessous pour savoir comment y accèder.
Remarque: si le rècepteur eBeam n’est pas dètectè, les palettes Outils interactifs ne s’activeront pas. Le rècepteur eBeam
sert de clè de sècuritè matèrielle qui active l’ensemble des fonctions du logiciel eBeam Interactive. Lorsqu’un rècepteur est
indisponible, vous avez accës une barre d’outils d’annotation standard utilisable dans Scrapbook.
FRANÇAIS
• Outils interactifs de l’espace de travail: (palette d’outils principale. Tous les autres outils interactifs sont accessibles
par le biais des outils interactifs de l’espace de travail.) La palette Outils interactifs de l’espace de travail vous permet
d’accèder toutes les fonctions et options principales du systëme eBeam Interactive.
• Outils interactifs d’annotation de l’espace de travail: La palette Outils interactifs d’annotation de l’espace de travail
vous fournit tous les outils nècessaires lorsque vous annotez votre espace de travail.
• Outils interactifs Scrapbook: La palette Outils interactifs Scrapbook vous fournit tous les outils de navigation et
d’annotation nècessaires pour travailler dans Scrapbook. Cette palette Outils interactifs est uniquement disponible
lorsque Scrapbook est l’application active. Chaque fois que vous sèlectionnez une zone de l’ècran ne faisant pas partie de
Scrapbook, la palette Outils interactifs Scrapbook va changer et devenir la palette Outils interactifs de l’espace de travail
palette. Pour restaurer la palette Outils interactifs Scrapbook, sèlectionnez une zone de Scrapbook.
• Outils interactifs PowerPoint: La palette Outils interactifs PowerPoint vous fournit les outils nècessaires pour annoter
et naviguer dans un diaporama PowerPoint. Cette palette Outils interactifs apparaót chaque fois que le logiciel eBeam
Interactive est en cours d’exècution et que vous lancez un diaporama PowerPoint, míme si vous ouvrez un diaporama
directement partir de la palette Outils interactifs de l’espace de travail.
72
© 3M 2007. Tous droits réservés.
Page 73

™
3M
Digital Media System 815
Mise en route de eBeam Interactive
Prèfèrences des outils interactifs
Chaque palette Outils interactifs peut ítre affichèe, masquèe, dèplacèe, redimensionnèe et la transparence peut ítre modifièe
en fonction de vos prèfèrences.
Pour afficher ou masquer une palette Outils interactifs:
• Appuyez sur le bouton Afficher/masquer les outils interactifs sur le stylet interactif.
• Sèlectionnez l’èlèment de menu Outils interactifs partir du menu de la barre des tçhes de Windows.
Pour dèplacer une palette Outils interactifs:
• Dèplacez la palette Outils interactifs vers un nouvel emplacement en plaáant la pointe du stylet interactif au centre de la
palette Outils interactifs et en la dèplaáant vers le nouvel emplacement.
• La palette Outils interactifs s’affiche l’emplacement o˘ vous affichez ou masquez la palette Outils interactifs l’aide du
stylet interactif.
Reportez-vous Propriètès de la molette pour savoir comment redimensionner une palette Outils interactifs et modifier sa
transparence.
Stylet interactif
Le stylet interactif eBeam a ètè spècifiquement conáu pour ítre utilisè avec le systëme de projection eBeam Interactive. Le
stylet interactif se comporte exactement comme une souris relièe l’ordinateur.
FRANÇAIS
Dans ce document, nous parlons d’appui sur le tableau par opposition au clic de souris pour indiquer que vous devez utiliser
le stylet interactif eBeam pour effectuer une action.
Le tableau suivant illustre les diffèrents composants du stylet interactif ainsi que leurs fonctions.
Bouton A - Bouton de
menu
Bouton B - Bouton
Afficher/masquer les
outils interactifs
Pointe du marqueur
Le bouton A, correspondant au bouton de menu,
èquivaut au bouton droit d’une souris.
Le bouton B, correspondant au bouton Afficher/masquer
les outils interactifs, affiche ou masque le menu eBeam
Interactive.
La pointe du marqueur remplit la míme fonction que le
bouton gauche d’une souris.
© 3M 2007. Tous droits réservés.
73
Page 74

Mise en route de eBeam Interactive
Couvercle de la pile Le couvercle de la pile se dèvisse dans le sens inverse
des aiguilles d’une montre pour vous permettre
d’insèrer ou de remplacer la pileAA.
3M™ Digital Media System 815
Menu Barre des tçhes de Windows
Le menu eBeam Interactive apparaót sous forme d’icùne dans la barre des tçhes de Windows lorsque le logiciel est en cours
d’exècution. Les èlèments de menu suivants proviennent du menu de la barre des tçhes systëme:
Elèment de menu Description
Outils interactifs Affiche/masque les outils interactifs de l’espace de travail.
Scrapbook Ouvre Scrapbook.
Calibrer la zone interactive... Lance le Calibrage. Le matèriel eBeam doit ítre dètectè par le logiciel avant que le
calibrage ne puisse commencer.
Dètecter le systëme
FRANÇAIS
Options...
A propos de eBeam Interactive... Affiche la boóte de dialogue A propos de pour le logiciel eBeam Interactive. Pour
Aide Ouvre un sous-menu disposant des options suivantes:
Quitter Ferme entiërement le logiciel eBeam Interactive. Si Scrapbook est ouvert, vous serez
Tente de dètecter le matèriel eBeam. Reportez-vous Connexion du logiciel au
rècepteur.
Ouvre la boóte de dialogue Options eBeam Interactive. Reportez-vous Options.
fermer la fenítre, cliquez n’importe o˘ dans cette derniëre.
• Sommaire: ouvre le systëme d’aide eBeam Interactive la page principale.
• Aide en ligne: ouvre votre navigateur Web et charge la page d’assistance
www.e-beam.com.
• Enregistrement: ouvre votre navigateur Web et charge la page d’enregistrement
www.e-beam.com.
• Questions courantes: ouvre votre navigateur Web et charge la page FAQ du site
www.e-beam.com.
• Mises jour logicielles: ouvre votre navigateur Web et charge la page des
tèlèchargements du site www.e-beam.com.
invitè enregistrer d’abord le fichier Scrapbook.
Outils interactifs de l’espace de travail
La palette Outils interactifs de l’espace de travail est la palette d’outils principale pour le
logiciel eBeam Interactive. Toutes les autres palettes d’outils et les fonctions logicielles sont
accessibles partir des outils interactifs de l’espace de travail.
Reportez-vous Prèfèrences des outils interactifs pour de plus amples informations sur le
dèplacement, l’affichage, l’occultation et la modification de l’aspect des outils interactifs.
Remarque: si un rècepteur eBeam n’est pas dètectè, les outils interactifs de l’espace de travail
eBeam ne s’activent pas. Le rècepteur eBeam sert de clè de sècuritè matèrielle qui active
toutes les fonctionnalitès du logiciel eBeam Interactive. La plupart des fonctions du logiciel
sont uniquement disponibles lorsqu’un rècepteur est dètectè.
74
© 3M 2007. Tous droits réservés.
Page 75

™
3M
Digital Media System 815
Mise en route de eBeam Interactive
Marqueur - Annotation
En sèlectionnant l’outil Marqueur, vous pouvez annoter votre espace de travail et faire changer la palette Outils interactifs de
l’espace de travail en palette Outils interactifs d’annotation de l’espace de travail.
Clavier affichè
En sèlectionnant Clavier affiché, le clavier affiché Windows s’ouvre pour vous permettre de saisir du texte à l’aide du stylet
interactif. Fermez le clavier affiché en sélectionnant de nouveau le bouton « Clavier affiché » ou en sélectionnant le bouton
Fermer du clavier affiché.
Lancer la prèsentation PowerPoint
Si vous sèlectionnez Lancer la présentation PowerPoint, la boîte de dialogue standard Ouvrir un fichier vous permet de
localiser une présentation PowerPoint. Reportez-vous à Lancement/arrêt d’un diaporama PowerPoint pour de plus amples
informations.
Options
En sèlectionnant Options, la boîte de dialogue Options interactives s’ouvre. Elle vous permet de configurer les options et les
préférences de configuration suivantes :
• Propriétés de la molette : définissez l’aspect et le comportement des outils interactifs.
• Réglages matériels : définit le port de communication et les options de configuration sans fil Bluetooth.
• Annotations : définir les préférences d’annotation.
• Mises à jour logicielles : définit la fréquence des mises à jour.
FRANÇAIS
Vous pouvez également lancer les options interactives à partir du menu Barre des tâches de Windows, en sélectionnant
Options... dans le menu eBeam Interactive.
Propriètès de la molette
L’onglet Propriétés de la molette dans la boîte de dialogue Options vous permet de sélectionner l’aspect et le comportement
des Outils interactifs. Les préférences disponibles sont décrites dans le tableau ci-dessous.
Aspect • Taille de la palette: cette option vous permet de sèlectionner la taille de la palette Outils interactifs.
• Transparence: cette option vous permet de sèlectionner la transparence de la palette Outils
interactifs. Cette option est pratique au cours d’une prèsentation si vous souhaitez que la palette
Outils interactifs reste l’ècran sans pour autant attirer l’attention.
Remarque: si la palette Outils interactifs devient trop transparente, sèlectionnez le bouton «Valeurs
par dèfaut» partir de l’onglet «Propriètès de la molette» pour rètablir la transparence d’origine.
© 3M 2007. Tous droits réservés.
75
Page 76

Mise en route de eBeam Interactive
Fonctions • Masquer le curseur pendant un tracè : cette option vous permet de masquer la flëche de sèlection
Windows lorsque vous annotez l’espace de travail ou une prèsentation PowerPoint.
• Double clic sur l’effaceur pour effacer l’écran : cette option vous permet de cliquer deux fois sur
l’outil Effaceur pour effacer toutes les annotations crèèes lorsque vous annotez l’espace de travail
ou lorsque vous utilisez une prèsentation PowerPoint.
Valeurs par dèfaut Le bouton Valeurs par dèfaut rètablit toutes les valeurs par dèfaut des paramëtres Fonctions et
Aspect.
Règlages matèriels
L’onglet Réglages matériels dans la boîte de dialogue Options vous permet de définir l’aspect et le comportement des outils
interactifs. Les préférences disponibles sont décrites dans le tableau ci-dessous.
3M™ Digital Media System 815
Port de communication
(portCOM)
Diagnostics matèriels... Affiche les informations utilisèes par l’assistance technique pour diagnostiquer les problëmes
FRANÇAIS
Informations systëme... Ouvre la boóte de dialogue Informations systëme Windows.
Vèrifier les mises jour
de microprogrammes...
Annotations
L’onglet Annotations dans la boîte de dialogue Options vous permet de définir la façon dont l’espace de travail et les
annotations PowerPoint sont enregistrés. Les options disponibles sont décrites dans le tableau ci-dessous.
Aprës annotation de
l’espace de travail
• Dètection automatique: si la dètection automatique est sèlectionnèe, le logiciel eBeam
Interactive va tenter automatiquement de se connecter au matèriel eBeam sur les portsCOM1,
COM2 etUSB.
• Connexion : cette option vous permet d’indiquer manuellement le port de communication sur
lequel connecter le matèriel eBeam.
d’environnement.
Le rècepteur doit ítre connectè au PC soit par une connexion sans fil, soit par un c‚bleUSB et doit
ítre dètectè par le logiciel eBeam Interactive.
Vèrifie automatiquement les mises jour de microprogrammes sur le site Web eBeam et vous
permet d’installer une mise jour s’il en existe une.
Le rècepteur doit ítre connectè au PC soit par une connexion sans fil, soit par un c‚bleUSB et doit
ítre dètectè par le logiciel eBeam Interactive.
Lorsque vous avez terminè d’annoter l’espace de travail (reportez-vous Outil Souris), vous pouvez
conserver une copie de l’espace de travail annotè en tant que nouvelle page de Scrapbook. Les
options disponibles pour annoter l’espace de travail sont Enregistrer, Ignorer ou Demander.
• Toujours enregistrer comme nouvelle page de Scrapbook: la page annotèe est transformèe
en nouvelle page de Scrapbook. Enregistrez le fichier Scrapbook pour conserver la nouvelle
page de Scrapbook.
• Toujours ignorer les annotations: la page annotèe est automatiquement ignorèe et aucune
copie n’est conservèe.
• Toujours demander: lorsque vous avez terminè d’annoter l’espace de travail, vous serez
invitè enregistrer la page annotèe en tant que nouvelle page de Scrapbook. Vous pourrez soit
enregistrer soit ignorer la page.
• Ouvrir Scrapbook aprës avoir enregistrè les annotations: il s’agit du paramëtre par dèfaut
(Scrapbook est ouvert). Ce paramëtre vous permet de savoir instantanèment que l’annotation
a ètè enregistrèe dans Scrapbook. Enregistrez le fichier Scrapbook pour conserver la nouvelle
page de Scrapbook.
76
© 3M 2007. Tous droits réservés.
Page 77

™
3M
Digital Media System 815
Mise en route de eBeam Interactive
Navigation au sein
d’un diaporama
PowerPoint annotè
Mises jour logicielles
L’onglet Mises jour logicielles dans la boóte de dialogue Options vous permet de rechercher la derniëre version du logiciel
eBeam Interactive.
La zone supèrieure de l’onglet Mises jour logicielles dècrit le statut courant du logiciel, y compris le numèro de la version et
la date de derniëre vèrification de cette version du logiciel.
La zone infèrieure de l’onglet Mises jour logicielles vous permet d’indiquer un calendrier pour rechercher pèriodiquement un
nouveau logiciel eBeam. Les options de calendrier sont les suivantes:
• A chaque lancement de l’application
• Chaque jour indiquè
• Jamais
Lorsque vous modifiez les diapositives dans un diaporama PowerPoint, vous devez choisir
d’enregistrer ou non les annotations dans le fichier PowerPoint en tant qu’objets. Les options
disponibles pour les annotations de l’espace de travail sont Enregistrer, Ignorer ou Demander.
• Toujours ajouter des objets un fichier PowerPoint: les annotations sont automatiquement
enregistrèes dans chaque diapositive en tant qu’objets de celle-ci. Vous devez enregistrer le
fichier PowerPoint afin de conserver les annotations en permanence. Reportez-vous ègalement
Naviguer dans un diaporama PowerPoint.
• Toujours ignorer les annotations: les annotations sont automatiquement ignorèes et aucune
copie n’est conservèe.
• Toujours demander: chaque modification des diapositives, vous serez invitè enregistrer les
annotations en tant qu’objets. Vous devez enregistrer le fichier PowerPoint afin de conserver
les annotations en permanence. Reportez-vous ègalement Naviguer dans un diaporama
PowerPoint.
FRANÇAIS
Sèlectionnez le bouton Vèrifier version maintenant pour vèrifier la version et afficher son statut dans la zone supèrieure de
l’onglet Mises jour logicielles.
Sèlectionnez le bouton Consulter site Web des mises jour pour vous connecter directement au site www.e-beam.com et
tèlècharger le logiciel le plus rècent.
Souris
L’outil Souris de l’espace de travail vous permet de basculer entre l’annotation de l’espace de travail et la navigation sur
l’espace de travail.
L’outil Souris reste sélectionné jusqu’à ce qu’un outil différent de la palette Outils interactifs de l’espace de travail soit
sélectionné.
Photo
Photo vous permet de prendre une photo de l’ècran actuel et de l’enregistrer dans Scrapbook.
• Sèlectionnez l’outil Photo partir de la palette Outils interactifs de l’espace de travail pour ouvrir la boóte de dialogue
Prendre une photo.
• Sèlectionnez l’une des options suivantes:
• Capturer écran : capture tout l’espace de travail et enregistre l’image dans Scrapbook.
© 3M 2007. Tous droits réservés.
77
Page 78

Mise en route de eBeam Interactive
• Capturer une sélection : Scrapbook est réduit et le curseur change en réticule. Pour sélectionner une zone à capturer,
utilisez le stylet interactif pour dessiner un rectangle de sélection.
L’image capturée est enregistrée comme nouvelle page de Scrapbook.
3M™ Digital Media System 815
Scrapbook
En sèlectionnant Scrapbook, vous lancez l’application Scrapbook eBeam Interactive. Reportez-vous à Description de
Scrapbook pour de plus amples informations. Si Scrapbook est réduit, la sélection du bouton Scrapbook va rétablir la fenêtre.
Si Scrapbook est ouvert, la sélection du bouton Scrapbook va réduire la fenêtre.
Calibrer
FRANÇAIS
En sèlectionnant Calibrer, le processus de calibrage de eBeam Interactive démarre. Vous serez invité à effectuer un calibrage
en 9 points.
Vous pouvez également démarrer le calibrage à partir de l’élément de menu Calibrer la zone interactive... du menu de la
barre des tâches Windows eBeam Interactive.
Pour effectuer le calibrage, reportez-vous à Calibrage et à Connexion du logiciel au récepteur pour de plus amples
informations.
Outils interactifs d’annotation de l’espace de travail
Les outils interactifs d’annotation de l’espace de travail apparaissent lorsque vous
sèlectionnez Annoter l’espace de travail (reportez-vous Outils interactifs de l’espace de travail
- Outil Traceur). La palette Outils interactifs d’annotation de l’espace de travail vous procure
tous les outils nècessaires pour annoter votre espace de travail.
Lorsque vous sèlectionnez Annoter l’espace de travail, une photo de l’espace de travail est
prise et est transformèe en image que vous pouvez annoter. Un cadre translucide apparaót
autour de l’ècran et une icùne d’annotation apparaót dans le coin infèrieur gauche de l’ècran
pour indiquer que vous annotez l’image de l’espace de travail et que vous n’ítes pas en train de
parcourir l’espace de travail.
Pour terminer l’annotation et revenir la navigation sur l’espace de travail et aux outils
interactifs de l’espace de travail, sèlectionnez l’outil Souris.
Reportez-vous Prèfèrences des outils interactifs pour de plus amples informations sur le dèplacement, l’affichage,
l’occultation et la modification de l’aspect des outils interactifs.
Remarque: si un rècepteur eBeam n’est pas dètectè, les outils interactifs de l’espace de travail eBeam ne s’activent pas.
Le rècepteur eBeam sert de clè de sècuritè matèrielle qui active toutes les fonctionnalitès du logiciel eBeam Interactive. La
plupart des fonctions du logiciel sont uniquement disponibles lorsqu’un rècepteur est dètectè.
78
© 3M 2007. Tous droits réservés.
Page 79

™
3M
Digital Media System 815
Mise en route de eBeam Interactive
Outil Traceur
L’outil Traceur vous permet d’annoter l’espace de travail à main levée et dans l’une des huit couleurs disponibles.
Lorsque l’outil Traceur est sélectionné, le bouton Outil Traceur est mis en surbrillance et le centre de la palette Outils
interactifs d’annotation de l’espace de travail change pour afficher la couleur et l’épaisseur de tracé actuelles.
L’outil Traceur reste sélectionné jusqu’à ce que vous sélectionniez les outils Effaceur, Surligneur, Formes ou Souris.
Modifier la
couleur
Modifier
l’èpaisseur du
tracè
• Sélectionnez la couleur au centre de la palette Outils interactifs d’annotation de l’espace de travail.
L’anneau extérieur du menu change pour afficher toutes les autres options de couleur.
• Sélectionnez une couleur sur l’anneau extérieur.
Lorsqu’une couleur a été sélectionnée, le centre de la palette Outils interactifs d’annotation de l’espace de travail change pour
afficher la couleur sélectionnée. Cette couleur reste sélectionnée jusqu’à ce que vous sélectionniez une nouvelle couleur.
• Sélectionnez l’épaisseur de tracé au centre de la palette Outils interactifs d’annotation de l’espace de travail.
L’anneau extérieur du menu change pour afficher les quatre options d’épaisseur de tracé disponibles.
• Sélectionnez un tracé sur l’anneau extérieur.
Lorsqu’un tracé a été sélectionné, le centre de la palette Outils interactifs d’annotation de l’espace de
travail change pour afficher l’épaisseur de tracé sélectionnée. Ce tracé reste sélectionné jusqu’à ce que
vous sélectionniez une nouvelle épaisseur de tracé.
Outil Formes
L’outil Formes vous permet de dessiner des formes, avec l’une des huit couleurs disponibles, sur l’espace de travail.
Lorsque l’outil Formes est sélectionné, le bouton Outil Formes est mis en surbrillance et le centre de la palette Outils
interactifs d’annotation de l’espace de travail change pour afficher la couleur et l’épaisseur de tracé actuelles.
FRANÇAIS
L’outil Formes reste sélectionné jusqu’à ce que vous sélectionniez les outils Effaceur, Surligneur, Marqueur ou Souris.
Modifier la
forme
Modifier la
couleur
Modifier
l’èpaisseur du
tracè
• Sélectionnez la forme au centre de la palette Outils interactifs d’annotation de l’espace de travail.
L’anneau extérieur du menu change pour afficher toutes les autres options de forme.
• Sélectionnez une forme sur l’anneau extérieur.
Lorsqu’une forme a été sélectionnée, le centre de la palette Outils interactifs d’annotation de l’espace de travail change
pour afficher la forme sélectionnée. Cette forme reste sélectionnée jusqu’à ce que vous sélectionniez une nouvelle forme.
• Sélectionnez la couleur au centre de la palette Outils interactifs d’annotation de l’espace de travail.
L’anneau extérieur du menu change pour afficher toutes les autres options de couleur.
• Sélectionnez une couleur sur l’anneau extérieur.
Lorsqu’une couleur a été sélectionnée, le centre de la palette Outils interactifs d’annotation de l’espace de travail change pour
afficher la couleur sélectionnée. Cette couleur reste sélectionnée jusqu’à ce que vous sélectionniez une nouvelle couleur.
• Sélectionnez l’épaisseur de tracé au centre de la palette Outils interactifs d’annotation de l’espace de travail.
L’anneau extérieur du menu change pour afficher les quatre options d’épaisseur de tracé disponibles.
• Sélectionnez un tracé sur l’anneau extérieur.
Lorsqu’un tracé a été sélectionné, le centre de la palette Outils interactifs d’annotation de l’espace de
travail change pour afficher l’épaisseur de tracé sélectionnée. Ce tracé reste sélectionné jusqu’à ce que
vous sélectionniez une nouvelle épaisseur de tracé.
© 3M 2007. Tous droits réservés.
79
Page 80

Mise en route de eBeam Interactive
3M™ Digital Media System 815
Outil Rètablir
L’outil Rètablir vous permet de rètablir la derniëre annotation annulèe, sous rèserve que vous ayez utilisè auparavant l’outil
Annuler. Si vous avez utilisè Annuler plusieurs reprises, vous pouvez rètablir les modifications jusqu’au dèbut de la sèrie de
modifications. L’outil Rètablir est dèsactivè lorsqu’une nouvelle annotation est effectuèe.
Outil Effaceur
L’outil Effaceur vous permet d’effacer les annotations sur l’espace de travail effectuées à l’aide de la palette Outils interactifs
d’annotation de l’espace de travail.
Lorsque l’outil Effaceur est sélectionné, le bouton Outil Effaceur est mis en surbrillance et le centre de la palette Outils
interactifs d’annotation de l’espace de travail change pour refléter le paramètre d’épaisseur de l’effaceur.
FRANÇAIS
L’outil Effaceur reste sélectionné jusqu’à ce que les outils Marqueur, Surligneur, Formes ou Souris soient sélectionnés.
Dèfinir l’èpaisseur
de l’effaceur
• Sèlectionnez l’èpaisseur au centre de la palette Outils interactifs d’annotation de l’espace de travail.
L’anneau extèrieur du menu change pour afficher les quatre options d’èpaisseur disponibles.
• Sèlectionnez une èpaisseur sur l’anneau extèrieur.
Lorsqu’une épaisseur a été sélectionnée, le centre de la palette Outils interactifs d’annotation de
l’espace de travail change pour refléter l’épaisseur sélectionnée. Ce paramètre restera sélectionné
jusqu’à ce qu’une nouvelle épaisseur soit sélectionnée.
Outil Souris
L’outil Souris de l’espace de travail vous permet de basculer entre l’annotation de l’espace de travail et la navigation dans
l’espace de travail. Il change également la palette Outils interactifs d’annotation de l’espace de travail en palette Outils
interactifs de l’espace de travail.
Outil Enregistrer
L’outil Enregistrer vous permet d’enregistrer une photo de l’espace de travail annotè dans Scrapbook en tant que nouvelle
page. Lors de l’enregistrement de la nouvelle page, une icùne d’enregistrement s’affiche sur l’espace de travail. Vous devez
enregistrer Scrapbook si vous souhaitez conserver la page en permanence.
80
© 3M 2007. Tous droits réservés.
Page 81

™
3M
Digital Media System 815
Scrapbook
Outil Annuler
Annuler efface l’annotation prècèdente. Il est possible de sèlectionner Annuler plusieurs reprises jusqu’ ce que la page soit vierge.
Outil Surligneur
L’outil Surligneur vous permet d’annoter l’espace de travail à main levée et dans l’une des huit couleurs translucides
disponibles.
Remarque: certaines couleurs de surligneur ne sont peut-être pas visibles sur certains arrière-plans d’ordinateur.
Lorsque l’outil Surligneur est sélectionné, le bouton Outil Surligneur est mis en surbrillance et le centre de la palette Outils
interactifs de l’espace de travail change pour afficher la couleur et l’épaisseur de tracé actuelles.
L’outil Surligneur reste sélectionné jusqu’à ce vous sélectionniez les outils Effaceur, Marqueur, Formes ou Souris.
Modifier la couleur • Sélectionnez la couleur au centre de la palette Outils interactifs de l’espace de travail. L’anneau
extérieur du menu change pour afficher les huit options de couleur disponibles.
• Sélectionnez une couleur sur l’anneau extérieur.
Lorsqu’une couleur a été sélectionnée, le centre de la palette Outils interactifs de l’espace de travail
change pour afficher la couleur sélectionnée. Cette couleur reste sélectionnée jusqu’à ce que vous
sélectionniez une nouvelle couleur.
Modifier l’èpaisseur
du tracè
• Sélectionnez l’épaisseur de tracé au centre de la palette Outils interactifs de l’espace de travail.
L’anneau extérieur du menu change pour afficher les quatre options d’épaisseur de tracé
disponibles.
• Sélectionnez un tracé sur l’anneau extérieur.
Lorsqu’un tracé a été sélectionné, le centre de la palette Outils interactifs de l’espace de travail
change pour afficher l’épaisseur de tracé sélectionnée. Ce tracé reste sélectionné jusqu’à ce que vous
sélectionniez une nouvelle épaisseur de tracé.
FRANÇAIS
© 3M 2007. Tous droits réservés.
81
Page 82

Scrapbook
3M™ Digital Media System 815
Scrapbook
Description de Scrapbook
L’application Scrapbook de eBeam Interactive transforme toute surface de projection en espace de travail numèrique.
FRANÇAIS
Scrapbook vous permet d’effectuer les actions suivantes:
• Prendre des notes numèriques lors d’un brainstorming, d’une planification, etc.
• Stocker des captures d’ècran.
• Importer des fichiers image, PowerPoint, Excel, Word puis annoter ces fichiers image.
• Lire, modifier et annoter des pages du fichier de rèunion Scrapbook puis les joindre aux e-mails, aux fax ou les imprimer
tout simplement.
• Partager en temps rèel des rèunions sur Internet ou l’intranet avec n’importe qui, n’importe quand.
• Enregistrer automatiquement le fichier de rèunion pour ítre s˚r de ne jamais perdre accidentellement des notes ou une
prèsentation importantes.
Toutes les donnèes importèes dans Scrapbook sont enregistrèes comme un ensemble de pages dans un fichier de rèunion
Scrapbook.
Remarque: si un rècepteur eBeam n’est pas dètectè, Scrapbook va s’activer mais ne sera pas totalement fonctionnel. Le
rècepteur eBeam sert de clè de sècuritè matèrielle qui active toutes les fonctionnalitès du logiciel eBeam Interactive. La
plupart des fonctions du logiciel sont uniquement disponibles lorsqu’un rècepteur est dètectè.
82
© 3M 2007. Tous droits réservés.
Page 83

™
3M
Digital Media System 815
Scrapbook
Description d’une rèunion
Une rèunion est un ensemble de notes et d’images stockèes en tant que pages dans un fichier de rèunion Scrapbook (*.esb).
Scrapbook vous permet d’ouvrir une rèunion la fois.
Une rèunion peut avoir un ou plusieurs participants dans la míme piëce et utilisant eBeam pour capturer des notes et des
diagrammes.
Une rèunion peut ègalement avoir des participants situès dans d’autres endroits, tels qu’un autre ètage du bureau, une autre
règion ou un autre pays. Le procèdè consistant organiser une rèunion sur Internet ou l’intranet en temps rèel s’appelle partage
d’une rèunion.
Affichages Scrapbook
Scrapbook vous permet de consulter vos donnèes de rèunion par Page ou par Vues miniatures. Les pages et les vues
miniatures s’associent pour crèer des affichages. Scrapbook dispose de trois options d’affichage:
• Affichages Page et Vues miniatures
• Affichage Vues miniatures
• Affichage Page
Passage d’un affichage l’autre
Vous pouvez passer d’un affichage l’autre l’aide du menu Affichage ou de la barre d’outils de l’application Scrapbook. Pour
passer d’un affichage l’autre:
• Affichage Page et vues miniatures:
• Choisissez Affichage > Normal, ou
• Appuyez sur ctrl+1, ou
• Sèlectionnez le bouton Afficher la page et les vues miniatures partir de la barre d’outils de l’application Scrapbook.
• Affichage Vues miniatures:
• Choisissez Affichage > Vues miniatures, ou
• Appuyez sur ctrl+2, ou
• Sèlectionnez le bouton Affichage Vues miniatures partir de la barre d’outils de l’application Scrapbook.
• Affichage Page:
• Choisissez Affichage > Page, ou
• Appuyez sur ctrl+3, ou
• Sèlectionnez le bouton Affichage Page button dans la barre d’outils de l’application Scrapbook.
FRANÇAIS
Affichage Page et Vues miniatures
Lorsque l’affichage Page et Vues miniatures est sèlectionnè, une colonne dèroulante de vues miniatures s’affiche sur le
cùtè gauche de la fenítre Scrapbook et une page entiëre s’affiche sur le cùtè droit de cette fenítre. Cet affichage contient les
èlèments et les actions possibles suivants:
• Une colonne dèroulante de vues miniatures destinèe afficher toutes les pages contenues dans la rèunion Scrapbook.
• La rèorganisation de la page par glisser-dèposer.
• Une colonne Vues miniature redimensionnable. En dèplaáant la bordure entre les vues miniatures et la page, vous
redimensionnez la colonne.
• En cliquant sur une vue miniature, son contenu s’affichera en pleine page dans le cùtè droit de la fenítre Scrapbook.
• Les outils Sèlection de page dans la barre d’outils de l’application Scrapbook.
• La lecture du fichier de réunion (affichage Page et Vues miniatures ou affichage Page uniquement).
• L’importation d’une image d’arriëre-plan dans la page affichèe.
• L’annotation de page l’aide des outils interactifs Scrapbook ou de la barre d’outils d’annotation standard.
© 3M 2007. Tous droits réservés.
83
Page 84

Scrapbook
Affichage Vues miniatures
Lorsque l’affichage Vues miniatures est sèlectionnè, seules les vues miniatures s’affichent dans la fenítre Scrapbook.
L’affichage Vues miniatures est particuliërement utile pour donner un rèsumè des pages de la rèunion et pour trouver
rapidement des pages individuelles. Cet affichage contient les èlèments et les actions possibles suivants:
• Une colonne dèroulante de vues miniatures destinèe afficher toutes les pages contenues dans la rèunion Scrapbook.
• La rèorganisation de la page par glisser-dèposer.
• En cliquant sur une vue miniature, son contenu s’affichera en pleine page dans le cùtè droit de la fenítre Scrapbook. Cela
est pratique pour:
• Importer une image d’arriëre-plan.
• Ajouter une nouvelle page aprës la vue miniature sèlectionnèe l’aide de Page > Dupliquer ou du bouton Dupliquer page
de la barre d’outils Scrapbook.
• Dupliquer une page insèrer aprës la vue miniature sèlectionnèe l’aide de Page > Dupliquer ou du bouton Dupliquer
page de la barre d’outils Scrapbook.
• Supprimer une page l’aide de Page > Supprimer ou du bouton Supprimer page de la barre d’outils Scrapbook.
• Imprimer une page l’aide de Page > Imprimer.
• L’affichage instantanè de la vue miniature en affichage Page en appuyant deux fois l’aide du traceur (stylet interactif) ou
FRANÇAIS
en cliquant deux fois (souris).
Affichage Page
3M™ Digital Media System 815
Lorsque l’affichage Page est sèlectionnè, seule une page s’affiche dans la fenítre Scrapbook. L’affichage Page est le mode le
plus utilisè dans Scrapbook. Cet affichage contient les èlèments et les actions possibles suivants:
• Les outils Sèlection de page dans la barre d’outils de l’application Scrapbook.
• L’importation d’une image d’arriëre-plan dans la page affichèe.
• L’annotation de page l’aide des outils interactifs Scrapbook ou de la barre d’outils d’annotation standard.
• Les options du menu Page pour ajouter, dupliquer ou supprimer une page.
• La lecture du fichier de réunion (affichage Page et Vues miniatures ou affichage Page uniquement).
84
© 3M 2007. Tous droits réservés.
Page 85

™
3M
Digital Media System 815
Scrapbook
Menus Scrapbook
Menu Fichier
Les options du menu Fichier sont dècrites ci-dessous:
Nouveau Nouveau crèe un nouveau fichier de rèunion Scrapbook aprës avoir fermè toutes les rèunions
prècèdemment ouvertes.
Pour crèer un nouveau fichier de rèunion Scrapbook:
1. Choisissez Fichier > Nouveau ou appuyez sur ctrl+n.
2. Si une rèunion est ouverte lorsque vous sèlectionnez Nouveau, Scrapbook vous demande
d’enregistrer la rèunion actuelle. Sèlectionnez Oui pour enregistrer la rèunion, Non pour
fermer la rèunion sans l’enregistrer ou Annuler pour rester dans la rèunion actuelle.
Une nouvelle rèunion est crèèe chaque fois que Scrapbook est ouvert.
Ouvrir... Ouvrir vous permet d’ouvrir un fichier Scrapbook (*.esb) et un fichier eBeam (*.wbd). Pour
ouvrir un fichier Scrapbook:
1. Choisissez Fichier > Ouvrir, ou appuyez sur ctrl+o. Une boóte de dialogue standard
Ouvrir s’affiche.
FRANÇAIS
2. Recherchez le fichier *.esb et sèlectionnez-le.
3. Sèlectionnez OK.
Remarque: Scrapbook ouvre ègalement les fichiers *.wbd crèès avec des versions antèrieures
du logiciel eBeam.
Importer une image
d’arriëre-plan...
Enregistrer Enregistrer vous permet d’enregistrer un fichier Scrapbook (*.esb). Pour enregistrer un
Importer une image d’arriëre-plan vous permet d’importer un fichier image l’arriëre-plan
de la page actuellement sèlectionnèe.
Pour importer une image d’arriëre-plan:
1. Choisissez Fichier > Importer une image d’arriëre-plan...
2. Une boóte de dialogue standard Ouvrir un fichier s’affiche. Recherchez le fichier image et
sèlectionnez-le pour qu’il s’ouvre.
Reportez-vous Images d’arriëre-plan pour de plus amples informations.
fichier Scrapbook:
1. Choisissez Fichier > Enregistrer ou appuyez sur ctrl+s.
2. Si le fichier a ètè prècèdemment enregistrè, il est enregistrè de nouveau sous le nom
existant.
Si la rèunion est enregistrèe pour la premiëre fois, la boóte de dialogue standard Enregistrer
sous s’ouvre.
© 3M 2007. Tous droits réservés.
85
Page 86

Scrapbook
Enregistrer sous... Enregistrer sous vous permet d’enregistrer un nouveau fichier (*.esb) ou d’enregistrer un
fichier de rèunion Scrapbook existant sous un autre nom.
Pour enregistrer un fichier Scrapbook:
1. Choisissez Fichier > Enregistrer sous.
2. La boóte de dialogue Enregistrer sous standard de Windows s’ouvre.
3. Saisissez un nom de rèunion et sèlectionnez l’emplacement du dossier. L’emplacement du
dossier par dèfaut se trouve dans Mes documents, dans Mon Scrapbook.
4. Sèlectionnez le type de fichier. Reportez-vous Types de fichiers pris en charge pour de plus
amples informations.
5. Sèlectionnez l’ètendue enregistrer en sèlectionnant le bouton d’option Etendue
correspondant situè en bas de la boóte de dialogue Enregistrer sous:
• Tous - l’ètendue par dèfaut est Toutes les pages. Seule cette option est disponible
lorsque le fichier Scrapbook n’a qu’une seule page.
• Sèlection - enregistre les pages sèlectionnèes uniquement. Vous pouvez sèlectionner
plusieurs pages en cliquant sur chaque vue miniature tout en maintenant la touche ctrl
FRANÇAIS
enfoncèe.
• Pages - vous permet de sèlectionner une ètendue enregistrer.
Remarque: si vous n’avez pas enregistrè le fichier auparavant, les pages non sèlectionnèes
ne seront pas conservèes lorsque vous utilisez les options Sèlection ou Pages et que vous
enregistrez au format *.esb ou *.wbd.
3M™ Digital Media System 815
6. Sèlectionnez OK.
Enregistrer en tant que
page Web...
Archiver la rèunion Archiver la rèunion vous permet d’archiver un fichier de rèunion Scrapbook sur un serveur
Enregistrer en tant que page Web vous permet d’enregistrer un fichier de rèunion
Scrapbook (*.esb) au format HTML pour le placer sur Internet ou sur l’intranet en tant que
page Web.
Pour enregistrer un fichier Scrapbook au format HTML:
1. Choisissez Fichier > Enregistrer en tant que page Web...
La boóte de dialogue Enregistrer sous s’ouvre, puis
2. Saisissez un nom de rèunion et sèlectionnez l’emplacement du dossier. L’emplacement du
dossier par dèfaut se trouve dans Mes documents, dans Mon Scrapbook.
3. Sèlectionnez l’ètendue enregistrer en sèlectionnant le bouton d’option Etendue
correspondant situè en bas de la boóte de dialogue Enregistrer sous:
• Tous - l’ètendue par dèfaut est Toutes les pages. Seule cette option est disponible
lorsque le fichier Scrapbook n’a qu’une seule page.
• Sèlection - enregistre les pages sèlectionnèes uniquement. Vous pouvez sèlectionner
plusieurs pages en cliquant sur chaque vue miniature tout en maintenant la touche ctrl
enfoncèe.
• Pages - vous permet de sèlectionner une ètendue enregistrer.
4. Sèlectionnez Enregistrer.
eBeam.
86
Reportez-vous Archiver une rèunion pour de plus amples informations.
Remarque: cette option est uniquement disponible si le matèriel eBeam est connectè au
logiciel et dètectè.
© 3M 2007. Tous droits réservés.
Page 87

™
3M
Digital Media System 815
Rècupèrer la rèunion Rècupèrer la rèunion vous permet de rècupèrer un fichier de rèunion Scrapbook archivè sur
un serveur eBeam.
Reportez-vous Rècupèrer une rèunion pour de plus amples informations.
Configuration de la page... Configuration de la page ouvre la boóte de dialogue Configuration de la page. Elle vous
permet de choisir les informations concernant les en-títes et les pieds de page pour une page
Scrapbook imprimèe et vous permet d’ajouter une bordure la page imprimèe.
Elle vous permet aussi de modifier le format de numèrotation des pages, le nom de la rèunion
et les formats de date et d’heure.
Configuration de
l’impression...
Imprimer la page Imprimer la page imprime uniquement la page affichèe ou sèlectionnèe sur l’imprimante
Imprimer... Imprimer ouvre la boóte de dialogue Imprimer standard de Windows. Elle vous permet
Configuration de l’impression ouvre la boóte de dialogue Configuration de l’impression
standard de Windows. Elle vous permet de sèlectionner tous les paramëtres d’imprimante
souhaitès, y compris l’orientation portrait ou paysage et la source du papier.
Elle vous permet ègalement de sèlectionner la maniëre d’imprimer les annotations en
surbrillance. Par dèfaut, les annotations surlignèes sont imprimèes de faáon opaque et peuvent
recouvrir d’autres annotations. Pour imprimer les annotations de faáon transparente:
1. Choisissez Fichier > Configuration de l’impression.
2. Sèlectionnez Imprimer tracès du surligneurs en marques transparentes.
3. Sèlectionnez OK.
Windows par dèfaut.
de sèlectionner une plage de pages et le nombre de copies de cette plage imprimer. Les
paramëtres par dèfaut sont l’impression de toutes les pages dans le fichier en un seul
exemplaire.
Scrapbook
FRANÇAIS
Pour imprimer le fichier Scrapbook:
1. Choisissez Fichier > Imprimer, ou
2. Appuyez sur ctrl+P.
Envoyer... Envoyer vous permet d’envoyer un fichier de rèunion Scrapbook (*.esb) en tant que piëce
jointe par le biais d’un systëme de messagerie compatible MAPI, tel que Microsoft Exchange.
Pour envoyer un fichier de rèunion Scrapbook par e-mail:
1. Choisissez Fichier > Envoyer pour ouvrir la boóte de dialogue Envoyer.
2. Sèlectionnez le format de fichier et l’ètendue dans la boóte de dialogue Envoyer.
3. Sèlectionnez OK.
Scrapbook ouvre un message e-mail sans titre avec le fichier en piëce jointe dans le
programme de messagerie compatible MAPI. Utilisez votre carnet d’adresses pour saisir les
noms des destinataires et envoyez l’e-mail normalement.
Vous pouvez enregistrer un fichier de rèunion Scrapbook dans tout format (hormis le HTML)
appropriè pour une piëce jointe. Reportez-vous Types de fichiers pris en charge pour de plus
amples informations. L’option de format HTML n’est pas disponible pour envoyer des emails.
Quitter
Quitter ferme Scrapbook eBeam mais ne ferme pas les outils interactifs. Reportez-vous Menu
Barre des tçhes de Windows pour de plus amples informations.
Si vous n’avez pas enregistrè votre fichier Scrapbook, vous serez invitè le faire avant la
fermeture de Scrapbook.
© 3M 2007. Tous droits réservés.
87
Page 88

Scrapbook
3M™ Digital Media System 815
Menu Edition
Les options du menu Edition sont dècrites ci-dessous:
Annuler Annuler efface l’annotation prècèdente. Il est possible d’annuler plusieurs fois jusqu’ ce
que toutes les annotations aient ètè effacèes.
Pour annuler:
1. Choisissez Edition > Annuler, ou
2. Sèlectionnez le bouton Annuler partir de la barre d’outils Scrapbook, ou
3. Appuyez sur ctrl+Z.
Rètablir Rètablir vous permet de rètablir la derniëre annotation annulèe, sous rèserve que vous
ayez utilisè auparavant l’outil Annuler. Si vous avez utilisè Annuler plusieurs reprises,
vous pouvez rètablir les modifications jusqu’au dèbut de la sèrie de modifications. L’outil
Rètablir est dèsactivè lorsqu’une nouvelle annotation est effectuèe.
Pour rètablir:
1. Choisissez Edition > Rètablir, ou
FRANÇAIS
Couper Couper est utilisè avec l’outil Texte pour couper et coller du texte dans les zones de texte
Copier Copier vous permet de copier une partie d’une page Scrapbook pour la coller dans une
Coller Coller est utilisè avec l’outil Texte pour couper et coller du texte dans les zones de texte
2. Sèlectionnez le bouton Rètablir partir de la barre d’outils Scrapbook, ou
3. Appuyez sur ctrl+Y.
actives.
Pour couper du texte d’une zone de texte:
1. Mettez en surbrillance le texte de la zone de texte.
2. Choisissez Edition > Couper ou appuyez sur ctrl+X.
autre application. Pour copier une partie de page:
1. Utilisez l’outil Sèlecteur pour dèfinir une zone copier.
2. Choisissez Edition > Copier ou appuyez sur ctrl+C.
3. Ouvrez une autre application telle que MS Word ou MS Paint et collez.
Il est impossible de coller des donnèes copièes dans une autre page de Scrapbook.
Cependant, les donnèes copièes sont contenues dans le presse-papiers et peuvent ítre
incluses une page de rèunion Scrapbook en tant qu’image d’arriëre-plan.
actives.
Pour coller:
1. Copiez du texte d’une autre application ou d’une autre zone de texte Scrapbook.
2. Choisissez Edition > Coller, ou appuyez sur ctrl + V.
Tout sèlectionner Tout sèlectionner vous permet de sèlectionner une page entiëre de rèunion Scrapbook, de
la copier et de la coller dans une autre application.
Pour sèlectionner cette option:
1. Choisissez Edition > Tout sèlectionner.
2. Appuyez sur ctrl+A.
Options... Options ouvre la boóte de dialogue Options Scrapbook.
88
© 3M 2007. Tous droits réservés.
Page 89

™
3M
Digital Media System 815
Menu Affichage
Les options du menu Affichage sont dècrites ci-dessous:
Scrapbook
Normal (Afficher la page
et les vues miniatures)
Vues miniatures
Page
Visualisation plein ècran Visualisation plein ècran agrandit la page actuelle pour la mettre en plein ècran. La barre
Normal vous permet de passer l’affichage Page et Vues miniatures. Reportez-vous Affichages
Scrapbook pour de plus amples informations. Passez l’affichage Page et Vues miniatures en
procèdant comme suit:
• Choisissez Affichage > Normal, ou
• Appuyez sur ctrl+1, ou
• Sèlectionnez le bouton Afficher la page et les vues miniatures (Normal) partir de la barre
d’outils Scrapbook.
Vues miniatures vous permet de passer l’affichage Vues miniatures. Reportez-vous Affichages
Scrapbook pour de plus amples informations. Passez l’affichage Vues miniatures en procèdant
comme suit:
• Choisissez Affichage > Vues miniatures, ou
• Appuyez sur ctrl+2, ou
• Sèlectionnez le bouton Vues miniatures partir de la barre d’outils Scrapbook.
Page vous permet de passer l’affichage Page. Reportez-vous Affichages Scrapbook pour de plus
amples informations. Passez l’affichage Page en procèdant comme suit:
• Choisissez Affichage > Page, ou
• Appuyez sur ctrl+3, ou
• Sèlectionnez le bouton Afficher la page partir de la barre d’outils Scrapbook.
d’outils de l’application Scrapbook devient flottante et peut ítre fermèe.
FRANÇAIS
Pour passer en plein ècran:
• Choisissez Affichage > Plein ècran, ou
• Sèlectionnez le bouton Plein ècran partir de la barre d’outils Scrapbook, ou
• Appuyez sur F11.
Pour revenir une taille d’ècran normale:
• Cliquez avec le bouton droit sur l’ècran (appuyez sur le boutonA du stylet interactif) et
sèlectionnez Plein ècran dèsactivè dans le menu qui s’affiche, ou
• Sèlectionnez le bouton Plein ècran partir de la barre d’outils Scrapbook, ou
• Appuyez sur F11.
Participants Participants ouvre la fenítre Participants afin que vous voyiez qui s’est joint une rèunion
Scrapbook partagèe. Pour ouvrir la fenítre Participants:
• Choisissez Affichage > Participants, ou
• Appuyez sur ctrl+4, ou
• Sèlectionnez le bouton Affichage des participants partir de la barre d’outils Scrapbook.
Reportez-vous Description du partage et Afficher les participants pour de plus amples
informations.
Barre d’outils (Afficher/
masquer les barres
d’outils)
Si vous choisissez l’option de menu Barre d’outils, un sous-menu s’ouvre avec les trois
options suivantes:
• Outils interactifs: choisissez cette option de menu pour afficher ou masquer les outils
interactifs pour Scrapbook.
• Lecture: choisissez cette option de menu pour afficher ou masquer la barre d’outils Lecture.
• Barre de statut: choisissez cette option de menu pour afficher ou masquer la barre de statut
Scrapbook.
© 3M 2007. Tous droits réservés.
89
Page 90

Scrapbook
Zoomer Zoomer vous permet d’agrandir ou de rèduire la page actuellement affichèe.
Si vous choisissez l’option de menu Zoomer, un sous-menu s’ouvre avec les options de zoom
suivantes: 500%, 300%, 200%, 100%, 50% et 25%.
La page conserve ce facteur de zoom jusqu’ ce qu’une nouvelle valeur soit choisie.
Pour de plus amples informations, reportez-vous l’outil Zoom.
Agrandir Agrandir vous permet d’agrandir la page actuellement affichèe. Chaque fois que vous
sèlectionnez Agrandir, le zoom va augmenter d’un facteur de1,25 sans dèpasser 2000%.
Pour agrandir une page:
• Choisissez Affichage > Agrandir, ou
• Appuyez sur ctrl+Num +
La page conserve ce facteur de zoom jusqu’ ce qu’une nouvelle valeur soit choisie.
Pour de plus amples informations, reportez-vous l’outil Zoom.
Rèduire Rèduire vous permet de rèduire la page actuellement affichèe. Chaque fois que vous
sèlectionnez Rèduire, le zoom va diminuer d’un facteur de1,25 sans descendre sous25%.
3M™ Digital Media System 815
FRANÇAIS
Ajuster la page Ajuster la page compresse ou agrandit la page pour l’ajuster la zone d’affichage de page. Cette
Taille rèelle Taille rèelle agrandit la page 100%.
Pour rèduire une page:
• Choisissez Affichage > Rèduire, ou
• Appuyez sur ctrl+Num -
La page conserve ce facteur de zoom jusqu’ ce qu’une nouvelle valeur soit choisie.
Pour de plus amples informations, reportez-vous l’outil Zoom.
option peut ègalement ítre sèlectionnèe en appuyant sur ctrl+0.
Toutes les pages sont ajustèes la zone d’affichage de page jusqu’ ce qu’une valeur de zoom
diffèrente soit sèlectionnèe.
Pour de plus amples informations, reportez-vous l’outil Zoom.
La page conserve sa taille actuelle jusqu’ ce qu’une nouvelle valeur de zoom soit sèlectionnèe.
Menu Page
Les options du menu Page sont dècrites ci-dessous:
Nouveau Nouveau crèe une nouvelle page vierge dans la rèunion Scrapbook.
Pour crèer une page:
• Choisissez Page > Nouveau, ou
• Sèlectionnez le bouton «Nouvelle page» partir de la barre d’outils Scrapbook.
La nouvelle page est directement insèrèe aprës la page affichèe ou sèlectionnèe.
Effacer Effacer efface toutes les annotations de la page affichèe ou sèlectionnèe.
Pour effacer une page, sèlectionnez la page effacer et:
• Choisissez Page > Effacer, ou
• Sèlectionnez le bouton «Effacer la page» partir de la barre d’outils Scrapbook.
90
© 3M 2007. Tous droits réservés.
Page 91

™
3M
Digital Media System 815
Dupliquer Dupliquer crèe une copie de la page affichèe ou sèlectionnèe et fait de cette copie la page
affichèe ou sèlectionnèe.
Pour dupliquer une page:
1. Sèlectionnez la page dupliquer.
2. Choisissez Page > Dupliquer, ou
3. Sèlectionnez le bouton «Dupliquer la page» partir de la barre d’outils Scrapbook.
La page dupliquèe est directement insèrèe aprës la page affichèe ou sèlectionnèe.
Supprimer Supprimer supprime la page affichèe ou sèlectionnèe.
Pour supprimer une page:
1. Sèlectionnez la page supprimer.
2. Choisissez Page > Supprimer, ou
3. Sèlectionnez le bouton «Supprimer la page» partir de la barre d’outils Scrapbook.
Supprimer tout Supprimer tout supprime toutes les pages de la rèunion Scrapbook. Toutes les donnèes
seront perdues.
Page suivante/Page
prècèdente
Page suivante passe la page suivante de la rèunion Scrapbook. Cette option est uniquement
disponible lorsque la derniëre page de la rèunion n’est pas affichèe ou sèlectionnèe.
Scrapbook
FRANÇAIS
Pour sèlectionner la page suivante:
1. Choisissez Page > Page suivante.
2. Sèlectionnez le bouton «Page suivante» partir de la barre d’outils Scrapbook.
3. Appuyez sur le bouton pgsuiv du clavier.
Page prècèdente passe la page prècèdente de la rèunion Scrapbook. Cette option est
uniquement disponible lorsque la premiëre page de la rèunion n’est pas affichèe ou
sèlectionnèe.
Pour sèlectionner la page prècèdente:
1. Choisissez Page > Page prècèdente.
2. Sèlectionnez le bouton «Page prècèdente» partir de la barre d’outils Scrapbook.
3. Appuyez sur le bouton pgprèc du clavier.
Atteindre... Atteindre vous permet de sèlectionner la page afficher en saisissant ou en sèlectionnant un
numèro de page.
Pour atteindre une page:
1. Choisissez Page > Atteindre pour ouvrir la boóte de dialogue «Atteindre».
2. Sèlectionnez une page l’aide des boutons flèchès haut et bas ou saisissez le numèro de la
page dans la zone de texte.
3. Sèlectionnez OK.
Ou:
Utilisez les outils Sèlection de page de la barre d’outils Scrapbook.
Lecture
Image d’arriëre-plan... Image d’arriëre-plan vous permet d’importer un fichier image ou une capture d’ècran
Reportez-vous Lecture pour de plus amples informations.
l’arriëre-plan de la page actuellement sèlectionnèe.
Reportez-vous Images d’arriëre-plan pour de plus amples informations.
© 3M 2007. Tous droits réservés.
91
Page 92

Scrapbook
Menu Rèunions
Les options du menu Rèunions sont dècrites ci-dessous:
3M™ Digital Media System 815
Partager/terminer la
rèunion...
Se joindre la rèunion/
quitter la rèunion...
Envoyer invitation... Envoyer invitation permet l’hùte de la rèunion d’envoyer des invitations par e-mail tous les
Autoriser les annotations Autoriser les annotations permet l’hùte de dècider s’il doit autoriser ou non les participants
Partager la rèunion permet l’hùte d’une rèunion de partager une rèunion Scrapbook sur
Internet ou sur l’intranet. Lorsqu’une rèunion est partagèe, cette option de menu change et
devient Terminer la rèunion.
Reportez-vous Partager une rèunion pour de plus amples informations.
Se joindre la rèunion permet des participants invitès de se connecter une rèunion Scrapbook
partagèe. Le participant doit connaótre le nom et le mot de passe (le cas èchèant) de la rèunion
avant d’essayer de s’y connecter. Lorsqu’une rèunion est en cours, cette option de menu
change et devient Quitter la rèunion.
Reportez-vous Se joindre une rèunion pour de plus amples informations.
participants invitès la rèunion Scrapbook partagèe.
Reportez-vous Envoi d’une invitation pour de plus amples informations.
ajouter des annotations la rèunion Scrapbook partagèe.
FRANÇAIS
Reportez-vous Outils de l’hùte de la rèunion pour de plus amples informations.
Synchroniser les
participants
Informations concernant le
participant...
Synchroniser les participants permet l’hùte de la rèunion de maintenir tous les participants
sur la míme page. Lorsque cette option est activèe, l’hùte contrùle la page afficher.
Reportez-vous Outils de l’hùte de la rèunion pour de plus amples informations.
Informations concernant le participant affiche les informations concernant chaque
participant et l’hùte. Ces informations comprennent le nom du participant, l’heure de
connexion, l’adresse IP, l’activation ou non de la fonction Interactif et tout commentaire
disponible.
Reportez-vous Afficher les participants pour de plus amples informations.
Exclure le participant Exclure le participant permet l’hùte de la rèunion d’exclure un participant de la rèunion
Scrapbook partagèe.
Reportez-vous Outils de l’hùte de la rèunion pour de plus amples informations.
Menu Aide
Les options du menu Aide sont dècrites ci-dessous:
Aide Scrapbook Aide Scrapbook ouvre le systëme d’aide pour le logiciel eBeam Interactive.
Aide en ligne Si vous disposez d’une connexion Internet et si vous sèlectionnez Aide en ligne, cela ouvre
la page Web d’assistance technique eBeam. Utilisez cette page pour envoyer des questions
l’assistance technique eBeam.
Enregistrement Si vous disposez d’une connexion Internet et si vous sèlectionnez Enregistrement, cela ouvre
la page Web d’enregistrement eBeam. Utilisez cette page pour enregistrer votre produit afin de
profiter d’une assistance technique continue, d’informations produit et de mises jour produit.
Questions courantes Si vous disposez d’une connexion Internet et si vous sèlectionnez Questions courantes, cela
ouvre la page Questions courantes eBeam.
Mises jour logicielles Si vous disposez d’une connexion Internet et si vous sèlectionnez Mises jour logicielles, cela
ouvre la page Mises jour logicielles eBeam.
A propos de eBeam
Scrapbook...
A propos de eBeam Scrapbook ouvre une boóte de dialogue d’information sur le logiciel
Scrapbook.
92
Cette page contient des informations concernant la version, le copyright et les brevets techniques.
© 3M 2007. Tous droits réservés.
Page 93

™
3M
Digital Media System 815
Scrapbook
Rèsumè des outils interactifs Scrapbook
Les outils interactifs Scrapbook apparaissent lorsque Scrapbook est la fenítre active. La
palette Outils Scrapbook vous procure tous les outils nècessaires pour annoter des pages,
zoomer et capturer des images sur une page.
Reportez-vous Préférences des outils interactifs pour de plus amples informations sur le
dèplacement, l’affichage, l’occultation et la modification de l’aspect des outils interactifs.
Veuillez noter les points importants suivants:
• Si vous sèlectionnez un endroit quelconque en dehors de la fenítre Scrapbook, la palette
Outils Scrapbook change en palette Outils interactifs de l’espace de travail.
• Si le matèriel eBeam n’est pas dètectè, la palette Outils interactifs Scrapbook ne s’active pas. Le matèriel eBeam sert de
clè de sècuritè matèrielle qui active toutes les fonctionnalitès du logiciel eBeam Interactive. Lorsque le matèriel n’est pas
dètectè, vous avez accës une barre d’outils d’annotation uniquement utilisable dans Scrapbook.
Outil Traceur
L’outil Traceur vous permet d’annoter la page affichée à main levée et dans l’une des huit couleurs disponibles.
FRANÇAIS
Lorsque l’outil Traceur est sélectionné, le bouton Outil Traceur est mis en surbrillance et le centre de la palette Outils
interactifs Scrapbook change pour afficher la couleur et l’épaisseur de tracé actuelles.
L’outil Traceur reste sélectionné jusqu’à ce que vous sélectionniez les outils Effaceur, Surligneur, Formes ou Souris.
Modifier la couleur • Sélectionnez la couleur au centre de la palette Outils interactifs Scrapbook. L’anneau extérieur
du menu change pour afficher toutes les autres options de couleur.
• Sélectionnez une couleur sur l’anneau extérieur.
Lorsqu’une couleur a été sélectionnée, le centre de la palette Outils interactifs Scrapbook change
pour afficher la couleur sélectionnée. Cette couleur reste sélectionnée jusqu’à ce que vous
sélectionniez une nouvelle couleur.
Modifier l’èpaisseur du
tracè
• Sélectionnez l’épaisseur de tracé au centre de la palette Outils interactifs Scrapbook. L’anneau
extérieur du menu change pour afficher les quatre options d’épaisseur de tracé disponibles.
• Sélectionnez un tracé sur l’anneau extérieur.
Lorsqu’un tracé a été sélectionné, le centre de la palette Outils interactifs Scrapbook change
pour afficher l’épaisseur de tracé sélectionnée. Ce tracé reste sélectionné jusqu’à ce que vous
sélectionniez une nouvelle épaisseur de tracé.
Outil Pointeur
L’outil Pointeur permet chaque participant d’une rèunion de pointer des donnèes en tout endroit de la fenítre de rèunion. Le
pointeur de chaque participant a une couleur diffèrente.
Remarque: l’outil Pointeur est uniquement activé lors d’une réunion partagée. Reportez-vous à Partager une réunion pour de
plus amples informations.
Lorsque l’outil Pointeur est sélectionné, le bouton Outil Pointeur est mis en surbrillance et le centre de la palette Outils
interactifs Scrapbook affiche le logo de pointeur.
© 3M 2007. Tous droits réservés.
93
Page 94

Scrapbook
3M™ Digital Media System 815
Pour pointer des
donnèes lors d’une
rèunion partagèe
Pour dèplacer le
pointeur
Afficher/masquer/faire
pivoter le pointeur
FRANÇAIS
• Sèlectionnez le bouton Outil Pointeur partir de la palette Outils interactifs Scrapbook.
• Appuyez ou cliquez sur la page pour afficher le pointeur.
• Utilisez le stylet interactif ou la souris pour dèplacer le pointeur dans la page vers un nouvel
emplacement.
• Sèlectionnez le bouton Outil Pointeur partir de la palette Outils interactifs Scrapbook.
• Sèlectionnez de nouveau ce bouton pour afficher l’anneau extèrieur contenant les options
de pointeur. Les options disponibles sont les suivantes (en commenáant par le haut et en se
dèplaáant dans le sens des aiguilles d’une montre le long de l’anneau extèrieur de la palette
Outils Scrapbook):
• Faire pivoter le pointeur dans le sens inverse des aiguilles d’une montre : fait pivoter le
pointeur de 90 degrés dans le sens inverse des aiguilles d’une montre.
• Afficher le pointeur: affiche le pointeur l’ècran.
• Faire pivoter le pointeur dans le sens des aiguilles d’une montre : fait pivoter le pointeur
de 90 degrés dans le sens des aiguilles d’une montre.
• Masquer le pointeur: masque le pointeur.
• Sèlectionnez une option.
Outil Texte
L’outil Texte vous permet d’ajouter une zone de texte à la page affichée.
Lorsque l’outil Texte est sélectionné, le bouton Outil Texte est mis en surbrillance et le centre de la palette Outils interactifs
Scrapbook affiche l’outil Texte.
L’outil Texte reste sélectionné jusqu’à ce que vous sélectionniez les outils Marqueur, Surligneur, Formes ou Souris.
Crèer une zone de texte
sur la page
Dèplacer ou modifier la
zone de texte
1. Sélectionnez l’outil Texte.
2. Appuyez ou cliquez sur la page.
• Pour saisir du texte dans la zone de texte, appuyez ou cliquez sur l’icône Clavier affiché
dans le coin inférieur droit de la zone de texte pour utiliser le clavier affiché de Windows, ou
saisissez du texte à partir du clavier.
• Pour fermer la zone de texte, appuyez ou cliquez n’importe où en dehors de la zone de texte
ou sélectionnez un nouvel outil pour fermer la zone de texte.
1. Sélectionnez l’outil Texte.
2. Appuyez ou cliquez directement en haut du texte à déplacer ou modifier pour rendre la zone
de texte active.
3. Apportez toutes les modifications nécessaires au texte.
• Pour déplacer la zone de texte, appuyez ou cliquez et déplacez le coin de la zone de texte.
• Pour fermer la zone de texte, appuyez ou cliquez n’importe où en dehors de la zone de texte
ou sélectionnez un nouvel outil.
94
© 3M 2007. Tous droits réservés.
Page 95

™
3M
Digital Media System 815
Scrapbook
Dèfinir les attributs du
texte
1. Sélectionnez le logo Texte à partir du centre de la palette Outils interactifs Scrapbook pour
ouvrir la boîte de dialogue Police.
2. Sélectionnez le type, le style, la taille, la couleur de la police, etc.
3. Sélectionnez OK.
Une fois que les attributs de texte ont été sélectionnés, ils ne changeront pas jusqu’à ce que
vous sélectionniez de nouveaux attributs.
Outil Effaceur
L’outil Effaceur vous permet d’effacer les annotations sur la page Scrapbook.
Lorsque l’outil Effaceur est sélectionné, le bouton Outil Effaceur est mis en surbrillance et le centre de la palette Outils
interactifs Scrapbook change pour refléter le paramètre d’épaisseur de l’effaceur.
L’outil Effaceur reste sélectionné jusqu’à ce que les outils Marqueur, Surligneur, Formes ou Souris soient sélectionnés.
Dèfinir l’èpaisseur de
l’effaceur
• Sèlectionnez l’èpaisseur au centre de la palette Outils interactifs Scrapbook. L’anneau extèrieur
du menu change pour afficher les quatre options d’èpaisseur disponibles.
• Sèlectionnez une èpaisseur sur l’anneau extèrieur.
FRANÇAIS
Lorsqu’une épaisseur a été sélectionnée, le centre de la palette Outils interactifs Scrapbook palette
change pour refléter l’épaisseur sélectionnée. Ce paramètre restera sélectionné jusqu’à ce qu’une
nouvelle épaisseur soit sélectionnée.
Outil Sèlectionner
L’outil Sélectionner vous permet de sélectionner une zone rectangulaire de la page affichée afin que vous puissiez copier et
coller la sélection dans une autre application.
L’outil Sélectionner reste sélectionné jusqu’à ce que vous sélectionniez un outil différent à partir de la palette Outils
interactifs Scrapbook.
Reportez-vous à Tout sélectionner pour de plus amples informations.
Outil Photo
Photo vous permet de prendre une photo de l’écran actuel et de l’enregistrer dans Scrapbook.
© 3M 2007. Tous droits réservés.
95
Page 96

Scrapbook
3M™ Digital Media System 815
FRANÇAIS
Prendre une photo
de l’espace de travail
(hormis la fenêtre
Scrapbook)
Prendre une photo de
l’espace de travail qui
contient Scrapbook
1. Sélectionnez le bouton Outil Photo à partir de la palette Outils interactifs Scrapbook pour
ouvrir la boîte de dialogue Prendre une photo.
2. Sélectionnez l’une des options suivantes :
• Capturer écran : l’espace de travail entier est capturé et enregistré dans Scrapbook.
• Capturer une sélection : Scrapbook est réduit et le curseur change en réticule. Pour
sélectionner une zone à capturer, utilisez le stylet interactif pour dessiner un rectangle de
sélection.
L’image capturée est enregistrée comme nouvelle page de Scrapbook.
Scrapbook est réduit pendant le processus de capture d’écran pour vous permettre de prendre
une photo précise de l’espace de travail. Pour inclure Scrapbook dans une photo :
1. Appuyez ou cliquez sur une zone vide de la barre du menu Démarrer de Windows. La palette
Outils interactifs Scrapbook va changer en palette Outils interactifs de l’espace de travail,
puis
2. Sélectionnez l’outil Photo à partir de la palette Outils interactifs de l’espace de travail, puis
3. Sélectionnez Capturer écran ou Capturer une sélection et suivez la procédure décrite cidessus.
Lorsque l’image capturée a été enregistrée dans Scrapbook, la palette Outils interactifs de
l’espace de travail va changer en palette Outils interactifs Scrapbook.
Outil Zoom
L’outil Zoom vous permet d’agrandir ou de réduire la page affichée dans Scrapbook.
Lorsque l’outil Zoom est sélectionné, le bouton Outil Zoom est mis en surbrillance et le centre de la palette Outils interactifs
Scrapbook change pour afficher le logo de zoom.
L’outil Zoom reste sélectionné jusqu’à ce que vous sélectionniez un autre outil à partir de la palette Outils interactifs Scrapbook.
Modifier la valeur
de zoom de la page
1. Sélectionnez le bouton Outil Zoom à partir de la palette Outils interactifs Scrapbook.
2. Sélectionnez de nouveau ce bouton pour afficher l’anneau d’options extérieur.
3. Sélectionnez une valeur de zoom. Les options de zoom disponibles, commençant à partir du signe
plus et réparties le long de la palette dans le sens des aiguilles d’une montre, sont les suivantes :
• Agrandir (signe plus) : agrandit la page avec un facteur de 1,25 sans dépasser 2 000 %.
• 300%
• 500%
• Ajuster la page: compresse ou ètire la page pour l’adapter la zone d’affichage de la page. Cette
option peut ègalement ítre sèlectionnèe en appuyant sur ctrl+0.
• Rèduire (signe moins): rèduit la page avec un facteur de 1,25 sans descendre sous 25 %.
• 50%
• 100%
• 200%
96
© 3M 2007. Tous droits réservés.
Page 97

™
3M
Digital Media System 815
Scrapbook
Outil Surligneur
L’outil Surligneur vous permet d’annoter la page affichée à main levée et dans l’une des huit couleurs translucides disponibles.
Remarque: certaines couleurs de surligneur ne sont peut-être pas visibles sur certains arrière-plans d’ordinateur.
Lorsque l’outil Surligneur est sélectionné, le bouton Outil Surligneur est mis en surbrillance et le centre de la palette Outils
interactifs Scrapbook change pour afficher la couleur et l’épaisseur de tracé actuelles.
L’outil Surligneur reste sélectionné jusqu’à ce vous sélectionniez les outils Effaceur, Marqueur, Formes ou Souris.
Modifier la couleur • Sélectionnez la couleur au centre de la palette Outils interactifs Scrapbook. L’anneau extérieur du
menu change pour afficher les huit options de couleur disponibles.
• Sélectionnez une couleur sur l’anneau extérieur.
Lorsqu’une couleur a été sélectionnée, le centre de la palette Outils interactifs Scrapbook change pour afficher
la couleur sélectionnée. Cette couleur reste sélectionnée jusqu’à ce que vous sélectionniez une nouvelle couleur.
Modifier l’èpaisseur
du tracè
• Sélectionnez l’épaisseur de tracé au centre de la palette Outils interactifs Scrapbook. L’anneau
extérieur du menu change pour afficher les quatre options d’épaisseur de tracé disponibles.
• Sélectionnez un tracé sur l’anneau extérieur.
FRANÇAIS
Lorsqu’un tracé a été sélectionné, le centre de la palette Outils interactifs Scrapbook change pour
afficher l’épaisseur de tracé sélectionnée. Ce tracé reste sélectionné jusqu’à ce que vous sélectionniez
une nouvelle épaisseur de tracé.
Barre d’outils d’annotation standard
La barre d’outils d’annotation standard est accessible dans Scrapbook en sèlectionnant Affichage > Barre d’outils > Outils
(uniquement lorsque le rècepteur eBeam n’est pas dètectè).
Les outils de la barre d’outils d’annotation standard contiennent, de gauche droite:
Marqueur L’outil Marqueur vous permet d’annoter la page affichèe main levèe et dans l’une des huit
couleurs disponibles. La couleur peut ítre sèlectionnèe partir de la palette qui s’affiche lorsque
l’outil Marqueur est sèlectionnè.
Surligneur L’outil Surligneur vous permet d’annoter la page affichèe main levèe et dans l’une des quatre
couleurs translucides disponibles. La couleur peut ítre sèlectionnèe partir de la palette qui s’affiche
lorsque l’outil Surligneur est sèlectionnè.
Effaceur L’outil Effaceur vous permet d’effacer les marques d’annotation effectuèes avec les outils
d’annotation. La taille de l’effaceur peut ítre sèlectionnèe partir de la palette qui s’affiche lorsque
l’outil Effaceur est sèlectionnè.
Zoom L’outil Zoom vous permet de règler la taille d’affichage de la page affichèe. La plage des valeurs
de zoom est comprise entre 25% et 2000%. En maintenant la touche Maj enfoncèe, vous inversez
le sens du zoom. Une valeur de zoom peut aussi ítre sèlectionnèe partir de la liste dèroulante qui
s’affiche lorsque l’outil Zoom est sèlectionnè.
Texte L’outil Texte vous permet d’ajouter des annotations texte une page, en fonction de la taille, de la
police et de la couleur disponibles sur votre ordinateur. La taille, la police et la couleur peuvent ítre
sèlectionnèes partir de la palette qui s’affiche lorsque l’outil Texte est sèlectionnè.
© 3M 2007. Tous droits réservés.
97
Page 98

Scrapbook
Pointeur L’outil Pointeur permet chaque participant d’une rèunion de pointer des donnèes en tout endroit
de la fenítre de rèunion. Le pointeur de chaque participant a une couleur diffèrente.
L’outil Pointeur est uniquement activé lors d’une réunion partagée
La direction du pointeur (droite, gauche, haute, basse) peut ítre sèlectionnèe partir de la palette
qui s’affiche lorsque l’outil Pointeur est sèlectionnè. Vous pouvez aussi masquer le pointeur en
sèlectionnant le bouton Masquer pointeur de la palette qui s’affiche lorsque l’outil Pointeur est
sèlectionnè.
Sèlecteur L’outil Sèlecteur vous permet de tracer un rectangle de sèlection et de copier cette sèlection. Le
rectangle sèlectionnè peut ensuite ítre collè dans une autre application.
3M™ Digital Media System 815
Barre d’outils Scrapbook
Les options suivantes sont disponibles dans la barre d’outils de l’application Scrapbook:
Vue normale (Afficher la page et les vues
miniatures) /Vues miniatures/Vue page
FRANÇAIS
Plein ècran Plein ècran agrandit la page actuelle en taille plein ècran. La barre
Nouvelle page Nouveau crèe une nouvelle page vierge dans la rèunion Scrapbook.
Normal, Vues miniatures et Page vous permettent de passer entre les
diffèrents affichages Scrapbook.
Vous pouvez ègalement passer d’une vue l’autre en effectuant la
combinaison de touches suivante:
• Normal: ctrl+1
• Vues miniatures: ctrl+2
• Page: ctrl+3
d’outils de l’application Scrapbook devient flottante:
Pour passer en plein ècran:
1. Choisissez Affichage > Plein ècran, ou
2. Sèlectionnez le bouton Plein ècran partir de la barre d’outils de
l’application Scrapbook.
Pour revenir une taille d’ècran normale:
1. Cliquez avec le bouton droit sur l’ècran (appuyez sur le bouton A
du stylet interactif), sèlectionnez Plein ècran dèsactivè dans le
menu qui s’affiche, ou
2. Sèlectionnez le bouton Plein ècran dans la barre d’outils
Scrapbook.
98
Pour crèer une nouvelle page:
1. Choisissez Page > Nouveau, ou
2. Sèlectionnez le bouton Nouvelle page dans la barre d’outils
Scrapbook.
La nouvelle page est directement insèrèe aprës la page affichèe ou
sèlectionnèe.
© 3M 2007. Tous droits réservés.
Page 99

™
3M
Digital Media System 815
Dupliquer page Dupliquer crèe une copie de la page affichèe ou sèlectionnèe et fait
de cette copie la page affichèe ou sèlectionnèe.
Pour dupliquer une page:
1. Sèlectionnez la page dupliquer.
2. Choisissez Page > Dupliquer, ou
3. Sèlectionnez le bouton Nouvelle page dans la barre d’outils
Scrapbook.
La page dupliquèe est directement insèrèe aprës la page affichèe ou
sèlectionnèe.
Supprimer page Supprimer supprime la page affichèe ou sèlectionnèe.
Scrapbook
Pour supprimer une page:
1. Sèlectionnez la page supprimer.
2. Choisissez Page > Supprimer, ou
3. Sèlectionnez le bouton Supprimer page dans la barre d’outils
Scrapbook.
Effacer page Effacer efface toutes les annotations de la page affichèe ou
sèlectionnèe.
Pour effacer une page:
1. Sèlectionnez la page effacer.
2. Choisissez Page > Effacer, ou
3. Sèlectionnez le bouton Effacer page dans la barre d’outils
Scrapbook.
Sèlection de page Les boutons de sèlection de page servent choisir la page afficher en
sèlectionnant le numèro de la page. De gauche droite, les boutons de
sèlection de page sont:
• Atteindre la premiëre page
• Page prècèdente
• Page suivante
• Atteindre la derniëre page
FRANÇAIS
Les options Atteindre la premiëre page et Page prècèdente sont
dèsactivèes lorsque la page1 s’affiche. Les options Page suivante et
Atteindre la derniëre page sont dèsactivèes lorsque la derniëre page
s’affiche.
Vous pouvez ègalement sèlectionner le numèro de page en saisissant
directement ce numèro dans la zone de texte puis en appuyant sur
entrèe ou en utilisant l’option Atteindre... du menu Page.
Annuler Annuler efface l’annotation prècèdente. Il est possible d’annuler
jusqu’ ce que la page soit vierge.
Pour annuler:
1. Choisissez Edition > Annuler, ou
2. Sèlectionnez le bouton Annuler dans la barre d’outils de
l’application Scrapbook, ou
3. Appuyez sur ctrl+Z.
© 3M 2007. Tous droits réservés.
99
Page 100

Scrapbook
Rètablir L’outil Rètablir vous permet de rètablir la derniëre annotation
annulèe, sous rèserve que vous ayez utilisè auparavant l’outil Annuler.
Si vous avez utilisè Annuler plusieurs reprises, vous pouvez rètablir
les modifications jusqu’au dèbut de la sèrie de modifications. L’outil
Rètablir est dèsactivè lorsqu’une nouvelle annotation est effectuèe.
Pour rètablir:
1. Choisissez Edition > Rètablir, ou
2. Sèlectionnez le bouton Rètablir dans la barre d’outils de
l’application Scrapbook, ou
3. Appuyez sur ctrl+Y.
Partager/terminer la rèunion Partager la rèunion permet l’hùte d’une rèunion de partager une
rèunion Scrapbook sur Internet ou sur l’intranet.
Lorsqu’une rèunion est partagèe, ce bouton change d’intitulè et
devient Terminer la rèunion.
Reportez-vous Partager une rèunion pour de plus amples
informations.
Se joindre la rèunion Se joindre la rèunion permet des participants invitès de se connecter
FRANÇAIS
une rèunion Scrapbook partagèe.
3M™ Digital Media System 815
Reportez-vous Se joindre une rèunion pour de plus amples
informations.
Affichage des participants Participants ouvre la fenítre Participants. La fenítre Participants vous
permet de savoir qui assiste une rèunion Scrapbook partagèe.
La fenítre Participants peut ègalement ítre ouverte en appuyant sur
ctrl+4.
Reportez-vous Description du partage et Afficher les participants
pour de plus amples informations.
Dèplacer la barre d’outils Le bouton Dèplacer la barre d’outils vous permet de dèplacer la
barre d’outils vers le haut ou le bas de la fenítre de l’application.
Barre d’outils Lecture
La barre d’outils Lecture peut ítre ouverte en choisissant Affichage > Barre d’outils > Lecture.
La barre d’outils Lecture vous permet de lire la rèunion comme s’il s’agissait d’un film. La rèunion peut ítre avancèe, ligne
par ligne, des vitesses variables. La lecture peut se limiter la page en cours ou s’ètendre toutes les pages.
Voici certaines utilisations de la barre d’outils Lecture:
• Affichage de la chaóne d’èvènements de la rèunion.
• Duplication, qui renvoie la rèunion un point spècifique et duplique la page. La page dupliquèe va crèer une nouvelle page
contenant les donnèes concernant la rèunion au point sèlectionnè, ce qui vous permet d’explorer une nouvelle idèe sans
dupliquer manuellement le travail prècèdent et tout en conservant intacte la page prècèdente.
Les outils de lecture suivants sont disponibles dans la barre d’outils Lecture ou dans le sous-menu Lecture du menu Page.
100
© 3M 2007. Tous droits réservés.
 Loading...