

3M 9262 62-9262-9930-6, 9237 62-9237-9930-8, 9238 62-9238-9930-6, 9284 62-9284-9930-0, 9234 62-9234-9930-5 User Manual
3
3
Sco
tch
-We
ld™
Hot
Me
lt
App
lic
ato
r L
T
Scotch-Weld™Hot Melt Applicator LT
™
Applicateur thermofusible 3M
Aplicador por fusión al calor de Scotch-Weld
OWNER’S MANUAL
MANUEL DE L’UTILISATEUR
MANUAL DEL PROPIETARIO
Scotch-Weld™LT
™
LT de 3M
™
For use with Low Melt Adhesives
Utilisez avec les adhésifs à faible point de fusion
Para uso con adhesivos de baja fusión

Read instructions thoroughly before
operating or performing any
maintenance on 3M™ Scotch-Weld™
Hot Melt Applicator LT. For use with
low melt adhesive only.
Lisez attentivement les instructions
avant d'utiliser ou d'effectuer toute
tâche de maintenance sur
l'applicateur d'adhésif thermo-fusible
LT 3M™ Scotch-Weld™. Utilisez avec
les adhésifs à faible point de fusion.
Lea detalladamente las
instrucciones antes de empezar a
operar o de realizar cualquier
mantenimiento del Aplicador por
fusión al calor de Scotch-Weld™ LT
de 3M. Para uso con adhesivos de
baja fusión.
Kit 9234
62-9234-9930-5
Kit 9262
62-9262-9930-6
Kit 9237
62-9237-9930-8
Kit 9284
62-9284-9930-0
Kit 9238
62-9238-9930-6
3

ENGLISH
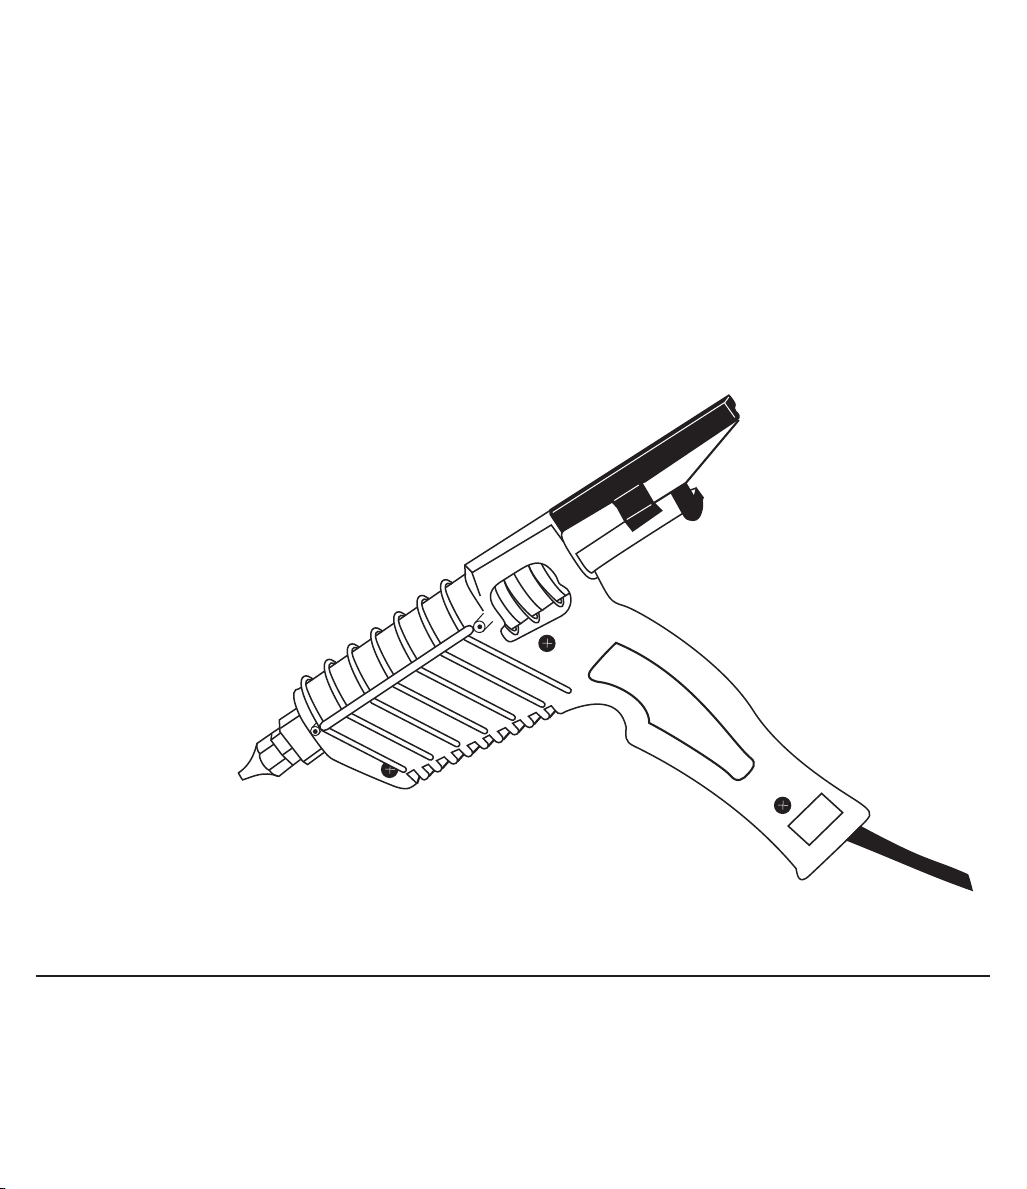
General Information
Thumb pressure on the feeder pushes the adhesive stick into
the heat block. The adhesive is melted by the heat block and
pushed out through the tip. A fixed thermostat on the heat
block maintains heat block temperature.
Start-Up and Operation
WARNING: USE ONLY 3M™ SCOTCH-WELD™ HOT MELT
2’’ x 5/8’’ LOW MELT ADHESIVE STICKS. OTHER
ADHESIVES MAY CAUSE BACKMELT AND POSSIBLE
INJURY. DO NOT USE NEAR HIGHLY FLAMMABLE
MATERIALS.
1. Plug the 3M™ Scotch-Weld™ Hot Melt Applicator LT into
a 120 VAC grounded receptacle. Allow 5 to 10 minutes for
heat-up.
2. Pull the feeder back toward the rear of the applicator.
3. Snap a 3M Scotch-Weld Hot Melt Adhesive Stick
(5/8’’ x 2’’) into the holder.
CAUTION: Do not force adhesive. Excessive force
can damage the applicator and cause molten
adhesive to flow out the rear.
4. Gently press the feeder forward and push the adhesive
into the heat block. Melted adhesive will flow from the tip.
WARNING: TIP AND VALVE ARE HOT. KEEP TIP POINTED
AWAY FROM BODY PARTS.
CAUTION: To avoid charring or plugging of the tip,
extrude at least one adhesive stick every three hours that
the applicator is turned on.
Shut-Down
1. Unplug the applicator.
2. Extrude one adhesive stick to cool down the applicator.
Preventive Maintenance
WARNING: TIP AND VALVE ARE HOT. WEAR HEATRESISTANT GLOVES WHEN CLEANING TIP. KEEP TIP
POINTED AWAY FROM BODY PARTS.
To maintain proper operation, follow these steps.
1. Inspect nozzle tip daily. Make sure it is clean and clear of
foreign matter.
2. Keep the adhesive clean and free of airborne
contaminants.
Accessory Tips
The 3M Scotch-Weld Hot Melt Applicator LT comes equipped
with a standard .093’’ tip. Contact your 3M Scotch-Weld Hot
Melt Applicator distributor for additional tips.
Applicator must be at operating temperature. Hold the valve
firmly with a 5/8’’ wrench and remove the tip with a 1/2’’
wrench. Mount the new tip and tighten.
ip Description
T
9725 Mini-extension/0.072’’ opening
9726 “T” tip/RSC carton closing
9727 “L” tip/FOL carton closing
9785 .070” Tapered aluminum extension
9940 .125’’ opening
9913 Two-hole spreader
9916 Three-hole spreader
9921 Standard .093’’ opening
9922 .063’’ Fluted tip
Changing Tips
WARNING: THE TIP AND VALVE ARE HOT. WEAR HEATRESISTANT GLOVES AND POINT TIP AWAY FROM BODY
PARTS.
CAUTION: Do not overtighten. Overtightening damages
threads.
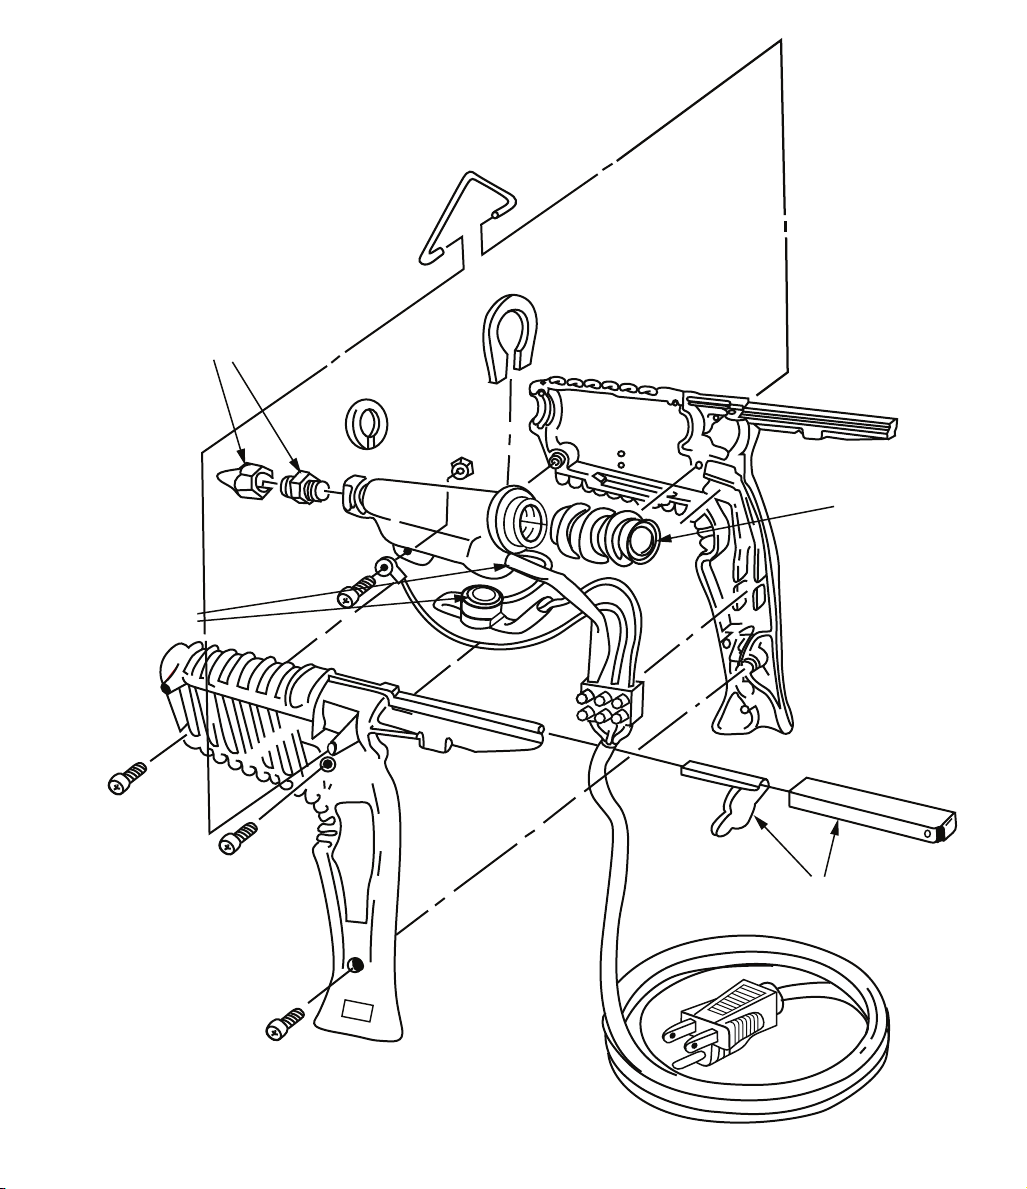
Repair Parts Kit
9234 Valve Assembly Kit 3M Stock # 62-9234-9930-5
a. .093’’ tip
b. Valve Assembly
9237 Sleeve Kit 3M Stock # 62-9237-9930-8
a. Sleeve
b. Brass Flange (4)
9238 Feeder Kit 3M Stock # 62-9238-9930-6
a. Feeder
b. Metal Clip
9284 Power Cord Kit
a. Power Cord (orange)
9262 Heater/Thermostat Kit
a. Heater
b.
Assembly
Thermostat/TCO
3M Stock # 62-9284-9930-0
3M Stock # 62-9262-9930-6

Troubleshooting
Problem Probable Cause Correction
1. Low or no No heat Check to see that 120 VAC service is on. Thermal fuse in the
adhesive flow thermostat may have blown. Use Repair Kit #9262.
Shutdown procedure was not observed Allow the applicator to heat up for at least 30 minutes.
Plugged tip If the applicator was left on overnight, the tip may be plugged.
Backmelt Remove the clip and feeder from the track of the applicator.
2. Dripping* Nozzle Backmelt Refer to preceding paragraph on backmelt.
Worn Valve Assembly Replace valve with Repair Kit #9234
Contaminated adhesive Keep adhesive clean and free of contamination.
*Thermal expansion may cause some dripping during start-up. This is normal.
This may block adhesive flow and cause backmelt. CAUTION:
Do not force adhesive. Clear the tip with a small nail or paper
clip. Extrude the remaining adhesive stick and one new
adhesive stick to clear the opening.
Push the existing adhesive stick into the white sleeve
approximately 3/4’’ with a new adhesive stick. Remove the new
adhesive stick before it melts and look into the white sleeve.
Look for a thin skin of adhesive around the inside of the white
sleeve. Scrape this skin toward the heat block. CAUTION: Do
not damage the white sleeve. Extrude one adhesive stick to
clear the sleeve.
TO AVOID BACKMELT: Observe the Start-Up and Shut-Down
procedures. Do not force adhesive through the applicator.

FRANÇAIS
Information générale
Une pression du pouce sur le distributeur pousse le bâton
d'adhésif dans le tampon isolant. L'adhésif fond avec le
tampon isolant et il est poussé dans l'embout. Un thermostat
fixé sur le tampon isolant maintient la température du tampon
isolant constante.
Démarrage et fonctionnement
AVERTISSEMENT: N’UTILISEZ QUE DES BÂTONS
D’ADHÉSIF À FAIBLE POINT DE FUSION 3M™ SCOTCHWELD™ 2 po x 5/8 po. LES AUTRES COLLES PEUVENT
CAUSER UN BRÛLAGE ET D'ÉVENTUELLES
BLESSURES. N'UTILISEZ PAS À PROXIMITÉ DE
MATÉRIAUX INFLAMMABLES.
1. Branchez l’applicateur 3M™ Scotch-Weld™ Hot Melt dans
une fiche avec mise à terre de 120 volts CA. Laissez
réchauffer 5 à 10 minutes.
2. Retirez le distributeur vers l’arrière de l’applicateur.
3. Glissez un petit bâton de colle 3M Scotch-Weld Hot Melt
(5/8 po x 2 po) dans le support.
PRUDENCE: Ne forcez pas le bâton de colle. Une force
excessive peut endommager l’applicateur et entraîner
l’écoulement de la colle fondue vers l’arrière.
4. Enfoncez délicatement le distributeur vers l’avant et
poussez la colle dans la chambre thermique. La colle
fondue s’écoulera de l’extrémité.
AVERTISSEMENT: L’EMBOUT ET LA VALVE SONT
CHAUDS. NE PAS DIRIGER L’EXTRÉMITÉ VERS LE
CORPS.
PRUDENCE: Pour éviter de carboniser ou de boucher
l’extrémité, expulsez au moins un bâton de colle à
chaque trois heures d’utilisation de l’applicateur.
Entretien préventif
AVERTISSEMENT: L’EMBOUT ET LA VALVE SONT
CHAUDS. PORTEZ DES GANTS THERMORÉSISTANT
POUR NETTOYER L’EXTRÉMITÉ. NE DIRIGEZ PAS
L’EXTRÉMITÉ VERS LE CORPS.
Afin de maintenir un bon fonctionnement, suivez ces étapes.
1. Vérifiez quotidiennement l’extrémité de la buse. Assurezvous qu’elle est propre et exempte de matière étrangère.
2. Gardez la colle propre et exempte de contaminants
aéroportés.
Conseils accessoires
L’applicateur 3M Scotch-Weld Hot Melt est équipé avec un
embout régulier de 0.093 po. Communiquez avec votre
distributeur d’applicateur 3M Scotch-Weld Hot Melt pour des
conseils supplémentaires. L’applicateur doit être à la
température de fonctionnement. Tenez la buse fermement
avec une clé 5/8 po et enlevez l'embout avec une clé de 3/4
po. Montez le nouvel embout et serrez.
Description de l’embout
9725 Petit prolongement / ouverture de 0.072 po
9726 Embout en T / Carton à rabats normaux
9727 Embout en T / Carton à rabats FOL
9785 Extension conique en aluminium 0.07 po
9940 Ouverture 0.125 po
9913 Diffuseur à deux trous
9916 Diffuseur à trois trous
9921 Ouverture standard 0.093 po
9922 Embout cannelé 0.063 po
Remplacement des embouts
AVERTISSEMENT: L’EMBOUT ET LA VALVE SONT
CHAUDS. PORTEZ DES GANTS THERMORÉSISTANT ET
NE DIRIGEZ PAS L’EMBOUT VERS LE CORPS PARTIES.
PRUDENCE: Ne pas trop serrer. Un serrage excessif
pourrait endommager les filets.
Fermeture
1. Débranchez l’applicateur.
2. Expulsez un bâton de colle pour refroidir l’applicateur
.

Trousse de réparation
9234 Trousse de jeu de soupape 3M no 62-9234-9930-5
a.Embout 0.093 po
b. Groupe soupape
9237 Trousse de manchon 3M no 62-9237-9930-8
a. Manchon
b. Bride en laiton (4)
9238 Trousse de distributeur 3M no 62-9238-9930-6
a. Distributeur
b. Agrafe métallique
9284 Trousse de cordon d’alimentation 3M no 62-9284-9930-0
a. Cordon d’alimentation (orange)
9262 Trousse filament/thermostat 3M no 62-9262-9930-6
a.Jeu de filament
b. Thermostat/TCO
Dépannage
Problème Cause probable Correction
1. Écoulement de la Pas de chaleur Vérifiez s’il y a du courant 120 VAC. Le fusible thermique dans le
colle Faible ou thermostat a peut-être sauté. Utilisez la trousse de réparation no
absent 9262.
La procédure de fermeture n’a pas Laissez l’applicateur se réchauffer pendant
été respectée au moins 30 minutes.
Embout bouché Si l’applicateur est resté allumé pendant la nuit, l'embout peut
Brûlage Enlevez l’agrafe et le distributeur du mécanisme de l'applicateur.
2. Égouttement* Buse Brûlage Reportez-vous au paragraphe précédent sur le brûlage.
Jeu de soupape usée Remplacez la soupape avec la trousse de réparation no 9234
Colle contaminée Maintenez la colle propre et exempte de toute contamination.
*Lors de la mise en marche, l’expansion thermique peut causer de l’égouttement. Cet égouttement est normal.
être bouché. Ceci pourrait bloquer l'écoulement de la colle et
causer un brûlage. PRUDENCE: Ne forcez pas le bâton de
colle. Nettoyez l’embout avec un petit clou ou une agrafe pour
papier. Expulsez le restant du bâton de colle et un bâton de colle
neuf pour libérer l’ouverture.
Poussez le bâton de colle qui est déjà introduit dans le manchon
blanc environ 3/4 po avec un bâton de colle neuf. Enlevez le
bâton de colle neuf avant qu’il ne fonde et regardez dans le
manchon blanc. Cherchez une fine couche de colle autour de
l’intérieur du manchon blanc. Grattez la couche vers le bloc de
chauffage.
blanc. Expulsez un bâton de colle pour libérer le manchon.
POUR ÉVITER LE BRÛLAGE: Respectez les procédures de
démarrage et de fermeture. Ne forcez pas la colle dans
l'applicateur.
PRUDENCE: N’endommagez pas le manchon

ESPAÑOL
Información general
Una presión con el pulgar sobre el alimentador empujará la
barra de adhesivo en el bloque de calentamiento. El
adhesivo se funde en el bloque de calentamiento y saldrá por
el pico. Un termostato fijo mantiene la temperatura en el
bloque de calentamiento.
Comienzo y operación
ADVERTENCIA: USE SÓLO BARRAS DE ADHESIVO DE
BAJA FUSIÓN 3M™ SCOTCH WELD™ 2’’ x 5/8.” EL USO
DE OTROS ADHESIVOS PUEDE CAUSAR SOBREFUSIÓN
Y PROBABLES LESIONES. NO LO USE CERCA DE
MATERIALES ÁLTAMENTE INFLAMABLE.
1. Enchufe el aplicador por fusión al calor de Scotch-Weld™
LT de 3M™ en un receptáculo con conexión a tierra a 120
VAC (de las siglas en inglés para significar “Voltios de
Corriente Alterna”) Mantenga 5 a 10 minutos en
calentamiento.
2. Jale el alimentador hacia atrás, hacia la parte posterior del
aplicador.
3. Coloque rápidamente una mini barra adhesiva (2’’ x 5/8’’)
de fusión por calor Scotch Weld de 3M en el soporte.
PRECAUCIÓN: No fuerce el adhesivo hacia dentro.
El uso de fuerza excesiva puede dañar el aplicador
y hacer que el adhesivo fundido salga por la parte
posterior.
4. Oprima suavemente el alimentador hacia delante y
empuje al adhesivo dentro del bloque de calentamiento.
Saldrá adhesivo fundido por el pico.
ADVERTENCIA: EL PICO Y LA VÁLVULA ESTÁN
CALIENTES. MANTENGA EL PICO APUNTANDO HACIA
OTRO LADO, NO HACIA SU CUERPO.
PRECAUCIÓN: Para evitar carbonizar o taponar el pico,
extruda por lo menos una barra de adhesivo cada tres
horas a partir del momento del encendido del aplicador.
Mantenimiento preventivo
ADVERTENCIA: EL PICO Y LA VÁLVULA ESTÁN
CALIENTES. USE GUANTES RESISTENTES AL CALOR
CUANDO LIMPIE EL PICO. MANTENGA EL PICO
APUNTANDO HACIA OTRO LADO, NO HACIA SU
CUERPO.
Para mantener una correcta operación, siga estos pasos.
1. Inspecciones diariamente el pico de la boquilla.
Asegúrese de que éste se halla limpio y no tiene
materiales extraños.
2. Mantenga al adhesivo limpio y libre de contaminantes del
aire.
Picos accesorios
El aplicador por fusión al calor de Scotch-Weld LT de 3M
viene equipado con un pico estándar de .093”. Por picos
adicionales tome contacto con su distribuidor de aplicadores
por fusión al calor de Scotch-Weld LT de 3M. El aplicador
debe estar a la temperatura de operación. Sostenga
firmemente con la llave de 5/8”, mientras quita el pico de la
boquilla con la llave de 3/4”. Coloque el nuevo pico y ajuste.
Descripción del pico
9725 Abertura de mini-extensión/0.072’’
9726 Pico “T” para cerrar envases de cartón RSC
9727 Pico “L” para cerrar envases de cartón FOL
9785 Alargamiento decreciente de aluminio de .070”
9940 Abertura de .125’’
9913 Esparcidor de dos orificios
9916 Esparcidor de tres orificios
9921 Abertura estándar de .093’’
9922 Pico estriado de .063”
Cambio de picos
ADVERTENCIA: EL PICO Y LA VÁLVULA ESTÁN
CALIENTES. USE GUANTES RESISTENTES AL CALOR Y
APUNTE EL PICO HACIA OTRO LADO, NO HACIA SU
CUERPO PARTES.
PRECAUCIÓN: No ajuste demasiado. Ajustar demasiado
podría dañar la rosca.
Cerrado
1. Desenchufe el aplicador.
2. Extruda una barra de adhesivo para enfriar el aplicador.

Juegos de partes de reparación
9234 Conjunto de juegos de válvula Artículo 3M número # 62-9234-9930-5
9237 Juego de manga Artículo 3M número # 62-9237-9930-8
9238 Juego de alimentador Artículo 3M número # 62-9238-9930-6
9284 Juego de cable eléctrico 3M número # 62-9284-9930-0
9262 Juego de calentador/ termostato Artículo 3M número # 62-9262-9930-6
a. Pico de .093”
b. Conjunto de la válvula
a. Manga
b. b. Brida de bronce (4)
a. Alimentador
b. b. Sujetador de metal
a. Cable eléctrico (color naranja)
a. Conjunto de calentador
b.Termostato/TCO
Solución de problemas
Problema Causa probable Corrección
1. Bajo o ningún No hay calor Compruebe si está conectada la corriente de 120 VAC. Puede
flujo de adhesivo haber saltado el fusible térmico del termostato. Use el Juego de
No se siguió el procedimiento de cierre Permita que el aplicador se caliente al menos durante 30
Pico taponado Si el aplicador se dejó encendido durante toda la noche, el pico
Sobrefusión Quite el sujetador y el alimentador de la guía del aplicador. Con
barra
2.Goteado* Boquilla Sobrefusión Consultar el párrafo anterior relativo a Sobrefusión.
Conjunto para válvula gastada Reemplazar con el Juego de reparación #9234
Adhesivo contaminado Mantenga el adhesivo limpio y libre de contaminación.
*La expansión termal puede causar algún goteo durante el comienzo. Esto es normal.
reparación #9262.
minutos.
puede estar taponado. Esto puede bloquear el flujo de adhesivo
y causar sobrefusión. PRECAUCIÓN: No fuerce el adhesivo
hacia dentro. Limpie el pico con una pequeña punta o clip de
papeles. Extruda lo que resta de la barra de adhesivo y pase
una nueva barra para limpiar el orificio.
una nueva barra empuje en la manga blanca aproximadamente
3/4” de la barra de adhesivo que ya estaba. Quite la nueva
de adhesivo antes de que esta se funda y revise la manga
blanca. Busque una fina película de adhesivo alrededor del
interior de la manga blanca. Raspe esta película en dirección
al bloque de calentamiento. PRECAUCIÓN: No dañe la manga
blanca. Extruda una barra de adhesivo para limpiar la manga.
PARA EVITAR LA SOBREFUSIÓN: Siga los procedimientos de
Iniciación y Finalización. No fuerce el adhesivo dentro del
aplicador.

Repair Service
During Warranty Period – Contact your nearest 3M Sales Branch or 3M™ Scotch-Weld Hot™ Melt Adhesive distributor.
After Warranty Period – The 3M™ Scotch-Weld™ Hot Melt Applicator LT has been engineered to be durable and reliable.
Recognizing that it will need maintenance, we have made it easy to disassemble and repair.
Should your applicator require repair, you can order repair part kits from your local 3M Scotch-Weld Hot Melt Adhesive distributor. If
you do not wish to make your own repair, check with your distributor. Many of our 3M Scotch-Weld Hot Melt Adhesive distributors
have in-house repair capability.
Warranty Repair Center
1150 Holstein Drive
Pine City, MN 55063
Limited Warranty
Your 3M Scotch-Weld Hot Melt Applicator LT is warranted by the 3M Company for a period of 12 months from date of use or
purchase (whichever occurs first) against defects in material and workmanship. During this period repairs or replacements will be
made free of charge at the option of the warrantor. This warranty does not cover damages caused by accident or misuse; or repair by
an unauthorized repair station; or by the installation, operation, or maintenance not in accordance with 3M’s recommended
procedures; or by the use of adhesive cartridges other than 3M manufacture or which are not subject to 3M’s quality control
standards. All transportation, mailing, and insurance costs to the repair facility are at the expense of the owner.
The foregoing warranties are exclusive and in lieu of all other warranties whether written, oral, implied or statutory. NO IMPLIED
WARRANTY OF MERCHANTABILITY OR FITNESS FOR PURPOSE SHALL APPLY. 3M’s limit of liability and user’s exclusive
remedy shall be repair or replacement or a refund of the purchase price, at 3M’s option.
Limitation of Liability
Except for the exclusive remedy stated above, 3M shall not otherwise be liable for any loss or damages, whether direct, indirect,
special, incidental, or consequential, regardless of the legal theory asserted, including negligence, warranty, or strict liability.
3M Branch Offices
RoHS compliant means that the product or part does not contain any of the substances in excess of the maximum
concentration values in EU Directive 2002/95/EC, as amended by Commission Decision 2005/618/EC, unless the substance
is in an application that is exempt under RoHS. Unless otherwise stated by 3M in writing, this information represents 3M’s
knowledge and belief based on information provided by third party suppliers to 3M.
Alaska
11151 Calaska Circle
Anchorage, AK 99515-2900
Phone: 907-522-5200
Canada
1840 Oxford St. East
P.O. Box 5757, Terminal A
London, Ontario
Canada N6A 4TI
Phone: 519-451-2500
Fax: 519-452-6262
Georgia
2860 Bankers Industrial Dr.
Atlanta, GA 30360-2764
Phone: 770-447-7000
Fax: 770-447-7161
Hawaii
4443 Malaii Street
Honolulu, HI 96818-3136
Phone: 808-422-2721
Fax: 808-422-9557
Illinois
4 Westbrook Corporate Center
Suite 300
estchester
W
Phone: 708-338-4580
Fax: 708-338-5601
, IL 60154
Mexico
3M Mexico S.A. de C.V.
Avenida Santa Fe #55
Col. Santa Fe
C.P. 01210, Mexico
Phone: 52-55-52-70-04-00
Fax: 52-55-52-70-22-99
Michigan
19460 Victor Pkwy.
Livonia, MI 48152-1061
P.O. Box 537907
Livonia, MI 48153-7907
Phone: 734-953-9300
Fax: 734-779-5239
Minnesota
6455 City West Pkwy
Eden Prairie, MN 55344
Phone: 1-800-328-3271
Fax: 952-947-0440
6744 33rd Street North
Oakdale, MN 55128-3623
Phone: 651-737-6700
New Jersey
20 Waterview Blvd., Suite 360
Parsippany
Phone: 973-658-3801
Fax: 973-658-3799
, NJ 07054-1229
Pennsylvania
7 Neshaminy Interplex, Suite 400
Trevose, PA 19053
Phone: 215-638-6371
Fax: 215-638-6482
Puerto Rico
350 Chardon Avenue, Suite 1010
San Juan, PR 00918
P. O. Box 6100
Carolina, PR 00986-6100
Phone: 787-620-3000
Fax: 787-620-3012
Tennessee
763 Walnut Knoll Lane, #8
Cordova, TN 38018-6301
Phone: 901-752-4441
Fax: 901-752-4496
Texas
12700 Park Central Drive, Suite 1210
Dallas, TX 75251-1504
Phone: 214-324-1000
West Virginia
Rock Branch Regional Industrial Park
Poca, WV 25159
Phone: 304-755-0719
3
Industrial Adhesives and Tape Division
St. Paul, MN 55144-1000
1-800-364-3577 or 651-737-6501
www.3M.com/adhesives
Rec
40% pr
10% post-consumer
led P
yc
e-consumer
per
a
Printed in U.S.A.
©3M 2006 38-9019-0536-4

Contact: Jenny Young
Creator: Susan Barker
Phone: (651) 736-2971
Fax: (651) 733-5273
Address: 3M Building 223-6N-01
Spec # 38-9019-0536-4
Structure: 34-7059-7987-9
Inks: Black
Date: 4/24/06
St. Paul, MN 55144-1000
SCALE:
1 Inch
 Loading...