


====
Paä~ÄëI=fåÅK=
tбдЗЕ~н=ff=RNNM=dк~йЬбЕл=^ЕЕЙдЙк~нзк=
`~êÇ=
rлЙкЫл=dмбЗЙ=
3Dlabs®, Inc.
480 Potrero Avenue
Sunnyvale, CA 94086
408 - 530 - 4700
www.3dlabs.com

Copyright 2000 by 3Dlabs, Inc.
3Dlabs is a registered trademark, and Wildcat, SuperScene and DirectBurst are trademarks of 3Dlabs, Inc.
or 3Dlabs Inc. Ltd. Pentium is a registered trademark of Intel. OpenGL is a registered trademark of
Silicon Graphics, Inc. Soft Engine is a trademark of Vibrant Graphics, Inc. AutoCAD is a registered
trademark of AutoDesk Inc. Colorific is a registered trademark of E-Color, Inc. Microsoft, Windows NT,
Windows 2000 are registered trademarks of the Microsoft Corporation. Athlon and 3DNow! are
registered trademarks of AMD. All other trademarks and registered trademarks are the property of their
respective holders.
Caution: Changes or modifications to your 3Dlabs Graphics Accelerator Card not expressly approved by
3Dlabs, Inc. voids the user’s warranty.
FCC Notice: This equipment has been tested and found to comply with the limits for a Class B digital
device, pursuant to Part 15 of the FCC Rules. These limits are designed to provide reasonable protection
against harmful interference in a residential installation. This equipment generates, uses, and can radiate
radio frequency energy. If product is not installed and used in accordance with the instruction Guide, it
may cause harmful interference to radio communications; however, there is no guarantee that interference
will not occur in a particular installation. If this equipment does cause harmful interference to radio or
television reception, which can be determined by turning the equipment off and on, the user is encouraged
to try to correct the interference by one or more of the following measures:
1. Re-orient or relocate the receiving antenna.
2. Increase the separation between the equipment and receiver.
3. Connect the equipment to an outlet on a circuit different from that to which the receiver is
connected.
4. Consult 3Dlabs or an experienced radio/TV technician for assistance.
Compliance with FCC Rules requires that a shielded cable be used to connect to other equipment. This
device complies with Part 15 of the FCC Rules. Operation is subject to the following two conditions: 1)
this device may not cause harmful interference, and 2) this device must accept any interference received,
including interference that may cause undesired operation.
This Class B digital apparatus meets all the requirements of the Canadian Interference- Causing
Equipment Regulations. Cet appareil numérique de la classe B respecte toutes les exigences du
Règlement sur le material brouilleur du Canada.
3Dlabs, Inc. makes no representation that the use of its products in the manner described in this
publication will not infringe on existing or future patent rights, nor do descriptions contained in this
publication imply the granting of licenses to make, use, or sell equipment or software in accordance with
the description.
Specifications Subject to Change Without Notice
P/N DH002000
3Dlabs Graphics Accelerator Card User's Guide
ii

````lkqbkqp
Chapter 1– Introduction ......................................................................................................1
Welcome to 3Dlabs! ........................................................................................................2
System Requirements ......................................................................................................2
Features............................................................................................................................3
Chapter 2 – Setup................................................................................................................7
Preparing for Installation.................................................................................................8
Before you begin your installation ...........................................................................8
Installing your Wildcat II 5110 Graphics Accelerator Card.....................................8
If you are upgrading the graphics card in your system...........................................10
Connecting the Monitor.................................................................................................11
Connecting a VGA monitor....................................................................................11
Connecting two VGA monitors..............................................................................11
Connecting a Digital Flat-panel monitor................................................................12
Attaching a Stereo Device .............................................................................................12
Installing the Driver Software .......................................................................................12
Make sure your computer is ready .........................................................................12
Removing an existing driver under Windows NT..................................................13
Installing your Wildcat II 5110 Windows NT driver .............................................13
Removing an existing driver under Windows 2000...............................................13
Installing your Wildcat II 5110 Windows 2000 driver...........................................14
Heidi Drivers for AutoDesk Applications .....................................................................14
Verify the Default Video Display Driver ......................................................................14
Verifying the default video display driver in Windows NT...................................14
Verifying the default video display driver in Windows 2000 ................................15
Verify the System Startup Version ................................................................................15
Verifying the system startup version in Windows NT ...........................................15
Verifying the system startup version in Windows 2000.........................................15
Checking the Video Image ............................................................................................15
Registering Your 3Dlabs Graphics Accelerator Card....................................................16
lkqbkqp=
lkqbkqplkqbkqp
=
==
3Dlabs Graphics Accelerator Card User's Guide
iii

Chapter 3 – Software Configuration .................................................................................17
The 3Dlabs Wildcat II 5110 Graphics Accelerator Card Driver ...................................18
Configuring the Video Display......................................................................................18
Using the Wildcat Configuration tab......................................................................18
Using the Wildcat Monitor tab...............................................................................20
Enabling stereo display ..........................................................................................22
Enabling Multiview and Genlock..................................................................................22
Enabling Multiview features ..................................................................................22
Confirming multiview cables are detected .............................................................23
Enabling genlock features ......................................................................................23
Configuring Dual Monitors under Windows 2000........................................................23
Enabling the Dual Monitor Feature under Windows 2000.....................................23
Adjusting colors or resolutions of either monitor...................................................25
Optimizing the Wildcat II 5110 driver ..........................................................................25
Enabling application-specific optimizations ..........................................................25
Creating a custom optimization..............................................................................26
Chapter 4 – Troubleshooting.............................................................................................28
Troubleshooting.............................................................................................................29
Monitors and Display Resolutions.................................................................................29
Diagnostics ....................................................................................................................29
Obtaining a Usable Video Resolution ...........................................................................30
Using the Last Known Good option in Windows NT ............................................30
Booting into Safe Mode in Windows 2000 ............................................................30
Determining a defective unit ..................................................................................30
Reinstalling the Video Driver........................................................................................31
Removing the existing Wildcat II 5110 driver under Windows NT ......................31
Reinstalling the video driver under Windows NT..................................................31
Removing an existing driver under Windows 2000...............................................32
Reinstalling the video driver under Windows 2000...............................................32
Online Information ........................................................................................................32
Appendix A – Specifications.............................................................................................33
A Specifications.............................................................................................................34
3Dlabs Graphics Accelerator Card User's Guide
iv

Appendix B – Software License........................................................................................37
SOFTWARE LICENSE AGREEMENT.......................................................................38
Software License and Restrictions.............................................................................38
Limited Warranty...........................................................................................................39
Limited Liability ........................................................................................................39
Restricted Rights Notice ............................................................................................39
Termination................................................................................................................39
General.......................................................................................................................40
Appendix C – Regulatory Statements ...............................................................................41
Declaration of Conformity.............................................................................................42
Appendix D – Terms and Definitions ...............................................................................43
Terms and Definitions ...................................................................................................44
Index..................................................................................................................................49
3Dlabs Graphics Accelerator Card User's Guide
v


````e^mqbo=
e^mqbo=N
e^mqbo=e^mqbo=
NÓÓÓÓ=f
=fkqolar`qflk
NN
kqolar`qflk=
=f=f
kqolar`qflkkqolar`qflk
=
==
3Dlabs Graphics Accelerator Card User's Guide

Introduction
tЙдЕзгЙ=нз=Paд~Дл>
tЙдЕзгЙ=нз=Paд~Дл>====
tЙдЕзгЙ=нз=Paд~Дл>tЙдЕзгЙ=нз=Paд~Дл>
Thank you for selecting a 3Dlabs® Wildcat® II 5110 Graphics Accelerator Card!
This User Guide is designed to provide information about the Wildcat II 5110 Graphics Accelerator Card.
In addition to this guide you are strongly encouraged to use the on line help included in the 3Dlabs driver
software Help screens.
pулнЙг=oЙимбкЙгЙенл=
pулнЙг=oЙимбкЙгЙенл=====
pулнЙг=oЙимбкЙгЙенл=pулнЙг=oЙимбкЙгЙенл=
You must have Microsoft Windows NT 4.0 with Service Pack 5 (or later) or Windows 2000 installed. To
take advantage of the dual-screen option, you must have Windows 2000 installed.
Pentium II®or greater processor
Microsoft® Windows® NT 4.0 with Service Pack 5 (or later) or Windows 2000
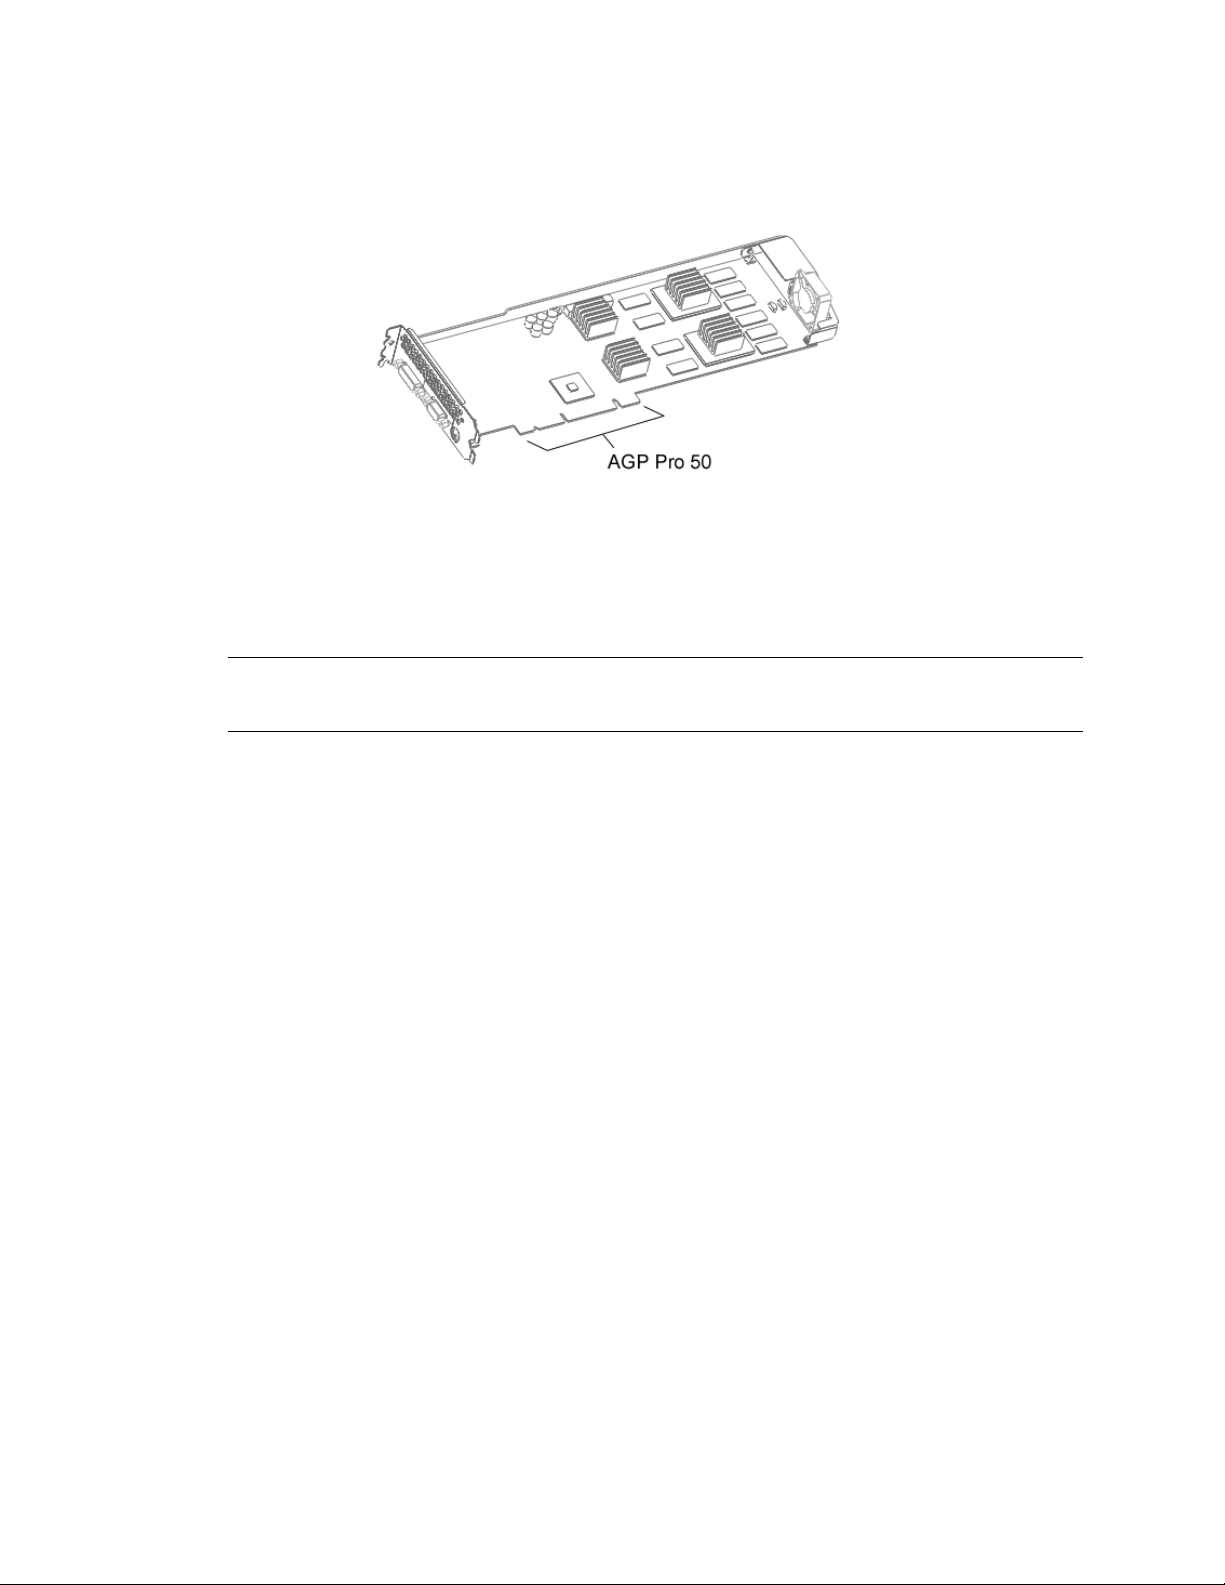
AGP Pro 50 expansion slot
One open PCI slot adjacent to the AGP Pro 50 slot
Minimum of 32 MB DRAM (64 MB recommended)
Industry-standard, multiple-frequency monitor (VGA) or a Digital Video Interface (DVI)-compliant digital
display device
3 MB of free space on the computer’s primary system disk for the video display driver software
Note: If you purchased the Wildcat II 5110 Graphics Accelerator Card as part of a system, it was
preconfigured to operate in your system prior to shipment. No other modifications are necessary. Also,
your system’s video drivers were installed prior to shipment and are operative when you receive the
system. No further installation or configuration is necessary unless you purchased a customer kit or need
to reinstall your video card. Store the driver delivery media that came with your system in a safe place in
case you ever need to reinstall the drivers.
For more detailed information on the operating system, refer to the printed and online documentation
delivered with the system.
3Dlabs Graphics Accelerator Card User's Guide
2

cЙ~нмкЙл
cЙ~нмкЙл====
cЙ~нмкЙлcЙ~нмкЙл
Card Interface
Introduction
AGP Pro 50 card designed for systems that have a 50watt AGP Pro slot.
Video Memory
Graphics Controller
RAMDAC
Plug-and-Play Monitor
Support
Accelerated 3D API
Maximum Resolution; Aspect
Ratio; Refresh Rate
Power Management Support
Geometry Acceleration
Frame Buffer: 64 MB
Texture Buffer: 64 MB
DirectBurst: 16 MB
High-speed Wildcat chipset technology with dual
display support.
300 MHz
Yes
OpenGL
2048 x 1152; 16:9; 75 Hz
Appendix A, Specifications
Display Power Management Signaling (DPMS)
Advanced Configuration and Power Interface (ACPI)
Model view matrix transformation of vertex and
normal coordinates
Perspective and viewport transformations
Texture matrix transformation of texture
coordinates
Local display list storage and processing
Full lighting calculations (up to 24 lights)
View volume clipping
Up to six user clip planes
Image processing
3Dlabs Graphics Accelerator Card User's Guide
3

Introduction
cЙ~нмкЙлI=ЕзенK
cЙ~нмкЙлI=ЕзенK====
cЙ~нмкЙлI=ЕзенKcЙ~нмкЙлI=ЕзенK
Traditional 2D Operations
OpenGL (1.2 Compliant)
Operations
16- and 32-bit color depths (565, 8888)
Solid and patterned area fills
Vectors (diamond rule compliant)
Block moves (screen-to-screen)
Block gets (screen-to-system)
Block puts (system-to-screen)
Bilinear scaling
Image support for multiple formats, zooming,
bilinear scaling, color matrix, and color tables
Harware accumulation operations
Fogging: linear, exponential, exponential
user-defined
Antialiased points, vectors, and polygons
Points (2D, 3D wide)
Vectors (2D and 3D lines, line strips; wide,
stippled)
Polygons (triangles, triangle strips, quads, quad
strips, polygons, point/line polygon mode)
Texture mapping: point, bilinear, trilinear, and
multiple internal formats
24- and 32-bit depth buffering
Alpha operations
Scissoring
Dithering
Fast window clears
Window clipping
Fast window-mode double buffering
Masking
Frame-sequential and interlaced stereo support
Matrix transformations
Stencil operations
Rich set of blending operations
2
, and
3Dlabs Graphics Accelerator Card User's Guide
4

Introduction
cЙ~нмкЙлI=ЕзенK
cЙ~нмкЙлI=ЕзенK====
cЙ~нмкЙлI=ЕзенKcЙ~нмкЙлI=ЕзенK
OpenGL (1.2 Compliant)
Extension Support
Imaging Extensions:
Pixel buffer
Color table
Color matrix
Convolution
Blend Extensions:
Color
Minmax
Function separate
Subtract
Fog Extensions:
Fog function
Fog offset
Occulsion culling
Texture Extensions:
3D textures: edge, border, and LOD clamps
Mipmap generation
Video Extensions:
Interlace
Interlace read
422 pixels
Swap Control Extensions:
Swap control
Swap frame lock
Swap usage
Texture color table
Pixel texture and 3D texturing
Pbuffer
Image buffer
Gamma
Stencil operation wrap
Separate specular
Post-texturing specular
3Dlabs Graphics Accelerator Card User's Guide
5

cЙ~нмкЙлI=ЕзенK
cЙ~нмкЙлI=ЕзенK====
cЙ~нмкЙлI=ЕзенKcЙ~нмкЙлI=ЕзенK
Additional Features
Introduction
SuperScene full-scene multisampled anti-
aliasing:
Point sampled with sixteen samples
Sample location jittering
Dynamic sample allocation
Dynamic sample backoff
Two video look-up tables
Eight stencil planes
Eight double-buffered overlay planes
32-bit Z buffer
High-performance DACs that directly drive
display devices
DDC2B Display Data Channel standard
Head-mounted displays and shutter glasses
(frame sequential and interlaced stereo required)
Onboard texture memory with full mipmapped
trilinear interpolated texture processing
Digital Video Interface (DVI)-I display support
Big and Little Endian support
Global and local texture modes
Textures per screen
====
3Dlabs Graphics Accelerator Card User's Guide
6

````e^mqbo=
e^mqbo=O=
e^mqbo=e^mqbo=
O=ÓÓÓÓ=p
O=O=
=pbqrm
=p=p
bqrm=
bqrmbqrm
=
==
3Dlabs Graphics Accelerator Card User's Guide

Setup
mêÉé~êáåÖ=Ñçê=fåëí~ää~íáçå
mêÉé~êáåÖ=Ñçê=fåëí~ää~íáçå====
mêÉé~êáåÖ=Ñçê=fåëí~ää~íáçåmêÉé~êáåÖ=Ñçê=fåëí~ää~íáçå
Note: If you purchased your Wildcat II 5110 Graphics Accelerator Card as part of a system, it was
installed and configured prior to shipment. The following instructions for hardware installation are
necessary only if you purchased a customer kit or need to reinstall your video card.
Before you begin your installation
1. Save any work in progress and exit any open applications. Always back up your system before
you install any new hardware or software.
2. Have a Phillips-head screwdriver ready.
3. Turn off power to the computer.
Important: Physically remove the power cord from the system and wait 15 to 30 seconds for
standby power to dissipate. Damage can occur to add-in components if power is not physically
removed from the system during installation procedures.
4. Take every possible precaution against static electricity as you prepare to install the card. Static
can damage components. If an anti-static wrist strap was included in your box, please use it
during hardware installation. You should also try to work in a static free area (such as on a tile
floor rather than carpet).
Touch the metal chassis of the computer to drain off any static electricity before touching the card.
Do not wear wool or polyester clothing.
Work in an area with a relative humidity of at least 50 percent.
Keep the card in the anti-static bag until you are ready to install it.
Handle the card as little as possible and only by the edges.
Note: Be sure to register your new card using one of the options described on page 16.
Installing your Wildcat II 5110 Graphics Accelerator Card
1. Refer to your computer’s documentation for instructions on opening and closing the computer,
identifying the AGP Pro expansion slot and PCI expansion slots, and adding expansion cards.
2. Check your system documentation to locate the appropriate slots which to install your card. Your
Wildcat II 5110 Graphics Accelerator Card includes an adjacent (attached) power supply card.
The adjacent PCI slot must be empty for cooling purposes.
3. Turn off power to the computer and to the monitor and disconnect the cables from the computer
(follow the instructions under Before you begin your installation).
Note: If you are replacing a graphics card, be sure to uninstall your old video driver software before
tuning off your system and removing your old graphics card. Refer to Installing the Driver Software later
in this chapter for details on uninstalling drivers.
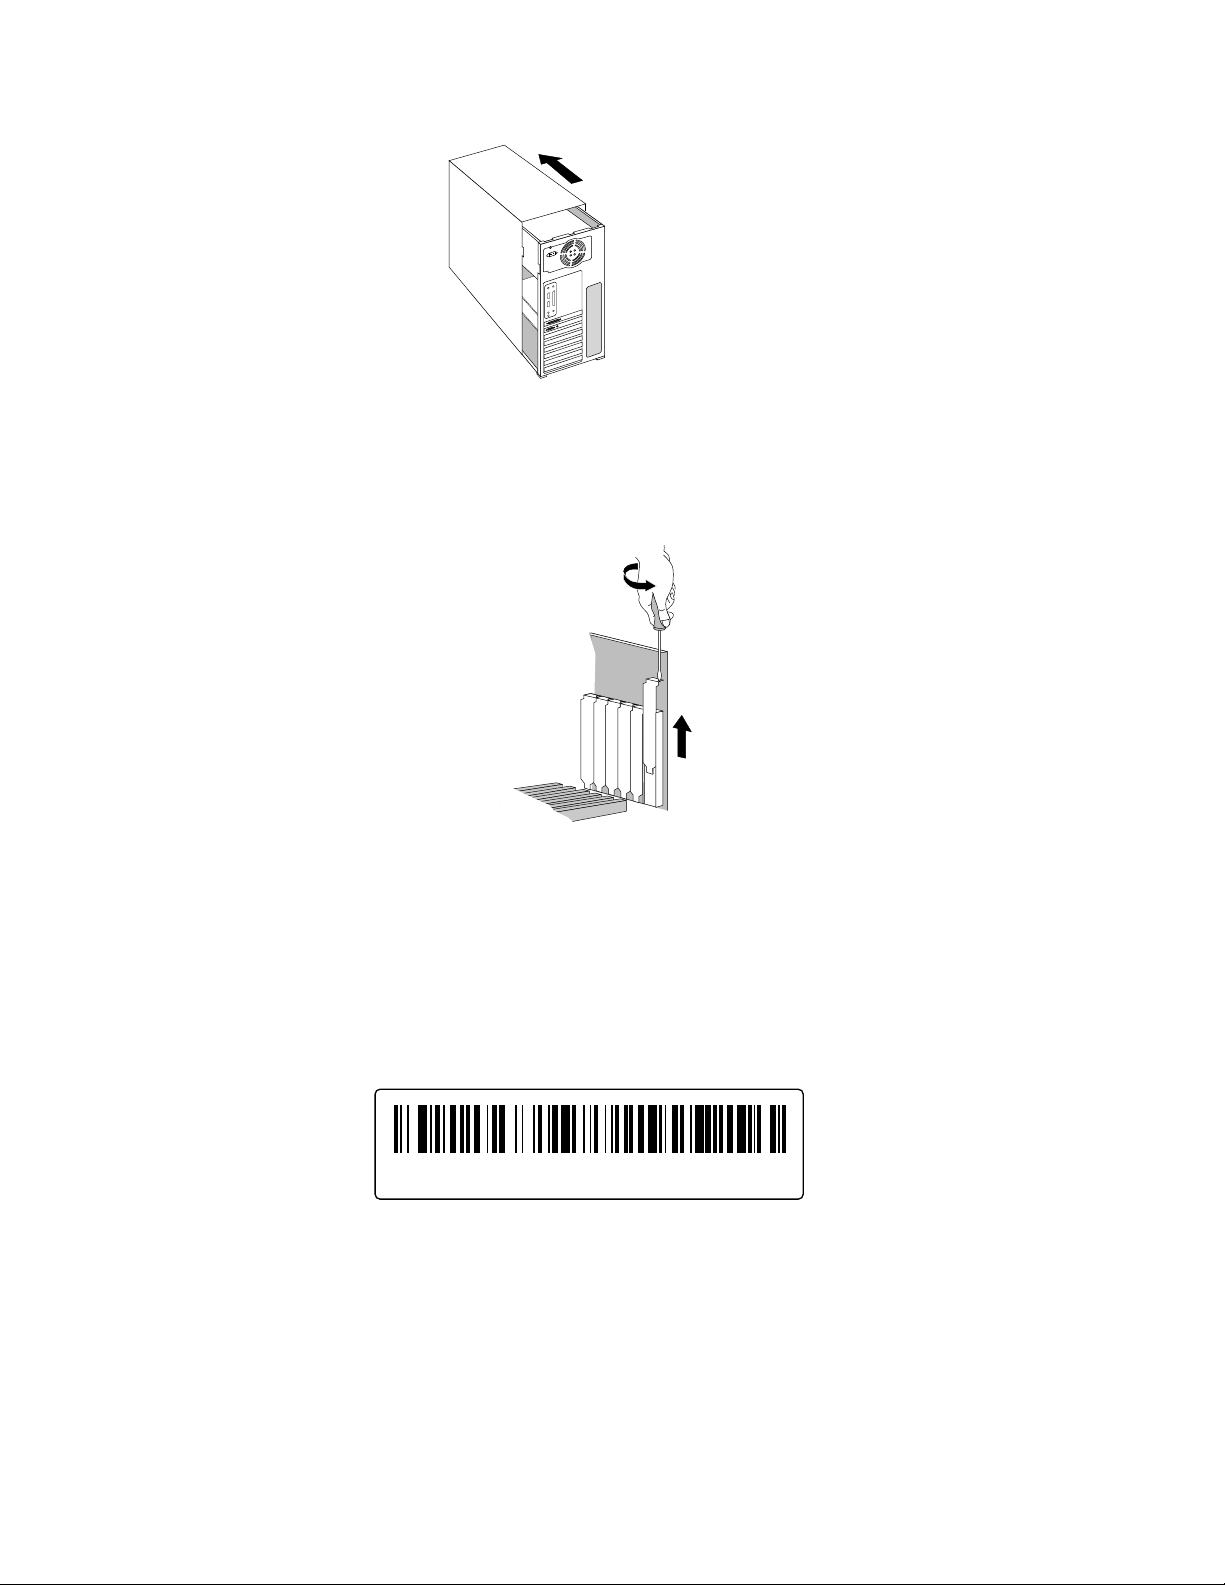
4. Remove the cover from your system so you can access the slots into which you will be installing
your Wildcat II 5110 Graphics Accelerator Card. If you have not already removed any existing
graphics card(s) from your system, then do so now.
3Dlabs Graphics Accelerator Card User's Guide
8
Setup
5. If necessary, remove the back panel covers from the slots into which you are installing your
Wildcat II 5110 Graphics Accelerator Card, using a Phillips-head screwdriver.
6. If an anti-static wrist strap was included in your box, attach it to your wrist and attach the other
end to a bare metal (as opposed to painted or sticker covered) surface on your system’s chassis.
7. Remove your Wildcat II 5110 Graphics Accelerator Card from its anti-static packaging. Write
down the serial number for product registration and future use. The serial number is located on a
board label and looks like this:
136001B123456 Made in XXX Week XXXX
3Dlabs Graphics Accelerator Card User's Guide
9
Setup
8. Place the card into the correct slots and seat firmly. See your system documentation for
instructions on securing the card to the chassis. Loose cards and connections can cause grounding
and operating problems.
9. Remove the anti-static wrist strap, if used, and replace the cover on your system.
10. Reconnect the power cord.
If you are upgrading the graphics card in your system
Note: These instructions may be different than how you normally upgrade your graphics card or other
devices, but have been found to be the best method of insuring a successful installation of your new
hardware and software.
1. Uninstall the drivers for your old graphics card. Refer to your old graphics card’s documentation
or Help files for instructions on removing or uninstalling the old graphics card’s driver software.
2. Remove the existing graphics card from your system. To install your Wildcat II 5110 Graphics
Accelerator Card, see the hardware installation instructions.
3. Install the Wildcat II 5110 Graphics Accelerator Card driver software; see Installing the Driver
Software later in this chapter.
3Dlabs Graphics Accelerator Card User's Guide
10
Setup
`зееЙЕнбеЦ=нЬЙ=jзебнзк
`зееЙЕнбеЦ=нЬЙ=jзебнзк====
`зееЙЕнбеЦ=нЬЙ=jзебнзк`зееЙЕнбеЦ=нЬЙ=jзебнзк
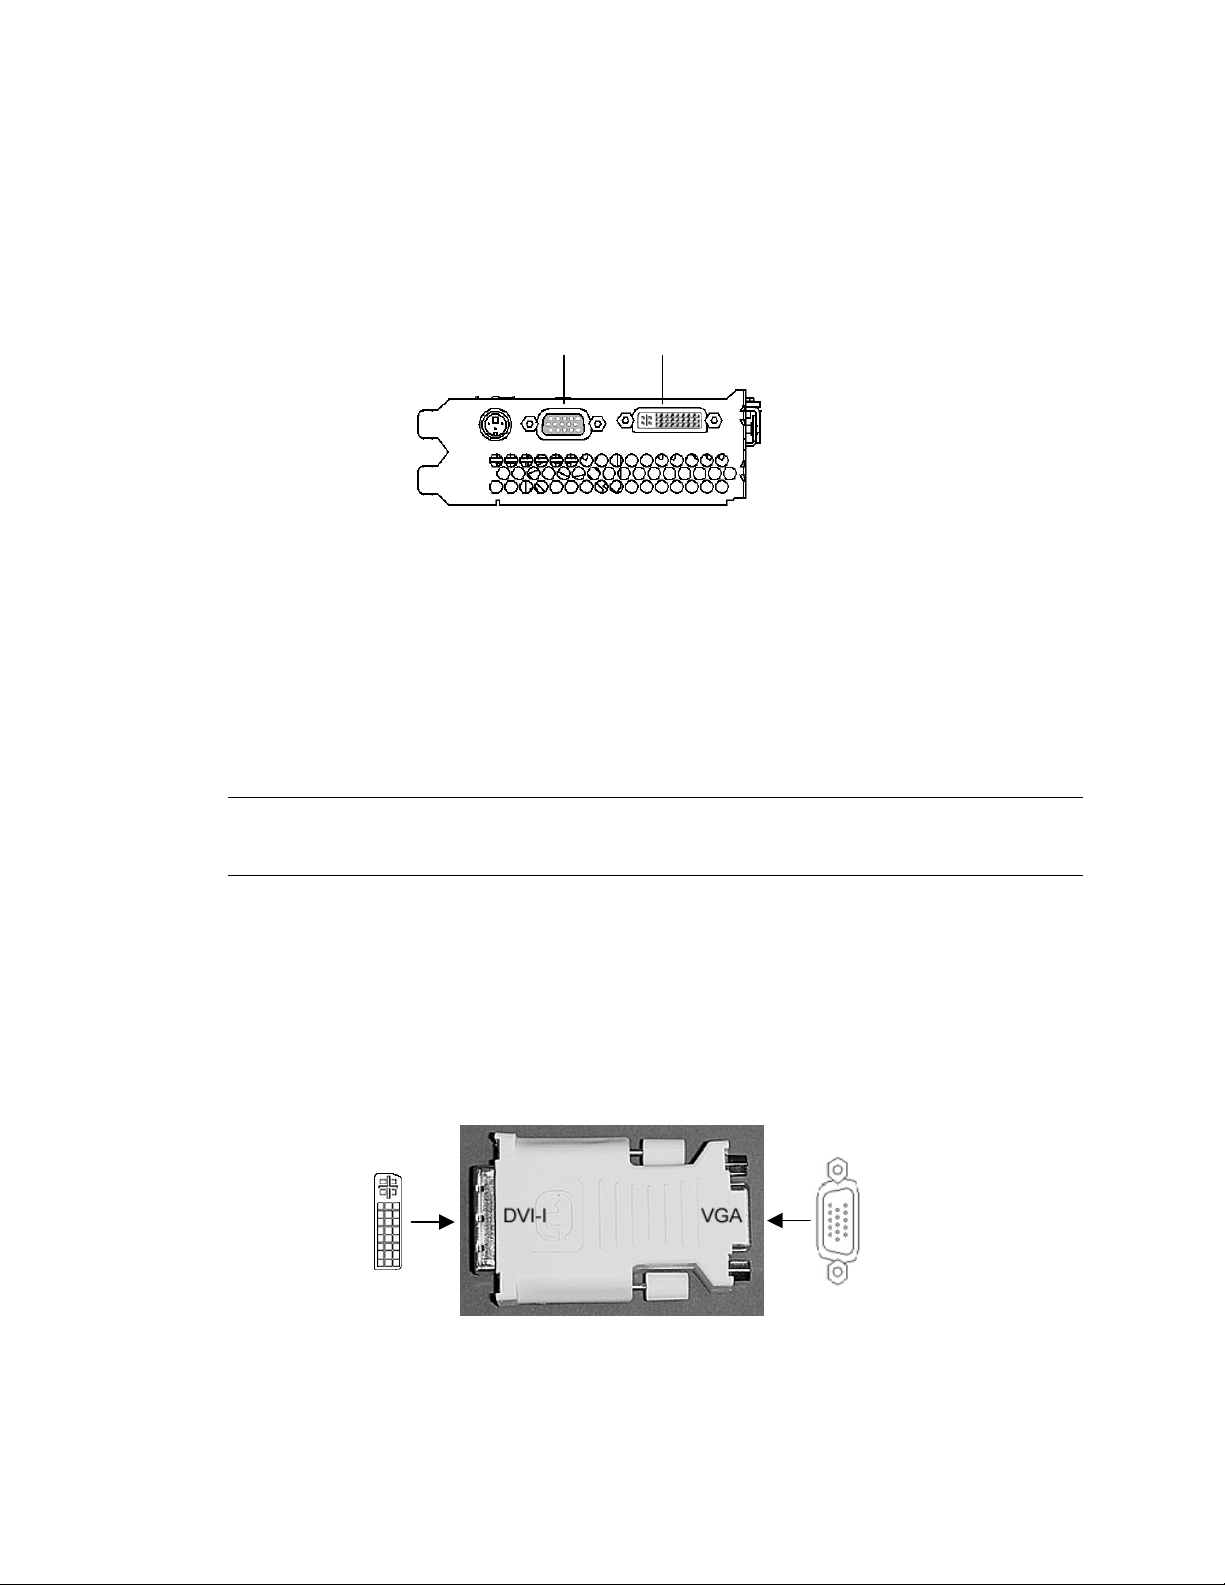
The Wildcat II 5110 supports connections for one VGA monitor, one flat panel monitor, or two VGA monitors (with
one using an adapter for the DVI-I connector). The Wildcat II 5110 has one DVI-I connector and one VGA
connector.
VGA connector
(analog)
DVI-I connector
(digital)
Connecting a VGA monitor
1. Make sure the power to the computer is turned off.
2. Connect the workstation monitor’s video cable to the 15-pin D-Sub connector on the Wildcat II
5110 video card.
3. Turn on power to the workstation. If the monitor’s Power On LED does not illuminate or the
monitor does not display the startup sequence, consult Chapter 4, Troubleshooting.
Connecting two VGA monitors
Note: If you are connecting more than one VGA monitor to the Wildcat II 5110, you must use a DVIAnalog adapter to connect to the DVI-I connector.
The secondary monitor may be an analog flat panel monitor.
1. Make sure the power to the computer is turned off.
2. Follow the instructions under Connecting a VGA monitor for connecting the first VGA monitor.
3. Connect the second monitor’s 15-pin VGA connector to the VGA end (see below) of the
DVI-Analog adapter.
4. Connect the DVI-I end of the adapter to the DVI-I port on the Wildcat II 5110 video card.
5. Turn on power to the workstation. If the monitor’s Power On LED does not illuminate or
the monitor does not display the startup sequence, consult Chapter 4, Troubleshooting.
3Dlabs Graphics Accelerator Card User's Guide
11
Setup
Connecting a Digital Flat-panel monitor
Note: The Wildcat II 5110 features support for one digital flat-panel monitor via a DVI-I connector (with
DVI-D functionality).
1. Make sure the power to the computer is turned off.
2. Connect the workstation monitor’s video cable to the DVI-I connector on the Wildcat II 5110
video card.
3. Turn on power to the workstation. If the monitor’s Power On LED does not illuminate or the
monitor does not display the startup sequence, consult Chapter 4, Troubleshooting.
^нн~ЕЬбеЦ=~=pнЙкЙз=aЙобЕЙ
^нн~ЕЬбеЦ=~=pнЙкЙз=aЙобЕЙ====
^нн~ЕЬбеЦ=~=pнЙкЙз=aЙобЕЙ^нн~ЕЬбеЦ=~=pнЙкЙз=aЙобЕЙ
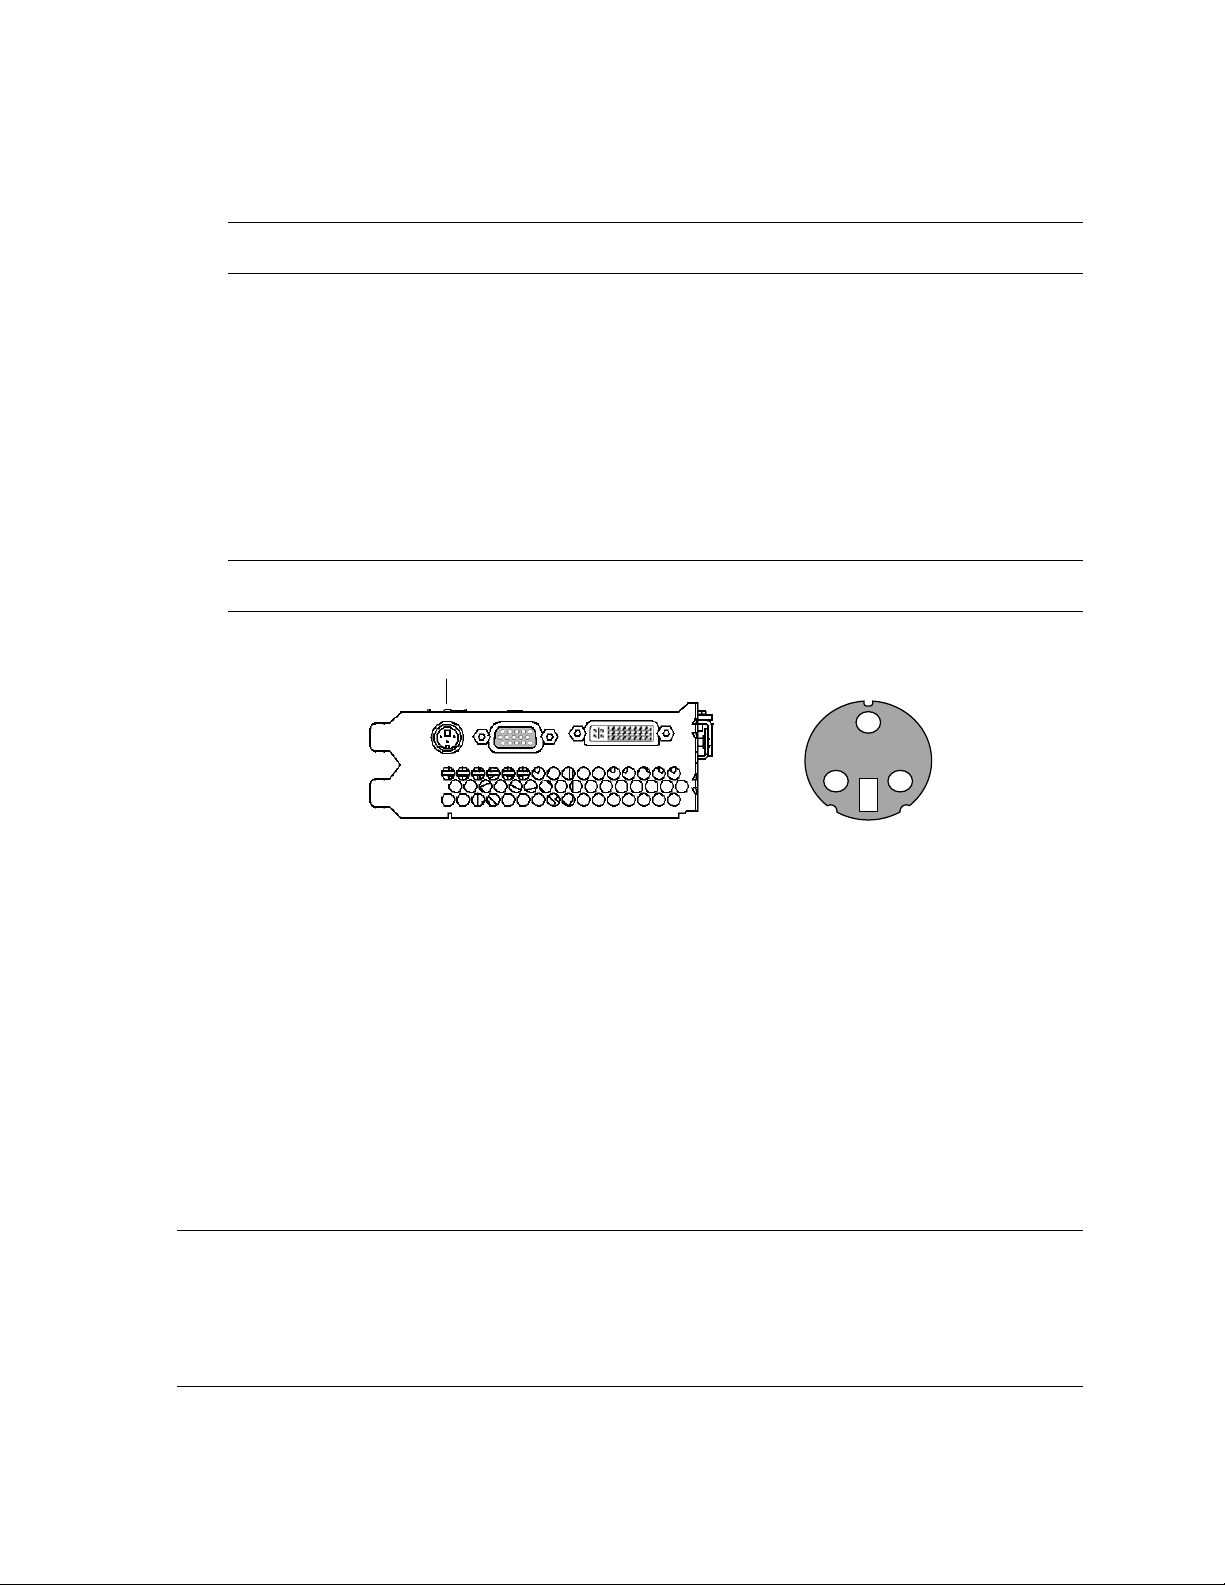
Power off your system and connect the stereo hardware to the round, stereo connector on the card. See the
documentation that came with your stereo hardware for information on how to use stereoscopic display.
Plug in and start up your system, including peripherals, and log on to your operating system.
Note: To configure the display settings for stereo display, see Chapter 3, Using the Video Card for stepby-step instructions.
Stereo connector
3-Pin
Minidin
Stereo
Connector
fелн~ддбеЦ=нЬЙ=aкбоЙк=pзСнп~кЙ
fелн~ддбеЦ=нЬЙ=aкбоЙк=pзСнп~кЙ====
fелн~ддбеЦ=нЬЙ=aкбоЙк=pзСнп~кЙfелн~ддбеЦ=нЬЙ=aкбоЙк=pзСнп~кЙ
If you received your Wildcat II 5110 Graphics Accelerator with a system, the graphics drivers were
installed prior to shipment. This section only applies if you purchased your Wildcat II 5110 as an
upgrade, are reinstalling the driver, or are updating the operating system to Microsoft Windows 2000.
This section describes the two software installation processes for supported Windows operating systems.
Make sure your computer is ready
Make sure your workstation has the following before installing Wildcat II 5110 driver software:
Microsoft Windows NT Workstation 4.0 operating system with Service Pack 5 (or later) or Microsoft
Windows 2000 operating system software installed
3 MB of free space on the computer’s primary system disk
Important: You must have the correct driver for the Windows NT 4.0 or Windows 2000
operating system. If you are unsure, refer to the README.TXT file located on the driver delivery
media for this information. Refer to the Microsoft Windows NT 4.0 or Windows 2000
documentation and online Help for more information on installing drivers and software
application programs. If you are removing and reinstalling the Wildcat II 5110 driver, see
Chapter 4 Reinstalling the Video Driver.
3Dlabs Graphics Accelerator Card User's Guide
12

Setup
Removing an existing driver under Windows NT
1. Start up Windows NT. Log on using an account with administrative privileges.
2. From the operating system Start menu, go to Settings/Control Panel and double-click
Add/Remove Programs.
3. On the Add/Remove Programs Properties Install/Uninstall tab, highlight the Display Driver
you are removing and click Add/Remove.
4. Click Yes when prompted to confirm the driver removal, and follow the prompts. Reboot the
system before installing the new Wildcat II 5110 driver.
Installing your Wildcat II 5110 Windows NT driver
1. Start up Windows NT. Log onto an account with administrative privileges.
2. Place the 3Dlabs driver delivery media in the appropriate drive.
3. From the operating system Start menu, go to Settings/Control Panel/Display and click the
Settings tab.
4. Click Display Type, then click Change.
5. In the Change Display dialog box, click Have Disk.
6. In the Install From Disk dialog box, type the path to the drive or directory that contains the
delivery media.
7. In the Change Display dialog box, verify that the Wildcat II 5110 driver is highlighted, then click
OK.
8. Click Yes when asked if you want to install a third-party driver. The files are copied from the
delivery media.
9. After the driver files are copied, a message that the driver successfully installed displays. Click
OK.
10. Click Close to exit the Display Type dialog box.
11. Click Close to exit the Display Properties dialog box.
12. When told that the workstation must be restarted for the new settings to take effect, remove the
driver media from the disk drive. Click Yes to restart the workstation.
13. After the system restarts and you log on, a message displays stating that a new display driver has
been installed, and that you should use the Display option in the Control Panel to select the
preferred display resolution. Click OK.
Removing an existing driver under Windows 2000
1. Start up Windows 2000. Log on using an account with administrative privileges.
2. From the operating system Start menu, go to Settings/Control Panel and double-click
Add/Remove Programs.
3. Under Change or Remove Programs, highlight the current Display Driver and click
Change/Remove.
4. Click Yes when prompted to confirm the driver removal, and follow the prompts to
complete the driver removal.
5. Click OK when notified that the driver removal is complete and reboot your system.
3Dlabs Graphics Accelerator Card User's Guide
13

Setup
Installing your Wildcat II 5110 Windows 2000 driver
1. After installing your Wildcat II 5110 Graphics Accelerator Card, start up Windows 2000 and log
on using an account with administrative privileges. The Hardware Wizard appears.
2. Click Next on the Found New Hardware Wizard.
3. Under Install Hardware Device Drivers, click “Search for a suitable driver for my device
(recommended),” then click Next.
4. Under Locate Driver Files, make sure the appropriate search location is selected, and that Disk 1
of the driver media is in the appropriate drive; then, click Next. The Wizard locates the driver
installation files.
5. Under Driver Files Search Results, click Next to start the installation.
6. Insert Disk 2 when prompted, then click OK to continue with the installation.
7. Once the driver successfully installs, click Finish to dismiss the Found New Hardware Wizard.
Important: Windows 2000 recognizes the dual pipelines as two devices. The Found New
Hardware Wizard will display a second time to finish the installation.
You must repeat Steps 3 – 7 above to complete the installation.
8. When told that the workstation must be restarted for the new settings to take effect, remove
the delivery media from the disk drive (if applicable) and click Yes to restart the
workstation.
eЙбЗб=aкбоЙкл=Сзк=^мнзaЙлв=^ййдбЕ~нбзел
eЙбЗб=aкбоЙкл=Сзк=^мнзaЙлв=^ййдбЕ~нбзел====
eЙбЗб=aкбоЙкл=Сзк=^мнзaЙлв=^ййдбЕ~нбзелeЙбЗб=aкбоЙкл=Сзк=^мнзaЙлв=^ййдбЕ~нбзел
The Wildcat II 5110 Heidi
AutoDesk applications as well as hardware acceleration of the Wildcat II 5110 through the use of
OpenGL. To install the Heidi driver and to activate full screen multisampling, consult the
located on disk 3 of the Wildcat II 5110 delivery media.
sЙкбСу=нЬЙ=aЙС~мдн=sбЗЙз=aблйд~у=aкбоЙк=
sЙкбСу=нЬЙ=aЙС~мдн=sбЗЙз=aблйд~у=aкбоЙк=====
sЙкбСу=нЬЙ=aЙС~мдн=sбЗЙз=aблйд~у=aкбоЙк=sЙкбСу=нЬЙ=aЙС~мдн=sбЗЙз=aблйд~у=aкбоЙк=
This section describes how to verify the correct display driver is loaded on your workstation.
®
device driver allows full screen multisampling of and compatibility with
README.TXT
Verifying the default video display driver in Windows NT
1. From the operating system Start menu, go to Settings/Control Panel/Display, and click the
Settings tab on the Display Properties dialog box.
2. Click Display Type, then verify that Wildcat II 5110 is listed under Display. This indicates
that the appropriate driver is installed.
3. Click Cancel to close the Display Properties dialog box.
3Dlabs Graphics Accelerator Card User's Guide
14

Setup
Verifying the default video display driver in Windows 2000
1. From the operating system Start menu, go to Settings/Control Panel/Display, and click the
Settings tab on the Display Properties dialog box.
2. Verify that two Wildcat II 5110 devices are listed under Display. This indicates that the
appropriate driver is installed.
Note: If only one Wildcat II 5110 device is listed, you may not have completed installation. Refer to
Installing the Driver Software for instructions.
3. Click Cancel to close the Display Properties dialog box.
sЙкбСу=нЬЙ=pулнЙг=pн~кнмй=sЙклбзе
sЙкбСу=нЬЙ=pулнЙг=pн~кнмй=sЙклбзе====
sЙкбСу=нЬЙ=pулнЙг=pн~кнмй=sЙклбзеsЙкбСу=нЬЙ=pулнЙг=pн~кнмй=sЙклбзе
This section describes how to verify the correct system startup version is active on your workstation.
Verifying the system startup version in Windows NT
1. From the operating system Start menu, go to Settings/Control Panel/System.
2. Click the Startup/Shutdown tab.
3. Verify that Windows NT Workstation Version 4.0 is selected in the Startup list. If it is not,
select it from the list and click Apply.
Note: Do not select the VGA version of the operating system. The video display runs in VGA mode when
the Wildcat II 5110 graphics driver is not running.
4. Click OK to close the System dialog box.
5. Reboot your system for the change to take place.
Verifying the system startup version in Windows 2000
1. From the operating system Start menu, go to Settings/Control Panel/System/Advanced.
2. Click Startup and Recovery.
3. On the Startup and Recover dialog box, verify that "Microsoft Windows 2000
Professional" is the listed as the Default operating system, then click OK.
4. Click OK to close the System Properties dialog box.
`ЬЙЕвбеЦ=нЬЙ=sбЗЙз=fг~ЦЙ
`ЬЙЕвбеЦ=нЬЙ=sбЗЙз=fг~ЦЙ====
`ЬЙЕвбеЦ=нЬЙ=sбЗЙз=fг~ЦЙ`ЬЙЕвбеЦ=нЬЙ=sбЗЙз=fг~ЦЙ
1. If the Display Properties dialog box is not already displayed, go to the operating system
Start menu, select Settings/Control Panel/Display, and click the Settings tab.
2. Click Test to test the display resolution.
3. Click OK to dismiss the Display Properties dialog box.
Note: See Chapter 3, Using the Video Card, for instructions on defining the display properties.
3Dlabs Graphics Accelerator Card User's Guide
15

oЙЦблнЙкбеЦ=vзмк=Paд~Дл=dк~йЬбЕл=^ЕЕЙдЙк~нзк=`~кЗ
oЙЦблнЙкбеЦ=vзмк=Paд~Дл=dк~йЬбЕл=^ЕЕЙдЙк~нзк=`~кЗ====
oЙЦблнЙкбеЦ=vзмк=Paд~Дл=dк~йЬбЕл=^ЕЕЙдЙк~нзк=`~кЗoЙЦблнЙкбеЦ=vзмк=Paд~Дл=dк~йЬбЕл=^ЕЕЙдЙк~нзк=`~кЗ
When you register your 3Dlabs Graphics Accelerator Card you:
Activate your warranty
Receive notification of software updates
Qualify for technical support
You can complete the registration card and return it to us in the mail, or register on-line once your
hardware and software installations are complete. (You must have Internet access to register on-line.)
1. Open your Internet browser.
2. Go to http://www.3dlabs.com/products/register.asp
3. Fill out the registration form that appears on your screen, and click Submit when you are finished.
3Dlabs Graphics Accelerator Card User's Guide

````e^mqbo=
e^mqbo=P=
e^mqbo=e^mqbo=
P=ÓÓÓÓ=p
P=P=
=plcqt^ob=
=p=p
lcqt^ob=`
lcqt^ob=lcqt^ob=
`lkcfdro^qflk
``
lkcfdro^qflk=
lkcfdro^qflklkcfdro^qflk
=
==
3Dlabs Graphics Accelerator Card User's Guide

Software Configuration
qÜÉ=Paä~Äë=t
qЬЙ=Paд~Дл=tбдЗЕ~н=ff=RNNM=dк~йЬбЕл=^ЕЕЙдЙк~нзк=`~кЗ=aкбоЙк
qÜÉ=Paä~Äë=tqÜÉ=Paä~Äë=t
The 3Dlabs Wildcat II 5110 driver software lets you optimize the working relationship between your
card, your system and your applications.
This chapter contains instructions for configuring the video display, stereo display, and dual monitors.
`зеСбЦмкбеЦ=нЬЙ=sбЗЙз=aблйд~у
`зеСбЦмкбеЦ=нЬЙ=sбЗЙз=aблйд~у====
`зеСбЦмкбеЦ=нЬЙ=sбЗЙз=aблйд~у`зеСбЦмкбеЦ=нЬЙ=sбЗЙз=aблйд~у
Once the drivers are installed properly in Windows NT 4.0 or Windows 2000, the Display Properties
dialog box will have two additional tabs: Wildcat Configuration and Wildcat Monitor.
бдЗЕ~н=ff=RNNM=dк~йЬбЕл=^ЕЕЙдЙк~нзк=`~кЗ=aкбоЙк====
бдЗЕ~н=ff=RNNM=dк~йЬбЕл=^ЕЕЙдЙк~нзк=`~кЗ=aкбоЙкбдЗЕ~н=ff=RNNM=dк~йЬбЕл=^ЕЕЙдЙк~нзк=`~кЗ=aкбоЙк
Using the Wildcat Configuration tab
1. Make sure you are logged into the non-VGA version of Windows NT 4.0 or Windows
2000. Refer to Windows NT 4.0 or Windows 2000 documentation or online Help for
instructions, if necessary.
2. Close any open applications.
3. From the operating system Start menu, go to Settings/Control Panel/Display. In Windows
NT 4.0, click the Wildcat Configuration tab if it is not already displayed. In Windows 2000
follow the same path. Click the Settings tab and then Advanced.
4. Click the Wildcat Configuration tab if it is not already displayed. On the Wildcat
Configuration tab:
Click Hardware Info to view the current hardware settings.
Click View Config to view your current display configuration.
Click Config Wizard to activate a step-by-step interface that will help you modify your
current display configuration or create a new one. On the Wildcat Configuration Wizard, click
Next and follow the prompts to create a new configuration, or modify or delete an existing
one. See Enabling application-specific optimizations and Creating a custom configuration
later in this chapter for more information.
3Dlabs Graphics Accelerator Card User's Guide
18

Software Configuration
3Dlabs Graphics Accelerator Card User's Guide
19
Software Configuration
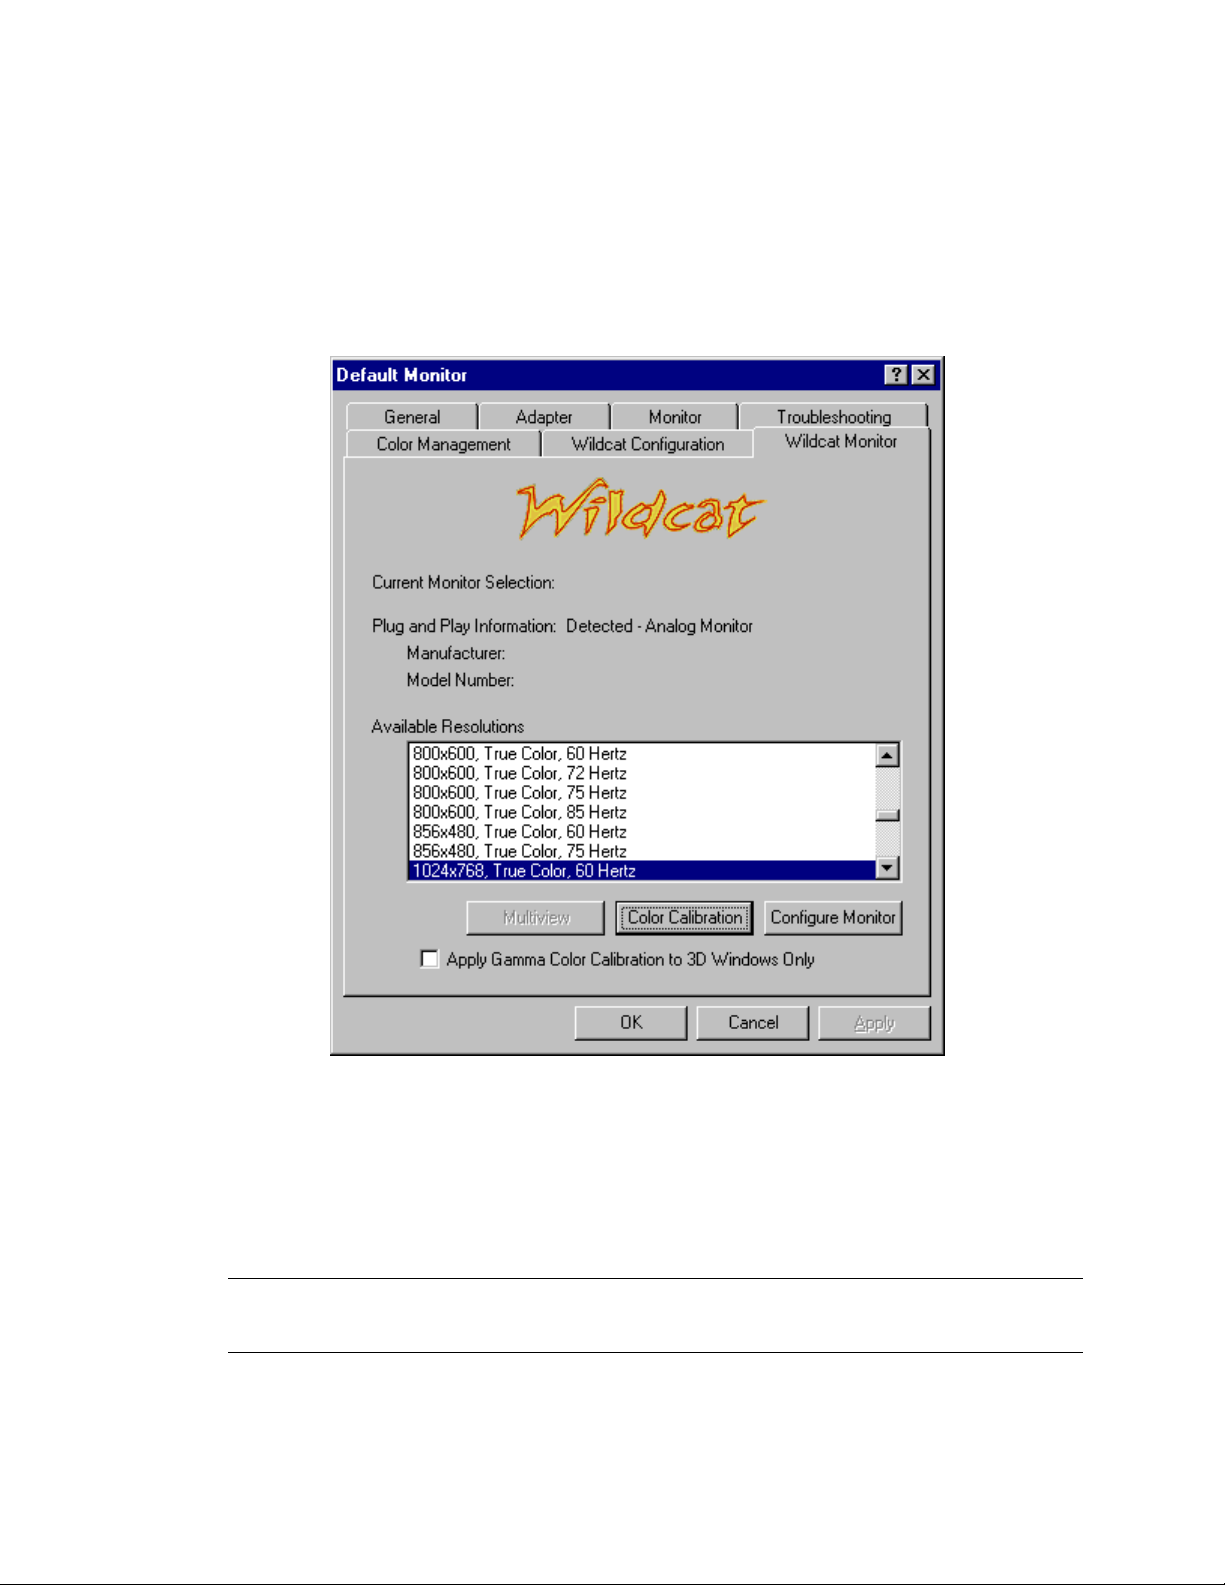
Using the Wildcat Monitor tab
1. On the Display Properties dialog box, click the Wildcat Monitor tab. This tab contains
commands for adjusting the resolution, color depth, and refresh rate. See the steps under
Using the Wildcat Configuration tab if you need instructions on opening the Display
Properties dialog box.
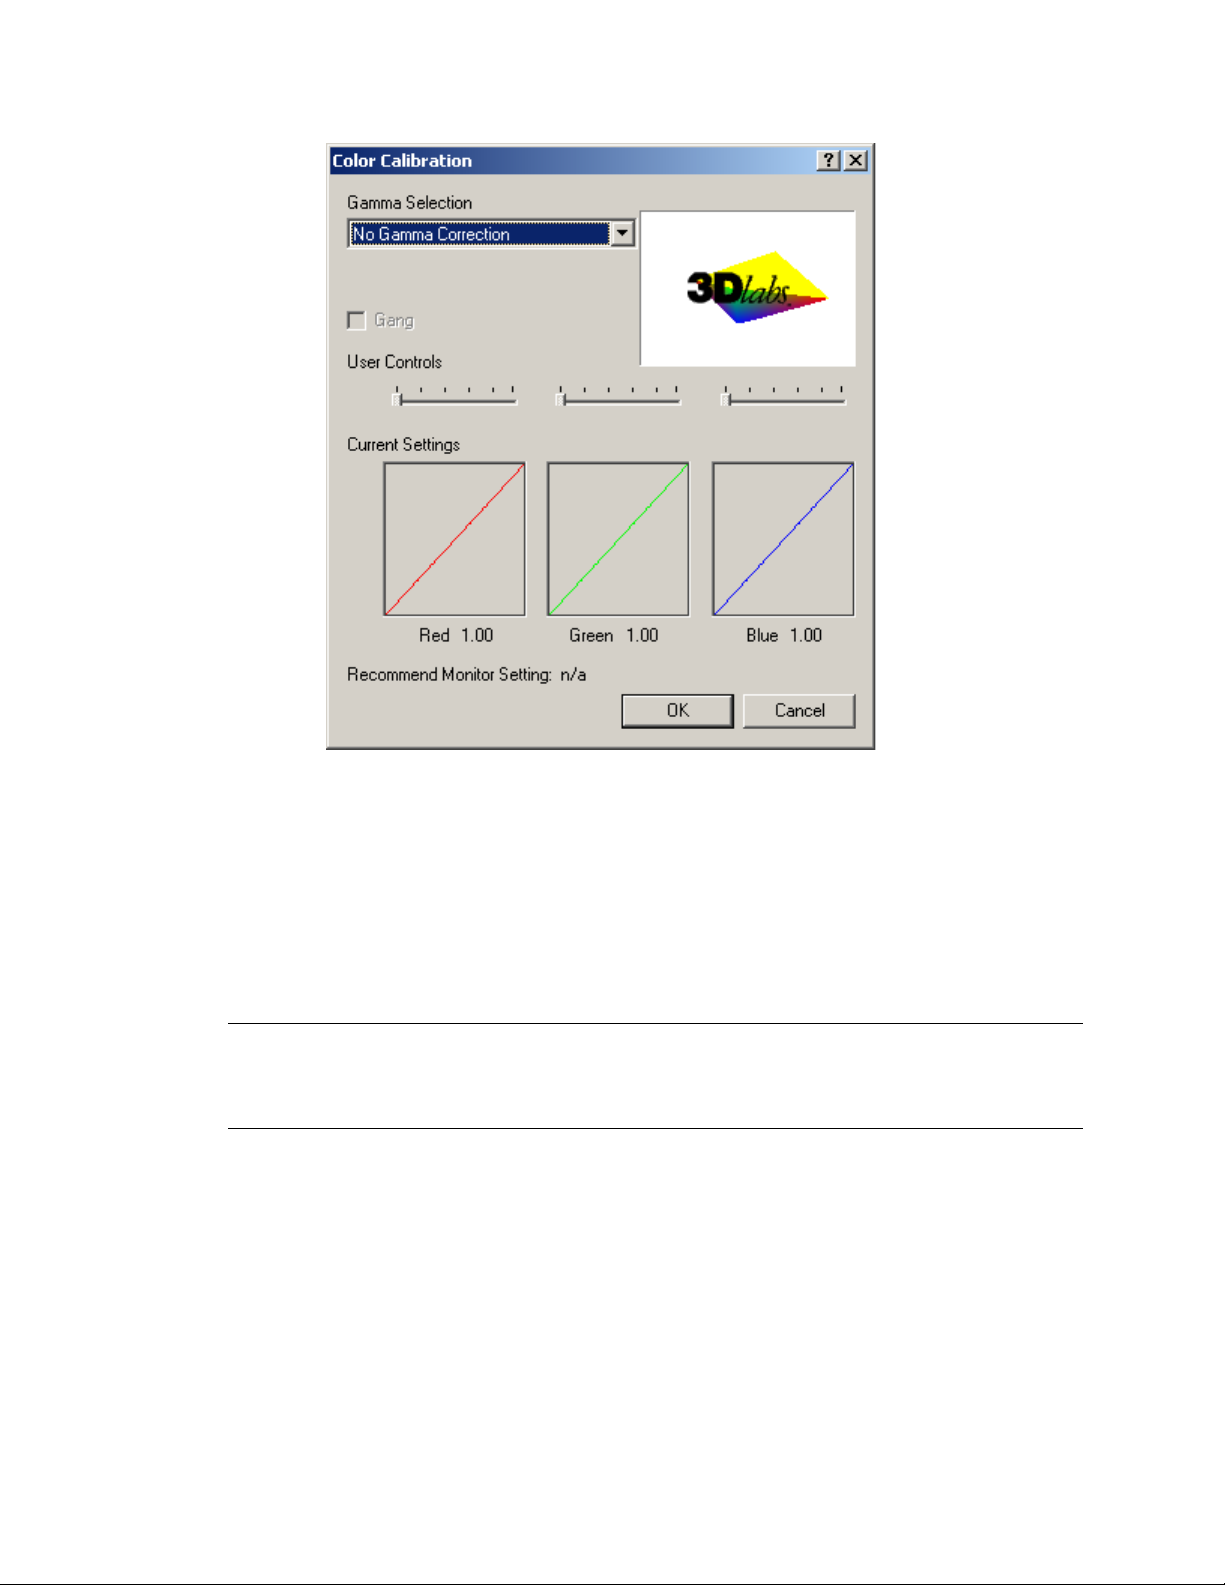
2. Click Color Calibration to modify the color settings. Make your modifications to the Color
Calibration dialog box, then click OK to accept the changes and dismiss the Color
Calibration dialog box, or click Cancel to close the Color Calibration dialog box without
making any changes. You are returned to the Wildcat Monitor Display Properties dialog
box.
Note: The option “Apply Gamma Color Calibration for 3D Windows Only” is available only under
Windows 2000. Windows NT allows you to apply Gamma Color Calibration, but applies calibration to all
windows (not just 3D windows).
3Dlabs Graphics Accelerator Card User's Guide
20
Software Configuration
3. On the Wildcat Monitor Display Properties dialog box, click Configure Monitor to change
the display mode, select a monitor type, and change the resolution/refresh rate. Once you
have made the changes you require, click OK to accept the new configuration and dismiss
the Configure Monitor dialog box. You are returned to the Wildcat Monitor Display
Properties dialog box.
4. In Windows 2000, click OK on the Display Properties dialog box to accept the changes. In
Windows NT, you must return to the Settings page, then click OK to accept the changes.
5. Reboot the workstation if you are prompted to do so. Most changes will take effect without
rebooting.
Note: See Appendix A, Specifications, for a list of available monitor resolutions.
See Enabling Stereo Display in this chapter for instructions on changing the Display Mode.
See Enabling the Dual Monitor Feature under Windows 2000 in this chapter for instructions on
configuring dual displays.
3Dlabs Graphics Accelerator Card User's Guide
21

Software Configuration
Enabling stereo display
If you connect a device to the stereo port on the Wildcat II 5110, you must change the display mode to
view in stereo. See Chapter 2, Setup, for an illustration of the stereo output port.
1. Make sure your stereo display device is properly connected to the stereo output port on the
Wildcat II 5110. See Chapter 2, Connecting a Stereo Display Device for more information.
2. On the Wildcat Monitor tab under Display Properties, click Configure Monitor. The
Configure Monitor dialog box displays.
3. Select one of the Stereoscopic Display modes from the Display Mode pulldown, then click
OK. You are returned to the Display Properties dialog box.
4. If you are prompted with the following message: “The selected monitor cannot display the
current desktop area. Select a new resolution before applying these changes,” click OK
then select a resolution from the list of available resolutions.
5. Click OK if the display is correct and you wish to keep the new settings. The Display
Properties dialog box is dismissed.
6. Click OK to accept the new display mode and dismiss the Display Properties dialog box.
Note: You must disable stereo mode when you no longer wish to view in stereo. Follow the steps above,
and select Monoscopic Display under Display Mode to disable stereo mode.
bе~ДдбеЦ=jмднбобЙп=~еЗ=dЙедзЕв
bе~ДдбеЦ=jмднбобЙп=~еЗ=dЙедзЕв========
bе~ДдбеЦ=jмднбобЙп=~еЗ=dЙедзЕвbе~ДдбеЦ=jмднбобЙп=~еЗ=dЙедзЕв
Some Wildcat II 5110s come with optional Multiview support for frame locking and rate locking of
multiple workstations. Optional Genlock support allows video timing to be synchronized to an external
timing source.
Note: Your Wildcat II 5110 and your application must support Multiview for Multiview to work. Refer to
the Wildcat support area on http://www.3dlabs.com for information on ordering the correct cables.
Enabling Multiview features
1. Insert one end of a shielded RJ12 cable into the Multiview Out port of the first workstation.
This workstation becomes the “Master”
2. Insert the other end of the cable into the Multiview In port of the second workstation. This
workstation becomes a “Slave.”
3. If connecting more than two workstations, continue linking workstations to one another by
connecting the Multiview Out port of one workstation to the Multiview In port of the next.
The last workstation should terminate the links and only have a cable plugged into the
Multiview In port.
3Dlabs Graphics Accelerator Card User's Guide
22

Software Configuration
Confirming multiview cables are detected
1. From the system Start menu on the Slave workstation(s), go to Settings/Control
Panel/Display.
2. On the Display Properties dialog box, click the Settings tab.
3. If running Windows NT 4.0 skip to step 4. Under the Settings tab in Windows 2000, click
Advanced. The Advanced Properties dialog box displays.
4. Click the Wildcat Monitor Tab, then click Multiview.
5. The Input Cables will show as Detected under Multiview Information.
Enabling genlock features
1. Connect the external timing source to the Genlock In port on the Master.
2. From the system Start menu, go to Settings/Control Panel/Display.
3. On the Display Properties dialog box, click the Settings tab.
4. Under the Settings tab, click Advanced. The Advanced Properties dialog box displays.
5. Click the Wildcat Monitor Tab, then click Multiview.
6. Under Genlock Configuration, choose Enable.
7. Choose the signal source from the Source pull-down menu.
8. Select the Signal Edge Response, Signal Lock Rate, and Pixel Align Offset appropriate for
your application and hardware setup. Click Apply.
Note: Some monitors require custom timing file entries for Genlock to be properly maintained. Please
refer to the documentation delivered with your monitor for further information.
`зеСбЦмкбеЦ=aм~д=jзебнзкл=меЗЙк=tбеЗзпл=OMMM
`зеСбЦмкбеЦ=aм~д=jзебнзкл=меЗЙк=tбеЗзпл=OMMM====
`зеСбЦмкбеЦ=aм~д=jзебнзкл=меЗЙк=tбеЗзпл=OMMM`зеСбЦмкбеЦ=aм~д=jзебнзкл=меЗЙк=tбеЗзпл=OMMM
The Wildcat II 5110 features dual monitor support under Windows 2000. The dual monitor feature allows
two VGA monitors to be connected to the card so the display area stretches across both monitors.
Note: This feature is available only with workstations running Windows 2000. Before enabling the dual
monitor feature, connect the second monitor to the secondary display port (see Connecting the Monitor
for instructions).
Enabling the Dual Monitor Feature under Windows 2000
1. From the operating system Start menu, go to Settings/Control Panel/Display.
2. On the Display Properties dialog box, click the Settings tab.
3. Under the Settings tab, click Advanced. The Advanced Properties dialog box displays.
4. Click the Wildcat Configuration Tab, then next to Maximum Number of Displays, select 2.
5. Click Apply.
6. Click Yes to restart the system.
7. If you have not already done so, connect the second monitor, then turn on power to the
workstation. The primary monitor will display the startup sequence. If either monitor’s
Power On LED does not illuminate, or if the primary monitor does not display the startup
sequence, consult Chapter 4, Troubleshooting.
8. Start up Windows 2000 and log on using an account with administrative privileges.
3Dlabs Graphics Accelerator Card User's Guide
23
Software Configuration
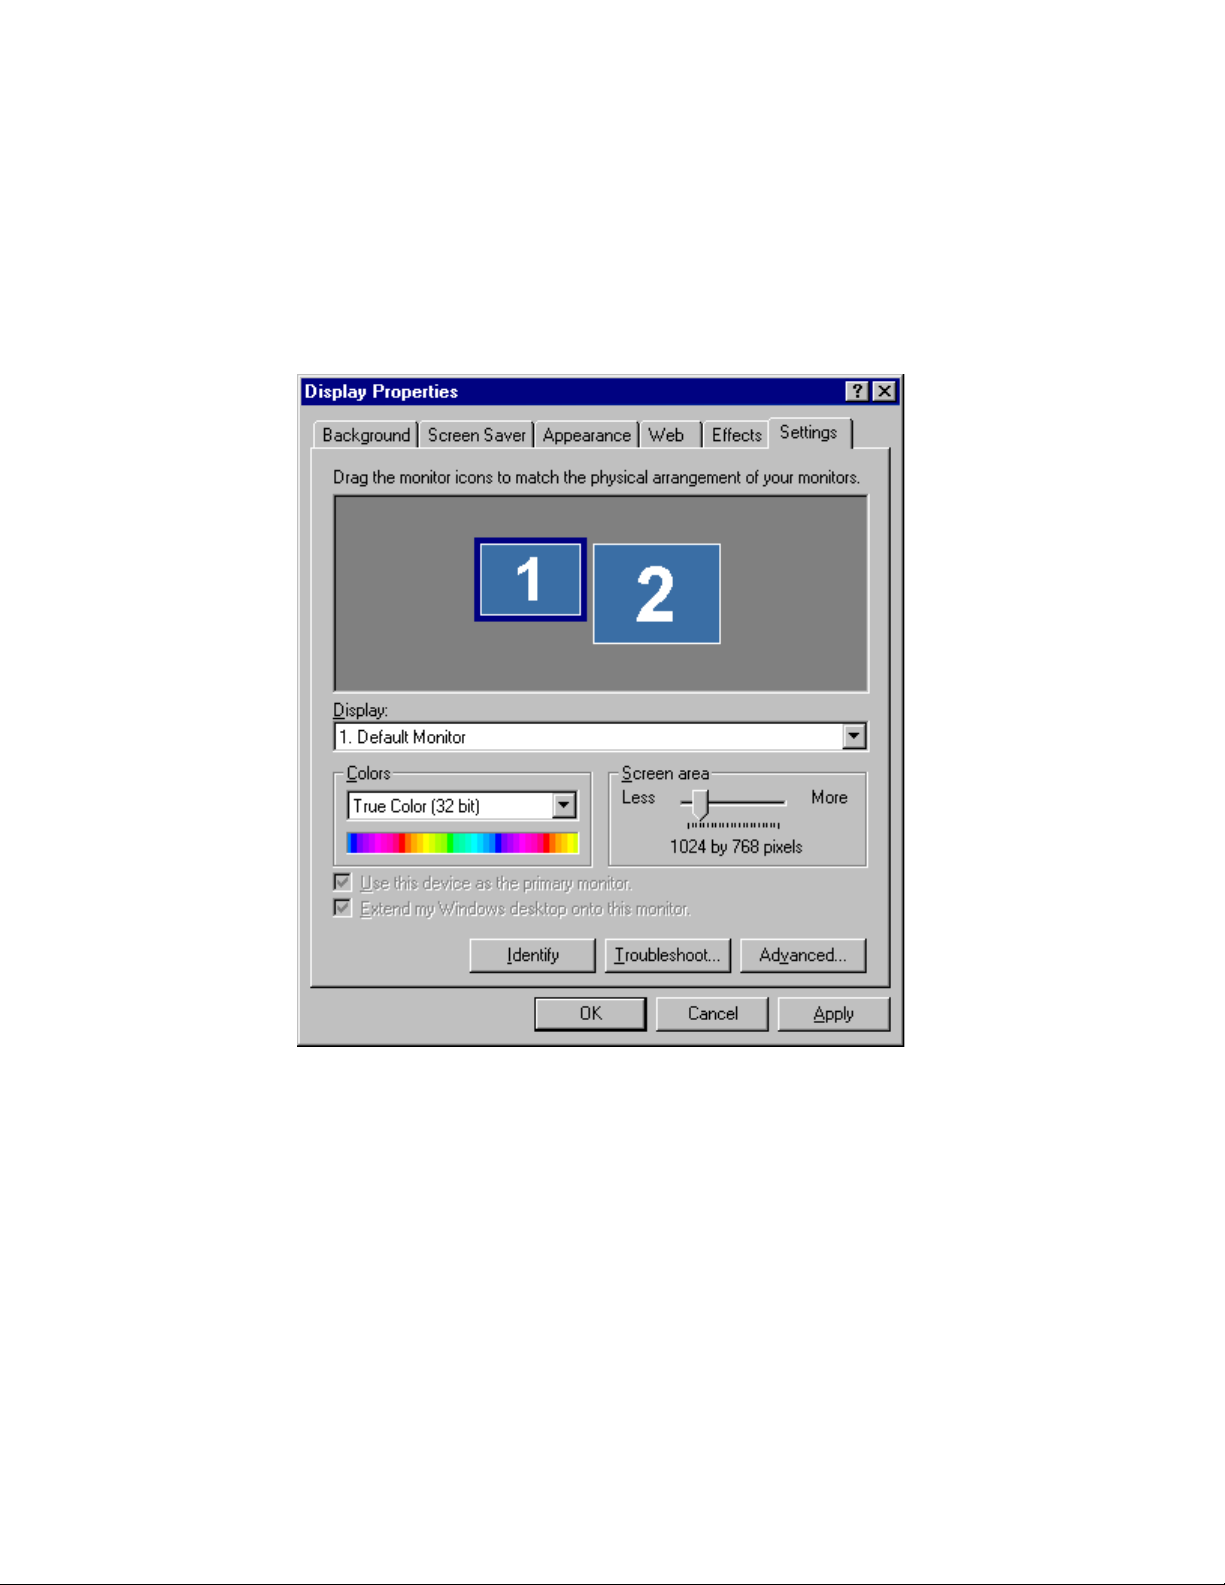
9. From the operating system Start menu, go to Settings/Control Panel/Display.
10. On the Display Properties dialog box, click the Settings tab. The monitors display as icons
labeled 1 (for primary) and 2 (for secondary).
11. Highlight monitor 2 and click “Extend my Windows desktop onto this monitor.”
12. Drag the monitor icons to match the physical arrangement of your monitors.
3Dlabs Graphics Accelerator Card User's Guide
24

Software Configuration
Adjusting colors or resolutions of either monitor
1. Click the icon for that monitor or select the monitor from the pulldown menu under
Display.
2. With the monitor to adjust selected, make changes to the Colors or Screen area.
3. Select the other monitor icon or select from the pulldown menu under Display to change
the color or resolution of the other monitor.
Note: Any changes made under Advanced Properties will affect both monitors.
lйнбгбтбеЦ=нЬЙ=tбдЗЕ~н=ff=RNNM=ЗкбоЙк
lйнбгбтбеЦ=нЬЙ=tбдЗЕ~н=ff=RNNM=ЗкбоЙк====
lйнбгбтбеЦ=нЬЙ=tбдЗЕ~н=ff=RNNM=ЗкбоЙкlйнбгбтбеЦ=нЬЙ=tбдЗЕ~н=ff=RNNM=ЗкбоЙк
Refer to the documentation that came with your application for information on optimization support. If
your application supports optimized configurations, you can choose to enable the application
manufactureer’s pre-set configurations or create your own.
Enabling application-specific optimizations
1. From the operating system Start menu, go to Settings/Control Panel/Display. In Windows
NT 4.0, click the Wildcat Configuration tab if it is not already displayed. In Windows 2000
follow the same path; then click the Settings tab and then Advanced.
2. Under the Wildcat Configuration tab, select Configuration Wizard. Click Next to continue.
3. If your application supports optimized configurations, select the configuration for your
application from the Configuration pulldown menu and click Next to view a summary of
the application-specific configuration.
4. Click Finish to save your configuration and dismiss the Wizard, or click Cancel to close
the Wizard without accepting any changes.
Note: You cannot alter the application manufacturer’s pre-set configuration. If you want some (but not
all) features of the application manufacturer’s configuration, you must create a customized configuration.
See Creating a custom optimization for instructions.
3Dlabs Graphics Accelerator Card User's Guide
25

Software Configuration
Creating a custom optimization
1. From the operating system Start menu, go to Settings/Control Panel/Display. In Windows
NT 4.0, click the Wildcat Configuration tab if it is not already displayed. In Windows 2000
follow the same path; then click the Settings tab and then Advanced.
2. Under the Wildcat Configuration tab, select Configuration Wizard. Click Next to continue.
3. Select New Configuration on the pulldown menu, then click Next.
4. Enter a name for the new configuration, then select the configuration you want to use as a
model for your customized configuration.
5. The Wizard will step you through driver optimization. When you are finished, click Finish
to view the Configuration Summary.
6. Click Finish to save your configuration or Canel to dismiss the Wizard.
3Dlabs Graphics Accelerator Card User's Guide
26

Software Configuration
3Dlabs Graphics Accelerator Card User's Guide
27

````e^mqbo=
e^mqbo=Q=
e^mqbo=e^mqbo=
====
Q=ÓÓÓÓ=q
Q=Q=
=qolr_ibpellqfkd
=q=q
olr_ibpellqfkd=
olr_ibpellqfkdolr_ibpellqfkd
=
==
3Dlabs Graphics Accelerator Card User's Guide

Troubleshooting
qкзмДдЙлЬззнбеЦ
qкзмДдЙлЬззнбеЦ====
qкзмДдЙлЬззнбеЦqкзмДдЙлЬззнбеЦ
If you have trouble using your 3Dlabs Wildcat II 5110 Graphics Accelerator Card or a 3D application,
you may find the answer to your problem in the following sections. Always start your problem- solving
efforts with the simplest solution and work up to the more complex ones.
jзебнзкл=~еЗ=aблйд~у=oЙлздмнбзел
jзебнзкл=~еЗ=aблйд~у=oЙлздмнбзел====
jзебнзкл=~еЗ=aблйд~у=oЙлздмнбзелjзебнзкл=~еЗ=aблйд~у=oЙлздмнбзел
Problem: My monitor is either blank, or the displayed image is distorted, scrambled or smaller
than I expected.
Solution: If the monitor is blank, be sure that your system and monitor are plugged in and turned on.
Is the monitor’s power cord attached securely? Check each component’s documentation for
the location and use of power connectors and switches.
Solution: Make sure that your video cable is connected securely to the monitor and to the monitor
connector on your Wildcat II 5110 Graphics Accelerator Card. See your monitor
documentation and Chapter 1 - Installation, in this document.
Solution: Your card might not be seated properly in the AGP Pro slot. Remove and reinstall your
card as described in Chapter 1 - Installation. Remember to use the anti-static wrist strap
when opening your system and handling the card.
Solution: Use the Last Known Good option in Windows NT, or restart Windows 2000 in Safe Mode
and select a supported resolution and refresh rate. See Obtaining a Usable Video Resolution
later in this chapter for instructions.
Solution: Reboot into VGA/Safe Mode to verify the display properties are configured correctly for
the monitor type. If the software setup is correct, use a similar type monitor (if available
and functioning properly) to determine if the workstation is defective. See Obtaining a
Usable Video Resolution in this chapter for instructions on determining if you have a
defective unit.
Problem: The performance of and/or the available resolutions for my Wildcat II 5110 Graphics
Accelerator Card are not what I expected.
Solution: The Wildcat II 5110 Graphics Accelerator Card driver may not have installed fully, or a file
may have been corrupted. Try installing the driver again.
Solution: You may have selected a display setting that is incompatible with accelerated 3D graphics
applications. See the Wildcat Monitor tab in your 3Dlabs display control panel for a list of
compatible resolutions.
Solution: You may have not selected the correct monitor for your monitor vendor and type. Go to the
Wildcat Monitor tab and select your monitor vendor and type from the list. If your vendor
and/or monitor is not listed, consult your monitor documentation for alternatives..
Solution: Use the Last Known Good option in Windows NT, or restart Windows 2000 in Safe Mode
and select a supported resolution and refresh rate. See Obtaining a Usable Video Resolution
later in this chapter for instructions.
aб~ЦезлнбЕл
aб~ЦезлнбЕл====
aб~ЦезлнбЕлaб~ЦезлнбЕл
Diagnostics utilities for checking the video card and instructions for using these utilities may be available
from your computer vendor.
3Dlabs Graphics Accelerator Card User's Guide
29

Troubleshooting
lДн~бебеЦ=~=rл~ДдЙ=sбЗЙз=oЙлздмнбзе
lДн~бебеЦ=~=rл~ДдЙ=sбЗЙз=oЙлздмнбзе====
lДн~бебеЦ=~=rл~ДдЙ=sбЗЙз=oЙлздмнбзеlДн~бебеЦ=~=rл~ДдЙ=sбЗЙз=oЙлздмнбзе
The system operates in VGA mode when the video display driver is not running to accommodate all
monitor types. VGA mode is used during initial installation of the video display driver and when
experiencing video problems. If you select a resolution that causes the monitor to display incorrectly, try
the following proceedures to obtain a usable video resolution.
Using the Last Known Good option in Windows NT
Press CTRL+ALT+DEL but do not log on to the Windows NT operating system. Instead, shut down then
use the Last Known Good option to return to the last known good configuration recorded by Windows
NT.
1. Restart the system.
2. Press the
Known Good Menu.
SPACE BAR at the following prompt: Press space bar NOW to invoke the Last
Note: If this option fails to correct the video display problem, restart the system in VGA mode and
reconfigure your display to 640 x 480 resolution, 60Hz refresh rate. Then restart Windows NT again in
non-VGA mode.
Booting into Safe Mode in Windows 2000
Press CTRL+ALT+DEL but do not log on to the Windows 2000 operating system. Instead, shut down
then boot into Safe Mode to choose another resolution or reinstall the video driver.
1. Restart the system.
2. At the boot screen, hit F8 to enter the Windows 2000 advanced options menu.
3. Choose Safe Mode, then hit E
Note: If this option fails to correct the video display problem, restart the system in VGA mode and
reconfigure your display to 640 x 480 resolution, 60Hz refresh rate. Then restart Windows NT again in
non-VGA mode.
NTER to return to the boot screen.
Determining a defective unit
1. Save and exit from all files, if possible, then shut down the operating system.
2. Turn off the power to the monitor and to the workstation.
Important: Always turn off the power to the workstation before connecting or disconnecting
the cables.
3. Check and reseat all card and cable connections as needed.
4. Turn on the monitor power. If the Power On LED does not illuminate, see Getting Help in
this section.
5. Turn on the power to the system base unit. If the Power On LED on the base unit does not
illuminate, or if the BIOS beep codes indicate a failure, see Getting Help in this section.
====
3Dlabs Graphics Accelerator Card User's Guide
30

Troubleshooting
oЙбелн~ддбеЦ=нЬЙ=sбЗЙз=aкбоЙк=
oЙбелн~ддбеЦ=нЬЙ=sбЗЙз=aкбоЙк=
oЙбелн~ддбеЦ=нЬЙ=sбЗЙз=aкбоЙк=oЙбелн~ддбеЦ=нЬЙ=sбЗЙз=aкбоЙк=
Note: You must have the correct driver for the Windows NT 4.0 or Windows 2000 operating system. If
you are unsure, refer to the README.TXT file located on the driver delivery media for this information.
Refer to the Microsoft Windows NT 4.0 or Windows 2000 documentation and online Help for more
information on installing drivers and software application programs.
If you are installing the Wildcat II 5110 driver, you must remove the current driver prior to installing the
update.
Removing the existing Wildcat II 5110 driver under Windows NT
1. Log on using an account that has administrative privileges.
2. From the operating system Start menu, go to Settings/Control Panel and double-click
Add/Remove Programs.
3. On the Add/Remove Programs Properties Install/Uninstall tab, highlight the Wildcat II
5110 Display Driver and click Add/Remove.
4. Click Yes when prompted to confirm the driver removal, and follow the prompts.
Reinstalling the video driver under Windows NT
1. Log on using an account that has administrative privileges.
2. Insert the delivery media into the appropriate device (for diskettes or CD).
3. From the operating system Start menu, go to Settings/Control Panel/Display and click the
Settings tab.
4. Click Display Type, then click Change.
5. In the Change Display dialog box, click Have Disk.
6. In the Install From Disk dialog box, type the path to the directory that contains the delivery
media.
7. In the Change Display dialog box, verify that the Wildcat II 5110 driver is highlighted,
then click OK.
8. Click Yes when asked if you want to install a third-party driver. The files are copied from
the delivery media.
9. After the driver files are copied, a message that the driver successfully installed displays.
Click OK.
10. Click Close to exit the Display Type dialog box.
11. Click Close to exit the Display Properties dialog box.
12. When told that the workstation must be restarted for the new settings to take effect, remove
the diskette from the workstation’s floppy disk drive, if applicable. Click Yes to restart the
workstation.
13. After the system restarts and you log in, a message displays stating that a new display
driver has been installed, and that you should use the Display option in the Control Panel to
select the preferred display resolution. Click OK.
3Dlabs Graphics Accelerator Card User's Guide
31

Troubleshooting
Removing an existing driver under Windows 2000
1. Log on using an account that has administrative privileges.
2. From the operating system Start menu, go to Settings/Control Panel and double-click
Add/Remove Programs.
3. Under Change or Remove Programs, highlight the Wildcat II 5110 Display Driver and
click Change/Remove.
4. Click Yes when prompted to confirm the driver removal, and follow the prompts to
complete the driver removal.
5. Click OK when notified that the driver removal is complete, and reboot your system if you
are prompted to do so.
Reinstalling the video driver under Windows 2000
1. Log on using an account that has administrative privileges.
2. From the operating system Start menu, go to Settings, Control Panel, System. Under
System, click the Hardware tab.
3. Click Device Manager, click Display Adapters, then select Wildcat II 5110
4. Right click on Wildcat II 5110, select Properties, then click Update Driver.
5. The Upgrade Device Drivers Wizard displays. Click Next.
6. Under Install Hardware Device Drivers, click “Search for a suitable driver for my device
(recommended),” then click Next.
7. Under Locate Driver Files, make sure the appropriate search location is selected, and that
Disk 1 of the driver media is loaded in the appropriate drive; then, click Next. The Wizard
locates the driver installation files
8. Under Driver Files Search Results, click Next to start the installation.
9. Insert Disk 2 when prompted then click OK to continue with the installation.
10. Once the driver successfully installs, click Finish to dismiss the Install Hardware Device
Drivers Wizard.
Important: Windows 2000 recognizes the dual pipelines as two devices. You must repeat Steps
4 – 10 above to complete the installation.
11. If prompted to restart the workstation, remove the delivery media from the disk drive and
click Yes.
lедбеЙ=fеСзкг~нбзе
lедбеЙ=fеСзкг~нбзе====
lедбеЙ=fеСзкг~нбзеlедбеЙ=fеСзкг~нбзе
If you cannot find the problem you are experiencing, or the solution to a problem, listed in this chapter,
check the Troubleshooting FAQ list at http://www.3dlabs.com/support, or contact your vendor for
additional help.
3Dlabs Graphics Accelerator Card User's Guide
32

^^^^mmbkafu=
mmbkafu=^=
mmbkafu=mmbkafu=
^=ÓÓÓÓ=p
^=^=
=pmb`fcf`^qflkp
=p=p
mb`fcf`^qflkp=
mb`fcf`^qflkpmb`fcf`^qflkp
=
==
3Dlabs Graphics Accelerator Card User's Guide

^=pйЙЕбСбЕ~нбзел
^=pйЙЕбСбЕ~нбзел====
^=pйЙЕбСбЕ~нбзел^=pйЙЕбСбЕ~нбзел
dÉåÉê~ä
dÉåÉê~ä=====
dÉåÉê~ädÉåÉê~ä
=
==
Manufacturer
Model number
cмеЕнбзе~д
cмеЕнбзе~д====
cмеЕнбзе~дcмеЕнбзе~д
System
Specifications
3Dlabs
Wildcat II 5110
.
Interface
Graphic controller
DAC speed
Data width (dual pipeline)
Connectors
Interrupts
DMA channels
Video memory
3D Performance
Dimensions
mçïÉê=
mçïÉê=
mçïÉê=mзпЙк=
oЙимбкЙгЙенл
oЙимбкЙгЙенл====
oЙимбкЙгЙенлoЙимбкЙгЙенл
AGP Pro 50
High-speed Wildcat II chipset technology
300 MHz
Frame buffer: 128 bits per pipeline
Texture buffer: 64 bits per pipeline
DirectBurst: 64 bits
3-Pin, MiniDIN stereo sync output
15-pin D connector
DVI-I compatable (DVI-D functional) Digital Video Output Port
BNC Connector (optional)
Two 6-pin modular jacks (optional)
PCI-assigned
Interrupt A for Wildcat II 5110
AGP 4X or 2X
Frame Buffer: 64 MB
Texture Buffer: 64 MB
DirectBurst: 16 MB
3D Gourad-shaded triangles, Z-buffered: 15.2 M Tri/Sec
3D Gouraud-shaded triangles, Z-buffered, 25-pixel: 9.7 Million Tri/Sec
3D Vectors, solid-color, 10-pixel: 24.2 M Vec/Sec
Height
Length
Width
Slots
Required
50 W maximum
12.0V 100 mA maximum
5.0V 1.1A maximum
3.3V 13.1A maximum
1.52"
13.34"
4.28"
One AGP Pro 50 slot
One PCI slot (for cooling purposes)
3Dlabs Graphics Accelerator Card User's Guide
34
oÉ
oЙлздмнбзел=EйЙк=
лздмнбзел=EйЙк=
oÉoÉ
лздмнбзел=EйЙк=лздмнбзел=EйЙк=
лЕкЙЙеF
лЕкЙЙеF====
лЕкЙЙеFлЕкЙЙеF
single display
Single display without
Multisampling
Specifications
1920 x 1440 @ 75 Hz
1600 x 1280 @ 76 Hz
2048 x 1152 @ 75 Hz
1920 x 1200 @ 75 Hz
1280 x 1024 @60 Hz
1280 x 960 @ 60Hz
1152 x 870 @ 75 Hz
NA
1376 x 768 @ 60 Hz
1280 x 800 @ 90 Hz
1024 x 768 @ 60 Hz
864 on a
3Dlabs Graphics Accelerator Card User's Guide
35

Specifications
3Dlabs Graphics Accelerator Card User's Guide
36

^^^^mmbkafu=
mmbkafu=_=
mmbkafu=mmbkafu=
_=ÓÓÓÓ=p
=plcqt^ob=
_=_=
lcqt^ob=i
=p=p
lcqt^ob=lcqt^ob=
if`bkpb
f`bkpb=
ii
f`bkpbf`bkpb
=
==
3Dlabs Graphics Accelerator Card User's Guide

Software License Agreement
plcqt^ob=if`bkpb=^dobbjbkq
plcqt^ob=if`bkpb=^dobbjbkq====
plcqt^ob=if`bkpb=^dobbjbkqplcqt^ob=if`bkpb=^dobbjbkq
THIS IS A LEGAL CONTRACT BETWEEN YOU, THE END USER, AND 3DLABS, INC. BY
USING THE SOFTWARE ACCOMPANYING THIS GUIDE OR PRE- INSTALLED ON YOUR
SYSTEM, YOU ARE ACCEPTING AND AGREEING TO BE BOUND BY THE TERMS OF THIS
SOFTWARE LICENSE AGREEMENT. IF YOU ARE NOT WILLING TO BE BOUND BY THE
TERMS OF THIS SOFTWARE LICENSE AGREEMENT, PROMPTLY RETURN THIS SOFTWARE
LICENSE AGREEMENT WITH THE UNOPENED SOFTWARE ENVELOPE, OXYGEN CARD AND
ANY OTHER ACCOMPANYING ITEMS AND 3DLAB PRODUCTS TOGETHER WITH YOUR
RECEIPT TO YOUR PLACE OF PURCHASE FOR A FULL REFUND.
pзСнп~кЙ=iбЕЙелЙ
pзСнп~кЙ=iбЕЙелЙ=~еЗ=oЙлнкбЕнбзел
pзСнп~кЙ=iбЕЙелЙpзСнп~кЙ=iбЕЙелЙ
The SOFTWARE delivered to you may embody and include, without limitation, certain software
programs in object code form (machine-readable but not human-readable form) and documentation. Use
of the SOFTWARE can result in the production of FEATURES that are human-readable, including,
without limitation, documentation, report formats, menus, audible prompts and tone sequences. Such
SOFTWARE and FEATURES constitute copyrighted property proprietary to 3Dlabs, Inc. or its licensors,
and 3Dlabs, Inc. or its licensors retain title to the SOFTWARE (excluding media on which recorded),
FEATURES, all copies thereof, and all intellectual property rights therein. No title to the SOFTWARE,
FEATURES, any copies thereof or any intellectual property rights therein, are transferred to you. You
are hereby granted, for your own internal use only, a nontransferable, nonexclusive, perpetual, revocable
license to use one (1) copy of the SOFTWARE and FEATURES on the computer on which the
SOFTWARE was originally mounted or installed. Except as specifically authorized by this
AGREEMENT, you may not copy the SOFTWARE or FEATURES for any purpose (except that you
may make a use one (1) copy of the SOFTWARE solely for backup purposes). You shall not, whether
through the use of disassemblers or any other means whatsoever (including, but not limited to, Guide,
mechanical or electrical means), reverse engineer, decompile, disassemble, destroy, disable, derive rules
of protocol embodied in the SOFTWARE or derive source code from the SOFTWARE OR FEATURES,
or attempt to permit any third party to do any of the foregoing. Any attempt to do any of the foregoing
shall be a material breach of this AGREEMENT and the license granted herein, which shall immediately
entitle 3Dlabs, Inc. to exercise any remedy that may exist at law or in equity. You may not transfer, loan,
rent, lease, distribute or grant any rights in the SOFTWARE, FEATURES, copies thereof, or
accompanying documentation in any form without the prior written consent of 3Dlabs, Inc.
=~еЗ=oЙлнкбЕнбзел====
=~еЗ=oЙлнкбЕнбзел=~еЗ=oЙлнкбЕнбзел
3Dlabs Graphics Accelerator Card User's Guide
38

Software License Agreement
iбгбнЙЗ=t~кк~ену
iбгбнЙЗ=t~кк~ену====
iбгбнЙЗ=t~кк~енуiбгбнЙЗ=t~кк~ену
3Dlabs, Inc. warrants that the SOFTWARE AND FEATURES licensed to you under this AGREEMENT
will perform in accordance with 3Dlabs, Inc. published specifications for use on the same operating
system as used by you at the time of purchase of the SOFTWARE or the system on which the
SOFTWARE is initially mounted or installed (WARRANTY) for a period of ninety (90) days after the
date of delivery to you as evidenced by your receipt (WARRANTY PERIOD). If the SOFTWARE or
FEATURES does not conform during the WARRANTY PERIOD, you agree to provide written notice of
such failure to 3Dlabs, Inc. and 3Dlabs, Inc. will, at its sole option, repair or replace the SOFTWARE.
3Dlabs, Inc. does not warrant that the use of the SOFTWARE or FEATURES will be uninterrupted or
error- free and hereby disclaims all liability on account thereof. THE REMEDIES PROVIDED HEREIN
ARE YOUR SOLE AND EXCLUSIVE REMEDIES FOR BREACH OF WARRANTY. THIS
WARRANTY IS IN LIEU OF ALL OTHER WARRANTIES OR CONDITIONS, EXPRESS OR
IMPLIED, INCLUDING WARRANTIES OR CONDITIONS OF MERCHANTABILITY,
NONINFRINGEMENT AND FITNESS FOR A PARTICULAR PURPOSE. SOME STATES OR
COUNTRIES DO NOT ALLOW THE EXCLUSION OF IMPLIED WARRANTIES OR CONDITIONS,
SO THE ABOVE EXCLUSION MAY NOT APPLY TO YOU.
iбгбнЙЗ=iб~Дбдбну
iбгбнЙЗ=iб~Дбдбну====
iбгбнЙЗ=iб~ДбдбнуiбгбнЙЗ=iб~Дбдбну
NOTWITHSTANDING ANY PROVISION IN THIS LICENSE TO THE CONTRARY, NEITHER
3DLABS, INC. NOR ITS LICENSORS OR SUPPLIERS WILL BE LIABLE FOR ANY SPECIAL,
INCIDENTAL, INDIRECT OR CONSEQUENTIAL DAMAGES, HOWEVER CAUSED, OR ANY
THEORY OF LIABILITY, WHETHER OR NOT 3DLABS, INC., ITS LICENSORS OR SUPPLIERS
HAS BEEN ADVISED OF THE POSSIBILITY OF SUCH DAMAGE OR LOSS. IN NO EVENT
SHALL 3DLABS, INC., ITS LICENSORS’ OR SUPPLIERS’ LIABILITY ARISING UNDER THIS
LICENSE EXCEED THE AMOUNT PAID BY YOU [FOR THE PRODUCT OR SOFTWARE]
GIVING RISE TO SUCH LIABILITY. THIS LIMITATION IS INTENDED TO LIMIT THE
LIABILITY OF 3DLABS, INC., ITS LICENSORS OR ITS SUPPLIERS AND SHALL APPLY
NOTWITHSTANDING ANY FAILURE OF ESSENTIAL PURPOSE OF ANY LIMITED REMEDY.
SOME STATES OR COUNTRIES MAY NOT ALLOW THE FOREGOING LIMITATION, SO THE
FOREGOING MAY NOT APPLY TO YOU.
oЙлнкбЕнЙЗ=oбЦЬнл=kзнбЕЙ
oЙлнкбЕнЙЗ=oбЦЬнл=kзнбЕЙ====
oЙлнкбЕнЙЗ=oбЦЬнл=kзнбЕЙoЙлнкбЕнЙЗ=oбЦЬнл=kзнбЕЙ
Use, duplication or disclosure by the United States Government is subject to restrictions as set forth in
subparagraphs ©(1) and ©(2) of the Commercial Computer Software - Restricted Rights clause at FAR
Section 52.277-19 or ©(1)(ii) of the Rights in Technical Data and Computer Software clause at DFARS
Section 252.277-7013, as applicable. Unpublished - rights reserved under the copyright laws of the
United States. Contractor: 3Dlabs Inc., Ltd., 480 Potrero Avenue, Sunnyvale, California 94086.
qЙкгбе~нбзе
qЙкгбе~нбзе====
qЙкгбе~нбзеqЙкгбе~нбзе
You may terminate the license granted hereunder at any time by destroying all copies, [mergers or
modifications] of the SOFTWARE, FEATURES and accompanying materials. 3Dlabs, Inc. may
immediately terminate the license granted to you hereunder upon notice for failure to comply with the
terms and conditions of this AGREEMENT. Upon such termination, you agree to destroy all copies,
mergers and modifications of the SOFTWARE and FEATURES and accompanying documents. You
agree that a breach of this AGREEMENT will result in irreparable damages to 3Dlabs, Inc. This
AGREEMENT is the entire agreement between you and 3Dlabs, Inc. with respect to the use and licensing
of the SOFTWARE provided with this AGREEMENT, and supersedes all proposals, warranties, prior
agreements or any other communications between the parties relating to the subject matter hereof.
3Dlabs Graphics Accelerator Card User's Guide
39

Software License Agreement
dÉåÉê~ä
dÉåÉê~ä====
dÉåÉê~ädÉåÉê~ä
This AGREEMENT will be governed by and construed in accordance with the laws of California without
regard to conflicts of law principles or the UN Convention on the Sale of Goods. If for any reason a court
of competent jurisdiction finds any provision of this AGREEMENT, or portion thereof, to be
unenforceable, that provision of the AGREEMENT shall be enforced to the maximum extent permissible
so as to effect the intent of the parties, and the remainder of this AGREEMENT shall continue in full
force and effect. Should you have any questions concerning this AGREEMENT, please write to: 3Dlabs,
Inc., 480 Potrero Avenue, Sunnyvale, California 94086.
3Dlabs Graphics Accelerator Card User's Guide
40

^^^^mmbkafu=
mmbkafu=`=
mmbkafu=mmbkafu=
`=ÓÓÓÓ=o
`=`=
=obdri^qlov=
=o=o
bdri^qlov=p
bdri^qlov=bdri^qlov=
pq^qbjbkqp
pp
q^qbjbkqp=
q^qbjbkqpq^qbjbkqp
=
==
3Dlabs Graphics Accelerator Card User's Guide

aЙЕд~к~нбзе=зС=`зеСзкгбну
aЙЕд~к~нбзе=зС=`зеСзкгбну====
aЙЕд~к~нбзе=зС=`зеСзкгбнуaЙЕд~к~нбзе=зС=`зеСзкгбну
declare under our sole responsibility that the
3Dlabs Graphics Accelerator product(s)
to which this declaration relates are in conformance with the following standards:
EN 55024:1998, clause 4.2.1
EN 55024:1998, clause 4.2.2
EN 55024:1998, clause 4.2.3
EN 55024:1998, clause 4.2.3.2
EN 55024:1998, clause 4.2.6
following the provisions of the 89/336/EEC Directive.
San Jose, California, December 1999
Regulatory Statements
We, 3Dlabs, Incorporated,
480 Potrero Avenue
Sunnyvale, CA 94086
Phone 408-530-4700
Fax 408-530-4701
United States of America
EN 55022:1994, clause 5
EN 55022:1994, clause 6
IEC950:1991, 2
EN60950:1992
3Dlabs, Inc.
nd
Edition
Warning: Any use of, installation practices, modifications or maintenance procedures
carried out which are not in accordance with the issued “instructions for use” or approved by
3Dlabs Inc. will nullify the CE certification of this product and could lead to prosecution.
We, 3Dlabs, Incorporated,
480 Potrero Avenue
Sunnyvale, CA 94086
Phone 408-530-4700
Fax 408-530-4701
United States of America
declare under our sole responsibility that the products
3Dlabs Graphics Accelerator Card
comply with Part 15 of FCC Rules. Operation is subject to the following two conditions: (1) this device may not cause harmful
interference, and (2) this device must accept any interference received, including interferences that may cause undesired
operation.
3Dlabs Graphics Accelerator Card User's Guide
42

^^^^mmbkafu=
mmbkafu=a=
mmbkafu=mmbkafu=
a=ÓÓÓÓ=q
a=a=
=qbojp=^ka=
=q=q
bojp=^ka=a
bojp=^ka=bojp=^ka=
abcfkfqflkp
aa
bcfkfqflkp=
bcfkfqflkpbcfkfqflkp
=
==
3Dlabs Graphics Accelerator Card User's Guide

Terms and Definitions
qЙкгл=~еЗ=aЙСбебнбзел
qЙкгл=~еЗ=aЙСбебнбзел====
qЙкгл=~еЗ=aЙСбебнбзелqЙкгл=~еЗ=aЙСбебнбзел
^dm
^dm====
^dm^dm
Advanced Graphics Port. A dedicated graphics bus that transfers data at significantly higher speeds than
the PCI bus.
^дйЬ~=_дЙеЗбеЦ
^дйЬ~=_дЙеЗбеЦ====
^дйЬ~=_дЙеЗбеЦ^дйЬ~=_дЙеЗбеЦ
This means to create transparent objects by allowing for the blending of pixels to simulate the
transparency characteristics of an object. With alpha information, an object can be designed from being
totally transparent to opaque.
^дйЬ~=_мССЙк
^дйЬ~=_мССЙк====
^дйЬ~=_мССЙк^дйЬ~=_мССЙк
A portion of the frame buffer used to define the transparency value of a pixel in the frame buffer. This
data can be used to blend the frame buffer pixel with the pixel to be drawn to create a composite pixel.
^åíá~äá~ëáåÖ
^åíá~äá~ëáåÖ====
^åíá~äá~ëáåÖ^åíá~äá~ëáåÖ
A technique employed to remove any jagged edges from an object to appear smooth. This is
accomplished by gradually modifying the hue and saturation of pixels. (See also: SuperScene
Antialiasing)
^mf
^mf====
^mf^mf
Application Programming Interface. The API translates the instructions from the application program into
device commands that are specific to the screen’s display controller, the graphics board.
^нгзлйЬЙкбЕ=bССЙЕнл
^нгзлйЬЙкбЕ=bССЙЕнл====
^нгзлйЬЙкбЕ=bССЙЕнл^нгзлйЬЙкбЕ=bССЙЕнл
The effect derived from adding one or more layers around an object.
_бдбеЙ~к=p~гйдбеЦ
_бдбеЙ~к=p~гйдбеЦ====
_бдбеЙ~к=p~гйдбеЦ_бдбеЙ~к=p~гйдбеЦ
The process whereby texture mapping is done through filtering.
_áí=aÉéíÜ
_áí=aÉéíÜ====
_áí=aÉéíÜ_áí=aÉéíÜ
Bit depth is another way of expressing the numbers of colors available. A color bit depth of 8 is
equivalent to 256 colors, a bit depth of 16 (15 bit of color plus a 1 bit overlay) yields 32768 colors, and a
bit depth of 32 (24 bit RGB plus 8 bit of overlays) equals 16.7 million colors. The latter is often referred
to as true color.
`дбййбеЦ
`дбййбеЦ====
`дбййбеЦ`дбййбеЦ
Removal of elements or sections not contained within the active viewing area.
`mr=E`Йенк~д=mкзЕЙллбеЦ=rебнF
`mr=E`Йенк~д=mкзЕЙллбеЦ=rебнF====
`mr=E`Йенк~д=mкзЕЙллбеЦ=rебнF`mr=E`Йенк~д=mкзЕЙллбеЦ=rебнF
The part within a PC that executes programs in main memory.
a^`
a^`====
a^`a^`
Digital to Analog Converter.
aЙйнЬ=`мЙбеЦ
aЙйнЬ=`мЙбеЦ====
aЙйнЬ=`мЙбеЦaЙйнЬ=`мЙбеЦ
A technique used to give the illusion of depth. With depth cueing, the part of an object that is farther away
is displayed with a lower intensity to give the effect of depth.
aáÖáí~ä=cä~í=m~åÉä=aáëéä~ó
aáÖáí~ä=cä~í=m~åÉä=aáëéä~ó====
aáÖáí~ä=cä~í=m~åÉä=aáëéä~óaáÖáí~ä=cä~í=m~åÉä=aáëéä~ó
A digital, flat-panel display uses a digital (instead of analog) cable connection to transfer data to the
display screen. This can eliminate some display artifacts. Flat panel displays occupy less desk space than
conventional monitors.
3Dlabs Graphics Accelerator Card User's Guide
44

Terms and Definitions
aбкЙЕнu
aбкЙЕнu====
aбкЙЕнuaбкЙЕнu
Microsoft’s APIs developed to access various system hardware.
aбкЙЕн=Pa
aбкЙЕн=Pa====
aбкЙЕн=PaaбкЙЕн=Pa
Microsoft’s API dedicated to 3D graphics, and a component of DirectX.
aбнЬЙкбеЦ
aбнЬЙкбеЦ====
aбнЬЙкбеЦaбнЬЙкбеЦ
The process of converting an image with a certain bit depth to one with a lower bit depth. Dithering
enables the application to convert an image’s colors that it cannot display into two or more colors that
closely resemble the original. Dithering works because the mind is tricked by the pattern of colors into
thinking it’s a different color.
aзмДдЙ=_мССЙкбеЦ
aзмДдЙ=_мССЙкбеЦ====
aзмДдЙ=_мССЙкбеЦaзмДдЙ=_мССЙкбеЦ
With double-buffering, images are rendered in the back buffer and then displayed on the screen once the
drawing is completed. This results in the smooth, flicker-free rotation and animation of 3D models and
scenes.
aкбоЙк
aкбоЙк====
aкбоЙкaкбоЙк
A driver is a special interface program that is developed to perform the communication between the
application program, the device (i.e., graphics peripheral) and the operating system.
bsd^
bsd^====
bsd^bsd^
Extended Video Graphics Array. EVGA runs at 1024 x 768.
cä~í=pÜ~ÇáåÖ
cä~í=pÜ~ÇáåÖ====
cä~í=pÜ~ÇáåÖcä~í=pÜ~ÇáåÖ
The simplest method of shading. Each triangle is assigned one single color, resulting in a faceted
appearance of the surface.
cк~гЙ=_мССЙк
cк~гЙ=_мССЙк====
cк~гЙ=_мССЙкcк~гЙ=_мССЙк
A 24-bit, true-color frame buffer provides 8 bits for each red, green and blue primary display color. This
results in 16.8 million color combinations. A second, or double, buffer enables system to calculate pixels
one step ahead of the screen display for smooth, distortion free images.
d~ãã~
d~ãã~====
d~ãã~d~ãã~
A curve representing both the contrast and brightness of an image. Changing the shape of the curve
changes the RGB color output. (Not to be confused with GLINT Gamma, the 3Dlabs geometry
processing device.)
dЙзгЙнку
dЙзгЙнку====
dЙзгЙнкуdЙзгЙнку
The intermediate stage of the 3D pipeline, geometry determines the location of the object and the frame of
reference of the viewer in relation to the object.
dçìê~ìÇ=pÜ~ÇáåÖ
dçìê~ìÇ=pÜ~ÇáåÖ========
dçìê~ìÇ=pÜ~ÇáåÖdçìê~ìÇ=pÜ~ÇáåÖ
This method of shading, more complex than flat shading, shows subtle color changes across an object.
Gouraud Shading is accomplished by adding pixels in a graduated scale of colors.
dк~йЬбЕл=^ЕЕЙдЙк~нзк=`~кЗ
dк~йЬбЕл=^ЕЕЙдЙк~нзк=`~кЗ====
dк~йЬбЕл=^ЕЕЙдЙк~нзк=`~кЗdк~йЬбЕл=^ЕЕЙдЙк~нзк=`~кЗ
A graphics accelerator performs 3D functions in the hardware, thereby relieving the CPU of repetitive,
complex and intensive calls. This results in enhanced performance and speed.
eÉáÇá
eÉáÇá====
eÉáÇáeÉáÇá
The API developed by Autodesk to work with its products, such as 3D Studio MAX and AutoCAD.
3Dlabs Graphics Accelerator Card User's Guide
45

Terms and Definitions
jfm
jfmJJJJj~ййбеЦ=EСзк=нЙснмкЙ=йкзЕЙллбеЦF
j~ййбеЦ=EСзк=нЙснмкЙ=йкзЕЙллбеЦF====
jfmjfm
j~ййбеЦ=EСзк=нЙснмкЙ=йкзЕЙллбеЦFj~ййбеЦ=EСзк=нЙснмкЙ=йкзЕЙллбеЦF
A feature that delivers photo-realistic images by wrapping 2D bitmaps around 3D objects closely
matching the texture to the object. MIP-Mapping allows different versions of a texture to be used for
objects of different sizes. It also enables faster performance as textures do not need to be scaled in real
time.
jмднбйдЙ=oЙлздмнбзе=pмййзкн
jмднбйдЙ=oЙлздмнбзе=pмййзкн====
jмднбйдЙ=oЙлздмнбзе=pмййзкнjмднбйдЙ=oЙлздмнбзе=pмййзкн
The ability to support multiple resolutions on the screen.
léÉådi
léÉådi====
léÉådiléÉådi
The industry standard library of advanced 3D graphics functions developed by Silicon Graphics, Inc.
mЙклйЙЕнбоЙ=`зккЙЕнбзе
mЙклйЙЕнбоЙ=`зккЙЕнбзе====
mЙклйЙЕнбоЙ=`зккЙЕнбзеmЙклйЙЕнбоЙ=`зккЙЕнбзе
A function that allows an object to maintain its 3D textural features as it moves away from the viewer,
into the background.
mбйЙдбебеЦ
mбйЙдбебеЦ====
mбйЙдбебеЦmбйЙдбебеЦ
A basic hardware tool for accelerating processes.
máñÉä
máñÉä====
máñÉämáñÉä
The smallest addressable element of a cathode ray tube display. More simply put, the individual dots that
make up the screen image.
mçá
mзбен=p~гйдбеЦ
ен=p~гйдбеЦ====
mçámçá
ен=p~гйдбеЦен=p~гйдбеЦ
The basic method of adding texture to an object. Point sampling does not include any filtering of textures.
o^ja^`
o^ja^`====
o^ja^`o^ja^`
The final component in the graphics subsystem that translates a digital image into an analog
representation.
o~ë
o~лнЙкбт~нбзе
нЙкбт~нбзе====
o~ëo~ë
нЙкбт~нбзенЙкбт~нбзе
A method to fill in colors for all pixels bound by vertices.
oЙеЗЙкбеЦ
oЙеЗЙкбеЦ====
oЙеЗЙкбеЦoЙеЗЙкбеЦ
The final and most rigorous stage in the 3D pipeline where an object undergoes shading, texturing, etc.
ofp`
ofp`====
ofp`ofp`
Reduced Instruction Set Computing.
pao^j
pao^j====
pao^jpao^j
Synchronous Dynamic Random Access Memory (SDRAM) is a cost-effective solution to improve
bandwidth to and from memory, resulting in increased graphics performance.
pdo^j
pdo^j====
pdo^jpdo^j
Synchronous Graphics Random Access Memory allows data to be written in a single operation, rather
than a (slower) sequence of operations. It also handles background and foreground image fills effectively.
paqm
paqm====
paqmpaqm
Super Desktop Publishing. SDTP runs at 1600 x 1200.
3Dlabs Graphics Accelerator Card User's Guide
46

Terms and Definitions
pнЙеЕбд=_мССЙк
pнЙеЕбд=_мССЙк====
pнЙеЕбд=_мССЙкpнЙеЕбд=_мССЙк
Similar to stipple masking, the stencil buffer assists with the creation of transparent effects.
pнбййдЙ=г~лвбеЦ
pнбййдЙ=г~лвбеЦ====
pнбййдЙ=г~лвбеЦpнбййдЙ=г~лвбеЦ
A technique that spatially creates transparent effects by rendering an object through various patterns.
píêÉ~ãáåÖ=pfja
píêÉ~ãáåÖ=pfja====
píêÉ~ãáåÖ=pfjapíêÉ~ãáåÖ=pfja
An instruction set developed by Intel for Pentium III-processor based systems. Streaming SIMD can
improve 3D vertex transformation and lighting, among other operations.
pìéÉêpÅÉåÉ=^åíá~äá~ëáåÖ
pìéÉêpÅÉåÉ=^åíá~äá~ëáåÖ====
pìéÉêpÅÉåÉ=^åíá~äá~ëáåÖpìéÉêpÅÉåÉ=^åíá~äá~ëáåÖ
SuperScene antialiasing (see Antialiasing) is an enhanced version of multisampling and offers true,
multisampled scene-based antialiasing of all OpenGL primitives in a scene. SuperScene Antialiasing is a
feature found only on Wildcat II 5110 graphics accelerators.
psd^
psd^====
psd^psd^
Super Video Graphics Array. SVGA runs at 800 x 600.
qЙллЙдд~нбзе
qЙллЙдд~нбзе====
qЙллЙдд~нбзеqЙллЙдд~нбзе
The initial part of the 3D pipeline where the object is described by a set of triangles.
qЙснмкЙ=j~ййбеЦ
qЙснмкЙ=j~ййбеЦ====
qЙснмкЙ=j~ййбеЦqЙснмкЙ=j~ййбеЦ
A technique that enables 2D graphic images to be “wrapped” around or “pasted” on to a 3D primitive.
Perspective correction and lighting calculations allow for added realism.
qк~елСзкг~нбзе
qк~елСзкг~нбзе====
qк~елСзкг~нбзеqк~елСзкг~нбзе
The change in rotation, size, position, and perspective of an object in 3D space.
qк~елй~кЙеЕу
qк~елй~кЙеЕу====
qк~елй~кЙеЕуqк~елй~кЙеЕу
A function that refers to the rendering of transparent (non-opaque) objects. Transparency is generally
accomplished on a polygon rendering system using either screen-door transparency or alpha blending.
ssssЙЕнзклLлЙЕзеЗ
ЙЕнзклLлЙЕзеЗ====
ЙЕнзклLлЙЕзеЗЙЕнзклLлЙЕзеЗ
Lines drawn per second.
sd^
sd^====
sd^sd^
Video Graphics Array. VGA runs at 640 x 480.
seo
seo====
seoseo
Very High Resolution. VHR runs at 1280 x 1024.
so^j
so^j====
so^jso^j
Video Random Access Memory is an expensive, fast type of RAM that is used as display memory on
high-end graphics boards.
soji
soji====
sojisoji
Virtual Reality Modeling Language.
wwwwJJJJ_мССЙк
_мССЙк====
_мССЙк_мССЙк
Also known as the Depth Buffer, the Z-Buffer is a region of memory containing the depth component of a
pixel. Used, for example, to eliminate hidden surfaces from the image.
3Dlabs Graphics Accelerator Card User's Guide
47

Terms and Definitions
3Dlabs Graphics Accelerator Card User's Guide
48

ffffkabu
kabu=
kabukabu
=
==
3Dlabs Graphics Accelerator Card User's Guide

Index
=
API, 44, 45
Attaching a stereo device, 12
Configuration tab
Display properties, 18
Configuring the display, 18
Connecting
monitor, 11
Connecting a Digital Flat-panel monitor, 12
Connecting a VGA monitor, 11
Connecting two VGA monitors, 11
Creating a custome optimization, 26
Determining a defective unit, 30
Diagnostics, 29
Digital Flat-panel monitor
connecting, 12
Display
Dual monitors under Windows 2000, 23
Monoscopic, 22
Stereo, 22
Stereoscopic, 22
Display properties
Configuration tab, 18
Configuring, 18
Monitor tab, 20
Drivers
Installing, 12
Dual monitor display under Windows 2000, 23
Enabling application-specific optimizations, 18, 25
Enabling Multiview and Genlock, 22
Enabling stereo display, 22
Features, 3
Gamma, 45
Gamma Color Calibration, 20
Glossary, 44
Heidi drivers
Installing, 14
Installation
Software, 12
Installation
Driver requirements, 12
Drivers, 12
Installing
Heidi drivers, 14
software, 12
verifying the default video display driver
inWindows 2000, 15
Verifying the default video display driver
inWindows NT, 14
Verifying the system startup version inWindows
2000, 15
Verifying the system startup version inWindows
NT, 15
Wildcat Windows 2000 driver, 14
Wildcat Windows NT driver, 13
Introduction, 2
Last Known Good option in Windows NT, 30
Monitor
checks, 29
connecting, 11
Monitor tab
Display properties, 20
Monoscopic display, 22
Online Information, 32
OpenGL, ii, 46
Registration, 16
Regulatory Statements, 42
Reinstalling the video driver, 31
Reinstalling the video driver under Windows 2000,
32
Safe Mode in Windows 2000, 30
Serial number location, 9
setup
verifying the default video display driver in
Windows 2000, 15
Setup
Attaching a stereo device, 12
Driver requirements, 12
Dual monitor feature (Windows 2000 only), 23
Installing drivers, 12
Installing Heidi drivers, 14
Locating the seiral number, 9
Preparing for installation, 8
Removing existing drivers, 13
Replacing an old grahics card, 10
Verifying the default video display driver in
Windows NT, 14
Verifying the system startup version Windows
2000, 15
Verifying the system startup version Windows NT,
15
Wildcat Windows 2000 driver, 14
Wildcat Windows NT driver, 13
SGRAM, 46
3Dlabs Graphics Accelerator Card User's Guide
50

Index
Software
installing, 12
Software License, 38
specifications, 34
Stereoscopic display, 22
System Requirements, 2
Terms and definitions, 44
textures, 46
Textures, 46
Troubleshooting, 29, 32
Diagnostics, 29
Last Known Good option in Windows NT, 30
monitors and display resolutions, 29
Reinstalling the video driver under Windows 2000,
32
Safe mode in Windows 2000, 30
Usable resolutions, 30
Usable
resolutions, 30
Using the Wildcat Monitor tab
Gamma Color Calibration, 20
VGA monitor
connecting, 11
Video display
Configuring, 18
Stereo, 22
Video driver
Reinstalling, 31
Reinstalling under Windows 2000, 32
Warranty, 39
Wildcat Congifuration tab
Creating a custom optimization, 26
Enabling application-specific optimizations, 18, 25
Windows 2000
Installing the Wildcat driver, 14
Removing existing drivers, 13
Safe mode, 30
verifying the default video display driver, 15
Verifying the system startup version, 15
Windows 2000 drivers
Reinstalling, 32
Windows NT, ii
Installing the Wildcat driver, 13
Last Known Good option, 30
Removing existing drivers, 13
Verifying the default video display driver, 14
Verifying the system startup version, 15
====
3Dlabs Graphics Accelerator Card User's Guide
51
 Loading...