

Page 1

The Oxygen
TM
OxygenTM GVX1
Graphics
Accelerator
User’s Guide
3Dlabs,® Inc.
480 Potrero Avenue
Sunnyvale, CA 94086
408 - 530 - 4700
www.3dlabs.com
VX1
and
Page 2

Copyright 1999 by 3Dlabs, Inc.
3Dlabs, GLINT and Permedia are registered trademarks, and Oxygen and PowerThreads are
trademarks of 3Dlabs, Inc. or 3Dlabs Inc. Ltd. Pentium is a registered trademark of Intel.
OpenGL is a registered trademark of Silicon Graphics, Inc. Soft Engine is a trademark of
Vibrant Graphics, Inc. AutoCAD is a registered trademark of AutoDesk Inc. Colorific is a
registered trademark of Sonnetech Ltd. Microsoft and Windows NT are registered trademarks
of the Microsoft Corporation. All other trademarks and registered trademarks are the property
of their respective holders.
Caution: Changes or modifications to the Oxygen VX1 or Oxygen GVX1 graphics
accelerator card not expressly approved by 3Dlabs, Inc. void the user’s warranty.
FCC Notice: This equipment has been tested and found to comply with the limits for a Class
B digital device, pursuant to Part 15 of the FCC Rules. These limits are designed to provide
reasonable protection against harmful interference in a residential installation. This
equipment generates, uses, and can radiate radio frequency energy. If product is not installed
and used in accordance with the instruction manual, it may cause harmful interference to
radio communications; however, there is no guarantee that interference will not occur in a
particular installation. If this equipment does cause harmful interference to radio or television
reception, which can be determined by turning the equipment off and on, the user is
encouraged to try to correct the interference by one or more of the following measures:
1.
Re-orient or relocate the receiving antenna.
2.
Increase the separation between the equipment and receiver.
3.
Connect the equipment to an outlet on a circuit different from that to which the
receiver is connected.
4.
Consult 3Dlabs or an experienced radio/TV technician for assistance.
Compliance with FCC Rules requires that a shielded cable be used to connect to other
equipment. This device complies with Part 15 of the FCC Rules. Operation is subject to the
following two conditions: 1) this device may not cause harmful interference, and 2) this
device must accept any interference received, including interference that may cause undesired
operation.
This Class B digital apparatus meets all the requirements of the Canadian InterferenceCausing Equipment Regulations. Cet appareil numérique de la classe B respecte toutes les
exigences du Règlement sur le material brouilleur du Canada.
3Dlabs, Inc. makes no representation that the use of its products in the manner described in
this publication will not infringe on existing or future patent rights, nor do descriptions
contained in this publication imply the granting of licenses to make, use, or sell equipment or
software in accordance with the description.
Rev. B, September 9, 1999
Page 3

ONTENTS
C
Introduction. . . . . . . . . . . . . . . . . . . . . . . . . . . . . . . . . . . . . . . . . . . . . . . . . . . . . . . . . .v
Welcome to 3Dlabs!. . . . . . . . . . . . . . . . . . . . . . . . . . . . . . . . . . . . . . . . . . . . . . . . vi
Overview . . . . . . . . . . . . . . . . . . . . . . . . . . . . . . . . . . . . . . . . . . . . . . . . . . . . . . . .vii
System Requirements. . . . . . . . . . . . . . . . . . . . . . . . . . . . . . . . . . . . . . . . . . . . . . viii
Software Partners . . . . . . . . . . . . . . . . . . . . . . . . . . . . . . . . . . . . . . . . . . . . . . . . . . ix
Chapter 1 - Installation . . . . . . . . . . . . . . . . . . . . . . . . . . . . . . . . . . . . . . . . . . . . . . . . .1
Getting Ready . . . . . . . . . . . . . . . . . . . . . . . . . . . . . . . . . . . . . . . . . . . . . . . . . . . . .2
Before You Start . . . . . . . . . . . . . . . . . . . . . . . . . . . . . . . . . . . . . . . . . . . . . . . .2
Installing Hardware . . . . . . . . . . . . . . . . . . . . . . . . . . . . . . . . . . . . . . . . . . . . . . . . .3
To remove an old card from your system. . . . . . . . . . . . . . . . . . . . . . . . . . . . . .3
To install your Oxygen card . . . . . . . . . . . . . . . . . . . . . . . . . . . . . . . . . . . . . . .3
To install additional Oxygen GVX1 cards for multiple monitor support. . . . . .5
Installing Software . . . . . . . . . . . . . . . . . . . . . . . . . . . . . . . . . . . . . . . . . . . . . . . . . .6
To uninstall an old video driver. . . . . . . . . . . . . . . . . . . . . . . . . . . . . . . . . . . . .6
To install the Oxygen Windows NT driver . . . . . . . . . . . . . . . . . . . . . . . . . . . .6
To install the Oxygen Windows 98 driver. . . . . . . . . . . . . . . . . . . . . . . . . . . . .6
To install Soft Engine . . . . . . . . . . . . . . . . . . . . . . . . . . . . . . . . . . . . . . . . . . . .7
To install Colorific . . . . . . . . . . . . . . . . . . . . . . . . . . . . . . . . . . . . . . . . . . . . . .7
Registering Oxygen VX1/Oxygen GVX1. . . . . . . . . . . . . . . . . . . . . . . . . . . . . . . . .8
Chapter 2 - Software Configuration . . . . . . . . . . . . . . . . . . . . . . . . . . . . . . . . . . . . . . . .9
The Oxygen VX1/Oxygen GVX1 Driver. . . . . . . . . . . . . . . . . . . . . . . . . . . . . . . .10
The Task Bar - based Configuration Manager. . . . . . . . . . . . . . . . . . . . . . . . 10
The Display Control Panel . . . . . . . . . . . . . . . . . . . . . . . . . . . . . . . . . . . . . . 11
Information Screen . . . . . . . . . . . . . . . . . . . . . . . . . . . . . . . . . . . . . . . . . . . . 12
Setup Screen . . . . . . . . . . . . . . . . . . . . . . . . . . . . . . . . . . . . . . . . . . . . . . . . . 13
Direct3D Support Screen . . . . . . . . . . . . . . . . . . . . . . . . . . . . . . . . . . . . . . . 14
OpenGL Support Screen. . . . . . . . . . . . . . . . . . . . . . . . . . . . . . . . . . . . . . . . 16
Monitor Screen . . . . . . . . . . . . . . . . . . . . . . . . . . . . . . . . . . . . . . . . . . . . . . . 18
Configuring Multiple Monitors. . . . . . . . . . . . . . . . . . . . . . . . . . . . . . . . . . . . . . .19
To configure additional Oxygen GVX1 cards . . . . . . . . . . . . . . . . . . . . . . . . .19
iii
Page 4

Using the Windows Manager. . . . . . . . . . . . . . . . . . . . . . . . . . . . . . . . . . . . . 20
Configuring your Oxygen GVX1 Card for Stereo Viewing. . . . . . . . . . . . . . . . . . 21
To set up and configure stereo viewing. . . . . . . . . . . . . . . . . . . . . . . . . . . . . . 21
Chapter 3 - Troubleshooting. . . . . . . . . . . . . . . . . . . . . . . . . . . . . . . . . . . . . . . . . . . . 24
Troubleshooting . . . . . . . . . . . . . . . . . . . . . . . . . . . . . . . . . . . . . . . . . . . . . . . . . . 25
Monitors and Display Resolutions . . . . . . . . . . . . . . . . . . . . . . . . . . . . . . . . . . . . 25
Systems and Networks . . . . . . . . . . . . . . . . . . . . . . . . . . . . . . . . . . . . . . . . . . . . . 26
Online Information . . . . . . . . . . . . . . . . . . . . . . . . . . . . . . . . . . . . . . . . . . . . . . . 26
Appendix A - Specifications. . . . . . . . . . . . . . . . . . . . . . . . . . . . . . . . . . . . . . . . . . . . . 27
Oxygen VX1 Specifications. . . . . . . . . . . . . . . . . . . . . . . . . . . . . . . . . . . . . . . . . . 28
Oxygen GVX1 Specifications . . . . . . . . . . . . . . . . . . . . . . . . . . . . . . . . . . . . . . . . 28
Monitor Resolutions. . . . . . . . . . . . . . . . . . . . . . . . . . . . . . . . . . . . . . . . . . . . . . . 28
Appendix B - Software License . . . . . . . . . . . . . . . . . . . . . . . . . . . . . . . . . . . . . . . . . . 29
SOFTWARE LICENSE AGREEMENT . . . . . . . . . . . . . . . . . . . . . . . . . . . . . . . 30
Software License and Restrictions. . . . . . . . . . . . . . . . . . . . . . . . . . . . . . . . . . 30
Limited Warranty . . . . . . . . . . . . . . . . . . . . . . . . . . . . . . . . . . . . . . . . . . . . . . . . . 31
Limited Liability . . . . . . . . . . . . . . . . . . . . . . . . . . . . . . . . . . . . . . . . . . . . . . 31
Restricted Rights Notice. . . . . . . . . . . . . . . . . . . . . . . . . . . . . . . . . . . . . . . . . 31
Termination. . . . . . . . . . . . . . . . . . . . . . . . . . . . . . . . . . . . . . . . . . . . . . . . . . 32
General . . . . . . . . . . . . . . . . . . . . . . . . . . . . . . . . . . . . . . . . . . . . . . . . . . . . . 32
Appendix C - Regulatory Statements. . . . . . . . . . . . . . . . . . . . . . . . . . . . . . . . . . . . . . 33
Declaration of Conformity . . . . . . . . . . . . . . . . . . . . . . . . . . . . . . . . . . . . . . . . . . 34
Appendix D - Glossary . . . . . . . . . . . . . . . . . . . . . . . . . . . . . . . . . . . . . . . . . . . . . . . . 35
Terms and Definitions . . . . . . . . . . . . . . . . . . . . . . . . . . . . . . . . . . . . . . . . . . . . . 36
Index. . . . . . . . . . . . . . . . . . . . . . . . . . . . . . . . . . . . . . . . . . . . . . . . . . . . . . . . . . . . . . 41
iv 3Dlabs Oxygen VX1/GVX1 User’s Guide
Page 5

NTRODUCTION
I
Page 6

Welcome to 3Dlabs!
Welcome to 3Dlabs!
Thank you for selecting a 3Dlabs® Oxygen™ graphics accelerator card!
®
The Oxygen VX1 accelerator uses 3Dlabs’ new GLINT
genuine, industrial strength workstation graphics for the same price as a games-only board.
Oxygen GVX1 is the first workstation graphics board to bring the heavy-duty power of
hardware-based geometry acceleration below $1,000. Oxygen GVX1 integrates the GLINT
R3 rasterization and the GLINT Gamma G1 geometry processing hardware on a single card.
Both cards use innovative 3Dlabs’ technologies, like PowerThreads™ SSE software to
distribute OpenGL throughput across multiple processors, and Virtual Textures to shatter the
limitations of on-board graphics memory.
Oxygen VX1
R3 graphics processor to deliver
Oxygen GVX1
vi 3Dlabs Oxygen VX1/GVX1 User’s Guide
Page 7

Overview
Your Oxygen card has the following features:
• The GLINT R3 rasterization engine
The GLINT R3 rasterization engine accelerates tasks like true-color shading, texture
mapping, anti-aliasing, and transparency operations.
• Virtual Textures
Virtual Textures is a hardware-based, full demand-paged virtual texture storage
sub-system. With it, your Oxygen card can cache up to 256MB of textures stored in
main system memory.
• PowerThreads SSE geometry processing
PowerThreads SSE software distributes OpenGL operations across multiple CPU’s
(where available) for faster rendering of your files, and leverages the Intel® Pentium®
III and Pentium III Xeon™ Streaming SIMD extensions for optimal geometry and
lighting performance.
• 32 MB memory
32 MB of SDRAM (Oxygen VX1) or SGRAM (Oxygen GVX1) memory supports
high-precision, high-performance acceleration.
Overview
• High-precision, high resolution display
Your Oxygen card has a 300 MHz RAMDAC enabling flicker-free resolutions up to
2048 x 1536.
• 16, 24, and 32-bit linear Z-buffer
The Z-buffer provides the highest level of depth-precision, even at the highest
resolutions.
• Full AGP sideband addressing
Sideband addressing ensures high-performance 3D acceleration through the
advanced features of the AGP bus.
• SoftEngine AutoCAD support
SoftEngine enhances AutoCAD R12, R13, R14, and LT performance by up to four
times on Windows NT systems.
• Colorific screen-to-print color matching
Colorific simplifies color matching without sacrificing accuracy.
• Optimized Application Settings
Your card comes with preset driver configurations for mainstream Direct3D and
OpenGL applications. You can quickly switch between configurations at any time
with several mouse clicks on the Windows Taskbar and also create your own settings.
Introduction vii
Page 8

System Requirements
The Oxygen GVX1 card adds:
• GLINT Gamma G1 geometry processing
The GLINT Gamma G1 chip accelerates the 3D geometry pipeline in hardware,
performing all vertex transformation and lighting calculations required by OpenGL
applications.
• Dynamic load balancing
When the GLINT Gamma processor is busy, geometry and transform calculations
are automatically shared between the CPU and the GLINT Gamma.
• Digital Flat Panel support
Oxygen GVX1 allows direct connection of a digital, flat-panel display for
dramatically improved on-screen image quality at resolutions up to 1280 x 1024.
• Quad-buffered stereo
Left and right buffers are flipped simultaneously to preserve synchronization in your
stereo 3D images at resolutions up to 1280 x 1024.
• Multiple Monitor Support
By installing additional Oxygen GVX1 cards, you can support up to four monitors
with full windows management capabilities.
System Requirements
Your system needs the following features in order to support Oxygen VX1:
• Intel-compatible, 166 MHz (minimum) system
®
• Windows
• 64 MB RAM (Random Access Memory)
• 16 MB minimum available hard drive space
• AGP expansion slot for AGP-based Oxygen VX1 cards
• VGA multisync monitor
Oxygen GVX1 requires these features:
• Intel-compatible, 166 MHz (minimum) system
• Windows
• 64 MB RAM (Random Access Memory)
• 16 MB minimum available hard drive space
• AGP expansion slot for AGP-based Oxygen GVX1 cards
• PCI expansion slot for PCI-based Oxygen GVX1 cards
• VGA multisync monitor
95, 98, or NT 4.0 (or later) operating system
®
NT 4.0 (or later) operating system, SP4 (or later)
viii 3Dlabs Oxygen VX1/GVX1 User’s Guide
Page 9

Software Partners
Software Partners
Your Oxygen VX1/Oxygen GVX1 card has been tested with a variety of graphics software
packages, several of which are listed below. As testing continues and performance
optimizations are made, the results and techniques are posted on the 3Dlabs, as well as the
appropriate software partner’s, website.
Software Application Web Site Address
AutoCAD http://www.autodesk.com
Colorific http://www.colorific.com
3D Studio MAX http://www.ktx.com
Lightscape http://www.lightscape.com
LightWave 3D http://www.newtek.com
Maya http://www.aw.sgi.com
MicroStation http://www.bentley.com
Pro/ENGINEER http://www.ptc.com
SDRC I-DEAS http://www.sdrc.com
Softimage | 3D http://www.softimage.com
SolidWorks http://www.solidworks.com
Unigraphics http://www.ug.eds.com/ug/
Introduction ix
Page 10

C
HAPTER
1 - I
NSTALLATION
Page 11

Getting Ready
Getting Ready
To successfully use your new Oxygen VX1 or Oxygen GVX1 card, you must install the card
and the accompanying driver software. Whether you install your new card or the driver first
depends on whether a video card is already present in your system.
If there is a video card in your system: Uninstall the drivers for the existing card, then install
the Oxygen driver. Once the new driver is loaded, remove the old card and install your
Oxygen VX1 or Oxygen GVX1 card. The instructions for uninstalling an old driver and
installing the new driver begin on page 6.
If there is not a video card in your system: Install your new card as described in the Installing
Hardware section, below, then install the driver.
Once the basic installation is complete, you can choose to install the SoftEngine and Colorific
enhancements as described on page 7.
Be sure to register your new card using one of the options described
N
!
OTE
on page 8.
✏
Before You Start
• Take every possible precaution against static electricity as you prepare to install the
card: static can damage components. We have included an anti-static wrist strap for
you to wear while installing the hardware: you should also try to work in a static free
area (such as on a tile floor rather than carpet). You might even consider wearing
special ESD, or at least rubber-soled, shoes.
• Save any work in progress and exit any open applications. Always back up your
system before you install new hardware or software.
• Have your anti-static strap and a Philips-head screwdriver ready.
2
Page 12

Installing Hardware
Installing Hardware
Oxygen GVX1 and Oxygen VX1 cards are available in PCI and AGP versions. Check the
documentation for your system for the location of PCI and AGP expansion slots in your
system.
✏
To remove an old card from your system
1.
Make sure you have uninstalled any old drivers and installed the Oxygen driver in
their place.
2.
Turn off and unplug the power source for your system and each of
its peripherals.
3.
Unplug the monitor cable from the old card.
4.
Remove the cover from your system.
5.
Attach the anti-static strap to your wrist, and attach the other end to a bare,
conductive (as opposed to painted or sticker-covered) area of your system’s chassis.
6.
Remove any screws securing the card to the chassis.
7.
Lift the card out of the slot.
✏
To install your Oxygen card
1.
Turn off and unplug the power source for your system and each of its peripherals, if
you have not already done so.
2.
Remove the cover from your system so you can access an appropriate expansion slot.
See your system documentation for AGP and PCI slot locations.
3 3Dlabs Oxygen VX1/GVX1 User’s Guide
Page 13

Installing Hardware
3.
Determine which slot you are going to use and remove its slot cover.
4.
Attach the anti-static strap to your wrist, and attach the other end to a bare,
conductive (as opposed to painted or sticker-covered) area of your system’s chassis.
5.
Remove the card from its anti-static packaging. WWrite down the serial number for
registration and future use.
6.
Place the card into the expansion slot and seat it firmly.
I
MPORTANT
See your system documentation for instructions on securing the
!
card to the chassis. Loose cards and connections can cause grounding
and operating problems.
4
Page 14

Installing Hardware
7.
Oxygen GVX1 users can install additional Oxygen GVX1 PCI cards for multiple
monitor support. To install a second Oxygen GVX1 card, repeat steps 3 through 6.
8.
Remove the anti-static strap and replace the cover on your system.
9.
Connect the video cable from your monitor to the video connector on the card.
Digital flat panel
display connector
Standard monitor
connector
Oxygen GVX1
Standard monitor
connector
Oxygen VX1
10 .
Plug in and start up your system, including peripherals, and log on to your operating
system.
✏
To install additional Oxygen GVX1 cards for multiple monitor support
• Repeat the steps in "To install your Oxygen card" to install up to a total of four
Oxygen GVX1 cards in your system. Install an additional Oxygen GVX1 card in any
available AGP slot for an AGP card or PCI slot for a PCI card.
5 3Dlabs Oxygen VX1/GVX1 User’s Guide
Page 15

Installing Software
Installing Software
The
Oxygen Product CD-ROM for the Oxygen VX1/Oxygen GVX1
includes Oxygen
PowerThreads video driver software, which lets you set image quality and performance
preferences for your card. It also includes the Soft Engine AutoCAD accelerator and
productivity tool package, and Colorific screen-to-print color matching software. Installing
Soft Engine on your AutoCAD equipped system will improve graphics performance by up to
four times, while Colorific painlessly ensures that what you see is what you print.
This section describes the three software installation processes for supported Windows
operating systems.
✏
To uninstall an old video driver
1.
If there is an icon for the video card on the taskbar, desktop, or on the Control Panel,
select the icon and then check for an uninstall option. If an uninstall option exists,
select the option and follow the instructions. (To display the Control Panel, click the
Start button, point to Settings, and click Control Panel.)
2.
If an uninstall option does not exist, click the Start button, point to Settings, and
click Control Panel.
3.
Double-click the Add/Remove Programs icon.
4.
Click the name of the video card driver you want to remove.
5.
Click Add/Remove and follow the instructions.
✏
To install the Oxygen Windows NT driver
1.
Start up Windows. If you are running Windows NT, log onto an account with
administrator privileges.
2.
Place the Oxygen Product CD-ROM in your CD-ROM drive. When the installation
window opens, choose the Oxygen driver installation.
3.
Follow the instructions that appear on your screen. (Be sure to read the software
license agreement.)
4.
Restart your system at the prompt.
✏
To install the Oxygen Windows 98 driver
1.
After installing your Oxygen graphics card, restart your system. Windows 98
automatically detects the new hardware and starts the New Hardware Wizard.
2.
In the Add New Hardware Wizard, click Next.
3.
Insert the Oxygen Product CD in the CD drive.
4.
Confirm that
Specify a Location
is selected, and then type xx:\Win98 (where "x" is the
letter of your CD drive).
6
Page 16

Installing Software
5.
Click Next in the next two steps of the wizard. The wizard copies the files to the
correct location.
6.
Click Finish, and then restart your system.
✏
To install Soft Engine
Soft Engine works exclusively with AutoDesk’s AutoCAD R12, R13,
N
!
OTE
R14, and LT software. Install Soft Engine if you use one of these AutoCAD
programs. Do not install Soft Engine if you do not use one of these AutoCAD
programs; it will have no beneficial effect.
1.
Place the Oxygen Product CD-ROM in your CD-ROM drive. When the installation
window opens, choose Install Soft Engine. A menu appears.
2.
Select your AutoCAD product type to start the installation.
3.
Follow the instructions that appear on your screen.
✏
To install Colorific
1.
Place the Oxygen Product CD-ROM in your CD-ROM drive. When the installation
window opens, choose the Colorific installation.
2.
Follow the instructions that appear on your screen.
7 3Dlabs Oxygen VX1/GVX1 User’s Guide
Page 17

Registering Oxygen VX1/Oxygen GVX1
Registering Oxygen VX1/Oxygen GVX1
When you register your Oxygen card you:
• Activate your warranty
• Receive notification of software updates
• Qualify for technical support
You can complete the registration card and return it to us in the mail, or register on-line once
your hardware and software installations are complete. (You must have Internet access to
register on-line.)
1.
Open your Internet browser.
2.
Go to http://www.3dlabs.com/register
3.
Fill out the registration form that appears on your screen, and click Submit when you
are finished.
8
Page 18

HAPTER
C
2 - S
OFTWARE CONFIGURATION
Page 19

The Oxygen VX1/Oxygen GVX1 Driver
The Oxygen VX1/Oxygen GVX1 Driver
The Oxygen driver software lets you optimize the working relationship between your card,
your system and your applications. The 3Dlabs Display Control Panel allows you to
customize and create driver settings. The Taskbar based Configuration Manager provides
quick and convenient access to most of the Display Control Panel features, and allows you to
quickly switch between alternative driver settings.
The Task Bar - based Configuration Manager
When you install the Oxygen VX1/Oxygen GVX1 card and software, the 3Dlabs logo
appears in your system tray, also called the task bar. Click the logo with your right mouse
button to access the Display Configuration Manager and its shortcuts to these configuration
tools:
•
Remove from System Tray
lets you delete this task bar utility from your system. You
will still be able to access the driver configuration options with the Display Control
Panel.
•
About 3DL Display Manager
displays version information for this configuration
utility.
•
Go to 3Dlabs Website
takes you directly to www.3dlabs.com through your existing
Internet connection.
•
Pop up the Display Panel
•
Display Driver Information
reaches the 3Dlabs section on the display control panel.
provides quick access to information about your Oxygen
card configuration.
•
Change Display Resolution
brings up a pop-up list of supported resolutions. Each
resolution has an associated pop-up list of available refresh rates.
•
Select Optimized Application
quickly accesses a list of supported applications. Click an
application in the list to optimize card settings for your selected option. (The Display
Control Panel allows you to create new application settings.)
•
N
OTE
provides standard Windows-style help on the driver and its settings.
Help
The Control Panel and the Configuration Manager are not supported by
!
Windows 95.
10
Page 20

The Oxygen VX1/Oxygen GVX1 Driver
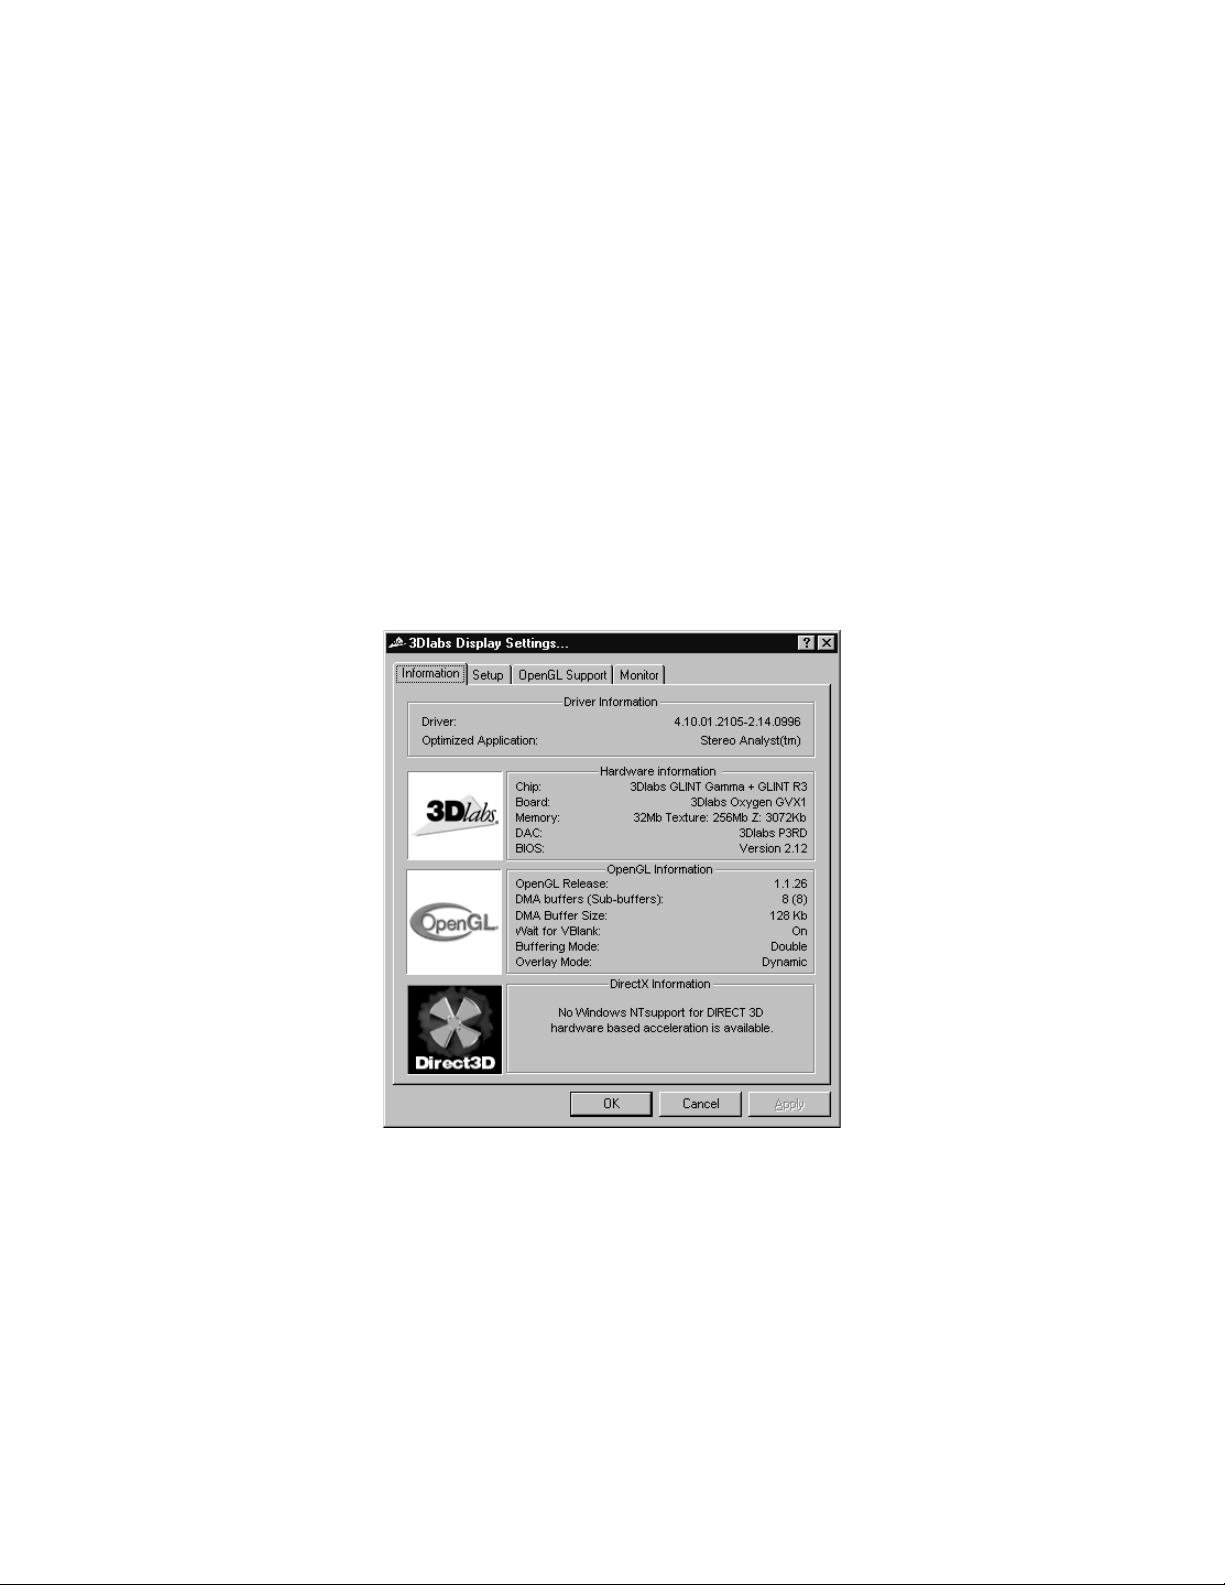
The Display Control Panel
When you first click the 3Dlabs tab in the Display Control Panel, this introductory page
appears:
It provides software version and basic hardware specifications, and a point-of-entry to the full
set of Oxygen driver customization tools. Click the Advanced button for access to these
panels:
• Information
• Setup
• Direct3D (Windows 98 only)
• OpenGL Support
• Monitor (Windows NT only)
The following sections describe each in detail.
11 3Dlabs Oxygen VX1/GVX1 User’s Guide
Page 21

The Oxygen VX1/Oxygen GVX1 Driver
Information Screen
The Information screen provides in-depth information about your selected (or the default)
settings, as well as detailed hardware, software, and Direct3D specifications. This information
can be especially useful if you should need to contact technical support about your Oxygen
card.
12
Page 22

The Oxygen VX1/Oxygen GVX1 Driver
Setup Screen
The Setup screen lets you configure settings that are not specifically related to Direct3D or
OpenGL.
• You can enable (check) and disable (uncheck) the
Manager
, which requires a system restart. This option is only available if there is more
3Dlabs multi-monitor Windows
than one 3Dlabs display card in the system.
• You can enable (check) or disable (uncheck) the
Configuration Manager
with a mouse click. The default setting is enabled. This
Taskbar based
application provides quick access to the main features of the Control Panel. When
the taskbar application is enabled, it appears on the taskbar (system tray) each time
the system is started. To remove the application from the taskbar, disable (uncheck)
the option and restart the system.
• The
Gamma Adjustment
slider on the Setup screen lets you simultaneously adjust
RGB color curves and define the color output for your display. You can also enter a
precise Gamma value, rather than use the slider, when you know which value is
appropriate for your monitor and ambient lighting conditions.
13 3Dlabs Oxygen VX1/GVX1 User’s Guide
Page 23

The Oxygen VX1/Oxygen GVX1 Driver
Direct3D Support Screen
The Direct3D Support screen controls Direct3D application specific driver settings for
Oxygen VX1 Windows 98 users, and lets you create your own settings. When the panel first
appears, the
Defaults, Add New
section, are hidden. They appear when you click the
and
Remove Settings
buttons, as well as the
Advanced
button.
Advanced Options
• Click
Driver is optimized for application
to reach a drop down list of Direct3D
applications, then select the application you want to use. The rest of your selections
on this screen will apply to the specified application. You can also click
optimized application
in the Configuration Manager and select your application from
Select
that pop-up list.
• The
Add New
will remove user created settings, but will not remove the default settings
Setting
created at driver installation time.
•
Texture Origin at Top Left Corner
button lets you create a new setting, with a user specified name.
Default
will restore the factory default settings.
shifts textures slightly as they are applied to objects,
and may result in better image quality with some applications.
•
8Bit RGB textures
enables Direct3D support for 8bit textures that do not use a
separate “look-up” table to specify color. These can be useful for applications which
use the new features of DirectX 6, but older applications can misinterpret these new
formats. If you have problems such as incorrect colors or poor quality texturing, try
disabling this option.
Remove
14
Page 24

The Oxygen VX1/Oxygen GVX1 Driver
•
Disable 16-bit alpha-luminance
textures enables Direct3D support for monochrome
(luminance) textures. These can be useful for applications which use the new features
of DirectX 6, but older applications can misinterpret these new formats. If you have
problems such as incorrect colors or poor quality texturing, try disabling this option.
•
Enable Palettized textures
enables Direct3D support for 8bit textures which use a
separate “look-up” table to specify the color. These are useful for graphics cards with
a small amount of memory. However, they can be slower than the alternatives
available on cards with large amounts of memory. For best performance this option
should only be enabled for applications that will not operate correctly otherwise.
•
Disable Direct3D Gamma Controls
lets you turn off DirectX gamma control if you
experience an extremely dark screen, potentially caused by an application’s use of an
incorrect default.
•
Gamma adjustment for this application
affects the entire screen display. As with the
contrast on your television, you can adjust this value if your application causes the
display to consistently look too dark or too light.
15 3Dlabs Oxygen VX1/GVX1 User’s Guide
Page 25

The Oxygen VX1/Oxygen GVX1 Driver
OpenGL Support Screen
This screen controls OpenGL-application-specific driver settings and enables you to create
your own settings. When the panel initially appears the
well as the
Advanced Options
section, are hidden. They appear when you click the
button at the top of the screen.
New
and
Remove Settings
buttons, as
Advanced
• Click
Driver is optimized for application
to reach a drop down list of applications,
then select the one you want to use. The rest of your actions on this screen will apply
to that choice. You can also click
Select optimized application
in the Configuration
Manager and select your application from that pop-up list.
• Click
to add an application to the list and customize its settings.
New
Remove Setting
will remove a user created setting, but will not remove default settings created at
driver installation time.
•
Number of DMA Buffers
lets you configure the number of visible 3D windows that
can be supported with full speed acceleration. For most applications, 8 buffers is
sufficient.
•
Size of each DMA buffer
controls the size (in bytes) of the Direct Memory Access
(DMA) buffer. DMA is a technique whereby a device can directly read commands
from host memory.
•
Number of DMA Sub-Buffers
lets you set the number of Direct Memory Access
(DMA) buffers allocated for use by OpenGL. (DMA is a technique whereby a device
can directly access memory without having to go through the CPU). Each DMA
16
Page 26

The Oxygen VX1/Oxygen GVX1 Driver
buffer is sub-divided into sub buffers which are used in conjunction with a queued
DMA mechanism to reduce latency in the system. The number of sub buffers can be
set. Setting it to 2 will disable the queued DMA mechanism.
•
Overlay / Alpha Mode
provides additional control of the overlay plane capabilities
exported in the OpenGL pixel formats. It is specific to just two applications:
is required by the Alias / Wavefront application “Maya” where retained alpha
Only
planes are required (e.g. the particle system package), and
Parametric Technology application “Pro/3DPaint”. Selection of the above
applications from the application menu cause the correct mode to be set
automatically. The
•
Wait for V blan k
Dynamic
lets you determine whether the OpenGL driver will attempt to
synchronize screen updates to the vertical blanking interval. Smooth animation of 3D
applications can be achieved by rendering (drawing) to an off-screen window/
desktop-sized color buffer and copying or swapping the contents to the displayable
front buffer at the completion of each frame.
Visible "tearing" can occur if
gives the highest rendering frame rates of double buffered applications. You should
disable this option, for instance, when running benchmarks.
Overlay Only
setting should be chosen for all other cases.
Wait for V Blank
is not selected. Disabling this option
Alpha
is for the
•
Stereo View Support
can be enabled (checked) and disabled (unchecked). This option
provides control over the export of stereo capable OpenGL pixel formats. You should
enable this option when there is a requirement to run OpenGL applications that
require stereo support, since additional graphics memory resources are consumed
when stereo is enabled. The stereo support provided is quad buffered and frame
interleaved. You must restart your system for a change to this setting to take effect.
For additional information, see “Configuring your Oxygen GVX1 Card for Stereo
Viewing” on page 21.
17 3Dlabs Oxygen VX1/GVX1 User’s Guide
Page 27
The Oxygen VX1/Oxygen GVX1 Driver
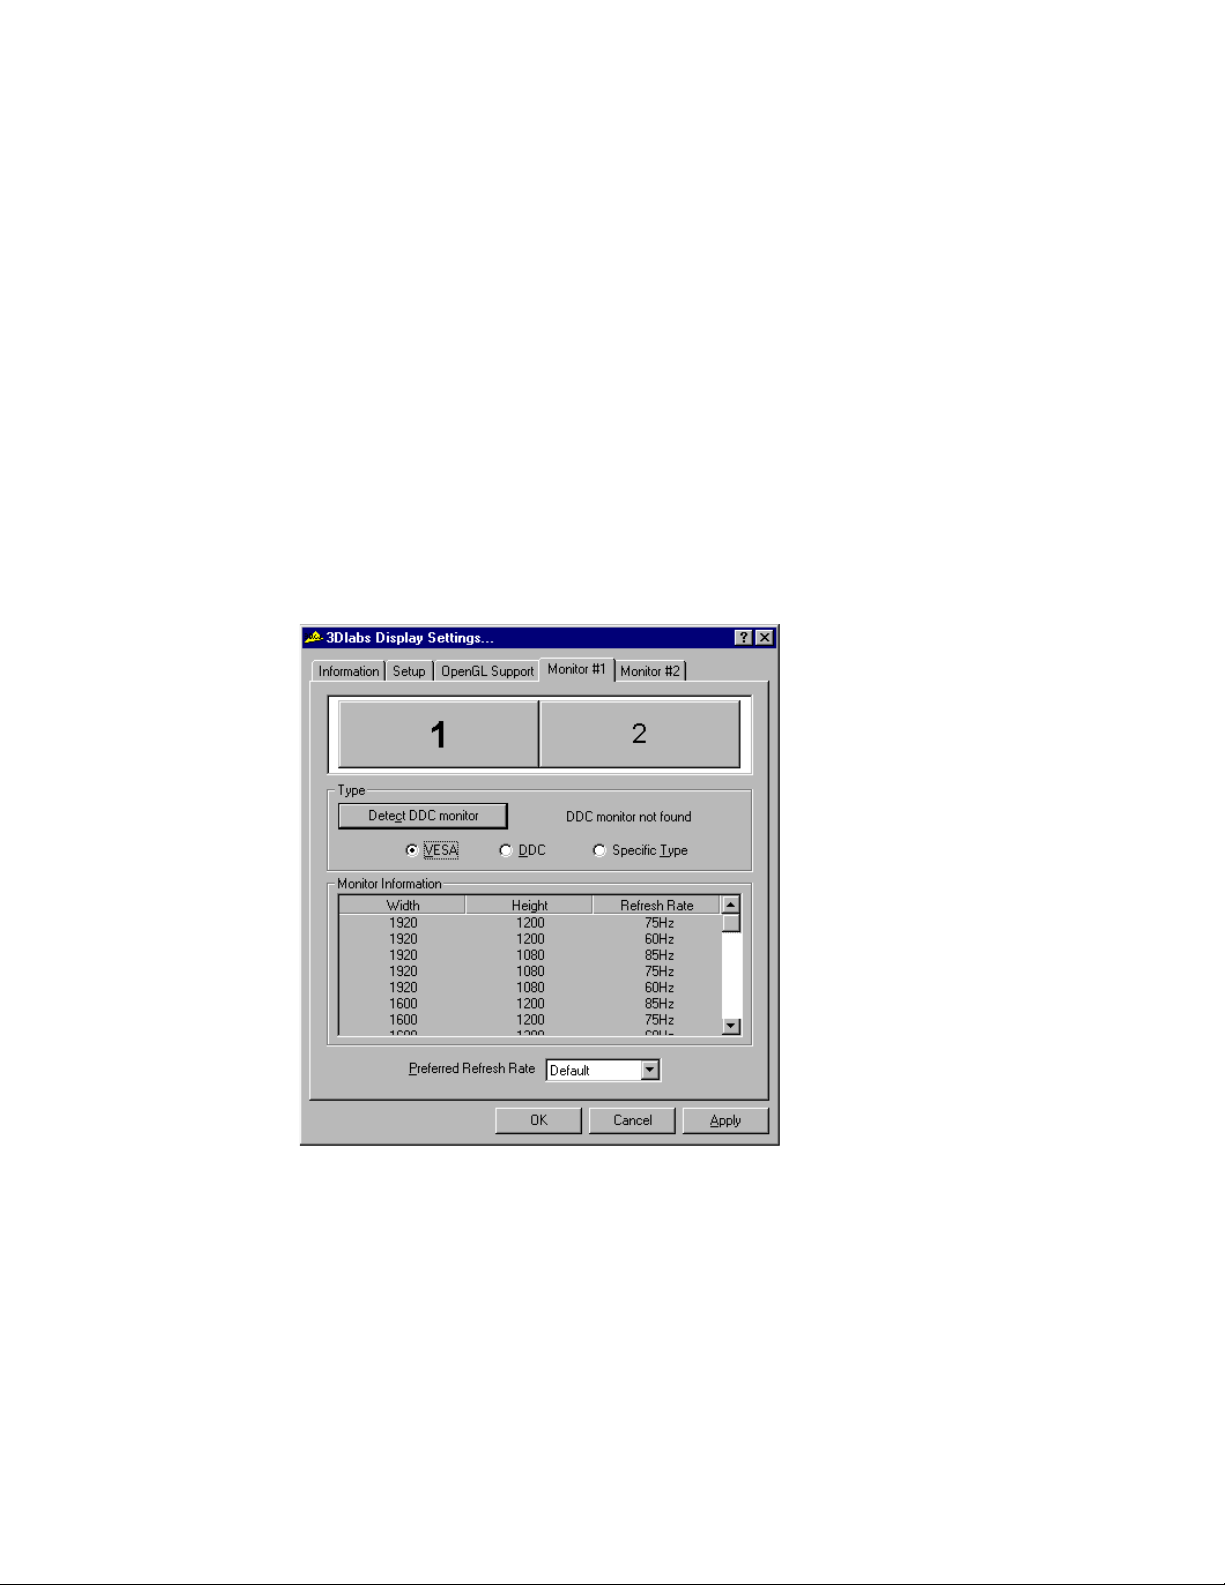
Monitor Screen
This page allows Windows NT users to specify a monitor type and display the available
settings, but it does not permit the actual selection of different monitor modes. To select
modes, click the Settings tab at the top of the Display Properties panel.
When you open the Display Properties panel and the DDC button is selected, your system
automatically checks whether it is connected to a DDC-type monitor. If so, the available
modes will be displayed. It is possible, however, for the display settings to fall out of
synchronization. This can happen, for example, if you hot-swap monitors. The Detect DDC
monitor button lets you manually tell your system to look for the DDC monitor again.
The
panel, and allows you to select a different type if desired. The
supported monitors. If your monitor is shown in this list, select
section shows which type of monitor was detected when you opened the control
Ty pe
Monitor Information
Specific Type
in the
section lists
Ty pe
section. If your monitor does not appear in the list and is not a DDC-type monitor, select
.
VESA
18
Page 28

Configuring Multiple Monitors
Configuring Multiple Monitors
You can configure your system to support up to four monitors by installing additional Oxygen
GVX1 cards and connecting additional monitors.
✏
To configure additional Oxygen GVX1 cards
1.
In the Display Properties Control Panel, click the Settings tab.
2.
Click List All Modes.
3.
In the List of Valid Modes click a resolution and then click OK. Select a resolution
that is twice the width of your current resolution. For example, if your current
resolution is 1024 x 768, select 2048 x 768, 75 Hertz for your new resolution.
19 3Dlabs Oxygen VX1/GVX1 User’s Guide
Page 29
Configuring Multiple Monitors
4.
On the Display Properties Panel, click Test. This tests the new mode on the second
monitor screen for five seconds.
5.
Click Ok to test the new mode.
6.
Click OK if you saw the test bitmap correctly.
7.
In the Display Properties Control Panel, click OK. Your second Oxygen GVX1 card
is now configured for dual monitor mode.
✏
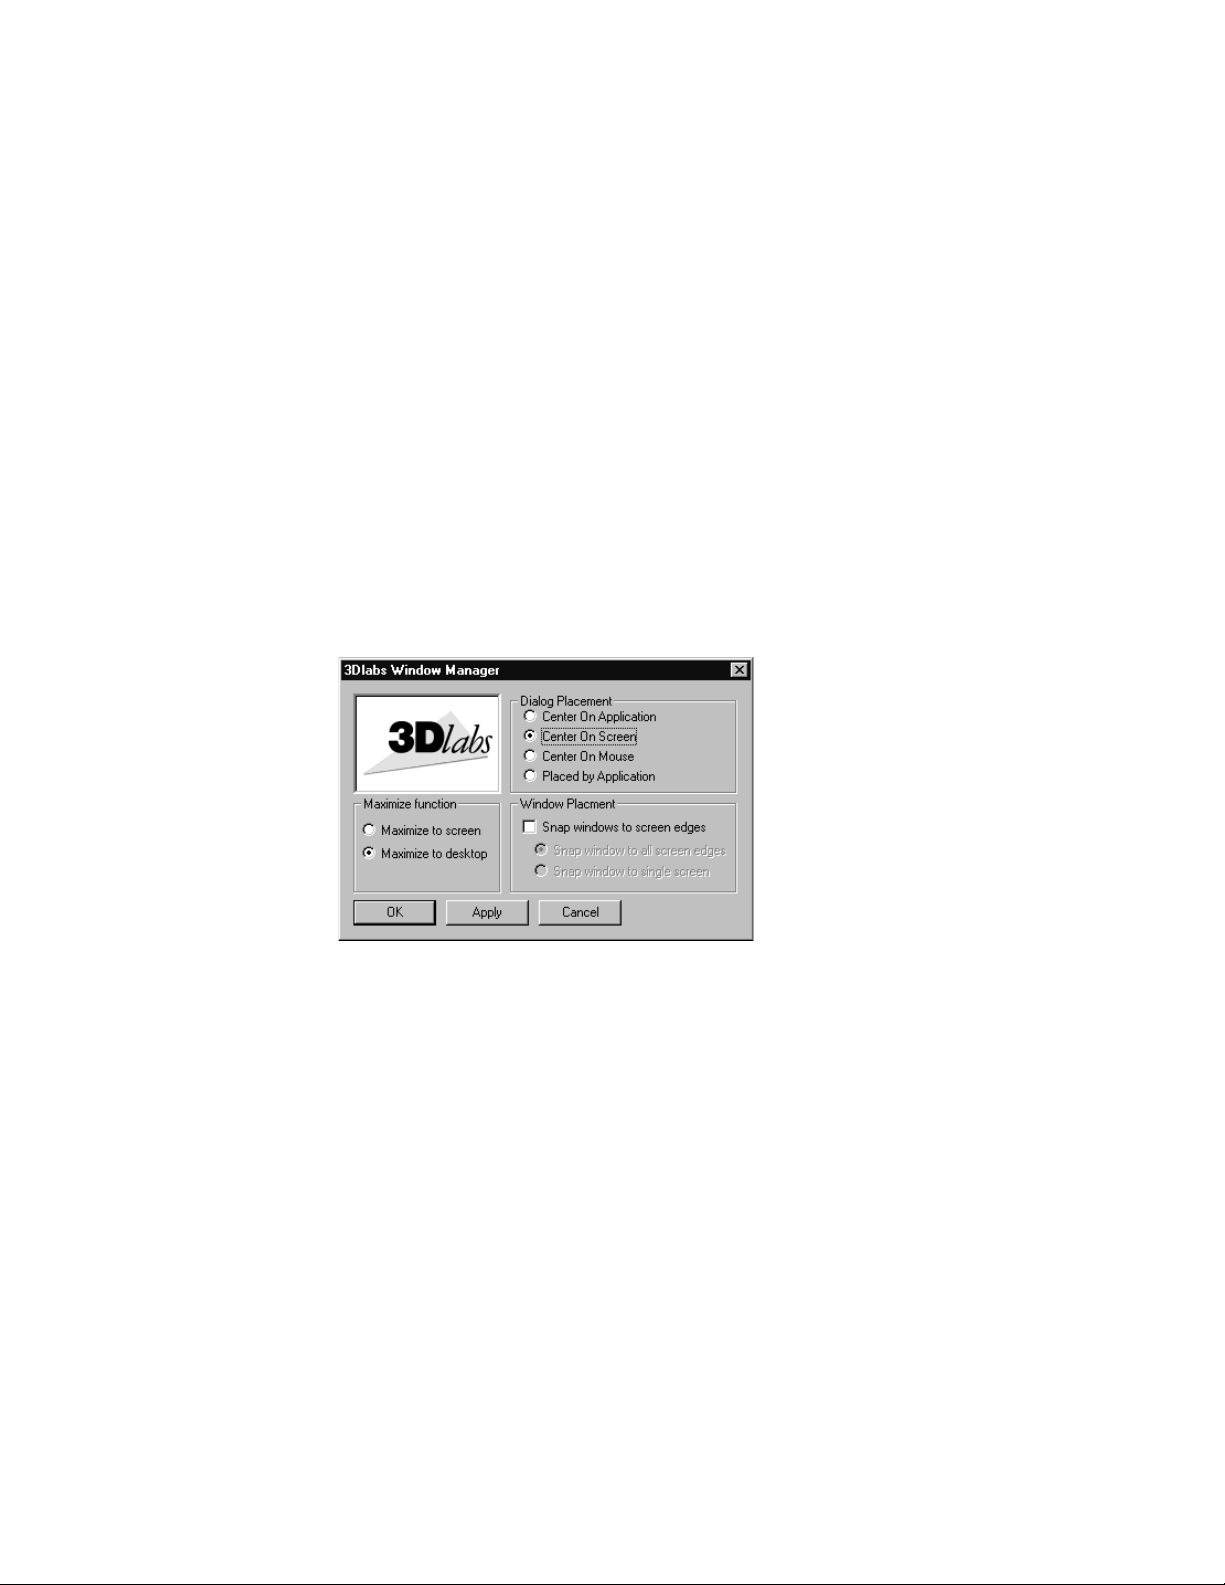
Using the Windows Manager
The 3Dlabs Window Manager provides enhanced control over the positioning of
windows and dialog boxes in multi-monitor systems. When running in single monitor
mode, the Window Manager is disabled. To access the Window Manger, right-click the
title bar of any window and select 3Dlabs WM from the drop-down menu.
1.
Right-click the toolbar.
2.
Select 3Dlabs WM, select Preferences, and then click Windows Manager.
3.
Select the display options you want and click OK.
Maximize Function
lets you maximize windows to one monitor screen or to span
windows across the desktop of both monitor screens.
Display Placement
Windows Placement
lets you specify the placement of dialog boxes on your monitor.
lets you specify placement of windows in 3D applications. You
can specify that windows be split across two monitors or kept to a single monitor
screen.
Click Apply and then click OK. These settings will apply to all future work sessions
4.
until you change them.
20
Page 30
Configuring your Oxygen GVX1 Card for Stereo Viewing
Configuring your Oxygen GVX1 Card for Stereo Viewing
The Oxygen GVX1 card supports 3D stereo viewing. This requires that the appropriate
equipment such as stereo glasses be connected to the 3-pin miniature DIN connector on the
Oxygen GVX1 card. It is recommended that you use a monitor with a vertical refresh
frequency of at least 100 Hertz.
In addition, it is recommended that you turn off fluorescent lighting before viewing stereo
images to prevent a possible headache.
✏
To set up and configure stereo viewing
1.
Connect the stereo hardware to the round, stereo connector at the top of the Oxygen
GVX1 card. See the documentation that came with your stereo hardware.
2.
In the Display Properties Control Panel, click the 3Dlabs tab.
3.
In the 3Dlabs Display Properties screen, click Advanced.
4.
Click the OpenGL Support tab.
21 3Dlabs Oxygen VX1/GVX1 User’s Guide
Page 31
5.
In the OpenGL Support screen, click Advanced.
Configuring your Oxygen GVX1 Card for Stereo
6.
Click the checkbox to the right of Stereo Support to select it.
7.
Click Apply and then click OK.
8.
In the Display Settings Control Panel, click the Settings tab.
9.
Click List All Modes.
10 .
Select a screen refresh frequency of 100 Hertz or higher and then click OK. If you are
using a DDC-type monitor, modes with suitably high refresh rates should be
available in the List of Valid Modes. If no high refresh modes are listed, open the
Display Properties Control Panel, click the 3Dlabs tab, and then click the Monitor
22
Page 32

Configuring your Oxygen GVX1 Card for Stereo Viewing
tab. Click DDC and check for stereo settings. If they still do not appear, click VESA
and check again. If necessary, restart your system.
11.
On the Display Properties Panel, click Test. This tests the new mode on the monitor
screen for five seconds.
12 .
Click OK to test the new mode.
13 .
Click OK if you saw the test bitmap correctly.
14 .
In the Display Properties Control Panel, click OK. Your Oxygen GVX1 card is now
configured for stereo viewing.
23 3Dlabs Oxygen VX1/GVX1 User’s Guide
Page 33

C
HAPTER
3 - T
ROUBLESHOOTING
Page 34

Troubleshooting
Troubleshooting
If you have trouble using your Oxygen VX1/Oxygen GVX1 card or a 3D application, you
may find the answer to your problem in the following sections. Always start your problemsolving efforts with the simplest solution and work up to the more complex ones.
Monitors and Display Resolutions
Q
UESTION
S
OLUTION
S
OLUTION
S
OLUTION
S
OLUTION
Q
UESTION
S
OLUTION
S
OLUTION
S
OLUTION
S
OLUTION
My monitor is either blank, or the displayed image is distorted, scrambled
:
or smaller than I expected.
If the monitor is blank, be sure that your system and monitor are plugged in
:
and turned on. Is the monitor’s power cord attached securely? Check each
component’s documentation for the location and use of power connectors
and switches.
Make sure that your video cable is connected securely to the monitor
:
the monitor connector on your Oxygen card. See your monitor
documentation and
Your card might not be seated properly in the AGP slot. Remove and
:
reinstall your card as described in
Chapter 1 - Installation
Chapter 1 - Installation
, in this document.
. Remember to use
the anti-static wrist strap when opening your system and handling the card.
If you have multiple Oxygen cards installed, try connecting the monitor
:
cable to one of the other Oxygen cards and then refer to the section
“Configuring Multiple Monitors” on page 19.
The performance of and/or the available resolutions for my Oxygen card
:
are not what I expected.
The Oxygen driver may not have installed fully, or a file may have been
:
corrupted. Try installing the driver again.
You may have selected a display setting that is incompatible with accelerated
:
3D graphics applications. See the Monitor Screen in your 3Dlabs display
control panel for a list of compatible resolutions. Monitor screen
information appears on page 18 in this guide.
If the performance is different from what you expected, check to see that the
:
correct application or setting has been selected in the Optimized Application
Setting in the Taskbar Based Configuration Manager.
If the performance is different from what you expected, check to see that the
:
Wait for V Blan k
setting has been set correctly in the Display Control Panel
under Direct3D Support or OpenGL Support.
and
to
Q
UESTION
When I restart my system, an “Invalid Display Settings” message appears
:
on-screen, followed by “The default display resolution has been
temporarily used by the system.”
25 3Dlabs Oxygen VX1/GVX1 User’s Guide
Page 35

Systems and Networks
S
OLUTION
Within a few seconds, the error messages should be replaced by a window
:
that allows you to set a display resolution. Pick your preferred resolution
from the list and you should get the sharp results you expected.
Systems and Networks
Q
UESTION
S
OLUTION
Since installing the Oxygen card, my system either hangs or crashes to a
:
blue screen when I try to start up, or the system starts up but VGA
graphics don’t display.
Try to disable “VGA Palette Snoop.” Follow these steps.
:
1.
Remove the Oxygen card and reinstall your old graphics card. See
Chapter 1 - Installation
2.
Restart your system and enter Setup at the on-screen prompt. The key
command to enter Setup can differ with each BIOS, so consult your
system documentation if you do not see the command displayed as the
system boots.
3.
Disable VGA Palette Snoop, again consulting your system
documentation for its specific location in your BIOS.
4.
Choose Exit and Save Settings.
5.
Shut down, remove your old graphics card, and reinstall your Oxygen
card.
, for instructions.
S
OLUTION
Make sure that you are not using an old graphics board driver, and that you
:
have uninstalled any other graphics drivers — particularly those provided by
other companies using 3Dlabs chipsets.
S
OLUTION
Please see the Oxygen and Permedia System Integration Guide in the
:
Troubleshooting FAQ section at
http://www.3dlabs.com/support
S
OLUTION
You may need to update your system BIOS. See your system documentation
:
for system BIOS update information.
Q
UESTION
S
OLUTION
I’m experiencing network problems since I installed my Oxygen card.
:
You may need to reinstall or update your Ethernet driver. See your system or
:
Ethernet adapter documentation for more information.
Online Information
If you cannot find the problem you are experiencing, or the solution to a problem, listed in
this chapter, check the Troubleshooting FAQ list at http://www.3dlabs.com/support, or
contact your Oxygen card vendor for additional help.
26
Page 36

A
PPENDIX
A - S
PECIFICATIONS
Page 37

Oxygen VX1 Specifications
Oxygen VX1 Specifications
Item Specification
Card size NLX shortcard, AGP or PCI, single-slot
Power requirement 10.25 W @ 3v3, 1.0 W @ 5V
Geometry processing PowerThreads SSE
Rasterizer GLINT R3 rasterization engine
RAMDAC frequency 300 MHz
Memory 32 MB SDRAM
Oxygen GVX1 Specifications
Item Specification
Card size Half-length ATX form factor, single slot
Power requirement 14.4 W @ 3v3, 6.46 W @ 5V
Geometry processing GLINT Gamma G1 with PowerThreads
SSE
Rasterizer GLINT R3 rasterization engine
RAMDAC frequency 300 MHz
Memory 32 MB SGRAM
Monitor Resolutions
Oxygen GVX1 and Oxygen VX1 are capable of supporting monitor resolutions up to 2048 x
1536, in color depths of 8, 16 and 32 bits, and with refresh rates from 60Hz to 200Hz –
dependent on your system hardware, operating system, graphics driver version, and your
monitor's capabilities.
In multi-monitor configurations using more than one Oxygen GVX1 card, the driver
N
!
OTE
provides additional resolutions corresponding to the total size of the desktop. By default, the
driver starts on the first monitor and may be expanded to the second monitor by selecting one
of these multi-monitor resolutions. For instance, if the chosen resolution per monitor is
1024 x 768, then in a dual-monitor configuration the second monitor may be enabled by
selecting the 2048 x 768 resolution.
28
Page 38

A
PPENDIX
B - S
OFTWARE LICENSE
Page 39

SOFTWARE LICENSE AGREEMENT
SOFTWARE LICENSE AGREEMENT
THIS IS A LEGAL CONTRACT BETWEEN YOU, THE END USER, AND 3DLABS,
INC. BY USING THE SOFTWARE ACCOMPANYING THIS GUIDE OR PREINSTALLED ON YOUR SYSTEM, YOU ARE ACCEPTING AND AGREEING TO BE
BOUND BY THE TERMS OF THIS SOFTWARE LICENSE AGREEMENT. IF YOU
ARE NOT WILLING TO BE BOUND BY THE TERMS OF THIS SOFTWARE
LICENSE AGREEMENT, PROMPTLY RETURN THIS SOFTWARE LICENSE
AGREEMENT WITH THE UNOPENED SOFTWARE ENVELOPE, OXYGEN CARD
AND ANY OTHER ACCOMPANYING ITEMS AND 3DLAB PRODUCTS
TOGETHER WITH YOUR RECEIPT TO YOUR PLACE OF PURCHASE FOR A
FULL REFUND.
Software License and Restrictions
The SOFTWARE delivered to you may embody and include, without limitation, certain
software programs in object code form (machine-readable but not human-readable form) and
documentation. Use of the SOFTWARE can result in the production of FEATURES that are
human-readable, including, without limitation, documentation, report formats, menus,
audible prompts and tone sequences. Such SOFTWARE and FEATURES constitute
copyrighted property proprietary to 3Dlabs, Inc. or its licensors, and 3Dlabs, Inc. or its
licensors retain title to the SOFTWARE (excluding media on which recorded), FEATURES,
all copies thereof, and all intellectual property rights therein. No title to the SOFTWARE,
FEATURES, any copies thereof or any intellectual property rights therein, are transferred to
you. You are hereby granted, for your own internal use only, a nontransferable, nonexclusive,
perpetual, revocable license to use one (1) copy of the SOFTWARE and FEATURES on the
computer on which the SOFTWARE was originally mounted or installed. Except as
specifically authorized by this AGREEMENT, you may not copy the SOFTWARE or
FEATURES for any purpose (except that you may make a use one (1) copy of the
SOFTWARE solely for backup purposes). You shall not, whether through the use of
disassemblers or any other means whatsoever (including, but not limited to, manual,
mechanical or electrical means), reverse engineer, decompile, disassemble, destroy, disable,
derive rules of protocol embodied in the SOFTWARE or derive source code from the
SOFTWARE OR FEATURES, or attempt to permit any third party to do any of the
foregoing. Any attempt to do any of the foregoing shall be a material breach of this
AGREEMENT and the license granted herein, which shall immediately entitle 3Dlabs, Inc.
to exercise any remedy that may exist at law or in equity. You may not transfer, loan, rent,
lease, distribute or grant any rights in the SOFTWARE, FEATURES, copies thereof, or
accompanying documentation in any form without the prior written consent of 3Dlabs, Inc.
30
Page 40

Limited Warranty
Limited Warranty
3Dlabs, Inc. warrants that the SOFTWARE AND FEATURES licensed to you under this
AGREEMENT will perform in accordance with 3Dlabs, Inc. published specifications for use
on the same operating system as used by you at the time of purchase of the SOFTWARE or
the system on which the SOFTWARE is initially mounted or installed (WARRANTY) for a
period of ninety (90) days after the date of delivery to you as evidenced by your receipt
(WARRANTY PERIOD). If the SOFTWARE or FEATURES does not conform during the
WARRANTY PERIOD, you agree to provide written notice of such failure to 3Dlabs, Inc.
and 3Dlabs, Inc. will, at its sole option, repair or replace the SOFTWARE. 3Dlabs, Inc. does
not warrant that the use of the SOFTWARE or FEATURES will be uninterrupted or errorfree and hereby disclaims all liability on account thereof. THE REMEDIES PROVIDED
HEREIN ARE YOUR SOLE AND EXCLUSIVE REMEDIES FOR BREACH OF
WARRANTY. THIS WARRANTY IS IN LIEU OF ALL OTHER WARRANTIES OR
CONDITIONS, EXPRESS OR IMPLIED, INCLUDING WARRANTIES OR
CONDITIONS OF MERCHANTABILITY, NONINFRINGEMENT AND FITNESS
FOR A PARTICULAR PURPOSE. SOME STATES OR COUNTRIES DO NOT
ALLOW THE EXCLUSION OF IMPLIED WARRANTIES OR CONDITIONS, SO
THE ABOVE EXCLUSION MAY NOT APPLY TO YOU.
Limited Liability
NOTWITHSTANDING ANY PROVISION IN THIS LICENSE TO THE CONTRARY,
NEITHER 3DLABS, INC. NOR ITS LICENSORS OR SUPPLIERS WILL BE LIABLE
FOR ANY SPECIAL, INCIDENTAL, INDIRECT OR CONSEQUENTIAL DAMAGES,
HOWEVER CAUSED, OR ANY THEORY OF LIABILITY, WHETHER OR NOT
3DLABS, INC., ITS LICENSORS OR SUPPLIERS HAS BEEN ADVISED OF THE
POSSIBILITY OF SUCH DAMAGE OR LOSS. IN NO EVENT SHALL 3DLABS, INC.,
ITS LICENSORS' OR SUPPLIERS' LIABILITY ARISING UNDER THIS LICENSE
EXCEED THE AMOUNT PAID BY YOU [FOR THE PRODUCT OR SOFTWARE]
GIVING RISE TO SUCH LIABILITY. THIS LIMITATION IS INTENDED TO LIMIT
THE LIABILITY OF 3DLABS, INC., ITS LICENSORS OR ITS SUPPLIERS AND
SHALL APPLY NOTWITHSTANDING ANY FAILURE OF ESSENTIAL PURPOSE OF
ANY LIMITED REMEDY. SOME STATES OR COUNTRIES MAY NOT ALLOW THE
FOREGOING LIMITATION, SO THE FOREGOING MAY NOT APPLY TO YOU.
Restricted Rights Notice
Use, duplication or disclosure by the United States Government is subject to restrictions as set
forth in subparagraphs (c)(1) and (c)(2) of the Commercial Computer Software - Restricted
Rights clause at FAR Section 52.277-19 or (c)(1)(ii) of the Rights in Technical Data and
Computer Software clause at DFARS Section 252.277-7013, as applicable. Unpublished rights reserved under the copyright laws of the United States. Contractor: 3Dlabs Inc., Ltd.,
480 Potrero Avenue, Sunnyvale, California 94086.
31 3Dlabs Oxygen VX1/GVX1 User’s Guide
Page 41

Limited Warranty
Termination
You may terminate the license granted hereunder at any time by destroying all copies,
[mergers or modifications] of the SOFTWARE, FEATURES and accompanying materials.
3Dlabs, Inc. may immediately terminate the license granted to you hereunder upon notice for
failure to comply with the terms and conditions of this AGREEMENT. Upon such
termination, you agree to destroy all copies, mergers and modifications of the SOFTWARE
and FEATURES and accompanying documents. You agree that a breach of this
AGREEMENT will result in irreparable damages to 3Dlabs, Inc. This AGREEMENT is the
entire agreement between you and 3Dlabs, Inc. with respect to the use and licensing of the
SOFTWARE provided with this AGREEMENT, and supersedes all proposals, warranties,
prior agreements or any other communications between the parties relating to the subject
matter hereof.
General
This AGREEMENT will be governed by and construed in accordance with the laws of
California without regard to conflicts of law principles or the UN Convention on the Sale of
Goods. If for any reason a court of competent jurisdiction finds any provision of this
AGREEMENT, or portion thereof, to be unenforceable, that provision of the AGREEMENT
shall be enforced to the maximum extent permissible so as to effect the intent of the parties,
and the remainder of this AGREEMENT shall continue in full force and effect. Should you
have any questions concerning this AGREEMENT, please write to: 3Dlabs, Inc., 480 Potrero
Avenue, Sunnyvale, California 94086.
32
Page 42

A
PPENDIX
C - R
EGULATORY STATEMENTS
Page 43

Declaration of Conformity
We, 3Dlabs, Incorporated,
480 Potrero Avenue
Sunnyvale, CA 94086
Phone 408-530-4700
Fax 408-530-4701
United States of America
declare under our sole responsibility that the products
3Dlabs
3Dlabs Oxygen GVX1
to which this declaration relates are in conformance with the following standards:
EN 55024:1998, clause 4.2.1
EN 55024:1998, clause 4.2.2
EN 55024:1998, clause 4.2.3
EN 55024:1998, clause 4.2.3.2
EN 55024:1998, clause 4.2.6
EN 55022:1994, clause 5
EN 55022:1994, clause 6
IEC950:1991, 2nd Edition
EN60950:1992
following the provisions of the 89/336/EEC Directive.
San Jose, California, May 14, 1999
®
Oxygen™ VX1
3Dlabs, Inc.
W
ARNING
Any use of, installation practices, modifications or maintenance procedures
:
carried out which are not in accordance with the issued “instructions for use” or
approved by 3Dlabs Inc. will nullify the CE certification of this product and could
lead to prosecution.
We, 3Dlabs, Incorporated,
480 Potrero Avenue
Sunnyvale, CA 94086
Phone 408-530-4700
Fax 408-530-4701
United States of America
declare under our sole responsibility that the products
®
3Dlabs
Oxygen™ VX1
3Dlabs Oxygen GVX1
comply with Part 15 of FCC Rules. Operation is subject to the following two conditions: (1) this device may not
cause harmful interference, and (2) this device must accept any interference received, including interferences that
may cause undesired operation.
Page 44

Appendix D - Glossary
Page 45

Terms and Definitions
Terms and Definitions
AGP
Advanced Graphics Port. A dedicated graphics bus that transfers data at significantly higher
speeds than the PCI bus.
Alpha Blending
This means to create transparent objects by allowing for the blending of pixels to simulate the
transparency characteristics of an object. With alpha information, an object can be designed
from being totally transparent to opaque.
Alpha Buffer
A portion of the frame buffer used to define the transparency value of a pixel in the frame
buffer. This data can be used to blend the frame buffer pixel with the pixel to be drawn to
create a composite pixel.
Anti-Aliasing
A technique employed to remove any jagged edges from an object to appear smooth. This is
accomplished by gradually modifying the hue and saturation of pixels.
API
Application Programming Interface. The API translates the instructions from the application
program into device commands that are specific to the screen’s display controller, the graphics
board.
Atmospheric Effects
The effect derived from adding one or more layers around an object.
Bilinear Sampling
The process whereby texture mapping is done through filtering.
Bit Depth
Bit depth is another way of expressing the numbers of colors available. A color bit depth of 8
is equivalent to 256 colors, a bit depth of 16 (15 bit of color plus a 1 bit overlay) yields 32768
colors, and a bit depth of 32 (24 bit RGB plus 8 bit of overlays) equals 16.7 million colors.
The latter is often referred to as true color.
Clipping
Removal of elements or sections not contained within the active viewing area.
CPU (Central Processing Unit)
The part within a PC that executes programs in main memory.
DAC
Digital to Analog Converter.
Depth Cueing
A technique used to give the illusion of depth. With depth cueing, the part of an object that is
farther away is displayed with a lower intensity to give the effect of depth.
Appendix D - Glossary 36
Page 46

Terms and Definitions
Digital Flat Panel Display
A digital, flat-panel display uses a digital (instead of analog) cable connection to transfer data
to the display screen. This can eliminate some display artifacts. Flat panel displays occupy less
desk space than conventional monitors.
DirectX
Microsoft’s APIs developed to access various system hardware.
Direct 3D
Microsoft’s API dedicated to 3D graphics, and a component of DirectX.
Dithering
The process of converting an image with a certain bit depth to one with a lower bit depth.
Dithering enables the application to convert an image’s colors that it cannot display into two
or more colors that closely resemble the original. Dithering works because the mind is tricked
by the pattern of colors into thinking it’s a different color.
Double Buffering
With double-buffering, images are rendered in the back buffer and then displayed on the
screen once the drawing is completed. This results in the smooth, flicker-free rotation and
animation of 3D models and scenes.
Driver
A driver is a special interface program that is developed to perform the communication
between the application program, the device (i.e., graphics peripheral) and the operating
system.
EVGA
Extended Video Graphics Array. EVGA runs at 1024 x 768.
Flat Shading
The simplest method of shading. Each triangle is assigned one single color, resulting in a
faceted appearance of the surface.
Floating Point
The portion of the mathematics execution unit of a processor generally associated with
multiply and divide operations.
Frame Buffer
A 24-bit, true-color frame buffer provides 8 bits for each red, green and blue primary display
color. This results in 16.8 million color combinations. A second, or double, buffer enables
system to calculate pixels one step ahead of the screen display for smooth, distortion free
images.
Gamma
A curve representing both the contrast and brightness of an image. Changing the shape of the
curve changes the RGB color output. (Not to be confused with GLINT Gamma, the 3Dlabs
geometry processing device.)
Geometry
The intermediate stage of the 3D pipeline, geometry determines the location of the object and
the frame of reference of the viewer in relation to the object.
37 3Dlabs Oxygen VX1/GVX1 User’s Guide
Page 47

Terms and Definitions
Gouraud Shading
This method of shading, more complex than flat shading, shows subtle color changes across
an object. Gouraud Shading is accomplished by adding pixels in a graduated scale of colors.
Graphics Accelerator Card
A graphics accelerator performs 3D functions in the hardware, thereby relieving the CPU of
repetitive, complex and intensive calls. This results in enhanced performance and speed.
Heidi
The API developed by Autodesk to work with its products, such as 3D Studio MAX and
AutoCAD.
MIP-Mapping (for texture processing)
A feature that delivers photo-realistic images by wrapping 2D bitmaps around 3D objects
closely matching the texture to the object. MIP-Mapping allows different versions of a texture
to be used for objects of different sizes. It also enables faster performance as textures do not
need to be scaled in real time.
Multiple Resolution Support
The ability to support multiple resolutions on the screen.
OpenGL
The industry standard library of advanced 3D graphics functions developed by Silicon
Graphics, Inc.
Perspective Correction
A function that allows an object to maintain its 3D textural features as it moves away from the
viewer, into the background.
Pipelining
A basic hardware tool for accelerating processes.
Pixel
The smallest addressable element of a cathode ray tube display. More simply put, the
individual dots that make up the screen image.
Point Sampling
The basic method of adding texture to an object. Point sampling does not include any
filtering of textures.
RAMDAC
The final component in the graphics subsystem that translates a digital image into an analog
representation.
Rasterization
A method to fill in colors for all pixels bound by vertices.
Rendering
The final and most rigorous stage in the 3D pipeline where an object undergoes shading,
texturing, etc.
RISC
Reduced Instruction Set Computing.
Appendix D - Glossary 38
Page 48

Terms and Definitions
SDRAM
Synchronous Dynamic Random Access Memory (SDRAM) is a cost-effective solution to
improve bandwidth to and from memory, resulting in increased graphics performance.
SGRAM
Synchronous Graphics Random Access Memory allows data to be written in a single
operation, rather than a (slower) sequence of operations. It also handles background and
foreground image fills effectively.
SDTP
Super Desktop Publishing. SDTP runs at 1600 x 1200.
Stencil Buffer
Similar to stipple masking, the stencil buffer assists with the creation of transparent effects.
Stipple masking
A technique that spatially creates transparent effects by rendering an object through various
patterns.
Streaming SIMD
An instruction set developed by Intel for Pentium III-processor based systems. Streaming
SIMD can improve 3D vertice transformation and lighting, among other operations.
SVGA
Super Video Graphics Array. SVGA runs at 800 x 600.
Tessellation
The initial part of the 3D pipeline where the object is described by a set of triangles.
Texture M ap pi ng
A technique that enables 2D graphic images to be “wrapped” around or “pasted” on to a 3D
primitive. Perspective correction and lighting calculations allow for added realism.
Transformation
The change in rotation, size and perspective of an object in 3D space.
Transparency
A function that refers to the rendering of transparent (non-opaque) objects. Transparency is
generally accomplished on a polygon rendering system using either screen-door transparency
or alpha blending.
Vectors/second
Lines drawn per second.
VGA
Video Graphics Array. VGA runs at 640 x 480.
VHR
Very High Resolution. VHR runs at 1280 x 1024.
VRAM
Video Random Access Memory is an expensive, fast type of RAM that is used as display
memory on high-end graphics boards.
39 3Dlabs Oxygen VX1/GVX1 User’s Guide
Page 49

Terms and Definitions
VRML
Virtual Reality Modeling Language.
Z-Buffer
Also known as the Depth Buffer, the Z-Buffer is a region of memory containing the depth
component of a pixel. Used, for example, to eliminate hidden surfaces from the image.
Appendix D - Glossary 40
Page 50

NDEX
I
A
accelerator, graphics
AGP
. . . . . . . . . . . . . . . . . . . . vii, 36
alpha blending
alpha buffer
anti aliasing
anti-static procedures
API
. . . . . . . . . . . . . . . . . . . . . . . . 36
atmospheric effects
. . . . . . . . . . . . . . . . . . 36
. . . . . . . . . . . . . . . . . . . 36
. . . . . . . . . . . . . 38
. . . . . . . . . . . . . . . . 36
. . . . . . . . . . . . . 2
. . . . . . . . . . . . . . 36
B
bilinear sampling
bit depth
. . . . . . . . . . . . . . . . . . . . 36
. . . . . . . . . . . . . . . 36
C
clipping
color curves
Colorific
configuration mgr
. . . . . . . . . . . . . . . . . . . . . 36
. . . . . . . . . . . . . . . . . . . 13
. . . . . . . . . . . . . . . . . . . vii, 7
. . . . . . . . . . . . . . 10
D
DACs
. . . . . . . . . . . . . . . . . . . . . . . 36
DDC-type monitors
declaration of conformity
depth cueing
digital flat panel displays
Direct 3D Support screen
display control panel
dithering
DMA
buffers
sub-buffers
double buffering
drivers
definition
Heidi
installation
OpenGL
setup
dynamic load balancing
. . . . . . . . . . . . . . . . . . 36
. . . . . . . . . . . . . . . . . . . . . 37
. . . . . . . . . . . . . . . . . . . 16
. . . . . . . . . . . . . . . . . . . . 38
. . . . . . . . . . . . . . . . . . 38
. . . . . . . . . . . . . . . . . . . . 11
. . . . . . . . . . . . 18
. . . . . . . . . 34
. . . . . . . . . viii
. . . . . . 11, 14
. . . . . . . . . . . . 11
. . . . . . . . . . . . . . . . 16
. . . . . . . . . . . . . . . 37
. . . . . . . . . . . . . . . . . 37
. . . . . . . . . . . . . . . . . 6
. . . . . . . . . viii
E
EVGA
. . . . . . . . . . . . . . . . . . . . . . .37
F
FCC statement
features
Oxygen GVX1
Oxygen VX1
flat shading
floating point
frame buffer
. . . . . . . . . . . . . . . . .34
. . . . . . . . . . . . . vii
. . . . . . . . . . . . . . vii
. . . . . . . . . . . . . . . . . . .37
. . . . . . . . . . . . . . . . . .37
. . . . . . . . . . . . . . . . . . .37
G
gamma adjustment
geometry
geometry processing
GLINT
Gouraud shading
graphics accelerator
. . . . . . . . . . . . . . . . . . . . .37
Gamma
R3
. . . . . . . . . . . . . . . . . . . . . vii
. . . . . . . . . . . . . .13
. . . . . . . . .vii, viii
. . . . . . . . . . . . . . . . . .viii
. . . . . . . . . . . . . . .38
. . . . . . . . . . . . . .38
H
Heidi
. . . . . . . . . . . . . . . . . . . . . . .38
I
information screen
installation
agp slots
anti-static procedures
back up first
before you start
Colorific
Oxygen cards
removing old cards
SoftEngine
software/drivers
tools
. . . . . . . . . . . . . . . . . . . . . .2
. . . . . . . . . . .11, 12
. . . . . . . . . . . . . . . . . . .3
. . . . . . . . . .2
. . . . . . . . . . . . . . . . .2
. . . . . . . . . . . . . .2
. . . . . . . . . . . . . . . . . . .7
. . . . . . . . . . . . . . . .3
. . . . . . . . . . . .3
. . . . . . . . . . . . . . . . . .7
. . . . . . . . . . . . . .6
Page 51

L
limited warranty
. . . . . . . . . . . . . . . 31
M
mapping
mip
. . . . . . . . . . . . . . . . . . . . . 38
texture
. . . . . . . . . . . . . . . . . . . 39
memory
Oxygen GVX1
OxygenVX1
SDRAM
SGRAM
VRAM
monitor screen
monitors
adjusting gamma
DDC
digital flat panel
resolutions
screen
troubleshooting
multiple resolution support
. . . . . . . . . . . . . . . . . . . 39
. . . . . . . . . . . . . . . . . . . . 18
. . . . . . . . . . . . . . . . . . . . 11
. . . . . . . . . . vii, 39
. . . . . . . . . . . . . . . vii
. . . . . . . . . . . . . . . vii, 39
. . . . . . . . . . . . . . . vii, 39
. . . . . . . . . . . . . . . . 18
. . . . . . . . . . . . 13
. . . . . . . . . . . . viii
. . . . . . . . . . . . . . . . 28
. . . . . . . . . . . . . 25
. . . . . . . . 38
PowerThreads SSE
processors
floating point
. . . . . . . . . . . . . vii
. . . . . . . . . . . . . . .37
Q
quad-buffered stereo
. . . . . . . . . . . . viii
R
ramdac
rasterization
rasterization engines
registration
rendering
resolutions
RISC
. . . . . . . . . . . . . . . . . . . . . .38
. . . . . . . . . . . . . . . . . . .38
. . . . . . . . . . . . vii
. . . . . . . . . . . . . . . . . . . .8
. . . . . . . . . . . . . . . . . . . . .38
. . . . . . . . . . . . . . . . . . . .28
EVGA
. . . . . . . . . . . . . . . . . . . .37
multiple
range
SDTP
SVGA
VGA
VHR
. . . . . . . . . . . . . . . . . . .38
. . . . . . . . . . . . . . . . . . . . vii
. . . . . . . . . . . . . . . . . . . .39
. . . . . . . . . . . . . . . . . . . .39
. . . . . . . . . . . . . . . . . . . . .39
. . . . . . . . . . . . . . . . . . . . .39
. . . . . . . . . . . . . . . . . . . . . . . .38
O
OpenGL
Overlay/Alpha mode
Oxygen GVX1
Oxygen VX1
. . . . . . . . . . . . . . . . . . vi, 38
screen
. . . . . . . . . . . . . . . . . 11, 16
. . . . . . . . . . . . 17
features
specifications
system requirements
Direct 3D Support
features
specifications
system requirements
. . . . . . . . . . . . . . . . . . . vii
. . . . . . . . . . . . . . . 28
. . . . . . . . . viii
. . . . . . . . . . 14
. . . . . . . . . . . . . . . . . . . vii
. . . . . . . . . . . . . . . 28
. . . . . . . . . viii
P
perspective correction
pipelining
pixel
point sampling
. . . . . . . . . . . . . . . . . . . . 38
. . . . . . . . . . . . . . . . . . . . . . . . 38
. . . . . . . . . . . . 38
. . . . . . . . . . . . . . . . 38
S
screens
Direct 3D
information
monitor
OpenGL
setup
SDRAM
SDTP
. . . . . . . . . . . . . . . . . . . . . . .39
setup screen
SGRAM
shading
flat
. . . . . . . . . . . . . . . . . . . . . .37
Gouraud
sideband addressing
SoftEngine
software
installation
setup
. . . . . . . . . . . . . .11, 14
. . . . . . . . . . . . .11, 12
. . . . . . . . . . . . . . . .11, 18
. . . . . . . . . . . . . . .11, 16
. . . . . . . . . . . . . . . . . .11, 13
. . . . . . . . . . . . . . . . . vii, 39
. . . . . . . . . . . . . . . .11, 13
. . . . . . . . . . . . . . . . . vii, 39
. . . . . . . . . . . . . . . . . .38
. . . . . . . . . . . . vii
. . . . . . . . . . . . . . . . . vii, 7
. . . . . . . . . . . . . . . . . .6
. . . . . . . . . . . . . . . . . . . . .11
42
Page 52

software license agreement
software partners
specifications
Oxygen GVX1
Oxygen VX1
static electricity
stencil buffer
stereo
quad-buffered
stipple masking
SVGA
. . . . . . . . . . . . . . . . . . . . . . 39
system requirements
Oxygen GVX1
Oxygen VX1
. . . . . . . . . . . . . . . ix
. . . . . . . . . . . . . 28
. . . . . . . . . . . . . . . 28
. . . . . . . . . . . . . . . . . 2
. . . . . . . . . . . . . . . . . . 39
. . . . . . . . . . . . . viii
. . . . . . . . . . . . . . . . 39
. . . . . . . . . . . . viii
. . . . . . . . . . . . . . viii
. . . . . . . . 30
T
task-bar
configuration mgr
tessellation
texture mapping
texture processing
textures, virtual
transformation
transparency
troubleshooting
. . . . . . . . . . . . . . . . . . . 39
. . . . . . . . . . . . . . . . 39
. . . . . . . . . . . . . . . . . . 39
monitor problems
network problems
resolution problems
system problems
. . . . . . . . . . . 10
. . . . . . . . . . . . . . . 39
. . . . . . . . . . . . . . 38
. . . . . . . . . . . . . . . . vii
. . . . . . . . . . . 25
. . . . . . . . . . . 26
. . . . . . . . . . 25
. . . . . . . . . . . . 26
3Dlabs
software partners
Z
Z-buffer
. . . . . . . . . . . . . . . . . vii, 40
. . . . . . . . . . . . . .8, 10, 26
. . . . . . . . . . . . ix
V
Vblank
vectors/second
VGA
VHR
virtual textures
VRAM
VRML
. . . . . . . . . . . . . . . . . . . . . . 17
. . . . . . . . . . . . . . . . . 39
definition
palette snoop
. . . . . . . . . . . . . . . . . 39
. . . . . . . . . . . . . . . 26
. . . . . . . . . . . . . . . . . . . . . . . 39
. . . . . . . . . . . . . . . . vii
. . . . . . . . . . . . . . . . . . . . . . 39
. . . . . . . . . . . . . . . . . . . . . . 40
W
warranty
limited
websites
43 3Dlabs Oxygen VX1/GVX User’s Guide
. . . . . . . . . . . . . . . . . . . 31
 Loading...