

Page 1

'ODEV,QF
*UDSKLFV$FFHOHUDWRU&DUG
8VHU·V0DQXDO
3Dlabs,® Inc.
480 Potrero Avenue
Sunnyvale, CA 94086
408 - 530 - 4700
www.3dlabs.c om
Page 2

ii
Copyright 2000 by 3Dlabs, Inc.
3Dlabs, GLINT and Permedia are registered trademarks, and Oxygen and
PowerThreads are trademarks of 3Dlabs, Inc. or 3Dlabs Inc. Ltd. Pentium is a
registered trademar k of Intel. OpenGL is a registered tra demark of Silicon Graphic s,
Inc. Soft Engine is a tradem a rk of Vibrant Graphics, Inc. A ut oCAD is a registered
trademark of AutoDesk Inc. Colorific is a registered tr ademark of E-Color, Inc.
Microsoft, Windows NT, Windows 2000, Windows Me are registered trademarks of the
Microsoft Corporation. Athlon and 3DNow! are registered trademarks of AMD. All other
trademarks and register ed trademarks are the propert y of their respective holders.
Caution:
Changes or modifications to your 3Dlabs Graphics Accelerator Card not
expressly approved by 3 Dla bs, Inc. voids the user’s warra nty.
FCC Notice:
This equipment has been tested and found to comply with th e limits for a
Class B digital device, p ursuant to Part 15 of the FCC Rules. Th ese limits are designed
to provide reasonable protection against harmful interference in a residential
installation. This eq u ipm ent generates, uses, and ca n radiate radio frequency energy.
If product is not installed and used in accordance with the instruction manual, it may
cause harmful interference to radio communications; however, there is no guarantee
that interference will not occur in a particular installation. If this equipment does
cause harmful interference to radio or television reception, which can be determined
by turning the equipment off and on, the user is encouraged to try to correct the
interference by one or more of the following measures:
1. Re-orient or relocate th e receiving antenna.
2. Increase the separation b etween the equipment and rec eiver.
3. Connect the equipment to an outlet o n a circuit differe nt from that to which the
receiver is connected.
4. Consult 3Dlabs or an experienced radio/TV techn ic ian for assi stance.
Compliance with FCC Rul es r eq uires that a shielded cable be used to connect to other
equipment. This device com plies with Part 15 of the FCC Rules. Operation is subject to
the following two conditions: 1) this device may not cause harmful interference, and 2)
this device must accept any interference received, including interference that may
cause undesired operation.
This Class B digital apparatus meets all the requirements of the Canadian
Interference- Causing Equipment Regulations. Cet appareil n um ér iq u e de la classe B
respecte toutes les exigences du Règlement sur le ma ter ial brouilleur du Canada.
3Dlabs, Inc. makes no representation that the use of its products in the manner
described in this public a tion will not infringe on ex isting or future patent rights, nor
do descriptions contained in this publication imply the granting of licenses to make,
use, or sell equipment or software in accorda nce with the description.
Specifications Subject to Change With Notice
P/N 62-000007-00 1, Final
3Dlabs Graphics Accelerator Card User's Manual
Page 3

iii
&
Introduction ............................................................................................v
Welcome to 3Dlabs! .............................................................................vi
System Requirements..........................................................................vi
Chapter 1 – Installation ......................................................................... 1
Installing the Hardware .......................................................................2
Before you begin your installation:................................................. 2
If you are replacing an old graphics card in yo ur system
and are running either Windows NT or Windows 2000................... 2
If there is no graphics ca r d in your system or you ar e
running Windows 98 or Windows Me............................................. 2
Installing your 3Dlabs Graphics Accelerator Card.......................... 3
Connecting one or more VGA or Digital Flat Panel (DFP) monitors . 5
Attaching a Stereo Device .............................................................. 6
Installing the Driver Software .............................................................. 7
To install your 3Dlabs Windows NT driver ..................................... 7
To install your 3Dlabs Windows 2000 driver.................................. 7
To install the 3Dlabs Windows 98 driver........................................ 7
Registering Your 3Dlabs Graphics Accelerator Card ............................ 8
217(176
Chapter 2 - Software Configuration ........................................................ 9
The 3Dlabs Graphics Accelerator Card Driver.................................... 10
The Task Bar - based Configuration Manager................................. 10
The Display Control Panel .............................................................. 11
If you are running Windows NT 4.0:............................................. 11
If you are running Windows 98,Windows Me,or Windows 2000.... 11
Configuring Multiple Monitors ........................................................... 13
To configure a second monitor in Windows NT............................. 13
To configure a second m on itor in Windows 98,
Windows 2000, or Windows Me ................................................... 14
Configuring your 3Dlabs Graphics Accelerator Card
for stereo viewing............................................................................... 15
To set up and configure stereo viewing......................................... 15
Installing Bundled Applications......................................................... 16
3Dlabs Graphics Accelerator Card User's Manual
Page 4

iv
Chapter 3 - Troubleshooting................................................................. 17
Troubleshooting................................................................................. 18
Monitors and Display Resolutions ..................................................... 18
Systems and Networks ...................................................................... 18
Online Information ............................................................................ 19
Appendix B - Software License ............................................................. 21
SOFTWARE LICENSE AGREEMENT.................................................. 22
Software License and Restrictions................................................... 22
Limited Warranty............................................................................... 23
Limited Liability.............................................................................. 23
Restricted Rights Notice.................................................................. 23
Termination.................................................................................... 23
General........................................................................................... 24
Appendix C - Regulatory Statements .................................................... 25
Declaration of Conformity.................................................................. 26
Index.................................................................................................... 27
3Dlabs Graphics Accelerator Card User's Manual
Page 5

1752'8&7,21
,
Page 6

Introduction
vi
:HOFRPHWR'ODEV
Thank you for selecting a 3Dlabs® Graphics Acce lerator Card! This User Ma nual is
designed to provide information common to all 3Dlabs Graphics Accelerator Cards. In
addition to this guide you are strongly enc ouraged to use the on lin e help included in
the 3Dlabs driver software Help screens.
6\VWHP5HTXLUHPHQWV
Before installing y our 3Dlabs Graphics Accelerator Card it is important that your
system meets the minimum system requirements for your card. Please make sure you
have the correct Operati ng System and version, the c or rect type of expansion adapter
slot(s) available and the minimum required amount of memory. Your card’s system
requirements can be fou nd either on your card’s datash eet located on our website or
on your card’s box.
3Dlabs Graphics Accelerator Card User's Manual
Page 7

+$37(5
&
²,
167$//$7,21
Page 8

Installation
2
,QVWDOOLQJWKH+DUGZDUH
Before you begin your installation:
1. Save any work in progre ss and exit any open applica tions. Always back up your
system before you install any new hardware or software.
2. Have a Phillips-head screwdriver ready.
3. Take every possible precaution against static electricity as you prepare to inst all
the card: static can damage components. If an anti-static wrist strap was
included in your box, please use it during your hardware installation. You
should also try to work in a static free area (such as on a tile floor rather than
carpet).
To successfully use y our 3Dlabs
card and the accompanying driver software. Whether you install your new card or
the driver first depends on whether a graphics card is a lr ea dy present in your
system and which operating system is installe d.
Graphics Accelerator Card, you must install the
If you are replacing an old graphics card in your system and are running
either Windows NT or Windows 2000:
Note: These instructions may be different than how you normally upgrade
your graphics card or other devices, but have been found to be the best
method of insuring a successful installation of your new hardware and
software.
1. Uninstall the driv er s for your old graphics ca rd. Refer to your old gr a p hics
card’s documentation or Help files for instructions on removing or uninstalling
the old graphics card’s driver software.
2. Install the 3Dlabs driver software; see the driver soft wa r e installation
instructions.
3. Remove the old graphics card from your system. To install your new 3Dlabs
Graphics Accelerator Ca rd, see the hardware instal lation instructions.
If there is no graphics card in your system or you are running Windows 98
or Windows Me:
1. Install your new 3D la bs Graphics Accelerator Card following the hardware
installation instructions in this document.
2. Install the 3Dlabs
software installation instructions in this document.
Graphics Accelerator Card driver software following the driver
Note: Be sure to register your new card using one of the options described on
page 8.
3Dlabs Graphics Accelerator Card User's Manual
Page 9

Installation
3
Installing your 3Dlabs Graphics Accelerator Card
1. Determine whether your 3Dlabs Graphics Accelerator Card is designed to fit
into either an AGP/ AGP Pro slot or a PCI slot in your computer.
Note: If your card is configured with a factory installed daughter card
attached, then the base (or larger) card is an AGP and/or AGP Pro compatible
card. If the daughter card includes a card edge connector, the daughter card
is a PCI compatible card and must be inserted in the adjacent PCI slot. If the
daughter card does not have a card edge connector, it still takes up the space
of a second slot, but is not inserted into that slot.
See the drawings below s ho wing these different types of card edge connectors to
determine which type of card you have.
PCI-Card AGP/AGP Pro-Card
2. If your 3Dlabs Graphics Accelerator Card includes a daughter card you must
install your base card into the AGP/AGP Pro sl ot and th e adjacent PCI slot
must be empty to accomodate the daughter card. Check your system
documentation to loca te the appropriate slot(s).
3. Turn off and unplug the power source for your system and each of its
peripherals.
Note: If you are replacing an old graphics card, be sure to uninstall your old
video driver software before tuning off your system and removing your old
graphics card.
3Dlabs Graphics Accelerator Card User's Manual
Page 10

Installation
4
4. Remove the cover from your system so you can access the slot(s) into w hich you
will be installing your 3Dlabs Graphics Accelerator Card. If you have not
already removed any existing graphics card from your system, then do so now.
5. If necessary, remove the back panel cover(s) f rom the slot(s) into which you are
going to install your 3Dlabs Graphics Accelerator Card, using the Phillips-head
screwdriver you should have handy.
6. If an anti-static wrist strap was included in your box, attach it to your wrist and
attach the other end to a bare metal (as opposed to painted or sticker covered)
surface on your system’s chassis.
7. Remove your new 3Dlabs Graphics Accelerator Card from its anti-static
packaging. Write down the serial number for product registration and future
use. The serial number is located on a board label and lo oks like this:
136001B123456 Made in XXX Week XXXX
3Dlabs Graphics Accelerator Card User's Manual
Page 11

Installation
5
8. Place the card into the corr ect slots(s) and seat it/them f ir m ly. See your system
documentation for i nstr u ctions on securing the car d to the chassis. Loose cards
and connections can ca use grounding and operat ing problems.
Single slot card Dual slot card
9. Remove the anti-static wr ist strap, if used, and replace t he cover on your
system.
Connecting one or more VGA or Digital Flat Panel (DFP) monitors
1. Depending on which model of 3Dlabs Graphics Accelerator Ca rd you
pruchased, you can connect one or two VGA or digital Flat Panel (DFP) monitors
to drive one or two displays.
2. Check your product’s packaging or the datasheet on the 3Dlabs website to
determine how many and which type of connectors are included. See the
drawings below for the different type of connectors.
DB-15 VGA Analog Connector
Connect analog displays using a c able
with a VGA connector.
DVI-D Connector
Connect digital displays using a cable
with a DVI-D connector.
DVI-I Connector
Connect digital or analog di splays
using a cable with a DVI-D or DV I-I
connector.
MDR-20 Connector
Connect digital displays using a cable
with an MDR-20 connector.
3Dlabs Graphics Accelerator Card User's Manual
Page 12
Installation
6
VGA
connectors
3-Pin
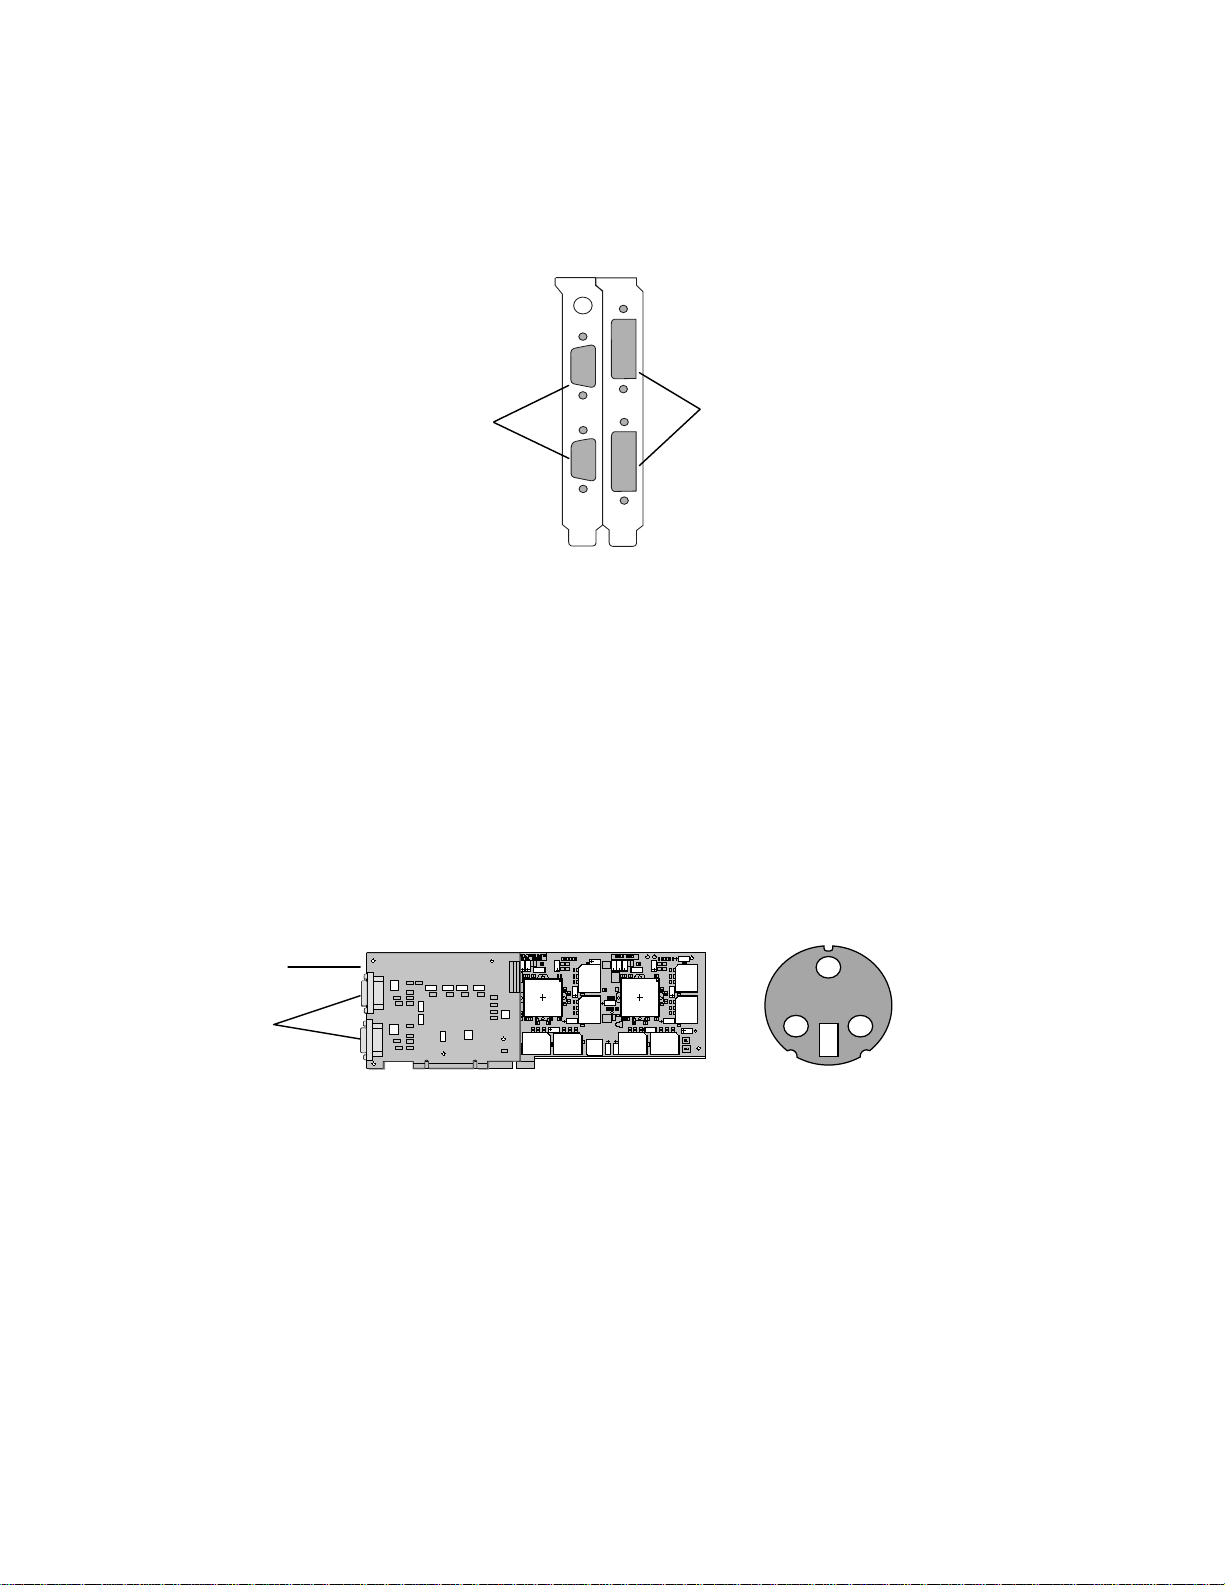
3. If your board contains either two VGA connectors or two DVI connectors (or two
of each), you must always connect your first or only monitor to the connector
marked “1” and then you can connect your second monitor (if used) to the
connector marked “2”.
connector
1
1
2
2
DVI
Attaching a Stereo Device
If your 3Dlabs Graphic s Accelerator Card suppor ts stereo viewing connect the stereo
hardware to the round, ster eo connector on the card. See the documentation that
came with your stereo hardware. Plug in and start up your system, including
peripherals, and log on to your operating system. Stereo viewing can also be supported
on boards without s t er eo connectors. An exa m ple of this is VX1-Stere o which uses a
dongle attached to the VGA connector.
Stereo
connector
DVI
connectors
for flat panel
Minidin
Stereo
Connector
3Dlabs Graphics Accelerator Card User's Manual
Page 13

Installation
7
,QVWDOOLQJWKH'ULYHU6RIWZDUH
Your product CD includes 3Dlabs PowerThr eads driver software, which lets you set
image quality and perf ormance preferences for yo ur ca rd. It also includes the Soft
Engine AutoCAD accelerator and productivity tool package, and Colorific screen-toprint color matching software. Installing Soft Engine on your AutoCAD equipped
system will improve graphics performance by up to four times, however it will only
improve performance with AutoCAD R14 or earlier versions. In addition, it will not
work with AutoCAD 2000. Colorific painlessly ensures that what you see is what you
print. This section descr ibes the two software insta llation processes for supported
Windows operatin g systems.
To install your 3Dlabs Windows NT driver
1. Start up Windows NT. Log onto an account with administrator privileges.
2. Place the 3Dlabs Product CD in your CD-ROM driv e. When the installation
window opens, choos e the 3Dlabs Windows NT driver installation.
3. Follow the instructions that appear on your screen. (Be sure to read the
software license agr eem ent.)
4. Restart your system at the prompt.
To install your 3Dlabs Windows 2000 driver
1. After installing your 3Dlabs Graphics Acce lerator Card, start up Windows 2000.
The Hardware Wizard appears.
2. Click Cancel in all dialog boxes that appear regarding "Found New Hardware."
3. Place the 3Dlabs Product CD in your CD-ROM driv e.
4. Select the Windows 2000 drivers directory and run s et up.exe. The 3Dlabs
Graphics Driver Setup pr ogram begins and guides yo u through the driver
installation proc ess.
5. When the “Digital S ignature Not Found” Box appears, click “yes”. This step may
be repeated up to three times. Continue clicki ng “yes” until the “Restart” dialog
appears, then click “Finish” to reboot.
To install the 3Dlabs Windows 98 driver
1. After installing your 3Dlabs Graphics Acceler a tor Card, restart your syst em .
Windows 98 automatically dete cts the new hardware and starts the New
Hardware Wizard.
2. In the Add New Hardware Wizard, click Next.
3. Place the 3Dlabs Product CD in your CD-ROM driv e.
4. Confirm that Specify a Location is selected, and then ty pe x:\Win98
(where “x” is the letter of your CD drive).
5. Follow the instructions that appear on your screen. (Be sure to read the
software license agr eem ent.) Restart your system at the prompt.
3Dlabs Graphics Accelerator Card User's Manual
Page 14

Installation
8
5HJLVWHULQJ<RXU'ODEV*UDSKLFV $FFHOHUDWRU&DUG
When you register your 3Dlabs Graphics Accelerator Card you:
• Activate your warranty
• Receive notification of sof tware updates
• Qualify for technical support
You can complete the registration card and return it to us in the mail, or register online once your har dware and software insta llations are compl ete. (You must have
Internet access to register on-line.)
1. Open your Internet browser.
2. Go to http://www.3dlabs.com/register.
3. Fill out the registration form that appears on your screen, and click Submit
when you are finish ed.
3Dlabs Graphics Accelerator Card User's Manual
Page 15

+$37(5
&
6
2)7:$5(&21),*85$7,21
Page 16

Software Configuration
10
7KH'ODEV*UDSKLFV$FFHOHUD WRU&D UG 'ULYHU
The 3Dlabs driver software lets you optimize the working relationship between your
card, your system and your applications. The 3Dla bs Display Control Panel allows you
to customize and create dr iver settings. The Taskbar based C onf i guration Manager
provides quick and convenient access to most of the Display Control Panel features,
and allows you to quick l y switch between alternative dr iver settings.
7KH7DVN%DUEDVHG&RQILJXUDWLRQ0DQDJHU
When you install your 3Dlabs Graphics Accelerator Card and software, the 3Dlabs
logo appears in your system tray, also called the task bar. Click the logo with your
right mouse butto n to a ccess the Display Configuration Manager a nd its shortcuts to
these configuration tools:
Remove from System Tray lets you delete this task bar utility from your system.
You will still be abl e to a c cess the driver config uration options with th e Display
Control Panel.
About 3DL Display Manager displays version information for this configuration
utility.
Go to 3Dlabs Website takes you directly to www.3dla bs.com through your
existing Internet connection.
Pop up the Display Panel rea ches the 3Dlabs section on the display control
panel.
Display Driver Information provides quick access to information about your card
configuration.
Change Display Resolution brings up a pop-up list of supported resolutions.
Each resolution has a n a sso cia ted pop-up list of available refresh rates.
Select Optimized Application quickly accesses a li st of supported applicatio ns.
Click an application in the list to opt imize card set tings for your selected option.
(The Display Control Panel allows you to create ne w application settings.)
Help provides help on t he ta sk ba r configuration manager, the driver, and its
settings.
3Dlabs Graphics Accelerator Card User's Manual
Page 17

Software Configuration
11
7KH'LVSOD\&RQWURO3DQHO
Access the configuration tools through the D isplay Properties Control Panel.
If you are running Windows NT 4.0:
1. Click the desktop with your right m ou se bu tton to display the panel.
2. Select Properties from the menu that appears, then select the 3 Dlabs tab.
If you are running Windows 98,Windows Me, or Windows 2000:
1. Click the desktop with your right m ou se bu tton to display the panel.
2. Select Properties from the menu that appears.
3. Choose the Settings tab.
4. Click the Advanced button, then select the 3Dlabs tab.
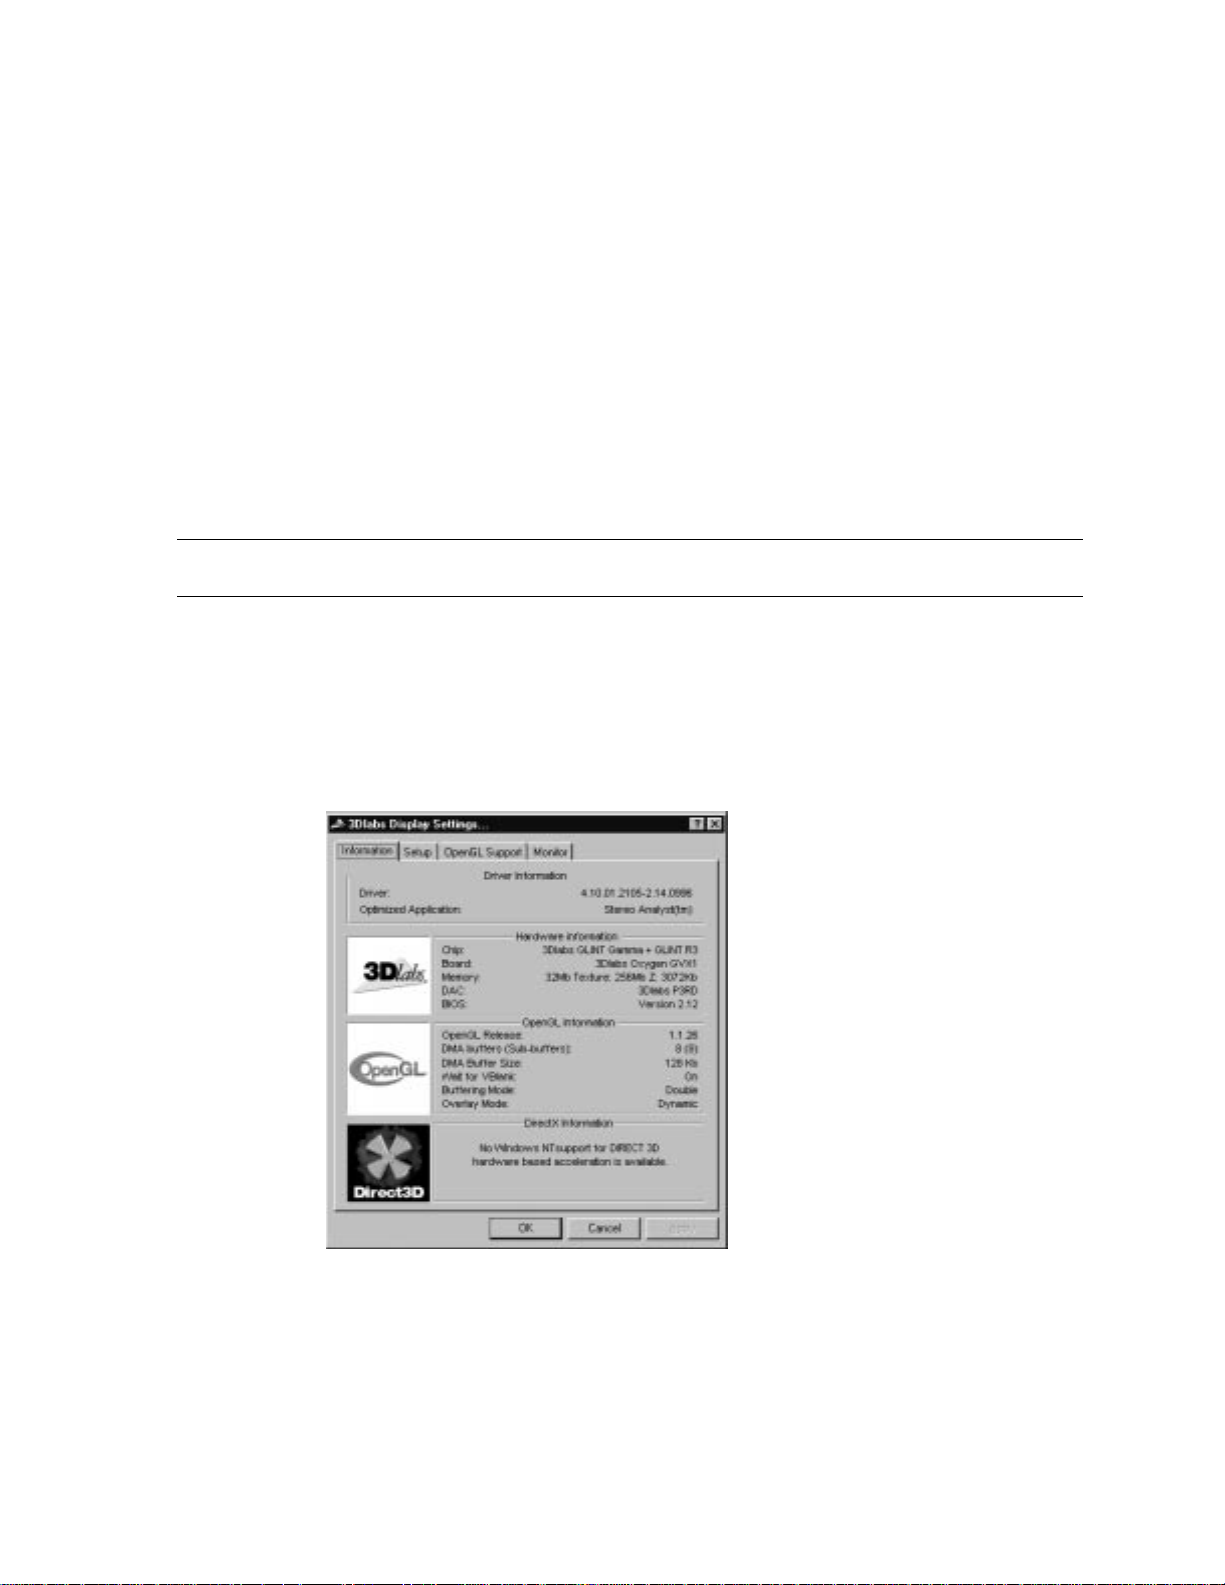
When you first click the 3Dlabs tab in the Display Control Panel, this introductory
page appears:
Note: This is only an example. Your own panel
displays the information specific to yo ur board,
BIOS, and driver version.
3Dlabs Graphics Accelerator Card User's Manual
Page 18

Software Configuration
12
The introductory page provides the software version and basic hardware
specifications, and a point-of-entry to the full set of 3Dlabs driver customiza tion tools.
To fine-tune your dr iver 's behavior, click the Adva nced button for access to these
panels:
Information
Setup
Direct3D (Windows 98 and Me only)
OpenGL Support
Monitor (Windows NT only)
Note: You also have easy access to Help by clicking the "?" icon in the top
right corner of the control panel, and then clicking the field in the panel
about which you want information. You will then find additional information
on how to configure the driver customization tools.
3Dlabs Graphics Accelerator Card User's Manual
Page 19

Software Configuration
13
&RQILJXULQJ0XOWLS OH0RQLWRUV
To configure a seco nd monitor in W indows NT:
1. In the Display Properties Control Panel, click th e Settings tab.
2. Click List All Modes.
3Dlabs Graphics Accelerator Card User's Manual
Page 20
Software Configuration
14
3. In the List of Valid Modes, click a resolution and then cl ick OK. Select a
resolution that is twice the width of your cur rent resolution. F or example, if
your current resolution is 1024 x 768, sele ct 2048 x 768, 75 Hertz for your new
resolution.
4. On the Display Properties Panel, cli ck Test. This tests the new mode on the
second monitor screen for five seconds.
5. Click OK to test the new mode.
6. Click OK if you saw the test bitmap correctly.
7. Click OK or Apply to select the new mode.
8. In the Display Properties Control Panel, click OK. Y our 3Dlabs Graphics
Accelerator Card is now configured for dual monitor mode.
To configure a second monitor in Windows 98, Windows 2000, or Windows
Me:
Note: The Windows 98 and Windows Me Operating Systems do not support
accelerated OpenGL in multimonitor configurations so performance will be
reduced for OpenGL applications when multiple monitors are enabled.
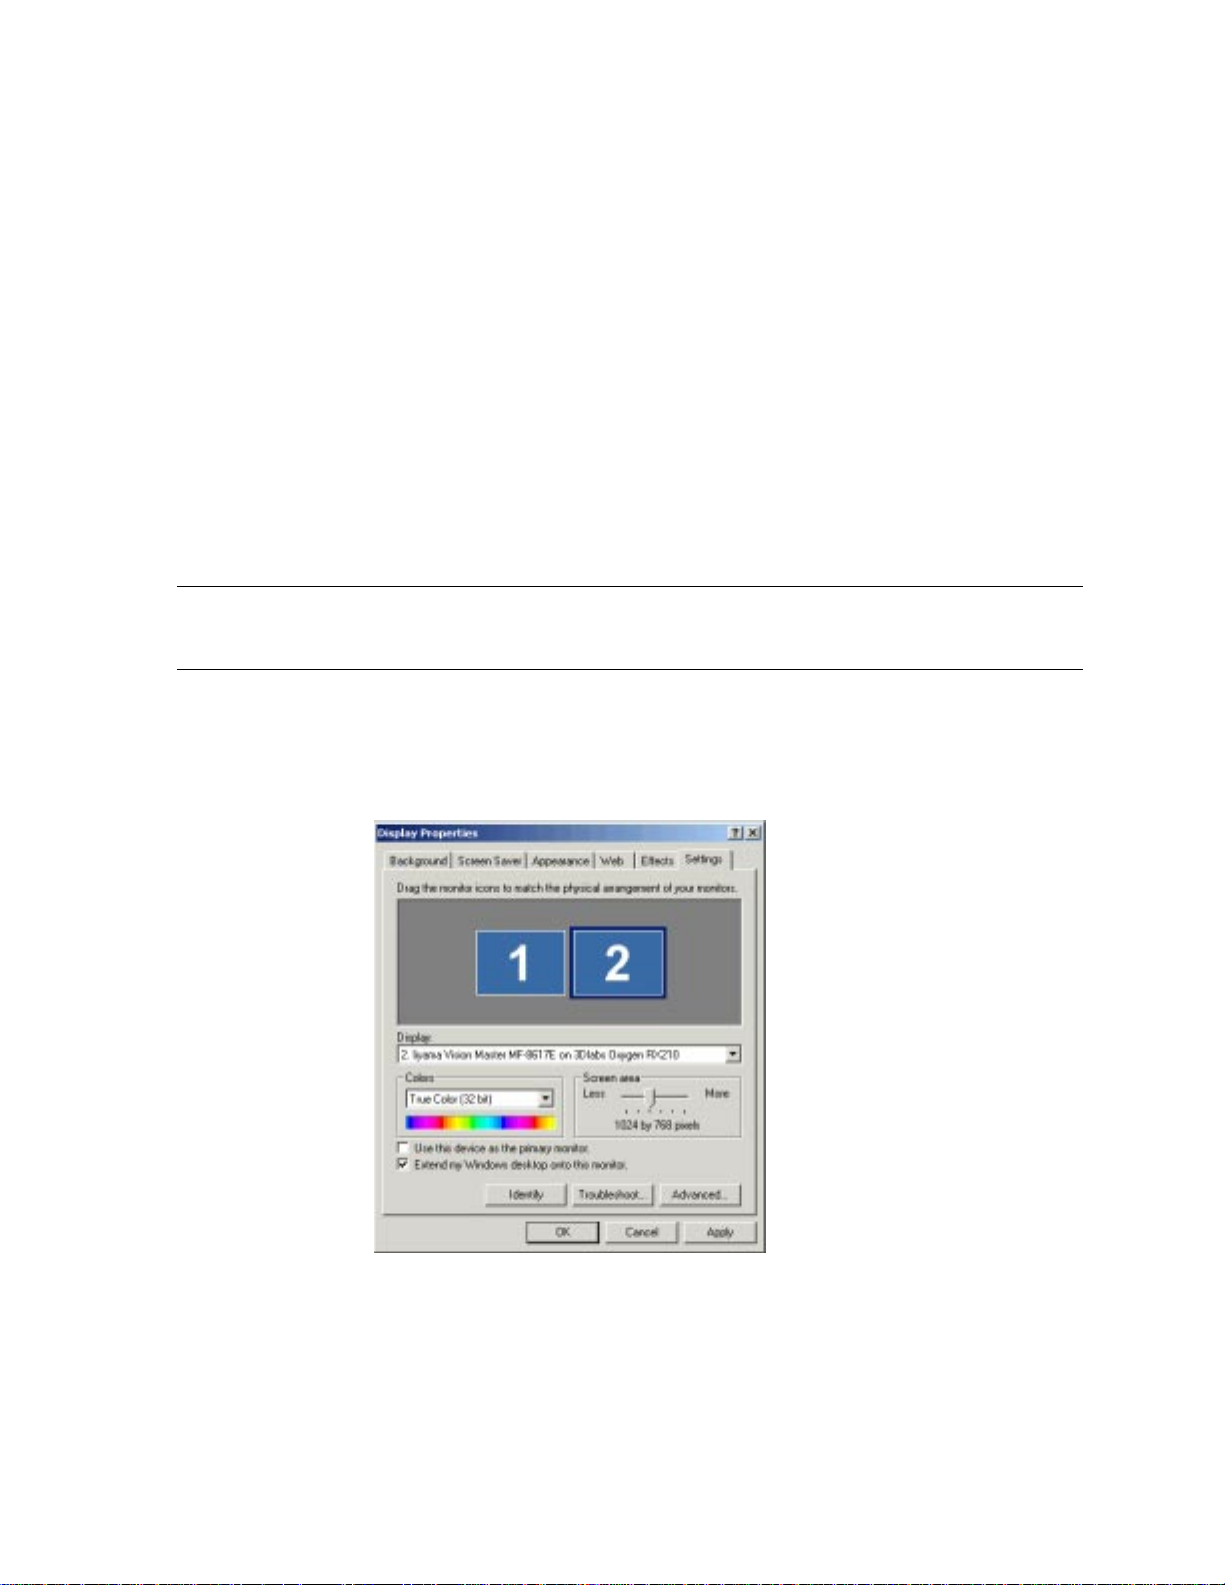
1. Open Display in the Control Panel.
2. In the Display Properties Control Panel, click th e Settings tab. A dialog box
appears displaying two monitor ico ns.
3. Select the monitor icon labeled "2".
4. Click the checkbox next to the option
Monitor
.
Extend my Windows desktop onto this
5. Click OK or Apply to accept the change.
3Dlabs Graphics Accelerator Card User's Manual
Page 21
Software Configuration
15
&RQILJXULQJ\RXU'ODEV*UDSKLFV$FFHOHUDWRU&DUG
IRU6WHUHR9LHZLQJ
If your 3Dlabs Graphic s Accelerator Card is equippe d with a VESA standard stereo
sync signal connector (3-pin mini-DIN), then it supports 3D stereo view ing. To view
stereoscopic images on your Windows PC, you wil l need to connect the appropriat e
equipment such as stereo glasses to the 3-pin mini-DIN connector on the car d.
If your 3Dlabs Graphic s Accelerator Card is not equ ipped with the stereo connect or ,
you can still view 3D ster eo images with the addition of the StereoGraphics
StereoEnabler
information and for installation and setup instructions.
For optimal stereo viewing, it is recommended that you use a monitor with a screen
refresh frequency of a t lea st 100 Hertz and that you turn of f a ll fluorescent lighting
before viewing stereo im a ges to prevent a possible heada che.
Note: Stereo viewing is only available on Windows NT and Windows 2000
systems.
To set up and configure stereo vie wing
to your system. Please refer to StereoGraphics documentation for more
1. Connect the stereo har dware to the round, stereo con nector on the card. See
the documentation that came with your stereo har dwa re.
2. In the Display Properties Control Panel, click th e 3Dlabs tab.
3. In the 3Dlabs Display Properties screen, click Adva nced.
Note: This is only an example. Your own panel
displays the information specific to yo ur board,
BIOS, and driver version.
4. Click the OpenGL Support tab.
3Dlabs Graphics Accelerator Card User's Manual
Page 22
Software Configuration
16
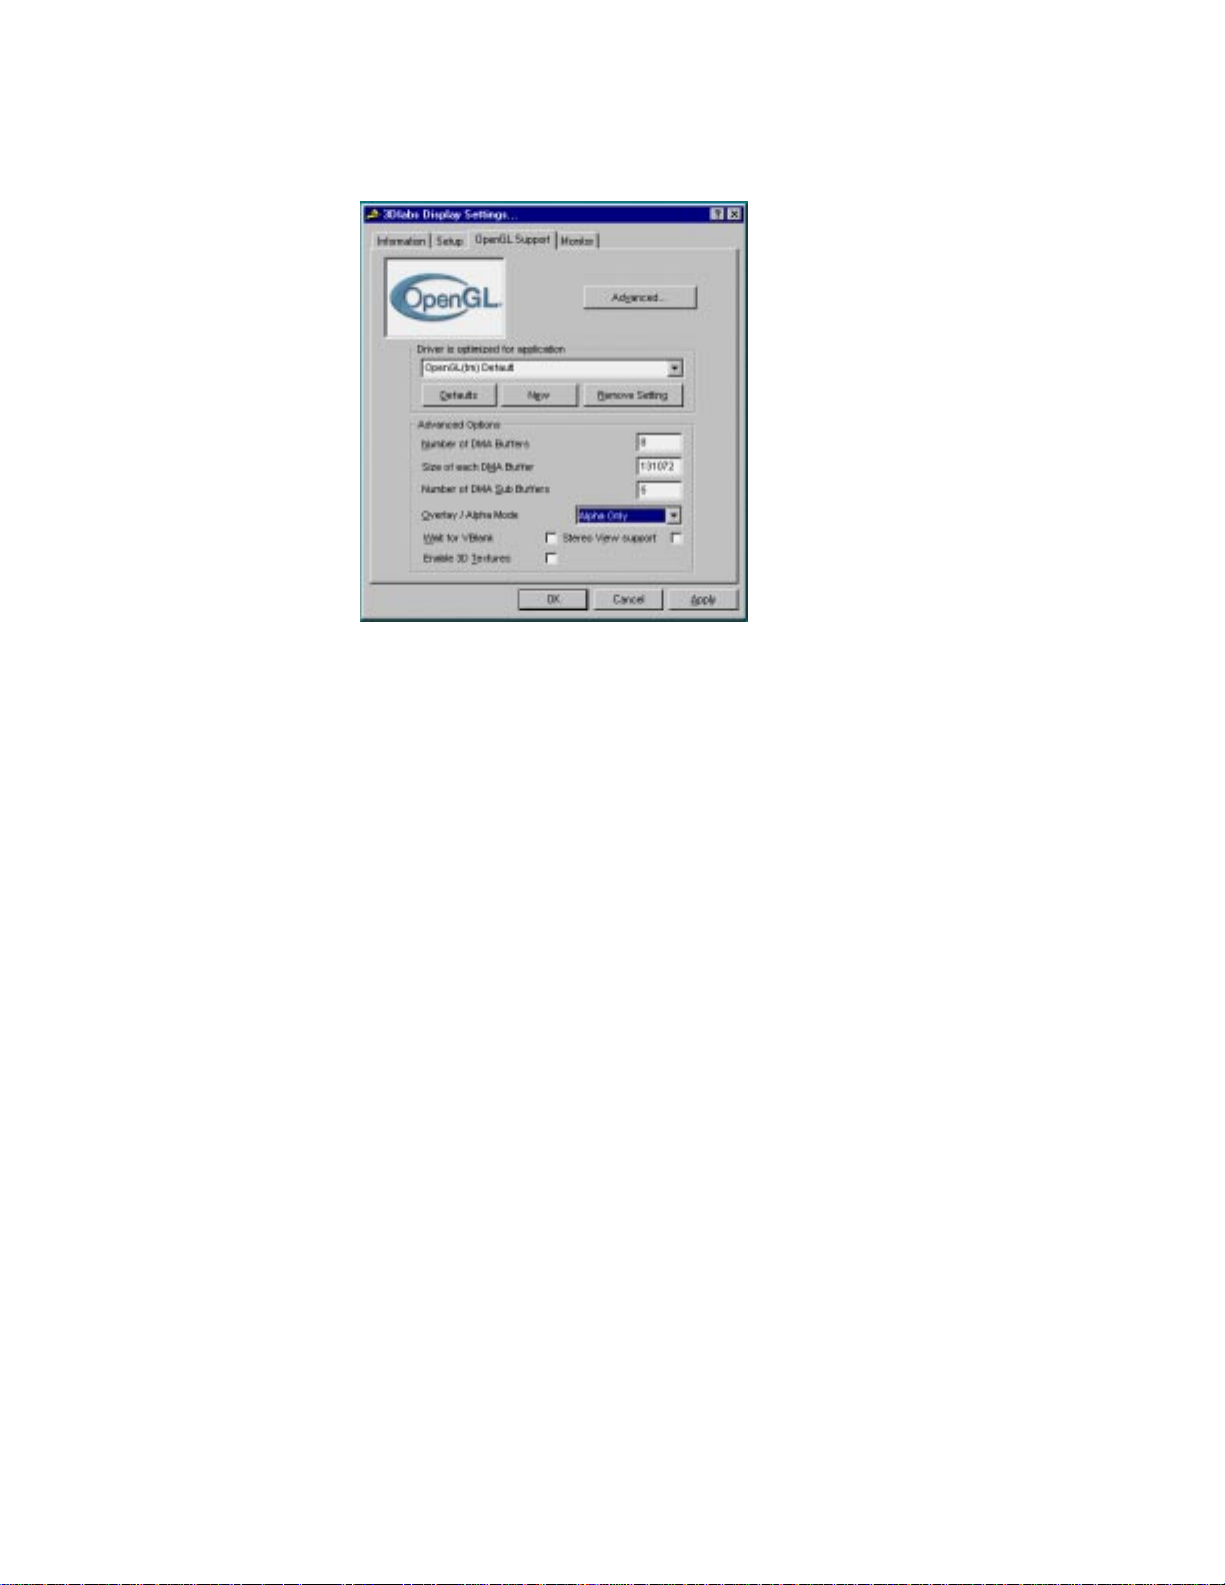
5. In the OpenGL Support screen, click Advanced.
6. Click the checkbox to the ri ght of Stereo View Support to select it.
7. Click Apply and then click OK.
8. In the Display Settings Control Pane l, click the Settings tab.
9. For information on suitable frequency please refer to the documentation for
your stereo glasses.
,QVWDOOLQJ%XQGOHG$SSOLFD WLRQV
If you purchased your 3Dlabs Graphics Accelerator Card with bundled software you
will need to refer to the following installation procedures:
1. Insert the Product CD into your CD ROM Drive.
2. At the opening menu screen, select Bundled Appl ica tions.
3. Select the bundled software you wish to install.
4. Follow the installa tion procedures on your screen
5. Reboot your compu t er if or when prompted.
3Dlabs Graphics Accelerator Card User's Manual
Page 23

+$37(5
&
7
528%/(6+227,1*
Page 24

Troubleshooting
18
7URXEOHVKRRWLQJ
If you have trouble using your 3Dlabs Graphics Accelerator Card or a 3D application,
you may find the answer to your problem in the following sections. Always start your
problem- solving efforts with the simplest solution and work up to the more complex
ones.
0RQLWRUVDQG'LVSOD\5HVROXWLRQV
Question:My monitor is either blank, or the displayed image is distorted,
scrambled or smaller than I expected.
Solution: If the monitor is blank, be sure that your system and monitor are
plugged in and turned on. Is the monitor’s power cord attached securely?
Check each component’s documentation for the location and use of
power connectors and switches.
Solution: Make sure that your video cable is c on nected securely to the monitor
to the correct monitor connector on your 3Dlabs Graphics Accelerator
Card. See your monitor docu mentation and Chapter 1 - Installation, in
this document.
Solution: Your card might not be seated properly in the appropriate slot. Remove
and reinstall your card as described in Chapter 1 - Installation
Remember to use the anti-static wrist strap when opening your system
and handling the card.
Question:The performance of and/or the available resolutions for my 3Dlabs
Graphics Accelerator Card are not what I expected.
Solution: The 3Dlabs Graphics Accelerator Card driver may not have installed
fully, or a file may have been corrupted. Try installing the driver again.
Solution: You may have selected a display setting that is incompatible with
accelerated 3D graphics applications. See the Monitor Screen in your
3Dlabs display con t r ol panel for a list of compatible resolutions.
Solution: If the performance is different from w hat you expec ted, check to see that
the correct application or setting has been selected in the Optimized
Application Setting i n the Taskbar Based Configuration Manager.
Solution: If the performance is different from w hat you expec ted, check to see that
the
Wait for VBlank
Panel under Direct3D Support or OpenGL Support.
Question:When I restart my system, an “Invalid Display Settings” message
appears on-screen, followed by “The default display resolution has
been temporarily used by the system.”
Solution: Within a few seconds, the error messages should be replaced by a
window that allows you to set a display resolution. Pick your preferred
resolution from the list and you should get the sharp results you
expected.
setting has been set correctly in the Display Control
and
.
6\VWHPVDQG1HWZRUNV
Question:Since installing the 3Dlabs Graphics Accelerator Card, the speakers
are unable to produce sound.
Solution: You may need to reinstall or update the drivers for your sound card.
3Dlabs Graphics Accelerator Card User's Manual
Page 25

Troubleshooting
19
Question:Since installing the 3Dlabs Graphics Accelerator Card, my system
either hangs or crashes to a blue screen when I try to start up, or the
system starts up but VGA graphics don’t display.
Solution: Try to disable “VGA Palette Snoop.” Follow these steps.
1. Remove the 3Dlabs Graphics Accelerator Card and reinstall your old
graphics card. See Chapter 1- Installation, for instructions.
2. Restart your system and enter Setup at the on-screen prompt. The
key command to enter Setup can differ with each BIOS, so consult
your system documentation if you do not see the command displayed
as the system boots.
3. Disable VGA Palette Snoop, again consulting your system
documentation for its specific location in your BIOS.
4. Choose Exit and Save Settings.
5. Shut down, remove yo ur old graphic s card, and reins tall your 3Dlabs
Graphics Accelerator Ca rd.
6. Make sure that you are not using an old graphics board driver, and
that you have uninstalled any other graphics drivers — particularly
those provided by other companies using 3Dlab s chipsets.
7. Please see the Oxygen and Permedia System Integration Guide in the
Troubleshooting FAQ section at http://www.3dlabs.c om/s upp ort
8. You may need to update your system BIOS. See your system
documentation for system BIOS update information.
Question:I’m experiencing network problems since I installed my 3Dlabs
Graphics Accelerator Card.
Solution: You may need to reinstall or update your Ethernet driver. See your
system or Ethernet adapter documentation for more information.
2QOLQH,QIRUPDWLRQ
If you cannot find the problem you are experiencing, or the solution to a problem,
listed in this chapter, check the Troubleshooting FAQ list at
http://www.3dlabs.com/support, or contact your 3Dlabs vend or for additi onal help.
3Dlabs Graphics Accelerator Card User's Manual
Page 26

Page 27

Software License
21
33(1',;
$
%6
2)7:$5(/,&(16(
3Dlabs Graphics Accelerator Card User's Manual
Page 28

Software License
22
62)7:$5(/,&(16($*5((0(17
THIS IS A LEGAL CONTRACT BETWEEN YOU, THE END USER, AND 3DLABS, INC.
BY USING THE SOFTWARE ACCOMPANYING THIS GUIDE OR PRE- INSTALLED ON
YOUR SYSTEM, YOU ARE ACCEPTING AND AGREEING TO BE BOUND BY THE
TERMS OF THIS SOFTWARE LICENSE AGREEMENT. IF YOU ARE NOT WILLING TO
BE BOUND BY THE TERMS OF THIS SOFTWARE LICENSE AGREEMENT, PROMPTLY
RETURN THIS SOFTWARE LICENSE AGREEMENT WITH THE UNOPENED
SOFTWARE ENVELOPE, OXYGEN CARD AND ANY OTHER ACCOMPANYING ITEMS
AND 3DLAB PRODUCTS TOGETHER WIT H YO UR RECEIPT TO YOUR PLACE OF
PURCHASE FOR A FULL REFUND.
6RIWZDUH/LFHQVHDQG5HVWULFWLRQV
The SOFTWARE delivered to you may embody and i nc lude, without limitation, certain
software programs in object code form (machine-readable but not human-readable
form) and documentation. Use of the SOFTWARE can result in the production of
FEATURES that are human-readable, including, without limitation, documentation,
report formats, menus, audible prompts and tone sequences. Such SOFTWARE and
FEATURES constitute cop yrighted property propri eta r y to 3Dlabs, Inc. or its licensors,
and 3Dlabs, Inc. or its lice nsors retain title to the SOFTWARE (excluding media on
which recorded), FEATURES, all copies thereof, and all intellectual property rights
therein. No title to the SOFTWARE, FEATURES, any copies t her eof or any intellectua l
property rights therein, are transferred to you. You are hereby granted, for your own
internal use only, a nontransferable, non exclusive, perpetual, revocable license to use
one (1) copy of the SOFTWARE and FEATURE S on the computer on which the
SOFTWARE was originally mounted or installed. Except as specifically authorized by
this AGREEMENT, you may not copy the SOFTWARE or FEATURES for any purpose
(except that you may make a use one (1) copy of the SOFTWARE solely for backup
purposes). You shall not, whether through the use of disassembl ers or any other
means whatsoever (in cluding, but not limited to, manual, mechanical or e lectrical
means), reverse engi neer, decompile, disassemble, destroy, disable, derive rules of
protocol embodied in the SOFTWARE or derive source code from the SOFTWARE OR
FEATURES, or attempt to permit any third party to do any of the foregoing. Any
attempt to do any of the foregoing shall be a material breach of this AGREEMENT and
the license granted herein, which shall immed ia tely entitle 3Dlabs, Inc. to exer cise any
remedy that may exist at law or in equity. You may not transfer, loan, rent, lease,
distribute or grant any rights in the SOFTWARE, FEATURES, copies thereof, or
accompanying doc umentation in any form without the prior written consent of 3Dlabs,
Inc.
3Dlabs Graphics Accelerator Card User's Manual
Page 29

Software License
23
/LPLWHG:DUUDQW\
3Dlabs, Inc. warrants tha t the SOFTWARE AND FEATURES lic ensed to you under this
AGREEMENT will perform in accordance with 3Dlabs, Inc. published specifications for
use on the same operating system as used by yo u at the time of purchase of the
SOFTWARE or the system on which the SOFTWARE is initially mounted or installe d
(WARRANTY) for a period of ninety (90) days after the date of delivery to you as
evidenced by your receipt (WARRANTY PERIOD). If the SOFTWARE or FEATURES
does not conform during the WARRANTY PERIOD, you agree to provide written notice
of such failure to 3Dlabs, Inc. and 3Dlabs, Inc. will, at its sole option, repair or replace
the SOFTWARE. 3Dlabs, Inc. does not warrant that the use of the SOFTWARE or
FEATURES will be uninterrupted or error- free and hereby disclaims all liability on
account thereof. THE REMEDIES PROVIDED HEREIN ARE YOUR SOLE AND
EXCLUSIVE REMEDIES FOR BREACH OF WARRANTY. THIS WARRANTY IS IN LIEU
OF ALL OTHER WARRANTIES OR CONDITIONS, EXPRESS OR IMPLIED, INCLUDING
WARRANTIES OR CONDITIONS OF MERCHANTABILITY, NONINFRINGEMENT AND
FITNESS FOR A PARTICULAR PURPOSE. SOME STATES OR COUNTRIES DO NOT
ALLOW THE EXCLUSION OF IMPLIED WARRANTIES OR CONDITIONS, SO THE
ABOVE EXCLUSION MAY NOT APPLY TO YOU.
/LPLWHG/LDELOLW\
NOTWITHSTANDING ANY PROVISION IN THIS LICENSE TO THE CONTRARY,
NEITHER 3DLABS, INC. NOR ITS LICENSORS OR SUPPLIERS WILL BE LIABLE FOR
ANY SPECIAL, INCIDENTAL, INDIRECT OR CONSEQUENTIAL DAMAGES, HOWEVER
CAUSED, OR ANY THEORY OF LIABILITY, WHETHER OR NOT 3DLABS, INC., ITS
LICENSORS OR SUPPLIERS HAS BEEN ADVISED OF THE POSSIBILITY OF SUCH
DAMAGE OR LOSS. IN NO EVENT SHALL 3DLABS, INC., ITS LICENSORS’ OR
SUPPLIERS’ LIABILITY ARISING UNDER THIS LICENSE EXCEED THE AMOUNT PAID
BY YOU [FOR THE PRODUCT OR SOFTWARE] GIVING RISE TO SUCH LIABILITY.
THIS LIMITATION IS INTENDED TO LIMIT THE LIABILITY OF 3DLABS, INC., ITS
LICENSORS OR ITS SUPPLIE RS AND SHALL APPLY NOTW I THSTANDING ANY
FAILURE OF ESSENTIAL PURPOSE OF ANY LIMITED REMEDY. SOME STATES OR
COUNTRIES MAY NOT ALLOW THE FOREGOING LIMITATION, SO THE FOREGOING
MAY NOT APPLY TO YOU.
5HVWULFWHG5LJKWV1RWLFH
Use, duplication or disclosure by the United States Government is subject to
restrictions as set forth in subparagraphs ©(1) and ©(2) of the Commercial Computer
Software - Restricted Rights clause at FAR Section 52.277-19 or ©(1)(ii) of the Rights
in Technical Data and Computer Software clause at DFARS Section 252.277-7013, as
applicable. Unpublished - rights reserved under the co pyright laws of the United
States. Contractor: 3Dlabs Inc., Ltd., 480 Potrero Avenue, Sunnyvale, California
94086.
7HUPLQDWLRQ
You may terminate the license granted hereunder at any time by destroying all copies,
[mergers or modifications] of the SOFTWARE, FEATURES and accompanying
materials. 3Dlabs, Inc. may immediately terminate the license granted to you
hereunder upon notice for failure to comply with the terms and conditions of this
3Dlabs Graphics Accelerator Card User's Manual
Page 30

Software License
24
AGREEMENT. Upon such termination, you agree to destroy all copies, mergers and
modifications of the SOFTWARE and FEAT URES and accompanying documents. You
agree that a breach of this AGREEMENT will result in irreparable damages to 3Dlabs,
Inc. This AGREEMENT is the entire agreement between you a nd 3Dlabs, Inc. with
respect to the use and licensi ng of the SOFTWARE provided with th is AGREEMENT,
and supersedes all proposals, warranti es, prior agreements or a ny other
communications between the parties relatin g to th e su bject matter hereof.
*HQHUDO
This AGREEMENT will be governed by and construed in accordance with the laws of
California without regard to conflicts of law principle s or the UN Convention on the
Sale of Goods. If for any reason a court of competent jurisdiction finds any provision of
this AGREEMENT, or portion thereof, to be unenforceable, that provision of the
AGREEMENT shall be enforced to the maximum extent permissible so as to effect the
intent of the parties, and the remainder of this AGREEMENT shall continue in full
force and effect. Should you have any questions concerning this AGREEMENT, please
write to: 3Dlabs, Inc., 480 Potrero Avenue, Sunnyvale, California 94086.
3Dlabs Graphics Accelerator Card User's Manual
Page 31

33(1',;
$
&5
(*8/$725<67$7(0(176
Page 32

26
'HFODUDWLRQRI&RQIRUPLW\
declare under our sole responsibility that the
3Dlabs Graphics Accelerator product(s)
to which this declaration relates are in conformance with the following standards:
EN 55024:1998, clause 4.2.3.2
following the provisions of the 89/336/EEC Directive.
San Jose, California, December 1999
Regulatory Statements
We, 3Dlabs, Incorporated,
480 Potrero Avenue
Sunnyvale, CA 94086
Phone 408-530-47 00
Fax 408-530-4701
United States of America
EN 55024:1998, clause 4.2.1
EN 55024:1998, clause 4.2.2
EN 55024:1998, clause 4.2.3
EN 55024:1998, clause 4.2.6
EN 55022:1994, clause 5
EN 55022:1994, clause 6
IEC950:1991, 2
EN60950:1992
3Dlabs, Inc.
nd
Edition
Warning:
carried out which are not in accordance with the issued “instructions for use” or approved by
3Dlabs Inc. will nullify the CE certification of this product and could lead to prosecution.
comply with Part 15 of FCC Rules. Operation is subject to the following two conditions: (1) this device may
not cause harmful interference, and (2) this device must accept any interference received, including
Any use of, installation practices, modifications or maintenance procedures
We, 3Dlabs, Incorporated,
480 Potrero Avenue
Sunnyvale, CA 94086
Phone 408-530-47 00
Fax 408-530-4701
United States of America
declare under our sole responsibility that the products
3Dlabs Graphics Accelerator Card
interferences that may cause undesired operation.
3Dlabs Graphics Accelerator Card User's Manual
Page 33

1'(;
,
Page 34

Index
28
3D stereo viewing, 15
Windows 2000, 15
Windows NT, 15
BIOS, 20
Configuration Manager, 10, 19
Direct3D, 12, 19
Display Control Panel, 10, 11, 19
configuration tools, 11
Windows 2000, 11
Windows 98, 11
Windows Me, 11
Windows NT 4.0, 11
Display Properties, 13, 14, 15
Driver, 10
Windows 2000, 2
Windows 98, 2
Windows Me, 2
Windows NT, 2
Hardware
driver, 2
Installing
AGP/AGP Pro slot, 3
Card, 3
DFP monitor, 5
hardware, 2
PCI slot, 3
software, 7
stereo device, 6
VGA monitor, 5
Windows 2000 driver, 7
Windows 98 driver, 7
Windows NT driver, 7
Installing Bundled Applications, 16
Monitor Screen, 19
Multiple Monitors, 13
Windows 2000, 14
Windows 98, 14
Windows Me, 14
Windows NT, 13
Online Information, 20
OpenGL, ii, 12, 15, 16, 19
registration, 8
Regulatory Statements, 26
Software License, 22, 23
System Requirements, vi
Task Bar, 10
Troubleshooting, 18, 19, 20
monitor resolutions, 19
systems and networks, 19
Warranty, 24
Windows 2000, 7, 12
Windows 98, 7
Windows NT, ii, 7, 12
3Dlabs Graphics Accelerator Card User's Manual
 Loading...