

Page 1
SuperStack® II Switch 3900
®
Getting Started Guide
http://www.3com.com/
Part No. 10005622
Published April 1998
Page 2
3Com Corporation ■ 5400 Bayfront Plaza ■ Santa Clara, California ■ 95052-8145
Copyright © 1998, 3Com Corporation. All rights reserved. No part of this
documentation may be reproduced in any form or by any means or used to
make any derivative work (such as translation, transformation, or adaptation)
without written permission from 3Com Corporation.
3Com Corporation reserves the right to revise this documentation and to make
changes in content from time to time without obligation on the part of 3Com
Corporation to provide notification of such revision or change.
3Com Corporation provides this documentation without warranty of any kind,
either implied or expressed, including, but not limited to, the implied
warranties of merchantability and fitness for a particular purpose. 3Com may
make improvements or changes in the product(s) and/or the program(s)
described in this documentation at any time.
UNITED STATES GOVERNMENT LEGENDS
If you are a United States government agency, then this documentation and
the software described herein are provided to you subject to the following:
All technical data and computer software are commercial in nature and
developed solely at private expense. Software is delivered as “Commercial
Computer Software” as defined in DFARS 252.227-7014 (June 1995) or as a
“commercial item” as defined in FAR 2.101(a) and as such is provided with only
such rights as are provided in 3Com’s standard commercial license for the
Software. Technical data is provided with limited rights only as provided in DFAR
252.227-7015 (Nov 1995) or FAR 52.227-14 (June 1987), whichever is
applicable. You agree not to remove or deface any portion of any legend
provided on any licensed program or documentation contained in, or delivered
to you in conjunction with, this User Guide.
EMISSIONS COMPLIANCE STATEMENTS FOR CLASS A PRODUCTS
United States — Federal Communications Commission Notice
This equipment has been tested and found to comply with the limits for a
Class A digital device, pursuant to Part 15 of the FCC Rules. These limits
are designed to provide responsible protection against harmful
interference when the equipment is operated in a commercial environment.
This equipment generates, uses, and can radiate radio frequency energy
and, if not installed and used in accordance with the instruction manual,
may cause harmful interference to radio communications. Operation of this
equipment in a residential area is likely to cause harmful interference, in
which case the user will be required to correct the interference at his or her
own expense.
Canada — Emissions Requirements
This Class A digital apparatus meets all requirements of the Canadian
Interference-Causing Equipment Regulations.
Cet appareil numérique de la classe A respecte toutes les exigences du
Règlement sur le matériel brouilleur du Canada.
Japan — VCCI Class A Compliance
This is a Class A product based on the standard of the Voluntary Control
Council for Interference by Information Technology Equipment (VCCI). If
this equipment is used in a domestic environment, radio disturbance may
arise. When such trouble occurs, the user may be required to take
corrective actions.
Page 3

EMC DIRECTIVE COMPLIANCE
This equipment was tested and found to conform to the Council Directive
89/336/EEC for electromagnetic compatibility. Conformity with this
Directive is based upon compliance with the following harmonized
standards:
EN 55022 Limits and Methods of Measurement of Radio Interference
EN 50082-1 Electromagnetic Compatibility Generic Immunity Standard:
Residential, Commercial, and Light Industry
Warning: This is a Class A product. In a domestic environment, this
product may cause radio interference, in which case you may be required
to take adequate measures.
LOW VOLTAGE DIRECTIVE COMPLIANCE
This equipment was tested and found to conform to the Council Directive
72/23/EEC for safety of electrical equipment. Conformity with this Directive
is based upon compliance with the following harmonized standard:
EN 60950 Safety of Information Technology Equipment
UK GENERAL APPROVAL STATEMENT
This equipment is manufactured to the international Safety Standard
EN60950 and is approved in the UK under the General Approval Number
NS/G/12345/J/100003 for indirect connection to the public
telecommunication network.
AUSTRALIAN EMC FRAMEWORKS COMPLIANCE
This product conforms to the EMC Frameworks and meets the Class A
limits of AS3548.
TRADEMARKS
Unless otherwise indicated, 3Com registered trademarks are registered in
the United States and may or may not be registered in other countries.
3Com, the 3Com logo, SuperStack, and Transcend are registered
trademarks of 3Com Corporation. 3ComFacts is a service mark of 3Com
Corporation.
IBM and NetView AIX are registered trademarks of International Business
Machines Corporation. Apple, AppleTalk, and Macintosh are trademarks of
Apple Computer, Inc. Ultrajet is a trademark of Chemtronics. CompuServe
is a registered trademark of CompuServe, Inc. MS-DOS and Windows are
registered trademarks of Microsoft Corporation. HP and OpenView are
registered trademarks of Hewlett-Packard Co. SunNet Manager, SunOS,
and OpenWindows are trademarks of Sun Microsystems, Inc. Microswabs
and Texwipe are registered trademarks of Texwipe. Liqui-Tool is a trademark
of Triangle Tool Group. UNIX is a registered trademark in the United States
and other countries, licensed exclusively through X/Open Company.
All other company and product names may be trademarks of the respective
companies with which they are associated.
Page 4

Page 5

ONTENTS
C
A
BOUT THIS GUIDE
Introduction 1
Finding Specific Information in This Guide 1
Conventions 2
SuperStack II Switch 3900 Documentation 3
Paper Documents 3
Documents on CD-ROM 4
Related Publications 4
Documentation Comments 4
Year 2000 Compliance 5
1
S
WITCH
3900 S
Switch 3900 Intelligent Switch 1-1
System Overview — 24-Port Front Panel 1-2
System Overview — 36-Port Front Panel 1-3
System Overview — Back Panel of Both Models 1-4
System Features and Benefits 1-5
System Management 1-5
Optional Gigabit Ethernet Modules 1-6
Network Configuration Example 1-6
Providing Dedicated Links for Fast Ethernet 1-6
Network Configuration Sample 1-7
YSTEM AND SETUP OVERVIEW
2
I
NSTALLING THE SYSTEM
Before You Begin 2-1
Installing the System on a Table Top or in a Free-Standing
Stack 2-2
Installing the System in a Distribution Rack 2-3
Preparing the System and Rack 2-3
Mounting the System into a Distribution Rack 2-5
3
C
ABLING SWITCH
Overview of Cabling 3-1
Fiber Safety Precautions 3-1
Fast Ethernet Ports 3-2
Cabling 10/100BASE-TX (RJ-45) Ports 3-2
10/100BASE-TX (RJ-45) Connector Pin Assignments 3-3
Gigabit Ethernet Ports 3-4
Cabling Gigabit Ethernet Ports 3-4
Cabling the Console Port 3-5
Console Port Pin Assignments 3-7
4
S
YSTEM POWER UP
Power Options 4-1
AC Power Cord 4-1
Optional Advanced Redundant Power System 4-1
Optional Uninterruptible Power System 4-1
3900 P
ORTS
Page 6

Power Up 4-2
To Power the Switch 3900 with the RPS 4-2
To Power the Switch 3900 from the Wall
Receptacle 4-2
Power-up Diagnostics 4-2
System Diagnostics 4-3
Power LED Activity 4-3
Fault LED Activity 4-3
Ethernet Port Diagnostics 4-3
Packet LED Activity 4-3
Status LED Activity 4-3
System and Port Status LEDs 4-4
System Checks 4-5
Next Step: Software Configuration 4-5
5
Q
UICK SETUP FOR
M
ANAGEMENT ACCESS
About Switch 3900 System Management 5-1
How Do You Want to Manage the System? 5-1
Terminal Connection 5-2
Modem Connection 5-2
IP Management Interface 5-2
Initial Management Access 5-2
Setting the Console Port Baud 5-3
Configuring the IP Interface 5-3
A
S
YSTEM SPECIFICATIONS
B
S
ITE REQUIREMENTS AND SAFETY CODES
General Safety Requirements B-1
Wiring Closet Recommendations B-1
Distribution Rack Requirements B-2
Protective Grounding for the Rack B-2
Space Requirements for the Rack B-2
Mechanical Requirements for the Rack B-3
Building and Electrical Codes B-4
Building Codes B-4
Electrical Codes B-5
C
T
ECHNICAL SUPPORT
Online Technical Services C-1
World Wide Web Site C-1
3Com FTP Site C-1
3Com Bulletin Board Service C-1
Access by Analog Modem C-2
Access by Digital Modem C-2
3ComFacts Automated Fax Service C-2
Support from Your Network Supplier C-2
Support from 3Com C-3
Returning Products for Repair C-4
6
T
ROUBLESHOOTING THE SYSTEM
Getting Additional Help 6-1
Diagnosing Problems 6-1
Power Failures 6-1
Abnormal LED Activity 6-1
Cleaning Dirty Fiber Optic Ports and Connectors 6-4
INDEX
3COM C
ORPORATION LIMITED WARRANTY
Page 7

BOUT
A
T
HIS
G
UIDE
Introduction
Your
SuperStack II Switch 3900 Getting Started Guide
provides all the information that you need to set up
your SuperStack® II Switch 3900 system and get it
operating in your network. This guide provides an
overview of your system and step-by-step procedures
for planning your configuration, installing your
system, cabling, powering up, configuring, and
troubleshooting. When you are ready to configure
your SuperStack II Switch 3900 system, see the
Administration Guide
If the information in the Software Installation and
Release Notes that are shipped with your Switch 3900
system differs from the information in this guide,
follow the instructions in the Release Notes.
This guide is intended for the system or network
administrator who is responsible for installing and
managing network hardware. It assumes that you
have a working knowledge of local area network
(LAN) operations, but it does not assume prior
knowledge of 3Com’s Switch 3900 high-performance
networking equipment.
Most user guides and release notes are available in
Adobe Acrobat Reader Portable Document Format
(PDF) or HTML on the 3Com World Wide Web site:
http://www.3com.com
on the Documentation CD.
Finding Specific Information in This Guide
This table shows where to find specific information.
For information on Turn to
Best ways to use the Switch
3900 system
The front and back panels “System Overview — 24-Port
Site requirements and other
issues to consider before
installing your Switch 3900
system
Installing the system on a table
or in a distribution rack
Cabling rules and pin
assignments:
■
Fast Ethernet ports “Fast Ethernet Ports” on page 3-2
■
Gigabit Ethernet ports “Gigabit Ethernet Ports” on
■
Console port “Cabling the Console Port” on
Checking system power-up
diagnostics and LEDs
(continued)
“System Features and Benefits”
on page 1-5
Front Panel” starting on page 1-2
“General Safety Requirements” on
page B-1
“Installing the System on a Table
Top or in a Free-Standing Stack”
starting on page 2-2 and
“Installing the System in a
Distribution Rack” on page 2-3
page 3-4
page 3-5 and “Console Port Pin
Assignments” on page 3-7
“Power Up” on page 4-2
Page 8
2
A
BOUT THIS GUIDE
For information on Turn to
Deciding how to manage your
system
“How Do You Want to Manage
the System?” on page 5-1
Setting the Console port baud “Setting the Console Port Baud”
on page 5-3
Configuring the IP management
interface
Troubleshooting hardware and
software problems
Complying with environmental
“Configuring the IP Interface” on
page 5-3
“Diagnosing Problems” on
page 6-1
Appendix A: System Specifications
and compliance specifications
Checking your site for
environmental and safety
Appendix B: Site Requirements
and Safety Codes
considerations
Getting help from your network
Appendix C: Technical Support
supplier or 3Com
Conventions
Table 1 and Table 2 list conventions that are used
throughout this guide.
Table 1
Icon Type Description
Notice Icons
Information
Note
Information that describes important
features or instructions
Caution Information that alerts you to potential loss
of data or damage to an application,
system, or device
Warning Information that alerts you to potential
personal injury
Table 2
Text Conventions
Convention Description
Screen
displays
Commands
This typeface represents information as it
appears on the screen.
The word “command” means that you must
enter the command exactly as shown and then
press Return or Enter. Commands appear in
bold. Example:
To update the system software, enter the
following command:
system softwareUpdate
This guide always gives the full form of a
command in uppercase and lowercase letters.
However, you can abbreviate commands by
entering the fewest letters in each command
that identify a unique command. Commands
are not case sensitive.
The words
“enter”
and “type”
When you see the word “enter” in this guide,
you must type something, and then press Return
or Enter. Do not press Return or Enter when an
instruction simply says “type.”
Keyboard key
names
If you must press two or more keys
simultaneously, the key names are linked with a
plus sign (+). Example:
Press Ctrl+Alt+Del
Words in
italics
Italics are used to:
Emphasize a point.
■
Denote a new term at the place where it is
■
defined in the text.
Identify menu names, menu commands, and
■
software button names. Examples:
From the
OK
Click
Help
menu, select
.
Contents
.
Page 9

SuperStack II Switch 3900 Documentation
The following documents comprise the SuperStack II
Switch 3900 documentation set. Documents are
shipped with your system in one of two forms:
■
Paper documents that are shipped with your
system or with optional components. They are
listed in the next section.
SuperStack II 3900 and 9300 Documentation CD
■
with online versions of the paper documents
To order a paper copy of a document that you see on
the compact disc, or to order additional compact
discs, contact your sales representative.
Paper Documents
These documents are shipped with your SuperStack II
Switch 3900 system:
SuperStack II Switch 3900 and 9300 Unpacking
■
Instructions
How to unpack your Switch 3900 system. Also, an
inventory list of items that are shipped with your
system.
■
SuperStack II Switch 3900 and 9300 Software
Installation and Release Notes
All of the new features, system issues, known
problems, and software corrections for the
software release. It also describes any changes to
the Switch 3900 system’s documentation.
SuperStack II Switch 3900 Documentation
SuperStack II Switch 3900 and 9300 Quick
■
3
Installation Guide
How to perform a quick installation of your
system. For more details on installation, see the
SuperStack II Switch 3900 Getting Started Guide
SuperStack II Switch 3900 Getting Started Guide
■
All the procedures necessary for getting your
system up and running, including information on
installing, cabling, powering up, configuring, and
troubleshooting the system.
SuperStack II Switch 3900 and 9300 Command
■
Quick Reference Card
All of the Administration Console switching
commands for the Switch 3900. For complete
descriptions, see the
Administration Guide
.
These documents are shipped with optional devices:
1000BASE-SX/1000BASE-LX Gigabit Ethernet
■
Module Installation Guide
How to install the optional Gigabit Ethernet
module.
SuperStack II Switch Advanced RPS User Guide
■
How to install the Advanced Redundant Power
Supply (RPS) and how to use it to provide
redundant and resilient power supplies for the
Switch 3900.
SuperStack II Switch Advanced RPS ‘Y’ Cable
■
Type 2 User Guide
How to install the Y cable with the Advanced
Redundant Power Supply (RPS) to provide fully
redundant capabilities.
.
Page 10

4
A
BOUT THIS GUIDE
Documents on CD-ROM
The compact disc that comes with your system
contains these documents:
Online versions of the paper documents that are
■
shipped with your system and its components
SuperStack II Switch 3900 and 9300
■
Administration Guide
How to use the Administration Console and the
management tasks that you can perform using it.
Related Publications
Depending on how you install and manage your
system, several related documents can provide helpful
information:
■
SNMP Network Manager documents
The Switch 3900 uses SNMP (Simple Network
Management Protocol), which can be accessed by
a remote network management application. 3Com
has network management applications for a
variety of platforms. Contact your supplier for
current product information. Each network
management application includes a guide that
explains how to manage your system.
If you are using network management software
from another vendor, refer to the sections of the
product’s documentation that describe how to
manage SNMP devices.
■
SNMP documents
3Com recommends these books for easy-to-read
descriptions of SNMP:
Marshall T. Rose.
■
The Simple Book: An
Introduction to Networking Management.
Englewood Cliffs, NJ: Prentice-Hall; 1996.
■ “Introduction to SNMP” Self-Study Guide.
Order from 3Com: Part Number 3CS-350A.
■ Telnet documents
To manage the Switch 3900 system over a TCP/IP
network using telnet, see the documentation that
is supplied with your telnet application.
Documentation Comments
Your suggestions are very important to us. They help
us make our documentation more useful to you.
Please send e-mail comments about this guide to:
sdtechpubs_comments@3Com.com
Please include the following information when
commenting:
■ Document title
■ Document part number (found on front or back
page of document)
■ Page number (if appropriate)
Example:
SuperStack II Switch 3900 Getting Started Guide
Part Number 10005622
Page 2-5 (chapter 2, page 5)
Page 11

Year 2000 Compliance
For information on Year 2000 compliance and 3Com
products, visit the 3Com Year 2000 Web page:
http://www.3com.com/products/yr2000.html
Year 2000 Compliance 5
Page 12

Page 13

1
SWITCH 3900 SYSTEM AND SETUP OVERVIEW
This chapter contains:
■ An overview of 3Com’s SuperStack
and how it provides solutions for your network
■ A description of the major features and
components of the system
■ A network configuration example
Switch 3900 Intelligent Switch
The Switch 3900 is the ideal product for network
managers who want to migrate from existing
switched 10 Mb networks to switched 100 Mb or
who need to deliver faster access to servers.
The Switch 3900 provides superior workgroup and
departmental switching performance with the added
flexibility of multiple Gigabit Ethernet links and server
connections.
The SuperStack II Switch 3900 family delivers full line
rate, nonblocking switching between 10/100 Mb
links and 1000 Mb Gigabit Ethernet links.
®
II Switch 3900
The Switch 3900 family consists of two models:
■ 3C39024 — The 24-port 10/100BASE-TX switch,
with up to three Gigabit Ethernet links. See
Figure 1-1.
■ 3C39036 — The 36-port 10/100BASE-TX switch,
with up to three Gigabit Ethernet links. See
Figure 1-2.
Both versions of the Switch 3900 provide:
■ One built-in Gigabit Ethernet multimode fiber
(MMF) link (1000BASE-SX)
■ Expansion slots on the back panel (see Figure 1-3)
that can hold one or two of these optional Gigabit
Ethernet modules:
■ Model 3C39001 — 1000BASE-SX for
multimode fiber (MMF)
■ Model 3C39002 — 1000BASE-LX for
single-mode fiber (SMF)
The cables for all Gigabit Ethernet ports use laser
transmission and have SC connectors.
See “Optional Gigabit Ethernet Modules” on
page 1-6 for more information.
Page 14
1-2 CHAPTER 1: SWITCH 3900 SYSTEM AND SETUP OVERVIEW
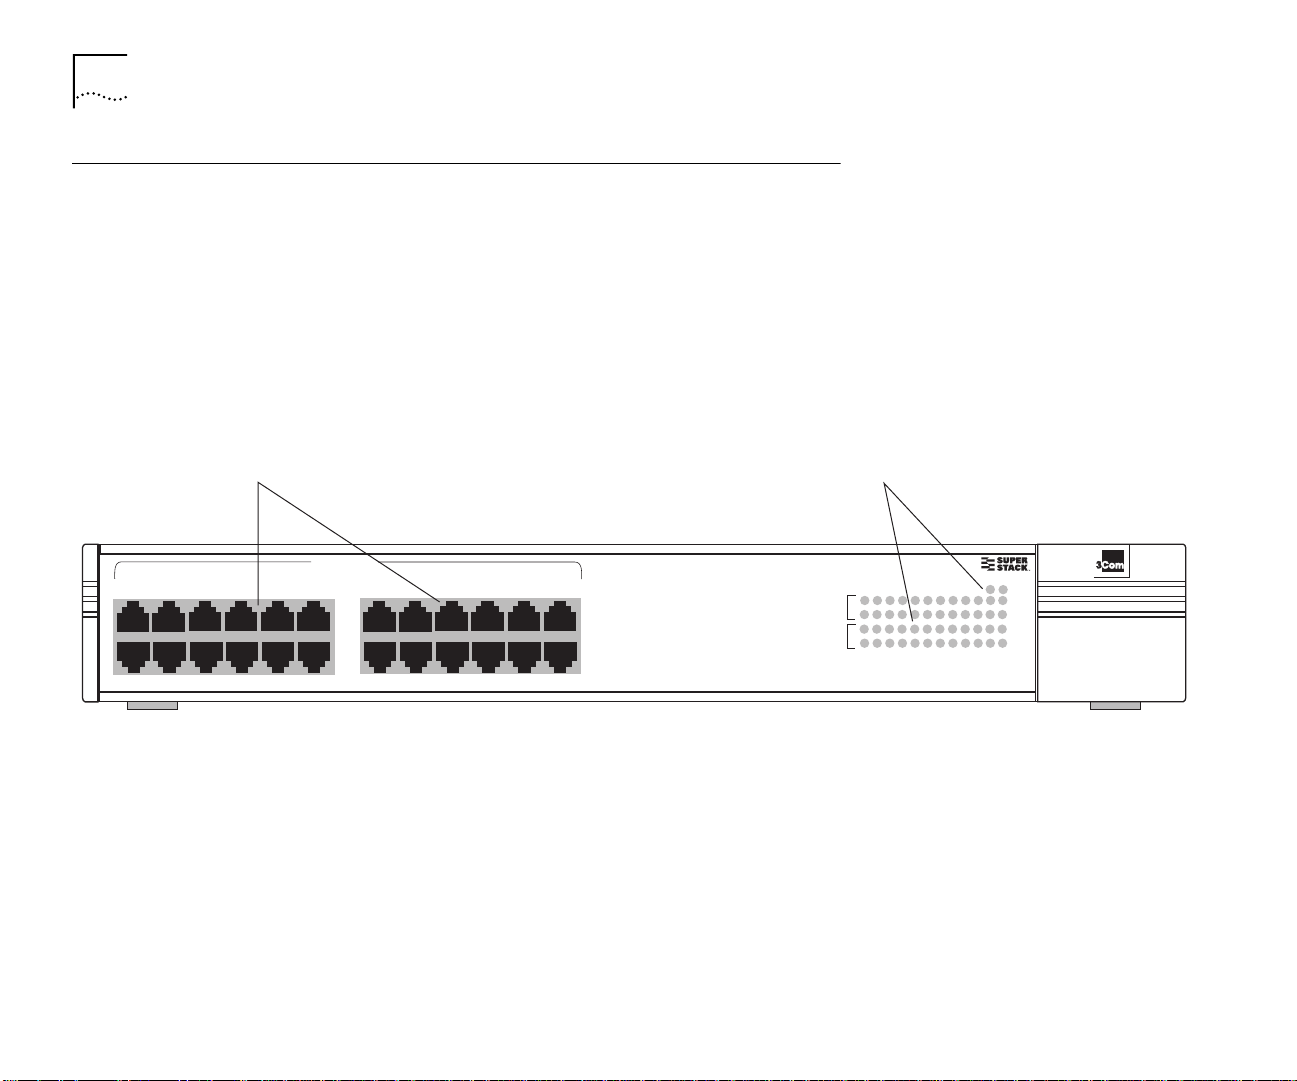
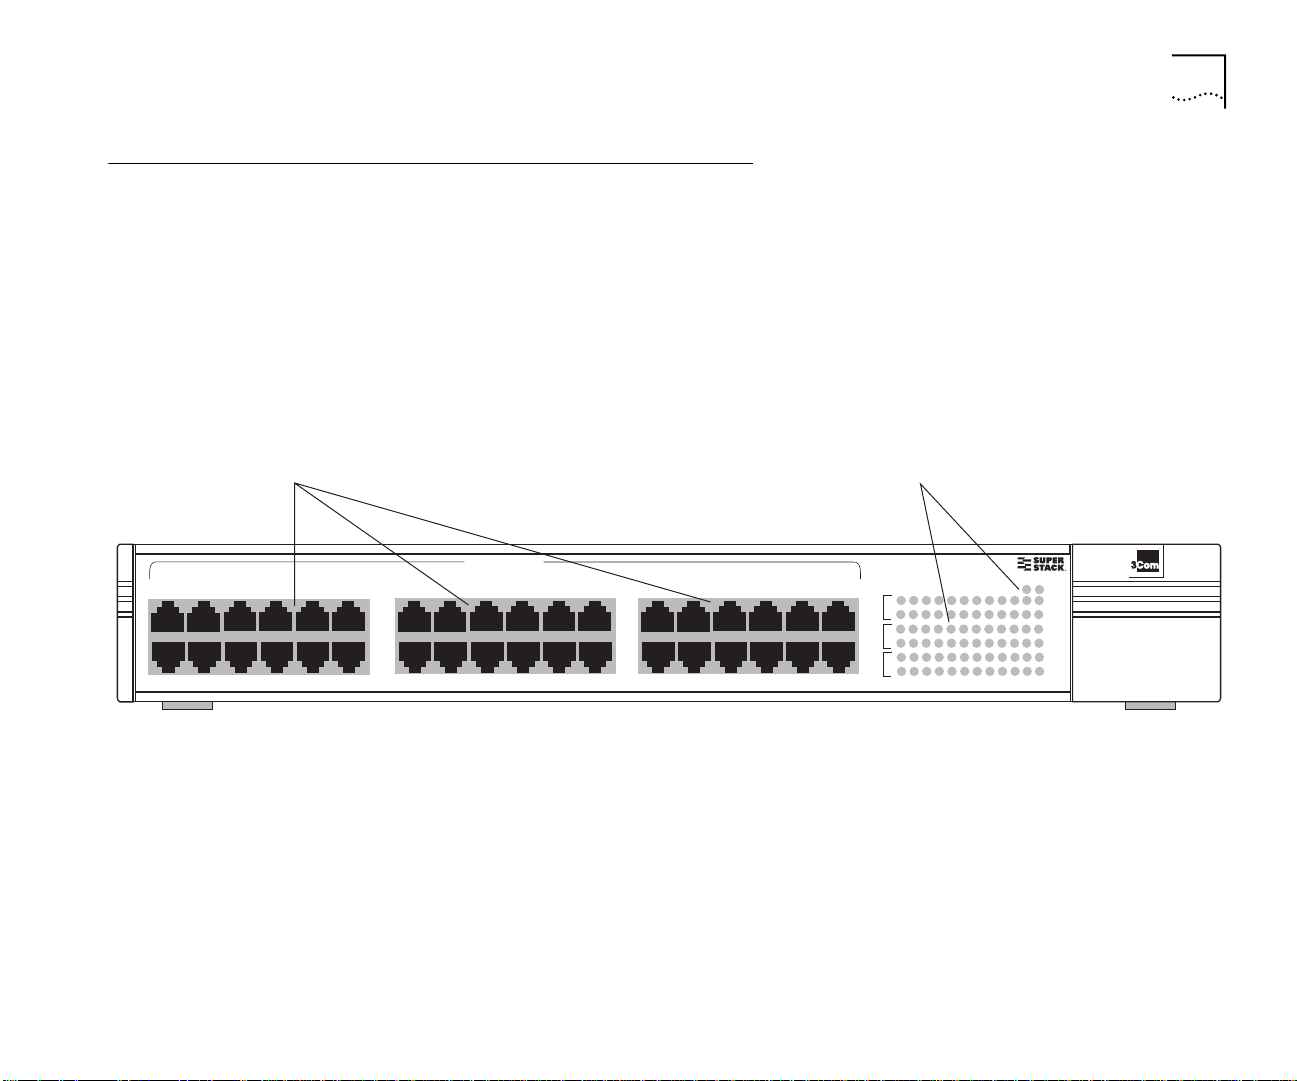
System Overview — 24-Port Front Panel
Ethernet Ports
Provide 24 10/100BASE-TX
(RJ-45) Ethernet ports
10/100 BASE - TX
1x
7x
6x
13x
12x
19x
Figure 1-1 Front Panel of the 24-Port SuperStack II Switch 3900
System and Port LEDs
Provide information about
the system and each port
Status
green = enabled, link OK
flashing green = disabled, link OK
18x
24x
off = link fail
31
2
31
2
5
16
13 18 192021 22 23
14
17
15
16
13 18 192021 22 23 24
14
17
15
Super Stack II Switch 3900
Power Fault
10
11 12456 789
106 789
11 124
24
Pckt
Stat
Pckt
Stat
Page 15
System Overview — 36-Port Front Panel
v
System Overview — 36-Port Front Panel 1-3
Ethernet Ports
Provide 36 10/100BASE-TX
(RJ-45) Ethernet ports
10/100 BASE - TX
1x
7x
6x
13x
12x
19x
Figure 1-2 Front Panel of the 36-Port SuperStack II Switch 3900
System and Port LEDs
Provide information about
the system and each port
Status
green = enabled, link OK
flashing green = disabled, link OK
off = link fail
25x
18x
31x
24x
30x
36x
2
2
13 18 192021 22 23 24
14
13 18 192021 22 23 24
14
25 30 313233 34 35 36
26
25 30 313233 34 35 36
26
31 10 11 12456 789
31 10 11 12456 789
16
17
15
16
17
15
28
29
27
28
29
27
Super Stack II Switch 3900
Power Fault
Pckt
Stat
Pckt
Stat
Pckt
Stat
Page 16
1-4 CHAPTER 1: SWITCH 3900 SYSTEM AND SETUP OVERVIEW
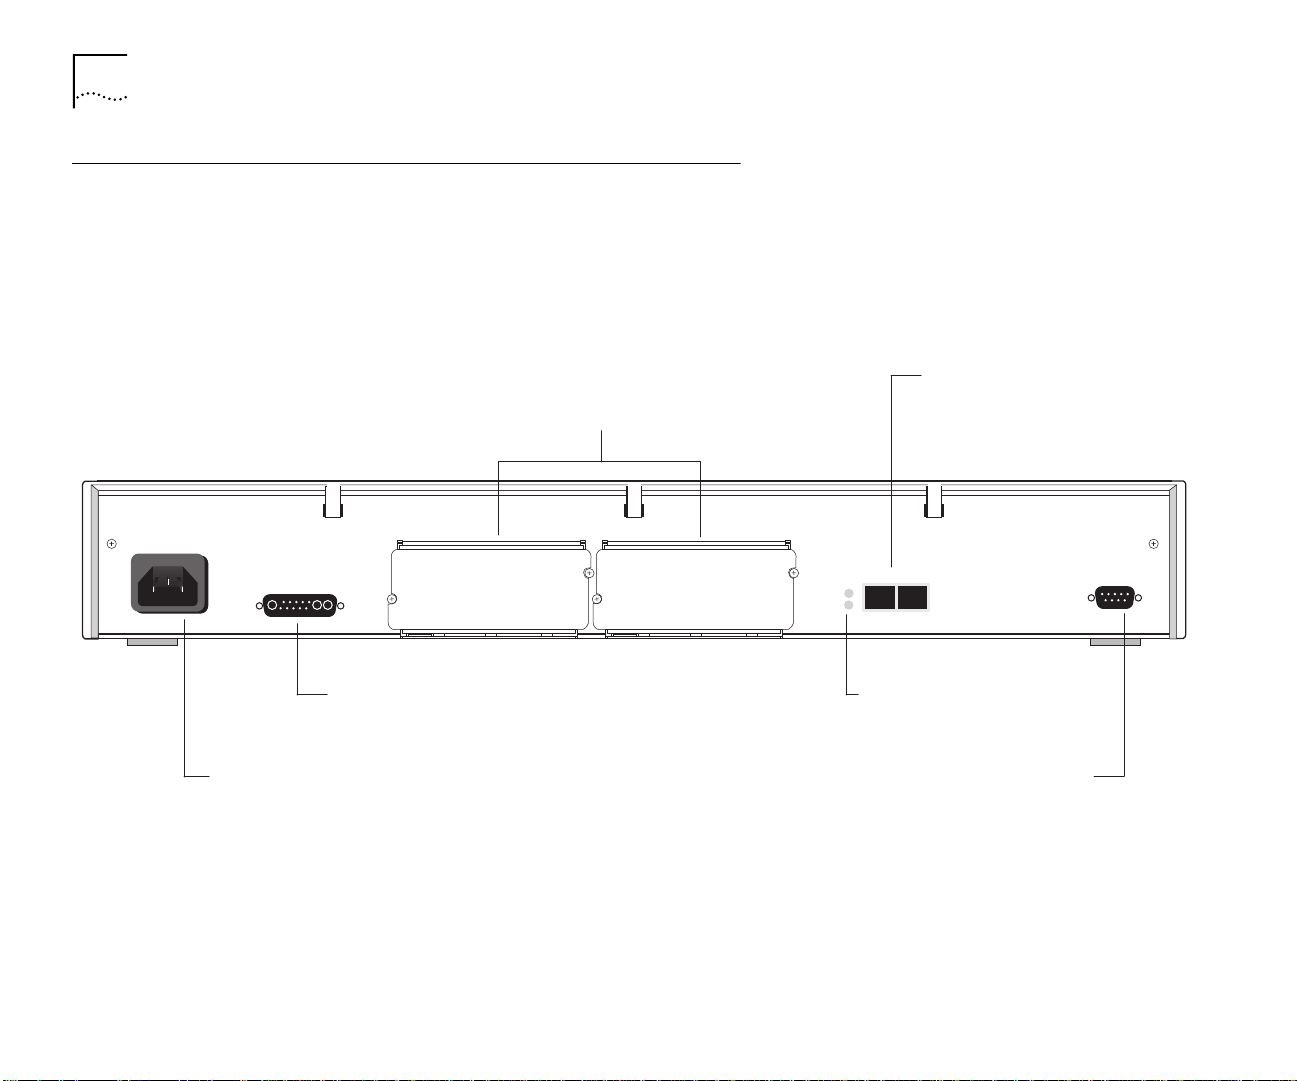
System Overview — Back Panel of Both Models
Optional Gigabit Ethernet Slots
Allow you to add additional
Gigabit Ethernet modules
RPS Connector
Connects to the Optional
Redundant Power System
Power Receptacle
Figure 1-3 Back Panel of the 24-Port and 36-Port SuperStack II Switch 3900
Fixed Gigabit Ethernet Port
Provides a 1000BASE-SX link
1000 Base SX
Pckt
Stat
Gigabit Ethernet Port LEDs
Provide information on the
port status and activity
Console Port
Allows you to connect a workstation or modem to
the Switch 3900 system for management access
Console
Page 17

System Features and Benefits 1-5
System Features and Benefits
The Switch 3900 is part of 3Com’s SuperStack family.
To combine diverse technologies as your network
grows, install the Switch 3900 in a SuperStack
network.
Some key features of the SuperStack II Switch 3900
system:
■ High-density Gigabit Ethernet and Fast Ethernet
configurations
The Switch 3900 has 24 or 36 Fast Ethernet ports
and up to three Gigabit Ethernet links.
■ Autonegotiation support
The Switch 3900 supports 10BASE-T/100BASE-TX
and full-duplex and half-duplex autonegotiation
on all front panel ports.
■ Multiple-link trunking for Gigabit Ethernet and
Fast Ethernet links
You can choose the performance level of links
between switches, even scaling beyond one
Gigabit.
■ Trunking links, Spanning Tree, and Advanced
Redundant Power Supply (RPS) support
The Switch 3900 protects against cable and
equipment failures with Spanning Tree Protocol
and trunking links. The optional RPS protects
against power interruptions for fault-tolerant
networks.
■ Manageability
The Switch 3900 provides full support for VLANs,
Fast IP, and RMON Version 1, as well as a roving
analysis port through SNMP management.
System Management
Switch 3900 systems include integrated management
to provide fault tolerance and maximum network
availability. This management is accessible in two
ways:
■ Switch 3900 Administration Console
■ Standard network managers based on SNMP, such
as 3Com’s Transcendware, Sun’s SunNet Manager,
HP OpenView, and IBM’s NetView AIX applications
■ IGMP Snooping
The Switch 3900 conserves the network
bandwidth that is consumed by audio and video
applications by keeping IP multicast traffic isolated
to specific ports.
Page 18

1-6 CHAPTER 1: SWITCH 3900 SYSTEM AND SETUP OVERVIEW
Optional Gigabit Ethernet Modules
The Switch 3900 back panel has two expansion slots
that can hold optional Gigabit Ethernet modules.
These modules are available in the following
configurations:
■ 1000BASE-SX Module — Multimode fiber with
paired SC connectors. It supports links of up to
260 meters (852 feet) over 62.5-micron multimode
fiber or up to 525 meters (1722 feet) over
50-micron multimode fiber.
■ 1000BASE-LX Module — Single-mode fiber with
paired SC connectors. It supports links of up to 3.0
kilometers (1.86 miles) over 8-micron to 10-micron
single-mode fiber.
The modules have the same physical configuration
and are installed in the same way.
For more information about installing and using the
optional Gigabit Ethernet modules, see the
1000BASE-SX/1000BASE-LX Gigabit Ethernet Module
Installation Guide that is on the Documentation CD
and shipped with either module.
Network Configuration Example
This section describes one way to place the Switch
3900 in your network to alleviate traffic congestion.
Providing Dedicated Links for Fast Ethernet
The rapid deployment of Fast Ethernet has increased
bandwidth demand many times over, not only by
supporting 100 Mb connections on the network but
also by placing demands on the servers to manage
the traffic coming through those connections.
Figure 1-4 shows how the Switch 3900 provides
direct 100 Mb links to devices on the network
through its Fast Ethernet ports and up to three
dedicated Gigabit links to your network’s servers.
In this sample configuration, the Switch 3900 can
provide up to 36 clients on your network with a
dedicated 100 Mb link and can multiplex the client
traffic for Gigabit-speed access to the servers. (You
can use one port on the Switch 3900 for in-band
management as well as for network traffic.)
Page 19
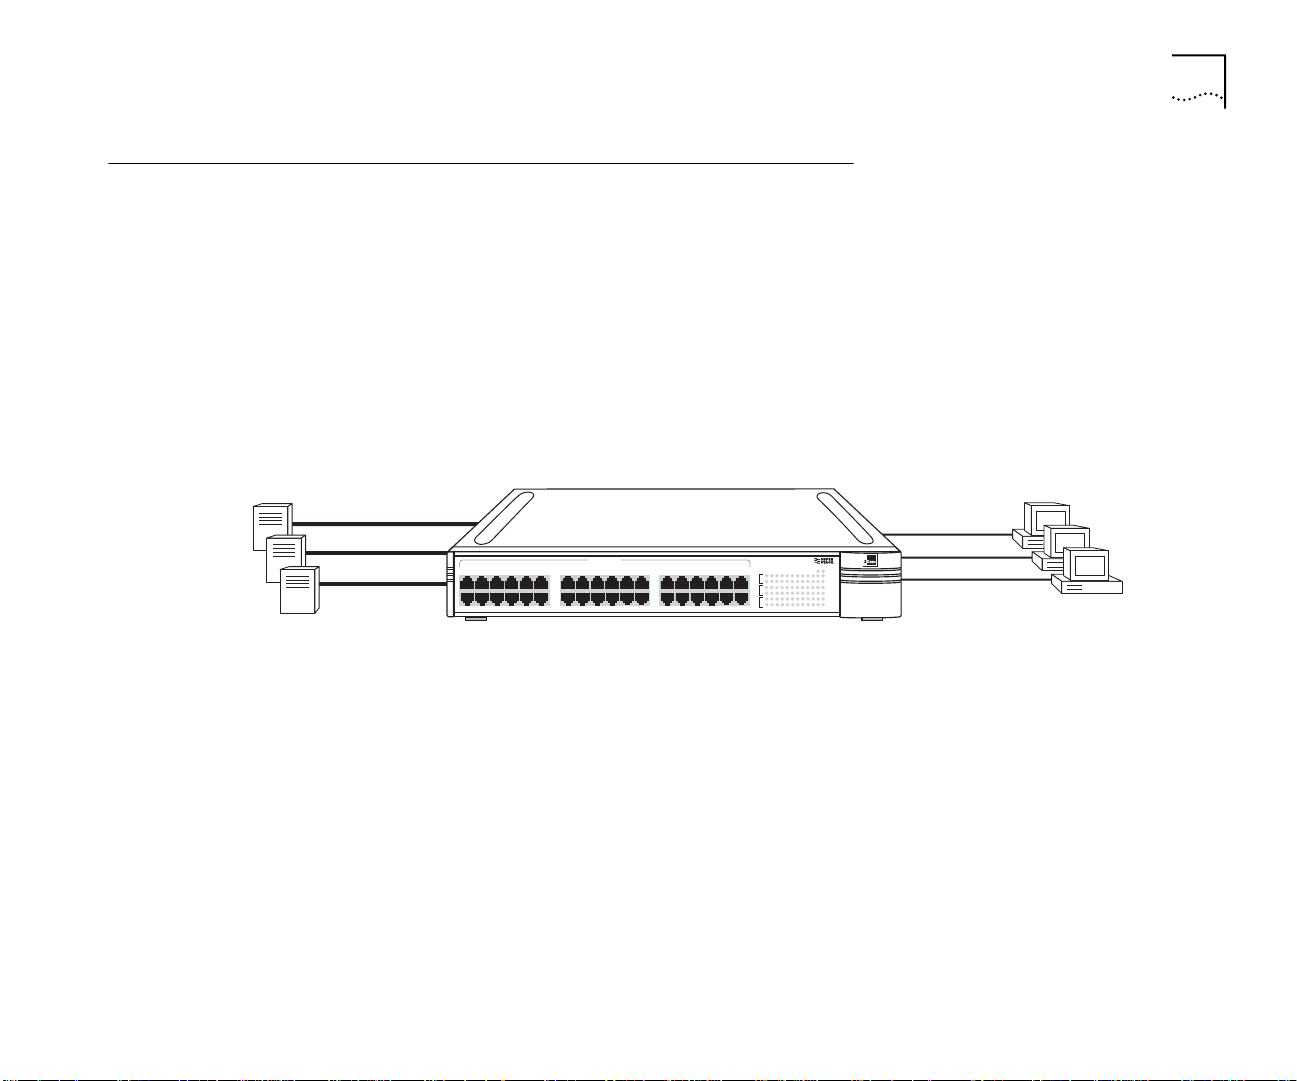
Network Configuration Sample
Network Configuration Sample 1-7
Switched Gigabit
server farm
10/100 BASE - TX
1x
7x
6x
13x
12x
19x
18x
24x
36-Port SuperStack® II Switch 3900
Figure 1-4 SuperStack II Switch 3900 Provides Dedicated Fast Ethernet Links
Switched 100 Mb
desktop systems
Status
green = enabled, link OK
flashing green = disabled, link OK
off = link fail
25x
31x
30x
36x
31 10
2
31 10
2
161713 18 192021 22
14
15
161713 18 192021 22
14
15
282925 30 313233 34
26
27
282925 30 313233 34
26
27
Super Stack II Switch 3900
FaultPower
11 12456 789
Pckt
11 12456 789
Stat
23 24
Pckt
23 24
Stat
35 36
Pckt
35 36
Stat
Page 20

Page 21

2
INSTALLING THE SYSTEM
This chapter describes how to install your
SuperStack® II Switch 3900 on a table top, in a
free-standing stack with other SuperStack II products,
or in a distribution rack.
See Appendix B for site requirements.
■ To install the Switch 3900 system on a table top or
in a free-standing stack, read these sections:
■ “Before You Begin” (the next section)
■ “Installing the System on a Table Top or in a
Free-Standing Stack” on page 2-2
■ To install the Switch 3900 system in a distribution
rack, read these sections:
■ “Before You Begin” (the next section)
■ “Installing the System in a Distribution Rack” on
page 2-3
Before You Begin
Before you begin this procedure, be sure to:
■ Move the Switch 3900 system close to where you
plan to install it.
Install the system near an easily accessible power
outlet. You can power down the system only by
removing the power cord from the power source.
■ Have a No. 1 Phillips screwdriver available.
■ Have the system mounting kit available. See
Table 2-1.
Table 2-1 Switch 3900 System Mounting Kit
Qty Item To use in
4 Rubber feet
(self-adhesive)
2 Mounting brackets Installing the system in a
6 M4 x 10 pan-head
screws
Stacking the system on a
table or in a stack
distribution rack
Installing the distribution rack
brackets
Page 22

2-2 CHAPTER 2: INSTALLING THE SYSTEM
Installing the System on a Table Top or in a
Free-Standing Stack
To install the Switch 3900 system on a table top or in
a free-standing stack, follow these instructions:
1 See Appendix B for site requirements.
2 Turn the system on its side.
3 Remove the protective covering from the rubber feet.
4 Place one rubber foot in each marked area at the four
corners of the unit.
5 Turn the system onto its feet.
6 Verify that the air intake vents and fan exhaust vents
at the sides of the system are not blocked.
To install the system into a free-standing stack, place
the system on top of another. Be sure that the rubber
feet of the upper unit fit securely in the recesses in
the top of the lower unit. See Figure 2-1.
CAUTION: Stack no more than eight SuperStack II
systems in a single free-standing stack.
You are now ready to cable your system. For
instructions, see Chapter 3.
Place the feet of one system into the
mounting recesses of the system below it.
10/100 BASE - TX
1x
7x
1x
7x
1x
7x
6x
13x
12x
19x
10/100 BASE - TX
6x
13x
12x
19x
10/100 BASE - TX
6x
13x
12x
19x
25x
18x
31x
24x
25x
18x
31x
24x
25x
18x
31x
24x
Figure 2-1 Stacking the Switch 3900
30x
36x
30x
36x
30x
36x
Status
green = enabled, link OK
flashing green = disabled, link OK
off = link fail
31 10
2
31 10
2
161713 18 192021 22
14
15
161713 18 192021 22
14
15
282925 30 313233 34
26
27
282925 30 313233 34
26
27
Super Stack II Switch 3900
Status
green = enabled, link OK
flashing green = disabled, link OK
off = link fail
31 10
2
31 10
2
161713 18 192021 22
14
15
161713 18 192021 22
14
15
282925 30 313233 34
26
27
282925 30 313233 34
26
27
Super Stack II Switch 3900
Status
green = enabled, link OK
flashing green = disabled, link OK
off = link fail
31 10
2
31 10
2
161713 18 192021 22
14
15
161713 18 192021 22
14
15
282925 30 313233 34
26
27
282925 30 313233 34
26
27
Super Stack II Switch 3900
FaultPower
11 12456 789
Pckt
11 12456 789
Stat
23 24
Pckt
23 24
Stat
35 36
Pckt
35 36
Stat
FaultPower
11 12456 789
Pckt
11 12456 789
Stat
23 24
Pckt
23 24
Stat
35 36
Pckt
35 36
Stat
FaultPower
11 12456 789
Pckt
11 12456 789
Stat
23 24
Pckt
23 24
Stat
35 36
Pckt
35 36
Stat
Page 23

Installing the System in a Distribution Rack
1x
7x
You can mount the system into a 19-inch distribution
rack. This section describes how to prepare the
system and distribution rack for installation and how
to mount the system in the rack.
Install your distribution rack near an easily accessible
power outlet. You can power down the system only
by removing the power cord from the power source.
Preparing the System and Rack
To prepare the system and distribution rack for
installing the Switch 3900 system:
1 See Appendix B for distribution rack requirements.
2 Attach the mounting brackets to the left and right
sides of the system using the M4 x 10 mounting
bracket screws. See Figure 2-2.
Installing the System in a Distribution Rack 2-3
M4 x 8 mounting
screws
Distribution rack
mounting bracket
Switch 3900
Figure 2-2 Installing System Mounting Brackets
3 Locate the top of a universal mounting hole pattern
on either mounting rail of the distribution rack.
In this pattern, the spacing between holes is 1/
5
/
inch, 5/8 inch, and 1/2 inch.
8
inch,
2
Page 24

2-4 CHAPTER 2: INSTALLING THE SYSTEM
To find the top of the pattern, locate the midpoint
between any two holes that are spaced 1/2 inch apart.
Figure 2-3 shows the universal mounting hole
pattern.
Top of the pattern
or top of the rack
Universal
mounting
hole pattern
= 1U
= 1 3/4 inches
Bottom of the pattern
1U
1U
1U
1/2"
5/8"
5/8"
1/2"
5/8"
5/8"
1/2"
5/8"
5/8"
1/2"
Figure 2-4 illustrates the positions of two Switch
3900s, one attached to holes 1 and 4 and the other
attached to holes 6 and 9.
To mount only one Switch 3900, use either position.
Placement of
Switch 3900
(position 1)
3U
(5.25")
Placement of
Switch 3900
(position 2)
Hole 1
Hole 3
Hole 6
Hole 8
Figure 2-3 Universal Mounting Hole Pattern
4 Determine which holes to use to mount your system.
Two Switch 3900s are designed to mount in any 3U
space of the rack (that is, the space occupied by three
instances of the universal mounting hole pattern).
Figure 2-4 Placement of Switch 3900s in a Distribution Rack
5 Repeat the process on the other rail.
Be sure to select holes that are parallel to each other
on the mounting rails.
Page 25

Installing the System in a Distribution Rack 2-5
1x
6x
12x
7x
13x
19x
1x
6x
12x
7x
13x
19x
Mounting the System into a Distribution Rack
To mount the system into a distribution rack:
1 Carefully lift the system into place and align the
appropriate holes in the mounting brackets with the
designated holes in the distribution rack. See
Figure 2-5.
Switch 3900
(Position 1)
Hole
#1
Hole
#3
3U
(5.25")
Hole
#6
Hole
#8
4 Tighten the mounting screws. The system is now
installed in the distribution rack.
Figure 2-6 shows two Switch 3900 systems installed
in a distribution rack.
Switch 3900
(Position 2)
Figure 2-5 Aligning Bracket and Distribution Rack Holes
2 Have another person hold the system in place. Insert
the four suitable mounting screws (not provided) into
the designated mounting holes on the bracket.
Repeat for the other side.
3 Verify that the system is level.
Figure 2-6 Two Systems Installed in a Rack
You are now ready to cable the system. For cabling
instructions, see Chapter 3.
Page 26

Page 27

3
CABLING SWITCH 3900 PORTS
This chapter describes how to cable your
SuperStack® II Switch 3900 system for connection to
the network. It gives an overview of module cabling
and describes how to cable:
■ Fast Ethernet ports
■ Gigabit Ethernet ports
■ System console port
When all your Ethernet, Gigabit Ethernet, and system
network connections are complete, see Chapter 4.
If you are staging the system, you do not need to
connect it to the network at this point. See Chapter 4
to start your system before you cable it.
Overview of Cabling
The Switch 3900 system is a fixed-configuration LAN
switch with:
■ 24 or 36 shielded, 10/100BASE-TX (RJ-45) Ethernet
ports on the front panel
■ One fixed Gigabit Ethernet port on the back panel
■ Two Gigabit Ethernet expansion slots for optional
Gigabit Ethernet modules on the back panel
Fiber Safety Precautions
SuperStack II Switch 3900 modules use lasers in their
fiber optic ports. To ensure your safety when you
install or work with these modules, comply with the
following precautions.
WARNING: The fiber optic lasers used in these
modules meet the regulatory requirements for casual
exposure to the eye. As with any source of bright
light, however, 3Com recommends that you do not
look into the laser light source.
IEC 825, Class 1 Laser Devices are for connection only
to Class 1 Laser Devices. MMF and SMF fiber optic
interfaces use lasers.
CLASS 1
LASER PRODUCT
Page 28

3-2 CHAPTER 3: CABLING SWITCH 3900 PORTS
Fast Ethernet Ports
Your Switch 3900 has 24 or 36 10/100BASE-TX ports
with RJ-45 connectors. This section contains
information on cabling the 10/100BASE-TX (RJ-45)
ports and pin assignments for the RJ-45 connectors.
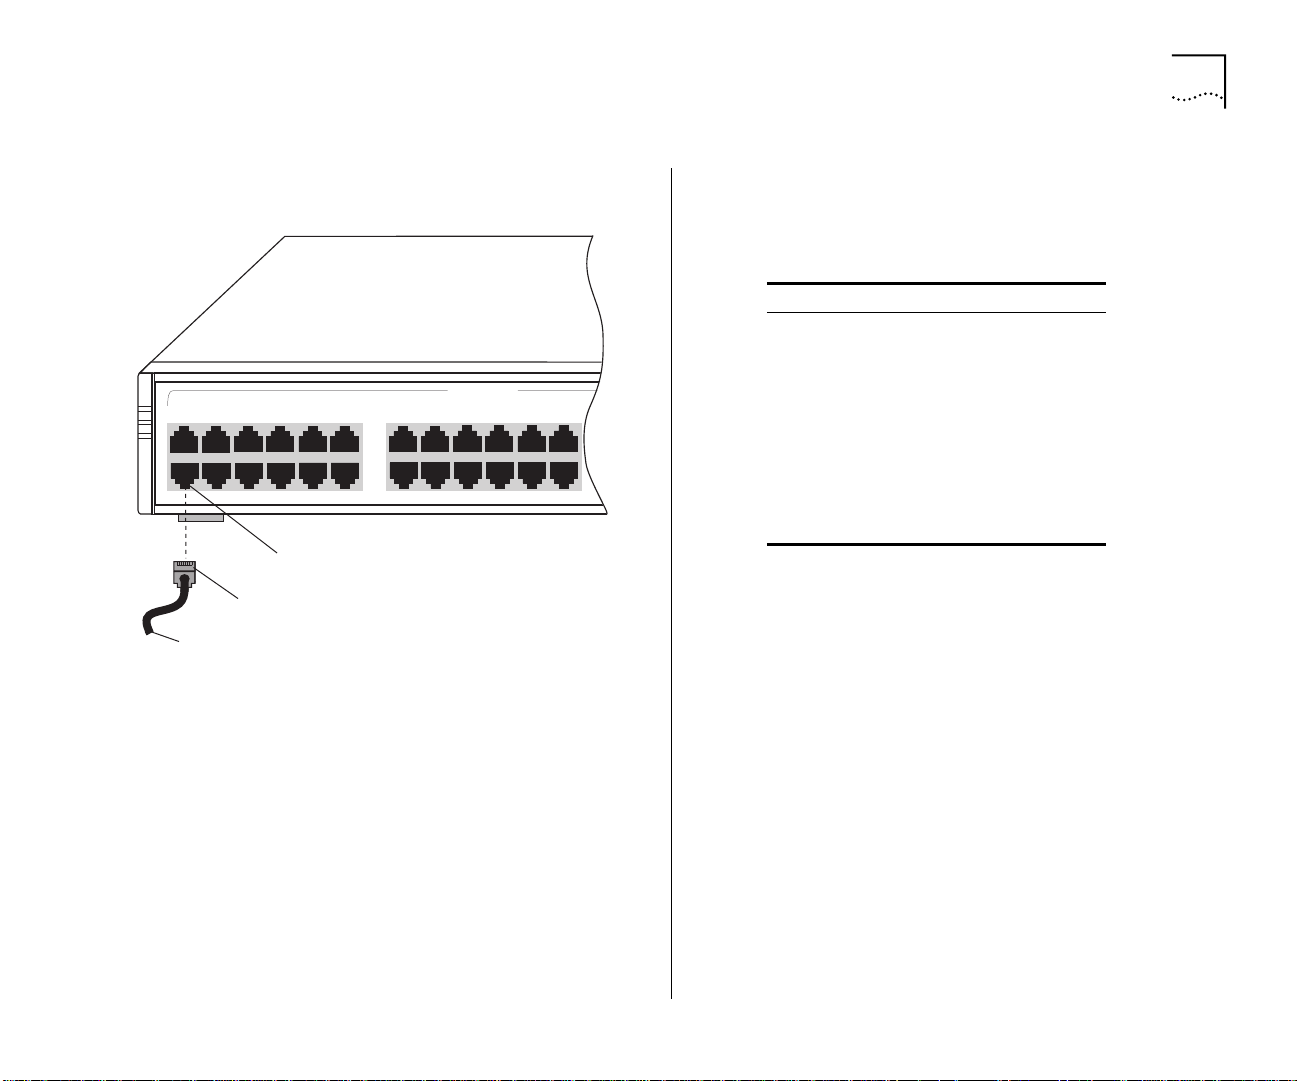
Cabling 10/100BASE-TX (RJ-45) Ports
The Switch 3900 system’s Ethernet ports are shielded
RJ-45 data sockets. You can connect shielded or
unshielded data cables with shielded or unshielded
jacks to these data sockets.
The Ethernet ports are numbered from 1X to 24X or
1X to 36X, depending on your system. They are
configured as MDI-X for direct connection to a
workstation or other data terminal equipment (DTE),
using straight-through twisted-pair wiring.
To connect a Switch 3900 system to a
10/100BASE-TX repeater or switch, use a crossover
cable, or set the port on the connected device to MDI
and use a straight-through cable.
Follow these guidelines when you cable
10/100BASE-TX connectors:
■ Use two twisted-pair wires for each link.
■ Use twisted-pair wire that is 22-26 AWG (0.5
millimeter) in diameter.
■ Use twisted-pair wire with an impedance of
between 85 and 115 Ohms.
■ Verify that the length of the twisted-pair link from
the system to any potential workstation location is
100 meters (328 feet) or less.
To cable a 10/100BASE-TX (RJ-45) port:
1 Remove the dust cover and save it for future use.
2 Plug the male RJ-45 connector on the
10/100BASE-TX cable into the selected port until it
clicks into place.
3 Attach the other end of the cable to an MDI port on a
workstation, repeater, or concentrator.
4 Repeat steps 2 and 3 for the remaining ports.
Page 29
Fast Ethernet Ports 3-3
1x
6x
12x
7x
13x
18x
24x
19x
25x
31x
10/100 BASE - TX
Figure 3-1 shows the cabling of a 10/100BASE-TX
(RJ-45) port.
Port 7
Male RJ-45 connector
10/100BASE-TX cable
Figure 3-1 Cabling a 10/100BASE-TX (RJ-45) Port
10/100BASE-TX (RJ-45) Connector Pin Assignments
Table 3-1 provides the pin assignments for the RJ-45
connectors.
Table 3-1 10/100 BASE-TX (RJ-45) Pin Assignments
Pin No. Signal Description
1 RX + Receive +
2 RX – Receive –
3 TX + Transmit +
4 Not used
5 Not used
6 TX – Transmit –
7 Not used
8 Not used
Page 30

3-4 CHAPTER 3: CABLING SWITCH 3900 PORTS
Gigabit Ethernet Ports
The back panel of the Switch 3900 has one fixed
Gigabit Ethernet port and slots for two optional
Gigabit Ethernet modules.
Cabling Gigabit Ethernet Ports
Both versions of the Switch 3900 (24 port and 36
port) have:
■ One fixed port designated for 1000BASE-SX
multimode fiber (MMF) cable with paired SC
connectors.
■ Two expansion slots on the back panel to hold
optional Gigabit Ethernet modules. Each slot
supports either the 1000BASE-LX module (SMF) or
the 1000BASE-SX module (MMF).
Follow these guidelines when cabling SC connectors:
■ Verify that the length of the fiber cable from the
system to any location does not exceed these
recommended distances:
■ Use 1000BASE-LX over 8-micron to 10-micron
SMF fiber for distances of up to 3 kilometers
(1.86 miles).
■ Use 1000BASE-SX over 62.5-micron MMF fiber
for distances of up to 260 meters (852 feet).
■ Use 1000BASE-SX over 50-micron MMF fiber
for distances of up to 525 meters (1722 feet).
■ Each Gigabit Ethernet fiber cable terminates in a
pair of SC connectors. The 1000BASE-LX cable
connectors are blue; the 1000BASE-SX cable
connectors are black. The connectors are made so
that you can only insert them correctly.
■ Keep the ports and connectors free of dust. Keep
dust covers over each empty port. See also
“Cleaning Dirty Fiber Optic Ports and Connectors”
on page 6-4 for details.
Page 31

Cabling the Console Port 3-5
1000 Base SX
Pckt
Stat
Console
To cable a Gigabit Ethernet SC port:
1 Remove the dust covers and save them for future use.
2 Attach one male connector of the SC cable connector
pair to the right side of one of the Gigabit Ethernet
ports on the back panel.
3 Attach the remaining connector of the pair to the left
side of the same Gigabit Ethernet port.
4 To cable another Gigabit Ethernet port, repeat steps 1
through 3.
Figure 3-2 shows the Gigabit Ethernet cabling.
Cabling the Console Port
The Console port on the back panel provides local or
remote administration:
■ For Local Administration — The Console port
provides a DB-9 connection to a local terminal or
workstation that runs a terminal emulation
program and acts as the Console.
■ For Remote Administration — The Console port
provides a DB-9 connection for an external
modem, which you can use to connect your
current Administration Console session to a
modem.
SC connector
Fiber cables
Figure 3-2 Cabling the Fixed Gigabit Ethernet Port
Page 32

3-6 CHAPTER 3: CABLING SWITCH 3900 PORTS
1000 Base SX
Pckt
Stat
Console
To cable the Console port:
1 Attach the female DB-9 cable connector to the
Console port’s male connector and tighten the
retaining screws.
2 Attach the other end of the DB-9 cable to your
terminal.
Figure 3-3 shows the cabling of the Console port.
You can also access the system remotely through any
Ethernet port using telnet. See the SuperStack II
Switch 3900 and 9300 Administration Guide.
To use the Administration Console to configure the
system for management access through the Console
port, see Chapter 5.
DB-9 connector
Serial cable
Figure 3-3 Cabling the Console Port
Page 33

Console Port Pin Assignments
Table 3-2 shows the DB-9 pin assignments for the
Console port.
Table 3-2 Console Port DB-9 Pin Assignments
Pin No. Signal Description
1 DCD Data Carrier Detect
2 RDA Received Data
3 TD Transmitted Data
4 DTR Data Terminal Ready
5 GND Signal Ground
6 DSR Data Set Ready
7 RTS Request To Send
8 CTS Clear To Send
9 — Not used
Cabling the Console Port 3-7
Page 34

Page 35

4
SYSTEM POWER UP
This chapter contains:
■ “Power Options” for the SuperStack
3900 system
■ “Power Up” instructions the Switch 3900 system
■ A description of “Power-up Diagnostics”
■ A list of “System Checks” after power up
For information on troubleshooting the system during
power up, see Chapter 6.
Power Options
You have three options for how to power up your
Switch 3900 system.
Place the system near a power receptacle. You can
power down the system only by removing the power
cord from the power source.
AC Power Cord
You can connect the system directly to a wall
receptacle with the AC power cord that is shipped
with the system. See “Power Up” for details.
®
II Switch
Optional Advanced Redundant Power System
To protect against internal power supply failures, you
can connect a 3Com Advanced Redundant Power
System Type 2 (RPS) to the Switch 3900 system. The
RPS connector is located on the rear panel.
CAUTION: Connect only a 3Com Advanced
Redundant Power System Type 2 to this connector,
using the external Type 2 Y cable that is shipped with
the RPS.
For details, follow the installation instructions and
safety precautions that are shipped with the
redundant power system.
Optional Uninterruptible Power System
To protect against external power interruption from
brownouts, blackouts, surges, and spikes, connect an
uninterruptible power system (UPS) to the Switch
3900 system. Connect only a 3Com Uninterruptible
Power System. Use the appropriate UPS for your
region:
■ United States
■ European/International
■ Japan
To install the UPS, follow the instructions and safety
precautions that are shipped with the UPS.
Page 36

4-2 CHAPTER 4: SYSTEM POWER UP
Power Up
This section provides instructions on how to set up
and plug in your system. See Chapter 3 and
Chapter 5 for information about cabling and
configuring the Console port.
To view error messages while the system runs
power-up diagnostics, connect a terminal, a
workstation, or a PC with terminal emulation to the
system’s Console port.
To Power the Switch 3900 with the RPS
To install the Advanced Redundant Power Supply
(RPS) Type 2, follow the installation instructions that
are shipped with the RPS and its cable.
CAUTION: To prevent damage to the 3900 system
and the power supply, plug the AC power cord into
the Switch 3900 before you plug it into the
redundant power system.
To Power the Switch 3900 from the Wall Receptacle
To get your Switch 3900 powered up and ready to
operate, follow these steps:
1 Verify that the power outlet is near the system and
easily accessible. You can turn the system off only by
removing the power cord from the power source.
2 Plug the power cord into the system.
3 Plug the other end of the power cord into the power
outlet. The LEDs provide information while the system
runs power-up diagnostics.
Power-up Diagnostics
The Switch 3900 system runs diagnostic software at
power up. This software verifies that the system
works before you add it to the network.
If any component fails during power-up diagnostics,
the system either fails to power up or keeps faulty
ports off-line. To verify if any ports have failed
diagnostics, look at the system configuration display
in the Switch 3900 Administration Console. See
Chapter 4 of the SuperStack II Switch 3900 and
9300 Administration Guide.
During power up, the system status LEDs provide
information on components in the Switch 3900
system. The system and port status LEDs and the
information that they provide are shown in
Figure 4-1.
To view messages that are displayed during power-up
diagnostics, connect a terminal, workstation, or PC
that has terminal emulation to the system’s Console
port.
Page 37

Power-up Diagnostics 4-3
System Diagnostics
This section describes the LEDs that provide
information about the system as a whole.
Power LED Activity
■ Green — The system is powered on; the system is
running or has run diagnostics.
■ No Light — The system has no power; no
diagnostics are running.
Fault LED Activity
■ No Light — System diagnostics have been
successfully completed and the system is
operational.
■ Solid or Blinking Yellow — The system has failed
diagnostics, or some other operational error has
occurred.
See Chapter 6 for troubleshooting information.
Ethernet Port Diagnostics
This section summarizes the information displayed by
the port LEDs.
Packet LED Activity
■ No Light — Data is not passing through the port.
■ Blinking Yellow — Data is passing through the
port.
■ Yellow — Data is passing through the port.
Status LED Activity
■ No Light — The port is off-line.
■ Blinking Green — The port is online but disabled.
■ Green — The port is online and enabled.
See Chapter 6 for troubleshooting information.
Page 38

4-4 CHAPTER 4: SYSTEM POWER UP
Status
30x
36x
green = enabled, link OK
flashing green = disabled, link OK
off = link fail
Power Fault
2
31 10
11 124
5
6 7
8
9
2
31 10
11 124
5
6 7
8
9
14
15
16
17
13 18 19
20
21 22
23 24
14
15
16
17
13 18 19
20
21 22
23 24
26
27
28
29
25 30 31
32
33 34
35 36
26
27
28
29
25 30 31
32
33 34
35 36
Pckt
Stat
Pckt
Stat
Pckt
Stat
System and Port Status LEDs
Green =
System powered on
Power
Super Stack II Switch 3900
Figure 4-1 System and Port Status LEDs on the SuperStack II Switch 3900
Flashing Green
Green
Ethernet Port Status LEDs
= Associated port is active
= Port active but disabled
OFF
= Port disabled
Fault
Solid or Blinking Yellow
System failed at power up
Ethernet Port Packet LEDs
Yellow =
Port is passing data
Flashing Yellow =
OFF =
No data
=
Port is passing data
Page 39

System Checks 4-5
System Checks
After the system has successfully completed the
power-up diagnostics, check the items in Table 4-1 to
verify that the system is operating correctly. If you
discover abnormal conditions, see Chapter 6.
Table 4-1 System Power-Up Checklist
Check Description
Power-up
error messages
Normal LED
activity
If there is a problem during power-up, the
messages are displayed in the Administration
Console connection through the Console port.
When the power-up diagnostics are running,
the LEDs light in a certain pattern as described in
the “Power-up Diagnostics” section. After you
properly cable the system and the system
successfully completes the power-up diagnostics,
look for the following normal LED activity:
System:
Power LED = Green
Fault LED = Not lit
Each port:
Pckt status LED = Yellow
Stat status LED = Green
If an LED does not light or shows a color different
from the one indicated here, see Chapter 6 for
information about the cause of the problem.
Next Step: Software Configuration
Your Switch 3900 system is shipped from the factory
with the software installed and IEEE 802.1d bridging
disabled. To configure your system for your particular
networking environment (including customized
filtering and setting up SNMP), you must first
establish management access. See Chapter 5.
Page 40

Page 41

5
QUICK SETUP FOR MANAGEMENT ACCESS
This chapter provides easy instructions for configuring
the SuperStack® II Switch 3900 system for
management access. After you decide how you want
to manage your system, follow the configuration
instructions for your preferred type of management
access.
About Switch 3900 System Management
To configure and manage your Switch 3900 system,
you can use one of several applications:
■ Switch 3900 Administration Console
■ Other SNMP-based network management
applications
The Switch 3900 Administration Console is a
character-oriented, menu-driven user interface for
administering the system. You can access the
Administration Console in-band using the network
ports through the IP network protocol. For more
detailed information, see the SuperStack II Switch
3900 and 9300 Administration Guide.
For more complete network management, access the
system with an external SNMP-based management
application such as 3Com’s Transcend Enterprise
Manager for UNIX or Windows or another network
management application.
How Do You Want to Manage the System?
You can manage your system locally through a
terminal connection or through the network with an
IP connection. Table 5-1 describes the access
mechanisms.
Table 5-1 Management Access Mechanisms
Access
Mechanism
Terminal Connect directly to the
Modem Connect remotely to the
IP Access the Administration
Allows you to Using
Administration Console and
stay attached across system
reboots
Administration Console
Console with the rlogin or
telnet commands. Or use an
external SNMP management
application to communicate
with the Switch 3900 SNMP
agent
These mechanisms are described more fully in the
next sections.
Console port
Console port
One of the Ethernet
ports assigned to an
IP interface
Page 42

5-2 CHAPTER 5: QUICK SETUP FOR MANAGEMENT ACCESS
Terminal Connection
Direct access through the Console port is often
preferred because it allows you to remain on the
system during system boots. A Macintosh or PC
attachment can use any terminal emulation program
for connecting to the Console port. A workstation
attachment under UNIX can use the emulator TIP. For
more details, see the documentation that is shipped
with your terminal emulation program.
Modem Connection
You can manage the Administration Console using a
modem by establishing a connection between your
current Console session and the Console port. When
you configure the external modem from the
Administration Console menu system, the Console
appears to be directly connected to the external
modem. See the SuperStack II 3900 and 9300
Administration Guide for more information.
Use the Console port for either a terminal connection
or a modem connection.
IP Management Interface
An IP management interface is the connection
between the Switch 3900 system and a subnetwork.
It allows you to manage the system through any of
the Ethernet ports.
Initial Management Access
The first time that you access your system, you
connect through the Console port using a terminal.
These are the default settings for this port: 9600
baud, 8 bits, 1 stop bit, No parity.
When you first access the Administration Console
using the Console port, you see this prompt:
Select access level (read, write, administer):
1 At the prompt, enter:
administer
2 At the password prompt, press Return.
The Administration Console top-level menu appears:
Menu options:
----------------------------------------------------system - Administer system-level functions
ethernet - Administer Ethernet ports
bridge - Administer bridging
ip - Administer IP
snmp - Administer SNMP
script - Run a script of console commands
logout - Logout of the Administration Console
Type ? for help.
----------------------------------------------------Select a menu option:
Use this menu to change the Console port baud
setting for the terminal or to configure your system
for another management access mechanism.
With an IP interface, you can use the rlogin or telnet
commands to access the Administration Console
using TCP/IP from a host computer. You can also use
the IP interface to manage the system with an
external management application.
Page 43

Configuring the IP Interface 5-3
Setting the Console Port Baud
To change the baud setting of the Console port:
1 From the top level of the Administration Console, at
the Select menu option prompt, enter:
system
2 At the system menu, enter:
consoleSpeed
3 At the prompt, enter the baud setting for the Console
port. The system supports these baud settings:
19200, 9600, 4800, 2400, and 1200.
The system changes the settings and displays this
message:
Changing the baud rate may cause a loss of
communication since you are currently connected
via the serial port.
Are you sure you want to change the baud rate?
(y/n):
4 Enter y (for yes) or n (for no) at the prompt.
If you enter y, the baud setting is changed
immediately, and you lose the ability to communicate
on the Console port until you adjust the baud setting
of your terminal or terminal emulator to match.
If you enter n, the baud setting does not change and
you return to the previous menu.
Configuring the IP Interface
These instructions include information on how to
define an IP interface through which you can manage
your Switch 3900 system. An IP interface contains the
following parameters:
■ IP address — This address, which is specific to
your network, is used to manage the system. The
IP address defines both the number of the network
to which the interface is attached and its host
number on that network.
■ Subnet mask — This 32-bit number uses the
same format and representation as an IP address.
The subnet mask determines which bits in the IP
address are interpreted as the network number, as
the subnet number, and as the host number. Each
IP address bit that corresponds to a 1 in the subnet
mask is in the network and subnet part of the
address. Each IP address bit that corresponds to a 0
is in the host part of the IP address.
To set the IP interface parameters:
1 From the top level of the Administration Console,
enter:
ip interface define
2 Enter the IP address of the interface.
3 Enter the subnetwork mask of the subnet to which
the interface is to be connected.
4 Enter the interface type as VLAN.
For more detailed instructions on assigning interface
parameters, see the SuperStack II Switch 3900 and
9300 Administration Guide.
Page 44

Page 45

6
TROUBLESHOOTING THE SYSTEM
This chapter explains how to troubleshoot certain
problems with the SuperStack® II Switch 3900 system.
It covers:
■ Getting Additional Help
■ Diagnosing Problems
■ Cleaning Dirty Fiber Optic Ports and Connectors
Getting Additional Help
If you experience system problems that are not
addressed in this chapter, contact 3Com Technical
Support or your service representative. Before you
call, gather the following information and have it
available:
■ System serial number
■ Maintenance agreement or warranty information
and the date of purchase
■ Software revision number
■ Brief description of the problem
You can view some of this information in the
Administration Console. From the top-level menu,
enter system display.
Diagnosing Problems
By observing system diagnostics, you can identify and
correct problems that might occur when the system
powers up.
Power Failures
If the system does not respond when you insert the
power cord, see the troubleshooting suggestions in
Table 6-1.
Abnormal LED Activity
The Switch 3900 system contains several status LEDs
that indicate system or port problems. If you see
abnormal LED activity, see the troubleshooting
suggestions in Table 6-2 (for system LEDs) and
Table 6-3 (for port LEDs).
For additional information and phone numbers, see
Appendix C.
Page 46

6-2 CHAPTER 6: TROUBLESHOOTING THE SYSTEM
Table 6-1 Troubleshooting Power Failures
Symptom Possible Sources of the Problem Steps to Take
System does not power up.
■ System is not receiving power.
■ Power supply malfunctioned.
1 Verify that the building’s power outlet has power.
2 Check that the power cord is firmly plugged into the system and either the
building’s power outlet, the redundant power system, or the
uninterruptible power system.
3 If you are using an RPS or a UPS, check that it is firmly plugged into the
building’s power outlet.
4 Try another power cable.
5 If the system still does not operate, contact 3Com Technical Support or
your service representative.
Table 6-2 Troubleshooting Abnormal System LED Activity
LED Status Possible Sources of the Problem Steps to Take
Fault LED blinks yellow. Diagnostic software is not running. 1 Check the Administration Console display.
2 Call 3Com Technical Support or your service representative.
Power LED does not light. System has failed. 1 Shut down the system by disconnecting the power plug.
2 Call 3Com Technical Support or your service representative.
Page 47

Table 6-3 Troubleshooting Abnormal Port LED Activity
LED Status Possible Sources of the Problem Steps to Take
Pckt LED does not light. Software error Check the Administration Console display.
Stat LED does not light. System does not recognize a
connection to the port.
■ Cable is not fully attached to the
port.
■ Port cable is faulty.
■ Fiber optic ports or connectors are
dirty.
1 Verify that all cables are firmly plugged into both the system’s affected
port and the attached device.
2 Test for faulty cables.
3 Clean the fiber optic ports and connectors. See next section.
When the problem is corrected, the LED lights green.
If the LED still does not light, contact 3Com Technical Support or your service
representative.
Diagnosing Problems 6-3
Page 48

6-4 CHAPTER 6: TROUBLESHOOTING THE SYSTEM
Cleaning Dirty Fiber Optic Ports and Connectors
Fiber optic transceivers are sensitive optical devices.
Handle them carefully. If dirt collects on a fiber optic
lens, the associated LED may not light. You may also
notice degradation in port performance, indicated by
an increase in the Link Error Rate (LER) count on a
port.
To prevent dust from collecting on the fiber optic lens,
keep the dust covers on the ports at all times when
they are not in use.
WARNING: Follow all safety precautions in Chapter 3
when working with fiber optic components.
To clean a fiber optic lens, take these steps:
1 Remove any accumulated dust or debris from the port
or connector by blowing across all surfaces with a
canned air duster.
Compressed gas is recommended, such as
Chemtronics’ Ultrajet or the Triangle Tool Group’s
Liqui-Tool Dust-A-Way. Do not use commercial
compressed air or “house air” because of the risk of
oil contamination.
2 Reconnect the cable to the port to check whether
dusting has corrected the problem.
3 Gently wipe the ports with a lint-free, nonabrasive,
nonadhesive swab. Microswabs by Texwipe are
recommended.
4 Gently wipe the connectors with a lint-free,
nonabrasive wipe or pad. Texwipe pads are
recommended.
Avoid touching any surface after you clean the
connectors.
Page 49

SYSTEM SPECIFICATIONS
A
Table A-1 System Specifications for the SuperStack II Switch 3900 Stackable Switch
Specifications
Physical Dimensions 6.5 cm (H) x 44 cm (W) x 30.5 cm (D)
2.59 inches (H) x 17.32 inches (W) x 12.00 inches (D)
Weight: 4.1 kg (12 lbs)
Environmental Requirements
Operating Temperature 0 to 50 ˚C (32 to 122˚F)
Operating Humidity 10 to 90% relative humidity, noncondensing
Storage Temperature –20 to 85 ˚C (– 4 to 185˚ F)
Storage Humidity 5% to 95% maximum relative humidity, noncondensing
Safety
Agency Certifications UL 1950, CSA 22.2 No. 950, TUV EN60950
UK General Approval Statement
The SuperStack™ II Switch 3900 is manufactured to the international Safety Standard
EN60950 and is approved in the UK under the General Approval Number
NS/G/12345/J/100003 for indirect connection to the public telecommunication network.
Designed to Comply with IEC 950
Electromagnetic Emissions
(Agency Certification)
Heat Dissipation 175 watts maximum (547 BTU/hour maximum)
Power Supply
Receptacles 15 ampere service receptacles, type N5/15 or NEMA 5-15R (United States and Canada only)
AC Line Frequency 47 to 63 Hz
Input Voltage Options 100 to 240 VAC
Current Rating 1.3 amperes at 120 volts
Meets FCC part 15, Subparagraph J, Class A limits, and CISPR Class A limits
Complies with EMC Council Directive 89/336/EEC, Class A limits
Page 50

A-2 APPENDIX A: SYSTEM SPECIFICATIONS
Table A-2 Standards Supported by the SuperStack II Switch 3900
Standard Type RFC Supported
SNMP
Software
■ SNMP protocol (RFC 1157)
■ MIB II (RFC 1213)
■ Ethernet MIB (RFC 1284)
■ Bridge MIB (RFC 1286)
tftp (RFC 959)
Installation
Terminal Emulation
Protocols Used for
Administration
■ telnet (RFC 854)
■ rlogin (RFC 1282)
■ UDP (RFC 768)
■ IP (RFC 791)
■ ICMP (RFC 792)
■ TCP (RFC 793)
■ ARP (RFC 826)
Table A-3 LED Indicators on the SuperStack II Switch 3900
LED Type Description
System LEDs
■ Power ■ Green — System is on.
■ Off — System is receiving no power.
■ Fault ■ Off — System is operational.
■ Solid or Blinking Yellow — System
failed diagnostics, or some other
operational failure has occurred.
Port LEDs
■ Stat ■ Off — Port is off-line.
■ Blinking Green — Port is online but
disabled.
■ Green — Port is online and enabled.
■ Pckt ■ Off — Port is off-line.
■ Blinking Yellow — Port is passing
data.
■ Yellow — Port is passing data.
Page 51

B
SITE REQUIREMENTS AND SAFETY CODES
You took careful steps to plan and prepare your site
for new or additional SuperStack® II Switch 3900
stackable switch systems. For your reference, this
appendix summarizes the criteria that your site should
meet for the Switch 3900 to operate safely and
effectively.
The topics covered in this appendix:
■ General Safety Requirements
■ Wiring Closet Recommendations
■ Distribution Rack Requirements, if you mount one
or more Switch 3900 systems in a distribution rack
■ Building and Electrical Codes
General Safety Requirements
For safe operation, your site must meet these general
safety requirements:
■ All environmental requirements listed in Appendix
A and in “Wiring Closet Recommendations.” Pay
special attention to temperature and humidity.
■ All building and electrical codes for your city and
country. See relevant “Building and Electrical
Codes” for more information.
■ All grounding requirements listed in “Wiring
Closet Recommendations” and “Distribution Rack
Requirements.”
Wiring Closet Recommendations
The cabling system plan at your facility probably
covers most wiring closet concerns. 3Com also
recommends that you check these items:
■ Verify that your wiring closet meets all of the
requirements in your facility cabling plan.
■ Verify that your wiring closet and your facility meet
all state, local, and country building and wiring
codes.
■ Be sure that your system is easily accessible for
installation and service.
■ Provide adequate overhead lighting for easy
maintenance.
■ Be sure that all wiring closet doors have locks to
prevent unauthorized access.
■ Assign wiring closet identification numbers using
architectural location codes or some type of
floor-grid matrix.
■ Select a vinyl floor covering for your wiring closet.
Concrete floors accumulate dust; carpets can
cause static electricity.
■ Be sure that the wiring closet floor is flat and level.
If you are using distribution racks and the floor is
not level, bolt the racks to the floor to prevent
them from tipping over.
Page 52

B-2 APPENDIX B: SITE REQUIREMENTS AND SAFETY CODES
■ Be sure that each wiring closet has a suitable
ground. Ground all metal racks, enclosures, boxes,
and raceways in the closet.
■ Use AC power, 15-ampere service receptacles, type
N5/15 or NEMA 5-15R for 120 VAC, and the other
system specifications shown in Appendix A.
■ Be especially sure to meet all system environmental
requirements in Appendix A, such as ambient
temperature and humidity.
■ Be sure that the ventilation in the wiring closet is
adequate to maintain a temperature below 40 ˚C
(104 ˚F).
■ Install a reliable air conditioning and ventilation
system if you plan to have two or more Switch
3900 systems in a single wiring closet.
■ To prevent overheating during nonbusiness hours,
guard against the ventilation being shut down
while a Switch 3900 system remains powered up.
Distribution Rack Requirements
If you plan to mount your SuperStack II Switch 3900
systems in a distribution rack, verify that your rack
meets the basic mechanical and space requirements
described in this section.
Protective Grounding for the Rack
To ensure that voltages induced into wiring by
lightning or other disturbances are directed to
ground, ground your distribution racks properly. Use a
distribution rack grounding kit and a ground
conductor that is carried back to earth or to another
suitable building ground. To order the grounding kit,
contact your sales representative.
Space Requirements for the Rack
Provide enough space in front of and behind the
system so that you can service it easily. Allow a
minimum of 76 cm (30 in.) between the rack and any
wall behind or in front of it. Extra room on each side
is optional. See Figure B-1.
Install your distribution rack near an easily accessible
power outlet. You can power down the system only
by removing the power cord from the power source.
Page 53

76 cm (30 in.)
76 cm (30 in.)
Figure B-1 Recommended Service Access
Mechanical Requirements for the Rack
Verify that your racks comply with the standards and
requirements in your cabling system plan and
conform to these conventional standards:
■ In the United States, comply with EIA Standard
RS-310C: Racks, Panels, and Associated
Equipment.
Distribution Rack Requirements B-3
■ In countries other than the United States, comply
with IEC Standard 297: Dimensions of Panels and
Racks.
In addition, 3Com recommends that your distribution
racks meet these requirements:
■ Use an open style, 19-inch rack. The rack styles
shown in Figure B-2 facilitate easy maintenance
and provide excellent ventilation.
■ Use a rack that has the universal mounting rail
hole pattern identified in IEC Standard 297. See
Figure 2-3 for a description of the universal
mounting hole pattern.
■ Use a rack that is made of steel.
■ Install equipment in the lower half of the
distribution rack to avoid making it top heavy.
■ Use a rack that supports approximately 272 kg
(600 lb)
■ Use a rack that has adequate electrical grounding,
for instance, with a distribution rack grounding kit.
■ Verify that the floor under the rack is level within
5 mm (
3
/
in.). Use a floor-leveling cement
16
compound or bolt the racks to the floor.
■ Attach the rack to the wiring closet floor with
9.5 mm (
■ Brace open distribution racks if the channel
thickness is less than 6.4 mm (
3
/
in.) lag screws or equivalent hardware.
8
1
/
in.).
4
Page 54

B-4 APPENDIX B: SITE REQUIREMENTS AND SAFETY CODES
Building and Electrical Codes
Follow all appropriate building codes and authorities
on electrical codes when planning your site and
installing your cable for the Switch 3900 system.
Specific building and electrical codes vary depending
on your location. The following lists are provided as
resources to help you to find additional information.
Building Codes
Major building codes:
■ Uniform Building Code
International Conference of Building Officials
(ICBO)
5360 South Workman Mill Road
Whittier CA 90601-2298
■ BOCA Basic Building Code
Building Officials and Code Administrators
(BOCA) International, Inc.
4051 West Flossmoor Road
Country Club Hills IL 60478-5795
Figure B-2 Recommended Rack Styles
■ Standard Building Code (SBC)
Southern Building Code Congress International,
Inc. (SBCCI)
900 Montclair Road
Birmingham AL 35213-1206
Page 55

Building and Electrical Codes B-5
Electrical Codes
Authorities on electrical codes (USA only):
■ National Electrical Code (NEC) Classification —
A recognized authority on safe electrical wiring.
Federal, state, and local governments use NEC
standards to establish their own laws, ordinances,
and codes on wiring specifications. The NEC
classification is published by:
National Fire Protection Association (NFPA)
1 Batterymarch Park
Quincy MA 02269-9101
■ Underwriters’ Laboratories (UL) Listing —
An independent research and testing laboratory.
UL evaluates the performance and capability of
electrical wiring and equipment to determine
whether they meet certain safety standards when
properly used. Acceptance is usually indicated by
the words “UL Approved” or “UL Listed.”
UL
333 Pfingsten Road
Northbrook IL 60062-2096
■ National Electrical Manufacturers Association
(NEMA) — An organization of electrical product
manufacturers. Members develop consensus
standards for cables, wiring, and electrical
components.
NEMA
1300 North 17th Street, Suite 1847
Rosslyn VA 22209
■ Electronic Industries Association (EIA) —
A trade association that develops technical
standards, disseminates marketing data, and
maintains contact with government agencies in
matters relating to electronics and related
industries.
EIA
2500 Wilson Boulevard
Arlington VA 22201
Page 56

Page 57

C
TECHNICAL SUPPORT
3Com provides easy access to technical support
information through a variety of services. This
appendix describes these services.
Information contained in this appendix is correct at
time of publication. For the very latest, 3Com
recommends that you access the 3Com Corporation
World Wide Web site.
Online Technical Services
3Com offers worldwide product support 24 hours
a day, 7 days a week, through the following online
systems:
■ World Wide Web site
■ 3Com FTP site
■ 3Com Bulletin Board Service (3Com BBS)
■ 3ComFacts
World Wide Web Site
Access the latest networking information on the
3Com Corporation World Wide Web site by entering
the URL into your Internet browser:
http://www.3com.com/
SM
automated fax service
software library, as well as support options ranging
from technical education to maintenance and
professional services.
3Com FTP Site
Download drivers, patches, MIBS, and software across
the Internet from the 3Com public FTP site. This
service is available 24 hours a day, 7 days a week.
To connect to the 3Com FTP site, enter the following
information into your FTP client:
■ Hostname: ftp.3com.com (or 192.156.136.12)
■ Username: anonymous
■ Password: <your Internet e-mail address>
A user name and password are not needed with Web
browser software such as Netscape Navigator and
Internet Explorer.
3Com Bulletin Board Service
The 3Com BBS contains patches, software, and
drivers for 3Com products. This service is available
through analog modem or digital modem (ISDN)
24 hours a day, 7 days a week.
This service provides access to online support
information such as technical documentation and
Page 58

C-2 APPENDIX C: TECHNICAL SUPPORT
Access by Analog Modem
To reach the service by modem, set your modem to
8 data bits, no parity, and 1 stop bit. Call the
telephone number nearest you:
Country Data Rate Telephone Number
Australia Up to 14,400 bps 61 2 9955 2073
Brazil Up to 14,400 bps 55 11 5181 9666
France Up to 14,400 bps 33 1 6986 6954
Germany Up to 28,800 bps 4989 62732 188
Hong Kong Up to 14,400 bps 852 2537 5601
Italy Up to 14,400 bps 39 2 27300680
Japan Up to 14,400 bps 81 3 3345 7266
Mexico Up to 28,800 bps 52 5 520 7835
P.R. of China Up to 14,400 bps 86 10 684 92351
Taiwan, R.O.C. Up to 14,400 bps 886 2 377 5840
U.K. Up to 28,800 bps 44 1442 438278
U.S.A. Up to 28,800 bps 1 408 980 8204
Access by Digital Modem
ISDN users can dial in to the 3Com BBS using a digital
modem for fast access up to 56 Kbps. To access the
3Com BBS using ISDN, use the following number:
1 408 654 2703
3ComFacts Automated Fax Service
The 3ComFacts automated fax service provides
technical articles, diagrams, and troubleshooting
instructions on 3Com products 24 hours a day, 7 days
a week.
Call 3ComFacts using your Touch-Tone telephone:
1 408 727 7021
Support from Your Network Supplier
If additional assistance is required, contact your
network supplier. Many suppliers are authorized
3Com service partners who are qualified to provide a
variety of services, including network planning,
installation, hardware maintenance, application
training, and support services.
When you contact your network supplier for
assistance, have the following information ready:
■ Product model name, part number, and serial
number
■ A list of system hardware and software, including
revision levels
■ Diagnostic error messages
■ Details about recent configuration changes,
if applicable
If you are unable to contact your network supplier,
see the following section on how to contact 3Com.
Page 59

Support from 3Com C-3
Support from 3Com
If you are unable to obtain assistance from the 3Com
online technical resources or from your network
supplier, 3Com offers technical telephone support
services. To find out more about your support
options, please call the 3Com technical telephone
support phone number at the location nearest you.
When you contact 3Com for assistance, have the
following information ready:
■ Product model name, part number, and serial
number
■ A list of system hardware and software, including
revision levels
■ Diagnostic error messages
■ Details about recent configuration changes,
if applicable
Below is a list of worldwide technical telephone
support numbers:
Country Telephone Number
Asia Pacific Rim
Australia
China
From anywhere in China:
From Shanghai:
Hong Kong
India
Indonesia
Japan
Malaysia
New Zealand
(continued)
1 800 678 515
86 21 6350 1590
10 800 3656
800 933 486
61 2 9937 5085
001 800 61 009
0031 61 6439
1800 801 777
0800 446 398
Country Telephone Number
Singapore
S. Korea
From anywhere in S. Korea:
From Seoul:
Taiwan
Thailand
Pakistan
Philippines
Europe
From anywhere in Europe, call: +31 (0)30 6029900 phone
From the following European countries, you may use the
toll-free numbers:
Austria
Belgium
Denmark
Finland
France
Germany
Hungary
Ireland
Israel
Italy
Netherlands
Norway
Poland
Portugal
South Africa
Spain
Sweden
Switzerland
U.K.
Latin America
Argentina
Brazil
Colombia
Mexico
North America 1 800 NET 3Com
800 6161 463
82 2 3455 6455
00798 611 2230
0080 611 261
001 800 611 2000
61 2 9937 5085
1235 61 266 2602
+31 (0)30 6029999 fax
06 607468
0800 71429
800 17309
0800 113153
0800 917959
0130 821502
00800 12813
1 800 553117
177 3103794
1678 79489
0800 0227788
800 11376
0800 3111206
05 05313416
0800 995014
900 983125
020 795482
0800 55 3072
0800 966197
541 312 3266
55 11 523 2725, ext. 422
571 629 4847
01 800 849 2273
(1 800 638 3266)
Page 60

C-4 APPENDIX C: TECHNICAL SUPPORT
Returning Products for Repair
Before you send a product directly to 3Com for repair,
you must first obtain a Return Materials Authorization
(RMA) number. Products sent to 3Com without RMA
numbers will be returned to the sender unopened, at
the sender’s expense.
To obtain an RMA number, call or fax:
Country Telephone Number Fax Number
Asia, Pacific Rim 65 543 6342 65 543 6348
Europe, South Africa,
and Middle East
From the following European countries, you may call the toll-free
numbers; select option 2 and then option 2:
Austria
Belgium
Denmark
Finland
France
Germany
Hungary
Ireland
Israel
Italy
Netherlands
Norway
Poland
Portugal
South Africa
Spain
Sweden
Switzerland
U.K.
Latin America 1 408 326 2927 1 408 764 6883
U.S.A. and Canada 1 800 876 3266,
011 44 1442 435860 011 44 1442 435718
06 607468
0800 71429
800 17309
0800 113153
0800 917959
0130 821502
00800 12813
1 800 553117
177 3103794
1678 79489
0800 0227788
800 11376
0800 3111206
05 05313416
0800 995014
900 983125
020 795482
0800 55 3072
0800 966197
1 408 764 7120
option 2
Page 61

INDEX
Numbers
10/100BASE-TX
cabling 3-2
connector pin assignments 3-3
1000BASE-LX module 3-4
1000BASE-SX module 3-4
3Com bulletin board service (3Com BBS) C-1
3Com FTP site C-1
3Com URL 1, C-1
3ComFacts fax service C-2
A
AC components
Redundant Power System 4-1
Uninterruptible Power System 4-1
Administration Console
accessing 5-2
configuring IP addresses 5-3
Advanced Redundant Power System (RPS) 4-1
air conditioning
requirements for system B-2
audience 1
B
baud setting
changing 5-3
brackets, mounting 2-3
building codes
BOCA Basic Building Code (BOCA) B-4
Standard Building Code (SBC) B-4
Uniform Building Code B-4
bulletin board service C-1
C
cabling
10/100BASE-TX (RJ-45) ports 3-2
1000BASE (SC) ports 3-4, 3-5
Console port 3-5
Ethernet ports 3-2 to 3-3
Gigabit Ethernet ports 3-4
modem 3-5
overview 3-1
serial port 3-5
cabling system plans B-3
cautions in text
defined 2
CD-ROM documentation 4
Console port
baud setting 5-2
cabling 3-5
default settings 5-2
pin assignments 3-7
terminal 5-1
conventions in text
defined 2
cooling the system B-2
D
DB-9 connector pin assignments 3-5
diagnostic signs 6-1 to 6-3
distribution rack
preparing for system installation 2-3
requirements B-2
universal mounting hole pattern 2-4
documentation
comments 4
for the Switch 3900 system 3
documents on CD-ROM 4
E
EIA (electrical code)
standard equipment rack B-3
standards B-5
electrical codes
Electronics Industry Association (EIA) B-5
National Electrical Code (NEC) B-5
National Electrical Manufacturers Association
(NEMA) B-5
Underwriters’ Laboratories (UL) Listing B-5
environmental specifications
and requirements B-2
requirements A-1
Ethernet LEDs 4-4, 6-3
Ethernet Pckt LED
position 4-4
troubleshooting 6-3
Ethernet ports, cabling 3-2 to 3-3
Ethernet Stat LED
position 4-4
troubleshooting 6-3
F
Fault LED 4-3
troubleshooting 6-2
fault tolerance 1-5
fax service (3ComFacts) C-2
feedback on documentation 4
fiber
multimode 3-1
single-mode 3-1
fiber optic cables
cleaning 6-4
floor plan B-1
FTP site C-1
Page 62

2 INDEX
G
Gigabit Ethernet
cabling 3-4
modules 3-4
ports 3-4
H
hardware mounting kit 2-1
humidity
specifications A-1, B-2
I
ICBO (building code) B-4
IEC Standard 297 B-3
impedance
twisted-pair guidelines 3-2
installation
distribution rack 2-3
free-standing stack 2-2
table-top 2-2
integrated management 1-5
interface parameters (IP) 5-3
IP address 5-3
and Switch 3900 management 5-1
quick configuration 5-3
L
LEDs
abnormal activity 6-1
fiber optic safety precautions 3-1
port status 4-4, 6-3
system fault 4-3, 6-2
system power 4-3, 6-2
system status 4-3, 6-2
troubleshooting 6-2
local management 5-1
M
management access 1-5, 5-1
management, Switch 3900
IP 5-1
modem 5-1
terminal 5-1
modem 3-5, 5-1
module
fiber optic safety 3-1
modules
Gigabit Ethernet 3-4
mounting brackets 2-3
mounting hole pattern 2-3
mounting rails B-3
multimode fiber
safety precautions 3-1
N
National Fire Protection Association (NFPA) B-5
NEC (electrical code) B-5
NEMA (electrical code) B-5
network supplier support C-2
notes in text
defined 2
O
online technical services C-1
P
pin assignments
10/100BASE-TX (RJ-45) connectors 3-3
Console port 3-7
ports
fiber optic safety 3-1
power
cord 4-1
cord, troubleshooting 6-2
down B-2
options 4-1
up 4-1
wiring B-2
Power LED 4-3
troubleshooting 6-2
power system
malfunction 6-2
redundant 4-1
specifications A-1
uninterruptible 4-1
power up
and staging the system 4-2
and system cabling 4-2
diagnostics 4-2
LED activity 4-2
protective grounding
wiring closet B-2
protocols supported A-2
R
rack
open-style B-3
preparing 2-3
requirements B-2
universal mounting hole pattern 2-4
redundant power system
connecting 4-1
release notes 1
returning products for repair C-4
RJ-45 ports 3-2
Page 63

INDEX 3
S
safety
requirements and standards B-1
working with fiber optic cables and
LEDs 3-1
SBC (Standard Building Code) B-4
SC connectors 3-4
serial line, and management access 5-1
serial port
cabling 3-5
single-mode fiber
safety 3-1
site planning
environmental and safety requirements B-1
rack requirements B-2
wiring closet considerations B-1
SNMP
agent 5-1
and Switch 3900 management 5-1
standards supported A-2
software release notes 1
stacking systems 2-1
subnet mask 5-3
Switch 3900
cabling 3-1
cooling B-2
description 1-1
installing 2-1
management 5-1
power options 4-1
turning off 4-1
turning on 4-1, 4-2
Switch 3900 documentation 3
system checks 4-5
system cooling B-2
T
table-top installation 2-2
technical support
3Com URL C-1
bulletin board service C-1
fax service C-2
FTP site C-1
network suppliers C-2
product repair C-4
temperature
specifications A-1
transceiver
fiber optic safety precautions 3-1
troubleshooting
port LED activity 6-3
power failures 6-2
system checks 4-5
system LED activity 6-2
turning off the system 4-1, B-2
turning on the system 4-1
twisted pair
AWG 3-2
impedance 3-2
maximum length 3-2
U
Uniform Building Code (UBC) B-4
uninterruptible power system (UPS) 4-1
URL 1, C-1
V
ventilation
air conditioning B-2
wiring closet B-2
W
warnings in text
defined 2
wiring 3-1
wiring closet
recommendations B-1
World Wide Web (WWW) 1, C-1
Y
Year 2000 compliance 5
Page 64

Page 65

3Com Corporation LIMITED WARRANTY
HARDWARE
3Com warrants its hardware products to be free from defects in workmanship and
materials, under normal use and service, for the following lengths of time from the date
of purchase from 3Com or its authorized reseller:
Network Interface Cards Lifetime
Other hardware products
*unless otherwise specified above
Spare parts and spares kits 90 days
If a product does not operate as warranted above during the applicable warranty
period, 3Com shall, at its option and expense, repair the defective product or part,
deliver to Customer an equivalent product or part to replace the defective item, or
refund to Customer the purchase price paid for the defective product. All products that
are replaced will become the property of 3Com. Replacement products may be new or
reconditioned. Any replaced or repaired product or part has a ninety (90) day warranty
or the remainder of the initial warranty period, whichever is longer.
SOFTWARE
3Com warrants that the software programs licensed from it will perform in substantial
conformance to the program specifications therefor for a period of ninety (90) days
from the date of purchase from 3Com or its authorized reseller. 3Com warrants the
media containing software against failure during the warranty period. No updates are
provided. 3Com’s sole obligation with respect to this express warranty shall be (at
3Com’s discretion) to refund the purchase price paid by Customer for any defective
software products, or to replace any defective media with software which substantially
conforms to applicable 3Com published specifications. Customer assumes responsibility
for the selection of the appropriate applications program and associated reference
materials. 3Com makes no warranty or representation that its software products will
meet Customer’s requirements or work in combination with any hardware or
applications software products provided by third parties, that the operation of the
software products will be uninterrupted or error free, or that all defects in the software
products will be corrected. For any third-party products listed in the 3Com software
product documentation or specifications as being compatible, 3Com will make
reasonable efforts to provide compatibility, except where the noncompatibility is caused
by a “bug” or defect in the third party's product.
YEAR 2000 WARRANTY
In addition to the Hardware Products Warranty and Software Products Warranty
identified above, 3Com warrants that all Heritage 3Com products sold or licensed to
Customer on and after January 1, 1998 that are date sensitive will continue performing
properly with regard to such date data on and after January 1, 2000, provided that all
other products used by Customer in connection or combination with the 3Com
products, including hardware, software, and firmware, accurately exchange date data
with the 3Com products, with the exception of those products identified at 3Com’s Web
site, http://www.3com.com/products/yr2000.html, as not meeting this standard. A
1 year*
product is considered a “Heritage 3Com product” if it is a member of a product family
that was manufactured by 3Com prior to its merger with US Robotics Corporation. This
Year 2000 limited warranty does not apply to Heritage US Robotics Corporation
products. If it appears that any such product does not perform properly with regard to
such date data on and after January 1, 2000, and Customer notifies 3Com before the
later of April 1, 2000, or ninety (90) days after purchase of the product from 3Com or its
authorized reseller, 3Com shall, at its option and expense, provide a software update
that would effect the proper performance of such product, repair such product, deliver
to Customer an equivalent product to replace such product, or if none of the foregoing is
feasible, refund to Customer the purchase price paid for such product.
Any software update or replaced or repaired product will carry a Year 2000 Warranty
for ninety (90) days or until April 1, 2000, whichever is later.
OBTAINING WARRANTY SERVICE
Customer must contact 3Com’s Corporate Service Center or an Authorized 3Com
Service Center within the applicable warranty period to obtain warranty service
authorization. Dated proof of purchase may be required. Products returned to 3Com’s
Corporate Service Center must be preauthorized by 3Com with a Return Material
Authorization (RMA) number marked on the outside of the package, and sent prepaid
and packaged appropriately for safe shipment, and it is recommended that they be
insured. The repaired or replaced item will be shipped to Customer, at 3Com’s expense,
not later than thirty (30) days after receipt of the defective product by 3Com.
Dead- or Defective-on-Arrival. In the event a product completely fails to function or
exhibits a defect in materials or workmanship within the first forty-eight (48) hours of
installation but no later than thirty (30) days after the date of purchase, and this is
verified by 3Com, it will be considered dead- or defective-on-arrival (DOA) and a
replacement shall be provided by advance replacement. The replacement product will
normally be shipped not later than three (3) business days after 3Com’s verification of
the DOA product, but may be delayed due to export or import procedures. When an
advance replacement is provided and Customer fails to return the defective product to
3Com within fifteen (15) days after shipment of the replacement, 3Com will charge
Customer for the replacement product, at list price.
3Com shall not be responsible for any software, firmware, information, or memory data
of Customer contained in, stored on, or integrated with any products returned to 3Com
for repair, whether under warranty or not.
WARRANTIES EXCLUSIVE
IF A 3COM PRODUCT DOES NOT OPERATE AS WARRANTED ABOVE, CUSTOMER’S
SOLE REMEDY FOR BREACH OF THAT WARRANTY SHALL BE REPAIR, REPLACEMENT,
OR REFUND OF THE PURCHASE PRICE PAID, AT 3COM’S OPTION. TO THE FULL EXTENT
ALLOWED BY LAW, THE FOREGOING WARRANTIES AND REMEDIES ARE EXCLUSIVE
AND ARE IN LIEU OF ALL OTHER WARRANTIES, TERMS, OR CONDITIONS, EXPRESS OR
IMPLIED, EITHER IN FACT OR BY OPERATION OF LAW, STATUTORY OR OTHERWISE,
INCLUDING WARRANTIES, TERMS, OR CONDITIONS OF MERCHANTABILITY, FITNESS
FOR A PARTICULAR PURPOSE, AND SATISFACTORY QUALITY. 3COM NEITHER
ASSUMES NOR AUTHORIZES ANY OTHER PERSON TO ASSUME FOR IT ANY OTHER
LIABILITY IN CONNECTION WITH THE SALE, INSTALLATION, MAINTENANCE, OR USE OF
ITS PRODUCTS.
Page 66

3COM SHALL NOT BE LIABLE UNDER THIS WARRANTY IF ITS TESTING AND
EXAMINATION DISCLOSE THAT THE ALLEGED DEFECT IN THE PRODUCT DOES NOT
EXIST OR WAS CAUSED BY CUSTOMER’S OR ANY THIRD PERSON'S MISUSE, NEGLECT,
IMPROPER INSTALLATION OR TESTING, UNAUTHORIZED ATTEMPTS TO REPAIR OR
MODIFY, OR ANY OTHER CAUSE BEYOND THE RANGE OF THE INTENDED USE, OR BY
ACCIDENT, FIRE, LIGHTNING, OR OTHER HAZARD.
LIMITATION OF LIABILITY
TO THE FULL EXTENT ALLOWED BY LAW, 3COM ALSO EXCLUDES FOR ITSELF AND ITS
SUPPLIERS ANY LIABILITY, WHETHER BASED IN CONTRACT OR TORT (INCLUDING
NEGLIGENCE), FOR INCIDENTAL, CONSEQUENTIAL, INDIRECT, SPECIAL, OR PUNITIVE
DAMAGES OF ANY KIND, OR FOR LOSS OF REVENUE OR PROFITS, LOSS OF BUSINESS,
LOSS OF INFORMATION OR DATA, OR OTHER FINANCIAL LOSS ARISING OUT OF OR IN
CONNECTION WITH THE SALE, INSTALLATION, MAINTENANCE, USE, PERFORMANCE,
FAILURE, OR INTERRUPTION OF ITS PRODUCTS, EVEN IF 3COM OR ITS AUTHORIZED
RESELLER HAS BEEN ADVISED OF THE POSSIBILITY OF SUCH DAMAGES, AND LIMITS ITS
LIABILITY TO REPAIR, REPLACEMENT, OR REFUND OF THE PURCHASE PRICE PAID, AT
3COM’S OPTION. THIS DISCLAIMER OF LIABILITY FOR DAMAGES WILL NOT BE
AFFECTED IF ANY REMEDY PROVIDED HEREIN SHALL FAIL OF ITS ESSENTIAL PURPOSE.
DISCLAIMER
Some countries, states, or provinces do not allow the exclusion or limitation of implied
warranties or the limitation of incidental or consequential damages for certain products
supplied to consumers or the limitation of liability for personal injury, so the above
limitations and exclusions may be limited in their application to you. When the implied
warranties are not allowed to be excluded in their entirety, they will be limited to the
duration of the applicable written warranty. This warranty gives you specific legal rights
which may vary depending on local law.
GOVERNING LAW
This Limited Warranty shall be governed by the laws of the State of California, U.S.A.,
excluding its conflicts of laws principles and excluding the United Nations Convention
on Contracts for the International Sale of Goods.
3Com Corporation, 5400 Bayfront Plaza, Santa Clara, CA 95052-8145
(408) 764-5000
 Loading...